

Page 1
DSJ-M9 Smart Device
332222523222120191818171717151211111111966
Page 2

DSJ-M9 Smart Device
I
DSJ-M9 Smart Device
User Manual
Dear Customer
We are very grateful for your purchasing Kirisun DSJ-M9 Smart Device. We believe the product
can bring great convenience to your work.
This Smart Device applies advanced technology and sophisticated techniques. We believe the
quality and features can be satisfying to you.
Page 3

User Manual
II
Notice
◆ Please carefully read the user manual before using the product for your easy operation. We will
consider that you have read this manual when you use the product.
◆ Please properly keep this manual for your future reference or for other users.
◆ To prevent your legal rights from infringement, please carefully fill in the warranty card at your
purchase and claim valid receipt.
◆ Relevant intellectual property rights of all parts including accessories of the product belongs to us
or its authorized parties. Any design or materials must not be copied, imitated, extracted or
translated without our authorization or our authorized parties.
◆Due to the update or modification of the product, we own the right to change the specifications of
software and hardware described in this manual without further notice. Specifications and
information contained in this manual are for reference only.
◆ All the words are carefully proofread but mistake may be inevitable. We reserve the rights to final
interpretation.
Page 4

DSJ-M9 Smart Device
III
Safety Precaution
◆To prevent damaging the device and to prevent injury to others or yourself, please carefully read the
notice below before using the product and put these safety instructions within reach of others or yourself.
◆Please do not try to disassemble or modify the product.
◆The operating temperature of the EUT can’t exceed 40℃ and shouldn’t be lower than 0℃.
◆Please do not use the product in the flammable or explosive atmosphere.
◆Please do not place the product anywhere near the heating device or at the place of extremely
abundant dust, damp or water splash. Pay attention to the notice below when charging with power
adaptor:
◆Please use the power adaptor offered or sold by us.
◆Please keep the metal part of the power adaptor plug dry and clean. Failure to comply may lead to fire
or electric shock.
◆Please do not use power adaptor in thunderstorm. Failure to comply may lead to electric shock.
◆Please do not try to damage, modify and repair the power adaptor, nor heat the BWC or place it
anywhere near open fire.
◆Please use the USB cable offered or sold by us.
◆Non-technician must not try to repair the product or its accessories
Page 5

User Manual
IV
Contents
1 UNPACKING
1.1 SUPPLIED ACCESSORIES
1.2 OPTIONAL ACCESSORIES
2 INTRODUCTION
3 BASIC OPERATION
3.1 POWER KEY
3.2 SCREEN ON/OFF
3.3 TOUCH OPERATION
3.4 OPERATION INDICATOR
3.5 CHARGING INDICATOR
3.6 VOLUME UP/DOWN KEY
3.7 BACK KEY
3.8 VIDEO REC KEY
3.9 AUDIO REC KEY
.............................................................................................................................
..........................................................................................................
.........................................................................................................
........................................................................................................................
....................................................................................................................
.............................................................................................................................
......................................................................................................................
.................................................................................................................
..........................................................................................................
............................................................................................................
.........................................................................................................
.................................................................................................................................
........................................................................................................................
........................................................................................................................
1
1
2
3
4
4
5
6
7
7
7
8
8
9
Page 6

DSJ-M9 Smart Device
V
3.10 ONE-SHOT/MULTI-SHOT KEY
3.11 ALARM KEY
3.12 MIC
........................................................................................................................................
3.13 CAMERAS
3.14 DUAL-SIM SOCKET
3.15 USB PORT
3.16 EARPHONE JACK
3.17 DISPLAY SCREEN
3.18 FILE PLAYBACK
3.19 SETTINGS
............................................................................................................................
...............................................................................................................................
.................................................................................................................
..............................................................................................................................
....................................................................................................................
....................................................................................................................
.......................................................................................................................
...............................................................................................................................
3.20 GPS/BDS POSITIONING
3.21 PTT KEY 1/2
...........................................................................................................................
3.22 SHOULDER MIC (OPTIONAL)
4 TROUBLESHOOTING
..............................................................................................................
5 MAINTENANCE AND CLEANING
................................................................................................
.........................................................................................................
.................................................................................................
............................................................................................
10
10
11
12
13
14
14
14
15
16
17
17
18
19
20
Page 7
DSJ-M9 Smart Device
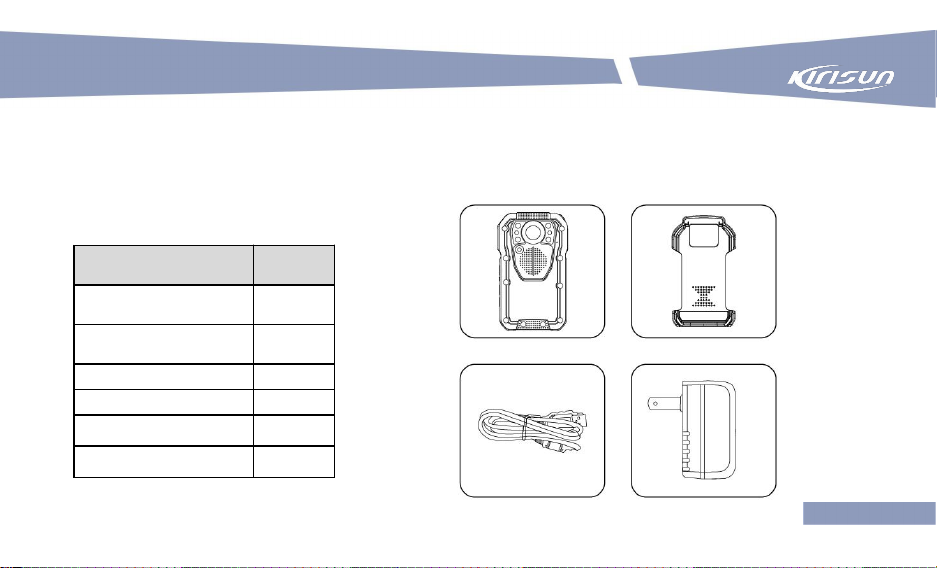
1
Item
Quantity
Smart Device
1
Power Adaptor
1
USB Cable
1
Belt Clip
1
User Manual
1
Certificate of Approval
1
1 Unpacking
Please carefully open the package and check if the items listed below are included. Please contact
your local dealer for anything lost or damaged.
1.1 Supplied Accessories
Page 8
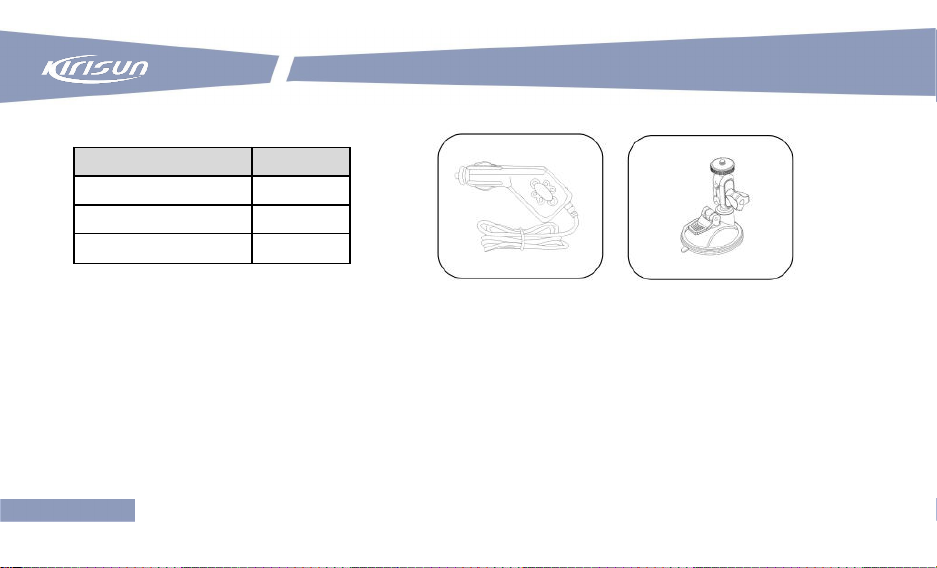
2
1.2 Optional Accessories
Item
Quantity
Car Charger
1
Bracket
1
BT shoulder lamp
1
User Manual
Page 9
DSJ-M9 Smart Device
3
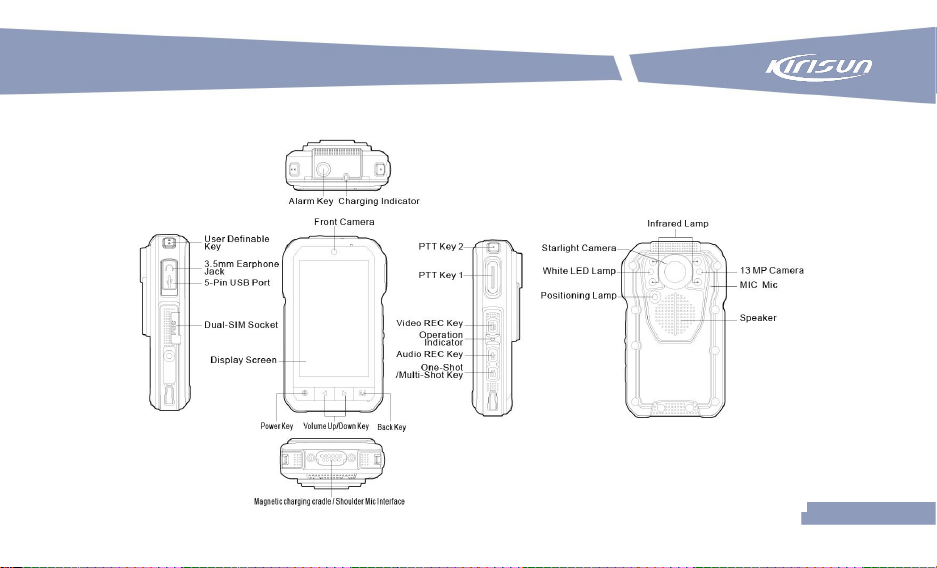
2 Introduction
Page 10

User Manual
4
3 Basic Operation
3.1 Power Key
Power On
Press and hold the Power key to power on the
device, and the login interface will be displayed. Enter
a user name and a password, and then click Login.
After login, the main interface will be displayed.
Page 11

DSJ-M9 Smart Device
5
3.2 Screen On/Off
Press the Power key to turn on/off the screen.
Power Off
To power off the device, press the Power key and hold for 2 seconds, and then tap the screen as
instructed.
Note:
The device has 2 sets multiple user management.
Administrator: No ID is set. The password is 456789 by default, which can be reset through the
DSJ-M9 PC software. After login with this account, the device time, passwords, department name,
user name, device no., loop video, GPS on/off and copy data can also be set through the software.
Normal user: The password is 123456 by default, which can be modified through the DSJ-M9 PC
software. Maximum 5 user IDs (ID1, ID2, ID3, ID4 and ID5) can share this account. Different users
have different passwords.
Page 12

6
Application
Interface
Playback
Interface
Media
Interface
Setting
Interface
Setting
Interface
Dial Interface
User Manual
3.3 Touch Operation
Page 13

DSJ-M9 Smart Device
7
The green indicator glows after the device is powered on. The red indicator
flashes once when a photo is taken, and keeps flashing when a video is
taken.
3.5 Charging Indicator
The red indicator glows during charging, and the green indicator glows after
the battery is fully charged.
3.4 Operation Indicator
3.6 Volume Up/Down Key
Adjust the volume of media, ring tone and alarm clock by pressing the Volume Up and Volume Down
keys.
Page 14

8
3.7 Back Key
3.8 Video REC Key
In preview mode, press the Video REC key to start
recording video, and the red indicator light keeps flashing
during recording. To stop recording and save the video file,
press this key again.
Note:
To mark an important video, press the Video REC key
and hold for seconds.
Video Interface
Return to the previous interface or quit the current application by pressing the Back key.
User Manual
Page 15

DSJ-M9 Smart Device
9
Pre-Recording/Prolonged Recording: On/off
3.9 Audio REC Key
In preview mode, press the Audio REC key to start recording
voice. To stop recording and save the file, press the key again.
In power-off state, press and hold the Video REC key to enter one-touch video mode. To stop
recording and save the file, press this key again.
In preview mode, you can set the followings.
Video Resolution: 1920*1080/1280*720/848*480 ppi
Video time: 5/10/30 min
One-Touch Video: On/off
Page 16

10
3.11 Alarm Key
When the smart dispatching software is running, press the Alarm key and hold
for seconds to send an alarm and real-time video.
When the smart dispatching software is not running, press the Alarm key and
User Manual
3.10 One-Shot/Multi-Shot Key
In preview mode, press the One-Shot/Multi-Shot key to take and save a photo. The red indicator
light flashes once.
In preview mode, you can set the followings.
Image Resolution: 2560*1440/3264*2448/3968*2976/ 4736*3552/6528*4896 ppi
Photographing Mode: One-shot
Quick Multi-Shot: 5/10/20 shots
Shooting Interval: 2/3/5/10/20/30s
Timed Shooting: 5/10/15/30s
Page 17

11
DSJ-M9 Smart Device
hold for seconds to call SOS contact.
3.12 Mic
The microphone is for sound collection during voice communication.
Page 18

12
User Manual
3.13 Cameras
a. Wide-angle starlight camera for low-illuminance environments.
b. 32 MP HD camera for taking macro photos, for example, certificate photos.
c. Front camera for taking real-time video during dispatching.
Page 19

DSJ-M9 Smart Device
13
3.14 Dual-SIM Socket
The device supports Nano-SIM (4FF) cards, six-mode 4G capable (d
single-active)
Supported Networks: 2G, 3G and 4G (TDD-LTE/FDD-LTE) networks
ual-SIM, dual-standby and
Page 20

14
User Manual
3.15 USB Port
Plug in USB cable to realize data exchange between the device and a computer and to charge the
battery.
3.16 Earphone Jack
The standard 3.5mm earphone jack is compatible with standard earphones.
3.17 Display Screen
The device applies a 3.5’’ 848*480 ppi HD touch screen. You can play back image, audio and video
files through touch.
Page 21

15
DSJ-M9 Smart Device
3.18 File Playback
You can play back an audio or video file through tapping the File Playback icon or a shortcut key in
preview mode.
Page 22

16
User Manual
3.19 Settings
Network Settings: Wi-Fi, GPS positioning, Bluetooth, mobile data, BT shoulder lamp, NFC, APN and
SIM cards.
Device Settings: Brightness, power saving mode, alarm clock, sound, SOS contact, auto IR on/off,
voice announcement, operation indicator on/off and PTT key switch.
System Settings: System info, date and time, language and screen on/off.
Page 23

17
3.21 PTT Key 1/2
After registering and logging in to the smart dispatching software, you can
perform PoC communication and dispatching by pressing the PTT key.
You may switch between PTT keys 1 and 2 by tapping the Settings icon in the
main interface.
DSJ-M9 Smart Device
3.20 GPS/BDS Positioning
The built-in GPS/BDS modules realize global positioning, location reporting, real-time tracking and
track playback, working together with the dispatcher software.
Page 24

18
User Manual
3.22 Shoulder Mic (Optional)
After connecting a two-way radio to the device using a shoulder microphone cable, you can send voice
by holding down the PTT key and then speaking to the shoulder mic, and receive voice by releasing
the key.
Page 25

DSJ-M9 Smart Device
19
Failure
Diagnosis
Solution
Power-on failure
Low Battery
Charge it for 4 hours.
Damaged Power key
Please obtain service from our authorized maintenance
station in your region or contact us.
The computer
cannot identify
device
Not logged in to the PC
software
After connecting USB cable with computer, please enter
the pin at the PC software to log in.
Bad data cable
Change the data cable.
USB driver installed
improperly
Install the USB driver again.
Files cannot be
copied
Insufficient account
permission
Under normal user account, only file reading is allowed.
To modify or delete files, please log in with the
administrator account.
4 Troubleshooting
Page 26

20
User Manual
5 Maintenance and Cleaning
The device adapts to harsh environments, but the operation standards and maintenance should be
complied with daily use to achieve its optimal performance.
◆ Carefully protect the lens, all the moveable parts and screen as they are inclined to damage due to
the material and structure design requirements. Do not handle with force or press it. Prevent glass
scratch if the display screen is damaged and prevent the liquid of the screen touching the skin, eyes or
mouth.
◆Battery
Please check the battery level before taking the product out in the field and charge it before hand if
necessary.
Stop the charging once the battery is full or the battery performance will be affected.
◆Cleaning
Lens: The lens and glass are vulnerable, so try to keep your hands off them. You can use balloon blow
to remove dust or lint. For stains which cannot be removed. You can use a clean soft cloth to wipe the
lens outwards from its center.
Page 27

21
DSJ-M9 Smart Device
Display Screen: For removing fingerprints or other stains, please use a soft dry cloth to wipe the
screen gently.
Body: Use balloon blow to remove dust or dirt and use a soft dry cloth to clean it.
◆Storage
For long storage of the product, please turn it off before storage. Keep the product away from the
followings.
◎ Devices which possibly generate strong magnetic field
◎ Environment with a temperature of 0 ℃ or above 40 ℃
◎ Damp places with poor ventilation
◎ To prevent battery deterioration, take down, charge and use the battery before storing it again.
Device is not restricted to use by only law enforcement agencies, device is also for other civil
industries use
Page 28

23
Page 29

FCC Statement
15.19 Labeling requirements.
This device complies with part 15 of the FCC Rules. Operation is subject to the following two
conditions: (1) This device may not cause harmful interference, and (2) this device must
accept any interference received, including interference that may cause undesired operation.
15.21 Information to user.
Any Changes or modifications not expressly approved by the party responsible for compliance
could void the user's authority to operate the equipment.
15.105 Information to user.
This equipment has been tested and found to comply with the limits for a Class B digital device,
pursuant to Part 15 of the FCC Rules. These limits are designed to provide reasonable
protection against harmful interference in a residential installation. This equipment generates
uses and can radiate radio frequency energy and, if not installed and used in accordance with
the instructions, may cause harmful interference to radio communications. However, there is
no guarantee that interference will not occur in a particular installation. If this equipment does
cause harmful interference to radio or television reception, which can be determined by turning
the equipment off and on, the user is encouraged to try to correct the interference by one or
more of the following measures:
-- Reorient or relocate the receiving antenna.
-- Increase the separation between the equipment and receiver.
-- Connect the equipment into an outlet on a circuit different from that to which the receiver is
connected.
-- Consult the dealer or an experienced radio/TV technician for help.
Specific Absorption Rate (SAR) information:
This product meets the government's requirements for exposure to radio waves. The
guidelines are based on standards that were developed by independent scientific
organizations through periodic and thorough evaluation of scientific studies. The standards
include a substantial safety margin designed to assure the safety of all persons regardless of
age or health.
FCC RF Exposure Information and Statement The SAR limit of USA (FCC) is 1.6 W/kg
averaged over one gram of tissue. This device was tested for typical body-worn operations
with the back of the handset kept 0mm from the body with belt-clips and 10mm without
belt-clips. To maintain compliance with FCC RF exposure requirements, use accessories that
maintain a 0mm separation distance between the user's body and the back of the handset.
The use of belt clips, holsters and similar accessories should not contain metallic components
in its assembly. The use of accessories that do not satisfy these requirements may not comply
with FCC RF exposure requirements, and should be avoided.
Body-worn Operation
This device was tested for typical body-worn operations. To comply with RF exposure
requirements, a minimum separation distance of 10mm for body worn must be maintained
between the user’s body, including the antenna. Third-party belt-clips, holsters, and similar
accessories used by this device should not contain any metallic components. Body-worn
accessories that do not meet these requirements may not comply with RF exposure
requirements and should be avoided. Use only the supplied or an approved antenna.
 Loading...