

Page 1

PT6500 User’s Manual
PT6500
User’s Manual
CONTENTS
Unpacking and checking
■
◆ Supplied accessories
■ Preparation
◆ Charging the battery
◆ Installing/Removing the battery pack
◆ Installing the antenna
■ Getting acquainted
■ Basic Operation
■ Programmable Button functions
■ VOX
■ Copy mode
■ Whole setting
◆ Time-out Timer(TOT)
◆ Battery Saving
◆ Low battery warning
◆ Voice Annunciation of Channel Number
◆ CTCSS/ DCS
■ User’s resolution
◆ Busy Channel Lockout(BCL)
◆ Receiving squelch mode
◆ DTMF signaling
◆ 2TONE signaling
◆ Transmit start/over signaling (PTT ID)
■ Problems and troubleshooting
■ Major Specifications
■ Status setting
Page 1 of 30
Page 2
PT6500 User’s Manual
FCC Warning:
PT6500-02 is a a occupational equipment. And it operate with a duty factor not exceeding 50%.
The EUT cannot worn on the body.
The us version of this transmitter operates solely on us frequencies. The user is not able to
select on non-us frequencies.
Page 2 of 30
Page 3
PT6500 User’s Manual
P
r
B
Charger
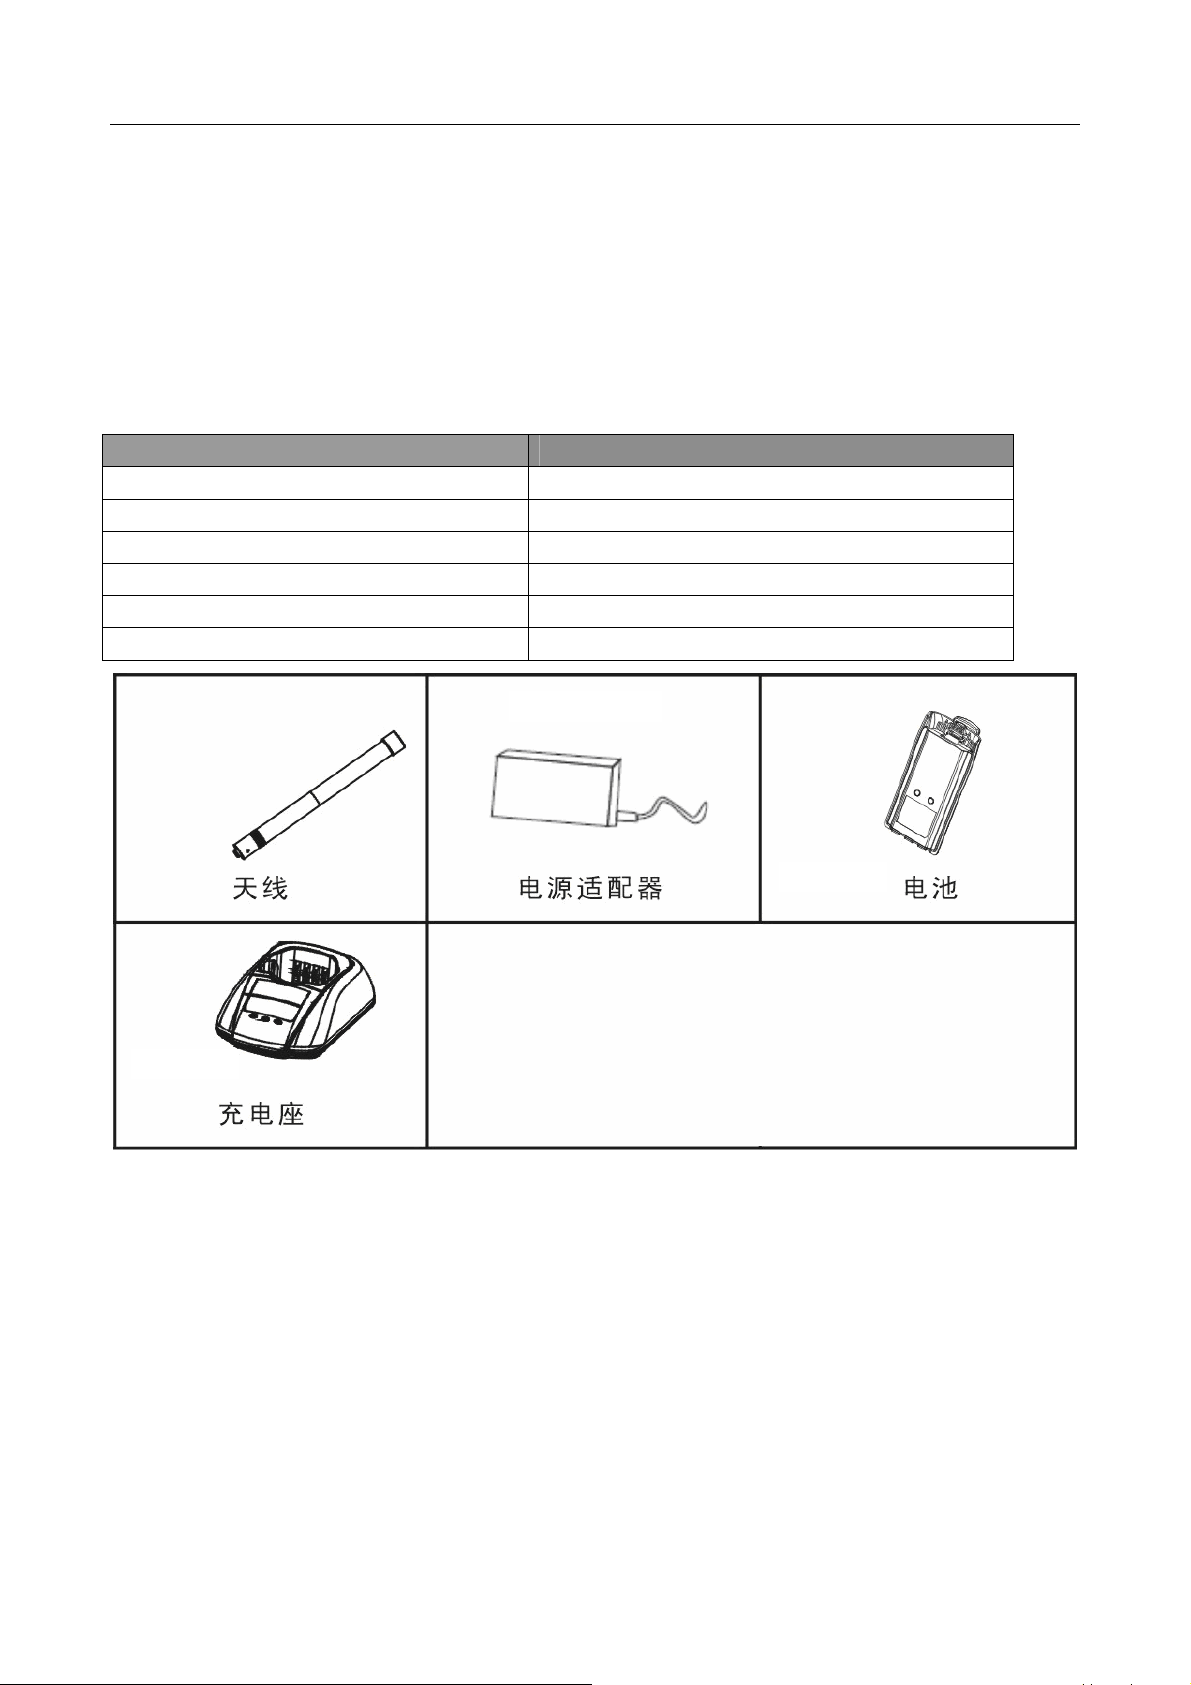
█ Unpacking and checking
Unpack the transceiver carefully. We recommend that you identify the items listed in the following table
before discarding the packing material. If any items are missing or have been damaged during
shipment, please contact the dealer immediately.
Supplied accessories
Item Quantity
Antenna 1
Battery 1
Charger 1
Power adapter 1
Hand strap 1
User’s Manual 1
Preparation
█
ower adapte
attery
◆Charging the battery
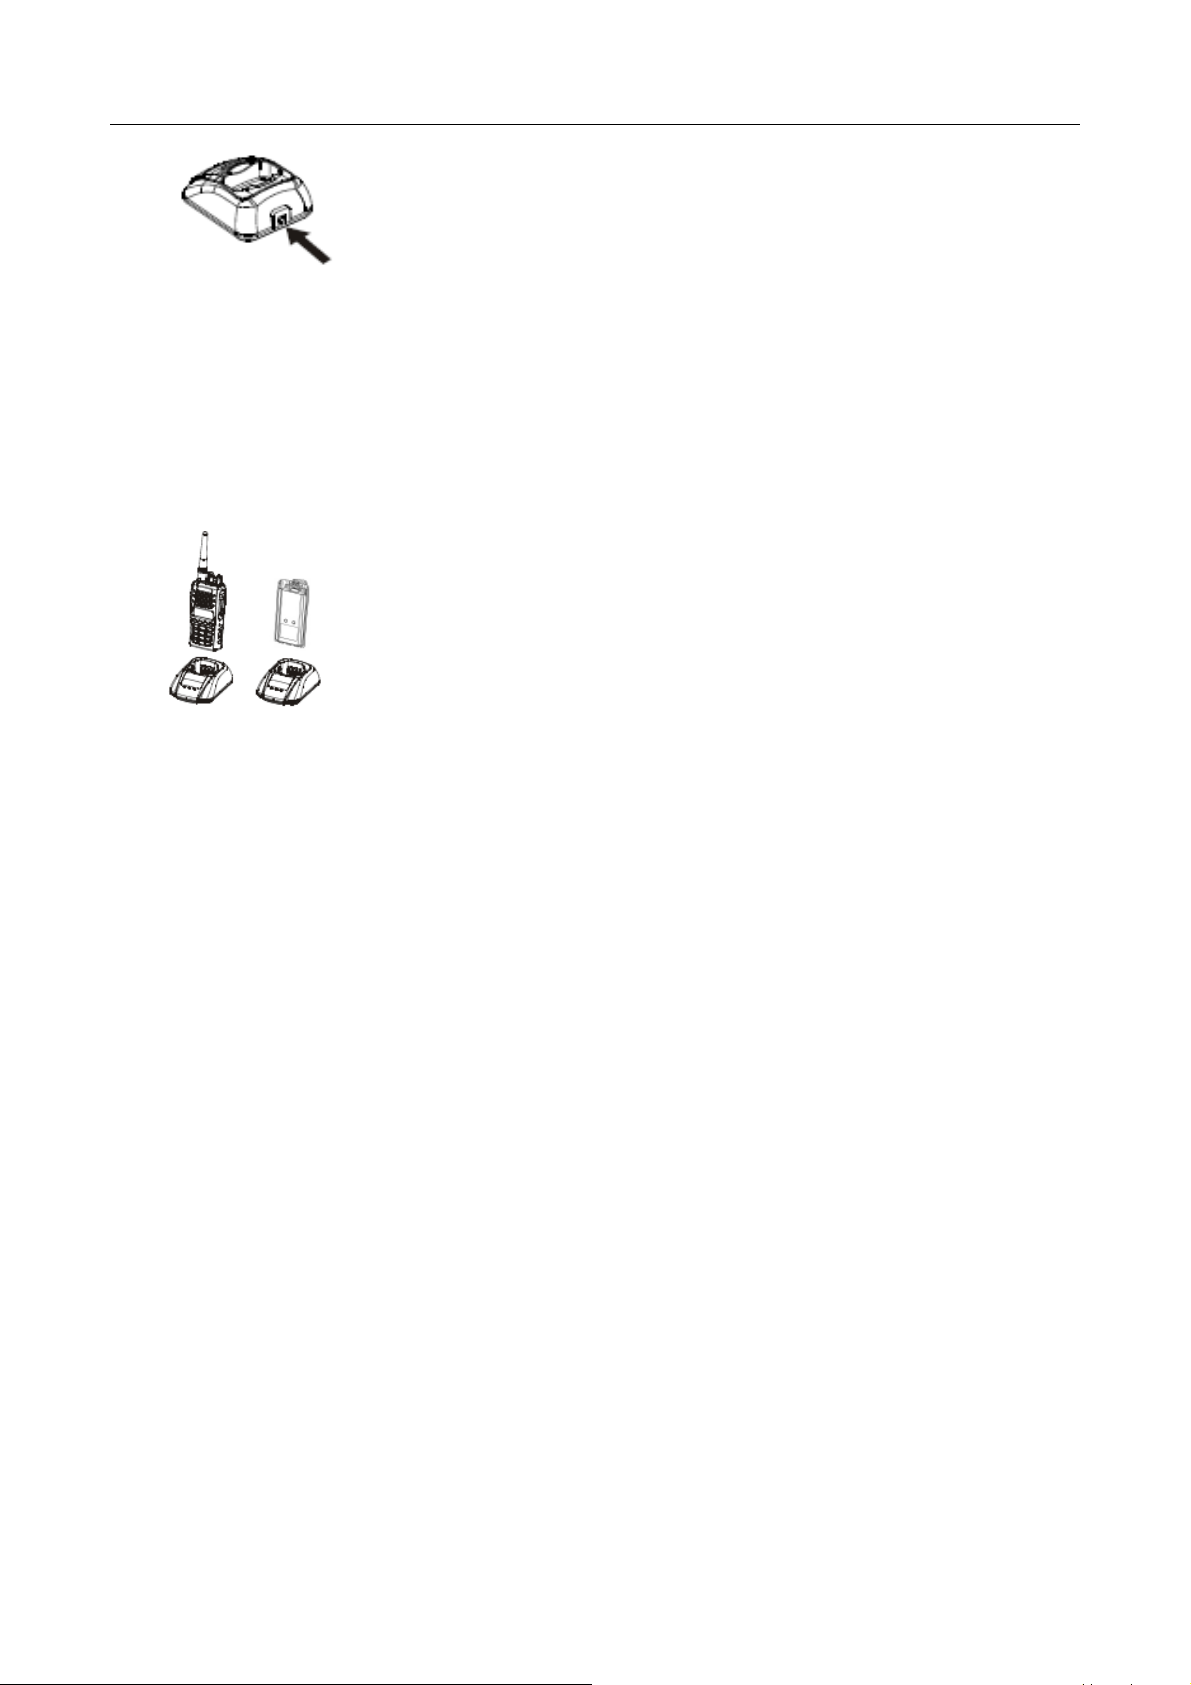
Connect the power adapter with the battery charger. Plug the adapter into an AC wall outlet
and the indicator turns green.
Page 3 of 30
Page 4
PT6500 User’s Manual
Place the battery or transceiver into the charger slot, and make sure the transceiver has
been turned off.
Make sure the battery is well connected with charger, then the indicator turns red or flashes,
then the charger gets in the state of charging automatically.
When battery is fully charged the indicator turns green.
The performance will be at the best condition if you remove the battery when the green
indicator is on. Then remove the power adaptor from the wall outlet.
The charger will enter the protection mode when the yellow indicator flashes, which means
the temperature or the circuit is abnormal. Do not charge the battery at this moment, just
remove the battery and turn off the power of the charger.
Notes:
*
The battery is not fully charged in the factory. Before the initial use, please charge the new
battery.
* The KB-36A Ni-MH battery/KB-36C Li-ion battery of this company is adaptable with this
machine.
* When you charge the battery the first time or after long time storage (2 months), several
times of charging is needed. Make sure the battery is charged at least once every three
months.
* Do not charge the battery again if it is charged fully or not in the low-pressure warning
mode, otherwise, its life will be shortened or it will be damaged. Remove the battery from
the charger after charging.
* When you use the KB-36A battery, and the transceiver is in the low-pressure warning
Page 4 of 30
Page 5
PT6500 User’s Manual
mode, recharge the battery before use. Do not power on by force, otherwise, its life will be
shortened or it will be damaged.
* There is a protection circuit in KB-36C battery, so the power will be cut off at too low
battery.
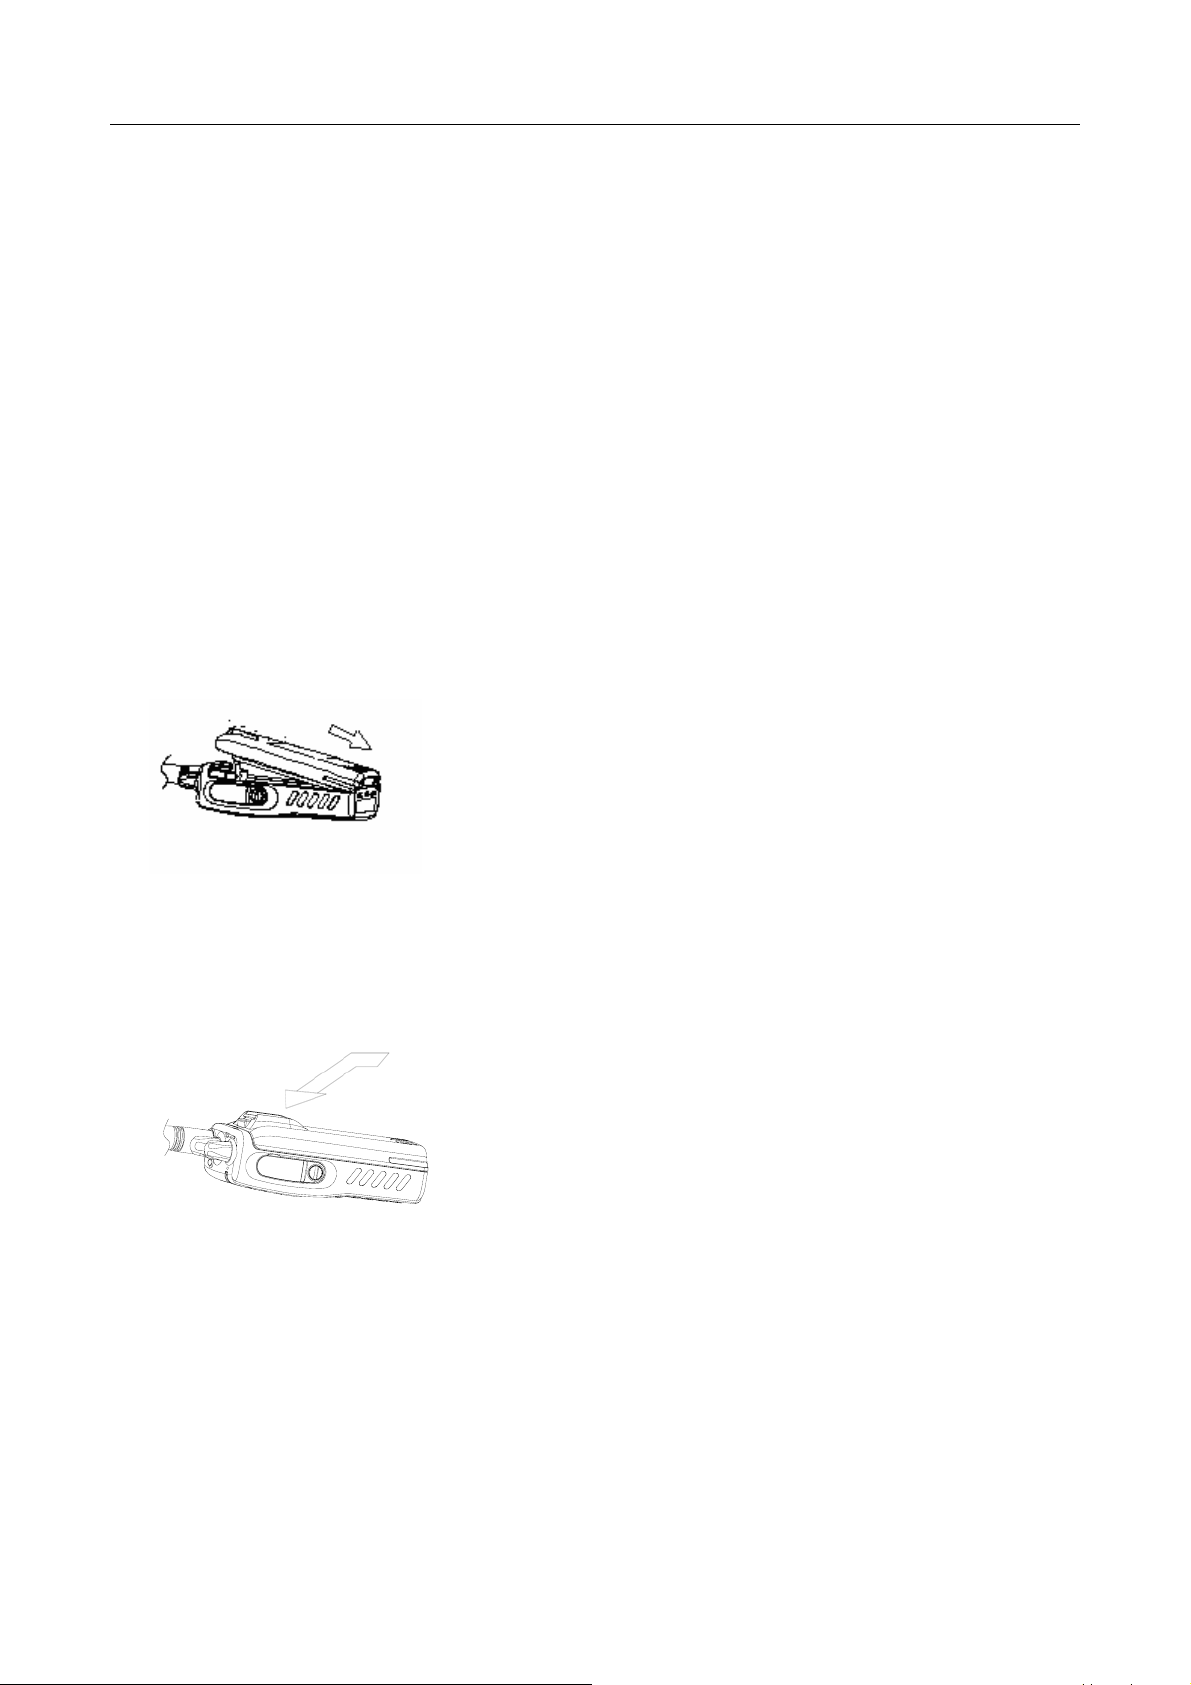
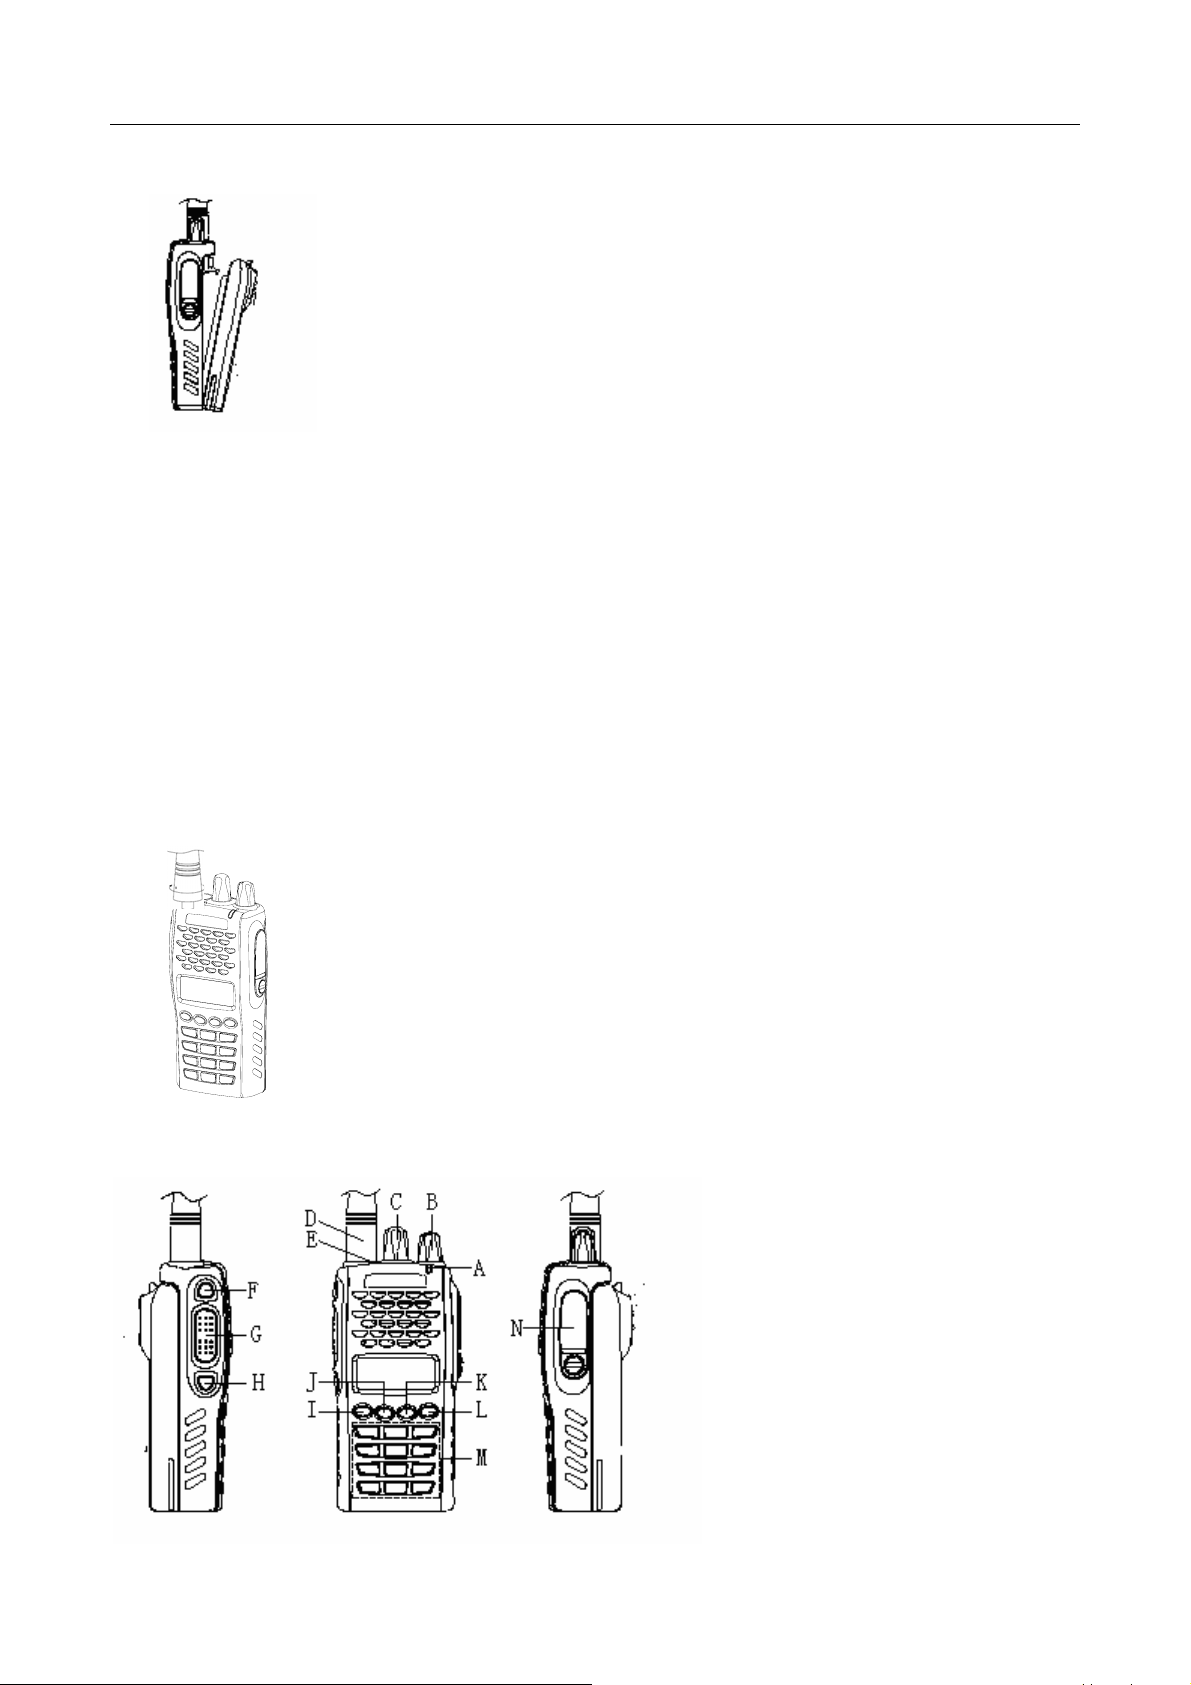
◆Installing/Removing the battery pack
To install the battery pack:
Match the 3 bulges of the battery pack with the corresponding holes at the rear Button of
the transceiver.
To install the battery pack:
Then firmly press the battery pack downwards to lock it in place until a click is heard.
To remove the battery pack:
Use your thumb to press the belt clip, and one side of your index finger to press the release
button; and then pull the battery away from the transceiver.
Page 5 of 30
Page 6
PT6500 User’s Manual
Notes:
* Do not cause short-circuit or throw the battery to the fire.
* Do not disassemble the battery by your self.
◆Installing the antenna
Screw the antenna into the connector at the top of the transceiver by holding the Button of
the antenna and turn it clockwise until secure.
Getting acquainted
Page 6 of 30
Page 7

PT6500 User’s Manual
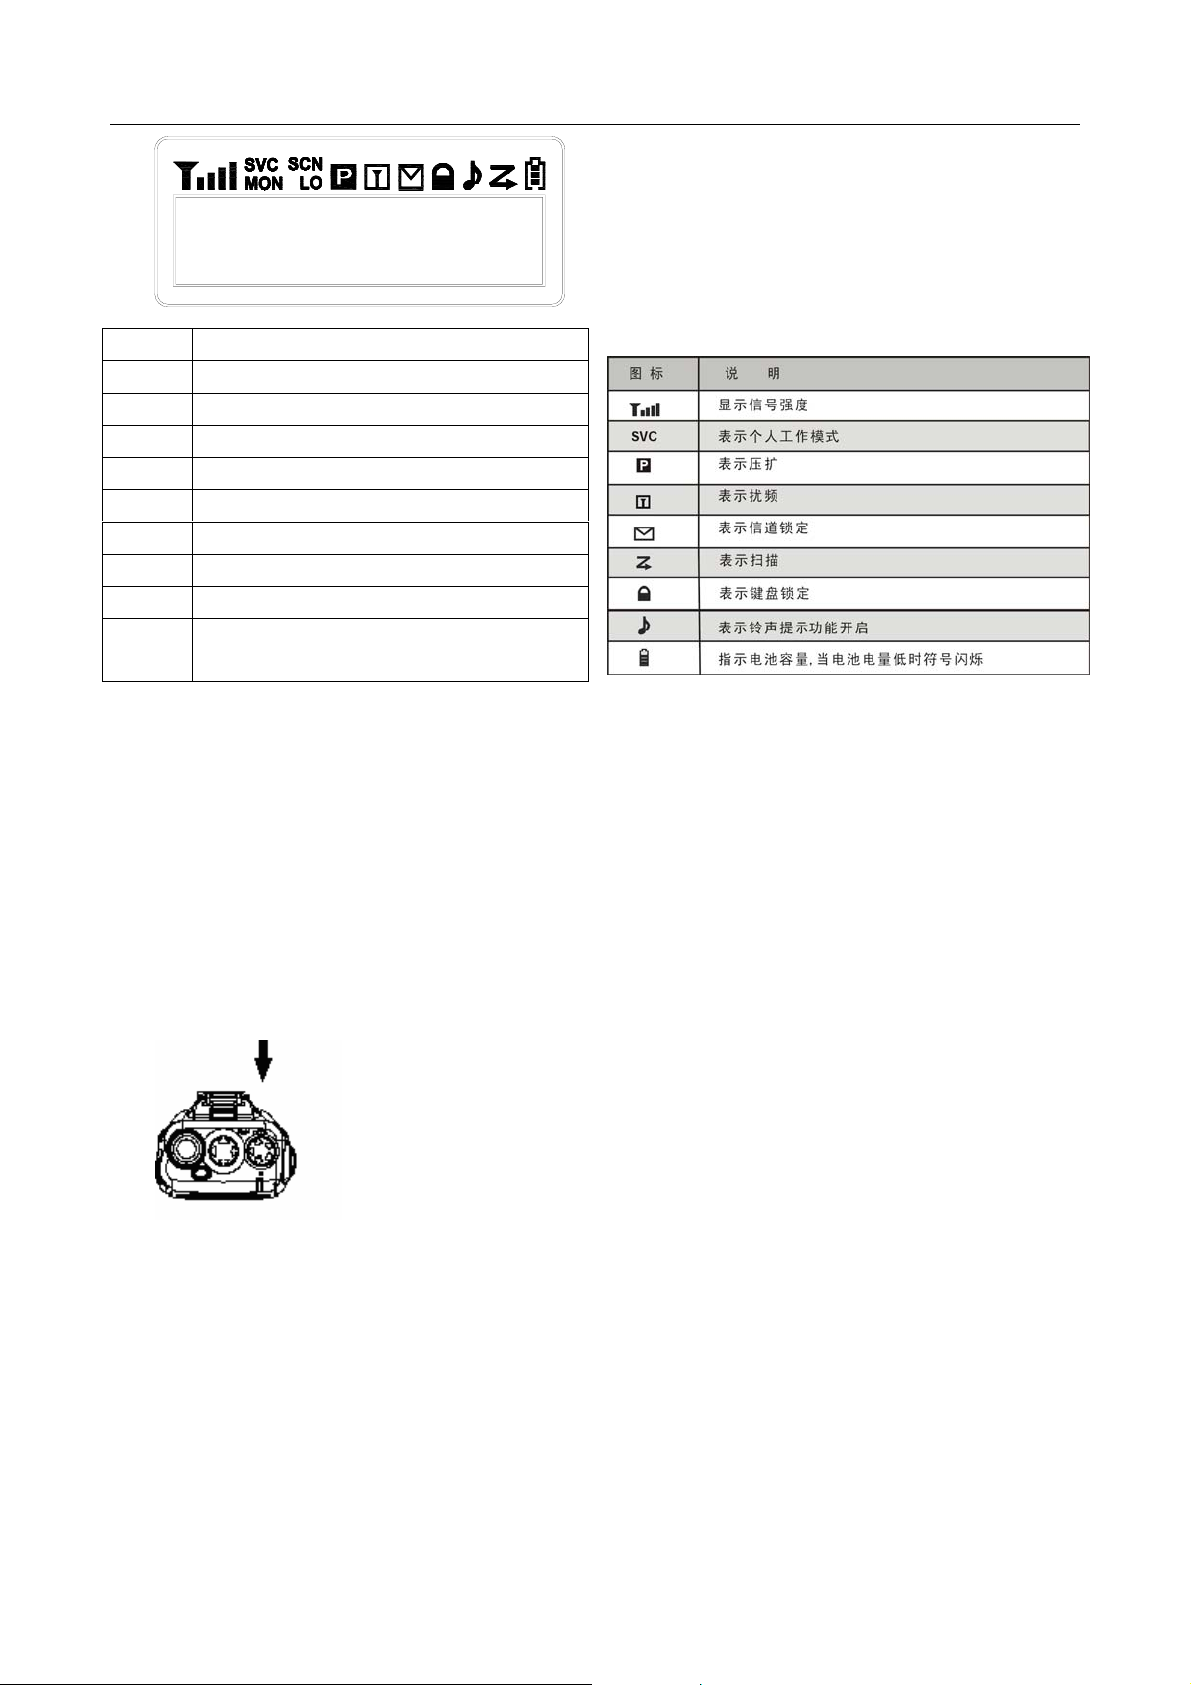
The functions of the components are as follows:
A. LED Indicator
Lights red while transmitting;
Lights green while receiving a signal.
B. Power/Volume Switch
Turn clockwise till a click is heard to switch on the radio.
Turn counterclockwise till a click is heard to switch off the radio.
Rotate to adjust the volume after turning on the radio.
C. Channel Selector
Rotate to select the channel 1-128.
D. Antenna
E. Top Button (programmable button)
It is recommended to be set as the emergency warning Button.
F. Side button 1 (programmable button)
G. P TT (PUSH-TO-TALK):
To make a call, press and hold the PTT button, then speak into the microphone with
normal voice.
H. Side button 2 (programmable button)
I. Button
Return and delete button in the menu.
J. Button
Select Button.
K. Button
Select Button.
L. Button
Enter and Confirm Button.
M.
Numeric keypad
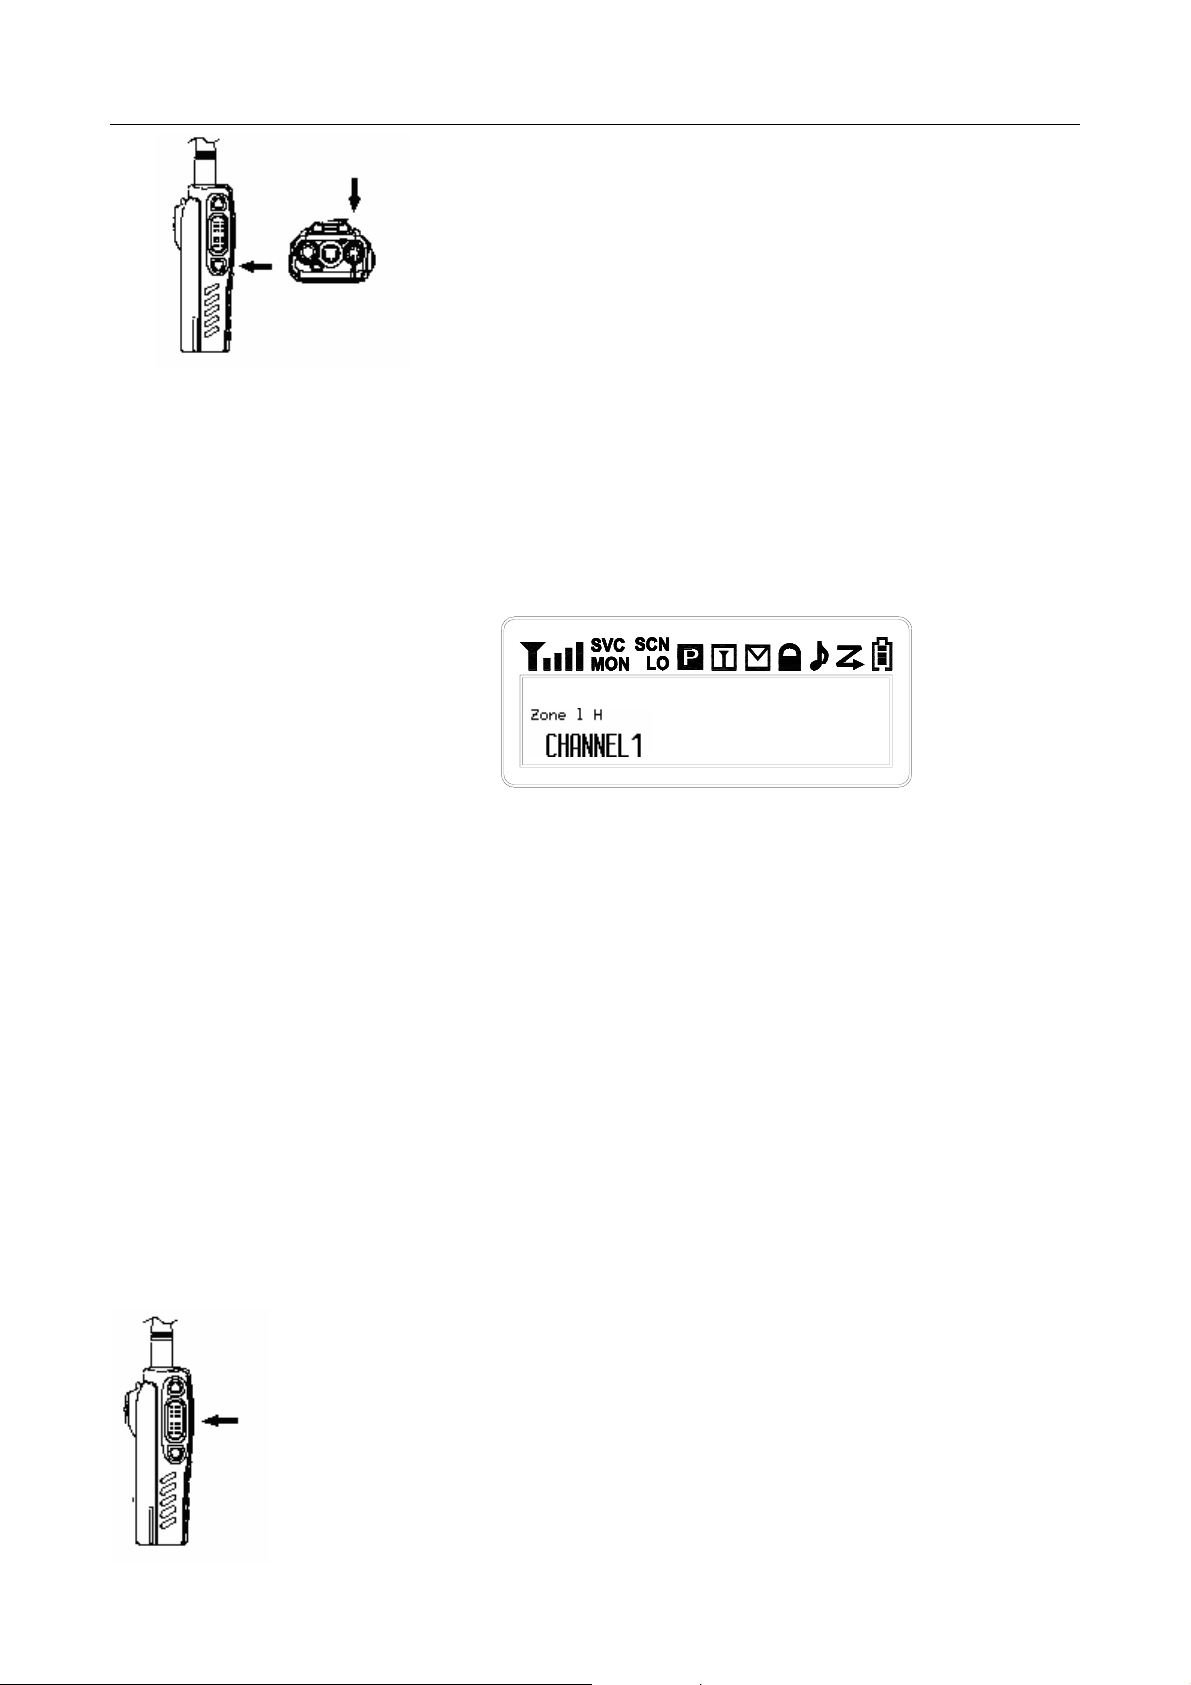
Explanation for the screen
Page 7 of 30
Page 8
PT6500 User’s Manual
Icon Description
Signal intensity
SVC
Compandor
Disturbance Frequency
Busy channel lockout
Scanning
Key lockout
Signal reminder is programmed
Battery volume, flashes when the
battery power goes too low
5 Basic Operation
1. Switch On
Switch on the radio by turning the Power/Volume switch clockwise
till a click is heard, then the radio will be in the state of stand by
and you will hear a beep if the dealer has set it.
2. Adjust Volume
Press the button preset as canceling squelch to listen to the background noise and rotate
the Power/Volume switch to adjust volume.
Page 8 of 30
Page 9
PT6500 User’s Manual
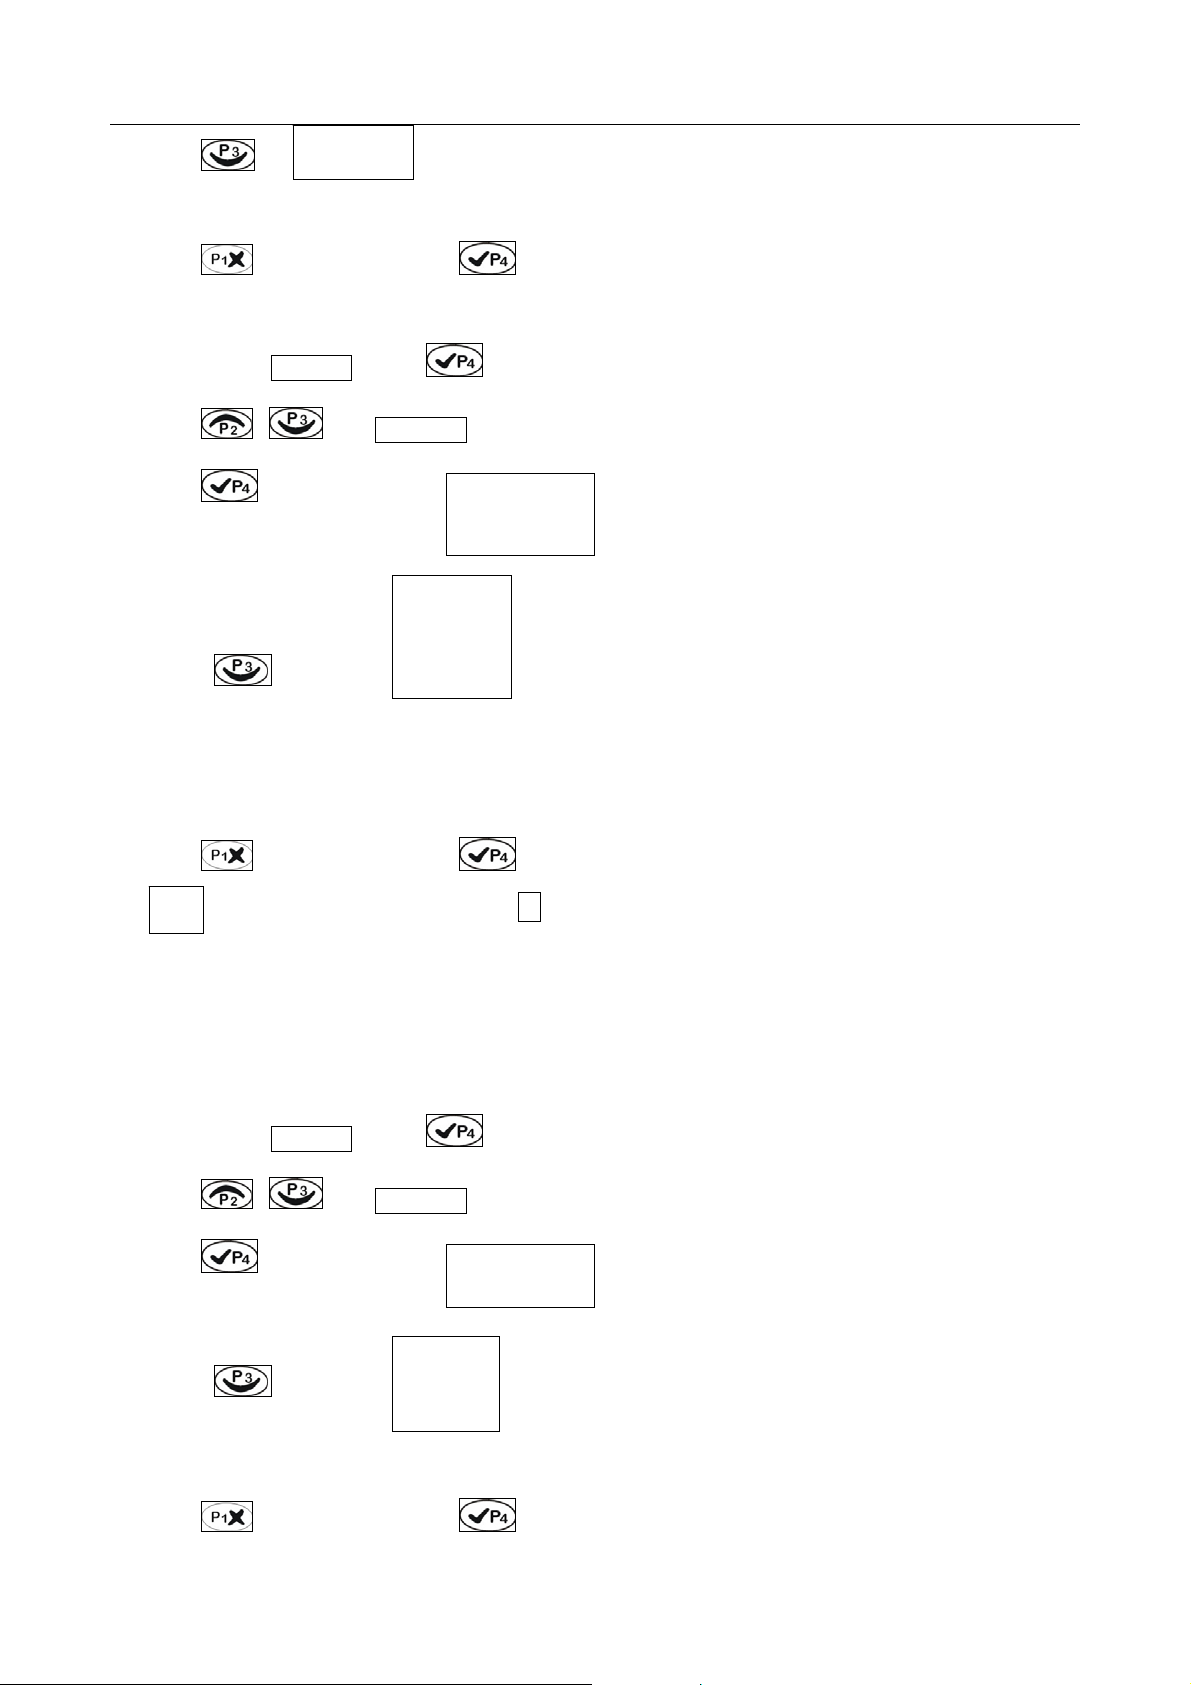
Select a Channel
3.
Rotate the channel selector to select channels. You will hear voice from the speaker while
receiving proper signals.
As shown in the above right figure:
Zone 1 is the zone of current channel (8 zones from 0 to 7).
H is the transmit power of the channel, H stands for high power, M for middle power while
L for low power.
CHANNEL 1 is the current channel (128 zones from 1 to 128).
4. Make a Call
To make a call, press PTT, and speak in normal voice and please keep your mouth 3~4
cm away from the microphone.
Page 9 of 30
Page 10

PT6500 User’s Manual
M
5. Receive a Call
e
n
u
Release the PTT button to receive a call.
Your dealer can set CTCSS, DCS, 2 Tone signaling on you radio channels by PC software.
If you select a channel that has been preset with the tone signaling, you will not hear any
other calls except those from your own system.
6.
Operation on menu: press “ ”button to enter the menu or confirm any contents;
press “ ” button to return to the previous menu or cancel the set. When entered the
menu, select the sub-menu with the “channel selector”, “ “or “ ”.
The
Utilities
(应用选项)
Scan
(扫描)
Back Light
(背景灯)
Squelch Levevl
(静噪等级)
Power Level
(功率水平)
menu
is as
follows
:
开/关开/关 0~9级 高、中、低
菜单
Phone
(电话)
Rptr/Talkarnd
(脱网)
Speak mode
(喇叭模式)
Zone Edit
(区编辑)
Call
(联系列表)
Ch Edit
(信道编辑)
Key tone
(按键音)
选择静噪模式
选择区域
对讲机号码名单
Rx FRQ
(接收频率)
接收频率设置
Scrambler
(扰频)
Tx FRQ
(传输频率)
传输频率设置
Save
(省电)
关闭省电或
1:1、1:2、1:4
Rx Ctcss
(接收亚音)
接收亚音频率
设置
Companding
(压缩扩展)
开/关开/关开/关
Tx Ctcss
(传输亚音)
传输亚音频率
设置
Page 10 of 30
Page 11

The operations are as follows:
Set scanning:
PT6500 User’s Manual
1. As shown: in CH 1 , press
utilities is shown;
2. Press , then scan is shown;
3. Press , then enter selecting scan;
4. Select Scan On or Scan Off with / , then press to confirm it.
If can not enter that way, you have to set in PC communications;
Set back light:
1. As shown: in CH 1 , press
2. Press to enter select mode,
3. Press / , and Back Light is shown,
, then
, utilities is shown.
4. Press to select On or Off,
5. Select On or Off with / , press to confirm.
Set the squelch level:
1. As shown: in CH 1 , press
2. Press to enter select mode,
3. Press / , then Squelch Level is shown,
4. Press to select squelch level, e.g., Leve 0
5. Change the squelch level with / , then press to confirm.
, utilities is shown.
Page 11 of 30
Page 12

Set power level (high/middle/low):
PT6500 User’s Manual
1. As shown: in CH 1 , press
2. Press to enter select mode,
3. Press / , then Power Level is shown,
4. Press to select, e.g., Power Low,
5. Change the power level with
Set Companding:
1.As shown: in CH 1 , press
2. Press to enter select mode,
3. Press / , and Companding is shown,
, utilities is shown.
/ , then press to confirm.
, utilities is shown.
4. Press to select Companding,
5. Select On or Off by / , press to confirm.
Set saving:
1.As shown: in CH 1 , press
2. Press to enter select mode,
3. Press / , and Save is shown,
4. Press to select Save 1:4,
5. Chang the save percentage with / , press to confirm.
Set scrambler:
, utilities is shown.
1.As shown: in CH 1 , press
, utilities is shown.
Page 12 of 30
Page 13

PT6500 User’s Manual
2. Press to enter select mode,
3. Press / , and Scrambler is shown,
4. Press to select, e.g., Scrambler Off,
5. Select On or Off by / , press to confirm.
Set key tone:
1.As shown: in CH 1 , press
2. Press to enter select mode,
3. Press / , and Key Tone is shown,
4. Press to select Off or On,
5. Select On or Off with / , press to confirm.
Set Rptr/Talkarnd:
1.As shown: in CH 1 , press
2. Press / , and Rptr/Talkarnd is shown,
3. Press to select the mode,
, utilities is shown.
to enter select mode,
4. Select Repeater Mode or Talkarnd mode with / , press to confirm.
Set speak On mode:
1.As shown: in CH 1 , press
2. Press / , and Speak Mode is shown,
3. Press to select the speak on mode,
4. Select with / , press to confirm.
Set zone mode:
to enter select mode,
Page 13 of 30
Page 14

PT6500 User’s Manual
1.As shown: in CH 1 , press to enter select mode,
2. Press / , and Zone Edit is shown,
3. Press to select the zone mode,
4. Select Zone No with / , press to confirm.
Set call list:
1.As shown: in CH 1 , press
2. Press / , and Call is shown,
3. Press to select the call list,
4. Select with / , press PTT to transmit.
Set Rx FRQ:
1.As shown: in CH 1 , press
2. Press / , and Ch Edit is shown,
3. Press to select
4. Press , is shown, enter the set of Rx FRQ,
Rx FRQ
401.660000
Ch alias
to enter select mode,
to enter select mode,
5.Set the Rx FRQ value with the keypad,
6. Press
Set Tx FRQ:
1.As shown: in CH 1 , press
2. Press / , and Ch Edit is shown,
3. Press to select
to delete, and press to confirm.
to enter select mode,
Ch alias
CHANNEL 1
Page 14 of 30
Page 15
PT6500 User’s Manual
4. Press , is shown, enter the set of Tx FRQ,
5.Set the Tx FRQ value with the keypad,
6. Press
Set Rx CTCSS/DCS:
1.As shown: in CH 1 , press
2. Press / , and Ch Edit is shown,
3. Press to select
4. Press
Tx FRQ
to delete, and press to confirm.
to enter select mode,
Ch alias
CHANNEL 1
Rx
CTCSS
, is shown, enter the set of Rx CTCSS/DCS FRQ,
401.660000
5.Set the Rx FRQ value with the keypad,
6. Press
7. stands for the radix point, press # to convert among CTCSS、DCS and
to delete, and press to confirm.
*
reverse DCS.
Set Tx CTCSS/DCS:
1.As shown: in CH 1 , press
2. Press / , and Ch Edit is shown,
3. Press to select
4. Press
, is shown, enter the set of Tx CTCSS/DCS FRQ,
Tx
CTCSS
XXXX
to enter select mode,
Ch alias
CHANNEL 1
5.Set the Tx FRQ value with the keypad,
6. Press
to delete, and press to confirm.
Page 15 of 30
Page 16
PT6500 User’s Manual
7. stands for the radix point, press # to convert among CTCSS、DCS and
*
reverse DCS.
Set contact list:
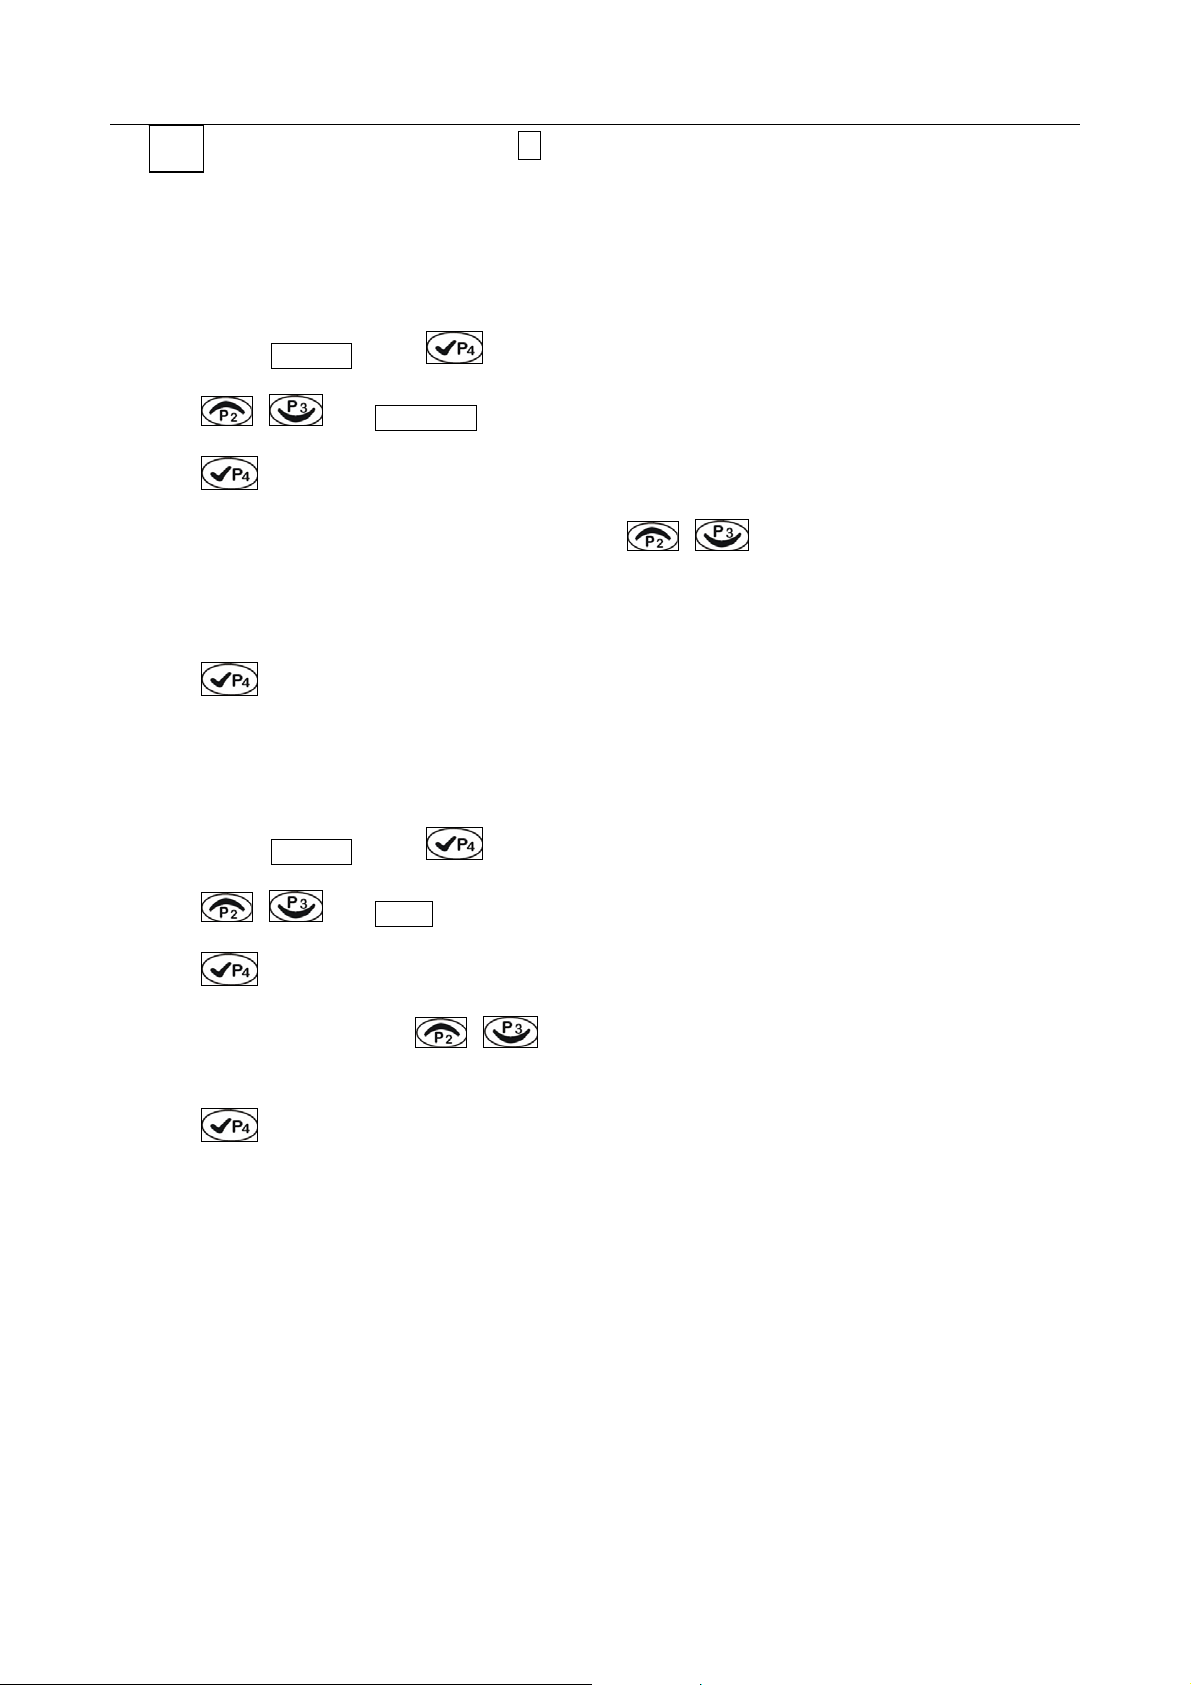
1.As shown: in CH 1 , press
2. Press / , and contact list is shown,
3. Press to select,
4. Select the address cable of the call to be made with / ,
5.Check the alias or address code by turning the knob,
6. Key in the address code of the person you are calling,
7. Press
Set status:
1.As shown: in CH 1 , press
2. Press / , and status is shown,
to transmit the current contact list.
to enter select mode,
to enter select mode,
3. Press to select,
4.Select the needed status with / ,
5.Check the alias or address code of the status by turning the knob,
6. Press
to select the current status.
■Programmable Button functions
The dealer can program the 2 Side Buttons and 1 top Button with one of the following auxiliary
functions.
None
Off (“do not set the functions”)
Scan
Separate working
Page 16 of 30
Page 17

PT6500 User’s Manual
Contact list
Power selector
Show or hide the channel alias
Busy Channel Lockout (BCL)
Key lock
Squelch level selector
Companding
Scrambler
Battery power
Zone
Monitoring
Cancel Squelch
Emergency Alert
Back light
Rptr/Talkarnd
Express select channel 1
Express select channel 2
Call 1, 2, 3 or 4
Channel lock
Adjust display contrast
Notes: programmable key can be set as short key or long key.
The following functions can be programmed by the
dealer:
● None
Set of None。
●
Scan
Press the button set as Scan to start scanning. When carrier wave scan is enabled. While in scanning,
the radio checks every channel (any channel in any zone) and stops on the channel on which a signal is
detected until that signal disappears. If the delay time between signal disappearing and continuing
scanning has been preset, the radio will remain on that channel. Only when there are two channels
added in the scan list and the scan function has been activated, the radio can start scanning.
▲ It can be set as: short key: scan, long key:off.
1. Press the programmable key once to start scanning (it should be effective in the channel scan list).
Page 17 of 30
Page 18

PT6500 User’s Manual
2. Press once to quit.
Notes: there are 8 zones from 0 (default zone) to 7; and there can be 128 channels to the most in
each zone. There are totally 16 scan lists; you can select any scan list. Every scan list can scan
any channels in different channels (16 channels to the most).
● Separate working
Press the button set as Separate Working to start separate working. This mode is to ensure the safety
of the user while using the transceiver separately.
▲It can be set as: short key: personal working, long key:off.
1. Press the programmable key once to start personal working;
2. Press once again to quit.
Notes: the separate working is connected with the automotive checking in the programming
software, and will be effective when both are set.
● Contact list
Enter the Contact list quickly:
▲ It can be set as: short key: contact list, long key:off.
1. Press the programmable key once to enter the contact list Call
2. Press again to enter the content interface of the contact list, e.g.: Dtmf Call
3. Select the options in the contact list with /
4. Press PTT to transmit
5. Press to quit.
Power select
Rotate the “channel selector” to enter the “power level” menu quickly. There are high, middle and low
levels.
▲ It can be set as: short key: power select, long key:off.
1. Press the programmable key once, will be shown,
2. Press it again,
Zone 0 L
CHANNEL 1
Page 18 of 30
Page 19

PT6500 User’s Manual
Zone 0 M
CHANNEL 1
3. Press it a third time,
will be shown.
will be shown,
Zone 0 H
CHANNEL 1
●Busy Channel Lockout (BCL)
Busy Channel Lockout can prevent you from interfering other radios that using the same channel.
Press the PTT button when the channel is busy, the radio with BCL function active will make warning
sound and prohibit transmitting. To stop the warning sound, please release the PTT button and the radio
returns to receiving mode.
▲It can be set as: short key: Busy Channel Lockout, long key:off.
1. Press the programmable key once, will be shown,
BCL none
2. Select the character you need with
3、Press
to confirm.
/ , e.g.:
BCL carryPL?
BCL none
BCL carry?
●Key lock
Press the key programmed as “key lock” for one second to lock/unlock the keys for the transceiver.
▲ It can be set as: short key: key lock, long key:off.
1. Press the programmable key once, will be shown,
2. Press it again, will be shown.
CHANNEL
CHANNEL
●Squelch level Selector
Enter the “Select squelch level” instantaneously, 0~9 levels are available with the channel selector.
▲ It can be set as: short key: Select squelch level, long key:off.
1. Press the programmable key once,
will be shown,
Level 2
Page 19 of 30
Page 20

PT6500 User’s Manual
2. Select squelch level with
3. Press
to confirm.
/ , e.g.:
Level 3
Level 4
Level 5
●Companding
Enter the Companding mode when press the key programmed as “Companding”,
▲ It can be set as: short key: Companding, long key:off.
1. Press the programmable key once to open the Companding mode,
Zone
CHANNEL 1
2. Cancel the mode by pressing it again, will be shown.
will be shown,
Zone
CHANNEL 1
●Scrambler
Press the key programmed as “scrambler” to prevent any third party to hear you talking on the phone.
▲ It can be set as: short key: scrambler, long key:off.
1. Press the programmable key once to open the scrambler mode,
CHANNEL 1
2. Cancel the mode by pressing it again,
will be shown.
will be shown,
CHANNEL 1
●Battery volume checking
Display the battery power.
▲It can be set as: short key: battery power checking, long key:off.
Page 20 of 30
Page 21

PT6500 User’s Manual
1. Press the programmable key once: the battery power will be shown,
2. Press again: close the display.
● Monitoring
Press the programmed as “monitor trigger” to shut up the CTCSS、DCS、2Tone and DTMF signal, and
you can listen to the signals can not be heard in normal operation, press the key again to return to
normal operation.
▲It can be set as: short key: monitor, long key:off.
1. Press the programmable key once to start monitoring, Moni Moment ON
will be shown,
2. Press again: stop monitoring, Moni Moment OFF will be shown.
●Cancel squelch
Press the key, no matter what the signal or carrier wave is (including optional signal), squelch will be
cancelled.
▲It can be set as: short key: cancel squelch, long key:off.
1. Press the programmable key once to start squelch constantly,
2. If you do not press it, the squelch will still work.
●Emergency Alert
If press the top key programmed as “Emergency Alert”, you can set the warning ring according to the
programming software, or send your identity or background music to your companion or the system.
▲It can be set as: short key: emergency alert, long key:off.
1. Press the programmable key once to start alert,
2. Press it again to stop the alert.
●Back light
Turn on/off the back light.
▲It can be set as: short key: back light, long key:off.
1. Press and hold this key, the back light is on,
2. Release it to recover the normal mode.
Page 21 of 30
Page 22

PT6500 User’s Manual
●Rptr/Talkarnd
When press the key programmed as “Rptr/Talkarnd”, the next transmission will be at the same
frequency as at which it is received.
▲It can be set as: short key: Rptr/Talkarnd, long key:off.
1. Press the key once, Rptr/Talkarnd will be shown,
2. Press to enter,
3. Press / to select the character you need: e.g.: Repeater Mode or Talkarnd mode,
4. Press to confirm.
●Instantaneously select the channel
Shift to the channel you selected instantaneously, so that you can communicate at the channel you are
used to.
▲It can be set as: short key: instantaneously select channel 1, long key:off.
1. Press the key once to instantaneously select the channel, e.g.:CHANN 15
2. Press again to return.
●Call 1, 2, 3, or 4
Press the side button programmed as Call 1, 2, 3, or 4 to transmit the specified code stored in the
contact list. Release “Call” button, and speak to the microphone to call with the PTT button still
pressed.
▲It can be set as: short key: Call 1, long key:off.
1. Press the key once to make a call(within the current channel), and will quit automatically after the
call.
●Voice Annunciation of Channel Number
Select or delete the voice annunciation function.
●Adjust display contrast
You can adjust the display contrast as per your need.
▲It can be set as: short key: display contrast, long key:off.
1. Press the key once, Contrast will be shown,
2. Press / to select the character you need,
Page 22 of 30
Page 23

PT6500 User’s Manual
3. Press to confirm.
●Manual programming
The dealer can open the manual programming rights of:
Channel frequency set, CTCSS,DCS.
Basic operations of programmable keys:
You can set the programmable keys with the “key set” in PC software, as follows:
▲It can be set as: short key: display channel frequency, channel alias and channel No., long key:off.
1. Press the key once, display the channel alias, e.g.:
,
2. Press it again, the channel frequency will be shown, e.g.:
3. Press it a third time,the channel alias will be shown, e.g.:
▲It can be set as: short key: Zone, long key:off.
1. Press the key once, Zone No will be shown,
2. Select zone No. with / ,
3. Press to confirm.
▲It can be set as: short key: channel lock, long key:off.
1. Press the key once to perform channel lock, then you can not choose the
channel, will be shown.
2. Press it again to cancel channel lock, will be shown.
CHANNEL 1
CHANNEL 1
CHANNEL 1
401.66500
CH 1
■ VOX
VOX function enables you to use the radio without manual operations. This function can only be set by
the dealer, and you have to be equipped with the specified earphones.
Before using VOX, you must set VOX gain level. Such setting enables the radio to identify the voice
volume. If the microphone is too sensitive, the background noise will trigger the radio to transmit. If the
microphone is not sensitive enough, it cannot receive your voice when you speak. Make sure to adjust
Page 23 of 30
Page 24

PT6500 User’s Manual
VOX gain level to proper sensitivity.
■ Auxiliary Functions)
◆ Time-out Timer (TOT)
TOT timer:
Time-out timer can prevent any caller from occupying one certain channel for an extended period of the
time.
The radio is set with a continuously transmitting limit. If the radio is continuously transmitting longer than
the time preset by the dealer, the radio will stop transmitting and warning
TOT forbidden period:
A period in which the radio is forbidden to transmit after its overtime activity.
During the period, if the PTT key is pressed, there will be a warning tone, and transmitting is forbidden.
TOT pre-warning:
The pre-warning will sound before the TOT action.
After the sound of the warning, the timer will take action when the transmitting time has gone beyond
the limit.
TOT reset:
The time delay from releasing the PTT key to the resetting of the timer is limited.
The countdown will go on if the time after releasing the PTT key is shorter than the reset time.
◆ Battery Saving
The dealer can set the type of this function by programming.
If the battery saving function is on, 10 seconds after the radio hasn't receive any signals or no operation
is being conducted, the radio enters battery saving mode. When a signal is received or any operation
occurs, it exits battery saving mode automatically.
The types include: 1:1, 1:2, 1:4 and off.
The automatic battery saving function decreases the power consumption.
◆ Voice Annunciation of Channel Number
The dealer can turn on or turn off this function by programming.
While switching to another channel, you can hear the voice annunciation of the current channel number.
◆ CTCSS/ DCS
The dealer can set CTCSS/DCS tones on radio channels, which enable you to ignore (not hear) calls
Page 24 of 30
Page 25

PT6500 User’s Manual
from other irrelevant parties who are using the same channel.
When you receive a signal that has a tone different from the one set on your radio, you will not hear the
signal. Likewise, signals that you transmit will only be received by parties whose CTCSS/DCS tones are
the same as yours.
Note: Using a CTCSS/DCS channel doesn't mean your calls are private. If other parties' CTCSS/DCS
tones are identical with yours, they can hear your calls.
■User’s resolution
◆Busy Channel Lockout (BCL)
Busy Channel Lockout can prevent you from interfering other radios that using the same channel.
Press the PTT button when the channel is busy, the radio with BCL function active will make warning
sound and prohibit transmitting. To stop the warning sound, please release the PTT button and the radio
returns to receiving mode.
The dealer may provide the following two lock mode:
Carrier wave: it will be locked if there is any Carrier wave;
Carrier wave+ CTCSS/DCS:transmitting is permitted if there are matched CTCSS/DCS in the channel.
◆ Receiving squelch mode
The dealer may set the condition under which to turn on the speakers:
1. CTCSS/DCS and audio squelch: only when the CTCSS/DCS and optional signaling are patchable.
2. Audio squelch: once the optional signaling is matchable.
3. CTCSS/DCS squelch: when the CTCSS/DCS is matchable.
4. Carrier wave squelch: once there is any Carrier wave.
5. CTCSS/DCS and audio squelch: when the CTCSS/DCS is matchable, or when optional signaling
are matchable.
◆DTMF signaling
The dealer can set this function by programming.
There are 4 systems of which the parameters can be set, e.g.: group call ID No., * and # sound, etc.
After set a DTMF code in the “code sequence” , select DTMF system in the “DTMF code”, then select
the correspondent DTMF code cable in the “user’s resolution” and transfer it with PTT. Set a DTMF
code in the “deenencoding sequence”, add the sequence into the decoding cable in “DTMF decoding”,
then select the correspondent decoding cable. The dealer may also set the “decoding replay”.
Page 25 of 30
Page 26

PT6500 User’s Manual
◆2TONE signaling
The dealer can set this function by programming.
There are 4 systems of which the parameters can be set, e.g.: the duration of the first and the second
tone, the duration of the long tone and audio spacing, etc. Select the audio frequency(3106.0~
288.0hz step size 0.1hz)in “encoding sequence”, and whether the tones sent are long or two tones,
select 2TONE system in “2TONE List”, then select the correspondent 2TONE code cable in the “user’s
resolution” and transfer it with PTT. Select the audio frequency(3106.0~288.0hz step size 0.1hz)in
“decoding sequence”, and whether the tones received are long or two tones, then select the
correspondent decoding cable in the “user’s resolution”. The dealer may also set the “decoding
replay”.
◆ Transmit start/over signaling (PTT ID)
The identify signal of transmit start/over are used to maintain or disconnect some repeaters or phone
system.
“Transmit start” is used to connect routine repeaters and auxiliary facilities. If the ID transmitted is
matchable with that of the repeaters, the repeaters and auxiliary facilities are available.
“Transmit over” is used to disconnect routine repeaters and auxiliary facilities. If the ID transmitted is
matchable with that of the repeaters, the repeaters and auxiliary facilities are disconnected.
■ Problems and troubleshooting
No. Problems Solution
1 No display
after switched on.
A.Battery power may be insufficient. Recharge or replace the
battery pack.
B.The power switch may be broken, replace the switch.
C.CPU may be broken, replace the IC.
D.Regulator tube Q45 may be broken,replace the IC.
2
3 Cannot transmit.
Phase locked loop
unlocked ( with “tick,
tick” )
A.Phase locked loop Crystal Oscillator X1 may be broken,
replace it.
B.Oscillator tube may be broken, replace it.
C.Phase locked loop IC2 may be broken,replace the IC.
A. The frequencies of both users are not the same, select the
same frequency channel again.
Page 26 of 30
Page 27

PT6500 User’s Manual
B.The CTCSS/DCS signaling of both users are not the same,
set it with PC.
C.Beyond the efficient communication range.
4 No signal
5 The transmitting red
light is on, but no
voice is heard
6 Receiving green light
is on, but no voice is
heard
7 Abnormal
programming
A.Make sure the antenna is well connected.
B.Low sensibility, trimming “computer test mode”。
C.HF amplifier may be broken, replace it.
D.The squelch level is too high, which makes the squelch
unable to switch on, reset it by PC.
E.Mixer tube Q19 may be broken, replace the tube.
F.Frequency Modulation IC4 may be broken, replace the IC.
A.Power-amplifier tube, no power output, replace the tube.
B.Replace the microphone if it is broken.
C.Operational Amplifier IC14 may be broken, replace it.
A.Replace the speaker if it is broken.
B.Audio power amplifier IC9 may be broken, replace it.
C.Switch Tube Q48 may be broken, replace it.
D.Operational Amplifier IC6 may be broken, replace it..
A.Make sure the wires are well connected.
B.Abnormal output of the RS-232 serial port of the computer,
check the computer .
C.Abnormal connection of MIC and SPK jack, check the jack.
■ Major Specifications
General specification
Model PT6500
Frequency USA: 406.1-454MHz 456-470MHz
EU:
406.1~430MHz 440-470MHz
RF Power
Modulation
Number of
Channels
Max Antenna Gain
Maximum Frequency
deviation
Channel Spacing
4.0W (H) /1.0W (L)
16K8F3E/11K6F3E
128
2.0dBi
±5.5kHz (W)/ ±2.2 kHz (N)
25 kHz/12.5kHz
Page 27 of 30
Page 28

PT6500 User’s Manual
MF
Working Voltage
Working
Temperature
Antenna
Battery (Standard)
Model
Dimensions
Weight
1st MF:51.65MHz 2nd MF:450kHz
7.5V cathode Grounding
-25 ~ +55℃℃
50Ω
Model:KB-36C,li-ion battery DC 7.4V , 1750mAh
time of use:8 hours (5:5:90 period)
56X120X35mm
413(with battery and antenna)
■ Status setting (by the dealer)
Model:___________ Serial No.: _____________
a) Channel setting:
Channel
No.
1
2
3
4
5
6
7
8
9
10
11
12
13
14
15
16
17
18
---
128
Receiving
frequency
Transmitting
frequency
CTCSS/DCS
decoding
CTCSS/DCS
encoding
Power
Band
width
Scannin
g
BCL
b) Optional function:
2.1 Time-out timer(T
OT):
15——600 s
2.2 Squelch level:
1——9
2.3 Voice annunciation:
Page 28 of 30
Page 29

PT6500 User’s Manual
On □ Off □ 2.4 Battery saving:
Off □ 1:1 □ 1:2 □ 1:4 □
c) A
uxiliary functions button setting:
Top button
None
Voice reporting selector
Rptr/Talkarnd
Call1/2/3/4
Separate working
Emergency alert
Cancel emergency alert
Rewind
Scanning
High/low power shift
Squelch level adjuster
Monitoring open/Cancel
Squelch open/Cancel
Lock key
□ □
□ □
□
□
□
□
□
□
□
□
□
□
□
□
Side button1
None
Voice reporting selector
Rptr/Talkarnd
Call1/2/3/4
Separate working
Rewind
Scanning
High/low power shift
Squelch level adjuster
Monitoring open/Cancel
Squelch open/Cancel
Lock key
□ □
□ □
□
□
□
□
□
□
□
□
□
□
Companding
Scrambler
Battery volume
Side button2
None
Voice reporting selector
Rptr/Talkarnd
Call1/2/3/4
Separate working
Rewind
Scanning
High/low power shift
Squelch level adjuster
Monitoring open/Cancel
□
□
□
□ □
□ □
□
□
□
□
□
□
□
□
Companding
Scrambler
Battery volume
□
□
□
Page 29 of 30
Page 30

PT6500 User’s Manual
Squelch open/Cancel
Lock key
Companding
Scrambler
Battery volume
□
□
□
□
□
Page 30 of 30
 Loading...