


 Owner’s Manual


Welcome to the Kirby family! Thank you for your purchase of a Kirby® home care system. It’s not just a vacuum; it is a complete home cleaning system! There is no need to invest in multiple appliances or to fill your storage closet with cleaning tools.
Read this manual carefully before using the Kirby® home care system. If you have questions, contact an independent authorized Kirby Distributor.
This manual is available online in a selection of languages. Please visit www.kirby.com to view a manual in an alternate language.
Or, contact The Kirby Company:
|
consumer@kirbywhq.com |
|
1-800-494-8586 (United States and Canada) |
|
216-529-6146 fax |
|
www.kirby.com |
|
The Kirby Company |
|
Attn: Consumer Relations |
|
1920 West 114th Street |
|
Cleveland, Ohio 44102 |
For parts and supplies: |
|
United States and Canada |
1-800-437-7170 |
|
imd@kirbywhq.com |
United Kingdom |
0800-328-1247 |
Europe |
00 800 547 292 72 |
Australia |
1800 781 556 |
South Africa |
0800-203-222 |
Russia |
7 800 500 51 46 |
|
7 495 374 72 82 |
Visit our welcome page at www.kirby.com/welcome/. We’ve put all of the information you need to get the most out of your Kirby home care system in one convenient location.
Kirby, Avalir, Micron Magic, Tech Drive, Miracle Waxer, and Mini Em-Tor are registered trademarks of The Scott Fetzer Company.
1
TABLE OF CONTENTS |
|
Parts of the Kirby® Home Care System.................................................................... |
6 |
Getting Started.............................................................................................. |
11 |
Assembling the Unit.................................................................................................. |
11 |
Power Switch........................................................................................................... |
12 |
Disposable Filter Bag................................................................................................ |
13 |
Moving the Unit with the Power Off............................................................................ |
14 |
Locking the Upright Handle ....................................................................................... |
15 |
Lift The Unit.............................................................................................................. |
16 |
Belt Lifter.................................................................................................................. |
16 |
Outer Permanent Bag & Mini Em-Tor® Collector.......................................................... |
18 |
Upright & Portable Cleaner ........................................................................... |
19 |
Upright Cord Management ....................................................................................... |
19 |
Adjusting the Cleaning Height ................................................................................... |
20 |
Tech Drive® Power Assist.......................................................................................... |
20 |
Converting to a Portable Cleaner............................................................................... |
21 |
Cleaning Carpeted Stairs.......................................................................................... |
22 |
Cleaning a Mattress ................................................................................................. |
22 |
Canister Cleaner and Attachments................................................................. |
22 |
Attach the Hose to Convert to a Canister Cleaner........................................................ |
22 |
Installing Attachments on the Hose ............................................................................. |
24 |
Zippbrush................................................................................................................ |
26 |
Blower/Inflator ........................................................................................................ |
27 |
Portable Sprayer ...................................................................................................... |
28 |
Portable Shampooer................................................................................................. |
30 |
Optional Accessories...................................................................................... |
31 |
Multi-Surface Shampoo System: Carpets..................................................................... |
31 |
Multi-Surface Shampoo System: Hard Floors ............................................................... |
38 |
Miracle Shine Kit...................................................................................................... |
45 |
Tile & Grout Kit ........................................................................................................ |
48 |
Hard Floor Pad ........................................................................................................ |
50 |
Turbo Accessory....................................................................................................... |
51 |
Maintenance.................................................................................................. |
53 |
Troubleshooting............................................................................................. |
58 |
2
Important Safety Instructions
Certified by: |
Kirby Model and Optional Accessories: |
|
|
|
|
Underwriters Laboratory |
Avalir: Model G10D Sentria |
|
2930** and 2950** Multi-Surface Shampoo System |
||
and Canadian Standards |
2931** and 2951** Floor Care System |
|
Association as a double |
||
2935** Zippbrush |
||
insulated appliance. |
||
|
2932** Turbo Accessory System |
|
|
|
|
Outside North America: |
Avalir: Model G10E Sentria 230/240 Volt |
|
Avalir: Model G10J Sentria 110 Volt |
||
Certified by national test |
||
authorities as appropriate. |
|
|
|
|
CE DECLARATION OF CONFORMITY
We, Kirby, declare under our sole responsibility that, where applicable, the Kirby Model G10E Vacuum Cleaner is in conformity with the following standards or standardized documents.
IEC 60335-1 (EN 60335-1), IEC 60335-2-2 (EN 60335-2-2),
EN 55014-1, EN 55014-2, EN 61000-3-2, EN 61000-3-3, EN 50366 and EN 62233 in accordance with the regulations including the
Low Voltage Directive 2006/95/EC and EMC Directive 2004/108/EC
CE 95
KIRBY
1920 West 114th Street • Cleveland, OH 44102 • U.S.A.
READ THIS MANUAL BEFORE USING THIS PRODUCT. FAILURE TO FOLLOW THE INSTRUCTIONS AND SAFETY PRECAUTIONS IN THIS MANUAL CAN RESULT IN PERSONAL INJURY. KEEP THIS MANUAL FOR FUTURE REFERENCE.
Operating Instructions are available by contacting The Kirby Company or online at www.kirby.com
3
Important Safety Instructions
Overview of Safety Guidelines and Your Responsibilities:
•Your safety and the safety of others depend on you thoroughly reading and understanding this manual. If you have questions or do not understand the information presented in this manual, please contact The Kirby Company.
•Most vacuum-related incidents are caused by failure to observe basic safety rules or precautions. You must be alert to potential hazards.
•The Kirby Company cannot anticipate every possible circumstance that might involve a potential hazard. Therefore, the warnings in this manual may not be all inclusive. If a tool, procedure, work method or operating technique that is not specifically recommended by The Kirby Company is used, you must ensure that the product will not be damaged or be made unsafe by the operation, maintenance or repair procedures that you choose.
 WARNING– To reduce the risk of fire, electric shock, or injury:
•ALWAYS unplug before cleaning or servicing.
•NEVER leave appliance when plugged in.
•NEVER use outdoors or on wet surfaces.
•NEVER use with damaged cord or plug. If appliance is not working as it should, has been dropped, damaged, left outdoors or dropped
into water, return it to a Kirby authorized service center.
•NEVER run appliance over cord, pull or carry by cord, use cord as a handle, close a door on cord, or pull cord around sharp edges or corners.
•KEEP cord away from heated surfaces.
•NEVER unplug by pulling on cord. To unplug, grasp the plug, not the cord.
•NEVER handle plug or appliance with wet hands.
•Use only as described in this manual. Use only Kirby’s recommended attachments.
•DO NOT put any object into openings. Do not use with any opening blocked; keep openings free of dust, lint, hair or anything that may reduce airflow.
•Keep hair, loose clothing, fingers and all parts of body away from openings and moving parts.
4

•Keep motor shaft free from lint, hair and debris build-up.
•NEVER use to pick up flammable or combustible liquids, such as gasoline, or use in areas where they may be present.
•Turn off all controls before unplugging.
•Use extra care when cleaning on stairs.
•Not intended for use by children. Do not allow to be used as a toy.
o Keep all Kirby chemicals out of reach of children. These chemicals may cause irritation or discomfort if swallowed or placed in the eyes.
o In the European Union:
This appliance can be used by children aged from 8 years and above and persons with reduced physical, sensory or mental capabilities or lack of experience and knowledge if they have been given supervision or instruction concerning use of the appliance in a safe way and understand the hazards involved. Children shall not play with the appliance. Cleaning and user maintenance shall not be made by children without supervision.
•Use only Kirby® cleaning solutions intended for use with the Multi-Surface Shampoo System. See the Kirby® Home Care Products section of the manual.
•Do not pick up anything that is burning or smoking, such as cigarettes, matches, or hot ashes.
•Do not use without dust bag and/or filters in place.
•In the State of California:
This product contains chemicals known to the State of California to cause cancer and birth defects or other reproductive harm.
Safety Symbols and Warning Levels
This is the safety alert symbol. It is used to alert you to potential personal injury hazards.
Attention! Become alert! Your safety may be at risk.
INTENDED FOR HOUSEHOLD USE ONLY.
5
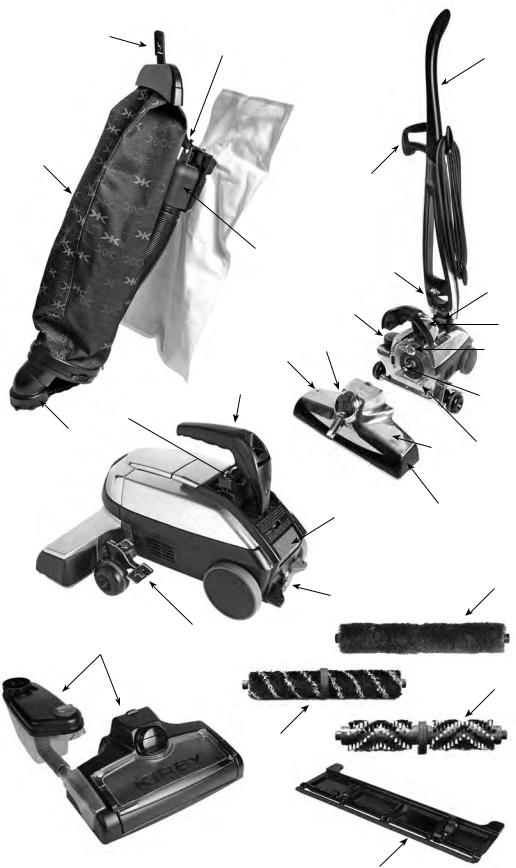
PARTS OF THE KIRBY® HOME CARE SYSTEM
No. Part
1Outer Permanent Bag
2Bag Release Button
3Bag Support Strap
4Disposable Filter Bag
5Top Adaptor
6Mini Em-Tor® Collector
7Brush Roll Performance Indicator Light
8Belt Lifter
9Air Exhaust Port
10Lower Carrying Grip
11Upper Carrying Grip
12Upright Handle
13Handle Tilt Latch Lever
14Headlight Hood
15Accessory Lock
16Motor Shaft
17Attaching Bar
18Power Nozzle
19Bumper
20Power Switch
21Tech Drive® Power Assist Pedals
22Toe-Touch Control Pedals
23Handle Release Button
Accessories & Attachments
24Multi-Surface Shampoo System (optional)
25Rotary Mop (optional)
26Miracle Shine Mop (optional)
27Tile & Grout Brush Roll (optional)
28Hard Floor Pad (optional)
6
|
|
|
|
||
|
|

|
|
|
|
||
|
||
|
||
|
|
|
|
||
|
||
|
|
|
|
||
|
|
|
|
|
|
|
7
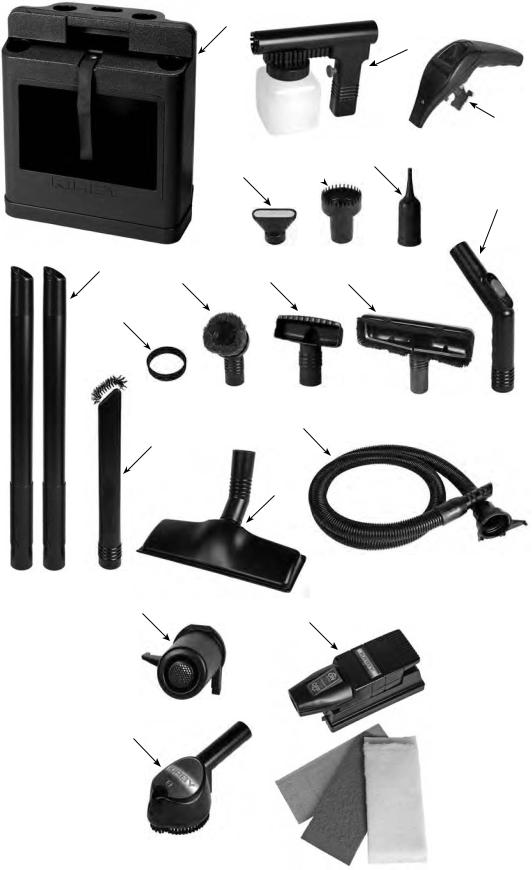
ACCESSORIES & ATTACHMENTS
No. Part
29Attachment Kaddy
30Portable Sprayer
31Portable Carry Handle
32Portable Shampooer Cap
33Utility Tool
34Inflator/Deflator Tool
35Extension Tubes
36Replacement Belt
37Duster Brush
38Upholstery Nozzle
39Wall and Ceiling Brush
40Suction Control Grip
41Crevice Tool
42Surface Nozzle
43Attachment Hose
44Air Intake Guard
45Zippbrush
46Turbo Accessory (optional)
8

|
|
|
|
|
|||
|
|
|
|
9
10
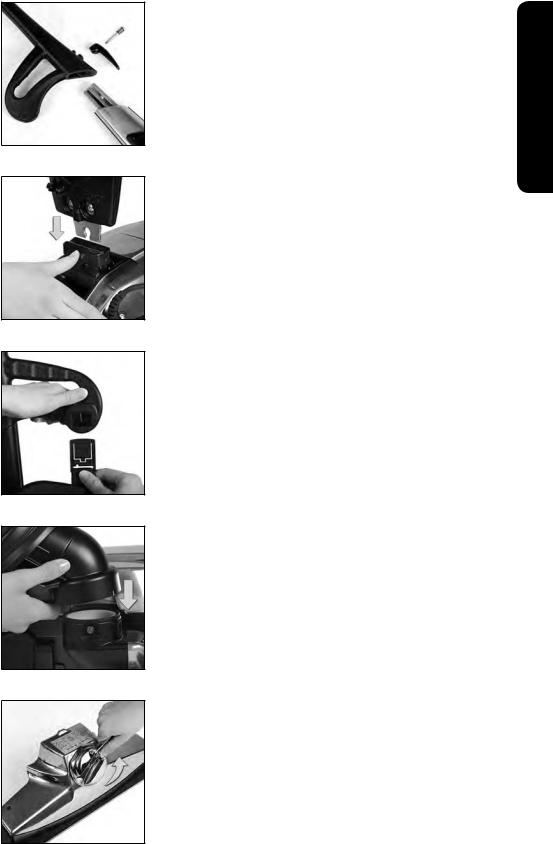
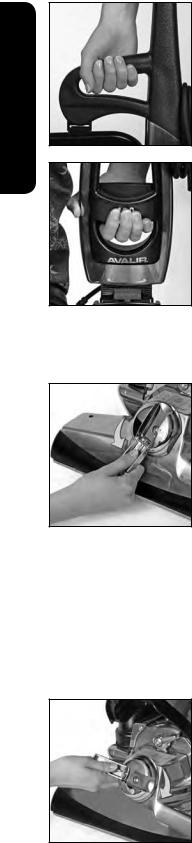
Assembling the Unit
1Assemble the Upright Handle by sliding the two pieces together. Screw in the cord hook and spring to secure.
2Push the base of the Upright Handle into the connection on the top of the unit.
3Attach the Bag Latch Tab on the Outer Permanent Bag to the Upright Handle.
4With the arrows lined up, slide the Mini Em-Tor® collector on to the Air Exhaust Port. Rotate it toward the unit to lock in place.
5Flip out the handle on the Belt Lifter on the Power Nozzle. Turn it counterclockwise until the red arrows line up.
The hook should catch and stretch the Belt inside the Power Nozzle.
STARTED GETTING
11
GETTING STARTED
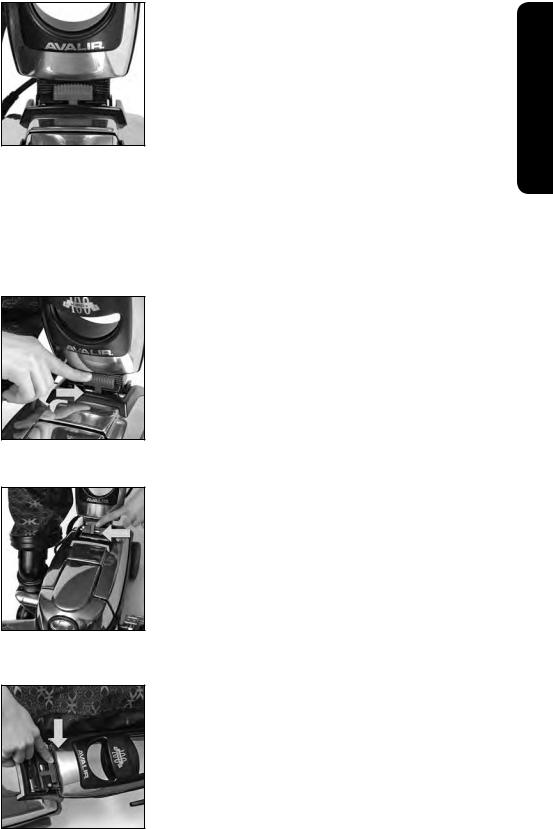
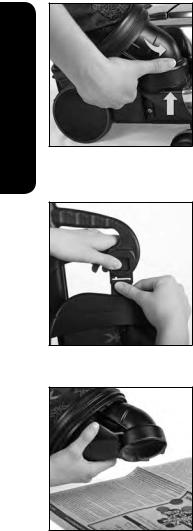
6Press the bottom pedal on the Toe-Touch Control all the way down to raise the front of the unit. Raise the Headlight Hood.
7Rest the two hooks on the back of the Power Nozzle on the Attaching Bar on the front of the unit. Press the Power
Nozzle against the unit and secure with the Accessory Lock.
8Flip out the handle on the Belt Lifter and use it to turn the Belt Lifter clockwise until the green arrows line up. This will engage the belt so the Brush Roll will spin. See page 17. Lower the Headlight Hood.
9Install a Disposable Filter Bag before vacuuming. See page 13.
Power Switch
Press the Power Switch at the rear of the unit to turn it on or off.
12
 Disposable Filter Bag
For best performance, use only Genuine Kirby® Disposable
Filter Bags and replace them when dirt reaches the FULL line. A
Disposable Filter Bag must be installed before vacuuming.
To Remove a Used Disposable Filter Bag:
1Turn the unit off. Unplug the power cord from the wall outlet. Unzip the Outer Permanent Bag. Flip up the cardboard tab that attaches the Disposable Filter Bag and pull it away.
 Do not use as a vacuum cleaner without filter bag in place.
 Before changing the Disposable Filter Bag, unplug the power cord from wall outlet and be sure that the motor and fan have stopped.
To Install a New Disposable Filter Bag:
2With the Outer Permanent Bag unzipped and the Top Adaptor pulled out, rest the cardboard faceplate of the Disposable Filter Bag against the bottom of the Top Adaptor.
3Pivot the cardboard faceplate up against the flat surface of the Top Adaptor.
4Bend and press the tab at the top of the cardboard face plate onto the Top Adaptor to secure.
5Check to make sure the Bag Support Strap is connected through the small hole of the Top Adaptor and that it is secured over the stud.
6Insert the Disposable Filter Bag into the Outer Permanent Bag and close the zipper.
STARTED GETTING
13
GETTING STARTED
Moving the Unit with the Power Off
TechDrive® power assist makes it easy to push or pull the unit when the motor is on. TechDrive power assist should be put in neutral before moving the unit when the motor is off.
1Raise the front of the unit by pressing the bottom pedal on the Toe-Touch Control down.
2Put Tech Drive power assist in neutral by pushing the left “N” neutral pedal down.
14
Locking the Upright Handle
This unit has a Handle Tilt Latch Lever which locks the upright handle for carrying and storage.
 Firmly grasp the handle BEFORE unlocking the Handle Tilt Latch Lever.
For vacuuming:
The Handle Tilt Latch Lever should be unlocked in the center position for vacuuming.
NOTICE Property Damage Risk. Unlock the Handle Tilt Latch Lever before pulling backwards. Failure to follow this notice could result in damage to the floor.
For carrying:
Move the Handle Tilt Latch Lever away from the bag to lock the base in place when the unit is lifted off the floor.
For lifting over a door threshold:
Move the Handle Tilt Latch Lever toward the bag and push down on the locked Upright Handle to raise the front of the unit over a door threshold or throw rug.
Optional Storage Method:
Lower the Upright Handle to a horizontal position near the floor and move the Handle Tilt Latch Lever away from the bag to lock the Upright Handle in place. Stand the unit up onto its Bumper and lean it against a wall for storage.
STARTED GETTING
15
GETTING STARTED
Lift The Unit
Move the Handle Tilt Latch Lever away from bag to lock the base in place. Use the handle on the bag arm to lift the unit.
Or, use the Lower Carrying Grip in the center of the handle to lift the unit.
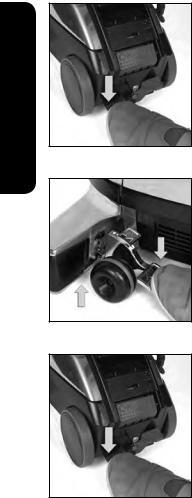
Belt Lifter
The Belt Lifter rotates a hook inside the Power Nozzle that lifts and lowers the belt on to the Motor Shaft. It is used to:
1Disengage the Brush Roll:
Turn the unit off. Raise the Headlight Hood. Flip out the handle on the Belt Lifter. Use it to turn the Belt Lifter counterclockwise until the red arrows line up. Close the handle. Close the Headlight Hood.
In this position, the Brush Roll will not spin during vacuuming.
 Do not turn Belt Lifter when unit is on.
NOTICE Property Damage Risk. Reengage the Brush Roll prior to storage so that it is not stretched on the Belt Lifter hook. Failure to follow this notice could result in damage to the belt.
2Engage the Brush Roll:
Turn the unit off. Raise the Headlight Hood. Flip out the handle on the Belt Lifter. Use it to turn the Belt Lifter clockwise until the green arrows line up. Close the handle. Close the Headlight Hood.
In this position, the Brush Roll will spin when vacuuming.
16

Straight Suction Cleaning
Disengage the Brush Roll to use straight suction cleaning to vacuum hard floors, throw rugs and delicate carpets.
When using straight suction cleaning on bare floors, lower the Power Nozzle as close as possible to the floor without touching the floor.
Put Tech Drive® power assist in neutral when cleaning hard floors.
For additional protection of hard floors, use the optional Hard Floor Pad. See page 50.
Brush Roll Performance Indicator Light
The Brush Roll Performance Indicator Light, located on the top of the Power Nozzle turns on when the Brush Roll is spinning.
If the Brush Roll Performance Indicator Light flashes intermittently or does not come on, the belt may not be engaged properly or the belt may need to be replaced. See page 53.
STARTED GETTING
17
GETTING STARTED
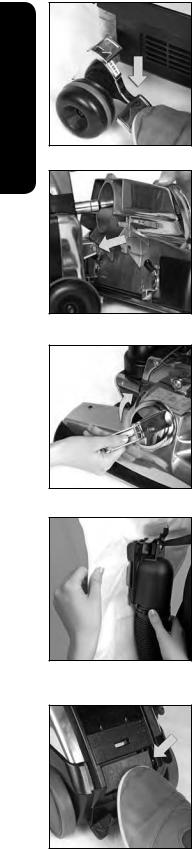
Removing the Outer Permanent Bag and the Mini Em-Tor® Collector
The Mini Em-Tor® collector holds large, heavy particles that do not reach the Disposable Filter Bag.
1Grasp the base of the Mini Em-Tor collector and rotate it away from the unit and lift it off.
2Remove the top of the Outer Permanent Bag from the unit by pressing the Bag Release Button.
3Position the opening of the Mini Em-Tor collector over a newspaper and shake it to remove particles. Reattach the Mini Em-Tor collector when complete.
 Lock the Mini Emtor collector securely in place or the unit will not operate. (It will not turn on).
NOTICE Property Damage Risk. Do not intentionally vacuum up heavy objects such as coins. Failure to follow these warnings could result in damage to the fan.
18

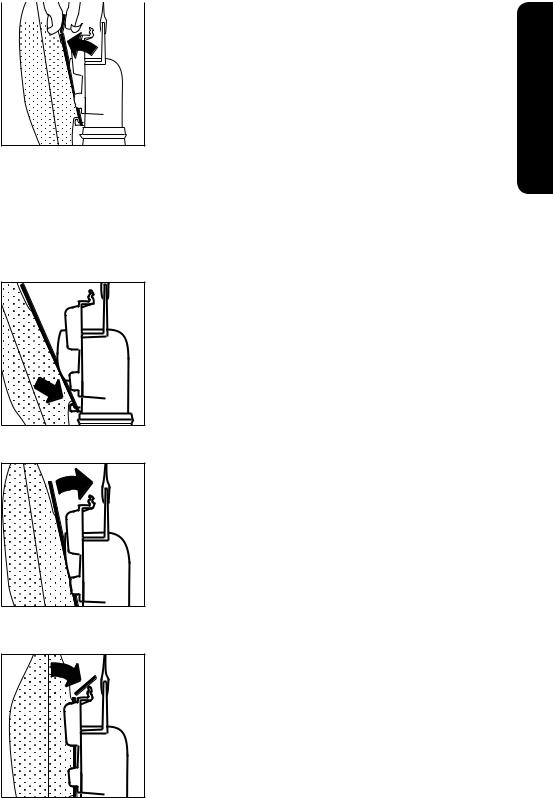
Upright Cord Management
A series of holders keeps the cord attached to the Upright Handle.
1Attach the cord by snapping it into the holders located at the base and side of the Upright Handle.
2With the upper cord hook in the up position, wrap the cord toward the rear of the unit and slide the cord under the holder on the hook.
 Electrical cord can only be inserted or removed from this holder when the upper cord hook is in the up position. The upper cord hook is designed to lock the cord in place when it is turned down.
3For storage, wrap the cord around the upper and lower cord hooks.
4Rotate the upper cord hook down to release the cord for use. The first loop will remain in the holder.
CLEANER PORTABLE & UPRIGHT
19
 Loading...