

Page 1

User Guide
Wi-Drive
Find the language and latest documentation for your Kingston® Wi-Drive here.
Wi-Drive User Guide
............ For instructions in English
. . . . . . . . . . . . . . . . . . Para instrucciones en español
......... Für Anleitungen in Deutsch
. . . . . . . . . . . . . . . . . . Pour des instructions en français
. . . . . . . . . . . . . . . . . . Per le istruzioni in italiano
............Por as instruções em português
. . . . . . . . . . . . . . . . . . Instrukcje w jezyku polskim
. . . . . . . . . . . . . . . . . . Для инструкции на русском
. . . . . . . . . . . . . . . . . . Turkce talimatlar icin
. . . . . . . . . . . . . . . . . . Česky
. . . . . . . . . . . . . . . . . . Slovensky
. . . . . . . . . . . . . . . . . . Hungary
. . . . . . . . . . . . . . . . . . Japanese
Simplied Chinese .....
Traditional Chinese ....
Page 2
Document No. 480WID16/32-001.A01
Kingston Wi-Drive
Page 1 of 16
Wi-Drive User Guide
Page 3

Document No. 480WID16/32-001.A01
Kingston Wi-Drive
Page 2 of 16
Table of Contents
Introduction................................................................................................................................. 3
Requirements ............................................................................................................................. 3
Supported File Types (Non-DRM) .............................................................................................. 3
Installing the Wi-Drive Application .............................................................................................. 4
Getting to Know Wi-Drive ........................................................................................................... 5
Battery Status ............................................................................................................................. 6
Connecting Wi-Drive to a Computer........................................................................................... 7
Loading Content Onto Wi-Drive.................................................................................................. 7
Connecting to Wi-Drive over Wireless........................................................................................ 8
Usage ......................................................................................................................................... 8
Configuring Wi-Drive ................................................................................................................ 11
Network Connections (Bridge Mode)........................................................................................ 12
Upgrade Firmware.................................................................................................................... 13
Page 4
Document No. 480WID16/32-001.A01
Kingston Wi-Drive
Page 3 of 16
Introduction
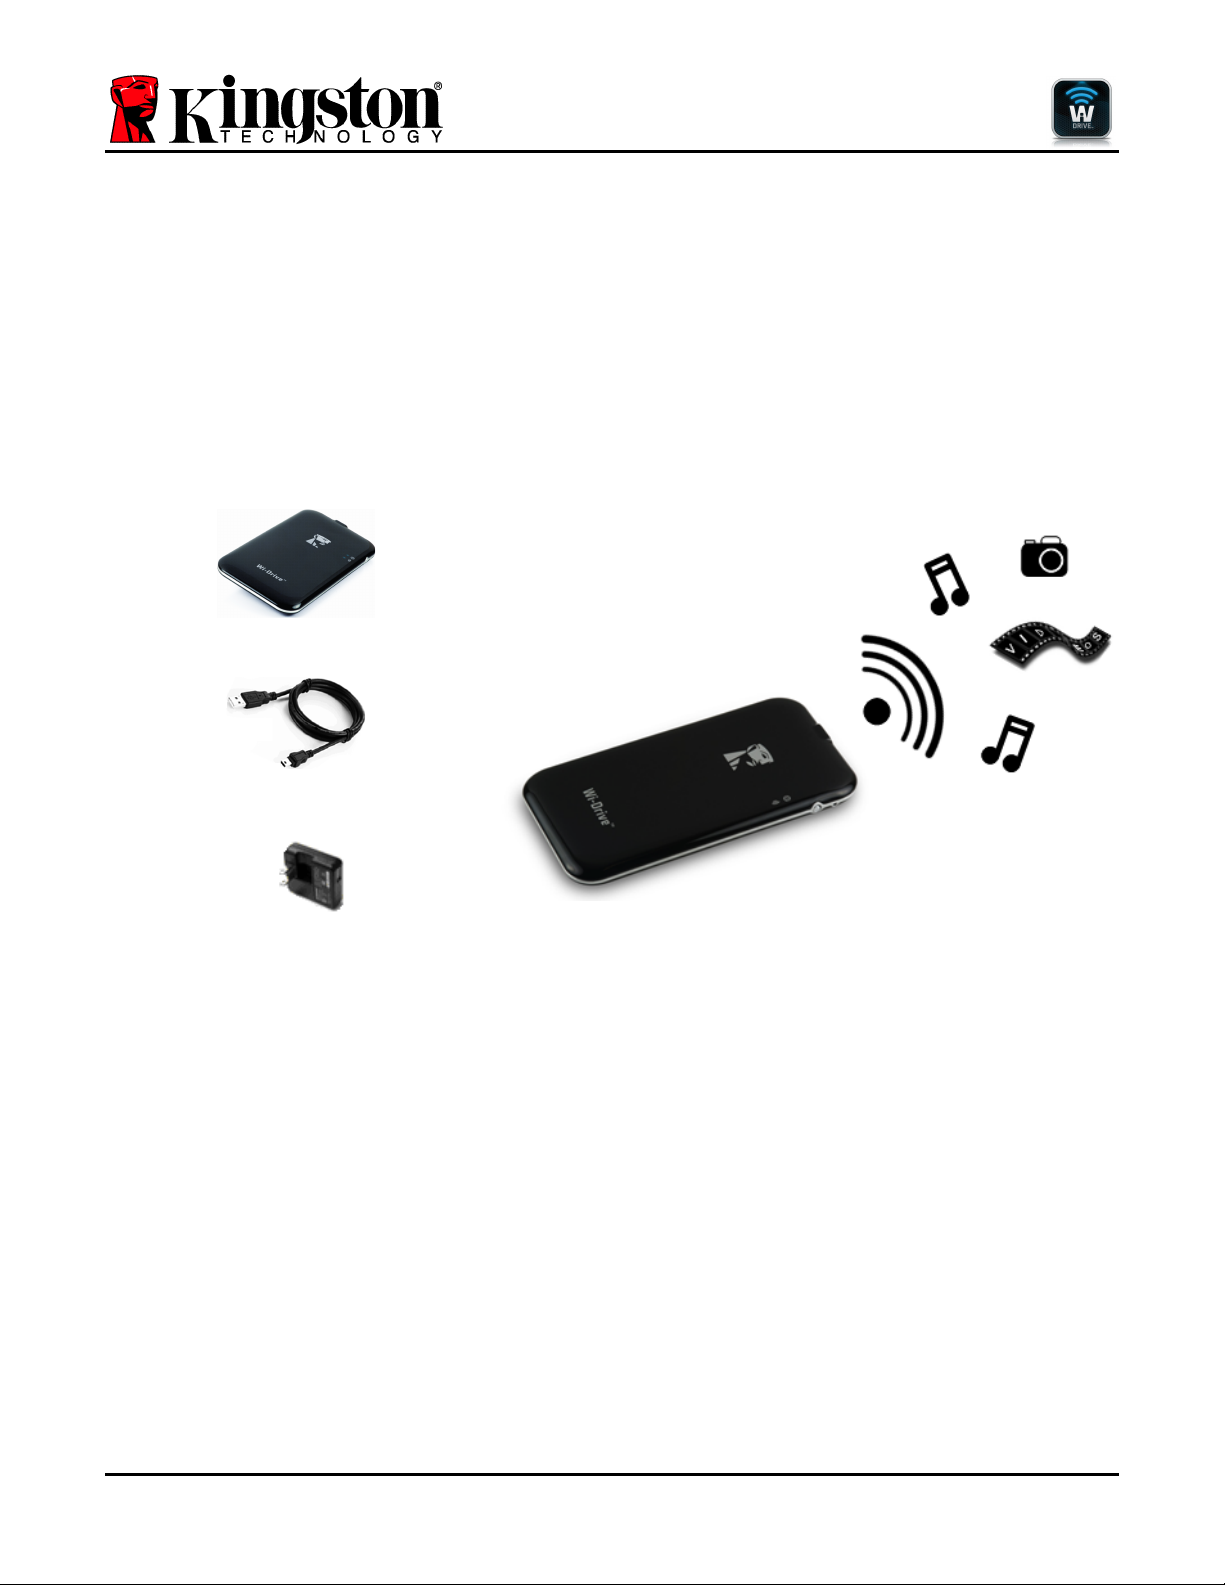
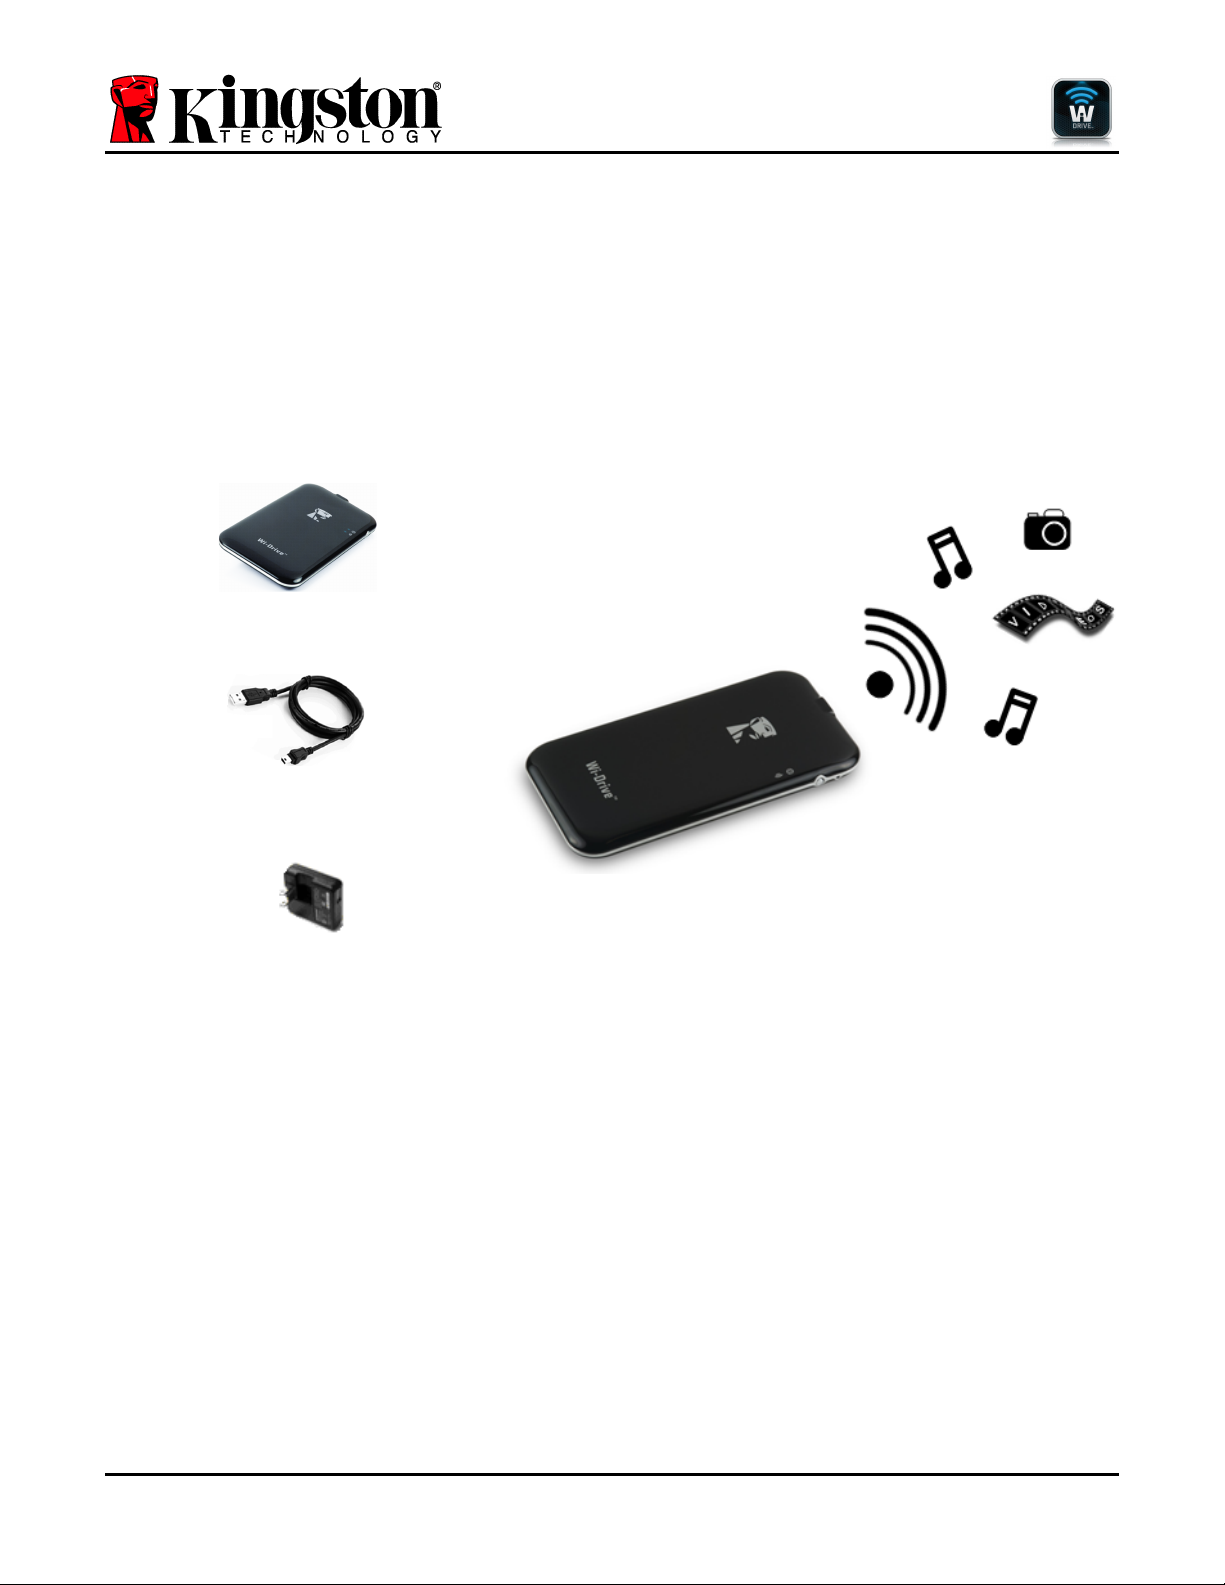
Wi-Drive is a portable USB Flash storage device that allows you to wirelessly stream digital media content (such
as music, photos, videos, etc.) to your iOS-based iPad®, iPhone®, or iPod touch® device. Serving as its own
wireless network, Wi-Drive’s lithium-polymer battery and 30-ft range give you up to four hours of continuous
access to your digital library anywhere you go. Available in 16GB or 32GB capacities and simple to set up, WiDrive is the perfect solution for expanding your on-the-go media library with devices that have no way of adding to
their storage capacity.
What’s Included:
• 1 Wi-Drive (16GB or 32GB)
• 1 USB Cable (3ft. A to Mini-B)
• AC adapter (U.S. only)
Requirements:
• Computer running Windows® 7, Windows Vista® (SP1, SP2), Windows XP (SP2, SP3), Mac OS X
(10.5.x+), Linux (v.2.6+ kernel) operating system with USB 2.0 support (for uploading content to Wi-Drive)
• Apple iPod touch® Gen 3, Gen 4, iPhone® (3G, 3GS, 4; 3G is limited to iOS4.2.1+) and iPad®
• Internet access to install the Wi-Drive application (from the App Store)
Supported File Types* (Non-DRM):
• Audio: aac, mp3, wav
• Video: m4v, mp4, mov
• Image: bmp, jpeg, jpg, png
• Docs: pdf, doc, docx, ppt, pptx, txt, rtf, xls, xlsx
*Wi-Drive can store files of any type. The supported file types listed here are what the Wi-Drive application can open without a 3rd party app.
Page 5
Document No. 480WID16/32-001.A01
Kingston Wi-Drive
Page 4 of 16
Installing the Wi-Drive Application
To configure Wi-Drive, you must first install the Wi-Drive App (to your iPad, iPhone, or iPod touch device) from the
on-line App Store (Internet access required). The Wi-Drive App is free and allows you to customize the wireless
network settings and wirelessly access the content you’ve uploaded to Wi-Drive. To install the App, please follow
these steps:
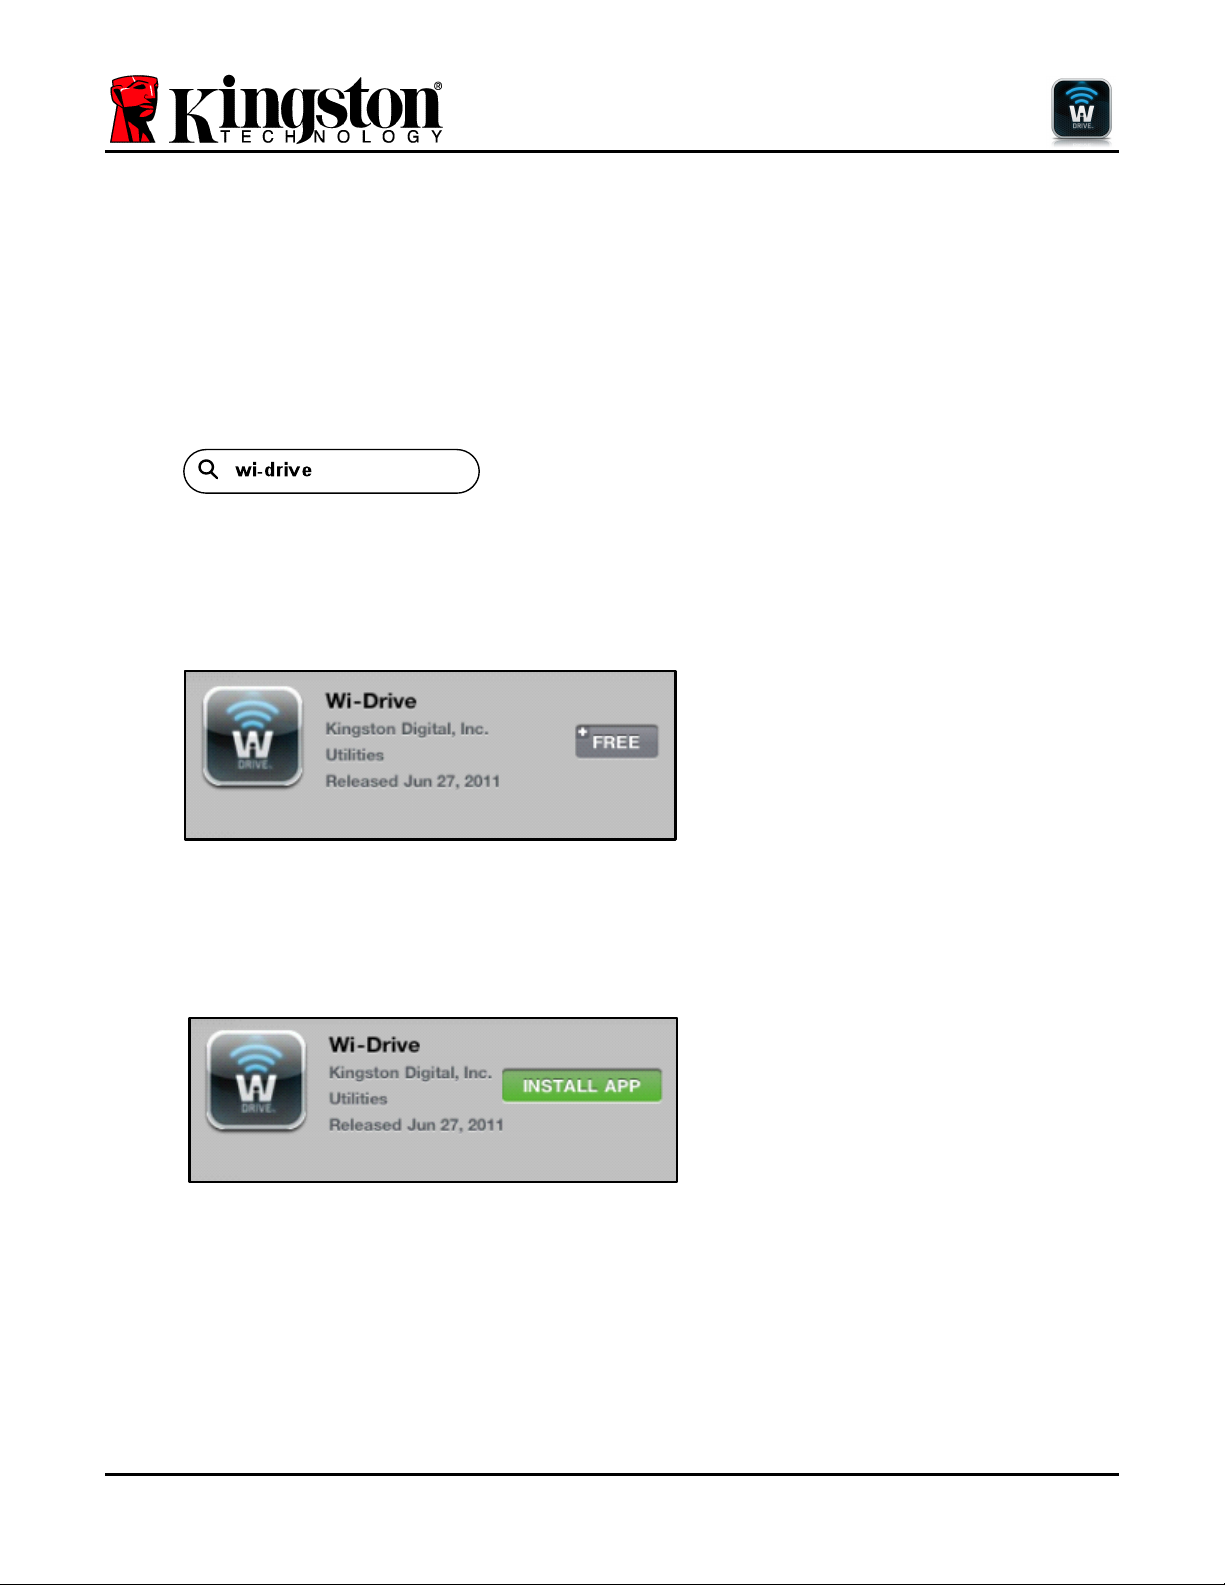
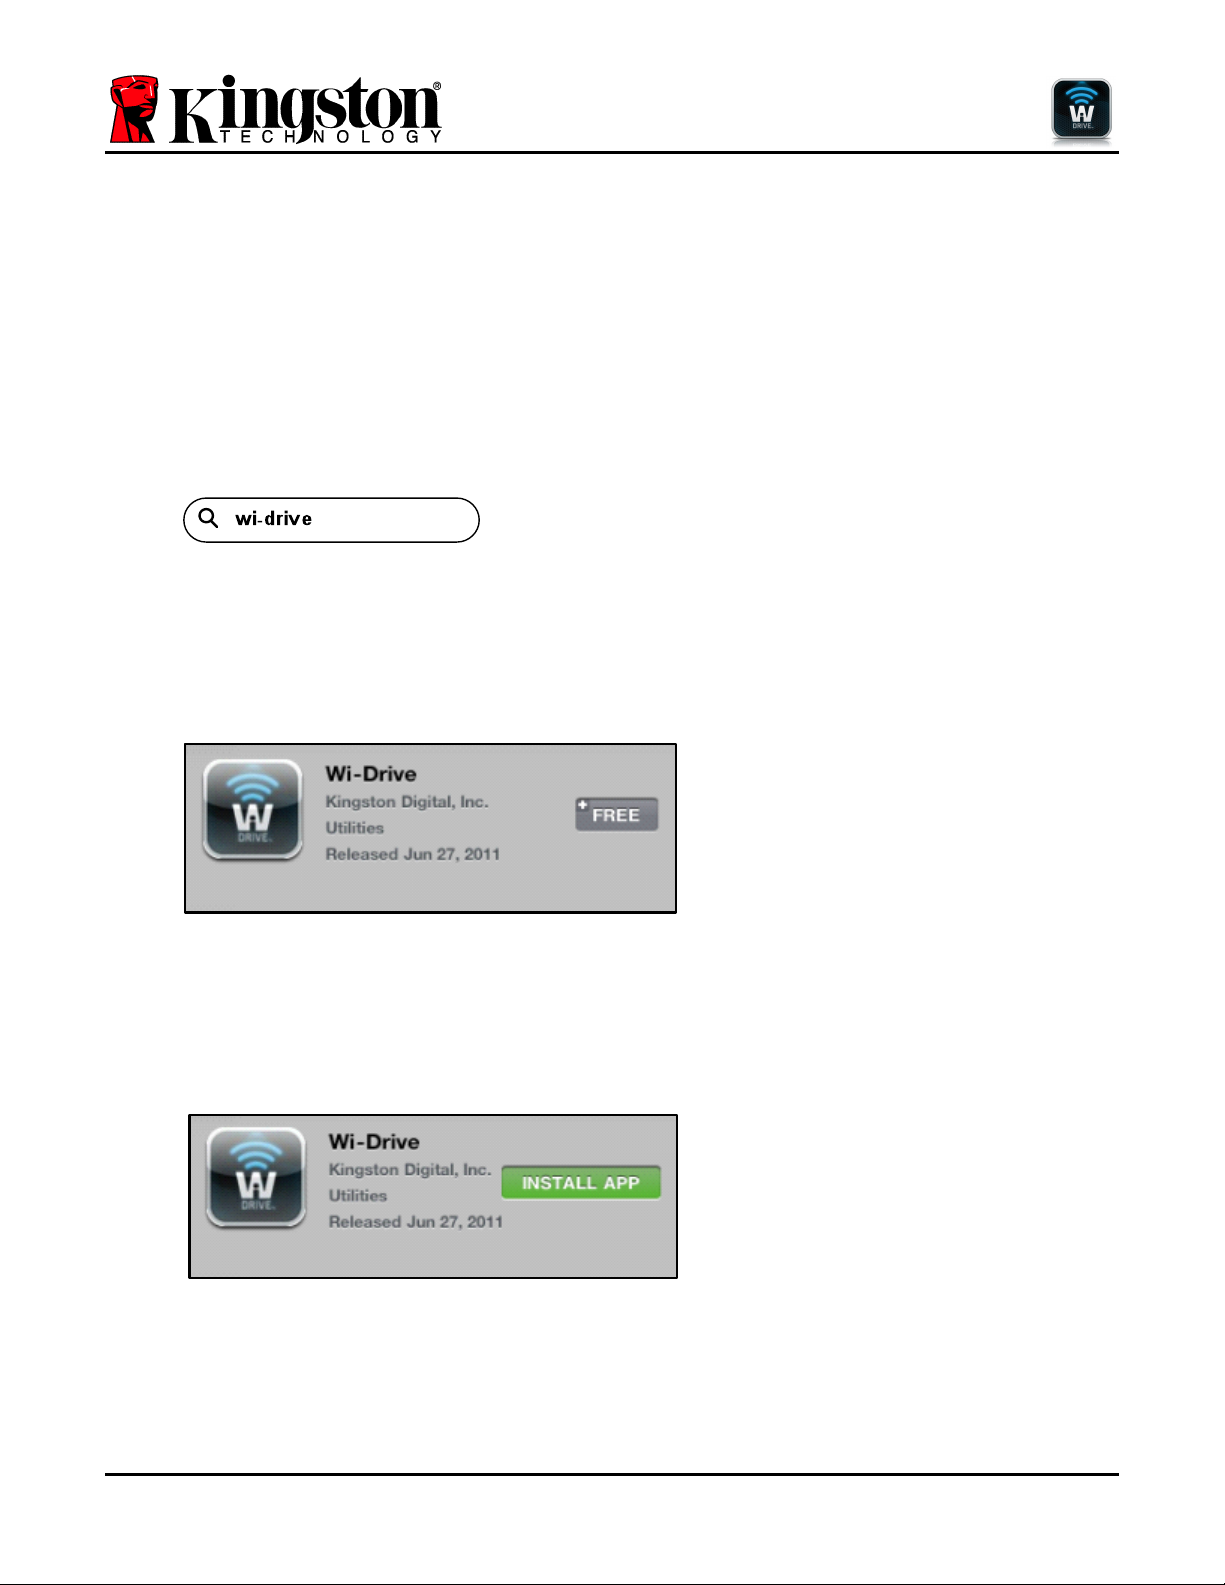
1. Open the App Store from your iPad, iPhone, or iPod touch device and search for “Wi-Drive.” See Figure
1.1 below. The App Store may return multiple results for your search.
Figure 1.1 – Wi-Drive Search
2. Locate and select the Wi-Drive App that corresponds to your device, i.e. Wi-Drive for iPad, for iPhone,
iPod touch, etc. by Kingston Digital, Inc. and tap the ‘FREE’ button link. See Figure 1.2.
Figure 1.2 – Wi-Drive App by Kingston Digital, ‘FREE’
3. After selecting ‘FREE,’ the grey button will turn green and change to ‘INSTALL APP.’ Select this button to
complete the installation of the Wi-Drive App to your device. See Figure 1.3.
Figure 1.3 – Wi-Drive App by Kingston Digital, ‘INSTALL APP’
Once the App has been installed, you may exit the App Store and proceed to the next section of this manual.
Page 6

Document No. 480WID16/32-001.A01
Kingston Wi-Drive
Page 5 of 16
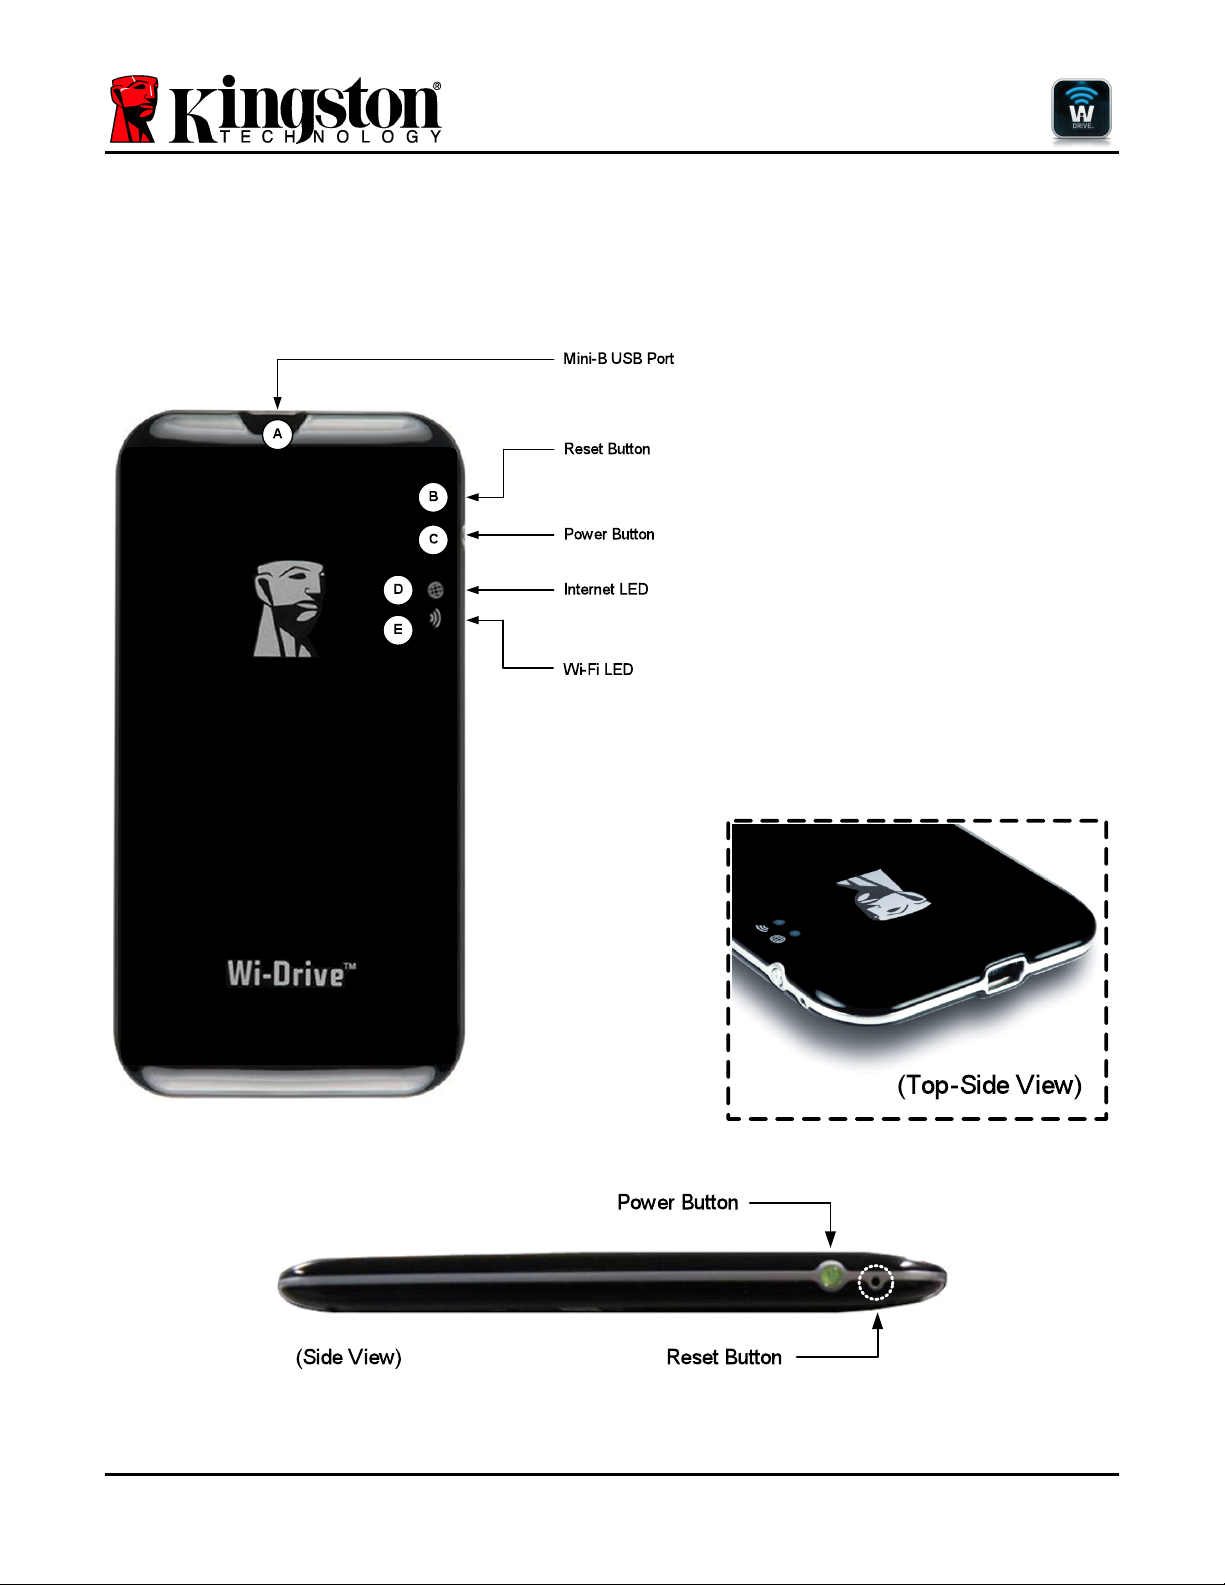
Getting to Know Wi-Drive
A. Mini-B USB Port – Allows you to copy
content to the Wi-Drive and/or charge
the device via USB 2.0.
B. Reset Button – Resets Wi-Drive back
to its original (default) configuration1 for
the network settings.
C. Power Button 2 – Allows you to power
on or power off the Wi-Drive.
D. Internet LED – Solid when powered on;
Flashes when there is Internet activity
E. Wi-Fi LED – Flashes when broadcasting
SSID or wireless network activity.
1
The default configuration for Wi-Drive is: 1) Device Name: Wi-Drive 2) Visibility Status: ON 3) Wireless Channel: 11 and 4) Security:
None. (Note: Resetting the device will not affect the user content on Wi-Drive.)
2
The power button is also an indicator of how much battery time is left while the Wi-Drive is powered on. Green indicates 75% - 100% battery
charge remaining; amber indicates 25% - 74% battery charge remaining; and red indicates 24% or less battery charge remaining.
Page 7
Document No. 480WID16/32-001.A01
Kingston Wi-Drive
Page 6 of 16
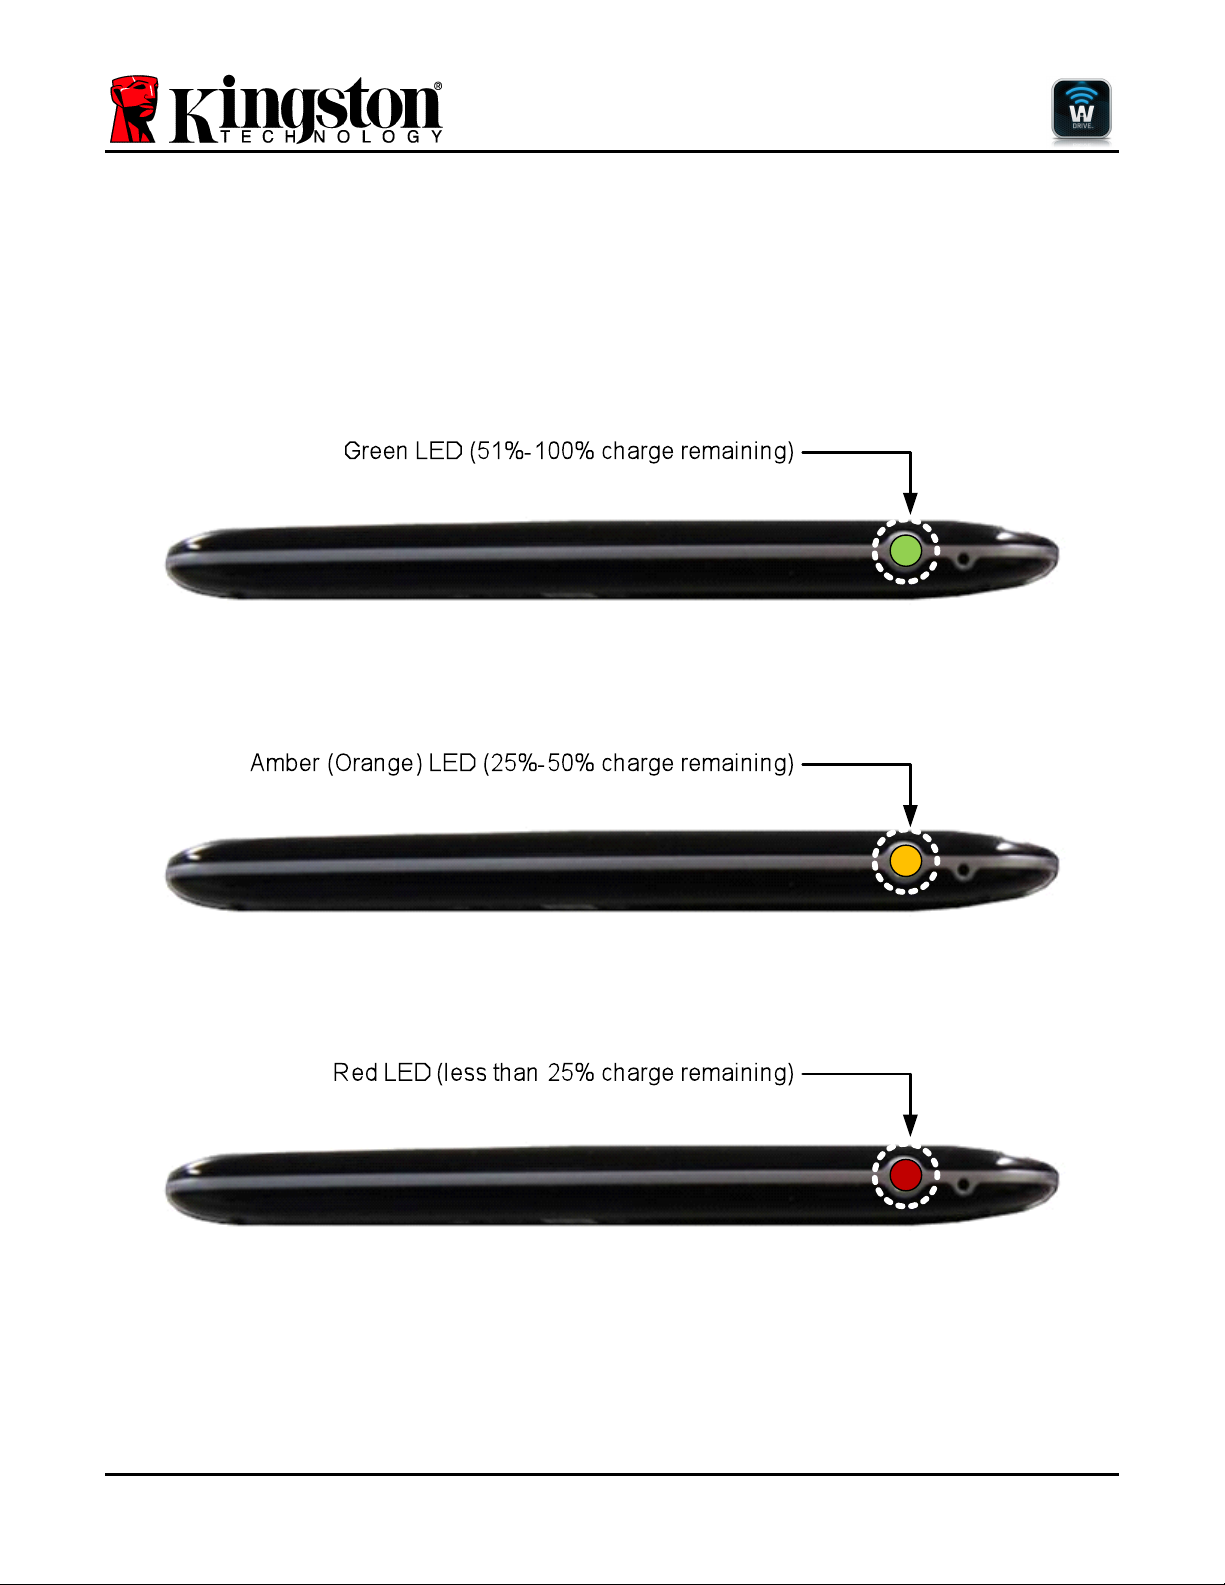
Battery Status
In addition to switching Wi-Drive on and off, the power button also serves as a battery indicator for how much time
is left before Wi-Drive must be charged again. Green indicates 51%-100% battery charge remaining; amber
indicates 25%-50% battery charge remaining; and red indicates less than 25% battery charge remaining. A
Flashing green power button indicates that the Wi-Drive battery is charging (occurs when using AC power adapter
only.)
Figure 2.1 – Power LED, Green
Figure 2.2 – Power LED, Amber
Figure 2.3 – Power LED, Red
Page 8
Document No. 480WID16/32-001.A01
Kingston Wi-Drive
Page 7 of 16
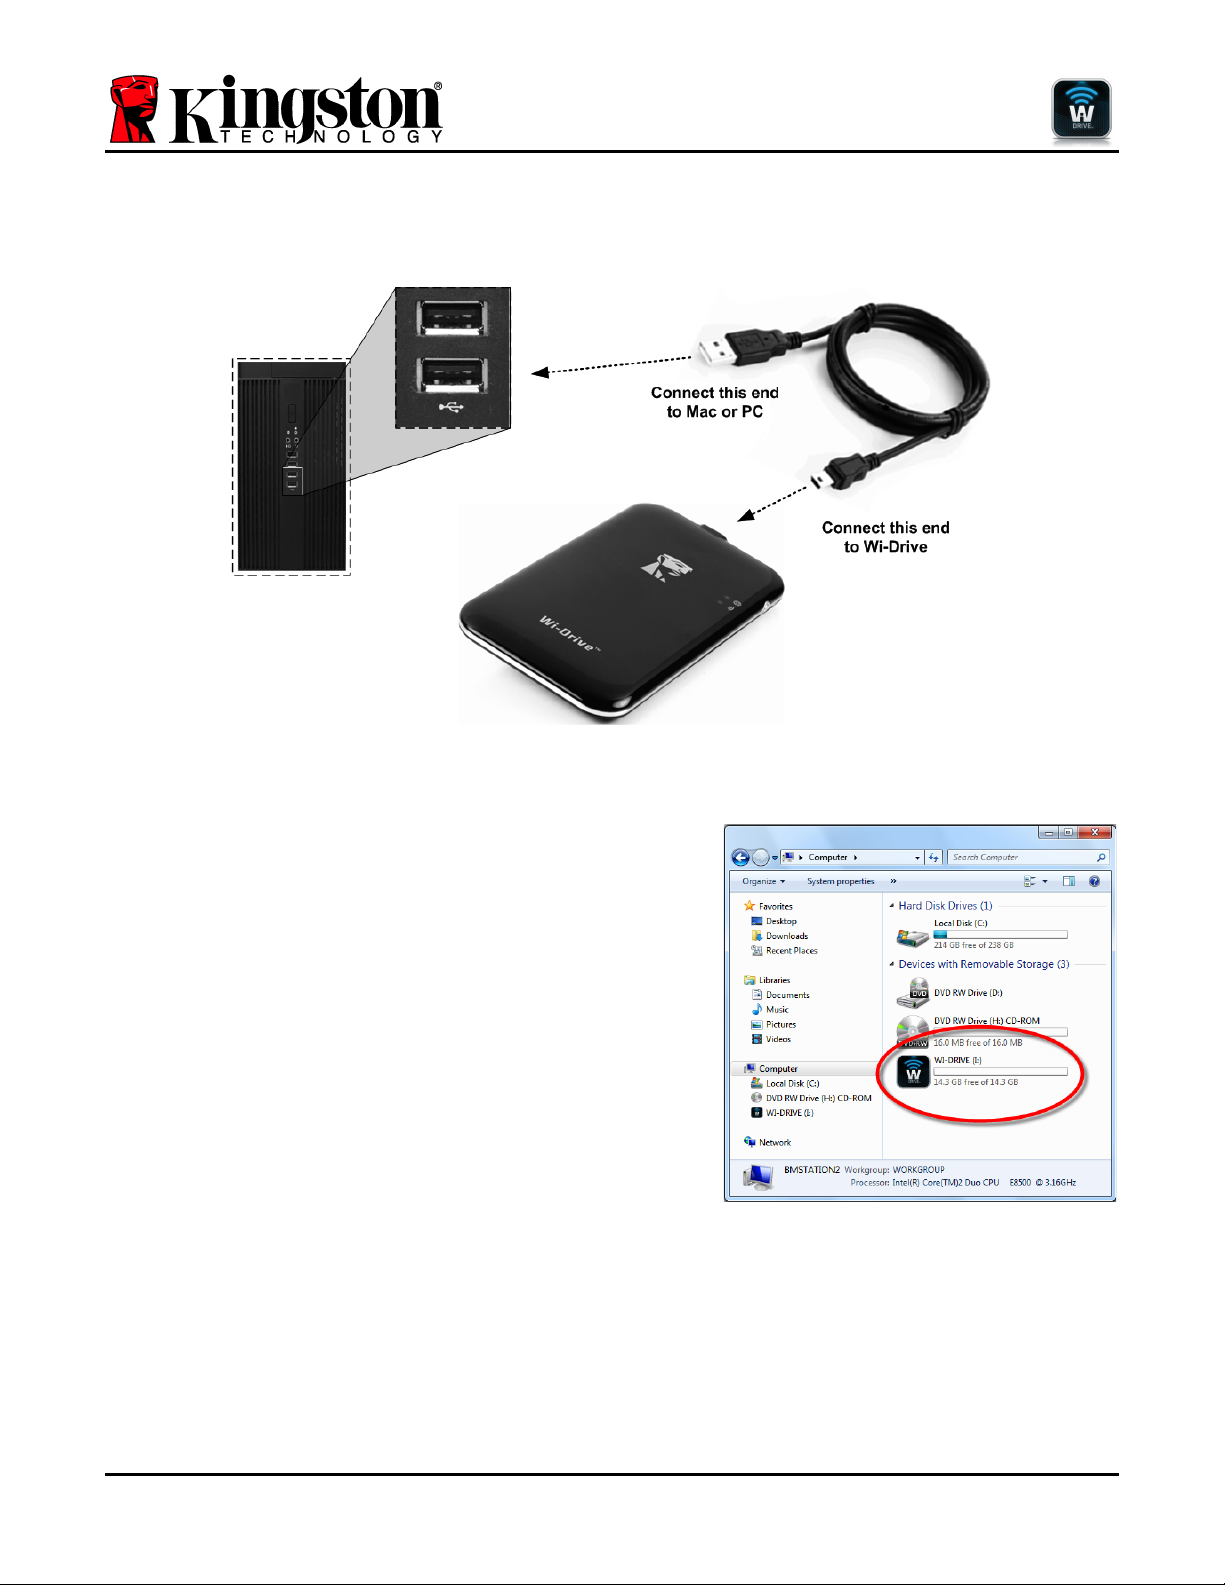
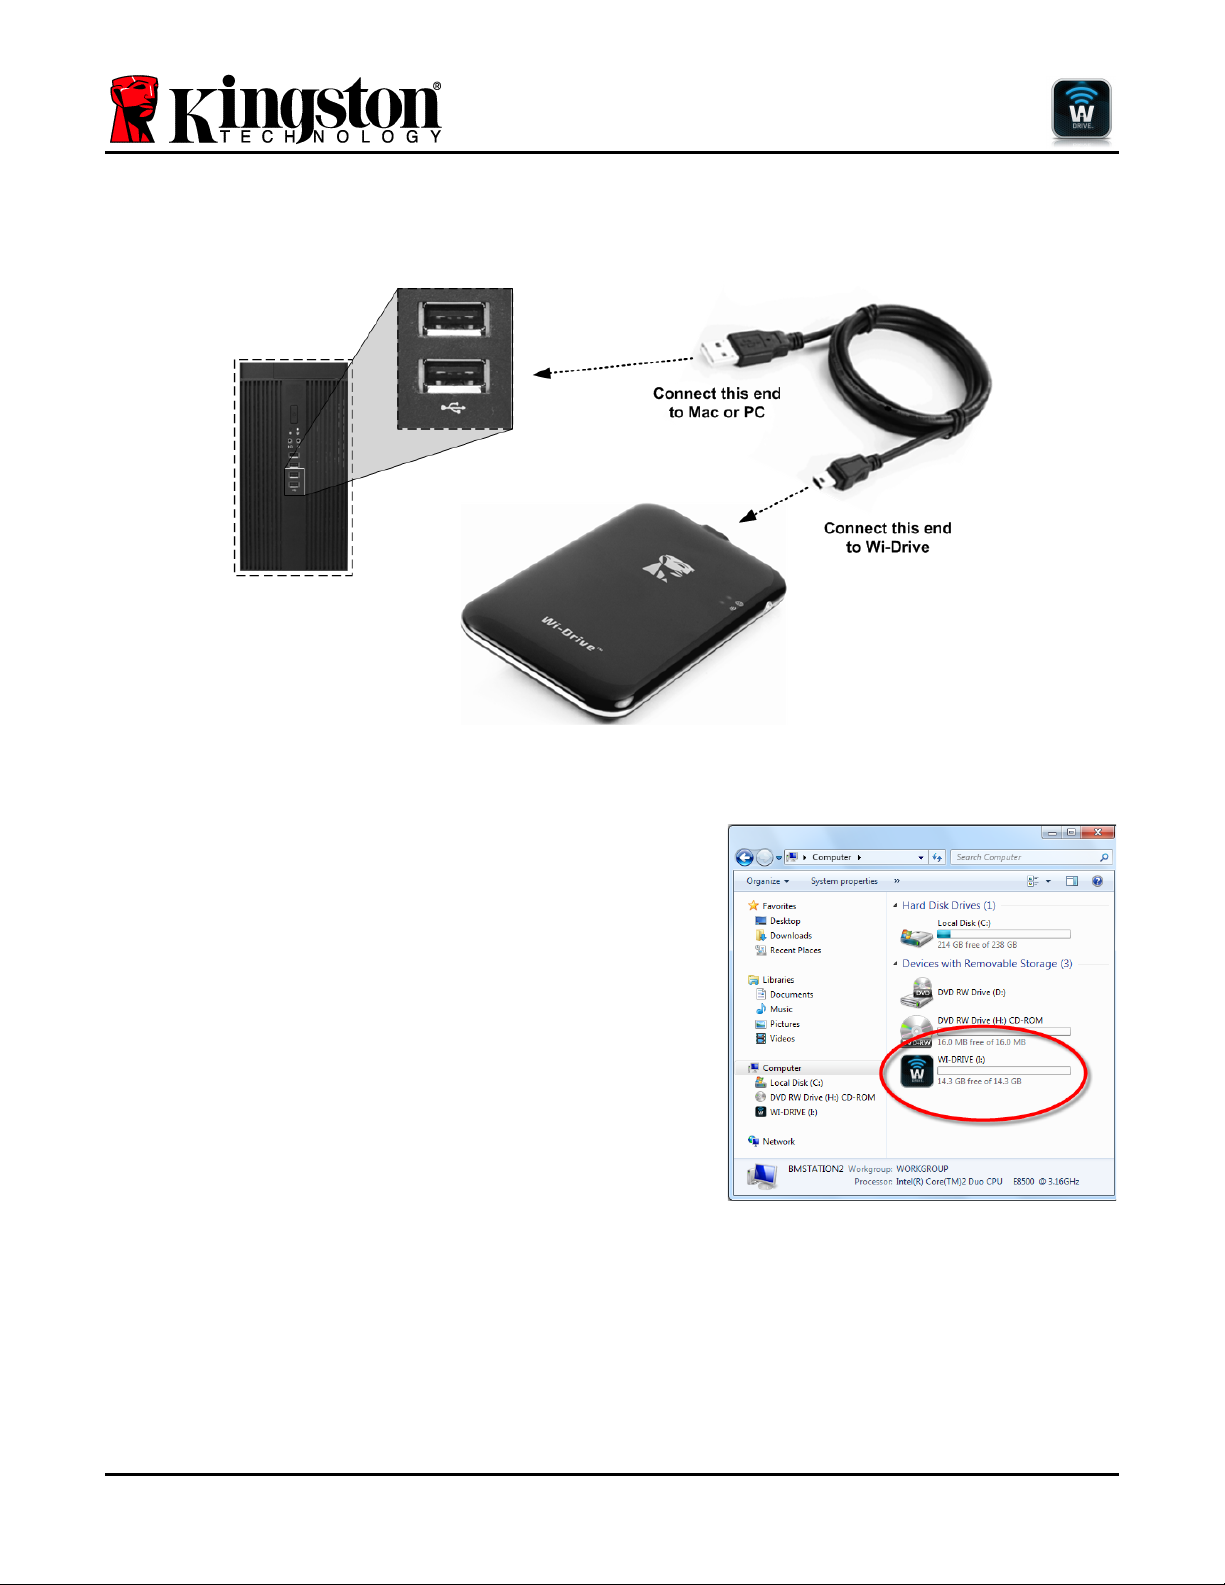
Connecting Wi-Drive to a Computer
To add content to Wi-Drive, connect it to a computer using the USB cable that came with the device. See Figure
3.1 below.
Figure 3.1 – Connecting Wi-Drive
to a computer
Loading Content Onto Wi-Drive
When connected to a computer, Wi-Drive behaves like any
standard USB Flash drive, creating a data volume on your PC or
Mac (see Figure 3.2.). This volume allows you to populate Wi-Drive
with digital content that you can later share or access wirelessly via
the Wi-Drive application.
When copying content to Wi-Drive, it is highly recommended that
you create folders on the data volume to help you organize and
quickly locate files each time you update and/or change the content
of Wi-Drive (as opposed to dumping all of your files onto the root
volume or into a single folder). For example, you may want to store
all of your music files in a folder called “My Music”, or keep all of
your photos in a separate folder called “My Pictures”, and so on.
When you are finished loading content, please safely3 disconnect
Wi-Drive from your computer. This will automatically power the
device off. To turn it back on, press and hold the power button until
it turns green.
Figure 3.2 – Wi-Drive Volume on PC
(Note: While connected to your computer, Wi-Drive does not broadcast a wireless signal. Therefore you cannot
access it from your iPad, iPhone, or iPod touch device in this state.)
3
For Windows users, please disconnect Wi-Drive safely by right-clicking the USB icon in the right-hand corner of the taskbar and selecting
‘Safely Remove Hardware’. For Mac users, please disconnect Wi-Drive safely by dragging the volume icon to the trash can.
Page 9
Document No. 480WID16/32-001.A01
Kingston Wi-Drive
Page 8 of 16
Connecting to Wi-Drive over Wireless
Wi-Drive is its own independent wireless network. When browsing for Wi-Fi networks from your iPad or iPhone,
you will see ‘Wi-Drive’ in the list of available networks to join. By default, there is no password and when you
connect to it from your iOS device, you are establishing a dedicated link to Wi-Drive over that wireless signal.
Once you connect to Wi-Drive, you will substitute your iPad/iPhone’s Internet connection with Wi-Drive’s wireless
connection. This means you will no longer have access to the Internet. However, Wi-Drive does provide a
bridging function that allows you to maintain access to Wi-Drive’s content while connecting to a Wi-Fi Internet
connection. See Network Connections on page 10.
Usage
Once you’re connected to the Wi-Drive network, you can begin accessing its content from your iPad, iPhone, or
iPod touch device by following these steps:
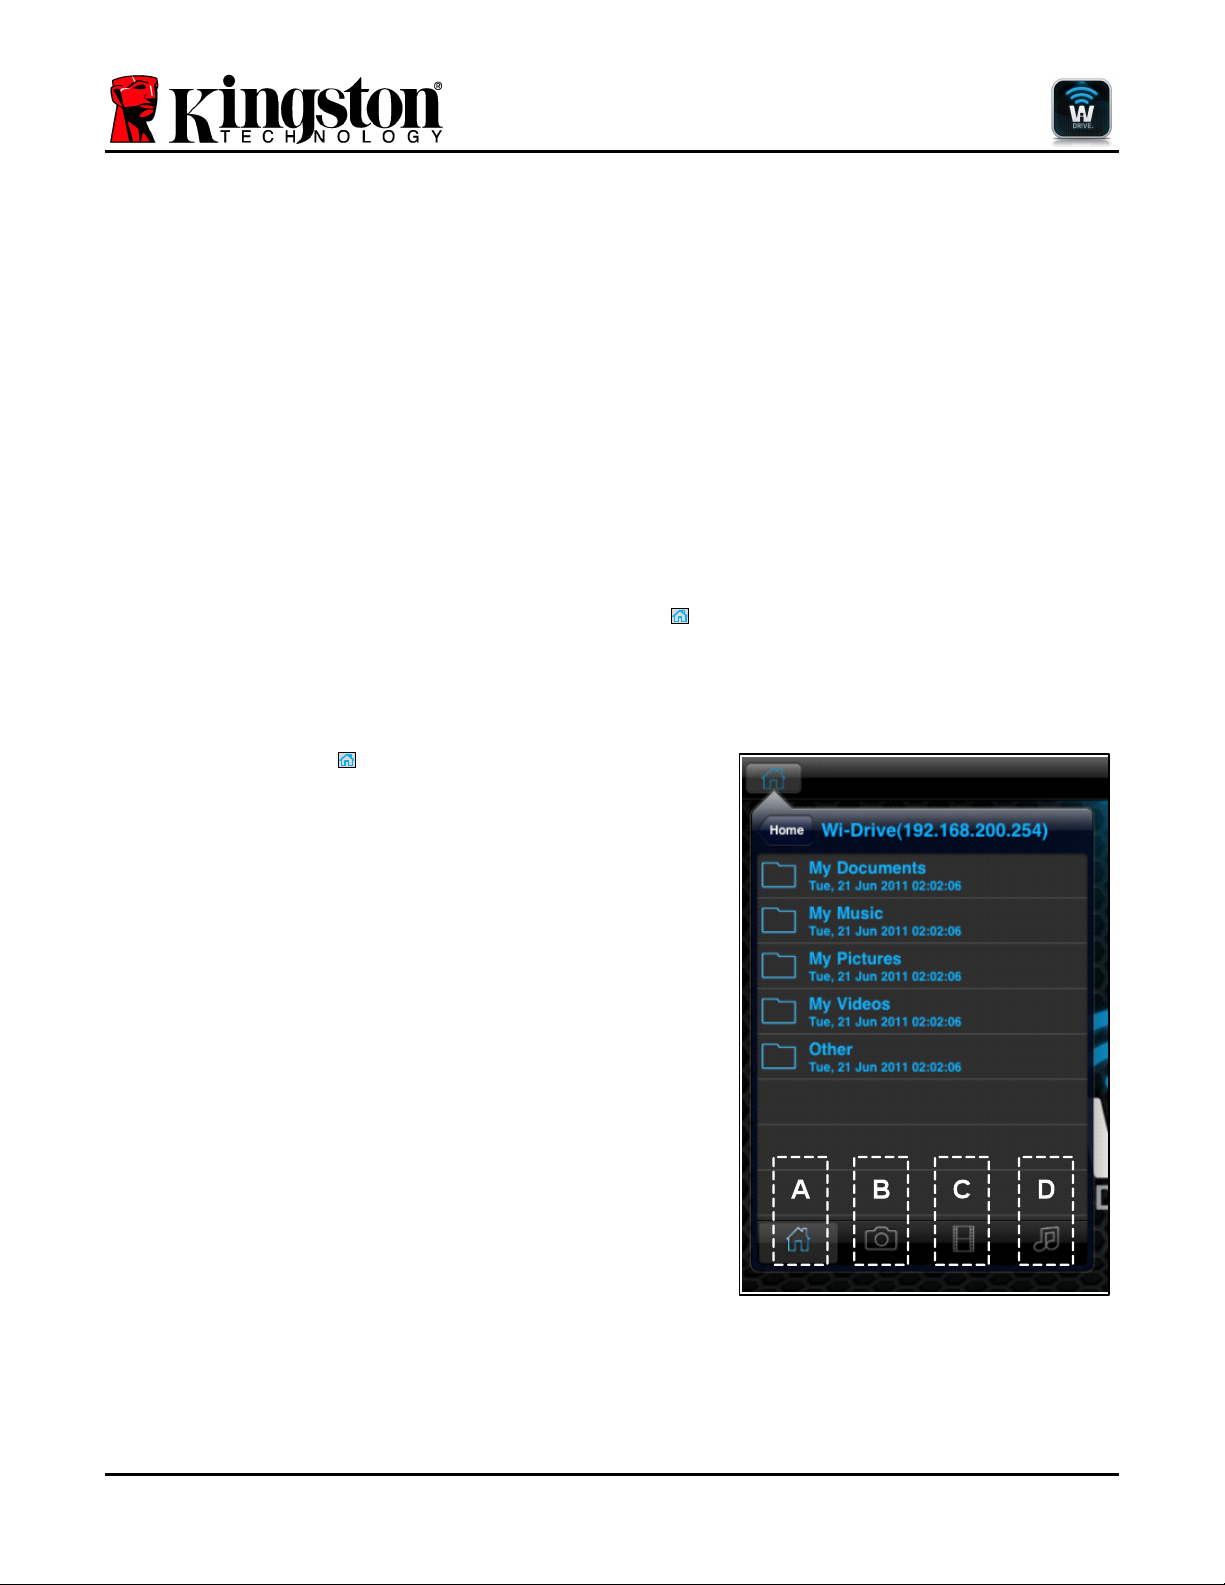
1. Open the Wi-Drive App on your iPad, iPhone, or iPod touch device.
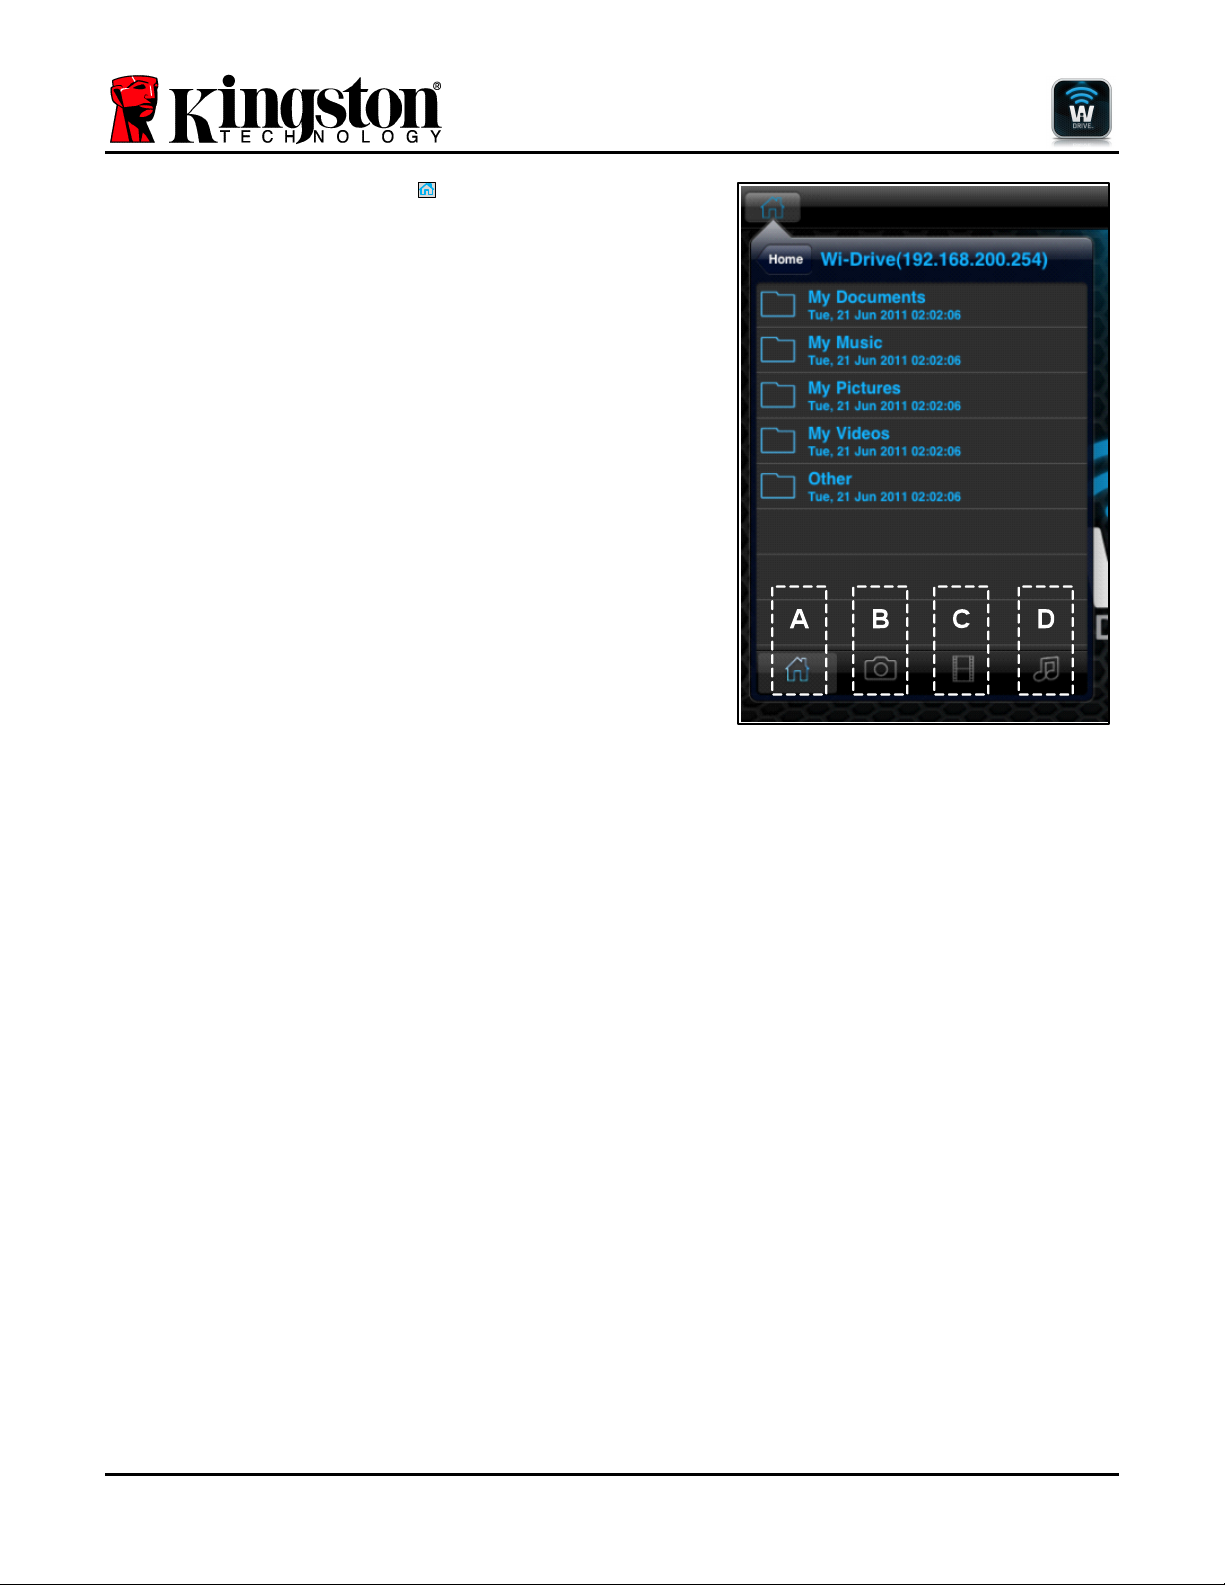
2. Tap the Home icon (upper left corner of Wi-Drive App.)
3. Tap the Device Name link, i.e. Wi-Drive (192.168.200.254). This will list the contents of your Wi-Drive.
4. Browse and select the media you wish to access. Only supported file types can be opened. See below.
A. The home button displays all stored content on the Wi-
Drive regardless of type or extension. If you created
folders during the content upload process on page 7, you
will see them listed first. Individual files are listed after
the folders.
B. Buttons B, C, & D are all filter buttons and display only
the content associated with each represented type. The
camera button represents photo/image file types. WiDrive will search through all files and folders on the
device and display the supported image file types.
C. The filmstrip button represents video file types. Wi-Drive
will search through all files and folders on the device and
display the supported video file types.
D. The musical note button represents music or audio files.
Wi-Drive will use this filter to search through all files and
folders for supported music file types and display them.
Once you’ve located the file you want to stream, simply tap the
file name in the list and you’re ready to go. For a list of all file
types currently supported by Wi-Drive, see page 3.
Figure 4.1 – Wi-Drive Contents
Page 10
Document No. 480WID16/32-001.A01
Kingston Wi-Drive
Page 9 of 16
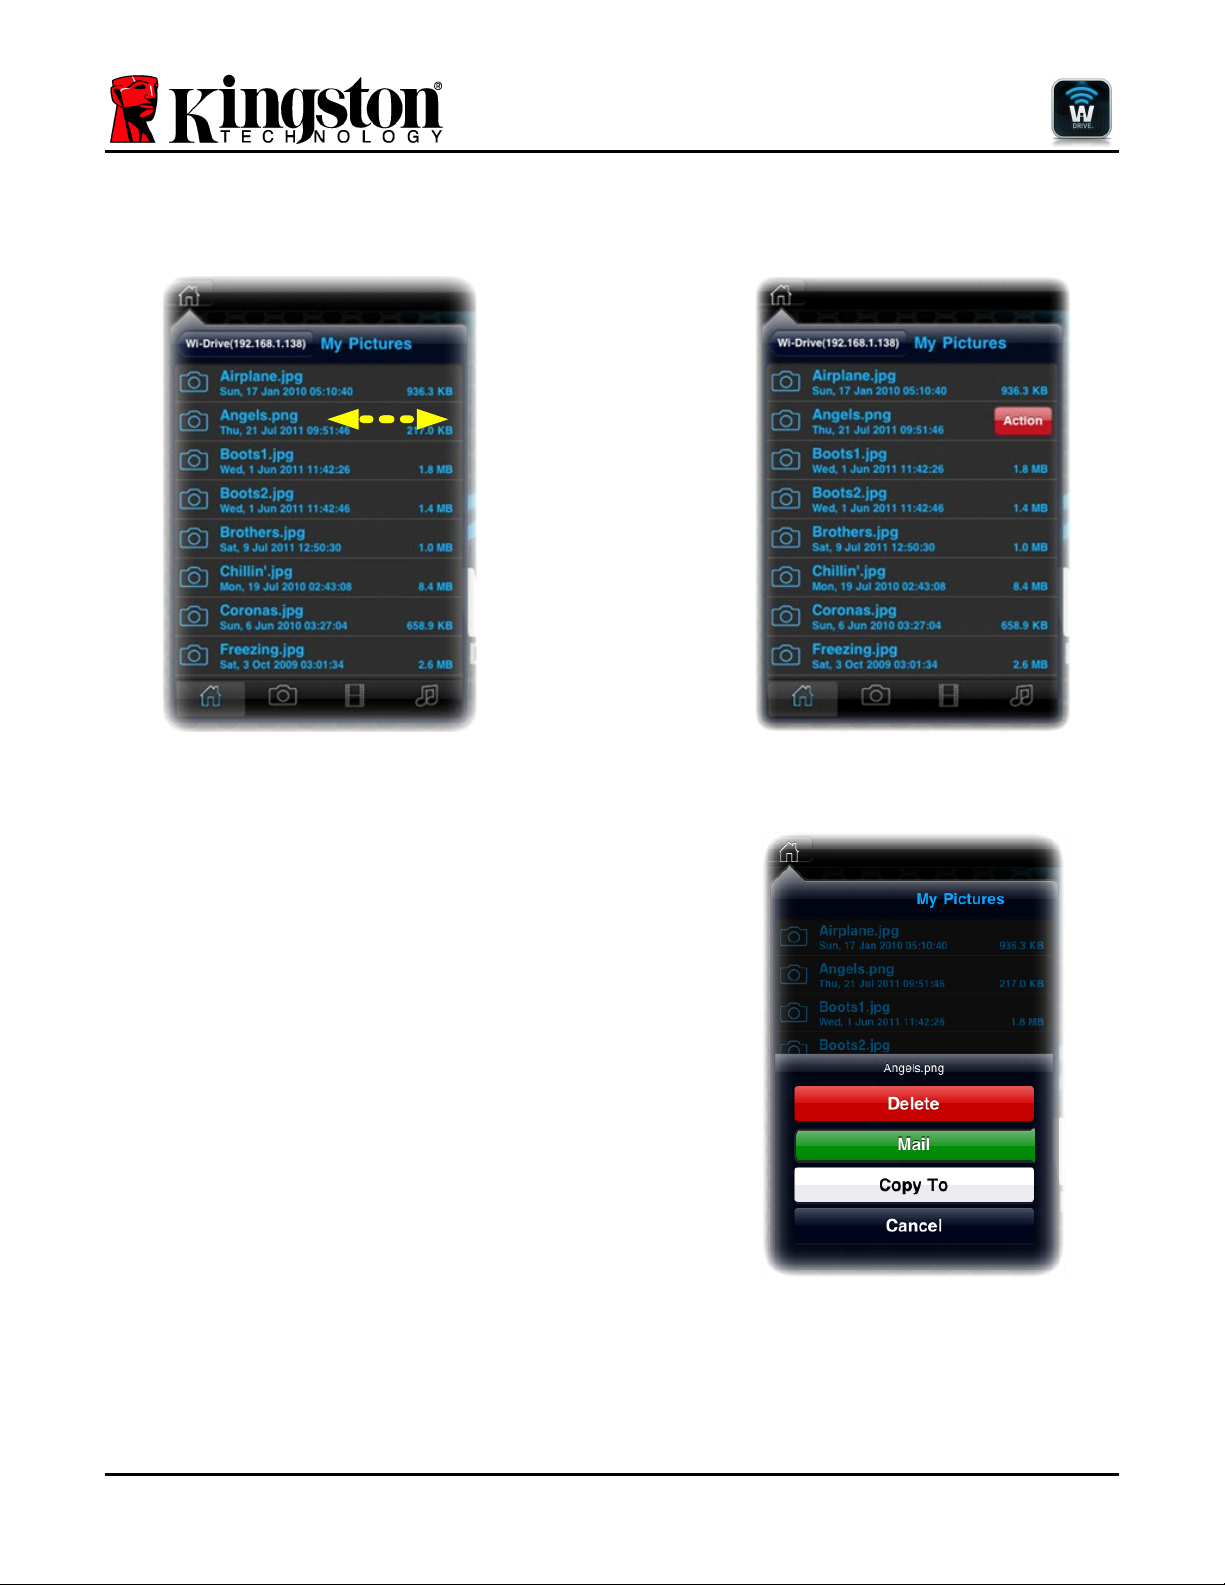
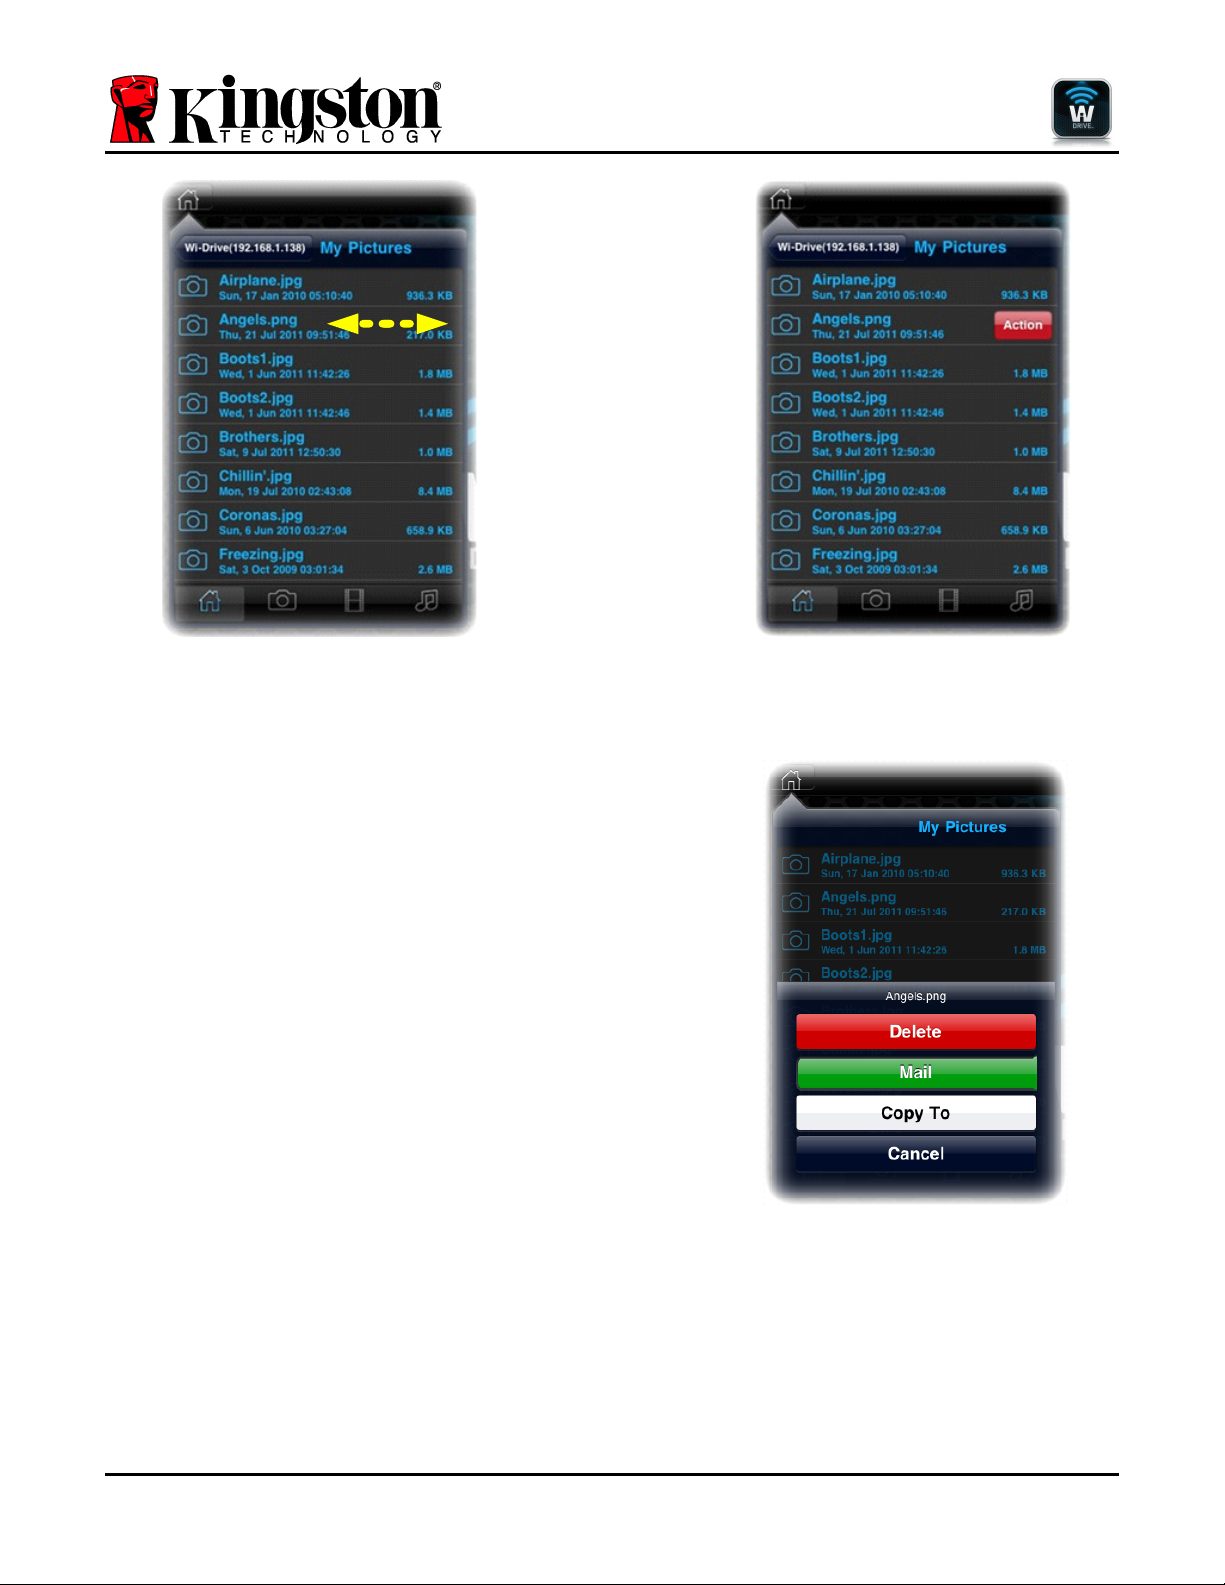
If you want to delete, email, or copy a file from the Wi-Drive, you can do so via the Action menu. Simply navigate
to the file you wish to copy (or delete) and swipe it in either direction, left or right, as seen in Figure 4.2. This will
reveal the red ‘Action’ button shown in Figure 4.3.
Figure 4.2 – Swipe Menu Item
Figure 4.3 – Action Button
Tap the ‘Action’ button to open the menu shown in Figure 4.4.
This menu allows you to delete, email, or copy content from
the Wi-Drive over the Wi-Fi connection you established earlier
on Page 8.
• The ‘Delete’ option allows you to delete files and/or
folders individually from the Wi-Drive.
• The ‘Mail’ option allows you to email a file (up to
10MB) using the default mail client set up on your iOS
device.
• The ‘Copy To’ option allows you to:
1. Copy a file or folder from its existing location on
the Wi-Drive to a new location on the Wi-Drive,
with the ability to create a new folder.
2. Copy a file or folder from the Wi-Drive to its app
storage location (Local.) This space is limited
to the capacity of your iOS device.
3. Copy a file or folder from the Wi-Drive app
storage location (Local) of your iOS device to a
physical folder on the Wi-Drive.
Figure 4.4 – Action Menu
Page 11

Document No. 480WID16/32-001.A01
Kingston Wi-Drive
Page 10 of 16
If you attempt to swipe a document file type
unsupported by the Wi-Drive app, you will have the
option to open the document file using an alternative
app associated with that document file type. The
associated app must be installed on the iOS device.
Simply swipe the document you wish to open, tap the
action menu button, and select the ‘Open In…’ option
shown in Figure 4.5. This will bring up a second
menu that lists the apps associated with the
document file type you are attempting to open.
The ‘Open In’ function only appears with document
file types and will not show on the action menu when
swiping a picture, audio, or video file.
Figure 4.5 – ‘Open In’ Option
Page 12
Document No. 480WID16/32-001.A01
Kingston Wi-Drive
Page 11 of 16
Configuring Wi-Drive
Using the Wi-Drive App, you can customize the wireless network settings for Wi-Drive. The default settings are:
Device Name: Wi-Drive, Visibility Status: ON, Wireless Channel: 11, and Security: None.
To access Wi-Drive’s Network Settings, please follow these steps:
1. Select the Wi-Drive App icon on your iPad, iPhone, or iPod touch
device.
2. Select the Home icon (upper left.)
3. Select the Device Name link, i.e. Wi-Drive (192.168.200.254).
4. Select the settings icon (gear symbol, lower left.)
5. Select the Wi-Drive Settings button.
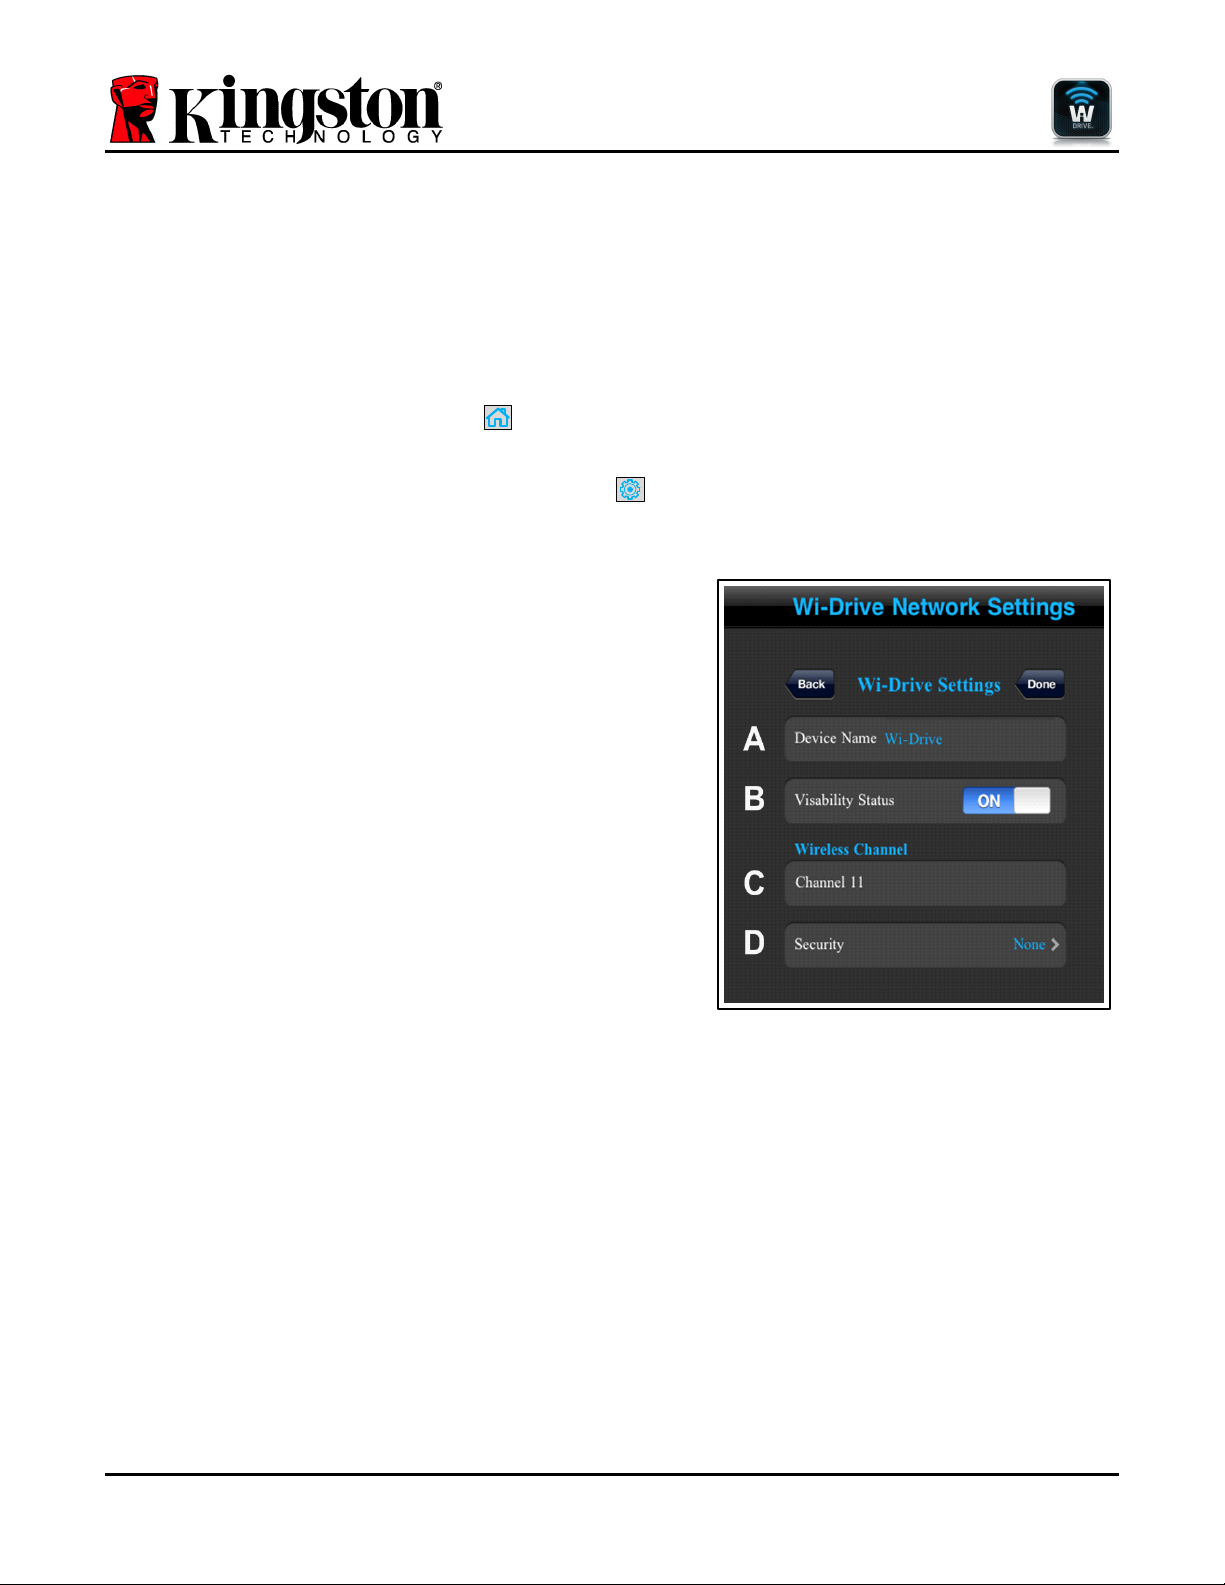
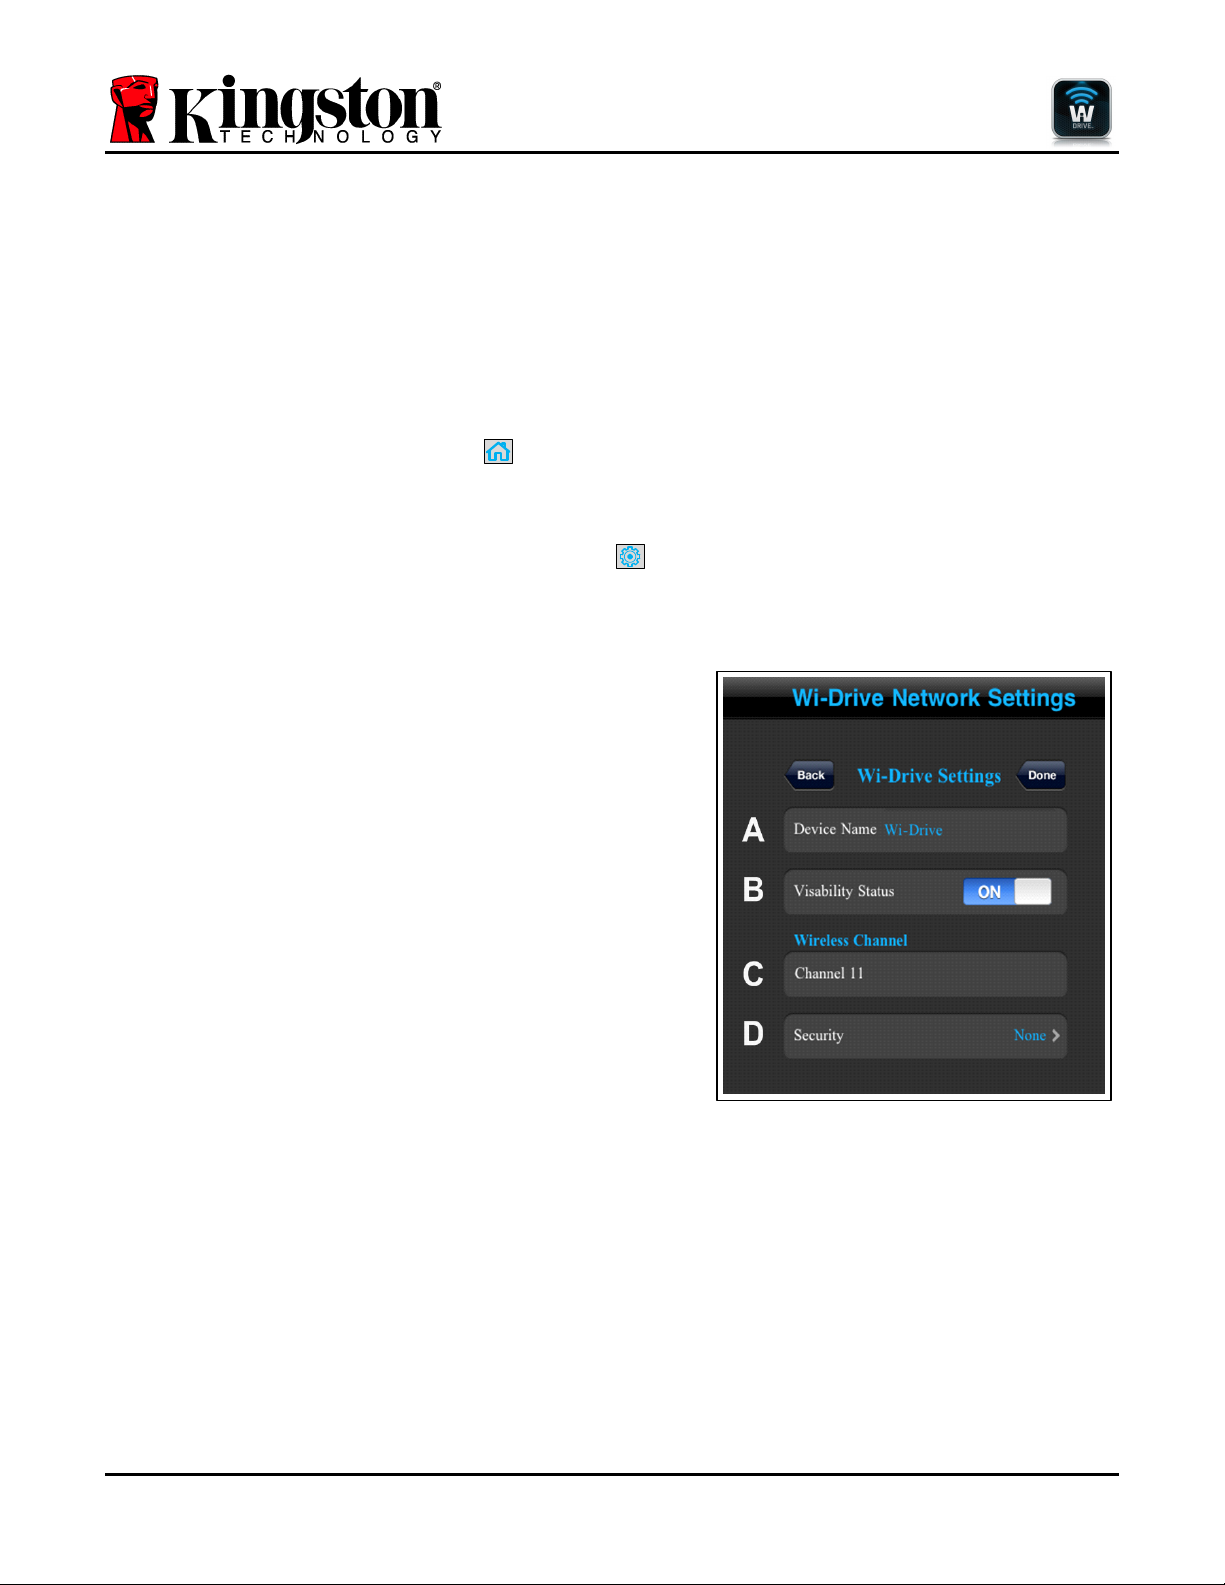
A. Device Name – commonly referred to as an SSID, or
Service Set IDentifier, this field allows you to specify a
device name (between 1 and 32 characters) that will
broadcast in the list of available wireless networks on your
iPad, iPhone, or iPod touch device. The default name is
Wi-Drive as seen in Figure 5.1.
B. Visibility Status – this gives you the option to hide or
unhide the SSID specified in the ‘Device Name’ field. By
default, the visibility status is turned ‘ON’. If you wish to
turn this feature ‘OFF’, the device name will NOT be
broadcasted1 in the list of available wireless networks on
your iPad, iPhone, or iPod touch device; however, you can
still join the Wi-Fi network by entering the device name
manually using the menu option, ‘Other…’.
C. Wi-Fi Channel – this setting allows you to select a specific
frequency channel used to communicate with other devices
on your wireless network. The default setting is Channel 11
(2.462 GHz.)
Figure 5.1 – Wi-Drive Network Settings
D. Security – this option helps prevent unauthorized access to your Wi-Drive wireless network by prompting
users for a password. The security protocols supported by Wi-Drive are WEP, WPA, WPA2, and WPA2
Mixed. The default setting is ‘None.’
• WEP (Wired Equivalent Privacy) – User-defined password, must be exactly 13 characters in length
• WPA or WPA2 (Wi-Fi Protected Access) – User-defined password, must be 8 to 13 characters in length
• Mixed – Combination of the other security protocols
1
If the visibility status has been turned off, you can still join the Wi-Drive network by entering the SSID manually on your iPad, iPhone, or iPod
touch, as long as you know the ‘Device Name’ (Step A). Please note that a password will be required if the security option is enabled.
Page 13
Document No. 480WID16/32-001.A01
Kingston Wi-Drive
Page 12 of 16
Network Connections (Bridge Mode)
Traditionally, the Wi-Fi antenna on your iPad or iPod touch device is used to access the Internet. The Wi-Drive,
however, uses the Wi-Fi antenna on your Apple device to stream content, which effectively disconnects your iOS
device from the Internet. Fortunately, Wi-Drive’s Wi-Fi antenna supports bi-directional traffic and can be used for
implementing a feature called Bridge Mode. This mode allows you to be connected to Wi-Drive while it is
connected to a Wi-Fi network (as a host client) that has access to the Internet.
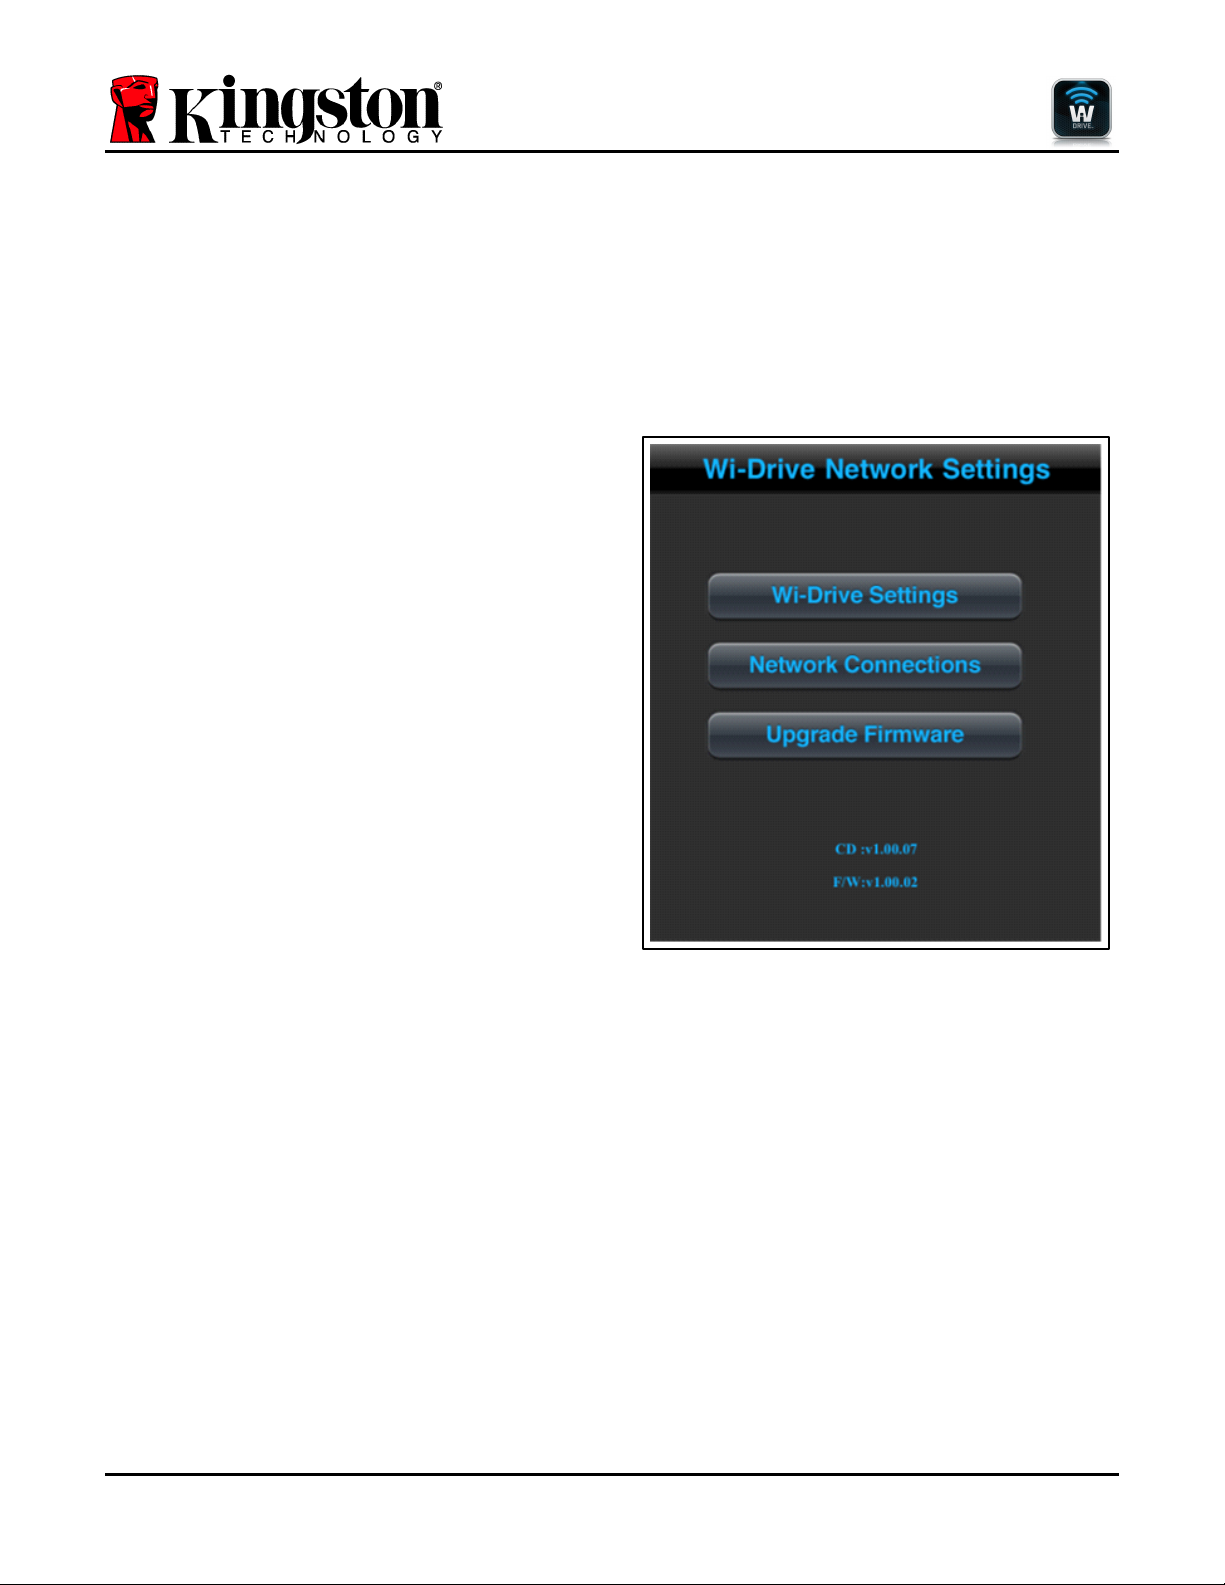
To set up this feature and see a list of available wireless networks in your range, open the Wi-Drive App and
select the settings icon (lower left) in the application. From the ‘Network Settings’ menu (Figure 6.1), tap
‘Network Connections’ and select the Wi-Fi network you want to connect to. After making your selection, WiDrive will prompt you for the Wi-Fi password (if security is enabled) and reboot. If there is no password, the
device will automatically reboot.
Once Wi-Drive has rebooted, you will be prompted to select a wireless network. You MUST select your Wi-Drive
network in order to maintain access to its contents. Since you’ve already connected to the network via Wi-Drive’s
App, there is no need to select it from the list again. If you do select it, you will be disconnected from Wi-Drive.
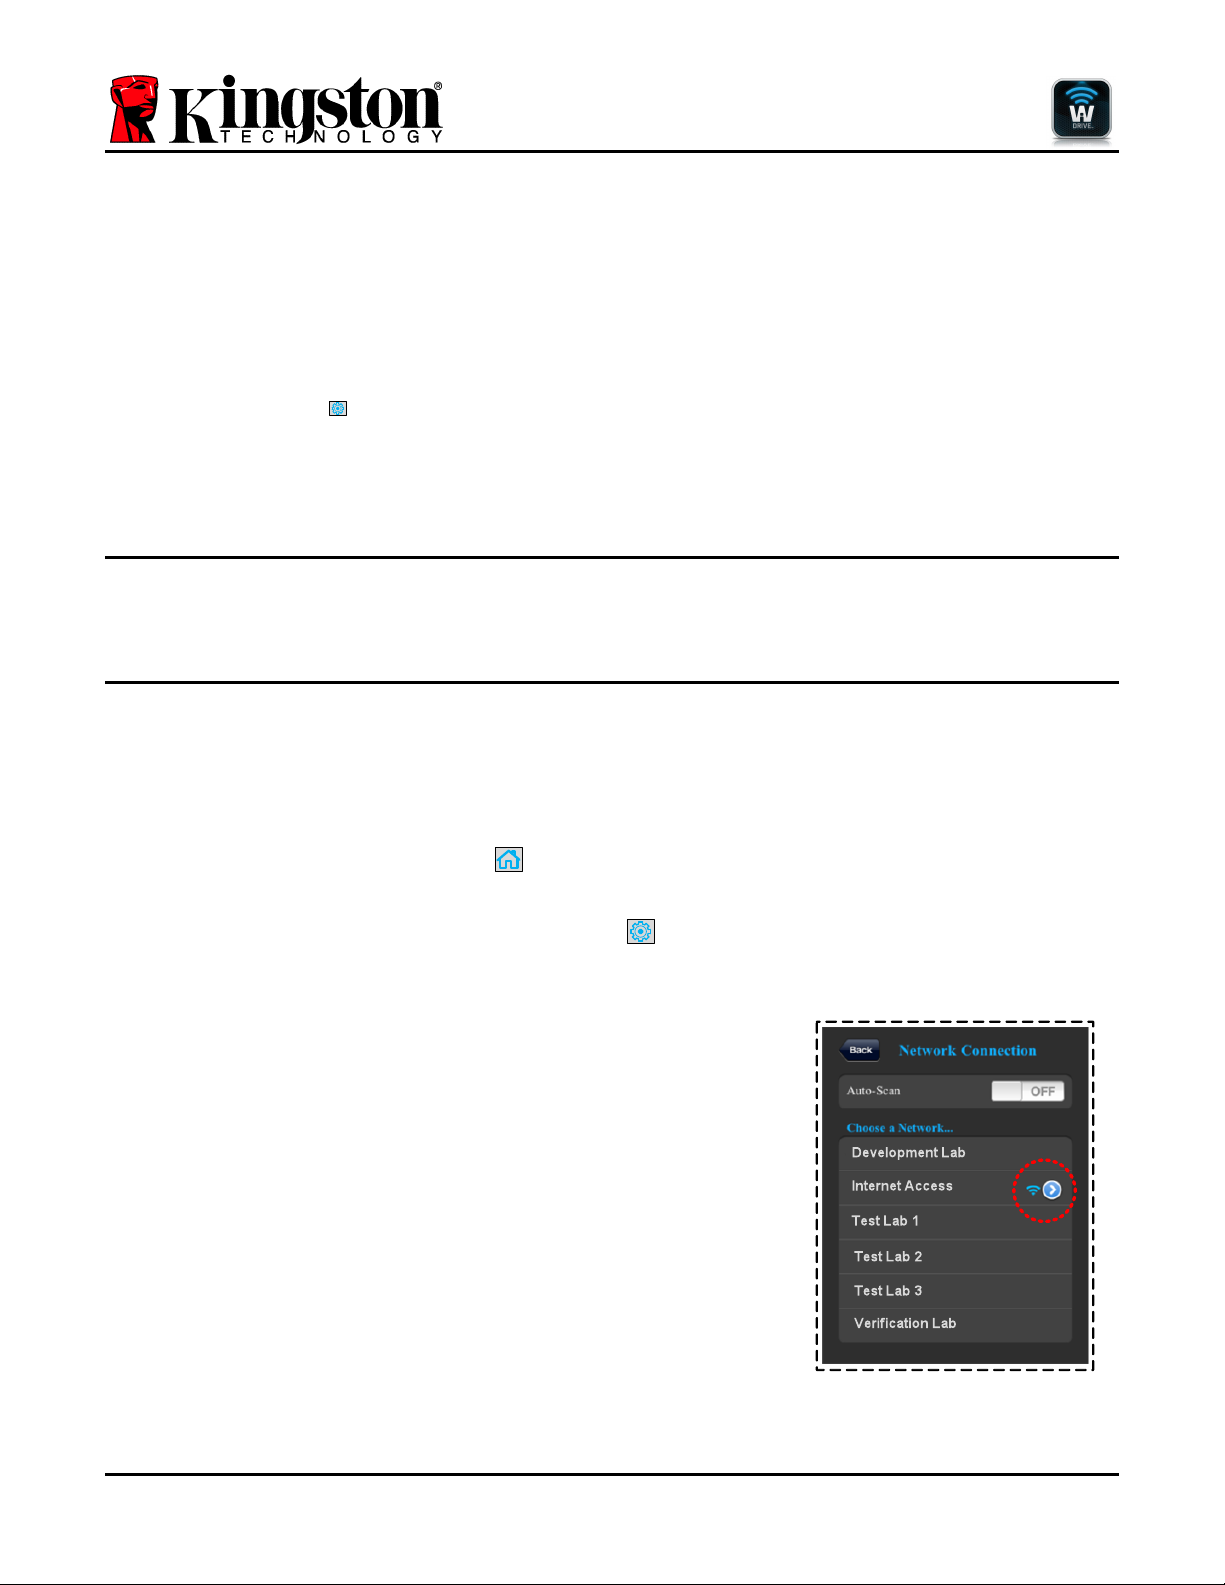
To verify that you have successfully enabled Bridge Mode:
1. Select the Wi-Drive App icon on your iPad, iPhone, or iPod touch
device.
2. Select the Home icon (upper left.)
3. Select the Device Name link, i.e. Wi-Drive (192.168.200.254).
4. Select the settings icon (gear symbol, lower left.)
5. Select the Network Connections button.
When the list of wireless networks appear, you will notice a Wi-Fi signal
and ‘greater than’ symbol located to the right of the network you
selected in the Wi-Drive App. See Figure 6.1. This indicates that the
bridge function is working properly and you are connected to Wi-Drive
and the Internet at the same time.
So if you're streaming content from the Wi-Drive to your Apple device
and need to quickly look something up on-line, just open your Safari
browser and away you go.
Figure 6.1 – Bridged Wi-Drive
Page 14
Document No. 480WID16/32-001.A01
Kingston Wi-Drive
Page 13 of 16
Upgrade Firmware
Recommendation: Always back up your data before a firmware upgrade.
1. If a firmware upgrade becomes available for your Wi-Drive device, it will be posted and made available on-line
for you to download. The firmware upgrade will be in the form of a .BIN file. Additional instructions may be
included with individual firmware upgrade(s).
2. Download the .BIN file and connect Wi-Drive to your computer. For help on connecting your device to a
computer, see page 7.
3. Copy the .BIN file from your computer to the data
partition of Wi-Drive.
4. Disconnect Wi-Drive from your computer.
5. Power on Wi-Drive and wait for the Wi-Fi LED to
start Flashing.
6. Open the Wi-Drive app on your iPad, iPhone, or
iPod touch device.
7. Navigate to Wi-Drive’s Network Settings.
8. Select the ‘Upgrade Firmware’ button.
9. Confirm by selecting Upgrade Firmware once
again.
10. Wi-Drive will complete the firmware upgrade and
automatically reboot. Please let the 100-second
countdown complete before proceeding.
Figure 7.1 – Wi-Drive’s Network Settings
IMPORTANT: To avoid undesired results, please do NOT interrupt the firmware upgrade
process. Once it completes, Wi-Drive will bring you back to the application screen.
Page 15

Document No. 480WID16/32-001.A01
Kingston Wi-Drive
Page 14 of 16
Industry Canada
Radio apparatuses shall comply with the requirements to include required notices or statements to the user of
equipment with each unit of equipment model offered for sale.
The required notices are specified in the RSS documents (including RSS-Gen) applicable to the equipment
model. These notices are required to be shown in a conspicuous location in the user manual for the equipment, or
to be displayed on the equipment model. If more than one notice is required, the equipment model(s) to which
each notice pertains should be identified. Suppliers of radio apparatuses shall provide notices and user
information in both English and French.
This device complies with Industry Canada license-exempt RSS standard(s). Operation is subject to the following
two conditions: (1) This device may not cause interference, and (2) this device must accept any interference,
including interference than may cause undesired operation of the device.
NCC / DGT 警語
第十二條:經型式認證合格之低功率射頻電機,非經許可,公司、商號或使用者均不得得擅自變更頻率、加大功
或變更通原計之特性及功能。
第十四條:低功率射頻電機之使用不得影響飛航安全及干擾合法通信;經發現有干擾現象時,應立即停用,並改善
至無干擾時方得繼續使用。
前項合法通信,指依電信法規定作業之無線電通信。低功率射頻電機須忍受合法通信或工業、科學及醫療用電波輻
射性電機設備之干擾。
Page 16

Document No. 480WID16/32-001.A01
Kingston Wi-Drive
Page 15 of 16
FCC Compliance and Advisory Statement
This device complies with Part 15 of the FCC rules. Operation is subject to the following two conditions: (1) This
device may not cause harmful interference, and (2) this device must accept any interference received, including
interference that may cause undesired operation. This equipment has been tested and found to comply with the
limits for a Class B digital device, according to Part 15 of the FCC rules. These limits are designed to provide
reasonable protection against harmful interference in a residential installation. This equipment generates, uses,
and can radiate radio frequency energy and if not installed and used in accordance with the instructions, may
cause harmful interference to radio communications. However, there is no guarantee that interference will not
occur in a particular installation. If this equipment does cause harmful interference to radio or television reception,
which can be determined by turning the equipment off and on, the user is encouraged to try and correct the
interference by trying one or more of the following:
1. Adjust the receiving antenna.
2. Increase the separation between the equipment and receiver.
3. Connect the equipment into an outlet on a circuit different from that to which the receiver is connected.
4. Consult Technical Support for help.
Any special accessories needed for compliance must be specified in the instruction manual.
Warning: A shielded-type power cord is required in order to meet FCC emission limits and also to prevent
interference to the nearby radio and television reception. It is essential that only the supplied power cord be used.
Use only shielded cables to connect I/O devices to this equipment.
CAUTION: Any changes or modifications not expressly approved by the party responsible for compliance could
void your authority to operate the equipment.
Page 17

Document No. 480WID16/32-001.A01
Kingston Wi-Drive
Page 16 of 16
Safety Guidelines
請依以下方式使用,不當的使用可能會導致電池性能降低或是損害到你的裝置
Please read the following carefully before using the Wi-Drive Product. Incorrect use of your device may
result in reduced battery performance, undesired operation, or damage to your device.
1. 請勿嘗試拆解產品
Do not attempt to open or disassemble this product.
2. 使用環境溫度0-45攝氏度
Store and operate between 0~45℃
3. 請勿將液態物接觸此產品
Do not allow this product to have contact with liquid(s).
4. 請勿將此產品放置或暴露在有熱源、火熱及很熱的汽車內
Do not place this product near a heat source or flame.
5. 請勿壓碎或刺穿此產品
Do not crush or puncture this product.
6. 長時間不用,請每六個月對本產品充電一次
Recharge the power pack every 6 months when not in use.
7. 產品報廢時,電池需要有專門機構回收,否則有可能發生危險
When scrapping this product, the battery needs to be disposed of properly.
Copyright© 2011 Kingston Technology. All rights reserved. Kingston Wi-Drive is a registered
trademark of Kingston Technology. Other trademarks used in this manual are property of their
respective owners.
Kingston Technology
17600 Newhope Street
Fountain Valley, CA 92708
U.S.A.
Page 18
Documento Nº 480WID16/32-001.A01
Wi-Drive de Kingston
Página 1 de 16
Manual del usuario de Wi-Drive
Page 19

Documento Nº 480WID16/32-001.A01
Wi-Drive de Kingston
Página 2 de 16
Índice
INTRODUCCIÓN........................................................................................................................ 2!
REQUISITOS: ............................................................................................................................ 3!
TIPOS* DE ARCHIVOS COMPATIBLES (NO DRM):............................................................... 3!
INSTALAR LA APLICACIÓN DE WI-DRIVE............................................................................. 4!
FAMILIARIZARSE CON EL WI-DRIVE..................................................................................... 5!
CONECTAR WI-DRIVE A UN ORDENADOR ........................................................................... 8!
CARGAR CONTENIDO EN EL WI-DRIVE................................................................................ 8!
CONECTARSE AL WI-DRIVE A TRAVÉS DE UNA RED INALÁMBRICA.............................. 9!
USO............................................................................................................................................ 9!
CONFIGURAR EL WI-DRIVE.................................................................................................. 13!
CONEXIONES DE RED (MODO PUENTE)............................................................................. 14!
ACTUALIZAR EL FIRMWARE................................................................................................ 15!
Introducción
Page 20
Documento Nº 480WID16/32-001.A01
Wi-Drive de Kingston
Página 3 de 16
Wi-Drive™ es un dispositivo de almacenamiento Flash USB portátil, que le permite transmitir contenido
multimedia digital de forma inalámbrica (como música, fotografías, vídeos, etc.) a su dispositivo basado en iOS
iPad®, iPhone® o iPod touch®. La batería de polímero de litio del Wi-Drive, actúa como su propia red inalámbrica,
y su alcance de 10 metros le proporcionan hasta cuatro horas de acceso continuo a su biblioteca virtual, donde
quiera que vaya. El Wi-Drive está disponible con capacidades de 16GB o 32GB, es muy fácil de instalar y es la
solución ideal para expandir su biblioteca virtual sobre la marcha con dispositivos que no tienen ninguna forma
de aumentar su capacidad de almacenamiento.
Qué incluye:
• 1 Wi-Drive (16GB o 32GB)
• 1 cable USB (90 cm. A para
Mini-B)
• Adaptador de CA (sólo
EE.UU.)
Requisitos:
• Ordenador con sistema operativo Windows® 7, Windows Vista® (SP1, SP2), Windows XP (SP2, SP3),
Mac OS X (10.5.x+), Linux (v.2.6+ kernel) con soporte para USB 2.0 (para cargar contenido en Wi-Drive)
• Apple iPod touch® Gen 3, Gen 4, iPhone® (3G, 3GS, 4; 3G se limita a iOS4.2.1+) y iPad®
• Conexión a Internet para instalar la aplicación de Wi-Drive (desde la App Store)
Tipos* de archivos compatibles (No DRM):
• Audio: aac, mp3, wav
• Vídeo: m4v, mp4, mov
• Imágenes: bmp, jpeg, jpg, png
• Documentos: pdf, doc, docx, ppt, pptx, txt, rtf, xls, xlsx
Page 21
Documento Nº 480WID16/32-001.A01
Wi-Drive de Kingston
Página 4 de 16
*El Wi-Drive puede almacenar archivos de cualquier tipo. Los tipos de archivos compatibles enumerados aquí son los que la aplicación de
Wi-Drive puede abrir sin necesidad de una 3ª aplicación.
Instalar la aplicación de Wi-Drive
Para configurar el Wi-Drive, primero debe instalar la aplicación de Wi-Drive (en su iPad, iPhone o iPod touch)
desde la App Store online (se necesita conexión a Internet). La aplicación de Wi-Drive es gratuita y le permite
personalizar las configuraciones de red inalámbrica y acceder de forma inalámbrica al contenido que ha cargado
en el Wi-Drive. Para instalar la aplicación, siga estos pasos:
1. Abra la App Store desde su iPad, iPhone o iPod touch y busque “Wi-Drive.” Ver Imagen 1.1 abajo. La
App Store puede ofrecerle numerosos resultados para su búsqueda.
Imagen 1.1 – Búsqueda de Wi-Drive
2. Localice y seleccione la aplicación de Wi-Drive App que se corresponda con su dispositivo, es decir, WiDrive para iPad, para iPhone, iPod touch, etc. por Kingston Digital, Inc. y pulse el enlace "FREE"
(gratis). Ver Imagen 1.2.
Imagen 1.2 – Aplicación de Wi-Drive de Kingston Digital, ‘FREE’
3. Tras seleccionar 'FREE(GRATUITO),' el botón gris se volverá verde y cambiará a 'INSTALL APP.'
(instalar aplicación) Seleccione este botón para finalizar la instalación de la aplicación de Wi-Drive en su
dispositivo. Ver Imagen 1.3.
Imagen 1.3 – Aplicación de Wi-Drive de Kingston Digital, ‘INSTALL APP’
Una vez instalada la aplicación, puede salir de la App Store y continuar con el siguiente apartado de este manual.
Page 22
Documento Nº 480WID16/32-001.A01
Wi-Drive de Kingston
Página 5 de 16
Familiarizarse con el Wi-Drive
A. Puerto USB Mini-B – Le permite copiar
contenido al Wi-Drive o cargar el
dispositivo mediante un USB 2.0.
B. Botón de reajuste – Reajuste el Wi-
Drive en su configuración original (por
defecto)1 en las configuraciones de red.
C. Botón de encendido 2 – Le permite
encender o apagar el Wi-Drive.
D. LED de Internet – Permanece fijo
cuando está encendido; parpadea
cuando hay actividad de Internet
E. LED de Wi-Fi – Parpadea cuando
detecta un SSID o actividad de red
inalámbrica.
Page 23

Documento Nº 480WID16/32-001.A01
Wi-Drive de Kingston
Página 6 de 16
1
La configuración predeterminada de Wi-Drive es: 1) Nombre del dispositivo: Wi-Drive 2) Estado de visibilidad: ON 3) Canal
inalámbrico: 11 y 4) Seguridad: Ninguna. (Nota: El reajuste del dispositivo no afectará al contenido del usuario en Wi-Drive.)
2
El botón de encendido es también un indicador del tiempo de batería restante mientras el Wi-Drive está encendido. Verde indica un 51% -
100% de batería restante; ámbar indica un 25% - 50% de batería restante; y rojo indica un 24% o menos de batería restante.
Page 24

Documento Nº 480WID16/32-001.A01
Wi-Drive de Kingston
Página 7 de 16
Estado de la batería
Además de encender y apagar el Wi-Drive, el botón de encendido también sirve como indicador del tiempo de
batería restante antes que Wi-Drive deba ser cargado nuevamente. Verde indica un 51%-100% de batería
restante; ámbar indica un 25%-50% de batería restante; y rojo indica menos de un 25% de batería restante. Si el
botón de encendido parpadea en color verde, significa que la batería del Wi-Drive se está cargando (sucede sólo
cuando se utiliza un adaptador de CA.)
Imagen 2.1 – LED de encendido, Verde
Imagen 2.2 – LED de encendido, Ámbar
Imagen 2.3 – LED de encendido, Rojo
Page 25
Documento Nº 480WID16/32-001.A01
Wi-Drive de Kingston
Página 8 de 16
Conectar Wi-Drive a un ordenador
Para añadir contenido a Wi-Drive, conéctelo a un ordenador utilizando el cable USB que se proporciona con el
dispositivo. Ver Imagen 3.1 abajo.
Imagen 3.1 – Conectar Wi-Drive
a un ordenador
Cargar contenido en el Wi-Drive
Cuando está conectado a un ordenador, el Wi-Drive se comporta
como cualquier dispositivo Flash USB estándar, creando un
volumen de datos en su PC o Mac (ver Imagen 3.2.). Este volumen
le permite llenar Wi-Drive con contenido digital que, más tarde,
podrá compartir o al que podrá acceder de forma inalámbrica
mediante la aplicación de Wi-Drive.
Cuando copie contenido en Wi-Drive, es altamente recomendable
que cree carpetas en el volumen de datos para ayudarle a
organizar y localizar rápidamente archivos cada vez que actualice o
cambie el contenido de Wi-Drive (en lugar de volcar todos sus
archivos en el volumen raíz o en una sola carpeta). Por ejemplo,
puede que desee almacenar todos sus archivos de música en una
carpeta llamada “Mi música”, o guardar todas sus fotografías en
una carpeta independiente llamada “Mis fotografías”, y así
sucesivamente.
Cuando haya terminado de cargar contenido, desconecte con
seguridad3 el Wi-Drive de su ordenador. Esto apagará el
dispositivo automáticamente. Para volver a encenderlo, mantenga
presionado el botón de encendido hasta que se vuelva color verde.
Imagen 3.2 – Volumen del Wi-Drive en la
PC
(Nota: Mientras esté conectado a su ordenador, el Wi-Drive no emite una señal inalámbrica. Por lo tanto, no
podrá acceder a él desde su iPad, iPhone o iPod touch en este estado.)
Page 26

Documento Nº 480WID16/32-001.A01
Wi-Drive de Kingston
Página 9 de 16
3
Los usuarios de Windows deben desconectar el Wi-Drive con seguridad haciendo clic con el botón derecho en el icono del USB ubicado en
la esquina derecha de la barra de tareas y seleccionando "Quitar hardware con seguridad". Los usuarios de Mac deben desconectar el Wi-
Drive con seguridad arrastrando el icono del volumen hasta la papelera.
Conectarse al Wi-Drive a través de una red inalámbrica
El Wi-Drive es su propia red inalámbrica. Cuando busque redes Wi-Fi desde su iPad o iPhone, verá 'Wi-Drive' en
la lista de redes disponibles a las que puede conectarse. Por defecto, no hay ninguna contraseña y cuando se
conecta a ella desde su dispositivo iOS, está estableciendo un enlace al Wi-Drive a través de esa señal
inalámbrica. Una vez que se conecte al Wi-Drive, sustituirá la conexión a Internet de su iPad/iPhone por una
conexión inalámbrica de Wi-Drive. Esto significa que ya no tendrá acceso a Internet. Sin embargo, el Wi-Drive
proporciona una función de puente que le permite mantener el acceso al contenido del Wi-Drive mientras está
conectado a una conexión de Internet Wi-Fi. Ver Conexiones de red en la página 10.
Uso
Una vez que está conectado a la red de Wi-Drive, podrá comenzar a acceder a su contenido desde su iPad,
iPhone o iPod touch siguiendo estos pasos:
1. Abra la aplicación del Wi-Drive en su iPad, iPhone o iPod touch
2. Pulse el botón de inicio Home (esquina superior izquierda de la aplicación Wi-Drive)
3. Pulse el enlace del nombre del dispositivo, por ejemplo Wi-Drive (192.168.200.254). Esto enumerará el
contenido del Wi-Drive.
4. Busque y seleccione los archivos multimedia a los que desea acceder. Sólo se pueden abrir los tipos de
archivos compatibles. Ver abajo.
Page 27
Documento Nº 480WID16/32-001.A01
Wi-Drive de Kingston
Página 10 de 16
A. El botón de inicio Home muestra todo el contenido
almacenado en el Wi-Drive, independientemente del tipo
de extensión. Si ha creado carpetas durante el proceso
de carga de contenido descrito en la página 7, las verá
enumeradas en primer lugar. Los archivos individuales
se muestran después de las carpetas.
B. Los botones B, C y D son botones de filtro y muestran
únicamente el contenido asociado con cada tipo
representado. El botón de la cámara representa los
tipos de archivo de fotografías/imágenes. El Wi-Drive
realizará una búsqueda en todos los archivos y carpetas
del dispositivo y mostrará los tipos de archivos de
imagen compatibles.
C. El botón de la tira de película representa los tipos de
archivos de vídeo. El Wi-Drive realizará una búsqueda
en todos los archivos y carpetas del dispositivo y
mostrará los tipos de archivos de vídeo compatibles.
D. El botón de la nota musical representa los archivos de
música o audio. El Wi-Drive utilizará este filtro para
realizar una búsqueda por todos los archivos y carpetas
de los tipos de archivos de música compatibles y los
mostrará.
Una vez que haya localizado el archivo que desea transmitir,
sólo tiene que pulsar el nombre del archivo en la lista. Si desea
obtener una lista de los tipos de archivos actuales compatibles
con el Wi-Drive, consulte la página 3.
Imagen 4.1 – Contenidos del Wi-Drive
Si desea eliminar, enviar por email o copiar un archivo desde el Wi-Drive, también puede hacerlo desde el menú
'Action'. Sólo tiene que navegar hasta el archivo que desee copiar (o eliminar) y deslizarlo en cualquier dirección,
izquierda o derecha, como se ve en la Imagen 4.2. Esto hará que aparezca el botón 'Action', que se muestra en
la Imagen 4.3.
Page 28
Documento Nº 480WID16/32-001.A01
Wi-Drive de Kingston
Página 11 de 16
Imagen 4.2 – Deslizar los elementos del
menú
Imagen 4.3 – Botón 'Action'
Pulse el botón ‘Action’ para abrir el menú que aparece en la
Imagen 4.4. Este menú le permitirá eliminar, enviar por email
o copiar contenido del Wi-Drive a través de la conexión Wi-Fi
que ha establecido según la página 8.
• La opción 'Delete' le permite eliminar archivos o
carpetas de forma individual desde el Wi-Drive.
• La opción 'Mail' le permite enviar por email un archivo
(de hasta 10MB) utilizando el cliente de correo
predeterminado en su dispositivo iOS.
• La opción 'Copy To' le permite:
1. Copiar un archivo o carpeta desde su ubicación
existente en el Wi-Drive a una nueva ubicación
en el mismo, con la posibilidad de crear una
nueva carpeta.
2. Copiar un archivo o carpeta desde el Wi-Drive a
su ubicación de almacenamiento de aplicaciones
(Local.) Este espacio está limitado por la
capacidad de su dispositivo iOS.
3. Copiar un archivo o carpeta desde la ubicación
de almacenamiento de aplicaciones (Local) del
Wi-Drive de su dispositivo iOS a una carpeta
física en el Wi-Drive.
Imagen 4.4 – Menú 'Action'
Page 29

Documento Nº 480WID16/32-001.A01
Wi-Drive de Kingston
Página 12 de 16
Si intenta deslizarse por el tipo de archivo de un
documento no compatible con la aplicación de WiDrive, tiene la opción de abrir el archivo del
documento utilizando una aplicación alternativa
asociada con ese tipo de archivo del documento. La
aplicación asociada debe estar instalada en el
dispositivo iOS.
Solo tiene que deslizar el documento que desee
abrir, pulsar el botón del menú 'Action' y seleccionar
la opción 'Open In...', que se muestra en la Imagen
4.5. Esto mostrará un segundo menú que enumera
las aplicaciones asociadas con el tipo de archivo del
documento que está intentando abrir.
La función 'Open In' sólo aparece con tipos de
archivos de documentos y no se mostrará en el
menú 'Action' cuando se deslice por un archivo de
imagen, audio o vídeo.
Figura 4.5 – Opción ‘Open In’
Page 30
Documento Nº 480WID16/32-001.A01
Wi-Drive de Kingston
Página 13 de 16
Configurar el Wi-Drive
Al utilizar la aplicación de Wi-Drive, puede personalizar las configuraciones de red inalámbrica para el Wi-Drive.
Las configuraciones predeterminadas son: Nombre del dispositivo: Wi-Drive, Estado de visibilidad: ON,
Canal inalámbrico: 11, y Seguridad: Ninguna.
Para acceder a las configuraciones de red del Wi-Drive, siga estos pasos:
1. Seleccione el icono de la aplicación del Wi-Drive en su iPad, iPhone
o iPod touch.
2. Seleccione el icono de inicio
Home (parte superior izquierda)
3. Seleccione el enlace con el nombre del dispositivo, por ejemplo
Wi-Drive (192.168.200.254).
4. Seleccione el icono de las configuraciones
(símbolo del engranaje, parte inferior izquierda)
5. Seleccione el botón Wi-Drive
Settings.
A. Device Name (nombre del dispositivo) – normalmente
se hace referencia a él como un SSID, o Service Set
IDentifier (identificador de red). Este campo le permite
especificar el nombre de un dispositivo (entre 1 y 32
caracteres) que se mostrará en la lista de redes
inalámbricas disponibles en su iPad, iPhone o iPod touch.
El nombre predeterminado es Wi-Drive, como se muestra
en la Imagen 5.1.
B. Visibility Status (estado de visibilidad) – le ofrece la
opción de ocultar o mostrar el SSID especificado en el
campo 'Device Name'. Por defecto, el estado de visibilidad
está en 'ON'. Si desea cambiar esta opción a 'OFF', el
nombre del dispositivo NO se mostrará1 en la lista de redes
inalámbricas disponibles en su iPad, iPhone o iPod touch;
sin embargo, todavía puede conectarse a la red Wi-Fi
introduciendo el nombre del dispositivo manualmente
utilizando la opción del menú 'Other…'.
C. Wi-Fi Channel (canal Wi-Fi) – esta configuración le
permite seleccionar un canal de frecuencia específico para
comunicarse con otros dispositivos en su red inalámbrica.
La configuración por defecto es 'Channel 11' (2.462 GHz.)
Imagen 5.1 – Configuraciones de red de
Wi-Drive
D. Security (seguridad) – esta opción le ayuda a evitar un acceso no autorizado a la red inalámbrica de su Wi-
Drive solicitando una contraseña a los usuarios. Los protocolos de seguridad compatibles con Wi-Drive son
WEP, WPA, WPA2 y WPA2 Mixed. La configuración por defecto es 'None' (ninguna).
• WEP (privacidad equivalente por cable) – La contraseña definida por el usuario debe tener exactamente
13 caracteres
Page 31

Documento Nº 480WID16/32-001.A01
Wi-Drive de Kingston
Página 14 de 16
• WPA o WPA2 (acceso protegido Wi-Fi) – La contraseña definida por el usuario debe tener de 8 a 13
caracteres
• Mixed (mixta) – Combinación de otros protocolos de seguridad
1
Aunque el estado de visibilidad se haya desconectado, usted puede conectarse a la red del Wi-Drive introduciendo el SSID manualmente en
su iPad, iPhone o iPod touch, siempre que conozca el nombre del dispositivo o 'Device Name' (Paso A). Recuerde que se solicitará una
contraseña si la opción de seguridad está habilitada.
Conexiones de red (modo Puente)
Normalmente la antena Wi-Fi de su iPad o iPod touch se utiliza para acceder a Internet. El Wi-Drive, sin
embargo, utiliza la antena Wi-Fi de su dispositivo Apple para transmitir contenido, algo que desconecta su
dispositivo iOS de Internet. Por suerte, la antena Wi-Fi de Wi-Drive admite el tráfico bidireccional y puede
utilizarse para aplicar una opción llamada modo Puente. Este modo le permite conectarse al Wi-Drive mientras
está conectado a una red Wi-Fi (como cliente huésped) que tiene acceso a Internet.
Para configurar esta opción y ver una lista de las redes inalámbricas disponibles a su alcance, abra la aplicación
del Wi-Drive y seleccione el icono de las configuraciones (parte inferior izquierda) en la aplicación. Desde el
menú ‘Network Settings’ (Imagen 6.1), pulse ‘Network Connections’ y seleccione la red Wi-Fi a la que desea
conectarse. Una vez seleccionada, el Wi-Drive le solicitará la contraseña Wi-Fi (si la seguridad está habilitada) y
se reiniciará. Si no hay contraseña, el dispositivo se reiniciará automáticamente.
Una vez que el Wi-Drive se haya reiniciado, se le solicitará que seleccione una red inalámbrica. DEBE
seleccionar su red de Wi-Drive para mantener el acceso a sus contenidos. Puesto que ya se ha conectado a la
red mediante la aplicación del Wi-Drive, no es necesario volver a seleccionarla de la lista. Si la selecciona, se
desconectará del Wi-Drive.
Para comprobar que ha habilitado correctamente el modo Puente:
1. Seleccione el icono de la aplicación del Wi-Drive en su iPad, iPhone
o iPod touch.
2. Seleccione el icono de inicio
Home (parte superior izquierda)
3. Seleccione el enlace con el nombre del dispositivo, por ejemplo
Wi-Drive (192.168.200.254).
4. Seleccione el icono de las configuraciones
(símbolo del engranaje, parte inferior izquierda)
5. Seleccione el botón Network
Connections.
Page 32

Documento Nº 480WID16/32-001.A01
Wi-Drive de Kingston
Página 15 de 16
Cuando aparezca la lista de las redes inalámbricas, observará una
señal Wi-Fi y un símbolo de 'mayor que' ubicado a la derecha de la red
que ha seleccionado en la aplicación del Wi-Drive. Ver Imagen 6.1.
Esto indica que la función de puente está funcionando correctamente y
que está conectado al Wi-Drive y a Internet al mismo tiempo.
Así pues, si está transmitiendo contenido del Wi-Drive a su dispositivo
Apple y necesita buscar algo rápidamente en línea, sólo tiene que abrir
su explorador Safari y ya puede navegar.
Figura 6.1 – Puente Wi-Drive
Actualizar el Firmware
Recomendación: Siempre debe hacer una copia de seguridad de sus datos antes de
actualizar el firmware.
1. Si hay una actualización de firmware disponible para su Wi-Drive, esta se publicará y estará disponible en
línea para que la descargue. La actualización de firmware tendrá el formato de un archivo .BIN. Se pueden
incluir instrucciones adicionales con las actualizaciones individuales de firmware.
2. Descargue el archivo .BIN y conecte el Wi-Drive a su ordenador. Para obtener ayuda sobre cómo conectar
su dispositivo a un ordenador, consulte la página 7.
3. Copie el archivo .BIN en su ordenador en la
partición de datos del Wi-Drive.
4. Desconecte el Wi-Drive de su ordenador.
5. Encienda el Wi-Drive y espere a que el LED de
Wi-Fi comience a parpadear.
6. Abra la aplicación del Wi-Drive en su iPad, iPhone
o iPod touch.
7. Navegue hasta las configuraciones de red
('Network Settings') del Wi-Drive.
8. Seleccione el botón ‘Upgrade Firmware’
(Actualizar Firmware).
9. Confirme seleccionando Upgrade Firmware de
nuevo.
10. El Wi-Drive finalizará la actualización de firmware
y se reiniciará automáticamente. Espere a que
finalice la cuenta regresiva de 100 segundos antes
Figura 7.1 – Configuraciones de red del Wi-Drive
Page 33

Documento Nº 480WID16/32-001.A01
Wi-Drive de Kingston
Página 16 de 16
de continuar.
IMPORTANTE: Para evitar resultados no deseados, NO interrumpa el proceso de
actualización de firmware. Una vez finalizado, el Wi-Drive volverá a la pantalla de la
aplicación.
Page 34

Dokument Nr. 480WID16/32-001.A01
Kingston Wi-Drive
Seite 1 von 16
Wi-Drive Anwenderleitfaden
Page 35

Dokument Nr. 480WID16/32-001.A01
Kingston Wi-Drive
Seite 2 von 16
Inhaltsverzeichnis
Introduction................................................................................................................................. 3
Requirements ............................................................................................................................. 3
Supported File Types (Non-DRM).............................................................................................. 3
Installing the Wi-Drive Application.............................................................................................. 4
Getting to Know Wi-Drive ........................................................................................................... 5
Battery Status............................................................................................................................. 7
Connecting Wi-Drive to a Computer........................................................................................... 8
Loading Content Onto Wi-Drive.................................................................................................. 8
Connecting to Wi-Drive over Wireless........................................................................................ 9
Usage ......................................................................................................................................... 9
Configuring Wi-Drive ................................................................................................................ 13
Network Connections (Bridge Mode)........................................................................................ 14
Upgrade Firmware.................................................................................................................... 15
Page 36

Dokument Nr. 480WID16/32-001.A01
Kingston Wi-Drive
Seite 3 von 16
Einleitung
EsWi-Drive™ ist ein tragbarer USB-Flashspeicher, mit dem Sie digitale Medieninhalte (wie Musik, Fotos, Videos
usw.) drahtlos auf Ihr iOS-basiertes iPad®, iPhone®, oder iPod touch® Gerät übertragen können. Der LithiumPolymer-Akku dient als eigenständige Wireless-Netzwerk, und die zehn Meter Reichweite geben Ihnen vier
Stunden lang kontinuierlichen Zugriff auf Ihre digitale Bibliothek, wo immer Sie gerade sind. Wi-Drive ist in
Ausführungen mit 16GB oder 32GB erhältlich und einfach einzurichten. Es ist die perfekte Lösung zur
Erweiterung Ihrer Medienbibliothek für unterwegs mit Geräten, die keine Möglichkeit für das Hinzufügen von
Speicherkapazitäten bieten.
Im Lieferumfang:
• 1 Wi-Drive (16GB oder 32GB)
• 1 USB Kabel (ca. 1 m A auf
Mini-B)
• Netzadapter (nur USA)
Systemanforderungen:
• Computer mit Windows® 7, Windows Vista® (SP1, SP2), Windows XP (SP2, SP3), Mac OS X (10.5.x+),
Linux (v.2.6+ kernel) Betriebssystem mit USB 2.0 Unterstützung (zum Hochladen von Inhalten zum WiDrive)
• Apple iPod touch® Gen 3, Gen 4, iPhone® (3G, 3GS, 4; 3G ist beschränkt auf iOS4.2.1+) und iPad®
• Internetzugang zur Installation der Wi-Drive-Anwendung (vom App-Store)
Unterstützte Dateitypen* (nicht DRM):
• Audio: aac, mp3, wav
• Video: m4v, mp4, mov
• Bilder: bmp, jpeg, jpg, png
• Dokumente: pdf, doc, docx, ppt, pptx, txt, rtf, xls, xlsx
Page 37

Dokument Nr. 480WID16/32-001.A01
Kingston Wi-Drive
Seite 4 von 16
*Wi-Drive kann Dateien aller Art speichern. Die hier aufgelisteten Dateitypen können von der Wi-Drive Anwendung ohne die Hilfe zusätzlicher
Apps geöffnet werden.
Installation der Wi-Drive Anwendung
Zur Konfiguration von Wi-Drive müssen Sie zunächst die Wi-Drive App (auf Ihrem iPad, iPhone oder iPod touchGerät) vom Online-App-Store installieren (Internetverbindung erforderlich). Die Wi-Drive App ist kostenlos und
ermöglicht Ihnen die Anpassung der Netzwerkeinstellungen und den drahtlosen Zugriff auf die Inhalten, die Sie
auf den Wi-Drive geladen haben. Zur Installation der App gehen Sie folgendermaßen vor:
1. Öffnen Sie auf Ihrem iPad, iPhone oder iPod touch den App-Store und suchen Sie nach „Wi-Drive“. Siehe
Abbildung 1.1. Möglicherweise zeigt der App-Store mehrere Ergebnisse für Ihre Suche an.
Abbildung 1.1 – Suche nach Wi-Drive
2. Finden Sie die Wi-Drive App, die zu Ihrem Gerät passt, d.h. Wi-Drive für iPad, für iPhone, iPod touch
usw. von Kingston Digital, Inc., wählen Sie sie aus und tippen Sie auf die Taste „FREE“ (Kostenlos).
Siehe Abbildung 1.2.
Abbildung 1.2 – Wi-Drive App von Kingston Digital, „FREE“
3. Nach der Auswahl von „FREE“ wechselt die graue Schaltfläche auf grün und zeigt „INSTALL APP“ (App
installieren) an. Wählen Sie diese Schaltfläche, um die Installation der Wi-Drive App auf Ihrem Gerät
abzuschließen. Siehe Abbildung 1.3.
Abbildung 1.3 – Wi-Drive App von Kingston Digital, „INSTALL APP“
Page 38

Dokument Nr. 480WID16/32-001.A01
Kingston Wi-Drive
Seite 5 von 16
Nach Installation der App können Sie den App-Store verlassen und mit dem nächsten Abschnitt dieses
Handbuchs fortfahren.
Kennenlernen des Wi-Drive
A. Mini-B USB Port – Ermöglicht das
Kopieren von Inhalten auf das Wi-Drive
sowie das Laden des Gerätes über USB
2.0.
B. Reset Taste – Versetzt das Wi-Drive
wieder in den ursprünglichen
Standardzustand1 für die
Netzwerkeinstellungen.
C. Hauptschalter 2 – Ermöglicht das Ein-
und Ausschalten des Wi-Drive.
D. Internet LED – Leuchtet nach dem
Einschalten auf und blinkt, wenn das
Internet aktiv ist
E. Wi-Fi LED – Blinkt beim Senden der
SSID oder drahtloser Netzwerkaktivität.
Page 39

Dokument Nr. 480WID16/32-001.A01
Kingston Wi-Drive
Seite 6 von 16
1
Die Standardkonfiguration für Wi-Drive ist: 1) Device Name (Gerätename): Wi-Drive 2) Visibility Status (Sichtbarkeitsstatus): ON (EIN)
3) Wireless Channel (Wireless-Kanal:) 11 und 4) Security (Sicherheit): Keine. (Hinweis: Die Benutzerinhalte auf dem Wi-Drive werden
vom Zurücksetzen nicht betroffen.)
2
Der Hauptschalter dient bei eingeschaltetem Wi-Drive gleichzeitig als Batterieladeanzeige und zeigt an, wie lange der Akku noch hält. Grün
bedeutet, dass noch 51 % bis 100 %, Orange , dass noch 25 % bis 50 % und Rot, dass noch 24 % oder weniger Ladung verbleiben.
Page 40

Dokument Nr. 480WID16/32-001.A01
Kingston Wi-Drive
Seite 7 von 16
Batterieladezustand
Der Hauptschalter dient neben dem Ein- und Ausschalten des Wi-Drive auch als Batterieladeanzeige und zeigt
an, wieviel Zeit noch verbleibt, bis der Wi-Drive wieder aufgeladen werden muss. Grün bedeutet, dass noch 51 %
bis 100 %, Orange , dass noch 25 % bis 50 % und Rot, dass noch 25 % oder weniger Ladung verbleiben. Eine
blinkende grüne Anzeige weist darauf hin, dass der Akku des Wi-Drive geladen wird (nur bei angeschlossenem
Netzgerät).
Abbildung 2.1 – Power-LED, Grün
Abbildung 2.2 – Power-LED, Orange
Abbildung 2.3 – Power-LED, Rot
Page 41

Dokument Nr. 480WID16/32-001.A01
Kingston Wi-Drive
Seite 8 von 16
Anschluss des Wi-Drive an einen Computer
Zum Laden von Inhalten auf den Wi-Drive schließen Sie ihn mit dem mitgelieferten USB-Kabel an einen
Computer an. Siehe Abbildung 3.1.
Abbildung 3.1 – Anschließen des Wi-Drive
an einen Computer
Laden von Inhalten auf den Wi-Drive
Wi-Drive verhält sich beim Anschließen an einen Computer wie ein
gewöhnlicher USB-Flashspeicher und erstellt einen Datenträger auf
Ihrem PC oder Mac an (siehe Abbildung 3.2.). Dieser Datenträger
ermöglicht das Füllen Ihres Wi-Drive mit digitalen Inhalten, die Sie
später über Ihre Wi-Drive Anwendung freigeben oder nutzen
können.
Beim Kopieren von Inhalten auf Wi-Drive wird dringend empfohlen,
dass Sie auf dem Datenträger Ordner anlegen, statt alle Ihre
Dateien einfach in das Root-Verzeichnis oder in einen einzigen
Ordner zu verschieben. So können Sie immer wenn Sie Inhalte auf
dem Wi-Drive aktualisieren bzw. ändern, die Dateien schnell
ordnen und finden. So können Sie beispielsweise alle Ihre
Musikdateien in einem Ordner „Meine Musik“ und alle Ihre Fotos in
einem anderen Ordner namens „Meine Fotos“ und so weiter
speichern.
Nach Abschluss des Ladens Ihrer Inhalte entfernen Sie das WiDrive vorsichtig3 wieder aus Ihrem Computer. Dies schaltet
automatisch das Gerät aus. Um es wieder einzuschalten, drücken
und halten Sie den Hauptschalter, bis er grün aufleuchtet.
Abbildung 3.2 – Wi-Drive
Datenträgersymbol auf dem PC
(Hinweis: Wenn Ihr Wi-Drive an einem Computer angeschlossen ist, sendet es kein Wireless-Signal aus. Sie
können in diesem Betriebszustand daher nicht von Ihrem iPad, iPhone oder iPod touch auf ihn zugreifen.)
Page 42

Dokument Nr. 480WID16/32-001.A01
Kingston Wi-Drive
Seite 9 von 16
3
Windows Benutzer entfernen das Wi-Drive sicher durch Rechtsklicken auf das USB-Symbol in der rechten Ecke der Taskleiste und Auswahl
von „Hardware sicher entfernen“. Mac Anwender entfernen das Wi-Drive sicher, indem Sie das Datenträgersymbol auf den Papierkorb
ziehen.
Anschluss des Wi-Drive über Wireless
Wi-Drive verfügt über sein eigenes, unabhängiges Wireless-Netzwerk. Beim Durchsuchen auf Wi-Fi-Netzwerke
von Ihrem iPad oder iPhone sehen Sie auf der Liste der verfügbaren Netzwerke das Wi-Drive. Wenn Sie von
einem iOS-Gerät auf das Wi-Drive zugreifen, brauchen Sie standardmäßig kein Passwort, um über das WirelessSignal eine eigene Verbindung herzustellen. Sobald Sie mit dem Wi-Drive verbunden sind, ersetzen Sie die
Internetverbindung Ihres iPad/iPhone mit der Wireless-Verbindung des Wi-Drive. Das bedeutet, dass Sie nicht
mehr länger mit dem Internet verbunden sind. Wi-Drive bietet jedoch eine Überbrückungsfunktion, die ermöglicht,
dass Sie weiterhin Zugriff auf die Inhalte des Wi-Drive haben, während Sie eine Wi-Fi-Internetverbindung
herstellen. Siehe Netzwerkverbindungen auf Seite 10.
Verwendung
Sobald Sie mit dem Wi-Drive-Netzwerk verbunden sind, können Sie beginnen, von Ihrem iPad, iPhone oder iPod
touch auf die Inhalte zuzugreifen. Gehen Sie dazu folgendermaßen vor:
1. Öffnen Sie die Wi-Drive App auf Ihrem iPad, iPhone oder iPod touch.
2. Tippen Sie auf das Home-Symbol (obere linke Ecke der Wi-Drive App).
3. Tippen Sie auf den Gerätenamen-Link, d.h. Wi-Drive (192.168.200.254). Dies öffnet eine Liste der
Inhalte Ihres Wi-Drive.
4. Durchsuchen und wählen Sie die Medien aus, auf die Sie zugreifen wollen. Nur unterstützte Dateitypen
können geöffnet werden. Siehe unten.
Page 43

Dokument Nr. 480WID16/32-001.A01
Kingston Wi-Drive
Seite 10 von 16
A. Die Schaltfläche Home zeigt zeigt alle gespeicherten
Inhalte auf dem Wi-Drive an, unabhängig von ihrer
Dateierweiterung. Wenn Sie während des UploadVorgangs der Inhalte auf Seite 7 Ordner erstellt haben,
sehen Sie diese zuerst. Einzelne Dateien werden nach
den Ordnern aufgelistet.
B. Tasten B, C, & D sind Filtertasten und zeigen nur die
Inhalte an, die mit dem jeweils dargestellten Typ
verbunden sind. Die Kamerataste stellt Foto-/BildDateitypen dar. Wi-Drive durchsucht alle Dateien und
Ordner auf dem Gerät und zeigt die unterstützten BildDateitypen an.
C. Die Filmstreifentaste stellt Video-Dateitypen dar. Wi-
Drive durchsucht alle Dateien und Ordner auf dem Gerät
und zeigt die unterstützten Video-Dateitypen an.
D. Die Note stellt Musik- oder Audiodateien dar. Wi-Drive
verwendet diesen Filter, um alle Dateien und Ordner
nach unterstützten Dateitypen zu durchsuchen und diese
darzustellen.
Wenn Sie die Datei, die Sie streamen wollen, gefunden haben,
tippen Sie einfach den Dateinamen in der Liste an, und schon
können Sie loslegen. Eine Liste aller derzeit von Wi-Drive
unterstützten Dateitypen finden Sie auf Seite 3.
Abbildung 4.1 – Wi-Drive Inhalte
Wenn Sie eine Datei aus dem Wi-Drive löschen, per E-Mail versenden oder kopieren möchten, können Sie dies
über das Menü Action (Aktion) tun. Finden Sie dazu die Datei, die Sie kopieren (oder löschen) wollen und
wischen Sie sie nach rechts oder links, wie in Abbildung 4.2 gezeigt. Die rote Aktionstaste (Action) wird
angezeigt. Siehe Abbildung 4.3.
Page 44

Dokument Nr. 480WID16/32-001.A01
Kingston Wi-Drive
Seite 11 von 16
Abbildung 4.2 – Menüpunkt wischen
Abbildung 4.3 – Aktionstaste
Tippen Sie die Aktionstaste, um das in Abbildung 4.4 gezeigte
Menü zu öffnen. Mit diesem Menü können Sie Inhalte von
dem Wi-Drive über die früher auf Seite 8 erstellte Wi-FiVerbindung löschen, per E-Mail versenden oder kopieren.
• Die Option „Delete“ (Löschen), ermöglicht das
Löschen einzelner Dateien bzw. Ordner aus dem WiDrive.
• Die Option „Mail“ (E-Mail) ermöglicht das Versenden
einer Datei (bis 10MB) mit Hilfe des Standard-E-MailProgramms, das in Ihrem iOS-Gerät festgelegt ist.
• Die Option „Copy To“ (Kopieren nach) ermöglicht
Ihnen:
1. Das Kopieren einer Datei oder eines Ordners von
seinem aktuellen Ablageort auf dem Wi-Drive zu
einem neuen Ablageort auf dem Wi-Drive, mit
der Möglichkeit, einen neuen Ordner zu erstellen.
2. Kopieren einer Datei oder eines Ordners vom WiDrive zu ihrem App-Speicherort (lokal). Dieser
Platz ist auf die Kapazität Ihres iOS-Gerätes
beschränkt.
3. Kopieren einer Datei oder eines Ordners vom WiDrive-Speicherort (lokal) Ihres iOS-Geräts zu
einem physischen Ordner auf dem Wi-Drive.
Abbildung 4.4 – Aktionsmenü
Page 45

Dokument Nr. 480WID16/32-001.A01
Kingston Wi-Drive
Seite 12 von 16
Wenn Sie einen Dateityp zu wischen versuchen, der
nicht von der Wi-Drive App unterstützt wird, haben
Sie die Möglichkeit, das Dokument unter
Verwendung einer alternativen App zu öffnen, die mit
diesem Dokumenten-Dateityp verbunden ist. Die
jeweilige App muss auf dem iOS-Gerät installiert
sein.
Wischen Sie einfach das Dokument, das Sie öffnen
wollen, tippen Sie auf die Aktionsmenütaste und
wählen Sie die in Abbildung 4.5 gezeigte Option
„Open In...“ (Öffnen in). Ein zweites Menü erscheint,
das die mit dem Dokumenttyp der zu öffnenden
Datei verbundenen Apps auflistet.
Die Funktion „Open In“ (Öffnen in) erscheint nur mit
Dokument-Dateitypen. Sie erscheint nicht im
Aktionsmenü, wenn Sie ein Bild, eine Audiodatei
oder eine Videodatei wischen.
Abbildung 4.5 – Option „Open In“ (Öffnen in)
Page 46

Dokument Nr. 480WID16/32-001.A01
Kingston Wi-Drive
Seite 13 von 16
Konfiguration des Wi-Drive
Mit Hilfe der Wi-Drive App können Sie die Wireless-Netzwerkeinstellungen für Wi-Drive anpassen. Die
Standardeinstellungen sind: Device Name (Gerätename): Wi-Drive, Visibility Status (Sichtbarkeitsstatus): ON
(EIN), Wireless Channel (Wireless-Kanal): 11 und Security (Sicherheit): None (Keine).
Um auf die Netzwerkeinstellungen des Wi-Drive zuzugreifen, gehen Sie folgendermaßen vor.
1. Wählen Sie die Wi-Drive App auf Ihrem iPad, iPhone oder iPod
touch.
2. Wählen Sie das Home-Symbol
(oben links).
3. Tippen Sie auf den Gerätenamen-Link, d.h. Wi-Drive
(192.168.200.254).
4. Wählen Sie das Symbol Einstellungen
(Gerätesymbol unten links.)
5. Wählen Sie die Taste Wi-Drive
Settings (Wi-Drive Einstellungen).
A. Device Name (Gerätename) – häufig auch als „SSID“ oder
Service Set IDentifier (Dienstesatz-ID) bezeichnet,
ermöglicht Ihnen die Angabe eines Gerätenamens
(zwischen 1 und 32 Zeichen), der in der Liste verfügbarer
Netzwerke auf Ihrem iPad, iPhone oder iPod touch
erscheint. Der Standardname ist Wi-Drive, wie in
Abbildung 5.1 gezeigt.
B. Visibility Status (Sichtbarkeitsstatus) – gibt Ihnen die
Möglichkeit, die im Feld Device Name angegebene SSID
aus- oder einzublenden. Die Standardeinstellung für den
Sichtbarkeitsstatus ist ON (EIN). Wenn Sie diese Funktion
auf OFF (AUS) stellen wollen, wird der Gerätename nicht 1
in der Liste verrfügbarer Wireless-Netzwerke auf Ihrem
iPad, iPhone oder iPod touch angegeben. Sie können
jedoch auf das Wi-Fi-Netzwerk zugreifen, indem Sie den
Gerätenamen über die Menüoption Other… (Andere...)
manuell eingeben.
C. Wi-Fi Channel (Wi-Fi-Kanal) – ermöglicht Ihnen die
Auswahl eines spezifischen Frequenzkanals für die
Kommunikation mit anderen Geräten in Ihrem WirelessNetzwerk. Die Standardeinstellung ist Channel 11 (2,462
GHz).
Abbildung 5.1 – Wi-Drive
Netzwerkeinstellungen
D. Security (Sicherheit) – diese Option verhindert unbefugten Zugriff auf Ihr Wi-Drive Wireless-Netzwerk durch
Aufforderung der Benutzer, ein Passwort anzugeben. Die vom Wi-Drive unterstützten Sicherheitsprotokolle
sind WEP, WPA, WPA2 und WPA2 Mixed. Die Standardeinstellung ist None (keine).
• WEP (Wired Equivalent Privacy) – benutzerdefiniertes Passwort, muss genau 13 Zeichen lang sein
Page 47

Dokument Nr. 480WID16/32-001.A01
Kingston Wi-Drive
Seite 14 von 16
• WPA oder WPA2 (Wi-Fi Protected Access) – benutzerdefiniertes Passwort muss 8 bis 13 Zeichen lang
sein
• Mixed (Gemischt) – Kombination der anderen Sicherheitsprotokolle
1
Wenn der Sichtbarkeitsstatus ausgeschaltet ist, können Sie noch immer auf das Wi-Drive Netzwerk zugreifen, indem Sie die SSID manuell
auf Ihrem iPad, iPhone oder iPod louch eingeben, sofern Sie den „Gerätenamen“ kennen (Schritt A). Bitte beachten Sie, dass ein Passwort
erforderlich ist, wenn die Sicherheitsoption aktiviert ist.
Netzwerkverbindungen (Überbrückungsmodus)
Zum Zugriff auf das Internet wird gewöhnlich die Wi-Fi-Antenne an Ihrem iPad oder iPod touch verwendet. Der
Wi-Drive verwendet jedoch die Wi-Fi-Antenne an Ihrem Apple Gerät zum Streamen von Inhalten. Dies trennt ihr
iOS-Gerät praktisch vom Internet. Glücklicherweise unterstützt die Wi-Fi-Antenne des Wi-Drive jedoch
bidirektionalen Datenverkehr und kann zur Anwendung des so genannten „Bridge Mode“ (Überbrückungsmodus)
verwendet werden. Dieser Modus ermöglicht es, dass Sie mit dem Wi-Drive verbunden sind, während dieser mit
einem Wi-Fi-Netzwerk (als Host-Client) verbunden ist, das Zugriff auf das Internet hat.
Zum Einrichten dieser Funktion und Anzeigen einer Liste der verfügbaren drahtlosen Netzwerke in Ihrer
Umgebung öffnen Sie die Wi-Drive App und wählen das Einstellungen-Symbol (unten links) in der Anwendung.
Vom Menü „Network Settings“ (Netzwerkeinstellungen) (Abbildung 6.1) tippen Sie auf „Network Connections“
(Netzwerkverbindungen) und wählen das Wi-Fi-Netzwerk, mit dem Sie eine Verbindung herstellen wollen. Wenn
Sie Ihre Auswahl getroffen haben, fordert Wi-Drive Sie zur Angabe Ihres Wi-Fi-Passwortes (falls Sicherheit
aktiviert ist) und zum Neustart auf. Wenn kein Passwort vorhanden ist, wird das Gerät automatisch neu gestartet.
Wenn Wi-Drive neu gestartet wurde, werden Sie aufgefordert, ein Wireless-Netzwerk zu wählen. Sie MÜSSEN
Ihr Wi-Drive-Netzwerk auswählen, um den Zugriff auf seine Inhalte aufrecht zu erhalten. Da Sie bereits über die
App des Wi-Drive mit dem Netzwerk verbunden sind, besteht nicht die Notwendigkeit, es noch einmal aus der
Liste auszuwählen. Wenn Sie es dennoch auswählen, werden Sie vom Wi-Drive getrennt.
Um zu überprüfen, dass Sie bereits erfolgreich den Überbrückungsmodus aktiviert haben, gehen Sie
folgendermaßen vor:
1. Wählen Sie die Wi-Drive App auf Ihrem iPad, iPhone oder iPod
touch.
2. Wählen Sie das Home-Symbol
(oben links).
3. Tippen Sie auf den Gerätenamen-Link, d.h. Wi-Drive
(192.168.200.254).
4. Wählen Sie das Symbol Einstellungen
(Gerätesymbol unten links.)
5. Wählen Sie die Taste Network
Connections (Netzwerkeinstellungen).
Page 48

Dokument Nr. 480WID16/32-001.A01
Kingston Wi-Drive
Seite 15 von 16
Wenn die Liste der Wireless-Netzwerke angezeigt wird, sehen Sie ein
Wi-Fi-Signal und ein Symbol „größer als“ rechts neben dem Netzwerk,
das Sie in der Wi-Drive App ausgewählt haben. Siehe Abbildung 6.1.
Dies zeigt an, dass die Überbrückungsfunktion einwandfrei funktioniert
und dass Sie gleichzeitig mit dem Wi-Drive und mit dem Internet
verbunden sind.
Wenn Sie also Inhalte von dem Wi-Drive auf Ihr Apple Gerät stremen
und rasch online etwas nachschauen müssen, öffnen Sie einfach Ihren
Safari-Browser und legen Sie los.
Abbildung 6.1 – Überbrückter Wi-
Drive
Firmware Aktualisieren
Empfehlung: Legen Sie immer eine Sicherungskopie Ihrer Daten an, bevor Sie eine FirmwareAktualisierung durchführen.
1. Wenn für Ihr Wi-Fi-Gerät eine Firmware-Aktualisierung verfügbar ist, wird sie online für Sie zum Download
angekündigt und verfügbar gemacht. Die Firmware-Aktualisierung wird in Form einer .bin-Datei zur
Verfügung stehen. Mit der jeweiligen Firmware-Aktualisierung werden möglicherweise weitere Anweisungen
bereitgestellt.
2. Laden Sie die .bin-Datei herunter und schließen Sie den Wi-Drive an Ihren Computer an. Für Hilfestellung für
das Anschließen Ihres Gerätes an einen Computer siehe Seite 7.
3. Kopieren Sie die .bin-Daten von Ihrem Computer
auf die Datenpartition Ihres Wi-Drive.
4. Trennen Sie das Wi-Drive von Ihrem Computer.
5. Schalten Sie das Wi-Drive ein und warten Sie, bis
die Wi-Fi-LED zu blinken beginnt.
6. Öffnen Sie die Wi-Drive App auf Ihrem iPad,
iPhone oder iPod touch.
7. Gehen Sie zu den Netzwerkeinstellungen des WiDrive.
8. Wählen Sie die Taste Upgrade Firmware
(Firmware aktualisieren).
9. Bestätigen Sie den Vorgang, indem Sie Upgrade
Firmware (Firmware aktualisieren) noch einmal
auswählen.
Page 49

Dokument Nr. 480WID16/32-001.A01
Kingston Wi-Drive
Seite 16 von 16
10. Wi-Drive führt die Firmware-Aktualisierung durch
und startet anschließend automatisch neu. Bitte
warten Sie den 100-Sekunden-Countdown ab,
bevor Sie fortfahren.
Abbildung 7.1 – Wi-Drive Netzwerkeinstellungen
WICHTIG: Um unerwünschte Ergebnisse zu vermeiden, darf der
Aktualisierungsvorgang der Firmware NICHT unterbrochen werden. Nach Abschluss
bringt Wi-Drive Sie zurück zum Anwendungsbildschirm.
Page 50

Document Nº 480WID16/32-001.A01
Kingston Wi-Drive
Page 1 sur 16
Manuel d'utilisation de Wi-Drive
Page 51

Document Nº 480WID16/32-001.A01
Kingston Wi-Drive
Page 2 sur 16
Table des matières
INTRODUCTION........................................................................................................................ 2!
SYSTÈME REQUIS : ................................................................................................................. 3!
TYPES DE FICHIERS SUPPORTÉS* (NON-DRM) : ................................................................ 3!
INSTALLATION DE L'APPLICATION WI-DRIVE ..................................................................... 4!
UTILISATION DE WI-DRIVE ..................................................................................................... 5!
CONNEXION DU WI-DRIVE À UN ORDINATEUR ................................................................... 8!
CHARGEMENT DE CONTENUS SUR LE WI-DRIVE............................................................... 8!
CONNEXION SANS FIL DE WI-DRIVE..................................................................................... 9!
UTILISATION............................................................................................................................. 9!
CONFIGURATION DE WI-DRIVE............................................................................................ 13!
CONNEXIONS DE RÉSEAU (MODE PASSERELLE) ............................................................ 14!
ACTUALISATION DU FIRMWARE ......................................................................................... 15!
Introduction
Page 52

Document Nº 480WID16/32-001.A01
Kingston Wi-Drive
Page 3 sur 16
Wi-Drive™ est un dispositif de stockage Flash USB portable qui vous permet de lire sans fil ses contenus médias
numériques (tels que musique, vidéos, etc.) sur votre iPad iOS®, iPhone®, ou votre iPod touch®. Grâce à sa
batterie au lithium-polymère, à son propre réseau sans fil et sa portée de 9 mètres, Wi-Drive offre pendant quatre
heures un accès continu à votre bibliothèque numérique pendant tous vos déplacements. Avec une capacité de
16 ou 32 Go et une configuration simple, Wi-Drive est la solution parfaite pour élargir votre bibliothèque média
portable avec des supports dont la capacité de stockage est inexpansible.
Le produit inclut :
• 1 Wi-Drive (16 ou 32 Go)
• 1 câble USB (90 cm A –
Mini-B)
• Adaptateur CA (U.S.
uniquement)
Système requis :
• Ordinateur Windows® 7, Windows Vista® (SP1, SP2), Windows XP (SP2, SP3), Mac OS X (10.5.x+),
Linux (v.2.6+ kernel) avec support USB 2.0 (pour charger les contenus sur le Wi-Drive)
• Apple iPod touch® Gen 3, Gen 4, iPhone® (3G, 3GS, 4 ; 3G étant limité à iOS4.2.1+) et iPad®
• Accès internet pour installer l'application Wi-Drive (depuis l'App Store).
Types de fichiers supportés* (non-DRM) :
• Audio : aac, mp3, wav
• Vidéo : m4v, mp4, mov
• Image : bmp, jpeg, jpg, png
• Docs : pdf, doc, docx, ppt, pptx, txt, rtf, xls, xlsx
*Wi-Drive peut stocker tous les types de fichiers. Les types de fichiers listés peuvent être ouverts par l'application Wi-Drive sans nécessiter
une application tierce.
Page 53

Document Nº 480WID16/32-001.A01
Kingston Wi-Drive
Page 4 sur 16
Installation de l'application Wi-Drive
Pour configurer le Wi-Drive, vous devez installer l'App Wi-Drive (sur votre iPad, iPhone, ou iPod touch) depuis
l'App Store en ligne (accès internet requis). L'App Wi-Drive est gratuite. Elle sert à personnaliser les paramètres
du réseau sans fil et à accéder sans fil aux contenus téléchargés sur le Wi-Drive. Pour installer cette App, suivez
les instructions ci-dessous :
1. Ouvrez l'App Store sur votre iPad, iPhone, ou iPod et cherchez “Wi-Drive”. Voir la Figure 1.1 ci-dessous.
L'App Store peut afficher plusieurs résultats de recherche.
Figure 1.1 – Recherche de Wi-Drive
2. Naviguez pour sélectionner l'App Wi-Drive correspondant à votre dispositif (ex. Wi-Drive pour iPad,
iPhone, iPod touch, etc. par Kingston Digital, Inc. et appuyez sur le bouton "GRATUIT". Voir la Figure
1.2.
Figure 1.2 – App Wi-Drive par Kingston Digital, "GRATUIT"
3. Après avoir appuyé sur "GRATUIT", le bouton gris devient vert et affiche "INSTALLER APP". Appuyez
sur ce bouton pour terminer l'installation de l'App Wi-Drive sur votre dispositif. Voir la Figure 1.3.
Figure 1.3 – App Wi-Drive par Kingston Digital, "INSTALLER APP"
Lorsque l'App est installée, vous pouvez quitter l'App Store et passer à la section suivante de ce manuel.
Page 54

Document Nº 480WID16/32-001.A01
Kingston Wi-Drive
Page 5 sur 16
Utilisation de Wi-Drive
A. Port USB Mini-B – Pour copier des
contenus sur le Wi-Drive et/ou charger
le dispositif via la connexion USB 2.0.
B. Bouton Reset – Pour restaurer la
configuration d'origine par défaut des
paramètres de réseau du Wi-Drive 1.
C. Bouton Alimentation2 – Pour allumer
et éteindre le Wi-Drive.
D. Témoin LED internet – Fixe lorsque le
Wi-Drive est allumé. Clignotant pendant
les accès internet.
E. Témoin LED Wi-Fi – Clignotant
pendant les transmissions SSID ou sur
un réseau sans fil.
1
La configuration par défaut du Wi-Drive est : 1) Nom du dispositif : Wi-Drive 2) Statut de visibilité : ON 3) Canal sans fil : 11 et 4)
Sécurité : Aucune. (Remarque : La réinitialisation n'a aucun effet sur les contenus stockés sur le Wi-Drive.)
Page 55

Document Nº 480WID16/32-001.A01
Kingston Wi-Drive
Page 6 sur 16
2
Le bouton Alimentation sert aussi d'indicateur de niveau de batterie lorsque le Wi-Drive est allumé. Vert signale un niveau de batterie
compris entre 51% et 100%. Ambre : 25% à 50%. Rouge : la charge restante est égale ou inférieure à 24%.
Page 56

Document Nº 480WID16/32-001.A01
Kingston Wi-Drive
Page 7 sur 16
Niveau de batterie
Outre la fonction Marche-Arrêt, le bouton Alimentation sert aussi d'indicateur de niveau de la batterie, donnant
ainsi une estimation du temps restant avant la prochaine recharge. Vert signale un niveau de batterie compris
entre 51% et 100%. Ambre : 25% à 50%. Rouge : la charge restante est égale ou inférieure à 25%. Le voyant
vert du bouton Alimentation signifie que la batterie du Wi-Drive est en cours de chargement (uniquement lorsque
l'adaptateur CA est connecté).
Figure 2.1 – Témoin vert du bouton Alimentation
Figure 2.2 – Témoin ambre du bouton Alimentation
Figure 2.3 – Témoin rouge du bouton Alimentation
Page 57

Document Nº 480WID16/32-001.A01
Kingston Wi-Drive
Page 8 sur 16
Connexion du Wi-Drive à un ordinateur
Pour stocker des contenus sur le Wi-Drive, connectez-le à un ordinateur avec le câble USB fourni. Voir la Figure
3.1 ci-dessous.
Figure 3.1 – Connexion du Wi-Drive
à un ordinateur
Chargement de contenus sur le Wi-Drive
Connecté à un ordinateur, le Wi-Drive fonctionne exactement
comme un lecteur Flash USB standard, représenté par un volume
supplémentaire affiché sur votre PC ou Mac (voir Figure 3.2). Ce
volume vous permet de stocker sur Wi-Drive les contenus
numériques que vous pourrez ensuite partager ou utiliser sans fil
avec l'application Wi-Drive.
Chaque fois que vous copiez, actualisez, ou modifiez des contenus
sur le Wi-Drive, il est fortement conseillé de créer des dossiers afin
de mieux organiser les fichiers et les retrouver rapidement, au lieu
de simplement déposer tous les fichiers en vrac sur la racine ou
dans un seul dossier. Par exemple, vous pouvez stocker tous les
fichiers de musique dans un dossier nommé Ma Musique, ou toutes
vos photos dans un dossier Mes Photos ou autres noms selon vos
besoins.
Lorsque vous avez terminé, vous pouvez déconnecter3 le Wi-Drive
de votre ordinateur sans aucun risque. La déconnexion éteint
automatiquement votre Wi-Drive. Pour l'allumer, appuyez sur le
bouton Alimentation jusqu'à ce que son voyant soit vert fixe.
Figure 3.2 – Volume Wi-Drive sur un PC
(Remarque : Pendant qu'il est connecté à un ordinateur, Wi-Drive n'émet aucun signal de communication sans fil.
Vous ne pouvez donc pas y accéder avec votre iPad, iPhone ou iPod touch tant qu'il reste connecté à un
ordinateur).
Page 58

Document Nº 480WID16/32-001.A01
Kingston Wi-Drive
Page 9 sur 16
3
Avant de déconnecter physiquement le Wi-Drive, les utilisateurs de Windows doivent cliquer sur l'option "Retirer le matériel en toute sécurité"
affichée avec le bouton droit de la souris sur l'icône USB affichée dans la zone de notification, à l'extrémité droite de la barre des tâches. Les
utilisateurs d'un Apple Mac doivent placer l'icône de leur Wi-Drive dans la Corbeille.
Connexion sans fil de Wi-Drive
Wi-Drive a son propre réseau sans fil indépendant. Sur votre iPad ou iPhone, "Wi-Drive" est affiché dans la liste
des réseaux Wi-Fi disponibles. Par défaut, aucun mot de passe n'est nécessaire pour connecter votre Wi-Drive
et votre dispositif iOS. Le signal de communication sans fil du Wi-Drive crée une liaison dédiée avec ce dispositif.
Dès que votre Wi-Drive est connecté à votre dispositif iOS, sa connexion internet est remplacée par la connexion
sans fil du Wi-Drive. Par conséquent, vous ne pouvez plus accéder à internet. Mais le Wi-Drive offre une
fonction de passerelle qui vous permet d'accéder à ses contenus tout en utilisant une connexion internet Wi-Fi.
Voir la section Connexions de réseau à la page 10.
Utilisation
Lorsque votre iPad, iPhone, ou iPod touch est connecté au réseau Wi-Drive, vous pouvez accéder à son contenu
à partir de votre dispositif iOS en suivant les instructions ci-dessous.
1. Ouvrez l'App Wi-Drive sur votre iPad, iPhone, ou iPod touch.
2. Touchez l'icone Accueil (coin supérieur gauche de l'App Wi-Drive).
3. Touchez le lien du nom du dispositif, ex. Wi-Drive (192.168.200.254). La liste des contenus du Wi-Drive
est affichée.
4. Parcourez et sélectionnez les contenus que vous souhaitez utiliser. Seuls les types de fichiers supportés
peuvent être ouverts. Voir ci-dessous.
Page 59

Document Nº 480WID16/32-001.A01
Kingston Wi-Drive
Page 10 sur 16
A. Le bouton Accueil affiche tous les contenus stockés
sur Wi-Drive, quel que soit leur type ou extension. Si
vous avez créé des dossiers pour y enregistrer des
contenus (comme indiqué à la page 7), ils sont listés en
premier. Les autres fichiers sont listés après les
dossiers.
B. Les boutons B, C et D servent à classer les contenus en
fonction des différents types de fichiers représentés. Le
bouton Caméra correspond aux fichiers graphiques ou
photographiques. Lorsque vous sélectionnez ce bouton,
Wi-Drive recherche tous les fichiers et dossiers et affiche
les types de fichiers d'image supportés.
C. Le bouton Film correspond aux types de fichiers vidéo.
Lorsque vous sélectionnez ce bouton, Wi-Drive
recherche tous les fichiers et dossiers et affiche les types
de fichiers vidéo supportés.
D. Le bouton Musique correspond aux types de fichiers
audio ou musicaux. Lorsque vous sélectionnez ce
bouton, Wi-Drive recherche tous les fichiers et dossiers
et affiche les types de fichiers de musique supportés.
Lorsque vous avez trouvé le fichier voulu, touchez son nom dans
la liste. Une liste de tous les types de fichiers supportés par WiDrive est disponible à la page 3.
Figure 4.1 – Contenus de Wi-Drive
Si vous voulez supprimer, envoyer par e-mail ou copier un fichier affiché sur votre Wi-Drive, ouvrez le menu
Action. Naviguez jusqu'au fichier à copier ou supprimer et glissez-le vers la droite ou la gauche, comme indiqué à
la Figure 4.2. Ce mouvement affiche le bouton Action (Figure 4.3).
Page 60

Document Nº 480WID16/32-001.A01
Kingston Wi-Drive
Page 11 sur 16
Figure 4.2 – Glisser l'option de menu
Figure 4.3 – Bouton Action
Touchez le bouton Action pour ouvrir le menu illustré à la
Figure 4.4. Ce menu vous permet de supprimer, envoyer par
e-mail ou copier des contenus présents sur Wi-Drive avec la
connexion Wi-Fi que vous avez établie (voir Page 8).
• L'option Supprimer permet d'effacer des fichiers ou
dossiers sélectionnés individuellement sur le Wi-Drive.
• L'option Mail permet d'envoyer par e-mail un fichier
(inférieur ou égal à 10 Mo) avec le logiciel de
messagerie par défaut configuré sur votre dispositif
iOS.
• L'option "Copier à" permet de :
1. Copier un fichier ou un dossier présent sur le WiDrive dans un autre dossier existant. Cette option
permet aussi de créer un dossier.
2. Copier un fichier ou un dossier depuis le WiDrive vers le volume de stockage des
applications Wi-Drive (local). L'espace
disponible est déterminé par la capacité de
votre dispositif iOS.
3. Copier un fichier ou un dossier depuis le volume
de stockage des applications Wi-Drive (local)
vers un dossier existant sur le Wi-Drive.
Figure 4.4 – Menu Action
Page 61

Document Nº 480WID16/32-001.A01
Kingston Wi-Drive
Page 12 sur 16
Lorsque vous essayez de glisser un fichier de type
document non-supporté par l'App Wi-Drive, le WiDrive vous propose d'ouvrir le fichier avec une autre
App associée à ce type de fichier. L'App associée
doit être déjà installée sur le dispositif iOS.
Glissez le document à ouvrir, touchez le bouton
Action dans le menu, puis sélectionnez "Ouvrir
avec…" comme indiqué à la Figure 4.5. Une
deuxième menu liste les Apps associées au fichier
de type document que vous souhaitez ouvrir.
La fonction "Ouvrir avec" est uniquement disponible
pour les fichiers de type document et jamais si vous
avez glissé un fichier graphique, audio ou vidéo.
Figure 4.5 – Fonction "Ouvrir avec"
Page 62

Document Nº 480WID16/32-001.A01
Kingston Wi-Drive
Page 13 sur 16
Configuration de Wi-Drive
L'App Wi-Drive vous permet de personnaliser les paramètres du réseau sans fil Wi-Drive. Les valeurs par défaut
sont les suivantes : Nom du dispositif : Wi-Drive, Statut de visibilité : ON, Canal sans fil : 11, et Sécurité :
Aucun.
Pour accéder aux paramètres du réseau Wi-Drive, suivez les instructions ci-dessous :
1. Sélectionnez l'icône App Wi-Drive sur votre iPad, iPhone, ou iPod
touch.
2. Sélectionnez l'icône Accueil (en
haut à gauche).
3. Sélectionnez le lien du nom du dispositif, ex. Wi-Drive
(192.168.200.254).
4. Sélectionnez l'icône Paramètres (symbole de
l'engrenage en bas à gauche).
5. Touchez le bouton Paramètres Wi-
Drive.
A. Nom du dispositif – Souvent désigné par l'acronyme
SSID : "Service Set IDentifier", ce champ sert à spécifier le
nom du dispositif (1 à 32 caractères) qui sera affiché dans
la liste des réseaux sans fil disponibles sur votre iPad,
iPhone, ou iPod touch. Le nom par défaut est Wi-Drive,
comme indiqué à la Figure 5.1.
B. Statut de visibilité – Ce paramètre vous permet de
montrer ou de masquer le SSID spécifié dans le champ
Nom du dispositif. Par défaut, ce paramètre est réglé sur :
ON et le SSID est affiché. Si vous souhaitez masquer le
SSID, sélectionnez la valeur OFF et le nom du dispositif
NE SERA PAS affiché1 dans la liste des réseaux sans fil de
votre iPad, iPhone, ou iPod touch. Dans ce cas, vous
pouvez vous connecter au réseau Wi-Fi en saisissant
manuellement le nom du dispositif grâce à l'option de menu
Autre….
C. Canal Wi-Fi – Ce paramètre sert à sélectionner le canal/
fréquence qui sera utilisé pour communiquer avec d'autres
dispositifs sur votre réseau sans fil. La valeur par défaut
est le canal 11 (fréquence 2,462 GHz.)
Figure 5.1 – Paramètres de réseau Wi-
Drive
D. Sécurité – Ce paramètre prévient les accès non-autorisés sur votre réseau sans fil Wi-Drive en demandant
un mot de passe aux utilisateurs. Les protocoles de sécurité supportés par Wi-Drive sont WEP, WPA, WPA2
et WPA2 Mixed. La valeur par défaut est Aucun.
• WEP (Wired Equivalent Privacy) – Le mot de passe défini par l'utilisateur doit contenir exactement 13
caractères.
• WPA ou WPA2 (Wi-Fi Protected Access) – Le mot de passe défini par l'utilisateur doit contenir entre 8 et
13 caractères.
Page 63

Document Nº 480WID16/32-001.A01
Kingston Wi-Drive
Page 14 sur 16
• Mixed – Combinaison d'autres protocoles de sécurité.
1
Si le statut de visibilité est réglé sur Off (SSID masqué), vous pouvez vous connecter au réseau Wi-Drive en saisissant manuellement le
SSID sur votre iPad, iPhone, ou iPod touch, si vous connaissez le "nom du dispositif" (Étape A). Remarque : un mot de passe vous sera
demandé si l'option de sécurité est activée.
Connexions de réseau (mode Passerelle)
Normalement, l'antenne Wi-Fi de votre iPad ou iPod sert à accéder à internet. Mais le Wi-Drive utilise l'antenne
Wi-Fi de votre dispositif Apple pour lire ses contenus, ce qui a pour conséquence de le déconnecter d'internet.
Mais l'antenne Wi-Fi du Wi-Drive supporte le trafic bidirectionnel et peut fonctionner en mode Passerelle. Ce
mode vous permet de connecter votre dispositif au Wi-Drive lorsque ce dernier est déjà connecté à un réseau WiFi (comme client hôte) qui offre un accès internet.
Pour configurer ce mode et afficher une liste des réseaux sans fil à portée, ouvrez l'App Wi-Drive et sélectionnez
l'icône Paramètres (dans le coin inférieur gauche) de l'application. Dans le menu Paramètres de réseau
(Figure 6.1), touchez Connexions de réseau et sélectionnez le réseau Wi-Fi auquel vous voulez vous connecter.
Ensuite, saisissez le mot de passe Wi-Fi (si la fonction de sécurité est activée) et redémarrez Wi-Drive. Si aucun
mot de passe n'est requis, Wi-Drive redémarre automatiquement.
Après le démarrage, Wi-Drive vous demande de sélectionner un réseau sans fil. Vous DEVEZ sélectionner votre
réseau Wi-Drive si vous souhaitez accéder au contenu de Wi-Drive. Comme vous êtes déjà connecté au réseau
par l'intermédiaire de l'App Wi-Drive, il n'est pas nécessaire de le sélectionner à nouveau dans la liste. Si vous le
sélectionnez, la connexion avec le Wi-Drive sera désactivée.
Pour vérifier que le mode Passerelle est correctement activé :
1. Sélectionnez l'icône App Wi-Drive sur votre iPad, iPhone, ou iPod
touch.
2. Sélectionnez l'icône Accueil (en
haut à gauche).
3. Sélectionnez le lien du nom du dispositif, ex. Wi-Drive
(192.168.200.254).
4. Sélectionnez l'icône Paramètres (symbole de
l'engrenage en bas à gauche).
5. Touchez le bouton Connexions de
réseau.
Page 64

Document Nº 480WID16/32-001.A01
Kingston Wi-Drive
Page 15 sur 16
Lorsque la liste des réseaux sans fil apparaît, le symbole Wi-Fi et le
caractère "supérieur à" encerclé est affiché à droite du réseau que vous
avez sélectionné dans l'App Wi-Drive. Voir la Figure 6.1. Ceci indique
que le mode Passerelle fonctionne normalement et que vous êtes
simultanément connecté au Wi-Drive et à internet.
Par conséquent, lorsque vous lisez des contenus du Wi-Drive avec
votre dispositif Apple, et que vous avez besoin d'accéder à internet, il
vous suffit d'ouvrir Safari.
Figure 6.1 – Wi-Drive en mode
Passerelle
Actualisation du firmware
Conseil : Vous devez toujours sauvegarder vos données sur un support permanent avant toute
mise à jour du firmware.
1. Lorsqu'une mise à jour du firmware est disponible pour votre Wi-Drive, elle sera affichée et disponible en ligne
pour que vous puissiez la télécharger. La mise à jour du firmware est un fichier identifié par l'extension .BIN.
Des instructions supplémentaires peuvent être fournies avec chaque mise à jour du firmware.
2. Téléchargez le fichier .BIN et connectez votre Wi-Drive à votre ordinateur. Pour connecter votre dispositif à
un ordinateur, suivez les instructions à la page 7.
3. Copiez le fichier .BIN depuis votre ordinateur sur
le volume Wi-Drive.
4. Déconnectez le Wi-Drive de l'ordinateur.
5. Allumez le Wi-Drive et attendez que le voyant LED
Wi-Fi clignote.
6. Ouvrez l'App Wi-Drive sur votre iPad, iPhone, ou
iPod touch.
7. Accédez aux Paramètres de réseau Wi-Drive.
8. Sélectionnez le bouton Mise à jour du firmware.
9. Confirmez en sélectionnant une deuxième fois
Mise à jour du firmware.
10. Wi-Drive effectue la mise à jour et redémarre
automatiquement. Veuillez ne pas interrompre le
décompte de 100 secondes.
Page 65

Document Nº 480WID16/32-001.A01
Kingston Wi-Drive
Page 16 sur 16
Figure 7.1 – Paramètres de réseau Wi-Drive
IMPORTANT : Pour éviter des résultats indésirables, N'INTERROMPEZ PAS le
processus de mise à jour du firmware. Lorsque ce processus est terminé, le Wi-Drive
revient à l'écran de l'application.
Page 66

Documento N. 480WID16/32-001.A01
Kingston Wi-Drive
Pagina 1 di 16
Wi-Drive - Guida Utente
Page 67

Documento N. 480WID16/32-001.A01
Kingston Wi-Drive
Pagina 2 di 16
Sommario
INTRODUZIONE ........................................................................................................................ 2!
REQUISITI: ................................................................................................................................ 3!
TIPI DI FILE SUPPORTATI* (NON-DRM):................................................................................ 3!
INSTALLAZIONE DELL'APPLICAZIONE WI-DRIVE ............................................................... 4!
FAMILIARIZZARE CON WI-DRIVE........................................................................................... 5!
CONNESSIONE DELL'UNITÀ WI-DRIVE A UN COMPUTER.................................................. 8!
CARICAMENTO DEI CONTENUTI SULL'UNITÀ WI-DRIVE.................................................... 8!
COLLEGAMENTO A WI-DRIVE MEDIANTE UNA CONNESSIONE WIRELESS.................... 9!
ISTRUZIONI D'USO................................................................................................................... 9!
CONFIGURAZIONE DI WI-DRIVE........................................................................................... 13!
CONNESSIONI DI RETE (MODALITÀ BRIDGE).................................................................... 14!
AGGIORNAMENTO DEL FIRMWARE.................................................................................... 15!
Introduzione
Page 68

Documento N. 480WID16/32-001.A01
Kingston Wi-Drive
Pagina 3 di 16
Wi-Drive™ è un dispositivo di storage Flash USB che consente lo streaming wireless di contenuti multimediali
(come musica, foto, video, ecc.), sui dispositivi basati su sistemi operativi iOS, come iPad®, iPhone®, e iPod
touch®. Wi-Drive è in grado di creare una propria rete wireless indipendente con un campo di portata di circa 10
metri, ed è dotato di una batteria ai polimeri di litio che garantisce fino a quattro ore di accesso ininterrotto alle
vostre librerie digitali, ovunque vi troviate. Disponibile con capacità di 16 o 32GB, e caratterizzato dalla massima
semplicità di configurazione, Wi-Drive è la soluzione perfetta per coloro che desiderano espandere le capacità
delle librerie di contenuti multimediali anche mentre sono in movimento, utilizzando i loro dispositivi mobili per
accedere a contenuti che, altrimenti, non potrebbero mai essere memorizzati sulle memorie interne di tali
dispositivi.
Contenuto della confezione:
• 1 unità Wi-Drive (da 16GB o
32GB)
• 1 cavo USB (1 metro di
lunghezza con connettori A e
mini B)
• Adattatore CA (solo per gli
USA)
Requisiti:
• Computer con sistema operativo Windows® 7, Windows Vista® (SP1, SP2), Windows XP (SP2, SP3),
Mac OS X (10.5.x+), Linux (v.2.6+ kernel), supporto USB 2.0 (per il caricamento dei contenuti sull'unità
Wi-Drive)
• Dispositivi Apple iPod touch® Gen 3, Gen 4, iPhone® (3G, 3GS, 4; il modello 3G è limitato alle versioni
dotate di iOS4.2.1 o superiore) e iPad®
• Connessione a Internet richiesta per l'installazione dell'applicazione Wi-Drive (scaricabile dall'App Store)
Tipi di file supportati* (Non-DRM):
• Audio: aac, mp3, wav
Page 69

Documento N. 480WID16/32-001.A01
Kingston Wi-Drive
Pagina 4 di 16
• Video: m4v, mp4, mov
• Immagine: bmp, jpeg, jpg, png
• Documenti: pdf, doc, docx, ppt, pptx, txt, rtf, xls, xlsx
*Wi-Drive può contenere file di qualunque tipo. I tipi di file supportati elencati sopra sono quelli che l'applicazione Wi-Drive è in grado di aprire
senza dover utilizzare applicazioni di terze parti.
Installazione dell'applicazione Wi-Drive
Per configurare l'unità Wi-Drive, è prima necessario scaricare dall'App Store online la relativa applicazione WiDrive; l'applicazione deve essere scaricata sui dispositivi iPad iPhone o iPod touch. L'operazione richiede un
accesso a Internet attivo. L'applicazione Wi-Drive è gratuita, e consente di personalizzare le impostazioni della
rete wireless, e di accedere ai contenuti precedentemente caricati sull'unità Wi-Drive, senza alcuna necessità di
fili. Per installare l'applicazione, seguire la procedura indicata di seguito:
1. Aprire l'App Store dal dispositivo iPad, iPhone o iPod touch e cercare l'applicazione "Wi-Drive".
VediFigura 1.1 sotto. La ricerca sull'App Store può dare risultati multipli.
Figura 1.1 – Ricerca dell'applicazione Wi-Drive
2. Individuare e selezionare l'applicazione Wi-Drive App corrispondente al dispositivo posseduto; per
esempio Wi-Drive per iPad, per iPhone, iPod touch, ecc. di Kingston Digital, Inc.; quindi, premere il link
del pulsante "FREE". Vedi Figura 1.2
Figura 1.2 – Applicazione Wi-Drive di Kingston Digital, finestra opzione "FREE"
3. Dopo aver selezionato il pulsante "FREE", il pulsante grigio diventerà di colore verde, visualizzando il
messaggio "INSTALL APP" (Installa applicazione). Selezionare questo pulsante per completare
l'installazione dell'unità Wi-Drive sul dispositivo in uso. Vedi Figura 1.3
Page 70

Documento N. 480WID16/32-001.A01
Kingston Wi-Drive
Pagina 5 di 16
Figura 1.3 – Applicazione Wi-Drive di Kingston Digital, finestra opzione "INSTALL APP"
Una volta completata l'installazione dell'applicazione, è possibile effettuare l'uscita dall'App Store, e procedere
alla sezione successiva di questo manuale.
Familiarizzare con Wi-Drive
A. Porta mini-B USB: consente di copiare
i contenuti sull'unità Wi-Drive e/o
modificare il dispositivo mediante una
connessione USB 2.0.
B. Pulsante di reset: consente di
effettuare il reset dell'unità Wi-Drive,
ripristinando la configurazione originaria
di default1 delle impostazioni di rete.
C. Pulsante di accensione/spegnimento
2
: consente di accendere e spegnere
l'unità Wi-Drive.
D. LED Internet: mostra una luce fissa
quando l'unità è accesa, oppure
lampeggiante quando viene rilevato
qualunque tipo di attività Internet
E. LED Wi-Fi: la luce lampeggia durante i
processi di trasmissione dei SSID,
oppure durante le attività di rete
wireless.
Page 71

Documento N. 480WID16/32-001.A01
Kingston Wi-Drive
Pagina 6 di 16
1
La configurazione di default per l'unità Wi-Drive è la seguente: 1) Nome dispositivo: Wi-Drive 2) Stato visibilità: ON 3) Canale wireless:
11 and 4) Sicurezza: Nessuno. (Nota: il reset del dispositivo non influisce in alcun modo sui contenuti memorizzati sull'unità Wi-Drive).
2
!Il pulsante di accensione funge anche da indicatore del tempo di autonomia residua della batteria, quando l'unità Wi-Drive è accesa. La luce
verde indica che l'energia residua della batteria è pari al 51% - 100% della carica totale; la luce ambra indica un'autonomia residua compresa
tra 25% - 50%; e la luce rossa indica una carica residua pari al 24% o inferiore.
Page 72

Documento N. 480WID16/32-001.A01
Kingston Wi-Drive
Pagina 7 di 16
Stato della batteria
Oltre a consentire l'accensione e lo spegnimento dell'unità Wi-Drive, il pulsante di accensione/spegnimento funge
anche da indicatore, mostrando il tempo di carica residuo prima che sia necessario effettuare la ricarica della
batteria. La luce verde indica che la carica di energia residua della batteria è pari al 51%-100% della carica totale;
la luce ambra indica un'autonomia del 25%-50% e la luce rossa indica una carica residua inferiore al 25%.
Quando la luce verde del pulsante di accensione/spegnimento lampeggia, significa che la batteria dell'unità WiDrive è sotto carica (questa modalità di lampeggio è visibile esclusivamente quando l'unità è collegata
all'adattatore di alimentazione CA).
Figura 2.1 – Led tasto di accensione - verde
Figura 2.2 – Led tasto di accensione - ambra
Figura 2.3 – Led tasto di accensione - rosso
Page 73

Documento N. 480WID16/32-001.A01
Kingston Wi-Drive
Pagina 8 di 16
Connessione dell'unità Wi-Drive a un computer
Per aggiungere nuovi contenuti all'unità Wi-Drive, è necessario collegarla a un computer mediante l'apposito cavo
USB fornito in dotazione con il dispositivo. VediFigura 3.1 sotto.
Figura 3.1 – Collegamento dell'unità Wi-Drive
a un computer
Caricamento dei contenuti sull'unità Wi-Drive
Quando collegato a un computer, Wi-Drive funziona come un
qualunque drive Flash USB, creando un volume dati sul PC o sul
Mac di destinazione (vedi Figura 3.2.). Tale volume consente
all'utente di popolare l'unità Wi-Drive con i contenuti digitali
desiderati, che potranno essere in seguito condivisi o consultati in
modalità wireless mediante l'applicazione Wi-Drive.
Durante la copia dei contenuti sull'unità Wi-Drive, anziché caricare
tutti i file sulla directory principale oppure all'interno di una singola
cartella, è vivamente consigliabile organizzare i contenuti del
volume dati suddividendoli per cartelle, per semplificare
l'organizzazione e il rapido reperimento dei file ogniqualvolta
vengono aggiornati e/o modificati i contenuti dell'unità Wi-Drive.
Per esempio, è possibile memorizzare tutti i file musicali in una
cartella denominata “Musica”, oppure memorizzare tutte le foto in
una cartella separata denominata “Immagini”, e così via.
Dopo aver completato il caricamento dei contenuti, procedere a
scollegare l'unità Wi-Drive dal computer mediante la procedura di
scollegamento corretta3. Una volta effettuata la disconnessione dal
computer, l'unità si spegnerà automaticamente. Per riavviare
l'unità, tenere premuto il pulsante di accensione, fino a quando il
led non si illumina di verde.
Figura 3.2 – Volume di Wi-Drive sul PC
Page 74

Documento N. 480WID16/32-001.A01
Kingston Wi-Drive
Pagina 9 di 16
(Nota: quando è collegato al computer dell'utente, Wi-Drive non trasmette alcun segnale wireless. Pertanto,
quando Wi-Drive si trova in questo stato, non sarà possibile accedervi dai dispositivi iPad, iPhone o iPod touch).
3
Per gli utenti Windows, si raccomanda di scollegare l'unità Wi-Drive mediante la procedura corretta, facendo clic col tasto destro del mouse
sul lato inferiore destro della barra applicazioni e selezionando l'opzione "Rimozione sicura dell'hardware". Per gli utenti Mac, scollegare
l'unità Wi-Drive in modo corretto, trascinando l'icona del volume nel cestino.
Collegamento a Wi-Drive mediante una connessione wireless
Wi-Drive opera su una rete wireless autonoma e indipendente. Durante l'esplorazione delle reti Wi-Fi rilevate dai
dispositivi iPad o iPhone, verrà visualizzata una rete denominata "Wi-Drive" nell'elenco delle reti accessibili. Per
default, l'unità non è protetta da alcun tipo di password; pertanto, quando si effettua il collegamento da un
dispositivo iOS, si effettua una connessione dedicata all'unità Wi-Drive, mediante il segnale wireless specifico di
tale unità. Una volta effettuata la connessione all'unità Wi-Drive, la connessione Internet standard del dispositivo
iPad/iPhone verrà sostituita con la connessione wireless di Wi-Drive. Ciò significa che una volta effettuato
l'accesso alla connessione Wi-Drive non sarà possibile accedere a Internet. Tuttavia, Wi-Drive integra anche una
funzionalità di bridging, che consente all'utente di mantenere l'accesso ai contenuti di Wi-Drive anche mentre si è
connessi a Internet mediante una connessione Wi-Fi. Vedi sezione Connessioni di rete, a pagina 10.
Istruzioni d'uso
Una volta effettuata la connessione alla rete di Wi-Drive, sarà possibile accedere ai contenuti memorizzati al suo
interno, da un dispositivo iPad, iPhone o iPod touch. Per fare ciò è necessario seguire la procedura sotto:
1. Aprire l'applicazione Wi-Drive dal dispositivo iPad, iPhone o iPod touch.
2. Premere l'icona "Home" (Posizionata sul lato superiore sinistro dell'applicazione Wi-Drive).
3. Cliccare sul link corrispondente al nome del dispositivo, ossia Wi-Drive (192.168.200.254). Verrà
visualizzato l'elenco dei contenuti memorizzati all'interno dell'unità Wi-Drive.
4. Ora è possibile esplorare i contenuti dell'unità da remoto, selezionando i contenuti a cui si desidera
accedere. Si noti che possono essere aperti solo i file supportati nativamente da Wi-Drive. Vedere
sezione sotto per ulteriori informazioni.
Page 75

Documento N. 480WID16/32-001.A01
Kingston Wi-Drive
Pagina 10 di 16
A. Il pulsante home consente di visualizzare tutti i
contenuti memorizzati sull'unità Wi-Drive,
indipendentemente dal tipo di estensione. Se l'utente ha
creato delle cartelle durante il processo di caricamento
dei contenuti descritto a pagina 7, queste cartelle
verranno visualizzate per prime. I file singoli verranno
elencati dopo le cartelle.
B. I pulsanti B, C e D sono riservati ai filtri, e consentono di
visualizzare esclusivamente i contenuti associati alle
tipologie di file descritti dai pulsanti. Il pulsante
raffigurante una fotocamera rappresenta i file di tipo
fotografico e le immagini. Premendo questo pulsante,
l'unità Wi-Drive effettuerà la ricerca di tutti i file e le
cartelle del dispositivo, visualizzando tutti i file immagine
di tipo supportato.
C. Il pulsante raffigurante una striscia di pellicola
rappresenta i file di tipo video. Premendo questo
pulsante, l'unità Wi-Drive effettuerà la ricerca di tutti i file
e le cartelle del dispositivo, visualizzando tutti i file video
di tipo supportato.
D. Il pulsante raffigurante una nota musicale rappresenta i
file musicali o di tipo audio. Premendo questo pulsante,
l'unità Wi-Drive effettuerà la ricerca di tutti i file e le
cartelle del dispositivo alla ricerca dei file audio/musicali,
visualizzando i file trovati.
Una volta localizzato il file che si desidera riprodurre in
streaming, è sufficiente premere il nome del file contenuto
nell'elenco per avviare la riproduzione. Per la lista dettagliata di
tutti i file attualmente supportati da Wi-Drive, vedere l'elenco a
pagina 3.
Figura 4.1 – Gestione dei contenuti di
Wi-Drive
Se si desidera eliminare, copiare, o inviare via e-mail un file contenuto su Wi-Drive, è possibile compiere tale
operazione dal menu "Action" (Azione). È sufficiente selezionare il file che si desidera copiare (o eliminare) e
quindi farlo scorrere verso destra o verso sinistra, come illustrato in Figura 4.2. Tale operazione farà apparire il
pulsante rosso denominato "Action" (Azione), raffigurato in Figura 4.3.
Page 76

Documento N. 480WID16/32-001.A01
Kingston Wi-Drive
Pagina 11 di 16
Figura 4.2 – Voce del menu di scorrimento
Figura 4.3 – Pulsante "Action"
Premere il pulsante "Action" per aprire il menu visualizzato in
Figura 4.4. Questo menu consente all'utente di eliminare,
copiare o inviare via e-mail qualunque tipo di contenuto
memorizzato sull'unità Wi-Drive, mediante la connessione WiFi creata in precedenza, durante la procedura descritta a
Pagina 8.
• L'opzione "Delete" (Elimina), consente di eliminare
singole file e/o cartelle dall'unità Wi-Drive.
• L'opzione "Mail" (E-Mail), consente di inviare un file
(fino a 10MB) via e-mail, utilizzando il client di posta di
default preconfigurato sul dispositivo iOS dell'utente.
• L'opzione "Copy to" (Copia su), consente di:
1. Copiare un file o una cartella dalla posizione
corrente sull'unità Wi-Drive a una nuova
posizione su Wi-Drive, con la possibilità di creare
una nuova cartella.
2. Copiare un file o una cartella dall'unità Wi-Drive
sulla memoria locale del dispositivo sul quale è
installata l'applicazione Wi-Drive (Copia locale).
Lo spazio disponibile per questa operazione è
limitato dalla capacità disponibile del
dispositivo iOS in uso.
3. Copiare un file o una cartella dalla posizione di
memorizzazione locale all'interno del dispositivo
iOS che ospita l'applicazione Wi-Drive (Copia
Figura 4.4 – Menu "Action"
Page 77

Documento N. 480WID16/32-001.A01
Kingston Wi-Drive
Pagina 12 di 16
locale), su una cartella fisica esterna situata
sull'unità Wi-Drive.
Quando si tenta di far scorrere un file documento di
tipo non supportato dall'applicazione Wi-Drive, viene
visualizzata l'opzione di aprire il documento
utilizzando un'applicazione alternativa associata con
quel tipo di file documento. L'applicazione associata
a tale tipo di file deve essere installata sul dispositivo
iOS.
È sufficiente far scorrere il documento che si
desidera aprire, premere il pulsante del menu
"Action" e selezionare l'opzione "Open In…" (Apri
con...), come illustrato in Figura 4.5. Ciò farà
comparire un secondo menu, nel quale sono
elencate le applicazioni associate al tipo di
documento selezionato che si sta tentando di aprire.
La funzione "Open In" (Apri con) viene visualizzata
esclusivamente con i file di tipo documento, e non
compare sul menu "Action" quando l'azione di
scorrimento viene effettuata su un file immagine,
audio o video.
Figura 4.5 – Finestra dell'opzione "Open In"
Page 78

Documento N. 480WID16/32-001.A01
Kingston Wi-Drive
Pagina 13 di 16
Configurazione di Wi-Drive
Utilizzando l'applicazione Wi-Drive è possibile personalizzare le impostazioni di Wi-Drive relative alla rete
wireless. Le impostazioni di default sono le seguenti: Nome dispositivo: Wi-Drive, Stato visibilità: ON, Canale
wireless: 11. e Sicurezza: Nessuno.
Per accedere alle impostazioni di rete di Wi-Drive, seguire la procedura sotto:
1. Selezionare l'icona dell'applicazione Wi-Drive dal dispositivo iPad,
iPhone o iPod touch.
2. Selezionare l'icona "Home" (lato
in alto a sinistra).
3. Selezionare il link corrispondente al nome del dispositivo, ossia
Wi-Drive (192.168.200.254).
4. Cliccare sull'icona delle impostazioni, (icona
raffigurante un ingranaggio in basso a sinistra).
5. Selezionare il pulsante Wi-Drive
Settings (Impostazioni di Wi-Drive).
A. Device Name - (Nome dispositivo): comunemente definito
anche SSID, o "Service Set IDentifier"; questo campo
consente all'utente di specificare il nome di un dispositivo
(di lunghezza compresa tra 1 e 32 caratteri), che effettuerà
le trasmissioni nella lista delle reti wireless disponibili sul
dispositivo iPad, iPhone, o iPod touch. Il nome di default è
Wi-Drive, come illustrato in Figura 5.1.
B. Visibility Status – (Stato visibilità): questa opzione offre la
possibilità rendere visibile o invisibile l'SSID specificato nel
campo "Device Name". Per impostazione di default, lo
stato di visibilità è impostato su "ON" (Attivo). Se si
desidera disattivare questa funzione, selezionando
l'opzione "OFF", il nome del dispositivo NON verrà
trasmesso1 nella lista delle reti wireless disponibili
visualizzata sul dispositivo iPad, iPhone o iPod touch
dell'utente; tuttavia, sarà ancora possibile accedere alla
rete associata all'SSID invisibile immettendo manualmente
il nome del dispositivo, attraverso il menu opzioni "Other…"
(Altro...).
C. Wi-Fi Channel – (Canale Wi-Fi): questa impostazione
consente all'utente di selezionare un canale di frequenza
specifico per comunicare con gli altri dispositivi presenti
nella rete wireless. Il canale impostato per default è il
Canale 11 (2.462 GHz).
Figura 5.1 – Impostazioni di rete di Wi-
Drive
Page 79

Documento N. 480WID16/32-001.A01
Kingston Wi-Drive
Pagina 14 di 16
D. Security – (Sicurezza): questa opzione consente di bloccare gli accessi non autorizzati alla rete wireless di
Wi-Drive, chiedendo una password di accesso a ogni utente. I protocolli di sicurezza supportati da Wi-Drive
sono: WEP, WPA, WPA2, e WPA2 Misto. L'impostazione di default è "Nessuna".
• WEP (Wired Equivalent Privacy): la password specificata dall'utente deve avere una lunghezza di 13
caratteri esatti
• WPA or WPA2 (Wi-Fi Protected Access): la password specificata dall'utente può avere una lunghezza
compresa tra 8 e 13 caratteri
• WPA2 Misto: è una combinazione degli altri protocolli di sicurezza
1
Se la visibilità di stato è stata disattivata, sarà ancora possibile accedere alla rete Wi-Drive, immettendo l'SSID manualmente dal dispositivo
iPad, iPhone o iPod touch, a condizione che si conosca il "Nome del dispositivo" (Punto A). Si noti che qualora l'opzione di abilitazione della
sicurezza sia attiva, sarà necessario immettere una password.
Connessioni di rete (Modalità bridge)
Tradizionalmente, l'antenna Wi-Fi dei dispositivi iPad o iPod touch è utilizzata per l'accesso a Internet. Tuttavia,
l'unità Wi-Drive utilizza l'antenna Wi-Fi del dispositivo Apple dell'utente per lo streaming dei contenuti; tale
operazione causa la disconnessione del dispositivo iOS da Internet. Fortunatamente, l'antenna di Wi-Drive
supporta il traffico bidirezionale e può pertanto essere utilizzata per implementare una funzionalità denominata
"Modalità Bridge". Questa modalità consente all'utente di effettuare la connessione a Wi-Drive quando questo è
connesso a una rete Wi-Fi (come client host) che dispone di un accesso a Internet.
Per impostare questa funzionalità e visualizzare una lista delle reti wireless disponibili nel campo di ricezione del
dispositivo, aprire l'applicazione Wi-Drive e selezionare le icone impostazioni (in basso a sinistra) all'interno
dell'applicazione. Dal menu "Network Settings" (Impostazioni di rete - Figura 6.1), selezionare l'opzione "Network
Connections" (Connessioni di rete), e quindi selezionare la rete Wi-Fi alla quale si desidera effettuare la
connessione. Una volta selezionata la rete, Wi-Drive chiederà all'utente di inserire la password Wi-Fi (se la
funzione di sicurezza è abilitata), per poi effettuare il riavvio dell'unità. Se non è stata inserita alcuna password, il
dispositivo effettuerà direttamente il riavvio.
Una volta riavviato, Wi-Drive chiederà all'utente di selezionare una rete wireless. Si noti che è OBBLIGATORIO
selezionare la rete di Wi-Drive, per poter mantenere l'accesso ai contenuti dell'unità. Dato che la connessione
alla rete è già stata effettuata attraverso l'applicazione Wi-Drive, non sarà necessario selezionare nuovamente
tale rete dalla lista. Selezionando nuovamente tale rete, verrà effettuata la disconnessione da Wi-Drive.
Per assicurarsi di aver abilitato con successo la modalità Bridge:
1. Selezionare l'icona dell'applicazione Wi-Drive dal dispositivo iPad,
iPhone o iPod touch.
2. Selezionare l'icona "Home" (lato
in alto a sinistra).
3. Selezionare il link corrispondente al nome del dispositivo, ossia
Page 80

Documento N. 480WID16/32-001.A01
Kingston Wi-Drive
Pagina 15 di 16
Wi-Drive (192.168.200.254).
4. Cliccare sull'icona delle impostazioni, (icona
raffigurante un ingranaggio in basso a sinistra).
5. Selezionare il pulsante Network
Connections (Connessioni di rete).
Quando appare la lista delle reti wireless disponibili, sarà possibile
notare la presenza di un segnale Wi-Fi e del simbolo "maggiore di",
posizionato sul lato destro della rete precedentemente selezionata
dall'applicazione Wi-Drive. Vedi Figura 6.1. Ciò indica che la funzione
di bridging sta funzionando correttamente e che si è connessi
contemporaneamente sia all'unità Wi-Drive che alla rete Internet.
Pertanto, se sta effettuando lo streaming di contenuti dall'unità Wi-Drive
al dispositivo Apple e si desidera consultare rapidamente qualche
informazione online, sarà sufficiente aprire il browser Safari per
utilizzare Internet.
Figura 6.1 – Unità Wi-Drive
collegata in modalità bridge
Aggiornamento del firmware
Raccomandazione: Prima di effettuare un upgrade del firmware si raccomanda di effettuare
sempre un backup dei dati.
1. Quando è disponibile un nuovo aggiornamento firmware per i dispositivi Wi-Drive, tale aggiornamento verrà
notificato e reso disponibile online, per consentirne lo scaricamento agli utenti. L'aggiornamento firmware è
fornito sottoforma di file in formato .BIN. I singoli aggiornamenti firmware possono contenere ulteriori
istruzioni.
2. Scaricare il file .BIN e collegare l'unità Wi-Drive al computer. Vedere procedure a pagina 7 per ulteriori
istruzioni sulle modalità di connessione del dispositivo al computer.
Page 81

Documento N. 480WID16/32-001.A01
Kingston Wi-Drive
Pagina 16 di 16
3. Copiare il file .BIN dal computer alla partizione dati
dell'unità Wi-Drive.
4. Scollegare l'unità Wi-Drive dal computer.
5. Quindi, accendere l'unità Wi-Drive e attendere che
il LED della rete Wi-Fi inizi a lampeggiare.
6. Aprire l'applicazione Wi-Drive sul dispositivo iPad,
iPhone o iPod touch.
7. Accedere al menu "Network Settings"
(Impostazioni di rete) di Wi-Drive.
8. Selezionare il pulsante Upgrade Firmware
(Aggiorna firmware).
9. Confermare la selezione premendo ancora una
volta il tasto Upgrade Firmware.
10. L'unità Wi-Drive completerà l'aggiornamento
firmware e verrà riavviata automaticamente.
Attendere il completamento del conto alla rovescia
di 100 secondi prima di procedere.
Figura 7.1 – Finestra impostazioni di rete di Wi-
Drive
IMPORTANTE: Per scongiurare il rischio di esiti imprevisti, NON interrompere la
procedura di aggiornamento del firmware. Al completamento dell'operazione, l'unità
Wi-Drive tornerà alla schermata dell'applicazione.
Page 82

Documento nº 480WID16/32-001.A01
Kingston Wi-Drive.
Página 1 de 16
Guia do usuário Wi-Drive
Page 83

Documento nº 480WID16/32-001.A01
Kingston Wi-Drive.
Página 2 de 16
Índice
INTRODUÇÃO ........................................................................................................................... 2!
REQUISITOS: ............................................................................................................................ 3!
TIPOS DE ARQUIVOS SUPORTADOS* (NÃO-DRM):............................................................. 3!
INSTALAÇÃO DO APLICATIVO WI-DRIVE ............................................................................. 4!
CONHECENDO O WI-DRIVE .................................................................................................... 5!
CONEXÃO DO WI-DRIVE A UM COMPUTADOR.................................................................... 8!
CARREGANDO CONTEÚDO NO WI-DRIVE............................................................................ 8!
CONECTANDO AO WI-DRIVE SEM FIO.................................................................................. 9!
USO............................................................................................................................................ 9!
CONFIGURANDO O WI-DRIVE .............................................................................................. 13!
CONEXÕES DE REDE (MODO BRIDGE)............................................................................... 14!
ATUALIZAR FIRMWARE ........................................................................................................ 15!
Introdução
Page 84

Documento nº 480WID16/32-001.A01
Kingston Wi-Drive.
Página 3 de 16
O Wi-Drive™ é um dispositivo de armazenamento portátil USB Flash que permite a você baixar conteúdo de
mídia digital sem fio (como música, fotos, vídeos, etc.) para o seu dispositivo de toque baseado em iOS, iPad®,
iPhone® ou iPod®. Servindo como sua própria rede sem fio, a bateria de polímero de lítio do Wi-Drive e o
alcance de 9 m (30 pés) oferecem a você até quatro horas de contínuo acesso à sua biblioteca digital onde quer
que você vá. Disponível em capacidades de 16GB ou 32GB e de fácil instalação, o Wi-Drive é a solução perfeita
para expandir sua biblioteca de mídia já ocupada com dispositivos que não podem mais adicionar capacidade de
armazenamento.
O que está incluído:
• 1 Wi-Drive (16GB ou 32GB)
• 1 cabo USB (90 cm - 3 pés. A
para Mini-B)
• Adaptador CA (somente para
os EUA)
Requisitos:
• Computadores com sistema operacional Windows® 7, Windows Vista® (SP1, SP2), Windows XP (SP2,
SP3), Mac OS X (10.5.x+), Linux (v.2.6+ kernel) com suporte USB 2.0 (para upload de conteúdo para o
Wi-Drive)
• Apple iPod touch® Gen 3, Gen 4, iPhone® (3G, 3GS, 4; 3G está limitado ao iOS4.2.1+) e iPad®
• Acesso à Internet para instalar a aplicativo Wi-Drive a partir da Loja de Aplicativos (App Store )
Tipos de Arquivos Suportados* (Não-DRM):
• Áudio: aac, mp3, wav
• Vídeo: m4v, mp4, mov
• Imagem: bmp, jpeg, jpg, png
• Documentos: pdf, doc, docx, ppt, pptx, txt, rtf, xls, xlsx
Page 85

Documento nº 480WID16/32-001.A01
Kingston Wi-Drive.
Página 4 de 16
*Wi-Drive pode armazenar arquivos de qualquer tipo. Os tipos de arquivos suportados listados aqui são aqueles que o aplicativo Wi-Drive
pode abrir sem aplicativos de terceiros.
Instalação do aplicativo Wi-Drive
Para configurar o Wi-Drive, você deve primeiro instalar o aplicativo Wi-Drive (em seu dispositivo de toque iPad,
iPhone ou iPod) a partir da Loja de Aplicativos (é necessário acesso à Internet). O aplicativo Wi-Drive é gratuito e
permite customizar as configurações de rede sem fio e o acesso sem fio ao conteúdo que você carregou para o
Wi-Drive. Para instalar o aplicativo siga os passos a seguir:
1. Abra a Loja de Aplicativos a partir do seu dispositivo de toque iPad, iPhone, ou iPod e busque “Wi-Drive.”
Consulte a Figura 1.1 abaixo. A Loja de Aplicativos pode retornar vários resultados para sua busca.
Figura 1.1 – Busca Wi-Drive
2. Localize e selecione o Aplicativo Wi-Drive que corresponde ao seu dispositivo, isto é, Wi-Drive para iPad,
iPhone, iPod, etc. da Kingston Digital, Inc. e toque no link ‘"FREE"’. Consulte a Figura 1.2.
Figura 1.2 – Aplicativo Wi-Drive da Kingston Digital, ‘"FREE"’
3. Depois de selecionar ‘"FREE",’ o botão cinza se tornará verde e mudará para ‘INSTALL APP.’ Selecione
este botão para concluir a instalação do Aplicativo Wi-Drive em seu dispositivo. Consulte a Figura 1.3.
Figura 1.3 – Aplicativo Wi-Drive da Kingston Digital, ‘INSTALL APP’
Depois que o aplicativo tiver sido instalado você pode sair da Loja de Aplicativos e prosseguir para a próxima
seção deste manual.
Page 86

Documento nº 480WID16/32-001.A01
Kingston Wi-Drive.
Página 5 de 16
Conhecendo o Wi-Drive
A. Porta USB Mini-B – Permite que você
copie conteúdo para o Wi-Drive e/ou
carregue o dispositivo via USB 2.0.
B. Botão "Reset" – Recoloca o Wi-Drive
de volta à sua configuração original
(default)1 para as configurações de
rede.
C. Botão "Power" 2 – Permite que você
ligue ou desligue o Wi-Drive.
D. LED Internet – Fixo quando ligado,
piscando quando houver atividade de
Internet
E. LED Wi-Fi – Pisca durante a transmissão
SSID ou atividade de rede sem fio.
1
A configuração padrão para o Wi-Drive é: 1) Nome do dispositivo: Wi-Drive 2) Status de visibilidade: ON 3) Canal sem fio: 11 e 4)
Segurança: Nenhum. (Observação: Ao reiniciar o dispositivo isso não afetará o conteúdo do usuário no Wi-Drive.)
Page 87

Documento nº 480WID16/32-001.A01
Kingston Wi-Drive.
Página 6 de 16
2
O botão "power" é também um indicador do tempo restante da bateria enquanto o Wi-Drive permanecer ligado. Verde indica 51% - 100%
de carga restante da bateria; âmbar indica 25% - 50% de carga restante da bateria e vermelho indica 24% ou menos de carga restante da
bateria.
Page 88

Documento nº 480WID16/32-001.A01
Kingston Wi-Drive.
Página 7 de 16
Status da bateria
Além de ligar e desligar o Wi-Drive o botão power também serve como um indicador do tempo restante da
bateria antes que o Wi-Drive precise ser novamente carregado. Verde indica 51% - 100% de carga restante da
bateria; âmbar indica 25% --50% de carga restante da bateria e vermelho indica 25% ou menos de carga
restante da bateria. O botão power piscando em verde indica que a bateria do Wi-Drive está carregando
(somente ocorre quando utilizamos um adaptador de corrente CA.)
Figure 2.1 – LED Power, Verde
Figure 2.2 – LED Power, Âmbar
Figure 2.3 – LED Power, Vermelho
Page 89

Documento nº 480WID16/32-001.A01
Kingston Wi-Drive.
Página 8 de 16
Conexão do Wi-Drive a um Computador
Para adicionar conteúdo ao Wi-Drive, conecte-o a um computador usando o cabo que acompanha o dispositivo.
Consulte a Figura 3.1 abaixo.
Figura 3.1 – Conectando o Wi-Drive
a um computador
Carregando conteúdo no Wi-Drive
Quando conectado a um computador, o Wi-Drive se comporta
como um drive USB Flash padrão, criando volume de dados em
seu PC ou Mac (consulte a Figura 3.2.). Esse volume permite a
você preencher o Wi-Drive com conteúdo digital que você pode
mais tarde compartilhar ou acessar sem fio através do aplicativo do
Wi-Drive.
Ao copiar conteúdo para o Wi-Drive é altamente recomendado que
você crie pastas a partir do volume de dados para ajudá-lo a
organizar e rapidamente encontrar arquivos sempre que for
atualizar e/ou alterar o conteúdo do Wi-Drive (ao invés de
descarregar todos os seus arquivos no volume raiz ou em uma
única pasta). Por exemplo, você pode desejar armazenar todos os
seus arquivos de música em uma pasta chamada “"Minhas
Músicas"”, ou manter todas as suas fotos em uma pasta separada
chamada “"Minhas Fotografias"”, e assim por diante.
Quando tiver acabado de carregar o conteúdo, desconecte o WiDrive com segurança3 do seu computador. O dispositivo então
será automaticamente desligado. Para ligar novamente, pressione
e mantenha o botão "power" até que fique verde.
Figura 3.2 – Volume Wi-Drive no PC
(Observação: Enquanto estiver conectado ao seu computador o Wi-Drive não transmitirá um sinal sem fio. Desse
modo, você não poderá acessá-lo do seu dispositivo de toque iPad, iPhone ou iPod touch nessa condição.)
Page 90

Documento nº 480WID16/32-001.A01
Kingston Wi-Drive.
Página 9 de 16
3
Para usuários do Windows desconecte o Wi-Drive com segurança clicando com o botão direito no ícone USB no canto direito da barra de
tarefas e selecionando ‘"Safely Remove Hardware"’. Para usuários Mac, desconecte o Wi-Drive com segurança arrastando o ícone volume
para a lixeira.
Conectando ao Wi-Drive sem fio
O Wi-Drive possui a sua própria rede sem fio independente. Ao procurar redes redes Wi-Fi a partir do seu iPad
ou iPhone, você verá ‘Wi-Drive’ na lista de redes disponíveis para conexão. Por padrão, não existem senhas e
ao se conectar a ele a partir do seu dispositivo iOS, você estará estabelecendo um link exclusivo para o Wi-Drive
ao longo do sinal sem fio. Depois de se conectar ao Wi-Drive, você irá substituir sua conexão de Internet
iPad/iPhone pela conexão sem fio do Wi-Drive. Isso significa que você não terá mais acesso à Internet.
Entretanto, o Wi-Drive oferece uma função de bridging que permite que você mantenha o acesso ao conteúdo do
Wi-Drive ao conectar-se a uma conexão Internet Wi-Fi. Consulte Conexões de rede na página 10.
Uso
Depois que estiver conectado à rede Wi-Drive você poderá acessar seu conteúdo a partir do seu dispositivo de
toque iPad, iPhone ou iPod seguindo esses passos:
1. Abra o Aplicativo Wi-Drive em seu dispositivo de toque iPad, iPhone ou iPod.
2. Toque no ícone "Home" (canto superior esquerdo do Aplicativo Wi-Drive)
3. Toque no link Nome do Dispositivo, i.e. Wi-Drive (192.168.200.254). Isso irá listar o conteúdo do seu WiDrive.
4. Procure e selecione a mídia que deseja acessar. Somente os tipos de arquivos suportados podem ser
abertos. Consulte abaixo.
Page 91

Documento nº 480WID16/32-001.A01
Kingston Wi-Drive.
Página 10 de 16
A. O botão "home" exibe todo o conteúdo armazenado
no Wi-Drive, sem levar em conta o tipo de extensão. Se
você criou pastas durante o processo de transferência
de conteúdo conforme a página 7, você as verá listadas
primeiro . Arquivos individuais são listados depois das
pastas.
B. Os botões "B", "C" e "D" são todos botões de filtro e
exibem somente o conteúdo associado a cada tipo
representado. O botão "câmera" representa tipos de
arquivo de foto/imagem. O Wi-Drive irá percorrer todos
os arquivos e pastas no dispositivo e exibir os tipos de
arquivos de imagens suportados.
C. O botão "filmstrip" representa os tipos de arquivos de
vídeo. O Wi-Drive irá percorrer todos os arquivos e
pastas no dispositivo e exibir os tipos de arquivos de
vídeos suportados.
D. O botão "nota musical" representa arquivos de música
ou áudio. O Wi-Drive irá usar este filtro para percorrer
todos os arquivos e pastas para tipos de arquivos de
música suportados e exibi-los em seguida.
Depois que você tiver localizado o arquivo que deseja baixar,
toque simplesmente no nome do arquivo na lista e estará pronto
para prosseguir. Para uma lista de todos os tipos atualmente
suportados pelo Wi-Drive, consulte a página 3.
Figura 4.1 – Conteúdo do Wi-Drive
Se desejar excluir, enviar por e-mail ou copiar um arquivo do Wi-Drive, você poderá fazê-lo através do menu
Action. Simplesmente navegue até o arquivo que deseja copiar (ou excluir) e mova-o em qualquer direção,
esquerda ou direita, como mostrado na Figura 4.2. O botão vermelho ‘Action’ será então exibido, como
mostrado na Figura 4.3.
Page 92
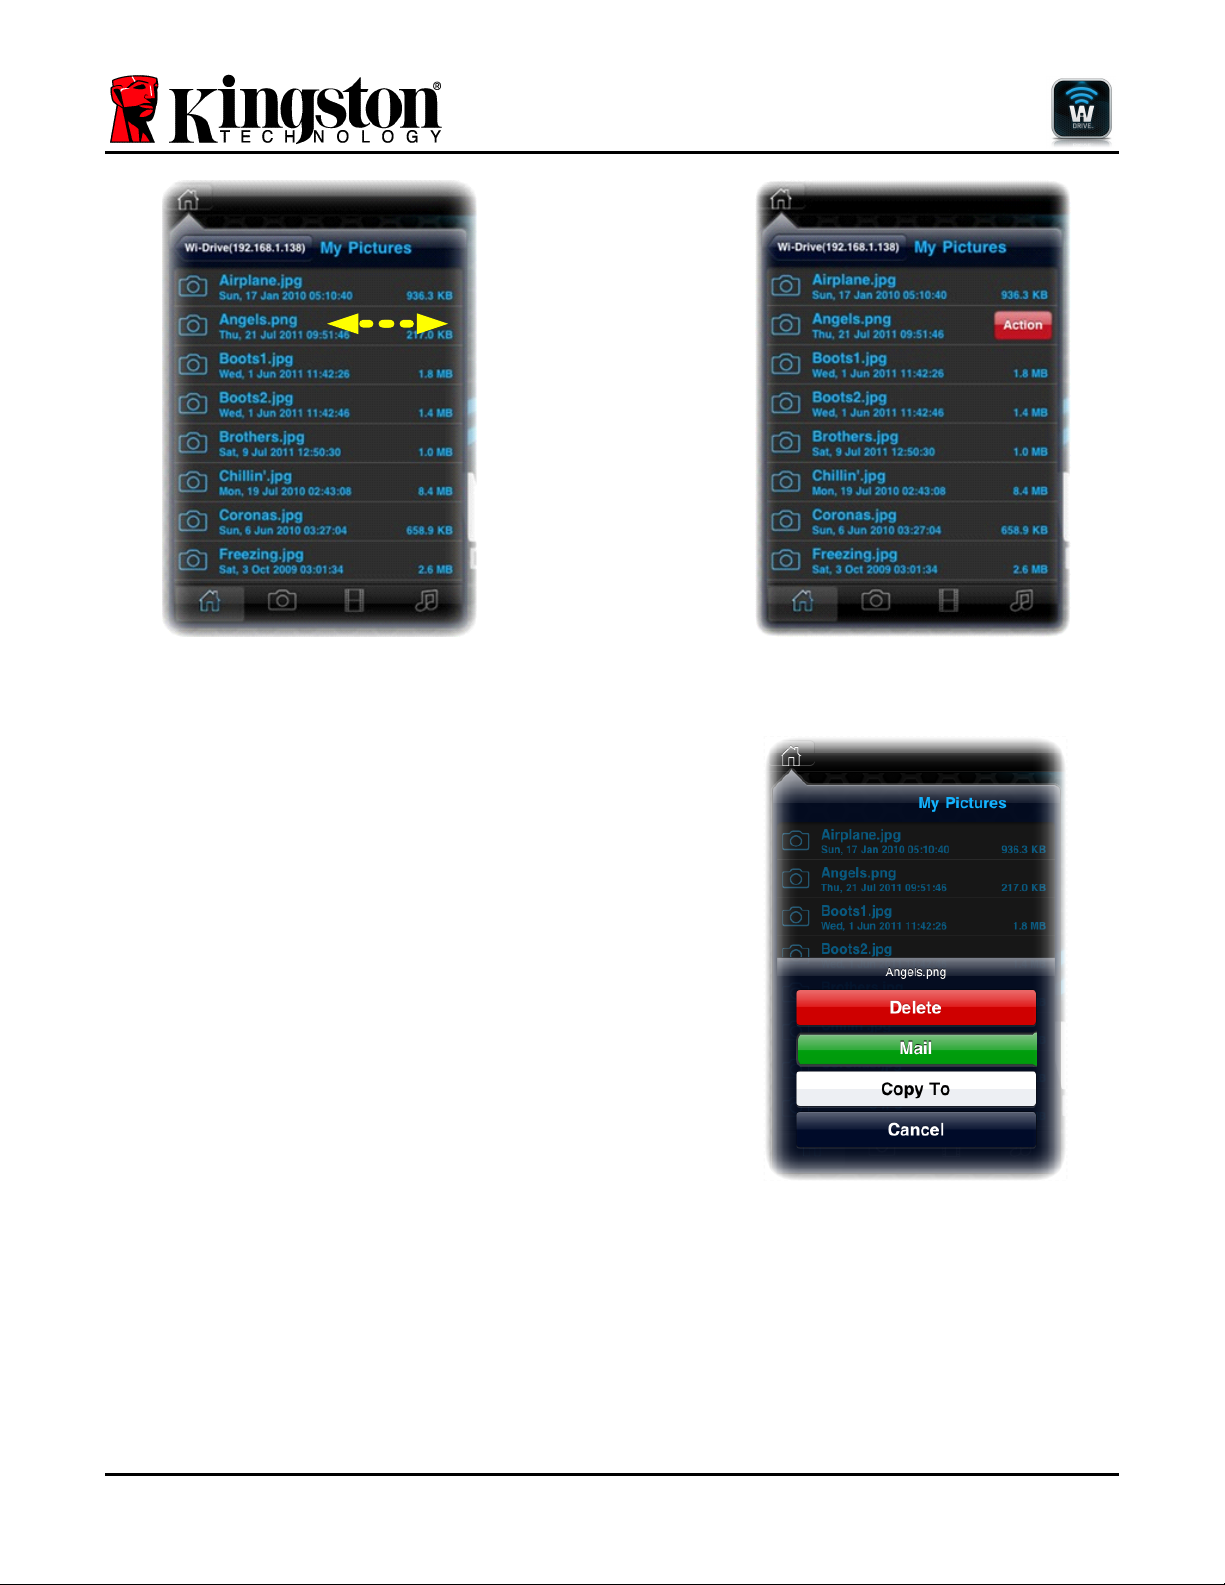
Documento nº 480WID16/32-001.A01
Kingston Wi-Drive.
Página 11 de 16
Figura 4.2 – Mover item do menu
Figura 4.3 – Botão "Action"
Toque no botão ‘"Action"’ para abrir o menu mostrado na
Figura 4.4. Esse menu permite que você exclua, envie por email ou copie conteúdo do Wi-Drive na conexão Wi-Fi que
você estabeleceu antes na página 8.
• A opção ‘Delete’ permite que você exclua arquivos
e/ou pastas individualmente do Wi-Drive.
• A opção ‘Mail’ permite que você envie um arquivo por
e-mail (até 10MB) usando o cliente correio padrão
definido em seu dispositivo iOS .
• A opção ‘Copy To’ permite a você:
1. Copiar um arquivo ou pasta dos locais existentes
no Wi-Drive para um novo local no Wi-Drive, com
a capacidade de criar uma nova pasta.
2. Copiar um arquivo ou pasta do Wi-Drive para
seu local de armazenamento no aplicativo
(Local.) Este espaço está limitado a
capacidade do seu dispositivo iOS.
3. Copiar um arquivo ou pasta do seu local de
armazenamento no aplicativo (Local) Wi-Drive do
seu dispositivo iOS para uma pasta física no WiDrive.
Figura 4.4 – Menu Action
Page 93

Documento nº 480WID16/32-001.A01
Kingston Wi-Drive.
Página 12 de 16
Se você tentar mover um tipo de arquivo/documento
não suportado pelo aplicativo Wi-Drive você terá a
opção de abrir o arquivo/documento usando um
aplicativo alternativo associado àquele tipo de
arquivo/documento. O aplicativo associado deve ser
instalado no dispositivo iOS.
Simplesmente mova o documento que deseja abrir,
toque no botão do menu action e selecione a opção
‘Open In…’ mostrada na Figura 4.5. Isso fará
aparecer um segundo menu listando os aplicativos
associados ao tipo de arquivo/documento que você
está tentando abrir.
A função ‘Open In’ somente aparece com tipos de
arquivos de documentos e não irá aparecer no menu
action ao se alternar para arquivos de fotos, áudio
ou vídeo.
Figure 4.5 – Opção ‘Open In’
Page 94

Documento nº 480WID16/32-001.A01
Kingston Wi-Drive.
Página 13 de 16
Configurando o Wi-Drive
Usando o Aplicativo Wi-Drive você pode customizar as configurações da rede sem fio para o Wi-Drive. As
configurações padrão são: Nome do dispositivo: Wi-Drive, Status de visibilidade: ON, Canal sem fio: 11, e
Segurança: Nenhum.
Para acessar as configurações de rede do Wi-Drive, siga os passos a seguir:
1. Selecione o ícone Aplicativo Wi-Drive em seu dispositivo de toque
iPad, iPhone ou iPod.
2. Selecione o ícone Home
(esquerda superior).
3. Selecione o link Nome do Dispositivo, i.e. Wi-Drive
(192.168.200.254).
4. Selecione o ícone configurações (símbolo de
engrenagem, inferior esquerdo).
5. Selecione o botão Configurações
Wi-Drive .
A. Nome do dispositivo – normalmente se refere a um
SSID, ou Service Set IDentifier, este campo permite que
você especifique um nome de dispositivo (de 1 a 32
caracteres) que irá transmitir na lista de redes sem fio
disponíveis em seu dispositivo de toque iPad, iPhone ou
iPod. O nome padrão é Wi-Drive conforme visto na Figura
5.1.
B. Status de visibilidade – isso lhe oferece a opção de
ocultar e reexibir a SSID especificada no campo ‘Nome do
Dispositivo’ . Por padrão, o status de visibilidade está
ativado em ‘ON’. Se desejar desativar este recurso
colocando na posição ‘OFF’, o nome do dispositivo NÃO
será transmitido1 na lista de redes sem fio disponíveis em
seu dispositivo de toque iPad, iPhone ou iPod; entretanto,
você ainda poderá se conectar à rede Wi-Fi digitando o
nome do dispositivo manualmente usando a opção do
menu, ‘Other…’.
C. Canal Wi-Fi – esta configuração permite que você
selecione um canal de frequência específico usado para se
comunicar com outros dispositivos em sua rede sem fio. A
configuração padrão é Channel 11 (2.462 GHz.)
Figura 5.1 – Configurações de Rede Wi-
Drive
D. Segurança – esta opção ajuda a evitar acesso não-autorizado à sua rede wireless Wi-Drive, solicitando uma
senha aos usuários. Os protocolos de segurança suportados pelo Wi-Drive são WEP, WPA, WPA2 e WPA2
Mixed. A configuração padrão é ‘Nenhuma.’
• WEP (Wired Equivalent Privacy) – A senha definida pelo usuário deve ter exatamente 13 caracteres
• WPA ou WPA2 (Wi-Fi Protected Access) – A senha definida pelo usuário deve ter de 8 a 13 caracteres
• Mixed – Combinação de outros protocolos de segurança
Page 95

Documento nº 480WID16/32-001.A01
Kingston Wi-Drive.
Página 14 de 16
1
Se o status de visibilidade tiver sido desativado, você ainda pode entrar na rede Wi-Drive inserindo o SSID manualmente em seu iPad,
iPhone ou iPod touch, desde que saiba o 'Nome do Dispositivo' (Etapa A)). Note que será necessária uma senha se a opção de segurança
estiver ativada.
Conexões de Rede (Modo Bridge)
Tradicionalmente, a antena Wi-Fi em seu dispositivo de toque iPad ou iPod é usada para acessar a Internet O
Wi-Drive, entretanto, utiliza a antena Wi-Fi em seu dispositivo Apple para carregar conteúdo, o que efetivamente
desconecta seu dispositivo de iOS da Internet.. Felizmente, a antena Wi-Fi do Wi-Drive suporta tráfego
bidirecional e pode ser usada para implementar um recurso chamado Modo Bridge. Este modo permite que você
esteja conectado ao Wi-Drive enquanto está conectado a uma rede Wi-Fi (como cliente) que tem acesso à
Internet.
Para configurar este recurso e ver uma lista de redes wireless disponíveis a seu alcance, abra o aplicativo WiDrive e selecione o ícone de configurações (canto esquerda inferior) no aplicativo. A partir do menu
"Configurações de Rede" (Figura 6.1), toque em "Conexões de Rede" e selecione a rede Wi-Fi à qual deseja se
conectar. Depois de fazer sua seleção o Wi-Drive irá solicitar a senha do Wi-Fi (se a segurança estiver ativada)
e reiniciar. Se não houver senha, o dispositivo será reiniciado automaticamente.
Após o Wi-Drive ter reiniciado, você será solicitado a selecionar uma rede wireless. Você DEVE selecionar sua
rede Wi-Drive para manter o acesso ao seu conteúdo. Como você já está conectado à rede através do Aplicativo
do Wi-Drive, não é necessário selecioná-la na lista novamente. Se você a selecionar, você será desconectado
do Wi-Drive
Para confirmar que você ativou o Modo Bridge com sucesso:
1. Selecione o ícone Aplicativo Wi-Drive em seu dispositivo de toque
iPad, iPhone ou iPod.
2. Selecione o ícone Home
(esquerda superior).
3. Selecione o link do Nome do Dispositivo, i.e. Wi-Drive
(192.168.200.254).
4. Selecione o ícone das configurações (símbolo
de engrenagem, esquerda inferior).
5. Selecione o botão "Conexões de Rede"
.
Page 96

Documento nº 480WID16/32-001.A01
Kingston Wi-Drive.
Página 15 de 16
Quando a lista de redes wireless aparecer, você irá observar um sinal
Wi-Fi e um símbolo "maior que" localizado à direita da rede que você
selecionou no Aplicativo Wi-Drive Consulte a Figura 6.1. Isso indica
que a função Bridge está funcionando adequadamente e que você está
conectado ao Wi-Drive e à Internet ao mesmo tempo.
Assim, se você estiver carregando conteúdo do Wi-Drive para o seu
dispositivo Apple e precisar rapidamente consultar alguma coisa online, é só abrir seu navegador "Safari" e pronto
Figura 6.1 – Wi-Drive na função
Bridge
Atualizar Firmware
Recomendação: Faça sempre backup de seus dados antes de uma atualização de firmware.
1. Se for disponibilizada uma atualização de firmware para seu dispositivo Wi-Drive, será publicada e estará
disponível on-line para download. A atualização de firmware será na forma de um arquivo .BIN.. Instruções
adicionais poderão ser incluídas com atualizações individuais do firmware.
2. Faça o download do arquivo .BIN e conecte o Wi-Drive a seu computador.. Para ajuda em conectar seu
dispositivo a um computador, consulte a página 7.
3. Copie o arquivo .BIN de seu computador para a
partição de dados do Wi-Drive..
4. Desconecte o Wi-Drive de seu computador.
5. Ligue o Wi-Drive e aguarde o LED de Wi-Fi
começar a piscar.
6. Abra o aplicativo do Wi-Drive em seu dispositivo
de toque iPad, iPhone ou iPod.
7. Navegue até as "Configurações de Rede" do WiDrive.
8. Selecione o botão ‘"Atualizar Firmware"’ .
9. Confirme selecionando "Atualizar Firmware" mais
uma vez.
10. O Wi-Drive irá concluir a atualização do firmware e
reiniciar automaticamente. Aguarde a conclusão
da contagem regressiva de 100 segundos antes
de prosseguir.
Figura 7.1 – Configurações de Rede do Wi-Drive
Page 97

Documento nº 480WID16/32-001.A01
Kingston Wi-Drive.
Página 16 de 16
IMPORTANTE: Para evitar resultados indesejados, NÃO interrompa o processo de
atualização do firmware. Quando estiver concluído, o Wi-Drive o levará de volta para a
tela do aplicativo
Page 98

Nr dokumentu: 480WID16/32-001.A01
Kingston Wi-Drive
Strona 1 z 16
Instrukcja obsługi Wi-Drive
Page 99

Nr dokumentu: 480WID16/32-001.A01
Kingston Wi-Drive
Strona 2 z 16
Spis treści
WPROWADZENIE ..................................................................................................................... 3!
WYMAGANIA: ........................................................................................................................... 3!
OBSŁUGIWANE TYPY PLIKÓW* (BEZ DRM):........................................................................ 3!
INSTALOWANIE PROGRAMU WI-DRIVE APP ....................................................................... 4!
ZAPOZNANIE Z WI-DRIVE ....................................................................................................... 5!
PODŁĄCZANIE URZĄDZENIA WI-DRIVE DO KOMPUTERA................................................. 8!
ŁADOWANIE TREŚCI DO URZĄDZENIA WI-DRIVE............................................................... 8!
ŁĄCZENIE Z WI-DRIVE POPRZEZ SIEĆ BEZPRZEWODOWĄ.............................................. 9!
UŻYTKOWANIE......................................................................................................................... 9!
KONFIGUROWANIE WI-DRIVE.............................................................................................. 13!
POŁĄCZENIA SIECIOWE (TRYB MOSTKA) ......................................................................... 14!
AKTUALIZACJA OPROGRAMOWANIA SPRZĘTOWEGO................................................... 15!
Page 100

Nr dokumentu: 480WID16/32-001.A01
Kingston Wi-Drive
Strona 3 z 16
Wprowadzenie
Wi-Drive™ jest przenośnym urządzeniem USB z pamięcią Flash, które umożliwia bezprzewodowe przesyłanie
cyfrowej treści multimedialnej (np. muzyka, fotografie, filmy, itp.) do urządzeń takich jak iPad® z systemem iOS,
iPhon®oraz iPod touch®. Wi-Drive tworzy własną sieć bezprzewodową, a dzięki akumulatorowi litowopolimerowemu i zasięgowi 30 stóp umożliwia nieograniczony dostęp do biblioteki cyfrowej trwający do 4 godzin.
Dostępny w wersjach o pojemności 16 GB i 32 GB oraz łatwy do konfiguracji, Wi-Drive jest doskonałym
rozwiązaniem służącym do rozszerzenia Twojej mobilnej biblioteki urządzeń, których pojemność pamięci nie
może zostać zwiększona.
Zawartość zestawu:
• 1 x Wi-Drive (16 GB lub
32 GB)
• 1 x kabel USB (dł. 3 stopy, z
końcówkami A oraz Mini-B)
• Zasilacz (tylko w USA)
Wymagania:
• Komputer z systemem operacyjnym Windows® 7, Windows Vista® (SP1, SP2), Windows XP (SP2, SP3),
Mac OS X (10.5.x+) lub Linux (v.2.6+ kernel), wyposażony w port USB 2.0 (w celu przesyłania treści do
Wi-Drive)
• Apple iPod touch® Gen 3, Gen 4, iPhone® (3G, 3GS, 4; w przypadku 3G ograniczenie do iOS4.2.1+) oraz
iPad®
• Dostęp do Internetu w celu zainstalowania programu Wi-Drive App (ze sklepu App Store)
Obsługiwane typy plików* (bez DRM):
• Audio: aac, mp3, wav
• Wideo: m4v, mp4, mov
• Obrazy: bmp, jpeg, jpg, png
 Loading...