


Your new Nighthawk carbon monoxide (CO) alarm is a sophisticated
instrument that has been carefully designed and tested to detect CO
build up in a residential environment. Your Nighthawk is for use
specifically in the home.
Carbon monoxide cannot be seen, smelled or tasted and can be fatal.
The build up of CO in the blood is called the carboxyhemoglobin level
and interferes with the body’s ability to supply itself with oxygen.
Depending on the concentration, carbon monoxide can kill in minutes.
The most common sources of carbon monoxide are malfunctioning gas
appliances used for heating and cooking, vehicles running in an
attached garage, blocked chimneys or flues, portable fuel burning
heaters, fireplaces, fuel powered tools and operating a barbeque in an
enclosed space.
Indications of carbon monoxide poisoning include symptoms similar to
the flu, but with no fever. Other symptoms include dizziness, fatigue,
weakness, headache, nausea, vomiting, sleepiness and confusion.
Everyone is susceptible to the danger of CO, but experts agree that
unborn babies, small children, pregnant women, senior citizens and
people with heart or respiratory problems are at the highest risk for
serious injury or death. Each year a qualified technician should inspect
and clean your heating system, vents, chimney, and flues.
Your new Nighthawk CO alarm has a five year limited warranty.
Please take a few minutes to thoroughly read the user’s guide and
familiarise yourself and your family with its operation. Your
Nighthawk CO alarm was designed to detect carbon monoxide gas
from ANY source of combustion. It is NOT designed to detect smoke,
fire or any other gases. If you have any questions please call 01753
685148.
This manual and the products described are copyrighted, with all rights
reserved. Under these copyright laws, no part of this manual may be
copied for use without the written consent of KIDDE Safety. If you
require further information, contact our Consumer Hotline, or write to
us at:
KIDDE Safety Europe Ltd
Mathisen Way, Colnbrook, Slough, Berkshire SL3 0HB
E-mail: info@kiddesafety.co.uk
www.kiddesafetyeurope.co.uk
2
Carbon Monoxide Overview
Carbon Monoxide Overview . . . . . .Page 2
Nighthawk Product View . . . . . . . . .Pages 3-4
Quick Set Up . . . . . . . . . . . . . . . . . .Page 5
Installation Instructions . . . . . . . . .Pages 6-7
Mounting
Where to Install
Where NOT to Install
Features and Operations . . . . . . . . .Pages 8-15
Digital Display
Other Possible Displays
Peak Level Button
Test/Reset Button
Lights
Battery Life Indicator (Fuel Gauge)
Protocol Label
Battery Installation/Replacement . .Pages 16-17
What To Do If The Alarm Sounds . .Pages 18-19
Alarm/Danger Levels . . . . . . . . . . . .Pages 20-23
Caring For Your Nighthawk
Battery Powered CO Alarm
. . . . . . .Pages 24-25
Troubleshooting Guide . . . . . . . . . .Page 26
Frequently Asked Questions . . . . . .Page 27
Product Specifications . . . . . . . . . . .Pages 28-29
Warranty . . . . . . . . . . . . . . . . . . . . .Pages 30-31
1
ENGLISH
Table of Contents
Thank you for the purchase of your new Nighthawk
carbon monoxide alarm. If you have any questions
about the operation or setup of your CO alarm,
feel free to call us on 01753 685148.
Benelux Guide 21/8/01 2:15 pm Page 1
4
NIGHTHAWK
Test/
Reset
Peak
Level
Operate Alarm
PPM of CO
CARBON MONOXIDE
ALARM
Model No. 900-0089
Covers Closed
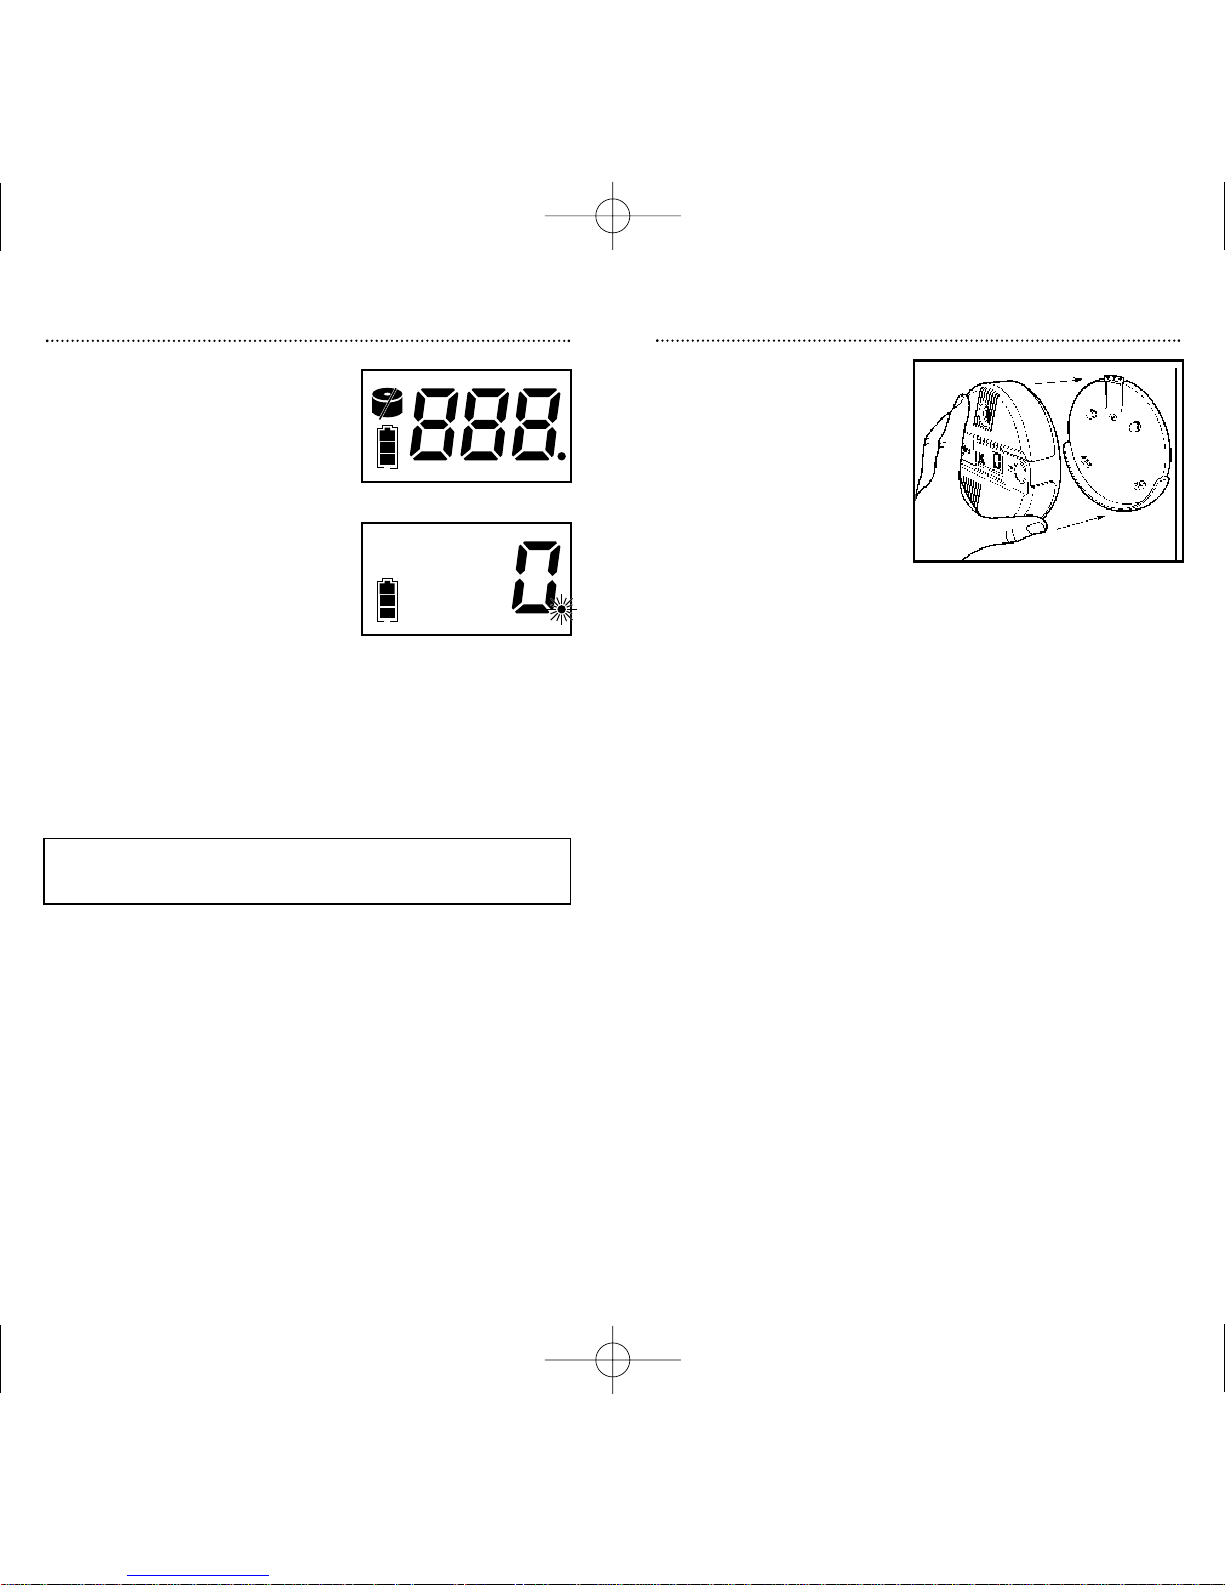
Nighthawk Product View
3
Nighthawk Product View
Covers Open
Digital Display
Displays concentration, in parts per million,
of carbon monoxide in air. Also displays "ERR" if unit
malfunctions, and "Lb" when low battery
levels are reached (see page 11 for more information).
Battery Life Indicator
See page 14 for more information.
Alarm
Loud 85 decibel alarm sounds
when detector senses dangerous
carbon monoxide levels.
See pages 18-23 for more information.
Protocol Label
Access by lifting top cover,
tells you what to do if the
alarm sounds.
See page 15 for more information.
Bottom Cover
Top Cover
Sensor Error Icon
See page 11 for
more information.
Local Emergency Number
If Reading/Alarm Occurs…
CAUTION
: See back
panel and/or Users Guide
for additional
information.
Alarm
Operate
Sensor
11 - 35 ppm
Ventilate your home –
monitor the unit for
rising CO levels.
100+ ppm
If no “flu-like” symptoms
are being experienced, follow
the previous procedures.
35 - 100 ppm
Ventilate your home –
call a qualified, service technician
to inspect for possible sources of
carbon monoxide.
If “flu-like” symptoms are
being experienced…
• Immediately evacuate the premises.
• Call 0800 111 999 or your local fire
department.
• Do not re-enter your home until the
problem is corrected.
Battery
Level
NIGHTHA
WK
Test/
Reset
Alarm
PPM of CO
CARBON MONOXIDE
ALARM
Peak
Level
Model No. 900-0089
Operate
WARNING: Malfunction may occur if tampered with
or not installed in accordance with
manufacturer’s instructions.
IMPORTANT THIS CARBON MONOXIDE ALARM IS NOT
NOTICE: INTENDED FOR PORTABLE USE.
Benelux Guide 21/8/01 2:15 pm Page 3
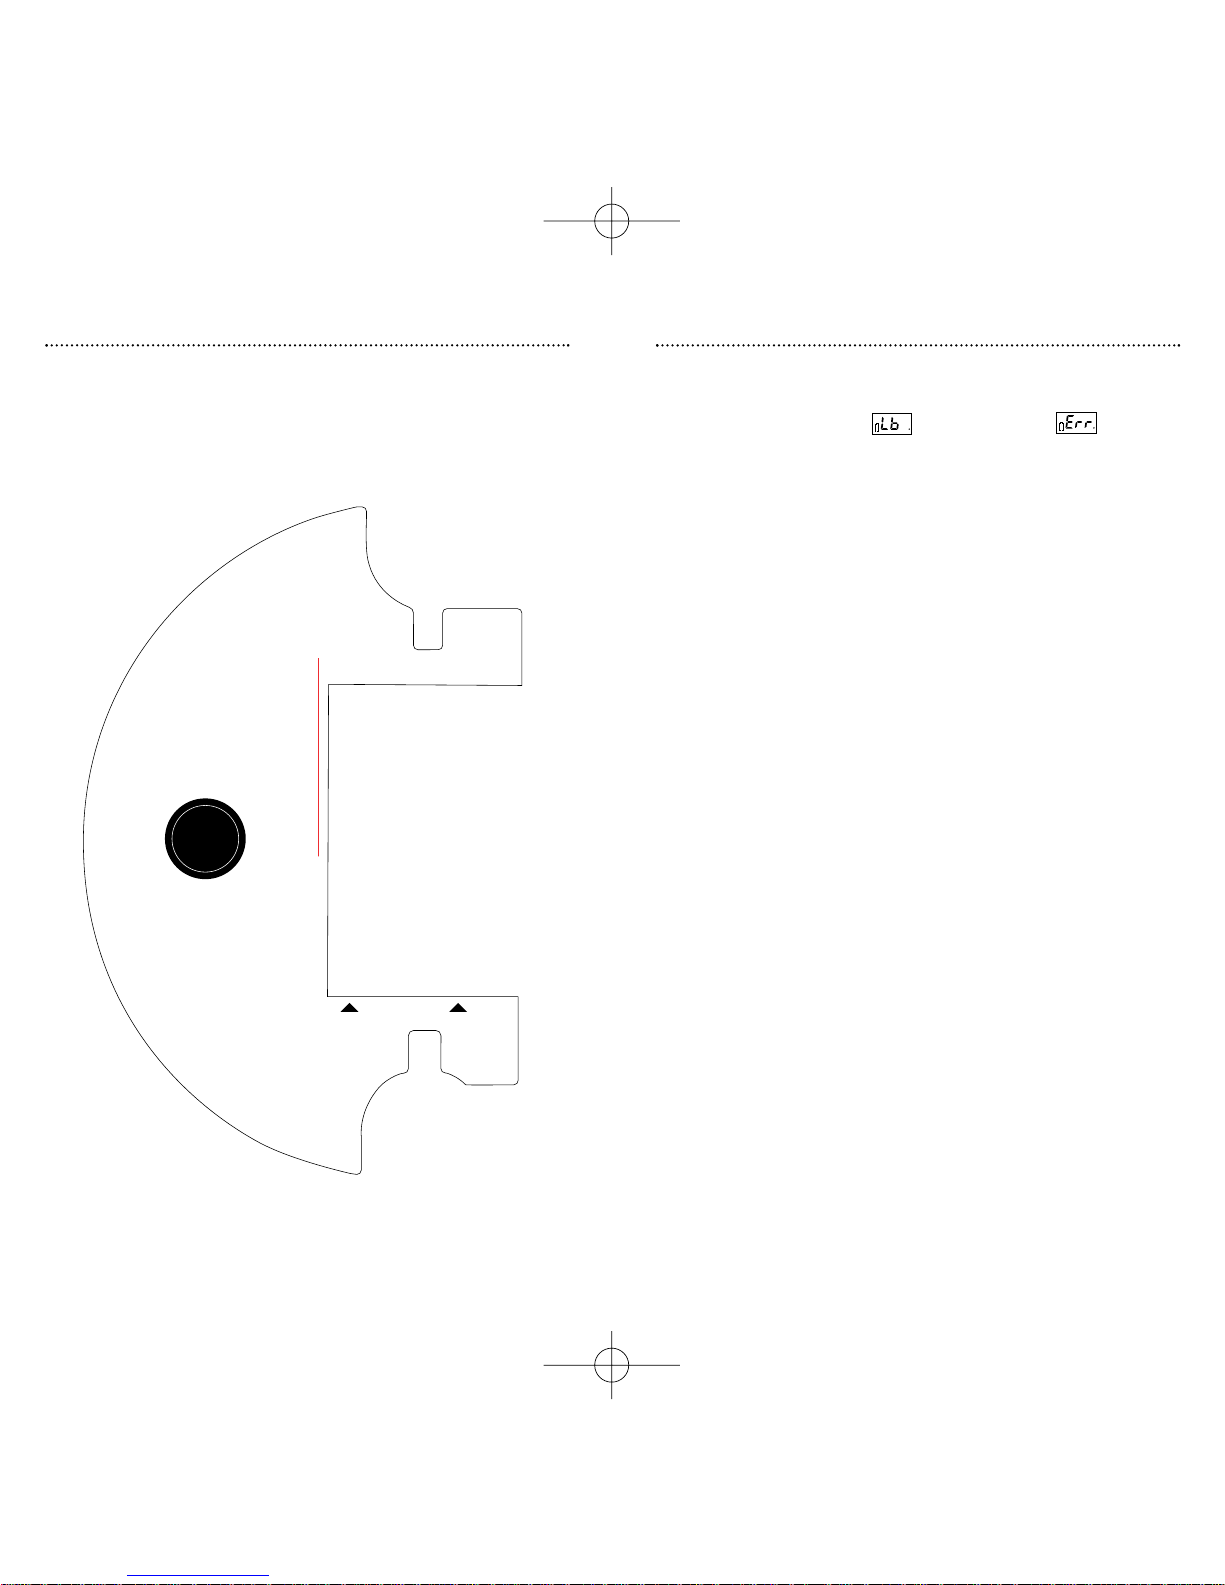
Mounting
Your CO alarm is designed for
mounting onto the inside wall.
You should fix the back plate
provided to the wall first, using
the screws and rawl plugs.
When the plate is attached,
locate the slots on the back of
the alarm with the keys on the
back plate, sliding downwards
and into position until the tab clips onto the top of the alarm
(see figure 1).
To remove, press the tab against the wall and lift the alarm out of
the mounting plate.
Where To Install Your Nighthawk CO Alarm
The following suggestions are intended to help you with the
placement and installation of your Nighthawk CO Alarm.
Ideally, you should have a alarm in or near every room that contains
a fuel burning appliance.
However, if you have more than one appliance, but only one alarm,
you should take the following into consideration when deciding
where best to put the alarm.
If there is an appliance in the room where you sleep, you should
put the alarm in that room.
If there is an appliance in a room that you use a lot e.g. a sitting
room, you should put it in that room.
If you live in a bedsit, put the alarm as far away from the cooking
appliances as possible, but near to the place where you sleep.
If the appliance is in a room not normally used (e.g. a boiler room),
put the alarm just outside the room so that you will be able to hear
the alarm more easily.
6
Installation Instructions
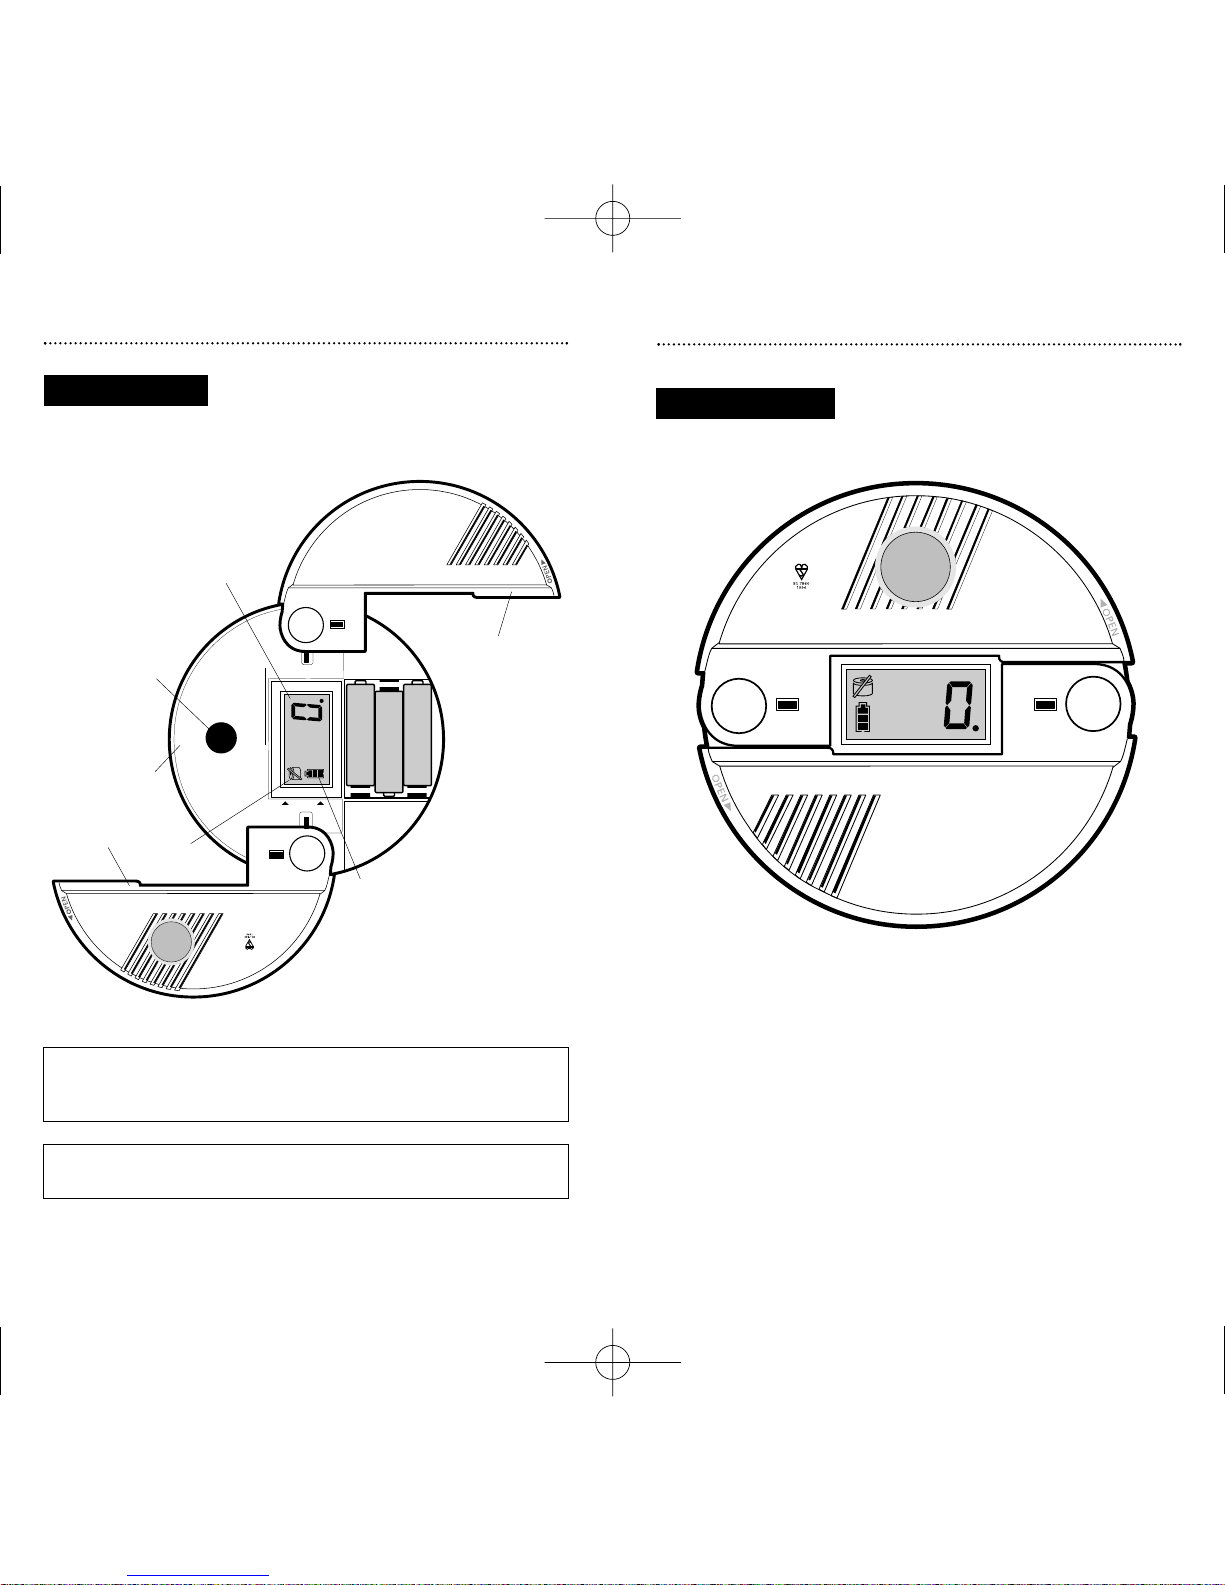
Figure 1
Remove the three enclosed AA
batteries and install them into the
battery compartment. Carefully place
the red battery warning flags into the
battery well. Observe the battery
polarity markings at the bottom of
the battery compartment.
The display should read 888
(see figure 1).
After approximately 30 seconds the
888 display will disappear, and a
black dot in the lower right hand
corner will flash on and off at 5
second intervals (see figure 2).
Your Nighthawk CO Alarm is now operational.
5
Quick Set Up
Figure 2
Figure 1
IMPORTANT NOTE:
Warm up time from initial switch on is one minute.
Benelux Guide 21/8/01 2:15 pm Page 5
Your new Nighthawk Battery Powered CO Alarm utilizes
sophisticated electronic components to protect you and your
family from the dangers of CO.
Unique features include a digital display capable of displaying
CO readings every 30 seconds, the highest levels of CO detected,
status of the battery life, and sensor health. Familiarise yourself
with these features:
Digital Display - Shows CO level in PPM
Your Nighthawk CO alarm continuously displays a digital
readout of the CO level in Parts Per Million (PPM). The digital
display is capable of detecting and displaying readings between
30 and 999 (PPM). A reading of 0 PPM is expected under
normal conditions (see figure 5).
You will become accustomed to glancing at the
display in much the same manner as you look at a
thermometer or clock. The unit will
not display a reading below 30 PPM.
See pages 19-23 for an understanding of which CO levels
are dangerous.
8
Features and Operation
Figure 5
Where NOT To Install Your Nighthawk CO
Alarm
• Outside the building.
• In or below a cupboard.
• In a damp or humid area.
• Directly above a sink or cooker.
• Next to a door or window or anywhere that it would be
affected by draughts.
• Where it would be obstructed by curtains or furniture.
• In an area where the temperature could drop below 4.4°C
or rise above 37.8°C.
• Where dirt or dust could block the sensor and stop it
working.
• Where it could be easily knocked or damaged, or where it
could be accidentally turned off or removed.
7
Installation Instructions (cont.)
Benelux Guide 21/8/01 2:15 pm Page 7
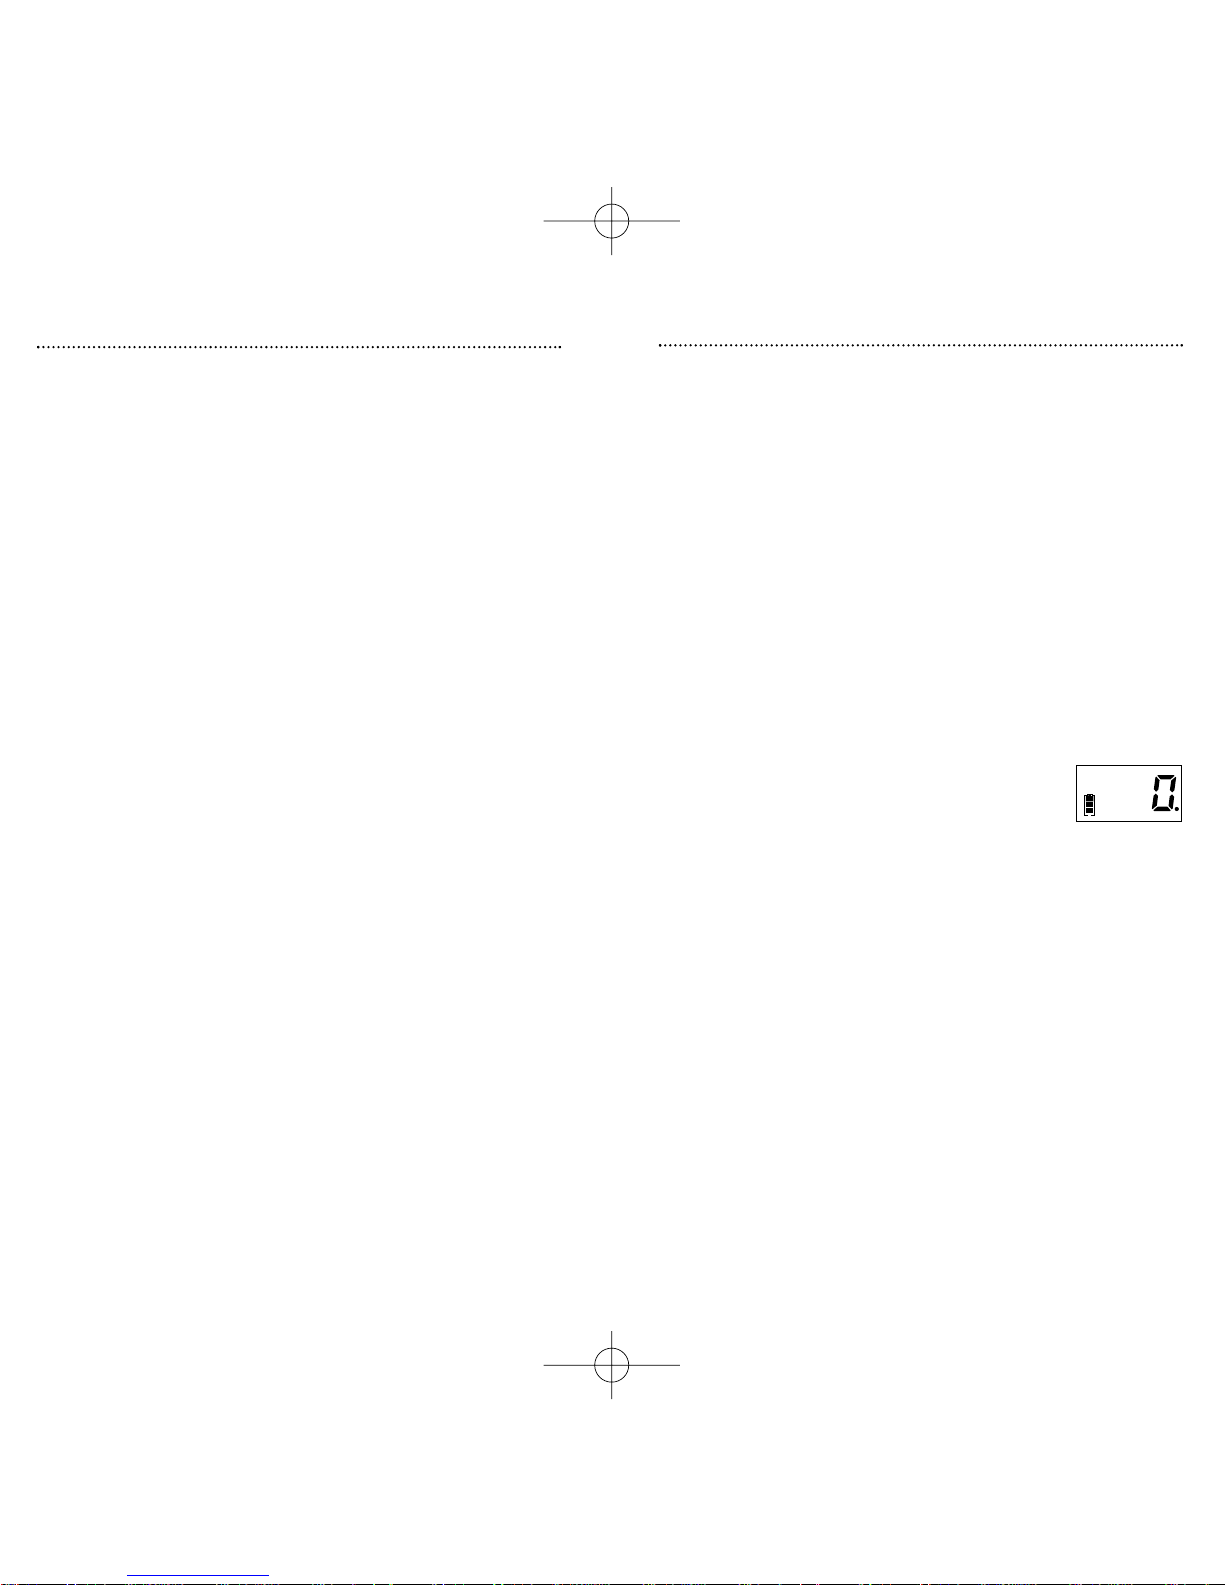
Peak Level Display (Cont.)
Concentrations of CO between 0 and 30 PPM can often occur in normal,
everyday conditions. Concentrations of CO below 30 PPM may be an
indication of a transient condition that may appear today and never
reappear. Just a few examples of conditions and/or sources that may
cause low level readings are heavy automobile traffic, a running vehicle
in an attached garage, an appliance that emits CO when starting up, a fire
in a fireplace or charcoal in a nearby barbecue. A temperature inversion
can trap CO generated by traffic and other fuel burning appliances causing
low level readings of CO.
Normally, the digital display will read “0” and under certain conditions you
may notice levels of 30 or more for short periods of time, by using the
Peak level memory feature on the Nighthawk CO alarm you can view the
highest concentrations of CO detected.
10
Features and Operation (cont.)
Other Possible Displays and Their Meanings
The following symbols will appear on the display during normal
or error operations, and are explained below.
Normal Operation
Normal operation (see figure 6) with a full
battery. The dot in the lower right corner
cycles on and off every 5 seconds. If CO is
present the display will indicate the reading in
Parts Per Million (PPM).
Normal Operation following Power-up or Reset
Figure 7 shows the normal display immediately
after installing batteries or after the test/reset
button is pressed. The display should change to
the normal display (see figure 7) approximately
30 seconds after pressing the test/reset button.
(see Test/Reset Button page 13).
If the test/reset button is pressed, the alarm will sound. The
display will show a number during the time that the alarm is
sounding. This number is a normal part of the test function, and
does not indicate a CO reading. Ignore the number during
the test/reset procedure.
Peak Level Display
When the peak level button is pressed and
held, the display shows the highest CO reading
taken by the CO alarm since its last peak level
reset or power-up. The battery fuel gauge
changes to show only the top segment of the battery to indicate
that peak level is being displayed (see figure 8). In this example
120 PPM was the maximum amount of CO recorded since the
unit was last reset (see Alarm/Danger Levels on pages 19-23).
Although the peak level feature will display levels below 30 PPM,
these levels will not result in an alarm no matter how long the
device is exposed to these levels.
9
Features and Operation (cont.)
Figure 6
Figure 7
Figure 8
Benelux Guide 21/8/01 2:15 pm Page 9

Peak Level Button
When the peak level button is
pressed (see figure 13), the fuel
gauge icon (battery life indicator)
changes and only the top segment of
the icon is displayed, this indicates
that the peak level is being read (see
figure 8). The peak CO level
displayed is the highest reading detected by the unit since its
last reset or power-up.
For additional information on the Peak Level Display, refer to
page 9 and 10.
Resetting the Peak Level Reading
To reset or clear the peak level reading, press and hold the
peak level button and then press and hold the test/reset button
at the same time. The number on the display will return to 0
PPM.
Note: The peak level reading will also be reset when the
batteries are removed.
12
Features and Operation (cont.)
Peak
Level
Alarm
Figure 13
Sensor Malfunction
The unit needs to be replaced
See figure 9.
Replace Battery or Battery Error
If Figure 10 or 11 is displayed the batteries
need to be replaced - note the empty battery
fuel gauge on the display (see Battery
Replacement/Installation Instructions pages
16-17).
Malfunction Display
The unit has malfunctioned (see figure 12)
(refer to Troubleshooting page 26). The
battery fuel gauge may show any state of
charge.
11
Features and Operation (cont.)
Figure 9
Figure 10
Figure 11
Figure 12
or
Benelux Guide 21/8/01 2:15 pm Page 11

Lights
Red Alarm Light
The red light flashing, accompanied
by the alarm “chirp”, indicates the
batteries need to be replaced, or the
unit has malfunctioned (see figure 15).
Rapid pulsing of the alarm indicates
the presence of carbon monoxide.
Refer to pages 18-19 for instructions on What to do if the
Alarm Sounds.
Green Operate Light
The green light indicates the unit is
functioning properly (see figure 16).
The green light will flash every 30
seconds indicating a CO reading is
being taken and when any button is
pressed.
Battery Life Indicator (Fuel Gauge)
The battery icon appears in the lower left hand corner of the CO
Alarm display and indicates remaining battery life.
The display is divided into three segments and will accurately
display:
1. Full Battery - All three segments of the indicator
are black.
2. 2/3 Battery Full - Two of the three segments are
black.
3. 1/3 Battery Full - One of the three segments is
black.
4. Empty Battery - See Battery Installation/Replacement
Instructions pages 16-17.
14
Features and Operation (cont.)
Peak
Level
Alarm
Test/
Reset
Operate
Figure 16
Figure 15
Test/Reset Button
The test/reset button is used to test the unit’s electronics and to
reset the unit during alarm.
Test the unit
To test, press the test/reset button (see figure 14)
Test the unit weekly!
Note: After the test/reset button is pressed, numbers
appear on the display. These are not CO readings and are
part of the internal testing process. Ignore these numbers!
After pressing the test/reset button,
the unit will display then other
numbers and then return to
monitoring CO levels.
Due to the loudness of the alarm we
suggest you place your fingers over the
sounder opening when testing your Nighthawk CO Alarm.
Familiarise yourself and family members with the alarm pattern.
A CO Alarm is rapid pulsing. This cycle will repeat in the event
of a CO alarm. This cycle will continue for the first 4 minutes of
a CO alarm and then change to one cycle every one minute until
the device is reset or the CO is eliminated.
Reset
If the alarm is sounding, pressing the test/reset button will
terminate the alarm. If the CO condition that caused the alert in
the first place continues, the alarm will reactivate. If the CO alarm
alarms again within six minutes, it is sensing high levels of CO
which can quickly become a dangerous situation.
If this happens follow What To Do If The Alarm Sounds on pages
18-19. Reactivation times depend on the amount of CO that
caused the CO alarm to initially alarm and the amount of CO
present after resetting the alarm.
13
Features and Operation (cont.)
Test/
Reset
P
Operate
Figure 14
Benelux Guide 21/8/01 2:15 pm Page 13
Since batteries are not installed in the unit at the factory, you will
need to install them. Also, you will need to replace the batteries
when your display shows “Low battery” or . Note the
battery fuel gauge is empty. The unit will remind you to replace
the batteries by chirping every 30 seconds for up to seven days.
Each chirp is accompanied by a flash of the red light.
Note: Your Nighthawk CO Alarm will NOT monitor CO
levels during the time that the “Low Battery” warning or
error warning is being displayed.
Three AA batteries have been included with your purchase.
When replacing the batteries, we recommend use of the
following for a minimum of one year normal operation:
• Duracell MN1500 • Camelion Mignon LR6-AM3-1.5
• Energizer E91 • Rayovac 815
These batteries can be purchased at your local retailer.
16
Battery Installation/Replacement
Protocol Label
The top cover of your unit slides open to expose a set of
helpful instructions in the event of a CO alarm.
15
Features and Operation (cont.)
Local Emergency Number
If Reading/Alarm Occurs…
CAUTION
: See back
panel and/or Users Guide
for additional
information.
Alarm
Operate
Sensor
810-1058
REV. A
11 - 35 ppm
Ventilate your home –
monitor the unit for
rising CO levels.
100+ ppm
If no “flu-like” symptoms
are being experienced, follow
the previous procedures.
35 - 100 ppm
Ventilate your home –
call a qualified, service technician
to inspect for possible sources of
carbon monoxide.
If “flu-like” symptoms are
being experienced…
• Immediately evacuate the premises.
• Call 0800 111 999 or your local fire
department.
• Do not re-enter your home until the
problem is corrected.
Battery
Level
Benelux Guide 21/8/01 2:15 pm Page 15

When the CO alarm senses a dangerous level of CO, the unit will
emit a loud alarm pattern. The alarm pattern is rapid and pulsing.
This alarm pattern will continue for the first 4 minutes after
detecting CO then, the cycle will repeat every one minute. Know
how to respond to a CO emergency. Periodically review this
user’s guide and discuss with all members of your family.
WHAT TO DO WHEN THE ALARM SOUNDS
1) Open the doors and windows to ventilate.
2) Turn off the appliance where possible and stop using
the appliance.
3) Evacuate the property leaving the doors and windows
open. A latching alarm will need to be reset in
accordance with the user instructions.
4) Call British Gas on 0800 111 999.
5) Do no re-enter the property until the alarm has
stopped.
6) Get medical help immediately for anyone suffering the
effects of carbon monoxide poisoning (headache,
nausea), and advise that carbon monoxide poisoning
is suspected.
7) Do not use the appliance again until it has been
checked by an expert. In the case of gas appliances
this must be a CORGI registered installer.
18
What To Do If The Alarm Sounds
▲
!
WARNING: Actuation of your CO
Alarm indicates the presence of Carbon
Monoxide (CO) which can KILL YOU.
Battery Replacement/Installation Instructions
To install or replace the batteries in your Nighthawk unit please
perform the following steps:
1. Gently slide open
the lower half of
the front cover to
expose the battery
compartment.
2. Remove the old
batteries and
properly dispose of
them as
recommended by
the battery manufacturer (see figure 17).
3. Reinstall the new batteries, being careful to seat
the red battery warning flags in the recess of the
battery well. Also, note the polarity illustration in the
bottom of the battery compartment. The unit will chirp
and display for approximately one minute and
return to normal operation.
4. Gently close the bottom cover. The bottom cover of
your CO alarm will NOT close if all three AA
batteries are not installed.
17
Battery Installation/Replacement (cont.)
NIGHTHAWK
T
est/
R
eset
Operate
P
e
ak
L
eve
l
Alarm
C
ARBO
N
M
ONO
XIDE
ALARM
Figure 17
Benelux Guide 21/8/01 2:15 pm Page 17
Exposure to high levels of carbon monoxide can be fatal
or cause permanent damage and disabilities.
Many victims of carbon monoxide poisoning indicate that while
they were aware that they were ill, they became so disoriented
and confused that they were unable to help themselves by
exiting the building or calling for assistance. If you experience
any symptoms of carbon monoxide poisoning, consult your
doctor immediately! CO poisoning can be determined by a
simple blood test called a carboxyhemoglobin test. Severe cases
may require treatment in a hyperbaric chamber. Remember,
young children and household pets may be the first effected.
If you have additional questions please call us on
01753 685148
20
Alarm/Danger Levels
Caution: This CO alarm will only indicate the presence of
CO at the sensor. CO may be present in other areas.
Common Mild Exposure Symptoms:
Slight headache, nausea, vomiting, fatigue (“flu-like” symptoms).
Common Medium Exposure Symptoms:
Throbbing headache, drowsiness, confusion, fast heart rate.
Common Extreme Exposure Symptoms:
Convulsions, unconsciousness, heart and lung failure. It can cause
brain damage and death. Many cases of reported CARBON MONOXIDE
POISONING indicate that while victims are aware they are not well,
they become so disoriented they are unable to save themselves by either
exiting the building or calling for assistance. Also young children and
household pets may be the first affected.
Familiarisation with the effects of each level is important. The
symptoms described in the chart above are related to carbon
monoxide poisoning and should be discussed with ALL members
of the household.
19
What To Do If The Alarm Sounds (cont.)
Alarm/Danger Levels
Benelux Guide 21/8/01 2:15 pm Page 19

High Levels:
100 PPM with no household members experiencing symptoms
or feeling ill is considered High Level Exposure. The only
difference between this level and a dangerous level is that no
symptoms are being experienced.
This can quickly tur
n into a serious situation!
All possible sources of CO should be immediately turned off and
a qualified service technician called. Ventilate the premises by
opening doors and windows. At this level it is advisable to wait
outside or at a neighbor’s home while your residence is being
ventilated. Do not restart any possible sources of CO until the
problem has been corrected.
Dangerous Levels:
Generally, levels of 100 PPM and greater accompanied by
symptoms is considered a dangerous level. Immediately gather
all residents, exit the house, and call 0800 111 999!
Symptoms indicate that this should be treated as an
emergency. This is a potentially life threatening situation!
Remain in fresh air and do not reenter under any circumstance
until the house has been ventilated and the source of the CO
emergency repaired.
22
Alarm/Danger Levels (cont.)
Low Levels:
Generally 35 PPM and below is considered Low Level Exposure.
Exposure to low levels of CO for extended periods of time can
still be dangerous and could result in loss of energy, headache,
etc. This situation should be closely monitored. Take extra care
to not expose any high risk individuals to even low levels for
more than eight hours. In some cases low levels can be caused
by air pollution, heavy traffic, cigarette smoke, temperature
inversions and other sources.
Mid Levels:
Generally 35 PPM-100 PPM is considered Mid Level Exposure.
Levels in this range are cause for concern and may cause serious
health problems. All possible sources of CO should be
immediately turned off and a qualified service technician called.
Ventilate the premises by opening doors and windows. Do not
restart any possible sources until the problem has been
corrected. Check all residents for symptoms!
If no symptoms are present, this is not considered a CO
emergency, but it should not be ignored!
21
Alarm/Danger Levels (cont.)
Benelux Guide 21/8/01 2:15 pm Page 21
To keep your CO alarm in good working order, please
follow these simple steps:
• Verify unit alarm, lights and battery operation by
pushing the test button once a week.
• Vacuum the CO alarm cover with a soft brush
attachment once a month to remove accumulated dust.
• Instruct children never to play with the CO alarm.
Warn children of the dangers of carbon monoxide
poisoning.
• Never use detergents or other solvents to clean the
CO alarm.
• Avoid spraying air fresheners, hair spray, paint or
other aerosols near the CO alarm.
• Do not paint the CO alarm. Paint will seal the vents
and interfere with the sensor ability to detect CO.
• Do not place near a nappy bucket.
24
Caring for your Nighthawk
Battery Powered CO Alarm
The chart above relates to healthy adults. Levels differ for those
at high risk. Individuals with medical problems may consider
using detection devices with lower COHb alarming capabilities.
This CO alarm meets the alarm response time requirements of
BSI 7860. Standard alarms times are as follows:
At 45 PPM, the unit must not alarm before 60 minutes
At 150 PPM, the unit must alarm within 10-30 minutes
At 350 PPM, the unit must alarm before 6 minutes
WARNING: This device may not alarm at low carbon monoxide
levels. The Health and Safety Executive (HSE) has established
that continuous exposure to levels of 50 PPM should not be
exceeded in an 8 hour period.
23
Alarm/Danger Levels (cont.)
The maximum allowable concentration for
continuous exposure for healthy adults in
any 8-hour period, according to HSE*.
Slight headache, fatigue, dizziness, nausea
after 2-3 hours.
Frontal headaches within 1-2 hours, life
threatening after 3 hours.
Dizziness, nausea and convulsions within 45
minutes. Unconsciousness within 2 hours.
Death within 2-3 hours.
Headache, dizziness and nausea within 20
minutes. Death within 1 hour.
Headache, dizziness and nausea within 5-10
minutes. Death within 25-30 minutes.
Headache, dizziness and nausea within 1-2
minutes. Death within 10-15 minutes.
Death within 1-3 minutes.
50 ppm
200 ppm
400 ppm
800 ppm
1,600 ppm
3,200 ppm
6,400 ppm
12,800 ppm
Concentration
of CO in Air
(ppm = par
ts
per million)
Approximate Inhalation Time
and Symptoms Developed
* Health and Safety Executive
Benelux Guide 21/8/01 2:15 pm Page 23

26
Troubleshooting Guide
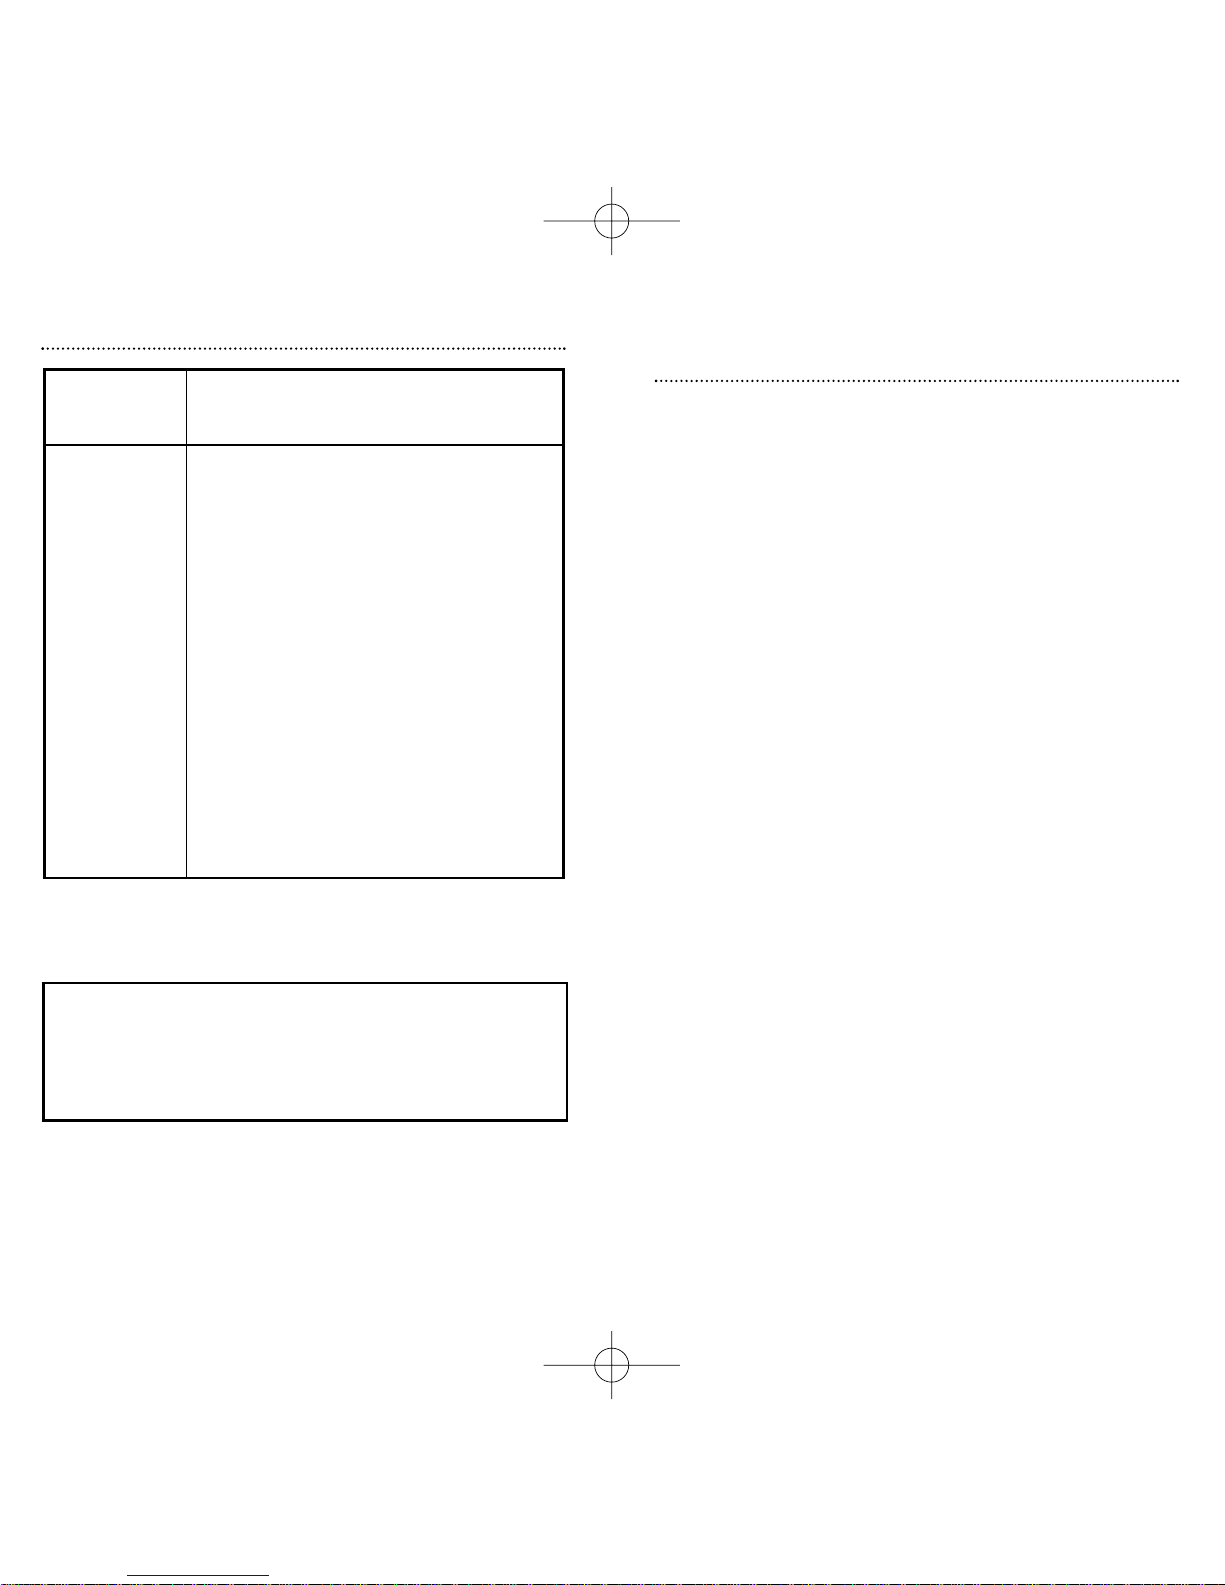
Symptom Problem Action
Unit shows an empty
battery symbol and
displays reading of
Lb. Alarm chirp
every 30 seconds
Batteries are low
and need
replacing.
See page 11.
Low Battery Warning.
See pages 16-17.
Battery Installation/
Replacement.
Unit shows an empty
battery symbol and
displays reading of
Err. Alarm chirp
every 30 seconds
Battery failure has
been
detected.
See page 11. Battery
Error Warning.
See pages 16-17.
Battery Installation/
Replacement.
Unit shows the
replace sensor icon
and displays a
reading of Err
(battery symbol may
show any state of
charge).
Alarm chirp
every 30 seconds
Sensor failure has
been
detected.
Sensor Malfunction.
No display, constant
alarm and red light.
Microprocessor
failure.
Unit has
malfunctioned.
Unit display shows
Err with battery at
any state of charge
other than empty.
Alarm chirp
every 30 seconds
Unidentified Remove batteries and
reinstall. If Err
continues, unit has
malfunctioned.
See pages 30-31 for
warranty information.
Move the CO alarm and place in another location prior to
performing any of the following:
• Staining or stripping wood floors or furniture
• Painting
• Wall papering
• Using adhesives
Storing the unit in a plastic bag during the above projects will
protect the sensor from permanent damage.
WARNING: As soon as possible, place the CO alarm back in
its proper location to assure continuous protection from
Carbon Monoxide poisoning.
When household cleaning supplies or similar contaminants are
used, the area should be well ventilated.
The following substances can affect the sensor and may
cause false readings:
Methane, propane, iso-butane, iso-propanol, ethylene, benzene,
toluene, ethyl acetate, hydrogen sulfide, sulphur dioxides,
alcohol based products, paints, thinners, solvents,
adhesives, hairsprays, aftershaves, perfumes, and some cleaning
agents.
25
Caring for your Nighthawk
Battery Powered CO Alarm (cont.)
Benelux Guide 21/8/01 2:15 pm Page 25

28
Power: Three AA batteries (supplied)
Sensor: Electrochemical carbon monoxide
sensor
Humidity Range: 10% to 90% rh (non-condensing)
Accuracy: +/- 20% +15 PPM
Temperature: Operating range 40°F (4.4°C) to
100°F (37.8°C)
Mounting: Accessories supplied for wall
mounting
Alarm: 85+ dB at 10' @ 3.4 ± 0.5 KHz
pulsing alarm
LED Operation: • Flashing red LED every 30 seconds
accompanied by an alarm chirp
indicates a system problem
• Flashing green LED every 30 seconds
indicates proper operation
• Pulsing red LED indicates presence
of CO
LCD Display: • Digital readout 30-999 PPM
• Battery charge indicator (fuel gauge)
• Sensor malfunction icon
Battery
Replacement: Unit displays Err or Lb and an empty
fuel gauge icon. Replace the three
AA batteries with one of the
following approved brands.
• Duracell MN1500
• Energizer E91
• Camelion Mignon LR6-AM3-1.5
• Rayovac 815
Product Specifications
27
Q.
How many CO alarms do I need in my house?
How many square metres will one CO alarm cover?
A.
We recommend you place CO alarms near the sleeping
area(s). If you have a multi-level home, you should place a CO
alarm on each level of the home. A good rule of thumb for the
number and placement of CO alarms for your particular home is
to place CO alarms near smoke alarms that have been installed to
meet current building code requirements.
Generally, one CO alarm can be adequate for 300 square metres
of living space. The most important determination for the number
of alarms needed is whether an alarm can be heard in all sleeping
areas.
Q.
Do I have to press the test button to get a CO
reading
?
A.
No. Your Nighthawk CO alarm continuously monitors the air
for carbon monoxide. An updated reading is shown on the digital
display every 30 seconds. If there is no CO present, the digital
display will show a zero. The CO alarm will alert you to the
presence of CO automatically. To test the internal components
and circuitry of your CO alarm, press the test/reset button.
Frequently Asked Questions
Benelux Guide 21/8/01 2:15 pm Page 27

WARRANTY COVERAGE: THE MANUFACTURER WARRANTS TO THE
ORIGINAL CONSUMER PURCHASER, THAT THIS ALARM WILL BE FREE OF
DEFECTS IN MATERIAL AND WORKMANSHIP FOR A PERIOD OF FIVE (5)
YEARS FROM DATE OF PURCHASE. THE MANUFACTURER’S LIABILITY
HEREUNDER IS LIMITED TO REPLACEMENT OF THE PRODUCT, REPAIR
OF THE PRODUCT OR REPLACEMENT OF THE PRODUCT WITH
REPAIRED PRODUCT AT THE DISCRETION OF THE MANUFACTURER. THIS
WARRANTY IS VOID IF THE PRODUCT HAS BEEN DAMAGED BY
ACCIDENT, UNREASONABLE USE, NEGLECT, TAMPERING OR OTHER
CAUSES NOT ARISING FROM DEFECTS IN MATERIAL OR WORKMANSHIP.
THIS WARRANTY EXTENDS TO THE ORIGINAL CONSUMER PURCHASER
OF THE PRODUCT ONLY.
Warranty Disclaimers: Any implied warranties arising out of this sale, including
but not limited to the implied warranties of description, merchantability and
fitness for a particular purpose, are limited in duration to the above warranty
period. In no event shall the Manufacturer be liable for loss of use of this
product or for any indirect, special, incidental or consequential damages, or
costs, or expenses incurred by the consumer or any other user of this product,
whether due to a breach of contract, negligence, strict liability in tort or
otherwise. The Manufacturer shall have no liability for any personal injury,
property damage or any special, incidental, contingent or consequential damage
of any kind resulting from gas leakage, fire or explosion.
This warranty does not affect your statutory rights.
Warranty Performance: During the above warranty period, your product will be
replaced with a comparable product if the defective product is returned,
postage prepaid, to Kidde Safety Europe Ltd, Mathisen Way, Colnbrook, Slough,
Berkshire SL3 0HB, together with proof of purchase date. Please include a note
describing the problem when you return the unit. The replacement product will
be in warranty for the remainder of the original warranty period or for six
months, whichever is longer. Other than the cost of postage, no charge will be
made for replacement of the defective product.
Important: Do not remove back cover. Back cover removal will void
warranty.
30
Warranty
Unit Malfunction: Err message with sensor
icon showing - sensor failure
Err message with empty fuel gauge
icon showing - batteries need replacing
Test/Reset Button: Test button verifies proper unit
operation.
Peak Level
Memory: When pressed, the display will show
the top segment of the battery icon
and the highest CO PPM level
detected since unit was powered up
or since last system reset. Reading
will be stored in memory until
batteries are removed/exhausted or
test/reset and peak level buttons are
pressed simultaneously.
Size & Weight: 140mm diameter x 35.5mm depth
0.3Kg with batteries
Warranty: Five-year warranty from date of
purchase against defects in material
and workmanship on CO Alarm
unit.
29
Product Specifications
Benelux Guide 21/8/01 2:15 pm Page 29

Inleiding koolmonoxide . . . . . . . .Pagina 33
Nighthawk productoverzicht . . . . .Pagina 34-36
Snelle ingebruikname . . . . . . . . . .Pagina 36
Installatie-instructies . . . . . . . . . . .Pagina 37-38
Montage
Waar u uw alarm moet installeren
Waar u uw alarm NIET moet installeren
Functies en bedieningen . . . . . . . .Pagina 39-46
Digitaal scherm
Andere mogelijke schermen
Piekgehalteknop
Test/reset-knop
Lampjes
Indicator batterijniveau (brandstofmeter)
Protocollabel
Plaatsen/vervangen van de
batterijen . . . . . . . . . . . . . . . . . . . .Pagina 47-48
Wat moet u doen als het alarm
afgaat . . . . . . . . . . . . . . . . . . . . . . .Pagina 49-50
Alarm/gevaarlijke gehaltes . . . . . . .Pagina 51-54
Zorg voor uw Nighthawk
CO-alarm op batterijen . . . . . . . . .Pagina 55-56
Probleemoplossing . . . . . . . . . . . .Pagina 57
Veel gestelde vragen . . . . . . . . . . . .Pagina 58
Productspecificaties . . . . . . . . . . . .Pagina 59-60
Garantie . . . . . . . . . . . . . . . . . . . . .Pagina 61-62
32
NEDERLANDS
Inhoudsopgave
Bedankt voor het kopen van uw nieuwe Nighthawk
koolmonoxidealarm. Als u vragen heeft over de
werking of instelling van uw CO-alarm, kunt u ons
altijd bellen op telefoonnummer
NL: +31 (0) 79 361 5236 B+L: +32 (0) 14 232 371
Your Nighthawk Carbon Monoxide Alarm is not a substitute for property,
disability, life or other insurance of any kind. Appropriate insurance
coverage is your responsibility. Consult your insurance agent.
Warranty Registration
To register for your five year factory warranty, please fill out the enclosed
warranty card completely, apply necessary postage and place in the mail.
You may place the warranty card in a separate envelope if you wish.
Please use the following address for warranty
registration and all other correspondence:
KIDDE Safety Europe Ltd, Mathisen Way,
Colnbrook, Slough, Berkshire SL3 0HB
Warranty information is located on the label on the back of the CO alarm.
For your convenience, please complete the warranty information before
installing the CO alarm.
The model number and assembly number can also be found on the label
on the back of the CO alarm.
For Warranty Service:
In many cases the quickest way to exchange your CO alarm is to
return it to the original place of purchase. If you have questions,
call us on 01753 685148
31
Warranty
For questions concerning your Carbon Monoxide Alarm,
please call 01753 685148
Please have the following information ready when calling:
CO Alarm Model Number (Located on the back of alarm):
CO Alar
m Assembly Number
(Located on back of alarm):
Date of Manufacture (Located on back of alarm):
Date of Purchase:
Wher
e Pur
chased:
Benelux Guide 21/8/01 2:15 pm Page 31

WAARSCHUWING: Het alarm kan defect raken als
ermee geknoeid wordt of als hij niet
volgens de instructies van de
fabrikant geïnstalleerd wordt.
BELANGRIJKE DIT KOOLMONOXIDEALARM IS NIET
OPMERKING: BEDOELD VOOR DRAAGBAAR GEBRUIK.
34
Nighthawk productoverzicht
Deksels open
Digitaal scherm
Op dit scherm kunt u de concentratie koolmonoxide in de
lucht aflezen (in delen per miljoen). Als het alarm niet goed
werkt verschijnt op dit scherm ook de storingsmelding, en als
de batterij bijna leeg is de melding "Lb" (low battery).
(Zie pagina 42 voor meer informatie).
Indicator batterijniveau
Zie pagina 45 voor meer informatie.
Alarm
Als de sensor een gevaarlijk hoge
koolmonoxideconcentratie meet, hoort
u een luide alarmtoon van 85 decibel.
Zie pagina 49-54 voor meer informatie.
Protocollabel
Het protocollabel wordt zichtbaar
als u de afdekkap verwijdert en
vertelt u wat u moet doen als het
alarm afgaat.
Zie pagina 46 voor meer informatie.
Kap onder
Kap onder
Pictogram Sensordefect
Zie pagina 42 voor
meer informatie.
Local Emergency Number
If Reading/Alarm Occurs…
CAUTION
: See back
panel and/or Users Guide
for additional
information.
Alarm
Operate
Sensor
11 - 35 ppm
Ventilate your home –
monitor the unit for
rising CO levels.
100+ ppm
If no “flu-like” symptoms
are being experienced, follow
the previous procedures.
35 - 100 ppm
Ventilate your home –
call a qualified, service technician
to inspect for possible sources of
carbon monoxide.
If “flu-like” symptoms are
being experienced…
• Immediately evacuate the premises.
• Call 0800 111 999 or your local fire
department.
• Do not re-enter your home until the
problem is corrected.
Battery
Level
NIGHTHAWK
T
est/
Reset
Alarm
PPM of CO
CARBON MONOXIDE
ALARM
Peak
Level
Model No. 900-0089
Operate
Uw nieuwe Nighthawk koolmonoxide (CO)-alarm is een verfijnd
instrument dat speciaal ontworpen en getest is om CO in een
woonomgeving te meten. Uw Nighthawk is specifiek bedoeld
voor gebruik binnenshuis.
U kunt koolmonoxide niet zien, ruiken of proeven en het kan fataal
zijn. De ophoping van CO in het bloed wordt het
carboxyhemoglobinegehalte genoemd en belemmert de opname van
zuurstof in het lichaam. Afhankelijk van de concentratie kan
koolmonoxide binnen slechts enkele minuten fataal zijn.
De meest voorkomende bronnen van koolmonoxide zijn defecte
gasapparaten die gebruikt worden voor verwarming en koken,
voertuigen die in een aangebouwde garage staan te draaien, verstopte
schoorstenen of rookkanalen, draagbare brandstofkachels, open
haarden, gereedschap met brandstofaandrijving en een barbecue in
een gesloten ruimte.
Symptomen van koolmonoxidevergiftiging zijn gelijk aan die van
griep, maar zonder koorts. Andere symptomen zijn duizeligheid,
vermoeidheid, zwakte, hoofdpijn, misselijkheid, overgeven,
slaperigheid en verwarring. Iedereen is gevoelig voor het gevaar van
CO, maar de deskundigen zijn het erover eens dat ongeboren baby’s,
kleine kinderen, zwangere vrouwen, oudere mensen en mensen met
hart- of ademhalingsproblemen het meeste risico lopen op ernstig
letsel of zelfs overlijden. Elk jaar moet een bevoegd installateur uw
verwarmingssysteem, ventilatiegaten, schoorstenen en rookkanalen
inspecteren en schoonmaken.
Er zit een beperkte garantie van vijf jaar op uw CO-alarm. Neem een
paar minuten de tijd om de gebruikersgids grondig door te lezen en
zorg dat u en uw familie bekend zijn met de werking ervan. Uw
Nighthawk CO-alarm is bedoeld om koolmonoxidegas van ELKE
verbrandingsbron waar te nemen. Hij is NIET gemaakt om rook,
brand of andere gassen waar te nemen. Als u vragen heeft kunt u
bellen naar NL: +31 (0) 79 361 5236 B+L: +32 (0) 14 232 371.
Deze handleiding en de hierin beschreven producten zijn voorzien
van een auteursrecht, met alle rechten voorbehouden. Onder deze
auteursrechtwetten, mag zonder de schriftelijke toestemming van
KIDDE Safety geen enkel deel van de handleiding voor gebruik
gekopieerd worden. Voor meer informatie kunt u contact opnemen
met onze consumentenlijn, of schrijven naar:
NL: De Raat Brandkasten, Edelgasstraat 5,
2718 SX Zoetermeer
B + L: De Raat Brandkasten, Geelseweg 64, 2250 Olen (B)
33
Inleiding koolmonoxide
Benelux Guide 21/8/01 2:15 pm Page 33

Verwijder de drie bijgevoegde AA
batterijen uit de verpakking en
plaats ze in de batterijruimte.
Plaats ook de rode batterijwaarschuwingsvlaggen voorzichtig
in de batterijruimte. Let op de
polariteitmarkeringen onder op de
batterijruimte. Het scherm moet 888
weergeven (zie figuur 1).
Na ongeveer 30 seconden verdwijnt
het 888-scherm en begint een
zwarte stip rechts onder in elke 5
seconden knipperen (zie figuur 2).
Uw Nighthawk CO-alarm is nu
operationeel.
36
Snelle ingebruikname
Figuur 2
Figuur 1
BELANGRIJKE OPMERKING:
Het alarm moet na het aanzetten één minuut opwarmen.
35
NI
GHTHAWK
T
est/
R
eset
P
eak
L
evel
Operate
Alarm
PPM of CO
CARBON MONOXIDE
ALARM
Model No. 900-0089
Deksels
gesloten
Benelux Guide 21/8/01 2:15 pm Page 35

Waar u uw Nighthawk CO-alarm NIET moet
installeren
• Buitenshuis.
• In of onder een kast.
• In een vochtige of natte ruimte.
• Direct boven een gootsteen of fornuis.
• Naast een deur of venster of op een plaats waar het tocht.
• Waar het door gordijnen of meubels belemmerd kan
worden.
• In een ruimte waar de temperatuur onder de -4,4°C of
boven de 37,8°C kan komen..
• Waar vuil of stof de sensor kunnen blokkeren waardoor hij
het niet meer doet.
• Waar er gemakkelijk tegen gestoten kan worden of waar
hij beschadigd of per ongeluk uitgezet of verwijderd kan
worden.
38
Installatie-instructies (vervolg)
Montage
Uw CO-alarm kan aan een
binnenmuur gemonteerd
worden.
U moet eerst de achterplaat met
de schroeven en keilbouten aan
de muur bevestigen.
Als de plaat bevestigd is, moet
de achterkant van de detector
over de achterplaat heen
geschoven worden totdat de tab boven aan het alarm vastklikt (zie
figuur 1).
Installeer uw CO-alarm op 1,5 meter boven de vloer, en niet verder
dan 2 meter van het verwarmingstoestel.
Om hem te verwijderen, moet u de tab tegen de muur drukken en
het alarm uit de montageplaat tillen.
Waar moet u uw Nighthawk CO-alarm
installeren
De volgende suggesties kunnen u helpen bij het plaatsen en
installeren van uw Nighthawk CO-alarm.
Ideaal gesproken zou u in of bij elke kamer met een
brandstofapparaat een detector moeten hebben.
Als u echter meer dan één apparaat heeft, maar slechts één detector,
dan dient u het volgende in overweging te nemen bij het vinden van
de beste plaats voor uw detector.
Als er in uw slaapkamer een apparaat is, moet u de detector in die
kamer monteren.
Als er een apparaat in een kamer is die u veel gebruikt, bijv. een
zitkamer, moet u het in die kamer monteren.
Als u een zit-/slaapkamer heeft, moet de detector zo ver mogelijk
van de kookapparatuur geplaatst worden, maar wel vlakbij de plaats
waar uw slaapt.
Als het apparaat in een kamer is die normaliter niet gebruikt wordt
(bijv. een boilerkamer), moet de detector net buiten de kamer
bevestigd worden, zodat u het alarm gemakkelijker kunt horen.
37
Installatie-instructies
Figuur 1
Benelux Guide 21/8/01 2:15 pm Page 37

Andere mogelijke schermen en de betekenissen
ervan
De volgende symbolen verschijnen tijdens normaal bedrijf of
foutbewerkingen op het scherm, en deze worden hieronder
uitgelegd.
Normaal bedrijf
Normaal bedrijf (zie figuur 6) met een volle
batterij. Het stipje rechts onder gaat elke 5
seconden aan en uit. Als er CO aanwezig is
geeft het scherm de meting aan in Parts per
Million (PPM) (deeltjes per miljoen).
Normaal bedrijf na aanzetten of reset
Figuur 7 toont een normaal scherm direct nadat
de batterijen geplaatst zijn of nadat de test/resetknop is ingedrukt. Het scherm moet ongeveer 30
seconden nadat de test/reset-knop is ingedrukt
naar het normale scherm gaan (zie figuur 7) (zie test/resetknop pagina 44).
Als de test/reset-knop wordt ingedrukt, klinkt het alarm. Het
scherm geeft gedurende de tijd dat het alarm klinkt een getal
weer. Dit getal is een normaal onderdeel van de testfunctie en
geeft geen CO-meting aan. Tijdens de test/reset-procedure
kan het getal genegeerd worden.
Scherm voor piekgehalte
Als de knop voor het piekgehalte ingedrukt
gehouden wordt, geeft het scherm de hoogste
CO-meting weer die door het CO-alarm genomen
is sinds de laatste reset van het piekgehalte of
aanzetten. De brandstofmeter van de batterij
wijzigt en geeft alleen het bovenste segment van de batterij aan
om aan te geven dat het piekgehalte wordt weergegeven (zie
figuur 8). In dit voorbeeld was 120 PPM de maximale
waargenomen hoeveelheid CO sinds de laatste reset van het
alarm (zie alarm/gevaarlijke gehaltes op pagina 51-54).
Hoewel de functie van het piekgehalte gehaltes onder 30 PPM
zal weergeven, veroorzaakt dit geen alarm, ongeacht hoe lang
het apparaat aan deze gehaltes wordt blootgesteld.
40
Functies en bediening (vervolg)
Figuur 6
Figuur 7
Figuur 8
Uw nieuwe Nighthawk CO-alarm op batterijen maakt gebruik
van geavanceerde elektronische onderdelen die u en uw familie
tegen de gevaren van koolmonoxide beschermen.
Unieke functies zijn een digitaal scherm waarop elke 30
seconden CO-metingen worden weergegeven, de hoogste
gemeten CO-gehaltes, status van de batterij en toestand van de
sensor. Zorg dat u bekend bent met deze functies.
Digitaal scherm - geeft CO-gehalte in PPM weer
Uw Nighthawk CO-alarm geeft continu een digitale meting van
het CO-gehalte in deeltjes per miljoen (PPM) weer. Het digitale
scherm kan metingen tussen de 30 en 999 (PPM) waarnemen en
weergeven. Onder normale omstandigheden wordt een
meting van 0 PPM verwacht(zie figuur 5).
U zult eraan gewend raken op het scherm te
kijken, net zoals u bijvoorbeeld op een
barometer of klok kijkt. Metingen onder de 30
PPM worden niet weergegeven.
Zie pagina 51-54 voor een overzicht over gevaarlijke COgehaltes.
39
Functies en bediening
Figuur 5
Benelux Guide 21/8/01 2:15 pm Page 39

Sensorstoring
Het alarm moet vervangen worden
(Zie figuur 9).
Batterijen vervangen of batterijfout
Als figuur 10 of 11 wordt weergegeven, moeten
de batterijen vervangen worden - let op de
brandstofmeter op het scherm die aangeeft dat
de batterijen leeg zijn (zie instructies voor het
vervangen/plaatsen van de batterijen op pagina
47-48).
Storingsscherm
Er is een storing in het alarm (zie figuur12) (zie
probleemoplossing pagina 57). De batterijmeter
kan een oplaadstatus aangeven.
42
Functies en bediening (vervolg)
Figuur 9
Figuur 10
Figuur 11
Figuur 12
of
Scherm voor piekgehalte (vervolg)
CO-concentraties tussen de 0 en 30 PPM kunnen in normale, alledaagse
omstandigheden vaak voorkomen. CO-concentraties onder de 30 PPM
kunnen een indicatie zijn van een tijdelijke toestand die zich vandaag voor
kan doen en vervolgens nooit meer. Omstandigheden en/of bronnen die
lage gehaltes kunnen veroorzaken zijn bijvoorbeeld veel autoverkeer, een
voertuig dat in een aangrenzende garage staat te draaien, een apparaat dat
bij het aanzetten CO afgeeft, een vuur in een open haard of houtskool in
een nabije barbecue. Bij temperatuursomslagen kan CO vastgehouden
worden dat door verkeer en andere brandstof verbrandende apparatuur
gegenereerd wordt, resulterend in lage CO-metingen.
Normaal gesproken geeft het scherm ‘0’ aan en bij bepaalde
omstandigheden kunt u gedurende korte tijdsperiodes gehaltes van 30 of
meer waarnemen. Met gebruik van de geheugenfunctie voor piekgehaltes
op het Nighthawk CO-alarm kunt u de hoogste concentraties
waargenomen CO bekijken.
41
Functies en bediening (vervolg)
Benelux Guide 21/8/01 2:15 pm Page 41

Test/reset-knop
De test/reset-knop wordt gebruikt om de elektronica van het
alarm te testen en het alarm tijdens een alarm te resetten.
Het alarm testen
Om het alarm te testen moet u de test/reset-knop indrukken (zie
figuur 14) Test het alarm wekelijks!
N.B.: Als de test/reset-knop is ingedrukt, verschijnen er
getallen op het scherm. Dit zijn geen CO-metingen en maken
deel uit van het interne testproces. Negeer deze getallen!
Als de test/reset-knop ingedrukt is,
verschijnt er , dan andere
getallen en daarna gaat hij terug naar
het controleren van CO-gehaltes.
Vanwege het lawaai dat het alarm
maakt, raden we u aan dat u uw
vingers over de geluidsopening plaatst
bij het testen van uw Nighthawk CO-alarm.
Zorg dat u en uw familieleden bekend zijn met het alarmpatroon.
Een CO-alarm geeft snelle pulsen af. Deze cyclus herhaalt zich in
het geval van een CO-alarm. Deze cyclus gaat gedurende de
eerste 4 minuten van een CO-alarm verder en gaat dan naar één
cyclus per minuut totdat het apparaat gereset is of de CO
verwijderd is.
Resetten
Als het alarm klinkt, kunt u het stoppen door op de test/resetknop te drukken. Als de CO-toestand die het alarm in de eerste
plaats veroorzaakt heeft, aanhoudt, dan wordt het alarm opnieuw
geactiveerd. Als het CO-alarm binnen 6 minuten weer afgaat,
neemt het hoge CO-gehaltes waar, waardoor snel een gevaarlijke
situatie kan ontstaan.
Als dit gebeurt moet u de instructie op pagina 49-50 volgen: wat
moet u doen als het alarm afgaat. De reactiveringstijden zijn
afhankelijk van de hoeveelheid CO waardoor het CO-alarm in
eerste instantie afging en de hoeveelheid CO die aanwezig is
nadat het alarm gereset is.
44
Functies en bediening (vervolg)
Test/
Reset
P
Operate
Figuur 14
Piekgehalteknop
Als de piekgehalteknop wordt
ingedrukt (zie figuur 13), dan
verandert het pictogram van de
brandstofmeter (indicator
batterijniveau) en wordt alleen het
bovenste gedeelte van het pictogram
weergegeven. Dit geeft aan dat het
piekgehalte gemeten wordt (zie figuur 8). Het piekgehalte dat
wordt weergegeven is de hoogste meting die door het alarm is
waargenomen sinds de laatste keer dat hij gereset of aangezet is.
Voor aanvullende informatie over het piekgehaltescherm, zie
pagina 40-41.
De meting van het piekgehalte resetten
Om de meting voor het piekgehalte te resetten of te wissen, moet
u de piekgehalteknop ingedrukt houden en dan de test/resetknop tegelijkertijd ingedrukt houden. Het getal op het scherm
wordt dan 0 PPM.
N.B.: De meting van het piekgehalte wordt ook gereset als
de batterijen verwijderd worden.
Figuur 13
43
Functies en bediening (vervolg)
P
eak
L
evel
Alarm
Benelux Guide 21/8/01 2:15 pm Page 43

Protocollabel
Het bovenste gedeelte van het alarm kan opengeschoven
worden. U vindt dan een set handige instructies in het
geval van een CO-alarm.
46
Functies en bediening (vervolg)
Local Emergency Number
If Reading/Alarm Occurs…
CAUTION
: See back
panel and/or Users Guide
for additional
information.
Alarm
Operate
Sensor
810-1058
REV. A
11 - 35 ppm
Ventilate your home –
monitor the unit for
rising CO levels.
100+ ppm
If no “flu-like” symptoms
are being experienced, follow
the previous procedures.
35 - 100 ppm
Ventilate your home –
call a qualified, service technician
to inspect for possible sources of
carbon monoxide.
If “flu-like” symptoms are
being experienced…
• Immediately evacuate the premises.
• Call 0800 111 999 or your local fire
department.
•
Do not re-enter your home until the
problem is corrected.
Battery
Level
Lampjes
Rood alarmlampje
Als het rode lampje knippert,
vergezeld door de alarmpiep, betekent
dit dat de batterijen vervangen moeten
worden, of dat het alarm defect is (zie
figuur 15). Als het alarm snelle pulsen
afgeeft, geeft het de aanwezigheid van koolmonoxide aan. Zie
pagina 49-50: ‘wat moet u doen als het alarm afgaat’.
Groen bedrijfslampje
Als het groene lampje brandt, wil dit
zeggen dat het alarm goed werkt (zie
figuur 16). Het groene lampje knippert
elke 30 seconden om aan te geven dat
er een CO-meting wordt genomen en
wanneer er een knop wordt
ingedrukt.
Indicator batterijniveau (brandstofmeter)
Het batterij-pictogram verschijnt in de linker benedenhoek van
het CO-alarmscherm en geeft aan hoe lang de batterijen nog
meegaan.
Het scherm is in drie gedeeltes verdeeld en geeft het volgende
nauwkeurig aan:
1. Volle batterijen - Alle drie de segmenten van de
indicator zijn zwart.
2. Batterijen voor 2/3e vol - Twee van de drie
segmenten zijn zwart.
3. Batterijen voor 1/3e vol - Eén van de drie segmenten
is zwart.
4. Batterijen leeg- Zie instructies voor het
plaatsen/vervangen van de batterijen op pagina 47-48.
Figuur 15
45
Functies en bediening (vervolg)
Peak
Level
Alarm
Test/
Reset
Operate
Figuur 16
Benelux Guide 21/8/01 2:15 pm Page 45

Instructies voor het vervangen/plaatsen van
batterijen
Om de batterijen in uw Nighthawk te vervangen, moet u de
volgende stappen volgen:
1. Schuif voorzichtig de
onderste helft van
het voordeksel open
zodat u de
batterijruimte kunt
zien.
2. Verwijder de oude
batterijen en gooi ze
weg zoals aanbevolen
door de fabrikant van
de batterijen (zie figuur 17).
3. Plaats de nieuwe batterijen, wees hierbij
voorzichtig dat u de rode
batterijwaarschuwingsvlaggen in de uitsparing
voor de batterijen bevestigt. Let ook op de tekening
over de polariteit in het batterijcompartiment. Het
alarm piept en toont gedurende ongeveer één
minuut, waarna hij teruggaat naar normaal bedrijf.
4. Doe voorzichtig het klepje weer dicht. Het klepje gaat
NIET dicht als niet alle drie AA batterijen zijn
geïnstalleerd.
48
Plaatsen/vervangen van de batterijen
(vervolg)
NIGHTHAWK
T
est/
Reset
Operate
P
e
a
k
L
eve
l
Alarm
C
ARBON
M
ONO
XID
E
ALARM
Figuur 17
Omdat batterijen niet in de fabriek geplaatst worden, moet u dat
zelf doen. U moet ook de batterijen vervangen als het scherm
‘batterij leeg’ of weergeeft. U zult dan ook zien dat
de batterijmeter leeg is. Het alarm herinnert u eraan dat u de
batterijen moet vervangen door elke 30 seconden te piepen. Hij
doet dit maximaal 7 dagen lang. Bij elke piep knippert het rode
lampje één keer.
N.B.: Uw Nighthawk CO-alarm controleert geen COgehaltes als de waarschuwing ‘batterij leeg’ of een
foutwaarschuwing wordt weergegeven.
De drie AA batterijen worden meegeleverd. Bij het vervangen
van de batterijen, raden we de volgende batterijen aan die
minimaal gedurende 1 jaar normaal gebruik mee kunnen gaan.
• Duracell MN1500 • Camelion Mignon LR6-AM3-1.5
• Energizer E91 • Rayovac 815
Deze batterijen kunt u bij elke ijzerwaren speciaalzaak winkel
kopen.
47
Plaatsen/vervangen van de batterijen
Benelux Guide 21/8/01 2:15 pm Page 47

Voorzichtig: Dit CO-alarm geeft alleen de aanwezigheid
van CO bij de sensor aan. Het kan zijn dat CO in andere
gebieden aanwezig is.
Algemene symptomen bij lage blootstelling:
Lichte hoofdpijn, misselijkheid, overgeven, vermoeidheid
(griepachtige symptomen).
Algemene symptomen bij middelmatige blootstelling.
Zware hoofdpijn, slaperigheid, verwarring, snelle hartslag.
Algemene symptomen bij extreme blootstelling:
Stuiptrekkingen, bewusteloosheid, hart- en longstoornissen. Het kan
hersenbeschadigingen en overlijden veroorzaken. Veel gevallen van gemelde
KOOLMONOXIDEVERGIFTIGING wijzen erop dat hoewel de slachtoffers er
zich van bewust zijn dat ze niet in orde zijn, ze zó gedesoriënteerd raken dat
ze zichzelf niet in veiligheid kunnen brengen door het gebouw te verlaten of
door om hulp te roepen. Jonge kinderen en huisdieren zijn vaak de eerste
slachtoffers.
Het is belangrijk dat u bekend bent met elk stadium van de
effecten. De hierboven beschreven symptomen hebben
betrekking op koolmonoxidevergiftiging en moeten met ALLE
leden van het gezin besproken worden.
50
Wat moet u doen als het alarm afgaat
(vervolg)
Alarm/gevaarlijke gehaltes.
Als het CO-alarm een gevaarlijk CO-gehalte waarneemt, klinkt er
een luid alarmpatroon. Het alarmpatroon gaat snel en met
pulsen. Dit alarmpatroon klinkt gedurende de eerste 4 minuten
nadat de CO is waargenomen. Daarna herhaalt de cyclus zich
elke minuut. Weet hoe u op een CO-noodtoestand moet
reageren. Lees deze gebruikersgids af en toe door en bespreek
hem met uw familie.
WAT MOET U DOEN ALS HET ALARM AFGAAT
1) Zet ramen en deuren open voor ventilatie.
2) Zet waar mogelijk het apparaat uit en gebruik het
apparaat niet meer.
3) Ontruim het pand en laat de ramen en deuren open.
Een vergrendelingsalarm moet in overeenstemming
met de gebruiksinstructies gereset worden.
4) Bel uw erkend service vakman
5) Ga het pand pas weer binnen als het alarm gestopt is.
6) Roep direct medische hulp in als iemand symptomen
van koolmonoxidevergiftiging vertoont (hoofdpijn,
misselijkheid), en vermeld dat u vermoedt dat het om
een koolmonoxidevergiftiging gaat.
7) Gebruik het apparaat pas weer als het door een
vakman gecontroleerd is.
49
Wat moet u doen als het alarm afgaat
▲
!
WAARSCHUWING: Activering van
uw CO-alarm duidt op de aanwezigheid
van koolmonoxide (CO) waar u AAN
KUNT OVERLIJDEN.
Benelux Guide 21/8/01 2:15 pm Page 49

Lage gehaltes:
Over het algemeen wordt 35 PPM beschouwd als lage
blootstelling. Het is nog steeds gevaarlijk om gedurende langere
periodes aan lage CO-gehaltes blootgesteld te zijn en dit kan
leiden tot vermoeidheid, hoofdpijn, enz. Deze situatie dient goed
in de gaten gehouden te worden. Wees extra voorzichtig en stel
geen personen met een hoog risico voor meer dan acht uur aan
lage gehaltes bloot. In sommige gevallen kunnen lage gehaltes
veroorzaakt worden door luchtvervuiling, zwaar verkeer,
sigarettenrook, temperatuursomzettingen en andere oorzaken.
Middelmatige gehaltes:
Over het algemeen wordt 35 PPM-100 PPM beschouwd als
middelmatige blootstelling. Gehaltes in dit bereik kunnen
ernstige gezondheidsproblemen veroorzaken. Alle mogelijke
CO-bronnen moeten onmiddellijk uitgezet worden en er moet
een bevoegde onderhoudstechnicus gebeld worden. Zorg voor
ventilatie in het pand door ramen en deuren te openen.
Eventuele mogelijke bronnen mogen pas weer in werking
gesteld worden als het probleem opgelost is. Controleer alle
bewoners op symptomen!
Als niemand symptomen heeft, wordt dit niet als een COnoodgeval beschouwd, maar het mag niet genegeerd
worden.
52
Alarm/gevaarlijke gehaltes (vervolg)
Blootstelling aan hoge koolmonoxidegehaltes kan fataal
zijn of permanente beschadiging en handicaps
veroorzaken.
Veel slachtoffers van koolmonoxidevergiftiging zijn zich ervan
bewust dat ze niet in orde zijn, maar ze raken zo gedesoriënteerd
dat ze zichzelf niet in veiligheid kunnen brengen door het
gebouw te verlaten of door om hulp te roepen. Als u symptomen
van koolmonoxidevergiftiging ervaart, raadpleeg dan
onmiddellijk een dokter. CO-vergiftiging kan door een
eenvoudige bloedtest - een carboxyhemoglobinetest genaamd vastgesteld worden. Bij ernstige gevallen kan behandeling in een
hogedrukkamer nodig zijn. Houd in gedachte dat jonge kinderen
en huisdieren vaak de eerste slachtoffers zijn.
Als u nog vragen heeft, bel ons dan gerust op
NL: +31 (0) 79 361 5236
B+L: +32 (0) 14 232 371
51
Alarm/gevaarlijke gehaltes.
Benelux Guide 21/8/01 2:15 pm Page 51

De bovenstaande tabel heeft betrekking op gezonde volwassenen.
Voor degenen met een hoog risico of personen met medische
problemen liggen de gehaltes anders. Zij dienen te overwegen om
waarnemingsapparatuur te gebruiken die bij een lager CO-gehalte
alarm slaat.
Dit CO-alarm voldoet aan de eisen voor alarm-responstijd van
BSI 7860. De standaard alarmtijden zijn als volgt:
Bij 45 PPM mag het alarm pas na 60 minuten afgaan. Bij 150
PPM moet het alarm binnen 10-30 minuten afgaan. Bij 350
PPM, moet het alarm binnen 6 minuten afgaan.
WAARSCHUWING: Bij lage koolmonoxidegehaltes kan het zijn dat
dit alarm niet afgaat. De functionaris voor gezondheid en veiligheid
(UK) heeft bepaald dat gedurende een periode van 8 uur de
continue blootstelling van 50 PPM niet overschreden mag worden.
54
Alarm/gevaarlijke gehaltes (vervolg)
De maximaal toelaatbare concentratie voor
continue blootstelling voor gezonde
volwassenen gedurende 8 uur, volgens de HSE*
Lichte hoofdpijn, vermoeidheid, duizeligheid,
misselijkheid na 2-3 uur.
Voorhoofdshoofdpijn binnen 1-2 uur,
levensbedreigend na 3 uur.
Duizeligheid, misselijkheid en stuiptrekkingen
na 45 minuten. Bewusteloosheid binnen 2
uur. Overlijden binnen 2-3 uur.
Hoofdpijn, duizeligheid en misselijkheid
binnen 20 minuten. Overlijden binnen 1 uur.
Hoofdpijn, duizeligheid en misselijkheid
binnen 5-10 minuten. Overlijden binnen 2530 minuten.
Hoofdpijn, duizeligheid en misselijkheid
binnen 1-2 minuten. Overlijden binnen 10-15
minuten.
Overlijden binnen 1-3 minuten.
50 ppm
200 ppm
400 ppm
800 ppm
1600 ppm
3200 ppm
6400 ppm
12.800 ppm
Concentratie van
CO in lucht
(ppm = deeltjes per
miljoen)
Inhalatietijd bij benadering en
ontwikkelde symptomen
*Health and Safety Executive
(functionaris voor gezondheid en veiligheid)
Hoge gehaltes:
100 PPM wordt beschouwd als een hoog blootstellingsgehalte
als geen leden van het gezin symptomen hebben of zich ziek
voelen. Het enige verschil tussen dit gehalte en een gevaarlijk
gehalte is dat er zich geen symptomen voordoen.
Er kan snel een er
nstige situatie ontstaan!
Alle mogelijke CO-bronnen moeten onmiddellijk uitgezet
worden en er moet een bevoegde onderhoudstechnicus gebeld
worden. Zorg voor ventilatie in het pand door ramen en deuren
te openen. Bij dit gehalte wordt aangeraden om buiten te
wachten of in het huis van een buurman terwijl uw woning
geventileerd wordt. Eventuele mogelijke bronnen mogen pas
weer in werking gesteld worden als het probleem opgelost is.
Gevaarlijke gehaltes:
Over het algemeen wordt een gehalte van 100 PPM en hoger,
gepaard met symptomen, beschouwd als een gevaarlijk gehalte.
Verzamel onmiddellijk alle inwoners, verlaat het huis en bel uw
erkend service vakman!
Symptomen duiden erop dat dit als een noodgeval
behandeld moet worden. Dit is een potentieel
levensbedreigende situatie!
Blijf in de buitenlucht en ga onder geen beding het huis binnen.
Dit mag alleen als het huis geventileerd is en de bron van de COnoodtoestand gerepareerd is.
53
Alarm/gevaarlijke gehaltes (vervolg)
Benelux Guide 21/8/01 2:15 pm Page 53

Verplaats het CO-alarm naar een andere locatie voordat u een
van de volgende taken uitvoert:
• Vernissen of strippen van houten vloeren of meubels.
• Verven
• Behangen
• Gebruik van lijm
Bewaar het alarm tijdens de bovengenoemde projecten in een
plastic zak, zodat de sensor beschermd is tegen permanente
schade.
WAARSCHUWING: Plaats het CO-alarm zo snel mogelijk
terug op zijn oorspronkelijke plaats zodat u voortdurend
beschermd bent tegen de gevaren van
koolmonoxidevergiftiging.
Als er huishoudelijke reinigingsmiddelen of gelijksoortige
verontreinigingsmiddelen worden gebruikt, moet dat gebied
goed geventileerd worden.
De volgende middelen kunnen invloed hebben op de
sensor en kunnen onjuiste metingen veroorzaken:
Methaan, propaan, iso-butaan, iso-propanol, ethyleen, benzeen,
tolueen, ethylacetaat, waterstofsulfide, zwaveldioxides,
producten op alcoholbasis, verf, verdunners, oplosmiddelen,
lijm, haarlak, aftershave, parfum en sommige
schoonmaakmiddelen.
56
Zorg voor uw Nighthawk
CO-alarm op batterijen (vervolg)
Om uw CO-alarm in goede staat te houden, dient u de
volgende eenvoudige stappen te volgen:
• Controleer of het alarm, de lampjes en de batterijen
goed werken door één keer per week op de testknop
te drukken.
• Veeg het CO-alarm een keer per maand af met een
zachte borstel om overtollig stof te verwijderen.
• Vertel kinderen dat ze nooit met het CO-alarm mogen
spelen.
Waarschuw kinderen voor de gevaren van
koolmonoxide vergiftiging.
• Gebruik nooit afwasmiddelen of andere
oplosmiddelen om het CO-alarm te reinigen.
• Spuit geen luchtverfrissers, haarlak, verf of
andere spuitbussen in de buurt van het CO-alarm.
• Verf het CO-alarm niet. Verf dekt de ventilatieopeningen af, waardoor de sensor geen CO meer kan
waarnemen.
• Plaats niet in de buurt van luieremmers.
55
Zorg voor uw Nighthawk
CO-alarm op batterijen
Benelux Guide 21/8/01 2:15 pm Page 55

V.
Hoeveel CO-alarms heb ik in mijn huis nodig?
Hoeveel vierkante meter beslaat één CO-alarm?
A.
We bevelen aan dat u CO-alarms vlakbij de slaapkamers
plaatst. Als u een huis met meerdere verdiepingen heeft, moet u
op elke verdieping een CO-alarm plaatsen. Een goede vuistregel
voor het aantal en plaatsen van CO-alarms voor uw huis is om COalarms vlakbij rookalarms te plaatsen die geïnstalleerd zijn volgens
de meest recente bouwvereisten.
Over het algemeen is één CO-alarm voldoende voor 300 vierkante
meter woonruimte. De belangrijkste factor bij het bepalen van het
aantal benodigde alarms is of een alarm in alle slaapkamers te
horen is.
V.
Moet ik op de knop drukken om een CO-meting te
krijgen
?
A.
Nee. Uw Nighthawk CO-alarm controleert de lucht
voortdurend op koolmonoxide. Elke 30 seconden wordt een
bijgewerkte meting op het digitale scherm weergegeven. Als er
geen CO aanwezig is, staat er een nul op het scherm. Het COalarm gaat automatisch af bij de aanwezigheid van CO. Om de
interne onderdelen en circuits van uw CO-alarm te testen, moet u
op de test/reset-knop drukken.
58
Veel gestelde vragen
57
Gids voor probleemoplossing
Symptoom Probleem Actie
Er staat een symbool
voor een lege batterij
op het alarm en
het scherm geeft Lb.
weer Alarm
piept elke 30
seconden
Batterijen zijn leeg
en moeten
vervangen worden.
Zie pagina 45
Waarschuwing
batterij leeg.
Zie pagina 47-48 Plaatsen/vervangen
van de batterijen.
Er staat een symbool
voor een lege batterij
op het alarm en het
scherm geeft Err.
weer. Alarm
piept elke 30
seconden.
Er is een
batterijstoring
waargenomen.
Zie pagina 45.
Waarschuwing
batterijstoring.
Zie pagina 47-48 Plaatsen/vervangen
van de batterijen.
Het pictogram
‘vervang sensor’
verschijnt en er
wordt Err
weergegeven
(batterijsymbool kan
een oplaadstatus
aangeven).
Alarm piept
elke 30 seconden.
Er is een
sensorstoring
waargenomen.
Sensorstoring.
Geen scherm,
constant alarm en
rood lampje.
Storing van de
microprocessor.
Het alarm is
defect.
Het alarm geeft
Err weer en de
batterij staat in een
laadstatus maar is
niet leeg.
Alarm piept
elke 30 seconden.
Onbekend Verwijder de
batterijen en plaats
ze opnieuw. Als Err
nog steeds verschijnt
is het alarm defect.
Zie pagina 61-62
voor informatie over
de garantie.
Benelux Guide 21/8/01 2:15 pm Page 57

Storing van het
alarm: Err bericht met sensor
pictogram dat sensordefect aangeeft.
Err bericht met lege brandstofmeter
pictogram verschijnt - batterijen
moeten vervangen worden.
Test/reset-knop: De testknop controleert of het alarm
goed werkt.
Geheugen
piekgehalte: Als de knop ingedrukt wordt, geeft het
scherm het bovenste segment van het
batterijpictogram weer en het hoogste
CO PPM gehalte dat waargenomen
werd sinds het alarm aangezet is of
sinds de laatste systeemreset. De
meting wordt in het geheugen
opgeslagen totdat de batterijen
verwijderd/leeg zijn of als de test/
reset-knop en de piekgehalteknop
gelijktijdig ingedrukt worden.
Grootte en
gewicht: 138mm x 35 mm/300 gram
met batterijen
Garantie: Beperkte garantie van vijf jaar vanaf de
aankoopdatum tegen materiaal- en
fabrieksfouten op het CO-alarm.
Levensduur
batterijen: Als het alarm afgaat, gaan de batterijen
405 uur mee.
60
Productspecificaties
Voeding: Drie AA batterijen (meegeleverd)
Sensor: Elektrochemische koolmonoxide
sensor
Luchtvochtigheid: 10% tot 90% relatieve vochtigheid
(niet-condenserend)
Nauwkeurigheid: +/- 20% +15 PPM
Temperatuur: Bedrijfsbereik 4,4°C tot 37,8°C
Montage: Accessoires voor wandmontage
meegeleverd.
Alarm: 85+ dB bij 30m @ 3,4 ± 0,5 KHz
pulsalarm
Werking van
lampjes: • Rood lampje knippert elke 30 seconden
vergezeld van een alarmpiep geeft een
systeemprobleem aan
• Groen lampje knippert elke
30 seconden geeft juiste werking aan
• Knipperend rood lampje duidt op
aanwezigheid van CO.
LCD-scherm: • Digitale meting 30-999 PPM
• Indicator batteryniveau (brandstofmeter)
• Pictogram voor sensordefect
Batterij
vervangen: Alarm geeft Err of Lb weer en het
pictogram geeft een lege brandstofmeter
weer. Vervang de drie AA batterijen
door batterijen van een van de
volgende goedgekeurde merken.
• Duracell MN1500
• Energizer E91
• Camelion Mignon LR6-AM3-1.5
• Rayovac 815
59
Productspecificaties
Benelux Guide 21/8/01 2:15 pm Page 59

Om voor uw vijfjarige fabrieksgarantie in aanmerking te komen, dient u de
bijgevoegde garantiekaart volledig in te vullen, de benodigde porto er op
te plakken en de kaart in de brievenbus te doen. U kunt de garantiekaart
eventueel in een aparte envelop doen.
Gebruik het volgende adres voor registratie van
de garantie en alle overige correspondentie:
NL: De Raat Brandkasten, Edelgasstraat 5, 2718 SX Zoetermeer
B+L: De Raat Brandkasten, Geelseweg 64, 2250 Olen (B)
Informatie over de garantie bevindt zich aan de achterkant van het CO-alarm.
Vul de informatie over de garantie in voordat u het CO-alarm gaat installeren.
Het modelnummer en montagenummer staan ook op het etiket op de
achterkant van het CO-alarm.
Voor garantieservice:
In veel gevallen is de snelste manier om uw CO-alarm om te wisselen,
het terug te sturen naar de plaats waar u het gekocht heeft. Als u
vragen heeft kunt u ons bellen op NL: +31 (0) 79 361 5236
B+L: +32 (0) 14 232 371
62
Garantieregistratie
Voor vragen over uw koolmonoxidealarm, kunt u bellen naar nummer
NL: +31 (0) 79 361 5236 B+L: +32 (0) 14 232 371
Houd als u belt, de volgende informatie bij de hand:
Modelnummer van het CO-alarm (bevindt zich achter op het alarm):
Montagenummer van het CO-alarm (bevindt zich achter op het alarm):
Fabricagedatum (bevindt zich achter op het alarm):
Aankoopdatum:
Plaats van aankoop:
DEKKING VAN DE GARANTIE: DE FABRIKANT GEEFT GARANTIE AAN DE
EERSTE KOPER, DAT DIT ALARM GEDURENDE VIJF (5) JAAR NA
AANKOOPDATUM GEEN MATERIAAL- EN FABRIEKSFOUTEN ZAL VERTONEN.
DE AANSPRAKELIJKHEID VAN DE FABRIKANT HIERONDER IS BEPERKT TOT
HET NAAR GOEDDUNKEN VERVANGEN OF REPAREREN VAN HET PRODUCT OF
HET VERVANGEN VAN HET PRODUCT DOOR HET GEREPAREERDE PRODUCT.
DEZE GARANTIE WORDT ONGELDIG ALS HET PRODUCT DOOR EEN
ONGEVAL, ONREDELIJK GEBRUIK, VERWAARLOZING, KNOEIEN OF ANDERE
OORZAKEN SCHADE OPLOOPT DIE NIET ONTSTAAT UIT MATERIAAL- OF
FABRIEKSFOUTEN. DEZE GARANTIE GELDT ALLEEN VOOR DE EERSTE KOPER.
Garantie-disclaimers: Eventuele geïmpliceerde garanties die uit deze verkoop
voortvloeien, inclusief maar niet beperkt tot de geïmpliceerde garanties van de
beschrijving, verkoopbaarheid en geschiktheid voor een bepaald doel, zijn beperkt
tot de bovengenoemde garantieperiode. In geen geval is de fabrikant aansprakelijk
voor gebruiksverlies van dit product of voor indirecte, bijzondere, incidentele of
resulterende schade, of kosten, of onkosten die door de klant of een andere
gebruiker van dit product opgelopen zijn, hetzij vanwege een contractbreuk,
nalatigheid, strikte aansprakelijkheid bij benadeling, hetzij anderszins. De fabrikant is
niet aansprakelijk voor eventueel persoonlijk letsel, schade aan eigendommen of
speciale, incidentele, onvoorziene of gevolgschade van enigerlei aard van gaslekken,
brand of explosie.
Deze garantie heeft geen invloed op uw statutaire rechten.
Garantieprestatie: Tijdens de bovengenoemde garantieperiode, wordt uw product
vervangen door een vergelijkbaar product als het defecte product port betaald
teruggestuurd wordt naar NL: De Raat Brandkasten, Edelgasstraat 5, 2718 SX
Zoetermeer. B+L: De Raat Brandkasten, Geelseweg 64, 2250 Olen (B) samen met het
aankoopbewijs. Doe er een briefje bij waarop het probleem beschreven wordt. De
garantie voor het vervangende product is geldig voor het restant van de
oorspronkelijke garantieperiode of voor zes maanden, welke het langste is. Afgezien
van de portokosten, worden er geen kosten in rekening gebracht voor het vervangen
van het defecte product.
Belangrijk: De achterplaat mag niet verwijderd worden. Als deze verwijderd is
wordt de garantie ongeldig.
Uw Nighthawk koolmonoxidealarm is geen vervanging voor een inboedel,
arbeidsongeschiktheids-, levensverzekering of andere verzekering. Het is
uw verantwoordelijkheid een geschikte verzekering af te sluiten. Raadpleeg
hiervoor uw verzekeringsadviseur.
61
Garantie
Benelux Guide 21/8/01 2:15 pm Page 61

Votre nouvelle alarme à l’oxyde de carbone (CO) Nighthawk est un
instrument sophistiqué qui a été conçu et testé avec soin pour
détecter le CO accumulé dans un environnement résidentiel. Votre
Nighthawk est spécifiquement conçu pour une utilisation à
l’intérieur du domicile.
L’oxyde de carbone est invisible, inodore et insipide et peut être fatal.
L’accumulation de CO dans le sang est appelée le niveau de
carboxyhémoglobine. Celui-ci interfère avec la capacité du corps à
s’alimenter en oxygène. En fonction de la concentration, l’oxyde de
carbone peut tuer en quelques minutes.
Les principales sources d’oxyde de carbone sont les appareils au gaz
utilisés pour la cuisine et le chauffage présentant des défauts de
fonctionnement, les véhicules dont le moteur est en marche dans un
garage, les cheminées ou les conduites bouchées, les chauffages
portables au fuel, les feux de cheminée, les outils alimentés à
l’essence ou les barbecues allumés à l’intérieur.
Les indications d’intoxication à l’oxyde de carbone incluent des
symptômes semblables à ceux de la grippe, mais sans fièvre. Les
autres symptômes incluent le vertige, la fatigue, la faiblesse, les maux
de tête, les nausées, les vomissements, l’assoupissement et la
confusion. Tout le monde est susceptible d’être en danger
d’intoxication au CO, mais les experts estiment que les bébés non
encore nés, les jeunes enfants, les femmes enceintes, les personnes
âgées et souffrant de problèmes respiratoires courent les risques les
plus importantes. Chaque année, un technicien qualifié doit inspecter
et nettoyer votre système de chauffage et de ventilation, les
cheminées, et les conduites.
Votre nouvelle alarme au CO Nighthawk bénéficie d’une garantie
limitée de 5 ans. Veuillez prendre quelques minutes pour lire avec
attention ce guide d’utilisation et vous familiariser avec le
fonctionnement de votre alarme. Votre alarme au CO Nighthawk a été
conçue pour détecter l’oxyde de carbone en provenance de TOUTES
les sources de combustion. Elle n’est PAS conçue pour détecter la
fumée, les incendies ou les autres gaz. Si vous avez des questions,
n’hésitez pas à appeler le +32 (0) 14 232 371.
Ce manuel et les produits décrits sont protégés par copyright, tous les
droits étant réservés. Dans le cadre des lois sur le copyright, ce
manuel ne peut être copié, partiellement ou en intégralité, sans
l’autorisation écrite préalable de KIDDE Safety. Si vous avez besoin
de plus d’informations, contactez notre service client par téléphone,
ou écrivez-nous à l’adresse suivante :
De Raat Brandkasten, Geelseweg 64, 2250 Olen (B).
64
Généralités sur l’oxyde de carbone
Généralités sur l’oxyde de carbone . .Page 64
Présentation produit Nighthawk . . .Pages 65-66
Installation rapide . . . . . . . . . . . . . . .Page 67
Instructions d’installation . . . . . . . .Pages 68-69
Installation
positions conseillées pour l’installation
Positions à éviter pour l’installation
Fonctionnalités et utilisation . . . . . . .Pages 70-77
Ecran numérique
Autres affichages possibles
Bouton de niveau maximum enregistré
Bouton de Test/Initialisation
Voyants
Indicateur de niveau de charge des piles (jauge
d’essence)
Etiquette de protocole
Installation/Remplacement des piles . . .Pages 78-79
Que faire lorsque l’alarme se
déclenche . . . . . . . . . . . . . . . . . . . . .Pages 80-81
Niveaux d’alarme/de danger . . . . . .Pages 82-85
Entretien de votre Nighthawk
Alarme au CO à alimentation à piles . . .Pages 86-87
Guide de dépannage . . . . . . . . . . . . .Page 88
Questions fréquemment posées . . . .Page 89
Caractéristiques produit . . . . . . . . . .Pages 90-91
Garantie . . . . . . . . . . . . . . . . . . . . . .Pages 92-93
63
FRANÇAIS
Table des matières
Nous vous remercions pour l’achat de la nouvelle
alarme à l’oxyde de carbone Nighthawk. Si vous avez
des questions sur l’utilisation ou l’installation de votre
alarme au CO, n’hésitez pas à nous appeler au
+32 (0) 14 232 371
Benelux Guide 21/8/01 2:15 pm Page 63

66
NIGHTHAWK
Test/
Reset
Peak
Level
Operate Alarm
PPM of CO
CARBON MONOXIDE
ALARM
Model No. 900-0089
Protections
fermées
ATTENTION : Des problèmes de fonctionnement sont
susceptibles de survenir si l’alarme est
altérée ou installée de manière non
conforme aux instructions du fabricant.
REMARQUE CETTE ALARME A L’OXYDE DE CARBONE
IMPORTANTE : N’EST PAS PREVUE POUR UNE UTILISATION
PORTABLE.
65
Présentation produit du Nighthawk
Protections
ouvertes
Affichage numérique
Affiche la concentration d'oxyde de carbone
dans l'air en parties par million. Affiche aussi "ERR"
si l'appareil présente un dysfonctionnement, et "Lb"
lorsque le niveau des piles est faible
(voir page 73 pour plus d'informations).
Indicateur de durée de
vie des piles
Voir page 76 pour
plus d'informations.
Alarme
L'alarme puissante de 85 décibels retentit
lorsque le détecteur capte des niveaux
dangereux d'oxyde de carbone.
Voir pages 80-85 pour plus d'informations.
Etiquette de protocole
Accessible en soulevant le panneau
supérieur. Vous indique la procédure
à suivre lorsque l'alarme se déclenche.
Voir page 77 pour plus d'informations.
Panneau inférieur
Panneau supérieur
Icône d'erreur du capteur
Voir page 73 pour
plus d'informations.
Local Emergency Number
If Reading/Alarm Occurs…
CAUTION
: See back
panel and/or Users Guide
for additional
information.
Alarm
Operate
Sensor
11 - 35 ppm
Ventilate your home –
monitor the unit for
rising CO levels.
100+ ppm
If no “flu-like” symptoms
are being experienced, follow
the previous procedures.
35 - 100 ppm
Ventilate your home –
call a qualified, service technician
to inspect for possible sources of
carbon monoxide.
If “flu-like” symptoms are
being experienced…
• Immediately evacuate the premises.
• Call 0800 111 999 or your local fire
department.
• Do not re-enter your home until the
problem is corrected.
Battery
Level
NIGHTHA
WK
Test/
Reset
Alarm
PPM of CO
CARBON MONOXIDE
ALARM
Peak
Level
Model No. 900-0089
Operate
Benelux Guide 21/8/01 2:15 pm Page 65

Fixation
Votre alarme au CO est conçue
pour être fixée sur un mur
intérieur.
Vous devez tout d’abord fixer au
mur la plaque de support
fournie, au moyen des vis et des
chevilles.
Une fois la plaque fixée, alignez
les emplacements à l’arrière du
détecteur avec les clavettes de la
plaque de support, en glissant en position vers le bas jusqu’à ce que
la languette s’enclenche sur le haut de l’alarme (voir figure 1).
Installez votre alarme au CO à 1,5 mètre du sol et à 2 mètres minimum
de l’appareil.
Pour démonter, pressez la languette contre le mur et soulevez l’alarme
de la plaque de fixation.
Position conseillée pour l’installation de
votre alarme au CO Nighthawk
Les suggestions ci-dessous sont destinées à vous aider au
positionnement et à l’installation de votre alarme au CO Nighthawk.
De manière idéale, vous avez besoin d’un détecteur dans ou à
proximité de chaque pièce contenant un appareil utilisant un
combustible.
Toutefois, si vous avez plus d’un de ces appareils mais un seul
détecteur, prenez en compte les éléments suivants lorsque vous
déterminez le meilleur endroit pour placer le détecteur.
Si un de ces appareils se trouve dans la pièce où vous dormez, placez
le détecteur dans cette pièce.
Si un de ces appareils se trouve dans une pièce que vous utilisez beaucoup
(par exemple un salon), placez le détecteur dans cette pièce.
Si vous vivez dans une seule pièce, placez le détecteur aussi loin que
possible des éléments de cuisine, mais près de l’endroit où vous
dormez.
Si l’appareil se trouve dans une pièce qui n’est généralement pas
utilisée (la pièce où se trouve le chauffe-eau par exemple), placez le
détecteur juste devant cette pièce pour vous permettre d’entendre plus
facilement l’alarme.
68
Instructions d’installation
Figure 1
Retirez les trois piles AA fournies et
installez-les dans le logement des
piles. Placez avec soin les
indicateurs rouges dans le logement
des piles. Respectez les indications
pour la polarité des piles situées au
fond du logement des piles. L’écran
doit afficher 888 (voir figure 1).
Au bout d’environ 30 secondes, le
888 affiché disparaît et un point
noir clignote à intervalles de cinq
secondes dans le coin inférieur
droit (voir figure 2).
Votre alarme au CO Nighthawk est
maintenant opérationnelle.
67
Installation rapide
Figure 2
Figure 1
REMARQUE IMPORTANTE :
Le temps de chauffe à partir de la mise sous tension est
d’une minute.
Benelux Guide 21/8/01 2:15 pm Page 67

Votre nouvelle alarme au CO Nighthawk à alimentation à piles
utilise des composants électroniques sophistiqués pour vous
protéger, vous et votre famille, des dangers du CO.
Ses fonctionnalités uniques comprennent notamment un écran
numérique capable d’afficher des niveaux de CO détectés toutes
les 30 secondes, les niveaux de CO maximum détectés, le niveau
de charge des piles, et l’état de santé du capteur. Familiarisezvous avec ces fonctionnalités :
Ecran numérique - affiche le niveau de CO en
PPM
Votre alarme au CO Nighthawk affiche en continu un niveau de
CO détecté en PPM (Parties Par Million). L’écran numérique est
capable de détecter et d’afficher des niveaux situés entre 30 et
999 (PPM). Un niveau de 0 PPM est à prévoir
dans des conditions normales (voir figure 5).
Vous vous habituerez à jeter un œil sur l’écran,
de la même manière que vous regardez un
thermomètre ou une horloge. L’alarme n’affiche cependant pas
les niveaux inférieurs à 30 PPM.
Reportez-vous aux pages 86-89 afin de connaître les
niveaux de CO dangereux.
70
Fonctionnalités et utilisation
Figure 5
Positions à éviter pour l’installation de
votre alarme au CO Nighthawk
• A l’extérieur du bâtiment.
• Dans ou sous un placard.
• Dans une zone humide.
• Directement au-dessus d’un évier ou d’un four.
• A proximité d’une porte, d’une fenêtre ou dans tout
endroit où les courants d’air risquent d’en affecter le
fonctionnement.
• Là où elle risque d’être obstruée par des rideaux ou des
meubles.
• Dans une zone où la température est susceptible de passer
au-dessous de -4,4°C ou au-dessus de 37,8°C.
• Dans un endroit où de la poussière est susceptible de
boucher le capteur et de l’empêcher de fonctionner.
• Dans un endroit où elle pourrait facilement être
endommagée, ou là où elle pourrait être éteinte ou
démontée par erreur.
69
Instructions d’installation (suite)
Benelux Guide 21/8/01 2:15 pm Page 69

Affichage du niveau maximum (suite)
Des concentrations de CO comprises entre 0 et 30 PPM surviennent
souvent dans des conditions normales. Des concentrations de CO
inférieures à 30 PPM sont aussi susceptibles d’indiquer un état transitoire
qui pourrait ne jamais se reproduire. Voici quelques exemples
d’environnements et/ou de sources susceptibles de provoquer des
niveaux de CO limités : un trafic automobile important, un véhicule dont
le moteur est allumé dans un garage, un dispositif émettant du CO lors de
la mise en route, un feu de cheminée ou du charbon dans un barbecue
situé à proximité. Une inversion de température est aussi susceptible de
bloquer du CO généré par le trafic et d’autres appareils à combustibles,
ce qui peut entraîner la détection de quantités limitées de CO.
D’une manière générale, l’écran numérique affiche “0”, et il est possible
que des niveaux de 30 ou plus soient détectés pour une période limitée.
En utilisant la fonctionnalité d’affichage du niveau maximum enregistré de
votre alarme au CO Nighthawk, vous avez la possibilité de voir les
niveaux de concentration de CO enregistrés les plus élevés.
72
Fonctionnalités et utilisation (suite)
Autres affichages possibles et leur signification
Les symboles suivants apparaissent sur l’affichage en cours de
fonctionnement normal ou en cas d’erreur. Leur signification est
décrite ci-dessous.
Fonctionnement normal
Fonctionnement normal (voir figure 6) avec
piles pleines. Le point situé dans le coin
inférieur droit s’allume et s’éteint toutes les cinq
secondes. Si du CO est détecté, l’écran en
indiquera la quantité en PPM (parties par
million).
Fonctionnement normal après la mise sous tension ou
l’initialisation
La figure 7 indique l’écran normal qui s’affiche
immédiatement après l’installation des piles ou une
fois que le bouton de test/initialisation a été activé.
L’écran doit passer en mode normal (voir figure 7)
environ 30 secondes après que le bouton de
test/initialisation ait été activé (voir Bouton de
Test/Initialisation à la page 79).
Si le bouton de test/initialisation est activé, l’alarme se déclenche.
L’écran affiche un chiffre pendant toute la durée de l’alarme. Ce
chiffre est un élément normal de la fonction de test : il n’indique
en aucun cas un niveau de CO. Ignorez ce chiffre au cours de
la procédure de test/initialisation.
Affichage du niveau maximum enregistré
Lorsque le bouton de niveau maximum est maintenu enfoncé,
l’écran affiche le niveau de CO maximum
enregistré par l’alarme au CO depuis la dernière
initialisation du niveau maximum ou depuis la
dernière mise sous tension. L’indicateur de niveau
des piles n’affiche plus que le segment supérieur
des piles afin d’indiquer que c’est le niveau
maximum enregistré qui est affiché (voir figure 8). Dans cet
exemple, la quantité maximum de CO enregistrée depuis la
dernière initialisation était de 120 PPM (voir Niveau d’alarme/de
danger aux pages 86-89).
Bien que la fonctionnalité d’affichage du niveau maximum
enregistré puisse afficher des niveaux inférieurs à 30 PPM, ces
niveaux n’entraîneront pas le déclenchement de l’alarme, quelle
que soit la durée pour laquelle le système y est exposé.
71
Fonctionnalités et utilisation (suite)
Figure 6
Figure 7
Figure 8
Benelux Guide 21/8/01 2:15 pm Page 71

Bouton de niveau maximum enregistré
Lorsque le bouton de niveau
maximum enregistré est activé (voir
figure 13), l’indicateur de niveau des
piles n’affiche plus que le segment
supérieur des piles afin d’indiquer que
c’est le niveau maximum enregistré
qui est affiché (voir figure 8). Le
niveau de CO affiché est le niveau maximum détecté par le
dispositif depuis la dernière initialisation ou la dernière mise sous
tension.
Pour plus d’informations sur l’affichage du niveau maximum
enregistré, reportez-vous aux pages 75.
Initialisation du niveau maximum enregistré
Afin d’initialiser ou d’effacer le niveau maximum enregistré,
maintenez enfoncé le bouton de niveau maximum enregistré et
maintenez enfoncé le bouton de test/initialisation en même
temps. Le chiffre affiché à l’écran repasse à 0 PPM.
Remarque : Le niveau maximum enregistré est aussi
initialisé lorsque les piles sont retirées.
Figure 13
74
Fonctionnalités et utilisation (suite)
P
eak
L
evel
Alarm
Problèmes de fonctionnement du
capteur
L’appareil doit être remplacé.
Voir figure 9.
Remplacer les piles ou Erreur Piles
Si la Figure 10 ou 11 s’affiche, il est nécessaire
de remplacer les piles — notez l’indicateur de
niveau zéro des piles sur l’écran (voir
Replacement/Installation des piles aux pages
82-83).
Affichage des problèmes de
fonctionnement
Le dispositif a subi un problème de
fonctionnement (voir figure 12) (reportez-vous
à la section Dépannage à la page 92).
L’indicateur de niveau des piles peut indiquer
un niveau quelconque.
73
Fonctionnalités et utilisation (suite)
Figure 9
Figure 10
Figure 11
Figure 12
ou
Benelux Guide 21/8/01 2:15 pm Page 73

Voyants
Voyant d’alarme rouge
Le voyant rouge clignotant
accompagné d’un léger son de
l’alarme indique qu’il est nécessaire
de remplacer les piles, ou que
l’alarme a subi un problème de
fonctionnement (voir figure 15). Une
pulsation rapide de l’alarme
indique la présence d’oxyde de carbone. Reportez-vous à la
section Que faire lorsque l’alarme se déclenche aux pages 8586 pour obtenir des instructions sur la procédure à suivre.
Voyant de bon fonctionnement vert
Le voyant vert indique que l’alarme
fonctionne correctement (voir figure
16). Le voyant vert clignote toutes les
30 secondes pour indiquer que la
présence de CO est recherchée, et
lorsqu'un bouton est activé.
Indicateur de niveau des piles
L’icône des piles apparaît dans le coin inférieur gauche de l’écran
de l’alarme au CO ; elle indique le niveau de charge des piles.
L’icône est divisée en trois segments et affiche avec précision :
1. Piles chargées
- les trois segments de l’indicateur
sont noirs.
2. Piles chargées aux 2/3
- Deux des trois segments
sont noirs.
3. Piles chargées à 1/3
- Un seul des trois segments est
noir.
4. Piles déchargées - Reportez-vous à la section
Installation/Remplacement des piles pages 82-83.
Figure 16
Figure 15
76
Fonctionnalités et utilisation (suite)
Peak
Level
Alarm
Test/
Reset
Operate
Bouton de Test/Initialisation
Le bouton de test/initialisation est utilisé pour tester le circuit
électronique de l’appareil et pour le réinitialiser en cours
d’alarme.
Test de l’alarme
Pour tester l’appareil, appuyez sur le bouton de test/initialisation
(voir figure 14) Testez votre alarme une fois par semaine !
Remarque : Une fois que le bouton de test/initialisation a
été activé, des chiffres apparaissent sur l’écran. Il ne s’agit
pas de niveaux de CO, mais d’éléments d’un processus de
contrôle interne. Ignorez ces chiffres !
Une fois que vous avez appuyé sur le
bouton de test/initialisation, l’alarme
affiche puis d’autres chiffres,
avant de repasser en mode de
détection.
En raison de la puissance de l’alarme,
nous vous conseillons de placer les
doigts sur le haut-parleur lorsque vous testez votre alarme au CO
Nighthawk.
Familiarisez-vous, ainsi que les membres de votre famille, avec le
son de l’alarme. Une alarme au CO émet des pulsations rapides.
Ce cycle se répète et continue pendant les 4 premières minutes
d’une alarme au CO, avant de passer à un cycle toutes les
minutes, jusqu’à ce que l’alarme soit initialisée ou que le CO soit
éliminé.
Initialisation
Si l’alarme se déclenche, appuyez sur le bouton de
test/initialisation pour l’arrêter. Si le niveau de CO qui a
provoqué le déclenchement de l’alarme se prolonge, celle-ci se
réactive. Si l’alarme au CO se réactive sous six minutes, c’est
qu’elle détecte un niveau de CO élevé susceptible de rapidement
devenir dangereux.
Si une telle situation survient, suivez les instructions de la section
Que faire lorsque l’alarme se déclenche, aux pages 85-86 Les
délais de réactivation dépendent de la quantité de CO qui a
provoqué la première alarme, et de la quantité de CO présente
après l’initialisation.
75
Fonctionnalités et utilisation (suite)
Test/
Reset
P
Operate
Figure 14
Benelux Guide 21/8/01 2:15 pm Page 75

Dans la mesure où l’alarme n’est pas équipée de piles en usine,
vous devez les installer. Vous devez aussi remplacer les piles
lorsque l’écran indique “niveau des piles faible” ou .
Notez que l'indicateur des piles est vide. L’alarme vous indiquera
qu’il faut remplacer les piles en émettant un son léger toutes les
30 secondes pour une durée allant jusqu’à sept jours. Chacune
de ces émissions de son est accompagnée d’un clignotement du
voyant rouge.
Remarque : Votre alarme au CO Nighthawk ne contrôle
PAS les niveaux de CO lorsque le message “niveau des piles
faible” ou le message d’erreur est affiché.
Trois piles AA sont fournies lors de l’achat. Lors du
remplacement, nous vous recommandons les piles suivantes
pour une durée de fonctionnement sans problème minimum
d’un an :
• Duracell MN1500 • Camelion Mignon LR6-AM3-1.5
• Energizer E91 • Rayovac 815
Ces piles peuvent être achetées auprès de votre revendeur local.
78
Installation/Remplacement des piles
Etiquette de protocole
La protection supérieure de votre alarme s’ouvre en
coulissant pour exposer un ensemble d’instructions utiles
en cas d’alerte au CO.
77
Fonctionnalités et utilisation (suite)
Local Emergency Number
If Reading/Alarm Occurs…
CAUTION
: See back
panel and/or Users Guide
for additional
information.
Alarm
Operate
Sensor
810-1058
REV. A
11 - 35 ppm
Ventilate your home –
monitor the unit for
rising CO levels.
100+ ppm
If no “flu-like” symptoms
are being experienced, follow
the previous procedures.
35 - 100 ppm
Ventilate your home –
call a qualified, service technician
to inspect for possible sources of
carbon monoxide.
If “flu-like” symptoms are
being experienced…
• Immediately evacuate the premises.
• Call 0800 111 999 or your local fire
department.
• Do not re-enter your home until the
problem is corrected.
Battery
Level
Benelux Guide 21/8/01 2:15 pm Page 77

Lorsque l’alarme détecte un niveau de CO dangereux, le
dispositif émet une puissante alarme. Le son de l’alarme est
constitué de pulsations rapides. Cette alarme dure 4 minutes
après la détection du CO, puis le cycle se répète toutes les
minutes. Soyez prêt à réagir à une alerte au CO. Relisez
régulièrement ce guide d’utilisation et parlez-en avec tous les
membres de votre famille.
QUE FAIRE LORSQUE L’ALARME SE DECLENCHE
1) Ouvrez les portes et les fenêtres pour ventiler.
2) Eteignez l’appareil lorsque cela est possible et arrêtez de
l’utiliser.
3) Evacuez le logement en laissant les portes et les fenêtres
ouvertes. Une alarme verrouillée devra être initialisée
conformément aux instructions de l’utilisateur.
4) Appelez votre fournisseur de gaz au numéro indiqué
dans votre annuaire.
5) Ne retournez pas dans le logement tant que l’alarme ne
s’est pas arrêtée de sonner.
6) Faites immédiatement consulter par un médecin toute
personne souffrant des symptômes d’une intoxication
au CO (maux de tête, nausée), et indiquez que vous
suspectez une intoxication à l’oxyde de carbone.
7) Ne réutilisez pas l’appareil tant qu’il n’a pas été contrôlé
par un professionnel.
80
Que faire lorsque l’alarme se déclenche.
▲
!
ATTENTION: Le déclenchement de
votre alarme au CO indique la présence
d’oxyde de carbone (CO), qui est
susceptible d’entraîner la mort.
Installation/Remplacement des piles
Pour installer ou remplacer les piles de votre alarme Nighthawk,
suivez la procédure suivante :
1. Ouvrez doucement la
partie basse de la
protection frontale afin
de mettre à jour le
logement des piles.
2. Retirez les piles
usagées et mettez-les
au rebut en respectant
les instructions du
fabricant (voir figure
17).
3. Installez les nouvelles piles, en faisant attention de
placer les indicateurs rouges dans le repli du
logement. Notez par ailleurs l’illustration de la polarité
au fond du logement des piles. L’alarme émet un petit
son et affiche pendant environ une minute avant
de repasser en mode de fonctionnement normal.
4. Refermez doucement la protection inférieure. La
protection inférieure de votre alarme au CO ne se
ferme PAS si trois piles AA ne sont pas installées.
79
Installation/Remplacement des piles
(suite)
NIGHTHA
WK
Test/
R
eset
Operate
P
e
ak
L
eve
l
Alarm
C
ARBO
N
M
ONO
XIDE
ALARM
Figure 17
Benelux Guide 21/8/01 2:15 pm Page 79

L’exposition à des niveaux élevés d’oxyde de carbone peut
être fatale ou provoquer des dommages ou des
incapacités de nature irréversible.
De nombreuses victimes d’une intoxication à l’oxyde de carbone
indiquent que bien qu’elles aient été conscientes de ne pas se
sentir bien, elles étaient si désorientées qu’elles étaient
incapables de sortir des bâtiments ou d’appeler de l’aide. Si vous
ressentez certains des symptômes d’une intoxication à l’oxyde de
carbone, consultez immédiatement votre médecin ! L’intoxication
au CO peut être détectée par un simple test sanguin qu’on
appelle test de carboxyhémoglobine. Les cas graves peuvent
nécessiter un traitement en caisson hyperbare. Souvenez-vous :
les jeunes enfants et les animaux familiers sont souvent les
premiers affectés.
Si vous avez d’autres questions, n’hésitez pas à nous
appeler au +32 (0) 14 232 371
82
Niveaux d’alarme/de danger
Avertissement : Cette alarme au CO indique uniquement la
présence de CO au niveau du capteur. Du CO est susceptible
d’être présent dans d’autres zones.
Symptômes communs d’une exposition légère :
Léger mal de tête, nausée, vomissements, fatigue
(symptômes similaires à ceux de la grippe).
Symptômes communs d’une exposition moyenne :
Violents maux de tête, somnolence, confusion, rythme cardiaque accéléré.
Symptômes communs d’une exposition extrême :
Convulsions, évanouissements, dysfonctionnement cardiaque ou des
poumons. Des dommages au cerveau peuvent être provoqués de même que
la mort. De nombreux cas signalés D’INTOXICATION À L’OXYDE DE
CARBONE indiquent que bien que les victimes soient conscientes de ne pas
se sentir bien, elles sont si désorientées qu’elles sont incapables de sortir des
bâtiments ou d’appeler de l’aide. Ce sont souvent les jeunes enfants et les
animaux de compagnie qui sont les premiers affectés.
Il est important de vous familiariser avec les effets de chaque
niveau. Les symptômes décrits dans le tableau ci–dessus sont liés
à l’intoxication à l’oxyde de carbone et vous devez en parler avec
TOUS les membres de votre famille.
81
Que faire lorsque l’alarme se déclenche
(suite)
Niveaux d’alarme/de danger
Benelux Guide 21/8/01 2:15 pm Page 81

Niveaux élevés :
Un niveau de 100 PPM sans qu’aucun des membres du foyer ne
présente de symptômes est considéré comme un niveau
d’exposition élevé. La seule différence entre ce niveau et un
niveau dangereux est constituée par le fait qu’aucun symptôme
n’est présente.
Une telle situation peut rapidement devenir très grave !
Toutes les sources possibles de CO doivent immédiatement être
désactivées et un professionnel qualifié doit être consulté.
Ventilez les lieux en ouvrant les portes et les fenêtres. A un tel
niveau, il est conseillé d’attendre à l’extérieur ou chez un voisin
pendant que votre résidence est ventilée. Ne remettez en marche
aucune source possible de CO avant que le problème n’ait été
résolu.
Niveaux dangereux :
Généralement, des niveaux de 100 PPM et plus accompagnés
de symptômes sont considérés comme étant dangereux.
Réunissez immédiatement tous les résidents, sortez du domicile,
et appelez le numéro d'urgence !
Les symptômes indiquent qu’une telle situation doit être
considérée comme une urgence. Il s’agit d’une situation
susceptible de provoquer des décès !
Restez dans un endroit en plein air et ne retournez en aucun cas
à l’intérieur avant que le domicile ait été ventilé et que la source
de l’alerte au CO ait été réparée.
84
Niveaux d’alarme/de danger (suite)
Niveaux faibles :
Généralement, un niveau de 35 PPM ou moins est considéré
comme une exposition de niveau faible. Une exposition à de
faibles niveaux de CO sur de longues durées peut malgré tout
être dangereuse et entraîner des pertes d’énergie, des maux de
tête, etc. Une telle situation doit être bien contrôlée. Faites
particulièrement attention de ne pas exposer de personnes à
risque, même à des niveaux faibles, pour des périodes de plus
de huit heures. Dans certains cas, des niveaux limités peuvent
être entraînés par la pollution de l’air, un trafic routier intense, la
fumée de cigarettes, des inversions de température ou d’autres
sources.
Niveaux moyens :
Généralement, un niveau de 35 PPM-100 PPM est considéré
comme une exposition de niveau moyen. Les niveaux de ce type
doivent être pris très au sérieux car ils peuvent entraîner de
graves problèmes de santé. Toutes les sources possible de CO
doivent immédiatement être désactivées et un professionnel
qualifié doit être consulté. Ventilez les lieux en ouvrant les portes
et les fenêtres. Ne remettez en route aucune source possible
avant que le problème n’ait été résolu. vérifiez qu’aucune des
personnes résidant dans les lieux ne présente de symptômes !
Si aucun symptôme n’est constaté, on considère qu’il ne
s’agit pas d’une situation d’urgence à l’oxyde de carbone,
mais il convient toutefois d’être prudent.
83
Niveaux d’alarme/de danger (suite)
Benelux Guide 21/8/01 2:15 pm Page 83

Afin de maintenir votre alarme au CO en bon état de
marche, veuillez suivre ces quelques étapes :
• Contrôlez le bon état de l’alarme, des voyants et des
piles en appuyant sur le bouton de test une fois par
semaine.
• Passez l’aspirateur sur l’alarme au CO avec une
extension à brosse douce une fois par mois afin
d’éliminer la poussière accumulée.
• Dites aux enfants de ne jamais jouer avec l’alarme au
CO. Avertissez les enfants des dangers d’une
intoxication à l’oxyde de carbone.
• N’utilisez jamais de détergents ou d’autres solvants
pour nettoyer l’alarme au CO.
• Evitez d’utiliser des bombes aérosol (laque, peinture,
désodorisant ou autres) à proximité de l’alarme.
• Ne peignez pas l’alarme au CO. La peinture
boucherait les aérations et empêcherait le capteur de
détecter l’oxyde de carbone.
• Ne placez pas l’alarme à proximité d’une table à
langer.
86
Entretien de votre Alarme au CO
Nighthawk à alimentation à piles
Le tableau ci-dessus concerne des adultes en bonne santé. Les
niveaux différents pour les personnes à haut risque. Les personnes
souffrant de problèmes de santé peuvent envisager d’utiliser des
systèmes de détection sensibles à des niveaux de CO plus faibles.
Cette alarme au CO est conforme aux normes de temps de
réaction BSI 7860. Les délais d’alarme standard sont les suivants:
A 45 PPM, le système ne doit pas se déclencher avant 60
minutes. A 150 PPM, le système doit se déclencher sous 10-30
minutes. A 350 PPM, le système doit se déclencher sous
6 minutes.
ATTENTION : Il est possible que ce système ne se déclenche pas
avec des niveaux d’oxyde de carbone trop faibles. Le HSE
(Organisme Hygiène et Sécurité) a établi qu’une exposition
continue à des niveaux de 50 PPM ne doit pas excéder une
période de 8 heures.
85
Niveaux d’alarme/de danger (suite)
La concentration maximum autorisée lors
d’une exposition continue pour des adultes
en bonne santé sur une période quelconque
de 8 heures, selon le HSE*.
Léger mal de tête, fatigue, vertige, nausée
après 2-3 heures.
Maux de tête frontaux sous 1-2 heures, risque
de décès au bout de 3 heures.
Vertige, nausée and convulsions sous 45
minutes. Inconscience sous 2 heures. Décès
sous 2-3 heures.
Maux de tête, vertige et nausée sous 20
minutes. Décès sous 1 heure.
Maux de tête, vertige et nausée sous 5-10
minutes. Décès sous 25-30 minutes.
Maux de tête, vertige et nausée sous 1-2
minutes. Décès sous 10-15 minutes.
Décès sous 1-3 minutes.
50 ppm
200 ppm
400 ppm
800 ppm
1600 ppm
3200 ppm
6400 ppm
12.800 ppm
Concentration de
CO dans l’air
(ppm = parties par
million)
Durée approximative d’inhalation et
symptômes
* Health and Safety Executive
(Or
ganisme Hygiène et Sécurité)
Benelux Guide 21/8/01 2:15 pm Page 85

88
Guide de dépannage
Symptôme Problème Action
L’alarme affiche un
symbole de pile vide
et une indication Lb.
L’alarme émet
un léger son toutes
les 30 secondes.
Les piles sont
déchargées et
doivent être
remplacées.
Reportez-vous à la
page 78.
Avertissement de
piles déchargées.
Reportez-vous aux
pages 82-83.
Installation/
Remplacement des
piles.
L’appareil indique un
symbole de piles
vides et affiche Err.
L’alarme émet
un petit son toutes les
30 secondes
Un problème a été
détecté au niveau
des piles.
Reportez-vous à la
page 79.
Avertissement de
piles déchargées.
Reportez-vous aux
pages 82-83.
Installation/
Remplacement des
piles.
L’appareil affiche
l’icône de
remplacement du
capteur et indique Err
comme niveau de CO
(le symbole de niveau
de charge des piles
peut indiquer tout
type de charge).
L’alarme émet
un léger son toutes
les 30 secondes
Une panne de
capteur a été
détectée.
Problème de
fonctionnement du
capteur.
Ecran vide, alarme et
voyant rouge en
permanence.
Panne de
microprocesseur.
L’appareil
a subi une panne.
L’écran affiche Err et
la pile est à un
niveau de charge
quelconque excepté
vide.
L’alarme émet
un léger son toutes
les 30 secondes
Non identifié
Retirez les piles et
remettez-les en place.
Si Err continue, c’est
que l’appareil a subi
une panne.
Reportez-vous aux
pages 98-99 pour les
infor
mations sur la
garantie.
Déplacez votre alarme et placez-la dans un autre endroit avant
d’effectuer l’une des opérations suivantes :
• Coloration ou décapage des parquets ou des meubles
• Peinture
• Papier peint
• Utilisation d’adhésifs
La conservation de l’appareil dans un sac plastique au cours des
opérations indiquées ci-dessus permettra de protéger le capteur
de dommages irréversibles.
ATTENTION : Dès que possible, replacez l’alarme au CO
dans sa position adéquate afin de garantir une protection
continue contre les intoxications à l’oxyde de carbone.
Lorsque des produits ménagers ou des contaminants de ce
type sont utilisés, il convient de bien ventiler la pièce.
Les substances ci-dessous sont susceptibles d’affecter le
capteur et peuvent falsifier les résultats :
Méthane, propane, isobutane, isopropanol, éthylène, benzène,
toluène, acétate d’éthyle, hydrogène sulfuré, oxydes sulfureux,
produits à base d’alcool, peintures, fluidifiants, solvants,
adhésifs, laques, après-rasages, parfums, ainsi que certains agents
nettoyants.
87
Entretien de votre Alarme au CO
Nighthawk à alimentation à piles
(suite)
Benelux Guide 21/8/01 2:15 pm Page 87

Alimentation : Trois piles AA (fournies)
Capteur : Capteur électrochimique d’oxyde de
carbone
Taux d’humidité : 10% à 90% d’humidité relative (sans
condensation)
Précision : +/- 20% + 15 PPM
Température : Température de fonctionnement de
4,4°C à 37,8°C
Fixation : Les accessoires sort livrés pour
effectuer le montage.
Alarme : Alarme à pulsations 85+ dB à 10’ @ 3,4
± 0,5 KHz
Diode électroluminescente : • Voyant rouge clignotant toutes les 30
secondes accompagné par un léger
bruit de l’alarme indiquant un
problème dans le système
• Voyant vert clignotant toutes les 30
secondes indiquant un fonctionnement
correct
• Pulsations du voyant rouge indiquant
la présence de CO
Ecran à cristaux
liquides : • Affichage numérique 30-999 PPM
• Indicateur de niveau de charge des piles
• Icône d’indication de
dysfonctionnement du capteur
Remplacement
des piles : L’alarme affiche Err ou Lb et un
indicateur vide. Remplacez les trois
piles AA avec des piles de l’une des
marques agréées suivantes.
• Duracell MN1500
• Energizer E91
• Camelion Mignon LR6-AM3-1.5
• Rayovac 815
90
Caractéristiques produit
Q.
Combien d’alarmes au CO dois-je installer chez
moi ? Combien de mètres carrés recouvre une
alarme au CO ?
R.
Nous vous recommandons de placer des alarmes au CO à
proximité des zones où des personnes dorment. Si vous vivez dans
un logement à plusieurs étages, placez une alarme au CO à
chaque étage. Une bonne indication pour les alarmes au CO est
d’en installer une à côté de chaque alarme à la fumée installée
pour respecter les réglementations actuelles.
D’un manière générale, une alarme au CO est suffisante pour
300 m
2
d’espace d’habitation. L’élément le plus important à
prendre en compte pour déterminer le nombre d’alarmes à
installer est le fait qu’une alarme puisse être entendue dans toutes
les pièces où des personnes dorment.
Q.
Dois J’appuyer sur le bouton de test pour obtenir
une mesure du niveau de CO
?
R.
Non. Votre alarme au CO Nighthawk contrôle en
permanence la présence de CO dans l’air. Le niveau est ainsi
détecté et indiqué toutes les 30 secondes. Si l’appareil ne détecte
pas de CO, l’écran numérique affiche un zéro. L’alarme au CO
vous alerte automatiquement en cas de présence de CO. Pour
tester les composants et les circuits internes de votre alarme au
CO, appuyez sur le bouton de test/initialisation.
89
Questions fréquemment posées
Benelux Guide 21/8/01 2:15 pm Page 89

PORTÉE DE LA GARANTIE : LE FABRICANT GARANTIT À L’ACHETEUR
D’ORIGINE QUE CETTE ALARME EST EXEMPTE DE DÉFAUT DE PIÈCES OU DE
MAIN D’ŒUVRE POUR UNE DURÉE DE CINQ (5) ANS À PARTIR DE LA DATE
D’ACHAT. LA RESPONSABILITÉ DU FABRICANT EST LIMITÉE AU
REMPLACEMENT DU PRODUIT, À LA RÉPARATION DU PRODUIT OU AU
REMPLACEMENT DU PRODUIT PAR UN PRODUIT RÉPARÉ, À LA DISCRÉTION DU
FABRICANT. CETTE GARANTIE SERA ANNULÉE SI LE PRODUIT A ÉTÉ
ENDOMMAGÉ PAR ACCIDENT, SUITE À UNE UTILISATION DÉRAISONNABLE,
UNE NÉGLIGENCE, UNE ALTÉRATION OU UNE AUTRE CAUSE NE RÉSULTANT
PAS D’UN DÉFAUT DE PIÈCES OU DE MAIN D’ŒUVRE. CETTE GARANTIE EST
UNIQUEMENT VALABLE POUR L’ACHETEUR D’ORIGINE DU PRODUIT.
Limitations de la garantie : Toute garantie implicite découlant de cette vente, soit,
entre autres, les garanties tacites de description, de capacité de commercialisation et
d’adaptation à un objectif particulier, est limitée en durée à la période de garantie cidessus. Le fabricant ne sera en aucun cas responsable de toute perte liée à
l’impossibilité d’utiliser ce produit ou de tout dommage indirect, spécial, fortuit ou
conséquent, ou des coûts et dépenses engagés par le client ou tout autre utilisateur
du produit, que ce soit pour rupture du contrat ou négligence, dommage causé par
négligence stricte ou autre. Le fabricant ne sera responsable d’aucun dommage
corporel ou matériel, ou de tout dommage spécial, fortuit, contingent ou conséquent
de toute sorte, résultant d’une fuite de gaz, d’un incendie ou d’une explosion.
Cette garantie n’affecte en aucun cas vos droits légaux.
Exécution de la garantie : Au cours de la période de garantie définie ci-dessus, votre
produit sera remplacé par un produit comparable si le produit défectueux est
retourné, port payé, à De Raat Brandkasten, Geelseweg 64, 2250 Olen (B),
accompagné d’une preuve de date d’achat. Veuillez inclure une description du
problème rencontré lorsque vous retournez l’alarme. Le produit de remplacement
sera sous garantie pour la durée restante de la période de garantie originale ou pour
une durée de six mois minimum. Les frais d’expédition exceptés, le produit
défectueux sera remplacé sans frais pour le client.
Important : Ne démontez pas la protection arrière. Le démontage de la protection
arrière entraînerait l’annulation de la garantie.
Votre alarme à l’oxyde de carbone Nighthawk ne remplace en aucun cas une
assurance d’aucune sorte, que ce soit une assurance sur les biens, une assurance
invalidité ou une assurance vie. La responsabilité d’une couverture adéquate par
une assurance vous incombe. Consultez votre assureur.
92
Garantie
Dysfonctionnement
de l’alarme : Message Err avec icône du capteur
affichée - panne de capteur
Message Err avec indicateur de pile vide
affiché - les piles doivent être remplacées
Bouton de Test/
Initialisation : Le bouton de Test permet de contrôler
le bon fonctionnement de l’alarme.
Niveau maximum
enregistré : Lorsqu’on appuie sur ce bouton, l’écran
affiche le segment supérieur de l’icône
des piles ainsi que le niveau de CO
maximum détecté en PPM depuis la mise
sous tension de l’appareil ou depuis la
dernière initialisation du système. Ce
niveau est mis en mémoire jusqu’à ce
que les piles soient retirées/déchargées
ou jusqu’à ce que les boutons de
test/initialisation et de niveau maximum
enregistré soient simultanément activés.
Taille et poids : 14 cm de diamètre x 3,6 cm de
profondeur/300 g piles comprises
Garantie : Garantie limitée cinq ans à partir de la
date d’achat contre tout défaut de pièces
ou main d’œuvre sur l’alarme au CO.
Durée de vie des
piles : Lorsque l’alarme est activée, les piles
durent 405 heures.
91
Caractéristiques produit
Benelux Guide 21/8/01 2:15 pm Page 91

94
Enregistrement à la garantie
Afin de vous enregistrer à la garantie usine 5 ans, veuillez remplir la carte
d’enregistrement à la garantie et l’envoyer par la poste en y apposant les
timbres adéquats. Si vous le souhaitez, vous pouvez placer la carte de
garantie dans une enveloppe.
Utilisez l’adresse ci-dessous pour l’enregistrement
pour la garantie et toute autre correspondance :
De Raat Brandkasten, Geelseweg 64, 2250 Olen (B)
Les informations concernant la garantie sont situées au dos de l’alarme au
CO. Pour votre confort, veuillez remplir les informations relatives à la
garantie avant d’installer l’alarme au CO.
Le numéro de modèle et le numéro de série se trouvent aussi sur l’étiquette
située au dos de l’alarme au CO.
Pour une réparation dans le cadre de la garantie :
Dans la plupart des cas, la meilleure manière d’échanger votre
alarme au CO est de la ramener sur le lieu d’achat d’origine. En
cas de questions, appelez-nous au +32 (0) 14 232 371
93
Si vous avez des questions au sujet de votre alarme à l’oxyde de
carbone, veuillez appeler le +32 (0) 14 232 371
Merci d’avoir les informations ci-dessous à votre disposition lorsque vous appelez :
CO Numéro du modèle de l’alarme (indiqué au dos de l’alarme) :
CO Numéro de série de l’alarme (indiqué au dos de l’alarme) :
Date de fabrication (indiquée au dos de l’alarme) :
Date d’achat :
Lieu d’achat :
Benelux Guide 21/8/01 2:15 pm Page 93

Battery Operated
Carbon Monoxide Alarm
BS 7860 1996
Fonctionnement à piles
Alarme à l’oxyde
de carbone
900-0089 Guide d’utilisation
Alarme au CO à piles avec écran numérique et
mémoire de niveau maximum
Op batterijen
Koolmonoxidealarm
900-0089 User’s Guide
Battery Operated CO Alarm
With Digital Display and Peak Level Memory
900-0089 Gebruikersgids
CO-alarm op batterijen Met digitaal scherm
en geheugen voor piekgehaltes
810-1413 REV A 05/00
Custom Assembled in Mexico with U.S. and Foreign Components.
MEMBER OF COGDEM
Mathisen Way, Colnbrook, Colnbrook, Slough, Berkshire SL3 0HB
Telephone 01753 685148 Fax 01753 685096
www.kiddesafetyeurope.co.uk
• e-mail: info@kiddesafety.co.uk
Benelux Guide 21/8/01 2:15 pm Page 96
 Loading...