

Page 1
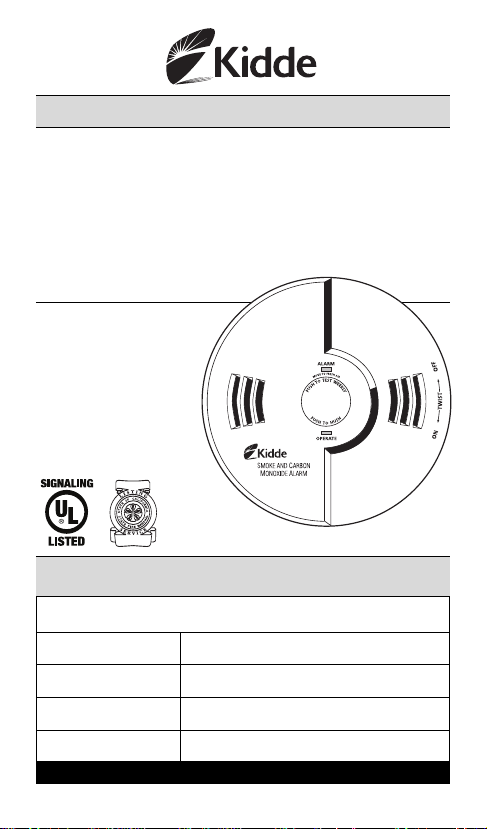
User’s Guide for Models KN-COSM-I and KN-COSM-IB
Combination
Smoke and
Carbon Monoxide
Alarm
• 120V AC
• 9V Battery Backup
(model KN-COSM-IB)
• 2-LED Display
• Peak Level Memory
®
• Hush
• Voice Message System
For questions concerning your Smoke and Carbon Monoxide
Alarm, please call our Consumer Hotline at 1-800-880-6788.
For your convenience, write down the following information. If you call
our consumer hotline, these are the first questions you will be asked:
Alarm Model Number
(located on back of the alarm):
Date of Manufacture
(located on back of the alarm):
Date of Purchase:
Where Purchased:
READ AND SAVE THIS USER’S GUIDE
Manual P/N 810-1512 Rev. H
Page 2

Table of Contents
Introduction . . . . . . . . . . . . . . . . . . . . . . . . . . . . Page 1
Product View . . . . . . . . . . . . . . . . . . . . . . . . . . . Pages 2-3
Features . . . . . . . . . . . . . . . . . . . . . . . . . . . . . . . . Pages 4-7
Installation Instructions
Step 1: Installation Instructions:
A. Recommended Installation Locations . . Pages 8-10
B. Where Not to Install . . . . . . . . . . . . . . . Page 10
Step 2: Wiring Instructions . . . . . . . . . . . . . . . . Page 11-12
Step 3: Mounting Instructions.. . . . . . . . . . . . . . Page 13-14
Step 4: Testing the Alarm. . . . . . . . . . . . . . . . . . Page 14
Operating Instructions
Interconnect Feature . . . . . . . . . . . . . . . . . . . . . Page 15
HUSH Control Feature . . . . . . . . . . . . . . . . . . . . Page 15-16
Reset Feature. . . . . . . . . . . . . . . . . . . . . . . . . . . Page 16
Peak Level Memory . . . . . . . . . . . . . . . . . . . . . . Page 17
LED Indicator Operation. . . . . . . . . . . . . . . . . . . Page 17
Tamper Resist Feature . . . . . . . . . . . . . . . . . . . . Page 17-18
What to do if the Alarm Sounds
Smoke Alarm. . . . . . . . . . . . . . . . . . . . . . . . . . . Pages 18-19
Carbon Monoxide Alarm . . . . . . . . . . . . . . . . . . Pages 20
Alarm Removal/Battery Replacement . . . . . . . . Pages 21-22
General Alarm Maintenance . . . . . . . . . . . . . . . Pages 26-27
Carbon Monoxide Safety Information
General CO Information . . . . . . . . . . . . . . . . . . Page 24
Possible Sources . . . . . . . . . . . . . . . . . . . . . . . . Page 24
CO Safety Tips . . . . . . . . . . . . . . . . . . . . . . . . . Page 25
Symptoms of CO Poisoning . . . . . . . . . . . . . . . Page 25-26
Fire Safety Information
Escape Plan . . . . . . . . . . . . . . . . . . . . . . . . . . . . Page 26
Fire Prevention. . . . . . . . . . . . . . . . . . . . . . . . . . Page 27
Industry Safety Standards
National Fire Protection Association . . . . . . . . . Page 27-28
California State Fire Marshall . . . . . . . . . . . . . . . Page 28
Consumer Product Safety Commission. . . . . . . . Page 28
NRC . . . . . . . . . . . . . . . . . . . . . . . . . . . . . . . . . Page 28
Limited Warranty and Service Information. . . . Pages 29-30
Product Registration . . . . . . . . . . . . . . . . . . . . . . Page 30
Page 3

Introduction
Thank you for purchasing the Kidde Combination Smoke and
Carbon Monoxide Alarm model # KN-COSM-I or # KN-COSMIB. This alarm is suitable as a Single Station and/or Multiple
Station (24 devices) alarm. This alarm has a five-year limited
warranty. Please take a few minutes to thoroughly read this
user’s guide, and save for future reference. Teach children how
to respond to the alarms, and that they should never play with
the unit. Your Kidde Smoke/CO Alarm was designed to detect
both smoke and carbon monoxide from any source of combustion in a residential environment. It is not designed for use in a
recreational vehicle (RV) or boat. If you have any questions
about the operation or installation of your alarm, please call our
toll free Consumer Hotline at 1-800-880-6788. The guide on
Page 27 will help you determine the correct location of safety
products that will help keep your home a safer place.
1
Page 4
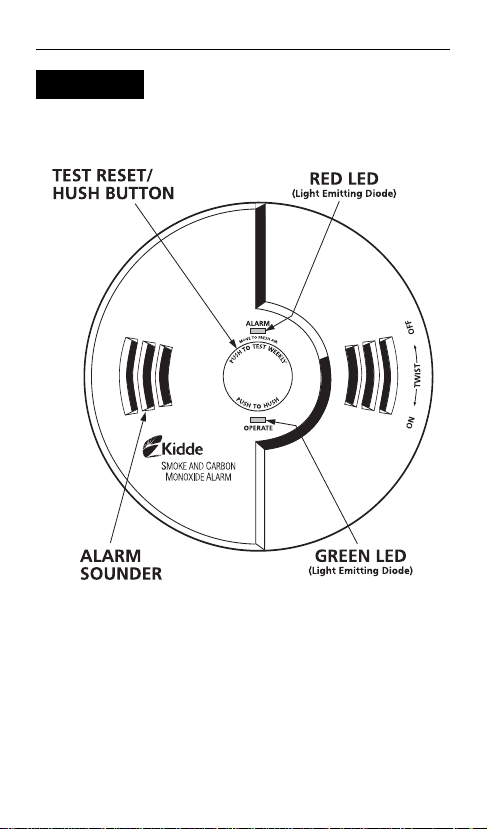
Product View
FRONT
2
Page 5
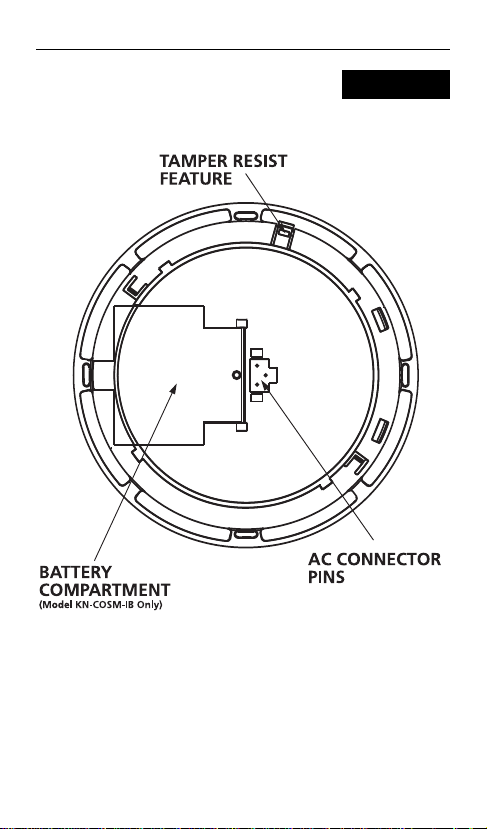
Product View
BACK
3
Page 6

Features
• Loud 85 decibel alarm.
• Permanent independent smoke and carbon monoxide sensors.
• Smoke alarm takes precedence when both smoke and
carbon monoxide are present.
• Powered by 120V AC (60 Hz, 25 mA max) wire-in connector.
Model KN-COSM-IB is also equipped with a 9V battery backup.
• Model KN-COSM-IB is equipped with Battery Pull Tab that
allows for easy battery connection. Simply pull tab out, and
battery is connected!
• Interconnectable to other Kidde/Nighthawk brand smoke and
CO alarms (see page 16 for details).
• Alarm/Voice message warning system that alerts you of the
following conditions in the manner described below, thus
eliminating any confusion over which alarm is sounding:
FIRE: The alarm/voice pattern is three long alarm beeps followed by the verbal warning message “FIRE! FIRE!” This pattern is repeated until the smoke is eliminated. The red LED
light will flash while in alarm/voice mode.
CARBON MONOXIDE: The alarm/voice pattern is four short
alarm beeps followed by the verbal warning message
“WARNING! CARBON MONOXIDE!". This continues until the
unit is reset or the CO eliminated. While powered by battery
only, after four minutes the alarm/voice pattern will sound
once every minute. The red Light Emitting Diode (LED) light
will flash while in alarm/voice mode.
LOW BATTERY(model KN-COSM-IB only): When the batteries are low and need replacing the red LED light will flash
and the unit will “chirp” one time, followed by the warning
message “LOW BATTERY.” This cycle will occur once every
minute and will continue for at least seven days.
4
Page 7

Features
• Voice Message System that alerts user to the following conditions:
– System announces “HUSH MODE ACTIVATED” when
the unit is first put into HUSH Mode.
– System announces “HUSH MODE CANCELLED” when
unit resumes normal operation after Hush Mode has
been cancelled.
– System announces “CARBON MONOXIDE PREVIOUSLY
DETECTED” when the unit has detected CO
concentrations of 100 ppm or higher.
– System announces “PUSH TEST BUTTON” when the unit
is powered up, reminding user to activate the Test
Button.
• One “chirp” every 30 seconds is an indication that the alarm
is malfunctioning. If this occurs call the Consumer Hotline at
1-800-880-6788.
• Test/Reset button performs the following functions:
– Tests the units electronics and verifies proper unit
operation
– Resets the unit during CO alarm
– Activates HUSH Feature
– Activates Peak Level Memory Feature
• HUSH Control Feature that silences the unit during nuisance
alarm situations (see page 15).
• Peak Level Memory Feature which alerts user when the unit
has detected CO concentrations of 100 ppm or greater (see
page 16).
• Alarm Memory Feature that gives visual indication when an
alarm has sensed a hazardous condition.
• Green and red LED lights that indicate normal operation and
alarm status (see page 17 for details).
• Tamper Resist Feature that deters children and others from
removing the alarm (see page 17).
• Model KN-COSM-IB is equipped with a battery reminder flag
that prohibits installation when battery is not present.
5
Page 8

Features and General Information
• Seven (7) years after initial power up, this unit will “chirp”
every 30 seconds. This is an “operational end of life” feature
which will indicate that it is time to replace the alarm.
Smoke Alarm
The smoke alarm monitors the air for products of combustion
that are produced when something is burning or smoldering.
When smoke particles in the smoke sensor reach a specified
concentration, the alarm/voice message warning system will
sound, and be accompanied by the flashing red LED light. The
smoke alarm takes precedence when both smoke and carbon
monoxide are present.
WARNING: PLEASE READ CAREFULLY AND
THOROUGHLY
NFPA 72 states: Life safety from fire in residential occupancies is
based primarily on early notification to occupants of the need
to escape, followed by the appropriate egress actions by those
occupants. Fire warning systems for dwelling units are capable
of protecting about half of the occupants in potentially fatal
fires. Victims are often intimate with the fire, too old or young,
or physically or mentally impaired such that they cannot escape
even when warned early enough that escape should be possible. For these people, other strategies such as protection-inplace or assisted escape or rescue are necessary.
• Smoke alarms are devices that can provide early warning of
possible fires at a reasonable cost; however, alarms have sensing limitations. Ionization sensing alarms may detect invisible
fire particles (associated with fast flaming fires) sooner than
photoelectric alarms. Photoelectric sensing alarms may detect
visible fire particles (associated with slow smoldering fires)
sooner than ionization alarms. Home fires develop in different
ways and are often unpredictable. For maximum protection,
Kidde recommends that both Ionization and Photoelectric
alarms be installed.
• A battery powered alarm must have a battery of the specified
type, in good condition and installed properly.
6
Page 9

Features and General Information
• AC powered alarms (without battery backup) will not operate
if the AC power has been cut off, such as by an electrical fire
or an open fuse.
• Smoke alarms must be tested regularly to make sure the batteries and the alarm circuits are in good operating condition.
• Smoke alarms cannot provide an alarm if smoke does not
reach the alarm. Therefore, smoke alarms may not sense fires
starting in chimneys, walls, on roofs, on the other side of a
closed door or on a different floor.
• If the alarm is located outside the bedroom or on a different
floor, it may not wake up a sound sleeper.
• The use of alcohol or drugs may also impair one’s ability to
hear the smoke alarm. For maximum protection, a smoke
alarm should be installed in each sleeping area on every level
of a home.
• Although smoke alarms can help save lives by providing an
early warning of a fire, they are not a substitute for an insurance policy. Home owners and renters should have adequate
insurance to protect their lives and property.
Carbon Monoxide (CO) Alarm
The Carbon Monoxide (CO) alarm monitors the air for the presence of CO. It will alarm when there are high levels of CO
present, and when there are low levels of CO present over a
longer period of time (see page 21 for alarm times). When a
CO condition matches either of these situations, the alarm/voice
message warning system will sound, and be accompanied by
the flashing red LED light. The carbon monoxide sensor uses an
electrochemical technology.
CAUTION: This alarm will only indicate the presence of
carbon monoxide gas at the sensor. Carbon monoxide
gas may be present in other areas.
Individuals with medical problems may consider using warning
devices which provide audible and visual signals for carbon
monoxide concentrations under 30 ppm.
7
Page 10
Installation Instructions
Step 1
Installation Guide:
IMPORTANT: THIS ALARM MUST BE MOUNTED ON A
CEILING OR WALL. IT WAS NOT DESIGNED FOR USE AS A
TABLETOP DEVICE! INSTALL ONLY AS DETAILED!
A. Recommended Installation Locations:
Kidde Safety recommends the installation of a Smoke/CO Alarm
in the following locations. For maximum protection we suggest
an alarm be installed on each level of a multilevel home, including every bedroom, hallways, finished attics and basements. Put
alarms at both ends of bedroom, hallway or large room if hallway or room is more than 30 ft (9.1m) long. If you have only
one alarm, ensure it is placed in the hallway outside of the main
sleeping area, or in the main bedroom. Verify the alarm can be
heard in all sleeping areas.
Locate an alarm in every room where someone sleeps with the
door closed. The closed door may prevent an alarm not located
in that room from waking the sleeper. Smoke, heat and combustion products rise to the ceiling and spread horizontally.
Mounting the alarm on the ceiling in the center of the room
places it closest to all points in the room. Ceiling mounting is
preferred in ordinary residential construction. When mounting
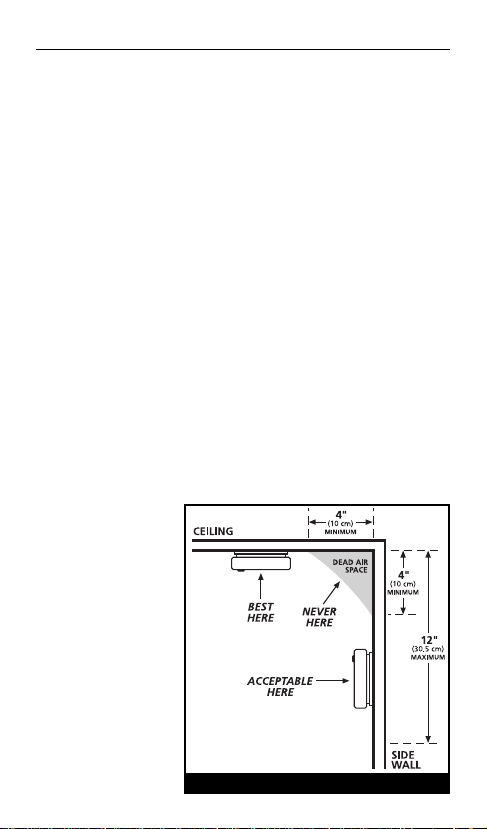
an alarm on the ceiling, locate it at a
minimum of 4”
(10cm) from the side
wall (see figure 1). If
installing the alarm
on the wall, use an
inside wall with the
top edge of the
alarm at a minimum
of 4” (10cm) and a
maximum of 12”
(30.5cm) below the
ceiling (see figure 1).
8
FIGURE 1
Page 11
Installation Instructions
Sloped Ceiling Installation:
The following information is from the National Fire Protection
Association and is listed in Fire Code 72.
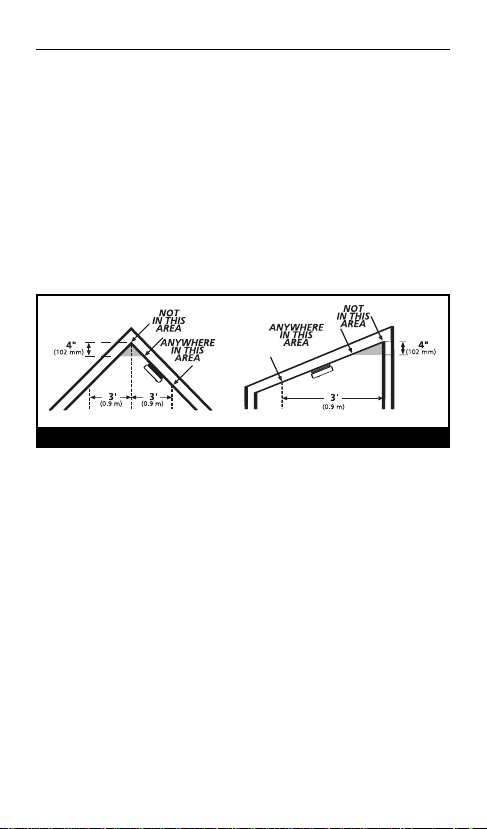
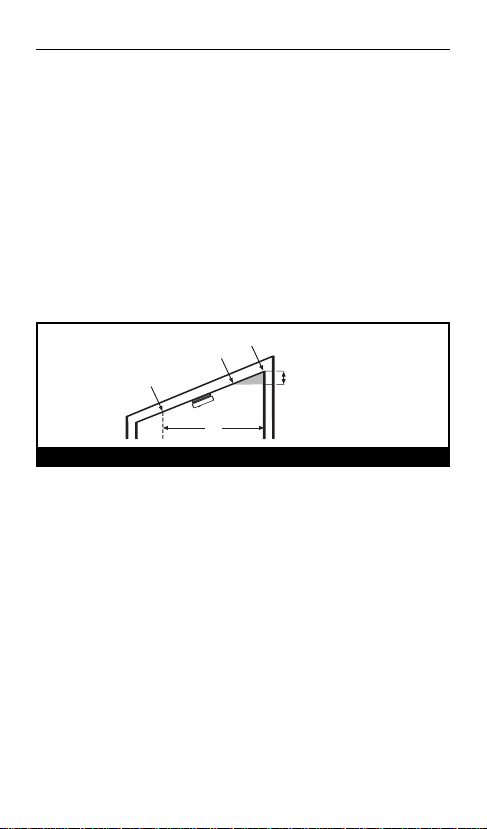
Install Smoke Alarms on sloped, peaked or cathedral ceilings at,
or within 3 ft (0.9m) of the highest point (measured horizontally). NFPA 72 states “Smoke alarms in rooms with ceiling slopes
greater than 1 ft to 8 ft (.3 m-2.4 m) horizontally shall be located on the high side of the room”.
NFPA 72 states “A row of alarms shall be spaced and located
within 3 ft (0.9 m) of the peak of the ceiling measured horizontally” (see figure 2).
FIGURE 2
Mobile Homes:
Modern mobile homes have been designed and built to be
energy efficient. Install Smoke/CO alarms as recommended
above (refer to Recommended Installation Instructions and figure 1). In older mobile homes that are not well insulated,
extreme heat or cold can be transferred from the outside to the
inside through poorly insulated walls and roof. This may cause
a thermal barrier, which can prevent smoke from reaching an
alarm mounted on the ceiling. In such mobile homes install
your Smoke/CO Alarm on an inside wall with the top edge of
the alarm at a minimum of 4 inches (10cm) and a maximum of
12 inches (30.5cm) below the ceiling (see figure 2). If you are
not sure about the insulation in your mobile home, or if you
notice that the outer walls and ceiling are either hot or cold,
install your alarm on an inside wall ONLY!
9
Page 12

Installation Instructions
THIS EQUIPMENT SHOULD BE INSTALLED IN ACCORDANCE
WITH THE NATIONAL FIRE PROTECTION ASSOCIATION’S
STANDARD 72 (National Fire Protection Association,
Batterymarch Park, Quincy, MA 02269).
WARNING - This product is intended
for use in ordinary indoor locations of
family living units. It is not designed to
!
B. Where Not to Install:
Do not install in garages, kitchens, furnace rooms or bath-
rooms! INSTALL AT LEAST 5 FEET AWAY FROM ANY FUEL
BURNING APPLIANCE.
Do not install within 3 ft (.9m) of the following: The door to a
kitchen, or a bathr
supply ducts used for heating or cooling, ceiling or whole house
ventilating fans, or other high air flow ares. Avoid excessively
dusty, dirty or greasy areas. Dust, grease or household chemicals can contaminate the alarm's sensors, causing it to not
operate properly.
Place the alarm where drapes or other objects will not block the
sensor. Smoke and CO must be able to reach the sensors to
accurately detect these conditions. Do not install in peaks of
vaulted ceilings, “A” frame ceilings or gabled roofs. Keep out
of damp and humid areas.
Install at least one (1) foot away from fluorescent lights, electronic noise may cause nuisance alarms. Do not place in direct
sunlight and keep out of insect infested areas. Extreme temperatures will effect the sensitivity of the Smoke/CO Alarm. Do not
install in areas where the temperature is colder than 40 degrees
Fahrenheit (4.4 Celsius) or hotter than 100 degrees Fahrenheit
(37.8 Celsius), such as garages and unfinished attics. Do not
install in areas where the relative humidity (RH) is above 85%.
Place away from doors and windows that open to the outside.
10
measure compliance with Occupational
Safety and Health Administration (OSHA)
commercial or industrial standards.
oom that contains a tub or shower, forced air
Page 13

Installation Instructions
Step 2
Wiring Instructions:
WIRING REQUIREMENTS
• This smoke alarm should be installed on a U.L. listed or recognized junction box. All connections should be made by a
qualified electrician and all wiring used shall be in accordance
with articles 210 and 300.3(B) of the U.S. National Electrical
Code ANSI/NFPA 70, NFPA 72 and/or any other codes having
jurisdiction in your area. The multiple station interconnect
wiring to the alarms must be run in the same raceway or
cable as the AC power wiring. In addition, the resistance of
the interconnect wiring shall be a maximum of 10 ohms.
• The appropriate power source is 120 Volt AC Single Phase
supplied from a non-switchable circuit, which is not protected
by a ground fault interrupter.
• Smoke alarms are not to be used with detector guards unless
the combination (alarm and detector guard) have been evaluated and found suitable for that purpose.
• WARNING: The alarm cannot be operated from power
derived from a square wave, modified square wave or modified sine wave, inverter. These types of inverters are sometimes used to supply power to the structure in off grid installations, such as solar or wind derived power sources. These
power sources produce high peak voltages that will damage
the alarm.
WIRING INSTRUCTIONS FOR AC QUICK CONNECT HARNESS
CAUTION! TURN OFF THE MAIN POWER TO THE CIRCUIT
BEFORE WIRING THE ALARM.
• For alarms that are used as single station, DO NOT CONNECT
THE RED WIRE TO ANYTHING. Leave the red wire insulating
cap in place to make certain that the red wire cannot contact
any metal parts or the electrical box.
• When alarms are interconnected, all interconnected units
must be powered from a single circuit.
11
Page 14
Installation Instructions
FUSE OR CIRCUIT BREAKER
REDBLACK
WHITE
CONNECTOR
REDBLACK
WHITE
CONNECTOR
First
Alarm
Additional
Alarm
Kidde
Relay Module
SM120X
Additional
Alarm
Optional
Accessory
A
L
A
R
M
O
P
E
R
A
T
E
A
L
A
R
M
O
P
E
R
A
T
E
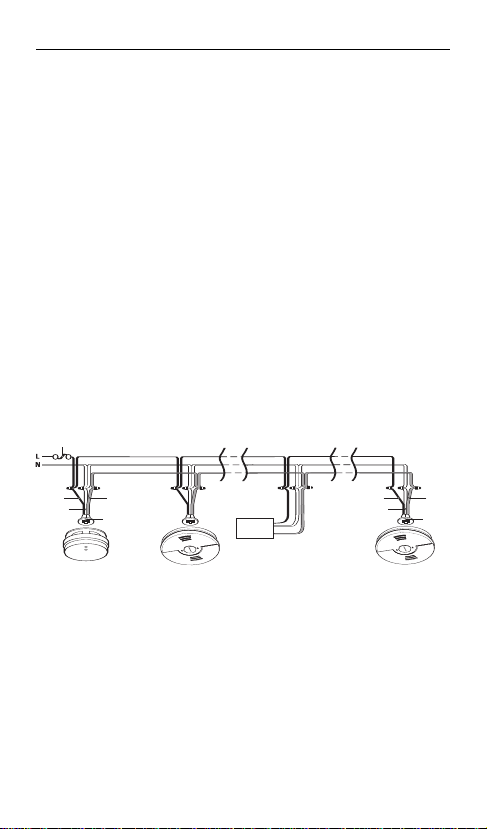
• A maximum of 24 Kidde Safety devices may be interconnected in a multiple station arrangement. The interconnect system should not exceed the NFPA interconnect limit of 12
smoke alarms and/or 18 alarms total (smoke, CO, Smoke/
CO Combination, heat, etc.). This Smoke/CO combination
alarm must be counted as a smoke alarm when determining
the number of units on an interconnect line. With 18 alarms
interconnected, it is still possible to interconnect up to a total
of 6 remote signaling devices and /or relay modules (see
page 16 for details on interconnecting Kidde devices).
• The maximum wire run distance between the first and last
unit in an interconnected system is 1000 feet.
• Figure 3 illustrates interconnection wiring. Improper connection will result in damage to the alarm, failure to operate, or
a shock hazard.
• Make certain alarms are wired to a continuous (non-switched)
power line. NOTE: Use standard UL Listed household wire
(as required by local codes) available at all electrical supply
stores and most hardware stores.
FIGURE 3 Interconnect Wiring Diagram
WIRES ON ALARM HARNESS CONNECTED TO
Black Hot Side of AC Line
White Neutral Side of AC Line
Red Interconnect Lines (Red Wires) of
Other Units in the Multiple Station
Set up
12
Page 15

Installation Instructions
Step 3
Mounting Instructions:
CAUTION: YOUR SMOKE/CO ALARM IS SEALED AND THE
COVER IS NOT REMOVABLE!
1.To help identify the date to replace the unit, a label has been
affixed to the side of the alarm. Write the “Replace by” date (7
years from initial power up) in permanent marker on the label.
See Alarm Replacement section for additional information.
2.Remove the mounting bracket from the back of the alarm by
holding the mounting bracket and twisting the alarm in the
direction indicated by the “OFF”arrow on the alarm cover.
3.After selecting the proper location for your Smoke/CO Alarm,
as described on Pages 8-10, and wiring the AC QUICK CONNECT harness as described in the WIRING INSTRUCTIONS,
attach the mounting bracket to the electrical box. To ensure
aesthetic alignment of the alarm with the hallway, or wall,
the “A” line on the mounting bracket must be parallel with
the hallway when ceiling mounted, or horizontal when wall
mounted.
4.Pull the AC QUICK CONNECTOR
through the center hole in the
mounting bracket and secure
the bracket, making sure that
the mounting screws are positioned in the small ends of the
keyholes before tightening the
screws.
5.Plug the AC QUICK CONNECTOR into the back of the alarm
(see figure 4), making sure that
the locks on the connector snap into place. Then push the
excess wire back into the electrical box through the hole in
the center of the mounting bracket.
6.Install the alarm on the mounting bracket and rotate the
alarm in the direction of the “ON” arrow on the cover until
the alarm ratchets into place (this ratcheting function allows
for aesthetic alignment). Note: The alarm will mount to the
bracket in 4 positions (every 90 degrees).
FIGURE 4 Installing AC
Quick Connect
13
Page 16

Installation Instructions
7.Turn on the AC power. The green AC Power On Indicator
should be lit when the alarm is operating from AC power.
8.Two labels are included with your alarm. They have important information on what to do in case of an alarm. Add the
phone number of your emergency service provider (Fire
Department or 911) in the space provided. Place one label
next to the alarm after it is mounted, and one label near a
fresh air source such as a door or window.
9.For model KN-COSM-IB only: Pull the Battery Pull Tab (yellow
tab protruding from unit) completely out of unit. This will
automatically connect the battery.
Step 4
Testing the Alarm
CAUTION: Due to the loudness (85 decibels) of the alarm,
always stand an arms length away from the unit when
testing.
The test/reset button has four purposes. It tests the unit’s electronics, resets the CO alarm, activates the HUSH feature, and
activates the Peak Level Memory Feature.
After installation, TEST THE UNIT’S ELECTRONICS by pressing
and releasing the test/reset button. A series of beeps will sound,
followed by the message “Fire! Fire!” then another two series
of beeps and the message “WARNING! CARBON MONOXIDE!”
followed by 4 additional short beeps.
Weekly testing is required! If at anytime it does not perform as
described, verify power is connected correctly and that the battery doesn’t need replacing. Clean dust and other buildup off
the unit. If it still doesn’t operate properly call the Consumer
Hotline at 1-800-880-6788.
14
Page 17

Operating Instructions
Interconnect Feature
Your Combination Smoke/CO Alarm is interconnectable to
other multiple station Kidde, Nighthawk and Kidde/Fyrnetics
products:
• When compatible smoke alarms and heat alarms are inter-
connected to your Smoke/CO Alarm, they will only respond
to a smoke related event.
• When mixing compatible models with battery backup with
models without battery backup, be advised that the models
without battery backup will not respond during an AC power
failure.
• This unit is only approved to interconnect with other
Kidde/Nighthawk products. It is NOT approved to interconnect with any other brand of detection product.
• This alarm is interconnect compatible with the following
alarms and accessories:
– Smoke alarms: 1235, 1275, 1276, 1285, 1296, i12020,
i12040, i12060, i12080, PE120, PI2000, KN-COSM-IB,
KN-COSM-I and RF-SM-ACDC
– Heat alarm: HD135˚F
– CO alarms: KN-COB-IC, KN-COP-IC
– Relay modules: 120X, SM120X, CO120X
– Strobe Light: SL177i
See User’s Guides for specific application information.
• For more information about compatible interconnect units
and their functionality in an interconnect system, visit our
web site at www.kidde.com.
HUSH Control Feature
The HUSH feature has the capability of temporarily desensitizing
the smoke alarm circuit for approximately 10 minutes. This feature is to be used only when a known alarm condition, such as
smoke from cooking, activates the alarm. You can put your
Smoke/CO Alarm in HUSH mode by pushing the test/reset button. If the smoke is not too dense, the alarm will silence imme-
15
Page 18

Operating Instructions
diately, the unit will verbally announce “HUSH MODE ACTIVATED”, and the green LED will flash every 2 seconds for approximately 10 minutes. This indicates that the smoke alarm is in a
temporarily desensitized condition. Your Smoke/CO Alarm will
automatically reset after approximately 10 minutes. When the
unit returns to normal operation after being in HUSH mode, it
will verbally announce “HUSH MODE CANCELLED”, and sound
the alarm if smoke is still present. The HUSH feature can be
used repeatedly until the air has been cleared of the condition
causing the alarm. While the unit is in HUSH mode, pushing the
test/reset button on the alarm will also end the HUSH period.
NOTE: DENSE SMOKE WILL OVERRIDE THE HUSH CONTROL FEATURE AND SOUND A CONTINUOUS ALARM.
CAUTION: BEFORE USING THE ALARM HUSH FEATURE,
IDENTIFY THE SOURCE OF THE SMOKE AND BE CERTAIN A
SAFE CONDITION EXISTS.
Reset Feature
If the the Smoke/CO Alarm is sounding a CO alarm, pressing
the test/reset button will silence the alarm.
If the CO condition that caused the alert continues, the alarm
will reactivate. Reactivation times depend on the amount of
CO present (see page 21).
Peak Level Memory
If the CO sensor has detected a CO level of 100 PPM or higher
since last reset, it will be recorded by the Peak Level Memory
function. To access the Peak Level Memory press the test/reset
button. If a reading of 100 PPM or higher has been recorded,
the unit will announce “Carbon Monoxide Previously detected.”
If you’ve been away from home this feature allows you to check
if there was a CO reading of 100, or higher, during your
absence. Pushing the test/reset button resets the memory. It’s
also reset when the power is removed.
16
Page 19

Operating Instructions
LED Indicator Operation
Red LED
Red LED will flash in conjunction with the alarm beep.
Therefore, the red LED will flash during a smoke alarm, a CO
alarm, a low battery mode chirp and a unit error mode chirp.
Green LED
The green LED will flash as described below under the following
conditions:
– Standby Condition (powered by AC and battery backup):
The LED will be constantly on, but will flicker every 30
seconds when a CO reading is taken.
– Standby Condition (for model KN-COSM-IB only –
powered by only battery backup):
The LED will flash every 5 seconds.
– Alarm Memory Condition: The LED will flash every
second signifying that the alarm sensed a smoke or CO
hazard. It will continue to flash every second until the
test/reset button is pressed, thus resetting the alarm.
– HUSH MODE Condition: The LED will flash every 2
seconds while the alarm is in HUSH mode.
Tamper Resist Feature
To make your smoke/CO alarm tamper resistant, a tamper resist
feature has been provided. Activate the tamper resist feature by
breaking off the four posts in the square holes in the trim ring
(see figure 5A). When the posts are broken off, the tamper
resist tab on the base is allowed to engage the mounting bracket. Rotate the alarm onto the mounting bracket until you hear
the tamper resist tab snap into place, locking the alarm on the
mounting bracket. Using the tamper resist feature will help
deter children and others from removing the alarm from bracket. NOTE: To remove the alarm when the tamper resist tab is
engaged, press down on the tamper resist tab, and rotate the
alarm off of the bracket (see figure 5B).
17
Page 20

Operating Instructions
A
Posts
A
FIGURE 5A
FIGURE 5B
NEVER IGNORE THE SOUND OF THE ALARM!
Determining what type of alarm has sounded is easy with your
Nighthawk Combination Smoke/CO Alarm. The voice message
warning system will inform you of the type of situation occurring. Refer to the Features section on pages 4-7 for a detailed
description of each alarm pattern.
What To Do If The Alarm Sounds
When the smoke alarm sounds:
Smoke alarms are designed to minimize false alarms. Cigarette
smoke will not normally set off the alarm, unless the smoke is
blown directly into the alarm. Combustion particles from cooking may set off the alarm if located too close to the cooking
area. Large quantities of combustible particles are generated
from spills or when broiling. Using the fan on a range hood
which vents to the outside (non recirculating type) will also help
remove these combustible products from the kitchen.
18
Page 21

What To Do If The Alarm Sounds
If the alarm sounds, check for fires first. If a fire is discovered
follow these steps. Become thoroughly familiar with these
items, and review with all family members!
• Alert small children in the home.
• Leave immediately using one of your planned escape routes
(see page 26). Every second counts, don’t stop to get
dressed or pick up valuables.
• Before opening inside doors look for smoke seeping in
around the edges, and feel with the back of your hand. If
the door is hot use your second exit. If you feel it’s safe, open
the door very slowly and be prepared to close immediately if
smoke and heat rush in.
• If the escape route requires you to go through smoke, crawl
low under the smoke where the air is clearer.
• Go to your predetermined meeting place. When two people
have arrived one should leave to call 911 from a neighbor’s
home, and the other should stay to perform a head count.
• Do not reenter under any circumstance until fire officials give the go ahead.
• There are situations where a smoke alarm may not be effective to protect against fire as stated in the NFPA Standard 72.
For instance:
a) smoking in bed
b) leaving children unsupervised
c) cleaning with flammable liquids, such as gasoline
19
Page 22
What To Do If The Alarm Sounds
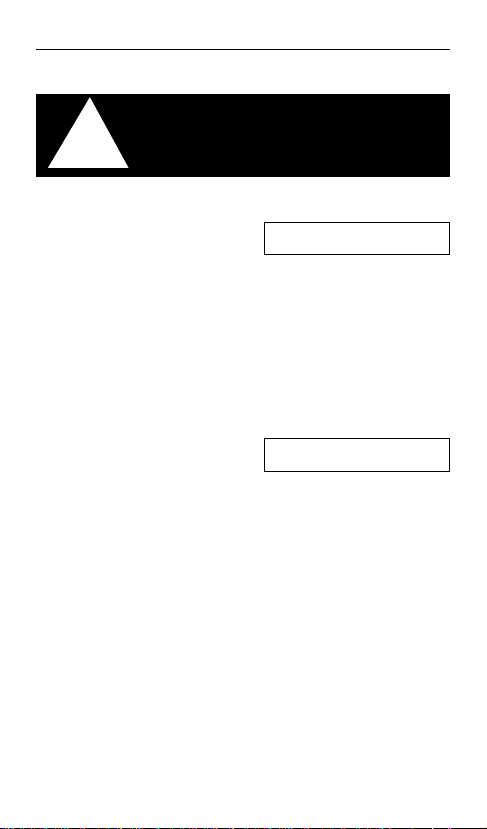
When the carbon monoxide alarm sounds:
WARNING - Actuation of your CO
Alarm indicates the presence of Carbon
!
If alarm signal sounds:
1) Operate the test/reset button
2) Call your emergency
services (Fire Dept. or 911)
3) Immediately move to fresh air - outdoors or by an
open door/window. Do a head count to check that
all persons are accounted for. Do not reenter the
premises nor move away from the open door/
window until the emergency services responders
have arrived, the premises has been aired out, and
your alarm remains in its normal condition.
4) After following steps 1-3, if your alarm reactivates
within a 24 hour period, repeat steps 1-3 and call
a qualified appliance
technician to investigate
for sources of CO from fuel burning equipment and
appliances, and inspect for proper operation of this
equipment. If problems are identified during this
inspection have the equipment serviced immediately.
Note any combustion equipment not inspected by
the technician and consult the manufacturer’s
instructions, or contact the manufacturer’s directly,
for more information about CO safety and this
equipment. Make sure that motor vehicles are not,
and have not been, operating in an attached
garage or adjacent to the residence.
Monoxide (CO) which can kill you.
PHONE NUMBER
PHONE NUMBER
Never restart the source of a CO problem until it has been
fixed. NEVER IGNORE THE ALARM!
20
Page 23

Alarm Removal and Battery Replacement
The CO sensor meets the alarm response time requirements of
UL standard 2034. Standard alarm times are as follows:
At 70 PPM, the unit must alarm within 60-240 minutes.
At 150 PPM, the unit must alarm within 10-50 minutes.
At 400 PPM, the unit must alarm within 4-15 minutes.
This carbon monoxide alarm is designed to detect carbon
monoxide gas from ANY source of combustion. It is NOT
designed to detect any other gas.
Fire Departments, most utility companies and HVAC contractors
will perform CO inspections, some may charge for this service.
It’s advisable to inquire about any applicable fees prior to having
the service performed. Kidde Safety will not pay for, or reimburse, the owner or user of this product, for any repair or dispatch calls related to the alarm sounding.
Alarm Removal
IF TAMPER RESIST FEATURE HAS BEEN ACTIVATED, REFER
TO TAMPER RESIST FEATURE DESCRIPTION ON PAGE 19
FOR REMOVAL INSTRUCTIONS.
Remove the alarm from the mounting bracket by rotating the
alarm in the direction of the “OFF” arrow on the cover. To disconnect the AC power harness, squeeze the locking arms on
the sides of the Quick Connector while pulling the connector
away from the bottom of the alarm (see page 13, figure 4).
Battery Replacement
(For model KN-COSM-IB only)
If any form of battery failure is detected the red LED light will
flash and the unit will “chirp” one time, followed by the warning message “LOW BATTERY”. This cycle will occur once every
minute, and will continue for at least seven days.
If the red LED light flashes along with a chirp every 30
seconds, and is not followed by the voice message “LOW
BATTERY” as described above, your unit has malfunctioned. Call our toll free Consumer Hotline at 1-800-880-6788
for instructions on how to return the unit.
21
Page 24

Alarm Removal and Battery Replacement
CAUTION: YOUR SMOKE/CO ALARM IS SEALED AND THE
COVER IS NOT REMOVABLE!
To replace the battery you must first remove the alarm from the
mounting bracket by following the ALARM REMOVAL instructions at the beginning of this section. After the alarm has been
removed, you can open the battery door and replace the battery.
Battery installation instructions are provided on the inside of the
battery door.
Battery
finger
FIGURE 6 Battery Replacement
When installing the battery, press the battery reminder finger
down into the battery compartment and install the battery (see
figure 6).
CAUTION! IF THE BATTERY REMINDER FINGER IS NOT
HELD DOWN IN THE BATTERY COMPARTMENT BY THE
BATTERY, THE BATTERY DOOR WILL NOT CLOSE, THE AC
QUICK CONNECTOR WILL NOT ATTACH TO THE ALARM,
AND THE ALARM WILL NOT ATTACH TO THE MOUNTING
BRACKET.
After installing or changing the battery, reinstall your alarm.
Test your alarm by using the test/reset button and check that
the green LED is on.
Replace batteries with one of the following approved brands:
Duracell MN1604, MX1604, Energizer 522, PANASONIC 6AM6,
6AM-6, 6AM-6PI, 6AM6X, and 6LR61(GA), Ultralife U9VL-J.
These batteries can be purchased at your local retailer.
22
Page 25

General Maintenance
WARNING! Use only the batteries specified. Use of different
batteries may have a detrimental effect on the Smoke/CO
alarm. A good safety measure is to replace the battery at least
once a year, or at the same time yo change your clocks for daylight saving time.
Alarm Replacement
Seven years after initial power-up, this unit will “chirp” every 30
seconds to indicate that it is time to replace the alarm. A label
has been provided on the side of the alarm that has “Replace
by” printed on it. Write the replace by date on the label. The
date written on the label should be after seven (7) years of
cumulative power.
REPLACE IMMEDIATELY! IT WILL NOT DETECT CO IN THIS
CONDITION.
To keep your Smoke/CO Alarm in good working order, please
follow these simple steps:
• Verify the unit's alarm and LED lights operation by pushing
the test/reset button once a week.
• Remove the unit from mounting bracket and vacuum the
alarm cover and vents with a soft brush attachment once a
month to remove dust and dirt. REINSTALL IMMEDIATELY
AFTER CLEANING AND THEN TEST USING THE TEST/RESET
BUTTON!
• Never use detergents or other solvents to clean the unit.
• Avoid spraying air fresheners, hair spray, or other aerosols
near the Smoke/CO Alarm.
Do not paint the unit. Paint will seal the vents and interfere
with the sensor’s ability to detect smoke and CO. Never
attempt to disassemble the unit or clean inside. This action will
void your warranty.
Move the Smoke/CO Alarm and place in another location prior
to performing any of the following:
• Staining or stripping wood floors or furniture
• Painting
• Wall papering
• Using adhesives
23
Page 26

General Maintenance
Storing the unit in a plastic bag during any of the above projects will protect the sensors from damage. Do not place near a
diaper pail.
WARNING: Reinstall the Smoke/CO Alarm as soon as possible
to assure continuous protection.
When household cleaning supplies or similar contaminates are
used, the area must be well ventilated. The following substances can effect the CO sensor and may cause false readings
and damage to the sensor:
Methane, propane, iso-butane, iso-propanol, ethyl acetate,
hydrogen sulfide, sulfide dioxides, alcohol based products,
paints, thinner, solvents, adhesives, hair spray, after shave, perfume, and some cleaning agents.
Carbon Monoxide Safety Information
General CO Information
Carbon monoxide (CO) is a colorless, odorless, and tasteless
poison gas that can be fatal when inhaled. CO inhibits the
blood’s capacity to carry oxygen.
Possible Sources
CO can be produced when burning any fossil fuel: gasoline,
propane, natural gas, oil and wood. It can be produced by any
fuel-burning appliance that is malfunctioning, improperly
installed, or not ventilated correctly. Possible sources include furnaces, gas ranges/stoves, gas clothes dryers, water heaters,
portable fuel burning space heaters, fireplaces, wood-burning
stoves and certain swimming pool heaters. Blocked chimneys or
flues, back drafting and changes in air pressure, corroded or disconnected vent pipes, and a loose or cracked furnace exchanger
can also cause CO. Vehicles and other combustion engines running in an attached garage and using a charcoal/gas grill or
hibachi in an enclosed area are all possible sources of CO.
The following conditions can result in transient CO situations:
Excessive spillage or reverse venting of fuel-burning appliances
caused by outdoor ambient conditions such as: Wind direction
and/or velocity, including high gusts of wind, heavy air in the
24
Page 27

Carbon Monoxide Safety Information
vent pipes (cold/humid air with extended periods between
cycles), negative pressure differential resulting from the use of
exhaust fans, simultaneous operation of several fuel-burning
appliances competing for limited internal air, vent pipe connections vibrating loose from clothes dryers, furnaces, or water
heaters, obstructions in, or unconventional, vent pipe designs
which can amplify the above situations, extended operation of
unvented fuel-burning devices (range, oven, fireplace, etc.),
temperature inversions which can trap exhaust gasses near the
ground, car idling in an open or closed attached garage, or
near a home.
CO Safety Tips
Every year have the heating system, vents, chimney and flue
inspected and cleaned by a qualified technician. Always install
appliances according to manufacturer’s instructions and adhere
to local building codes. Most appliances should be installed by
professionals and inspected after installation. Regularly examine vents and chimneys for improper connections, visible rust,
or stains, and check for cracks in furnace heat exchangers.
Verify the color of flame on pilot lights and burners is blue. A
yellow or orange flame is a sign that the fuel is not burning
completely. Teach all household members what the alarm
sounds like and how to respond.
Symptoms of CO Poisoning
Initial carbon monoxide poisoning symptoms are similar to the
flu with no fever and can include dizziness, severe headaches,
nausea, vomiting and disorientation. Everyone is susceptible but
experts agree that unborn babies, pregnant women, senior citizens and people with heart or respiratory problems are especially vulnerable. If symptoms of carbon monoxide poisoning are
experienced seek medical attention immediately. CO poisoning
can be determined by a carboxyhemoglobin test.
The following symptoms are related to CARBON MONOXIDE
POISONING and should be discussed with ALL members of the
household:
25
Page 28

Carbon Monoxide Safety Information
1. Mild Exposure: Slight headache, nausea,vomiting, fatigue
(often described as “Flu-like” symptoms).
2. Medium Exposure: Severe throbbing headache,
drowsiness, confusion, fast heart rate.
3. Extreme Exposure: Unconsciousness, convulsions,
cardiorespiratory failure, death.
The above levels of exposure relate to healthy adults. Levels differ for those at high risk. Exposure to high levels of carbon
monoxide can be fatal or cause permanent damage and disabilities. Many cases of reported carbon monoxide poisoning indicate that while victims are aware they are not well, they
become so disoriented they are unable to save themselves by
either exiting the building, or calling for assistance. Also, young
children and household pets may be the first effected.
Familiarization with the effects of each level is important.
Fire Safety Information
Escape Plan
Familiarize everyone with the sound of the smoke alarm and
train them to leave the home when they hear it. Practice a fire
drill at least every six months, including fire drills at night.
Ensure that small children hear the alarm and wake when it
sounds. They must wake up in order to execute the escape
plan. Practice allows all occupants to test your plan before an
emergency. You may not be able to reach your children. It is
important they know what to do. Know two ways out of every
room (door & window) and identify a meeting place outside the
home where everyone will gather once they have exited the residence. When two people have reached the meeting place, one
should leave to call 911 while the second person stays to
account for additional family members.
Establish a rule that once you’re out, you never reenter
under any circumstance!
Current studies have shown smoke alarms may not awaken all
sleeping individuals, and that it is the responsibility of individuals in the household that are capable of assisting others to provide assistance to those who may not be awakened by the
alarm sound, or to those who may be incapable of safely evacuating the area unassisted.
26
Page 29
Fire Safety Information
Fire Prevention
Never smoke in bed, or leave
cooking food unattended.
Teach children never to play
with matches or lighters!
Train everyone in the home to
recognize the alarm pattern,
voice message warning and to
leave the home using their
escape plan when it’s heard.
Know how to do “Stop, Drop
and Roll” if clothes catch on
fire, and how to crawl low
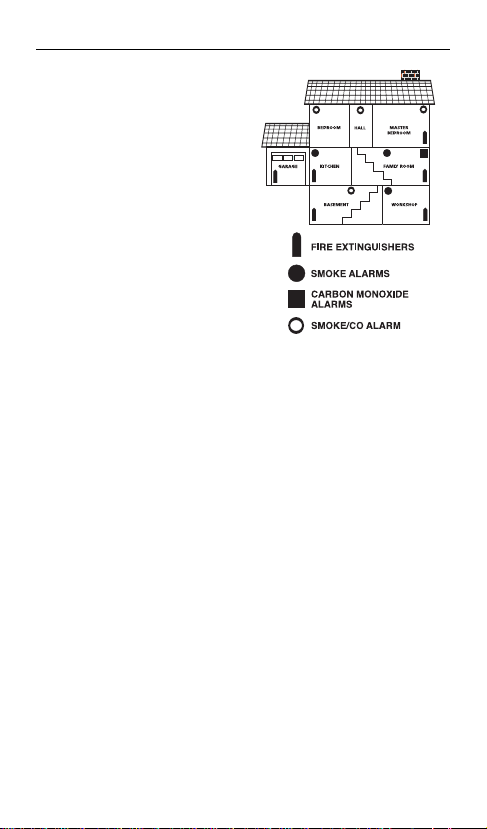
under smoke. Install and
maintain fire extinguishers on
every level of the home and in the kitchen, basement and
garage. Know how to use a fire extinguisher prior to an emergency. Second level and higher occupied rooms with windows,
should have an escape ladder.
Industry Safety Standards
NFPA (National Fire Protection Association)
For your information, the National Fire Protection Association’s
Standard 72, reads as follows:
Smoke Detection. Where required by applicable laws, codes, or
standards for the specified occupancy, approved single- and
multiple-station smoke alarms shall be installed as follows: (1) In
all sleeping rooms Exception: Smoke alarms shall not be
required in sleeping rooms in existing one- and two-family
dwelling units. (2) Outside of each separate sleeping area, in
immediate vicinity of the sleeping rooms. (3) On each level of
the dwelling unit, including basements Exception: In existing
one- and two-family dwelling units, approved smoke alarms
powered by batteries are permitted.
Smoke Detection - Are More Smoke Alarms Desirable? The
required number of smoke alarms might not provide reliable
early warning protection for those areas separated by a door
27
Page 30

Industry Safety Standards
from the areas protected by the required smoke alarms. For this
reason, it is recommended that the householder consider the use
of additional smoke alarms for those areas for increased protection. The additional areas include the basement, bedrooms, dining room, furnace room, utility room, and hallways not protected by the required smoke alarms. The installation of smoke
alarms in kitchens, attics (finished or unfinished), or garages is
not normally recommended, as these locations occasionally
experience conditions that can result in improper operation.
California State Fire Marshall
Early warning fire detection is best achieved by the installation
of fire detection equipment in all rooms and areas of the household as follows: A smoke alarm installed in each separate
sleeping area (in the vicinity, but outside the bedrooms), heat or
smoke detectors in the living rooms, dining rooms, bedrooms,
kitchens, hallways, attics, furnace rooms, closets, utility and
storage rooms, basements and attached garages.
Consumer Product Safety Commission
The Consumer Product Safety Commission (CPSC) recommends
the use of at least one CO Alarm per household, located near
the sleeping area.
NRC
Ionization type smoke alarms use a very small amount of a
radioactive element in the sensing chamber to enable detection
of visible and invisible combustion products. The radioactive element is safely contained in the chamber and requires no adjustments or maintenance. This smoke alarm meets or exceeds all
government standards. It is manufactured and distributed under
license from the U.S. Nuclear Regulatory Commission.
28
Page 31

Warranty and Service Information
Limited Warranty
FIVE YEAR LIMITED WARRANTY
KIDDE warrants that the enclosed alarm (but not the battery)
will be free from defects in material and workmanship or design
under normal use and service for a period of five years from the
date of purchase. The obligation of KIDDE under this warranty
is limited to repairing or replacing the alarm or any part which
we find to be defective in material, workmanship or design,
free of charge, upon sending the alarm with proof of date of
purchase, postage and return postage prepaid, to Warranty
Service Department, KIDDE, 1016 Corporate Park Dr., Mebane,
NC 27302.
This warranty shall not apply to the alarm if it has been damaged, modified, abused or altered after the date of purchase or
if it fails to operate due to improper maintenance or inadequate
AC or DC power. Any implied warranties arising out of this
sale, including but not limited to the implied warranties of
description,merchantability and fitness for a particular purpose,
are limited in duration to the above warranty period. In no
event shall the Manufacturer be liable for loss of use of this
product or for any indirect, special, incidental or consequential
damages, or costs, or expenses incurred by the consumer or any
other user of this product, whether due to a breach of contract,
negligence, strict liability in tort or otherwise. The
Manufacturer shall have no liability for any personal injury,
property damage or any special, incidental, contingent or consequential damage of any kind resulting from gas leakage, fire
or explosion.
Since some states do not allow limitations of the duration of an
implied warranty or do not allow the exclusion or limitation of
incidental or consequential damages, the above limitations or
exclusions may not apply to you. While this warranty gives you
specific legal rights, you may also have other rights which vary
from state to state.
Also, KIDDE makes no warranty, express or implied, written or
oral, including that of merchantability or fitness for any particular purpose, with respect to the battery.
29
Page 32

Warranty and Service Information
The above warranty may not be altered except in writing signed
by both parties hereto.
Your Nighthawk Combination Smoke & CO Alarm is not a substitute for property, fire, disability, life or other insurance of any
kind. Appropriate insurance coverage is your responsibility.
Consult your insurance agent.
Removal of the front cover will void the warranty.
This alarm is not intended to alert hearing impaired individuals.
During the specified warranty period Kidde Products will repair
or replace, at its discretion any defective Nighthawk
Combination Smoke & CO Alarms that are returned in a
postage paid package to the following address: Kidde Products
Attn: Warranty Returns, 1016 Corporate Park Dr., Mebane, NC
27302, USA. Please include your name, address and phone
number along with a brief description of what is wrong with
the unit. For further assistance please call our toll free
Consumer Hotline at 1-800-880-6788. Damage from neglect,
abuse or failure to adhere to any of the enclosed instructions
will result in termination of the warranty, and the unit will not
be replaced or repaired.
Product Registration
This manual and the products described herein are copyrighted,
with all rights reserved. Under these copyright laws, no part of
this manual may be copied for use without the written consent
of Kidde. If you require further information please contact out
Consumer Hotline at 1-800-880-6788 or write us at: Kidde
Products, 1016 Corporate Park Dr., Mebane, NC 27302.
Our internet address is www.kidde.com.
30
Page 33

QUESTIONS OR FOR MORE INFORMATION
Call our Consumer Hotline at 1-800-880-6788 or contact
us at our website at www.kidde.com
Kidde 1016 Corporate Park Drive, Mebane, NC 27302
Custom Assembled in China with U.S. and Foreign Components
Page 34
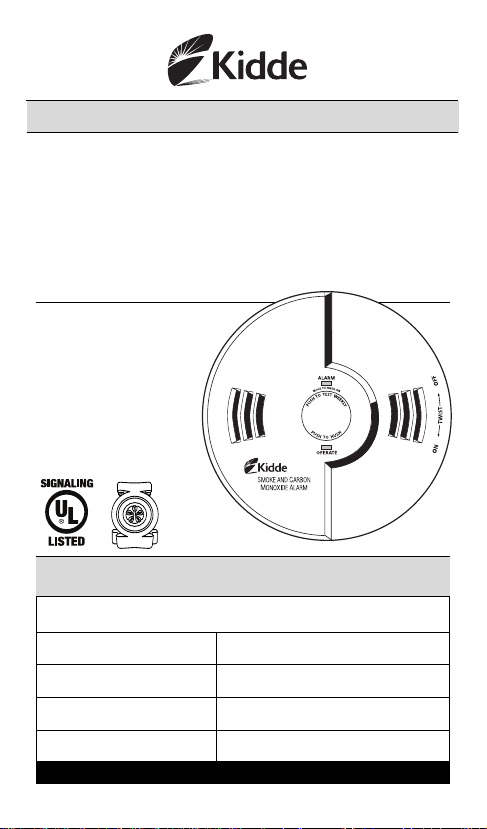
Guía del usuario por Modelos KN-COSM-I y KN-COSM-IB
G
N
I
T
S
I
L
S
E
R
V
I
C
E
C
A
L
I
F
O
R
N
I
A
O
F
S
T
A
T
E
R
E
I
F
M
A
R
S
H
A
L
E
T
A
T
S
ALARMA
COMBINADA
CONTRA HUMO Y
MONÓXIDO
• Con sistema de mensaje de
voz, silenciador y nivel de
memoria máximo
• Batería de emergencia de
120 V CA y 9 V
Para consultas relacionadas con su alarma contra humo y monóxido de carbono,
llamea nuestra línea directa parael consumidor al 1-800-880-6788.
Para su comodidad, escriba la siguiente información. Si llama a nuestra línea directa de
asistencia para el consumidor, éstas son las primeras preguntas que se le formularán:
Número de modelo de la alarma
(
ubicado en la parte posterior de la alarma
Fecha de fabricación
(ubicada en la parte posterior de la alarma):
Fecha de compra:
Lugar de compra:
LEÍDO Y AHORRAR ESTO GUÍA DEL USUARIO
Manual P/N 810-1512 Rev. H
):
Page 35

Table of Contents
Introducción . . .. . .. . .. . . . . . . . . . . . . . . . . . . . . . . . Página 1
Vista del producto . . . . . . . . . . . . . . . . . . . . . . . . . . . Páginas 2-3
Características. . . . . . . . . . . . . . . . . . . . . . . . . . . . . . . . Página 4-7
Instrucciones de instalación
Paso 1 Instrucciones de instalación:
A. Ubicaciones de instalación recomendadas . . . . . . . Páginas 8-10
B.Dónde no instalar . . . . . . . . . . . . . . . . . . . . . . . . . . Página 10
Paso 2 Instrucciones de cableado . . . . . . . . . . . . . . . . . . . .
Paso 3 Instrucciones de montaje. . . . . . . . . . . . . . . . . . . . .
Paso 4 Prueba de la alarma . . . . . . . . . . . . . . . . . . . . . . . . Página 15
Instrucciones de puesta en funcionamiento
Característica de interconexión. . . . . . . . . . . . . . . . . . . .
Función de control de silenciador(HUSH®) . . . . . . . . . . .
Función restablecer . . . . . . . . . . . . . . . . . . . . . . . . . . . .
Memoria de nivel máximo.. . . . . . . . . . . . . . . . . . . . . . .
Funcionamiento del indicador LED . . . . . . . . . . . . . . . . .
Característica de protección contra la manipulación
indebida . . . . . . . . . . . . . . . . . . . . . . . . . . . . . . . . . . . .
Qué hacer si suena la alarma
Alarma contra humo . . . . . . . . . . . . . . . . . . . . . . . . . . .
Alarma contra monóxido de carbono . . . . . . . . . . . . . . .
Retiro de la alarma/reemplazo de baterías. . . .
Mantenimiento general de la alarma . . . . . . . .
Información de seguridad sobre el monóxido de carbono
Información general sobre el monóxidode carbono . . . .
Fuentes posibles . . . . . . . . . . . . . . . . . . . . . . . . . . . . .
Consejos de seguridad sobre el monóxidode carbono . .
Síntomas de intoxicación por monóxidode carbono . . . .
Información de seguridad contra incendios
Plan de escape. . . . . . . . . . . . . . . . . . . . . . . . . . . . . . . . . . .
Prevención de incendios. . . . . . . . . . . . . . . . . . . . . . . . . . . .
Normas de seguridad de la industria
Asociación Nacional de Protección
contra Incendios . . . . . . . . . . . . . . . . . . . . . . . . . . . . . . . . . . . . . . Páginas 27-28
Jefe de bomberos del estado de California . . . . . . . . . . . . . . . . . . . Página 28
Comisión para la Seguridad de los Productosde Consumo. . . . . . . . Página 28
Comisión Reguladora Nuclear . . . . . . . . . . . . . . . . . . . . . . . . . . . . Página 28
Información de garantía limitada y servicio . . .
Registro del producto . . . . . . . . . . . . . . . . . . . . . . . .
Páginas 11-12
Páginas 13-14
Página
15
Páginas 15-16
Página
16
Página
17
Página
17
Páginas 17-18
Páginas 18-19
Página
s 20
Páginas 21-22
Páginas 26-27
Página
24
Página
24
Página
25
Páginas 25-26
Página
26
Página
27
Página
s 29-30
Páginas
30-31
Page 36

Introducción
Gracias por comprar la alarma combinada contra humo y
monóxido de carbono Kidde modelo
Esta alarma es apropiada para funcionar como estación única y/o
múltiples estaciones (24 dispositivos). Esta alarma tiene una
garantía limitada de cinco años. Dedique algunos minutos para
leer completamente esta guía del usuario y guárdela para consultarla en el futuro. Enseñe a sus hijos cómo deben responder a
las alarmas y a nunca jugar con la unidad. Su alarma contra
humo/monóxido de carbono Kidde fue diseñada para detectar
humo y monóxido de carbono de cualquier fuente de combustión en un ambiente residencial. No está diseñada para su
uso en un vehículo de recreación o bote. Si tiene alguna pregunta acerca del funcionamiento o de la instalación de su
alarma,llame gratis a la línea directa para el consumidor al
1-800-880-6788. La guía de la página 28 le ayudará a determinar la ubicación correcta de los productos de seguridad que
harán de su hogar un lugar más seguro.
KN-COSM-IoKN-COSM-IB
.
1
Page 37
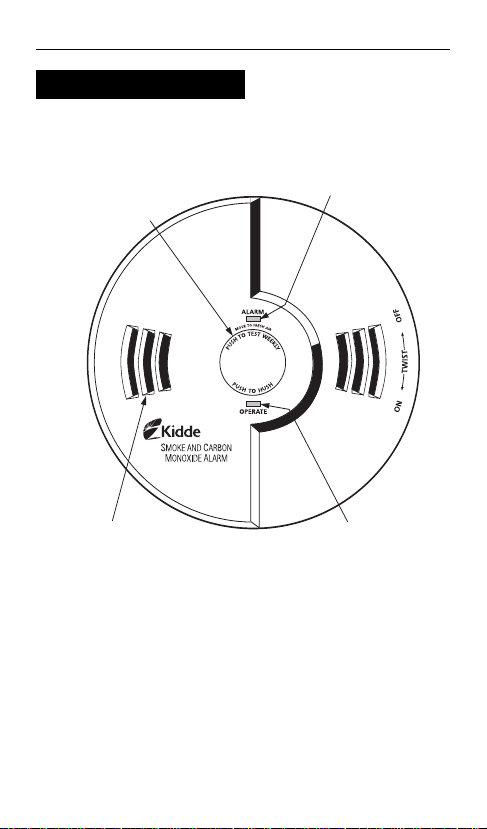
Vista del producto
LED ROJO
(Diodo fotoemisor)
LED VERDE
(Diodo fotoemisor)
BOTÓN PROBAR/
RESTABLECER/
SILENCIADOR
RESONADOR
DE LA ALARMA
PARTE FRONTAL
2
Page 38
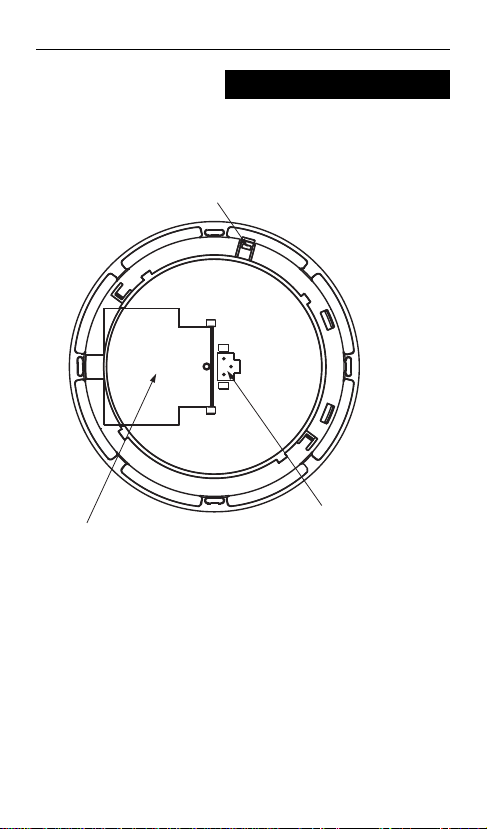
Vista del producto
CARACTERÍSTICA DE PROTECCIÓN
CONTRA MANIPULACIÓN INDEBIDA
ESPIGAS DEL
CONECTOR DE CA
COMPARTIMIENTO
DE BATERÍAS
Sólo modelo KN-COSM-IB
PARTE POSTERIOR
3
Page 39

Características
• Alarma fuerte de 85 decibeles.
• Sensores independientes de humo y monóxido de carbono
permanentes
• La alarma contra humo tiene prioridad cuando se encuentren
presentes humo y monóxido de carbono.
• Recibe alimentación del cable de 120 V CA (60 Hz,25mA
máx.) del conector.El modelo KN-COSM-IB también está
equipado con una batería de emergencia de 9 V.
• El modelo KN-COSM-IB también se encuentra equipado con
una lengüeta de extracción para conectar fácilmente la
batería. ¡Sólo saque la lengüeta y se conectará la batería!
• Se interconecta con otras alarmas contra humo y monóxido
de carbono de marca Kidde/Nighthawk (consulte la página 16
para obtener detalles).
• Sistema de advertencia con mensaje de voz/alarma que lo
alerta de las siguientes condiciones en la manera que se
describe a continuación,eliminando de esa forma cualquier
confusión por la cual la alarma está sonando:
FUEGO:
El patrón de alarma/voz son tres pitidos de alarma
largos seguidos del mensaje de advertencia verbal “¡FUEGO!”
Este patrón se repite hasta que se elimine el humo. El LED
rojo destellará mientras se encuentre en el modo de
alarma/voz.
MONÓXIDO DE CARBONO:
cuatro pitidos de alarma cortos seguidos del mensaje de
advertencia verbal “¡ADVERTENCIA! ¡MONÓXIDO DE CARBONO!”. Esto continúa hasta que se restablece la unidad o se
elimina el monóxido de carbono. Aunque sólo reciba alimentación de la batería, después de cuatro minutos el patrón
de alarma/voz sonará cada un minuto. El diodo fotoemisor
(LED) rojo se encenderá cuando se encuentre en el modo
larma/voz.
BA
TERÍA BAJA (sólo para el modelo KNCOSM-IB):Cuando
las baterías estén bajas y se deban reemplazar, el LED rojo se
encenderá y la unidad emitirá un “chirrido”una vez, seguido
del mensaje de advertencia “BATERÍA BAJA”. Este ciclo se
producirá una vez cada minuto y continuará por lo menos
durante siete días.
El patrón de alarma/voz son
4
Page 40

Características
• El sistema de mensaje de voz alerta al usuario en las siguientes condiciones:
– El sistema anuncia “SE ACTIVÓ EL MODO DE SILENCI-
ADOR”cuando la unidad se ponga por primera vez en el
modo de silenciador.
– El sistema anuncia “SE CANCELÓ EL MODO DE SILENCI-
ADOR”cuando la unidad reanuda su funcionamiento
normal después que se haya cancelado el modo de silenciador
– El sistema anuncia “SE DETECTÓ PREVIAMENTE
MONÓXIDO DE CARBONO”detectado concentraciones
de monóxido de carbono de 100 PPM o mayores.
– El sistema anuncia “PRESIONE EL BOTÓN PROBAR” cuan-
do se enciende la unidad, lo que le recuerda al usuario
que debe activar el botón probar.
• Un “chirrido”cada 30 segundos es una señal de que la alarma no está funcionando bien. Si esto sucede, llame a la línea
directa para el consumidor al 1-800-880-6788.
• El botón probar/restablecer realiza las siguientes funciones:
– Prueba los dispositivos electrónicos de las unidades y
verifica el funcionamiento correcto de las unidades
– Restablece la unidad durante la alarma contra monóxido
de carbono
– Activa la función de silenciador
– Activa la función memoria de nivel máximo
•
Función de control de silenciador que silencia la unidad durante
situaciones de alarmas molestas. (Consulte la página 16).
• La función memoria de nivel máximo que alerta al usuario
cuando la unidad ha detectado concentraciones de monóxido
de carbono de 100 PPM o mayores. (Consulte la página 17).
•
Característica de memoria de alarma que proporciona señal visual cuando una alarma ha detectado una condición peligrosa.
• Los LED verde y rojo indican el funcionamiento normal y el
estado de la alarma (consulte la página 17 para obtener
detalles).
• La característica de protección contra la manipulación indebida ayuda a evitar que niños y otras personas retiren la alarma.(Consulte la página 18).
5
Page 41

Características de la alarma contra humo
• El modelo KN-COSM-IB también se encuentra equipado con
un señalizador del indicador de batería que prohíbe la instalación cuando la batería no se encuentra adentro.
• Después de siete (7) años del encendido inicial, esta unidad
emitirá un “chirrido”cada 30 segundos. Esta es una característica de “fin de la vida útil”que indicará que es tiempo de
reemplazar la alarma.
Alarma contra humo
La alarma contra humo supervisa el en caso de que existan productos de combustión provenientes de algo que se está quemando o ardiendo sin llama. Cuando las partículas de humo
alcanzan una concentración especificada, suena el sistema de
advertencia de mensaje de voz/alarma y se enciende el LED rojo
destellante. La alarma contra humo tiene prioridad cuando haya
presencia de humo y monóxido de carbono.
ADVERTENCIA: LEA ATENTA Y COMPLETAMENTE LO
SIGUIENTE
La NFPA 72 señala que la seguridad de las personas en caso de
incendio en edificios r
aviso oportuno a los ocupantes de la necesidad de salir de
inmediato, seguido de las medidas de desalojo adecuadas que
tomen dichos ocupantes. Los sistemas de advertencia de incendios para las unidades residenciales pueden proteger aproximadamente a la mitad de los ocupantes en incendios potencialmente fatales. Las víctimas son, a menudo, personas que están
muy cerca del fuego, ancianos o niños, o personas con discapacidad mental o física, quienes no pueden escapar, incluso,
cuando se les advierte con suficiente anticipación como para
que puedan salir. Para estas personas, son necesarias otras
estrategias, como la protección en el mismo lugar, o bien, la salida o el rescate asistido.
• Las alarmas contra humo son dispositivos que pueden entregar una advertencia oportuna de posibles incendios a un
costo razonable; sin embargo, las alarmas tienen limitaciones
de detección. Las alarmas de detección de ionización pueden
detectar partículas de humo invisibles (asociadas a incendios
de expansión rápida) más rápido que las alarmas fotoeléctricas. Las alarmas de detección fotoeléctricas pueden detectar
partículas de humo visibles (asociadas a incendios de expansión lenta) más rápido que las alarmas de ionización. Los
incendios en las casas se pueden producir de diferentes formas y, con frecuencia, son impredecibles. Kidde recomienda
que, para una máxima protección, se instalen alarmas de ionización y fotoeléctricas.
6
esidenciales se basa principalmente en el
Page 42

Características de la alarma contra humo
• Una alarma alimentada por baterías debe tener una batería
del tipo especificado, en buenas condiciones e instalada adecuadamente.
• Una alarma alimentada por baterías debe tener una batería
del tipo especificado, en buenas condiciones e instalada adecuadamente.
• Las alarmas contra humo se deben probar regularmente para
asegurarse de que las baterías y los circuitos de alarma estén
en buenas condiciones de funcionamiento.
• Las alarmas contra humo no pueden dar la alarma si el humo
no llega a ellas. Por lo tanto, es posible que estas alarmas no
detectenincendios que se inicien en chimeneas, paredes,
techos, al otro lado de una puerta cerrada o en otro piso.
• Si la alarma está ubicada fuera del dormitorio o en otro piso,
es posible que no despierte a una persona de sueño profundo.
• El uso de alcohol o drogas también puede disminuir la capacidad de escuchar la alarma. Para una máxima protección, se
debe instalar una alarma en cada área de dormitorios y en
cada piso de una casa.
• Aunque las alarmas contra humo pueden ayudar a salvar
vidas al advertir oportunamente de un incendio, no son un
sustituto de una póliza de seguro. Los propietarios y arrendatarios deben contratar un seguro adecuado para proteger
su vida y su propiedad.
Alarma contra monóxido de carbono (CO)
La alarma contra monóxido de carbono (CO) supervisa la presencia de monóxido de carbono en el aire. Se activará ante niveles altos y bajos de monóxido de carbono durante un período
prolongado. (Consulte la página 22 para conocer los tiempos
de alarma) Cuando una condición de monóxido de carbono
corresponda a una de estas situaciones, sonará el sistema de
advertencia de mensaje de voz/alarma junto con el LED rojo
destellante. El sensor de monóxido de carbono usa una tecnología electroquímica.
PRECAUCIÓN: Esta alarma sólo indicará la presencia de gas
de monóxido de carbono en el sensor. El gas de monóxido
de carbono puede estar presente en otras áreas.
Las personas con problemas médicos pueden considerar el uso de
dispositivos que entreguen señales sonoras y visuales para las
concentraciones de monóxido de carbono de menos de 30 PPM.
7
Page 43
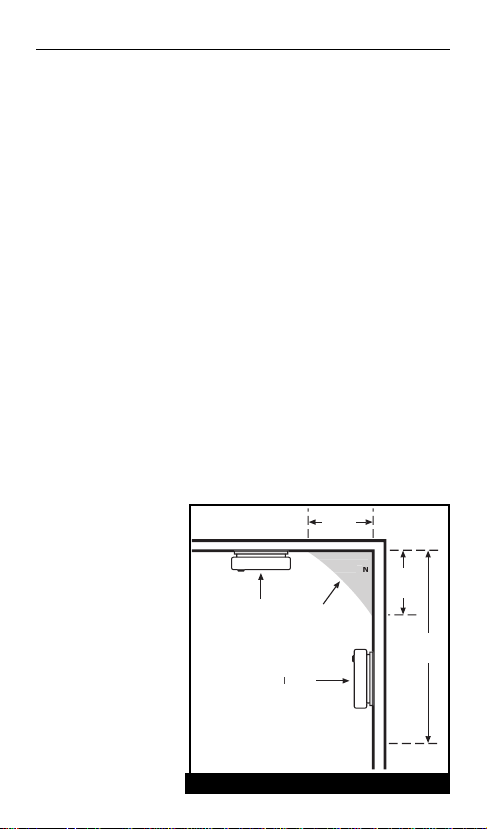
Instrucciones de instalación
(10 cm)
4 pulg.
CIELO RASO
ESPACIO DE AIRE
SIN CIRCULACI
Ó
Í
XIMO
MEJOR
NUNCA
ES
4 pulg.
Í
Paso 1
Guía de instalación:
IMPORTANTE: ESTA ALARMA SE DEBE INSTALAR EN UN
CIELO RASO O EN UNA PARED. ¡NO FUE DISEÑADA PARA
SU USO COMO UN DISPOSITIVO PARA COLOCAR SOBRE
UNA REPISA! ¡INSTÁLELA COMO SE INDICA!
A. Ubicaciones de instalación recomendadas:
Kidde Safety recomienda la instalación de una Alarma contra
humo/monóxido de carbono en las siguientes ubicaciones. Para
obtener una máxima protección, r
ma en cada piso de una casa de varios pisos, que incluya cada
dormitorio, pasillos, áticos y sótanos terminados. Coloque las
alarmas en ambos extremos del dormitorio, pasillo o habitación
grande si el pasillo o la habitación tiene más de 30 pies (9.1 m)
de largo. Si tiene sólo una alarma, asegúrese de que esté ubicada en el pasillo, fuera del área principal de los dormitorios o en
la habitación principal. Verifique que la alarma se pueda oír en
todas las habitaciones. Coloque una alarma en cada habitación
en que una persona duerma con la puerta cerrada. Es posible
que la puerta cerrada impida que una alarma que no esté ubicada en esa habitación despierte a la persona que duerme. El
humo, el calor y los productos de combustión suben al cielo
raso y se propagan horizontalmente. La instalación de la alarma
en el cielo raso en el
centro de la
habitación deja la
alarma más cerca de
todos los puntos de la
habitación. En
construcciones de
viviendas comunes, es
preferible la instalación en cielo raso.Al
instalar una alarma en
el cielo raso,
colóquela a una distancia mínima de 4
pulg. (10 cm) de la
pared lateral (consulte
la Figura 1). Si instala
8
ecomendamos instalar la alar-
FIGURA 1
Page 44
Instrucciones de instalación
(
0.9 m)
3'
(0.9 m)
3'
(
102 mm)
4"
(0.9 m)
3'
(102 mm)
4"
NO EN ESTA
ÁREA
EN CUALQUIER
LUGAR DENTRO
DE ESTA ÁREA
NO EN ESTA
ÁREA
EN CUALQUIER
LUGAR DENTRO
DE ESTA ÁREA
la alarma en la pared, use una pared interior con el borde superior de la alarma a un mínimo de 4 pulg. (10 cm) y un máximo
de 12 pulg. (30.5 cm) bajo el cielo raso (consulte la Figura 1).
Instalación en un techo con pendiente:
La siguiente información la proporciona la Asociación Nacional
de Pr
otección contra Incendios y se indica en el Código de
incendios 72. Instale alarmas contra humo en cielos rasos en
pendiente, a dos vertientes o catedral a 3 pies (0.9 m), o
menos, del punto más alto en 8 pies(0.3 m a 2.4 m) medido
horizontalmente se deben ubicar en el lado más alto de la
habitación”.
La NFPA 72 señala que “las alarmas en hilera deben estar separadas y ubicadas a menos de 3 pies (0.9 m) del vértice del cielo
raso medido horizontalmente”. (Consulte la Figura 2)
FIGURA 2
Casas rodantes:
Las casas rodantes moder
para lograr un uso eficiente de la energía. Instale las alarmas
contra humo/monóxido de carbono según las recomendaciones
anteriores. (Consulte las Instrucciones de instalación recomendadas y la Figura 1). En casas rodantes antiguas que no están
bien aisladas, el calor y el frío extremos se pueden filtrar desde
el exterior al interior a través de paredes y un techo inadecuadamente aislados. Esto puede formar una barrera térmica,
que puede evitar que el humo llegue a una alarma montada en
el cielo raso. En ese tipo de casas rodantes, instale la alarma
contra humo/monóxido de carbono en una pared interna con el
extremo superior de la alarma a un mínimo de 4 pulgadas (10
cm) y un máximo de 12 pulgadas (30.5 cm) bajo el cielo raso
(consulte la Figura 2). Si no está seguro de cuál es el aislamiento
de su casa móvil o si observa que las paredes externas y el cielo
raso están calientes o fríos, ¡SÓLO! instale la alarma en una
pared interna.
nas han sido diseñadas y construidas
9
Page 45

Instrucciones de instalación
ESTE EQUIPO SE DEBE INSTALAR DE ACUERDO CON LA
NORMA 72 DE LA ASOCIACIÓN NACIONAL DE
PROTECCIÓN CONTRA INCENDIOS (National Fire Protection
Association, Batterymarch Park, Quincy, MA 02269).
B. Dónde no instalar:
¡No instale la alarma en garajes, cocinas, calderas ni
baños! INSTÁLELA A UNA DISTANCIA MÍNIMA DE 5 PIES
DE CUALQUIER APARATO QUEMADOR DE COMBUSTIBLE.
ADVERTENCIA: Este producto está
diseñado para su uso en habitaciones interiores comunes de viviendas familiares. No está diseñado
!
No la instale a menos de 3 pies (0.9 m) de lo siguiente:
La puerta que dé a una cocina o a un baño, que tenga una
bañera o ducha, los conductos de suministr
para calefacción o refrigeración, los ventiladores de cielo raso o
en otras áreas de corrientes de aire. Evite las áreas con exceso
de polvo, suciedad o grasa. El polvo, la grasa y los químicos
domésticos pueden contaminar los sensores de la alarma, impidiendo su funcionamiento normal.
Coloque la alarma en lugares donde las cortinas u otros objetos
no bloqueen el sensor. El humo y el monóxido de carbono
deben llegar a los sensores para que la unidad pueda detectar
adecuadamente estas condiciones. No la instale en vértices de
cielos rasos abovedados, con forma de “A” o en techos de
gabletes. Manténgala lejos de áreas mojadas o húmedas.
Instálela a una distancia mínima de un (1) pie de luces fluorescentes, porque el ruido electrónico puede causar alarmas
molestas. No la exponga a la luz solar directa y manténgala
fuera de áreas infestadas de insectos. Las temperaturas
extremas afectan la sensibilidad de la alarma contra
humo/monóxido de carbono. No la instale en áreas en que la
temperatura sea inferior a 40 grados Fahrenheit (4.4 Celsius) o
superior a 100 grados Fahrenheit (37.8 Celsius). No la instale en
10
para medir el cumplimiento con las
normas comerciales e industriales de
la Administración de Seguridad y
Salud Ocupacional (OSHA).
o de aire a presión
Page 46

Instrucciones de instalación
áreas en las cuales la humedad relativa (HR) sea superior al
85%. Colóquela lejos de puertas y ventanas que se abran hacia
el exterior.
Paso 2
Instrucciones de cableado:
REQUISITOS DE CABLEADO
• Esta alarma contra humo debe instalarse en una caja de
conexiones r
deben realizarse por un electricista calificado y el cableado
debe realizarse de acuerdo a lo establecido en los artículos
210 y 300.3 (B) del Código de Electricidad Nacional de
EE.UU. ANSI/NFPA 70, NFPA 72 y/o cualquier otro código
aplicable en su área. El cableado para interconectar estaciones múltiples a las alarmas debe pasar por el mismo conducto eléctrico o cable que el cableado de alimentación de
CA. Además, la resistencia del cableado de interconexión será
de 10 ohms como máximo.
• La fuente de energía adecuada es de 120 voltios de CA
monofásica suministrada por un circuito no conmutable que
no esté protegido por un interruptor accionado por corriente
de pérdida a tierra.
• Las alarmas contra humo no se deben usar con rejillas de pro-
tección para los detectores, a menos que se haya evaluado la
combinación (rejilla de protección para la alarma y el detector) y se encuentre adecuada para ese propósito.
• ADVERTENCIA: La alarma no debe funcionar con energía
proveniente de un convertidor de onda cuadrada o de onda
cuadrada modificada. Estos tipos de convertidor
usan para suministrar energía a la estructura en instalaciones
aisladas de la red, como fuentes de energía solar o eólica.
Estas fuentes de energía producen voltajes de alta frecuencia
que dañarán la alarma.
INSTRUCCIONES PARA UN CABLEADO DE CONEXIÓN
RÁPIDA DE CA
¡PRECAUCIÓN! DESACTIVE EL SUMINISTRO DE ENERGÍA
PRINCIP
CABLES DE LA ALARMA.
egistrada o UL homologada. Todas las conexiones
es a veces se
AL QUE VA AL CIRCUITO ANTES DE CONECTAR LOS
11
Page 47

Instrucciones de instalación
• En alarmas que se usan como una estación única,NO
CONECTE EL CABLE ROJO A NADA. Deje en su lugar el
casquillo aislante para asegurar que el cable rojo no haga
contacto con ninguna pieza de metal ni con la caja eléctrica.
• Cuando las alarmas están interconectadas, todas las unidades
interconectadas deben activarse desde un circuito único.
• En una disposición de estaciones múltiples se pueden inter-
conectar un máximo de 24 dispositivos Kidde Safety. El sistema interconectado no debe exceder el límite de interconexión de la NFPA de 12 alarmas contra humo y/o 18 alarmas en
total (contra humo,monóxido de carbono, combinada contra
humo/monóxido de carbono, de calor, etc.) Esta alarma combinada contra humo/monóxido de carbono se debe considerar como una alarma contra humo al determinar el número de
unidades de una línea de interconexión. Con 18 alarmas
interconectadas, aún es posible interconectar un total de 6
dispositivos de señalización remotos y/o módulos de relé.
(Consulte la página 16 para obtener detalles sobre la interconexión de dispositivos Kidde).
• La distancia máxima del tendido de cables entre la primera y
la última unidad en un sistema interconectado es de 1,000
pies.
• En la Figura 3 se muestra un cableado de interconexión. Una
conexión inadecuada originará daños a la alarma, incapacidad
de funcionamiento de ésta o riesgo de recibir una descarga
eléctrica.
• Asegúrese de que algunas alarmas estén cableadas en una
línea de alimentación continua (no conmutada). NOTA: Use
el cable estándar aprobado por UL (calibre 18 o mayor según
lo requieran los códigos locales) disponible en todas las tiendas de suministros eléctricos y la mayoría de las ferreterías.
12
Page 48
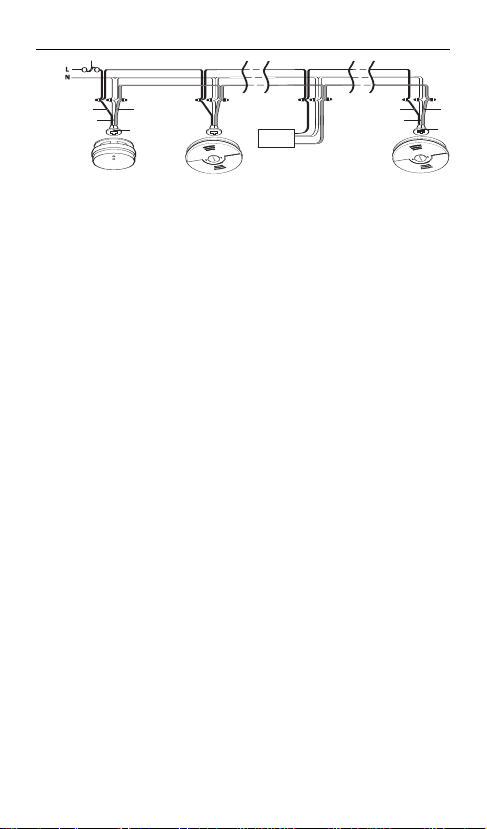
Instrucciones de instalación
A
L
A
R
M
O
P
E
R
A
T
E
A
L
A
R
M
O
P
E
R
A
T
E
F
USIBLE O INTERRUPTOR AUTOMÁTICO
ROJONEGRO
BLANCO
NEGRO
BLANCO
ROJO
C
ONECTOR
CONECTOR
Primera
alarma
Alarma
adicional
Modelo SM120X
del módulo de
relés de Kidde
Alarma
adicional
Accesorio opcional
FIGURA 3 “DIAGRAMA DEL CABLEADO DE INTERCONEXIÓN”
CABLES EN CABLEADO CONECTADO A
DE ALARMA
Negro Polo vivo de línea de CA
Blanco Polo neutro de línea roja de CA
Rojo Líneas de interconexión (cables
rojos) de otras unidades en un
esquema de estaciones múltiples
Paso 3
Instrucciones de montaje:
PRECAUCIÓN: ¡LA ALARMA CONTRA HUMO/MONÓXIDO
DE CARBONO ESTÁ SELLADA Y LA CUBIERTA NO ES
REMOVIBLE!
1. Para ayudar a identificar la fecha de reemplazo de la unidad,
se ha colocado una etiqueta al costado de la alarma.Escriba la
fecha de reemplazo en la etiqueta “Replace by”(7 años a partir
de la activación inicial) con un marcador permanente. Para
obtener información adicional, consulte la sección Reemplazo
de la alarma.
2. Retire el soporte de montaje de la parte posterior de la alarma
sosteniéndolo y girando la alarma en la dirección que indica la
flecha “OFF”en la cubierta de la alarma.
3. Después de seleccionar la ubicación adecuada para la alarma
contra humo/monóxido de carbono,como se describe en las
páginas 8-11 y de conectar los cables de CONEXIÓN RÁPIDA
de CA según se describe en las INSTRUCCIONES DE CABLEADO, conecte el soporte de montaje a la caja eléctrica. Para asegurarse de que la alarma esté alineada con el pasillo, o la
pared, la línea “A” del soporte de montaje debe estar paralela
13
Page 49

Instrucciones de instalación
al pasillo cuando se instala en el cielo raso u horizontal cuando
se instala en la pared.
4. Introduzca el CONECTOR RÁPIDO DE CA por el orificio central
del soporte de montaje y fije el soporte, asegurándose que los
tornillos de montaje estén ubicados en los extremos pequeños
de los orificios de agarre antes de apretar los tornillos.
5. Conecte el CONECTOR RÁPIDO
de CA en la parte posterior de la
alarma (consulte la Figura 4),
asegurándose de que los
enganches del conectorencajen
en su lugar. Luego, ponga de
nuevo el cable sobrante en la
caja eléctrica a través del orificio
que se encuentra en el centro
del soporte de montaje.
6. Instale la alarma en el soporte de montaje y gire la alarma en
la dirección de la flecha “ON”de la cubierta hasta que la
alarma se ajuste en su lugar (esta función de ajuste permite
una alineación estética). Nota: La alarma se montará en el
soporte en 4 posiciones (cada 90 grados).
7. Active la CA. Se debe encender el indicador verde de CA
cuando la alarma esté funcionando con CA.
8. Se incluyen dos etiquetas con la alarma. Contienen informa-
ción importante sobre qué hacer en caso de una alarma.
Agregue el número de teléfono de su proveedor de servicios
de emergencia (bomberos o el 911) en el espacio correspondiente. Coloque una etiqueta junto a la alarma después de
montarla y la otra cerca de una fuente de aire fresco tal
como una puerta o una ventana.
9. Sólo para el modelo KN-COSM-IB: Saque completamente la
lengüeta de extracción de la batería (lengüeta amarilla que
sobresale de la unidad). Esto conectará automáticamente la
batería.
FIGURA 4 “INSTALACIÓN DE
LA CONEXIÓN RÁPIDA DE CA”
14
Page 50

Instrucciones de puesta en funcionamiento
Paso 4
Prueba de la alarma
PRECAUCIÓN: Debido a la intensidad acústica (85 decibeles)
de la alarma, permanezca siempre a un brazo de distancia
de la unidad en el momento de realizar la prueba.
El botón probar/restablecer tiene cuatro propósitos. Prueba los
dispositivos electrónicos de la unidad, restablece la alarma contra monóxido de carbono, activa la función de silenciador y activa la memoria de nivel máximo.
Después de la instalación,PRUEBE LOS DISPOSITIVOS
ELECTRÓNICOS DE LA UNIDAD presionando y soltando el botón
probar/restablecer. Sonarán una serie de pitidos, seguidos del
mensaje“¡FUEGO! ¡FUEGO!” luego otras dos series de pitidos y
el mensaje “¡ADVERTENCIA! ¡MONÓXIDO DE CARBONO!”,
seguido de 4 pitidos cortos adicionales.
¡Es necesario hacer pruebas semanalmente! Si en algún
momento no funciona como se describe, verifique que la
energía esté conectada correctamente y que no sea necesario
reemplazar las baterías. Limpie el polvo y otras acumulaciones
de la unidad. Si aún no funciona adecuadamente, llame a la
línea directa para el consumidor al 1-800-880-6788.
Característica de interconexión
Su alarma combinada contra humo/monóxido de carbono se
puede interconectar con otros productos de estaciones múltiples Kidde, Nighthawk y Kidde/Fyrnetics:
• Cuando se interconectan alarmas contra humo y de calor
compatibles a su alarma contra humo/monóxido de carbono,
sólo responderán a un evento relacionado con el humo.
• Cuando se mezclan modelos compatibles que poseen baterías
de emergencia con modelos sin estos elementos, advertimos
que los modelos sin las baterías de emergencia no se
accionarán durante un corte de CA.
• Esta unidad sólo está aprobada para interconectarse con otros
productos Kidde/Nighthawk. NO se encuentran aprobados
para interconectarse con productos de detección de cualquier
otra marca.
15
Page 51

Instrucciones de puesta en funcionamiento
• Esta alarma admite la interconexión con las siguientes alarmas
y accesorios:
– Alarmas contra humo: i12020, i12040 i12060,
i12080,1235, 1275, 1276, 1285, 1296, PE120, PI2000,
KN-COSM-IB, KN-COSM-I y RF-SM-ACDC
– Alarma de calor: HD135F
–
Alarmas contra monóxido de carbono: KN-COB-IC, KN-COP-IC
– Módulos de relés: 120X, SM120X, CO120X
– Luz estroboscópica: SL177I
Consulte las Guías del usuario para encontrar información
específica acerca de cada aplicación.
• Para obtener mayor información sobre las unidades de interconexión compatibles y su funcionalidad en un sistema interconectado, visite nuestro sitio Web en: www.kidde.com.
Función de control de silenciador
La función de silenciador tiene la capacidad de insensibilizar
temporalmente el circuito de la alarma durante aproximadamente 10 minutos. Esta función sólo se debe usar cuando una
condición de alarma conocida,como humo proveniente de la
cocina, activa la alarma. Puede poner la alarma contra
humo/monóxido de carbono en el modo de silenciador presionando el botón probar/restablecer. Si el humo no es demasiado
denso,la alarma se silenciará inmediatamente,la unidad anunciará verbalmente “SE ACTIVÓ EL MODO DE SILENCIADOR”y el
LED verde destellará cada 2 segundos durante aproximadamente 10 minutos. Esto indica que la alarma contra humo se
encuentra en una condición de insensibilidad temporal. Su alarma contra humo/monóxido de carbono se restablecerá
automáticamente después de aproximadamente 10 minutos.
Cuando la unidad regrese al funcionamiento normal después de
haber estado en el modo de silenciador,anunciará verbalmente
“SE CANCELÓ EL MODO DE SILENCIADOR”y sonará la alarma
si todavía hay humo presente. La función de silenciador se
uede usar repetidamente hasta que haya desaparecido la condición que causa la alarma.Mientras la unidad esté en el modo de
silenciador,también puede presionar el botón probar/restablecer
de la alarma para terminar el período de silenciador.
NOTA: LA PRESENCIA DE HUMO MUY DENSO ANULARÁ
LA FUNCIÓN DE CONTROL DE SILENCIADOR Y LA ALARMA
SONARÁ EN FORMA CONTINUA.
16
Page 52

Instrucciones de puesta en funcionamiento
PRECAUCIÓN: ANTES DE USAR LA FUNCIÓN DE SILENCIADOR DE LA ALARMA, IDENTIFIQUE LA FUENTE DEL
HUMO Y ASEGÚRESE DE QUE LAS CONDICIONES EXISTENTES SEAN SEGURAS.
Función restablecer
Si la alarma contra humo/monóxido de carbono emite una alarma de monóxido de carbono, presione el botón probar/restablecer para silenciar la alarma. Si continúa la condición de monóxido de carbono que causó la alerta, se reactivará la alarma. Los
tiempos de reactivación dependen de la cantidad de monóxido
de carbono presente. (Consulte la página 22).
Memoria de nivel máximo
Si el sensor de monóxido de carbono detecta un nivel de
monóxido de carbono de 100 PPM o superior desde el último
restablecimiento, la función memoria de nivel máximo lo registrará.Para acceder a la memoria de nivel máximo,presione el
botón probar/restablecer. Si se registró una lectura de 100 ppm
o mayor, la unidad anunciará Se detectó monóxido de carbono
previamente.” Si ha estado ausente de su hogar, esta función le
permite verificar si hubo una lectura de monóxido de carbono
de 100 PPM o superior, durante su ausencia.Al presionar el
botón probar/restablecer se reestablece la memoria. También se
restablece cuando se desconecta la energía.
Funcionamiento de indicador LED
LED rojo
El LED rojo destellará junto con el pitido de la alarma. Por lo
tanto, el LED rojo destellará durante una alarma de humo, una
alarma de monóxido de carbono o un chirrido de modo de
batería baja y un chirrido de modo de error en la unidad.
LED verde
El LED verde destellará como se describe a continuación de
acuer
do con las siguientes condiciones:
– CONDICIÓN DE ESPERA (recibe alimentación de CA y de
la batería de emergencia): El LED estará encendido constantemente, pero parpadeará cada 30 segundos cuando
se tome una lectura de monóxido de carbono.
– CONDICIÓN DE ESPERA (recibe alimentación de CA y de
la batería de emergencia): El LED estará encendido constantemente, pero parpadeará cada 30 segundos cuando
se tome una lectura de monóxido de carbono.
17
Page 53

Instrucciones de puesta en funcionamiento
– CONDICIÓN DE MEMORIA DE ALARMA: El LED destellará
a cada segundo, lo que significa que la alarma detectó
un riesgo de humo o de monóxido de carbono. Seguirá
destellando a cada segundo hasta que se presione el
botón probar/restablecer, para restablecer la alarma.
– CONDICIÓN DE MODO DE SILENCIADOR: El LED destel-
lará cada 2 segundos mientras la alarma se encuentre en
modo de silenciador.
Característica de protección contra la manipulación indebida
Su alarma contra humo/monóxido de carbono viene con una
característica de protección contra la manipulación indebida.
Active la característica de protección contra la manipulación
indebida desprendiendo los cuatro terminales de tornillo de los
orificios cuadrados del anillo de ajuste (consulte la Figura 5A).
Una vez que se haya desprendido los terminales de tornillo, es
posible enganchar la lengüeta de protección contra la manipulación indebida, que se ubica en la base, al soporte de montaje.
Haga girar la alarma en el soporte de montaje hasta que
escuche el enganche de la lengüeta de protección contra la
manipulación indebida en su lugar, lo que bloquea la alarma en
el soporte de montaje. Esta característica de protección contra
la manipulación indebida ayuda a evitar que los niños y otras
personas saquen la alarma del soporte. NOTA: Para retirar la
alarma cuando la lengüeta de protección contra la manipulación indebida esté enganchada, presione la lengüeta y gire la
alarma hasta sacarla del soporte (consulte la Figura 5B).
FIGURA 5A
Ubicación de los terminales
FIGURA 5B
18
A
A
A
A
Page 54

Qué hacer si suena la alarma
¡NUNCA IGNORE EL SONIDO DE LA ALARMA!
Es fácil determinar qué tipo de alarma sonó con la alarma combinada contra humo/monóxido de carbono Nighthawk. El sistema de advertencia de mensaje de voz le informará el tipo de
situación que se está produciendo. Consulte la sección
Características en las páginas 4-7 para obtener una descripción
detallada de cada patrón de alarma.
Qué hacer si suena la alarma
Cuando suena la alarma contra humo:
Las alarmas contra humo están diseñadas para reducir al mínimo las falsas alarmas. El humo de cigarrillo normalmente no la
activará, a menos que llegue directamente a la alarma. Las
partículas por combustión provenientes de la cocina pueden
activar la alarma si está ubicada demasiado cerca del área en
que se cocina. Se generan grandes cantidades de partículas
combustibles por derrames o al asar. El uso del ventilador de
una campana de cocina que expulsa el aire hacia el exterior
(que no sea de recirculación) también ayuda a eliminar estos
productos combustibles de la cocina.
Si la alarma suena, primero verifique si hay un incendio. Si descubre un incendio, siga estos pasos. ¡Familiarícese con estos
puntos y revíselos con todos los miembros de su familia!
• Alerte a los niños pequeños de la casa.
• Salga de la casa inmediatamente usando una de las rutas de
escape planificadas (consulte la página 28). Cada segundo
cuenta; no se detenga para vestirse o tomar objetos de valor.
• Antes de abrir las puertas interiores, asegúrese de ver si hay
humo filtrándose por los bordes y haga contacto con la parte
posterior de la mano. Si la puerta está caliente, use la segunda salida de emergencia. Si cree que es segura, abra la puerta
muy lentamente y esté preparado para cerrarla de inmediato
si entra una bocanada de humo y calor.
• Si al escapar debe pasar a través del humo, gatee por debajo
del humo donde el aire está más limpio.
• Diríjase al lugar de encuentro predeterminado. Cuando dos
personas hayan llegado al punto de encuentro, una debe llamar al 911 desde la casa de un vecino y la otra debe uedarse
para contar a los habitantes de la casa.
19
Page 55

Qué hacer si suena la alarma
• No vuelva a ingresar por ningún motivo hasta que os
bomberos den la autorización para hacerlo.
• Hay situaciones en la que puede que una alarma contra
humo no sea efectiva para pr
según lo que se establece en la Norma 72 de la NFPA. Por
ejemplo:
a) fumar en la cama;
b) dejar a los niños sin supervisión;
c) limpiar con líquidos inflamables,como gasolina
oteger contra un incendio,
20
Page 56

Qué hacer si suena la alarma
Cuando suena la alarma contra monóxido de
carbono:
ADVERTENCIA - La activación de esta
alarma contra monóxido de carbono indica
!
Si suena una señal de alarma:
1) Presione el botón probar/restablecer.
2) Llame a los servicios de
emergencias (departamento
de bomberos u 911).
3) Retírese de inmediato a un lugar donde corra aire puro
– ya sea afuera o cerca de una ventana o puerta abierta.
Cuente las personas una por una para comprobar que
todas ellas se encuentren presentes. No vuelva a
entrar al lugar ni se aleje de la puerta o ventana
abierta hasta que hayan llegado los servicios de
emergencia, se haya aireado el lugar y su alarma esté
en su condición normal.
4) Después de seguir los pasos 1 al 3, si su alarma se
reactiva dentro de un período de 24 horas, repita los
pasos 1 al 3 y llame a un técnico calificado para que
investigue las fuentes de monóxido de carbono proveniente de equipos y aparatos
quemadores de combustible
y verifique el correcto funcionamiento de este equipo.
Si se identifican problemas durante esta inspección,
haga reparar el equipo inmediatamente. Observe todo
equipo de combustión que no haya sido inspeccionado
por el técnico y consulte las instrucciones del fabricante
o comuníquese directamente con el fabricante para
obtener mayor información acerca de la seguridad con
respecto al monóxido de carbono y sobre este equipo.
Asegúrese de que los vehículos motorizados no estén,
o no hayan estado, funcionando en un garaje adjunto
o adyacente a la residencia.
Nunca vuelva a activar la fuente de un problema de
monóxido de carbono hasta que se haya reparado.
¡NUNCA IGNORE LA ALARMA!
la presencia de monóxido de carbono (CO)
que puede OCASIONARLE LA MUERTE.
NÚMERO DE TELÉFONO
NÚMERO DE TELÉFONO
21
Page 57

Retiro de la alarma/reemplazo de baterías
El sensor de monóxido de carbono cumple con los requerimientos de tiempo de respuesta ante una alarma de UL norma
2034. Los tiempos de alarma estándar son los siguientes:
Con 70 PPM, la unidad debe dar la alarma dentro de 60 a 240
minutos.
Con 150 PPM, la unidad debe dar la alarma dentro de 10 a 50
minutos.
Con 400 PPM, la unidad debe dar la alarma dentro de 4 a 15
minutos.
Esta alarma contra monóxido de carbono está diseñada
para detectar gas de monóxido de carbono desde
CUALQUIER fuente de combustión. NO está diseñada para
detectar ningún otr
Los bomberos, la mayoría de las compañías de servicios públicos
y los contratistas de HV
de carbono;algunos de ellos pueden cobrar por este servicio. Es
recomendable que pregunte por las tarifas correspondientes
antes de que se preste el servicio. Kidde Safety no pagará ni
reembolsará al propietario o usuario de este producto por
ninguna llamada de reparación o despacho relacionada con la
activación de la alarma.
Retiro de la alarma
SI ESTÁ ACTIVADA LA CARACTERÍSTICA DE PROTECCIÓN
CONTRA LA MANIPULACIÓN INDEBIDA, CONSULTE LA
DESCRIPCIÓN DE ESTA CARACTERÍSTICA EN LA PÁGINA 18
PARA OBTENER INSTRUCCIONES SOBRE EL RETIRO DE LA
ALARMA.
Retire la alarma del soporte de montaje al girar la alarma en la
dir
ección de la flecha “OFF”que se encuentra en la cubierta.
Para desconectar el cableado de CA, apriete los brazos de cierre
de los lados del conector rápido sacando, al mismo tiempo, el
conector de la parte inferior de la alarma (consulte la página
14, Figura 4).
Reemplazo de baterías
(Sólo para el modelo KN-COSM-IB)
Si se detecta cualquier forma de falla de la batería, destellará el
LED rojo y la unidad emitirá un “chirrido”, seguido del mensaje
de advertencia “BATERÍA BAJA”. Este ciclo se producirá una
vez cada minuto y continuará por lo menos durante siete días.
22
o tipo de gas.
AC realizarán inspecciones de monóxido
Page 58
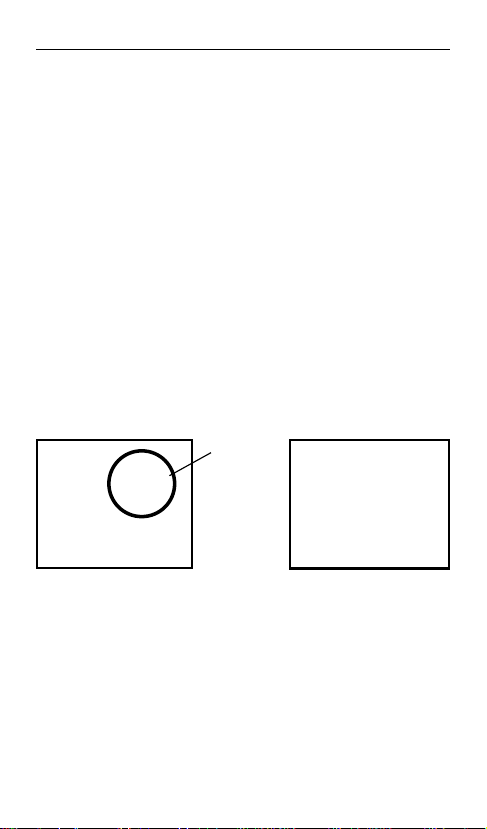
Reemplazo de baterías
(sólo para el modelo KN-COSM-IB)
Si el LED rojo destella junto con emitir un chirrido cada 30
segundos y no va seguido del mensaje de voz “BATERÍA
BAJA” como se describió anteriormente, su unidad no
funciona bien. Llame gratis a nuestra línea directa para el con-
sumidor al 1-800-880-6788 para obtener instrucciones sobre la
devolución de la unidad.
PRECAUCIÓN: ¡LA ALARMA CONTRA HUMO/MONÓXIDO
DE CARBONO ESTÁ SELLADA Y LA CUBIERTA NO ES
REMOVIBLE!
Para reemplazar la batería, primero debe sacar la alarma del
soporte de montaje de acuerdo con las instrucciones del RETIRO
DE LA ALARMA que se encuentran al principio de esta sección.
Después que retire la alarma, puede abrir la puerta del compartimiento de baterías y reemplazar la batería.
Las instrucciones de instalación de las baterías se encuentran en
el interior de la puerta del compartimiento de baterías.
Al instalar la batería, presione hacia abajo el enganche de retención indicador de batería en el compartimiento e instale la
batería (consulte la Figura 6).
Enganche
de la
batería
FIGURA 6 “REEMPLAZO DE BATERÍAS”
¡PRECAUCIÓN! SI NO SE MANTIENE PRESIONADO EL
ENGANCHE DE RETENCIÓN INDICADOR DE BATERÍA EN EL
COMPARTIMIENTO CORRESPONDIENTE, LA PUERTA DEL
COMPARTIMIENTO NO SE CERRARÁ, EL CONECTOR
RÁPIDO DE CA NO SE CONECTARÁ A LA ALARMA Y, A SU
VEZ, ÉSTA NO SE CONECTARÁ AL SOPORTE DE MONTAJE.
Después de instalar o cambiar la batería, vuelva a instalar la
alarma. Pruébela usando el botón probar/restablecer y verifique
que esté encendido el LED verde.
23
Page 59

Mantenimiento general
Reemplace las baterías por una de las siguientes marcas
aprobadas: Duracell MN1604, MX1604, Energizer 522, PANASONIC 6AM6, 6AM-6, 6AM-6PI, 6AM6X y 6LR61(GA), Ultralife
U9VL-J. Estas baterías se pueden comprar en el mercado local.
¡ADVERTENCIA! Use sólo las baterías que se especifican. El
uso de baterías difer
alarma contra humo/monóxido de carbono. Una buena medida
de seguridad es reemplazar la batería por lo menos una vez al
año o al mismo tiempo que cambie sus relojes al horario de verano.
Reemplazo de la alarma
Después de siete años del encendido inicial, esta unidad emitirá
un “chirrido” cada 30 segundos para indicar que es tiempo de
reemplazar la alarma. Se proporciona una etiqueta en el costado de la alarma que tiene “Replace by” (Reemplazar antes del)
impreso. Escriba la fecha de reemplazo en la etiqueta. La fecha
debe ser la equivalente a siete (7) años de encendido continuo.
¡REEMPLAZAR INMEDIATAMENTE! NO DETECTARÁ EL
MONÓXIDO DE CARBONO EN EST
Para mantener su alarma contra humo/monóxido de carbono en
buenas condiciones de funcionamiento, siga estos sencillos pasos:
• Verifique el funcionamiento de la alarma y los LED de la
unidad al presionar el botón probar/restablecer una vez por
semana.
• Retire la unidad del soporte de montaje y aspire la cubierta de
la alarma y los orificios de ventilación con un accesorio de
escobilla suave una vez al mes para eliminar el polvo y la
suciedad. ¡VUELVA A INSTALARLA INMEDIATAMENTE
DESPUÉS DE LIMPIARLA Y LUEGO PRUÉBELA USANDO EL
BOTÓN PROBAR/RESTABLECER!
• Nunca use detergentes ni otros solventes para limpiar la
unidad.
• Evite rociar desodorantes ambientales, aerosol para el pelo u
otros aerosoles cerca de la alarma contra humo/monóxido de
carbono.
No pinte la unidad. La pintura obstruye los orificios de ventilación e
interfiere con la capacidad del sensor de detectar humo y monóxido de carbono. Nunca trate de desmontar la unidad o de limpiarla
por dentro. Esta acción dejará sin efecto su garantía.
24
entes puede tener un efecto adverso en la
A CONDICIÓN.
Page 60

Información de seguridad sobre el
monóxido de carbono
Mueva la alarma contra humo/monóxido de carbono y ubíquela en
otro lugar antes de realizar cualquiera de las siguientes actividades:
• teñir o desforrar muebles o pisos de madera;
• pintar;
• empapelar muros;
• usar adhesivos.
Si se guarda la unidad en una bolsa plástica durante las actividades
antes mencionadas se protegerán los sensores contra daños. No la
coloque cerca de un cubo de pañales.
ADVERTENCIA: Vuelva a instalar la alarma contra
humo/monóxido de carbono lo antes posible para asegurar una
pr
otección continua. Cuando use artículos para la limpieza del
hogar o contaminantes similares, el área debe estar bien ventilada. Las siguientes sustancias pueden afectar el sensor de
monóxido de carbono y pueden producir lecturas falsas o daño
al sensor:
metano, propano, isobutano, isopropanol, acetato etílico, sulfuro de hidrógeno, dióxidos de azufre, productos en base a
alcohol, pinturas, diluyente, solventes, adhesivos, aerosoles para
el pelo, productos para después de afeitarse, perfumes y ciertos
productos de limpieza.
Información de seguridad sobre el
monóxido de carbono
Información general sobre el monóxido de carbono
El monóxido de carbono (CO) es un gas venenoso incoloro,
inodoro e insípido que puede ser fatal si se inhala. El monóxido
de carbono inhibe la capacidad de la sangre de transportar
oxígeno.
Posibles fuentes
El monóxido de carbono se puede producir al quemar cualquier
combustible fósil: gasolina,propano,gas natural, petróleo y leña.
Se puede producir por el mal funcionamiento,instalación o ventilación inadecuadas de un aparato quemador de combustible. Las
fuentes posibles incluyen hornos,cocinas/hornillos a gas,secadoras de ropa a gas,hervidores, estufas quemadoras de combustible portátiles,chimeneas de leña,cocinas a leña y algunos
calentadores de piscinas. También pueden producir monóxido de
carbono las chimeneas y cañones bloqueados, contratiros y
25
Page 61

Información de seguridad sobre el
monóxido de carbono
cam
bios en la presión del aire,tubos de ventilación corroídos o
desconectados,un termointercambiador de caldera suelto o agrietado.Los vehículos y otros motores de combustión en funcionamiento
en un garaje adyacente o el uso de una parrilla de carbón
vegetal/gas o parrilla portátil en un área cerrada también son posibles fuentes de monóxido de carbono.
Las siguientes condiciones pueden dar como resultado situaciones
transitorios de monóxido de carbono transitorio:
el derrame excesivo o la ventilación invertida de aparatos quemadores de combustible causado por condiciones ambientales
externas como: la dirección y/o velocidad del viento, lo que incluye
grandes ráfagas de viento; el aire pesado en los tubos de ventilación (aire frío/húmedo con períodos extendidos entre ciclos); el
diferencial negativo de presión provocado por el uso de ventiladores eductores; el funcionamiento simultáneo de varios aparatos
quemadores de combustible que compiten por el aire interno limitado; las conexiones de tubos de ventilación sueltas de las secadoras de ropa; las calderas o calentadores de agua, obstrucciones o
diseños de tuberías de ventilación no convencionales que pueden
acentuar las situaciones anteriores; el funcionamiento prolongado
de dispositivos quemadores de combustible sin orificios de ventilación (hornillo, caldera,chimenea,etc.); las inversiones de temperatura que pueden atrapar gases de escape cerca del suelo, y la
marcha en ralentí de un automóvil en un garaje adyacente abierto
o cerrado o cerca de la casa.
Consejos de seguridad sobre el monóxido de carbono
Cada año solicite a un técnico calificado que inspeccione y
limpie el sistema de calefacción, los orificios de ventilación, la
chimenea y el cañón. Instale siempre los aparatos de acuerdo
con las instrucciones del fabricante y los códigos de construcción locales. La mayoría de los aparatos deben ser instalados
por profesionales y se deben inspeccionar después de la instalación. Examine regularmente los orificios de ventilación y las
chimeneas para ver si hay conexiones inadecuadas, herrumbre
visible o decoloraciones, y verifique si hay hendiduras en termointercambiadores de caldera. Verifique que el color de la
llama del piloto y de los aparatos de calefacción sea azul. Una
llama amarilla o anaranjada es una señal de que no se está consumiendo adecuadamente el combustible. Enseñe a todos los
miembros de la familia el sonido de la alarma y la forma de
responder ante ésta.
26
Page 62

Información de seguridad contra incendios
Síntomas de intoxicación por monóxido de carbono
Los síntomas iniciales de intoxicación por monóxido de carbono
son similares a los de la gripe sin fiebre y pueden incluir mareos,
intensos dolores de cabeza, náuseas, vómitos y desorientación.
Cada uno de nosotros es susceptible a sufrir intoxicación por
monóxido de carbono, pero los expertos están de acuerdo en
que los bebés nonatos, las mujeres embarazadas, los ancianos y
las personas con problemas cardíacos y respiratorios son especialmente vulnerables. Si experimenta síntomas de intoxicación
por monóxido de carbono, busque inmediatamente atención
médica. La intoxicación por monóxido de carbono se puede
determinar mediante un examen de carboxihemoglobina.
Los siguientes síntomas están relacionados con la
INTOXICACIÓN POR MONÓXIDO DE CARBONO y se deben
analizar con TODOS los miembros de la familia:
1. Exposición leve: Dolor de cabeza leve, náuseas, vómitos, fatiga (descritos normalmente como síntomas “similares a la gripe).
2. Exposición media: dolor de cabeza intenso con pulsaciones, somnolencia, confusión, ritmo car
do.
3. Exposición extrema: Inconsciencia, convulsiones, paro
cardior
espiratorio, muerte.
Los niveles anteriores de exposición están relacionados con adultos saludables. Los niveles difieren para quienes están en alto
riesgo. La exposición a altos niveles de monóxido de carbono
puede ser fatal o provocar daños e incapacidades permanentes.
Muchas víctimas de intoxicación por monóxido de carbono indican que, aunque estaban conscientes de que estaban
enfermas, se sintieron tan desorientadas que no fueron capaces
de ayudarse a sí mismas saliendo del edificio o pidiendo ayuda.
Recuerde, los niños y las mascotas pueden ser los primeros afectados. Es importante familiarizarse con los efectos de cada nivel.
díaco acelera-
27
Page 63
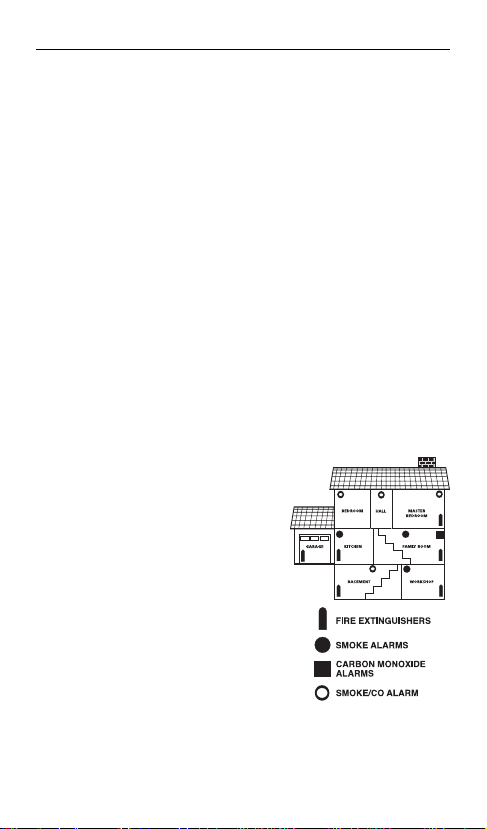
Normas de seguridad de la industria
Plan de escape
Haga que todos se familiaricen con el sonido de la alarma contra humo y capacítelos para que salgan de la casa cuando lo
escuchen. Lleve a cabo un simulacro de incendio cada seis
meses por lo menos, también debe incluir simulacros nocturnos.Asegúrese de que los niños pequeños escuchen la alarma y que despierten cuando ésta suene, ya que deben despertar para ejecutar el plan de escape. Esta práctica permite que
todos los ocupantes prueben su plan ante una emergencia. Es
posible que no pueda llegar donde están los niños, Es importante que usted sepa qué hacer. Tenga conocimiento de dos
salidas de cada habitación (puerta y ventana) e identifique un
lugar de encuentro fuera de la casa en que cada uno de los
integrantes se reúna una vez que hayan salido de la vivienda.
Cuando hayan llegado dos personas al lugar de encuentro, una
debe llamar al 911 mientras que la segunda persona debe
quedarse para contar a los miembros de la familia.
¡Establezca una regla de que una vez afuera, no se debe
volver a entrar por ningún motivo!
Prevención de incendios
Nunca fume en la cama ni deje cocinando alimentos en la cocina sin
supervisión. ¡Enseñe a sus hijos a
nunca jugar con fósforos o encendedores! Entrene a cada integrante de la
casa para que reconozca el patrón de
alarma, la advertencia de mensaje de
voz y para que salga de la casa usando
su plan de escape cuando escuche la
alarma.
Sepa cómo detenerse, dejarse caer y
rodar por el suelo si el fuego envuelve
su ropa y cómo gatear bajo el humo.
Instale y mantenga extintores de
incendios en cada piso de la casa y en
la cocina, sótano y garaje. Sepa cómo usar un extintor de incendios antes de que se produzca una emergencia. El segundo piso
y las habitaciones con ventanas ocupadas en pisos más altos
deben tener una escalera de emergencia.
28
Page 64

Información de garantía y servicio
Normas de seguridad de la industria
NFPA(Asociación Nacional de Protección contra Incendios)
Para su información, la Norma 72 de la Asociación Nacional de
otección contra Incendios, señala lo siguiente:
Pr
Detección de humo. Donde lo requiera la ley, las normas o los
códigos aplicables a la ocupación específica de una vivienda, se
deberán instalar las alarmas contra humo con estación múltiple
y simple aprobada de la siguiente manera: (1) En todos los dormitorios, excepto: No se requerirá la instalación de alarmas contra humo en los dormitorios de una y dos viviendas unifamiliares. (2) Afuera de cada dormitorio, y próximo a los mismos.
(3) En cada nivel de la vivienda unifamiliar, incluyendo el sótano,
excepto: Se permite el uso de alarmas contra humo accionadas
con pilas y aprobadas en viviendas unifamiliares existentes.
Detección de humo: ¿Son necesarias más alarmas contra
humo? Es posible que el número requerido de alarmas contra
humo no proporcione una protección de advertencia confiable y
a tiempo en aquellas áreas que están separadas por una puerta
de las áreas protegidas. Por este motivo, se recomienda que el
propietario de la casa considere usar alarmas contra humo adicionales en aquellas áreas, a fin de contar con una mejor protección. Las áreas adicionales incluyen el sótano, los dormitorios, el comedor, el área destinada a la calefacción, el área destinada a los servicios generales y los pasillos no protegidos por las
alarmas contra humo requeridas. Por lo general, no se
recomienda la instalación de alarmas contra humo en cocinas,
áticos (terminados y no terminados) o garajes, ya que estos
lugares ocasionalmente experimentan condiciones que pueden
dar como resultado un funcionamiento inadecuado.
Jefe de bomberos del estado de California
La detección temprana de una advertencia de incendio se logra
mejor mediante la instalación de equipos de detección de
incendios en todas las habitaciones y áreas de la vivienda de la
siguiente manera: Una alarma contra humo instalada en cada
área para dormir separada (en las proximidades,pero fuera de
los dormitorios), detectores de calor o humo en comedores, livings,dormitorios, cocinas, pasillos, áticos, áreas destinadas a la
calefacción,clósets, áreas destinadas a los servicios generales y
despensas, sótanos y garajes adyacentes.
29
Page 65

Garantía
Comisión para la Seguridad de los Productos de
Consumo
La Comisión para la Seguridad de los Productos de Consumo
(CPSC) recomienda el uso de por lo menos una alarma contra
monóxido de carbono por vivienda, ubicada cerca del área de
dormitorios.
NRC
Las alarmas contra humo de ionización usan una pequeña cantidad de un elemento radiactivo en la cámara de detección para
permitir la detección de productos de combustión visibles e
invisibles. El elemento radiactivo está guardado en forma segura
en la cámara y no necesita ajuste ni mantenimiento. Esta alarma contra humo cumple o supera todas las normas gubernamentales. Se fabrica y distribuye bajo la licencia de la Comisión
Reguladora Nuclear de los Estados Unidos.
Garantía limitada
GARANTÍA LIMITADA DE CINCO AÑOS
KIDDE garantiza que la alarma adjunta (excluida la batería) no presenta
defectos de material, mano de obra ni de diseño para su uso y servicio en
condiciones normales durante un período de cinco años a partir de la
fecha de compra. La obligación de KIDDE, según esta garantía, se limita a
reparar o reemplazar la alarma o cualquier pieza que consideremos que
presente defectos de material, mano de obra o diseño, sin costo alguno,
contra envío de la alarma con un comprobante de la fecha de compra,
franqueo y franqueo de devolución prepagados, a Warranty Service
Department, KIDDE, 1016 Corporate Park Drive, Mebane, NC 27302.
Esta garantía no será válida para una alarma contra humo si ésta ha sufrido daños, modificaciones, se le ha dado un mal uso o ha sido alterada
después de la fecha de compra o si no puede funcionar debido a un
mantenimiento inadecuado o al uso inapropiado de CA o CC. La
duración de todas las garantías implícitas que surjan de esta venta, entre
otras las garantías implícitas de descripción, comerciabilidad e idoneidad
para un propósito en particular, se limita al período de garantía arriba
estipulado. En ningún caso el fabricante será responsable por pérdidas
derivadas del uso de este producto ni de ningún daño, costo o gasto indirecto, especial o incidental en que pueda incurrir el consumidor o
cualquier otro usuario de este producto, ya sea debido a violación del
contrato, negligencia, responsabilidad objetiva u otros. El fabricante no
tendrá responsabilidad alguna en caso de lesiones personales, daños a la
propiedad o cualquier otro daño especial, incidental o condicional de
30
Page 66

Garantía
ningún tipo provocado por filtraciones de gas, incendio o explosión.
Puesto que en algunos estados no se reconocen las limitaciones de la
duración de una garantía implícita o no se reconoce la exclusión o limitación de daños fortuitos o indirectos, las limitaciones o exclusionesanteriores pueden no corresponder a su caso. A pesar de que esta garantía le
otorga derechos legales específicos, usted también puede tener otros
derechos que varían de un estado a otro.
Además, KIDDE no entrega ninguna garantía, expresa o implícita, escrita
u oral, lo que incluye aquella relacionada con la comercialización o la
idoneidad para un propósito en particular, con respecto a la batería.
La garantía anterior no se puede alterar, salvo que se haga por escrito y
que tenga la firma de ambas partes involucradas.
La alarma combinada contra humo y monóxido de carbono Nighthawk
no es un sustituto de los seguros de daños a la propiedad, contra incendios, de incapacidad, de vida u otros seguros de cualquier clase. La
cobertura de un seguro apropiado es su responsabilidad. Consulte a su
agente de seguros.
El retiro de la cubierta delantera anula la garantía.
Esta alarma no está diseñada para alertar a personas con discapacidad auditiva.
Durante el período de garantía especificado, Kidde Products reparará o
eemplazará, a su discreción, toda alarma combinada contra humo y
r
monóxido de carbono Nighthawk que sea devuelta en un paquete con el
franqueo pagado a la siguiente dirección: Kidde Products Attn: Warranty
Returns, 1016 Corporate Park Dr., Mebane, NC 27302, USA. Incluya su
nombre, dirección y número de teléfono junto con una breve descripción
del problema que experimenta la alarma. Para obtener más ayuda, llámenos en forma gratuita a la línea directa para el consumidor al 1-800880-6788. Los daños debidos a negligencia, mal uso o desatención a las
instrucciones incluidas dará como resultado el término de la garantía y,
por consiguiente, no se reemplazará ni reparará la unidad.
Registro del producto
Este manual y los productos descritos están registrados, con todos los
echos reservados. Según estas leyes de propiedad intelectual, ninguna
der
parte de este manual se puede copiar para su uso sin el consentimiento
escrito de Kidde. Si necesita información adicional, póngase en contacto
con la línea directa para el consumidor al 1-800-880-6788 o escríbanos a:
Kidde Products, 1016 Corporate Park Dr., Mebane, NC 27302.
Nuestra dirección en Internet es www.kidde.com.
31
Page 67

Línea directa para el consumidor: 1-800-880-6788
www.kidde.com
Kidde 1016 Corporate Park Drive, Mebane, NC 27302
Ensamblada en China con componentes estadounidenses y de otros países.
 Loading...