

Page 1
Manual P/N 820-1497 Rev. A 04/08
ATTENTION: Please take a few minutes to thoroughly read this
user’s guide, which should be saved for future reference and
passed on to any subsequent owner.
Smoke Alarm
User’s Guide
i9070CA
with Front loading
battery door
i9070CA
9 V Battery Operated
S
INGLE STATION
S
MOKE ALARM
Page 2

I ntrod uct i o n . . . . . . . . . . . . . . . . . . . . . . . . . . . . 1
In s t a l l at io n . . . . . . . . . . . . . . . . . . . . . . . . . . . . . 2-9
O peration . . . . . . . . . . . . . . . . . . . . . . . . . . . . . . 9- 12
Ma i nten ance . . . . . . . . . . . . . . . . . . . . . . . . . . . . 13-16
Fi re Sa fe ty . . . . . . . . . . . . . . . . . . . . . . . . . . . . . . 17 -20
Warr an ty . . . . . . . . . . . . . . . . . . . . . . . . . . . . . . . 21
Contents
Introduction
Thank you for purchasing this smoke alarm. It is an important
part of your family’s home safety plan. You can tr ust this
product to provide the highest quality safety protection. We
know you expect nothing less when the lives of your family are
at stake.
Please take a few minutes to thoroughly read this alarm manual,
and save it for future reference. Teach children how to respond
to the alarms, and that they should never play with the unit.
If you have any questions about the operation or installation of
your alarm, please call our toll free Consumer Hotline at
1-800-880-6788.
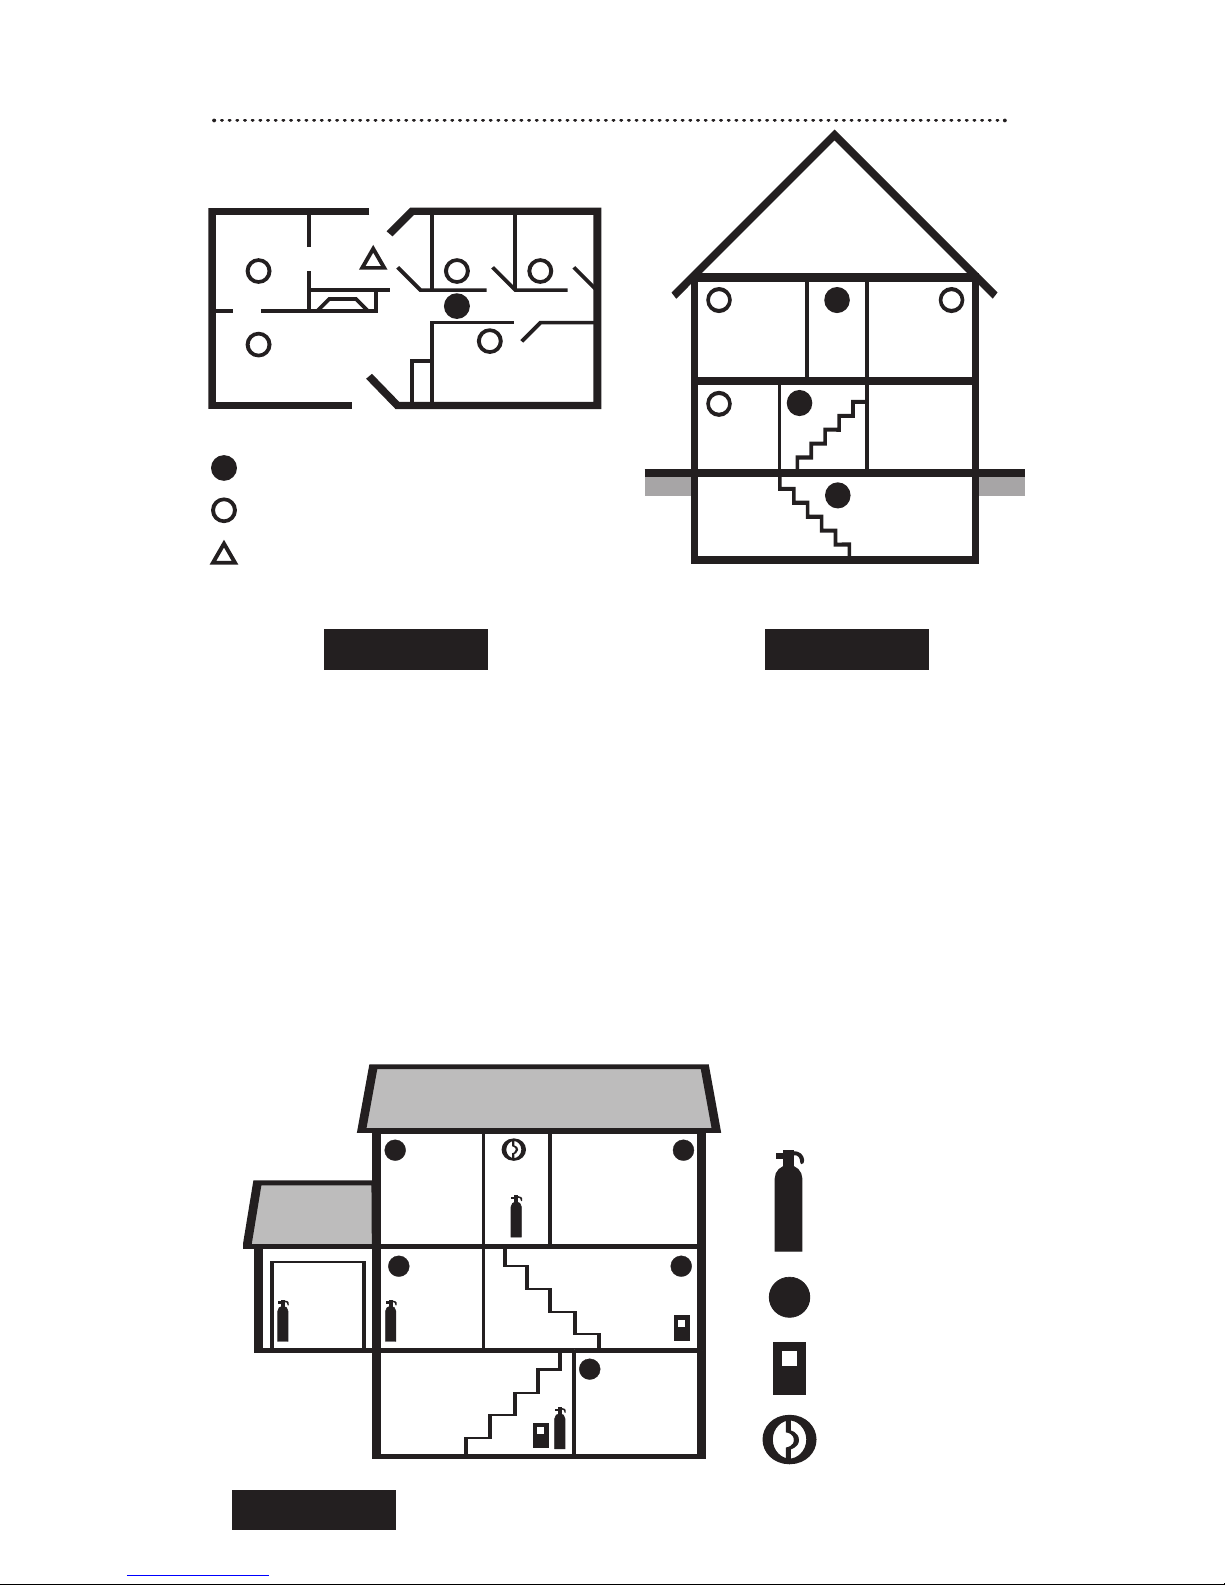
Image 1C will help you deter mine the correct location of safety
products that will help make your home a safer place.
1
Made in China. Patents Pending
Kidde Canada Inc.
P.O. Box 40, Apsley, ON K0L 1A0
www .kiddecanada.com
Page 3

This product is designed to detect products of combustion using
the ionization technique. It contains 0.9 microcurie of Americium
241, a radioactive material. Distributed under U.S. NRC License
No. 32-23858-01E. Manufactured in compliance with U.S. NRC
safety criteria in 10 CFR 32.27. T he purchaser is exempt from any
regulatory requirements.
This smoke alarm uses an extremely small amount of radioactive
element in the ionization sensor chamber. Do not tr y to re pair the
smoke alarm yourself. Refer to the instructions in Warranty for
service.
WARNING! Removal of the smoke alarm battery will render the
smoke alarm inoperative.
IMPORTANT! Read all instructions before installation and keep
this manual near the alarm for future reference.
Installation
2
Page 4

3
Installation
Recommended Locations
• Locate the first alarm in the immediate area of the sleeping
rooms. Try to monitor the exit path, as the sleeping rooms are
usually farthest from the exit. If more than one sleeping area
exists, locate additional alarms in each sleeping area (Image 1A).
• Locate additional alarms to monitor any stairway as stairways act
like chimneys for smoke and heat.
• Locate at least one alarm on ever y floor level (Image 1B).
• Locate an alarm in every sleeping room.
• Locate an alarm in every room where electrical appliances are
operated (i.e. portable heaters or humidifiers).
• Locate an alarm in every room where someone sleeps with the
door closed. The closed door may prevent an alarm not located in
that room from waking the sleeper.
• Smoke, heat, and combustion products rise to the ceiling and
spread horizontally. Mounting the smoke alarm on the ceiling in
the center of the room places it closest to all points in the room.
Ceiling mounting is preferred in ordinary residential construction.
• For mobile home installation, select locations carefully to avoid
thermal barriers that may form at the ceiling. For more details, see
Mobile Homes.
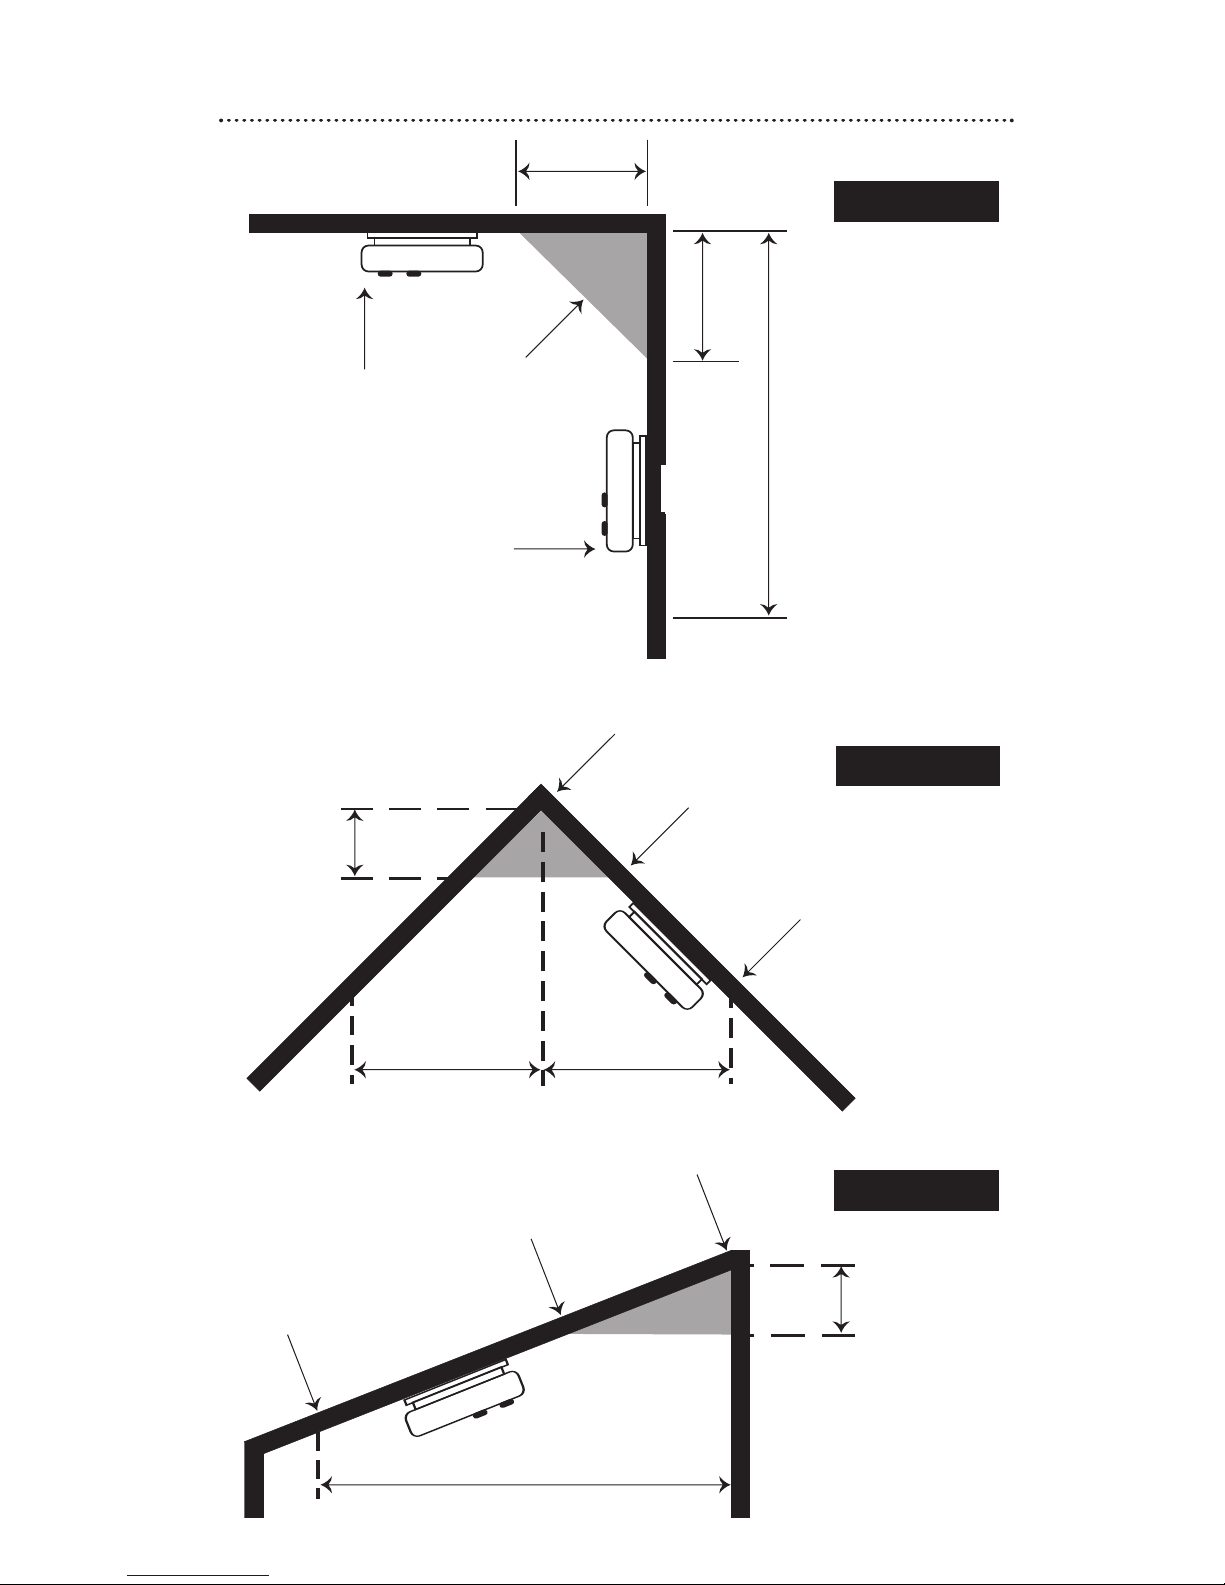
• When mounting an alarm on the ceiling, locate it at a minimum of
10 cm (4") from the side wall (Image 2A).
• When mounting the alarm on the wall, use an inside wall with the
top edge of the alarm at a minimum of 10 cm (4") and a
maximum of 30.5 cm (12") below the ceiling (Image 2A and 2B).
• Put smoke alarms at both ends of a hallway or large room if the
hallway or room is more than 9.1 m (30 ft) long. For large rooms,
one smoke alarm is recommended for every 500 square feet of
floor space.
• Install smoke alarms on sloped, peaked or cathedral ceilings at or
within 0.9 m (3') of the highest point (measured horizontally).
NFPA 72 states: “Smoke alarms in rooms with ceiling slopes
greater than 0.3 m in 2.4 m (1 foot in 8 feet) horizontally shall be
located on the high side of the room.” NFPA 72 states: “A row of
detectors shall be spaced and located within 0.9 m (3') of the peak
of the ceiling measured horizontally” (Image 2B and 2C).
Page 5
4
Installation
DINING
ROOM
L
IVING
R
OOM
Smoke Alarms for Minimum Protection
Ionization Type Smoke Alarm with
Hush
®
Control or Photoelectric Type
Smoke Alarms for Additional Protection
KITCHEN BEDROOM
B
EDROOM
BEDROOM
LIVING
ROOM
K
ITCHEN
B
EDROOMBEDROOM HALL
BASEMENT
IMAGE 1A
IMAGE 1C
IMAGE 1B
SINGLE FLOOR PLAN MULTIPLE FLOOR PLAN
BEDROOM
FAMILY ROOM
WORKSHOPBASEMENT
KITCHEN
HALL
GARAGE
MASTER
BEDROOM
FIRE
EXTINGUISHERS
SMOKE
ALARMS
CARBON
MONOXIDE
ALARMS
TALKING
SMOKE/CO
ALARM
TOTAL HOME PROTECTION
• In homes that are not well insulated, extreme heat or cold can
be transferred from the outside to the inside through poorly
insulated walls and roof. This may create a thermal barrier
which can prevent the smoke from reaching an alarm mounted
on the ceiling. If you are not sure about the insulation in your
home, or if you notice that the outer walls and ceiling are either
hot or cold, install the alarm on an inside wall. In such homes,
install the smoke alarm with the top edge of the alar m at a
minimum of 10 cm (4") and a maximum of 30.5 cm (12")
below the ceiling (Image 2A).
Page 6

• Install Smoke Alarms on tray-shaped ceilings (coffered ceilings) on
the highest portion of the ceiling or on the sloped portion of the
ceiling within 12” (305mm) vertically down from the highest point
(Image 2D).
Locations to Avoid
• Do not install within 0.9 m (3') of the following: T he door to a
kitchen, or a bathroom that contains a tub or shower, forced
air supply ducts used for heating or cooling, ceiling or whole
house ventilating fans, or other high air-flow areas.
• Do not place the alarm where drapes or other objects will
block the sensor. Smoke must be able to reach the sensor to
accurately detect conditions.
• Do not install in peaks of vaulted ceilings, “A” frame ceilings
or gabled roofs. (Less than 10 cm (4") from the peak of an “A”
frame type ceiling.)
• Install at least 30.5 cm (12") away from fluorescent lights as
electronic noise may cause nuisance alarms.
• Keep out of insect infested areas. Avoid excessively dusty, dir ty
or greasy areas. Dust particles may cause nuisance alar ms or
failure to alarm.
• Extreme temperatures may effect the sensitivity of the alarm.
Do not install in areas where the temperature is colder than
4.4°C (40°F) or hotter than 37.8°C (100°F), such as garag es
and unfinished attics.
• Do not install in areas where the relative humidity (RH) is
greater than 85%. Very humid areas, with moisture or steam,
can cause nuisance alarms.
• Avoid placing ionization smoke alarms in kitchen areas.
Normal cooking may cause nuisance alar ms. If a kitchen alarm
is desired, it should have an alarm silence feature or be a
photoelectric type.
• Do not place in the garage. Particles of combustion are
present when you start your automobile.
• Smoke alarms are not to be used with detector guards unless
the combination (alarm and guard) has been evaluated and
found suitable for that purpose.
Installation
5
Page 7
Installation
6
IMAGE 2A
IMAGE 2C
HORIZONT
AL DIST
ANCE FROM PEAK
CEILING
10 cm (4”)
MINIMUM
10 cm (4”)
MINIMUM
30.5 cm (12”)
MAXIMUM
SIDE W ALL
BEST
PLACEMENT
ACCEPTABLE
PLACEMENT
NEVER HERE
STAGNANT
AIR
10 cm (4”)
0.9 m (3’) 0.9 m (3’)
NOT IN
THIS AREA
ANYWHERE IN THIS
AREA
10 cm (4”)
NOT IN
THIS AREA
ANYWHERE IN THIS
AREA
0.9 m (3’)
IMAGE 2B
Page 8

Mobile Homes
Modern mobile homes have been designed and built to be energy
efficient. Install smoke alarms as recommended in Recommended
Locations and Image 2A.
In mobile homes that are not well insulated compared to present
standards, extreme heat or cold can be transferred from the
outside to the inside through poorly insulated walls and roof. This
may create a thermal bar rier that can prevent the smoke from
reaching an alarm mounted on the ceiling. In such units, install
the smoke alarm on an inside wall with the top edge of the alar m
at a minimum of 10 cm (4") and a maximum of 30.5 cm (12")
below the ceiling (Image 2A).
If you are not sure about the insulation in your mobile home, or
if you notice that the outer walls and ceiling are either hot or
cold, install the alarm on an inside wall. For minimum protection,
install at least one alarm close to the slee ping areas. For additional
protection, see Imag e 1A.
WARNING: Test your smoke alarm operation after R.V. or mobile
home vehicle has been in storage, before each trip and at least
once a week during use.
Mounting
CAUTION: This unit is sealed. The cover is not removable!
CAUTION: When wall mounting, the unit must be mounted so
that battery door faces down! (Image 3C) Incorrect orientation
of wall mounted smoke alarms will decrease operational
effectiveness.
Installation
7
ANYWHERE IN THIS
AREA
3
0 cm (12")
IMAGE 2D
Page 9
Installation
8
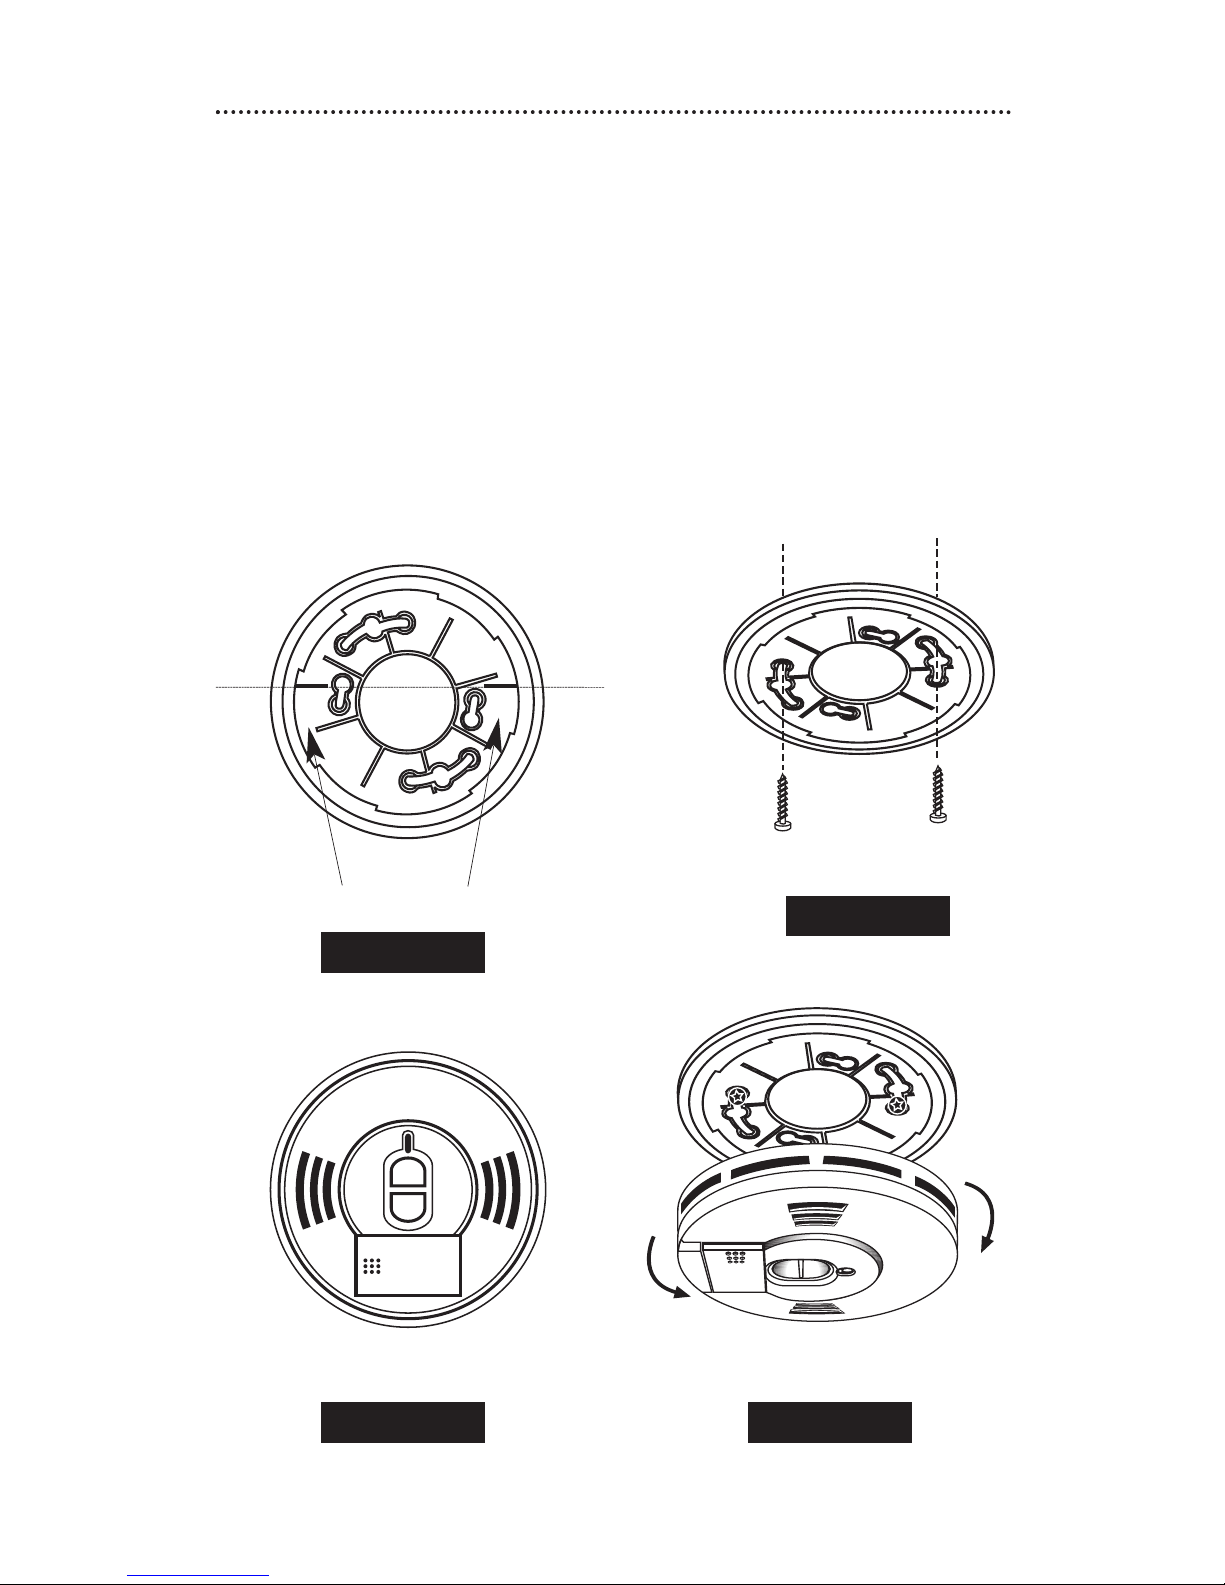
• After selecting the proper smoke alarm location as described
previously, hold the mounting plate against the selected
installation location (wall or ceiling) and mark the center of the
holes with a pencil. To ensure aesthetic alignment of the alarm
with the hall-way, or wall, the “A” line on the mounting plate
should be parallel with the hallway when ceiling mounted, or
horizontal when wall mounted (Image 3A and 3B). Drill a
hole through the pencil marks and use the enclosed screws and
anchors to secure. Use 3/16” drill for anchor holes. Align the
alarm with the mounting plate and rotate clockwise (right) until
the unit is aligned.
A A
IMAGE 3A
IMAGE 3C IMAGE 3D
“A” LINE
ALIGNMENT MARKS
WALL MOUNTING
POSITION
ROTATE TO MOUNT OR
TO REMOVE
IMAGE 3B
Install
Remove
Page 10

Installation
9
• Install the alarm on the mounting plate and rotate the alar m in
the direction of the “ON” ar row on the cover until the alarm
ratchets into place (Image 3D). T his ratcheting function allows
for aesthetic alignment.
Note: T he alar m will attach to the mounting plate in
4 positions (every 90 deg rees). When wall mounting, make
sure the battery door is at the bottom of the unit (Image 3C).
Battery
This unit will not function without a properly installed battery,
and is equipped with a battery lockout feature which prevents the
battery door from closing if a batter y is not installed cor rectly.
See Maintenance section for additional infor mation concerning
battery installation.
• For initial installation a pre-installed 9 V battery is included
with a battery pull tab that allows for easy connection. Simply
pull the tab out, and the batter y is connected! See
Maintenance for additional information concerning batter y
installation.
• Pull the Battery Pull Tab (yellow tab protruding from the unit)
completely out of the unit. This will automatically connect the
battery.
Testing
• Test the unit to ensure proper operation by pressing the Test
button.
CAUTION: Due to the loudness (85 decibels) of the alarm, always
stand an arms-length away from the unit when testing.
The smoke alarm is operating once a fresh battery is installed and
testing is complete. When the smoke alarm ionization sensor
chamber senses products of combustion, the horn will sound a loud
(85db) alarm until the sensing chamber is cleared of smoke par ticles.
Operation
Page 11

Operation
10
Hush®Control Feature
Smoke alarms are designed to minimize nuisance alar ms.
Cigarette smoke will not normally set off the alarm, unless the
smoke is blown directly into the alarm. Combustion par ticles
from cooking may set off the alar m if the alar m is located close
to the cooking area. Larg e quantities of combustible particles are
generated from spills or when broiling. Using the fan on a range
hood that vents to the outside (non-recirculating type) will also
help remove these combustible particles from the kitchen. The
Hush®button is extremely useful in a kitchen area or other areas
prone to nuisance alarms.
The Hush®feature has the capability of temporarily desensitizing
the smoke alarm circuit for about 7 minutes. This feature is to be
used only when a known alarm condition, such as smoke from
cooking, activates the alarm.
If the alarm does sound, check for fires first. If a fire is
discovered, get out and call the fire depar tment. If no fire is
present, check to see if one of the reasons listed in
Locations to
Avoid may have caused the alar m.
The smoke alarm is desensitized by pushing the Hush®button on
the smoke alarm cover. If the smoke is not too dense, the alarm
will silence immediately
and the red LED will f lash ever y 10
seconds for 8 minutes. This indicates that the alar m is in a
temporarily desensitized condition. T he smoke alar m will
automatically reset after approximately 7 minutes. If after this
period particles of combustion are still present, the alarm will
sound again.
The Hush
®
feature can be used repeatedly until the air has been
cleared of the condition causing the alarm. Pushing the Test
button on the alarm will end the Hush®period.
NOTE: Dense smoke will override the Hush®control feature and
sound a continuous alarm.
CAUTION: Before using the alarm Hush
®
feature, identify the
source of the smoke and be certain a safe condition exists.
Page 12

LED Indicators
This alar m is equipped with a red LED indicator, with two modes
of operation.
Red LED - Flashing every 30-40 seconds:Indicates that the smoke
alarm is operating properly.
Red LED - Flashing: When the smoke alar m senses par ticles of
combustion and goes into alarm (constant pulsating sound), the red
LED will flash once per second. The flashing LED and pulsating
alarm will continue until the air is cleared.
Operation
11
Page 13
12
Operation
Battery Tamper Resist Feature
This alar m has a batter y tamper resist feature, which prevents the
battery door from being opened. This feature is effective in
preventing the removal of the battery from this device (which will
render the unit inoperable).
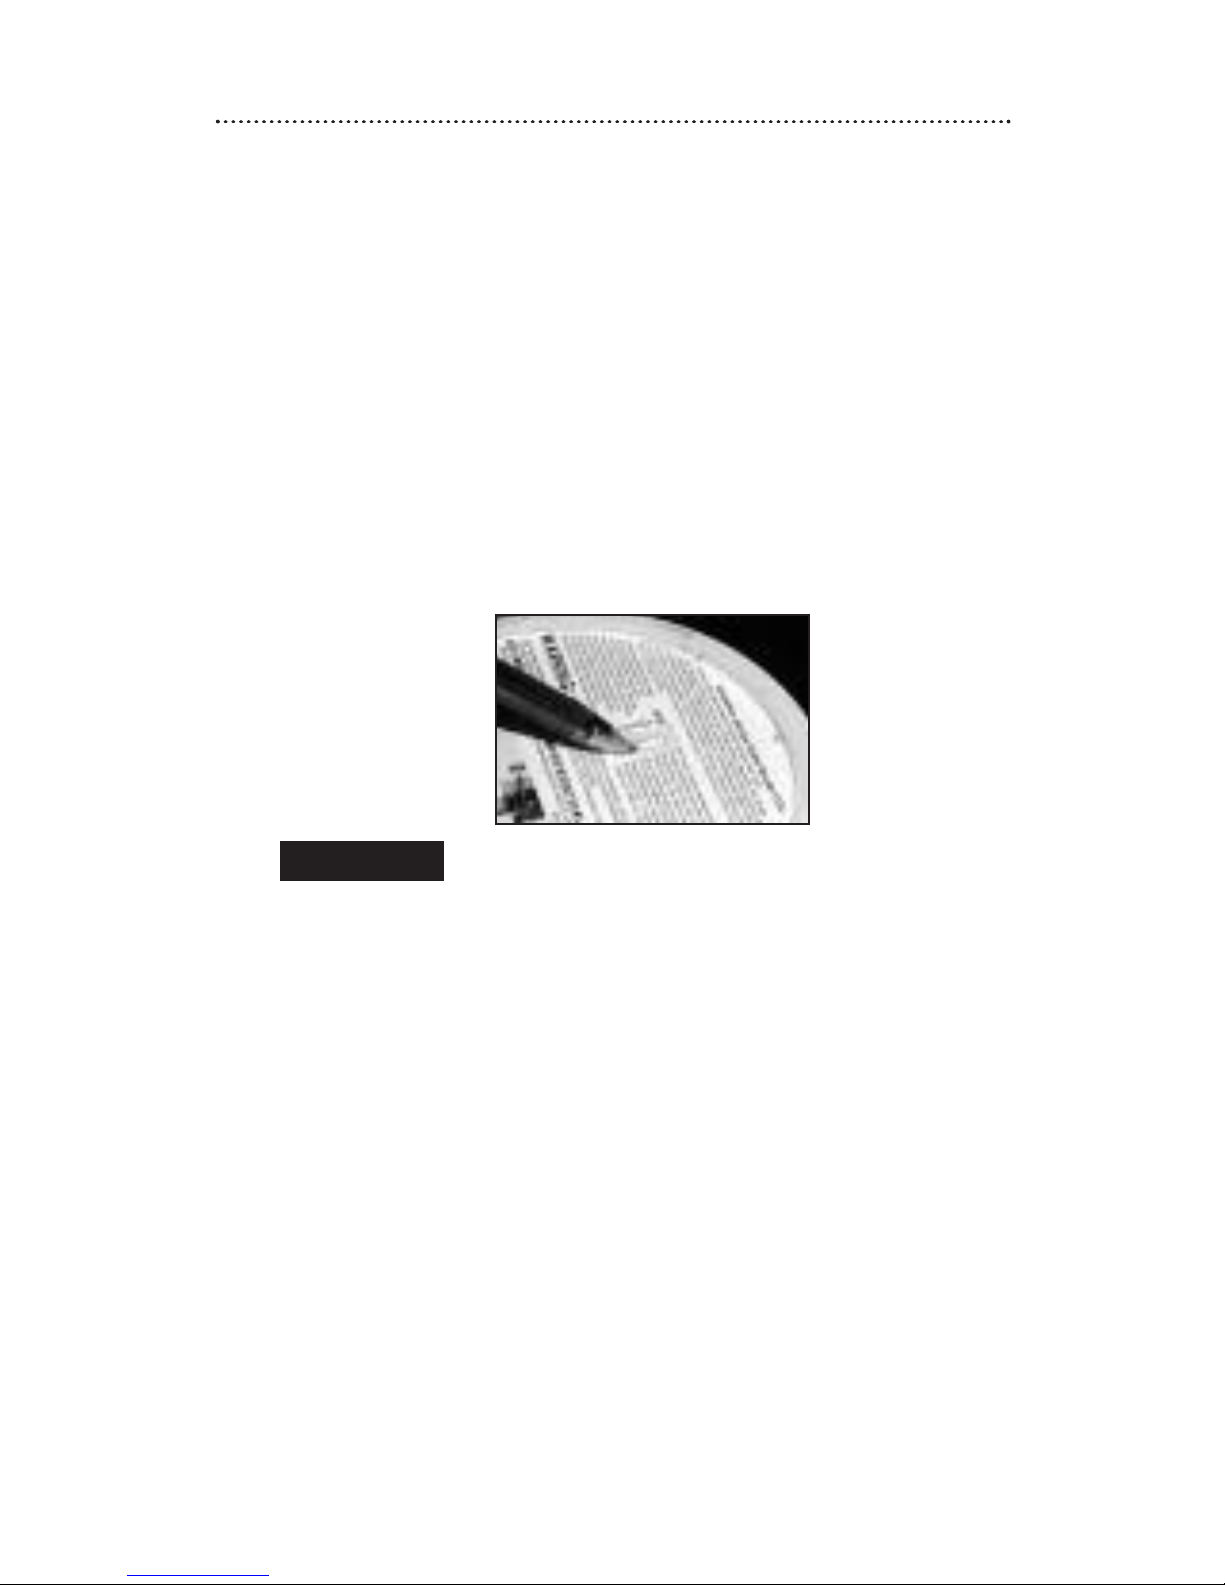
To activate the battery tamper resist feature, remove the unit from
the mounting plate and locate the small cut-out in the middle of
the product label on the back of the unit. With a small
screwdriver, or similar tool, slide the switch towards the direction
indicated by the arrows (Image 4). The tamper resist feature is
now active and the battery door can not be opened until the
tamper resist feature is deactivated.
NOTE: Before activating the battery tamper resist feature, make
sure a fresh battery is installed in the unit and that the batter y
door is properly closed. If the batter y tamper resist feature is
activated while the battery door is open, the batter y door will not
close and the unit will be inoperable.
To deactivate the battery tamper resist, in order to change the
battery, remove the unit from the mounting plate and locate the
small cut-out in the middle of the product label. Using a
screwdriver or similar tool, slide the switch in the OPPOSITE
DIRECTION OF THE ARROWS. T he batter y door can now be
opened.
BATTERY TAMPER RESIST SWITCH
IMAGE 4
Page 14

Testing
CAUTION: Due to the loudness (85 decibels) of the alarm, always
stand an arms length away from the unit when testing.
Test by pushing the Test button on the cover and hold it down
for a minimum of 5 seconds. This will sound the alarm if all the
electronic circuitry, hor n and batter y are working. If no alarm
sounds, the unit has a defective battery or some other failure. DO
NOT use an open flame to test your alarm, you could damage the
alarm or ignite combustible materials and star t a fire.
Test the alar m weekly to ensure proper operation. Erratic or
low sound coming from your alarm may indicate a defective
alarm, and it should be retur ned for ser vice (see Warranty
section).
Alarm Removal
To remove the alarm from the mounting plate, rotate the alarm in
the direction of the “OFF” ar row on the cover.
Maintenance
13
Page 15
Battery Removal
NOTE: If batter y tamper resist feature has been activated it will
need to be deactivated in order to change the batter y. Refer to the
Battery Tamper Resist Feature section for instructions.
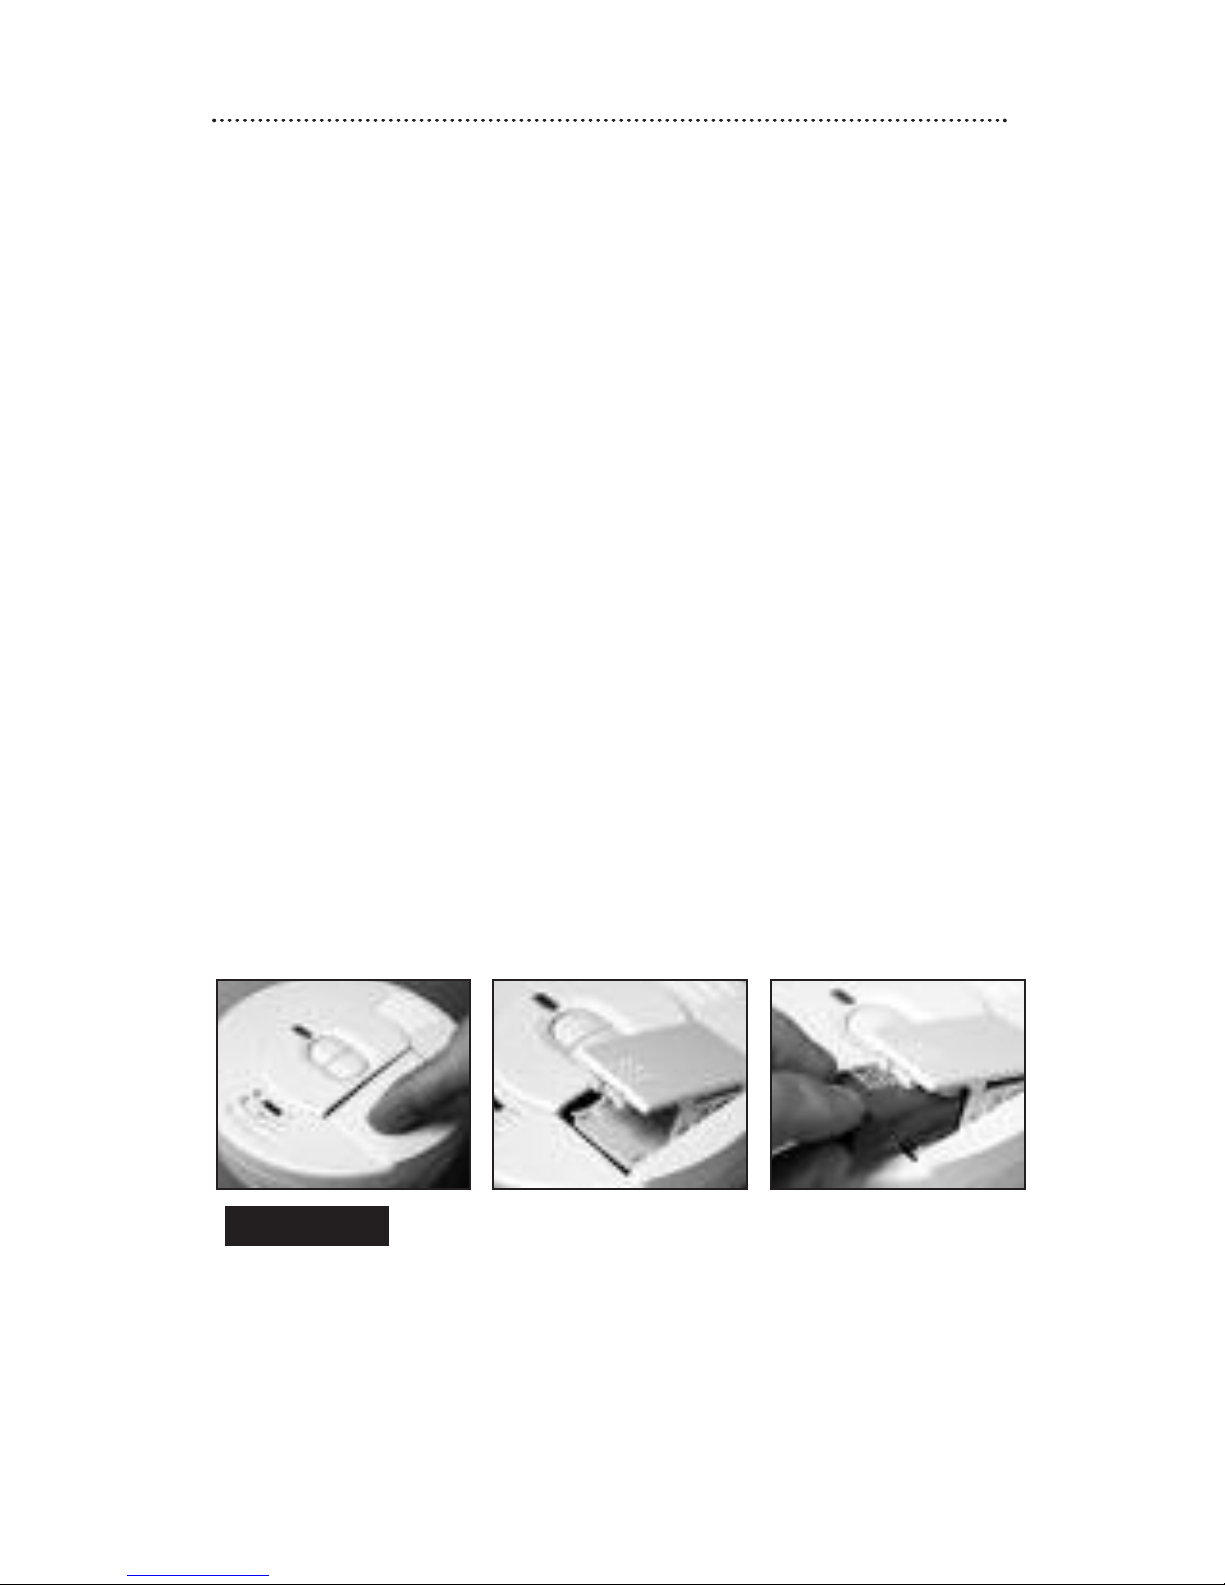
To replace or install the batter y press down on the batter y door
and then release to allow the door to pop open. The batter y can
then be pulled out (Image 5). When installing a new battery, make
sure the battery ter minals are facing outwards as illustrated inside
the battery door and that the polarity matches the markings
printed. Completely press the batter y door down into the alar m
and release. The batter y door will secure into the closed position.
A missing or improperly installed batter y will prevent the batter y
door from closing and result in improper alarm operation.
This alarm has a low batter y monitor cir cuit which will cause the
alarm to “chirp” approximately every 30-40 seconds for a
minimum of seven (7) days when the battery gets low. Replace
the battery when this condition occurs.
Maintenance
14
BATTERY DOOR OPERATION
IMAGE 5
Page 16

This smoke alarm uses a 9 V carbon zinc batter y (alkaline and
lithium batteries may also be used). A fresh batter y should last for
one year under normal operating conditions.
Use only the following 9 volt batteries for replacement:
Carbon-Zinc Type Eveready 216 or 1222
Gold Peak 1604P or 1604S
Alkaline Type Energizer 522
Duracell MN1604 or MX1604
Gold Peak 1604A
Panasonic 6AM6,6AM-6,6AM-6PI,
6AM6X or 6LR61(GA)
Lithium Type Ultralife U9VL-J
These batteries can be purchased at your local retailer.
WARNING! Use only the batteries specified above. Use of different
batteries than the recommended ones, may have a detrimental
effect on the smoke alarm. A good safety measure is to replace
the battery at least once a year, or at the same time you change
your clocks for daylight saving time. Be sure to follow the
battery installation instructions printed on the back of the alarm.
NOTE: REGULAR WEEKLY TESTING IS REQUIRED!
NOTE: If after batter y replacement the alarm continues to chirp,
push the Test button. T he Hush®feature may have been activated
accidently while changing the battery and pushing the Test button
will end the Hush
®
cycle.
Maintenance
15
Page 17

Cleaning the Alarm
The alarm should be cleaned at least once a year.
• To clean your alarm, remove it from the mounting plate as
outlined in previous sections. You can clean the alar m by using
compressed air or a vacuum cleaner hose with a soft brush
attachment. Blow or vacuum around the perimeter of the
alarm to remove dust and dirt. The outside of the alar m can
be wiped with a damp cloth (do not use a wet cloth to avoid
water entering the unit).
• After cleaning, reinstall your alarm and test your alar m by
using the Test button. If cleaning does not restore the alar m to
normal operation, the alar m should be re placed.
• Do not paint the unit. Paint will seal the vents and interfere
with the sensor’s ability to detect smoke. Never attempt to
disassemble the unit or clean inside. This action will void your
warranty.
Replacing the Alarm
The National Fire Protection Association (NFPA) and Kidde
recommend replacing this alar m ten years from the date code
label (located on the back of the alar m).
Maintenance
16
Page 18

WARNING: Please read carefully and thoroughly.
• NFPA 72 states: Fire-warning equipment for residential occupancies
are capable of protecting about half of the occupants in potentially
fatal fires. Victims are often intimate with the fire, too old or too
young, or physicall y or mentally impaired suc h that they cannot
escape even when w arned early enough that escape should be
possible. For these people, other strategies such as protection-in-place
or assisted escape or rescue would be necessary.
• Smoke alarms are devices that can provide early warning of
possible fires at a reasonable cost; however, alarms have
sensing limitations. Ionization sensing alarms may detect
invisible fire particles (associated with fast flaming fires) sooner
than photoelectric alarms. Photoelectric sensing alar ms may
detect visible fire particles (associated with slow smouldering
fires) sooner than ionization alarms. Home fires develop in
different ways and are often unpredictable. Neither type of
alarm (photoelectric or ionization) is always best, and a given
alarm may not always provide warning of a fire.
• A battery powered alarm must have a battery of the specified
type, in g ood condition and installed properly.
• AC powered alar ms (without batter y backup) will not operate
if the AC power has been cut off, such as by an electrical fire
or an open fuse.
• Smoke alarms must be tested regularly to make sure the
batteries and the alarm circuits are in g ood operating
condition.
• Smoke alarms cannot provide an alar m if smoke does not
reach the alarm. Therefore, smoke alarms may not sense fires
starting in chimneys, walls, on roofs, on the other side of a
closed door or on a different floor.
• If the alar m is located outside the sleeping area or on a
different floor, it may not wake up a sound sleeper.
• The use of alcohol or dr ugs may also impair one’s ability to
hear the smoke alarm. For maximum protection, a smoke
alarm should be installed in each sleeping area on every level
of a home.
• Although smoke alarms can help save lives by providing an
early warning of a fire, they are not a substitute for an
insurance policy. Home owners, landlords and tenants should
have adequate insurance to protect their lives and property.
Fire Safety
17
Page 19

18
Fire Safety
Good Safety Habits
Develop and practice a plan of escape!
• Install and maintain Fire extinguishers on every level of the
home and in the kitchen, basement and garage. Know how to
use a fire extinguisher prior to an emergency.
• Make a floor plan indicating all doors and windows and at least
two (2) escape routes from each room. Second story windows
may need an escape ladder.
• Have a family meeting and discuss your escape plan, showing
everyone what to do in case of fire.
• Determine a place outside your home where you all can meet if a
fire occurs.
• Familiarize everyone with the sound of the smoke alarm and
train them to leave your home when they hear it.
• Practice a fire drill at least every six months, including fire drills at
night. Ensure that small children hear the alarm and wake when
it sounds. They must wake up in order to execute the escape
plan. Practice allows all occupants to test your plan before an
emergency. You may not be able to reach your children. It is
important they know what to do.
• Current studies have shown smoke alarms may not awaken all
sleeping individuals, and that it is the responsibility of individuals
in the household that are capable of assisting others to provide
assistance to those who may not be awakened by the alarm sound,
or to those who may be incapable of safely evacuating the area
unassisted.
Page 20

Alarm Exit Procedure
• Alert small children in the home.
• Leave immediately by your escape plan. Every second counts,
so don’t waste time getting dressed or picking up valuables.
• In leaving, don’t open any inside door without first feeling its
surface. If hot, or if you see smoke seeping through cracks,
don’t open that door! Instead, use your alternate exit. If the
inside of the door is cool, place your shoulder against it, open it
slightly and be ready to slam it shut if heat and smoke r ush in.
• Stay close to the floor if the air is smoky. If possible do not
breathe too deeply to avoid smoke inhalation. Breathe through
a cloth (preferably wet) if possible.
• Once outside, go to your selected meeting place and make sure
everyone is there.
• Call the fire department from your neighbor’s home - not from
yours!
• Don’t return to your home until the fire officials say that it is
all right to do so.
• There are situations where a smoke alarm may not be effective to
protect against fire as noted by the NFPA and UL. For instance:
a) smoking in bed
b) leaving children home alone
c) cleaning with flammable liquids, such as gasoline
d) fires where the victim is intimate with a flaming initiated fire;
for example, when a person’s clothes catch fire while cooking
e) fires where the smoke is prevented from reaching the
detector due to a closed door or other obstruction
f) incendiary fires where the fire grows so rapidly that an
occupant’s eg ress is blocked even with properly located
detectors
NRC Information
Ionization type smoke alarms use a very small amount of a
radioactive element in the sensing chamber to enable detection of
visible and invisible combustion products. T he radioactive
element is safely contained in the chamber and requires no
adjustments or maintenance. This smoke alar m meets or exceeds
all government standards. It is manufactured and distributed
under license from the U.S. Nuclear Regulatory Commission.
19
Fire Safety
Page 21

Additional Recommendations
The National Fire Protection Association’s Standard 72 provides
the following information:
Smoke Detection. Where required by applicable laws, codes, or
standards for a specific type of occupancy, approved single- and
multiple-station smoke alarms shall be installed as follows:
(1) In all sleeping rooms and guest rooms
(2) Outside of each separate dwelling unit sleeping area, within
6.4 m (21 ft) of any door to a slee ping room, the distance
measured along a path of travel
(3) On every level of a dwelling unit, including basements
(4) On every level of a residential board and care occupancy
(small facility), including basements and excluding crawl
spaces and unfinished attics
(5) In the living area(s) of a guest suite
(6) In the living area(s) of a residential board and care occupancy
(small facility)
Smoke Detection - Are More Smoke Alarms Desir able?
Required number of smoke alarms (as shown in Image 1A
and Image 1B):
The required number of smoke alar ms might
not provide reliable early warning protection for those areas
separated by a door from the areas protected by the required
smoke alarms. For this reason, the use of additional smoke
alarms for those areas for increased protection is recommended.
The additional areas include the basement, bedrooms, dining
room, fur nace room, utility room, and hallways not protected by
the required smoke alar ms. The installation of smoke alar ms in
kitchens, a ttics (finished or unfinished), or garages is not
normally recommended, because these locations occasionally
experience conditions that can result in improper operation.
Alarms should be installed in accordance with the National Fire
Protection Association’s Standard 72 (NFPA, Batterymarch Park,
Quincy, MA 02269).
Notify your local fire department and insurance company of
your smoke alar m installation.
Fire Safety
20
Page 22

If after reviewing this manual you feel that your smoke alarm is
defective in any way, do not tamper with the unit. In many cases,
the quickest way to exchange your alarm is to return it to the
original place of purchase. Alter natively, you may return it for
servicing to Kidde. If you have questions, call Kidde Customer
Service at 1-800-880-6788.
10 Year Limited Warranty
Kidde warrants to the original purchaser that the enclosed smoke
alarm (but not the batter y) will be free from defects in material and
workmanship or design under normal use and ser vice for a period of
ten years from the date of purchase. The obligation of Kidde under
this warranty is limited to repairing or replacing the smoke alar m or
any part which we find to be defective in material, workmanship or
design, free of charge to the customer, upon sending the smoke
alarm with proof of date of purchase, postage and retur n postag e
prepaid, to Kidde Canada Inc., P.O. Box 40, Apsley K0L 1A0.
1-800-880-6788.
This warranty shall not apply to the smoke alarm if it has been
damaged, modified, abused or altered after the date of purchase or if
it fails to operate due to improper maintenance or inadequate AC or
DC electrical power.
The liability of Kidde or any of its parent or subsidiary corporations
arising from the sale of this smoke alarm or under the terms of this
limited warranty shall not in any case exceed the cost of replacement of
this smoke alarm and, in no case, shall Kidde or any of its parent or
subsidiary corporations be liable for consequential loss or damages
resulting from the failure of this smoke alarm or for breach of this or any
other warranty, express or implied, even if the loss or damage is caused
by the company’ s negligence or fault.
Since some provinces do not allow limitations on the duration of an
implied warranty or do not allow the exclusion or limitation of
incidental or consequential damages, the above limitations or
exclusions may not apply to you. While this warranty gives you
specific legal rights, you may also have other rights which vary from
province to province.
Also, Kidde makes no warranty, express or implied, written or oral,
including that of merchantability or fitness for any particular
purpose, with respect to the battery.
The above warranty may not be altered except in writing signed by
both parties hereto.
W arranty
21
 Loading...