

Page 1

USER GUIDE
GUIDE D'UTILISATION
GUÍA DEL USUARIO
G3100
®
1013 Technology Way, Libertyville, IL 60048
800.553.5529
www.kidco.com
®
Auto Close Heart hGate
CUSTOM FIT INSTALLATION
Fits openings 132” • Optional 9” and 24” extensions available for larger areas
Barrière adaptée à des ouvertures de 335.2 cm • Rallonges de 22,8 et 60,9 cm
disponibles en option pour les grandes surfaces
Para aberturas de 132" • Hay disponibles extensiones opcionales de 9” y 24" para áreas más grandes
™
Page 2

USER GUIDE
G3100
Auto Close Heart hGate
™
G3100
Auto Close Heart hGate
™
LISTA DE PIEZAS Y MÉTODO DE PAGO
Parts list
A 24” Section (4)
B 30” Walk-Through Door Section
C Upper Post Wall Bracket
D Upper Receiver Wall Bracket
E Lower Post Wall Bracket
F Lower Receiver Wall Bracket
G Sliding Wall Bracket Assembly (2)
H Wall Plate (4-assembled to parts C, D, and G)
I Wood Screw (8) (1
J Wall Mount Bar (2)
B
3
/8”)
A A AA
G3100
Auto Close Heart hGate
™
C Soporte superior del poste de montaje en la pared
D Soporte receptor superior de montaje en la pared
E Soporte inferior del poste de montaje en la pared
F Soporte receptor inferior de montaje en la pared
G Conjunto de soportes deslizantes de montaje en la pared
H Placa para la pared
J Barra de montaje en la pared
Precio G3100
$5.00
$5.00
$5.00
$5.00
$5.00
$2.00
$7.00
MÉTODO DE PAGO Por favor no envíe dinero en efectivo
Cheque/Giro postal adjunto (pagadero a: KidCo, Inc.)
VISA (13 ó 16 dígitos) Mastercard (16 dígitos)
Mes Año
Número de la tarjeta de crédito Fecha de vencimiento (requerida)
Firma del portador de la tarjeta
Fecha
Por favor escriba en letras de molde el nombre del portador de la tarjeta
C D E
Nombre
Domicilio residencial
Ciudad
Estado
N.º telefónico diurno
Unidad
Código postal
F G H I
CARGOS POR ENVÍO Y MANEJO
Si el pedido incluye tubos de extensión,
®
J
1013 Technology Way
Libertyville, IL 60048-5349
2
barras o pivotes, añada $8.00.
Para todos los demás pedidos, añada $5.00.
Cantidad del pedido
Envío y manejo
Total
$
$
$
23
Page 3

USER GUIDE
Assembly
G3100
Auto Close Heart hGate
™
G3100
Auto Close Heart hGate
™
PARTS PRICE LIST AND METHOD OF PAYMENT
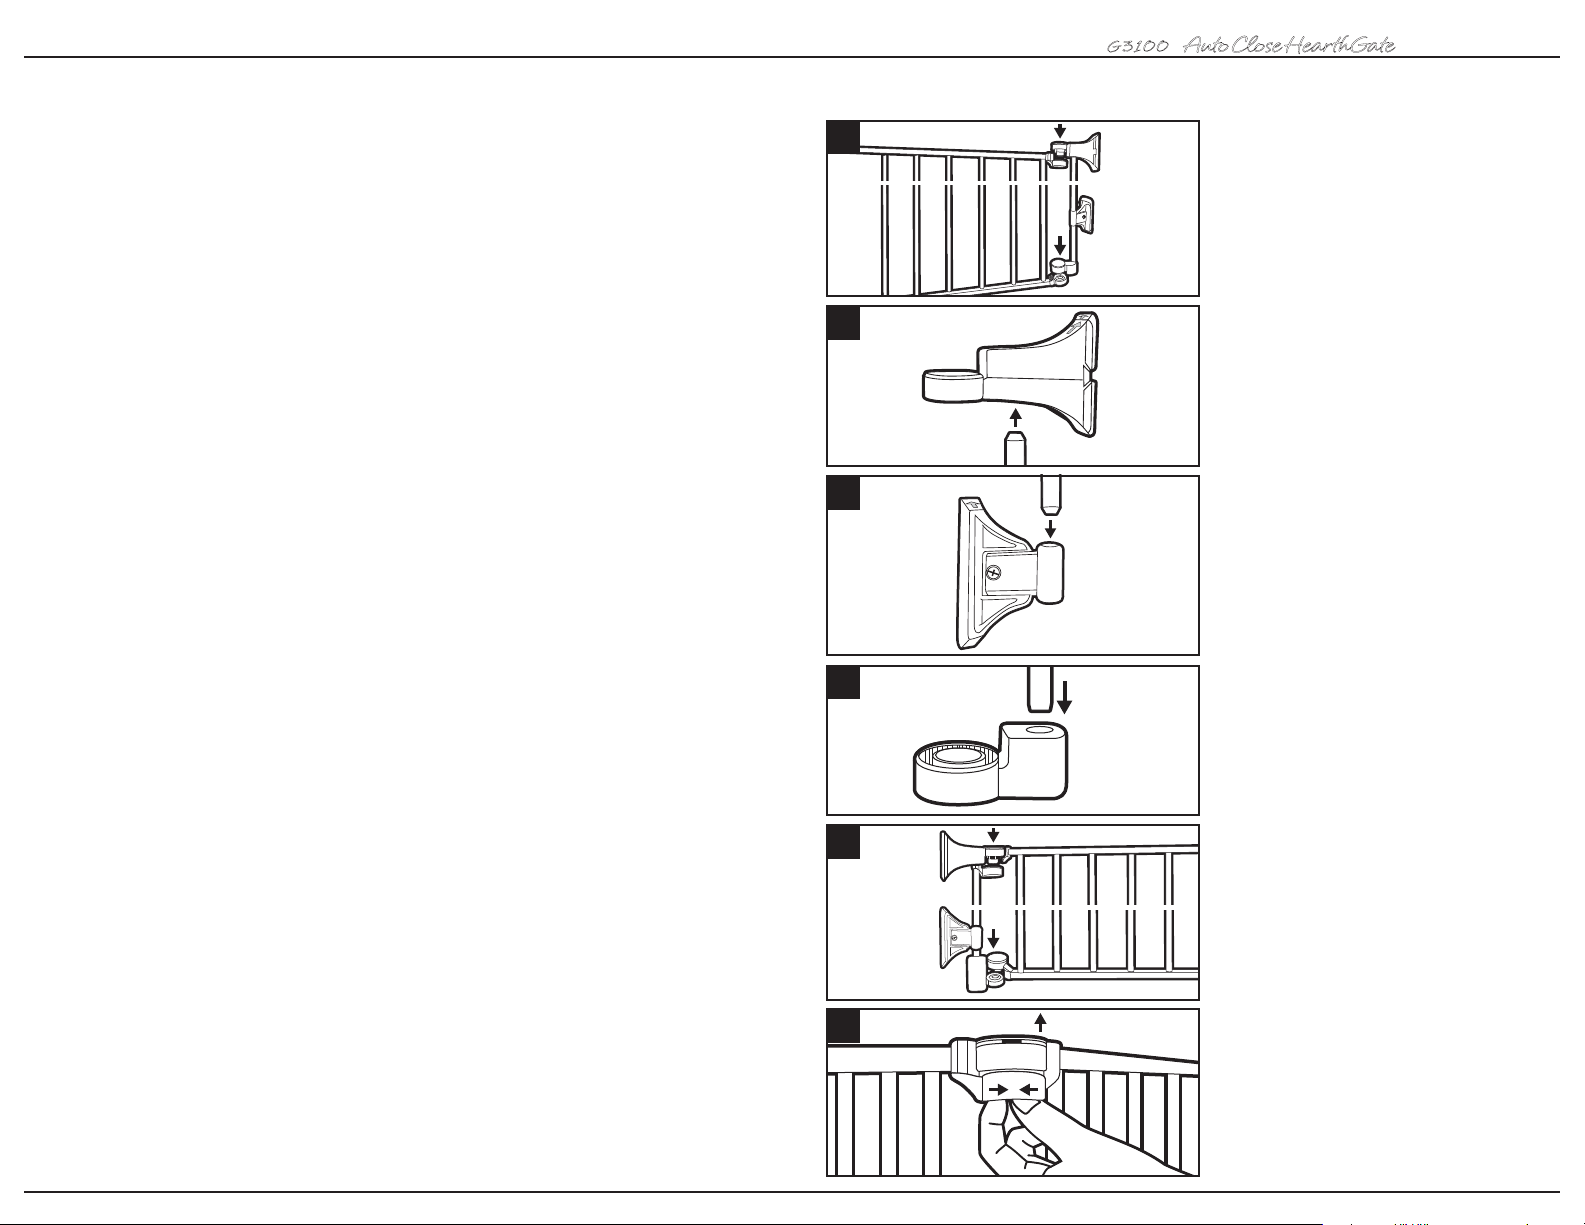
1 To connect two sections, place hinge
posts over the center of the next section’s
hinge receivers and press down until a click is
heard. Continue adding more sections the
same way. Optional 9” and 24” sections are
available for purchase for larger areas or to
construct a free standing enclosure.
NOTE: The walk through door section can be
positioned anywhere within the layout of the
gate. For the auto close door feature to work
properly the entire gate must be on a level
surface, otherwise the door may have to be
manually pushed shut.
2 Once all sections have been assembled
lift all locking caps into the raised unlocked
position (a) and adjust the angle of each
section until desired configuration is achieved
(b). Push down on all locking caps (c). If
locking cap is difficult to lift, gently rotate
sections to relieve pressure and/or carefully
insert a coin or slotted screwdriver in notch
(d) between cap and housing, and push up.
3 Insert wall mount bar into upper
post bar bracket. The wall plate is already
attached to the upper post bar bracket.
1
G3100
Auto Close Heart hGate
C Upper Post Wall Bracket
D Upper Receiver Wall Bracket
E Lower Post Wall Bracket
F Lower Receiver Wall Bracket
G Sliding Wall Bracket Assembly
H Wall Plate
2
(a) (c)
(d)
J Wall Mount Bar
™
Price G3100
$5.00
$5.00
$5.00
$5.00
$5.00
$2.00
$7.00
METHOD OF PAYMENT Please do not send cash
(b)
3
Check/Money Order enclosed (payable to: KidCo, Inc.)
VISA (13 or 16 digits) Mastercard (16 digits)
Mo Yr
Credit card account number Expiration date (required)
Signature of cardholder
Please print name of cardholder
Date
4 Insert bar into sliding wall bracket
assembly with locking tabs lined up on right
side and arrows facing up.
5 Insert bar into lower post bar housing.
4
Name
Daytime phone number
4
Street address
City
State
5
®
1013 Technology Way
Libertyville, IL 60048-5349
Unit
Zip
SHIPPING AND HANDLING CHARGES
If order includes extension tubes,
bars or spindles add $8.00
All others add $5.00
Order amount
Shipping & handling
Total
$
$
$
21
Page 4

USER GUIDE
G3100
Auto Close Heart hGate
™
G3100
Auto Close Heart hGate
™
GUÍA DEL USUARIO
Installation
NOTE: Move HearthGate to desired location.
Sections may need to be adjusted again for
proper fit.
12 Lift locking caps and rotate upper and
lower wall brackets until flush against
mounting surface and lower bar housing is
aligned with the upper bracket assembly.
NOTE: Sliding wall bracket assembly is
adjustable for uneven walls and should be
installed as low as possible.
13 With a pencil, lightly outline brackets on
mounting surface.
14 Remove wall plates from brackets by
pressing locking tabs and sliding up.
15 Hold one wall plate with arrow facing up
inside pencil outline and install using two
wood screws. Repeat for all other wall
plates. NOTE: Screws provided are for
mounting directly into wood. If mounting into
brick, drywall or other surfaces, use
appropriate hardware.
16 Attach gate to wall plates by aligning
arrows and inserting round tabs into wall
plates (a). Slide down to lock (b). Tighten bolts
on sliding wall brackets. Gate should now be
properly installed.
12
13
14
15
16
(a)
17
10
18
19
20
(b)
(a)
(a) (b)
Uso
17 Deslice hacia atrás el botón de bloqueo
y levante la puerta para abrirla hacia
cualquier dirección. La puerta se cerrará
automáticamente y el pestillo se reactivará
cuando se escucha un “clic”.
NOTA: La sección de la puerta se debe
colocar sobre una superficie nivelada
para que el cierre automático funcione
apropiadamente; de otra manera, será
necesario cerrar manualmente la puerta.
Pruebe la característica de cierre
automático antes de usar la reja.
18 Botón para mantener la reja abierta: Este
botón se encuentra en el centro de la parte
superior de la bisagra. Al presionarlo
mientras la puerta se encuentra en posición
totalmente abierta, la puerta se mantendrá
abierta hasta que se presione para cerrarla.
Para quitar la reja
19 Para quitar la reja, presione la ceja de
bloqueo que se encuentra en el conjunto
inferior del soporte de montaje en la pared,
deslícela hacia arriba y sepárela de la placa
de pared. Repita el procedimiento con el
conjunto superior del soporte de montaje en
la pared y separe toda la reja de la pared.
Repita el procedimiento en el otro lado.
Instalación de un área
de juego cerrada
20 Para formar un área de juego cerrada
independiente con la reja HearthGate, será
necesario comprar secciones adicionales.
Después de montar todas las secciones
conecte entre sí los dos extremos. Una vez
montadas todas las secciones, ajústelas
hasta lograr la forma deseada.
(b)
6
19
Page 5

GUIDE D'UTILISATION
G3100
Auto Close Heart hGate
™
G3100
Auto Close Heart hGate
™
GUÍA DEL USUARIO
Liste des pièces
A Section de 60,9 cm (4)
B Section portail de 76,2 cm
C Support mural de montant supérieur
D Support mural de récepteur supérieur
E Support mural de montant inférieur
F Support mural de récepteur inférieur
G Support mural coulissant (2)
H Plaque murale (4 montées sur les pièces C, D et G)
I Vis à bois (8)
J Barre de fixation murale (2)
B
A A AA
6
6 Instale el conjunto de la barra en el
extremo de la sección de la reja que tiene
el receptor.
7
7 Inserte la barra de montaje en la pared
en el soporte receptor superior de la barra.
La placa de pared ya está instalada en el
soporte receptor superior de la barra.
8
8 Inserte la barra en el conjunto del
soporte deslizante de montaje en la pared
con las cejas de cierre alineadas en el lado
derecho y las flechas orientadas hacia arriba.
9
9 Inserte la barra en el orificio del receptor
inferior de la barra.
C D E
10
10 Instale el conjunto de la barra en el
extremo de la sección de la reja que tiene
el poste.
F G H I
11
J
8
11 NOTA: Para quitar una sección. Coloque
el pulgar y el dedo índice en las lengüetas
acanaladas que se encuentran en el interior
del perno de la bisagra superior y comprima
a la vez que levanta.
17
Page 6

GUIDE D'UTILISATION
G3100
Auto Close Heart hGate
™
G3100
Auto Close Heart hGate
™
GUÍA DEL USUARIO
Assemblage
1 Pour raccorder les deux sections, placer
les montants de charnière au-dessus du
centre des récepteurs de charnière de la
section suivante, puis appuyer jusqu'à ce
qu'un déclic indique un bon enclenchement.
Continuer à ajouter des sections
supplémentaires de la même manière. Des
sections de 22,8 et 60,9 cm sont proposées
en option pour les plus grandes surfaces
ou pour construire un enclos indépendant.
REMARQUE : La section portail peut être
positionnée n'importe où dans la configuration
de la barrière. Pour que la fermeture
automatique fonctionne normalement, toute
la barrière doit se trouver sur une surface
plane, sinon la porte devra possiblement être
manuellement poussée pour être fermée.
2 Une fois toutes les sections assemblées,
soulever tous les capuchons de verrouillage
en position déverrouillée (relevée) et ajuster
l'angle de chaque section jusqu'à obtention
de la configuration souhaitée. S'il est difficile
de lever le capuchon de verrouillage, tourner
doucement les sections pour soulager la
pression et/ou insérer avec précaution une
pièce ou un tournevis dans la fente (d) entre
le capuchon et le boîtier et pousser vers
le haut.
3 Insérer la barre de fixation murale dans
le support de barre du montant supérieur.
La plaque murale est déjà attachée au
support de barre du montant supérieur.
4 Insérer la barre dans le support mural
coulissant en alignant les ergots de
verrouillage sur le côté droit et les flèches
pointant vers le haut.
5 Insérer la barre dans le boîtier de barre
du montant inférieur.
Notas importante
1
2
(a) (c)
(d)
(b)
3
SIGA CUIDADOSAMENTE ESTAS INSTRUCCIONES Y CONSÉRVELAS
PARA SU REFERENCIA FUTURA
La reja está diseñada para niños de 6 a 24 meses de edad. Debido a que cada niño desarrolla destrezas a
diferentes edades, estos límites de edad se deben ajustar al desarrollo particular de su hijo.
Cuando se instala de acuerdo con las instrucciones, entre dos superficies limpias y estructuralmente sólidas,
esta reja cumple con las normas ASTM aplicables.
ADVERTENCIA
Diseñada para usarse con niños de
6 a 24 meses de edad.
Revise la estabilidad de la reja y
apriete regularmente todo el herraje
y los accesorios de montaje.
Para evitar una lesión grave o la
muerte, instale con seguridad la reja
o el corral y úselos de acuerdo con
las instrucciones del fabricante.
Nunca use estos productos para un
niño que se pueda subir a ellos o
El producto no necesariamente
evitará todos los accidentes.
Nunca deje al niño desatendido.
Use sólo piezas de repuesto
®
de KidCo
.
Nunca permita que el niño se suba
o se columpie en la reja.
Use la reja sólo con el mecanismo
de cierre firmemente asegurado.
Nunca use la reja en la parte
superior de las escaleras.
abrir la reja o el corral.
4
Nunca use la reja si su altura es
No use la reja si alguna de sus
piezas está dañada.
menor que 3/4 partes de la estatura
del niño.
No use la reja si alguna de sus
partes falta o está rota.
Nunca se pase sobre la reja.
Nunca cuelgue ni amarre juguetes
u otros objetos a ninguna parte
de la reja.
5
Mantenimiento
Ninguna pieza de la reja requiere lubricación. Limpie con agua jabonosa tibia o con un paño húmedo. No use limpiadores
abrasivos ni blanqueador. Una vez instalada la reja se debe revisar periódicamente para asegurar un ajuste firme y seguro
y mantenerla funcionando adecuadamente.
10
15
Page 7

GUIDE D'UTILISATION GUIDE D'UTILISATION
G3100
Auto Close Heart hGate
™
G3100
Auto Close Heart hGate
™
Installation
REMARQUE : Amener la HearthGate à
l'endroit souhaité. Il est possible que les
sections exigent un réajustement pour
bien tenir.
12 Soulever les capuchons de verrouillage
et tourner les supports muraux supérieurs et
inférieurs jusqu'à ce qu'ils affleurent avec la
surface de fixation et que le boîtier de barre
inférieur soit aligné sur le support supérieur.
REMARQUE : Le support mural coulissant
est ajustable pour les murs irréguliers et doit
être installé le plus bas possible.
13 Tracer légèrement au crayon le contour
des supports sur la surface de fixation.
14 Enlever les plaques murales des
supports en pressant les onglets de
verrouillage et en les relevant.
15 Tenir une plaque murale la flèche vers
le haut dans le contour tracé et l'installer à
l'aide des deux vis à bois. Répéter l'opération
pour les autres plaques murales.
REMARQUE – Les vis fournies sont
destinées à une fixation directe dans le bois.
Pour une fixation dans de la brique, une
cloison sèche ou d'autres surfaces, utiliser
la visserie appropriée.
16 Attacher la barrière aux plaques murales
en alignant les flèches et en insérant les
onglets ronds dans les plaques murales.
Rabaisser pour verrouiller. Serrer les boulons
sur les supports muraux coulissants.
La barrière devrait maintenant être
correctement installée.
12
13
14
15
16
(a)
(b)
17
10
18
19
20
(b)
(a)
(a) (b)
Mode d’emploi
17
Glisser le bouton de verrouillage vers
l'arrière et soulever la porte pour ouvrir dans
l'une ou l'autre direction. Le portail se
referme automatiquement et le verrou se
réenclenche par un déclic audible.
REMARQUE : Pour que la fermeture
automatique fonctionne normalement, la
section portail doit se trouver sur une surface
plane, sinon la porte devra possiblement être
manuellement poussée pour être fermée.
Contrôler le fonctionnement de la fermeture
automatique avant utilisation.
18 Bouton de maintien en position ouverte :
ce bouton se trouve au milieu du haut de la
charnière. En appuyant dessus lorsque la
porte est en position ouverte au maximum,
celle-ci restera ouverte jusqu'à ce qu'on la
ferme en la poussant.
Retrait
19 Pour enlever la barrière, appuyer sur
l'ergot de verrouillage du support mural
inférieur, puis la glisser vers le haut et la
dégager de la plaque murale. Reprendre la
procédure sur le support mural supérieur
et enlever toute la barrière. Reprendre du
côté opposé.
Création d'une zone
de jeu fermée
20 Pour transformer le HearthGate en
une zone de jeu fermée indépendante, des
sections supplémentaires devront être
achetées. Une fois toutes les sections
assemblées, raccorder les deux extrémités.
Une fois le tout assemblé, ajuster pour
donner la forme souhaitée.
1312
Page 8

GUÍA DEL USUARIO
G3100
Auto Close Heart hGate
™
G3100
Auto Close Heart hGate
™
GUIDE D'UTILISATION
Lista de piezas
A Sección de 24" (4)
B Sección de la puerta de acceso, de 30"
C Soporte superior del poste de montaje en la pared
D Soporte receptor superior de montaje en la pared
E Soporte inferior del poste de montaje en la pared
F Soporte receptor inferior de montaje en la pared
G Conjunto de soportes deslizantes de montaje en la pared (2)
H Placa para la pared (4, montada en las piezas C, D y G)
I Tornillo para madera (8)
J Barra de montaje en la pared (2)
B
A A AA
6
6 Attacher la barre au récepteur de la
section de barrière finale.
7
7 Insérer la barre de fixation murale dans
le support de barre du récepteur supérieur.
La plaque murale est déjà attachée au
support de barre du récepteur supérieur.
8
9
8 Insérer la barre dans le support mural
coulissant en alignant les ergots de
verrouillage sur le côté droit et les flèches
pointant vers le haut.
9 Insérer la barre dans le boîtier de barre
du récepteur inférieur.
C D E
10
10 Attacher la barre au montant de la
section de barrière finale.
F G H I
11
J
14
11 REMARQUE : Pour enlever une section.
Placer le pouce et l'index sur les onglets
crantés à l'intérieur du montant de charnière
supérieure et pincer tout en soulevant.
11
Page 9

GUÍA DEL USUARIO
G3100
Auto Close Heart hGate
™
G3100
Auto Close Heart hGate
™
GUIDE D'UTILISATION
Montaje
Para conectar dos secciones, coloque los
1
postes de las bisagras sobre el centro de los
receptores de las bisagras de la siguiente
sección y presione hacia abajo hasta que
oiga un clic. Continúe añadiendo secciones
de la misma manera. Se pueden comprar
secciones opcionales de 9" y de 24" para
áreas más grandes o para construir un
cerramiento independiente. NOTA: La sección
de la puerta de acceso se puede colocar
en cualquier parte de la reja. Para que la
característica de cierre automático funcione
adecuadamente, toda la reja debe estar
sobre una superficie nivelada, de otra
manera es posible que sea necesario
cerrarla manualmente.
2 Una vez montadas todas las secciones,
levante todas las tapas de cierre a su
posición elevada (abierta) y ajuste el ángulo
de cada sección hasta lograr la configuración
deseada. Si es difícil levantar la tapa de
bloqueo, suavemente rote las secciones para
aliviar la presión, y/o inserte cuidadosamente
una moneda o un destornillador ranurado en
la muesca (d) que se encuentra entre la tapa
y la caja, y presione hacia arriba.
3 Inserte la barra de montaje en la pared
en el soporte superior de la barra. La placa
de pared ya está instalada en el soporte
superior de la barra.
4 Inserte la barra en el conjunto del soporte
deslizante de montaje en la pared con las
cejas de cierre alineadas en el lado derecho
y las flechas orientadas hacia arriba.
Remarques importantes
1
SUIVRE ATTENTIVEMENT CES INSTRUCTIONS ET LES CONSERVER
À TITRE DE RÉFÉRENCE ULTÉRIEURE
Cette barrière de sécurité a été conçue pour les enfants âgés de 6 à 24 mois. Comme les facultés de chaque
enfant se développent à des âges différents, ces paramètres devront être surveillés en fonction du
développement de votre propre enfant.
Lors d'une installation conforme aux instructions, entre deux surfaces propres et adéquates sur le plan
structurel, cette barrière est conforme aux normes de l'ASTM.
AVERTISSEMENT
2
(a) (c)
Prévue pour les enfants âgés
de 6 mois à 24 mois
Vérifier la stabilité de la barrière
(d)
et resserrer régulièrement toute
la visserie et les supports
(b)
Pour éviter les blessures graves
ou la mort, installer solidement
3
la barrière ou l'enclos et utiliser
conformément aux instructions
du fabricant
Ne jamais utiliser avec un enfant
capable de grimper par-dessus la
barrière ou l'enclos ou de les
déloger ou les ouvrir
4
Ne jamais utiliser si la barrière
mesure moins des ¾ de la
hauteur de l'enfant
Ne pas utiliser si une pièce de la
barrière est cassée ou manquante
5
Le produit n'évitera pas
nécessairement tous les
accidents. Ne jamais laisser
un enfant sans surveillance
Utiliser uniquement les pièces
proposées par KidCo
®
Ne jamais laisser un enfant
grimper ou se balancer sur
la barrière
Utiliser uniquement avec le
mécanisme de verrouillage
bien enclenché
Ne jamais utiliser la barrière
en haut d'un escalier
Cesser d'utiliser si une pièce de
la barrière est endommagée
Ne jamais grimper sur la barrière
Ne jamais suspendre ni attacher
de jouets, etc., sur quelque partie
de la barrière que ce soit
5 Inserte la barra en el orificio para la
barra inferior.
16
Maintenance
Aucune pièce de la barrière n'exige de lubrification. Nettoyer avec de l'eau chaude et du savon ou avec un chiffon
humide. Ne pas utiliser de nettoyants abrasifs ou un agent blanchissant. Une fois installée, la barrière doit être
périodiquement vérifiée pour s'assurer de son ajustement sûr et de son bon fonctionnement.
9
Page 10

GUÍA DEL USUARIO
G3100
Auto Close Heart hGate
™
G3100
Auto Close Heart hGate
™
USER GUIDE
Instalación
NOTA: Mueva la reja HearthGate al lugar
deseado. Es posible que sea necesario
ajustar otra vez las secciones para lograr el
ajuste perfecto.
12 Levante las tapas de cierre y gire los
soportes superior e inferior de montaje en
la pared hasta que queden al ras de la
superficie de montaje y el compartimiento
de la barra inferior quede alineado con el
conjunto del soporte superior. NOTA: El
conjunto de soportes deslizantes de montaje
en la pared se puede ajustar en paredes
irregulares y se debe instalar tan bajo
como sea posible.
13 Con un lápiz, delinee ligeramente los
soportes sobre la superficie de montaje.
14 Separe las placas de pared de los
soportes presionando las lengüetas de
cierre y levantándolas.
15 Sujete una placa de pared con la fecha
orientada hacia arriba dentro del perfil
trazado con lápiz e instálela con dos tornillos
para madera. Repita el procedimiento con
todas las otras placas de pared. NOTA: Los
tornillos que se proporcionan son para
montar directamente en la madera. Si el
montaje se va a hacer en ladrillo, muro seco
u otras superficies, use el herraje adecuado.
16 Conecte la reja en las placas de pared
alineando las flechas e insertando las cejas
redondas en las placas de pared. Deslícelas
hacia abajo para bloquearlas. Apriete los
tornillos de los soportes deslizantes de
montaje en la pared. Ahora la reja debe estar
instalada adecuadamente.
12
13
14
15
16
(a)
(b)
17
10
18
19
20
(b)
(a)
(a) (b)
Operation
17 Slide back the locking button (a) and lift
door to open in either direction (b). Door will
automatically close and the lock will
re-engage with an audible “click”.
NOTE: The door section must be placed on a
level surface for the auto close function to
work properly, if not, the door will need to be
manually pushed shut. Test auto close
function before use.
18 Hold Button: This button is located in
the middle of the hinge top. By pressing
it down while the door is in its most open
position, it will hold the door open until it
is pushed closed.
Removal
19 To remove gate from wall press locking
tab on the lower wall bracket assembly
sliding it up and off the wall plate (a).
Repeat the process on the upper wall
bracket assembly and remove entire gate
from wall (b). Repeat for other side.
Making an enclosed
play area
20 To make the HearthGate a self standing,
enclosed play area, additional sections will
need to be purchased. After assembly of all
sections connect the two ends together. Once
all sections have been assembled, adjust
them to make a desired shape.
18
7
Page 11
WARRANTY • GARANTIE • GARANTÍA
KidCo® Limited Warranty
Your KidCo product is warranted to be free from manufacturing defects for a period of one year from date of purchase under normal non
commercial use and in compliance with the operating instructions. This warranty extends only to the original retail purchaser and is only valid
when supplied with proof of purchase. KidCo will either repair, or at our option replace, free of charge, any parts necessary to correct defects in
material or workmanship during the warranty period. This warranty is complete and exclusive. The warranty expressly disclaims liability for
incidental, special and consequential damages of any nature. Any implied warranty arising by operation of law shall be limited in operation to the
terms of this warranty. Some states do not allow the exclusion or limitation of incidental or consequential damages or limitations on how long an
implied warranty lasts, so the above may not apply to you. This warranty gives you specific legal rights, and you may have other rights which vary
from state to state.
Should Repair Or Parts Be Necessary
Should a repair be needed during the warranty period, ship the gate in the original carton or similar protective container (check any retail store or
purchase from UPS) and send freight prepaid (we suggest UPS) to: KidCo Inc., 1013 Technology Way, Libertyville, IL 60048-5349. Include a
note with your return address, day-time telephone number, and specify what is wrong with the product. Repairs can normally be made within 48
hours after receipt at KidCo. For additional information CALL our customer service department at (800) 553-5529.
G3100
6
Auto Close Heart hGate
6 Attach bar assembly to receiver of end
™
USER GUIDE
gate section.
7
7 Insert wall mount bar into upper receiver
bar bracket. The wall plate is already
attached to the upper receiver bar bracket.
Garantie Limitée KidCo
Votre produit KidCo est garantit contre tout défaut de fabrication pendant une période d’un an à partir de la date d’achat dans des conditions
normales d’utilisation non commerciale et conforme au mode d’emploi. Cette garantie est uniquement accordée à l’acheteur d’origine chez un
revendeur et elle est uniquement valable pour toute réclamation accompagnée d’un justificatif d’achat. KidCo réparera ou, à sa discrétion,
remplacera gratuitement toute pièce nécessaire pour corriger les vices de matériel ou de fabrication durant la période de garantie. Cette garantie
est complète et exclusive. Par cette garantie, KidCo rejette expressément toute responsabilité vis-à-vis de dommages accessoires, spéciaux et
indirects, quelle qu’en soit la nature. Toute garantie tacite par effet de la loi se limitera aux termes de cette garantie. Certaines provinces
n’autorisant pas l’exclusion ou la limitation de dommages accessoires ou indirects en rapport avec la durée d’une garantie tacite, il est possible
que ce qui précède ne vous concerne pas. Cette garantie vous accorde des droits légaux spécifiques et il est possible que vous ayez d’autres
droits, variables d’une province à l’autre.
Pour toute réparation ou pièce nécessaire
Si une réparation s’avère nécessaire durant la période de garantie, expédiez la barrière de sécurité dans son carton d’origine ou une boîte de
protection similaire (disponible auprès d’un revendeur ou vendue par UPS) et envoyez en fret payé d’avance (UPS suggéré) à: KidCo Inc.,
1013 Technology Way, Libertyville, IL 60048-5349. Incluez une note mentionnant vos adresse de retour et numéro de téléphone, et décrivez
la nature du problème. Les réparations sont normalement effectuées sous 48 heures après réception par KidCo. Pour plus
d’informations, REJOIGNEZ notre service clientèle au (800) 553-5529.
Garantía Limitada de KidCo
Se garantiza que su producto KidCo estará libre de defectos de fabricación por un período de un año a partir de la fecha de compra bajo
condiciones de uso normales y no comerciales y si se cumple con las instrucciones de operación. Esta garantía se extiende sólo al comprador
minorista original y sólo es válida cuando se proporciona con un comprobante de compra. KidCo gratuitamente reparará o reemplazará, a su
opción, cualquier pieza necesaria para corregir los defectos en los materiales o la mano de obra durante el período de la garantía. Esta garantía
es completa y exclusiva. La garantía expresamente renuncia a la responsabilidad por daños incidentales, especiales y resultantes de cualquier
naturaleza. Cualquier garantía implícita que surja del ministerio de la ley estará limitada en aplicación a los términos de esta garantía. Algunos
estados no permiten la exclusión ni la limitación de daños incidentales o resultantes ni las limitaciones en la duración de una garantía implícita,
de manera que lo antedicho puede no aplicar a usted. Esta garantía le confiere derechos legales específicos, y usted puede tener otros derechos
dependiendo del estado en donde resida.
Si se requiere reparación o piezas
Si se requiere la reparación de la reja durante el período de la garantía, empáquela en su caja original o en un recipiente protector similar (puede
conseguir uno en alguna tienda minorista o cómprelo en UPS) y envíela con porte prepagado (sugerimos UPS) a: KidCo Inc., 1013 Technology
Way, Libertyville, IL 60048-5349. Incluya una nota que contenga la dirección de devolución, un número telefónico de contacto durante el día y
especifique cuál es el problema con el producto. Normalmente las reparaciones se hacen en el transcurso de 48 horas después de que el
producto se recibe en KidCo. Si desea información adicional LLAME a nuestro Departamento de Servicio al Cliente al teléfono (800) 553-5529.
®
®
8
9
10
11
8 Insert bar into sliding wall bracket
assembly with locking tabs lined up on right
side and arrows facing up.
9 Insert bar into lower receiver bar
housing.
10 Attach bar assembly to post end
gate section.
11 NOTE: To remove a section, place
thumb and index finger on ribbed tabs
inside upper hinge post and pinch
while lifting.
20
5
Page 12

LISTE DES PIÈCES ET MODE DE PAIEMENT
G3100
Auto Close Heart hGate
™
G3100
Auto Close Heart hGate
™
USER GUIDE
Important Information
G3100
C Support mural de montant supérieur
D Support mural de récepteur supérieur
E Support mural de montant inférieur
F Support mural de récepteur inférieur
G Support mural coulissant
H Plaque murale
J Barre de fixation murale
Auto Close Heart hGate
MODE DE PAIEMENT
™
Prière de ne pas envoyer de paiement en espèces
Prix G3100
$5.00
$5.00
$5.00
$5.00
$5.00
$2.00
$7.00
Chèque ou mandat ci-joint (à l’ordre de : KidCo, Inc).
VISA (13 ou 16 chiffres) Mastercard (16 chiffres)
Mo. An.
Numéro de carte de crédit Date d’expiration (obligatoire)
Signature du titulaire de la carte Date
Indiquer le nom du titulaire en toutes lettres
Nom Numéro de téléphone (jour)
Adresse No d’appart.
Ville Province Code postal
FRAIS DE PORT ET MANUTENTION
Si la commande inclut des tubes d’extension,
des barres ou des axes, ajouter 8 $US.
®
1013 Technology Way
Libertyville, IL 60048-5349
Toutes les autres commandes, ajouter 5 $US.
Montant de la commande
Port et manutention
Total
$
$
$
U.S.
U.S.
U.S.
FOLLOW THESE INSTRUCTIONS CAREFULLY AND KEEP THEM
FOR FUTURE REFERENCE
This gate is designed for children from 6 months to 24 months. Since each child’s skills develop at different
ages, these age parameters should be monitored against your child’s own development.
When installed as instructed, between two clean structurally sound surfaces, this gate conforms to applicable
ASTM standards.
WARNING
Intended for use with children
•
from 6 months through 24 months
Check the stability of the gate
•
and tighten all hardware and
mountings regularly
To prevent serious injury or death,
•
securely install gate or enclosure
and use according to
manufacturer’s instructions
Never use with a child able to
•
climb over or dislodge/open the
gate or enclosure
Never use if gate is less than
•
¾ of child’s height
Do not use if any part of the gate
•
is broken or missing
Maintenance
No part of the gate requires lubrication. Clean using warm, soapy water or a damp cloth. Do not use abrasive
cleaners or bleach. Once installed the gate should be checked periodically to ensure a safe and secure fit
and to maintain proper working order.
This product will not necessarily
•
prevent all accidents. Never leave
child unattended
Use only spare parts available
•
from KidCo
Never allow child to climb or
•
®
swing on gate
Use only with the locking/latching
•
mechanism securely engaged
Never use gate at top of stairs
•
Discontinue use if any part of
•
the gate is damaged
Never climb over the gate
•
Never hang or tie toys, etc,
•
to any part of the gate
22
3
 Loading...