

Kidco G2201 User Manual [en, es, fr]
USER GUIDE
GUIDE D'UTILISATION
GUÍA DEL USUARIO
Extension Placement Guide
Guía de colocación de las extensiones
G4400 Extension Guide for Angle Mount Safeway Select Model G2200
G4401 Extension Guide for Angle Mount Safeway Select Model G2201
Note: Each G4400/G4401 kit contains one extension
Width Opening Extensions What You Need Placement
28”– 42 ½” Basic Gate No extensions
42” – 52 ½” 1-G4400/G4401 Gate + 1 extension -1 on one end
52” – 63” 2-G4400/G4401 Gate + 2 extensions -1 on each end
Guide de positionnement des rallonges
Guide de rallonge G4400 pour Angle Mount Safeway Select modèle G2200
Guide de rallonge G4401 pour Angle Mount Safeway Select modèle G2201
Remarque : Chaque ensemble G4400/G4401 contient rallonge.
Largeur d'ouverture Rallonges Matériel requis Positionnement
71 à 108 cm Barrière de base Sans rallonges
107 à 133 cm 1-G4400/G4401 Barrière + 1 rallonge -1 à une extrémité
132 à 160 cm 2-G4400/G4401 Barrière + 2 rallonges -1 à chaque extrémité
G2200
G2201
®
1013 Technology Way, Libertyville, IL 60048
800.553.5529
www.kidco.com
®
Angle
Fits openings 28” – 42 1/2” • Optional 10“ extensions for openings 42” - 63“ wide
Pour les embrasures de 71 à 108 cm • Rallonges facultative de 25 cm pour les embrasures de 107 à 160 cm
Para aberturas de 28” – 42
M
ount SafewaySelect
HARDWARE MOUNT INSTALLATION
1
/2” • Extensiónes opcional de 10” para aberturas de 42” a 63” de ancho
®
USER GUIDE
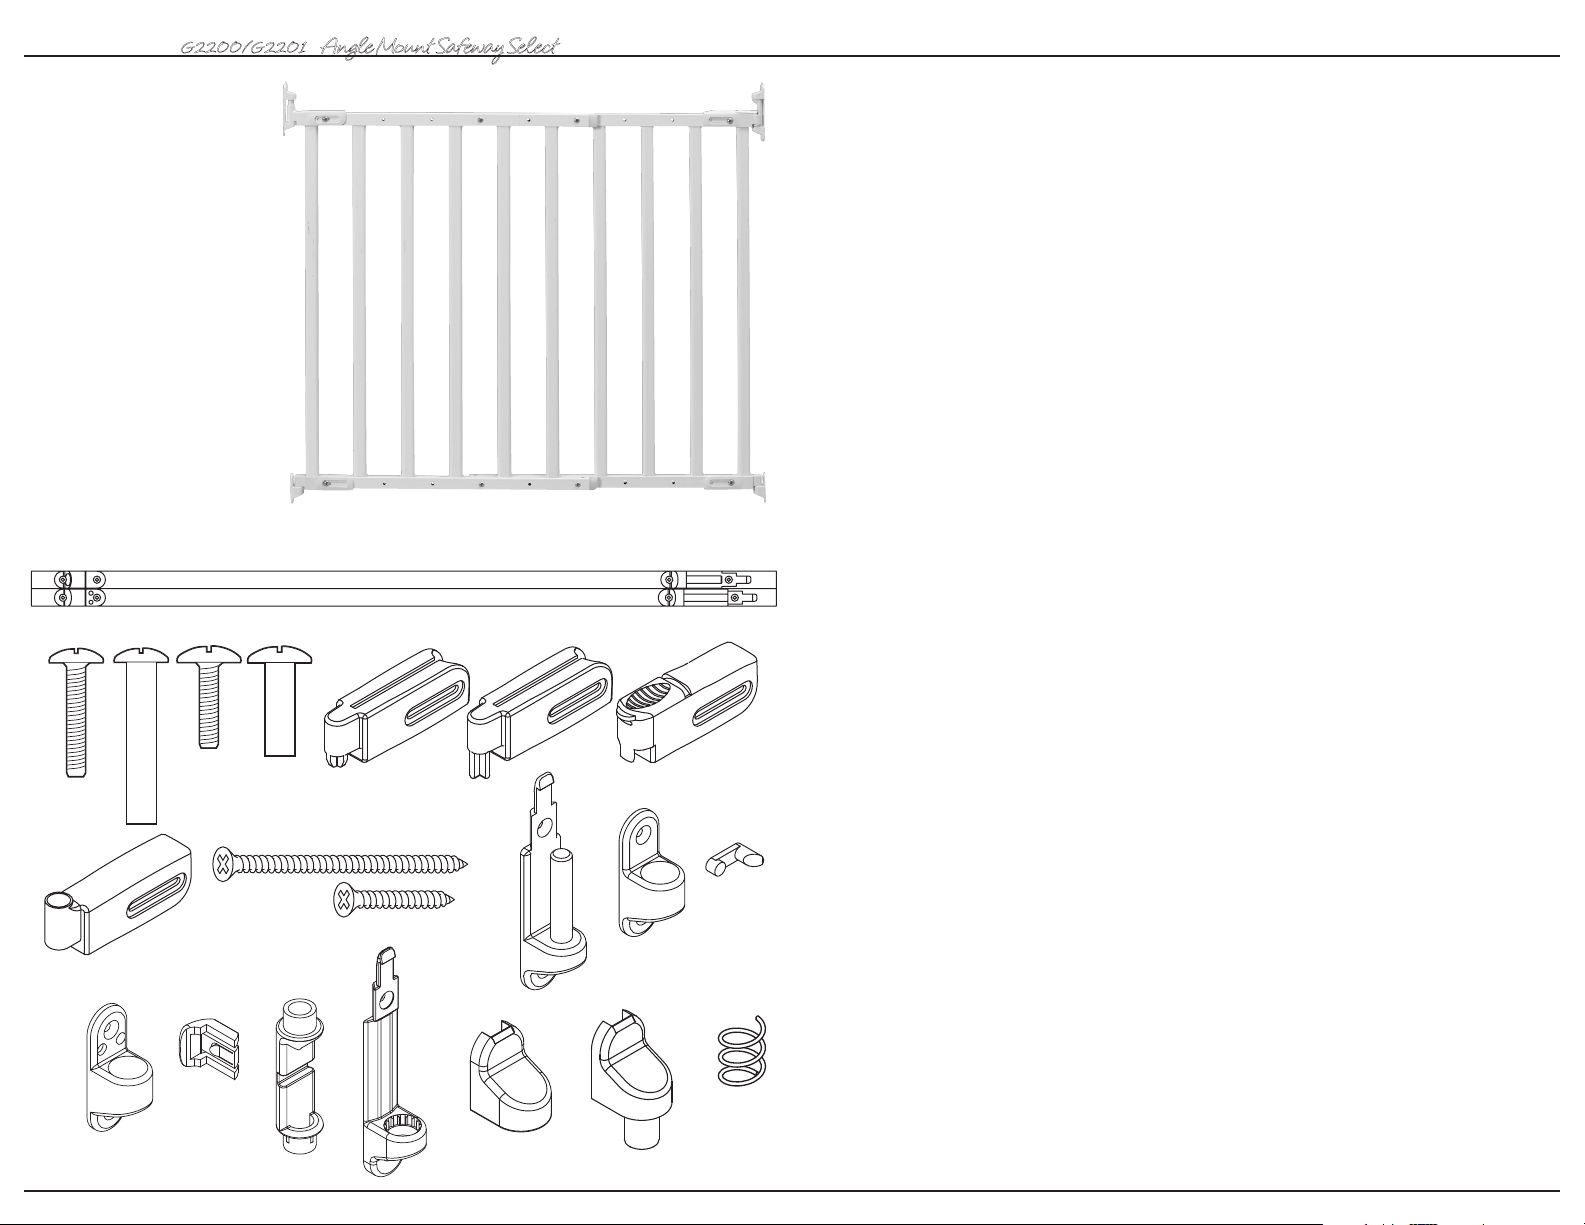
Parts list
A Hinge side template
B Locking side template
C-F Screw/screw socket
G Lower handle part
H Lower hinge part
I Upper handle part
J Upper hinge part
K Wood screws
L Upper hinge bracket
M Lower hinge bracket
N Stop pin
O Lower locking bracket
P Stop clip
Q Upper latch
R Upper locking bracket
S Locking cap
T Hinge cap
U Spring
G2200/G2201
Angle Mount Safeway Select
®
A
Cx4
Dx4 Ex4
Fx4
B
G
H
I
L
M
N
J
K
R
O
2
P
Q
S
T
U
G2200/G2201
Angle Mount Safeway Select
®
USER GUIDE
Important Information
FOLLOW THESE INSTRUCTIONS CAREFULLY AND KEEP THEM
FOR FUTURE REFERENCE
This gate is designed for children from 6 months to 24 months. Since each child’s skills develop at different
ages, these parameters should be monitored against your child’s own development.
When installed in as instructed, between two clean, structurally sound surfaces, this gate conforms to
applicable ASTM standards.
WARNING
Intended for use with children
•
from 6 months through 24 months
Check the stability of the gate
•
and tighten all hardware and
mountings regularly
To prevent serious injury or death,
•
securely install gate or enclosure
and use according to
manufacturer’s instructions
Never use with a child able to
•
climb over or dislodge/open the
gate or enclosure
Never use if gate is less than
•
¾ of child’s height
Do not use if any part of the gate
•
is broken or missing
This product will not necessarily
•
prevent all accidents. Never leave
child unattended
Use only spare parts available
•
from KidCo
Never allow child to climb or
•
®
swing on gate
Use only with the locking/latching
•
mechanism securely engaged
Never use gate at top of stairs
•
Discontinue use if any part of
•
the gate is damaged
Never climb over the gate
•
Never hang or tie toys, etc,
•
to any part of the gate
Maintenance
No part of the gate requires lubrication. Clean using warm, soapy water or a damp cloth. Do not use abrasive
cleaners or bleach. Once installed the gate should be checked periodically to ensure a safe and secure fit
and to maintain proper working order.
3
USER GUIDE
G2200/G2201
Angle Mount Safeway Select
®
G2200/G2201
Angle Mount Safeway Select
®
MÉTODO DE PAGO
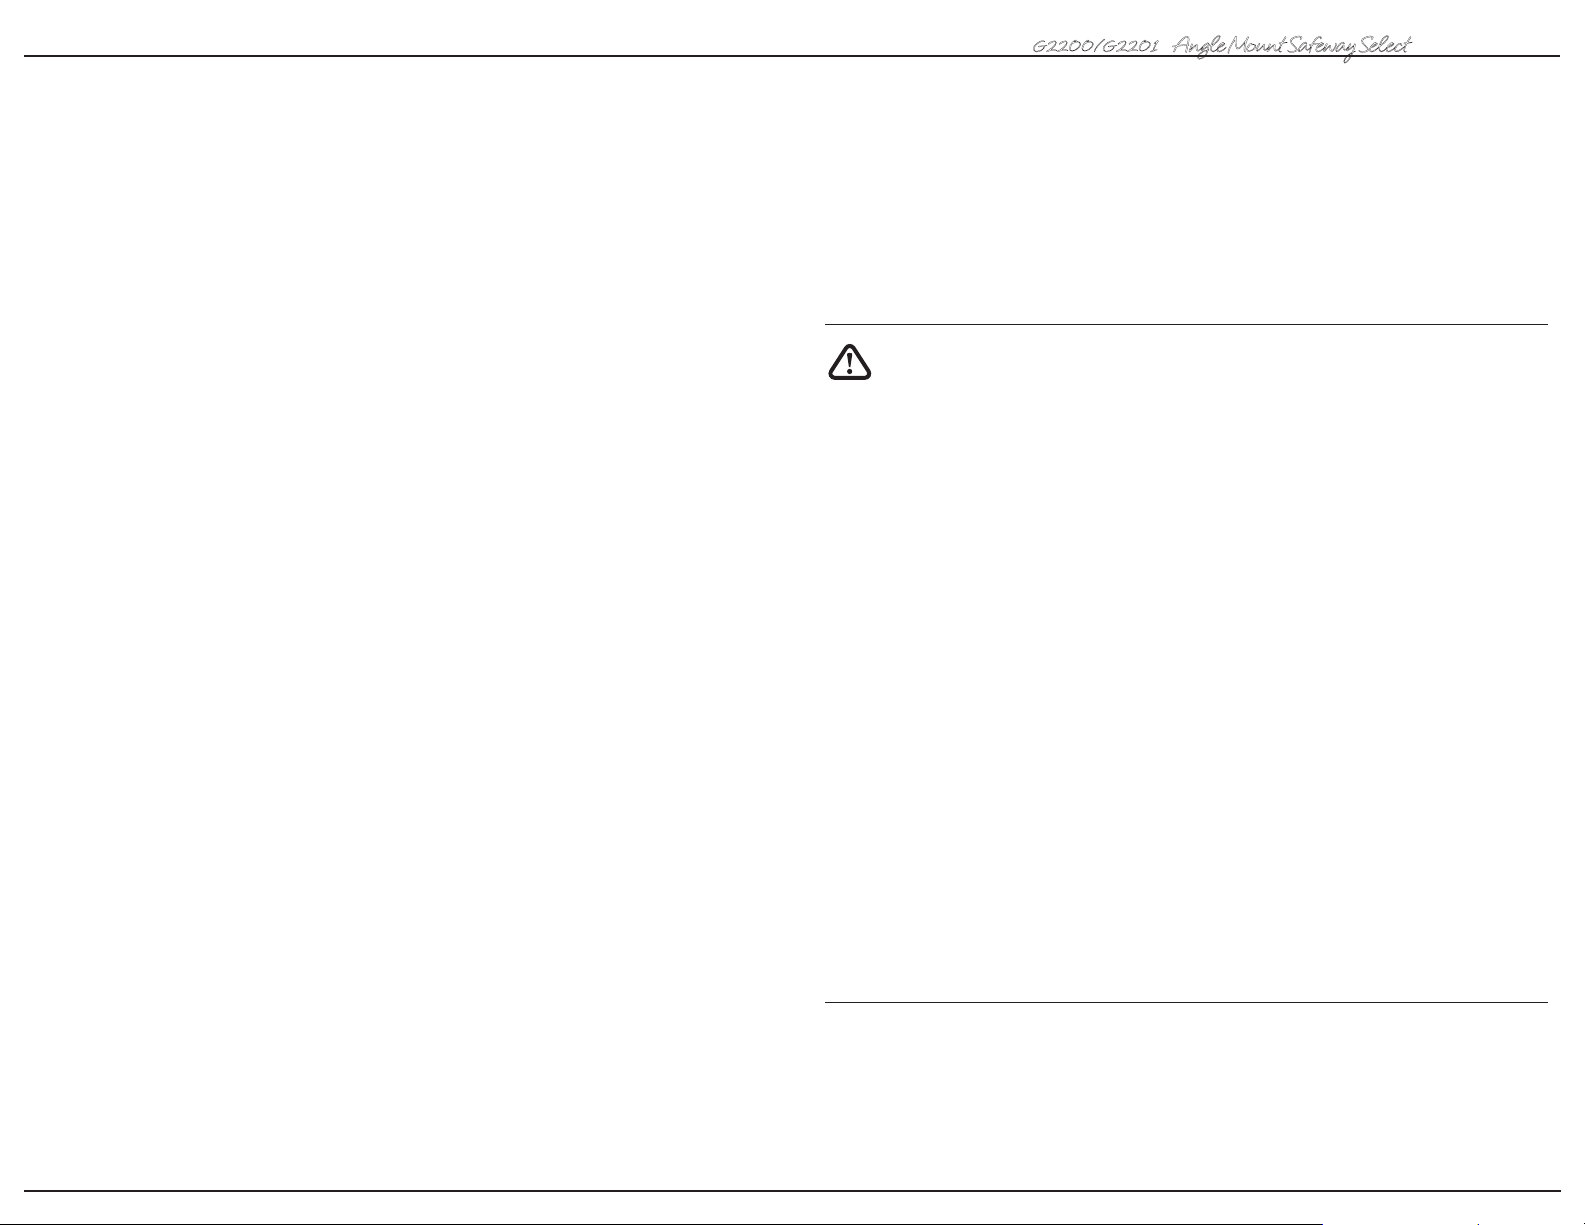
Installation
1 Important: Gate must be installed in a
structurally sound opening. The gate must
be mounted to a rigid surface. Ensure
mounting surface (wall, door frame,
stairposts, etc.) is strong, rigid and has
an even surface.
2 If using gate on a stairway, it must be
placed either on top stair or on lowest stair
at the bottom.
G2200/G2201
1
C-F Tornillo/manguito roscado - jeugo de 4
Angle Mount Safeway Select
®
G Pieza inferior del asa
H Pieza inferior de la bisagra
I Pieza superior del asa
J Pieza superior de la bisagra
L Soporte superior de la bisagra
M Soporte inferior de la bisagra
N Pivot de tope
O Soporte inferior del mecanismo de cierre
P Clip de tope
Q Pestillo superior
R Soporte superior del mecanismo de cierre
S Tapa de cierre
T Tapa de la bisagra
2
U Resorte
Precio G2200 G2201
$1.00
$3.00
$3.00
$3.00
$3.00
$1.00
$1.00
$1.00
$1.00
$1.00
$1.00
$1.00
$1.00
$1.00
$1.00
MÉTODO DE PAGO Por favor no envíe dinero en efectivo
Cheque/Giro postal adjunto (pagadero a: KidCo, Inc.)
VISA (13 ó 16 dígitos) Mastercard (16 dígitos)
Mes Año
Número de la tarjeta de crédito Fecha de vencimiento (requerida)
3 When assembling the gate, it is
important that the sections fit without
any distance between rails or bars.
4
Firma del portador de la tarjeta
Por favor escriba en letras de molde el nombre del portador de la tarjeta
3
Nombre
Domicilio residencial
Ciudad
1013 Technology Way
Libertyville, IL 60048-5349
Estado
®
Fecha
N.º telefónico diurno
Unidad
Código postal
CARGOS POR ENVÍO Y MANEJO
Si el pedido incluye tubos de extensión,
barras o pivotes, añada $8.00.
Para todos los demás pedidos, añada $5.00.
Cantidad del pedido
Envío y manejo
Total
$
$
$
29
MODE DE PAIEMENT
G2200/G2201
Angle Mount Safeway Select
®
G2200/G2201
Angle Mount Safeway Select
®
USER GUIDE
G2200/G2201
Angle Mount Safeway Select
C-F Vis/cuvette à vis - jeu de 4
G Partie inférieure de la poignée
H Partie inférieure de la charnière
I Partie supérieure de la poignée
J Partie supérieure de la charnière
L Charnière supérieure
M Charnière inférieure
N Butée
O Verrou inférieur
P Clip d’arrêt
Q Loquet supérieur
R Verrou supérieur
S Capuchon de verrouillage
T Capuchon de charnière
U Ressort
MODE DE PAIEMENT
®
Prière de ne pas envoyer de paiement en espèces
Precio G2200 G2201
$1.00
$3.00
$3.00
$3.00
$3.00
$1.00
$1.00
$1.00
$1.00
$1.00
$1.00
$1.00
$1.00
$1.00
$1.00
Chèque ou mandat ci-joint (à l’ordre de : KidCo, Inc).
VISA (13 ou 16 chiffres) Mastercard (16 chiffres)
Mo. An.
Numéro de carte de crédit Date d’expiration (obligatoire)
4
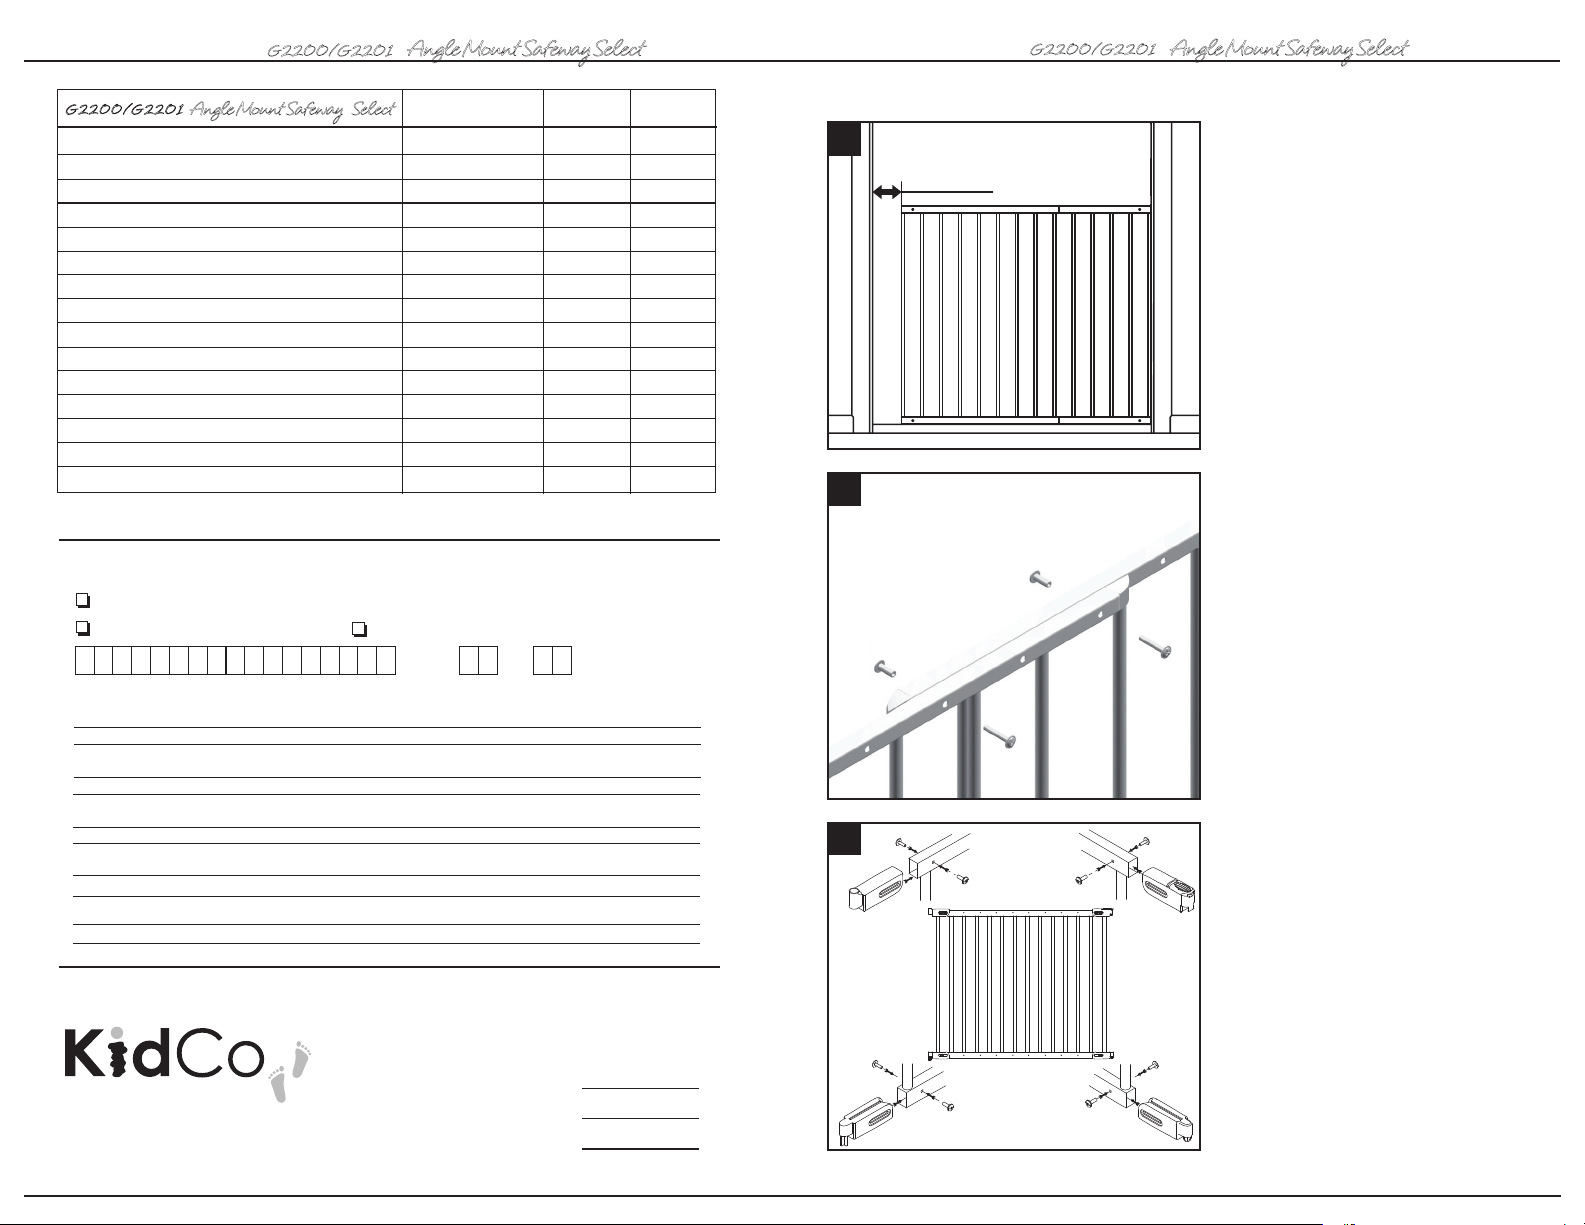
4 Finding appropriate width of gate
With the two sections aligned against each
2”-43/4”
other, place gate against one side of
opening where it is to be installed. The
distance between the opposite side of gate
and wall/doorframe must be between
2” – 4 ¾”.
5
5 Place screws (C) and screw sockets (D)
in top and bottom sets of overlapping
adjustment holes nearest the hinge and
D
locking sides of gate. Do not fully
tighten yet.
D
C
Signature du titulaire de la carte Date
Indiquer le nom du titulaire en toutes lettres
Nom Numéro de téléphone (jour)
Adresse No d’appart.
Ville Province Code postal
FRAIS DE PORT ET MANUTENTION
Si la commande inclut des tubes d’extension,
®
1013 Technology Way
Libertyville, IL 60048-5349
28
des barres ou des axes, ajouter 8 $US.
Toutes les autres commandes, ajouter 5 $US.
Montant de la commande
Port et manutention
Total
C
F
6
J
E
E
F
6 Place handle and hinge parts (G), (H),
(I) and (J) onto the gate. Insert the screws
I
(E) and the screw sockets (F) into all four
parts according to picture. Do not fully
tighten yet.
$
$
$
U.S.
U.S.
U.S.
F
E
H
E
F
G
5
 Loading...