

Kidco G2101 User Manual [en, es, fr]
USER GUIDE
GUIDE D'UTILISATION
GUÍA DEL USUARIO
Extension Placement Guide
G4200 Extension Kit for Angle Mount Safeway Model G2100
G4201 Extension Kit for Angle Mount Safeway Model G2101
Note: Each kit contains one extension
Width Opening Extensions What You Need Placement
28”-42 ½” Basic Gate No extensions
42”-52 ½” 1-G4200/4201 Gate + 1 extension -1 on one end
52”-63” 2-G4200/4201 Gate + 2 extensions -1 on each end
Guide de positionnement des rallonges
Ensemble de rallonges G4200 pour la barrière Angle Mount Safeway modèle G2100
Ensemble de rallonges G4201 pour la barrière Angle Mount Safeway modèle G2101
Remarque : Chaque ensemble contient une rallonge
Largeur d’ouverture Rallonges Matériel requis Positionnement
71 à 108 cm barrière de base Sans rallonges
107 à 133 cm 1-G4200/4201 Barrière + 1 rallonge -1 à une extrémité
132 à 160 cm 2-G4200/4201 Barrière + 2 rallonges -1 à chaque extrémité
Guía de colocación de las extensiones
Juego de extensión G4200 para la reja Angle Mount Safeway modelo G2100
Juego de extensión G4201 para la reja Angle Mount Safeway modelo G2101
Nota: cada juego contiene un extensión
Ancho de la abertura Extensiones Lo que usted necesita Colocación
28”-42 ½” Reja básica Sin extensiones
42”-52 ½” 1-G4200/4201 Reja + 1 extensión -1 en un extremo
52”-63” 2-G4200/4201 Reja + 2 extensiones -1 en cada extremo
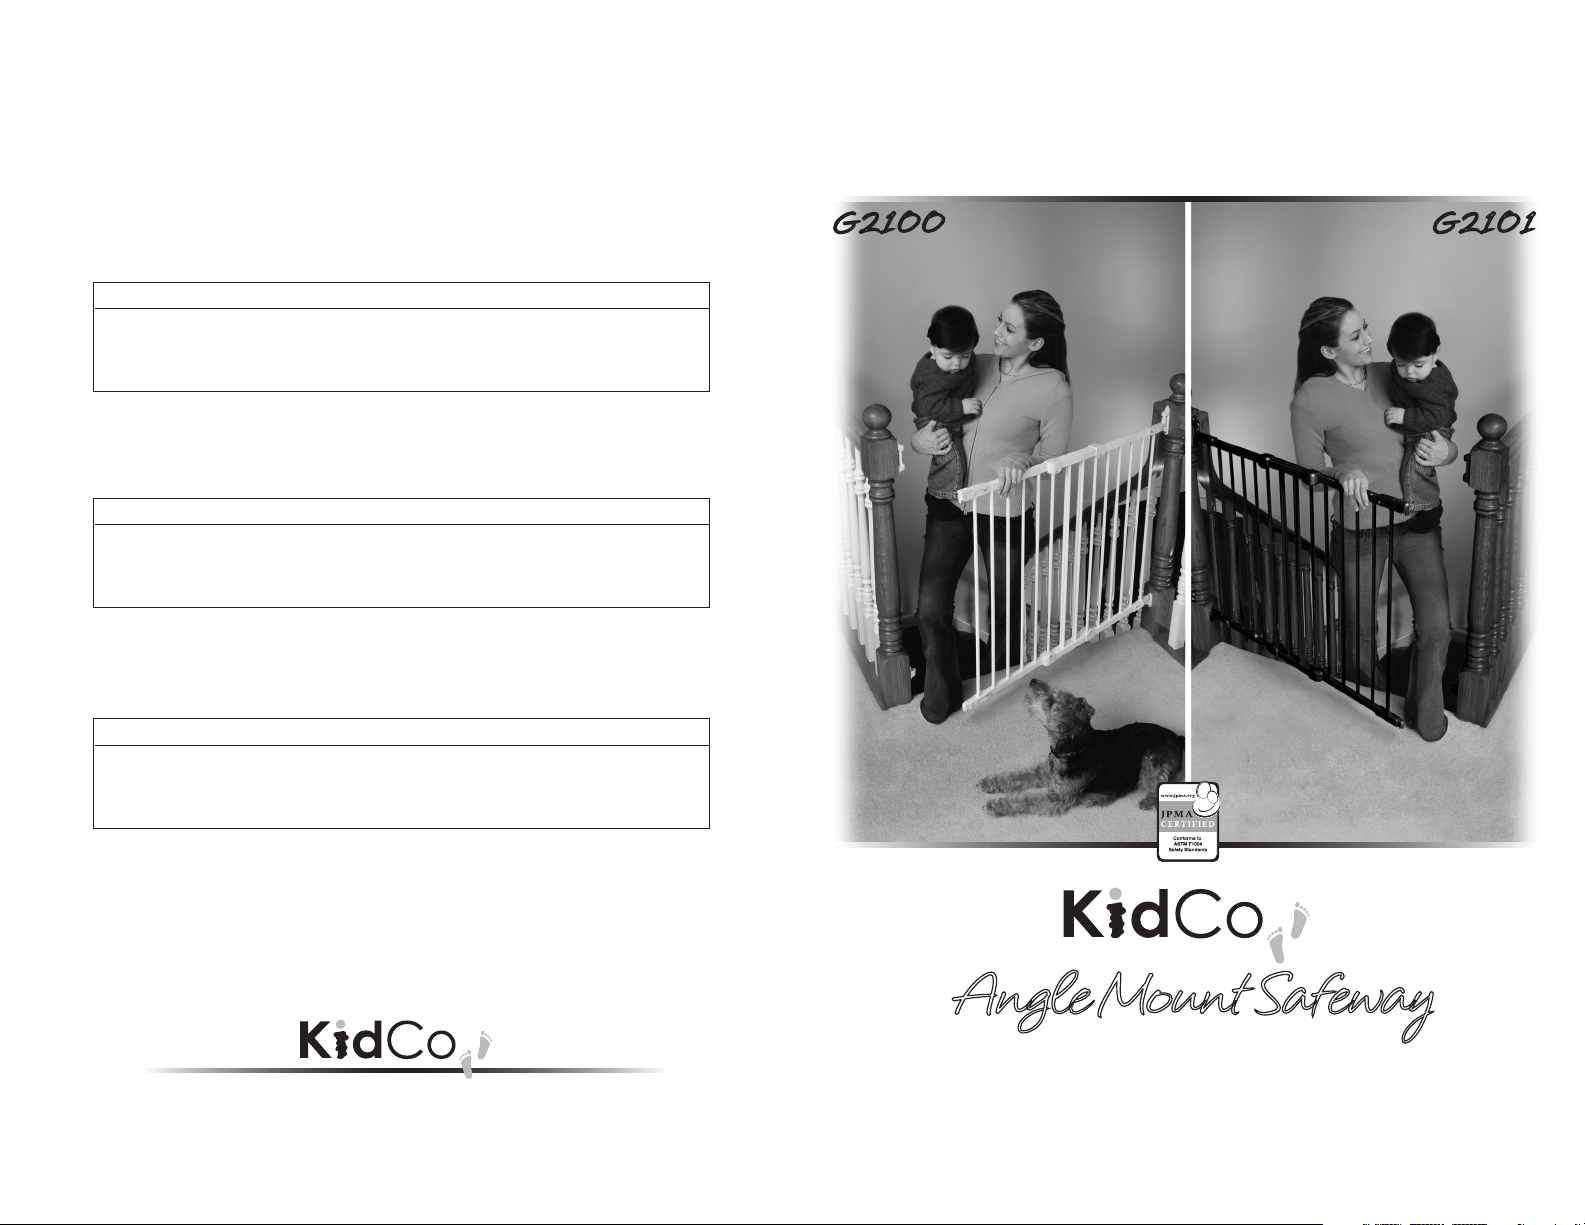
G2100
G2101
®
1013 Technology Way, Libertyville, IL 60048
800.553.5529
www.kidco.com
®
Angle
HARDWARE MOUNT INSTALLATION
M
ount Safeway
Fits openings 28” – 42.5”
Pour les embrasures de 71 à 108 cm
Para aberturas de 28” – 42.5”
®
USER GUIDE
G2100/G2101
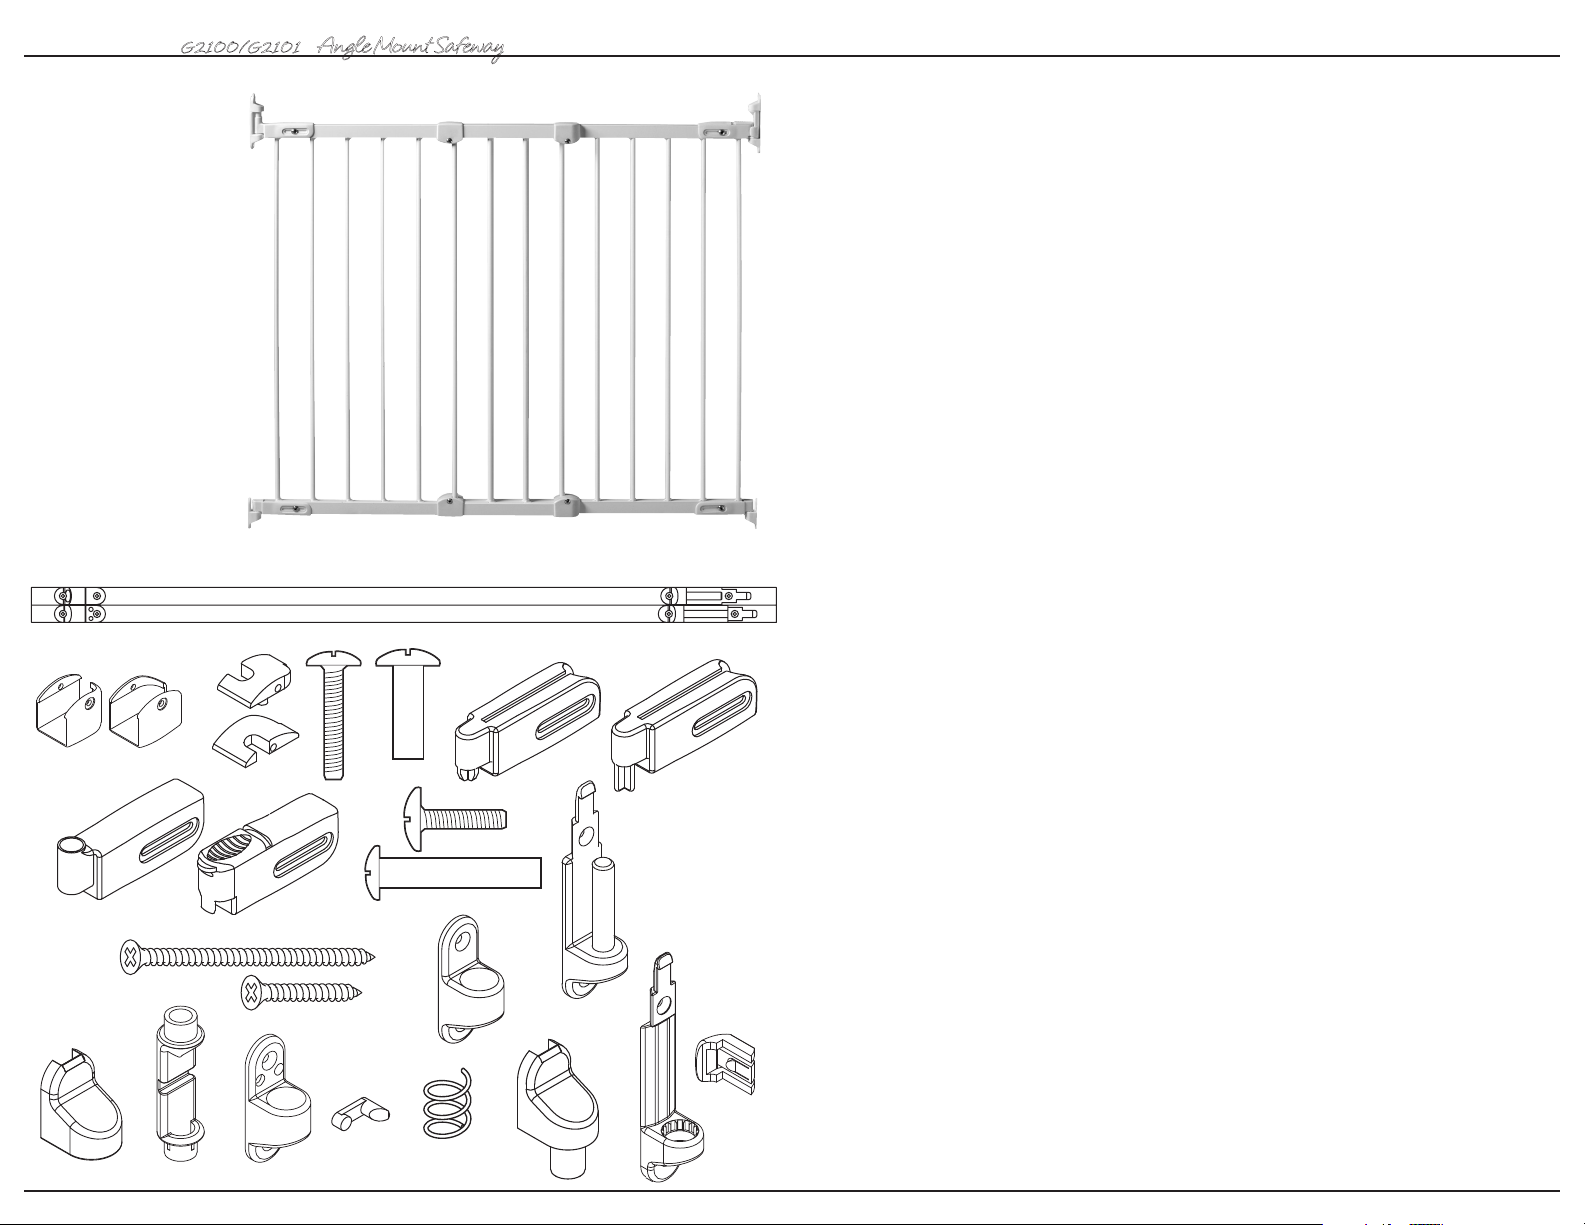
Parts list
A Hinge side template
B Locking side template
C Gate
D Assembly part (housing)
E Assembly part (cover)
F-G Screw/socket
H Lower handle part
I Lower hinge part
J Upper hinge part
K Upper handle part
L-M Screw/socket
N Upper hinge bracket
O Wood screws
P Lower hinge bracket
Q Locking cap
R Upper latch
S Lower locking bracket
T Stop pin
U Spring
V Hinge cap
W Upper locking bracket
Y Stop clip
Angle Mount Safeway
®
C
A
2
D1 D2
J
Q
E1
E2
K
O
R S
B
F
G
L
H
N
I
M
P
T
U
V
W
Y
WARRANTY • GARANTIE • GARANTÍA
G2100/G2101
Angle Mount Safeway
®
USER GUIDE
KidCo® Limited Warranty
Your KidCo product is warranted to be free from manufacturing defects for a period of one year from date of purchase under normal non
commercial use and in compliance with the operating instructions. This warranty extends only to the original retail purchaser and is only valid
when supplied with proof of purchase. KidCo will either repair, or at our option replace, free of charge, any parts necessary to correct defects in
material or workmanship during the warranty period. This warranty is complete and exclusive. The warranty expressly disclaims liability for
incidental, special and consequential damages of any nature. Any implied warranty arising by operation of law shall be limited in operation to the
terms of this warranty. Some states do not allow the exclusion or limitation of incidental or consequential damages or limitations on how long an
implied warranty lasts, so the above may not apply to you. This warranty gives you specific legal rights, and you may have other rights which vary
from state to state.
Should Repair Or Parts Be Necessary
Should a repair be needed during the warranty period, ship the gate in the original carton or similar protective container (check any retail store or
purchase from UPS) and send freight prepaid (we suggest UPS) to: KidCo Inc., 1013 Technology Way, Libertyville, IL 60048-5349. Include a
note with your return address, day-time telephone number, and specify what is wrong with the product. Repairs can normally be made within 48
hours after receipt at KidCo. For additional information CALL our customer service department at (800) 553-5529.
Garantie Limitée KidCo
Votre produit KidCo est garantit contre tout défaut de fabrication pendant une période d’un an à partir de la date d’achat dans des conditions
normales d’utilisation non commerciale et conforme au mode d’emploi. Cette garantie est uniquement accordée à l’acheteur d’origine chez un
revendeur et elle est uniquement valable pour toute réclamation accompagnée d’un justificatif d’achat. KidCo réparera ou, à sa discrétion,
remplacera gratuitement toute pièce nécessaire pour corriger les vices de matériel ou de fabrication durant la période de garantie. Cette garantie
est complète et exclusive. Par cette garantie, KidCo rejette expressément toute responsabilité vis-à-vis de dommages accessoires, spéciaux et
indirects, quelle qu’en soit la nature. Toute garantie tacite par effet de la loi se limitera aux termes de cette garantie. Certaines provinces
n’autorisant pas l’exclusion ou la limitation de dommages accessoires ou indirects en rapport avec la durée d’une garantie tacite, il est possible
que ce qui précède ne vous concerne pas. Cette garantie vous accorde des droits légaux spécifiques et il est possible que vous ayez d’autres
droits, variables d’une province à l’autre.
Pour toute réparation ou pièce nécessaire
Si une réparation s’avère nécessaire durant la période de garantie, expédiez la barrière de sécurité dans son carton d’origine ou une boîte de
protection similaire (disponible auprès d’un revendeur ou vendue par UPS) et envoyez en fret payé d’avance (UPS suggéré) à: KidCo Inc.,
1013 Technology Way, Libertyville, IL 60048-5349. Incluez une note mentionnant vos adresse de retour et numéro de téléphone, et décrivez
la nature du problème. Les réparations sont normalement effectuées sous 48 heures après réception par KidCo. Pour plus
d’informations, REJOIGNEZ notre service clientèle au (800) 553-5529.
Garantía Limitada de KidCo
Se garantiza que su producto KidCo estará libre de defectos de fabricación por un período de un año a partir de la fecha de compra bajo
condiciones de uso normales y no comerciales y si se cumple con las instrucciones de operación. Esta garantía se extiende sólo al comprador
minorista original y sólo es válida cuando se proporciona con un comprobante de compra. KidCo gratuitamente reparará o reemplazará, a su
opción, cualquier pieza necesaria para corregir los defectos en los materiales o la mano de obra durante el período de la garantía. Esta garantía
es completa y exclusiva. La garantía expresamente renuncia a la responsabilidad por daños incidentales, especiales y resultantes de cualquier
naturaleza. Cualquier garantía implícita que surja del ministerio de la ley estará limitada en aplicación a los términos de esta garantía. Algunos
estados no permiten la exclusión ni la limitación de daños incidentales o resultantes ni las limitaciones en la duración de una garantía implícita,
de manera que lo antedicho puede no aplicar a usted. Esta garantía le confiere derechos legales específicos, y usted puede tener otros derechos
dependiendo del estado en donde resida.
Si se requiere reparación o piezas
Si se requiere la reparación de la reja durante el período de la garantía, empáquela en su caja original o en un recipiente protector similar (puede
conseguir uno en alguna tienda minorista o cómprelo en UPS) y envíela con porte prepagado (sugerimos UPS) a: KidCo Inc., 1013 Technology
Way, Libertyville, IL 60048-5349. Incluya una nota que contenga la dirección de devolución, un número telefónico de contacto durante el día y
especifique cuál es el problema con el producto. Normalmente las reparaciones se hacen en el transcurso de 48 horas después de que el
producto se recibe en KidCo. Si desea información adicional LLAME a nuestro Departamento de Servicio al Cliente al teléfono (800) 553-5529.
26
®
®
Important Information
FOLLOW THESE INSTRUCTIONS CAREFULLY AND KEEP THEM
FOR FUTURE REFERENCE
This gate is designed for children from 6 months to 24 months. Since each child’s skills develop at different
ages, these parameters should be monitored against your child’s own development.
When installed in as instructed, between two clean, structurally sound surfaces, this gate conforms to
applicable ASTM standards.
WARNING
Intended for use with children
•
from 6 months through 24 months
Check the stability of the gate
•
and tighten all hardware and
mountings regularly
To prevent serious injury or death,
•
securely install gate or enclosure
and use according to
manufacturer’s instructions
Install according to the
•
manufacturer’s instructions
Never use with a child able to
•
climb over or dislodge/open the
gate or enclosure
Never use if gate is less than
•
¾ of child’s height
Do not use if any part of the gate
•
is broken or missing
Maintenance
No part of the gate requires lubrication. Clean using warm, soapy water or a damp cloth. Do not use abrasive
cleaners or bleach. Once installed the gate should be checked periodically to ensure a safe and secure fit
and to maintain proper working order.
•
This product will not necessarily
prevent all accidents. Never leave
child unattended
•
Use only spare parts available
from KidCo
•
Never allow child to climb or
®
swing on gate
•
Use only with the locking/latching
mechanism securely engaged
•
Discontinue use if any part of
the gate is damaged
•
Never climb over the gate
•
Never hang or tie toys, etc,
to any part of the gate
3
USER GUIDE
Installation
G2100/G2101
Angle Mount Safeway
®
G2100/G2101
Angle Mount Safeway
®
GUÍA DEL USUARIO
1 Important: Gate must be installed in a
structurally sound opening. The gate must
be mounted to a rigid surface. Ensure
mounting surface (wall, door frame,
stairposts, etc.) is strong, rigid and has
an even surface.
2 If using gate on a stairway, it must be
placed either on top stair or on lowest stair
at the bottom.
1
16
16 Remoción temporal
La reja se puede quitar presionando la
lengüeta de cierre que se encuentra en la
parte superior de la bisagra superior a la
vez que se desliza hacia arriba la tapa de la
bisagra. Quite el resorte y levante la reja
separándola de las bisagras superior e
inferior. POR RAZONES DE SEGURIDAD,
VUELVA A COLOCAR EL RESORTE Y LA
TAPA DE LA BISAGRA EN EL POSTE DE
LA BISAGRA, ASEGÚRESE DE QUE LA
TAPA ESTÉ FIJA EN SU LUGAR.
17 Si la reja se encuentra en el exterior
2
17
montada en una pared (en lugar de estar en el
bastidor de una puerta), es muy importante que
el herraje de la pared quede al ras del borde.
Cuando la reja quede en su lugar asegúrese
de que:
a) La distancia entre la pared o el bastidor de
la puerta y la primera barra sea menos de 3"
de ambos lados.
b) La distancia entre el piso y la parte más baja
del bastidor de la reja sea de
3
/4" a 2 1/2".
3 When assembling the gate, it is
important that the sections fit without
any distance between rails or bars.
4
c) El resorte se coloque en la parte superior de
la bisagra en la reja. No debe quedar debajo.
3
d) El pivote de tope se coloque de manera que
la reja no se pueda abrir sobre las escaleras,
si es el caso.
e) El pestillo del asa se pueda mover
libremente (hacia atrás y hacia adelante) de
manera que quepa adecuadamente en la
ranura del soporte superior del mecanismo
de cierre.
f) Todos los tornillos se aprieten.
NOTA: LA REJA SIEMPRE DEBE ESTAR EN POSICIÓN CERRADA. SI LA REJA ESTÁ
ABIERTA Y SE APLICA EXCESIVA PRESIÓN (COMO AL PARARSE O COLUMPIARSE
SOBRE LA REJA) SE PUEDEN CAUSAR DAÑOS ESTRUCTURALES.
25
GUÍA DEL USUARIO
G2100/G2101
Angle Mount Safeway
®
G2100/G2101
Angle Mount Safeway
®
USER GUIDE
13 Centre la reja en la abertura. Afloje los
tornillos de las piezas (H), (I), (J) y (K) y
ajústelos de manera que descansen
firmemente en la bisagra y en los soportes
del lado del mecanismo de cierre. La
distancia entre la reja y la pared o el
bastidor de la puerta debe ser
de 1” - 3”.
14 Si la reja se instala en ángulo,
necesitará girar la pieza (R) para que el asa
de la reja descanse de manera segura
dentro del soporte superior del mecanismo
de cierre. Una vez que el asa de la reja
descanse seguramente en el interior del
soporte del mecanismo de cierre, deslice la
tapa de cierre (Q) en el soporte superior del
mecanismo de cierre (W).
IMPORTANTE: ASEGÚRESE DE QUE
LA TAPA DE CIERRE NO SE PUEDA
EMPUJAR HACIA ARRIBA Y QUE
ESTÉ FIJA EN SU LUGAR.
Asegúrese de apretar todos los tornillos
de la reja.
Operación
15 Para abrir la reja, con su pulgar hale
hacia atrás el mecanismo de cierre y
levante la reja hacia arriba y hacia afuera
del soporte.
Al cerrar la reja, asegúrese de que tanto la
parte superior como la inferior del lado del
cierre estén descansando de manera
segura en los soportes, y que el cierre
superior esté cerrado.
13
14
15
K
4
2”-43/4”
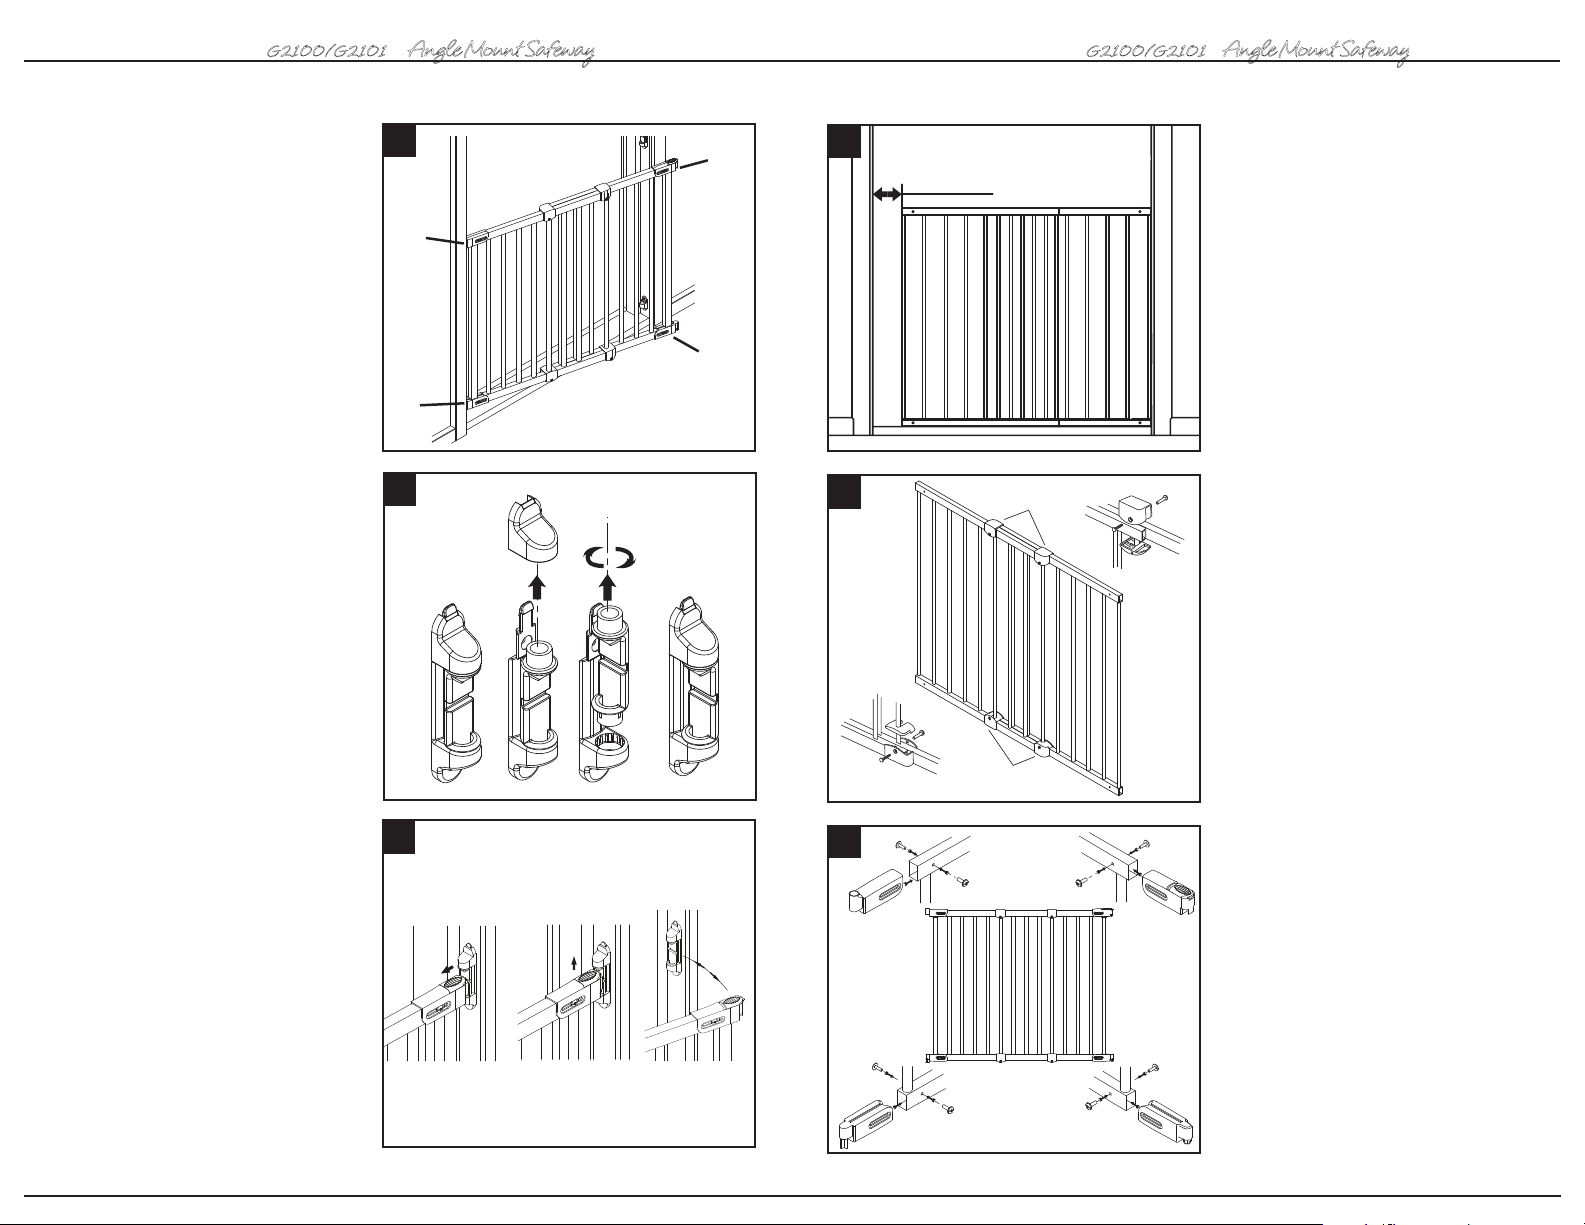
4 Finding appropriate width of gate
With the two sections aligned against each
other, place gate against one side of
opening where it is to be installed. The
J
distance between the opposite side of gate
and wall/doorframe must be between
2” – 4 ¾”.
H
I
5
Q
D1
+
E1
D1
F
M
E1
5 Once proper width is achieved, it is
ready to assemble. Place parts (D1) and
(E1) on top gate rail with (E1) fitting under
the top rail around the end vertical bar of
one gate panel and (D1) locking around
RW
(E1) above top rail. Line up screw holes
and insert one set of screws (F and M),
loosely securing. Repeat for second side of
top assembly. Next, place parts (D2)
E2
M
F
D2
D2+E2
locking around (E2) below bottom rail. Line
up screw holes and insert screws (F and M)
loosely securing. Repeat for second side of
bottom assembly. Once all four assemblies
are attached, tighten screws.
L
6
J
G
G
L
K
6 Place handle and hinge parts (H), (I),
(J) and (K) onto the gate. Insert the screws
(L) and the screw sockets (G) into all four
parts according to picture. Do not fully
tighten yet.
L
G
I
G
L
H
24
5
 Loading...