

Kidco BR200 User Manual [en, es, fr]
Children’s Bed Rail-Model BR200
Barre de lit d'enfant – Modèle BR200
Barandal para camas de niños – Modelo BR200
Bl. 3001-616b • BR200-0407
User Guide
Guide d’utilisation
Guía del Usuario
2
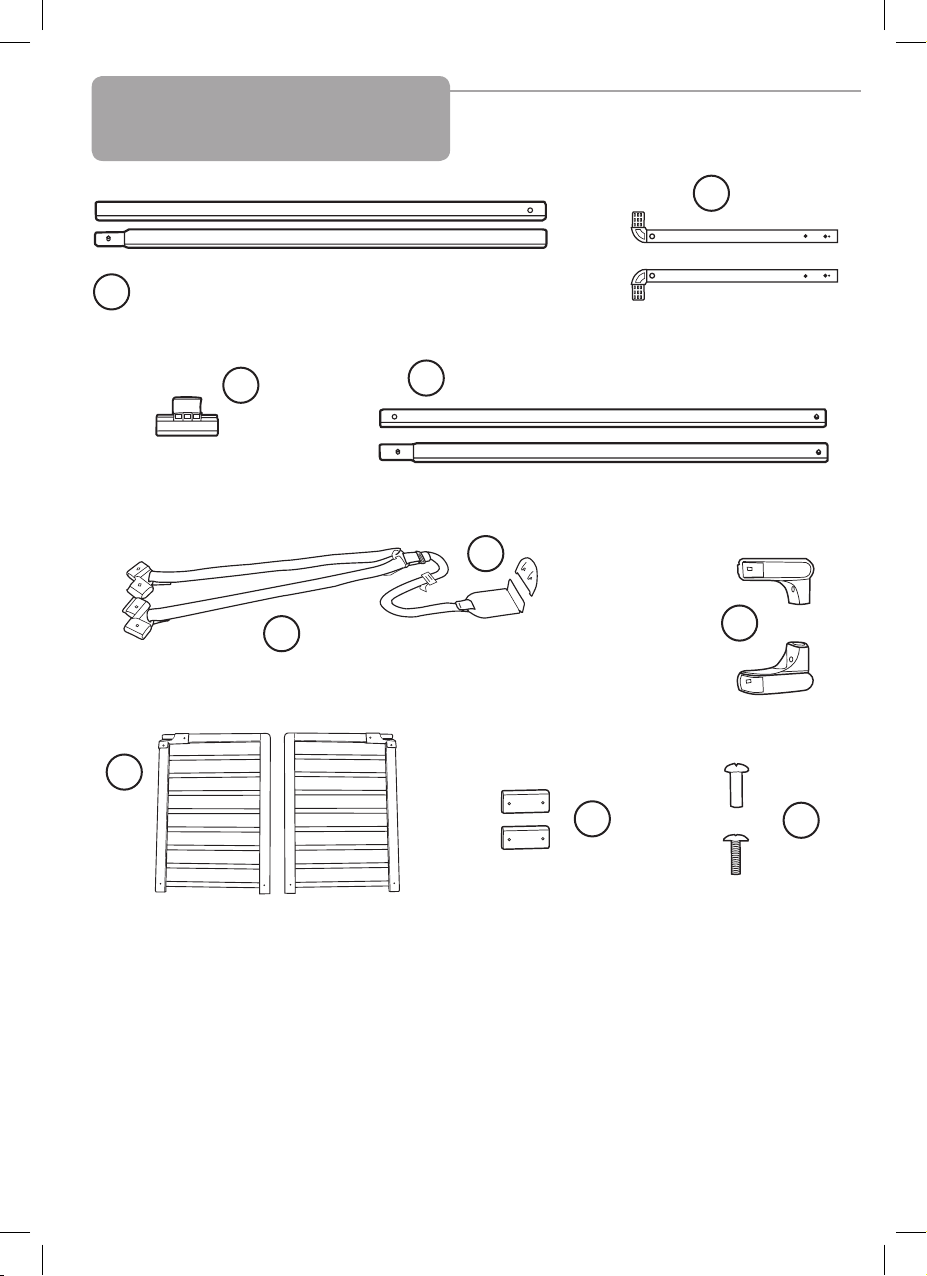
A – Back Bar A – Barre arrière A – Barra posterior
B – Side Bars (2) B – Barres latérales (2) B – Barras laterales (2)
C – Rail Brace C – Support de barre de lit C – Refuerzo del barandal
D – Front Bar D – Barre avant D – Barra frontal
E – Strap Set E – Jeu de sangles E – Juego de correas
F – Corner Brackets (2) F – Supports d'angle (2) F – Abrazaderas de esquina (2)
G – Extension G – Rallonge G – Extensión
H – Bed Rail H – Barre de lit H – Barandal para cuna
I – Connectors (2) I – Connecteurs (2) I – Conectores (2)
J – Screws/Screw Sockets (4) J – Vis/chevilles (4) J – Tornillos/Cubos para tornillo (4)
Parts List
Liste des pièces
Lista de piezas
A
C
G
F
D
B
E
H
I
J
x 4
x 4

FOLLOW THESE
INSTRUCTIONS
CAREFULLY AND
KEEP THEM FOR
FUTURE
REFERENCE
• Typically for children 2 years and up
• For use on platform beds and mattress/box
spring beds
• Use only original KidCo spare parts
• No part of the bed rail requires lubrication.
• Clean using warm soapy water, or a damp
cloth.
1. Assemble back bar (A) by pushing tapered end
of one piece into other piece until pin pops up
and ‘click’ is heard.
2. Insert side bars (B) with pins facing up, into
assembled back bar (A).
3. Slide rail brace (C) onto one end of front bar (D).
4.a Assemble front bar (D) by pushing tapered
end of one piece into other piece until pin pops
up and ‘click’ is heard.
4.b Slide rail brace over joint until pin pops up
and ‘click’ is heard.
5. Slide closed end of corner brackets on strap
set (E) onto ends of front bar (D). Keep sliding
until a click is heard.
6. Slide side bars (B) into empty corner bracket
Important Information
Maintenance
• Suffocation and Strangulation Hazard.
• Death or Serious Injury Can Occur.
• Infants who cannot get in and out of an
adult bed without help can be trapped
between a mattress and a wall and suffocate.
• NEVER place infants in adult beds with
or without a bed rail.
• BED RAIL USE: Bed rail can trap
young children against mattress, headboard or footboard.
• Use only for children who have out-
grown a crib.
• NEVER use in place of a crib.
• Use only with children who can get in
and out of adult bed without help (typically 2 years and up).
• ALWAYS keep bed rail pushed firmly
against mattress and at least 9 inches
from headboard and footboard.
• NEVER use on toddler bed, bunk bed,
water bed, or bed with inflatable mattress.
• Use only on adult bed with mattress
support as defined by the manufacturer.
• Discontinue use if any bed rail parts are
damaged or missing.
ENG
• Do not use abrasive cleaners or bleach.
of strap set (E) using second set of pins. Ends
of side bars (a) and one pin will be sticking out.
When laid out flat, V-strap and buckle are facing
back bar (A).
7. Slide corner brackets (F) onto ends of side
bars (B) until a click is heard. Finger tabs will be
parallel with front bar (D).
8. Slide extension (G) onto L-bracket of strap set,
until a click is heard.
9. Assemble two halves of bed rail (H) by
sliding one connector (I) on both top and bottom
sides of rail; slide in other half of bed rail. Using
screws and screw sockets (J) secure connectors
tightly to bed rail.
Assembly
WARNING
3

4
10. Take assembled bed rail frame and place on
top of bare mattress so that corner brackets (F)
are facing down. Stretch straps across mattress
so that L-bracket is on opposite mattress edge.
11. Place L-bracket facing down on edge of
mattress and adjust strap length to mattress
width. Pull strap tight (strap will need to be
twisted). The entire unit should fit snugly against
mattress. Lift off bed rail frame and remove
mattress from bed.
NOTE-Platform Beds: Slats or solid board will
now be exposed.
NOTE-Standard Beds: Leave box spring in bed
frame.
12.1-Standard Beds: (a) Place upright bed rail
frame on top of box spring with corner brackets
facing up and L-bracket facing down (strap will
be flat). (b) Lower mattress on top of bed rail
frame. Corner brackets should be exposed and
tight against mattress. L-bracket should be facing down towards floor and tight against box
spring. Tighten strap if needed.
12.2-Platform Beds: (a) Place upright bed
rail frame on top of board or slats (if on slats
L-bracket must be aligned directly on top of one
slat) with corner brackets and L-bracket facing
up (strap will be twisted). (b) Lower mattress
on top of bed rail frame. Corner brackets and
L-bracket should be exposed and tight against
mattress but inside bed frame.
13. Slide ends of bed rail (H) into corner
brackets until a click is heard.
14. Complete bed rail is now installed.
15. To remove, simply press bed rail finger tabs
in and lift rail out of corner brackets. Bed rail
frame stays in place for future use.
Installation
Your KidCo product is warranted to be free from manufacturing defects for a period of one (1) year
from date of purchase under normal, non-commercial use and in compliance with the operating
instructions. This warranty extends only to the original retail purchaser and is only valid when
supplied with proof of purchase. KidCo will either repair, or at our option replace, free of charge, any
parts necessary to correct defects in material or workmanship during the warranty period. This warranty is complete and exclusive. The warranty expressly disclaims liability for incidental, special and
consequential damages of any nature. Any implied warranty arising by operation of law shall be limited in operation to the terms of this warranty. Some states do not allow the exclusion or limitation
of incidental or consequential damages or limitations on how long an implied warranty lasts, so the
above may not apply to you. This warranty gives you specific legal rights, and you may have other
rights which vary from state to state.
Should a repair be needed during the warranty period, ship the bed rail in the original carton or
similar protective container (check any retail store or purchase from UPS) and send freight prepaid
to: KidCo, Inc. 1013 Technology Way, Libertyville, IL 60048. Include a note with your return address,
day-time telephone number and specify what is wrong with the product. Repairs can normally be
made within 48 hours after receipt at KidCo. The KidCo repair department reserves the right to
make the final determination as to whether the returned item is covered under the limited warranty.
For additional information call our customer service department at (800) 553-5529.
Warranty

Informations importantes
Entretien
AVERTISSEMENT
LIRE ATTENTIVEMENT CES
INSTRUCTIONS ET
LES CONSERVER
POUR POUVOIR
S’Y RÉFÉRER
ULTÉRIEUREMENT.
• Tranche d'âge : 2 ans et plus
• S'utilise sur des lits à plate-forme et à
sommier/matelas
• Utiliser uniquement les pièces détachées
KidCo d'origine
• Risque de suffocation et de strangula-
tion.
• Risque de mort ou de blessure grave.
• Les nourrissons qui ne peuvent pas
monter dans un lit d'adulte ou en sortir
sans l'aide d'un adulte risquent d'être
coincés entre le matelas et le mur et de
mourir par suffocation.
• NE JAMAIS placer le nourrisson dans un
lit d'adulte avec ou sans barre de lit.
• MODE D'EMPLOI : La barre de lit peut
coincer de jeunes enfants contre le
matelas, la tête de lit ou le pied de lit.
• L'utiliser uniquement avec des enfants
qui ne dorment plus dans un lit de bébé.
• NE JAMAIS l'utiliser à la place d'un lit de
bébé.
• Utiliser uniquement avec des enfants qui
peuvent monter tout seul dans un lit
d'adulte ou en sortir (2 ans et plus,
généralement).
• TOUJOURS maintenir la barre de lit fermement plaquée contre le matelas et à
au moins 23 cm de la tête de lit et du
pied de lit.
• NE JAMAIS l'utiliser sur un lit pour bébé
marcheur, un lit superposé, un lit d'eau
ou un lit à matelas gonflable.
• Utiliser uniquement sur un lit d'adulte
avec un support de matelas, comme
indiqué par le fabricant.
• Cesser d'utiliser si des pièces de barre
de lit sont absentes ou endommagées.
• Aucune pièce de la barre de lit ne requiert de
lubrification.
• Nettoyer avec de l’eau chaude et du savon ou
avec un chiffon humide.
1. Assembler la barre arrière (A) en poussant
l'extrémité conique d'une section dans l'autre,
jusqu'à ce que la goupille remonte et qu'un déclic
confirme son bon enclenchement.
2. Insérer les barres latérales (B) avec les goupilles
vers le haut, dans la barre arrière assemblée (A).
3. Glisser le support de barre de lit (C) sur une
extrémité de la barre avant (D).
4.a Assembler la barre avant (D) en poussant
l'extrémité conique d'une section dans l'autre,
jusqu'à ce que la goupille remonte et qu'un déclic
confirme son bon enclenchement.
• Ne pas utiliser de nettoyants abrasifs ni
d’agents de blanchiment.
4.b Glisser le support de barre de lit sur le joint
jusqu'à ce que la goupille remonte et qu'un déclic
confirme son bon enclenchement.
5. Glisser l'extrémité fermée des supports d'angle
sur le jeu de sangles (E) et jusqu'aux extrémités
de la barre avant (D). Continuer à glisser, jusqu'au
déclic.
6. Glisser les barres latérales (B) dans le support
d'angle vide du jeu de sangles (E) à l'aide du
second jeu de goupilles. Les extrémités des
barres latérales (A) et une goupille dépasseront.
Posées à plat, la sangle en V et la boucle sont
tournées vers la barre arrière (A).
FRE
Assemblage
5
 Loading...