

Page 1
KM
Coaxial Speakers
KICKER MARINE SPEAKERS
KM4
KM65
KM8
Owner’s Manual | English
Manual del Propietario | Español
ALTAVOZ COAX KM
Benutzerhandbuch | Deutsch
KM KOAX-SYSTEM
Manuel d’utilisation | Français
HAUT-PARLEURS COAXIAUX KM
2014 KM Coax Rev d.indd 12014 KM Coax Rev d.indd 1 11/22/2013 11:44:25 AM11/22/2013 11:44:25 AM
Page 2
KM Coaxial Speakers
Owner’s Manual
Authorized KICKER Dealer:
Purchase Date:
Speaker Model Number:
The KICKER KM coaxial speakers are specifi cally designed for mounting in free-air applications. The
speakers do not require a sealed enclosure for optimum performance. It is important to isolate the sound
coming off the front of the driver from the sound radiating from the back of the driver. This isolation is
usually accomplished by using the driver in a factory speaker location, or in a location with a semi-isolated
rear chamber.
SPECIFICATIONS
Model: KM4 KM65 KM8
Woofer [in, mm] 4, 100 6-1/2, 160 8, 200
Tweeter [in,mm] 1/2, 13 3/4, 20 1, 25
Rated Impedance [Ω] 2, 4 2, 4 4
Peak Power Handling [ Watts] 150 195 300
Continuous Power Handling [Watts RMS] 50 65 150
Sensitivity [1W, 1m] 89 90 92
Frequency Response [Hz] 60-20k 35-21k 30-21k
Mounting Hole Diameter [in, mm] 3-13/16, 97 5-1/8, 130 6-11/16, 170
Mounting Depth [in, mm] 1-7/8, 48 2-7/8, 72 3-1/4, 82
Grilles Yes Yes Yes
Tweeter Magnet Material Neodymium Neodymium Neodymium
Tweeter Dome Material PEI (polyether imide) Titanium Titanium
Tweeter Design Balanced Dome Dome Dome
Woofer Cone Material Polypropylene Polypropylene Polypropylene
Woofer Surround Material Santoprene Santoprene Santoprene
LOCATION
The sound produced by the KM coaxials is directional. Find the best location for stereophonic sound. If
necessary, add more KM coaxial speakers to the system to help distribute and balance the sound-stage.
After determining the best mounting locations, carefully check the areas where the mounting hardware will
be placed.
Pro Tip: You are one KXM Amplifi er and a few cables away from a complete, high-quality system with
rock-solid bottom end as only available from KICKER! Please ask your dealer about KICKER KXM amplifi er
upgrades.
2
2014 KM Coax Rev d.indd 22014 KM Coax Rev d.indd 2 11/22/2013 11:44:33 AM11/22/2013 11:44:33 AM
Page 3
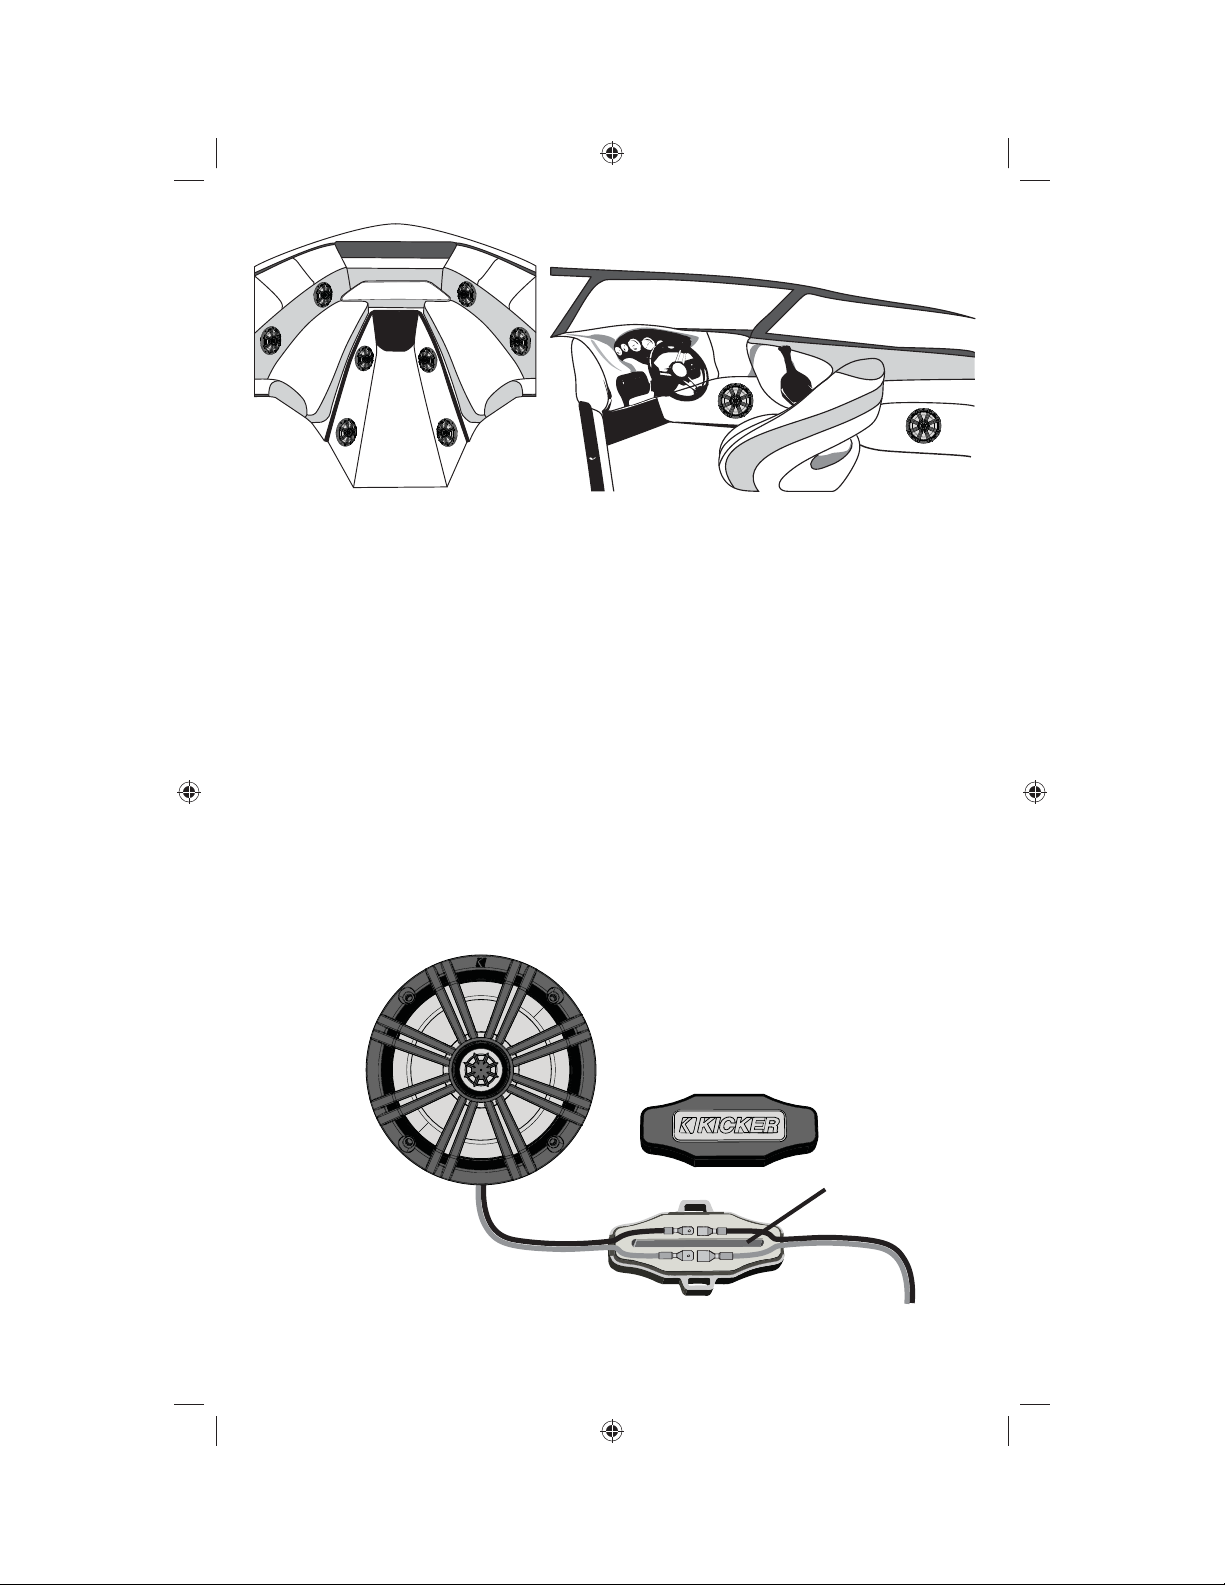
Possible locations for KM
Coaxial Speaker Mounting
Mounted
Mid-Ship
Mounted in the Bow
Stern
Mounted
INSTALLATION
Mounting: Make sure the stainless steel mounting screws and U-type speed clips will not puncture the
fuel cell, wiring, or interfere with any mechanical parts on the underside of the mounting surface. Pre-drill
the mounting screw holes using a 7/64” (2.5mm) bit, and attach the KM coaxial speakers to the boat
by fastening the supplied stainless steel coarse-threaded screws to the boat’s structure. If applicable,
use the enclosed stainless steel U-type speed clips. If the supplied hardware is not applicable to your
installation, some other means of securely attaching the speakers to the boat must be used.
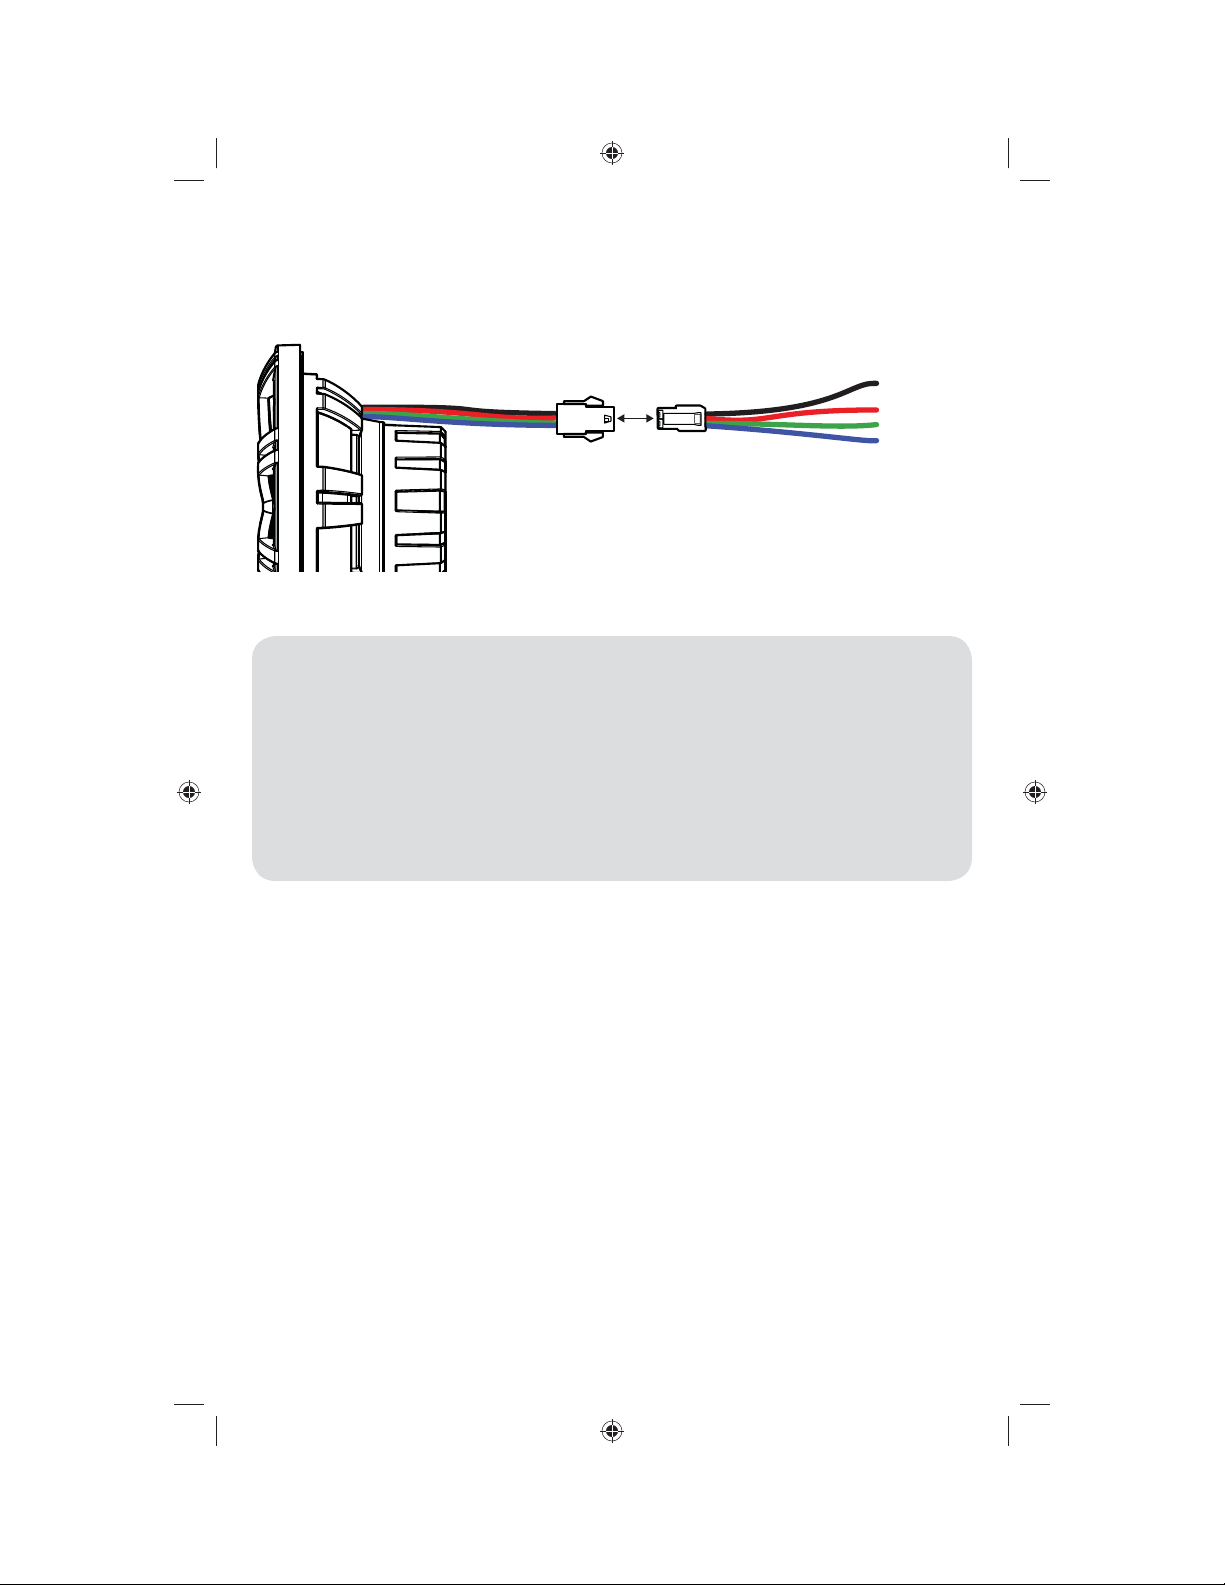
Wiring: Carefully place the speaker wire in a location that is clear of standing water and moving
components of the boat. For reference, the Blue wire is Positive and the Grey wire is Negative. The
locking terminal cover with water resistant gasket is removable for wiring installation; it helps prevent
terminal corrosion and electrical shorting. Connect the gold-plated male quick-disconnect on the end of
the 18 inch (46cm) speaker wire leads coming out of the sealed speaker basket to the wires from your
amplifi er or source unit. Place the connected wires into the locking terminal, making sure the divider
separates the blue and silver wire quick disconnects, and snap the locking terminal cover into place.
Connect the other end of the wire to your amplifi er in accordance with its owner’s manual. Mount the
locking terminal cover in a location free and clear of standing water by utilizing the supplied zip ties
through the integrated loops in the locking terminal cover.
Locking Terminal Cover
Wire Divider
Mount the speaker and
grille right side-up to take
advantage of the coaxial
system’s integrated
moisture draining system.
Loops for mounting with Zip Ties
3
2014 KM Coax Rev d.indd 32014 KM Coax Rev d.indd 3 11/22/2013 11:44:33 AM11/22/2013 11:44:33 AM
Page 4
LED Wiring (KM654LCW/KM84LCW only): When hard-wiring the RGB lighting, the black lead is +12V
and the red, green, and blue leads are ground. There are seven colors available, depending on your
wiring confi guration. KICKER recommends using the KMLC lighting controller (sold separately) for more
colors, patterns, and special effects.
+12V
Ground
}
Color Combinations: Splice and combine the ground wires to yield a different color.
Red Red
Green Green
Blue Blue
Red/Green Lime Green
Red/Blue Magenta
Blue/Green Aquamarine
Red/Green/Blue Blue-White
Please E-mail support@kicker.com or call Technical Services at (405) 624-8583 for specifi c or
unanswered questions.
Note: KICKER Marine speakers meet or exceed industry standards for environmental humidity and corrosion, and for
material degradation due to UV exposure. All specifi cations and performance fi gures are subject to change. Please visit
www.kicker.com for the most current information.
4
2014 KM Coax Rev d.indd 42014 KM Coax Rev d.indd 4 11/22/2013 11:44:36 AM11/22/2013 11:44:36 AM
Page 5
Manual del Propietario
Altavoces Coaxiales KM
Distribuidor Autorizado
KICKER:
Fecha de compra:
Número de modelo de
altavoz:
Los altavoces coaxiales KICKER KM están diseñados específi camente para su instalación en
aplicaciones al aire libre. Los altavoces no requieren de un gabinete sellado para un desempeño óptimo.
Es importante aislar el sonido que proviene del frente del conductor del sonido radiante de la parte
posterior del conductor. Este aislamiento se consigue normalmente usando el conductor en una posición
de altavoz de fábrica o en una posición con una cámara posterior semi-aislada.
ESPECIFICACIONES
Modelo: KM4 KM65 KM8
Altavoz de baja frecuencia [pulg., mm] 4, 100 6-1/2, 160 8, 200
Altavoz de alta frecuencia [pulg., mm.] 1/2, 13 3/4, 20 1, 25
Impedancia especifi cada [Ω] 2, 4 2, 4 4
Máximo manejo de potencia [Watts] 150 195 300
Manejo de potencia continua [Watts RMS] 50 65 150
Sensibilidad [1W, 1m] 89 90 92
Respuesta de frecuencia[Hz] 60-20k 35-21k 30-21k
Diámetro de orifi cio de instalación [pulg., mm] 3-13/16, 97 5-1/8, 130 6-11/16, 170
Profundidad de instalación [pulg., mm] 1-7/8, 48 2-7/8, 72 3-1/4, 82
Rejillas Si Si Si
Material de imán de altavoz de alta frecuencia Neodimio Neodimio Neodimio
Material de domo de altavoz de alta frecuencia PEI (poliéter imida) Titanio Titanio
Diseño de altavoz de alta frecuencia Domo balanceado Domo Domo
Material de cono de altavoz de baja frecuencia Polipropileno Polipropileno Polipropileno
Material envolvente de altavoz de baja frecuencia
Santoprene Santoprene Santoprene
UBICACIÓN
El sonido producido por los coaxiales KM es direccional. Encuentre la mejor posición para un sonido
estereofónico. Si fuera necesario, agregue al sistema más altavoces coaxiales KM para ayudar a distribuir
y a balancear el escenario de sonido. Después de determinar las mejores ubicaciones de instalación,
compruebe cuidadosamente las áreas en donde se colocarán los accesorios de instalación.
Consejo Profesional: ¡Usted está a la distancia de un Amplifi cador KXM y de unos cuantos cables de
un sistema de alta calidad con extremo inferior clásico como sólo es posible con KICKER! Pregunte a su
distribuidor acerca de las actualizaciones del amplifi cador KICKER KXM.
5
2014 KM Coax Rev d.indd 52014 KM Coax Rev d.indd 5 11/22/2013 11:44:36 AM11/22/2013 11:44:36 AM
Page 6

Posibles ubicaciones para
la Instalación del altavoz
coaxial KM
Instalación
al centro
de la nave
Instalación en la proa
Instalación en
popa
INSTALACIÓN
Instalación: Cerciórese que los tornillos de instalación de acero inoxidable y los clips en U no perforen
la unidad de combustible, el cableado o interfi eran con cualquier parte mecánica en el lado inferior de
la superfi cie de instalación. Haga un barreno piloto usando una broca de 7/64” (2,5 mm) y coloque
los altavoces coaxiales KM en el bote sujetando los tornillos de cuerda basta de acero inoxidable a la
estructura del bote. Si fuera aplicable, use los clips en U de acero inoxidable incluidos. Si los accesorios
incluidos no son aplicables para su instalación, debe usarse algún otro medio para sujetar los altavoces
al bote con seguridad.
Cableado: Coloque cuidadosamente el cable del altavoz en una ubicación libre de agua y de
componentes móviles del bote. Para referencia, el cable azul es positivo y el gris es negativo. La cubierta
asegurable de terminales con junta resistente al agua es desmontable para instalación del cableado;
ayuda a evitar la corrosión de los terminales y cortos eléctricos. Conecte el conector macho enchapado
en oro de desconexión rápida en el extremo de los terminales del cable del altavoz de 18 pulgadas (46
cm) que salen de la canastilla sellada del altavoz a los cables de su amplifi cador o unidad de origen.
Coloque los cables conectados en el terminal asegurable, cerciorándose de que el divisor separe los
conectores de desconexión rápida azul y plata, y encaje la cubierta de terminales asegurable en su lugar.
Conecte el otro extremo del cable grueso a su amplifi cador de acuerdo con su manual de usuario. Instale
la cubierta asegurable de terminales en una posición libre de agua utilizando los cintillos suministrados a
través de las pestañas integradas en la cubierta asegurable de terminales.
Cubierta asegurable de terminales
Divisor de
cables
Instale el altavoz y la rejilla
con el lado derecho hacia
arriba para aprovechar
el sistema de drenaje de
humedad integrado en el
sistema coaxial.
Pestañas para Instalación con Cintillos
6
2014 KM Coax Rev d.indd 62014 KM Coax Rev d.indd 6 11/22/2013 11:44:36 AM11/22/2013 11:44:36 AM
Page 7

Cableado de LED (KM654LCW/KM84LCW solamente): Al cablear la iluminación RGB, el terminal
negro es +12V y la roja, verde y azul son de tierra. Existen siete colores disponibles, dependiendo de su
confi guración de cableado. Para más colores, patrones y efectos especiales, KICKER recomienda el uso
de un controlador de alumbrado KMLC (vendido por separado).
+12V
Conexión
}
a tierra
Combinaciones de Color: Empalme y combine los cables a tierra para conseguir un color diferente.
Rojo Rojo
Verde Verde
Azul Azul
Rojo/Verde Verde Limón
Rojo/Azul Magenta
Azul/Verde Aguamarina
Rojo/Verde/Azul Azul-Blanco
Para preguntas específi cas o no contestadas, escriba a support@kicker.com o llame al
Servicio Técnico al (405) 624-8583.
Nota: Los altavoces marinos KICKER cumplen o exceden los estándares de la industria para la humedad ambiental y
corrosión y para la degradación de materiales debido a exposición a los rayos UV. Todas las especifi caciones y cifras de
desempeño están sujetas a cambio. Para la información más actual, visite www.kicker.com.
7
2014 KM Coax Rev d.indd 72014 KM Coax Rev d.indd 7 11/22/2013 11:44:39 AM11/22/2013 11:44:39 AM
Page 8

KM Koaxial-Lautsprecher
Bedienungsanleitung
KICKER-Vertragshändler:
Kaufdatum:
Lautsprecher-Modellnummer:
KICKER KM-Koaxial-Lautsprecher wurden speziell für den Einbau im Außenbereich entwickelt. Die
Lautsprecher benötigen kein abgedichtetes Gehäuse für eine optimale Leistung. Es ist wichtig, den
vorne aus dem Lautsprecher austretenden Schall vom Schall zu trennen, der von der Rückseite
des Lautsprechers kommt. Diese Schalldämmung wird meist durch die Verwendung der korrekten
Treibergröße und Einbau an einer isolierten hinteren Stelle erreicht.
SPEZIFIKATIONEN
Modell: KM4 KM65 KM8
Tieftöner [in, mm] 4, 100 6-1/2, 160 8, 200
Hochtöner [in, mm] 1/2, 13 3/4, 20 1, 25
Nennimpedanz [Ω] 2, 4 2, 4 4
Spitzenleistung [Watt] 150 195 300
Dauerbelastbarkeit [Watt RMS] 50 65 150
Empfi ndlichkeit [1 W, 1 m] 89 90 92
Frequenzgang [Hz] 60-20 k 35-21 k 30-21 k
Einbaudurchmesser [in, mm] 3-13/16, 97 5-1/8, 130 6-11/16, 170
Einbautiefe [in, mm] 1-7/8, 48 2-7/8, 72 3-1/4, 82
Schutzgitter Ja Ja Ja
Hochtöner-Magnetmaterial Neodym Neodym Neodym
Material des Kalottenhochtöners PEI (Polyetherimid) Titan Titan
Hochtönerkonstruktion Kalottenhochtöner mit
Balanced Drive
Tieftöner-Membran Polypropylen Polypropylen Polypropylen
Tieftöner-Sicken Santoprene Santoprene Santoprene
Kalottenhochtöner Kalottenhochtöner
POSITION
Der von den KM-Koaxen erzeugte Sound ist richtungsabhängig. Finden Sie die beste Position für einen
Stereo-Sound. Falls erwünscht können Sie dem System weitere KM-Koaxial-Lautsprecher hinzufügen,
um dem Raumklang zu optimieren. Nachdem Sie die beste Einbauposition gewählt haben, prüfen Sie
sorgfältig die Stellen, an denen die Montagehalterung angebracht werden soll.
Expertentipp: Sie sind nur einen KXM-Verstärker und ein paar Kabel davon entfernt, ein hochwertiges
Komplettsystem zu besitzen, wie es nur KICKER anbietet! Bitte informieren Sie sich bei Ihrem Händler
über das Nachrüsten von KICKER KXM-Verstärkern.
8
2014 KM Coax Rev d.indd 82014 KM Coax Rev d.indd 8 11/22/2013 11:44:39 AM11/22/2013 11:44:39 AM
Page 9

Mögliche Einbaupositionen für
KM-Koaxial-Lautsprecher
Mittige
Montage
Montage im Bug
Heckmontage
INSTALLATION
Montage: Vergewissern Sie sich, dass die Montageschrauben aus Edelstahl keine Treibstofftanks, Kabel oder
mechanischen Teile an der Unterseite der Einbauoberfl äche punktieren oder stören. Bohren Sie die Löcher mit
einem 2,5-mm-Bohraufsatz (7/64”) vor und befestigen Sie die KM-Koaxial-Lautsprecher mit den beiliegenden
Edelstahl-Grobgewindeschrauben am Boot. Wenn zutreffend, verwenden Sie die beiliegenden Edelstahl “U-TypeSpeed”-Klammern. Wenn die beiliegenden Befestigungselemente sich nicht für die von Ihnen gewünschte
Installation eignen, muss eine andere Methode zur sicheren Befestigung des Systems am Boot verwendet werden.
Verkabelung: Positionieren Sie die Verkabelung an einem Ort, der frei von stehendem Wasser und beweglichen
Bauteilen des Boots ist. Das blaue Kabel ist positiv und das silberne Kabel ist negativ. Die verschließbare
Klemmenabdeckung mit wasserbeständiger Dichtung kann für die Verkabelungsinstallation abgenommen werden.
Dies trägt zum Schutz der Klemmen vor Korrosion und Kurzschlüssen bei. Verbinden Sie den vergoldeten
männlichen Schnellsteckverbinder am Ende des 46 cm (18 Zoll) langen Lautsprecherkabels, das aus dem
versiegelten Lautsprecherkorb kommt, mit den Kabeln Ihres Verstärkers bzw. der Quelle. Positionieren Sie die
verbundenen Kabel in der verschließbaren Klemme, so dass die Unterteilung die Schnellsteckverbinder des
blauen und silbernen Kabels trennt und rasten Sie die Klemmenabdeckung ein. Schließen Sie das andere Ende
des starken Kabels an den Verstärker an. Nutzen Sie die Bedienungsanleitung des Verstärkers als Referenz.
Befestigen Sie die verschließbare Klemmenabdeckung an einem Ort, der frei von stehendem Wasser ist.
Benutzen Sie die beiliegenden Kabelbinder und führen Sie diese durch die integrierten Ösen der verschließbaren
Klemmenabdeckung.
Verschließbare Klemmenabdeckung
Kabelunterteilung
Befestigen Sie den
Lautsprecher und das
Gitter richtig herum,
um die vollständige
Leistung der integrierten
feuchtigkeitsentziehenden
Funktion des
Koaxialsystems
auszuschöpfen.
2014 KM Coax Rev d.indd 92014 KM Coax Rev d.indd 9 11/22/2013 11:44:39 AM11/22/2013 11:44:39 AM
Ösen für die Befestigung mit Kabelbindern
9
Page 10

LED-Verdrahtung (Ausschließlich bei KM654LCW/KM84LCW): Bei Verkablung der RGB-Beleuchtung
gilt: Der schwarze Draht ist +12V und die roten, grünen und blauen Drähte sind Erdungsdrähte. Je nach
Verdrahtungskonfi guration sind sieben Farben vorhanden. KICKER empfi ehlt die Verwendung der KMLCBeleuchtungssteuereinheit (separat erhältlich), um weitere Farben, Muster und Spezialeffekte zu erhalten.
+12V
Erdung
}
Farbkombinationen: Verbinden und kombinieren Sie die Masseleiter, um eine andere Farbe zu erhalten.
Rot Rot
Grün Grün
Blau Blau
Rot/Grün Lindgrün
Rot/Blau Magenta
Blau/Grün Aquamarin
Rot/Grün/Blau Blau-Weiß
Bei spezifi schen oder offenen Fragen senden Sie bitte eine E-mail an support@kicker.com
oder kontaktieren Sie den technischen Support telefonisch unter (405) 624-8583.
Hinweis: KICKER Marine-Lautsprecher entsprechen den bzw. übertreffen die Industriestandards für Luftfeuchtigkeit und
Korrosion sowie Materialzersetzung aufgrund von UV-Belastung. Änderungen an Spezifi kationen und Leistungswerten
vorbehalten. Bitte besuchen Sie unsere Website www.kicker.com, um aktuelle Informationen zu erhalten.
10
2014 KM Coax Rev d.indd 102014 KM Coax Rev d.indd 10 11/22/2013 11:44:41 AM11/22/2013 11:44:41 AM
Page 11

Haut-parleurs coaxiaux KM
Manuel de l'utilisateur
Revendeur KICKER agréé:
Date d'achat:
Numéro de modèle du haut-parleur:
Les haut-parleurs coaxiaux KICKER KM ont été spécialement conçus pour un montage en plein air.
Ces haut-parleurs ne nécessitent aucun caisson étanche pour assurer des performances optimales.
Il est important d'isoler le son provenant de l'avant du pilote du son rayonné, provenant de l'arrière.
Une telle isolation est habituellement effectuée en plaçant le pilote sonore dans un lieu spécial hautparleur ou à un endroit disposant d'une cavité arrière semi-isolée.
CARACTÉRISTIQUES
Modèle: KM4 KM65 KM8
Graves [po; mm] 4; 100 6-1/2; 160 8; 200
Aigus [po; mm] 1/2; 13 3/4; 20 1; 25
Impédance nominale [Ω] 2, 4 2, 4 4
Puissance maximale [ Watts] 150 195 300
Puissance continue [Watts RMS] 50 65 150
Sensibilité [1W, 1m] 89 90 92
Réponse en fréquence [Hz] 60 à 20k 35 à 21k 30 à 21k
Diamètre du trou de montage [po; mm] 3-13/16; 97 5-1/8; 130 6-11/16; 170
Profondeur du montage [po; mm] 1-7/8; 48 2-7/8; 72 3-1/4; 82
Grilles Oui Oui Oui
Matière magnétique du haut-parleur des aigus Néodyme Néodyme Néodyme
Matière du dôme du haut-parleur des aigus Polyéther-imide (PEI) Titane Titane
Forme du haut-parleur des aigus Dôme équilibré Dôme Dôme
Matière du cône du caisson de basses Polypropylène Polypropylène Polypropylène
Matière du caisson de basses Santoprène Santoprène Santoprène
LIEUX DE MONTAGE
Le son produit par les haut-parleurs coaxiaux KM est directionnel. Trouvez le meilleur endroit pour
reproduire un son stéréophonique. Si nécessaire, ajoutez des haut-parleurs coaxiaux supplémentaires
au système pour permettre de distribuer et d'équilibrer l'étage son. Une fois les meilleurs endroits de
montage déterminés, inspectez avec attention les zones où les pièces à monter seront installées.
Astuce de pro: il ne vous manque plus qu'un amplifi cateur KXM et quelques câbles pour obtenir un
système complet de haute qualité avec une base inébranlable comme seul en est capable KICKER!
Veuillez vous adresser à votre revendeur au sujet des mises à niveau des amplifi cateurs KICKER KXM.
11
2014 KM Coax Rev d.indd 112014 KM Coax Rev d.indd 11 11/22/2013 11:44:41 AM11/22/2013 11:44:41 AM
Page 12

Exemple d'endroits où monter un
haut-parleur coaxial KM
Montage
au centre
du bateau
Montage en proue
Montage en poupe
INSTALLATION
Montage: assurez-vous que les vis de montage en acier inox et les attaches rapides en U ne perforent
aucune pile à combustible ni câble, qu'elles n'interfèrent avec aucune pièce mécanique située sous la
surface de montage. Pré-forez les trous de montage des vis avec un foret de 2,5mm (7/64po) et fi xez
les haut-parleurs coaxiaux KM en serrant les vis en acier inox à large fi letage fournies dans la structure du
bateau. Si nécessaire, utilisez les attaches rapides en U, en acier inox, qui sont incluses. Si les pièces
fournies ne conviennent pas à votre installation, utilisez d’autres moyens de fi xation sûre des haut-parleurs
sur le bateau.
Câblage: placez avec précaution le fi l du haut-parleur à un endroit éloigné de toute eau stagnante et
des parties en mouvement du bateau. À titre de référence, le fi l bleu est positif et le fi l gris, négatif. Le
couvercle de raccord du bornier à joint étanche est amovible pour l'installation des câbles: il permet
d'éviter la corrosion de la borne et les courts-circuits. Connectez la fi che mâle à déconnexion rapide
plaquée or, située au bout câblel de 46 cm (18 pouces) sortant du panier scellé du haut-parleur, aux fi ls
de votre amplifi cateur ou de votre unité audio. Placez les fi ls de raccordement dans le bornier, séparez
bien les fi ls bleu et argent, puis clipsez le couvercle du bornier en position. Connectez l'autre extrémité
du fi l électrique à votre amplifi cateur en suivant le manuel de l'utilisateur. Fixez le couvercle du raccord de
bornes à un endroit libre et éloigné de toute eau stagnante en faisant passer les liens de serrage fournis à
travers les boucles intégrées au couvercle de raccord du bornier.
Couvercle de raccord du bornier
Séparateur de fi ls
Montez le haut-parleur et
la grille face droite vers
le haut pour bénéfi cier du
système d'évacuation de
l'humidité intégré au hautparleur coaxial.
Boucles pour montage avec liens de serrage
12
2014 KM Coax Rev d.indd 122014 KM Coax Rev d.indd 12 11/22/2013 11:44:42 AM11/22/2013 11:44:42 AM
Page 13

e
Câblage LED (KM654LCW/KM84LCW uniquement): en cas de câblage d'éclairage RGB, le fi l noir est
à +12V et les fi ls rouge, vert et bleu sont reliés à la masse. Il existe sept couleurs disponibles, selon votre
confi guration de câblage. KICKER vous recommande d'utiliser la commande d'éclairage KMLC (vendue
séparément) pour davantage de couleurs, de motifs et d'effets spéciaux.
+12V
Prise
}
de terre
Combinaisons de couleurs: raccorder et combiner les fi ls de prise de terre pour obtenir
une couleur différente.
Rouge Rouge
Vert Vert
Bleu Bleu
Rouge/Vert Vert citron
Rouge/Bleu Magenta
Bleu/Vert Aigue marine
Rouge/Vert/Bleu Bleu-blanc
Veuillez adresser un e-mail à support@kicker.com ou appeler notre assistance technique au
+14056248583 pour toutes vos questions.
Remarque: les haut-parleurs Marine de KICKER suivent ou dépassent les normes de l'industrie en termes de
protection contre l'humidité et la corrosion ainsi que la dégradation des matériaux par exposition aux UV. Tous les chiffres
relatifs aux spécifi cations et aux performances sont susceptibles de changer. Veuillez visiter le site www.kicker.com
pour obtenir les informations les plus récentes.
13
2014 KM Coax Rev d.indd 132014 KM Coax Rev d.indd 13 11/22/2013 11:44:44 AM11/22/2013 11:44:44 AM
Page 14

ACOUSTICS LIMITED WARRANTY
When purchased from an Authorized KICKER Dealer, KICKER warrants this product to be free from defects in material and
workmanship under normal use for a period of ONE (1) YEAR from date of original purchase with receipt. If this product is
identifi ed as “Refurbished” or “B Goods”, the warranty is limited to a period of THREE (3) MONTHS from the date of original
purchase. In all cases you must have the original receipt. Should service be necessary under this warranty for any reason due
to manufacturing defect or malfunction during the warranty period, KICKER will repair or replace (at its discretion) the defective
merchandise with equivalent merchandise. Warranty replacements may have cosmetic scratches and blemishes. Discontinued
products may be replaced with more current equivalent products. This warranty is valid only for the original purchaser and is
not extended to owners of the product subsequent to the original purchaser. Any applicable implied warranties are limited in
duration to a period of the express warranty as provided herein beginning with the date of the original purchase at retail, and
no warranties, whether express or implied, shall apply to this product thereafter. Some states do not allow limitations on implied
warranties; therefore, these exclusions may not apply to you. This warranty gives you specifi c legal rights; however you may
have other rights that vary from state to state.
WHAT TO DO IF YOU NEED WARRANTY OR SERVICE
Defective merchandise should be returned to your local Authorized Stillwater Designs (KICKER) Dealer for warranty service.
Assistance in locating an Authorized Dealer can be found at www.kicker.com or by contacting Stillwater Designs directly. You
can confi rm that a dealer is authorized by asking to see a current authorized dealer window decal.
If it becomes necessary for you to return defective merchandise directly to Stillwater Designs (KICKER), call the KICKER
Customer Service Department at (405) 624-8510 for a Return Merchandise Authorization (RMA) number. Package all defective
items in the original container or in a package that will prevent shipping damage, and return to:
Stillwater Designs, 3100 North Husband Road, Stillwater, OK 74075
The RMA number must be clearly marked on the outside of the package. Please return only defective components. The return
of functioning items increases your return freight charges. Non-defective items will be returned freight-collect to you.
Include a copy of the original receipt with the purchase date clearly visible, and a “proof-of-purchase” statement listing the
Customer’s name, Dealer’s name and invoice number, and product purchased. Warranty expiration on items without proof-ofpurchase will be determined from the type of sale and manufacturing date code. Freight must be prepaid; items sent freightcollect, or COD, will be refused.
WHAT IS NOT COVERED?
This warranty is valid only if the product is used for the purpose for which it was designed. It does not cover:
o Damage due to improper installation
o Subsequent damage to other components
o Damage caused by exposure to moisture, excessive heat, chemical cleaners, and/or UV radiation
o Damage through negligence, misuse, accident or abuse. Repeated returns for the same damage may be
considered abuse
o Any cost or expense related to the removal or reinstallation of product
o Speakers damaged due to amplifi er clipping or distortion
o Items previously repaired or modifi ed by any unauthorized repair facility
o Return shipping on non-defective items
o Products with tampered or missing barcode labels
o Products with tampered or missing serial numbers
o Products returned without a Return Merchandise Authorization (RMA) number
o Products purchased from an UNAUTHORIZED dealer
o Freight Damage
o The cost of shipping product to KICKER
o Service performed by anyone other than KICKER
HOW LONG WILL IT TAKE?
KICKER strives to maintain a goal of 1 week service for all acoustics (subwoofers, midrange drivers, tweeters,
crossovers, etc) returns. Delays may be incurred if lack of replacement inventory or parts is encountered. Failure to
follow these steps may void your warranty. Any questions can be directed to the KICKER Customer Service Department
at (405) 624-8510. Contact your International KICKER dealer or distributor concerning specifi c procedures for your
country’s warranty policies.
stillwaterdesigns
KMCOAX-d-20131122
14
2014 KM Coax Rev d.indd 142014 KM Coax Rev d.indd 14 11/22/2013 11:44:44 AM11/22/2013 11:44:44 AM
Page 15

INTERNATIONAL WARRANTY
Contact your International KICKER dealer or distributor concerning
specifi c procedures for your country’s warranty policies.
WARNING: KICKER products are capable of producing sound levels
that can permanently damage your hearing! Turning up a system to a
level that has audible distortion is more damaging to your ears than
listening to an undistorted system at the same volume level. The
threshold of pain is always an indicator that the sound level is too loud
and may permanently damage your hearing. Please use common
sense when controlling volume.
GARANTÍA INTERNACIONAL Versión Español
Comuníquese con su concesionario o distribuidor KICKER internacional para obtener infor ación sobre procedimientos específi cos
relacionados con las normas de garantía de su país.
ADVERTENCIA: Los excitadores KICKER son capaces de producir niveles de sonido que pueden dañar permanentemente
el oído. Subir el volumen del sistema hasta un nivel que produzca distorsión es más dañino para el oído que escuchar un
sistema sin distorsión al mismo volumen. El dolor es siempre una indicación de que el sonido es muy fuerte y que puede dañar
permanentemente el oído. Sea precavido cuando controle el volumen.
La frase “combustible para vivir la vida Livin’ Loud™ a todo volumen” se refi ere al entusiasmo por la vida que la marca KICKER
de estéreos de automóvil representa y a la recomendación a nuestros clientes de que vivan lo mejor posible (“a todo volumen”)
en todo sentido. La línea de altavoces y amplifi cadores KICKER es la mejor del mercado de audio de automóviles y por lo tanto
representa el “combustible” para vivir a todo volumen en el área de “estéreos de automóvil” de la vida de nuestros clientes.
Recomendamos a todos nuestros clientes que obedezcan todas las reglas y reglamentos locales sobre ruido en cuanto a los
niveles legales y apropiados de audición fuera del vehículo.
INTERNATIONALE GARANTIE Deutsche Version
Our goods come with guarantees that cannot be
excluded under the Australian Consumer Law.
You are entitled to a replacement or refund for a
major failure and for compensation for any other
reasonably foreseeable loss or damage. You are also
entitled to have the goods repaired or replaced if the
goods fail to be of acceptable quality and the failure
does not amount to a major failure.
Nehmen Sie mit Ihren internationalen KICKER-Fachhändler oder Vertrieb Kontakt auf, um Details über die Garantieleistungen in
Ihrem Land zu erfahren.
WARNUNG: KICKER-Treiber können einen Schallpegel erzeugen, der zu permanenten Gehörschäden führen kann! Wenn Sie ein
System auf einen Pegel stellen, der hörbare Verzerrungen erzeugt, schadet das Ihren Ohren mehr, als ein nicht verzerrtes System
auf dem gleichen Lautstärkepegel. Die Schmerzschwelle ist immer eine Anzeige dafür, dass der Schallpegel zu laut ist und zu
permanenten Gehörschäden führen kann. Seien Sie bei der Lautstärkeeinstellung bitte vernünftig!
Der Slogan “Treibstoff für Livin’ Loud” bezieht sich auf die mit den KICKER-Autostereosystemen assoziierte Lebensfreude und die
Tatsache, dass wir unsere Kunden ermutigen, in allen Aspekten ihres Lebens nach dem Besten (“Livin’ Loud”) zu streben. Die
Lautsprecher und Verstärker von KICKER sind auf dem Markt für Auto-Soundsysteme führend und stellen somit den “Treibstoff”
für das Autostereoerlebnis unserer Kunden dar. Wir empfehlen allen unseren Kunden, sich bezüglich der zugelassenen und
passenden Lautstärkepegel außerhalb des Autos an die örtlichen Lärmvorschriften zu halten.
GARANTIE INTERNATIONALE Version Française
Pour connaître les procédures propres à la politique de garantie de votre pays, contactez votre revendeur ou distributeur
International KICKER.
AVERTISSEMENT: Les haut-parleurs KICKER ont la capacité de produire des niveaux sonores pouvant endommager l’ouïe de
façon irréversible ! L’augmentation du volume d’un système jusqu’à un niveau présentant une distorsion audible endommage
davantage l’ouïe que l’écoute d’un système sans distorsion au même volume. Le seuil de la douleur est toujours le signe que le
niveau sonore est trop élevé et risque d’endommager l’ouïe de façon irréversible. Réglez le volume en faisant prevue de bon sens!
L’expression “ carburant pour vivre plein pot “ fait référence au dynamisme de la marque KICKER d’équipements audio pour
véhicules et a pour but d’encourager nos clients à faire le maximum (“ vivre plein pot “) dans tous les aspects de leur vie. Les
haut-parleurs et amplifi cateurs KICKER sont les meilleurs dans le domaine des équipements audio et représentent donc pour nos
client le “ carburant pour vivre plein pot “ dans l’aspect “ installation audio de véhicule “ de leur vie. Nous encourageons tous nos
clients à respecter toutes les lois et réglementations locales relatives aux niveaux sonores acceptables à l’extérieur des véhicules.
15
2014 KM Coax Rev d.indd 152014 KM Coax Rev d.indd 15 11/22/2013 11:44:44 AM11/22/2013 11:44:44 AM
Page 16

©2013 Stillwater Designs
2014 KM Coax Rev d.indd 162014 KM Coax Rev d.indd 16 11/22/2013 11:44:44 AM11/22/2013 11:44:44 AM
 Loading...