

Page 1

>> OWNER’S MANUAL
QUICK REFERENCE GUIDE
Page 2
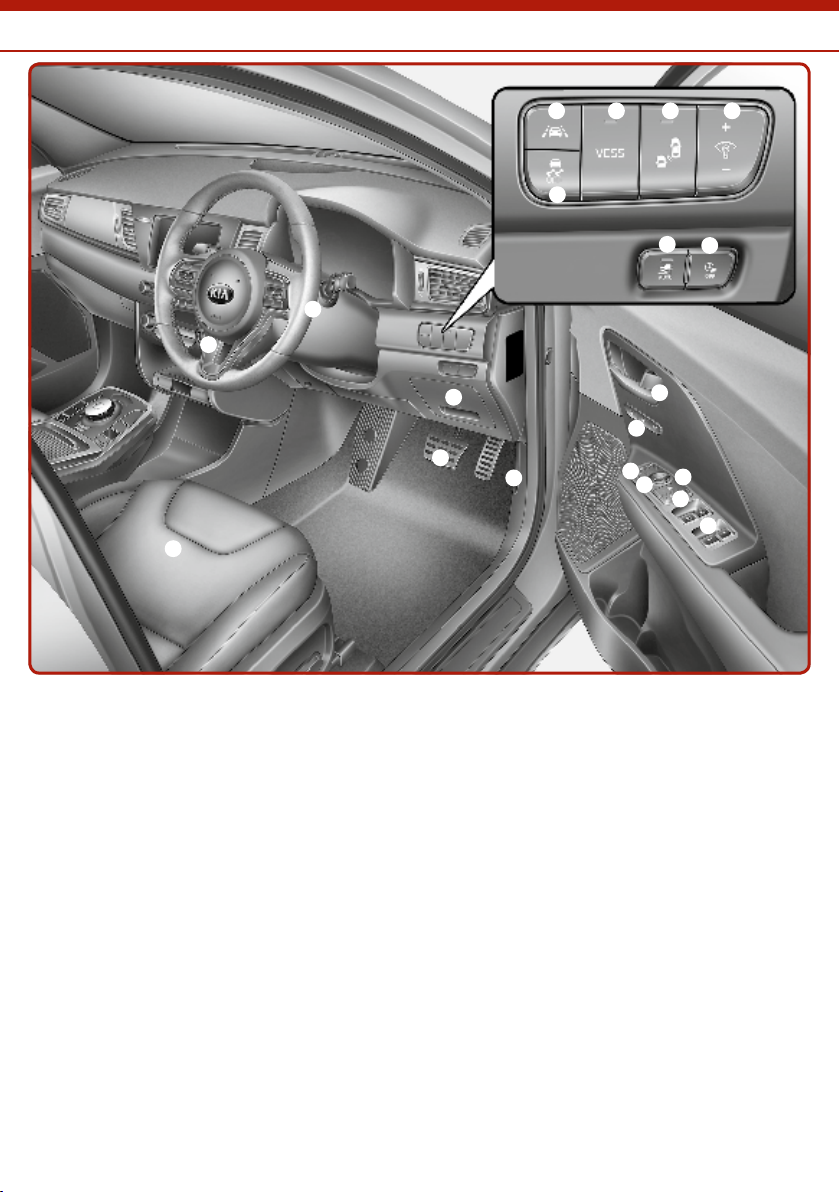
Interior Overview
l
1
2
3
4
5
6
89ab
c
d
e
f
g
h
j
k
7
a Inside door handle [4]
b Driver position memory
system* [3]
c Outside rearview mirror
folding switch [4]
d Outside rearview mirror
control switch [4]
e Power window lock
button [4]
f Central door lock switch [4]
g Power window switches [4]
h Instrument panel
illumination control [4]
i Blind-spot Collision Warning
(BCW) system* [5]
j Virtual Engine Sound
System (VESS) [Vehicle
guide]
k Lane Keeping Assist (LKA)
system [5]
l ESC (Electronic Stability
Control) OFF button [5]
m Charging connector AUTO/
LOCK mode button [Vehicle
guide]
* if equipped
[#] Number in brackets indicates chapter in Owner‘s Manual.
The illustrations in this guide may vary from the actual vehicle.
2
n Scheduled charging
deactivation button [Vehicle
guide]
o Steering wheel [4]
p Tilt and telescopic steering
column control lever [4]
q Interior fuse box [7]
r Brake pedal [5]
s Bonnet release lever [4]
t Seat [3]
Page 3
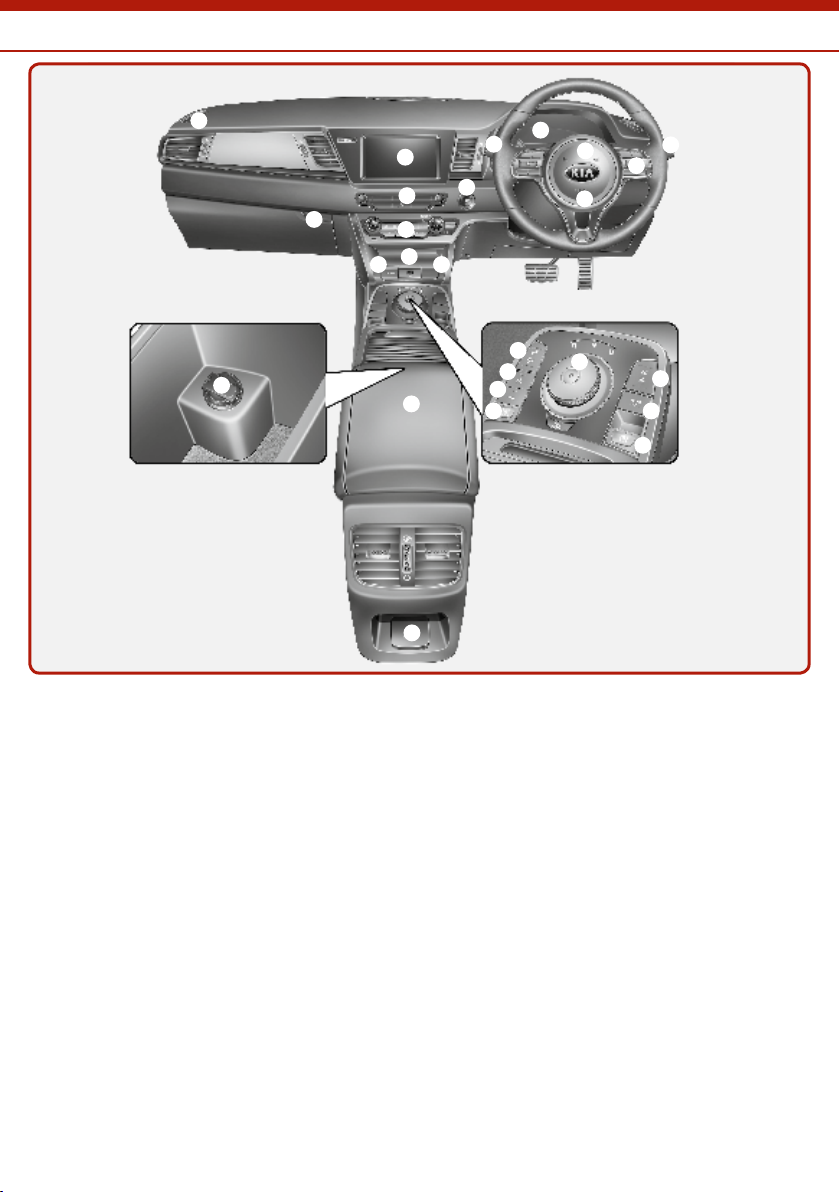
Instrument Panel Overview
1
2
3
4
5
6
7
8
9
a
b
c
dd
e
f
f
g
h
j
k
l
m
n
o
p
a Cruise control/Smart cruise
control buttons* [5]
b Driver’s front air bag [3]
c Horn [4]
d Passenger’s front air bag [3]
e Instrument cluster [3]
f Turn signal/Headlamp
control lever [4]
g Wiper and washer control
lever [4]
h POWER button [5]
i AVN (Audio/Video/
Navigation)* [see Car
Multimedia Manual]
j Hazard warning light [6]
k Automatic climate control
l Wireless cellular phone
system [4]
charging system* [4]
m Power outlet [4]
n Reduction gear (shifter
dial) [5]
o Seat warmer/cooler
button* [4]
p AUTO HOLD switch [5]
q EPB (Electronic Parking
Brake) switch [5]
r Heated steering wheel
s Parking distance warning
button* [4]
(Reverse/Forward) ON
button* [4]
t Drive mode button [5]
u Glove box [4]
v Center console storage
box [4]
w USB charger* [4]
x AC 220V inverter* [4]
3
Page 4
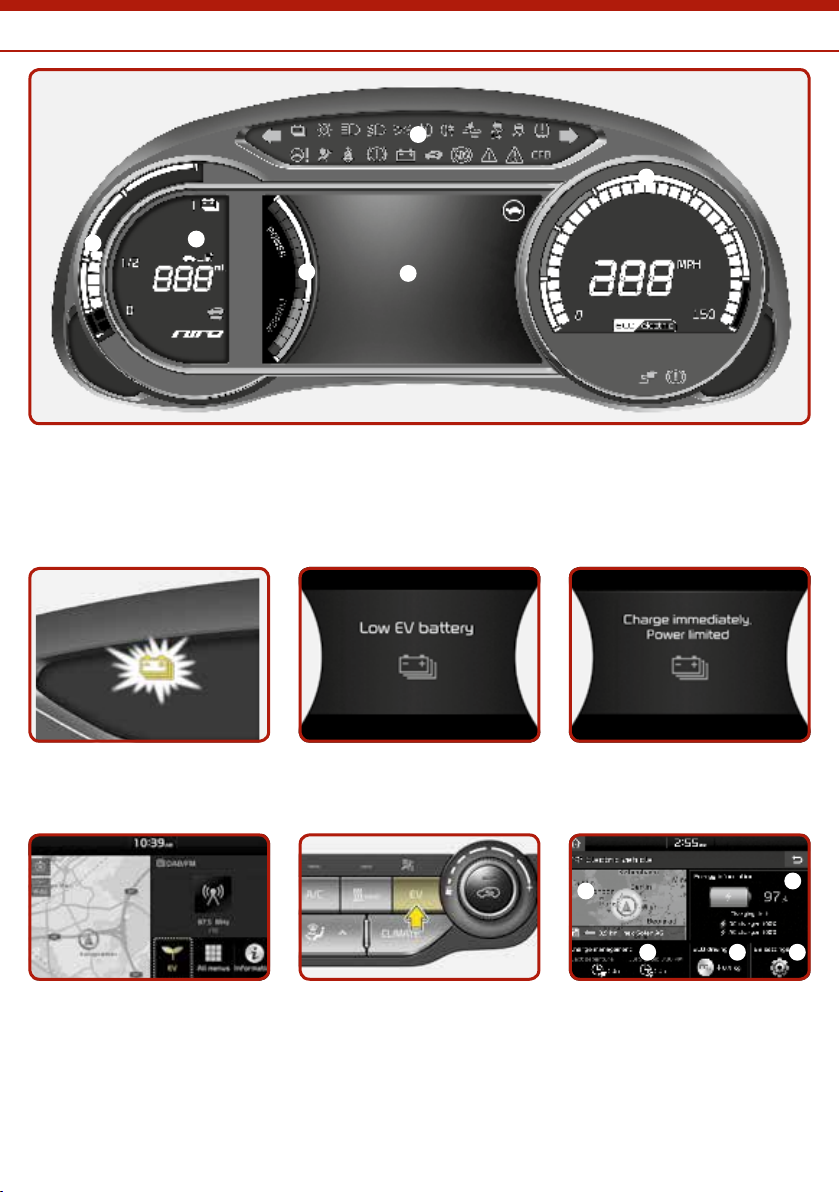
Instrument Cluster / Battery Information / EV Mode
1
2
3
4
5
6
1
2
3
4
5
Instrument cluster [4]
a Power/Charge gauge
b Speedometer
c Warning and indicator lights
d LCD information screen
(including Trip computer)
e Battery SOC (State of
Charge) gauge
f Distance to empty
Low level warning light [EV-Guide]
Vehicle can drive an additional
20-30 km depending on
different factors
Low battery [EV-Guide]
High voltage battery level ~8%
or less
EV mode [EV-Guide]
If you select the “EV” menu on the AVN home screen or press the
“EV” button on the left side of the air intake control button, you can
enter EV mode. The EV mode has a total of 5 menus.
4
Charge immediately [EV-Guide]
High voltage battery level ~3%
or less
EV mode menus [EV-Guide]
a Available range
b Energy information
c Charge management
d ECO driving
e EV settings
Page 5
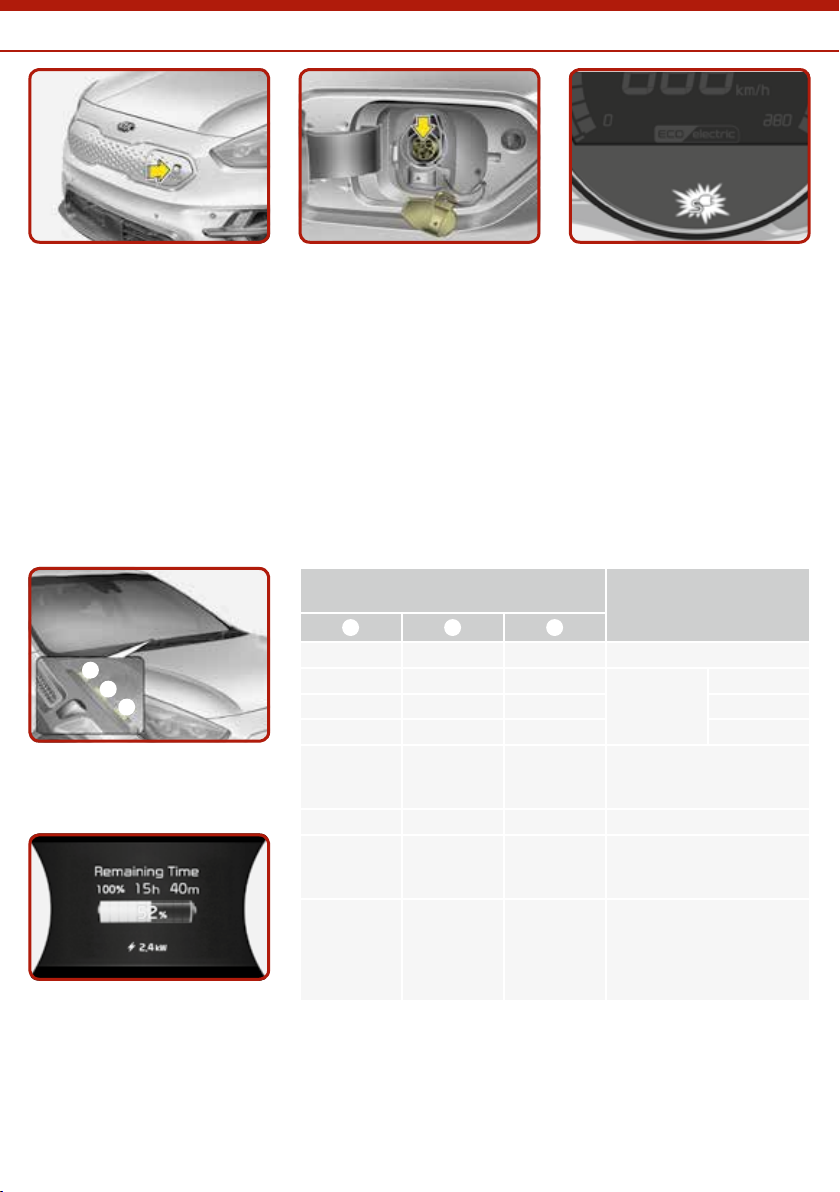
Charging
1
2
3
How to connect AC charger [EVGuide]
1. While the brake pedal is
pressed, engage the parking
brake.
2. Turn OFF all switches, place
the shift lever in P (Park),
and turn OFF the vehicle.
3. After unlocking doors,
open the charging door by
pressing the icon on the
charging door.
Checking charging status [EVGuide]
Estimated charging time
displayed on instrument cluster
4. Ensure the connector and
plug are suitably clean and
undamaged.
5. Hold the charging connector
handle. Then, insert it into
the charging inlet, until you
hear a “click” sound. If it is
not fully connected, a bad
connection between the
charging connector and the
charging terminal may cause
a fire.
Operation of Charging
Indicator Lamp
1
○ (OFF) ○ (OFF) ○ (OFF) Not Charged
Blinking ○ (OFF) ○ (OFF)
● (ON) Blinking ○ (OFF) 34~66 %
● (ON) ● (ON) Blinking 67~99 %
● (ON) ● (ON) ● (ON)
Blinking Blinking Blinking Error while charging
○ (OFF) ○ (OFF) Blinking
○ (OFF) Blinking ○ (OFF)
2 3
6. Check if the charge indicator
lamp of the high voltage
battery in the instrument
cluster has turned ON.
Charging does not occur if
the charging indicator lamp
is OFF. If not charging, try
reconnecting the cable.
Details
Charging
Charging complete
(100 %) (turns OFF in
5 seconds)
Charging 12 V auxiliary
battery or reserved air
conditioner is operating
Reserved charging in
operation (turns OFF in
3 minutes) or temporary
interruptions (e.g. power
failure)
0~33 %
Note: charging time is dependent on the settings of the Portable Charging Cable (ICCB) and in the charge
management menu of the Entertainment System.
5
Page 6
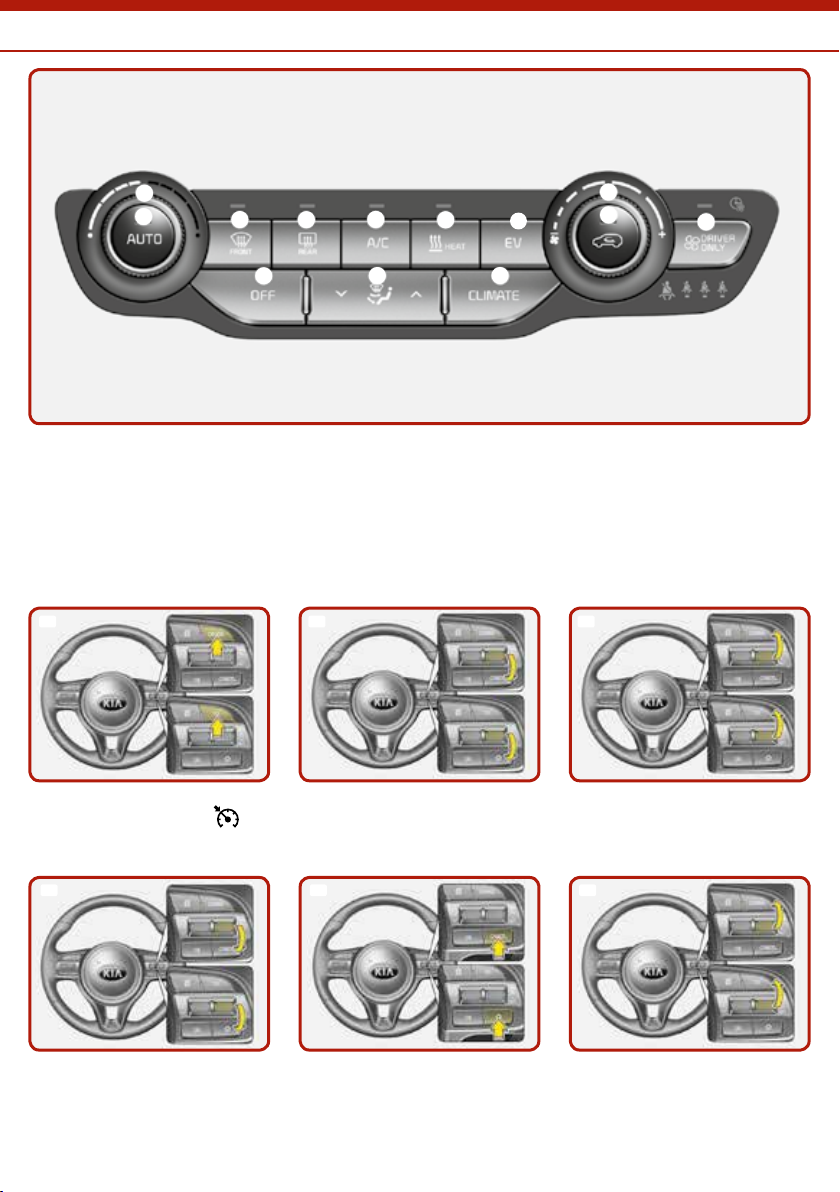
Climate Control System / Cruise Control System
1
2
3
7
Automatic climate control system [4]
a Driver’s temperature
control
b AUTO (automatic control)
c Front windscreen defroster
d Rear window defroster
e Air conditioning
1
4
5
9
c
d
a
f Air intake control
g OFF
h Fan speed control
i Mode selection
2 3
8
6
b
j Climate button
k Driver only select button
l HEAT button
m EV mode
Cruise control system* [5]
ON-OFF button (CRUISE/
activate cruise control system
4
To decrease cruise control set
speed
6
) to
Set cruise control speed by
moving the lever down to SET -
5 6
Cancel cruise control set speed
by pressing the cancel button
(CANCEL/O)
To increase cruise control set
speed
Resume cruising speed by
moving the lever up to RES +
Page 7
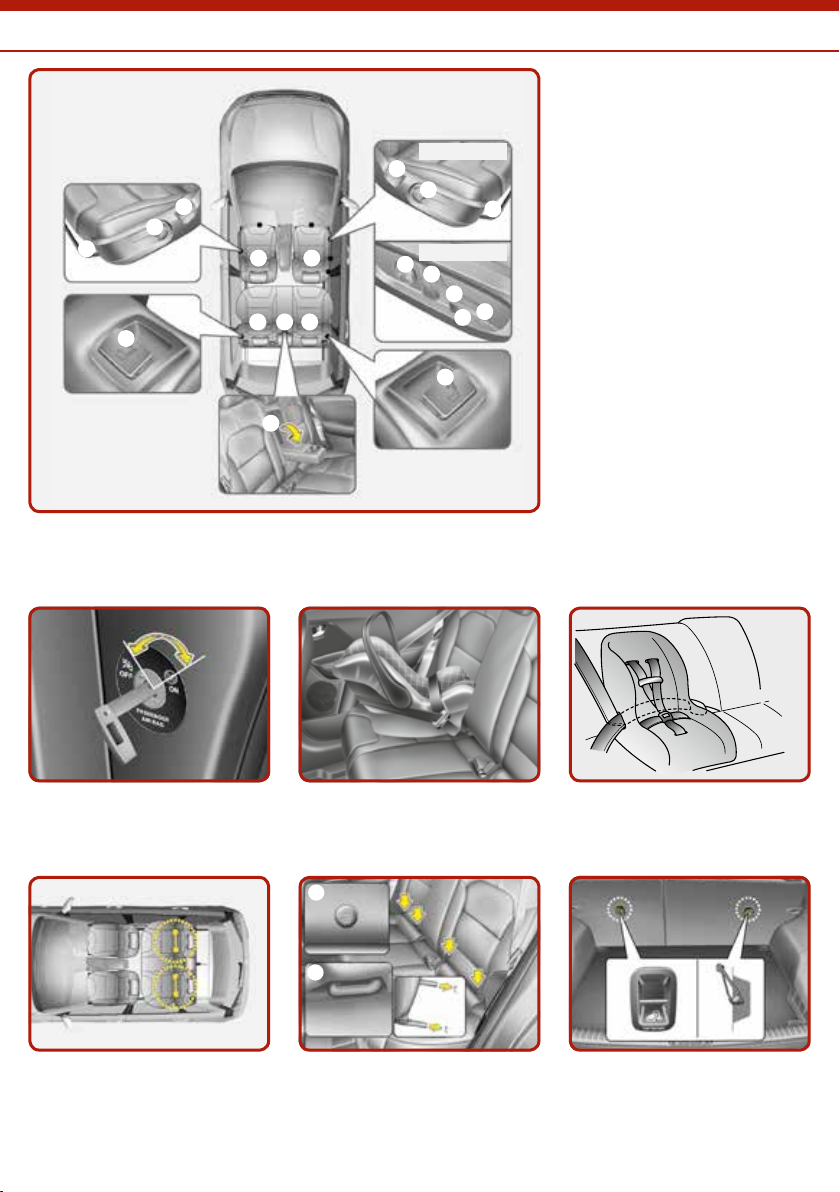
Seats [3]
1
1
1
2
2
2
3
3
3
3
4
5 5
6
6
7 7 7
8
1
2
Seat / Air Bag / Child Restraint System
Front seat
a Forward and backward
b Seatback angle
■ Manual seat
■ Power seat
c Seat cushion height
d Lumbar support (Driver’s
seat)*
e Headrest
Rear seat
f Seatback folding
g Headrest
h Armrest*
Passenger’s front air bag ON/
OFF switch* [3]
Securing with “ISOFIX” system
and “Tether Anchorage”
system [3]
Rearward-facing child restraint
system [3]
a ISOFIX Anchor Position
Indicator
b ISOFIX Anchor
Installing a child restraint
system by lap/shoulder belt [3]
Securing with “Tether
Anchorage” system [3]
7
Page 8
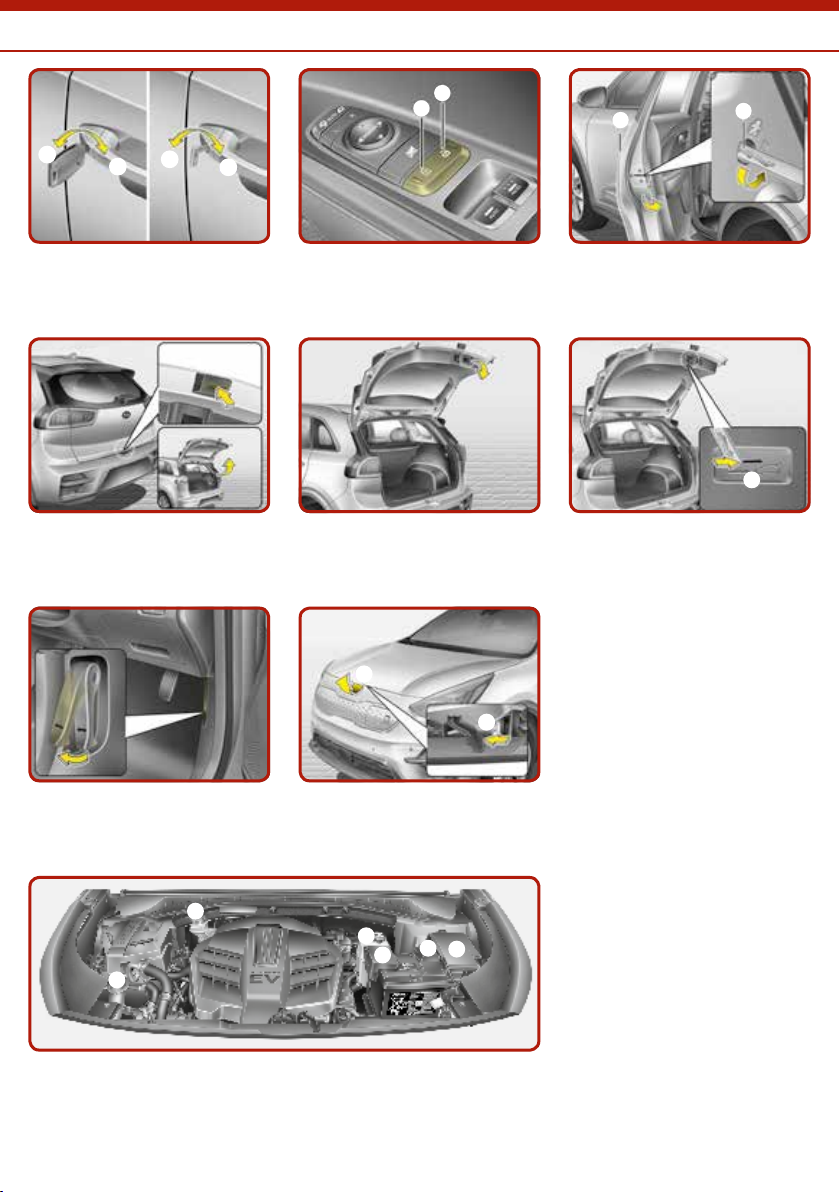
Door Locks / Tailgate / Bonnet / Motor Compartment
1
2
1
2
1
2
2
1
2
1
1
2
1
2
3
4
5
6
Operating door locks
manually [4]
a Lock
Central door lock switch [4]
a Lock
b Unlock
Child-protector rear door
lock [4]
b Unlock
Opening the tailgate [4] Closing the tailgate [4] Emergency tailgate safety
release [4]
a Push the mechanical key to
the right
Closing the bonnet
> Before closing the bonnet,
check if all filler caps are
correctly installed and any
other combustible material
must be removed from the
engine compartment.
> Lower the bonnet until it is
about 30 cm above the closed
Opening the bonnet [4]
Pull the release lever to unlatch
the bonnet
a Lift the bonnet slightly
b Push the secondary latch
inside to the left and
continue to lift the bonnet
position and let it drop to
securely lock in place.
a Coolant reservoir [7]
b Brake fluid reservoir [7]
c Motor room fuse box [7]
d Positive battery terminal [7]
e Negative battery
terminal [7]
f Windscreen washer fluid
Motor compartment [2]
8
reservoir [7]
Page 9
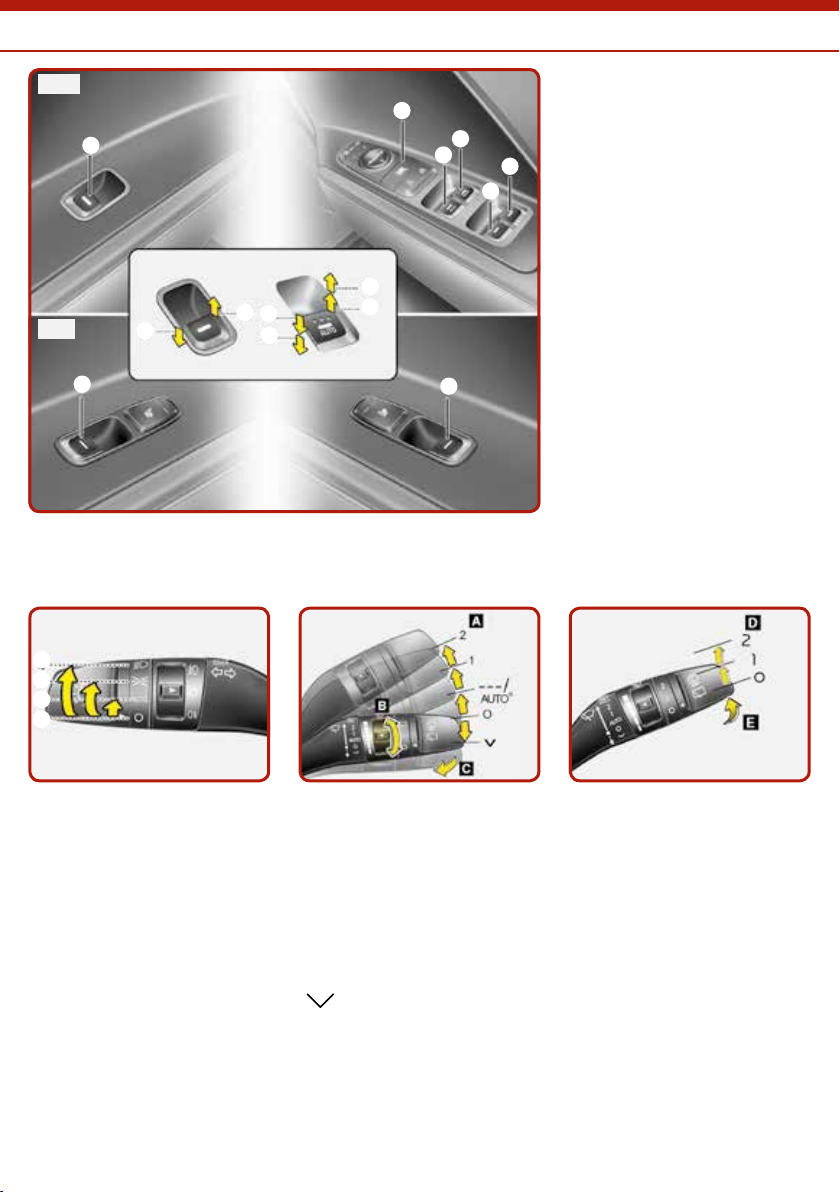
Windows / Lighting Control / Wipers and Washers
1
2
3
4
1
2
2
3
3
4
4
5
5
5
5
6
6
7
Front
Rear
Windows [4]
a Driver’s door power window
switch
b Front passenger’s door
power window switch
c Rear door (right) power
window switch
d Rear door (left) power
window switch
e Window opening and closing
f Automatic power window
up*/down*
g Power window lock button
The POWER button must be
in the ON position for power
windows to operate.
Note: In cold and wet climates,
power windows may not
work properly due to freezing
conditions.
Lighting control [4]
To operate the lights, turn the
knob at the end of the control
lever to one of the following
positions:
a OFF
b Auto light*
c Position light
d Headlight
Wipers and washers [4]
A: Front wiper speed control
B: Intermittent wipe time
adjustment
C: Wash with brief wipes
(front)*
2 High wiper speed
1 Low wiper speed
---/
AUTO*
O Off
Intermittent wipe/
Automatic control
wipe
Single wipe
D: Rear wiper/washer control
2
1 Intermittent wipe*
O Off
E: Wash with brief wipes (rear)
Continuous wipe
9
Page 10
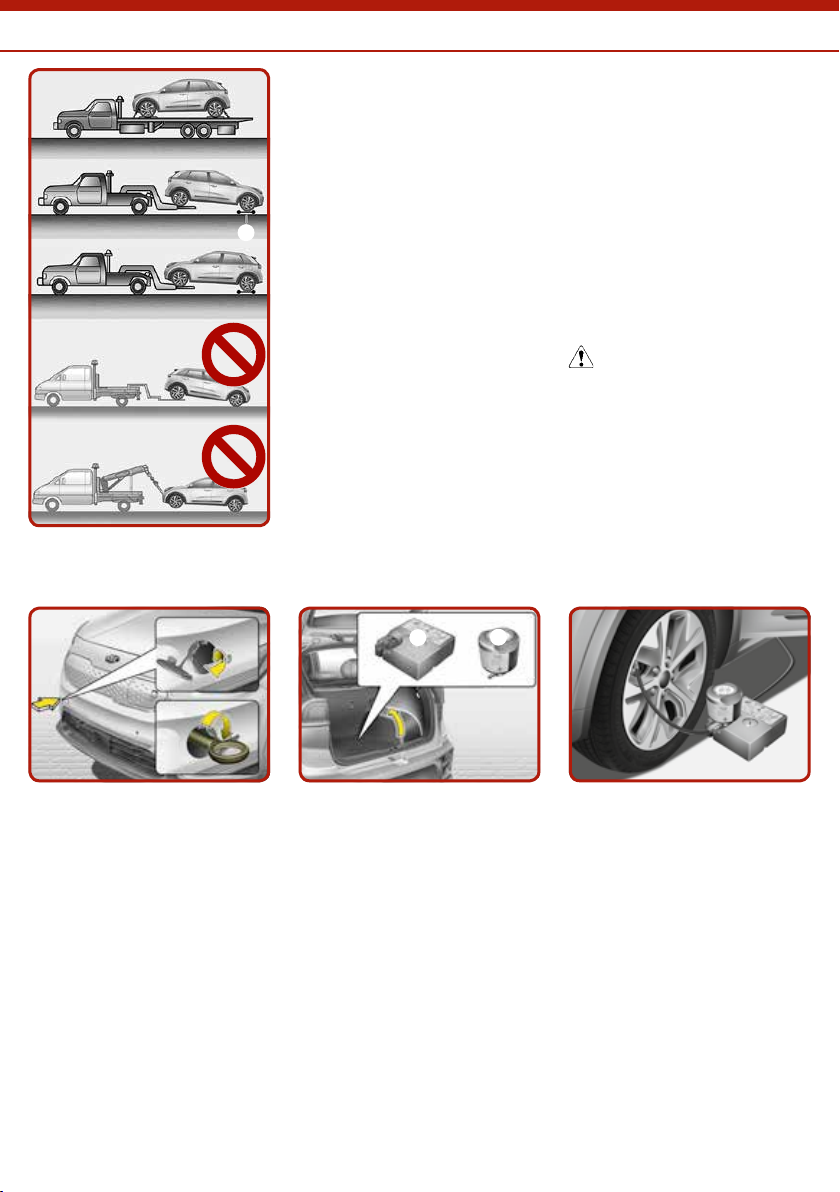
Towing / Tyre Mobility Kit
1
2
1
Towing [6]
a Wheel dollies
If towing is required, lift all four
wheel off the ground and tow
the vehicle.
If you must tow the vehicle
using only two wheels, lift the
front wheels off the ground
and tow the vehicle. The use
of wheel dollies or flatbed is
recommended.
If you tow the vehicle while
the front wheels are touching
the ground, the vehicle motor
may generate electricity and
the motor components may be
damaged or a fire may occur.
Emergency towing
If towing is necessary, it is
recommended to have it done
by an authorized Kia dealer or a
commercial tow truck service.
When towing your vehicle in
an emergency without wheel
dollies.
1. While depressing the brake
pedal shift to the N (Neutral)
position and turn the vehicle
off. The POWER button will
be in the ACC position.
2. Place the shifter dial in
N (Neutral) position.
3. Release the parking brake.
CAUTION
Failure to shift to N (Neutral)
may cause internal damage to
the vehicle.
Removable towing hook [6]
1. Open the tailgate and
remove the towing hook
from the tool case.
2. Remove the hole cover by
pressing the upper (front)/
lower (rear) part of the cover
on the bumper.
3. Install the towing hook by
turning it clockwise until it is
fully secured.
4. Remove the towing hook and
10
install the cover after use.
Tyre Mobility Kit [6]
Please read the instructions
before using the Tyre Mobility
Kit.
a Compressor
b Sealant bottle
With the Tyre Mobility Kit
you stay mobile even after
experiencing a tyre puncture.
After you ensure that the tyre
is properly sealed you can drive
cautiously on the tyre (up to
200 km (120 miles)) at a max.
speed of 80 km/h (50 mph)
in order to reach a vehicle or
tyre dealer to have the tyre
replaced.
Page 11
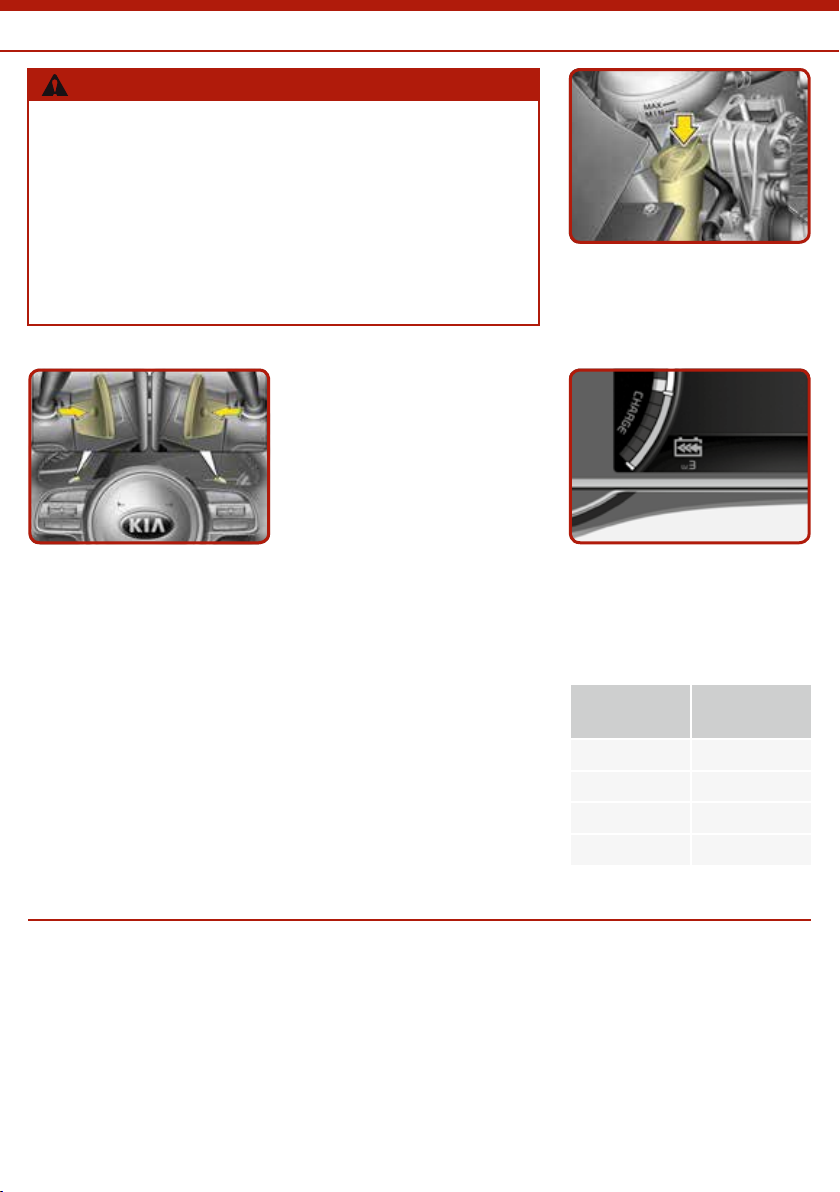
WARNING
●
This vehicle operates using
high voltages. Do not
remove or disassemble any
high voltage connectors or
wires identified by orange
cable/shielding. Failure to
observe safety warnings
(see Electric Vehicle Guide)
could result in serious
injury.
Washer Fluid / Additional Info
●
When inspection and
maintenance is required for
high voltage components
or the high voltage
battery, we recommend
that you contact an
authorized Kia dealer.
Pull and hold the left side
paddle shifter for more than
0.5 seconds and One Pedal
Driving function is operated,
increasing the regenerative
braking. In this case, stopping
the vehicle is possible by keep
on pulling the paddle shifter.
Checking the washer fluid
level [7]
Check the fluid level and add
fluid if necessary.
Regenerative braking
(Paddle shifter) [5]
The paddle shifter is used
to adjust the regenerative
braking level from 0 to 3
during decelerating or braking.
Every time you decelerate or
go downhill, the regenerative
braking system recovers kinetic
energy that would otherwise be
lost. That energy goes straight
to recharging the battery.
Additional Info*
Bluetooth
Many of our cars have
Bluetooth® connectivity to
enable the driver to safely
enjoy the convenience of the
mobile phone. For Bluetooth®
compatibility please visit
the owners section on our
website.
®
With the Smart Regeneration
System activated, pull and hold
the right side paddle shifter for
over 1 second to turn on and
off the automatic change of the
regenerative braking.
Parking brake (handbrake)
When engaging the parking
brake, apply the footbrake
first and keep it depressed.
Then apply the parking
brake.
The selected regenerative
braking level is displayed on the
instrument cluster. The initial
setting of the regenerative
braking level will vary according
to the selected Drive mode.
Drive mode Initial setting
ECO+ 2
ECO 2
COMFORT 1
SPORT 1
We strongly recommend
to leave the car in first or
reverse gear or in the ‘P’
(Park) position on automatics
when leaving the car.
11
Page 12
Additional Info*
Idle Stop & Go (ISG)
When enabled, ISG automatically
stops the car’s engine to reduce
fuel consumption and emissions.
The ISG function may not work if
the car’s battery charge status,
ambient temperature and/or
engine temperature is too low. Air
conditioning/heater control settings
may also affect ISG function.
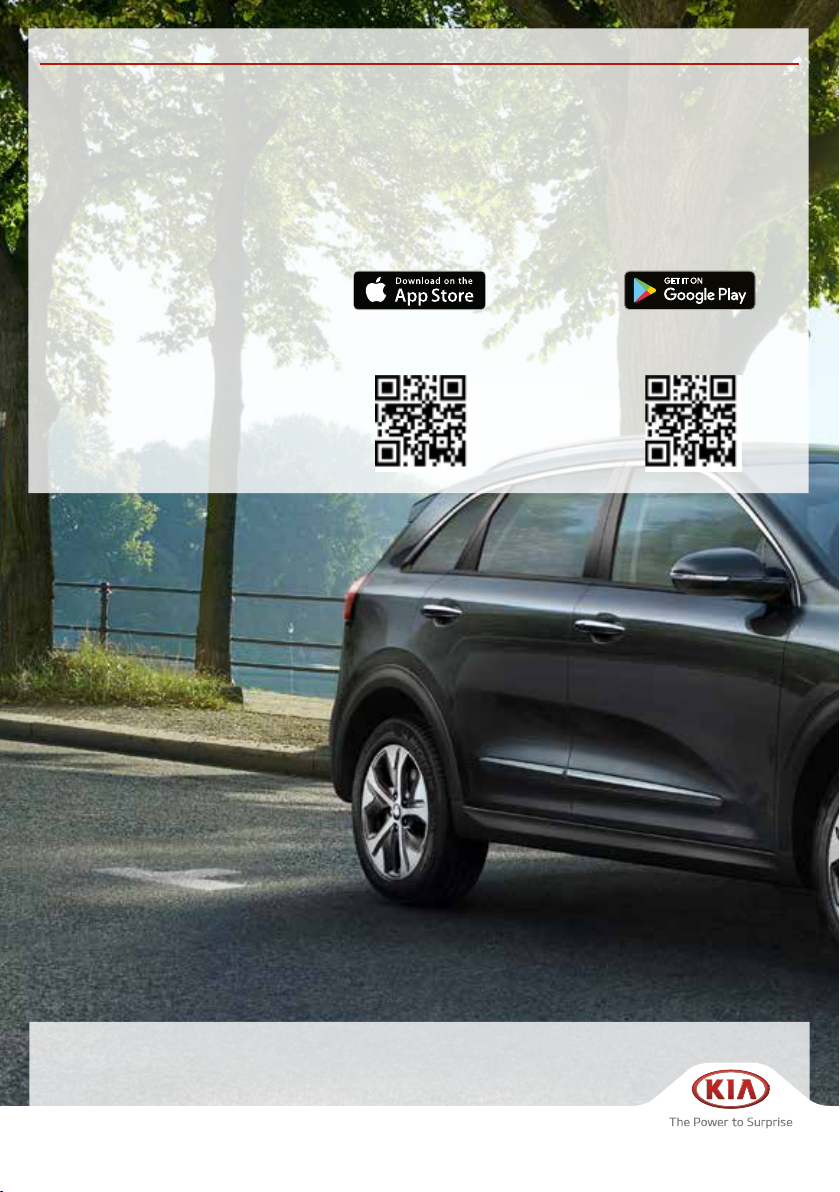
Kia Service App
The Kia Service App – now available
for free on iPhone/iPad and Android
With the Kia Service App, you have
(almost) all Kia dealers in Europe
within reach*. Looking for a showroom
or just a service, the app displays all
dealers around your current location
on the map. With one click you can
call a dealer, visit their website or get
directions to the showroom.
(*) In selected markets only
Parking brake (handbrake)
When engaging the parking brake,
apply the footbrake first and keep it
depressed. Then apply the parking
brake.
We strongly recommend to leave the
car in first or reverse gear or in the ‘P’
(Park) position on automatics when
leaving the car.
Kia Service App Kia Service App
®
Bluetooth
Many of our cars have Bluetooth®
connectivity to enable the driver
to safely enjoy the convenience of
the mobile phone. For Bluetooth
compatibility please visit the owners
section on our website.
®
For full details and instructions on any item contained in this quick reference guide, please read the owner’s manual.
Copyright © 2018 Kia Motors Europe GmbH, all rights reserved.
18.000587 - QRG DE EV - ENG-UK RHD
 Loading...