

Page 1

Keysight PW9112EDU
PathWave Lab Operations for
Remote Learning Solution
Getting
Started Guide
Page 2

Notices
Copyright Notice
© Keysight Technologies 2021
No part of this manual may be
reproduced in any form or by any
means (including electronic storage
and retrieval or translation into a
foreign language) without prior agreement and written consent from
Keysight Technologies as governed by
United States and international
copyright laws.
Manual Part Number
U3810-90010
Edition
Edition 1, March 2021
Printed in:
Printed in Malaysia
Published by:
Keysight Technologies
Bayan Lepas Free Industrial Zone,
11900 Penang, Malaysia
Technology Licenses
The hardware and/or software
described in this document are
furnished under a license and may be
used or copied only in accordance
with the terms of such license.
Declaration of Conformity
Declarations of Conformity for this
product and for other Keysight
products may be downloaded from
the Web. Go to
http://www.keysight.com/go/conform
ity. You can then search by product
number to find the latest Declaration
of Conformity.
U.S. Government Rights
The Software is “commercial computer
software,” as defined by Federal
Acquisition Regulation (“FAR”) 2.101.
Pursuant to FAR 12.212 and 27.405-3
and Department of Defense FAR
Supplement (“DFARS”) 227.7202, the
U.S. government acquires commercial
computer software under the same
terms by which the software is customarily provided to the public.
Accordingly, Keysight provides the
Software to U.S. government
customers under its standard
commercial license, which is
embodied in its End User License
Agreement (EULA), a copy of which can
be found at
http://www.keysight.com/find/sweula.
The license set forth in the EULA
represents the exclusive authority by
which the U.S. government may use,
modify, distribute, or disclose the
Software. The EULA and the license
set forth therein, does not require or
permit, among other things, that
Keysight:
(1) Furnish technical information
related to commercial computer
software or commercial computer
software documentation that is not
customarily provided to the public; or
(2) Relinquish to, or otherwise provide,
the government rights in excess of
these rights customarily provided to
the public to use, modify, reproduce,
release, perform, display, or disclose
commercial computer software or
commercial computer software
documentation. No additional
government requirements beyond
those set forth in the EULA shall
apply, except to the extent that those
terms, rights, or licenses are explicitly
required from all providers of
commercial computer software
pursuant to the FAR and the DFARS
and are set forth specifically in writing
else- where in the EULA. Keysight
shall be under no obligation to update,
revise or otherwise modify the
Software. With respect to any
technical data as defined by FAR
2.101, pursuant to FAR 12.211 and
27.404.2 and DFARS 227.7102, the
U.S. government acquires no greater
than Limited Rights as defined in FAR
27.401 or DFAR 227.7103-5 (c), as
applicable in any technical data.
Warranty
THE MATERIAL CONTAINED IN THIS
DOCUMENT IS PROVIDED “AS IS,”
AND IS SUBJECT TO BEING
CHANGED, WITHOUT NOTICE, IN
FUTURE EDITIONS. FURTHER, TO
THE MAXIMUM EXTENT PERMITTED
BY APPLICABLE LAW, KEYSIGHT
DISCLAIMS ALL WARRANTIES,
EITHER EXPRESS OR IMPLIED, WITH
REGARD TO THIS MANUAL AND
ANY INFORMATION CONTAINED
HEREIN, INCLUD ING BUT NOT
LIMITED TO THE IMPLIED WARRANTIES OF MERCHANTABILITY AND
FITNESS FOR A PARTICULAR
PURPOSE. KEYSIGHT SHALL NOT
BE LIABLE FOR ERRORS OR FOR
INCIDENTAL OR CONSEQUENTIAL
DAMAGES IN CONNECTION WITH
THE FURNISHING, USE, OR
PERFORMANCE OF THIS DOCUMENT OR OF ANY INFORMATION
CON- TAINED HEREIN. SHOULD
KEYSIGHT AND THE USER HAVE A
SEPARATE WRITTEN AGREEMENT
WITH WARRANTY TERMS
COVERING THE MATERIAL IN THIS
DOCUMENT THAT CONFLICT WITH
THESE TERMS, THE WARRANTY
TERMS IN THE SEPARATE
AGREEMENT SHALL CONTROL.
Safety Information
CAUTION
A CAUTION notice denotes a hazard.
It calls attention to an operating
procedure, practice, or the like that,
if not correctly performed or adhered
to, could result in damage to the
product or loss of important data. Do
not proceed beyond a CAUTION
notice until the indicated conditions
are fully understood and met.
WARNING
A WARNING notice denotes a hazard.
It calls attention to an operating
procedure, practice, or the like that, if
not correctly performed or adhered
to, could result in personal injury or
death. Do not proceed beyond a
WARNING notice until the indicated
conditions are fully understood and
met.
Page 3

Sales and Technical Support
To contact Keysight for sales and technical support, refer to the support links on the
following Keysight websites:
– Product-specific information and support, software, and documentation updates
– www.keysight.com/find/PW9112EDU
– Worldwide contact information for repair and service
– www.keysight.com/find/assist
Page 4

Table of Contents
Notices .................................................................................................................................................. 2
Table of Contents .................................................................................................................................. 4
Overview ................................................................................................................................................ 5
Intended Use of Getting Started Guide .................................................................................. 6
Characteristics and Specifications .......................................................................................... 6
First-Time Setup ................................................................................................................................... 7
Software Prerequisites ............................................................................................................ 7
PC Operating System ....................................................................................................... 7
Software Required ............................................................................................................ 7
User Interface Tour ............................................................................................................................... 8
Home View............................................................................................................................... 8
Bench Management View ....................................................................................................... 9
Lab Bench and Remote Agent ......................................................................................... 9
Schedule Remote Lab Session View ..................................................................................... 10
Students and Lecturers Roles ............................................................................................................. 11
Registration and Login .......................................................................................................... 11
Schedule Remote Lab Session .............................................................................................. 14
Connect to Scheduled Session ............................................................................................. 15
Administrator’s Roles .......................................................................................................................... 17
Keycloak Administration Console .......................................................................................... 17
Configure Roles .............................................................................................................. 19
Add User ......................................................................................................................... 21
Manage User ................................................................................................................... 23
Email Settings ................................................................................................................. 24
Set Up Single Sign-On (SSO) ......................................................................................... 24
Install the Remote Agent ....................................................................................................... 25
Add A New Bench .................................................................................................................. 27
Manage Scheduled Sessions ................................................................................................ 29
Manage Remote Benches ..................................................................................................... 29
General Troubleshooting .................................................................................................................... 30
Seeing a Blank Screen .......................................................................................................... 30
Application Ceases to Respond or Bench Freeze ................................................................. 30
Page 5

Keysight PW9112EDU PathWave Lab Operations Getting Started Guide 5
Overview
Online learning has been a part of many educational institutions since the spread of the
Internet. Now, new norms such as physical distancing and limits on face-to-face
interaction is dramatically accelerating the shift from traditional in-building learning to
virtual classes offered remotely on digital platforms. The availability of online courses
opens opportunities to international and distance learning students, and remote learning
offers students the flexibility of learning anytime, anywhere. With these benefits, online
learning is expanding exponentially, and educational institutes must rapidly transform to
keep pace with this megatrend.
Keysight's industry-ready remote access lab solution offers you a convenient way to make
the switch to online learning. This end-to-end solution is designed for complete remote
setup of your basic instrument lab and covers your needs from web-based lab
management and scheduling administration to instrument control and remote access for
measurement and analysis. And since your students continue working with industrygrade test and measurement instruments and software, they will gain the similar practical
skills and application knowledge as industry engineers conducting their work in the lab
today.
Page 6

Keysight PW9112EDU PathWave Lab Operations Getting Started Guide 6
Intended Use of Getting Started Guide
The Getting Started Guide is intended for use by students, lecturers, and University Teaching Lab
Manager as a guide for set up the PathWave Lab Operations for Remote Learning application.
The features that you can access in this software may vary depending on the roles assigned to your
account. Upon registration, new accounts will be assigned with the Student access. Please consult
your Lab Manager to assign new roles.
Here are the three access levels or roles that you can assign to the accounts:
Student
— Schedule Remote Lab Session (only invite other users with the Student role)
— See and Connect to Scheduled Sessions.
— Connect to Test Bench (via scheduled session).
Lecturer
— Schedule Remote Lab Session (only invite other users with the Lecturer and Student role)
— View and Connect to Scheduled Sessions
— Connect to Test Bench (via scheduled session)
Administrator
— Install the Remote Agent
— Add A New Bench
— Manage Scheduled Sessions
— Manage Remote Benches
— User Management
Characteristics and Specifications
For the characteristics and specifications of the Remote Lab Access Management Software, refer to
the Data Sheet at https://www.keysight.com/us/en/assets/3121-1016/data-sheets/PathWave-
Lab-Operations-for-Remote-Learning-PW9112EDU.pdf.
Page 7

Keysight PW9112EDU PathWave Lab Operations Getting Started Guide 7
First-Time Setup
Before you use the PathWave Lab Operations for Remote Learning application for the first time, take
note of the following items:
— Ensure that your PC meets the software prerequisites listed below and that the instruments
are set up on your bench.
— For security purposes, it is recommended to change the password of the Account Console for
security purposes. Go to Keycloak Administration Console for the instructions.
— By default, the User registration setting is set as OFF. This is the recommended setting to
prevent other users from registering an account using the link. For more information, go to
Add User.
Software Prerequisites
PC Operating System
1 Windows 10 Enterprise (32-bit or 64-bit) with Internet access
Software Required
1 Google Chrome or Firefox web browser
2 Remote Agent (provided by Keysight personnel)
3 (Optional) VPN access to range of IPs
Page 8
Keysight PW9112EDU PathWave Lab Operations Getting Started Guide 8
User Interface Tour
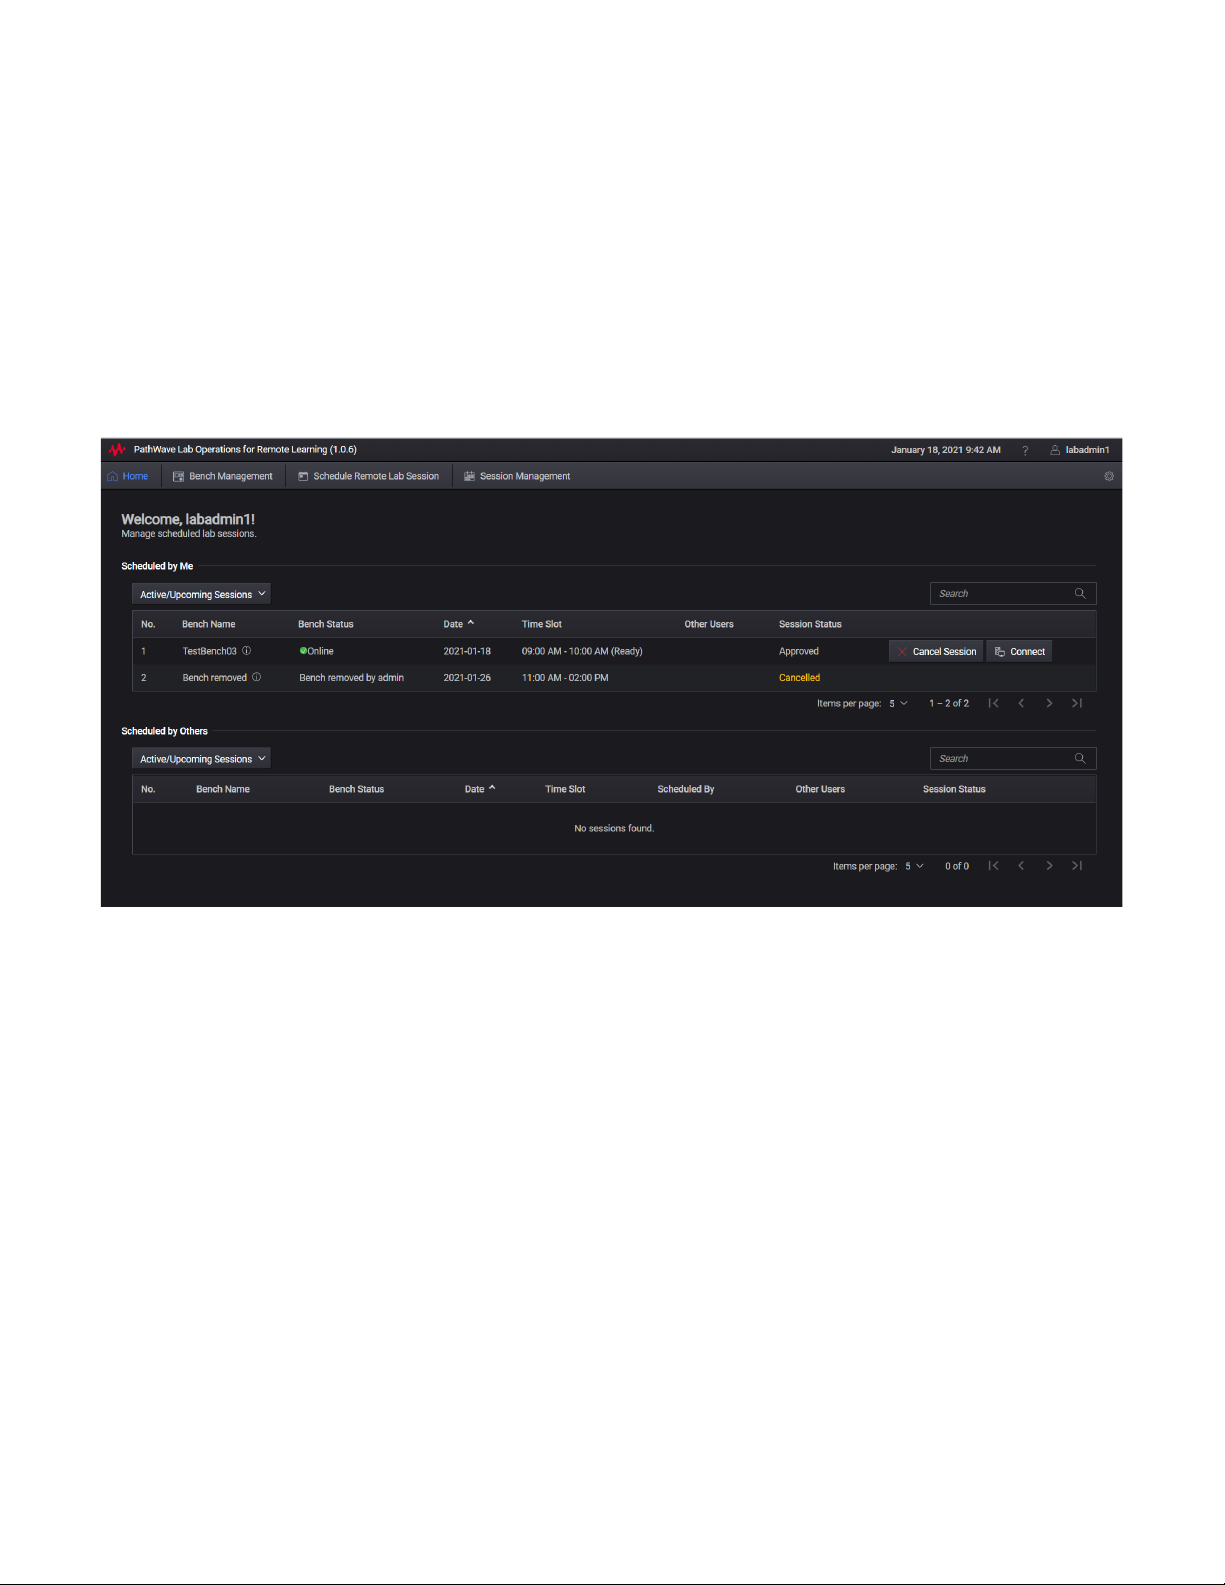
Home View
This view displays a summary of the lab benches scheduled and the lab sessions that you are invited
to join. Subject to the roles assigned to your account, you may see the following tabs on your home
page:
- Bench Management (accessible by Admin and Lecturer access levels)
- Schedule Remote Lab Session (accessible by Admin, Lecturer and Student access levels)
- Session Management (accessible by Admin access level only)
Page 9

Keysight PW9112EDU PathWave Lab Operations Getting Started Guide 9
Bench Management View
For this page, Admin accounts can manage the bench while the lecturer and student accounts can
only view and connect to the bench.
Lab Bench and Remote Agent
1
7
3
6
2
5
8
4
9
No.
Function
Description
1
Add New Bench
- Bench Name: Name the bench
- Bench Description: Describe the usage of this bench
- Bench Location: State the physical location of this bench
- Bench Instruments: Lists the instruments available to this bench
- Agent: Assign a Remote agent to this bench
- Access Level: Select the type of accounts allowed to access this bench
2
Refresh button
Refresh the list of benches available or assigned
3
Search bar
Enter the keywords here to filter the list of benches available
4
List of Lab
Bench
Click any of the header to sort the list according to Bench Name, Computer Name,
Status or Access Level
5
Lab Bench
Controls
Manage the settings for the respective Lab Bench:
- Edit: Modify the details of selected Lab Bench or change the assigned Remote
Agent. The list will only show the unassigned agents that you can use (even it is
offline).
- Remove: Remove the bench from the list. This will also remove the Remote
Agent assigned to the bench (when applicable).
- Connect: Connect to the bench remotely and begin the remote lab session. A
countdown timer will appear when it is 15 minutes before the scheduled session.
You will not be able to connect to the bench when the status is ‘Offline’.
Page 10

Keysight PW9112EDU PathWave Lab Operations Getting Started Guide 10
Schedule Remote Lab Session View
This page is accessible across all access levels.
1
6
The greyed-out sessions here are over and thus,
not available for booking.
4
5
3
2
No.
Function
Description
6
View
Set the number of items to view in the table per page
7
Download
Agent Installer
Download the Remote Agent installation package to add a new PC to PathWave Lab
Operations for Remote Learning application server.
8
List of Remote
Agents
Lists the remote agents available in the server for management purposes and display
the status of each remote agent and assigned bench.
9
Remove Agent
Remove the agent from your PC and server. Ensure that it is not assigned to any
bench.
No.
Function
Description
1
Date
Set the date and month of your lab session. Click the Calendar icon to show the
dates of each month
2
List of Bench
List of benches available for the remote lab session
3
Filter
Filter the benches according to the keywords or desired time slots
4
Schedule or Invite
There are two options to schedule a remote lab session:
- Select the ‘Schedule on behalf of others, I will not join the session’ check
box to submit a request for booking. For this case, you will be able to invite
up to five participants to access this test bench at the selected booking
timeframe.
- Use the ‘Invite Others’ field to invite four other participants (maximum) in
the same session.
* You may only invite the participants with the same access level as you are.
Only those with the Admin roles can invite participants of all access roles.
5
Note (Optional)
Enter the information of the session here
6
Legend
The visual representation of the indicator on the chart when identifying the time
slots available.
Page 11

Keysight PW9112EDU PathWave Lab Operations Getting Started Guide 11
Students and Lecturers Roles
This section covers the commonly used functions that you will need to navigate around the Keysight
Remote Laboratory application. First time users will need to go through the following sections.
NOTE
− Before you begin, ensure that PC is connected to the Internet.
− By default, the User registration setting is set as OFF. This setting will only allow
accounts with Administrator roles to register new users and set the appropriate
roles and access. To change this setting to ON, go to Add User.
Registration and Login
New users will need to register and create a new account. Go to Step 4 to log in with your
existing account.
1 Launch your web browser and enter the link provided (subject to the hostname) in the address
bar to launch the Keysight Remote Lab Application. First time users will need to click Register
and create a new account.
2 Enter the required details to set up your account. By default, new accounts are assigned with the
Student role. To change the roles assigned, consult your lecturer or lab managers.
Page 12

Keysight PW9112EDU PathWave Lab Operations Getting Started Guide 12
3 When prompted, set up a Mobile Authenticator to activate your account. It is recommended to
set up either FreeOTP or Google Authenticator to secure your account with a one-time password.
4 Log in with your details when you are shown this page.
Page 13

Keysight PW9112EDU PathWave Lab Operations Getting Started Guide 13
5 Once you are logged in, you should see the Home View. Click your username at the top-right
corner to access information about your profile and account.
6 In User Info, click Edit account on Keycloak to modify your account details and password in a
separate window.
7 At the end of your session, click your account name (top-right corner) and click Logout.
Page 14

Keysight PW9112EDU PathWave Lab Operations Getting Started Guide 14
Schedule Remote Lab Session
1 Click the Schedule Remote Lab Session page. It will show the available test benches at the
hourly interval according to the time of your PC.
2 Use the forward (>) and back (<) button to switch between the days or click the calendar icon to
see the monthly view. You can schedule bookings up to 30 days.
3 Select one or more time slots for your session. Refer to the legend to identify the time slots
available.
4 You can also enter keywords in the Filter by bar or set the desired time slots to only show the
available benches. For more information about the session, move your mouse over the info icon.
5 Select the ‘Schedule on behalf of another person’ check box to submit a request for booking. If
you are hosting the remote session, you can invite four other participants to join the lab session.
NOTE
You can only schedule a session on behalf of another person if you have the Lecturer or
Administrator roles assigned to your account.
6 Before you click Submit, you may add notes about this session which will be visible to the
attendees and those with Administrator roles. The bookings submitted will then be approved by
those with Administrator roles.
Page 15

Keysight PW9112EDU PathWave Lab Operations Getting Started Guide 15
Connect to Scheduled Session
1 When it is 15 minutes before the session, you will see a timer counting down to the scheduled
session. The Connect button will only appear when it is time to start the scheduled session or
when the host or participant has started the session.
NOTE
When you click Connect on a Lab Bench that is currently online, you will not see a timer.
You will return to the Bench Management page upon exit.
2 Follow the on-screen instructions. As the host, click the Start Remote Access button in the
Remote Access page.
3 A successful connection to the remote agent will show the screen of PC. Click the Request
Control button to take control the PC.
4 When you are currently controlling the remote desktop, this icon ( )will appear next to your
username. Other participants in the session can click the Request Control button and it will send
a notification to the current presenter to Allow or Deny the request.
Page 16

Keysight PW9112EDU PathWave Lab Operations Getting Started Guide 16
5 Here are a few other controls that you can access during the Remote Lab Session.
— Open File ( ): Click this button to upload or download any files. Click Upload and browse
to the directory of the file.
— Chat ( ): Click this button to expand the Chat panel and view the list of Participants. Use
this panel to send messages to other participants in the session.
— Full Screen Mode ( ): Click this button to view in full screen. Press the Esc button to return
to this window.
6 To disconnect from the Remote Lab Session, click Stop Remote Access.
7 Click the Close ( ) button to exit the session and return to the Bench Management page.
Page 17

Keysight PW9112EDU PathWave Lab Operations Getting Started Guide 17
Administrator’s Roles
This section covers the additional functions available for Administrator roles to manage users,
benches, and sessions scheduled in the Keysight Remote Laboratory application.
Keycloak Administration Console
To access the Keycloak Administration Console, you will need to use the default credentials as below:
— Username: admin
— Password: admin
It is recommended to change the password before you begin to use the PathWave Lab Operations for
Remote Learning application.
1 On a web browser, copy the link provided by Keysight Technologies (in the URL Notification
Sheet) and add port “:8443” at the end of the link. For example, the link will be
https://dev.realremotelab.keysight.com:8443/. When you see the page below, click
Administration Console and log in with details above.
2 Go to the development realm as shown below.
Page 18

Keysight PW9112EDU PathWave Lab Operations Getting Started Guide 18
3 Go to Users on the left panel and click View All Users. For the account “admin”, click Edit.
4 Go to the Credentials tab and under Manage Password, enter a new secure password and
disable Temporary option. Click Reset Password.
Once you have access to the development realm, you can perform the following tasks:
– Configure Roles
This section describes the steps to create or configure the types of roles that you could later
assign to the accounts.
– Add User
This is an optional step provided you have the User registration setting as Off (default).
Follow the step-by-step instructions in this section to manually add users.
– Manage User
Perform the steps in this section to assign the types of roles to the registered accounts.
– Email Settings
Perform the steps in this section to turn on the ‘Forgot Password’ feature.
– Set Up Single Sign-On (SSO)
This is an optional step to set up the social signin for your application.
Page 19

Keysight PW9112EDU PathWave Lab Operations Getting Started Guide 19
Configure Roles
This section describes the steps to set and assign the roles to an account. The types of roles assigned
will determine the access level to the application. With the Administrator’s role, you can set the
default role to assign to new accounts and assign specific roles to each account.
1 Go to the Roles > Realm Roles to view the type of roles available. These are the roles that you
can assign to an account.
2 Go to the Default Roles tab to view or modify the default roles assigned to new accounts. By
default, new accounts are assigned with Student role during registration.
NOTE
You can only add or remove one role at a time. To change the default role, you must first
select the Student role and click Remove Selected button. Then, select the desired role
and click Add Selected to set it as the Realm Default Role.
3 To add a new role, return to Realm Roles tab and click the Add Role button.
4 Enter the name and click the Save button. The example below will create a Guest role.
Page 20

Keysight PW9112EDU PathWave Lab Operations Getting Started Guide 20
5 Successful creation of the role will prompt the following message. You should now see the new
role listed in the Realm Roles tab.
Page 21

Keysight PW9112EDU PathWave Lab Operations Getting Started Guide 21
Add User
NOTE
By default, the User registration setting is set as OFF. This is the recommended setting to
prevent other users from registering an account using the link to the application.
Go to Realm settings > Login tab to view this setting.
– When the User registration setting is set as OFF, only accounts with Administrator
roles assigned will be able to register new users and set the appropriate roles and
access.
– When the User Registration is set to ON, any users with the link to the application
will be able to register on their own with the default Student role.
1 From the side panel, click Users to view the Add user page as shown below. At minimum, you will
need to enter the desired Username. Click Save when you have completed the form.
Page 22

Keysight PW9112EDU PathWave Lab Operations Getting Started Guide 22
2 You will be redirected to the Credentials tab where you will need to perform the following steps:
a In the Manage Password section, enter the desired password as shown above.
b Enable the Temporary option to create a temporary password.
NOTE
When the Temporary option is enabled, users are required to change the password when they
first log in to the application. You may turn off the Temporary option if you prefer to create a
permanent password for the user.
c In the Credential Reset section, select the appropriate Reset Actions from the drop-down list.
The recommended options are:
i Verify Email: This option will send an email to the user to verify their email address.
ii Update Password: You will be prompted to enter a new password when you first log in to
the application.
iii Expires in: This is the duration set before the link expires. You will need to request for
another link to verify your account.
3 Click Change Password to update the password to the newly created account. Click Reset
Password to activate the new password.
4 Click Send email to send out the email as per the settings above. When the user has verified the
account, the Verified switch will change to ‘ON’.
Page 23

Keysight PW9112EDU PathWave Lab Operations Getting Started Guide 23
Manage User
Perform the following steps to assign the types of roles to the registered accounts.
1 To modify the assigned roles for an account, go to Manage > Users and click View all users.
2 You should now see a list of users and their registered accounts. Click Edit in the Action column.
3 Go to the Role Mappings tab to view the role assigned. Similar to step 4 earlier, you must first
remove the assigned role (if any) before you can assign a new role to an account. The changes
will take effective immediately.
Page 24

Keysight PW9112EDU PathWave Lab Operations Getting Started Guide 24
Email Settings
NOTE
In order to turn on the ‘Forgot Password’ feature, you will need to complete the Email
Settings. Go to https://wjw465150.gitbooks.io/keycloak-
documentation/content/server_admin/topics/realms/email.html for instructions on how to
enable Email Settings in Keycloak.
Keycloak sends emails to users to verify their email address, when they forget their passwords, or
when an admin needs to receive notifications about a server event. To enable Keycloak to send
emails, you need to provide Keycloak with your SMTP server settings. This is configured per realm.
Go to the Realm Settings left menu item and click the Email tab.
Set Up Single Sign-On (SSO)
An identity provider is usually based on a specific protocol that is used to authenticate and
communicate authentication and authorization information to their users. It can be a social provider
or cloud-based identity service that you want to integrate with PathWave Lab Operations for
Remote Learning Solution.
Once you have set up an identity provider, you may sign in to the PathWave Lab Operations for
Remote Learning Solution application using any of the social provider such as Facebook, Google or
Twitter.
Refer to the https://www.keycloak.org/docs/latest/server_admin/#_identity_broker for specific
instructions to set up the Identity Brokering.
Here are a few examples:
− OpenID Connect v1.0 Identity Providers.
OpenID Connect (OIDC) is an authentication protocol that is an extension of OAuth 2.0.
While OAuth 2.0 is only a framework for building authorization protocols and is mainly
incomplete, OIDC is a full-fledged authentication and authorization protocol.
Go to https://www.keycloak.org/docs/latest/server_admin/#_identity_broker_oidc
− SAML v2.0 Identity Providers
Security Assertion Markup Language (SAML) is an open standard that allows identity
providers (IdP) to pass authorization credentials to service providers.
Go to https://www.keycloak.org/docs/latest/server_admin/#saml-v2-0-identity-providers
NOTE
The authentication and authorization process uses Keycloak solution which is designed
following standard security protocols to provide dynamic single sign-on solution. University
IT can configure PathWave Lab Operations for Remote Learning Solution to access the
university’s active directory. This addresses security concerns, helps eliminate tedious
registration process and streamlines the authentication and authorization process.
Keycloak’s documentation: https://www.keycloak.org/docs/latest/server_admin/
Page 25

Keysight PW9112EDU PathWave Lab Operations Getting Started Guide 25
Install the Remote Agent
A remote agent is a .exe installation file that you will need run and install in the PC at the benches.
Before you can use the PC as a remote agent, you must perform the following steps to download and
run the Remote Agent installation package to add it as an agent in the server.
1 Click the Download Agent Installer button to see the pop-up window below. Click the
installation.zip link.
2 Unzip the content in installation.zip file to the PC that acts as the remote agent. Right-click the
agentBetaVersion.bat file and run it with administrator privileges.
3 You should see a Command Prompt window where you will need to enter Y to initiate the
installation process. Close this window when the installation has completed.
Page 26

Keysight PW9112EDU PathWave Lab Operations Getting Started Guide 26
NOTE
If you have previously installed an older version of the Agent in the same PC, running the
batch file will uninstall the existing version before installing the latest version.
4 Return to the Home view and click Refresh to update the list of Remote Agent. You should now
see the newly added Agent in the list.
5 Repeat Step 1 to 4 to set up a new Remote Agent in another PC.
Proceed to the next section to assign a bench to the newly added agent.
Page 27

Keysight PW9112EDU PathWave Lab Operations Getting Started Guide 27
Add A New Bench
A bench is a location where you have set up the hardware connections and which the PC assigned as
the remote agent will interact with.
1 Click the Add New Bench button and enter the required details in the pop-up window below.
2 The example below assigns the Agent GEMSQA09V7 and the Admin, Lecturer, Student Access
Level. Accounts with Admin, Lecturer, Student roles will be able to see this bench. Click Add
when you have completed the form.
Page 28

Keysight PW9112EDU PathWave Lab Operations Getting Started Guide 28
3 Upon successful setup, you should see the newly assigned remote agent to the respective bench.
4 Unzip the content in installation.zip file to the PC that acts as the remote agent.
Page 29

Keysight PW9112EDU PathWave Lab Operations Getting Started Guide 29
Manage Scheduled Sessions
Click the Session Management button to view the status and manage the scheduled sessions. Use
the drop-down list to only view either Active Sessions or Past Sessions in the table. Similarly, you can
enter the keywords in the Search bar to filter and show only the sessions with the keywords.
The sessions submitted will approved by those with the Administrator roles.
Manage Remote Benches
Click the Bench Management button the view a list of test benches that you can sort according to
their names, status, or access levels.
For each of the test bench, you have the option to Edit or Remove it from the table. The Connect
button will only appear when the specific test bench is Online.
Page 30

Keysight PW9112EDU PathWave Lab Operations Getting Started Guide 30
General Troubleshooting
Seeing a Blank Screen
A stable internet connection is required when using this application.
1 Check your internet connection
2 Restart your remote PC at the bench
Application Ceases to Respond or Bench Freeze
This could happen when the participants are downloading large files simultaneously in a session. The
application supports a maximum of two users to perform downloads at the same time.
NOTE
To optimize the use of this application, it is not recommended to stream videos on the
remote bench PC.
1 All participants in the session are recommended to exit and rejoin the session.
2 Restart the web browser that you are using to access the application.
Page 31

This information is subject to change
without notice.
© Keysight Technologies 2021
Edition 1, March 2021
Printed in Malaysia
*U3810-90010*
U3810-90010
www.keysight.com
 Loading...