

Page 1
Keysight Add 4-Port Capability
Upgrade Kit
To Upgrade PNA-X N5241A or N5242A Option 200 to Option
400
For Analyzers with Serial Numbers Prefixed MY/SG/US5201
and Above
Upgrade Kit Order Number: N5241AU- 950 and N5242AU- 950
Keysight Kit Number: N5242-60115
Installation Note
Page 2

Installation Note N5242-90115 1
Page 3

WARRANTY STATEMENT
THE MATERIAL CONTAINED IN THIS DOCUMENT IS PROVIDED “AS IS,” AND IS SUBJECT TO BEING
CHANGED, WITHOUT NOTICE, IN FUTURE EDITIONS. FURTHER, TO THE MAXIMUM EXTENT PERMITTED BY
APPLICABLE LAW, KEYSIGHT DISCLAIMS ALL WARRANTIES, EITHER EXPRESS OR IMPLIED WITH REGARD
TO THIS MANUAL AND ANY INFORMATION CONTAINED HEREIN, INCLUDING BUT NOT LIMITED TO THE
IMPLIED WARRANTIES OF MERCHANTABILITY AND FITNESS FOR A PARTICULAR PURPOSE. KEYSIGHT
SHALL NOT BE LIABLE FOR ERRORS OR FOR INCIDENTAL OR CONSEQUENTIAL DAMAGES IN CONNECTION
WITH THE FURNISHING, USE, OR PERFORMANCE OF THIS DOCUMENT OR ANY INFORMATION CONTAINED
HEREIN. SHOULD KEYSIGHT AND THE USER HAVE A SEPARATE WRITTEN AGREEMENT WITH WARRANTY
TERMS COVERING THE MATERIAL IN THIS DOCUMENT THAT CONFLICT WITH THESE TERMS, THE
WARRANTY TERMS IN THE SEPARATE AGREEMENT WILL CONTROL.
DFARS/Restricted Rights Notice
If software is for use in the performance of a U.S. Government prime contract or subcontract, Software is
delivered and licensed as “Commercial computer software” as defined in DFAR 252.227-7014 (June 1995), or as
a “commercial item” as defined in FAR 2.101(a) or as “Restricted computer software” as defined in FAR 52.22719 (June 1987) or any equivalent agency regulation or contract clause. Use, duplication or disclosure of
Software is subject to Keysight Technologies’ standard commercial license terms, and non-DOD Departments
and Agencies of the U.S. Government will receive no greater than Restricted Rights as defined in FAR 52.22719(c)(1-2) (June 1987). U.S. Government users will receive no greater than Limited Rights as defined in FAR
52.227-14 (June 1987) or DFAR 252.227-7015 (b)(2) (November 1995), as applicable in any technical data.
Safety Notes
The following safety notes are used throughout this document. Familiarize yourself with each of these notes
and its meaning before performing any of the procedures in this document.
WARNING Warning denotes a hazard. It calls attention to a procedure which, if not correctly
performed or adhered to, could result in injury or loss of life. Do not proceed beyond a
warning note until the indicated conditions are fully understood and met.
CAUTION Caution denotes a hazard. It calls attention to a procedure that, if not correctly performed
or adhered to, could result in damage to or destruction of the instrument. Do not proceed
beyond a caution sign until the indicated conditions are fully understood and met.
2 Installation Note N5242-90115
Page 4

Description of the Upgrade
IMPORTANT In June 2013, the N5241A/AS and N5242A/AS analyzers underwent significant hardware changes.
Some components that have 2.4 mm connectors (bias tees, couplers, and some semi-rigid cables) were
replaced with components that have 3.5 mm connectors.
If your analyzer’s serial number prefix is MY/SG/US5310 and below:
Your analyzer was originally shipped with 2.4 mm components. The 2.4 mm couplers and connecting
cables in your analyzer must be replaced with the new 3.5 mm items included in this kit.
If your analyzer’s serial number prefix is MY/SG/US5321 and above:
Your analyzer was shipped with 3.5 mm components, so it is not necessary to replace the couplers and
connecting cables. These items are included in this kit, but will not be used for your upgrade. Set them
aside for possible use in the future.
Be very careful to use the appropriate hardware in your analyzer. Using the wrong hardware can ruin
analyzer components, resulting in additional customer costs.
This upgrade converts your N5241A or N5242A Option 200 2-port analyzer to a N5241A or N5242A Option 400 4port analyzer by adding:
• an additional 26.5 GHZ source board
• an additional 13.5 GHZ source synthesizer board
• an additional mixer brick
• two additional bridges
• four couplers
•a splitter
• a modified front panel, including 2 new test ports
•many new cables
Getting Assistance from Keysight
Installing this upgrade kit requires special skills and experience. If you think you may not be qualified to do the
work, or need advice, contact Keysight.
Contacting Keysight
Assistance with test and measurements needs and information on finding a local Keysight office are available
on the Web at:
http://www.keysight.com/find/assist
If you do not have access to the Internet, please contact your Keysight field engineer.
Installation Note N5242-90115 3
Page 5

NOTE In any correspondence or telephone conversation, refer to the Keysight product by its model
number and full serial number. With this information, the Keysight representative can determine
whether your product is still within its warranty period.
If You Have Problems With the Upgrade Kit Contents
Keysight stands behind the quality of the upgrade kit contents. If you have problems with any item in the kit,
email Keysight Component Test Division (CTD) Support at [email protected], or telephone the
CTD Hotline at (707) 577-6802 and leave a voice mail message. Please include details of the problem.
4 Installation Note N5242-90115
Page 6

Getting Prepared
CAUTION The PNA contains extremely sensitive components that can be ruined if mishandled. Follow
instructions carefully when making cable connections, especially wire harness connections.
The person performing the work accepts responsibility for the full cost of the repair or
replacement of damaged components.
To successfully install this upgrade kit, you will need the following:
• A PDF copy or a paper copy of the PNA Service Guide - refer to “Downloading the Online PNA Service
Guide” below.
• An ESD-safe work area - refer to “Protecting Your Workspace from Electrostatic Discharge” below.
• Correct tools - refer to “Tools Required for the Installation” on page 6.
• Enough time - refer to “About Installing the Upgrade” on page 7.
• Test equipment for the post-upgrade adjustments. To view the equipment list, click the Chapter 3 bookmark
1
"Tests and Adjustments" in the PDF Service Guide
License Key Redemption
.
NOTE The enclosed Option Entitlement Certificate is a receipt, verifying that you have purchased a
licensed option for the PNA of your choice. You must now use a Keysight Web page to request a
license key for the instrument that will receive the option.
To enable the option product, you must request a license key from: http://www.keysight.com/find/
softwarelicense. To complete the request, you will need to gather the following information:
• From the certificate
❏ Order number
❏ Certificate number
• From your instrument
❏ Model number
❏ Serial number
❏ Host ID
The instrument information is available on the network analyzer – on the analyzer’s Help menu, click About
Network Analyzer.
If you provide an email address, Keysight will promptly email your license key. Otherwise, you will receive your
license key via postal mail.
1. See “Downloading the Online PNA Service Guide” on page 6.
Installation Note N5242-90115 5
Page 7

Downloading the Online PNA Service Guide
To view the online Service Guide for your PNA model number, use the following steps:
1. Go to www.keysight.com.
2. In the Search box, enter the model number of the analyzer (Ex: N5242A) and click Search.
3. Click Technical Support > Manuals.
4. Click Service Manual.
5. Click the service guide title to download the PDF file.
6. When the PDF of the Service Guide is displayed, scroll through the Contents section bookmarks to locate the
information needed.
Protecting Your Workspace from Electrostatic Discharge
For information, click on the Chapter 1 bookmark, “Electrostatic Discharge Protection” in the PDF Service
1
Guide
.
ESD Equipment Required for the Installation
Description Keysight Part Number
ESD grounding wrist strap 9300-1367
5-ft grounding cord for wrist strap 9300-0980
2 x 4 ft conductive table mat and 15-ft grounding wire 9300-0797
ESD heel strap (for use with conductive floors) 9300-1308
Tools Required for the Installation
Description Qty Part Number
T-10 TORX driver - set to 9 in-lbs (1.02 N.m) 1 N/A
T-20 TORX driver - set to 21 in-lbs (2.38 N.m) 1 N/A
5/16-in (8 mm) nutsetter or open end torque wrench
- set to 10 in-lbs (1.13 N.m)
5/16-in (8 mm) nutsetter or open end torque wrench - set to 21 in-lbs
(2.38 N.m)
3/16-in (5 mm) nutsetter or open end torque wrench - set to 6 in-lbs
(0.68 N.m)
5/8-in (16 mm) nutsetter or open end torque wrench - set to 21 in-lbs
(2.38 N.m)
1-in (25.4 mm) torque wrench - set to 72 in-lbs (8.15 N.m) 1 N/A
1/4-in (6 mm) open end wrench 1 N/A
1N/A
1N/A
1N/A
1N/A
6 Installation Note N5242-90115
Page 8

CAUTION Use a 5/16-in torque wrench set to 10 in-lbs on all cable connections except the front and rear
panel bulkhead connectors. Torque these connections to 21 in-lb.
About Installing the Upgrade
Products affected . . . . . . . . . . . . . . . . . . . . . . . . . . . . . . . . . . . .N5241A and N5242A Option 200
Installation to be performed by . . . . . . . . . . . . . . . . . . . . . . . .Keysight service center or personnel qualified by
Keysight
Estimated installation time . . . . . . . . . . . . . . . . . . . . . . . . . . . .4 hours
Estimated adjustment time. . . . . . . . . . . . . . . . . . . . . . . . . . . .1 hour
Estimated full instrument calibration time . . . . . . . . . . . . . . .4.5 hours
Installation Note N5242-90115 7
Page 9

Items Included in the Upgrade Kit
Check the contents of your kit against the following list. If any part is missing or damaged, contact Keysight
Te c hn o lo g ie s . R e fe r to “Getting Assistance from Keysight” on page 3.
Table 1 Contents of Upgrade Kit N5242-60115
Ref
Desig.
Description Qty Part Number
-- Installation note (this document) 1 N5242-90115
A8 26.5 GHz source (2) board 1 5087-7307
N5240-60074
A13 13.5 GHz source 2 synthesizer board 1
Was N524260150
A22 Splitter 1 5087-7139
5087-7829
A24 Mixer brick (2) 1
Was 5087-7766,
or 5087-7722
A26 Test port 3 bridge
A27 Test port 4 bridge
2 5087-7757
A29 Test port 1 coupler
A30 Test port 3 coupler
A31 Test port 4 coupler
4 5087-7813
A32 Test port 2 coupler
Machine screw, M3.0 x 20, pan head (3 to attach mixer brick 2 to mounting
--
block; 4 to attach 2 bridges to brackets)
Machine screw, M3.0 x 8, pan head (2 to attach mixer brick 2 to mounting
--
block)
7 0515-1410
4 0515-0372
-- Machine screw, M3.0 x 6, pan head (4 to attach 2 bridges to deck) 4 0515-0430
Machine screw, M3.0 x 14, pan head (2 to attach splitter to mixer brick
--
mounting block
Machine screw, M4 x 10, pan head (to attach A8 source 2 assy. to A19
--
motherboard)
2 0515-2994
2 0515-0380
-- Bulkhead connector assembly for test set front plate 16 1250-3805
-- Front panel overlay (label), 4-port 1 N5242-80003
-- Keypad overlay (label) 1 N5242-80005
-- Power switch overlay (label) 1 N5242-80007
-- Test set front plate, 4-port 1 N5221-00007
-- Gap pad (between each coupler and test set front plate) 4 E4403-20033
-- Vibration mount (between couplers 1 & 3, and 2 & 4) 2 0460-2725
-- Mounting nuts (for ports 3 & 4 test port couplers) 2 5022-1087
-- Short (for Mixer Brick A24) 1 0960-0055
N5247-20141
-- Front frame, 1-piece, machined, 4-port 1
Was N524520128
8 Installation Note N5242-90115
Page 10

Table 1 Contents of Upgrade Kit N5242-60115
Ref
Desig.
-- Bracket for test port bridge 2 N5242-00006
-- Cable guard 1 N5242-00030
-- Nameplate, N5241A 1 N5241-80001
-- Nameplate, N5242A 1 N5242-80006
-- Dust caps for test ports 4 1401-0214
-- Tie wrap, to secure cables to side of deck 7 1400-0249
A13 13.5 GHz (source 2) synth board J1207 to A8 26.5 GHz source (2) board
W2
P1
W5 A8 source (2) to W6 1 N5222-20062
W6 W5 to A26 port 3 bridge 1 N5222-20041
W7 A8 source (2) to W8 1 N5222-20063
W8 W7 to A27 port 4 bridge 1 N5222-20042
W12 A29 port 1 coupler to front-panel Port 1 CPLR THRU 1 N5222-20045
W14 A29 port 1 coupler to front-panel Port 1 CPLR ARM 1 N5222-20030
W15 A26 port 3 bridge to front-panel Port 3 SOURCE OUT 1 N5222-20047
W16 A30 port 3 coupler to front-panel Port 3 CPLR THRU 1 N5222-20049
W17 A26 port 3 bridge to front-panel REF 3 SOURCE OUT 1 N5222-20023
W18 A30 port 3 coupler to front-panel Port 3 CPLR ARM 1 N5222-20015
W19 A27 port 4 bridge to front-panel Port 4 SOURCE OUT 1 N5222-20050
W20 A31 port 4 coupler to front-panel Port 4 CPLR THRU 1 N5222-20054
W21 A27 port 4 bridge to front-panel REF 4 SOURCE OUT 1 N5222-20025
W22 A31 port 4 coupler to front-panel Port 4 CPLR ARM 1 N5222-20018
W24 A32 port 2 coupler to front-panel Port 2 CPLR THRU 1 N5222-20053
W26 A32 port 2 coupler to front-panel Port 2 CPLR ARM 1 N5222-20034
W30 Front panel jumpers 6 N5222-20091
W32 Port 3 RCVR C IN to A24 mixer brick (C) 1 N5222-20048
W33 Port 4 RCVR D IN to A24 mixer brick (D) 1 N5222-20055
W42 A21 HMA26.5 to A22 splitter 1 N5222-20009
W43 A22 splitter to A23 mixer brick 1 N5222-20007
W44 A22 splitter to A24 mixer brick 1 N5222-20008
W49 REF 3 RCVR R3 IN to A24 mixer brick (R3) 1 N5222-20057
W50 REF 4 RCVR R4 IN to A24 mixer brick (R4) 1 N5222-20058
W52 A23 mixer brick (R1) to A20 IF multiplexer (P411) 1 N5242-60021
W53 A23 mixer brick (R2) to A20 IF multiplexer (P412) 1 N5242-60022
W55 A24 mixer brick (D) to A20 IF multiplexer (P801) 1 N5242-60024
W56 A24 mixer brick (R4) to A20 IF multiplexer (P414) 1 N5242-60019
W57 A24 mixer brick (R3) to A20 IF multiplexer (P413) 1 N5242-60020
Description Qty Part Number
1 N5222-20090
Installation Note N5242-90115 9
Page 11

Table 1 Contents of Upgrade Kit N5242-60115
Ref
Desig.
W58 A24 mixer brick (C) to A20 IF multiplexer (P601) 1 N5242-60023
W67
A10 frequency reference board J7 to A13 13.5 GHz (source 2) synth board
J5
-- Ribbon cable, A19 test set motherboard J213 to A24 mixer brick (2) 1 N5242-60006
Description Qty Part Number
1 N5242-60030
10 Installation Note N5242-90115
Page 12

Installation Procedure for the Upgrade
The network analyzer must be in proper working condition prior to installing this option. Any necessary repairs
must be made before proceeding with this installation.
WARNING This installation requires the removal of the analyzer’s protective outer covers. The analyzer
must be powered down and disconnected from the mains supply before performing this
procedure.
Overview of the Installation Procedure
Step 1. Obtain a Keyword and Verify the Information.
Step 2. Remove the Outer Cover.
Step 3. Remove the Inner Cover.
Step 4. Remove the Front Panel Assembly.
Step 5. Remove the A19 Test Set Motherboard.
Step 6. Remove Some Existing Semirigid Test Set Cables.
Step 7. Remove the A23 Mixer Brick Assembly.
Step 8. Assemble the A24 Mixer Brick and A22 Splitter.
Step 9. Assemble the A26 and A27 Test Port Bridges.
Step 10. Install the Mixer Bricks Assembly and Test Port Bridge Assemblies.
Step 11. Assemble the A29 - A32 Test Port Coupler Assemblies.
Step 12. Install the LED Boards and Test Port Coupler Assemblies to the Test Set Front Plate.
Step 13. Install the Bulkhead Connectors in the Test Set Front Plate.
Step 14. Install the Coupler Plate Assembly to the Deck.
Step 15. Install the Second Source Boards.
Step 16. Install the Semirigid Test Set Cables.
Step 17. Reinstall the A19 Test Set Motherboard.
Step 18. Replace the 2-Port Front Frame with a 4-Port Front Frame.
Step 19. Reinstall the Front Panel Assembly.
Step 20. Install the Front Panel Overlays.
Step 21. Install the Front Panel Jumper Cables.
Step 22. Position the Cables and Wires to Prevent Pinching.
Step 23. Reinstall the Inner Cover.
Step 24. Reinstall the Outer Cover.
Step 25. Enable Option 400.
Installation Note N5242-90115 11
Page 13

Step 26. Perform Post-Upgrade Adjustments and Calibration.
Step 27. Prepare the PNA for the User.
Step 1. Obtain a Keyword and Verify the Information
Follow the instructions on the Option Entitlement Certificate supplied to obtain a license key for installation of
this upgrade. Refer to “License Key Redemption” on page 5.
Verify that the model number, serial number, and option number information on the license key match those of
the instrument on which this upgrade will be installed.
If the model number, serial number, or option number do not match those on your license key, you will not be
able to install the option. If this is the case, contact Keysight for assistance before beginning the installation of
this upgrade. Refer to “Contacting Keysight” on page 3.
Once the license key has been received and the information verified, you can proceed with the installation at
step 2.
Step 2. Remove the Outer Cover
For instructions, click the Chapter 7 bookmark "Removing the Covers" in the PDF Service Guide1.
Step 3. Remove the Inner Cover
For instructions, click the Chapter 7 bookmark “Removing the Covers” in the PDF Service Guide1.
Step 4. Remove the Front Panel Assembly
For instructions, click the Chapter 7 bookmark “Removing and Replacing the Front Panel Assembly” in the PDF
Service Guide
1
.
Step 5. Remove the A19 Test Set Motherboard
For instructions, click the Chapter 7 bookmark “Removing and Replacing the A19 Test Set Motherboard” in the
PDF Service Guide
1
.
Step 6. Remove Some Existing Semirigid Test Set Cables
NOTE Leave the gray flexible cables, the wire harnesses, and the ribbon cables connected where
possible. Any that are removed should be labeled for reconnection later.
CAUTION Be careful not to damage the center pins of the semirigid cables. Some flexing of the cables may
be necessary but do not over-bend them.
1. Place the analyzer bottom-side up on a flat surface.
1. See “Downloading the Online PNA Service Guide” on page 6.
12 Installation Note N5242-90115
Page 14
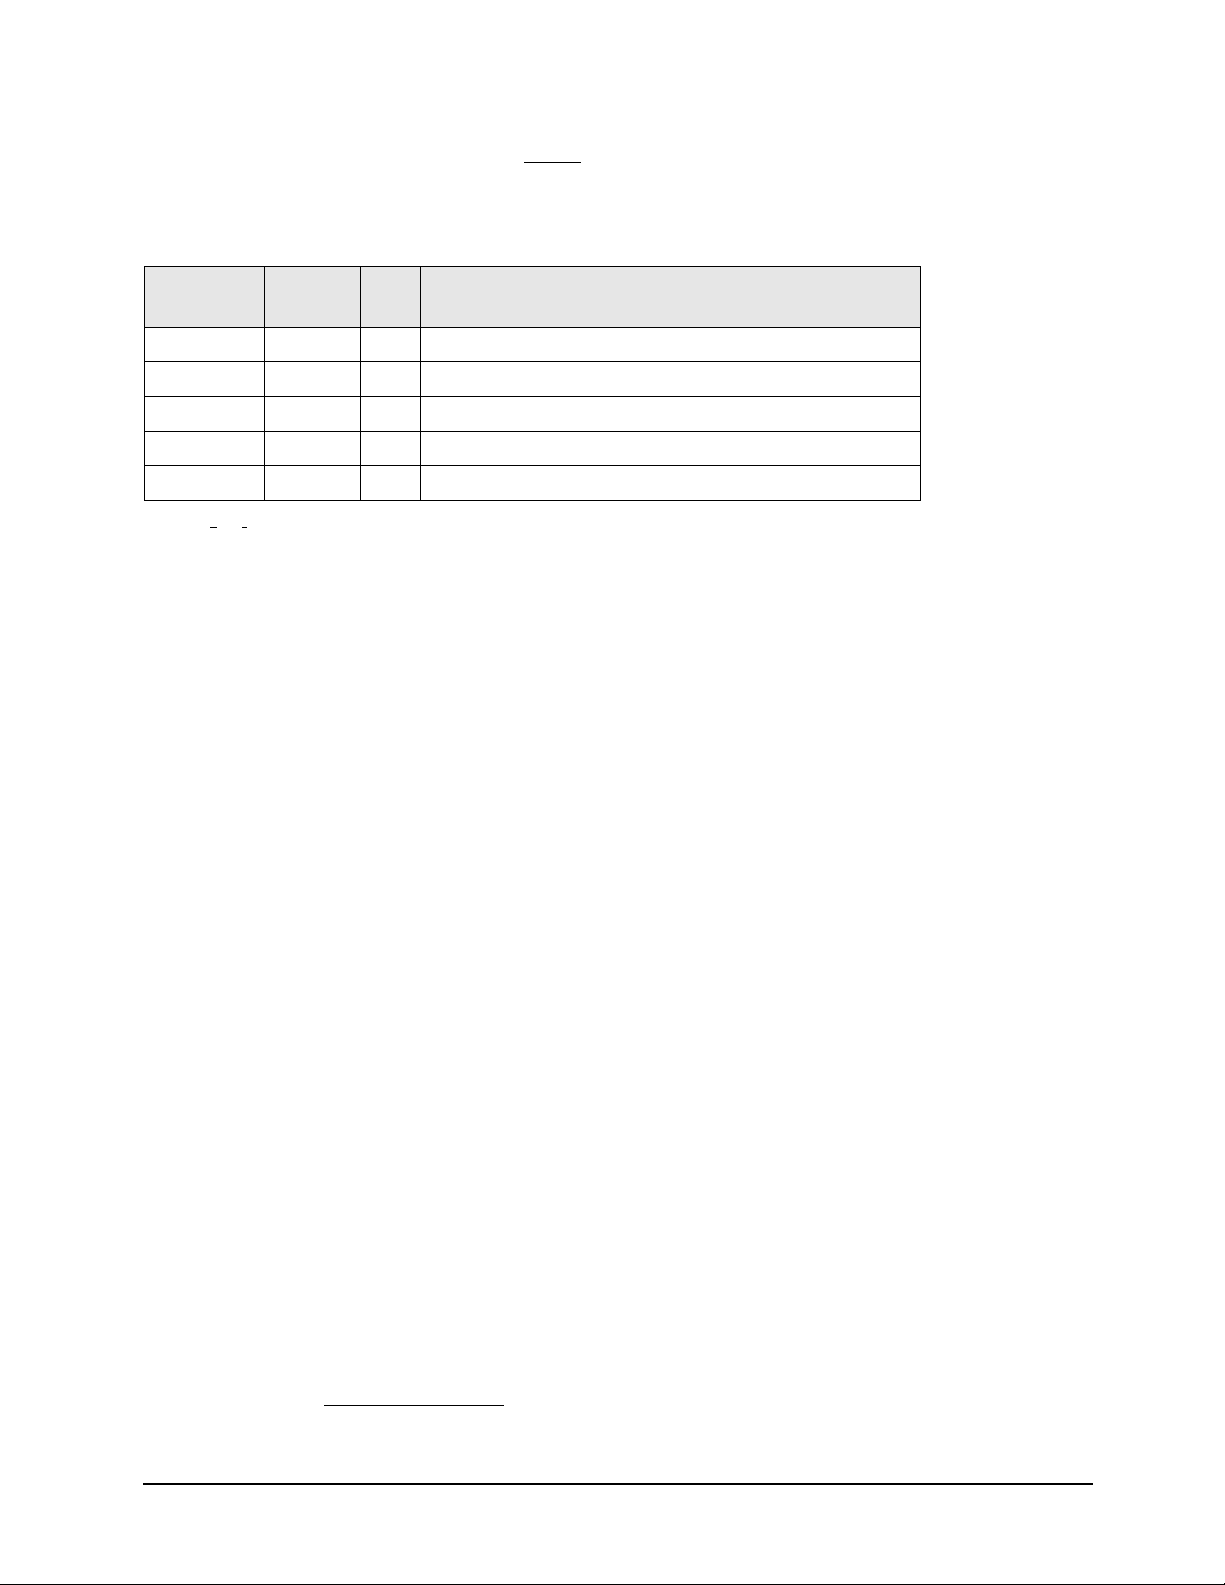
2. Remove all bottom-side semirigid cables except for those in the table below. To see an image showing the
location of these cables, click the Chapter 6 bookmark “Bottom RF Cables, Standard 2-Port Configuration,
Option 200" in the PDF Service Guide
1
. Do not discard the cables because some will be reused later in the
procedure.
Reference
Designator
W3 SR 1 A5 source (1) to W4
W9 SR 1 A5 source (1) to W10
W45 SR 1 A5 source (1) to W46
W46 SR 1 W46 to rear-panel EXT TSET DRIVE RF OUT (J6)
W47 SR 1 A23 mixer brick to EXT TSET DRIVE LO OUT (J5)
a. SR = semirigid coaxial cable.
Ty pe
a
Qty Description
3. Leave the gray flexible cables, the wire harnesses, and the ribbon cables connected where possible. Any
that are removed should be labeled for reconnection later.
Step 7. Remove the A23 Mixer Brick Assembly
Remove the A23 mixer brick assembly from the PNA. For instructions, click the Chapter 7 bookmark, “Removing
and Replacing the A23 and A24 Mixer Bricks” in the PDF Service Guide
1
.
Step 8. Assemble the A24 Mixer Brick and A22 Splitter
Refer to Figure 1 in this document for this step. New parts are listed in Table 1 on page 8 of this document.
1. Install the A24 mixer brick (5087-7829) to the mounting block by hand-starting three screws (item
1410). Do not tighten.
2. Install two screws (item
3. Go back and torque the three screws (item
1. See “Downloading the Online PNA Service Guide” on page 6.
➁; 0515-0372) and torque to 9 in-lbs.
; 0515-1410) to 9 in-lbs.
①
①
; 0515-
Installation Note N5242-90115 13
Page 15
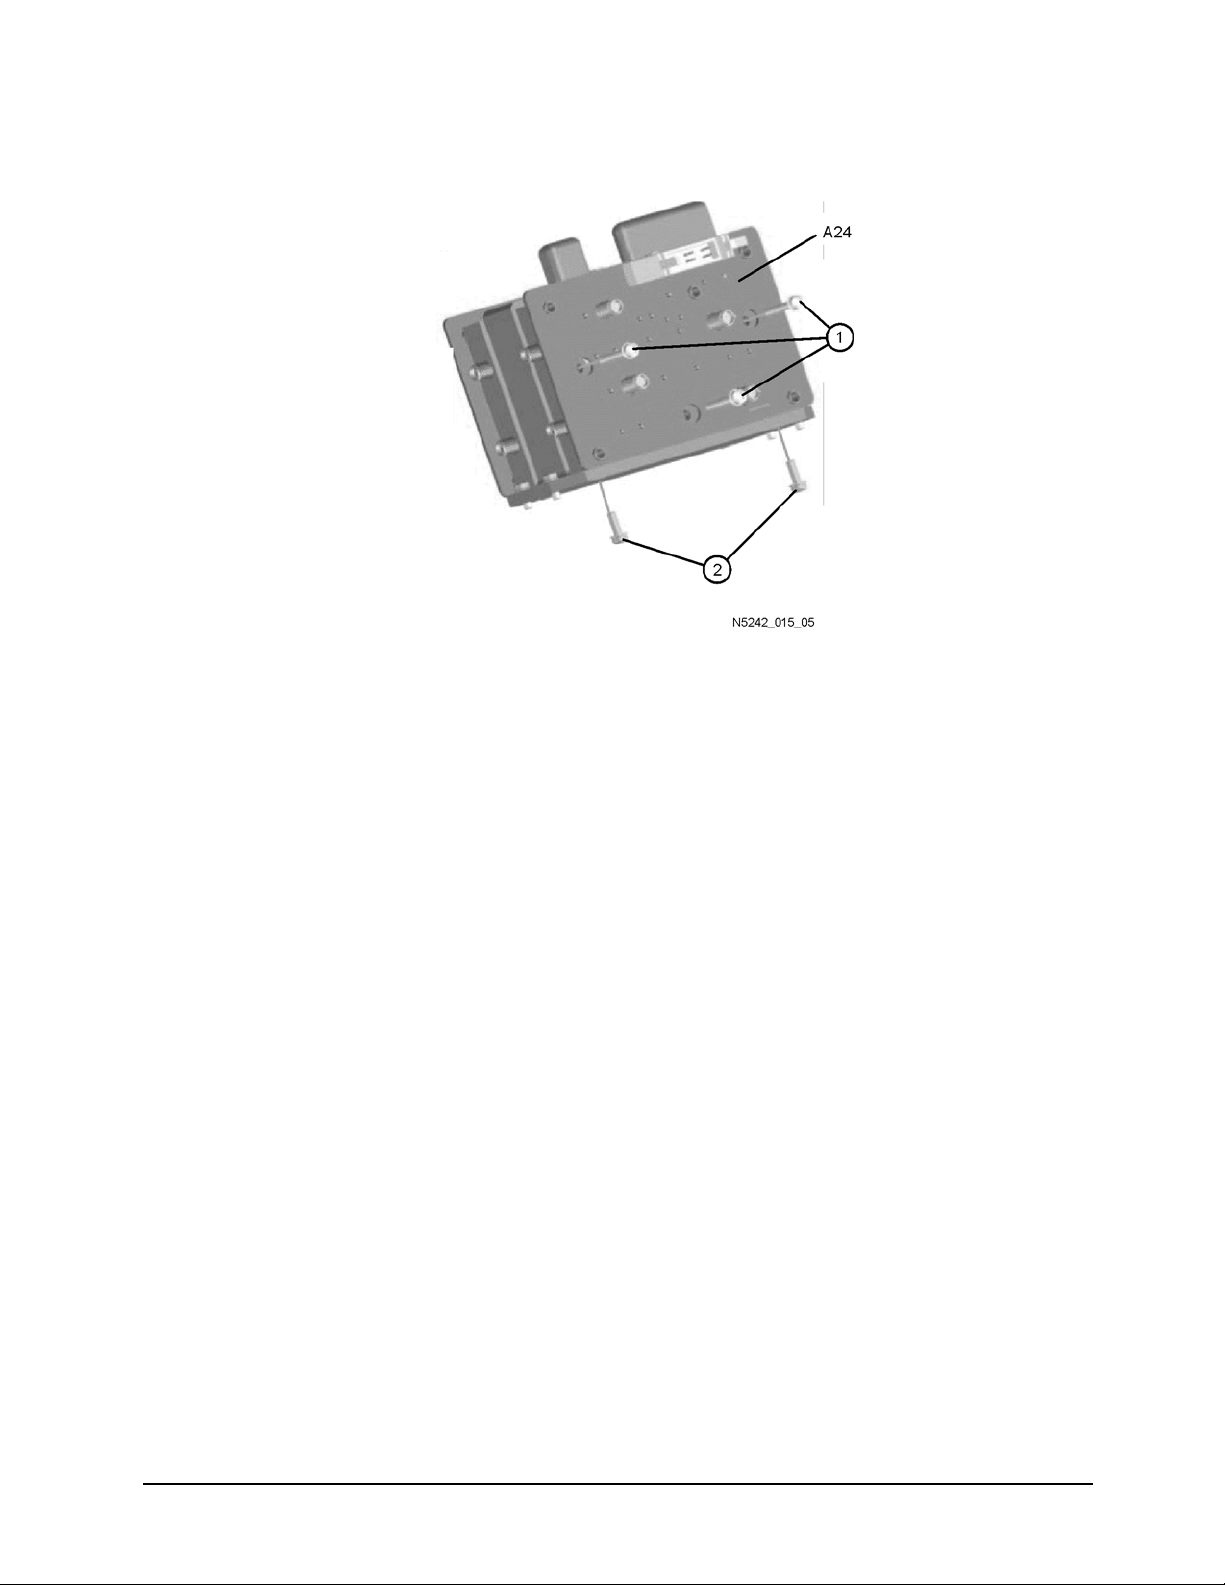
Figure 1 A24 Mixer Brick Assembly
14 Installation Note N5242-90115
Page 16
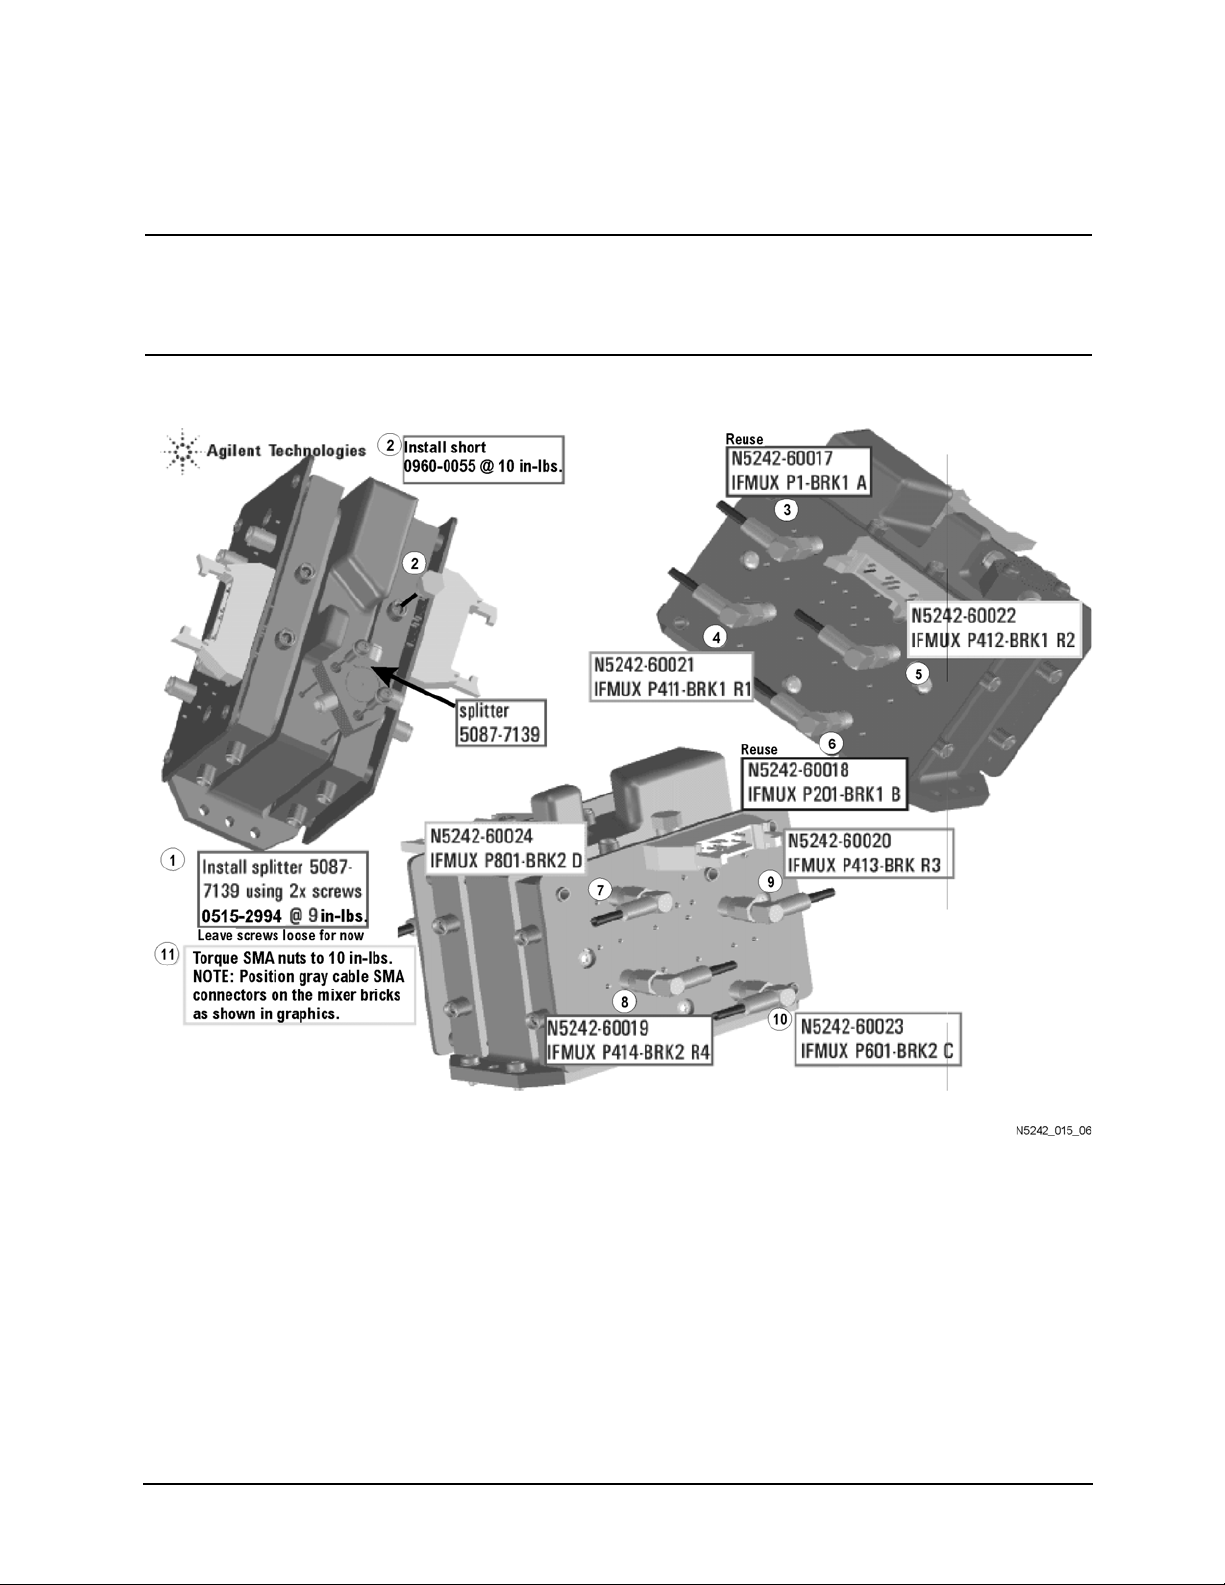
Refer to Figure 2 in this document for the remainder of this step.
4. Follow the eleven instructions shown in Figure 2. New parts are listed in Table 1 on page 8 of this document.
NOTE Graphics in this document such as Figure 2 use very brief text to instruct where to connect a
cable. For example, text that reads “N5242-60018 IFMUX P201 - BRK1 B” means to connect the
N5242-60018 gray flexible cable at the A20 IF MUX board connector P201 and at A23 Mixer Brick
1 connector B.
Figure 2 A23 and A24 Mixer Brick Assembly
Step 9. Assemble the A26 and A27 Test Port Bridges
Follow the two instructions shown in Figure 3 in this document. New parts are listed in Table 1 on page 8 of this
document.
Installation Note N5242-90115 15
Page 17
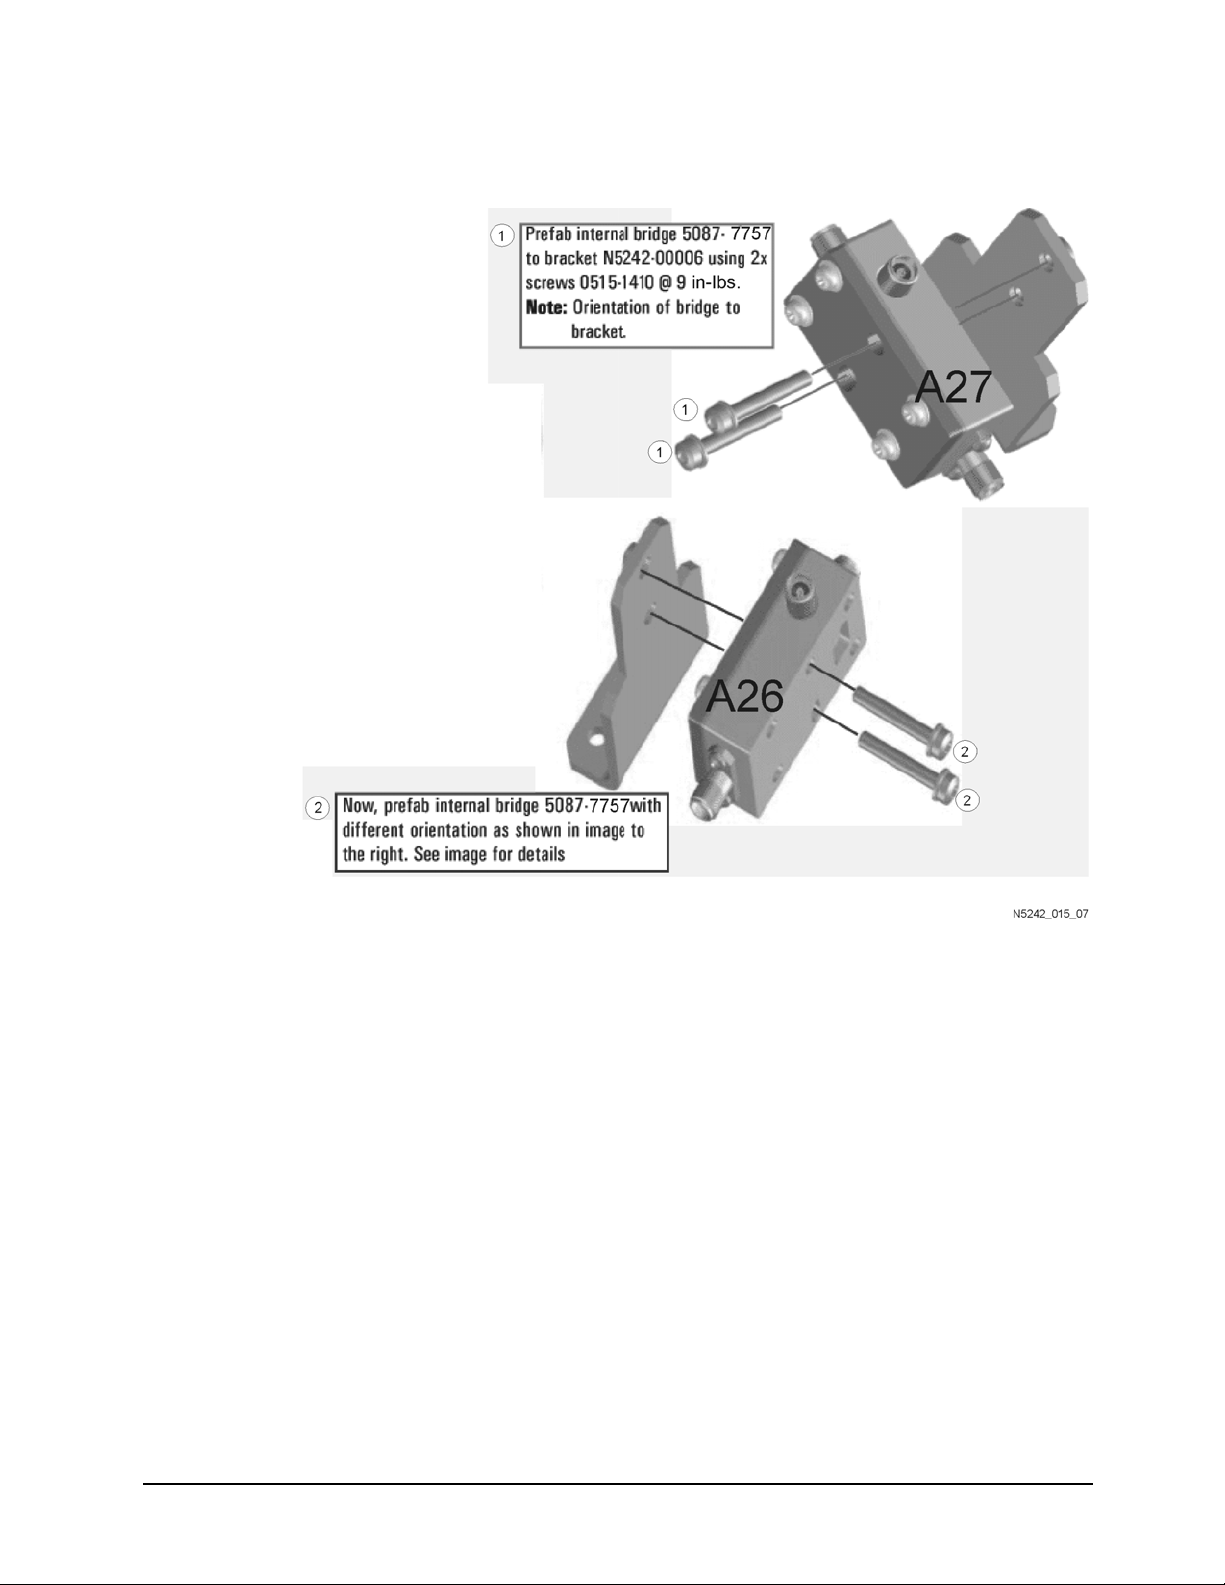
Figure 3 A26 and A27 Test Port Bridge Assembly
Step 10. Install the Mixer Bricks Assembly and Test Port Bridge Assemblies
Follow the two instructions shown in Figure 4 in this document. New parts are listed in Table 1 on page 8 of this
document.
16 Installation Note N5242-90115
Page 18
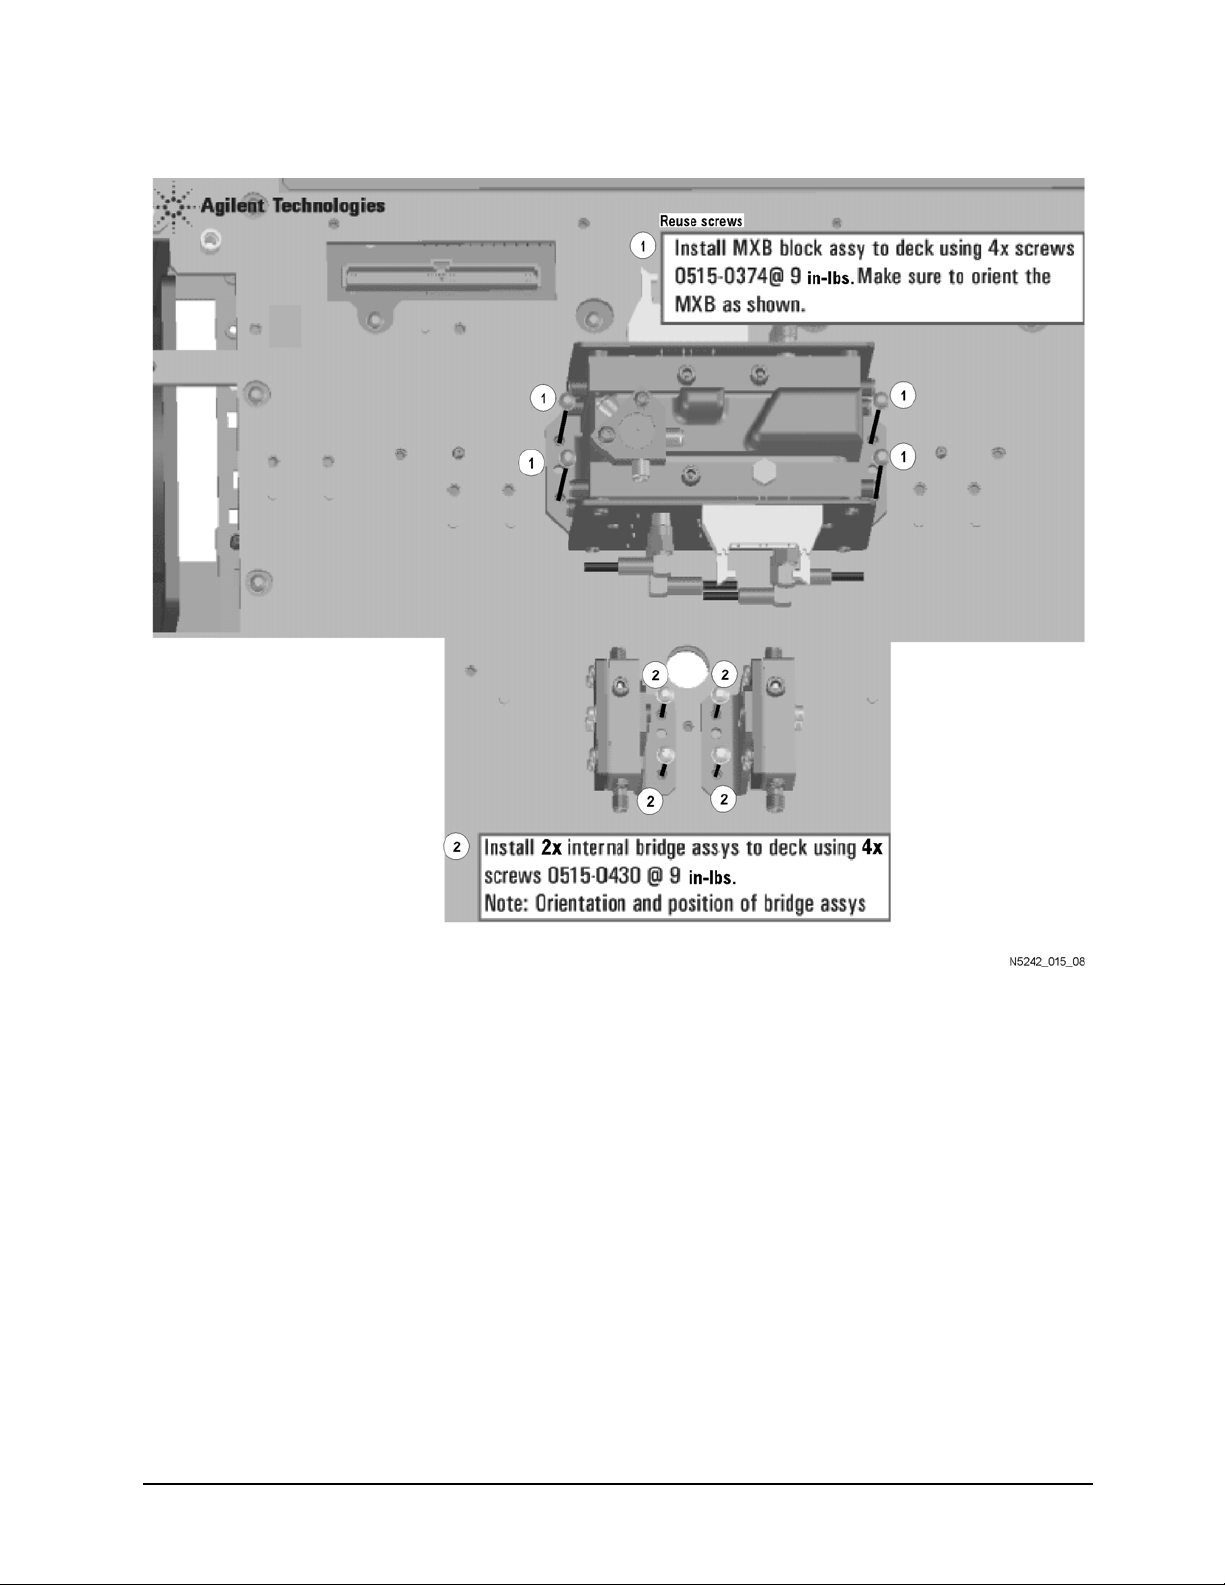
Figure 4 A23, A24 Mixer Bricks Installation and A26, A27 Test Port Bridges Installation
Installation Note N5242-90115 17
Page 19
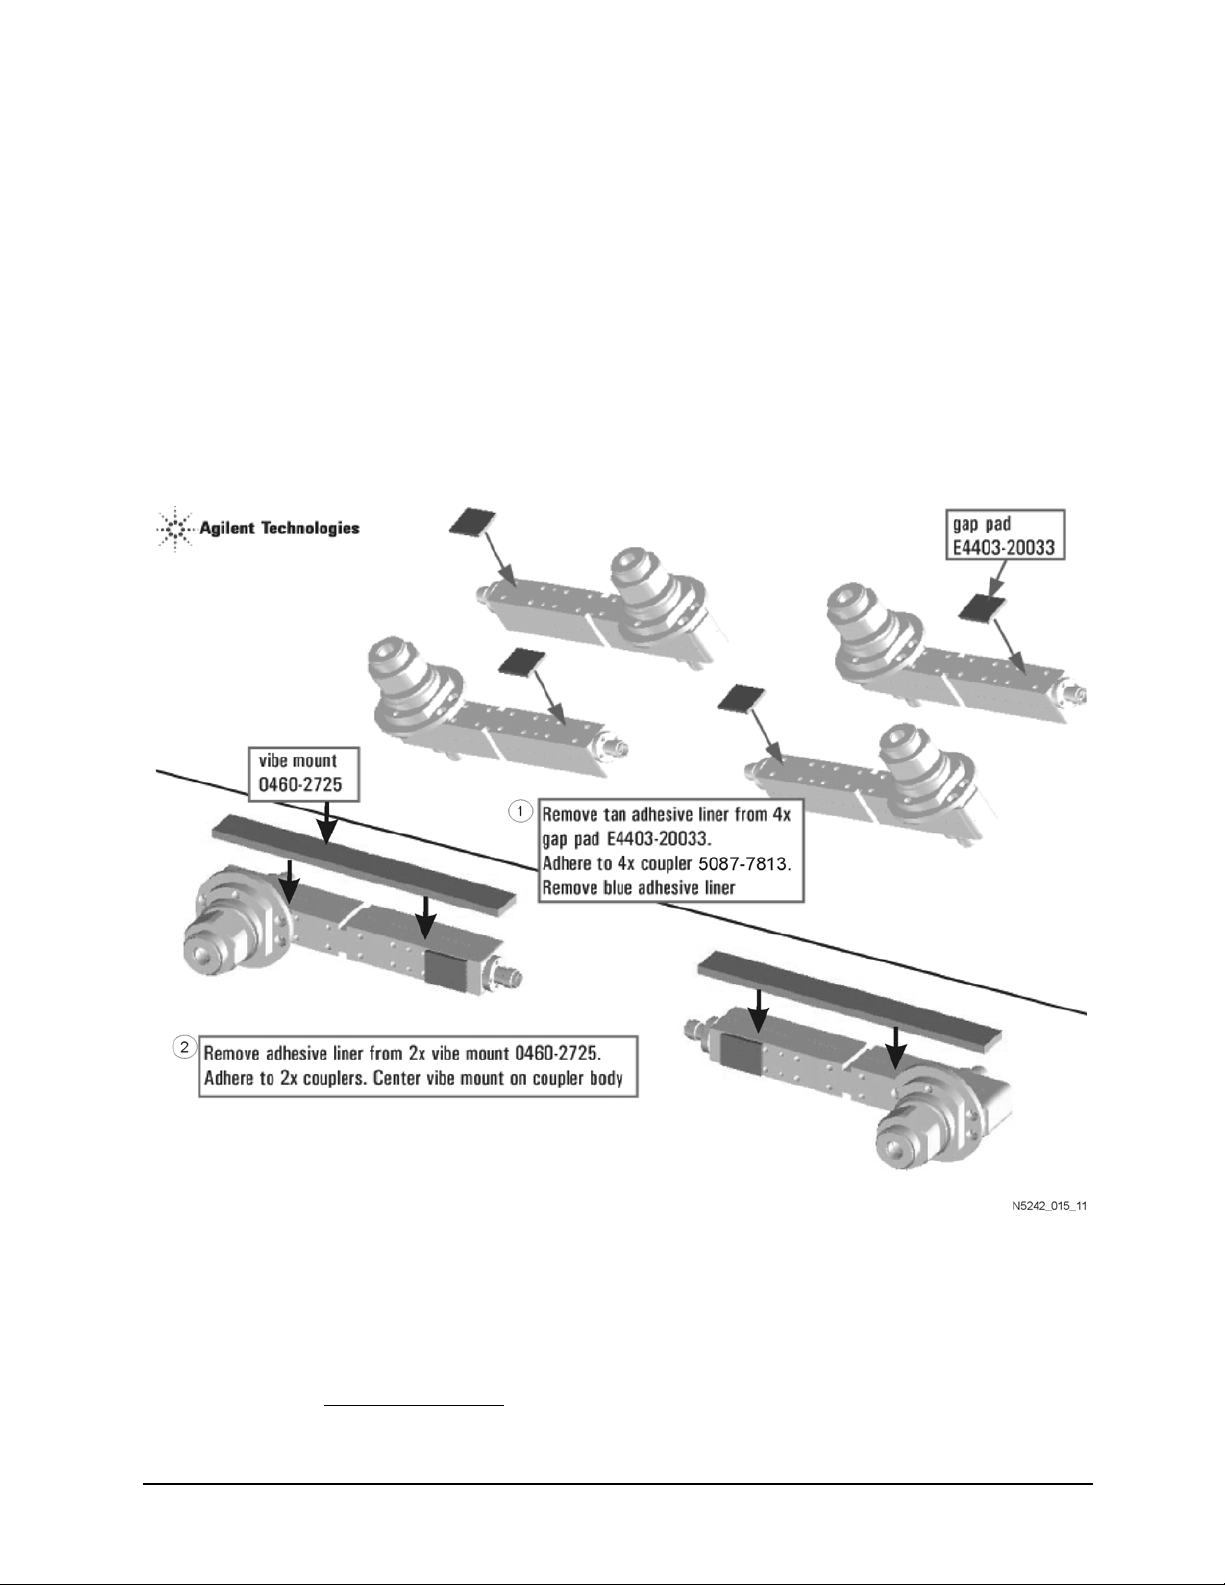
Step 11. Assemble the A29 - A32 Test Port Coupler Assemblies
1. Remove the A29 test port 1 coupler and A32 test port 2 coupler from the PNA. For instructions, click the
Chapter 7 bookmark, "Removing and Replacing the A29 - A32 Test Port Couplers" in the PDF Service Guide
2. If your analyzer’s serial number prefix is MY/SG/US5321 and above: Using pliers, remove the adhesive
bumper on the A29 test port 1 coupler and on the A32 test port 2 coupler.
3. If your analyzer’s serial number prefix is MY/SG/US5310 and below: Discard the test port couplers you
just removed from the PNA. These old couplers have 2.4 mm connectors and must be replaced with the new
couplers (3.5 mm connectors) included in the kit.
4. Follow the two instructions shown in Figure 5. New parts are listed in Table 1 on page 8 of this document.
Figure 5 A29 - A32 Test Port Coupler Assembly
1
.
1. See “Downloading the Online PNA Service Guide” on page 6.
18 Installation Note N5242-90115
Page 20
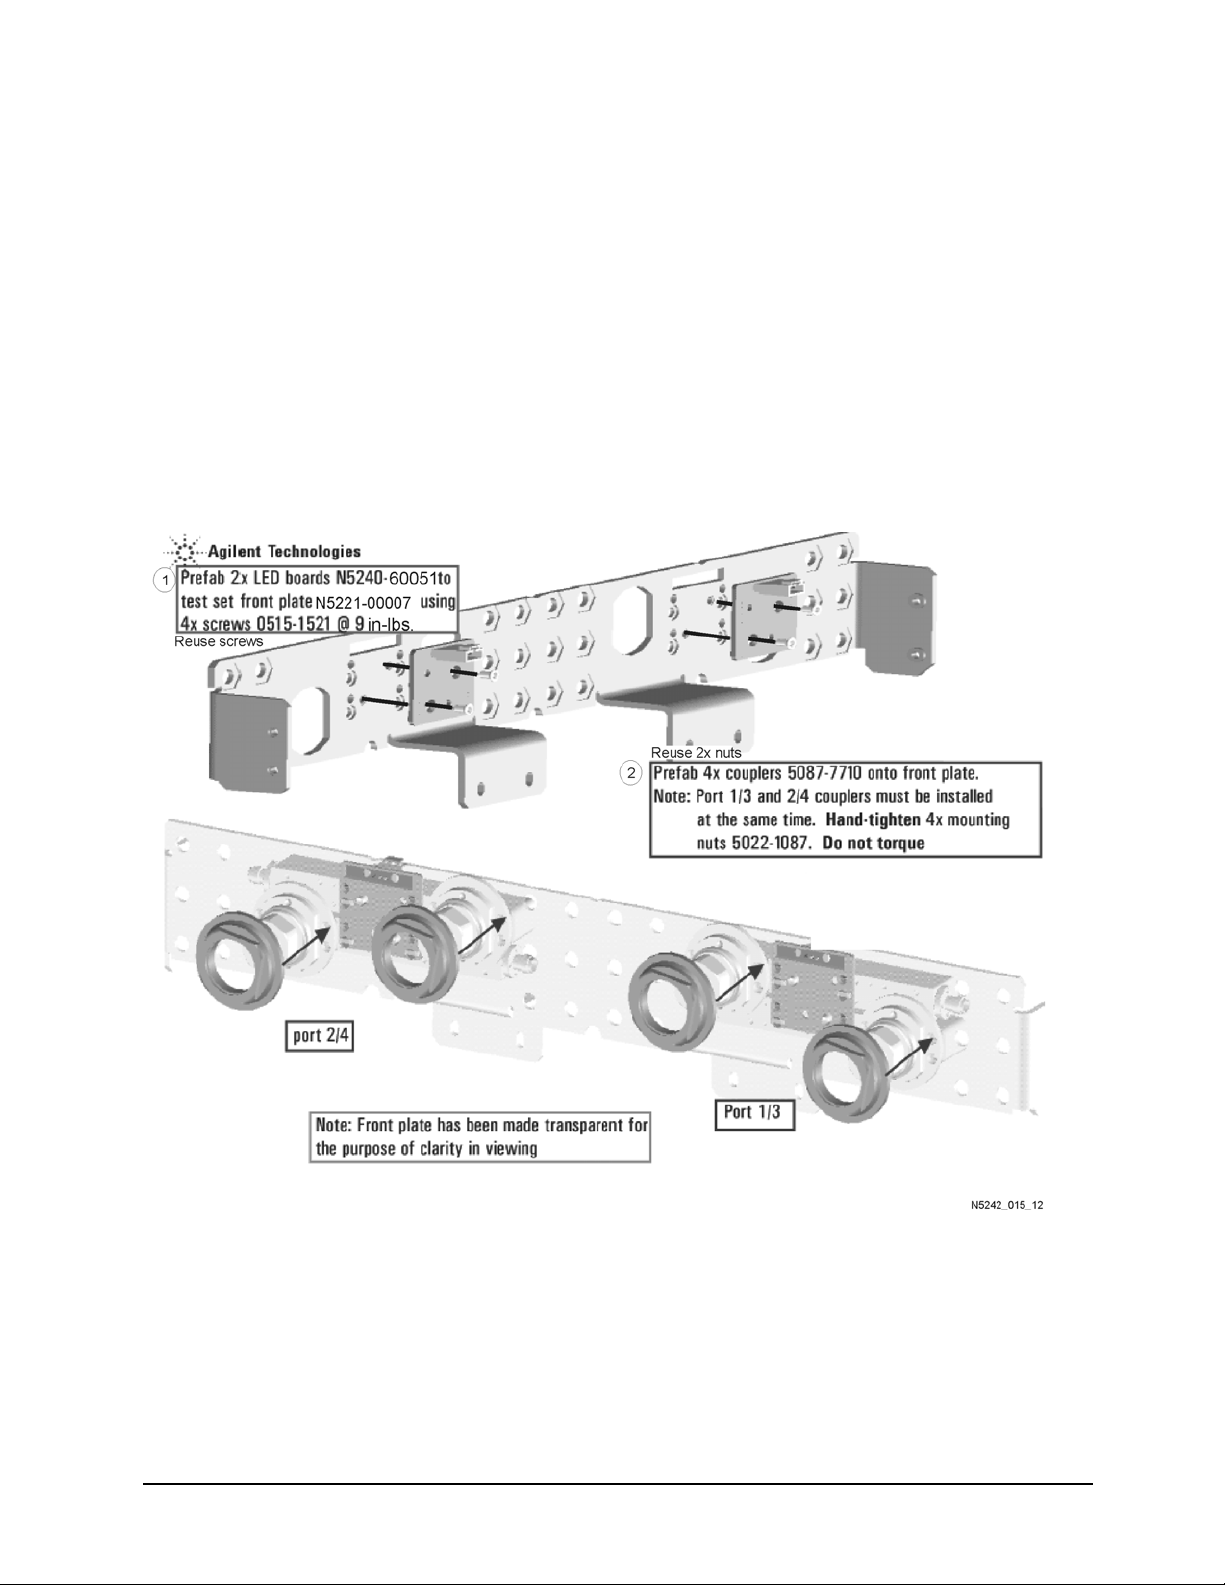
Step 12. Install the LED Boards and Test Port Coupler Assemblies to the Test Set Front Plate
1. Remove two screws from each LED board and remove the boards from the 2-port test set front plate of the
PNA.
2. If your analyzer’s serial number is MY/SG/US5321 and above:
Remove the bulkhead connectors from the 2-port test set front plate of the PNA. They will be installed later
in the 4-port test set front plate.
3. Remove the 2-port test set front plate from the test set deck.
4. Follow the two instructions shown in Figure 6 of this document. New parts are listed in Table 1 on page 8 of
this document.
Figure 6 LED Board Assemblies and Test Port Coupler Assemblies Installation
Installation Note N5242-90115 19
Page 21
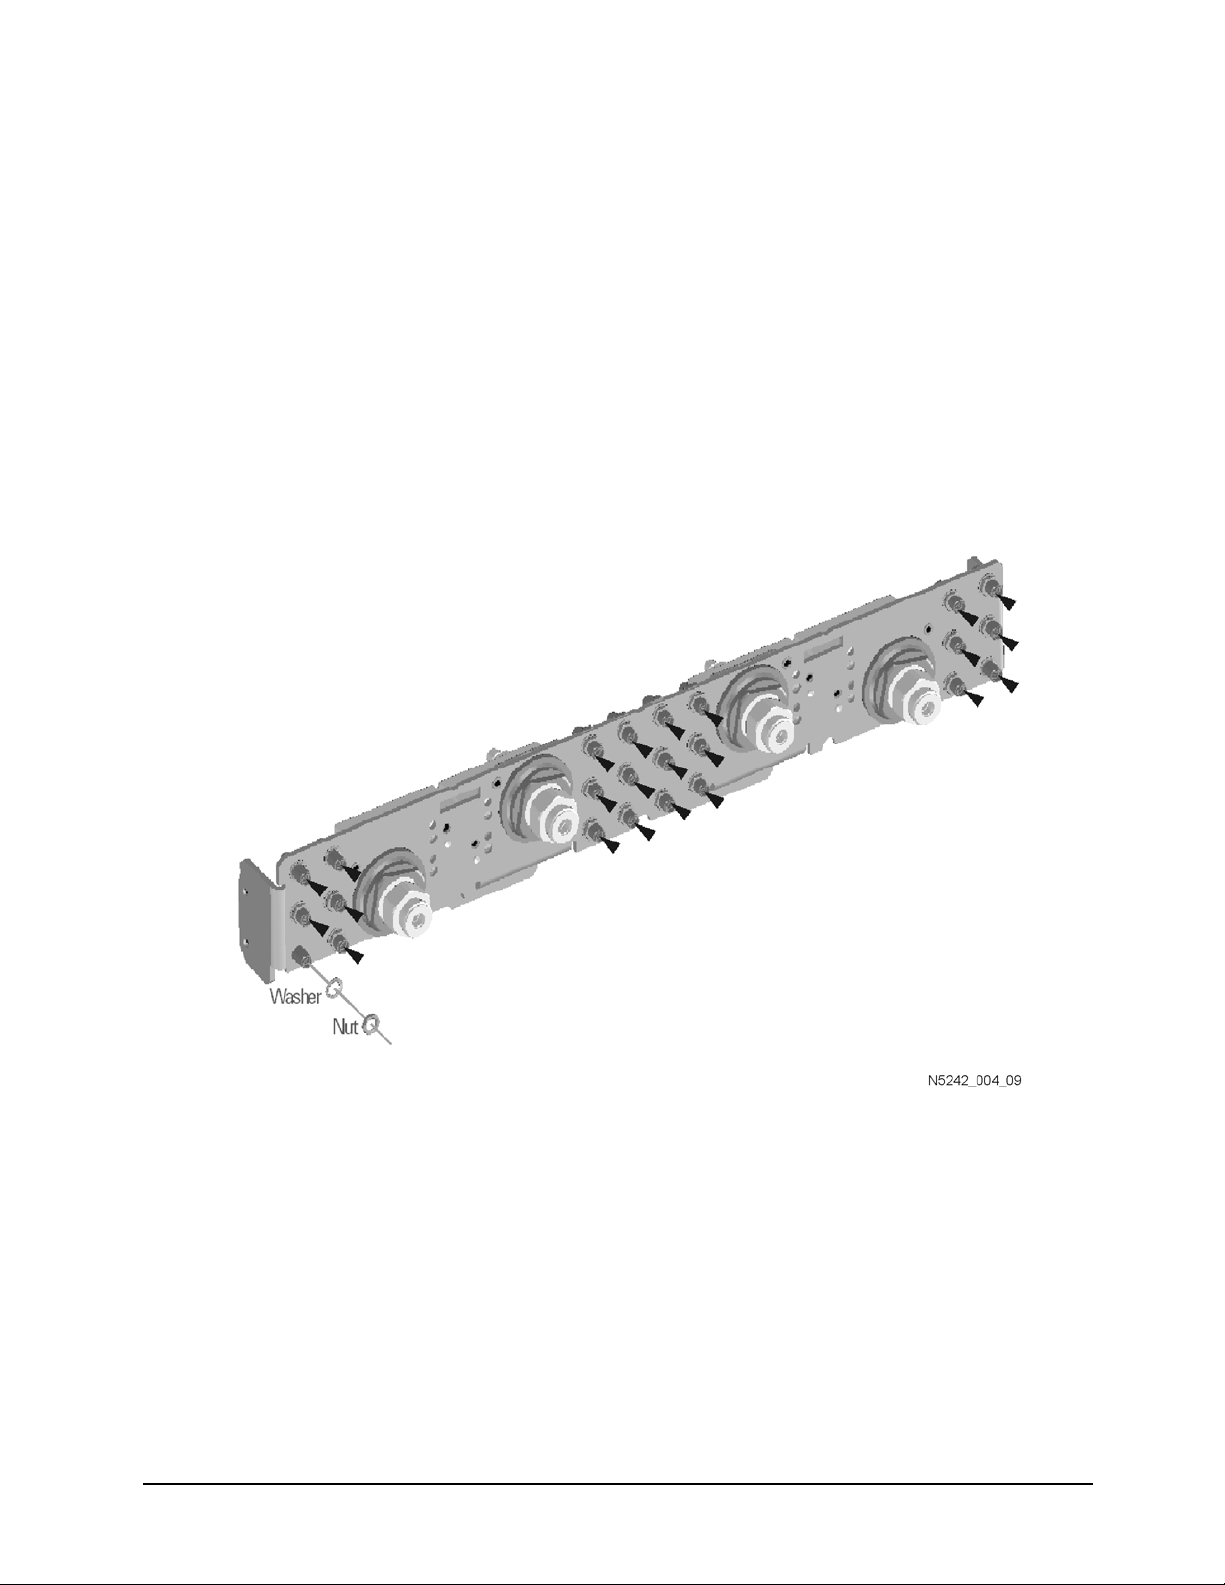
Step 13. Install the Bulkhead Connectors in the Test Set Front Plate
Refer to Figure 7 for this procedure. New parts are listed in Table 1 on page 8.
1. If your analyzer’s serial number is MY/SG/US5321 and above:
Locate the bulkhead connectors you removed earlier from the 2-port test set front plate of the PNA. Use
these and the new bulkhead connectors included in the kit for the remainder of this step.
2. From the back side of the test set front plate, insert a bulkhead connector into a hole in the plate.
3. Install 1x washer and 1x nut. Hand tighten nut and ensure bulkhead connector hexagon nut, on the back side
of test set front plate, is aligned to the test set subpanel hexagon indent.
4. Repeat previous two steps for the remaining bulkhead connectors.
5. Torque nuts, on the front side of test set front plate, to 21 in-lbs.
Figure 7 Bulkhead Connectors Installation
20 Installation Note N5242-90115
Page 22
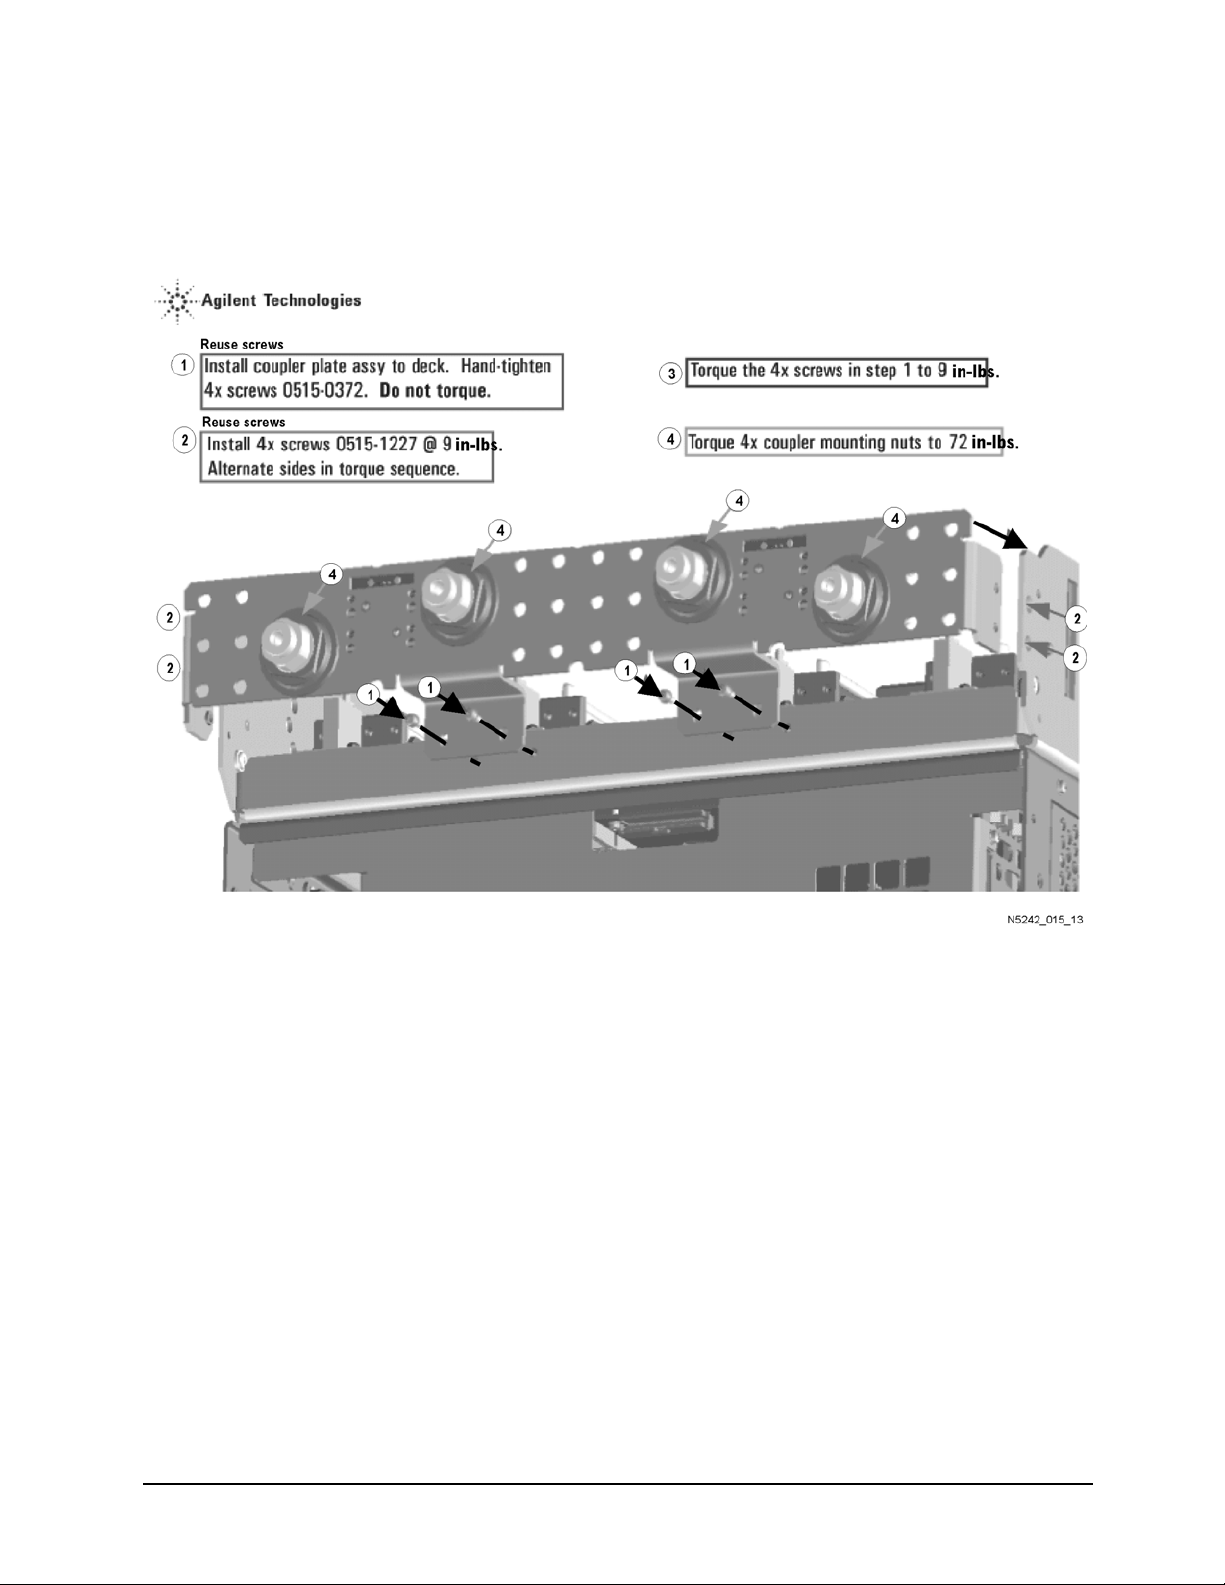
Step 14. Install the Coupler Plate Assembly to the Deck
Follow the four instructions shown in Figure 8.
Figure 8 Coupler Plate Assembly Installation
Step 15. Install the Second Source Boards
Install Cables on Source 2 Board
Refer to Figure 9 of this document for this part of this step. New parts are listed in Table 1 on page 8 of this
document.
1. Attach new cables W5 (N5222-20062) and W7 (N5222-20063) to the A8 26.5 GHz source 2 board as shown.
Make sure that both cables are parallel to the A8 26.5 GHz source board as shown in the END VIEW. Cable
W5 is the longer of the two cables.
2. Use a 5/16-in torque wrench set to 10 in-lbs to tighten the cable connectors.
Installation Note N5242-90115 21
Page 23
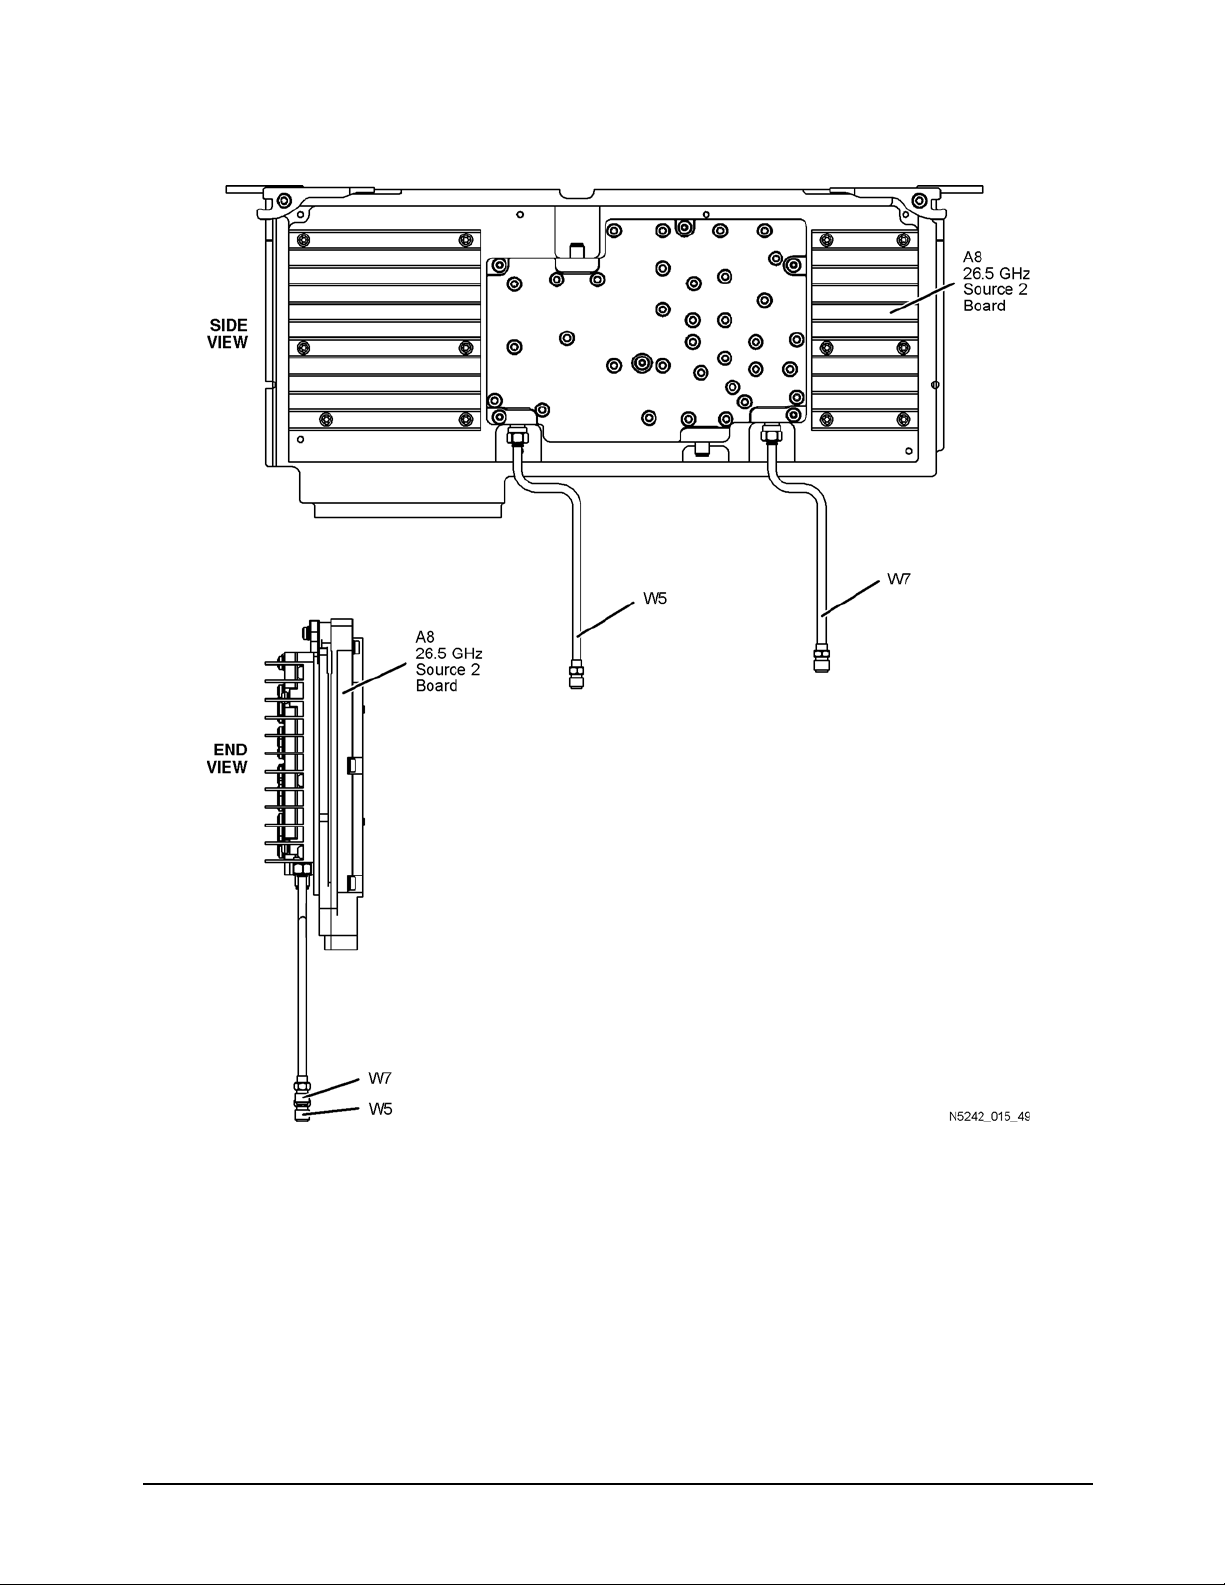
Figure 9 Second Source Boards Installation, Part 1
Install Cable on Source 2 Synthesizer Board
Install gray cable W67 (N5242-60030) to connector J5 of the Source 2 Synthesizer board. The loose end of the
cable will be connected on the A10 frequency reference board (J7) after the Source 2 Synthesizer board has
been installed in the analyzer.
Install the Second Source Boards into the Analyzer
Refer to Figure 9-2 for this part of this step of the procedure. New parts are listed in Table 1 on page 8.
1. Install the A8 26.5 GHz source 2 board (5087-7307) and the A13 13.5 GHz source 2 synthesizer board (N5240-
22 Installation Note N5242-90115
Page 24
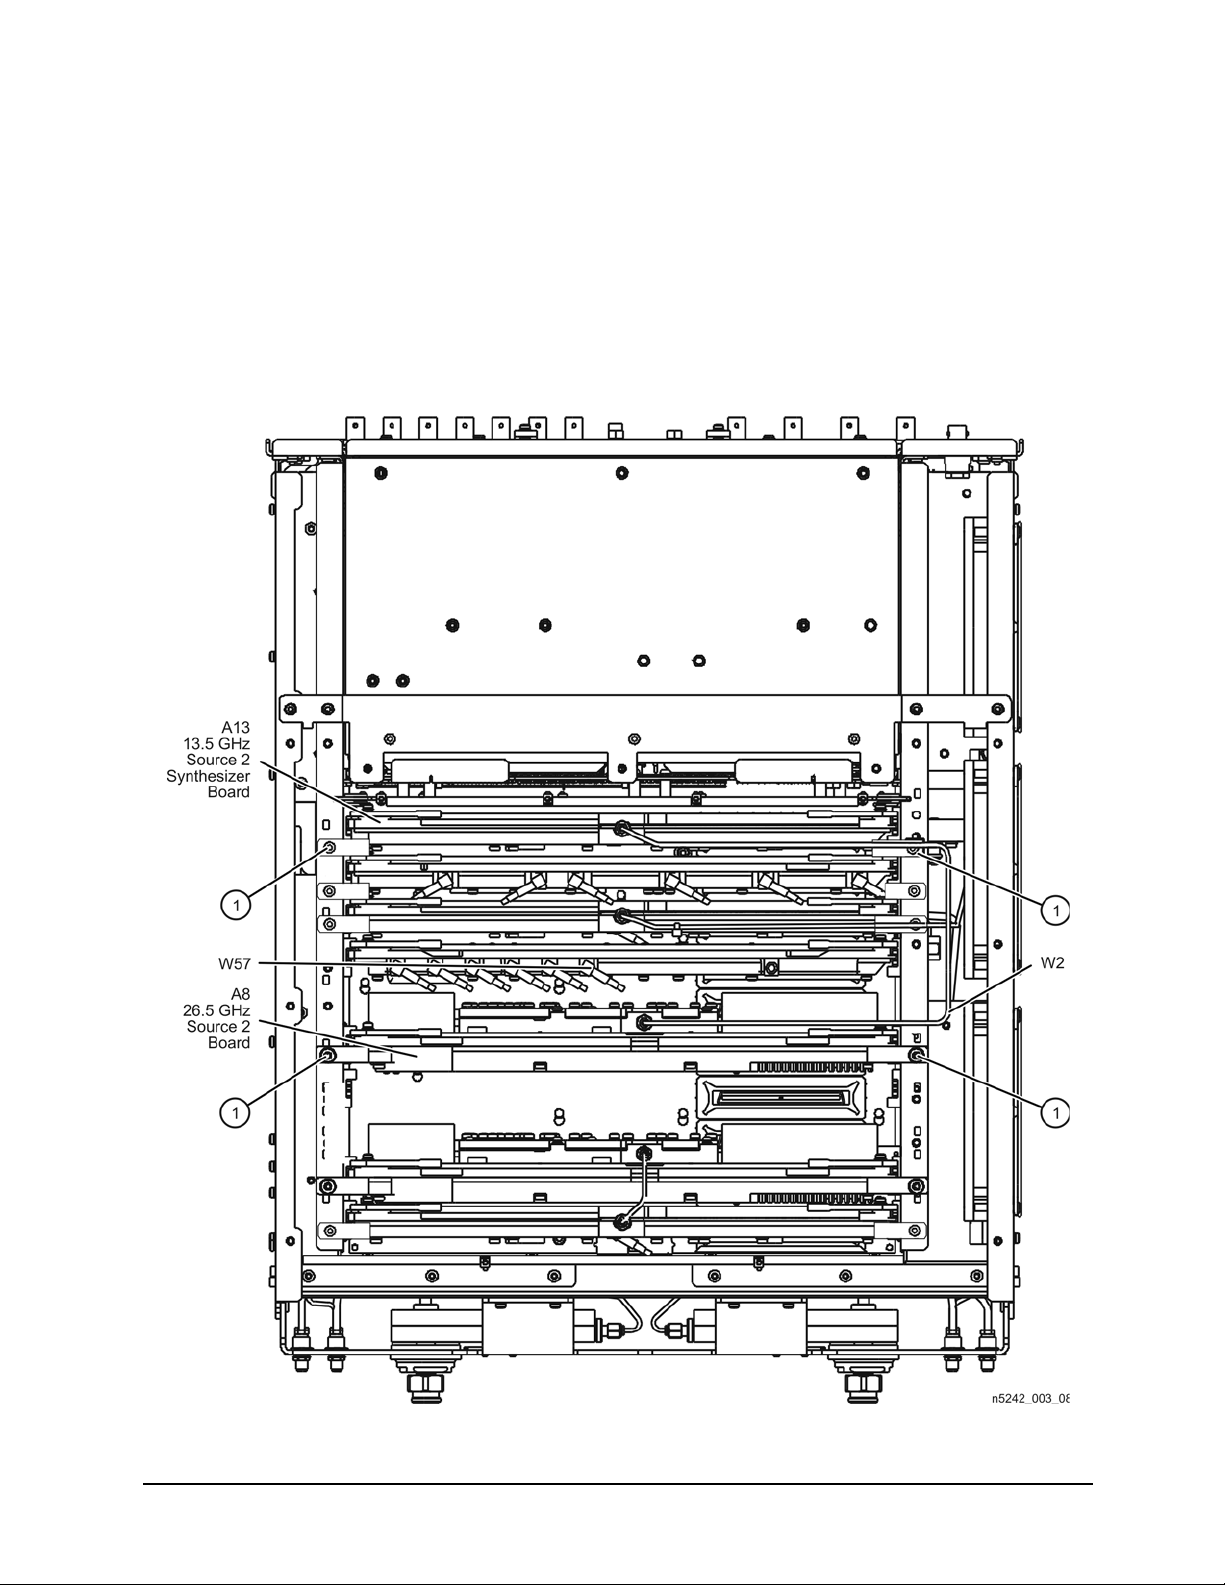
60074) in the analyzer as shown. Secure both boards with two screws (item ①; 0515-0380) and torque to 21
in-lbs.
2. Connect cable W2 (N5222-20090) between the A8 26.5 GHz source 2 board and the A13 13.5 GHz source 2
synthesizer board as shown. Be sure to position the cable in the wire looms as shown. Tighten the cable
connectors to 10 in-lbs using a 5/16-in torque wrench.
3. Connect the loose end of new gray flex cable W22 (N5242-60030) on the A10 frequency reference board
(J7). (The other end of this cable was previously connected to J5 of the source 2 synthesizer board
.)
Figure 9-2 Second Source Boards Installation
Installation Note N5242-90115 23
Page 25

Step 16. Install the Semirigid Test Set Cables
CAUTION Follow instructions carefully when making cable connections, especially wire harness
connections. Incorrect connections can destroy components, resulting in additional customer
costs.
CAUTION Be careful not to damage the center pins of the semirigid cables. Some flexing of the cables may
be necessary but do not over-bend them.
CAUTION Use a 5/16-in torque wrench set to 10 in-lbs on all cable connections except the front and rear
panel bulkhead connectors. Torque these connections to 21 in-lb.
NOTE Cables that are to be reinstalled are designated with “reuse.” Part numbers in a normal weight
font are for analyzers with serial numbers MY/SG/US5310 and below. Part numbers in a bold
font are for analyzers with serial numbers MY/SG/US5321 and above.
To see an image showing the location of these cables, click the Chapter 6 bookmark “Bottom RF Cables,
Standard 4-Port Configuration, Option 400" in the PDF Service Guide
1
.
4. Install the following semirigid cables in the order listed. New parts are listed in Table 1 on page 8.
• W50 (N5222-20058) REF 4 RCVR R4 IN to A24 mixer brick (R4)
• W49 (N5222-20057) REF 3 RCVR R3 IN to A24 mixer brick (R3)
• W34 (reuse) (N5242-20062 or N5222-20052) Port 2 RCVR B IN to A23 mixer brick (B)
• W26 (N5222-20034) A32 port 2 coupler to front-panel Port 2 CPLR ARM
• W33 (N5222-20025) Port 4 RCVR D IN to A24 mixer brick (D)
• W22 (N5242-20028) A31 port 4 coupler to front-panel Port 4 CPLR ARM
• W24 (N5242-20063) A32 port 2 coupler to front-panel Port 2 CPLR THRU
• W20 (N5222-20054) A31 port 4 coupler to front-panel Port 4 CPLR THRU
• W19 (N5222-20050) A27 port 4 bridge to front-panel Port 4 SOURCE OUT
• W23 (reuse) (N5242-20061 or N5222-20051) A28 port 2 bridge to front-panel Port 2 SOURCE OUT
• W27 (reuse) (N5242-20079 or N5222-20059) A28 port 2 bridge to front-panel REF 2 SOURCE OUT
* Secure W27 (N5242-20079) to side of deck with 2x tie wraps (1400-0249)
• W21 (N5222-20025) A27 port 4 bridge to front-panel REF 4 SOURCE OUT
• W32 (N5222-20048) Port 3 RCVR C IN to A24 mixer brick (C)
• W18 (N5222-20023) A30 port 3 coupler to front-panel Port 3 CPLR ARM
• W31 (reuse) (N5242-20056 or N5222-20046) Port 1 RCVR A IN to A23 mixer brick (A)
1. See “Downloading the Online PNA Service Guide” on page 6.
24 Installation Note N5242-90115
Page 26

• W14 (N5222-20030) A29 port 1 coupler to front-panel Port 1 CPLR ARM
• W12 (N5222-20045) A29 port 1 coupler to front-panel Port 1 CPLR THRU
• W16 (N5222-20049) A30 port 3 coupler to front-panel Port 3 CPLR THRU
• W15 (N5222-20047) A26 port 3 bridge to front-panel Port 3 SOURCE OUT
• W17 (N5222-20023) A26 port 3 bridge to front-panel REF 3 SOURCE OUT
• W11 (reuse) (N5242-20054 or N5222-20044) A25 port 1 bridge to front-panel Port 1 SOURCE OUT
* Loosen 3x screws on A33 Reference Mixer Switch board, then slide the board to the rear of the
instrument to connect the following two cables (N5242-20042 and N5242-20043).
• W36 (reuse) (N5242-20042 or N5222-20032) REF 1 RCVR R1 IN to A33 reference mixer switch
• W35 (reuse) (N5242-20043 or N5222-20033)
* Torque 3x screws on A33 Reference Mixer Switch board to 9 in-lbs.
* Use 1/4” wrench to hold source cable connectors when tightening mating semi-rigid cables.
• W10 (reuse) (N5242-20053 or N5222-20043) W9 to A28 port 2 bridge
• W6 (N5222-20041) W5 to A26 port 3 bridge
• W8 (N5222-20042) W7 to A27 port 4 bridge
• W4 (reuse) (N5242-20050 or N5222-20040) W3 to A25 port 1 bridge
• W48 (reuse) (N5242-20076 or N5222-20056) A33 reference mixer switch to A23 mixer brick (R1)
* Secure W48 (N5242-20076) to side of deck with 3x tie wraps (1400-0249).
• W13 (reuse) (N5242-20011 or N5222-20005) A25 port 1 bridge to A33 reference mixer switch
• W40 (reuse) (N5242-20049 or N5222-20039) REF 2 RCVR R2 IN to A23 mixer brick (R2)
• W43 (N5222-20007) A22 splitter to A23 mixer brick
* Leave the W43 loose for now.
• W44 (N5222-20008) A22 splitter to A24 mixer brick
* Leave the W44 loose for now.
• W42 (N5222-20009) A21 HMA26.5 to A22 splitter
* Leave the W42 loose for now.
* Tighten 2x screws on A22 splitter to 9 in-lbs.
* Tighten cable nuts on W42, W43, and W44 to 10 in-lbs.
A33 reference mixer switch to front-panel REF 1 SOURCE OUT
• W41 (reuse) (N5242-20110 or N5222-20067) A11 13.5 GHz synthesizer to A21 HMA26.5
* Route cable through deck cutout to A11 synthesizer board.
Installation Note N5242-90115 25
Page 27

Step 17. Reinstall the A19 Test Set Motherboard
1. For instructions, click the Chapter 7 bookmark “Removing and Replacing the A19 Test Set Motherboard” in
the PDF Service Guide
1
.
2. Connect new ribbon cable N5242-60006 from J213 to A24 mixer brick (2).
To see an image showing the location of the cable, click the Chapter 6 bookmark "Bottom Ribbon Cables and
Wire Harnesses, Standard 4-Port Configuration, Option 400" in the PDF Service Guide
1
.
Step 18. Replace the 2-Port Front Frame with a 4-Port Front Frame
Before the front frame can be replaced, the items making up the back side of the front panel assembly must be
removed. For instructions on removing these items, click the Chapter 7 bookmark “Removing and Replacing the
A1-A3 and Other Front Panel Subassemblies” in the PDF Service Guide
page 8.
1. In the section “Removing the A2 USB Board,” perform step 1 (the only step).
2. In the section “Removing the A1 Front Panel Interface Board and Keypad Assembly”, perform steps 1 - 5.
3. In the section “Removing the Power Switch Board and Power Button Keypad”, perform only steps 1 and 2.
4. Remove the braided gasket from the backside edges of the 2-port front frame and install it in the 4-port front
frame (N5247-20141).
5. Reassemble the front panel assembly with the new 4-port front frame (N5247-20141) by reversing the order
of the instructions previously followed.
1
. New parts are listed in Tab le 1 o n
Step 19. Reinstall the Front Panel Assembly
For instructions on reinstalling the front panel assembly, click the Chapter 7 bookmark “Removing and
Replacing the Front Panel Assembly” in the PDF Service Guide
1
.
Step 20. Install the Front Panel Overlays
To see an image of the front panel overlay, keypad overlay, and power button overlay, click the Chapter 6
bookmark “Front Panel Assembly, Front Side, All Options” in the PDF Service Guide
Table 1 on page 8.
1. Remove the protective backing from the new front panel overlay (N5242-80003 for instruments without
option 029 or N5242-80012 for instruments with option 029).
2. Loosely place the overlay in the recess on the front panel.
3. Placing two fingers at the middle, press the overlay firmly onto the frame while sliding your fingers in
opposite directions towards the ends of the overlay. Repeat on all areas of the overlay.
4. Repeat steps 1-3 to install the keypad overlay (N5242-80005).
5. Repeat steps 1-3 to install the power button overlay (N5242-80007).
6. Repeat steps 1-3 to install the new nameplate (N5241-80001 for N5241A models or
1. See “Downloading the Online PNA Service Guide” on page 6.
1
. New parts are listed in
26 Installation Note N5242-90115
Page 28

N5242-80006 for N5242A models).
System
Service
Option Enable
Step 21. Install the Front Panel Jumper Cables
For instructions on installing the W30 front panel jumpers (N5222-20091), click the Chapter 7 bookmark
“Removing and Replacing the Front Panel Assembly” in the PDF Service Guide
1
.
Step 22. Position the Cables and Wires to Prevent Pinching
On the top side of the PNA, carefully position the grey flex cables so they can’t be pinched between the covers
and the rails.
On the bottom side of the PNA, carefully fold or push down the ribbon cables and wires so they can’t be
pinched between the hardware and the outer cover. Ribbon cables and wires must never be positioned on top
of hardware.
Step 23. Reinstall the Inner Cover
For instructions, click the Chapter 7 bookmark “Removing the Covers” in the PDF Service Guide1.
Step 24. Reinstall the Outer Cover
For instructions, click the Chapter 7 bookmark “Removing the Covers” in the PDF Service Guide1.
Step 25. Enable Option 400
Procedure Requirements
• The analyzer must be powered up and operating to perform this procedure.
• The Network Analyzer program must be running.
• Obtain a license key for installation of this upgrade by following the instructions on the supplied Option
Entitlement Certificate.
Option Enable Procedure
1. To start the option enable utility, press UTILITY , then , then . An
option enable dialog box will appear.
2. Click the arrow in the Select Desired Option box. A list of available options will appear.
3. In the Select Desired Option list, click P04 - 4-Ports.
4. Using the keyboard, enter the license key in the box provided. The license key is printed on the the license
message you received from Keysight. Enter this key exactly as it is printed on the message.
5. Click Enable.
6. Click Ye s in answer to the displayed question in the Restart Analyzer? box.
7. When the installation is complete, click Exit.
Option Verification Procedure
Installation Note N5242-90115 27
Page 29

Once the analyzer has restarted and the Network Analyzer program is again running:
1. On the analyzer’s Help menu, click About Network Analyzer.
2. Verify that “400” is listed after “Options:” in the display. Click OK.
NOTE If Option 400 has not been enabled, perform the ”Option Enable Procedure” again. If the
option is still not enabled, contact Keysight Technologies. Refer to “Getting Assistance
from Keysight” on page 3.
Step 26. Perform Post-Upgrade Adjustments and Calibration
Adjustments
The following adjustments must be made due to the hardware changes of the analyzer.
• default EE
•source adjustment
• receiver adjustment
• receiver characterization
These adjustments are described in the PNA Service Guide and in the PNA on-line HELP. A list of equipment
required to perform these adjustments is also found in the service guide.
To view this service guide information, click the Chapter 3 bookmark "Tests and Adjustments" in the PDF
1
Service Guide
.
After the specified adjustments have been performed, the analyzer should operate and phase lock over its entire
frequency range.
Operator’s Check
Perform the Operator’s Check to check the basic functionality of the analyzer. For instructions, click the Chapter
1
3 bookmark “Tests and Adjustments” in the PDF Service Guide
.
If you experience difficulty with the basic functioning of the analyzer, contact Keysight. Refer to “Contacting
Keysight” on page 3.
Calibration
Although the analyzer functions, its performance relative to its specifications has not been verified. It is
recommended that a full instrument calibration be performed using the analyzer’s internal performance test
software. To view information on the performance test software, click the Chapter 3 bookmark “Tests and
1
Adjustments” in the PDF Service Guide
.
1. See “Downloading the Online PNA Service Guide” on page 6.
28 Installation Note N5242-90115
Page 30

Step 27. Prepare the PNA for the User
1. If necessary, reinstall front jumper cables.
2. Install the cable guards, pushing them over the front jumper cables until the cushioning material touches the
front panel of the PNA.
3. Install the dust caps on the test ports.
4. Clean the analyzer, as needed, using a damp cloth.
Installation Note N5242-90115 29
Page 31

30 Installation Note N5242-90115
Page 32

This information is subject to change without notice.
© Keysight Technologies 2009 - 2014
December 1, 2014
*N5242-90115*
N5242-90115
www.keysight.com
 Loading...