

Page 1
7883-090 & 7883-099
Version C
VERSO by Kettler™
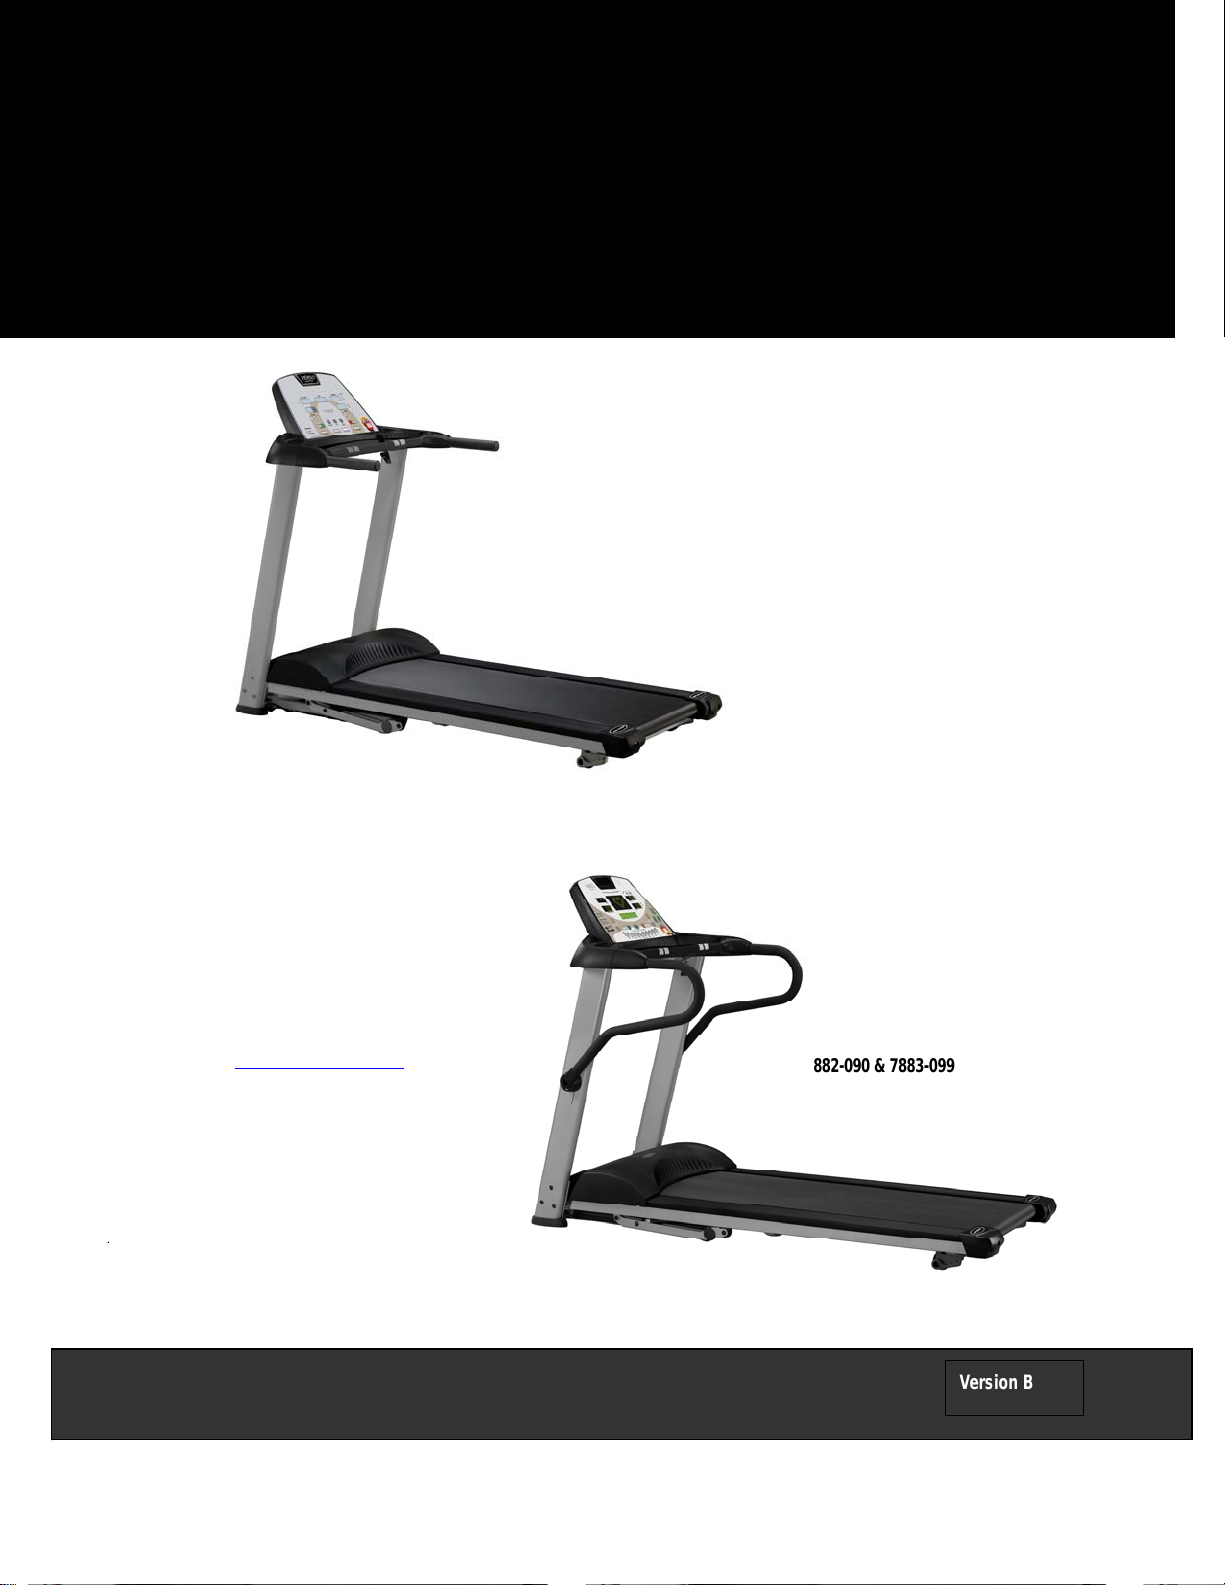
TX1
TX3
Item# 7882-090 and Item # 7882-099 (230v)
Item# 7883-090 and Item# 7883-099 (230v)
Foldable Treadmill Owner’s Manual
KETTLER International Inc.
1355 London Bridge Rd.
Virginia Beach, VA 23453
Office Phone: 757-427-2400
Office Fax: 757-427-0183
Email: info@kettlerusa.com
Parts & Service Department:
Phone: 866-804-0440
Email: parts@kettlerusa.com
TX1 #7882-090 & 7882-099
TX3 #7882-090 & 7883-099
Retain this owner’s manual for future reference.
Read and follow all instructions in this owner’s manual.
Version B
Page 2
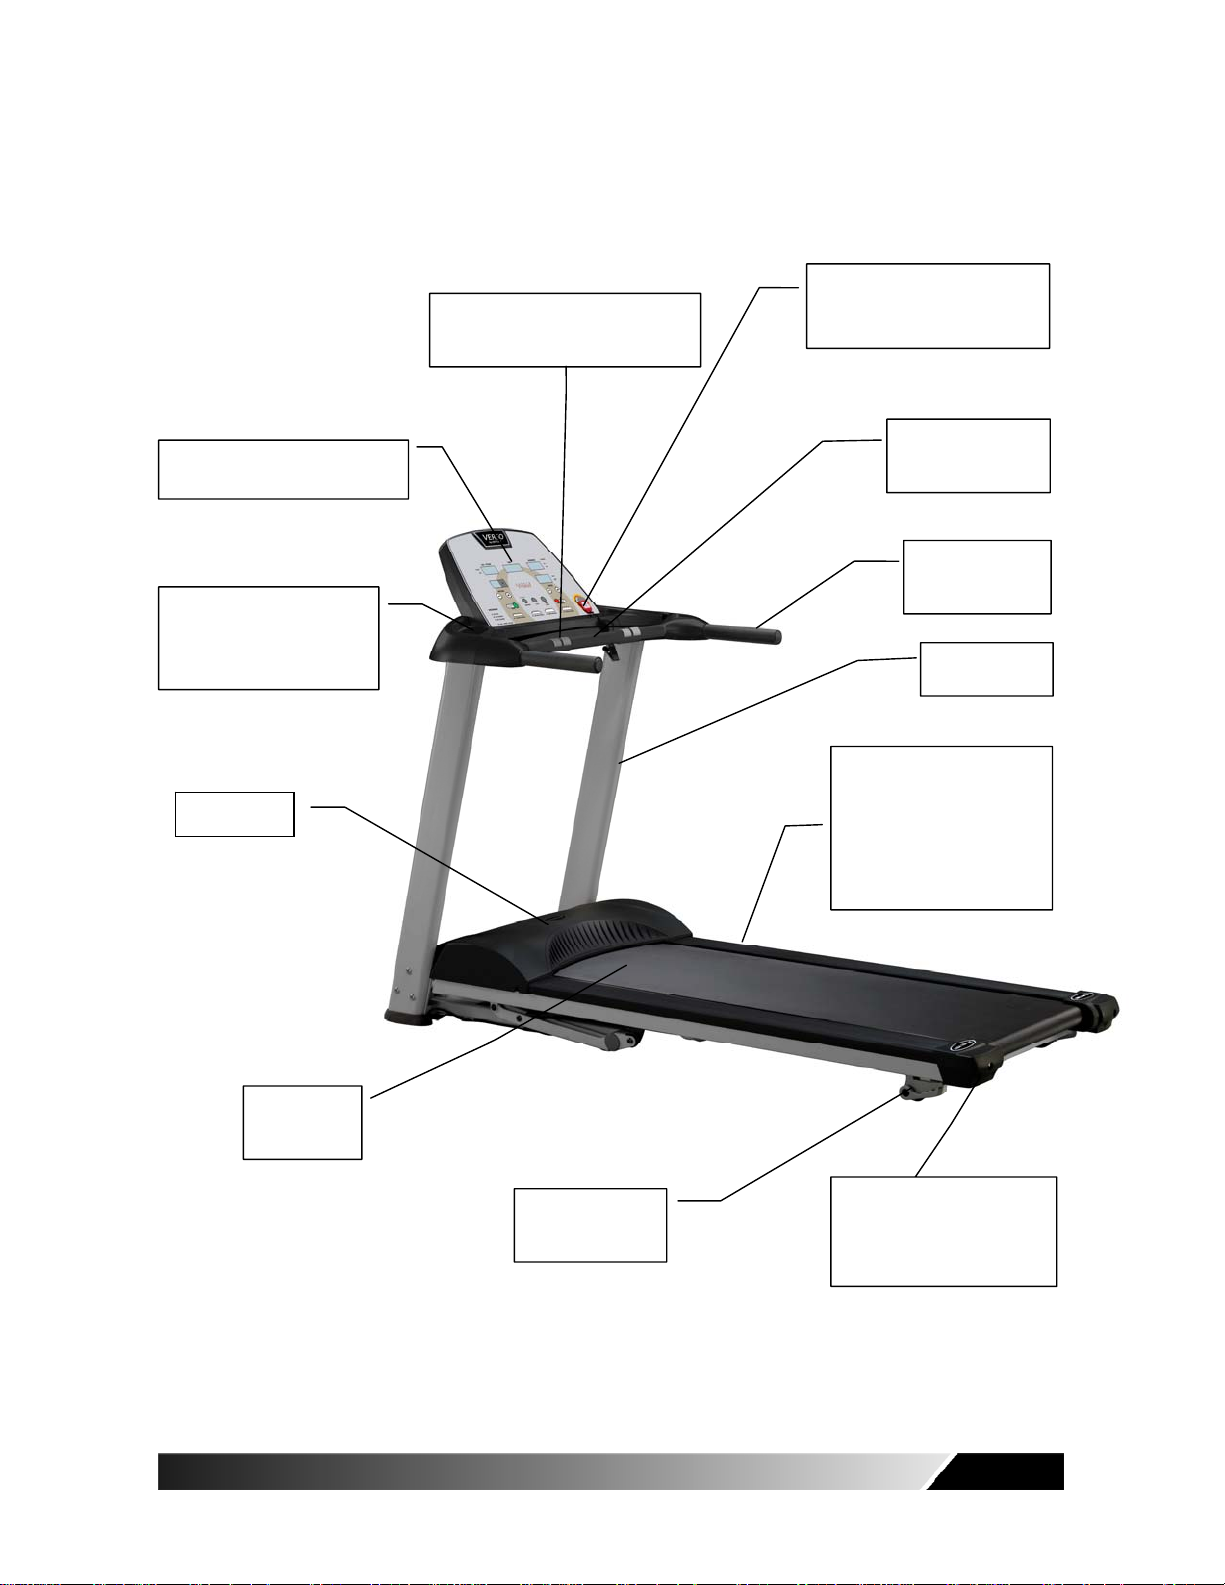
TX1 INTRODUCTION:
Contact heart rate hand sensors
for quick check of your pulse.
Safety key – treadmill will not
activate unless the safety key
is secured in place.
Console with 5 LED windows
Water bottle holder and
accessory holder built into
the console.
Motor cover
Running
belt
Patented folding
lock release
Horizontal bar with
foam grip
Handle bar with
foam grip
Upright post
Wide side landing to place
your feet before and after
your workout, or anytime
you feel like a rest during
the workout.
Running belt adjustment to
adjust belt tension or to
center the running belt
Owner’s Manual 1
Page 3

KEY FEATURES:
Congratulations on choosing a state-of-the-art treadmill.
CAUTION!
Before beginning any
exercise program,
always consult your
physician. If you
experience chest pains,
nausea, dizziness or
shortness of breath,
STOP exercising and
consult your physician
before continuing.
Console with text messages makes
customizing your workout easily.
Big LED and dot matrix display
windows for real time feed back of
all workout stats.
You have taken the first step to a healthier and more rewarding lifestyle.
This treadmill has been especially designed to give you reliable performance and enjoyable
workouts in the comfort of your home. Please find below the features and benefits of this
treadmill.
Compact frame to take up less space and 78-degree-fold design is better for space saving.
The base frame is hidden below the main frame to maximize the running surface size.
Gas assisted lift makes folding and unfolding of the deck safe and easy.
The folding lock release mechanism is located at the end of the deck so that when folded,
only adults can access the release.
Built-in wireless pulse receiver compatible with Polar® and CardioSport ® chest straps to
monitor your heart rate during exercise. Wireless chest strap transmitter is optional.
Low impact design with cushions so that your joints are protected against injury.
Self-centering belt alignment helps to keep the running belt always tracked correctly in the
center.
2
Owner’s Manual
TX3 INTRODUCTION:
Contact heart rate hand sensors
for quick check of your pulse.
Safety key – treadmill will not
activate unless the safety key
is secured in place.
Page 4
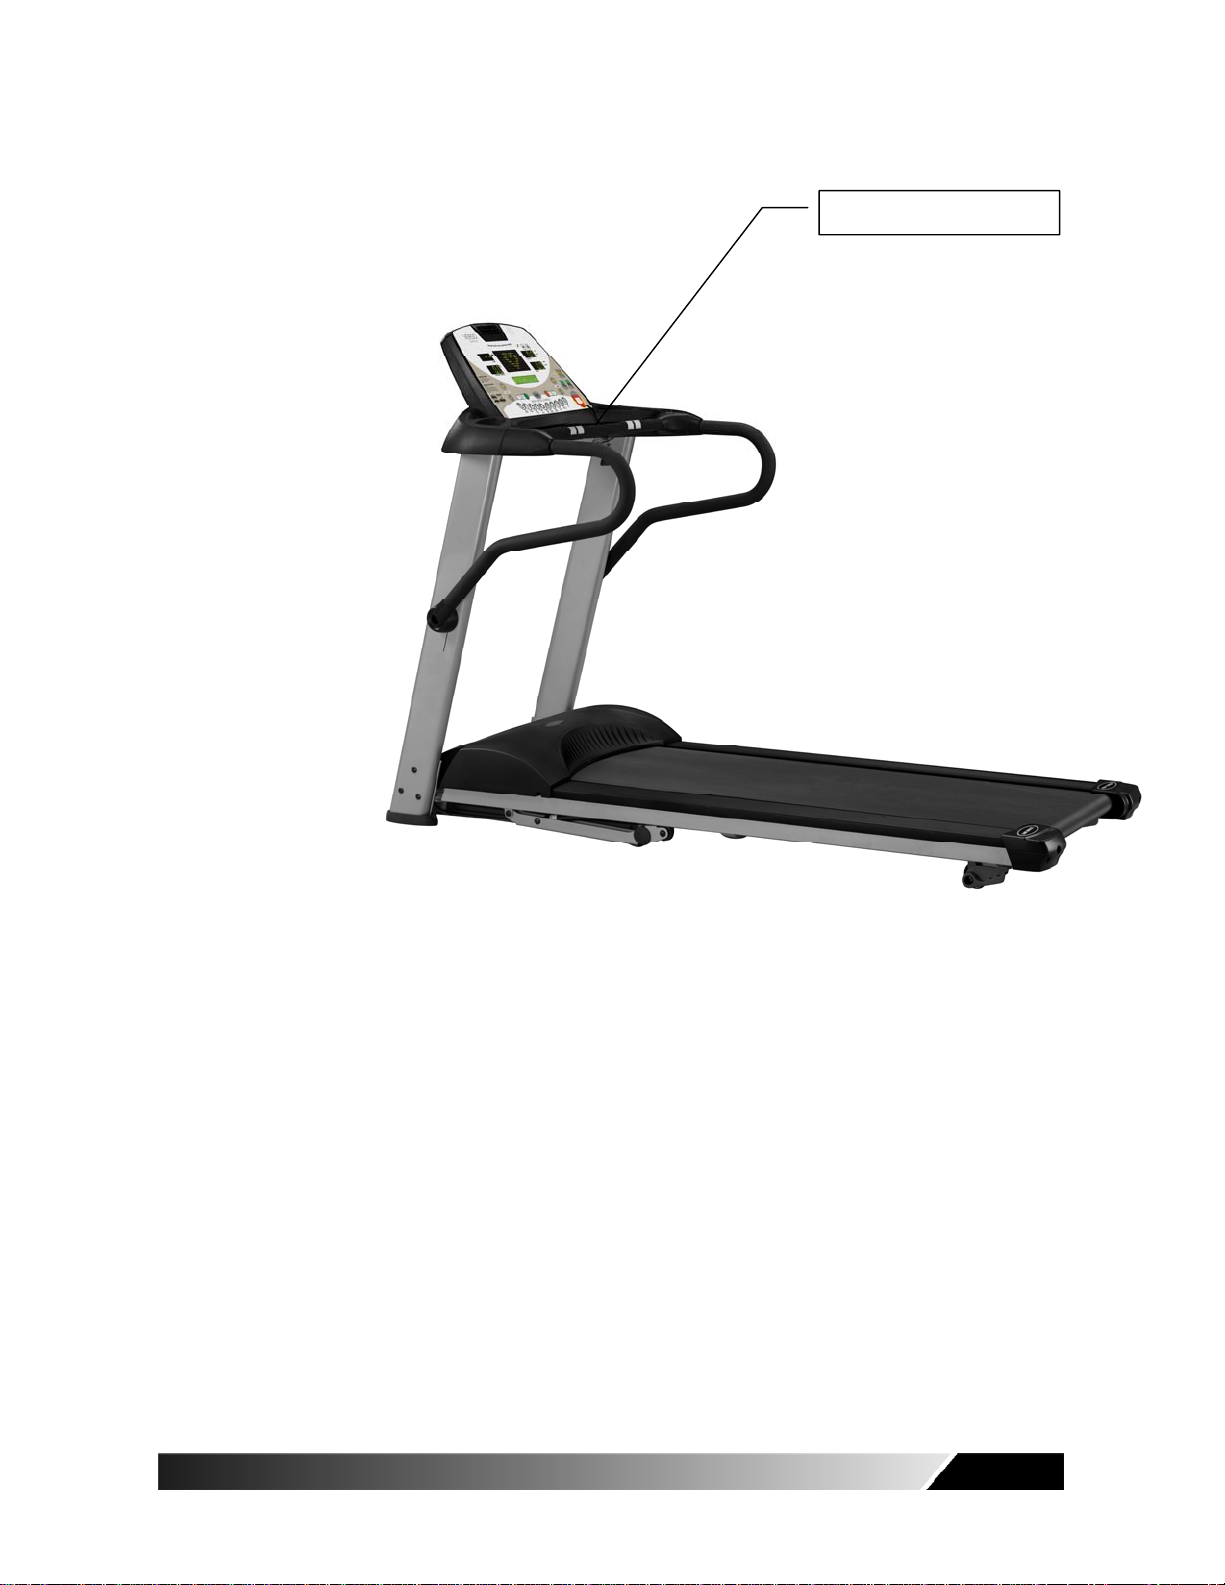
Horizontal bar with foam grip
KEY FEATURES:
Congratulations on choosing a state-of-the-art treadmill.
CAUTION!
Before beginning any
exercise program,
always consult your
physician. If you
experience chest pains,
nausea, dizziness or
Owner’s Manual 3
shortness of breath,
STOP exercising and
consult your physician
before continuing.
You have taken the first step to a healthier and more rewarding lifestyle.
This treadmill has been designed to provide you with reliable performance and enjoyable
workouts in the comfort of your home. Please find below the features and benefits of this
treadmill.
Compact frame to takes up less space and 78-degree-fold design is better for saving space.
The base frame is hidden below the main frame to maximize the running surface size.
Page 5

Gas assisted lift makes folding and unfolding of the deck safe and easy.
The folding lock release mechanism is located at the end of the deck so that when folded,
only adults can access the release.
Wireless pulse receiver compatible with Polar® and CardioSport® chest straps to monitor
your heart rate during exercise.
Low impact design with cushions so that your joints are protected against injury.
Self-centering belt alignment so that the running belt is always tracked correctly in the center.
SPECIAL FEATURES:
Model # TX3
Special
features
Message instructions
Direct speed control
Speed and elevation
adjust buttons at the
handlebar
Service notice
Extended handlebar
Back cover
TABLE OF CONTENTS:
4
Owner’s Manual
Page 6

I. IMPORTANT SAFETY PRECAUTIONS……..……………………….…….
Grounding Instructions
Electrical Safety
Mechanical Safety
Appropriate Attire
Children and Pets
II. SETTING UP YOUR TREADMILL ……………………………………….….
Placement in Your Home
Leveling the Base
Use Dedicated Circuit
III. HANDLING YOUR TREADMILL……………………….…………………….
Folding and Unfolding the Treadmill
Moving the Treadmill
IV. OPERATING THE TREADMILL………………………………………………
Turn Power on
Safety Tether Key and Clip
Getting on and off the Treadmill
V.
OPERATING THE CONSOLE TX1…………………………………………
VI.
OPERATING THE CONSOLE
VII. EXERCISE TIPS AND GUIDELINES………………………………………..
Stretch
Warm Up
Cool Down
How Often
How Long
How Hard
Target Heart Rate
VIII. MAINTENANCE…..……………………………………………………………….
Cleaning
Running Belt Centering Adjustment
Running Belt Tension Adjustment
Lubricating the Deck
IX. TROUBLE SHOOTING ………………………………………………………...
When to Call for Help
Trouble Shooting Guide
X. PART DESCRIPTION………………………………………………..………….
XI.
ASSEMBLY INSTRUCTION……………………………………….……
XII.
WARRANTY
TX1 110V / 230V PART LIST………………………………………………….
XIII.
TX3 110V / 230V PART LIST …………………………………………..………
XIV .
TX3…………………………………………
…………………………………………………………………..…...
6
8
9
10
11
19
26
28
30
31
32
35
36
39
Owner’s Manual 5
Page 7

I. IMPORTANT SAFETY PRECAUTIONS:
When using an electrical product, basic precautions should always be followed. Read all
instructions before using this treadmill.
WARNING!
GROUNDING INSTRUCTIONS
Connect this unit to a
properly grounded
outlet only.
This product must be grounded! If treadmill should malfunction or break down, grounding
provides a path of least resistance for electrical current to reduce the risk of electrical shock.
This product is equipped with a cord having an equipment-grounding conductor and a grounding
plug. This plug must be connected to an appropriate outlet that is properly installed and
grounded in accordance with local codes and ordinances.
DANGER!
Improper connection of the equipment-grounding conductor can result in a risk of electrical shock.
Check with a qualified electrician or service technician if you are in doubt as to whether the
product is properly grounded. Do not modify the plug provided with the product – if it will not fit
the outlet, have a proper outlet installed by a qualified electrician.
CAUTION!
STOP your workout
immediately if you
feel any pain or
abnormal symptoms
ELECTRICAL SAFETY
To reduce the risk of burns, fire, electrical shock or injury to persons, take the following
precautions.
DO NOT leave the treadmill unattended at any time when plugged in. Unplug the treadmill
from the power source when it is not in use.
DO NOT use the treadmill if the unit is wet or the plug or cable is damaged or the treadmill is
not working properly. DO NOT use damaged or defective equipment. Keep equipment
out of use until unit is repaired by trained technician.
Keep the power cable and plug away from heated surfaces.
NEVER place the power cord under carpeting or have any object on top of the power cord.
ONLY use the power cord provided with this treadmill.
To disconnect, turn the switch to the off position, then remove the plug from the outlet.
This exercise equipment is designed and built for optimum safety for the home use. However,
certain precautions always apply whenever you operate any exercise equipment. Be sure to
read the entire manual before assembly and operation of this machine. Also, please note the
following safety precautions.
6
Owner’s Manual
Page 8

MECHANICAL SAFETY
Before you start exercise, make sure the unit functions correctly. To maintain the safety level
of the exercise equipment, DO NOT use a faulty device.
Replace defective components immediately and/or keep the equipment out of use until repair.
Inspect the equipment prior to exercising to ensure that all nuts and bolts are fully tightened
before each use.
DO NOT use attachments not recommended by the manufacturer.
NEVER drop or insert any object into any opening.
ONLY one person may use the treadmill at a time.
NEVER activate the speed when someone else is standing on the treadmill.
APPROPRIA TE ATTIRE
Always wear appropriate clothing. DO NOT wear clothing that might catch on any
part of the treadmill.
Always wear non-slippery shoes during workout with the treadmill. DO NOT wear
shoes with heels or leather soles. Check the soles of your shoes and remove any dirt and
embedded stones.
CHILDREN AND PETS
Most exercise equipment is not recommended for use by young children.
Children should not use the equipment unless they are under constant adult supervision.
To ensure safety, keep young children off the treadmill at all times.
■ Exercise equipments have many moving parts. In the interest of safety, keep others
(especially children and pets) at a safe distance while you exercise.
Owner’s Manual 7
Page 9

II. SETTING UP YOUR TREADMILL:
CAUTION!
Make sure the
running deck is level
to the ground.
If the deck is
positioned on uneven
surface, it would
cause premature
damage to the
electronic system.
PLACEMENT IN YOUR HOME
To make exercise a desirable daily activity for you, the treadmill should be placed in a
comfortable and convenient setting. This treadmill is designed to use a minimal amount
of floor space and to fit nicely in your home.
z DO NOT place the treadmill outdoors.
z DO NOT place the treadmill near water or in high moisture content environment.
z Make sure power cord is not in the path of heavy traffic.
z If your room is carpeted, check the clearance to make sure there is enough space
between the carpet fiber and the treadmill deck. If you are uncertain, it is best to
place a mat beneath your treadmill.
z Locate the treadmill at least 4 feet from walls or furniture.
z Allow a safety area of 5 feet X 3 feet behind the treadmill so that you can easily get
on and off the treadmill without being trapped during an emergency.
Occasionally after extended use you will find a fine black dust below your treadmill. This is
normal wear and DOES NOT mean there is anything wrong with your treadmill. This dust can
be easily removed with a vacuum cleaner. If you wish to prevent this dust from getting on your
floor or carpet, place a mat beneath your treadmill.
LEVELING THE BASE
It is important that you place the treadmill on a firm level surface.
Check the treadmill to ensure the frame is level once you have moved the treadmill into
the position of your choice.
USE DEDICATED CIRCUIT
The outlet selected should be a dedicated circuit. It is particularly important that NO
sensitive electrical equipments, such as computer or TV, share the same circuit.
8
Owner’s Manual
Page 10

III. HANDLING YOUR TREADMILL:
FOLDING THE TREADMILL
Folding and unfolding of this treadmill is made easy with the assistance of gas shock. After the
treadmill has come to a complete stop, it is important to make sure the elevation is lowered all
the way to the lowest level before folding the treadmill. The display console will indicate “0%
elevation” in the lower left window when positioned at the lowest level. With caution, fold up the
deck slowly with both hands. Fold the deck vertically upright until you hear a click, then the
folded deck is locked in place. Please note that if you failed to lower the elevation to the lowest
level (0% elevation) then the folding safety lock will not click nor lock in place. Be certain the fold
lock clicks and locks in place,
UNFOLDING THE TREADMILL
Pull out the lock pin on the upright post (L) with your left hand. At the same time, press the
deck slowly with right hand. Use both hands to bring the deck slowly to the ground. As the
deck gets closer to the ground, it will drop at a faster rate and feel heavier. Please handle with
caution.
MOVING THE TREADMILL
This treadmill is easy to move around safely.
To move the treadmill:
1. Turn power switch off.
2. Unplug the power cord.
3. Make sure the deck is at 0% grade elevation.
4. Fold the treadmill and make sure lock is engaged. You should hear a click to indicate
positive engagement.
5. Simply roll the treadmill on four wheels to the desired location.
STORING THE TREADMILL
For safety precaution, especially when you have children in the house, we recommend that you
follow these steps to keep the treadmill out of potential harm.
1. Turn off the power switch when you have finished workout.
2. Disconnect the plug from the wall socket.
3. Remove the safety tether key and store out of reach of children.
Owner’s Manual 9
Page 11

IV. OPERATING THE TREADMILL:
TURN POWER ON
WARNING!
NEVER use this
treadmill without first
securing the safety
tether clip to your
clothing.
CAUTION!
For your safety, step
onto the belt when the
speed is no more
than 1.5 MPH or 2.4
Km/H.
NEVER start the
treadmill at a running
speed and attempt to
get on while it is
moving fast.
NOTE!
The deck should NOT
be folded unless the
elevation is at 0%
grade. Attempts to
fold the deck while it
is elevated may
cause damage to the
frame.
The ON/OFF switch for the treadmill is located next to the power supply cord at the back of the
motor cover. Flip this switch to the “ON” position.
SAFETY TETHER KEY AND CLIP
The safety key is designed to cut the main power to the treadmill should you fall. Therefore, the
safety key is designed to bring the treadmill to a abrupt stop. At high speeds, it may be
uncomfortable and somewhat dangerous to come to a complete stop immediately. So, use the
safety key as emergency stop only. To bring the treadmill to a complete stop safely and
comfortably, use the red stop button.
Your treadmill will not start unless the safety key is properly inserted into the key holder at the
side of the console. The other end of the safety key should be securely clipped to your clothing
so that in case you fall, you will pull the safety key from the console, which will stop the treadmill
immediately to minimize injury. For your safety, never use the treadmill without securing the
safety key clipped to your clothing. Pull on the safety key clip to make sure it will not come off
your clothing.
GETTING ON AND OFF THE TREADMILL
Handle with care when getting on or off the treadmill. Try to use the handlebars while getting
on or off safely. While you are preparing to use the treadmill, do not stand on the running belt.
Straddle the running belt by placing your feet on both side rails of the treadmill deck. Place
your foot on the belt only after the belt has begun to move at a consistent slow speed.
During exercise, keep your body and head facing forward at all times. Never attempt to turn
around on the treadmill when the running belt is still moving. When you have finished
exercising, stop the treadmill by pressing the red stop button. Wait until the treadmill comes to
a complete stop before attempting to get off the treadmill
If you feel uneasy with the speed and are not sure how to stop, hold the handlebars, lift your feet
off the running belt and place on both sides of the side landing. The side landing is a
non-moving platform and would be a good place to rest before resuming the workout. Always
remember to start at a low speed for your safety and comfort.
.
10
Owner’s Manual
Page 12
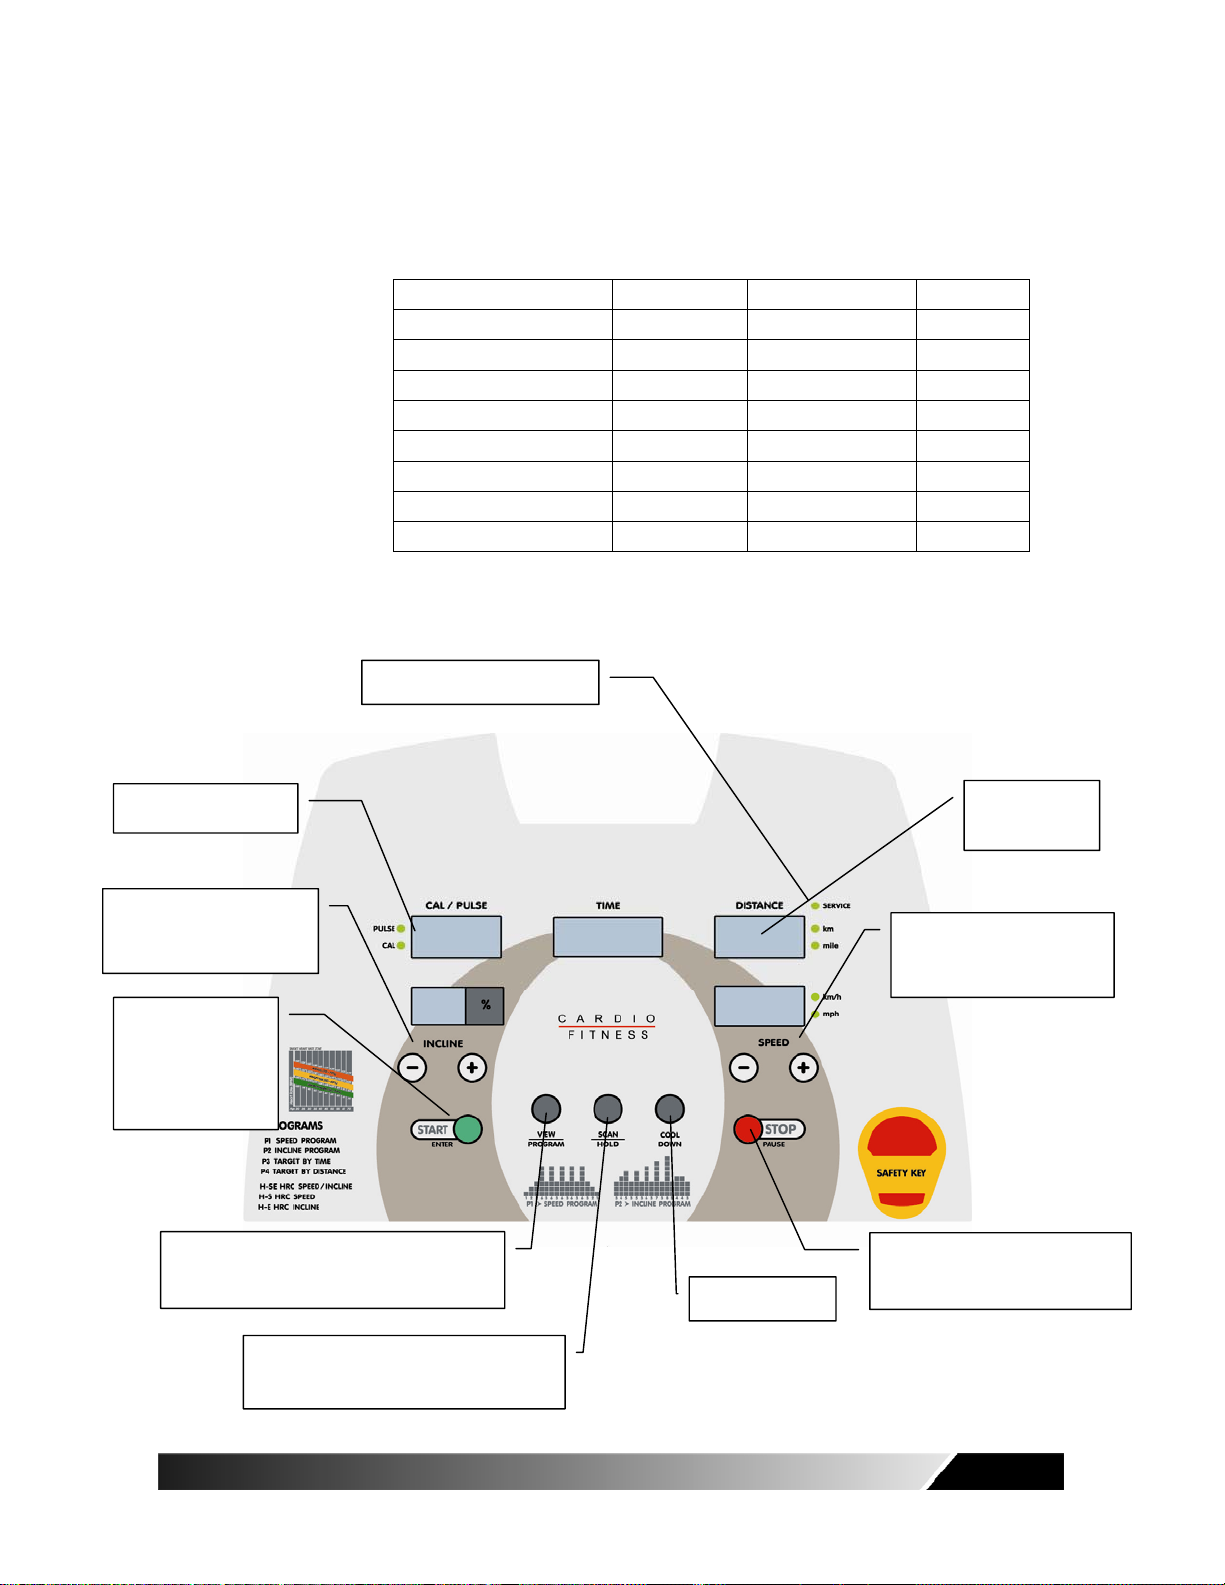
Pulse indicator
UP – elevation up
DOWN – elevation down
V. OPERATING THE CONSOLE TX1:
MODEL TX1
DISPLAY VALUES
Display Resolution Range Increment
PULSE XXX 40-240 1
ELEVATION (%) XX 0-12 1%
DISTANCE (Miles) XX.X 00.1 – 99.0 0.1
DISTANCE (Km) XX.X 00.1 – 99.0 0.1
SPEED (MPH) XX.X 00.5 – 10.0 0.1
SPEED (Km/H)TX1 XX.X 01.0 – 16.0 0.1
TIME XX:XX 00:01 – 99:00 00.01
CALORIES XXX 1-999 1
NOTE: Display can be switched between Mile/MPH or Kilometer/Km/H readouts.
See “Unit Conversion” on page 13
Service required indicator
FAST – increase speed
SLOW – decrease speed
LED display
windows
QUICK START /
START / ENTER -
three different
functions
PROGRAM – program selection
VIEW – pulse or calories display selection
HOLD – display pulse or calories
SCAN – display both interchangeably
Owner’s Manual 11
COOL DOWN
PAUSE – press once to pause
STOP – press twice to stop
Page 13

SPEED ADJUSTMENTS
A single press of FAST and SLOW buttons will adjust speed by increments of 0.1 MPH (or Km/H)
during workout…or you may press and hold these buttons to quickly scroll up or down.
ELEV ATION ADJUSTMENTS
For safety reasons, the elevation level is designed to be manually adjusted for most applications.
The treadmill will only automatically adjust elevation during one of the following three programs:
P2 = elevation program, H-SE = HRC by speed and elevation, and H-E = HRC by elevation. You
will find more details in the “Preset Programs” section beginning on page 15.
Elevation may be manually adjusted even while the running belt is not moving, however, during
the program setup mode, elevation will not be adjustable.
PULSE FUNCTION
This treadmill features wireless heart rate monitoring, the most advanced technology to date for
accurate read out of your heart rate. For convenience, this treadmill is also designed to pick
up heart rate info via the contact sensors located on the horizontal handlebar. Treadmill will
look for wireless pulse signal first. If no wireless pulse signal is present, then treadmill will look
for the signal from contact sensors.
To use the wireless pulse monitoring system, you must wear the heart rate transmitter chest
strap. Place the contact surface next to your skin directly under your heart to pick up the pulse
signals from your heart. The heart rate transmitter strap is an optional purchase and not
included with this treadmill.
To use the contact heart rate, place your hands gently but firmly around the contact sensors on
the handlebars. Movements in the hands may cause difficulty for the treadmill to pick up the
signal properly. When signal is picked up, the LED light next to the pulse display window will
light up and flash to the rate of your heart beat.
Please note that some fibers used in clothes (e.g. polyester, polyamide) create static electricity
which may prevent reliable heart rate measurement. Also, note that mobile phone, television
and other electrical appliances form an electro-magnetic field around them, which may also
cause problems in heart rate measurement.
PAUSE FUNCTION
When STOP button is pressed during workout, the program is suspended. After the running
belt has come to a complete stop, display will count down from 03:00. During pause mode,
12
Owner’s Manual
Page 14

only START and STOP buttons will function.
If START is pressed within three minutes during the pause mode, the treadmill will bring the
running belt movement back to the speed at which the treadmill was paused. Workout values
will resume counting and continue where it left off.
If STOP is pressed during the pause mode, the program will end. After three minutes if no
button is pressed, treadmill will automatically end the workout program.
END OF WORKOUT STATS
When you have completed your workout or if you have ended your workout, the display windows
will report your workout stats for one minute. After the running belt has come to a complete
stop, the displays will show total time, total distance, total calories and average speed. Then
the display will go to idle mode, ready for the next workout setup. If you wish to skip the
workout stats report, simply press the STOP button, which will skip display to the idle mode.
UNIT CONVERSION
To change units from metric to English or English to metric, you must be in the idle mode.
Follow the steps below to make the unit conversion.
1. Simultaneously press both the STOP and SLOW together.
2. The message center will display “unit”.
3. Simply press START to confirm.
Notice that the LED lights next to both the speed and distance display windows on the upper
right corner will have changed the measurement unit accordingly.
VIEW / PROGRAM
During workout setup – this button will select program.
During workout – this button will change PULSE to CALORIES or CALORIES to PULSE.
SCAN / HOLD
This button will allow user to view both calories and pulse display values intermittently (SCAN).
The user may select to steadily view only calories or only pulse (HOLD).
COOL DOWN
Whenever you are ready to stop your workout, even if you are in the middle of a program, be
sure to use the COOL DOWN program. When the cool down button is pressed, it will
automatically interrupt the current workout and go directly into cool down routine, which is
programmed for four minutes. The first two minutes will reduce speed and elevation by 50% of
Owner’s Manual 13
Page 15

your last display values. The last two minutes will reduce speed by another 50% and the
elevation will reduce to 0%.
14
Owner’s Manual
Page 16

PRESET PROGRAMS:
QUICK START:
QUICK START
Once the power is on
and the safety tether
key is secured in place,
simply press the
START button, and
after three- second
count down treadmill
will activate and
maintain the running
belt at .5 MPH (1.0
Km/H).
Once the power switch is turned on and the safety key is secured in place, simply press the
QUICK START button. Treadmill will activate at 1.0 Km/H (.6 mph) after 3 seconds. You may
increase/decrease speed or elevation at any time during your workout. To end workout, simply
press the STOP button to stop the treadmill. During manual quick start workout, time will count
up. During other program workouts, time will count down.
1. Turn power on
2. Check safety key secured to treadmill and clip secured to user clothing
3. Press START to begin workout
SPEED PROGRAMS:
Once the power switch is turned on and the safety key is secured in place, you may press the
PROGRAM button to choose the pre-set speed program P1, press START key to activate the
treadmill. Where user may customize, the default value (or the previous input value) will flash
indicating that you may either confirm the value flashing or change the value. Once you have
made your data input, press START to activate the treadmill.
1. Turn power on
2. Check safety key secured to treadmill and clip secured to user clothing
3. Press the PROGRAM button once, PI (speed program) will be displayed
4. Press ENTER to confirm
5. Use FAST or SLOW buttons to input workout time
6. Press ENTER to confirm
7. Use FAST or SLOW buttons to input intensity level based on maximum speed
8. Press ENTER to confirm, program will begin workout
ELEVATION PROGRAMS:
Once the power witch is turned on and the safety key is secured in place, you may press the
PROGRAM button twice to choose the pre-set elevation program P2. Where user may
customize, the default value (or the previous input value) will flash indicating that you may either
confirm the value flashing or change the value. Once you have made your data input, press
START to activate the treadmill.
1. Turn power on
2. Check safety key secured to treadmill and clip secured to user clothing
3. Press the PROGRAM button twice, P2 (elevation program) will be displayed
4. Press ENTER to confirm
5. Use FAST or SLOW buttons to input workout time
6. Press ENTER to confirm
7. Use FAST or SLOW buttons to input intensity level based on maximum elevation
8. Press ENTER to confirm, program will begin workout
Owner’s Manual 15
Page 17

TARGET TRAINING PROGRAMS:
Users have the option to customize workout based on setting training targets for time and
distance. Once the power switch is turned on and the safety key is secured in place, you may
press the PROGRAM button to choose one of the target program, P3 set training target based
on time and P4 set training target based on distance. Where user may customize, the default
value (or the previous input value) will flash indicating that you may either confirm the value
flashing or change the value. Once you have made your data input, press START to activate
the treadmill.
1. Turn power on
2. Check safety key secured to treadmill and clip secured to user clothing
3. Press the PROGRAM button three times for P3 = Target time, or press the program
button four times for P4 = Target distance
4. Press ENTER to confirm
5. Use FAST and SLOW buttons to input target time or distance
6. Press ENTER to confirm, program will begin workout
HEART RATE CONTROL PROGRAMS:
Users have the option to customize their heart rate control programs based on their target heart
rate value. Once the power switch is turned on, and the safety key is secured in place, you
may press the PROGRAM button to select H-SE program, H-S program or H-E program.
Where user may customize, the default value (or the previous input value) will flash indicating
that you may either confirm the value flashing or change the value. Once you have made your
data input, press START to activate the treadmill.
Treadmill will automatically adjust by elevation or speed or both (depending on which program is
chosen) to reach and maintain the user’s target heart rate. During workout, users may still be
able to adjust speed or elevation. During workout, time counts down from total time, which is
defined as time for workout and cool down.
At the end of the workout, treadmill will automatically go into cool down mode. Cool down
mode is pre-set up for 4 minutes. In the first two minutes, speed and elevation will reduce by
50%. The last two minutes, speed will reduce by another 50% and elevation will go to 0%.
To use the heart rate control programs, user must wear wireless transmitter chest strap.
16
Owner’s Manual
Page 18

INSTRUCTIONS FOR TARGET
HEART RATE CONTROL PROGRAMS:
1. Turn power on
2. Check safety key secured to treadmill and clip secured to user clothing
3. Press PROGRAM button to select H-SE (HRC by speed and elevation adjustments),
H-S (HRC by speed adjustment only) or H-E (HRC by elevation adjustment only).
4. Press ENTER to confirm
5. Use FAST or SLOW buttons to input your age
6. Press ENTER to confirm
7. Use FAST or SLOW buttons to input workout time
8. Press ENTER to confirm
9. Use FAST or SLOW buttons to input target heart rate
10. Press START to begin workout
Owner’s Manual 17
Page 19

NOTES:
18
Owner’s Manual
Page 20

Pulse indicator
UP – elevation up
DOWN – elevation down
VI. OPERATING THE CONSOLE TX3:
DISPLAY VALUES
Display Resolution Range Increment
PULSE XXX 40-240 1
ELEVATION (%) XX 0-12 1%
DISTANCE (Miles) XX.X 00.1 – 99.0 0.1
DISTANCE (Km) XX.X 00.1 – 99.0 0.1
SPEED (Miles/H) XX.X 00.5 – 11.0 0.1
SPEED (Km/H)TX3 XX.X 00.8 – 18.0 0.1
TIME XX:XX 00:01 – 99:00 00.01
CALORIES XXX 1-999 1
NOTE: Display can be switched between Mile/MPH or Kilometer/Km/H readouts.
See “Unit Conversion” on page 21
Service required indicator
LED dot matrix
display window
LCM with backlight
message center
FAST – increase speed
SLOW – decrease speed
QUICK START /
START –
two different
functions
ENTER - confirm selection or input
Owner’s Manual 19
PAUSE – press once to pause
0 ~ 9 buttons
– preset program selections
– direct speed control during workout
STOP – press twice to stop
Page 21

SPEED ADJUSTMENTS:
There are three ways to adjust speed during workout. A single press of the FAST and SLOW
buttons will adjust speed by increments of 0.1 MPH (or Km/H), or you may press and hold these
buttons to quickly scroll up or down. If the speed adjustment increment is large, it is easier to
use the number buttons, which function as direct speed control buttons during the workout.
Another way to adjust speed is to press the extension-keys on the handle bar cover.
Extension-key FAST and SLOW will also adjust speed by increments of 0.1MPH (or Km/H).
Example: to change from 3 MPH to 8 MPH, we could just press the number 8 button once.
Also, we could press and hold the FAST button or extension-key FAST until the speed display
shows 8 MPH.
ELEV ATION ADJUSTMENTS:
For safety reasons, the elevation level is designed to be manually adjusted for most applications.
The treadmill will only automatically adjust elevation during one of the following three programs:
elevation program, HRC adjust by elevation, and fitness test.
Elevation may be adjusted even while the running belt is not moving. However, during the
program setup mode, elevation will not be adjustable.
There are two ways to adjust elevation during workout: UP and DOWN on the console,
extension-key UP and DOWN on the handle bar cover. The buttons will adjust elevation by
increments of 1%.
PULSE FUNCTION:
This treadmill features wireless heart rate monitoring, the most advanced technology to date for
accurate read out of your heart rate. For convenience, this treadmill has been designed to
pick up heart rate info via the contact sensors located on the +horizontal handlebar. Treadmill
will look for wireless pulse signal first. If no wireless pulse signal is present, then treadmill will
look for the signal from contact sensors.
To use the wireless pulse monitoring system, you must wear a heart rate transmitter chest strap
(optional). For best results, place the contact surface next to your skin directly under your heart
to pick up the pulse signals from your heart. The heart rate transmitter strap is an optional
purchase and not included with this treadmill.
To use the contact heart rate, place your hands gently but firmly around the contact sensors on
the handlebars. Movements in the hands may cause difficulty for the treadmill to pick up the
signal properly. When signal is picked up, the LED light next to the pulse display window will
light up and flash to the rate of your heart beat.
Please note that some fibers used in clothes (e.g. polyester, polyamide) create static electricity
which may prevent reliable heart rate measurement. Also, note that mobile phone, television
20
Owner’s Manual
Page 22

and other electrical appliances form an electro-magnetic field around them, which may also
cause problems in heart rate measurement.
PAUSE FUNCTION:
When STOP button is pressed during workout, program is suspended. Message center will
flash “WORKOUT PAUSED”. After the running belt has come to a complete stop, dot matrix
display window will count down from 3:00. During pause mode, only START and STOP buttons
will function.
If START is pressed within three minutes during the pause mode, treadmill will bring the running
belt movement back to the speed at which the treadmill was paused. Workout values will
resume counting and continue where it was left off.
If STOP is pressed during the pause mode, program will end. After three minutes if no button is
pressed, treadmill will automatically end the workout program.
END OF WORKOUT STATS:
When you have completed your workout or if you have ended your workout, the display will
report your workout stats. After the running belt has come to a complete stop, the message
center will display total time, total distance, total calories and average speed twice. Then the
display will go to idle mode, ready for the next user workout setup. If you wish to skip the
workout stats report, simply press the STOP button, which will skip display to the idle mode.
UNIT CONVERSION:
To change from metric to English or English to metric, you must be in the idle mode, where the
dot matrix window displays a flashing heart. Follow the steps below to make the unit
conversion.
1. Simultaneously press both the STOP and SLOW buttons together.
2. The message center will show Km to Mi or Mi to Km.
3. Simply press START to confirm.
Notice that the LED light next to the distance display window on the upper right corner will have
changed the measurement unit accordingly.
PRESET PROGRAMS:
QUICK START:
QUICK START
Once the power is on
and the safety tether
Owner’s Manual 21
key is secured in
place, simply press
the START button,
Once the power switch is turned on, and the safety key is secured in place, simply press the
QUICK START button. Treadmill will activate at 1.0 Km/H. You may increase or decrease
Page 23

speed or elevation at any time during your workout. To end workout, simply press the STOP
button to stop the treadmill. During the workout, time will count up.
1. Turn power on
2. Check safety key secured to treadmill and clip secured to user clothing
3. Press START to begin workout
SPEED PROGRAMS:
Once the power switch is turned on and the safety key is secured in place, you may press the
numeric button 0 or 1 to choose one of the two pre-set speed programs, SPEED INTERVAL or
AEROBIC. Message center will prompt user to set up workout duration, and intensity level
based on max speed value. Once you have made your selection, press START key to activate
the treadmill.
During workout, treadmill will automatically adjust speed according to pre-set program settings.
User may still be able to adjust speed if the preset is not appropriate. The entire remaining
program will scale up or down accordingly. During workout, user may adjust elevation level at
will. To end workout, simply press the STOP button to stop the treadmill. During workout, time
counts down from target workout time.
1. Turn power on
2. Check safety key secured to treadmill and clip secured to user clothing
3. Press 0 for SPEED INTERVAL program or 1 for AEROBIC program
4. Display will show program selected
5. Press ENTER to confirm
6. Use numeric buttons to input workout duration
7. Press ENTER to confirm
8. Use numeric buttons to input intensity level based on maximum speed
9. Press ENTER to confirm
10. Press START to begin workout
ELEVATION PROGRAMS:
Once the power switch is turned on and the safety key is secured in place, you may press the
numeric buttons 2 or 3 to choose one of the two pre-set elevation programs, WEIGHT LOSS or
HILL CLIMB. Message center will prompt user to set up workout duration, and intensity level
based on max elevation value. Once you have made your selection, press START key to
activate the treadmill.
During workout, treadmill will automatically adjust elevation according to pre-set program setting.
User may still be able to adjust elevation if the preset is not appropriate. The entire remaining
program will scale up or down accordingly. During workout, user may adjust speed level at will.
To end workout, simply press the STOP button to stop the treadmill. During workout, time
counts down from target workout time.
1. Turn power on
22
Owner’s Manual
Page 24

2. Check safety key secured to treadmill and clip secured to user clothing
3. Press 2 for WEIGHT LOSS program or 3 for HILL CLIMB program
4. Display will show program selected
5. Press ENTER to confirm
6. Use numeric buttons to input workout duration
7. Press ENTER to confirm
8. Use numeric buttons to input intensity level based on maximum elevation
9. Press ENTER to confirm
10. Press START to begin workout
TARGET TRAINING PROGRAMS:
Users have the option to customize workout based on setting training targets for time, distance,
or calories. Once the power switch is turned on, and the safety key is secured in place, you
may press the numeric button 4 to set training target based on time or 5 to set training target
based on distance or 6 to set training target based on calories. Message center will prompt
user to set up workout target value. Once you have made your selection, press START key to
activate the treadmill.
During workout, users may adjust speed and or elevation at will. To end workout, simply press
the stop button to stop the treadmill. During workout, a target training value will be displayed on
the dot matrix display window.
1. Turn power on
2. Check safety key secured to treadmill and clip secured to user clothing
3. Press 9 to select fitness test program
4. Display will show program selected
5. Press ENTER to confirm
6. Use numeric buttons to input training target value
7. Press ENTER to confirm
8. Press START to begin workout
HEART RATE CONTROL PROGRAMS:
Users have the option to customize their heart rate control programs based on their target heart
rate value. Once the power is turned on and the safety key is secured in place, you may press
the numeric button 7 to select HRC program adjust by speed or numeric button 8 to select HRC
program adjust by elevation. Message center will prompt user to set up workout step-by-step.
Once you have made your selection, press START button to activate the treadmill.
Owner’s Manual 23
Page 25

Users also have the option to set up their warm up speed and warm up time. During warm up
mode, target heart rate training function will not be in operation.
After the warm up mode, treadmill will automatically adjust by elevation or speed (depending on
which program is chosen) to reach and maintain the user’s target heart rate. During workout
mode, users may still be able to adjust speed or elevation. During workout, time counts down
from the total time, which is defined as time of warm up, workout, and cool down.
At the end of the workout time, treadmill will automatically go into cool down mode. Cool down
mode is pre-set up for 4 minutes. In the first two minutes, the speed and elevation will reduce
by 50%. The last two minutes, the speed and elevation will reduce by another 50%. To end
workout, simply press STOP to stop the treadmill.
To use the heart rate control programs, user must wear a wireless transmitter chest strap.
Signals from the contact heart rate sensors cannot be used in heart rate control programs.
1. Turn power on
2. Check safety key secured to treadmill and clip secured to user clothing
3. Press button “7” to select HRC program adjust by speed OR press button “8” to
select HRC program to adjust by elevation.
4. Display will show program selected
5. Press ENTER to confirm
6. Use numeric buttons to input your age
7. Press ENTER to confirm
8. Use numeric buttons to input workout time
9. Press ENTER to confirm
10. Use numeric buttons to input target heart rate
11. Press ENTER to confirm
12. Use numeric buttons to input warm up time
13. Press ENTER to confirm
14. Use numeric buttons to input warm up speed
15. Press ENTER to confirm
16. Press START to begin workout
FITNESS TEST PROGRAM:
Fitness test is a motivational program designed to determine user’s physical fitness level.
During workout, user will not be able to adjust speed or elevation. The program will increase
the workout intensity level. Based on the actual heart rate picked up from the transmitter and the
age user input, the treadmill computer will be able to assess user’s physical fit level.
To use the fitness test program, user must wear the wireless transmitter chest strap. If treadmill
does not pick up the transmitter heart rate signal, this program will not function.
24
Owner’s Manual
Page 26

1. Turn power on
2. Check safety key secured to treadmill and clip secured to user clothing
3. Press 9 to select fitness test program
4. Display will show program selected
5. Press ENTER to confirm
6. Use numeric buttons to input your age
7. Press ENTER to confirm
8. Press START to begin workout
CAUTION!
Always consult your
physician before
beginning any
exercise program.
VII. EXERCISE TIPS AND GUIDELINES:
STRETCH
Stretching prior to exercise will improve flexibility and reduce chances of exercise related injury.
Ease into each of these stretches with a slow gentle motion. Hold for a count of 10. DO NOT
bounce. Repeat the stretch exercises again after cool down will help to loosen and relax your
muscles to prevent soreness.
WARM UP
The first five minutes of a workout should be devoted to warming up. This warm up will limber
your muscles and prepare them for a more strenuous exercise. Warm up on the treadmill by
Owner’s Manual 25
Page 27

walking at slow speed.
COOL DOWN
NEVER stop exercising suddenly. A cool down period of about 5 minutes will allow your heart to
re-adjust to the decreased demand. Use a low speed setting during the cool down to gradually
lower your heart rate.
HOW OFTEN?
Fitness experts most often recommend, that you exercise at least three to four times a week to
maintain cardiovascular fitness. If you have other goals such as weight loss or fat loss, you will
achieve your goal faster with more frequent exercise. Whether it is three days or six days,
remember that your ultimate goal should be to make exercise a lifetime habit.
HOW LONG?
For aerobic exercise benefits, it’s recommended, that you exercise for about thirty minutes per
session. Always start slowly, especially if you have been sedentary during the past year. In
the beginning, you may begin with as little as 5 minutes per session. Your body will need time
to adjust to the new activity. As your body adjusts, gradually increase your workout time per
session.
If your goal is weight loss, a longer exercise session at lower intensities is most effective. A
workout time of 45-50 minutes or more is recommended for best weight loss results.
26
Owner’s Manual
Page 28

CAUTION!
For your health and
safety, DO NOT over
exert yourself.
CAUTION!
If you experience chest
pains, nausea,
dizziness or shortness
of breath, STOP
exercising immediately
and consult your
physician before
continuing.
TARGET HEART RATE
Age Target Zone
( 60% - 75% )
20 120 - 150
25 117 - 146
30 114 - 142
35 111 - 138
40 108 - 135
45 105 - 131
50 102 - 127
55 99 - 123
60 96 - 120
65 93 - 116
70 90 - 113
HOW HARD?
How hard you work out is determined by your goal. Regardless of your fitness goals, always
begin an exercise program at low intensity. Aerobic exercise does not have to be painful to be
beneficial !
There are two ways to measure your exercise intensity. The first is by evaluating your
perceived exertion level and the second is by monitoring your heart rate.
During exercise, if you cannot maintain a conversation without gasping, you are working too hard.
A good rule of thumb is to work to the point of exhilaration, not exhaustion. If you cannot catch
your breath, it is time to slow down. Always be aware of other warning signs of overexertion.
To monitor your heart rate you can use a pulse monitor or take your pulse with your fingers.
Pulse monitors are convenient tools for monitoring your heart rate. However, these values are for
reference only. You should always listen to your body first.
You can measure your pulse with your fingers by placing your first two fingers lightly over the blood
vessel (carotid artery) on your neck located next to your Adam’s apple. Count your pulse for ten
seconds and multiply by six. This figure is your heart rate in beats per minute. Compare this
number to the Target Heart rate zone for your age group.
CALCULATING YOUR TARGET HEART RATE ZONE
The most common method for calculating your target heart rate is to first determine your maximum
heart rate. The standard formula is: 220 - your age = maximum heart rate.
You DO NOT want to work out at your maximum heart rate. Instead, you should work out in
your target heart rate zone. Your target heart rate zone is a percentage of your maximum heart
rate. The AHA (American Heart Association) recommends working out at a target heart rate
zone of between 60% - 75% of your maximum heart rate. If you are just beginning a program,
exercise near or below the lower limit of your target zone.
Lower limit of target zone = maximum heart rate x 0.60
Upper limit of target zone = maximum heart rate x 0.75
Maximum heart rate (for user age 30) = 220 – 30 = 190
60% of max HR = 190 x .60 = 114
75% of max HR = 190 x .75 = 142
If you have not been exercising on a regular basis, it is recommended that you start slower. It
may be advised that you use 114 to begin as your target heart rate. If you find this pace too
difficult to maintain, go to a lower target heart rate. As you become stronger, you may want to
increase your target heart rate.
VIII. MAINTENANCE:
Owner’s Manual 27
Page 29

CLEANING
DANGER!
To reduce the risk of
electrical shock, always
unplug the treadmill
from the electrical outlet
immediately after use
and before cleaning.
Remove dust on the treadmill with vacuum or slightly damp cloth. Fold up the deck and clean
the floor with vacuum periodically will help to prolong the treadmill product life.
NEVER use solvents on the deck or running belt. Use of solvents can reduce critical lubrication
of the deck and belt.
RUNNING BELT CENTERING ADJUSTMENT:
When you run or walk, you may push off harder with one foot than the other. This will cause the
running belt to run off center. This treadmill is designed and built to ensure proper tracking of the
belt is always centered on the deck. Occasionally the belt may need further adjustment to keep it
centered. To center the belt, use the enclosed Allen wrench to adjust the rear roller position.
BELT CENTERING PROCEDURES:
1. DO NOT wear loose clothing, neckties or loose jewelry while making this adjustment.
2. NEVER turn the bolt more than 1/4 turn at a time.
3. Always tighten one side and loosen the other to prevent over tightening or over loosening the
belt.
4. Run the treadmill. Adjust belt while the treadmill is running at 4 Mi/H (6.4 Km/H) with no
person on the belt.
After making the adjustment, walk on the belt for five minutes to test. If necessary, repeat the
procedure but NEVER turn the bolts more than 1/4 turn at a time. Over tightening the belt can
significantly shorten the belt life.
IF BELT TOO FAR TO THE LEFT SIDE:
1. Turn the left roller bolt 1/4 turn clockwise (tighten)
2. Turn the right roller bolt 1/4 turn counterclockwise (loosen)
IF BELT TOO FAR TO THE RIGHT SIDE:
1. Turn the right roller bolt 1/4 turn clockwise (tighten)
2. Turn the left roller bolt 1/4 turn counterclockwise (loosen)
RUNNING BELT TENSIONING ADJUSTMENT:
CAUTION!
Over tightening of the
belt will severely shorten
the life of the belt and
may cause further
damage to other
28
If you place your feet on the belt and feel a slipping sensation, then the belt has stretched and is
slipping across the rollers. All belts will stretch over time. This is a normal and common
Owner’s Manual
Page 30

adjustment on any treadmill. To eliminate this slipping, tension both Allen bolts on the rear roller
1/4 turn. Try the treadmill again to check for slipping. Repeat if necessary, but NEVER turn
the roller bolts more than 1/4 turn at a time.
DRIVE BELT TENSIONING ADJUSTMENT:
If you have tensioned the running belt and are still experiencing a slipping sensation, call your
dealer. Only an authorized dealer should perform tensioning of the drive belt.
LUBRICATING THE DECK:
A well-lubricated deck will ensure high performance of your treadmill and reduce the level of
normal wear and tear to important components. This treadmill has been pre-lubricated at the
factory. However, for optimal performance, the running deck may require periodic lubrication.
With average usage (30 minute workout at 5-6 Km/H 3 times a week for two people) lubricate
every six months. You may adjust the timing of the lubrication based on the intensity of the
treadmill use level.
To check the lubrication level, simply lift the running belt, and put your hand as far into the center
of the belt as you can reach. If your hand shows signs of silicone, then it does not need
additional lubrication. If the board feels dry and there is very little evidence of silicone on your
hand, then additional lubrication is necessary.
TO LUBRICATE THE DECK:
1. Stop running belt so that the seam is located on top and in the center of the deck.
2. Insert extending tube nozzle into spray head of lubricant can.
3. Lift running belt.
4. Position nozzle between the belt and the deck board approximately 200mm (8”) from the front
of the treadmill.
5. Apply the silicon from the front to the rear of the treadmill on each side of the treadmill. Try to
reach the spray as far into the center of the running deck as possible. A light coating of
silicone spray should be applied to the deck under the belt on each side. Be certain the
center of the walking area gets lubricated.
6. Spread the silicon by running the treadmill at 1 Km/H and step gently on the belt from left to
right. Do that for a few minutes and allow the silicon to soak into the belt.
Owner’s Manual 29
Page 31

IX. TROUBLE SHOOTING:
WHEN TO CALL FOR HELP
This treadmill has been designed with user safety as the number one priority. In the event of
electrical failure, the treadmill will shut off automatically to prevent user injury and to prevent
damage to expensive components such as the motor.
When you encounter unusual behavior from the treadmill, simply go to the front of the treadmill
and turn the power switch off and on to reset the treadmill. This should clear incidental errors
and ready the treadmill for normal operation again.
If you have reset the treadmill by turning the power switch off and on again, and the treadmill is
still not operational, then it is time to call your dealer for service.
TROUBLE SHOOTING GUIDE
Problem Potential cause Corrections
Treadmill will not start 1. Not plugged in
2. Safety tether key not inserted
3. House circuit breaker tripped
4. Treadmill circuit breaker tripped
5. Switch on OFF
Running belt slips 1. Running belt not tight enough
2. Drive belt not tight enough
Running belt hesitates when
stepped on
Running belt is off centered Running belt tension not even across
1. Insufficient lubrication
2. Running belt too tight
the rear roller
1. Plug into grounded outlet.
2. Insert safety tether key into
console.
3. Reset or replace fuse.
4. Lubricate treadmill deck and
reset.
5. Turn switch to ON
1. Adjust running belt tension
2. Adjust drive belt tension
1. Apply silicone lubricant between
Belt and deck
2. Adjust running belt tension
Center the running belt
30
Owner’s Manual
Page 32

X. PART DESCRIPTION:
Owner’s Manual 31
Page 33

XI. ASSEMBLY DESCRIPTION:
32
Owner’s Manual
Page 34

STEP 3 Assemble Console
1. Insert console cable/cables #14 and #18 through the
holes on the console base before setting the console
on the base.
2 Secure and tighten console in place with
two screws #7, M8x30mm and two flat washers #1.
3. Connect console cable #14 to upright cable #13
from the bottom.
4. Also connect contact HR cables #18 to #19 together
from the bottom.
5. For model TX3 only: Connect extension key
cables #16 to #17 and #17 to #15 together on both sides
of the console from the bottom.
Owner’s Manual 33
Page 35

STEP 4 Assemble handle bar
1. Insert handle bars into the console base.
2. Secure each handle bar to the console base with two
screws #6, M8x15 and two star washers #10.
3. For model TX3 only: Insert fixing cover onto bottom of
handle bar and secure them to the upright post with
one screw #9, M8x55 and one star washer #10.
4. Tighten all screws after they are in position.
34
Owner’s Manual
Page 36

XII.
LIMITED WARRANTY
THERE ARE NO WARRANTIES, EXPRESSED OR IMPLIED, MADE BY EITHER THE DISTRIBUTOR OR THE MANUFACTURER ON VERSO by
KETTLER PRODUCTS, EXCEPT THE MANUFACTURER’S LIMITED WARRANTY AGAINST DEFECTS IN MATERIAL SET OUT BELOW:
This VERSO by KETTLER™ Limited Warranty applies to products sold through the VERSO by KETTLER™ Authorized Dealer Network to the original retail
purchaser and authenticated by proof of purchase from a retailer located in the United States. Any shipments made under this warranty will be shipped to
the United States only. Any shipment outside of the United States will be at the sole cost of the customer. This VERSO by KETTLER™ Limited Warranty is
a manufacturer’s warranty and is not changed or modified by additional warranties extended by individual retailers at the point of sale. Manufacturer
warrants this product to be free from defects in material at the time of the product’s tender of delivery for a period of 1 year for electronic components, 3
years for non-electronic components, and 6 years on the motor for residential use only. This Limited Warranty is not transferable and does not cover normal
wear and tear (including, but not limited to, damage and wear to power shocks, drive belts, and other non-durable parts). The liability of the manufacturer
under this Limited Warranty shall not include any liability for direct, indirect, or consequential damages resulting from the defect. This Limited Warranty is
void if the product is damaged by accident, unreasonable use, improper service, failure to follow instructions provided, modification from its
original state, or other causes determined not arising out of defects in material.
This warranty gives you specific legal rights. Should this product become defective due to material within the warranty period, contact VERSO by
KETTLER™ and KETTLER® Parts & Service Dept. by phone at 866.804.0440, fax at 757.563.9273, or e-mail at parts@kettlerusa.com
THIS LIMITED WARRANTY IS EXPRESSLY IN LIEU OF ANY OTHER WARRANTIES, EXPRESSED OR IMPLIED, INCLUDING ANY IMPLIED
WARRANTY OF MERCHANTABILITY OR FITNESS FOR A PARTICULAR PURPOSE, AND OF ANY OTHER OBLIGATIONS OR LIABILITY ON THE
PART OF THE MANUFACTURER. KETTLER NEITHER ASSUMES NOR AUTHORIZES ANY OTHER PERSON TO ASSUME FOR IT ANY OTHER
LIABILITY IN CONNECTION WITH SUCH PRODUCTS.
.
KETTLER ® Parts & Service Department: 866.804.0440 Fax at 757.563.9273 Email at parts@kettlerusa.com
Owner’s Manual 35
Page 37

XIII. TX1 110V / 230V Part List
ITEM DESCRIPTION PART # QTY.
Motor, incline, 230V S004679
1
Motor, incline, 110V S005238
Shaft, fixing M004198
2
Screw, hex, special M001447
3
Sleeve, frame, H M004212
4
Sleeve, gas shock M004220
5
Cylinder, hybrid M005925
6
Cap, frame, H M004246
7
Sleeve, fixing, frame, base M004244
8
Cardboard, frame, base O006519
9
Foot, front, frame, base M004264
10
Jacket, cable, frame, base M004939
11
Foot, adjustable M004614
12
Cover, fix, wheel, front, R M004263
13
Cover, fix, wheel, front, L M004254
14
Wheel, moving M003823
15
Bushing, wheel M004936
16
Coating, frame, base S006094
17
Coating, incline S006096
18
Bushing, tube, connection M001406
19
Slider, track M004940
20
Cap, pin, lock M005770
21
Assy, cable, pin, lock S006126
22
Rubber M001821
23
Bracket, stopper, side landing M004184
24
Bushing, snap M005376
25
Bushing, snap M001438
26
Sleeve, pin, lock M004175
27
Foot, frame, main M004180
28
Guard, dec k M005361
29
Cap, frame, main, rear, btm, R M007138
30
Landing, side M007136
31
Cap, frame, main, rear, top, L M007139
32
Cap, frame, main, rear, btm, L M007140
33
Cap, frame, main, rear, top, R M007137
34
Bracket, pin, lock M004187
35
Spring, pin, loc k M004193
36
Lever, release M005886
37
Haft, release M005887
38
1
1
1
2
2
4
2
2
2
1
2
1
2
1
1
4
2
1
1
2
2
1
1
1
2
1
1
1
2
2
1
2
1
1
1
1
1
1
1
36
Owner’s Manual
Page 38

ITEM DESCRIPTION PART # QTY.
39 Bushing, wheel, rear M004183 2
Inlet, AC M003150
40
Switch, power M006157
41
Breaker, circuit, 230V M005689
42
Breaker, circuit, 110V M003149
Controller, 230V S006089
43
Controller, 110V S006114
Belt, drive M001688
44
Cushion, deck M001557
45
Belt, running M003833
46
Roller, rear S004663
47
Deck M004952
48
Coating, frame, main S006099
49
Roller, front S005417
50
Coating, upright, L S006274
51
Coating, upright, R S006275
52
Bar, handl e S006277
53
Sleeve, shaft M004129
54
Wheel, incline M005931
55
Bushing, fix, frame, base M004942
56
Coating, frame, H, R S006211
57
Coating, frame, H, L S006202
58
Weldment, bracket, motor S005514
59
Sensor, speed, w/ cable S006867
60
Motor , 23 0V M002627
61
Motor, 110V M002628
Cover, bar, handle, btm, R M007145
62
Cover, bar, handle, top, L M007142
63
Cover, bar, handle, btm, L M007143
64
Cover, bar, handle, top, R M007144
65
Coating, bracket, console S006273
66
Assy Console S006899
67
Assy, bar, horizontal S006270
68
Cover, base, console M007148
69
Cover, motor M007141
70
Cap, handlebar end M004294
71
Key, safety S005017
72
Filter 230V only S004850
73
Choke 230V only M004158
74
Cable, signal, frame, main 1920mm M004259
75
Cable, signal, upright 1230mm M004262
76
Signal cable+ ferrite core 465mm M003907
77
Signal cable, Hand pulse PCB(6P) 390mm M004743
78
1
1
1
1
1
6
1
1
1
1
1
1
1
2
2
2
2
1
1
1
1
1
1
1
1
1
1
1
1
1
1
1
2
1
1
1
1
1
1
1
Owner’s Manual 37
Page 39

0
/
30
V
2
V
TX1 11
38
Owner’s Manual
Page 40

ITEM DESCRIPTION PART # QTY.
1 Shaft, fixing M004198 1
2 Screw, hex, sp ecial M001447 2
3 Sleeve, frame, H M004212 2
4 Sleeve, gas shock M004220 4
5 Cylinder, hybrid M005925 2
6 Sleeve, fixing, frame, base M004244 2
7 Cap, frame, H M004246 2
8 Foot, front, frame, base M004264 2
9 Jacket, cable, frame, base M004939 1
10 Foot, adjustable M004614 2
11 Cover, fix, wheel, front, R M004263 1
12 Bushing, wheel M004936 2
13 Cover, fix, wheel, front, L M004254 1
14 Wheel, moving M003823 4
15 Coating, frame, base S006094 1
16 Coating, incline S006096 1
17 Bushing, tube, connection M001406 2
18 Slider, track M004940 2
19 Cover, fixing, bar, handle M007171 2
20 Coating, upright, L S006283 1
21 Coating, upright, R S006284 1
22 Ca p, pin, lock M005770 1
23 Cover, back M005830 1
24 Assy, cable, pin, lock S006126 1
25 Cover, motor M007141 1
26 Si gnal cable+ ferrite core 465mm M003907 1
27 Key, safety S005017 1
28 Sl eeve, pin, lock M004175 1
29 Foot, frame, main M004180 2
30 Guard, deck M005361 2
31 Landing, side M007136 2
32 Cap, frame, main, rear, top, L M007139 1
33 Cap, frame, main, rear, btm, L M007140 1
34 Cap, frame, main, rear, top, R M007137 1
35 Cap, frame, main, rear, btm, R M007138 1
36 Spring, pin, lock M004193 1
37 Lever, release M005886 1
38 Haft, release M005887 1
39 Bracket, pin, lock M004187 1
XIV. TX3 110V / 230V Part List
Owner’s Manual 39
Page 41

ITEM DESCRIPTION PART # QTY.
40 Bushing, wheel, rear M004183
41 Inlet, AC M003150
42 Switch, power M006157
43 Breaker, circuit, 230V M005689
Breaker, circuit, 110V M003149
44 Controller, 230V S006691
Controller, 110V S006719
45 Filter 230V only S004850
46 Choke 230V only M004158
47 Belt, drive M001688
48 Roller, front S005417
49 Cushion, deck M001557
50 Belt, running M003833
51 Roller, rear S004663
52 Deck M004952
53 Coating, frame, main S006099
54 Weldment, bracket, motor S005514
55 Sensor, speed, w/ cable S006867
56 Motor, 2HP 230V M005404
Motor, 2HP 110V M006801
57 Assy, bar, horizontal S006270
58 Bar, han dle S006286
59 Assy Console S006961
60 Cover, bar, handle, btm, L M007142
61 Cover, bar, handle, top, R M007144
62 Cover, bar, handle, btm, R M007145
63 Cover, bar, handle, top, L M007143
64 Cover, base, console M007148
65 Coating, bracket, console S006273
66 Signal cable, Hand pulse PCB(6P) 390mm M004743
67 Motor, incline, 230V S004679
Motor, incline, 110V S005238
68 Bushing, fix, frame, base M004942
69 Coating, frame, H, L S006202
70 Wheel, incline M005931
71 Sleeve, shaft M004129
72 Coating, frame, H, R S006211
73 Cable, signal, upright 1230mm M004262
74 Cable, signal, frame, main 1920mm M004259
75 Decal,Motor ,cover O007001
76 Board, HR, contact M005905
2
1
1
1
1
1
1
1
1
1
1
6
1
1
1
1
1
1
1
1
1
2
1
1
1
1
1
1
1
1
1
1
2
1
2
2
1
1
1
2
1
40
Owner’s Manual
Page 42

3
0
/
30
V
2
V
11
TX
Owner’s Manual 41
 Loading...