

Kettler Track-3 User Manual
2-13
D
14-25
26-37
38-49
50-61
62-73
74-85
86-97
98-109
110-121
GB
F
NL
E
I
PL
P
DK
CZ
Abb. ähnlich
Computer- und Trainingsanleitung „KETTLER TRACK-3“
für Art.-Nr. 07881-500
D
SICHERHEITSHINWEISE
Informationen zu Ihrer Sicherheit:
■ Um Verletzungen infolge von Fehlbelastung oder Überlastung
zu verhindern, darf das Trainingsgerät nur nach Anleitung bedient werden.
■ Vor der ersten Inbetriebnahme und zusätzlich nach ca. 6 Be-
triebstagen sind die Verbindungen auf festen Sitz zu überprüfen.
■ Überzeugen Sie sich regelmäßig von der Funktionsfähigkeit
und dem ordnungsgemäßen Zustand des Trainingsgerätes.
■ Die sicherheitstechnischen Kontrollen zählen zu den Betrei-
berpflichten und müssen regelmäßig und ordnungsgemäß
durchgeführt werden.
■ Das Sicherheitsniveau des Gerätes kann nur unter der Vor-
aussetzung gehalten werden, dass es regelmäßig auf Schäden
und Verschleiß geprüft wird.
■ Defekte oder beschädigte Bauteile sind umgehend auszutau-
schen. Eingriffe an den elektrischen Bauteilen sind nur von
qualifiziertem Personal durchzuführen. Verwenden Sie nur Original KETTLER Ersatzteile.
■ Bis zur Instandsetzung darf das Gerät nicht benutzt werden.
■ Lassen Sie vor Aufnahme des Trainings durch Ihren Hausarzt
klären, ob Sie gesundheitlich für das Training mit diesem
Gerät geeignet sind. Der ärztliche Befund sollte Grundlage
für den Aufbau Ihres Trainingsprogramms sein. Falsches oder
übermäßiges Training kann zu Gesundheitsschäden führen.
■ Das Laufband darf nur für seinen bestimmungsgemäßen
Zweck verwendet werden, d. h. für das Lauf- und Gehtraining
erwachsener Personen.
■ Beachten Sie das maximale Benutzergewicht.
■ Trainieren Sie immer nur mit angebrachtem Sicherheitsschlüs-
sel.
■ Machen Sie sich bei den ersten Trainingseinheiten mit dem
Bewegungsabläufen bei niedriger Geschwindigkeit vertraut.
■ Bei Unsicherheit halten Sie sich an den Griffstangen fest und
verlassen das Band auf den Seitenplattformen und stoppen
das Band.
■ Wichtig: Beachten Sie auch die Sicherheitshinweise in der
Montage- und Aufbauanleitung.
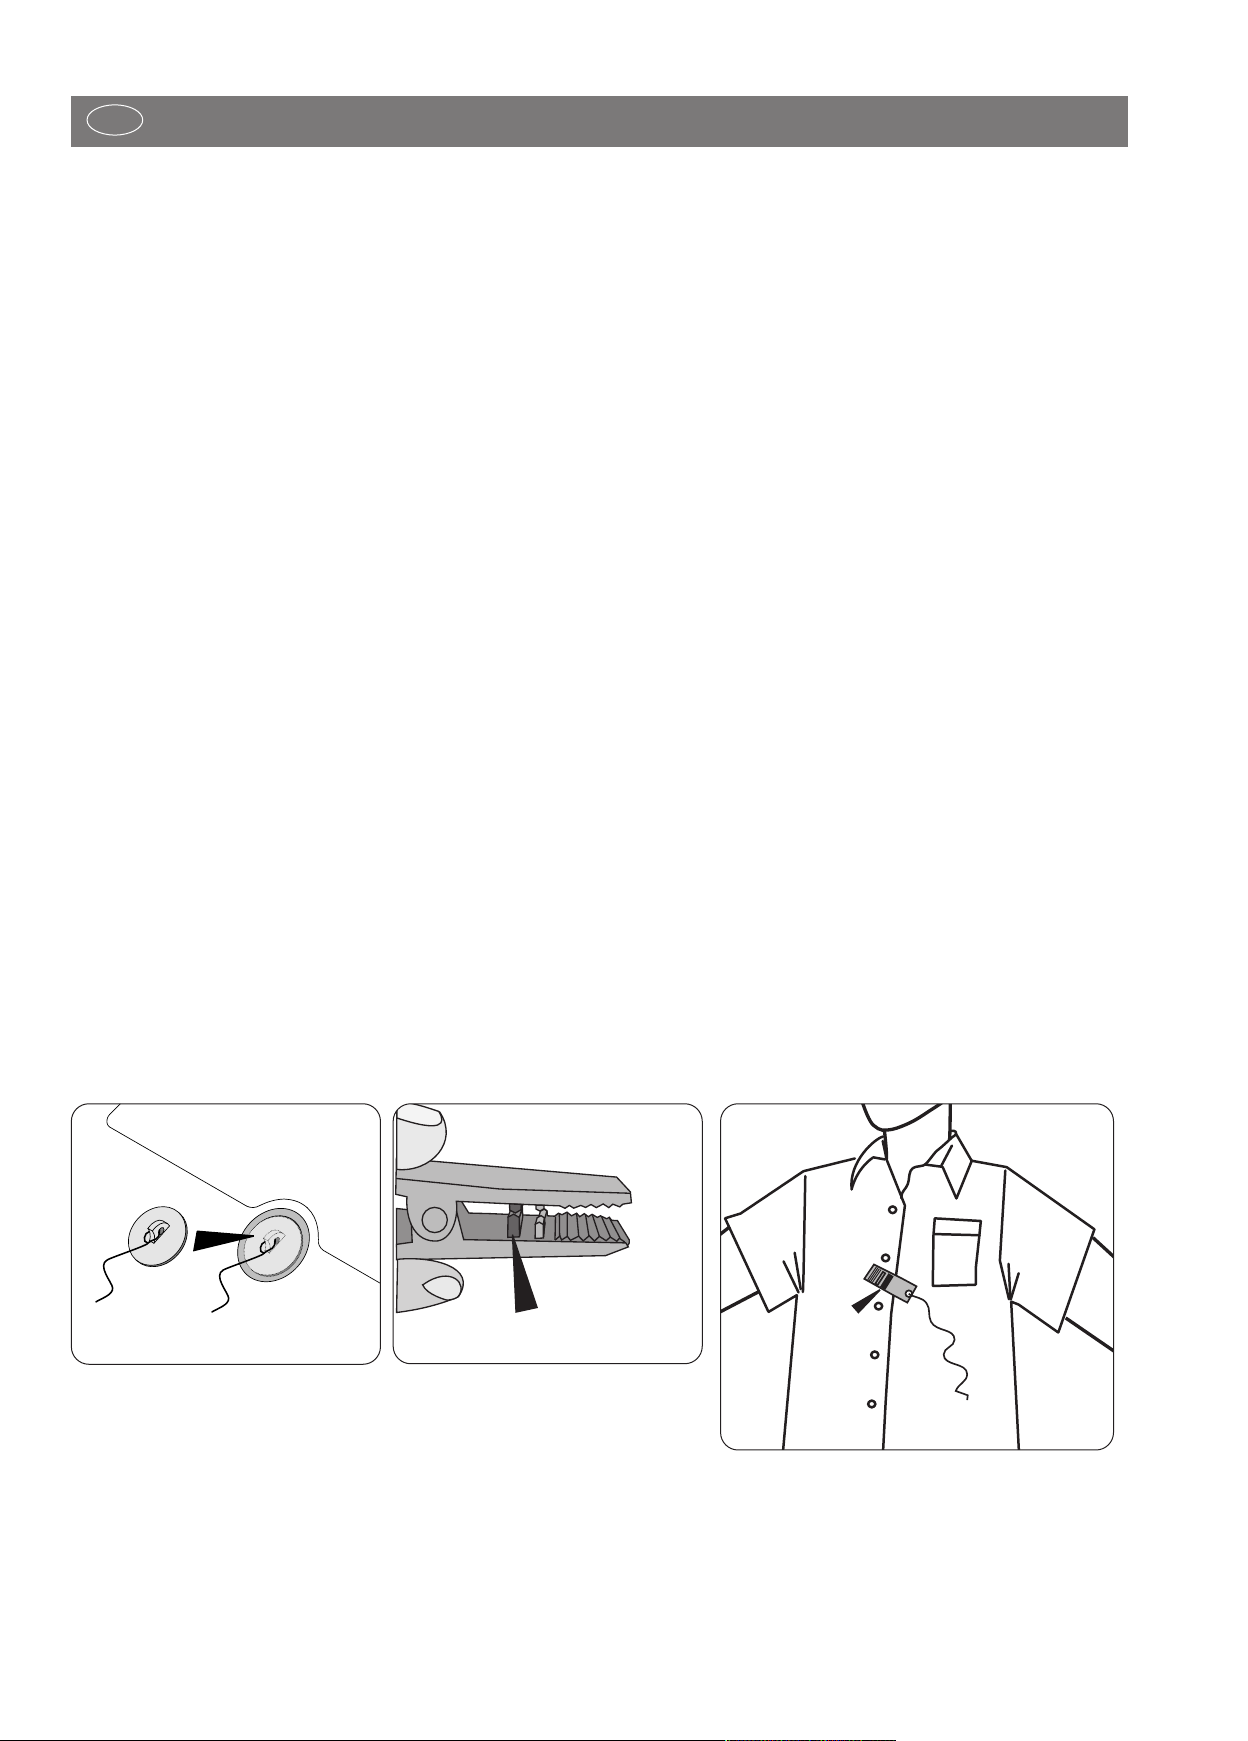
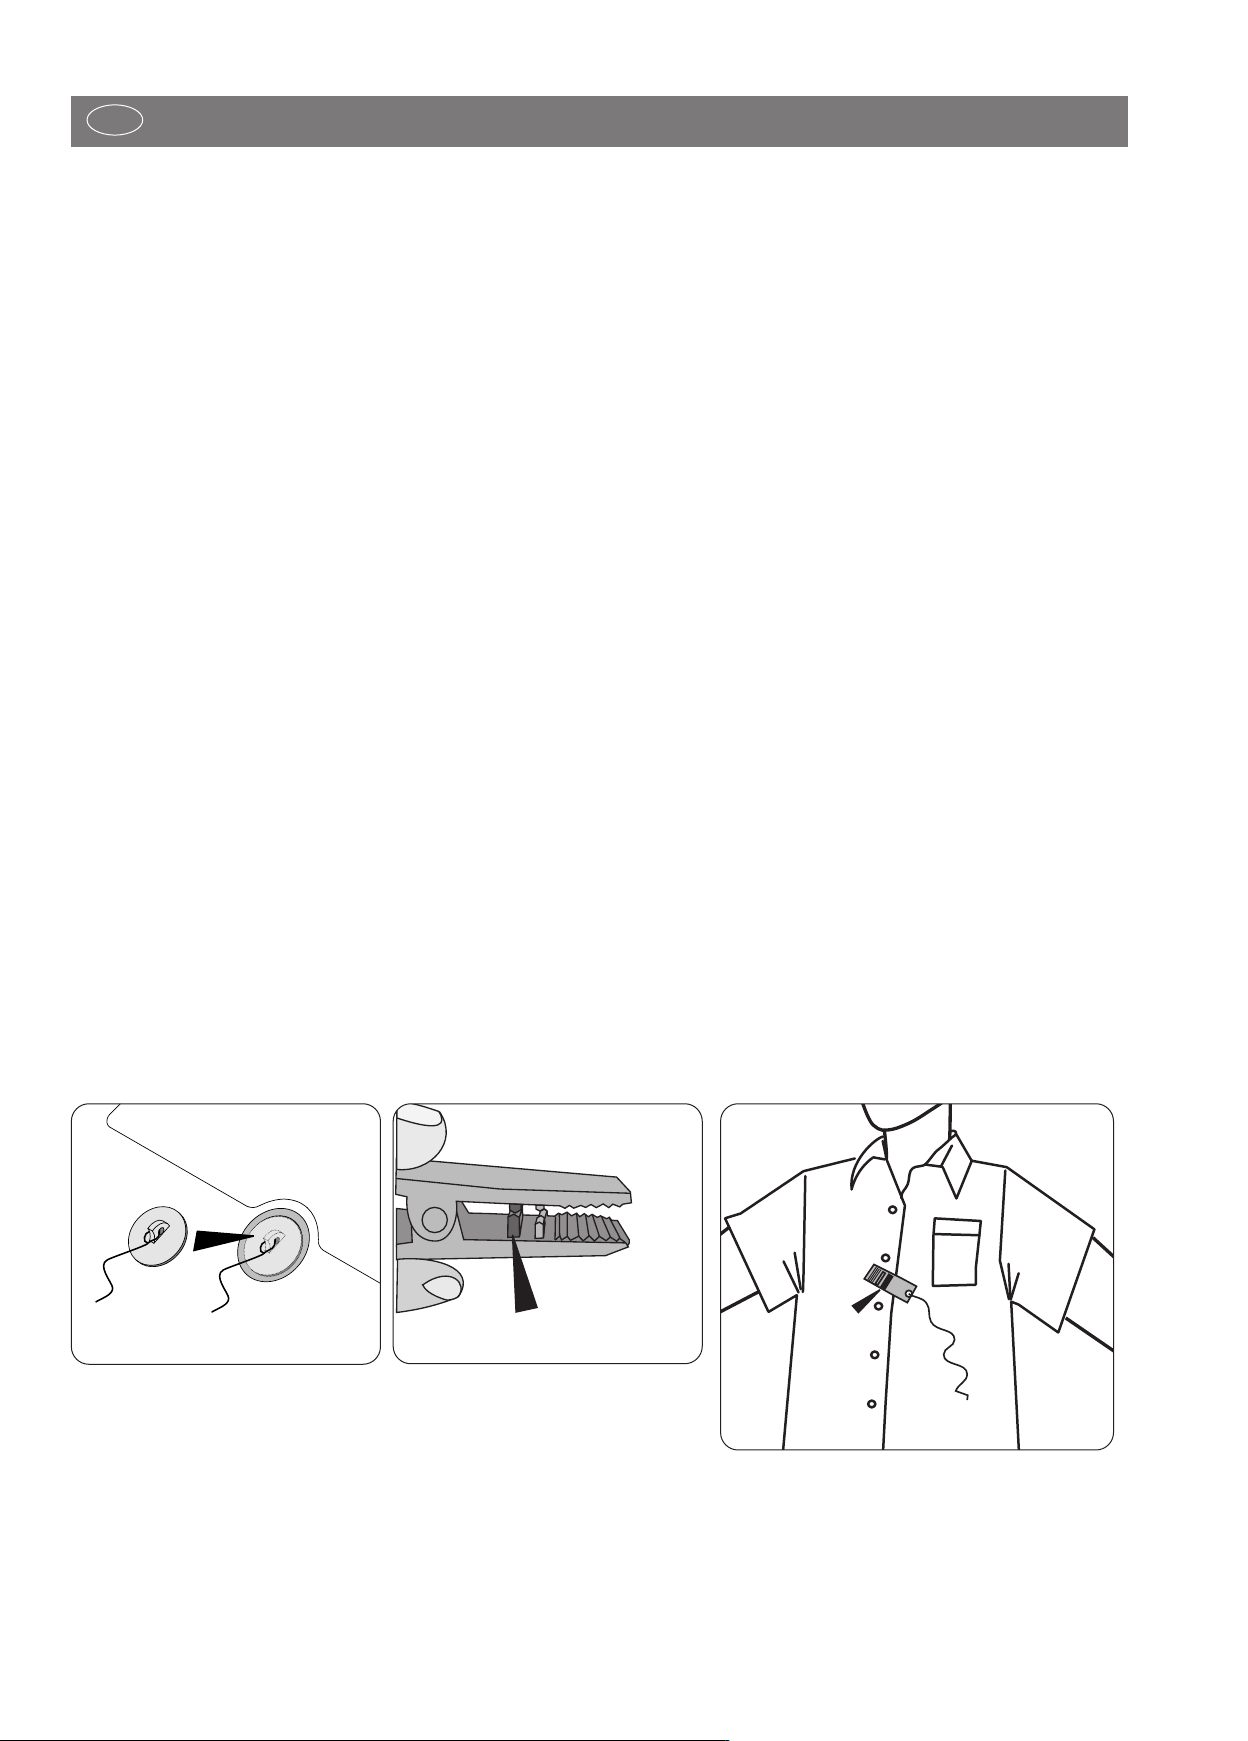
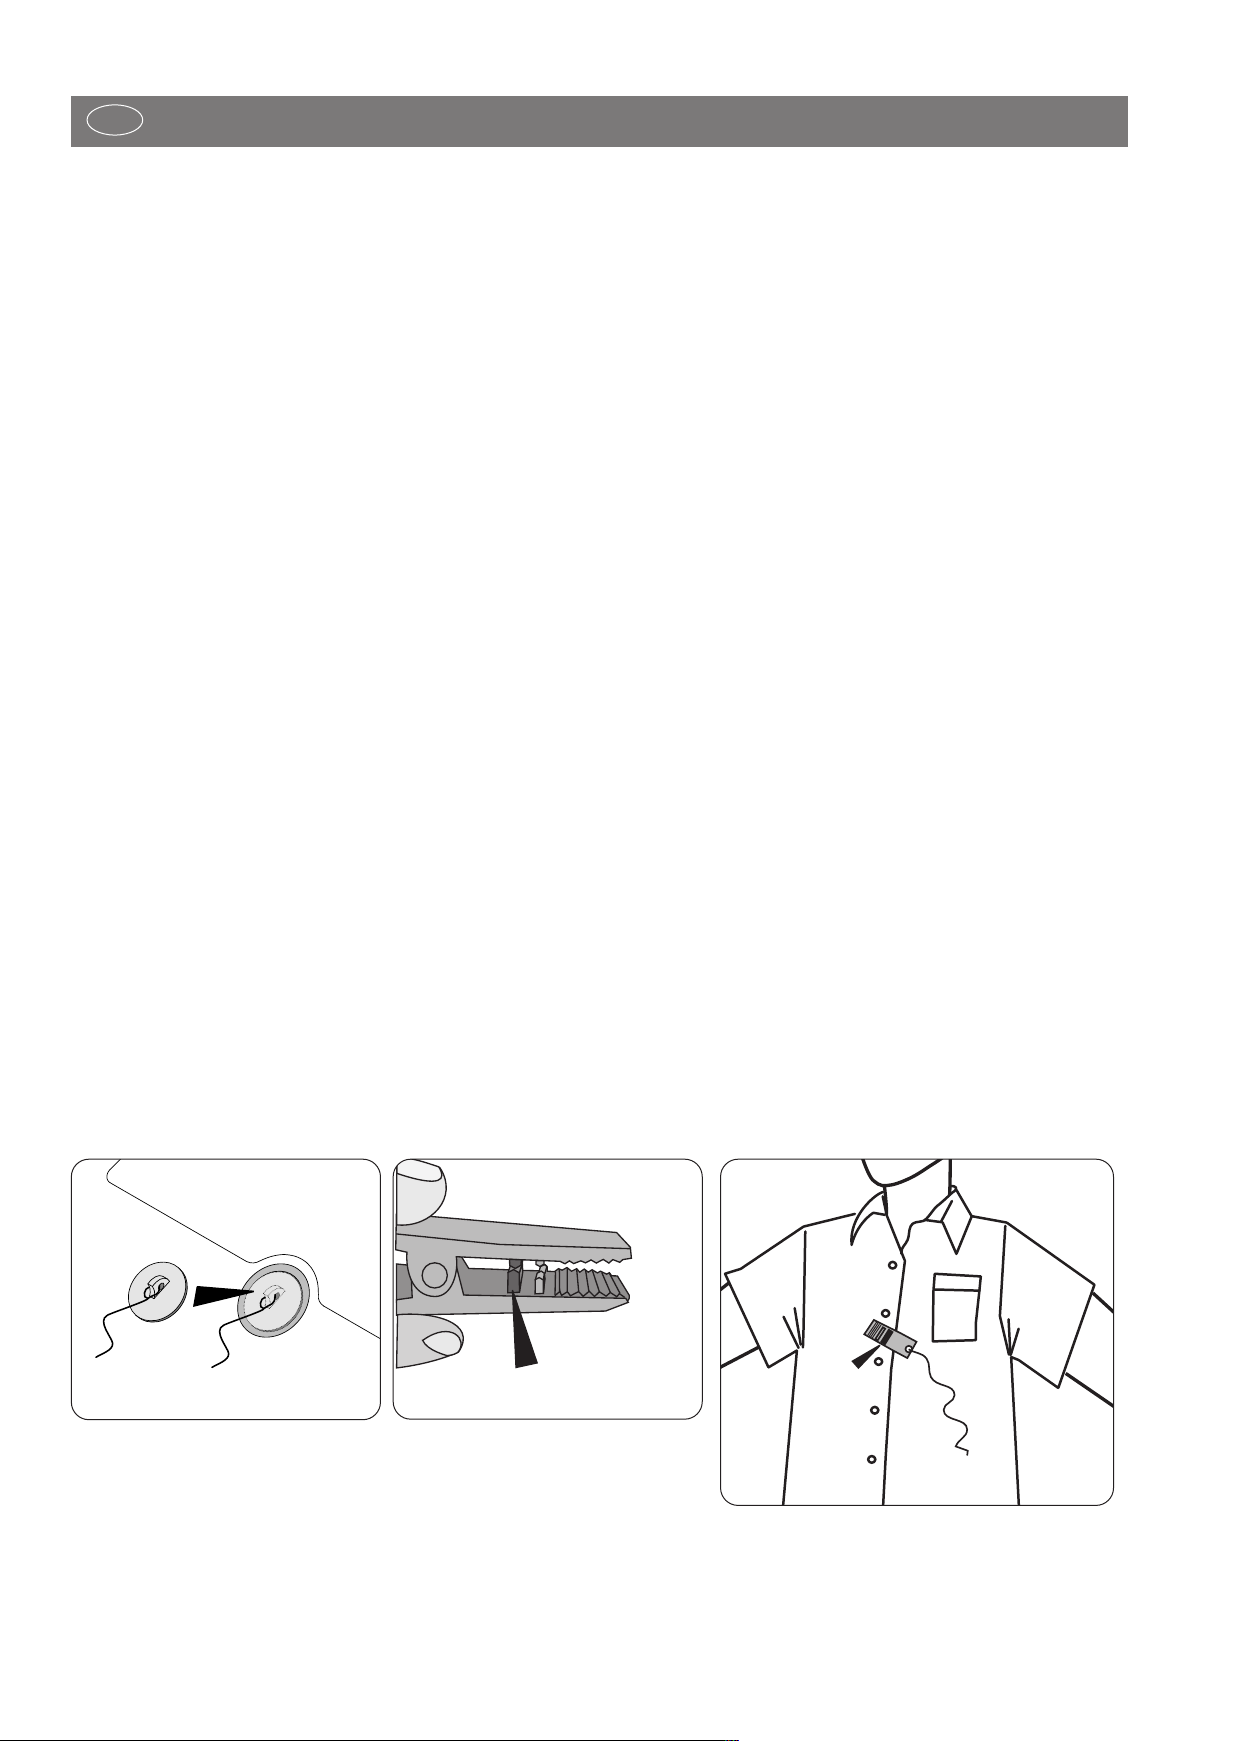
Sicherheitsschalter
■ Befestigen Sie immer vor jedem Training den Sicherheits-
schlüssel am Sicherheitsschalter und klemmen Sie die Schnur
des Sicherheitsschlüssels an der Kleidung fest. Passen Sie die
Schnurlänge an: Beim „Straucheln“ soll der Sicherheitsschalter auslösen.
■ Der Sicherheitsschalter wurde entwickelt, um die Antriebe für
das Band und die Höhenverstellung sofort abzuschalten, falls
Sie stürzen sollten oder Sie sich in einer Notsituation befinden. Bei hohen Geschwindigkeiten kann es unangenehm und
auch etwas gefährlich werden, wenn das Laufband sofort zum
Stehen kommt. Benutzen Sie den Sicherheitsschalter daher nur
für einen Notstopp. Um das Laufband während des Trainings
sicher, bequem und vollständig unter normalen Bedingungen
zum Stehen zu bringen, verwenden Sie die STOP Taste.
■ Überprüfung des Sicherheitsschalters vor Trainingsbeginn
■ Stellen Sie sich auf die Seitenplattformen und starten das Band
it minimaler Geschwindigkeit. Ziehen Sie den Sicherheits-
m
schlüssel vom Sicherheitsschalter ab. Das Band muss sofort
stoppen. Danach befestigen Sie den Sicherheitsschlüssel wieder am Sicherheitsschalter und die Schnur an Ihrer Kleidung.
Bei gestopptem Band bewegen Sie sich nach hinten. Der Sicherheitsschlüssel muss sich vom Sicherheitsschalter lösen. Die
Schnur sollte noch fest an der Kleidung sein. Danach befestigen Sie den Sicherheitsschlüssel wieder am Sicherheitsschalter.
Laufbandsicherung
■ Eine unkontrollierte Benutzung des Laufbandes durch Dritte,
kann durch Abziehen und Verwahrung des Sicherheitsschlüssels vermieden werden. Bitte bewahren Sie den Sicherheitsschlüssel sorgfältig auf und verhindern, dass Kinder an den
Sicherheitsschlüssel gelangen!
2
D
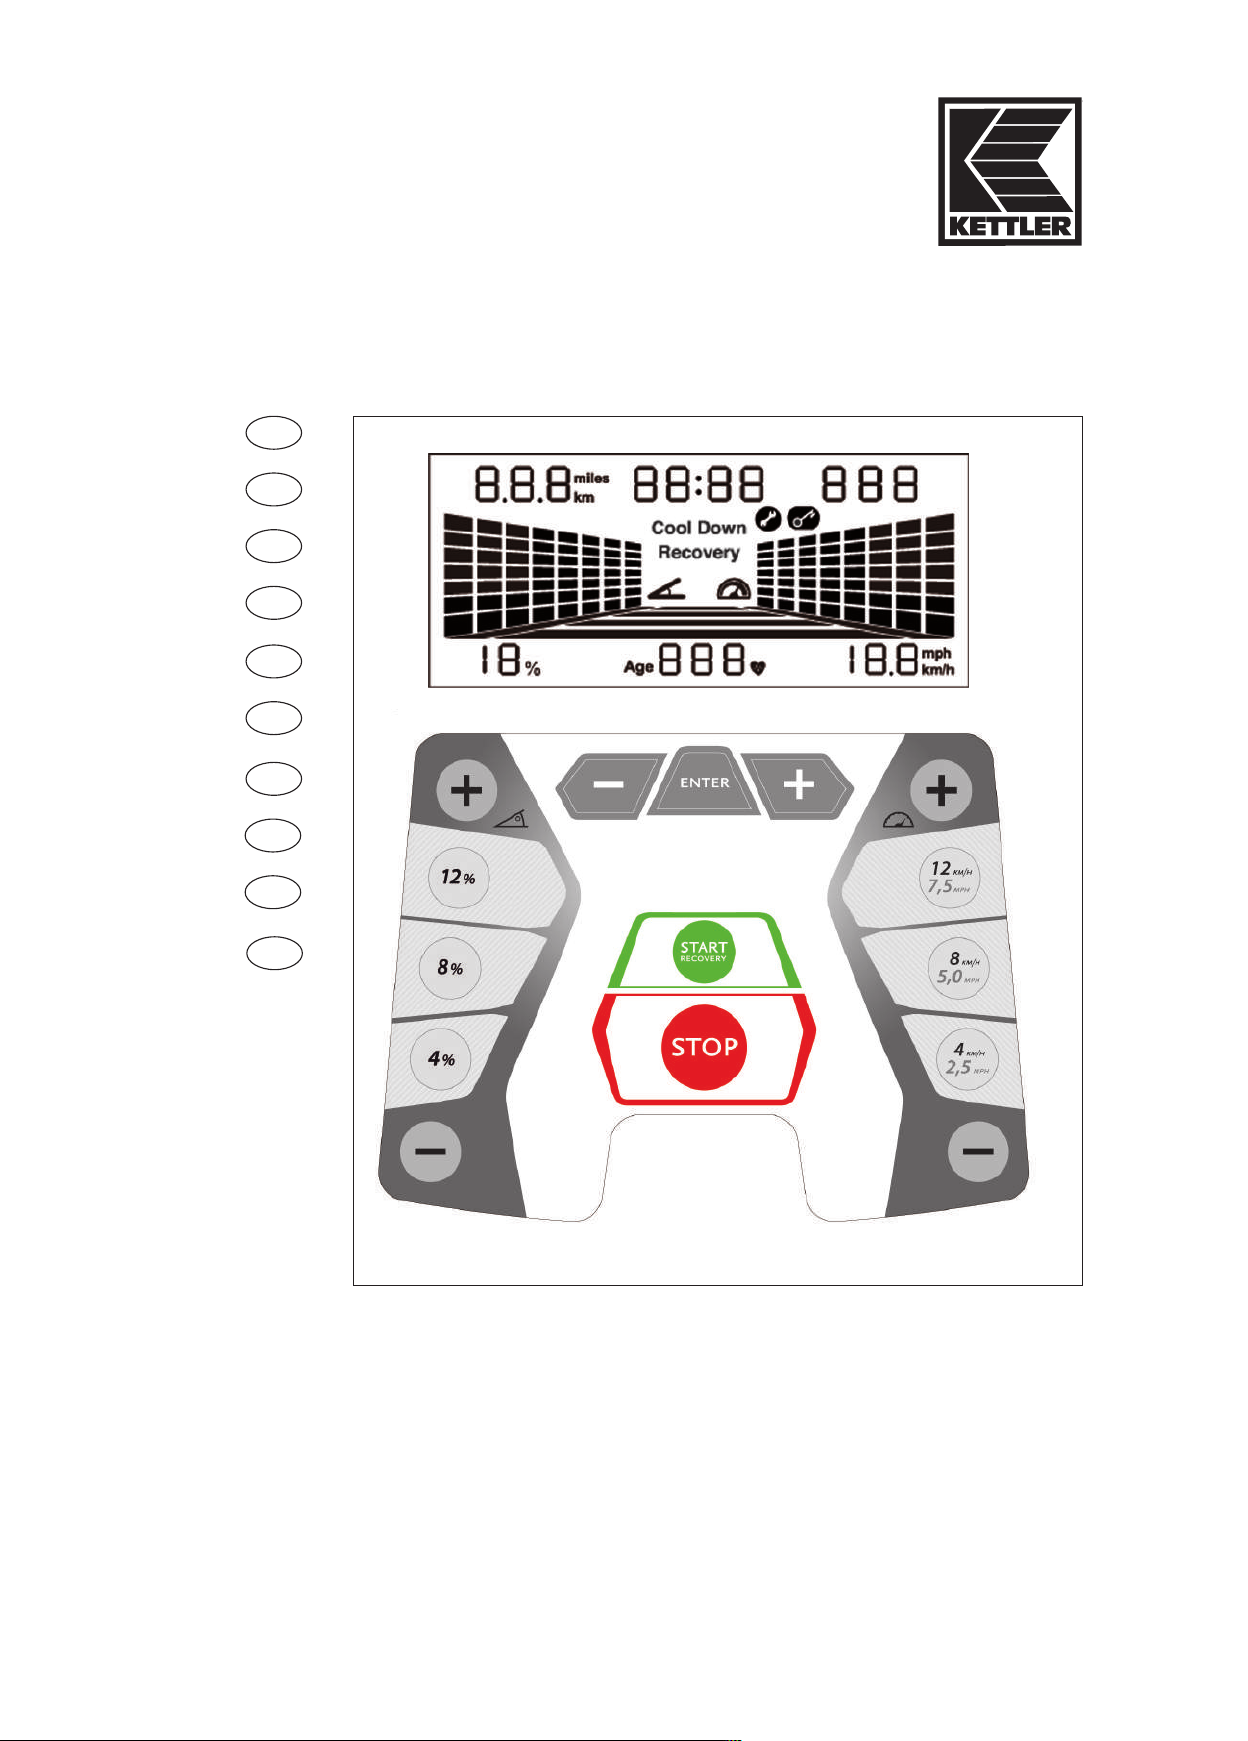
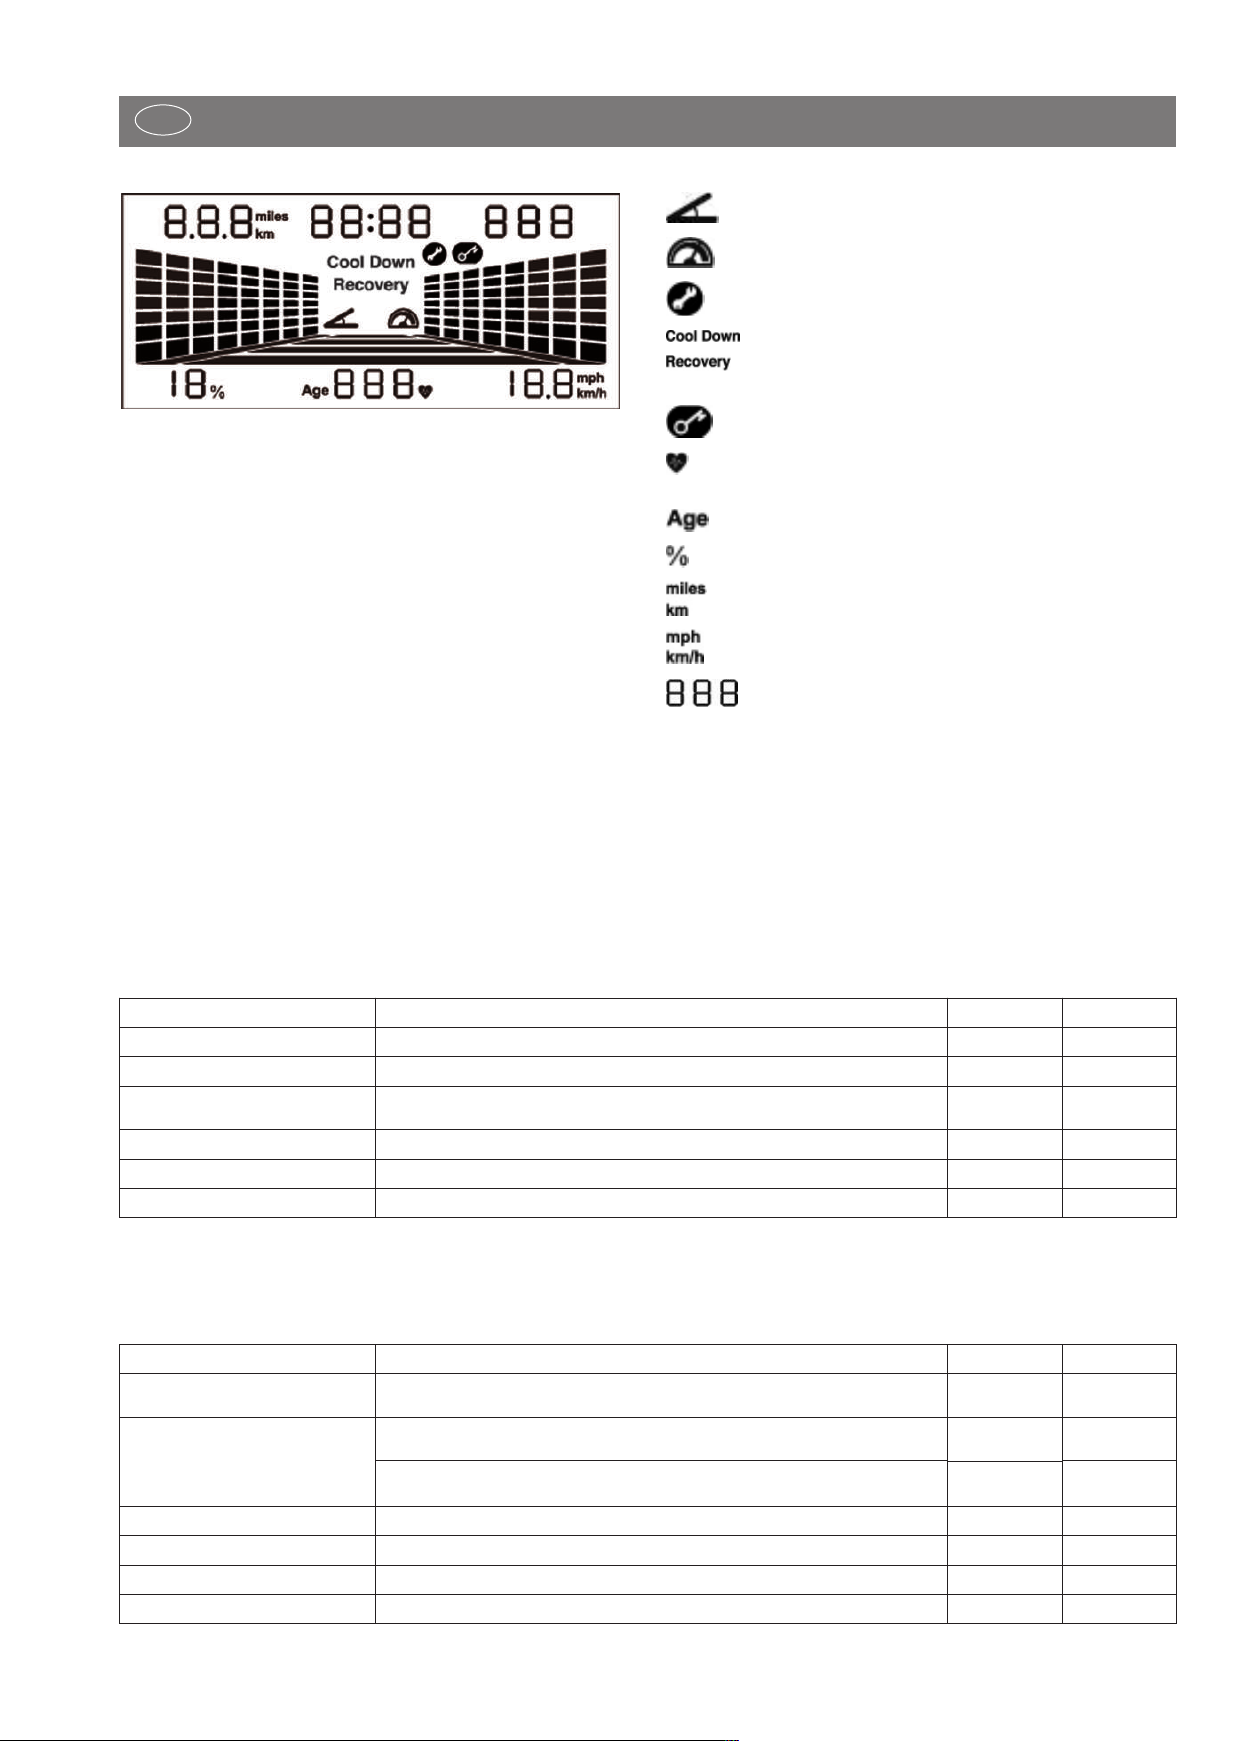
BETRIEB DES ANZEIGECOMPUTERS TRACK MOTION
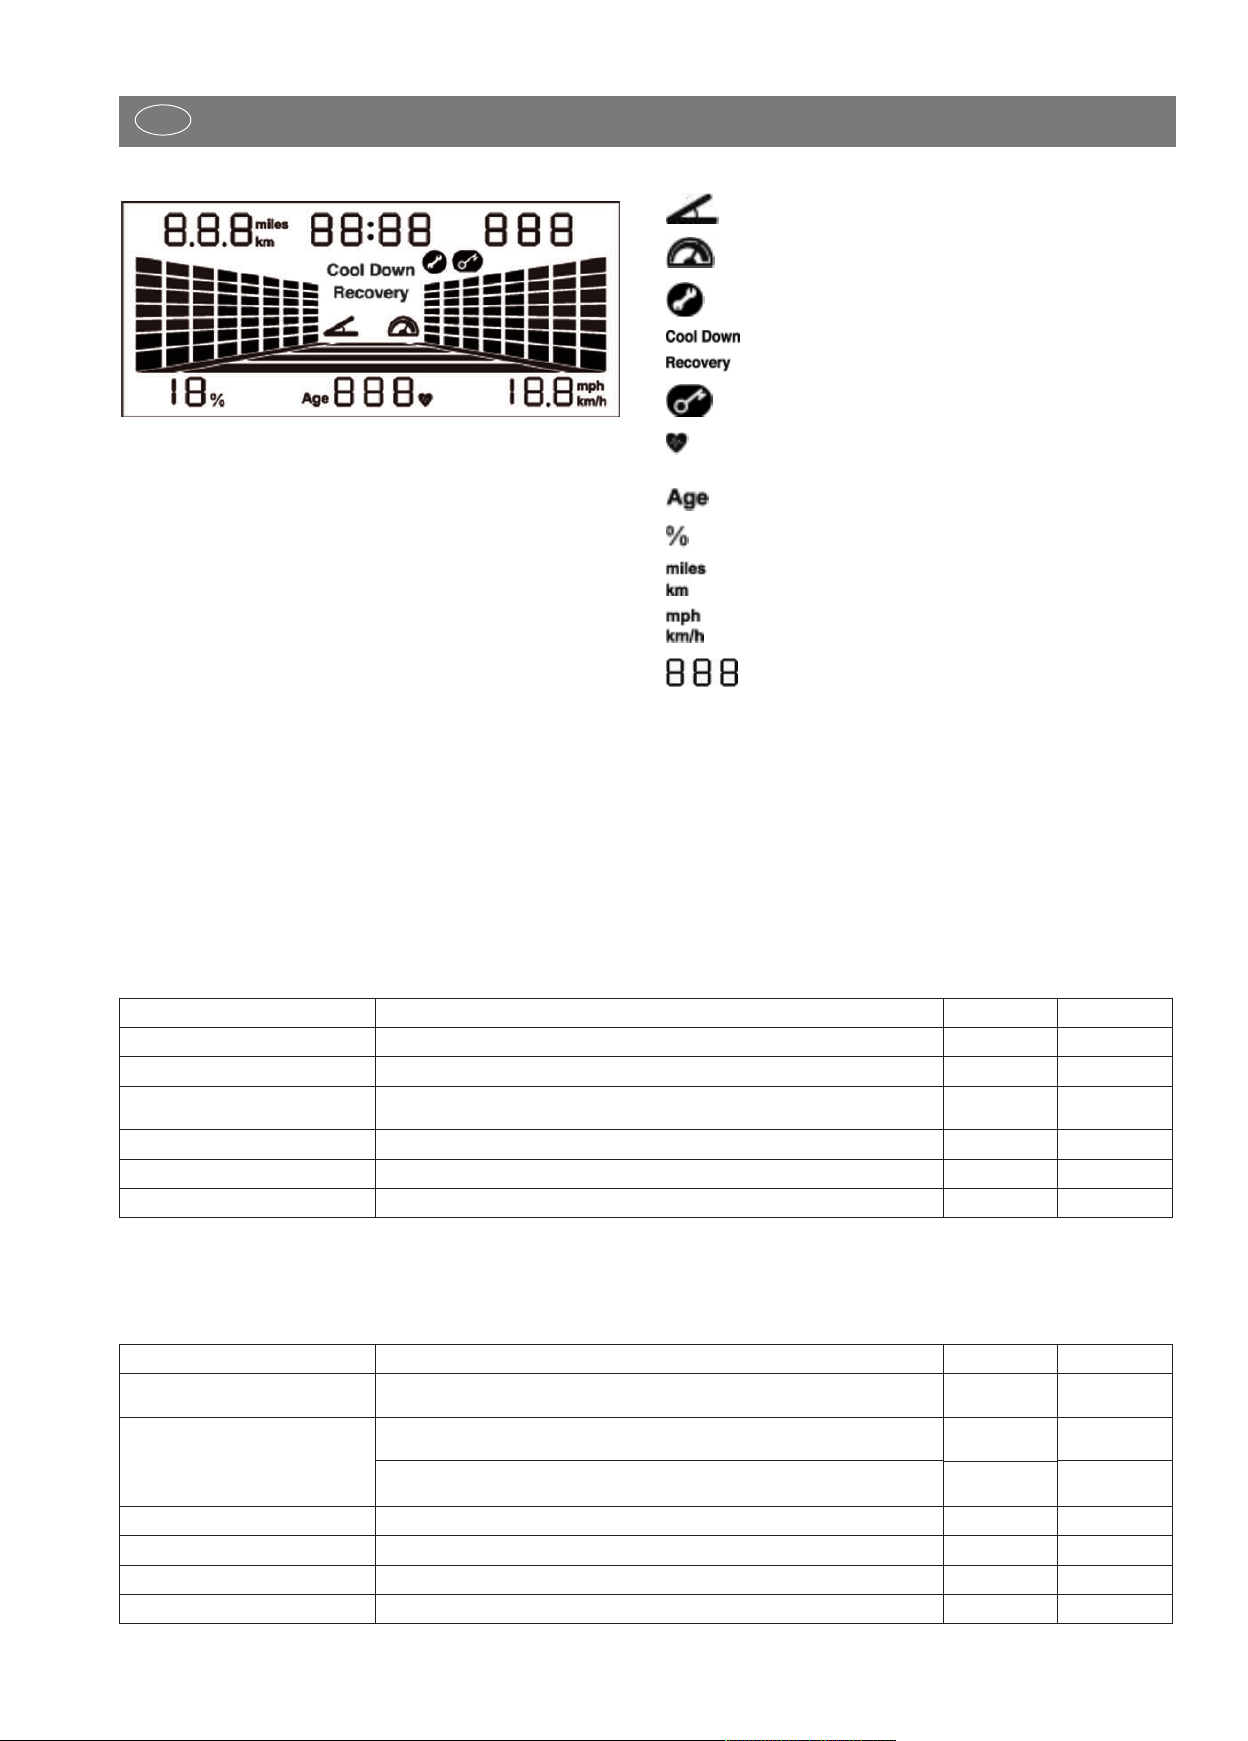
DISPLAY
Symbol Steigung
Symbol Geschwindigkeit
Symbol Laufbandwartung
Cool Down “Auslaufen”
Recovery Ermittlung der Fitnesnote“
Symbol Sicherheitsschalter
Anzeige Pulse in bpm (beat per minute = Schläge pro
Minute)
Anzeige Alter
Anzeige Steigung in %
Anzeige Trainingsstrecke in km oder Meilen“
Anzeige Geschwindigkeit in km/h oder mph
Anzeige Energieverbrauch in Kilokalorien
ANZEIGEWERTE
Während des Programm Setups
Anzeige Eingabe Bereich Auflösung Stufung
Alter 10-99 XX 1
Zeit 10:00 ~ 99:00 min XX:XX 01:00
Trainingsstrecke
MAX. SPEED max: 16km/h(metric),10mph(English) XX.X 0.5
MAX.INCLINE max: 12% XX 1
Ziel Puls 70~210 bpm XXX 1
Während des Trainings
Anzeige Anzeigebereich Auflösung Stufung
Zeit
Trainingsstrecke
Kilokalorien 0-999 XXX 1
Herzfrequenzrate 40-240 bmp XXX 1
INCINE 0~12.0 % XX 1
SPEED 1.0~16.0km/h(metric), 0.6~10mph(English) XX.X 0.1
1.0~50.0 km(metric),
0.6~30.0 miles(English)
Normal: 00:00~99:59 bis 99min 59sec,
dann 01:40~18:00 ab 1Std. 40min.
0.00~9.99km(metric),
0.00~9.99mi(English) bis 9.99(km/mi)
10.0~99.9km(metric),
10.0~99.9mi(English) ab 10(km/mi)
XX.X 0.2
XX 1
X:XX
XX.X
0.01
0.1
3
D
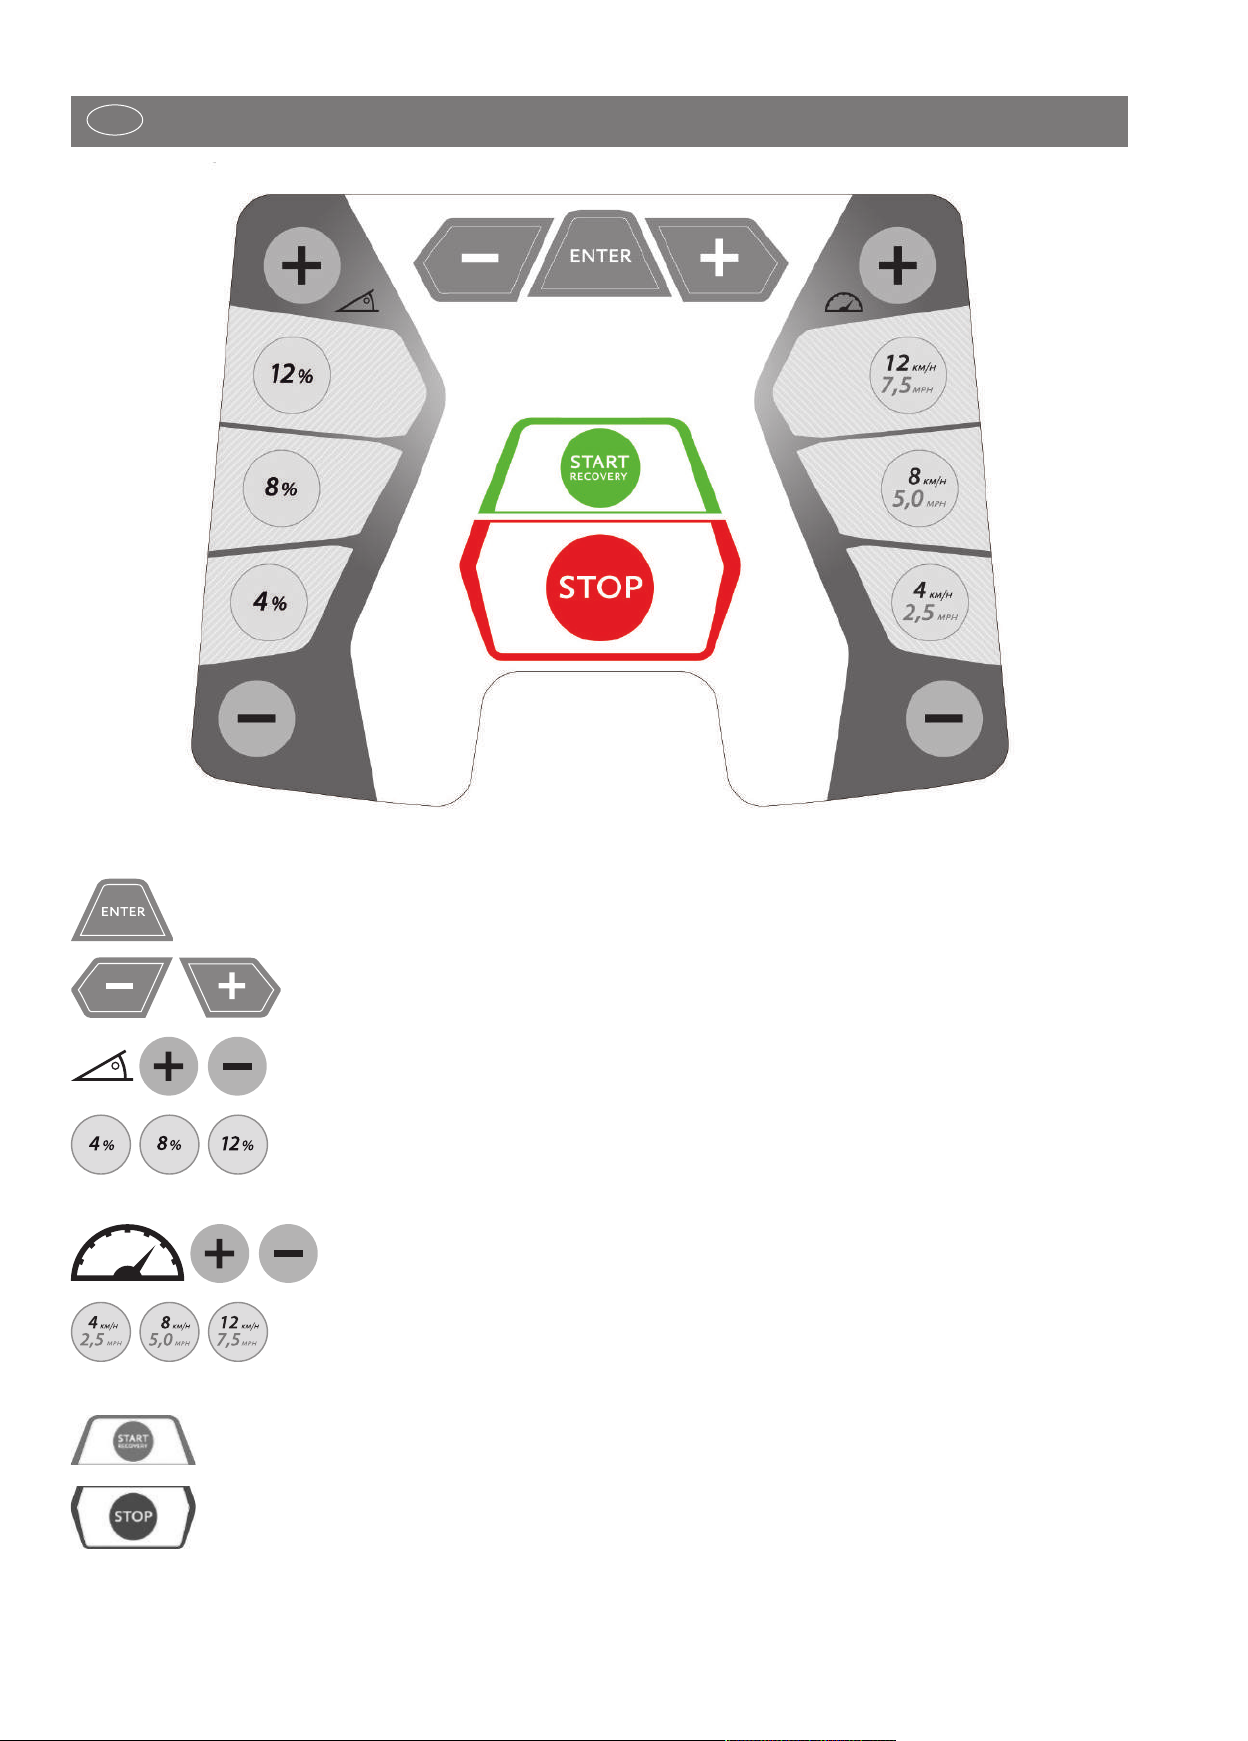
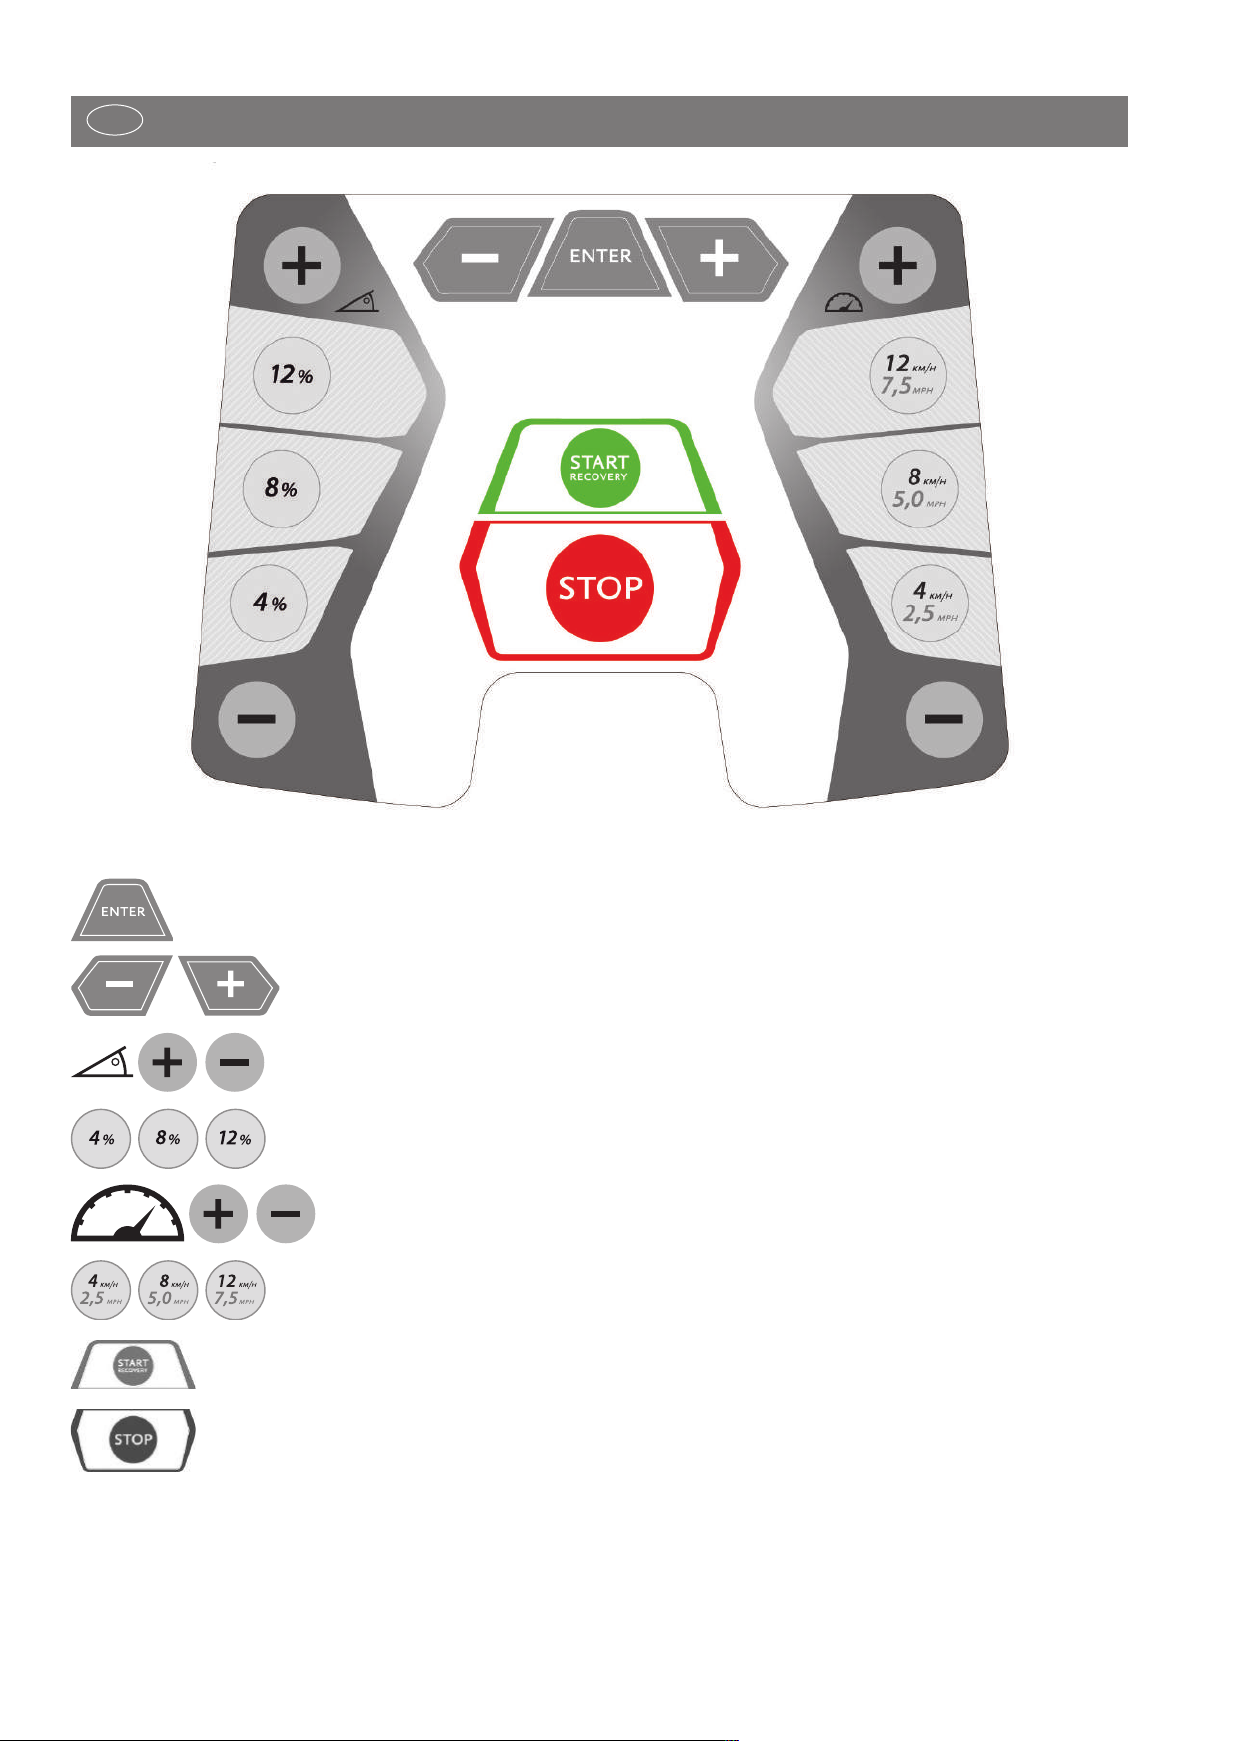
TASTATUR
ENTER Bestätigung von Programmen und Werten
CURSOR (+) (–) Auswahl von Programmen und Werten
INCLINE (+) (–) Steigungseinstellung
DIRECT INCLINE Direkte Steigungsanwahl
(4%, 8%, 12%)
SPEED (+) (–) Geschwindigkeitseinstellung
DIRECT SPEED Direkte Geschwindigkeitsanwahl
(4/2.5; 8/5; 12/7.5)
START / RECOVERY Startet das Band / Startet die Fitnessnotenberechnung
STOP Stoppt das Band
4

D
STEIGUNGSEINSTELLUNG
Mit der INCLINE Taste (+) wird der Steigungswinkel um 1 % erhöht.
Mit der INCLINE Taste (-) wird der Steigungswinkel um 1 % verringert.
Längeres Drücken dieser Tasten führt zu einem automatischen Wertedurchlauf.
Mit den DIRECT INCLINE Tasten 4%, 8%, 12% für Steigung können Sie die Steigung direkt einstellen.
Aus Sicherheitsgründen kann der Steigungswinkel nur manuell eingestellt werden. Eine Ausnahme sind die Programme mit Steigungsprofilen und die HRC Programme
(Herzfrequenzkontrollprogramm). Hier wird der Steigungswinkel
automatisch eingestellt.
GESCHWINDIGKEITSEINSTELLUNG
Mit der SPEED Taste (+) wird die Geschwindigkeit während des
Trainings um 0,1 km/h (mph) erhöht.
Mit der SPEED Taste (-) wird die Geschwindigkeit während des
Trainings um 0,1 km/h (mph) verringert.
Längeres Drücken dieser Tasten führt zu einem automatischen Wertedurchlauf.
Mit den DIRECT SPEED Tasten (4,0 km/h / 2,5 mph), (8,0 km/h
/ 5,0 mph) und (12 km/h / 7,5 mph) für die Geschwindigkeit können Sie die Geschwindigkeit direkt einstellen.
PROGRAMMAUSWAHL
Nach dem Einschalten oder nach der Beendigung eines Programms
können Sie mit den CURSOR Tasten und der ENTER Taste ein Programm auswählen. Es stehen 6 Programme mit Unterprogrammen
zur Verfügung.
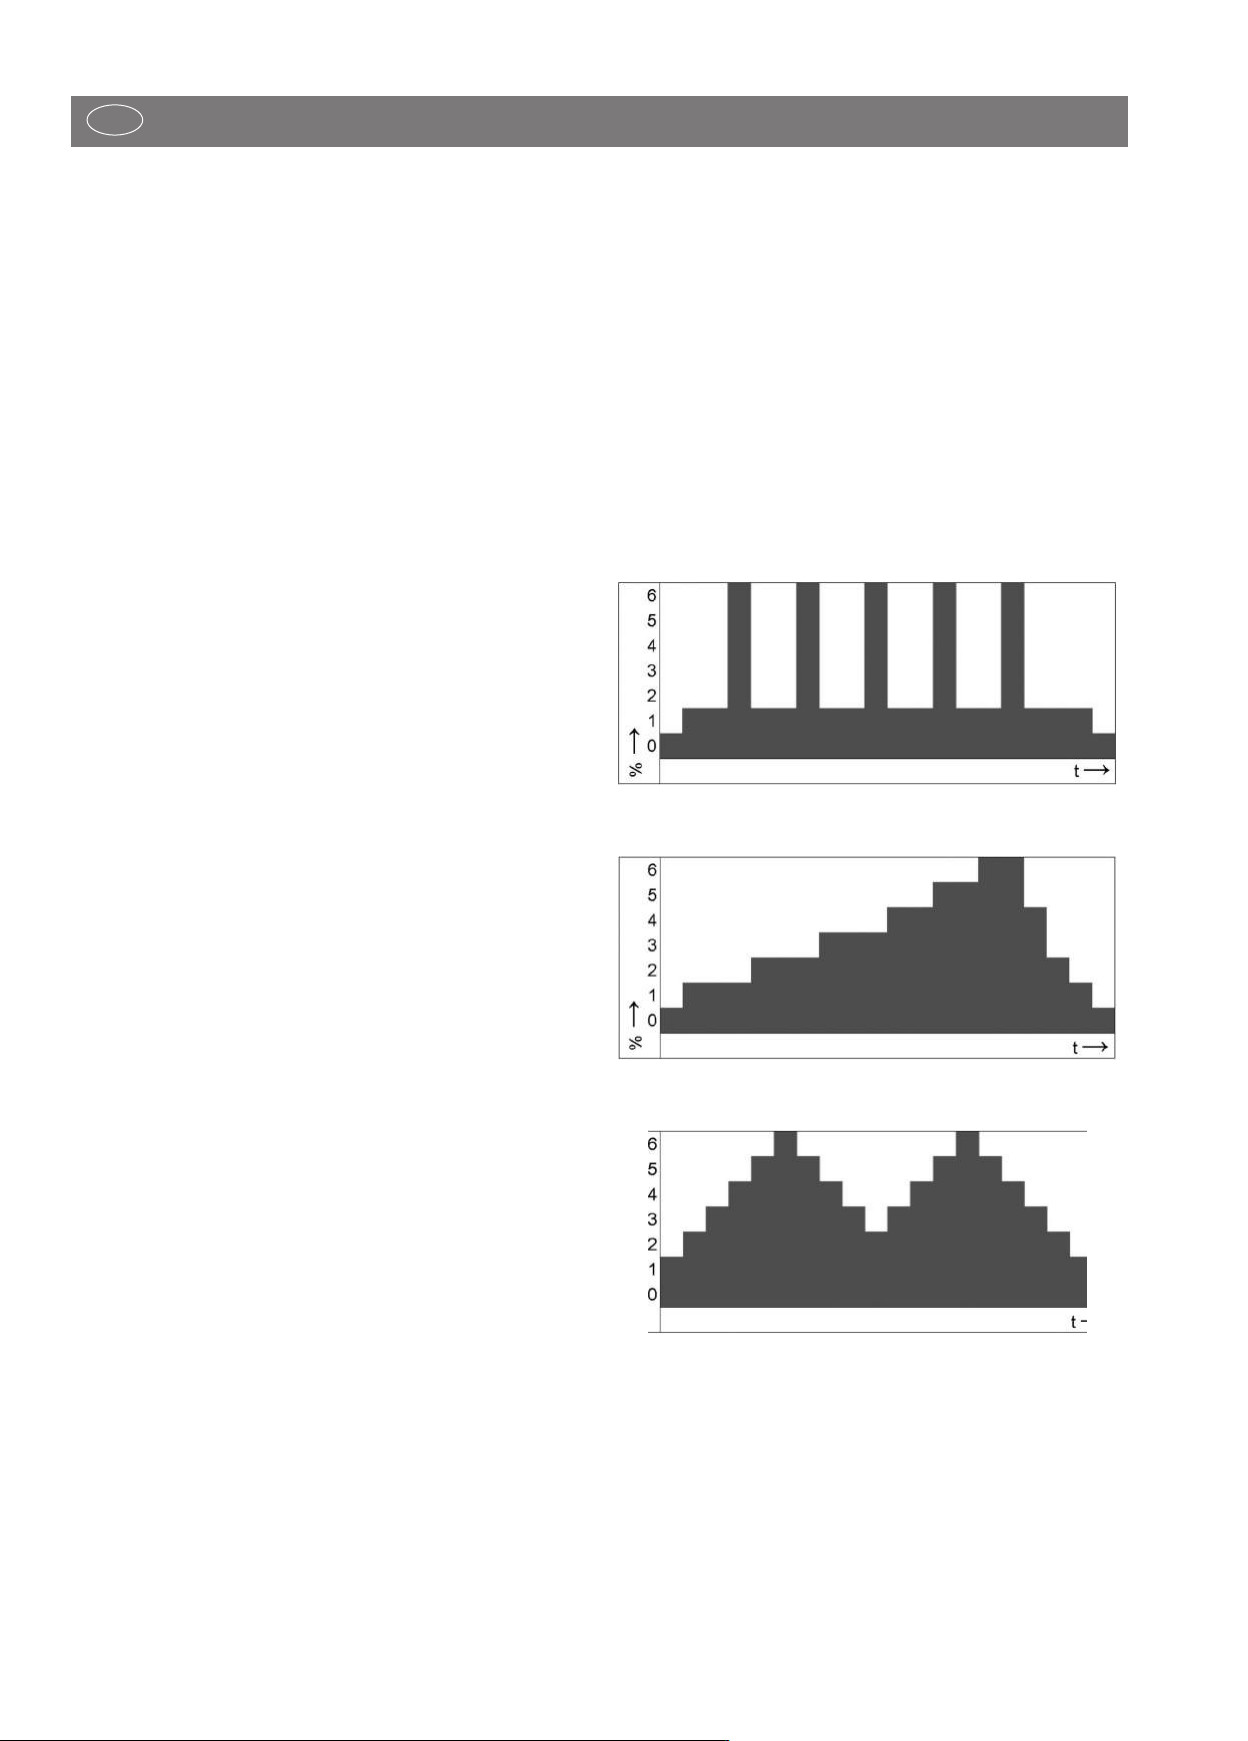
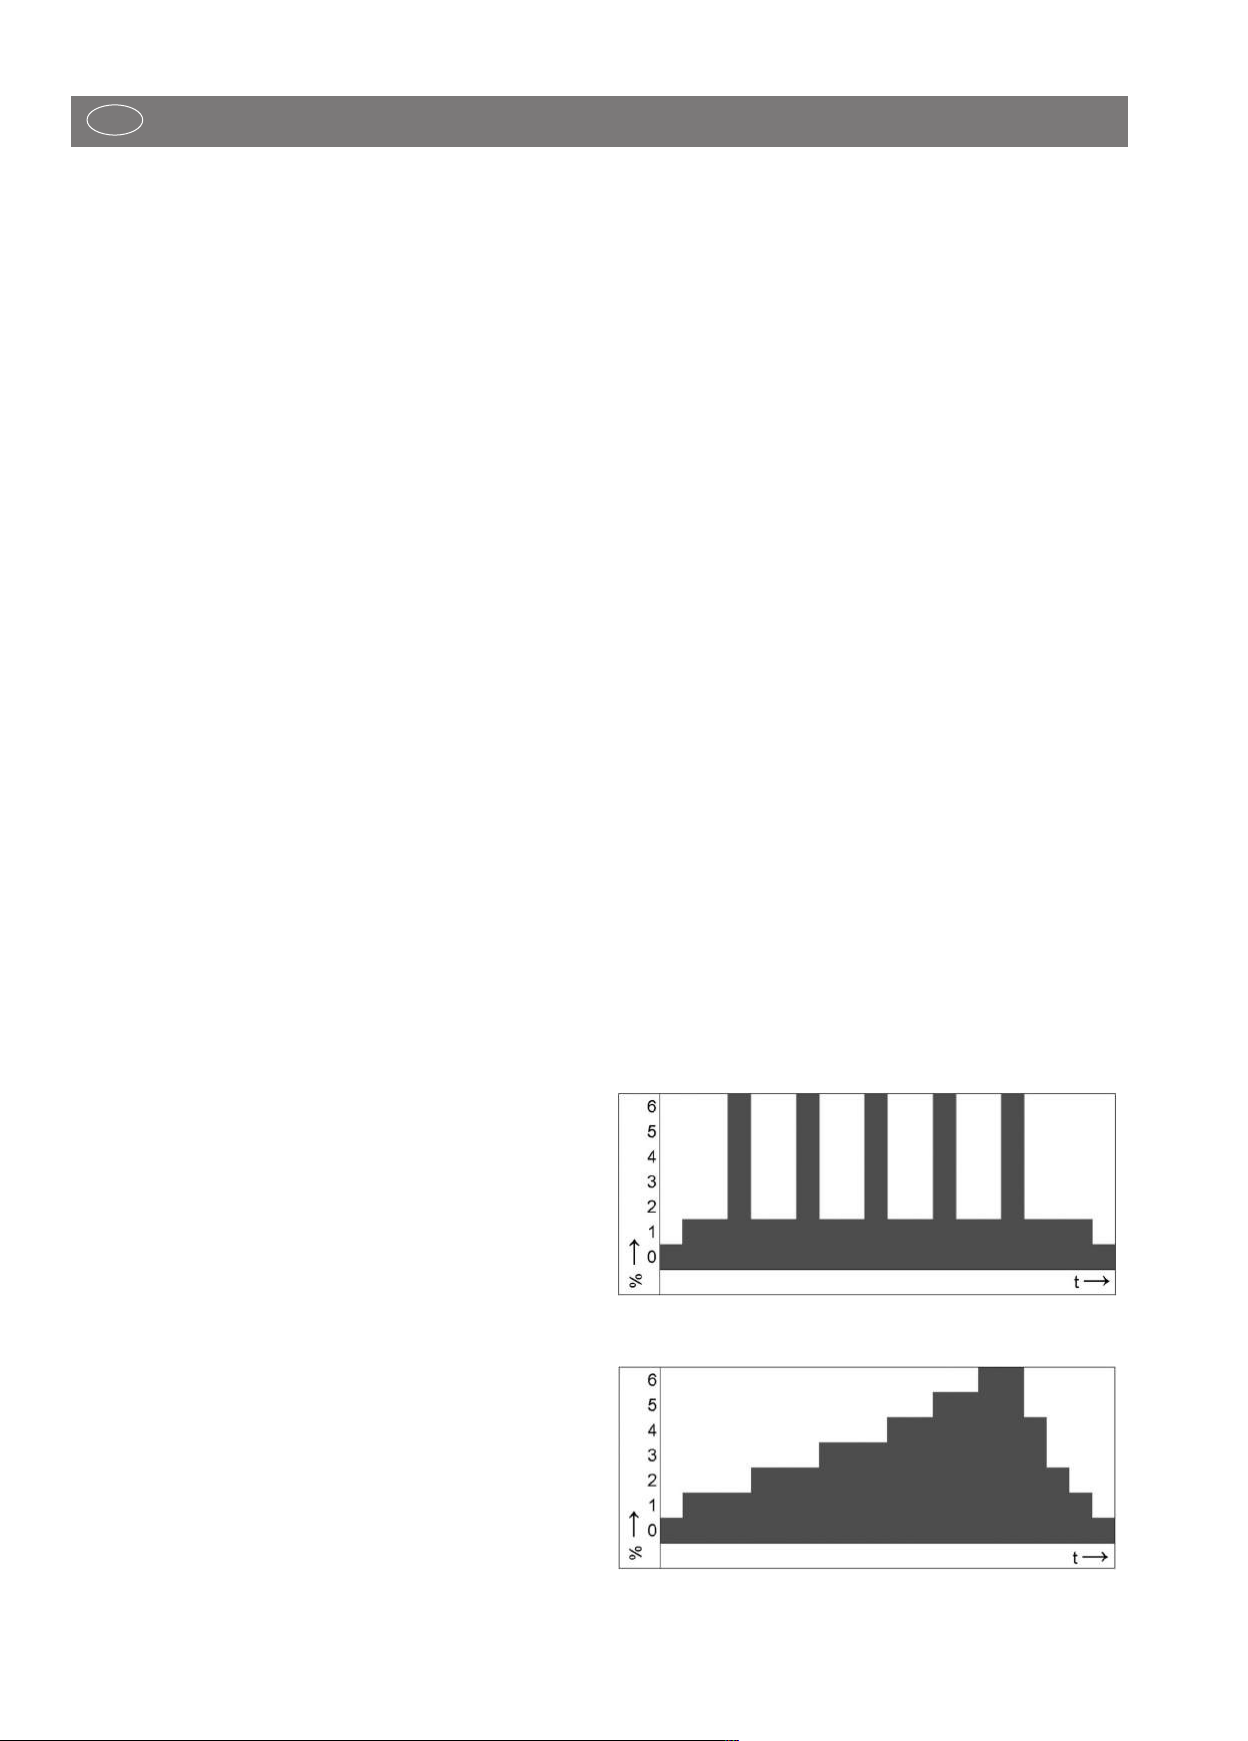
PROFILSEGMENTE
Bei der Anwahl der Programme (vor Aufnahme des Trainings) werden die Profile für Steigung und Geschwindigkeit räumlich dargestellt. Die Steigungsprofile werden in der linken und die
Geschwindigkeitsprofile in der rechten Anzeigenhälfte dargestellt.
Im Training werden links die Steigungswerte und rechts die Geschwindigkeitswerte auf die vorhandenen Segmente skaliert. Dadurch kann es in der Darstellung zu einer Verfälschung des Profils
kommen. Die aktuelle Position des Benutzers blinkt.
RECOVERY
Wenn während des Trainings ein Pulssignal anliegt, lösen Sie mit
der RECOVERY Taste die Erholungspulsmessung aus. Das Laufband
wird zum Stillstand gebracht. Es werden der Belastungs- und eine
Minute später der Erholungspuls gemessen und eine Fitnessnote ermittelt. Bei gleichem Training ist die Verbesserung dieser Note ein
Maß für Fitnesssteigerung.
In der Trainingsstrecke Anzeige wird der Belastungspuls P1 und in
der Kalorien-Anzeige der Erholungspuls P2 eingeblendet. Nach
ca. 16 Sekunden wechselt die Anzeige in den Pause-Modus. Die
Fitnessnote wird in der Geschwindigkeit-Anzeige unten rechts dargestellt.
Berechnung der Fitness-Note:
Note = 6 –
P1= Belastungspuls, P2 = Erholungspuls
1,0 = Sehr gut F6,0 = Ungenügend
(10 x (P1–P2)
(
P1)
2
)
Stand-by
Leistungsaufnahme im Stand-by Modus < 0,5Watt.
Wird während des Stillstandes die Stand-by-Taste betätigt oder
eine unter Systemumstellungen definierte Zeit abgelaufen, schaltet
das Laufband in Stand-by.
Durch Betätigen der Stand-by-Taste, kann das Laufband wieder aktiviert werden.
PAUSE
Wird die STOP-Taste während des Trainings gedrückt, wird das
Programm unterbrochen und der Pause-Modus aktiviert. Während
des Pause-Modus funktionieren nur die START- und die STOP-Taste.
Wird während des Pause-Modus die START-Taste gedrückt, startet
das Laufband wieder und nimmt die Geschwindigkeit auf, die vor
der Pause-Funktion aktiviert war. Die Trainingswerte werden weiter
gezählt und fortgeführt, von da aus, wo sie unterbrochen wurden.
Wird während des Pause-Modus drei Minuten lang keine Taste
oder die STOP-Taste gedrückt, wird das Programm beendet und
die Trainingsstatistik gezeigt.
Wenn Sie diese überspringen möchten, drücken Sie einfach die
STOP-Taste
KALORIENBERECHNUNG
Die Kalorienberechnung ist ein Anhaltswert. Dieser wird oben
rechts in der Anzeige dargestellt. Der berechnete Wert erhebt keinen medizinischen Anspruch.
PULSEMPFANG
Das Laufband ist mit einer Handpulserfassung ausgestattet. Um eine
gute Handpulserfassung zu gewährleisten, sind beide Handpulssensoren fest und vollständig mit den Händen zu umfassen, ohne
dabei die Hände zu bewegen. Bewegungen der Hände können
zu Störungen führen. Die Puls-Anzeige benötigt ca. 5 bis 15 Sekunden, um Ihren aktuellen Puls anzuzeigen.
Das Laufband verfügt auch über einen eingebauten POLAR-kompatiblen Herzfrequenzempfänger. Um das kabellose Pulssystem benutzen zu können, müssen Sie einen Brustgurt für die Übertragung
der Herzfrequenz tragen. Der Brustgurt zur Übertragung der Herzfrequenz ist nicht im Lieferumfang dieses Laufbands enthalten. Wir
empfehlen den POLAR Brustgurt T34. Dieser ist als Zubehör im
Fachhandel erhältlich.
Bitte beachten Sie, dass einige Materialien, die in Ihrer Kleidung
verwendet werden (z.B. Polyester, Polyamid), statische Ladungen
erzeugen und möglicherweise eine verlässliche Herzfrequenzmessung verhindern. Beachten Sie weiterhin, dass Mobiltelefone, Fernseher und andere elektrische Geräte, die ein elektromagnetisches
Feld um sich herum bilden, möglicherweise ebenfalls Probleme bei
der Herzfrequenzmessung verursachen können.
SYMBOL LAUFBANDWARTUNG
Wenn das Symbol Laufbandwartung angezeigt wird, warten Sie
das Laufband, wie in der Montageanleitung beschrieben.
FEHLERMELDUNGEN
Während des Betriebes werden bei Fehlern an der Steuerung verschiedene Meldungen in der Anzeige eingeblendet. Die Fehlermeldungen können durch Ausschalten und Einschalten des
Netzschalters zurückgesetzt werden. Sollte danach die Fehlermeldung wieder erscheinen, ist der Service zu kontaktieren.
5
D
BETRIEB
EINSCHALTEN
Schalten Sie zuerst das Gerät ein. Der AN/AUS-Schalter für das
Laufband befindet sich neben dem Netzkabel an der vorderen Seite
unterhalb der Motorabdeckung. Kippen Sie den Schalter in die
“AN“-Stellung.
SICHERHEITSSCHLÜSSEL
Zum Aufsteigen und Absteigen immer an den Handläufen festhalten.
Vor Beginn des Trainings auf die Seitenplattform des Laufbandes
stellen. Das Gerät nie auf der Lauffläche stehend in Bewegung setzen. Beginnen Sie Ihr Training mit einer langsamen Geschwindigkeit und steigern Sie dann die Geschwindigkeit bzw. den
Steigungswinkel. Laufen Sie möglichst immer in der Mitte der Lauffläche.
Halten Sie Ihren Körper und Ihren Kopf während des Trainings
immer nach vorn gerichtet. Versuchen Sie niemals, sich auf dem
Laufband zu drehen, während sich das Band noch bewegt.
TRAINING BEGINNEN
Zum Aufsteigen und Absteigen immer an den Handläufen festhalten.
Vor Beginn des Trainings auf die Seitenplattform des Laufbandes
stellen. Das Gerät nie auf der Lauffläche stehend in Bewegung setzen. Beginnen Sie Ihr Training mit einer langsamen Geschwindigkeit und steigern Sie dann die Geschwindigkeit bzw. den
Steigungswinkel. Laufen Sie möglichst immer in der Mitte der Lauffläche.
Halten Sie Ihren Körper und Ihren Kopf während des Trainings
immer nach vorn gerichtet. Versuchen Sie niemals, sich auf dem
Laufband zu drehen, während sich das Band noch bewegt.
Nach der Anwahl eines Programms kann der Benutzer Vorgaben
machen. Der voreingestellte Wert blinkt und zeigt an, dass Sie diesen entweder bestätigen oder verändern können. Sobald Sie Ihre
Werte eingegeben und bestätigt haben, können Sie mit dem Training auf dem Laufband beginnen.
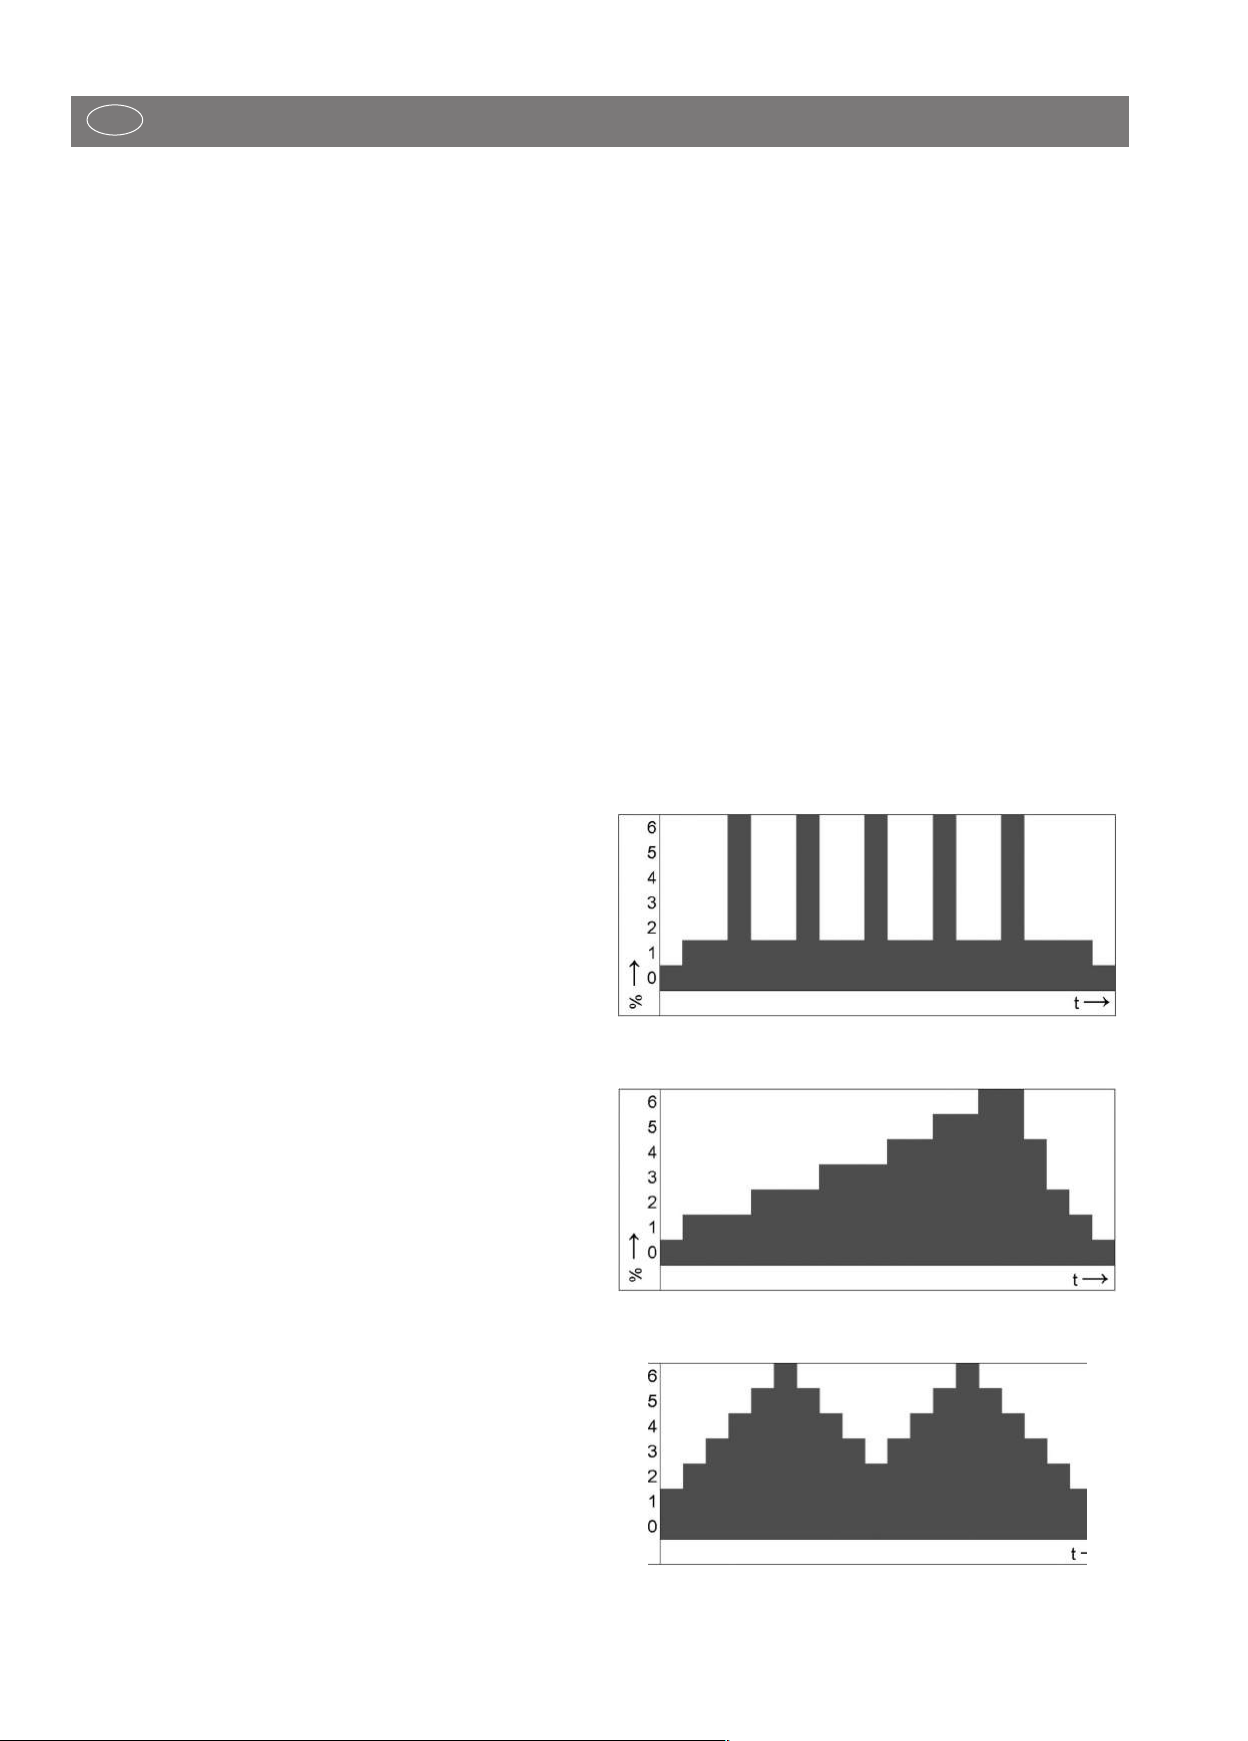
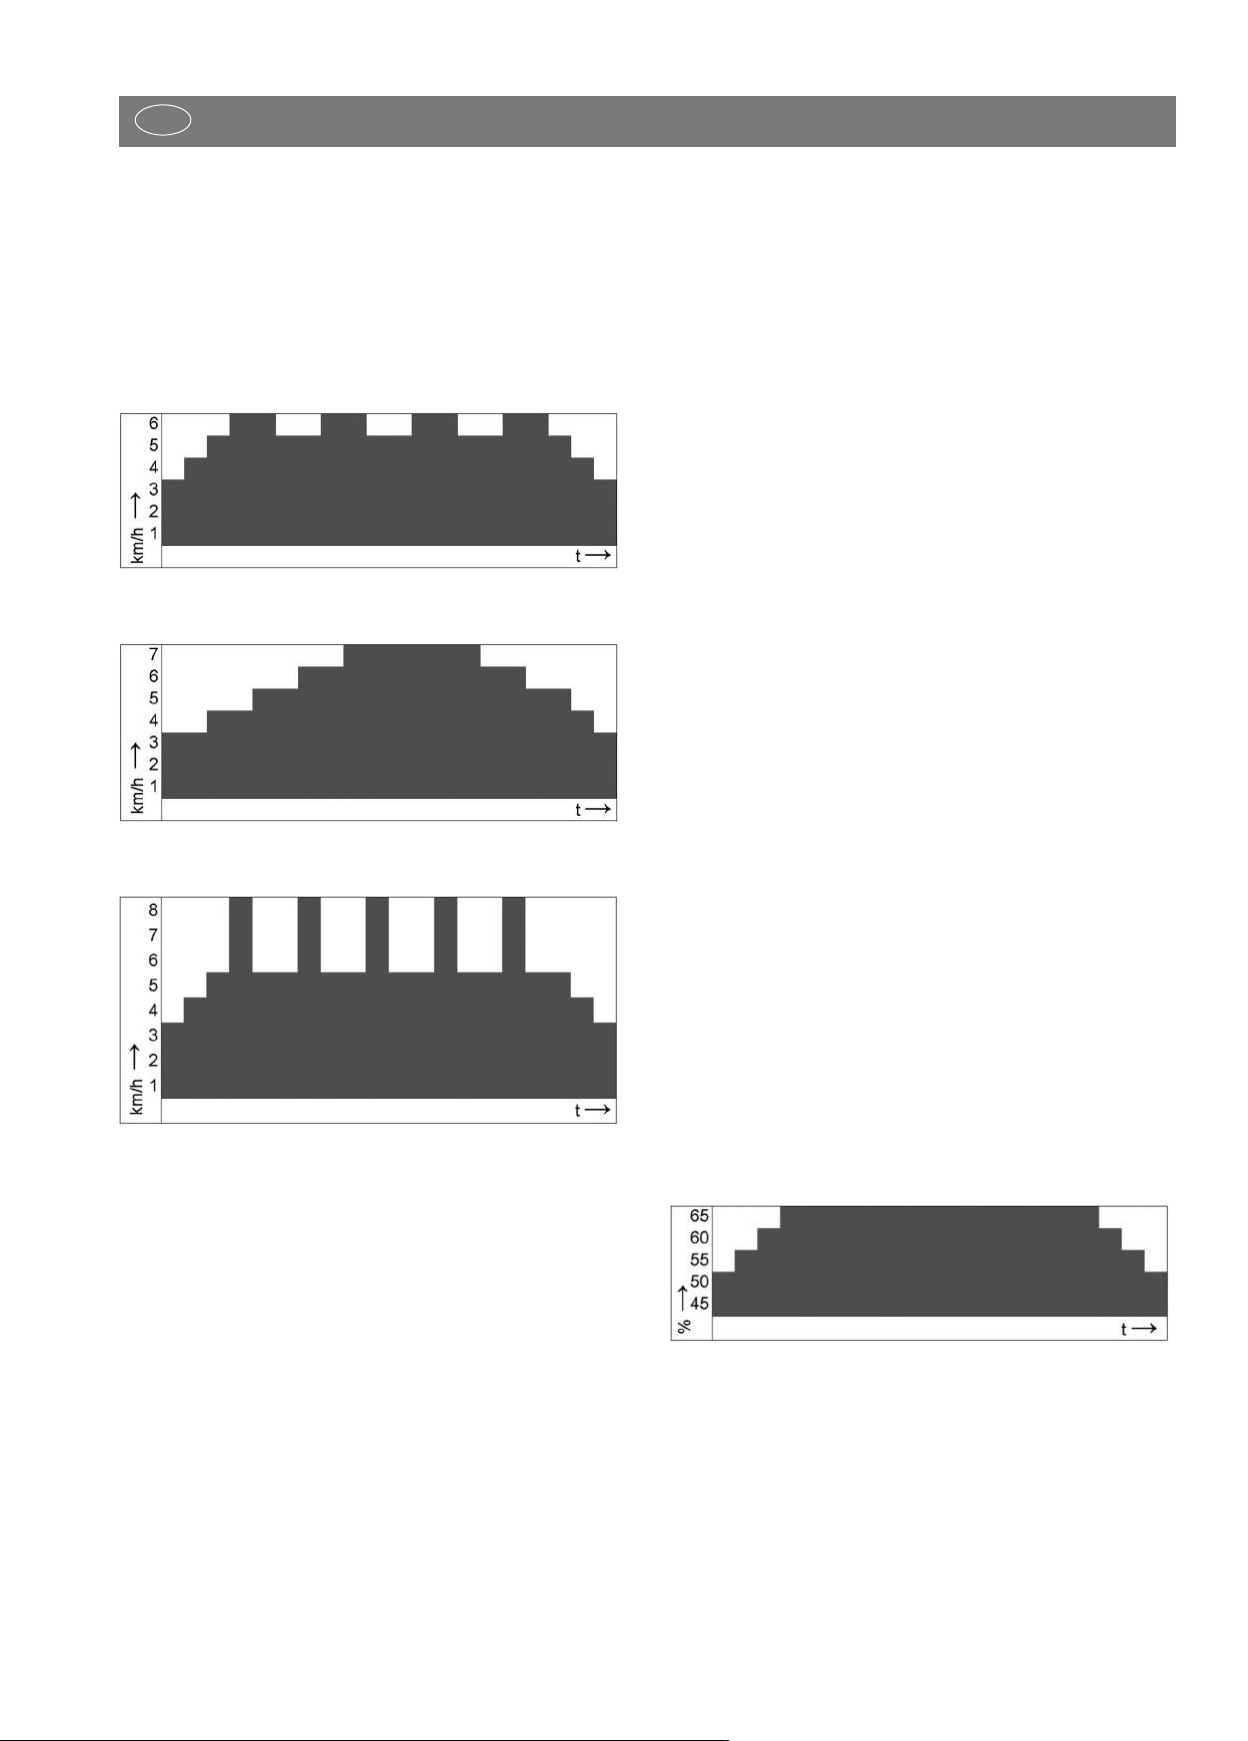
P1: STEIGUNGSPROGRAMM: MIT 3 PROFILEN
Sie können unter „P1: Steigungsprogramm“ zwischen drei voreingestellten Profilen auswählen. Sie können die Geschwindigkeit oder
die Steigung während des Trainings jederzeit erhöhen / verringern. Die Zeitvorgabe wird in der Anzeige heruntergezählt und
die zurückgelegte Strecke hochgezählt.
1. Schalten Sie das Gerät ein.
2. Den Sicherheitsschlüssel am Laufband und den Clip an der Kleidung des Benutzers sichern.
3. Das „P1: Steigungsprogramm“ mit den Cursor-Tasten auswählen und mit Enter bestätigen
4. Zeiteingabe bestätigen (Enter) oder ändern (Cursor-Tasten)
5. Ein Profil auswählen (Cursor-Tasten) und mit Enter bestätigen
6. Maximale Steigung bestätigen (Enter) oder ändern (Cursor-Tasten)
7. Enter Taste betätigen, um mit dem Training zu beginnen.
8. Das Training kann jederzeit mit der STOP Taste unterbrochen
werden, eine Wiederaufnahme des Trainings ist innerhalb von
3 Minuten möglich.
TRAININGSPROGRAMME
MANUAL PROGRAM
Nachdem das Gerät eingeschaltet und der Sicherheitsschlüssel eingerastet ist, drücken Sie die START Taste. Das Laufband wird nach
3 Sekunden mit 1,0 km/h (0,6 mph) gestartet.
Sie können die Geschwindigkeit oder die Steigung während des
Trainings jederzeit erhöhen / verringern. Um das Training zu beenden, drücken Sie die STOP-Taste.
Beim manuellen Start des Trainings werden die Anzeige Trainingsstrecke und Trainingszeit hochgezählt. Das Manual Programm
ist ein Training ohne Zeitlimit. Das Trainingsprogramm kann am
Ende nicht abgespeichert werden.
1. Schalten Sie das Gerät ein.
2. Sicherheitsschlüssel am Laufband und den Clip an der Kleidung
des Benutzers sichern.
3. Betätigen Sie die START-Taste, um mit dem Training zu beginnen.
PROGRAMMAUSWAHL
Der Benutzer hat die Möglichkeit zwischen verschiedenen Programmen auszuwählen.
Folgende Programme stehen zur Auswahl:
P1 : Steigungsprogramm: mit 3 unterschiedlichen Profilen
P2 : Geschwindigkeitsprogramm: mit 3 unterschiedlichen Profilen
P3 : Kalorien-Programm
P4 : Strecken-Programm
P5 : HRC Steigungs-Programm
P6 : HRC Geschwindigkeits-Programm
P1: Steigungsprofil 1
P1: Steigungsprofil 2
P1: Steigungsprofil 3
6
D
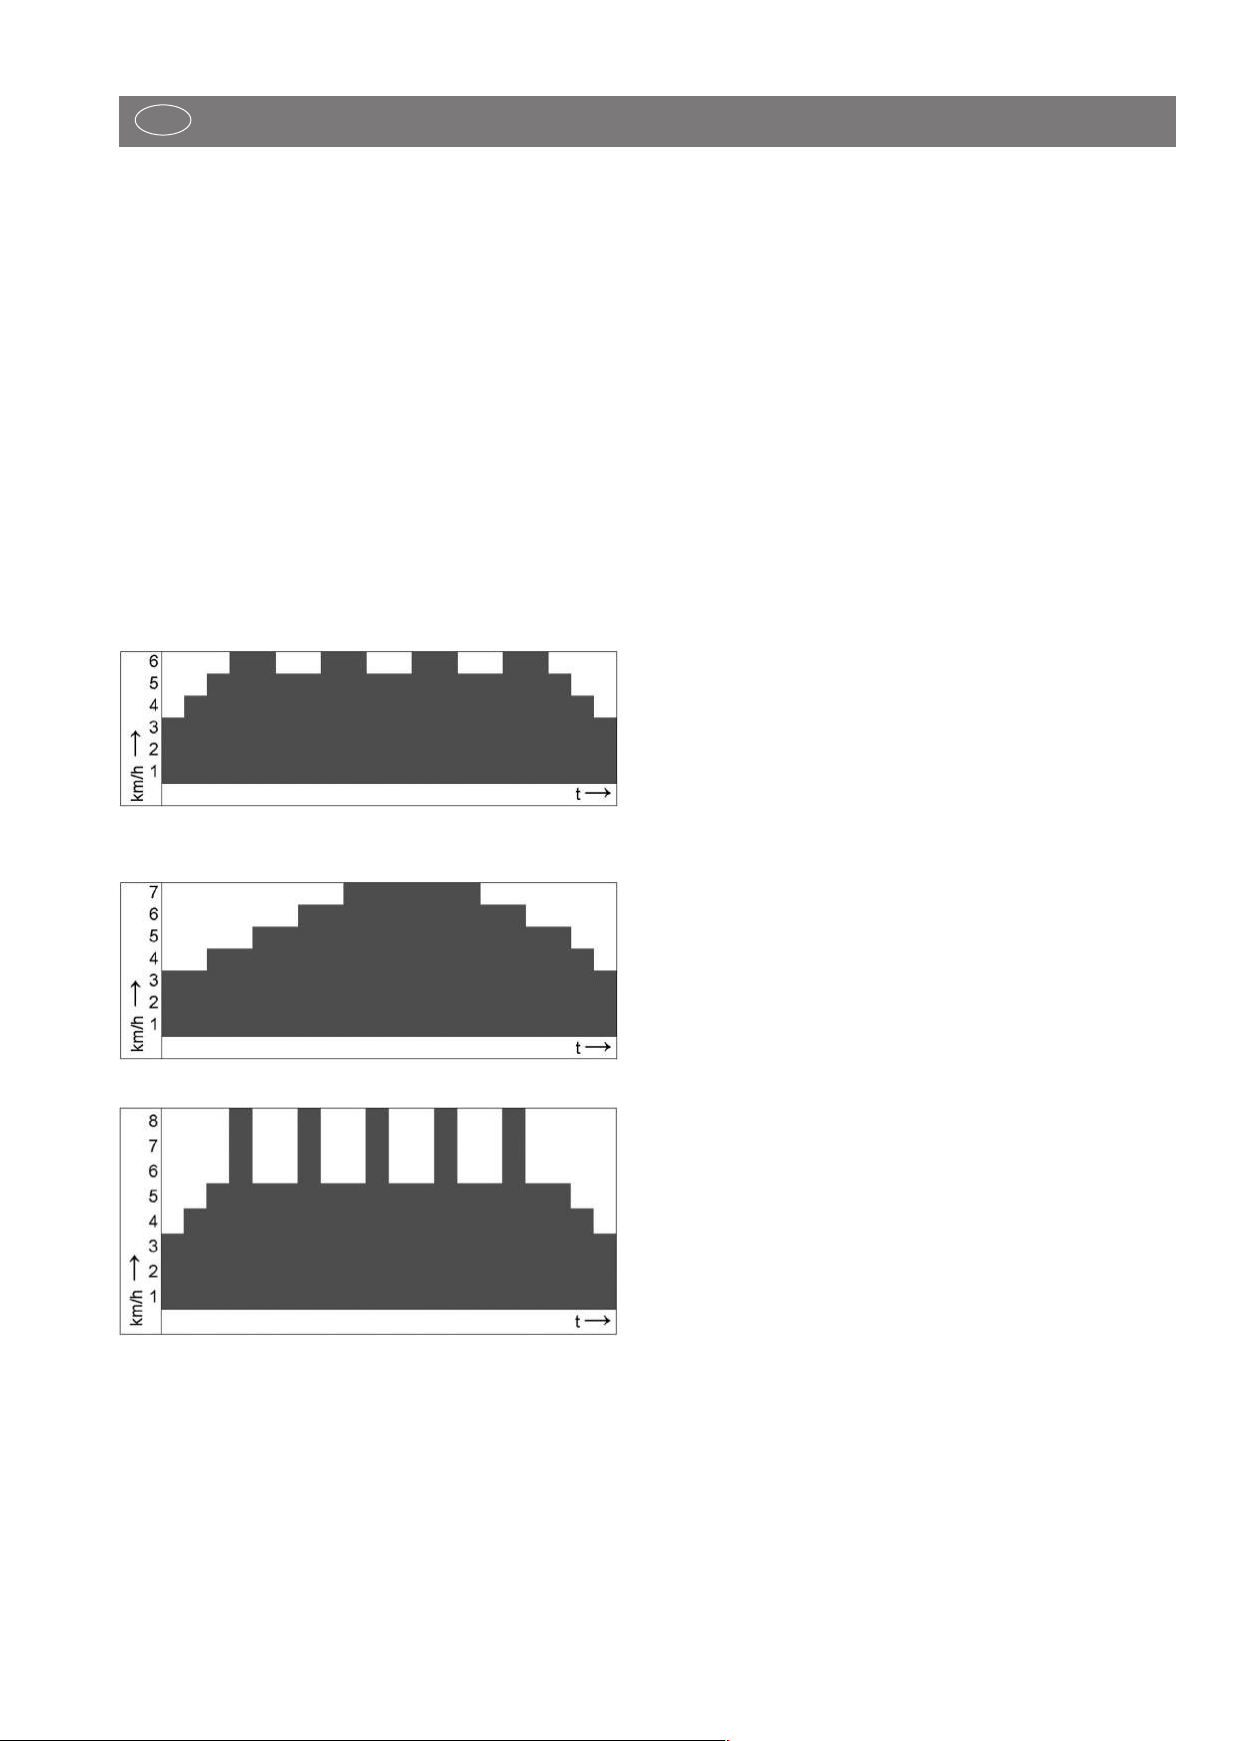
P2: GESCHWINDIGKEITSPROGRAMM: MIT 3 PROFILEN
Sie können unter „P2: Geschwindigkeitsprogramm“ zwischen drei
unterschiedlichen Profilen auswählen. Sie können die Geschwindigkeit oder die Steigung während des Trainings jederzeit erhöhen
/ verringern. Die Zeitvorgabe wird in der Anzeige heruntergezählt
und die zurückgelegte Strecke hochgezählt.
1. Schalten Sie das Gerät ein.
2. Den Sicherheitsschlüssel am Laufband und den Clip an der Kleidung des Benutzers sichern.
3. Das „P2: Geschwindigkeitsprogramm“ mit den Cursor-Tasten
auswählen und mit Enter bestätigen
4. Zeiteingabe bestätigen (Enter) oder ändern (Cursor-Tasten)
5. Ein Profil auswählen (Cursor-Tasten) und mit Enter bestätigen
6. Maximale Geschwindigkeit bestätigen (Enter) oder ändern (Cursor-Tasten)
7. Enter Taste betätigen, um mit dem Training zu beginnen.
8. Das Training kann jederzeit mit der STOP Taste unterbrochen
werden, eine Wiederaufnahme des Trainings ist innerhalb von
3 Minuten möglich.
P2: Geschwindigkeitsprofil 1
3. Das „P3: Kalorien-Programm „ mit den Cursor-Tasten auswählen und mit Enter bestätigen
4. Kalorien Vorgabe bestätigen (Enter) oder ändern (Cursor-Tasten)
5. Enter Taste betätigen, um mit dem Training zu beginnen.
6. Das Training kann jederzeit mit der STOP-Taste unterbrochen
werden, eine Wiederaufnahme des Trainings ist innerhalb von
3Min möglich.
7. Ein COOL DOWN (sich Abkühlen) von 4Min wird nach dem
rogrammende eingeleitet (kann durch die STOP Taste abge-
P
brochen werden)
P4: STRECKEN-PROGRAMM
Bei diesem Programm können Sie die Geschwindigkeit oder die
Steigung während des Trainings jederzeit erhöhen / verringern.
Hier wird die Trainingsstrecken-Vorgabe in der Anzeige heruntergezählt.
1. Schalten Sie das Gerät ein.
2. Den Sicherheitsschlüssel am Laufband und den Clip an der Kleidung des Benutzers sichern.
3. Das „P4: Strecken-Programm „ mit den Cursor-Tasten auswählen und mit Enter bestätigen
4. Trainingsstrecken Vorgabe bestätigen (Enter) oder ändern (Cursor-Tasten)
5. Enter Taste betätigen um, mit dem Training zu beginnen.
6. Das Training kann jederzeit mit der STOP-Taste unterbrochen
werden, eine Wiederaufnahme des Trainings ist innerhalb von
3Min möglich.
7. Ein COOL DOWN (sich Abkühlen) von 4Min wird nach dem
Programmende eingeleitet (kann durch die STOP-Taste abgebrochen werden)
P2: Geschwindigkeitsprofil 2
P2: Geschwindigkeitsprofil 3
P3: KALORIEN-PROGRAMM
Bei diesem Programm können die Sie Geschwindigkeit oder die
Steigung während des Trainings jederzeit erhöhen / verringern.
Es dient zur optimalen Fettverbrennung. Die Kalorienzahl wird in
der Anzeige oben rechts angezeigt und heruntergezählt.
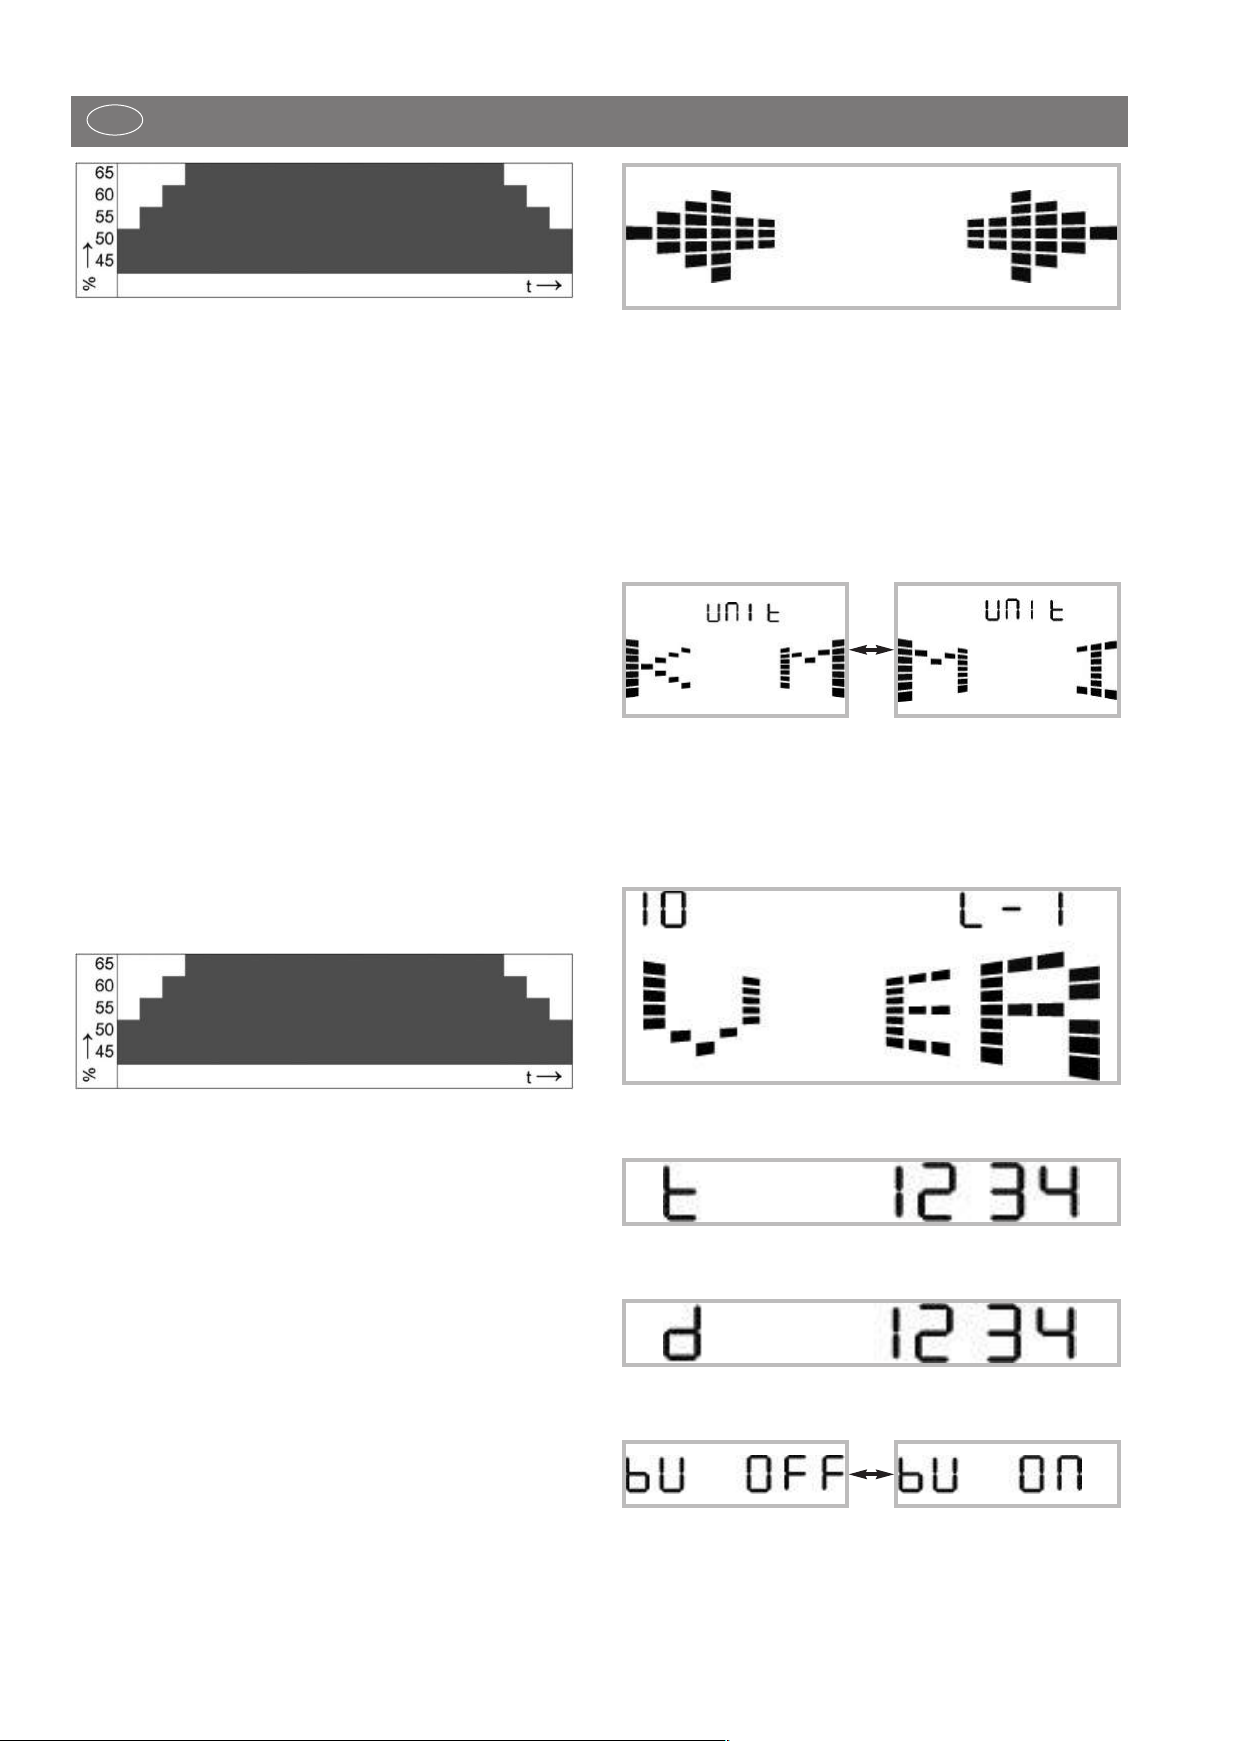
P5: HRC STEIGUNGS-PROGRAMM
Der Benutzer hat die Möglichkeit, das Programm auf Grundlage
seines maximalen Zielpuls individuell einzustellen. Das Laufband
stellt automatisch im Programm die Steigung ein, um die Zielherzfrequenz des Benutzers zu erreichen und beizubehalten. Während
des Trainings kann der Benutzer die Geschwindigkeit oder die Steigung manuell verändern.
Um die Herzkontrollprogramme verwenden zu können, muss der
Benutzer einen Brustgurt tragen.
1. Schalten Sie das Gerät ein.
2. Den Sicherheitsschlüssel am Laufband und den Clip an der Kleidung des Benutzers sichern.
3. Das „P5: HRC Steigungs-Programm „mit den Cursor-Tasten auswählen und mit Enter bestätigen
4. Alterseingabe bestätigen (Enter) oder ändern (Cursor-Tasten)
5. Zeiteingabe bestätigen (Enter) oder ändern (Cursor-Tasten)
6. Max Zielpuls bestätigen (Enter) oder ändern (Cursor-Tasten)
7. Enter Taste betätigen, um mit dem Training zu beginnen.
8. Das Training kann jederzeit mit der STOP Taste unterbrochen
werden, eine Wiederaufnahme des Trainings ist innerhalb von
3Min möglich.
1. Schalten Sie das Gerät ein.
2. Den Sicherheitsschlüssel am Laufband und den Clip an der Kleidung des Benutzers sichern.
7
D
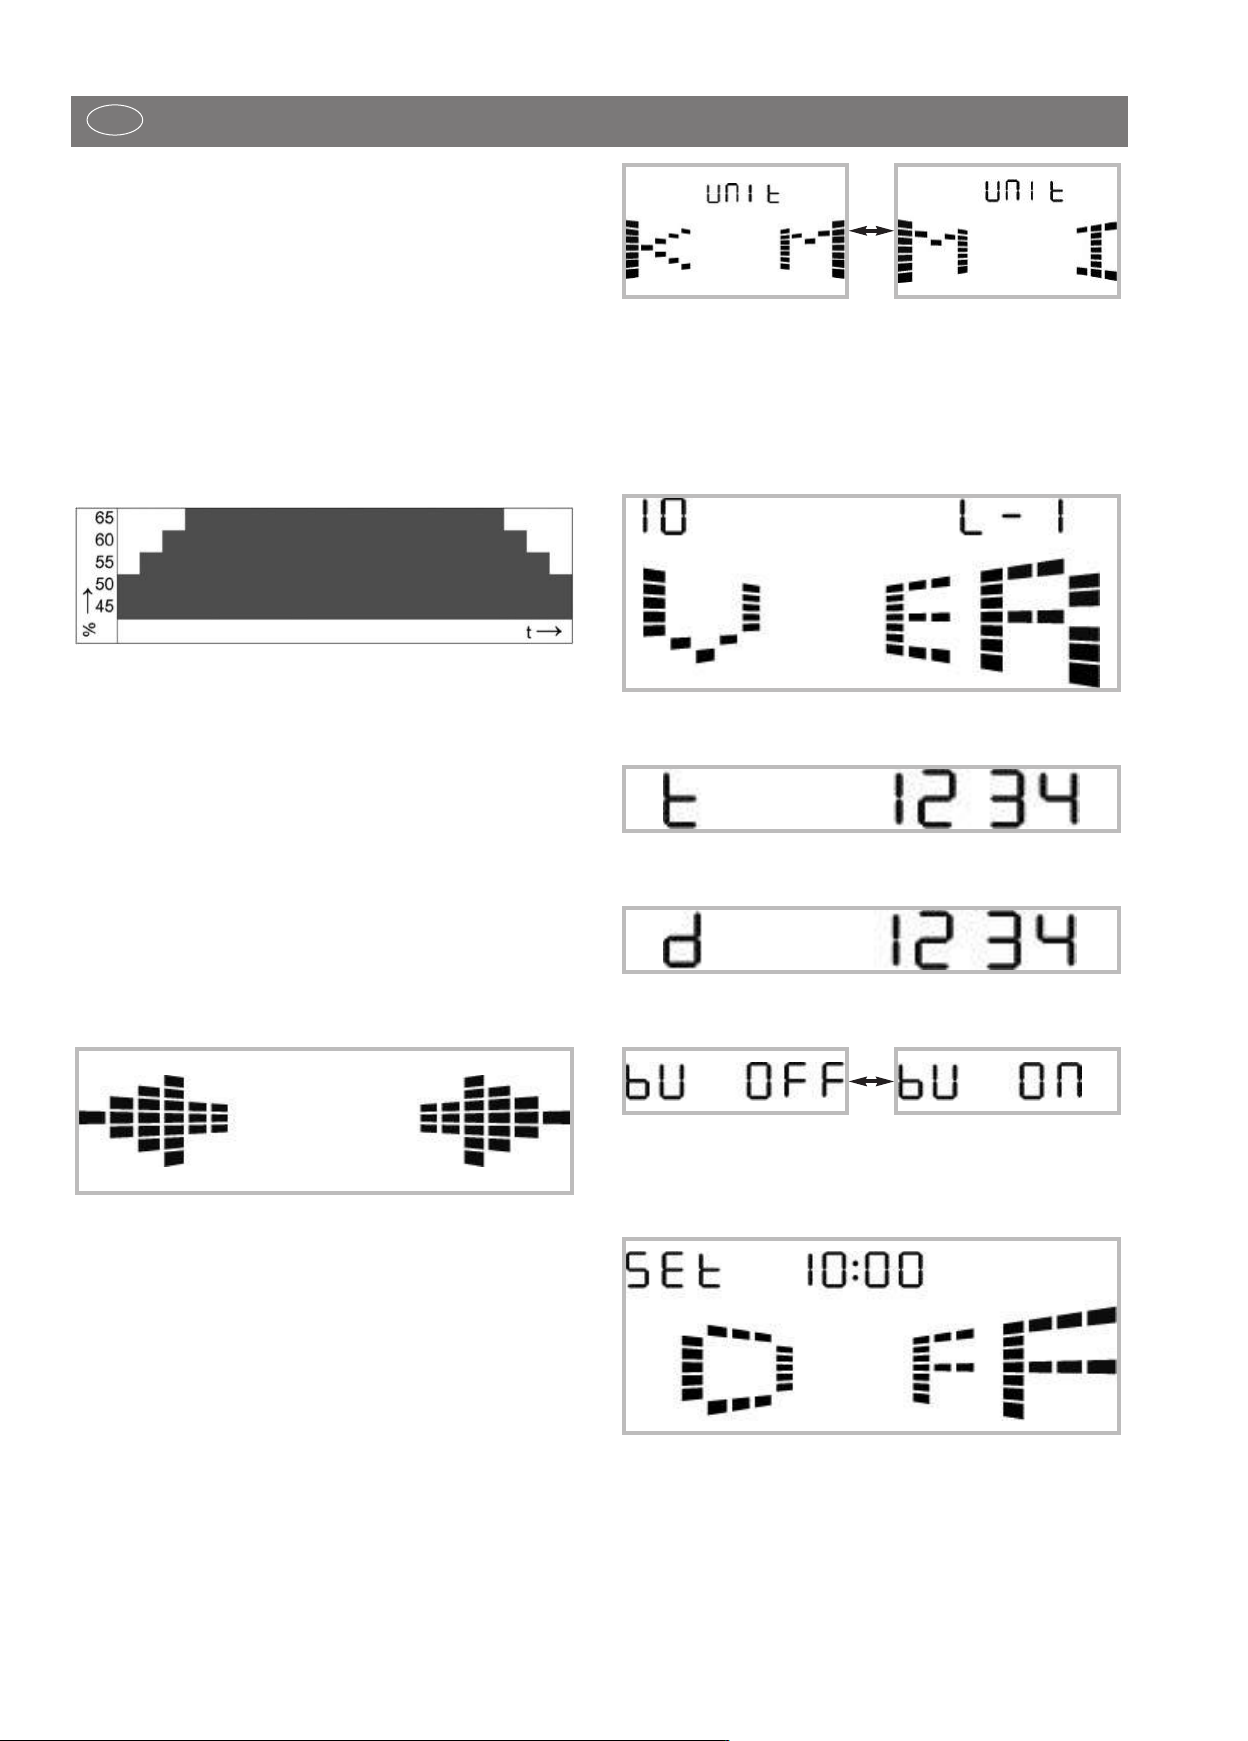
P5: Pulsprofil
P6: HRC GESCHWINDIGKEITS-PROGRAMM
Der Benutzer hat die Möglichkeit, das Programm auf Grundlage
seines maximalen Zielpuls individuell einzustellen. Das Laufband
stellt automatisch im Programm die Geschwindigkeit ein, um die
Zielherzfrequenz des Benutzers zu erreichen und beizubehalten.
Während des Trainings kann der Benutzer die Geschwindigkeit
oder die Steigung manuell verändern.
Um die Herzkontrollprogramme verwenden zu können, muss der
Benutzer einen Brustgurt tragen.
1. Schalten Sie das Gerät ein.
2. Den Sicherheitsschlüssel am Laufband und den Clip an der Kleidung des Benutzers sichern.
3. Das „P6: HRC Geschwindigkeits-Programm“ mit den Cursor-Tasten auswählen und mit Enter bestätigen
4. Alterseingabe bestätigen (Enter) oder ändern (Cursor-Tasten)
5. Zeiteingabe bestätigen (Enter) oder ändern (Cursor-Tasten)
6. Max Zielpuls bestätigen (Enter) oder ändern (Cursor-Tasten)
7. Enter Taste betätigen, um mit dem Training zu beginnen.
8. Das Training kann jederzeit mit der STOP Taste unterbrochen
werden, eine Wiederaufnahme des Trainings ist innerhalb
3Min möglich.
Drücken Sie die SPEED-Taste (-) mindestens für 2sec., jetzt sind Sie
im Systemumstellungs-Menü.
Der Einstellmodus kann jederzeit wieder ohne eine Änderung mit
der STOP Taste verlassen werden.
Das Wechseln in weitere Menüunterpunkte wird durch Drücken der
SPEED-Taste (-) oder SPEED-Taste (+) erreicht.
1) Wechsel zwischen metrischen und englischen System-
Die Anzeige zeigt “UNit“ an.
Drücken Sie START, um zwischen KM und MI zu wechseln.
Drücken Sie STOP, um zu Bestätigen und das Menü zu verlassen.
Die Maßeinheit für Geschwindigkeit und Strecke werden entspre-
chend geändert.
2) LCD und Controller Version auslesen
P6: Pulsprofil
Hinweis Herzkontrollprogramme:
Wird die Herzfrequenz nicht erkannt, wird aus Sicherheitsgründen
die Geschwindigkeit bis auf 1km/h(metric), 0.6MPH(English) heruntergeregelt.
SYSTEMUMSTELLUNG
Die Menüunterpunkte Unit (Metrisch/Englisch), LCD und Controller Version, Gesamt-Laufzeit, Gesamt-Laufleistung, Summer
(Ein/Aus) und Stand-by Zeit einstellen, können selbstständig bearbeitet werden. Die LCD und Controller Version, Gesamt-Laufzeit,
Gesamt-Laufleistung können nur ausgelesen und nicht verändert
werden.
Um Systemumstellungen durchzuführen, müssen Sie sich in der Programmauswahl befinden.
8
3) Auslesen der Gesamt-Laufzeit in Stunden
4) Auslesen der Gesamt-Laufleistung (km oder Meilen)
5) Summer ein oder ausschalten
Drücken Sie einfach START, um den Summer ein oder auszuschalten.
Die Anzeige wechselt anschließend in den Programm Auswahl
Modus.

D
6) Zeit einstellen für Stand-by
rücken Sie START, um danach die Ausschaltzeit mit den Speed (+)
D
oder Speed(-) einzustellen.
Ein erneutes Drücken von START bestätigt den Wert.
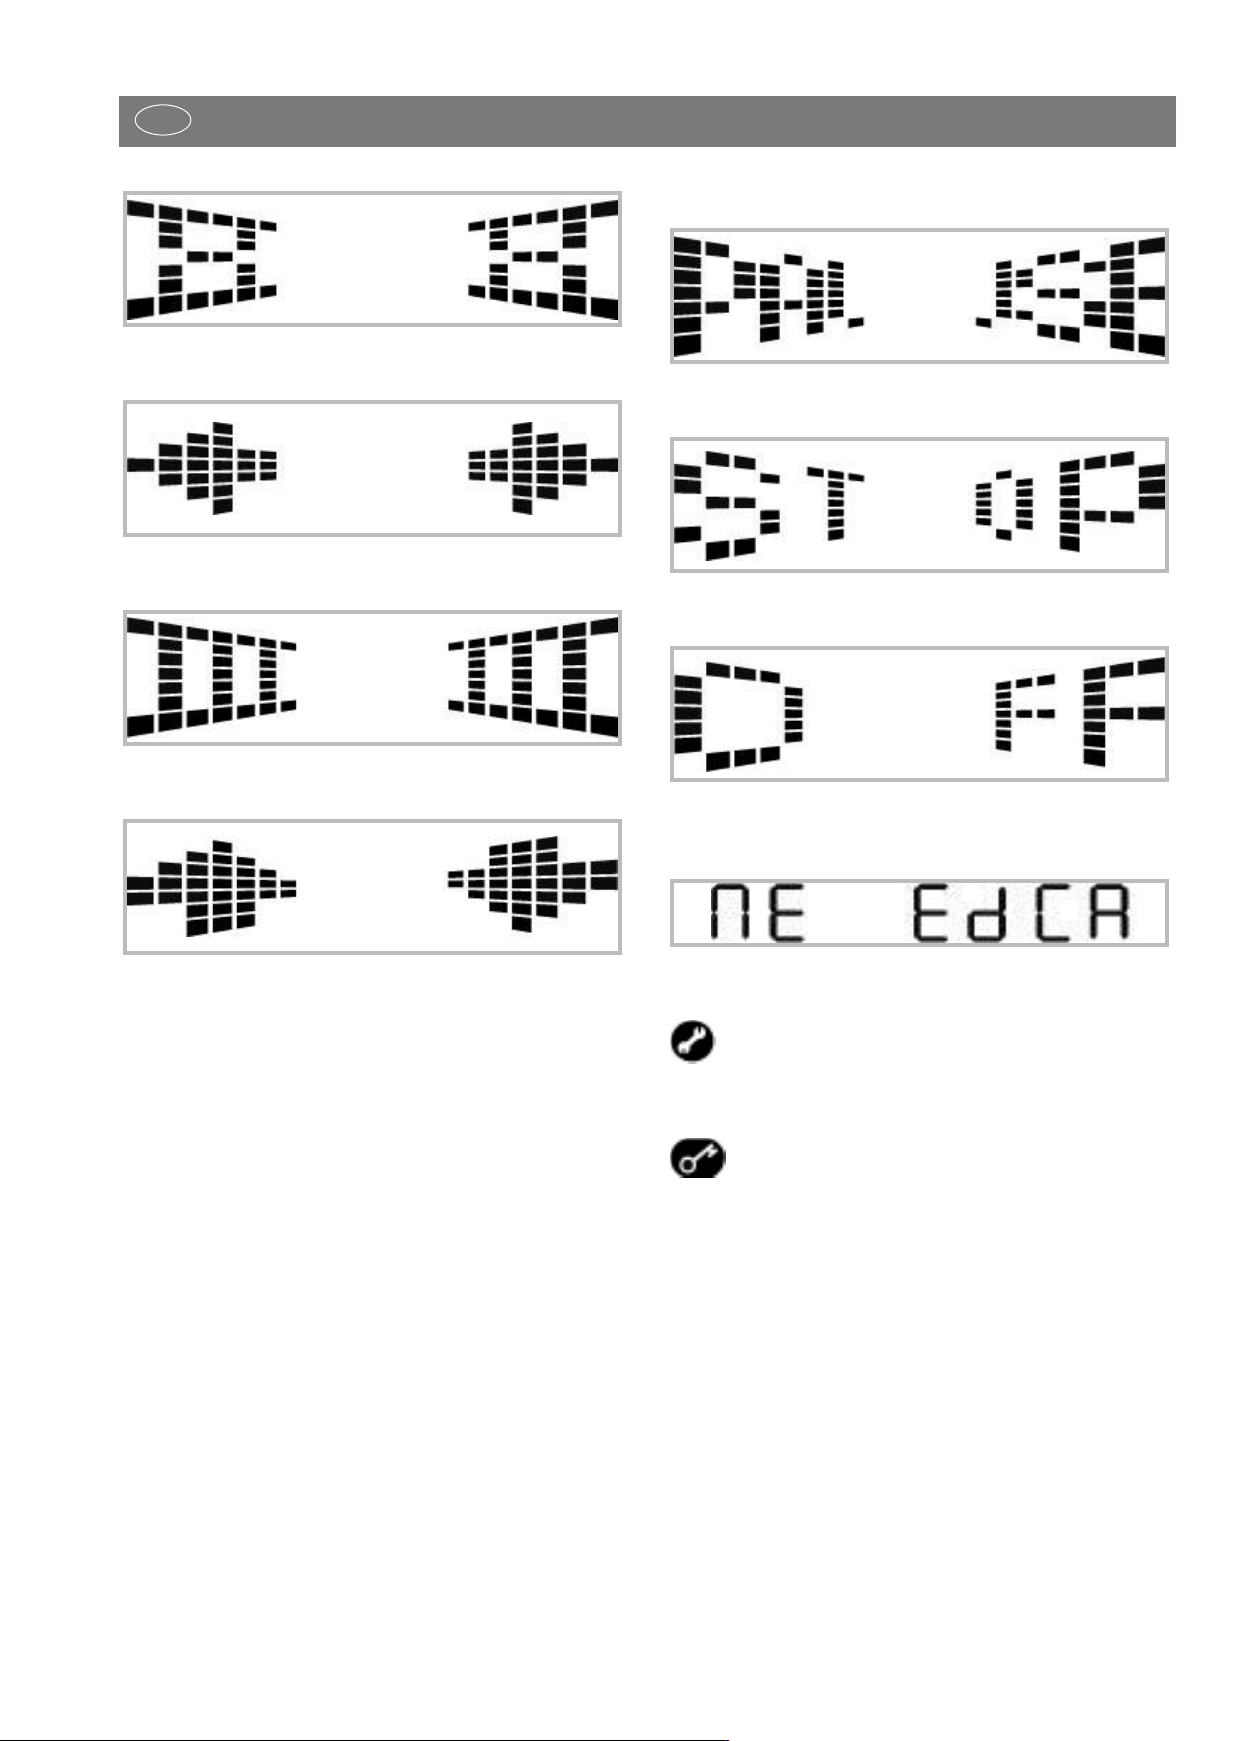
ZUSAMMENFASSUNG DER MELDUNGEN /
HINWEISE IN DER LCD-ANZEIGE
Einschalten
Trainings Pause
Programm Auswahl
Bereit
Warnmeldung
Training Stop
Hinweis: Gerät schaltet in den Stand-by
Benötigt Kalibrierung der Steigung (bitte Kundenservice kontaktieren)
Laufband soll gewartet werden
Sicherheitsschlüssel nicht eingesteckt
9
D
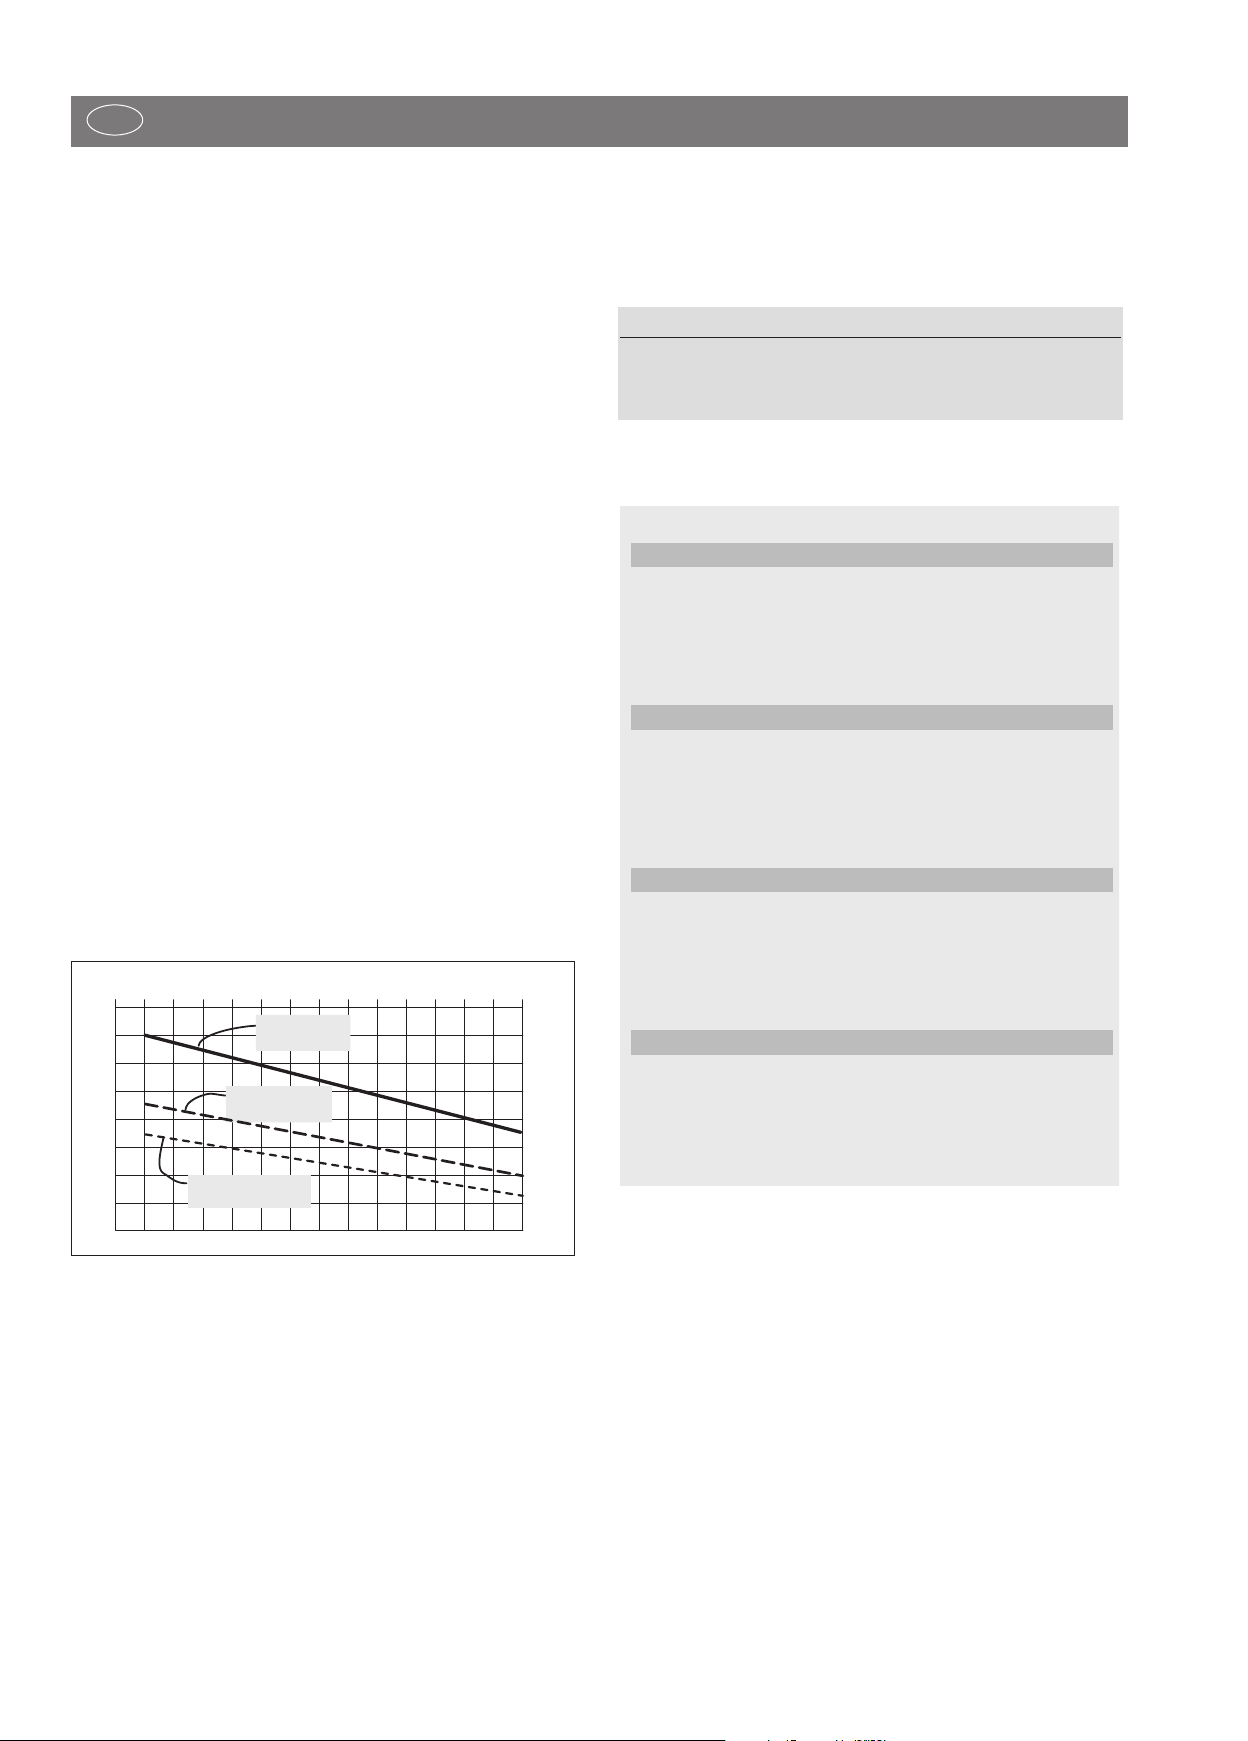
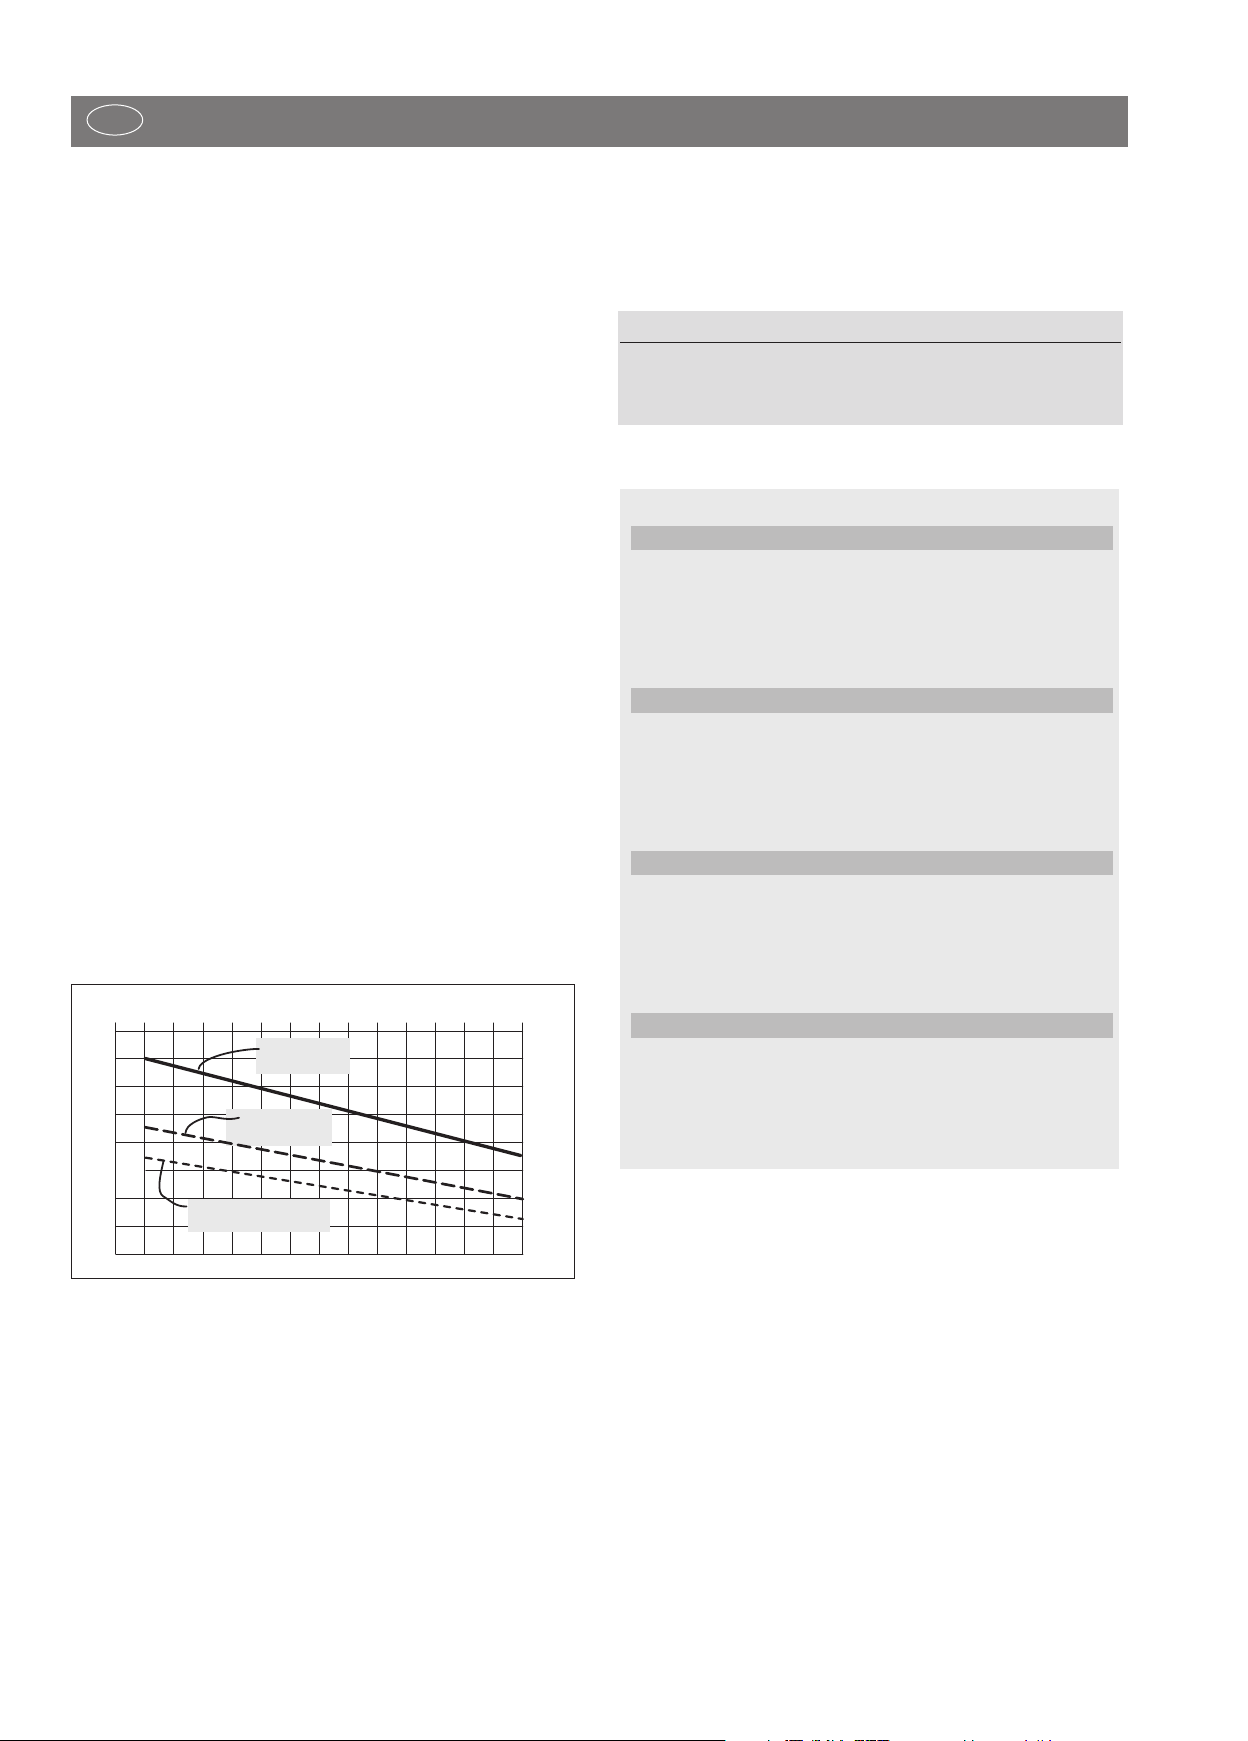
Pulsdiagramm
Fitness und Fettverbrennung
220
200
180
160
140
120
100
80
Puls
Alter
20 25 30 35 40 45 50 55 60 65 70 75 80
Fettverbrennungspuls
90
(65% vom Max.Puls)
Fitnesspuls
(75% vom Max.Puls)
Maximalpuls
(220 minus Alter)
Trainingshäufigkeit Umfang einer Trainingseinheit
3 x wöchentlich 2 Minuten Training
1 Minute Pause für Gymnastik
2 Minuten Training
1 Minute Pause für Gymnastik
2 Minuten Training
3 x wöchentlich 3 Minuten Training
1 Minute Pause für Gymnastik
3 Minuten Training
1 Minute Pause für Gymnastik
2 Minuten Training
3 x wöchentlich 4 Minuten Training
1 Minute Pause für Gymnastik
3 Minuten Training
1 Minute Pause für Gymnastik
3 Minuten Training
3 x wöchentlich 5 Minuten Training
1 Minute Pause für Gymnastik
4 Minuten Training
1 Minute Pause für Gymnastik
4 Minuten Training
4. Woche
3. Woche
2. Woche
1. Woche
TRAININGSANLEITUNG
Trainingsanleitung
Das Laufen ist eine sehr effiziente Form des Fitnesstrainings. Mit
dem Laufband können Sie unabhängig von jeder Witterung ein
kontrolliertes und dosiertes Lauftraining zu Hause durchführen. Das
aufband eignet sich nicht nur für das Jogging, sondern ebenso für
L
das Gehtraining. Bevor Sie mit dem Training beginnen, sollten Sie
die folgenden Hinweise sorgfältig lesen!
Planung und Steuerung Ihres Lauftrainings
Die Grundlage für die Trainingsplanung ist Ihr aktueller körperlicher Leistungszustand. Mit einem Belastungstest kann Ihr Hausarzt
die persönliche Leistungsfähigkeit diagnostizieren, die die Basis für
Ihre Trainingsplanung darstellt. Haben Sie keinen Belastungstest
durchführen lassen, sind in jedem Fall hohe Trainingsbelastungen
bzw. Überlastungen zu vermeiden. Folgenden Grundsatz sollten
Sie sich für die Planung merken: Ausdauertraining wird sowohl
über den Belastungsumfang als auch über die Belastungshöhe /-intensität gesteuert.
Richtwerte für das Ausdauertraining
Belastungsintensität
Die Belastungsintensität wird beim Lauftraining bevorzugt über die
Pulsfrequenz Ihres Herzens kontrolliert.
Maximalpuls: Man versteht unter einer maximalen Ausbelastung
das Erreichen des individuellen Maximalpulses. Die maximal erreichbare Herzfrequenz ist vom Alter abhängig.
Hier gilt die Faustformel: Die maximale Herzfrequenz pro Minute
entspricht 220 Pulsschlägen minus Lebensalter.
Beispiel: Alter 50 Jahre > 220 – 50 = 170 Puls/Min.
Belastungspuls:
Die optimale Belastungsintensität wird bei 65–75% der individuellen Herz–/Kreislaufleistung erreicht (vgl. Diagramm).
65% = Trainingsziel Fettverbrennung
75% = Trainingsziel verbesserte Fitness
Belastungsumfang
Dauer einer Trainingseinheit und deren Häufigkeit pro Woche:
Der optimale Belastungsumfang ist gegeben, wenn über einen längeren Zeitraum 65–75% der individuellen Herz–/Kreislaufleistung
erreicht wird.
Faustregel:
Trainingshäufigkeit Trainingsdauer
täglich 10 min
2–3 x wöchentlich 20–30 min
1–2 x wöchentlich 30–60 min
Anfänger sollten nicht mit Trainingseinheiten von 30-60 Minuten
beginnen. Das Anfängertraining kann in den ersten 4 Wochen intervallartig konzipiert sein:
In Abhängigkeit vom Alter verändert sich dieser Wert.
Die Intensität wird beim Training mit den Laufband einerseits über
die Laufgeschwindigkeit und andererseits über den Neigungswinkel der Lauffläche geregelt. Mit steigender Laufgeschwindigkeit erhöht sich die körperliche Belastung. Sie nimmt ebenfalls zu, wenn
der Neigungswinkel vergrößert wird. Vermeiden Sie als Anfänger
ein zu hohes Lauftempo oder ein Training mit zu großem Neigungswinkel der Lauffläche, da hierbei schnell der empfohlene Pulsfrequenzbereich überschritten werden kann. Sie sollten Ihr
individuelles Lauftempo und den Neigungswinkel beim Training mit
den Laufband so festlegen, daß Sie Ihre optimale Pulsfrequenz
gemäß der o. g. Angaben erreichen. Kontrollieren Sie während
des Laufens anhand Ihrer Pulsfrequenz, ob Sie in Ihrem Intensitätsbereich trainieren.
10

D
Warm-Up
Zu Beginn jeder Trainingseinheit sollten Sie sich 3-5 Minuten mit
langsam ansteigender Belastung ein- bzw. warmlaufen, um Ihren
Herz- /Kreislauf und Ihre Muskulatur auf “Trab” zu bringen.
Cool-Down
Genauso wichtig ist das sogenannte “Abwärmen”. Nach jedem
Training sollten Sie noch ca. 2-3 Minuten langsam weiterlaufen.
Die Belastung für Ihr weiteres Ausdauertraining sollte grundsätzlich zunächst über den Belastungsumfang erhöht werden, z.B. wird
täglich statt 10 Minuten, 20 Minuten oder statt wöchentlich 2x, 3x
trainiert. Neben der individuellen Planung Ihres Ausdauertrainings
können Sie auf die im Trainingscomputer des Laufbandes integrierten Trainingsprogramme zurückgreifen.
Ob Ihr Training nach einigen Wochen die gewünschten Auswir-
ungen erzielt hat, können Sie folgendermaßen feststellen:
k
1. Sie schaffen eine bestimmte Ausdauerleistung mit weniger
Herz–/Kreis-laufleistung als vorher
2. Sie halten eine bestimmte Ausdauerleistung mit der gleichen
Herz–/Kreislaufleistung über eine längere Zeit durch.
3. Sie erholen sich nach einer bestimmten Herz–/Kreislaufleistung
schneller als vorher.
Hinweise zur Pulsmessung mit Handpuls
Eine durch díe Kontraktion des Herzens erzeugte Kleinstspannung
wird durch die Handsensoren erfasst und durch die Elektronik ausgewertet
• Umfassen Sie die Kontaktflächen immer mit beiden Händen
• Vermeiden Sie ruckartiges Umfassen
• Halten Sie die Hände ruhig und vermeiden Sie Kontraktionen
und Reiben auf den Kontaktflächen.
Besondere Trainingshinweise
Der Bewegungsablauf des Laufens dürfte jedem bekannt sein. Trotzdem sollten einige Punkte beim Lauftraining beachtet werden:
• Stets vor dem Training auf den korrekten Aufbau und Stand des
Gerätes achten.
• Besteigen und verlassen Sie das Gerät nur bei vollständigem
Stillstand des Laufbandes und halten Sie sich dabei am Haltegriff fest.
• Befestigen Sie vor dem Starten des Laufbandes die Schnur des
Bandstop-Sicherheitsschlüssels an Ihrer Kleidung.
• Trainieren Sie mit entsprechenden Lauf- bzw. Sportschuhen.
• Das Laufen auf einem Laufband unterscheidet sich vom Laufen
auf normalem Untergrund. Deshalb sollten Sie sich mit langsamem Gehen auf dem Laufband auf das Lauftraining vorbereiten.
• Halten Sie sich während der ersten Trainingseinheiten am Haltegriff fest, um unkontrollierte Bewegungen, die einen Sturz provozieren könnten, zu vermeiden. Dies gilt besonders bei der
Bedienung des Computers während des Lauftrainings.
• Anfänger sollten den Neigungswinkel der Lauffläche nicht in
zu hoher Position justieren, um Überlastungen zu vermeiden.
• Laufen Sie nach Möglichkeit in einem gleichmäßigen Rhythmus.
• Nur in der Mitte der Lauffläche trainieren.Faustregel:
11
D
Biomechanik
Biomechanik - Laufband
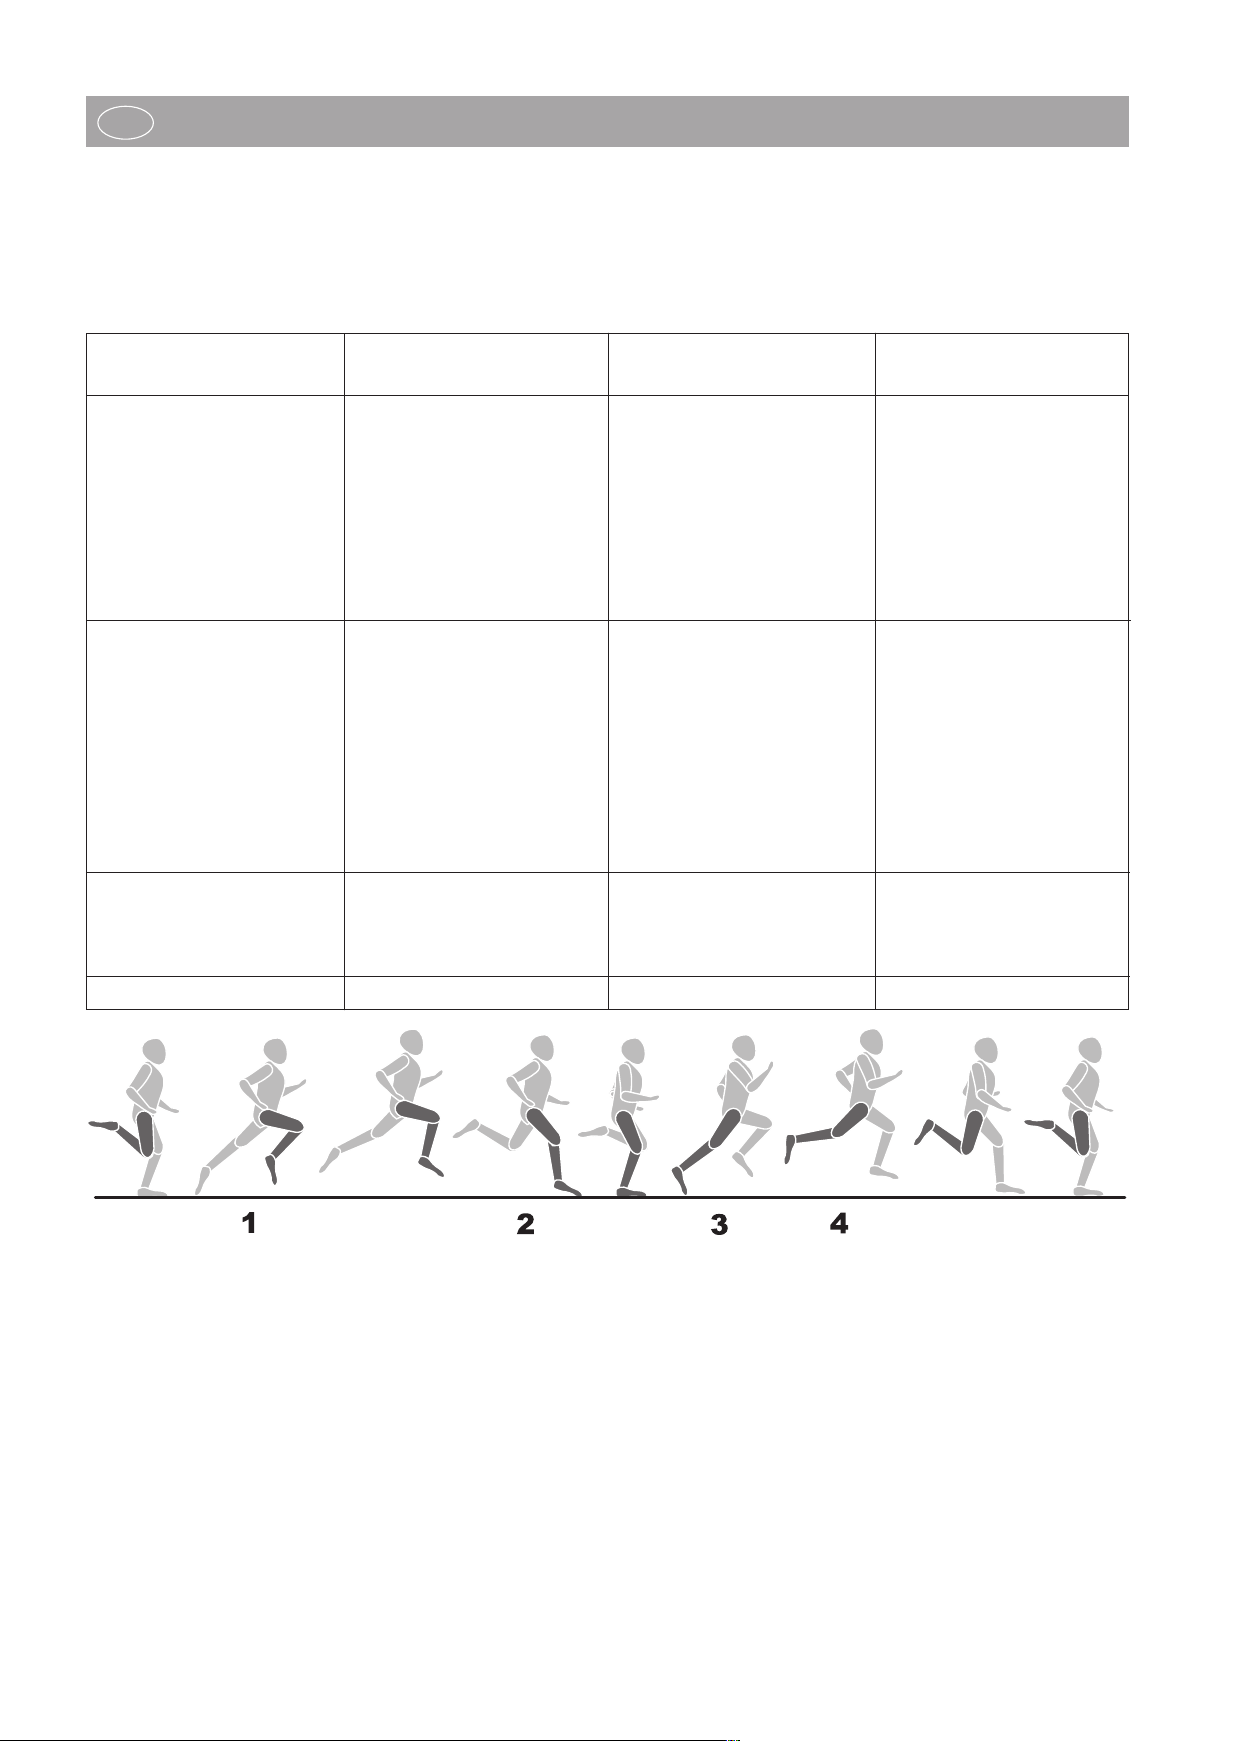
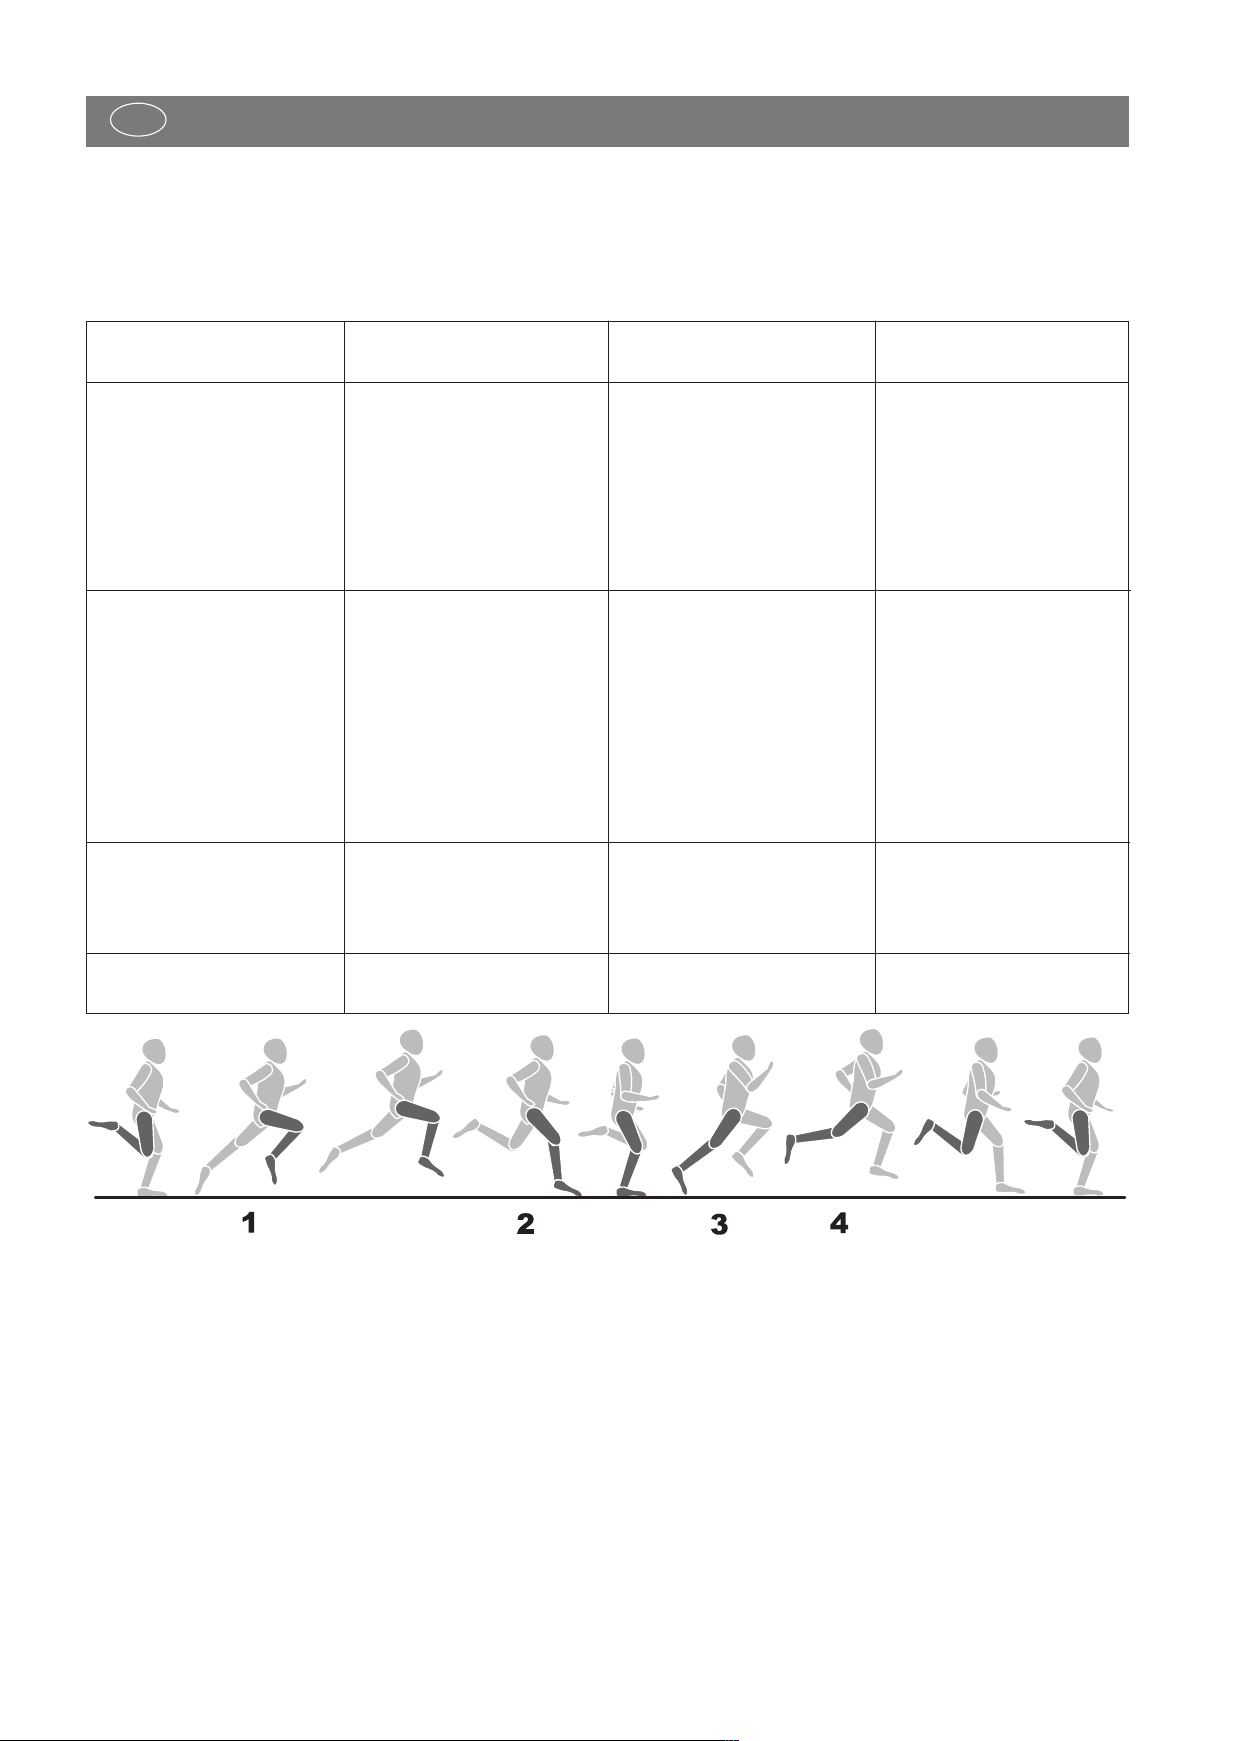
Trainingsform und Bewegungsausführung
Auf dem Laufband kommen von Gehen über Walking bis hin
zum Sprint verschiedenste Trainingsformen zum Einsatz. Die Bewegungsausführung des Gehens, Walkings, Laufens und Sprintens wird dabei in vier Phasen unterteilt:
hase Beginn Ende Hinweise /
P
Bewegungsbeschreibung
Vordere Schwungphase Stützbein unter dem
Körperschwerpunkt
Aufsetzen des Fußes
Hier findet der maximale Kniehub statt und dient hauptsächlich dem Nachvornschwingen
des Beines. Beim Aufsetzen
des Fußes werden innerhalb
von 10-20ms die unteren Extremitäten durch eine passive Abbremsbewegung gedämpft
Vordere Stützphase
Aufsetzen des Fußes Vertikale Körperhaltung
Vertikale Körperhaltung Abstoßen des Fußes
Beim Aufsetzen des Fußes ent- stehen Kräfte die das 2-3
In der Endphase wird der Fuß gestreckt und es findet ein Ab-
Abstoßen des Fußes Vertikale Körperhaltung Laufstile
fache des Körpergewichts ausmachen. Es sollte daher darauf
geachtet werden das passende
Schuhwerk zu tragen, um die
aufkommenden Kräfte adäquat
zu absorbieren und eine gesunde Pronation des Fußes zu
gewährleisten.
Hintere Stützphase
stoßen über den ersten Zeh
statt
Hintere Schwungphase
Die Bewegungsabläufe des Laufens können nicht genormt werden und daher ist die Auswahl des ökonomischsten Laufstils sehr
individuell und hängt maßgeblich von der Laufgeschwindigkeit
und Körperkonstitution ab. Unterschieden wird zwischen den unterschiedlichen Arten des Fersenaufsatzes.
• Vorfußaufsatz: Initialer Bodenkontakt beginnt mit dem Vorderfuß. Das Knie ist beim Fußaufprall leicht gebeugt und daher
wird ein Großteil der auftretenden Kräfte wird über die Muskulatur gedämpft.
• Rückfußaufsatz: Initialer Bodenkontakt beginnt mit der Ferse.
Das Knie ist beim Fersenaufprall nahezu gestreckt und die Bewegung wird durch den passiven Bewegungsapparat und
das Schuhwerk gedämpft.
• Mittelfußaufsatz: Initialer Bodenkontakt über den Mittelfuß.
12
Kombination aus Vorfuß- und Rückfußaufsatz.
Festzuhalten ist, dass eine Ökonomisierung der Lauftechnik eine
frühzeitige Ermüdung verhindert und Verletzungen vorgebeugt
und die biomechanischen Anforderungen beim Laufen und die
auftretende Kräfte von folgenden Punkten abhängen:
• Laufgeschwindigkeit
• Bodenbeschaffenheit / Streckenprofil
• Körperkonstitution
• Lauftechnik
• Schuhwerk
• Statik der unteren Extrimitäten
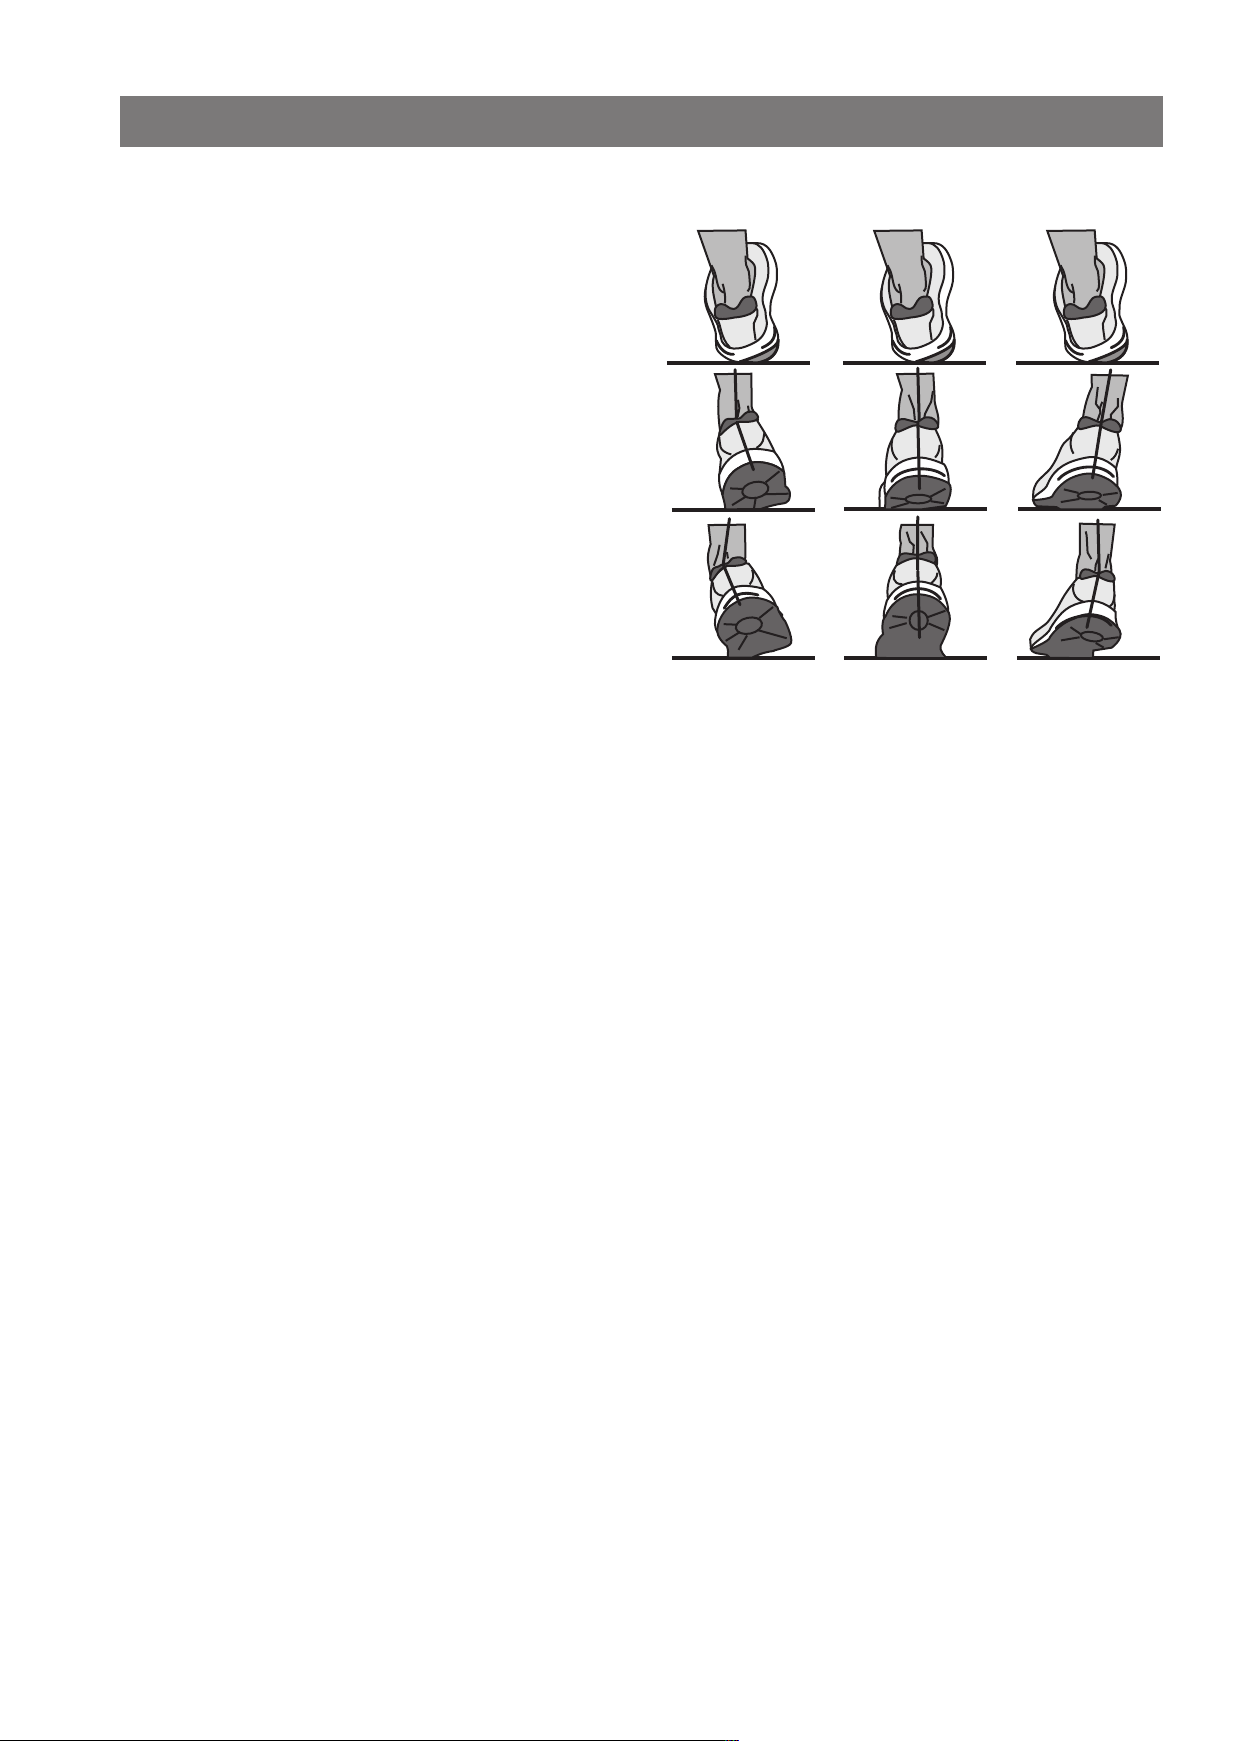
Pronation des Fußes
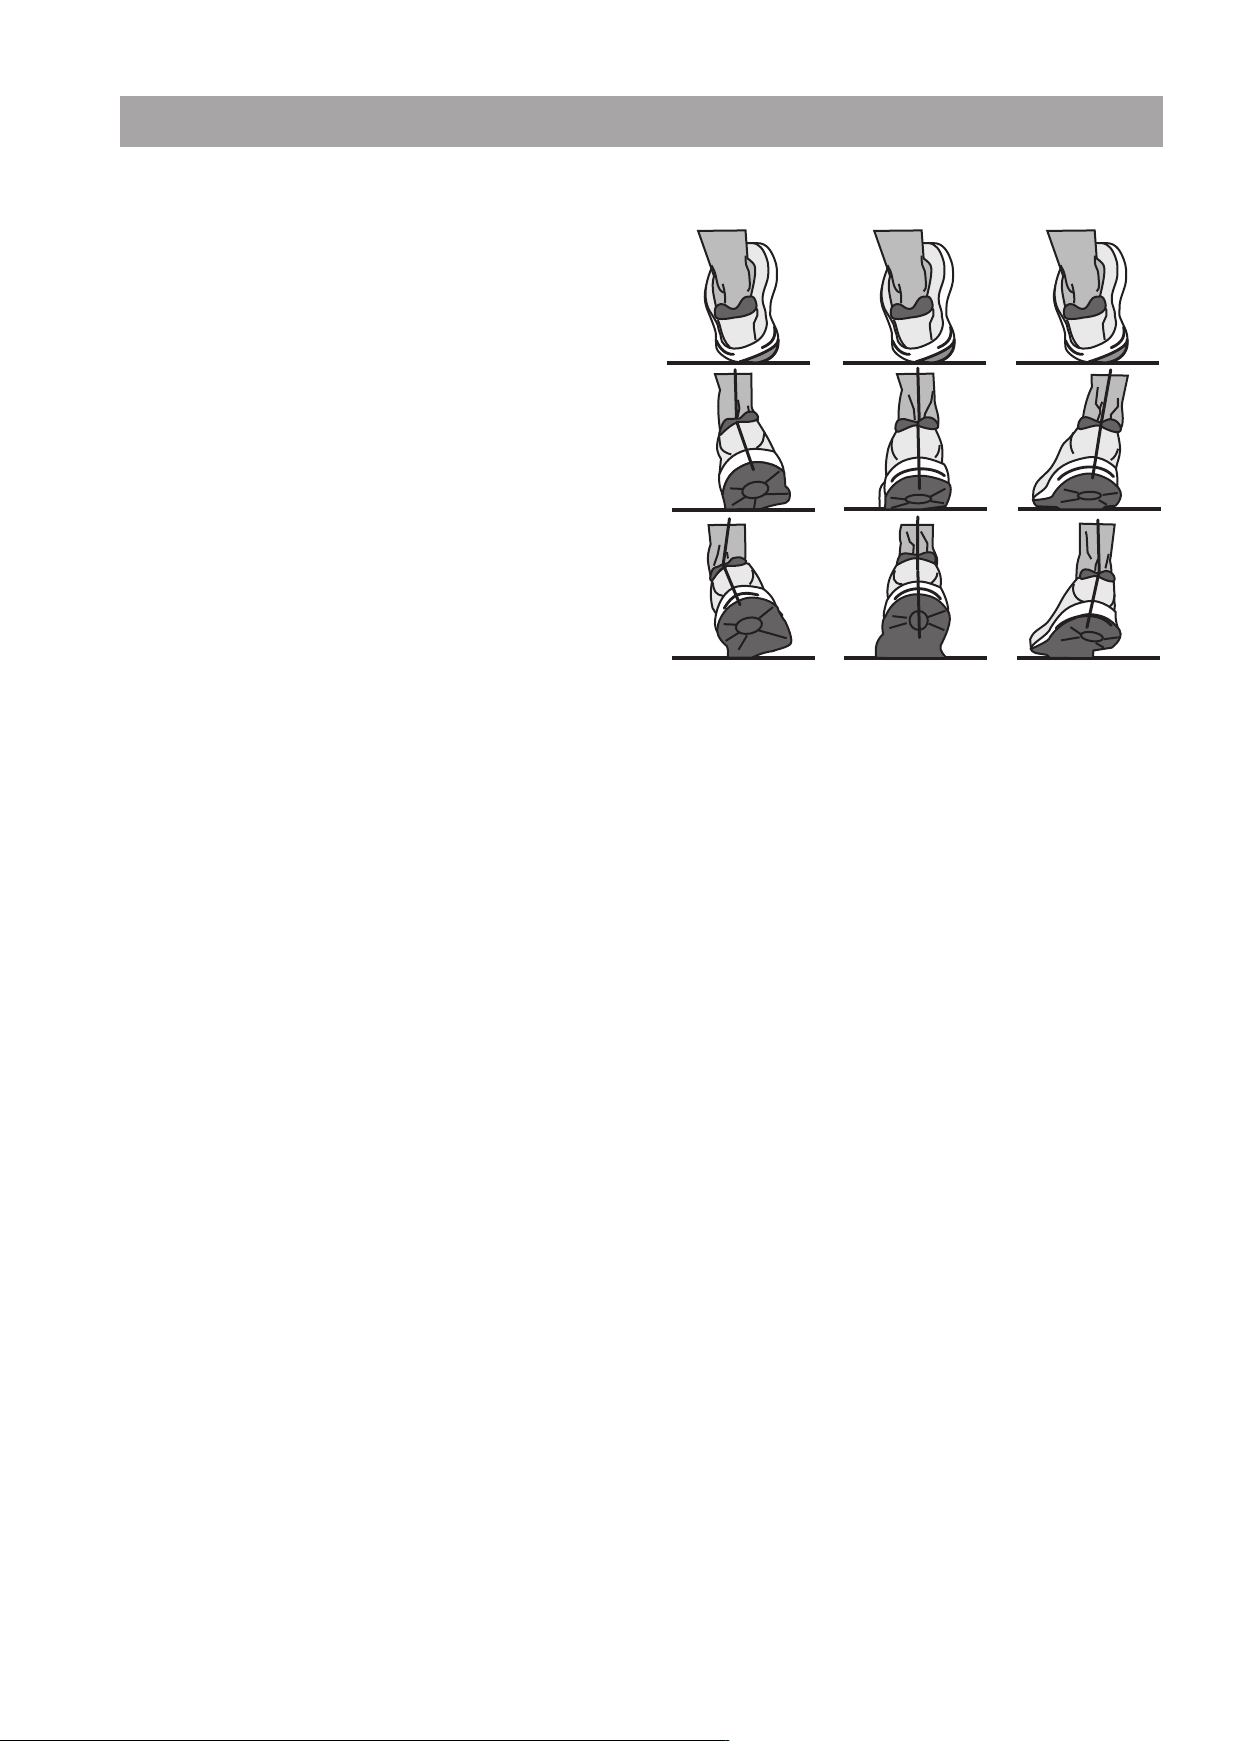
Biomechanik
ie Pronation beschreibt die natürliche Dämpfung des Fußes zur
D
Abfederung des Aufpralls. Die Pronation des Fußes kann je nach
Läufertyp unterschiedlich ausfallen. Es wird dabei in normaler
Pronation, Überpronation und Supination unterschieden.
Ein Laufschuh sollte bei einem Läufer mit normaler Pronation
immer die natürliche Pronationsbewegung unterstützen, ohne
diese allerdings durch Stabilitätstechnologien einzuschränken.
Für Läufer ist insbesondere die Überpronation oder die Supination eine hohe Problematik und kann zu vielfältigen Verletzungen
führen. Durch geeignete Laufschuhe lassen sich individuelle Fehlstellungen oder Probleme allerdings ausgleichen.
SUPINATION NORMAL ÜBERPRONATION
1
2
3
13
GB
Information for your safety:
• To avoid injuries as a result of overstress or overload, the exer-
• Prior to the first commissioning and after approx. 6 operating
• Regularly check the operability and the proper condition of
• The safety technical controls are part of the obligations of the
• The security level of the device can only be maintained if the
• Defective or damaged components shall be replaced imme-
• Until repair the device shall no longer be used.
• For care, cleaning and maintenance only use the KETTLER De-
• Please clarify with your general practitioner before you start
• The treadmill shall only be implemented for its intended pur-
• Please consider the maximum user weight.
• Only exercise with attached security key.
• Start the first training units at low speed to make yourself fa-
• When feeling insecure, grab hold of the handle bars, leave
Important: Please also note the safety guidelines in the installa-
SAFETY GUIDELINES
cise device shall only be operated according to the instructions.
days, check if the connections are mechanically secured.
the exercising device.
owner and shall be implemented regularly and properly.
device is regularly checked for wear and damages.
diately. Works on the electrical components shall only be implemented by qualified staff. Only use KETTLER original spare
parts.
vice-Care-Set Art.-No. 7921-000
the training, whether or not your health conditions allow you
to train with this device. The medical result shall be the basis
for the elaboration of your training program. Wrong or excessive training can lead to health impairments.
pose, i.e. the walking and running exercise of adults.
miliar with the new motion sequences.
the treadmill over the side platforms and stop the belt.
tion and assembly instruction.
Safety Switch
• Prior to every training unit, insert the safety key into the safety
switch and attach the string of the safety key to your clothes.
Adapt the length of the string: When “stumbling” the safety
witch shall be released.
s
• The safety switch was developed to immediately shut down
the drives for the belt and the height adjustment in case you
fall or for emergency situations. Only use the safety switch for
emergency stops. To stop the treadmill during normal training
in a safe, comfortable and proper way under normal conditions, use the STOP button.
• Check the safety switch prior to the begin of your exercises
• Position yourself on the side platforms and start the belt at normal speed. Remove the safety key from the safety switch. The
belt must stop immediately. Afterwards reattach the safety key
to the safety switch and the string to your clothes. When the
elt is stopped, move backwards. The safety key must detach
b
from the safety switch. However the string shall remain attached to the clothes. Afterwards reattach the safety key back
to the safety switch.
Treadmill protection
• By removing the safety key an unauthorised use of the treadmill through third parties can be avoided. Please keep the safety key in a safe place and avoid children to get hold of the
safety key.
14

GB
DISPLAY
OPERATION OF THE COMPUTERISED DISPLAY TRACK MOTION
Symbol Incline
Symbol Speed
Symbol Treadmill Maintenance
Cool Down “Run down”
Recovery Determination of the fitness mark
Symbol Safety Switch
Display pulse in bpm (beat per minute)
Display Age
Display Incline in %
Display Exercise distance in km or miles
Display Speed in km/h or mph
Display Number of calories
DISPLAY VALUES
During the programming
Display Input Area Resolution Step Range
Age 10-99 XX 1
Time 10:00 ~ 99:00 min XX:XX 01:00
Training Distance
MAX. SPEED Max: 16km/h(metric),10mph(English) XX.X 0.5
MAX.INCLINE max: 12% XX 1
Target Pulse 70~210 bpm XXX 1
During the Training
Display Display Area Resolution Step Range
Time
Training Distance
Kilocalories 0-999 XXX 1
Heart Rate 40-240 bmp XXX 1
INCINE 0~12.0 % XX 1
SPEED 1.0~16.0km/h(metric), 0,6~10mph(English) XX.X 0.1
1.0~50.0 km(metric),
0.6~30.0 miles(English)
Normal: 00:00~99:59 until 99min 59sec,
then 01:40~18:00 after 1h. 40 min
0.00~9.99km(metric),
0,00~9.99mi(English) until 9,99(km/mi)
10.0~99.9km(metric),
10.0~99.9mi(English) from 10(km/mi)
XX.X 0.2
XX 1
X:XX
XX.X
0.01
0.1
15

GB
KEYPAD
ENTER Confirmation of programs and values
CURSOR (+) (–) Selection of programs and values
INCLINE (+) (–) Incline Adjustment
DIRECT INCLINE Direct incline selection
(4%, 8%, 12%)
SPEED (+) (–) Speed adjustment
DIRECT SPEED ) Direct speed selection
(4/2.5; 8/5; 12/7.5
START / RECOVERY Starts the belt / starts the fitness mark calculation
16
STOP Stops the belt

GB
INCLINE ADJUSTMENT
With the INCLINE button (+) the incline angle will be increased by
1%.
With the INCLINE button (-) the incline angle will be decreased by
1%.
Pressing and holding of this button leads to an automatic fast run
through the values.
Through the DIRECT INCLINE buttons 4%, 8%, 12% for the incline
you can directly adjust the incline.
Due to safety reasons the incline angle can only be adjusted manually. Exceptions to this are the programs with incline profiles and
the HRC programs (heart rate control programs). Here the incline
angle is automatically adjusted.
SPEED ADJUSTMENT
With the SPEED button (+) the speed can be increased during the
training by 0.1 km/h (mph).
With the SPEED button (-) the speed can be decreased during the
training by 0.1 km/h (mph).
Pressing and holding of this button leads to an automatic fast run
through the values.
With the DIRECT SPEED buttons (4.0km/h / 2.5mph), (8.0km/h /
5.0mph) and (12km/h / 7.5mph) for the speed you can directly
adjust the speed setting.
Stand-by
Power consumption during stand-by mode < 0.5 watt.
If the stand-by button is pushed during standstill or if a time defined
in the system changeover runs out, the treadmill goes in stand-by
mode.
The treadmill can be reactivated by pressing the stand-by button.
PAUSE
If the STOP button will be pressed during the training the program
will be interrupted and the pause mode will be activated. Only the
START and the STOP buttons are working during the pause.
If the START button is pressed during the pause mode, the treadmill
starts again and reassumes the speed activated prior to the pause.
The training values will be continued and the count will be resumed
from the point of interruption.
If no button will be pressed for three minutes during the pause mode
or the STOP button will be pressed, the program ends and the training statistics will be shown.
If you want to skip the statistics just press the STOP button.
CALORIE CALCULATION
The calculation of the calories is a reference value. This value is
shown in the top right corner of the display. The calculated value
does not claim to be a medical reference.
PROGRAM SELECTION
After the starting of or after the completion of a program you can
select a program by using the CURSOR buttons and the ENTER button for confirmation. You can choose between 6 programs with
sub-programs.
PROFILE SEGMENTS
When selecting the program (prior to the start of the training) the
profiles for incline and speed will be graphically presented. The
incline profiles will be shown in the left half of the display and the
speed profiles in the right half of the display. During the training the
incline values will be shown on the left and the speed values on the
right, scaled on the existing segments. This might lead to a falsification of the profiles in the presentation. The current position of the
user is blinking.
RECOVERY
If the pulse signal is taken during the training, start a recovery pulse
measurement at the end of the training by pressing the RECOVERY
button. The belt of the treadmill will be stopped. The training heart
rate and one minute later the recovery pulse will be measured and
a fitness mark will be determined. With the same training, the improvement of this mark gives a measure for the increase of your fitness level.
The display of the training distance will show the training heart
rate P1 and the calorie display will show the recovery pulse P2.
After approx. 16 seconds the display changes into the pause mode.
The fitness mark will be shown in the speed display at the bottom
right.
Calculation of the Fitness Mark:
Mark = 6 –
P1= Training rate pulse, P2= Recovery pulse
1.0 = Very good F6.0 = Insufficient
(10 x (P1–P2)
(
P1)
2
)
PULSE RECEPTION
The treadmill is equipped with a hand pulse detection. To guarantee a good hand pulse detection both hand pulse sensors shall be
firmly and entirely covered by the hands without moving the hands.
Movements of the hands can lead to interferences. The pulse display requires approx. 5 to 15 seconds to show your current pulse.
The treadmill also comprises of an in-built POLAR compatible heart
rate receiver. To be able to use the wireless pulse system you need
to wear a chest strap for the transmission of the heart rate. The
chest strap for the transmission of the heart rate is not included in
the scope of supply of this treadmill. We recommend the POLAR
Chest Strap T34. This can be purchased as additional equipment
in specialist shops.
Please remember that some materials used in your clothes (e.g. polyester, polyamide) can cause electrostatic charging and possibly
prevent an accurate heart rate measurement. Please also consider
that mobile phones, televisions and other electrical devices that
create an electromagnetic field around them, might also cause problems with the measurement of the heart rate.
SYMBOL - TREADMILL MAINTENANCE
If the symbol of the treadmill maintenance is shown, maintain the
treadmill as described in the assembly instructions.
ERROR MESSAGES
During the operation different messages will be shown in the display in case of an error of the control. Error messages can be reversed by switching off and restarting of the power supply. If the
error message remains, contact the customer support.
17
GB
Indicaciones importantes
OPERATION
SWITCH ON
First switch on the device. The ON/OFF button for the treadmill is
located next to the power supply cable on the front, underneath
the motor cover. Move the switch in the ON-Position.
SAFETY KEY
Check the function of the safety key prior to every training. Attach
the safety key to the safety switch and the string to your clothes. If
the safety key is not inserted in the safety switch the symbol of the
safety switch will be shown in the display.
START OF TRAINING
For stepping on and off the treadmill always hold tight to the hand
rails.
Prior to the commencement of the training step on the side platforms of the treadmill. Never start the device when standing on the
belt. Start your training with a low speed and later increase the
speed and the incline angle. Try to always run as centred as possible on the belt.
During the training your head and your body shall always point to
the front. Never try to turn on the treadmill, while the belt is still
moving.
TRAINING PROGRAMS
Manual Program
After switching on the device and inserting the safety key, press
the START button. The treadmill will be started after 3 seconds with
a speed of 1.0km/h (0.6mph).
You can increase / decrease the speed or the incline at any time
during the training. To stop the training, simply press the STOP button.
When manually starting the training the display of the training distance and training time will increase. The manual program is a
training without temporal limit. The training program cannot be
saved at the end of the workout.
1. Switch on the device.
2. Attach the safety key to the treadmill and the clip to the clothes
of the user.
3. Press the START button to start the training.
any time during the training. The time setting in the display will
decrease and the distance covered will increase.
1. Switch on the device.
2. Attach the safety key to the treadmill and the clip to the clothes
of the user.
3. Select the “P1 : Incline Program” with the cursor buttons and
confirm with Enter
4. Confirm (Enter) or change (Cursors buttons) the time input
5. Select a profile (cursor buttons) and confirm with Enter
6. Confirm (Enter) or change (Cursors buttons) the maximum incline
7. Confirm with Enter to begin the training.
8. The training can be interrupted at any time by pressing the
STOP button. A restart of the training is possible during the first
3 minutes.
P1: Incline Profile 1
P1: Incline Profile 2
PROGRAM SELECTION
The user has the choice to select between two different programs.
The following programs are available:
P1:Incline Program with 3 different profiles
P2:Speed Program: with 3 different profiles
P3:Calorie Program
P4:Distance Program
P5:HRC Incline Program
P6:HRC Speed Program
After the selection of the program the user can add some details.
The predefined value is blinking and indicates that this value could
be confirmed or changed. As soon as you entered and confirmed
your values you can start with the training on the treadmill.
P1 : INCLINE PROGRAM WITH 3 DIFFERENT PROFILES
In the “P1: Incline Program” you can choose between three preset
profiles. You can increase / decrease the speed or the incline at
18
P1: Incline Profile 3
P2: SPEED PROGRAM: WITH 3 DIFFERENT PROFILES
In the “P2: Speed Program” you can choose between three preset
profiles. You can increase / decrease the speed or the incline at
any time during the training. The time setting in the display will
decrease and the distance covered will increase.
1. Switch on the device.
2. Attach the safety key to the treadmill and the clip to the clothes
of the user.
GB
3. Select the “P2 : Speed Program” with the cursor buttons and
confirm with Enter
4. Confirm (Enter) or change (Cursors buttons) the time input
5. Select a profile (cursor buttons) and confirm with Enter
6. Confirm (Enter) or change (Cursors buttons) the maximum speed
7. Confirm with Enter to begin the training.
8. The training can be interrupted at any time by pressing the
STOP button. A restart of the training is possible during the first
3 minutes.
P2: Speed Profile 1
P4: DISTANCE PROGRAM
You can increase / decrease the speed or the incline at any time
during the training of this program. This training distance target is
shown in the display decreases.
1. Switch on the device.
2. Attach the safety key to the treadmill and the clip to the clothes
of the user.
3. Select the “P4: Distance Program” with the cursor buttons and
confirm with Enter
4. Confirm (Enter) or change (Cursors buttons) the training distance
target
5. Confirm with Enter to begin the training.
6. The training can be interrupted at any time by pressing the
STOP button. A restart of the training is possible during the first
3 minutes.
7. A COOL DOWN (run down) of 4 minutes is started at the end
of the program (can be interrupted by pressing the STOP button)
P5: HRC INCLINE PROGRAM
The user can individually adjust the program based on their maximum target pulse. The treadmill automatically adjusts the incline
during the training to reach and maintain a certain target heart
rate of the user. During the training the user can manually chance
the speed and incline of the treadmill.
The user needs to wear a chest strap to be able to use the heart rate
control programs.
P2: Speed Profile 2
P2: Speed Profile 3
P3: CALORIE PROGRAM
You can increase / decrease the speed or the incline at any time
during the training of this program. It is useful for maximised fat burning. The calorie amount will be shown in the top right corner of
the display and will decrease.
1. Switch on the device.
2. Attach the safety key to the treadmill and the clip to the clothes
of the user.
3. Select the “P3: Calorie Program” with the cursor buttons and
confirm with Enter
4. Confirm (Enter) or change (Cursors buttons) the calorie target
5. Confirm with Enter to begin the training.
6. The training can be interrupted at any time by pressing the
STOP button. A restart of the training is possible during the first
3 minutes.
7. A COOL DOWN (run down) of 4 minutes is started at the end
of the program (can be interrupted by pressing the STOP button)
1. Switch on the device.
2. Attach the safety key to the treadmill and the clip to the clothes
of the user.
3. Select the “P5: HRC Incline Program” with the cursor buttons
and confirm with Enter
4. Confirm (Enter) or change (Cursors buttons) the age input
5. Confirm (Enter) or change (Cursors buttons) the time input
6. Confirm (Enter) or change (Cursors buttons) the maximum target pulse
7. Confirm with Enter to begin the training.
8. The training can be interrupted at any time by pressing the
STOP button. A restart of the training is possible during the first
3 minutes.
P5: Pulse Profile
P6: HRC SPEED PROGRAM
The user can individually adjust the program based on his maximum target pulse. The treadmill automatically adjusts the speed during the training to reach and maintain a certain target heart rate
of the user. During the training the user can manually chance the
speed and incline of the treadmill.
The user needs to wear a chest strap to be able to use the heart rate
control programs.
19
GB
1. Switch on the device.
2. Attach the safety key to the treadmill and the clip to the clothes
of the user.
3. Select the “P6: HRC Speed Program” with the cursor buttons
and confirm with Enter
4. Confirm (Enter) or change (Cursors buttons) the age input
5. Confirm (Enter) or change (Cursors buttons) the time input
6. Confirm (Enter) or change (Cursors buttons) the maximum target pulse
7. Confirm with Enter to begin the training.
8. The training can be interrupted at any time by pressing the
STOP button. A restart of the training is possible during the first
3 minutes.
P6: Pulse Profile
Press START to change between KM and MI.
Press STOP to confirm and leave the menu.
Die unit of measurement for speed and distance will be changed
correspondingly.
2) Read LCD and Controller Version
Note for Heart Control Programs:
If the heart rate is not detected, due to safety reasons the speed
will be limited to 1km/h(metric), 0.6MPH(English).
SYSTEM CHANGEOVER
The menu items for Unit (metric/English), LCD and Controller Version, Total Running Time, Total Running Performance, Buzzer
(ON/OFF) and Stand-by Time can be adjusted individually. The
LCD and Controller Version, Total Running Time and Total Running
Performance can only be read but not edited.
To be able to carry out a system changeover you must be in the program selection.
Press the SPEED button (-) for at least 2 sec. to enter the system
changeover menu.
You can leave the adjustment mode without any changes at any
time by using the STOP button.
3) Reading the total running time in hours
4) Reading the total running performance (km or miles))
5) Switch buzzer on/off.
Simply press START to turn the buzzer on or off.
The display then changes in the program selection mode.
6) Adjust time for stand-by
You can navigate through further menu points by pressing the buttons SPEED (-) or SPEED (+).
1) Change between the metrical and the English System-
The display shows “UNIT”.
20
Press START and adjust the switch off time by using the buttons
Speed (+) or Speed (-).
Pressing START again will confirm the value.
SUMMARY OF THE MESSAGES/NOTES IN THE
LCD-DISPLAY
GB
Switch on
Program selection
Ready
Training Stopp
Note: Device turns into stand-by
Warning Message
Training Pause
Calibration of the incline required (please contact customer support)
Treadmill needs immediate service
Safety key not inserted
21
GB
Pulsediagramm
Fitness and Fat Burner
220
200
180
160
140
120
100
80
Pulse
Age
20 25 30 35 40 45 50 55 60 65 70 75 80
Maximalpulse
(220 minus Age)
Fitnesspulse
(75% of Max.Pulse)
Fat combustion pulse
(65% of Max.Pulse)
90
Training frequency Extent of training session
3 times a week 2 minutes of training
Break of 1 minute for physical exercises
2 minutes of training
Break of 1 minute for physical exercises
2 minutes of training
3 times a week 3 minutes of training
Break of 1 minute for physical exercises
3 minutes of training
Break of 1 minute for physical exercises
2 minutes of training
3 times a week 4 minutes of training
Break of 1 minute for physical exercises
4 minutes of training
Break of 1 minute for physical exercises
3 minutes of training
3 times a week 5 minutes of training
Break of 1 minute for physical exercises
4 minutes of training
Break of 1 minute for physical exercises
4 minutes of training
4th week
3rd week
2nd week
1st week
TRAINING INSTRUCTION
Training directions
Running is a very efficient form of fitness training. With the treadmill, you can go through controlled and regulated running exercises at home, no matter what the weather is like outside. The
readmill is suitable not only for jogging, but also for walking exer-
t
cise. Before you start training, you should read the following notes!
Planning and controlling your running training
The basis for planning your training is your current physical fitness. With an endurance test, your physician can diagnose your
personal capability, upon which you will base your training plan.
If you have not had an endurance test, you must at any rate avoid
high training loads or overload.
You should remember the following principle for the training plan:
Endurance training is regulated both by the extent of the load and
the amount / intensity of the load.
Guidelines for endurance training
Load intensity
The load intensity during running training is preferably monitored
by your heart’s pulse rate.
Maximum pulse: maximum load is the term used when the individual maximum heart rate has been reached. The maximum reachable heart rate depends on age.
The rule of thumb here is: the maximum heart rate per minute equals
220 beats minus your age.
Example: age 50 years > 220 -50 = 170 beats/min.
Load pulse:
The optimum load intensity is reached at 65 – 75% of the individual
cardiovascular performance (see diagram).
65% = aim of training is to burn fat
75% = aim of training is to improve fitness
Extent of load
Duration of one training unit and number of units per week:
The optimum extent of load is reached when 65 – 75% of the in-
dividual cardiovascular performance is reached over a long period.
Rule of thumb:
Training frequency Duration of training
daily 10 minutes
2–3 times a week 20–30 minutes
1–2 times a week 30–60 minutes
Beginners should not begin with training units of 30 – 60 minutes.
Beginner training can be arranged in intervals for the first 4 weeks:
This value changes depending on age.
The intensity during training is regulated with the treadmill firstly by
running speed and secondly by the incline angle of the tread. The
physical load increases at higher speeds. It also increases if the incline angle is increased. If you are a beginner, avoid too high a
running pace or training with the tread inclined too steeply, otherwise you could quickly exceed the recommended heart rate range.
You should set your individual running pace and incline angle
when training on the treadmill such that you reach your optimum
heart rate according to the indications above. While running, monitor whether you are training within your intensity range by your
heart rate.
22

GB
Warm-up
At the beginning of every training unit, you should do 3 – 5 minutes of warm up running, slowly increasing the load in order get
your cardiovascular system and musculature going.
Cool-down
Just as important is the so-called cool-down. After every training
session, you should continue to run slowly for about 2 – 3 minutes.
The load for your further endurance training should generally be increased first by the extent of the load, e.g. instead of 10 minutes
daily, do 20 minutes or instead of once weekly, train twice or three
times a week. Beside the individual planning of your endurance
training, you can fall back on the training programs integrated into
the training computer on the treadmill. You can determine whether
your training has achieved the desired result after some weeks as
follows:
1. You manage a certain endurance level at lower cardiovascular
performance than before.
2. You maintain a certain endurance level with the same cardiovascular performance over a long time.
3. You recover more quickly from a certain cardiovascular performance level than before.
Notes on pulse measurement by hand pulse
A minute current created by the contraction of the heart is recorded
by the hand sensors and analysed by the electronics
• Always cover the contact areas completely with both hands
• Avoid clasping jerkily
• Hold your hands calmly and avoid contraction and rubbing
on the contact areas.
Special training directions
The sequence of running exercises should be familiar to everyone.
Nevertheless, there are certain points that should be observed when
running:
• Always make sure the structure and condition of the unit
are correct before training.
• Only get on and off the unit when it is at a complete sta
still and hold the hand grips to do so.
• Fasten the cord of the safety tread-stop key to your clothing
before starting the treadmill.
• Train with the proper running or sports shoes.
• Running on a treadmill is different from running on normal
ground. Therefore, you should prepare yourself for the
running training with slow walking on the treadmill.
• Hold firmly onto the handlebars during your first training
units in order to avoid uncontrolled movements that could
lead to a fall. This applies especially to operating the com
puter while running.
• Beginners should not adjust the incline of the tread to too
high a position, in order to avoid overload.
• Run in as even a rhythm as possible.
• Only train in the middle of the tread.
23
GB
Biomechanics
Biomechanics - treadmill
Form of training and execution of movement
On the treadmill the most different forms of training can be executed, from walking to running to sprinting. The execution of movement of walking, running and sprinting is divided into four
phases:
Phase Beginning End Hints /
description of movement
Front swing phase Support leg under the bo-
dy's centre of gravity
Touching the ground
with the foot
Here the knee is maximally lifted and the leg is mainly
swung forwards. When touching the ground with the foot
the lower extremities will be
cushioned within a period of
10 - 20ms by a passive deceleration movement.
Front support phase Touching the ground with
Vertical posture
the foot
Rear support phase Vertical posture Pushing off from the ground
with the foot
Rear swing phase Pushing off from the ground
Vertical posture
with the foot
Touching the ground with the
foot causes forces which are 2
to 3 times higher than the
body weight. Therefore you
should make sure to wear the
suitable shoes in order to adequately absorb the arising forces and guarantee a healthy
pronation of the foot.
In the final phase the foot is
straight and pushed off from
the ground via the first toe
Running styles
The motion sequences while running cannot be standardised and
therefore the choice of the economic running style is very individual and significantly depends on the running speed and the
physical constitution. One distinguishes between different types
of touchdown of the heel.
• Touchdown of the front foot: Initial floor contact starts with the
front foot. The knee is slightly bended when the foot hits the
ground and therefore a major part of the arising forces is cushioned via the muscular system.
• Touchdown of the rear foot: Initial floor contact starts with the
heel. The knee is almost stretched when the heel hits the
ground and the movement is cushioned by the passive locomotor system and the shoes.
24
• Touchdown of the midfoot: Initial contact with the ground via
the midfoot Combination from touchdown of front and rear
foot.
It is a fact that an economisation of the running technique prevents early fatigue and injuries and that the biomechanical requirements during running and the occurring forces depend on the
following points:
• Running speed
• Floor conditions / route profile
• Physical constitution
• Running technique
• Shoes
• Statics of the lower extremities
Biomechanics
Pronation of the foot
The pronation describes the natural cushioning of the foot for absorbing the impact. The pronation of the foot can be different depending on the type of runner. One distinguishes between
normal pronation, overpronation and supination.
For a runner with a normal pronation a running shoe should always support the natural pronation movement, however without
limiting it due to stability technologies. Mainly the overpronation
or the supination are a big problem for runners and can lead to
diverse injuries. However, suitable running shoes can balance individual malpositions or problems.
SUPINATION NORMAL OVERPRONATION
1
2
3
25
F
CONSEILS DE SECURITE
Informations pour votre sécurité :
• Pour éviter toute blessure résultant d'une mauvaise charge ou
d'une surcharge, n'utiliser l'appareil d'entraînement que conformément aux instructions.
• Avant la première mise en service et, en plus, au bout d'environ 6 jours de service, vérifier la bonne fixation des connexions.
• Assurez-vous régulièrement du bon fonctionnement et de l'état
convenable de l'appareil d'entraînement.
• Les contrôles techniques de sécurité font partie des obligations
de l'exploitant et doivent avoir lieu de façon régulière et correcte.
• Le niveau de sécurité de l'appareil ne peut être maintenu qu'à
condition de vérifier régulièrement l'absence de dommages
et d'usure.
• Remplacer immédiatement toute pièce de construction défectueuse ou endommagée. Seul un personnel qualifié doit effectuer les interventions sur les pièces électriques. N'utilisez
que des pièces de rechange d'origine KETTLER .
• Jusqu'à la remise en état, l'appareil ne doit pas être utilisé.
• Pour le nettoyage, l'entretien et la maintenance, veuillez n'utiliser que le set d'entretien pour appareils KETTLER, art. n°
7921-000
• Avant de commencer l'entraînement, consulter votre médecin
traitant pour vous assurer que l'entraînement avec cet appareil
ne risque pas de nuire à votre santé. Le diagnostic du médecin devrait servir de base à la conception de votre programme
d'entraînement. Un entraînement abusif ou incorrect risque de
s'avérer nuisible.
• Le tapis ne doit être utilisé que conformément à sa finalité, c.à-d. pour l'entraînement de marche ou de course de personnes adultes.
• Tenez compte du poids maximal de l'utilisateur.
• Ne vous entraînez jamais que lorsque la clé de sécurité est en
place.
• Profitez des premières unités d'entraînement pour vous habituer à petite vitesse aux déroulements des mouvements.
• Si vous n'êtes pas sûr, tenez-vous aux barres-poignées, quittez le tapis par les plateformes latérales et arrêtez le tapis.
Important : tenez également compte des conseils de sécurité se
trouvant dans les instructions de montage et d'installation.
Interrupteur de sécurité
• Avant chaque entraînement, fixez toujours la clé de sécurité
sur l'interrupteur de sécurité et accrochez le cordon de la clé
de sécurité à vos vêtements. Adaptez la longueur du cordon
: l'interrupteur de sécurité doit se déclencher en cas de „faux
pas“.
• L'interrupteur de sécurité a été conçu pour mettre les entraînements du tapis et le réglage vertical immédiatement hors
service pour le cas où vous viendriez à chuter ou si vous deviez vous trouver dans une situation d'urgence. N'utilisez l'interrupteur de sécurité que pour un arrêt d'urgence. Pour
arrêter totalement le tapis dans des conditions normales pendant l'entraînement de manière sûre et aisée, utilisez la touche
STOP.
• Vérification de l'interrupteur de sécurité avant le début de l'entraînement
• Placez-vous sur les plateformes latérales et démarrez le tapis
à vitesse minimale. Retirez la clé de sécurité de l'interrupteur
de sécurité. Le tapis doit s'arrêter immédiatement. Fixez ensuite de nouveau la clé de sécurité à l'interrupteur de sécurité
et le cordon à vos vêtements. Le tapis étant arrêté, déplacezvous en arrière. L'interrupteur de sécurité doit se détacher de
l'interrupteur de sécurité. Le cordon doit demeurer accroché
aux vêtements. Fixez ensuite de nouveau la clé de sécurité à
l'interrupteur de sécurité.
Sécurité du tapis de course
• Une utilisation non contrôlée du tapis de course par autrui
peut être évitée en retirant la clé de sécurité. Veuillez conserver soigneusement la clé de sécurité et éviter que des enfants
ne puissent y accéder !
26
F
DISPLAY
EXPLOITATION DE L'ORDINATEUR D'AFFICHAGE TRACK MOTION
Symbole Inclinaison
Symbole Vitesse
Symbole Maintenance du tapis de course
Cool Down “Refroidissement”
Recovery Détermination de la note de condition physi-
que
Symbole interrupteur de sécurité
Affichage du pouls en bpm (beat per minute = battements
par minute)
Affichage âge
Affichage inclinaison en %
Affichage Trajet d'entraînement en km ou miles
Affichage Vitesse en km/h ou en mph
Affichage Consommation d'énergie en kilocalories
VALEURS D'AFFICHAGE
Pendant la programmation
Affichage Plage entrée Résolution Gradation
Age 10-99 XX 1
Temps 10:00 ~ 99:00 min XX:XX 01:00
Parcours d'entraînement
MAX. SPEED max. : 16km/h (metric), 10mph (English) XX.X 0.5
MAX.INCLINE max: 12% XX 1
Pouls à atteindre 70~210 bpm XXX 1
1.0~50.0 km (metric),
0.6~30.0 miles (English)
XX.X 0.2
Pendant l'entraînement
Affichage Plage affichage Résolution Stufung
Temps
Parcours d'entraînement
Normal : 00:00~99:59 à 99min 59sec,
puis 01:40~18:00 à partir d'1heure 40min.
0.00~9.99 km (metric),
0.00~9.99mi (English) à 9.99 (km/mi)
10.0~99.9 km (metric),
10.0~99.9mi (English) à partir de 10(km/mi)
XX 1
X:XX
XX.X
0.01
0.1
Kilocalories 0-999 XXX 1
Fréquence cardiaque 40-240 bmp XXX 1
INCINE 0~12.0 % XX 1
SPEED 1.0~16.0km/h (metric), 0.6~10mph(English) XX.X 0.1
27
F
CLAVIER
ENTER Confirmation de programmes et valeurs
CURSOR (+) (–) Sélection de programmes et valeurs
INCLINE (+) (–) Réglage de l'inclinaison
DIRECT INCLINE (4%, 8%, 12%) Sélection directe de l'inclinaison
SPEED (+) (–) Réglage de la vitesse
DIRECT SPEED (4/2.5; 8/5; 12/7.5) Sélection directe de la vitesse
START / RECOVERY Démarre le tapis / Démarre le calcul de la note de condition physique
STOP Arrête le tapis
28

F
REGLAGE DE L'INCLINAISON
Avec la touche INCLINE (+), vous augmentez l'angle d'inclinaison
de 1 %.
Avec la touche INCLINE (-), vous diminuez l'angle d'inclinaison de
1 %.
Une pression prolongée de ces touches entraîne un défilement automatique des valeurs.
Avec les touches DIRECT INCLINE 4%, 8%, 12% pour l'inclinaison, vous pouvez régler directement l'inclinaison.
Pour des raisons de sécurité, l'angle d'inclinaison ne peut être réglé
que manuellement. Les programmes contenant les profils d'inclinaison et les programmes HRC (programme de contrôle de la fréquence cardiaque) constituent une exception. L'angle d'inclinaison
y est automatiquement réglé.
REGLAGE DE LA VITESSE
Avec la touche SPEED (+) on augmente la vitesse pendant l'entraînement de 0,1 km/h (mph).
Avec la touche SPEED (-) on diminue la vitesse pendant l'entraînement de 0,1 km/h (mph).
Une pression prolongée de ces touches entraîne un défilement automatique des valeurs.
Avec les touches DIRECT SPEED (4,0 km/h / 2,5 mph), (8,0 km/h
/ 5,0 mph) et (12 km/h / 7,5 mph) pour la vitesse, vous pouvez
régler la vitesse directement.
P1= pouls de charge, P2 = pouls de repos
1,0 = très bien F6,0 = insuffisant
Stand-by (mode veille)
Puissance absorbée en mode veille < 0,5 watt.
Si la touche Stand-by est activée pendant l'arrêt ou qu'un temps
défini aux changements de système s'est écoulé, le tapis de course
passe en mode veille.
Par actionnement de la touche Stand-by, il est possible de réactiver le tapis de course.
PAUSE
Si la touche STOP est appuyée pendant l'entraînement, le programme est interrompu et le mode pause est activé. Pendant le
mode Pause, seules les touches START et STOP fonctionnent.
Si la touche START est appuyée pendant le mode Pause, le tapis
de course redémarre et reprend la vitesse qui était activée avant la
fonction Pause. Les valeurs d'entraînement sont de nouveau comptées à partir de là où elles avaient été interrompues.
Si, pendant le mode Pause, aucune touche n'est appuyée pendant
trois minutes ou si la touche STOP est appuyée, le programme est
terminé et la statistique d'entraînement est présentée.
Si vous voulez sauter cette étape, appuyez simplement sur la touche STOP
SELECTION DE PROGRAMME
Après la mise en marche ou l'achèvement d'un programme, vous
pouvez sélectionner un programme avec les touches de CURSOR
et la touche ENTER. 6 programmes sont disponibles avec des sousprogrammes.
SEGMENTS DE PROFILS
Lors de la sélection des programmes (avant le début de l'entraînement), les profils pour l'inclinaison et la vitesse font l'objet d'une représentation spatiale. Les profils d'inclinaison sont représentés dans
la moitié gauche de l'affichage et les profils de vitesse dans la moitié droite. Pendant l'entraînement, les valeurs d'inclinaison sont cadrées à gauche sur les segments existants et les valeurs de vitesse
à droite. Il peut en résulter une altération du profil dans la représentation. La position actuelle de l'utilisateur clignote.
RECOVERY
Lorsqu'un signal de pouls existe pendant l'entraînement, vous
déclenchez avec la touche RECOVERY la mesure du pouls de
repos. Le tapis de course est mis à l'arrêt. Le pouls de charge est
mesuré et une minute plus tard le pouls de repos et une note de condition physique est déterminée. Pour un entraînement identique,
l'amélioration de cette note est un critère d'augmentation de la condition physique.
Le pouls de charge P1 est visualisé à l'affichage du parcours d'entraînement et le pouls de repos P2 à l'affichage calories. Au bout
d'env. 16 secondes, l'affichage passe au mode repos. La note de
condition physique est représentée à l'affichage de vitesse en bas
à droite.
Calcul de la note de condition physique :
Note = 6 –
(10 x (P1–P2)
(
P1
2
)
CALCUL DES CALORIES
Le calcul des calories est une valeur de référence. Celle-ci est représentée en haut à droite dans l'affichage. La valeur calculée ne
prétend pas être de caractère médical.
DETECTION DU POULS
Le tapis de course est équipé d'une détection du pouls de la main.
Pour assurer une bonne détection du pouls de la main, tenir bien
fermement les deux détecteurs avec les mains sans bouger ces dernières. Des mouvements des mains risquent d'être la cause de
défauts. L'affichage du pouls nécessite env. 5 à 15 secondes pour
afficher votre pouls actuel.
Le tapis de course dispose aussi d'un récepteur de fréquence cardiaque compatible POLAR intégré. Pour pouvoir utiliser le système
pour le pouls sans fils, vous devez porter une ceinture pectorale
pour la transmission de la fréquence cardiaque. La ceinture pectorale pour la transmission de la fréquence cardiaque ne fait pas
partie des fournitures de ce tapis de course. Nous recommandons
la ceinture pectorale POLAR T34. Celle-ci est disponible comme
accessoire dans le commerce spécialisé.
Veuillez tenir compte du fait que certains matériaux utilisés pour vos
vêtements (p. ex. le polyester, le polyamide) créent des charges
électrostatiques et risquent d'empêcher une mesure fiable de la fréquence cardiaque. Tenez compte en outre du fait que les téléphones mobiles, télévisions et autres appareils électriques qui forment
un champ électromagnétique autour d'eux, risquent éventuellement
aussi de causer des problèmes lors de la mesure de la fréquence
cardiaque.
SYMBOLE - MAINTENANCE DU TAPIS DE
COURSE
Lorsque le symbole Maintenance du tapis de course est affiché, ef-
29
F
fectuez la maintenance du tapis de course comme décrit dans les
instructions de montage.
MESSAGES D'ERREUR
Pendant l'exploitation, différents messages apparaissent à l'affichage lors d'erreurs à la commande. Les messages d'erreur peuvent
être remis à zéro par mise à l'arrêt et remise en marche de l'interrupteur d'alimentation. Si le message d'erreur devait ensuite réapparaître, veuillez contacter le service après-vente.
EXPLOITATION
MISE EN MARCHE
Mettez d'abord l'appareil en marche. L'interrupteur
MARCHE/ARRET du tapis de course se trouve près du câble de réseau sur le devant, en dessous du couvercle du moteur. Faites basculer l'interrupteur en position “MARCHE“.
CLE DE SECURITE
Vérifiez la fonction de l'interrupteur de sécurité avant chaque entraînement. Fixez la clé de sécurité à l'interrupteur de sécurité et le
cordon à vos vêtements. Si la clé de sécurité n'est pas emboîtée
dans l'interrupteur de sécurité, le symbole interrupteur de sécurité
apparaît à l'affichage.
COMMENCER L'ENTRAINEMENT
Pour monter et descendre, toujours tenir les mains courantes.
Avant le début de l'entraînement, se placer sur la plateforme
latérale du tapis de course. Ne jamais mettre l'appareil en mouvement en étant debout sur la surface de course. Débutez votre entraînement à vitesse lente et augmentez ensuite la vitesse ou l'angle
d'inclinaison. Marchez toujours autant que possible au centre de
la surface de course.
Pendant l'entraînement, maintenez votre corps et votre tête toujours
dirigés vers l'avant. N'essayez jamais de tourner sur le tapis de
course quand le tapis se déplace encore.
Les programmes suivants peuvent être sélectionnés :
P1:programme d'inclinaison : avec 3 profils différents
P2:programme de vitesse : avec 3 profils différents
P3:programme calories
P4:programme trajets
P5:programme d'inclinaison HRC
P6:programme de vitesse HRC
Après la sélection d'un programme, l'utilisateur peut donner des indications. La valeur préréglée clignote et indique que vous pouvez
soit la confirmer soit la modifier. Dès que vous avez entré et confirmé vos valeurs, vous pouvez commencer l'entraînement sur le
tapis de course.
P1 : PROGRAMME D'INCLINAISON : AVEC 3 PROFILS
Vous pouvez choisir à „P1 : programme d'inclinaison“ entre trois
profils préréglés. Vous pouvez à tout moment augmenter/diminuer
la vitesse ou l'inclinaison pendant l'entraînement. Un compte à rebours de la valeur temps allouée a lieu à l'affichage tandis que le
trajet parcouru est compté dans l'ordre croissant.
1. Mettez l'appareil en marche.
2. Veillez à la clé de sécurité sur le tapis de course et au clip sur
les vêtements de l'utilisateur.
3. Sélectionner le„P1: programme d'inclinaison“ avec les touches
de curseur et confirmer avec Enter
4. Confirmer l'entrée du temps (Enter) ou la modifier (touches de
curseur)
5. Sélectionner un profil (touches de curseur) et confirmer avec
Enter
6. Confirmer l'inclinaison maximale (Enter) ou la modifier (touches
de curseur)
7. Actionnez la touche Enter pour commencer l'entraînement.
8. L'entraînement peut être interrompu à tout moment avec la touche STOP, une reprise de l'entraînement est possible au cours
des 3 minutes suivantes.
Programmes d'entraînement
Programme manuel
Après avoir mis l'appareil en marche et encliqueté la clé de sécurité, appuyez sur la touche START. Le tapis de course démarre au
bout de 3 secondes à 1,0 km/h (0,6 mph).
Vous pouvez à tout moment augmenter/diminuer la vitesse ou l'inclinaison pendant l'entraînement. Pour terminer l'entraînement, appuyez sur la touche STOP.
Lors du démarrage manuel de l'entraînement, le compte des valeurs à l'affichage trajet d'entraînement et durée d'entraînement
s'effectue dans l'ordre croissant. Le Manual Programm est un entraînement sans limite de temps. Le programme d'entraînement ne
peut pas être mémorisé à la fin.
1. Mettez l'appareil en marche.
2. Veillez à la clé de sécurité sur le tapis de course et au clip sur
les vêtements de l'utilisateur.
3. Actionnez la touche START pour commencer l'entraînement.
SELECTION DE PROGRAMME
L'utilisateur a la possibilité d'effectuer une sélection parmi différents
programmes.
30
P1 : profil d'inclinaison 1
P1 : profil d'inclinaison 2
 Loading...