

Kettler ALU RAD Assembly And User's Manual

Montage- und Bedienungsanleitung
Assembly and User Manual
Garantieunterlagen
Guarantee Documents
Fahrradpass
Bike Pass

Garantie- und Gewährleistungsbedingungen Guarantee and Warranty Conditions
56
Garantie
Lieber Kunde,
wir freuen uns und danken Ihnen für das Vertrauen,das Sie mit dem Kauf dieses deutschen Qualitätsproduktes in die FREIZEIT
MARKE KETTLER gesetzt haben.
10 Jahre KETTLER Garantie
KETTLER gibt Ihnen die volle Garantie auf den KETTLER Alu-Rahmen, wenn Sie diesen ursprünglich zum privaten Gebrauch (und
nicht zum Weiterverkauf) von KETTLER oder einem von KETTLER ermächtigten Händler erworben haben (ursprünglicher Kauf).
Die Garantie-Laufzeit für jedes Produkt beginnt an dem Tag des ursprünglichen Kaufs,wie er aus der Quittung und den Angaben im
Garantiepass ersichtlich ist.
KETTLER gibt Ihnen die Garantie von 10 Jahren neben Ihren gesetzlichen Rechten.
Diese kann allerdings nur gewährt werden, wenn die Garantieunterlagen vollständig und korrekt ausgefüllt sowie umgehend nach
Auftreten des Reklamationsgrundes bei Ihrem KETTLER Fachhändler eingereicht werden. Folgeschäden,die durch eine verspätete
Meldung des Garantieanspruchs auftreten, sind nicht in der Garantie enthalten. KETTLER garantiert Ihnen,dass das Produkt am
Tage des ursprünglichen Kaufs hinsichtlich Material und Verarbeitung in fehlerfreiem Zustand ist.Sollte sich das Produkt trotz aus
giebiger Qualitätsbemühungen innerhalb der Garantielaufzeit als fehler- bzw.mangelhaft erweisen, so wird es für Sie kostenlos
nach KETTLER´s Wahl ersetzt oder repariert.Ausgeschlossen von den Garantie-Leistungen ist jedoch die Behebung von Problemen,
die auf einem Unfall, Missbrauch, einer nicht von KETTLER durchgeführten Bearbeitung,Änderung oder Reparatur des Produktes,
auf unsachgemäße Lagerung, nicht bestimmungsgemäßen Gebrauch, fehlende Wartung oder auf normalen Verschleiß beruhen.
Sollten Sie unsere Garantieleistungen in Anspruch nehmen müssen, so geben Sie bitte das Produkt mit den vollständig ausgefüllten
Garantieunterlagen und dem Nachweis über den ursprünglichen Kauf innerhalb der Garantielaufzeit an Ihren Fachhändler zurück.
Sie müssen die Sendung versichern oder das Verlust-oder Schadensrisiko beim Transport selber tragen und die Versandkosten
übernehmen. Sie erwerben Eigentum an dem Ihnen im Rahmen der Garantie-Leistung als Ersatz gelieferten Produkt zum Zeitpunkt
des Austauschs. Das zurückgesandte Produkt wird Eigentum von KETTLER,sobald es bei KETTLER eingeht.
Die Garantie-Forderung muss die Beanstandung darstellen, verbunden mit dem Hinweis, dass sie auf einem bestimmten,durch
Tatsachen zu beschreibenden Mangel beruht und wann der Mangel aufgetreten ist; weiterhin ist das Datum des Kaufs, der Name des
Verkäufers und die Angabe der geforderten Garantie-Leistung anzugeben und die ausgefüllte Garantiekarte beizufügen.
Alle Garantie-Leistungen sind auf den Ersatz des tatsächlich aufgetretenen Schadens beschränkt. Der Schaden ist auf den Betrag
begrenzt, den Sie beim ursprünglichen Kauf für das Produkt bezahlt haben. Diese Haftungsbeschränkung gilt nicht für Ansprüche
aus Personen- oder Sachschäden aufgrund fahrlässigen Verhaltens von KETTLER.
Ihr Garantiegeber ist die Firma Heinz KETTLER GmbH & Co. KG, Hauptstraße 10,59469 Ense-Parsit.
Neben der von KETTLER gewährten 10-jährigen Garantie auf den KETTLER Alu-Rahmen erhalten Sie natürlich die gesetzlichen
Gewährleistungsrechte für das von Ihnen erworbene KETTLER-Produkt.
Sachmängelhaftung (Gewährleistung)
Die Sachmängelhaftung (Gewährleistung) für das von Ihnen erworbene Produkt beträgt zwei Jahre. Bitte beachten Sie hierzu die
neuen, seit dem 01.01.2002 geltenden Gewährleistungsregelungen.Technische Änderungen an Ihrem Fahrrad dürfen nur nach
Rücksprache mit KETTLER durchgeführt werden, da die von KETTLER eingesetzten Teile höheren Belastungstests unterzogen wer
den als normal üblich.
Gewährleistungsansprüche können nur von autorisierten KETTLER Fachhändlern unter Vorlage des vollständig ausgefüllten
Fahrradpasses bearbeitet werden.
Berechtigte Gewährleistungsansprüche liegen nicht vor:
• Wenn ein Schaden, durch unsachgemäße oder mangelhafte Pflege oder nicht fachmännisch durchgeführte Reparaturen,
Umbauten oder Austausch von Teilen am Fahrrad entstanden ist (Beachten Sie bitte den Punkt Pflegehinweise).
• Bei nachträglichen Anbauten von Teilen,die zum Zeitpunkt der Übergabe nicht zum Lieferumfang des Produktes gehörten oder
Schäden, die durch nicht-fachmännische Montage dieser Anbauten entstehen.
• Wenn ein Schaden durch unsachgemäße und nicht bestimmungsgemäße Verwendung hervorgerufen wurde.
• Bei Schäden die durch wettkampfmäßigen Einsatz des Rades entstehen.
• Wenn die Punkte in der Bedienungs- und Wartungsanleitung nicht beachtet wurden.
• Wenn es sich um Teile handelt, die einem funktionsbedingten Verschleiß unterliegen (wie Bereifung,Schläuche, Antriebseinheit,
Bremsbeläge etc.) oder damit eventuell einhergehenden Folgeschäden.
• Bei Batterien.
Guarantee
Dear Customer,
We are pleased and would like to thank you for your confidence in buying this German quality product in
FREIZEIT MARKE KETTLER.
10-Year KETTLER Guarantee
KETTLER gives you a full guarantee on the KETTLER aluminium frame if originally purchased for private use (and not for resale)
from KETTLER or from an authorised KETTLER dealer (original purchase)
The duration of the guarantee for each product begins on the day of the original purchase which can be established by the receipt
and the information contained in the guarantee pass.
In addition to your legal rights, KETTLER gives you a 10-year guarantee.
This, however,is only applicable if the guarantee documents are fully and correctly completed as well as being immediately sent to
the KETTLER specialist dealer upon making the claim. Consequential damage resulting from the late notification of the guarantee
claim is not covered by the guarantee.
KETTLER guarantees that the product, on the day of the original purchase, is in perfect condition both in material and manufactu
ring quality.Should the product, in spite of considerable efforts in quality, show defects within the guarantee period, it will either be
repaired or replaced as decided by KETTLER free of charge. The solution to problems resulting from an accident,improper use,
work not carried out by KETTLER, product repair or modification, inappropriate storage, unauthorised use,inadequate maintenance
or normal wear and tear is not included in the guarantee conditions.
Should you make a claim, please return both the product and the fully completed guarantee documents as well as proof of the ori
ginal purchase within the guarantee period to your specialist dealer.You must insure the dispatch or bear the costs for any loss or
damage incurred and for the transport costs. At the time of the exchange you acquire property which is the replacement product
delivered to you within the framework of the guarantee agreement. The returned product is KETTLER’s property as soon as it is
received.
The guarantee claim must illustrate the complaint, presuming that it is based on a specific defect demonstrated by facts and when
the defect occurred; furthermore the date of the purchase, the name of the seller and the information concerning the requested
guarantee agreement should be submitted and the completed guarantee card enclosed.
All guarantee conditions are limited to the replacement of the detected damage. The damage is limited to the amount which was
paid for the product in the original purchase. This liability limitation is not applicable to claims related to personal or property
damage due to negligence by KETTLER.
The warrantor is the company Heinz KETTLER GmbH & Co. KG, Hauptstrasse 10,59469 Ense-Parsit
In addition to the 10-year KETTLER guarantee on the KETTLER aluminium frame you naturally also receive the legally applicable
guarantee rights for the KETTLER product you have purchased.
Liability for Material Defects (Guarantee)
The liability for material defects (guarantee) for the product you have purchased is two years. In this respect, please observe the
new, applicable guarantee regulations in force since 01.01.2002.Technical modifications to your bike can only be carried out after
prior consultation with KETTLER since the parts used by KETTLER will be subjected to higher load test than is normal.
Guarantee claims can only be processed by authorised KETTLER specialist dealers accompanied by the fully completed bike pass.
Legitimate Guarantee Claims are not accepted:
• If the bike has been subjected to damage caused by unprofessional or insufficient care or repairs, modifications or exchange of
parts not carried out by a specialist (observe the point concerning care indications).
• If additional parts have been constructed which at the time of handing over the product did not pertain to the delivery contents or
damage which has resulted from the unprofessional assembly of the aforementioned parts.
• If damage has occurred through unprofessional use or use which is not in accordance with regulations.
• If damage has occurred as a result of using the bike for competitive purposes.
• If the points in the user and maintenance manual are not observed.
• If the claim concerns parts which have been subjected to wear and tear (such as tyres, the drive unit, brake liners etc.) or possible resulting damage from this.
• If concerning batteries.

57
Contents
Manuel Layout 52
Handover Documentation / Bike Pass 53-56
Contents 57
KETTLER Aluminium-Bike - an exellent choice 58
Aluminium - the high-tech Material in the Construction of bikes 59
Safety and manufactury of KETTLER Aluminium-Bikes 60
Your Contribution to Enviromental Protection 61
Road and operational Safety 62/63
General Cycling Advice 64
Bike-Overview 65
Pedals 66
Adjusting the Stem 67
Stem Ahead Set System 68
Ahead Stem/downward Inclination Adjustment Handlebar Arm 69
Seating Position 70
City Model Seat 71
Mountain Bike/Trekking Model Seat 72
Brake Power Modulator 73
Brake – Safety-Line 74
Brake – V Brake Rim Brake 75/76
Lighting Equipment / lateral running Generator 77
Lighting Equipment / Hub Generator 78
Headlamp/Rear Lamp 79
Assembly/Disassembly of the front Wheel in Hubgears 80
Assembly/Disassembly of the rear Wheel in the Roller Brakes 81
Assembly/Disassembly of the Rear Wheel in the Roller Brakes 82
Assembly/Disassembly of the Rear Wheel in the Hubgears 83/84
Assembly/Disassembly of the front Wheel in Quick Release Hubs 85
Assembly/Disassembly of the rear Wheel in Quick Release Hubs 86
Setting Instructions for the sprung Seat Post 87
Setting Instructions for the Spring Damper Components 88/89/90
Suspension Fork 91
Tyres / Valves 92/93
Derailleur Gearing– Shifting Tips 94/95
Maintenance 96/97
Care 98
Chain 99
Torque Specifications 100
Tyres Specifications 101
Guarantee and Warranty Conditions 102/103
Checklist for the Handover Inspection / Maintenance Control 104
Inspection Certificates 105

KETTLER Aluminium Bike – an excellent Choice
With this new quality bike you have purchased a technically fully modern product.
Through the application of high-quality materials, state-of-the-art process technologies and technical perfection we have managed to develop and construct a new generation of bikes.
KETTLER aluminium bikes set new standards in high-class bikes through their elegant style, high-quality equipment, superior
technology and extremely easy cycling features.
They are manufactured in compliance with the most demanding safety standards and optimal quality controls. KETTLER aluminium bikes comply with the requirements according to the bike DIN Norm 79100-2 and TÜV regulations. From the raw material
through to the finished, packaged product, KETTLER aluminium bikes are subjected to various controls.
The most modern of control and measuring equipment guarantee consistently high quality. We are convinced that your aluminium bike will become your constant and steadfast companion. In order to maintain the quality and road safety features of your
KETTLER aluminium bike for years to come you should treat it with the utmost care and have it serviced.
In order to ensure long-term enjoyment of your KETTLER aluminium bike, we recommend that you carry out regular maintenance and repair work with the KETTLER aluminium bike dealer of your choice at the applicable cost in compliance with the
assembly and maintenance manual.
Furthermore, we would recommend a first safety and maintenance inspection after approximately 250 Km or six weeks after
the initial use of the bike (stamp sheet on page 55).
58

Aluminium – The high-tech Material in the Construction of Bikes
You have chosen a KETTLER aluminium bike – thank you for your confidence.
Aluminium bike frames has proved itself with practice. This is particularly due to the material’s outstanding “lightweight features”. Compared to steel it is almost three times lighter.
When cycling, the highest degree of effectiveness is achieved with the bike’s force transmission. In other words, the lighter
weight means that less force is required.
Apart from the sheer pleasure when cycling, the aluminium bike also provides an optimal cycling relationship.
Aluminium, however, has even more convincing advantages to offer:
It doesn’t rust and is, therefore, weather-resistant and easy to care for
The polyester coating provides an optimal overall protection for your bike
Aluminium in bike construction – a convincing concept.
59

Safety and Manufacturing of KETTLER Aluminium Bikes
“Safety on the inside and outside” is the argument given in car manufacturing. KETTLER aluminium bikes can also be considered as having “inner safety” in relation to the materials used and purposeful manufacturing. ”Outer safety” is achieved by the
protective design of parts and accessories against injury hazards.
The aluminium tubing used is made of a special aluminium alloy. With modern, recently developed aluminium welding machines we achieve impeccable firmness in all of the welded joints. KETTLER aluminium bikes are welded under computerised control. This is a modern technique which is perfectly controlled by KETTLER.This production method, together with peening,
achieves higher stability and a longer lifespan.
As far as the effectiveness of the brakes is concerned and, thereby, for your increased safety, we only use wheel rims with
polished sides and a wear and tear indicator (safety line) on our KETTLER models.
For the paint finish we use enamel of the highest quality which is stable to light and colour as well as a powdered polyester
coating. The electrostatic three-coat paint finish has a uniformly strong covering. KETTLER’s own know-how also guarantees
you state-of-the-art and high-value products in the KETTLER aluminium bikes.
Please observe:
KETTLER aluminium bikes are not equipped with a lock when they leave the factory. Each purchaser can personally
decide which lock or system respectively he requires for individual security against theft. An optimal protection
against theft can be obtained by using a high-quality strap lock or rope clamp. You can thereby attach your bike to
objects (traffic signs etc.).
Due to operational security it is not possible to mount a child’s seat to any bikes with full suspension (frame suspension as well as suspension fork).
60

Your Contribution to environmental Protection
You have chosen a KETTLER aluminium bike which is progressive in all senses of the word, including the environment. Your
new vehicle is developed in such a way that the environment suffers as little as possible.
Our motto is that nowadays far more can be achieved for the environment by giving up certain things. It is in this way that we,
as far as possible, rejected the use of environmentally unfriendly materials during the manufacturing process such as:
CFCs in our synthetic parts
Chemical solvents as far as possible in the paintwork etc.
Your KETTLER aluminium bike is an environmentally friendly mode of transport.We would therefore ask you to observe the following for the sake of our environment:
• In order to protect plant and animal ecosystems cycle on paths and not over meadows and fields or through forests.
• Please do not cycle through any waters.
• Keep the brakes at the ready when descending mountains or areas with little visibility, show respect for passers-by
and walkers.
• For the sake of environmental protection please keep the use of lubricants and maintenance materials to a minimum
and only use those which are labelled as environmentally friendly. It is not quantity that counts but the correct, suitable
application!
Thank you!
61

62
Road and operational Safety
According to the StVZO (Road Licensing Regulations of the Federal Republic of Germany), as a cyclist you are obliged to only
use your bike in a safe condition, however, the following minimum requirements must be fulfilled:
• Two independent brakes
• An acoustic warning signal, i.e. a bell
• Yellow rear lamps on both sides of the pedals
• Phosphor strips on the front and rear wheel tyres.
• A red tail lamp, usually combined with a red rear lamp of a permitted design.
• Headlamp with reflector.A headlamp at the front which must be positioned in such a way that the light beam reaches a
distance of 10m over the road.
• The total weight of your bike is 120 Kg with touring bikes, 130 Kg with mountain and trekking bikes, with full suspension, i.e.
models with full suspension 110 Kg.
As far as load specifications for luggage racks are concerned they are given on the luggage rack according to DIN. Different
load specifications are possible depending on the model. The maximum load limit is 25 Kg and may not be exceeded under any
circumstances.
Should you use racing bikes, road or cross-country, trekking or mountain bikes in road traffic they must be
equipped accordingly in compliance with the StVZO (Road Licensing Regulations of the Federal Republic of
Germany).
Carrying Children
Carrying children is only allowed with the appropriate child’s seat in compliance with DIN 79120. We would recommend the
KETTLER child’s seats from our extensive range of accessories.
• Child’s seats must be equipped with adjustable foot supports or foot rests accordingly
• In the area of the foot supports or rests there must be covers on both sides to ensure that the feet do not come into contact
with the wheels or spokes respectively.

63
Road and operational Safety
• When using a child’s seat, the seat’s open coil springs should be covered to avoid squashing (KETTLER clamp protection, Art.
No. 08947-690)
• Children should only wear the appropriate bike helmet.
Carrying Loads
If carrying an increased load on the bike you should:
• Keep lightweight parts on an additional front luggage rack
• In bikes with full suspension, adjust the suspension to the increase in weight
• Try and keep heavy loads to the rear
• Secure loads against slipping, tilting and falling
By carrying loads of any kind the bike will react differently: the bigger the load the worse the cycling conditions.
Increase the braking distance!
Please observe the maximum load for your aluminium bike (body weight + load).

64
General Cycling Advice
General Cycling Indications
•For your own safety each time, and at frequent intervals, before you use the bike check all the screw joints, brakes and lights.
•Before starting to cycle the bike stand has to be retracted, no objects (luggage parts, garments etc.) should come into contact with the turning parts.
•It is absolutely necessary to get to know the respective braking system to prevent so-called over-braking of the front wheel.
•Even if you are an experienced cyclist it must not be forgotten that just like cars, no two bikes work in the same way. Ensure that you get familiarised with it.
•Ensure that your cycling style is, in any case, adapted to your ability, weather conditions and road conditions.
•Consider that depending on the ground conditions (foliage, sand, wetness, gravel etc.) road adhesion can be reduced.This is particularly important in bends
and when braking.
•Only cycle with tight-fitting leg clothing or reduce the volume of leg clothing by using, amongst other things, cycling clips.
•Safety is also increased by wearing reflective clothing, an appropriate cycling helmet and glasses, most particularly at the darkest time of the year.
•When cycling, always keep enough distance from the vehicles in front. Please remember that a speed of approx. 18 Km /h means 5m per second should be
kept.
•Never cycle without hands.
•Always look ahead when cycling and be fair and clear to other road-users.
•Experience has shown that cross-country cycling is always far more demanding for bikes than on city and touring bikes.
• With these models always ensure that all moveable parts such as brakes, gears, chain and wheels are in impeccable condition before each
cycle.
•Reduce the seat height with sufficient time to ensure that your feet touch the floor.
•Please observe that when cycling cross-country larger objects such as branches, foliage, grass and stones etc. can get stuck between the
mudguard / tyres and enter the gearing mechanism. Remove these immediately otherwise damage could occur and parts may be subject to
failure.
•Always cycle with firm, fully-pumped tyres. If they don’t have enough pressure this requires extra exertion by the cyclist and damages the tyres.
•When cycling, always be aware of any unusual noises (e.g. cracking, grinding) or a change in the way the bike reacts and, if necessary, investigate the source
of the problem.
•If you leave your bike unattended secure it against theft and remove any moveable parts as far as possible (air pump, tools etc.). Also remember that your bike
could be manipulated when absent (e.g. quick release, seat, wheels).

65
Bike – Overview
The illustration below shows the most important bike components and their correct names. Please remember that this is a
general overview thus different components perhaps look different or are differently equipped in your bike or are not available
for your model.
01.Stem 08.Headlamp with reflector 15. Tyre with reflex 22. Rear wheel hub 29. Seat post clamp
02.Handlebar 09.Front V brake 16. Pedal with reflector 23. Chain protection 30. Sprung seat post
03.Bell 10.Fork 17. Pedal arm (right and left) 24. Rear lamp 31. Seat
04.Bar end extension 11.Front wheel hub 18. Chain 25. Mud flap 32. Bottle holder
05.Shifter cable 12.Front wheel 19. Gearing mechanism 26. Rear lamp with reflector 33. Aluminium frame
06.Brake handle 13. Wheel rim 20. Stand 27. Luggage rack
07.Bowden cable 14. Spoke 21. Freewheel 28. Generator
a
c
f
b
e
g
h
i
j
k
l
pq
v
F
rs
m
n
o
t
u
x
D
z
A
y
B
E
C
G
d
w

66
Pedals
Assembly
• Turn the pedal which is labelled with an “R” located at the threaded bush in the right-hand pedal arm (the chain wheel side)
to the right and turn the pedal which is labelled with an “L” in the left pedal arm to the left.
• Firmly tighten the pedals (observe the torque)
• With so-called system pedals (click pedal) you should get familiarised with the shoe locking mechanism before going cycling.
• At the beginning position the closing mechanism into the easiest position. Observe the pedal or shoe manufacturer’s indicati
ons respectively.
Important Advice!
Verify that the pedal axle thread is not bent out of line when turning otherwise it will be irreparably damaged.
Observe the torque (see table).
Torques

67
Adjusting the Stem
Adjusting the Handlebar Height and the Stem Angle
1.In order to modify the handlebar height, loosen the clamping screw (fig. 1). You can now pull the stem out to the maximum
mark and by doing so adjust the height.
Attention! Do not pull out further than the maximum mark (breaking hazard; serious injury).
Once you have chosen the desired height tighten the clamping screw to the torque given on the torque page.
2.You can now set the stem’s angle between 0º and 70º. In order to do so loosen the lower clamping screw (fig. 2). Sit on the
bike and try and find the most comfortable position.
Afterwards tighten the screw again and ensure that the gearing is gripping tightly.
3.Modify the handlebar position with the screw (fig. 3). Once you have modified the handlebar position, ensure that the braking
and gear shift lever are returned to the correct position.
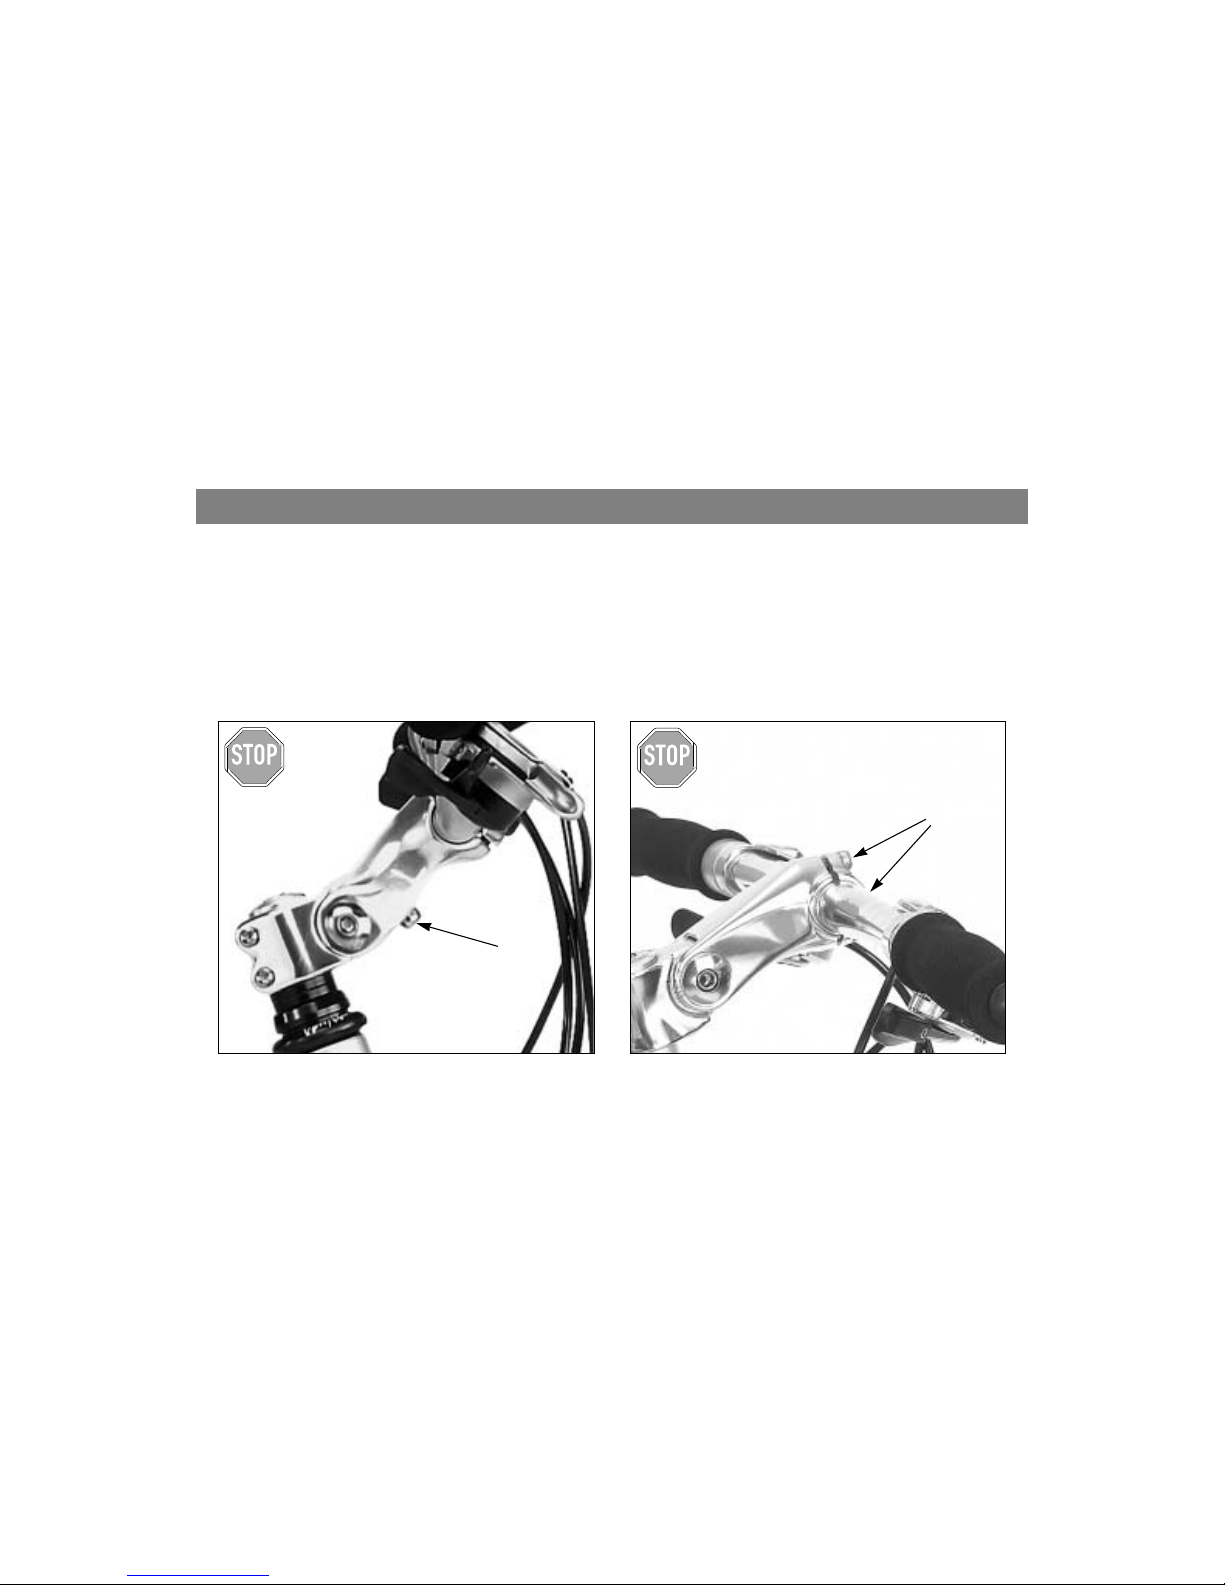
4.The screw joint must not be loosened under any circumstances (fig. 4). Injury hazard! It is the connection bet
ween the front and rear stem!
Important Advice!
Frequently check that the clamping screws are properly fixed. Verify in the adjustment of the stem that the screws have been tightened to the correct torque.
abcd
Max.
Torques

68
Stem Ahead Set System
With Ahead steering bearing systems the stem is used for adjusting the initial bearing tension. Should the stem be modified the
bearing has to be readjusted. A height adjustment is only possible by changing the spacers. In order to do so it is necessary to
remove the spacer ring and to place it over the stem again. The exception to this are models which have an adapter. The
adjustment can be made as described on page 14, point 1.
Adjusting
Loosen the lateral Allen screws a and align the handlebar arm in the direction of alignment. Set the cover screw b
until reaching the correct bearing clearance (neither stiff nor too loose). Finally, tightly screw both lateral screws a.
We recommend that these adjustments are only carried out by a specialist dealer.
a
b
Torques
69
Ahead Stem / downward Inclination Adjustment Handlebar Arm
In order to modify the stem angle loosen the Allen screw c. Set the desired handlebar downward incline and afterwards firmly
tighten the screw again (observe the torques).
You can change the position of the handlebar by loosening the Allen screw d. When changing the position of the handlebar
arm observe that the position of the braking and gear handles changes. If necessary this may have to be corrected.
Important Advice!
Please remember that all screws are to be tightened according to the torques.
When using bar ends, it is absolutely necessary to remember that the way to the brake handle changes
considerably.
d
c
Torques
Torques

70
Seating Position
General Advice
An incorrect seat and / or handlebar position can lead to problems in the knees and back. In order to cycle comfortably, safely
and without fatigue your KETTLER aluminium bike seat must be at the correct height.
Seat Position
The seat is set to the correct height if when seated you can reach the lowest part of the pedal with your heel and whilst
doing so your knee is approximately out (Fig. 1).
You have attained the optimal seat position if, when in a horizontal pedal position, your knee cap and the balls of your feet are
completely vertical (perpendicular) over the pedal axle (Fig. 2).
Should this not be the case, please correct the stem position (page 13/15 Stem Adjusting) or the seat position (pages 17 and
18) accordingly.
ab
 Loading...