

Page 1
D
GB
F
B
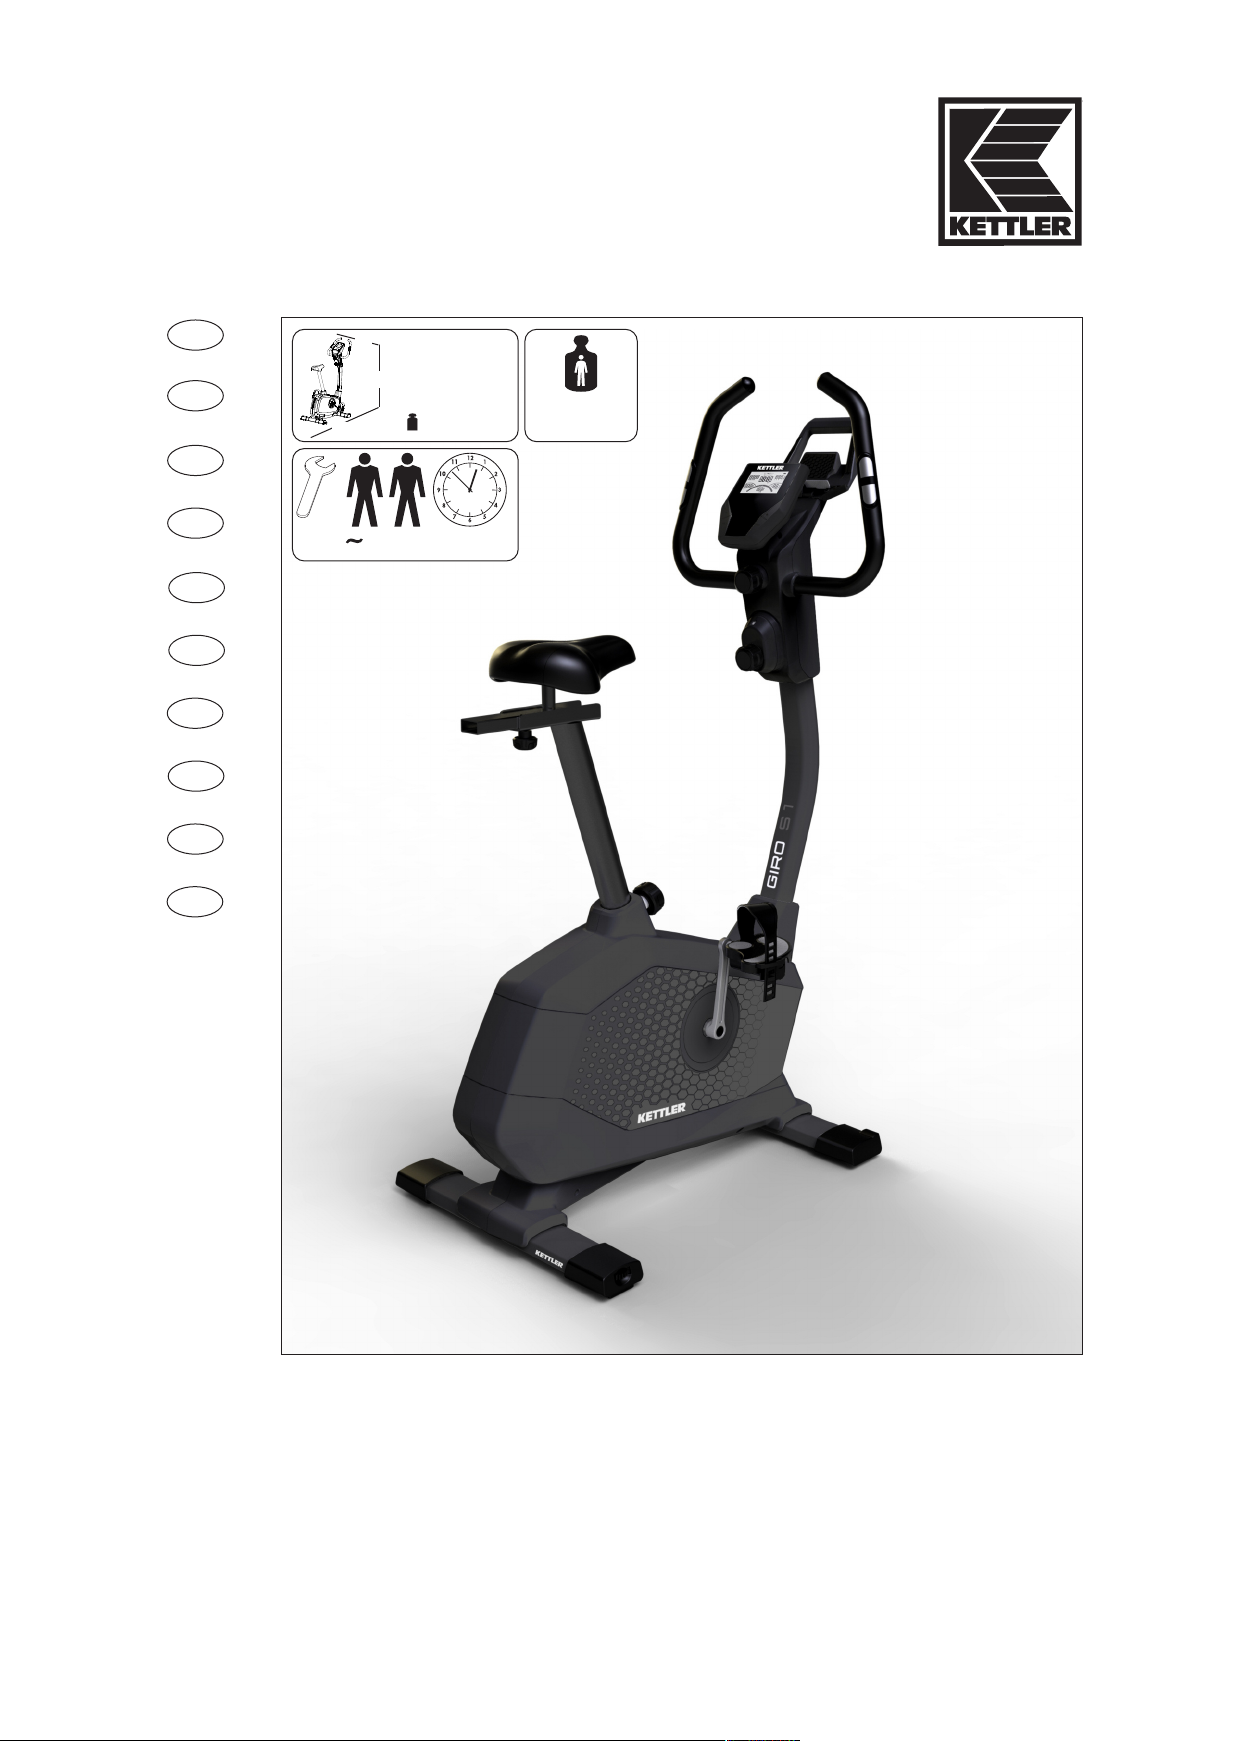
A 90 cm
B 60 cm
C
C 136 cm
A
30,7 kg
max.
130 kg
NL
E
I
PL
P
DK
CZ
30 – 40 Min.
Abb. ähnlich
Montageanleitung Hometrainer
„GIRO S 1”
Art.-Nr. 07689-150
Page 2

!
GB
!!!!!!!
Assembly Instructions
Before assembling or using the exercise cycle , please read the following instructions carefully. They contain important
nformation for use and maintenance of the equipment as well as for your personal safety. Keep these instructions in a
i
safe place for maintenance purposes or for ordering spare parts.
For Your Safety
RISK! Instruct people using the equipment (in particular children)
on possible sources of danger during exercising.
RISK! While assembly of the product keep off children’s reach
(Choking hazard - contains small parts).
RISK! Heart rate monitoring systems can be imprecise. Excessive
training may lead to serious health damage or death. If you feel
giddy or weak, please stop the training immediately.
WARNING! The training device should be used only for its
intended purpose, i.e. for physical exercise by adult people.
WARNING! Any other use of the equipment is prohibited
nd may be dangerous. The manufacturer cannot be held liable
a
for damage or injury caused by improper use of the equipment.
WARNING! Before beginning your program of training, study
the instructions for training carefully.
WARNING! All electric appliances emit electromagnetic
radiation when in operation. Please do not leave especially
radiation-intensive appliances (e.g. mobile telephones) directly
next to the cockpit or the electronic controlsystem as otherwise
values displayed might be distorted (e.g. pulse measurement.
• Exercise has been designed in accordance with the latest standards of safety. Any features which may have been a possible
cause of injury have been avoided or made as safe as possible.
• Incorrect repairs and structural modifications (e.g. removal or
replacement of original parts) may endanger the safety of the
user.
• Damaged components may endanger your safety or reduce the
lifetime of the equipment. For this reason, worn or damaged parts
should be replaced immediately and the equipment taken out
of use until this has been done. Use only original KETTLER spare
parts.
• If the equipment is in regular use, check all its components thoroughly every 1 -2 months. Pay particular attention to the
tightness of bolts and nuts.This applies especially to the securing
bolts for saddle and handelbars.
• To ensure that the safety level is kept to the highest possiblestandard, determined by its construction, this product should be
serviced regulary (once a year) by specialist retailers.
Before beginning your program of exercise, consult your doctor
•
o ensure that you are fit enough to use the equipment. Base your
t
program of exercise on the advice given by your doctor. Incorrect
or excessive exercise may damage your health!
• Any interference with parts of the product that are not des-
cribed within the manual may cause damage, or endanger the
erson using this machine. Extensive repairs must only be carried
p
out by KETTLER service staff or qualified personnel trained by
KETTLER.
• Our products are subject to a constant innovative quality assu-
rance. We reserve the right to perform technical modifications.
• In case of enquiry, please contact your KETTLER dealer.
• In choosing the location of the apparatus, ensure a sufficient safety
distance from any obstacles. The apparatus must not be mounted
in the immediate vicinity of main passageways (paths, doorways,
corridors). The safety distance surrounding must extend at least
1 meter further than the practice area.
• The training machine must be positioned on a horizontal, stable
surface.
• For a comfortable training position please adjust the handlebar
andsaddle position to your body height.
• When mounting the product please take the recommended
torque information into account (M = xx Nm).
• The exercise cycle complies with the DIN EN 20957-1/
EN 957-5, class HB. It is therefore unsuitable for therapeutic use.
• This appliance can be used by children aged from 14 years and
above and persons with reduced physical, sensory or mental capabilities or lack of experience and knowledge if they have been
given supervision or instruction concerning use of the appliance
in a safe way and understand the hazards involved. Children
shall not play with the appliance. Cleaning and user maintenance shall not be made by children without supervision.
Handling the equipment
ATTENTION! It is not recommended to use or store the appa-
ratus in a damp room as this may cause it to rust. Please ensure
that no part of the machine comes in contact with liquids (drinks,
perspiration etc.). This may cause corrosion.
• Before using the equipment for exercise, check carefully to
ensure that it has been correctly assembled.
• Before beginning your first training session, familiarize yourself
thoroughly with all the functions and settings of the unit.
• The machine is designed for use by adults and children should
not be allowed to play with it. Children at play behave unpredictably and dangerous situations may occur for which the
manufacturer cannot be held liable. If, in spite of this, children
are allowed to use the equipment, ensure that they are instructed
in its proper use and supervised accordingly.
4
• A slight production of noise at the bearing of the centrifugal mass
is due to the construction and has no negative effect upon operation. Possibly occurring noise during reverse pedalling result
from engineering and are absolutely safe.
• Use for your regular cleaning, maintenance and care our
appliance maintenance set (Article no. 07921-000) specifically
licensed for KETTLER Sports apparatus and available from the
Sport specialized trade.
• The exercise cycle has a magnetic brake system.
• The equipment is dependent of revolutions per minute.
• Please ensure that liquids or perspiration never enter the machine
or the electronics.
Page 3

!
• Before use, always check all screws and plug-in connections as
GB
USA
well as respective safety devices fit correctly.
• Always wear suitable shoes when using.
• Nobody may be in the moving range of a training person during
training
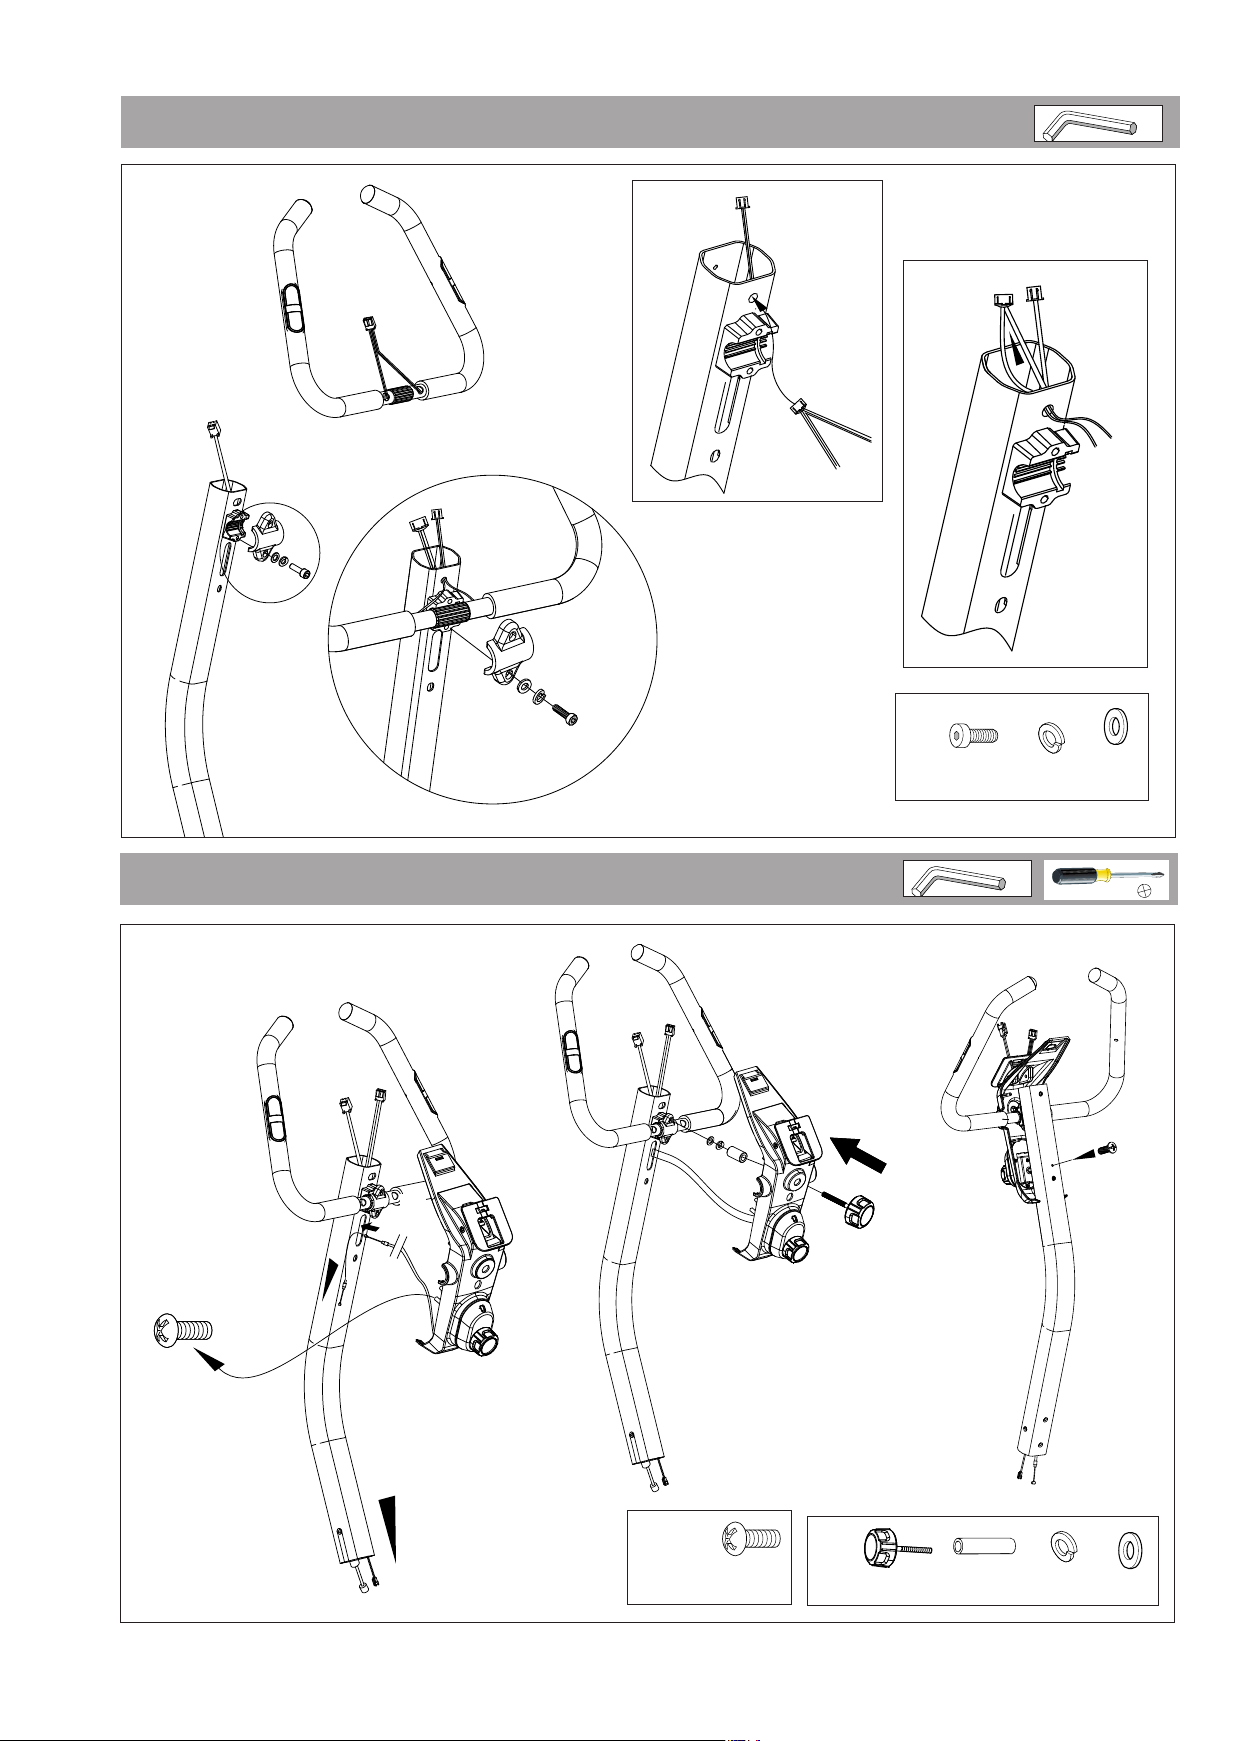
Instructions for Assembly
nsure that your working area is free of possible sources
RISK! E
of danger, for example don’t leave any tools lying around.
Always dispose packaging material in such a way that it may
not cause any danger. There is always a risk of suffocation if
children play with plastic bags!
Ensure that you have received all the parts required (see check
•
ist) and that they are undamaged. Should you have any cause
l
for complaint, please contact your KETTLER dealer.
• Before assembling the equipment, study the drawings carefully
and carry out the operations in the order shown by the diagrams.
The correct sequence is given in capital letters.
• The equipment must be assembled with due care by an adult
person. If in doubt call upon the help of a second person, if possible technically talented.
• Please note that there is always a danger of injury when working
with tools or doing manual work. Therefore please be careful
when assembling this machine.
List of spare parts page 48-49
When ordering spare parts, always state the full article number,
spare-partnumber, the quantity required and the S/N of the product
(see handling).
Example order: Art. no. 07689-150 / spare-part no. 68009750
/ 1 pieces / S/N .................... Please keep original packaging
of this article, so that it may be used for transport at a later date,
if necessary.
Goods may only be returned after prior arrangement and in
(internal) packaging, which is safe for transportation, in the original
box if possible. It is important to provide a detailed defect description
/ damage report!
Important: spare part prices do not include fastening material; if
fastening material (bolts, nuts, washers etc.) is required, this should
be clearly stated on the order by adding the words „with fastening
material“.
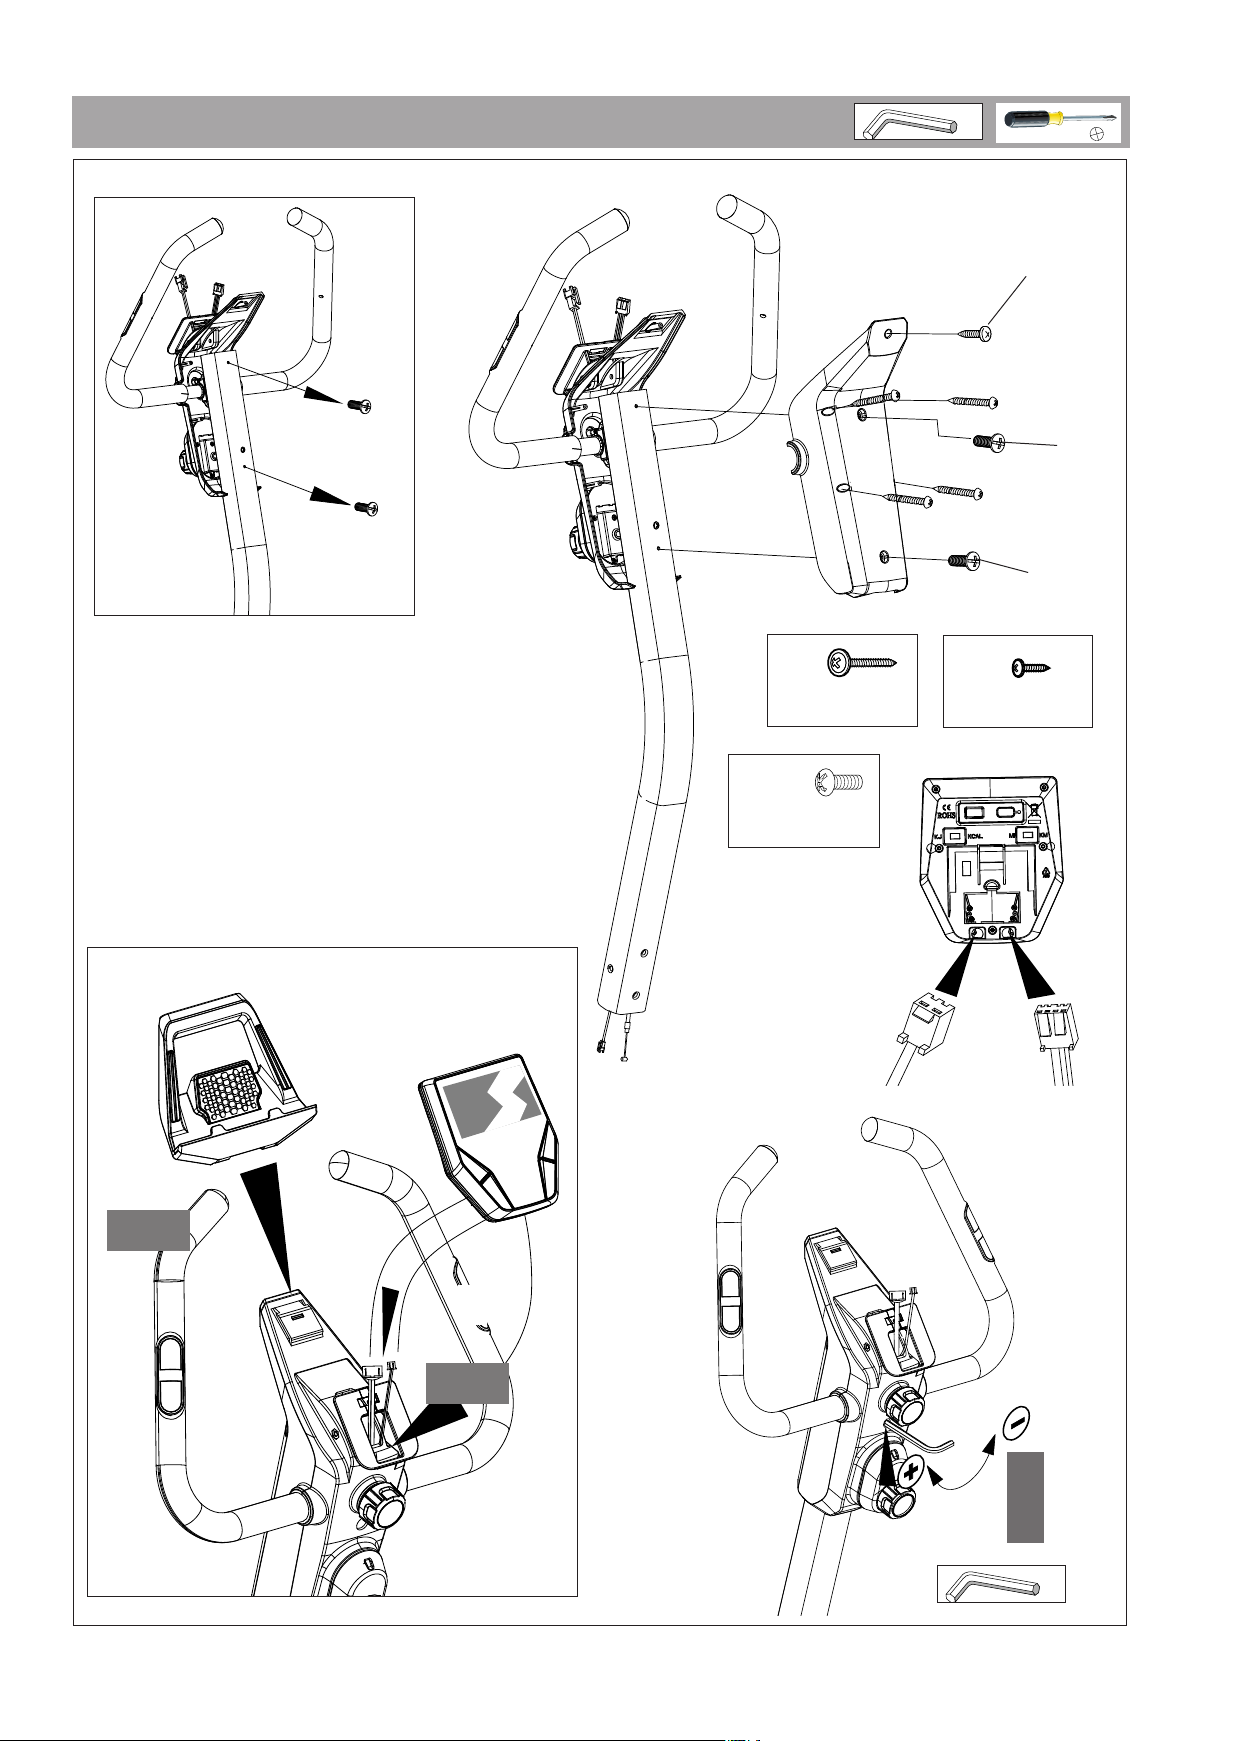
• The fastening material required for each assembly step is shown
in the diagram inset. Use the fastening material exactly as
instructed.
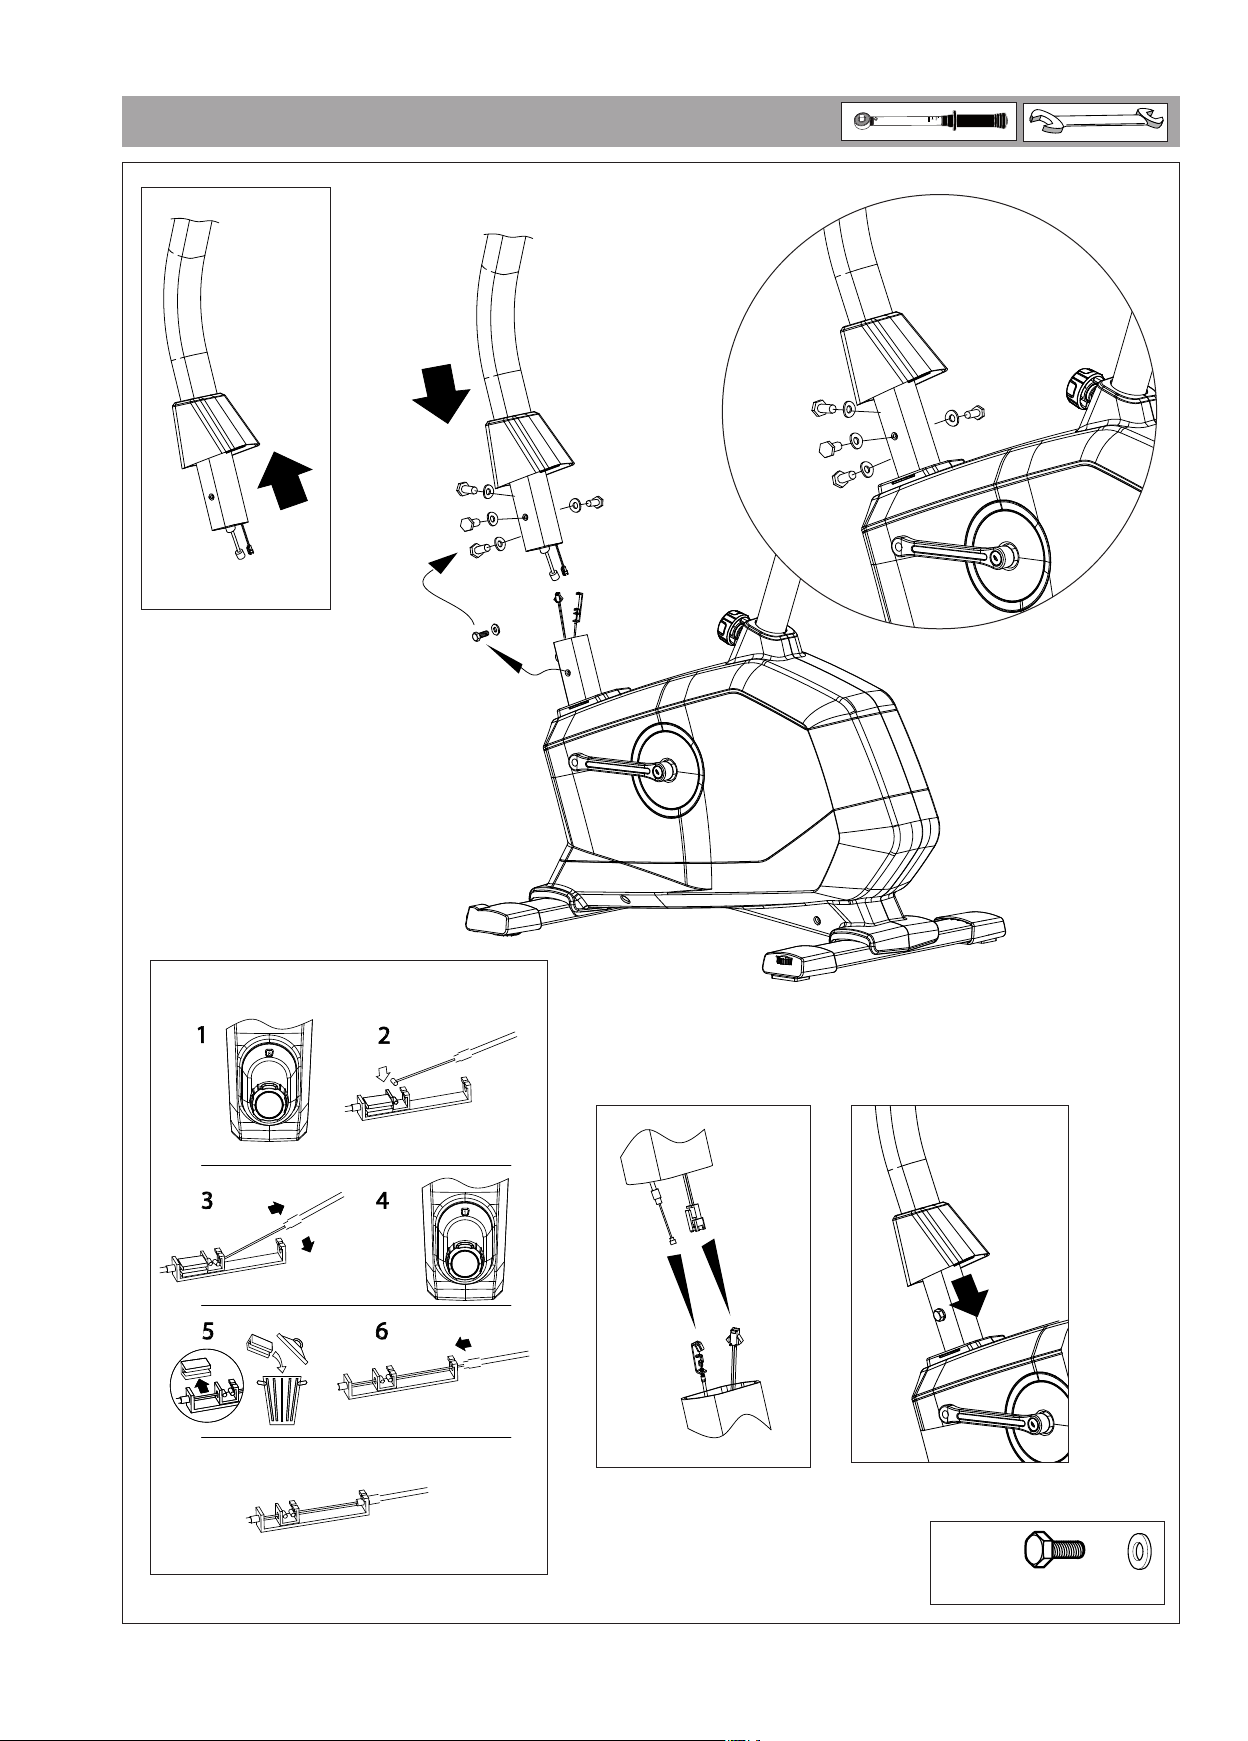
• Bolt all the parts together loosely at first, and check that they have
been assembled correctly. Tighten the locknuts by hand until resistance is felt, then use spanner to finally tighten nuts completely
gainst resistance (locking device). Then check that all screw con-
a
nections have been tightened firmly. Attention: once locknuts have
been unscrewed they no longer function correctly (the locking
device is destroyed), and must be replaced.
• For technical reasons, we reserve the right to carry out preliminary
assembly work (e.g. addition of tubing plugs).
Waste Disposal
KETTLER products are recyclable. At the end of its useful life please
dispose of this article correctly and safely (local refuse sites).
KETTLER GB Ltd.
Kettler House, Merse Road
North Moons Moat
Redditch, Worcestershire B98 9HL
+44 1527 591901 +44 1527 62423
www.kettler.co.uk Mail: sales@kettler.co.uk
KETTLER International Inc.
1355 London Bridge Road +1 888 253 8853
Virginia Beach, VA 23453 +1 888 222 9333
www.kettlerusa.com
5
Page 4
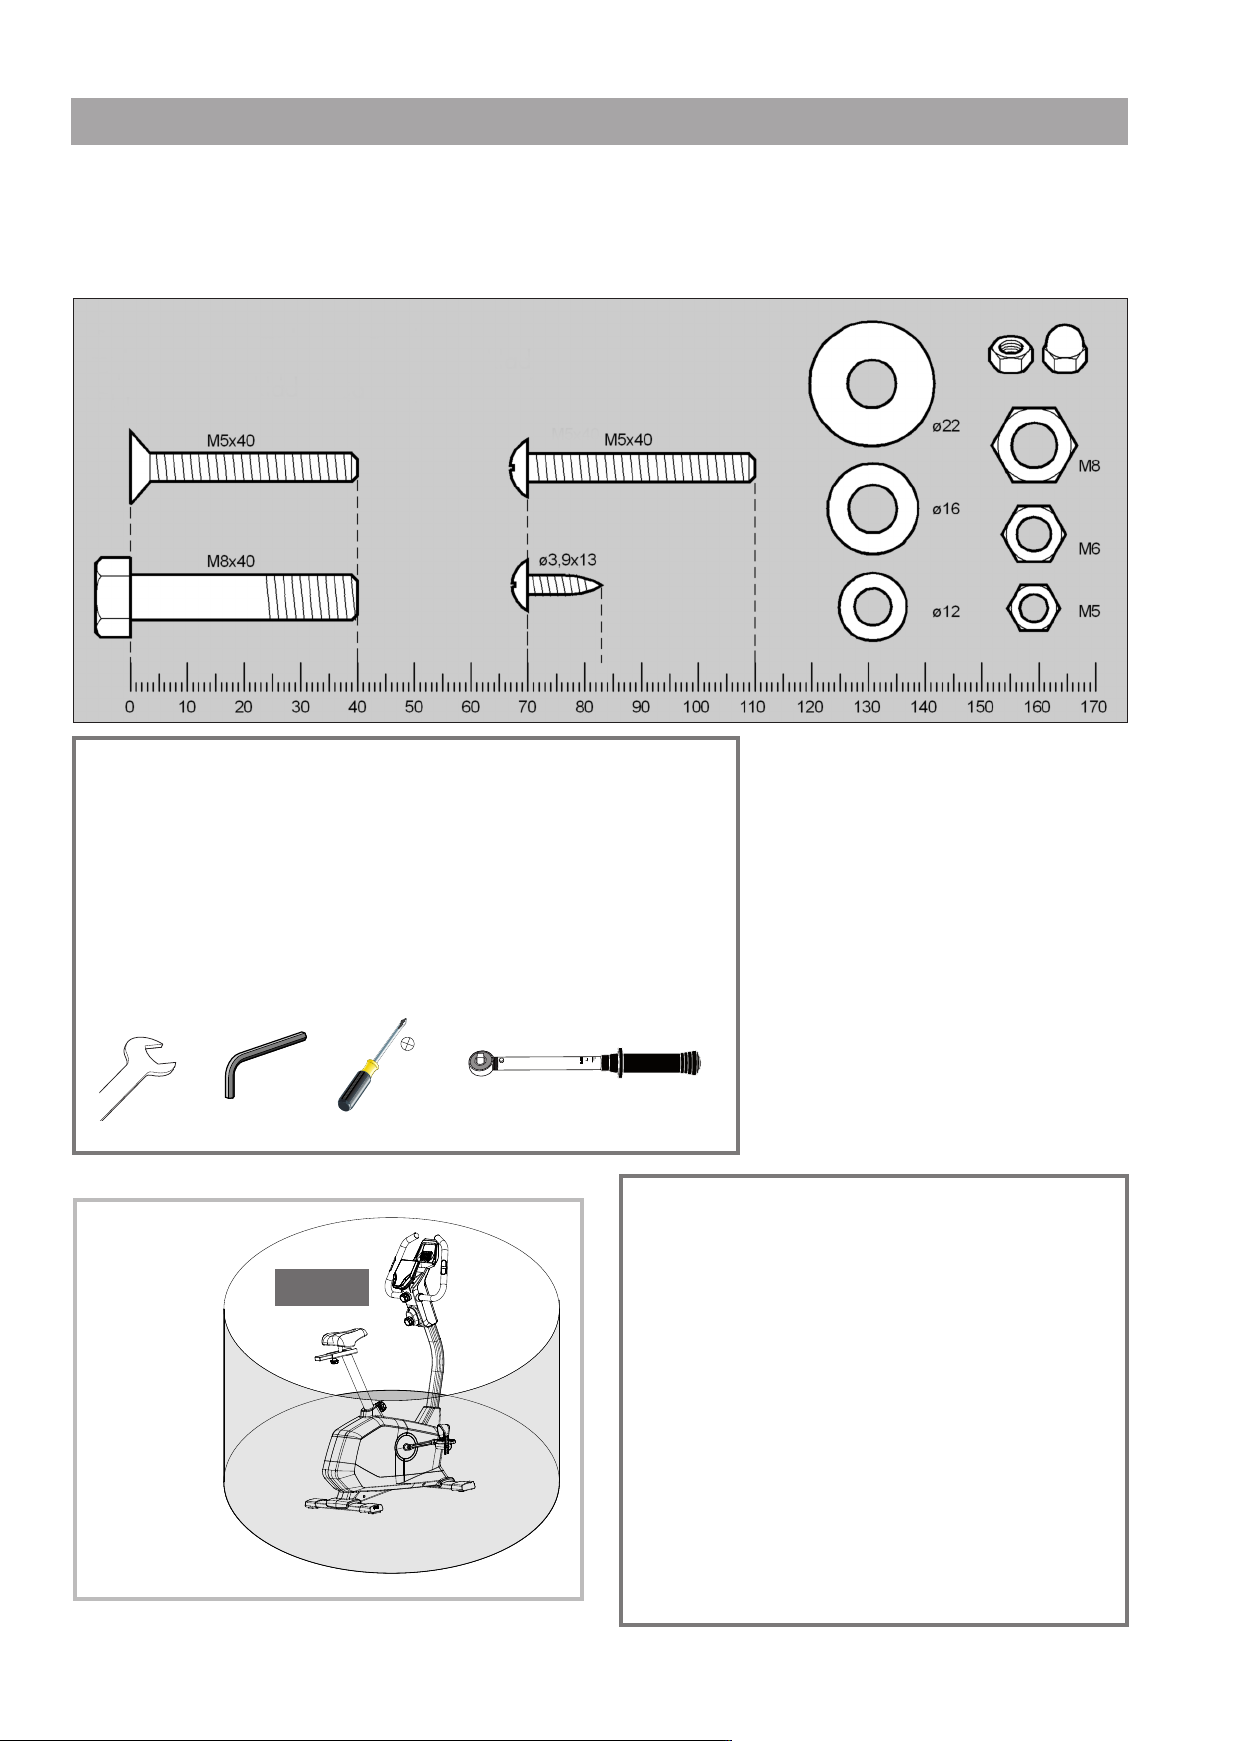
Messhilfe für Verschraubungsmaterial
– GB – Measuring help for screw connections
– F – Gabarit pour système de serrage
– NL – Meethulp voor schroefmateriaal
– E – Ayuda para la medición del material de atornilladura
– I – Misura per materiale di avvitamento
– D – Beispiele; – GB – Examples; – F – Examples; – NL – Bij voorbeeld; – E – Ejemplos;
– I – Esempio; – PL – Przyktady; – P – Exemplo; – DK – Eksempel; – CZ – Příklad
– PL – Wzornik do połączeń śrubowych
– P – Auxiliar de medição para materiais de aparafusamento
– DK – Hjælp til måling af skruer
– CZ – Měřící pomůcka pro materiál k přišroubování
– D – Benötigtes Werkzeug – Gehört nicht zum Lieferumfang.
– GB – Tools required – Not included.
– F – Outils nécessaires – Ne fait pas partie du domaine de livraison.
– NL – Benodigd gereedschap – Is niet bij de levering inbegrepen.
– E – Herramientas necesarias – No forma parte del volumen de entrega.
– I – Strumenti necessari – Non in dotazione alla fornitura.
– PL – Narzędzi – Nie należy do zakresu dostawy.
– CZ – Nářadí potřebné – Nepatří do rozsahu dodávky
– P – Ferramentas necessárias – Não está incluído nas peças fornecidas
– DK – Værktøjer kræves – Er ikke inkluderet i leveringsomfanget.
Abstand
distance
distance
afstand
distancia
distanza
dystans
distância
Afstand
vzdálenost
1 mtr
!
!
– D – Schraubverbindung regelmäßig kontrollieren.
– GB – The screwed connections must be controled at regular intervals.
– F – Resserrer le raccord à vis à intervalles réguliers.
– NL – Schroefverbinding moet regelmatig opnieuw vastgedraaid
worden.
– E – La atornilladura debe ser apretada con regularidad.
– I – Il collegamento a vite va riserrato ad intervalli regolari.
– PL – Połączenie śrubowe musi być regularnie dokręcane.
– CZ – Šroubové spojení pravidelně kontrolujte.
– P – Verifique regularmente as uniões roscadas.
– DK – Kontrollér skrueforbindelsen regelmæssigt.
22
Page 5
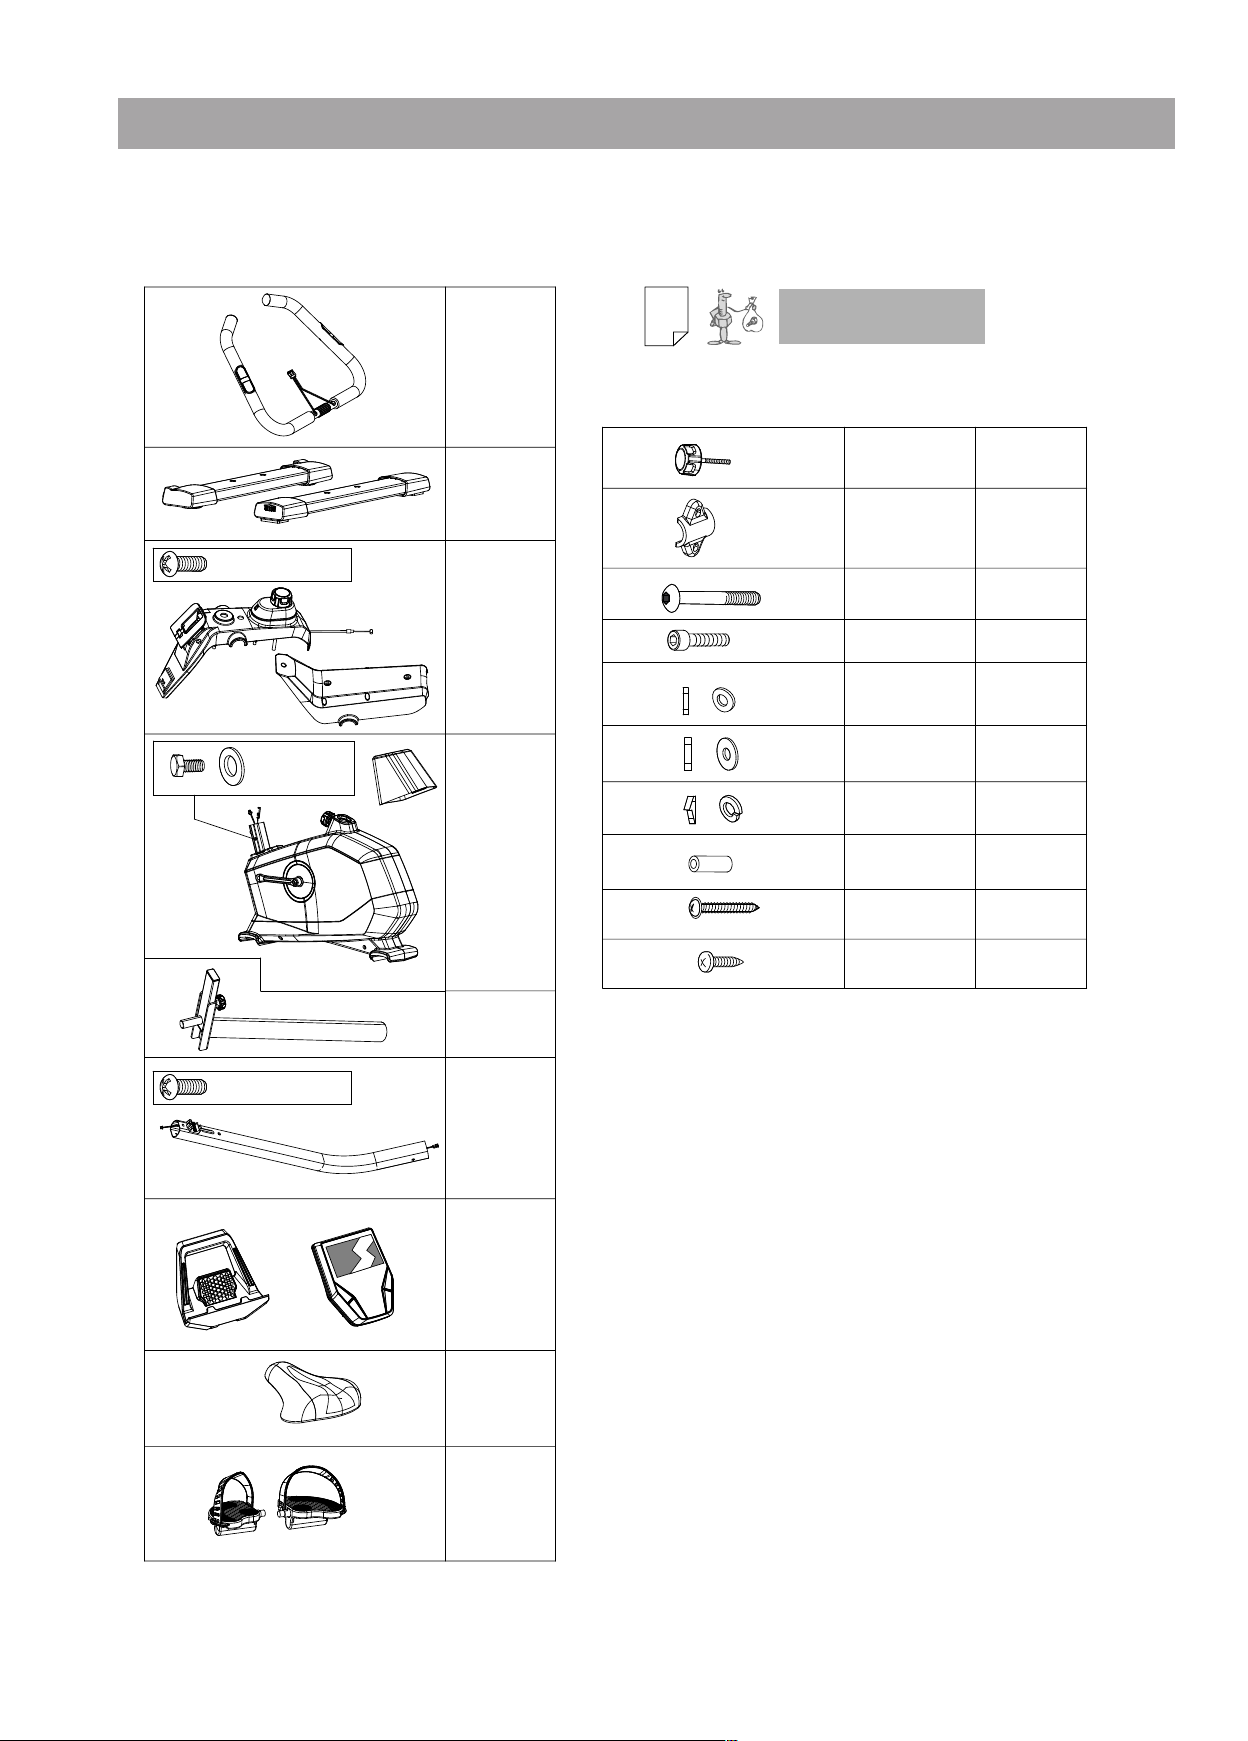
Checkliste (Packungsinhalt)
– GB – Checklist (contents of packaging)
– F – Checklist (verpakkingsinhoud)
– NL – Checklist (verpakkingsinhoud)
1x M5x14
4x M8x20
– E – Lista de control (contenido del paquete)
– I – Lista di controllo (contenuto del pacco)
– PL – Lista kontrolna (zawartość opakowania)
Stck.
48
1
1
1
1
– P – Lista de verificação (conteúdo da embalagem)
– DK – Checkliste (pakkens indhold)
– CZ – Kontrolní seznam (obsah balení)
os. 31
P
1
1
M 8x45
M 7x30
ø 7
ø 8x19
ø 7
4
1
2
4
2
2x M5x16
ø 7x35
3x30
3x16
1
4
1
1
1
1
1
1
23
Page 6
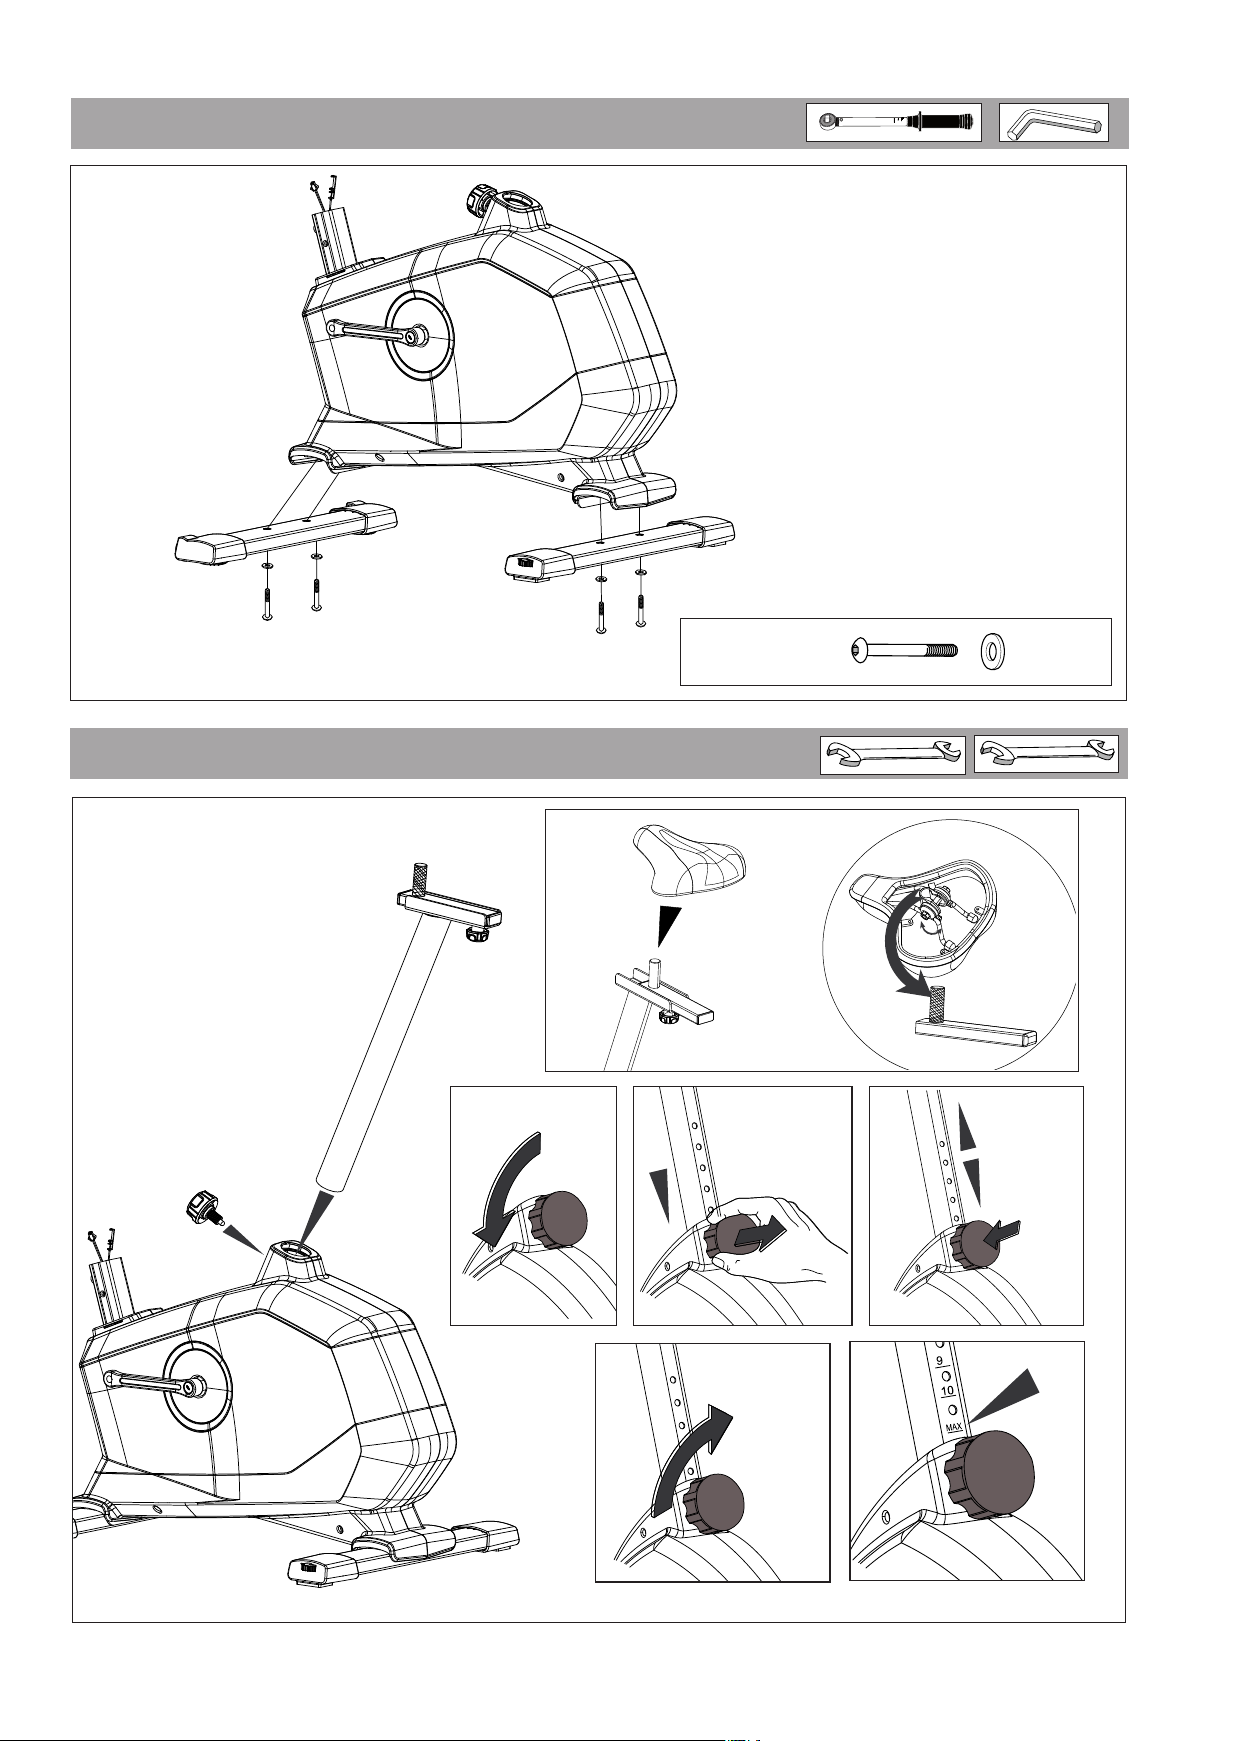
1
2
A-G
A
H
M 8x45 = 25 Nm
C
Ø 8x19
H
D
B
24
E
!
!
F
G
Page 7
3
B
A
C
4
B
B
D
D
C
1x
M 7x30
Ø 7
Ø 7
E
A
B
A/E
1x
M 5 x14
D
1x
M 7x50
Ø 7x35
Ø 7
Ø 7
25
Page 8
5
D
A
C
B
A
A/E
2x
C
4x
3x30
M 5 x16
D
1x
E
C
E
3x16
H
klick
!
G
klick
!
D
F
!
26
Page 9
6
A
F
E
E
E
B
C
F
D
B/E
M 8x20=25 Nm
6x
Ø 8x19
27
Page 10
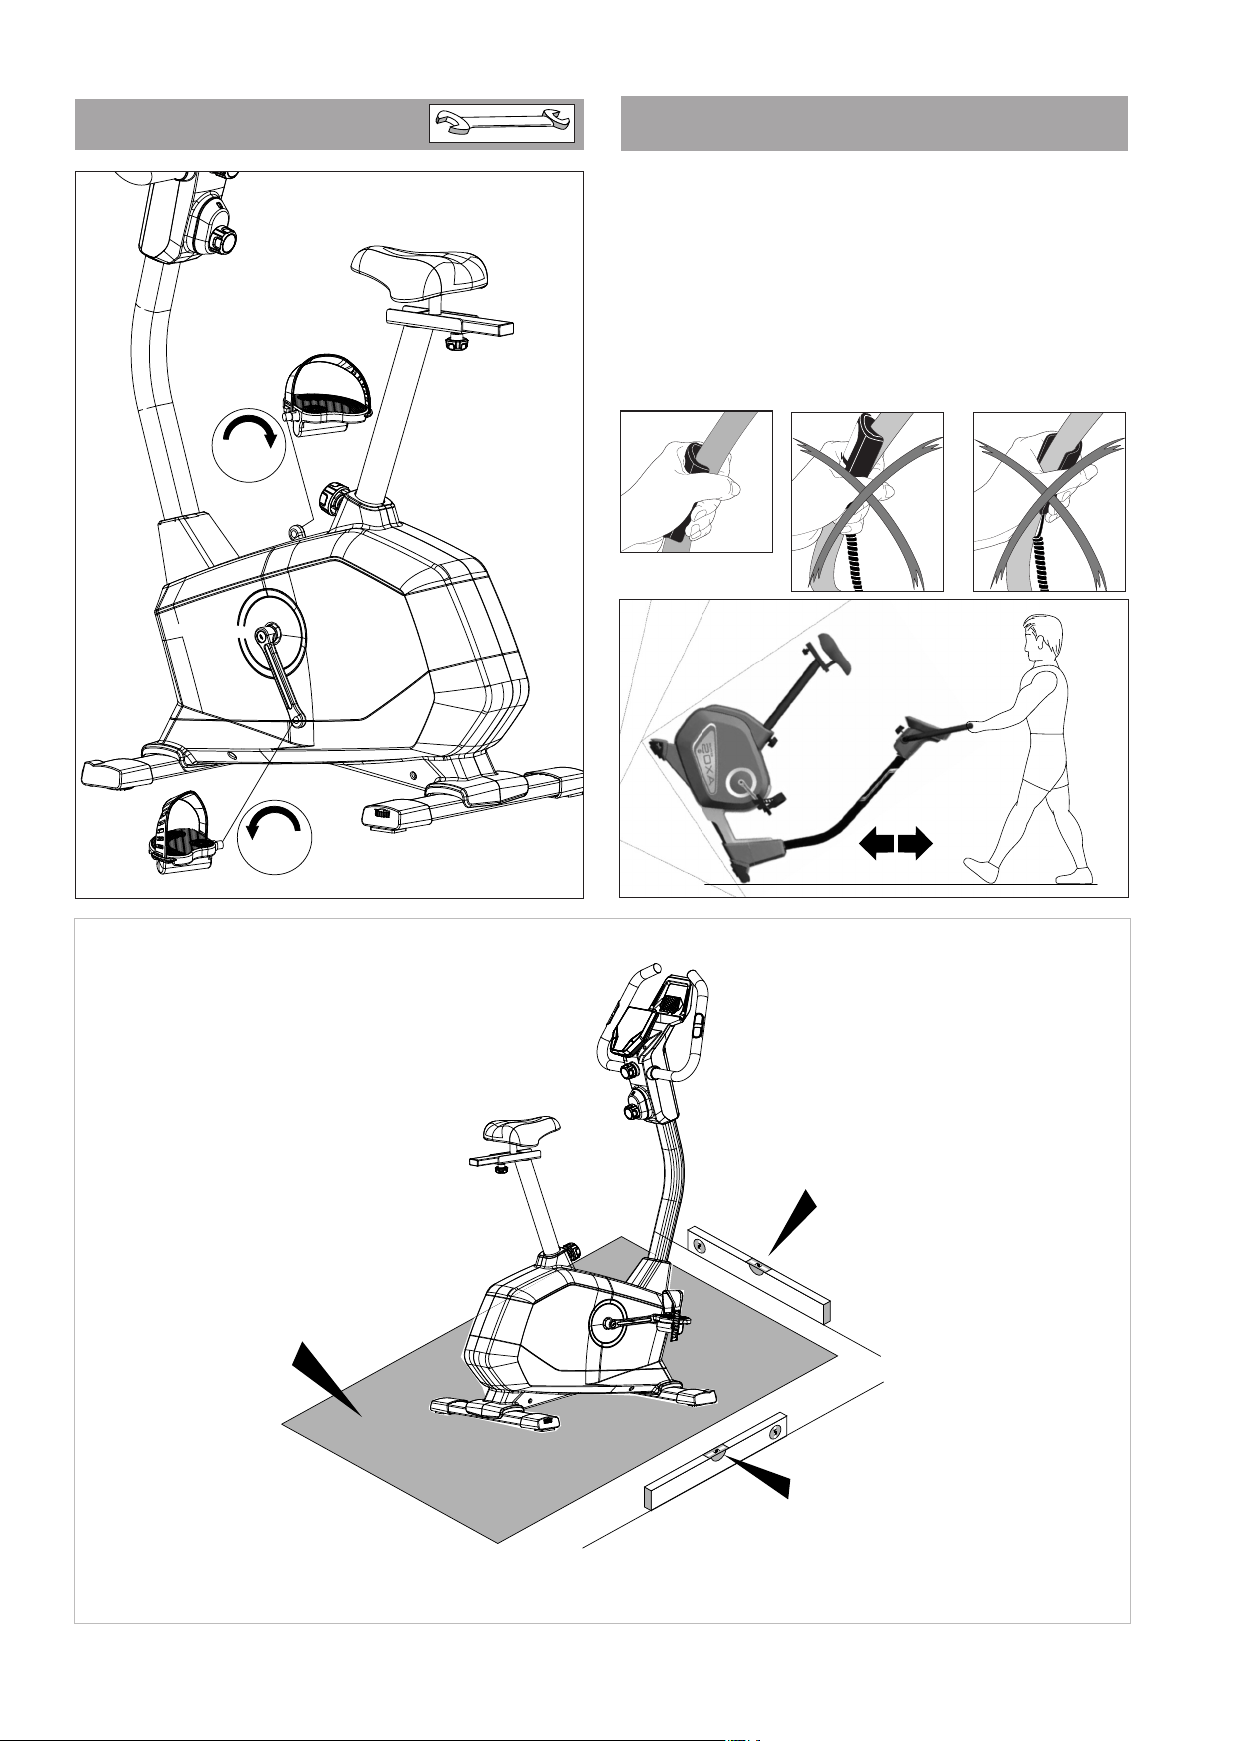
7
Handhabungshinweise
– GB – Handling
– F – Indication relative à la manipulation
– NL – Bedieningsinstruktie
– E – Instrucciones de manejo
– I – Avvertenze per il maneggio
– PL – Wskazówki obsługowe
– P – Nota sobre o manuseamento
– DK – Håndtering
– CZ – āPokyny k manipulaci
R
!
L
!
28
!
Page 11
Pb
PbPb
Pb
Batteriewechsel
A
B
Eine schwache oder erloschene Computeranzeige macht einen
Batterie wechsel erforderlich. Der Computer ist mit zwei Batterien
ausgestattet. Nehmen Sie den Batteriewechsel wie folgt vor:
• Nehmen Sie den Batteriefachdeckel ab und ersetzen Sie die Batterien durch zwei neue vom Typ AA 1,5V.
• Achten Sie beim Einsatz der Batterien auf die Kennzeichnung
im Batteriefachboden.
• Sollte es nach dem Wiedereinschalten zu Fehlfunktionen kommen,
klemmen Sie die Batterien noch einmal kurz ab und wieder an.
Wichtig: Aufgebrauchte Batterien fallen nicht unter die Garantie bestim mun gen.
Entsorgung von gebrauchten Batterien und Akkus.
Dieses Symbol weist darauf hin, dass Batterien und
Akkus nicht mit dem normalen Hausmüll entsorgt werden
dürfen.
Die Buchstaben Hg (Quecksilber) und Pb (Blei) unter der durchgestrichenen Mülltonne weisen zusätzlich darauf hin, dass in der
Batterie/dem Akku ein Anteil von mehr als 0,0005%
Quecksilber oder 0,004% Blei enthalten ist. Falsches Entsorgen
schädigt Umwelt und Gesundheit, Materialrecycling schont
kostbare Rohstoffe. Entfernen Sie bei der Stillegung dieses Produktes alle Batterien/Akkus und geben Sie sie an einer Annahmestelle für das Recycling von Batterien oder elektrischen und
elektronischen Geräten ab.
Informationen über entsprechende Annahmestellen erhalten Sie
bei Ihrer örtlichen Kommunalbehörde, Entsorgungsbetrieb oder
der Verkaufsstelle dieses Gerätes.
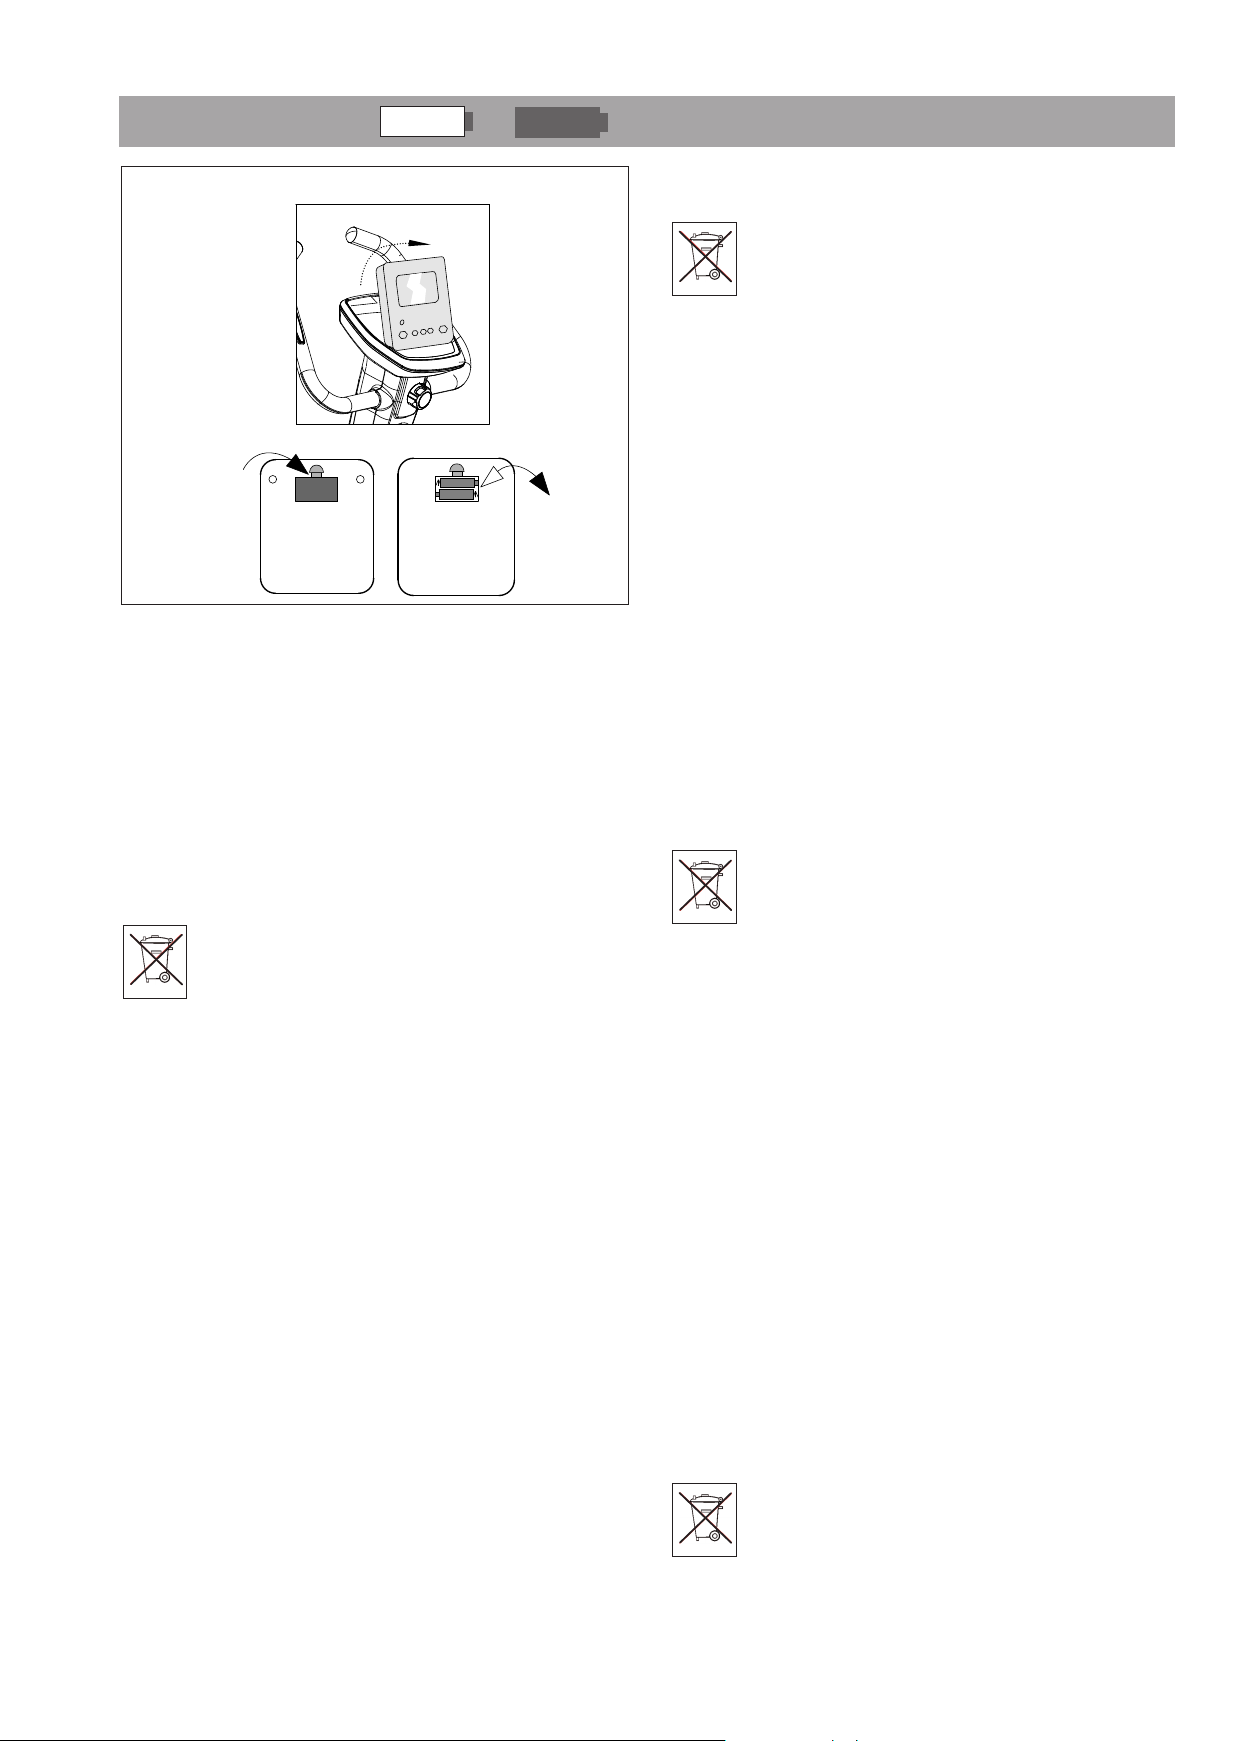
– GB – Battery change
A weak or an extinguished computer display makes a battery
change necessary. The computer is equipped with two batteries.
Perform the battery change as described below:
• Remove the lid of the battery compartment and replace the bat-
teries by two new batteries of type AA 1,5V.
• When inserting the batteries pay attention to the designation an
the bottom of the battery compartment.
• Should there be any misoperation after switching on the computer
again, shortly disconnect the batteries once again and re-insert
them.
C
IImportant: The guarantee does not cover worn-out batteries.
Disposal of used batteries and storage batteries
This symbol tells you that batteries and storage batteries
must not be disposed of with the normal household waste.
The symbols Hg (mercury) and Pb (lead) underneath the
rossed-out rubbish bin also tell you that the battery or
c
storage battery contains more than 0.0005% mercury or more than
0.004% lead.
Improper disposal damages the environment and can damage
people’s health. Recycling of materials conserves precious raw mate-
ials. When disposing of the appliance, remove all batteries and
r
storage batteries from the product and hand them over to the
collection point for the recycling of batteries or electrical or electronic appliances. Information about the appropriate collection
points can be obtained from your local authorities, your waste dis-
osal team or in the outlet where this appliance was sold.
p
– F – Changement de piles
Un affichage de l'ordinateur faible ou éteint impose un changement des piles. L'ordinateur est équipé de deux piles. Effectuez
le changement comme suit:
• Enlevez le couvercle du logement des piles et remplacez-les par
deux piles neuves du type AA 1,5V.
• Veillez au marquage au fond du logement lors de la mise en
place des piles.
• En cas de dysfonctionnement après la remise en marche, enlevez
brièvement les piles et remettez-les ensuite.
Important: Les piles usées sont exclues des dispositions de garantie.
Elimination des piles et des accumulateurs usagés.
Ce symbole indique que les piles et les accumulateurs ne
doivent pas être éliminés avec les déchets ménagers ordinaires.
Les lettres Hg (mercure) et Pb (plomb) situées sous la pou-
belle barrée indiquent en outre que la pile/l’accumulateur contient
une part de plus de 0,0005 % de mercure ou de 0,004% de plomb.
Une mauvaise élimination nuit à l’environnement et à la santé ; le
recyclage des matériaux épargne de précieuses matières premières. Enlevez toutes les piles/accumulateurs lorsque ce produit
est mis hors service et remettez-les dans un dépôt afin de recycler
les piles ou les appareils électriques et électroniques.
Vous trouverez des informations concernant les dépôts correspondants auprès de votre commune, d’une entreprise de traitement ou
dans le point de vente où l’appareil a été acheté.
– NL – Verwisselen van de batterijen
Een zwakke of weggevallen computerweergave maakt een batterijwisseling noodzakelijk. De computer werkt op 2 batterijen. Verwisselen van de batterijen gaat als volgt:
• Verwijder het deksel van het batterijenvak en vervang de batte-
rijen door twee nieuwe van het type AA 1,5V.
• Let bij het verwisselen van de batterijen op de tekens in het bat-
terijenvak.
• Treden er na het verwisselen nog foutieve functies op, haalt u dan
de batterijen nogmaals uit het vak en duw ze weer terug.
Belangrijk: batterijen vallen niet onder de garantie.
Verwijderen van gebruikte batterijen en accu’s.
Dit symbool attendeert erop dat batterijen en accu’s niet
met het normale huisvuil verwijderd mogen worden.
De letters Hg (kwikzilver) en Pb (lood) onder de doorgestreepte vuilcontainer geven tevens aan dat de batterij /
accu een aandeel van meer dan 0,0005% kwikzilver of 0,004%
lood bevat.
29
Page 12

Pb
Pb
Pb
A
B
outieve verwijdering schaadt het milieu en de gezondheid, mate-
F
riaalrecycling ontziet kostbare grondstoffen.
Verwijder na het stilleggen van het product alle batterijen / accu’s
en geef ze bij het afgeefpunt voor recycling van batterijen en elektrische en elektronische apparaten af.
Informatie over genoemde afgeefpunten kunt u bij uw plaatselijke
gemeente-instanties, het recyclingbedrijf of het verkooppunt van dit
apparaat verkrijgen.
– E – Cambio de la pilas
Una indicación debil o inexistente en el monitor hace necesario
un cambio de pilas. El ordenador dispone de dos pilas. Efectúe el
cambio de pilas de la siguiente forma:
• Retire la tapa de la caja de pilas y cambie las pilas usadas por
nuevas del tipo AA, 1,5V
• Al poner las pilas observe la caracterización en el fondo de la
caja de las pilas.
• Si después de ser puesto de nuevo en funcionamiento se pro-
dujeran errores, desconecte brevemente las pilas y vuelva a conectarlas.
Importante: Las pilas gastadas no est·n incluidas en la garantÌa.
Eliminación de baterías y pilas usadas
Este símbolo indica que las baterías y pilas no se deben
eliminar con los residuos domésticos normales.
Las letras Hg (mercurio) y Pb (plomo) debajo de un cubo
de basura tachado indican adicionalmente que las baterías
y pilas tienen un contenido de más de 0,0005% de mercurio o de
0,004% de plomo.
Una eliminación incorrecta perjudica al medio ambiente y a la salud;
el reciclaje de materiales ahorra valiosas materias primas. En la
puesta fuera de servicio de este producto, saque todas las baterías
y pilas y deséchelas en un punto de recogida para el reciclaje de
pilas o aparatos eléctricos y electrónicos.
Puede obtener más información sobre los puntos de recogida correspondientes a través de los servicios municipales, la empresa de
eliminación de residuos o el punto de venta de este aparato.
C
I – Cambio delle batteria
–
Una visualizzazione debole o spenta del computer richiede il
cambio della batteria. Il computer è munito di due batterie. Pro-
edete al cambio delle batterie nel modo seguente:
c
ogliete il coperchio della batteria e sostituite le batterie con 2
• T
nuove del tipo AA, 1,5V
• Fate attenzione nel montaggio al contrassegno nel suolo del vano
batteria.
• Se dopo l'inserimento ci dovessero essere funzioni sbagliate,
staccate di nuovo le batterie per poco e attaccatele di nuovo.
Importante: Le batterie usate non rientrano nelle condizioni di
garanzia.
Smaltimento di pile e batterie usate.
Il presente simbolo avverte che le batterie e le pile non
devono essere gettate via insieme ai normali rifiuti domestici.
Le lettere “Hg“ (mercurio) e „Pb“ (piombo), sotto il simbolo
barrato del “bidone della spazzatura con rotelle”, indicano inoltre
che nelle batterie/pile è presente una concentrazione di mercurio
maggiore del 0,0005% oppure di piombo, superiore al 0,004%.
Uno smaltimento errato di tali prodotti danneggia l’ambiente e la
salute delle persone,
mentre il riciclaggio dei rifiuti risparmia delle materie prime preziose!
Con la cessazione d’uso di questo prodotto, rimuovere tutte le batterie/pile e consegnarle in un centro di ritiro apposito per il riciclaggio di batterie o di apparecchi elettrici ed elettronici.
Maggiori informazioni in merito al riciclaggio di rifiuti sono disponibili presso le autorità comunali, le aziende di smaltimento e
presso il punto-vendita di questo apparecchio.
– PL – Wymiana baterii
Słaby lub gasnący wyświetlacz komputera oznacza konieczność
wymiany baterii. Komputer wyposażony jest w dwie baterie.
Baterie wymienia się w sposób następujący:
• Zdjąć osłonę baterii i wymienić baterie na dwie nowe typu AA
1,5 V.
• Wkładając baterie należy przestrzegać oznakowania na dnie
zagłębienia na baterie.
• Jeżeli po ponownym włączeniu stwierdzi się niewłaściwe
działanie, to baterie należy na chwilę wyjąć i potem ponownie
włożyć.
UWAGA! Zużyte baterie nie podlegają pod warunki gwarancyjne.
Utylizacja zużytych baterii i akumulatorów
Ten symbol oznacza, że baterii i akumulatorów nie wolno
utylizować razem z normalnymi odpadami domowymi.
Litery Hg (rtęć) i Pb (ołów) umieszczone poniżej pojemnika
na śmieci dodatkowo oznaczają, że w baterii / akumu-
latorze zawartość rtęci przekracza 0,0005% lub zawartość ołowiu
przekracza 0,004%.
Nieprawidłowa utylizacja szkodzi środowisku i zdrowiu, poprzez
recykling materiału odzyskiwane są wartościowe surowce! Jeśli
produkt nie działa należy wyjąć wszystkie baterie/akumulatory i
oddać je do punktu recyklingu baterii lub urządzeń elektrycznych
i elektronicznych. Informacje na temat odpowiednich punktów
przyjęć otrzymają Państwo w lokalnym urzędzie, zakładzie gospodarki odpadami lub w punkcie sprzedaży tego urządzenia.
30
Page 13

P
b
Pb
Pb
A
B
– P – Substituição das pilhas
Se as indicações no computador estiverem fracas ou desaparecerem por completo, é necessário substituir as pilhas. O computador tem duas pilhas. Para substituir as pilhas:
• Remova a tampa do compartimento das pilhas e substitua as
pilhas usadas por duas pilhas novas do tipo AA 1,5 V.
• Coloque as pilhas conforme indicado no fundo do comparti-
mento.
• Se, ao ligar novamente, verificar algum defeito no funcio-
namento, retire as pilhas e volte a colocá-las de seguida.
Importante: As pilhas gastas não estão cobertas pela garantia.
Eliminação de pilhas e acumuladores usados.
Este símbolo indica que as pilhas e os acumuladores
não podem ser eliminados através do lixo doméstico
normal.
Além disso, as letras Hg (mercúrio) e Pb (chumbo) sob o
caixote do lixo riscado advertem para um teor de mais de 0,0005%
de mercúrio ou de 0,004% de chumbo na pilha/no acumulador.
A eliminação incorrecta prejudica o meio ambiente e a saúde. A
reciclagem de material permite preservar matérias-primas valiosas.
Quando deixar de usar este produto, remova todos os acumuladores/pilhas e entregue-os num posto de recolha para reciclagem
de pilhas ou de aparelhos eléctricos e electrónicos.
Para informações sobre os postos de recolha adequados, contacte
a entidade municipal local responsável, a empresa de tratamento
de resíduos ou o local de venda onde adquiriu este aparelho.
C
– DK – Udskiftning af batterier
atteriet skal udskiftes, hvis visningen i displayet er svag eller ikke
B
findes mere. Computeren er udstyret med to batterier. Udskift batterierne således:
• Fjern dækslet på batterirummet og udskift batterierne med to nye
batterier, type AA 1,5V.
• Iagttag mærkningen i bunden af batterirummet ved ilægning af
atterierne.
b
• Hvis der opstår fejlfunktioner ved genindkobling, så afbryd for-
bindelsen og prøv igen.
Vigtigt: Garantien dækker ikke opbrugte batterier.
Bortskaffelse af brugte batterier og akkumulatorer.
Dette symbol viser, at batterier og akkumulatorer ikke må
smides i det normale husholdningsaffald.
Bogstaverne Hg (kviksølv) og Pb (bly) under skralde-
spanden med et kryds over henviser til, at et batteri/en akku-
mulator indeholder mere end 0,0005% kviksølv eller 0,004% bly.
Forkert bortskaffelse skader miljøet og helbredet, ved genanvendelse
af materialer spares der på værdifulde råstoffer. Fjern alle batterier/akkumulatorer, når dette produkt er udtjent, og aflever dem
ved et modtagelsessted for genanvendelse af battereier eller elektriske og elektroniske apparater.
Du kan få informationer om modtagelsessteder hos kommunen, det
lokale renovationsselskab eller salgsstedet for dette apparat.
– CZ – Výměna baterií
Slabé nebo vůbec žádné zobrazení údajů na displeji počítače poukazuje na potřebu výměny baterií. Počítač je vybaven dvěma bateriemi. Při výměně baterií postupujte následovně:
• Odeberte kryt přihrádky na baterie a zaměňte baterie za dvě
nové typu AA 1,5 V.
• Při vsazování baterií dbejte na značení vyobrazené na dně
přihrádky pro baterie.
• Jestliže dojde po opětovném zapnutí přístroje k chybné funkci,
odeberte krátce baterie a opět je vložte.
Důležité: Vypotřebované baterie nespadají do záručních ustanovení.
Likvidace použitých baterií a akumulátorů.
Tento symbol poukazuje na to, že baterie a akumulátory
nesmějí být likvidovány spolu s domácím odpadem.
Písmena Hg (rtuť) a Pb (olovo) pod přeškrtnutou nádobou
na domácí odpad dodatečně poukazují na to, že je
v baterii / akumulátoru obsažen vyšší podíl rtuti než 0,0005 % nebo
olova než 0,004 %.
Chybná likvidace poškozuje životní prostředí a zdraví, recyklace
materiálu šetří vzácné suroviny. Při uvedení zařízení mimo provoz
vyjměte všechny baterie / akumulátory a odevzdejte je příslušné
sběrně pro recyklaci baterií nebo elektrických a elektronických
zařízení. Informace o příslušných sběrnách obdržíte na vašem
místním obecním úřadě, sběrně zabývající se likvidací odpadu nebo
na prodejním místě tohoto zařízení.
31
Page 14

D
Biometrie Hometrainer
Heimtrainer – Für alle, die Spaß am Radfahren haben
und Belastungen der Gelenke vermeiden wollen
Durch die runde Beinbewegung entsteht eine besonders für Fuß-,
Knie- und Hüftgelenke schonende Bewegungsform. Sie ist ideal für
ein dosiertes Herz-Kreislauf-Training mit dem Trainingsziel der Fettverbrennung, da die körperliche Beanspruchung geringer ist als
beim Lauftraining. Somit eignen sich Heimtrainer auch für
Menschen mit Übergewicht oder körperlichen Problemen, die zu
starke Beanspruchungen von Knie- und Hüftgelenk vermeiden
wollen.
Die Vorteile:
ergonomisch optimal einstellbar auf die gewünschte
•
rainingsposition
T
• ideal für Herz-Kreislauftraining und Fettverbrennung
• geringe Beanspruchung der Gelenke
• auch für Übergewichtige und Einsteiger geeignet
• platzsparend und einfach zu transportieren
itzhöhe
S
Stellen Sie den Sattel zunächst auf die für Sie optimale Sitzhöhe
ein. Diese haben Sie, wenn Sie bei durchgedrücktem Knie mit
der Ferse gerade noch die Pedale erreichen. Eine runde Bewegungsform der Beine erhalten Sie, wenn Sie das Knie nie
vollständig durchstrecken. So haben Sie ein Gelenk schonendes
Training für Fuß-, Knie und Hüftgelenk.
Energieverbrauch (kcal)
a. 60 0 pro Std .
c
Fettverbrauch
a. 48 -54 gr. p ro Std.
c
Einstellen der optimalen Sitzposition
Die ideale Körperhaltung haben Sie, wenn der Oberkörper
leicht nach vorn gebeugt ist. Sollten Sie Rückenprobleme haben,
verstellen Sie den Neigungswinkel des Lenkers, so dass der
Oberkörper eine aufrechtere Sitzposition hat, welche die Wirbelsäule und Gelenke schont.
Abstand von Sattel zum Lenker
Der Sattel Ihres Heimtrainers ist (je nach Modell) auch horizontal
verstellbar. Dazu lösen Sie die Schraube unterhalb des Sattels
und verschieben den Sattel, abhängig von Ihrer Körpergröße,
auf der Schiene nach vorne oder hinten.
Neigung des Lenkers
Der Lenker Ihres Heimtrainers ist neigungsverstellbar. Lösen Sie
die Schraube unterhalb des Cockpits und stellen Sie die für Sie
optimale Position ein. Ziehen Sie danach die Schraube wieder
fest, so dass der Lenker nicht durchrutscht!
32
Trainingsvariationen
Um die Belastung der Oberschenkel- und Gesäßmuskulatur zu verstärken, betonen Sie das Treten der Pedale. Um ein verstärktes
Training der Oberschenkel-Rückseite zu erzielen, betonen Sie das
Ziehen der Pedale mit der Schlaufe nach oben.
Darüber hinaus haben Sie die Möglichkeit, mit hohem Pedalwiderstand eine Bergauffahrt zu simulieren. Bei diesem Training werden
zur Beinmuskulatur auch die Bauch- und Rückenmuskulatur, sowie
Oberkörper- und Schultermuskulatur mit einbezogen.
Page 15

Biometrie Hometrainer
Trainingsempfehlung
Denken Sie immer an die anschließenden Dehnübungen, um
Verletzungen und Muskelkater vorzubeugen.
4-Wochen Trainingsplan für Einsteiger auf dem Heimtrainer
B
G
Biometrics exercise bike
Home trainer - for anyone who likes cycling and wants
to avoid strain on the joints
Due to the round leg movement this is a particularly gentle form
of exercise for foot, knee and hip joints. It is ideal for regulated
cardiovascular training with the training goal of fat burning, as
the physical strain is lower than with running training.Therefore
ome trainers are also suitable for people who are overweight or
h
ho have physical problems and want to avoid too much strain
w
n knee and hip joints.
o
The advantages:
• ergonomic, optimally adjustable to the desired training
position-
• ideal for cardiovascular training and fat burning
• low strain on joints
• also suitable for overweight people and beginners
• space saving and easy to transport
Energy use (kcal)
pprox . 600 per hour
a
Fat burning
pprox . 48 - 54 g per h our
a
Montag
Dienstag
Mittwoch
D
onnerstag
Freitag
Samstag
Sonntag
1. Woche
15 Minuten bei
n
iedriger Belastung
S
tufe 1-3
P
ause
15 Minuten bei
niedriger Belastung
Stufe 1-3
Pause
1
5 Minuten bei
niedriger Belastung
Stufe 1-3
Pause
Pause
2. Woche
20 Minuten bei
n
iedriger Belastung
Stufe 1-3
P
ause
20 Minuten bei
niedriger Belastung
Stufe 1-3
Pause
2
0 Minuten bei
niedriger Belastung
Stufe 1-3
Pause
Pause
3. Woche
30 Minuten bei
n
iedriger Belastung
Stufe 1-3
3
0 Minuten bei
niedriger Belastung
S
tufe 1-3
Pause
30 Minuten bei
n
iedriger Belastung
S
tufe 1-3
P
ause
30 Minuten bei
niedriger Belastung
Stufe 1-3
Pause
4. Woche
30 Minuten bei
m
ittlerer Belastung
Stufe 4-6
3
0 Minuten bei
mittlerer Belastung
S
tufe 4-6
Pause
30 Minuten bei
m
ittlerer Belastung
S
tufe 4-6
P
ause
30 Minuten bei
mittlerer Belastung
Stufe 4-6
Pause
Hinweis: Ab der 5. Woche die Dauer der Trainingseinheit z. B.
auf 40 Minuten steigern. In der 6. Woche können Sie mit einem
leichten Intervalltraining starten. Beachten Sie, dass Ihr
Trainingspuls in den ersten 8 Wochen ca. 60 – 65% Ihrer max.
Pulsfrequenz beträgt und 75% nicht übersteigt
.
Setting the optimum sitting position
The ideal posture is to have your upper body slightly bent
forward. If you have back problems, adjust the tilt angle so that
the upper body is in an upright sitting position, which protects
the spine and joints.
Seat height
First of all adjust the saddle to the optimum seat height. This is
achieved when you can just reach the pedals with your heel with
bent knees. You will maintain a round movement of the legs if
you never completely stretch out the knee. Therefore you have a
training which is gentle on foot, knee and hip joints.
33
Page 16

GB
Biometrics exercise bike
Distance from saddle to handlebars
The saddle of your home trainer can also be adjusted horizontally (according to the model). To do this loosen the screws
underneath the saddle and slide the saddle forwards or backwards down the bar, depending on your body height.
Tilting the handlebars
The tilt of the handlebars of your home trainer can be adjusted.
Loosen the screws underneath the cockpit and set it in the
optimum position. Then tighten the screws again so that the
handlebars do not slip!!
Training recommendation
Always remember the stretching exercises afterwards in
order to avoid injuries and muscle ache.
4 week training plan for beginners on the home trainer
Monday
Tuesday
Wednesday
Thursday
Friday
Saturday
Sunday
1st week
1
5 minutes at low
i
mpact stage 1 -3
Break
15 minutes at low
impact stage 1 -3
Break
15 minutes at low
impact stage 1 -3
Break
Break
2nd week
20 minutes at low
impact stage 1 -3
Break
20 minutes at low
impact stage 1 -3
Break
20 minutes at low
impact stage 1 -3
Break
Break
3rd week
30 minutes at low
impact stage 1 -3
3
0 minutes at low
i
mpact stage 1 -3
Break
30 minutes at low
i
mpact stage 1 -3
Break
30 minutes at low
impact stage 1 -3
Break
4th week
30 minutes at
medium impact
stage 4-6
3
0 minutes at
m
edium impact
s
tage 4-6
Break
30 minutes at
m
edium impact
stage 4-6
Break
30 minutes at
medium impact
stage 4-6
Break
Training variations
In order to increase the strain on the thigh and buttock muscles,
emphasise your steps on the pedals. In order to achieve increased
training of the back of the thighs, emphasise pulling the pedals
with the loop upwards.
Furthermore you will have the opportunity to simulate a mountain
ascent with high pedal resistance. In this training the stomach and
back muscles, upper body and shoulder muscles will be included
as well as leg muscles.
34
Tip: From the 5th week increase the duration of the exercise
intervals until you can run for 20 to 30 minutes without
interruption. Ensure that you training pulse is approx. 60 - 65% of
your maximum pulse frequency in the first 8 weeks and does not
exceed 75%.
Page 17

F
Biométrie vélo
Vélo d'appartement – Pour tous ceux qui ont du plaisir à
faire du vélo et veulent éviter de mettre leurs articulations à contribution
Les avantages:
• réglage optimal à la position d'entraînement souhaitée au
niveau ergonomique
• idéal pour l'entraînement cardio-vasculaire et la combustion
de graisse
• sollicitation réduite des articulations
• convient aussi aux personnes obèses et aux débutants
• peu encombrant et simple à transporter
Consommation d’nergie (kcal)
env. 600 par he ure
Réglage de la position assise optimale
Consommation de graisse
env. 48- 54 gr. par heu re
Hauteur d'assise
Réglez tout d'abord la selle à la hauteur d'assise optimale pour
vous. Vous l'avez lorsque, votre genou étant tendu, vous
atteignez encore juste la pédale avec le talon. Vous obtenez une
forme de mouvement ronde des jambes en ne tendant jamais
complètement le genou. Vous avez ainsi un entraînement qui
ménage les articulations pour les pieds, genoux et hanches.
Ecart entre la selle et le guidon
La selle de votre vélo d'appartement est (selon le modèle) aussi
réglable horizontalement. A cet effet, desserrez la vis en dessous
de la selle et déplacez la selle sur la glissière vers l'avant ou l'arrière en fonction de votre taille.
La position de votre corps est idéale lorsque votre buste est
légèrement penché en avant. Si vous avez des problèmes de
dos, modifiez l'angle d'inclinaison du guidon de manière à ce
que le buste ait une position assise plus droite ménageant la
colonne vertébrale et les articulations.
Inclinaison du guidon
Le guidon de votre vélo d'appartement est réglable dans son inclinaison. Desserrez la vis en dessous du cockpit et réglez la
position optimale pour vous. Resserrez bien la vis ensuite de
manière à ce que le guidon ne glisse pas !
35
Page 18

L
F
Biométrie vélo
N
Biometrie Hometrainer
Variations d'entraînement
Pour renforcer l'effort des muscles des cuisses et du fessier,
accentuez la pression sur les pédales. Pour obtenir un
entraînement renforcé du dos des cuisses, accentuez la traction
des pédales vers le haut avec la boucle.Par ailleurs, vous avez
la possibilité de simuler une montée de côte avec une résistance
élevée des pédales. En plus des muscles des jambes, les muscles
du ventre et du dos, ainsi que du buste et des épaules sont
intégrés dans cet entraînement.
Hometrainer – Voor iedereen die houdt van fietsen en bela-
sting van de gewrichten wil vermijden
Door de ronde beenbeweging ontstaat een bewegingsvorm die
vooral de voet-, knie- en heupgewrichten spaart. Ze is ideaal
voor een gedoseerde training van het hart- en vaatstelsel met als
trainingsdoelstelling vetverbranding, aangezien de lichamelijke
belasting kleiner is dan bij looptraining. Hierdoor zijn
hometrainers ook geschikt voor mensen met overgewicht of lichamelijke problemen, die te sterke belasting van knie- en heupgewricht willen vermijden.
Voordelen:
Ergonomisch optimaal instelbaar op de gewenste trainingspo-
•
itie
s
Ideaal voor training van hart- en vaatstelsel en vetverbranding
•
Lage belasting van de gewrichten
•
• Ook geschikt voor mensen met overgewicht en beginners
• Plaatsbesparend en eenvoudig te transporteren
Conseil d'entraînement
Pensez toujours aux exercices d'étirement après pour prévenir
blessures et courbatures.
Plan d'entraînement de 4 semaines pour débutants sur le vélo
d'appartement
1ère semaine
Lundi
Mardi
Mercredi
Jeudi
Vendredi
Samedi
Dimanche
1
5 minutes à faible
c
harge au niveau
1-3
P
ause
15 minutes à faible
charge au niveau
1-3
Pause
15 minutes à faible
charge au niveau
1-3
Pause
Pause
Remarque: à partir de la 5ème semaine, augmentez la durée des
intervalles de charge jusqu'à ce que vous parveniez à courir sans
interruption pendant 20 à 30 minutes. Veillez à ce que votre pouls
d'entraînement comporte env. 60 – 65 % de votre fréquence cardiaque pendant les 8 premières semaines et ne dépasse pas 75
%.
2ème semaine
2
0 minutes à
f
aible charge au
niveau 1-3
P
ause
20 minutes à faible
charge au niveau
1-3
Pause
20 minutes à faible
charge au niveau
1-3
Pause
Pause
3ème semaine
3
0 minutes à
f
aible charge au
niveau 1-3
3
0 minutes à faible
charge au niveau
1-3
Pause
30 minutes à
faible charge au
niveau 1-3
Pause
30 minutes à faible
charge au niveau
1-3
Pause
4ème semaine
3
0 minutes à
c
harge moyenne
au niveau 4-6
3
0 minutes à
charge moyenne
au niveau 4-6
Pause
30 minutes à
charge moyenne
au niveau 4-6
Pause
30 minutes à
charge moyenne
au niveau 4-6
Pause
Energieverbruik (kcal)
a. 6 00 p er uur
c
Vetverbruik
a. 4 8-54 gr. pe r uur
c
Instellen van de optimale zitpositie
De ideale lichaamshouding is deze waarbij het bovenlichaam
lichtjes naar voren gebogen is. Als u rugproblemen hebt,
verplaats dan de hellingshoek van het stuur, zodat het
bovenlichaam een rechtere zitpositie heeft, die de wervelkolom
en gewrichten spaart.
36
Page 19

NL
Biometrie Hometrainer
Zithoogte
Stel het zadel eerst in op de voor u optimale zithoogte. Dit is de
hoogte waarbij u met een gestrekte knie met de hak nog precies
de pedaal bereikt. Een ronde bewegingsvorm van de benen verkrijgt u, als u de knie nooit volledig strekt. Zo verkrijgt u een
gewrichtsparende training voor voet-, knie- en heupgewrichten.
Afstand van het zadel tot het stuur
Het zadel van uw hometrainer is (in functie van het model) ook
horizontaal verplaatsbaar. Daarvoor lost u de schroef onder het
zadel en verschuift u het zadel, afhankelijk van uw
lichaamsgrootte, op de rail naar voren of naar achteren.
Helling van het stuur
Trainingsvariaties
Om de belasting van de dij- en bilspieren te versterken,
benadrukt u het trappen op de pedalen. Om een versterkte
training van de achterkant van de dijen te verkrijgen, benadrukt
u het trekken aan de pedalen met de lus naar boven.
Bovendien hebt u de mogelijkheid, met hoge pedaalweerstand
een bergbeklimming na te bootsen. Bij deze training worden
naast de beenspieren ook de buik- en rugspieren evenals de
bovenlichaam- en schouderspieren getraind.
Trainingstip
Denk altijd aan de aansluitende stretchoefeningen, om letsels en
spierkaters te voorkomen.
De helling van het stuur van uw hometrainer kan aangepast
worden. Los de schroef onder de cockpit en stel de voor u
optimale positie in. Draai daarna de schroef weer vast, zodat
het stuur niet wegglijdt!
Trainingsplan van 4 weken voor beginners op de hometrainer
4e week
30 minuten bij
middelmatige belasting niveau 4-6
30 minuten bij
middelmatige belasting niveau 4-6
Pauze
30 minuten bij
middelmatige belasting niveau 4-6
Pauze
30 minuten bij
middelmatige belasting niveau 4-6
Pauze
M
aandag
D
insdag
Woensdag
Donderdag
Vrijdag
Zaterdag
Zondag
1e week
15 minuten bij lage
belasting niveau 13
Pauze
15 minuten bij lage
belasting niveau 13
Pauze
15 minuten bij lage
belasting niveau 13
Pauze
Pauze
2e week
20 minuten bij
lage belasting
niveau 1-3
Pauze
20 minuten bij lage
belasting niveau 13
Pauze
20 minuten bij lage
belasting niveau 13
Pauze
Pauze
3e week
30 minuten bij
lage belasting
niveau 1-3
30 minuten bij lage
belasting niveau 13
Pauze
30 minuten bij
lage belasting
niveau 1-3
Pauze
30 minuten bij lage
belasting niveau 13
Pauze
Tip: Vanaf de 5e week de duur van de belastingsintervallen
verhogen tot u erin slaagt, 20 tot 30 minuten zonder onderbreking
te lopen. Zorg ervoor, dat uw trainingspolsslag in de eerste acht
weken ca. 60 – 65 % van uw maximale polsfrequentie bedraagt
en 75 % niet overschrijdt.
37
Page 20

E
Biometría bicicleta estática
Bicicleta estática - para aquellos que disfrutan del ciclismo
y quieren evitar esfuerzos específicos en las articulaciones
Por el movimiento circular de las piernas se produce, especialmente para las articulaciones de pie, rodilla y cadera, una cuidadosa forma de movimiento. Es ideal para un entrenamiento
cardiovascular dosificado con el objetivo de combustión de
grasa, ya que el esfuerzo físico es menor que en el
entrenamiento de marcha. Por ello, las bicicletas estáticas
también están indicadas para personas con sobrepeso o problemas físicos que desean evitar esfuerzos demasiado intensos
en las articulaciones de rodilla y cadera.
Las ventajas:
Ajuste ergonómico óptimo a la posición de entrenamiento
•
deseada
• Ideal para el entrenamiento cardiocirculatorio y para la combustión de grasa
• Reducido esfuerzo para las articulaciones
• Indicada también para personas con sobrepeso y
principiantes
• Ahorro de espacio y facilidad de transporte
ltura del sillín
A
En primer lugar ajuste el sillín a la altura de asiento óptima para
usted. Ésta la habrá alcanzado cuando con la rodilla recta
alcance con el talón justo los pedales. Logrará una forma
circular del movimiento de las piernas si nunca llega a estirar
completamente la rodilla. De esta forma conseguirá un entrenamiento que protegerá las articulaciones del pie, rodilla y
cadera.
Consumo de energa (kcal)
ca. 6 00 p ro St d.
Consumo de grasa
aprox . 48 -54 g r. p ro S td.
Ajustar la posición óptima del sillín
Distancia del sillín al manillar
El sillín de su bicicleta estática (según el modelo) puede ajustarse
también horizontalmente. Para ello, afloje el tornillo debajo del
sillín y desplace el sillín hacia delante o atrás sobre el carril, en
función de su talla corporal.
Inclinación del manillar
Es posible ajustar la inclinación del manillar de su bicicleta
estática. Afloje el tornillo debajo del Cockpit y ajuste la posición
óptima para usted. A continuación, vuelva a apretar el tornillo,
¡de manera que el manillar no se deslice!
Habrá alcanzado su posición corporal óptima cuando su torso
esté ligeramente inclinado hacia delante. Si tuviera problemas
con la espalda, ajuste el ángulo de inclinación del manillar,
para que el torso adopte una posición más erecta que proteja
la columna vertebral y las articulaciones.
38
Page 21

Biometría bicicleta estática
I
Biometria cyclette
Variantes de entrenamiento
Para reforzar el esfuerzo de la musculatura de los muslos y
glúteos, acentúe el pedaleo. Para lograr un entrenamiento
reforzado de la parte trasera de los muslos, acentúe la tracción
de los pedales con la cinta hacia arriba.Además, tiene la posibilidad de simular una cuesta con una resistencia elevada de
los pedales. Con este entrenamiento se incluye, aparte de la
musculatura de las piernas, también la del abdomen y la
lumbar, así como la del torso y los hombros.
Hometrainer – per chi ama andare in bicicletta e vuole
evitare carichi eccessivi alle articolazioni
Il movimento circolare delle gambe crea una forma di
movimento particolarmente delicata per le articolazioni di piedi,
ginocchia e fianchi. Risulta il movimento ideale per un
allenamento cardiocircolatorio dosato, mirato a bruciare i
rassi, in quanto lo sforzo fisico è minore di quello della corsa.
g
’hometrainer quindi risulta ideale anche per persone in
L
ovrappeso o con problemi fisici, che vogliono evitare carichi
s
eccessivi delle articolazioni di ginocchia e fianchi.
I vantaggi:
• Regolabile ergonomicamente in modo ottimale alla posizione
di allenamento desiderata
• Ideale per l’allenamento cardiocircolatorio e per bruciare i
grassi
• Carico ridotto sulle articolazioni
• Adatto anche per persone in sovrappeso e principianti
• Ingombro ridotto e facile da trasportare
Recomendación para el entrenamiento
Acuérdese siempre de los ejercicios de flexión posteriores, para
prevenir lesiones y agujetas.
Programa de entrenamiento de 4 semanas sobre la bicicleta
estática para principiantes
1. Woche
Montag
Dienstag
Mittwoch
Donnerstag
Freitag
Samstag
Sonntag
15 Minuten bei
niedriger Belastung
Stufe 1-3
Pause
15 Minuten bei
niedriger Belastung
Stufe 1-3
Pause
15 Minuten bei
niedriger Belastung
Stufe 1-3
Pause
Pause
Aviso: A partir de la 5ª semana deberá aumentar la duración de
los intervalos de esfuerzo para lograr correr de 20 a 30 minutos
sin interrupción. Procure que su pulso de entrenamiento durante
las primeras 8 semanas se sitúe aprox. en el 60 – 65 % de su frecuencia máxima de pulsación, y que no supere el 75 %.
2. Woche
20 Minuten bei
niedriger Belastung
Stufe 1-3
Pause
20 Minuten bei
niedriger Belastung
Stufe 1-3
Pause
20 Minuten bei
niedriger Belastung
Stufe 1-3
Pause
Pause
3. Woche
30 Minuten bei
niedriger Belastung
Stufe 1-3
30 Minuten bei
niedriger Belastung
Stufe 1-3
Pause
30 Minuten bei
niedriger Belastung
Stufe 1-3
Pause
30 Minuten bei
niedriger Belastung
Stufe 1-3
Pause
4. Woche
30 Minuten bei
mittlerer Belastung
Stufe 4-6
30 Minuten bei
mittlerer Belastung
Stufe 4-6
Pause
30 Minuten bei
mittlerer Belastung
Stufe 4-6
Pause
30 Minuten bei
mittlerer Belastung
Stufe 4-6
Pause
Consumo energetico (kcal)
ca. 6 00 p er or a
Combustione dei grassi
ca. 4 8 - 54 g per ora
Regolazione della posizione ottimale di seduta
La posizione ideale è quella con il busto leggermente piegato in
avanti. Se si soffre di problemi di schiena, regolare l’angolo
d’inclinazione del manubrio in modo che il busto sia in
posizione eretta, in quanto in tal modo non si sforzano la
colonna vertebrale e le articolazioni.
39
Page 22

I
Biometria cyclette
Altezza di seduta
Regolare il sellino dapprima all’altezza di seduta ottimale per le
proprie esigenze. Tale posizione comporta che, con le
ginocchia completamente tese, si raggiunge appena i pedali
con il tallone. Un movimento circolare delle gambe è garantito
quando non si tende completamente il ginocchio. Ciò
garantisce un allenamento delicato per le articolazioni di piedi,
ginocchia e fianchi.
Distanza tra sellino e manubrio
Distanza tra sellino e manubrioIl sellino del proprio hometrainer
(in base al modello) si lascia regolare anche in senso
orizzontale. Basta allentare la vite sotto il sellino e spostare
quest’ultimo, in base alla propria statura, in avanti o indietro,
lungo la barra guida.
Inclinazione del manubrio
arianti di allenamento
V
Per aumentare lo sforzo sulla muscolatura di coscia e glutei,
accentuare la fase di pressione sui pedali. Invece per un allenamento maggiore del lato posteriore della coscia, accentuare la
fase di trazione dei pedali con la cinghia verso l'alto.
Inoltre aumentando la resistenza dei pedali è possibile simulare
un tratto di salita in montagna. Con questo tipo di allenamento si
allenano non solo i muscoli delle gambe, ma anche quelli di
addome e schiena e i muscoli del busto e delle spalle.
Consigli per l’allenamento
Non dimenticate gli esercizi successivi di stretching, per
prevenire lesioni e dolori muscolari.
Schema di allenamento con l’hometrainer per 4 settimane per
principianti
Il manubrio del proprio hometrainer si lascia inclinare. Allentare
la vite sotto il cockpit e impostare la posizione ottimale per la
propria costituzione. Poi serrare nuovamente la vite per
impedire che il manubrio si sposti.
4th week
3
0 minuti a sforzo
medio, livello 4-6
30 minuti a sforzo
medio, livello 4-6
Pausa
30 minuti a sforzo
medio, livello 4-6
Pausa
30 minuti a sforzo
medio, livello 4-6
Pausa
L
unedì
Martedì
Mercoledì
Giovedì
Venerdì
Sabato
Domenica
1st week
1
5 minuti a sforzo
ridotto, livello 1-3
Pausa
15 minuti a sforzo
ridotto, livello 1-3
Pausa
15 minuti a sforzo
ridotto, livello 1-3
Pausa
Pausa
2nd week
2
0 minuti a sforzo
ridotto, livello 1-3
Pausa
20 minuti a sforzo
ridotto, livello 1-3
Pausa
20 minuti a sforzo
ridotto, livello 1-3
Pausa
Pausa
3rd week
3
0 minuti a sforzo
ridotto, livello 1-3
30 minuti a sforzo
ridotto, livello 1-3
Pausa
30 minuti a sforzo
ridotto, livello 1-3
Pausa
30 minuti a sforzo
ridotto, livello 1-3
Pausa
Nota: A partire dalla 5a settimana aumentare la durata degli
intervalli sotto sforzo fino a pedalare senza interruzioni per circa
20 – 30 minuti. Fare attenzione a che le pulsazioni di
allenamento nelle prime 8 settimane corrispondano a circa il 6065% delle pulsazioni massime e non superino il 75%
40
Page 23

PL
Biometria ćwiczenia na rowerze
Hometrainer (rower stacjonarny) – Dla wszystkich,
którzy lubią jeździć rowerem i chcą uniknąć obciążania stawów
Dzięki kołowemu ruchowi nóg powstaje oszczędzająca stawy
tóp, kolan i bioder forma ruchu. Jest idealna dla
s
awkowanego treningu układu krążenia, mającego na celu spa-
d
anie tłuszczów, gdyż wysiłek fizyczny jest wówczas mniejszy
l
niż w przypadku trenowania biegu. Tym samym hometrainer
nadaje się również dla osób z nadwagą oraz mających
problemy fizyczne i chcących uniknąć nadmiernego obciążania
stawów kolan i bioder.
Zalety:
• daje się optymalnie dostosować w sposób ergonomiczny do
żądanej pozycji treningowej
• idealny do trenowania układu krążenia oraz spalania
łuszczów
t
• niewielkie obciążenie stawów
• odpowiedni również dla osób z nadwagą i początkujących
• nie zajmuje dużo miejsca i jest łatwy do przewożenia
Wysokość siedzenia
Ustaw najpierw siodełko na optymalnej dla Ciebie wysokości.
Masz ją zapewnioną, gdy przy wyprostowanym kolanie
dosięgasz piętą do pedału. Kołowy ruch nóg uzyskujesz
wówczas, gdy nigdy całkowicie nie wyprostowujesz kolan. W
ten sposób zapewniasz oszczędzający stawy trening stóp, kolan
i bioder.
Odległość od siodełka do kierownicy
Siodełko Twojego roweru stacjonarnego (w zależności od
modelu) jest również przestawiane poziomo. W tym celu
poluzuj śrubę poniżej siodełka i przesuń siodełko, w zależności
od Twojego wzrostu, po szynie do przodu wzgl. do tyłu.
Zu?ycie energii (kcal)
ok. 6 00 n a god z.
Zu?ycie t?uszczw
ok. 4 8-54 gr. na g odz.
Ustawianie optymalnej pozycji siedzenia
Idealną postawę ciała masz wówczas, gdy górna część ciała
jest lekko pochylona do przodu. Jeśli masz problemy z plecami,
przestaw kąt nachylenia kierownicy tak, aby górna część ciała
miała bardziej wyprostowaną pozycję podczas siedzenia, co
pozwala oszczędzać kręgosłup i stawy.
Kąt nachylenia kierownicy
Kąt nachylenia kierownicy Twojego roweru stacjonarnego daje
się również przestawiać. Poluzuj śrubę poniżej deski
rozdzielczej i ustaw optymalną dla Ciebie pozycję. Przykręć
potem z powrotem śrubę, żeby kierownica się nie ześlizgiwała!
41
Page 24

L
P
Biometria ćwiczenia na rowerze
P
Biometria bicicleta ergométrica
Warianty treningu
Aby wzmocnić obciążenie mięśni udowych i pośladkowych,
kładź nacisk na dociskanie pedałów. Aby uzyskać wzmocniony
trening tylnych partii ud, odciągaj pedały za strzemiona do
góry.Ponadto masz możliwość symulowania jazdy pod górę,
zwiększając opór pedałów. Podczas takiego treningu do ćwiczenia mięśni nóg dochodzi również ćwiczenie mięśni brzucha
i pleców oraz górnej części ciała i barków.
Bicicleta estática – Para todos que se divertem a andar de
bicicleta e querem evitar sobrecarregar as articulações
Através do movimento circular das pernas surge uma forma de
movimento tolerante para as articulações dos pés, dos joelhos e
da anca. É ideal para um treino cardiovascular doseado com o
objectivo de treino de queima de gorduras, dado a exigência
física ser menor à do treino de corrida. Assim, a bicicleta
estática também se adequa a pessoas com excesso de peso ou
problemas físicos, que querem evitar sobrecarregar as
articulações dos joelhos e da anca.
As vantagens:
• ergonomicamente ajustável à posição de treino pretendida
ideal para o treino cardiovascular e para a queima de
•
orduras
g
sobrecarregamento reduzido das articulações
•
também adequado para pessoas com excesso de peso e prin-
•
cipiantes
• ocupa pouco espaço e é fácil de transportar
Zalecenie treningowe
Pamiętaj po treningu o ćwiczeniach rozciągających, żeby
zapobiec urazom i zakwasom..
4-tygodniowy plan treningu na rowerze stacjonarnym dla
początkujących
T
T
ydzień 3
30 minut przy
niskim obciążeniu,
stopień 1-3
30 minut przy
niskim obciążeniu,
stopień 1-3
Przerwa
30 minut przy
niskim obciążeniu,
stopień 1-3
Przerwa
30 minut przy
niskim obciążeniu,
stopień 1-3
Przerwa
Poniedziałek
Wtorek
Środa
Czwartek
Piątek
Sobota
Niedziela
Uwaga:
T
ydzień 1
15 minut przy
niskim obciążeniu,
stopień 1-3
Przerwa
15 minut przy
niskim obciążeniu,
stopień 1-3
Przerwa
15 minut przy
niskim obciążeniu,
stopień 1-3
Przerwa
Przerwa
T
ydzień 2
20 minut przy
niskim obciążeniu,
stopień 1-3
Przerwa
20 minut przy
niskim obciążeniu,
stopień 1-3
Przerwa
20 minut przy
niskim obciążeniu,
stopień 1-3
Przerwa
Przerwa
Od 5-tego tygodnia zwiększaj stopniowo czas trwania
interwałów obciążeniowych, aż zdołasz przebiec 20 do 30 minut
bez przerwy. Pamiętaj, żeby Twoje tętno treningowe wynosiło w
pierwszych 8 tygodniach treningu ok. 60 – 65 % maksymalnej
częstotliwości Twojego tętna i nie przekraczało 75 %.
ydzień 4
30 minut przy
średnim obciążeniu, stopień 4-6
30 minut przy
średnim obciążeniu, stopień 4-6
Przerwa
30 minut przy
średnim obciążeniu, stopień 4-6
Przerwa
30 minut przy
średnim obciążeniu, stopień 4-6
Przerwa
onsumo de energia (kcal)
C
aprox . 60 0 por hor a
onsumo de gordura
C
aprox . 48 -54 g por hor a
Ajuste da posição ideal
A postura ideal ocorre quando o tronco está ligeiramente
inclinado para a frente. Se tiver problemas de costas, ajuste o
ângulo de inclinação do volante, de modo a que o tronco tenha
uma posição vertical no banco, que poupa a coluna e as articulações.
42
Page 25

P
Biometria bicicleta ergométrica
Altura do banco
Comece por ajustar o banco à altura indicada para si. Esta
ocorre quando, com o joelho esticado, o calcanhar ainda consegue atingir o pedal. Um movimento circular das pernas ocorre
quando o joelho nunca tem de ficar totalmente esticado. Desta
forma, obtém um treino que poupa as articulações dos pés, dos
joelhos e da anca.
Para o treino orientado por ritmo cardíaco, recomenda-se um cinto
torácico.
Distância entre o banco e o volante
O banco da sua bicicleta estática também pode ser ajustado na
horizontal (consoante o modelo). Para isso, basta soltar o
parafuso por baixo do banco e desviar o banco, de acordo
com a sua altura, para a frente ou para trás na calha.
Inclinação do volante
Variações de treino
De modo a reforçar o esforço para os músculos das coxas e dos
glúteos, dê mais ênfase ao carregar nos pedais. De modo a
obter um treino reforçado da parte de trás das coxas, dê mais
ênfase ao puxar dos pedais com a fivela para cima.Além disso,
tem a possibilidade de simular a subida de um monte com uma
elevada resistência dos pedais. Com este treino são trabalhados
os músculos da perna, da barriga e das costas, bem como a
musculatura do tronco e dos ombros.
Recomendações de treino
Nunca se esqueça de fazer os exercícios de alongamento finais,
a fim de evitar ferimentos e dores musculares.
Plano de treino para 4 semanas para principiantes na bicicleta
estática
O volante da sua bicicleta estática pode ser ajustado em termos
de inclinação. Solte o parafuso por baixo do cockpit e ajuste a
posição ideal para si. Volte a apertar o parafuso, para que o
volante não escorregue para baixo!
1. semana
S
egunda-feira
Terça-feira
Quarta-feira
Quinta-feira
Sexta-feira
Sábado
Domingo
Nota:
15 minutos com
esforço reduzido
N
ível 1-3
Intervalo
15 minutos com
esforço reduzido
Nível 1-3
Intervalo
15 minutos com
esforço reduzido
Nível 1-3
Intervalo
Intervalo
A partir da 5ª semana, aumente a duração dos intervalos
2. semana
2
0 minutos com
esforço reduzido
Nível 1-3
Intervalo
20 minutos com
esforço reduzido
Nível 1-3
Intervalo
20 minutos com
esforço reduzido
Nível 1-3
Intervalo
Intervalo
3. semana
3
0 minutos com
esforço reduzido
Nível 1-3
30 minutos com
esforço reduzido
Nível 1-3
Intervalo
30 minutos com
esforço reduzido
Nível 1-3
Intervalo
30 minutos com
esforço reduzido
Nível 1-3
Intervalo
4. semana
3
0 minutos com
esforço médio
Nível 4-6
30 minutos com
esforço médio
Nível 4-6
Intervalo
30 minutos com
esforço médio
Nível 4-6
Intervalo
30 minutos com
esforço médio
Nível 4-6
Intervalo
de esforço até conseguir correr 20 a 30 minutos sem
interrupção. Observe se nas primeiras 8 semanas a sua
pulsação de treino está aprox. entre 60 – 65 % da sua pulsação
máxima e se não ultrapassa 75 %.
43
Page 26

DK
Biometri motionscykel
Motionscykel - for alle der nyder at cykle og ønsker at
undgå at belaste leddene
Den cirkulære benbevægelse skaber en blid form for bevægelse
for især fod-, knæ- og hofteled. Den er ideel til kredsløbstræning
med det formål at forbrænde fedt, da den fysiske belastning er
mindre end ved løbetræning. Således egner motionscyklen sig
også for overvægtige mennesker eller personer med fysiske problemer, der ønsker at undgå for stor belastning af knæ og hofte.
Fordelene:
ergonomisk tilpasset til den ønskede træningsindstilling
•
ideel til kredsløbstræning og fedtforbrænding
•
lav vægt på leddene
•
også velegnet til overvægtige og nybegyndere
•
• pladsbesparende og nem at transportere
adelhøjde
S
Først justeres sædet til din optimale sadelhøjde. Den optimale
sadelhøjde er, når du med strakt knæ lige præcis stadig kan nå
pedalen med hælen. Du opnår en mere rund bevægelse, når du
aldrig skal strække knæet helt igennem. Du opnår således en
mere skånsom træning af fod-, knæ- og hofteled.
Energiforbrug (kcal)
ca. 6 00 i time n
Fedtforbrnding
ca. 4 8-54 gr. i ti men
Indstilling af optimal siddestilling
I den ideelle siddestilling hælder overkroppen lidt fremad. Har
du problemer med ryggen justeres vinklen på styret, således at
overkroppen får en mere oprejst siddestilling, hvorved rygsøjlen
og leddene skånes.
Afstand fra sadel til styr
Sadlen på din motionscykel kan (afhængig af model) også
justeres vandret. For at gøre dette, skal du løsne skruen under
sadlen og afhængig af din egen størrelse, skubbes sadlen
fremad eller bagud på skinnen.
Styrets hældning
Styrets hældning kan indstilles. Løsn skruen under cockpittet og
indstil din optimale position. Stram derefter skruen igen, så styret
ikke glider igennem.
44
Page 27

Biometri motionscykel
Z
C
Biometrie rotoped
Træningsvariationer
For at øge belastningen på lår- og baldemuskler betones trædningen i pedalerne. For at øge belastningen på lårets bagside
betones opad bevægelsen ved at trække i pedalremmene.Du
har også mulighed for, med høj pedalmodstand, at simulere en
opkørsel på et bjerg. Ved denne træning bliver musklerne i
både ben, mave og ryg, såvel som musklerne i overkrop og
skuldre involveret.
Domácí trenažér - pro všechny, koho baví jízda na kole a
chtějí se vyvarovat zatěžování kloubů
Díky kruhovému pohybu nohou vzniká forma pohybu, která
obzvláště šetrná ke kotníkům a kolenním a kyčelním kloubům. Je
ideální pro pravidelný trénink srdečního oběhu s cílem spalování
tuků, protože namáhání tělesné soustavy je nižší než při
ěžeckém tréninku. Vzhledem k tomu je domácí trenažér vhodný
b
ro osoby s nadváhou nebo tělesnými problémy, kteří se chtějí
p
yhnout vysokému namáhání kolenních a kyčelních kloubů.
v
Výhody:
• lze ergonomicky optimálně nastavit na požadovanou
tréninkovou polohu
• ideální pro trénink srdečního oběhu a spalování tuků
• nízké namáhání kloubů
• vhodné též pro osoby s nadváhou a začátečníky
• šetří místo a lze jím jednoduše manipulovat
Anbefaling
Foretag altid udstrækningsøvelser efter træningen for at undgå
skader og ømme muskler.
4-ugers træningsprogram for nybegyndere på motionscyklen
3
. uge
30 minutter ved
l
av belastning
niveau 1-3
3
0 minutter ved lav
b
elastning niveau
1-3
Pause
30 minutter ved
lav belastning
niveau 1-3
Pause
30 minutter ved lav
belastning niveau
1-3
Pause
4
. uge
30 minutter ved
m
iddel belastning
niveau 4-6
3
0 minutter ved
m
iddel belastning
niveau 4-6
Pause
30 minutter ved
middel belastning
niveau 4-6
Pause
30 minutter ved
middel belastning
niveau 4-6
Pause
Mandag
T
irsdag
Onsdag
Torsdag
Fredag
Lørdag
Søndag
Bemærk:
1
. uge
15 minutter ved lav
b
elastning niveau
1
-3
Pause
15 minutter ved lav
belastning niveau
1-3
Pause
15 minutter ved lav
belastning niveau
1-3
Pause
Pause
Fra den femte uge øges varigheden af belastningsinter-
2
. uge
20 minutter ved
l
av belastning
niveau 1-3
Pause
20 minutter ved lav
belastning niveau
1-3
Pause
20 minutter ved lav
belastning niveau
1-3
Pause
Pause
vallerne indtil du kan klare 20 til 30 minutter uden afbrydelse.
Sørg for at din træningspuls de første otte uger ligger på ca. 60
– 65 % af din maks. puls og at den ikke overstiger 75 %.
Spotřeba energie (v kilokaloriích)
cca 600 za hodinu
Spalování tuku
ca 48-54 gramů za hodinu
c
Nastavení optimální polohy sezení
Ideální držení těla dosáhnete, když je horní část těla mírně
nahnutá směrem dopředu. Pokud máte problémy se zády,
nastavte si úhel sklonu řidítek tak, aby se horní část těla
nacházela ve vzpřímené poloze, která šetří páteř a klouby.
45
Page 28

CZ
Biometrie rotoped
Výška sezení
Nastavte si nejprve sedlo na pro vás optimální výšku sezení. Tu
dosáhnete tak, když s propnutým kolenem patou ještě tak akorát
dosáhnete na pedály. Kruhové formy pohybu nohou dosáhnete,
když úplně nepropínáte kolena. Tak provádíte trénink, který šetří
kotníky a kolenní a kyčelní klouby.
Vzdálenost sedla od řidítek
Sedlo vašeho domácího trenažéru lze (v závislosti na modelu)
nastavit také horizontálně. Za tímto účelem se uvolní šroub pod
sedlem a sedlo se posune podle vaší tělesné velikosti po liště
směrem dopředu nebo dozadu.
Sklon řidítek
bměny tréninku
O
Pro posílení namáhání stehenního a hýžďového svalstva, zvyšte
důraz při šlapání na pedály. Pro posílení tréninku zadní strany
stehen zvyšte důraz na zvedání pedálů s klipsnami.Mimoto existuje možnost simulace jízdy do kopce nastavením většího
odporu pedálů. Při tomto tréninku se mimo svalstva nohou
zapojuje také břišní a zádové svalstvo a také svalstvo horní části
těla a ramen.
Doporučení pro trénink
Nezapomínejte na následná protahovací cvičení, zabráníte tak
zraněním a namožení svalů.
4týdenní tréninkový plán pro začátečníky na domácím trenažéru
Sklon řidítek domácího trenažéru lze nastavit. Uvolněte šroub
pod ovládacím panelem a nastavte pro vás optimální polohu
řidítek. Poté šroub opět pevně dotáhněte, aby řidítka neprokluzovala.
Pondělí
Úterý
Středa
Čtvrtek
Pátek
Sobota
Neděle
1. týden
15 minut při
nízké zátěži,
stupeň 1-3
Přestávka
15 minut při
nízké zátěži,
stupeň 1-3
Přestávka
15 minut při
nízké zátěži,
stupeň 1-3
Přestávka
Přestávka
2. týden
20 minut při
nízké zátěži,
stupeň 1-3
Přestávka
20 minut při
nízké zátěži,
stupeň 1-3
Přestávka
20 minut při
nízké zátěži,
stupeň 1-3
Přestávka
Přestávka
3. týden
30 minut při
nízké zátěži,
stupeň 1-3
30 minut při
nízké zátěži,
stupeň 1-3
Přestávka
30 minut při
nízké zátěži,
stupeň 1-3
Přestávka
30 minut při
nízké zátěži,
stupeň 1-3
Přestávka
4. týden
30 minut při
střední zátěži,
stupeň 4-6
30 minut při
střední zátěži,
stupeň 4-6
Přestávka
30 minut při
střední zátěži,
stupeň 4-6
Přestávka
30 minut při
střední zátěži,
stupeň 4-6
Přestávka
Upozornění: Od 5. týdne zvyšujte dobu intervalů zátěže, až
zvládnete cvičit 20 až 30 minut bez přerušení. Dbejte na to,
aby váš tréninkový puls během prvních 8 týdnů obnášel cca 60 65 % vaší maximální tepové frekvence a nepřekročil 75 %.
46
Page 29

47
Page 30

Ersatzteilzeichnung
7
6
2
1
31
4
30
23
26
24
19
29
18
3
8
19
9
16
13
17
15
5
22
25
11
10
12
16
14
48
27
28
21
20
21
Page 31

Ersatzteilbestellung
– GB – Spare parts order
– F – Commande de pièces de rechange
– NL – Bestelling van reserveonderdelen
– E – Pedido de recambios
– I – Ordine di pezzi di ricambio
GIRO S1
07689-150
1 1x 68009750
2 1x 68009751
3 1x 68009752
4 1x 68009753
5 1x 68009754
6 1x 68009755
7 1x 68009756
8 1x 68009757
9 1x 68009758
10 1x 68009759
11 1x 68009367
– PL – Zamówiene części zamiennych
– P – Encomenda de peças sobressalentes
– DK – Bestilling af reservedele
– CZ – Objednání náhradních dílů
– D – Farbliche Abweichungen bei Ersatzteilen sind möglich.
– GB – Colours may vary with replacement parts.
– F – Des écarts de couleur sont possibles pour les pièces de rechange.
– NL – Afwijkingen in kleur bij reserveonderdelen zijn mogelijk.
– E – Es posible que los recambios presenten diferencias en el color
– I – Per le parti di ricambio sono possibili differenze di colore.
– PL – W przypadku części zamiennych kolor może się różnić od
koloru oryginalnego.
– P – Existe a possibilidade de existirem desvios nas cores das peças
sobressalentes.
– DK – Farveafvigelser på reservedele kan forekomme.
– CZ – Barevné odchylky u náhradních dílů možné.
12 1x 68009011
13 1x 68009012
14 1x 68009760
15 1x 68009369
16 1x 68009300
17 1x 68009016
18 1x 68009762
19 1x 68009763
20 1x 68009764
21 1x 68009765
22 1x 68009298
23 1x 68009054
24 1x 68009374
25 1x 68009768
26 1x 68009769
27 1x 68009026
28 1x 68009027
29 1x 68009028
30 1x 68009770
31 1x 68009771
07 68 9- 15 0
– D – Beispiel Typenschild - Seriennummer
– GB – Example Type label - Serial number
– F – Example Plaque signalétiqu - Numèro de serie
– NL – Bij voorbeeld Typeplaatje - Seriennummer
– E – Ejemplo Placa identificativa - Número de serie
– I – Esempio Targhetta tecnica - Numero di serie
– PL – Przyklady Tabliczka identifikacyna - Numer serii
– P – Exemplo placa de características - número de série
– DK – Eksempel type label – serienummer
– CZ – Primer tipske ploščice – serijske številke
49
Page 32

505152
Page 33

Page 34

HEINZ KETTLER GmbH & Co. KG · Postfach 1020 · D-59463 Ense-Parsit
www.kettler.net
docu 3834/03.16
 Loading...