


KERN & Sohn GmbH
Ziegelei 1
E-Mail: info@kern-sohn.com
Phone: +49-[0]7433- 9933-0
Internet: www.kern-sohn.com
Operating manual
Counting balanc es
KERN CIB
Version 1.0
2020-09
GB
D-72336 Balingen
Fax: +49-[0]7433-9933-149
CIB-BA-e-2010

KERN CIB
Counting balances
GB
Version 1.0 2020-09
Operating manual
Contents
1 Technical data ................................................................................................ 4
2 Appliance overview ....................................................................................... 5
2.1 Overview of displays ................................................................................................................ 6
2.1.1 Display weight ............................................................................................................................ 6
2.1.2 Display reference weight ............................................................................................................ 7
2.1.3 Display piece quantity................................................................................................................. 7
2.1.4 Power supply unit display ........................................................................................................... 7
2.2 Keyboard overview ................................................................................................................... 8
3 Basic Information (Gener al) ........................................................................ 11
3.1 Utilisation in accordance with specifica tion ....................................................................... 11
3.2 Improper Use .......................................................................................................................... 11
3.3 Warranty .................................................................................................................................. 11
3.4 Monitoring of Test Resources ............................................................................................... 12
4 Basic Safety Precautions ............................................................................ 12
4.1 Pay attention to the instructions in the Operation Manual ................................................ 12
4.2 Personnel training .................................................................................................................. 12
5 Transport and storage ................................................................................. 12
5.1 Testing upon acceptance ...................................................................................................... 12
5.2 Packaging / return transport ................................................................................................. 12
6 Unpacking, Setup and Commissioning ..................................................... 13
6.1 Installation Site, Location of Use .......................................................................................... 13
6.2 Unpacking, Scope of delivery ............................................................................................... 13
6.2.1 Placing ...................................................................................................................................... 14
6.3 Mains connection ................................................................................................................... 14
6.4 Rechargeable battery operation ........................................................................................... 14
6.5 Initial Commissioning ............................................................................................................ 14
6.5.1 Start-up ..................................................................................................................................... 15
6.5.2 Switch Off ................................................................................................................................. 16
6.5.3 Balance zero display ................................................................................................................ 16
6.5.4 Stability display ......................................................................................................................... 16
6.6 Adjustment .............................................................................................................................. 16
6.6.1 Adjustment menu ...................................................................................................................... 17
7 Piece counting ............................................................................................. 19
7.1 Determination of the reference weight by weighing ........................................................... 19
7.2 Numeric input of the reference weight ................................................................................. 20
7.3 Delete reference weight ......................................................................................................... 20
7.4 Automatic reference optimization ........................................................................................ 20
7.5 Store/call up reference weight .............................................................................................. 21
7.5.1 Save via numeric keyboard ...................................................................................................... 21
7.5.2 Call up via numeric keyboard ................................................................................................... 22
7.5.3 Save via quick keyboard........................................................................................................... 22
7.5.4 Call up via quick keyboard ....................................................................................................... 23
7.6 Counting with target piece number ...................................................................................... 24
7.6.1 Set target piece number ........................................................................................................... 24
7.7 Count with tolerance control - Fill to target ......................................................................... 25
7.7.1 Enter tolerance range ............................................................................................................... 25
2 CIB-BA-e-2010

8 Taring ............................................................................................................ 27
8.1 Determination of the tare weight by weighing .................................................................... 27
8.2 Numerical input of tare weight (PRE-TARE) ........................................................................ 28
9 Totalization ................................................................................................... 29
9.1 Add up “Number of parts" ..................................................................................................... 29
9.2 Add up “weight" ..................................................................................................................... 30
9.3 Delete stored values............................................................................................................... 31
10 Menu ............................................................................................................. 32
10.1 Navigation in the menu .......................................................................................................... 32
10.2 Menu overview functions menu „UF 1-10“ .......................................................................... 33
11 Operation ...................................................................................................... 35
11.1 Automatic switch-off function – UF-3 ................................................................................... 35
11.2 Background illumination of display – UF-4 ......................................................................... 36
12 Servicing, maintenance, disposal .............................................................. 38
12.1 Cleaning .................................................................................................................................. 38
12.2 Servicing, maintenance ......................................................................................................... 38
12.3 Disposal ................................................................................................................................... 38
12.4 Error reports ........................................................................................................................... 38
13 Instant help ................................................................................................... 39
14 Declaration of conformity ........................................................................... 40
CIB-BA-e-2010 3

Weighing plate, stainless
1 Technical data
KERN TCIB
3K-4-A
Readability (d) 0.2 g 0.5 g 1 g 2 g
Weighing range (max) 3 kg 6 kg 15 kg 30 kg
Reproducibility 0.2 g 0.5 g 1 g 2 g
Linearity ± 0.4 g ± 1.0 g ± 2 g ± 4 g
Stabilization time 2 sec. 2 sec. 2 sec. 2 sec.
Recommended
adjustment weight, not
added (class)
Weighing unit kg kg kg kg
Smallest part weight for
piece counting under lab
conditions*
Smallest part weight for
piece counting under
normal conditions**
3 kg (M1) 5 kg (M1) 15 kg (M1) 30 kg (M1)
0.1 g 0.2 g 0.5 g 1 g
1 g 2 g 5 g 10 g
TCIB
6K-4-A
TCIB
15K-3-A
TCIB
30K-3-A
Heating time (operating
temperature)
Reference quantity freely selectable
Net weight (kg) 4 kg
Permissible ambient
condition
Humidity of air 15% - 85% (non-condensing)
steel
Dimensions of the
housing (B x D x H)
Mains connection Mains adapter 100-240 V, 50/60 Hz; balance 12 V, 1000 mA
Rechargeable battery Without display backli g hti ng
Operating duration approx. 160 h / loading time approx. 14
Operating duration approx. 90 h / loading time approx. 14
350 x 330 x 120 mm
With display backlig hti ng :
30 min
-10° C to 40° C
315 x 215 mm
hours
hours
4 CIB-BA-e-2010

1. Weighing pan
6. Adjustment feet
7. Battery compartment
2 Appliance overview
2. Keyboard
3. Display
4. Battery charge status display
5. Bubble level
8. Mains connection
9. Adjustment switch
CIB-BA-e-2010 5

Weight
Reference weight
Quantity
LED power supply unit
2.1 Overview of displays
2.1.1 Display weight
Here, the weight of your goods is displayed.
The overlay indicates:
Tare value in memory
placed weighing good tared
Zeroing display
6 CIB-BA-e-2010

2.1.2 Display reference weight
The reference weight of a sample is shown here. This value is either entered by user
or calculated by the balance.
The overlay indicates:
Placed reference weight insufficient for reference calculation
Placed number of pieces insufficient for reference calculation/
Stability display
2.1.3 Display piece quantity
Here, all the parts placed on balance are immediately displayed by number.
The overlay indicates:
Memory locations 01-10
Memory locations 11-20
Data in sum memory
2.1.4 Power supply unit display
If the LED next to this symbol glows green, the power
green
supply unit is correctly connected and the rechargeable
battery is being charged.
CIB-BA-e-2010 7

2.2 Keyboard overview
8 CIB-BA-e-2010

Selection
Function
Quick buttons memory locations 1-20
-
Changeover button between quick buttons 1-10 and 11-20
Addition in sum memory
-
-
Call up sum memory
Turn on or off the balanc e
Numeric keys
Decimal point
Deleting key
Return to weighing mode
Call up counting with target weight
Call up counting with tolerance control
Enter reference weight through weighing
Display reference weight stored last
Store reference weights in memory
Call up stored reference weights
CIB-BA-e-2010 9
Call up sum memory

In menu: Scroll up
Decimal digit: To left
In menu: Scroll down
Decimal digit: to right
Addition in sum memory
Call up sum memory
In menu: Confirm selected setting
Zeroing key
Taring key
10 CIB-BA-e-2010

3 Basic Information (General)
3.1 Utilisation in accord ance with specificatio n
The balance you pur ch as ed i s i n tended to determine the weighing value o f m ater i al to
be weighed. It is int ended to b e used as a “no n-auto matic balanc e”, i .e. the ma teri al to
be weighed is manually and care fully pl aced in t he centre of the w eighing pan. As soon
as a stable weighing value is reached, the weighing value can be read.
3.2 Improper Use
• Do not use balance for dynamic add-on weighing procedures, if small amounts of
goods to be weig hed a r e r emov ed or add ed. The “stability compe nsation“ installed
in the balance may result in displaying an incorrect measuring value! (Example:
Slowly draining fluids from a container on the balance.)
• Do not leave permanent load on t he weighing pan. This may damage the measuring
system.
• Impacts and overloading exceeding the s tated maxi mum load (max ) of the balance,
minus a possibly existing tare load, must be strictly avoided. Balance may be
damage by this.
• Never operate balance in expl osive environment. The ser ial version is not ex plosion
protected.
• The structure of the balance may not be modified. This may lead to incorrect
weighing results, safety-related fault s and des tr uc ti on o f the bala nce.
• The balance may only be used according to the described conditions. Other areas
of use must be released by KERN in writing.
3.3 Warranty
Warranty claims shall be voided in case
• Our conditions in the operation manual are ignored
• The appliance is used outside the described applications
• The appliance is modified or ope ned
• Mechanical damage or damage by media, liquids, natural wear and tear
• Improper setup or incorrect electrical connection
• The measuring system is overloaded
CIB-BA-e-2010 11

3.4 Monitoring of Test Resources
In the framework o f qu al i ty assurance the me asur i ng -related properties of t he bal a nce
and, if applic able, the testing weight, must be c heck e d r eg ul ar ly. The responsibl e user
must define a suitable interval as well as type and scope of this test. Information is
available on KERN’s home page (www.kern-sohn.com) with regard to the monitoring
of balance test subs tances and the t est weig hts requir ed for this. In K ERN's accr edited
calibration laboratory test weights and balances may be calibrated (return to the
national standard) fast and at moder ate cost.
4 Basic Safety Precautions
4.1 Pay attention to the instructions in the Operation Manual
Carefully read this operation manual before setup and
commissioning, even if you are already familiar with KERN balances.
4.2 Personnel training
The appliance may only be operated and maintained by trained personnel.
5 T ransport and storage
5.1 Testing upon acceptance
When receiving the appliance, ple ase check pack aging immediatel y, and the appl iance
itself when unpacking, for possible visible damage.
5.2 Packaging / return transport
Keep all parts of the original packaging for a possibly
required return.
Only use original packaging for returning.
Prior to dispatch disconnect all cables and remove
loose/mobile parts.
Reattach possibly supplied transport securing devices.
Secure all parts such as the glass wind screen, the
weighing platform, power unit etc. against shifting and
damage.
12 CIB-BA-e-2010

Balance
Weighing plate
Mains adapter
Protective cover
Internal battery
Operating manual
6 Unpacking, Setup and Commi s si oning
6.1 Installation Site, Location of Use
The balances are designed in a way that reliable weighing results are achieved in
common conditions of use.
You will work accurately and fast, if you select the right location for your balance.
On the installation site observe the following:
• Place the balance on a firm, level surface.
• Avoid extreme heat as well as temper ature fluct uatio n caus ed by i nstall ing next
to a radiator or in direct sunlight.
• Protect the balance against direct draughts due to open windows and doors.
• Avoid jarring during weighing.
• Protect the balance against high humidity, vapours and dust.
• Do not expose the device to extreme dampness for longer periods of time.
Non-permitted condensation (co ndensation of air humidity on the appl i ance)
may occur if a cold appliance is taken to a considerably warmer environment.
In this case, acclimatize the disconnected appliance for approx. 2 hours at
room temperature.
• Avoid static charge of goods to be weighed or weighing container.
• Do not operate in areas with hazard of explosive material or in potentially
explosive atmospheres due to materials such as gasses, steams, mists or
dusts.
• Keep away chemicals (such as liquids or gasses), which could attack and
damage the balance inside or from outside.
If electro-magnetic fields or static charge occur, or if the power supply is unstable,
major deviations on the display (incorrect weighing results) are possible. In that case,
the location must be changed.
6.2 Unpacking, Scope of delivery
Remove device and access ories car efully from p ackaging , remov e packagi ng mater ial
and place device at the planned work place. Check if that there has been no damage
and that all packing items are present.
Scope of delivery / serial accessories
CIB-BA-e-2010 13

flashing
The balance switches off automatically if the rechargeable battery capacity is
below 5.4 V
6.2.1 Placing
Level balance with foot screws until the air bubble of the
water balance is in the prescribed circle.
6.3 Mains connection
Power is supplied via the external mains adapter. The stated voltage value must be
the same as the local voltage. Only use original KERN mains adapters. Using other
makes requires consent by KERN.
If the LED next to this power supply unit symbol glows green, the power supply
unit is connected correctly.
6.4 Rechargeable battery operation
The optionally supplied battery is charged with the supplied power supply.
Before the first use, the rechargeable battery should be charged by connecting it to
the mains power supply for at least 14 hours. The rechargeable battery has a service
life of approx. 160 hours without background illumination or 90 hours with
background illumination. Charging time until complete recharging is approx. 14 h.
The appearance of the battery symbol in the weight display indicates that the
rechargeable battery is almost exhausted. If no load is placed during the red LED
display, the balance will switch off automatically after about 20-30 minutes. Connect
the mains adapter as soon as possible to charge the rechargeable battery.
Check levelling regularly.
• The appearance of the battery symbol in the weight display indicates that the
rechargeable battery is soon exhausted. Charge the battery with the help of the
supplied power pack.
is displayed
6.5 Initial Commissioning
In order to obtain exact results with the electronic balances, your balance must have
reached the operating temperature (see warming up time chap.1). During this
warming up time the balance must be connected to the power supply (mains,
accumulator or battery).
The accuracy of the balance depends on the local acceleration of gravity.
Strictly observe hints in chapter Adjustment.
Rechargeable battery capacity below 5.6 V
Rechargeable battery capacity below 5.5 V
14 CIB-BA-e-2010
6.5.1 Start-up
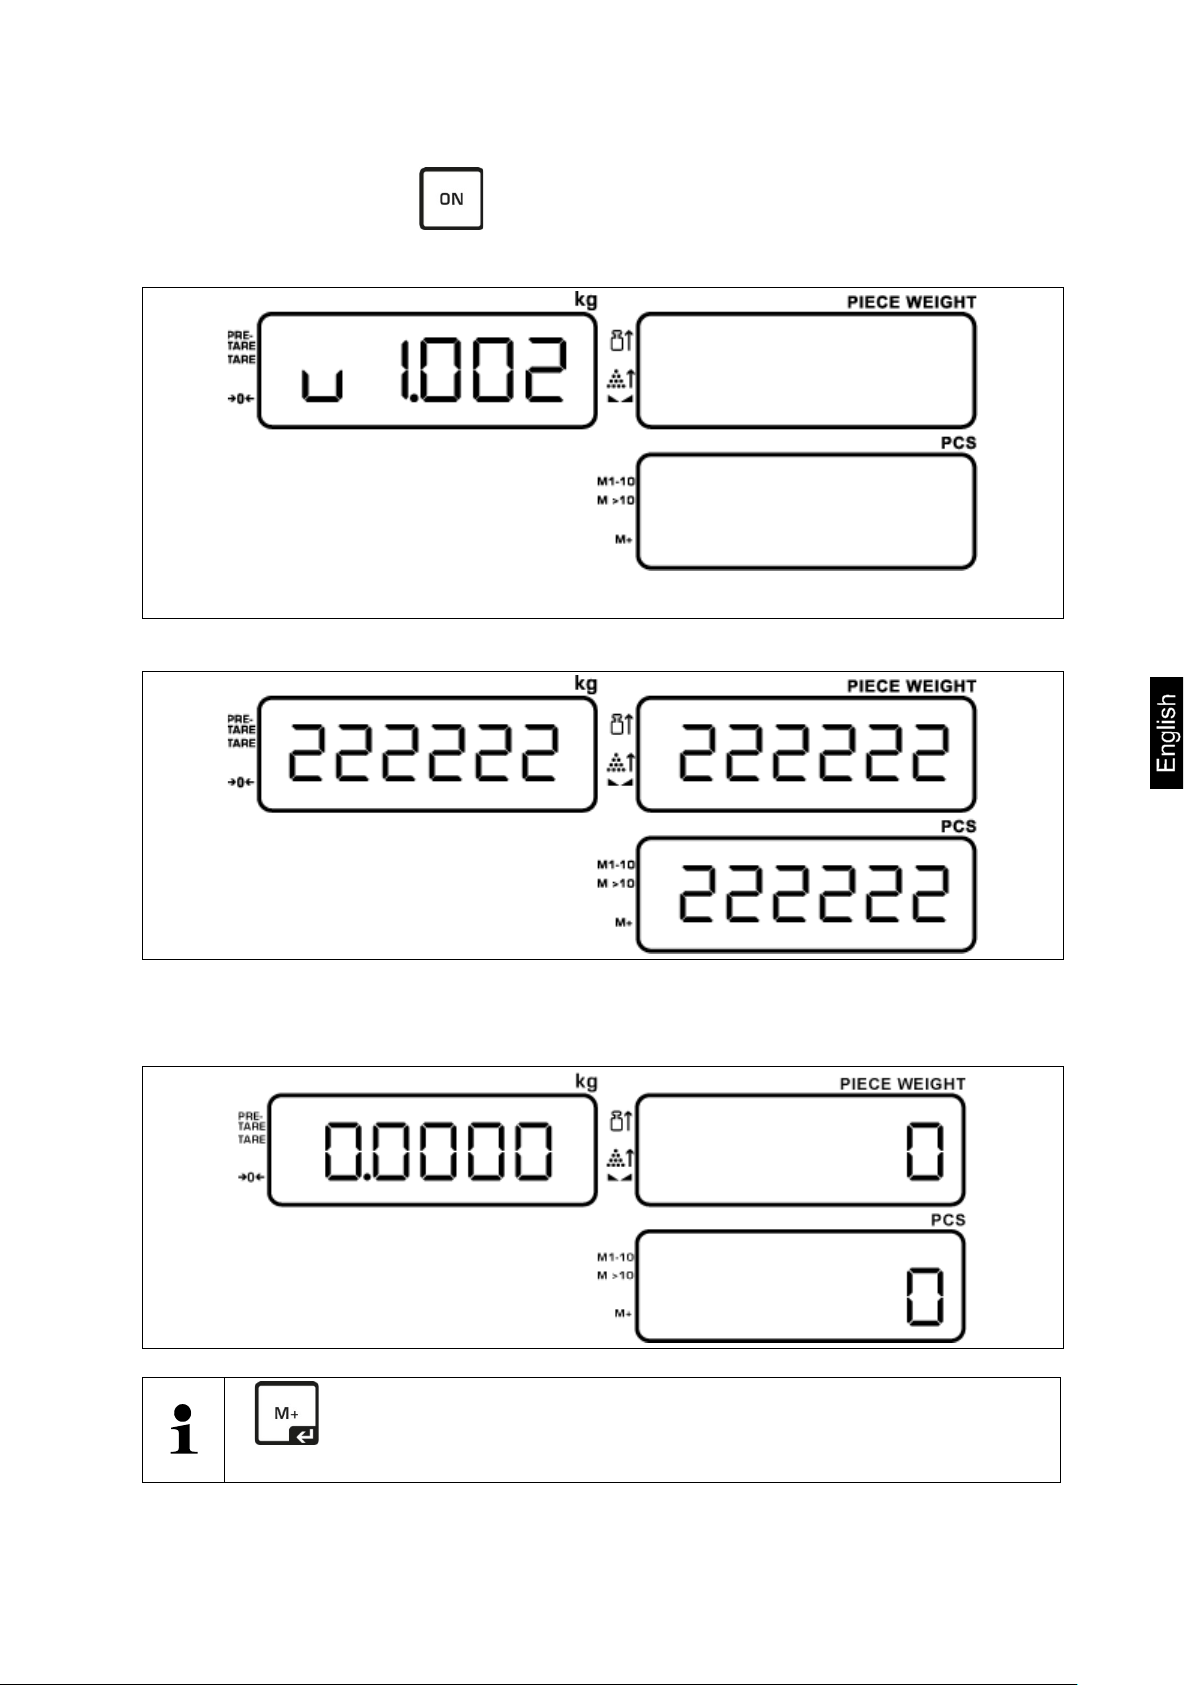
Start balance by pressing .
After switch-on, the software version will appear shortly:
(example)
Afterwards the balance will carry out a segment test:
After that the balance will change automatically into the weighing mode, the zero
display appears in all three display windows and the balance is now ready for
operation:
If is pressed longtime during the segment test, the software date will
appear. Example: 202 0-04-01.
CIB-BA-e-2010 15

required for stabilization.
6.5.2 Switch Off
Switch off balance using .
6.5.3 Balance zero display
Environmental influences can lead to the exact figure of zero not being displayed in
spite of an empty weighing dish. It is, however, possible to reset your balance to zero
at any time and thus ensure that weighing really does commence at zero. Setting to
zero when a weight is applied is only possible within a certain type-dependent range.
In the event t hat the bal ance c annot be r es et t o z ero w ith a n appli ed w eight, thi s range
has been exceeded (± 0,2 % max).
To reset the balance to zero, press key . A triangle pops up next to the
symbol on the display.
6.5.4 Stability display
If in the display next to the symbol a triangle appears, the balance is in a
stable status. If the status is instable the display disappears.
6.6 Adjustment
As the acceleration value due to gravity is not the same at every location on earth,
each balance must be coordinated - in compliance with the underlying physical
weighing principle - to the existing acceleration due to gravity at its place of location
(only if the balance has not already been adjusted to the location in the factory). This
adjustment process must be carried out for the first commissioning, after each
change of location as well as in case of fluctuating environment temperature. To
receive accurate measuring values it is also recommended to adjust the balance
periodically in weighing operation.
• Prepare adjustment weight, see chap. 1.
The adjustment weight you use is dependent on the capacity of the balance.
Perform adjustment as close as possible to the maximum load. Info about test
weights can be found on the Internet at: http://www.kern-sohn.com
• Observe stable environmental conditions. A warm up time (see chapter 1) is
16 CIB-BA-e-2010

Use to advance to next menu item
Press
Press .
6.6.1 Adjustment menu
In order to adjust the balance, default settings have to be carried out in the
adjustment menu.
Navigation in the adjustment menu:
Call up menu
In weighing mode keep
pressed and also press .
The first menu item ECF-1 is
displayed.
Select menu block
• Use to return to previous menu item
•
Set parameter
With numeric keys to
Confirm setting
Return to weighing mode/ exit function without saving
Menu overview adjustment menu
Menu item
Description of function
ECF-1 Adjustment weight
ECF-2 Zero point adjustment
ECF-3 Adjustment weight and AD converter value
CIB-BA-e-2010 17

required adjustment weight.
Place an adjustment weight of the
Procedure when adjusting:
Observe stable environmental conditions. A warming up time (see chapter 1) is
required for stabilization. Ensure that there are no objects on the weighing plate.
How to carry out adjustments
Ensure that there are no objects on the weighing pan.
In weighing mode keep pressed
and at the same time press . The
first menu item “ECF-1” is displayed.
Press , in the PCS-window the AD
converter value appears. 0.0 g is
displayed
Press anew. The weight display
flashes. Use the numeric keys to
for entering the value of the
(example)
corresponding size on the weighing
plate and press to finish the
adjustment process.
The balance changes then
automatically into weighing mode.
* The adjustment should be made with the recommended adjustment weight (see
chap. 1 "Technical data"). Weights of different nominal values may also be used for
adjustment but are not optim al for t ech ni c al m eas ur ing.
Info about adjustment w eig hts can be foun d on the Inter net at: http://www.kernsohn.com
18 CIB-BA-e-2010

are displayed.
7 Piece counting
With piece counting you can either count parts into a container or remove parts from
a container. To count a greater number of parts, the average weight per part has to
be determined with a small quantity (reference quantity). The larger the reference
quantity, the higher the counting exactness. High reference must be selected for
small parts or parts with considerably different sizes.
7.1 Determination of the reference weight by weighing
Set balance to zero and tare, as
required. Place a known number of
single parts on the balance as reference
weight. If the balance is stable, enter
the quantity of the placed parts on the
numeric keyboard. The input is shown
in the reference weight window; press
(example)
, the total weight of the parts, the
piece weight and the number of parts
Unload the weighing plate and place the
parts to be counted on the weighing
plate.
The weight of all parts, the piece weight
and the number of parts are displayed.
CIB-BA-e-2010 19

parameters are displayed.
7.2 Numeric input of the reference weight
Unload the balance, enter the reference
weight via the numeric keyboard and
confirm by .
Now place the parts to be counted on
the weighing plate. All piece quantity
(example)
7.3 Delete reference wei gh t
Unload the weighing plate and press , the reference weight is deleted.
7.4 Automatic reference o pt i miz at ion
If it was impossible to determine a reference due to instable goods to be weighed or
an insufficient reference weight, the [ ] display will appear in the reference weight
window during reference calculation.
The overlay indicates:
Placed number of pieces insufficient for reference calculation
< 40 d
Placed reference weight insufficient for reference calculation
< 4/5 d
Add additional parts now until the [ ] display disappears.
An audio signal indicates that reference optimization has been carried out.
At every reference optimisation, the reference weight is calculated anew. As the
additional parts increase the base for the calculation, the reference also becomes
more exact.
20 CIB-BA-e-2010

Unload the weighing plate and enter the
Enter the desired memory location via
7.5 Store/call up reference weight
50 memory locations (+ 20 quick memory locations) are available.
7.5.1 Save via numeric keyboard
reference weight via the numeric
keyboard. Then press l ong t ime the
button .
(example)
Then press longtime the button .
„S 00“ is displayed flashing.
the numeric keyboard and confirm by
.
The memory location has now been
allocated by the reference weight, the
balance is in weighing mode.
CIB-BA-e-2010 21

The reference weight is now stored in this button.
7.5.2 Call up via numeric keyboard
When the reference weight is required at a later point in time it can be called by
pressing the key and entering the relevant memory location number.
Unload the weighing plate and press
longtime the button . „G00“ is
displayed flashing .
Use the numeric keys to enter the
memory location and confirm by
pressing .
The reference weight stored in this
memory location appears.
The balance is in weighing mode and
now you can count with this reference
weight.
7.5.3 Save via quick keyboard
Unload the weighing plate and enter the
reference weight via the numeric
keyboard.
After that press , followed by
. „PLU 00“ is displayed.
Then press the desired quick button.
(example)
22 CIB-BA-e-2010

Use to change over between the memory locations 1-10 and 11-20. In the
piece quantity window the [ ] display shows which memory place group has been
selected at the moment:
7.5.4 Call up via quick keyboard
Unload the weighing plate and press the respective quick button, the stored
reference weight is displayed. Now it is possible to count.
CIB-BA-e-2010 23

Target value
Optical signal
Audio signal
The balance changes automatically into
7.6 Counting with target piece number
This function can be used to program a target number of pieces. Reaching the target
value is now supported by an optical and an acoustic signal:
Placed piece number less
than target value
The placed piece number
corresponds to the target
Display background
illumination lights yellow
Display background
illumination lights green
value
Placed piece number over
target value
Display background
illumination lights red
7.6.1 Set target piece number
First determine the piece weight as
specified in chap. 7.1 or 7.2.
Press and enter target piece
number via the numeric keyboard.
Slow beeping
No beeping
Fast beeping
(example)
Acknowledge with . „On“ is shortly
displayed, the functio n i s enabl ed.
target piece counting mode.
Count-in the parts, when display green and no signal sounds, the target piece
number is reached.
(example)
(example)
24 CIB-BA-e-2010

Target value
Optical signal
Audio signal
Placed piece number
below tolerance
Display background
illumination lights yellow
Slow beeping
Placed piece number
within tolerance
Display background
illumination lights green
No beeping
above tolerance
illumination lights red
Press , enter „000000“ and confirm by .
Delete tolerance value:
In weighing mode press , enter „000000“ and confirm by .
7.7 Count with tolerance control - Fill to target
This function allow s count-in parts within a tolerance determined beforehand.
Reaching the target value is now supported by an optical and an acoustic signal:
Placed piece number
Display background
7.7.1 Enter tolerance range
Note:
If a target value has been determined before by the button, this val ue must
be deleted first:
First determine the piece weight as
specified in chap. 7.1 or 7.2.
Fast beeping
Press longtime, the display for
entering the lower limit value „PCS L“
appears.
Enter the lower limit value and confirm
with
CIB-BA-e-2010 25
(example)
(example)

The balance changes automatically to
Finish the input by and enter the values anew.
the prompt for entering the upper limi t
value. Enter upper limit value and
confirm with .
„on“ is displayed shortly.
The balance changes automatically into
tolerance weighing mode.
(example)
Count-in parts; when the piece number is within the tolerance range, the display
background illumination changes to green.
Note:
If in the display appears:
a wrong input was entered.
Delete tolerance value:
In weighing mode press , enter „000000“ and confirm by .
26 CIB-BA-e-2010

Place empty tare container on the
Fill weighing goods into the container and read the weight.
reached when the whole weighing range is exhausted.
8 Taring
The dead weight of any weighing container may be tared away by pressing a button,
so that the following weighing procedures show the net weight of the goods to be
weighed.
8.1 Determination of the tare weight by weighing
weighing plate. The total weight of the
container is displayed.
(example)
Press
After dead stop control was carried out,
the display is reset to "0". The weight of
the container is now internally saved.
The zero display and the arrow next to
the symbol are displayed.
• When the balance is unloaded the saved taring value is displayed with
negative sign.
• To delete the stored tare value, unload the weighing plate and then
press the TARE key; the [ ] display next to the symbol
disappears.
• The taring process can be repeated any number of times. The limit is
CIB-BA-e-2010 27

value and confirm by .
8.2 Numerical input of tare weight (PRE-TARE)
Ensure that there are no loads on the
weighing plate.
Press and use the numeric keys
to for entering the pre-tare
The tare weight is displayed as negative
value.
Now you can weigh into the container, the tare weight will automatically be deducted.
• To delete the pre-tare value with unloaded weighing plate, press
28 CIB-BA-e-2010

confirm with .
The reference weight, the piece weight and the number of parts are displayed.
of parts of the second weighing.
Weigh-in more parts as specified. Please note that the balanc e mus t be unlo ade d
9 Totalization
The balance is equipped with a sum memory used for adding up of identical counted
parts to total quantity and total weight.
9.1 Add up “Number of parts"
Place a reference weight which should
correspond to a certain number of parts
and enter the number of parts via the
numeric keys to and
Remove the reference weight and for the
first totalization plac e a number o f parts
and press . „r01“ is shortly
displayed, followed by the weight, the
piece weight and the number of parts.
The [ ] display next to "M+" indicates
the stored value.
Remove the parts and place the parts of
(example)
↓
(example)
the second count, then press .
„r02“ is shortly displayed, followed by the
weight, the piece weight and the number
(example)
between the individual weighing procedures.
This process can be repeated up to 99 times or until the weighing range of the
balance is exhausted.
CIB-BA-e-2010 29

procedures as well as total parts quantity
the number of parts are display ed.
of parts of the second weighing.
Display of the saved weighing data:
Unload the balance and press .
Total weight, number of weighing
appear for 3 sec.
9.2 Add up “weight"
Place any number of parts and enter the
piece weight using numeric keys
to , then confirm by .
The total weight, the piece weight and
Unload the weighing plate, place the
weighing good for the first weighing and
press .
„r01“ is shortly displayed, followed by the
weight, the piece weight and the number
of parts.
(example)
↓
The [ ] display next to "M+" indicates
the stored value.
Remove the weighing good and place
the weighing good of the second count
and press .
„r02“ is shortly displayed, followed by the
weight, the piece weight and the number
30 CIB-BA-e-2010
(example)

If needed, weigh-in more weighings as specified. Ensure that the balance is
procedures as well as total parts quantity
unloaded between the weighing procedures.
This process can be repeated up to 99 times or until the weighing range of the
balance is exhausted.
Display of the saved weighing data:
Unload the balance and press .
Total weight, number of weighing
appear for 3 sec.
9.3 Delet e stored values
To delete the stored weighing data press and keep it pressed until a signal
sounds two times. Stored values, total weight, total number of pieces and number of
weighings will be set to zero.
The [ ] display next to "M+" disappears.
CIB-BA-e-2010 31

Press
Press .
10 Menu
To adjust the balance to individual requirements, use the menu to change settings for
the balance
10.1 Navigation in the menu
Call up menu
Press and in
weighing mode.
The first menu item UF1
(internal value or current volt
number of the
battery/rechargeable battery) is
displayed.
Select menu block
• Use to return to previous menu item
• Use to advance to next menu item
Set parameter
• With numeric key s to
Confirm setting
Return to weighing mode/ exit function without saving
32 CIB-BA-e-2010

864650
Internal value
bat. 6.4
Shows the current volt number of the battery
Internal value
UF-2
Average piece weight for reference optimisation
AavG 1
On
Off
UF-3
AoFF00
Value 00 - Auto off switched off
UF-4
Lit 0
Background illumination automatic
Lit 1
Background illumination on:
Lit 2
Background illumination off
UF-5
„A“ first value:
0
Stability must be displayed
1
Stability needs not to be displayed
„B“ second value:
0
The zero throughput must take place to carry out
the next totalizing
1
The zero throughput needs not to take place to
carry out the next totalizing
UF-6
RS232 interface
No interface available
UF-7
Speed 1
Speed can be set from 1 to 3 (1 = slow (7.5hz),
Speed 2
Speed 3
10.2 Menu overview functions menu „UF 1-10“
Menu item Submenu
UF-1
Internal value/
Battery capacity
Average piece
weight
350994
AavG 2
Auto-Off
Background
illumination
Description of function
• AoFF00 is defined as default
• Values of 0-99 can be entered (in
minutes)
•
Settings of
totalizing
function
A/D Update
Rate
2 = medium (15hz), 3 = fast (30hz)
CIB-BA-e-2010 33

UF-8
ZP 0
Not documented
ZP 1
ZP 2
ZP 3
ZP 4
ZP 5
UF-9
Function blocked.
value.
UF-10
Not documented
Gravitation
Operate the adjustment switch to adapt the
34 CIB-BA-e-2010

11 Operation
11.1 Automatic switch-off function – UF-3
Here can be set the number of minutes, a ft er which the balance is automatically
switched off. Values of 0-99 can be entered.
The autom atic switch-off function can be set as follows:
Press and in
weighing mode. “UF -1“ is
displayed.
Press repeatedly until
„UF-3“ is displayed.
Press , „AoFF00“ will
appear flashing.
Use the numeric keyboard to
set the number of minutes
after which the display is
automatically switched off.
Here as example 10 minutes.
Confirm input with , the
balance automatically returns
to the menu.
(example)
CIB-BA-e-2010 35

Return to weighing mode
using
When entering „AoFF00“, the automatic switch -off function is disabled.
11.2 Background illumination of display – UF-4
The back light for the display can be adjusted as follows:
Press and in
weighing mode. “UF -1“ is
displayed.
Press repeatedly until
„UF-4“ is displayed.
Press , „Lit 0“ is
displayed flashing .
Now the following settings can be carried out:
• Lit 0 = Auto Backlight (background illumination switches off approx. 10 sec.
after reaching a stable weighing value)
• Lit 1 = background illumination on
• Lit 2 = background illumination off
36 CIB-BA-e-2010

Use the numeric keyboard to
enter the corresponding code
number of the desired type of
background illumination.
Confirm input with , the
balance automatically returns
to the menu.
Return to weighing mode
using
The display appears in the
desired setting.
CIB-BA-e-2010 37

Error message
Display
Description
Err H
Weight
Internal error
hhhhh
Quantity
Number of parts over display range
12 Servicing, maintenance, di s pos al
12.1 Cleaning
Before cleaning, disconnect the appliance from the operating voltage.
Please do not use aggressive cleaning agents (solvents or similar agents), but a
cloth dampened with mild soap suds. Ensure that no liquid penetrates into the device
and wipe with a dry soft cloth.
Loose residue sample/powder can be removed carefully with a brush or manual
vacuum cleaner.
Spilled weighing goods must be removed immediately.
12.2 Servicing, maintenance
The appliance may only be opened by trained service technicians who are authorized
by KERN.
Before opening, disconnect from power supply.
12.3 Disposal
Disposal of packaging and a ppliance must be car ried out by operator according to vali d
national or regional law of the location where the appliance is used.
12.4 Error reports
Err n Weight Instable load
Err L Weight Internal error
hhhhh Weight Overload
38 CIB-BA-e-2010

• No batteries inserted.
13 Instant help
In case of an error in the program process, briefly turn off the balance and disconnect
from power supply. The weighing process must then be restarted from the beginning.
Fault Possible cause
The displayed weight does not glow.
The displayed weight is permanently
changing
The weighing result is obviously
incorrect
• The balance is not switched on.
• The mains supply connection has been
interrupted (mains cable not plugged
in/faulty).
• Power supply interrupted.
• Batteries are inserted incorrectly or empty
• Draught/air movement
• Table/floor vibrations
• Weighing pan has contact with other
objects.
• Electromagnetic fields / stati c c har g i ng
(choose different location/switch off
interfering device if possible)
• The display of the balance is not at zero
• Adjustment is no longer correct.
• Great fluctuations in temperature.
• Electromagnetic fields / stati c c har g i ng
(choose different location/switch off
interfering device if possible)
Should other error messages occur, switch balance off and then on again. If the error
message remains inform manufacturer.
CIB-BA-e-2010 39

For verified weighing scales (= weighing scales assessed for
conformity) a declaration of conformity is included in the scope of
14 Declaration of conformity
The current EC/EU Conformity declaration can be found online in:
www.kern-sohn.com/ce
delivery.
40 CIB-BA-e-2010
 Loading...