

Page 1
Sauter GmbH
Ziegelei 1
D-72336 Balingen
E-Mail: info@sauter.eu
Tel: +49-[0]7433- 9933-199
Fax: +49-[0]7433-9933-149
Internet: www.kern-sohn.com
Instruction Manual
SO 200K
DIGITAL LIGHT METER
Annotation: The purchase of this SAUTER Digital Light
Meter marks a step forward into the field of measurement
precision. Although this instrument is a complex and
delicate instrument, its ruggedness will allow many years
of use. Please read the following instructions carefully and
always keep this manual within easy reach.
We hope you are pleased with your high quality Light
Meter. If you have any queries, wishes or helpful
suggestions, do not hesitate to call our service number.
Table of contents
1. Instruction
2. Features
3. Specifications
4. Name of parts and positions
5. Spectral sensitivity characteristics
6. Operation instructions
7. Battery check and replacement
8. Maintenance
9. Recommended illumination
10. Declaration of Conformity
1. Instruction
This digital light meter is a precision instrument used to
measure illuminance in the field. It is totally cosine
corrected for the angular incidence of light.
The light meter is compact, tough and easy to handle due
to its construction. The light sensitive component used in
the meter is a very stable, long life silicone diode.
2. Features
* Light-measuring levels ranging from 0.1Lux to
200,000 Lux, 0.01 FC to 20,000 FC repeatedly
* High accuracy and rapid response
* Peak-Hold function for holding measuring values
* Unit and sign display for easy reading
* Automatic zeroing
* Meter corrected for Luminous Efficiency function
* The Correction factor doesn’t have to be manually
calculated for non-standard light sources
* Short rise and fall times
3. Specifications
Display: 3 ½ digit LCD
Measuring range: 200; 2,000; 20,000; 200,000 Lux
(20,000 Lux range reading x 10,
200,000 Lux range reading x 100)
20; 200; 2,000; 20,000 FC
(20,000 FC range reading x 10)
1 FC= 10.76 Lux
Over range display: Highest digit of “1” is displayed
Accuracy: ± 3% rdg ± 0.5% f.s (± 5% rdg ± 10 dgt as >
20,000 Lux / 2,000 FC range).
Calibrated to standard incandescent lamp at
Colour temperature 2856K
Repeatability: ± 2%
Temperature Characteristic: ± 1%/°C
Measuring Rate: approximately 2.0 times/sec.
Photo detector: one silicone photo diode with filter
Operating Temperature: 0°C to 40°C (32°F to 104°F)
Operating Humidity: 0 to 70 RH
Storage Temperature: -10°C to 50°C (14°F to 122°F)
Storage Temperature: 0 to 80% RH
Power Source: One 9V battery, 6F22
Battery life (typically): 200h, alkaline battery
Dimensions: 148mm x 70mm x 40mm
Photo detector lead length: 1500mm (approx.)
Photo detector dimensions: 100mm x 60mm x 28mm
Weight: approx. 250g (5.8 oz)
Accessories: Carrying case, instruction manual, battery
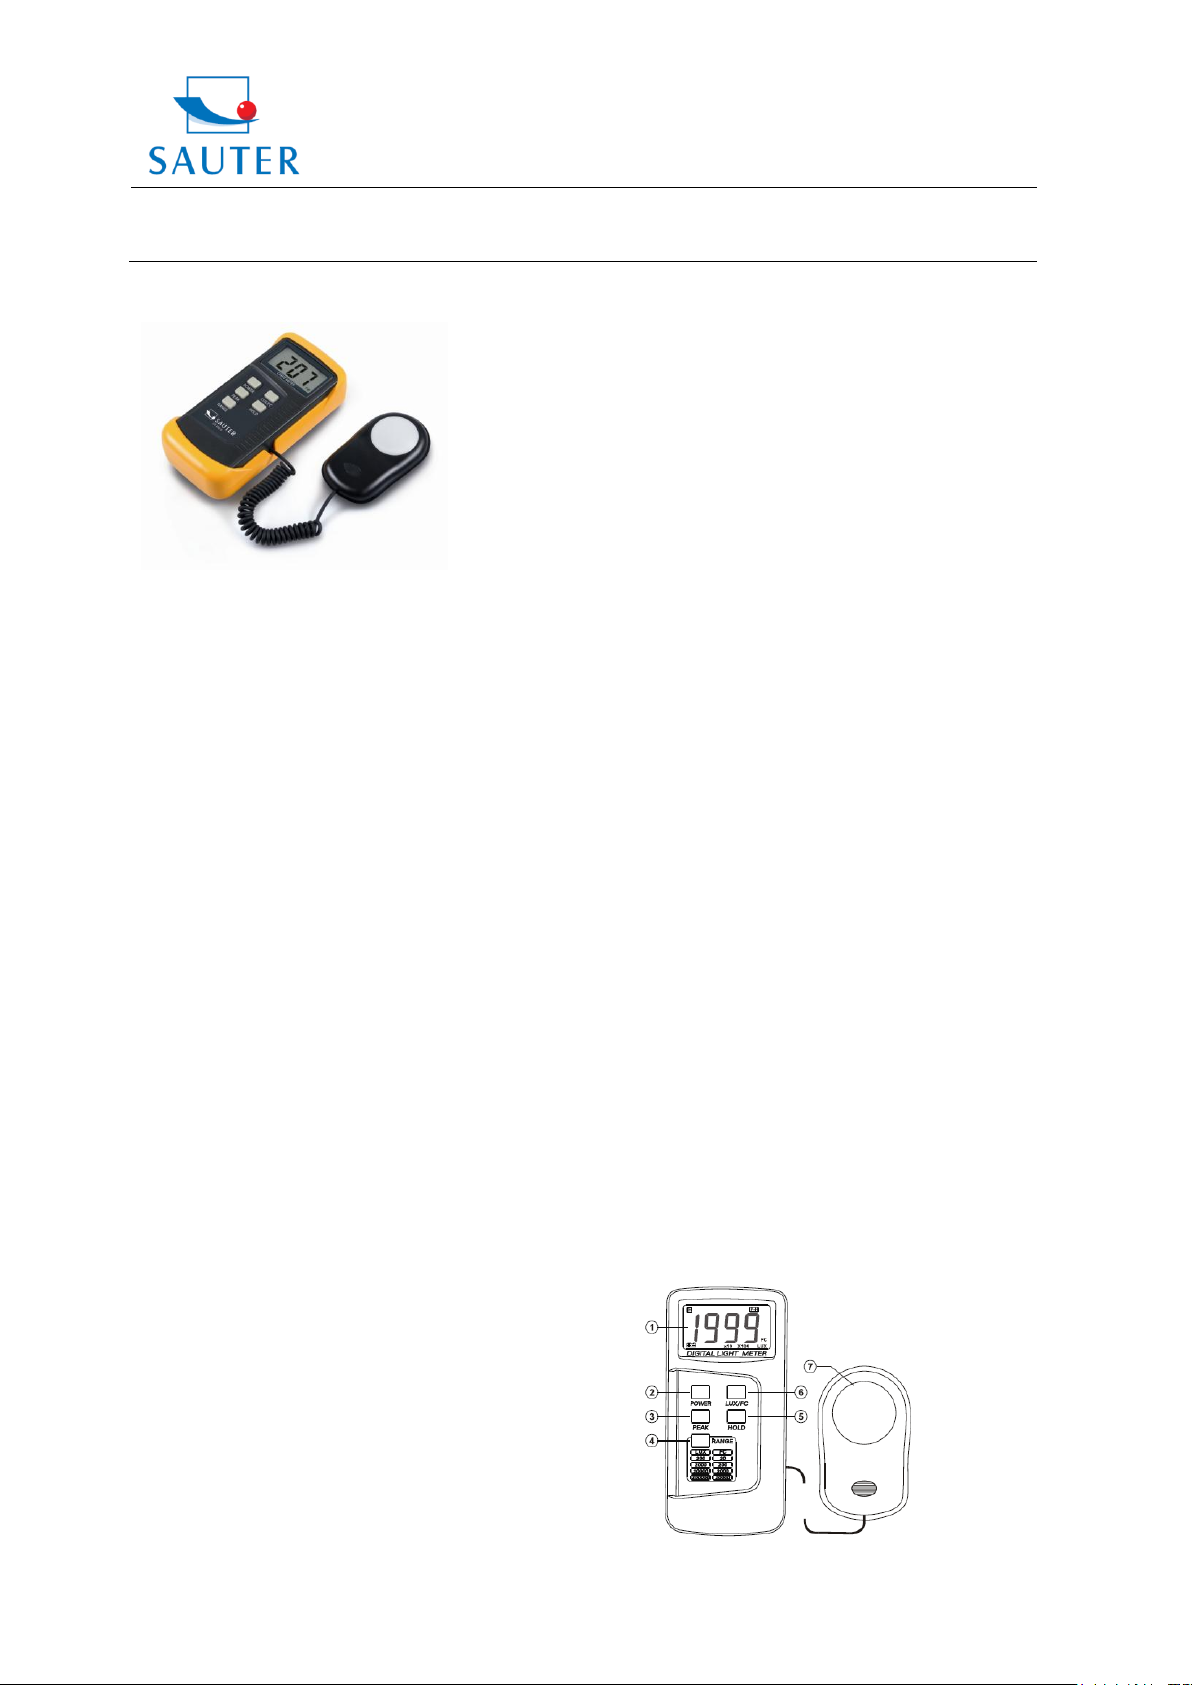
4. Name of parts and positions
SO 200K-BA-e-1311 1
Page 2
Sauter GmbH
Ziegelei 1
D-72336 Balingen
E-Mail: info@sauter.eu
Tel: +49-[0]7433- 9933-199
Fax: +49-[0]7433-9933-149
Internet: www.kern-sohn.com
Instruction Manual
SO 200K
1. LCD Display: 3 ½ digits with a maximum reading of
1999.
2. Power key: the power key turns the light meter ON or
OFF.
3. Data-Peak button: the PEAK key has to be pressed
again to clear the peak recording mode.
4. Range button: the range button has to be pressed to
change the ranges of 200Lux/20FC; 2,000Lux/200FC;
20,000Lux/2,000FC; 200,000Lux/ 20,000FC circularly.
5. Data-Hold button: If the HOLD key is pressed, the
HOLD mode is selected. When this mode is being
selected, the light meter will stop all further measurements.
If the HOLD button is pressed again, this operation will be
cancelled and the light meter will be ready to take
measurements.
6. Lux/FC Unit button: This key has to be pressed to
choose the Lux or FC unit.
7. Photo detector
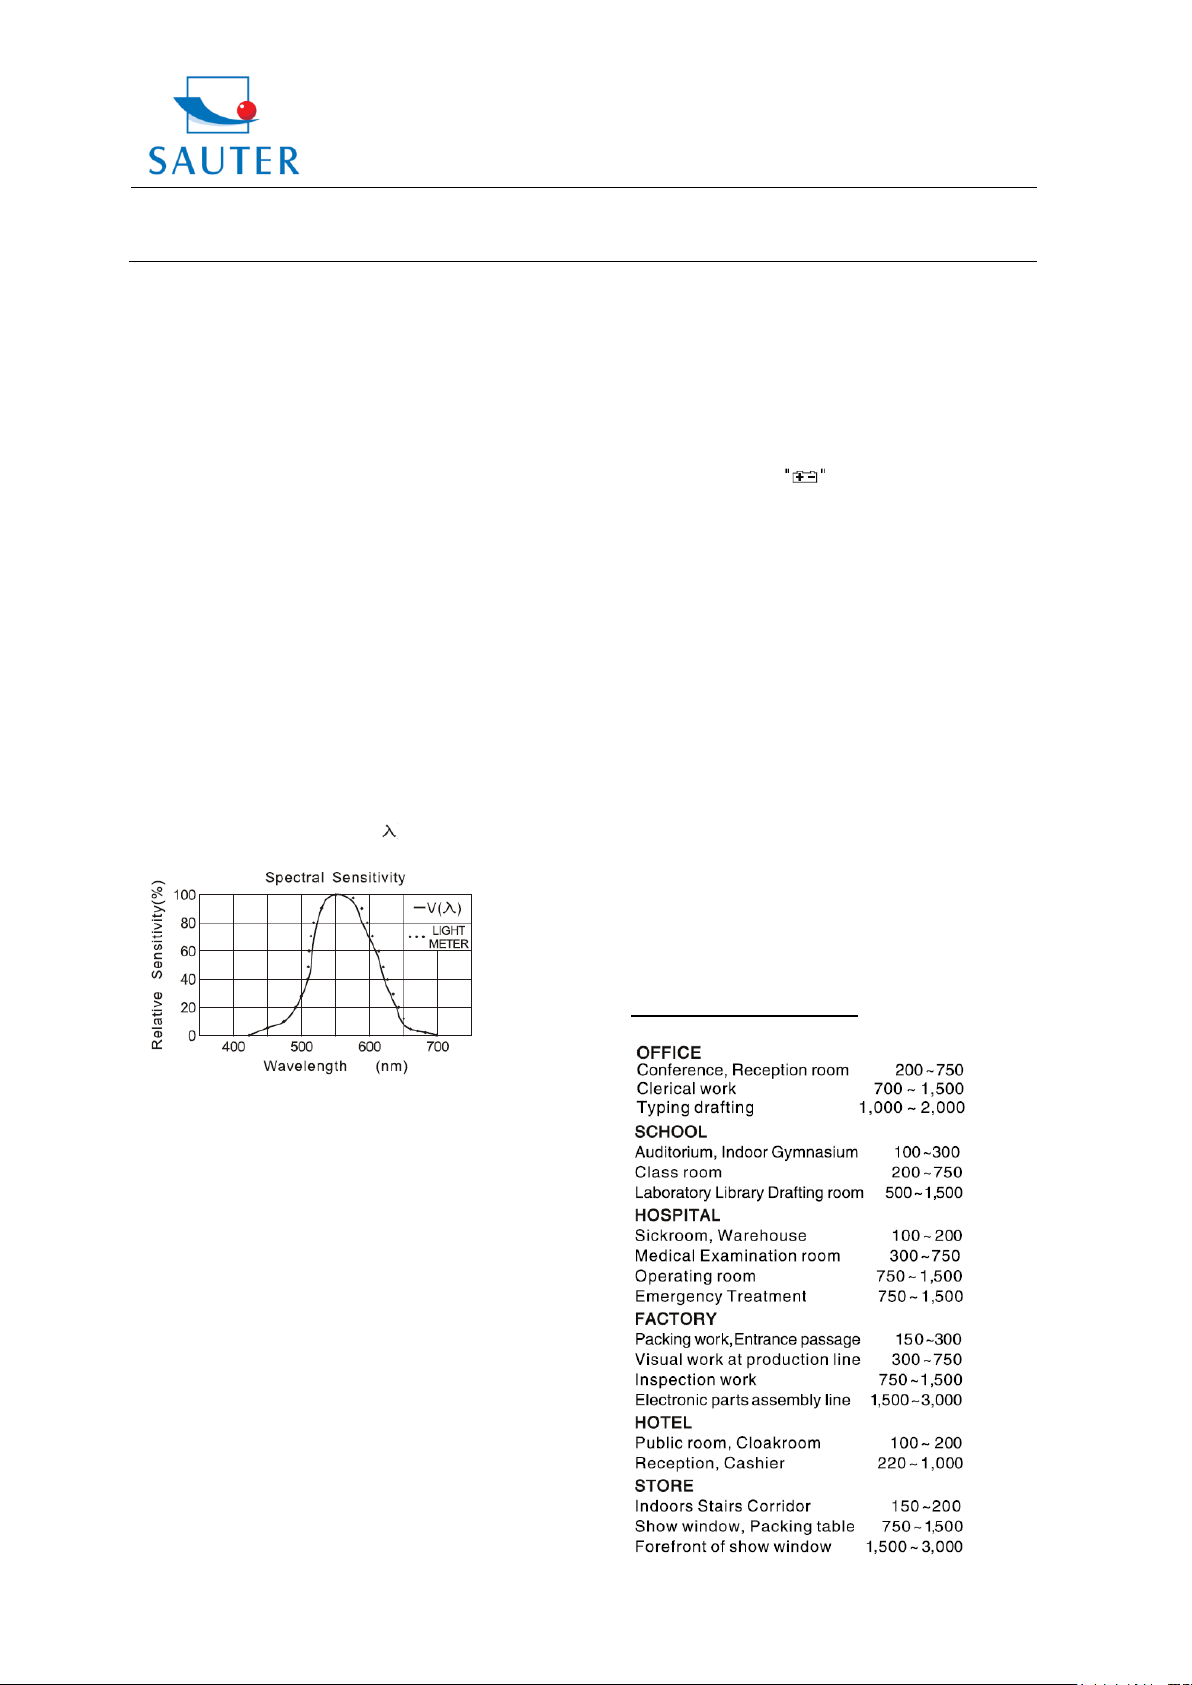
5. Spectral sensitivity characteristics
Concerning the detector, the applied photo diode with
filters makes the spectral sensitivity characteristic almost
meeting the standard C.I.E. (International Commission on
Illumination) photopic curve V ( ) as described in the
following chart below
pressed again, P-H mode is being cancelled and it returns
to normal operation.
8. When the measurement is completed, the photo
detector cap has to be clipped on again and the power key
has to be turned off.
7. Battery check and replacement
1. As the battery power is not sufficient, the LCD will
display the symbol and replacement of a new
battery type 9V is required.
2. Therefore, the instrument has to be powered off. Then
the battery cover has to be pressed and pushed (at the
same time) in the direction of the arrow shows to open.
3. The battery has to be disconnected from the instrument
and replaced with a standard 9V transistor battery.
4. The battery cover has to be snapped on again.
8. Maintenance
1. The white plastic disc on the top of the detector should
be cleaned with a damp cloth from time to time and if
necessary.
2. The instrument may not be stored when temperature or
humidity is excessively high.
3. The reference level, as the marker on the face plate, is
the tiof thep photo detector globe.
4. The calibration interval for the photo detector will vary
according to operational conditions, but generally the
sensitivity decreases in direct proportion to the product of
luminous intensity by the operational time.
In order to maintain the basic accuracy of the instrument, a
periodical calibration is recommended.
9. Recommended illumination
Locations Lux
6. Operation instructions
1. Power-key: The power key has to be pressed to turn
the light meter ON or OFF.
2. Selection of the Lux/FC scale: The range selection
switch has to be set to the desired Lux/FC range.
3. The photo detector cap has to be removed and it has to
be faced to the light source in a horizontal position.
4. The illuminance nominal has to be read from the LCD
display.
5. Over range: If the instrument only displays one “1” in
the M.S.D., the input signal has been too strong and a
higher range should be selected.
6. Data-HOLD mode: The HOLD key has to be pressed to
select the HOLD mode, the light meter will stop all further
measurements.
If the HOLD button is pressed again, this operation will be
cancelled and the light meter will return to normal
operation.
7. Data-PEAK mode: The PEAK key has to be pressed to
select the PEAK mode. If this item is selected, the light
meter stops all further measurements. If the PEAK key is
SO 200K-BA-e-1311 2
Page 3

Sauter GmbH
Ziegelei 1
D-72336 Balingen
E-Mail: info@sauter.eu
Tel: +49-[0]7433- 9933-199
Fax: +49-[0]7433-9933-149
Internet: www.kern-sohn.com
Instruction Manual
SO 200K
NOTE:
When the photo detector is covered, the instrument
will always display “000”; if not, please find the
adjustable resistance on the back of it.
10. Declaration of Conformity
SO 200K-BA-e-1311 3
 Loading...