

Page 1

KERN & Sohn GmbH
Ziegelei 1
E-Mail: info@kern-sohn.com
Phone: +49-[0]7433- 9933-0
Internet: www.kern-sohn.com
Operating and Installation
Instructions Display Unit
KERN KEN-TM / KET-TM
11/2014
GB
Version 2.0
D-72336 Balingen
Fax: +49-[0]7433-9933-149
KEN-TM / KET-TM-BA-e-1420
Page 2

KERN KEN-TM / KET-TM
Display unit
GB
Version 2.0 11/2014
Operating and installation instructions
Contents
1 TECHNICAL DATA ................................................................................................. 7
1.1 Dimensions .................................................................................................................................... 8
1.2 Anschlüsse / Schnittstellen .......................................................................................................... 9
1.2.1 KET-TM ....................................................................................................................................... 9
1.2.2 KEN-TM ..................................................................................................................................... 10
2 CONTROL ELEMENTS AND PROGRAM STRUCTURE ..................................... 12
2.1 Keyboard overview ...................................................................................................................... 12
2.2 Overview of display ..................................................................................................................... 14
2.3 Program structure ....................................................................................................................... 16
2.3.1 Menu overview .......................................................................................................................... 16
2.3.2 Navigation in the menu .............................................................................................................. 17
2.4 Authorisation levels .................................................................................................................... 19
3 BASIC INSTRUCTIONS ........................................................................................ 20
3.1 Proper use .................................................................................................................................... 20
3.2 Improper Use ................................................................................................................................ 21
3.3 Warranty ....................................................................................................................................... 21
3.4 Monitoring of Test Resources .................................................................................................... 21
4 BASIC SAFETY PRECAUTIONS ......................................................................... 22
4.1 Pay attention to the instructions in the Operation Manual ..................................................... 22
4.2 Personnel training ....................................................................................................................... 22
5 TRANSPORT AND STORAGE ............................................................................. 22
5.1 Testing upon acceptance ........................................................................................................... 22
5.2 Packaging / return transport ...................................................................................................... 22
6 UNPACKING, SETUP AND COMMISSIONING.................................................... 23
6.1 Installation Site, Location of Use ............................................................................................... 23
6.2 Unpacking and placing ............................................................................................................... 23
6.3 Scope of delivery / serial accessories ....................................................................................... 23
6.4 How to connect the platform ...................................................................................................... 24
6.5 Mains connection ........................................................................................................................ 24
6.6 Commissioning ............................................................................................................................ 24
6.7 Log out .......................................................................................................................................... 26
6.8 Putting out of service / Standby mode ...................................................................................... 26
6.9 Basic Operation ........................................................................................................................... 27
2 KEN-TM / KET_TM-BA-e-1420
Page 3

6.9.1 Simple weighing ........................................................................................................................ 27
6.9.2 Zeroing ...................................................................................................................................... 27
6.9.3 Selecting weighing unit ............................................................................................................. 28
6.9.4 Weighing with tare ..................................................................................................................... 29
6.10 Connection of peripheral devices .............................................................................................. 30
7 SYSTEM SETTINGS (MENU) ................................................................................ 31
7.1 Weighing ...................................................................................................................................... 32
7.1.1 Median filter ............................................................................................................................... 33
7.1.2 Filter .......................................................................................................................................... 33
7.1.3 Auto Zero................................................................................................................................... 34
7.1.4 LO threshold .............................................................................................................................. 34
7.1.5 Last digit display accuracy ........................................................................................................ 34
7.2 Communication parameters ....................................................................................................... 35
7.2.1 RS232 (1) / RS232 (2) .............................................................................................................. 35
7.2.2 Ethernet / IP .............................................................................................................................. 36
7.2.3 TCP ........................................................................................................................................... 36
7.3 Devices ......................................................................................................................................... 37
7.3.1 PC ............................................................................................................................................. 38
7.3.2 Printer ........................................................................................................................................ 41
7.3.3 Barcode scanner ....................................................................................................................... 43
7.3.4 Transponder card reader .......................................................................................................... 45
7.3.5 Additional display ...................................................................................................................... 46
7.4 Configure display ........................................................................................................................ 47
7.4.1 Select information texts ............................................................................................................. 47
7.4.2 Selecting function keys ............................................................................................................. 50
7.4.3 Display all platforms .................................................................................................................. 53
7.4.4 Select bargraph type ................................................................................................................. 54
7.5 I/O settings ................................................................................................................................... 59
7.5.1 Inputs ......................................................................................................................................... 60
7.5.2 Outputs ...................................................................................................................................... 61
7.6 Authorisations ............................................................................................................................. 62
7.7 Weighing Units ............................................................................................................................ 66
7.8 General parameters ..................................................................................................................... 68
7.8.1 User language ........................................................................................................................... 68
7.8.2 Enter date / time, select display format ..................................................................................... 69
7.8.3 Signal tone when pressing button ............................................................................................. 71
7.8.4 Set the touch screen alignment ................................................................................................ 72
7.8.5 Setting brightness of display ..................................................................................................... 73
7.8.6 Set mouse support .................................................................................................................... 73
7.8.7 Setting “Log on required“ .......................................................................................................... 74
7.8.8 Setting start logo ....................................................................................................................... 74
7.8.9 Setting viewing times for error messages ................................................................................. 75
7.9 Adjustment ................................................................................................................................... 76
7.10 Verification ................................................................................................................................... 76
7.11 Weighing scale info ..................................................................................................................... 78
KEN-TM / KET_TM-BA-e-1420 3
Page 4

8 APPLICATION SETTINGS ................................................................................... 79
8.1 Select application ........................................................................................................................ 79
8.2 Application specific settings ...................................................................................................... 82
9 WEIGHING ............................................................................................................ 85
9.1 Setting storage conditions for alibi memory ............................................................................ 86
9.2 Dispensing ................................................................................................................................... 88
9.3 Checkweighing ............................................................................................................................ 89
9.4 Tare mode ..................................................................................................................................... 92
9.5 Labelling ....................................................................................................................................... 93
9.6 Statistics ....................................................................................................................................... 94
9.7 Differential weighing ................................................................................................................... 95
9.8 Peak value function ..................................................................................................................... 96
9.9 Info about saved weighing activities ......................................................................................... 97
10 PARTS COUNTING ........................................................................................... 98
10.1 Select application ........................................................................................................................ 98
10.2 Application specific settings ...................................................................................................... 99
10.2.1 Automatic reference optimization........................................................................................ 100
10.2.2 Minimum reference single weight ....................................................................................... 102
10.3 Carry out parts counting ........................................................................................................... 103
10.3.1 Determination of the reference piece weight by weighing .................................................. 103
10.3.2 Enter reference single weight as numeric value ................................................................. 105
10.4.1 Load reference single weight from database. ..................................................................... 106
10.4.2 Allocating reference single weight in database to a product .............................................. 107
11 PERCENT DETERMINATION ......................................................................... 109
11.1 Select application ...................................................................................................................... 109
11.2 Application specific settings .................................................................................................... 110
11.3 How to carry out percentage calculation ................................................................................ 111
11.3.1 Determination of the reference weight by weighing ............................................................ 111
11.3.2 Enter reference weight as numeric value ........................................................................... 112
12 FORMULATION ............................................................................................... 114
12.1 Select application ...................................................................................................................... 114
12.2 Application specific settings .................................................................................................... 116
12.3 Defining recipe in database ...................................................................................................... 117
12.4 Process recipe from database ................................................................................................. 124
12.5 Log recipe ................................................................................................................................... 128
13 ANIMAL WEIGHING ........................................................................................ 131
13.1 Select application ...................................................................................................................... 131
13.2 Application specific settings .................................................................................................... 132
13.2.1 Average time ....................................................................................................................... 133
13.2.2 Auto start ............................................................................................................................. 133
13.3 Dynamic weighing using manual start .................................................................................... 134
4 KEN-TM / KET_TM-BA-e-1420
Page 5

13.4 Dynamic weighing with automatic start .................................................................................. 135
14 DATABASE ...................................................................................................... 136
14.1 Configuring database (administrator only) ............................................................................ 137
14.1.1 Accessibility of databases ................................................................................................... 138
14.1.2 Categories ........................................................................................................................... 138
14.1.3 Products / Operators / Clients ............................................................................................. 140
1.1.1 ..................................................................................................................................................... 140
1.1.1 ..................................................................................................................................................... 140
14.1.4 Extra variables .................................................................................................................... 141
14.1.5 Data record format .............................................................................................................. 141
14.1.6 Importing / exporting database file from USB storage medium .......................................... 142
14.2 Search for Data Record / Add Data Record ............................................................................ 143
14.4 Deleting data record (administrator only) ............................................................................... 145
14.5 Print data record ........................................................................................................................ 146
14.6 Basic data record operations via context menu .................................................................... 147
14.7 Edit databases (administrator only) ........................................................................................ 149
14.7.1 User database..................................................................................................................... 149
14.7.2 Product database ................................................................................................................ 150
14.7.3 Client database ................................................................................................................... 152
14.7.4 Database “Dosing Processes“ ............................................................................................ 152
14.7.5 Database “Recipes“ ............................................................................................................ 153
14.7.6 Database “Identification Processes“ ................................................................................... 153
14.7.7 Database “Packaging“ ........................................................................................................ 153
14.7.8 Database “Storage“ ............................................................................................................ 154
14.7.9 Database “Universal Variables“ .......................................................................................... 154
14.7.10 Database “Graphic“ ............................................................................................................ 154
15 LOGS ................................................................................................................ 155
15.1 Enabling accessibility to logs .................................................................................................. 156
15.2 Deleting older data (advanced users only) ............................................................................ 157
15.3 Weighing logs ............................................................................................................................ 158
15.3.1 Alibi memory ....................................................................................................................... 159
15.3.2 Filter .................................................................................................................................... 160
15.3.3 Record print out .................................................................................................................. 161
15.3.4 Display weighing procedures as a diagram ........................................................................ 163
15.3.5 Export weighing data to USB storage medium ................................................................... 164
15.3.6 Counter for weighing activities ............................................................................................ 165
16 COMMUNICATION ........................................................................................... 166
16.1 Overview interface commands ................................................................................................ 166
16.2 General response format .......................................................................................................... 167
16.3 Detailed information about interface logs .............................................................................. 168
16.3.1 Zeroing ................................................................................................................................ 168
16.3.2 Taring .................................................................................................................................. 168
16.3.3 Retrieve tare value .............................................................................................................. 169
16.3.4 Set tare value ...................................................................................................................... 169
16.3.5 Send stable weighing value in standard weighing unit ....................................................... 169
16.3.6 Send weighing value immediately in standard weighing unit ............................................. 170
KEN-TM / KET_TM-BA-e-1420 5
Page 6

16.3.7 Send weighing values for all platforms in default weighing unit immediately ..................... 171
16.3.8 Send stable weighing value in current weighing value ....................................................... 171
16.3.9 Send weighing value immediately in current weighing unit ................................................ 172
16.3.10 Start continuous output in standard weighing unit .............................................................. 172
16.3.11 Stop continuous output in standard weighing unit .............................................................. 172
16.3.12 Start continuous output in current weighing unit ................................................................. 173
16.3.13 Stop continuous output in current weighing unit ................................................................. 173
16.3.14 Set value for “Lower Threshold“.......................................................................................... 173
16.3.15 Set value for “Upper Threshold“.......................................................................................... 173
16.3.16 Retrieve value for “Lower Threshold“ ................................................................................. 174
16.3.17 Retrieve value for “Upper Threshold“ ................................................................................. 174
16.3.18 Press simulation “PRINT key“ ............................................................................................. 174
16.3.19 Send all implemented messages ........................................................................................ 174
16.4 Data format ................................................................................................................................. 175
17 SERVICING, MAINTENANCE, DISPOSAL ..................................................... 176
17.1 Cleaning ...................................................................................................................................... 176
17.2 Servicing, maintenance ............................................................................................................ 176
17.3 Disposal ...................................................................................................................................... 176
18 TROUBLESHOOTING GUIDE / ERROR MESSAGES ................................... 177
19 APPENDIX A – VARIABLES FOR PRINTOUTS ............................................ 178
19.1 List of variables ......................................................................................................................... 178
19.2 Format variables ........................................................................................................................ 184
20 APPENDIX B – LIST “FUNCTION KEYS“ ...................................................... 189
21 INSTALLATION DISPLAY UNIT / PLATFORM .............................................. 193
21.1 Technical data ............................................................................................................................ 193
21.2 Weighing system design .......................................................................................................... 193
21.3 How to connect the platform .................................................................................................... 194
21.4 Configure display unit ............................................................................................................... 196
21.4.1 Entering metrology / configuration data ............................................................................. 200
21.4.2 Adjusting a weighing system ............................................................................................... 202
21.4.3 How to linearize a weighing system .................................................................................... 204
21.4.4 Display configuration data ................................................................................................... 207
21.4.5 Reset to default settings ..................................................................................................... 207
21.4.6 Geo value ............................................................................................................................ 208
22 CONFORMITY EXPLANATION/ TEST CERTIFICATE ................................... 212
6 KEN-TM / KET_TM-BA-e-1420
Page 7
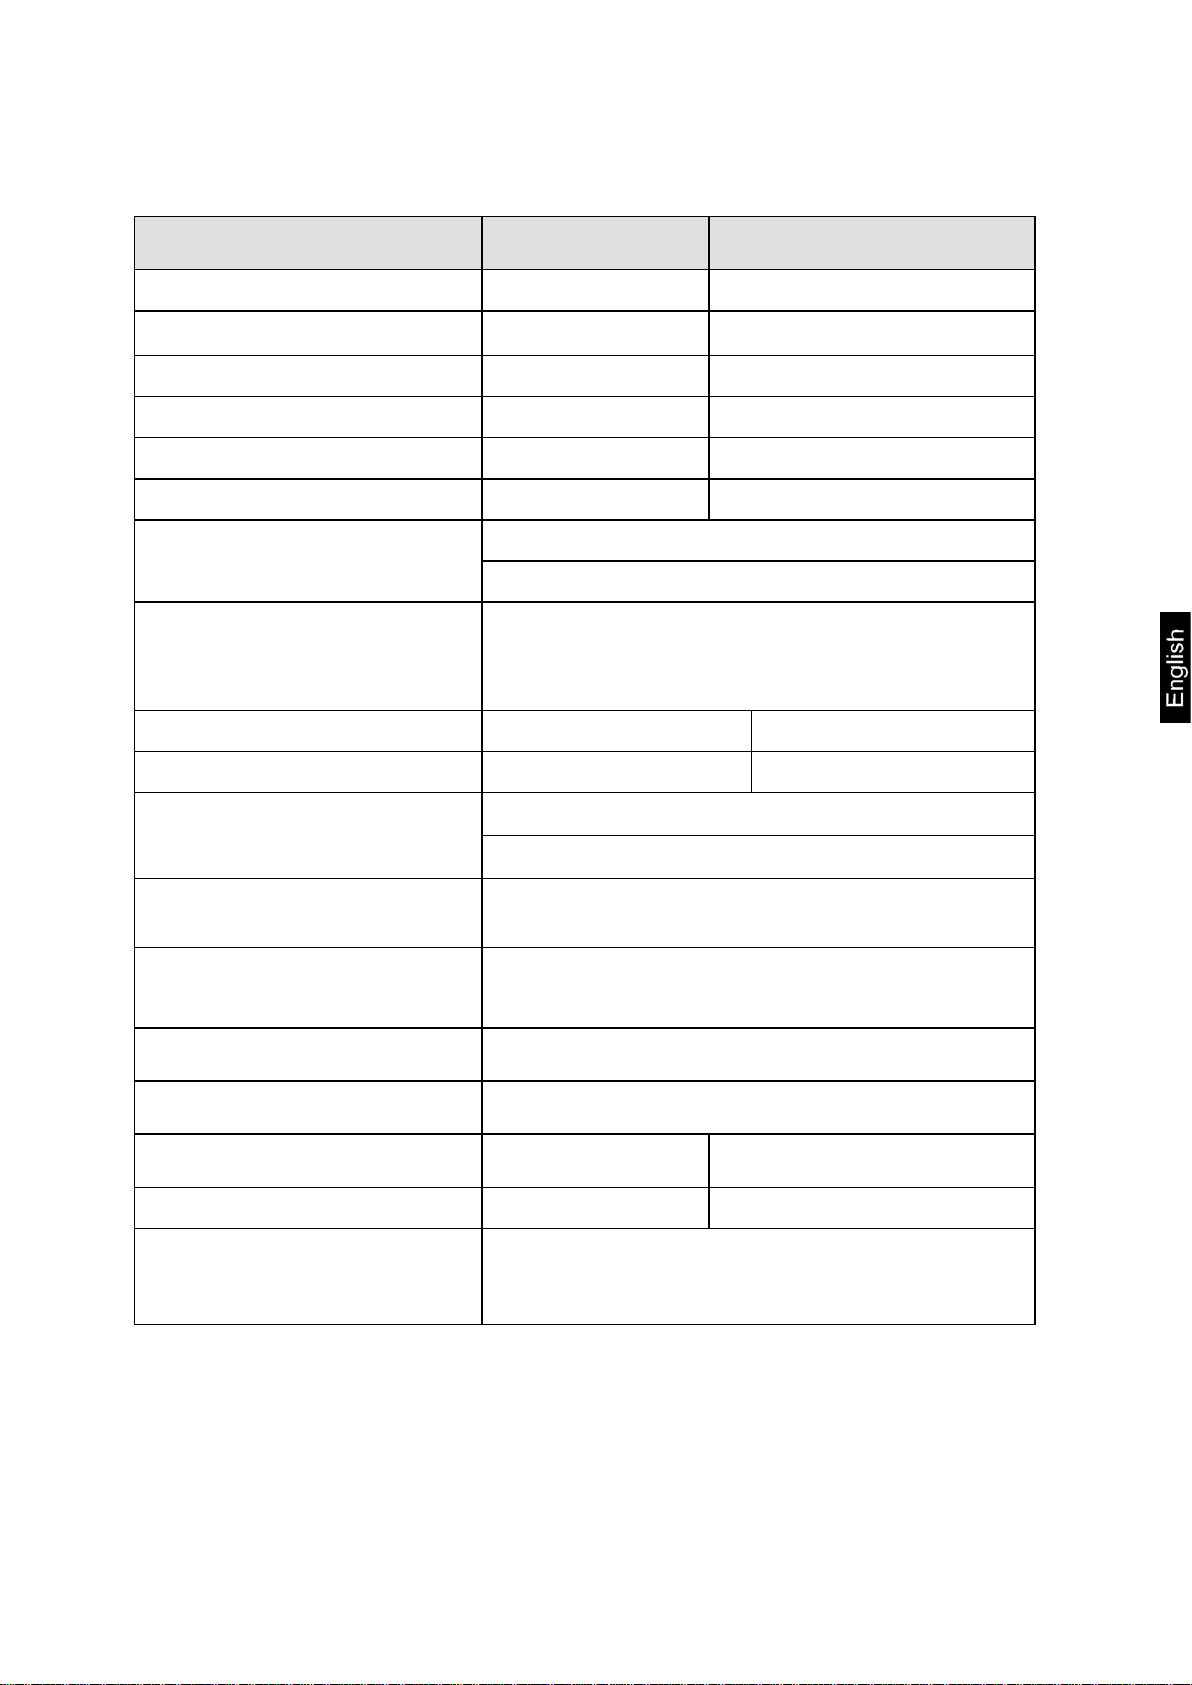
1 Technical data
KERN KET-TM KEN-TM
Display (segments) 7-digit 7-digit
Resolution (verified)
Resolution (non-verified) 100.000 d 100.000 d
Verification class III III
Weighing ranges 3 3
Divisions 1,2,5,…10n 1,2,5,…10n
Weighing Units
Display
Housing material Synthetic material Stainlees steel
Dimensions case [mm] 215 x 156 x 71 282 x 200 x 76
Load cell resistance
Recommended adjustment
weight
6000 e 6000 e
Models with type approval: g, kg
Models without type approval: g, kg, ct, lb, N, oz
Graphic LCD – Touch
Height of digit small 19 mm
Height of digit large 21 mm
min. 80 Ω
max. 1200 Ω
We recommend ≥ 50 % max.
Admissible
ambient temperature
Humidity of air 30 ~ 80 % relative (not condensing)
Input voltage – power unit 110 - 230 V AC
Input voltage - device 13.5 - 16 V 110- 240 V AC 65 – 150 mA
Net weight 650 g 4.5 kg
Languages
user interface
German, English, French, Italian, Polish,
Rumanian, Spanish, Turkish, Czech, Hungarian
see chap. 7.8.1
-10° C to +40° C
KEN-TM / KET_TM-BA-e-1420 7
Page 8
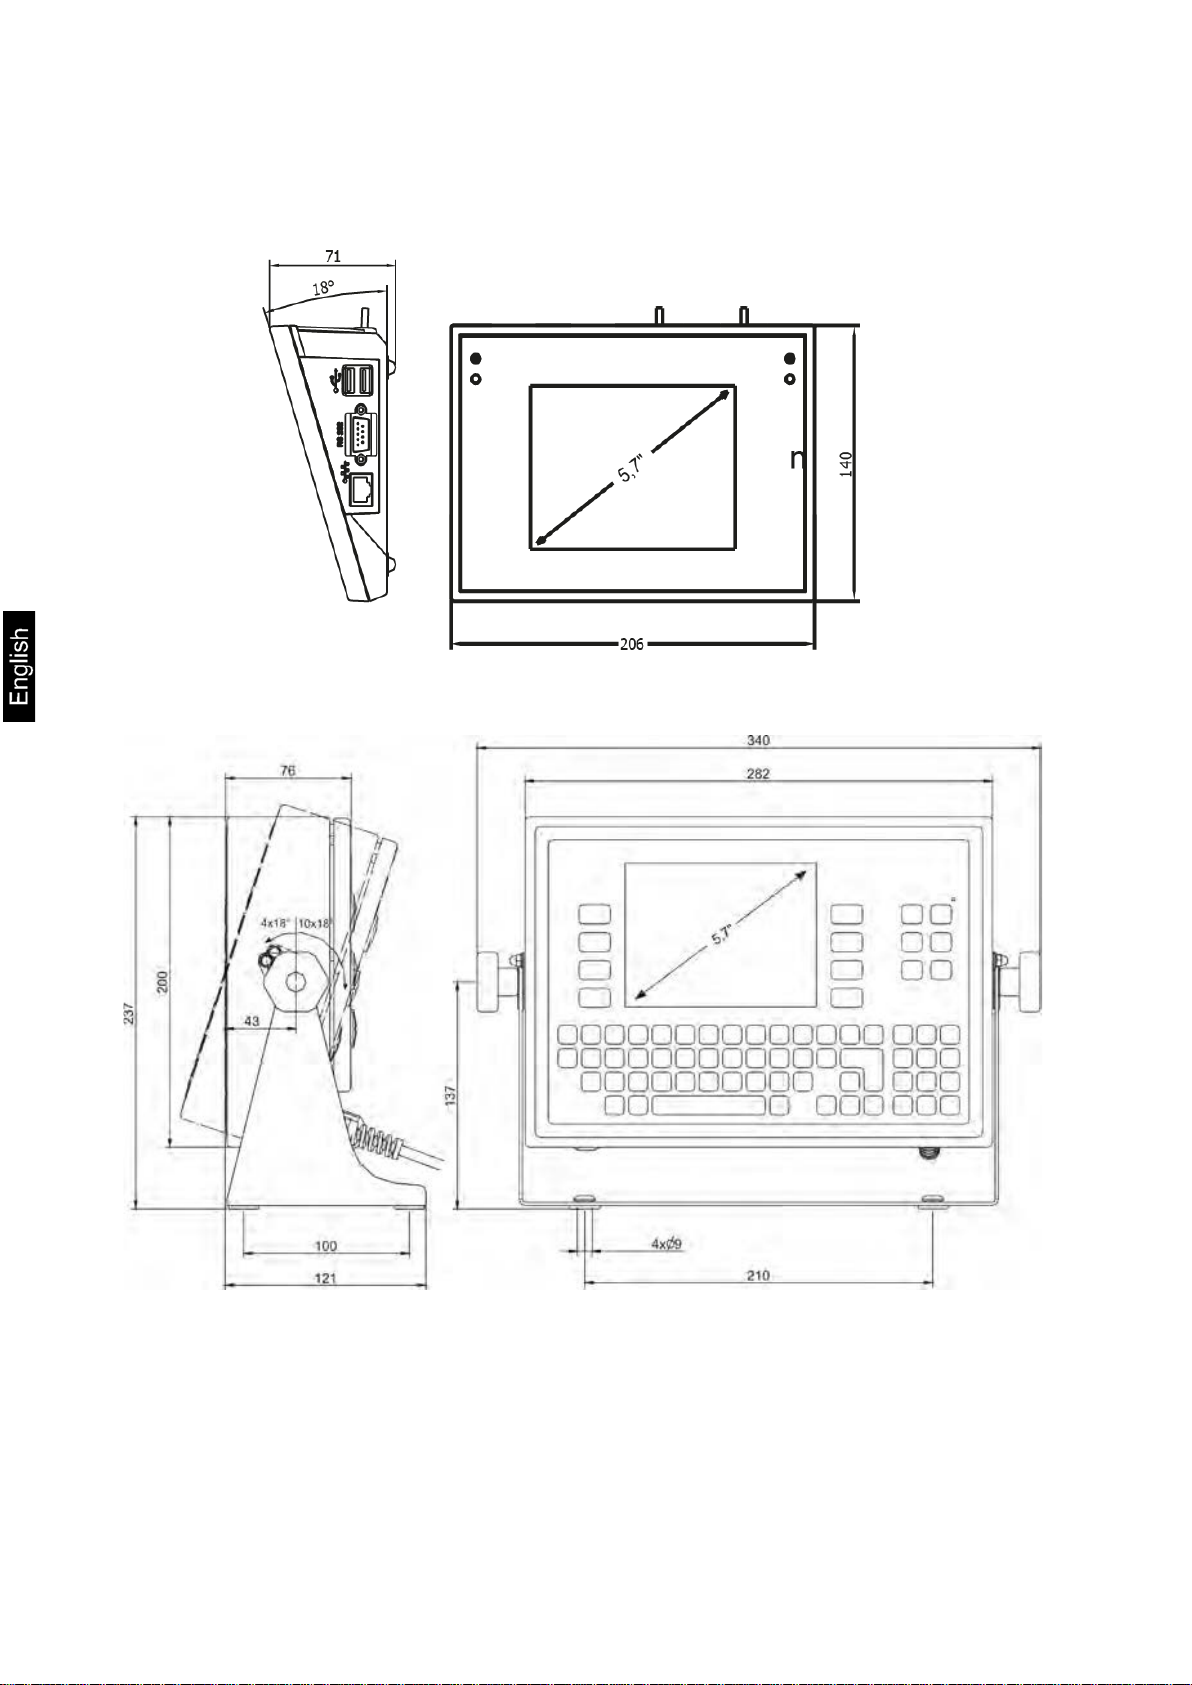
1.1 Dimensions
KET-TM:
KEN-TM:
8 KEN-TM / KET_TM-BA-e-1420
Page 9

3. USB port
Pin1 - GNDWE
Pin15 - OUT3
1.2 Anschlüsse / Schnittstellen
1.2.1 KET-TM
Pin allocation (front view):
1. Ethernet
2. RS232 (COM1)
RS232 DB9/M (9-pin plug)
Pin2 - RxD
Pin3 - TxD
Pin5 - GND
Digital I/O, RS232 DSUB15/F (15-pin socket)
Configuration IN1 – IN4 / OUT1 – OUT 4, see chap.7.5
Pin2 - OUT1
Pin3 - OUT2
Pin4 - COMM
Pin5 - 6÷9VDC
Pin6 - IN4
Pin7 - IN3
Pin8 - TxD2
Pin9 - 5VDC
Pin10 - GNDRS
Pin11 - IN2
Pin12 - IN1
Pin13 - RxD2
Pin14 - OUT4
4. Digital I/O, RS232 (COM2)
KEN-TM / KET_TM-BA-e-1420 9
Page 10
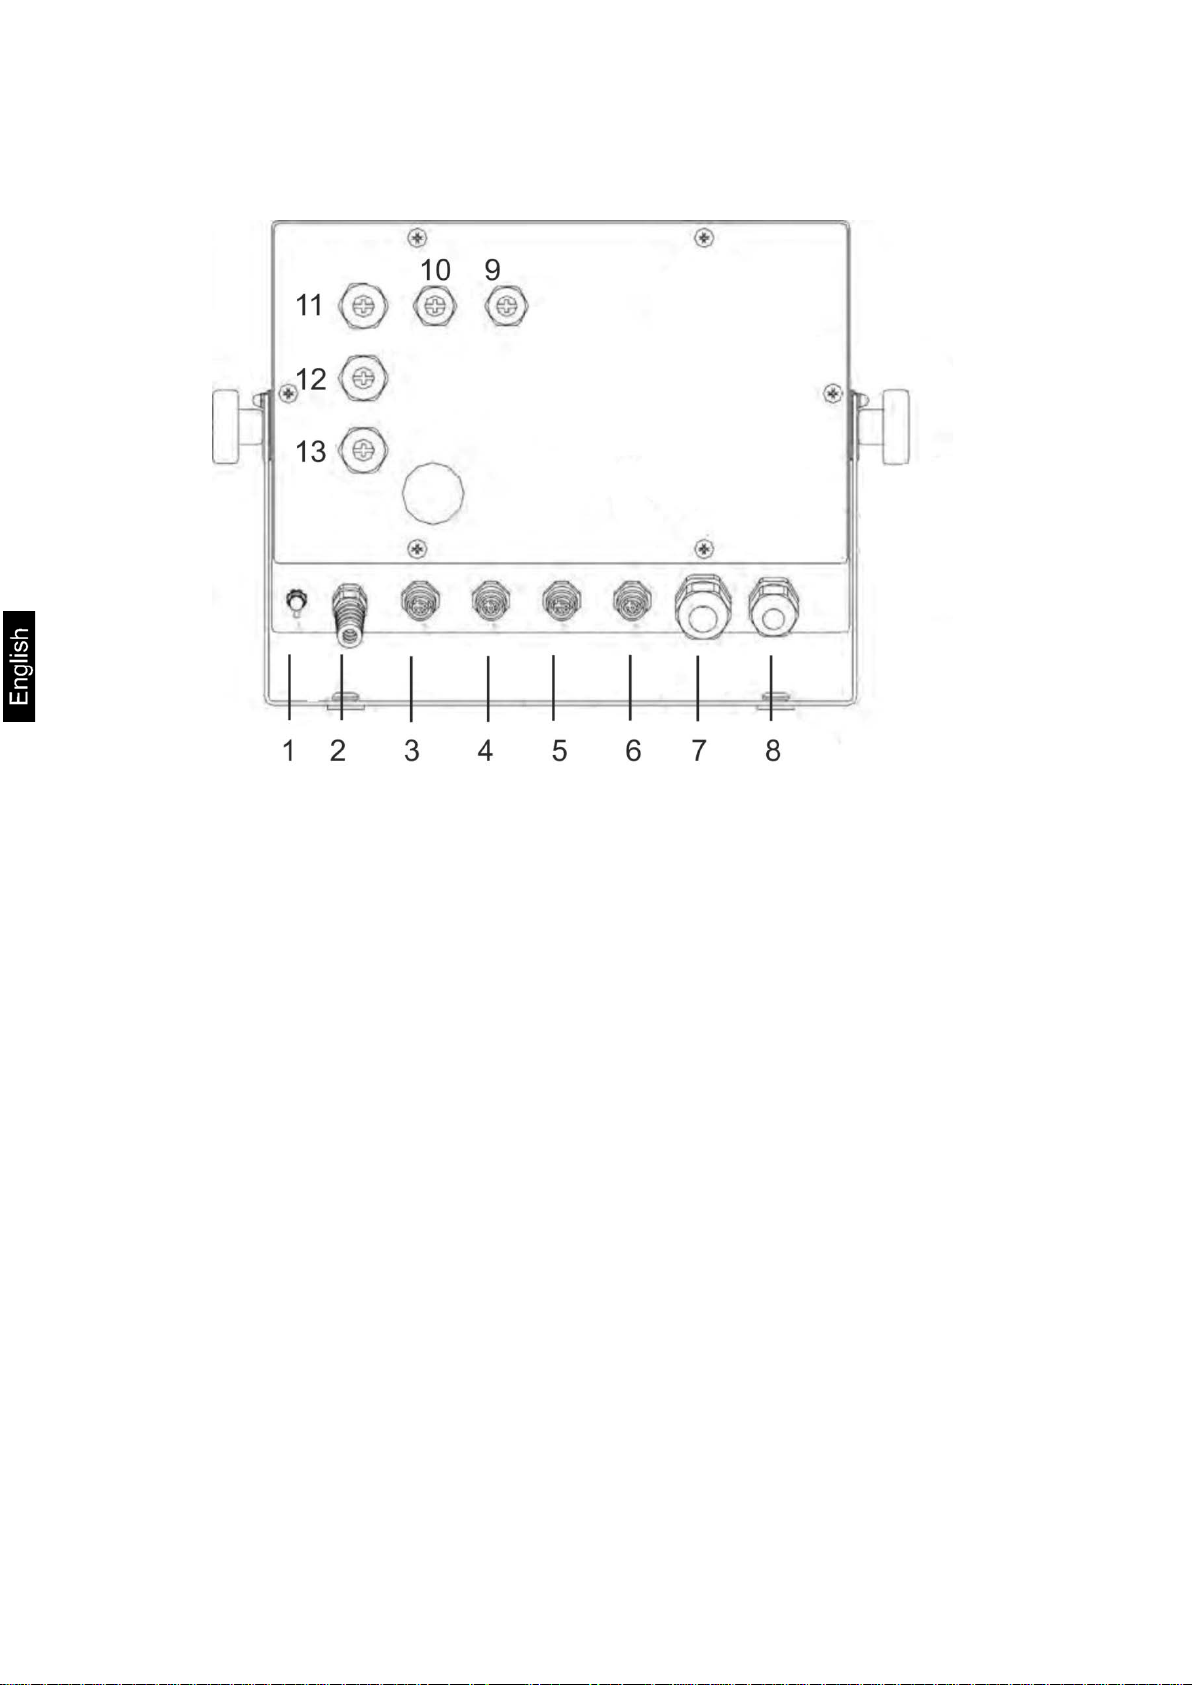
1.2.2 KEN-TM
1. Protective conductor
2. Electric Supply
3. Ethernet
4. 3IN/OUT
5. RS232
6. USB port
7. Peripherals (8IN/8OUT)
8. Platform 1
9. Add-on devices
10. Add-on devices
11. Platform 2
12. Platform 3
13. Platform 4
10 KEN-TM / KET_TM-BA-e-1420
Page 11
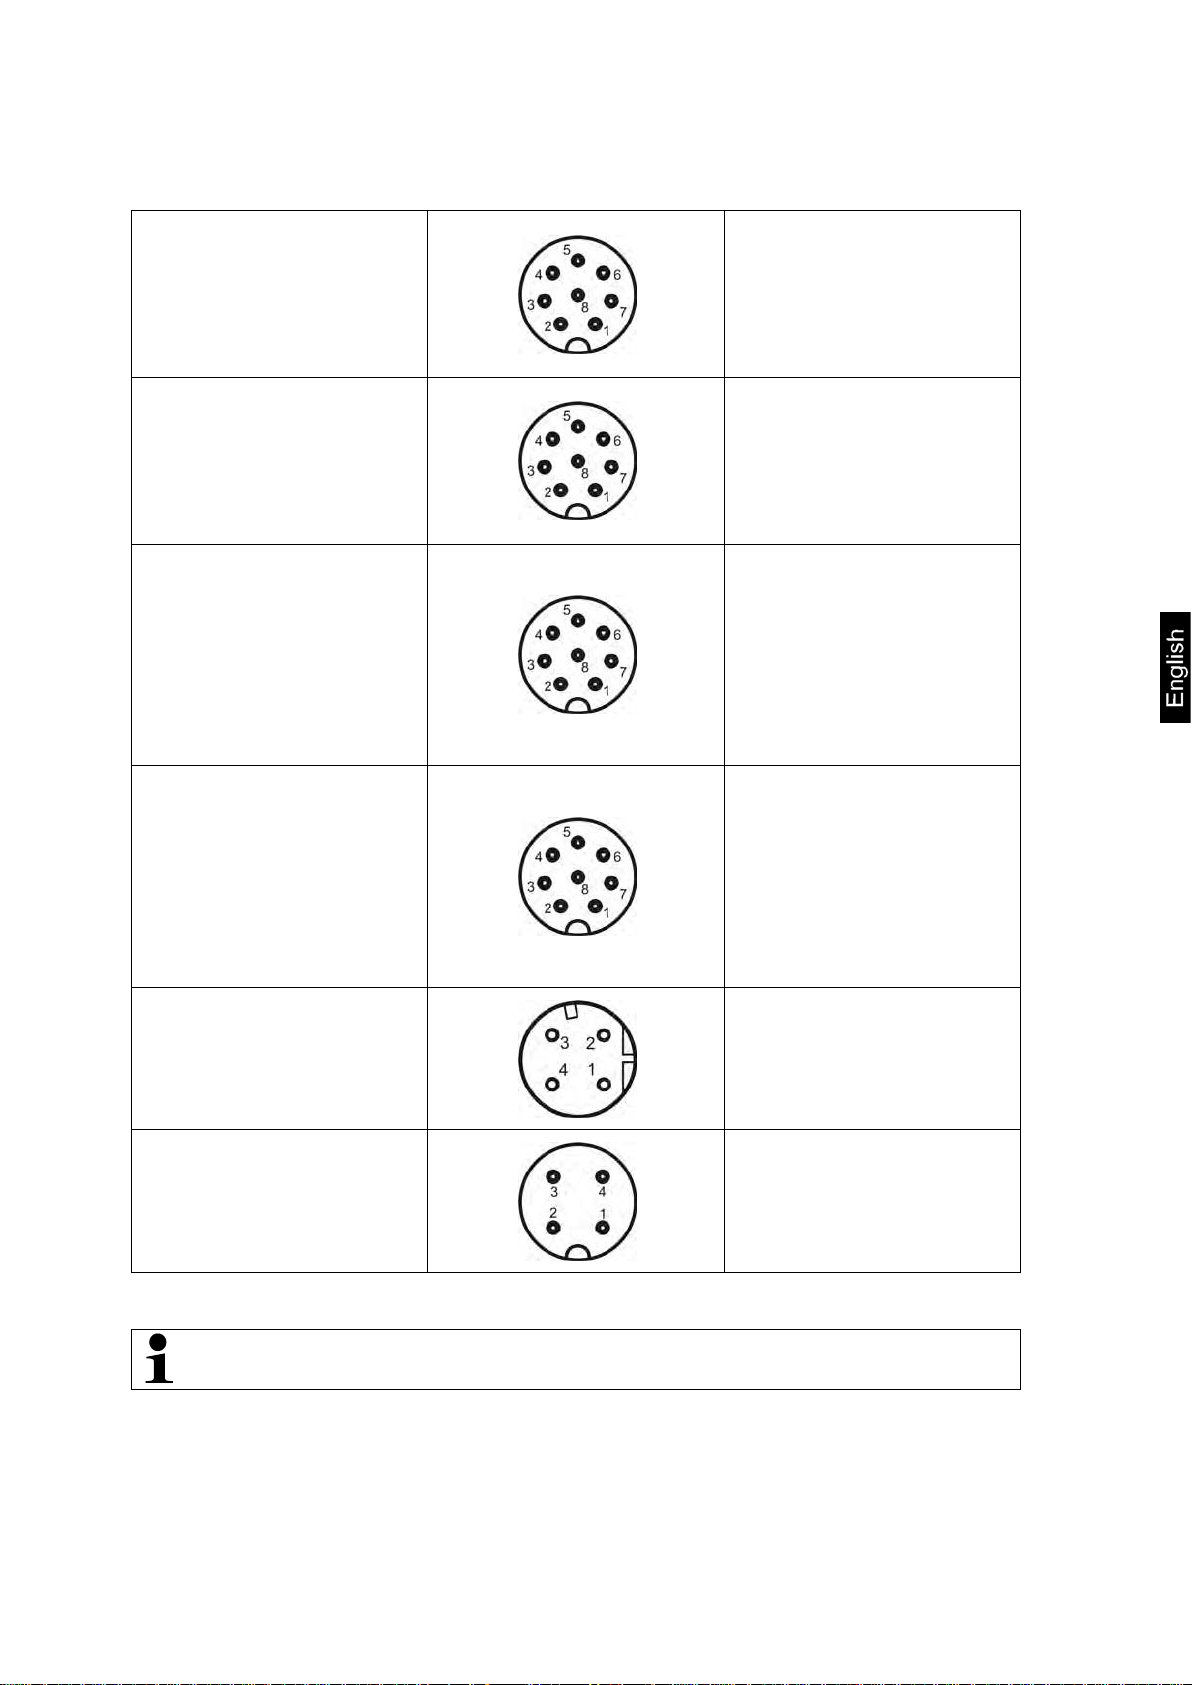
Pin1 – B
Pin6 – +5VDC
Pin1 – NC
Pin6 – +5VDC
Pin1 – OUT3
Pin8 – GNDWE
Pin1 – NC
Pin8 – IN4
Error-free operation is only guaranteed when using the optionally available
KERN interface cables.
Pin allocation:
RS 232 / BUS Module
(option)
Addition RS 232
3IN/OUT
Pin2 – RxD
Pin3 – TxD
Pin4 – A
Pin5 – GND
Pin2 – RxD
Pin3 – TxD
Pin4 – NC
Pin5 – GND
Pin2 – OUT2
Pin3 – OUT1
Pin4 – COMM
Pin5 – IN3
Pin6 – IN2
Pin7 – IN1
4INPUTS
Ethernet
USB
Pin2 – NC
Pin3 – NC
Pin4 – +24VDC
Pin5 – IN3
Pin6 – IN2
Pin7 – IN1
Pin1 – Rx+
Pin2 – Tx+
Pin3 – RxPin4 – Tx-
Pin1 – Vcc
Pin2 – DPin3 – D+
Pin4 – GND
KEN-TM / KET_TM-BA-e-1420 11
Page 12

2 Control elements and program structure
2.1 Keyboard overview
Fig.: KET-TM
Fig.: KEN-TM
12 KEN-TM / KET_TM-BA-e-1420
Page 13
KET-TM KEN-TM
1
2
3
4
LED
Status display
Touch-free sensors.
Adjustable function, see chap. 7.4.2. Operate this function by
moving your hand across the respective sensor. The sensor
-
will confirm (if enabled in the menu see chap. 7.8.3) by
sounding an audio signal that it has detected and executed a
command.
The sensors are supplied disabled by default.
Shortcut key for frequently used applications, functions
and settings
Settings, see chap 7.4.2
Call up menu
OFF: when instrument ready for operation
ON:
Flashi
ng:
When weighing scale is connected to power
supply
When operating system is loading
5
6
7
8
9 -
10 -
11 -
12 -
Turn on/off
Zeroing
Taring
• Issue weighing data
• Confirm
Enter tare value numerically
Change platform
Switch-over weighing unit
Alphanumerical keyboard
KEN-TM / KET_TM-BA-e-1420 13
Page 14
Do not operate the touch screen with sharp or pointed objects!
This could damage the touch screen.
select the desired application.
2.2 Overview of display
The coloured touch screen is a touch-sensitive display. The touch screen does not only
display information, you can also enter orders, by tapping certain areas of the surface.
1. Range
1
Active application.
Tapping the control button will call up a menu where you can
2
Logged-in user
Tapping this control key will allow you to select additional users.
3
Active connection to PC
Active connection to a PC is indicated by an icon.
4
Current date/time
Tapping this button can be used to change date / time. For
setting of display format see chap. 7.8.2
The display has four areas:
14 KEN-TM / KET_TM-BA-e-1420
Page 15
calibrated part of weighing scales with type approval is
highlighted.
Settings, see chap 7.4.1
function keys see chap. 7.4.2
2. Range
5
Current measuring value.
The non-
6
Current weighing unit
To select an item from the menu, tap the button. (For definition
of selection see chap. 7.7).
7
Stability display
The stability display shows that the weighing value is stable.
8
Zero indicator
3. Range
9
Info field
This area shows additional information to the enabled
application.
Tap this button to select which info fields and function keys [0]
are to be shown, see chap.7.4.1.
The bar filled black at the upper margin shows the enabled info
field.
For instance when the field in the centre is enabled
4. Range
KEN-TM / KET_TM-BA-e-1420 15
0
Function keys
The function keys allow direct access to frequently required
functions and settings in the enabled application. For defining
Page 16
WEIGHING
see chap. 7.1.
DATABASES
see chap. 14.
REPORTS
see chap. 15.
WORKING MODES
see chap. 8.
COMMUNICATION
see chap. 7.2.
DEVICES
see chap. 7.3.
DISPLAY
see chap. 7.4
INPUTS / OUTPUTS
see chap. 7.5
ACCESS LEVELS
see chap. 7.6
UNITS
OTHERS
CALIBRATION
type approval
INFO
see chap. 7.11
UPDATE
Not documented
2.3 Program structure
2.3.1 Menu overview
The menu is split into the following blocks:
To call up individual menu blocks and change their settings, tap the icons.
16 KEN-TM / KET_TM-BA-e-1420
see chap. 7.7.
see chap. 7.8
see chap. 7.9
only available for models without
Page 17

2.3.2 Navigation in the menu
Call up menu
Scroll forward in menu
Scroll backwards in menu
Scroll „down“.
Confirm entry, back to previous view
Cancel entry, back to previous view
Add position in database
Search date in database
Search name in database
Search code in database
Print position from database
Delete editing field
Hide / show keyboard
Import data from USB storage medium
Display menu showing all available variables
Display returns one step to previous view
KEN-TM / KET_TM-BA-e-1420 17
Display returns directly to main window
Page 18

Exit menu / back to weighing mode.
The display returns one step to previous view by tapping
Press Back to Main Window repeatedly.
or
In the upper bar and press once and the device will return immediately
to the start screen.
After returning to the previous view or the start screen all the changes you entered
will be saved automatically.
18 KEN-TM / KET_TM-BA-e-1420
Page 19

Authorisation level
Available rights and functions
Administrator
The administrator is allowed to use all the functions and
Advanced user
Start and carry out weighing.
User Start and carry out weighing.
none
Carry out weighing.
2.4 Authorisation levels
The software is designed for users with different access rights:
Administrator and various users There is only one administrator.
The administrator is allowed to use all the functions and has all access rights.
A user, on the other hand, is not allowed to use all the functions and has limited
rights, see table 1 below.
Tab. 1:
has all access rights.
There is only one administrator.
Delete old data from database
Access the following functions:
<Operating modes>
<Profiles read-out>
<Communication>
<Devices>
<Other> except <date / time>
Define universal variables
Export weighing data
View data from database
Access the following functions:
<Profiles read-out>
<General parameters> except <date / time>
No access to menu and database.
KEN-TM / KET_TM-BA-e-1420 19
Page 20

3 Basic instructions
3.1 Proper use
The display unit acquired by you is used in combination with a load cell and serves to
determine the weighing value of material to be weighed. It is not intended for use as
non-automatic weighing system.
Place load manually but carefully on weighing platform.
Prevent loads from dropping.
Place load in centre.
Prevent lateral stress as well as pushing from the side.
As soon as a stable weighing value is reached the weighing value can be
read.
20 KEN-TM / KET_TM-BA-e-1420
Page 21

3.2 Improper Use
Do not use weighing system for dynamic weighing. In the event that small quantities are
removed or added to the material to be weighed, incorrect weighing results can be
displayed due to the “stability compensation“ in the unit. (Example: Slowly draining
fluids from a container on the balance.)
Do not leave permanent load on the weighing pan. This may damage the measuring
system.
Impacts and overloading exceeding the stated maximum load (max) of the weighing
plate, minus a possibly existing tare load, must be strictly avoided. Both, the weighing
plate and the display unit may be damaged during this process.
Never operate display unit in explosive environment. The serial version is not explosion
protected.
Changes to the display unit's design are not permitted. This may lead to incorrect
weighing results, safety-related faults and destruction of the display unit.
The display unit may only be operated in accordance with the described default
settings. Other areas of use must be released by KERN in writing.
3.3 Warranty
Warranty claims shall be voided in case
• Our conditions in the operation manual are ignored
• The appliance is used outside the described uses
• The appliance is modified or opened
• Mechanical damage or damage by media, liquids, natural wear and tear
• The appliance is improperly set up or incorrectly electrically connected
• The measuring system is overloaded
3.4 Monitoring of Test Resources
In the framework of quality assurance the measuring-related properties of the display
unit and, if applicable, the testing weight, must be checked regularly. The responsible
user must define a suitable interval as well as type and scope of this test. Information is
available on KERN’s home page (www.kern-sohn.com with regard to the monitoring of
display units’ test substances and the test weights required for this. In KERN’s
accredited DKD calibration laboratory test weights and display units may be calibrated
(return to the national standard) fast and at moderate cost.
KEN-TM / KET_TM-BA-e-1420 21
Page 22

4 Basic Safety Precautions
4.1 Pay attention to the instructions in the Operation Manual
Carefully read this operation manual before setup and
commissioning, even if you are already familiar with KERN balances.
All language versions contain a non-binding translation.
The original German is binding.
4.2 Personnel training
The appliance may only be operated and maintained by trained personnel.
5 Transport and storage
5.1 Testing upon acceptance
When receiving the appliance, please check packaging immediately, and the appliance
itself when unpacking for possible visible damage.
5.2 Packaging / return transport
Keep all parts of the original packaging for a possibly
required return.
Only use original packaging for returning.
Prior to dispatch disconnect all cables and remove
loose/mobile parts.
Reattach possibly supplied transport securing devices.
Secure all parts against shifting and damage.
22 KEN-TM / KET_TM-BA-e-1420
Page 23
KET-TM
KEN-TM
Display Unit
Display unit with integrated power unit
Protective cover
Operating and Installation Instructions
Mains adapter
IEC cable
Ferrite core for cable shielding
Operating and Installation Instructions
6 Unpacking, Setup and Commissioning
6.1 Installation Site, Location of Use
The display units are designed in a way that reliable weighing results are achieved in
common conditions of use.
Precise and fast work is achieved by selecting the right place for your display unit and
your weighing plate.
On the installation site observe the following:
• Place the weighing system on a firm, level surface;
• Avoid extreme heat as well as temperature fluctuation caused by installing next
to a radiator or in the direct sunlight;
• Protect the display unit and the weighing plate against direct draft from open
windows or doors.
• Avoid jarring during weighing;
• Protect the display unit and the weighing plate against high humidity, vapours
and dust.
• Do not expose the display unit to extreme dampness for longer periods of time.
Non-permitted condensation (condensation of air humidity on the appliance) may
occur if a cold appliance is taken to a considerably warmer environment. In this
case, acclimatize the disconnected appliance for ca. 2 hours at room
temperature.
• Avoid static charge of goods to be weighed or weighing container.
Major display deviations (incorrect weighing results) may be experienced should
electromagnetic fields (e.g. due to mobile phones or radio equipment), static electricity
accumulations or instable power supply occur. Change location or remove source of
interference.
6.2 Unpacking and placing
Take the display unit carefully out of its packaging, remove the plastic jacket and install
it at the designated work space. Mount the display unit in a way that facilitates operation
and where it is easy to see.
The display unit is not mounted rigidly on the weighing platform. If
required, it may be placed independently within the vicinity of the weighing
scale as long as the length of the cable allows such a setup.
6.3 Scope of delivery / serial accessories
KEN-TM / KET_TM-BA-e-1420 23
Page 24

6.4 How to connect the platform
See chap. 21 “Installing display unit / platform“.
Please also follow the instructions for installing a platform, as these contain all the
details for the set-up and first start-up.
6.5 Mains connection
Power supply is achieved via external power units (KET-TM only). The stated voltage
value must be the same as the local voltage.
Only use original KERN mains adapters. Using other makes requires consent by KERN.
6.6 Commissioning
+ Connect scale to power supply.
Connect display unit to power supply; the red status light will light up.
Press and the operating system will be loaded when the red status light is
flashing.
Wait until the start screen followed by the user interface is displayed.
As soon as the weight display appears, the balance is ready for weighing. On
delivery, the weighing scale will be in a logged-out status, that is, merely the
simplest functions such as Weigh or Tare are enabled, see chap. 6.9.
To obtain full access to the user parameters and to the editing functions of
databases, the user has to log on as administrator by following the steps below:
Later on, the last used user profile will be loaded on start-up.
24 KEN-TM / KET_TM-BA-e-1420
Page 25
+ Log in
,
Tap <Log in> button.
<Operators> window appears.
The weighing scale is supplied without
user profiles. To adjust all settings, the
user has to register as administrator.
Tap <Admin> button.
KEN-TM / KET_TM-BA-e-1420 25
Page 26

Initial Commissioning
In order to obtain exact results with the electronic balances, your balance
g temperature (see warming up time chap.
During this warming up time the weighing system must be connected to
hing system depends on the local acceleration of
Strictly observe hints in chapter Adjustment.
+ Setting user language
On delivery the display is set to German. For setting additional languages see
chap.7.8.1.
must have reached the operatin
1).
the power supply (mains, accumulator or battery).
To adapt the balance to ambient conditions, open wind screen doors.
The accuracy of the weig
gravity.
6.7 Log out
Tap logged-on user in the upper bar of the display.
This will bring up the <User> window.
Tap <log out> button
6.8 Putting out of service / Standby mode
Press and tap desired option.
When selecting <Stand by> the weighing scale will be ready for operation. It is ready
for operation immediately after start-up without requiring warm-up time.
When selecting <Off> you will have to restart the weighing scale as described in chap.
6.6 and observe the required warm-up time.
26 KEN-TM / KET_TM-BA-e-1420
Page 27
6.9 Basic Operation
+ Stabilisation requires a certain warm-up time.
+ For further information on specific setting options for the weighing
application please refer to chap.8.2
6.9.1 Simple weighing
Check zero display [ ] and set to zero with the help of .
Place goods to be weighed on balance.
Wait until the stability display appears ( ).
Read weighing result.
To save and print the weighing value if an optional printer is connected, press
For data format see chap. 16.4
6.9.2 Zeroing
In order to obtain optimal weighing results, reset to zero the balance before weighing.
Setting to zero requires a range ± 2% max. Values greater than ± 2% max will trigger
the error message “Err2“.
Unload the balance
Press and zero display as well as indicator will appear.
KEN-TM / KET_TM-BA-e-1420 27
Page 28
Unit
Designation
With type approval
Without type approval
Gram
[g]
yes
yes
Kilogram
[kg]
yes
yes
Carat
[ct]
yes
yes
Pound
[lb]
no
yes
Ounce
[oz]
no
yes
Newton
[N]
no
yes
6.9.3 Selecting weighing unit
Tap unit to select from the displayed
menu.
Not all weighing units are available for weighing scales with type approval.
For definition of start unit and user defined units see chap. 7.7.
28 KEN-TM / KET_TM-BA-e-1420
Page 29
Tare weight
displayed with
The attempt of taring negative
The limit is
6.9.4 Weighing with tare
Taring
The dead weight of any weighing container may be tared away by pressing a button, so
that the following weighing procedures show the net weight of the goods to be weighed.
Put weighing container on the weighing pan.
Wait until the stability display appears ( ), then press . Zero display and
indicator (Net) appear. The weight of the container is now internally saved.
Weigh the material.
Wait until the stability display appears ( ).
Read net weight.
• Tare weight can be allocated to a product in the database.
will be loaded automatically as soon as a product is selected.
• When the balance is unloaded the saved taring value is
negative sign.
• Taring negative values is prohibited.
values will result in error message “Err 3“
• The taring process can be repeated any number of times.
reached when the whole weighing range is exhausted.
Numeric entering of tara weight
Press or the the function key (allocating function key, see chap.
7.4.2) and the numeric input window will appear.
Enter known tare weight and confirm by tapping . The balance returns to
weighing mode.
The entered weight will be saved as tare weight whereupon the indicator [Net]
and the tare weight including minus sign will appear.
Place the filled weighing container.
Wait until the stability display appears [ ].
Read net weight.
KEN-TM / KET_TM-BA-e-1420 29
Page 30

Delete tare
1. Unload weighing plate and press .
The (Net) indicator turns off, the zero display shows.
2. When the weighing platform is loaded, you can only press if the zero setting
range is kept within 2% max (>2% max will generate error message “Err 2“).
The (Net) indicator turns off, the zero display shows.
3. Press function key <Turn off tare> when weighing platform is loaded (<2%
max) or unloaded (For allocation of function key see chap.7.4.2. The (Net)
indicator turns off, the zero display shows.
If there is a function key allocated to <Reset tare> , the most recently used
tare value will be called up. (Allocation of function key, see chap. 7.4.2).
6.10 Connection of peripheral devices
Before connecting or disconnecting of additional devices (printer, PC) to the data
interface, always disconnect the balance from the power supply.
With your balance, only use accessories and peripheral devices by KERN, as they are
ideally tuned to your balance.
30 KEN-TM / KET_TM-BA-e-1420
Page 31

7 System settings (menu)
The system settings are used to customise the behaviour of the weighing scales to your
requirements (such as ambient conditions, special weighing processes).
System settings apply to all user profiles and applications.
To change settings, you have to select <Administrator> as user.
Weighing scales with type approval offer access to all settings.
Call up system settings (menu):
+ To open system settings, press and the options for system settings will
appear, see chap. 2.3.1.
+ Navigation in menu see chap. 2.3.2
KEN-TM / KET_TM-BA-e-1420 31
Page 32

7.1 Weighing
This function is used to customise the behaviour of the weighing scale to the
ambient conditions of special requirements.
Filter
Confirm results
Autozero
Autozero: Dosing
Last digit
Tap <Weighing>.
To call up and change settings tap the
icons.
32 KEN-TM / KET_TM-BA-e-1420
Page 33

Please note that in general slowing down reaction times result in higher
influence on the stability deterioration.
7.1.1 Median filter
The median filter removes shocks such as mechanical vibrations.
Tap <Medianfilter>
The menu will appear.
Select desired setting.
7.1.2 Filter
This setting is used to customise the behaviour of the weighing scale to
the ambient conditions.
stability of the set data handling, while speeding up reaction times have an
<very fast> The balance reacts quickly and in a
<slow> The balance reacts slowly and in a robust
Tap <Filter>
The menu will appear.
sensitive manner, quiet set-up location.
manner, busy set-up location
KEN-TM / KET_TM-BA-e-1420 33
Page 34

below the net value set for the LO threshold.
Tap <LO threshold> and the numeric
7.1.3 Auto Zero
The automatic zero point adapter (auto zero) provides continuous
correction for minor weight variations such as contamination on the
weighing platform.
In the event that small quantities are removed or added to the material to
be weighed, incorrect weighing results can be displayed due to the
“stability compensation“. (e.g. slow flow of liquids from a container placed
on the balance, evaporating processes).
When apportioning involves small variations of weight, it is advisable to
switch off this function.
Available settings:
- Auto zero disabled
- Auto zero enabled
7.1.4 LO threshold
Entering threshold for automatic operation
The next measurement will not be saved until the weighing display falls
input window will appear.
Enter value and take over by .
7.1.5 Last digit display accuracy
Lower display accuracy results in faster display.
Tap < Last digit >
The menu will appear.
34 KEN-TM / KET_TM-BA-e-1420
Always All digits on
Never Last digit off
When stable Last digit on for
stable weighing value
Page 35

7.2 Communication parameters
Via the interfaces weighing data may be exchanged with connected peripheral devices.
Connect balance using a suitable cable with the interface of the peripheral device.
Error-free operation is only guaranteed when using the optionally available KERN
interface cables.
Available interfaces (See image chap. 1.2)
Ethernet
RS232 (COM1)
USB port
Digital I/O, RS232 (COM2)
All interfaces must be configured according to peripheral device and desired function.
7.2.1 RS232 (1) / RS232 (2)
Tap <Communication>.
Select interface to be configured.
Tap < RS232 (1) or RS232 (2)>
Configuration options will be displayed.
Select setting.
The communication parameters of
weighing scale and peripheral device must
match.
KEN-TM / KET_TM-BA-e-1420 35
Page 36

DHCP
IP-address
Mask
Gate
DNS
MAC address
Device specific (not editable)
Transfer parameters have to be set according to local network.
7.2.2 Ethernet / IP
Tap < Ethernet >
The configuration options below will be
displayed:
yes
no
Automatic manual
The import of changes requires that you restart the device by .
7.2.3 TCP
Tap <TCP>
Set TCP-Port in input window.
Default value for KERN devices is “4001“.
36 KEN-TM / KET_TM-BA-e-1420
Page 37

7.3 Devices
Tap <Devices>.
Select peripheral device to be
configured.
KEN-TM / KET_TM-BA-e-1420 37
Page 38

7.3.1 PC
Select / configure computer interface
1. Port
Tap < Computer >
Configuration options will be displayed.
Tap <Port>.
The display will show the interfaces
available for connecting the device to the
computer.
2. Address
Tap <Address>.
Enter the desired address in the input
window and confirm by tapping
38 KEN-TM / KET_TM-BA-e-1420
Page 39

3. Continuous transmission
Setting options:
no
yes
4. Default log
This is used to determine which information is to be issued to the PC.
Continuous data transmission disabled
Continuous data transmission enabled
Tap < Weighing Printout Template >
and the input window will appear. Enter
texts and variables (For table see chap.
19) and import by tapping .
Variables are to be presented in curly
brackets {x}.
Tap and the menu showing all
variables will appear.
To enter line break tap <Enter>.
To hide the keyboard / zoom out the
input window, tap
To import a complete draft from an
USB storage medium, tap
To import a complete draft from an
USB storage medium, tap
To delete the content in the editing
field, tap
KEN-TM / KET_TM-BA-e-1420 39
Page 40

System active.
The following icons are displayed on the upper screen bar when the
5. E2R system
Setting options:
Tap < E2R System >.
The settings
<System enabled> /
<Product selection blocked> are
blocked by default.
These settings may only be modified by
the manufacturer!
no
yes
System disabled
functions are enabled:
System active
Active connection to PC software
40 KEN-TM / KET_TM-BA-e-1420
Page 41

1. Port
7.3.2 Printer
Selecting / configuring printer interface
Tap < Printer >
Configuration options will be displayed.
2. Code
Tap <Port>.
The display will show the interfaces
available for connecting the device to the
computer.
Tap <Code>.
Enter desired value in input window and
confirm by tapping
KEN-TM / KET_TM-BA-e-1420 41
Page 42

3. Defining logs
Tap <Printouts>.
Select log type (such as weighing printout
sample), and the input window will
appear. Enter texts and variables (For
variables menu see chap. 19 ) and import
by tapping .
Variables are to be presented in curly
brackets {x}.
Finish each line by tapping “ Enter“
Display example:
Default log “Weighing“
4. Enabling printouts
Tap and the menu showing all
variables will appear.
To enter line break tap <Enter>.
To hide the keyboard / zoom out the
input window, tap
To import a complete draft from an
USB storage medium, tap
To delete the content in the editing
field, tap .
Tap < Printouts activation >.
enabled
disabled
42 KEN-TM / KET_TM-BA-e-1420
Page 43

Ensure that communication parameters of weighing scale (standard
9600 baud) and barcode scanner match.
7.3.3 Barcode scanner
Select / configure interface
The barcode scanner allows fast access to:
Product
Customer
Packaging
Bearing
Dispensing processes
Recipe
Components of recipe
Universal variables
Serial number
Batch number
1. Port
Tap < Bar Code Reader >
Configuration options will be displayed.
Tap <Port>.
The available interfaces will be displayed.
KEN-TM / KET_TM-BA-e-1420 43
Page 44

2. Prefix / suffix
3. Field selection
Tap < Prefix / Suffix >.
Enter values (hexadecimal) for prefix /
suffix in input window and import by
tapping .
Tap < Field selection >.
To call up and change settings tap the
icons.
44 KEN-TM / KET_TM-BA-e-1420
Page 45

Ensure that communication parameters of weighing scale
(standard 9600 baud) and transponder card reader match.
4. Test
Tap < Test >.
Check error-free functioning of barcode
scanner.
7.3.4 Transponder card reader
Select / configure interface
Tap < Transponder card reader >
Tap <Port>.
The available interfaces will be displayed.
KEN-TM / KET_TM-BA-e-1420 45
Page 46

1. Port
7.3.5 Additional display
Tap < Additional display >
2. Sample
Tap <Port>.
The available interfaces will be displayed.
Tap <Sample>.
The input window used to define the
communication log will appear.
Factory settings:
{141} KERN KET-A03
{142} KERN KET-A06
46 KEN-TM / KET_TM-BA-e-1420
Page 47

7.4 Configure display
This function allows the user to customise the terminal to his/her requirements.
Tap < Display >.
The available parameters will be
displayed.
7.4.1 Select information texts
Tap < Text information >.
To call up and change settings tap the
icons.
KEN-TM / KET_TM-BA-e-1420 47
Page 48

Main display sample
(middle)
Select information texts in info field
The info field is displayed in the application below
the weighing value in the form of a grey field. This
Left display sample
section also shows additional information to the
enabled application. It is possible to create 3
Right display sample
separate info fields. To change between fields, use
a swiping movement with your hand.
To enter the information text, tap the desired field and the input window
will appear. Enter texts and variables (For table see chap. 19.1) and
import by tapping . For default settings see table 2 below:
Variables are to be presented in curly brackets {x}.
Tap and the menu showing all variables will appear.
To enter line break tap <Enter>.
To hide the keyboard / zoom out the input window, tap
To import a complete draft from an USB storage medium, tap
To import a complete draft from an USB storage medium, tap
To delete the content in the editing field, tap .
Font
Font
Font style Character font available: Arial, Courier
Font size Font size options small, normal, large.
yes
Grease, lubricant Font style “Bold“
no
yes
Font tilt Font style “Italic“
no
Font colour
Background colour
Font colour for text information at the working area,
18 colour options
Colour display for display screen, 18 colour options
Set default
Reset to default setting
48 KEN-TM / KET_TM-BA-e-1420
Page 49

Weighing:
{40:Product:,-15}{50}
{40:Total:,-15}{16}{11}
Parts counting:
{40:Product:,-15}{50}
{40:Tare:,-15}{9}{11}
Percent
{40:Product:,-15}{50}
{40:Tare:,-15}{9}{11}
Dosing:
Dosiervorgang: {175}
Formulation:
{220}
{40:Designed:,-12}{225:F0}
Density:
Product: {50}
Animal
weighing:
{40:Tare:,-15}{9}{11}
{40:Gross:,-15}{8}{11}
FPVO
Product: {50} Code: {51}
Table 2: Default settings “information texts“
{40:Tare:,-15}{9}{11}
{40:Gross:,-15}{8}{11}
{40:Quantity:,-15}{15}
{40:Mass of reference weight:,-15}{35}{11}
{40:Net:,-15}{7}{11}
determination:
{40:Mass of reference weight:,-15}{36}{11}
{40:Net:,-15}{7}{11}
{40:Ingredient:,-12}{230}/{231}[{226}]
{40:Dose:,-12}{228}{11}/{227}{11}
{40:Batch:,-12}{232}/{233}
KEN-TM / KET_TM-BA-e-1420 49
Page 50

The menu will appear.
7.4.2 Selecting function keys
Function keys allow direct access to frequently used functions and settings of the
enabled application. They are displayed on the application at the lower margin of the
display.
Tap < Button functions >.
Menu will appear:
Keys F1 – F3
Display keys 1- 9
Touch free sensors,
left / right (KET-TM only)
Use the cursor to scroll forward or
backward.
The numbers of the display keys
determine the order on the display.
Tap desired key.
For default settings see table 3 below:
Use the cursor to scroll forward or
backward.
Selection is imported by tapping. The
display returns to the previous screen.
50 KEN-TM / KET_TM-BA-e-1420
Page 51

Set limit values MIN and MAX for control
Table 3: Default settings “function keys“
Weighing:
Parts counting:
F1-key Search product
F2-key Select customer
F3-key Set tare
Screen key 1 Application specific settings
Screen key 2
Screen key 3 Select packaging
Screen key 4 Edit serial number
Screen key 5 Edit batch number
Screen key 6 Statistics Z: Zeroing
F1-key Search product
F2-key Select customer
F3-key Set tare
Screen key 1 Application specific settings
weighing
Percent determination:
Dosing:
Screen key 2 Select packaging
Screen key 3 Enter reference single weight numerically
Screen key 4 Determine reference single weight by weighing
Screen key 5 Allocate reference single weight
F1-key Search product
F2-key Select customer
F3-key Set tare
Screen key 1 Application specific settings
Screen key 2 Select packaging
Screen key 3
Screen key 4
F1-key Select dispensing
F2-key Select customer
Enter reference weight (100%) as numeric
value
Determine reference weight (100%) by
weighing
KEN-TM / KET_TM-BA-e-1420 51
F3-key Set tare
Screen key 1 Application specific settings
Page 52

Determination of
density:
Formulation:
Screen key 2 Select dispensing
Screen key 3 Start
Screen key 4 Stop
Screen key 5 Failure
F1-key Select recipe
F2-key Select customer
F3-key Set tare
Screen key 1 Application specific settings
Screen key 2 Select recipe
Screen key 3 Start recipe
Screen key 4 Stop recipe
Screen key 5 Select component from recipe menu
Screen key 6 Select previous component of recipe
Screen key 7 Select next recipe
Animal weighing:
Screen key 8 Enter weight manually
Screen key 9 Edit serial number of component
F1-key Search product
F2-key Select customer
F3-key Set tare
Screen key 1 Application specific settings
Screen key 2 Determine density of liquid
Screen key 3 Determine density of solids
Screen key 4 Stop
F1-key
F2-key
F3-key
Screen key 1
Search product
Select customer
Set tare
Local parameters
52 KEN-TM / KET_TM-BA-e-1420
Screen key 2
Start
Page 53

7.4.3 Display all platforms
When used as weighing system with several platforms, the display for each platform
can be switched as follows:
For assigning switching option to function key or sensor, see chap. 7.4.2.
or
Enable function <Show all platforms> as described below:
Tap < Show all platforms >.
- no
- yes
All platforms will be displayed when this function is enabled.
To edit the desired platform, tap it.
KEN-TM / KET_TM-BA-e-1420 53
Page 54

7.4.4 Select bargraph type
1. Bargraph type
Tap < Bargraph >.
The available bargraph types will be
displayed:
None – bargraph is not displayed
Fast weighing
Pilot light settings
Linearity
Tap < Bargraph Type >.
Select type of your choice to be
displayed.
54 KEN-TM / KET_TM-BA-e-1420
Page 55

2. Fast weighing
Function:
Eight red and three green pilot lights indicate whether the load is within the tolerance
limits (MIN / MAX threshold).
The signal lights provide the following information:
The red pilot lights on the left
indicate that the target weight is
below the lower tolerance limit
(MIN threshold).
The lower the weight value
below the MIN threshold the
more red arrows will light up on
the left.
Settings:
The green pilot lights
indicate that the target
weight is within the
tolerance range (OK
threshold).
< 1/3 MIN-MAX
range
> 1/3 and 2/3
MIN-MAX range
> 2/3 MIN-MAX
range
Tap < Fast weighing >.
The menu will be displayed; see table 4
below.
The red pilot lights on the
right indicate that the target
weight is above the upper
tolerance limit (MAX
threshold).
The greater the weight value
above the MAX threshold, the
more red arrows will light up
on the right.
KEN-TM / KET_TM-BA-e-1420 55
Page 56

Tab. 4:
Operating mode for
thresholds
MIN, MAX
Operating mode of
OK threshold
Stable – pilot light for thresholds MIN, MAX
will be visible after exceeding the LO threshold and
after reaching a stable weighing result;
Unstable – pilot light for thresholds MIN / MAX will be
visible after exceeding the LO threshold.
Stable – pilot light for threshold OK will be visible after
exceeding the LO threshold and after reaching a stable
weighing result;
Unstable – pilot light for threshold OK will be visible
after exceeding the LO threshold
Pilot light colour for MIN
threshold
Pilot light threshold for OK
threshold
Pilot light colour for MAX
threshold
Gradient Turn on / turn off filling flow for type “Gradient“.
Background colour
Frame colour
Select pilot light colour for threshold MIN, 18 colour
options available
Select pilot light threshold for threshold OK, 18 colour
options available
Select pilot light threshold for threshold MAX, 18 colour
options available.
Select background colour for bargraph, 18 colour
options available.
Select frame colour for bargraph, 18 colour options
available.
3. Pilot light setting (checkweighing)
Three colour pilot lights indicate whether the load is within the tolerance limits (MIN /
MAX threshold).
The signal lights provide the following information:
Target weight below lower
tolerance limit
(MIN threshold)
Target weight within
tolerance range (OK
threshold)
Target weight above
upper tolerance limit
(MAX threshold)
56 KEN-TM / KET_TM-BA-e-1420
Page 57

Settings:
Tap < Signalling checkweighing
ranges >.
Menu will appear, see table. 4.
4. Linearity
Function:
The bargraph display moves from the left to the right and proceeds equally to the
weight loaded onto the weighing balance. Its full width is reached at maximum load.
For tolerance controls such as dosaging, apportioning or sorting the balance will
display violated upper or lower limits vie the bargraph display. The analogue
bargraph display (length of displayed bars) indicates where the weight of the
weighed goods comes in the tolerance range. The tolerance range is always
standardised between target value and limit values (Min / MAX threshold) so that it
corresponds to the bar length of the bargraph.
Target weight below lower tolerance limit (MIN threshold):
Target weight within tolerance range (OK threshold):
Target weight above upper tolerance limit (MAX threshold):
KEN-TM / KET_TM-BA-e-1420 57
Page 58

Settings:
Tab. 5:
Pilot light colour for MIN
threshold
Tap < Linear >.
Menu will appear, see table. 5.
Select pilot light colour for threshold MIN, 18 colour
options available
Pilot light threshold for OK
threshold
Pilot light colour for MAX
threshold
Gradient Turn on / turn off filling flow for type “Gradient“.
Background colour of OK
range
Frame colour
Select pilot light threshold for threshold OK, 18 colour
options available
Select pilot light threshold for threshold MAX, 18 colour
options available.
Select background colour for OK range on bargraph,
18 colour options available.
Select frame colour for bargraph, 18 colour options
available.
58 KEN-TM / KET_TM-BA-e-1420
Page 59

7.5 I/O settings
Tap < Inputs / Outputs >.
KEN-TM / KET_TM-BA-e-1420 59
Page 60

7.5.1 Inputs
For pin allocation IN1 – IN4, see chap. 1.2
Tap < Inputs >.
Select input to configure
(IN1 – IN4).
Default settings of all inputs: <none>.
Select action to be carried out on
enabling selected input.
60 KEN-TM / KET_TM-BA-e-1420
Page 61

No
Output disabled
Stable
Stable weighing value above LO weight
MIN stable
Stable weighing value below threshold MIN
MIN unstable
Unstable weighing value below threshold MIN
OK stable
Stable weighing value between thresholds MIN and MAX
OK unstable
Unstable weighing value between thresholds MIN and MAX
MAX stable
Stable weighing value above threshold MAX
MAX unstable
Unstable weighing value above threshold MAX
Zero
Stable weighing value zero net
Cycle end confirmation
Confirmation signal for cycle completion of dispensing
Zero
Zero weighing result (character “zero“)
! OK unstable
Unstable weighing value outside OK threshold
! OK stable
Stable weighing value outside OK threshold
7.5.2 Outputs
For pin allocation OUT1 – OUT4, see chap. 1.2
Tap < Outputs >.
Select output to configure
(OUT1 – OUT4).
Tab. 6:
The default setting for all parameters is
<none>.
Select event that is to trigger enabling of
output, see table below. 6.
KEN-TM / KET_TM-BA-e-1420 61
Page 62

Function <Access Level> is only available when you are logged on as
<Administrator>.
7.6 Authorisations
This function is used by the administrator (See chap.2.4 / Table. 1) to set protection for
certain functions individually and to grant rights to a user of the weighing scale who is
not logged on (“anonymous user“ ).
1. Anonymous user
This function is used to grant rights to a user of the weighing scale who
is not logged on.
Tap < Access level >.
Tap <Anonymous operator>
The menu will appear.
For available rights and functions of the
respective option, see chap.2.4 / table. 1
62 KEN-TM / KET_TM-BA-e-1420
Page 63

2. Date and time
This function is used to grant the user access to <Date and Time>.
Tap < Date and time >
The menu will appear.
Select users who are to be granted rights
of access.
For available rights and functions of the
respective option, see chap.2.4 / table 1
3. Print document
This function is used to grant the user right of access to define logs.
Tap <Printouts>
Select users who are to be granted rights
of access.
For available rights and functions of the
respective option, see chap.2.4 / table 1
Selecting <none> results in free access to the function.
KEN-TM / KET_TM-BA-e-1420 63
Page 64

4. Editing database
This function is used to grant rights that are supposed to be available to
the user for editing the respective database.
Tap < Database edition >
Select database for which right of access
is to be granted.
Selecting <none> results in free access to the function.
Select access level.
For available rights and functions of the
respective option, see chap.2.4 / table 1
64 KEN-TM / KET_TM-BA-e-1420
Page 65

5. Select database
This function is used to grant rights that are to be available to the user
for viewing the respective database.
Tap < Set element from the database >
Select database for which right of access
is to be granted.
Selecting <none> results in free access to the function.
6. FPVO
Not documented
Select access level.
For available rights and functions of the
respective option, see chap.2.4 / table. 1
KEN-TM / KET_TM-BA-e-1420 65
Page 66

7.7 Weighing Units
This function is used to determine which weighing units are to be used
for the operation of the weighing scale.
Tap < Units >.
1. Unit switch over
This function is used to set the units into which the weighing result can be
switched to, see chap.2.2. [6].
To call up and change settings tap the
icons.
Tap < Accessibility >.
Weighing unit activated
Weighing unit deactivated
66 KEN-TM / KET_TM-BA-e-1420
Page 67

The selected unit will be displayed after a
2. Starting unit
This function is used to set the unit to be displayed when the weighing scale is
started.
3. Gravitational acceleration
Tap < Start unit >.
Select desired starting unit.
restart.
Not all units are available for
weighing scales with type approval.
Tap < Acceleration of gravity >.
Enter local gravitations constant in input
window.
KEN-TM / KET_TM-BA-e-1420 67
Page 68

This is used to set parameters influencing the operation of the weighing
y, key level, brightness of
7.8 General parameters
scale, such as user language, date / time displa
display etc.
Tap < Others >.
To call up and change settings tap the
icons.
7.8.1 User language
Tap < Language >.
Select language.
The display will change directly to the
selected language.
68 KEN-TM / KET_TM-BA-e-1420
Page 69

You may also set date / time directly by tapping the date / time display in the
main window, see chap. 2.2 [4]
7.8.2 Enter date / time, select display format
Tap < Date and time >.
The individual settings can be called up
and edited by tapping the icon.
1. Setting date and time
Tap < Set date and time >
Go to the numeric input window and enter
date / time.
Follow the on-screen instruction. Enter
year, month, day, hour, minutes one by
one and import accordingly by .
Confirm query for import by tapping
KEN-TM / KET_TM-BA-e-1420 69
Page 70

2. Selecting date format
Tap < Date format >
Import desired format by tapping.
3. Selecting time format
Tap < Time format >
4. Display of currently set time / date
Select desired display format by tapping.
70 KEN-TM / KET_TM-BA-e-1420
Page 71

This function can be enabled / disabled as follows.
7.8.3 Signal tone when pressing button
Every time a key is pressed, a brief audio signal will be sounded for confirmation.
Tap < Beep >.
The menu will appear.
None
Button
Sensors
All
Audio signal disabled
Audio signal will be sounded
every time you press a key.
The sensor confirms that it has
detected and executed a
command by sounding an audio
signal.
Audio signal will be sounded
when keys and optic sensors are
operated.
KEN-TM / KET_TM-BA-e-1420 71
Page 72

+ The adjustment cannot be interrupted.
7.8.4 Set the touch screen alignment
When the alignment of the touch-sensitive ranges of the display does not match
exactly with the position of the buttons, it can be corrected with the help of this
function.
Tap < Touch screen calibration >.
To adjust the touch screen, follow the
instructions on the screen.
With a pen tick the centre of the cross as
exactly as possible. Press and hold until
the next cross appears.
Repeat this process for all items.
Press PRINT key to confirm the new
settings.
To cancel, tap the screen on the top right
corner (See image).
+
Ensure that during adjustment no other ranges of the display are
touched.
+ Do not touch the display by hand.
72 KEN-TM / KET_TM-BA-e-1420
Page 73

7.8.5 Setting brightness of display
Tap < Screen brightness >.
The currently set brightness will be
displayed.
7.8.6 Set mouse support
To change, drag bar to the right or left.
Every movement will change the
brightness immediately, making the
change immediately noticeable.
Take over setting with .
Adjustable: 0 % - 100 %
Default setting: 90 %
Tap < Cursor >.
Mouse support enabled
Mouse support disabled
KEN-TM / KET_TM-BA-e-1420 73
Page 74

7.8.7 Setting “Log on required“
7.8.8 Setting start logo
Tap <Login in required >.
To force the user to log on after starting
up the device, enable function <log on
required>.
Log on required
Log on not required
Tap < Startlogo >.
1. Startlogo
This function is used to customise the start
logo.
Connect the USB storage medium
containing the start logo file.
Optimal resolution for start logo file (JPEG,
PNG) is 640 x 480 pixel
Tap < Start logo > and import file.
The start logo will be updated on
restarting.
74 KEN-TM / KET_TM-BA-e-1420
Page 75

2. Standard Settings
Tap < Set Default >.
To reset the default setting for the start
logo, tap
7.8.9 Setting viewing times for error messages
Tap <Error information preview time>.
Tap desired duration.
KEN-TM / KET_TM-BA-e-1420 75
Page 76

be reused for applications subject to verification.
7.9 Adjustment
As the acceleration value due to gravity is not the same at every location on earth, each
display unit with connected weighing plate must be coordinated - in compliance with the
underlying physical weighing principle - to the existing acceleration due to gravity at its
place of location (only if the weighing system has not already been adjusted to the
location in the factory). This adjustment process must be carried out for the first
commissioning, after each change of location as well as in case of fluctuating
environment temperature. To receive accurate measuring values it is also
recommended to adjust the display unit periodically in weighing operation.
The adjustment of this menu item is locked in calibrated weighing systems.
It is not shown on the menu.
To disable the access lock, destroy the seal and actuate the service switch.
For position of service switch see chap. 7.10.
Attention:
After destruction of the seal the weighing system must be re-verified by an
authorised agency and a new verification wire/seal mark fitted before it can
+ For execution of “adjust weighing system“ see chap. 21.4
7.10 Verification
General introduction:
According to EU directive 2009/23/EC balances must be officially verified if they are
used as follows (legally controlled area):
a) For commercial transactions if the price of goods is determined by weighing.
b) For the production of medicines in pharmacies as well as for analyses in the
medical and pharmaceutical laboratory.
c) For official purpose.
d) For manufacturing final packages.
In cases of doubt, please contact your local trade in standard.
Verification notes:
An EU Qualification Approval is in existence for verified weighing systems. If a balance
is used where obligation to verify exists as described above, it must be verified and reverified at regular intervals.
Reverification is carried out according to the relevant national statutory regulations. The
validity for verification of balances in Germany is e.g. 2 years.
The legal regulation of the country where the balance is used must be observed!
76 KEN-TM / KET_TM-BA-e-1420
Page 77

1
1
2
Notes on verified weighing systems
In calibrated weighing systems the adjustment switch used for adjustments is locked.
To disable the access lock, destroy the seal and actuate the service switch.
Position of seals and adjusting switch:
• Verification of the weighing system is invalid without the "seal".
1
Self-destructing seals
2
Service switch
KEN-TM / KET_TM-BA-e-1420 77
Page 78

7.11 Weighing scale info
This function is used to call up weighing scale information.
Tap < Info >.
The following information about the
weighing scale will be displayed:
• Serial number
• Program version “metrology“
• Program version “applications“
• Current storage capacity
78 KEN-TM / KET_TM-BA-e-1420
Page 79

8 Application settings
Overview of available applications:
Weighing see chap. 9.
Parts counting see chap. 10.
Percent
determination
Dosing
Recipes see chap. 12.
Density
determination
Animal weighing see chap. 13.
FPVO
Vehicle weighing
see chap. 11.
Not documented; for further information please contact KERN
Not documented; for further information please contact KERN
Not documented; for further information please contact KERN
Not documented; for further information please contact KERN
8.1 Select application
There are two options available:
1. By tapping the icon on the top left corner of the window
or
2. By calling up in the menu
1. Tap the icon on the top left corner of the window [1].
The menu will appear.
Tap desire application.
KEN-TM / KET_TM-BA-e-1420 79
Page 80

Which applications are to be available on the menu is defined under menu item <
functions availability>.
For menu access press .
Tap < Working modes >.
Tap < Accessibility >.
Enable functions to be available on the
menu.
enabled
disabled
80 KEN-TM / KET_TM-BA-e-1420
Page 81

2. Call up application on menu
For menu access press .
Tap < Working modes >.
Tap desire application.
KEN-TM / KET_TM-BA-e-1420 81
Page 82

8.2 Application specific settings
Application specific settings are available to customise the application according to your
requirements. The available settings depend on the currently enabled application.
Some of these settings are global, that is, they are available with most applications
(except Recipeting, dispensing). Please refer to the overview below:
Weighing Piece
counter
Percentage
determination
Animal
weighing
Density
determination
Storage mode
Differential weighing
Checkweighing
Tare mode
Labelling
Statistics
Peak value function
- - - -
-
-
Two options are available for defining application specific settings:
1. By tapping the icon on the bottom left corner of the window.
or
2. By calling up in the menu
82 KEN-TM / KET_TM-BA-e-1420
Page 83

1. Tap the icon on the bottom left corner of the window.
This action will bring up the application specific settings of the currently
enabled applications.
Tap the desired setting.
KEN-TM / KET_TM-BA-e-1420 83
Page 84

2. For menu access please press .
Tap < Working modes >.
Tap desired application (such as
weighing).
The application related settings will be
displayed.
84 KEN-TM / KET_TM-BA-e-1420
Page 85

The default setting for the weighing scale in the application is weighing.
For selecting application, see chap. 8.1
9 Weighing
How to carry out a simple weighing process is described in chap. 6.9 “Basic operation“
Apart from the operating steps described therein (simple weighing, zero setting, taring,
selecting weighing unit) the weighing system also offers additional options for
customising application “Weighing“ to your specific requirements.
For selecting application specific settings, see chap. 8.2
The following settings are available for application “Weighing“:
Storage mode see chap. 9.1.
Dispensing see chap. 9.2.
Checkweighing see chap. 9.3.
Tare mode see chap. 9.4.
Labelling mode see chap. 9.5..
Statistics see chap. 9.6.
Differential weighing see chap. 9.7.
Peak hold see chap. 9.8.
Info about saved weighing activities see chap. 9.9.
KEN-TM / KET_TM-BA-e-1420 85
Page 86

This function is used to determine under which conditions weighing
9.1 Setting storage conditions for alibi memory
values are to be saved to the alibi memory; options include:
Manual all stable
Manual first stable
Automatic last stable
Automatic first stable
Tap < Save mode >.
Select condition that is to trigger
storage, see table below: 7.
Tab. 7:
Manual all stable
Manual first stable
Automatic last stable
Automatic first stable
Each stable weighing value will be saved
after pressing the PRINT key.
The first stable weighing value will be
saved after pressing the PRINT key.
The last stable weighing value will be
saved automatically.
The first stable weighing value will be
saved automatically.
86 KEN-TM / KET_TM-BA-e-1420
Page 87

Under the menu item
<Reports>
<Reports from weighing records>
<Weighings / Alibi>
the saved weighing value can be seen
KEN-TM / KET_TM-BA-e-1420 87
Page 88

Remove portions of components and save them at the same time to the
the saved weighing values can be seen, see chap. 9.1.
Weighing scale is working in
Weighing scale is working in
9.2 Dispensing
Place and tare full container.
alibi memory (Depends on menu setting in storage module), see chap.
9.1). The displayed minus figures are saved to the alibi memory as plus
figures.
Under the menu item
<Reports>
<Reports from weighing records>
<Weighings / Alibi>
Tap < Dispensing >.
default weighing mode
mode
“Differential Weighing“
88 KEN-TM / KET_TM-BA-e-1420
Page 89

Checkweighing allows you to set an upper as well as a lower limit value
see chap. 7.4.4.
Under the menu item
9.3 Checkweighing
(min / max threshold) and ensures that weighed loads are kept precisely
Log / save result of tolerance check
within the set tolerance limits.
The bargraph display facilitates checkweighing by differently coloured
displays according to the settings in the menu. < display bargraph >,
Tap < Checkweighing >.
Weighing scale saves / logs each
weighing activity
Weighing scale saves / logs only
weighing activities that are kept
within the min / max threshold.
Save result in alibi memory after
tolerance check (according to menu
setting in storage mode> see chap. 9.1).
<Reports>
<Reports from weighing records>
<Weighings / Alibi>
the saved weighing value can be seen,
see chap. 9.1.
KEN-TM / KET_TM-BA-e-1420 89
Page 90

Entering limits:
Press assignable function key
(For assigning function to a key, see chap.
7.4.2).
The numeric input window for min
threshold will be displayed.
Enter value for min threshold (such as
1500 g) and press to import.
The numeric input window for max
threshold will be displayed.
Enter value for max threshold (such as
2000 g) and press to import.
90 KEN-TM / KET_TM-BA-e-1420
Page 91

Start checkweighing:
Tare when using a weighing container.
Put on goods to be weighed, tolerance control is started. The pilot lights indicate
whether the load is within the min / max threshold.
Display example for bargraph setting “pilot light“:
State Display Factory setting
<too light>
<good>
yellow
green
<too heavy>
red
KEN-TM / KET_TM-BA-e-1420 91
Page 92

Subsequent
This function allows multiple taring. The limit is reached when the whole
For additional containers / packaging repeat these steps.
Total of
When selecting a product with tare value from the database
original value in the database.
Total of
When selecting a product with tare value from the database
be added to the previous tare value.
Auto tare
Each first stable weighing value will be automatically imported as tare
container on weighing scale and the net weight will be shown.
Each
measurement
9.4 Tare mode
Tap < Tare mode >.
Select tare mode; see table below. 8.
Tab. 8:
tare weight
current
weighing range is exhausted.
Example:
Place first container or packaging on weighing scale and press the
TARE key. The tare weight will be saved and zero display and [Net]
indicator will appear.
Weigh the material, the net weight will be indicated.
Place second container or packaging on weighing scale and again
press the TARE key.
The loaded total weight will be saved as the new tare weight and zero
will be displayed. Weigh load into the second container, net weight
will be displayed.
you can increase this tare value numerically by pressing the function key
(For assigning function key, see chap. 7.4.2
entry overwrites the previous tare value. Everything is based on the
). Each new tare value
all
This value can be increased numerically by pressing the function key
(For assigning function key, see chap. 7.4.2
value. Zero display and indicator [Net] appear. Place filled weighing
Each confirmed weighing value will be imported as tare value.
92 KEN-TM / KET_TM-BA-e-1420
). Each numeric tare value will
Page 93

9.5 Labelling
The creation of labels is only possible in combination with label printers
KERN PET A07 or PET A08.
Available labels:
• Standard labels for attaching to individual products
• Miscellaneous labels for attaching to container
• Miscellaneous labels, of miscellaneous labels for attaching to
container
Tap < Labelling mode >.
For further information please refer to the operating instructions enclosed
with the optional label printers KERN PET A07 / PET A08.
Select function
KEN-TM / KET_TM-BA-e-1420 93
Page 94

Statistics will be updated each time a new value is imported. This
function is used to determine whether statistical data updating shall take
place independent on a certain product or dependently on a product in
When <Statistics> <Goods> is selected, only data relating to the most
restart.
9.6 Statistics
the database.
Tap < Statistics >.
recently weighed product will be imported to the device’s statistics after a
Select function:
Global
Product
Statistics data will be updated
globally
Statistics data will be updated
separately for each weighed
product from the database.
94 KEN-TM / KET_TM-BA-e-1420
Page 95

In differential weighing, samples are investigated with regard to changes
between the two weighing activities.
9.7 Differential weighing
in weight. The first working step is to determine the initial weight of the
sample. Afterwards some components of the sample will be removed or
added (such as drying, separating, filtering, reducing to ash, vaporizing
and letting condense, coating). The sample will be reweighed after
processing. Then the weighing scale will measure the difference
Activate function:
Tap < Differential weighing >.
The menu will appear.
Not documented; for further information
please contact KERN
KEN-TM / KET_TM-BA-e-1420 95
Page 96

This function shows the highest load value (peak value) in a series of
The peak value remains in the display until it will be deleted.
The peak value remains in the display
9.8 Peak value function
weighing activities.
Activate function:
Display peak value:
Tap < Peak hold>.
Function deactivated
Function activated
Load weighing pan.
The highest load value is displayed in
red digits.
until it will be deleted using . Then
the balance is ready for further
measurements.
96 KEN-TM / KET_TM-BA-e-1420
Page 97

9.9 Info about saved weighing activities
Activate function:
Tap <Information about saved
measurement>.
Function deactivated
Function activated
When this function is enabled, the info
field will appear after every saving action.
Confirm query for import by tapping
KEN-TM / KET_TM-BA-e-1420 97
Page 98

10 Parts counting
Before the balance can count parts, it must know the average part weight (i.e.
reference). Various methods are at hand for determining a reference single weight .
(See chap. 10.3.1, chap.10.3.2).
10.1 Select application
Tap for instance symbol in the top left corner of the display window and select
the application < Parts counting> or you can call it up from the menu (For details
see chap. 8.1).
The piece counting window is displayed showing the unit “pcs“.
Two special function keys < , > as well as a special info field are enabled by
default for parts counting.
The reference single weight is entered as numerical value, see chap.10.3.2
The reference single weight is determined by weighing a known reference
number of parts, see chap. 10.3.1
Selecting further function keys, see chap. 7.4.2
98 KEN-TM / KET_TM-BA-e-1420
Page 99

10.2 Application specific settings
Tap icon in the bottom left corner of the window or call it up from the menu
(For details see chap.8.2).
The application specific settings will be displayed.
Automatic correction of reference mass see chap. 10.2.1.
Minimum reference mass see chap. 10.2.2.
Save mode see chap. 9.1.
Dispensing see chap. 9.2.
Checkweighing see chap. 9.3.
Tare mode see chap. 9.4.
Labelling mode see chap. 9.5
Statistics see chap. 9.6.
Differential weighing see chap. 9.7.
Info about saved weighing activities see chap. 9.9.
KEN-TM / KET_TM-BA-e-1420 99
Page 100

The setting options for the application “Parts counting“, are with a few exceptions
identical to those of the application “Weighing“. For that reason the description below is
restricted to the divergent settings.
10.2.1 Automatic reference optimization
This function is used to determine whether the reference single weight is to be
optimised automatically during counting.
At every reference optimisation, the reference piece weight is calculated anew. As the
additional pieces increase the base for the calculation, the reference also becomes
more exact.
Activate function:
Tap <Automatic correction of reference
mass>.
Function deactivated
Function activated
100 KEN-TM / KET_TM-BA-e-1420
 Loading...