

Page 1
Sauter GmbH
Ziegelei 1
FK
Model
Capacity
Resolution
FK 10
10 N
0,005 N
FK 25
25 N
0,01 N
FK 50
50 N
0,02 N
FK 100
100 N
0,05 N
FK 250
250 N
0,1 N
FK 500
500 N
0,2 N
FK 1k
1 000 N
0,5 N
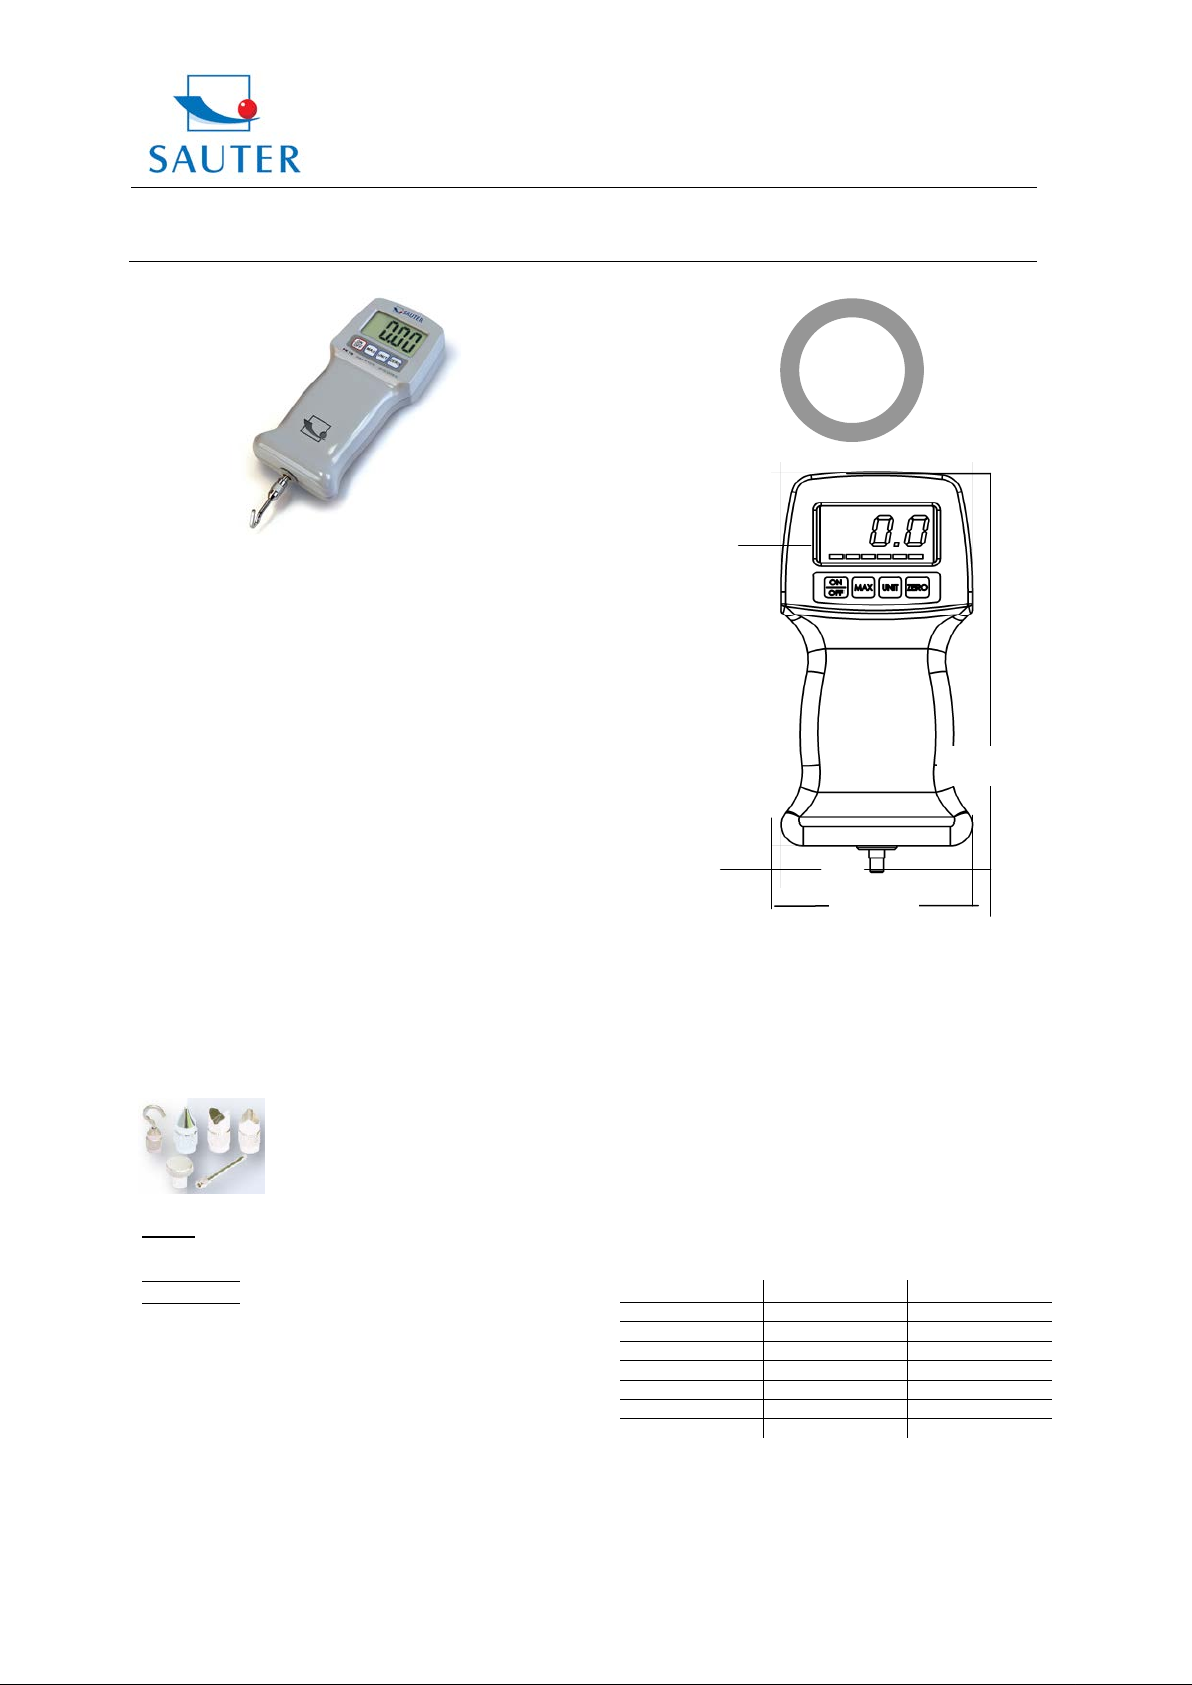
LCD
Force Sensor
195 mm
83 mm
D-72336 Balingen
E-Mail: info@sauter.eu
Instruction Manual
Thank you for buying a SAUTER force gauge. We hope
you are pleased with your high quality force gauge with its
big functional range. If you have any queries, wishes or
helpful suggestions, do not hesitate to call our service
number.
„Sensor inside“means the measuring cell is inside the
housing.
Table of contents
1. Included in delivery
2. Working conditions
3. Electrical power supply
4. Technical data
5. Operation
6. Backside fixing on a test stand
7. Adjusting procedure
8. Declaration of conformity
9. Warning
1.
Included in delivery
- SAUTER FK
- Power cable
- Standard attachments as shown below
Terms:
1.Track Mode= continuous measurement
2. Peak Mode= Capture of the maximum value
In this mode, always the max value is captured during
several consecutive measurements
2.
Working Conditions
Temperatures: 10°C up to 30°C
Humidity: 15% up to 80%
Tel: +49-[0]7433- 9933-199
Fax: +49-[0]7433-9933-149
Internet: www.kern-sohn.com
dimensions in mm
(M7 x 0.75mm
Sensor
Inside
3. Electrical Power Supply
- Either by batteries (6 x AA batteries
Batteries have to be changed if necessary.
- or current power supply
Power supply:
- Connection by power adapter cable
4.
Technical Data
- Accuracy: ± 0,5 % of Capacity
- Data Sampling Rate: 1.000 Hz
) not rechargeable!
FK-BA-e-1213 1
Page 2
Sauter GmbH
FK
(1)
(2)
(3)
(4)
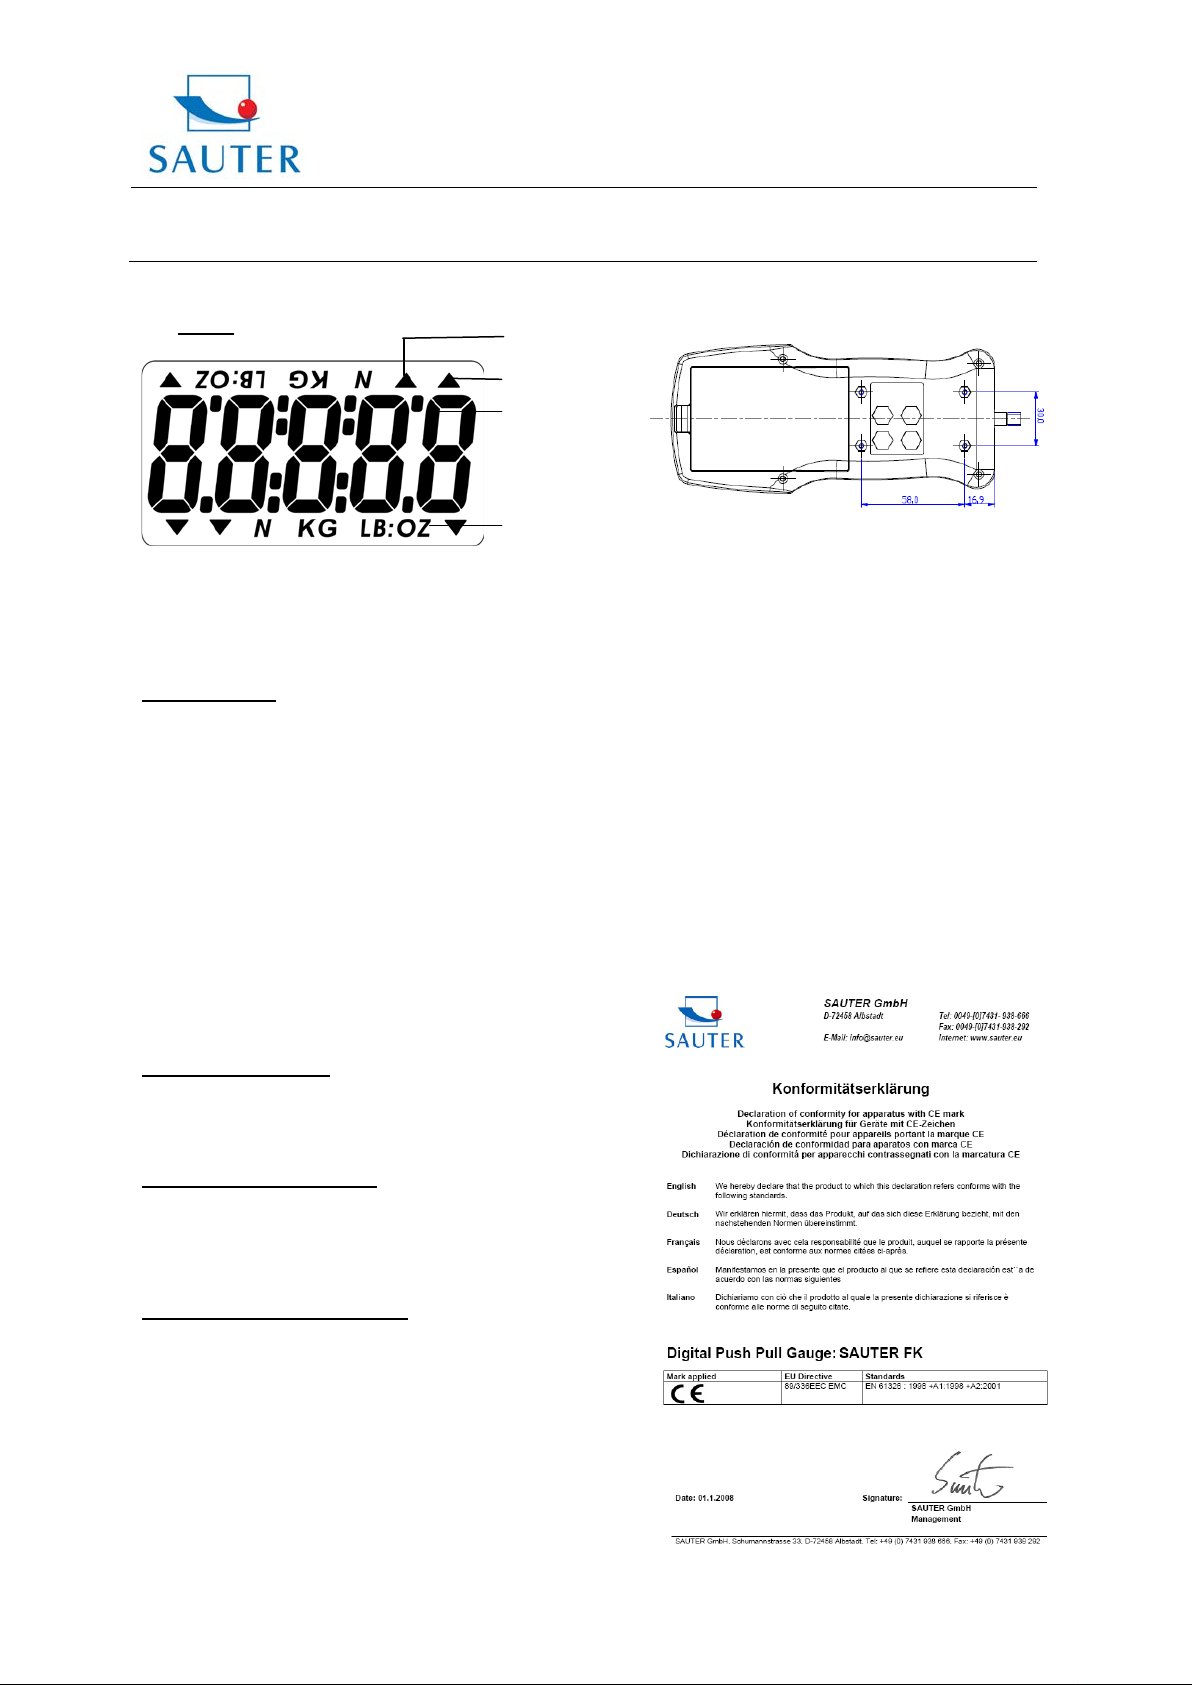
5. Operation
a. Display
Ziegelei 1
D-72336 Balingen
E-Mail: info@sauter.eu
Tel: +49-[0]7433- 9933-199
Fax: +49-[0]7433-9933-149
Internet: www.kern-sohn.com
Instruction Manual
6. Backside Fixing to a test stand
Measuring Result
Measuring Units
Measuring Direction
Indication of PEAK Mode
b. Operating keys
ON / OFF:
to switch on, ON has to be pressed for about 1s
MAX:
Changes between Track and Peak mode (capture of
maximum values)
UNIT:
Press shortly to select desired unit:
N, kg, lb, ou
ZERO:
- Zeros the measuring result (Tara function)
- Cleans the peak value (in Peak mode)
c. Display Return of 180°
When the instrument itself is turned so that the head faces
down, the display returns automatically.
d. Measurement (Track Modus)
- Display (1) shows the continuous force in a defined
direction (3)
- To zero the display, press ZERO key:
e. Peak-Hold Function (Peak Mode)
Please press: MAX key
Fixing by 4 x M3 screws.
7. Adjusting procedure
- Observe stable environmental conditions. A short
warming up time of approx. 1 minute is recommended for
stabilization.
- Switch on the unit by p ressing the Unit-key and keep it
pressed until in the display first appears shortly "CAL".
- After that there appears the fix size of the adjustment
weight. Attach the adjustment weight; a short time later
appears "F". Then the instrument returns automatically to
the measuring mode.
In case of an adjustment error or i ncorrect adjusting weight
the display will show "E"; repeat adjustment process.
8. CE Declaration of Conformity
FK-BA-e-1213 2
Page 3

Sauter GmbH
Ziegelei 1
FK
D-72336 Balingen
E-Mail: info@sauter.eu
Instruction Manual
9. Warning
9.1 Intended use
The instrument you have acquired serves to determine the
measuring value of the material to be measured. It is
intended to be used as a “non-automatic“ instrument, i.e.
the material to be measured is manually and carefully
attached at the instrument. The measuring value can be
read off after a stable measuring value has been obtained.
9.2 Inappropriate use
Do not use the instrument for medical measurements. In
the event that small quantities are removed or added to the
material to be measured, incorrect measuring results can
be displayed due to the “stability compensation“ in the
instrument. (Example: Slow draining off of liquid from a
container suspended at the instrument). Do not attach a
continuous load. This can damage the measuring unit as
well as the parts, relevant to safety.
Important:
* Always make sure that there are no people or materials
below the load that could be injured or damaged!
* The instrument is
not use as a baby scale!
* The instrument does
law (MPG).
Never operate the instrument in hazardous locations. The
series design is not explosion-proof. Structural alterations
may not be made to the instrument. This can lead to
incorrect measuring results, faults concerning safety
regulations as well as to destruction of the instrument. The
instrument may only be used in compliance with the
described guidelines. Varying areas of application/
planned use must be approved by SAUTER in writing.
9.3 Guarantee
The guarantee is not valid under following circumstances:
• non- observance of our guidelines in the instruction
manual
• use beyond the described applications
• alterations or opening of the device
• mechanical damage and damage caused by media,
liquids
• natural wear and tear
• inappropriate assembling or electric installation
• overloading of the measuring equipment
9.4 Monitoring the test substances
The metrology features of the instrument and any possible
available adjusting weight must be checked at regular
intervals within the scope of quality assurance. For this
purpose, the answerable user must define a suitable
not suitable for measuring people. Do
not comply with the medical product
Tel: +49-[0]7433- 9933-199
Fax: +49-[0]7433-9933-149
Internet: www.kern-sohn.com
interval as well as the nature and scope of this check.
Information is available on the home page
(www.KERN-sohn.com) with regard to the monitoring of
instrument test substances and the test weights required
for this. Test weights and instruments can be adjusted
quickly and reasonably priced in KERN’s accredited DKD
calibration laboratory (return to national normal).
9.5 Fundamental safety information
Do not use the hanging instrument to transport loads.
Prevent jolts, torsion and oscillation (e.g. by suspending
aslopely) of all kinds.
Be sure to prevent overloading the instrument (over the
maximum permitted weight) in excess of the stated
maximum load (max.), minus any tare weight that may
possibly exist. This could damage the instrument (risk of
breakage!!!).
Always make sure that there are no living beings or
materials below the load that could be injured or damaged.
The hanging electronic instruments from the SAUTER
series are only suitable for hand-held use or use together
with a test stand.
They are not suitable being hung on a mechanical hook,
e.g. a crane hook.
9.5.1 Observe the information in the operating instructions
please read the instruction manual carefully before
assembling and the initial operation, even if you already
have gained experience with SAUTER instruments.
9.5.2 Staff training
The device may only be operated and maintained by
trained members of staff.
FK-BA-e-1213 3
Page 4

Sauter GmbH
Ziegelei 1
FK
D-72336 Balingen
E-Mail: info@sauter.eu
Instruction Manual
How to adjust an FK Force Measuring Device:
1. A short warming up time of approx. 1 minute is
recommended for stabilisation.
Switch on the FK by pressing “ON/OFF” button while
holding it in vertical position.
2. When display shows zero, simultaneously press “UNIT”
and “ZERO” butt on unt il “CAL” appears on display.
Tel: +49-[0]7433- 9933-199
Fax: +49-[0]7433-9933-149
Internet: www.kern-sohn.com
5. Hold position until “F” appears on display. In this cas e
remove weight and adjusting is completed. In case of “E”
showing up on display - repeat step 1. to 5. until “F”
attests a successful adjustment
3. Wait a few seconds and display will show the necessary
adjustment weight, e.g. 5,000kg for FK 50 or 10,00kg for
FK 100.
4. Put the corresponding weight at t he l oadi ng hook. Avoid
trembling and keep still while holding the weight (hint:
hold device with both hands while s horing up your elbows
on table or desk).
FK-BA-e-1213 4
 Loading...