

Page 1
KERN & Sohn GmbH
Ziegelei 1
D-72336 Balingen
email: info@kern-sohn.com
Instruction Manual
Tel: +49-[0]7433- 9933-0
Fax: +49-[0]7433-9933-149
Internet: www.kern-sohn.com
Platform/floor scales
KERN EOS_F
Version 1.2
11/2011
GB
EOS_F-BA-e-1112
Page 2

GB
KERN EOS_F
Version 1.2 11/2011
Contents
1 Technical data................................................................................................ 4
2 Appliance overview ....................................................................................... 5
3 Overview of display ....................................................................................... 7
3.1 Keyboard overview.......................................................................................................8
4 Basic Information (General).......................................................................... 9
4.1 Proper use....................................................................................................................9
4.2 Improper Use................................................................................................................9
4.3 Warranty.......................................................................................................................9
4.4 Monitoring of Test Resources.....................................................................................10
5 Basic Safety Precautions ............................................................................ 10
5.1 Pay attention to the instructions in the Operation Manual..........................................10
5.2 Personnel training.......................................................................................................10
6 Transportation & Storage............................................................................ 10
6.1 Testing upon acceptance ...........................................................................................10
6.2 Packaging / return transport.......................................................................................10
Operating instructions Platform/floor scales
7 Unpacking, Setup and Commissioning ..................................................... 11
7.1 Installation Site, Location of Use................................................................................11
7.2 Unpacking and erection..............................................................................................11
7.2.1 Scope of delivery / serial accessories...................................................................................... 12
7.2.2 Assembly instructions for the use of the wall fixture ................................................................ 12
7.3 Mains connection........................................................................................................13
7.4 Battery operation........................................................................................................13
7.5 Initial Commissioning..................................................................................................14
8 Adjustment ................................................................................................... 15
2
EOS_F-BA-e-1112
Page 3

9 Operation Mode ........................................................................................... 16
Start-up...................................................................................................................................16
Switching Off..........................................................................................................................16
Weighing ................................................................................................................................17
Switch over weighing unit......................................................................................................17
Taring.....................................................................................................................................18
Hold function (animal weighing function)................................................................................20
Plus/minus weighings.............................................................................................................21
Setting channels.....................................................................................................................22
10 Menu ............................................................................................................. 24
11 Service, maintenance, disposal.................................................................. 25
11.1 Cleaning .....................................................................................................................25
11.2 Service, maintenance.................................................................................................25
11.3 Disposal......................................................................................................................25
12 Error messages, troubleshooting guide .................................................... 25
EOS_F-BA-e-1112
3
Page 4
1 Technical data
KERN
Readability (d) 50 g 100 g
Weighing range (max) 150 kg 300 kg
Reproducibility 50 g 100 g
Linearity ± 100 g ± 200 g
EOS
150K50XLF
EOS
300K100XLF
Recommended
adjustment weight, not
added (class)
Stabilization time (typical) 2.5 sec.
Warm-up time 10 min.
Input Voltage 220 V- 240 V, AC 50 Hz
Power pack
secondary voltage
Battery (optional) 6 x 1.5 V AA (=9V)
Battery operation period Display unit: 70 h
Auto-Off 3 min
Weighing Units kg, lb
Ambient temperature + 10°C …+ 35°C
100 kg
(M2)
200 kg
(M2)
9V, 100 mA
Platform: 110 h
Humidity of air max. 80 % (not condensing)
Display unit
(B x D x H) mm
Radio transmission to
weighing platform
Weighing surface mm 900 x 550 900 x 550
Weight kg (net) 18.8 18.8
4
Range: max. 10 m on free surface, free of buildings
210 x 110 x 45
EOS_F-BA-e-1112
Page 5

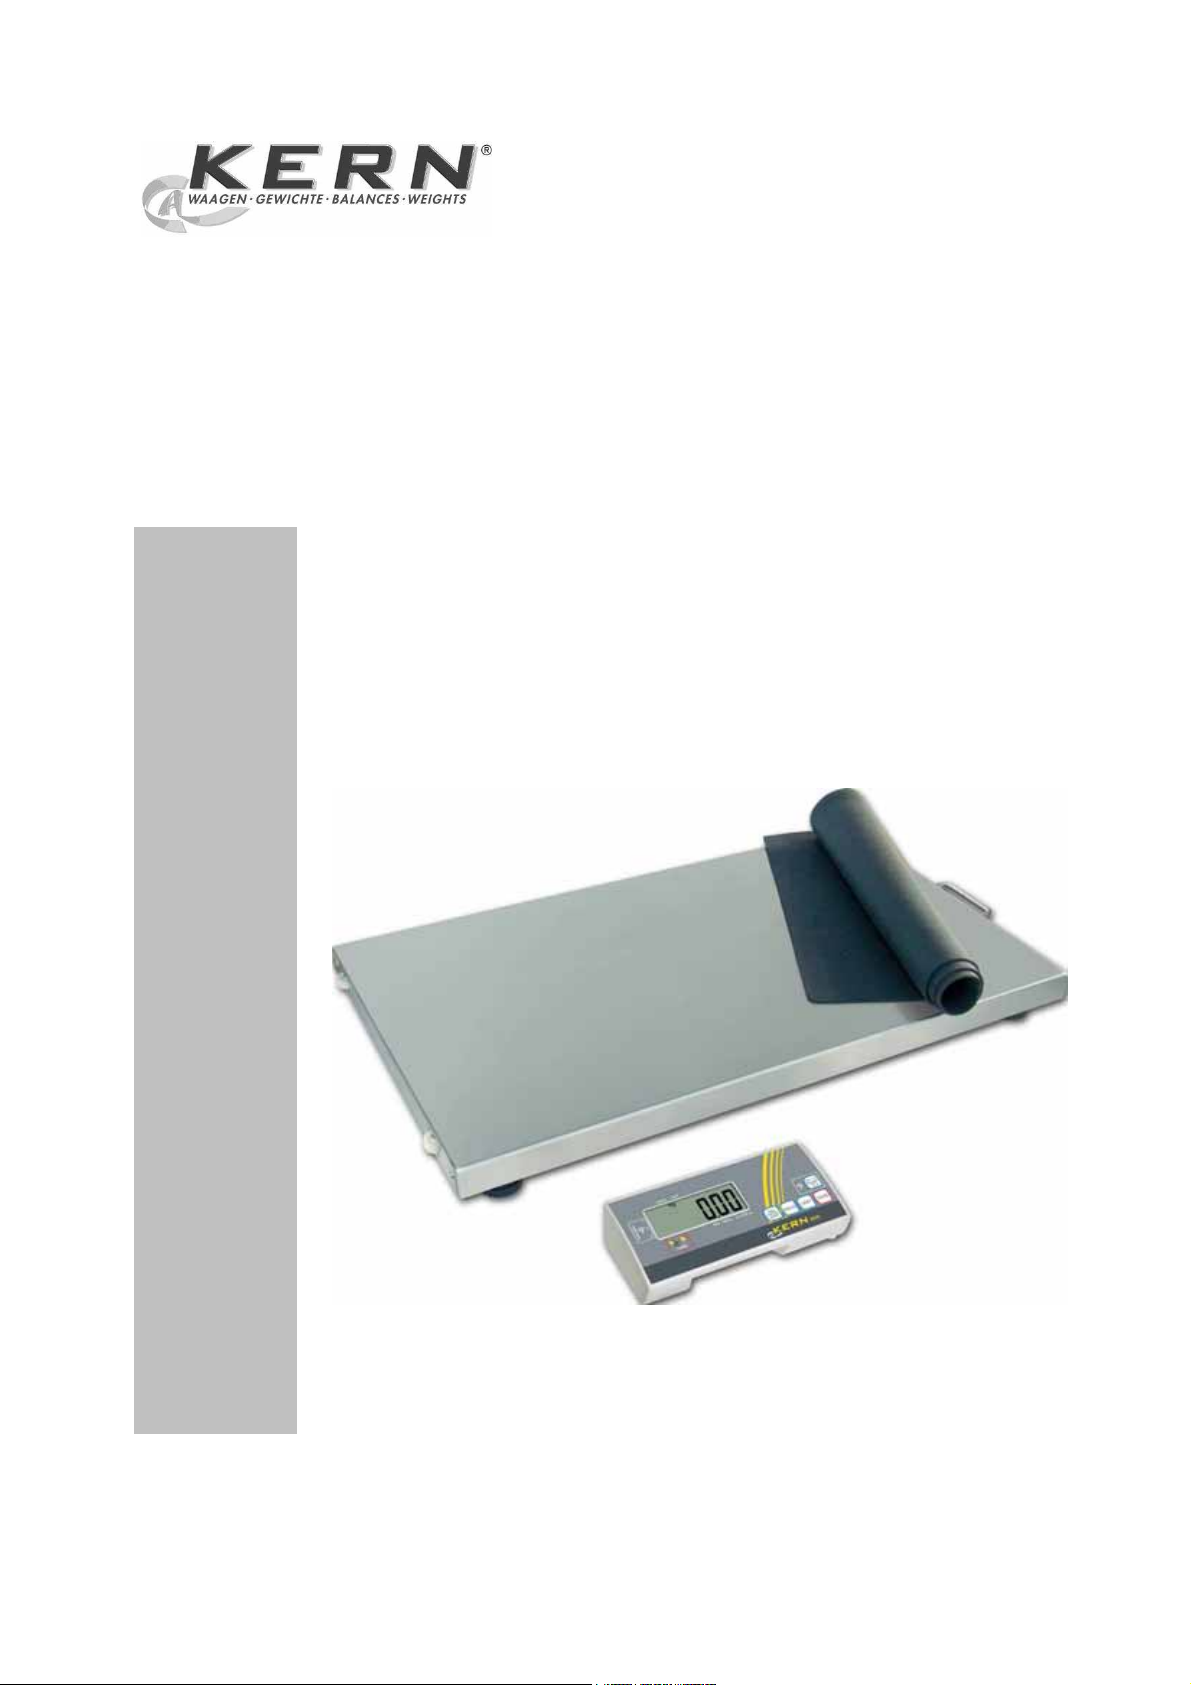
2 Appliance overview
• Weighing plate, stainless steel
• Anti-slip rubber mat
• Display unit with wall fixing device:
EOS_F-BA-e-1112
5
Page 6

• Comfortable transport due to 2 rollers and 1 grab handle
6
EOS_F-BA-e-1112
Page 7
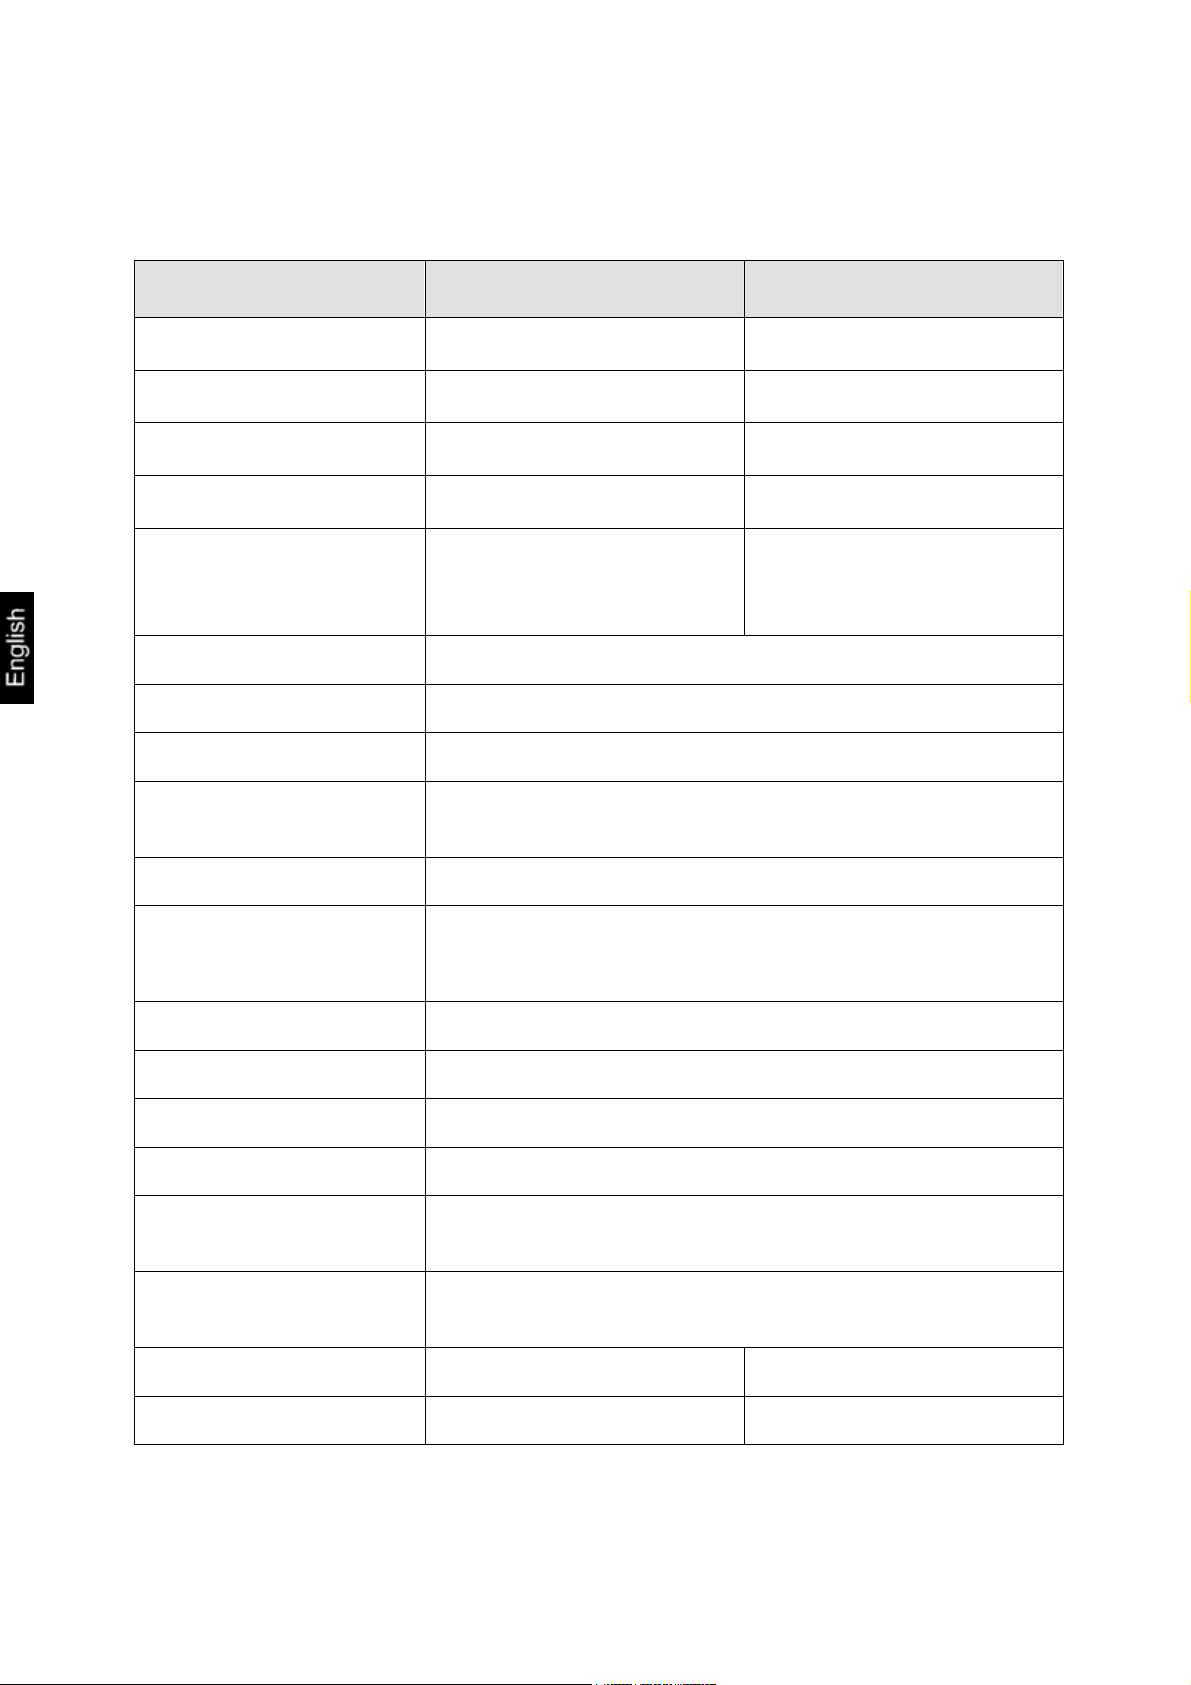
3 Overview of display
No. Description
1 Is displayed, when the battery capacity is exhausted.
2 Balance zero display:
Should the balance not exactly display zero despite of unloaded weighing
plate, use taring function (see chap. 7).
The balance will be set to zero after a short standby time.
3 Display of the three possible channels
4 Display of receiving mode
5 Stability display:
If the display shows the stability display [ο] the balance is in a stable
status. The [ο] indication disappears if the condition is unstable.
6 Hold/animal weighing function active, see chap. 7
7
Weighing unit [kg ' lb], (see chap. 7) „Switch-over weighing unit“
8 Stored tare value, (see chap. 7) „Taring“
9 Contact-free taring field
EOS_F-BA-e-1112
7
Page 8
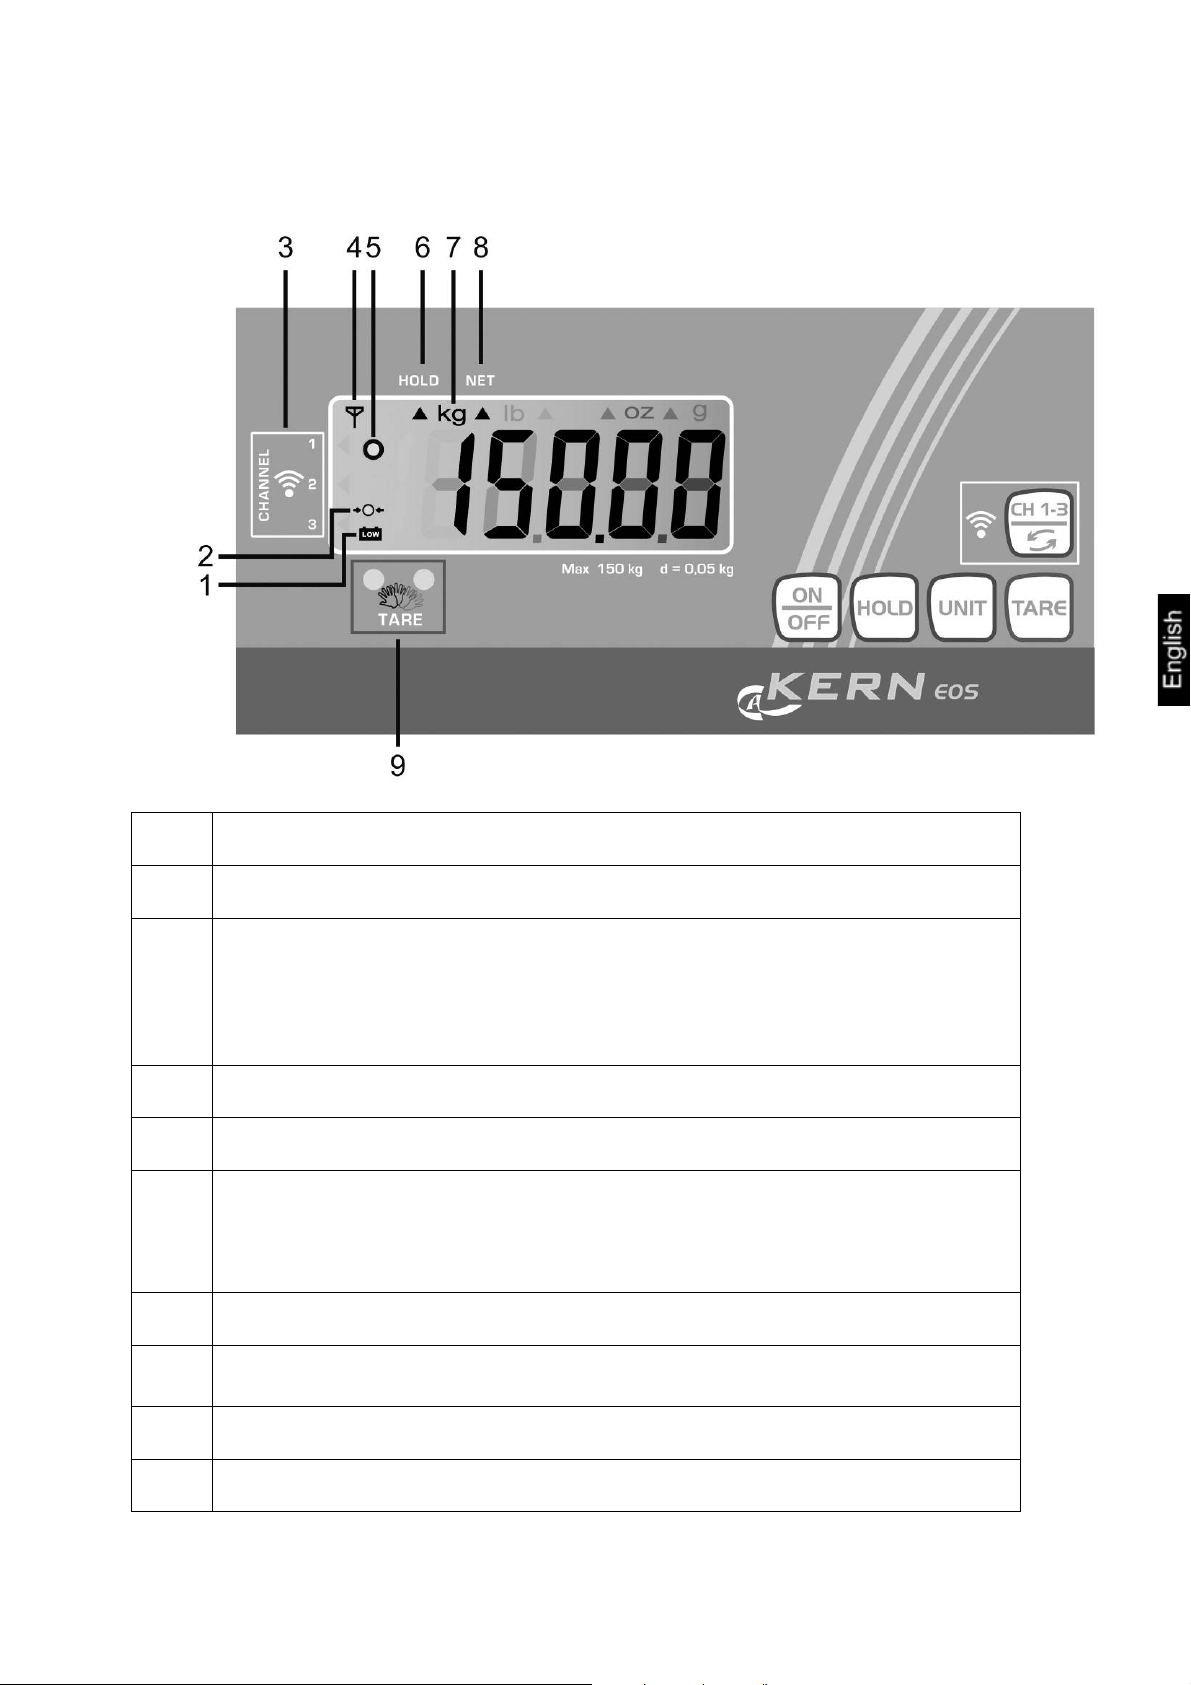
3.1 Keyboard overview
Key Function
Turn on/off balance
Hold/ animal weighing function
Tare balance by
• The TARE button or
+
• The contact-free taring field
Switch-over weighing unit
Select channel
8
EOS_F-BA-e-1112
Page 9

4 Basic Information (General)
4.1 Proper use
The balance you purchased is intended to determine the weighing value of material
to be weighed. It is intended to be used as a “non-automatic“ balance, i.e. the
material to be weighed is manually and carefully placed in the centre of the weighing
plate. As soon as a stable weighing value is reached the weighing value can be read.
4.2 Improper Use
Do not use balance for dynamic add-on weighing procedures, if small amounts of
goods to be weighed are removed or added. The “stability compensation“ installed in
the balance may result in displaying an incorrect measuring value! (Example: Slowly
draining fluids from a container on the balance.)
Do not leave permanent load on the weighing plate. This may damage the measuring
system.
Impacts and overloading exceeding the stated maximum load (max) of the balance,
minus a possibly existing tare load, must be strictly avoided. Balance may be
damage by this.
Never operate balance in explosive environment. The serial version is not explosion
protected.
The structure of the balance may not be modified. This may lead to incorrect
weighing results, safety-related faults and destruction of the balance.
The balance may only be used according to the described conditions. Other areas of
use must be released by KERN in writing.
4.3 Warranty
Warranty claims shall be voided in case
• Our conditions in the operation manual are ignored
• The appliance is used outside the described uses
• The appliance is modified or opened
• Mechanical damage or damage by media, liquids, natural wear and tear
• The appliance is improperly set up or incorrectly electrically connected
• The measuring system is overloaded
EOS_F-BA-e-1112
9
Page 10

4.4 Monitoring of Test Resources
In the framework of quality assurance the measuring-related properties of the
balance and, if applicable, the testing weight, must be checked regularly. The
responsible user must define a suitable interval as well as type and scope of this test.
Information is available on KERN’s home page (www.kern-sohn.com with regard to
the monitoring of balance test substances and the test weights required for this. In
KERN’s accredited DKD calibration laboratory test weights and balances may be
calibrated (return to the national standard) fast and at moderate cost.
5 Basic Safety Precautions
5.1 Pay attention to the instructions in the Operation Manual
Carefully read this operation manual before setup and commissioning, even if you
are already familiar with KERN balances.
5.2 Personnel training
The appliance may only be operated and maintained by trained personnel.
6 Transportation & Storage
6.1 Testing upon acceptance
When receiving the appliance, please check packaging immediately, and the
appliance itself when unpacking for possible visible damage.
6.2 Packaging / return transport
Ö Keep all parts of the original packaging for a possibly
required return.
Ö Only use original packaging for returning.
Ö Prior to dispatch disconnect all cables and remove
loose/mobile parts.
Ö Reattach possibly supplied transport securing devices.
Ö Secure all parts such as the glass wind screen, the
weighing platform, power unit etc. against shifting and
damage.
10
EOS_F-BA-e-1112
Page 11

7 Unpacking, Setup and Commissioning
7.1 Installation Site, Location of Use
The balances are designed in a way that reliable weighing results are achieved in
common conditions of use.
You will work accurately and fast, if you select the right location for your balance.
Therefore, observe the following for the installation site:
• Place the balance on a firm, level surface;
• Ensure that the surroundings between display unit and weighing platform are
free of buildings, otherwise the radio connection may be disturbed
• Avoid extreme heat as well as temperature fluctuation caused by installing
next to a radiator or in the direct sunlight;
• Protect the balance against direct draughts due to open windows and doors;
• Avoid jarring during weighing;
• Protect the balance against high humidity, vapours and dust;
• Do not expose the device to extreme dampness for longer periods of time.
Non-permitted condensation (condensation of air humidity on the appliance)
may occur if a cold appliance is taken to a considerably warmer environment.
In this case, acclimatize the disconnected appliance for ca. 2 hours at room
temperature.
• Avoid static charge of goods to be weighed or weighing container.
If electro-magnetic fields or static charge occur, or if the power supply is unstable
major deviations on the display (incorrect weighing results) are possible. In that case,
the location must be changed.
7.2 Unpacking and erection
Open package, take out the appliance and accessories. Verify that there has been no
damage and that all packing items are present.
The balance must be installed in a way that the weighing plate is exactly in horizontal
position.
Mount the display unit in a way that facilitates operation and where it is easy to see.
EOS_F-BA-e-1112
11
Page 12

7.2.1 Scope of delivery / serial accessories
• Platform and display unit
• 4 x adjustable feet
• 2 x Power unit
• Wall fixture (with fixing screws)
• Instruction Manual
7.2.2 Assembly instructions for the use of the wall fixture
12
EOS_F-BA-e-1112
Page 13

7.3 Mains connection
On the bottom side of the display unit or of the platform there is located the mains
connection. Two mains adapters are delivered.
Power is supplied via the external mains adapter. The stated voltage value must be
the same as the local voltage. Only use original KERN mains adapters. Using other
makes requires consent by KERN.
Fig. Mains connection platform:
Connection of mains
adapter
7.4 Battery operation
On the rear side of the display unit – the platform remove the battery cover and
connect 6 x 1.5V mignon cells. Reinsert the battery cover.
In order to save the battery, the balance switches automatically off after 3 minutes
without weighing. Further shutdown times can be set in the Menu (Function "A.OFF"),
see chap. 10.
If the batteries are exhausted, the battery symbol will appear (see chap.3). Switch-off
balance and replace batteries at once.
If the balance is not used for a longer time, take out the batteries and store them
separately. Leaking battery liquid could damage the balance.
Fig. Battery compartment - platform:
Battery compartment - platform
EOS_F-BA-e-1112
13
Page 14

7.5 Initial Commissioning
In order to obtain exact results with the electronic balances, your balance must have
reached the operating temperature (see warming up time chap. 1). During this
warming up time the balance must be connected to the power supply (mains,
accumulator or battery).
The accuracy of the balance depends on the local acceleration of gravity.
Strictly observe hints in chapter Adjustment.
14
EOS_F-BA-e-1112
Page 15

8 Adjustment
As the acceleration value due to gravity is not the same at every location on earth,
each balance must be coordinated - in compliance with the underlying physical
weighing principle - to the existing acceleration due to gravity at its place of location
(only if the balance has not already been adjusted to the location in the factory). This
adjustment process must be carried out for the first commissioning, after each
change of location as well as in case of fluctuating environment temperature. To
receive accurate measuring values it is also recommended to adjust the balance
periodically in weighing operation.
Observe stable environmental conditions. A warming up time (see chapter 1) is
required for stabilization.
Ö In weighing mode press the UNIT key and keep it pressed until „CAL“ followed by
the weight value of the required adjustment weight in displayed. „LOAd“ is
displayed alternatively.
Ö
Ö Carefully place the required adjustment weight (see tab. 1 „Technical data“) in
the centre of the weighing plate
Press TARE key, adjustment is started.
Ö
(Example)
Ö Wait until the stability display appears, after that the adjustment is finished. The
balance will automatically return to Weighing mode upon successful completion
of the adjustment and will display the weight of the adjustment weight.
(Example)
Ö Take away adjustment weight.
Ù
(Example)
An error message will be displayed in the event of an adjustment error or
incorrect adjustment weight. Remove the adjustment weight and repeat the
adjustment process.
Keep the adjustment close to the balance. Daily control of the weighing
exactness is recommended for quality-relevant applications.
EOS_F-BA-e-1112
15
Page 16

9 Operation Mode
Start-up
Ensure that the channel at the platform corresponds to the
channel of the display unit (see section „Setting channels).
Moreover the distance between the platform and the display
unit must not exceed 10 m.
Ö Set rocker switch next to the platform to „1“.
Ö Press the ON/OFF key on the display unit.
The balance will carry out a self-test The balance is ready
for weighing when the weight display appears.
The data receiving symbol flashes
The triangle displays the selected channel
If the data receiving symbol does not flash, use the CH1-3
button to change to the correct channel
Should the balance not display exactly zero despite empty
weighing plate, press the TARE button. The balance will be
set to zero after a short standby time.
Switching Off
Ö Press ON/OFF button, the display disappears
Ö Set rocker switch next to the platform to „0“.
16
EOS_F-BA-e-1112
Page 17

Weighing Ö Turn on balance by pressing the ON/OFF key
Ö Position item to be weighed
Ö Wait for stability display
Ö Read weighing result.
Switch over
weighing unit
The weighing units in the menu (see chap.10) must be put on „ON“.
Ö By pressing the UNIT button the weighing result can be
displayed in another unit [kg ' lb].
Unit conversion: 1 kg = 2.20462 lb
EOS_F-BA-e-1112
17
Page 18

Taring
a)
b)
or
Ö Place an empty weighing container, the weight of the
weighing container will be displayed.
Ö Press the TARE button or touch with your hand the contact-
free taring field, the zero display appears. The indicator [S]
under [NET] is displayed. The tare weight is saved until it is
deleted.
Ø
Ö Weigh the material, the net weight will be indicated.
The taring process can be repeated any number of times,
e.g. when adding several components for a mixture
(adding). The limit is reached when the whole weighing
range is exhausted.
The weight of the weighing container will be displayed as a
minus number after removing the weighing container.
The tare weight is saved until it is deleted.
18
EOS_F-BA-e-1112
Page 19

Delete tare
Ö Unload the balance and press the TARE button, or touch
the taring field with your hand, the zero display appears.
or
The contact-free taring function can be switched on or switched off via the
menu (see chap.10): „t_lr“ on „ON“ or „OFF“
Ø
EOS_F-BA-e-1112
19
Page 20

Hold function
(animal weighing
function)
The balance has an integrated animal weighing function (mean
value calculation). Using this function it is possible to weigh
domestic or small animals exactly (min. load 1% of the max.
one), although they do not stand quiet on the weighing plate.
Ö Put upon weighing goods and press the HOLD key. In the
display the indicator [S] starts flashing. During this time the
balance takes up several measured values and displays
then the calculated mean value.
Ø
Ö This value remains in the display until the HOLD button is
pressed again. The indicator [S] under [HOLD] goes out,
the balance returns into normal weighing mode.
Ö Press the HOLD button once more to repeat this function
as often as required.
There is no average value calculation in the event of too much movement
(heavy display oscillation).
20
EOS_F-BA-e-1112
Page 21

Plus/minus
weighings
Ö For example for item weight check, production check etc.
switch-on the balance using ON/OFF button and wait for
zero display.
Ö Put the nominal weight on the weighing plate
(Example)
Ö Use the TARE button or the TARE-touchfield for taring to
zero.
Ö Remove the nominal weight.
Ö Put the test objects subsequently on the weighing plate, the
respective deviation from the nominal weight is displayed
with the respective sign to „+“ and „-“ (e.g. + 0.73 g).
According to the same procedure also packages with the
same weight can be produced, referring to a nominal
weight.
Ö Back to weighing mode by pressing the TARE button or the
TARE-touchfield.
EOS_F-BA-e-1112
21
Page 22

Setting channels
(display unit)
+
(platform)
The balance has the possibility to set different channels. This is
particularly necessary if several platforms are inserted next to
each other. In this case failures may appear if not different
channels have been set. It is possible to select between 3
channels.
Setting channels on the display unit:
Set rocker switch next to the platform to „1“.
Switch-on display unit using ON/OFF button and wait for zero
display. The data receiving symbol flashes
The triangle displays the selected channel.
If the data receiving symbol does not appear, use the CH1-3
button to change to the correct channel
Setting the channels on the platform:
Switch-off platform (rocker switch on the side to „0“)
Actuate the dip switch at the lower side of the platform. (pin 4 is
not used).
22
EOS_F-BA-e-1112
Page 23

In order to set the respective channel, put the corresponding
switch to „ON“. The other pins must remain on the opposite
side.
* default setting channel 1
Then switch-on the platform. The new setting will be imported.
The display unit changes to the zero display and thus is ready
for use.
Should the balance not display exactly zero despite empty
weighing plate, press the TARE button. The balance will be set
to zero after a short standby time.
EOS_F-BA-e-1112
23
Page 24

10 Menu
Changes are only allowed on the functions (weighing units) and
(automatic switch-off function).
Ö In weighing mode keep TARE button depressed for approx. 3 sec until "SETUP"
is displayed followed by "UNIT"
Ö Press the HOLD button as often as necessary until the required function is
displayed.
Ö Press the TARE button to confirm the selected function. The current setting will
be displayed. Using the HOLD or TARE button, select the desired
parameter. Use the HOLD button to return to the menu.
Ö To exit the Menu and save, press the HOLD button as often as required until
"END" is displayed and then confirm by pressing TARE. The balance returns
automatically into weighing mode.
Navigation:
24
Factory settings are marked by *.
EOS_F-BA-e-1112
Page 25

11 Service, maintenance, disposal
11.1 Cleaning
Before cleaning, disconnect the appliance from the operating voltage.
Please do not use aggressive cleaning agents (solvents or similar agents), but a cloth
dampened with mild soap suds. Take care that the device is not penetrated by fluids
and polish it with a dry soft cloth.
Loose residue sample/powder can be removed carefully with a brush or manual
vacuum cleaner.
Spilled weighing goods must be removed immediately.
11.2 Service, maintenance
The appliance may only be opened by trained service technicians who are authorized
by KERN.
Before opening, disconnect from power supply.
11.3 Disposal
Disposal of packaging and appliance must be carried out by operator according to
valid national or regional law of the location where the appliance is used.
12 Error messages, troubleshooting guide
Error message Function
LO
LO d
ErrE
ErrEd
Err
ErrL
Capacity of batteries display unit exhausted
Capacity of batteries platform exhausted
EEPROM error display unit
EEPROM error platform
Overload
Minimum weight under min. value
EOS_F-BA-e-1112
25
Page 26

In case of an error in the program process, briefly turn off the balance and disconnect
from power supply. The weighing process must then be restarted from the beginning.
Help:
Fault Possible cause
The displayed weight does not
appear.
The displayed weight is permanently
changing
The weighing value is obviously
wrong
•
The balance is not switched on.
• The mains supply connection has been
interrupted (mains cable not plugged
in/faulty).
• Power supply interrupted.
• Draught/air movement
• Table/floor vibrations
• The weighing plate is in contact with
foreign matter.
• Electromagnetic fields / static charging
(choose different location/switch off
interfering device if possible)
• The display of the balance is not at zero
• Adjustment is no longer correct.
• The balance is on an uneven surface.
• Great fluctuations in temperature.
• Electromagnetic fields / static charging
(choose different location/switch off
interfering device if possible)
Should other error messages occur, switch balance off and then on again. If the error
message remains inform manufacturer.
26
EOS_F-BA-e-1112
 Loading...