

Page 1
KERN & Sohn GmbH
Ziegelei 1
E-Mail: info@kern-sohn.com
Phone: +49-[0]7433- 9933-0
Internet: www.kern-sohn.com
Operating instructions
Electronic Moisture Analyser
KERN DBS
Version 1.1
03/2013
GB
D-72336 Balingen
Fax: +49-[0]7433-9933-149
DBS-BA-e-1311
Page 2

KERN DBS
Electronic Moisture Analyser
GB
Version 1.1 03/2013
Operating instructions
Contents
1 Technical data ................................................................................................ 4
2 Appliance overview ....................................................................................... 6
2.1 Overview of display .................................................................................................................. 8
2.1.1 Display examples .................................................................................................................................... 12
2.2 Keyboard overview ................................................................................................................. 13
3 Basic Information (General) ........................................................................ 15
3.1 Proper use ............................................................................................................................... 15
3.2 Improper Use........................................................................................................................... 15
3.3 Warranty .................................................................................................................................. 15
3.4 Monitoring of Test Resources ............................................................................................... 15
3.5 Danger Information ................................................................................................................ 16
3.5.1 “Hazard information” sticker .................................................................................................................... 20
4 Transport and storage ................................................................................. 21
4.1 Testing upon acceptance ...................................................................................................... 21
4.2 Packaging / retur n transport ................................................................................................. 21
5 Unpacking, Setup and Commissioning ..................................................... 21
5.1 Installation Site, Lo cation of Use .......................................................................................... 21
5.2 Unpacking and checking ....................................................................................................... 24
5.2.1 Scope of delivery / serial accessories ..................................................................................................... 24
5.3 Placing ..................................................................................................................................... 25
5.4 Mains connection ................................................................................................................... 28
5.4.1 Turning On the Power ............................................................................................................................. 29
5.5 Commissioning ....................................................................................................................... 30
5.6 Connection of periphera l devices ......................................................................................... 30
6 Adjustment ................................................................................................... 31
6.1 Adjust balance ........................................................................................................................ 31
6.2 Adjust temperature ................................................................................................................. 33
6.3 ISO/GLP log ............................................................................................................................. 36
7 Menu ............................................................................................................. 37
7.1 Navigation in the menu .......................................................................................................... 38
7.1.1 Numeric entry .......................................................................................................................................... 39
8 Moisture analysis ......................................................................................... 40
8.1 Start drying .............................................................................................................................. 40
8.2 Abort drying ............................................................................................................................ 42
8.3 Finish drying ........................................................................................................................... 42
8.4 Turn off appliance .................................................................................................................. 42
9 Drying parameters ....................................................................................... 43
2 DBS-BA-e-1311
Page 3

9.1 Save / access .......................................................................................................................... 44
9.2 Adjust ....................................................................................................................................... 45
9.2.1 Drying modes .......................................................................................................................................... 45
9.2.1.1 Drying mode AUTO (Standard drying/switch-off criterion “∆M“) ...................... 45
9.2.1.2 Drying mode TIME (Standard drying/switch-off criterion “Time“) ..................... 46
9.2.1.3 RAPID Drying mode (Rapid drying) .............................................. 47
9.2.1.4 SLOW Drying mode (Slow drying) ............................................... 49
9.2.1.5 STEP Drying mode (Step drying) ................................................ 51
9.2.2 Result display .......................................................................................................................................... 54
9.2.3 Start criterion ........................................................................................................................................... 56
10 Miscellaneous settings ............................................................................... 57
10.1 Enter sample desi g n ation ...................................................................................................... 57
10.2 Set date/time for mea suring protocol ................................................................................... 58
10.3 Menu Lock ............................................................................................................................... 59
10.4 Change password ................................................................................................................... 61
10.5 Enter identification nu mber ................................................................................................... 62
10.6 Resetting the menu ................................................................................................................ 63
11 Print, store and call-up measurement results ........................................... 64
11.1 Pin allocation RS232C interface ............................................................................................ 65
11.2 Interface parameters .............................................................................................................. 66
11.3 Output interval ........................................................................................................................ 68
11.4 Call up and print out measu ring results............................................................................... 69
11.5 Print out currently preset drying parameters ...................................................................... 70
11.6 Delete measuring results from memory ............................................................................... 71
11.7 Printout examples .................................................................................................................. 72
12 General inform ation concerning moisture analysis ................................. 75
12.1 Application .............................................................................................................................. 75
12.2 Basics ...................................................................................................................................... 75
12.3 Adjustment to existing measuring method .......................................................................... 75
12.4 Preparing a sample................................................................................................................. 76
12.5 Sample material ...................................................................................................................... 77
12.6 Sample size / origi n ally weighted in quantity ...................................................................... 77
12.7 Drying temperature................................................................................................................. 78
12.8 Recommendations / Guidelines ............................................................................................ 78
13 Service, maintenance, disposal .................................................................. 83
13.1 Cleaning................................................................................................................................... 83
13.2 Service, maintenance ............................................................................................................. 84
13.2.1 Remove protective glass guard .......................................................................................................... 84
13.2.2 Lamp change...................................................................................................................................... 86
13.2.3 Replacing fuses .................................................................................................................................. 87
13.3 Disposal ................................................................................................................................... 87
14 Instant help ................................................................................................... 88
14.1 Error messages ....................................................................................................................... 89
15 Declaration of c onform ity ........................................................................... 91
DBS-BA-e-1311 3
Page 4
1 Technical data
Slow drying (SLOW)
• 5°C….+40°C ambient temperature
• max 85% air humidity non-condensing
Data DBS 60-3
Radiator Halogen (1 x 400 W)
Temperature range
Maximum load (Max) 60 g
Minimum weight (min) 0.02 g
Warm-up time 2 h
Weighing mode 0.001g
Readability (d)
Moisture analysis mode 0.01 %
Reproducibility
„Weighing mode“
Initial weight 2 g: 0.15 %
Reproducibility
„Weighing mode“
Initial weight 5g 0.05 %
Initial weight 10 g 0.02 %
Standard drying (AUTO / TIME))
1°C increments selectable
50°C - 200°C
0.001 g
Drying modes
Linearity ± 0.003 g
Stabilization time (typical) 3 sec.
Recommended adjustment
weight, not added (class)
Environmental conditions
Step drying (STEP)
Rapid drying (RAPID)
50g (F1)
4 DBS-BA-e-1311
Page 5

Housing 202 x 336 x 157 mm
Available drying room
Ø 95 mm, 20 mm high
Net weight
4.2 kg
Electric Supply
220 – 240 V AC 50/60 Hz
Power consumption
Rating 430 VA
Voltage fluctuations
Within ±10 %
Power line fuse
3.15 A, 250V
Interrupting rating of fuse
35 A
Switch-off criterion
Sample dishes included Ø 95 mm
Weigh ing Units
• AUTO
The drying is finished when the preset weight loss
(∆M ) remains constant for 30 seconds.
• TIME
The drying is finished after the preset time, 1 minute
– 4 hours (1 minute increments)
or 12 hours can be selected
• Manual (STOP button)
[M/W]
[D/W]
[M/D]
[W/D] ATRO* moisture
[GRAM] Gram display
[%] moisture
[%] dry mass:
ATRO* dry mass
Internal memory
Interface RS232
Dimensions (B x D x H)
Pollution Degree 2
Overvoltage Category Category II
Altitude Up to 2000 m
Method memory 10 memory locations for drying
programs, see chap. 9.1
Sample memory 100 memory locations for measuring
results, see chap. 11
Installation Site device may only be used indoors
DBS-BA-e-1311 5
Page 6
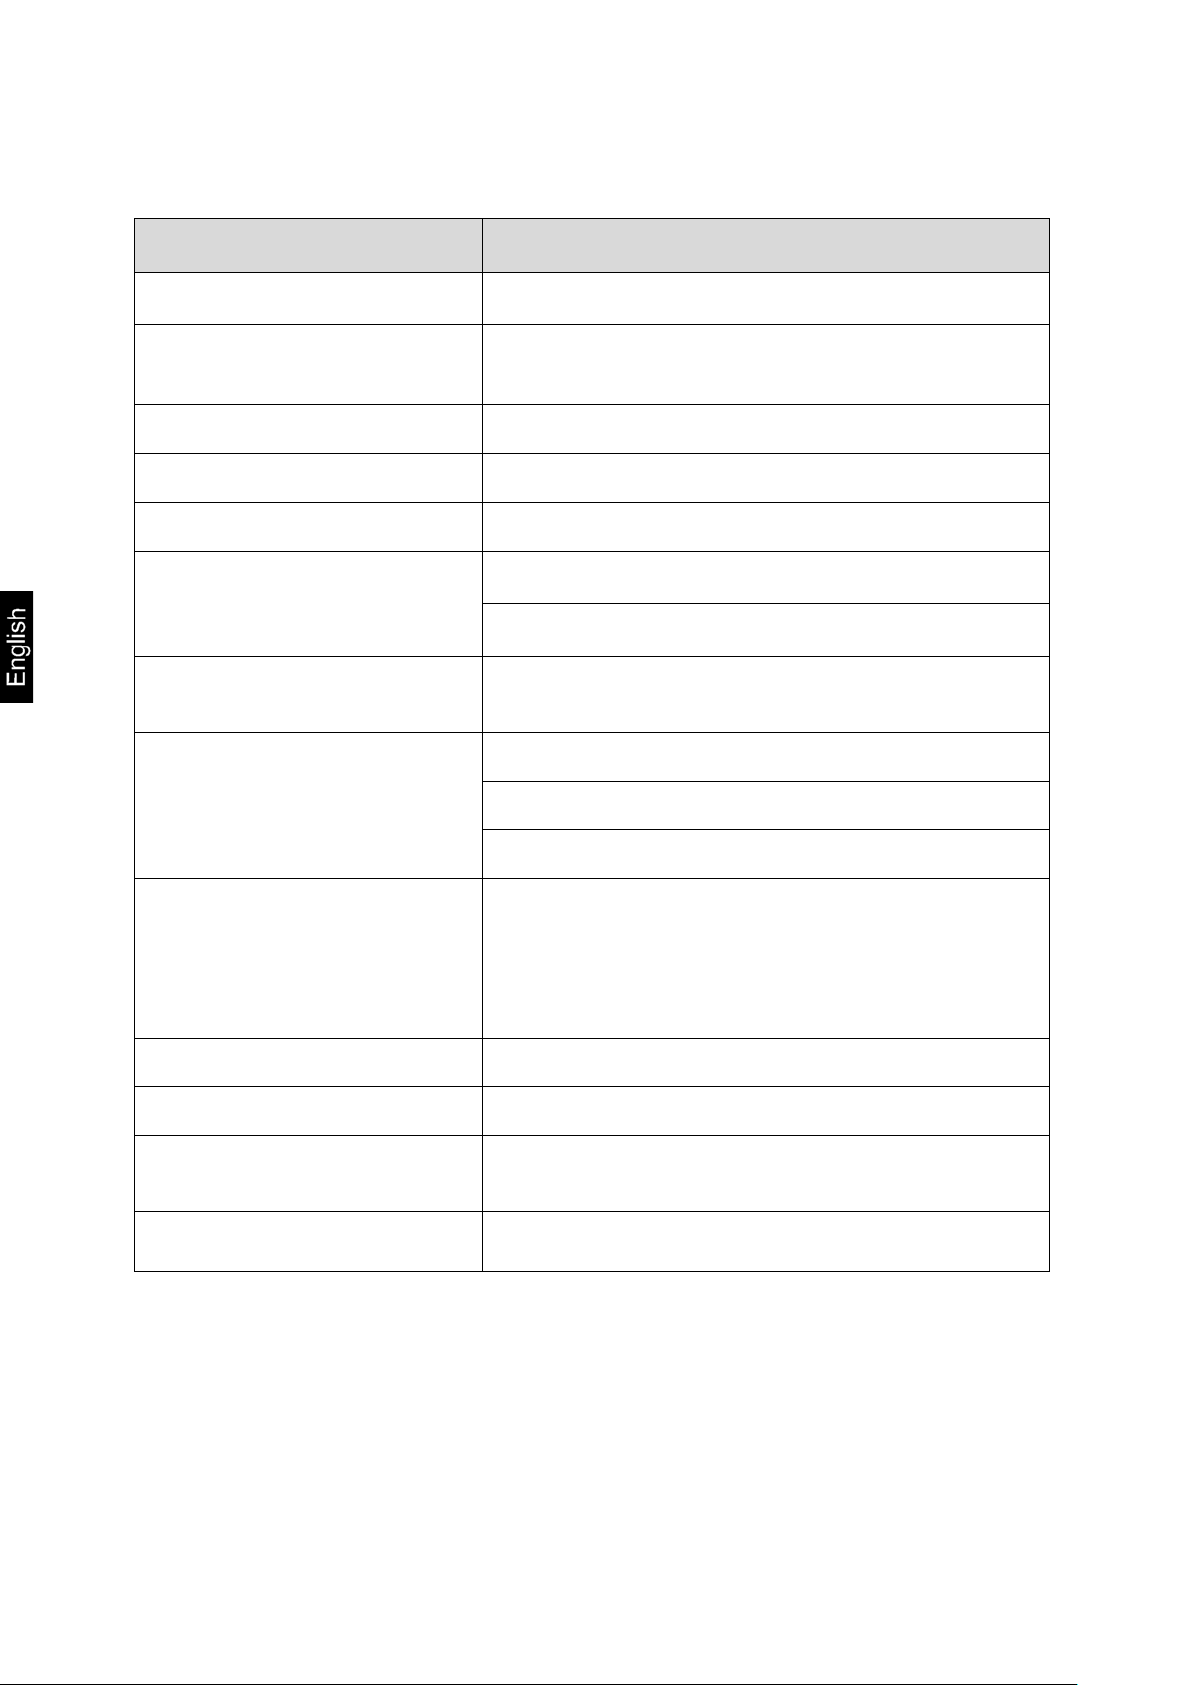
2 Appliance overview
Front view:
Pos. Description
1 Viewing panel
2 Sample dish
3 Display
4 Bubble level
5 Keyboard
6 Adjustable foot
7 Heated cover
8 Halogen lamp
9 Temperature sensor
6 DBS-BA-e-1311
Page 7
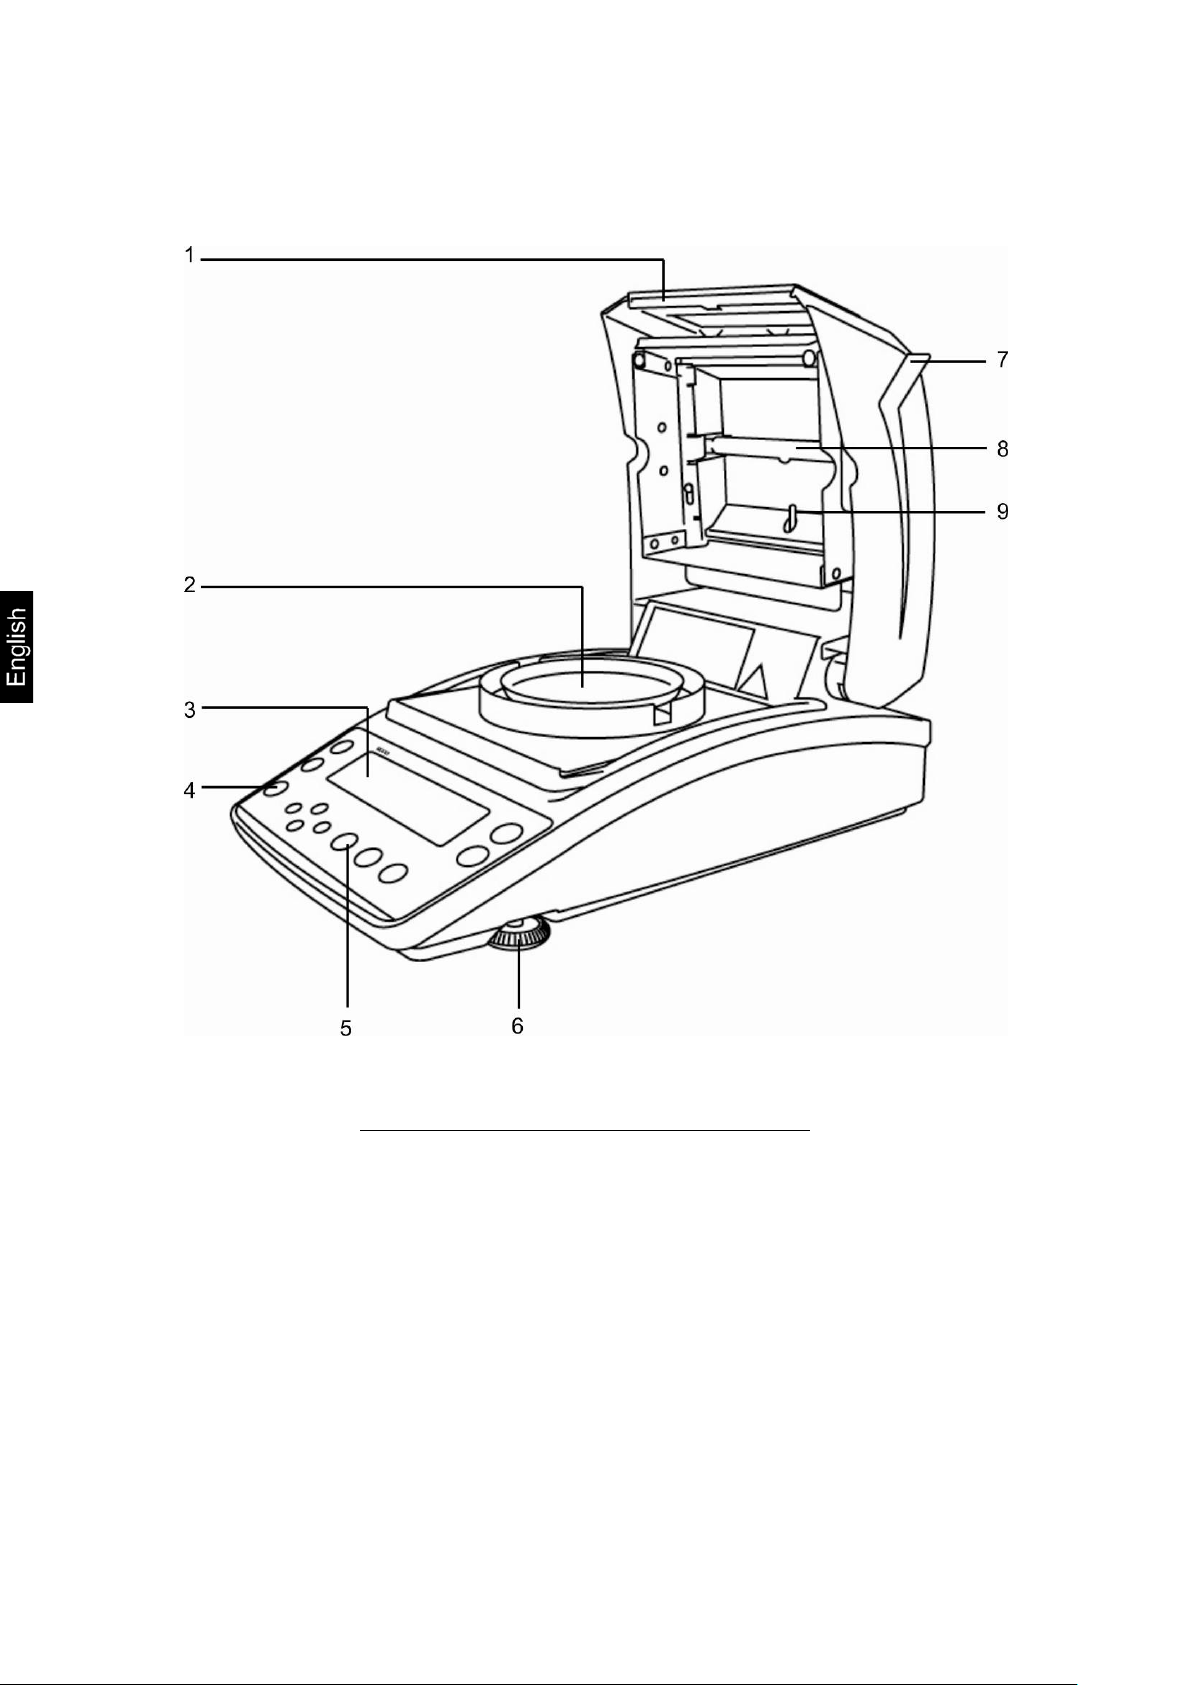
Rear view:
Pos. Description
10 Anti-theft protection device connection
11 Not documented
12 RS232
13 USB, not documented
14 Mains connection socket
15 Fuse box
DBS-BA-e-1311 7
Page 8
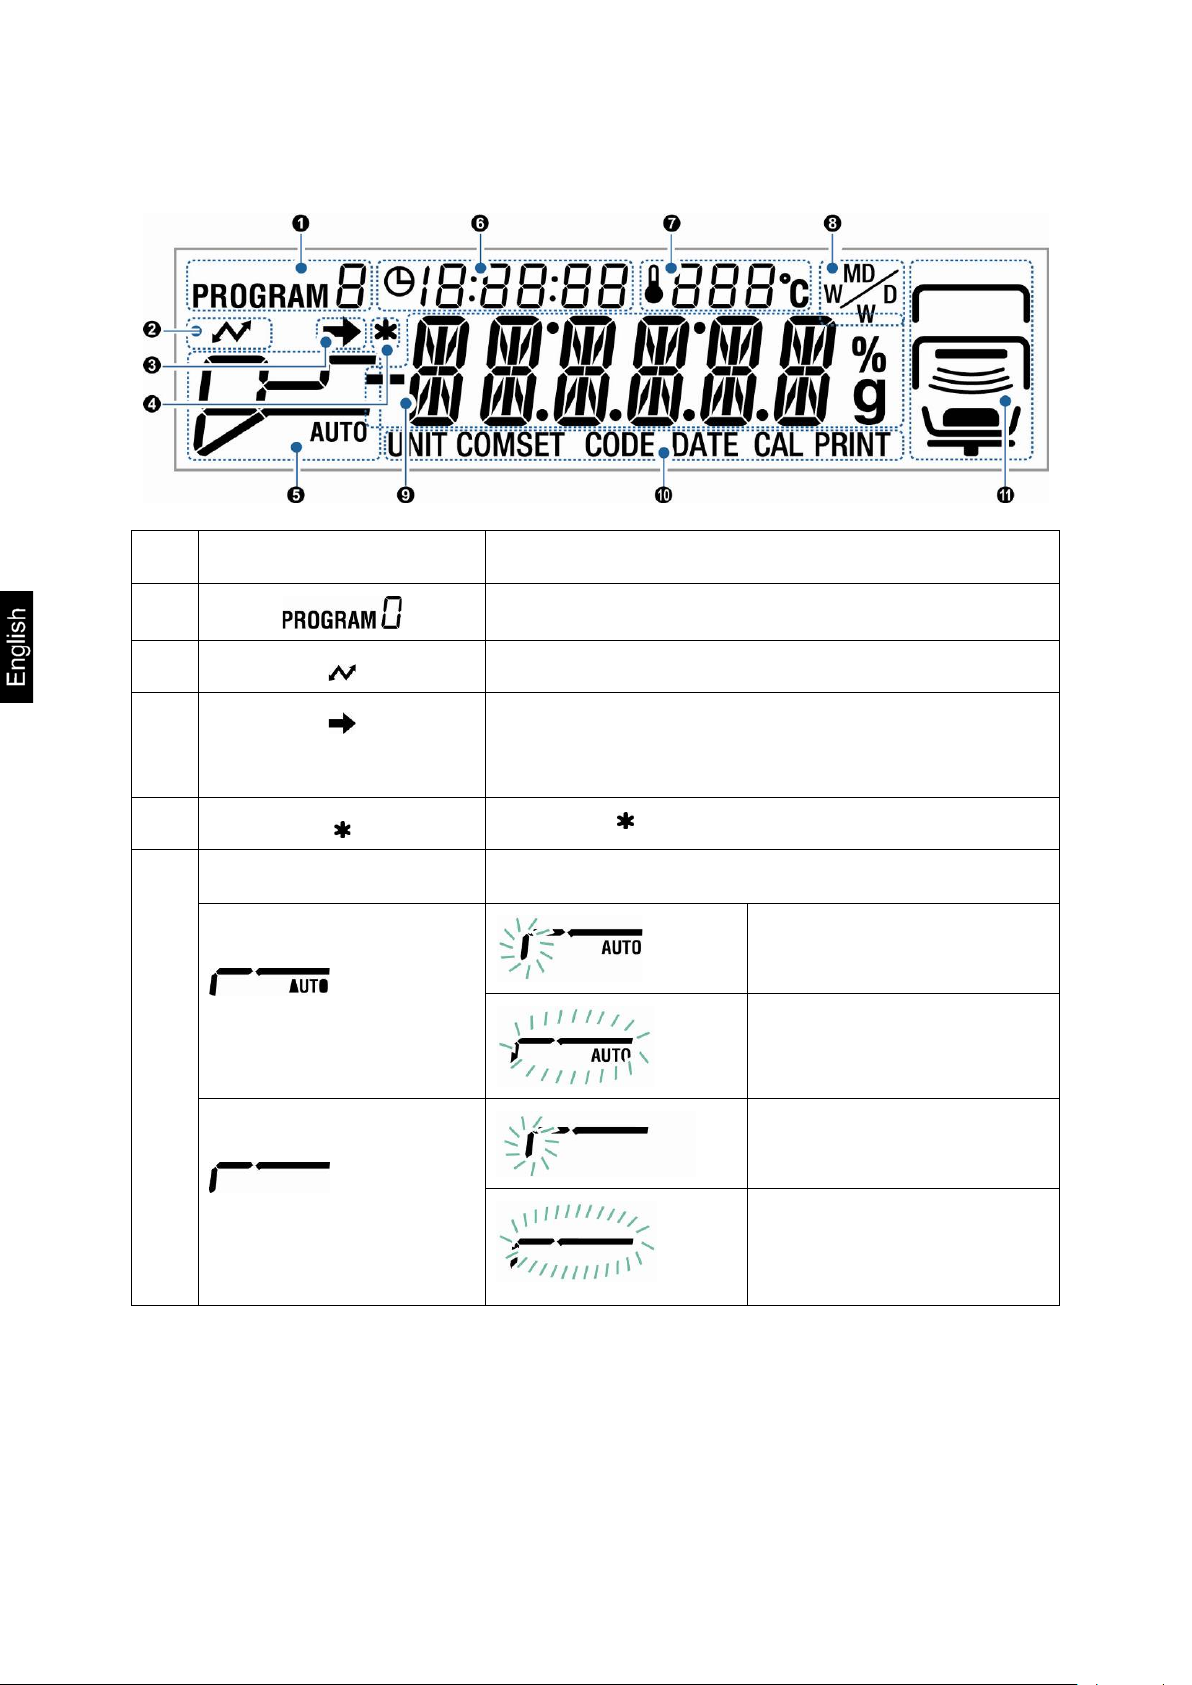
2.1 Overvie w of display
No. Display Description
1
2
3
4
5
Drying mode
AUTO
+ see chap. 9.2.1.1
TIME
+ see chap. 9.2.1.2
Currently loaded drying program, see chap. 9.1
Illuminates during communication with external devices.
• The stability display indicates that the weighing value is
stable.
• Highlights current setting in the menu.
The indicator will mark the measuring result
Status display during drying
Heating-up period
Preset drying temperature is
reached. The drying is finished
when ∆M constant.
Heating-up period
Preset drying temperature is
reached. The drying is finished
when the preset drying time has
expired.
8 DBS-BA-e-1311
Page 9
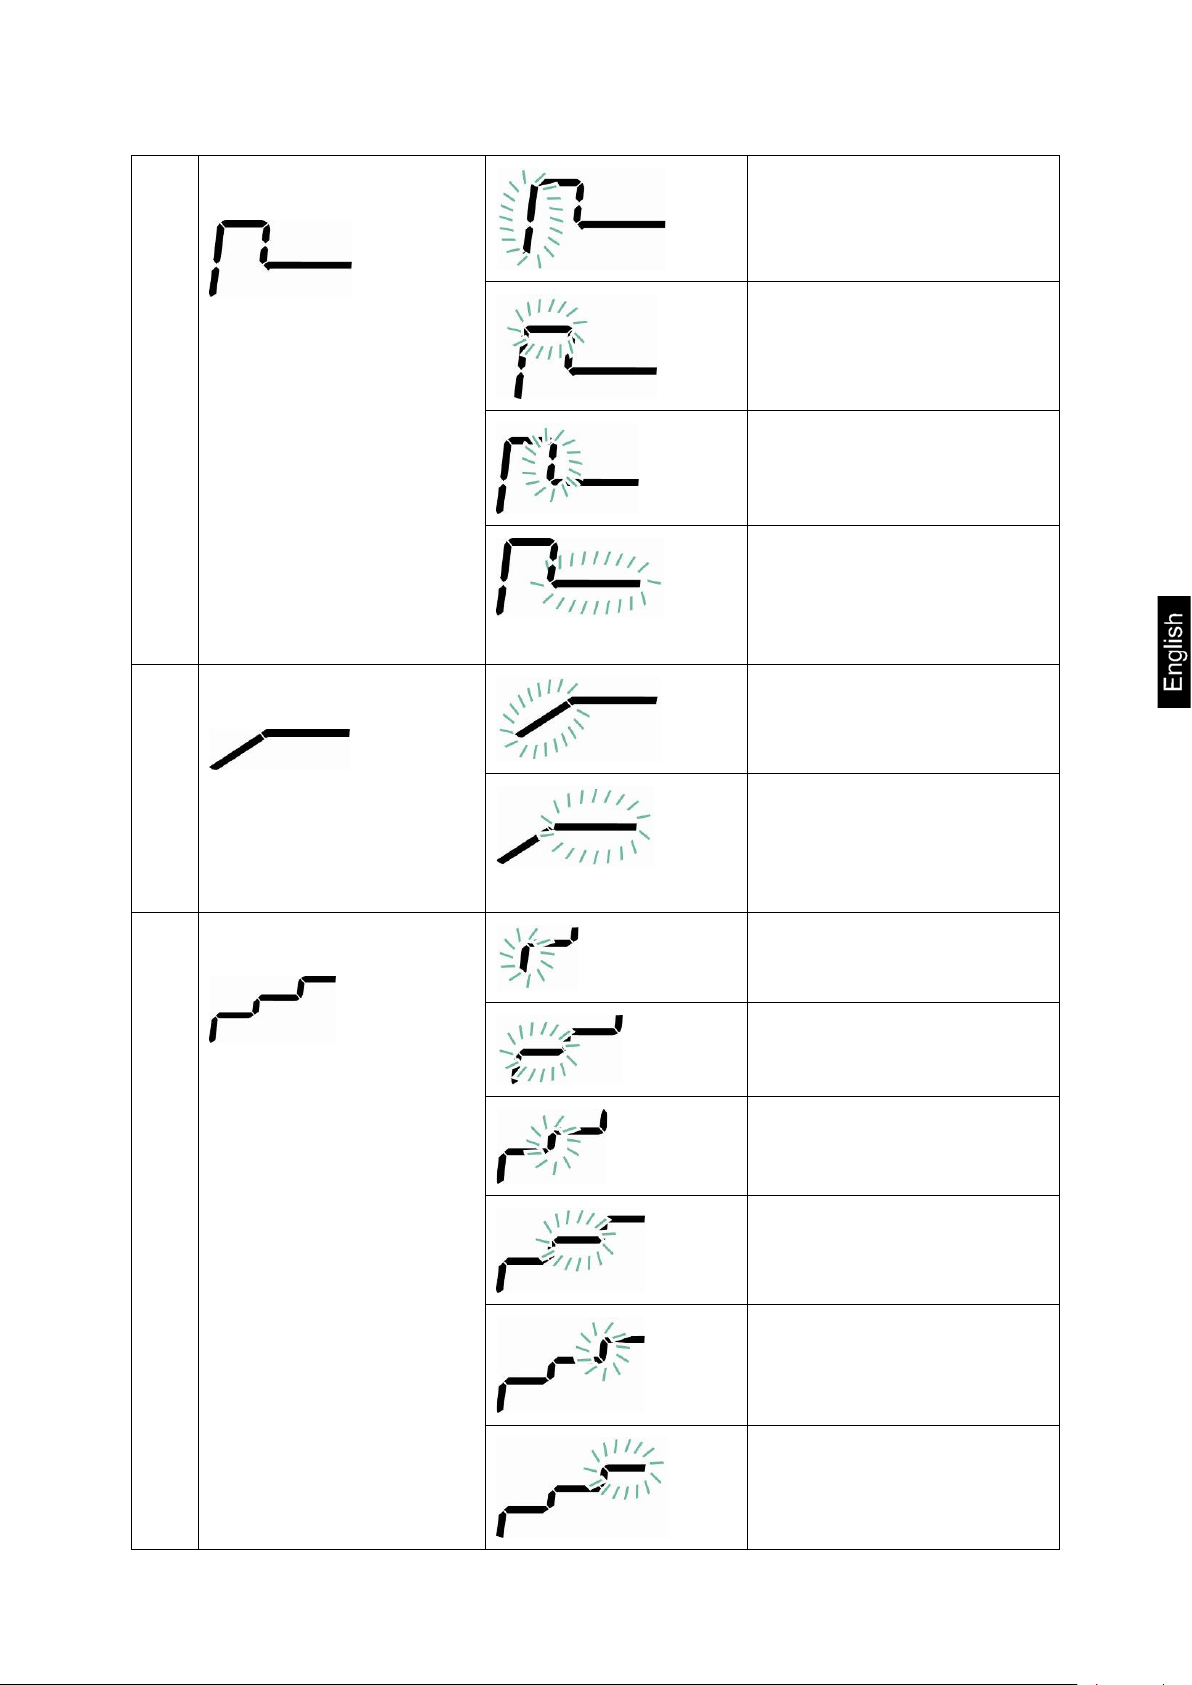
RAPID
+ see chap. 9.2.1.3
SLOW
Heating-up period “pre-heating
step”
The pre-heating step is switched
on until “∆M pre-heating step” is
constant.
Temperature is lowered to the
preset drying temperature.
Preset drying temperature is
reached.
The drying is finished when the
preset completion criterion is
fulfilled.
Heating-up period
+ see chap. 9.2.1.4
STEP
+ see chap. 9.2.1.5
Preset drying temperature is
reached.
The drying is finished when the
preset completion criterion is
fulfilled.
Heating-up period step 1
Drying step 1
Heating-up period step 2
Drying step 2
Heating-up period step 3
Drying step 3
DBS-BA-e-1311 9
Page 10
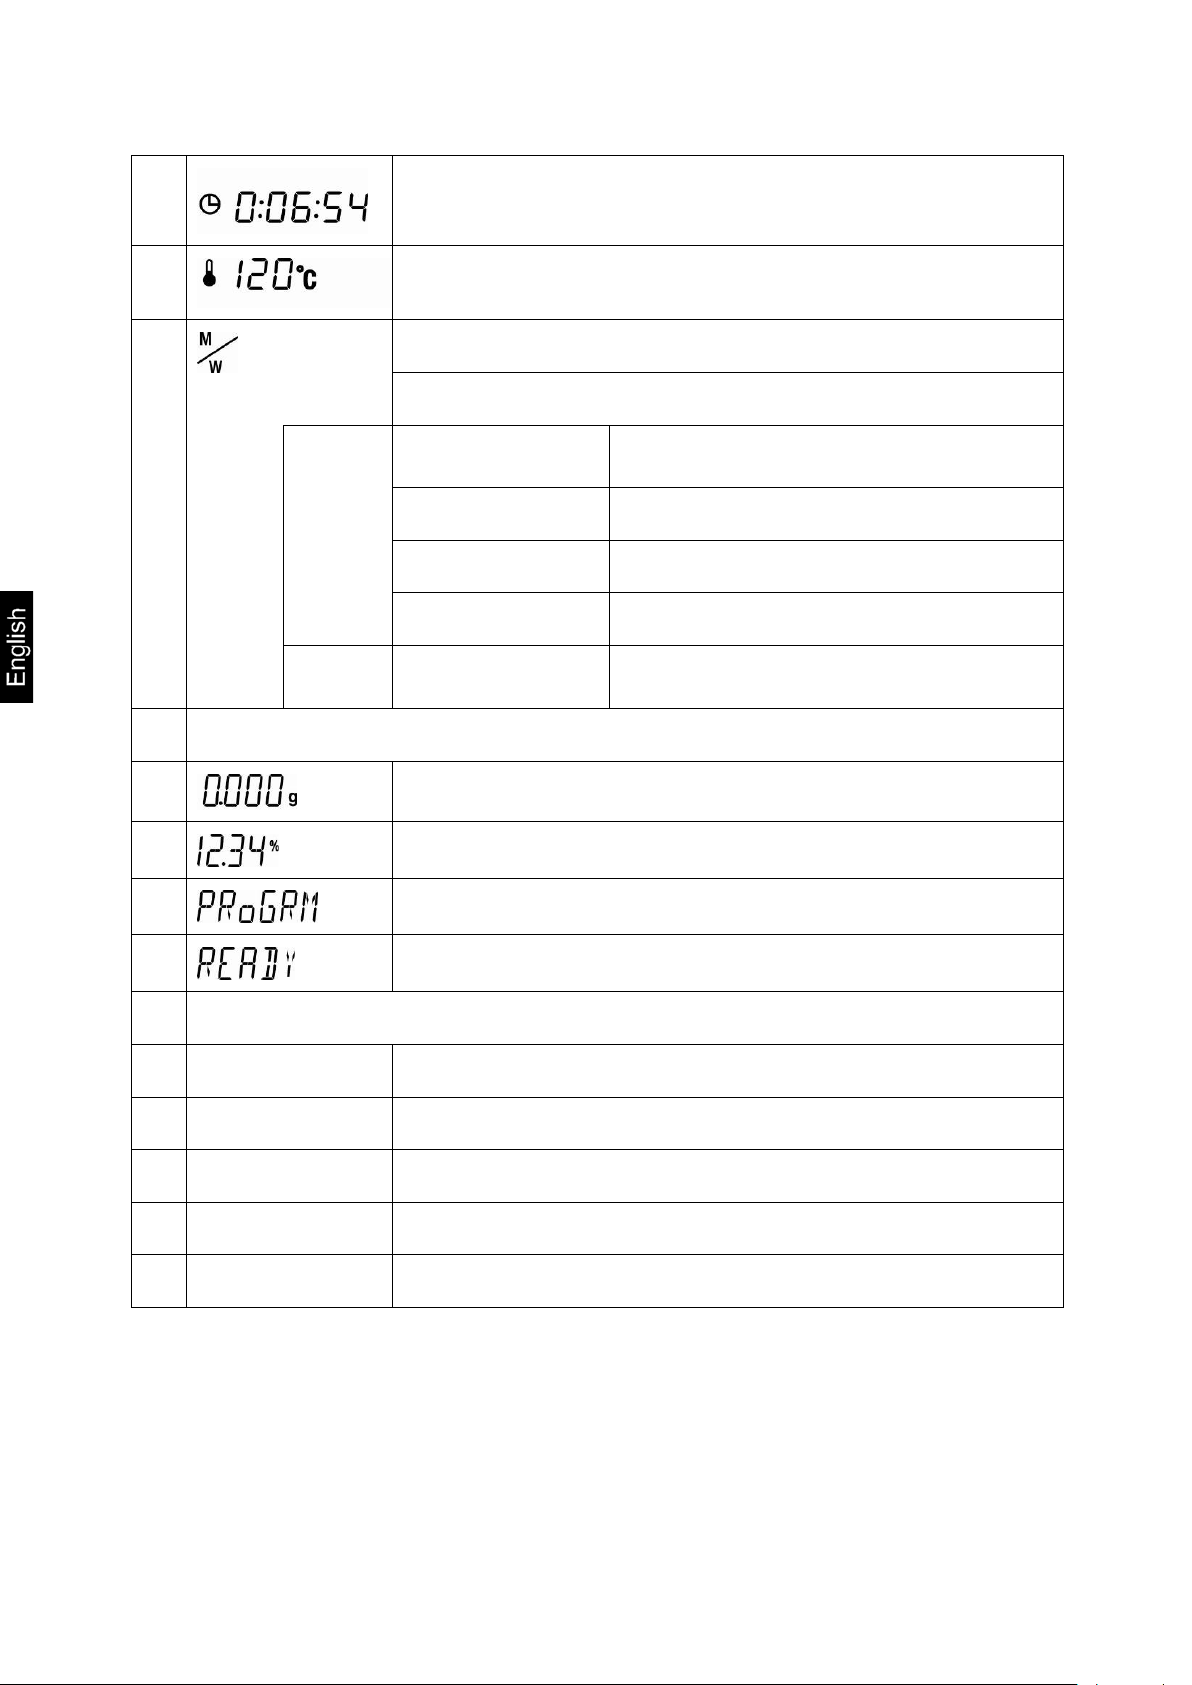
6
Previous drying time
7
8
9
Basic displays
Current temperature
Result display, see chap. 9.2.2
%
M/W [%] moisture
D/W
M/D
W/D
g
Gram
Weight display
Display % moisture
[%] dry mass:
ATRO dry mass
ATRO moisture
Gram display
0
Current menu selection
UNIT
COMSET
CODE
CAL
PRINT
Menu access via MENU button
Equipment is in Ready mode, see chap. 8.4.
Equipment is in menu „Display of results“, see chap. 9.2.2
Equipment is in menu „Interface parameters“, see chap. 11.2
Equipment is in menu „Sample denomination“, see chap. 10.1
Equipment is in menu „Adjustment“, see chap. 6
Equipment is in menu „Printer“, see chap. 11.3 – 11.5
10 DBS-BA-e-1311
Page 11
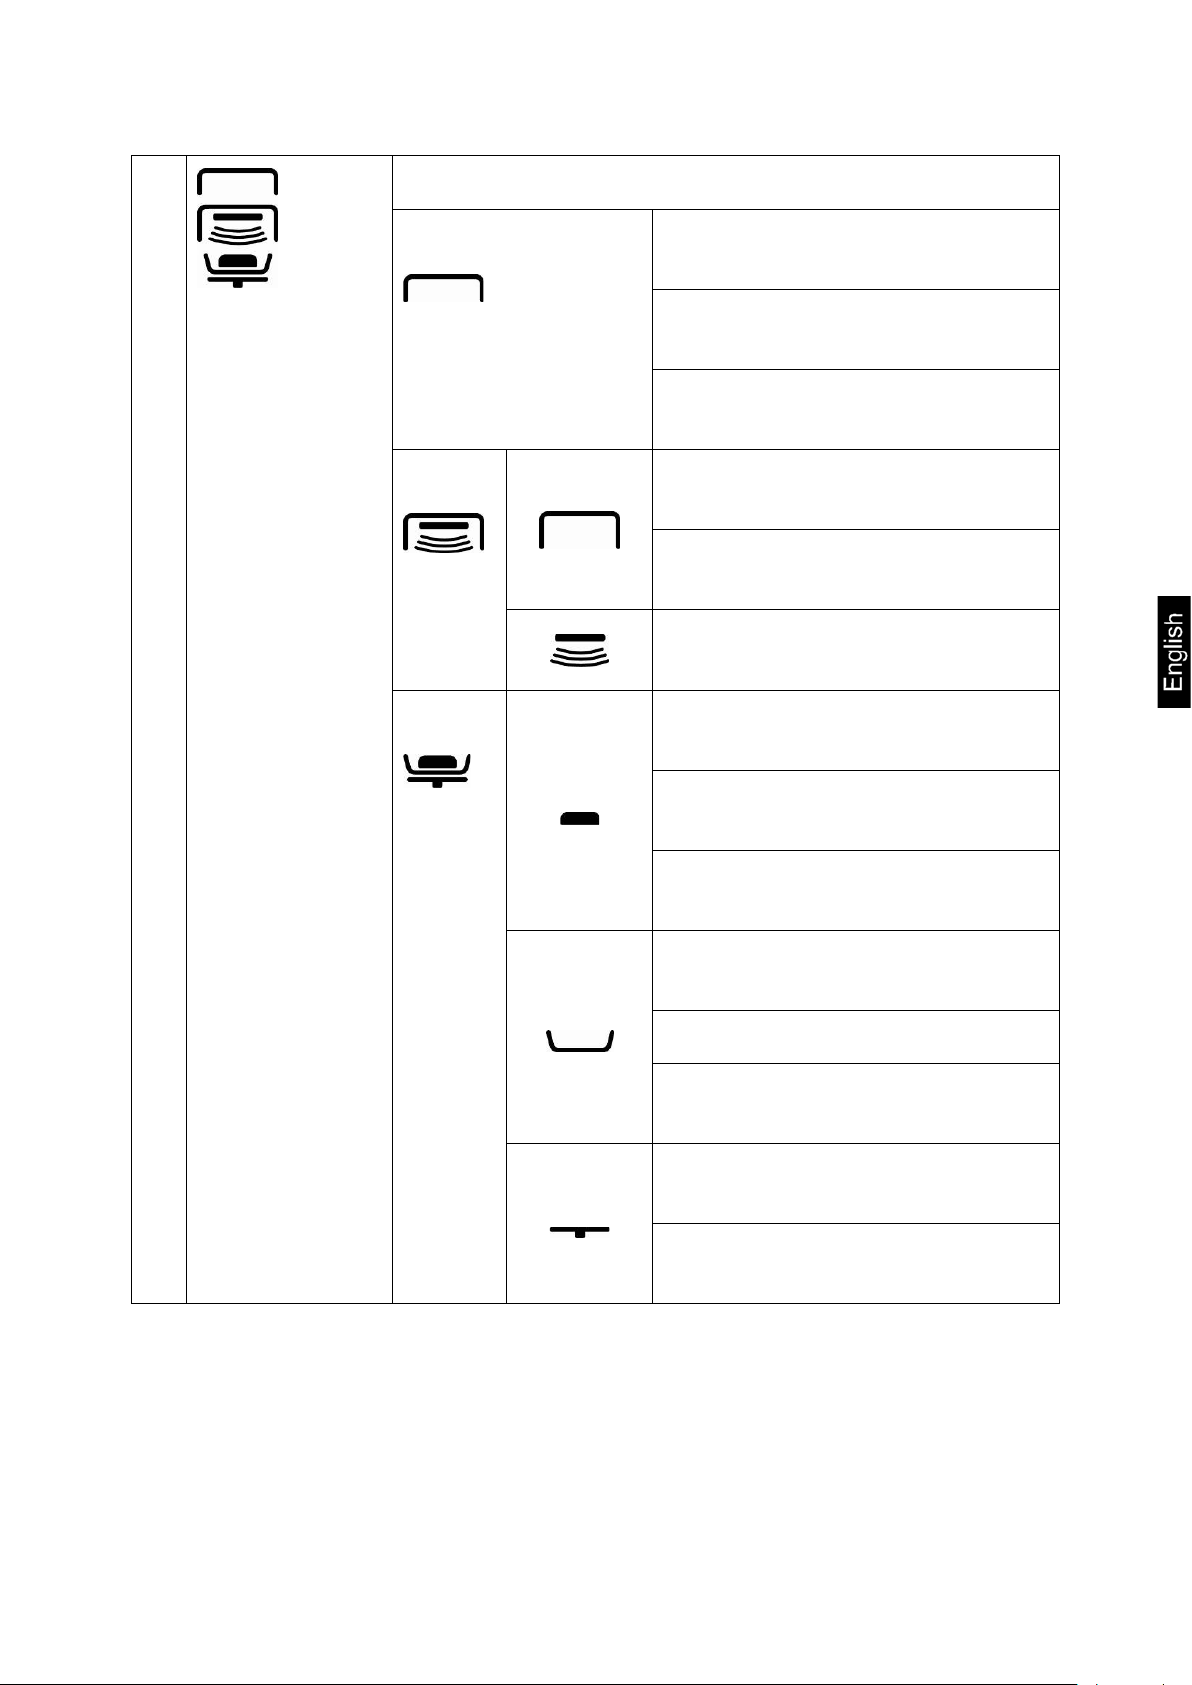
a
Status display „Equipment“
Top
Centre
Bottom
Is displayed when the heated cover
is open.
Flashes when the heated cover
needs to be closed.
Goes out when heated cover is
closed
Is displayed when the heated cover
is open.
Goes out when heated cover is
closed
Flashes when drying process is
active
Indicates that a sample is in the
sample dish.
Flashes when a sample needs to be
loaded.
Goes out if there is no sample in
the sample dish.
Indicates that a sample is in the
sample dish.
Flashes if taring is required.
Goes out if no sample dish is in
place.
Indicates upon switch-on that the
dish holder is installed.
Flashes upon switch-on if the dish
holder is not installed.
DBS-BA-e-1311 11
Page 12
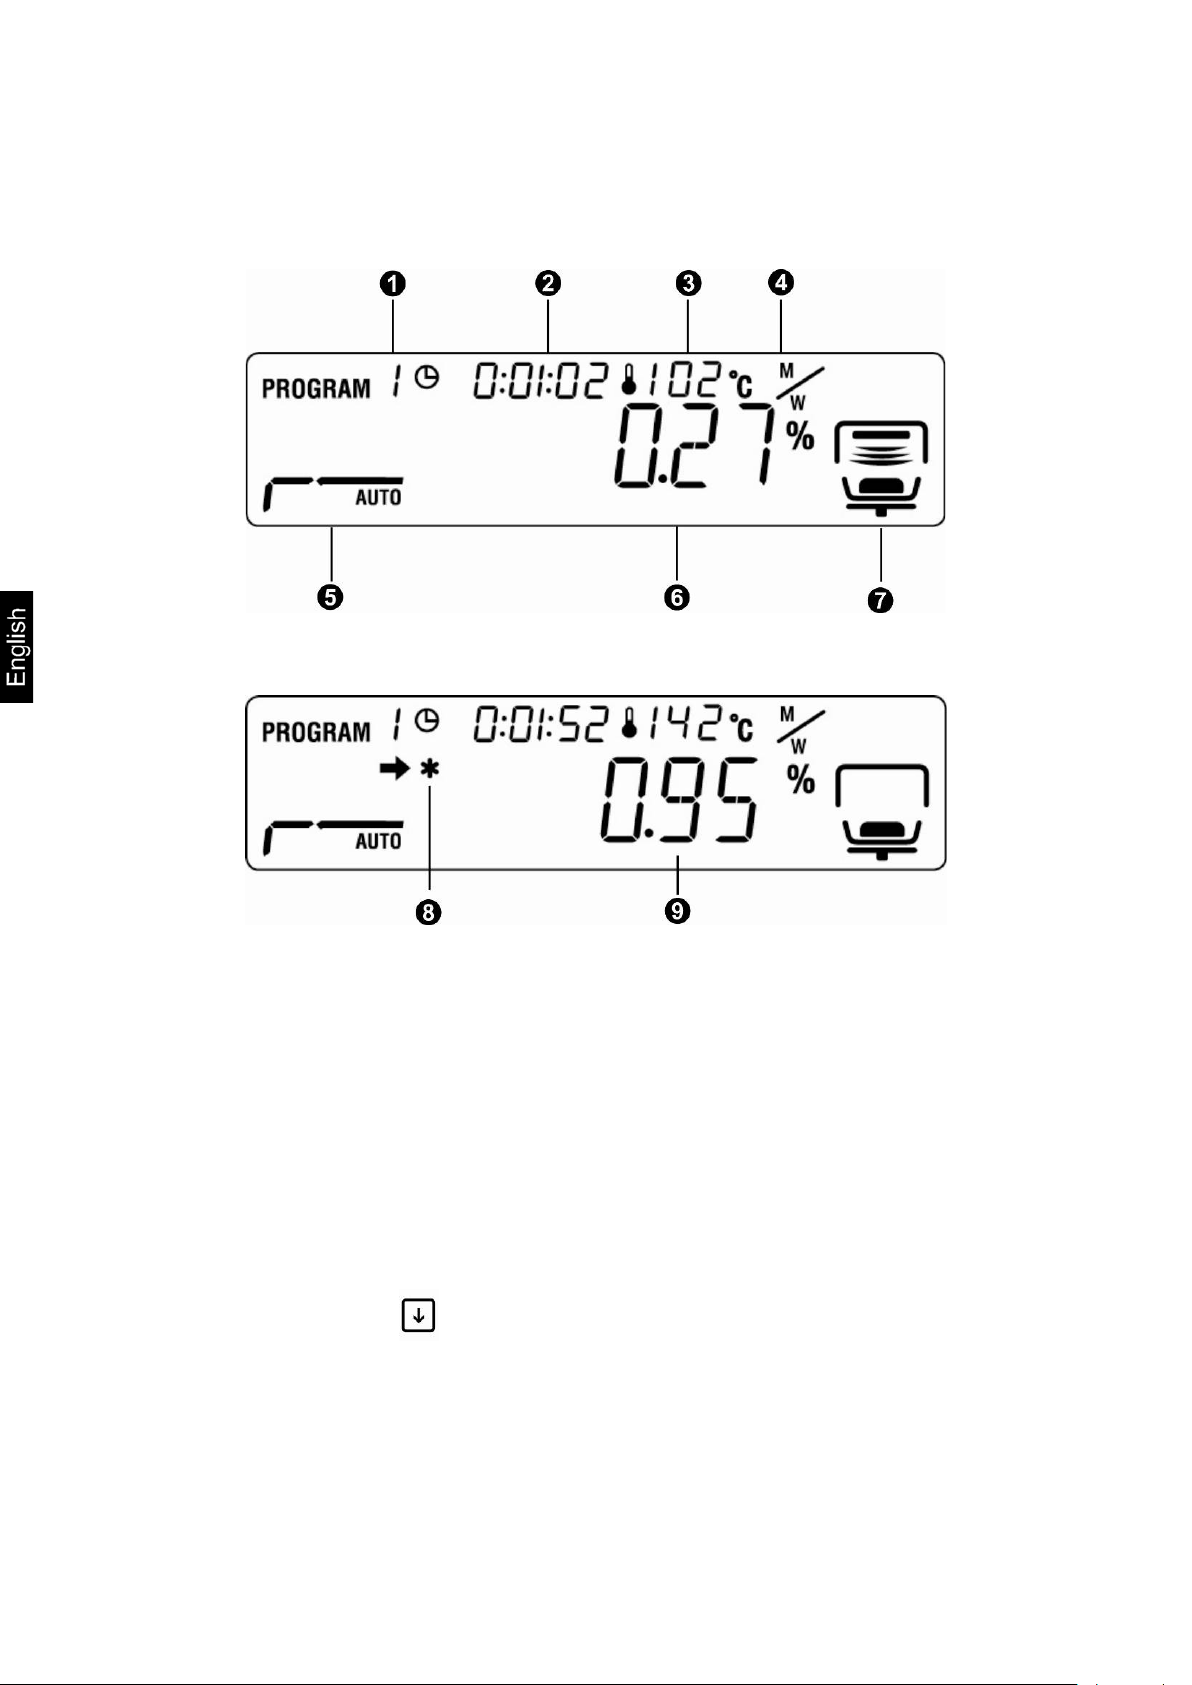
2.1.1 Display examples
During drying:
After drying:
1
Loaded drying program + see chap 9.1
2
Previous time
3
Current temperature
4
Unit „Display of results“ + see chap. 9.2.2
5
Preset drying mode /
Status display drying
6
Current moisture content in %.
During drying with can be switched in ∆M (see chap. 9.2.1.1).
7
Drying process active + see chap. 2.1
8
Measuring result indicator
9
Measuring value (unit in the preset result display) + see chap. 9.2.2
+ see chap. 9.2.1
+ see chap. 2.1
12 DBS-BA-e-1311
Page 13
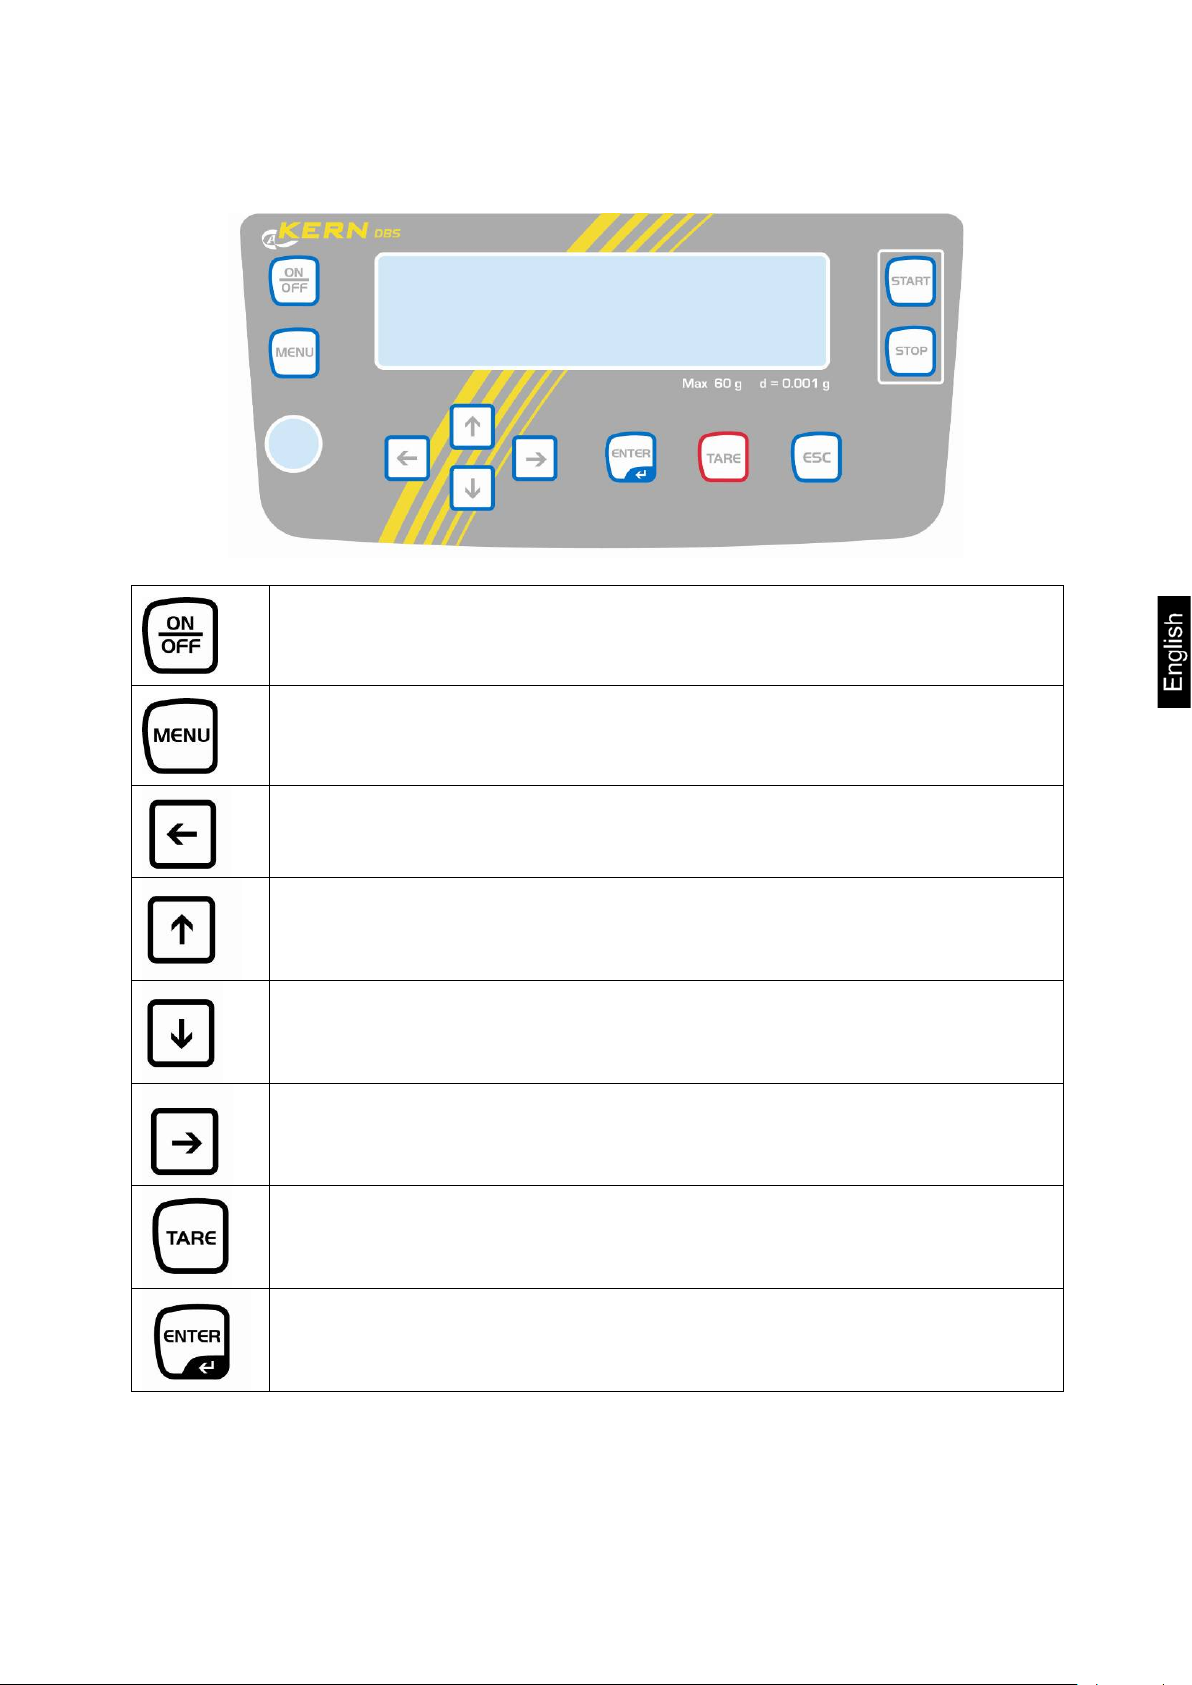
2.2 Keyboard overview
Turn on/off
• Call up menu
• Selecting a menu item to the left.
• Scroll back
• Scroll to next page
• Selection of a menu item in clockwise direction
• Taring
• Zeroing
• Activate menu item
• Save setting
DBS-BA-e-1311 13
Page 14
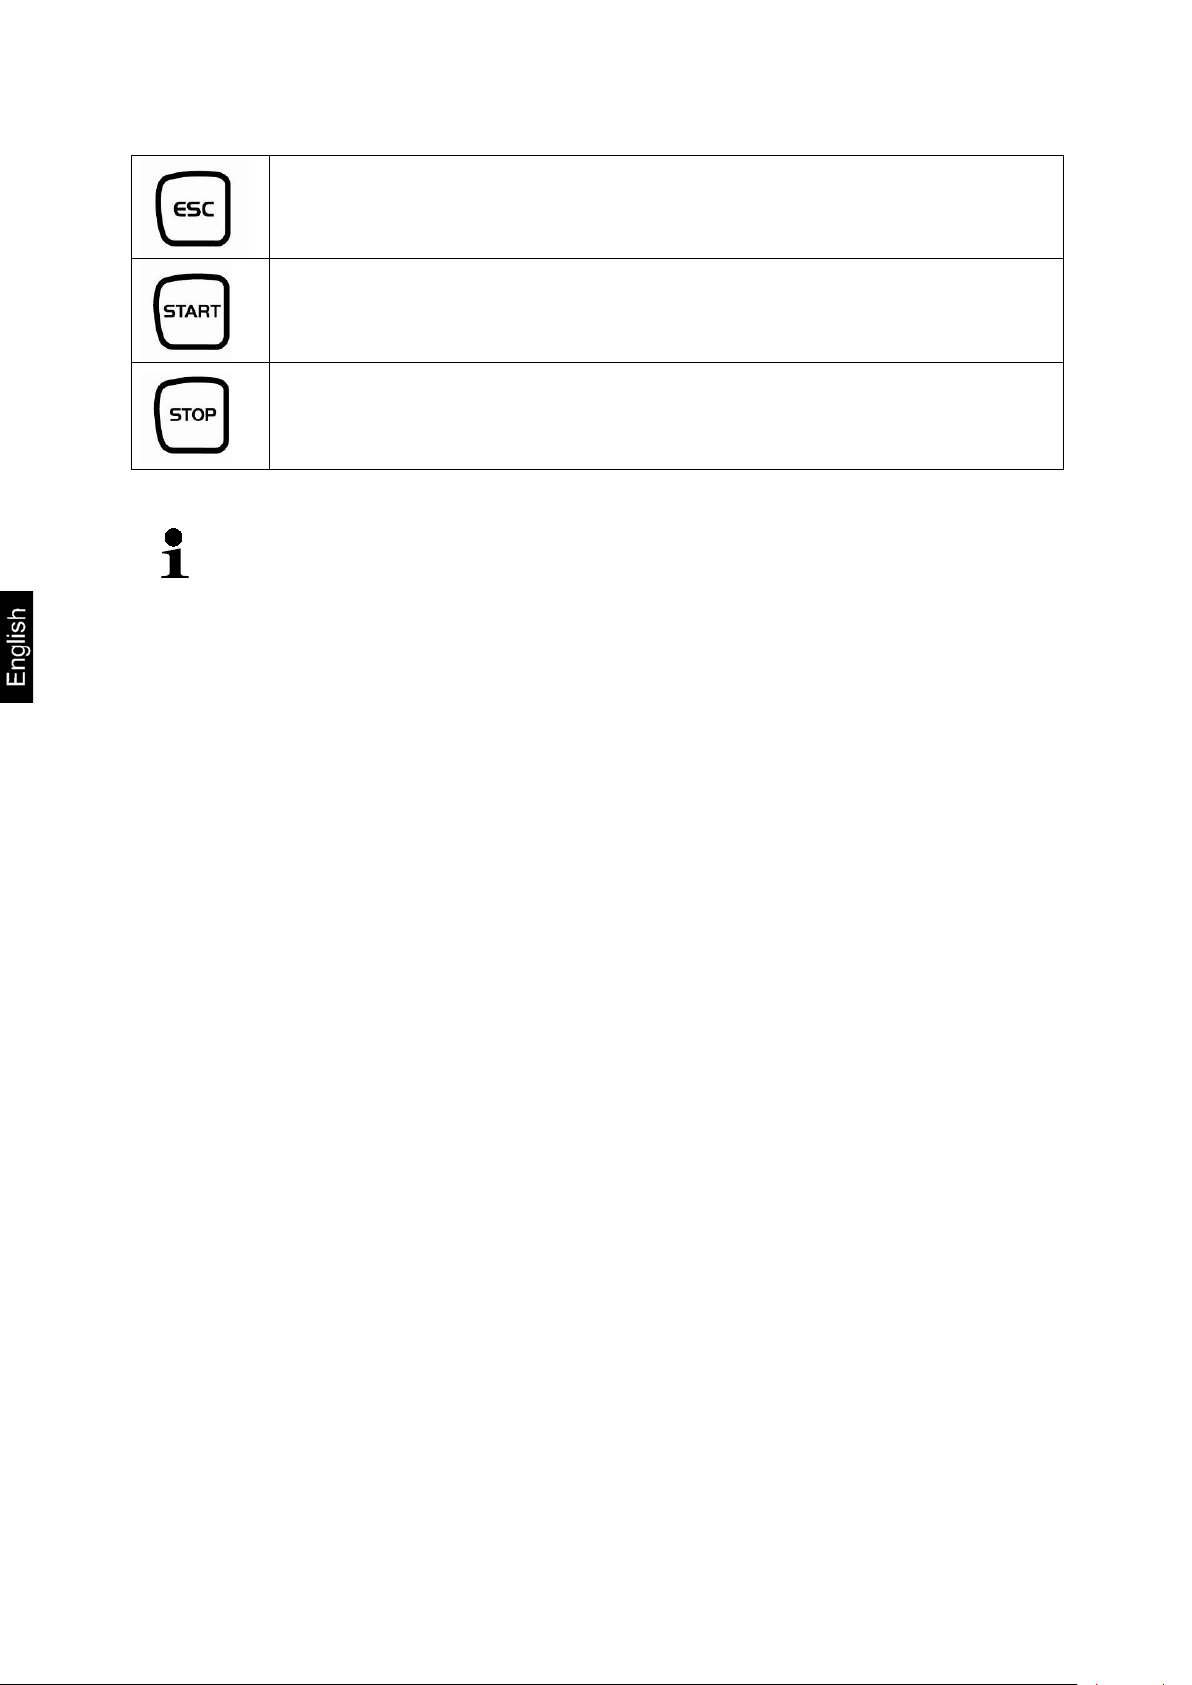
• Exit menu
• Back to moisture analysis mode
• Quit
Start drying
Complete drying
Numerical input, see chap. 7.1.1
14 DBS-BA-e-1311
Page 15

3 Basic Information (General)
3.1 Proper use
The device purchased by you is designed for a fast and reliable determination of
material moisture in liquid, porous and solid materials by applying the method of
thermogravimetrics.
3.2 Improper Use
Impacts and overloading exceeding the stated maximum load (max) of the device,
minus a possibly existing tare load, must be strictly avoided.
Balance may be damage by this.
Never operate device in explosive environment. The serial version is not explosion
protected.
The structure of the balance may not be modified. This may lead to incorrect
weighing results, safety-related faults and destruction of the moisture analyser.
The moisture analyser may only be used according to the described conditions.
Other areas of use must be released by KERN in writing.
3.3 Warranty
Loss of warranty due to
• Our conditions in the operation manual are ignored
• The appliance is used outside the described uses
• The appliance is modified or opened
• mechanical damage and damage caused by media, liquids
• natural wear and tear
• The appliance is improperly set up or incorrectly electrically connected
• The measuring system is overloaded
3.4 Monitoring of Test Re sources
In the framework of quality assurance the measuring-related properties of the
moisture analyser and, if applicable, the testing weight, must be checked regularly.
The responsible user must define a suitable interval as well as type and scope of this
test. Information is available on KERN’s home page (www.kern-sohn.com) with
regard to the monitoring of balance test substances and the test weights required for
this. In KERN's accredited DKD calibration laboratory test weights and balances may
be calibrated (return to the national standard) fast and at moderate cost.
DBS-BA-e-1311 15
Page 16
3.5 Danger I nform ation
!
!
!
!
!
!
!
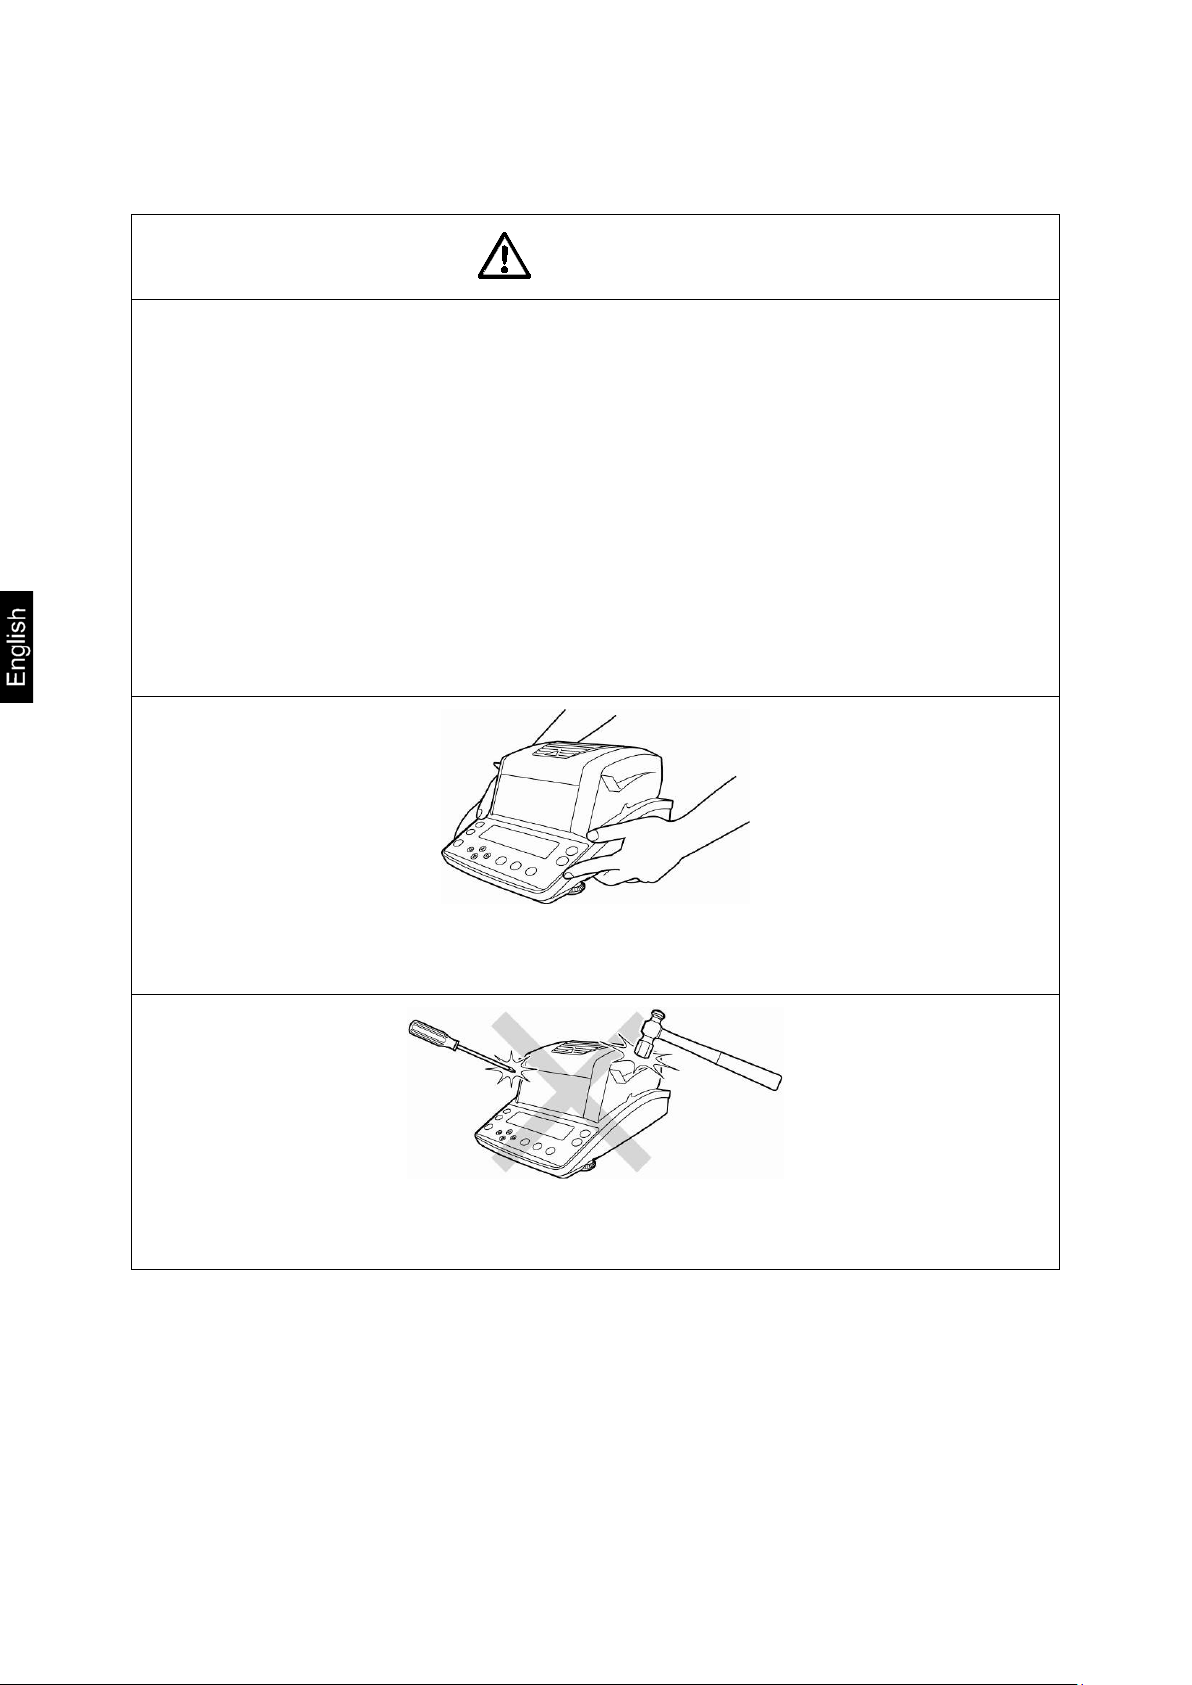
WARNING
The moisture analyser is used to analyse the moisture content of materials.
This instrument must be used exclusively for this purpose. Any other usage
may cause a risk to personnel, damage to the equipment or other material
damage.
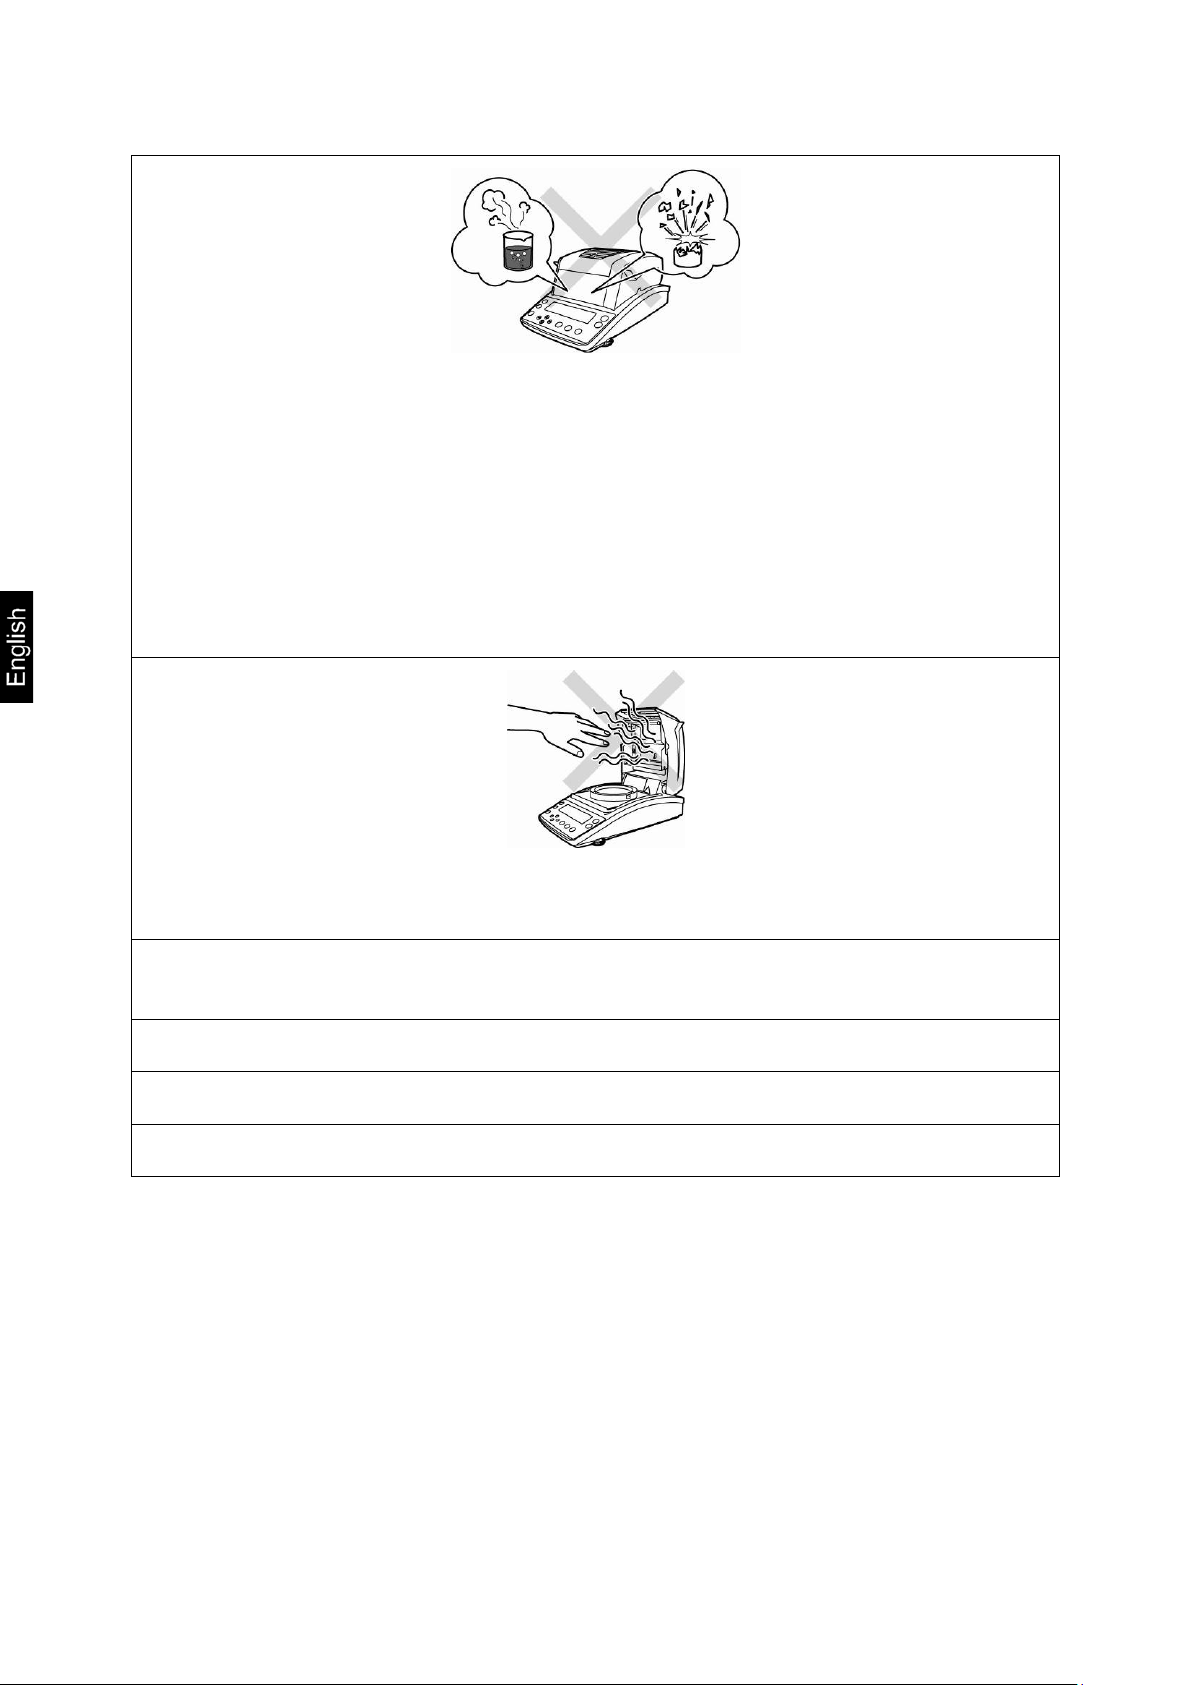
The moisture analyser should be used mainly for the drying of aqueous
substances.
The moisture analyser may not be used in a hazardous area.
The appliance may only be operated and maintained by trained personnel.
Carefully read this operation manual before setup and commissioning, even if
you are already familiar with KERN appliances.
This moisture analyser is a robust precision instrument, however, it must be
handled with care to ensure many years of trouble-free operation.
Never make any modifications or design changes to the equipment
whatsoever. Always use original spare parts and accessories.
16 DBS-BA-e-1311
Page 17

!
!
!
Make sure that liquids do not get in contact with the interior of the device, the
connections at the rear of the device and the peripherals (connected PC or
printer).
If you spill liquid on the device, disconnect it immediately.
Afterwards do not operate the moisture analyzer and have it checked by a
competent KERN stockist before any further use.
Never store materials on the equipment.
Never place combustible materials on, under or next to the equipment, as the
environment of the instrument heats up to a high temperature.
DBS-BA-e-1311 17
Page 18
!
!
!
!
!
!
!
!
Explosive, easily flammable samples and samples that go into a chemical
reaction when subjected to heat, may not be analysed with the moisture
analyser.
Sample materials emitting toxic substances must be dried with a special
extraction system in place. Create an environment that prevents the inhalation
of vapours hazardous to health.
Sample materials developing aggressive vapours (e. G. Acids) may cause
corrosion problems on some parts of the device.
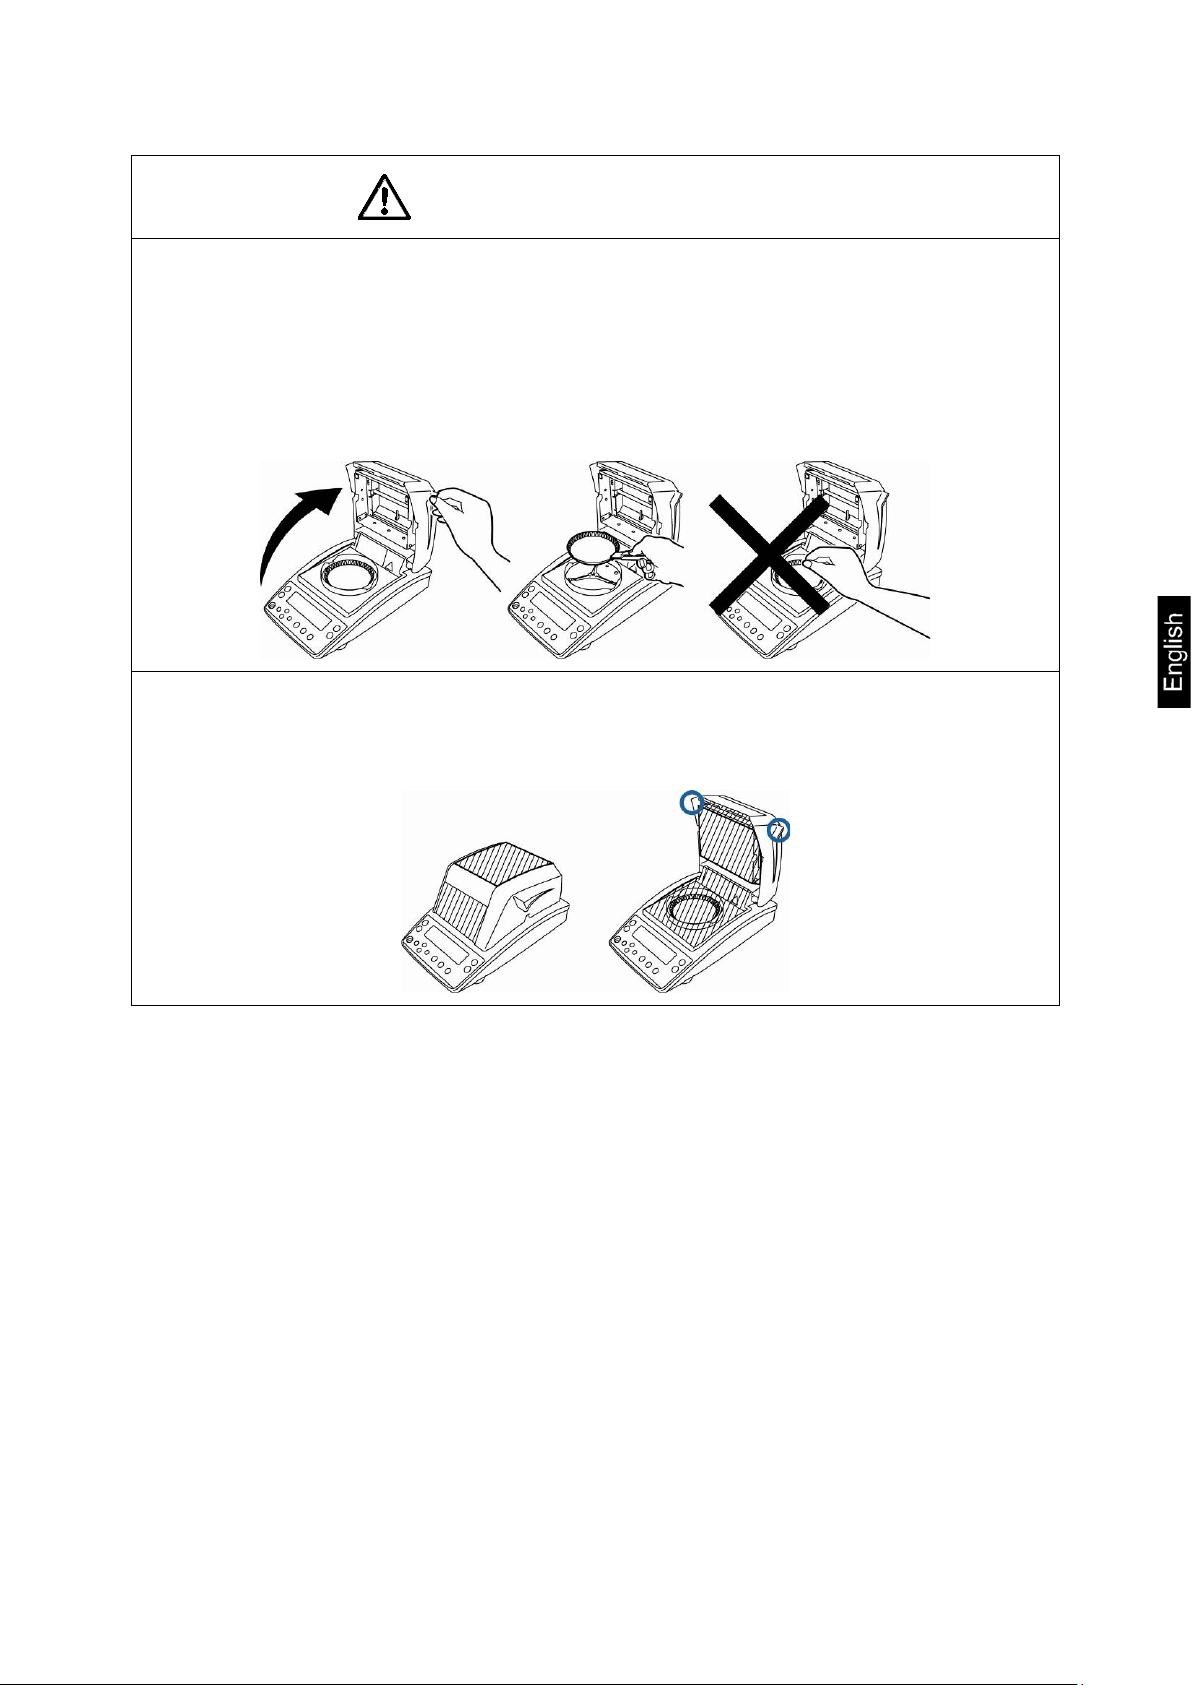
Careful when removing the sample. The sample itself, the sample dish and
the heating unit may be very hot.
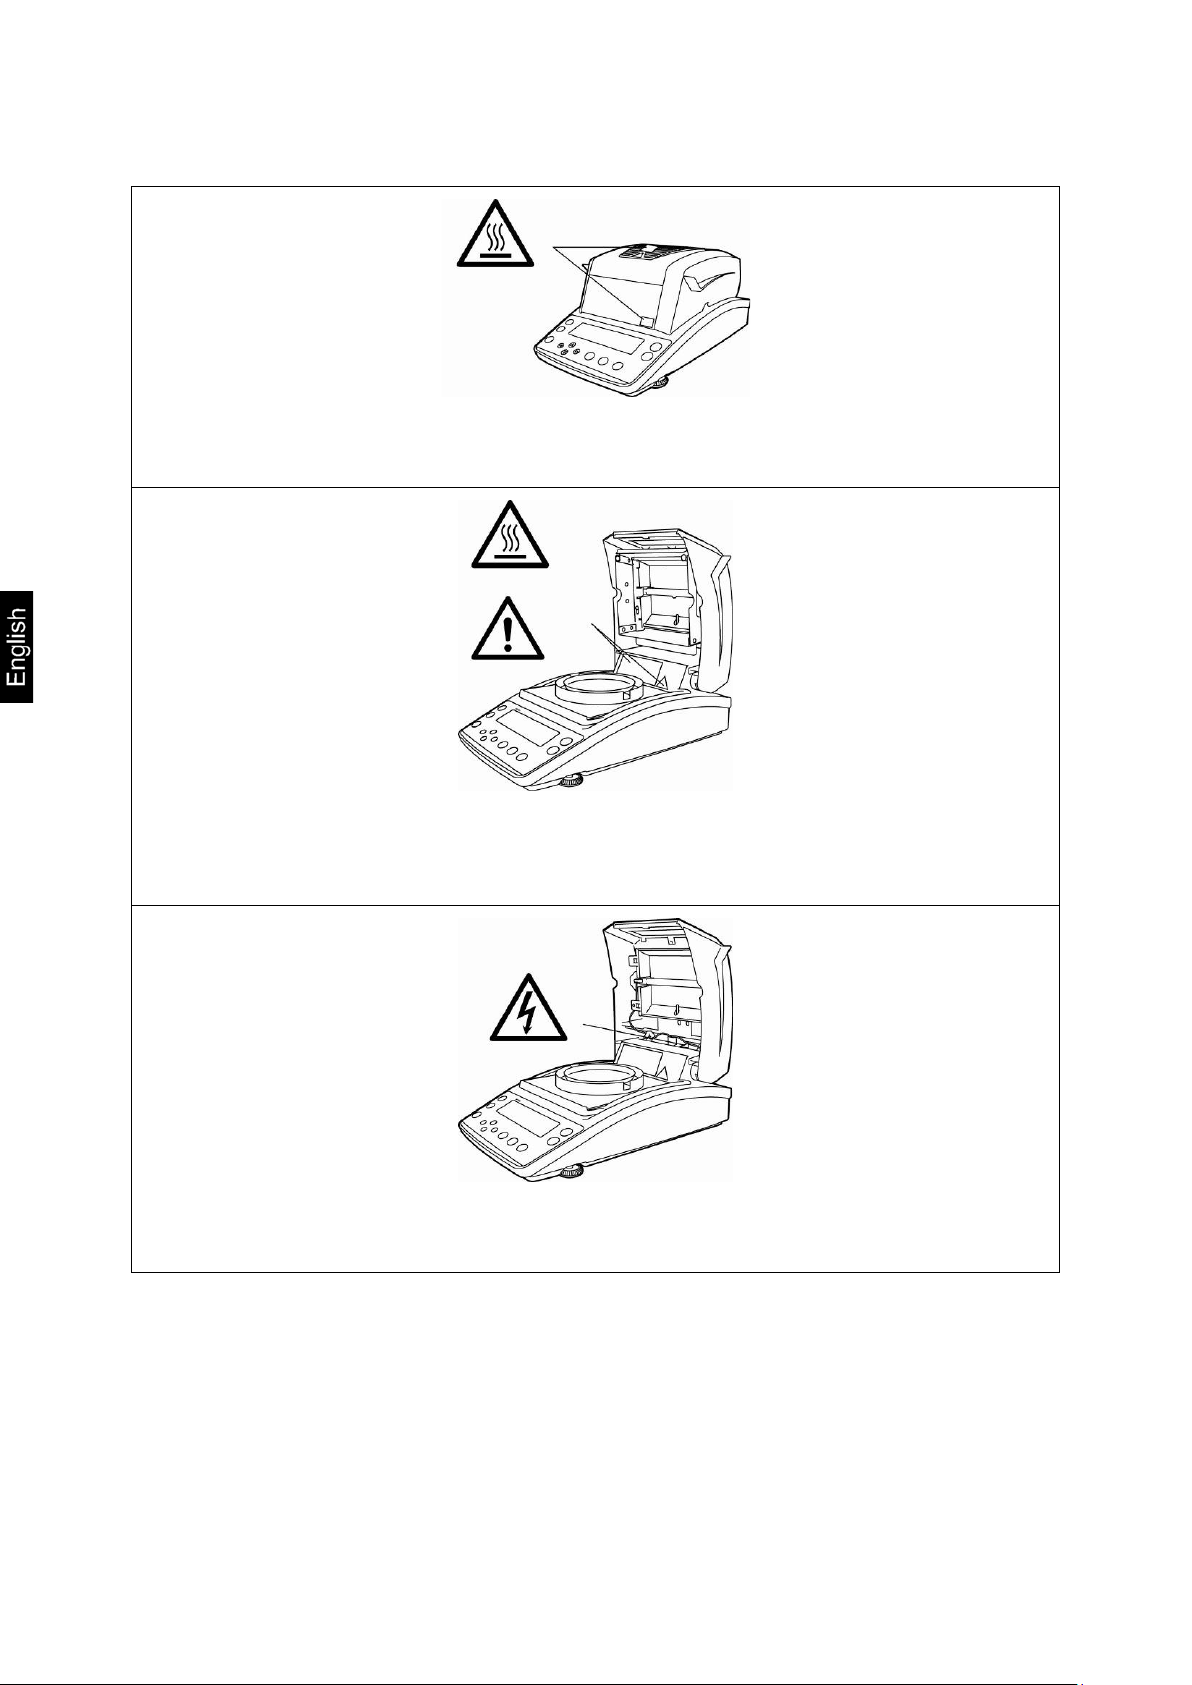
Maintain sufficient space in the environment of the equipment to prevent heat
build-up (distance from the equipment 20cm, upwards 1m).
Do not operate the humidity analyser in areas with hazard of explosion
Do not place anythin which may interfere the unplugging
The power plug must be easily accessible
18 DBS-BA-e-1311
Page 19
!
!
!
!
Hazards during and after measuri ng
Ensure correct installation of all components, see chap. 5.3
Careful when removing the sample. The sample itself, the sample dish and
the heating unit may be very hot.
Use the sample retainer at all times as it allows safe working and prevents
burns.
Individual parts of the case (e. g. the ventilation grids) may heat up
considerably during operation. Therefore, only take hold of the equipment by
the marked handles.
DBS-BA-e-1311 19
Page 20
3.5.1 “Hazard information” sticker
!
!
!
!
Ventilation grilles and inspection windows may become very hot during
operation
Always open heated cover completely.
Do not use any combustible sample materials.
Disconnect the equipment from the power supply prior to changing a lamp,
see chap. 13.2.2.
20 DBS-BA-e-1311
Page 21

4 Transport and stora ge
4.1 Testing upon acceptance
When receiving the appliance, please check packaging immediately, and the
appliance itself when unpacking for possible visible damage.
4.2 Pac kaging / return transport
Keep all parts of the original packaging for a possibly
required return.
Only use original packaging for returning.
Prior to dispatch disconnect all cables and remove
loose/mobile parts.
Reattach possibly supplied transport securing devices.
Secure all parts such as the glass wind screen, the
weighing platform, power unit etc. against shifting and
damage.
5 Unpacking, Setup and Commissioning
5.1 Instal lation Site, Location of Use
The unit is designed to achieve reliable weighing results under normal conditions of
use.
You will work accurately and fast, if you select the right location for the appliance.
DBS-BA-e-1311 21
Page 22
On the installation site observe the following:
!
!
!
!
!
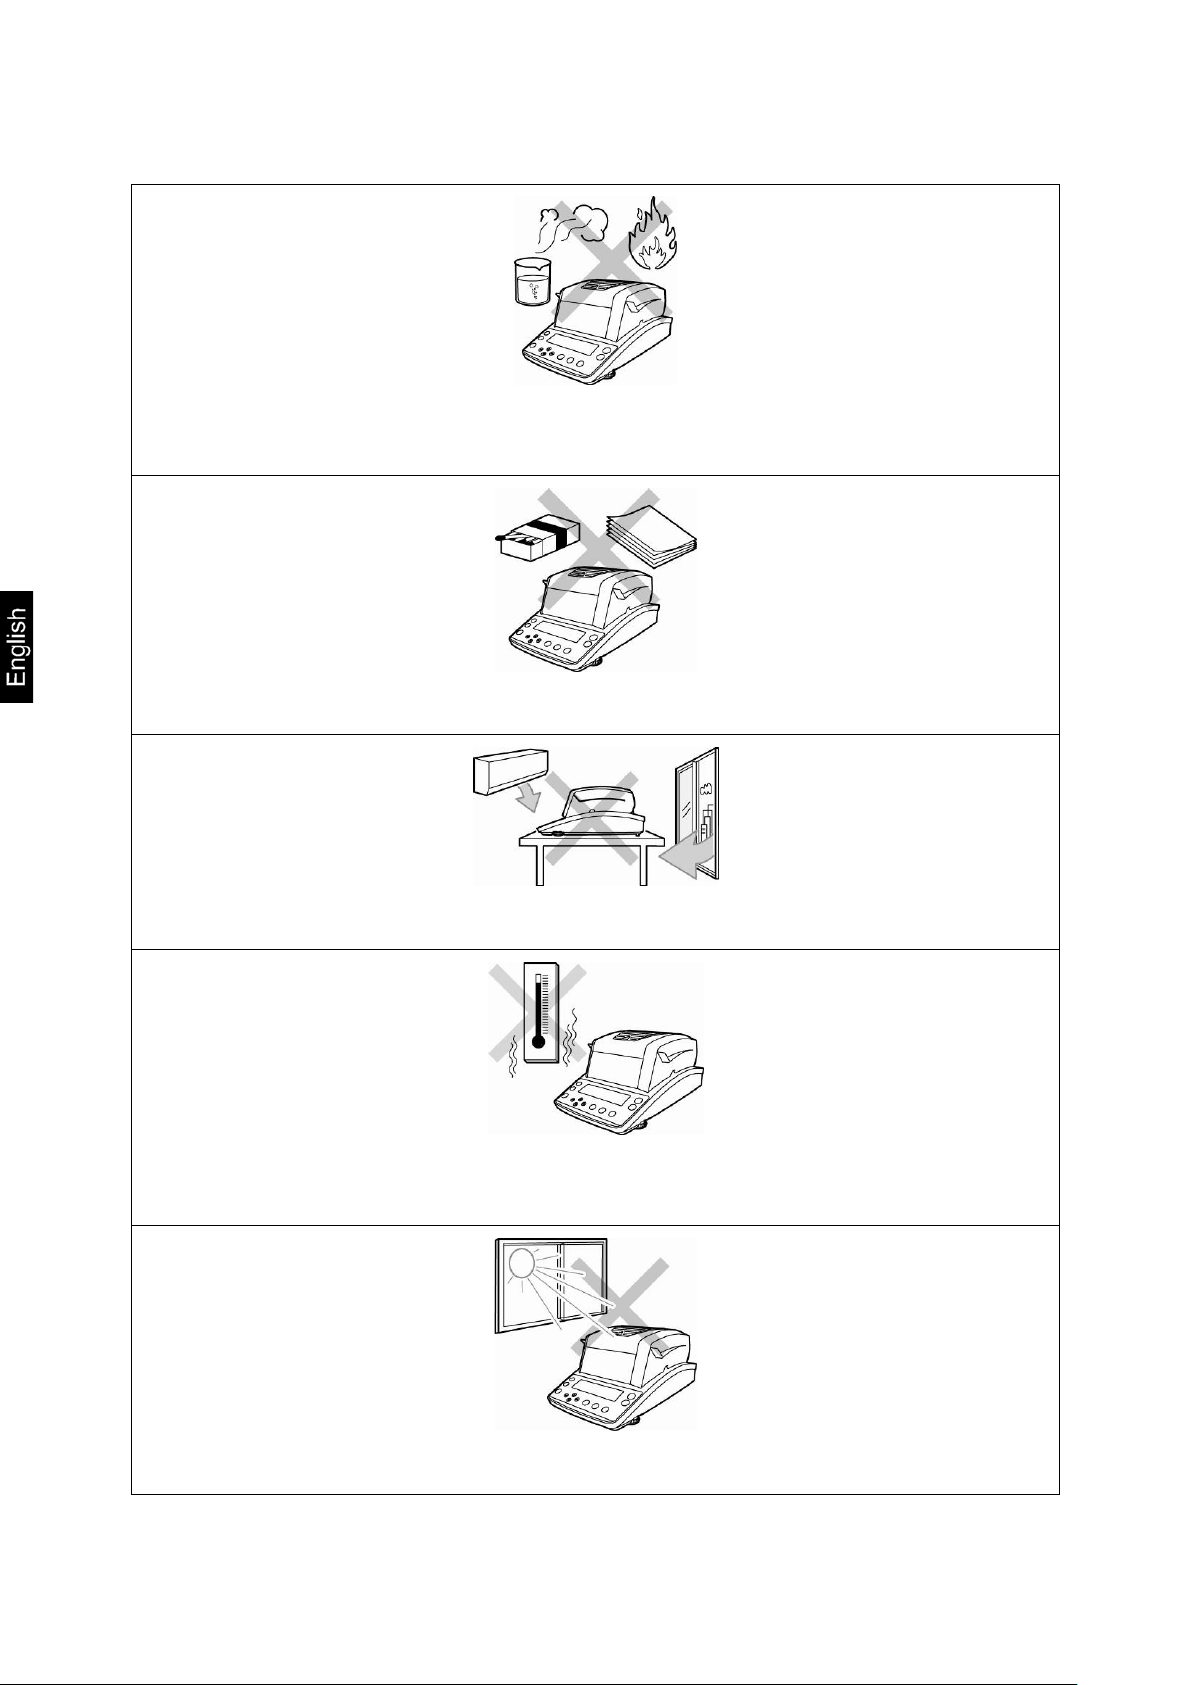
Remove explosive materials from the immediate vicinity.
Emerging vapours, sample dish and all parts of the sample chamber are hot!
Remove easily flammable materials from the immediate vicinity.
Protect the device against direct draughts due to open windows and doors.
Avoid extreme heat and temperature fluctuations e.g. due to installation next
to radiators.
Avoid direct sunlight
22 DBS-BA-e-1311
Page 23
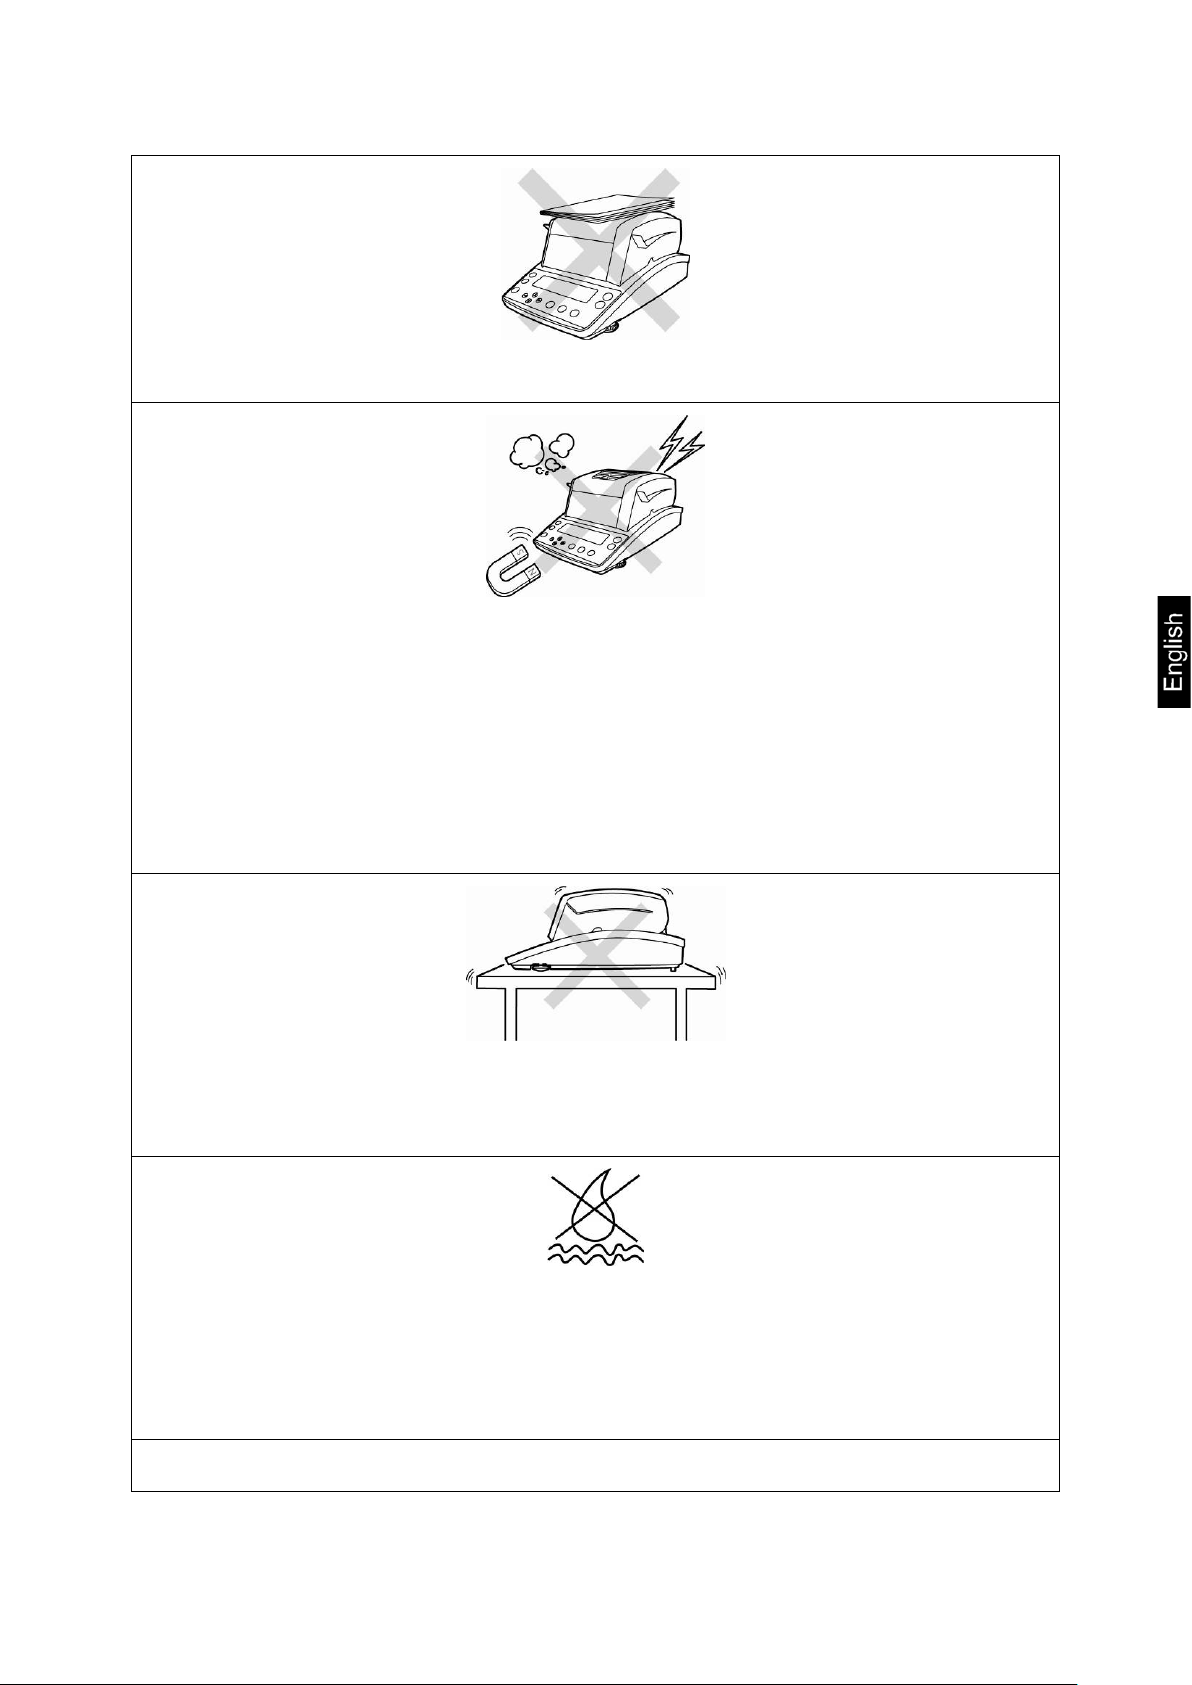
!
!
!
!
!
!
!
!
Never store materials on the equipment.
Protect the appliance against high humidity, vapours and dust,
Major display deviations (incorrect weighing results) may be experienced
should electromagnetic fields (e.g. due to mobile phones or radio equipment),
static electricity accumulations or instable power supply occur. Change
location or remove source of interference.
Avoid static charging of the material to be weighed, weighing container and
windshield
Place the device on a firm, level surface.
Avoid jarring during weighing.
Do not expose the device to extreme dampness for longer periods of time.
Non-permitted condensation (condensation of air humidity on the appliance)
may occur if a cold appliance is taken to a considerably warmer environment.
In this case, acclimatize the disconnected appliance for ca. 2 hours at room
temperature.
Operate the device only indoors.
DBS-BA-e-1311 23
Page 24
5.2 Unpack ing and checking
Open package, take out the appliance and accessories. Verify that there has been
no damage and that all packing items are present.
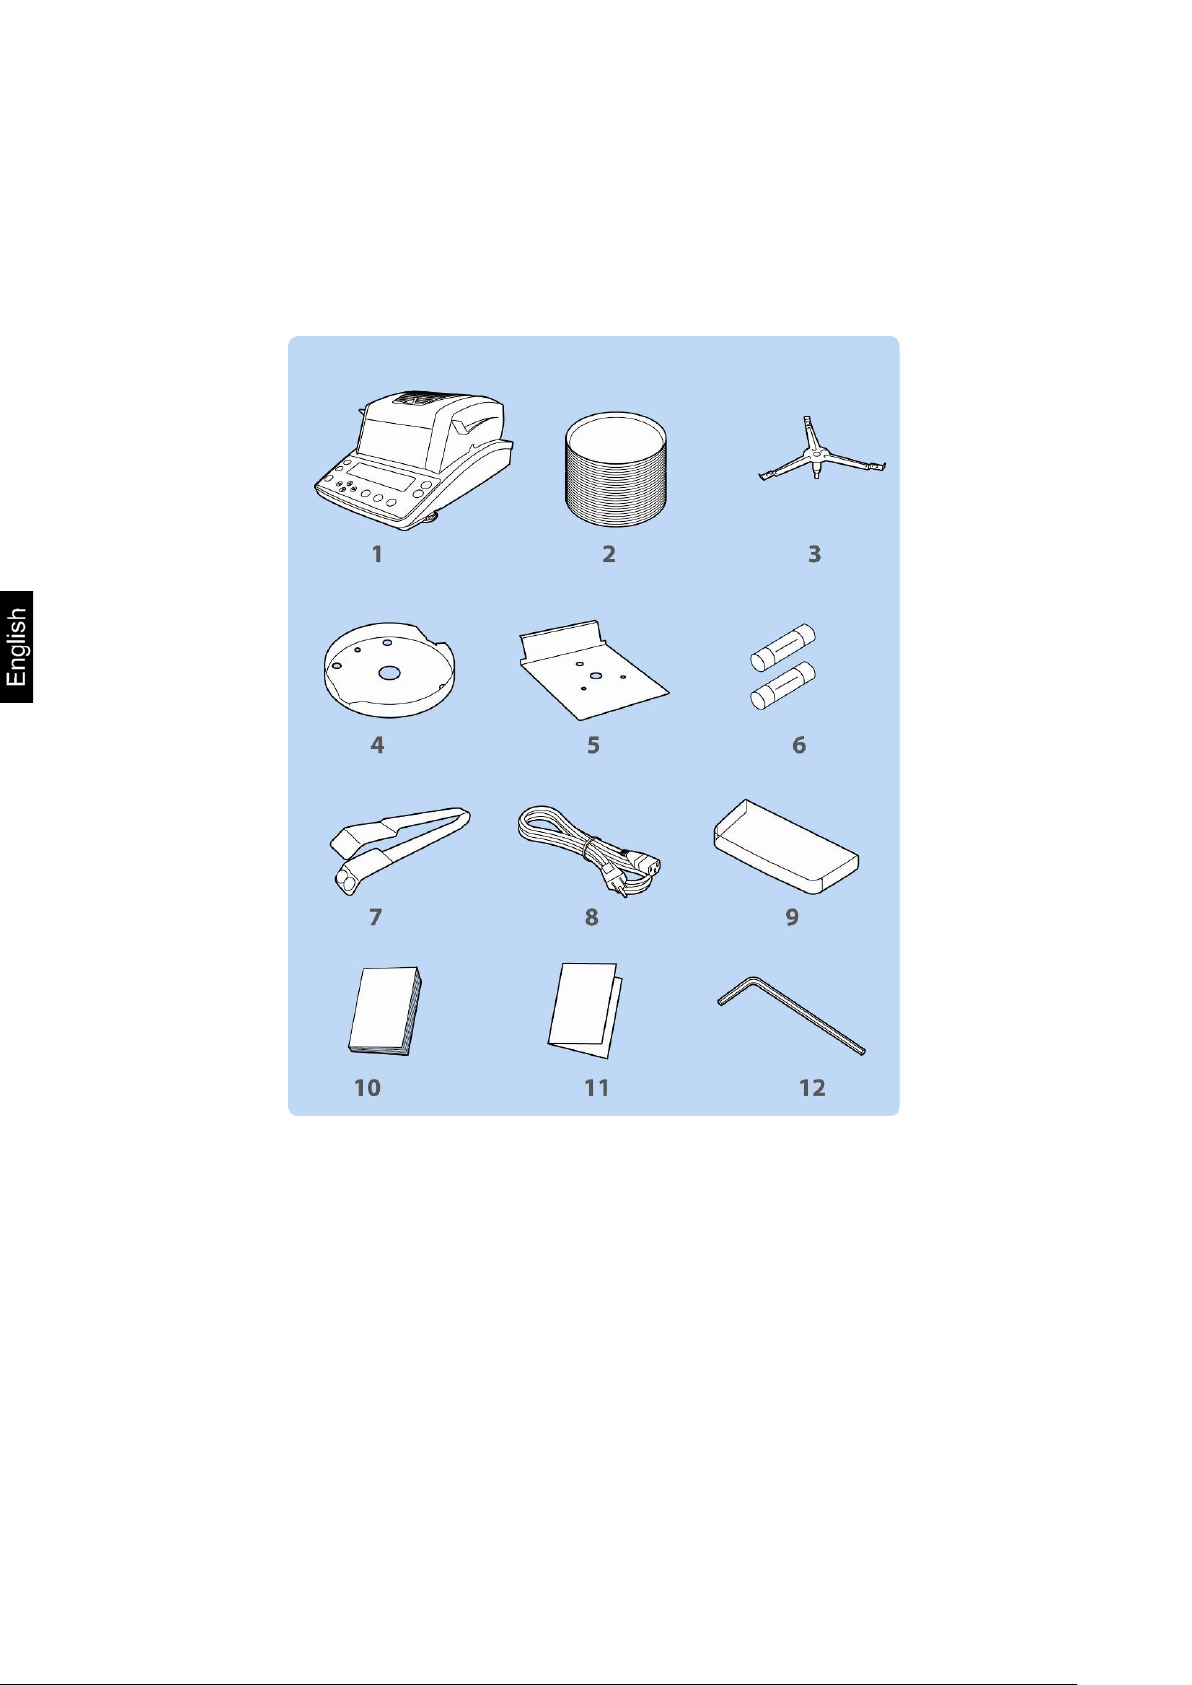
5.2.1 Scope of delivery / serial accessories
1. Instrument
2. 50 disposable sample dishes
3. Dish holder
4. Wind protection ring
5. Heat shield
6. Spare fuse
7. Removal aid
8. Power cable
9. Protective cover
10. Operating instructions
11. Menu overview
12. Hexagonal socket wrench
24 DBS-BA-e-1311
Page 25
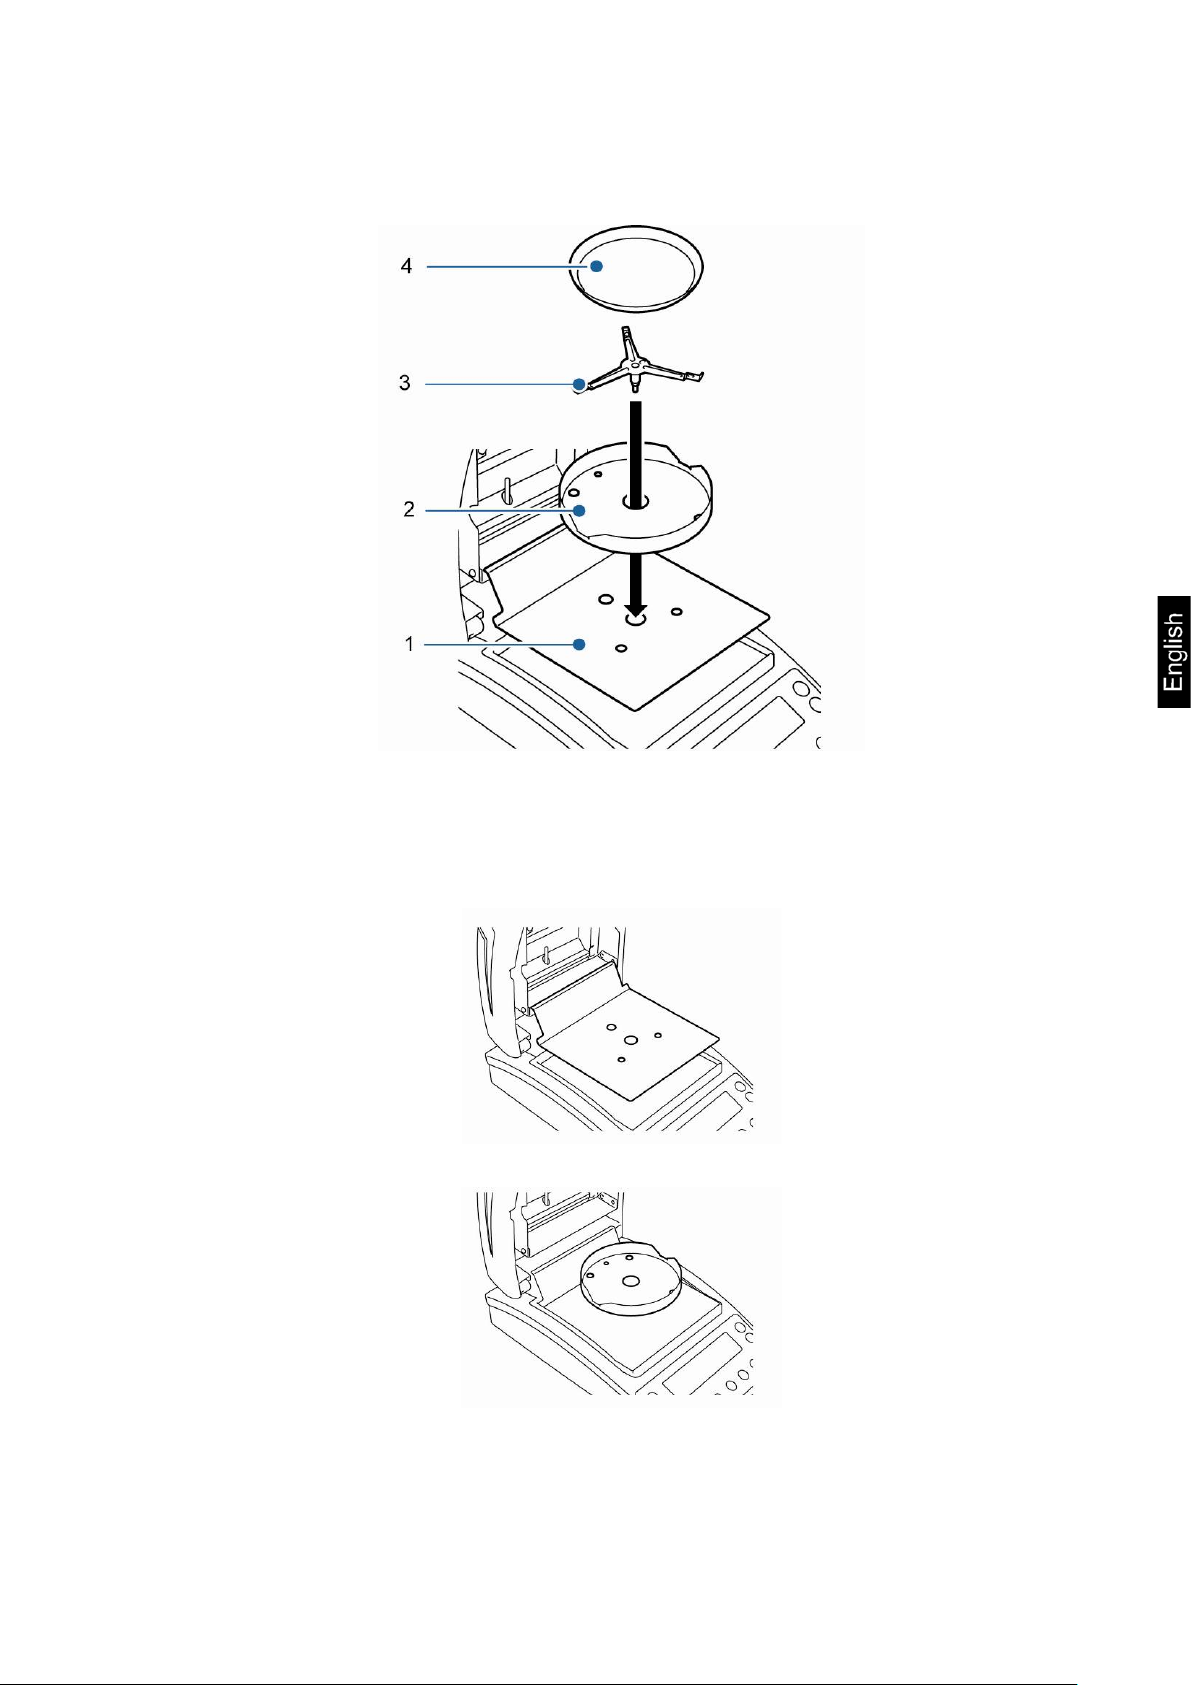
5.3 Placing
The moisture analyser is delivered in pieces. Check immediately after unpacking all the
parts that the delivery is complete and assemble the individual components as described
below.
1. Fit heat shield.
2. Install wind protection ring, ensuring correct positioning, on .
DBS-BA-e-1311 25
Page 26
3. Install dish holder, ensuring correct positioning, on .
4. Fit sample dish.
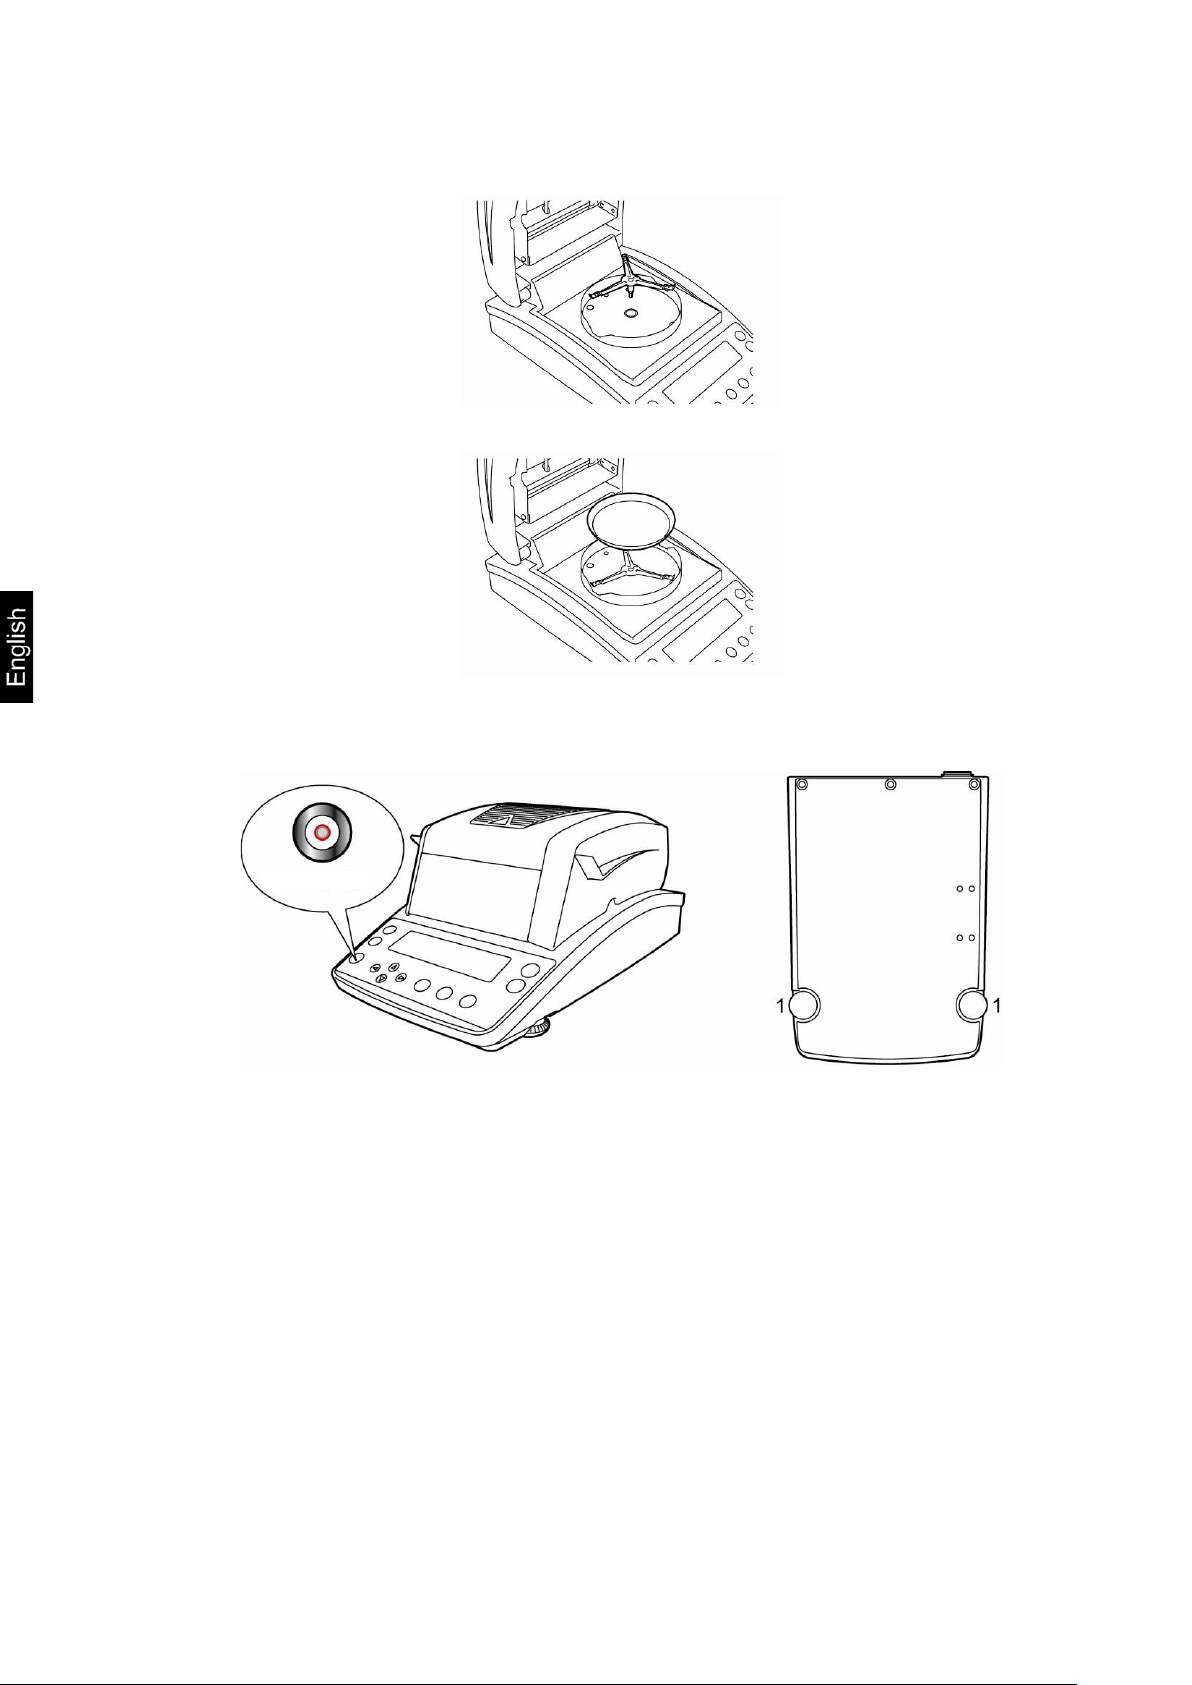
5. Level the equipment with foot screws [1] until the air bubble of the water balance is
in the prescribed circle.
26 DBS-BA-e-1311
Page 27
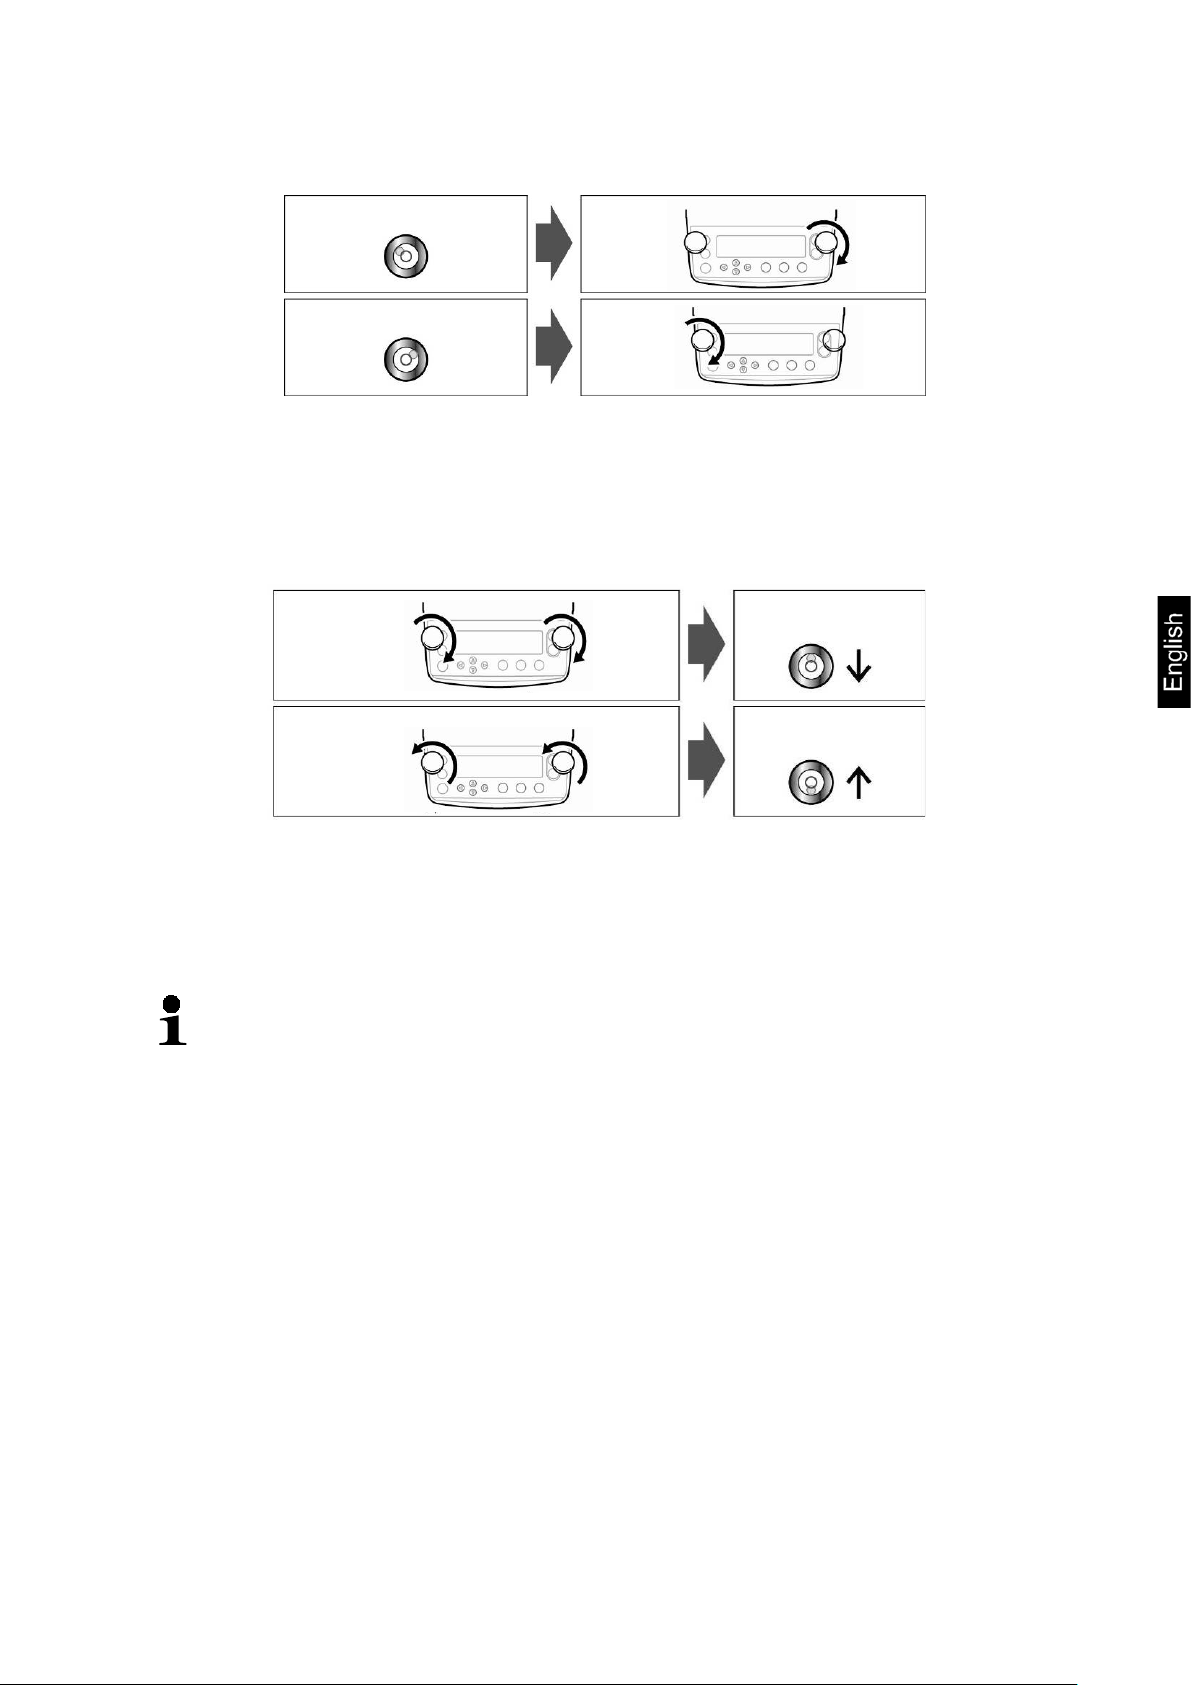
If both foot screws are turned simultaneously in clockwise direction, the air bubble will
Fig. 1
Fig. 3
Fig. 2
If the air bubble is at the lefthand edge, level the equipment with the righthand foot
screw, see Fig.1.
If the air bubble is at the righthand edge, level the equipment with the lefthand foot
screw, see Fig.2.
Fig. 4
move forwards (see Fig.3).
If both foot screws are turned simultaneously in anticlockwise direction, the air bubble will
move backwards (see Fig.4).
Check levelling regularly.
DBS-BA-e-1311 27
Page 28
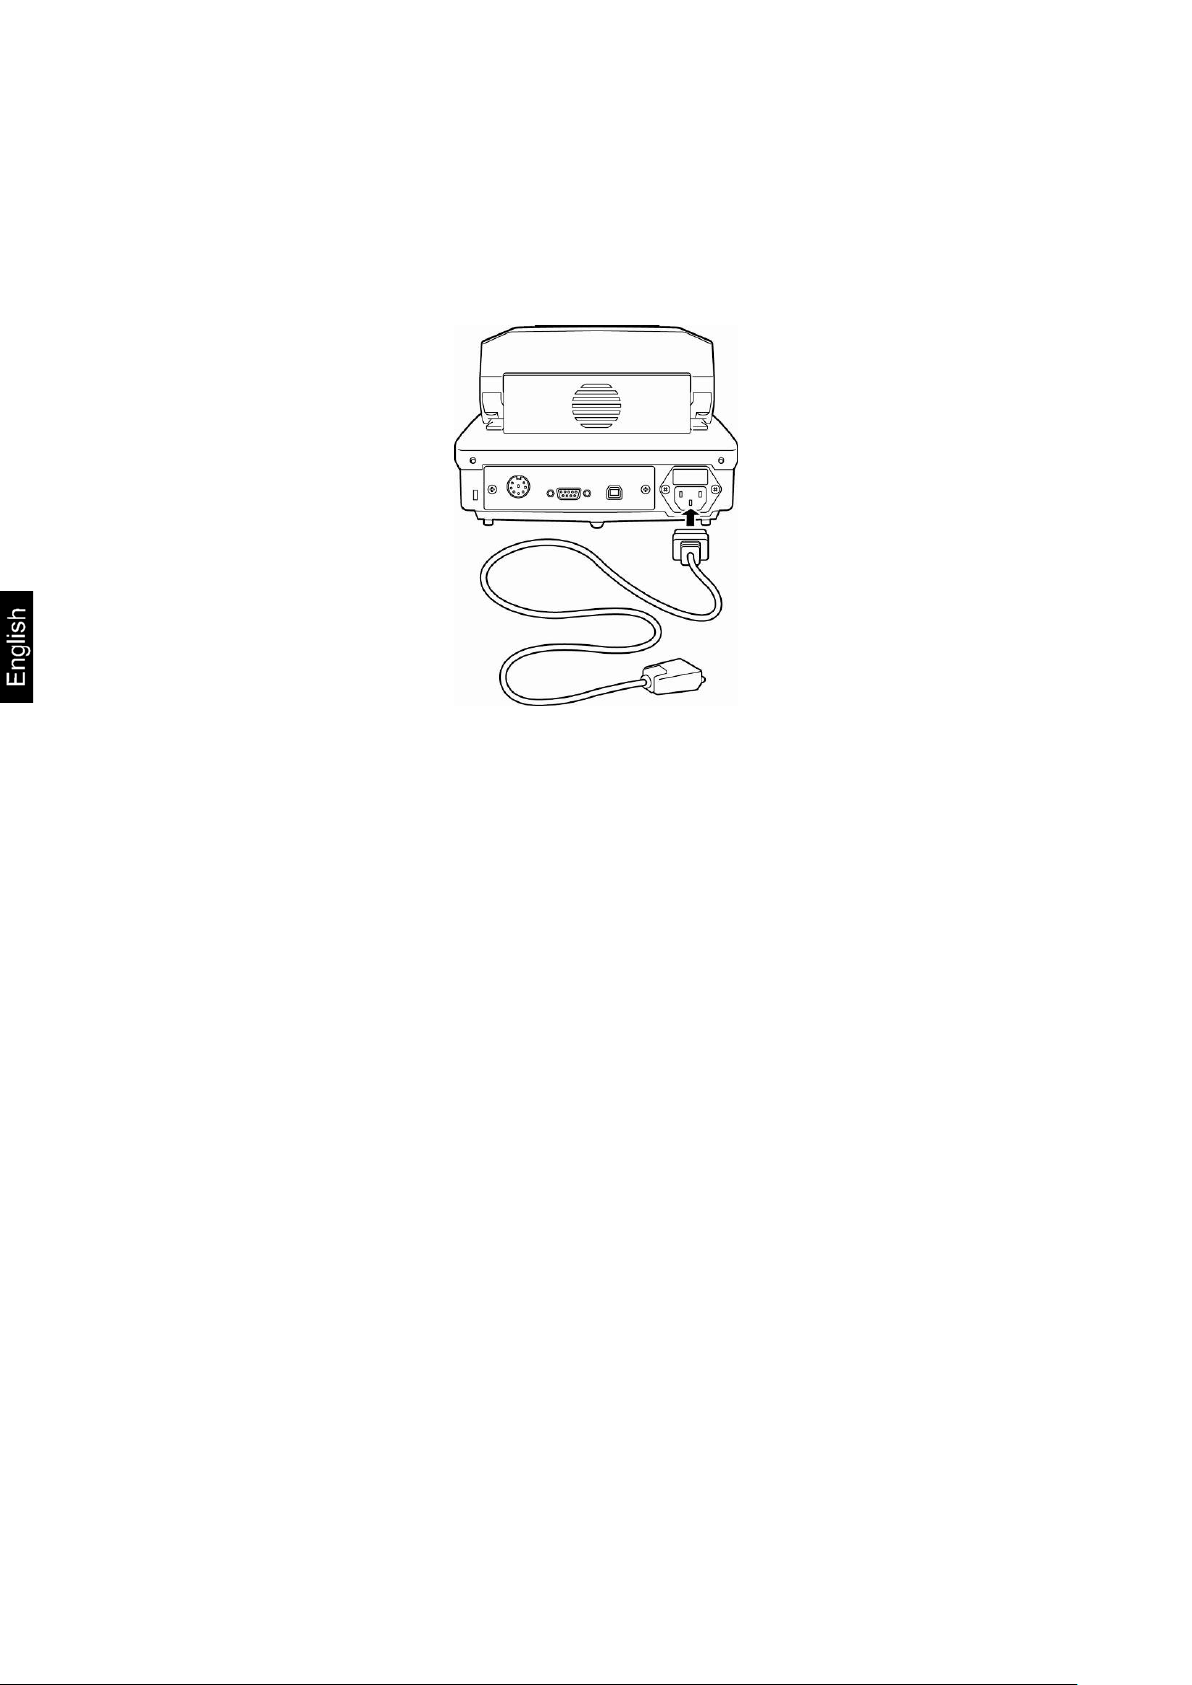
5.4 Mains connection
Power supply is provided via the supplied mains cable.
Check, whether the voltage acceptance on the scales is set correctly. Do not connect
the appliance to the power grid unless the information on the appliance (sticker)
matches the local mains voltage.
Important:
Does the labelling match the local mains voltage?
- Do not connect if mains voltages are different!
- If matching, connect the scales.
The moisture analyzer must be connected to a standard socket with earth terminal.
Do not eliminate the protective effect by using an extension lead without earth
terminal. For power supplies from power grids without earth terminals call a specialist
to establish equivalent protection according to the relevant installation regulations.
- The power plug must be always accessible.
- Before operating, check all cables for damage.
- Guide the cables so that they cannot become damaged or interfere with the
measuring process.
28 DBS-BA-e-1311
Page 29

5.4.1 Turning On the Power
Supply balance with power via the mains power cable. The display lights up and
the equipment conducts a self-test.
The selftest is completed when „OFF“ appears on the display.
To switch on press the ON/OFF button. The equipment conducts a segment test.
As soon as the weight display appears, the instrument will be ready to weigh.
DBS-BA-e-1311 29
Page 30

5.5 Commissioning
In order to obtain exact results, the appliance must have reached its operating
temperature (see warm-up time chap. 1).
For this warm-up time the appliance must be connected to the power supply.
The accuracy of the appliance depends on the local acceleration of gravity.
Strictly observe hints in chapter Adjustment.
5.6 Connection of pe r i pheral devices
Before connecting or disconnecting of additional devices (printer, PC) to the data
interface, always disconnect the moisture analyser from the power supply.
Only use accessories and peripheral devices by KERN, as they are ideally tuned to
the appliance.
30 DBS-BA-e-1311
Page 31

6 Adjustment
6.1 Adjust balance
As the acceleration value due to gravity is not the same at every location on earth,
each balance must be coordinated - in compliance with the underlying physical
weighing principle - to the existing acceleration due to gravity at its place of location
(only if the balance has not already been adjusted to the location in the factory). This
adjustment process must be carried out for the first commissioning, after each
change of location as well as in case of fluctuating environment temperature. To
receive accurate measuring values it is also recommended to adjust the balance
periodically in weighing operation.
• Observe stable environmental conditions. A warming up time (see chapter
1) is required for stabilization.
• Carry out adjustment with placed sample dish. Ensure that no objects are
within the sample dish.
• Carry out adjustment as near as possible to the balance’s maximum
weight (recommended adjustment weight see chap. 1). Weights of
different nominal values (10g – 60g) may be used for adjustment but are
not optimal for technical measuring. Info about test weights can be found
on the Internet at: http://www.kern-sohn.com
Press the Menu button to access the menu.
Use navigation buttons to select menu item
“CAL”.
Acknowledge using ENTER key, the current
setting is displayed. If necessary, use navigation
buttons to select “BAL”.
Press ENTER to confirm and “WAIT” will be
displayed followed by the currently preset
adjustment weight.
Open heated cover
DBS-BA-e-1311 31
Page 32

•
•
If the value of the adjustment weight needs to be changed, use the
When the adjustment weight display flashes, e.g.
50g, place it carefully in the centre of the sample
dish.
Adjustment starts.
Wait until „0.000g“ appears. Remove the
adjustment weight during the flashing display.
navigation buttons to make the required setting (see chap. 7.1.1.
“Numerical input”).
The adjustment protocol output is started upon connection to an
optional printer and activated GLP function (see chap. 6.3).
The adjustment is completed when “END” is
displayed. The device returns to the menu
automatically.
Press ESC to return to weighing mode.
32 DBS-BA-e-1311
Page 33

6.2 Adjust temperature
We recommend sometimes to check the temperature value of the device using the
Preparation:
optional temperature calibrating set DBS-A01. The temperature is measured at two
points (100°C and 180°C) and can be adjusted at these two points.
The equipment should cool down first to room temperature after the last heating
period.
Fix the temperature sensor on the
temperature calibration set in
accordance with the illustration.
Remove sample dish and dish holder
from the moisture analyser.
Install the temperature-calibration set
acc. to fig.
Close heated cover.
If applicable, the error message “ol” will
be displayed, but can be ignored in this
case.
On the temperature calibration set
switch-on the digital thermometer by the
ON/OFF button.
DBS-BA-e-1311 33
Page 34

•
•
Call up menu:
Press the Menu button to access the menu and
the first menu item “PRoGRM” will be
displayed.
Use navigation buttons to select menu
item “CAL”.
Acknowledge using ENTER key, the current
setting is displayed. If necessary, use
navigation buttons to select “TEMP”.
Press ENTER to confirm and the first
temperature point to be tested will be displayed.
Press START and the first heating-up period
will start.
• Do not leave the heated cover open for more than 1 minute during the
Temperature calibration for the first point takes
15 min. Compare the displayed temperature
value on the thermometer with that of the
moisture analyser whilst the temperature
display is flashing. If the two values do not
match, correct them using the navigation
buttons and confirm with the ENTER
button Numerical input, see chap. 7.1.1.
heating-up period, otherwise the error message “ERR.100” will appear.
In this case press ESC and restart menu item “TEMP”.
Attention: some parts e.g. ventilation grilles and inspection windows
may become very hot during operation.
The adjustment must be made within 15 minutes when the temperature
display flashes, otherwise the temperature adjustment will be aborted
(ABORT will be displayed).
34 DBS-BA-e-1311
Page 35

•
The second temperature point to be tested will
be displayed.
Confirm with the ENTER button, the second
heat-up phase is started.
Temperature calibration for the second point
takes 15 min. Compare the displayed
temperature value on the thermometer with that
of the moisture analyser whilst the temperature
display is flashing. If the two values do not
match, correct them using the navigation
buttons and confirm with the ENTER
button Numerical input, see chap. 7.1.1.
The adjustment is completed when “END” is
displayed. The device returns to the menu
automatically.
The adjustment protocol output is started upon
connection to an optional printer and activated
GLP function (see chap. 6.3).
Press ESC to return to Moisture analysis mode.
The adjustment protocol output is started upon connection to an
optional printer and activated GLP function (see chap. 6.3).
DBS-BA-e-1311 35
Page 36

6.3 ISO/GLP log
Indicator
Display
Selection
Quality assurance systems require printouts of measuring results as well as of
correct adjustment stating date and time and equipment identification. The easiest
way is to have a printer connected.
• Ensure that the communication parameters for moisture analyser and
Press the Menu button to access the menu and
Use navigation buttons to select menu item
Press ENTER to confirm and the current
printer concur, see chap. 11.2.
• For printout sample see chapter 11.7
the first menu item “PRoGRM” will be displayed.
“CAL”.
Adjustment mode “BAL / TEMP” will be displayed.
Use navigation buttons to select
“CAL.REC”.
Press ENTER to confirm and the indicator
next to “CAL.REC” will display the current
setting.
is displayed
is not displayed
Press ENTER to activate/de-activate this function.
Press ESC to return to Moisture analysis mode.
Adjustment protocol output
activated
Adjustment protocol output deactivated
36 DBS-BA-e-1311
Page 37

7 Menu
DBS-BA-e-1311 37
Page 38

7.1 Navigation in the menu
• Call up menu
• Select and scroll up through the menu items
• Select setting within one function
• Select and scroll down through the menu items
• Select setting within one function
• Selecting a menu item to the left
• Selection of a menu item in clockwise direction
• Conf irm and save
• Exit menu
38 DBS-BA-e-1311
Page 39

7.1.1 Numeric entry
Key Description Function
Navigation key Increase flashing digit
Navigation key Decrease flashing digit
Navigation key Digit selection to the right
Navigation key Digit selection to the left
ENTER-key
ESC-key
Confirm entry
Cancel input
DBS-BA-e-1311 39
Page 40

8 Moisture analysis
8.1 Sta rt drying
First set the drying parameters as described in chap. 9 during initial start-up.
Or set the drying parameters as described in chap. 9
or load from store a suitable drying program for the
sample, see chap. 9.1.
Ensure that the equipment is in Moisture analysis
mode. Press ESC if necessary.
Open heated cover
Deposit a sample dish acclimatised to room
temperature.
When the heated cover is closed, wait for the stability
display [] and press the TARE button to reset to
zero.
Load sample within 30 minutes otherwise the message “TIM.oUT” will be
displayed. In this case, press ESC and reset to zero.
Place sample in sample dish.
Sample preparation see chap. 12.4
Ensure minimum initial weight > 0.02 g
40 DBS-BA-e-1311
Page 41

•
•
•
Close heated cover and measuring will start
automatically.
If measuring does not start automatically, the equipment is preset for
Manual start. Press the START button to start.
Manual or Automatic start can be selected in the menu, see chap. 9.2.3
Observe hazard information,
see Chapter 3.5 “Hazards during and after measuring”
When drying is finished, you will hear an acoustic
signal and the heating will be shut off.
The measuring result, marked by the indicator [ ]],
will be displayed.
The blower will switch off automatically after a short
time.
Press the ON/OFF button for further measurements
and the equipment will revert to Moisture analysis
mode. The indicator [ ]] will go out.
Finish drying, see chap. 8.3
When an optional printer is connected, the measurement log will be edited
independently on the settings in the menu, see chap. 11.3
DBS-BA-e-1311 41
Page 42

8.2 Abort drying
!
!
!
The measuring can be aborted at any time by
pressing the STOP button. A long signal will sound,
and “ABORT” will be displayed.
Either
Press ESC key. The equipment reverts to Moisture
analysis mode and the measuring result is
discarded.
or
Press STOP key again.
The measuring result, marked by the indicator [ ]],
will be displayed and saved.
8.3 Finish dr ying
Open heated cover
Observe hazard information,
see Chapter 3.5 “Hazards during and after
measuring”
Careful when removing the sample. The sample
itself, the sample dish and the heating unit may be
very hot.
Always work with a removal aid as this will enable
safe working and prevent burns.
If you will repeat measurement for the same
sample
Press START key to measure the same
sample after the measurement successively.
If you switch the mode to manual start, you
can measure successively after resetting the
measuremaent result.
8.4 Turn off applia nce
Press ON/OFF button until “OFF” appears and the
display will change to “READY”. The equipment
migrates to Ready mode.
The moisture analyser does not require any warmup time in Ready mode in order to be used for
measuring.
The equipment must be disconnected from the
mains in order to switch the power supply off
completely.
42 DBS-BA-e-1311
Page 43

9 Drying parameters
criterion
time
temperature
The equipment can be used to store complete drying programs with drying
parameters individually adapted to the sample.
Four drying modes (Standard drying, Step drying, Slow drying and Rapid drying) and
two switch-off criteria (Time-controlled and Automatic) can be selected.
Further parameters such as drying time, drying temperature and ∆M (constant weight
loss per 30 seconds) should be set depending on the modes, see table below.
Display Drying mode Switch-off
Drying
Drying
∆M
AUTO
+ see chap.
9.2.1.1
TIME
+ see chap.
9.2.1.2
RAPID
+ see chap.
9.2.1.3
SLOW
+ see chap.
9.2.1.4
STEP
+ see chap.
9.2.1.5
RAPID
SLOW
STEP
Standard Automatic
Standard Time-controlled
Time-controlled
Fast drying
Slow drying
Step drying
or
Automatic
Time-controlled
or
Automatic
Time-controlled
or
Automatic
- x x
x x -
x x
- x x
x x
- x x
x x
- x x
Select memory location for the drying program prior to selecting the drying
parameters, see chap. 9.1.
-
-
-
Do not exceed the operating time of 1 hour to protect the equipment at
drying temperatures above 180°C.
DBS-BA-e-1311 43
Page 44

9.1 Save / access
10 memory locations, which can be simply called up and started as necessary under
the saved Program number, are available for complete drying processes.
Press the Menu button to access the menu and
the first menu item “PRoGRM” will be displayed.
Use navigation button and confirm by
pressing ENTER.
The current setting will be displayed.
Use navigation buttons to select the
required Program Number, Nos.0 – 9 can be
selected.
Press ENTER to confirm selection.
displays the currently preset drying parameters.
Press ESC to return to Moisture analysis mode.
Set the drying parameters under the selected
program number, see chap. 9.2 below.
44 DBS-BA-e-1311
Page 45

9.2 Adjust
9.2.1 Drying modes
9.2.1.1 Drying mode AUTO
(Standard drying/switch-off criterion “∆M“)
Drying will be carried out at the drying temperature preset by the user.
The drying is finished automatically when the preset weight loss (∆M ) remains
constant for 30 seconds.
SETTINGS:
• Drying mode AUTO
• Drying temperature
• ∆M
Press the Menu button to access the menu and
the first menu item “PRoGRM” will be displayed.
Press navigation button , then use navigation
buttons to select “AUTO”.
Press ENTER to confirm and the currently preset
drying temperature will flash in the display.
Use navigation buttons to select the
required setting,
50°C – 200°C (1°C increments) can be selected.
Press ENTER to confirm selection. The currently
preset value for ∆M will be displayed.
Use navigation buttons to select the
required setting, 0.01% – 0.1% (0.01%
increments) can be selected.
Press ENTER to save.
Press ESC to return to Moisture analysis mode.
The measuring can be started (see chap. 8.1).
All the settings that have been made control the
drying process.
The switch-off criterion has been fulfilled with a sample whose moisture content is below
0.01%. In this case, we recommend selecting the drying program TIME described below, see
chap. 9.2.1.2
DBS-BA-e-1311 45
Page 46

9.2.1.2 Drying mode TIME (Standard drying/switch-off criterion “Time“)
The drying will be carried out at the drying temperature preset by the user and will
end automatically when the preset time has expired.
SETTINGS:
• Drying mode TIME
• Drying temperature
• Drying time
Press the Menu button to access the menu and
the first menu item “PRoGRM” will be displayed.
Press navigation button , then use navigation
buttons to select “TIME”.
Press ENTER to confirm and the currently preset
drying temperature will flash in the display.
Use navigation buttons to select the
required setting,
50°C – 200°C (1°C increments) can be selected.
Press ENTER to confirm selection. The currently
set drying time is displayed.
Use navigation buttons to select the
required setting, 1 minute – 4 hours (1 minute
increments) or 4 hours - 12 hours (1 hour
increments) can be selected
Press ENTER to save.
Press ESC to return to Moisture analysis mode.
The equipment is ready to measure
(see chap. 8.1). All the settings that have been
made control the drying process.
46 DBS-BA-e-1311
Page 47

9.2.1.3 RAPID Drying mode (Rapid drying)
A preheating step is switched on for Rapid drying, i.e. the temperature will increase
very quic kly and will exceed the preset drying temperature until it falls below the
preset reference value (weight loss/30 sec).
After that the temperature will be adjusted down to the set value. The drying will end
depending on the setting, when the preset time has expired or the preset weight loss
(∆M) remains constant for 30 seconds.
Rapid drying is suitable for samples with high moisture content (e.g. liquids).
Settings:
• RAPID Drying mode
• ∆M “pre-heating step”
• Drying temperature
• Drying time switch-off criterion or ∆M
Press the Menu button to access the menu and
the first menu item “PRoGRM” will be displayed.
Press navigation button , then use navigation
buttons to select “RAPID”.
Press ENTER to confirm and the currently preset
reference value for the preheating step will flash
in the display.
0.1% -9.9% (0.01% increments) can be selected
Press ENTER to confirm and the currently preset
drying temperature will flash in the display.
Use navigation buttons to select the
required setting,
50°C – 200°C (1°C increments) can be selected.
DBS-BA-e-1311 47
Page 48

Press ENTER to confirm selection. The currently
present switch-off criterion will be displayed.
Use navigation buttons to select the
required setting,
TIME = time-controlled
∆M = automatic
TIME setting
Press ENTER to confirm selection. The currently
set drying time is displayed.
Use navigation buttons to select the
required setting, 1 minute – 4 hours (1 minute
increments) or 4 hours - 12 hours (1 hour
increments) can be selected
Press ENTER to save.
Press ESC key to return to weighing mode. The
moisture analysis can be started (see chap. 8.2).
All the settings that have been made control the
drying process.
or
Setting ∆M
Press ENTER to confirm selection. The currently
preset value for ∆M will be displayed.
Use navigation buttons to select the
required setting,
0.01% – 0.1% (0.01% increments) can be
selected.
Press ENTER to save.
Press ESC to return to Moisture analysis mode.
The equipment is ready to measure
(see chap. 8.1). All the settings that have been
made control the drying process.
48 DBS-BA-e-1311
Page 49

9.2.1.4 SLOW Drying mode (Slow drying)
• SLOW Drying mode
The Slow drying temperature is increased more slowly to the preset value than for
Standard drying.
The drying will end depending on the setting, when the preset time has expired or
the preset weight loss (∆M) remains constant for 30 seconds.
Slow drying is suitable for samples that cannot tolerate rapid heating by the heaters.
The same applies to samples that form a skin during rapid heating. This skin will then
affect the evaporation of the trapped moisture.
Settings:
• Drying temperature
• Drying time switch-off criterion or ∆M
Press the Menu button to access the menu and
the first menu item “PRoGRM” will be displayed.
Press navigation button , then use navigation
buttons to select “SLOW”.
Press ENTER to confirm and the currently preset
drying temperature will flash in the display.
Use navigation buttons to select the
required setting,
50°C – 200°C (1°C increments) can be selected.
DBS-BA-e-1311 49
Page 50

Press ENTER to confirm selection. The currently
present switch-off criterion will be displayed.
Use navigation buttons to select the
required setting,
TIME = time-controlled
∆M = automatic
TIME setting
Press ENTER to confirm selection. The currently
set drying time is displayed.
Use navigation buttons to select the
required setting, 1 minute – 4 hours (1 minute
increments) or 4 hours - 12 hours (1 hour
increments) can be selected
Press ENTER to save.
Press ESC key to return to weighing mode. The
moisture analysis can be started (see chap. 8.2).
All the settings that have been made control the
drying process.
or
Setting ∆M
Press ENTER to confirm selection. The currently
preset value for ∆M will be displayed.
Use navigation buttons to select the
required setting,
0.01% – 0.1% (0.01% increments) can be
selected.
Press ENTER to save.
Press ESC to return to Moisture analysis mode.
The equipment is ready to measure (see chap.
8.1). All the settings that have been made
control the drying process.
50 DBS-BA-e-1311
Page 51

9.2.1.5 STEP Drying mode (Step drying)
1. Level
2. Level
3. Level
STEP Drying mode
Drying temperature
Drying temperature
Drying temperature
Switch-off criterion
Drying time
Drying time
Drying time
or
or
∆M
∆M
Step-by-step drying is suitable for substances that display special behaviour during
warming. 2 or 3 steps can be selected.
The individual steps are freely selectable regards duration and temperature rising
step.
The drying will end depending on the setting for step 2 or 3, when the preset time
has expired or the preset weight loss (∆M) remains constant for 30 seconds.
Settings:
-
1. Press the Menu button to access the menu.
.
2. Select drying mode
Press navigation button , then use
navigation buttons to select “STEP”.
3. Set drying temperature for step 1
Press ENTER to confirm and the currently
preset drying temperature for step 1 will flash
in the display.
Use navigation buttons to select the
required setting,
DBS-BA-e-1311 51
50°C – 200°C (1°C increments) can be
selected.
Page 52

or
4. Preset drying time for step 1
Press ENTER to confirm. The currently preset
drying time for step 1 will be displayed.
Use navigation buttons to select the
required setting, 1 minute – 4 hours (1 minute
increments) can be selected
5. Set drying temperature for step 2
Press ENTER to confirm and the currently
preset drying temperature for step 2 will flash
in the display.
Use navigation buttons to select the
required setting,
50°C – 200°C (1°C increments) can be
selected.
6. Set drying time or ∆M for step 2
Acknowledge using ENTER key, the current
setting is displayed.
Use navigation buttons to select switch-
off criterion (TIME or ∆M) for step 2.
Setting ∆M
Press ENTER to confirm selection. The
currently preset value for ∆M will be
displayed.
Use navigation buttons to select the
required setting, 0.01% – 0.1% (0.01%
increments) can be selected.
TIME setting
Press ENTER to confirm selection. The
currently set drying time is displayed.
Use navigation buttons to select the
required setting, 0 minutes – 240 minutes
(1 minute increments) can be selected
If 0 minutes are entered, the next step will be
cancelled.
Press ENTER to confirm.
Continue from step 8 for 2-step drying.
Continue from step 7 for 3-step drying.
52 DBS-BA-e-1311
Page 53

7. Set drying parameters for step 3.
For drying temperature input, see step 5.
For drying time input or ∆M see step 6
8. Return to weighing mode
Press ESC to return to Moisture analysis
mode. The equipment is ready to measure
(see chap. 8.1). All the settings that have
been made control the drying process.
DBS-BA-e-1311 53
Page 54

9.2.2 Result display
Explanation of symbols
W:
Starting weight (weight at start of measuring)
D:
Residual weight (weight value at the end of measurement)
M:
Weight loss = starting weight – residual weight
*ATRO is a unit which is exclusively used in the timber industry.
(RG).
The result display enables the selection of a display in % moisture, % dry mass,
ATRO* dry mass, ATRO* moisture and residual weight in grams.
Calculation:
Unit Calculation Display
[%] moisture
0 – 100%
[%] dry mass 100 –
0%
ATRO* dry mass 100
– 999%
ATRO* moisture:
0 – 999%
The timber humidity (ATRO) means the percentage of water contained in the
timber, indicated in percent of the mass of the water-free timber.
It is calculated from the difference between fresh weight (SG) and dry weight
Menu settings:
Press the Menu button to access the menu and
the first menu item “PRoGRM” will be displayed.
54 DBS-BA-e-1311
Page 55

Use the navigation key to select menu item
„UNIT“.
Acknowledge using ENTER key, the current
setting is displayed.
Select the desired unit using the navigation keys
( ).
Display Description
[M/W] [%] moisture
[D/W] [%] dry mass:
[M/D] ATRO* dry mass
[W/D] ATRO* m oisture
[GRAM] Gram display
Press ENTER to confirm selection. The
currently preset value for the minimum reading
will be displayed.
Select the desired position using the navigation
keys .
Unit Options:
[M/W]
[D/W]
[M/D]
[0.1%] or [0.01%]
[W/D]
[GRAM]
[0.001g] or [0.01g]
Press ENTER to confirm selection.
Press ESC to return to Moisture analysis mode.
DBS-BA-e-1311 55
Page 56

9.2.3 Start criterion
Indicator
Display
Selection
Description
Measuring will
been closed.
Measuring starts
open or closed.
The menu item “START” enables the selection of Manual and Automatic start of a
measurement.
Press the Menu button to access the menu and
the first menu item “PRoGRM” will be displayed.
Use the navigation keys to select the menu
item „START“ .
Press ENTER to confirm and the indicator
next to “EASY” will display the current setting.
Use the ENTER button to switch between
Manual and Automatic start.
is displayed
is not displayed
Automatic
start
Manual start
start after the
heated cover has
after the START
button has been
pressed,
regardless of
whether the
heated cover is
Press ESC to return to Moisture analysis mode.
56 DBS-BA-e-1311
Page 57

10 Miscellaneous settings
10.1 Enter sample designation
A 4-digit sample code can be saved for a sample under menu item “CoDE”. This is
output in the measuring protocol.
Options:
1st and 2nd digit: „0 – 9“ or „A –Z“ or „_“
3th and 4th digit: “0-9” (the value is automatically increased by “1” for each
measurement, it reverts to “00” upon reaching “99”)
Default setting: „0000“
Press the Menu button to access the menu and
the first menu item “PRoGRM” will be displayed.
Use the navigation keys to select the
menu item „CoDE“ .
Press ENTER to confirm and a 4-digit number
will be displayed. The active digit is flashing.
Use the navigation buttons to enter the required
sample designation, see chap. 7.1.1 “Numerical
input”.
Press ESC to return to Moisture analysis mode.
DBS-BA-e-1311 57
Page 58

10.2 Set date/time for measuring protocol
Press the Menu button to access the menu and
the first menu item “PRoGRM” will be displayed.
Use the navigation key to select menu item
„DATE“.
Press ENTER to confirm and the currently
preset date format will be displayed.
Use navigation buttons to select the
required format.
Display Description
[YYMMDD] Year/Month/Day
[MMDDYY] Month/Day/Year
[DDMMYY] Day/Month/Year
Press ENTER to confirm and the currently
preset date will be displayed. The active digit is
flashing.
Use the navigation buttons to enter the current
date, see chap. 7.1.1 “Numerical input”.
Confirm with ENTER button, the currently set
time will be displayed. The active digit is
flashing.
Use the navigation buttons to enter the current
time, see chap. 7.1.1 “Numerical input”.
Confirm input with ENTER button.
Press ESC to return to Moisture analysis mode.
58 DBS-BA-e-1311
Page 59

10.3 Menu Lock
The menu setting operations can be locked so that the settings cannot be changed.
The following menu blocks are available despite menu lock.
+ PRG-No / call up drying programs, see chap. 9.1
+ LoCK / menu lock, current chap.
+ PRINT / output of measuring results, see chap. 11.4
Activate menu lock:
1. Press the Menu button to access the menu and
the first menu item “PRoGRM” will be displayed.
2. Use the navigation key to select menu item
„LoCK“.
3. Acknowledge using ENTER key, the password
inquiry is displayed. The active digit is flashing.
4. Use the navigation buttons to enter a new
password, see chap. 7.1.1 “Numerical input”.
+ Default setting: „9999“.
+ Change password, see following chapter
+ If the correct password has been entered, „ok“ will be displayed.
+ If the password has been entered incorrectly, „NG“ will be displayed.
Repeat password input from step 1.
5. Press ENTER to confirm. The current setting will
be displayed.
Press ESC if “LOCK” is displayed.
The menu lock is activated. The equipment
reverts to Moisture analysis mode.
DBS-BA-e-1311 59
Page 60

Remove the menu lock
Repeat steps 1-5.
Press ENTER to confirm. The current setting will
be displayed.
Press ESC if “LOCK” is displayed.
The menu lock is cancelled. The equipment
reverts to Moisture analysis mode.
60 DBS-BA-e-1311
Page 61

10.4 Change password
Standard password (factory setting): „9999“
1. Press the Menu button to access the menu and
the first menu item “PRoGRM” will be displayed.
2. Use the navigation key to select menu item
„PASS“.
3. Acknowledge using ENTER key, the password
inquiry is displayed. The active digit is flashing.
4. Use the navigation buttons to enter the currently
set password, see chap. 7.1.1 “Numerical input”.
+ Default setting: „9999“.
+ If the correct password has been entered, „ok“ will be displayed.
+ If the password has been entered incorrectly, „NG“ will be displayed.
Repeat password input from step 1.
Use the navigation buttons to enter a new
password, see chap. 7.1.1 “Numerical input”.
Press ENTER to save the input and the display
will change to “SET” followed by “PASS”.
Press ESC to return to Moisture analysis mode.
DBS-BA-e-1311 61
Page 62

10.5 Enter identification number Options:
Four characters, to select from „0 – 9“ or „A –Z“ or „_“
Default setting: ID „0000“
Press the Menu button to access the menu and
the first menu item “PRoGRM” will be displayed.
Use the navigation keys to select the menu
item „ID“ .
Press ENTER to confirm and a 4-digit number
will be displayed. The active digit is flashing.
Enter the desired ID no. using navigation
buttons (see chapter 3.1.1 „Numeric input“).
Press ENTER to save the input and the display
will change to “SET” followed by “ID”.
Press ESC to return to Moisture analysis mode.
62 DBS-BA-e-1311
Page 63

10.6 Resetting the menu
A menu reset will return all the settings to factory setting.
Press the Menu button to access the menu and
the first menu item “PRoGRM” will be displayed.
Use the navigation keys to select the menu
item „RESET“ .
Acknowledge with ENTER key, „“RST.OK?“ will
be displayed.
Confirm query with ENTER key.
All settings will be reset to factory settings.
Press ESC to return to Moisture analysis mode.
DBS-BA-e-1311 63
Page 64

11 Print, store and call-up measurement results
The data exchange between moisture analyser and printer occurs via the RS 232C
interface.
In addition to the measurement result, for the finished drying process all drying
parameters are automatically stored with the printout (100 positions). The memory
location designation is automatically allocated with a consecutive number (XX00 –
XX99) as well as a selectable designation “XX” (see chap. 10.1).
+ Call up and print out measuring results, see chap. 11.4
+ Delete memory, see Chapter 11.6
RS232
The following conditions must be met to provide successful communication between
the moisture analyser and the printer.
• Disconnect moisture analyser from the power supply and connect to the printer
interface with a suitable cable. Faultless operation requires an adequate KERN
interface cable.
• Communication parameters (baud rate, bits and parity) for moisture analyser
and printer must concur, see chap. 11.2.
64 DBS-BA-e-1311
Page 65

11.1 Pin allocation RS232C interface
DBS-BA-e-1311 65
Page 66

11.2 Interface parameters
1. Press the Menu button to access the menu and
the first menu item “PRoGRM” will be displayed.
2. Use the navigation buttons to select menu
item „CoM.SET“.
3. Confirm with ENTER key, the currently preset
port will be displayed
oUT.I = RS232
oUT.2 = USB
4. Use the navigation keys to select „oUT.I“.
5. Press ENTER to save input and the currently
preset baud rate will be displayed.
6. Use the navigation buttons to select the
desired setting.
7. Press ENTER to save input, the next interface
parameter will be displayed.
Set all interface parameters in turn and then repeat
steps 6 and 7 in each case.
• Baud rate
Selectable settings:
Display B.1200* B.2400 B.4800 B.9600 B.19.2k B.38.4k
Baud rate 1200bps 2400bps 4800bps 9600bps 19.2k bps 38.4k bps
• Parity
Selectable settings:
Display P.NoNE* P.oDD P.EVEN
Parity Small parity, 8 bit Odd parity, 7 bit Straight parity, 7 bit
• Stop bit
Selectable settings:
Display SToP. 1* SToP. 2
Stop bit 1 bit 2 bit
66 DBS-BA-e-1311
Page 67

Handshake
Hardware
handshake
Terminat
or
• Handshake
Selectable settings:
Display HS.HW* HS.SW HS.TiM HS.oFF
Software handshake Timer handshake No handshake
• Delimiter (terminator)
Selectable settings:
Display CR* LF CR+LF
CR LF CR+LF
Press ESC to return to Moisture analysis mode.
Factory settings are marked by *.
DBS-BA-e-1311 67
Page 68

11.3 Output interval
Press the Menu button to access the menu and
the first menu item “PRoGRM” will be displayed.
Use the navigation keys to select the menu
item „PRINT“ .
Acknowledge with ENTER key, “INTVAL“ will be
displayed.
Press ENTER to save input and the currently
preset output interval will be displayed.
Use the navigation buttons to select the
desired setting.
Selectable settings:
oFF No data output
1SEC Output interval 1 sec
2SEC Output interval 2 sec
5SEC Output interval 5 sec
10SEC Output interval 10 sec
30SEC Output interval 30 sec
1MIN Output interval 1 Min.
2MIN Output interval 2 Min.
5MIN Output interval 5 Min.
10MIN Output interval 10 Min.
FINAL Data output at end of measurement
Press ENTER to save input and the equipment
will revert to the menu.
Press ESC to return to Moisture analysis mode.
68 DBS-BA-e-1311
Page 69

11.4 Call up and print out measuring results
Press the Menu button to access the menu and
the first menu item “PRoGRM” will be displayed.
Use the navigation keys to select the menu
item „PRINT“ .
Press ENTER to confirm.
Use the navigation keys to select the menu
item „MEMoRY“.
Press ENTER to confirm. All drying processes
will be output to the printer.
Press ESC to return to Moisture analysis mode.
• The ESC key may be used to cancel the data output.
• For printout sample see chapter 11.7
DBS-BA-e-1311 69
Page 70

11.5 Print out currently preset drying parameters
Press the Menu button to access the menu and
the first menu item “PRoGRM” will be displayed.
Use the navigation keys to select the menu
item „PRINT“ .
Press ENTER to confirm.
Use the navigation keys to select menu
item „CND.oUT“.
Press ENTER to confirm. The currently preset
drying parameters will be output to the printer.
Press ESC to return to Moisture analysis mode.
For printout sample see chapter 11.7
70 DBS-BA-e-1311
Page 71

11.6 Delete measuring results from memory
Press the Menu button to access the menu and
the first menu item “PRoGRM” will be displayed.
Use the navigation keys to select menu
item „MEM.CLR“.
Confirm with ENTER key, the query CLR.oK?
will be displayed.
Press ENTER to confirm. The entire memory
content will be deleted.
Press ESC to return to Moisture analysis mode.
DBS-BA-e-1311 71
Page 72

11.7 Printout examples
KERN & Sohn GmbH
TYPE
DBS60-3
Model
SN
WBIIAH0000I
Serial no.
ID
0000
Identification No. (see chap. 10.5)
CODE
0006
Sample designation (see chap. 10.1)
DATE
10-05-11
Date
TIME
10:17
Time
PNO.
6
Program No. (see chap.9.1)
UNIT
M/W
Results display unit(see chap. 9.2.2)
MODE
TIME
Drying mode (see chap. 9.2.1)
TEMP
120C
Drying temperature e.g. 120 °C
STOP
00:02
Switch-off criterion, e.g. 2 min.
WET W(s)
1.638
Starting weight e.g. 1.638g
TIME
M/W (%)
Output interval Measuring value
00:00:00
0.00
00:00:30
0.10
00:01:00
0.14
00:01:30
0.16
00:02:00
0.18
* 00:02:00
0.18
Measuring result in the preset unit (see chap. 9.2.2)
Dry W(g)
1.635
Residual weight e.g. 1.635g
1. Moisture analysis measuring protocol
Company
(see chapter. 10.2).
72 DBS-BA-e-1311
Page 73

2. Adjustment log „Balance“
KERN & Sohn GmbH
TYPE
DBS60-3
Model
SN
WBIIAH0000I
Serial no.
ID
0000
Identification No. (see chap. 10.5)
DATE
10-05-11
Date
TIME
10:17
Time
REF=
50.000g
Used adjustment weight
BFR=
50.002g
Before adjustment
AFT=
50.000g
After adjustment
-COMPLETE
CAL-BALANCE
-SIGNATURE-
Adjust balance (see chap. 6.1)
Company
(see chap. 10.2).
Signature Processor
DBS-BA-e-1311 73
Page 74

3. Adjustment log „Temperature“
KERN & Sohn GmbH
TYPE
DBS60-3
Model
SN
WBIIAH0000I
Serial no.
ID
0000
Identification No. (see chap. 10.5)
DATE
10-05-11
Date
TIME
10:17
Time
REF=
100C
First temperature point
BFR=
100C
Temperature before adjustment
AFT=
100C
Temperature after adjustment
REF=
180C
Second temperature point
BFR=
181C
Temperature before adjustment
AFT=
180C
Temperature after adjustment
-COMPLETE
CAL-TEMPERATURE
Adjust temperature (see chap. 6.2)
Company
(see chap. 10.2).
-SIGNATURE-
Signature Processor
74 DBS-BA-e-1311
Page 75

12 General information concerning moist ure analysis
12.1 Application
In all cases where moisture is added to or removed from products, a fast
determination of the moisture content is of enormous importance. For countless
products the moisture content is not only a quality feature but also an important cost
factor. Very often fixed limits for moisture content apply to the trade in industrial or
agricultural goods as well as chemical or food products which are defined by terms of
delivery and general standards.
12.2 Basics
Moisture does not only mean water but includes all substances that evaporate when
heated up. In addition to water this includes,
- Fats
- Oils
- Alcohol
- Solvent
- etc...
There are various methods to analyse moisture in a product.
KERN DBS uses a method called thermogravimetrics. In accord with this method,
the sample is weighed before and after heating, determining the material moisture by
looking at the difference.
The conventional drying chamber method follows the same principle, with the
exception that this method requires a considerably longer measuring period. . In
accord with the drying chamber method, the sample is heated from the outside to the
inside by a hot air current, so as to remove the moisture. The radiation applied in the
KERN DBS penetrates mainly the sample in order to be transformed inside it into
heat energy that is, warming from the inside to the outside. A minor amount of
radiation is reflected by the sample, a reflection that is less in dark samples than in
light-coloured ones. The depth of penetration of the radiation depends on the
permeability of the sample. In samples of low permeability the radiation only
penetrates the outer layers of the sample, possibly resulting in imperfect drying,
incrustation or burning. For that reason the preparation of a sample is of great
importance.
12.3 Adjustment to existing measuring method
Quite frequently the KERN DBS replaces a different drying method (such as a drying
chamber) as the KERN DBS achieves shorter measuring times during a simplified
operation. For that reason the conventional measuring method must be matched to
the KERN DBS in order to achieve comparable results.
• Carry out parallel measurement
Lower temperature setting for KERN DBS than drying chamber method
• Result of KERN DBS does not match reference
- Repeat measurement with changed temperature setting
- Vary switch-off criterion
DBS-BA-e-1311 75
Page 76

12.4 Preparing a sample
Preparing a sample from solids:
• fast evaporation due to a greater surface
Prepare one sample at a time for measuring. This prevents the sample from
exchanging moisture with its surroundings. If several samples have to be taken at the
same time, they should be packed in airtight boxes so that they do not undergo
changes during storage.
To receive reproducible results, spread the sample thinly and evenly on a sample
dish.
Patchy spreads will produce inhomogeneous heat distribution in the sample to be
dried resulting in incomplete drying and increased measuring time. Sample clusters
generate increased heating of the upper layers resulting in combustion or
incrustation. The high layer thickness or possibly arising incrustation makes it
impossible for the moisture to escape from the sample. Due to this residual moisture,
measured results calculated in this way will not be comprehensible or reproducible.
• Spread powdery or grainy samples evenly on the sample dish.
• Grind coarse samples using a mortar or a shredder. When grinding the sample avoid
any heat supply as this may cause loss of humidity.
Preparing a sample from liqui ds:
For liquids, pastes or melting samples we recommend to use a glass fiber filter. The glass
fiber filter has the following advantages:
• Even distribution thanks to capillary attraction
• no formation of droplets
76 DBS-BA-e-1311
Page 77

12.5 Sample material
Easy to determine are usually samples with the following characteristics:
- Grainy to powdery, pourable solids
- Thermally stable materials, emitting the moisture to be determined easily
without other substances evaporating at the same time
- Liquids that vaporize to leave a dry substance without developing a film
Difficult to determine may be samples that are:
- Glutinous or sticky
- Become incrusted easily or tend to form a film
- Decompose easily under the influence of heat or emit various elements
12.6 Sample size / originally weighted in quantity
Drying times, as well as achievable accuracy, are significantly influenced by sample
distribution. In the course of this arise two opposed requirements:
The lighter the originally weighted in quantity, the easier it is to achieve shorter drying
times.
However, the heavier the originally weighted in quantity, the more accurate a result.
DBS-BA-e-1311 77
Page 78

12.7 Drying temperature
Bear in mind the following factors when setting the drying temperature:
Surface of the sample:
Compared with powdery or grainy samples, liquid and spreadable samples have a
smaller surface for the transmission of heat energy.
The use of a glass fibre filter improves the heat application.
Colour of sample:
Light-coloured samples reflect more heat radiation than dark ones and therefore
require a higher drying temperature.
Availability of volatile substances:
The better and faster the water or other volatile substances can be disposed, the
lower a drying temperature is required. If water is difficult to get to (e. g. in
synthetics), it has to be calcined at high temperatures (the higher the temperature,
the higher the water vapour pressure).
Results equivalent to other moisture analysing methods (e. g. drying chamber) can
be achieved by experimentally optimising the setting parameters such as
temperature, heating level and shutoff criteria.
12.8 Recommendations / Guidelines
Prepare standard sample:
- Crush sample, as required, and spread it evenly in the aluminium dish.
Prepare special samples:
- For sensitive or hard to spread test materials (e. g. mercury) a glass fibre filter
is available for use.
- Apply the sample equally on the glass fibre filter and cover it with a second
glass fibre filter.
- The glass fibre filter is also useful as a protection when splashing materials
are dealt with (each splash falsifies the final result).
78 DBS-BA-e-1311
Page 79

Table of applications:
Drying
(min)
Solid
(approx.)
ABS (Novodur P2H-AT)
10
60
10
0.11
Accumulator lead
10
110
2,6
0.19
Acryl granulate
10-15
80
12
0.18
Activated carbon
10
80
9,8
13.33
Activated carbon
7.6
80
4.1
6.12
Sliced pineapple
5
110
14.4
6.71
Sliced apple (dry)
5-8
100
10-15
76.5
Sliced apple (humid)
5-8
100
5-10
7.5
Artesan powder
0.5
80
3.5
98.44
Aspartame granulate
0.5
105
3.4
96.84
Bath milk 3 80
27.4
83.87
Cotton seed
3-4
110
6.3
6.8
Blue-veined cheese
2
160
13.3
53.06
Body lotion
3
80
31.6
87.76
Beans
4.5
150
9.7
11.85
Butter
1.7
140
4.3
84.95
Acetyl cellulose
5.5-6
50
1.3
0.81
Chinese Virility powder
2.5-3
110
5.5
6.24
CN photographic paper
2
150
6.4
5.81
Cornflakes
2-4
120
5-7
9.7
Roof tile mass
2.5
160
10
81.74
Roof tile mass
7
160
20
81.74
Dialysis membrane
(Polyethes – polycarbonate)
Dialysis membrane
(Polyethes – polycarbonate)
Indoor sealing compound
3
160 7
64.04
Dispersion adhesive
1.5
140
9.5
55.69
Dispersion adhesive (watery)
2.5
155
7.2
43.77
Dolomite
10-12
160
6.1
0.06
Printer ink fluid
1.5
120
10
19.15
E-filter dust of waste
incineration
Peas, „danish yellow“
3.5
135
7.9
15.19
Peanut cores
2.8
100
4
1.97
Peanut cores
3
100
6
3.2
Refreshment candies
3-3.4
90
2.9
0.29
Dye powder
1.5
120
3.5
99.07
Fine ceramic mass
2.5
160 9
86.89
Film waste
8-9
60
1.2
0.4
River water
4
160
20
99.2
Fudge/sugar mass
5
130
20 8
Formaldehyde urea dispersion
2
155
7.6
34.07
Cottage cheese
1.4
70
15
41.03
Forage pellets
3-4
150
5.7
6.35
Dried beans
3-4
105
5
7.3
Dried peas
5-7
110
9.6
5.89
Dried carrots
5.5-6
120
3
4.92
Dried chicken dung
4
140
8
14.81
Dried corn
5-7
110
10
6.21
Glass powder
8-10
160
5
0.26
Material
Weight
Sample
(g)
0.5 80 2.2 7.85
Drying
temperature
( °C)
period
(approx.)
Moisture
%
(approx.)
body
%
0.5-0.7 80 2.0 7.86
7-10 135 7 26.23
DBS-BA-e-1311 79
Page 80

Drying
(min)
Solid
(approx.)
Setting lotion
0.01
145
9
98.76
Setting lotion (extra strong)
1
130
8
97.85
Hair styling gel
5
105
37.0
94.71
Oat flakes
2
105
5.6
9.35
Hazelnut cores
2.2
100
3.8 4
Hazelnut cores (peeled)
2.6
100
4.5
3.74
Hydranal sodium tatrate – 2
– hydrate
Yoghurt
2-3
110
4.5-6.5
86.5
Coffee 2 150
8
4.99
Coffee cream
2-3
130
6-8
78.5
Coffee seed
3.5-4
120
8
8.53
Cocoa
2.5
105
4
3.45
Cocoa seed
4-5
130
7.8
6.23
Limestone
12-14
160
5
0.05
Potato powder
2.5-3.0
130
5.8
12.46
Potato chips
3-4
106
7.5
6.9
Ketchup 2 120
18
74.44
Silica gel
9.5
115
4.5
0.63
Adhesive
2-5
136
6-8
54.3
Garlic, powder
2
100
7.3
5.36
Coal powder
4
160
3.4
2.11
Chalk (natural)
8
160
1.7
0.06
Crystal sugar
3
90
2.8
0.05
Synthetic resin dispersion
(diluted)
Latex
1-2
160
5.2
38.64
Latex LE1
3-5
125
10.8
46.58
Latex LE2
3-5
125
9.4
50.37
Latex O44
3-5
125
9.4
50.65
Lentils 4 135
5.4
12.49
Loam soil
10-15
160
5.5
9.89
Loam clay
2.5
160
14.5
80.75
Skim milk powder
4
90
5.5
3.67
Low fat curd cheese
1.2
130 8
18.5
Corn starch
2
160
5.2
89.1
Almonds (caramelised)
3.5
80
4.8
1.81
Almonds (natural)
2.5
100
5.3
4.19
Almonds „californian“
3
100
5.3
4.34
Margarine
2.2
160
4
19.15
Brick mass
7
160
20
80.13
Mayonnaise
1-2
138
10
56.5
Flour
8-10
130
4.5
12.5
Micronyle
7-8
60 8 0.4
Milk
2-3
120
6-8
88
Milk powder (MMP)
4.5
100
6.3
2.46
Milk powder (VMP)
4.5
100
5.5
2.56
Mozzarella
1.5
160
11.1
45.78
Multivitamin candies
3-3.4
115
3.3
0.4
Natural latex
1.4
160
5.3
42.56
Nougat mass
2.5
103
10
0.6
Noodle dough
0.55
160
5
12
Concentrated orange juice
2-3
115
13
52.1
Material
Weight
Sample
(g)
1.6 160 12 15.67
Drying
temperature
( °C)
period
(approx.)
Moisture
%
(approx.)
body
%
2 160 5.9 60.21
80 DBS-BA-e-1311
Page 81

Drying
(min)
Solid
(approx.)
Paper
2-4
106
10
6.4
PA 6 (Ultramide B3WG5)
10
60
10
0.05
PA 6.6 (Ultramide B3WG5)
10
80
10
0.15
PBTP (Crastin SK645FR)
10
80
10
0.05
PC (Macrolon 2805)
10-12
80
15
0.08
PC/ABS (Babyblend T65MN)
9-11
80
10
0.12
Pepper, black, powder
2
85
8.8
7.97
PMMA (Plexiglass 6N)
10
70
10
0.12
Polypropylene
13
130
9
0.23
Polypropylene
3.3
120
2.2
0.09
Polystyrene sulfonic acid
Sodium salt solution
POM (Hostaform C9021))
10
80
10
0.13
PS (Polystyrene 168 N)
10
80
10
0.05
Purine 2 105
3.8
8.64
Curd 1 140 7
18
Curd cheese, „Fat curd cheese“
1.2
130 8
23
Silica sand
10-14
160
1.9
0.24
Raclette cheese
1.5
160
14.4
56.9
Canola seed
3-4
90
7.4
6.18
Rice (US parboiled)
3.5
105
12.5
10.98
Rye
4.5
150
11.5
10.72
Red wine
3-5
100
15-20
97.4
Sugar beet pulp pellets
4.5
150
8.6
11.77
Salt 2 100
3
4.9
Pretzel sticks
3-4
75
4.5
1.67
Sludge
11-12
130
90
80
Melted cheese
1.5
70
15
35.65
Chocolate
2.5
103
10
0.5
Chocolate powder
2-4
100
4
1.9
Chocolate water
2-3
90
10 6
Hogwash of kitchen waste
4-5
160
21
17.67
Lard
0.70
160
3.5
1.2
Shampoo 2 100
14.1
75.89
Soap 3 120
6
7.86
Mustard
2.5-3
80
19
34.69
Sesame seed
3
130
8
5.48
Soya bean flour
4.6
95
4.9
4.8
Soya beans, granulate
5
110
22.6
12.16
Bruised sunflower seed
3-3.5
100
4
5.92
Sunflower oil
10-14
138
2
0.1
Spaghetti 3 105
15.1
10.63
Rinsing agent
2
80
13.7
59.64
Dust
5-10
104
8-15
7.3
Starch derivative
2.5
150
12.3
30.29
Starch glue
1.5
100
8.9
17.96
Spread cheese
2.5-2.8
160
4.5
36.81
Soup
(instant product)
Material
Weight
Sample
(g)
2-2.5 120 8.7 19.01
Drying
temperature
( °C)
period
(approx.)
Moisture
%
(approx.)
body
%
DBS-BA-e-1311 81
2-3 80 4.5-7 3
Page 82

Drying
(min)
Solid
(approx.)
Tobacco
1.5
100
16
10.18
Tea, black
2
105 4 7.67
Pasta
1.5
120
8
10.64
Textile fibre
0.8-1.2
85
3.6
14.03
Theophylline
1.5
130
1.9
7.33
Thermoplastic PUR –
granulate
Walnut
2.8
100
5.6
3.5
Washing powder
2
160
12
7.32
Wheat spring water
2-3
90
10 6
Sausage casing
0.2
150
3.5
78.56
Toothpaste
2
100
7.7
34.28
Pulp
2.5
130
4.5
7.32
Cement
8-12
138
4-5
0.8
Sugar
4-5
138
10
11.9
Sugar beets
2
130
13.4
30.94
Material
Weight
Sample
(g)
15-18 80 18 0.08
Drying
temperature
( °C)
period
(approx.)
Moisture
%
(approx.)
body
%
For real-life examples please refer to our application manual by going to our KERN
Homepage (www.kern-sohn.com).
82 DBS-BA-e-1311
Page 83

13 Service, maintenance, disposal
+
+
olvents or
Remove protective glass guard (see chap. 13.1.1) and clean
Remove heat shield, wet clean and dry thoroughly before
13.1 Cleaning
Before any maintenance, cleaning and repair work disconnect the
appliance from the operating voltage.
Only carry out cleaning tasks when the equipment has cooled down.
1. Display
2. Wind
protection ring
3. Sample dish
4. Housing
5. Protective
glass guard
6. Heat shield
Please do not use aggressive cleaning agents (s
similar agents), but a cloth dampened with mild soap suds.
Remove wind protection ring / sample dish, wet clean and dry
thoroughly before fitting
Please do not use aggressive cleaning agents (solvents or
similar agents), but a cloth dampened with mild soap suds.
Take care that the device is not penetrated by fluids and polish
it with a dry soft cloth.
Loose residue sample/powder can be removed carefully with a
brush or manual vacuum cleaner.
Remove any spilt sample material immediately.
with a commercially available glass cleaner.
fitting
DBS-BA-e-1311 83
Page 84

13.2 Service, maintenance
+
+
+
The appliance may only be opened by trained service technicians who are
authorized by KERN.
Ensure that the balance is regularly calibrated, see chap. Testing
instruments control.
13.2.1 Remove protective glass guard
Avoid contact with halogen lamp and sensor!
1. Open heated cover.
2. Undo the screws marked with arrows with the
hexagonal socket wrench included in the scope
of supply.
Handle protective glass guard with care.
Attention: Risk of breakage
Risk of cuts.
84 DBS-BA-e-1311
Page 85

3. Remove protective glass guard and clean with a
commercially available glass cleaner.
Glass plate [1] can be removed if necessary by
undoing the screws [2].
4. Refit the cleaned protective glass guard in
reverser order.
DBS-BA-e-1311 85
Page 86

13.2.2 Lamp change
4. Clips
Position plug connector in accordance with illustration.
Fit protective glass guard, see chap. 13.2.1
+ Disconnect equipment from power supply.
+ Only change the lamp when the equipment has cooled down.
1. Remove protective glass guard, see chap.
13.2.1
2. Remove plug connector [3]. Remove cable from
terminals [2] with care.
3. Loosen lamp [1] from the clips [4] on both sides.
1. Light
2. terminal
3. Plug connector
4. Install new lamp in reverse order.
Avoid contact with the halogen lamp to maintain service life.
86 DBS-BA-e-1311
Page 87

13.2.3 Replacing fuses
+ Disconnect equipment from power supply.
+ Only use 6.3 A microfuses
1. Remove fuse box (see chap. 2, Item 15) from
the back of the equipment and change the fuse
in accordance with the illustration.
13.3 Disposal
Disposal of packaging and appliance must be carried out by operator according
to valid national or regional law of the location where the appliance is used.
DBS-BA-e-1311 87
Page 88

14 Instant help
constantly / the stability display
Fault Possible cause
Display is not lit up.
The display does not change
when a sample is being loaded
The weight display changes
does not appear.
• The display unit is not switched on.
• The mains supply connection has been
interrupted (mains cable not plugged in/faulty).
• Power supply interrupted.
• Fuse has blown
• Sample dish / dish holder is fitted incorrectly.
• Sample dish has contact with wind protection
device or heated cover.
• Draught/air movement
• Table/floor vibrations
• Electromagnetic fields / static charging (choose
different location/switch off interfering device if
possible)
Incorrect measuring result
Measurement is taking too
long
Measurement is
not reproducible
Drying does not start
• Check adjustment
• No resetting to zero before loading the sample
• Incorrect setting shutoff criterion
• Sample is not homogenous
• Drying time is too short
• Drying temperature too high (e.g. oxidation
sample material, boiling point of sample
exceeded)
• Temperature sensor soiled or defective
• Heated cover open
• The mains supply connection has been
interrupted (mains cable not plugged in/faulty).
88 DBS-BA-e-1311
Page 89

14.1 Error messages
Error message
Explication
Remedy
ERR.001
ERR.002
ERR.005 Memory error
ERR.100
ERR.101
ERR.102
ERR.110
TIM.oUT
ERR.121
ERR.122
ERR.123
Hardware error
Heated cover is open for more
than 1 minute during
measuring.
Failure „Temperature sensor“
Heated cover not closed
properly
Measuring start 30 minutes
after resetting to zero
Failure „Heating“
Switch equipment off and on
again. If the error message
remains inform manufacturer.
Switch equipment off and on
again. If the error message
remains inform manufacturer.
Press ESC to abort measuring.
Switch equipment off and on
again. If the error message
remains inform manufacturer.
Press ESC to abort measuring.
Press ESC to abort measuring.
Switch equipment off and on
again. If the error message
remains inform manufacturer.
ERR.124 Measuring lasts too long
ERR.200 Failure „Current supply“
ERR.201 Internal error
ERR.202 Failure „Electrical voltage“
Check drying time switch-off
criterion or ∆M
Switch equipment off and on
again. If the error message
remains inform manufacturer.
Switch equipment off and on
again. If the error message
remains inform manufacturer.
Switch equipment off and on
again. If the error message
remains inform manufacturer.
DBS-BA-e-1311 89
Page 90

ERR.C01
ERR.C02
ERR.C04
Adjustment
error
ERR.oL
ERR.-oL
CoM.ERR W rong remote control order. Correct remote control order.
oL
-OL
ABORT Process cancelled
Should other error messages occur, switch balance off and then on again. If the error
message remains inform manufacturer.
High zero point shift during
adjustment
There are objects in the sample
dish
Missing sample dish
Overload Check sample dish
Overload
Press ESC to abort and repeat
adjustment procedure.
Install sample dish correctly
Reduce sample weight
Press ESC to return to
Weighing mode
90 DBS-BA-e-1311
Page 91

15 De claration of confor m ity
KERN & Sohn GmbH
D-72322 Balingen-
Tel: 0049-[0]7433- 9933-0
sohn.de
D
Konformitätserklärung
Wir erk lären hiermit, dass das Produkt, auf das sich diese Erk lärung bezieht,
mit den nachstehenden Normen übereinstimmt.
GB
Declaration of
conformity
We hereby declare that the product to which this declaration refers conf orms
with the following standards.
CZ
Prohlášení o
shode
Tímto prohlašujem e, že výrobek, kterého se toto prohlášení týká, je v souladu
s níže uvedenými normami.
E
Declaración de
conformidad
Manifestamos en la presente que el producto al que se refiere esta
declaración está de acuerdo con las normas siguientes
F
Déclaration de
conformité
Nous déclarons avec cela responsabilité que le produit, auquel se rapporte la
présente déclaration, est conforme aux normes citées ci-après.
I
Dichiarazione di
conformitá
Dichiariamo con ciò che il prodotto al quale la presente dichiarazione si
riferisce è conforme alle norme di seguito citate.
NL
Conformiteitverklaring
Wij verklaren hiermede dat het product, waarop deze verklaring betrekking
heeft, met de hierna vermelde normen overeenstemt.
P
Declaração de
conformidade
Declaramos por meio da presente que o produto no qual se refere esta
declaração, corresponde às normas seguintes.
PL
Deklaracja
zgodności
Niniejszym oświadczamy, że produkt, którego niniejsze oświadczenie dotyczy,
jest zgodny z poniższymi normami.
RUS
Заявление о
соответствии
Мы заявляем, что продукт, к которому относится данная декларация,
соответствует перечисленным ниже нормам.
EU Directive
Standards
2004/108/EC
EN 61326-1:2006
2006/95/EC
EN 61010-1: 2010
Signature
Datum
27.03.2013
Ort der Ausstellung
Place of issue
72336 Balingen
Albert Sauter
KERN & Sohn GmbH
Geschäftsführer
Managing director
KERN & Sohn GmbH, Ziegelei 1, D-72336 Balingen, Tel. +49-[0]7433/9933-0
Fax +49-[0]7433/9933-149, E-Mail: info@kern-sohn.com, Internet: www.kern-sohn.com
Frommern
Postfach 4052
E-Mail: info@kern-sohn.de
Fax: 0049-[0]7433-9933149
Internet: www.kern-
Declaration of conformity
EG-Konformitätserklärung EC-Declarat i on of -Conformity
Déclaration de conformité EC-Declaración de Conformidad
ECEC-Dichiarazione di conformit à EC-Conformiteitverklaring
EC- Declaração de conformidade EC- Prohlášení o shode
EC-Deklaracja zgodności EC-Заявление о соответствии
Electronic Balance: KERN DBS
EN 61010-2-010: 2003
Date
DBS-BA-e-1311 91
Signatur
 Loading...