

Page 1
KERN & Sohn GmbH
Ziegelei 1
info@kern-sohn.com
Phone +49-[0]7433- 9933-0
www.kern-sohn.com
Instruction Manual
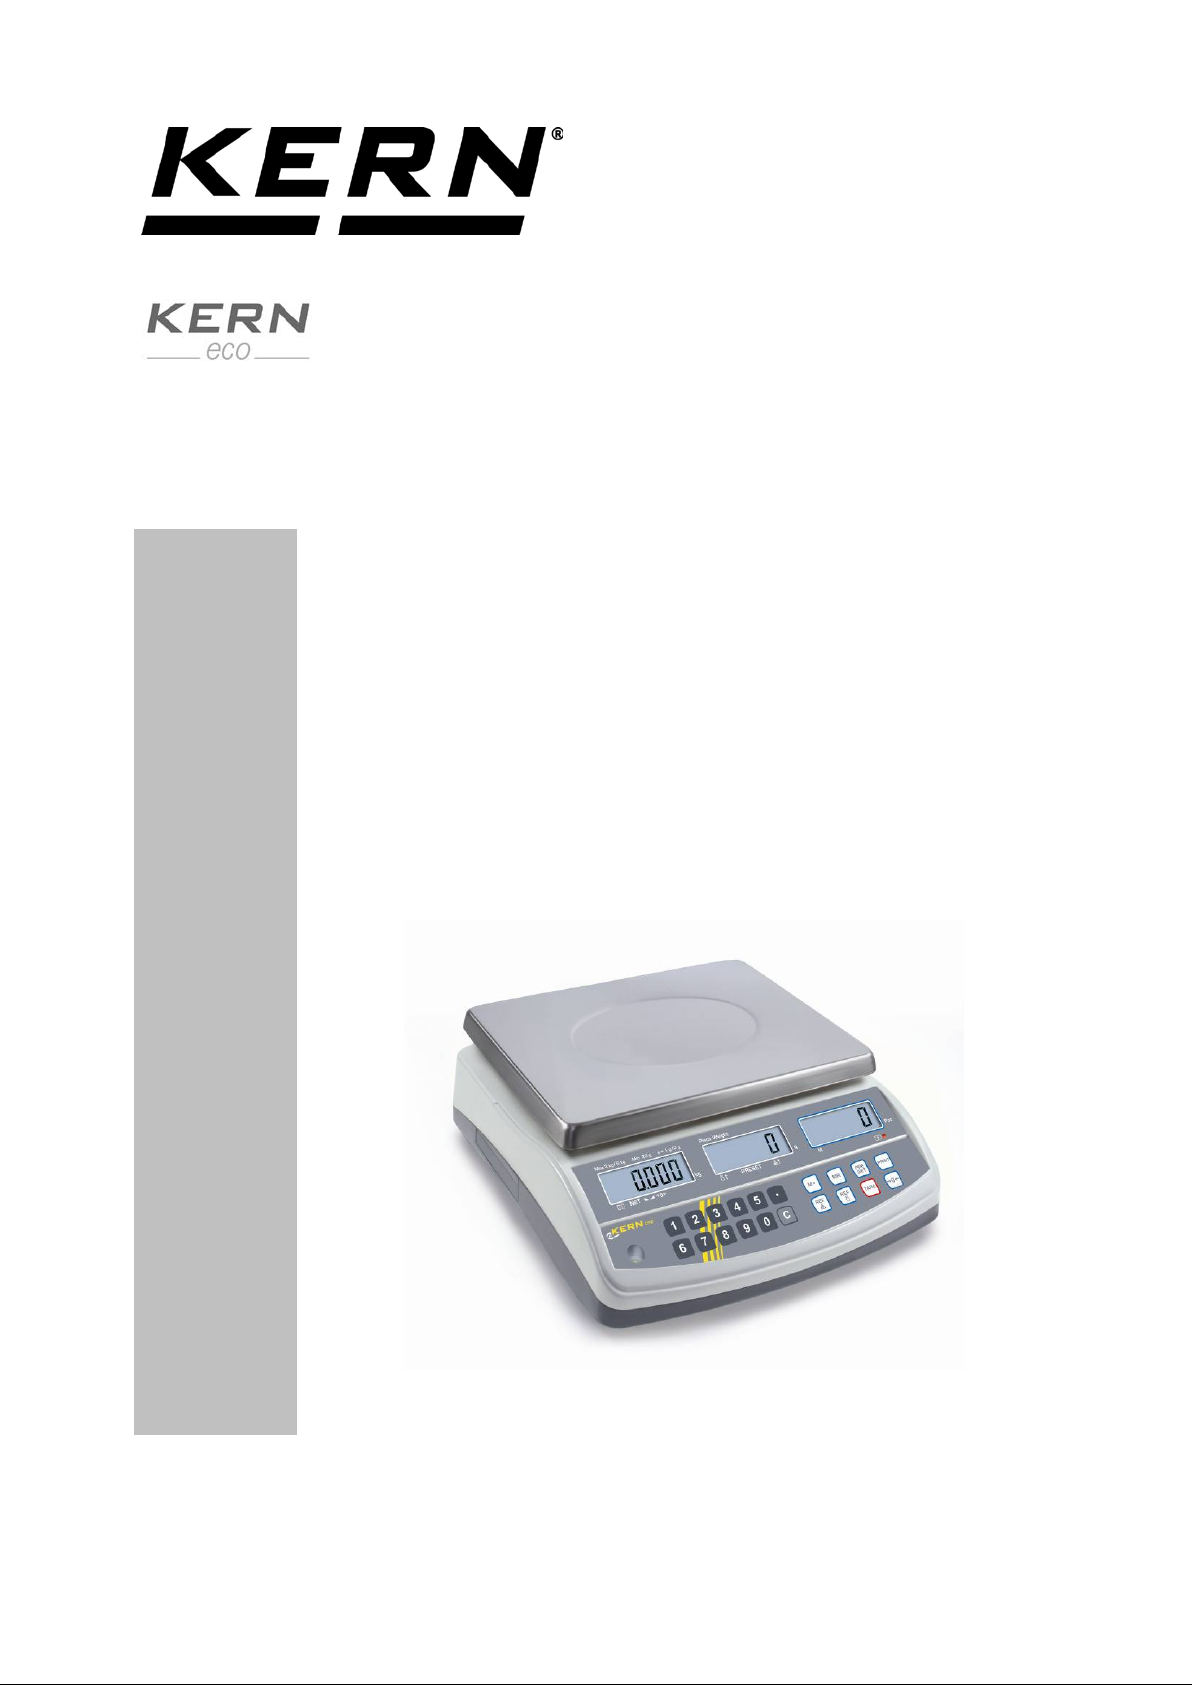
Counting balance
KERN CPB-N / CPB-DM
Version 2.4
08/2014
GB
D-72336 Balingen
E-Mail:
Fax +49-[0]7433-9933-149
Internet:
CPB-N / CPB-DM-BA-e-1424
Page 2
KERN CPB-N / CPB-DM
Counting balance
GB
Version 2.4 08/2014
Instruction Manual
Contents
1 Technical data ................................................................................................ 5
2 Appliance overview ....................................................................................... 7
2.1 Overview of display .................................................................................................... 8
2.1.1 Display weight ............................................................................................................................. 8
2.1.2 Display reference weight ............................................................................................................ 8
2.1.3 Display quantity ........................................................................................................................... 8
2.2 Keyboard overview .................................................................................................... 9
3 Basic Information (General) ........................................................................ 10
3.1 Proper use ................................................................................................................10
3.2 Improper Use ............................................................................................................10
3.3 Warranty ...................................................................................................................10
3.4 Monitoring of Test Resources ...................................................................................11
4 Basic Safety Precautions ............................................................................ 11
4.1 Pay attention to the instructions in the Operat ion Manual .........................................11
4.2 Personnel training .....................................................................................................11
5 Transport and storage ................................................................................. 11
5.1 Testing upon acceptance ..........................................................................................11
5.2 Packaging / return t ransport .....................................................................................11
6 Unpacking, Setup and Commissioning ..................................................... 12
6.1 Installation Site, Location of Use ...............................................................................12
6.2 Unpacking.................................................................................................................12
6.2.1 Placing ...................................................................................................................................... 12
6.2.2 Scope of delivery ...................................................................................................................... 14
6.3 Mains connection ......................................................................................................14
6.4 Rechargeable battery operation (optional) ................................................................14
6.5 Connection of peripheral devices ..............................................................................14
6.6 Initial Commissio nin g ................................................................................................14
6.7 Adjustment................................................................................................................15
6.7.1 Models CPB-N (non verified models) ....................................................................................... 15
6.7.2 Models CPB-DM (verified models) ........................................................................................... 17
6.8 Linearization (non-verified models only) ....................................................................19
6.9 Verification ................................................................................................................22
6.9.1 Adjustment switch and seals .................................................................................................... 23
6.10 Checking the balance verification settings ................................................................23
6.11 Ser vice mode ( verified models).................................................................................24
CPB-N / CPB-DM-BA-e-1424 3
Page 3

7 Operation Mode ........................................................................................... 27
7.1 Switch on/off and set zero ........................................................................................27
7.2 Simple weighing ........................................................................................................27
7.3 Weighing with tar ing .................................................................................................28
7.4 Display background illumination ................................................................................30
8 Piece counting ............................................................................................. 31
8.1 Determination of the ref erence weight by weighing...................................................31
8.2 Numeric entering of the reference weight .................................................................33
8.3 Automatic correction of t he r eference weight (verifiable models only) .......................34
9 Totalization ................................................................................................... 35
9.1 Manual totalizing .......................................................................................................35
9.2 Automatic adding-up .................................................................................................38
10 Weighing to target quantity or target weight and tolerance check ......... 39
10.1 Tolerance check for targ et quantity ...........................................................................39
10.2 Tolerance check for target weight .............................................................................41
11 Change readability (only models CPB-M) .................................................. 43
12 Menu (non verifiable models) ..................................................................... 44
12.1 Menu overview ..........................................................................................................45
13 Data output RS 232 C .................................................................................. 47
13.1 Technical data ..........................................................................................................47
13.2 Rem ot e c ont r ol inst r uc t ions ......................................................................................47
14 Service, maintenance, disposal .................................................................. 48
14.1 Cleaning ...................................................................................................................48
14.2 Ser vice, m aint enance ...............................................................................................48
14.3 Disposal ....................................................................................................................48
14.4 Er r or messages ........................................................................................................48
15 Instant help ................................................................................................... 49
16 Declaration of conformity ........................................................................... 50
CPB-N / CPB-DM-BA-e-1424 4
Page 4
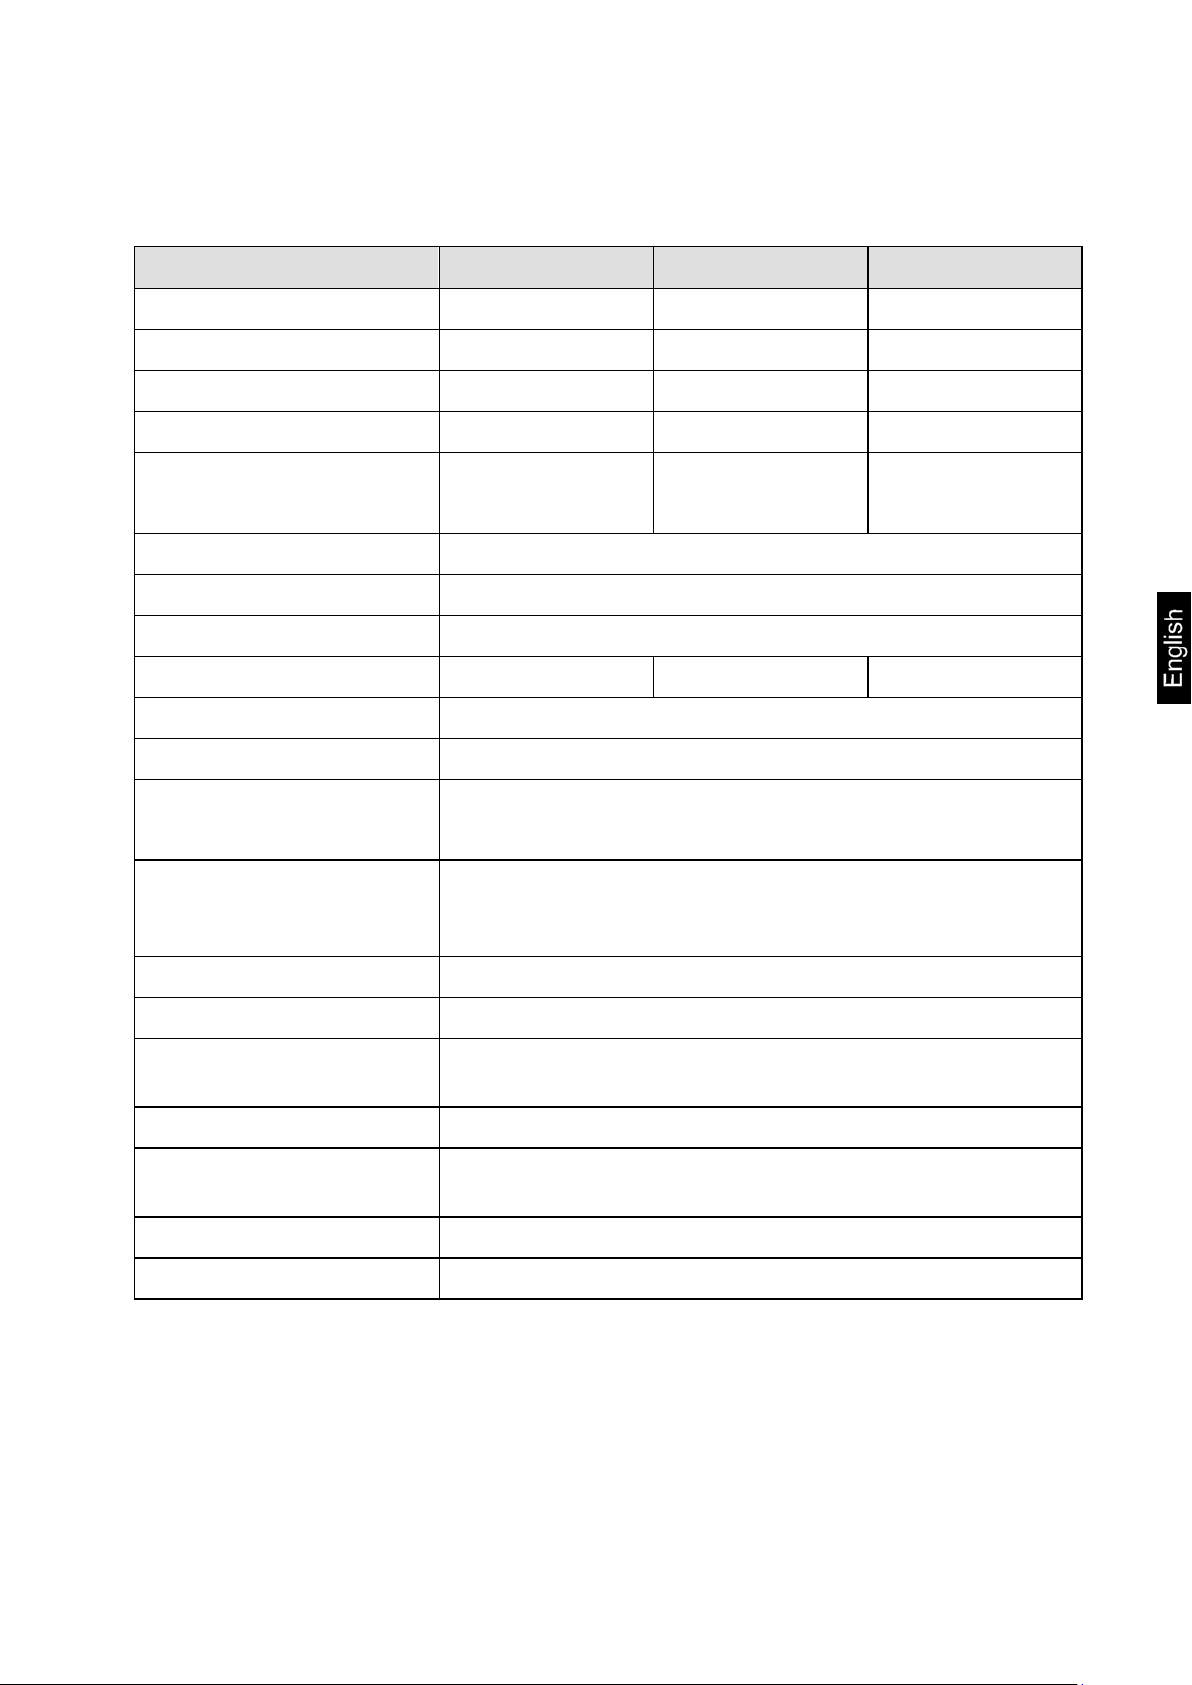
1 Technical data
KERN CPB 6K0.1N CPB 15K0.2N CPB 30K0.5N
Readability (d) 0.0001 kg 0.0002 kg 0.0005 kg
Weighing range (max) 6 kg 15 kg 30 kg
Reproducibility 0.0001 kg 0.0002 kg 0.0005 kg
Linearity ± 0.0002 kg ± 0.0004 kg ± 0.002 kg
Recommended adjusting
weight (not supplied)
Weigh ing Units kg, lb
Stabilization time 2 sec.
Warm-up time 120 min.
Minimum piece weight 100 mg 250 mg 500 mg
Reference quantity freely selectable
Input Voltage 220 V – 240 V AC 50 Hz
Mains adapter
Secondary voltage
Rechargeable battery
(optional)
Operating time
Loading time of battery 12 h
Auto-Off (battery) Options: 3, 5, 15, 30 min.
5 kg (F2) +
1 kg (F2)
Background illumination on: 60 h
Background illumination off: 70 h
10 kg (F2) +
5 kg (F2)
12 V, 500 mA
20 kg (F2) +
10 kg (F2)
Dimensions fully mounted
(W x D x H)
Weighing surface 294 x 225 mm
Permissible ambient
condition
Humidity of air max. 80 % relative (not condensing)
Net weight (kg) 3.8 kg
CPB-N / CPB-DM-BA-e-1424 5
320 x 350 x 125 mm
0° C to + 40° C
Page 5
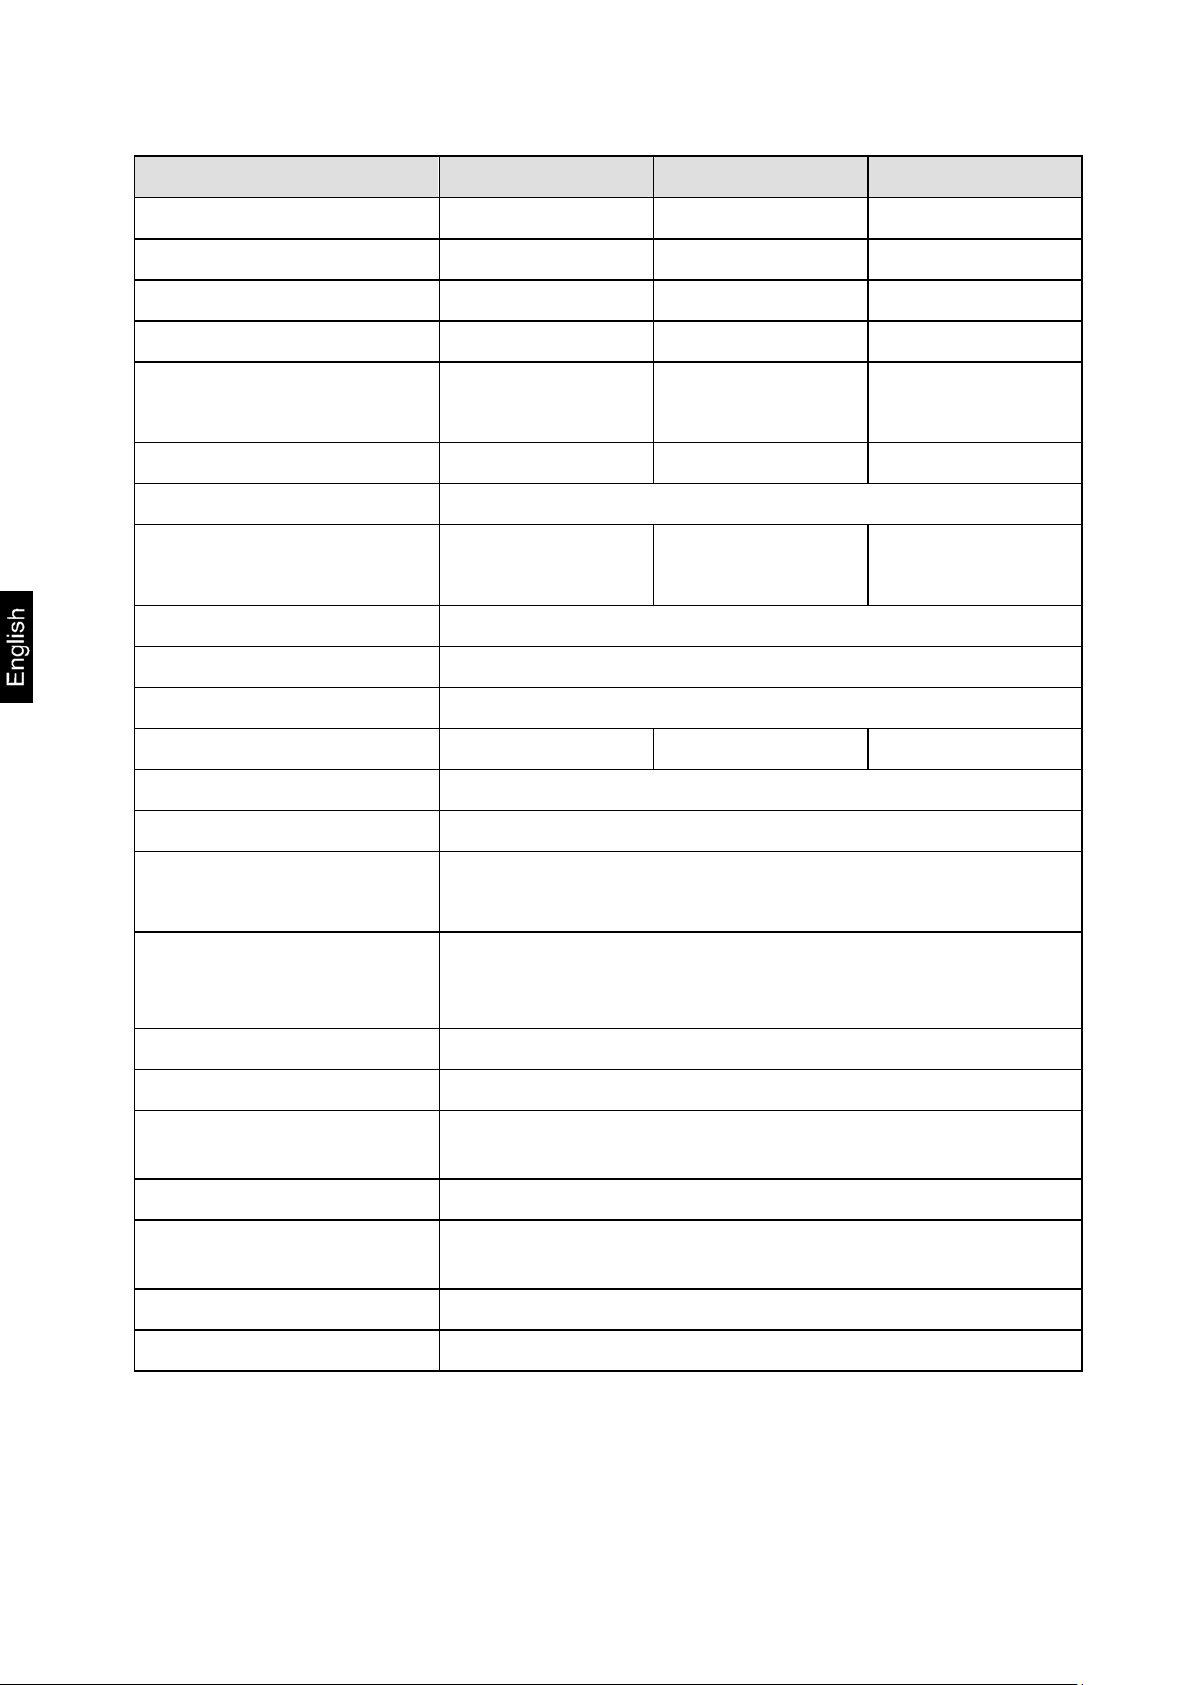
KERN CPB 6K1DM CPB 15K2DM CPB 30K5DM
Readability (d)
0.001 kg; 0.002 kg 0.002 kg;0.005 kg; 0.005 kg;0.01 kg;
Weighing range (max) 3 kg; 6 kg 6 kg; 15 kg 15 kg; 30 kg
Minimum weight (min) 20 g 40 g 100 g
Reproducibility
0.001 kg; 0.002 kg 0.002 kg; 0.005 kg 0.005 kg; 0.01 kg
± 0.002 kg;
± 0.004 kg;
± 0.01 kg;
Linearity
± 0.004 kg
± 0.01 kg
± 0.02 kg
Verification value (e) 1 g 2 g 5 g
Accuracy class III
Recommended adjusting
weight (not supplied)
5 kg (F2)
1 kg (F2)
10 kg (F2)
5 kg (F2)
20 kg (F2)
10 kg (F2)
Weigh ing Units kg
Stabilization time 2 sec.
Warm-up time 10 min.
Minimum piece weight 100 mg 250 mg 500 mg
Reference quantity freely selectable
Input Voltage 220 V – 240 V AC 50 Hz
Mains adapter
12 V, 500 mA
Secondary voltage
Rechargeable battery
(optional)
Operating time
Background illumination on: 60 h
Background illumination off: 70 h
Loading time of battery 14 h
Auto-Off (battery) Options: 3, 5, 15, 30 min.
Dimensions fully mounted
(W x D x H) mm
320 x 350 x 125 mm
Weighing surface 294 x 225 mm
Permissible ambient
condition
-10° C to + 40° C
Humidity of air max. 80 % relative (not condensing)
Net weight (kg) 3.8 kg
CPB-N / CPB-DM-BA-e-1424 6
Page 6
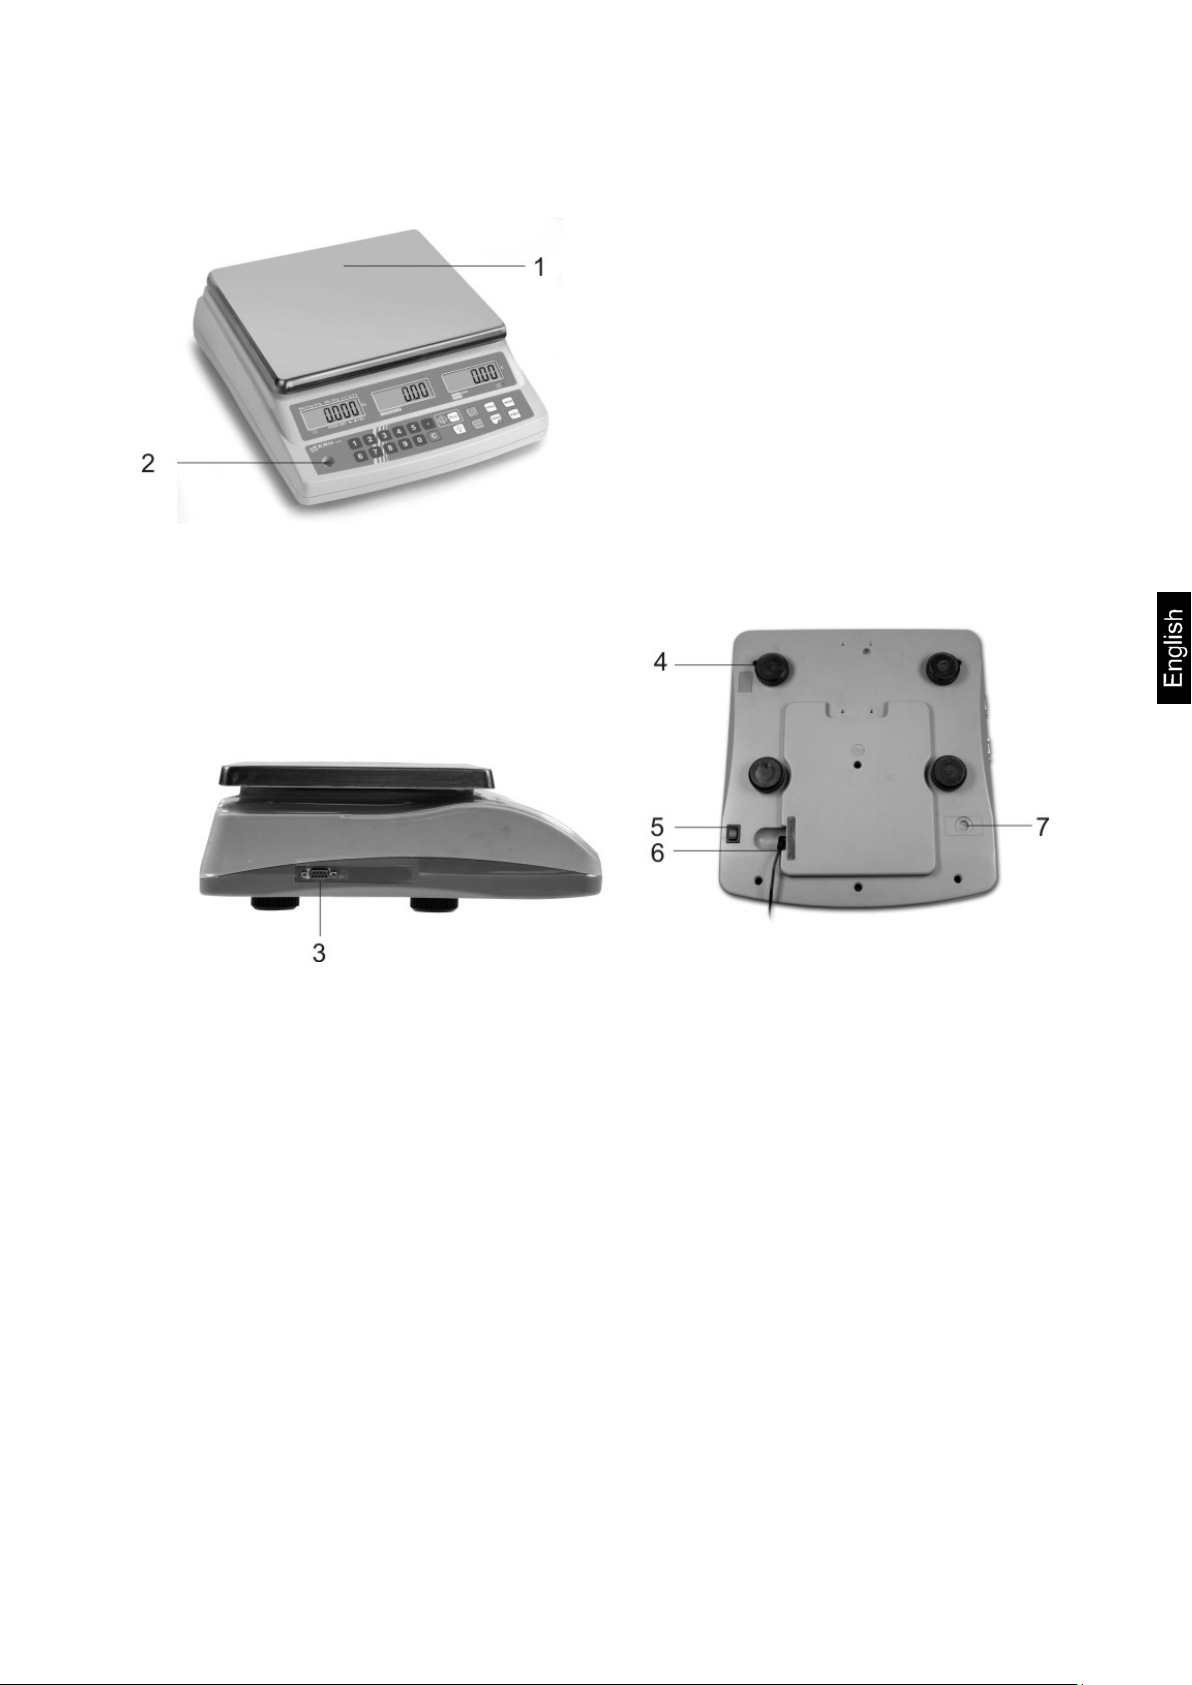
2 Appliance overview
1. Weighing plate / rechargeable battery compartment
(under weighing plate)
2. Bubble level
3. RS 232 interface
4. Footscrews
5. ON/OFF switch
6. Mains adapter connection
7. Adjustment switch
CPB-N / CPB-DM-BA-e-1424 7
Page 7
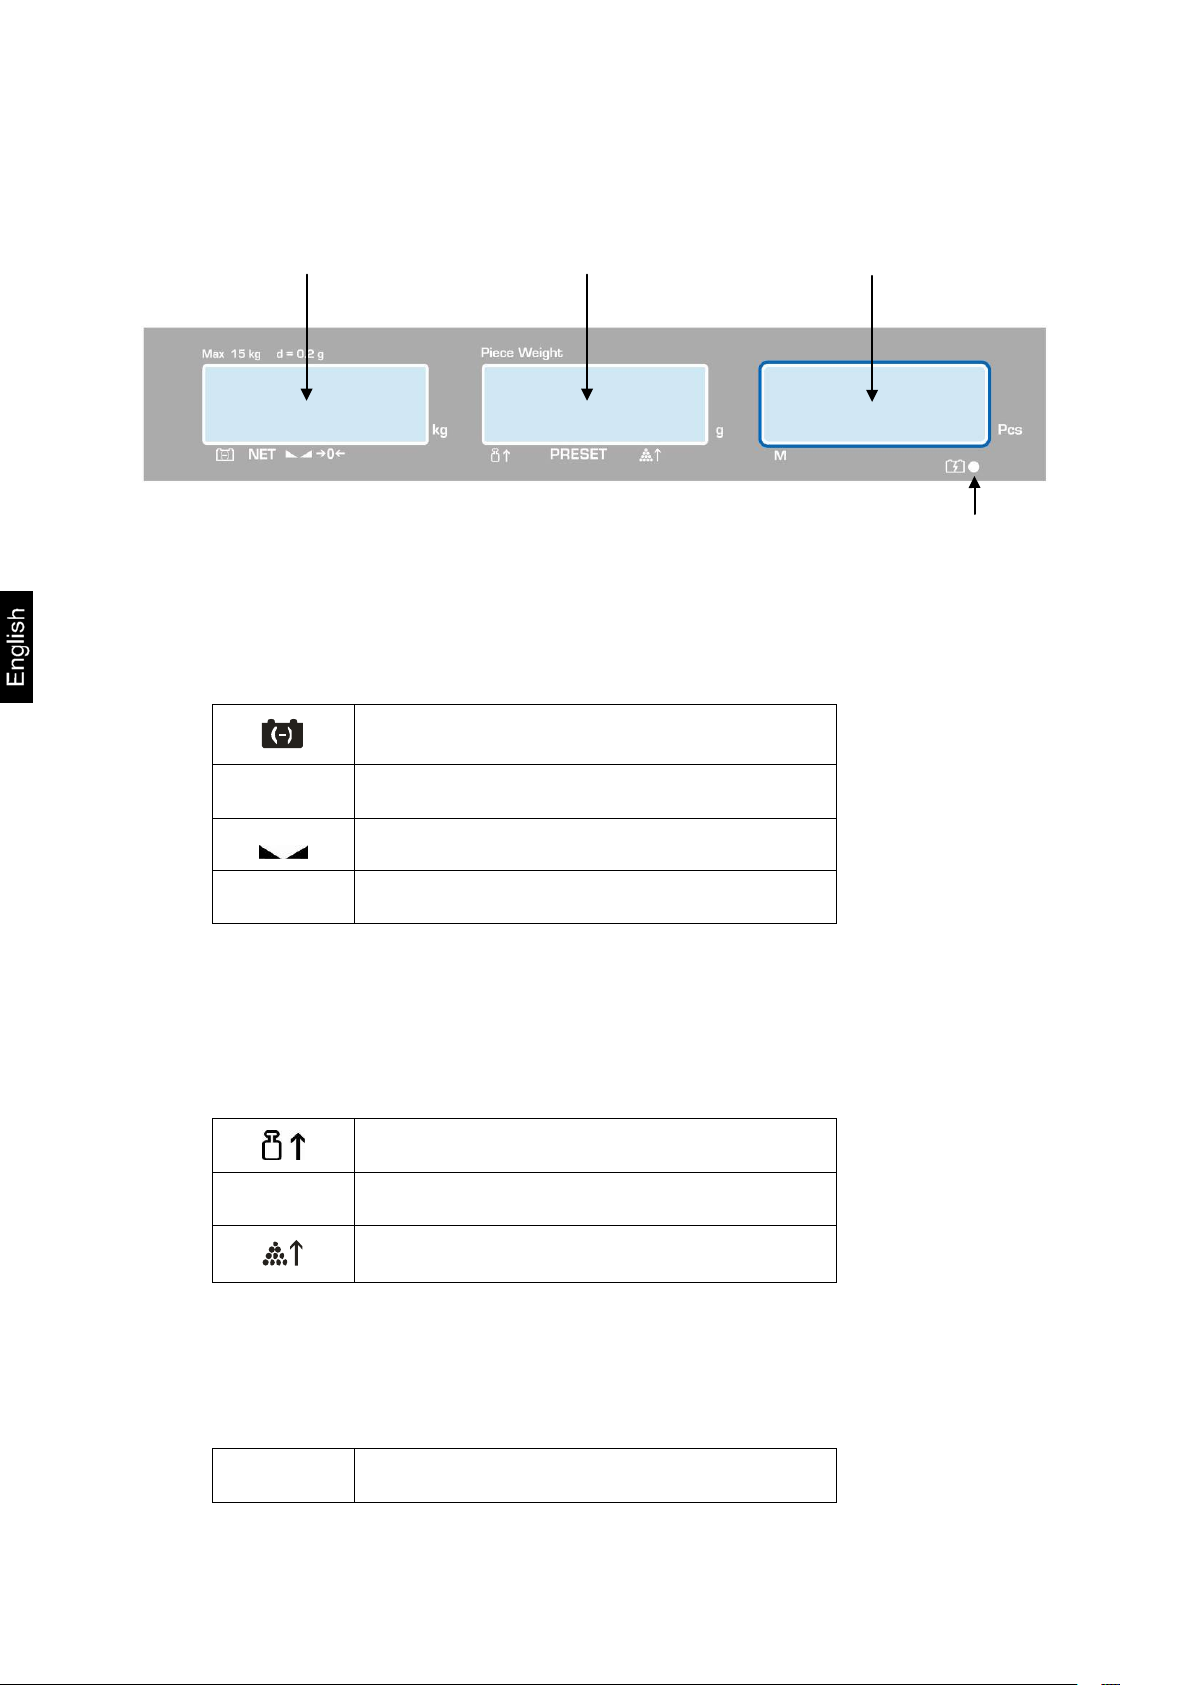
Weight
Reference weight
Quantity
Battery
charge status display
2.1 Overview of display
2.1.1 Display weight
Here the weight of the load is displayed in [kg].
The arrows above the symbols show:
Battery very low
NET
a
2.1.2 Display reference weight
Here, the reference weight of a sample is displayed in [g]. This value is either
entered by user of calculated by balance.
The arrows above the symbols show:
PRESET
Net weight
Stability display
Zeroing display
Reference weight placed on bal ance too small
Stored target quantity / target weight
Number of pieces placed on balance too small
2.1.3 Display quantity
Here, all the pieces placed on balance are immediately displayed by number.
The arrows above the symbols show:
CPB-N / CPB-DM-BA-e-1424 8
M
Data in the summation memory
Page 8

•
•
•
Invoke display background illumination (press button long
time)
2.2 Keyboard overview
Selection Function
Numeric keys
Deleting key
Call up target quantity and target weight mode
• Addition in sum memory
• Call up total memory
• Enter/display limit value for tolerance check
•
• Output to external device (printer) or PC
• Enter reference weight through weighing
• Numeric entry reference weight
• Function /parameter selection
• Taring key
• Save
• Zeroing key
• Back to weighing mode
CPB-N / CPB-DM-BA-e-1424 9
Page 9

3 Basic Information (General)
3.1 Proper use
The balance you purchased is intended to determine the weighing value of material
to be weighed. It is intended to be used as a “non-automatic balance”, i.e. the
material to be weighed is manually and carefully placed in the centre of the weighing
plate.. As soon as a stable weighing value is reached the weighing value can be
read.
3.2 Improper Use
Do not use balance for dynamic weighing. In the event that small quantities are
removed or added to the material to be weighed, incorrect weighing results can be
displayed due to the “stability compensation“. (Example: Slowly draining fluids from a
container on the balance.)
Do not leave permanent load on the weighing plate. This may damage the
measuring system.
Impacts and overloading exceeding the stated maximum load (max) of the balance,
minus a possibly existing tare load, must be strictly avoided. Balance may be
damage by this.
Never operate balance in explosive environment. The serial version is not explosion
protected.
The structure of the balance may not be modified. This may lead to incorrect
weighing results, safety-related faults and destruction of the balance.
The balance may only be used according to the described conditions. Other areas of
use must be released by KERN in writing.
3.3 Warranty
Warranty claims shall be voided in case
• Our conditions in the operation manual are ignored
• The appliance is used outside the described uses
• The appliance is modified or opened
• Mechanical damage or damage by media, liquids, natural wear and tear
• The appliance is improperly set up or incorrectly electrically connected
• The measuring system is overloaded
CPB-N / CPB-DM-BA-e-1424 10
Page 10
3.4 Monitoring of Test Resources
In the framework of quality assurance the measuring-related properties of the
balance and, if applicable, the testing weight, must be checked regularly. The
responsible user must define a suitable interval as well as type and scope of this
test. Information is available on KERN’s home page (www.kern-sohn.com with
regard to the monitoring of balance test substances and the test weights required for
this. In KERN's accredited DKD calibration laboratory test weights and balances may
be calibrated (return to the national standard) fast and at moderate cost.
4 Basic Safety Precautions
4.1 Pay attention to the instructions in the Operation Manual
Carefully read this operation manual before setup and
commissioning, even if you are already familiar with KERN
balances.
Versions in other languages are non-binding translations.
The only binding version is the original document in German.
4.2 Personnel training
The appliance may only be operated and maintained by trained personnel.
5 Transport and stora ge
5.1 Testing upon acceptance
When receiving the appliance, please check packaging immediately, and the
appliance itself when unpacking for possible visible damage.
5.2 Packaging / return transport
Keep all parts of the original packaging for a possibly required
return.
Only use original packaging for returning.
Prior to dispatch disconnect all cables and remove loose/mobile
parts.
Reattach possibly supplied transport securing devices.
Secure all parts such as the glass wind screen, the weighing
platform, power unit etc. against shifting and damage.
CPB-N / CPB-DM-BA-e-1424 11
Page 11

6 Unpacking, Setup and Comm issioning
6.1 Installation Site, Location of Use
The balances are designed in a way that reliable weighing results are achieved in
common conditions of use.
You will work accurately and fast, if you select the right location for your balance.
Therefore, observe the following for the installation site:
• Place the balance on a firm, level surface;
• Avoid extreme heat as well as temperature fluctuation caused by installing
next to a radiator or in the direct sunlight;
• Protect the balance against direct draughts due to open windows and doors;
• Avoid jarring during weighing;
• Protect the balance against high humidity, vapours and dust;
• Do not expose the device to extreme dampness for longer periods of time.
Non-permitted condensation (condensation of air humidity on the appliance)
may occur if a cold appliance is taken to a considerably warmer environment.
In this case, acclimatize the disconnected appliance for ca. 2 hours at room
temperature.
• Avoid static charge of goods to be weighed or weighing container.
If electro-magnetic fields or static charge occur, or if the power supply is unstable
major deviations on the display (incorrect weighing results) are possible. In that case,
the location must be changed.
6.2 Unpacking
Carefully remove the balance from the packaging, remove plastic cover and setup
balance at the intended workstation.
6.2.1 Placing
Level balance with foot screws until the air bubble of the
water balance is in the prescribed circle.
CPB-N / CPB-DM-BA-e-1424 12
Page 12
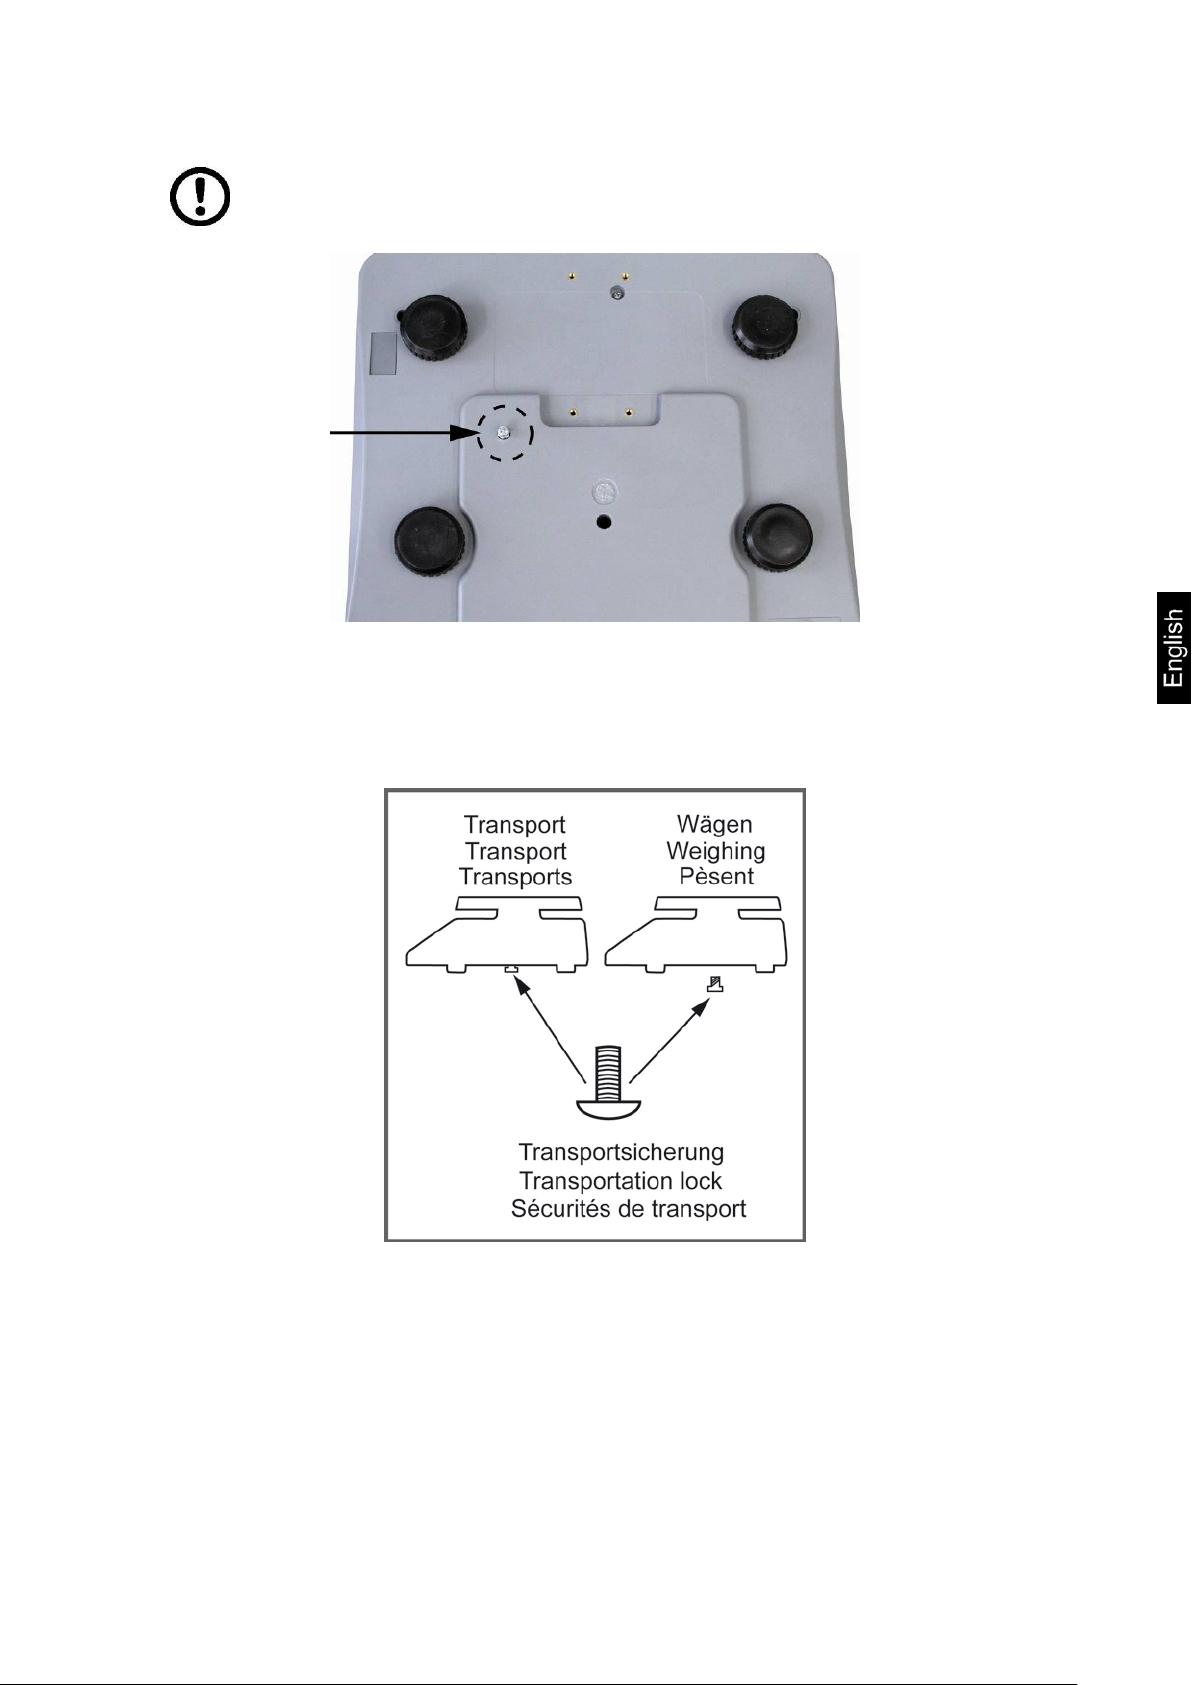
1
Ensure that transport guard has been r emoved
(only existing in 6 kg models)
To loosen the transport guard screw out transport screw [1] anticlockwise.
For transportation carefully screw-in transport screw clockwise till to the stopper
and then fix it using locknut.
CPB-N / CPB-DM-BA-e-1424 13
Page 13
• Balance
6.2.2 Scope of delivery
Serial accessories:
• Weighing plate
• Power cable
• Protective cover
• Instruction Manual
6.3 Mains connection
Power is supplied via the external mains adapter. The stated voltage value must be
the same as the local voltage.
Only use original KERN mains adapters. Using other makes requires consent by
KERN.
6.4 Rechargeable battery operation (optional) The internal battery is charged with the supplied mains cable.
Before the first use, the rechargeable battery should be charged by connecting it to
the mains power cable for at least 12 hours. The operating time of the battery is
about. 70h. Charging time until complete recharging ca. 12h.
AUTO-OFF function can be selected after 3, 5, 15, 30 min. to save the rechargeable
battery (see chap.12).
If an arrow appears on the weight display [] above the battery symbol
or "bat lo" when turning on the balance, this is an indication that the capacity of the
rechargeable battery will soon be exhausted. The balance will be ready to operate
for about another 10 hours, then it will switch off automatically. Connect the power
cable as soon as possible to load the rechargeable battery.
The LED display under the piece number window informs you during charging about
the charging status of the rechargeable battery.
red: Battery is almost discharged
green: Battery is completely discharged
6.5 Connection of peripheral devices
Before connecting or disconnecting of additional devices (printer, PC) to the data
interface, always disconnect the balance from the power supply.
With your balance, only use accessories and peripheral devices by KERN, as they
are ideally tuned to your balance.
6.6 Initial Commissioning
A warming up time of 2 hours after switching on stabilizes the measuring values.
The accuracy of the balance depends on the local acceleration of gravity.
Strictly observe hints in chapter Adjustment.
CPB-N / CPB-DM-BA-e-1424 14
Page 14
6.7 Adjustment
As the acceleration value due to gravity is not the same at every location on earth,
each balance must be coordinated - in compliance with the underlying physical
weighing principle - to the existing acceleration due to gravity at its place of location
(only if the balance has not already been adjusted to the location in the factory). This
adjustment process must be carried out for the first commissioning, after each
change of location as well as in case of fluctuating environment temperature. To
receive accurate measuring values it is also recommended to adjust the balance
periodically in weighing operation.
Procedure when a djusting:
Observe stable environmental conditions. A warming up time (see chapter 1) is
required for stabilization. Ensure that there are no objects on the weighing plate.
Provide calibration weight, for details, see chapter 1 "Technical Data. "
6.7.1 Models CPB-N (non verified models)
Operation Display
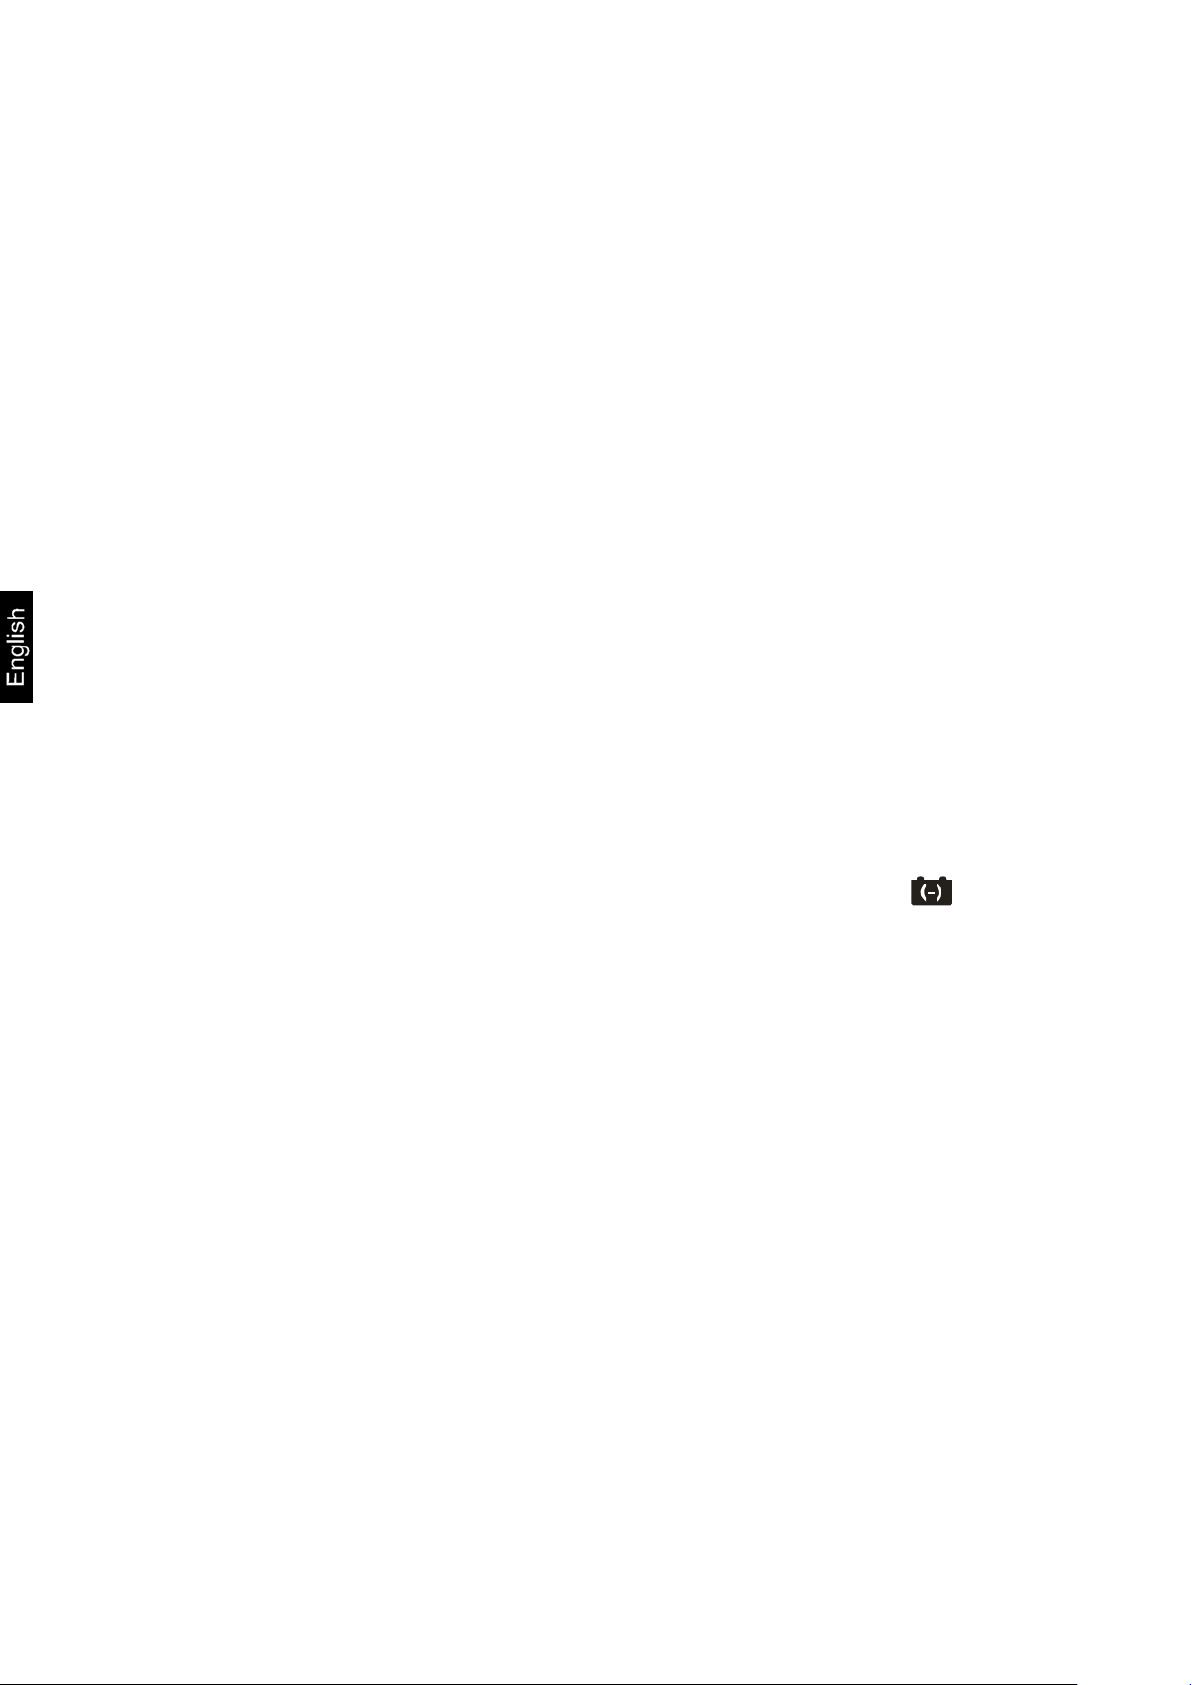
Switch on balance and during self-check
press the TARE key
Use the numeric keys to enter password:
• Default password "0000"
Should this password entry not be possible,
enter a personal password; (entry using
function [F6 PKn] see. chap.11.1).
Also possible to continue the adjustment
process with button.
CPB-N / CPB-DM-BA-e-1424 15
Page 15
error message; repeat adjustment process.
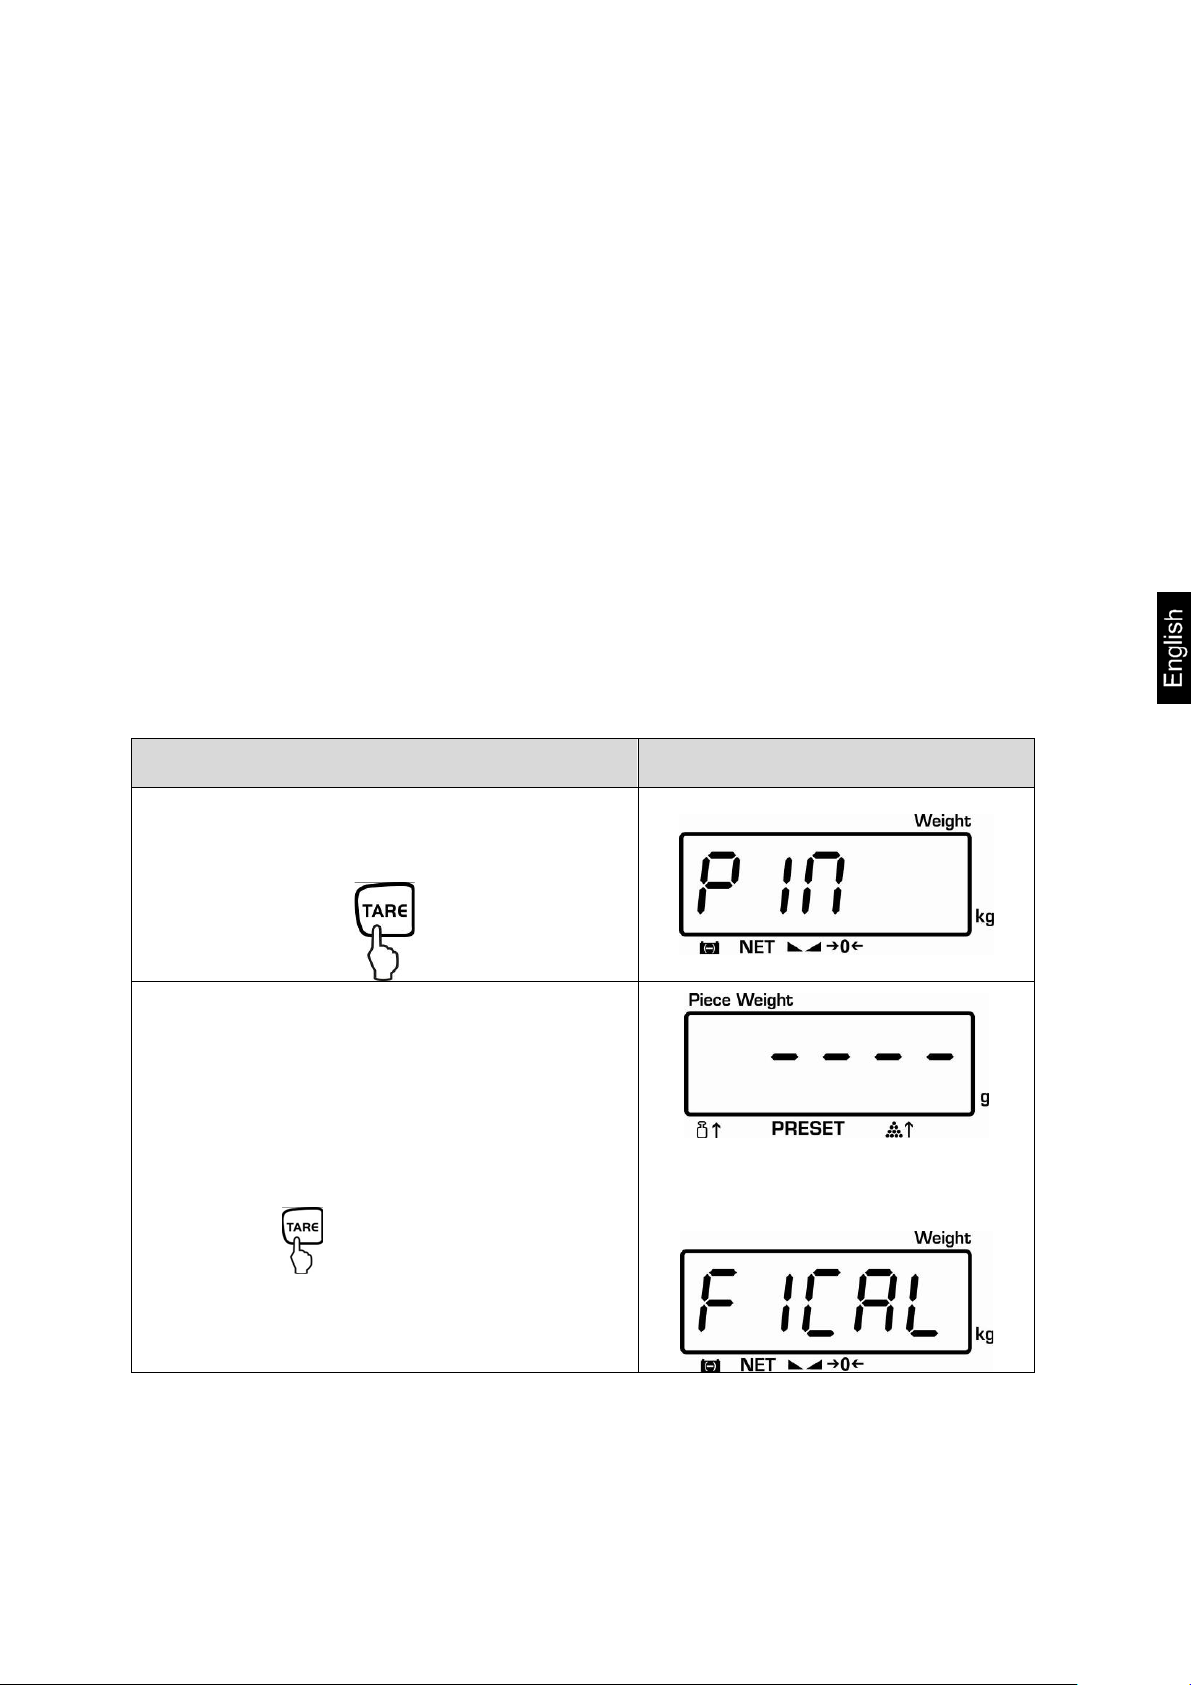
Press the TARE button, the acceleration
value due to gravity is displayed.
Press the TARE key anew.
„UnLoAd“, followed by „LoAd“ is displayed
Put the adjustment weight (see chap. 1)
carefully in the center of the weighing
plate, „PASS“ will be displayed.
While the balance carries out a self test,
remove the adjustment weight.
After successful adjustment the balance
automatically returns to weighing mode.
In case of an adjustment error or incorrect
adjusting weight the display will show an
CPB-N / CPB-DM-BA-e-1424 16
Page 16
6.7.2 Models CPB-DM (verified models)
The adjustment is locked for verified balances. Carrying out adjustment
be reused for applications subject to verification.
requires that the seal is destroyed and the adjusting switch is pressed when
turning on the scale. For position of adjusting switch, see chap. 6.9.1.
Attention:
After destruction of the seal the balance must be re-verified by an
authorised agency and a new verification wire/seal mark fitted before it can
Operation Indication
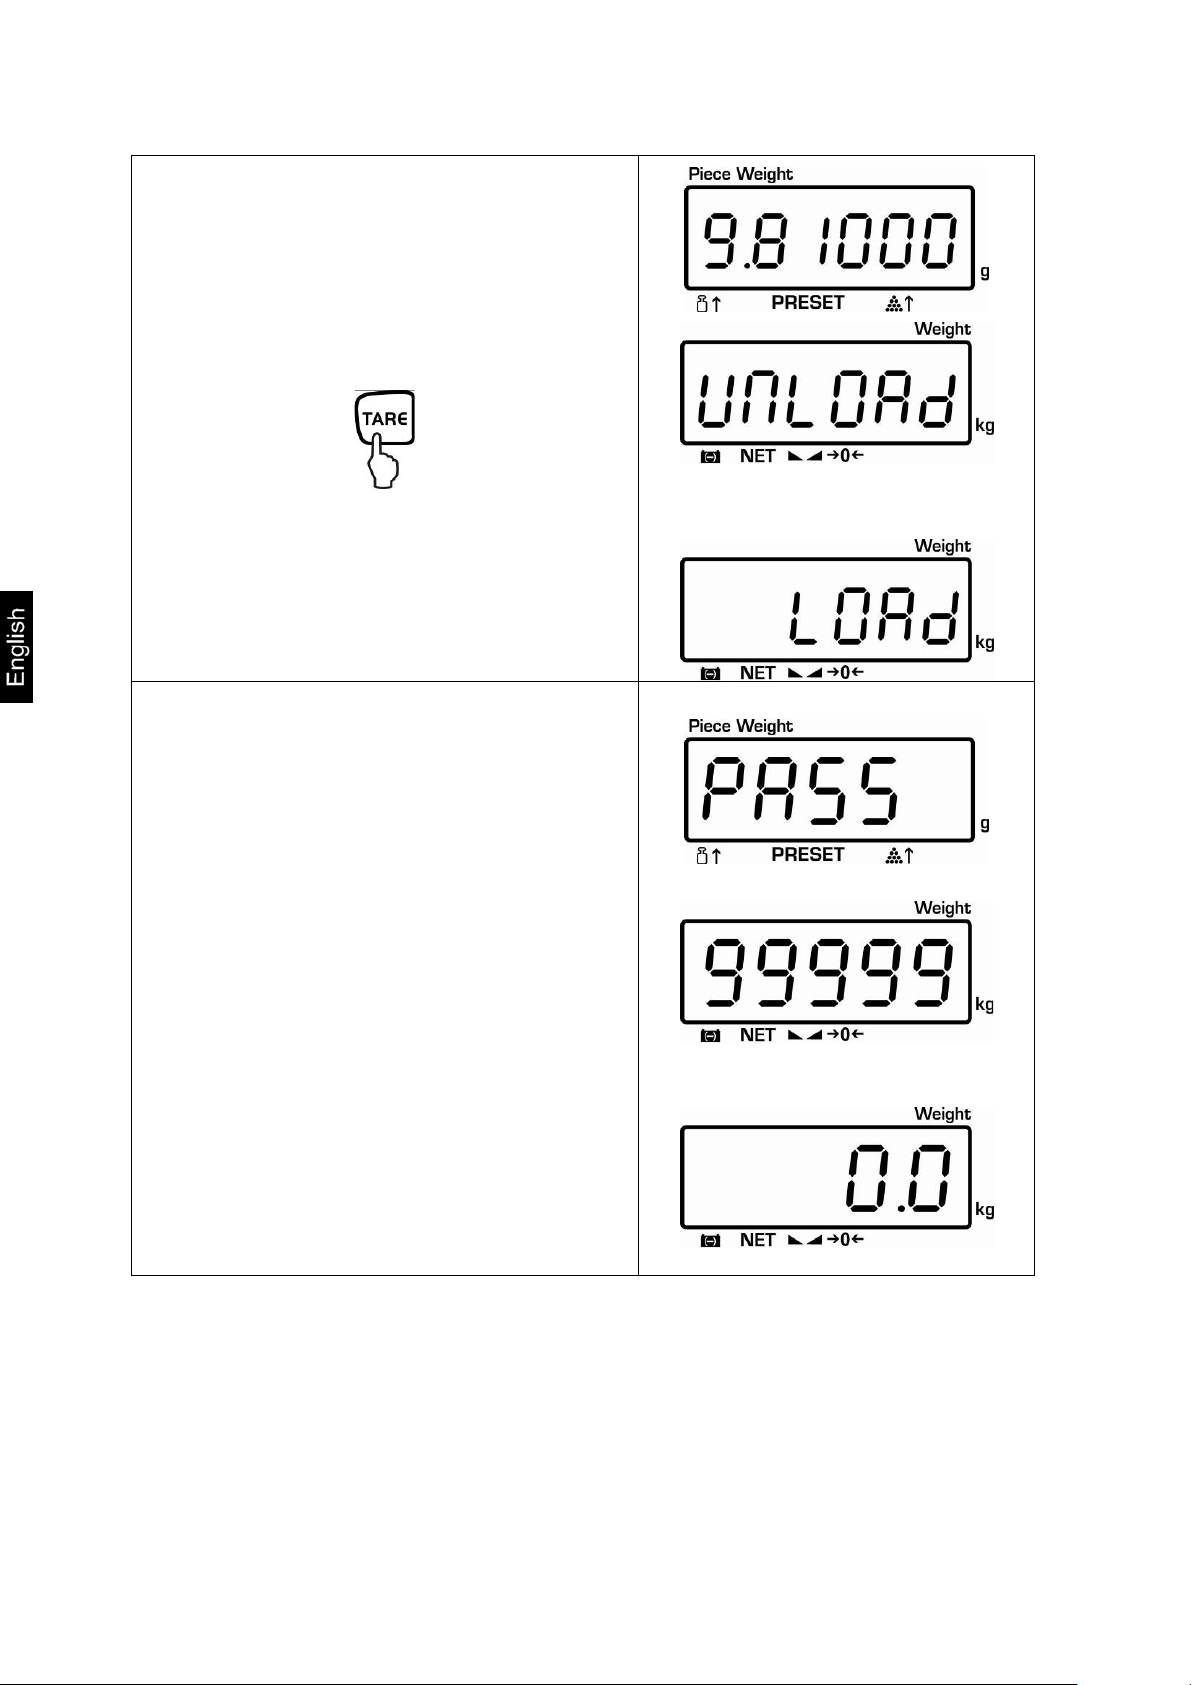
Switch-on balance and during the selftest
actuate the adjustment switch and press
the TARE button
Use the number keys to enter password:
either
• Default password "0000"
or
• Personal password, enter under
function [F6 PKn ] see chap.12
Confirm with TARE button
CPB-N / CPB-DM-BA-e-1424 17
Page 17

error message; repeat adjustment process.
TARE button, „UnLoAD“ appears
Press the TARE key anew
„LoAd“ as well as the currently set
adjustment weight appear flashing
either
• Confirm with TARE
or
• In order to change, enter the desired
weight value of the adjustment weight
by the numeric keyboard and confirm
on the TARE button.
In order to achieve high-quality weighing
results in the sense of the measuring
technology, it is recommended to select the
nominal value as high as possible.
We recommend 80 % max.
Carefully place adjusting weight in the
centre of the weighing plate
Wait for stability display, then press the
TARE button
While the balance carries out a self test,
remove the adjustment weight.
+
(Example)
After successful adjustment the balance
automatically returns to weighing mode.
In case of an adjustment error or incorrect
adjusting weight the display will show an
CPB-N / CPB-DM-BA-e-1424 18
Page 18

6.8 Linearization (non-verified models only)
• Carrying out linearization is restricted to specialist staff possessing well
chapter 3.4 “Testing instruments control”
Adjustment
weight
1.
1 kg
2.5 kg
5 kg
2.
2 kg
5 kg
10 kg
3.
4 kg
10 kg
15 kg
4.
6 kg
15 kg
30 kg
o enter password
Linearity shows the greatest deviation of a weight display on the scale to the value of
the respective test weight according to plus and minus over the entire weighing
range.
If linearity deviation is discovered during a testing instrument control, you can
improve this by means of linearization.
acquainted with the workings of weighing scales.
• The test weights to be used must be adapted to the weighing scale’s
specifications; see chapter 3.4 “testing instruments control”.
• Observe stable environmental conditions. Stabilisation requires a
certain warm-up time.
• After successful linearization you will have to carry out calibration; see
Tab. 1: Adjustment points
CPB 6K0.1N CPB 15K0.2N CPB 30K0.5N
Operation Display
How to carry out linearization:
Switch on balance and during self-check
press the TARE key
Use the numeric keys t
„9999“
Confirm with TARE button
CPB-N / CPB-DM-BA-e-1424 19
Page 19

Press TARE button, the acceleration
value due to gravity is displayed.
Press the TARE key anew
(Example)
„LoAd 0“ appears, after a short time a signal
will sound and „LoAd 1“ appears
First adjustment weight (s. tab. 1)
after a short time a signal will sound and
„LoAd 2“ appears
Second adjustment weight
after a short time again a signal will sound
and „LoAd 3“ appears.
Third adjustment weight
after a short time again a signal will sound
and „LoAd 4“ appears.
Forth adjustment weight
after a short time again a signal will sound
and „LoAd 3“ appears.
Forth adjustment weight
after a short time a signal will sound and
„LoAd 2“ appears.
Third adjustment weight
after a short time a signal will sound and
„LoAd 1“ appears
CPB-N / CPB-DM-BA-e-1424 20
Page 20

Second adjustment weight
after a short time a signal will sound and
„LoAd 0“ appears.
First adjustment weight
After successful linearization the balance
automatically returns to weighing mode.
In case of an adjustment error or incorrect adjusting weight the display will show an
error message; repeat linearization process.
CPB-N / CPB-DM-BA-e-1424 21
Page 21

•
•
6.9 Verification
General introduction:
According to EU directive 90/384/EEC balances must be verified if they are used as
follows (legally controlled area):
a) For commercial transactions if the price of goods is determined by weighing.
b) For the production of medicines in pharmacies as well as for analyses in the
medical and pharmaceutical laboratory.
c) For official purpose.
d) For manufacturing final packages.
In cases of doubt, please contact your local trade in standard.
After verification the balance is sealed at the indicated positions.
Verification of the balance is invalid without the "seal".
Verification notes:
An EU type approval exists for balances described in their technical data as
verifiable. If a balance is used where obligation to verify exists as described above, it
must verified and re-verified in regular intervals.
Re-verification of a balance is carried out according to the respective national
regulations. The validity for verification of balances in Germany is e.g. 2 years.
The legal regulation of the country where the balance is used must be observed!
Balances with obli gation to verify must be taken out of operation if:
The weighing result of the balance is outside the error limit. Therefore, in
regular intervals load balance with known test weight (ca. 1/3 of the max. load)
and compare with displayed value.
The reverification deadline has been exceeded.
CPB-N / CPB-DM-BA-e-1424 22
Page 22

6.9.1 Adjustment switch and seals
In the service mode the parameters of the balance can be modified.
balance settings.
Possible seals: enforced, and or
1. Seal mark 1
2. Cover
3. Verification switch
4. Verification wire
6.10 Checking the balance verification settings
For the adjustment, the balance must be switched over to service mode.
The service parameters may not be modified, as this could damage the
In calibrated scales the service mode is locked individually for each switch. To
disable the access lock, destroy the seal and actuate the switch. For position of
switch see chap. 6.9.1.
Attention:
After destruction of the seal the balance must be re-verified by an authorised agency
and a new verification wire/seal mark fitted before it can be reused for applications
subject to verification.
CPB-N / CPB-DM-BA-e-1424 23
Page 23

6.11 Service mode (verified models)
This overview of the service parameters is merely for checking the parameters set by
the appropriate Bureau of Standards. No changes may be made.
Access to menu:
Switch-on balance and during the selftest
press the TARE button
Use the number keys to enter password:
either
• Default password "0000"
or
• Personal password, enter under
function [F6 PKn ] see chap.12
Confirm with TARE button
Select function:
Press to select the individual functions showing the current settings one by
one.
Change / save settings:
Confirm selected function by pressing . Select desired setting by pressing
and confirm by pressing or cancel by pressing .
Exit menu:
Using the balance returns into the weighing mode.
CPB-N / CPB-DM-BA-e-1424 24
Page 24

Overview for service parameter:
Menu block
Main menu
Menu item
Submenu
F2 rES
6000d *
Resolution
duAL
Always use this setting
30000 d
3000 d
F3 Cnt
A/D - value
F4 AU
AU on*
mode
b9600*, b600,
b4800
b9600*, b600,
b4800
AU off
mode
F5 tAr
Pre-Tare
Pt oFF*
Pretaring value off: Always use this setting
Pt on
Pretaring value on
F6 Pin
Password
Pin 1*
Enter the new password
Pin 2
Confirm the new password
F7 SPd
SPd 7.5*
SPd 15
SPd 30
SPd 60
F8 oFF
oF 0*
Automatic shutdown off
oF 3
Automatic shutdown after 3 min
oF 5
Automatic shutdown after 5 min
oF 15
Automatic shutdown after 15 min
oF 30
Automatic shutdown after 30 min
* = Factory settings
= The menu item is blocked; to modify press the justification button.
Available settings / explanation
F1 CAL
Add-up mode
and data output
Automatic
summation
P ASt
P Cont
Manual
summation
Adjustment
b9600*, b600,
b1200, b2400,
b4800
b1200, b2400,
b1200, b2400,
b9600*, b600,
b1200, b2400,
b4800
LP 50 EnG CHi Not documented
tP Standard printer setting
EnG CHi
Sd0 on Send zero on
Sd0 off Send zero off
LP 50 EnG CHi Not documented
tP Standard printer setting
Remote control
instructions
Continuous data
output
Display speed
Auto Off
CPB-N / CPB-DM-BA-e-1424 25
not documented
Page 25

F9 Grv
not documented
F10 bEP
ok*
Signal sound, when the load is within the set range
Low
Signal sound, when the load is below the lower limit value
nG
Signal sound, when the load is beyond the set range
HiGH
Signal sound, when the load is above the upper limit value
F11 t n
P-tArE
Always use this setting
o-tArE
F12 rSt
Reset to default setting
F13 bEE
off
Acoustic signal when pressing button
on
F14 AUW
off
Automatic correction of reference weight
on
Gravity
Audio signal
CPB-N / CPB-DM-BA-e-1424 26
Page 26

7 Operation M ode
- symbol.
If the goods are heavier than the weighing
7.1 Switch on/off and set zero
Operation Indication
1. Switch on balance
Press ON/OFF switch and hold briefly (at the
bottom right side of the balance)
The balance will carry out a self-test
2. Set on zero
As soon as the weight display shows
"0" in all the three display windows
your balance is ready to weigh.
The zero display and the arrow
above the „→0←“ symbol are
displayed.
7.2 Simple weighing
Operation Display
Place load onto weighing plate
range, the display will show "QL"
(=Overload), and a whistle is sounded.
CPB-N / CPB-DM-BA-e-1424 27
Read weighing result
If weighing values are stable the
arrow will be displayed above the
Page 27

- - will appear.
Read the weight of the goods on
7.3 Weighing with taring
The dead weight of any weighing container may be tared away by pressing a button,
so that the following weighings show the net weight of the goods to be weighed.
Operation Indication
Place empty tare container on the weighing
plate. The total weight of the container is
displayed.
(Example)
Reset display to "0":
Place the goods to be weighed into the tare
container.
• The taring process can be repeated any number of times, e.g. when adding
several components for a mixture (adding). The limit is reached when the
whole weighing range is exhausted.
The weight of the container is now
internally saved. The zero display
and the arrows above the symbols
the display.
• The tare value will be rounded off according to the readability of the
weighing scales.
CPB-N / CPB-DM-BA-e-1424 28
Page 28

tared away.
Add more components into the weighing
Now read off the weight of the
added item to be weighed on the
Reset display to "0":
The total weight of the container is
container (adding).
display.
Delete tare value:
Unload the weighing platform and press .
CPB-N / CPB-DM-BA-e-1424 29
Page 29

Display background illumination
The setting is taken over and the balance
7.4 Display background illumination
The balance has the following possibilities of setting for the display background
illumination:
Keep pressed in weighing mode.
The last selected setting will be shown.
Press to select the following settings:
• Display background illumination off
• Display background illumination on
•
automatically off
Select desired setting by .
changes into weighing mode.
CPB-N / CPB-DM-BA-e-1424 30
Page 30

8 Piece counting
Set reference:
With pieces counting you can either count parts into a container or remove parts
from a container. To count a greater number of parts the average weight per part has
to be determined with a small quantity (reference quantity). The larger the reference
quantity, the higher the counting exactness. High reference must be selected for
small parts or parts with considerably different sizes.
8.1 Determination of the reference weight by weighing
Operation Display
Reset balance to zero or tare the empty
weighing container if necessary.
Place a known number of pieces on the
balance as reference
Wait for the stability display, than enter the
number of individual items via the numeric
keypad. Confirm within 5 sec:
„SAMP“ is shortly displayed;
The reference weight will be determined
and displayed.
CPB-N / CPB-DM-BA-e-1424 31
Page 31

Item counter
NO.
0
Weight placed on
balance
GS
Reference weight
U.W.
100.0000
g
Quantity placed on
balance
PCS
Notes:
Count the items:
Tare if necessary, place weighing good and read off the number of items.
Weight placed on balance:
Reference weight:
Quantity placed on balance:
The display value can be printed out by connecting an optional printer and pressing .
Printout example KERN YKB-01N:
0.300 kg
3 pcs
If necessary, the reference weight will be calculated anew when more pieces are placed
whose quantity is less than the placed reference material. This reference optimisation will
be indicated by a signal sound.
The reference weight is only determined with stable weighing values
If weighing values are under zero, the piece counter display shows a negative number of
items.
Delete reference
Press , the reference weight will be deleted.
CPB-N / CPB-DM-BA-e-1424 32
Page 32

8.2 Numeric entering of the reference weight
Set reference:
Item counter
NO.
0
Weight placed on
balance
GS
Reference weight
U.W.
100
g
Quantity placed on
balance
PCS
If you know the reference weight/piece you can enter this via numeric keys.
Enter reference weight via number keys
Confirm within 5 sec:
Count the items:
Tare if necessary, place weighing good and read off the number of items.
Weight placed on balance:
Reference weight:
Quantity placed on balance:
The display value can be printed out by connecting an optional printer and pressing .
Printout example KERN YKB-01N:
0.500 kg
5 pcs
CPB-N / CPB-DM-BA-e-1424 33
Page 33

F14�AQ�Qn
Set reference:
(example)
8.3 Automatic correction of the reference weight (verifiable models only)
The balance has the possibility to correct the deviation automatically if the reference
weight differs from the previously adjusted value of the reference weight.
• Menu setting: [
Operation Display
Reset balance to zero or tare the empty
weighing container if necessary.
Place a known number of pieces on the
balance as reference
Wait for the stability display, than enter the
number of individual items via the numeric
keypad. Confirm within 5 sec:
], see chap. 6.11 Service mode
Put on more items to be weighed, the
„SAMP“ is shortly displayed;
The reference weight will be determined
and displayed.
balance will correct the reference weight
and an acoustic signal sounds, if it has
been activated under menu item „F13 bee“
CPB-N / CPB-DM-BA-e-1424 34
Page 34

9 Totalization
F4�AU�QFF
Currently placed quantity of items
This function allows you to execute several weighing procedure. After that, the total
items number, the total weight and the number of weighing procedures will be
displayed.
9.1 Manual totalizing
• Menu setting: [
Determine the average piece weight (see chap. 8.1) or enter manually (see chap.
8. 2).
Place weighing goods A.
], see chap. 12.2.1
Currently placed weight
Wait for stability display, then press
. The displayed values are
added into the summation memory
and edited, when an optional printer
is connected. Weight, number of
weighing procedures (ACC 1) as well
as the quantity of items are displayed
for 2 sec..
Selected item weight
CPB-N / CPB-DM-BA-e-1424 35
Page 35

Printout example KERN YKB-01N:
Number weighing
processes
NO.
Weight placed on
balance
GS
Reference weight
U.W.
100
g
Quantity placed on
balance
PCS
Number weighing
processes
NO.
Weight placed on
balance
GS
Reference weight
U.W.
100
g
Quantity placed on
balance
PCS
1
2.000 kg
20 pcs
Remove the weighed good. More weighed goods can only be added when the
display ≤ zero.
Place goods to be weighed B.
Wait for stability display, then press
. The displayed values are
added into the summation memory
and edited, when an optional printer
is connected. Total weight, number
of we ighing procedures (ACC 2) as
well as total items number appear for
2 sec.
Printout example KERN YKB-01N:
2
5.000 kg
50 pcs
CPB-N / CPB-DM-BA-e-1424 36
Page 36

Add more weighed goods as described before.
Current total number of items
Printout example KERN YKB-01N:
End total
Total
Number weighing
processes
NO.
Total weight
wgt
5.000
kg
Total number of pieces
PCS
50
pcs
*************************************
Please note that the weighing system must be unloaded between the individual
weighing procedures.
You can repeat this process until the capacity of the weighing system is
exhausted.
Display sum total:
Press , total weight, number of
weighing procedures and total
number of items will be displayed
shortly.
Total weight
Press during this display for data
output.
Number of weighing procedures
2
Delete total added memory
Press , the total weight, number of weighing procedures as well as total
number of items are displayed. During this display press . The data in the
summation memory are deleted.
CPB-N / CPB-DM-BA-e-1424 37
Page 37

9.2 Automatic adding-up
F4�AU�QN
chap. 9.1.
With this function the individual weighing values are automatically added into the
summation memory when the balance is unloaded without pressing and edited,
when an optional printer is connected.
Menu settings: [
Add up:
Place weighing goods A.
After the standstill control sounds a signal tone. Unload the weighing good, the
weighing value is added into the summation memory (ACC1) and printed out.
Place goods to be weighed B.
After the standstill control sounds a signal tone. Unload the weighing good, the
weighing value is added into the summation memory (ACC2) and printed out.
Add more weighed goods as described before.
Please note that the balance must be unloaded between the individual weighing
procedures.
This process can be repeated 99 times or until the weighing range of the balance
is exhausted.
For how to display and delete the total sum, as well as a printout example, see
]
CPB-N / CPB-DM-BA-e-1424 38
Page 38

10 Weighing to target quantity or target weight and tol e rance check
•
•
•
•
An acoustic signal is sounded as soon as the number of items placed or a certain
weight value reaches or exceeds/drops below a pre-set limit (depending on the
settings in menu F10)
Options:
OK Signal sound, when the load is within the set range
Low Signal sound, when the load is below the lower limit value
NG Signal sound, when the load is beyond the set range
High Signal sound, when the load is above the upper limit value
10.1 Tolerance check for target quantity
Select target number mode:
Keep pressed, the set mode will
appear
Check psc - Tolerance check f or t arget item
number
Press
Check off – Tolerance check switched of f
Press
Check net -: Tolerance check for target
weight
CPB-N / CPB-DM-BA-e-1424 39
Page 39

Set limit values:
Determine upper limit value for target
item number:
Press , „Hi Cnt“ will appear:
Enter the upper limit value via the
numeric keyboard, e.g.: 70 Pcs
Press
„Lo Cnt“ appears:
Determine lower limit value for target
item number:
Enter the lower limit value via the
numeric keyboard, e.g.: 60 Pcs
Press
Press repeatedly until the
balance is in weighing mode
CPB-N / CPB-DM-BA-e-1424 40
Page 40

Delete limit values:
Start tolerance check
Determine the average piece weight (see chap. 8.1) or enter manually (see
chap. 8. 2).
Place the load, wait until the acoustic signal sounds, depending on the settings
in the menu „F10“ (see chap. 11.2, only for non-verified models).
For all limit values enter „0“ and confirm using the TARE button.
10.2 Tolerance check for target weight
Select target weight mode:
Keep pressed, the set mode will
appear
Check psc - Tolerance check f or t arget item
number
Press
Check off – Tolerance check switched of f
Press
Check net -: Tolerance check for target
weight
CPB-N / CPB-DM-BA-e-1424 41
Page 41

•
•
•
Select target weight mode:
By keeping pressed the desired
tolerance weighing mode can be
selected:
Check off – Tolerance check
switched off
Check psc - Tolerance check for
target item number
Check net -: Tolerance check for
target weight
Set limit values:
Determine upper limit value for target
weight:
Press repeatedly and confirm
via the TARE button until „Hi nEt“
appears:
Enter the upper limit value via the
numeric keyboard, e.g. 100 g
Confirm within 5 sec:
„Lo nEt“ appears:
CPB-N / CPB-DM-BA-e-1424 42
Page 42

Determine lower limit value for target
is in weighing mode
in the menu „F10“ (see chap. 11.2, only for non-verified models).
Delete limit values:
weight:
Enter the lower limit value via the
numeric keyboard, e.g.: 90 g
Confirm within 5 sec:
Press repeatedly until the balance
Start tolerance check
Place the load, wait until the acoustic signal sounds, depending on the settings
For all limit values enter „0“ and confirm using the TARE button.
11 Change readability (only models CPB-M)
In order to change the readability, keep pressed. The last decimal point
flashes for approx. 3 sec. Within this period the value can be read-off in another
resolution.
This value is not verified!
CPB-N / CPB-DM-BA-e-1424 43
Page 43

12 Menu (non verifiable models)
Access to menu:
Switch-on balance and during the selftest
press the TARE button.
Use the number keys to enter password:
either
• Default password "0000"
or
• Personal password, enter under
function [F6 PKn ] see chap.12
Confirm with TARE button
Select function:
Press to select the individual menu items showing the current settings one
by one.
Change / save settings:
Confirm selected function by pressing . Select desired setting by pressing
and confirm by pressing or cancel by pressing .
Exit menu:
Using the balance returns into the weighing mode.
CPB-N / CPB-DM-BA-e-1424 44
Page 44

Menu block
Main menu
Menu item
Submenu
F2 di
d 6000*
Resolution
d 3000
d 60000
d 30000
d 15000
F3 Cnt
A/D - value
F4 AU
AU on*
mode
not
documented
b9600*, b600,
b4800
b9600*, b600,
b4800
AU off
mode
not
documented
F5 AZn
2d*
4d
0.5d
1d
F6 Pin
Password
Pin 1*
Enter the new password
Pin 2
Confirm the new password
F7 SPd
SPd 7.5*
SPd 15
SPd 30
SPd 60
F8 oFF
oF 0*
Automatic shutdown off
oF 3
Automatic shutdown after 3 min
oF 5
Automatic shutdown after 5 min
oF 15
Automatic shutdown after 15 min
oF 30
Automatic shutdown after 30 min
12.1 Menu overview
Available settings / explanation
F1 CAL
Add-up mode
and data output
Automatic
summation
P ASt
P Cont
Manual
summation
Adjustment
b9600*, b600,
b1200, b2400,
b4800
b1200, b2400,
b1200, b2400,
b9600*, b600,
b1200, b2400,
b4800
LP 50 EnG CHi
tP Standard printer setting
EnG CHi
EnG CHi
LP 50 EnG CHi
tP Standard printer setting
Remote control
instructions
Continuous
data output
Zeroing range
Display speed
Auto Off
CPB-N / CPB-DM-BA-e-1424 45
Automatic zero-setting, selectable bet ween 0.5d, 1d, 2d and
4d
not documented
Page 45

F9 Gru
F10 bEP
ok*
Signal sound, when the load is within the set range
Low
Signal sound, when the load is below the lower limit value
nG
Signal sound, when the load is beyond the set range
HiGH
Signal sound, when the load is above the upper limit value
F11 rSt
Reset to default setting
Gravity
Audio signal
* default setting
not documented
CPB-N / CPB-DM-BA-e-1424 46
Page 46

13 Data output RS 232 C
Pin 7 signal earth
The balance is typically equipped with a RS 232C interface. Weighing data can be
edited according to menu setting or automatically or by pressing via the interface.
This data exchange is asynchronous using ASCII - Code.
The following conditions must be met to provide successful communication between
the weighing balance and the printer.
• Use a suitable cable to connect the weighing balance to the interface of the
printer. Faultless operation requires an adequate KERN interface cable.
• Communication parameters (baud rate, bits and parity) of weighing balance
and printer have to match, see chap. 11.2, Menu block „F4 AU“.
13.1 Technical data
Connection D-Sub 9 poles jack
Pin 2 output
Pin 3 input
Baud rate
Selectable 600/1200/2400/4800/9600
Parity 8 bits, no parity
bold printed = factory setting
13.2 Remote control instructions
The remote control commands are sent from the remote control unit to the balance
as ASCII code. After the balance having received the commands, it will send the
following data.
Take into account that the following remote control commands must be sent without
a subsequent CR LF.
T Tare placed weighing vessel
Z Zeroing
C Delete
P Pieces to send
S Send stable value
W Send instable value
CPB-N / CPB-DM-BA-e-1424 47
Page 47

14 Service, maintenance, disposal
14.1 Cleaning
Before cleaning, please disconnect the appliance from the operating voltage.
Please do not use aggressive cleaning agents (solvents or similar agents), but a
cloth dampened with mild soap suds. Ensure that no liquid penetrates into the device
and wipe with a dry soft cloth.
Loose residue sample/powder can be removed carefully with a brush or manual
vacuum cleaner.
Spilled weighing goods m ust be removed immediately.
14.2 Service, maintenance
The appliance may only be opened by trained service technicians who are
authorized by KERN.
Before opening, disconnect from power supply.
14.3 Disposal
Disposal of packaging and appliance must be carried out by operator according to
valid national or regional law of the location where the appliance is used.
14.4 Error messages
Error message Description
Err 4
Err 5
Err 6
Err 9
Should other error messages occur, switch balance off and then on again. If the error
message remains inform manufacturer.
Zero range exceeded
Invalid entry
Damaged electronics
Weighing result unstable
CPB-N / CPB-DM-BA-e-1424 48
Page 48

15 Instant help
• No batteries inserted.
In case of an error in the program process, briefly turn off the balance and
disconnect from power supply. The weighing process must then be restarted from
the beginning.
Fault Possible cause
The displayed weight does not glow.
The displayed weight is permanently
changing
The weighing result is obviously
incorrect
• The balance is not switched on.
• The mains supply connection has been
interrupted (mains cable not plugged
in/faulty).
• Power supply interrupted.
• Batteries are inserted incorrectly or empty
• Draught/air movement
• Table/floor vibrations
• Weighing plate has contact with other
objects.
• Electromagnetic fields / static charging
(choose different location/switch off
interfering device if possible)
• The display of the balance is not at zero
• Adjustment is no longer correct.
• Great fluctuations in temperature.
• Electromagnetic fields / static charging
(choose different location/switch off
interfering device if possible)
CPB-N / CPB-DM-BA-e-1424 49
Page 49

KERN & Sohn GmbH
D-72322 Balingen-Frommern
E-Mail: info@kern-sohn.de
Tel: 0049-[0]7433- 9933-0
Internet: www.kern-sohn.de
D
Konformitätserklärung
Wir erk lären hiermit, dass das Produkt, auf das sich diese Erk lärung bezieht,
mit den nachstehenden Normen übereinstimmt.
GB
Declaration of
conformity
We hereby declare that the product to which this declaration refers c onforms
with the following standards.
CZ
Prohlášení o
shode
Tímto prohlašujem e, že výrobek, kterého se toto prohlášení týká, je v souladu
s níže uvedenými normami.
E
Declaración de
conformidad
Manifestamos en la presente que el producto al que se refiere esta
declaración está de acuerdo con las normas siguientes
F
Déclaration de
conformité
Nous déclarons avec cela responsabilité que le produit, auquel se rapport e la
présente déclaration, est conforme aux normes citées ci-après.
I
Dichiarazione di
conformitá
Dichiariamo con ciò che il prodotto al quale la presente dichiarazione si
riferisce è conforme alle norme di seguito citate.
NL
Conformiteitverklaring
Wij verklaren hiermede dat het product, waarop deze verklaring betrekking
heeft, met de hierna vermelde normen overeenstemt.
P
Declaração de
conformidade
Declaramos por meio da presente que o produto no qual se refere esta
declaração, corresponde às normas seguintes.
PL
Deklaracja
zgodności
Niniejszym oświadczamy, że produkt, którego niniejsze oświadczenie dotyczy,
jest zgodny z poniższymi normami.
RUS
Заявление о
соответствии
Мы заявляем, что продукт, к которому относится данная декларация,
соответствует перечисленным ниже нормам.
EU Directive
Standards
2004/108/EC
EN55022: 2006 A1:2007
EN55024: 1998+A1:2001+A2:2003
2006/95/EC
EN 60950-1:2006
EN 60065:2002+A1:2006
Signature
Datum
08.04.2013
Ort der Ausstellung
Place of issue
72336 Balingen
Albert Sauter
KERN & Sohn GmbH
Geschäftsführer
Managing director
KERN & Sohn GmbH, Ziegelei 1, D-72336 Balingen, Tel. +49-[0]7433/9933-0
Fax +49-[0]7433/9933-149, E-Mail: info@kern-sohn.com, Internet: www.kern-sohn.com
16 Declaration of confor m ity
Postfach 4052
Fax: 0049-[0]7433-9933-149
Declaration of conformity
EG-Konformitätserklärung EC-Declaration of -Conformity
Déclaration de conformité EC-Declaración de Conformidad
ECEC-Dichiarazione di conformità EC-Conformiteitverklaring
EC- Declaração de conformidade EC- Prohlášení o shode
EC-Deklaracja zgodności EC-Заявление о соответствии
17
Electronic Balan ce: KERN CPB-N
EN61000-3-3:1995+A1:2001+A2:2005
Date
Signatur
CPB-N / CPB-DM-BA-e-1424 50
Page 50

KERN & Sohn GmbH
D-72322 Balingen-Frommern
E-Mail: info@kern-sohn.de
Tel: 0049-[0]7433- 9933-0
Internet: www.kern-sohn.de
EG-Konformitätserklärung
EC-Declaration of -Conformity
EC- Déclaration de conformité
EC-Declaración de Conformidad
EC-Dichiarazione di conformità
EC-Conformiteitverklaring
EC- Declaração de conformidade
EC- Prohlášení o shode
EC-Deklaracja zgodności
D
GB
Wir erklären hiermit unter alleiniger Verantwortung, dass das Produkt, auf das sich diese
Erklärung bezieht, mit den nachstehenden Richtlinien übereinstimmt.
Für die Waage liegt eine EG-Bauartzulassung vor. Das Jahr der EG-Eichung ist neben der CE
Konformitätskennzeichnung aufgeführt. Solche Waagen sind ab Werk EG-geeicht und tragen die
Kennzeichnung „M“ auf dem Gerät selbst und auf der Verpackung. Sie dürfen im eichpflichtigen
Verkehr verwendet werden. Die Fallbeschleunigung gibt bei EG-geeichten Waagen an, für
welchen Aufstellungsort die Waage EG-geeicht ist.
We hereby declare and assume sole responsibility for the declaration that the product complies
with the standards hereinafter.
The scale was issued with an EC Type Approval Certificate. The year of EC verification can be
found next to the CE mark of conformity. Such scales are EC verified ex factory and bear the
mark “M“, on the device itself as well as on the packaging. They can be used for weighing with
obligation to verify. For EC verified scales, gravity acceleration indicates for which place of
installation the scale is EC verified.
Postfach 4052
Fax: 0049-[0]7433-9933-149
CZ
E
F
I
Prohlašujeme tímto na svou výhradní odpovědnost, že výrobek, jehož se toto prohlášení týká, je
v souladu s níže uvedenými směrnicemi.
Pro váhu je k dispozici schválení konstrukce podle předpisů EU. Rok cejchování podle předpisů
EU je uveden vedle značky CE. Tyto váhy jsou cejchovány podle předpisů EU ve výrobním
závodě a jsou označeny písmenem M, jak na samotném zařízení, tak i na obalu. Mohou být
uváděny do oběhu tam, kde se povinně vyžaduje cejchování. Gravitační zrychlení uváděné na
vahách cejchovaných podle předpisů EU znamená, pro které místo instalace je váha
cejchována.
Manifestamos bajo sola responsabilidad en la presente que el producto al que se refiere esta
declaración está de acuerdo con las normas siguientes.
Para la balanza hay una autorización CE del tipo constructivo. El año de la primera verificación
CE se ve al lado del símbolo CE. Estas balanzas han sido verificadas CE en fábrica y llevan la
identificación „M“ en el equipo mismo y en el embalaje. Ellas se pueden usar en transacciones
con obligación de verificación. La acceleración de gravedad en las balanzas verificadas CE
indica para cual lugar de emplazamiento la balanza ha sido verificada.
Nous déclarons par la présente que le produit auquel se réfère cette déclaration est conforme
aux normes ci-après.
Un certificat d`approbation a été établi par la CE pour la balance. L`an de l`homologation selon
CE est indiqué à côté de la marque CE. De telles balances sont homologuées au départ de
l’usine et portent la marque „M“ sur l’appareil-même et sur l’emballage. Elles peuvent être
utilisées dans des actions soumises à l’obligation d’étalonnage. L’accélération due à la pesanteur
indique sur les balances homologuées selon CE, le site d’implantation pour lequel elles ont été
homologuées.
Dichiariamo con ciò in responsabilità unica che il prodotto al quale la presente dichiarazione si
riferisce è conforme alle norme di seguito citate.
Per la bilancia esiste un permesso di costruzione UE. L’anno della taratura CE viene indicato
vicino al simbolo CE. Queste bilance sono state tarate in fabbrica e portano il contrassegno „M“
sullo stesso apparecchio e sull’imballaggio. Possono utilizzarsi in negozi soggetti ad obbligo di
taratura. L’accelerazione di caduta delle bilance CE tarate indica per quale luogo di impiego la
bilancia è stata tarata.
CPB-N / CPB-DM-BA-e-1424 51
Page 51

Mark applied
EU Directive
Approval/Test-certificate N°
EMV
2006/95/EC
Low voltage
2011/65/EU
RoHS
g =
Ort oder Zone
Location or zone
Datum
Date
24.07.2014
Ort der Ausstellung
Place of issue
72336 Balingen
Signatur
Signature
KERN & Sohn GmbH
Albert Sauter
KERN & Sohn GmbH
Eichbevollmächtigter
Verification officer
Geschäftsführer
Managing director
NL
P
PL
Wij verklaren hiermede op exclusieve verantwoordelijkheid dat het product, waarop deze
verklaring betrekking heeft, met de hierna volgende richtlijnen overeenstemt.
Voor de weegschaal ligt er een EG-modelgoedkeuring ter inzage. Het jaar van de EG- ijking
staat naast het CE-conformiteitsmerkteken vermeld. Dergelijke weegschalen werden in de
fabriek EG-geijkt en dragen het identificatielabel „M“ op het apparaat zelf en op de verpakking.
Deze weegschalen mogen voor toepassingen, die een ijking vereisen, gebruikt worden. De
valversnelling geeft bij EG-geijkte weegschalen aan, voor welke plaats van installatie de
weegschaal EG-geijkt is.
Declaramos por meio da presente sob a nossa sola responsabilidade que o produto no que se
refere esta declaração, corresponde às normas seguintes.
Para a balança éxiste uma homologação CE do tipo construtivo. O ano da primeira aferição CE
fica ao lado do símbolo CE. Estas balanças foram aferidas CE em oficina e levam a
identificação „M“ no aparelho mesmo e na embalagem. Elas podem usar-se no tratamento
comercial com aferição obrigatória. aceleração de queda indica nas balanças aferidas CE para
qual sítio de colocação a balança foi aferida.
Świadomi ponoszonej przez nas odpowiedzialności oświadczamy, że produkt, którego dotyczy to
oświadczenie, jest zgodny z poniższymi normami.
Waga posiada zatwierdzenie typu WE. Rok legalizacji WE jest umieszczony obok oznaczenia
CE. Tego typu wagi są legalizowane w zakładzie producenta i mogą być wykorzystywane do
wszystkich celów wymagających legalizacji wagi, odpowiednie oznaczenie „M“ znajduje się na
urządzeniu oraz na opakowaniu. Wartość siły grawitacji u wag legalizowanych podaje miejsce
użytkowania wagi, dla jakiego została legalizowana.
Scale Series: RPB-DM, CPB-
DM, GAB-DNM
year
0103
2009/23/EC
Non-automatic Weighing
Instruments Directive
2004/108/EC
Serial Number: XXXXXXXXXX
T7681
KERN & Sohn GmbH, Ziegelei 1, D-72336 Balingen, Tel. +49-[0]7433/9933-0,Fax +49-[0]7433/9933-149
CPB-N / CPB-DM-BA-e-1424 52
 Loading...