

Page 1
KERN & Sohn GmbH
Ziegelei 1
D-72336 Balingen
E-Mail: info@kern-sohn.com
Operating instructions
Pocket balance
KERN CM
Version 1.8
10/2006
GB
Tel: +49-[0]7433- 9933-0
Fax: +49-[0]7433-9933-149
Internet: www.kern-sohn.com
CM-BA-e-0618
Page 2

GB
KERN CM
Version 1.8 10/2006
Operation instructions
Pocket Balance
Table of contents
1 Technical data ----------------------------------------------------------------------------------- 3
2 Declaration of conformty--------------------------------------------------------------------3 Fundamental information (general)-------------------------------------------------------
3.1 Intended use------------------------------------------------------------------------------------------- 5
3.2 Inappropriate use------------------------------------------------------------------------------------- 5
3.3 Guarantee---------------------------------------------------------------------------------------------- 5
3.4 Monitoring the test substances ------------------------------------------------------------------- 5
4 Fundamental safety information----------------------------------------------------------- 6
4.1 Observe the information in the operating instructions -------------------------------------- 6
4.2 Staff training ------------------------------------------------------------------------------------------- 6
5 Transport and storage ------------------------------------------------------------------------ 6
5.1 Acceptance check------------------------------------------------------------------------------------ 6
5.2 Packaging ---------------------------------------------------------------------------------------------- 6
6 Unpacking, installation and commissioning ------------------------------------------ 6
6.1 Place of installation, place of use ----------------------------------------------------------------6
6.2 Unpacking---------------------------------------------------------------------------------------------- 7
6.2.1 Installation ----------------------------------------------------------------------------------------------------7
6.2.2 List of items supplied--------------------------------------------------------------------------------------- 7
6.3 Battery operation and change--------------------------------------------------------------------- 7
6.4 Draft shield + weighing container (CM 50-C2N, CM 500-GN1) -------------------------- 8
6.5 Initial start-up ------------------------------------------------------------------------------------------ 8
6.6 Adjustment --------------------------------------------------------------------------------------------- 8
6.7 Adjusting------------------------------------------------------------------------------------------------ 8
7 Operation------------------------------------------------------------------------------------------ 9
7.1 Overview of display CM 60-2N / CM 150-1N / CM 320-1N / CM 1K1N ---------------- 9
7.2 Overview of display CM 50-C2N ----------------------------------------------------------------- 9
7.3 Overview of display CM 500-GN1 --------------------------------------------------------------- 9
7.4 Operating elements---------------------------------------------------------------------------------- 9
7.4.1 Weighing ------------------------------------------------------------------------------------------------------9
7.4.2 Taring -------------------------------------------------------------------------------------------------------- 10
7.4.3 Plus/Minus Weighings ----------------------------------------------------------------------------------- 10
7.4.4 Net-total weighings --------------------------------------------------------------------------------------- 10
7.4.5 Unit change------------------------------------------------------------------------------------------------- 11
7.5 Rear illuminated display -------------------------------------------------------------------------- 12
7.6 Calculator -------------------------------------------------------------------------------------------- 13
8 Maintenance, upkeep, disposal-----------------------------------------------------------13
8.1 Cleaning ---------------------------------------------------------------------------------------------- 13
8.2 Maintenance, upkeep ----------------------------------------------------------------------------- 13
8.3 Disposal ---------------------------------------------------------------------------------------------- 13
9 Troubleshooting -------------------------------------------------------------------------------
4
5
14
2
CM-BA-e-0618
Page 3
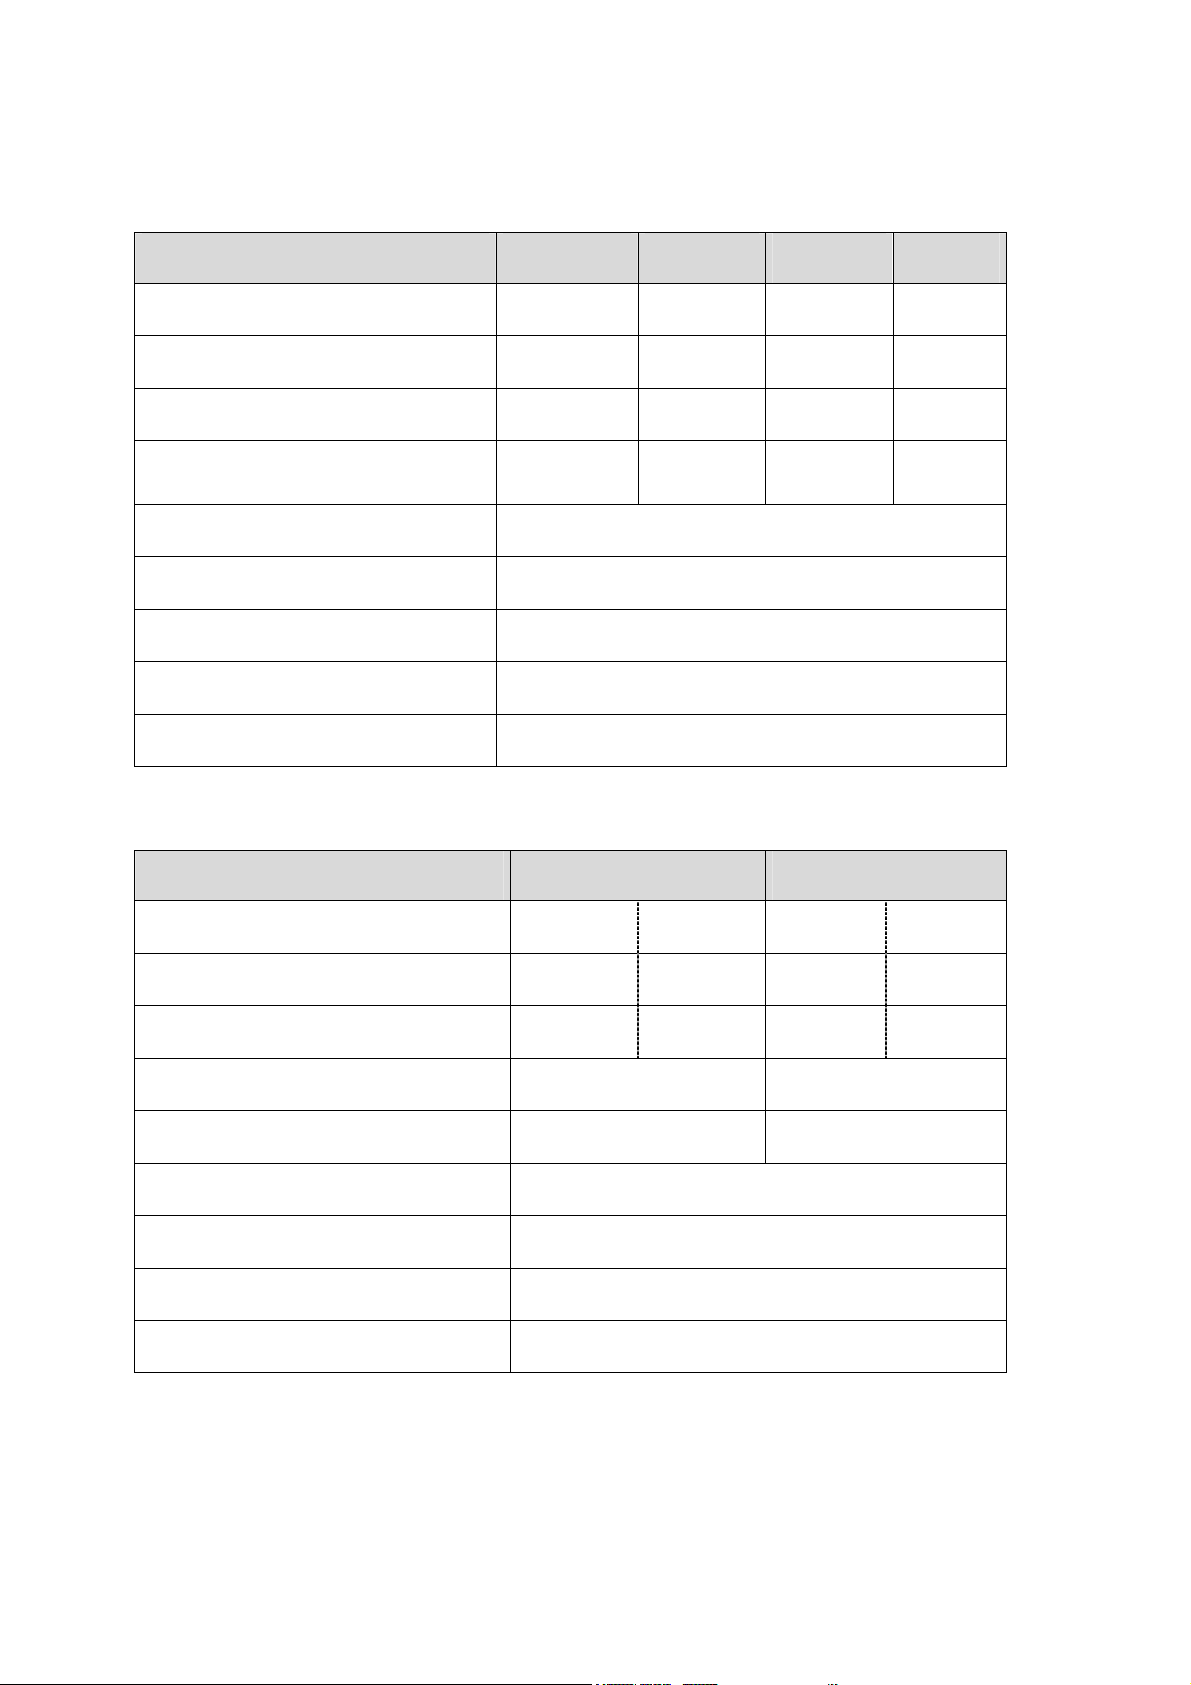
1 Technical data
KERN CM 60-2N CM150-1N CM 320-1N CM 1K1N
Readout (d) 0,01 g 0,1 g 0,1 g 1 g
Weighing range (max) 60 g 150 g 320 g 1.000 g
Taring range (subtractive) 60 g 150 g 320 g 1.000 g
Recommended adjusting weight,
not included (class)
50 g
(M2)
100 g
(M3)
200 g
(M3)
1000 g
(M3)
Optimal temperature range 18 – 25 °C
Units g / tol / tlt
Permissible relative humidity < 85 %(non-condensing)
Weighing plate mm 70 x 80
Size (B x H x T) mm 85 x 130 x 25
KERN CM 50-C2N CM 500-GN1
Readout (d) 0,01 ct 0,002 g 0,1 gn 0,01 g
Weighing range (max) 50ct 10 g 500 gn 32 g
Taring range (subtractive) 50ct 10 g 500 gn 32 g
Test weight (included) 5 g (M1) 10 g (M2)
Units ct / g g / gn
Optimal temperature range 18 – 25 °C
Permissible relative humidity < 85 % (non-condensing)
Weighing plate mm 40 x 50
Size (B x H x T) mm 85 x 130 x 25
CM-BA-e-0618
3
Page 4
2 Declaration of conformty
Declaration of Conformity
The electronic pocket balance
Type: KERN CM 60-2N
KERN CM 150-1N
KERN CM 250-1N
KERN CM 1K1N
KERN CM 50-C2N
KERN CM 500-GN1
correspond to the following EC requirements:
EC-EMC-directive version 89/336/EEC
Compatible norms are, in particular
Standards for electronic scale.
EN 61000-6-3 :2001
EN 61000-6-1 :2001
Standard for calculator :
EN 55022 : 1998+A1 : 2000
EN 55024 : 1998+A1 : 2001
If a change is made to the above mentioned appliances without consulting KERN
this declaration will become invalid
Date: 01.10 2004 Signature:
Gottl. KERN & Sohn GmbH
Management
Gottl. KERN & Sohn GmbH, Ziegelei 1, 72336 Balingen-Frommern, Tel. 07433/9933-0, Fax 07433/9933-149
4
CM-BA-e-0618
Page 5

3 Fundamental information (general)
3.1 Intended use
The balance you have acquired serves to determine the weighing value of the material to be weighed. It is intended to be used as a “non-automatic“ balance, i.e. the
material to be weighed is manually and carefully placed in the centre of the weighing
plate. The weighing value can be read off after a stable weighing value has been obtained.
3.2 Inappropriate use
Do not use the balance for dynamic weighing. In the event that small quantities are
removed or added to the material to be weighed, incorrect weighing results can be
displayed due to the “stability compensation“ in the balance. (Example: Slowly draining fluids from a container on the balance.)
Do not leave a permanent load on the weighing plate. This can damage the measuring equipment.
Be sure to avoid impact shock and overloading the balance in excess of the prescribed maximum load rating (max.), minus any possible tare weight that is already
present. This could cause damage to the balance.
Never operate the balance in hazardous locations. The series design is not explosion-proof.
Structural alterations may not be made to the balance. This can lead to incorrect
weighing results, faults concerning safety regulations as well as to destruction of the
balance.
The balance may only be used in compliance with the described guidelines. Varying
areas of application/planned use must be approved by KERN in writing.
3.3 Guarantee
The guarantee is not valid following
• non-observation of our guidelines in the operating instructions
• use outside the described applications
• alteration to or opening of the device
• mechanical damage and damage caused by media, liquids
• natural wear and tear
• inappropriate erection or electric installation
• overloading of the measuring equipment
3.4 Monitoring the test substances
The metrology features of the balance and any possible available adjusting weight
must be checked at regular intervals within the scope of quality assurance. For this
purpose, the answerable user must define a suitable interval as well as the nature
and scope of this check. Information is available on KERN’s home page (www.kern-
sohn.com) with regard to the monitoring of balance test substances and the test
weights required for this. Test weights and balances can be adjusted quickly and at
a reasonable price in KERN’s accredited DKD calibration laboratory (return to national normal).
CM-BA-e-0618
5
Page 6

4 Fundamental safety information
4.1 Observe the information in the operating instructions
Please read the operating instructions carefully before erecting and commissioning,
even if you already have experience with KERN balances.
4.2 Staff training
The device may only be operated and looked after by trained members of staff.
5 Transport and storage
5.1 Acceptance check
Please check the packaging immediately upon delivery and the device during unpacking for any visible signs of external damage.
5.2 Packaging
Please retain all parts of the original packaging in case it should be necessary to return items at any time.
Only the original packaging should be used for return consignments.
6 Unpacking, installation and commissioning
6.1 Place of installation, place of use
The balance is constructed in such a way that reliable weighing results can be
achieved under normal application conditions.
By selecting the correct location for your balance, you will be able to work quickly and
precisely.
Therefore please observe the following at the place of installation:
• Place the balance on a firm, level surface;
• Avoid extreme heat as well as temperature fluctuation caused by installing
next to a radiator or in the direct sunlight;
• Protect the balance against direct draughts due to open windows and doors;
• Avoid jarring during weighing;
• Protect the balance against high humidity, vapours and dust;
• Do not expose the device to extreme dampness for longer periods of time. In-
admissible bedewing (condensation of air moisture on the device) can occur if
a cold device is taken into a significantly warmer environment. In this case,
please acclimatise the device for approx. 2 hours at room temperature after it
has been disconnected from the mains.
• Avoid static charging of the material to be weighed, weighing container and
windshield.
6
CM-BA-e-0618
Page 7
Major display deviations (incorrect weighing results, or a failure function of the calculator) are possible if electromagnetic fields occur as well as due to static charging and
instable power supply. It is then necessary to change the location.
If the calculator is interrupted by static charging, reset it to normal by pressing the
“ON/AC” button.
6.2 Unpacking
Carefully remove the balance from its packaging, remove the plastic wrapping and
position the balance in its intended working location.
6.2.1 Installation
Install the balance in such a fashion that the weighing plate is absolutely horizonta.
6.2.2 List of items supplied
Standard accessories:
• Pocket balance
• Batteries
• Operating instructions
• Test weight (only CM 5-C2N, CM 500-GN1)
• Weighing container (only CM 50-C2N, CM 500-GN1)
• Draft shield (only CM 50-C2N, CM 500-GN1)
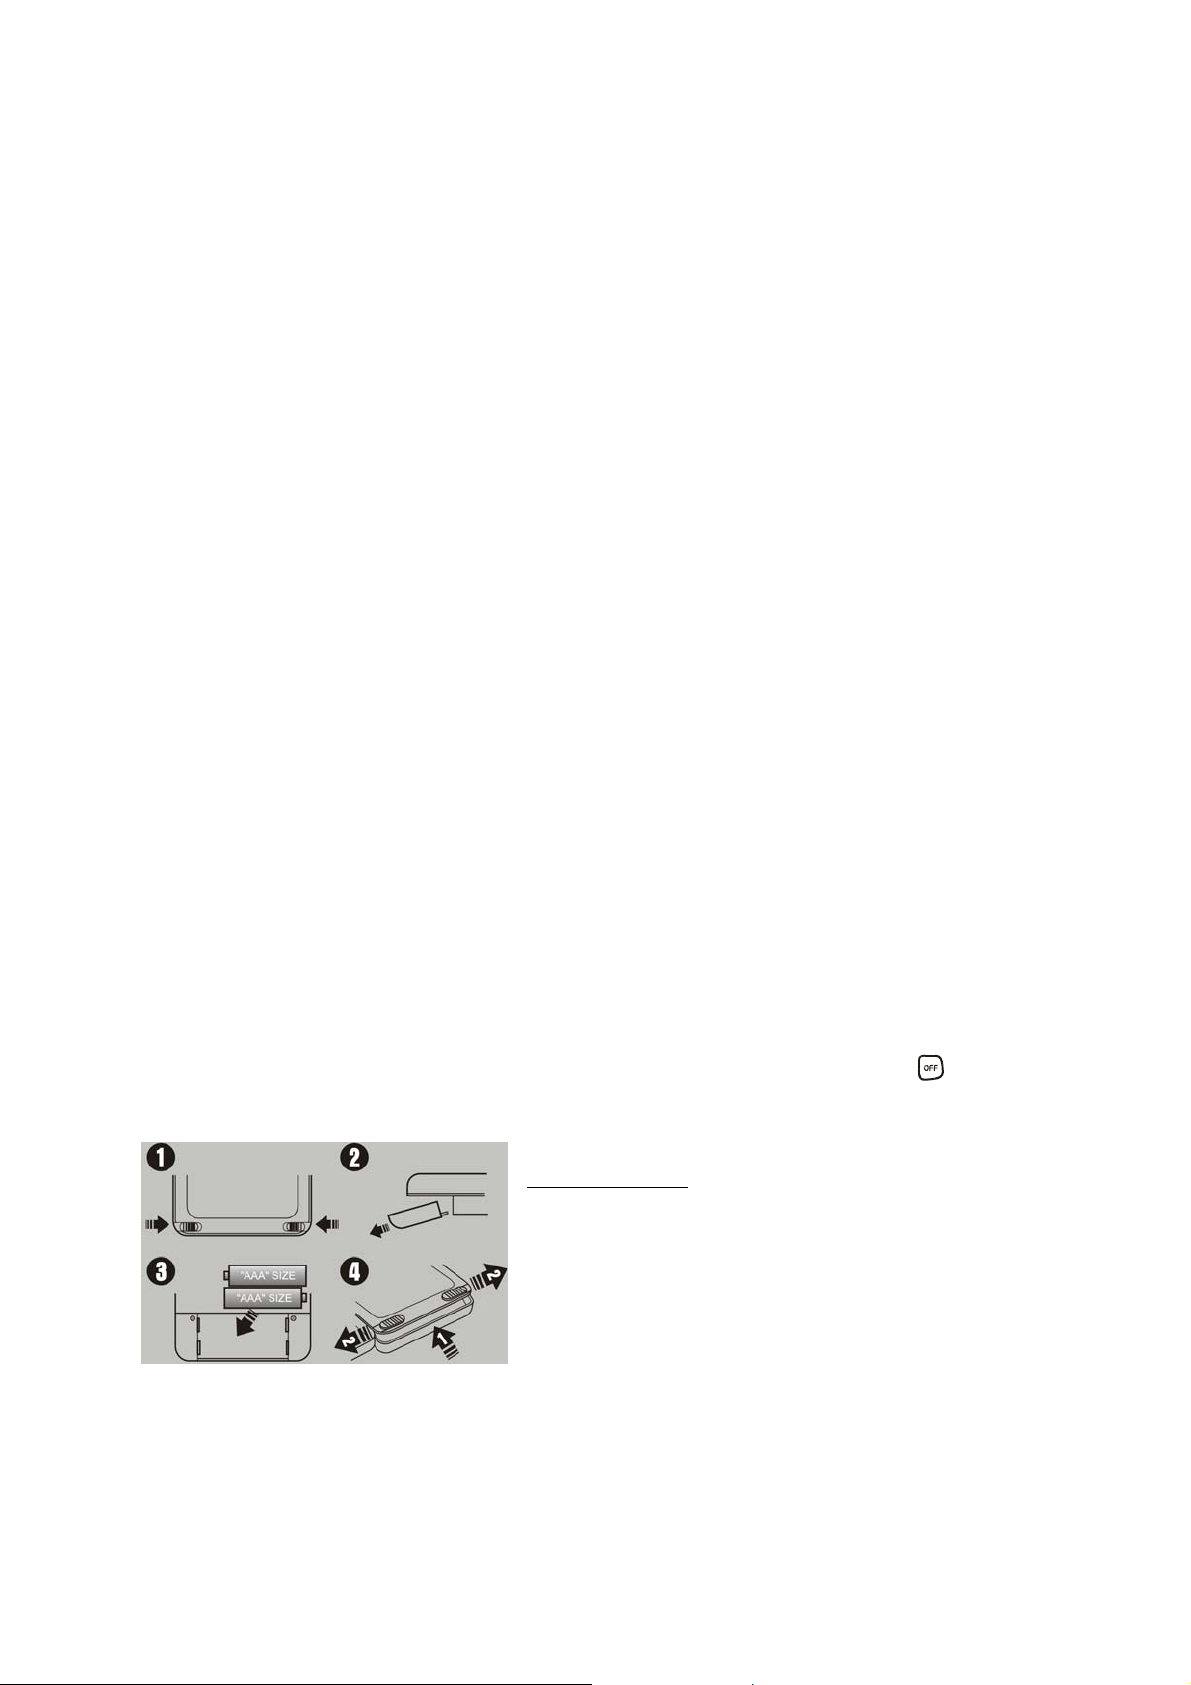
6.3 Battery operation and change
• Battery conservation through automatic power-off 3 –4 minutes after ending a
weighing operation.
• When the battery power is used the display will show “LO”. Press the key and
change the batteries at once.
Battery change
1. Open the battery compartment cover located at
the bottom of the balance (Unblocking battery
compartment cover ( picture 1+2).
2. Insert 2 AAA type batteries (picture 3) .
3. Re-insert and lock the battery cover.( picture 4).
When the balance is not in use for a longer period of time remove batteries and keep
them separately. Leakage of battery liquid might damage the balance.
CM-BA-e-0618
7
Page 8

6.4 Draft shield + weighing container (CM 50-C2N, CM 500-GN1)
6.5 Initial start-up
A warm-up time of 1 minutes stabilises the measured values after switching on.
The accuracy of the balance depends on the local acceleration of the fall.
Please be sure to observe the information in the chapter on adjusting.
Before weighing:
• Put on Weighing pan
• Unfold draft shield
• Place the weighing material
on weighing plate.
• put on draft shield.
After weighing:
• Put Draft shield and weighing
pan over weighing plate
6.6 Adjustment
As the acceleration value due to gravity is not the same at every location on earth,
each balance must be coordinated – in compliance with the underlying physical
weighing principle - to the existing acceleration due to gravity at its place of location (
only if the balance has not already been adjusted to the location in the factory). This
adjustment process must be carried out during the initial start-up, after change in location and variation of surrounding temperature. It is also recommendable to adjust
the balance periodically during weighing operation in order to obtain exact measured
values.
6.7 Adjusting
Using a precision weight, the accuracy of the balance can be checked at any time
and adjusted.
Adjustment procedure:
Check that the surrounding conditions are stable.
A short warm-up time of about 1 minutes are recommended for stabilisation.
Press key approx. 3 seconds, ”CAL ” and then the exact weight of the adjusting
weight will appear the display.
Place the adjusting weight on the centre of the weighing plate.
“ F” will appear somewhat later, and then turn off.
In case of an adjusting error or a wrong adjusting weight “ E” appears in the display.
8
CM-BA-e-0618
Page 9

7 Operation
7.1 Overview of display CM 60-2N / CM 150-1N / CM 320-1N / CM 1K1N
(Units on display)
7.2 Overview of display CM 50-C2N
(Units on panel sheet)
7.3 Overview of display CM 500-GN1
(Units on panel sheet)
7.4 Operating elements
7.4.1 Weighing
Switch the balance on by pressing the
The balance will show “8888” for approx. 3 seconds and then change to “0”. Now it
is ready for use.
key.
Important: If the display does not show 0, press the key.
Only now (!) place object on the weighing pan. Make sure that the weighing object
does not stripe or touch the housing or base.
If the object should be heavier than the weighing range allowance, the symbol “E”
(overload) will appear on the display .
CM-BA-e-0618
9
Page 10

7.4.2 Taring
Switch the balance on by pressing the key, then wait for the “0” indication.
Place the tare cup on the weighing plate and press the key. Indication will go to
“0”. Now the weight of the cup is memorised internally.
Fill the object into the cup, read the measuring value.
By pressing the key after a weighing procedure, “0” will appear on the display
again.
The taring procedure can be repeated continuously, for instance when mixing several
components.
The limit is reached when the full weighing range is overlay.
After having removed the tare cup , the total weight will appear as a negative value.
7.4.3 Plus/Minus Weighings
For instance to control piece-weights.
Switch the balance on by pressing the key, then wait until “0” is indicated.
Place rated weight on the weighing plate and tare on “0” by key. Remove rated
weight.
Place the objects on the weighing pan successively, the balance will show any devia-
tion from the rated weight in “+” and “-“.
According to the same procedure packages with the same weight, related to a rated
weight, can be produced. Return to the weighing mode by pressing the key.
7.4.4 Net-total weighings
Useful when a mixture of several components will be weighed in a tare cup, and finally the sum weight of all components weighed in will be needed for direction (nettotal, i.e. without the weight of the tare cup).
Example:
Tare cup on weighing plate, tare on “0“ by pressing the key.
Weigh component n and tare back to “0” with the key. The activation of the
memory is shown by a triangle on the far left of the display.
Weigh component o, by pressing the key the net total is displayed, this means
the sum of component n and o. Tare to “0” by pressing the key.
Weigh component p, by pressing the key the net-total is displayed, this means
the sum of the components n and o and p.
If necessary fill the formula container up to the desirable level. To return to the weigh-
ing mode press the
10
key
CM-BA-e-0618
Page 11

7.4.5 Unit change
Switch the balance on by pressing the key, then wait for the “0” indication.
The units set in the balance can be selected between the different units, by pressing
the key
Models:
CM 60-2N / CM 150-1N / CM 320-1N / CM 1K1N
Display
Gramm * g 1
Tael Taiwan tlt 0.02667
Tola tol 0.08573
* Factory setting
Model:
CM 50-C2N
Display
Conversion factor
1 g =
Conversion factor
1 g =
Gramm * g 1
Carat ct 5
* Factory setting
Model:
CM 500-GN1
Display
Gramm * g 1
Grain gn 15.43236
* Factory setting
Conversion factor
1 g =
CM-BA-e-0618
11
Page 12

7.5 Rear illuminated display
To choose the backlight mode, please follow the below instruction for the setting:
Turn off the balance.
Press and hold the key, then press the key one time; after that release the
key. Display shows„bl“.
Press the key to confirm the entry of the backlight mode.
Press the key to switch among the modes:
Display Mode Function
Contrasting display which
„bl“ on
Backlight on
can also be read in the
dark.
„bl“ off
„bl“ Ch
Confirm with the key.
Backlight off Save the battery
Backlight switches automatically off 10 sec after
stable indication
Save the battery
12
CM-BA-e-0618
Page 13

7.6 Calculator
(not included in models CM50-C2N and CM500-GN1)
KERN CM Calculator
ON/AC Switch ON /All clear
+ Addition
- Subtraction
÷ Division
x Multiplication
= Result
% Percent
M + Memory plus
M - Memory minus
MC Memory clear
MR Independent Memory recall
+/- Sign change
√ Square Root
, Comma
C Clear
Notice:
Data exchange between balance and pocket calculator is not possible.
8 Maintenance, upkeep, disposal
8.1 Cleaning
Please disconnect the device from the operating voltage before cleaning.
Only use a cloth dampened with mild suds and not aggressive cleaning agents (solvents or similar). Please ensure that fluids are not able to get into the device and rub
off using a clean, soft cloth.
Loose sample residue/powder can be removed carefully using a brush or hand vacuum cleaner.
Remove any spilt material to be weighed immediately.
8.2 Maintenance, upkeep
The device may only be opened by trained service engineers authorised by KERN.
8.3 Disposal
The operating company shall dispose of the packaging and the device in compliance
with the valid national or regional law of the operating location.
CM-BA-e-0618
13
Page 14

9 Troubleshooting
The balance should be switched off for a short time following an interruption in the
programme sequence . It is then necessary to repeat the weighing process from the
beginning.
Help:
Interruption Possible cause
Weight display is not illuminated.
The weight display changes continually
The weighing result is obviously incorrect
• The balance is not switched on.
• The batteries are wrongly inserted, the
batteries are empty
• No batteries are attached
• Draught/air movement
• Table/floor vibrations
• The weighing plate is in contact with for-
eign matter.
• Electromagnetic fields / static charging
(choose different location/switch off interfering device if possible)
• The balance display is not set to zero
• Adjustment is no longer correct.
Switch the balance off if other error messages should appear and then switch on
again. Contact the manufacturer if the error message does not disappear.
14
• Great fluctuations in temperature.
• Electromagnetic fields / static charging
(choose different location/switch off interfering device if possible)
CM-BA-e-0618
 Loading...