

Page 1
KERN & Sohn GmbH
Ziegelei 1
E-Mail: info@kern-sohn.com
Phone: +49-[0]7433- 9933-0
Internet: www.kern-sohn.com
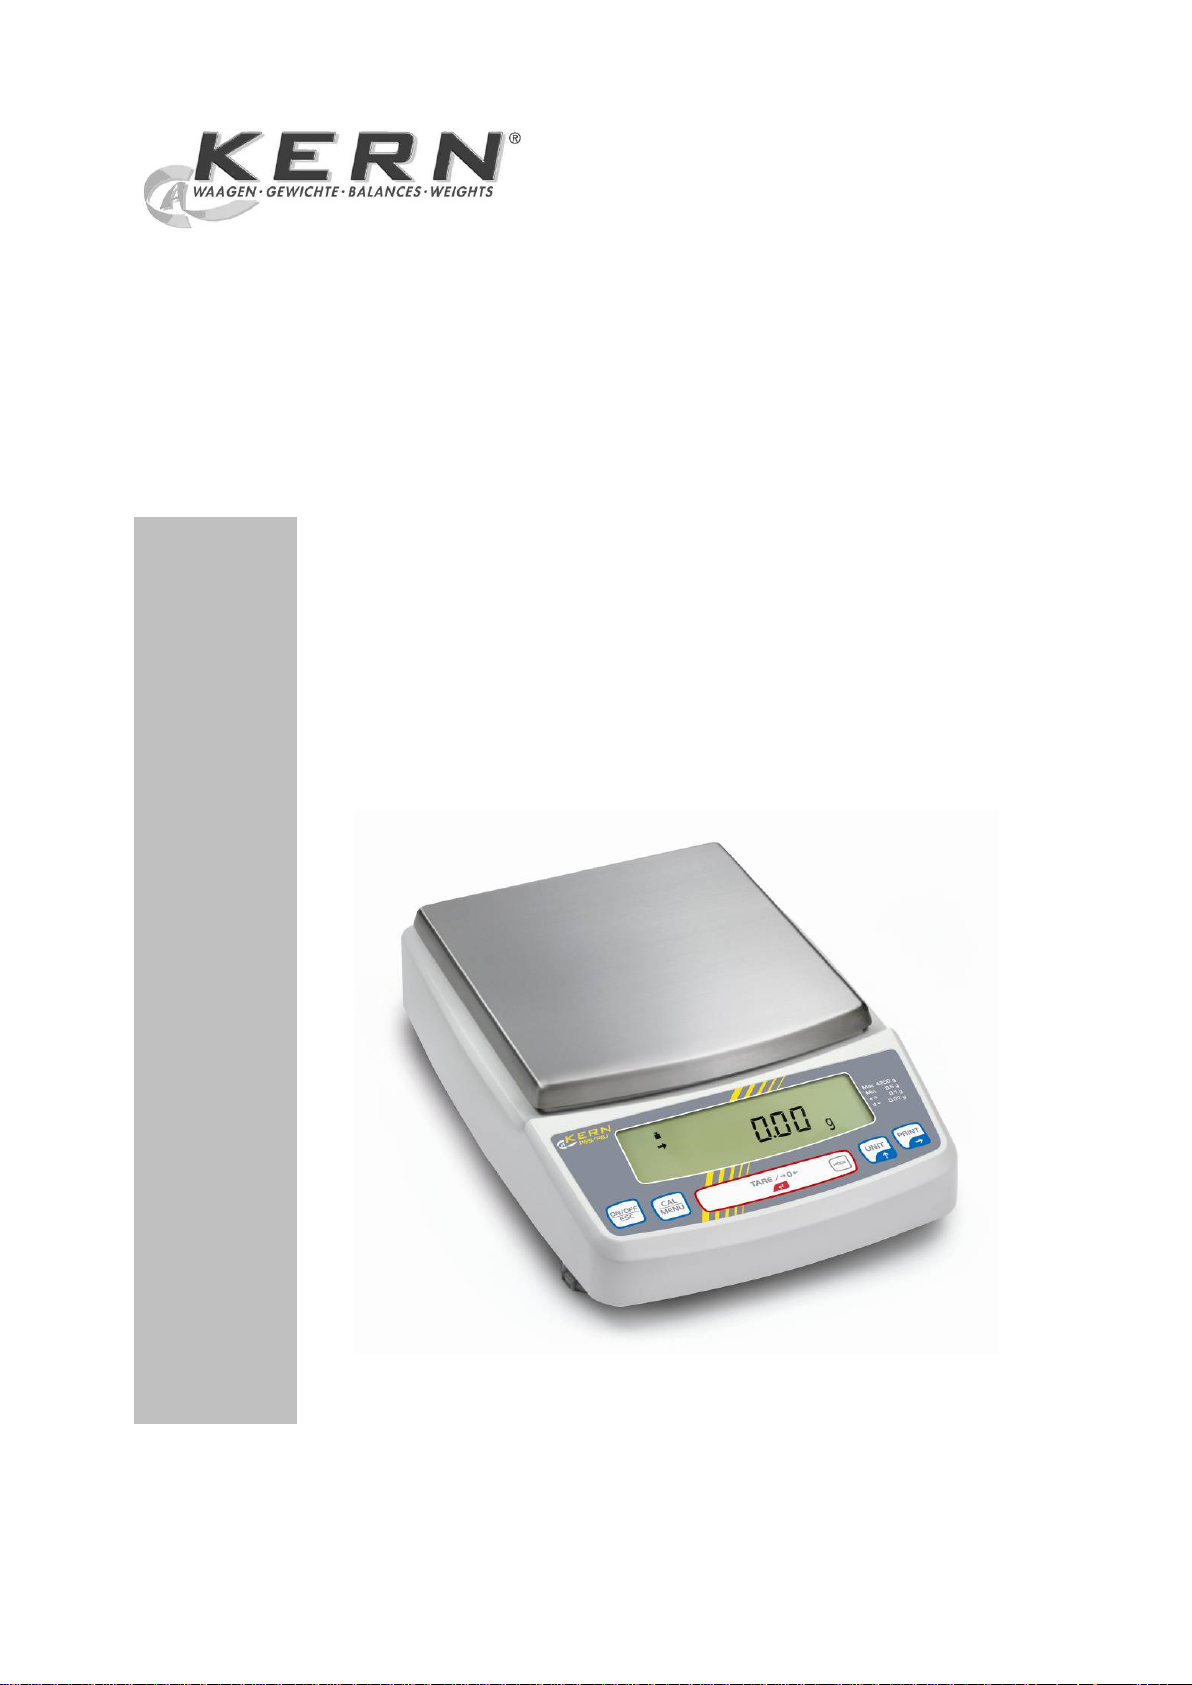
Operating instructions
Precision balances
KERN PBS/PBJ
Version 1.4
03/2013
GB
D-72336 Balingen
Fax: +49-[0]7433-9933-149
PBS/PBJ-BA-e-1314
Page 2
Weitere Sprachversionen finden Sie online unter www.kern-sohn.com/manuals
Další jazykové verze najdete na webu pod adresou www.kern-sohn.com/manuals
Yderligere sprogversioner finder de online på www.kern-sohn.com/manuals
Más versiones de idiomas se encuentran online bajowww.kern-sohn.com/manuals
Rohkem keeli internetis aadressil www.kern-sohn.com/manuals
Vous trouverez d’autres versions de langue online sous www.kern-sohn.com/manuals
Further language versions you will find online under www.kern-sohn.com/manuals
A használati utasítás egyéb nyelveken a www.kern-sohn.com/manuals címről tölthető le
Trovate altre versioni di lingue online inwww.kern-sohn.com/manuals
Ytterligere språkversjoner finner du online under www.kern-sohn.com/manuals
Bijkomende taalversies vindt u online op www.kern-sohn.com/manuals
Encontram-se online mais versões de línguas em www.kern-sohn.com/manuals
Inne wersje językowe znajdą Państwo na stroniewww.kern-sohn.com/manuals
Другие языковые версии Вы найдете по адресу в Интернете
www.kern-sohn.com/manuals
Ytterligare språkversioner finns online under www.kern-sohn.com/manuals
Muita kieliversioita löydät osoitteesta www.kern-sohn.com/manuals
Ostale jezikovne različice boste našli online na www.kern-sohn.com/manuals
Diğer lisan versiyonlarını internetten www.kern-sohn.com/manuals adresinden temin
edeblirsiniz
3 PBS/PBJ-BA-e-1314
Page 3

KERN PBS/PBJ
Precision balances
GB
Version 1.4 03/2013
Operating instructions
Contents
1 Technical data ................................................................................................... 7
2 Declaration of conformity ............................................................................... 11
3 Appliance overview ......................................................................................... 12
3.1 Keyboard overview .............................................................................................13
3.1.1 Numeric entry ................................................................................................................... 14
3.1.2 Setting the decimal point when entering numerical values .............................................. 15
3.2 Overview of display ............................................................................................16
4 Basic Information (General) ........................................................................... 17
4.1 Proper use ...........................................................................................................17
4.2 Improper Use .......................................................................................................17
4.3 Warranty ..............................................................................................................17
4.4 Monitoring of Test Resources ...........................................................................18
5 Basic Safety Precautions ................................................................................ 18
5.1 Pay attention to the instructions in the O per at ion Manual ..............................18
5.2 Personnel training ..............................................................................................18
6 Transport and storage .................................................................................... 18
6.1 Testing upon acceptance ...................................................................................18
6.2 Packaging ............................................................................................................18
7 Unpacking, Setup and Commissioning ......................................................... 19
7.1 Installation Site, Locat ion of Use .......................................................................19
7.2 Unpacking / Scope of delivery ...........................................................................19
7.3 Placing .................................................................................................................21
7.4 Mains connection................................................................................................25
7.5 Switch power supply on .....................................................................................25
7.6 Connection of peripheral devices ......................................................................26
7.7 Initial Commissioning .........................................................................................
26
PBS/PBJ-BA-e-1314 4
Page 4

8 Adjustment ....................................................................................................... 27
8.1 Manual adjustment by CAL button ....................................................................27
8.1.1 Adjustment with internal weight (only models PBJ) ......................................................... 27
8.1.2 Adjustment with external weight (factory setting models PBS) ........................................ 29
8.2 Adjustment test ...................................................................................................31
8.2.1 Adjustment test with external weight ................................................................................ 32
8.2.2 Adjustment test with internal weight ................................................................................. 34
8.3 Automatic adjustment by PSC (Perfect Self Calibration), only models PBJ ..35
8.4 Automatic adjustment by Clock-CAL (model PB only).....................................36
8.5 ISO/GLP log .........................................................................................................38
8.5.1 Setting of adjustment protocol and scale identification number ....................................... 38
9 Verification ....................................................................................................... 40
10 Basic Operation ........................................................................................... 41
10.1 Switch on off balance .........................................................................................41
10.1 Zeroing ................................................................................................................41
10.2 Si m ple weighing .................................................................................................42
10.3 Taring ...................................................................................................................43
10.4 Under f l oor weighing ...........................................................................................44
11 The menu ...................................................................................................... 45
11.1 Navigation in the menu ......................................................................................45
11.2 Usef ul functions ..................................................................................................48
11.2.1 Recall of last menu ...................................................................................................... 48
11.2.2 Resetting the menu ..................................................................................................... 48
11.3 Menu Lock ...........................................................................................................49
12 Set the installed clock ................................................................................. 50
12.1 Date ......................................................................................................................50
12.2 Time .....................................................................................................................51
12.3 Set t ing the display for the standby mode .........................................................52
13 Functions for adaptation to ambient conditions ....................................... 53
13.1 Stability and reaction (average value) ...............................................................53
13.1.1 Automatic mode ........................................................................................................... 53
13.1.2 Filling mode ................................................................................................................. 53
13.1.3 Standard mode ............................................................................................................ 53
13.1.4 Antivibration mode ....................................................................................................... 53
13.1.5 Antiwind mode ............................................................................................................. 53
13.2 St ability Detection Band .....................................................................................54
13.3 Tracking ...............................................................................................................54
14 Capacity display ........................................................................................... 54
5 PBS/PBJ-BA-e-1314
Page 5

15 Switch-over weighing unit .......................................................................... 55
15.1 Per cent age conversion .......................................................................................56
16 Application Functions ................................................................................. 57
16.1 Par t s count ing .....................................................................................................57
16.2 Cont r ol weighing and target weighing ..............................................................58
16.2.1 Control weighing (comparator) display type 1 ............................................................. 58
16.2.2 Control weighing (comparator) – display type 2 .......................................................... 58
16.2.3 Target weighing mode ................................................................................................. 59
16.3 Densi t y determinat ion ........................................................................................60
16.3.1 Specific measurement of solid weight ......................................................................... 60
16.3.2 Table of temperatures and densities ........................................................................... 61
16.3.3 Specific measurement of liquid weight ........................................................................ 62
16.4 Ext r em e value recor di ng ....................................................................................62
16.5 Auto Print functi on .............................................................................................63
16.6 Automatic zero setting .......................................................................................64
16.7 Zer o r ange ...........................................................................................................64
16.8 Taring /printing at stabilit y (models PBJ) .........................................................64
16.9 For m ul ation mode...............................................................................................65
16.10 Automatic saving and zeroing .......................................................................66
16.11 Animal weighing .............................................................................................67
17 Data output ................................................................................................... 68
17.1 Per sonal Computer - RS-232C ...........................................................................68
17.1.1 Connecting the Cable .................................................................................................. 68
17.2 Dat a For m at s .......................................................................................................69
1. For
2. For „oL“ or „-oL“ ....................................................................................................69
17.3 Usi ng codes of com m ands ................................................................................70
17.4 User Settings .......................................................................................................75
measuring values:............................................................................................69
17.4.1 Overview ...................................................................................................................... 75
17.4.2 Handshaking ................................................................................................................ 75
17.4.3 Format ......................................................................................................................... 76
17.4.4 Speed of communication ............................................................................................. 76
17.4.5 Parity / Bit length .......................................................................................................... 76
17.4.6 Stop Bits ...................................................................................................................... 76
17.4.7 Limiter .......................................................................................................................... 76
18 Service, maintenance, disposal .................................................................. 77
18.1 Clean ....................................................................................................................77
18.2 Ser vice, m aintenance .........................................................................................77
18.3 Disposal ...............................................................................................................77
19 Instant help ................................................................................................... 78
PBS/PBJ-BA-e-1314 6
Page 6
1 Technical data
Minimum load (Min)
0.02 g
0.1 g
-
Stabilization time
2.5 sec.
2.5 sec.
2.5 sec.
piece counting
(l x L x h) [mm]
Underfloor weighing device
Hooks
Altitude
Up to 2000 m
KERN PBJ 420-3M PBJ 620-3M PBJ 1020-3
Readability (d) 0.001 g 0.001 g 0.001 g
Weighing range (max) 420 g 620 g 1020 g
Verification value (e) 0.01 g 0.01 g -
Verification class II I -
Reproducibility 0.001 g 0.001 g 0.001 g
Linearity ± 0.002 g ± 0.002 g ± 0.003 g
Warm-up time 4 h 4 h 8 h
Adjustment weight internal
Weighing units
(calibrated appliances)
Smallest part weight for
Reference quantities at
piece counting
Weighing plate, stainless
steel
Dimensions caisse
Dimensions wind screen
[mm]
Net weight (kg) 3.7 kg
Permitted environmental
condition
Humidity of air max. 80 % relative (not condensing)
Interface RS-232
exterior 202 x 228 x 103
g, kg, pcs, %
1 mg
5, 10, 20, 50 100, 200
108 x 105 mm
209 x 322 x 78
interior 180 x 193 x 87
+10° C to +30° C
AC adapter (Primary) AC 100 -240 V, 400 mA 50/60Hz
Rated electric power supply 12 V, 1 A
Pollution Degree 2
Overvoltage Category Category II
Installation Site device may only be used indoors
7 PBS/PBJ-BA-e-1314
Page 7

Weighing plate, stainless
KERN PBJ 4200-2M PBJ 6200-2M PBJ 8200-1M
Readability (d) 0.01 g 0.01 g 0.1 g
Weighing range (max) 4.2 kg 6.2 kg 8.2 kg
Minimum load (Min) 0.5 g 1 g 5 g
Verification value (e) 0.1 g 0.1 g 1 g
Verification class II I II
Reproducibility 0.01 g 0.01 g 0.08 g
Linearity ± 0.02 g ± 0.02 g ± 0.1 g
Warm-up time 4 h 4 h 2 h
Stabilization time 2.5 sec. 2.5 sec. 1.2 sec.
Adjustment weight internal
Weighing units
(calibrated appliances)
Smallest part weight for
piece counting
Reference quantities at
piece counting
steel
Dimensions caisse
(l x L x h) [mm]
10 mg 100 mg
g, kg, pcs, %
5, 10, 20, 50 100, 200
170 x 180 mm
209 x 322 x 78
Net weight (kg) 4.8 kg
Permitted environmental
condition
+10° C to +30° C
Humidity of air max. 80 % relative (not condensing)
Interface RS-232
Underfloor weighing device Hooks
AC adapter (Primary) AC 100 -240 V, 400 mA 50/60Hz
Rated electric power supply '&12 V, 1 A
Pollution Degree 2
Overvoltage Category Category II
Altitude Up to 2000 m
Installation Site device may only be used indoors
PBS/PBJ-BA-e-1314 8
Page 8
Verification value (e)
0.01 g
0.01 g
-
Warm-up time
4 h
4 h
8 h
Possible Adjustment Points
100 – 420 g
100 – 620 g
100 – 1020 g
piece counting
exterior 202 x 228 x 103
condition
Rated electric power supply
KERN PBS 420-3M PBS 620-3M PBS 1020-3
Readability (d) 0.001 g 0.001 g 0.001 g
Weighing range (max) 420 g 620 g 1020 g
Minimum load (Min) 0.02 g 0.1 g -
Verification class II I -
Reproducibility 0.001 g 0.001 g 0.001 g
Linearity ± 0.002 g ± 0.002 g ± 0.003 g
Stabilization time 2.5 sec. 2.5 sec. 2.5 sec.
Recommended adjustment
weight, not added (class)
Weighing units
(calibrated appliances)
Smallest part weight for
piece counting
Reference quantities at
Weighing plate, stainless
steel
Dimensions caisse
(l x L x h) [mm]
Dimensions wind screen
400 g (E2) 600 g (E2) 1000 g (E2)
g, kg, pcs, %
0.001g
5, 10, 20, 50 100, 200
108 x 105 mm
209 x 322 x 78
interior 180 x 193 x 87
[mm]
Net weight (kg) 3 kg
Permitted environmental
+5° C to +40° C
Humidity of air max. 80 % relative (not condensing)
Interface RS-232
Underfloor weighing device Hooks
AC adapter (Primary) AC 100 -240 V, 400 mA 50/60Hz
Pollution Degree 2
Overvoltage Category Category II
Altitude Up to 2000 m
Installation Site device may only be used indoors
9 PBS/PBJ-BA-e-1314
DC 12 V, 1 A
Page 9
(calibrated appliances)
steel
Net weight (kg)
3 kg
KERN PBS 4200-2M PBS 6200-2M PBS 8200-1M
Readability (d) 0.01 g 0.01 g 0.1 g
Weighing range (max) 4.2 kg 6.2 kg 8.2 kg
Minimum load (Min) 0.5 g 1 g 5 g
Verification value (e) 0.1 g 0.1 g 1 g
Verification class II I II
Reproducibility 0.01 g 0.01 g 0.1 g
Linearity ± 0.02 g ± 0.02 g ± 0.2 mg
Warm-up time 4 h 4 h 2 h
Stabilization time 2.5 sec. 2.5 sec. 1.2 sec.
Recommended adjustment
weight, not added (class)
4 kg (E2) 5 kg (E2) 7 kg (E2)
Possible Adjustment Points 1000 – 4200 g 1000 – 6200 g 1000 – 8200 g
Weighing units
Smallest part weight for
piece counting
Reference quantities at
piece counting
Weighing plate, stainless
Dimensions caisse
(l x L x h) [mm]
Permitted environmental
condition
10 mg 100 mg
g, kg, pcs, %
5, 10, 20, 50 100, 200
170 x 180
209 x 322 x 78
+5° C to +40° C
Humidity of air max. 80 % relative (not condensing)
Interface RS-232
Underfloor weighing device Hooks
AC adapter (Primary) AC 100 -240 V, 400 mA 50/60Hz
Rated electric power supply DC 12 V, 1 A
Pollution Degree 2
Overvoltage Category Category II
Altitude Up to 2000 m
Installation Site device may only be used indoors
PBS/PBJ-BA-e-1314 10
Page 10
2 Declaration of c onf ormity
KERN & Sohn GmbH
D-72322 Balingen-Frommern
E-Mail: info@kern-sohn.de
Tel: 0049-[0]7433- 9933-0
Internet: www.kern-sohn.de
D
Konformitätserklärung
Wir erklären hiermit, dass das Produkt, auf das sich diese Erklärung bezieht,
mit den nachstehenden Normen übereinstimmt.
GB
Declaration of
conformity
We hereby declare that the product to which this declaration refers conforms
with the following standards.
CZ
Prohlášení o
shode
Tímto prohlašujeme, že výrobek, kterého se toto prohlášení týká, je v souladu
s níže uvedenými normami.
E
Declaración de
conformidad
Manifestamos en la presente que el producto al que se refiere esta
declaración está de acuerdo con las normas siguientes
F
Déclaration de
conformité
Nous déclarons avec cela responsabilité que le produit, auquel se rapporte la
présente déclaration, est conforme aux normes citées ci-après.
I
Dichiarazione di
conformitá
Dichiariamo con ciò che il prodotto al quale la presente dichiarazione si
riferisce è conforme alle norme di seguito citate.
NL
Conformiteitverklaring
Wij verklaren hiermede dat het product, waarop deze verklaring betrekking
heeft, met de hierna vermelde normen overeenstemt.
P
Declaração de
conformidade
Declaramos por meio da presente que o produto no qual se refere esta
declaração, corresponde às normas seguintes.
PL
Deklaracja
zgodności
Niniejszym oświadczamy, że produkt, którego niniejsze oświadczenie dotyczy,
jest zgodny z poniższymi normami.
RUS
Заявление о
соответствии
Мы заявляем, что продукт, к которому относится данная декларация,
соответствует перечисленным ниже нормам.
Signature
Datum
27.03.2013
Ort der Ausstellung
Place of issue
72336 Balingen
Albert Sauter
KERN & Sohn GmbH
Geschäftsführer
Managing director
KERN & Sohn GmbH, Ziegelei 1, D-72336 Balingen, Tel. +49-[0]7433/9933-0
Fax +49-[0]7433/9933-149, E-Mail: info@kern-sohn.com, Internet: www.kern-sohn.com
Postfach 4052
Fax: 0049-[0]7433-9933-149
Declaration of conformity
EG-Konformitätserklärung EC-Declaration of -Conformity
Déclaration de conformité EC-Declaración de Conformidad
ECEC-Dichiarazione di conformit à EC-Conformiteitverklaring
EC- Declaração de conformidade EC- Prohlášení o shode
EC-Deklaracja zgodności EC-Заявление о соответствии
Electronic Balan ce: KERN PBJ / PBS
2004/108/EC EN 61326-1:2006
2006/95/EC EN 61010-1: 2010
Date
11 PBS/PBJ-BA-e-1314
Signatur
Page 11
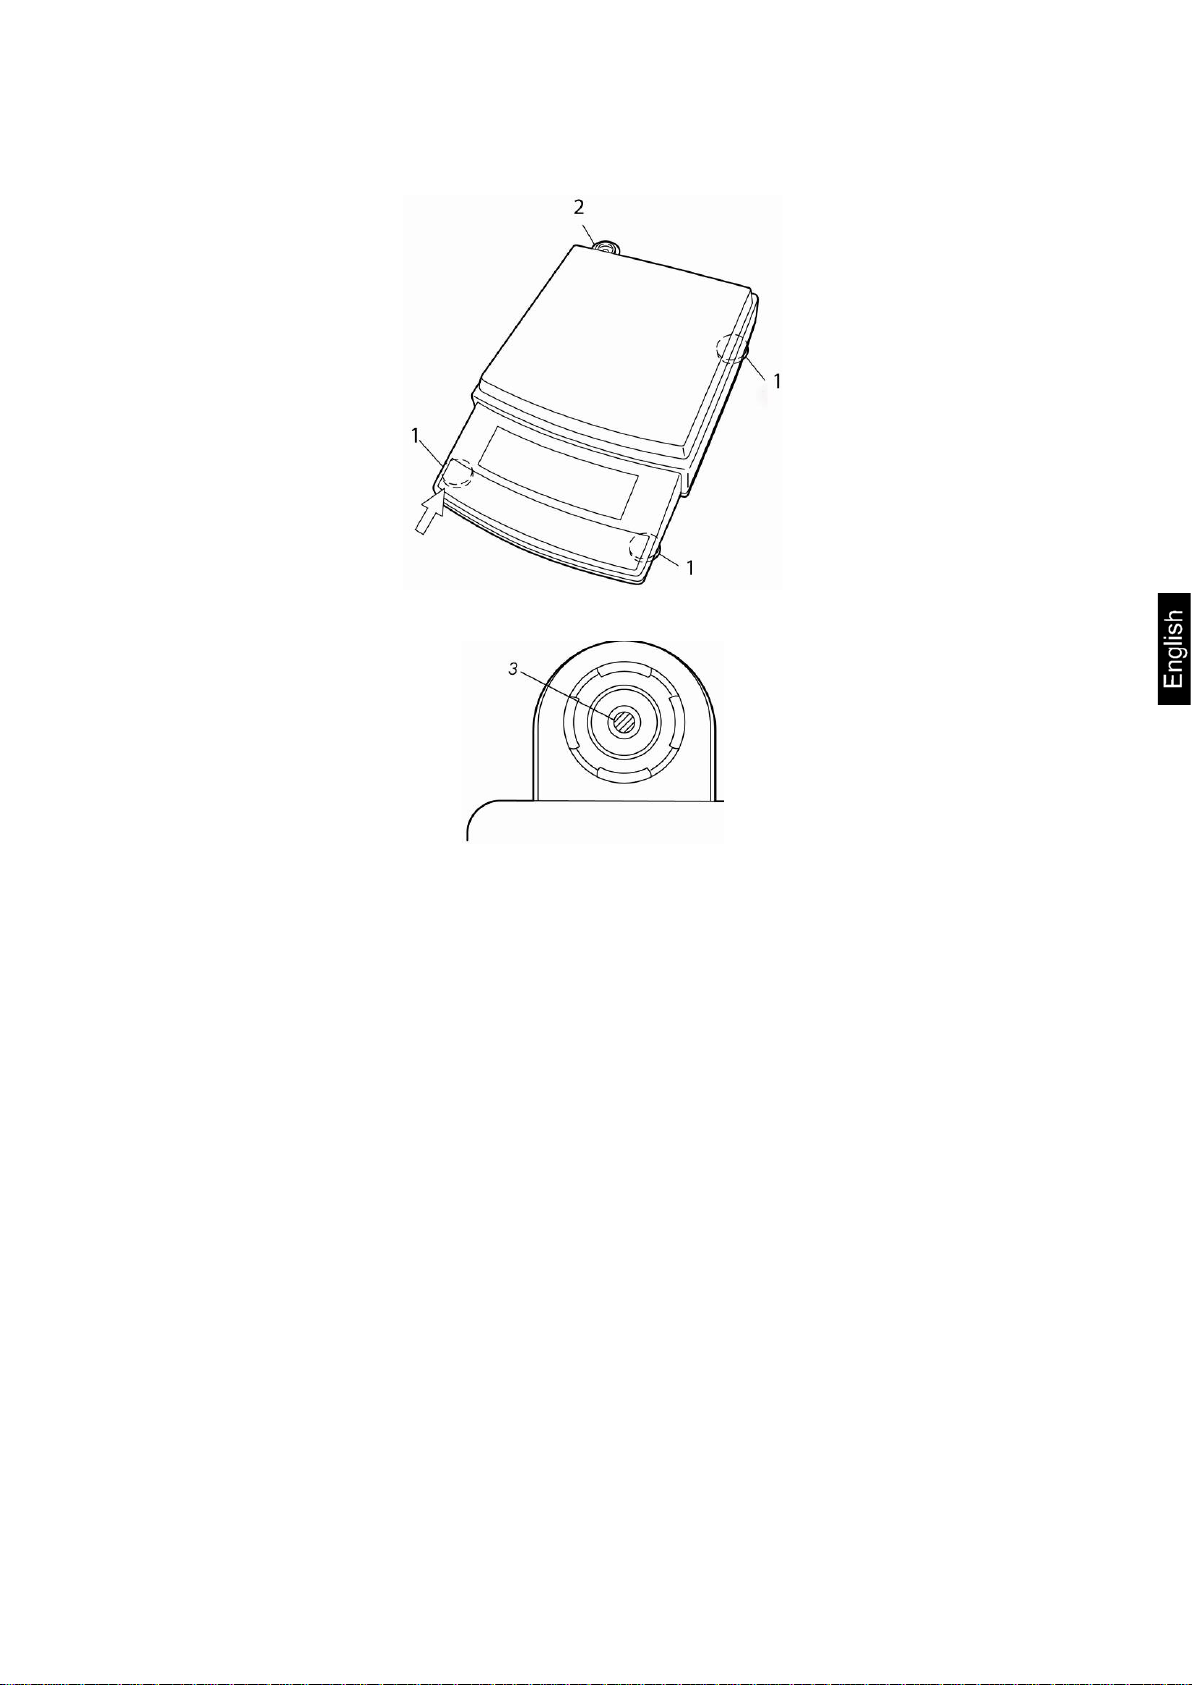
3 Appliance overview
Models with readability d = 0.001 g:
Models with readability d ≥ 0.01 g:
1. Windshield
2. Weighing pan
3. Display
4. Keyboard
5. Levelling screw
PBS/PBJ-BA-e-1314 12
Page 12
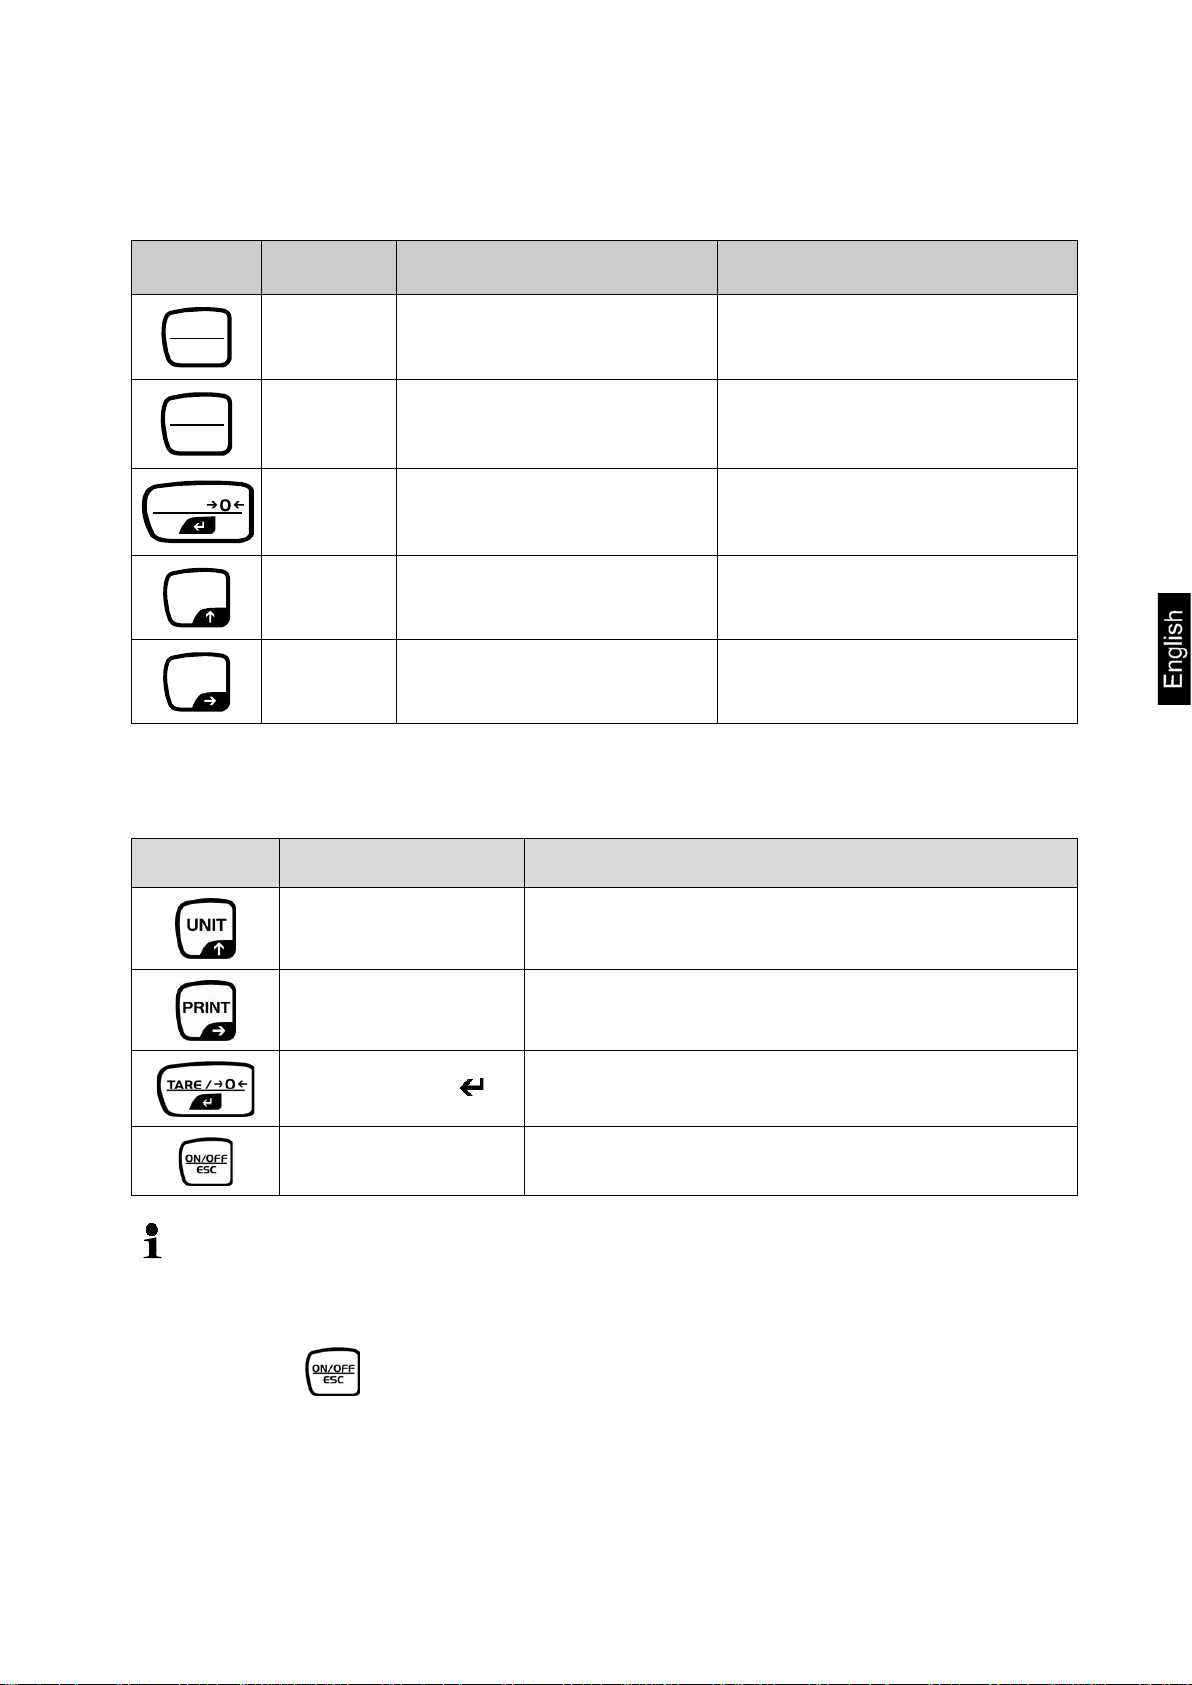
3.1 Keyboard overview
Pressed once and released
Keep pressed for about 3
seconds
ESC
ON/OFF
Switches between the
modes.
MENU
CAL
TARE /
UNIT
PRINT
Issue of weighing value to
(printer, PC)
In weighing mode:
Description
[ON/OFF]
[CAL]
[TARE] Taring / Setting to zero No operation
operation and standby
Invokes adjustment or
menu selection. (*1)
Exit menu / Return to
weighing mode
To display the menu
element recently set.
Button
[UNIT]
[PRINT]
Switch over weighing unit
(*3)
external appliances
No operation
Issue of date and time to
external appliances.
*1 This key is used to set a value when percent (%), number of pieces (PCS), specific weight
of solids (▼d) or specific weight of liquid (d) is displayed.
*3 Units different than „g” must be first set in the balance, before they can be used for
measurements. Only gram (g), percent (%) and number of pieces (PCS) are factory set.
13 PBS/PBJ-BA-e-1314
Page 13
Pressed once and released
Keep pressed for about 3
seconds
ESC
ON/OFF
MENU
CAL
TARE /
UNIT
of flashing digit by 1.
PRINT
by and repeat enter.
In menu:
Button
Description
[ON/OFF]
[CAL]
[TARE]
[UNIT]
[PRINT]
3.1.1 Numeric entry
To return to a submenu or
weighing mode.
Moves to the next menu item.
To select or set the menu
element recently displayed.
Entering numeric values:
Increases the numeric value
Entering numeric values: To
go to the next position.
Return to weighing mode
To display the menu
element recently set.
No operation
No operation
No operation
Button Description Function
Navigation button
Increase flashing digit
Navigation button
Navigation button
Digit selection to the right
Confirm entry
ESC Cancel input
• With numerical input the indicator [#] appears.
• „SET“ indicates that the value has been saved successfully.
• „ERR“ means that the value could not be saved successfully; back to menu
PBS/PBJ-BA-e-1314 14
Page 14

3.1.2 Setting the decimal point when e ntering numerical values
PRINT
PRINT
UNIT
TARE /
Entering a decimal point is necessary only for determining the specific gravity or if a
multiplier shall be defined for the user-defined unit.
• Repeat actuating the
button again in order to call up the decimal point setting mode. The reversed
triangle symbol ▼or the current decimal point flashes.
• Actuate the
position by one digit each.
• Actuate the
message „SEt“ which appears for a short period of time indicates that setting
has been completed.
button until the last digit flashes. Actuate the
button in order to move the decimal point to the required
button to define the position of the decimal point. The
15 PBS/PBJ-BA-e-1314
Page 15
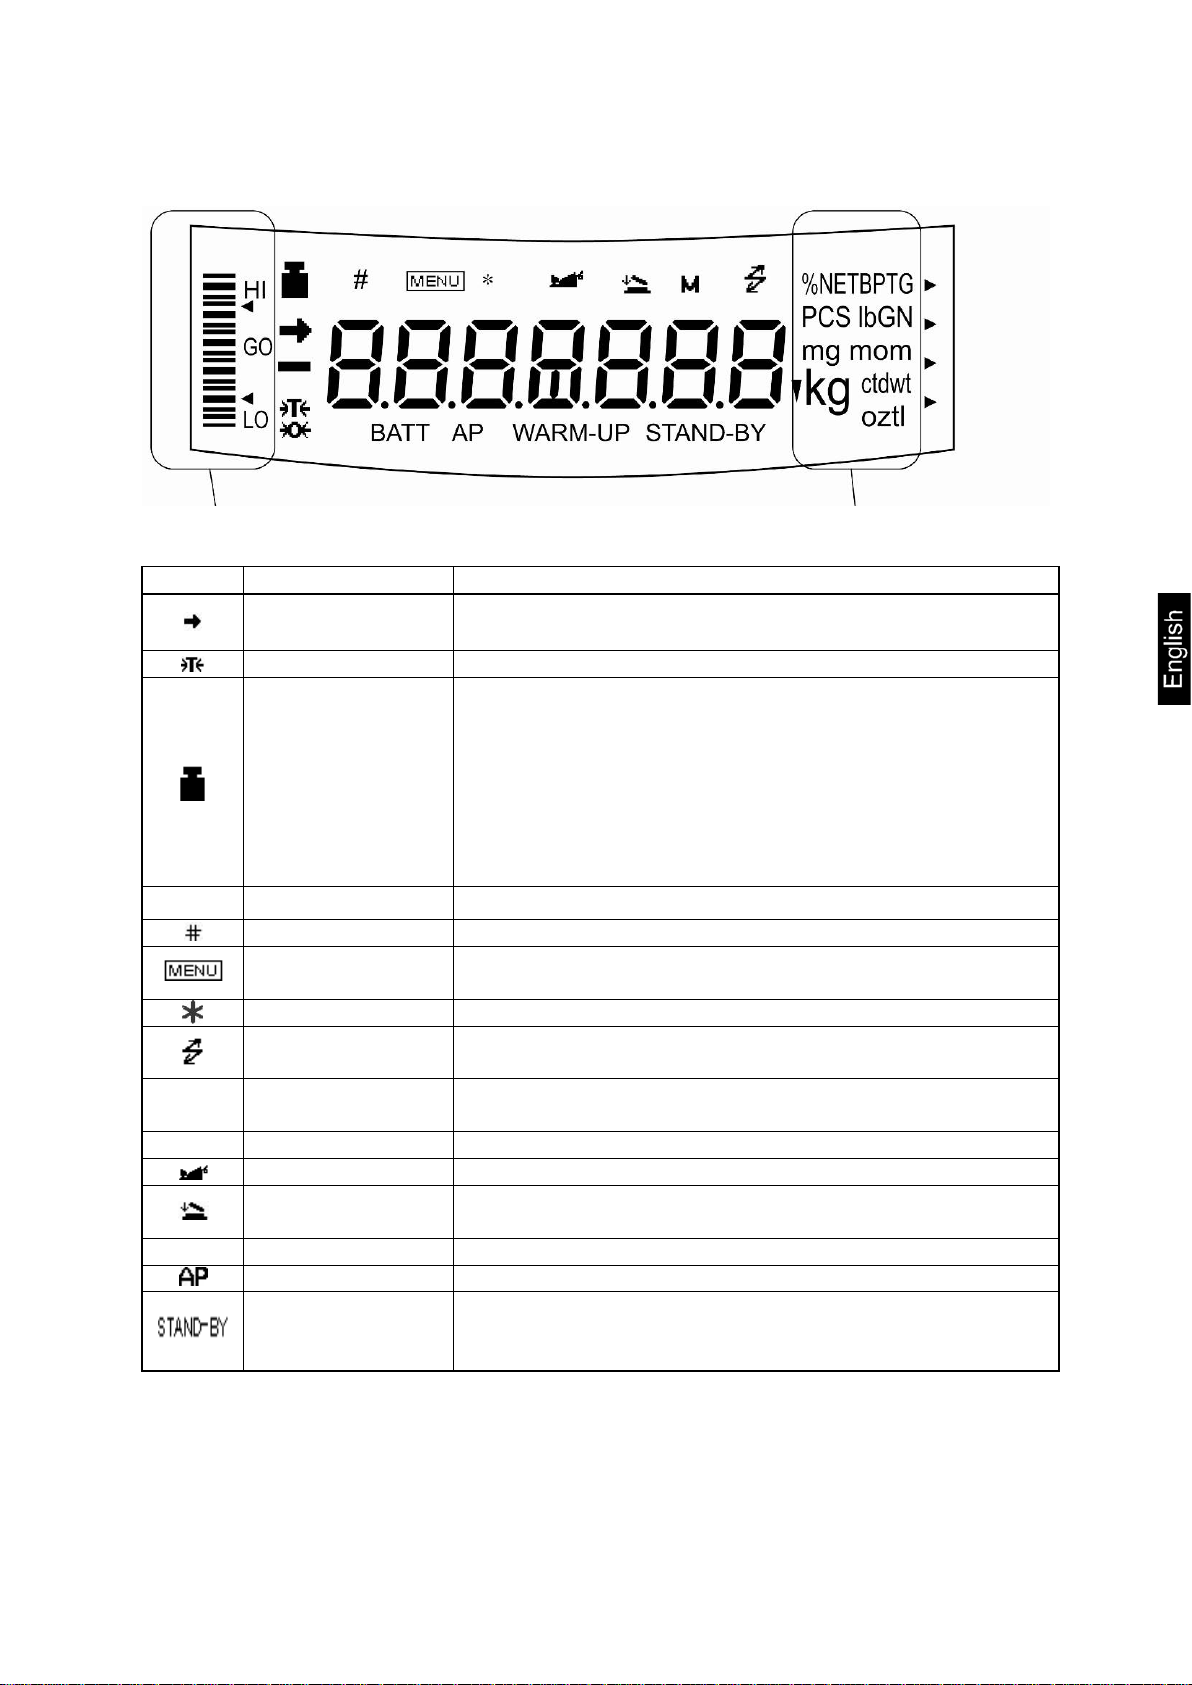
Display
Designation
Description
currently selected element during menu element selection.
Tare symbol
Informs about setting an initial tare value.
It is displayed during adjusting the measuring range. It indicates
• with external weight (PBS models refer to chapter 8.1.2).
[ ]
Number symbol
Indicates numeric value entry.
Appears during menu selection. Always shown when the menu is
locked.
Asterisk
Indicates that the displayed numeric value is not a mass value.
Communication
symbol
Is lit up during communication with external appliances via RS232C cable. Shown when communication functions are ON.
symbol
an alternative to the decimal point.
→0←
Zero indicator
Animal symbol
Shows the setting of animal weighing function.
and zeroing symbol
M
Memory Symbol
Balance is in formula mode
Auto Print symbol
Displays set-up of the Auto Print function.
Appears when the balance power supply is in stand-by mode. It is
mode.
Capacity display
Display of units
Stability display
3.2 Overview of display
Indicates that the weighed value is stable. (*1) It marks the
adjusting settings during menu selection. Flashes prior to start of
automatic adjustment.
Weight symbol
Note:
If automatic adjusting of measuring range is not activated, a user
must perform it when this symbol flashes.
• with built-in weight (PBJ models refer to chapter 8.31.1)
Brackets The non-calibrated value is given in brackets in calibrated scales.
Menu symbol
▼
*1 Stabilisation symbol
Inverse triangle
Automatic storage
Standby mark
When the stabilisation symbol is illuminated for a long time, the displayed value may oscillate when a
weight is slowly changed or stabilisation detection range is set to high value.
Indicates the setting of specific weight measurement. It is used as
Shows the setting of automatic saving and zeroing function.
also displayed when operational function changes into stand-by
PBS/PBJ-BA-e-1314 16
Page 16

4 Basic Information (General)
4.1 Prope r use
The balance you purchased is intended to determine the weighing value of material
to be weighed. It is intended to be used as a “non-automatic balcance”, i.e. the
material to be weighed is manually and carefully placed in the centre of the weighing
pan.. As soon as a stable weighing value is reached the weighing value can be read.
4.2 Improper Use
Do not use balance for dynamic add-on weighing procedures, if small amounts of
goods to be weighed are removed or added. The “stability compensation“ installed in
the balance may result in displaying an incorrect measuring value! (Example: Slowly
draining fluids from a container on the balance.)
Do not leave permanent load on the weighing pan. This may damage the measuring
system.
Impacts and overloading exceeding the stated maximum load (max) of the balance,
minus a possibly existing tare load, must be strictly avoided. Balance may be
damage by this.
Never operate balance in explosive environment. The serial version is not explosion
protected.
The structure of the balance may not be modified. This may lead to incorrect
weighing results, safety-related faults and destruction of the balance.
The balance may only be used according to the described conditions. Other areas of
use must be released by KERN in writing.
4.3 Warranty
Warranty claims shall be voided in case
• Our conditions in the operation manual are ignored
• The appliance is used outside the described uses
• The appliance is modified or opened
• Mechanical damage or damage by media, liquids, natural wear and tear
• The appliance is improperly set up or incorrectly electrically connected
• The measuring system is overloaded
17 PBS/PBJ-BA-e-1314
Page 17

4.4 Monitoring of Test Resources
In the framework of quality assurance the measuring-related properties of the
balance and, if applicable, the testing weight, must be checked regularly. The
responsible user must define a suitable interval as well as type and scope of this
test. Information is available on KERN’s home page (www.kern-sohn.com with
regard to the monitoring of balance test substances and the test weights required for
this. In KERN's accredited DKD calibration laboratory test weights and balances may
be calibrated (return to the national standard) fast and at moderate cost.
5 Basic Safety Precautions
5.1 Pay attention to the instructions in the Operation Manual
Carefully read this operation manual before setup and commissioning, even if you
are already familiar with KERN balances.
5.2 Per sonnel training
The appliance may only be operated and maintained by trained personnel.
6 Transport and stora ge
6.1 Tes ting upon acceptance
When receiving the appliance, please check packaging immediately, and the
appliance itself when unpacking for possible visible damage.
6.2 Packaging
Keep all parts of the original packaging for a possibly
required return.
Only use original packaging for returning.
Prior to dispatch disconnect all cables and remove
loose/mobile parts.
Reattach possibly supplied transport securing devices.
Secure all parts such as the glass wind screen, the
weighing platform, power unit etc. against shifting and
damage.
PBS/PBJ-BA-e-1314 18
Page 18

7 Unpacking, Setup and Commissioning
7.1 Insta llation Site, Location of Use
The balances are designed in a way that reliable weighing results are achieved in
common conditions of use.
You will work accurately and fast, if you select the right location for your balance.
Therefore, observe the following for the installation site:
• Operate the device only indoors.
• Place the balance on a firm, level surface;
• Avoid extreme heat as well as temperature fluctuation caused by installing
next to a radiator or in the direct sunlight;
• Protect the balance against direct draughts due to open windows and doors;
• Avoid jarring during weighing;
• Protect the balance against high humidity, vapours and dust;
• Do not expose the device to extreme dampness for longer periods of time.
Non-permitted condensation (condensation of air humidity on the appliance)
may occur if a cold appliance is taken to a considerably warmer environment.
In this case, acclimatize the disconnected appliance for ca. 2 hours at room
temperature.
• Avoid static charge of goods to be weighed or weighing container.
If electro-magnetic fields or static charge occur, or if the power supply is unstable
major deviations on the display (incorrect weighing results) are possible. In that case,
the location must be changed.
7.2 Unpacking / Scope of delivery
Remove device and accessories carefully from packaging, remove packaging
material and place device at the planned work place. Verify that there has been no
damage and that all packing items are present.
19 PBS/PBJ-BA-e-1314
Page 19
• Mains adapter
Carrier weighing pan
Protective cover
Weighing pan
2 Fixiing screws
Wiindshield
2 screws
Main weighing unit
Scope of delivery / serial accessories:
Models with readability d = 0.001 g: Models with readability d ≥ 0.01 g:
PBS/PBJ-BA-e-1314 20
Protection hood
• Operating instructions
• Menu overview
Page 20
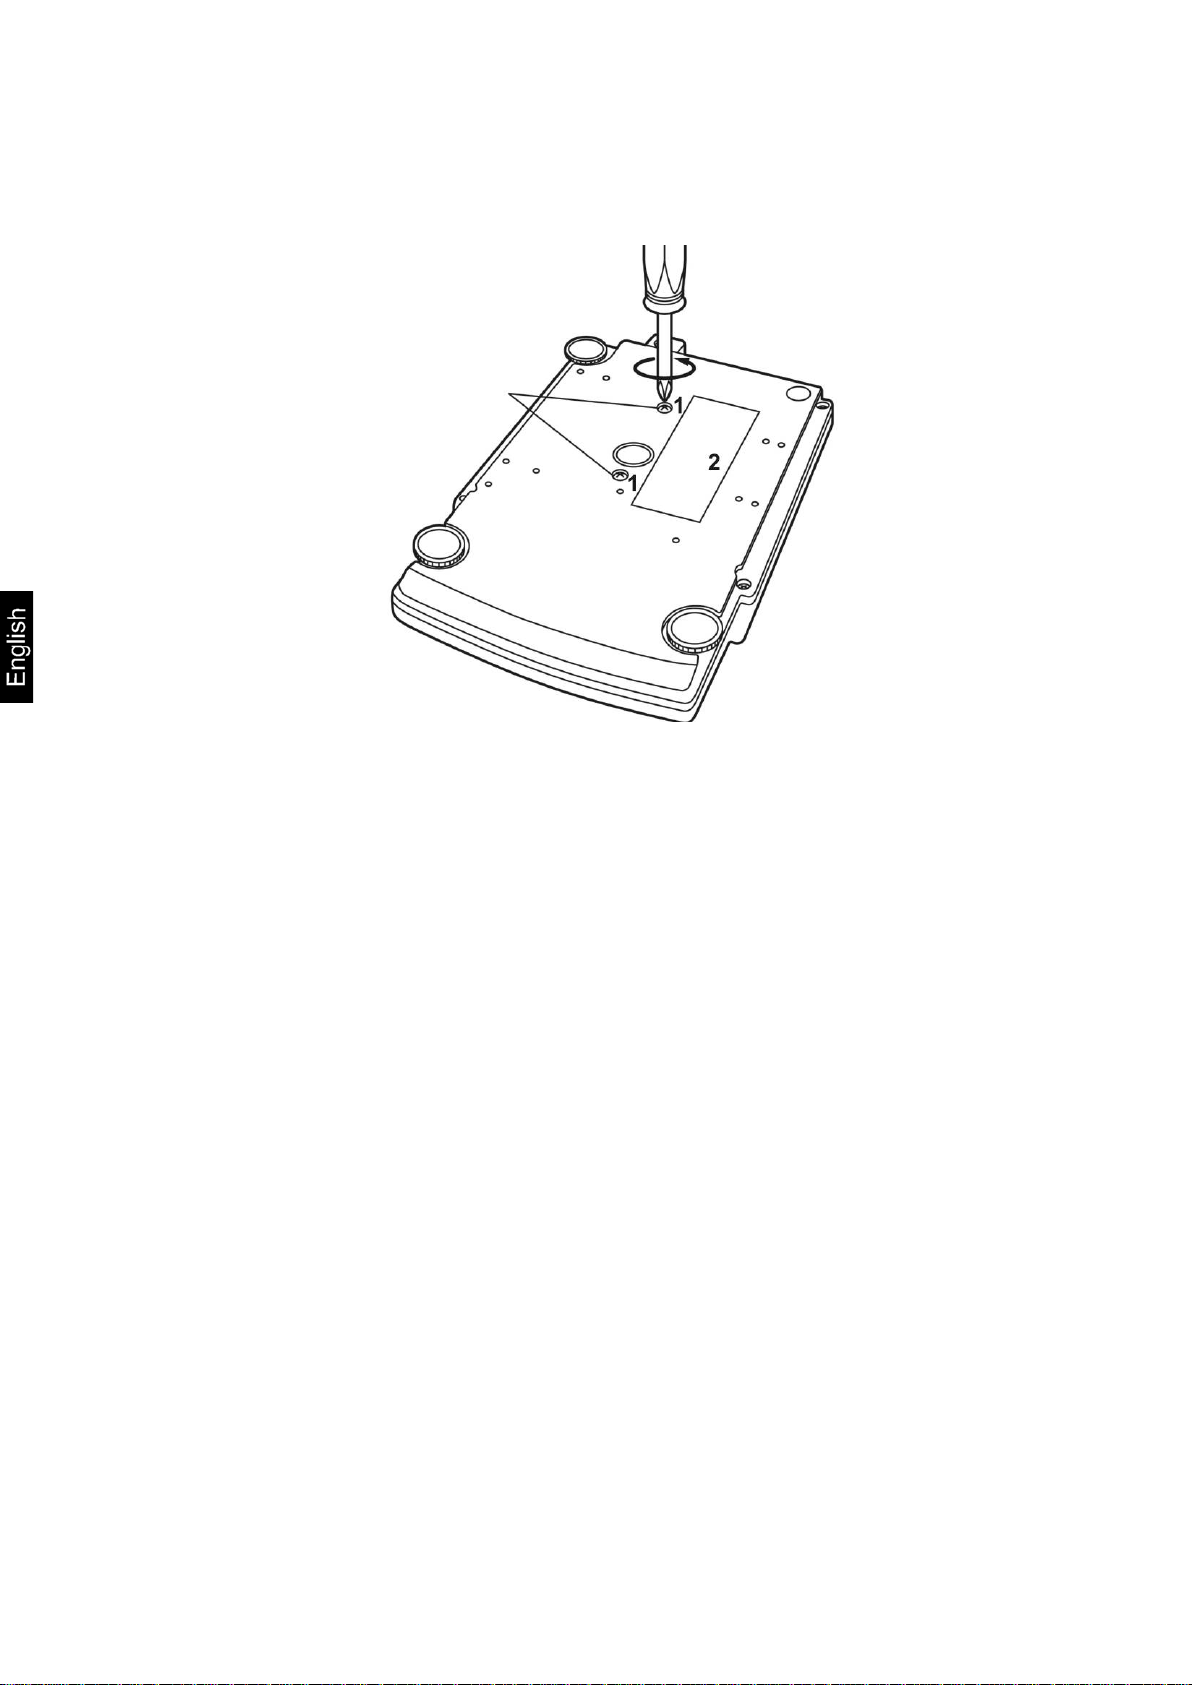
7.3 Placing
Remove transport guard (models PBJ)
To loosen the transport guard, turn both transport screws [1] anti-clockwise until they
are locked (refer to sign [2]).
For transport, turn both transport screws clockwise until they are locked.
Mount safety hood
Remove protective foil from adhesive strips and mount the safety hood so that it
does not contact the weighing plate.
21 PBS/PBJ-BA-e-1314
Page 21
Turn in all three foot screws [1] as far as they go.
Slightly press down the left front side of the scale and turn out the two
prescribed circle.
While continuing to exert a slight pressure to the front side of the scale,
Check levelling regularly.
Levelling
front foot screws until the air bubble [3] in the spirit level [2] is within the
turn out the rear foot screw until the scale stands in stable position.
PBS/PBJ-BA-e-1314 22
Page 22
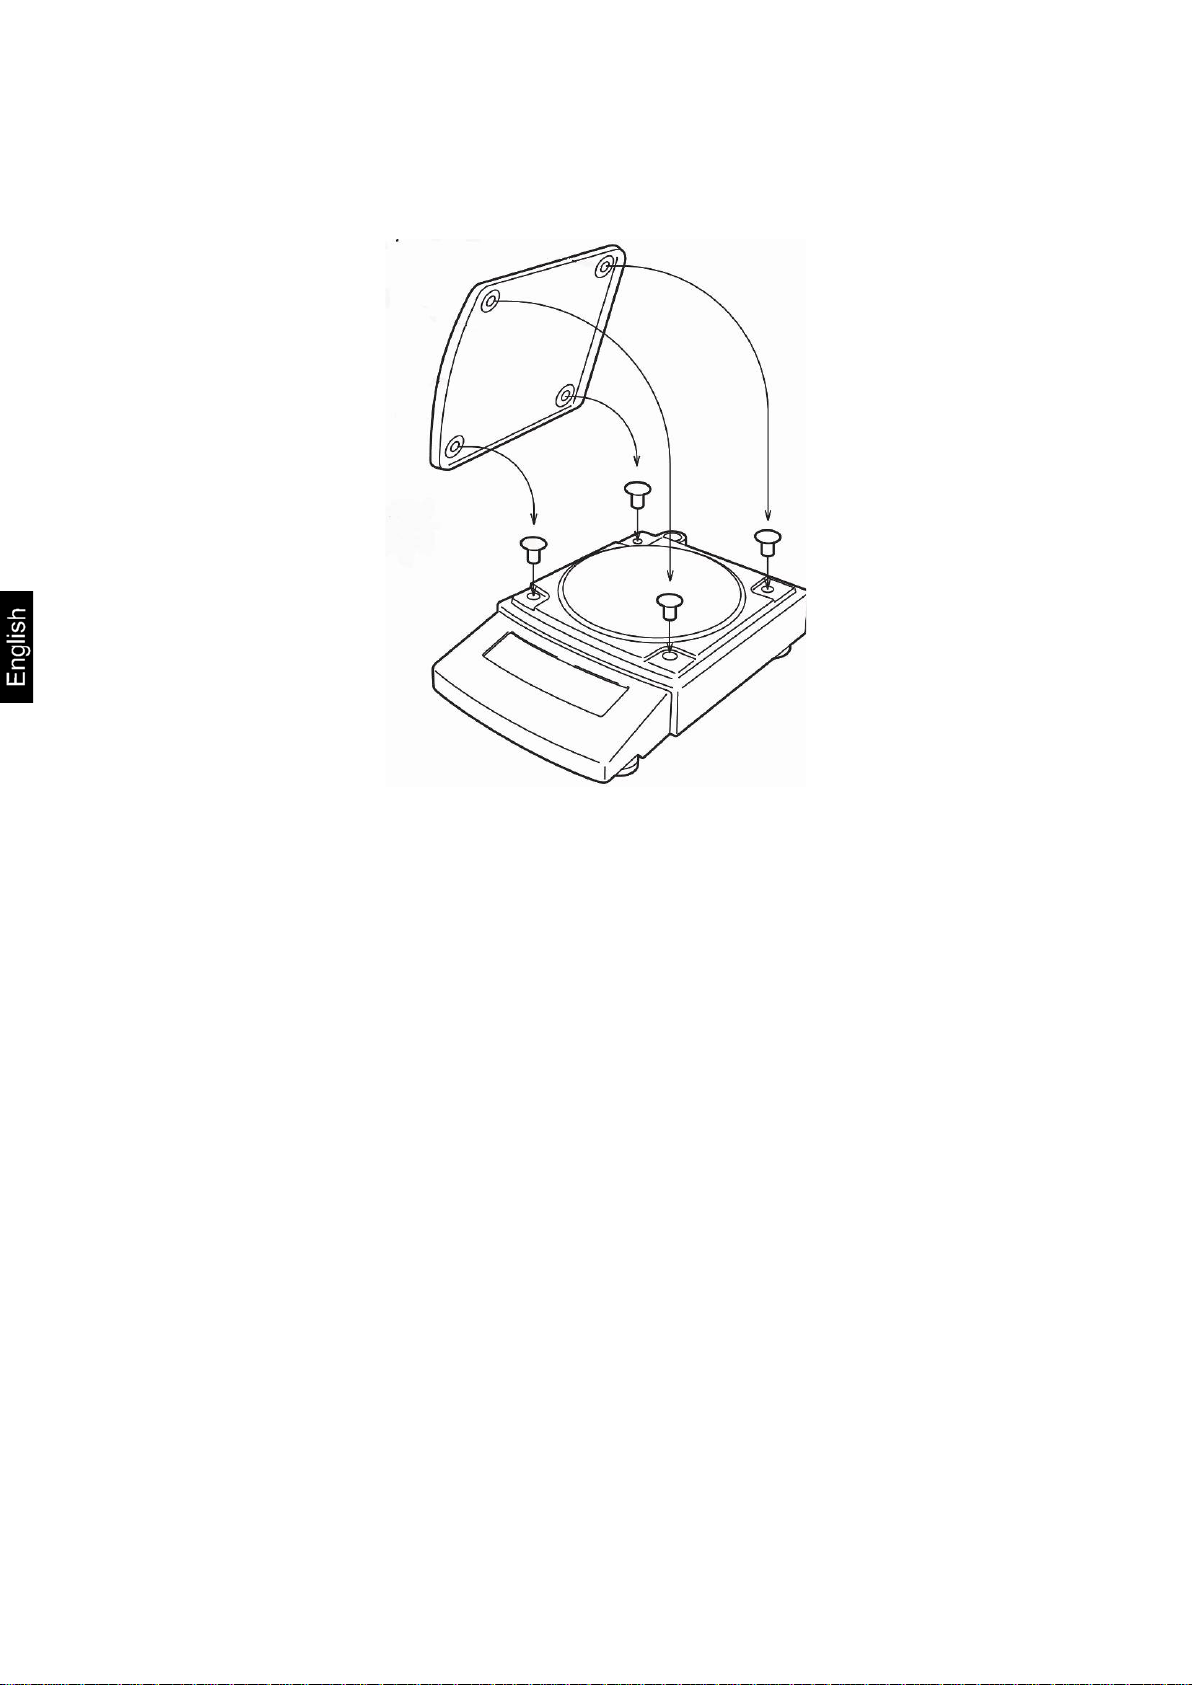
Installation of weighing plate
Models with readability d ≥ 0.01 g:
23 PBS/PBJ-BA-e-1314
Page 23
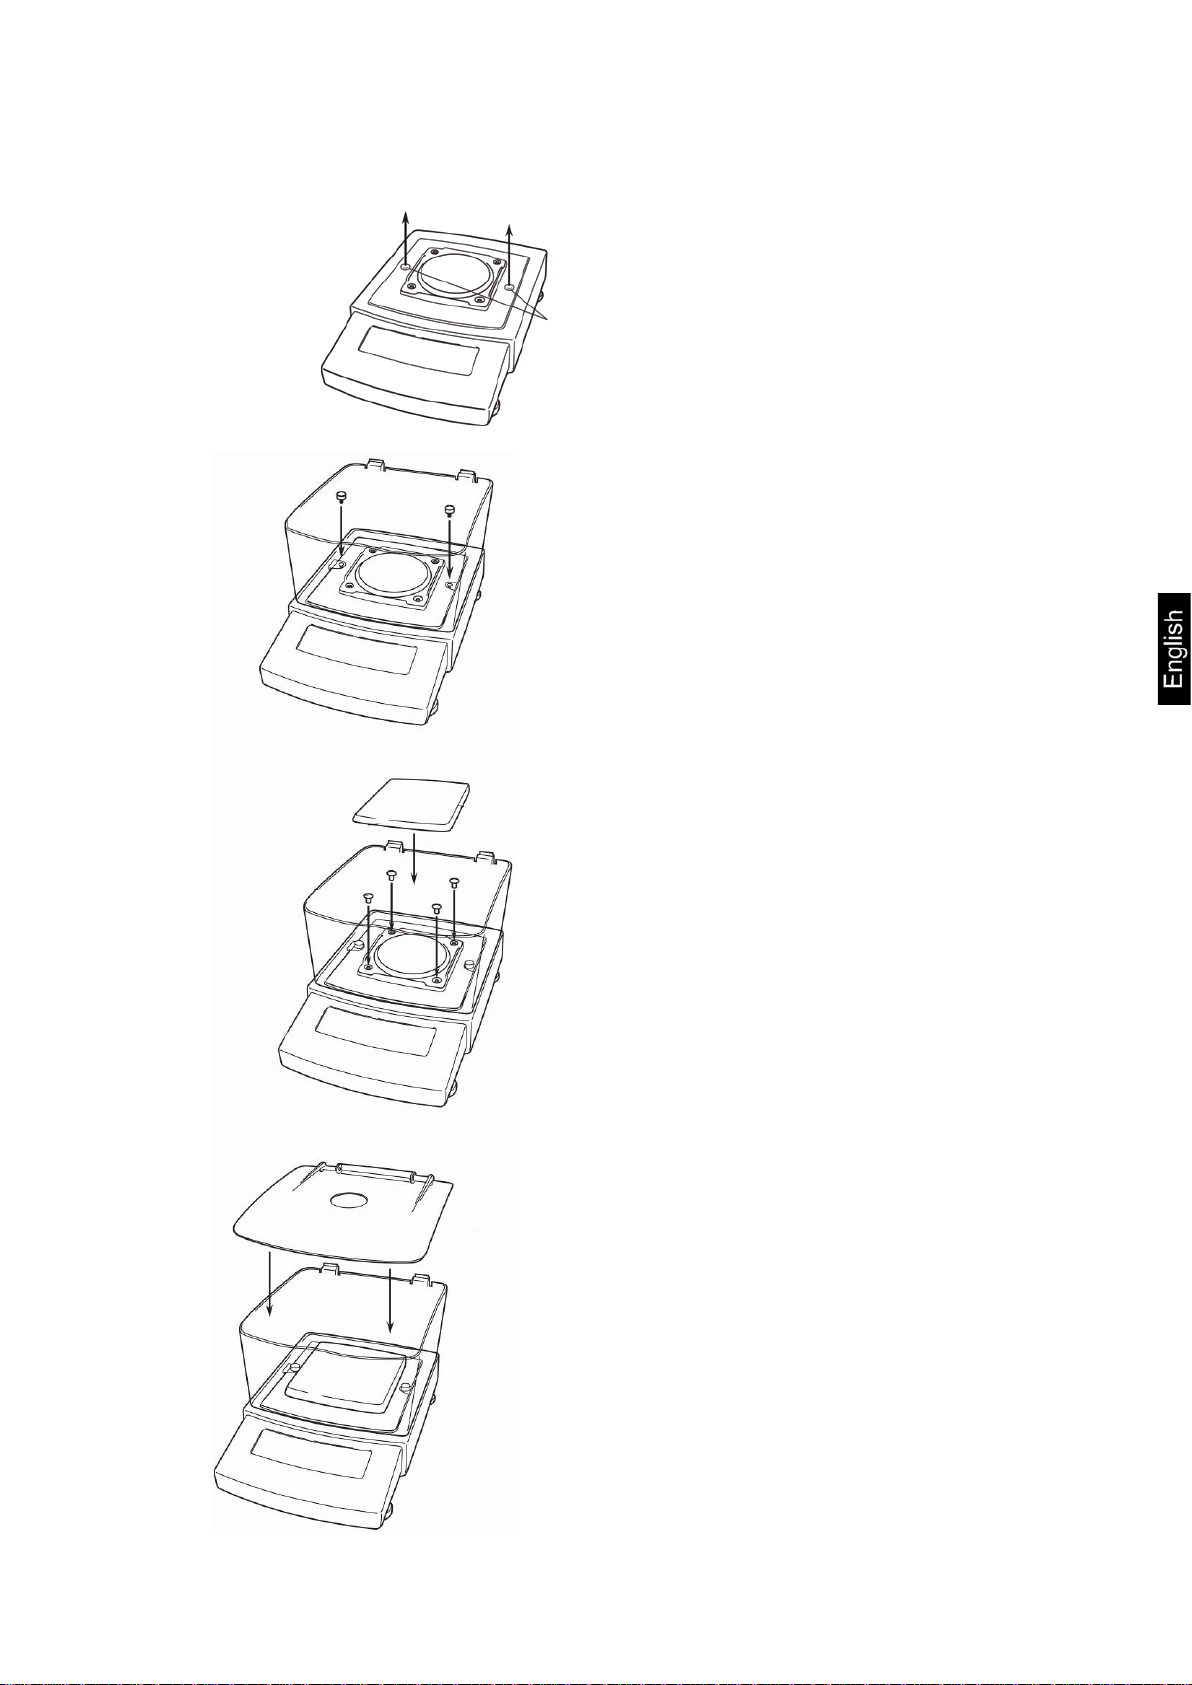
Models with readability = 0.001 g:
Remove rubber plug as shown in picture.
Attach wind guard and fix it by means of
screws.
Install weighing pan as per illustration.
Note the correct position.
Place the wind guard cover.
PBS/PBJ-BA-e-1314 24
Page 24
7.4 Mains connection
Supply power to balance via mains adapter. The display lights up and the
for weighing.
Power is supplied via the external mains adapter. The stated voltage value must be
the same as the local voltage.
Only use original KERN mains adapters. Using other makes requires consent by
KERN.
Models PBJ:
Prior to mains connection, loosen the transport guard screws at the scale
according to the sign in any case, see chapter 7.3
7.5 Switch power supply on
balance carries out a selftest.
Models PBS
After a successful selftest „OFF“ is displayed.
To switch on press the ON/OFF button. The balance will carry out a
display test. As soon as the weight display appears, the balance is ready
25 PBS/PBJ-BA-e-1314
Page 25

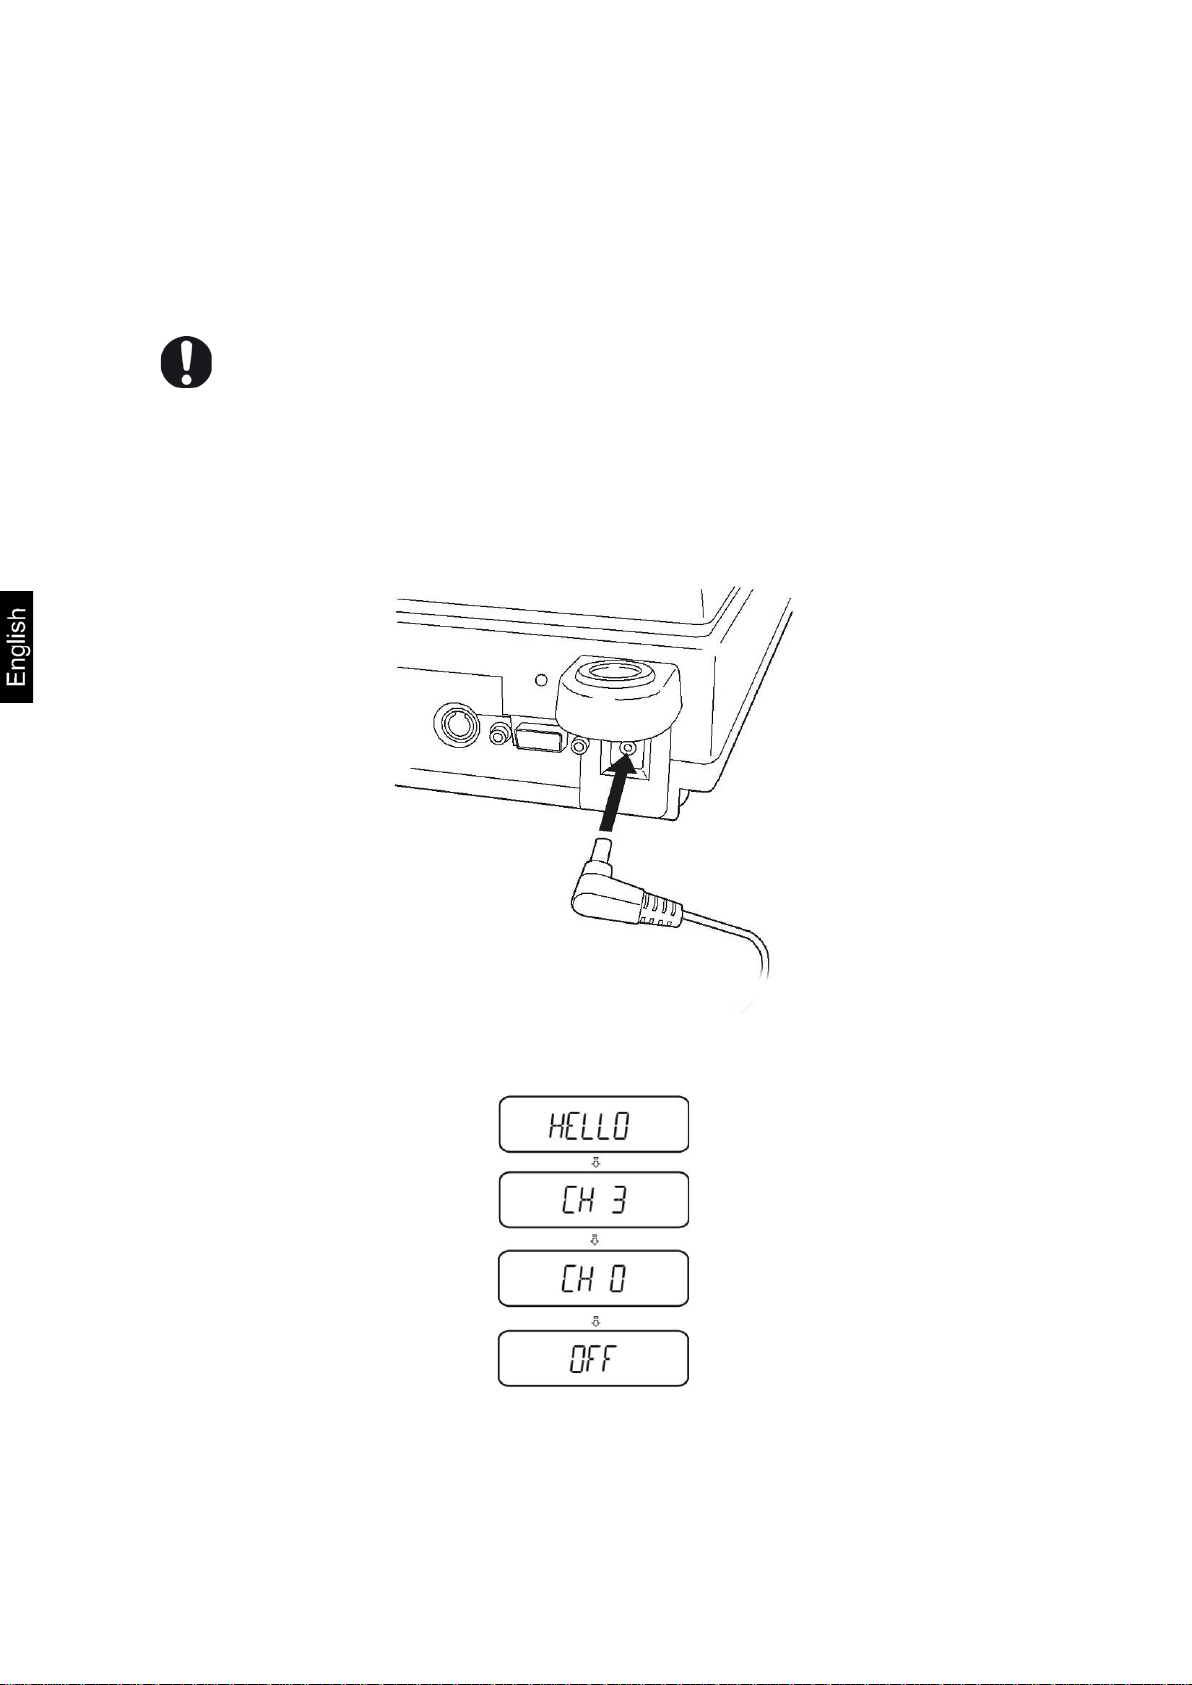
Interfaces at the balance back
1
RS-232C interface
2
DATA IO interface
3
AUX interface
4
DC-IN connection
5
Keyboard interface
5
4 3 2
1
7.6 Connecti on of pe r ipheral devices
Before connecting or disconnecting of additional devices (printer, PC) to the data
interface, always disconnect the balance from the power supply.
With your balance, only use accessories and peripheral devices by KERN, as they
are ideally tuned to your balance.
Terminal for external devices:
7.7 Initial Commissioning
In order to obtain exact results with the electronic balances, your balance must have
reached the operating temperature (see warming up time chap. During this warming
up time the balance must be connected to the power supply (mains, accumulator or
battery).
The accuracy of the balance depends on the local acceleration of gravity.
Strictly observe hints in chapter Adjustment.
PBS/PBJ-BA-e-1314 26
Page 26

8 Adjustment
Observe stable environmental conditions. A warming up time (see chapter 1)
pan.
As the acceleration value due to gravity is not the same at every location on earth,
each balance must be coordinated - in compliance with the underlying physical
weighing principle - to the existing acceleration due to gravity at its place of location
(only if the balance has not already been adjusted to the location in the factory). This
adjustment process must be carried out for the first commissioning, after each
change of location as well as in case of fluctuating environment temperature. To
receive accurate measuring values it is also recommended to adjust the balance
periodically in weighing operation.
is required for stabilization. Ensure that there are no objects on the weighing
(only models PBJ)
8.1 Manual adjustment by CAL button
The scales have been set by the manufacturer so that adjustment can be started
directly from the weighing mode using the CAL button.
• Models PBJ: Adjustment with internal weight
• Models PBS: Adjustment by external weight (blocked for calibrated scales)
Other adjustment procedures can be activated in the menu.
8.1.1 Adjustment with internal weight (only models PBJ)
Condition: Menu setting „I.CAL“ / Menu element 1
1. In weighing mode press . I-CAL is displayed.
27 PBS/PBJ-BA-e-1314
Page 27

TARE /
- - - - - - - - - - - - - - - - -
- - - - - - - - - - - - - - - - -
KERN
Company
TYPE
PBJ4200-2M
Model
SN
WBxxxxxxxxx
Serial no.
ID
1234
Balance identification no. (see chap.
DATE
27-01-2011
TIME
11.54.53
REF
4000.00g
Used adjustment weight
BFR
4003.97g
Before adjustment
AFT
4000.00g
After adjustment
-COMPLETE
-SIGNATURE-
prepared by
- - - - - - - - - - - - - - - - -
If „I-CAL“ is not displayed, press to return into weighing mode and
activate menu element 1, see menu overview.
2. Press the
button and adjustment will take place
automatically.
3. After successful adjustment the balance automatically
returns to weighing mode.
In case of an adjustment error (e.g. objects on the
weighing plate) the display will show an error message,
repeat adjustment.
When an optional printer is connected and the GLP
function is connected, the adjustment log will be edited,
see chap. 8.5
Printout example (KERN YKB-01N):
CAL –INTERNAL
Adjustment mode
8.5.1)
PBS/PBJ-BA-e-1314 28
Page 28

8.1.2 Adjustment with external weight (factory setting models PBS)
• Condition: menu setting „E-CAL“ / menu element 3. .
• At verified balances, the adjustment is locked by a switch (except accuracy
class I). To disable the access lock, destroy the seal and actuate the
adjustment switch. Position of the adjustment switch see chap. 9
Attention:
After destruction of the seal the balance must be re-verified by an authorised
agency and a new verification wire/seal mark fitted before it can be reused
for applications subject to verification.
• Carry out adjustment as near as possible to the balance’s maximum weight
(recommended adjustment weight see chap. 1). Weights of different nominal
values or tolerance classes may be used for adjustment but are not optimal
for technical measuring. The accuracy of the adjustment weight must
correspond approximately to or, if possible, be better than, the readability d
of the balance.
Information about test weights you will find in the internet under
http://www.kern-sohn.com
In weighing mode press . E CAL is displayed.
Press, the weight value of the recommended
If „E-CAL“ is not displayed, press to return into weighing mode and
activate menu element 3, see menu overview.
adjustment weight (see chap. 1) appears flashing.
If the weight value shall be changed, press , the active digit flashes.
Carry out the desired setting using navigation buttons (see chapter 3.1.1
„Numeric input“).
Carefully place adjusting weight in the centre of the
weighing plate ,press .
29 PBS/PBJ-BA-e-1314
Page 29

8.5. Printout example (KERN YKB-01N):
- - - - - - - - - - - - - - - - -
- - - - - - - - - - - - - - - - -
KERN
Company
TYPE
PBS4200-2M
Model
SN
WBxxxxxxxxx
Serial no.
ID
1234
Balance identification no. (see chap. 8.5.1)
DATE
27-01-2011
TIME
11.54.53
REF
4000.00g
Used adjustment weight
BFR
3999.97g
Before adjustment
AFT
4000.00g
After adjustment
-COMPLETE
-SIGNATURE-
prepared by
- - - - - - - - - - - - - - - - -
Wait until the zero display flashes.
Remove adjustment weight and press . After
successful adjustment the balance automatically returns to
weighing mode.
In case of an adjustment error (e.g. objects on the weighing
plate) the display will show an error message, repeat
adjustment.
When an optional printer is connected and the GLP function
is connected, the adjustment log will be edited, see chap.
CAL –EXTERNAL
Adjustment mode
PBS/PBJ-BA-e-1314 30
Page 30

8.2 Adjustment test
The saved setting can now be called up directly via .
Activate function:
Press 3 times in weighing mode.
Menu group 1 „Adjustment“ is displayed, the indicator
flashes.
Acknowledge by , the current setting flashes.
Adjustment with internal weight „I-CAL“ (only
models PBJ, see chap. 8.1.1), Menu element 1
Adjustment test with internal weight „I-tESt“ (only
models PBJ, see chap. 8.2.2), Menu element 2
Adjustment with external weight „E-CAL“
(see chap. 8.1.2), Menu element 3
Adjustment test with external weight „E-tESt“
(see chap. 8.2.1), Menu element 4
Acknowledge by .
Press repeatedly or for 3 s and the scale returns
into weighing mode
31 PBS/PBJ-BA-e-1314
Page 31

8.2.1 Adjustment test with external weight
• Condition: Menu setting „E-tESt“ / Menu element 4
• At verified balances, the adjustment test is locked by a switch (except
accuracy class I). To disable the access lock, destroy the seal and actuate
the adjustment switch. Position of the adjustment switch see chap. 9
Attention:
After destruction of the seal the balance must be re-verified by an authorised
agency and a new verification wire/seal mark fitted before it can be reused
for applications subject to verification.
In weighing mode press . E-tESt is displayed.
If „E-tESt“ is not displayed, press to return into weighing mode and
activate menu element 4, see menu overview.
Press , checking is started. The displayed
weight value of the recommended adjustment weight
(see chapter 1) flashes.
If the weight value shall be changed, press , the active digit flashes. Carry out the
desired setting using navigation buttons (see chapter 3.1.1 „Numeric input“).
Carefully place adjusting weight in the centre of the
weighing plate ,press .
Wait until the zero display flashes.
PBS/PBJ-BA-e-1314 32
Page 32

Remove adjustment weight and press .
Wait for a short period of time, the difference to the
previous adjustment is displayed.
Either
press , the d-value is reset to zero.
Adjustment of balance by resetting.
or
press , the d-value is not reset to zero. No
adjustment occurs.
33 PBS/PBJ-BA-e-1314
Page 33

8.2.2 Adjustment test with internal weight
Condition: Menu setting „I-tESt“/ menu element 2
In weighing mode press . I-tESt is displayed.
Press , checking is automatic.
If „i-tESt“ is not displayed, press to return into weighing mode and
activate menu element 2, see menu overview.
Wait for a short period of time, the difference to the
previous adjustment is displayed.
Either
Press , the d-value is reset to zero.
Adjustment of balance by resetting.
or
Press , the d-value is not reset to zero. No
adjustment occurs.
PBS/PBJ-BA-e-1314 34
Page 34

8.3 Automatic adjustment by PSC (Perfect Self Calibration), only models PBJ
The PSC function determines the ambient temperature of the scale at any time. If
the tolerance groups are exceed upwards or downwards, this is signalled and the
necessary adjustment is carried out fully automatically. This will ensure that the scale
is ready at any time.
Activate function:
Press 3 times in weighing mode.
Menu group 1 „Adjustment“ is displayed, the indicator
flashes.
Acknowledge by , the current setting flashes.
Press several times until „A“ flashes.
Acknowledge with .
is used to change-over among the following
settings.
„PSC on“ (menu element 5) = function activated
„PSC off“ (menu element 6) = function deactivated
The current setting is marked by the stability display
( ).
Acknowledge selection by .
Press repeatedly or for 3 s and the scale returns
into weighing mode.
35 PBS/PBJ-BA-e-1314
Page 35

8.4 Automatic adjustment by Clock-CAL (model PB only)
With the help of its internal adjusting weight and integrated clock the balance can be
set to carry out automatic adjustment at set times (up to three times daily, „ACALt1“,
„ACALt2“ und „ACALt3“). Clock-CAL is a very convenient function, when calibration
logs are desired to be made for regular calibrations, or when wishing span
calibrations during break times to avoid interruption of measurement work.
In order to execute Clock-Cal the following conditions must be met at the defined
time. If the conditions are not met within one minute, adjustment is skipped.
• The flashing weight symbol signals that automatic adjustment is
imminent.
• In order to avoid that adjustment is started possibly during a series of
measurements, actuate as soon as the weight symbol flashes. This
will interrupt automatic adjustment.
• If the PSC function has not been activated, the operator has to adjust by
means of an internal adjustment weight (chapter 8.1.1) as soon as the
weight symbol flashes.
o The scale must be in weighing or standby mode.
o The stability display must be indicated.
o The load at the weighing plate must be near zero.
o No other adjustment process must be started.
o The weight symbol blinks for about two minutes as notification of span
calibration before it begins.
o In order to avoid that adjustment is started possibly during a series of
measurements, actuate as soon as the weight symbol flashes. This
will interrupt automatic adjustment.
o If all three times ate set to „00:00“ the function is switched off.
PBS/PBJ-BA-e-1314 36
Page 36

Setting the time for Clock-CAL:
Example „ACALt1“ to 12:00 p.m..
Press 3 times in weighing mode.
Menu group 1 „Adjustment“ is displayed, the indicator
flashes.
Acknowledge by , the current setting flashes.
Press several times until „t“ flashes.
Acknowledge by , the first time „tCAL t1“ (menu
element 7) is displayed.
Acknowledge by , the current setting is
displayed (the active digit flashes).
Carry out the desired setting using navigation buttons
(see chapter 3.1.1 „Numeric input“).
Acknowledge by .
Call up „tCAL t2“ (menu element 8) or „tCAL t3“ (menu
element 9) by and enter required time as
described above.
Back to weighing mode press again or for 3 s.
37 PBS/PBJ-BA-e-1314
Page 37

Make sure that the communication parameter of balance and printer are the
Communication parameter, see chap. 17.4
8.5 ISO/GLP log
Quality assurance systems require printouts of weighing results as well as of correct
adjustment of the balance stating date and time and balance identification. The
easiest way is to have a printer connected.
same.
8.5.1 Setting of adjustment protocol and scale identifica ti on num ber
Actuate in weighing mode until „S“ flashes.
Acknowledge with .
Press several times until „t“ flashes.
Acknowledge with .
Press
is used to change-over among the following
settings.
„GLP on“ (menu element 68) = function activated
„GLP off“ (menu element 69) = function deactivated
The current setting is marked by the stability display ( ).
PBS/PBJ-BA-e-1314 38
Page 38

Acknowledge selection by .
Return to menu by .
Use to invoke menu element 70
Acknowledge by , the currently set scale
identification number is displayed (the active digit
flashes).
Use the navigation buttons and enter a 4-digit number
between„0000“ and „9999“eingeben (see chapter 3.1.1
„Numerical entry“).
Acknowledge with .
Back to weighing mode press again or for 3 s.
39 PBS/PBJ-BA-e-1314
Page 39

Seal of approval
Seal/Verification switch
9 Verification
General introduction:
According to EU directive 90/384/EEC or 2009/23EG balances must be officially
verified if they are used as follows (legally controlled area):
a) For commercial transactions if the price of goods is determined by weighing.
b) For the production of medicines in pharmacies as well as for analyses in the
medical and pharmaceutical laboratory.
c) For official purposes
d) For manufacturing final packages
In cases of doubt, please contact your local trade in standard.
Verification notes:
An EU type approval exists for balances described in their technical data as
verifiable. If a balance is used where obligation to verify exists as described above, it
must be verified and re-verified at regular intervals.
Re-verification of a balance is carried out according to the respective national
regulations. The validity for verification of balances in Germany is e.g. 2 years.
The legal regulation of the country where the balance is used must be observed!
Verification of the balance is invalid without the seal.
The seal marks attached on verified balances point out that the balance may
only be opened and serviced by trained and authorised specialist staff. If the
seal mark is destroyed, verification looses its validity. Please observe all
national laws and legal regulations. In Germany a re-verification will be
necessary.
Position of seals and adjusting switch
PBS/PBJ-BA-e-1314 40
Page 40

10 Basic Operation
Switching off:
10.1 Switch on off balance
Start-up:
1. After connection to the power supply the balance
displays . For switching on, press , the scale
carries out a segment test and starts automatically in
weighing mode.
2. If the scale is in standby mode, press . The scale is
ready for service immediately without heating up time.
1. Press ; the balance changes into standby mode,
that means that the balance is now in state ready-foroperation..
2. To switch-off the balance completely, separate balance
from power supply.
If [WAIT] or [SET] are displayed, do not separate the balance from power
supply.
10.1 Zeroing
Unload the balance
Press , the zero display appears.
41 PBS/PBJ-BA-e-1314
Page 41

In order to obtain exact weighing results, your balance must have reached the
operating temperature (see warming up time chap. 1).
oL
Overload, the capacity of the scale has been exceeded
-oL
Under-load, the load at the scale is too low
50.5[7] g
1999.93 g
Measuring Value
08:51 25/02/11
Output date/time
50.5[7] g
Output weight value
10.2 Simple weighing
Wait for zero display, reset to zero using .
Place goods to be weighed on balance.
Wait until the stability display appears ( ).
Read weighing result.
Error display during the weighing process
When an optional printer is connected, the weighing value can be edited.
Printout examples (KERN YKB-01N):
1. Verified models:
2. Non-verified models
3. Output date/time
Weighing value, the non-calibrated value is given in
brackets in calibrated scales.
PBS/PBJ-BA-e-1314 42
Page 42

10.3 Taring
ue is displayed with
To delete the stored tare value, remove load from weighing plate and
The dead weight of any weighing container may be tared away by pressing a button,
so that the following weighing procedures show the net weight of the goods to be
weighed.
Put weighing container on the weighing pan.
Wait until the stability display appears ( ), then press .
The weight of the container is now internally saved.
Weigh the material.
Wait until the stability display appears ( ).
Read net weight.
Note:
• When the balance is unloaded the saved taring val
negative sign.
•
press .
• The taring process can be repeated any number of times. The limit is
reached when the whole weighing range is exhausted.
• The PRE-TARE function for subtracting a known container weight can be
activated in the menu, see chapter / menu element 36
43 PBS/PBJ-BA-e-1314
Page 43

!
10.4 Underfloor weighing
Objects unsuitable for placing on the weighing scale due to size or shape may be
weighed with the help of the flush-mounted platform.
Proceed as follows:
• Switch off the balance.
• Open closing cover at the balance bottom.
• Place weighing balance over an opening.
• Attach load to hook and carry out weighing procedure.
CAUTION
• Always ensure that all suspended objects are stable enough to hold the desired
goods to be weighed safe ly (danger of breaking).
• Never suspend loads that exceed the stated maximum load (max) (danger of
breaking)
Always ensure that there are no persons, animals or objects that might be
damaged underneath the load.
NOTICE
After completing the underfloor weighing the opening on the bottom of the bal ance
must always be closed (dust protection).
PBS/PBJ-BA-e-1314 44
Page 44

11 The menu
For navigation in the menu the
11.1 Navigation in the menu
The menu consists of 7 groups and 4 levels.
The configuration of the menu shows this structure where access to the required
functions is facilitated by the numbering of the relevant menu elements.
For navigation in the menu please use the enclosed menu is displayed.
symbol is displayed.
Call function:
Press 3 times in weighing mode.
The first menu group „Adjustment“ is displayed, the indicator flashes.
Select the required menu group by . When pressing , the relevant
symbols flashes; refer to the explanation below.
45 PBS/PBJ-BA-e-1314
Page 45

Menu group Flashing symbol Description
1
Adjustment
2 Analog display Capacity display, control and target weighing
3 E Installation environment and taring
4 A Application measurements and automatic output
5 U Conversion of units and specific weight
measurement
6 S Setting of time and generation of an adjustment
data set
7
Communication with external devices
Making settings:
As an example, the condition for evaluating the stability of 1 count
(menu element 27) to 4 counts (menu element 29) shall be set.
Use the number and look for the function in the menu overview and make the
following settings at the scale.
Call up menu group 3, the symbol „E“ flashes.
Press , the next menu level is displayed.
Press repeatedly until „b“ flashes.
PBS/PBJ-BA-e-1314 46
Page 46

Press , „Eb-1“ (menu element 27 ) is displayed.
The stability display ( ) lights if „Eb-1“ is the current setting.
Repeatedly press , until „Eb-4“ (menu element 29 ) is displayed.
Save by . „SET“ followed by the current setting „Eb-4“ is displayed,
characterized by the stability display ( ).
Back to menu or onto weighing mode:
Actuate for a short time, back to menu.
Actuate for a long time, back to weighing mode.
47 PBS/PBJ-BA-e-1314
Page 47

MENU
CAL
Select menu element
11.2 Useful functions
11.2.1 Recall of last menu
This function is useful if an application requires frequent changes at a certain menu
element.
In weighing mode or when selecting the menu, keep the
button pressed for
approx. 3 seconds. Then the menu element is displayed which has been changed or
set lastly.
11.2.2 Resetting the menu
This function is used to reset all settings in the menu to default setting. Default
settings are marked by “#
” in the menu overview.
’
72 in the menu overview
Actuate in weighing mode until „S“ flashes.
Acknowledge with .
Press several times until „r“ flashes.
Acknowledge with . The query for menu reset
„rESEt?“ is displayed
Press „rESEt“ indicates that menu reset has
been completed.
Back to weighing mode press repeatedly or for 3 s.
PBS/PBJ-BA-e-1314 48
Page 48

11.3 Menu Lock Locking the access to the menu:
Connect scale to power supply.
During the off display, keep pressed until „Locked“
appears.
Menu access is rejected now and the message „Locked“
appears as soon as the operator tries to select a menu.
Canceling the access lock:
Disconnect scale from power supply. Wait for 10
seconds, then re-connect scale.
During the off display, keep pressed until „release“
appears.
49 PBS/PBJ-BA-e-1314
Page 49

Select menu element
12 Set the installed clock
12.1 Date
63, see chap. 11.1
Actuate in weighing mode until „S“ flashes.
Acknowledge with .
Press several times until „d“ flashes.
Press
Press again, the current date is displayed.
Change by means of navigation buttons (see chapter
3.1.1 „Numerical entry“).
Confirm input by .
Either
Return to weighing mode using
or
Press to go to date format setting
Press , the current set format is displayed.
PBS/PBJ-BA-e-1314 50
Page 50

The installed clock will carry out the corrections automatically for a leap
function (±), see chapter 12.3.
Select menu element
is used to select among the following formats
Y.m.d.
d.m.Y.
m.d.Y.
Confirm input by .
or
Back to weighing mode - press repeatedly or for 3 s.
Menu element 63a
Menu element 63b
Menu element 63c
•
year.
• If the button is actuated to complete date setting, the seconds
are set to zero If the date is set after the time, the second value is thus
not correct. Thus it is important to set the date first and then the time
and/or correct the second value by means of the second correction
12.2 Time
64, see chap. 11.1
Set time in the same way as the date (see chap. 12.1).
51 PBS/PBJ-BA-e-1314
Page 51

Select menu element
Select menu element
Select menu element
chapter 11.1
ode, you have the following functions
for seconds.
12.3 Setting the display for the standby mode
Define the items which shall be displayed in standby mode.
If the time is displayed in standby m
available
• Display of seconds
Using you can activate display/hiding of seconds.
• Correction by ±30 seconds:
Actuate while the seconds are displayed. If the value is between
00 - 29 seconds, the seconds are rounded off to zero. If the value is
between 30 -59 seconds, it is round up by one minute and 00 is displayed
65 if the time shall be displayed, see chapter 11.1
66 is the date shall be displayed, see chapter 11.1
67 if neither the time nor the date shall be displayed, see
PBS/PBJ-BA-e-1314 52
Page 52

13 Functions for adaptation to ambient condit ions
MODE
13.1 Stability and reaction (average value)
Exists the possibility to tune the stability of the display and the degree of reaction of
the balance to the requirements of certain applications or the installation
environment. There is a possibility of selection among five operating modes. Please
note that in general slowing down reaction times result in higher stability of the set
data handling, while speeding up reaction times have an influence on the stability
deterioration. However, the balances of PBS/PBJ type are designed to ensure both
properties i.e. fast reaction time and high stability.
13.1.1 Automa ti c mode
Select the menu element 22:
The balance automatically and dynamically undertakes to optimally determine the
average value during observation of load data. If there are not any special
circumstances, this setting should always be used.
13.1.2 Filling mode
Select the menu element 23:
This mode is suitable for weighing invariable liquid volumes. It is very susceptible to
wind and vibration.
(When the filling mode is active, the
button makes it possible to switch over
between 3 stability settings.)
13.1.3 Sta ndard mode
Select the menu element 24:
This mode is suitable for weighing in normal environment. The determination of the
average value is fixed and is not subject to adaptation as in the automatic mode
which is performed dynamically.
13.1.4 Antivibration mode
Select the menu element 25:
This mode should be used if the balance is placed at a location where there are
strong vibrations, and its readings fluctuate in automatic mode.
The balance reaction is deteriorated in a result of small changes of weight.
13.1.5 Antiwind mode
Select the menu element 26:
This mode should be used if the balance is placed at a location where it is exposed
to air currents which cause fluctuations of its readings in automatic mode.
This reaction is deteriorated even more than in the antivibration mode, but the
weighing process is more stable.
53 PBS/PBJ-BA-e-1314
Page 53

27
for
1 count
28
2 counts
29
4 counts
30
8 counts
The bar located within the lower scale range indicates
13.2 Stability Detection Band
(up to 8 counts for verifiable, up to 64 counts for non verifiable models)
The band makes it possible to select conditions at which the balance should be
considered as stable. If „1 count” is selected, and the reading (within counting the
readings) remains constant, the balance is considered as stable and the stability
display is shown. The stability detection band can be set from 2 to 64 counts.
Select the menu element:
13.3 Tracking
Tracking is the function which ensures to receive present value displaying in possible
long period.
To ACTIVATE this function, select the menu element 34.
To DEACTIVATE this function, select the menu element 35.
14 Capacity display
This function displays a bar graph representation of the load on the weighing pan.
This may be used to prevent sudden appearance of “oL” (overload) during
measurement.
Select the menu element 11 in the menu overview to set the full range mode:
(1)
(2)
that the weight located on the scale pan is small. (1)
The bar approaching the upper scale range indicates
that the weight located on the scale pan almost
reaches the balance capacity. (2)
If the bar graph is not to be displayed, press the menu element 21
PBS/PBJ-BA-e-1314 54
Page 54

15 Switch-over weighing unit
UNIT
MENU
CAL
Save the selected unit using
TARE /
button
The unit has been accepted.
Press the
button several times to switch over the display between the activated
units.
The default setting provides the following options:
[g] → [%] → [PCS] → [%]
Other settings must be activated in the menu as follows:
Menu overview No. 54 to 62 :
(Example)
Press button to switch over between the units.
„SET“ appears shortly.
55 PBS/PBJ-BA-e-1314
Page 55

UNIT
symbol will be seen on the display.
Setting 100% of the reference value:
Press the
TARE /
key to tare the balance.
This value must correspond to 100 or more counts in „g” unit.
MENU
CAL
once.
„SET“ appears shortly.
The reference sample weight will be shown as 100%.
the reference sample weight.
15.1 Percentage conversion
In weighing mode, press the
key repeatedly until the „%”
Put the reference sample which represents 100% value.
When the stabilisation display appears, press the
key at
Weights of next samples will be displayed as a percent value of
PBS/PBJ-BA-e-1314 56
Page 56
16 Application Functions
UNIT
TARE /
MENU
CAL
MENU
CAL
TARE /
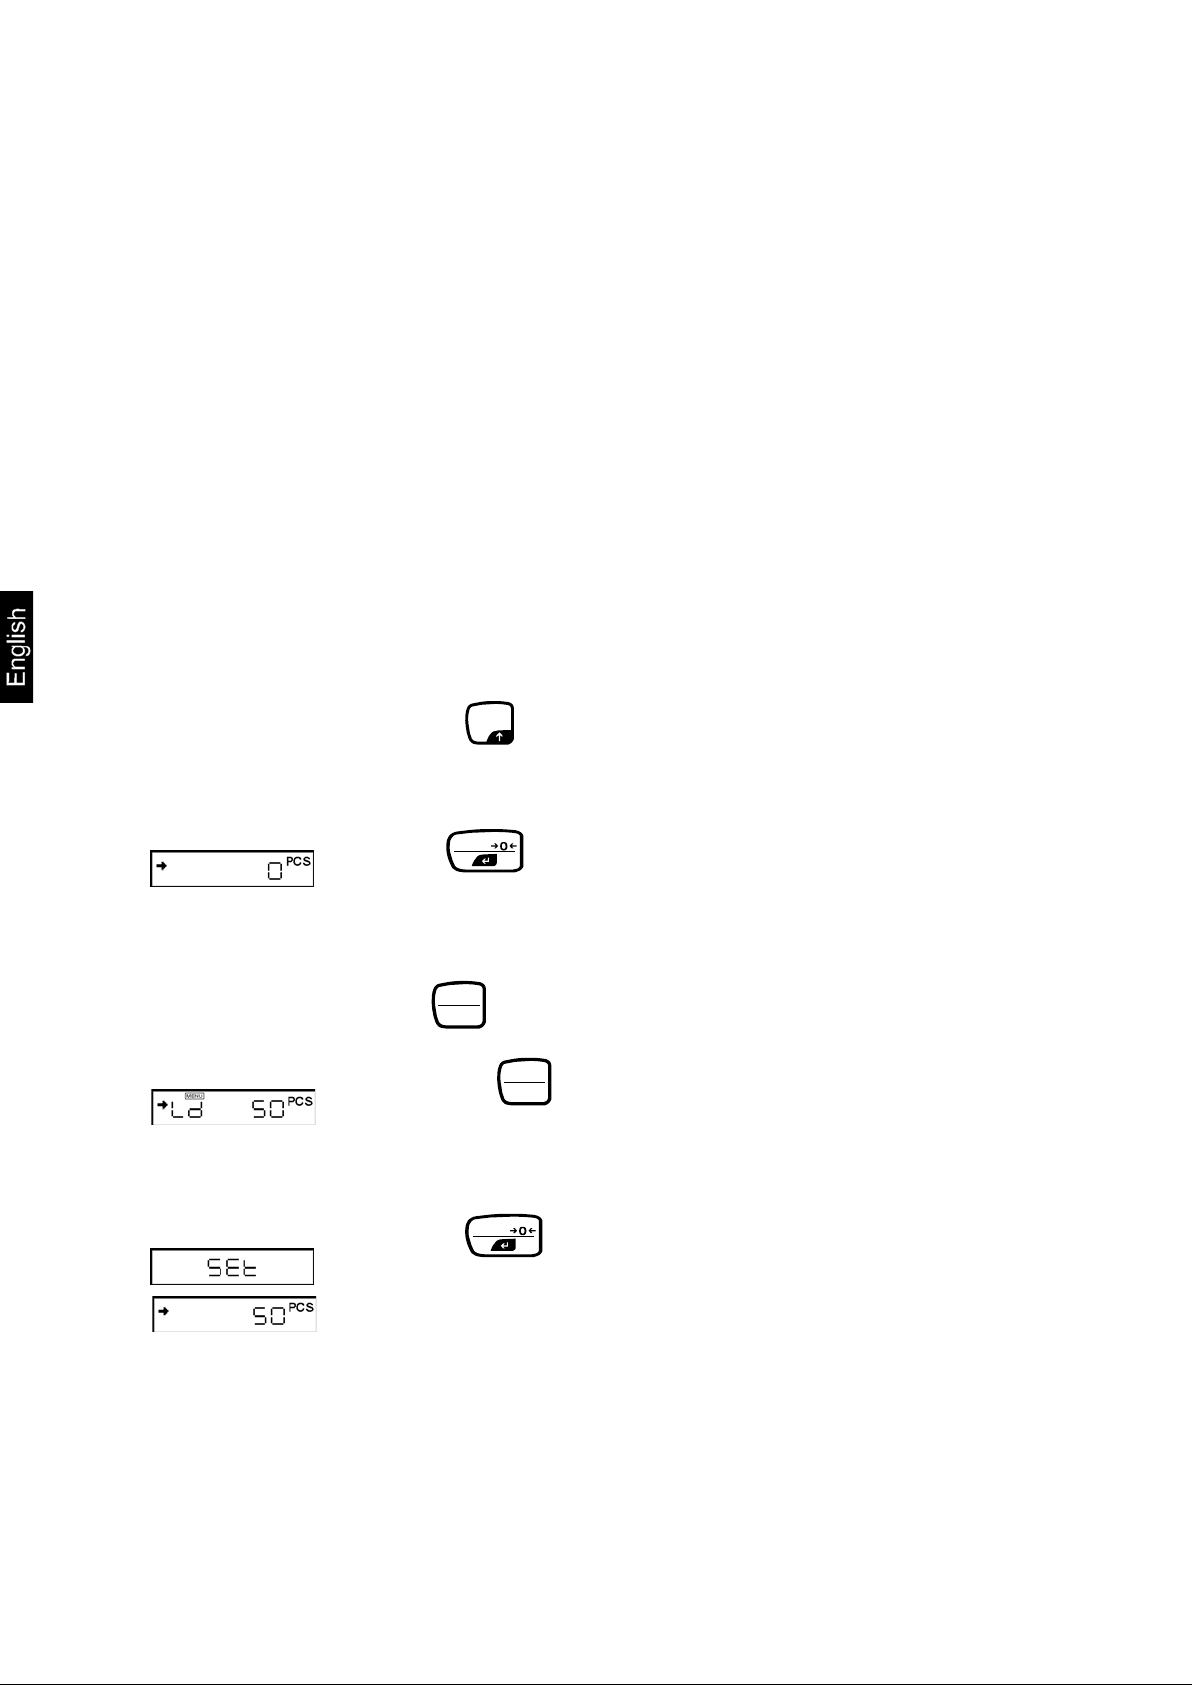
16.1 Parts counting
With parts counting you can either count parts into a container or remove parts from
a container. To count a greater number of parts the average weight per part has to
be determined with a small quantity (reference quantity). The larger the reference
quantity, the higher the counting exactness. High reference must be selected for
small parts or parts with considerably different sizes.
The process has four steps:
• Tare the weighing container
• Determine the reference unit
• Weigh in the reference unit
• Count the items
Condition: Activate the PCS function with the menu element 57 if it is not set. (The
unit of PCS function is factory set.)
Make sure that the balance is in the weighing mode. (the unit of „g” is displayed)
Press the
displayed.
button repeatedly until the „PCS” symbol is
Place the container on the balance plate and tare the balance
with the
button.
Count exactly 9 (or 10, 20, 50, 100 or 200) pieces of the sample
to be weighed and put them into the container.
(Example)
Press
Pressing the
following symbols „Ld 5pcs”…„Ld 200pcs”, „Ld 5pcs”…
button.
button switches over display among the
The standard setting is „Ld 10pcs”.
Press the
number of the pieces being put.
The reference quantity is saved.
button when the display corresponds to the
57 PBS/PBJ-BA-e-1314
Page 57

16.2 Control weighing and target weighing
16.2.1 Control weighing (comparator) displa y type 1
It is the most suitable method which makes it possible to assess weighing courses or
errors on the basis of the sample weight.
Select the menu element 15 in the menu overview.
Display elements used
The upper threshold value, indicated with the upper
The lower threshold value, indicated with the lower
Note:
Determination is carried out in the following way:
Upper threshold value < sample weight HI
Lower threshold value ≤ sample weight ≤ upper threshold value GO
triangle symbol, is defined with the menu element
16.
triangle symbol, is defined with the menu element
17.
Sample weight < lower threshold value LO
16.2.2 Control weighing (comparator) – display type 2
This mode should be used for classifying on the basis of the sample weight. The
display looks like a bar graph, but it also includes the control weighing function.
Select the menu element 18 in the menu overview.
Display elements used
The lower threshold value, indicated with the lower
Note:
Determination is carried out in the following way:
Upper threshold value < sample weight HI
Lower threshold value ≤ sample weight ≤ upper threshold value GO
The upper threshold value, indicated with the upper
triangle symbol, is defined with the menu element
19.
triangle symbol, is defined with the menu element
20.
Sample weight < lower threshold value LO
PBS/PBJ-BA-e-1314 58
Page 58

16.2.3 Ta r get weighing mode
Target value
Without load
With weight within
limit range
This mode is used for weighing constant liquid quantities or for assessment of
missing quantities or excess quantities.
The target value is the numeric value which corresponds to the nominal quantity of
the used unit. The target value is a numerical value which corresponds to quantity of
the set unit to be used for weighing. The target value on the analogue display is
presented as the centre line. The limit values are indicated with the triangle symbols.
The movable bar presents the current weight on the scale pan.
The target weighing mode is selected with the menu element 12.
Display elements used
The „target value”, which corresponds to the centre
line on the graphic display, is to be set with the
menu element 13.
The „limit value”, which corresponds to the distance
between the centre line and upper or lower triangle
symbol, is to be set with the menu element 14.
59 PBS/PBJ-BA-e-1314
Page 59

ESC
ON/OFF
UNIT
TARE /
MENU
CAL
TARE /
16.3 Density determination
16.3.1 Specific measurement of solid weight
In the case of specific measurement of solid weights, the sample (solid) weight is
measured in air as well as in the liquid with known density and the sample density is
calculated on the basis of that results. The ▼ symbol presents the solid density on
this balance. Density determination with the help of the flush-mounted platform
facility is described in the following.
Density determination becomes even easier when an optional set for density
determination is applied. For further information please refer to the operating
instructions enclosed with the set for density determination.
Select the menu element 60 in the menu overview.
• From the below table (chapter 16.3.2) enter the density value (g/cm³) of the
liquid (water, alcohol etc.) in which the sample is immersed. (Entering
numerical values, refer to chapter 11.4, setting decimal point, refer to chapter
11.7). To write off the setting, zero the value.
• Remove the cover of the hook for underfloor weighing in the balance bottom.
• Attach the scale pan to be hung on the hook and immerse it in the container
filled with the liquid with known density.
• Restore the weighing mode with the
button and repeatedly press the
key until the „▼d” (inverted triangle and „d”) symbol is displayed.
• Press the
button
• Place the sample on the weighing plate. (If necessary, the „dSP oL” symbol
will be displayed, which does not indicate any disturbance.)
• When the stabilisation display is illuminated, press
button.
• Place the sample on the scale pan to be hung. The density of the sample is
shown.
Notes:
• 4 positions after the point is displayed for the specific weight. If it is not
possible to stabilize the balance with all four positions after the point, use the
1d/10d switch over function (refer to chapter 12.8).
• If the sample lies on the scale pan immersed in the liquid, make sure that the
whole sample is immersed in the liquid.
• The balance is not zeroed again if the
key is pressed within this
function.
PBS/PBJ-BA-e-1314 60
Page 60

16.3.2 Table of temperatures and densities
Temperatur
Density p [g/cm3]
Water
Ethyl Alcohol
Methyl Alcohol
10
0.9997
0.7978
0.8009
12
0.9995
0.7961
0.7991
13
0.9994
0.7953
0.7982
14
0.9993
0.7944
0.7972
15
0.9991
0.7935
0.7963
16
0.9990
0.7927
0.7954
17
0.9988
0.7918
0.7945
18
0.9986
0.7909
0.7935
19
0.9984
0.7901
0.7926
20
0.9982
0.7893
0.7917
21
0.9980
0.7884
0.7907
22
0.9978
0.7876
0.7898
23
0.9976
0.7867
0.7880
24
0.9973
0.7859
0.7870
25
0.9971
0.7851
0.7870
26
0.9968
0.7842
0.7861
28
0.9963
0.7824
0.7842
29
0.9960
0.7816
0.7833
31
0.9954
0.7800
0.7814
32
0.9951
0.7791
0.7805
34
0.9944
0.7774
0.7886
35
0.9941
0.7766
0.7877
e [°C]
11 0.9996 0.7969 0.8000
27 0.9965 0.7833 0.7852
30 0.9957 0.7808 0.7824
33 0.9947 0.7783 0.7896
61 PBS/PBJ-BA-e-1314
Page 61

ESC
ON/OFF
UNIT
MENU
CAL
16.3.3 Specific measurement of liquid weight
In the case of specific measurement of liquid weight, the weight of reference solid
with known volume is measured in air and the liquid to be tested. The specific liquid
weight is calculated on the basis of those both values.
The display unit for the specific liquid weight is „d”.
Density determination becomes even easier when an optional set for density
determination is applied. For further information please refer to the operating
instructions enclosed with the set for density determination.
Select the menu element 61 in the menu overview.
• Enter the sinker density value.
• Remove the cover of the hook for underfloor weighing in the balance bottom.
• Attach the sinker on the hook and immerse it in the container filled with the
liquid to be tested.
• Restore the weighing mode with the
button and press
button
repeatedly until the „d” symbol is displayed.
• Place the sinker on the balance plate.
• When the stabilisation display is illuminated, press
button. (If
necessary, the „dSP oL” symbol will be displayed, which does not indicate any
disturbance.)
• Place the reference weight on the scale pan and immerse it in the tested
liquid. The specific weight of the tested liquid will be displayed.
Notes:
• 4 positions after the point is displayed for the specific weight. If it is not
possible to stabilize the balance with all four decimal positions, use the 1d/10d
switch over function (refer to chapter 14.1. gelöscht).
• If the reference weight lies on the weighing pan immersed in the liquid, make
sure that the whole weight is immersed in the liquid.
16.4 Extreme value recording
(models with non-verifiable setting only)
The “extreme value” stands for the highest or lowest value indicated after a value
alteration of more than fivefold the null region.
To determine the extreme value, choose menu item 49.
PBS/PBJ-BA-e-1314 62
Page 62

16.5 Auto Print function
PRINT
TARE /
TARE /
TARE /
TARE /
(models with non-verifiable setting only)
Using the Auto Print function ensures automatic data printing without necessity to
press the
button for each single measurement. If the function is activated, the
(Auto-Print) symbol is displayed.
It is possible to select from six types of automatic printing. Information concerning
setting the zero range can be found in chapter 11.7
Printing whilst loading:
Select the menu element 42 in the menu overview.
Place or remove the sample when the displayed value lies within the zero range. The
data will be output automatically when the stabilisation symbol is illuminated and
the displayed positive value exceeds 5 times the zero range value. The next data
output will occur when the display is brought to the value within the zero range by
removing the sample or pressing the
button.
Printing whilst loading and unloading:
Select the menu element 43 in the menu overview.
Place or remove the sample when the displayed value lies within the zero range. The
data will be output automatically when the stabilisation symbol is illuminated and
the displayed positive or negative value exceeds 5 times the zero range value. The
next data output will occur when the display is brought to the value within the zero
range by removing the sample or pressing the
button.
Printing whilst loading and at zero:
Select the menu element 44 in the menu overview.
Place or remove the sample when the displayed value lies within the zero range. The
data will be output automatically when the stabilisation symbol is illuminated and
the displayed positive value exceeds 5 times the zero range value. Remove the
sample or press the
button. The data will be output again when the displayed
value lies within the zero range and the stabilisation symbol is illuminated.
Printing whilst loading, unl oading and at zero:
Select the menu element 45 in the menu overview.
Place or remove the sample when the displayed value lies within the zero range. The
data will be output automatically when the stabilisation symbol is illuminated and
the displayed positive or negative value exceeds 5 times the zero range value.
Remove the sample or press the
button. The data will be output again when
the displayed value lies within the zero range and the stabilisation symbol is
illuminated.
63 PBS/PBJ-BA-e-1314
Page 63

PRINT
TARE /
TARE /
ESC
ON/OFF
PRINT
ESC
ON/OFF
16.6 Automatic zero setting
(models with non-verifiable setting only)
If the displayed value is within the zero range and the stability display lights up, zero
setting occurs automatically. The zero symbol appears.
To switch-on the zero setting function, select menu symbol 41
16.7 Zero range
The „zero range“ is used as a reference value, whether a sample was placed or not.
To determine the zero range, select the menu element 48 .
16.8 Taring /printing at s tability (models PBJ)
(only in verifiable units)
Determine if the balance first has to reach stability before printing via the
or the zero point can be displayed via the
button.
If you want to print or to tare without waiting for stability:
(immediate operation)
• Select the menu element 39.
If printing or taring only after having reached stability: (waiting for stability)
• Select the menu element 40.
Notes:
While the balance waits for stability, „----“ is displayed.
• Press
At this opportunity press the
button, then „---“ appears.
button, if
you deactivate this function and want to cancel taring.
• If the communication - and the standby symbol are illuminated and
you press the
button, you have to wait for the stability symbol .
The data are output, when the stability symbol is illuminated.
button
If during waiting time you press the
button, the balance goes to standby
mode. Data are printed as soon as in the next weighing process stability has
been reached.
PBS/PBJ-BA-e-1314 64
Page 64

16.9 Formulation mode
PRINT
ESC
ON/OFF
TARE /
TARE /
PRINT
ESC
ON/OFF
PRINT
PRINT
ESC
ON/OFF
This mode is used for convenient weighing of individual recipe components.
Weights of each component are displayed and saved after each pressing the
button. The weights of those component are sent with the RS-232C or DATA I/O
interface, and the display is automatically zeroed to weigh the next component.
When all components are weighed, their weights are added up and the total weight is
displayed. This value output is edited by the
button.
Select the menu element 51 in the menu overview.
• 1. If the recipe mode is activated, the display is in the recipe stand-by mode
until it is started. The display shows the Add-On symbol, memory symbol and
stand-by mode symbol. Place the container (if used) and press the
button to tare it. Please remember that taring with the
be accepted after previous pressing the
is possible again after previous pressing the
• 2. Press the
button. If a peripheral device is connected,
button (as in the step 2). Taring
button (as in the step 5).
button will not
„--------- FORMULATION MODE ---------” will be emitted.
• 3. Place the first component and then press the
button. The weight value
will be output as „CMP001”. After that, the display will be automatically
zeroed.
• 4. Step 3 is to be repeated for all components to be weighed.
• 5. Then press the
button. The total weight will be displayed and output to
peripheral devices with the „TOTAL=” unit.
• 6. Remove everything from the balance plate. The next recipe is started from
the step 1.
65 PBS/PBJ-BA-e-1314
Page 65

TARE /
PRINT
PRINT
ESC
ON/OFF
ESC
ON/OFF
PRINT
PRINT
ESC
ON/OFF
16.10 Automatic saving and zeroing
This function is used for weighing large number of single samples. If the function is
activated, the automatic saving and zeroing symbol is illuminated.
Select the menu element 52 in the menu overview.
• Place the container to be weighed on the balance and press the
button when the automatic saving and zeroing function is in the stand-by
mode. (The automatic saving and zeroing symbol and mode
symbol are illuminated.)
The balance will be zeroed.
• Press the
button. The stand-by symbol disappears and measurements
within the automatic saving and zeroing function can be started.
• Place the first sample on the scale pan. Each time when the stabilisation
symbol is illuminated and the value corresponding to five times the zero range
or higher is illuminated or when the
button is pressed, the illuminating
value output and balance zeroing is carried out.
• Weighing process of the next sample is carried out without the necessity to
press the
• Press the
button.
button. The balance returns to the stand-by mode of the
automatic saving and zeroing function, the total weight placed on the scale
pan without the packaging weight is displayed. To print this value, press the
button.
Notes:
• If the stabilisation symbol is illuminated and the display value lies within the
zero range, zeroing is carried out automatically.
• Pressing the
button when the display value lies below five times the zero
range is followed by zeroing after data output. (Manual loading)
• Pressing the
button when the automatic saving and zeroing function is in
stand-by mode is also followed by setting mains supply in stand-by mode.
PBS/PBJ-BA-e-1314 66
Page 66

16.11 Animal weighing
TARE /
TARE /
ESC
ON/OFF
PRINT
(only possible with non verifiable setting)
This function is used for weighing animals. The animal symbol is displayed when
the animal weighing mode is active.
Select the menu element 53 in the menu overview.
• Place the weighing container on the scale pan and press the
button.
Note:
When the weighing container is placed on the scale pan, data output is possible. It is
not a fault. This no malfunction.
• Place an animal on the scale pan. Its weight must exceed 50 times the zero
range.
• The value will be given automatically when the weighing value is stabilised.
• Press the
button or remove an animal from the scale pan.
• If the displayed value is stable, but it lies below 10 times of the zero range,
the balance will be zeroed automatically. Any remaining materials on the
scale pan (excrement or skin) will be automatically written off and zeroed. If
the balance is not zeroed, the zero range value must be increased (refer to
chapter 10.7).
Notes:
• The stand-by mode is not provided for the animal weighing function.
• Press the
button to switch over to the mains supply stand-by mode.
• When live animals are weighed in the animal weighing mode, automatic
extension of stability detection band is carried out. Repeatability of measuring
data is a bit lower than in other operational modes.
• If an animal being weighed cannot be controlled and the automatic printing
function does not respond, you can press the
button to output the display
value. Then remove an animal from the balance. Even if the stability symbol
appears before an animal is removed from the balance, the data will not be
printed again.
• The stability symbol will appear earlier due to setting the wider stability
detection band in the menu.
• If the balance returns to the zero point too slowly, the zero range is to be set
to a higher value.
• The initial taring function (chapter 11.2.1) cannot be used together with the
animal weighing function.
67 PBS/PBJ-BA-e-1314
Page 67

Computer side
Balance side
EARTH REFERENCE
SCREEN
EARTH REFERENCE
not always required).
Computer side
Balance side
17 Data output
17.1 Personal Computer - RS-232C
17.1.1 Connecting the Cable ATTENTION:
By using the RS-232C/AUX interface of the PBS/PBJ type balances it is also
possible to output other signals than RS-232C ones. Incorrect connection of those
signal cables may lead to the personal computer or balance failure. Therefore, make
sure that the suitable and correctly connected cable provides communication
between the balance and computer.
Some types of computers may not operate normally when they are connected by
using the optional RS-232C cable in the way shown in the below figure.
(1) IBM PC/AT computer and compatible (9-pin D-sub connector)
(2) IEEE standard (D-sub 25-pin)
(This installation cable is
PBS/PBJ-BA-e-1314 68
Page 68

17.2 Data Formats
First sign
Minus: '−' Not minus: space
from 2. to 11. sign:
Numerical values or „[”, ”]” are right justified. Position of the
decimal point is changed depending on the device type.
from 12. to 13. sign:
Units such as g or kg
from 14. to 15. sign:
Limiter
The following explanations refer to the case when the menu element 77 (EB type
format) is selected. Explanations concerning other formats are included in the data
of computers compatible with the suitable data formats.
Note:
The mark indicates the space code, and <Limiter> indicates the limiter code.
1. For measuring values:
Note:
• If the CR or LF command is the limiter (the menu element 94 or 95 is
selected), sign 13 is not available.
• When stability information is printed, the first of the above mentioned signs is
preceded with the following sign:
Stable time: S
Instable time: D
2. For „oL“ or „-oL“
„oL“ OL < Limiter >
„-oL“ − OL < Limiter >
69 PBS/PBJ-BA-e-1314
Page 69

1. Commands ending wit h a digit, letter or symbol differ ent t han [ = ] :
commands to the balance must be transmitted with a limiter for each command code.
Example 1:
PRINT
button.
2. Commands ending wit h the [=] sign: Digits must be t r ansm i t ted with a limiter to
the balance.
Example 2:
TIME=1234 <CR> .. The time of 12:34 is set as the current time
Example 3:
P.TARE=1.23 <CR> (example for two positions after the point).
The value of 1,23 g is set as the initial taring value.
Example 4:
P.TARE=0.00 <CR> (example for two positions after the point).
... cancels (writes off) the initial taring value.
17.3 Using codes of com m ands Note:
Incorrect setting of communication parameters results in displaying the
communication error „ComErr”.
PRINT<CR> ... The same process as after pressing the
Note:
Number of positions, decimal point and position of the decimal point in the number
sign transmitted after the ‘=’ sign are the same as they would be for entering
numerical value with the buttonboard.
Use the same number of places after the point as in the weighing mode.
This limitation does not refer to USER=, SOLID= and LIQUID= commands.
PBS/PBJ-BA-e-1314 70
Page 70
Example 6:
#=2.56 <CR>
Example 7:
#=12.345.67 <CR>
PRINT
strings are sent from the balance.
3. Return message command
commands for N ≤30.
Example 8:
ABCDEFG12345<CR>
printer.
4. Codes of commands for EB type formats (the menu element 77) and Old EB type
(menu element 78 )
(i) Output commands
D01
Continuous output
D03
Continuous output with stability information
D05
Single output
D06
Automatic printing setting (type of automatic printing is set separately)
D07
Single output with stability information
D09
Cancellation of continuous output and automatic printing
Notes:
• If 0 is at the beginning of the four-position number, the setting is finished at
this point, and the menu selection is finished.
• The result of such a command depends on the balance type.
A computer makes it possible to determine the specified
presentation way of numbers for processes of weighing and
displaying on the balance.
In the case of commands from examples 6 and 7, the values of
[#2.56] and [#12.345.67] are displayed on the balance.
When
the
button is pressed, the ’2-56<CR>’ and ’12-345-67<CR>’
The balance sends back the N string of signs which are limited by the return message
command ‘{‘ or ’}’ and limiter.
In the receive buffer of the balance there are not left any not processed return message
... When this command is received, the balance sends
ABCDEFG12345<CR> string. This string can be printed by the
Note:
Only capital letters and part of symbols (decimal point, decimal symbol etc.) can be
used for data output with an electronic printer. Maximal length of line is 15
characters.
71 PBS/PBJ-BA-e-1314
Page 71

(ii) Commands concerning user buttons
Corresponds to the
ESC
ON/OFF
button.
Corresponds to the
ESC
ON/OFF
button.
Corresponds to the
MENU
CAL
button.
Corresponds to the
ESC
ON/OFF
button.
Corresponds to the
MENU
CAL
button.
Corresponds to the
UNIT
button.
Corresponds to the
PRINT
button.
Corresponds to holding the
ESC
ON/OFF
button for about 3 seconds.
Corresponds to holding the
MENU
CAL
button for about 3 seconds.
Corresponds to holding the
UNIT
button for about 3 seconds.
Corresponds to holding the
PRINT
button for about 3 seconds.
(iii) Commands concerning user measur ements
ADDON
Sets automatic saving and zeroing mode.
Comes into use immediately after setting the automatic saving and
zeroing mode.
A
Sets animal weighing mode.
ANIMAL
Sets animal weighing mode.
R
Cancels user weighing mode.
(iv) Commands concerning conversion of units
g
Switches over to „g” unit.
kg
Registration of „kg” unit and switching over.
PERCENT
Registration of „%” unit and switching over.
%
Sets 100% when displaying is carried out in „%” unit.
G
g - % switching over.
PCS
Registration of „PCS” unit and switching over.
SDENSE
Registration of „Solid density” unit and switching over.
LDENSE
Registration of „Liquid density” unit and switching over.
RSTUNIT
Return to the standard settings.
POWER
Q
MENU
TARE
T
UNIT
PRINT
POWER*
MENU+
UNIT+
PRINT+
+
PBS/PBJ-BA-e-1314 72
Page 72

(v) Reading commands for set values
TARGET
Readout of the set target value.
LIMIT
Readout of the set limit value.
Readout of the set lower limit value on the display of the check weighing
1.
Readout of the set upper limit value on the display of the check
weighing 1.
Readout of the set lower limit value on the display of the check weighing
2.
Readout of the set upper limit value on the display of the check
weighing 2.
UW
Readout of the set value for weight unit.
G/PCS
Corresponds to the „g/PCS” button.
Readout of the set external weight value for calibration of measuring
range.
ACALT1
Readout of time 1 in the Clock-CAL mode.
ACALT2
Readout of time 2 in the Clock-CAL mode.
ACALT3
Readout of time 3 in the Clock-CAL mode.
P.TARE
Readout of the set initial taring value.
ZRNG
Readout of the set zero range value.
USER
Readout of conversion factors for the user unit.
VOL
Readout of the set value for reference weight.
DENSE
Readout of the set value for ambient liquid density.
ITIME
Readout of the set value for interval timer.
(vi) Commands for setting numerical values
CALWIT=
Sets external weight value for calibration of measuring range.
ACALT1=
Sets time 1 in the Clock-CAL mode.
ACALT2=
Sets time 2 in the Clock-CAL mode.
ACALT3=
Sets time 3 in the Clock-CAL mode.
UW=
Sets weight unit.
VOL=
Sets volume of reference weight.
SDENSE=
Sets density of ambient liquid.
DATE=
Sets date.
TIME=
Sets time.
TARGET=
Sets target value.
LIMIT
Sets limit value.
G.LO=
Sets lower limit value on the display of the check weighing 1.
G.UP=
Sets upper limit value on the display of the check weighing 1.
L.LO=
Sets lower limit value on the display of the check weighing 2.
L.UP=
Sets upper limit value on the display of the check weighing 2.
PCS=
Sets any number of pieces.
#=
Corresponds to numeric buttons of the keyboard.
ID=
Specifies ID.
G.LO
G.UP
L.LO
L.UP
CALWIT
73 PBS/PBJ-BA-e-1314
Page 73

(vii) Commands of special functions
CAL
Calls up measuring range calibration mode.
C18
Calls up measuring range calibration mode.
LOCK
Sets menu lockout.
RELEASE
Releases menu lockout.
TIME
Reads date and time.
ADJCLK
Carries out correction by ± 30 seconds.
RSTMN
Resetting the menu
MENU=
Makes it possible to call up any menu.
{
Return message.
}
Return message.
Switches over to the multipoint connection mode. (@ for lower case
letters)
5. Commands compatible with Mettler Toledo series elect r onic balances
S
Single output in stable condition
SI
Immediate, single output
SIR
Continuous output
SR
Continuous output in stable condition
T
Taring after stabilisation
TI
Immediate taring
Z
Zeroing (the same as immediate taring)
5. Commands compatible with Sartorius series electr oni c balances
<ESC>P
Single taring
<ESC>T
Taring
[@]
Note:
<ESC> for escape code (1BH)
PBS/PBJ-BA-e-1314 74
Page 74

17.4 User Settings
If the software handshake function is not to be performed, select the menu
element
73
If the software handshake function is to be performed in the way described
balance data output is started.
74
If the hardware handshake function is to be performed in the way described
started.
75
To call up the time controlled hardware handshake function, select the
menu element
76
17.4.1 Overview
This menu is used to determine technical data of communication between the
balance and a computer or electronic printer.
Note:
This menu applies both to the RS-232C interface and DATA I/O interface.
For the device to which the DATA I/O interface is connected e.g. electronic printer,
the balance communication parameters should be set to the standard settings i.e.
select the following menu elements: 76, 77, 83, 89, 92, 94.
17.4.2 Handshaking
The handshake function determines whether or not peripheral devices can receive
communication data from the balance. It does not transfer the balance status to the
peripheral devices. The balance can receive data as long as there is a free space in
its receive buffer memory. This function is ready for operation when the „oFF” symbol
is displayed. Its reliable operation in other states cannot be guaranteed.
If the balance data output is interrupted by the handshake function, the balance
display is locked.
Enter the suitable settings for the handshake function.
below, select the menu element
• When the X-OFF (13H) command is received by the balance, the
balance data output is stopped.
• When the X-ON (11H) command is received by the balance, the
below, select the menu element
• If the DTR parameter is set to OFF, the balance data output is
stopped.
• If the DTR parameter is set to ON, the balance data output is
75 PBS/PBJ-BA-e-1314
Page 75

No parity, 8-bit length:
Select the menu element 89
Odd parity, 7-bit length:
Select the menu element 90
Straight parity, 7-bit length:
Select the menu element 91
Stop bit 1:
Select the menu element 92
Stop bit 2:
Select the menu element 93
Setting to CR(0DH):
Select the menu element 94
Setting to LF(0AH):
Select the menu element 95
Setting to CR+LF(0D0AH):
Select the menu element 96
17.4.3 Format
Specify the format of data output by the balance.
For the standard format of the KERN electronic balances
• Select menu element 77 .
For the old data output format of the KERN electronic balances:
• Select menu element 78 .
17.4.4 Speed of communication
Specify the transmission speed (300, 600, 1200, 2400, 4800, 9600, 19200 or
38400 bps).
The value presented as „b-xxx” gives the number of bps (bits/second). Baud-rate
and bps are the same value.
Select one of the menu elements from 81 to 88.
17.4.5 Parity / Bit length
Select the parity and bit length.
17.4.6 Stop Bits
Select the number of stop bits.
17.4.7 Limiter
The „limiter” is used to separate single data or commands from each other. The
limiter is to be set in the following way:
PBS/PBJ-BA-e-1314 76
Page 76

18 Service, maintenance, disposal
18.1 Clean
Before cleaning, please disconnect the appliance from the operating voltage.
Please do not use aggressive cleaning agents (solvents or similar agents), but a
cloth dampened with mild soap suds. Ensure that no liquid penetrates into the device
and wipe with a dry soft cloth.
Loose residue sample/powder can be removed carefully with a brush or manual
vacuum cleaner.
Spilled weighing goods m ust be removed immediately.
18.2 Service, maintenance
The appliance may only be opened by trained service technicians who are
authorized by KERN.
Before opening, disconnect from power supply.
18.3 Disposal
Disposal of packaging and appliance must be carried out by operator according to
valid national or regional law of the location where the appliance is used.
77 PBS/PBJ-BA-e-1314
Page 77

Display
Explication
Too large error was found during calibration check. (Please
contact your sales representative.)
Too large error was found during calibration check. (Please
contact your sales representative.)
All number signs are
flashing.
19 Instant help
In case of an error in the program process, briefly turn off the balance and
disconnect from power supply. The weighing process must then be restarted from
the beginning.
General display:
Wait for the next display.
Date and time are output.
The process has been interrupted.
Operational measurement is allowed.
Menu lock active
Menu lockout released.
The menu has been reset.
The contents of the new setting and factor have been saved.
Return in a result of mains failure.
The built-in weight is moving. Please wait.
Put the calibration weight being displayed.
PBS/PBJ-BA-e-1314 78
Page 78

Error message:
Displayed error
code
Explication
Remedy
Disturbances in weight loading
mechanical elements.
Check transport screws.
Weight on the scale pan is unstable
during calibration.
Large zero point drift during
calibration.
Empty the scale pan.
Large drift during the PCAL function.
Use the correct weight.
Large drift during calibration of the
measuring range.
Calibration weight is incorrect.
Use the correct weight.
Disturbances in the balance (the
appears).
Received command code is
incorrect.
Total number of the displayed unit is
longer than 7 positions.
Reduce load.
Disturbance in the balance.
The power voltage is incorrect.
Check the power voltage .
* Please contact your sales representative.
balance is stopped when this display
Use the correct weight.
∗
Check limiters etc.
∗
79 PBS/PBJ-BA-e-1314
Page 79

Symptom
Possible cause
Remedy
Display is empty.
• Mains adapter is not connected.
• Incorrect voltage.
Check mains voltage and
„OL” or „-OL” display
The transport screws are not locked.
Turn the screws anticlockwise
until they are locked.
Pads of the scale pan not installed.
Install pads of the scale pan.
Use the weight within its
capacity.
The display does not
pan.
The weighing pan is displaced.
Place the weighing pan correctly.
The display
Influence of vibrations or air flow.
Place the weight at the suitable
settings.
Protective shield is touching the
scale pan.
Install the shield on the main unit
of the balance.
Incorrect weighing
result.
Calibration of the measuring range is
not effective.
Calibrate the balance correctly
Tare the balance before
weighing.
The balance does not
unit.
The unit has not been set.
First set the unit.
Selection of the menu
element is rejected.
Menu lock ACTIVATED.
Remove the menu lock
Fault finding Procedures:
• The room mains circuit-breaker is
switched off.
To large weight on the scale pan.
react after putting a
weight on the scale
fluctuates.
connect the mains adapter
correctly.
location.
Try to change environment
Taring is not effective.
display the required
PBS/PBJ-BA-e-1314 80
 Loading...