

Page 1
KERN & Sohn GmbH
Ziegelei 1
D-72336 Balingen
E-Mail: info@kern-sohn.com
Service manual
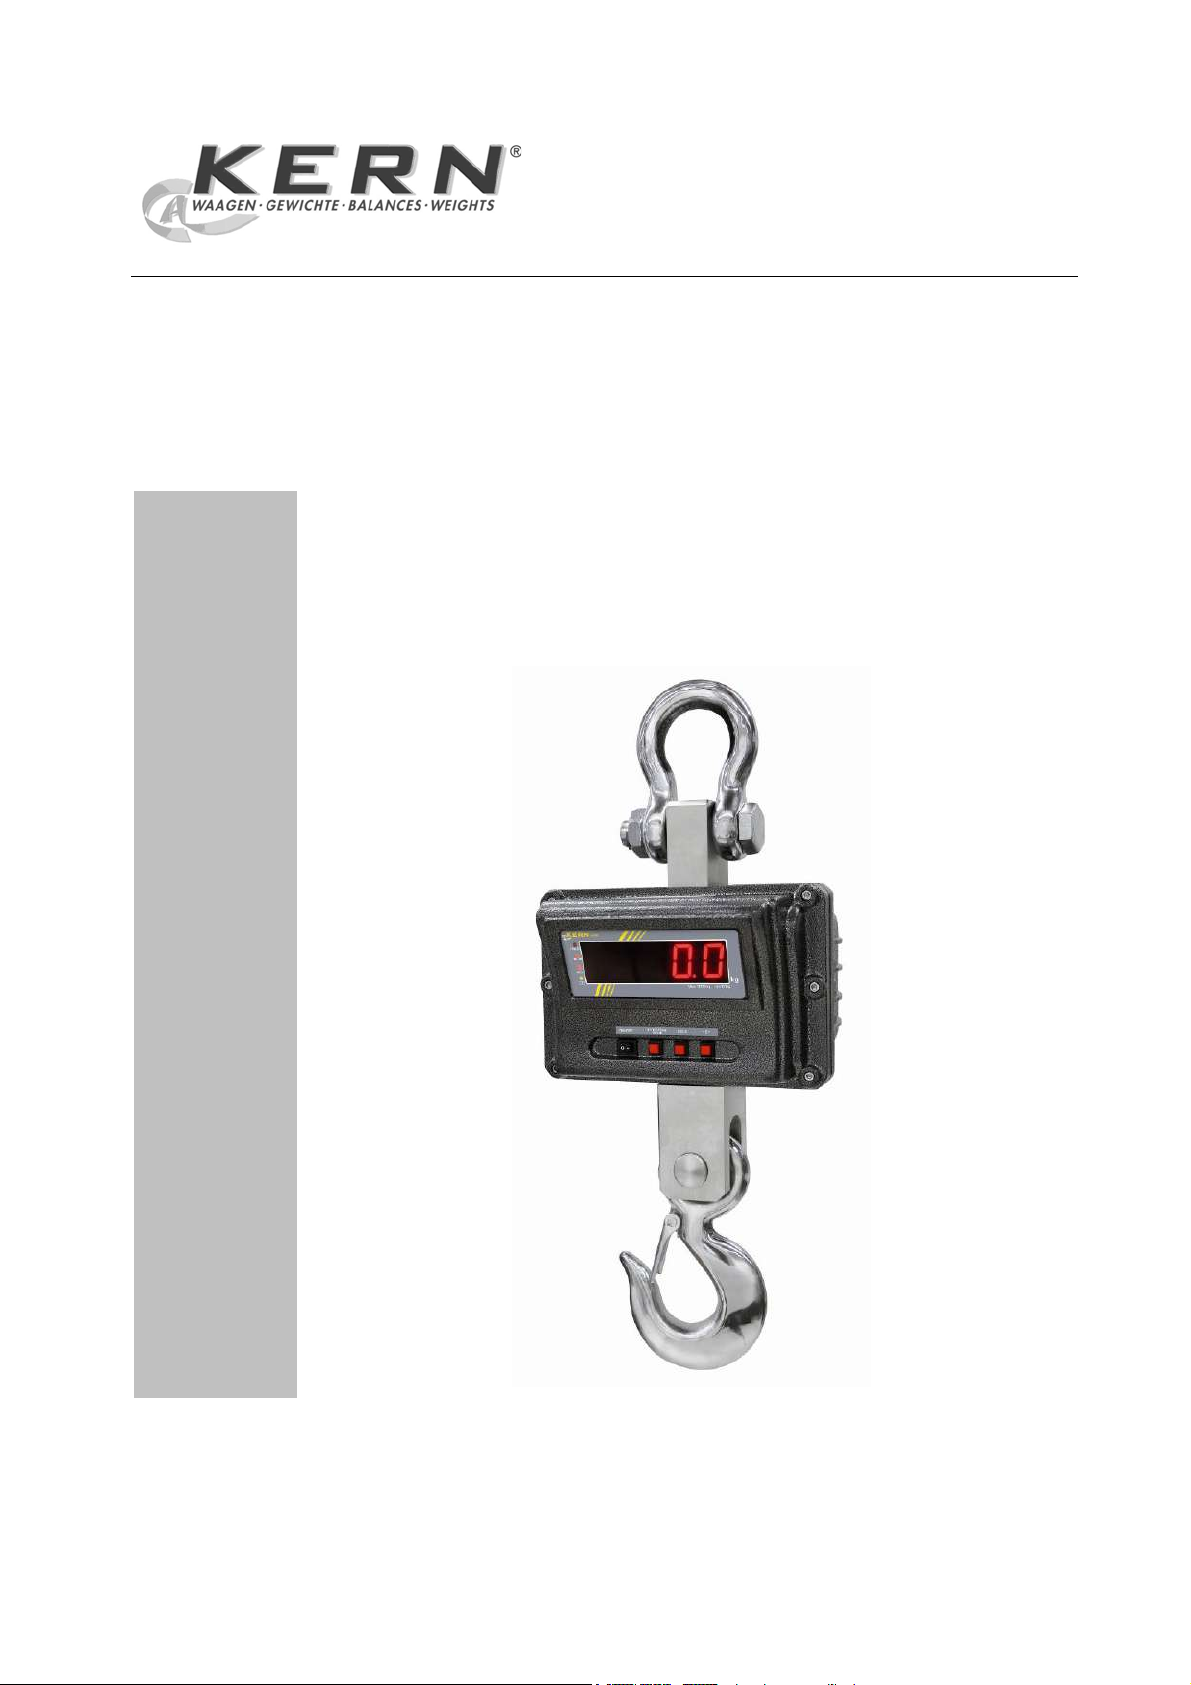
Crane scale
KERN HFM
Version 1.0
12/2011
GB
Tel: +49-[0]7433- 9933-0
Fax: +49-[0]7433-9933-149
Internet: www.kern-sohn.com
HFM-SH-e-1110
Page 2

GB
KERN HFM
Version 1.0 12/2011
Service manual
Crane scale
CONTENTS
1 Basic information .............................................................................................. 3
2 General safety regulations ............................................................................... 4
2.1 Owner’s duties ........................................................................................................ 4
2.2 Organizational measures ....................................................................................... 4
2.3 Ambient conditions ................................................................................................ 4
2.4 Intended use ........................................................................................................... 5
2.5 Safety conscious working methods ..................................................................... 5
3 Menu ................................................................................................................... 6
3.1 Navigation in the menu .......................................................................................... 6
3.2 Menu overview ........................................................................................................ 7
3.3 Setup of capacity (maximum load) ....................................................................... 8
4 Adjustment ......................................................................................................... 9
5 Trouble shooting ............................................................................................. 10
6 Maintenance ..................................................................................................... 12
6.1 Cleaning ................................................................................................................ 12
6.2 Replacement of rechargeable battery ................................................................. 12
6.3 Regular maintenance ........................................................................................... 13
7 Spare parts ....................................................................................................... 14
7.1 Exploded drawing ................................................................................................. 14
7.2 Parts list ................................................................................................................ 15
8 Circuit diagram ................................................................................................ 16
2 HFM-SH-e-1110
Page 3
1 Basic information
Grundlegende Hinweise
The device must be repaired only by trained specialist staff or personnel with
professional formation (such as a repair-specialist accredited by law
concerning verification).
The service manual is obligatory for repair work.
After repair, original conditions of the device have to be restored.
Only original spare parts should be used.
When it becomes necessary to replace a load-bearing part, ALL load-
bearing parts need to be replaced for safety reasons.
The safety bracket on the hook may be changed.
Das Gerät darf nur von geschultem oder beruflich ausgebildetem
Fachpersonal (z. B. eichrechtlich anerkannter Instandsetzer) repariert werden.
Die Serviceanleitung ist bindend für Reparaturen.
Das Gerät muss nach erfolgter Reparatur wieder in den Originalzustand
zurückversetzt werden.
Es dürfen nur Originalersatzteile verwendet werden.
Sollte es notwendig sein, ein lasttragendes Teil zu tauschen, so müssen in
diesem Falle aus Sicherheitsgründen ALLE lasttragenden Teile getauscht werden.
Die Sicherheitslasche am Haken darf getauscht werden.
HFM-SH-e-1110 3
Page 4

2 General safety regulations
Risk of injury and damage!
The crane scale is part of the lifting device!
Æ Read the User manual carefully before you put the crane scale
DANGER
2.1 Owner’s duties
▲ Only operate the crane scale in compliance with the instructions given in this
Service manual, the User manual or in any other documents provided by the
manufacturer.
▲ Observe the national accident prevention regulations and the owner’s occupational, operating and safety regulations.
▲ The manufacturer declines any warranty and liability for damages caused as a
result of the owner’s failure to operate the crane scale in compliance with the
instructions given in this Service manual, the User manual or in compliance with
any other regulations referred to in this clause or that are otherwise applicable.
▲ Perform periodical safety inspection and maintenance as described in the User
manual.
▲ Log test result and file in inspection and test log book.
into operation for the first time.
2.2 Organizational measures
▲ Only entrust trained and instructed personnel with operation.
▲ Make sure that the User manual is available at all times at the crane scale
operation location.
▲ Have installation, commissioning and maintenance carried out by specially
trained personnel only.
▲ The crane scale may only be repaired by authorized KERN service personnel.
▲ Have all safety inspections and repairs logged in the lists in the User manual.
2.3 Ambient conditions
▲ Do not operate the crane scale in explosion hazardous areas.
▲ Only operate the crane scale in ambient conditions as described in the User
manual.
▲ Avoid temperature changes that could cause condensation in the inner of the
crane scale.
▲ Do not operate the crane scale in corrosive ambient conditions.
4 HFM-SH-e-1110
Page 5
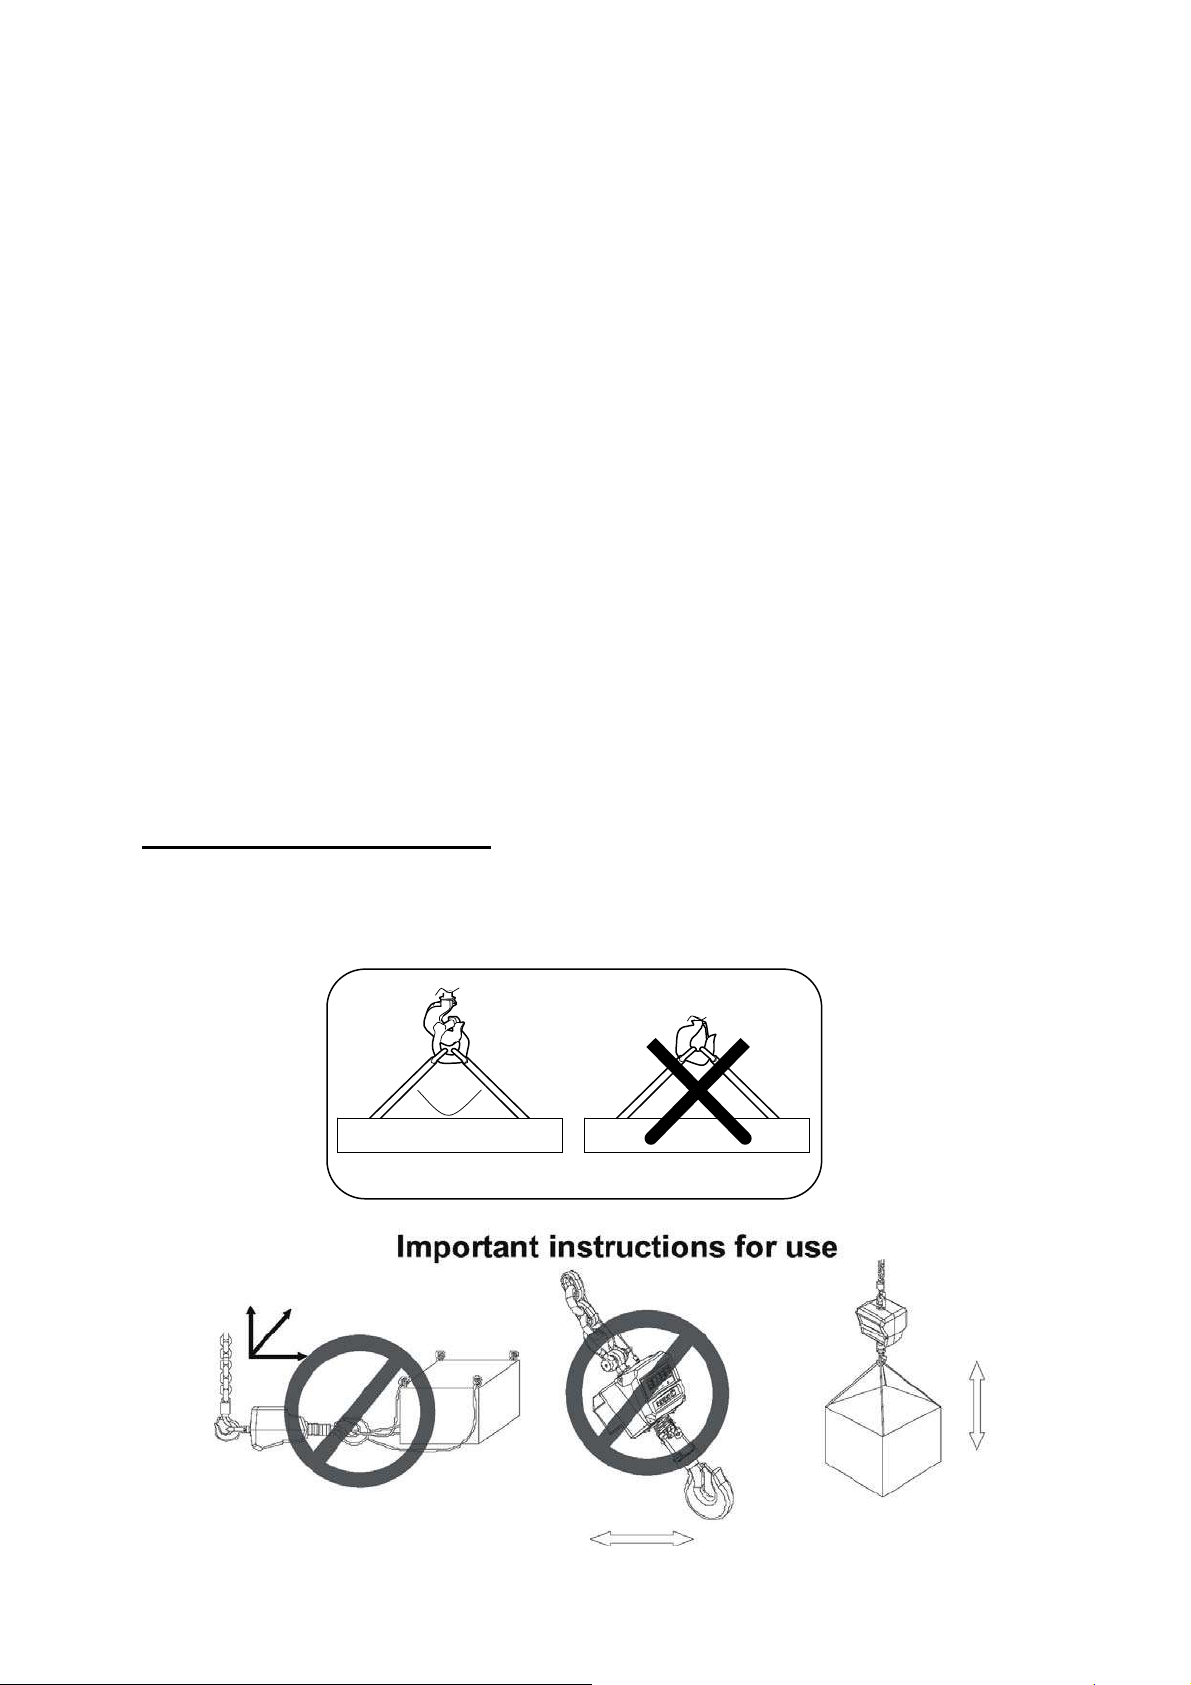
2.4 Intended use
▲ Use the crane scale exclusively for lifting and weighing freely moveable loads.
▲ Danger of injury in case of improper use. For example, the following is not
permitted:
–exceeding the permissible nominal load of the crane, crane scale or any type
of load attachment equipment,
–transporting persons,
–pulling loads at an angle,
–tearing loose, pulling or dragging loads.
▲ Changes or modifications to the crane scale or the crane are not permitted.
2.5 Safety conscious working methods
▲ Do not stand under suspended loads.
▲ Only position the crane so that the load is lifted vertically.
▲ Wear personal safety equipment (helmet, safety gloves) when working with the
crane and crane scale.
▲ Do not leave controls while load is suspended.
▲ Operate the crane at a safe speed.
▲ Do not allow the load to swing when it is being moved.
Decommissioning and storage
▲ When the crane scale is not in use, always remove all load attachment equipment from the crane scale and remove the crane scale from the crane.
▲ Do not store the crane scale outdoors.
HFM-SH-e-1110 5
Page 6

3 Menu
3.1 Navigation in the menu
Call function
Select function
Ö Switch on the balance and during the self test press the
ZERO and the button once at the same time.
„P1 - - - “ is displayed.
Ö Enter password:
Select standard password „000“.
Pressing the button increases the numerical
value of the blinking digit by one.
Pressing the HOLD button moves the digit.
or
personal password, see function „F8 Ci”
or
supervisor password „315”
Ö Confirm with ZERO button.
The first function „F0 di“ is displayed.
Ö The button allows to select the individual
functions one after the other.
Select setting
Change settings
Confirm setting
Exit menu / Return to
weighing mode
Ö Confirm the selected function by the ZERO button. The
current setting will be displayed.
Ö Use the button to switch over into the
available settings.
Ö Press the ZERO button, the balance returns into the
menu.
Ö Press the HOLD button.
6 HFM-SH-e-1110
Page 7

3.2 Menu overview
Function
Available
settings
Description
F0 di
Modification of readability
F1 A2
Automatic zero point
correction
(zero tracking range)
F2 bt
Low
High*
cap
1 t 2kg 1kg 500g 500g 200g 100g
3 t 10kg 5kg 2kg 2kg 1kg 500g
5 t 10kg 5kg 2kg 2kg 1kg 500g
7.5 t 20kg 10kg 5kg 5kg 2kg 1kg
10 t 20kg 10kg 5kg 5kg 2kg 1kg
A2n oF
A2n 0.5
A2n 1
A2n 2 *
A2n 4
Not documented
d (low)
off
0.5 d
1 d
2 d
4 d
d (high)
specialist with competent knowledge.
Modifications may only be carried out by a
F3 SP
F4 iP
F5 Ut Not documented
F6 SL
Standby mode
F7 Gv Not documented
F8 Ci
Personal password entry
„P1 - - - “
F9 CL Adjustment, see chapter 4
* = default setting
Not documented
Internal A/D converter value, e.g. 90035
SLP 0 Standby mode switched off
SLP 1* Standby mode after 5 minutes
SLP 2 Standby mode after 10 minutes
SLP 3 Standby mode after 20 minutes
SLP 4 Standby mode after 30 minutes
Pressing the button increases the numerical
value of the blinking digit by one.
Pressing the HOLD button moves the digit.
Confirm with ZERO button.
HFM-SH-e-1110 7
Page 8

3.3 Setup of capacity (maximum load)
1) Switch off the balance.
2) Open the top cover of housing.
3) Set jumper on pin J2.
4) Switch on the balance and during the self test press the ZERO and the
button once at the same time.
„P3 - - - “ is displayed.
5) Enter password „999“ and confirm with ZERO button.
Pressing the button increases the numerical value of the blinking
digit by one.
Pressing the HOLD button moves the digit.
6) The current capacity is displayed, e.g. 1000
Press button to change the capacity and confirm with ZERO
button.
7) Now balance will return to normal weighing mode.
8) Switch off the balance and remove the jumper J2.
8 HFM-SH-e-1110
Page 9

4 Adjustment
Ö Switch-on balance and during the self test press the ZERO and the
button once at the same time. „P1 - - - “is displayed.
Ö Enter password:
Select standard password „000“.
Pressing the button increases the numerical value of the blinking digit
by one.
Pressing the HOLD button moves the digit.
or
personal password, see function „F8 Ci”
or
supervisor password „315”
Ö Confirm with ZERO button, the first function „F0 di“ is displayed.
Ö
Press the button repeatedly until „F9 CL“ will be displayed.
Ö Press the ZERO button, „UnLD“ will be displayed.
Ö Unload the balance and wait until the LED lights up.
Ö Press the ZERO button, the currently set adjustment weight is displayed.
Ö In order to change, select the number to be changed using the HOLD button and
set the desired value using the button, the respective active digit
flashes.
Ö Confirm by the ZERO button, „Load“ will be displayed.
Ö Attach the adjustment weight and wait until the LED lights up.
Ö Press the ZERO button.
Ö After successful adjustment the balance carries out a selftest, then it
automatically returns to weighing mode.
An adjusting error or incorrect adjusting weight will be indicated by the error
message; repeat adjustment procedure
HFM-SH-e-1110 9
Page 10

5 Trouble shooting
Error Code Fault Remedy
-ol- Overload Remove weight from the Scale.
Check with mass Weight and do
the calibration.
Err 5 Key board error Key board short circuit. Check
the cable, the connector and the
keys.
Err 6 A/D converter out of range If overloaded, remove the
weight, make sure that the hook
is proper and check the load cell
and PCB.
bA lo Battery low Charge the battery
No display:
• Mains power is turned off or power supply not plugged proper.
• Power supply faulty.
• Internal Battery is not charged.
• Check On/OFF switch is turned on and faulty or not.
• Check the PCB power connecters and cable.
Display is Blank after the self test / Err stuck:
• Unstable weight.
• Release the hook and check the hook is lying correctly.
• Try again to turning on.
• Check the load cell is not touching any where.
• Load cell is damaged. Check the load cell connections and all.
OL or( -------) appear the display:
• Maximum capacity exceeded.
• Power supply faulty. Check all power cables and connecters.
• Calibrate again with correct calibration weights.
• Load cell damaged. Check load cell connections.
10 HFM-SH-e-1110
Page 11

(------) or Lo:
• Weight is below permissible limit.
• Check loop and hook seated proper and installed correctly.
• Calibrate again with correct calibration weights.
• Power Supply faulty. Check all power cables and connecters.
• Load cell damaged. Check load cell connections and connecters.
• Try to turn on again.
Unstable display:
• Check loop is seated proper
• Check any vibrations, noises, sudden temperature changes.
• Check power supply.
• Check battery and connect to charging.
• Check the hook and load weight is proper.
• Check the load cell connections and connecters.
Incorrect value:
• Calibration error.
• Calibrate again with exact calibration mass weights.
• Check the weight sample is hanging proper and avoids touching the cover or
surface.
• Check power supply and battery.
• Check load cell connections and connectors.
Can not use scale full capacity:
• Before weighing make sure zero indication is showing and scale is empty.
• Check the weighing mode.
• Check the load cell is fitted proper and touching housing or hitting somewhere.
• Calibrate again with exact calibration mass weights.
• Load cell damaged. Check load cell connections and connectors.
• Main Board problem.
Battery not charging:
• Mains voltage problem. Check the power supply voltage and adaptor voltage.
• Charging circuit failure.
• Battery failure. Check the battery connections.
HFM-SH-e-1110 11
Page 12

6 Maintenance
6.1 Cleaning
Disconnect the power before cleaning.
Use a cloth with mild suds and light cleaning agents. Make sure that fluid not able to
get into the device. Use a clean and soft cloth for rub off.
This devise does not require any routine maintenance. It may be necessary to
perform periodic checks of the calibration of the scale due to mechanical reasons.
The frequency of the checks depends on the conditions to use.
6.2 Replacement of rechargeable battery
1. Remove the four screws from the back cover.
2. Open the battery case and replace the rechargeable battery.
3. After replacement close the battery case.
4. Fix the four screws from the back cover.
12 HFM-SH-e-1110
Page 13

6.3 Regular maintenance
Initial
Commissioning,
every 3 months or
anyway after
12 500 weighings
Every 12 months or
in any case after
50 000 weighings
Check all dimensions,
Check the shackle or the eyelet for wear and tear, such as
e.g. plastic deformation, mechanical damage (unevenness),
notches, striation, cracks, corrosion, thread damage and
torsions.
Check the application of the safety bracket on the hook,
moreover check for fault and correct function
For balances of big construction size: Check that the split pin
and the nut on the shackle are not loose
If a dimension exceeds the admitted deviation from the original
dimension or if other discrepancies have been found, the
balance must be repaired at once by trained specialized staff
(KERN customer service). Never do repair it by yourself!
Take balance out of operation immediately!
All repairs and spare parts must be documented by the service
partner .
If the enhanced maintenance has to be carried out by trained
staff (KERN customer service). At this general revision all
load carrying parts must be checked for gaps with magnetic
powder
Every 5 years or
anyway after
All load carrying parts have to be exchanged by trained
specialized staff (KERN customer service).
250 000 weighings
Every 10 years or
anyway after
Replace the crane scales entirely
500 000 weighings
Note
During the revision watch out for wear and tear according to the following drawings .
DANGER Risk of injury due to falling loads!
➜ After service work the crane scale must not be taken into
operation unless a 3-months periodical safety inspection has been
passed successfully, see User manual.
➜ Always operate with great care according to the general rules
for operating a crane, see User manual.
➜ Never stay under hanging loads.
➜ Do not exceed the rated load capacity of the crane, crane scale
or any load bearing item attached to the crane scale.
HFM-SH-e-1110 13
Page 14

7 Spare parts
7.1 Exploded drawing
14 HFM-SH-e-1110
Page 15

7.2 Parts list
No Parts
1 Loop 1
2 Back Cover 1 Al
3 Screw(internal hexagon) 4 M4x10
4 Washer 1 SUS
5 Overlay 1
6 PCBA 1
7 Power Switch 1
8 Function Switch 3
9 Screw 4 M6x15
10 Front Cover 1 Al
11 Load Cell 1
12 Screw 4 M4x10
13 Battery Bar 2 SUS
14 Battery 1 Lead Acid
15 Battery Cover 1 Al
16 Screw 4 SUS M4x8
Qty
Material
Spec
When it becomes necessary to replace a load-bearing part, ALL load-
bearing parts need to be replaced for safety reasons.
Therefore position 1 and 11 are only available as a complete kit and not
separately.
The safety bracket on the hook may be changed.
HFM-SH-e-1110 15
Page 16

8 Circuit diagram
16 HFM-SH-e-1110
 Loading...