

Page 1

KE-8 Controller Enclosure
Installation Guide
Section 1 – Specifications
Section 2 – Wall Mounting the Enclosure
Section 3 – Controller Installation
Section 4 – Tamper Relay Board Mounting
Section 5 – Wire Routing
Section 6 – Keri Contact Information
The KE-8 Controller Enclosure handles up to four NXT Controllers or PXL Controllers in a powder-coated, steel box.
The KE-8 has two locks to ensure the lid is secured to the enclosure body.
1.0 Specifications
1.1 Dimensions
• 15.75 inches tall by 17.50 inches wide by 6.625 inches deep
• 40.00 cm by 44.45 cm by 16.83 cm
1.2 Weight
• 13.6 lbs / 6.17 kgs – Enclosure only
• Up to 25 lbs (11 kgs) for a fully loaded enclosure
1.3 Knockouts
• 14 at 0.688 inches (1.75 cm) – 4 each top and bottom, 3 each left and right sides
• 4 at 0.880 inches (2.24 cm) – 2 each top and bottom
Page 1 of 5 P/N: 01515-001 Rev. C
Page 2

KE-8 Controller Enclosure
0.75 in
14.375 in
2.50 in
8.50 in
14.50 in
Enclosure
Lock Tabs
Lid
Hinge
Tamper Annunciation Board Mounting PIMs
Enclosure Body - TOP
Installation Guide
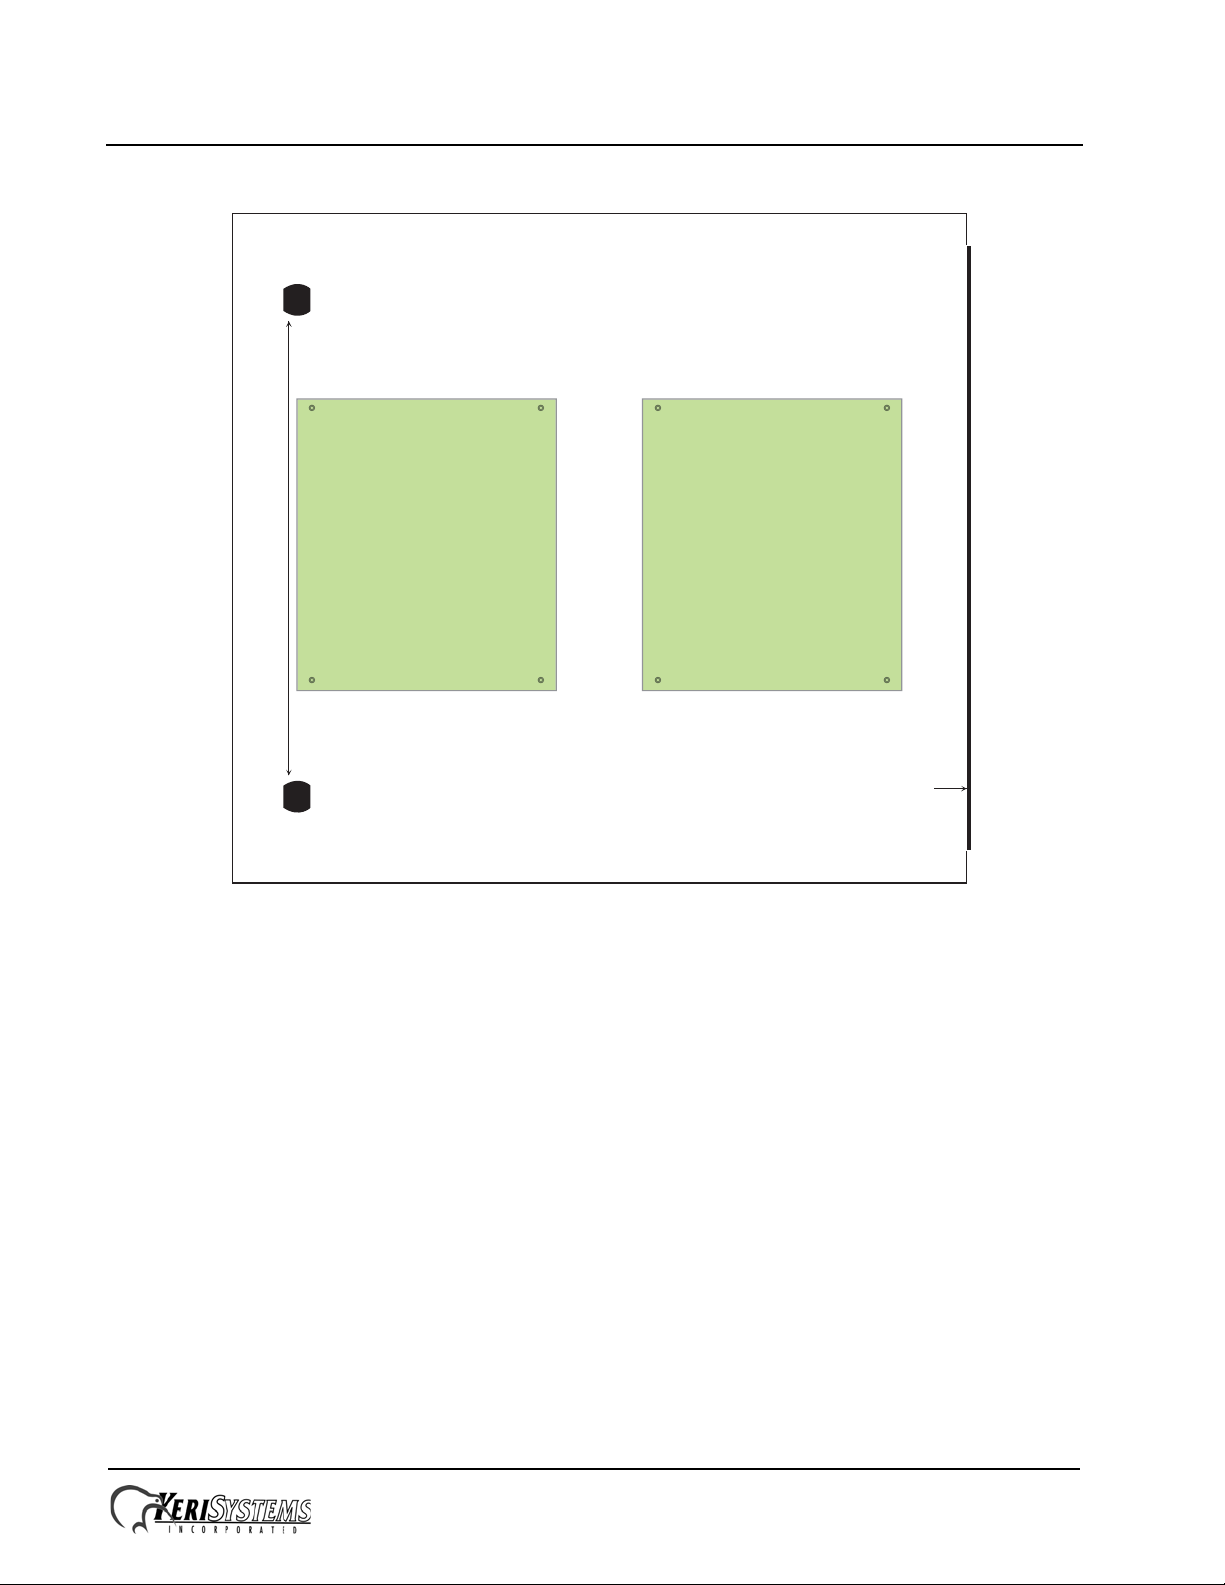
2.0 Mounting the Enclosure
The enclosure has three key-hole slots and three corresponding screw holes for mounting the enclosure securely to a solid
wall surface. Please ensure the mounting surface can handle the weight of the enclosure; a fully loaded enclosure
(4 controllers with peripheral boards and wiring) can weigh 25 pounds (11 kgs) or more. Refer to Figure 1 for the
mounting hole pattern.
Figure 1 - Mounting Holes in Enclosure Body
Page 2 of 5 P/N: 01515-001 Rev. C
Page 3

KE-8 Controller Enclosure
Enclosure
Lock Tabs
Lid
Hinge
Enclosure Body - TOP
Controller Mounting Locations
Installation Guide
3.0 Controller Installation
Two Controllers can be installed in the body of the enclosure and two in the enclosure lid. Keep Controller wiring
requirements in mind as you install Controllers into the enclosure. Refer to Figures 2 and 3 for Controller mounting
locations.
Figure 2 - Controller Mounting in Enclosure Body
Page 3 of 5 P/N: 01515-001 Rev. C
Page 4
KE-8 Controller Enclosure
Lid
Hinge
Enclosure Lid - TOP
Controller Mounting Locations
Locks
Installation Guide
Figure 3 - Controller Mounting in Enclosure Lid
Page 4 of 5 P/N: 01515-001 Rev. C
Page 5

KE-8 Controller Enclosure
Enclosure Body - TOP EDGE
Tamper Annunciation Board
Mounting Location
Installation Guide
4.0 Tamper Annunciation Relay Board Mounting
A Tamper Annunciation Relay Board is required to meet UL-294 requirements. Please refer to the Tamper Annunciation
installation document for wiring instructions.
Figure 4 - Tamper Relay Board Mounting
5.0 Wire Routing
Eighteen knockouts are included for your convenience around the perimeter of the enclosure. Use good wiring
practices when wiring Controllers and the Tamper Relay board. Ensure all wiring is done to nati onal and local
electrical codes (NEC).
6.0 Contact Keri Systems
Keri USA Keri UK, Ireland, Europe
2305 Bering Drive
San Jose, CA 95131
T elephone: (800) 260-5265
(408) 435-8400
Fax: (408) 435-7163 Fax:+ 44 (0) 1763 274 106
Web: www.kerisys.com Web:www.kerisystems.co.uk
E-mail: sales@kerisys.com
techsupport@kerisys.com
Park Farm Industrial Estate
Telephone: + 44 (0) 1763 273 243
E-mail:sales@kerisystems.co.uk
tech-support@kerisystems.co.uk
Unit 17
Ermine Street
Buntingford
Herts SG9 9AZ UK
End of document.
Page 5 of 5 P/N: 01515-001 Rev. C
 Loading...