

Page 1
Intelliprox Blue User Guide
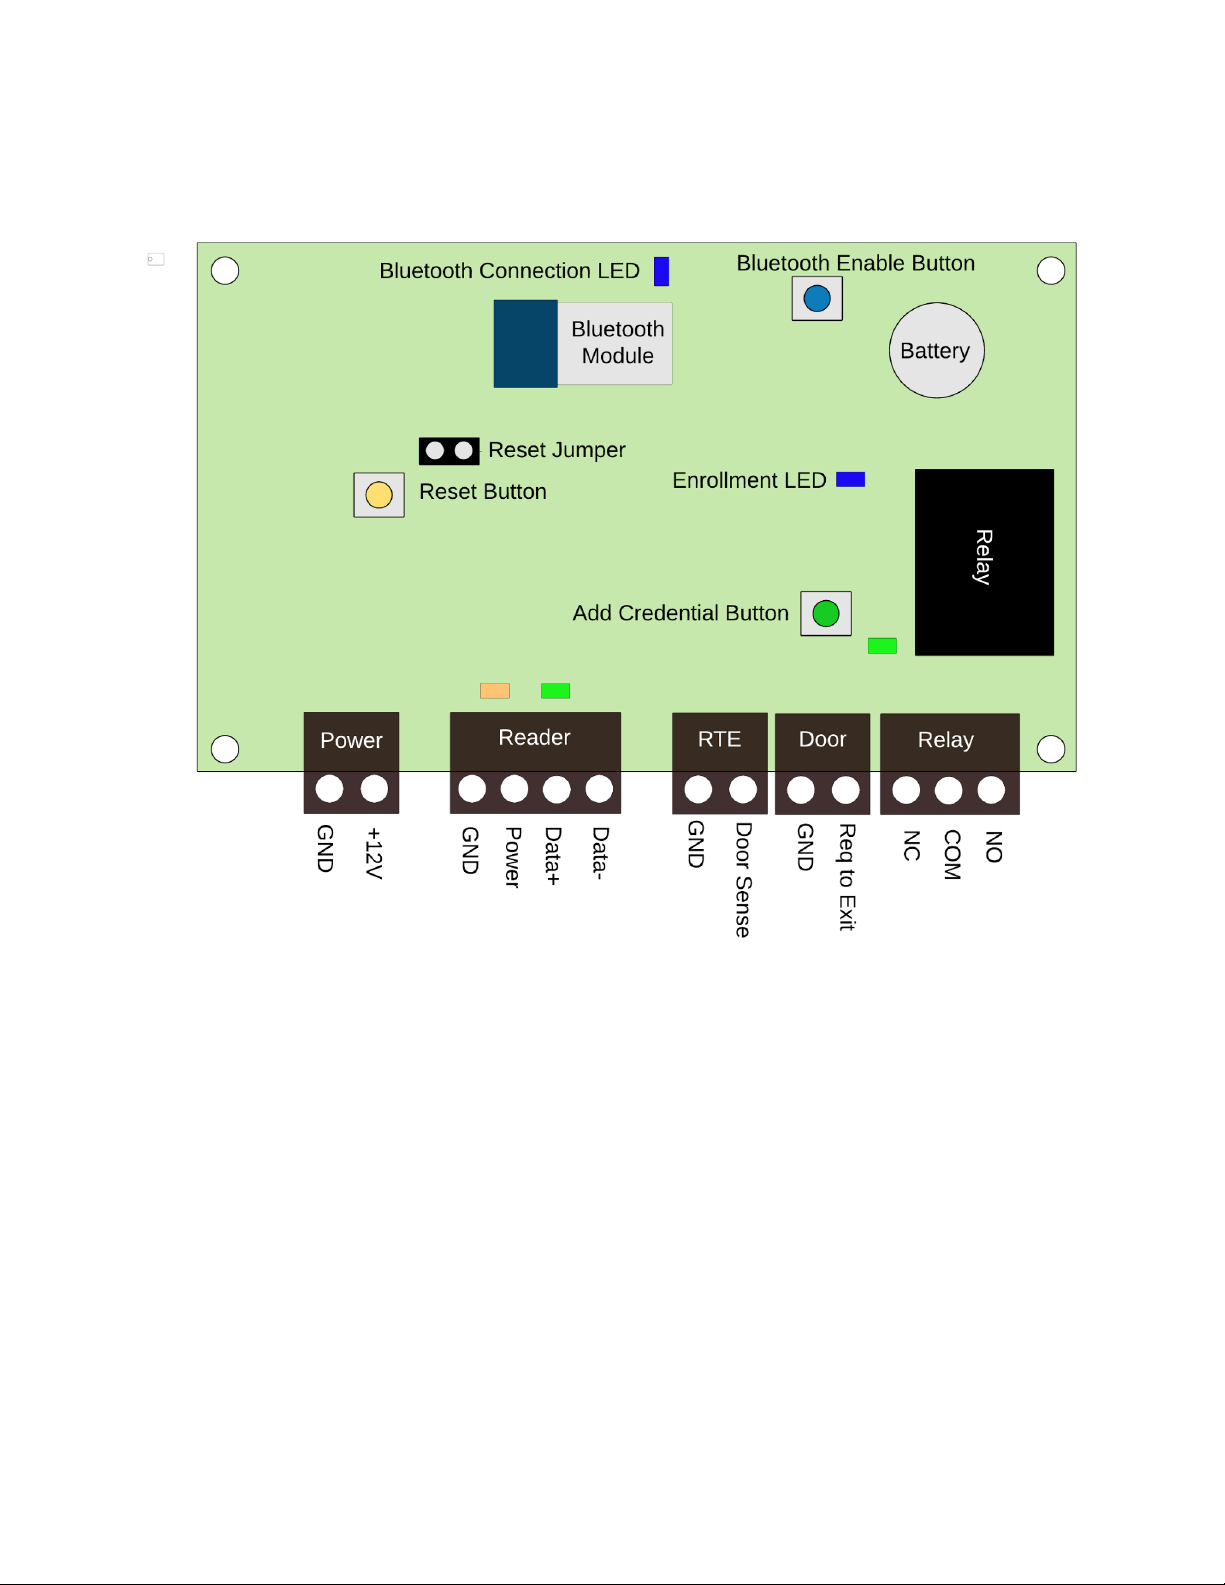
Hardware Installation
● Power
○ The IP Blue controller requires a standard +12v DC, 1.0 Amp power supply
● Reader
○ The IP Blue supports up to two Keri NXT-RS485 readers, one a Primary reader, one an Exit
reader.
● Inputs
○ Request to Exit - Normally Open Circuit. Close the Circuit to enable the RTE
○ Door Sense - Normally Closed Circuit. Closed = Door Closed; Open = Door Open
● Output
○ Form C Relay, 1.0 amp (24 VDC max.) dry circuit
1 Version 0.1
Page 2

App Installation
The Intelliprox Blue uses iOS and Android apps available for free from the Apple iTunes and Google Play App
Stores. To install the app, search for Intelliprox Blue in the app store and download the Keri Systems
Intelliprox App.
Hardware Configuration
Open the IP Blue App. The default username is “admin”, the default password is “pass"
Establish a connection to the IP Blue Controller, if not already connected.
1. Press the Hardware Setup icon.
2. Press the “connect” button to the right of the desired Intelleprox device in the list of available devices. If
already connected, press the Intelleprox device name to advance to the Function screen.
The following options are available within the Function screen:
● Device Info - View or modify the Device Name and Password
● Open Door - Press the Open button to initiate a temporary unlock of the door.
● Door unlock by time - Set the Auto-unlock schedule for the door
● Set Date/Time - Set the device date and time
● Door Type - Configure the number of readers connected to the controller
● Set alarm - Enable / Disable Alarms on the controller
● Unlock time - Set the door unlock time.
● Antipassback - Enable/Disable Antipassback feature
Cardholders / Credentials
Credentials can be added to the controller from the controller or within the IP Blue app.
Enrollment using the Controller
1. Enter enrollment mode - Press and hold the Green Add Credential button until the Add Credential LED
(DS1) flashes. The reader LED will also flash Amber.
2. Present credential or credentials to the reader.
3. Exit enrollment mode - Press and hold the Green Add Credential button until the Add Credential LED
stops flashing.
Credentials added with this method will be given total access with no expiration date. Name and other data
can be modified at a later time from within the Cardholder area, selecting the Cardholders icon icon
from the home page.
2 Version 0.1
Page 3

Credentials can also be added from within the Cardholders area.
1. Press the Cardholders icon from the home page.
2. Press the add button
3. Enter Cardholder Details
a. Name
b. Card Number - The number printed on the credential.
c. Valid Period - The date range where the credential is enabled.
d. Access Group - The times and days the credential is valid for access.
4. Press Save to commit changes to the controller
Time Schedules and Access Groups
Cardholders use Time Schedules and Access Groups to set the time of day and days the credential access is
valid. A Time Schedule is assigned to an Access Group and an Access Group is assigned to the Cardholder.
Time Schedules contain a list of valid access times for each day of the week. To create a Time schedule:
1. Press the Time Schedules icon from the home page
2. Press the add button
3. Configure the time range for each day by pressing anywhere on the line for that day.
4. Press Save to commit changes to the controller
Access Groups link Time Schedules to the readers on a controller. The Access Group can be configured for all
readers or just the Entrance or Exit Reader. To create an Access Group:
1. Press the Access Groups icon from the home page
2. Press the add button
3. Select the Reader type for this Access Group
a. All Readers
b. Access Reader
c. Exit Reader
4. Set the Timezone to be used with the Access Group
5. Press Save to commit changes to the controller
3 Version 0.1
Page 4

FCC Caution: Any changes or modifications not expressly
approved by the party responsible for compliance could void the user's authority to operate this equipment.
This device complies with Part 15 of the FCC Rules.
Operation is subject to the following two conditions: (1) This device may not cause harmful interference, and
(2) this device must accept any interference received, including interference that may cause undesired operation.
This device and its antenna(s) must not be co-located or operating in conjunction with any other antenna or transmitter.
15.105 Information to the user.
(b) For a Class B digital device or peripheral, the instructions furnished the user shall include the following or
similar statement, placed in a prominent location in the text of the manual:
Note: This equipment has been tested and found to comply
with the limits for a Class B digital device, pursuant to part 15 of the FCC Rules.
These limits are designed to provide reasonable protection against harmful
interference in a residential installation. This equipment generates, uses and
can radiate radio frequency energy and, if not installed and used in
accordance with the instructions, may cause harmful interference to radio
communications. However, there is no guarantee that interference will not
occur in a particular installation. If this equipment does cause harmful
interference to radio or television reception, which can be determined by
turning the equipment off and on, the user is encouraged to try to correct the
interference by one or more of the following measures:
—Reorient or relocate the receiving antenna.
—Increase the separation between the equipment and receiver.
—Connect the equipment into an outlet on a circuit different from that to which the receiver is connected.
—Consult the dealer or an experienced radio/TV technician for help.
Radiation Exposure Statement:
This equipment complies with FCC radiation exposure limits set forth for an uncontrolled environment.
This transmitter must not be co-located or operating in conjunction with any other antenna or transmitter.
The module should not be installed and operated simultaneously with other radios except additional RF
exposure was evaluated for simultaneously transmission.
The availability of some specific channels and/or operational frequency bands are country dependent and
are firmware programmed at the factory to match the intended destination.
The firmware setting is not accessible by the end user.
The final end product must be labelled in a visible area with the following:
Contains Transmitter Module FCC ID: N42-IPBC001 or Contains Module IC: 4579A-IPBC001.
 Loading...