

Page 1
HPP–22: Hand Held Programmer
1.0 Using the HPP-22
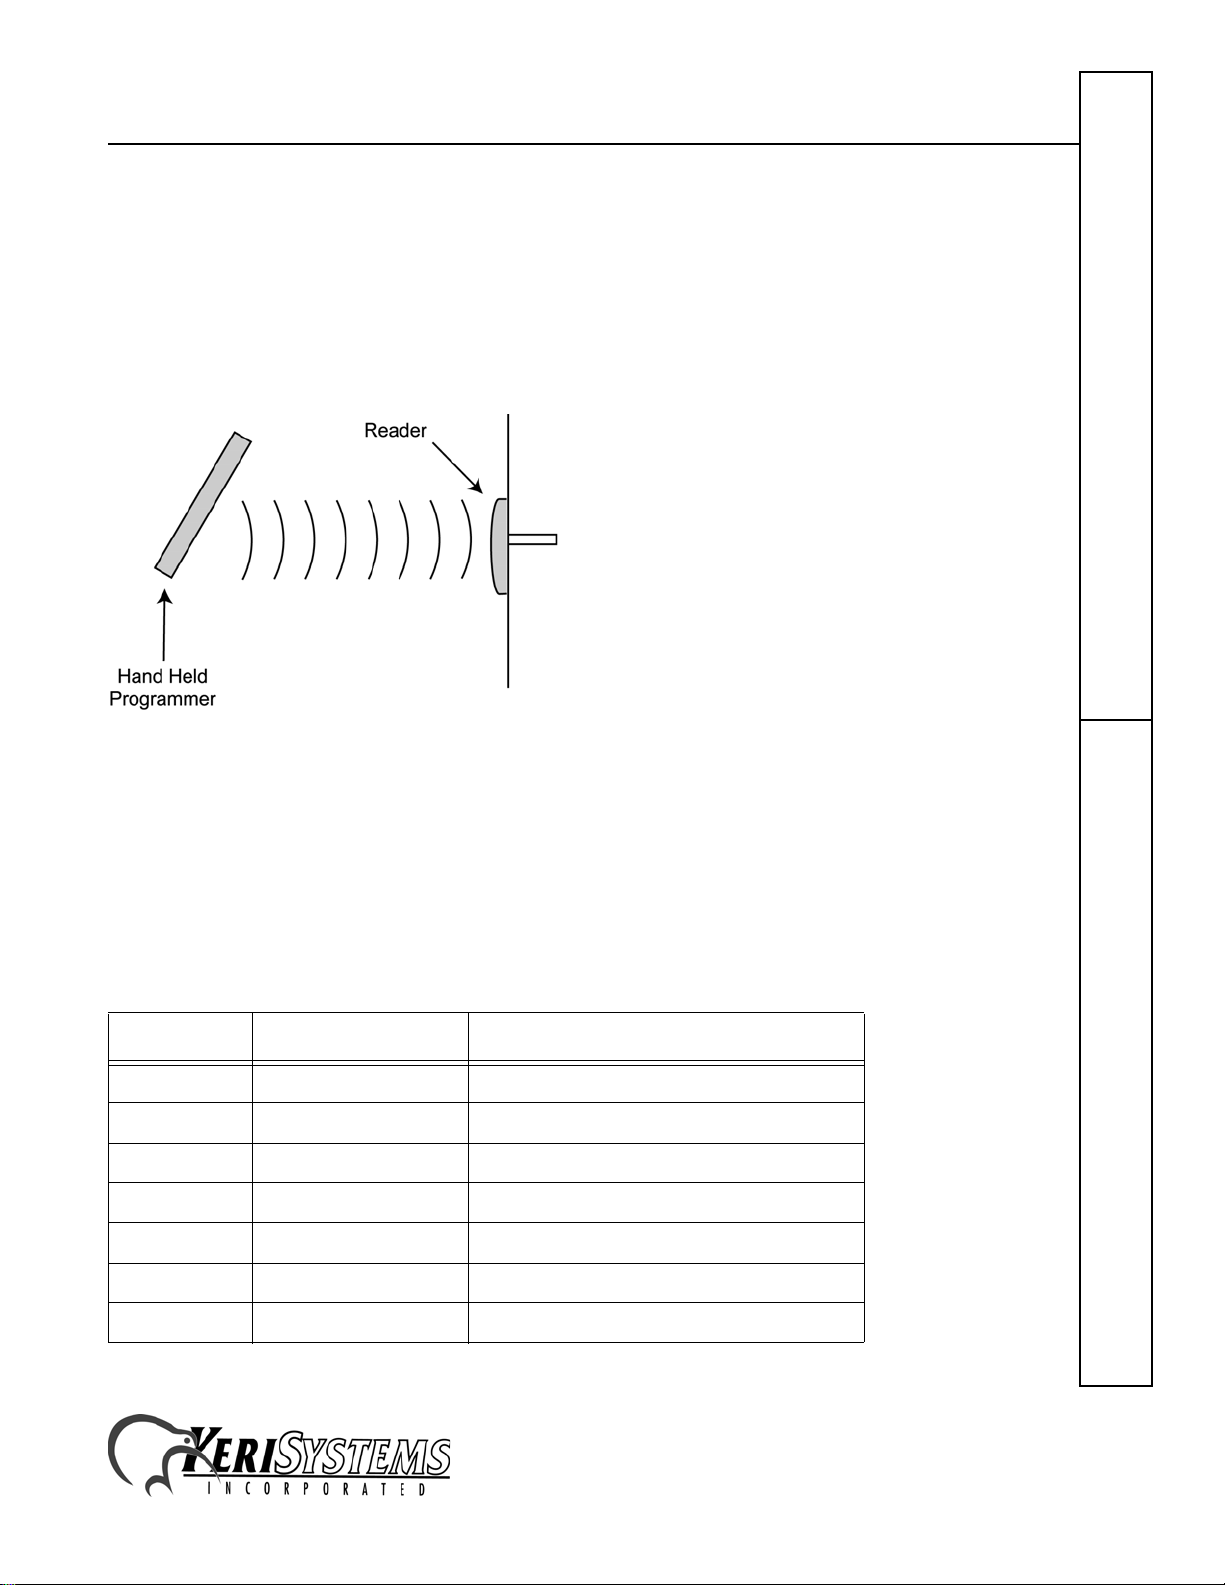
Programming an IntelliProx unit is accomplished using the HPP-22 Hand-Held Remote Programmer. The HPP-22 has
the appearance of a TV remote control, but has a different principle of operation. It is a mini-transmitter using a radio
frequency (RF) rather than an infrared signal to transmit data. Unlike a television remote control (that requires a direct
line-of-sight between the infrared transmitter in the remote and the infrared receiver in the television) the HPP-22
should be held parallel to the proximity antenna (see Figure 1). Hold the HPP-22 within the range of the proximity
antenna (approximately 1-foot) and press the appropriate button to send a command. Allow about 0.5 seconds for a
response from the reader.
Figure 1: HPP–22 Orientation for Transmitting Commands
2.0 Programming an IntelliProx (SM-1000 and SM-2000)
Programming security is maintained through use of a Personal Identification Number (PIN) entry. The PIN can be any
number between 0-9999. The leading 0’s in a PIN are automatically cut off so that if '0045' is entered, the PIN is '45'.
The factory default PIN is '1234'. Enter the factory default PIN to begin programming. Once in the programming mode,
if a command is not issued within 40 seconds, the IntelliProx automatically exits programming mode and returns to
normal operation.
When programming, the reader's LED will reflect the IntelliProx's status as follows.
Color State Meaning
Amber Steady On Power On – Normal Operation
Amber Continuous Flashing Programming IntelliProx Commands
Green Steady On Enroll Card Mode
Green Steady On Door Unlocked by Door Unlock Command
Green Continuous Flashing Programming IntelliProx Operating Mode
Red Steady On Void Card Mode
HPP–22Quick Start Guide
Red Continuous Flashing Programming Error
2305 Bering Drive 01831-003 Rev. C
San Jose, CA 95131 USA
(800) 260-5265 (408) 435-8400 FAX (408) 577-1792
Web: www.kerisys.com E-mail: sales@kerisys.com Page 1 of 10
Page 2

HPP–22: Hand Held Programmer
When programming, the reader's beeper reflects the IntelliProx's status as follows.
Tone Meaning
Short BEEP Key–press accepted or Valid Card Read
Two BEEPS Command Entry Error or ‘Clear’ Key
Three BEEPS Command Accepted
Long BEEP Command Rejected
Continuous Beeping Alarm Condition
2.1 Programming Notes
• Each time a key is pressed the reader BEEPs and the LED flashes Amber.
• Enter the PIN and press [#] to enter programming m ode.
• A continuously blinking Amber LED indicates the IntelliProx is in programming mode.
• Commands to be entered by the user are shown in [BOLD FACE].
• When in programming mode, if a command is not issued within 40 seconds, the IntelliProx automatically exits
Quick Start GuideHPP–22
programming mode and returns to normal operation.
• When in programming mode, all other operations are locked out by the IntelliProx.
Complete instructions for programming the SM-2000 IntelliProx are given followed by the complete instructions for
programming the SM-1000 IntelliProx.
2305 Bering Drive 01831-003 Rev. C
San Jose, CA 95131 USA
(800) 260-5265 (408) 435-8400 FAX (408) 577-1792
Web: www.kerisys.com E-mail: sales@kerisys.com Page 2 of 10
Page 3

HPP–22: Hand Held Programmer
3.0 SM-2000 Programming Commands
3.1 Entering a PIN
1. Enter the PIN code [nnnn] (the factory default is '1234') and press [#].
2. If an incorrect PIN is entered, the reader BEEPs twice and the LED flashes Red, then the LED returns to steady
Amber.
3. A valid PIN entry is confirmed with three BEEPs and a Green LED flash.
4. The LED then turns to blinking Amber indicating that the SM-2000 is in programming mode.
5. Press [#] to exit programming mode and return to standard operation. The reader BEEPs twice and the LED flashes
Red, then the LED returns to steady Amber.
3.2 Changing a PIN
1. Enter the current PIN (the factory default PIN is '1234') and press [#]. The reader BEEPs three times and the LED
flashes Green, then the LED changes to blinking Amber indicating that the SM-2000 is in programming mode.
2. Press [7], the LED turns off.
3. Enter the new PIN [nnnn] (it can be any number between 1 and 4 digits). Press [#].
4. The new PIN entry is confirmed with three BEEPs and a Green LED flash, then the LED returns to blinking Amber
indicating that the SM-2000 is still in programming mode.
5. Press [#] to exit programming mode and return to standard operation. The reader BEEPs twice and the LED flashes
Red, then the LED returns to steady Amber.
3.3 Resetting the PINs to the Factory Default Values
1. Ensure the SM-2000 power is OFF.
2. Install a jumper across the two pins of JP1 (refer to the SM-2000 Quick Start Guide for the location of JP1).
3. Turn the SM-2000 power ON. If the original PINs are not at the factory default values, they are changed to the
default values, the reader's LED is steady Green and the beeper is beeping. If the original PINs are at the default
values, the reader's LED is steady Red and the beeper is beeping.
4. Turn the SM-2000 power OFF.
5. Remove the jumper from across the two pins of JP1. The SM-2000's PINs are now at the default values of "1234"
for the SM-2000 and "0000" for the host computer (for use with D-Lite).
NOTE: If the jumper on JP1 is removed before the power is turned OFF, not only will the PINs be returned to the
factory default value, but the SM-2000's database will be cleared.
3.4 Clearing Unit Memory
1. Ensure the SM-2000 power is OFF.
2. Install a jumper across the two pins of JP1 (refer to the SM-2000 Quick Start Guide for the location of JP1).
3. Turn the SM-2000 power ON. If the original PINs are not at the default values, they are changed to the default
values, the reader's LED is steady Green and the beeper is beeping. Turn the SM-2000's power OFF and then ON
again. The SM-2000's PINs are now set to the default values of "1234" for the SM-2000 and "0000" for the host
computer (for use with D-Lite).
4. If the original PINs are at the default values, the reader's LED is steady Red and the beeper is beeping indicating the
SM-2000 is ready for the memory to be cleared.
5. While the LED is blinking Red and the beeper is beeping, remove the jumper from JP1. The LED turns off, flashes
Amber then Green, there are 4 beeps, and the LED returns to steady Amber. The SM-2000's memory is cleared and
the SM-2000 is ready for programming.
HPP–22Quick Start Guide
2305 Bering Drive 01831-003 Rev. C
San Jose, CA 95131 USA
(800) 260-5265 (408) 435-8400 FAX (408) 577-1792
Web: www.kerisys.com E-mail: sales@kerisys.com Page 3 of 10
Page 4

HPP–22: Hand Held Programmer
NOTE: From this point on, the jumper across JP1 should never be installed on the SM-2000 unless it is necessary to
reset the PINs, or clear system memory and rebuild its database from scratch. Applying power with the jumper installed
on JP1 irretrievably resets the PIN. Applying power a second time and removing the jumper from across JP1
irretrievably erases all card holder data. A database can be restored only if the database has been saved using the DLite program prior to being cleared.
3.5 Enrolling One Card or a Group of Cards
The user assigns a slot number into which the card is enrolled. There are 500 slots available - 1 to 500. The SM-2000
will not allow one card to be enrolled into two slots, nor will it allow a card to be enrolled into a slot already occupied
by another card. Cards enrolled in a group will be assigned sequential slot numbers beginning with the slot number
assigned to the first card.
1. Enter the PIN and press [#]. The reader BEEPs three times and the LED flashes Green, then the LED changes to
blinking Amber indicating that the SM-2000 is in programming mode.
2. Press [1]. The LED changes to steady Green.
3. Enter the slot number to be assigned to the card [nnn] (1 to 500) and press [#]. You can enter one, two, or three
digits as needed. A valid slot entry is confirmed with three BEEPs and a Green LED flash, then the LED changes to
blinking Green.
4. Present the card to the reader. There is one BEEP to acknowledge the card has been read. A valid card enrollment is
Quick Start GuideHPP–22
confirmed with four BEEPs and one Green LED flash, then the LED returns to blinking Green.
5. Repeat Step 4 for each card to be enrolled.
6. Press [#] to exit enrollment mode. There are two BEEPs, an Amber LED flash followed by a Red LED flash, then
returns to blinking Amber indicating the SM-2000 is still in programming mode.
7. Press [#] to exit programming mode and return to standard operation. The reader BEEPs twice and the LED flashes
Red, then the LED returns to steady Amber.
NOTE: When enrolling cards, if an invalid slot number is entered or an invalid card is presented, the reader BEEPs
once and the LED flashes Red indicating enrollment mode has been exited. The LED returns to blinking Amber
indicating the SM-2000 is back in programming mode.
3.6 Erasing One Card or a Group of Cards from Memory
1. Enter the PIN and press [#]. The reader BEEPs three times and the LED flashes Green, then the LED changes to
blinking Amber indicating that the SM-2000 is in programming mode.
2. Press [9]. The LED changes to steady Red.
3. Enter the slot number [nnn] (1 to 500) for the card to be erased and press [#]. Y ou can enter one, two, or three digits
as needed. A valid slot entry is confirmed with three BEEPs and a Green LED flash, then changes to blinking
Amber indicating the SM-2000 is still in programming mode.
4. If there are more cards to delete, return to step 2.
5. Press [#] to exit programming mode and return to standard operation. The reader BEEPs twice and the LED flashes
Red, then the LED returns to steady Amber.
2305 Bering Drive 01831-003 Rev. C
San Jose, CA 95131 USA
(800) 260-5265 (408) 435-8400 FAX (408) 577-1792
Web: www.kerisys.com E-mail: sales@kerisys.com Page 4 of 10
Page 5

HPP–22: Hand Held Programmer
3.7 Enrolling One Card or a Group of Cards to Empty Slots
After you have deleted a card, you may enroll another card into that slot.
1. Enter the PIN and press [#]. The reader BEEPs three times and the LED flashes Green, then the LED changes to
blinking Amber indicating that the SM-2000 is in programming mode.
2. Press [1]. The LED changes to steady Green.
3. Enter the slot number to be assigned to the card [nnn] (1 to 500) and press [#]. You can enter one, two, or three
digits as needed. A valid slot entry is confirmed with three BEEPs and three Green LED flashes, then the LED
changes to blinking Green.
4. Present the card to the reader. There is one BEEP to acknowledge the card has been read. A valid card enrollment
is confirmed with four BEEPs and a Green LED flash, then the LED returns to blinking Green. This will happen
only if the next slot is also empty.
5. Repeat Step 4 for each card to be enrolled.
6. When you have reached the last empty slot, you are automatically taken out of programming mode. There is one
BEEP and the LED flashes Red, then the LED returns to steady Amber.
3.8 Unlock Door Command
1. Enter the PIN and press [#]. The reader BEEPs three times and the LED flashes Green, then the LED changes to
blinking Amber indicating that the SM-2000 is in programming mode.
2. Press [3]. The LED changes to steady Green.
3. Press [1] then [#]. The unlock command is confirmed with three BEEPs and the LED flashes Green, the door is
unlocked, then the LED returns to blinking Amber indicating that the SM-2000 is back in programming mode.
4. Press [#] to exit programming mode and return to standard operation. The reader BEEPs twice and the LED flashes
Red, then the LED changes to steady Green (indicating the door is unlocked). The door will remain unlocked until
it is locked with the Lock Door command.
3.9 Lock Door Command
1. Enter the PIN and press [#]. The reader BEEPs three times and the LED flashes Green, then the LED changes to
blinking Amber indicating that the SM-2000 is in programming mode.
2. Press [3]. The LED changes to steady Green.
3. Press [0] then [#]. The lock command is confirmed with three BEEPs and the LED flashes Green, the door is
locked, then the LED returns to blinking Amber indicating that the SM-2000 is back in programming mode.
4. Press [#] to exit programming mode and return to standard operation. The reader BEEPs twice and the LED flashes
Red, then the LED returns to steady Amber. The door will remain locked until it is unlocked with the Unlock Door
command, an RTE input signal, or a valid card presentation.
NOTE: Use caution if using the HPP-22 to program SM-2000 units in conjunction with the D-Lite
Database Management Software. Both the HPP-22 and D-Lite are able to enroll cardholders into SM-2000 units. This
means it is possible to have the cardholder D-Lite file for an SM-2000 unit become out of synch with the cardholder file
in the SM-2000 unit if the HPP-22 is used to program new cards. It is possible to synchronize the two sets of cardholder
files by using the merge function in the D-Lite software. Please refer to the D-Li te Soft ware Users Guide (P/N 01869-
001) for information on using this function.
2305 Bering Drive 01831-003 Rev. C
San Jose, CA 95131 USA
(800) 260-5265 (408) 435-8400 FAX (408) 577-1792
Web: www.kerisys.com E-mail: sales@kerisys.com Page 5 of 10
TM
Cardholder
HPP–22Quick Start Guide
Page 6

HPP–22: Hand Held Programmer
4.0 SM-1000 Programming Commands
4.1 Entering the PIN
1. Enter the PIN code [nnnn] (the factory default is '1234') and press [#].
2. If an incorrect PIN is entered, the reader BEEPs twice and the LED flashes Red, then the LED returns to steady
Amber.
3. A valid PIN entry is confirmed with three BEEPs and the LED turns Green.
4. The LED then turns to blinking Amber indicating that the SM-1000 is in programming mode.
5. Press [#] to exit programming mode and return to standard operation. The reader BEEPs twice and the LED flashes
Red, then the LED returns to steady Amber.
4.2 Changing the PIN
1. Enter the current PIN (the factory default PIN is '1234') and press [#]. The LED changes to blinking Amber
indicating that the SM-1000 is in programming mode.
2. Press [7]. The LED turns OFF.
3. Enter the new PIN [nnnn] (it can be any number between 1 and 4 digits). Press [#].
4. The new PIN entry is confirmed with three BEEPs and three Green LED flashes, then the LED returns to blinking
Quick Start GuideHPP–22
Amber indicating that the SM-1000 is in programming mode.
5. Press [#] to exit programming mode and return to standard operation. The reader BEEPs twice and the LED flashes
Red, then the LED returns to steady Amber.
4.3 Changing the PIN to a New Value (used when the current PIN is forgotten)
1. Ensure the SM-1000 power is ON.
2. Locate JP1 on the back of the unit (refer to the SM-1000 Quick Start Guide for the location of JP1).
3. Place a jumper across the two pins of JP1. Enter the new PIN (it can be any number between 1 and 4 digits). Press
[#].
4. The new PIN entry is confirmed with seven BEEPs and seven Green LED flashes, then the LED returns to solid
Amber.
5. Remove the jumper across JP1. The new PIN is now active and stored in the SM-1000's memo ry.
NOTE: From this point on, the jumper across JP1 should never be installed on the SM-1000 unless it is necessary to
reset the PIN, or clear system memory and rebuild its database from scratch. Applying power with the jumper installed
on JP1 irretrievably resets the PIN. Applying power a second time and removing the jumper from across JP1
irretrievably erases all card holder data.
4.4 Clearing the SM-1000's Memory
1. Ensure the SM-1000 power is ON.
2. Locate JP1 on the back of the unit (refer to the SM-1000 Quick Start Guide for the location of JP1).
3. Place a jumper across the two pins of JP1. Turn unit power OFF, wait 5 seconds, and then turn unit power back ON.
4. The clear memory command is confirmed with a long and a short beep and a Red-Green-Amber-Green-Red-Off
LED flash pattern. This is followed by an Amber LED flash, 8 beeps, 8 Green LED flashes, and then the LED
returns to solid Amber.
5. Remove the jumper across JP1. All cards are erased from memory and the unit PIN is returned to the factory
default value of '1234'.
NOTE: Clearing the SM-1000's memory erases all information from the SM-1000 unit. Once erased, the information is
not recoverable.
2305 Bering Drive 01831-003 Rev. C
San Jose, CA 95131 USA
(800) 260-5265 (408) 435-8400 FAX (408) 577-1792
Web: www.kerisys.com E-mail: sales@kerisys.com Page 6 of 10
Page 7

HPP–22: Hand Held Programmer
4.5 Enrolling One Card or a Group of Cards
The user assigns a slot number into which the card is enrolled. There are 500 slots available - 1 to 500. The SM-1000
will not allow one card to be enrolled into two slots, nor will it allow a card to be enrolled into a slot already occupied
by another card. Cards enrolled in a group will be assigned sequential slot numbers beginning with the slot number
assigned to the first card.
1. Enter the PIN and press [#]. The LED changes to blinking Amber indicating that the SM-1000 is in programming
mode.
2. Press [1]. The LED changes to steady Green.
3. Enter the slot number to be assigned to the card [nnn] (1 to 500) and press [#]. You can enter one, two, or three
digits as needed. A valid slot entry is confirmed with three BEEPs and three Green LED flashes, then the LED
changes to blinking Green.
4. Present the card to the reader. There is one BEEP to acknowledge the card read. A valid card enrollment is
confirmed with four BEEPs, four Green LED flashes, a Red LED flash, and then the LED returns to blinking
Green.
5. Repeat Step 4 for each card to be enrolled.
6. Press [#] to exit enrollment mode. There are two BEEPs and a Red LED flash, then the LED returns to blinking
Amber indicating that the SM-1000 is still in programming mode.
7. Press [#] to exit programming mode and return to standard operation. The reader BEEPs twice and the LED flashes
Red, then the LED returns to steady Amber.
NOTE: When enrolling cards, if an invalid slot number is entered or an invalid card is presented, the reader BEEPs
once and the LED flashes Red indicating enrollment mode has been exited. The LED returns to blinking Amber
indicating that the SM-1000 is back in programming mode.
4.6 Erasing a Card or a Group of Cards from Memory
1. Enter the PIN and press [#]. The LED changes to blinking Amber indicating that the SM-1000 is in programming
mode.
2. Press [9]. The LED changes to steady Red.
3. Enter the slot number [nnn] (1 to 500) for the card to be erased and press [#]. Y ou can enter one, two, or three digits
as needed. A valid slot entry is confirmed with three BEEPs and three Green LED flashes, then the LED changes to
blinking Amber indicating the SM-1000 is still in programming mode.
4. If there are more cards to delete, return to step 2.
5. Press [#] to exit programming mode and return to standard operation. The reader BEEPs twice and the LED flashes
Red, then the LED returns to steady Amber.
HPP–22Quick Start Guide
2305 Bering Drive 01831-003 Rev. C
San Jose, CA 95131 USA
(800) 260-5265 (408) 435-8400 FAX (408) 577-1792
Web: www.kerisys.com E-mail: sales@kerisys.com Page 7 of 10
Page 8

HPP–22: Hand Held Programmer
4.7 Enrolling One Card or a Group of Cards to Empty Slots
After you have deleted a card, you may enroll another card into that slot.
1. Enter the PIN and press [#]. The LED changes to blinking Amber indicating that the SM-1000 is in programming
mode.
2. Press [1]. The LED changes to steady Green.
3. Enter the slot number to be assigned to the card [nnn] (1 to 500) and press [#]. You can enter one, two, or three
digits as needed. A valid slot entry is confirmed with three BEEPs and three Green LED flashes, then the LED
changes to blinking Green.
4. Present the card to the reader. There is one BEEP to acknowledge the card read. A valid card enrollment is
confirmed with four BEEPs, four Green LED flashes, a Red LED flash, and then the LED returns to blinking
Green. This will happen only if the next slot is also empty.
5. Repeat Step 4 for each card to be enrolled.
6. When you have reached the last empty slot, there are two BEEPs and a Red LED flash, then the LED returns to
blinking Amber indicating that the SM-1000 is still in program ming mode.
7. Press [#] to exit programming mode and return to standard operation. The reader BEEPs twice and the LED flashes
Red, then the LED returns to steady Amber.
4.8 Unlock Door Command
Quick Start GuideHPP–22
1. Enter the PIN and press [#]. The LED changes to blinking Amber indicating that the SM-1000 is in programming
mode.
2. Press [3]. The LED changes to steady Green.
3. Press [1] then [#]. The unlock command is confirmed with three BEEPs and one Red LED flash, the door is
unlocked, and the LED returns to blinking Amber indicating that the SM-1000 is back in programming mo de.
4. Press [#] to exit programming mode and return to standard operation. The reader BEEPs twice and the LED flashes
Red, then the LED changes to steady Green (indicating the door is unlocked). The door will remain unlocked until
it is locked with the Lock Door command.
4.9 Lock Door Command
1. Enter the PIN and press [#]. The LED changes to blinking Amber indicating that the SM-1000 is in programming
mode.
2. Press [3]. The LED changes to steady Green.
3. Press [0] then [#]. The lock command is confirmed with three BEEPs and one Red LED flash, the door is locked,
and the LED returns to blinking Amber indicating that the SM-1000 is back in programming mode.
4. Press [#] to exit programming mode and return to standard operation. The reader BEEPs twice and the LED flashes
Red, then the LED returns to steady Amber. The door will remain locked until it is unlocked with the Unlock Door
command, an RTE input signal, or a valid card presentation.
2305 Bering Drive 01831-003 Rev. C
San Jose, CA 95131 USA
(800) 260-5265 (408) 435-8400 FAX (408) 577-1792
Web: www.kerisys.com E-mail: sales@kerisys.com Page 8 of 10
Page 9

HPP–22: Hand Held Programmer
5.0 Using an HPP-100 in place of an HPP-22
For those who already have and use an HPP-100, the HPP-100 can be used in place of the HPP-22 for programming an
IntelliProx. Refer to Figure 2 for a drawing corresponding key assignments on the HPP-100 to the HPP-22.
Figure 2: HPP–100 to HPP–22 Key Assignments
6.0 Troubleshooting
Problem Probable Cause Corrective Action
The IntelliProx is unable to
enroll a card.
When using the IntelliProx for
optional back–up door control, a
card continues to have access
after being voided from the host
system.
The slot to which the card is
being enrolled already has a card
in it.
The card is still enrolled in the
IntelliProx database.
Enroll the new card to a different
slot or delete the old card from
the slot and then enroll the new
card.
Delete the card from the
IntelliProx.
7.0 Card Holder Log Sheet
To assist in tracking card holder and slot assignments a Cardholder Log Sheet has been provided on the next page.
Make copies of this sheet and fill it out prior to enrolling cards into the IntelliProx. Archive a copy of the completed log
in a safe place for reference when maintaining the card database in the future. Unless the D-Lite program is being used,
these sheets could be the only copy of the enrollment database. You may consider leaving several blank lines between
card/slot entries to accommodate changes, voiding old cardholders and enrolling new cardholders.
HPP–22Quick Start Guide
2305 Bering Drive 01831-003 Rev. C
San Jose, CA 95131 USA
(800) 260-5265 (408) 435-8400 FAX (408) 577-1792
Web: www.kerisys.com E-mail: sales@kerisys.com Page 9 of 10
Page 10

HPP–22: Hand Held Programmer
CARD HOLDER LOG SHEET
Slot Number Card Holder Name
Quick Start GuideHPP–22
Card
Number
Enroll Date Void Date
2305 Bering Drive 01831-003 Rev. C
San Jose, CA 95131 USA
(800) 260-5265 (408) 435-8400 FAX (408) 577-1792
Web: www.kerisys.com E-mail: sales@kerisys.com Page 10 of 10
 Loading...