

Page 1

BioPointe
User's Manual
Page 2

Getting to know the BioPointe
Notices:
Information in this document is subject to change without notice.
NO WARRANTY OF ANY KIND IS MADE WITH REGARD TO THIS MATERIAL INCLUDING, BUT
NOT LIMITED TO, THE IMPLIED WARRANTIES OF MERCHANTABILITY AND FITNESS FOR A
PARTICULAR PURPOSE.
No liability is assumed for errors contained herein or for incidental damages in connection with the
furnishing, performance, use of this material.
No part of this document may be photocopied, reproduced or transmitted in any form or by any means,
electronic or mechanical, without the prior written permission of Keri Systems Incorporated.
Other products and corporate names may be trademarks or registered trademarks of other companies and are
only for explanation without intent to infringe.
Copyright 2004 © Keri Systems Incorporated.
All rights reserved.
Release date: August 2004
Revision 1.7
Part Number: 01954-001
1
Page 3

Getting to know the BioPointe
Thank you for choosing the BioPointe Fingerprint Identification System by Keri
Systems Incorporated. This device is not only simple to use, but it also provides a
variety of versatile, flexible and powerful features at the same time. In this manual,
you will learn about the features of the BioPointe, how to administer the BioPointe
and how to communicate with the BioPointe.
Preface
2
Page 4

Getting to know the BioPointe
Using the Manual
If you are reading this manual for the first time, we suggest you read it from the start to end in order
to achieve an overall understanding of the features provided by the BioPointe.
However, if you are looking for specific information, you may turn to the Table of Contents to help
you look for the information you want quickly. The Table of Contents is on the next page.
In the chapters to follow, you will see the following chapters. The synopsis describes what you can
expect to find in each of these chapters:
• Chapter 1 - Getting to Know the BioPointe
Gives an overview of the BioPointe. Read this chapter to gain an overview of the device.
• Chapter 2 - Getting Started
Gives a quick and concise introduction to what you need to do to get started when you first
receive the device.
• Chapter 3 - Features
Gives a detailed description of the features provided by the BioPointe. The description is
divided into sections according to each feature. Read all or the relevant sections you need.
• Chapter 4 - Administering the BioPointe
Shows you how you can access the functions within the BioPointe such as enrollment. Read
this chapter to get started on enrolling the first fingerprint of the device.
• Chapter 5 – Performing Authentication on the BioPointe
Shows you how to use the device for fingerprint, card or card with PIN authentication.
• Chapter 6 – Configuring the BioPointe
Gives a description on how you can connect interfacing cables to the control board. Also
covers DIP switch settings.
• Chapter 7 – Communicating with the BioPointe
Gives a description on how to communicate with the device with RS232, RS4422 and RS485.
• Chapter 8 – Interfacing to a Keri System Controller
Gives a description on how to interface to a Keri System Controller.
• Chapter 9 - Technical Specifications
• Chapter 10 - Troubleshooting
• Appendix A – Log Types in BioPointe
• Appendix B – Configuring the ADAM 4520
• Appendix C – Communicating in RS422 and RS485
• Appendix D – Communication Using Modem
3
Page 5

Getting to know the BioPointe
Table Of Contents
1 Getting to Know The BioPointe 6
1.1 How The BioPointe Works 6
2 Getting Started 8
2.1 Unpacking And Initial Inspection 8
2.2 Identifying the Parts 9
2.3 Applying Power 10
2.4 Typical Setup For Use in Door Access 12
2.5 Mounting The BioPointe 13
3
Features 14
3.1 Authentication and Managing Authentication Properties 15
3.1.1 Fingerprint Authentication 15
3.1.2 Card Authentication 17
3.1.3 Card with PIN Authentication 17
3.2 Local Administration from Device 18
3.3 Remote Administration from Host Program 19
3.4 Logging of Transactions and Trace Events 20
3.5 Interfacing to Keri System Controller 20
4 Administering The BioPointe 21
4.1 Understanding the Administration Modes 21
4.2 Interpreting the LEDs 23
4.2.1 Table of LED Status (For Administration Modes Only ) 23
4.3 Using the Keypad 27
4.4 Using the Administration Modes (Enrollment) 28
4.4.1 Enrolling the First Master of the Device 28
4.4.2 Enrolling a Next Master 29
4.4.3 Enrolling a User with 1 to 3 Fingerprints 31
4.4.4 Enrolling a User with Card Only 33
4.4.5 Enrolling a User with Card with PIN 34
4.4.6 Enrolling a User with Card with Fingerprint 36
4.4.7 Deleting a Single Record 38
4.4.8 Deleting All Records 39
4.5 Using the Administration Modes (Configuration) 40
4.5.1 Enabling or Disabling Communication Authentication 40
4.5.2 Enabling or Disabling the Fingerprint Identify Mode 41
4.5.3 Changing the Security Level 42
4.5.4 Enabling or Disabling the Alarm 43
4.5.5 Erasing the Logs 44
4
Page 6

Getting to know the BioPointe
5 Performing Authentication With The BioPointe 45
5.1 Performing Fingerprint Authentication 46
5.2 Performing Card Only Authentication 50
5.3 Performing Card with PIN Authentication 50
6 Configuring The BioPointe 51
6.1 Location of DIP Switches and Connectors 51
6.2 DIP Switches 52
7 Communicating with The BioPointe 54
7.1 Setting up the Communication 54
7.2 Tips for Ensuring Good Communication 58
7.3 Troubleshooting Communication Problems 59
7.4 Communication using Modem 60
8 Interfacing with Keri System Controllers 61
9 Technical Specifications 63
9.1 Technical Specifications 63
9.2 Maintenance Instructions 64
10 Troubleshooting 65
Appendix A – Log Types in The BioPointe 67
11
5
Page 7

Getting to know the BioPointe
Chapter 1
1 Getting to Know The BioPointe
Introduction
The BioPointe is a fingerprint identification device designed for use in access control. It relies on 3 LEDs to
convey status information to the user. Depending on the color and speed of the blinking LEDs, different
statuses are conveyed.
1.1 How The BioPointe Works
Types of Authentication Properties
The BioPointe is able to perform three types of authentications. The three types are:
• Fingerprint
• Card Only
• Card with PIN
Each of these authentication properties is associated with an ID. For fingerprint enrollment, each ID
can be enrolled with up to 3 different fingers, unless the ID is for a Master. You will come across
terms like a Master and a User. The difference between a Master and a User is described later.
The other two authentication properties, Card Only and Card with PIN are necessary in order to
cater for some people whose fingerprints cannot be enrolled at all.
Device Master and User
When you are enrolling using fingerprint, you can choose to enroll as a Master, or as a User. A
Master is someone whose fingerprint is allowed to enter the administration or master mode of the
device. When this administration mode is entered, he can enroll other Users. A User, on the other
hand, does not have this privilege access.
Unlike a User, each Master can only be enrolled with one fingerprint. The BioPointe can enroll up
to a maximum of 5 Masters fingerprints.
With up to 5 Masters, you can assign more than one person to administer the device.
6
Page 8

Getting to know the BioPointe
Local Enrollment and Central Enrollment
The system is designed to cater for both local and central enrollment. By central, it means that the
users of the device are enrolled centrally on a host PC. Their authentication properties are then
downloaded by means of a communication link, to the BioPointe.
Central enrollment requires the use of the central enrollment software, known as BioPointe Cen tral.
For local enrollment, you can refer to Chapter 4 - "Administering The BioPointe".
Communicating With The BioPointe
As mentioned, the authentication properties can be downloaded using a communication link. This
link can be RS232, RS422 and RS485.
Transaction Logging
Every time a user successfully verifies his authentication property at the device, a transaction log is
recorded. This log remains in the device in a round-robin flash storage. The role of the host
software is to upload the log from the device to the host PC.
Event Logging
Besides the transaction logs, there is also another category of logs which is known as Event Logs.
Event logs are recorded whenever any exceptional events happen. An example of such and event is
when an alarm is triggered.
For a full listing of the different types of event logs, you can refer to the Appendix.
Wiegand Interface To Keri Systems Controllers
The BioPointe provides a Wiegand interface to a Keri System Controller. The Wiegand signals are
sent out upon a successful verification of the authentication property.
7
Page 9

Getting Started
Chapter 2
2 Getting Started
2.1 Unpacking And Initial Inspection
The following items are included in the packing box:
Packing List
BioPointe Unit
CDROM (User’s Manual)
Warranty Statement
Verify the items against the packing list and inform us if there is any discrepancy immediately.
8
Page 10

Getting Started
2.2 Identifying the Parts
9
Page 11

Getting Started
2.3 Applying Power
Safety instructions
It is necessary to take special precautions to avoid the introduction of hazards while operating, installing,
maintaining, transporting or storing the device.
The power supply that is used should have an output vol t ag e of betwee n 1 2V to 24V DC rat ed at 1. 0 A (please
refer to the Technical Specifications for more details).
[WARNING!]
Make sure the mains supply voltage rating of the power adapter is suitable for the supply voltage in
your country before you power on. When in doubt, you should consult your local representative for
advice.
10
Page 12

Getting Started
Steps for Applying Power
Step 1: Ensure that the power adapter is powered off.
Step 2: Insert the two wires of the power adapter correctly in to the connector.
Inserting the cable:
1) Use a test-pen to push
in the spring lever.
2) Insert cable into hole.
3) Release spring lever.
4) To ensure cable is
secure, pull it slightly.
Make sure it is seated
tightly and does not
come out.
Spring lever
Pin Description
1 GND
2 DC 12 to 24V
1 2 3 4 5 6 7 8 9 10 11 12
Step 3: Switch on the power to the adapter.
When the device is powered on, all three LEDs will be blinking continuously in red color.
When the device is ready, the first LED will turn to steady amber color while the second and third
will be turned off. However, if the first LED is blinking periodically in red color instead of being
steady amber, it is likely that the tamper switch is opened.
If you want the first LED to stop blinking in red attach the C-bracket so that the tamper switch is set,
or disable the alarm through the device settings (see Chapter 4 – Administering the BioPointe).
11
Page 13

Getting Started
A
2.4 Typical Setup For Use in Door Access
The figure below shows a typical setup of the BioPointe device used for access control. It consists of a
communication link from the BioPointe Central software to communicate with the device, as well as a
Wiegand line to a controller. The following steps are in no particular order.
Step 1 – Enroll fingerprints (authentication properties):
In order to start using the device, fingerprints or any other authentication properties (that is card or card with
PIN) need to be enrolled. The fingerprints and other authentication properties can be enrolled locally on the
device or remotely using the central enrollment feature in the BioPointe Central software. You can refer to
Chapter 3-1 to 3-3 for a description on managing authentication properties, local administration as well as
remote administration.
Step 2 - Set up the communication link:
To successfully setup the communication link, the appropriate device ID, baud rate, type of communication
and the serial interface type have to be configured. This can be done through the DIP switches located on the
back of the BioPointe device. Refer to Chapter 6 – Configuring the BioPointe or Chapter 7 –
Communicating with the BioPointe to find out how to set the DIP switches.
Step 3 - Set up the Wiegand link:
Having setup the communication link, you will also need to wire the Wiegand output from the BioPointe
device to the controller. Refer to Chapt er 8 – Interfacing to a Keri System Controlle r.
DIP switch settings required :
• SW1 (for Device ID)
• SW2 (for Baud Rate and
Comm Type)
• SW3 (for RS232, 422 or
485 type)
BioPointe Central
Software
Communication link
(RS232, 422 or RS485)
BioPointe
Device
cknowledgement
from door controller
(optional)
Wiegand
link
Typical Setup for Door Access
Door
Controller
Wiegand output
to door controller
12
Page 14

Getting Started
2.5 Mounting The BioPointe
The figure below shows how the BioPointe can be mounted using the C-bracket.
Two mounting screws are
inserted to hold the C-bracket
to the BioPointe device
Mounting The BioPointe using the C-bracket
Horizontal slots for
C-bracket insertion
C-bracket
13
Page 15

Features
Chapter 3
3 Features
The BioPointe functions are designed as an access control device aimed to provide irrefutable personal
identification using fingerprints. Its system architecture includes the fingerprint identification technology,
the recording of event logs, the interfacing to security panels and so on. In this chapter, you will learn about
the variety of features that make up the system.
List of Features
The following table lists the features of the BioPointe, and also provides a quick reference to what you can
expect to find within the device. In the table, you will find next to each entry a reference to a specific subsection. The sub-section describes the particular features.
Feature Group Section
1
Authentication and Managing Authentication Properties
• Door Access Authentication (using fingerprint, card only or card with PIN)
• Multiple Fingerprints Verification
• Quick Search
• One-To-Many Search
2
Local Administration from Device
• Master Authentication
• Enroll, delete user and basic local configurations
3
Remote Administration from Host Program
• Communication Authentication Mode
4
Transactions and Trace Events Logging
5
Interfacing with Keri System Controllers through Wiegand
6
Usage of Other Auxiliary Devices
• Legic, Mifare, Mag stripe, and Barcode readers.
3.1
3.2
3.3
3.4
3.5
3.6
14
Page 16

Features
3.1 Authentication and Managing Authentication Properties
The BioPointe is designed to refute unauthorized access using fingerprint authentication. However,
the device also caters to the use of a non-fingerprint medium.
As you have seen briefly, the BioPointe also supports the use of card only and card with PIN
authentication. The type that is being used is defined during the enrollment process.
As you read this section and the next few, you will come across the term 'authentication' quite
frequently. The various types of authentication can be grouped as follows:
• Door Access Authentication
Fingerprint, card only and card with PIN authentication are grouped under this, since they
essentially involve authenticating you to gain access, regardless of whether you are enrolled with
fingerprint, card only or card with PIN.
• Master Authentication
A master authentication involves ascertaining whether you have the device administrator rights to
administer the device.
• Door Access Authentication Time-Zone Control
Door Access Authentication Time-Zone Control is similar to Door Access Authentication except
that the first type checks a user against schedule that he or she is assigned to before granting access,
while the second type does not.
In this section, you will learn more about Door Access Authentication only. The other two types of
authentication will be described in the next few sections.
3.1.1 Fingerprint Authentication
For fingerprint authentication, each user will be assigned with a unique ID (not necessary a secret
ID). The number of digits to use for the ID is 4 by default. However, the ID can be configured to be
in other number sets, in the range of 3 to 10, using the BioPointe Central software.
The fingerprint authentication operation begins when the User provides the ID (either by entering
keys or scanning a contactless card). The device will check whether the ID has already been
registered in the device. If the entered ID is valid, it will activate the fingerprint sensor to capture the
live fingerprint. The fingerprint authentication operation completes with the result being shown on
the LEDs.
Up to Three Fingerprints can be enrolled for each ID
Each ID can be associated with a maximum of three fingerprint templates. During the authentication
operation, the device will match the live fingerprint with the entire associated fingerprints
automatically. Matching speed will be fastest if the first fingerprint (primary fingerprint) matches.
Otherwise, any subsequent matching will take up a little more time. This is one of the most powerful
features provided by the BioPointe.
15
Page 17

Features
Multiple Fingerprint Verification
In usual operation, the BioPointe only matches a single fingerprint to successfully pass a verification
process. However, it can be configured to match two or even three fingerprints bef ore a verification
process can be considered as successful.
In such a mode, the user has to enroll this ID with the same number of fingerprints that it is
matching with, or more. For example, if the BioPointe is configured to match two fingerprints, this
ID must be enrolled with at least two fingerprint templates. If it is configured to match three
fingerprints, three fingerprint templates must be enrolled.
During the matching process, the fingerprints that are provided need not be in the order that they
were enrolled.
Note that the three fingerprint templates that were enrolled for a particular ID can come from the
same person, or from up to three different persons. This powerful feature allows the BioPointe to be
deployed in areas of higher security where more than one person is required to authenticate.
Note that for master authentication, only one fingerprint matching is required.
Quick Search
In a usual verification process, the user enters his or her full ID. The BioPointe provides a feature
where you only need to enter a trailing part of your ID to activate a match.
Hence, if your ID is 1234, you only need to press "34" to begin matching, the BioPointe will search
its fingerprint database (in the device) for all the IDs that ends with "34" to find the correct
fingerprint template that matches the live finger. This feature is useful in applications when long
digits are used for the ID.
One-To-Many Search
Another advanced feature to take note of is the one-to-many search capability provided by the
BioPointe. This mode is also known as identification as opposed to verification.
An ID is not required during one-to-many fingerprint matching operation. It works by searching
through the complete fingerprint database to look for the matching fingerprint template. This is an
effective tool to replace the need for remembering IDs.
One-to-many search is operated on a higher level of stringency as compared to verification.
Therefore, the rejection rates will be higher. In addition, searching time increases with the number
of fingerprints registered in the device.
16
Page 18

Features
3.1.2 Card Authentication
Besides fingerprint authentication, you are also allowed to enroll the user to authenticate using a
contactless card combined with a PIN or just the contactless card alone. Every contactless card
carries a unique ID.
The security level provided by this mode of authentication also depends on the type of card being
used. Some cards store more (or unique) information than the others. For example, if a Wiegand
card is used, the device can extract the unique system code and site code (depending on the Wiegand
format supported by the card) besides the card ID. During the enrollment, this information will be
stored in the device and it will be used for verification later.
3.1.3 Card with PIN Authentication
For the card with PIN authentication, each card registered into the device is associated with a six
digits PIN number (provided during the enrollment stage), which the User must key-in to complete
the presentation. The device will then check the database for authenticity when the User enters his
PIN.
17
Page 19

Features
3.2 Local Administration from Device
Local administration means tasks can be performed at the device without the need for a host
program.
Master Authentication
Before any of these tasks can be performed, a master authentication is first carried out. The master
authentication allows the device administrator to enter the device administration mode, which
permits the device administrator to register new Master or User and access the device basic
configurations.
Each device can register up to a maximum of five Master fingerprints. You are designated as the
device administrator once your fingerprint is enrolled as a Master fingerprint.
During registration, each master has to provide a unique ID (Master ID). This Master ID will not be
required during the authentication to get into the administration mode. However, the Master ID is
still required when the administrator uses this particular ID during authentication for access control.
Tasks that can be Administrated Locally
The tasks that you can do at the device are listed out as follows. These tasks are described in greater
detail in Chapter 4.
• Enroll, delete any of three different authentication properties
• Delete the entire database
• Configure basic settings
18
Page 20

Features
3.3 Remote Administration from Host Program
The BioPointe device provides two modes of communication channel so that the remote PC can
connect to the device to perform administrative function and upload log records from the device.
The serial interface supports the RS232, RS485 and RS422 specification. In order to prevent
unauthorized access to the device from remote PC, the authentication protocol is added to the
communication protocol.
Communication Authentication Mode
If the Communication Authentication Mode is enabled, the device will only accept command from
the remote PC only if the PC has successfully authenticated the device through the Start
Authentication
to process all subsequent commands it received.
Take note that all subsequent commands must be send back-to-back within the next five seconds i.e.
before the remote PC closes the communication channel. The End Authentication sequence
command must be sent to the device (to terminate the sequence) so that other PC connected to the
same network will not be able to access the device unless it has started another authentication
sequence successfully.
Note that BioPointe Central will handle the above procedure. However, the administrator is required
to register his or her fingerprint into the BioPointe Central database (from the User Setup option
provided by the BioPointe Central application). The registered finger will then be sent to the
BioPointe device for authentication before the device can accept any other commands.
1
sequence. If the start authentication sequence is successful, the device will be able
1
The Start Authentication Sequence and End Authentication Sequence commands are transparent from the
user of the BioPointe Central.
19
Page 21

Features
3.4 Logging of Transactions and Trace Events
The BioPointe device handles three types of log records listed as follows:
• Transaction Log
A transaction log is recorded upon a successful Door Access Authentication or Door Access
Authentication Time-Zone Control. Each log contains the ID of the user performing the
authentication, as well as the date and time.
• Trace Event Log
A trace event log is re corded whenever any critical event has occurred during local
administration or during operation (such as when the device was being tampered with).
• Fail Attempt Log
A fail attempt log is recorded when the authentication process fails.
The BioPointe allocates a storage space for 22000 log records before they are over-written by a firstin-first-overwritten basis. As a system administrator, you ought to upload the log record to the host
database periodically. Logging of the Trace Event and Fail Attempt can be disabled if these logs are
not required. You can refer to the Appendix for a full listing of the types of logs.
3.5 Interfacing to Keri System Controller
The BioPointe device supports the following Wiegand formats to interface to a Keri System
Controller:
• 26 Bits Standard
• 26 Bits Vendor 1
• 35 Bits Standard
• 36 Bits Standard
• 37 Bits Standard
• 40 Bits Standard
When Wiegand output is enabled, the device will be able to generate and send the Wiegand da ta (ID
with site code and system code) to the external controller upon a successful authentication. The
type of external controllers used must be able to support the above Wiegand formats.
20
Page 22

Administering the BioPointe
Chapter 4
4 Administering The BioPointe
Introduction
This chapter describes how you can perform a range of administration tasks from the device. For
example, you can enroll authentication properties, or have them deleted from the device. In
addition, you can also configure certain settings like the Communication Authentica tion Mode (see
Chapter 3.3) or the Fingerprint Identify Mode (see Chapter 3.1.1).
4.1 Understanding the Administration Modes
All the tasks that you can administer at the BioPointe device are collectively known as the
Administration Modes. This section describes the various types of Administration Modes and how
you can get into them.
Only a Master can administer the Device
For security, only a Master can administer the device. As such, as you enter any of the
administration modes, a Master fingerprint authentication will be carried out first.
Types of Administration Modes
The various administration modes can be categorized into 2 types, namely Configuration and
Enrollment. Each Administration Mode is associated with an Administration Number. Please refer
to the tree diagram for the complete list of the various modes.
21
Page 23

Administering the BioPointe
The Administration Modes of the BioPointe
Administration
Modes
Enrollment Configuration
Press the key twice
followed by the admin number.
Press the key twice followed by the admin
number.
Admin
No.
1 Enroll Master Finger 1
2 Enroll User Finger(s) 2
3 Enroll Card Only 3
4 Enroll Card + PIN 4
5 Delete User 5 Erase All Logs
6 Delete All
Mode Admin
No.
Mode
Config Comms
Authentication
Config Identify
Mode
Config Security
Level
Enable or
Disable Alarm
After master
authentication, press
relevant mode
followed by # key.
Modes:
a) 1 – Normal
b) 2 – Normal with authen
Modes:
a) 0 – Disable
b) 1 – Enable
Modes:
a) 1 – Normal
b) 2 - High
Modes:
a) 0 – Disable
b) 1 - Enable
-
Getting into an Administration Mode
To get into any Administration Mode, press the second or third function key twice
relevant Administration Number using the numeric key.
If the device does not contain any master fingerprints, only entry into Administration Mode 1 will be
allowed. In such a case, the first person to access Mode 1 would be asked to enroll himself as the first
Master.
On the other hand, if the device already contains one or more master fingerprints, a master authentication
will be carried out. Upon passing the authentication, you would then be allowed to perform the operation
associated with the chosen Administration Mode.
followed by the
22
Page 24

Administering the BioPointe
4.2 Interpreting the LEDs
The three status LEDs on the BioPointe are used to convey different status interpretations.
First LED is used to indicate the Device Status.
Second LED is used to indicate an Action to be taken.
Third LED is used to indicate a particular Mode (or State).
The different interpretations act as guidelines while you are in any of the Administration Modes.
Each LED can be displayed in 3 different colors or be switched off simply. The colors can be:
Red
Amber
Green
At any time, each LED can be in one of the following state:
Stationary
Blinking fast
Blinking slow
The combination of color and state together helps you to navigate thro ugh the Administration
Modes. In addition to using the LEDs, the buzzer from the BioPointe is also used to indicate
different status. A short buzzer sound usually indicates a pass status, while a long buzzer sound
usually indicates a fail status.
4.2.1 Table of LED Status (For Administration Modes Only)
The following tables list all the different statuses that the BioPointe can be in. You can use these
tables to help you interpret the status conveyed at any point while you are administrating the device.
This table is only applicable to administration.
For ease of reference, there is a separate table in Chapter 5 – "Performing Authentication in the
BioPointe". This table is applicable when the user is performing authentication on the device.
The following describes what each LED is used for:
• LED 1 is usually used to indicate pass or fail status.
• LED 2 is used to indicate the action waiting for you to carry out. For example, when it blinks
slowly in red, it means that the device is waiting for you to enter the desired ID of the master or
user that you are going to enroll.
• LED 3 is used to indicate the type of mode you are in. For example, when you have just entered
into administration mode 1 (to enroll master), you can know this by its amber color and its slow
blinks.
23
Page 25

Administering the BioPointe
Table 1: For the Enrollment Administration Modes
LED 1 (Device Status)
Steady Light
LED 2 (Action)
Steady Light
Slow Blinking
Fast Blinking
LED 3 (Mode)
Steady Light
Slow Blinking
Fast Blinking
Amber
Green
Red
Amber
Green
Red
Amber
Green
Red
Amber
Green
Red
Amber
Green
Red
Amber
Green
Red
Amber
Green
Red
Device Ready (in Normal Mode)
OK
Not OK
Enroll first finger
Enroll second finger
Enroll third finger
(The above are 1 sec steady light followed by "Place
finger on sensor" LED.)
Enter PIN
Enter ID
Waiting for Hex # key (3 times)
Waiting for Hex # key (1 time)
Place finger on sensor
Enroll User
Enroll Card
Enroll PIN
Enroll Master
Delete Record
Deleting all in progress
-
-
-
24
Page 26

Administering the BioPointe
Table 2: For the Configuration Administration Modes
LED 1 (Device Status)
Steady Light
LED 2 (Action)
Steady Light
Slow Blinking
Fast Blinking
LED 3 (Mode)
Steady Light
Slow Blinking
Fast Blinking
Amber
Green
Red
Amber
Green
Red
Amber
Green
Red
Amber
Green
Red
Amber
Green
Red
Amber
Green
Red
Amber
Green
Red
Device Ready (in Normal Mode)
OK
Not OK
-
-
-
Enter Comm Authentication Mode number or
Enter Fingerprint Identify Mode number or
Enter Security Level or
Disable or enable alarm (enter the mode number)
-
Waiting for Hex # key (3 times)
Waiting for Hex # key (1 time)
Place finger on sensor
Set Comm Authentication Mode
Set Fingerprint Identify Mode
Set Security Level Mode
Enable or disable alarm mode
Erase log records mode
Erase all log records in progress
-
-
-
25
Page 27

Administering the BioPointe
Notations Used for LED Status and Buzzer Sound
In the rest of this chapter, detailed steps are provided to help you to navigate through the various
Administration Modes. You may take note of the following notations for the LED and buzzer sound
that would be used in the description.
Color : State :
Amber
Green
Red
Buzzer:
Short
Long
AMBER
Stationary
GREEN
Slow Blinking
Fast Blinking
Off
GREEN
GREEN
GREEN
*
Has no color
indication
26
Page 28

Administering the BioPointe
4.3 Using the Keypad
The following diagram shows the BioPointe keypad. There are three function keys. The first
function key, is used for performing Quick Search and One-To-Many matching. For more
detailed information in using this key, please refer to Chapter 5 on "Using the BioPointe".
While the configuration of the device and the enrollment of authentication properties can be totally
performed from the interfacing software, the BioPointe does also cater to some minimal level of
standalone capabilities. This is provided through the use of two other function keys that serve to
configure basic parameters and to enroll authentication properties locally.
The second, and the third function keys are used respectively for such configuration
and enrollment.
1
4
7
*
2
5
8
0
3
6
9
#
LED 1
LED 2
LED 3
Function keys,
F1, F2 and F3
ENTER
CLEAR
KEY Purpose
Quick Search &
One-To-Many
matching
Configuration
Enrollment and
Deletion
Clearing key s
previously pressed
*
#
For "confirming" to
a key value while in
the administration
mode
Parts of the keypad
27
Page 29

Administering the BioPointe
4.4 Using the Administration Modes (Enrollment)
4.4.1 Enrolling the First Master of the Device
When you first receive the device, there are neither any master nor any other fingerprints within it. The steps
below show you how to enroll the first Master.
Steps LED and Buzzer Status
Press , , .
1
The LEDs will light up as shown in 1.
When the 2nd LED starts to blink slowly
2
in red,
Enter a 4-digit
2
ID.
a) If the 4-digit ID is accepted, the 2nd LED will
blink fast in red as shown in 2(a), and the sensor
will light up. Proceed to step 3.
b) If the ID is not accepted, the 1
red briefly as shown in 2(b). Operation will cease
and return to normal mode.
Place your finger on the sensor for the
3
enrollment when the sensor lights up.
Each successful enrollment requires 2 image
captures.
a) The sensor will go off after the first image has
been successfully captured, and a series of beep
sound will be heard. Proceed to step 4.
b) If the first capture is not successful, the 1
LED will blink red briefly as shown in 3.
Operation will cease and return to normal mode.
Lift up your finger when you hear the
4
series of beep sound and place it back on
the sensor when it lights up again.
This is for the second capture.
a) If the 2
blink green briefly as shown in 4(a). The
enrollment is successful. Operation will return to
normal mode.
b) If the 2
will blink red briefly as shown in 4(b). Operation
will cease and return to normal mode.
nd
capture is successful, the 1st LED will
nd
capture is not successful, the 1st LED
1
st
LED will blink
1
AMBER RED
AMBER
2a
AMBER RED
2b
RED
→AMBER
ID not accepted
3
RED
→AMBER
st
1st capture not successful
4a
GREEN
→AMBER
4b
RED
→AMBER
2nd capture not successful.
enrollment fails.
AMBER
2
The number of digits, by default is 4. But it can be changed by BioPointe Central. The range can be from 3 to 10 digits.
28
Page 30

Administering the BioPointe
4.4.2 Enrolling a Next Master
When there are already one or more masters in the device, enrolling subsequent masters will first require a
master fingerprint verification. The following steps describe how to enroll subsequent masters.
Steps LED and Buzzer Status
Press , , .
1
The LEDs will light up as shown in 1. The sensor
will also light up, waiting for a master fingerprint
to be placed and verified.
Place the master finger on the sensor to
2
verify.
a) If the finger is successfully verified as a
master, the 1
shown in 2(a). Proceed to step 3.
b) If the finger is not successfully verified as a
master, the 1st LED will blink red briefly.
Operation will cease and return to normal mode.
When the 2nd LED starts to blink slowly
3
in red,
st
LED will blink green briefly as
Enter a 4-digit ID.
a) If the 4-digit ID is accepted, the 2nd LED will
blink fast in red as shown in 3(a), and the sensor
will light up. Proceed to step 4.
b) If the ID is not accepted, the 1
red briefly as shown in 3(b). Operation will cease
and return to normal mode.
Place your finger on the sensor for the
4
enrollment when the sensor lights up.
Each successful enrollment requires 2 image
captures.
a) The sensor will go off after the first image has
been successfully captured, and a series of beep
sound will be heard. Proceed to step 5.
b) If the first capture is not successful, the 1
LED will blink red briefly as shown in 4.
Operation will cease and return to normal mode.
1
st
LED will blink
1
2a
AMBER RED
GREEN
→AMBER
RED AMBER
2b
RED
→AMBER
Master verification fails
3a
AMBER RED
3b
RED
→AMBER
ID not accepted
4
RED
→AMBER
1st capture not successful
st
AMBER
29
Page 31

Administering the BioPointe
Lift up your finger when you hear the
5
series of beep sound and place it back on
the sensor when it lights up again.
This is for the second capture.
a) If the 2
blink green briefly as shown in 5(a). The
enrollment is successful. Operation will return to
normal mode.
b) If the 2
will blink red briefly as shown in 5(b). Operation
will return to normal mode.
nd
capture is successful, the 1st LED will
nd
capture is not successful, the 1st LED
5a
5b
GREEN
→AMBER
RED
→AMBER
2nd capture not successful.
enrollment fails.
30
Page 32

Administering the BioPointe
4.4.3 Enrolling a User with 1 to 3 Fingerprints
The following steps describe how you can enroll a user with fingerprint. Each user can be enrolled up to 3
fingerprints. You can choose to enroll just 1 or 2 in any case by quitting the enrollment process after you
have enrolled the desired number.
Steps LED and Buzzer Status
Press , , .
1
The LEDs will light up as shown in 1. The sensor
will also light up, waiting for a master fingerprint
to be verified.
Place the master finger on the sensor to
2
verify.
a) If the finger is successfully verified as a
master, the 1
shown in 2(a). Proceed to step 3.
b) If the finger is not successfully verified as a
master, the 1st LED will blink red briefly.
Operation will cease and return to normal mode.
When the 2nd LED starts to blink slowly
3
in red,
st
LED will blink green briefly as
Enter a 4-digit ID.
a) If the 4-digit ID is accepted, the 2nd LED will
blink fast in red as shown in 3(a), and the sensor
will light up. Proceed to step 4.
b) If the ID is not accepted, the 1st LED will blink
red briefly as shown in 3(b). Operation will cease
and return to normal mode.
Place your finger on the sensor for the
4
enrollment when it lights up.
Each successful enrollment requires 2 image
captures.
a) The sensor will go off after the first image has
been successfully captured, and a series of beep
sound will be heard. Proceed to step 5.
b) If the first capture is not successful, the 1
LED will blink red briefly as shown in 4. The 2
LED will next blink fast in green. While this
LED is blinking fast in green, press to
retry or to exit. If the # key is pressed,
repeat step 4. If the * key is pressed, operation
will cease and return to normal mode.
*
2
1
AMBER RED
2a
2b
GREEN
→AMBER
RED
→AMBER
Master verification fails
RED AMBER
3a
AMBER RED
3b
RED
→AMBER
ID not accepted
4
RED
→AMBER
st
nd
st
1
capture not successful
#
AMBER GREEN
Press # to retry or * to exit
31
AMBER
Page 33

Administering the BioPointe
Lift up your finger when you hear the
5
series of beep sound and place it back on
the sensor when it lights up again.
This is for the second capture.
a) If the 2
blink green briefly as shown in 5(a). The
enrollment is successful. The 2
fast in green next. Proceed to step 6.
b) If the 2
will blink red briefly as shown in 5(b). The 2
LED will blink fast in green next. Proceed to step
6.
nd
capture is successful, the 1st LED will
nd
capture is not successful, the 1st LED
Press to enroll the 2nd finger, or
6
to re-enroll the current 1st finger that was
#
not successfully done so earlier.
Or,
Press to exit.
*
If the # key was pressed, the 2nd LED flashes
briefly in the color associated with the finger that
it will enroll next. The color is amber for the first
finger, green for the second finger, and red for
the third finger. Proceed to step 7.
If the * key was pressed, however, operation will
cease and return to normal mode.
Place your finger on the sensor for the 2
7
finger enrollment when it lights up.
As before, each successful enrollment requires 2
image captures. The sensor will go off after the
first image has been successfully captured, and a
series of beep sound will be heard. Proceed to
step 8.
Lift up your finger when you hear the
8
8
series of beep sound and place it back on
the sensor when it lights up again.
Steps 7 and 8 are similar to steps 4, 5 and 6.
Repeat steps 6, 7 and 8 to enroll the 3rd
9
finger, or to re-enroll the current 2nd
finger if it was not successfully done so
earlier.
If the 3rd finger was successfully enrolled,
operation will cease and return to normal mode.
nd
LED will blink
5a
GREEN
→AMBER
AMBER GREEN
nd
or * to exit
Press # to enroll 2nd finger,
5b
RED
→AMBER
2nd capture not successful.
enrollment fails.
AMBER GREEN
Press # to re-enroll 1st finger,
or * to exit
nd
32
Page 34

Administering the BioPointe
4.4.4 Enrolling a User with Card Only
The following steps describe how to enroll a user with card only access.
Steps LED and Buzzer Status
Press , , .
1
The LEDs will light up as shown in 1. The sensor
will also light up, waiting for a master fingerprint
to be verified.
Place the master finger on the sensor to
2
verify.
a) If the finger is successfully verified as a
master, the 1
shown in 2(a). Proceed to step 3.
b) If the finger is not successfully verified as a
master, the 1st LED will blink red briefly.
Operation will cease and return to normal mode.
When the 2nd LED starts to blink slowly
3
in red,
Flash your card above the fingerprint
sensor.
a) If the card ID is accepted, the 1st LED will
blink green briefly as shown in 3(a). Operation is
completed and will return to normal mode.
b) If the card ID is not accepted, the 1st LED will
blink green briefly as shown in 3(b). Operation
will cease and return to normal mode.
st
LED will blink green briefly as
3
1
2a
3a
2b
3b
AMBER RED
GREEN
→AMBER
RED
→AMBER
Master verification fails
GREEN
→AMBER
RED
→AMBER
RED GREEN
Card ID not accepted
33
Page 35

Administering the BioPointe
4.4.5 Enrolling a User with Card with PIN
The following steps describe how to enroll a user with Card with PIN.
Note: The presence of the Card is not necessary when the "PIN-Only" feature is turned on. If Card presence
is not necessary, the ID input can be through the keypad. For more details on this feature, refer to the section
on "PIN-Only" in Chapter 3 – Features.
Steps LED and Buzzer Status
Press , , .
1
The LEDs will light up as shown in 1. The sensor
will also light up, waiting for a master fingerprint
verified.
Place the master finger on the sensor to
2
verify.
a) If the finger is successfully verified as a
master, the 1
shown in 2(a). Proceed to step 3.
b) If the finger is not successfully verified as a
master, the 1st LED will blink red briefly.
Operation will cease and return to normal mode.
When the 2nd LED starts to blink slowly
3
in red,
st
LED will blink green briefly as
Flash your card above the fingerprint
sensor.
a) If the card ID is accepted, the 1st LED will
blink green briefly as shown in 3(a). The 2
will blink slowly in amber next. Proceed to step
4.
b) If the card ID is not accepted, the 1st LED will
blink green briefly as shown in 3(b). Operation
will cease and return to normal mode.
4
nd
LED
1
2a
3a
AMBER RED
2b
GREEN
→AMBER
RED
→AMBER
RED RED
Master verification fails
GREEN
→AMBER
AMBER AMBER
Waiting for PIN to be entered
3b
RED
→AMBER
Card ID not accepted
RED
34
Page 36

Administering the BioPointe
When the 2nd LED blinks slow in amber,
4
Enter a 6-digit PIN.
When the 6-digits has been accepted, the 1
will blink green briefly to indicate that it has been
accepted as shown in 4.
The 2nd LED will blink slowly in amber next.
When the 2
5
nd
LED blinks slowly in amber again,
Re-enter the same 6-digit PIN for
confirmation.
a) If the 2 PINs match, the enrollment is
successful. The 1
as shown in 5(a). Operation is completed and will
return to normal mode.
b) If the 2 PINs do not match, the enrollment is
not successful. The 1
as shown in 5(b). Operation ceases and will
return to normal mode.
st
LED
st
LED will blink green briefly
st
LED will blink red briefly
4
5a
GREEN
→AMBER
AMBER
AMBER
Waiting for re-entering of PIN
for confirmation
GREEN
→AMBER
5b
RED
→AMBER
PIN enrollment fails
RED
35
Page 37

Administering the BioPointe
4.4.6 Enrolling a User with Card with Fingerprint
The following steps describe how to enroll a user with Card with fingerprint.
Steps LED and Buzzer Status
Press , , .
1
The LEDs will light up as shown in 1. The sensor
will also light up, waiting for a master fingerprint
to be verified.
Place the master finger on the sensor to
2
verify.
a) If the finger is successfully verified as a
master, the 1
shown in 2(a). Proceed to step 3.
b) If the finger is not successfully verified as a
master, the 1
Operation will cease and return to normal mode.
When the 2nd LED starts to blink slowly
3
in red, present a card in front of the
st
LED will blink green briefly as
st
LED will blink red briefly.
keypad.
a) If the card ID is accepted, the 2nd LED will
blink fast in red as shown in 3(a), and the sensor
will light up. Proceed to step 4.
b) If the card ID is not accepted, the 1st LED will
blink red briefly as shown in 3(b). Operation will
cease and return to normal mode.
4
Place your finger on the sensor for the
enrollment when it lights up.
Each successful enrollment requires 2 image
captures.
a) The sensor will go off after the first image has
been successfully captured, and a series of beep
sound will be heard. Proceed to step 5.
b) If the first capture is not successful, the 1
LED will blink red briefly as shown in 4. The 2
LED will next blink fast in green. While this
LED is blinking fast in green, press to
retry or to exit. If the # key is pressed,
repeat step 4. If the * key is pressed, operation
will cease and return to normal mode.
*
2
1
AMBER RED
2a
GREEN
→AMBER
2b
RED
→AMBER
Master verification fails
3a
AMBER RED
3b
RED
→AMBER
Card ID not accepted
4
RED
→AMBER
st
nd
#
1
AMBER GREEN
Press # to retry or * to exit
RED AMBER
AMBER
st
capture not successful
36
Page 38

Administering the BioPointe
Lift up your finger when you hear the
5
series of beep sound and place it back on
the sensor when it lights up again.
This is for the second capture.
a) If the 2
blink green briefly as shown in 5(a). The
enrollment is successful. The 2
fast in green next. Proceed to step 6.
b) If the 2
will blink red briefly as shown in 5(b). The 2
LED will blink fast in green next. Proceed to step
6.
nd
capture is successful, the 1st LED will
nd
capture is not successful, the 1st LED
Press to enroll the 2nd finger, or
6
to re-enroll the current 1st finger that was
#
not successfully done so earlier.
Or,
Press to exit.
*
If the # key was pressed, the 2nd LED flashes
briefly in the color associated with the finger that
it will enroll next. The color is amber for the first
finger, green for the second finger, and red for
the third finger. Proceed to step 7.
If the * key was pressed, however, operation will
cease and return to normal mode.
Place your finger on the sensor for the 2
7
finger enrollment when it lights up.
As before, each successful enrollment requires 2
image captures. The sensor will go off after the
first image has been successfully captured, and a
series of beep sound will be heard. Proceed to
step 8.
Lift up your finger when you hear the
8
8
series of beep sound and place it back on
the sensor when it lights up again.
Steps 7 and 8 are similar to steps 4, 5 and 6.
Repeat steps 6, 7 and 8 to enroll the 3rd
finger, or to re-enroll the current 2nd
9
finger if it was not successfully done so
earlier.
If the 3rd finger was successfully enrolled,
operation will cease and return to normal
mode.
nd
LED will blink
5a
GREEN
→AMBER
AMBER GREEN
nd
or * to exit
Press # to enroll 2nd finger,
5b
RED
→AMBER
2nd capture not successful.
enrollment fails.
AMBER GREEN
Press # to re-enroll 1st finger,
or * to exit
nd
37
Page 39

Administering the BioPointe
G
4.4.7 Deleting a Single Record
The following steps describe how a record can be deleted. The recor d can belon g to any of the three
authentication properties. It can also be a master or a user.
Steps LED and Buzzer Status
Press , , .
1
The LEDs will light up as shown in 1. The sensor
will also light up, waiting for a master fingerprint
to be verified.
2
Place the master finger on the sensor to
verify.
a) If the finger is successfully verified as a
master, the 1
shown in 2(a). Proceed to step 3.
b) If the finger is not successfully verified as a
master, the 1
Operation will cease and return to normal mode.
When the 2nd LED starts to blink slowly in red,
3
st
LED will blink green briefly as
st
LED will blink red briefly.
Enter the 4-digit ID of the record to be deleted
a) If the ID exists, the record will be successfully
deleted. The 1
shown in 3(a). Operation is completed and will
return to normal mode.
st
LED will blink green briefly as
b) If the ID does not exist, the deletion cannot be
carried out. The 1
shown in 3(b). Operation ceases and will return
to normal mode.
st
LED will blink red briefly as
5
1
AMBER RED
2a
3a
3
.
GREEN
→AMBER
RED
2b
RED
→AMBER
Master verification fails
GREEN
→AMBER
3b
RED
→AMBER
Fail to delete (ID does not exist)
REEN
3
You can also flash a card, if the card ID is the one you are going to delete.
38
Page 40

Administering the BioPointe
4.4.8 Deleting All Records
The following steps describe how all user records in the BioPointe can be deleted. To prevent accidental
deletion, two instances of master verifications are put in place.
Steps LED and Buzzer Status
Press , , .
1
The LEDs will light up as shown in 1. The sensor
will also light up, waiting for a master fingerprint
to be verified.
Place the master finger on the sensor to
2
verify.
a) If the finger is successfully verified as a
master, the 1
shown in 2(a). The 2
amber next. Proceed to step 3.
b) If the finger is not successfully verified as a
master, the 1st LED will blink red briefly.
Operation will cease and return to normal mode.
Press 3 times to proceed with the
3
operation.
st
LED will blink green briefly as
nd
#
Or,
Press once to abort.
*
When the # key is pressed 3 times, The 2nd LED
will blink fast in red as shown in 3. The sensor
will also light up to ask for the master fingerprint
verification again. Proceed to step 4.
If the * key is pressed, operation will cease and
return to normal mode.
Place the master finger on the sensor to verify.
4
a) If the finger is successfully verified as a
master, the 1
shown in 4(a). The 3
red next, indicating that the operation is in
progress. At the end of the operation, the 1
will blink green briefly to indicate that the delete
all operation has been completed successfully.
st
LED will blink green briefly as
rd
b) If the finger is not successfully verified as a
master, the 1
shown in 4(b). Operation ceases and will return
to normal mode.
st
LED will blink red briefly as
6
LED will blink fast in
LED will blink slowly in
st
LED
1
2a
3
4a
AMBER RED
GREEN
→AMBER
2b
AMBER RED
GREEN
→AMBER
AMBER
GREEN
→AMBER
4b
Master verification fails,
AMBER
RED
→AMBER
Master verification fails
RED
RED
→AMBER
delete-all not continued
39
Page 41

Administering the BioPointe
4.5 Using the Administration Modes (Configuration)
4.5.1 Enabling or Disabling Communication Authentication
The following steps describe how the Communication Authentication Mode in the BioPointe can be set. To
find out more about this feature, you can refer to the section on "Remote Administrati o n Fro m Host " in
Chapter 3.1.
Steps LED and Buzzer Status
Press , , .
1
The LEDs will light up as shown in 1. The sensor
will also light up, waiting for a master fingerprint
to be placed and verified.
Place the master finger on the sensor to
2
verify.
a) If the finger is successfully verified as a
master, the 1
shown in 2(a). The 2
green next, while the 3
Proceed to step 3.
b) If the finger is not successfully verified as a
master, the 1st LED will blink red briefly as
shown in 2(b). Operation will cease and return to
normal mode.
3
Press or , the number that
st
LED will blink green briefly as
1 2
corresponds to the appropriate mode,
followed by to confirm.
#
Or,
Press to exit.
*
1 corresponds to the Normal mode, while
2 corresponds to the Normal with Authentication
mode.
When the mode has been successfully set, the 1
LED will blink green briefly as shown in 3.
1
nd
LED will blink slowly in
rd
LED is steady amber.
1
AMBER RED
2a
2b
GREEN
→AMBER
RED
→AMBER
Master verification fails
GREEN
AMBER
3
GREEN
→AMBER
st
40
Page 42

Administering the BioPointe
4.5.2 Enabling or Disabling the Fingerprint Identify Mode
The following steps describe how the Fingerprint Identify Mode in the BioPointe can be set. To find out
more on this feature, you can refer to the section on "Fingerprint Authentication" in Chapter 3.1.1.
Steps LED and Buzzer Status
Press , , .
1
The LEDs will light up as shown in 1. The sensor
will also light up, waiting for a master fingerprint
to be verified.
Place the master finger on the sensor to
2
verify.
a) If the finger is successfully verified as a
master, the 1
shown in 2(a). The 2
green next while the 3
Proceed to step 3.
b) If the finger is not successfully verified as a
master, the 1st LED will blink red briefly as
shown in 2(b). Operation will cease and return to
normal mode.
Press or , the number that
3
corresponds to the appropriate mode,
followed by to confirm.
Or,
Press to exit.
0 corresponds to Disable, while
1 corresponds to the Enable
When the mode has been successfully set, the 1st
LED will blink green briefly as shown in 3.
st
LED will blink green briefly as
nd
0
#
*
2
LED will blink slowly in
rd
LED is steady green.
1
level.
1
2a
3
AMBER RED
GREEN
→AMBER
2b
RED
→AMBER
Master verification fails
GREEN
→AMBER
GREEN
GREEN
41
Page 43

Administering the BioPointe
4.5.3 Changing the Security Level
The following steps describe how the Security Level in the BioPointe can be set. The allowed levels are
Normal and High. By default, the security level of the device is at the Normal level.
Note that this security level pertains to using one-to-one matching (verification) as opposed to using one-tomany matching (identification). Configuring of the security level used in one-to-many matching is not
allowed. It is defaulted to a high level.
Steps LED and Buzzer Status
1
2
3
Press , , .
The LEDs will light up as shown in 1. The sensor
will also light up, waiting for a master fingerprint
to be verified.
Place the master finger on the sensor to
verify.
a) If the finger is successfully verified as a
master, the 1
shown in 2(a). The 2
green next while the 3
Proceed to step 3.
b) If the finger is not successfully verified as a
master, the 1st LED will blink red briefly as
shown in 2(b). Operation will cease and return to
normal mode.
Press or , the number that
st
LED will blink green briefly as
nd
1
corresponds to the appropriate mode,
followed by to confirm.
#
Or,
Press to exit.
1 corresponds to the Normal level, while
2 corresponds to the High
When the mode has been successfully set, the 1st
LED will blink green briefly as shown in 3.
*
3
LED will blink slowly in
rd
LED is steady red.
2
level.
42
1
AMBER RED
2a
2b
GREEN
→AMBER
GREEN
RED
→AMBER
RED
Master verification fails
3
GREEN
→AMBER
Page 44

Administering the BioPointe
4.5.4 Enabling or Disabling the Alarm
There are two events that can trigger an alarm indication from the BioPointe:
• The tamper switch of the BioPointe was triggered, and
The following steps describe how the alarm indication in the BioPointe can be enabled or disabled. The user
would find this operation used oftentimes especially during installation or maintenance when preventing false
alarm triggers is necessary.
Steps LED and Buzzer Status
1
Press , , .
1
The LEDs will light up as shown in 1. The sensor
will also light up, waiting for a master fingerprint
to be verified.
Place the master finger on the sensor to
2
verify.
a) If the finger is successfully verified as a
master, the 1
shown in 2(a). The 2
green and while the 3
amber next. Proceed to step 3.
b) If the finger is not successfully verified as a
master, the 1st LED will blink red briefly as
shown in 2(b). Operation will cease and return to
normal mode.
Press or , the number that
3
st
LED will blink green briefly as
0
corresponds to the appropriate mode,
followed by to confirm.
#
Or,
Press to exit.
0 corresponds to the Disable , while
1 corresponds to the Enable
When the mode has been successfully set, the 1st
LED will blink green briefly as shown in 3.
*
4
nd
LED will blink slow in
rd
LED will blink slow in
1
.
1
2a
3
AMBER RED
GREEN
→AMBER
2b
RED
→AMBER
Master verification fails
GREEN
→AMBER
GREEN
AMBER
43
Page 45

Administering the BioPointe
4.5.5 Erasing the Logs
The log records that are stored in the device can be erased totally through this authentication mode. This
process will involve an additional master fingerprint authentication to prevent accidental erasure.
Steps LED and Buzzer Status
1
Press , , .
The LEDs will light up as shown in 1. The sensor
will also light up, waiting for a master fingerprint
to be verified.
Place the master finger on the sensor to verify.
2
a) If the finger is successfully verified as a
master, the 1
shown in 2(a). The 2
green while the 3
green next. Proceed to step 3.
b) If the finger is not successfully verified as a
master, the 1st LED will blink red briefly as
shown in 2(b). Operation will cease and return to
normal mode.
st
LED will blink green briefly as
nd
rd
LED will blink slowly in
Press 3 times to proceed with the
#
operation.
3
Or,
Press once to abort.
*
When the # key is pressed 3 times, The 2nd LED
will blink fast in red as shown in 3. The sensor
will also light up to ask for the master fingerprint
verification again. Proceed to step 4.
If the * key is pressed, operation will cease and
return to normal mode.
Place the master finger on the sensor to verify.
4
a) If the finger is successfully verified as a
master, the 1
shown in 4(a). The 3
red next, indicating that the operation is in
progress. At the end of the operation, the 1st LED
will blink green briefly to indicate that the delete
all operation has been completed successfully.
st
LED will blink green briefly as
rd
b) If the finger is not successfully verified as a
master, the 1
shown in 4(b). Operation ceases and will return
to normal mode.
st
LED will blink red briefly as
5
LED will blink fast in
LED will blink slowly in
1
2a
3
4a
AMBER RED
AMBER GREEN GREEN
2b
RED
→AMBER
Master verification fails
AMBER RED
GREEN
→AMBER
GREEN
→AMBER
4b
RED
→AMBER
Master verification fails,
erasure not continued
RED
44
Page 46

Performing Authentication with the BioPointe
Chapter 5
5 Performing Authentication With The
BioPointe
This chapter assumes that you have already learned how to enroll the authentication properties. If you have
not learned how to do so, you may like to look at Chapter 4 – Administering the BioPointe again. This
chapter describes how your fingerprints and other authentication properties can be enrolled locally on the
device. Alternatively, if you are enrolling the authentication properties remotely, you can refer to the section
on Remote Administration, and to the BioPointe Central manual that comes separately.
Handling Exceptions with Card Only and Card with PIN Authentication
As mentioned, there are three main types of authentication properties – namely, fingerprint, card only and
card with PIN. While fingerprint authentication will be the main usage, the other two types of authentication
are provided to handle exceptions, such as in the case of persons having severely callous fingerprints. By
handling such exceptions, you would then be able to use the device for the entire spectrum of people in your
organization.
We will now take a look at how the various authentication modes can be performed.
45
Page 47

Performing Authentication with the BioPointe
5.1 Performing Fingerprint Authentication
There are 4 ways to perform fingerprint matching.
The first is to use the keypad to enter your full ID. The second is to present your full ID to the
BioPointe through the hidden card reader by flashing the card across the device. These 2 methods are
also known as one-to-one-matching (verification). The third method is to use Quick Search. This
method also uses the keypad, but eliminates the need of having to enter your full ID. Only 2 or more
digits of your ID are sufficient to tell the device to search for a match.
The last method is to use one-to-many matching (or identification), where no ID is required to be
entered. However, the user should note that this method is carried out at a higher level of security, and
hence may be more difficult to match successfully for reasons such as the finger was not well enrolled
initially, or when it was not placed well on the sensor.
One-to-One Matching using the Keypad
Using the numeric keys, enter your ID.
1
If the ID exists, the sensor will light up and the 2
2
Place your finger on the sensor, removing it only when the sensor light goes off.
3
If the 1
If the 1
sensor again when it lights up.
st
LED lights up in green, the authentication is successful.
st
LED lights up in red, you will be allowed another try. Place your finger on the
nd
LED will blink fast in red.
46
Page 48

Performing Authentication with the BioPointe
One-to-One Matching using the Card Reader
1
Flash your card across the device.
(Your card ID must be the same as the UserID enrolled previously.)
If the ID exists, the sensor will light up and the 2
2
Place your finger on the sensor, removing it only when the sensor light goes off.
If the 1
3
If the 1
sensor again when it lights up.
st
LED lights up in green, the authentication is successful.
st
LED lights up in red, you will be allowed another try. Place your finger on the
nd
LED will blink fast in red.
47
Page 49

Performing Authentication with the BioPointe
Quick Search
Quick search eliminates the need for you to enter your full ID. This is useful if the number of digits
you organization used for the ID is long, making it hard for the staff to remember the full ID.
With quick search, what you need to do is to enter just 2 or more digits of your ID from the back and
then hit the first function key to initiate the matching process.
As an example, if your ID is 12345, enter ‘4’, ‘5’ followed by the key.
1
(The BioPointe device will perform a search for IDs ending with ‘45’.)
2
If any ID ending with ‘45’ is found, the sensor will light up and the 2
in red.
Place your finger on the sensor, removing it only when the sensor light goes off.
If no IDs ending with ‘45’ is found, the 1st LED lights up in red immediately.
If the 1
3
If the 1
sensor again when it lights up.
st
LED lights up in green, the authentication is successful.
st
LED lights up in red, you will be allowed another try. Place your finger on the
nd
LED will blink fast
48
Page 50

Performing Authentication with the BioPointe
One-to-Many Matching (or Identification)
With one-to-many matching, you need not remember your ID. However, the user must note that this
matching process is carried out at a higher security level.
Before one-to-many matching can be used, the mode must first be enabled. To enable this mode, you
can refer to Chapter 4 – Administering the BioPointe.
Note that one-to-many matching mode will be automatically disabled if the Multiple Fingerprint
Matching feature is configured at 2 or 3. For more information on this feature, you can refer to
Chapter 3 – Features.
With the one-to-many matching mode enabled, press the key 2 times.
1
2
Place your finger on the sensor, removing it only when the sensor light goes off.
3
If the 1
If the 1
(There is no automatic retry for one-to-many matching.)
st
LED lights up in green, the authentication is successful.
st
LED lights up in red, the authentication fails.
49
Page 51

Performing Authentication with the BioPointe
5.2 Performing Card Only Authentication
Flash your card across the device.
1
(Your card ID must be the same as the UserID enrolled previously. In addition, this card ID
must be enrolled as the Card Only authentication property.)
If the 1
2
If the 1
(This could be because the ID was not found within the device.)
st
LED lights up in green, the authentication is successful.
st
LED lights up in red, the authentication fails.
5.3 Performing Card with PIN Authentication
Flash your card across the device.
1
(Your card ID must be the same as the UserID enrolled previously. In addition, this card ID
must be enrolled as the Card with PIN authentication property.)
2
If the ID exists, the 2
Enter your 6 digits PIN.
If the ID does not exist, the 1
If the PIN is correct, the 1
3
If the PIN is incorrect, the 1
nd
LED will blink slowly in amber.
st
LED will light up in red.
st
LED will light up in green.
st
LED will light up in red.
50
Page 52

Configuring the BioPointe
Chapter 6
6 Configuring The BioPointe
This chapter describes how DIP switch settings can be made and how the serial and Wiegand cables can be
wired to the BioPointe control board.
6.1 Location of DIP Switches and Connectors
Power and
Communication
Cable
Connector
(12 way)
1 2 3 4 5 6 7 8 9 10 11 12
PIN No. Description
1
2
3
4
5
6
7
8
9
10
11
12
Backview and Pin Layout of the BioPointe
GND
+12V
Rx+
RxGND
D+ (Rx)
D- (Tx)
RST
W0
COM
W1
ACK
Tamper
Switch
located within
Dip Switch
SW1
Dip Switch
SW2
Dip Switch
SW3
51
Page 53

Configuring the BioPointe
6.2 DIP Switches
There are three DIP switches on the control board. The usage of each switch is as tabulated:
SW1 8-way To set the Device ID
SW2 4-way To set the baud rate and communication type
SW3 8-way To set the type of serial communication (i.e.
whether RS232, 422 or 485)
The following tables show the settings for each of the three DIP switches.
Note that a "-"indicates an "OFF" position.
Table 1: SW1 (Device ID)
SW1 is used to set the Device ID of the device. It has a row of 8 DIP switches. The range of Device IDs that
can be set is 0 to 255. However, the acceptable range for field operation is 1 to 254. The Device ID is set
according to the binary format of an 8-bit byte. An "ON" position is interpreted as binary bit 0. To help you
to find the dip switching settings for a particular Device ID, use the index value a ssociated with each bit.
Switch /
Device ID
Index Value
0 (Not used) ON ON ON ON ON ON ON ON
1 - ON ON ON ON ON ON ON
2 ON - ON ON ON ON ON ON
3 - - ON ON ON ON ON ON
4 ON ON - ON ON ON ON ON
5 - ON - ON ON ON ON ON
6 ON - - ON ON ON ON ON
7 - - - ON ON ON ON ON
8 ON ON ON - ON ON ON ON
9 - ON ON - ON ON ON ON
10 ON - ON - ON ON ON ON
:
:
:
253 - ON - - - - - 254 ON - - - - - - -
255 (Not used) - - - - - - - -
Examples:
Switch/
1 2 3 4 5 6 7 8
Device ID
Index Value 1 2 4 8 16 32 64 128
Device ID 5 = 1 + 4
Position - ON - ON ON ON ON ON
Device ID 6 = 2 + 4
Position ON - - ON ON ON ON ON
Device ID 10 = 2 + 8
Position ON - ON - ON ON ON ON
Device ID 30 = 2 + 4 + 8 + 16
Position ON - - - - ON ON ON
1 2 3 4 5 6 7 8
1 2 4 8 16 32 64 128
:
:
:
:
:
:
52
Page 54

Configuring the BioPointe
Table 2(a): SW2 (Baud Rate)
SW2 has a row of 4 DIP switches. Two is used to determine the baud rate while another two is used to
indicate the communication type.
Switch /
Baud Rate (Bps)
38400* ON ON
19200 - ON
9600 - 2400 ON -
*- Default setting
1 2
Table 2(b): SW2 (Communication Type)
The communication type is a setting that lets the BioPointe know how to respond to incoming data from the
host. For example, if the Modem type is chosen, the BioPointe has to be able to respond to 'AT' command s
coming from the modem.
Switch /
Comm Type
RS232* ON ON
Modem ON -
TCP/IP - ON
RS422 / 485 - -
*- Default setting
3 4
Table 3: SW3 (Serial Communication Type)
In Table 3, you will see the serial communication type. This is different from the communication type. The
serial communication type lets the BioPointe know what type of signals is to be expected. For example,
RS232 is single-ended, while both RS422 and RS485 are differential.
Switch No./
Serial Interface
Type
RS232* - - - ON - ON - ON
RS422 - ON ON - ON - ON RS485 ON - ON - ON - ON -
* - Default setting
1
2
3
4
5
6
7
8
53
Page 55

Communicating with the BioPointe
Chapter 7
7 Communicating with The BioPointe
The BioPointe supports 4 types of serial communication i.e. RS232, RS485, RS422 and Modem.
When you have decided which type of serial communication interface to use, make sure that each cable is
inserted correctly at the location that corresponds with the signal type. In addition, you also need to
configure the BioPointe to the correct type of serial interface and the correct type of baud rate through DIP
switches. Another point to take note is that if you are using RS485 or RS422 for several devices connected
in a multi-drop manner, each device has to be assigned a unique device ID.
This chapter describes how you can communicate with the BioPointe with RS232, RS485, RS422 and the
modem.
7.1 Setting up the Communication
In brief form, a communication link can be setup based on the sequential layout steps listed below. The
details are described in the sections to follow:
Step 1: Power off device
Ensure that the power is switched off so that any wrong connection would not damage the
device. Also ensure that the positive and ground line is connected correctly.
Step 2: Connect cables :
Insert the wires correctly at the location that corresponds to the signal type.
Step 3: Configure type of serial interface with SW3
This is a hardware setting.
The type of serial interface chosen with SW3 allows the BioPointe to communicate with the
correct signal type.
Step 4: Configure type of communication and baud rate with SW2
Both are software settings.
The type of communication chosen with SW2 tells the BioPointe how to respond to the
command received. For example, if the selected type is 'RS422 or RS485', the BioPointe would
not respond to commands not addressed to it, but was received in a multi-drop network.
The baud rate chosen also with SW2 should correspond with the baud rate that the host
software uses to communicate with the devices.
Step 5: Set the Device ID with SW1
54
Page 56

Communicating with the BioPointe
Step 1: Power off device
Connect the pair of power supply wires as shown in the figure below. Ensure that the location of each wire is
correct. Keep the device powered off so that any wrong connection later will not damage the device.
1 2 3 4 5 6 7 8 9 10 11 12
Pin Description
1 GND
2 12V
Step 2: Connect Cables
1 2 3 4 5 6 7 8 9 10 11 12
Pins 3 to Pin 7 are designated for different signal depen di ng on the ty pe of seri al communication selected.
(Pin 8 is currently not used for serial communication.) If you are communicating via a modem, you can
connect using RS232, RS422 or RS485 mode, depending on the number of BioPointe devices you need to
communicate with. Please refer to the appendix for a description of the modem connection setup.
Note 1: Pin-out for RS232 cable for connecting between PC and the BioPointe Device :
BioPointe
Device
5 5
6 3
7 2
DB-9 Connector
(Female)
Pin RS232 (See Note 1) RS422 RS485
3 - Rx+ 4 - Rx- 5 GND - 6 Rx Tx+ D+
7 Tx Tx- D8 - -
55
Page 57

Communicating with the BioPointe
[NOTE]
In RS422/485 mode, it is necessary to install termination resistors at both ends of the communication lines. The value of
each resistor should equal the characteristic impedance of the signal wires (approximately 120 Ohms). No resistors are
installed at the factory.
Step 3: Configure type of serial interface with SW3
The BioPointe supports three different signal types – RS232, RS422 and RS485. Depending of which signal
type you are using, the device has to be configured correspondingly. The configuration is done through the 8way DIP switch, SW3. The table below shows the different settings.
Switch No./
Serial Interface
Type
RS232* - - - ON - ON - ON
RS422 - ON ON - ON - ON RS485 ON - ON - ON - ON -
* - Default setting
1
2
3
4
5
6
7
Step 4: Configure the type of communication and the baud rate with SW2
The baud rate is configured through switches 1 and 2 of SW2 as shown in the table below:
Switch /
Baud Rate (Bps)
38400* ON ON
19200 - ON
9600 - 2400 ON -
*- Default setting
For multi-drop networks (RS422 and RS485), devices do not respond to commands that are not addressed to
it. In order for the BioPointe to respond correctly, you need to set the type of communication using switches
3 and 4 of DIP SW2 as shown in the table below:
Switch /
Comm Type
RS232* ON ON
Modem ON -
TCP/IP - ON
RS422 / 485 - -
*- Default setting
1 2
3 4
8
56
Page 58

Communicating with the BioPointe
Step 5: Setting the Device ID
SW1 is used to set the Device ID of the device. It has a row of 8 DIP switches. The range of Device IDs that
can be set is 0 to 255. However, the acceptable range for field operation is 1 to 254.
The Device ID is set according to the binary format of an 8-bit byte. An "ON" position is interpreted as
binary bit 0. To help you to find the dip switching settings for a particular Device ID, use the index value
associated with each bit.
Switch /
Device ID
Index Value
0 (Not used) ON ON ON ON ON ON ON ON
1 - ON ON ON ON ON ON ON
2 ON - ON ON ON ON ON ON
3 - - ON ON ON ON ON ON
4 ON ON - ON ON ON ON ON
5 - ON - ON ON ON ON ON
6 ON - - ON ON ON ON ON
7 - - - ON ON ON ON ON
8 ON ON ON - ON ON ON ON
9 - ON ON - ON ON ON ON
10 ON - ON - ON ON ON ON
:
:
:
253 - ON - - - - - 254 ON - - - - - - -
255 (Not used) - - - - - - - -
Examples:
Switch/
1 2 3 4 5 6 7 8
Device ID
Index Value 1 2 4 8 16 32 64 128
Device ID 5 = 1 + 4
Position - ON - ON ON ON ON ON
Device ID 6 = 2 + 4
Position ON - - ON ON ON ON ON
Device ID 10 = 2 + 8
Position ON - ON - ON ON ON ON
Device ID 30 = 2 + 4 + 8 + 16
Position ON - - - - ON ON ON
After all the steps above have been performed, power up the device and check the communication using the
host software.
1 2 3 4 5 6 7 8
1 2 4 8 16 32 64 128
:
:
:
:
:
:
57
Page 59

Communicating with the BioPointe
7.2 Tips for Ensuring Good Communication
Communication faults are problems that are commonly faced during field setups of RS485 and RS422
networks. To alleviate the occurrence of problems, do take note of the following points:
• Obtain good communication cables. The Beldon 8102 (4-core) is the recommended cable to use.
• Ensure that wire tips are soldered-tinned and seated securely in the connector of the device.
58
Page 60

Communicating with the BioPointe
7.3 Troubleshooting Communication Problems
The table below describes some of the problems that are commonly faced and what you can check to resolve
them:
Error reported at TDM
software program
1
Error code 203 (CB hex)
– Zero byte received
2
Error code 199 (C7 hex)
– Receive header wrong
Error code 198 (C6 hex)
– Receive footer wrong
Error code 202 (CA hex)
– CRC mismatch at host
3 Error code 201 (C9 hex)
- Device ID mismatch
Description of Error Items to check
Device does not respond
Some garbage was received
Device ID does not match
1. Check that the serial 9-pin DB
connector is connected to the
serial port of the PC. Ensure that
the correct com port setting is set
on BioPointe Central.
2. Check that the RS232 to
RS422/485 converter has been
switched on.
3. Check that the device has been
powered up.
4. Check that the baud rate at
BioPointe Central and that at the
device are the same
5. Check that the cables are
correctly wired, e.g. Rx+ from the
converter will go into Tx+ of the
device
6. Check the continuity of the cables
by isolating them from other parts
of the network.
1. Check that the baud rate at
BioPointe Central and the device
are the same
2. Check that each individual wire is
not shorted to any other wires
3. If the distance of the cable used
(as in RS422/485 communication)
is reasonably long, try to run at a
lower baud rate).
1. One of the devices in multi-drop
is configured as "RS232" for the
type of communication.
59
Page 61

Communicating with the BioPointe
7.4 Communication using Modem
Communication using the modem is supported in the BioPointe for one device as well as with multiple
devices. If the modem is connected to only one device, the signal type is RS232 in nature. The SW2 setting
for communication type has to be "Modem" for this device.
If the modem is connected to multiple devices in a multi-drop network, the signal type will be either RS485
or RS422 depending on which is chosen.
Only one device can handshake with the modem. As such, one and only one device has to be configured as
"Modem" to be the communication type, while the remaining will be either RS485 or RS422.
The connection setup for communication using the modem is described in more details in the Appendix.
60
Page 62

Interfacing with Door Controllers
A
Chapter 8
8 Interfacing with Keri System
Controllers
This chapter describes how you can interface the BioPointe with Keri System controllers through Wiegand
signaling.
The BioPointe currently supports the following Wiegand formats:
• 26 bits standard and other versions
• 34 bits standard
• 35 bits standard
• 36 bits standard
• 37 bits standard
• 40 bits
If you are unsure whether your controller supports any of the above formats, please consult with Keri
Systems.
Wiegand output from the BioPointe to an external controller is interfaced by W0 and W1 outputs.
CK
W1
COM
W0
1 2 3 4 5 6 7 8 9 10 11 12
61
Page 63

Interfacing with Door Controllers
Configuring the BioPointe to work with Keri System Controllers
The BioPointe has to be configured with the necessary settings to assure operation with Keri System
controllers. In the BioPointe Central software, follow the steps below:
Step 1: Go to Device Management System.
Step 2: Under the Wiegand selection box, select the appropriate format to work with the door controller. E.g.
26 Bits Vendor 1.
Step 3: Under the Wiegand Out selection, select "Enable"
Table 1: Summary of necessary settings in the BioPointe
Property in TDM Setting
Wiegand Format E.g. 26 Bits Standard, 26 Bits Vendor 1, etc
Wiegand Out Enable
62
Page 64

Technical Specifications
Chapter 9
9 Technical Specifications
9.1 Technical Specifications
Controller
Supply Voltage 12 to 24 VDC
Power Consumption < 5 W
Operating Environment
(for indoor use only)
Dimension 137.8 x 110.8 x 44.0 mm
Weight <1 kg
Fingerprint Storage 720 fingerprint templates (basic option)
Event Log At least 20,000 records
Comm Interface RS232 / RS485 / RS422 / Wiegand (multi-format)
CPU 98Mhz-32Bit RISC/DSP
Memory Flash 4Mbyte
LED 3 (3 colours each)
Clock / Calendar Battery backup
Keypad 15 keys (with 3 Function keys)
Material - Keypad (membrane)
Built-in with - Contactless card reader (HID compatible available)
Optional - Modem (external)
Sensor
Type Optical type
Light Source LED (red)
Verification Speed < 1 second
Resolution 500 dpi
Sensing Area 12.6 (W) x 16.2 (L) mm
Minutiae Size 400 bytes (encrypted)
Ambient temperature 0°C ~ 60°C
Humidity 10 ~ 90 %RH
(non-condensing)
(expandable to 4400 fingerprint templates)
(store in non-volatile memory)
- Enclosure (high impact PC-ABS)
- Barcode reader (external)
- Magnetic stripe reader (external)
63
Page 65

Technical Specifications
9.2 Maintenance Instructions
The BioPointe is a very rugged device that can operate trouble-free for many years. Although no stringent
maintenance and handling requirement is required, some basic caring, and precaution is still needed to ensure
good and reliable performance.
Cleaning and caring
Never use a sharp object to scrape deposits from the fingerprint sensor. Permanent damage will result.
Normally do not require routine cleaning of fin ger print sensor if no noticeable degradation of fin gerprint
verification performance. However, for general cleaning, wipe the fingerprint sensor with a piece of dry and
soft tissue paper.
Only use 99% pure Isopropyl Alcohol and lightly damp a piece of soft foam, soft cotton cloth or soft tissue
paper to remove oily deposits or dirt from the fingerprint sensor or the enclosure surface.
Do not use wet (soiled or excessive moisture) cloth to clean the sensor or it’s surrounding because the liquid
can diffuse into the enclosure or the fingerprint s ensor.
Normally not require to switch off the power supply when cleaning the fingerprint sensor or the enclosure
surface.
After cleaning the fingerprint sensor, always allow two minutes for the liquid to dry up (before resume using
it).
Preventive maintenance
Fingerprint sensor and other electronics devices inside the BioPointe device do not require routine calibration
or preventive maintenance.
The optical based fingerprint sensor can withstand harsh environment and ESD; nevertheless, adequate
precaution has to be taken to prevent degradation. Do not expose the device to intense sunlight, operate or
storage environment exceeding the rated specification. Fingerprint sensor should not be exposed to excessive
moisture or condensation.
Ensure wiring is secured to the screw terminal blocks and the screw terminal blocks are fully inserted.
Inspection maintenance frequency
Conduct weekly inspection to check for damages on the LCD display, key buttons or enclosure. Normally do
not require routine cleaning of fingerprint sensor if no noticeable degradation of fingerprint verification
performance.
64
Page 66

Troubleshooting
Chapter 10
10 Troubleshooting
If you have difficulty in operating the BioPointe, the troubleshooting suggestions in this section should, in
most cases, solve the problem. If you still have difficulty after trying these suggestions, contact your
authorized reseller for technical assistance.
Interpreting LED Indication for Critical Events
The following list the LED indication when a critical event happens.
Number of Blinks
for 1st LED
1 Steady red light Power up fail Permanent.
2 3 (Red color) Alarm within the
BioPointe
3 5 (Red color) Error reading the internal
clock
4 7 (Red color) Error recording log One time only (after verification pass)
Troubleshooting Communication Problems
Refer to troubleshooting guide in Chapter 7 – Communicating with the BioPointe.
Description Duration of blink
If the trace log is turned on, a log entry will
be recorded. This log will record Startup
Error.
Subsequent logs will not be recorded.
Continuous until alarm event is removed
One time only (after verification pass)
65
Page 67

Troubleshooting
Contacting Customer Support
If your device is not operating properly and you cannot solve your problem with the troubleshooting
information in this manual, contact customer support services for assistance.
We will be able to help you much quickly if you are able to give the exact information indicated below:
Serial number
(The serial number label is on the back of the device)
Keri Systems Customer Support
Contact us below:
Keri Systems, Inc.
1530 Old Oakland Road, Suite 100
San Jose, CA 95112 USA
Tel: 1-800-260-5265 or 1-408-451-2520
or mail to: techsupport@kerisys.com
66
Page 68

Appendix A – Log Types
Appendix A
11 Appendix A – Log Types in The
BioPointe
The BioPointe device handles three types of log records listed as follows:
• Transaction Log
A transaction log is recorded upon a successful Authentication. The log contains the ID of the user
performing the authentication, as well as the date and time.
• Fail Attempt Log
A fail attempt log is recorded when the authentication process fails.
• Trace Event Log
A trace event log is recorded whenever any critical event has occurred during local administration or
during operation (such as when the device was being tampered with).
Using the BioPointe Central software, you can disable the Trace Event and Fail Attempt logs if they are not
required.
Each log record carries with it a type value to indicate what log it is. The following tables show the various
types of logs and the circumstances under which they would be recorded.
Table 1: Transaction Log
Type value Event Additional Description
1 1 Pass authentication Logged when Door Access
Authentication is successful
Table 2: Fail Attempt Logs
Type value Event Description
Events related to Door Access Authentication
1 231 (E7 hex) Fail fingerprint matching 2 232 (E8 hex) Fail card matching 3 233 (E9 hex) Fail card with PIN matching 4 234 (EA hex) ID was not found 5 235 (EB hex) Fingerprint match was not found
using Quick Search
6 236 (EC hex) Matching was aborted -
-
67
Page 69

Appendix A – Log Types
Table 3: Trace Logs
Type value Event Additional Description
Event related to the alarm indication
1 28 (1C hex) Tamper switch opened See note 1
2 29 (1D hex) Tamper switch closed See note 1
3 129 (81 hex) Activated alarm was acknowledged
and disabled
The tamper switch being opened will
cause the alarm indication via the 1
st
LED to be shown. If BioPointe Central
subsequently sends a command to the
BioPointe to disable the alarm
indication, this log will be recorded.
Events related to the device powering up
4 144 (90 hex) Device powered up Recorded when the BioPointe powers
up.
5 145 (91 hex) Start-up error Recorded when there are errors during
power up.
Events related to the administration modes
6 160 (A0 hex) Administration mode was entered 7 161 (A1 hex) Administration mode was exited 8 178 (B2 hex) A user was added Recorded when a user is added, be it
using fingerprint, card only or card
with PIN.
If the user uses fingerprint, and enrolls
three fingerprints for the same User ID,
there will be three such consecutive
logs.
9 179 (B3 hex) A user was deleted 10 180 (B4 hex) A master was added 11 181 (B5 hex) A master was deleted -
Note 1: The Alarm setting must be enabled for this log to be recorded.
68
Page 70

Appendix B – Configuring the ADAM 4520
Appendix B
13 Appendix B – Configuring the ADAM 4520
In this illustration, we are showing the communication wiring diagrams on ADAM-4520 Isolated RS232 to
RS422/485 Converter.
You can power this converter with any unregulated power source between +10 and +30 VDC (Keri Systems
KPS-7).
RS422 to RS232 Converter Connection Diagram
RS485 to RS232 Converter Connection Diagram
69
Page 71
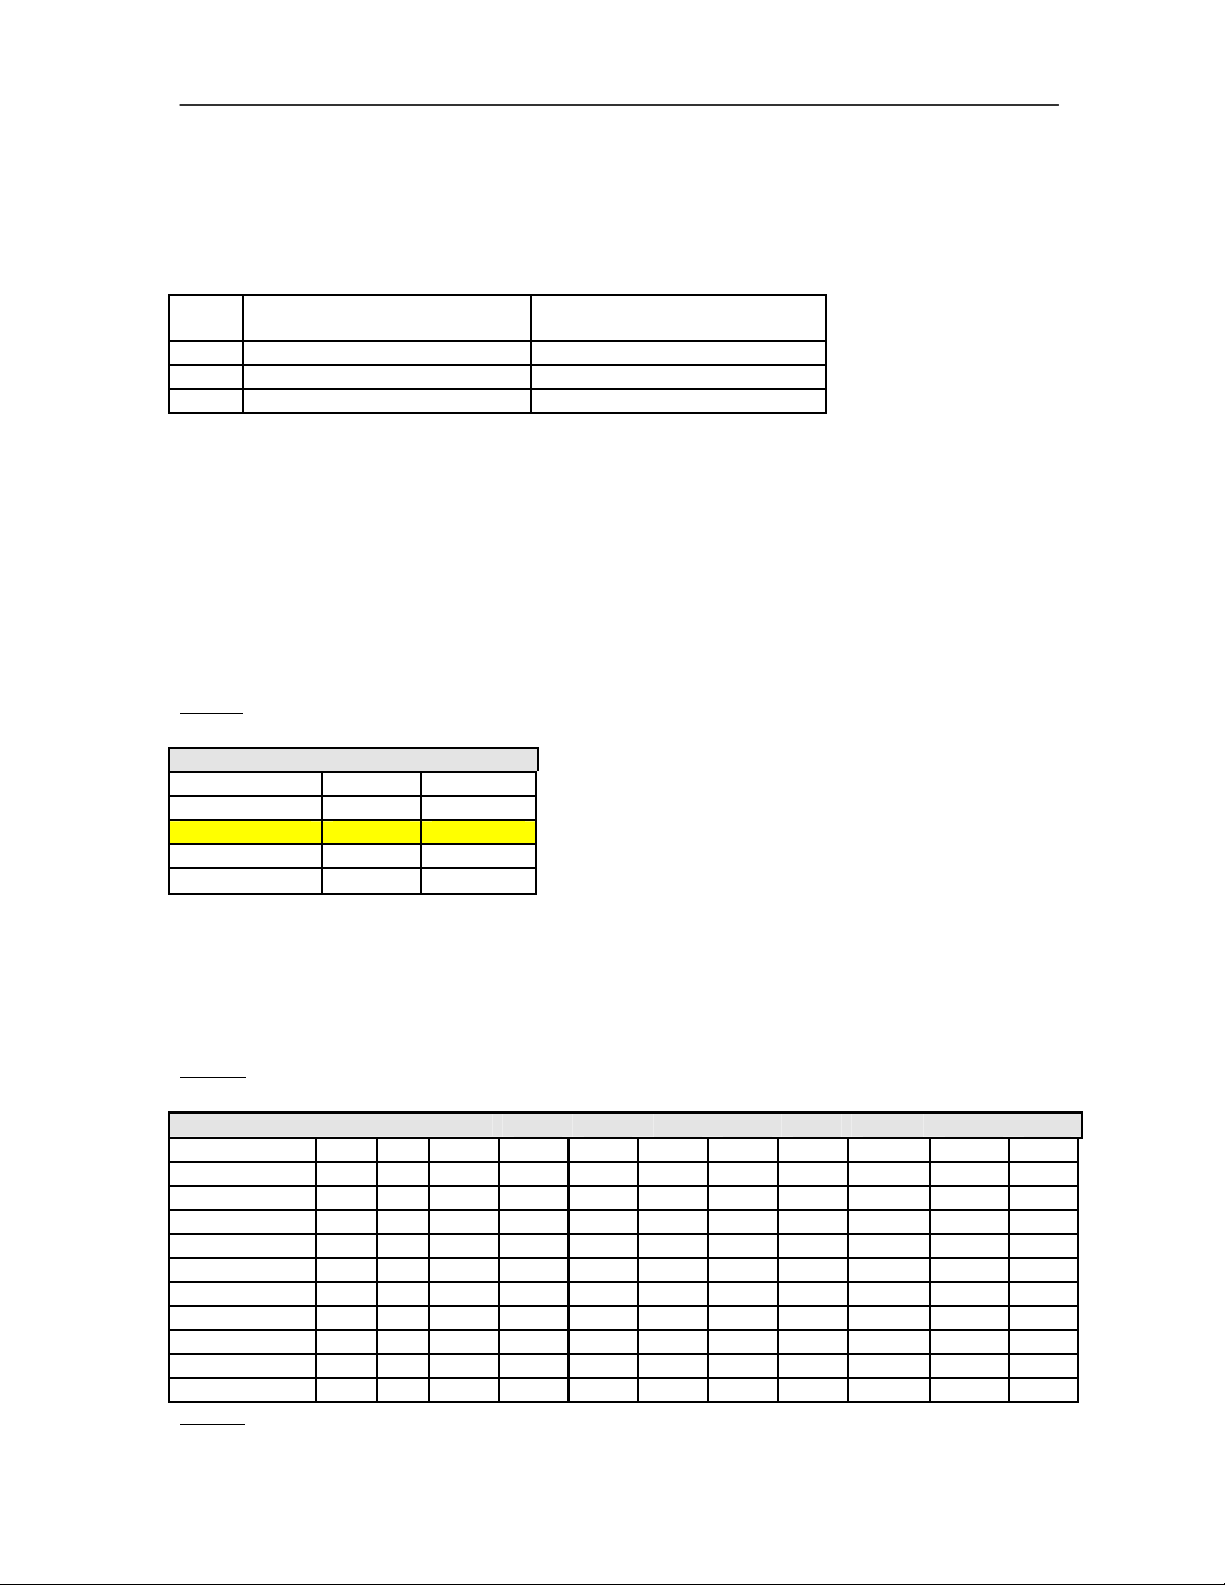
Appendix B – Configuring the ADAM 4520
RS232 Cable Connection
The table below shows the pin to pin connection between the RS232 port of the ADAM Converter module and
the PC’s Com port.
GND 5 5
ADAM 4520 (D-SUB 9-pin male
connector)
Tx 2 2
Rx 3 3
PC (Com Port 1) (D-SUB 9-pin
female connector)
Switches and Jumper Settings
The following tables illustrate the possible switch settings for the ADAM Converter when you open up the
module.
You will find that in the Converter board, there are 2 switch settings. One of it is labeled as SW1 while the
other is labeled as SW2. SW1 controls the data format settings.
BioPointe uses the 10 bits data format (8 data bits, no parity, 1 stop bit and 1 start bit). Hence, you will need to
set SW1 to the 10 bits data format (Table 1).
Table 1:
ADAM 4520 Data Format Settings (SW1)
Data Format 1 2
9 bits - 10 bits ON 11 bits - ON
12 bits ON ON
SW2 controls the baud rate settings and the communication mode used (whether RS422 and RS485). If you
are using RS422, you need only to on the RS-422 switch (Sw 10), leaving the rest of the switches at the
OFF position. If you are using RS485 however, turn off the RS-422 switch (Sw 10), and turn on the switch
for the desired baud rate. Take note the baud rate you set on the module must be the same as that
configured at the device and that used at the host program (Table 2).
Table 2:
ADAM 4520 Baud Rate Settings (SW2)
Baud Rate Sw 1 2 3 4 5 6 7 8 9 10
RTS control 1 ON - - - - - - - - 1200 bps 2 - ON - - - - - - - 2400 bps 3 - - ON - - - - - - 4800 bps 4 - - - ON - - - - - 9600 bps 5 - - - - ON - - - - -
19.2 Kbps 6 - - - - - ON - - - -
38.4 Kbps 7 - - - - - - ON - - -
57.6 Kbps 8 - - - - - - - ON - -
115.2 Kbps 9 - - - - - - - - ON RS-422 10 - - - - - - - - - ON
Legend -= OFF 13–2
70
Page 72
Appendix C –Communicating in RS422 and RS485
Appendix C
14 Appendix C – Communicating in RS422 and RS485
The following examples show how three BioPointe are connected in daisy chain using RS422 first and
RS485 next.
The following diagram shows a schematic layout of the connection. Appendix C can be referred to for a pinout
description for the RS422 or RS485 signals at the ADAM. ADAM configurations are also described in the
Appendix C. Note that terminating resistors are required at the ADAM. The contents that follow in this Appendix
will describe how the terminating resistors are connected as well as how to connect the various pin -outs.
Schematic Diagram of a netwok of BioPointe in RS422 / RS485
The following diagram shows a schematic layout of the T-Junction box. There are three main sections for the
pin-outs, namely ‘IN’, ‘OUT’ and ‘DAISY CHAIN’. Each pin number of a section is internally shorted to the
similar pin number of the other two sections. If this is the first T-Junction box from the ADAM, the RS422 or
RS485 signals go into the ‘IN’ section. The signals from the ‘OUT’ section go into the BioPointe unit. And the
signals from the ‘DAISY CHAIN’ section go into the next T-Junction box. Take note that the ‘DAISY CHAIN’
section of the last junction box has to be terminated with terminating resistors. The recommended colors of the
wires to use are also shown.
CN2
CN1
1 2
3 4 1 2 3 4
71
Page 73

Appendix C –Communicating in RS422 and RS485
IN
1 2
3
RS422 Connection
RS422 Signals between BioPointe Control Board and T-Junction Box
DAISY CHAIN
4
1) Connection between ADAM and JB1
72
Page 74

Appendix C –Communicating in RS422 and RS485
2)
3)
** This color scheme used is consistent with that shown in (1).
4) Connection at JB3 (last junction box or end of line)
JB3 (Pin No. at ‘OUT’) Remarks
1 120 Ohms terminating resistor across
2
3 120 Ohms terminating resistor across
4
Pin nos. 1 and 2.
Pin nos. 3 and 4.
73
Page 75
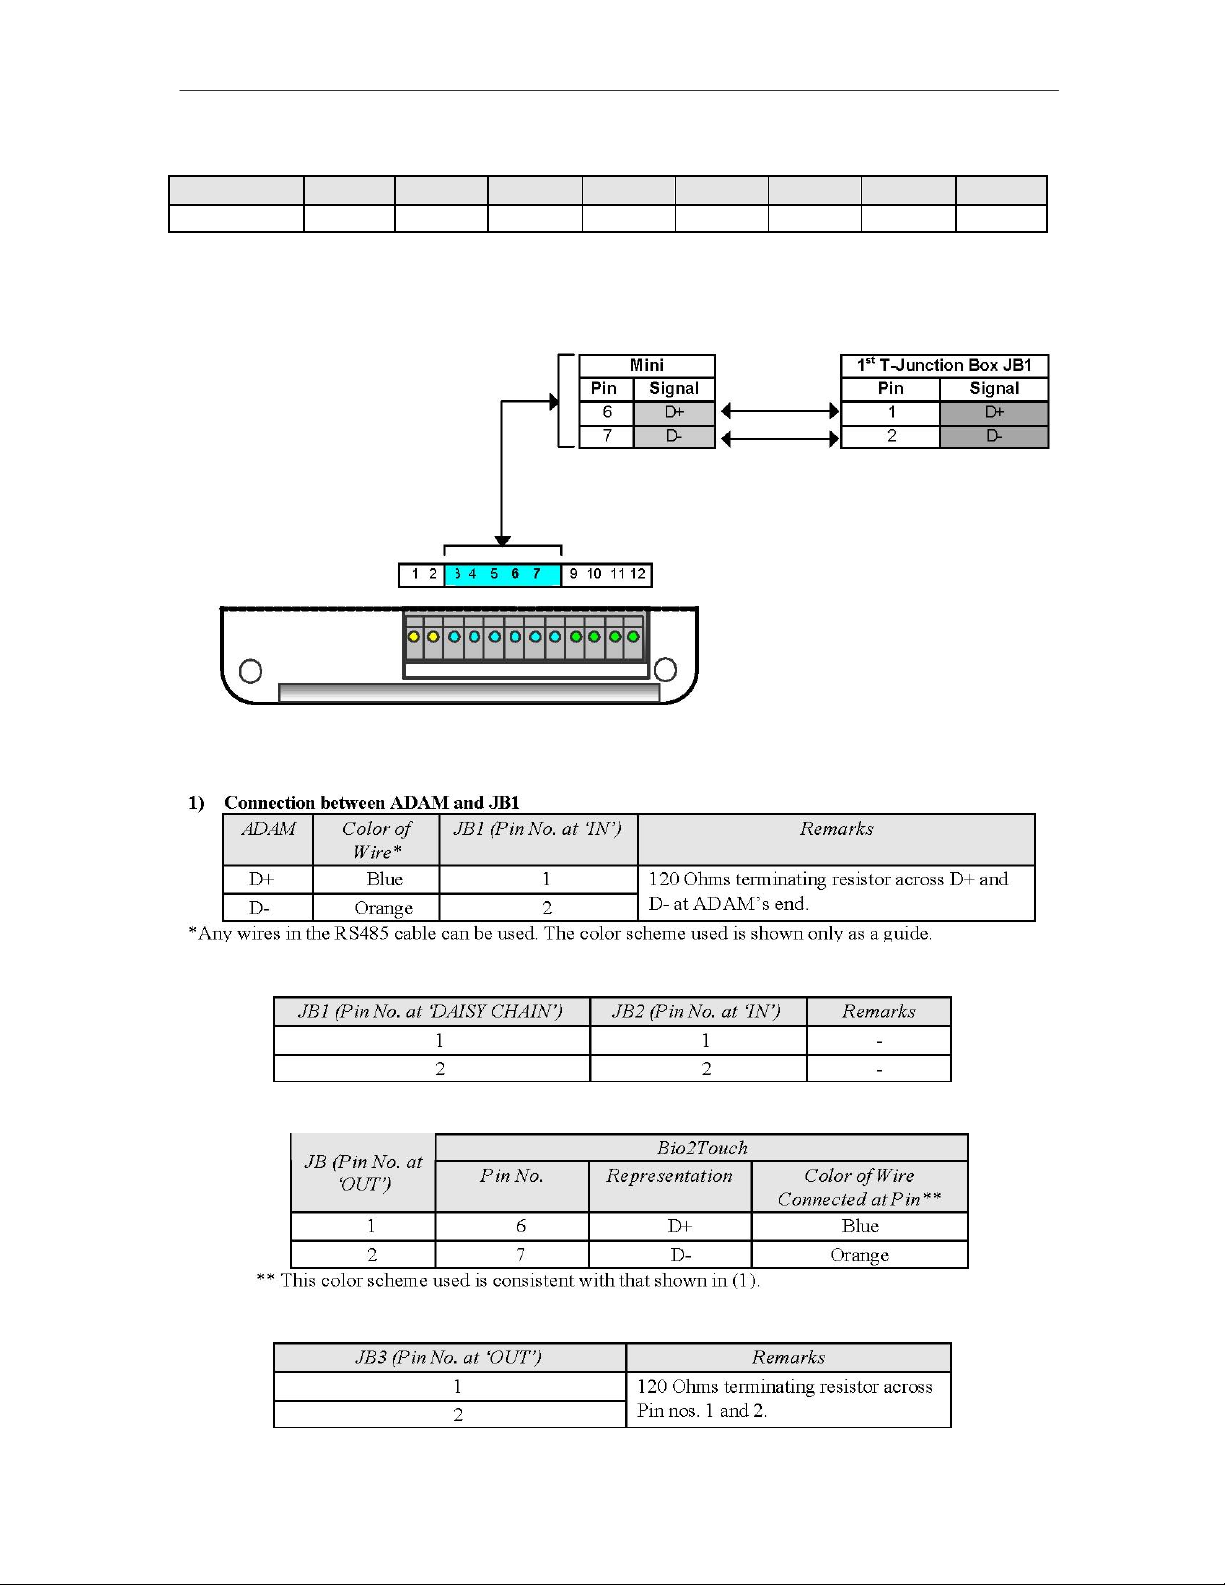
Appendix C –Communicating in RS422 and RS485
5) SW3 DIP Settings in BioPointe
Switch No. 1 2 3 4 5 6 7 8
RS422
-
ON ON
-
ON
-
ON
[Note]
At each T-Junction box, the drain wires of the interconnecting branches must be shorted together.
-
RS485 Signals between BioPointe Control Board and T-Junction Box
2) Connection between JB1 and JB2
3) Connection between JB and BioPointe
4) Connection at JB3 (last junction box or end of line)
74
Page 76

Appendix C –Communicating in RS422 and RS485
5) SW3 DIP Settings in BioPointe
[Note]
At each T-Junction box, the drain wires of the interconnecting branches must be shorted together.
75
Page 77

Appendix F – TCP/IP Subnet Mask Translation
Appendix D
15 Appendix D – Communication Using
Modem
BioPointe supports communication using the modem. This Appendix describes the setup you can use to effect
the connection. If you have only one device unit that is situated at a remote site, and you wish to communicate
with it, you can follow the setup described in (A). On the other hand, if you wish to communicate remotely with
a network of devices, you can follow the setup described in (B). The setup in
(B) is basically similar to the network configuration described in Appendix D (Communicating in RS422 and
RS485), except for some differences in the unit settings.
A. Single BioPointe
If there is only a single device located remotely from the Host, the following setup can be used. RS232 link is
used between the device and the modem. Hence, take note that the DIP switch settings in the BioPointe device
have to follow the RS232 mode.
Schematic diagram of single BioPointe unit accessed via Modem
2) SW3 - Serial Interface Type Setting (follows RS232 mode)
Switch No. 1 2 3 4 5 6 7 8
Position - - - ON - ON - ON
This setup can also be extended to individual devices located at different sites. In this case, the
configuration in each device would be the same as the device setup as above. However, if the devices are
located at the same site, the setup described next can be used.
76
Page 78

Appendix F – TCP/IP Subnet Mask Translation
B. Network of BioPointe Devices
The following schematic shows how a network of devices can be acce ssed remotely from a central host that is
located geographically apart from the devices that it has to access.
PSTN
BioPointe Mini devices located geographically
together
Schematic diagram of network of BioPointe devices accessed via a modem
The network of BioPointe devices can be connected in RS422 or RS485 configuration as described in
Appendix C. The connection between ADAM and T-Junction box, between T-Junction box and T-Junction box
and at the last T-Junction box are described in the Appendix C.
77
Page 79

Appendix F – TCP/IP Subnet Mask Translation
A point to take special note is the DIP switch settings in the BioPointe devices. As only one unit can perform
handshaking with the modem, only that unit is set to be at the ‘MODEM’ for the Comm Type. The rest of the
units have to set at RS422 or RS485 for the Comm Type, depending on which is being used. The settings are
tabulated in the tables as follows:
1) SW2 - Type of Communication Setting
Switch No / Switch Position
for Device
3 4 Remarks
Device ID: 1 ON Device ID: 2 - -
Device ID: 3 - -
Only one device can be set to
"Modem" for the type of
communication setting for
handshaking with the modem. (In this
case, it is Device ID 1)
2) SW3 - Serial Interface Type Setting if setup follows RS422:
If setup follows RS485:
Modem to BioPointe Interface Cable
The following diagram shows the cable connection from the BioPointe device to the modem DB-25 connector.
(Modem side)
78
Page 80

Appendix F – TCP/IP Subnet Mask Translation
Pin 4, 5 and 20 are shorted together at the modem side.
Modem to ADAM Converter (4520) Interface Cable
If the type of setup for modem communication is RS422 or RS485, the modem has to be connected to the
ADAM unit. The following diagram shows the wiring setup.
DB-25 Male (Modem side)
Pin at ADAM Side Pin at Modem Side
2 2
3 3
5 7
Pin 4, 5 and 20 are shorted together at the modem side.
Modem Specifications
As listed under the section, Technical Specifications, the type of modem used at the Host and at the BioPointe
unit need to comply with the following specifications:
79
 Loading...