

Page 1
UD COMPONENT SYSTEM/COMPACT HI-FI SYSTEM
UD-703
UD-753
INSTRUCTION MANUAL
KENWOOD CORPORATION
This manual contains instructions for two models. There are differences in some of
the features (functions). Refer to the descriptions of your resective model respec
tively.
For your records
Record the serial number, found on the back of the unit, in the spaces designated on the warranty card,
and in the space provided below. Refer to the model and serial numbers whenever you call upon your
dealer for information or service on the product.
Model
_____________________________
Unpacking
Unpack the unit carefully and make sure that all accessories are put aside so they will not be lost.
Examine the unit for any possibility of shipping damage. If your unit is damaged or fails to operate, notify
your dealer immediately. If your unit was shipped to you directly, notify the shipping company without
delay. Only the consignee (the person or company receiving the unit) can file a claim against the carrier
for shipping damage.
We recommend that you retain the original carton and packing materials for use should you transport or
ship the unit in the future.
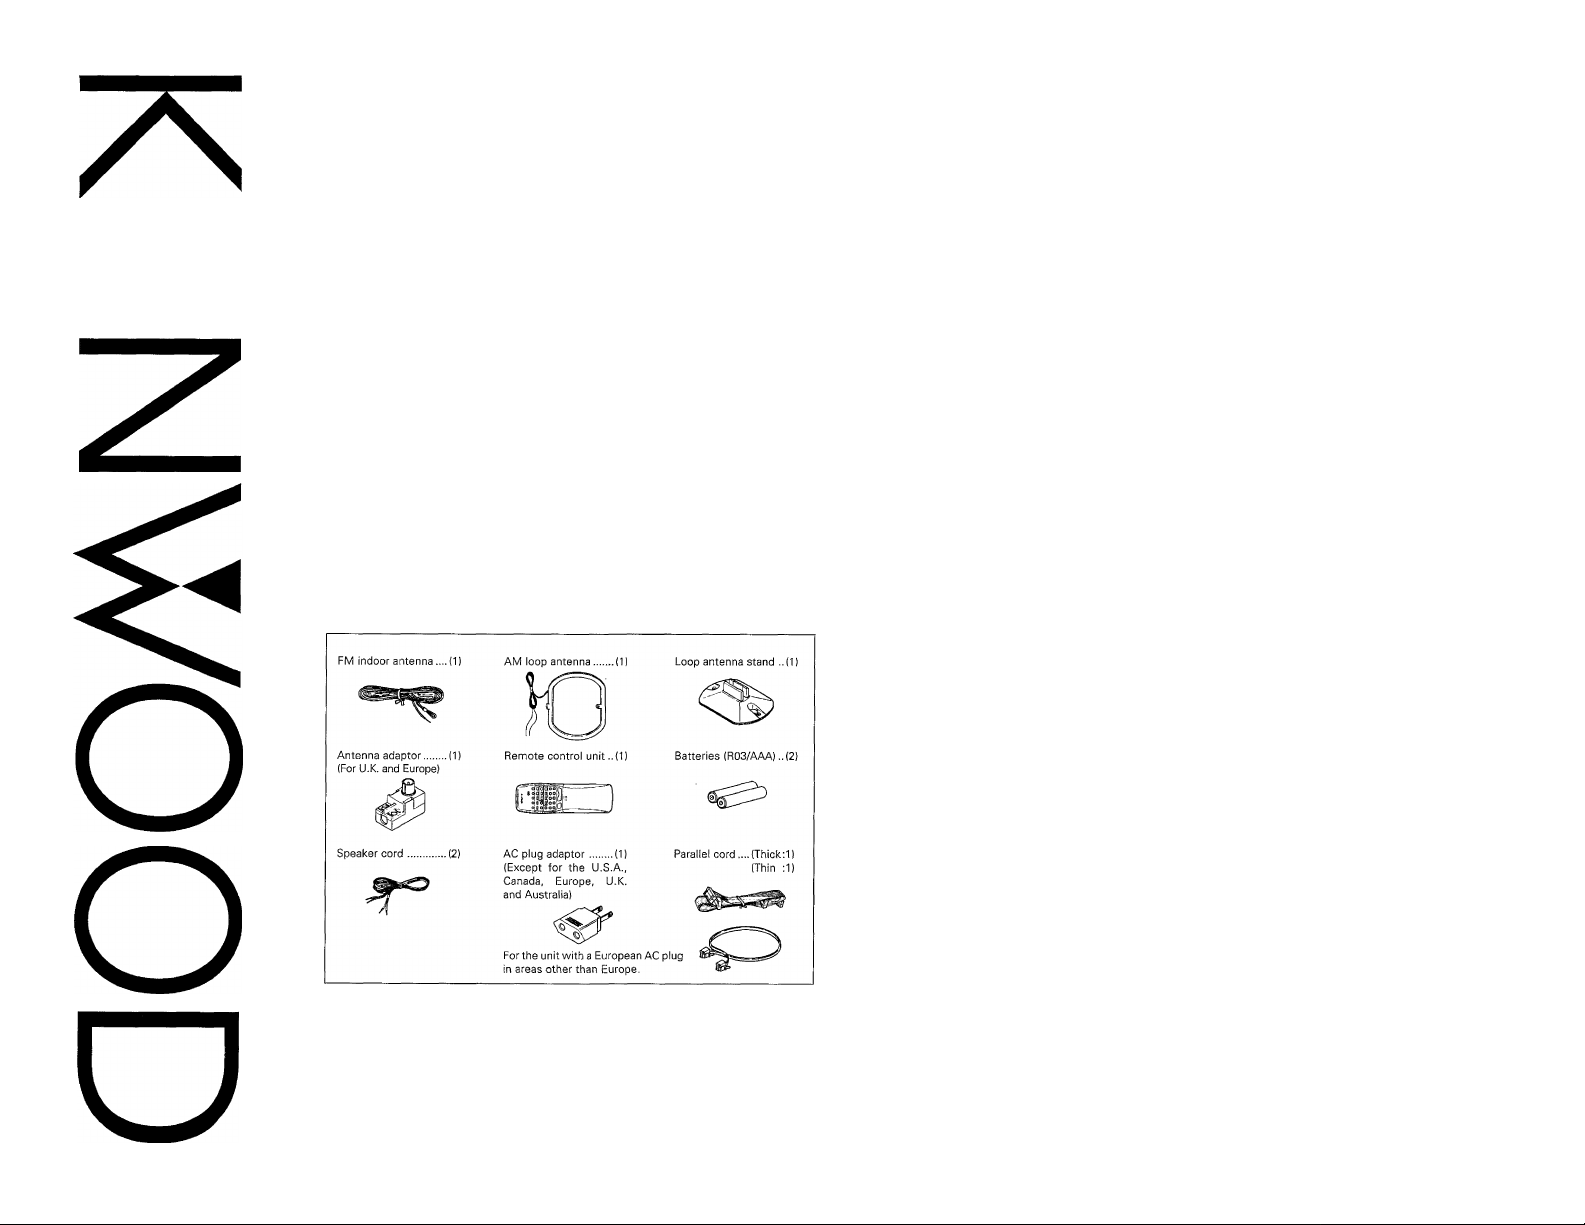
Accessories
Serial Number
_________________________________________
COMPACT
DIGITAL AUDIO
B60-2066-00 dD (K, P, T) Tmci
NOTE
Do not transport the system with a CD left in it.
Page 2

Before applying power
Units are designed for operation as follows.
U.S.A. and Canada..
Australia.............................................................................AC240 Vonly
For the United Kingdom
1. The mains plug contains a fuse. For replacement, use only a 13-Amp
ASTA-approved (BS1362) fuse.
2. The fuse cover must be refitted when replacing the fuse in the
moulded plug.
3. Do not cut off the mains plug from this equipment. If the plug fitted
is not suitable for the power points in your home or the cable is too
short to reach a power point, then obtain an appropriate safety
approved extension lead or adapter, or consult your dealer.
If nonetheless the mains plug is cut off, remove the fuse and
dispose of the plug immediately, to avoid a possible shock hazard
by inadvertent connection to the mains supply.
IMPORTANT
The wires in the mains lead are coloured in accordance with the
following code:
Do not connect those leads to the earth terminal of a three-pin plug.
..............................................
Factory fitted moulded mains plug
Blue :Neutral
Brown :Live
AC120Vonly
A\Caution; Read this page carefully to ensure safe operation.
Europe and U.K...
Other countries..
..AC 110-120/220/230-240 Vswitchable
UD-703/753 [ЕлЗ
...AC230 Vonly
Safety precautions
WARNING ; TO PREVENT FIRE OR ELECTRIC SHOCK, DO NOT EXPOSE THIS APPLIANCE TO RAIN
OR MOISTURE.
CAUTION: TO REDUCE THE RISK OF ELECTRIC SHOCK, DO NOT REMOVE COVER
(OR BACK). NO USER-SERVICEABLE PARTS INSIDE, REFER SERVICING TO QUALIFIED
SERVICE PERSONNEL.
THE LIGHTNING FLASH WITH ARROWHEAD SYMBOL, WITHIN AN EQUILATERAL TRIANGLE, IS
INTENDED TO ALERT THE USER TO THE PRESENCE OF UNINSULATED "DANGEROUS VOLTAGE"
A
A
The marking of products using lasers
(Except for some areas)
The label is attached to the rear panel and says that the compo
nent uses laser beams that have been classified as Class 1. It
means that the unit is utilizing laser beams that are of a weaker
class. There is no danger of hazardous radiation outside the unit.
■
WITHIN THE PRODUCT'S ENCLOSURE THAT MAY BE OF SUFFICIENT MAGNITUDE TO CONSTITUTE A
RISK OF ELECTRIC SHOCK TO PERSONS.
THE EXCLAMATION POINT WITHIN AN EQUILATERAL TRIANGLE IS INTENDED TO ALERTTHE USER TO
THE PRESENCE OF IMPORTANT OPERATING AND MAINTENANCE (SERVICING) INSTRUCTIONS IN THE
LITERATURE ACCOMPANYING THE APPLIANCE.
CLASS 1 I
LASER PRODUCT |
Page 3
Special features
f
When you want to listen at a low volume, for example in the night time,
the sound ievel can be reduced with a one-touch operation. While the
level is low, the insufficiency in the base and treble levels felt by human
hearing are automatically compensated.
The volume can be varied freely even while the listening at a low level.
The reproduced sound can be enjoyed with absolute purity a
essary circvitry is by-passed.
When adjusting the volume, the amount of volume variation is variable
according to the speed of rotating the VOLUME CONTROL. Rotating
the control slowly decreases the variable effect amount so a finer
adjustment is possible.
LLC. (Low Leve! Control
SOURCE DIRECT-m
Dynamic rotary volume controhQ^
Convenient DPSS-^
Contents
tern coimectidn...
FM DE-EMPHASIS/CHANNEL SPACE switch..
Ibntrblsanijiadicators.
iperation of remote control unit
lock adjustment
tund adjustment functions
^mayback of CD{UD-703}..
Playing tracks in order from track No. 1..
Playback from desired track..
Programming tracks in desired order...
Repeated playback...
Playback in a random order (Random playback}..
backof}
Loading a disc..
Playing tracks in order from track No. 1..
Playback from desired track..
Programming tracks in desired order...
Repeated playback...
Playback in a random order (Random playback)
^^fayback of tape
Tape playback..
Relay playback...
Skip search..
Dash & play, One-prograni repeat playback. Rewind playback 37
Receiving broadcast stations
Storing radio stations in memory (Station preset)
Rftitftii/ifjg a pref^nt stntinn
^Sejbording (Deck 8 only).....................—.......................
Preparation for fi^/^nrding
Rennrriing (Deck B only)
Copying tape (Tape dubbing)
tmeo edit recordina (UD-703)....................................
Program edit recording............................................
CrnsB-farie edit recnrrUng
Timed edit recording
ai adit ntcnrriing.......................................................
Faria ariit rannrriing.................................................
dmCD edit recording (UD-753)
Select the type of edit recording...
Program edit recording
Cross-fade edit recording
Timed edit recording
Al edit recording
Fade edit recording...
i^fam adjustment
Playing music with the desired tone...
^Sfyesence effects
Adjustment and playback of DOLB Y 3 STEREO ...
Dolby Pro Logic Surround adjustment
Dolby Pro Logic Surround play...
Enjoying music with the presence effect (presence modes) — 66
Eg asy karaoke singing (HIT MASTEH)
iiBtiditner operafibn
Timer programming...
Sleep timer________
^Maintenance..
^incase of difficulty...
^^^ecrfications
....................................................
............................................................ 17
....
................................................
....................................
..............................
..................................
....
..........
.........
................
..........................
..............................................
..................................
___
.................................
...........
................
............
....................
............................
_____
...
.........................
.. .
..
...............
...............
....
.............................
..............................................................
.....
....................................................».............
.
............
.......................... 67
.
....
...
..........
.
.
UD-703/753 [En]
.......
4
____
7
10
16
.. 21
.. 22
..24
..25
.26
..27
.. 28
.. 29
.. 31
.. 33
.34
.. 34
..35
.......
38 1
___
39 1
.......
39
........
40 1
41 1
.......
43 1
.......
44
44
46
____
47
.......
48
49
SO
........
52
........
52
____
54
. SB
. 57
.. 58
. 60
. 61
68
.. 71
.7^
; 74
77
Live, being-there sounds
of presence effects-W
miDotayauwwtmDi playback is a matter of course. In addition, sound
can be reproduced in KENWOOD original sound fields and the depth
of sound can be adjusted as desired. You can enjoy music in the sound
field you like.
Convenient timer functions-^
In addition to the possibility of storing up to 2 timer programs in
memory, the following functions are available.
• Al timer; When the power is turned ON by the timer, the
• Sleep timer: Useful when you want to go asleep while
sound level increases gradually.
listening to music.
Page 4
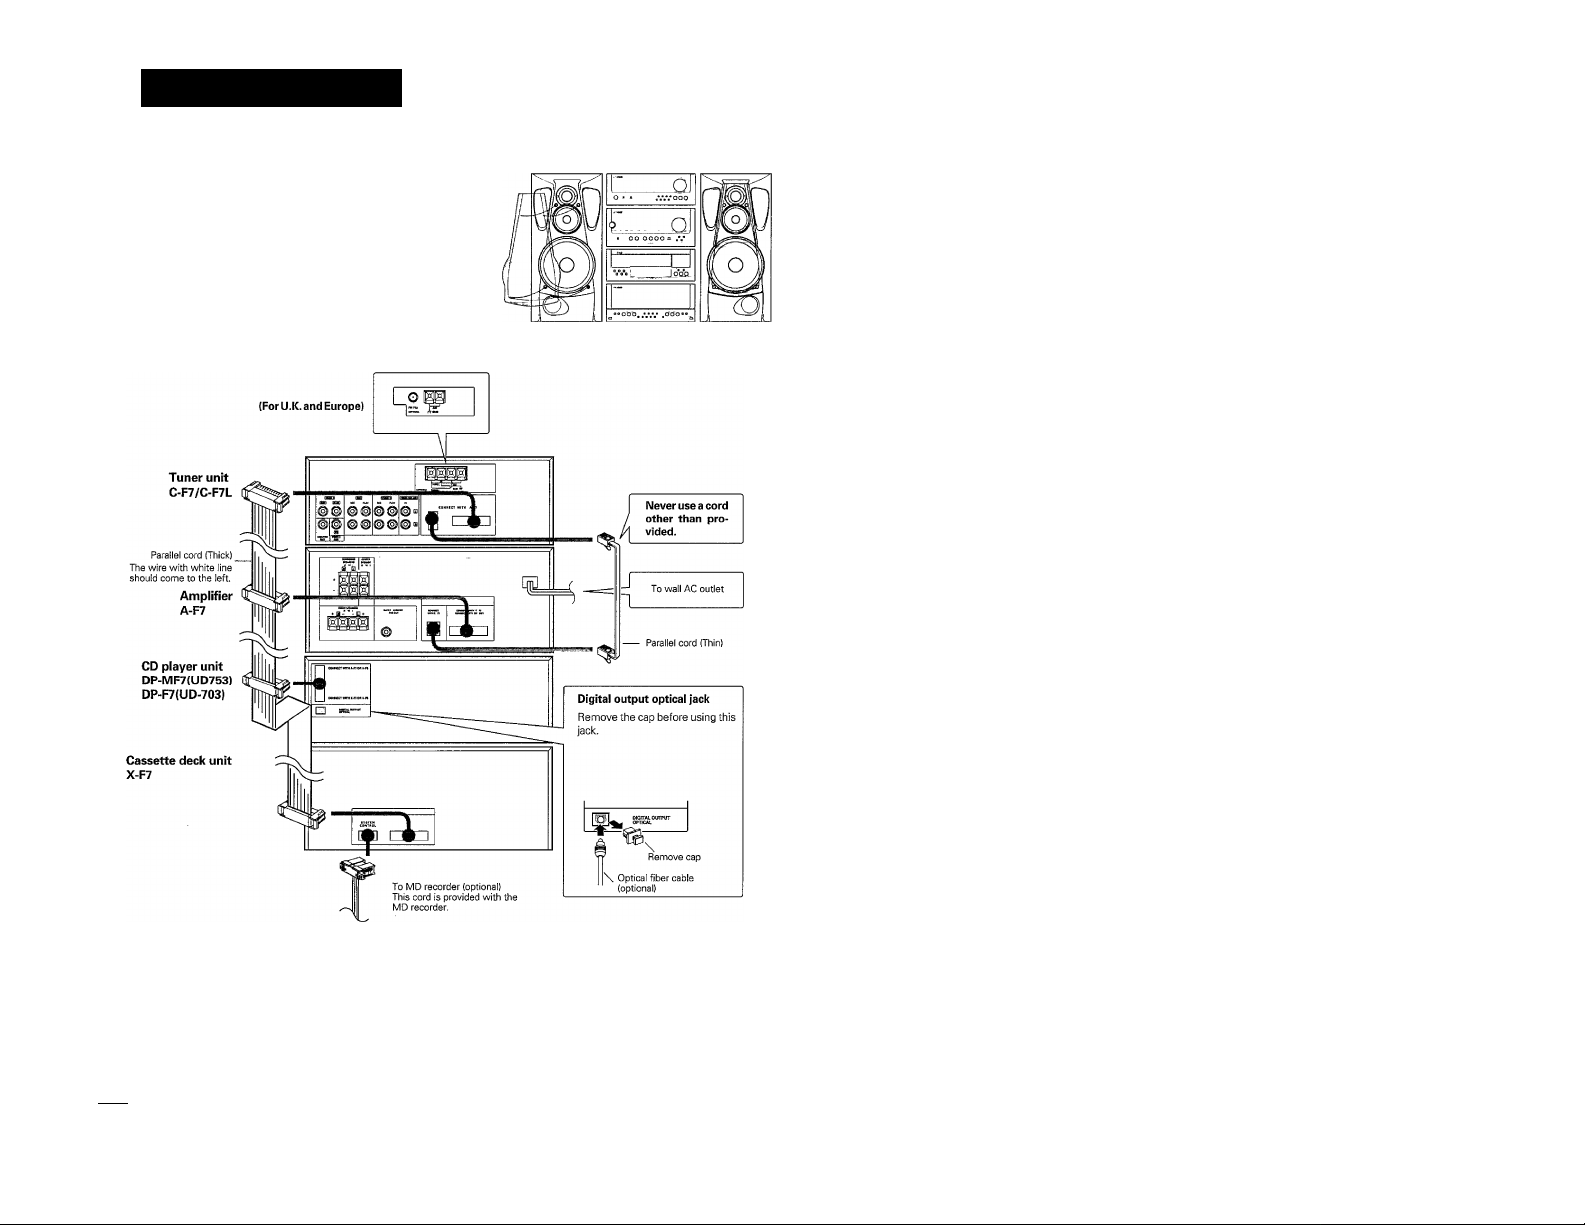
System connections
Do not plug the power cord into the power outlet until all of
the required connections have been made.
• When arranging the systenn units in a vertical, stacked configuration,
observe the stacking order indicated in the system connection
diagram below.
• In the case an associated system component being connected, also
read the instruction manual of the component.
• Align the front panels of the unit flush..
I Malfunction of microcomputer )
If operation is not possible or erroneous display
appears even though all connections have been
made properly, reset the microcomputer referring
to "In case of difficulty".
UD-703/753 [En)
Optical fiber cable connection
The digital OPTICAL output is designed for use in the connec
tion with an MD recorder (optionally available). The digital
signal transmission allows you to record the CD sound on MD
without spoiling the high sound quality. This jack can also be
connected to an amplifier equipped with a digital optical input
(optical fiber).
1. Be sure to insert all connection cords securely. If their connections are imperfect, the sound may not produced or noise may interfere.
I Notes I
2. Before plugging or unplugging a connection cord, be sure to unplug the power cord from the wail AC outlet. If connection cords are plugged
or unplugged with the power cord left plugged in, malfunction or damage may result.
3. Do not connect up a power source which is larger than that indicated on the socket at rear of the unit.
• When using an optical fiber cable to connect this unit to a MD recorder
or digital amplifier, insert the plug straight into the jack until a click sound
is heard.
• Be careful not to bend, coil or bundle the optical fiber cable.
• Optical fiber cables available in audio accessory stores may not always be
able to be used with this unit. If your cable cannot be used with this unit,
consult the store from which you purchased the cable or your nearest
dealer.
Page 5
Connection of the front speakers
UD-7D3/753 (En)
Speaker rear panels
-----
Tweeter
(for high frequencies)
-----
Mid-range unit
(for medium frequencies)
if
\y\/nnfo|(for low frequencies)
Tweeter ----------------------
(for medium and
high frequencies)
Tweeter
_______________
(for medium and
high frequencies)
(for low frequencies) M
LS-F7: For other countries LS-F5: For U.S.A. and Canada
• Never short-circuit the + and - speaker cords.
■ If the left and right speaker connections or the + and - polarity are inverted, the sound will be unnatural with unclear positioning of musical instruments, etc.
Be sure to connect them without mistake.
Connection of parallel cord
1
........1.....
‘^■■■■'mnii III lini ^
•When connecting the parallel cord, insert the plug straight into the
connector until it clicks to lock them securely.
•When connecting the parallel cord, the wire with white line should come
to the left side end.
•When disconnecting the parallel cord, push in the two sides of the plug
and pull it straight out.
Page 6
Connection method
O Push the lever.
© Insert cord.
© Return the lever.
■jLl
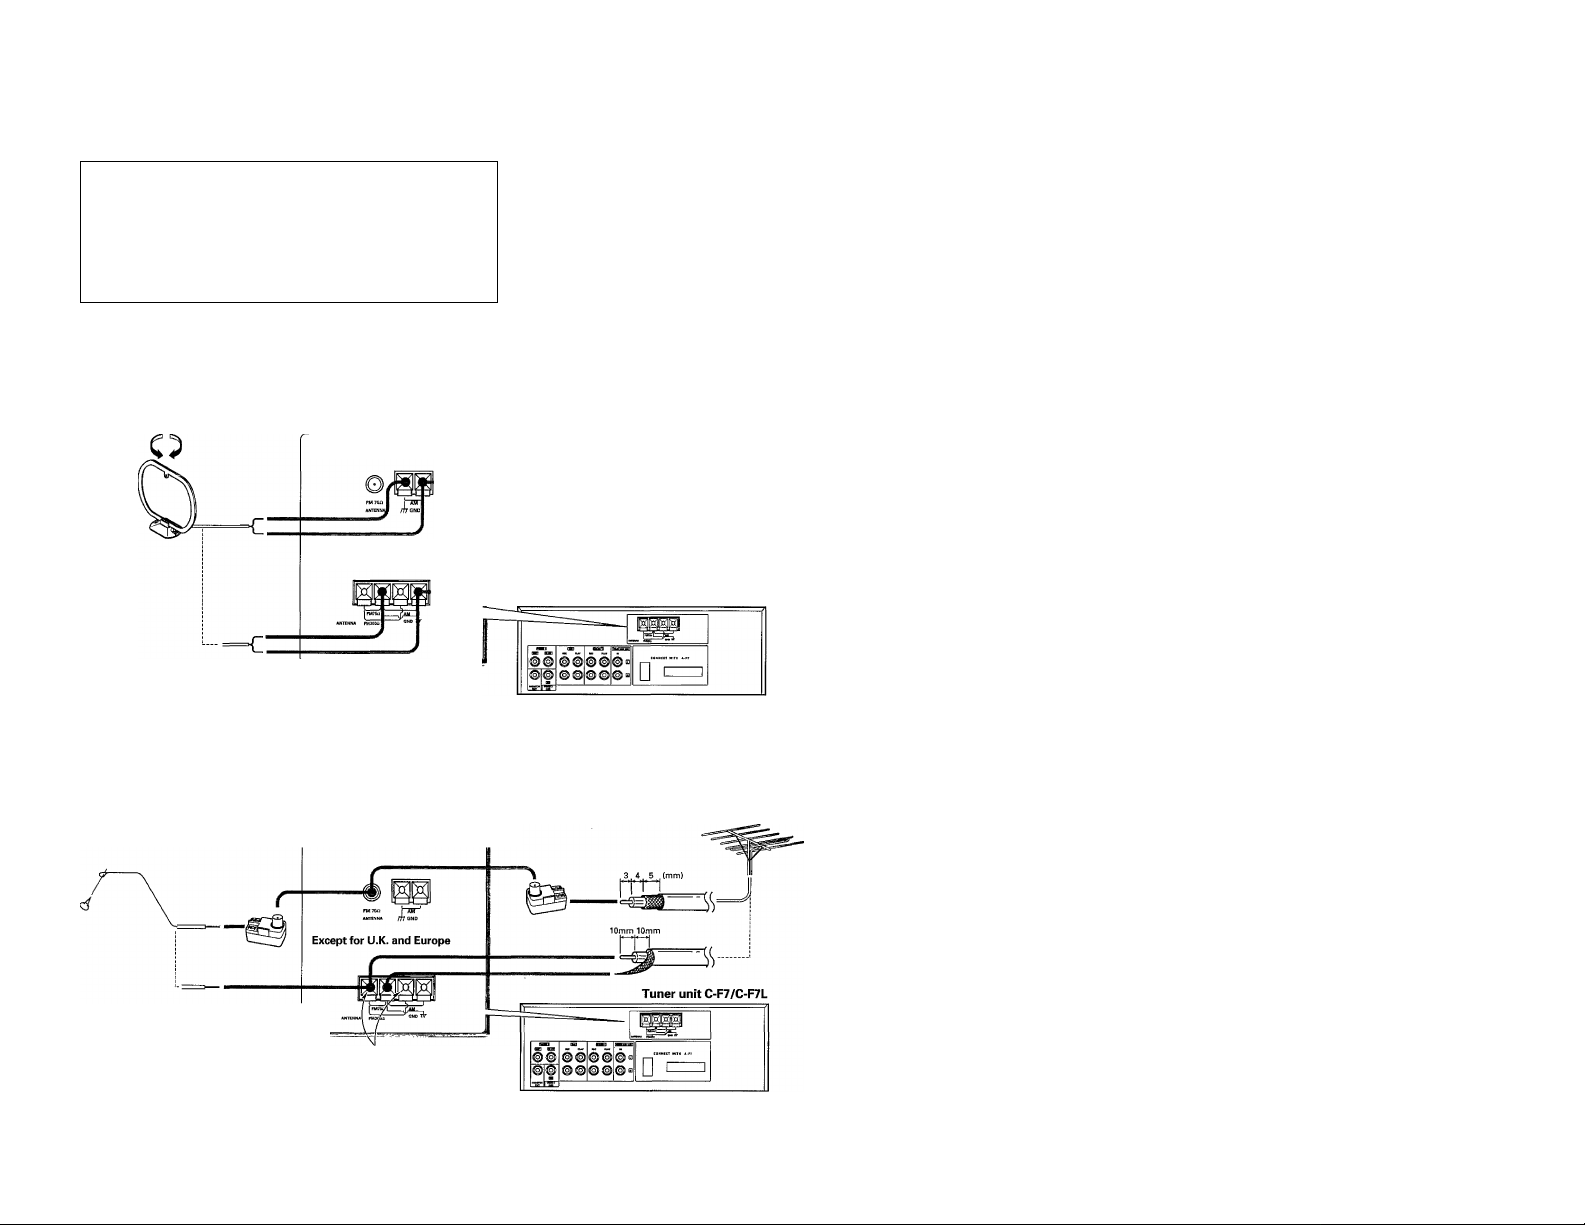
Connection of AMantenna
Connection of AM ioop antenna
The provided antenna is for indoor use. Place it in a position as far as possible
from this system, TV, speaker cords and power cord and set to the
orientation which provides the best reception condition.
For U.K, and Europe
Except for U.K. and Europe
UD-703/753 [En]
Tuner unit C-F7/C-F7L
^1©
Connection of AM outdoor antenna
If the reception condition is poor with the loop antenna alone, connect a
vinyl coated wire of more than 6 m {20 ft) and extend it outdoors while
leaving the loop antenna connected.
G ^
Tuner unit C-F7/C-7L
Connection ofFM antenna
Connection of FM simplified antenna Connection of FM outdoor antenna
The accessory antenna is for temporary indoor use only. For stable signal Lead the antenna wire indoors using a 75 £2 coaxial cable and connect it to
reception we recommend using an outdoor antenna. Remove the indoor the FM 75 £2 connector,
antenna if you connect one outdoors.
For U.K. and Europe
O Remove the coating from the cord tip
section and twist conductors.
© Find the location providing the best re
ceiving condition. When a T-shaped, FM indoor antenna (300 Q)
© Fix the antenna there. which is marketed in audio stores is used, connect
it to these terminals. (In this case, disconnect the
provided FM simplified antenna.)
Page 7

Connection of antenna adapter (UlC^ and Europe only)
FMDE-EMPHASIS/CHANNEL SPACE switch
(Except for U.SA, Canada U.K. Europe and Australia)
The FM DE-EMPHASIS/CHANNEL SPACE switch on the rear panel is set
to the correct setting that prevails in the area to which the unit is shipped.
However, if the FM DE-EMPHASIS/CHANNEL SPACE setting is not
matched to the area where the unit is to be used; for instance, when you
move from area 1 to area 2 or vice versa, desired reception of AM/FM
broadcasts is not expected. In this case, change the FM DE-EMPHASIS/
CHANNEL SPACE setting in accordance with the area corresponding to the
table. The FM DE-EMPHASIS is switched over at the same time.
• When changing the setting of the FM DE-EMPHASIS/CHANNEL SPACE
switch, first disconnect the power cord, then reset the channel space
switch, connect the power cord again, and turn the power on.
•
Page 8
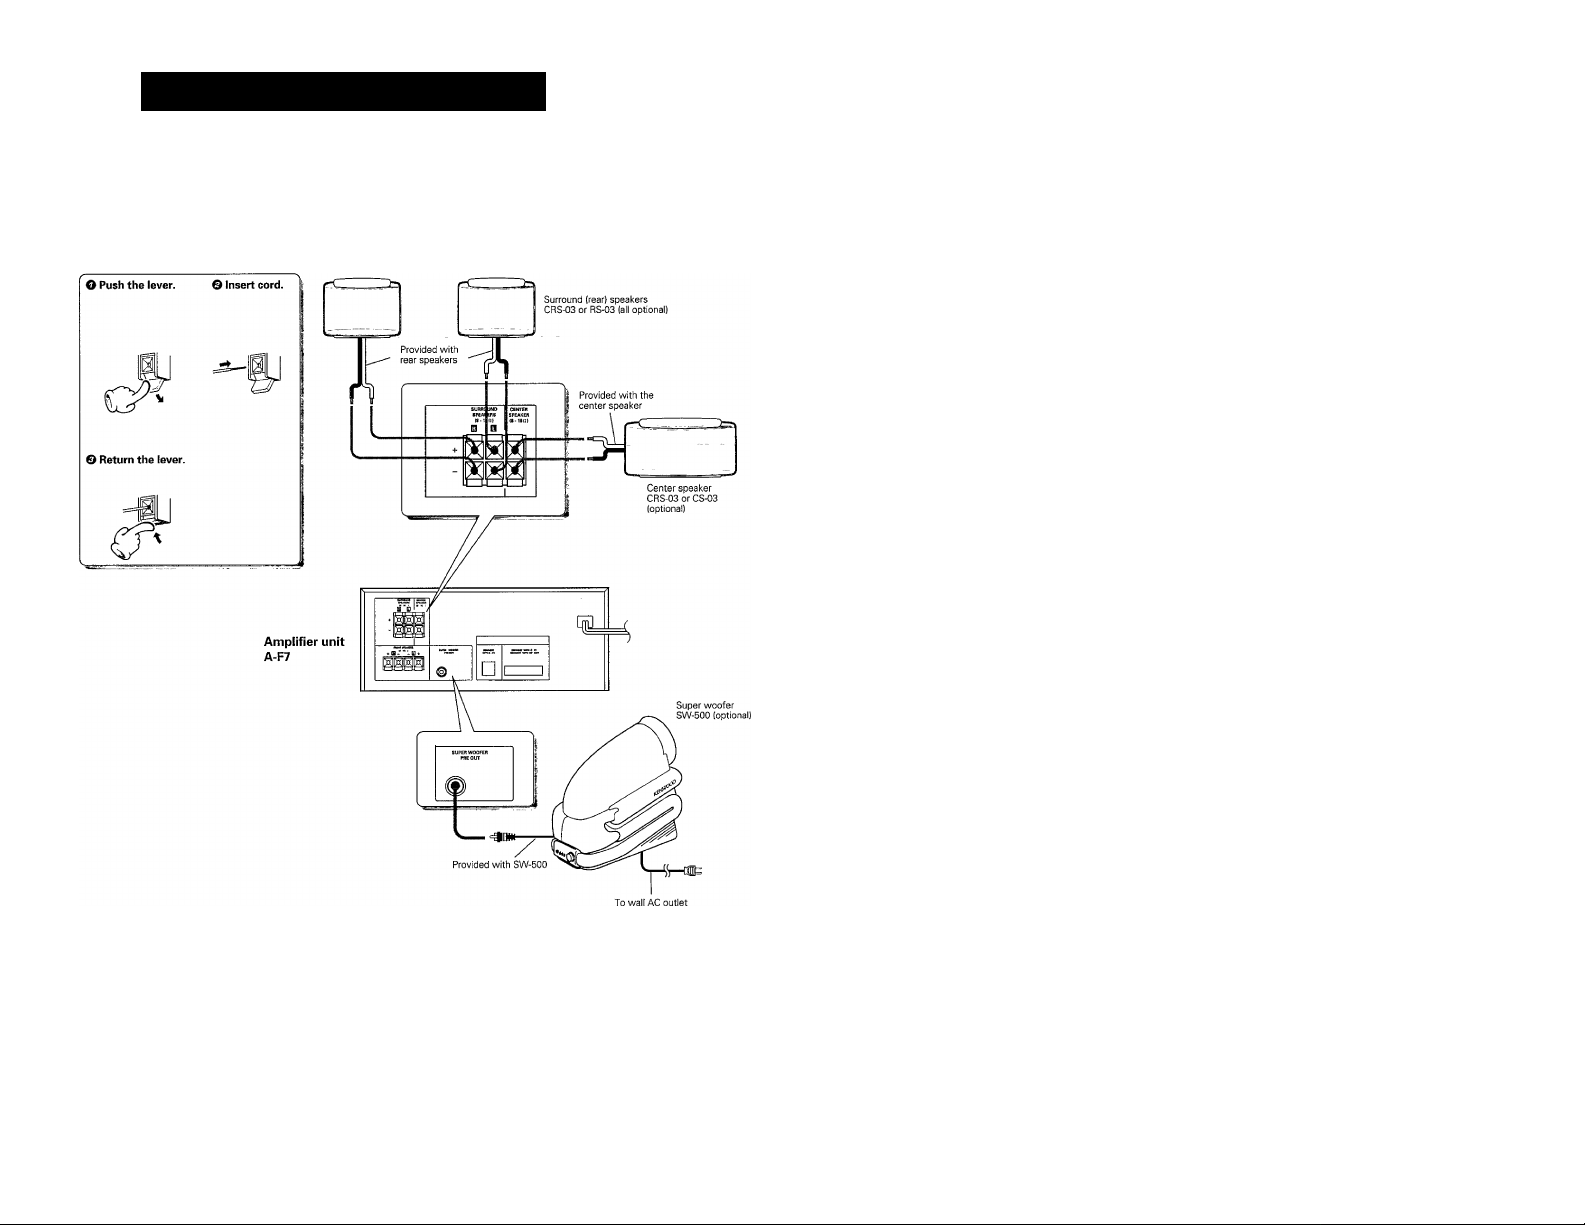
Connection of optional speakers
(Right)
UD-703/753 fEn]
Page 9
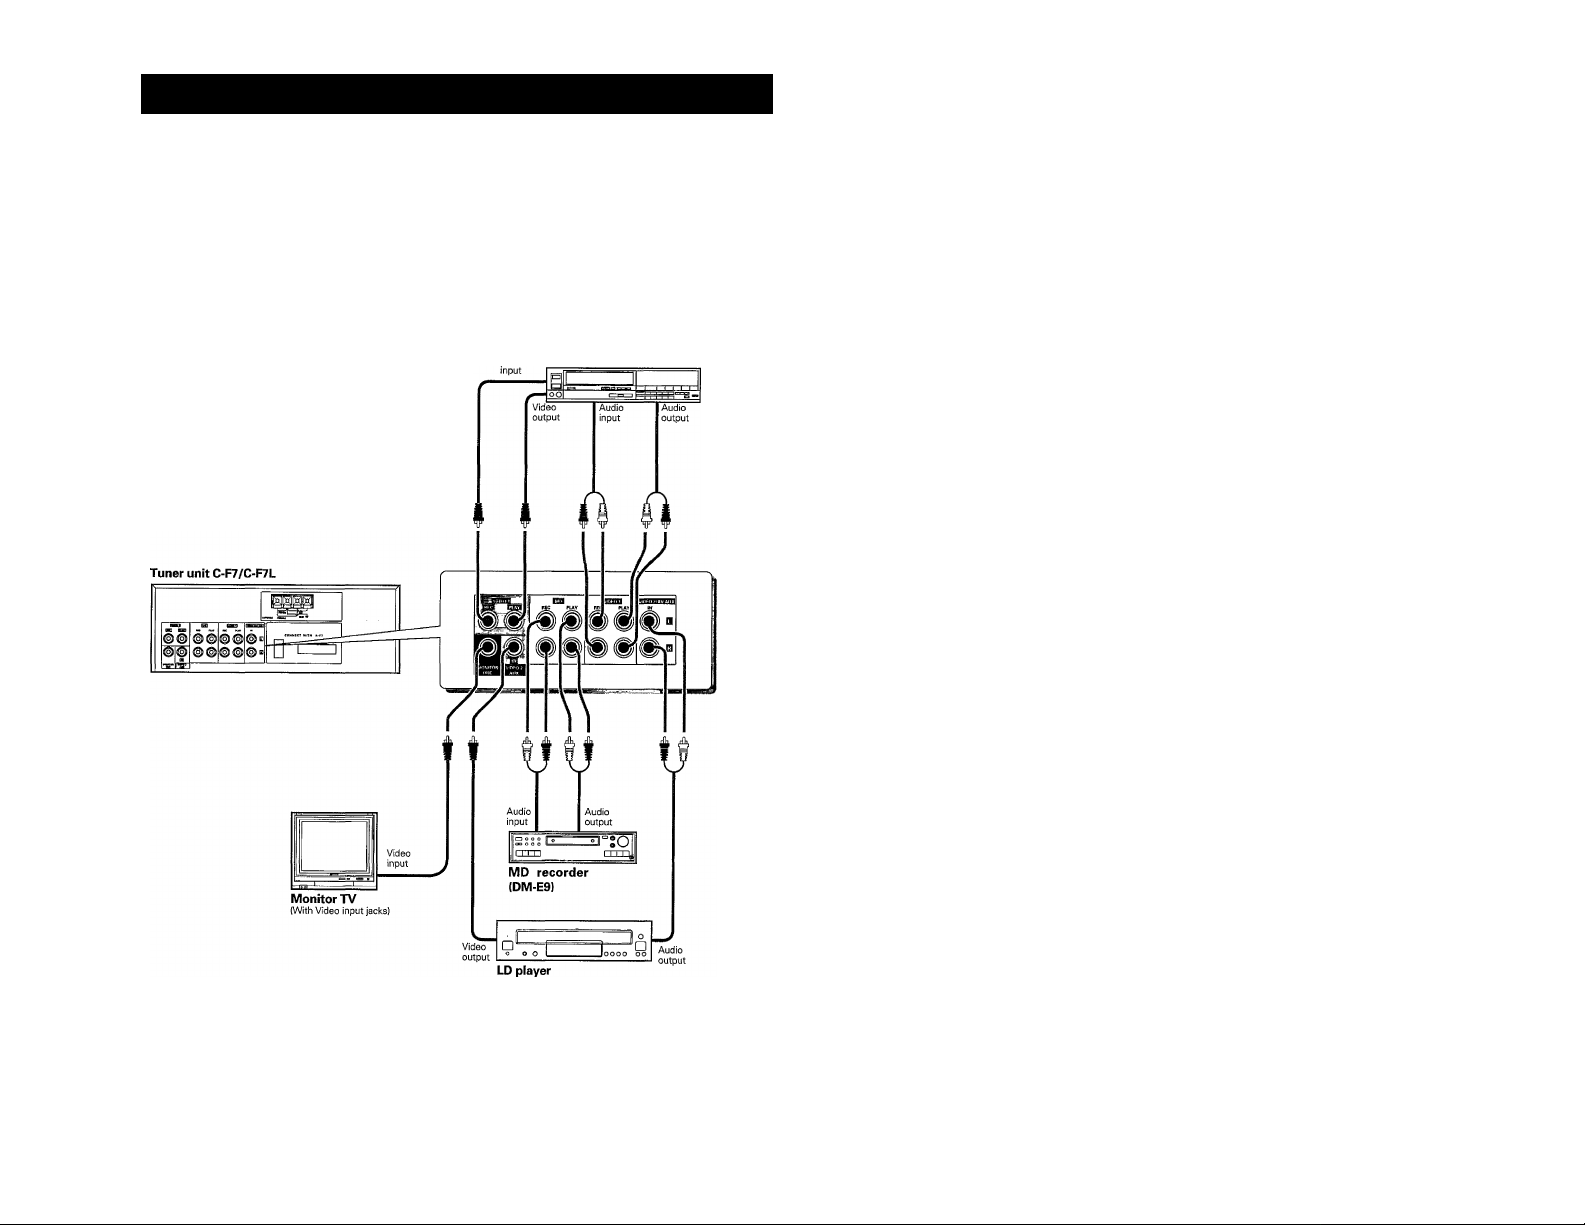
Connection of Audio/Visual components (optional)
• Connection cords are not supplied with this system.
• Any of the following components can be connected in place of the LD
player shown below.
• DBS tuner
• Video camera
• Video recorder
•A DAT recorder can also be connected in place of the MD (Mini Disc)
recorder.
UD-703/753 [En]
VCR
Page 10
Controls and indicators
j Amplifier unit
UO-7Q3/733 [En]
Video input indicators
MUTE indicator
bd bid bid
Volume display
KENWOOD i
Ó è ©
O Remote sensor
O POWER key
Press to turn the power ON/OFF.
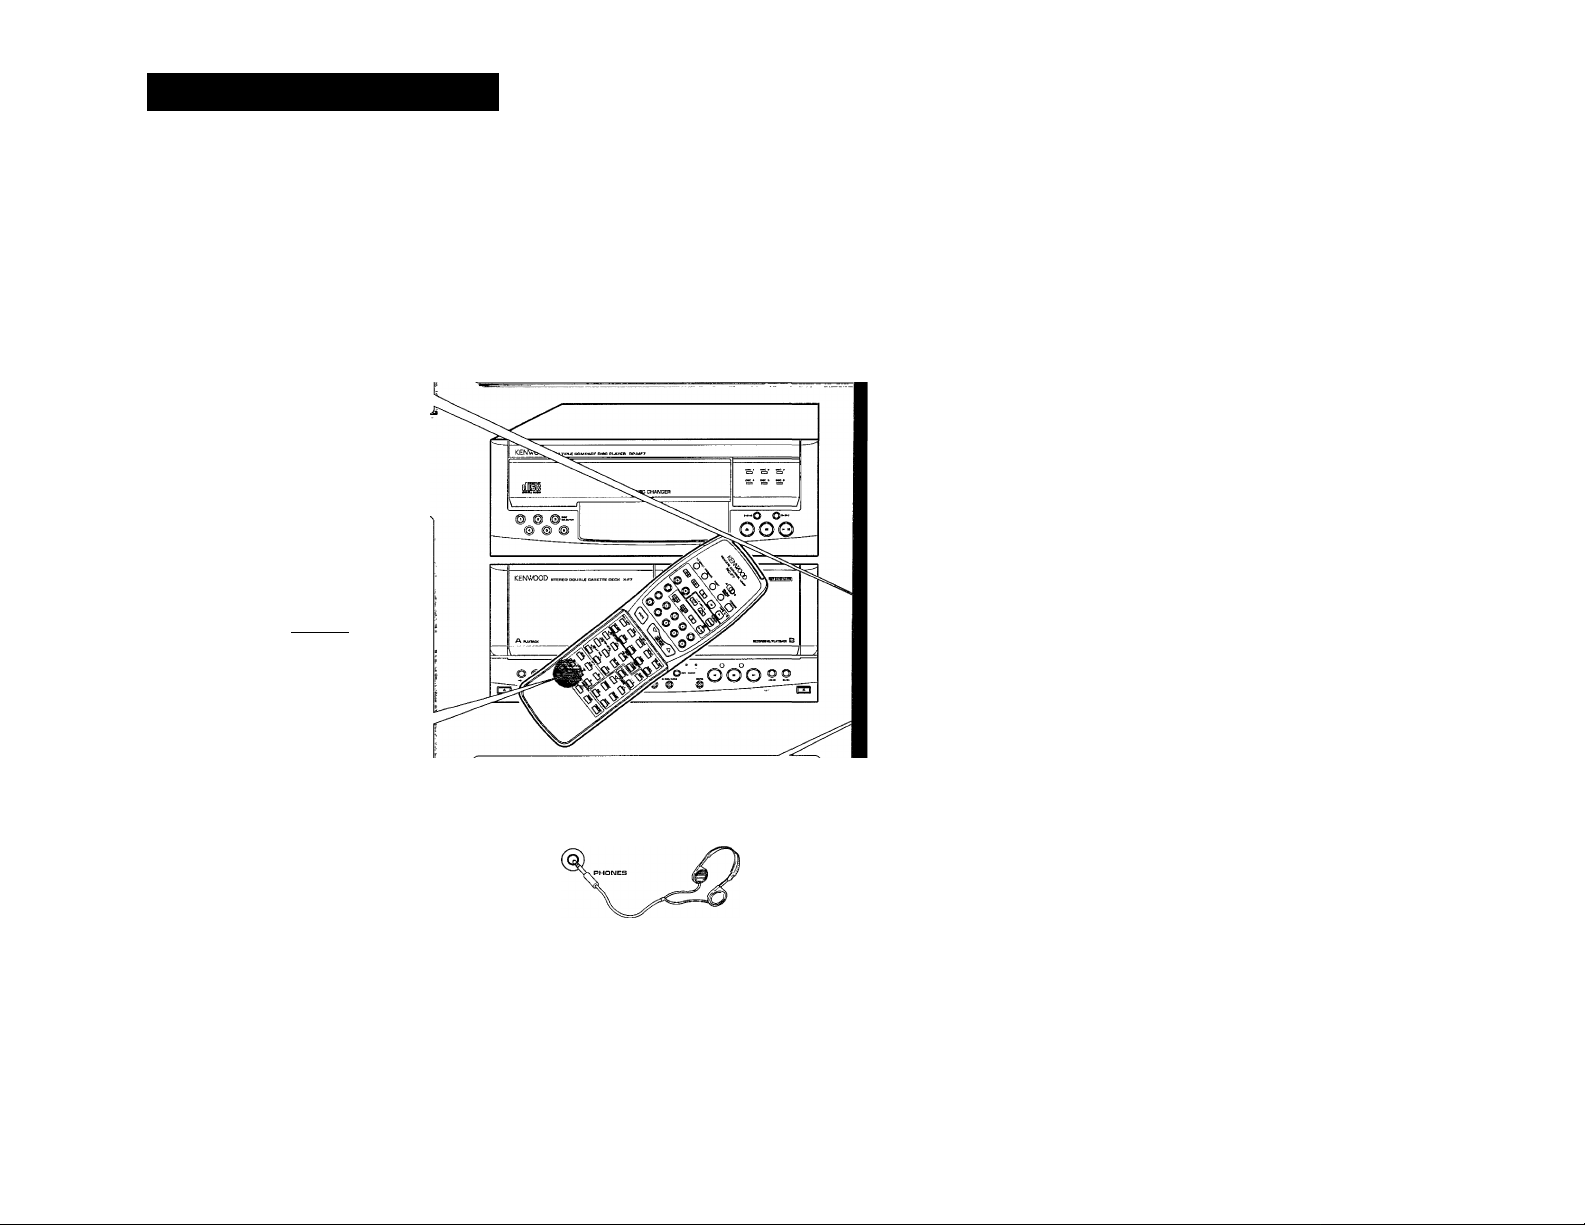
O PHONES jack
Connect headphones for listening through them.
O VIDEO input switch keys
Press to select the video input source.
0 Input selector keys
Press to select the component to be played.
0 SOURCE DIRECT indicator
Lights when the SOURCE DIRECT function is ON.
Display
Character information display
©
O SOURCE DIRECT key
“□2
Press to enjoy music with a purer sound.
© L.L.C. key
Press to listen to sound at a low level.
© N.B.CIRCUIT key
Press to ON to activate automatic control of bass tone.
© BALANCE (LEFT, RIGHT) keys
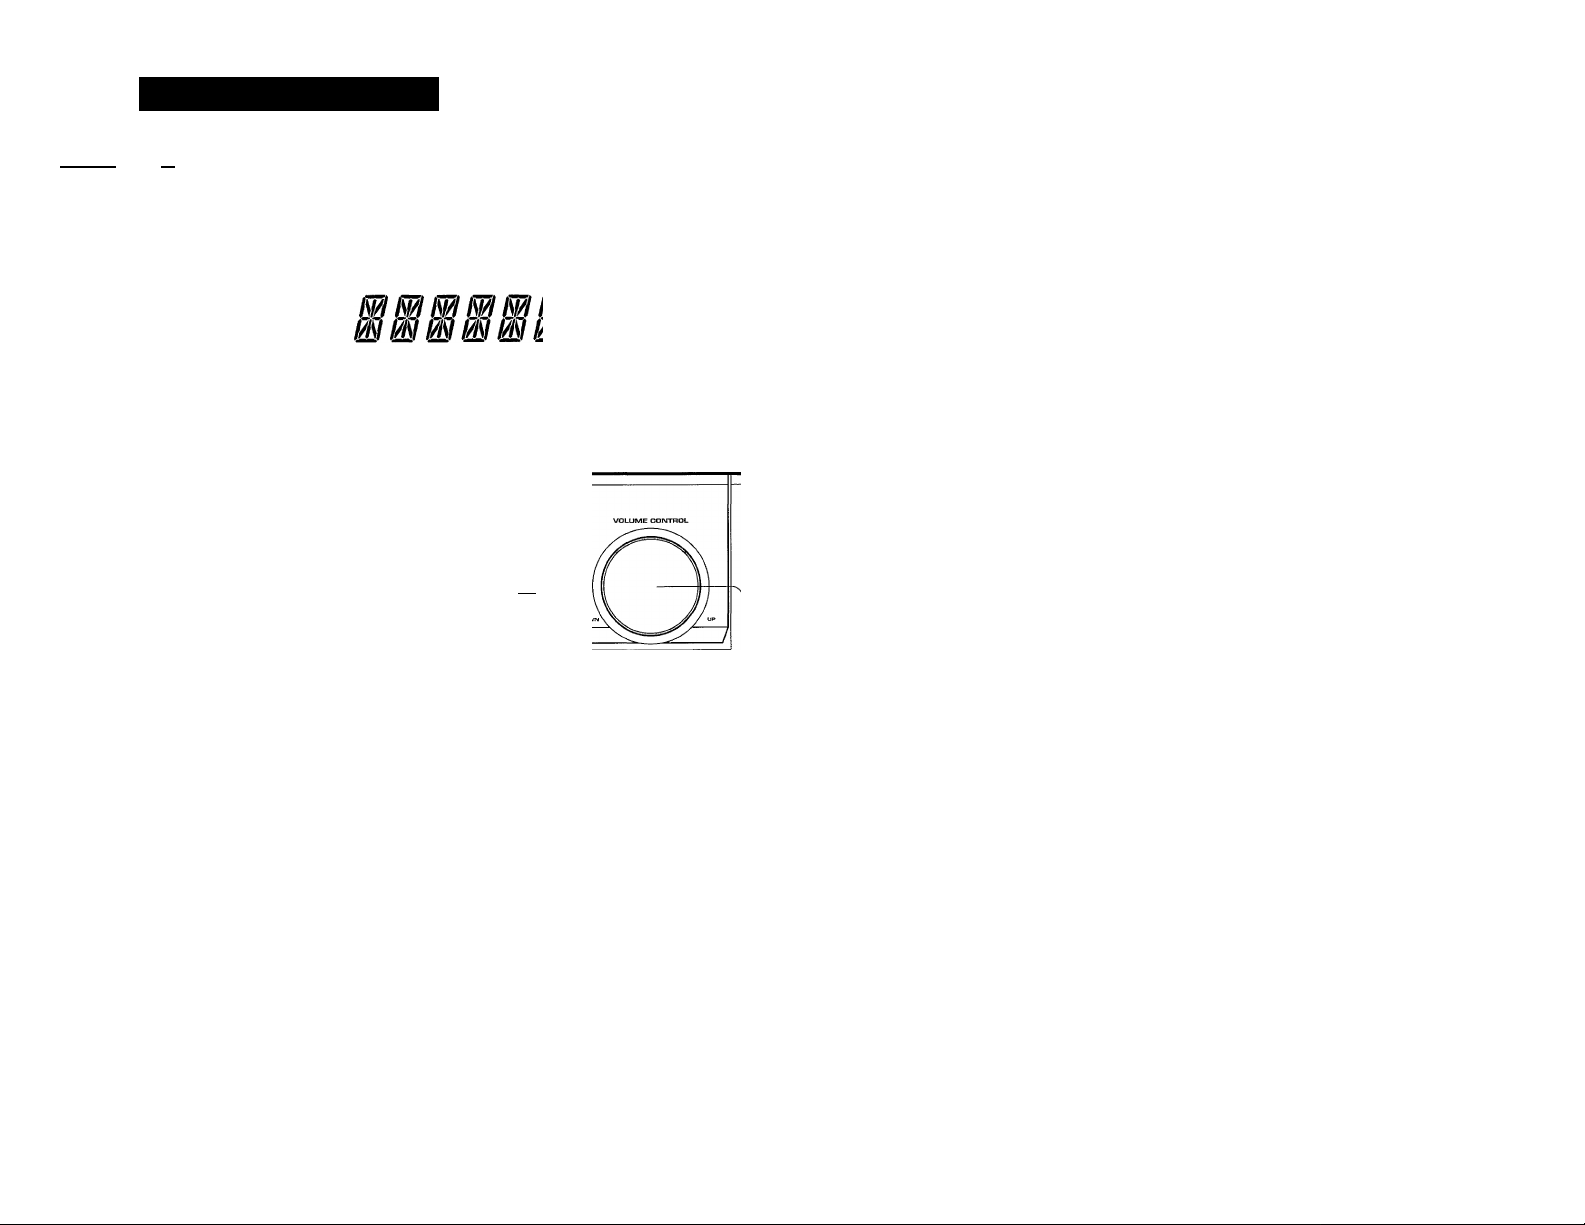
© VOLUME CONTROL knob
rwK
OO ^ O C}
-02
-02
-02
Press to adjust the volume balance between the left and right speakers.
-02
-02
Page 11
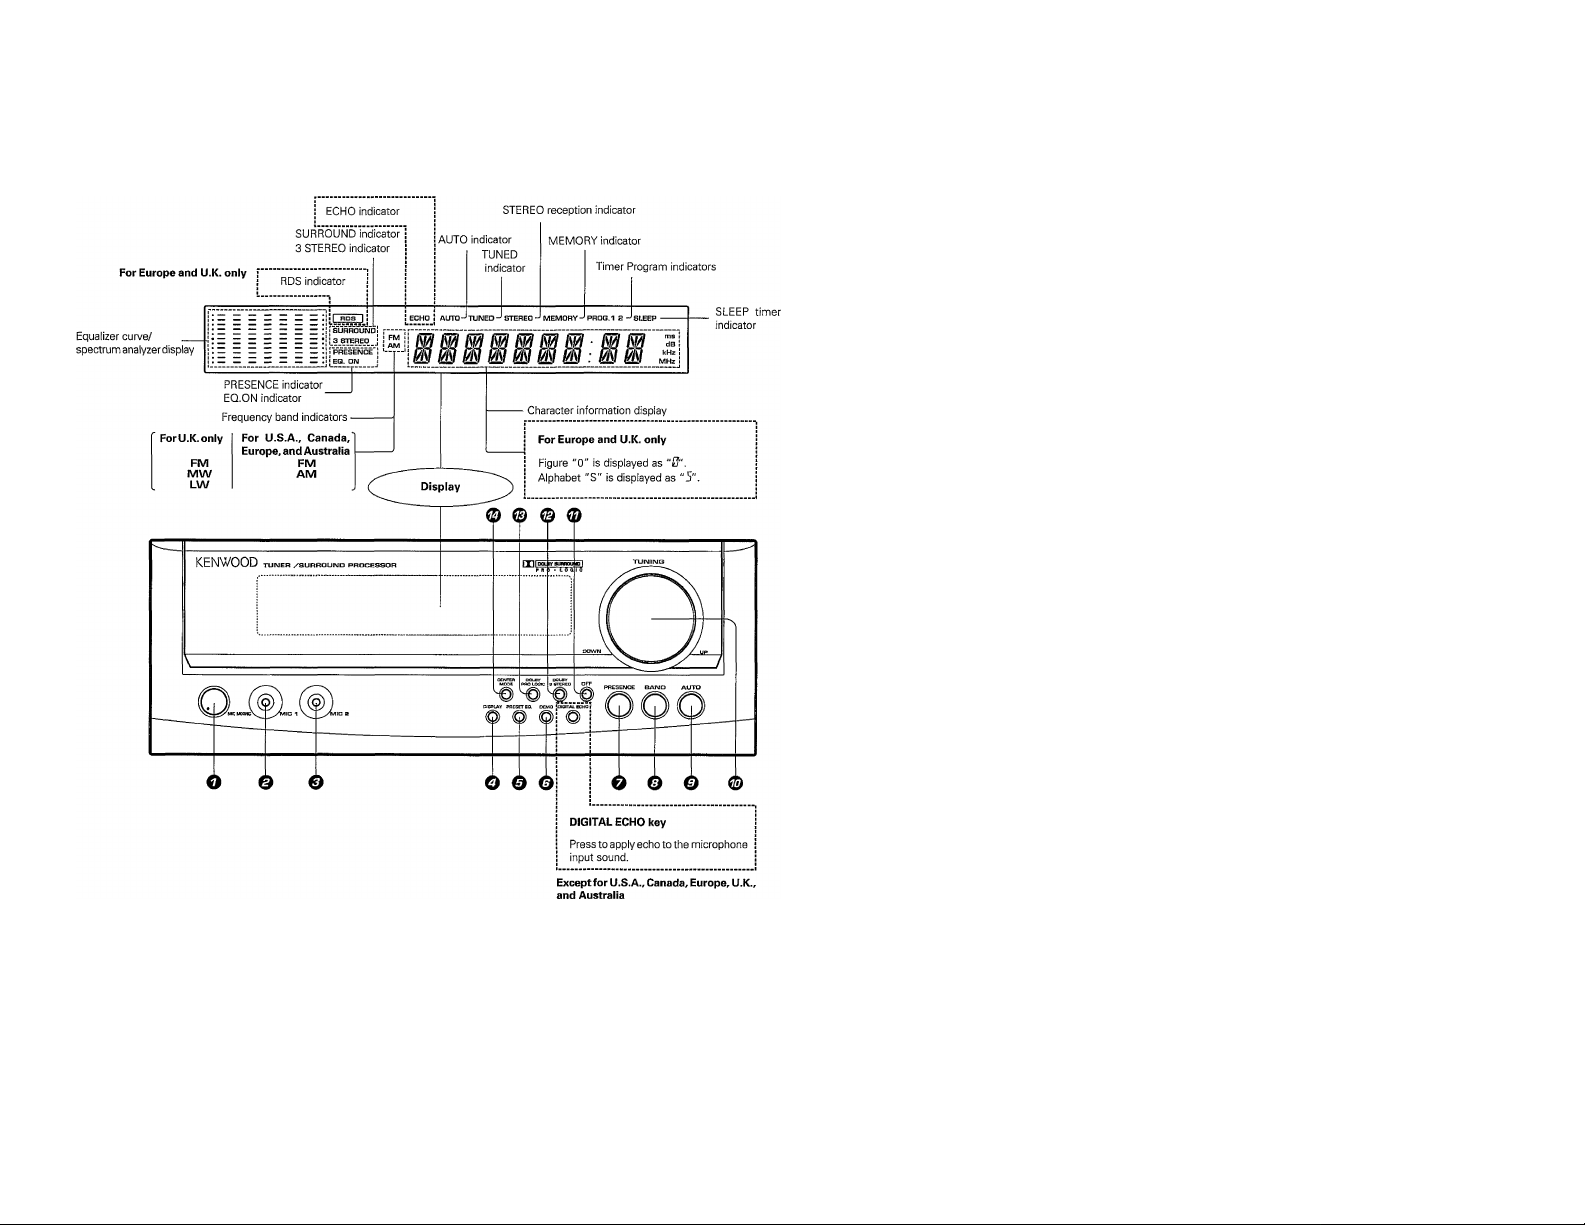
O MIC MIXING control
Turn to adjust the nnicrophone input volume.
© MIC 1 jack
O MIC 2 jack
O DISPLAY key
Press to change over the display contents.
© PRESET EQ. key
Press to apply an equalizer pattern matching the category of the music
being played.
© DEMO key Used in adjustment of or playback in the Dolby Pro Logic mode.
Press to start demonstration.
O PRESENCE key Used in adjustment of or playback in the Dolby 3 Stereo or Dolby Pro
Press for presence play.
© BAND key
Press to select the required frequency band.
-IM!
-sa
© AUTO key
Press to receive stations in auto tuning mode.
©TUNING knob
Press to select the station to be received.
© OFF key
Press to switch the surround and presence modes OFF.
© DOLBY 3 STEREO key
Used in adjustment of or playback in the Dolby 3 Stereo mode.
® DOLBY PRO LOGIC key
© CENTER MODE key
Logic mode.
-sa
-ss
-sa
Page 12
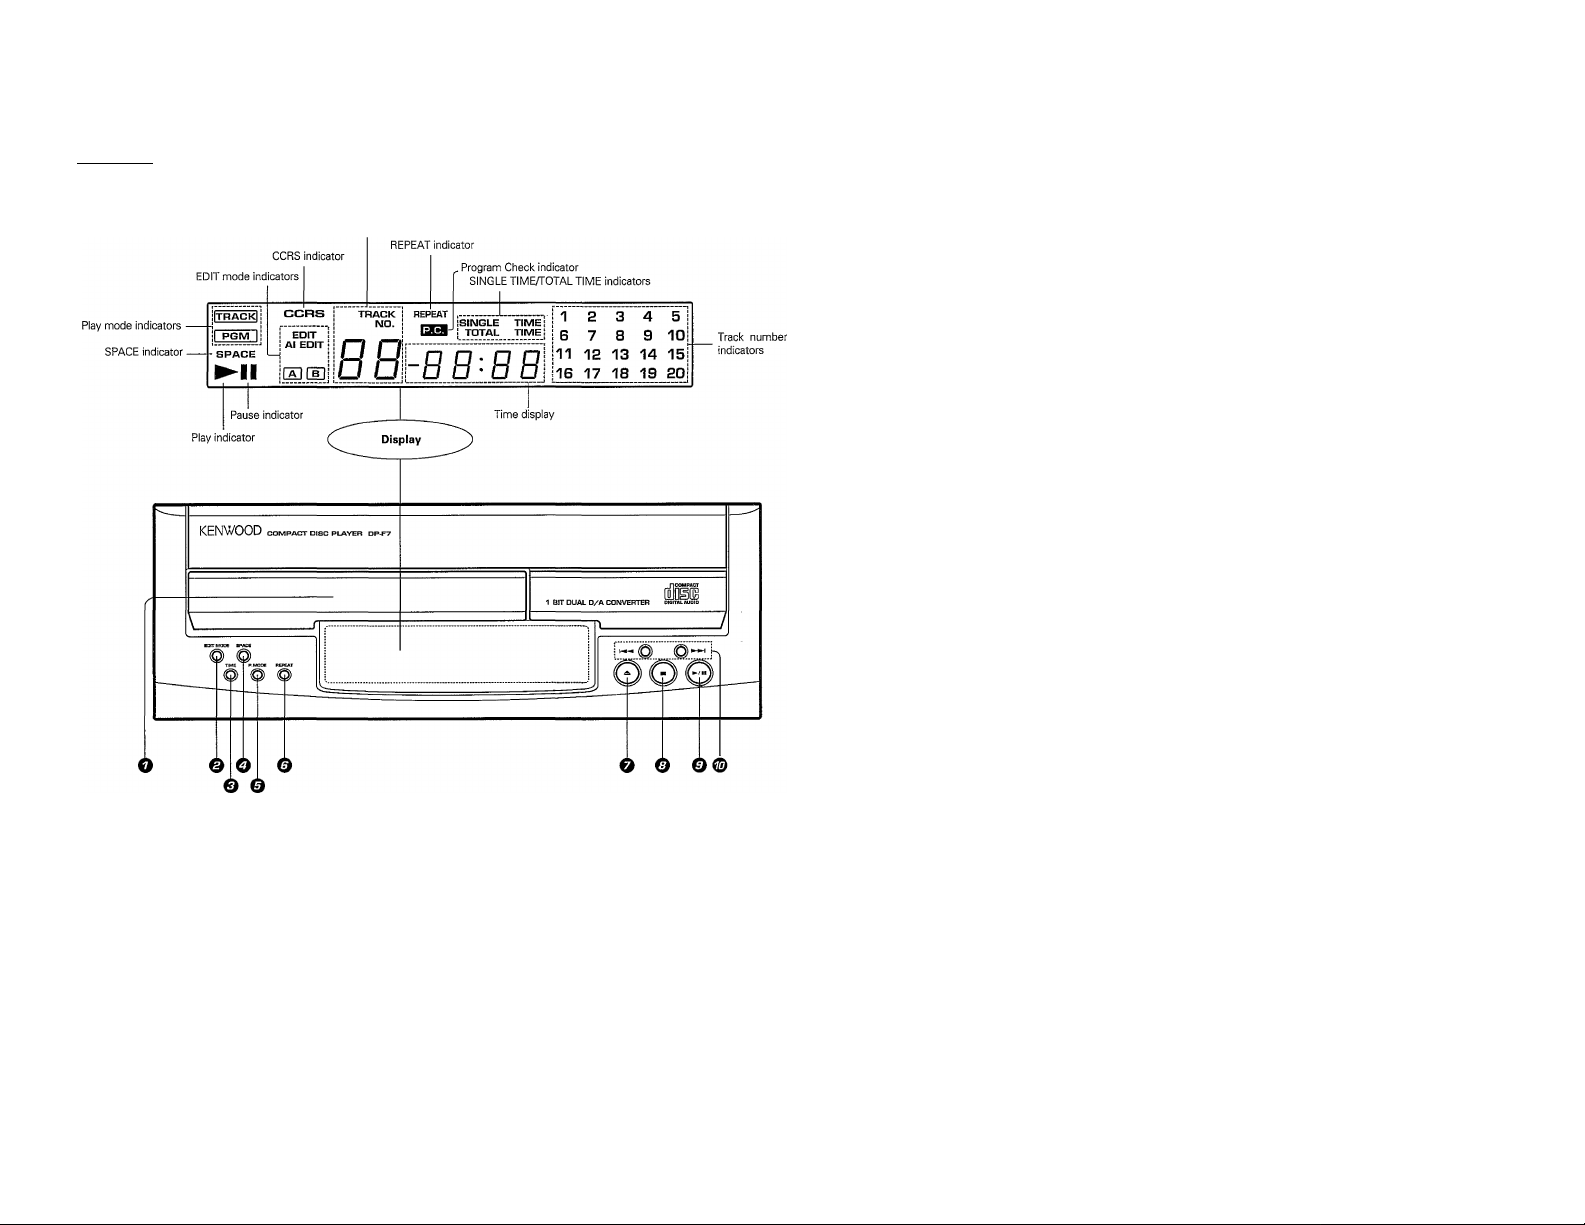
d CDj^yer unit (UD-7(^)
UD-703/753 [En]
Playing TRACK NO. display
O Disc tray
O EDIT MODE key
Press to select the edit recording mode.
G TIME key
Press to switch the time display mode.
O SPACE key
Press in PGM mode to create a non-recorc
between recorded tracks automatically.
G P.MODE key
Press to switch between the TRACK moc
G REPEAT key
Press for repeated playback.
seconds
G Open/Close key
G Stop key
G Play/pause key
G Skip keys
Press to skip to the beginning of another track.
Page 13
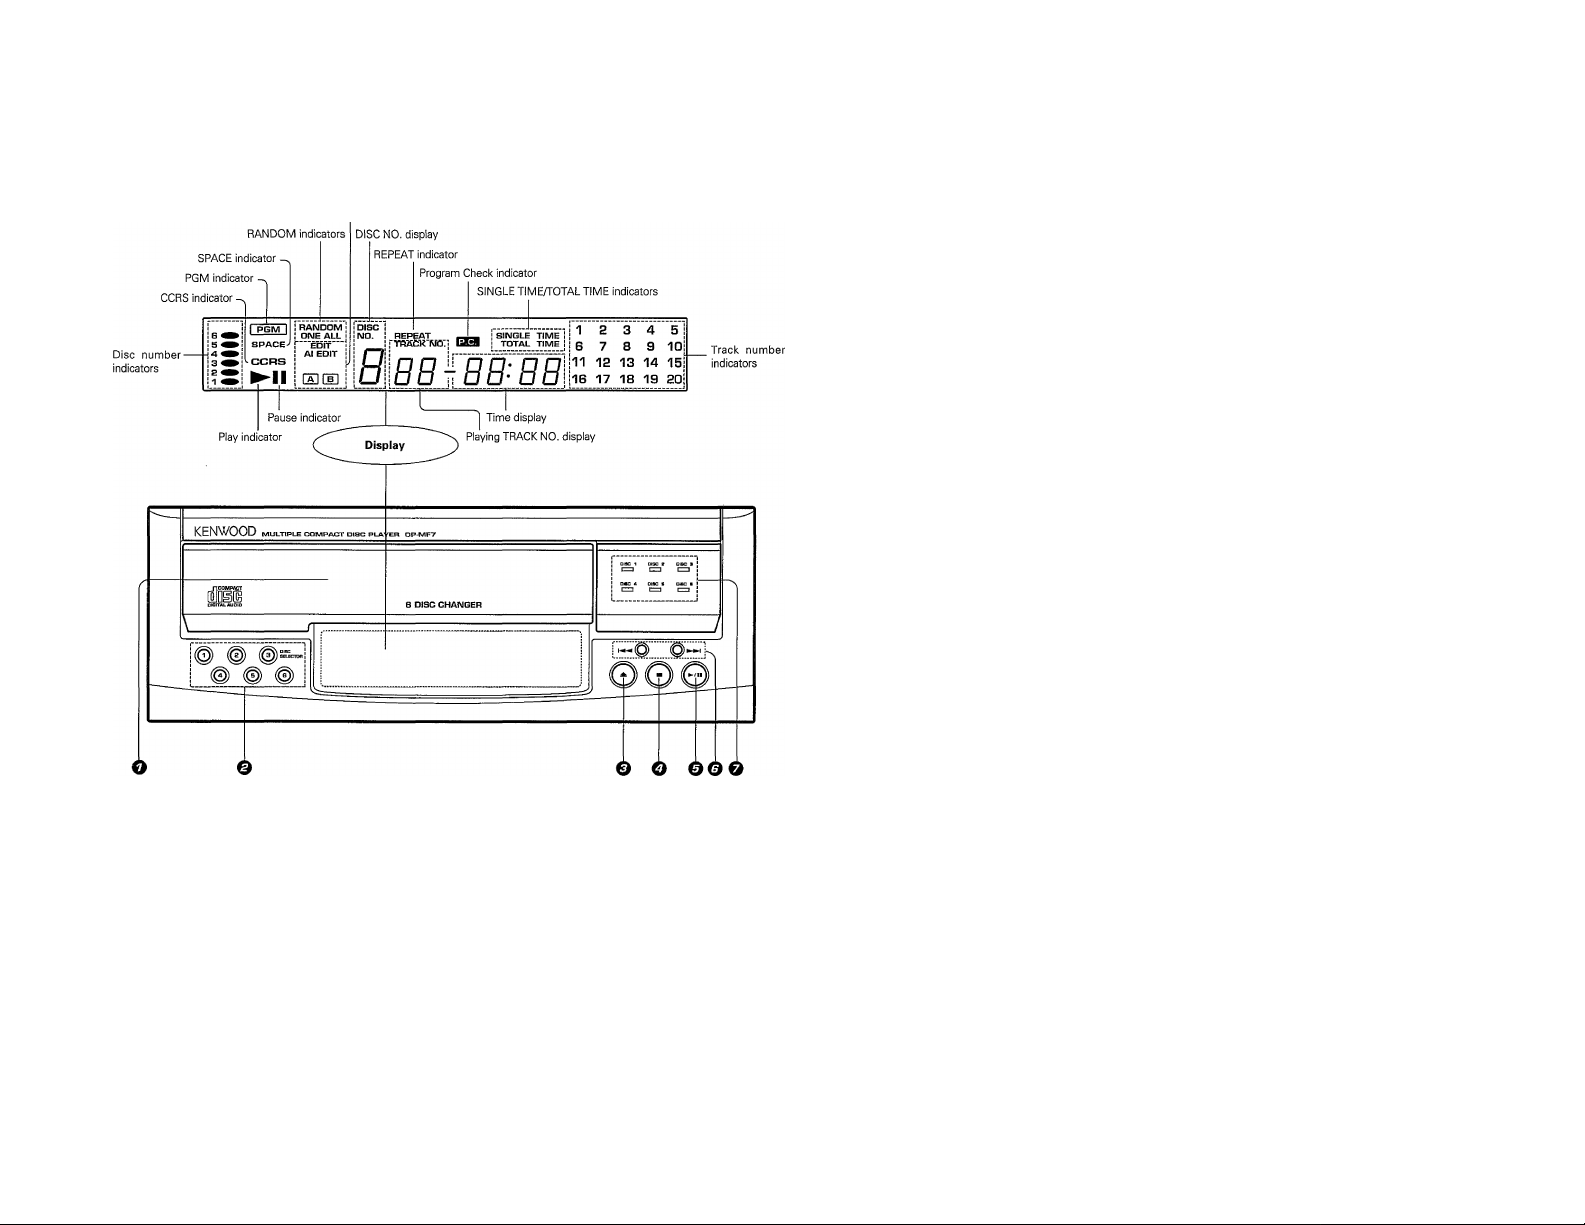
CDplayerunit IUD-7^)
UD-703/753 [EnJ
EDIT mode indicators
O Disc tray
O Disc selector keys
© Open/Close key
Q Stop key
© Play/pause key
© Skip keys
Press to skip to the beginning of another track.
-w
O Disc selector indicators
Page 14
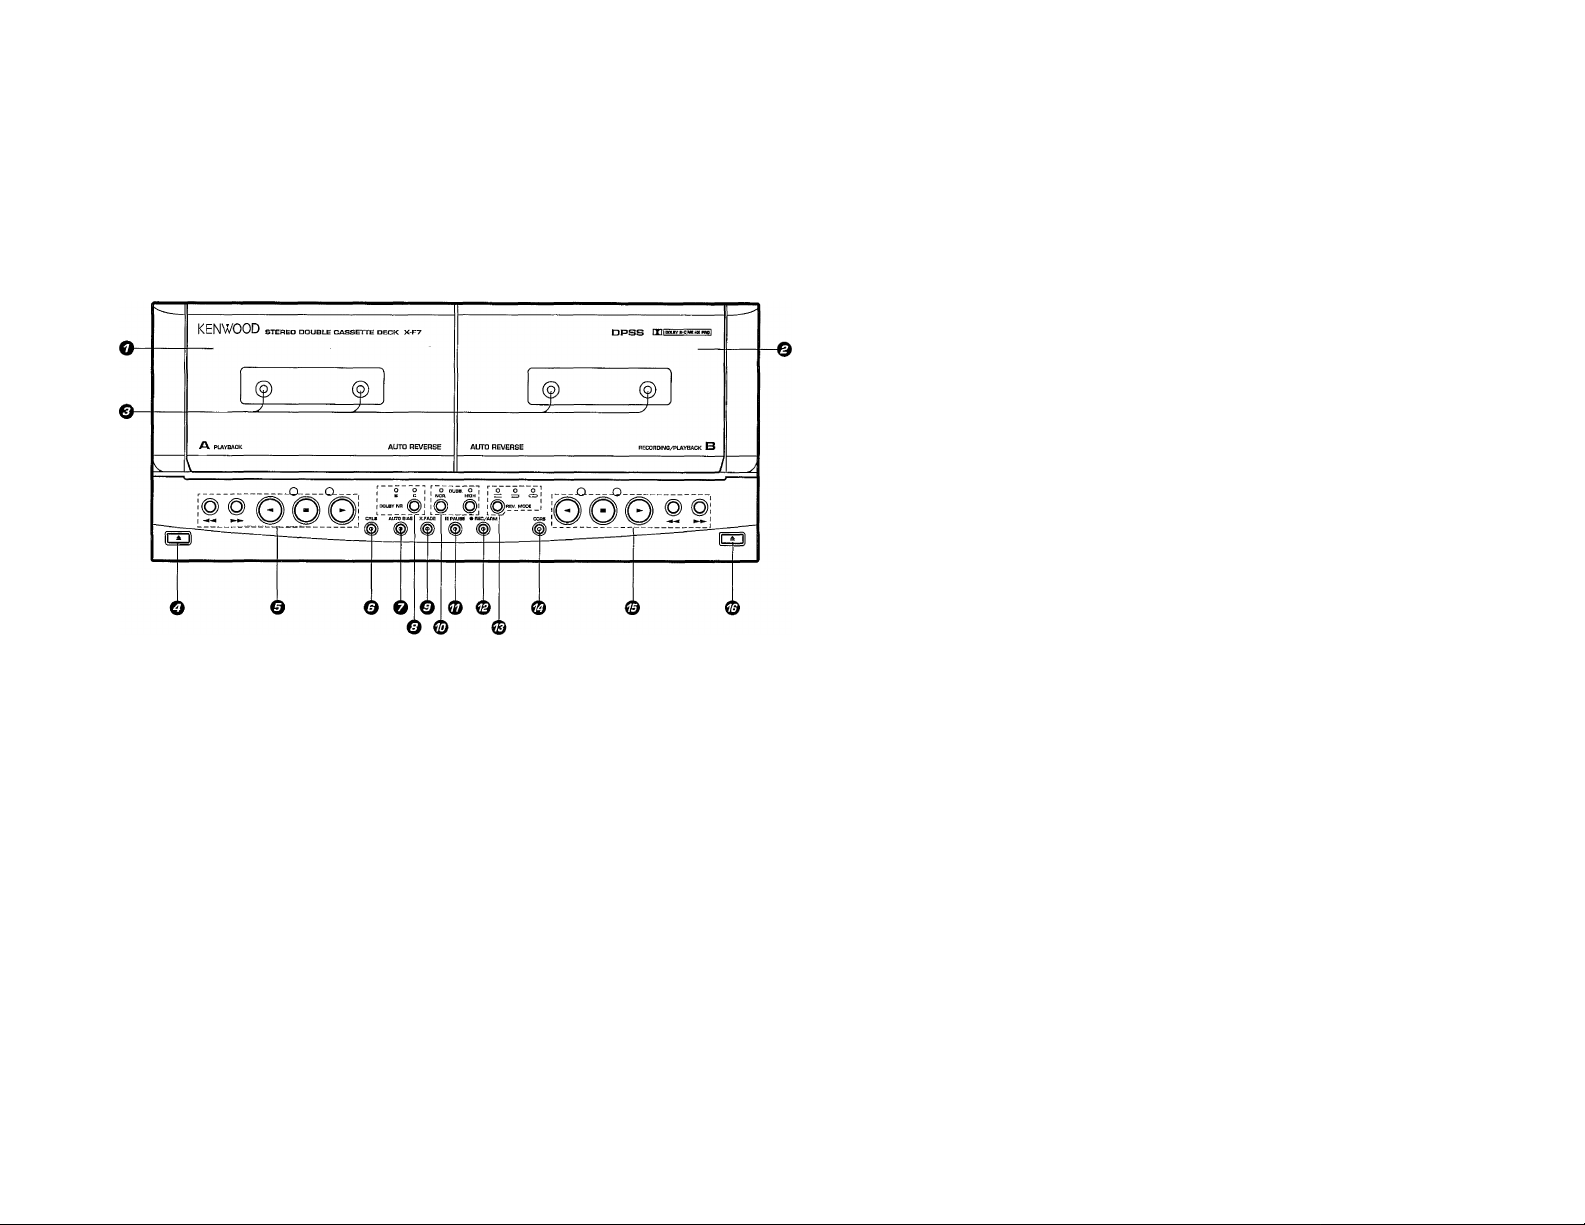
Cassette deck unit
UD-703/753 (En)
O Deck A cassette holder
O Deck B cassette holder
Q Tape running indicators
O Deck A eject key
O Deck A operation keys
◄, ► Play keys/indicators
■ Stop key
►► Fast Forward key
◄◄ Rewind key
© CRLS key/indicator
Press to set the optimum recording level
automatically.
O AUTO BIAS key/indicator **32
Press to set the tape recording bias automati
cally.
O DOLBY NR key/indicator
© X.FADE (Cross-fade) key/indicator cally.
Press to create a tape with continuous music
by fading in the beginning and fading out the
end of every tune.
0 DUBB. keys (HIGH, NOR.)/indicators
Press for dubbing between tapes.
© Pause key/indicator
© REC/ARM key / indicator
© REV. MODE key / indicator
Press to switch over the play modes.
© OCRS key/indicator ""l4£l
Press to start recording after having set the
optimum recording level for the CD and the
optimum recording bias for the tape automati-
© Deck B operation keys
■<, ►
■
►►
0 Deck B eject key
-1^
Play keys/indicators
Stop key
Fast Forward key
Rewind key
Page 15
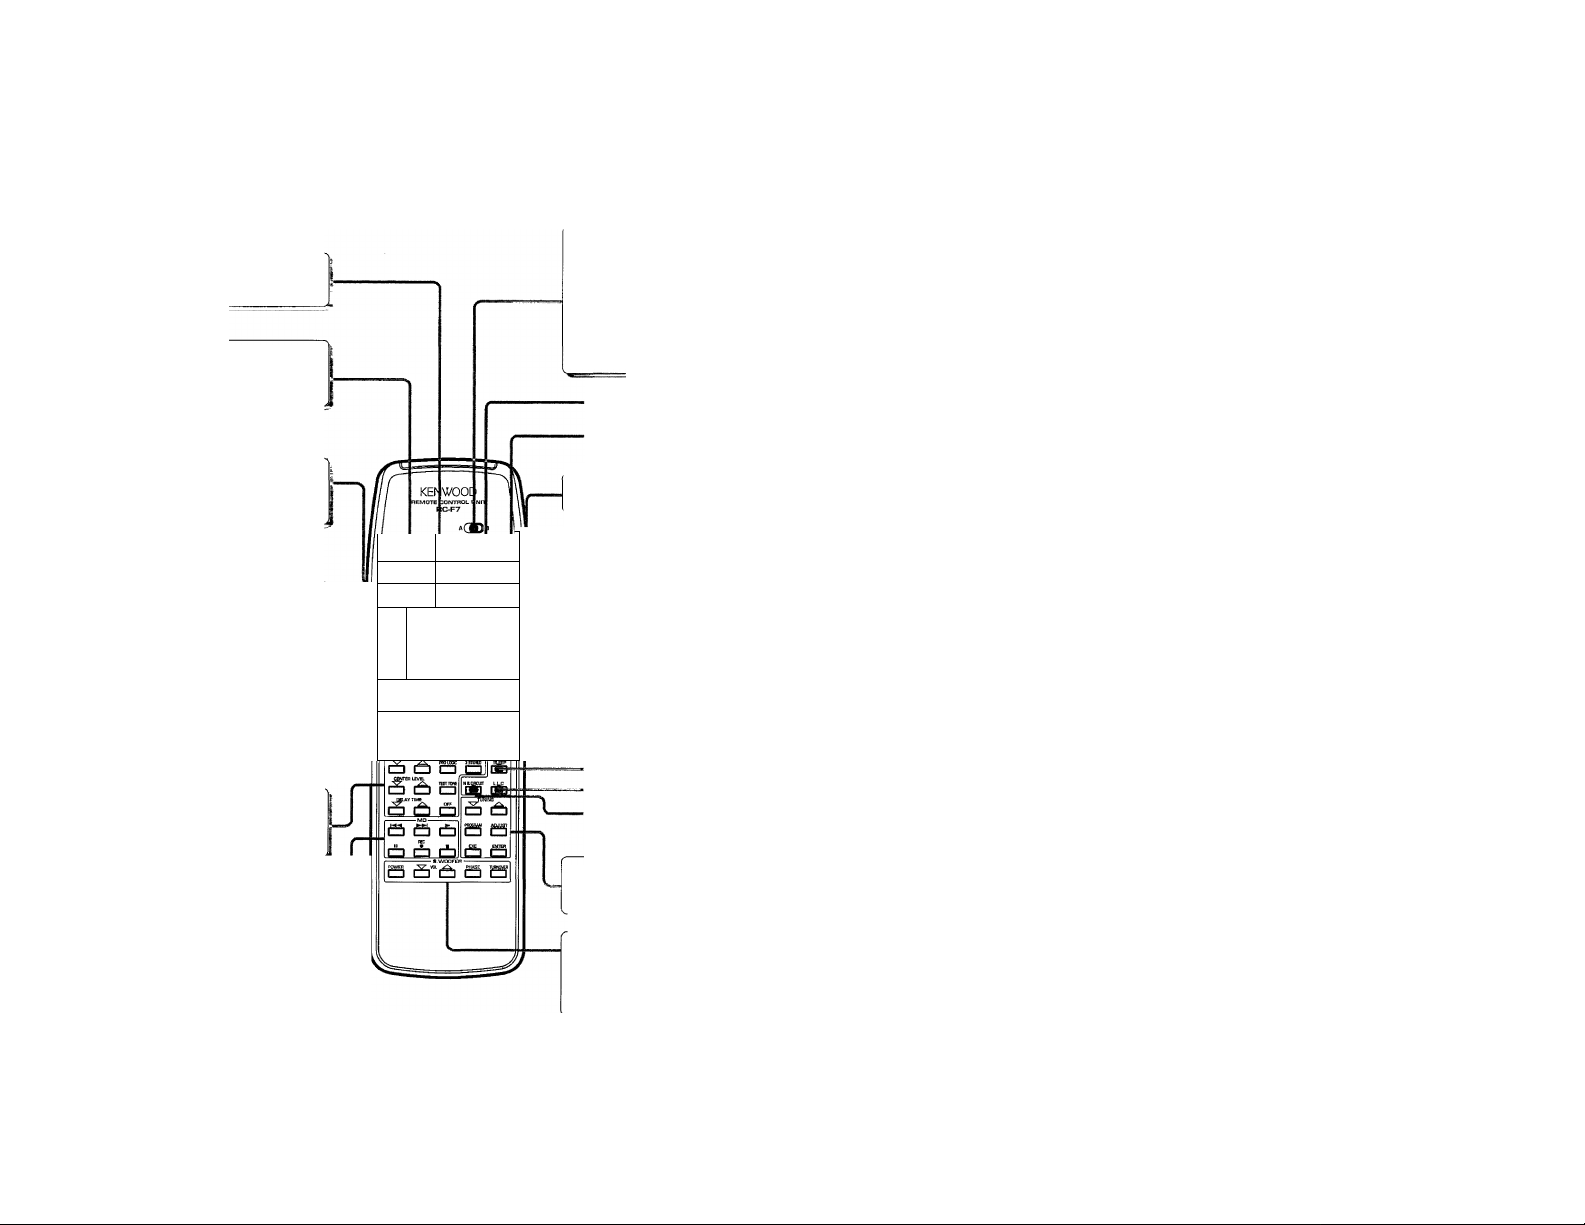
Remote control unit
Input selector key
INPUT key: Press to select the component to be
Graphic equalizer operation keys
EQ.EFFECT: Press to select a graphic equalizer
PRESENCE; Press to select a presence effect.
Cassette deck operation keys
To operate deck A, set the A/B switch to A. (The •
key is invalidated.)
To operate deck B, set the A/B switch to B.
Numeric keys
Function as the numeric keys of the CD player
when the CD input is selected.
Function as the numeric keys of the tuner when
the TUNER input is selected.
VOLUME CONTROL keys
Press to adjust the volume.
MUTE key
Press to mute the sound temporarily.
Surround effect keys
REAR LEVEL keys, DOLBY PRO LOGIC key,
DOLBY 3 STEREO key, CENTER LEVEL keys,
TEST TONE key, DELAY TIME keys, OFF key
MD recorder operation keys
Use these keys to operate a MD (Mini Disc)
recorder (optional).
played.
effect.
and keys, ► key, • REC key, il key, ■ key,
(SJ ED
CZ3 q'q
,-Р.еди.-,
iS) tSD ©
m в
W @ @ ¿1
@ ® ® ®i/l
им, СШбЕ тиле паЙкни repeat disc skip
C3 C3 CD C3 CD ^
—тетпшг--B5B?—
-------
UD-703/753 [En]
A/B switch
When operating keys in sections hashedC3,
set this switch according to the deck (A or B} you
want to remote control.
• With keys which have two names, one printed in
white and the other printed in brown, they func
tion as indicated with the brown letters when the
A/B switch is set to A and as indicated with the
white letters when the switch is set to B.
SOURCE DIRECT key
POWER key
Tuner operation keys
BAND key, P.CALL keys
CD player basic operation keys
!◄◄ and keys, ◄◄ and ►► keys, ■ key, ►/!!
key
CD player operation keys
OPEN/CLOSE key, TIME key, RANDOM key, RE
PEAT key, *DiSC SKIP key, EDIT MODE key,
SPACE key, P.MODE key, CLEAR key, CHECK key
SLEEP key
LLC. key
N.B.CIRCUIT key
Tuning/timer operation keys
TUNING keys, PROGRAM key, ADJUST key,
ENTER key, EXE. key
Super woofer keys
Use these keys to operate a super woofer (op
tional).
POWER key, VOL. keys, PHASE key, TURNOVER
key.
The DISC SKIP key is for use
with the UD-753 system.
I
Model: RC-F7
Infrared ray system
Page 16
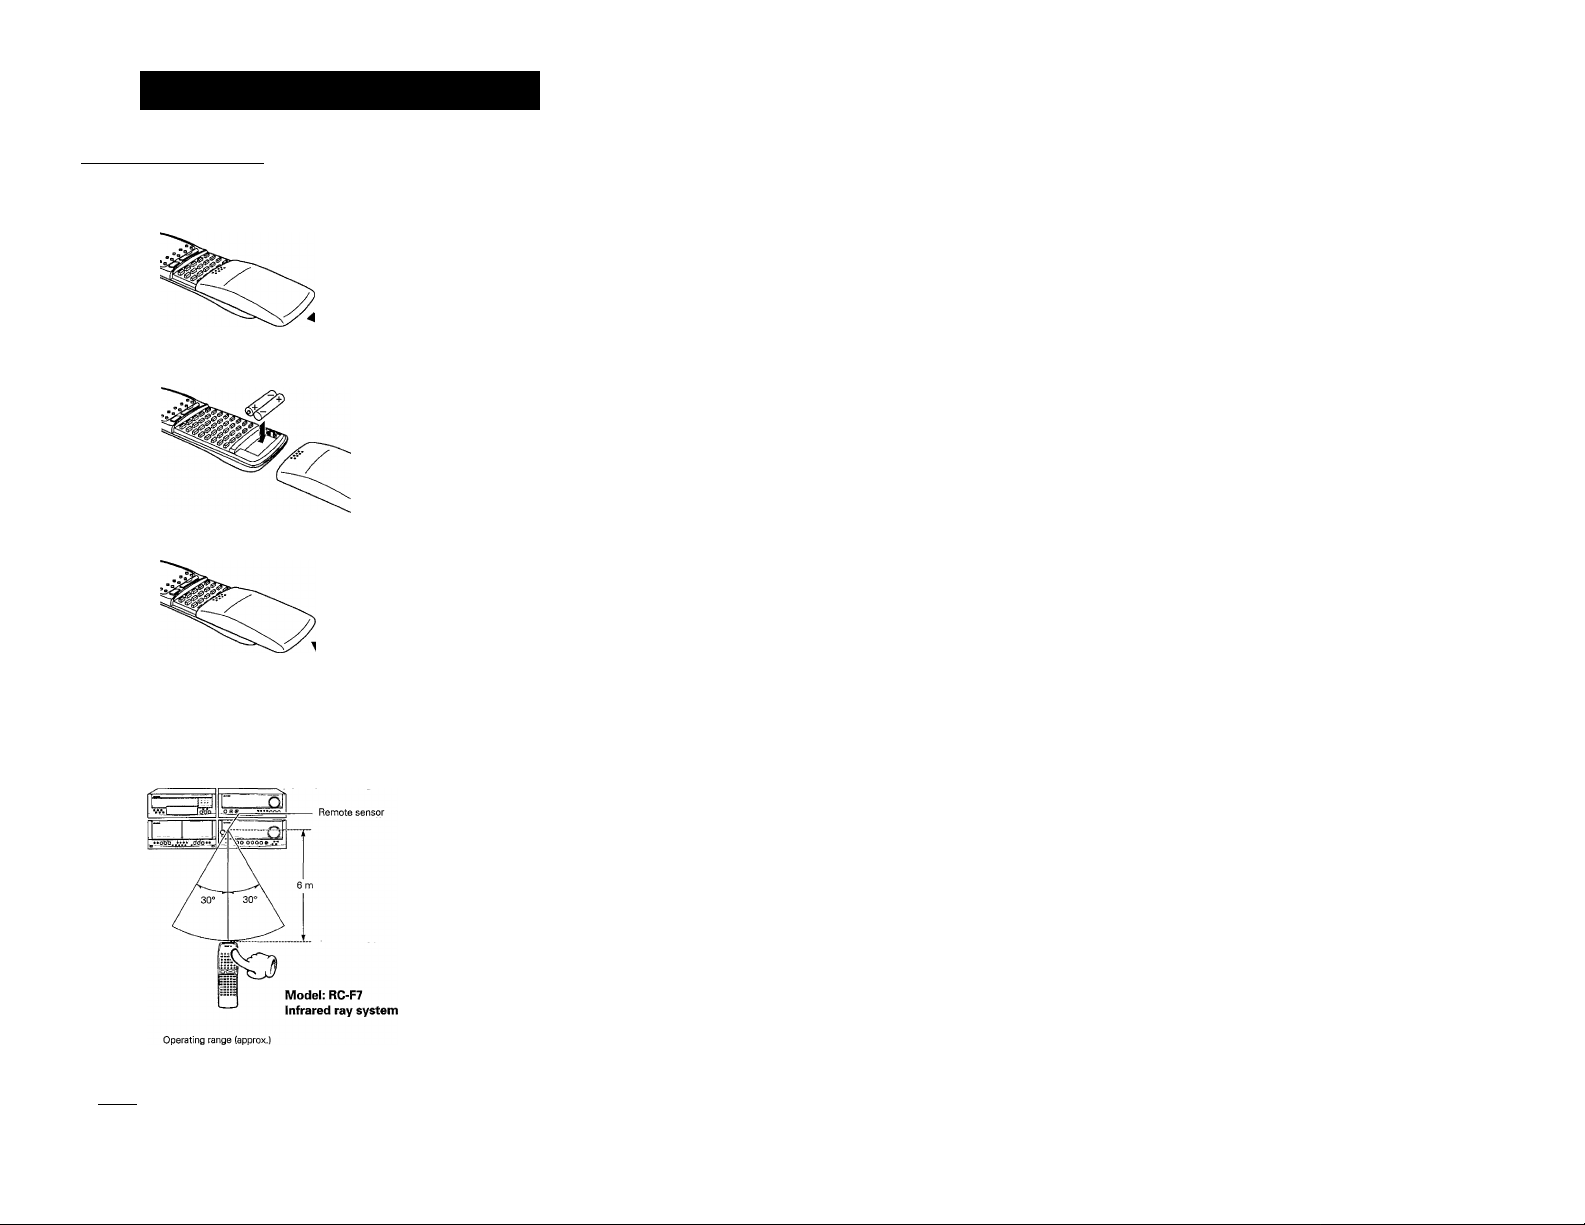
Operation of remote control unit
Loading batteries
Remove the cover.
Insert batteries.
Close the cover.
UD-7D3/753 fEn]
• Insert two R03 ("AAA"-size) batteries following the polarity indications.
deration
After plugging in the power cord of the amplifier, press the
POWER key of the remote control unit to turn the power of the
system ON. When the power is turned ON, press the key of the
function to be operated.
1. The provided batteries are intended for use in operation checking, and their service life may be short.
I Not^l
2. When the remote controllable distance becomes short, replace both of the batteries with new ones.
3. If direct sunlight orthe light of a high-frequency fluorescent lamp (inverter type, etc.) is incident to the remote sensor, malfunction may occur.
In such a case, change the installation position to avoid malfunction.
•When pressing more than one remote control key successively, press the
keys securely by leaving an interval of 1 second or more between keys.
In this manual, the remote control unit is illustrated with its cover
omitted. This is simply for the convenience of explanation.
Page 17
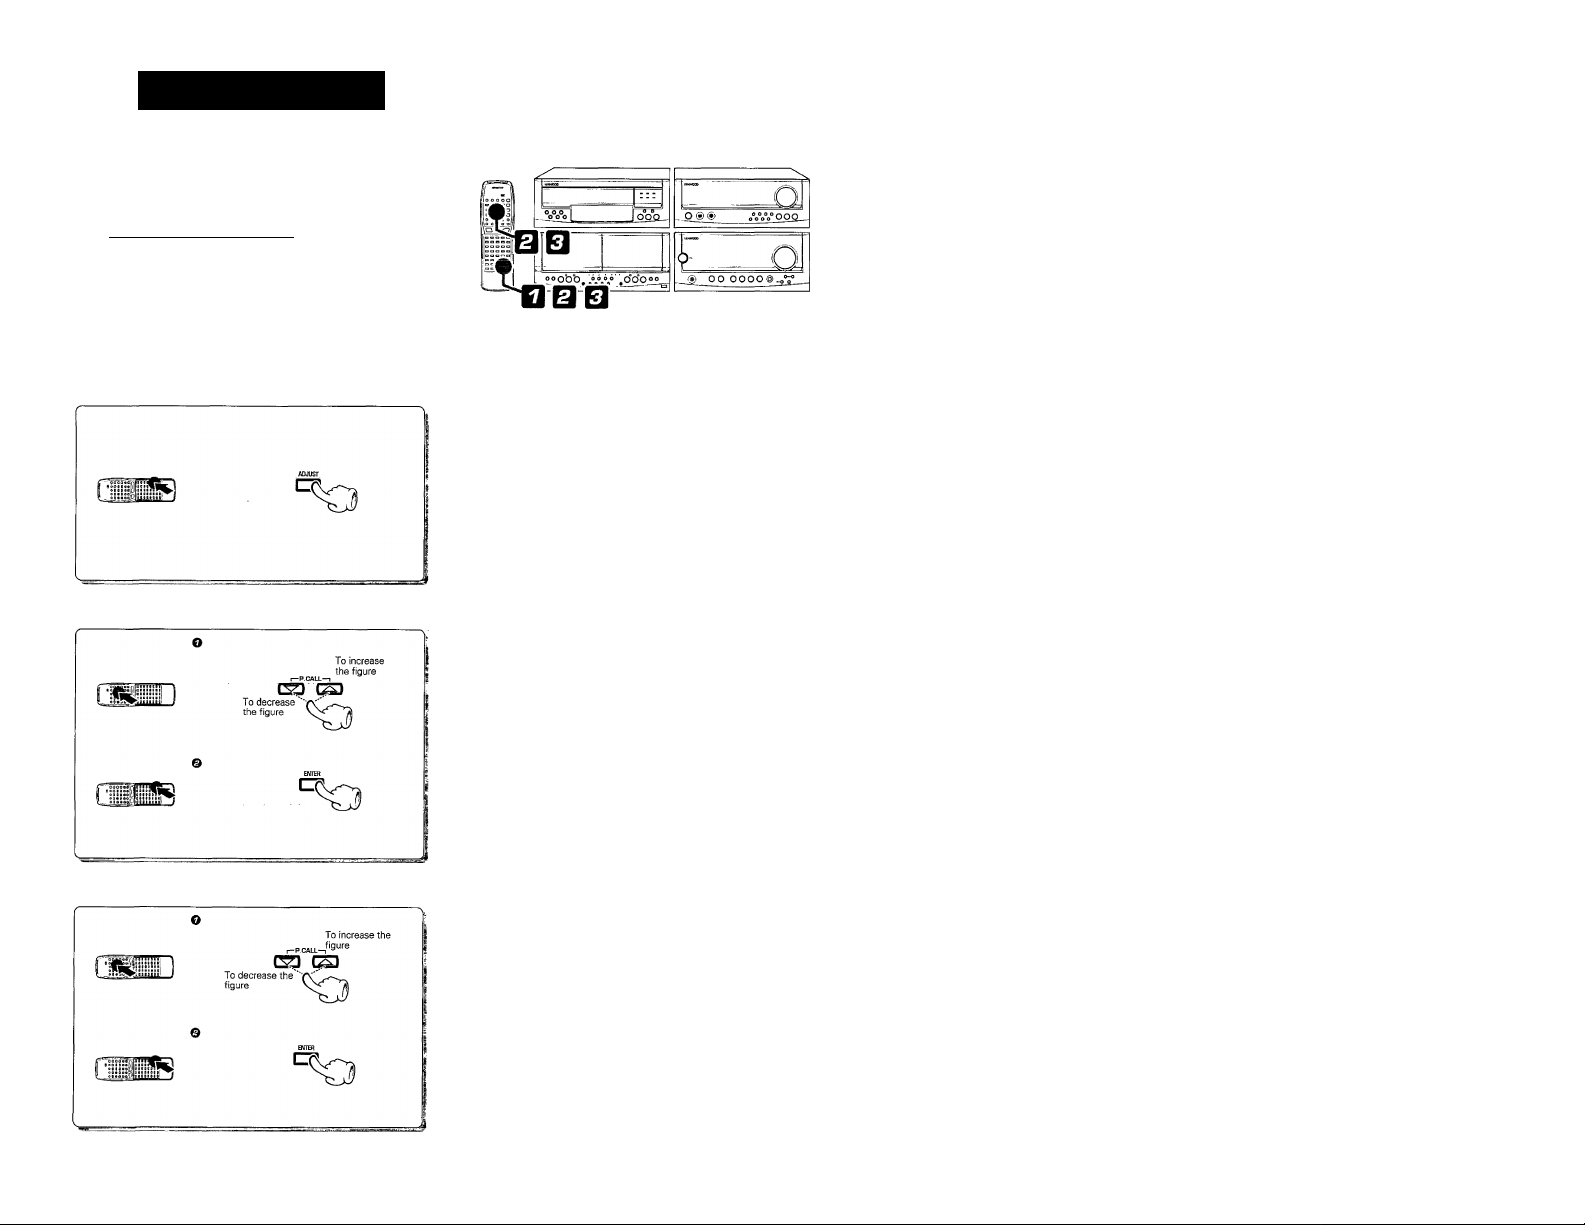
Clock adjustment
This unit incorporates a clock function. Be sure to adjust the
correct time before using the timer function.
Preparation
I Ensure that the power is OFF. I
Activate the clock adjustment mode.
Enter the hour.
Example: Adjustment to 8:45AM
• The time display starts to blink.
RM
-----
UD-7Q3/753 (En]
-------
Enter the minutes.
\\ I //
RR iff i/o
------
—
• The time of the day is represented in 12-hour AM/PM method.
• Press the ENTER key. The hour is entered and the minute display starts
to blink.
•
RM
• If you make a mistake, restart from the beginning.
•To adjust correct time, press the ENTER key at the same moment as a
time announcement.
• The time display blinks after a power failure or when the power cord has
been unplugged from the AC outlet and plugged in again. In such a case,
adjust the clock again.
Page 18
Sound adjustment functions
Power ON/OFF
Press the POWER key of the amplifier unit.
STANDBY indicator
Qs’
Rennote control unit
• The power of the overall system can be turned ON/OFF by pressing
the POWER key of amplifier unit.
Enhanced bass entertainment with super woofer (optional)
i Press the S.WOOFER POWER key.
PHASE TURHQVEB
CD CD CD
UD'703/753 [En)
Listening at a low volume (LLC.: Low Level Control)
Tlie volume set for quiet listening (L.L.C. volume) can be
recalled with a one-touch operation.
Blinks. -> Lights.
(For a few seconds)
• The volume is decreased and the bass and treble tones are compensated.
•When L.L.C. is ON, amount of volume varied by rotating the VOLUME
CONTROL becomes constant regardless of the speed the control is
rotated.
• If the L.L.C. volume which has been stored in memory is higher than
the current listening volume, the volume will not be changed by
pressing this key.
• The volume does not return to the original level even after L.L.C. has
been switched OFF. Adjust the volume as desired.
Remote control unit
(Point remote control unit at the super woofer.)
© Adjust the super woofer volume.
Listening through headphones
O Insert the headphone plug into the PHONES jack.
a'
To decrease
volume
(Point remote control unit at
the super woofer.)
■ Once the super woofer volume has been set, it will increase or
decrease according to the VOLUME CONTROL adjustment.
• For the PHASE and TURNOVER key settings, read the instruction
manual of your super woofer.
STANDBY mode of POWER switch
When the power cord is plugged into an AC outlet the STANDBY indicator lights regardless of the power ON/OFF setting. This is because, even when the
power is set to OFF, a small amount of power is supplied to the system to back up the memory. This status is called the standby mode of the system. While
the STANDBY indicator is lit the power can also be turned ON/OFF from the remote control unit.
It can also be adjusted with the
volume control provided on the
super woofer.
• The sounds from all speakers are cut off.
© Adjust the volume.
• Minimize the volume before plugging or unplugging the plug.
Page 19
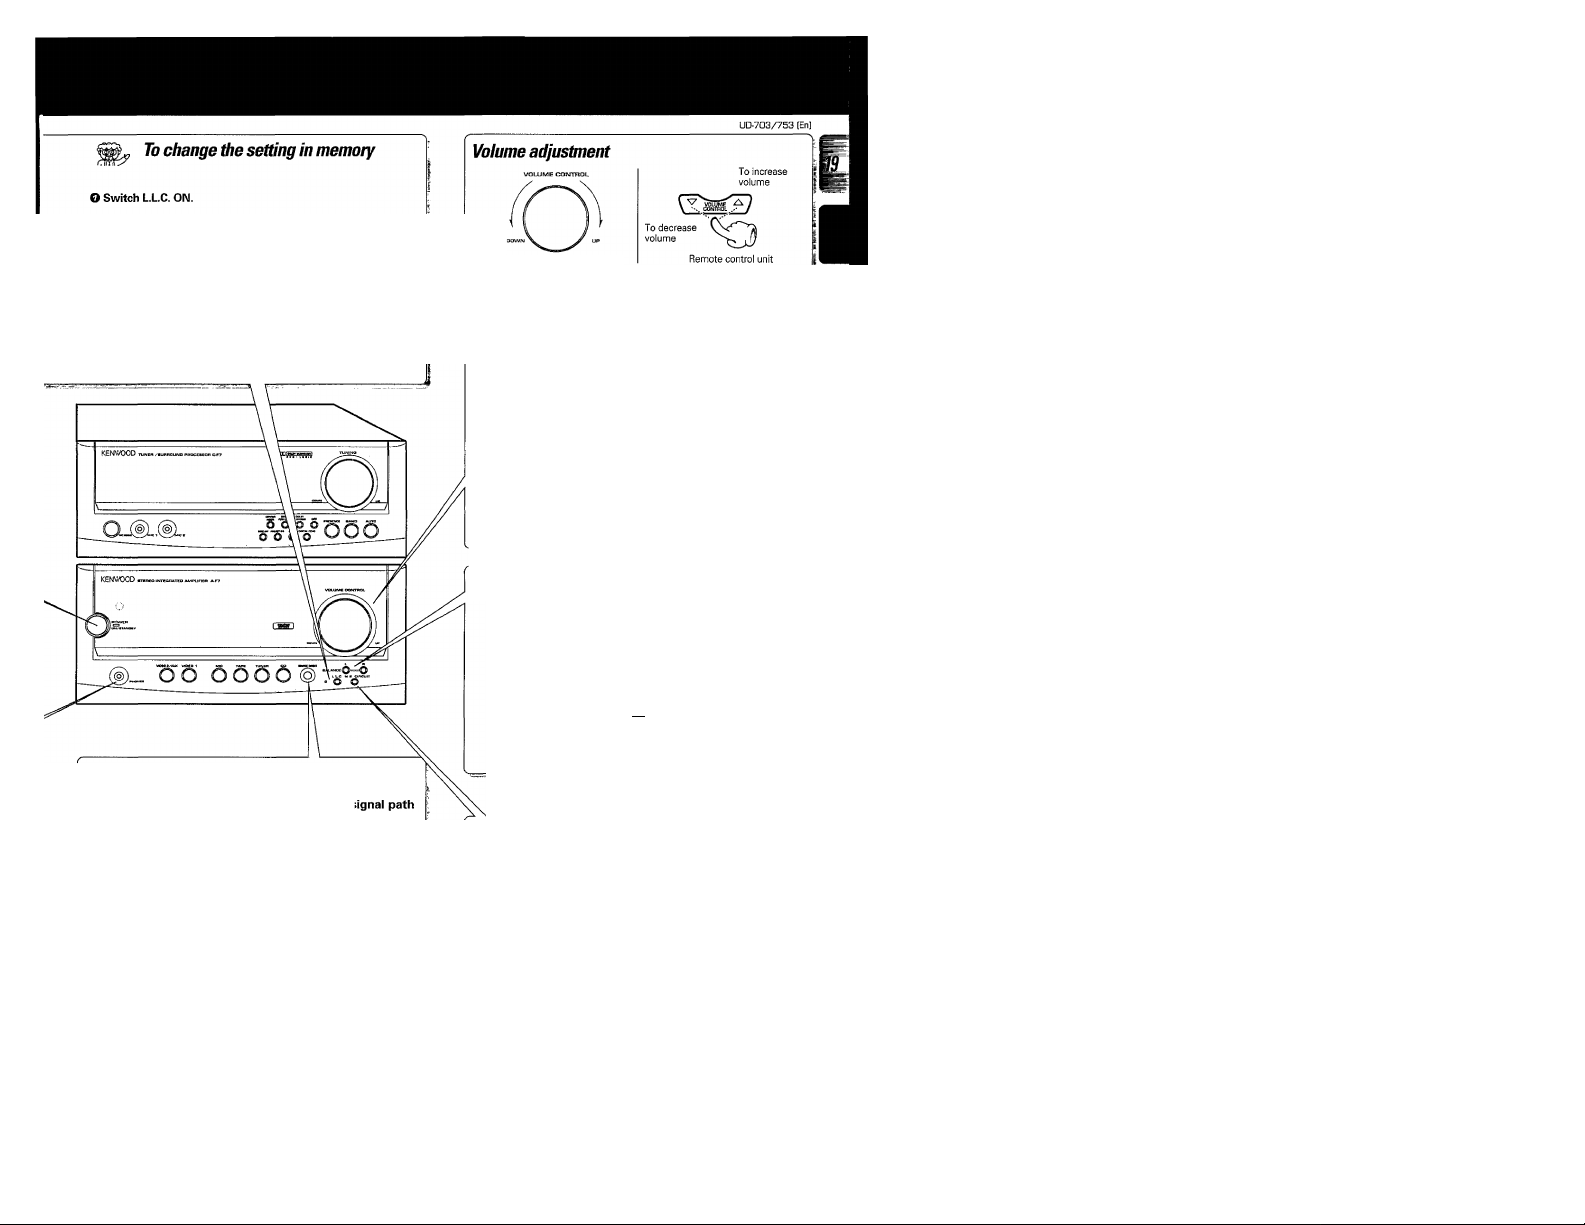
0 While the L.LC. indicator is blinking, settheLL.C. volume with
the VOLUME CONTROL or from the remote control unit.
G Press the L.L.C, key again while the L.L.C. indicator is blinking.
• When the key is pressed again after the L.L.C. indicator has finished
flashing, this function is cancelled.
• If a larger L.L.C. volume than 29 is set, the bass and treble tones will
not be compensated.
To decrease To increase
volume volume
i/ni I/MO m
^/^ uo u/ /L lu
Volume display
• When the L.L.C. key is pressed to ON, these controls function as the
L.L.C. volume control.
Muting the sound temporarily
Remote control unit only
^lJ]
► Press again to resume the original volume.
Adjusting the lefl/right volume balance
Indicates the center.
1
.......
To decrease
balance
Right volume Left volume
O)
----
-W
O) To decrease
Indicates the balance setting.
-R
Playing sound with higher purity
Switching SOURCE DIRECT ON simplifies the s
and thereby improves the purity of sound.
DIRECT
»When the SOURCE DIRECT is ON, the SOURCE DIRECT indicators
on the front panel lights.
»Press the key again to cancel the SOURCE DIRECT.
Input selection on the amplifier unit and easy operation function
With the easy operation function, simply selecting an input source with the input selector keys (TAPE, TUNER, CD, MD, etc.) of the amplifier unit start playback
of the selected source component. On the contrary, starting playing a component switches the input selectors automatically to that input source.
The same operation is also possible with the INPUT key of the remote control unit. When the power is switched ON, the source which has been input before
the power was switched OFF last time (TUNER, CD, etc.) will be played.
Compensation of bass sound
N.B.CIRCUIT
► Press the key again to cancel the N.B. CIRCUIT.
N.B.CIRCUIT: Natural Bass CIRCUIT
Press to ON to activate automatic adjust
ment of bass tone.
r 77
mL JJ
/Vi
Page 20
Playback of CD
UD-703 only
For the operation of UD-753: to
2F
Use the following procedure to play a CD In the original order
of tracks from track No. 1.
I
PJaying tracks in order from track No. 1
Load a disc.
UD-7G3/753 (En)
"CD” should be displayed.
r 77
L II
■ Playback starts when a disc has been loaded.
• Do not touch the played side of disc.
• Load only one disc at a time.
• A single CD (8 cm disc) can also be played.
• Place the disc properly along the groove on the tray. {If the disc is not
placed horizontally, malfunction will result.)
• Ordinary CD single (8 cm) disc adapters sold in audio stores cannot be
used with this unit.
Lights,
The recorded track Nos. are shown.
• If the “TRACK” indicator is not lit, press the P.MODE key to light it.
tTRACI^ TRAC
•After a few seconds, play starts from the track No.1.
To Stop playback To pause playback
Ü I 0--D0
Elapsed time of track being played
J'-A n
/ 0-D5
u
}. SNGUE TlMg t b: *3 <4 O
1 19 3 4 5
1 6 7 8 9 10
Page 21
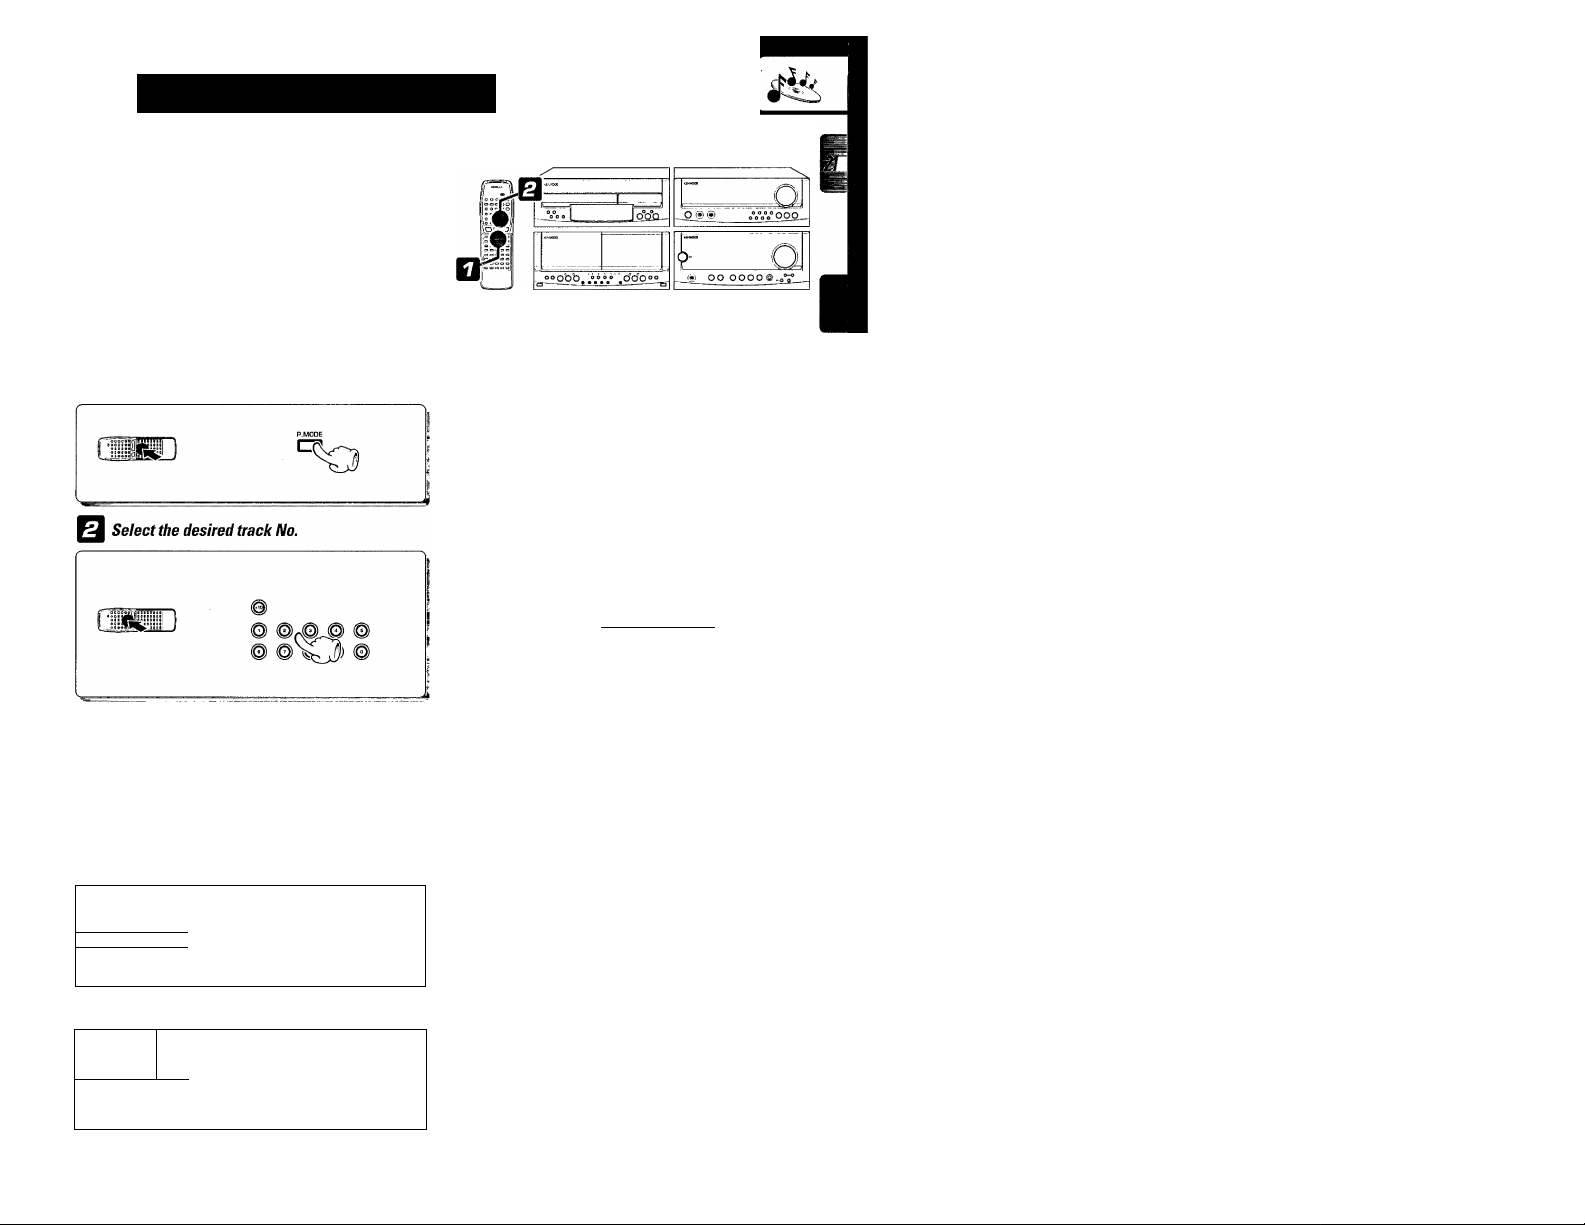
Playback from desired track
UD-703 only
For the operation of UD-753: -QS to
UD-703/753 (En)
Prepardtion *
• Load a disc in the CD player.
Check that the "TRACK" indicator is lit
• If the "TRACK” indicator is not lit, press the P.MODE key to light it.
Press the numeric keys as shown below.,,.
To enter track No, 23 :
To select track No. 40 ; |+10| |+1011+10| pTO] [o]
• Playback starts from the selected track and continues on the subsequent
tracks.
• If a track No. which does not exist on the disc is selected while the disc
tray is open, the last track on the disc will be played.
Skipping tracks
i i
UiiilL)
Searching
i Afnn
f*ID
To skip backward To skip forward
Backward search (^5) Forward search i
• The track in the direction of the pressed button is skipped, and the
selected track will be played from the beginning.
• When the key is pressed once during playback, the track being played
will be played from the beginning.
I
• Playback starts from the position where the key is released.
Page 22
■U
Programming tracks in desired order
UD-703 only
For the operation of UD-753: to
----------
\
UD-7D3/753 (En)
I
Preparation
• Select the “CD” input.
• Load a disc in the CD player.
I Press so that the "PGM" indicator lights.
I Enter track Nos. in the order you want to play
them.
“SINGLE TIME” changes to
fl 1
U 1
n f
u 1
‘TOTAL TIME".
_ n
u ■ ■ DO
1 2 3 4 5
TAL TIME B 7 8 9 ID
Displays the total playing time
of the programmed tracks.
Lights.
A.
TPGMTr
'V—^
Displays the entered track No.
for a few seconds.
TRACK
O^p-
• Up to 32 tracks can be programmed. When "FUL i" is displayed, no more
tracks can be programmed.
• If you make a mistake, press the CLEAR key and enter the track No. from
the beginning,
• Track numbers can also be selected while the tray is open.
• Tracks will be played in the order they were programmed (in order of P
Nos.).
•When the or key is pressed during playback, the track will be
skipped in the direction of the pressed button.
•When the key is pressed once during playback, the play position
returns to the beginning of the current track being played.
To Stop playback To return to playback in order of track Nos.
-- -- ----- -- --- -- -- --- -- ----- -- --- -- -- -
>1
1
LÜÜ1U
Í
C*|]
• Playback in the original order of tracks starts with the track being played.
P.MQDE “
^ !
Page 23
UD-703 only
For the operation of UD-753: to
u
UD-703/753 [En]
Auto space function |
When the SPACE key is pressed during programming of tracks, a nonrecorded space of a few seconds will be created between tracks. By
recording tracks with these spaces on tape, the search and repeat play
operations of tape using the DPSS function (which works by searching the
non-recorded spaces) can be performed reliably.
• Even when the performances of two tracks are continuous (which occurs
with classical or live recording music), the spaces will be created if they
have different track Nos.
• The displayed total playing time will include these non-recorded spaces.
• To cancel the auto space function, press the P. MODE key or the SPACE
key again.
To check the programmed tracks [ Remote control unit oniy |
CHECK
filili
To adda track to the program
To change a track in the program \ Remote control unit only |
To clear tracks from the program
QQI lights.
I //
• Each time the key is pressed, the program No. (P-NO) and the track No.
on CD are displayed.
• The previous display resumes in a few seconds.
• When a track No. is entered, the track will be added to the end of the
existing program.
■^5 P- BEu
¡lights.
NO
USp-be
• Press while the P.C. indicator is lit.
•The track being played cannot be changed.
• Each time the key is pressed, the last track in the program is cleared.
• The track being played cannot be changed.
•The entire program is cleared.
Page 24
Repeated playback
UD-703 only
For the operation of UD-753: to
Time display on CD player
Each press of the TIME key changes the displayed contents.
UD-703/753 [En]
^ Lodd 3 disc in the CD pisycr.
To repeat only the programmed tracks
raim
© Press so that the "PGM" indicator lights, f
LliiU
© Program desired tracks.
@
C*1D
1 )
CKZ)
N.
----------------------------
© ©f©..© ©
© ©
O Switch REPEAT ON.
© Start playback.
O Select the "CD" input. I
REPEAT
INPUT I
p.McmE 1
® /;£^^ : Elapsed time of track being played
(2) ;5 7 : Remaining time of track being played
® E3-HS ■ Elapsed time of entire disc
. ¡5 ; Remaining time on entire disc
• Only SINGLE TIME is displayed in RANDOM and EDIT modes.
“CD" should be displayed.
I
Lights,
rn
12 3 4 5
TtME 6 7 a 9 10
u I -D--0D
•All of the programmed tracks will be repeated.
• In case only one track is programmed, only that track will be repeated.
• Up to 32 tracks can be programmed. When "FUL L" is displayed, no more
tracks can be programmed.
______
Lights.
___________
~ ' TOTAL TIME
u5-IB--E8
To cancel repeated playback
Press the REPEAT key again.
To repeat the entire disc
“CD" should be displayed.
r'77
^ L JJ
!!!
............
Lights.
1
■ Ttpac^
n /
U 1
ITRACKI
To cancel repeated playback
Press the REPEAT key again.
Lights.
/ / / n-n n
U 1 u • u u
o- on
SINGLE TIME 1 2 3 4 5
6 7 8 9 10
RME I 2 3 4 5
, 6 7 8 9 10
Page 25

Playback in a random order (Random playback)
UD-703 only
For the operation of UD-753: to -QH
As tracks are selected at random, you can enjoy listening to for
a long time.
UD-703/753 (En]
Preparation
Check that the "TRACK" indicator is lit.
• Select the “CD” input. |t
• Load discs in the CD player. |
1
Lights.
^ . D / O S lU
n / _ n . n n 'll 12 13 14 15
/_( f L/ • iJ U 16 17 18 19 20
• If the ‘TRACK” indicator is not lit, press the P.MDDE key to light it.
• After every track, the track number display blinks and the next selected
track will be played.
In case track No, 7 is selected
n ~i
u i B--D
• Random play stops after all of the tunes have been played once.
• The random playback can also be repeated by pressing the REPEAT key.
To select anothertrack in the middle of playing one To cancel random playback
• Pressing the key once returns to the beginning of the track being •Press the RANDOM key to start normal playback,
played.
RANDOM
Page 26

Page 27

Playing tracks in order from track No. 1
UD-753 only
For the operation of UD-703: -(22 fo
Use the following procedure to play CDs in the original order of
tracks from track No. 1.
I Select the "CD" input.
Load a disc.
"CD” should be displayed.
r 77
L JJ
lui a-DD:i:v,i
UO-703/753 CEn)
T 0 3 4 5
6 7 8 9 10
11 12 13 14 15
Start playback.
To Stop playback
BFJ s-^b
m Playback starts from the selected disc and continues in order of disc Nos.
• If the ►/!! key is pressed without selecting a disc, discs will be played
automatically in the following
order; 1—2-*-3-*-4-^5-^6.
To pause playback
• Each press pauses and plays the CD alternately.
Page 28

Playback from desired track
UD-753 only
For the operation of UD-703: to -QS
UD-703/753 [En)
• Select the “CD” input.
• Load discs in the CD player.
Press SO that “PGM" indicator goes off.
Select the desired track No.
O Select the disc.
CrFn
O Select the desired track No.
© @f©„© ©
© © ©
w
.............
......................
....... _
DISC SKIP
O ® oVoVoog^
“Obb..v.v'.cfcfo°
• The disc can also be selected with the DISC SELECTOR key.
Press the numeric keys as shown below....
To enter track No. 23 : j+1Q| 1+101
To select track No. 40 ; l+IOl I+101 l+IO] 1+10]
• Playback starts from the selected track and continues on the subsequent
tracks.
• If a track No. which does not exist on the disc is selected while the disc
tray is open, the last track on the disc will be played.
m
jQ
Skipping tracks
a( nirDB
Searching
i i
mUIL)
To skip backward To skip forward
Backward search Forward search
• The track in the direction of the button pressed is skipped, and the
selected track will be played from the beginning.
• When the key is pressed once during playback, the track being played
will be played from the beginning.
• Playback starts from the position where the key is released.
•
Page 29

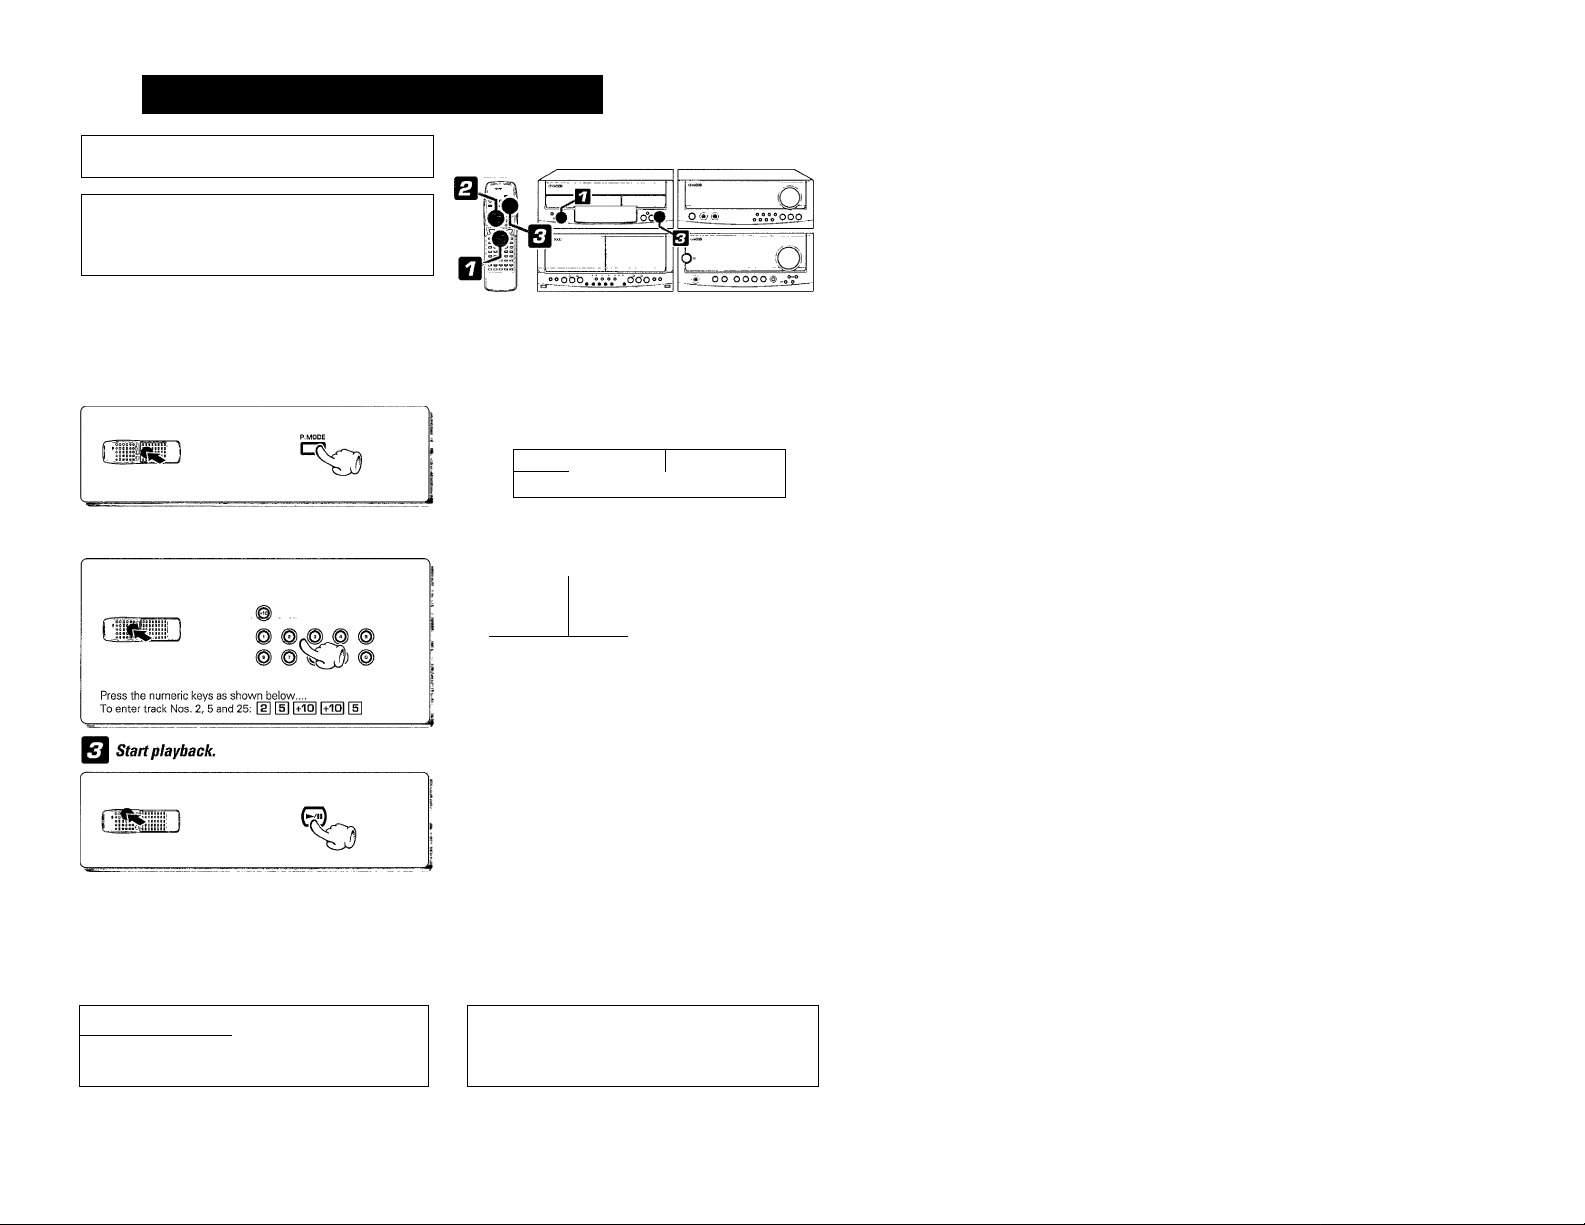
Programming tracks in desired order
UD-753 only
For the operation of UD-703: to -p
Use the following procedure to select desired tracks (up to 32
tracks) from up to 6 discs and program them in the desired
order.
Preparation
Press SO that the “PGM" indicator lights.
• Select the “CD” input.
• Load discs in the CD player.
Displays the entered track No.
6*
N0.'^ ^
™u|KNO.
^£/P P- D 1
To select tracks from more than one CD, repeat
steps O and 0 above.
Start playback
To Stop playback
• Up to 32 tracks can be programmed When "FUL L" is displayed, no more
tracks can be programmed.
• If you make a mistake, press the CLEAR key and enter the track No. from
the beginning.
• If the track No. is not selected within 8 seconds after having selected the
disc No., all of the tracks on the disc will be programmed.
• If a disc No. which is not present in the magazine is entered, it is
programmed temporarily but canceled at the time of playback.
• Tracks will be played in the order they were programmed (in order of P
Nos.).
• When the or key is pressed during playback, the track will be
skipped in the direction of the pressed button.
To return to playback in order of track Nos.
UH
• Playback in the original order of tracks starts with the track being played.
Page 30

UD-753 only
For the operation of UD-703: to
To add a track to the program
UD-703/753 [En]
Auto space function
When the SPACE key is pressed during programming of tracks, a nonrecorded space of a few seconds will be created between tracks. By
recording tracks with these spaces on tape, the search and repeat play
operations of tape using the DPSS function {which works by searching the
non-recorded spaces) can be performed reliably.
• Even when the performances of two tracks are continuous (which occurs
with classical or live recording music), the spaces will be created if they
have different track Nos.
• To cancel the auto space function, press the P.MODE key or the SPACE
key again.
•When a track No. is entered, the track will be added to the end of the
existing program.
To change a track in the program
To clear tracks from the program
lights.
505 P- 05
• Press the CHECK key repeatedly until the track No, to be changed is
displayed.
• Press while the P.C. indicator is lit
• The track being played cannot be changed.
• Each time the key is pressed, the last track in the program is cleared.
•The track being played cannot be cleared.
•The entire programmed contents are also cleared when the Open/Close
(^) key is pressed.
Page 31

Repeated playback
UD-753 only
For the operation of UD-703: -QB to -QS
Preparation
-W
To repeat ail discs
All tracks on all of the discs loaded on the disc tray will be played repeatedly.
• Select the "CD” input.
• Load discs in the CD player.
Time dispiayon CDpiayer
Each press of the TIME key changes the displayed contents.
: Elapsed time of track being piayed
j
CD -3^31
CD 33^35
• Only the SINGLE TIME displays are shown in the PGM, EDIT and
RANDOM modes.
: Remaining time of track being played
: Elapsed time of entire disc
: Remaining time on entire disc
Goes off.
lF7 D-DDi
Each press switches the repeat mode,
p- (D REPEAT
I— (2) Repeat OFF
Lights.
¡0! O-ODVs
UD-703/753 [En]
1 H 3 4 5
B 7 8 9 10
IS 13 14 15
16 17 18 19 30
1 3 3 4 5
6 7 8 g 10
13 13 14 15
16 17 18 19 30
To cancei repeated piayback
Press the REPEAT key again.
Page 32

Page 33

Page 34

Playback of tape
Tape playback
Select the "TAPE" input
UD-703/753 [En)
Press so that ‘TAPE” is displayed.
I
To Stop playback
Load a cassette tape.
i Open the door.
O Insert a tape and close the door.
Determine the playback modes.
DOLBY NR
Start playback.
Press the ◄ or ► key.
To play side B
(when side A is facing toward you)
^ O O
o o
To play side A
JRPE
•The type of tape, that is, Normal, Chrome or Metal, is set automatically.
• Remove tape slack before loading.
• Close the door securely.
Each press switches the modes as follows.
(T) “ciD" ....Endless playback occurs.
d) Playback stops after having played a side.
r
(D "z=>" .... Playback stops after having played the two sides.
(If the key is pressed, only tape side B will be played and
tape will stop after it.)
© DOLBY NR “B”
d) DOLBY NR “C”............. NR with higher performance.
r
d) DOLBY NR "OFF"
(no indication)
• Select the Dolby NR mode according to the recording condition of the tape.
•When the remote control unit is used, set the A/B switch according to the
deck to be operated.
To wind tape at high speed
........
....................
iiii --i i
...
General NR.
Dolby NR is not used.
|aQ[£)b
Press in stop mode.
To fast wind in
direction
To operate deck B
To fast wind in
direction
• Do not press the eject key until the tape has stopped completely.
• Press the ■ key to stop fast winding.
Page 35

Relay playback
Use the following proce dure to p lay tapes in dec ks A and B
alternately.
Load tapes.
Start playback.
UD-703/753 (En)
__
if
•The tape sides indicated by the tape transport direction indicators will be
played.
Each press switches the modes as follows.
® "cio" .........Relay playback does not occur with this position,
@ "Tzt"
......... Playback stops after having played one side on each of
— (3) "z=d" ...
0 DOLBY NR “B"..
d) DOLBY NR “C”
r
(D DOLBY NR “OFF”
• Select the Dolby NR mode according to the recording condition of the tape.
tapes in decks A and B.
.........
.The two sides of tapes in decks A and B will be played
repeatedly
..........
.General NR.
............
NR with higher performance.
(no indication)
..................
Dolby NR is not used.
-0@ ® oVoV oop_
r
0 0 (B)0@
o
•
Dolby Noise Reduction (NR)
The Dolby NR system is used to minimize the hiss noise heard when
playing tape. The system has the B type and C type, and the same type
should be used in recording and playback to obtain the noise reduction
effect.
When you record a tape, it is recommended to write the type used, "B"
or "C", on the cassette label.
Dolby B NR: Generally-used Dolby NR.
Dolby C NR: Features a higher noise reduction effect than the B type.
The use of Dolby C NR is recommended if you record tapes to be played
on this unit.
• Relay playback starts with the deck corresponding to the pressed key.
Transport direction indicators
The ◄ and ► indicators indicate the current direction in which the tape
advances when playback or recording is started automatically by the easy
operation function, etc. This direction is the direction stored in memory
when the tape was last stopped.
(To change the direction, press the ► key for the opposite direction then
press the ■ key.)
Transport direction indicators
Page 36

I DPSS (Direct Program Search System)
35? The DPSS is capable of detectin g non-recorde d spaces of more
I than 4 seco nds as "blanks betw een program s". It can be used
— • in four ways as described below .
Non-recorded spaces (Blank)
UO-703/753 [En]
1. Skip search
2. Dash & play
3. One-program repeat playback
4. Rewind playback
Skipsearch
: Plays the de sired music program from the beginning by skipping program s until
there.
Up to 16 pro grams can b e skip ped.
: P lays m usic programs repeatedly by skipping non-recorded spaces of m o re than 10
seconds.
: P lays a single music program repeatedly up to 16 tim es.
; R ewinds tape to the beginning an d re starts playback from there.
rrj~—I 1. The DPSS cannot be used on decks A and B simultaneously.
2. The DPSS may not function normally with the following kinds of tape,
• Tapes containing several no-sound intervals of more than 4 seconds, such as conversation and talk tapes.
• Tapes containing pianissimo sections, such as classical music tape.
• Tapes in which large noise Is recorded in blanks between programs,
• Tapes containing blanks between programs that are shorter than 4 seconds.
• Tapes recorded at low level.
• Tapes recorded by cross-fade recording (in which the beginning of next program is overlapped on the end of previous program).
Page 37

Dash & play
WM Select the playback modes.
UD-703/753 [En)
When a non-recorded space of more than 10 seconds is detected during
playback, that space isautomatically skipped byfast winding toplay only the
tape sections where sound is recorded.
Each press of the key switches the modes as follows.
® "ctD" ....The two tape sides are played 8 times, after which play
back stops.
(D „..A tape side is played 8 times, after which playback stops.
— (D .„.The two tape sides are played once times, after which
• If "zid" is selected while tapes are present in both decks A and B, Dash
& Play of the second deck starts after Dash & Play of the first selected
deck has completed. This is repeated 16 times, after which the playback
stops.
playback stops.
•
I
\ Start dash & play.
One-program repeat playback
J^windplaYback
During pia^ack of side A (while ► is lit)
floOOQ
" jr simultaneously, C' y
Press simultaneously.
During playback of side B (while M is lit)
o
Press simultaneously, g
(when side A is facing toward you) I
I M ain unit o nly I
• When the ■ key is pressed, playback stops and the dash & play i
canceled.
• The program being played will be repeated 16 times, after which normal
playback resumes.
• When the ■ key is pressed, playback stops and the one-program repeat
is canceled.
I M ain unit o nly I
•Tape is rewound until the beginning of the program being played, then its
playback starts.
Page 38

Broadcast reception
It is possib le to receive broadcasts by one-touch operations by
sto ring u p to 40 stations in the preset memory.
UD-703/753 [En]
Preparation •
Select the “TUNER” input.
Receiving broadcast station
Select the broadcast band.
Select a station.
TUNING
II -
1^0«® .v.vooa^
O'
To decrease To increase
frequency frequency
1 L -1
_ °o°oVi looa
^g^oob, .v.v
Each press alternates the band,
r- (DF-tl
L- (^Rtl (For U.K. tIR
‘«1 OO 0000@..oV _
B1.50,
Each press alternates the mode,
p- (DAUTO lit (Auto tuning)
L (DAUTO not lit (Manual tuning)
Lights.
07,5/7..
• Normally, use the AUTO (Auto tuning) mode.
Use the manual tuning mode when reception is noisy due to weak
reception. (In the manual mode, stereo broadcasts are received in
monaural.)
The ‘TUNED" indicator lights
when a station is received.
AUT^^NW^TiRSC
00.00
Lights during
stereo reception.
Auto tuning
Manual tuning : Frequencies vary continuously while the con
: Every time the control is rotated, a next station
will be received.
trol is kept rotated.
Frequency display
_ 4
0®® oVoVO®
DlSPlAYkey
Every time the DISPLAY key is pressed, the display contents change.
Each press changes the display as follows.
(T) Frequency display; The frequency being received is displayed.
I— (D Clock display : When an operation related to turning is done,
•While the power is OFF, the display shows time of the day.
For the Europe and U.K. m odels, read th e attached booklet.
these change to the frequency display for a few
seconds.
Page 39

Storing radio stations in memory (Station preset)
PrGOaration »Receive a station to be stored in preset [:
“ memory.
I Press the ENTER key during reception.
ENTER
MB
• The station being received will be stored in preset memory.
Go to step S within 5 sec.
If more than 5 seconds have elapsed, press the ENTER key again.
Select one of the preset numbers from 1 to 40.
Press the numeric keys as follows
To store the station in preset "15"
' To store the station in preset "40"; 1+101 [+10] j+IOj l+10| [o]
UD-703/753 [En]
MEMORY lights {for approx. 5 sec.).
BB.DO.
BB.BB.
____
Receiving a preset station
• Repeat steps □ 0 to preset other stations.
• If several stations are preset under the same number, the previous
memory is replaced with the latest memory contents.
• Every time the key is pressed, the preset stations are switched over as
follows.
Press A for the order of ... 38-^39-*-40-*'1...
Press V for the order of 40-^39-^38 ... 3->-2-*-1-*-40...
• When a key is held depressed, preset stations will be skipped atan interval
of about 0.5 second.
Press the numeric keys as follows
To call "15": fTiolfsl
' To call "40" ; ®
Page 40

Recording (Deck B only)
This unit incorporates the CRLS (Computer Recording Level
System), automatic recording level setting and Dolby HX Pro
headroom extension to allow excellent sound recording with
simple operation.
Preparation for recording
Load a tape in deck B.
O open the door of deck B.
© Insert a tape. _
I
Select the tape transport direction.
O Close the door.
UD-703/753 [En]
•The type of tape, that is, Normal, Chrome or Metal, is set automatically.
• Remove tape slack before loading.
•When the microphone is not used, set the MIC MIXING control fully
counterclockwise to the minimum position.
Select the recording mode.
Select the Dolby NR mode.
_o o o
•When recording is started, the tape is transported in the direction selected
in this step.
•Wind the tape to the position where recording is to be started.
Each press of the key switches the modes as follows.
® "cio"........................(Inthiscase, too, the two tape sides are recorded,
(2) "xzt"
...............
d) "z=5"
.............
Each press of the key switches the modes as follows.
DOLBY NR “B”
d) DOLBY NR “C”
(D DOLBY NR “OFF”
(no indication)..........
after which recording stops.)
tape side is recorded, after which recording
stops.
........The two tape sides are recorded, after which
recording stops.
..
B type (general type).
.....
C type (with higher performance).
Dolby NR is not used.
Page 41

Preparation
• Load a cassstte tape in the deck.
• Select the tape transport direction (◄ or ►).
• Select (two-side recording) or
(one- side recording).
• Select the Dolby NR mode.
• (insert a disc in the CD player.)
Recording (DeckB only)
UD-7G3/753 (En)
Select the source to be recorded.
Start auto recording level adjustment
O Play the contents to be recorded
(or receive the radio station to be recorded).
Blinks. . Lights.
Approx.
cRLs 20 sec. CRl-S
Start recording.
The source component to be
recorded should be displayed.
!!l..
•When the CD input is selected and if a disc has been set in the CD player,
its playback starts immediately.
•The bias adjustment consists of checking the characteristics of the loaded
tape and adjusting the deck to allow best-balanced recording. The
adjustment data are held in memory unless the power is turned OFF orthe
door of deck B is opened, so it is not required to re-adjust the bias in case
of re- recording.
• The bias adjustment is completed in approx. 45 seconds, after which the
deck enters the stop mode.
• To stop bias adjustrnent in the middle, press the ■ key.
• Even if the bias adjustment is not performed, there will be no trouble In
recording because a general bias has been set depending on the Normal,
Chrome or Metal type of tape.
• The recording level setting is completed in approx. 20 seconds, after
which the deck enters the record-pause mode.
• If recording is started during the setting (while the CRLS indicator is
blinking), distorted sound may be recorded.
• If the CRLS key is pressed during the setting (while the indicator Is
blinking), the setting is interrupted and the deck enters the record-pause
mode.
• If a non-recorded space of more than 3 seconds is detected after the
CRLS key is pressed, the recording level setting is aborted.
If the CD track to be recorded is selected without pressing the
■ key, recording on the cassette deck starts automatically.
(Synchro recording)
TUNER
* •
• Recording starts.
• Recording stops automatically when the tape side(s) to be recorded have
been recorded.
Page 42

42
UD-7G3/753 CEn]
Function ofCRLS key
The CRLS sets the recording level automatically in 20 seconds by analyzing the sound to be recorded.
If the key has never been pressed
The sound is recorded with the basic level set with the unit.
If the key is pressed
The recording level is set automatically and stored in memory as the recording level to be
used with the current input being selected (CD, TUNER, AUX, etc.). From the next time on,
this recording level is set automatically for that input even if the key is not pressed.
To return to the level used in previous recording
Press the ■ key while the CRLS indicator is blinking.
To return to the basic level
Hold the key depressed until the indicator goes off (for approx. 3 seconds).
Re-recording
I
To pause recording temporarily
• In case there is a non-recorded blank of more than 4 seconds immediately
before the recording start position, recording is aborted and tape is
rewound as shown below.
Tape stops after 2
sec. of transport.
Recorded tune
tz=b
Blank of 4 sec. or
more
• If there is no recorded tune before, the tape will be rewound then stopped.
• After leaving a non-recorded blank of about 4 seconds, the deck enters the
record-pause mode.
• When re-recording from the beginning of tape, feed the leader tape (the
first portion of tape that cannot be recorded) before starting re-recording.
• Recording will start.
• Press the • REC/ARM key to restart recording.
Tune to be
re-recorded
R 8-recording
□K
To end recording in the middle DolbyHXPm
The Dolby HX Pro headroom extension system records high frequencies
such as the cymbal sound clearly by controlling the bias current during
recording according to the frequency composition of the sound being
recorded. This system is activated automatically during recording with this
unit.
Page 43

Copying tape (Tape dubbing)
PtCpdtdtiOn * Select the tape transport direction (◄ or ►).
Start auto-bias adjustment.
Start dubbing.
Select (two-side recording) or
":=t" (one- side recording).
Approx.
AUTO BIAS 45 sec. auto bias
1^ For high-spe«d
dubbing
For normal-speed
dubbing
l>
The contents of the tape in deck A can be copied onto the tape
in deck B.
• The bias adjustment consists of checking the characteristics of the loaded
tape and adjusting the deck to allow best-balanced recording. The
adjustment data are held in memory unless the power is turned OFF or the
door of deck B is opened.
• The bias adjustment is completed in approx. 45 seconds, after which the
deck enters the stop mode.
• To stop bias adjustment in the middle, press the ■ key.
• Even if the bias adjustment is not performed, there will be no trouble in
recording because a general bias has been set depending on the Normal,
Chrome or Metal type of tape.
• Dubbing starts.
• Dubbing ends automatically when the sideisj to be dubbed has been
completed.
UD-703/753 (En)
To Stop dubbing
To pause dubbing
1. The recording level adjustment is not necessary in dubbing.
I Notes I
2. The DOLBY NR key is not active in dubbing mode. The tape recorded on deck B is given the same Dolby NR condition as the tape played
on deck A.
3. To prevent interference of noise, the unit should be separated at a distance from a TV during high-speed dubbing.
4. To avoid sound quality degradation, use the normal-speed dubbing when dubbing from a tape recorded with a high recording level.
For high-speed
dubbing
i
For normal-speed
dubbing
1)
• Both decks A and B stops.
• Only deck B enters the record-pause mode after leaving a non-recorded
space of approx. 4 seconds in case of normal-speed dubbing or approx. 6
seconds in case of high-speed dubbing.
•To skip a tune which need not to be dubbed, press the ►► key of deck A.
• To restart dubbing, press the DUBB. NOR., or DUBB. HIGH key which
was pressed to pause dubbing.
Page 44

Page 45

UD-703 only
For the operation of UD-753: to
UD-703/753 (En)
Fade-in/fade-out
Program edit recording
CD tracks are recorded in the order they are
programmed. The tune interrupted at the end of
tape side A is erased and side B starts from the
beginning of that tune, (Up to 32)
Side A
The tune interrupted in the middle at the
end of tape side B is erased. Side B
Cross-fade edit recording - W
Side A
The tune interrupted in the middle at the
end of tape side B is left as it is.
The cross-fade edit recording can be combined with a desired edit recording
function (except for AI edit recording).
Tunes are connected by fade-out and fade-
in, and the tune interrupted at the end of
tape side A is re-recorded at the beginning
of tape side B.
SideB
Fade-out Fade-in
Fade-out : Ending a tune by gradually decreasing the volume.
Fade-in : Starting a tune by gradually increasing the volume.
Cross-fade : Combination of fade-out and fade-in so that the sounds of two
tunes are overlapped.
4}
Ai edit recording -Ui
In case the recording time of tape is shorter than
the playing time of CD, all of CD tracks (Up to 32}
are accommodated byfadingoutthe ending parts.
Cross-fade
Side A
Fade edit recording
Side A
The tune interrupted in the middle at the end of
tape side B is simply faded out.
CD tracks are recorded in the order they are
recorded. The tune interrupted at the end of
tape side A is faded out and side B starts
with fading in from the middle of that tune.
(Up to 32)
Timed edit recording
The order of CD tracks are changed automati
Side A
cally so that no tune is interrupted at the end
of tape sides A and B. (Up to 32)
douzzm:
"Priority edit" function
The programmed CD tracks are recorded in priority
over other CD tracks.
la
SideB
Page 46

Page 47

Cross-fade edit recording
The cross-fade editing may be easier to understand by saying
that it is a function for cross-fading tunes rather than saying
that it edits the order of tunes. This function can be used in
combination with the desired editing method as well as in
simple recording of CD tracks in the order they are recorded on
the CD.
• Load a cassette tape in deck B.
• Select the tape transport direction {◄ or ►
• Select "c:tzi","zzD" (two-side recording).
• Select the Dolby NR mode.
• Select the "CD” input. |
»Insert disc(s) in the CD player.
I Apply desired editing to the CD tracks.
(Go directly to step S below if CD tracks are to be
recorded in the order they are recorded on the CD.)
UD-7D3/733 (En)
UD-703 only
For the operation of UD-753: to
Program editing
Timed editing
Start edit recording.
• After the editing operation, do not press the CCRS key, but return to this
page and go to step S. If the CCRS key is pressed after editing, the
corresponding edit recording will start in place of cross-fade recording.
• The recording level and bias will be adjusted automatically in approx. 90
seconds (variable depending on CD contents), after which recording
starts.
I jsjQ^gg I 1 • If a CD track which has already been faded in or out is recorded by cross-fade recording, the space between the adjacent tune may become
very long.
2. When the timed edit and cross-fade edit recording are combined, the spaces at the two extremities of A and B increase for the amount the
space is increased due to cross-fading.
Page 48

Timed edit recording
By specifying the recording time of the tape used, CD tracks can
be recorded with their order automatically changed so that no
i tune is interrupted at the end of tape sides A and B.
I
If there are favorite CD tracks to be recorded in priority over
others, they can be recorded in the beginning of tape by
programming them. (Priority edit function)
Preparation
I Select the CD tracks to be recorded in priority
(Priority editing)
(Go to step S if this operation is not required.)
Light the "EDIT" indicator.
• Load a cassette tape in the deck B.
• Select the tape transport direction (-• or ►).
• Select "cId".(two-side recording).
• Select the Dolby NR mode.
I
•Select the “CD” input. |
• Insert a disc in the CD player.
O Check that the "PGM" indicator is lit.
O Enter CD track Nos.
UD-703 only
For the operation of UD-753: “Q2 to “1^
JC
----------------------T---------------
1
-----------------
Press the numeric keys as shown below...
To enter track Nos. 2:
To enter track Nos. 25: (HUBill
To check the edited contents
To clear the edited contents
• The REPEAT key is invalid.
. O 'sJ'i' „“AVooo _
r . „
OO 0000@..oV
UD-703/753 CEn)
EDtT MODE
l=c^
Go to step El within 8 seconds^
If more than 8 seconds have elapsed, select the mode again.
Enter the recording length of the tape.
Start edit recording.
Press so that the “EDir’ indicator lights.
• To use the auto-space function, press the SPACE key after having
pressed the EDIT MODE key and go to step S. To cancel the auto-space
function, press the P, MODE key and restart the recording procedure from
the beginning.
Press the numeric keys as shown below.
30-minute tape i [TiÙÌ [Tio] piò] [o]
46-minute tape : f+io] f+ioi rPìòì is]
46-, 54-, 60- or 90-minute tapes can be selected simply by pressing the
TIME key for the required number of times, (The recording time can be
adjusted in 1-minute steps with the and keys.)
After entry, press the EDIT MODE key then proceed to step □.
• Up to 32 tracks can be edited.
• CD tracks will be edited automatically onto tape sides A and B, After
editing, the “EDIT” indicator stops blinking and starts to light steadily.
• The recording level and bias will be adjusted automatically in approx. 90
seconds (variable depending on CD contents), after which recording
starts.
•The tape and CD stop automatically when recording has completed.
Page 49

Page 50

Page 51

UD-703 only
For the operation of UD-753: to
To check the edited contents I Remote control unit only
To clear the edited contents
P.MODE
or
uE R- 0 I
• Each time the key is pressed, the edited CD track Nos. are displayed in
order,
• The "P.C.” indicator goes off in a few seconds.
J •The edited data is cleared entirely.
J
Page 52

Page 53

UD-753 only
For the operation of UD-703: -QS to -fJi]
Fade-in/fade-out
Volume decreases! Volume increases
gradually.
gradually,
I Sounds are
overlapped.
UD-703/753 (En) ’
Program edit recording
I From one CD I tracks are recorded in the order they are
'
--------------^---------
1 programmed. The tune interrupted at the end of
tape side A is erased and side B starts from the
beginning of that tune. (Up to 32)
Side A
The tune interrupted in the middle at the
end of tape side B is erased.
From more than one CD
CD tracks of several CDs are recorded in the order
they are programmed. The tune interrupted in the
middle at the end of tape side A is erased and side
B starts from the beginning of that tune. (Up to 32)
Side A
r^ir
i 7
II i^l 5 I
The tune interrupted in the middle at
the end of tape side B is erased. Side B
Fade-out Fade-in
Fade-out : Ending a tune by gradually decreasing the volume.
Fade-in : Starting a tune by gradually increasing the volume.
Cross-fade : Combination of fade-out and fade-in so that the sounds of two
tunes are overlapped.
Cross-fade
Timed edit recording
The order of CD tracks are changed automati
cally so that no tune is interrupted at the end of
tape sides A and B. (Up to 32)
Side A
SideB
Al edit recording
In case the recording time of tape is shorter
than the playing time of CD, all of CD tracks (Up
to 32) are accommodated by fading out the
Side A
If the specified tape recording length is
long enough, all CD tracks will be recorded
without being faded out.
ending parts.
'I \
Side B
Cross-fade edit recording
Tunes are connected by fade-out and fade-in, and
the tune interrupted at the end of tape side A is re
recorded at the beginning of tape side B.
Side A
The tune interrupted in the middle at the
end of tape side B is left as it is.
The cross-fade edit recording can be combined with a desired edit recording
function (except for Al edit recording).
Fade edit recording
Side A i 32)
The tune interrupted in the middle at the end of
tape side B is simply faded out.
CD tracks are recorded in the order they are
recorded. The tune interrupted at the end of
tape side A is faded out and side B starts with
fading in from the middle of that tune. (Up to
Side B
Page 54

Program edit recording
Use the following procedure to record CD tracks in the order
gji programmed by yourself so that no tune is interrupted in the
middle at the ends of tape sides.
_ I ThetuneinterruptedattheendoftapesideAiserasedandside
B starts from the beginning of that tune.
• Load a cassette tape in deck B.
• Select the tape transport direction or ►).
• Select "cio","7=D" (two-side recording}.
• Select the Dolby NR nnode.
I • Select the "CD” input. |
• Insert disc(s) in the CD player.
UD-753 only
For the operation of UD-703: to -1^
UD-703/753 (EnJ
Press so that the "PGM" indicator lights.
P.MODE
I Enter disc Nos. and track Nos. in the order you
want to record them. (Editing)
O Enter the disc No.
MD
I Within 8 seconds}
> Enter the track No.
To edit tracks from more than one CD, repeat
O and O for each CD.
To check the edited contents
To clear the edited contents
Start edit recording.
Only “SINGLE TIME” display is
shown in PGM mode.
a 3 4 s
In
Press the numeric keys as shown below....
To enter track Nos. 2, 5 and 25; [11 [Tio] pio]
Displays the entered track No.
IS ^
SSnM//
• Select CD tracks so that their total playing time does not exceed the
recording time of the tape.
• Upto32 tracks can be programmed. When "FULL" isdisplayed, no more
tracks can be programmed.
• If you make a mistake, press the CLEAR key and enter the track No. from
the beginning.
• The CCRS setting will not occur if the track No. is not selected within 8
seconds after having selected the disc No.
• The REPEAT key is invalid.
lOE P- 0 1
n- fin r
u- Liu II
_________
7 8 9 10
11 12 13 14 15
6 17 18 19 20
• The recording level and bias will be adjusted automatically in approx. 90
seconds (variable depending on CD contents), after which recording
starts.
• In editing from more than one CD, the CCRS setting operation is
performed after every disc change. In this case, the deck stops automati
cally and restart recording after having completed the CCRS operation.
rrj---------1 1. When the CCRS key is pressed during playback of CD, the playback stops and the CCRS setting (preparation for edited recording) starts.
2. The automatic recording level setting operation in the edit recording utilizes a section suitable for this purpose in the CD present in the CD
player.
3. Edit recording is not possible with CDs containing a track that is longer than one tape side, which may occur with classical music, etc.
4. If the deck is set for one-side recording (zzi), the processing at the tape end is applied only on side A.
Page 55

Cross-fade edit recording
The cross-fade editing may be easier to understand by saying
that it is a function for cross-fading tunes rather than saying
that it edits the order of tunes. This function can be used in
combination with the desired editing method as well as in
simple recording of CD tracks in the order they are recorded on
the CD.
Preparation
in case the order of tracks on CD is to be edited
in case the CD tracks are to be recorded in the
order they are recorded on CDs
• Load a cassette tape in deck B.
• Select the tape transport direction (◄ or ►).
• Select "ctD'',"z=3" (two-side recording}.
• Select the Dolby NR mode.
I • Select the “CD” input. |
• Insert disc(s) in the CD player.
O Perform the editing steps of program or
timed edit recording.
Program editing
Timed editing
© Start edit recording.
O Select the disc to be recorded.
(21 ((31
UD-703/753 [En)
UD-753 only
For the operation of UD-703: to -i3tl
• After the editing operation, do not press the OCRS key, but return to this
page and go to step ®. If the CCRS key is pressed after editing, the
corresponding edit recording will start in place of cross-fade recording.
• The recording level and bias will be adjusted automatically in approx. 90
seconds (variable depending on CD contents), after which recording
starts.
© Start edit recording.
• The recording level and bias will be adjusted automatically in approx. 90
seconds (variable depending on CD contents), after which recording
starts.
rr——I 1. If a CD track which has already been faded in or out is recorded by cross-fade recording, the space between the adjacent tune may
become very long.
2. When the timed edit and cross-fade edit recording are combined, the spaces at the two extremities of A and B increase for the
amount the space is increased due to cross-fading.
Page 56

Timed edit recording
I By specifying the recording time of thetape used, CD tracks can
be recorded with their order automatically changed so that no
tune is interrupted at the end of tape sides A and B.
UD-703/753 (En)
UD-753 only
For the operation of UD-703: -Q2 to
Preparation
• Load a cassette tape in deck B.
• Select the tape transport direction (-4 or ►
• Select (two-side recording).
• Select the Dolby NR mode.
I •Select the “CD” input. |
• Insert disc(s) in the CD player.
Press so that the "PGM" indicator goes off.
Light the "EDIT" indicator.
Go to step B within 8 seconds.
If more than 8 seconds have elapsed, select the mode again.
Enter the disc and tape conditions.
j
_ O (S' ,°oVo° OOP _
Should be OFF.
B 7 S 9 10
11 12 13 14 15
16 17 18 19 20
O'OD
Each press switches the edit modes as follows,
r- ©EDIT
L- (DAI EDIT Press so that the “EDIT” indicator lights.
•To use the auto-space function, press the SPACE key after having
Lights.
J / c r 12 13 1
U I D L 16 17 18 1
pressed the EDIT MODE key and go to step □. To cancel the auto-space
function, press the P. MODE key and restart the recording procedure from
the beginning.
/
Press the numeric keys as shown below.
30-minute tape : Fio] f?io]
46-minute tape : |+10| 1+10| 1+101 i+10| [§]
46-, 54-, 60- or 90-minute tapes can be selected simply by pressing the
TIME key for the required number of times. (The recording time can be
adjusted in 1-minute steps with the and keys.)
After entry, press the EDIT MODE key then proceed to step □.
• Up to 32 tracks can be edited.
• CD tracks will be edited automatically onto tape sides A and B. After
editing, the “EDIT" indicator stops blinking and starts to light steadily.
• The recording level and bias will be adjusted automatically in approx. 90
seconds (variable depending on CD contents), after which recording
starts.
• The tape and CD stop automatically when recording has completed.
Page 57

Al edit recording
In case the recording time of tape is shorter than the playing
time of the CD to be recorded, all of CD tracks can be accommo
dated by fading out the ending parts.
UD-753 only
For the operation of UD-703: to -gp
UD-703/753 (En]
Preparation
• Load a cassette tape in deck B.
• Select the tape transport direction (◄ or ►
• Select (two-side recording).
• Select the Dolby NR mode.
• Select the “CD" input. |
• Insert disc(s) in the CD player.
Press so that the "PGM" indicator goes off.
Enter the disc and tape conditions.
When you repeat Al edit recording (CCRS), be sure to start
from step □.
Should be OFF.
Ini /7--0D"
Each press switches the edit modes as follows,
r.- ©EDIT
L (DAI EDIT
•The SPACE key and REPEAT key are invalid.
Press the numeric keys as shown below....
30-minute tape: i+10| |+10l k1D| 0
46-minute tape: l+10| |+10| |+10| [+10| fs]
Press so that the "Al EDIT” indicator lights.
Lights.Lignis. I
d I sen
L-i-
12 3 4 5
IB 17 18 19 20
1 2 3 4 5
C-41 12 13 14 15
I vN
7 8 9 10
12 13 14 15
9 10
17 18 19 20
m
t>
46-, 54-, 60- or 90-minute tapes can be selected simply by pressing the
TIME key for the required number of times. (The recording time can be
adjusted in 1-minute steps with the and keys.)
After entry, press the EDIT MODE key then proceed to step □.
• CD tracks will be edited automatically onto tape sides A and B. After
editing, the “Al EDIT” indicator stops blinking and starts to light steadily.
• If an extremely short time is specified, editing may not occur or the CD
tracks programmed for Al priority editing may be faded out.
• The recording level and bias will be adjusted automatically in approx. 90
seconds (variable depending on CD contents), after which recording
starts.
• The tape and CD stop automatically when recording has completed.
Page 58

Fade edit recording
The tune interrupted at the end of tape side A is faded out and
side B starts with fading in from the middle of that tune. The
I tune interrupted at the end of tape side B is simply faded out.
Preparation
Press so that the "PGM" indicator goes off.
• Load a cassette tape in the deck B.
• Select the tape transport direction (◄ or *
• Select (two-side recording).
• Select the Dolby NR mode.
I •Select the “CD” input. |
• Insert a disc(s) in the CD player.
UD-753 only
For the operation of UD-703: to -ilil
Should be OFF.
D:DD
Selected disc No.
/ n /
I U I
n- nn
U‘ uu
UD-703/753 [En]
12 3 4 5
6 7 a 9 10
11 12 13 14 15
16 17 IB 19 20
12 3 4
• The recording level and bias will be adjusted automatically in approx. 90
seconds (variable depending on CD contents), after which recording
starts.
• The CD tracks are recorded in the order they are recorded on the CD.
• The tape and CD stop automatically when recording has completed.
rrj——I 1. When the CCRS key is pressed during playback of CD, the playback stops and the CCRS setting (preparing edited recording) starts,
2. The automatic recording level setting operation in the edit recording utilizes a section suitable for this purpose in the CD present in the CD
player.
3. Edit recording is not possible with CDs containing a track that is longer than one tape side, which may occur with classical music, etc.
4. If the deck is set for one-side recording (=t), the processing at the tape end is applied only on side A,
5. When the last tune of tape side B is faded out, the ending part of the last but one tune may sometimes be faded out if the space between
it and the last tune is short.
Page 59

UD-753 only
For the operation of UD-703: to
To check the edited contents \ Remote control unit only
UD-7Q3/753 (En)
To clear the edited contents
1 PGM 1
TRACK NO era
e
IDE R- a 1
• Each time the key is pressed, the edited CD track Nos, are displayed in
order.
•The “P.C,” indicator goes off in a few seconds.
• The edited data is cleared entirely.
Page 60

Tone adjustment
The system allows you to select 4 kinds of graphic equalizer
patterns and 4 kinds of presence (sound field) modes. Select
graphic equalizer patterns according to the genre of music and
select the presence modes according to the acoustic ambience
required. -22
UD-703/753 (En]
Demonstration
This feature applies various tone adjustment effects of the graphic equalizer and presence sound fields in sequence with the sound.
The display also changes as the applied effects change. Check out the tone adjustment effects both visually and aurally.
Th e graphic equalizer a nd p resence effects are dem onstrated
audibly.
Display characters scroll
HEMO
from the right to the left.
Each press of the key switches the demonstration modes as follows,
r*- ® HE MU
I— (D OFF Frequency display (demonstration OFF}
Demonstration also starts automatically when the power plug is unplugged then plugged while the power is ON or when the power supply
I Note I
has recovered from a failure.
Page 61

Playing music with the desired tone
The graphic equalizer patterns can be selected according to the genre of music played.
Play the desired music.
U0-7Q3/753 (En]
i
¥4 Select the music category.
------------
'POP
Lights, Display characters scroll
from the right to the left.
• Select the category according to the genre or contents of the nnusic
played.
Select by pressing repeatedly.
(T) PUP (Popular)
(3) JPZ 2 (Jazz)
®CLP55IC (Classic)
1— (DES OFF (Equalizer OFF)
(Rock)
Page 62

Presence effects
Various modes for reproducing the effects of presence are
available. Select the mode according to the played source or
UD-703/753 (En]
Page 63

Adjustment and playback of DOLBY 3 STEREO
The Dolby 3 STEREO provides an active center channel to
produce a better, stable center image. This mode can be
used when listening to stereo video program and music or
when surround listening or surround system set-up is not
possible.
UD-703/753 [En)
Set the Dolby 3 STEREO mode.
Adjust the volume balance.
Center mode display
ir
3 3 TERE U ■* NORtlRL
Each press changes the center modes as follows.
NDRnHL : When the center speaker is compact-sized.
'— WJi/E IflNH ; When the center speaker is medium-or large-sized.
• If you cannot tell whether your center speaker is of the compact or
medium size, try both modes and use the one that you like.
• Once the center mode is selected, it is automatically held in memory and
will not change until It is set again.
• Noise-like test tone moves across the speakers every 1.5 second.
®JE5T ¿.(Left)
® TEE J r (Center)
[
®JE5T /?(Right)
• Be sure to adjust from the listening position.
• When one of the CENTER LEVEL keys is pressed, the current volume
level is displayed. While the level is displayed, it can be adjusted in 1 dB
steps every time one of the keys is pressed.
• The volume level can be adjusted in the range from -10 to +10 dB,
• The center level is stored in memory as the common setting with the
DOLBY PRO LOGIC SURROUND mode.
gj Play a video software program.
FI Adjust the listening volume.
r
To increase I
To decrease 1
^ 1
To cancel DOLBY3 STEREO play
OFT
Page 64

Dolby Pro Logic Surround adjustment
When video (LD) software carrying nniDt*BY8URii«iB]D| mark is
played, this mode provides the Dolby Surround effect, similar
to movie theaters.
UD-703/753 [En)
I
Set the delay time.
Adjust the volume balance.
Lights up
PRD LDD ID-*
Each press changes the center modes as follows.
NURnRL : When the center speaker is compact-sized.
UIJÌE : When the center speaker is medium-or large-sized.
r
РИИи TOM : When the center spea ker is not used.
• If you cannot tell whether your center speaker is of the compact or
medium size, try both modes and use the one that you like.
• Once the center mode is selected, it is automatically held in memory and
will not change until it is set again.
Center mode display
DDRhRi
Delay time display
'IE lPY ED
•When one of the DELAY TIME keys is pressed, the delay time is displayed
and it can be varied in 5 steps.
•The delay time can be adjusted in the range from 15 to 30 ms.
• Set to the closest value to the result of delay time calculation.
• Once the delay time has been set, it is stored automatically in memory and
will not change until it is set again.
• Noise-like test tone moves across the speakers every 1.5 second.
In NORMAL or WIDE BAND mode:
QTEBJ L(Left)
(T) JEST E(Center)
(3) TEST ff(Right)
0 TEST 5(Surround)
• Be sure to adjust from the listening position.
•When one of the CENTER LEVEL keys is pressed, the current volume
level is displayed. While the level is displayed, it can be adjusted in 1 dB
steps every time one of the keys is pressed.
•The volume level can be adjusted in the range from -10 to +10 dB.
• The center level is stored in memory as the common setting with the
DOLBY 3 STEREO mode.
In PHANTOM mode:
r*- 0 TEST L (Left)
®TEST (Right)
^ (3) TEST 5(Surround)
Page 65

Dolby Pro Logic Surround play
Before using the Dolby Surround mode, be sure to
perform the "Dolby Surround field adjustment" proce
dure.
Set Dolby Surround mode.
Play video or LD software.
Adjust the volume.
PRB LDE iL
rr-f
Center mode display
NDRMflL
To cancelDOLBYSURROUNDplay
Howto calculate the delay time
The optimum delay time varies depending on the position where the
listener is located. Calculate the optimum delay time referring to the
following illustration,
Delay time (ms) = 20 ms + 3 ms x (A - B)
For example, if A = 5 m and B = 3 m;
20 ms + 3 ms X (5 - 3) = 26 ms
Use the integral value which is closest to the calculation result.
SURROUND goes off.
WLiY DFF-
A: Distance from the front speakers
B: Distance from the rear speakers
Rear speakers
Front speakers
Page 66

Enjoying music whh die presence effect (presencemodes)
The presence (sound field) mode can be selected according to the music played and to your liking.
Qj Pfay a desired music.
UD-703/753 [En]
I
Sefect a presence sound field.
--------------
• Select the category according to the genre or contents of the music
played.
Select by pressing repeatedly.
ORRE NR
Reproduction of a live feeling as if the listener is in the first row of
the arena seat.
OJR2Z EiUB
Reproduction of a jazz live house where cymbals resound.
OSJRBIUM
Reproduction of an open atmosphere with little reverberations
which are usually reflected from the ceiling,
® HI I MR5TER (Vocal canceller)
For use in Karaoke singing.
O PRESENEE OPE (Presence OFF)
Page 67

Easy Karaoke singing (HITMASTER}
To apply echo to the microphone
(Except for U.S.A., Canada, Europe, U.K., and Australia)
O '-ights.
ECHO I : Light echo effect.
CD ECHDB : Strong echo effect.
®EEHO DEE
~^EHD I
UD-703/753 [Ел)
• Use a microphone equipped with a mini-plug.
I Play the music.
I
Select HIT MASTER.
Ж
1 Щ
Sing along with the accompaniment.
To record Karaoke singing
о Perform the procedure above until step El.
о Start recording.
On
-И
PRESENCE i
• Set the MIC MIXING control to the fully counterclockwise position When
the microphone is not used.
Select by pressing repeatedly.
ORRENEI
®JRZZ ELU3
®STR]}IUM
(i)Rir MRSTER
— (E)PRE5ENEE {Presence OFF)
*
•The volume of the vocal parts of the song decreases. However, this effect
may not be clear with some songs and discs.
• Adjust the overall volume with the VOLUME CONTROL knob.
• Press the OFF key when Karaoke singing is not required.
During Karaoke singing using the song recorded on a tape, the
Karaoke sound cannot be recorded.
A Karaoke tape can be created by recording the performance while the
'MIC MIXING control is in the fully counterclockwise position.
Lights.
r T
HI
It
Display characters flow from the right to the left. I
НЯ5 ТЕ
Page 68

Timer operation
Two 24-hour timer systems (PROG.1, PROG.2) (which can be
used every day) and a sleep timer system (which works only
once) are available.
In each of PROG.1 and PROG.2, the timer data including the
operating period and played contents can be set and selected
to be activated or not as required.
Timer reservation is possible for the two types PROG.1
and PROG.2 at the same time.
• Please make reservations with an interval of at least one
minute, so that the operation times of PROG.1 and PROG.2 do
not overlap.
Jlmerpivgianjimi^^^^
Make preparations for the play (recording).
•To listen to radio •To listen to CD
The station should be Insert a disc.
preset before timer pro
gramming.
Adjust the listening volume.
(Program playback is not pos
sible.)
The CD must be loaded in
disc bank No. 1; otherwise
timer playback will not be
possible. (UD-753)
•To listen to tape
Insert a tape. Set the timer for the Make prepara
if tapes are inserted in both
decks A and B, playback starts
with the tape in deck B.
Timer playback, timer recording (PROG.1, PROG.2)
With each of the two timer programs, a selected source can be played
(or radio broadcast can be recorded) in the previously set time period.
Al timer playback (PROG.1, PROG.2)
When timer playback starts, the volume increases gradually.
Sleep timer
The power is turned OFF automatically after the specified period has
elapsed.
r®)a
i-.ddooo
•Playing the auxiliary •For broadcast
input source
component connected tions for record
to the input jacks such
as MD or VIDEO.
recordings
ing. -S4SQ
UD-703/753 [En]
I
Set the POWER switch to OFF (STANDBY) position.
A // on/st;
I Select a program No.
Press immediately after selection.]
&
• When recording a broadcast, the listening volume is automatically set to
the minimum at the moment the power is turned ON by the timer.
•The selected program No. lights.
• if a program No. under which a timer program has already been reserved,
it is replaced by the new timer program.
Each press of the key switches the program numbers as follows.
© PROG.1 (Program 1)
© PROG.2 (Program 2)
r
© Normal operation
Page 69

Enter the ON time.
о To decrease To increase
И Enter the OFF time.
ГМЕП
Make the desired reservation.
the figure figure
ШВ
To decrease j i i To increase
the figure L^J the figure
UD-703/753 [Еп]
•After entering the figure of "hour" with the procedure in O an O, enter '
the figure of "minute" using the same procedure.
ON TIME RM ^JOrn
------------------- ----------
• If you make a mistake, restart from step □ .
•After entering the figure of "hour" with the procedure in O an ©, enter
the figure of "minute" using the same procedure.
OFF
TIME RM lO^lOE
---------- -----------:---
• If you make a mistake, restart from step □ .
---------
I //
For timer playback or Al timer playback
O Select the mode.
r-P.CAU.-i
Ф Select the input source.
сё)
io
Select the broadcast station (only when TUNER Is selected above).
I—P.CAU.—I
EWBI
Select "Р/.ЯГ" or "ffJ PLRY".
(Each press alternates them.)
тал
- PEC
Enter it.
Select the source to be played.
(Each press switches the following).
Г- TUNER
ТИРЕ
МЛ
t'HEO I
VUED Р/.
ЕЛ
Enter it.
Select the preset station No.
Enter it.
• The station to be received with timer must be preset
beforehand.
At the ON time, playback starts.
fU Piny] : At the ON time, playback starts and its
volume increases gradually.
:x:§LRt^
L'Ruh^Z^TT^TX.
\\l//
a/5-
B1.50.
И Seiect the timer program No. to be used.
Timer recording of broadcasts
O Select the mode. Select “REE".
H.UAU.“!
(S) cs>
■\э
©Select the broadcast station (only when
TUNER is selected above).
Enter it.
t Ln I
PLPY
RIPL
C
ШЁЛ(Each press alternates them.)
сё)
Select the preset station No.
■^3
Each press of the key switches the program numbers as follows.
r*- PR0G.1
..........
PROG.2
PR0G.1 2
Timer OFF
• The selected program No. lights.
•The timer will not function unless a program No. is selected.
....Execution of program 1 only.
..........
Execution of program 2 only.
........
Execution of programs 1 and 2.
Enter it.
PLPY
Page 70

Ensure that the power is OFF
UD-7D3/753 (En]
Check the reservation content
When timer operation is not required
To set the same timer program again
Each press of the key swftches the program numbers as follows.
PROG.1 (Contents of the program 1 are displayed.)
PR0G.2 (Contents of the program 2 are displayed.)
[
Normal mode
•The reserved contents will be displayed for 3 seconds per item. After this,
the previous display content appears again.
To change the reserved contents
Restart the procedure of "Timer programming" from the be
ginning.
Each press of the key switches the program numbers as follows,
r*- PRQG.1 (Only the program 1 is carried out.)
PROG.2 (Only the program 2 is carried out.)
PROG.1 2 (Both programs 1 and 2 are carried out.)
Timer OFF (No timer operation is carried out)
•The reservation contents are held in memory.
Each press of the key switches the program numbers as i
r*- PROG.1 (Only the program 1 is carried out.)
PROG.2 (Only the program 2 is carried out.)
PROG.1 2 (Both programs 1 and 2 are carried out.)
Timer OFF (No timer operation is carried out)
• Also prepare the disc or tape and adjust the listening volume.
I
The reservation contents cannot be cleared. The contents are cleared only when they are changed.
[ Note
I
Page 71

Sleep timer
Set the number of minutes after which the power
is to be turned OFF.
0 Turn the power ON.
CFl
) Set the time.
I Adjust the clock before setting the timer.
UD-703/753 tEn)
• The power is turned OFF automatically after the set time has elapsed.
• Each press decreases the time by 10 minutes. The maximum time that
can be set is 90 minutes.
90“^80-^70...30-»^20-^10-^Cancel-^90^80...
Lights.
X
iLEBP
Duration for sleep timer.
To cancel
Turn the power OFF or press the SLEEP key until the sleep time
is cancelled.
C
Page 72

Maintenance
Notes on cassette tape
Safety tab (accidental erasure prevention tab)
After an important recording has been finished, break the safety tab, to
prevent the recorded contents from being erased or recorded on acciden
tally.
UD-703/753 (En)
To store cassette tapes
Do not store the tapes in a place which is subject to direct sunlight, or
near equipment that generates heat. Keep the cassette tapes away
from any magnetic field.
When there is slack in the tape
In such a case, insert a pencil into the reel hole and wind the reel hub
to remove the slack.
To re-record Apply tape only to the position where the
1.120-minute cassette tape
I Notes I
Since a 120-minute cassette tape is very thin, the tape
could adhere to the pinch roller or be easily broken. It is
recommended that these tapes not be used with this unit
to prevent possible damage.
tab has been removed.
Cleaning the head section
Cleaning the heads and peripheral com
ponents
For maintaining the best condition of the deck
and for longer service life, always keep the
heads (recording / playback / erase), capstan
and pinch roller dean. To clean them, perform
the following:
1. Open the cassette holder.
2. Using a cotton swab dipped in alcohol, clean
the head (recording / playback / erase), cap
Pinch roller
Tape guides
stan and pinch roller carefully.
There are precisely aligned parts around the heads, including the tape guides.
I Note I
When cleaning, pay special attention so as not to apply shock to them.
Beware of condensation
When water vapor comes into contact with the surface of a cold material,
condensation is produced.
If condensation occurs, correct operation may not be possible, or the unit
may not function correctly.
This is not a malfunction, however, and the unit should be dried-out.
(To do this, turn the POWER switch ON and leave the unit as it is for
several hours.)
2. Endless tapes
Do not use an endless tape, as this could damage the mechanism
of the unit.
Demagnetizing the head
When the recording / playback head is magnetized,
the sound quality will deteriorate. In such a case,
demagnetize the head using a commercially available
demagnetizer (head eraser).
Be especially careful in the following conditions:
•When the unit is brought from a cold place to a warm place, and there
is a large temperature difference.
•When a heater starts operating.
• When the unit is brought from an air-conditioned place to a place of high
temperature with high humidity.
•When there is a large difference between the internal temperature of
the unit and the ambient temperature, or in conditions where conden
sation occurs easily.
■
Page 73

Disc handling precautions
UD-7G3/753 [En]
Handling
Hold compact discs so that you do not
touch the playing surface.
Caution on disc used
Discs which can be played with this unit
CD (12 cm, 8 cm), CDV (only the audio part)
• With CD-G (CD Graphics) discs, this unit can play only the audio.
Dolby noise reduction and HX Pro headroom extension manufactured
under license form Dolby Laboratories Licensing Corporation. HX Pro
originated by Bang & Olufsen.
"DOLBY" and the double-D symbol and "HX PRO" are trademarks of
Dolby Laboratories Licensing Corporation.
When your unit needs to be repaired, bring the entire set (Speakers
excluded) to your dealer.
Cleaning
If fingerprints or foreign matter become attached to
the disc, lightly wipe the disc with a soft cotton cloth
(or similar) from the center of the disc outwards in a
radial manner.
Storage
When a disc is not to be played for a long period of
time, remove it from the CD player and store it in its
case.
Never play cracked or warped disc.
During playback, the disc rotates at high speed in the player.
Therefore, to avoid malfunction, never use a cracked or deformed disc
or a disc repaired with tape or adhesive agent.
WARNING NDTICE:
IN MOST CASES IT IS AN INFRINGEMENT OF COPYRIGHTTO MAKE
COPIES OF TAPES OR DISCS WITHOUT THE PERMISSION OF THE
COPYRIGHT OWNERS. ANYONE WISHING TO COPY COMMER
CIALLY AVAILABLE TAPES OR DISC SHOULD CONTACT THE ME
CHANICAL COPYRIGHT PROTECTION SOCIETY LIMITED OR THE
PERFORMING RIGHTS SOCIETY LIMITED.
Manufactured under license from Dolby Laboratories Licensing Corpo
ration. Additionally licensed under one or more of the following patents;
U.S. numbers3,959,590: Canadian numbers 1,004,603and 1,037,877.
"DOLBY", "Pro Logic" and the double-D symbol are trademarks of
Dolby Laboratories Licensing Corporation.
Memory backup function
Stored contents which are
cleared immediately when
power plug is unplugged from
power outlet
Stored contents which are
cleared in at least 1 day after
power plug is unplugged from
power outlet
Clock display
POWER status (ON or OFF)
Tuner unit
Surround
Receiving band
Frequency
Preset stations
Program settings
Cassette deck unit '
Transport direction 1
DOLBY NR f
Reverse mode !
-
............................
.1
Note related to transportation and movement (CD player)
Before transporting or moving this unit, carry out the following opera- I
tions.
1. Turn the power ON but do not load a disc.
• Press the ►/!! key to check that no disc is present on the tray.
2. Wait a few seconds and verify that the display shown
appears.
UD-703 UD-753
no d I SC
3. Turn the power OFF.
i
I
...no
Page 74

In case of difficulty
Operation to reset
The microcomputer may fall into malfunction (impossibility to operate
erroneous display, etc.) when the power cord is unplugged while
power is ON or due to an external factor. In this case, execute the
following procedure to reset the microcomputer and return it to normal
condition.
Amplifier unit speakers
Symptom
Sound is not produced.
The character display blinks and sound is
not produced.
Sound is not produced through head
phones
Sound is not produced from the left or
right speakers.
Sound is not produced from the sur
round (rear) speakers or center speaker
or their volume is very low.
Tuner unit
Symptom
The clock display blinks without chang
ing the figures.
Timer operation is not possible.
• The speaker cords, are disconnected.
• The volume control is set to the minimum position.
• The MUTE switch of remote control unit is
switched ON.
• The headphone plug is inserted into the jack.
• The system connection cord is disconnected.
•The speaker cords are short-circuited.
• The headphone plug is not inserted fully.
• The speaker cords are disconnected.
• The BALANCE is set completely to the ieft or
right channel.
•The rear or center speaker cords are discon
nected.
•The surround play mode is not activated.
• The rear level or center level is set to the mini
mum volume.
• There was a power failure.
•The power cord was unplugged from the outlet.
• The present time has not been adjusted or there
was a power failure.
• The timer ON time and OFF time have not been set.
•The timer execution was not set up.
Amplifier unit : Unplug the power cord from the power socket
Tuner unit : Unplug the power cord from the power socket
• Please note that resetting the microcomputer clears the contents
stored in it returns it to the condition when it left the factory.
and, while holding the POWER key, plug the power
cord into the socket again.
and, while holding the AUTO key, plug the power
cord into the socket again.
Cause Remedy
• Connect properly referring to "System con
nections".
• Adjust to an required volume. “Q2
• Switch MUTE OFF.
• Unplug the headphone plug.
• Check the connection of the system connec
tion cord. -*[43
• Turn the power OFF, remove the short-circuit
and turn the power ON again.
• Insert it into the plug.
• Connect properly referring to "System con
nections".
• Adjust the optimum left and right balance.
• Connect properly referring to "System con
nections".
• Activate a surround mode.
• Adjust the rear level or center level. —[iSj
Cause
• Adjust the present time again. —p%)
• Adjust the present time again.
• Adjust the present time referring to "Clock
adjustment".
• Set the timer ON time and OFF time.
• Press the EXE. key to set up the execution.
Remedy
UD-703/753 [En)
Radio stations cannot be received.
Noise interferes.
A station has been preset but it cannot
be received by pressing the P.CALL key.
Demonstration starts suddenly.
I
• The antennas have not been connected.
• A proper broadcasting band has not been selected,
•The frequency of the station to be received is not
tuned.
• Car ignition noise.
• Influence of an electric appliance.
•A TV set is installed near the system.
•The frequency of the preset station is not tunable.
•The preset memory has been cleared because the
power cord has been unplugged for a long period.
• The power plug was unplugged from the outlet
while the power switch was ON, or there was a
power failure.
• Connect antennas.
• Select a band, -*121]
• Tune to the frequency of the desired station.
• Install the outdoor antenna in an apart position
from the road.
• Switch the suspected electric appliance OFF.
• Install the TV or the system at an increased
distance between them.
• Preset stations with tunable frequencies.
• Preset stations again.
• This is not malfunction. Press the DEMO key
to cancel the demosnstration. *22
Page 75

Cassette deck unit
Symptom
Sound cannot be produced by pressing
the play key or no operation occurs even
when an operation key is pressed.
No operation occurs even when an operation key is pressed.
The DPSS malfunctions.
The OCRS does not function.
In dubbing, the tape stops at different
moments in decks A and B.
The cassette holder cannot be opened by
pressing the eject key.
Sound is harsh or high frequencies are
not reproduced.
UD-7Ü3/753 [En]
Cause
• The connections cords are wrong.
• The head is dirty.
•The tape is wound too tight due to irregular
winding.
• A nonrecorded tape is played.
• The cassette holder is not closed completely.
• The operation key is pressed immediately after
closing the cassette holder.
•The operation key is pressed in less than 4
seconds after turning the power ON.
• A tape is not inserted in the unit.
•The tape is wound too tight due to irregular
winding.
• The tape is fully wound to one of the reels.
• The tape used is not suitable for DPSS, for example
the spaces between tunes may be too short.
• A recordable tape is not present in deck B.
• A disc is not present in the CD player. • Place a disc in the CD playerand retry operation.
• The disc is dirty.
• This is due to the difference in the tape length or
characteristics of the mechanisms of two cas
sette decks.
• The key is pressed during recording or playback. • Press in stop mode.
• The microcomputer is malfunctioning due to
external noise.
• The head is dirty.
• The tape is stretched or shrunk. • Try another tape.
• Connect properly referring to " System connec
tions".
• Clean the head referring to "Maintenance".
•Try another tape.
• Play a recorded tape.
• Close the holder completely.
seconds after closing the holder.
• Press operation keys after waiting for more
than 4 seconds.
• Inserts tape.
•Try another tape.
• Change the tape transport direction or reverse
the tape insertion orientation.
• Insert a recordable tape in deck B and retry
operation.
• Clean the disc, place it in the CD player and try
• Small time difference does not mean a mal
function.
• Unplug the power cord and plug it again.
• Clean the head referring to "Maintenance".
Remedv
• Press operations keys in more than a few
• Refer to " Skip search ". -I22
the operation again. *[S3
-w
Sound is distorted.
Noise is noticeable.
Sound vibrates.
Recording cannot be started by pressing
the record key.
Volume of the recorded track changed.
•The tape being played was recorded with dis
torted sound.
• The tape head is magnetized.
• External noise is induced.
• Atape recorded with Dolby NR ON is played with
Dolby NR OFF.
•The capstans or pinch rollers are dirty.
• The tape is wound irregularly.
• The recording protect tab of the cassette has
been broken. protect tab or block the hole.
• The cassette holder is not closed completely. • Close the holder completely.
• The TAPE input is selected.
• The tape is fully wound to one of the reels. • Change the tape transport direction of deck B
• MIC MIXING control knob is moved during • Fully turn the MIC MIXING control knob to the
recording.
•Try another tape.
• Demagnetize the head referring to "Mainte
nance".
• Install the system at a distance from other
electric appliances and TV.
• Clean the head referring to "Maintenance".
• Wind the tape again by fast forwarding, re
winding or playing from an end to the other.
• Use a cassette with an unbroken recording
• Select the source to be recorded with the input
selector key.
or reverse the tape insertion orientation.
left.
• Set the Dolby NR to on. “(32
i
Page 76

CD player unit
Symptom
A CD is placed in the player but it cannot
be played.
Sound is not produced.
UD-7Ü3/753 (En)
Cause
• The disc is placed upside down.
• The disc position is displaced.
• The disc is extremely dirty. • Clean the disc referring to "Disc handling pre
• The disc is scratched.
• Dew is condensed on the optics lens.
• The disc has not been placed. • Place a disc in the CD player.
• The player is not put to the play mode.
• The disc is extremely dirty. • Clean the disc referring to "Disc handling pre
• The disc is scratched.
• The connection cords are not inserted securely.
facing upward.
• Place the disc properly.
• Try another disc.
• Refer to "Beware of condensation" and re
move the condensation by evaporation.
• Press the ►/!! key.
cautions".
•Try another disc.
• Connect securely.
Remedy
• Place the disc properly, with the label side
cautions". -*02
-w
Sound skips.
Remote control unit
Symptom
Remote control operation is not pos
sible.
• The disc is dirty.
• The disc is scratched.
• The player is subject to vibration.
Cause
• Batteries are exhausted.
• The remote control is too far away from the
system, the controlling angle is deviated orthere
is an obstacle in between.
•There is no tape or CD set in the component to
be played.
•An attempt is made to play the cassette deck
which is recording something.
•The A/B switch is not set properly.
• Clean the disc referring to "Disc handling pre
cautions".
• Try another disc.
• Install the unit in a place not subject to vibra
tions.
Remedy
• Replace with new batteries.
• Operate the unit inside the remote controllable
range. —QEl
• Set a tape or CD in the component to be
played.
• Wait until the recording ends.
• Set the A/B switch properly.
I 1. With some tapes, a squeaky noise is produced when the tape is stopped automatically. This is due to the tape protection, and not a
malfunction.
2. Do not use 120-minute tapes, for the tape is too thin and gets easily tangled.
3. Do not use contact cleaners because it could cause a malfunction. Be specially careful not to use contact cleaners containing oil, for they
may deform the plastic component.
Page 77

Specifications
Tuner/Amplifier unit (C-F7/ C-F7L /A-F7)
FM Tuner section
Tuning frequency range
Sensitivity (DIN at 75 Q)
MONO
Signal to noise ratio
Selectivity (DIN ± 300 kHz).............................................. 64 dB
Stereo separation (DIN at 1 kHz)..............................................40 dB
Frequency response
MW Tuner section
Tuning frequency range
Usable sensitivity
Signal to noise ratio..................................................................48 dB
LW Tuner section (U.K. only)
Tuning frequency range........................... 153 kHz ~ 279 kHz
Usable sensitivity................................................................22 ^V
Signal to noise ratio
[General]
Dimensions .......................................
Weight (net)
.......................................................
(DIN weighted at 1 kHz, 65.2 dBf input)
MONO...................................................................................65 dB
STEREO........................................................................ 62 dB
.........................................................
..........................
.............
30 Hz ~ 15 kHz + 0.5 dB, -3 dB
..........................
....................................
............................................................
W: 270 mm (10-5 / 8")
(For U.K. and Europe)
_______________
87.5 MHz ~ 108 MHz
1.2 |iV/ 13.2dBf
531 kHz ~ 1,602 kHz
12 |xV / (500 |J.V / m)
H : 104 mm (4-1 /8")
D : 334 mm (13-1/8")
2.0 kg (4.4 lb)
45 dB
UD-703/753 tEn]
Amplifier section
Rated power output (1 kHz, 5 % T.H.D. at 8 O)
........................................................................80 W + 80 W
SURROUND MODE
CENTER (1 kHz, 5 % T.H.D. at 8 Q)
REAR (1 kHz, 5 % T.H.D. at 8 Q) .......................
Signal to noise ratio
VIDEO 1,2
Input sensitivity / Impedance
Output level / Impedance
Video section
Input level / Impedance
Output level / Impedance
[General]
Power consumption
Dimensions ........................................W : 270 mm (10-5 / 8")
Weight (net)........................................................6.1 kg (13.41b)
......................................................87 dB (IHF'66)
VIDEO 1, 2
MIC...............................................................2.0 mV / 22 kO
SUPER WOOFER PRE OUT ........................
TAPE REC
VIDEO (composite)
VIDEO (composite)
.................................................. 200 mV / 33 kQ
.................................................. 200 mV / 47 kQ
.......................................
.......................................
........................................................
............................
Input (VIDEO 1, VIDEO 2 / AUX)
Output (MONITOR, VIDEO 1)
H : 124 mm (4-7 / 8")
D : 336 mm (13-1 / 4")
10 W
3 W + 3 W
2.0 V / 600 Q
1 Vp-p / 75 Q
1 Vp-p f 7B Q
150 W
I I KENWOOD follows a policy of continuous advancements in development. For this reason specifications may be changed without
notice.
For the U.S.A.
Note to CATV system installer;
This reminder is provided to call the CATV system installer's attention
to Article 820-40 of the NEC that provides guidelines for proper
grounding and, in particular, specifies that the cable ground shall be
connected to the grounding system of the building, as close to the point
of cable entry as practical.
Ivrtbe U.S.A.
CAUTION:
Use of controls or adjustments or performance of proce
dures other than those specified herein may result in
hazardous radiation exposure.
In compliance with Federal Regulations, following are re
productions of labels on, or inside the product relating to
laser product safety.
KENWOOD CORPORATION
I 2967-3, ISHIKAWA-CHO,
I HACHIOJI-SHI,
TOKYO, JAPAN
KENWOOD CORP. CERTIFIES THIS EQUIPMENT
CONFORMS TO DHHS REGULATIONS NO. 21 CFR
1040.10, CHAPTER I, SUBCHAPTER J.
Location: Back Panel
Page 78

Specifications (For U.S.A. and Canada}
Tuner/Amplifier unit (C-F7/A-F7)
FM Tuner section
Tuning frequency range..........................87.5 MHz ~ 108 MHz
Sensitivity (IHF)
Signal to noise ratio at 1 kHz
MONO
STEREO..............................................68 dB (65 dBf input)
Selectivity (IHF ± 400 kHz).................................................50 dB
Stereo separation (IHF at 1 kHz).......................................40 dB
Frequency response
AM Tuner section
Tuning frequency range
Usable sensitivity
Signal to noise ratio
[General]
Dimensions
Weight (net)
................................
13.2 dBf (1.2 |iV at 75 Q)
.................................................75 dB (65 dBf input)
.............
30 Hz ~ 15 kHz + 0.5 dB, - 3 dB
..........................
....................................
..........................................................
.........................................
.........................................................
530 kHz ~ 1,700 kHz
12 piV / (500 |liV / m)
W : 270 mm (10-5 / 8")
H : 104 mm (4-1/8")
D : 334 mm (13-1/8")
________
48 dB
2.0 kg (4.4 lb)
UD-703/753 [En)
Amplifier section
Rated power output
80 watts per channel minimum RMS, both channels
driven, at 8 from 40 Hz to 18 kHz with no more than
0.4 % total harmonic distortion.
SURROUND MOPE
CENTER (1 kHz, 1 % T.H.D. at 8 П)............................
REAR (1 kHz, 1 % T.H.D. at 8 П) .......................
Signal to noise ratio
VIDEO 1,2
Input sensitivity / Impedance
VIDEO 1,2
MIC
Output level / Impedance
SUPER WOOFER PRE OUT
TAPE REC
Video section
Input level / impedance
VIDEO (composite)
Output level / Impedance
VIDEO (composite).......................................
[General]
Power consumption..
Dimensions
Weight (net)........................................................6.1 kg (13.41b)
....................................................87 dB (IHF'66)
.............................................. 200 mV / 33 kQ
..............................................................
.................................................
..........................
.......................................
Input (VIDEO 1, VIDEO 2 / AUX)
Output (MONITOR, VIDEO 1)
.......................................................150W
.........................................
W: 270 mm (10-5 / 8")
H : 124 mm (4-7 / 8")
D : 336 mm (13-1 / 4")
200 mV / 47 kQ
10 W
3 W + 3 W
2.0 mV / 22 kQ
2.0 V / 600 О
1 Vp-p / 75 Q
1 Vp-p / 75 Q
I [yjQjg I KENWOOD follows a policy of continuous advancements in development. For this reason specifications may be changed without
notice.
For the U.S.A.
FCC WARNIIMG
This equipment may generate or use radio frequency energy. Changes or modifications to this equipment may cause harmful interference
unless the modifications are "expressly approved in the instruction manual. The user could lose the authority to operate this equipment if an
unauthorized change or modification is made.
NOTE:
This equipment has been tested and found to comply with the limits for a Class B digital device, pursuant to Part 15 of the FCC Rules. These
limits are designed to provide reasonable protection against harmful interference in a residential installation. This equipment may cause
harmful interference to radio communications, if it is not installed and used in accordance with the instructions. Flowever, there is no guaran
tee that interference will not occur in a particular installation. If this equipment does cause harmful interference to radio or television reception,
which can be determined by turning the equipment off and on, the user is encouraged to try to correct the interference by one or more of the
following measures:
- - Reorient or relocate the receiving antenna.
- - Increase the separation between the equipment and receiver.
— Connect the equipment into an outlet on a circuit different from that to which the receiver is connected.
— Consult the dealer or an experienced radio / TV technician for help.
Page 79

Specifications
Cassette deck section
Track
............................................. 4-track, 2-channel stereo
Recording system............................................AC bias system
Heads
A deck
B deck
Motors
A deck...................................................................................1
B deck..................................................................................
Fast winding time
Frequency response
Normal tape..
CrOz tape.................................80 Hz to 18,000 Hz, ± 3 dB
Metal tape
Signal to noise ratio
Dolby B NR ON
Dolby C NR ON
Dolby NR OFF........................................58 dB (Metal tape)
Harmonic distortion
Wow and flutter............................................0.09 % (W.R.M.S.)
DIN..............................................................................0.19 %
[General]
Dimensions
Weight (net)
Playback head
Playback / recording head........................... 1
Erasing head
..................................
...................... 80 Hz to 17,000 Hz, ± 3 dB
...............................
.......................................
..........................................................
..................................................
..................................
.....................................
........................................
(1 kHz, 3rd H.D., 250 nWb / m. Metal tape)
CD DlaverunitiDPzF7/DPzMF7)^ __________
CD player section
Laser
.......................................................
Playing rotation
Frequency response
Signal to noise ratio ..................................... More than 95 dB
Total harmonic distortion
.............................................Less than 0.007 % (at 1 kHz)
Channel separation
Wow & Flutter..........................................Unmeasurable Limit
[General]
Dimensions...........................................W; 270 mm (10-5 / 8")
Weight (net)
DP-F7
DP-MF7
............................ 200 rpm ~ 500 rpm (CLV)
.............................
.....................
.............................................................
...........................................................4.0 kg (4.9 lb)
(Frequency: 105 kHz)
................................................
Approx. 110 seconds
80 Hz to 18,000 Hz, ± 3 dB
66 dB (Metal tape)
W: 270 mm (10-5 / 8")
H : 124 mm (4-7 / 8")
D :300 mm (11-13/16")
Semiconductor laser
8 Hz ~ 20 kHz, ±1.0 dB
More than 88 dB (at 1 kHz)
H : 104 mm (4-1 / 8")
(C-60 tape)
73 dB (Metal tape)
Less than 3.2 %
2.7 kg (5.6 lb)
D : 320 mm (12-5/8")
2.2 kg (8.8 lb)
Speakers .
(LS-F7)
Enclosure
Speaker configuration
1
Impedance .........................................................................
1
Maximum input level..........................................................100 W
Frequency response....................................45 Hz ~ 20,000 Hz
1
(LS-F5)
Enclosure
Speaker configuration
impedance...................................................................................8 Q
Maximum input level........................................................ 100 W
Frequency response....................................45 Hz ~ 20,000 Hz
[General]
Dimensions
Weight (net)
______
_________
.........................................................
Woofer
................................................ 150 mm, cone type
Midrange
.............................................. 80 mm, cone type
Tweeter.................25 mm, Piezo-Electric dome type x 2
Tweeter
....................................... 25 mm, dome type x 1
..........................................................
Woofer
.................................................
Tweeter
...........................................
Tweeter
........
.......
. 25 mm, Piezo-Electric dome type x 1
......................................
LS-F7
..........................................
LS-F5
...........................................
___ _______
.......................................
...
.................................... 3-Way system
150 mm, cone type
65 mm, cone type x 1
..W: 215 mm (8-7 / 16")
H :456 mm (17-15/16")
D :278 mm (10-15/16")
6.5 kg (14.3 lb) (1 piece)
5.9 kg (13.0 lb) (1 piece)
UD-703/753 [En]
_____
Bass-reflex type
4-Way system
8 Q.
Bass-reflex type
' „if notice.
KENWOOD follows c
policy of continuous advancements in development. For this reason specifications may be changed without
Page 80

KENWOOD
 Loading...