

TYPE CCC20
instructions
1
3
2
5
bk
bm
bl
bn
9
76 8
4
9
bo
bp
cn co cp
bq
dk dl dm
cq cr cs ct
br bs bt ck cl cm
1a 1b
3 4
6a 6b 8
9 10
2
5
7
11

safety
Read these instructions carefully and retain for future
reference.
Remove all packaging and any labels.
Switch off and unplug the appliance before fitting or removing
tools/attachments, after use and before cleaning.
Keep body parts, jewellery and loose clothing away from
moving parts and fitted tools/attachments.
Always remove the blade before pouring contents from the
bowl.
Keep hands and utensils out of the bowl whilst connected to
the power supply.
Never leave the appliance on and unattended unless the is
displayed on the screen.
Never use a damaged appliance. Get it checked or repaired:
see “service and customer care”.
Do not exceed the 1.5 litre maximum fill level marked on the
inside of the bowl.
Never let the power unit, cord or plug get wet.
Be careful when handling or touching any part of the
appliance when being used in the cook mode or after
cooking. In particular the bowl, lid and tools as they will
remain HOT long after the appliance has been switched off.
Use the handles to remove and carry the bowl. Use oven
gloves when handling the hot bowl and hot tools.
The underside of the bowl will remain hot long after the
heating has stopped. Use caution when handling and use a
work surface protection mat when placing the bowl on heat
sensitive surfaces.
Be careful of steam escaping from the bowl particularly when
removing the lid or filler cap.
Do not remove the lid or filler cap whilst liquid is boiling.
Always fit the filler cap when using the chopping function.
2

3
Only use the bowl and tools supplied with this appliance.
Never use the bowl with any other heat source.
Never operate the appliance in the cook mode with the bowl
empty.
Do not use the lid to operate the processor, always use the
Start/Pause or Cancel button. This appliance will be
damaged and may cause injury if the interlock
mechanism is subjected to excessive force.
When using this appliance ensure it is positioned on a level
surface away from the edge. Do not position below
overhanging cupboards.
• For the correct and safe operation ensure that the bowl base
and temperature sensors are clean and dry before cooking.
• This appliance is not intended to be operated by means of an
external timer or separate remote-control system.
• Always ensure food is thoroughly cooked and is piping hot
before eating.
• Food should be eaten shortly after cooking or allowed to cool
quickly and then refrigerated as soon as possible.
• Misuse of your appliance can result in injury.
• Appliances can be used by persons with reduced physical,
sensory or mental capabilities or lack of experience and
knowledge if they have been given supervision or instruction
concerning use of the appliance in a safe way and if they
understand the hazards involved.
• Children should be supervised to ensure that they do not play
with the appliance.
• This appliance shall not be used by children. Keep the
appliance and its cord out of reach of children. Never let the
cord hang down where a child could grab it.
• Only use the appliance for its intended domestic use.
Kenwood will not accept any liability if the appliance is subject
to improper use, or failure to comply with these instructions.

4
before plugging in
Make sure your electricity supply is the same as
the one shown on the underside of your appliance.
WARNING: THIS APPLIANCE MUST BE
EARTHED.
This appliance conforms to EC directive
2004/108/EC on Electromagnetic Compatibility and
EC regulation no. 1935/2004 of 27/10/2004 on
materials intended for contact with food.
before using for the first time
Remove the plastic blade covers from the blade.
These covers should be discarded as they are to
protect the blade during manufacture and transit
only.
Wash the parts: see ‘care and cleaning’.
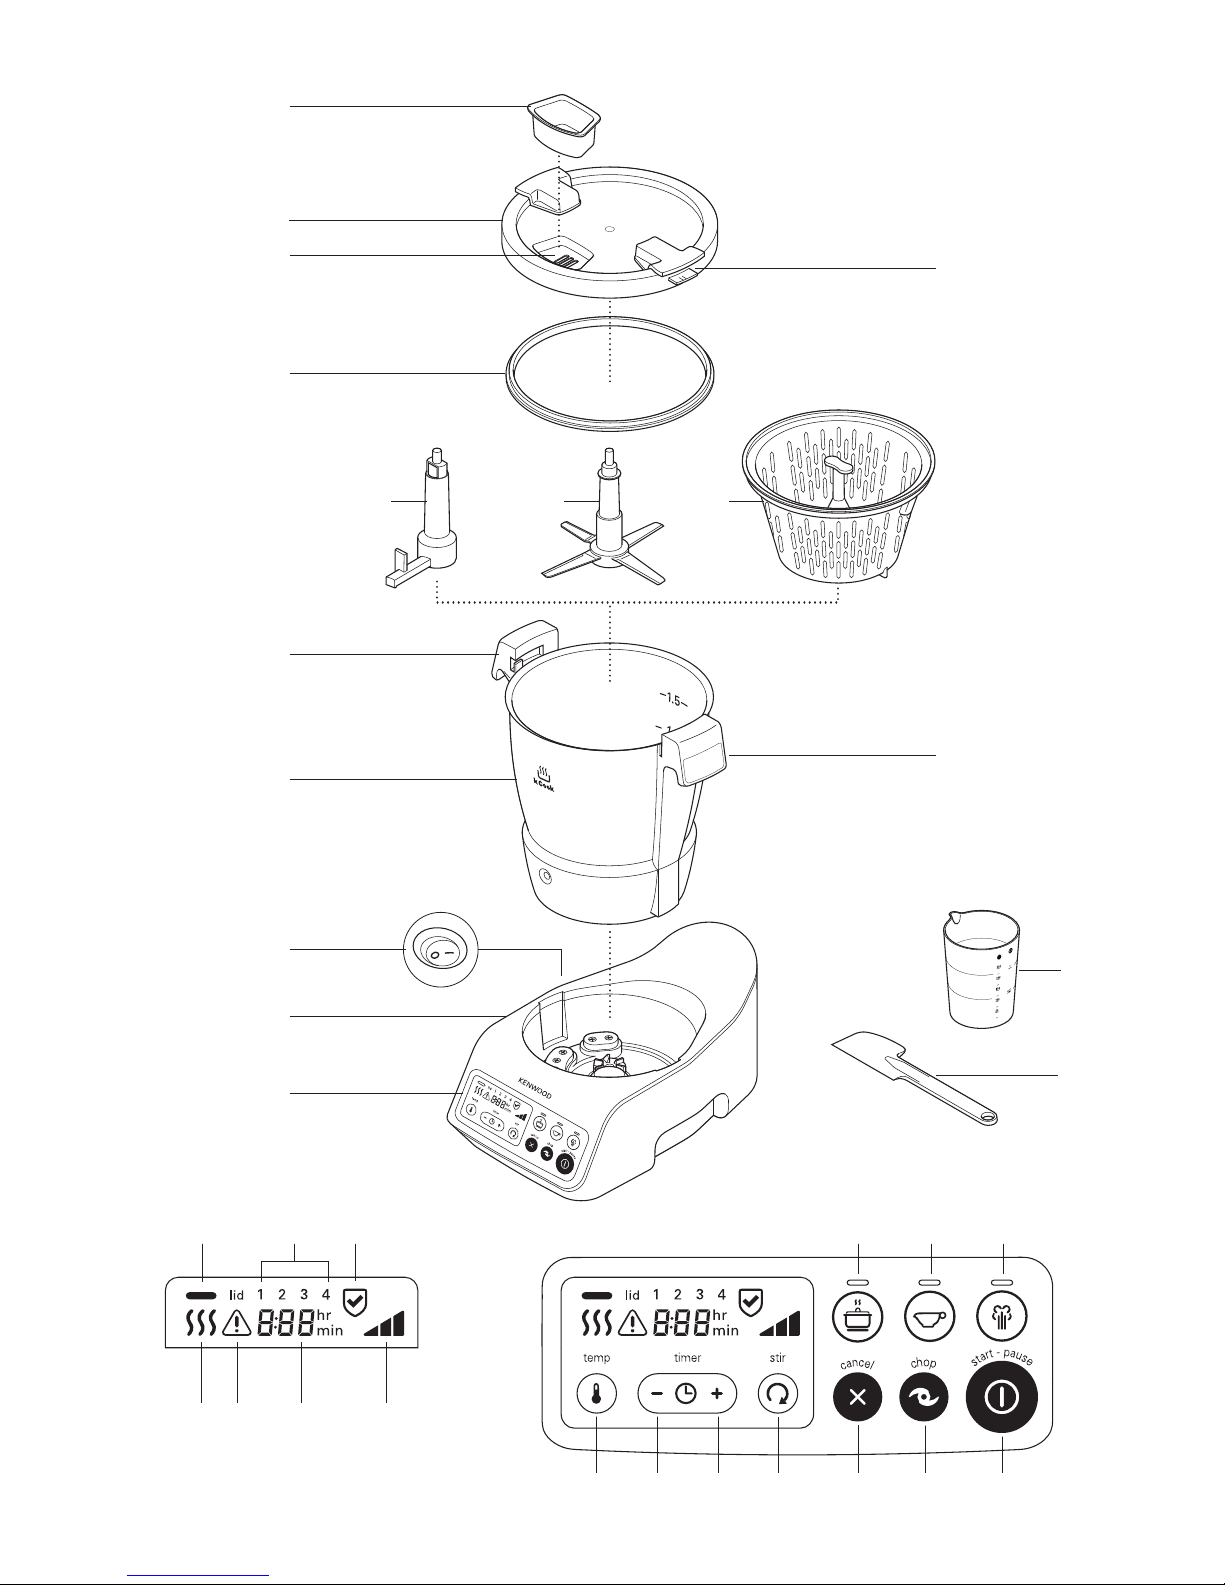
key
1
filler cap
2
lid
3
filling aperture
4
interlock tabs
5
lid seal
6
stirring paddle
7
processing blade
8
steaming basket
9
handles
bk
cooking bowl
bl
power on switch
bm
power unit
bn
display screen
bo
measuring cup
bp
spatula
bq
Temperature button
br
Time Decrease button
bs
Time Increase button
bt
Stir button
ck
Cancel button
cl
Chop button
cm
Start/Pause button
cn
One Pot programme
co
Sauce/Soups programme
cp
Steaming programme
Display screen graphics
cq
temperature selection
cr
lid removed
cs
time selection
ct
stir selection
dk
hot temperature warning
dl
programme stage
dm
cooking mode
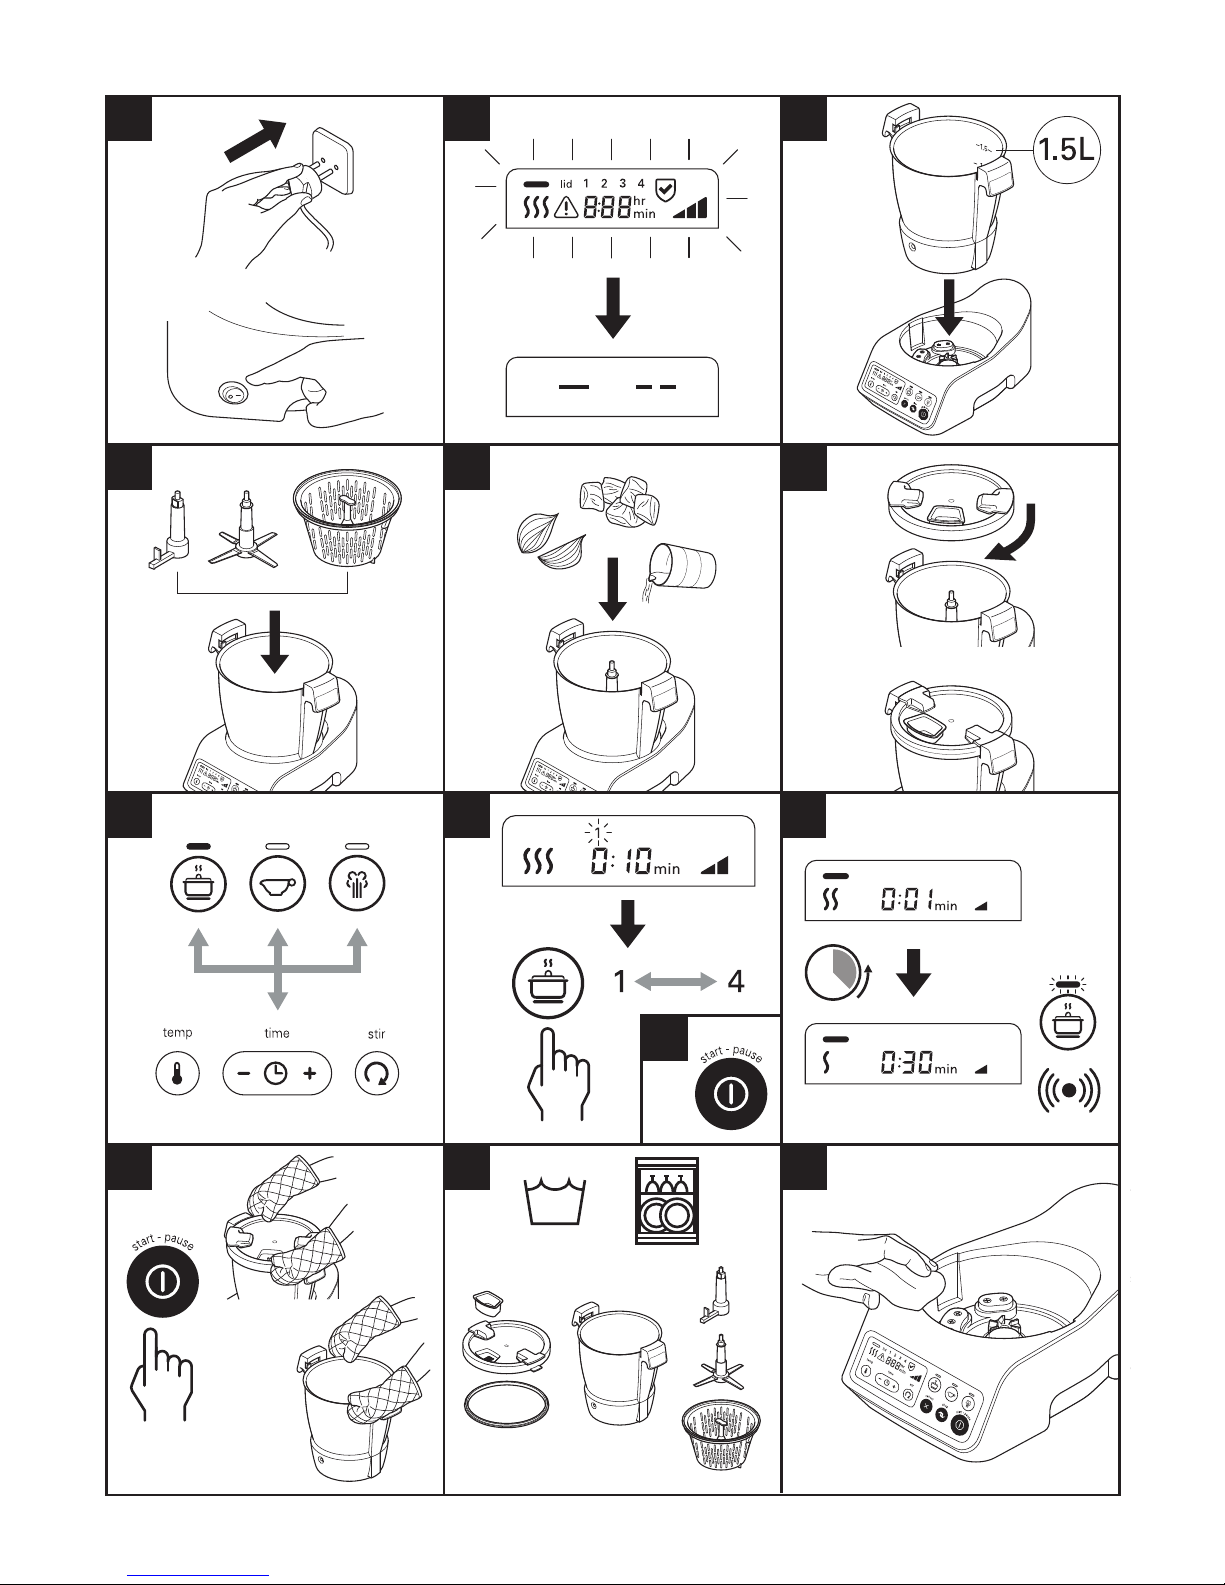
using your cooking food
processor
1 Switch on by pressing the power on blswitch on
the left side of the power unit. The unit will beep,
the programme lights will come on and the display
screen will light up for an instant. The screen will
then display - -- and go into standby mode.
2 Fit the bowl to the power unit with the capacity
markings to the back of the unit. Press down lightly
to locate.
3 Fit the stirring paddle 6blade 7or steaming
basket 8to the bowl.
Use the blade for chopping ingredients before
cooking and for pureeing after cooking is complete.
Use the stirring paddle for recipes where you want
to stir gently without breaking the ingredients down.
4 Add the relevant ingredients to be processed or
cooked.
5 Fit the lid and filler cap – filler cap positioned to the
right hand front corner. Turn clockwise until the
interlock tabs are aligned with the handles and the
filler cap is positioned to the front of the unit.
6 Select one of the following options:
Manual Cooking
One Pot programme
Sauce/Soups programme
Steaming programme
Note: When a pre-set programme button is
pressed the unit will beep and the bar above the
relevant button will light up.

5
Standby Mode
If no selection is made within 5 minutes the unit will
go into standby mode and - -- will be displayed
on the screen. Press any function to reactivate the
unit.
7 Press the Start/Pause button to start the cooking
process.
8 Once each programme stage has finished the bar
above the relevant programme button will light up
and the unit will automatically go into the Keep
Warm cycle for 30 minutes.
9 To stop the unit, press the Start/Pause button and
then remove the lid. Take care as the bowl and lid
will be hot.
Keep Warm Cycle
The Keep Warm cycle will continuously stir the
ingredients at 65°C.
To stop the Keep Warm cycle press the
Start/Pause button to pause the unit. Remove the
lid to check on the progress or add other
ingredients and then press the Start/Pause button
to resume cooking. If you press the Cancel button
during the Keep Warm cycle the programme will
return to the default settings.
When the timer has counted down to 0:00 on
either manual mode or at the end of each
programme stage the unit will automatically go into
the Keep Warm cycle for 30 minutes.
The unit will beep every 10 seconds for the first
minute and then every 30 seconds to indicate the
unit is in the Keep Warm cycle and the cooking
cycle has finished.
After cooking
Be careful when handling or touching any part of
the appliance when being used in the cook mode
or after cooking, IN PARTICULAR THE BOWL AND
TOOLS as they will remain HOT long after the
appliance has been switched off.
Use the handles to remove and carry the bowl. Use
oven gloves when handling the hot bowl and hot
tools.
The underside of the bowl will remain hot long after
the heating has stopped. Use caution when
handling and cleaning.
Hints & Tips
Raw meat and hard vegetables should be
chopped into small pieces before adding to the
bowl.
To prevent sticking or burning always use the
stirring paddle or blade when processing milk
based recipes.
Cut ingredients into even sized pieces as this will
assist with even cooking.
Where required we recommend that meats are
browned and vegetables sautéed in a pan on the
stove prior to adding to the processor bowl. The
machine is capable of softening vegetables i.e.
onions but will not colour or brown the food.
Use the spatula supplied to scrape down the
ingredients between each programme stage.

6
Display screen symbols explained
cq
Shows temperature selected
= 65°C
= 92°C
= 100°C
cr
The red warning triangle appears on the display screen if the lid is
removed or not locked into position.
cs
This is the time selected in hours and minutes.
The time will count down once the Start/Pause button is pressed.
ct
Indicates which stir function has been selected
- continuous stir – constant slow speed suitable for stirring
sauces.
- intermittent stir with short pauses. When set to this position
intermittently operate on a slow speed once every 5 seconds
for approximately 2 revolutions.
- intermittent stir with long pauses. When set to this position,
intermittently operate on a slow speed once every 30
seconds, making it suitable for stirring casseroles etc.
dk
Hot warning indicator – The red bar will appear on the display
screen if the bowl temperature is above 60°C.
dl
Indicates the programme stage from 1 to 4.
dm
When the is displayed on the screen the cooking process will
continue and no further action is required.
If leaving the appliance in this mode pay close attention to the
following:a) Ensure the instructions are followed with regards to temperatures
and maximum quantities to process. Do not over fill above the
1.5 litre mark.
b) Make sure the unit and cord are positioned out of the reach of
children and away from the edge of the work surface.
c) If the time is set for 1 hour or above check progress on a regular
basis to ensure enough liquid is added and food is not
overcooking.
d) The symbol will only display when the temperature is set to 92°C
or 65°C and when pre-set programmes are used.

7
Manual Mode
Manually select the required temperature, time, stirring or chopping function.
Hints & Tips
Once the timer has counted down to 0:00 the unit will beep and go into the Keep Warm cycle for
30 minutes. After 30 minutes has elapsed the display will go into standby mode until another selection is
made.
3 different temperature setting can be
selected.
3 settings
= 65°C
= 92°C
= 100°C
Time can be set by pressing the (-)
and (+) buttons until the required time
is reached.
Note: Hold the button down for
3 seconds to scroll through the times
more rapidly.
Time can be manually set from
1 min – 3 hrs
Three stir functions are available which enable you to select the appropriate amount of
stirring for individual recipes. Some recipes will require constant stirring to stop
ingredients from sticking to the bottom of the bowl, whereas others will benefit from
intermittent stirring to maintain the consistency of the food.
- continuous stir – constant slow speed suitable for stirring sauces.
- intermittent stir with short pauses. When set to this position intermittently
operate on a slow speed once every 5 seconds for approximately 2
revolutions.
- intermittent stir with long pauses. When set to this position, intermittently
operate on a slow speed once every 30 seconds, making it suitable for
stirring casseroles etc.
Press to cancel the programme stage or function selected at any time.
If pressed during a pre-set programme the unit will return to the default settings.
The machine can be re-started by selecting the required programme stage on
screen and pressing start.
To activate - press and hold down the button for 2 seconds and the unit will beep
when the function is cancelled.
65˚C
92˚C
100˚C
0:00 - 3:00hr

8
Manual Mode continued
Cold Ingredients
Operate in short bursts for chopping or hold down for longer burst to puree and blend
food down.
Note: The chop function does not operate continuously when the unit or ingredients
are cold. If the button is manually held down the display will countdown from 2
minutes.
Hot Unit/Ingredients (Hot Temperature Warning on display)
Note: To prevent excessive splashing the speed will be restricted following a heating
cycle or whilst the bowl/ingredients are still hot. Hold the button down and the speed
will gradually increase until the desired processing speed is reached. The button will
operate for a maximum of 2 minutes before automatically switching off.
To stop the operation before the 2 minutes has elapsed either press the Cancel button
or press the Chop button again.
The filler cap should always be fitted when using the chopping
function.
After selecting a programme or manually setting the required function, press the
Start/Pause button once to commence the cooking process.
Press the button again to pause the operation. The display screen will flash when the
unit has been paused.
If the Start/Pause button is pressed without selecting a function the unit will beep 3
times to indicate an action is required.

9
One Pot programme
cn
Use this setting for cooking stews, casseroles, curries, risotto and similar one pot recipes.
Programme Stages
Stage 1 – recommended for softening vegetables and meat before cooking.
Stage 2-3 – bring ingredients up to the boil and simmering.
Stage 4 – where extra cooking time is required or to add
delicate ingredients requiring a shorter cooking time.
Set the programme
Press the programme button and set up each stage as required. After each stage has been set you will
need to press the button again or any changes made will be lost.
Note: When the button is pressed the unit will beep and the bar above the button will light up.
Use the spatula supplied to scrape down the ingredients between each programme stage.
Programme
Stage
Display Default Setting Temperature
Range
Time Range Stirring
Options
Available
1
= 65°C
= 92°C
= 100°C
1 min – 30 mins
2
= 65°C
= 92°C
= 100°C
1 min – 30 mins
3
= 65°C
= 92°C
1 min – 2hrs
4
= 65°C
= 92°C
1 min – 2hrs

10
Note:
At the end of each stage the unit will beep and go into the Keep Warm cycle for 30 minutes until the next
stage is selected or cooking is resumed. To stop the Keep Warm cycle press the Start/Pause button to
pause the unit. Remove the lid to check on the progress or add other ingredients and then press the
Start/Pause button to resume cooking. If you press the Cancel button during the Keep Warm cycle the
programme will return to the default settings.
If the lid is removed during operation the unit will pause operation until the lid is fitted back on correctly.
Once the Start/Pause button is pressed the temperature, time and stirring selection can be changed without
cancelling the programme. Just press the relevant function button that you want to change.
If stage 4 is not set the unit will automatically go into the Keep Warm cycle for 30 minutes after stage 3.
Once stage 4 has been set and the button has been pressed the
display will return to stage 1 and show the selected temperature, time
and stir function.
Press the Start/Pause button to commence cooking.
Note: If you do not press the after stage 4 the programme will
return to the default settings.

11
One Pot programme
cn
Recipe idea for guidance – adapt to personal taste and preference.
Recipe/
Ingredients
Stage 1 Stage 2 Stage 3 Stage 4
Beef Stew Oil & Beef
Stir 2
10 minutes
100°C
Add Veg
Stir 1
15 minutes
100°C
Add Liquid
Stir 1
20 minutes
92°C
Additional
Ingredients
Stir 3
2 hours
92°C
Chilli Con Carne
(400g minced beef)
Oil & Mince
Stir 2
10 minutes
100°C
Add Liquid
Stir 1
15 minutes
100°C
Add Kidney
Beans
Stir 1
20 minutes
92°C
N/A
Chicken Casserole Soften Veg in oil
Stir 2
10 minutes
100°C
Add Flour
Stir 1
5 minutes
100°C
Add Liquid
Stir 1
10 minutes
92°C
Add Chicken
Stir 1
20 – 30 minutes
92°C
Chicken Curry Oil & Puree
Stir 2
10 minutes
100°C
Tomatoes &
Coconut Milk
Stir 1
15 minutes
100°C
Add Chicken
Stir 1
15-20 minutes
92°C
N/A
Macaroni Cheese
(900mls Milk &
250g Macaroni)
Flour & Butter
Stir 2
10 minutes
100°C
Add Milk
Stir 1
15 minutes
100°C
Add Macaroni
Stir 1
20 minutes
92°C
N/A
Paella Softening Veg
Stir 3
10 minutes
100°C
Add Rice
Stir 1
3 minutes
100°C
Add Liquid
Stir 1
15 minutes
92°C
Add Seafood
Stir 1
15 minutes
92°C
Ratatouille
Oil, Onion & Garlic
Stir 2
10 minutes
100°C
Vegetables
Stir 1
15 minutes
100°C
Simmer
Stir 1
15 - 20 minutes
92°C
N/A
Risotto
(360g rice)
Softening Veg
Stir 2
5 minutes
100°C
Rice & Wine
Stir 1
15 minutes
100°C
Additional
Ingredients
Stir 1
10 – 15 minutes
92°C
Additional
Ingredients
Stir 2
92°C
Vegetable Curry
Oil, Curry
Powder
Stir 2
10 minutes
100°C
Vegetables &
Liquid
Stir 1
40 minutes
92°C
N/A N/A

12
Sauce/Soups programme
co
Use this setting for cooking a range of sauces and soups.
Programme Stages
Stage 1 – recommended for softening vegetables and other ingredients before cooking.
Stage 2 – adding liquid and bring ingredients up to the boil and simmering.
Set the programme
Press the programme button and set up each stage as required.
After each stage has been set you will need to press the button again or any changes made will be lost.
Note: When the button is pressed the unit will beep and the bar above the button will light up.
Use the spatula supplied to scrape down the ingredients between each programme stage.
Note:
At the end of each stage the unit will beep and go into the Keep Warm cycle for 30 minutes until the next
stage is selected or cooking is resumed. To stop the Keep Warm cycle press the Start/Pause button to
pause the unit. Remove the lid to check on the progress or add other ingredients and then press the
Start/Pause button to resume cooking. If you press the Cancel button during the Keep Warm cycle the
programme will return to the default settings.
Once the Start/Pause button is pressed the temperature ,time and stirring selection can be changed
without cancelling the programme. Just press the relevant function button that you want to change.
Programme
Stage
Display Default Setting Temperature
Range
Time Range Stirring
Options
Available
1
= 65°C
= 92°C
= 100°C
1 min – 30 mins
2
= 65°C
= 92°C
= 100°C
1 min – 2hrs
Once stage 2 has been set and the button has been pressed the
display will return to stage 1 and show the selected temperature, time
and stir function.
Then Press the Start/Pause button to commence cooking.
Note: If you do not press the after stage 2 the programme will
return to the default settings.

13
Sauce/Soups programme
co
Recipe idea for guidance – adapt to personal taste and preference.
Recipe/ingredients Stage 1 Stage 2 Blade or Stirring
Paddle
Stock based soup
1.5litres
Soften Vegetables
Stir 1
10 minutes
100°C
Add Liquid & Simmer
Stir 1
15 - 45 minutes
92°C
Blade
To Puree
End of cooking puree for
1 minute using the Chop
button.
Tomato sauce
(400g chopped tomatoes)
Oil & Puree
Stir 2
10 minutes
100°C
Add Tomatoes
Stir 1
15 minutes
100°C
Stirring Paddle
Vegetable Curry Oil, Curry Powder
Stir 2
10 minutes
100°C
Vegetables & Liquid
Stir 1
40 minutes
92°C
Stirring Paddle
Bolognese Sauce
Oil & Tomato
Puree
Stir 2
10 minutes
100°C
Minced Beef/
Tomatoes
Stir 1
35 minutes
100°C
Stirring Paddle

14
Steaming programme
cp
Use this setting for steaming vegetables, chicken and fish.
1 Fill the bowl with water up to the 300ml mark.
2. Insert the steamer basket 8into the bowl with the food to be cooked.
3. Fit and lock the lid. Insert the filler cap.
4. Press the button. Note: When the button is pressed the unit will beep and the bar above the button will
light up.
5 Set the programme to the desired steaming time and press the Start/Pause button. The unit will then beep
when 100°C is reached.
Note: The time will not start to count down until the water has reached boiling point. The time shown on
the display will flash until the boiling point (100°C) is reached.
Hints & Tips
The temperature is fixed at 100°C and stirring options cannot be selected.
The cooking times are a guide only. Always check that food is thoroughly cooked before eating.
If your food is not cooked enough, reset the time. You may need to top up with water.
Leave gaps between pieces of food and do not layer the food in the basket.
Similar sized pieces of food cook more evenly.
When steaming more than 1 type of food, if something needs less time, add it later.
Do not allow the unit to boil dry, top up with water as necessary.
Programme
Stage
Display Default Setting Temperature
Range
Time Range Stirring Options
Available
Stage 1
Steaming
= 100°C 1 min – 30 mins None

15
Steaming guidelines
Food Qty Preparation Recommended
cooking time
(minutes)
Beans
Green or Runner
50g Trim and thinly slice 5 – 10
Broccoli 100g Cut into florets 10 – 15
Carrots 120g Thinly slice 10 - 15
Cauliflower 100g Cut into florets 10 – 15
New Potatoes 270g Wash and cut larger ones
into smaller pieces
10 – 15
Chicken,
Boneless Breast
3
(330g)
– 15 – 20
Fish
Fillets or Steak
2
(230g)
– 10 – 15
care and cleaning
Always switch off and unplug before cleaning.
Remove the lid and tool from the bowl before
cleaning,
power unit
Wipe with a damp cloth, then dry.
Never use abrasives or immerse in water.
bowl temperature sensors
Wipe with a damp cloth then dry thoroughly. Never
use abrasives or sharp instruments to clean the
sensors.
bowl/stirring paddle/blade
Wash the parts, then dry thoroughly.
If food sticks or burns on the inside of the bowl,
remove as much as possible using a spatula. Fill
the bowl with warm soapy water and allow to
soak. Remove any stubborn deposits using a
cleaning brush. Any discolouration of the bowl will
not affect its performance.
lid
Always remove the seal from the lid before cleaning.
To remove the seal, lift the black ring that supports
the grey seal by placing a spoon between the
black ring and clear lid. 1. Do not use anything
sharp such as a knife as this may damage the
seal.
After washing, clip the seal back into the lid - push
the seal down into place to ensure that it is
securely located 2.
Note: Leaking from the lid will occur if the seal is
not fitted correctly.
1
2

16
dishwashing
Alternatively the washable parts are dishwasher
safe and can be washed on the top rack of your
dishwasher. Avoid placing items on the bottom
rack directly over the heating element. A short low
temperature (Maximum 50°C) programme is
recommended.
service and customer care
If the cord is damaged it must, for safety reasons,
be replaced by KENWOOD or an authorised
KENWOOD repairer.
If you experience any problems with the
operation of the machine or attachments,
before calling for assistance refer to the
troubleshooting guide.
For hints/tips and recipe ideas visit the Kenwood
website: www.kenwoodworld.com
If you need help with:
using your appliance
servicing or repairs
Contact the shop where you bought your
appliance.
Designed and engineered by Kenwood in the UK.
Made in China.
IMPORTANT INFORMATION FOR CORRECT
DISPOSAL OF THE PRODUCT IN
ACCORDANCE WITH EC DIRECTIVE
2002/96/EC.
At the end of its working life, the product must not be
disposed of as urban waste.
It must be taken to a special local authority differentiated
waste collection centre or to a dealer providing this
service.
Disposing of a household appliance separately avoids
possible negative consequences for the environment
and health deriving from inappropriate disposal and
enables the constituent materials to be recovered to
obtain significant savings in energy and resources. As
a reminder of the need to dispose of household
appliances separately, the product is marked with a
crossed-out wheeled dustbin.
Item Suitable for dishwashing
Bowl
Lid and seal
Stirrer
Processing blade
Steamer basket

17
Problem Cause Solution
No power to appliance /display
screen not coming on.
Appliance not plugged in.
Power ON switch not operated.
Check appliance plugged in.
Press the Power ON switch blto
the On position.
Appliance not operating. Bowl not located correctly.
Start not pressed.
Time not set.
Check bowl is located to power
unit correctly.
Press the Start button to start
cooking.
Check time set.
Food sticking or burning on
bottom of bowl.
Stirring paddle or blade not fitted
when softening vegetables.
Temperature selected too high.
Always use the stirring paddle or
blade.
Check correct temperature has
been selected.
Leaking from lid during processing. Lid seal not fitted correctly to lid. Refer to “care and cleaning” for
how to fit the seal.
Display shows
Lid not closed correctly. Check that lid interlock tabs are
inserted into handles correctly.
Display shows error message E01,
E02, E04.
Unit not functioning correctly. Switch off and unplug the unit and
wait 30 seconds. Plug back in, if
this does not resolve the problem
refer to the “service and customer
care” section.
Display shows error message E03 Unit stalled or overloaded. Reduce the ingredients in the
bowl, switch off and allow the
unit to cool down for 15 minutes
before restarting.
Display shows H2O whilst using
the steaming programme.
Boil Dry protection activated.
No water or run dry during
operation.
Switch off and then switch back
on.
Add water to 300 mls
troubleshooting guide
 Loading...