

Kenwood TT756SL, RadiaFaster TT755 SERIES, RadiaFaster TT756 SERIES User Manual
COD. 6035101300 Rev. 1 del 01/04/2005
TT755 / TT756 SERIES
Kenwood Limited
New Lane - Havant
Hampshire P09 2NH
UK
Phone: 023 9247 6000
Fax: 023 9248 0214
825440
FOR BEST RESULTS
PLEASE INSERT BREAD
IN A HORIZONTAL POSITION
POUR LES MEILLEUR RÉSULTANTS,
S.V.P. METTEZ LE PAIN DANS LE
POSITION HORIZONTAL.
Warning: Changes or modifications to this unit not expressly approved by the party responsible for compliance could void the user's authority to operate the equipment.
Mise en garde: Toute altération ou modification à cet appareil qui n’a pas été explicitement
approuvée par l’organisme responsable du respect du règlement pourra annuler le droit de
l'utilisateur de faire fonctionner l’équipement.
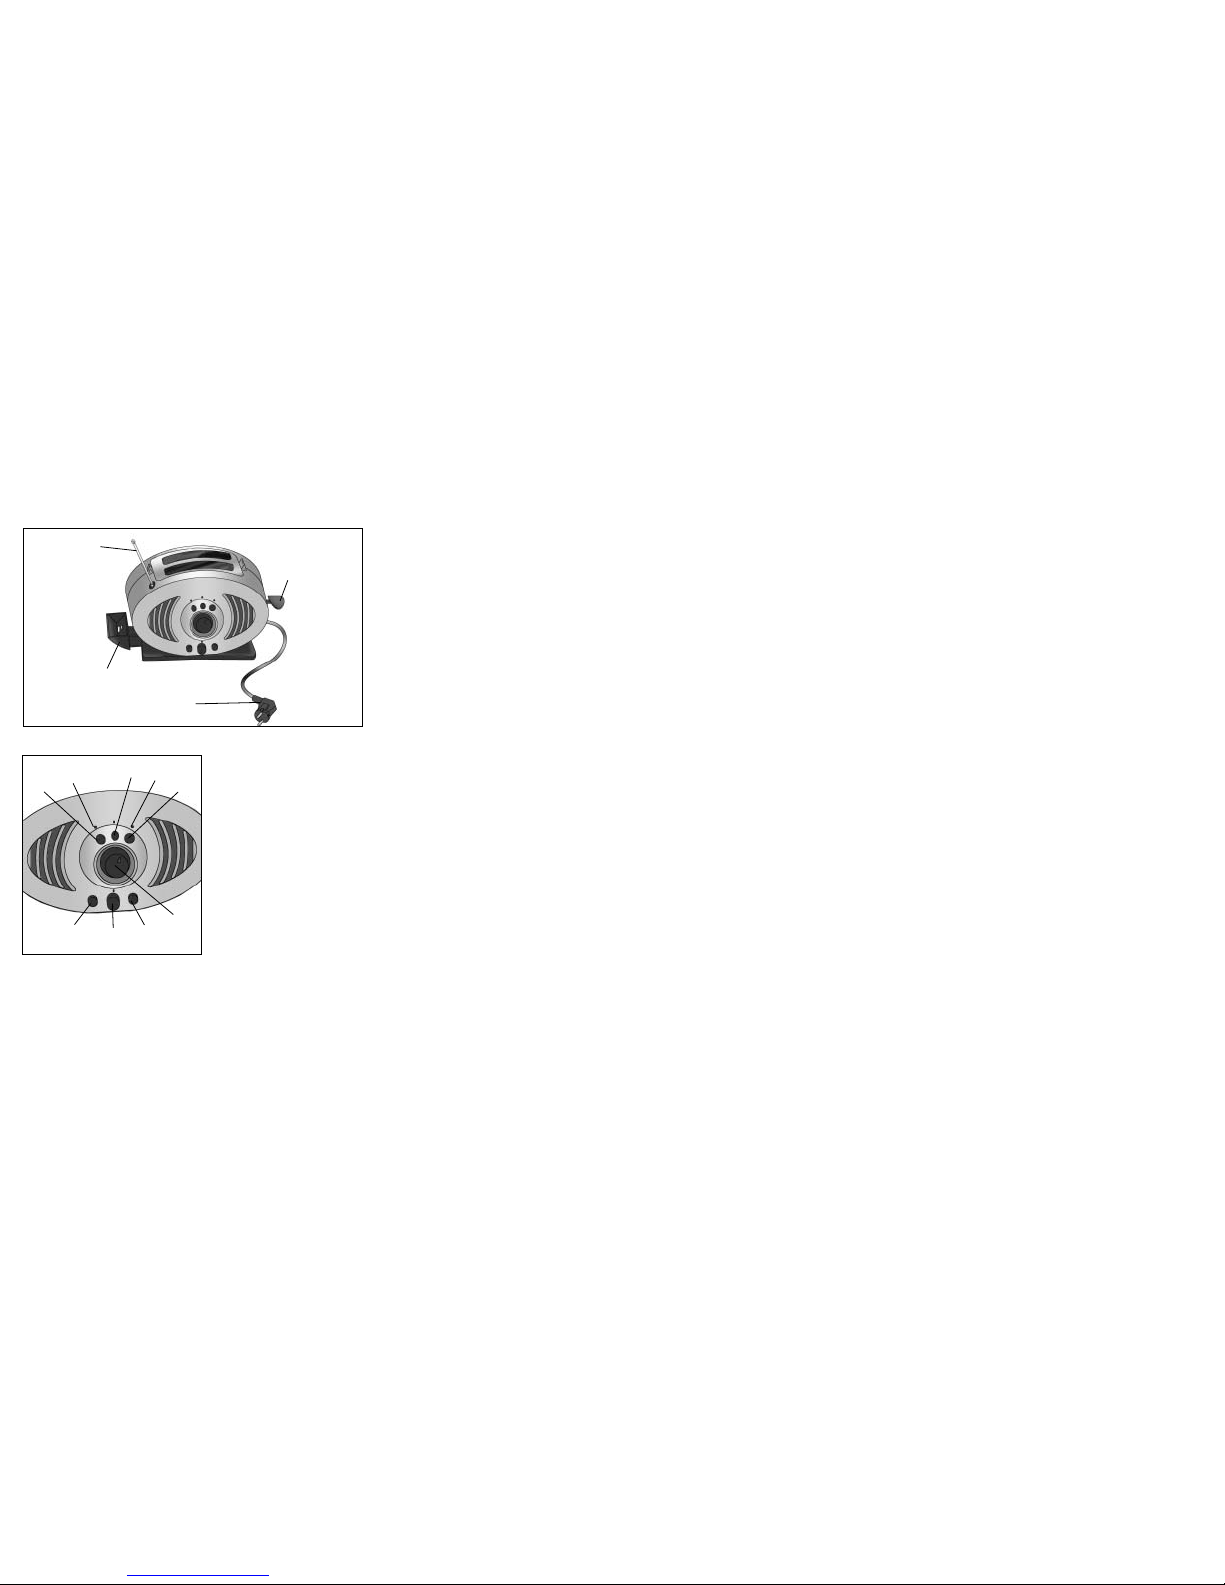
Fig. 1
C
B
D
A
Fig. 2
E
F
G
I
H
J
M
K
L

1
GB
IMPORTANT INFORMATION
• Read the instructions carefully before use.
• The appliance is to be used only for the use for which it was expressly designed. All other
uses are to be considered unfit and therefore dangerous.
• This product is intended for household use only; it may not be operated for commercial or
industrial purposes.
• Make sure the product is in good condition after you have removed the packing. In case of
doubt, contact only an authorized center.
• Before you connect the appliance to the supply mains, check that the voltage indicated on
the data plate found underneath the machine corresponds to that of the local mains.
• Always plug the appliance to a grounded electrical outlet.
• Use of extension cords not authorized by the appliance’s manufacturer may cause damage,
injuries and accidents.
• The power cable must not come into contact with hot surfaces.
• Do not leave this appliance unattended when it is plugged in.; always unplug immediately
after use.
• Keep away from heated surfaces.
• Remove the plug from the socket-outlet before any cleaning or maintenance operation.
• Never leave the appliance in operation within the reach of children.
• If the power cable is damaged, it must be replaced by the manufacturer or by its Technical
Assistance department or in any case by a person with similar qualifications so as to prevent all risks.
• After having disconnected the power plug and after all the hot parts have cooled down, the
appliance must be cleaned only with a non-abrasive, slightly dampened cloth, adding a few
drops of neutral, non-aggressive detergent (never use solvents that damage the paint). Do
not immerse the appliance in water or other liquids.
• Never touch the appliance with wet or damp hands.
• Never use sharp metal utensils for cleaning the interior of the appliance.
• We recommend you operate the toaster empty for a few minutes the first time it is used.
This is so as to completely eliminate the fumes caused by the machining of the resistor.
• The accessible parts of the appliance become hot during use. Avoid touching them.
• Do not set dishes or other objects on top of the toaster during use.
• The bread may burn, so the toaster must not be used underneath or near curtains or other
combustible materials. It must also be watched.
• Do not insert more than one slice in each slot.
• Never put the live parts in contact with water. It can cause a short circuit!
• In the event of faults, defects or a suspected defect following a fall, immediately take the

2
GB
plug out of the socket-outlet. Never put the defective appliance into operation. ONLY
AUTHORIZED SERVICE CENTERS CAN MAKE REPAIRS. The manufacturer declines
all responsibility for any damage caused by repair jobs performed incorrectly.
• Do not put forks or other utensils inside the toaster to remove the bread since
they could damage the resistors of the appliance.
• Do not twist the power supply chord, or wind it around the toaster while still warm.
• Set the browning control knob to a lower setting for dry or thin bread.
• Do not insert your hands or metallic components of any kind (i.e. knives or
aluminium foil) inside the toasting slots.
ALWAYS KEEP THESE INSTRUCTIONS
This appliance is in conformity with directive 89/336 EEC regarding electromagnetic
compatibility.
The Kenwood kitchen line includes a wide range of products that are easy and quick to
use in the kitchen, comprising: blenders, mixers, centrifuges, citrus-fruit squeezers,
mincers, deep-fryers, pepper grinders, robots, immersion blenders, electric graters,
vegetable mills, etc.
Have fun cooking every day with Kenwood products!
OPERATION PRECAUTIONS
• Do not use slices of bread that are too thin or broken.
• Do not put in food products that may drip during toasting. In addition to making cleaning difficult and
time-consuming, they can cause fires. It is also important to clean the crumb tray (A) of any drippings
before every use.
• Do not insert food product that are too large by forcing them in.
• Do not put forks or other utensils inside the toaster to remove the bread since they
could damage the resistors of the appliance. RISK OF ELECTRIC SHOCKS.
DESCRIPTION OF THE COMPONENTS
A Crumb tray
B Directional radio antenna
C On lever
D Power supply cable
DESCRIPTION OF THE CONTROLS
E Thaw button
F Thaw button pilot light
G Stop heating button
H Bagel button
I Bagel button pilot light

3
GB
J Toasting level adjustment knob
K Radio on and volume adjustment knob
L Radio station search button
M Radio frequency reset button
INSTALLATION
Keep the original packing for future use if it should prove necessary. It is the best way to properly protect it from being damaged during transportation. Carefully follow the directions given in the
section “IMPORTANT INFORMATION” before you install the appliance.
INSTRUCTIONS FOR USE
Keep the appliance on for a few minutes the first time it is used so as to get rid of the
“new” odor and the fumes caused by the machining of the resistors.
Preparing toast
Put the slices of bread inside the slits of the toaster and lower the on lever (C) until it locks into place.
Note: if the appliance is not plugged in, the lever does not lock.
Adjust the toasting lever with the knob (J). Wait a few minutes and after the toast is automatically ejected, check its toasting level. If the toast is not browned enough, select a higher toasting level. If, on the
other hand, it is too dark, select a lower level.
Press the button (G) at any time to stop the toasting process.
Press the button (G) to turn the appliance off and disconnect the plug from the socket-outlet.
Preparing bagel
Put the bagel inside the slits of the toaster with the cut part towards the internal side of the toaster and
lower the on lever (C) until it locks into place.
Note: if the appliance is not plugged in, the lever does not lock.
Adjust the toasting lever with the knob (J). Wait a few minutes and after the bagel is automatically ejected, check its toasting level. If the bagel is not browned enough, select a higher toasting level. If, on the
other hand, it is too dark, select a lower level.
Press the button (G) at any time to stop the toasting process.
Press the button (G) to turn the appliance off and disconnect the plug from the socket-outlet.
Thawing function
You can toast frozen slices of bread by pressing the button (E) Fig. 2 right after you lower the lever (C)
and by setting the browning control knob (J) onto 1. If you wish to cook, rather than defrosting, the knob
will have to be set onto darker settings (i.e. 3, 4 or 5).The red pilot light (F) will stay on as long as the
thawing function is in use.
Bagel function
Lower the on lever (C) and press the bagel button (H). The bagel pilot light (I) will stay on while this
function is in use.

4
GB
Radio Function
To turn it on, turn the knob (K) clockwise and adjust the volume. Extract the directional antenna (B) and
use the push-button (L) to search for the radio stations. To return to the beginning of the radio frequencies, press the reset button (M) and start again with the search using the button (L). The radio mode
remains active during the toasting cycle.
CLEANING
It is severely forbidden to disassemble the appliance or to try in any way to work on it inside.
Keeping the appliance clean and tidy will ensure you will get optimum toasting and a longer lifetime of
the appliance.
• Turn off the appliance by pressing the button (G) and remove the plug from the socket-outlet before you start to clean it.
• Wait for the appliance to cool down before cleaning.
• Use only a slightly dampened cloth.
• Do not immerse the appliance in water or other liquids.
• Always dry the appliance parts by hand without putting them in an oven or microwave.
• Never use sharp metal utensils for cleaning the interior of the appliance.
• Unplug the appliance and empty the crumb tray (A) after each use.
From time to time clean the exterior of the appliance with a damp cloth and then dry. Do not use abrasive detergents since they could ruin the surface.
 Loading...