

Page 1

1
Setting up your
Kenwood
Audio System
Spectrum 350
Page 2

2.
Licensing
Manufactured under license from Dolby Laboratories
Licensing Corporation. Additionally licensed under one
or more of the following patents: US numbers 3,632,886;
3,746,792; and 3,959,590; Canadian numbers 1,004,603
and 1,037,877. ‘Dolby’, and the ) symbol are trademarks of Dolby Laboratories Licensing Corporation.
Page 3
Safety first
3.
WARNING:
TO PREVENT FIRE OR ELECTRIC SHOCK, DO NOT
EXPOSE THIS UNIT T O RAIN OR MOISTURE.
Safety Symbols
We’ve placed these safety symbols on the back of the unit.
CAUTION:
To prevent electric shock, match the wide blade of the plug to the wide slot
in a wall socket, and insert fully.
The lightning bolt symbol is to alert you to the danger of
electric shock from the operating of electric parts inside
the unit.
The exclamation point symbol is to let you know that there
are important operating and servicing instructions in this
manual that you should read before you operate this unit.
Canadian IC Compliance Notice
This device complies with RSS-210 of Industry Canada. Operation is subject to the following two
conditions: (1) this device may not cause interference, and (2) this device must accept any
interference, including interference that may cause undesired operation of the device.
Rechargeable Battery Warning
If this unit uses a rechargeable battery, use the battery charger that came with the unit only. Do
NOT take apart, damage, burn, or short circuit the battery, or expose it to heat—this could
cause it to burst or to release toxic materials. Keep the battery away from children.
About the power supply
This unit is designed for operation in the USA
and Canada using a power supply of AC 120
volts only.
Safety Precautions
Read this page carefully to ensure safe
operation.
Please read all of the safety and operating
instructions before operating this unit.
Adhere to all warnings on the unit and in this
manual. Follow all the safety and operating
instructions. These safety and operating
instructions should be retained for future
reference.
1 Power sources. The unit should be
connected to a power supply only of the
type described in this manual or as
marked on the unit. If you are not sure of
the type of power supply to your home,
consult your unit dealer or local power
company. For units intended to operate
from battery power, or other sources,
refer to the instruction manual.
2 Power-cord protection. Power
supply cords should be routed so that
they are not likely to be walked on or
pinched by items placed upon or against
them, paying particular attention to cords
at plugs, convenience receptacles, and the
point where they exit from the unit.
3 CAUTION—Polarization. This unit
may be equipped with a polarized alternating-current line plug (a plug having one
blade wider that the other). This plug will
fit into the power outlet only one way.
This is a safety feature. If you are unable
to insert the plug fully into the outlet, try
reversing the plug. If the plug should still
fail to fit, contact your electrician to
replace your outlet. Do not defeat the
safety purpose of the polarized plug.
4 Ventilation. Slots and openings in the
cabinet are provided for ventilation and
to ensure reliable operation of the unit
and to protect it from overheating, and
these openings must not be blocked or
covered. The unit should be situated so
that its location or position does not
interfere with its proper ventilation.
To maintain good ventilation, do not put
records or a table-cloth on the unit. Place
the unit at least 4 inches away from the
walls.
CAUTION
RISK OF ELECTRIC SHOCK
DO NOT OPEN
!
!
Page 4
Do not use the unit on a bed, sofa, rug or
similar surface that may block the ventilation openings. This unit should not be
placed in a built-in installation such as a
bookcase or rack unless proper ventilation is provided or the manufacturer’s
instructions have been adhered to.
5 Water and moisture. The unit should
not be used near water. for example,
near a bathtub, washbowl, kitchen sink,
laundry tub, in a wet basement, or near a
swimming pool, etc.
6 Temperature. The unit may not func-
tion properly if used at extremely low, or
freezing temperatures. The ideal ambient
temperature is above +41ºF.
7 Heat. The unit should be situated away
from heat sources such as radiators, heat
registers, stoves, or other units (including
amplifiers) that produce heat.
8 Electric Shock. Care should be taken
so that objects do not fall and liquid is
not spilled into the enclosure through
openings. If a metal object, such as a hair
pin or a needle, comes into contact with
the inside of this unit, a dangerous electric
shock may result. For families with children, never permit children to put
anything, especially metal, inside this unit.
9 Enclosure removal. Never remove
the enclosure. If the internal parts are
touched accidentally, a serious electric
shock might occur.
10 Cleaning. Unplug this unit from the wall
outlet before cleaning. Do not use
volatile solvents such as alcohol, paint
thinner, gasoline, or benzine, etc. to clean
the cabinet. Use a clean dry cloth.
11 Lightning. For added protection for this
unit during a lightning storm, or when it is
left unattended and unused for long periods of time, unplug it from the wall outlet
and disconnect the antenna or cable
system. This will prevent damage to the
unit due to lightning and power-line
surges.
12 Abnormal smell. If an abnormal smell
or smoke is detected, immediately turn
the power OFF and unplug the unit from
the wall outlet. Contact your dealer or
nearest service center.
13 Damage requiring service. The unit
should be serviced by qualified service
personnel when:
The power-supply cord or the plug has
been damaged.
Objects have fallen, or liquid has been
spilled into the unit.
The unit has been exposed to rain or
water.
The unit has been dropped, or the enclosure damaged.
The unit exhibits a marked change in
performance.
The unit does not appear to operate
normally by following the instruction
manual. Adjust only those controls that
are covered by the instruction manual as
an improper adjustment of other controls
may result in damage and will often
require extensive work by a qualified
technician to restore the unit to its
normal operation.
14 Servicing. The user should not attempt
to service the unit beyond that described
in the instruction manual. All other servicing should be referred to qualified service
personnel.
15 Power lines. An outside antenna
system should not be located in the vicinity of overhead power lines or other electric light or power circuits, or where it
can fall into such power lines or circuits.
When installing an outside antenna
system, extreme care should be taken to
keep from touching such power lines or
circuits as contact with them might be
fatal.
16 AC outlets. Do not connect other
audio equipment with a power consumption larger than that specified to the AC
outlet on the rear panel. Never connect
other electrical units, such as an iron or
toaster, to it to prevent fire or electric
shock.
17 Overloading. Do not overload wall
outlets, extension cords, or integral
convenience receptacles as this can result
in a risk of fire or electric shock.
18 Attachment. Do not use attachments
not recommended by the unit manufacturer as they may cause hazards.
19 Replacement parts. When replace-
ment parts are required, be sure the
service technician has used replacement
parts specified by the manufacturer or
have the same characteristics as the original parts. Unauthorized substitutions may
result in fire, electric shock, or other
hazards.
20 Safety check. Upon completion of any
service or repairs to this unit, ask the
service technician to perform safety
checks to determine that the unit is in
proper operating condition.
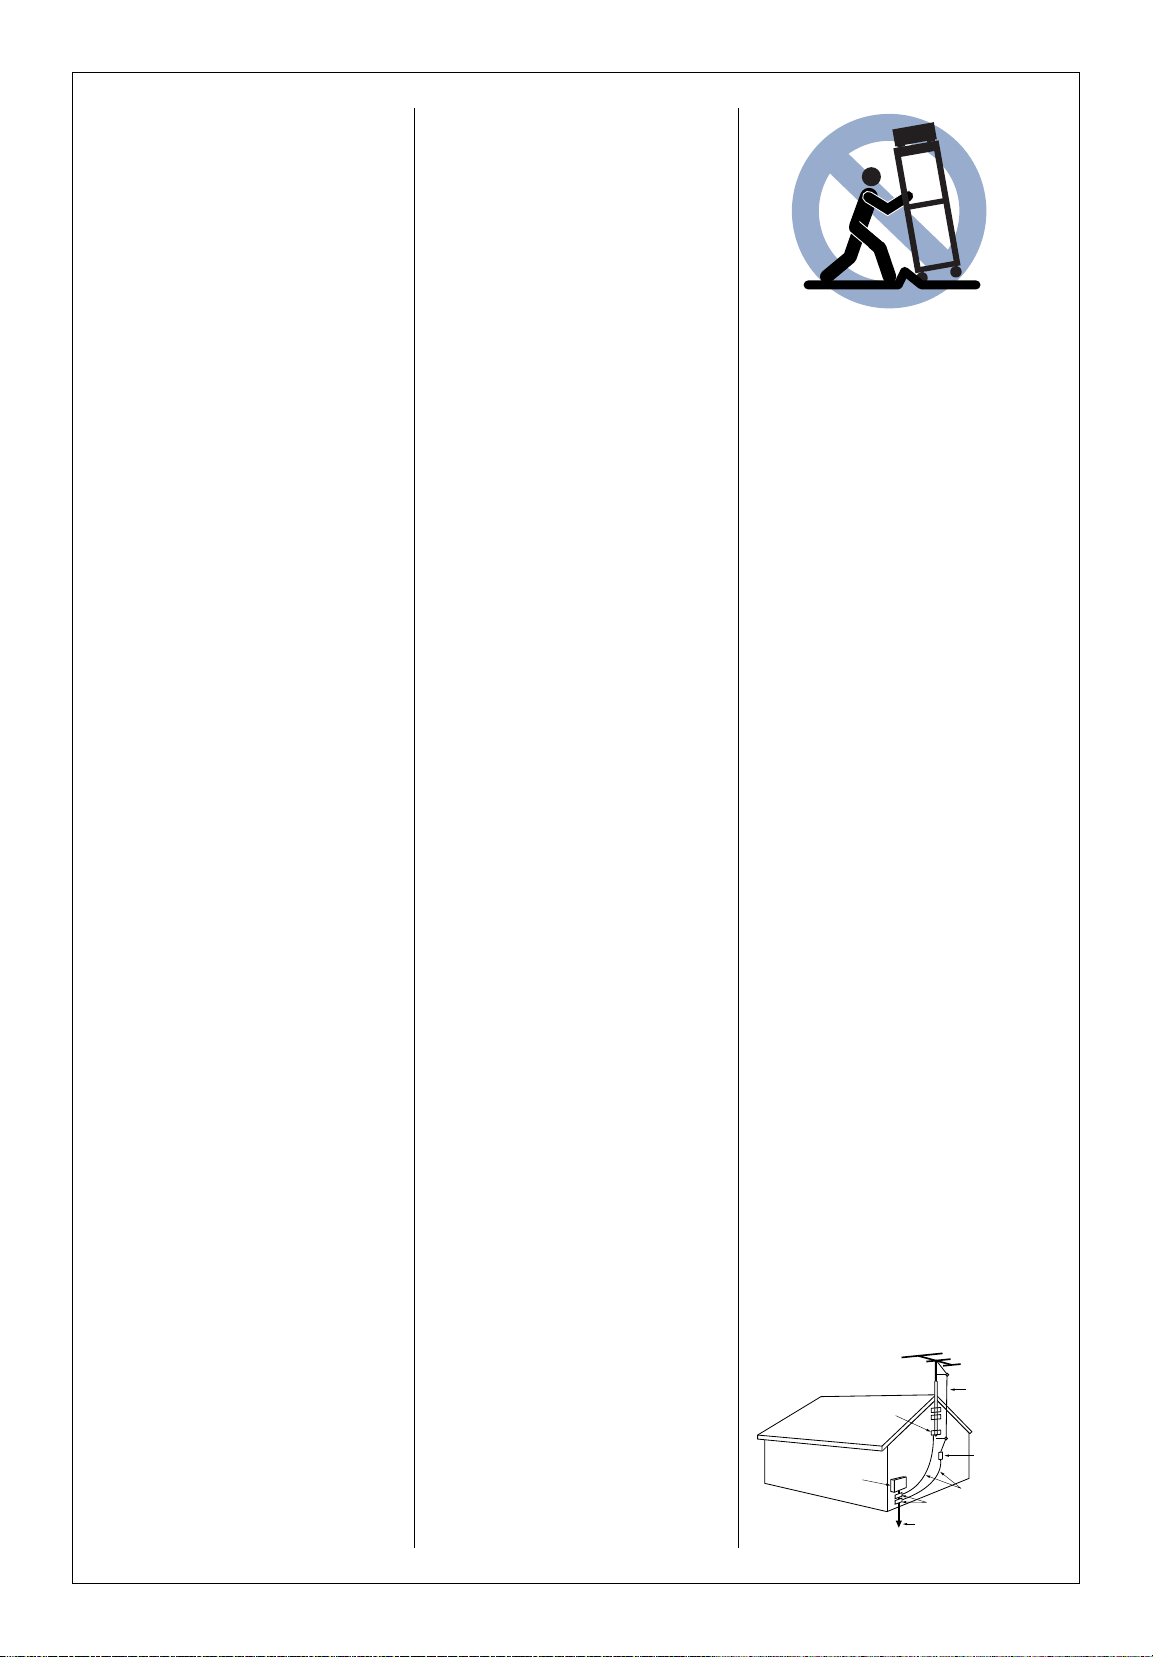
21 Carts and stands. Don’t put this unit
on a cart or stand that is unsteady or that
can not support the unit’s weight. If you
move this unit on a cart or stand, be
careful—quick stops, excessive force and
pushing over or uneven surfaces, may
cause the cart to overturn and damage
your equipment.
FCC Warning
This equipment may generate or use radio
frequency energy. Changes or modifications
to this equipment may cause harmful
interference unless the modifications are
expressly approved in the instruction manual.
The user could lose the authority to operate
this equipment if an unauthorized change or
modification is made.
Important
This equipment has been tested and found to
comply with the limits for a Class B digital
device, pursuant to Part 15 of the FCC Rules.
These limits are designed to provide
reasonable protection against harmful
interference in a residential installation. This
equipment may cause harmful interference to
radio communications if it is not installed and
used in accordance with the instructions.
However, there is no guarantee that
interference will not occur in a particular
installation. If this equipment does cause
harmful interference to radio or television
reception, which can be determined by
turning the equipment OFF and ON, the user
is encouraged to try to correct the
interference by one or more of the following
measures:
• Reorient or relocate the receiving
antenna
• Increase the separation between the
equipment and receiver
• Connect the equipment into an outlet on
a circuit different from that to which the
receiver is connected
• Consult the dealer or an experienced
radio/TV technician for help
Cable System Installer Notice
Article 820-40 of the NEC provides
guidelines for proper grounding and, in
particular, specifies that the cable ground shall
be connected to the grounding system of the
building, as close to the point of cable entry
as practical.
4.
Antenna
lead in wire
Antenna
discharge unit
(NEC section 810-20)
Grounding conductors
(NEC section 810-21)
Grounding
clamps
Grounding
clamp
Electrical service
equipment
Power service grounding
Electrode system
(NEC ART 250, part H)
Page 5

Safety First. . . . . . . . . . . . . . . . . . . . . . . . . . . . . . . . . . 3
Welcome. . . . . . . . . . . . . . . . . . . . . . . . . . . . . . . . . . . . . 6
Unpacking . . . . . . . . . . . . . . . . . . . . . . . . . . . . . . . . . 6
Did you get everything?. . . . . . . . . . . . . . . . . . . . 6
You may need to purchase. . . . . . . . . . . . . . . . . 6
You’ll need these tools. . . . . . . . . . . . . . . . . . . . . 6
Assembling the rack. . . . . . . . . . . . . . . . . . . . . . . 7
How to get replacement parts
for your rack . . . . . . . . . . . . . . . . . . . . . . . . . . . . . 10
Placing your system . . . . . . . . . . . . . . . . . . . . . . 11
Stacking your components in the rack. . . . 11
Positioning your speakers. . . . . . . . . . . . . . . . . 11
Connecting your components . . . . . . . . . . . 12
Connecting your speakers . . . . . . . . . . . . . . . . 12
Connecting your CD player, cassette deck,
and optional turntable or VCR. . . . . . . . . . . . 13
Connecting your antennas. . . . . . . . . . . . . . . . 14
Connecting the antenna wires to the
antenna jacks . . . . . . . . . . . . . . . . . . . . . . . . . . . . . . . 14
Using the AM indoor loop antenna (supplied) . . . 14
Using the FM indoor antenna (supplied) . . . . . . . . 14
Using an AM outdoor antenna (optional) . . . . . . . 15
Using a FM outdoor antenna (optional). . . . . . . . . 15
Connecting the system control cables . . . . 16
Connecting other audio components . . . . . 17
Plugging in your power cords. . . . . . . . . . . 18
Turning on the power . . . . . . . . . . . . . . . . . . . . 19
Warranty . . . . . . . . . . . . . . . . . . . . . . . . . . . . . . . . . . . 21
Contents
5.
Page 6

Setting up your SPECTRUM System
isn’t difficult, but getting your system
up and running will be even easier if
you follow the step-by-step directions in this manual.
Unpacking
Unpack all of the components carefully, and examine them for shipping
damage. If any are damaged or fail
to operate, notify your dealer immediately. If your SPECTRUM System
was shipped to you directly, notify
the shipping company without delay.
Only the person or company who
originally received the system can
file a claim against the carrier for
shipping damage. Keep the original
carton and packing materials in case
you need to transport or ship your
SPECTRUM System.
Did you get everything?
Check the lists below to make sure
you have everything. And before
you start setting up the system, look
at the list of tools and other items
you need. If you’re setting up other
components along with your
system, read the manual that came
with each of those components to
see what you need.
Receiver parts
• Receiver (KR-596)
• Remote Control (RC-S0501)
• 2 Batteries for remote
• FM indoor antenna
• AM loop antenna
• Loop antenna stand
CD player parts
• CD Player (DP-R896)
• Audio cable
• System control cable
Cassette deck parts
• Cassette Deck (KX-W595)
• 2 Audio cables
Speaker parts
• 2 Main speakers (JL-506)
• 2 Speaker wires
Rack parts
• Left panel
• Right panel
• Rack base
• RAck top
• Top back panel
• Bottom back panel
• Kick panel
• Fixed shelf
• Removable shelf
• Glass Door
• Hardware bag
(see page 7 for contents of the
hardware bag)
You may need to
purchase
• Audio cables
• Video cables
• Speaker wire
You’ll need these
tools
• Screwdriver (slot and/or Phillips)
• Pliers
Welcome
6.
Page 7

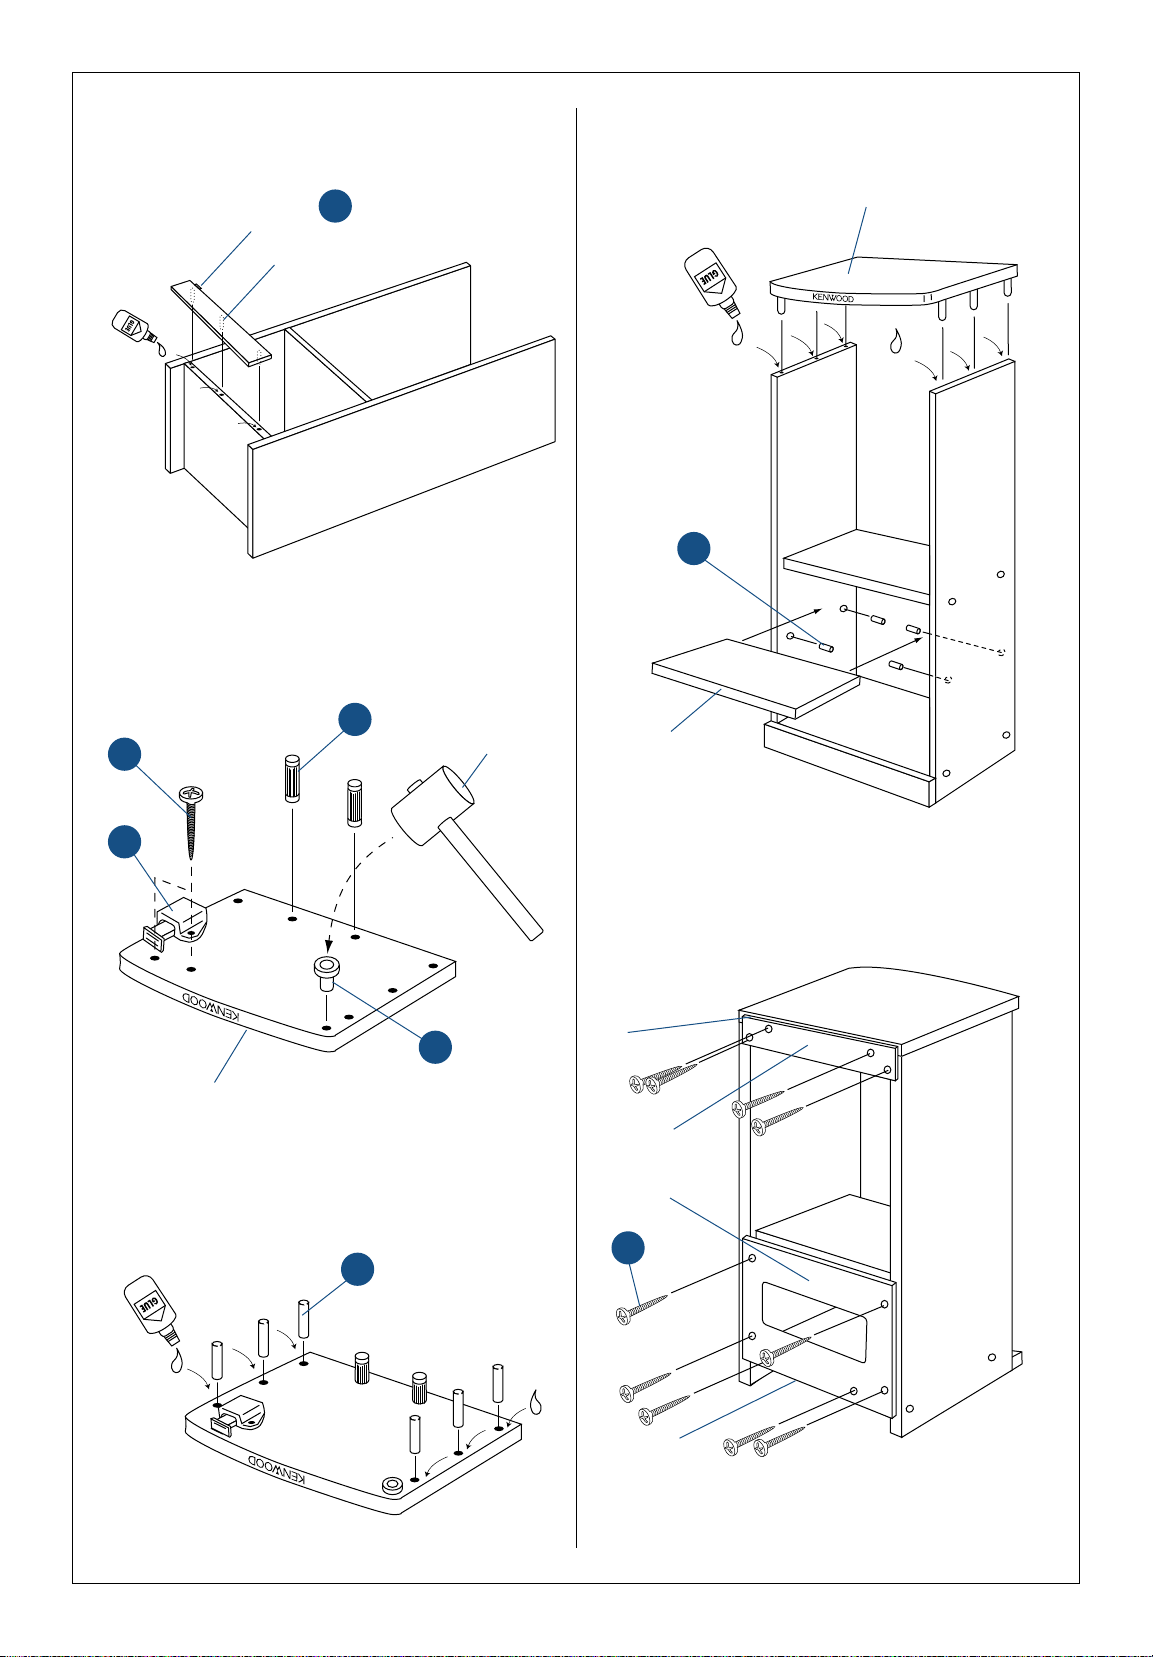
Assembling the rack
7.
Hardware list
Before assembling your rack check to be sure that you
received all of the hardware listed below.
J
K
L
M
N
S
Q
O
R
T
U
V
W
8
12
1
2
1
2
9
1
4
1
1
1
1
Item Description Quantity
Step1
J
x 8
Fixed shelf
Bottom
Left side
Right side
Step 2
Dowel holes
for kick panel
Q
x 3
Kick Panel
R
Allen bolt
Phillips head
screw
Allen wrench
Hinge insert
Magnetic
catch
Wood dowel
(long)
Wood dowel
(short)
Glue
Shelf pin
Upper hinge
Lower hinge
Catch plate
Catch plate
pad
Finished edge
Finished edge
Finished edge
M
Page 8
8.
Step
3
Kick Panel
Step 4
O
x 2
Rack top
Mallet
(not included)
K
x 2
M
N
Step 5
Q
x 6
Step 6
Step 7
Rack top
K
x 10
Top of panel should
be 1/2" below top
edge of rack
Bottom of panel
should be even with
bottom shelf
Hinge insert faces
toward top
M
Removable shelf
(optional)
S
x 4
Black surface of both
back panels face
toward inside of rack
Optional
Page 9
9.
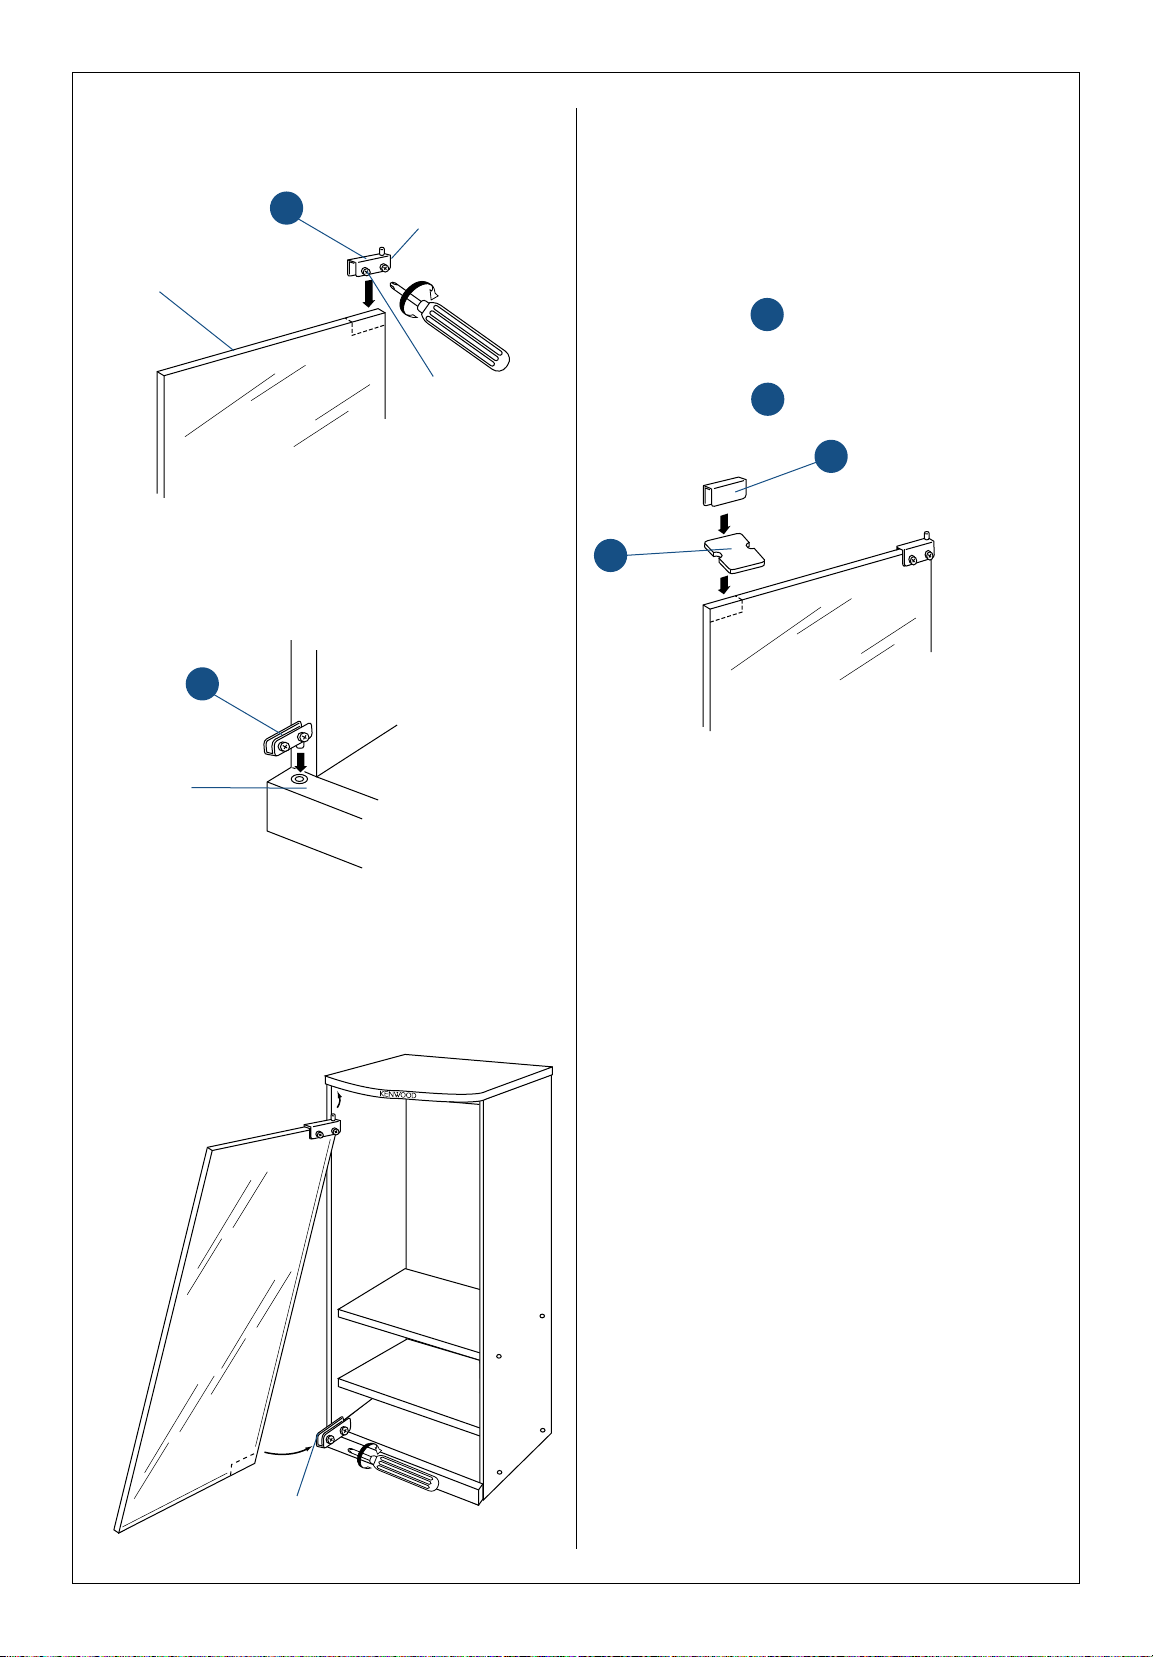
Step
8
T
Screws face
toward the inside
of the rack
Glass door (top)
Step 9
Step 10
Step 11
U
Top edge of
kick panel
V
W
First close the door to see where the magnetic catch
contacts it.
Attach the cushion to the door where the
magnetic catch contacted it.
Slip the catch plate over the cushion.
W
V
Slide door into hinge
(edge of hinge even with
edge of glass)
Edge of hinge even
with edge of glass
Page 10

Use the following parts list to identify missing or damaged parts:
SRC-406C SRC-406N
Item Description Quantity Part No. Part No.
A Left side panel 1 XW1061 349092-0
B Rack bottom 1 XW0903 344739-1
C Right side panel 1 XW1060 349093-9
D Kick panel 1 XW0902 344733-2
E Rack top 1 XW0897 344727-8
F Bottom back panel 1 XW0905 433734-4
G Fixed shelf 1 XW0900 344737-5
H Removable shelf 1 XW0901 344738-3
I Top back panel 1 XW1062 431295-3
J Allen screws 8 S0033 423699-8
K Small screws 12 S0034 414954-8
L Allen wrench 1 M0018 408737-2
M Hinge inserts 2 P0054 425226-8
N Magnetic door catch 1 P0098 431264-3
O Long wooden dowels 2 W0981 429169-7
Q Short wooden dowels 9 W0092 404578-5
R Glue 1 G0012 404589-0
S Shelf pegs 4 M0019 424881-3
T Top door hinge 1 M0026 425226-8
U Bottom door hinge 1 M0027 425226-8
V Door catch plate 1 M0011 422201-6
W Catch plate pad 1 G0047 422201-6
X Glass door 1 G0241 431296-1
How to get replacement parts for your rack
10.
If any of the rack parts are missing
or damaged, look for the rack
model number on the ID sticker on
the back panel. Then, contact the
appropriate company for replacement parts.
If your rack’s model number is:
SRC-406C
contact:
Tocabi America
755 Otay Valley Road
Chula Vista, CA 91911
(619) 661-6136
or
SRC-406N
contact:
Kenwood
1900 Gulf Street
Lamar MO 64759
(800) 327-9782
Page 11
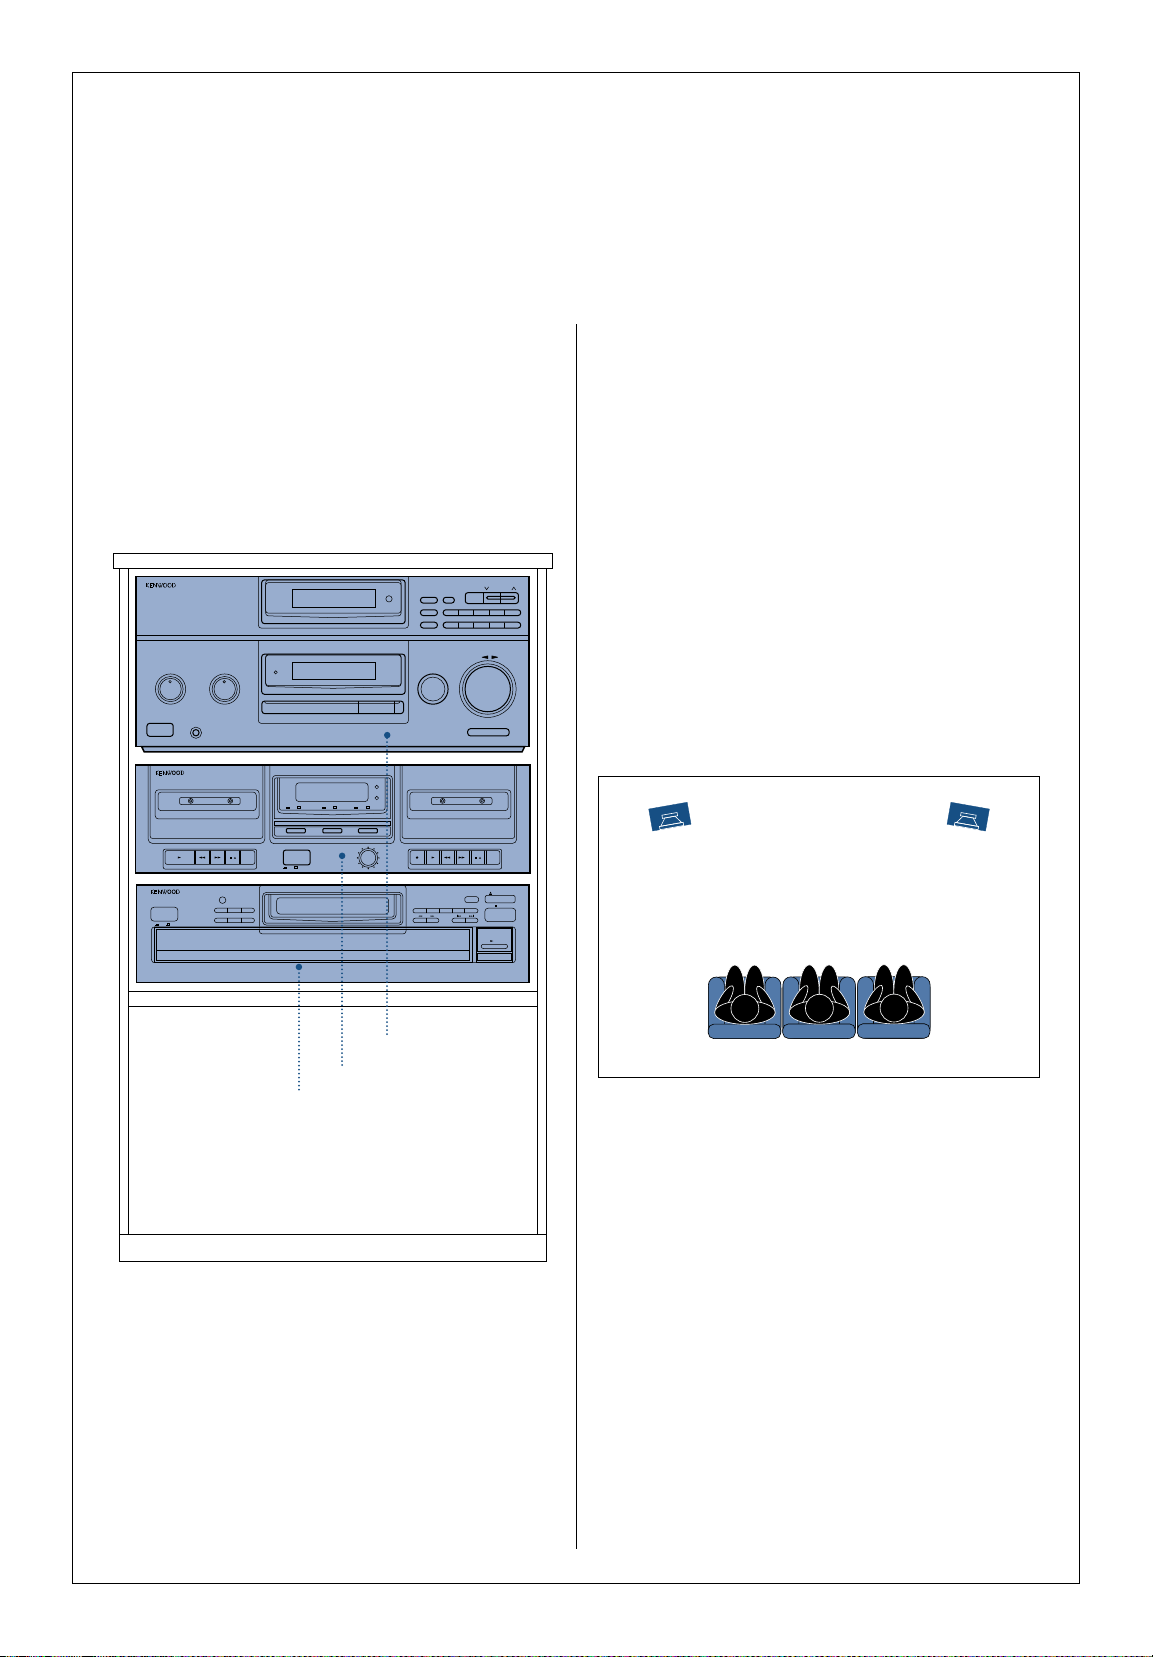
Stacking your components in
the rack
To make sure that they’re properly ventilated and stable,
stack them according to the following diagram. If you’re
using a turntable, place it on top of the rack.
Positioning your speakers
You can get the best stereo effect by placing your speakers 6' to 12' apart along the same wall, with the main
listening area midway between the 2 speakers.
• To enhance the stereo effect (especially if the speakers are more than 8' apart), rotate each speaker
slightly toward the listening area.
• Placing the speakers against a wall will increase their
bass output, but could also make them sound unnaturally ‘thick’ or ‘heavy’. If this occurs, try moving them
away from the wall a foot or so.
Placing your system
11.
MULTIPLE COMPACT DISC PLAYER DP-R896
POWER
P.MODE
TIME DSP RANDOM REPEAT
CHECK
EDIT
MODE
CLEAR
ON STANDBY
/II
DISC 1 DISC 2 DISC 3 DISC 4 DISC 5
DISC SKIP
OPEN/CLOSE
STOP
PLAY/PAUSE
AM-FM STEREO RECEIVER KR-596
■ AUTO TUNING SYSTEM
■ 30 STATION RANDOM PRESET
BASS
FLAT
22
44
66
88
+10-10
TREBLE
FLAT
22
44
66
88
+10-10
ON/STANDBY
POWER
PHONES
STANDBY
SPEAKERS
SPEAKERS
INPUT SELECTOR
VOLUME CONTROL
DOWN UP
BALANCE RL
BAND TUNING
1MEMORY
AUTO/MANU
. +10
2 3 4 5
6P.CALL 7 8 9 0
/
II
/
II
B RECORDING/PLAYBACKAPLAYBACK ONLY
REC PLAY REW FF STOP/EJECT PAUSEPLAY REW FF STOP/EJECT PAUSE
STEREO DOUBLE CASSETTE DECK KX-W595
ON STANDBY
POWER
REC LEVEL
DOLBY NR DUBBING TAPE SELECTOR
ON OFF
ON OFF HIGH NORMAL
REC
DUBBING
)VWX
Receiver (KR-596)
Cassette Deck (KX-W595)
CD Player (DP-R896)
Page 12
Important:
Please wait until you’ve connected
all of the cables before plugging any
of the components into AC wall
outlets and turning them on.
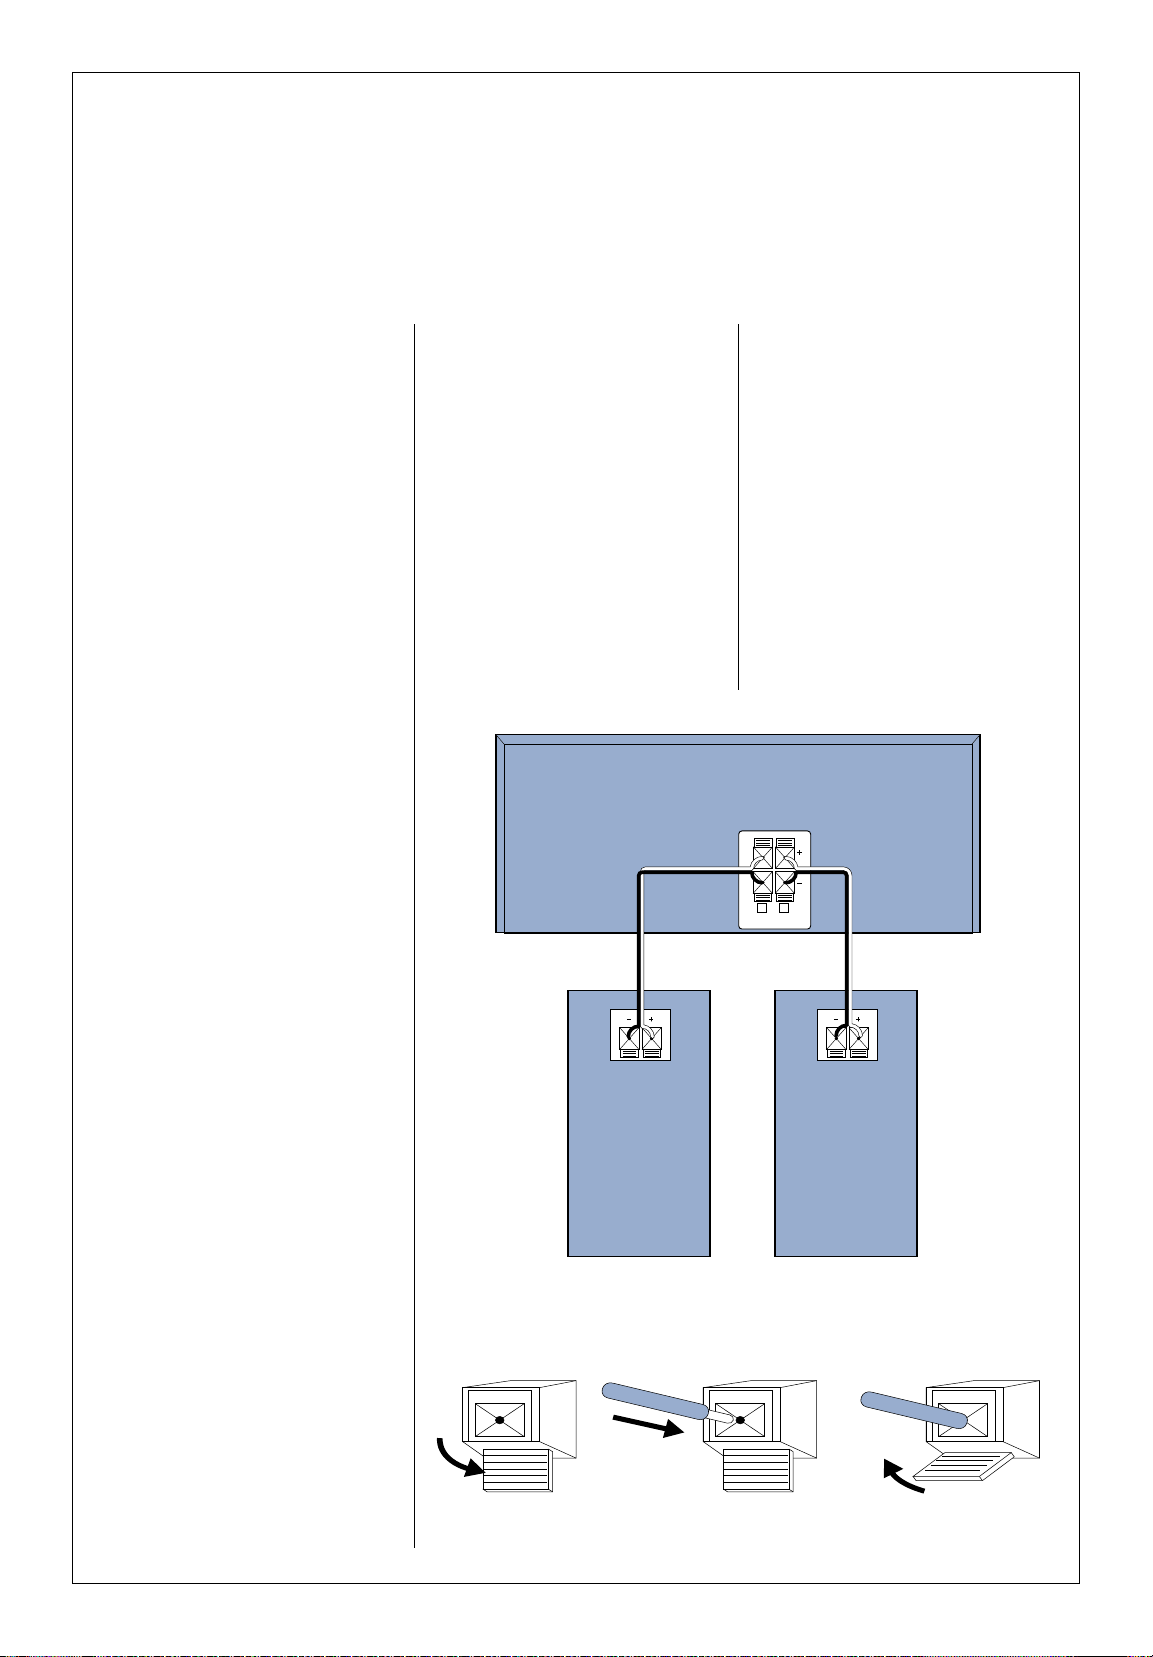
Connecting your
speakers
Connect your speakers first. You’ll
have an easier time getting to the
connections on the backs of the
components before you connect all
of the other cables.
1 Place the speakers in their
approximate locations first, then
leave a little extra speaker wire
so you can fine-tune their locations.
2 Use the speaker wire supplied
with the speakers. If you need
longer wire, buy speaker wire
that is 18-gauge or thicker.
Remember, the smaller the
number, the thicker the wire:
18-gauge wire is thicker than
20-gauge.
A few tips
• To save you time, we’ve
removed the insulation from the
ends of the speaker wire we
supplied.
• When connecting speaker wires,
be sure to connect positive
connections to each other and
negative connections to each
other. Connecting positive to
negative (+ to - ) or negative to
positive (- to +) can cause poor
sound quality.
• Never allow the positive and
negative speaker wires to touch
each other. Touching wires can
cause a short circuit, which could
damage your electronics.
Left and right speakers
Connect the left and right speakers
to the ‘Speakers’ jacks on the
receiver.
To connect the wire:
Connecting your
components
12.
R L
SPEAKERS
(8-16Ω)
KR-596
RECEIVER
JL-776
SPEAKER
JL-776
SPEAKER
RIGHT
LEFT
1 Unlock the lever
2 Insert the wire 3 Lock the lever
Page 13
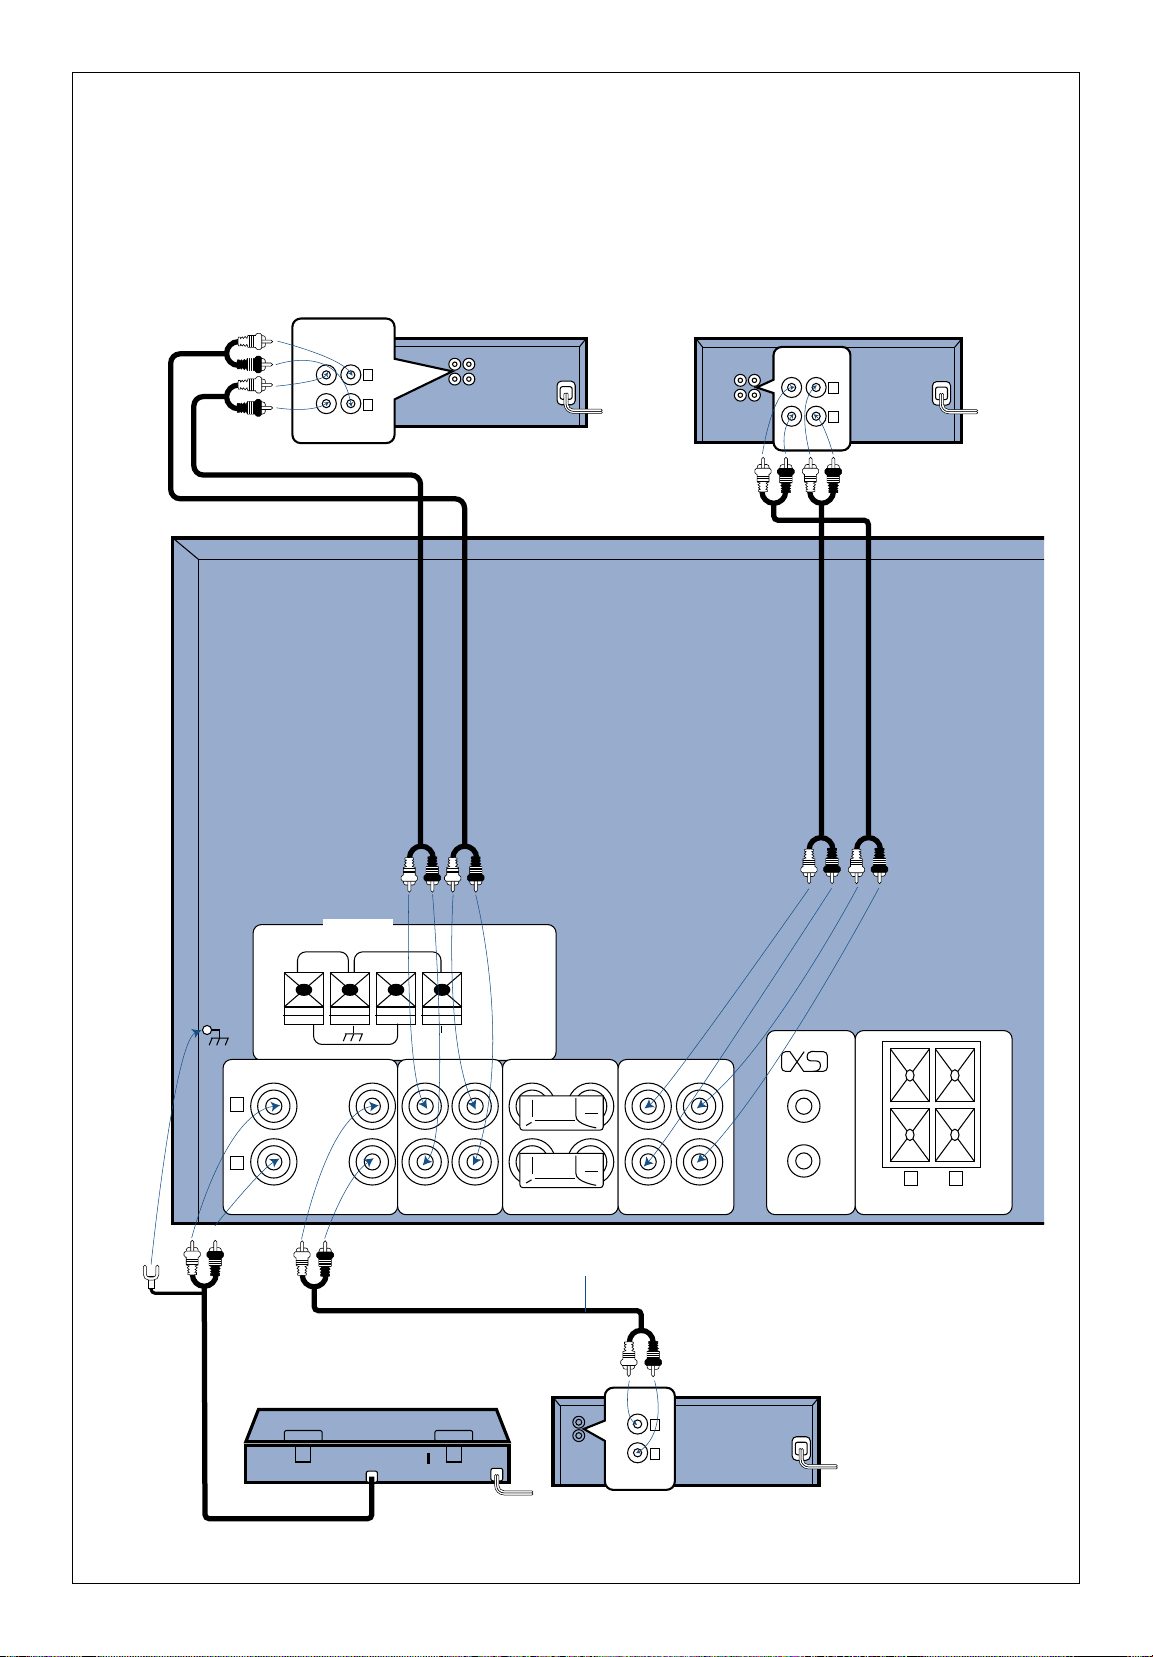
Connecting your CD player, cassette deck, and optional turntable or VCR
Use the cables that came with the audio and video components. You can connect any turntable that has a magnetic
phono cartridge.
13.
TAPECD
L
R
REC
OUT
PLAYINOUT IN OUT IN SYSTEM
CONTROL
SPEAKERS
(8-16Ω)
PHONO ADAPTOR VIDEO
FM75Ω LOOP ANTENNA
FM300Ω
GND
ANTENNA
LINE OUT
L
R
GND
AM
L
R
L
R
OUT
AUDIO
IN
L
R
REC PLAY
TAPE
KR-596 Receiver
Cassette Deck
CD Player
VCR
(optional)
Turntable (optional)
Audio cord
Page 14
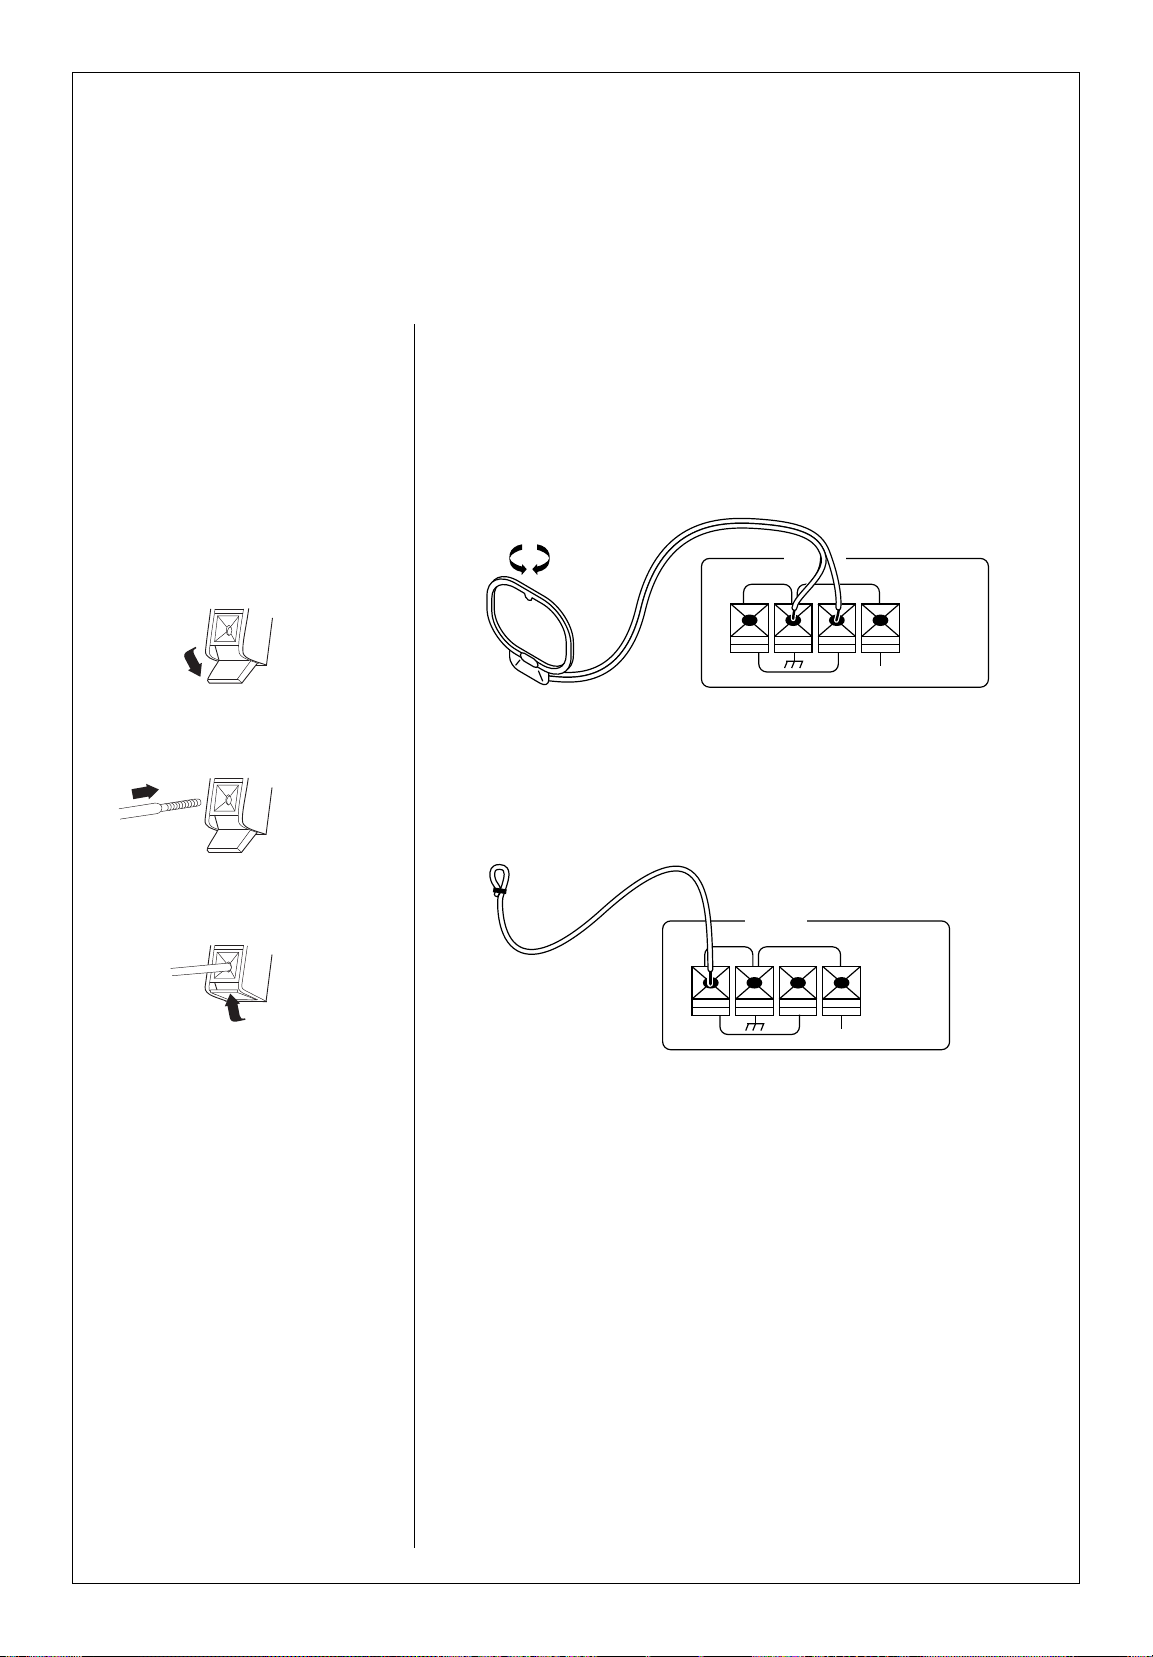
Using the AM indoor loop antenna (supplied)
Place the antenna as far away as possible from the main system, television,
speaker wires and power cords.
Rotate the antenna until you get the best reception.
Using the FM indoor antenna (supplied)
Use this antenna until you can install an outdoor antenna. When you do,
remove the indoor antenna.
1 Remove the insulation from the wire tip, and twist the wire tightly to get
rid of any loose strands.
2 Connect the end of the wire to the left-most antenna jack on the receiver.
3 Fully extend the antenna, and place it along a wall or bookshelf.
4 Adjust the antenna to find the position that provides the best reception.
5 Attach the looped end to the wall or bookshelf.
The quality of your FM/AM reception depends on how well you place
your antennas. So please follow the
instructions carefully.
Connecting the antenna wires
to the antenna jacks
1 Unlock lever
2 Insert wire
3 Lock lever
Connecting your antennas
14.
FM75Ω LOOP ANTENNA
FM300Ω
GND
AM
ANTENNA
FM75Ω LOOP ANTENNA
FM300Ω
GND
AM
ANTENNA
Page 15

15.
Using an AM outdoor antenna (optional)
If you’re using the AM loop antenna, but reception is poor, run a vinyl-coated
wire of more than 20 feet outdoors. Do not disconnect the loop antenna.
Using an FM outdoor antenna (optional)
For the best reception and sound quality, we recommend using an outdoor
FM antenna. Since most outdoor antennas use either 75 ohm or 300 ohm
connections, your Spectrum System’s receiver provides connections for both.
Contact your local electronics dealer/installer for more information.
FM75Ω LOOP ANTENNA
FM300Ω
GND
AM
ANTENNA
Page 16

16.
Connecting the system control cables
Connect the system control cables as shown below. Be sure to push the plugs all the way in.
TAPECD
REC
OUT
PLAYINOUT IN OUT IN SYSTEM
CONTROL
FRONT SPEAKERS
(8-16Ω)
PHONO ADAPTOR VIDEO
5M75Ω LOOP ANTENNA
FM300Ω
GND
ANTENNA
SWITCHED
TOTAL 200 WATTS MAX.
SYSTEM
CONTROL
L
R
LINE OUTPUT
SYSTEM
CONTROL
SYSTEM
CONTROL
SYSTEM
CONTROL
SYSTEM
CONTROL
XS
Optional Turntable
Receiver (KR-596)
Cassette Deck (KX-W595)
CD Player (DP-R896)
Page 17

17.
You can connect a graphic equalizer or similar component to your SPECTRUM System.
Remove the shorting plugs from the ‘Adapter’ jacks, and connect the component to those jacks.
Connecting other audio components
A few tips:
• Read the manual that came with
the other component.
• If you’re using the ‘Adapter’ jacks,
keep the shorting plugs for future
use.
• If you’re not connecting another
component to the ‘Adapter’
jacks, be sure you insert the
shorting plugs properly into the
jacks. Otherwise, the sound will
be cut off.
• Never plug a shorting plug into
jacks other than the ‘Adapter’
jacks. You could damage the
amplifier.
O
(REAR)
OUT
IN
KR-596 Receiver (back detail)
Equalizer
APE
PLAY
IN
ADAPTOR VIDE
OUT IN OUT
Page 18

18.
KX-W595
KR-596
DP-R896
SWITCHED
TOTAL 200 WATTS MAX.
Important: Make sure you follow
these instructions carefully when
you plug in the power cords. If the
connections are wrong, they could
cause electrical overload and fire.
1 Plug the power cord of the CD
player into one of the accessory
outlets on the back of the
receiver.
2 Plug the power cord of the
cassette deck into the other
accessory outlet on the back of
the receiver.
3 Plug the power cord of the
receiver into the wall AC outlet.
Plugging in your
power cords
To AC outlet
Page 19

If you’ve connected all of the power
and system control cables as we’ve
shown, you can turn on the power
to the entire system from the
receiver.
• Press the power switch on the
receiver (or the POWER button
on the remote) to turn the
entire system ON and OFF.
Turning ON the power
19.
Important:
• Since the CD player and cassette deck have mechanical switches you must
press their POWER switches when you turn the system ON for the very
first time. After the first time, they will automatically turn ON and OFF
with the rest of the system.
MULTIPLE COMPACT DISC PLAYER DP-R896
POWER
P.MODE
TIME DSP RANDOM REPEAT
CHECK
EDIT
MODE
CLEAR
ON STANDBY
AM-FM STEREO RECEIVER KR-596
■ AUTO TUNING SYSTEM
■ 30 STATION RANDOM PRESET
BASS
FLAT
22
44
66
88
+10-10
TREBLE
FLAT
22
44
66
88
+10-10
ON/STANDBY
POWER
PHONES
STANDBY
SPEAKERS
SPEAKERS
/
II
BAPLAYBACK ONLY
PLAY REW FF STOP/EJECT PAUSE
STEREO DOUBLE CASSETTE DECK KX-W595
ON STANDBY
POWER
REC LEVEL
DOLBY NR DUBBING TAPE SELECTOR
ON OFF
ON OFF HIGH NORMAL
REC
DUBBING
Page 20

20.
CONGRATULATIONS!
Your SPECTRUM System is ready to go! Now, look at the ‘Using your
Kenwood Spectrum Audio System’ manual to operate your system.
Have fun!
Page 21

21.
Warranty
Write the serial numbers (they’re on the back of each
unit, along with the model number) in the space below.
If you need to call your dealer for information or service,
you’ll need the model and serial numbers. We suggest
you keep your sales receipt as proof of purchase to validate your warranty coverage.
See the complete text of the warranty below. Please
read it carefully.
Model number Serial number
KR-596
DP-R896
KX-W595
JL-506
Kenwood Limited Warranty
Spectrum Systems
Kenwood is proud of its audio equipment, and stands behind it. For that reason,
we offer you, the owner of a new Kenwood product, the following warranty:
Warranty period: One year parts & labor
This Kenwood product is warranted for the stated period from the date of the
original purchase.
Scope of warranty
Except as specified below, this warranty covers all defects in material and
workmanship in Kenwood products. The following are not covered by the
warranty:
1 Voltage and/or line frequency conversions.
2 Periodic check-ups which do not disclose any defects covered by
the warranty.
3 Units on which the serial number has been defaced, modified or removed.
4 Damage or deterioration:
a Occuring to any external cabinet, including but not limited to
appearance items such as knobs, speaker grill and batteries.
b Resulting from accident, misuse, abuse, neglect, unauthorized
product modification or failure to follow instructions contained
in the owner’s manual.
c Resulting from repair or attempted repair by anyone not
authorized by Kenwood.
d Resulting from installation of parts or accessories that do not conform
to the quality or specifications of the original parts or accessories.
e Occurring during shipment (claims must be presented to the shipper)
5 Product purchased or serviced outside the United States and its territories,
unless the product is purchased through the U.S.A. Military Exchange
Service.
Who is protected
This warranty is extended only by the original purchaser. A purchase receipt or
other proof of date of original purchase will be required before warranty service
is rendered.
What we will pay for
We will pay all labor and material expenses for covered items. Payment of
shipping charges is discussed in the next section of this warranty.
How to obtain warranty service
If your Kenwood product requires service:
1 Take or ship it to any Kenwood Authorized Service Center along with a
complete description of the problem. If you are uncertain as to whether a
Service Center is authorized, please call “1-800-KENWOOD” (1-800-536-
9663) for the nearest service center in the continental U.S.A.).
2 Although you must pay any shipping charges if it is necessary to ship the
product for warranty service, we will pay the return shipping charges if the
repairs are covered by the warranty.
3 Whenever your units are taken or sent for warranty service, you must
include a copy of the original dated sales receipt as proof of warranty
coverage.
LIMITATION OF IMPLIED WARRANTIES
ALL IMPLIED WARRANTIES, INCLUDING WARRANTIES OF
MERCHANTABILITY AND FITNESS FOR PATICULAR PURPOSE, ARE
LIMITED IN THE DURATION TO THE LENGTH OF THIS WARRANTY.
EXCLUSION OF CERTAIN DAMAGES
KENWOOD’S LIABILITY FOR ANY DEFECTIVE PRODUCT IS LIMITED TO
THE REPAIR OR REPLACEMENT OF SAID PRODUCT, AT OUR OPTION,
AND SHALL NOT INCLUDE DAMAGES OF ANY KIND, WHETHER
INCIDENTAL, CONSEQUENTIAL OR OTHERWISE. SOME STATES DO NOT
ALLOW LIMITATIONS ON HOW LONG AN IMPLIED WARRANTY LASTS
AND/OR DO NOT ALLOW THE EXCLUSION OR LIMITATION OF
INCIDENTAL OR CONSEQUENTIAL DAMAGES, SO THE ABOVE
LIMITATIONS AND EXCLUSIONS MAY NOT APPLY TO YOU.
This warranty gives you specific legal rights, and you may also have other rights
which vary from state to state.
If a problem develops during or after the Limited Warranty Period, or if you have
questions regarding the operation of the product, you should contact your
Kenwood Athorized Dealer or Authorized Service Center. If the problem or your
question is not handled to your satisfaction, please contact our Customer
Relations Department at the address below.
Kenwood Service Corporation
PO Box 22745
Long Beach, CA 90801-5745
USA
For your nearest
Kenwood Authorized Service Center, call:
1-800-536-9663
24 hours a day, 7 days a week
Page 22

KENWOOD USA CORPORATION
PO Box 22745
Long Beach, California 90801-5745
Page 23

Using your
Kenwood
Audio System
Spectrum 350
2
F.P.O.
Page 24

Welcome. . . . . . . . . . . . . . . . . . . . . . . . . . . . . . . . . . . . . 5
Using the controls. . . . . . . . . . . . . . . . . . . . . . . . . . 6
Front panel controls . . . . . . . . . . . . . . . . . . . . . . . 6
Reading the display . . . . . . . . . . . . . . . . . . . . . . . . 8
Remote. . . . . . . . . . . . . . . . . . . . . . . . . . . . . . . . . . . . . . 10
A few tips. . . . . . . . . . . . . . . . . . . . . . . . . . . . . . . . . 10
Loading and replacing the batteries . . . . . . 11
The basic audio functions. . . . . . . . . . . . . . . 12
Selecting the input source . . . . . . . . . . . . . . . . 12
Adjusting the volume. . . . . . . . . . . . . . . . . . . . . 13
Adjusting the bass and treble . . . . . . . . . . . . . 14
Muting the sound. . . . . . . . . . . . . . . . . . . . . . . . . 14
Activating the speakers. . . . . . . . . . . . . . . . . . . 15
Adjusting the speaker balance . . . . . . . . . . . . 15
Using headphones . . . . . . . . . . . . . . . . . . . . . . . . 16
Using the tuner. . . . . . . . . . . . . . . . . . . . . . . . . . . . 17
Tuning stations automatically . . . . . . . . . . . . 17
Tuning stations manually . . . . . . . . . . . . . . . . . 17
Storing preset stations . . . . . . . . . . . . . . . . . . . 18
Tuning preset stations. . . . . . . . . . . . . . . . . . . . 18
Scrolling through preset stations . . . . . . . . . 19
Using the CD player . . . . . . . . . . . . . . . . . . . . . . 20
The front panel controls and display. . . . . . 20
Before using the CD player . . . . . . . . . . . . . . . 22
Compatible CDs . . . . . . . . . . . . . . . . . . . . . . . . . . . . 22
Handling CDs. . . . . . . . . . . . . . . . . . . . . . . . . . . . . . . 22
Cleaning CDs. . . . . . . . . . . . . . . . . . . . . . . . . . . . . . . 22
Storing CDs . . . . . . . . . . . . . . . . . . . . . . . . . . . . . . . . 22
Damaged CDs . . . . . . . . . . . . . . . . . . . . . . . . . . . . . . 22
Condensation. . . . . . . . . . . . . . . . . . . . . . . . . . . . . . . 22
Before you transport your CD player. . . . . . . . . . . 22
Displaying CD time information . . . . . . . . . . 23
Loading CDs. . . . . . . . . . . . . . . . . . . . . . . . . . . . . . 23
Changing CDs . . . . . . . . . . . . . . . . . . . . . . . . . . . . 23
Playing CDs. . . . . . . . . . . . . . . . . . . . . . . . . . . . . . . . 24
From the beginning. . . . . . . . . . . . . . . . . . . . . . . 24
From a specific track . . . . . . . . . . . . . . . . . . . . . 25
Playing a combination of tracks. . . . . . . . . . . 26
Programming tracks. . . . . . . . . . . . . . . . . . . . . . . . . . 26
To check a program . . . . . . . . . . . . . . . . . . . . . . . . . 27
To resume normal play. . . . . . . . . . . . . . . . . . . . . . . 27
To cancel a program and stop play. . . . . . . . . . . . . 27
Adding a track to a program . . . . . . . . . . . . . . . . . . 27
Changing a track in a program. . . . . . . . . . . . . . . . . 27
Clearing a track in a program. . . . . . . . . . . . . . . . . . 27
Clearing a whole program . . . . . . . . . . . . . . . . . . . . 27
Playing CDs over (repeat play) . . . . . . . . . . . 28
Repeating a single CD. . . . . . . . . . . . . . . . . . . . . . . . 28
Repeating all loaded CDs . . . . . . . . . . . . . . . . . . . . . 28
Repeating programmed tracks. . . . . . . . . . . . . . . . . 28
To stop repeat play. . . . . . . . . . . . . . . . . . . . . . . . . . 28
Playing tracks in random order (random
play). . . . . . . . . . . . . . . . . . . . . . . . . . . . . . . . . . . . . . 29
To select another track during random play . . . . . 29
To cancel random play . . . . . . . . . . . . . . . . . . . . . . . 29
Using a timer to play CDs . . . . . . . . . . . . . . . . 29
Using the cassette deck . . . . . . . . . . . . . . . . . . 30
The front panel controls and display. . . . . . 30
Before using the cassette deck. . . . . . . . . . . . 32
Preventing accidental recording on pre-recorded
tape . . . . . . . . . . . . . . . . . . . . . . . . . . . . . . . . . . . . . . . 32
If there is slack in the tape . . . . . . . . . . . . . . . . . . . . 32
Storing cassettes. . . . . . . . . . . . . . . . . . . . . . . . . . . . . 32
Contents
3.
Page 25

4.
Now that you’ve set up your SPECTRUM system, the
real fun begins! Operating your system is easy, if you
follow the step-by-step instructions in this manual.
Spend a little time with the manual before you jump in,
so you become familiar with the many capabilities of
your system. You’ll find a handy table of contents to
guide you to the information you need. Then put up
your feet, sit back and enjoy the fabulous sound of your
SPECTRUM system!
Welcome
5.
Special tapes. . . . . . . . . . . . . . . . . . . . . . . . . . . . . . . . 32
Listening to tapes . . . . . . . . . . . . . . . . . . . . . . . . . 33
Playing tapes . . . . . . . . . . . . . . . . . . . . . . . . . . . . . 33
Fast-winding tapes. . . . . . . . . . . . . . . . . . . . . . . . 33
Recording tapes. . . . . . . . . . . . . . . . . . . . . . . . . . . 34
Setting the recording level. . . . . . . . . . . . . . . . 34
Recording a tape . . . . . . . . . . . . . . . . . . . . . . . . . 35
Copying (dubbing) a tape. . . . . . . . . . . . . . . . . 35
Maintaining the cassette deck . . . . . . . . . . 36
Cleaning the heads . . . . . . . . . . . . . . . . . . . . . . . 36
Demagnetizing the heads. . . . . . . . . . . . . . . . . 36
Troubleshooting guide . . . . . . . . . . . . . . . . . . . 37
Receiver. . . . . . . . . . . . . . . . . . . . . . . . . . . . . . . . . . 37
CD player . . . . . . . . . . . . . . . . . . . . . . . . . . . . . . . . 38
Cassette deck . . . . . . . . . . . . . . . . . . . . . . . . . . . . 38
Specifications. . . . . . . . . . . . . . . . . . . . . . . . . . . . . . 40
Receiver (KR-596) . . . . . . . . . . . . . . . . . . . . . . . . 40
CD player (DP-R896) . . . . . . . . . . . . . . . . . . . . . 40
Cassette deck (KX-W595). . . . . . . . . . . . . . . . 40
Speakers (JL-506). . . . . . . . . . . . . . . . . . . . . . . . . 41
Page 26

7.
Using the controls
Front panel controls
6.
AM-FM STEREO RECEIVER KR-596
■ AUTO TUNING SYSTEM
■ 30 STATION RANDOM PRESET
BASS
FLAT
22
44
66
88
+10-10
TREBLE
FLAT
22
44
66
88
+10-10
ON/STANDBY
POWER
PHONES
STANDBY
SPEAKERS
SPEAKERS
INPUT SELECTOR
VOLUME CONTROL
DOWN UP
BALANCE RL
BAND TUNING
1MEMORY
AUTO/MANU
. +10
2345
6P.CALL 7 8 9 0
POWER button
HEADPHONES jack
STANDBY indicator
REMOTE SENSOR
SPEAKERS button
VOLUME CONTROL
knob
INPUT SELECTOR
knob
TONE CONTROL
knobs
BALANCE CONTROL
button
TUNING buttons
SPEAKERS indicator BAND SELECTOR
button
NUMBER buttons
AUTO/MANUAL button
PRESET CALL button
MEMORY button
Page 27

9.
Reading the display
8.
AUTO TUNED
STEREO
MEMORY
FM
AM
MHz
KHz ch
MUTING
AUTO indicator
STEREO indicator
MEMORY indicator
TUNED indicator
BAND indicator FREQUENCY indicator CHANNEL indicator
MUTING indicatorVOLUME indicator SPEAKERS indicatorINFORMATION display
INPUT SELECTOR indicator
L/R BALANCE indicator
UPPER (tuner)
LOWER (amplifier)
Page 28

If the receiver doesn’t respond
when you press a button on the
remote, you need new batteries.
We recommend replacing both
batteries at the same time for longer
battery life.
1 Remove the cover by pressing
down on the ridged area and
sliding it off in the direction of
the arrow.
2 Insert 2 AA-size alkaline batteries
(be sure to pay attention to the
(+) and (-) signs when you’re
inserting the batteries).
3 Close the cover.
Loading and replacing the batteries
11.
You can use your SPECTRUM
system remote for many functions.
A few tips
• Depending on temperature,
humidity, and other environmental conditions, the operating
range of your remote is approximately 30’ and up to 30° on
either side of the receiver’s
remote light sensor.
• When the operating distance of
your remote begins to get
shorter, replace both alkaline
batteries with new ones.
• When you press 2 buttons one
after the other, press each
button securely for more than 1
second each.
• The remote may malfunction if
direct sunlight or high-frequency
fluorescent light enters the light
sensor. In this case, either move
the audio system, or remove the
light source.
Important:
The batteries that came with this
system are test batteries and may
not last as long as alkaline batteries.
The remote
10.
DISC
EFFECT
TUNER
BAND
REC/ARM
M.CALL
TAPE A TAPE B
/
IIII
CD
P.CALL EQ.
POWER
VOLUME CONTROL
REMOTE CONTROL UNIT
RC-SO501
INPUT MUTE
DISC
EFFECT
TUNER
BAND
REC/ARM
M.CALL
TAPE A TAPE B
/
IIII
CD
P.CALL EQ.
CASSETTE DECK
buttons
Note: These buttons only
work with a Kenwood
cassette deck with system
control connections (not
included with this system)
• Press
F orE
to play or
reverse tape
• Press
FF orEE
to
fast-forward or rewind
tape
• Press
L
to stop tape
• Press REC/ARM to put
the player into
RECORD/PAUSE mode
INPUT SELECTOR
button
Press to scroll through
input choices
POWER button
Press to turn the
system ON or OFF
TUNER buttons
• TUNER BAND:
Press to switch
between FM and
AM
• P. CALL: Press to
scroll through
preset stations
EQUALIZER buttons
For use with an optional
equalizer
• Press EFFECT to activate
and deactivate EQ
circuits
• Press M. CALL to activate EQ curves stored in
memory
MUTE button
Press to MUTE the sound,
press again to turn ON
sound
VOLUME buttons
Press
G
or Hto increase or
decrease volume
CD PLAYER
buttons
• Press
E
to play
disc, press again to
pause disc
• Press
L
to stop
disc
• Press
EEI
to skip
to the next track
• Press I
FF
to skip
to the previous
track
• Press DISC to
change to next
disc
REMOTE SENSOR
on the receiver
30˚
30˚
approx.
30 feet
1
2
3
Page 29

You can increase or decrease the volume level in 1
decibel (dB) increments. The display shows the decibel
level change.
Adjusting from the front panel
Turn the VOLUME knob clockwise to increase the
volume. Turn the knob counter-clockwise to decrease it.
Adjusting from the remote
Press the VOLUME buttons to increase or decrease the
volume level.
Adjusting the volume
13.
Selecting the input source
You can play audio from as many as 5 different sources,
including:
• TUNER • CD • PHONO
• TAPE • VIDEO
Selecting from the front panel
Rotate the INPUT SELECTOR knob until you see the
input source you want on the display.
Selecting from the remote
Press the INPUT button until you see the input source
you want on the display.
The basic audio
functions
12.
AM-FM STEREO RECEIVER KR-596
■ AUTO TUNING SYSTEM
■ 30 STATION RANDOM PRESET
BASS
FLAT
22
44
66
88
+10-10
TREBLE
FLAT
22
44
66
88
+10-10
ON/STANDBY
POWER
PHONES
STANDBY
SPEAKERS
SPEAKERS
INPUT SELECTOR
VOLUME CONTROL
DOWN UP
BALANCE RL
BAND TUNING
1MEMORY
AUTO/MANU
. +10
2 3 4 5
6P.CALL 7 8 9 0
POWER
VOLUME CONTROL
REMOTE CONTROL UNIT
RC-SO501
INPUT MUTE
DISC
EFFECT
TUNER
BAND
REC/ARM
M.CALL
TAPE A TAPE B
/
IIII
CD
P.CALL EQ.
POWER
VOLUME CONTROL
REMOTE CONTROL UNIT
RC-SO501
INPUT MUTE
DISC
EFFECT
TUNER
BAND
REC/ARM
M.CALL
TAPE A TAPE B
/
IIII
CD
P.CALL EQ.
AM-FM STEREO RECEIVER KR-596
■ AUTO TUNING SYSTEM
■ 30 STATION RANDOM PRESET
BASS
FLAT
22
44
66
88
+10-10
TREBLE
FLAT
22
44
66
88
+10-10
ON/STANDBY
POWER
PHONES
STANDBY
SPEAKERS
SPEAKERS
INPUT SELECTOR
VOLUME CONTROL
DOWN UP
BALANCE RL
BAND TUNING
1MEMORY
AUTO/MANU
. +10
2 3 4 5
6P.CALL 7 8 9 0
Page 30

You can turn the speakers ON or OFF (for example, to
use headphones) with the SPEAKERS button.
1 Press the SPEAKERS button (while they are off) to
turn the speakers ON.
2 Press the SPEAKERS button again to turn the
speakers OFF.
The SPEAKERS light on the display turns ON when
the speakers are ON, and it goes OFF when then
speakers are OFF.
You can adjust the balance of the volume between the
left and right speakers.
1 Press the L BALANCE button to decrease the right
speaker volume and maintain the left.
2 Press the R BALANCE button to decrease the left
speaker volume and maintain the right.
While you’re adjusting the balance, the display shows
the relative balance between the left and right
speakers.
Activating the speakers
15.
You can increase or decrease the bass or treble to
personalize the sound.
Turn the BASS and TREBLE controls clockwise to
increase them. Turn the controls counter-clockwise to
decrease them.
You can quickly turn OFF the sound (when the phone
rings, for example), and turn it ON again without
stopping play.
Press the MUTE button to turn the sound OFF. Press it
again to turn the sound ON. The MUTE light on the
display flashes while MUTE is ON.
Adjusting the bass and treble
14.
Muting the sound Adjusting the speaker balance
AM-FM STEREO RECEIVER KR-596
■ AUTO TUNING SYSTEM
■ 30 STATION RANDOM PRESET
BASS
FLAT
22
44
66
88
+10-10
TREBLE
FLAT
22
44
66
88
+10-10
ON/STANDBY
POWER
PHONES
STANDBY
SPEAKERS
SPEAKERS
INPUT SELECTOR
VOLUME CONTROL
DOWN UP
BALANCE RL
BAND TUNING
1MEMORY
AUTO/MANU
. +10
2 3 4 5
6P.CALL 7 8 9 0
POWER
VOLUME CONTROL
REMOTE CONTROL UNIT
RC-SO501
INPUT MUTE
DISC
EFFECT
TUNER
BAND
REC/ARM
M.CALL
TAPE A TAPE B
/
IIII
CD
P.CALL EQ.
AM-FM STEREO RECEIVER KR-596
■ AUTO TUNING SYSTEM
■ 30 STATION RANDOM PRESET
BASS
FLAT
22
44
66
88
+10-10
TREBLE
FLAT
22
44
66
88
+10-10
ON/STANDBY
POWER
PHONES
STANDBY
SPEAKERS
INPUT SELECTOR
VOLUME CONTROL
DOWN UP
BALANCE RL
BAND TUNING
1MEMORY
AUTO/MANU
. +10
2 3 4 5
6P.CALL 7 8 9 0
SPEAKERS
AM-FM STEREO RECEIVER KR-596
■ AUTO TUNING SYSTEM
■ 30 STATION RANDOM PRESET
BASS
FLAT
22
44
66
88
+10-10
TREBLE
FLAT
22
44
66
88
+10-10
ON/STANDBY
POWER
PHONES
STANDBY
SPEAKERS
INPUT SELECTOR
VOLUME CONTROL
DOWN UP
BALANCE RL
BAND TUNING
1MEMORY
AUTO/MANU
. +10
2 3 4 5
6P.CALL 7 8 9 0
SPEAKERS
1 2
1 2
Page 31

Tuning stations automatically
You can automatically find the strongest radio
station signals.
1 Select the TUNER input.
2 Press the BAND button to select FM or AM.
3 Press the AUTO/MANU button to select AUTO.
The AUTO indicator light turns ON.
4 On the TUNING buttons, press Gto move up
the broadcast band, or Hto move down the
broadcast band.
The tuner stops automatically when it finds a strong
station, and the TUNED light turns ON. If the station
is broadcasting in stereo, the STEREO light turns ON.
5 Press Gor Hagain to find the next strong signal.
Tuning stations manually
You can search for radio stations in small steps up and
down the broadcast band to tune in a weak station that
automatic tuning might miss.
1 Select the TUNER input.
2 Press the BAND button to select FM or AM.
3 Press the AUTO/MANU button to select MANUAL.
The AUTO indicator light turns OFF.
4 On the TUNING buttons, press Gto move up the
broadcast band, or H to move down the broadcast
band to the station you want.
The frequency changes by 0.1 MHz each time you
press the button, or it continually changes if you hold
the button down.
Important
During manual tuning, the tuner receives stations only
in mono.
• To receive a tuned station in stereo, press the
AUTO/MANU button so the AUTO light turns ON.
If the station is broadcast in stereo, you receive it in
stereo.
• You may receive weaker stations with more background noise in stereo than in mono. To decrease the
noise, press the AUTO/MANU button so the AUTO
light goes OFF.
Using the tuner
17.
You can use headphones to listen to music in private.
1 Turn the speakers OFF.
2 Insert the headphone plug into the HEADPHONE
jack, and then put them on.
Important
There are a few things to keep in mind when using headphones:
• Turn the volume down before switching the speakers
back on.
• You can use your headphones with the speakers on
but be careful. The volume delivered through the
headphones is usually lower than that delivered
through speakers. When you turn up the volume for
the headphones, be careful not to turn it up so loud
you damage your speakers.
Using headphones
16.
AM-FM STEREO RECEIVER KR-596
■ AUTO TUNING SYSTEM
■ 30 STATION RANDOM PRESET
BASS
FLAT
22
44
66
88
+10-10
TREBLE
FLAT
22
44
66
88
+10-10
ON/STANDBY
POWER
PHONES
STANDBY
SPEAKERS
INPUT SELECTOR
VOLUME CONTROL
DOWN UP
BALANCE RL
BAND TUNING
1MEMORY
AUTO/MANU
. +10
2 3 4 5
6P.CALL 7 8 9 0
SPEAKERS
AM-FM STEREO RECEIVER KR-596
■ AUTO TUNING SYSTEM
■ 30 STATION RANDOM PRESET
BASS
FLAT
22
44
66
88
+10-10
TREBLE
FLAT
22
44
66
88
+10-10
ON/STANDBY
POWER
PHONES
STANDBY
SPEAKERS
INPUT SELECTOR
VOLUME CONTROL
DOWN UP
BALANCE RL
BAND TUNING
1MEMORY
AUTO/MANU
. +10
2 3 4 5
6P.CALL 7 8 9 0
SPEAKERS
AM-FM STEREO RECEIVER KR-596
■ AUTO TUNING SYSTEM
■ 30 STATION RANDOM PRESET
BASS
FLAT
22
44
66
88
+10-10
TREBLE
FLAT
22
44
66
88
+10-10
ON/STANDBY
POWER
PHONES
STANDBY
SPEAKERS
INPUT SELECTOR
VOLUME CONTROL
DOWN UP
BALANCE RL
BAND TUNING
1MEMORY
AUTO/MANU
. +10
2 3 4 5
6P.CALL 7 8 9 0
SPEAKERS
12
1
3 42 5
1
3 42
Page 32

Scrolling from the front panel
You can scroll through all preset stations in sequence.
1 Select the tuner input.
2 Press the P.CALL (Preset Call) button. Each time you
press the button, the tuner advances to the next
preset station number. The display shows the preset
numbers.
If you hold the button down, the tuner advances
through the preset stations at 1/2-second intervals.
When you release the button, you hear the station
tuned in at that time.
Scrolling from the remote
1 Use the INPUT button to select the tuner input.
2 Press the P. CALL buttons to scroll up or down
through the preset stations. Each time you press the
button, the tuner changes to the next or previous
preset station number. The display shows the preset
numbers. If you hold either button down, the tuner
scrolls through the preset stations at 1/2-second intervals. When you release the button, you hear the
station tuned in at that time.
Scrolling through preset stations
19.
You can store up to 30 of your favorite radio stations
in memory.
1 Tune in the station you want to preset.
2 Press the MEMORY button. The MEMORY light
turns ON.
3 Within 5 seconds, enter the preset number using the
number buttons. For example, to select preset #15,
press the +10 button, then 5. To select preset #20,
press the +10 button, the +10 button again, then 0.
If you’ve already assigned a station to a preset
number, assigning a new station erases the old one.
4 To preset additional stations, repeat these steps.
You can quickly tune to any preset station.
1 Select the tuner input.
2 Press the number buttons assigned to the station.
Storing preset stations
18.
Tuning preset stations
AM-FM STEREO RECEIVER KR-596
■ AUTO TUNING SYSTEM
■ 30 STATION RANDOM PRESET
BASS
FLAT
22
44
66
88
+10-10
TREBLE
FLAT
22
44
66
88
+10-10
ON/STANDBY
POWER
PHONES
STANDBY
SPEAKERS
INPUT SELECTOR
VOLUME CONTROL
DOWN UP
BALANCE RL
BAND TUNING
1MEMORY
AUTO/MANU
. +10
2 3 4 5
6P.CALL 7 8 9 0
SPEAKERS
AM-FM STEREO RECEIVER KR-596
■ AUTO TUNING SYSTEM
■ 30 STATION RANDOM PRESET
BASS
FLAT
22
44
66
88
+10-10
TREBLE
FLAT
22
44
66
88
+10-10
ON/STANDBY
POWER
PHONES
STANDBY
SPEAKERS
INPUT SELECTOR
VOLUME CONTROL
DOWN UP
BALANCE RL
BAND TUNING
1MEMORY
AUTO/MANU
. +10
2 3 4 5
6P.CALL 7 8 9 0
SPEAKERS
POWER
VOLUME CONTROL
REMOTE CONTROL UNIT
RC-SO501
INPUT MUTE
DISC
EFFECT
TUNER
BAND
REC/ARM
M.CALL
TAPE A TAPE B
/
IIII
CD
P.CALL EQ.
1
2
1
2
2
1
AM-FM STEREO RECEIVER KR-596
■ AUTO TUNING SYSTEM
■ 30 STATION RANDOM PRESET
BASS
FLAT
22
44
66
88
+10-10
TREBLE
FLAT
22
44
66
88
+10-10
ON/STANDBY
POWER
PHONES
STANDBY
SPEAKERS
SPEAKERS
INPUT SELECTOR
VOLUME CONTROL
DOWN UP
BALANCE RL
BAND TUNING
1MEMORY
AUTO/MANU
. +10
2 3 4 5
6P.CALL 7 8 9 0
1
2 3
Page 33

21.
Using the CD player
The front panel controls and display
20.
MULTIPLE COMPACT DISC PLAYER DP-R896
POWER
P.MODE
TIME DSP RANDOM REPEAT
CHECK
EDIT
MODE
CLEAR
ON STANDBY
/II
DISC 1 DISC 2 DISC 3 DISC 4 DISC 5
DISC SKIP
OPEN/CLOSE
STOP
PLAY/PAUSE
PGM
RANDOM
MULTI
EDIT
1 2 3 4 5
A B
DISC
NO.
REPEAT
TRACK NO.
SINGLE
ALL
P.C.
1 2 3 4 5
6 7 8 9 10
11 12 13 14 15
16 17 18 19 20
POWER button
TIME DISPLAY
button
RANDOM button
REPEAT button
DISC TRAY SEARCH buttons SKIP buttons
PLAY/PAUSE button
STOP button
OPEN/CLOSE button
DISC SKIP buttonDISC SELECTOR
buttons (1-5)
CLEAR button
CHECK button
EDIT MODE button
(works with Kenwood computercontrolled cassette decks–not
included with this system)
PROGRAM MODE button
PLAY indicator
DISC NO. indicators TRACK NO. indicator TIME COUNTER,
PROGRAM NO.
single/total
MUSIC CALENDER
(total disc tracks) indicator
PROGRAM
CHANGE
indicator
ALL indicator
REPEAT indicator
EDIT indicator
RANDOM indicator
PROGRAM MODE
indicator
PAUSE indicator
Page 34

Please read the following instructions carefully to help prevent
damage to your CD player and your
CDs.
Compatible CDs
Your CD player plays standard 5”
CDs and 3” CD singles and the
audio portion of CDV discs and
CD-G (CD plus graphics) discs.
Handling CDs
Hold a CD by its edges and center
hole. Don’t touch the playing
surface or attach labels or tape to
either side of the CD.
Cleaning CDs
To clean fingerprints or other dirt
from a CD, gently wipe it with a soft
cotton cloth moving in circles
outward from the center.
Storing CDs
To protect your CDs, store them in
their cases. Don’t leave them in the
player for a long time.
Damaged CDs
To avoid possible damage to your
player, don’t attempt to play
cracked or warped CDs.
Condensation
Condensation of water vapor on
the pickup lens may prevent proper
operation of your CD player. To
eliminate the condensation, leave
the player ON for several hours.
Condensation may occur when:
• You bring the player from a cool
or cold place to a warm or
humid place.
• You operate a heater in the
vicinity of the player.
• There’s a big difference between
the player’s internal temperature
and the temperature of the
room the player is in.
Before you transport your CD
player
1 Turn the player’s power ON.
Don’t load any CDs.
2 Wait until 5 seconds after NO
DISC appears on the display.
3 Turn the player’s power OFF.
Before using the CD player
22.
You can view time information for the CD you’re playing.
Press the TIME DISP. button to cycle between:
TRACK TIME: Elapsed and remaining time of the
current track.
TOTAL TIME: Elapsed and remaining time of the CD.
1 Press the OPEN/CLOSE button to open the tray.
2 Place a CD in one of the tray’s circular wells. While
the tray is open, you can insert a CD in each of the 2
exposed wells.
3 To insert more CDs, press the DISC SKIP button to
rotate the tray. Insert a CD when the tray stops rotating.
4 When you’re done, press the OPEN/CLOSE button
to close the tray.
Changing CDs
During play
1 Press the OPEN/CLOSE button to open the tray.
2 Change CDs in the exposed wells. If you want to put
a CD in an unexposed well, press the DISC SKIP
button to rotate the tray. You can’t change the CD
currently playing.
When the player is stopped
1 Press the OPEN/CLOSE button to open the tray.
2 Change CDs in the exposed wells. If necessary, press
the DISC SKIP button to rotate the tray.
Displaying CD time information
23.
Loading CDs
MULTIPLE COMPACT DISC PLAYER DP-R896
POWER
P.MODE
TIME DSP RANDOM REPEAT
CHECK
EDIT
MODE
CLEAR
ON STANDBY
/II
DISC 1 DISC 2 DISC 3 DISC 4 DISC 5
DISC SKIP
OPEN/CLOSE
STOP
PLAY/PAUSE
Page 35

Playing from the front panel
1 Make sure that the PGM (Program Mode) light
is OFF. If the PGM light is ON, press the
P.MODE button.
2 Select the CD using the DISC SELECTOR buttons.
3 Select the track using the lFF and EEl buttons.
Play begins from the selected track and continues.
Playing from the remote
1 Make sure that the PGM light is OFF. If the PGM light
is ON, press the P.MODE button.
2 Select the CD using the DISC button.
3 Select the track using the lFFand EEl buttons. Play
begins from the selected track and continues.
From a specific track
25.
From the beginning
Playing from the front panel
1 Load one or more CDs.
2 Select the CD using the DISC SELECTOR buttons.
An indicator Happears on the display over the
number of the selected CD. The selected CD
automatically begins playing.
Whether you use the front panel or remote:
• If you don’t select a CD when you’ve inserted more
than 1 CD, the CDs play in order, starting with the
CD in the lowest-numbered CD well.
• If you don’t select a CD and you press the
PLAY/PAUSE button, play begins with the CD
number currently indicated on the display.
Playing from the remote
1 Load one or more CDs.
2 Press the DISC button until the indicator Happears
on the player’s display over the number of the
selected CD. The selected CD automatically
begins playing.
Playing CDs
24.
MULTIPLE COMPACT DISC PLAYER DP-R896
POWER
P.MODE
TIME DSP RANDOM REPEAT
CHECK
EDIT
MODE
CLEAR
ON STANDBY
/II
DISC 1 DISC 2 DISC 3 DISC 4 DISC 5
DISC SKIP
OPEN/CLOSE
STOP
PLAY/PAUSE
POWER
VOLUME CONTROL
REMOTE CONTROL UNIT
RC-SO501
INPUT MUTE
DISC
EFFECT
TUNER
BAND
REC/ARM
M.CALL
TAPE A TAPE B
/
IIII
CD
P.CALL EQ.
1
2
2
1
2
3
3
2
Page 36

To check a program
Press the CHECK button. Each time you press the
button, you see the CD and track numbers in the order
you programmed them on the display.
To resume normal play
Press the P.MODE button. After the current track
is done, the tracks continue to play in the order on
the CD.
To stop play
Press the STOP button.
Adding a track to a program
You can add another track to the end of a program after
the program has started playing.
1 Press the STOP button.
2 Select the CD and track to add.
3 Press the P.MODE button.
Changing a track in a program
You can change a track in a program after the program
has started playing.
1 Press the STOP button.
2 Press the CHECK button until you see the P—# you
want on the display. The P.C. light turns ON.
3 Select the new CD and track.
4 Press the P.MODE button.
Clearing a track in a program
You can clear upcoming tracks in a program while
it’s playing.
Press the CLEAR button. Each time you press the
button, you clear the tracks in order from the last track.
You can’t clear the track currently playing.
Clearing a whole program
Press either the P.MODE button or the OPEN/CLOSE
button.
27.
You can program up to 32 tracks from any combination
of CDs to play in any order.
Programming tracks
1 Press the STOP button.
2 Press the P.MODE button. The PGM light turns ON.
3 Select a CD.
4 Select a track.
5 Press the P.MODE button. The PLAY light flashes,
and the display shows the selected CD and track and
indicates P—01.
6 Repeat steps 3 through 5 above to program each
track.
7 Press the PLAY button to play.
You can program all the tracks on a CD (in order) by
pressing the P.MODE button without selecting any
track numbers. The CD takes up only 1 program
memory slot, regardless of how many tracks are on it.
Playing a combination of tracks
26.
MULTIPLE COMPACT DISC PLAYER DP-R896
POWER
P.MODE
TIME DSP RANDOM REPEAT
CHECK
EDIT
MODE
CLEAR
ON STANDBY
/II
DISC 1 DISC 2 DISC 3 DISC 4 DISC 5
DISC SKIP
OPEN/CLOSE
STOP
PLAY/PAUSE
MULTIPLE COMPACT DISC PLAYER DP-R896
POWER
P.MODE
TIME DSP RANDOM REPEAT
CHECK
EDIT
MODE
CLEAR
ON STANDBY
/II
DISC 1 DISC 2 DISC 3 DISC 4 DISC 5
DISC SKIP
OPEN/CLOSE
STOP
PLAY/PAUSE
MULTIPLE COMPACT DISC PLAYER DP-R896
POWER
P.MODE
TIME DSP RANDOM REPEAT
CHECK
EDIT
MODE
CLEAR
ON STANDBY
/II
DISC 1 DISC 2 DISC 3 DISC 4 DISC 5
DISC SKIP
OPEN/CLOSE
STOP
PLAY/PAUSE
MULTIPLE COMPACT DISC PLAYER DP-R896
POWER
P.MODE
TIME DSP RANDOM REPEAT
CHECK
EDIT
MODE
CLEAR
ON STANDBY
/II
DISC 1 DISC 2 DISC 3 DISC 4 DISC 5
DISC SKIP
OPEN/CLOSE
STOP
PLAY/PAUSE
MULTIPLE COMPACT DISC PLAYER DP-R896
POWER
P.MODE
TIME DSP RANDOM REPEAT
CHECK
EDIT
MODE
CLEAR
ON STANDBY
/II
DISC 1 DISC 2 DISC 3 DISC 4 DISC 5
DISC SKIP
OPEN/CLOSE
STOP
PLAY/PAUSE
MULTIPLE COMPACT DISC PLAYER DP-R896
POWER
P.MODE
TIME DSP RANDOM REPEAT
CHECK
EDIT
MODE
CLEAR
ON STANDBY
/II
DISC 1 DISC 2 DISC 3 DISC 4 DISC 5
DISC SKIP
OPEN/CLOSE
STOP
PLAY/PAUSE
A few hints:
• The player automatically adds a space of about
4 seconds between tracks in the PGM mode.
This makes it easy to record tapes that are
compatible with the track-finding function of
Kenwood cassette decks. However, the PGM
mode also inserts a 4-second space between 2
continuous, consecutive tracks programmed
into memory, such as those on classical and live
recordings.
• If you select the wrong track, press the CLEAR
button, and select the correct track.
• When selecting tracks using the number
buttons on the remote, you don’t have to press
the P.MODE button after each selection.
• Once you’ve programmed 32 tracks, the display
indicates FULL, and you can’t program any
more tracks.
• If you press IFFor EEI buttons during
Programmed play, the player skips the current
track either forward or backward.
MULTIPLE COMPACT DISC PLAYER DP-R896
POWER
P.MODE
TIME DSP RANDOM REPEAT
CHECK
EDIT
MODE
CLEAR
ON STANDBY
/II
DISC 1 DISC 2 DISC 3 DISC 4 DISC 5
DISC SKIP
OPEN/CLOSE
STOP
PLAY/PAUSE
MULTIPLE COMPACT DISC PLAYER DP-R896
POWER
P.MODE
TIME DSP RANDOM REPEAT
CHECK
EDIT
MODE
CLEAR
ON STANDBY
/II
DISC 1 DISC 2 DISC 3 DISC 4 DISC 5
DISC SKIP
OPEN/CLOSE
STOP
PLAY/PAUSE
5 2 1
437
123
2
3
14
Page 37

You can repeat a single CD, all loaded CDs, or the
contents of a program.
Repeating a single CD
1 Press the STOP button.
2 Press the P.MODE button. The PGM light turns ON.
3 Select a CD.
4 Press the P. Mode button. The ALL indicator light
turns on.
5 Press the REPEAT button. The REPEAT light
turns ON.
6 Press the PLAY button.
Repeating all loaded CDs
1 Make sure that the PGM light is OFF. If the PGM light
is ON, press the P.MODE button.
2 Press the REPEAT button. The REPEAT light
turns ON.
3 If you weren’t already playing CDs, press the PLAY button.
Repeating programmed tracks
You can repeat a programmed combination of tracks
(see page 26, ‘Programming Tracks’). If you only
programmed 1 track, it plays over and over again.
1 Make sure that the program is playing (and the PGM
light is ON).
2 Press the REPEAT button. The REPEAT light
turns ON.
To stop repeat play
Press the REPEAT button while repeat play is ON. The
REPEAT light goes OFF.
Playing CDs over (repeat play)
28.
You can randomly play all the tracks from the CDs in the
tray without repeating any tracks.
1 Make sure the PGM light is OFF. If the PGM light is
ON, press the P.MODE button.
2 Press the RANDOM button. The RANDOM light
turns ON, and the MUSIC CALENDAR flashes.
Random play continues until all tracks have
been played.
You can continuously repeat random play by pressing
the REPEAT button during random play.
To select another track during random play
Press the Forward TRACK SKIP button.
To cancel random play
Press either the STOP, OPEN/CLOSE, or RANDOM
buttons. If you press RANDOM, normal play starts from
the track you’re currently playing.
You can use your CD player with an audio timer (you’ll
have to buy it on your own) to play CDs at a time you
choose.
1 Connect the power cords of the SPECTRUM system
to the audio timer so that the timer turns the system
on. Be sure to follow the instructions included with
the timer.
2 Turn the system ON.
3 Insert 1 or more CDs. If you insert more than 1 CD,
play begins with the CD in the lowest-numbered CD
well.
4 Set the volume.
5 Set the timer. At the set time, the system will turn on,
and the CD player will begin playing.
Playing tracks in random order
(random play)
29.
MULTIPLE COMPACT DISC PLAYER DP-R896
POWER
P.MODE
TIME DSP RANDOM REPEAT
CHECK
EDIT
MODE
CLEAR
ON STANDBY
/II
DISC 1 DISC 2 DISC 3 DISC 4 DISC 5
DISC SKIP
OPEN/CLOSE
STOP
PLAY/PAUSE
MULTIPLE COMPACT DISC PLAYER DP-R896
POWER
P.MODE
TIME DSP RANDOM REPEAT
CHECK
EDIT
MODE
CLEAR
ON STANDBY
/II
DISC 1 DISC 2 DISC 3 DISC 4 DISC 5
DISC SKIP
OPEN/CLOSE
STOP
PLAY/PAUSE
MULTIPLE COMPACT DISC PLAYER DP-R896
POWER
P.MODE
TIME DSP RANDOM REPEAT
CHECK
EDIT
MODE
CLEAR
ON STANDBY
/II
DISC 1 DISC 2 DISC 3 DISC 4 DISC 5
DISC SKIP
OPEN/CLOSE
STOP
PLAY/PAUSE
Using a timer to play CDs
MULTIPLE COMPACT DISC PLAYER DP-R896
POWER
P.MODE
TIME DSP RANDOM REPEAT
CHECK
EDIT
MODE
CLEAR
ON STANDBY
/II
DISC 1 DISC 2 DISC 3 DISC 4 DISC 5
DISC SKIP
OPEN/CLOSE
STOP
PLAY/PAUSE
1
2 3
65
1
32
2
1
2
4
Page 38

31.
Using the cassette deck
The front panel controls and display
30.
/
II
/
II
B RECORDING/PLAYBACKAPLAYBACK ONLY
REC PLAY REW FF STOP/EJECT PAUSEPLAY REW FF STOP/EJECT PAUSE
STEREO DOUBLE CASSETTE DECK KX-W595
ON STANDBY
POWER
REC LEVEL
DOLBY NR DUBBING TAPE SELECTOR
ON OFF
ON OFF HIGH NORMAL
REC
DUBBING
)VWX
PEAK LEVEL METER
(dB) –∞ –5 0 +3 +6
PLAY
button
REWIND
button
FAST
FORWARD
button
STOP/EJECT
button
PAUSE
button
DOLBY NR
button
DUBBING button
POWER
button
RECORDING LEVEL
knob
TAPE SELECTOR
button
RECORDING
button
DUBBING indicator
RECORDING indicator
DOLBY NR
reference level
PLAY
button
REWIND
button
FAST
FORWARD
button
STOP/EJECT
button
PAUSE
button
Page 39

Please read the following instructions carefully to help prevent
damage to your cassette tapes.
Preventing accidental
recording on pre-recorded
tape
To prevent the accidental recording
of a tape, use a small screwdriver or
other tool to remove the recordingactivation tabs on the top edge of
the cassette case.
To record on the tape after you’ve
removed the tabs, use cellophane
tape to cover the portion of the
hole previously covered by the tabs.
Covering the entire hole may interfere with the operation of the
cassette deck’s automatic tape-type
sensing mechanism.
If there is slack in the tape
Insert a pencil into the tape reel
hole, and wind the excess tape into
the cassette case.
Storing cassettes
Store tapes away from direct
sunlight, magnetic fields (including
those produced by speakers and
television sets), and heaters.
Special tapes
Using 120-minute tapes and/or
endless tapes could damage the
tape mechanisms. We don’t recommend them.
Before using the cassette deck
32.
Playing tapes
1 Insert a tape into a tape well. On tape A, the tape
type (Normal or Chrome) is automatically selected.
On tape B, press the TAPE SELECTOR button to
select the proper tape type.
2 Select Dolby Noise Reduction for the tape you’re
playing. For example, if you’re playing a tape recorded
using Dolby, select ON.
3 Press the E button to begin play.
4 Press the L button to stop play.
Fast-winding tapes
1 Press the Lbutton to stop play.
2 Press the EEbutton to fast-forward through the
tape, or press the FFbutton to rewind through the
tape.
3 Press the Lbutton to stop fast-winding.
Listening to tapes
33.
/
II
/
II
B RECORDING/PLAYBACK
REC PLAY REW FF STOP/EJECT PAUSEPLAY REW FF STOP/EJECT PAUSE
ON STANDBY
POWER
REC LEVEL
DOLBY NR DUBBING TAPE SELECTOR
ON OFF
ON OFF HIGH NORMAL
REC
DUBBING
)VWX
APLAYBACK ONLY
STEREO DOUBLE CASSETTE DECK KX-W595
II
/
II
B RECORDING/PLAYBACK
REC PLAY REW FF STOP/EJECT PAUSEPLAY REW FF STOP/EJECT PAUSE
ON STANDBY
POWER
REC LEVEL
DOLBY NR DUBBING TAPE SELECTOR
ON OFF
ON OFF HIGH NORMAL
REC
DUBBING
)VWX
APLAYBACK ONLY
STEREO DOUBLE CASSETTE DECK KX-W595
/
1
2
3 4
For B side
For A side
Page 40

Recording a tape
1 Put a blank tape in tape-well B.
2 Press the PAUSE button, and then press the REC and
PLAY buttons simultaneously.
3 Set the input of the receiver to the source you want
to record. You can’t select TAPE.
4 Set the record level (see above).
5 Set the source at the beginning.
6 Press the PAUSE button to release the cassette
from pause.
7 Play the music source.
To pause the recording
Press the PAUSE button.
To resume recording
Press the PAUSE button again.
To stop recording
Press the STOP button.
Copying (dubbing) a tape
You can automatically copy a tape in tape-well A onto a
tape in tape-well B.
A few tips about recording tape-to-tape:
• You can’t adjust recording level during copying. It is
set automatically.
• The new recording in tape-well B will automatically
have the same noise reduction as the original recording in tape-well A. This means you can’t add Dolby
Noise Reduction during dubbing.
1 Insert the tape to copy into tape-well A, and a blank
tape into tape-well B.
2 Select the tape type for tape-well B.
3 Press the DUBBING button.
4 Press the REC and PLAY buttons for tape-well B
simultaneously.
5 Press the PLAY button for tape-well A. Dubbing
starts automatically.
• Dubbing stops automatically when the side has
been recorded.
• Remember to turn the DUBBING switch OFF after
you’ve finished dubbing the tape.
To pause dubbing
Press the PAUSE button for tape-well B.
To resume dubbing
Press the PAUSE button for tape-well B again.
To stop dubbing
Press the STOP/EJECT buttons for both tape-wells.
35.
You can record tapes from any source connected to
your system: CDs, other tapes, records (if you’ve
connected a record player), the radio, and even the
audio portion of videotapes or laser discs (if you have
these components connected).
Setting the recording level
Setting the proper recording level is an important part of
making good tapes. If the recording level is too low, tape
hiss may mask the music’s softer parts. If the recording
level is too high, the music may sound distorted. These
instructions help you set the optimum recording level.
1 Put a blank tape in tape-well B.
2 Press the PAUSE button, and then press the REC and
PLAY buttons simultaneously.
3 Set the input of the receiver to the source you want
to record. You can’t select TAPE.
4 Find a loud section from the source you want to
record, and play it.
5 Using the REC LEVEL knob, adjust the recording level
so that the level indicators flash at 0 dB on the
music’s loudest passages. Turn the knob clockwise to
increase the recording level or counter-clockwise to
reduce it.
Recording tapes
34.
A few tips:
• To record tapes, use tape-well B.
• You can’t make recordings on metal tapes.
• Dolby Noise Reduction reduces tape hiss
produced during the record/play process. Dolby
B is the most widely used noise reduction
system on pre-recorded tapes. Be sure you
mark the tapes you record either Dolby B or
not so you can play them back properly.
/
II
REC PLAY REW FF STOP/EJECT PAUSEPLAY REW FF STOP/EJECT PAUSE
ON STANDBY
POWER
REC LEVEL
DOLBY NR DUBBING TAPE SELECTOR
ON OFF
ON OFF HIGH NORMAL
REC
DUBBING
APLAYBACK ONLY
STEREO DOUBLE CASSETTE DECK KX-W595
/
II
)VWX
B RECORDING/PLAYBACK
/
II
REC PLAY REW FF STOP/EJECT PAUSEPLAY REW FF STOP/EJECT PAUSE
ON STANDBY
POWER
REC LEVEL
DOLBY NR DUBBING TAPE SELECTOR
ON OFF
ON OFF HIGH NORMAL
REC
DUBBING
APLAYBACK ONLY
STEREO DOUBLE CASSETTE DECK KX-W595
/
II
)VWX
B RECORDING/PLAYBACK
/
II
REC PLAY REW FF STOP/EJECT PAUSEPLAY REW FF STOP/EJECT PAUSE
ON STANDBY
POWER
REC LEVEL
DOLBY NR DUBBING TAPE SELECTOR
ON OFF
ON OFF HIGH NORMAL
REC
DUBBING
APLAYBACK ONLY
STEREO DOUBLE CASSETTE DECK KX-W595
/
II
)VWX
B RECORDING/PLAYBACK
1
5 2
1
4
2 6
1
23
PEAK LEVEL METER
(dB) –∞ –5 0 +3 +6
Page 41

Sometimes things just don’t seem to be working right.
When this happens:
• First, look back over this manual to find the instructions for what you’re trying to do. You may find the
solution to your problem right there.
• If that doesn’t work, look for the problem in this
Troubleshooter’s guide.
• If you have a problem with another component,
check the manual for that unit.
• If you still can’t solve the problem, call the store
where your purchased your system, or call a
Kenwood Authorized Service Center.
To find a Kenwood Authorized Service Center
• Call 1-800-536-9663, in the continental US, 24 hours
a day, 7 days a week.
Receiver
Remote doesn’t operate
• Check the batteries, and replace them if needed.
• Check that the remote is close enough to the system;
that the controlling angle is small enough; that there’s
no obstacle in between.
• Check that you’ve placed your CD, videotape, laser
disc, or other source in the proper player.
• Check to make sure that the audio cables and system
control cables are connected properly.
No sound from the system
• Check that the volume is set at a proper level.
• Check that the mute is OFF.
• Check that the speakers are turned ON. If the speak-
ers are ON, the speaker indicator is ON.
• Check that all your power cords are connected properly.
• Check that the speaker cables are connected properly.
• Check that the input cable from the source component is connected properly.
• Check that the shorting plugs have not been removed
from the ADAPTER loop jacks.
No sound from one of the speakers
• Check that the balance between the left and right
speakers isn’t set too far to one side.
• Check that the audio and speaker cables are
connected properly.
The STANDBY light blinks, but there is no
sound
• Check that the speaker cables aren’t short-circuited—
that is, the (+) and (-) wires aren’t touching each
other. If they are, separate the wires.
A hum when you select the PHONO input
• Check that the audio cables are plugged securely into
the PHONO jacks.
• Check that the turntable is grounded on the rear
panel. The ground wire should be connected to the
screw labeled GND.
None of the functions operate, or the display
shows wrong information
• Reset the unit’s microcomputer by unplugging the
power cord from the AC outlet and plugging it back
in while holding down the POWER button.
Troubleshooting guide
37.
Performing routine maintenance helps keep your
cassette deck operating at peak performance.
Cleaning the heads
We recommend that you clean the head assemblies,
tape guides, capstans, and pinch rollers of both cassette
wells after every 10 hours of use. For best results, use
tape head cleaning fluid and long-handled cotton swabs.
(Using alcohol to clean the pinch rollers may cause them
to dry out over a long period of time.) Be careful not to
press too hard during cleaning, because the parts are
precisely aligned.
1 Open the cassette well doors.
2 Dip a swab into the cleaning fluid, and clean the
surface of the heads.
3 Using a clean swab, clean the capstan shafts, making
sure to clean all the way around them.
4 Using a clean swab, clean the pinch rollers, making
sure to clean all the way around them. Use a clean
swab to keep them from turning.
Demagnetizing the heads
Since tape is magnetic, when the tape heads and capstan
shaft contact the tapes, they become magnetized over
time, increasing distortion. Playing tapes on a player with
magnetized heads and capstans can also deteriorate the
recordings on the tapes. For best performance, use a
head demagnetizer to demagnetize the heads and
capstans of both cassette wells.
Maintaining the
cassette deck
36.
Heads Capstan shaft
Pinch roller
Page 42

• Make sure that Dolby Noise Reduction isn’t activated
when playing tapes recorded with no Dolby Noise
Reduction.
Recordings are distorted
• The recording level may be too high. Set the recording level according to the section ‘Setting the recording level’ on page 34.
Pressing the REC and PLAY buttons
simultaneously doesn’t start recording
• Make sure that the recording-activation tabs have not
been removed from the tape.
• Make sure that the cassette well door is completely
closed.
• Check that the recording level isn’t set to minimum.
• Check that the tape isn’t fully wound to the end.
Tape noise (hiss) level is high
• Make sure that the proper Dolby Noise Reduction is
selected for play.
• Make sure that the head is demagnetized properly.
• The tape may have been recorded at too low a
recording level. If so, record it again at a higher level.
Sound is ‘sour’, with unstable pitch
• Make sure that the capstans and pinch rollers are
clean.
• Make sure that the tape is wound properly in the
cassette case.
None of the functions operate, or the display
shows wrong information
• Reset the unit’s microcomputer by unplugging the
power cord from the AC outlet and plugging it back
in while holding down the STOP button.
39.
You can’t receive radio stations
• Check that the station is tuned in properly.
• Check that the TUNER input is selected.
• Check that the antenna is connected properly.
You can’t receive a preset station by pressing
the corresponding number buttons
• Check that the TUNER input is selected.
• Check that the preset station is a receivable
frequency.
• Check that the preset memory hasn’t been cleared
because the power cord was unplugged a long time. If
so, preset the station again.
Interference with reception
• Check for interference from electrical appliances. If so,
turn them OFF.
• Check for interference from the TV set. If so, turn it
OFF, or move the antenna away from the TV.
• Check for interference from automobiles. If so, install
the outdoor antenna away from roads.
CD player
Power light doesn’t come on
• Check that the power cord is properly plugged into
the AC outlet on the back of the receiver.
Player doesn’t play a loaded CD
• Check that the CD is loaded right-side up.
• Check that the CD isn’t cracked or dirty.
• There may be condensation on the lens. Leave the
player on for at least 1 hour before using it.
No sound
• Check that the CD is loaded properly.
• Check that the CD isn’t cracked or dirty.
• Check that the PLAY mode is active (the PLAY indi-
cator light should be ON).
• Check that the audio cables are connected properly.
Skipping (mis-tracking)
• Check that the CD isn’t cracked or dirty.
• Make sure that the player isn’t subjected to strong
vibrations.
CD automatically plays when power is turned
on
• Remove all CDs before turning the unit OFF. The
player is designed to automatically begin playing when
the power is turned ON.
Cassette deck
No sound when the PLAY button is pressed
• Check that the tape isn’t blank.
• Check that the tape is wound properly in the cassette
case. If not, replace the tape.
• Check that the audio cables are connected properly.
• Check that the tape heads are clean.
None of the operation buttons work
• Make sure that a tape has been inserted into the well.
• Make sure the cassette well door is completely
closed.
• Make sure that the tape isn’t fully wound to the end.
If it is, reinsert the tape facing the other direction.
• Check that the tape is wound properly in the cassette
case. If not, replace the tape.
Recordings sound dull
• Check that the tape heads are clean.
• The recording level may be too high. Set the record-
ing level according to the section ‘Setting the recording level’ on page 34.
38.
Page 43

Cassette deck
(KX-W595)
Format
Track system: 4 track, 2 channel
Recording system: AC bias
(105 kHz)
Heads
Well-A: Playback head x 1
Well-B: Record/playback head x 1,
Erase head x 1
Performance
Wow and flutter: 0.3% (WRMS)
Fast-wind time: Approx 110
seconds (C-60 tape)
Frequency response:
Normal tape: 30 Hz ~ 13 kHz, +3 dB
High-bias tape: 30 Hz ~ 13 kHz,+3 dB
Signal-to-noise ratio: (3% 3rd
harmonic distortion, high bias tape):
Dolby NR OFF: >57 dB
Dolby B NR ON: >66 dB
Harmonic distortion (315 Hz,
250 nWb/m, high bias tape): <1%
Input sensitivity/impedance:
122.8 mV/47 k-ohms
Output level/impedance:
775 mV/3.3 k-ohms
General
Power consumption: 12 W
Dimensions
Width: 17-5/16"
Height: 5-1/16"
Depth: 9-13/16"
Weight (net): 8.8 lb
Speakers (JL-506)
Drivers
Woofer: 10" cone-type
Midrange: 3" cone-type
Tweeter: 1" dome-type
Power handling: 140 watts
General
Dimensions
Width: 12-5/8"
Height: 35-7/16"
Depth: 9-1/2"
Weight (net): 23.1 lbs
Because Kenwood follows a policy
of continuous product improvement, these specifications may be
changed without notice.
41.
Receiver (KR-596)
Power amp section
100 watts per channel minimum
RMS, both channels driven, at 8
ohms, from 40 Hz to 20 kHz, with
no more than 0.09% total harmonic
distortion (FTC)
Pre amp section
Signal-to-noise ratio (IHF-A)
Phono: 70 dB
CD, Tape, Video: 95 dB
Input sensitivity/impedance
Phono: 3.5 mV/47 k-ohms
CD, Tape, Video: 200 mV/47 k-ohms
Tone controls
Bass: +_10 dB at 100 Hz
Treble: +_10 dB at 10 kHz
FM tuner section
Tuning frequency range:
87.5 MHz ~ 108 MHz
Useable sensitivity (IHF):
13.2 dBf (1.2 mv at 75 ohms)
50 dB quieting sensitivity (stereo):
41.2 dBf (3.2 mv at 75 ohms)
Total harmonic distortion (1 kHz)
Stereo: 0.7%
Mono: 0.6%
Signal-to-noise ratio at 65 dBf (IHF)
Stereo: 68 dB
Mono: 75 dB
Selectivity (IHF+400 kHz): 50 dB
Stereo separation at 1 kHz (IHF):
40 dB
Frequency response:
30 Hz ~ 15 kHz, +0.5 dB, -3.0 dB
AM tuner section
Tuning frequency range:
530 ~ 1700 kHz
Usable sensitivity:
12 mv/(500 mV/m)
Total harmonic distortion: 0.7%
Signal-to-noise ratio: 48 dB
Selectivity: 30 dB
General
Power consumption: 2.3 A
AC outlet (2 switched): 200 W
1.6 A max. total
Dimensions
Width: 17-5/16"
Height: 7-9/16"
Depth: 11-13/16"
Weight (net): 23.1 lb
CD player (DP-R896)
Format
Laser: Semiconductor laser
Channel format: 2 channel
Disc rotation speed: 200 ~ 500 rpm
(CLV)
D/A converters: Dual 1 Bit
Oversampling digital filter:
8 fs (352.8 kHz)
Performance
Frequency response: 4 Hz ~ 20 kHz,
+1.0 dB
Signal-to-noise ratio: >96 dB
Dynamic range: >94 dB
Total harmonic distortion + noise:
<0.007% (1 kHz)
Channel separation: >90 dB (1 kHz)
Wow and flutter: Unmeasurable
Output level/impedance:
2.0 V/3.3 k-ohms
General
Power consumption:10 W
Dimensions
Width: 17-5/16"
Height: 5-1/16"
Depth: 15-7/16"
Weight (net): 11 lb
Specifications
40.
Page 44

KENWOOD USA CORPORATION
PO Box 22745
Long Beach, California 90801-5745
F.P.O.
 Loading...