

Page 1
COMPACT HI-FI SYSTEM
INSTRUCTION MANUAL
KENWOOD CORPORATION
XD-SERIES
DIGITAL AUDIO
COMPACT
TEXT
XD-653 / XD-753
XD-503 / XD-553
XD-303 / XD-353
This instruction manual is used to describe multiple models listed above.
Model availability and features (functions) may differ depending on the country
and sales area. P
B60-4473-00 (EN)
Page 2
2
Preparation section
Before applying power
Caution : Read this page carefully to ensure safe operation.
For the United Kingdom
Factory fitted moulded mains plug
1.The mains plug contains a fuse. For replacement, use only
a 13-Amp ASTA-approved (BS1362) fuse.
2.The fuse cover must be refitted when replacing the fuse in
the moulded plug.
3.Do not cut off the mains plug from this equipment. If the
plug fitted is not suitable for the power points in your home
or the cable is too short to reach a power point, then obtain
an appropriate safety approved extension lead or adapter,
or consult your dealer.
If nonetheless the mains plug is cut off, remove the fuse
and dispose of the plug immediately, to avoid a possible
shock hazard by inadvertent connection to the mains
supply.
IMPORTANT: The wires in the mains lead are colored in
accordance with the following code:
Blue : Neutral
Brown : Live
Do not connect those leads to the earth terminal of a threepin plug.
Safety precautions
WARNING : TO PREVENT FIRE OR ELECTRIC SHOCK, DO NOT EXPOSE THIS
APPLIANCE TO RAIN OR MOISTURE.
CAUTION: TO REDUCE THE RISK OF ELECTRIC SHOCK, DO NOT
REMOVE COVER (OR BACK). NO USER-SERVICEABLE PARTS
INSIDE. REFER SERVICING TO QUALIFIED SERVICE PERSONNEL.
RISK OF ELECTRIC SHOCK
DO NOT OPEN
THE LIGHTNING FLASH WITH ARROWHEAD SYMBOL, WITHIN AN EQUILATERAL TRIANGLE, IS INTENDED TO ALERT THE USER TO THE PRESENCE OF UNINSULATED “DANGEROUS VOLTAGE” WITHIN
THE PRODUCT’S ENCLOSURE THAT MAY BE OF SUFFICIENT MAGNITUDE TO CONSTITUTE A RISK
OF ELECTRIC SHOCK TO PERSONS.
THE EXCLAMATION POINT WITHIN AN EQUILATERAL TRIANGLE IS INTENDED TO ALERT THE USER
TO THE PRESENCE OF IMPORTANT OPERATING AND MAINTENANCE (SERVICING) INSTRUCTIONS
IN THE LITERATURE ACCOMPANYING THE APPLIANCE.
CAUTION
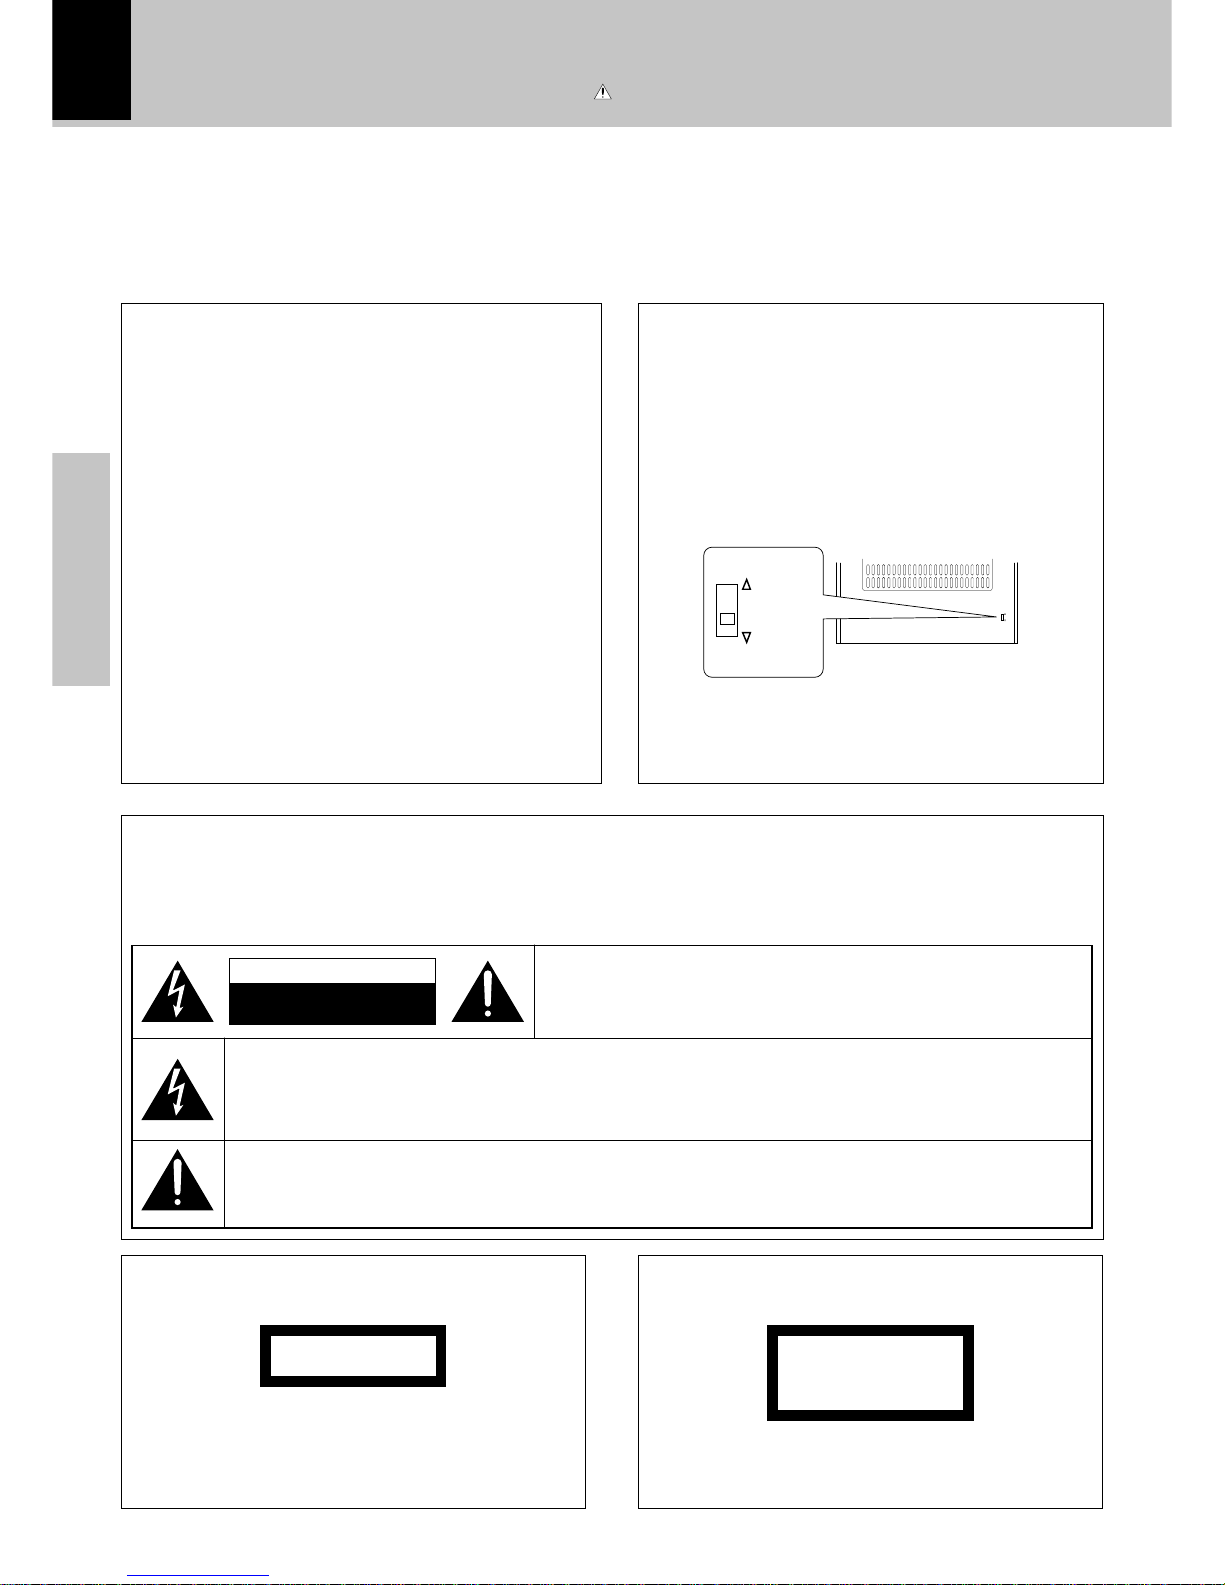
*AC voltage selection
The AC voltage selector switch on the rear panel is set to
the voltage that prevails in the area to which the unit is
shipped. Before connecting the power cord to your AC
outlet, make sure that the setting position of this switch
matches your line voltage. If not, it must be set to your
voltage in accordance with the following direction.
AC voltage selector switch
Move switch lever to match your line voltage with a
small screwdriver or other pointed tool.
Note:
Our warranty does not cover damage caused by excessive line voltage due to improper setting of the AC
voltage selector switch.
Inside this laser product, a laser diode classified as Class
3A laser radiation is contained as alerted by the internal
caution label shown above. To avoid exposure to laser
beams, do not open the cover.
The marking of products using lasers
(Except for some areas)
Units are designed for operation as follows.
Europe and U.K. ................................................. AC 230 V only
China.................................................................... AC 220 V only
*Other countries...........AC 110-120 / 220-240 V switchable
U.S.A. and Canada ............................................ AC 120 V only
Australia ............................................................. AC 240 V only
AC 220240V~
AC 110120V~
AC 220-
240V~
AC 110120V~
CAUTION
INVISIBLE LASER RADIATION
WHEN OPEN. AVOID EXPOSURE TO BEAM.
The marking is located on the rear panel and says that
the component uses laser beams that have been classified as Class 1. It means that the unit is utilizing laser
beams that are of a weaker class. There is no danger of
hazardous radiation outside the unit.
CLASS 1
LASER PRODUCT
The marking of products using lasers
(Except for some areas)
Page 3
Preparation section
3
Contents
Preparation section Application section
Knowledge section
Before applying power .............................. 2
Safety precautions...................................... 2
Special features ............................................... 4
Handling of discs and tapes ............................ 5
System connection........................................... 6
Accessories ....................................................................... 6
Connection of the system accessories......................... 6
Connection with other components (optional or com-
mercially-available equipment)..................................... 8
Controls and indicators ................................. 10
Main unit........................................................................... 10
Display .............................................................................. 12
Remote control unit ........................................................ 13
Operation of remote control unit .................. 14
Operation of jog dials ..................................... 15
Clock adjustment............................................. 16
Changing the display language ................... 17
Let's have sound .............................................. 18
Basic operation ............................................................... 18
Playback of CD ................................................................ 20
Tape playback.................................................................. 22
CHANNEL SPACE setting................................................25
Receiving broadcast station ..........................................26
Let's record...................................................... 28
Recording on TAPE ......................................................... 28
Copying tape (Tape dubbing) .........................................31
Playback of CD................................................ 32
Listening in the desired sequence
(program playback)................................................... 32
Repeated playback ......................................................... 34
Random playback............................................................ 36
R.D.S. (Radio Data System)
(For U.K. and Europe)................................. 37
Searching for a desired program type
(PTY search) ................................................................38
Convenient CD recording ............................... 40
Selection of the recording type.................................... 40
Recording only desired titles
(CD ONE TRACK RECORDING)................................. 41
Recording of an entire CD
(CD DIRECT RECORDING)..........................................42
Recording the programmed titles
(CD PROGRAM RECORDING)....................................43
Effective sound adjustment .......................... 44
Balance adjustment.........................................................44
Input level adjustment ....................................................45
Listening to music with desired tone and sound field/
Switching the display (Equalizer effect and 3D surround
effect) .................................................................................46
Equalizer pattern setting and saving............................47
Timer operation............................................... 48
Sleep timer ........................................................................48
Timer programming..........................................................49
Auto Power Save..............................................................50
Important Items............................................... 52
Maintenance .................................................................... 52
Reference ......................................................................... 52
In case of difficulty ........................................ 53
Specifications................................................. 57
Before applying power
Caution : Read the pages marked
carefully to ensure safe operation.
Basic section
Basic section Application section Knowledge section
As an ENERGY STAR
®
Partner, Kenwood Corporation
has determined that this products meets the
ENERGY
STAR
®
guidelines for energy efficiency.
This product can save energy.
Saving energy reduces air
pollution and lowers utility bills.
Page 4
4
Preparation section
Special features
The large sound level meter represents the movement in music with brilliant colors to offer the joy of
viewing the music at the same time as listening.
Large-sized color display panel
Simplified operations using large-sized, Jog Dial
This dial allows you to set the CD program and timer-related operations while observing the operating
conditions shown by the display.
3-Disc carousel CD player
Three discs can be set. There are various ways for enjoyment at the time of program playback, repeat
playback, random playback, etc.
Multi-control jog dial (For use in selecting a function)
Timer programming : Timer playback, AI timer playback, and timer recording can be pro-
grammed.
÷ AI timer playback : When the unit is turned ON by the timer, the sound level
increases gradually.
Sleep timer : Useful when you want to go asleep while listening to music.
Convenient timer functions
Auto power save
When the power is ON and neither recording nor playback is executed for 30 minutes or more, the
power is switched off automatically.
Demonstration
When the power supply is restored after a power failure or the power cord is unplugged and plugged in again during
use, this unit automatically starts the demonstration function (display only). During the demonstration, the display
changes in sequence but the sound mode does not change.
To cancel : To switch on and off the demonstration :
Press the DISPLAY/DEMO key during demonstration to stop it.
Turn the unit OFF (STANDBY mode) and press the
DISPLAY/DEMO key.
Each press of the key switches the demonstration
as shown below.
1 ”Demo on“ (Demonstration on)
2 “Demo off” (Demonstration off)
DISPLAY
/DEMO
Multi language display function
The menu items for the operation can be displayed in any of five of languages, English, French, German,
Spanish, and Italian.
CD text information display (CD TEXT compatibility)
The text information (disc title and track titles) recorded into CDs can be displayed.
Page 5
Preparation section
5
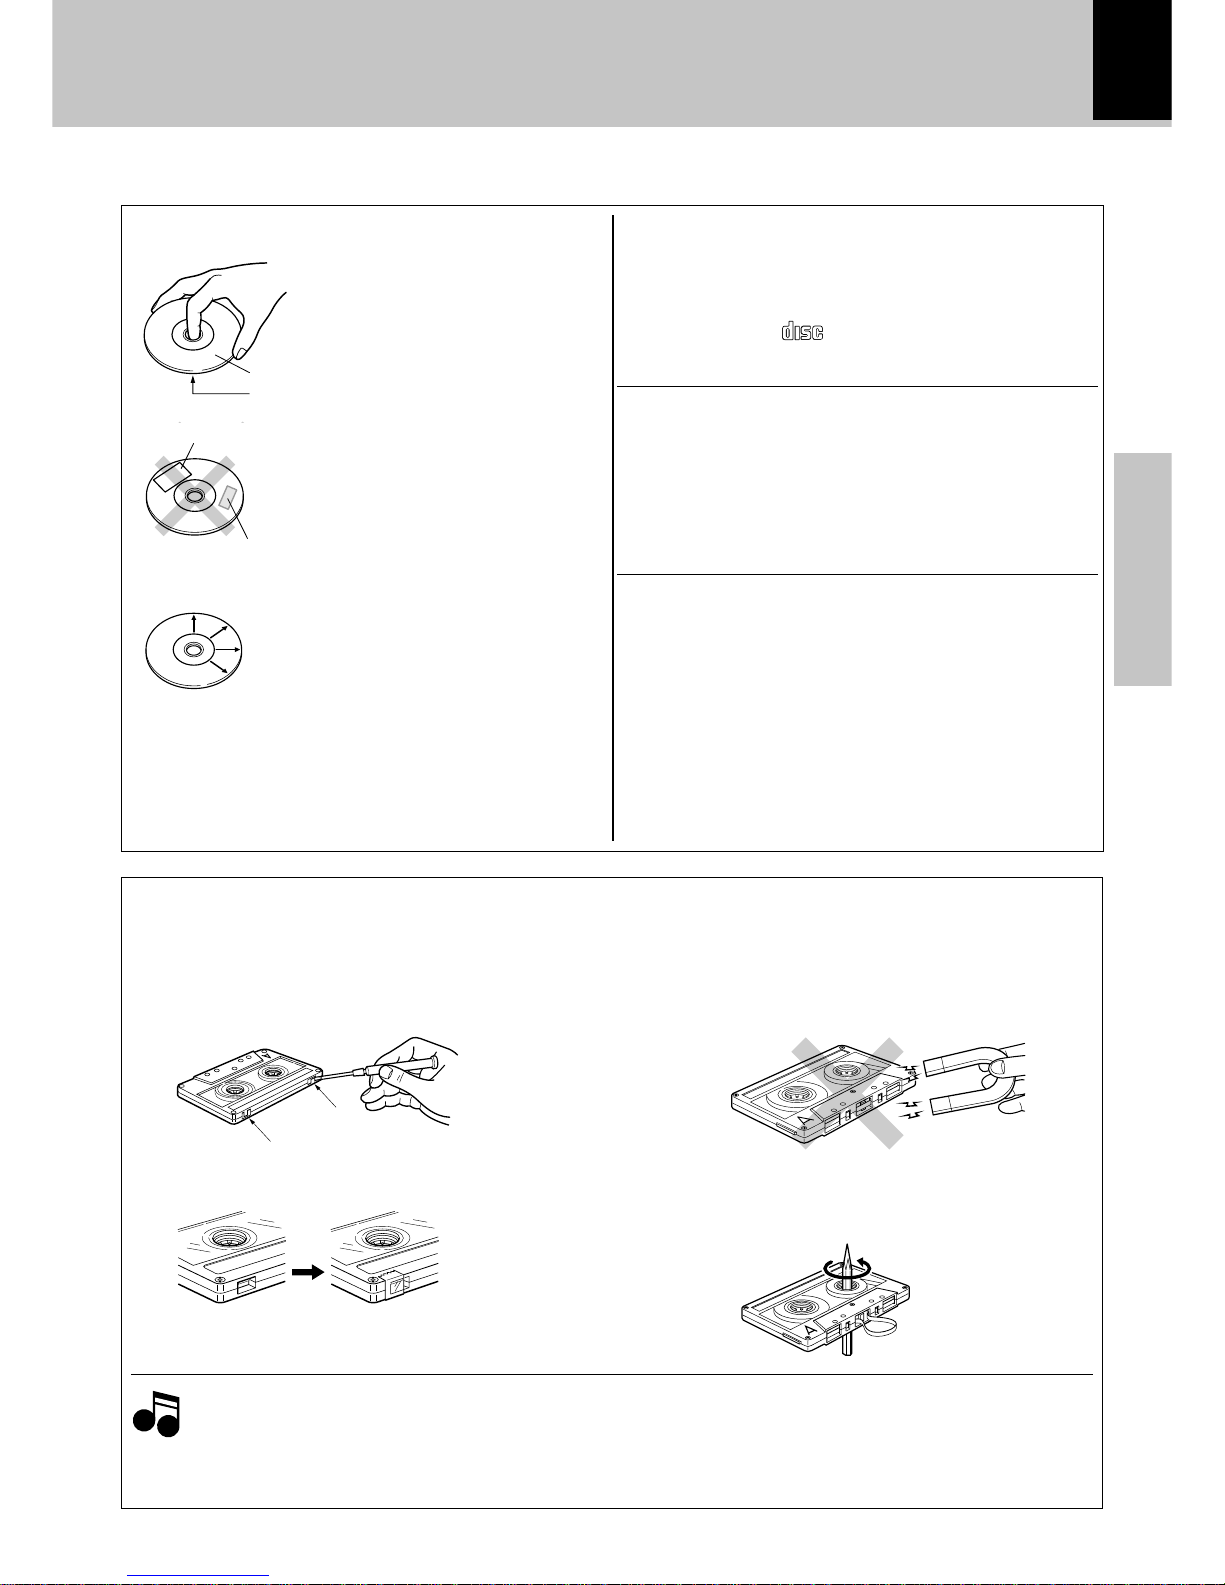
Safety tab (accidental erasure prevention tab)
After an important recording has been finished, break the
safety tab, to prevent the recorded contents from being
erased or recorded on accidentally.
For B side
For A side
To store cassette tapes
Do not store the tapes in a place which is subject to
direct sunlight, or near equipment that generates heat.
Keep the cassette tapes away from any magnetic field.
To re-record
Apply tape only to the position where
the tab has been removed.
When there is slack in the tape
In such a case, insert a pencil into the reel hole and wind
the reel hub to remove the slack.
N
S
1.Cassette tapes that are longer than 100 minutes
Since tapes that are longer than 100 minutes are very thin, the tape could adhere to the pinch roller or be easily
cut. It is recommended that these tapes not be used with this unit to prevent possible damage.
2.Endless tapes
Do not use an endless tape, as this could damage the mechanism of the unit.
Notes
Notes
Notes on cassette tape
Handling of discs and tapes
Label side
Playing side
Cleaning
If fingerprints or foreign matter become
attached to the disc, lightly wipe the disc
with a soft cotton cloth (or similar) from
the center of the disc outwards in a radial
manner.
Storage
When a disc is not to be played for a
long period of time, remove it from the
player and store it in its case.
Handling
Hold the discs so that you do not touch
the playing surface.
Disc handling precautions
Disc accessories
The disc accessories (stabilizer, protection sheet, protection ring,
etc.) which are marketed for improving the sound quality or protecting discs as well as the disc cleaner should not be used with
this system because they may cause malfunction.
Do not attach paper or tape to either
the playing side or the label side of the
discs.
Sticker
Sticky paste
Never play a cracked or warped disc
During playback, the disc rotates at high speed in the player.
Therefore, to avoid danger, never use a cracked or deformed disc
or a disc repaired with tape or adhesive agent.
Please do not use discs which are not round because they may
cause a malfunction.
Discs which can be played with this unit
CD (12 cm, 8 cm), and the audio part of CDV, CD-G, CD-EG
and CD-EXTRA.
Use discs that comply with the IEC standard, for example
a disc carrying the
DIGITAL AUDIODIGITAL AUDIO
COMPACTCOMPACT
marking on the label surface.
Page 6
6
Preparation section
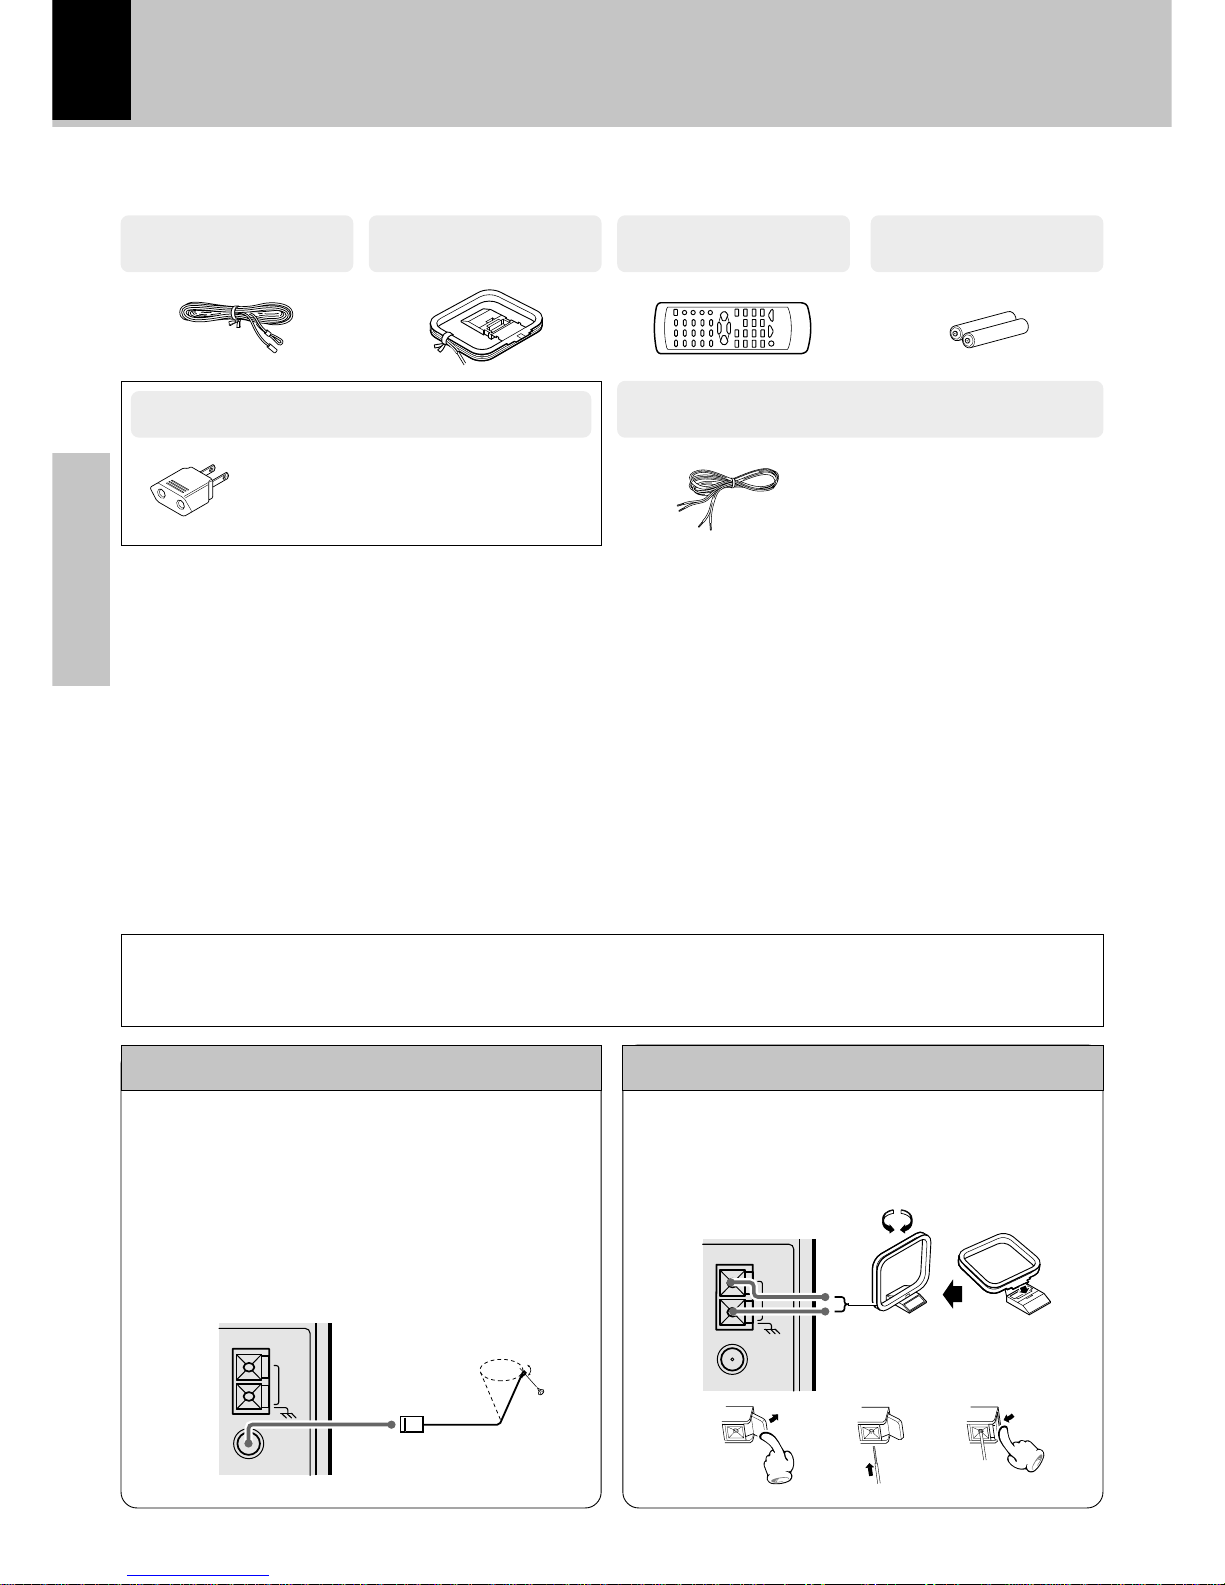
Accessories
FM indoor antenna
(1)
AM loop antenna
(1)
Speaker cords (2)
(XD-653 only)
Remote control unit
(1)
Connection of the system accessories
System connection
The supplied antenna is for indoor use. Place it as far
as possible from the main system, TV set, speaker
cords and power cord, and set it to a direction which
provides the best reception.
The accessory antenna is for temporary indoor use
only. For stable signal reception we recommend using an outdoor antenna. Remove the indoor antenna
if you connect one outdoors.
1 Connect to the antenna terminal.
2 Locate the position providing good recep-
tion condition.
3 Fix the antenna.
FM indoor antenna AM loop antenna
Unpacking
Unpack the unit carefully and make sure that all accessories
are put aside so they will not be lost.
Examine the unit for any possibility of shipping damage. If
your unit is damaged or fails to operate, notify your dealer
immediately. If your unit was shipped to you directly, notify
the shipping company without delay. Only the consignee
(the person or company receiving the unit) can file a claim
against the carrier for shipping damage.
We recommend that you retain the original carton and
packing materials for use should you transport or ship the
unit in the future.
Keep this manual handy for future reference.
CAUTION
Note on Connection
Connect the components as shown in the diagram. Only plug the power cord into a power outlet once connections are completed. The rear panel configuration is variable depending on the models (countries or area).
Use to adapt the plug on the power cord to
the shape of the wall outlet.
(Accessory only for regions where use is
necessary.)
AC plug adaptor (1)
123
Assemble.
Provided in the speaker package
Batteries (R6/AA)
(2)
GND
FM
75Ω
AM
ANTENNA
GND
FM
75Ω
AM
ANTENNA
Page 7
Preparation section
7
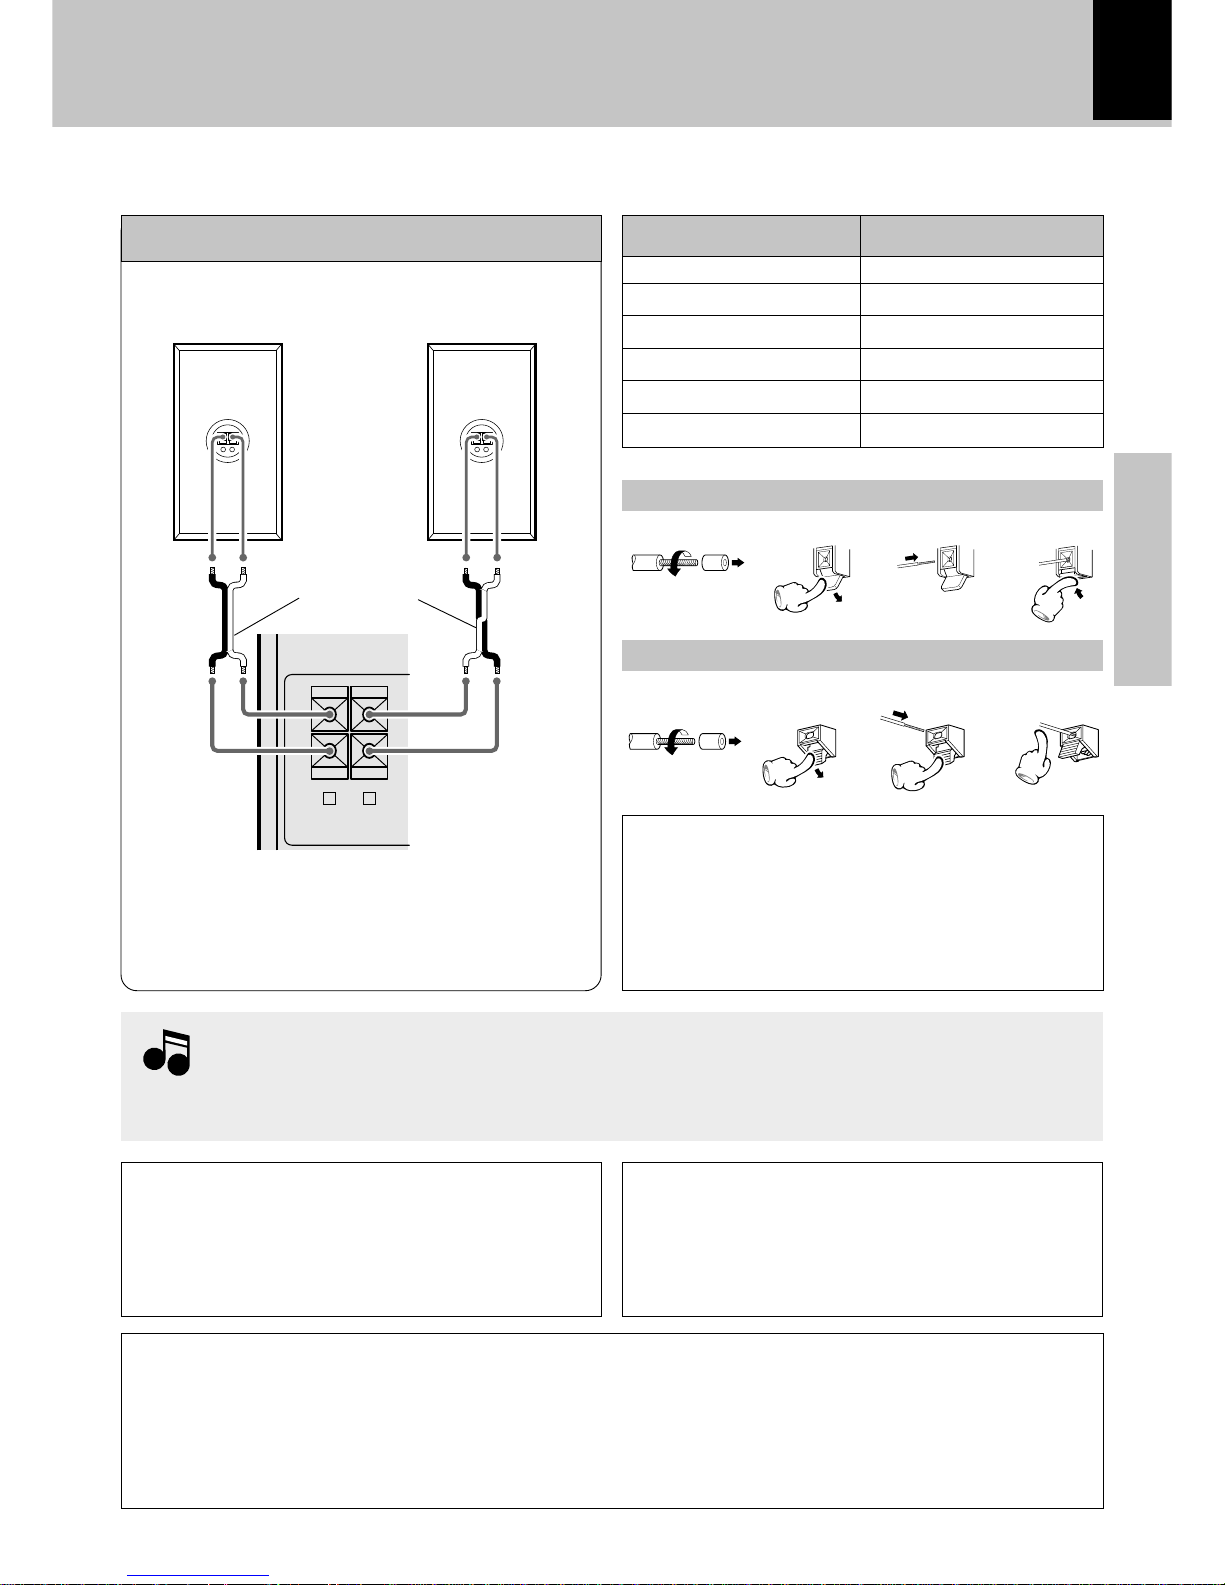
1.Be sure to insert all connection cords securely. If their connections are imperfect, the sound may
not be produced or noise may interfere.
2.Before plugging or unplugging a connection cord, be sure to unplug the power cord from the wall
AC outlet. If connection cords are plugged or unplugged with the power cord left plugged in,
malfunction or damage may result.
Malfunction of microcomputer
If operation is not possible or erroneous display appears
even though all connections have been made properly,
reset the microcomputer. Refer to “In case of difficulty”.
E
Twist
Speakers
Twist
Speaker Unit (XD-653 only)
Main Unit
System connection
NotesNotes
Notes
CAUTION
Speaker and TV installation
The magnet in the speaker may cause color irregularity on
the TV. Place the speaker farther away from the TV set.
Speaker (left)Speaker (right)
Speaker cord
·ª ·ª
÷ Never short-circuit the “+” and “–” speaker cords.
÷ If the left and right speaker connections or the “+” and
“–” polarity are inverted, the sound will be unnatural
with unclear positioning of musical instruments, etc. Be
sure to connect them properly.
LS-N303
LS-N353
LS-N503
LS-N553
LS-N653
LS-N753
XD-303
XD-353/XD-A33
XD-503
XD-553/XD-A53
XD-653
XD-753/XD-A73
Speaker Model NameSystem Name
Be sure to adhere followings. Or proper ventilation will be blocked causing damage or fire hazard.
• Do not place any objects impairing heat radiation onto the top of unit.
• Leave a space around the unit (from the largest outside dimension including projection) equal or greater than, shown
below.
Top panel : 50 cm Side panel : 10 cm Back panel : 10 cm
1234
1234
CAUTION
(For U.S.A., U.S.-Military and Canada)
Be sure to adhere followings. Or proper ventilation will
be blocked causing damage or fire hazard.
÷ Do not place any objects impairing heat radiation onto
the top of unit.
+
-
FRONT
SPEAKERS
(
6-16Ω
)
R
L
−
+
−
+
The speaker illustration is of the XD-653.
Page 8
8
Preparation section
L
R
DVD/VIDEO INPUT
DIGITAL OUT
OPTICAL
System connection
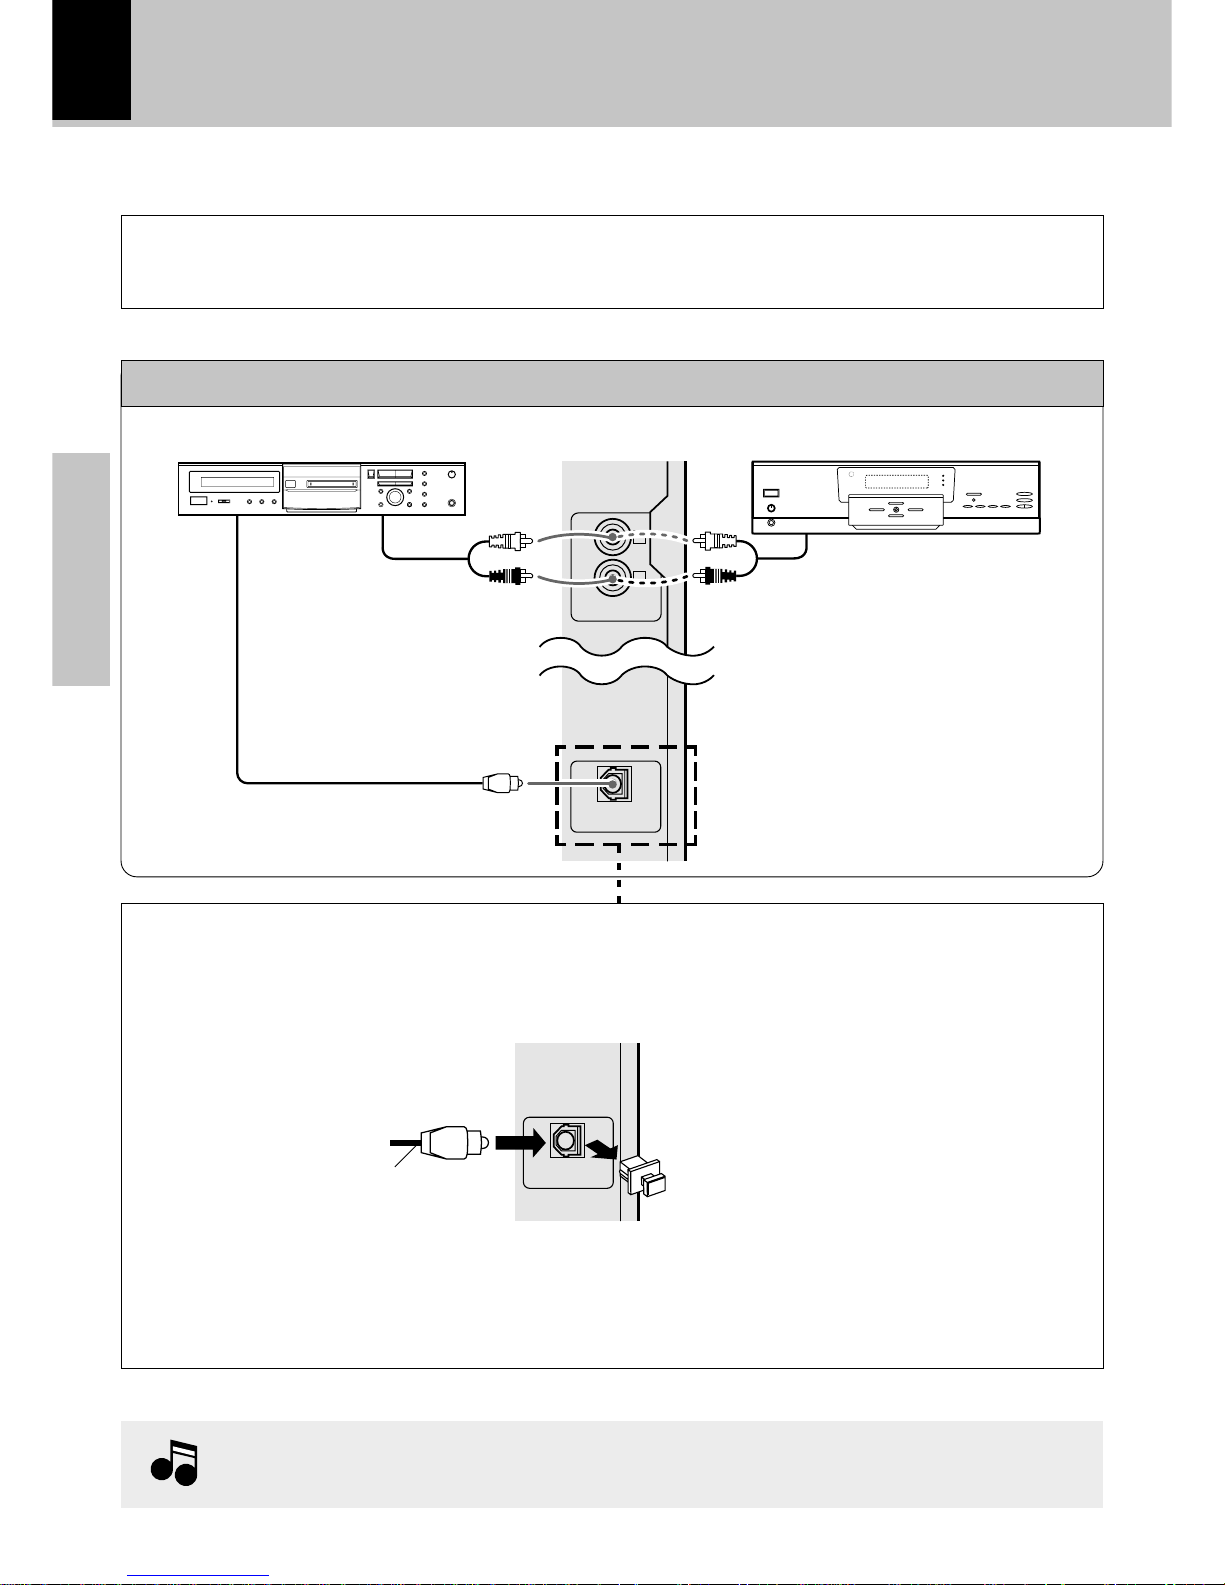
Connection with other components
(optional or commercially-available equipment)
Cap
Remove the cap and plug the optical-fiber cable.
Optical-fiber cable
(Provided with the MD
recorder)
÷ Insert the optical-fiber cable straight into the connector until it clicks.
÷ Be sure to attach the protection cap when the connector is not used.
÷ Never bend or bundle up the optical-fiber cable.
When an external system component is connected, please read the instruction manual of the
component as well.
Note
Note
CAUTION
Note on Connection
Connect the components as shown in the diagram. Only plug the power cord into a power outlet once connections are completed. The rear panel configuration is varies depending on the model (countries or area).
Optical-fiber cable
MD recorder, DVD player, VCR or analog turntable
DIGITAL OUT OPTICAL jack
MD recorder
DVD player/VCR/analog turntable (P-110/optional)
Audio output
Digital
input
Audio
output
DIGITAL OUT
OPTICAL
For XD-753/653/XD-553/503
(Europe and U.K. only)
Page 9
Preparation section
9
System connection
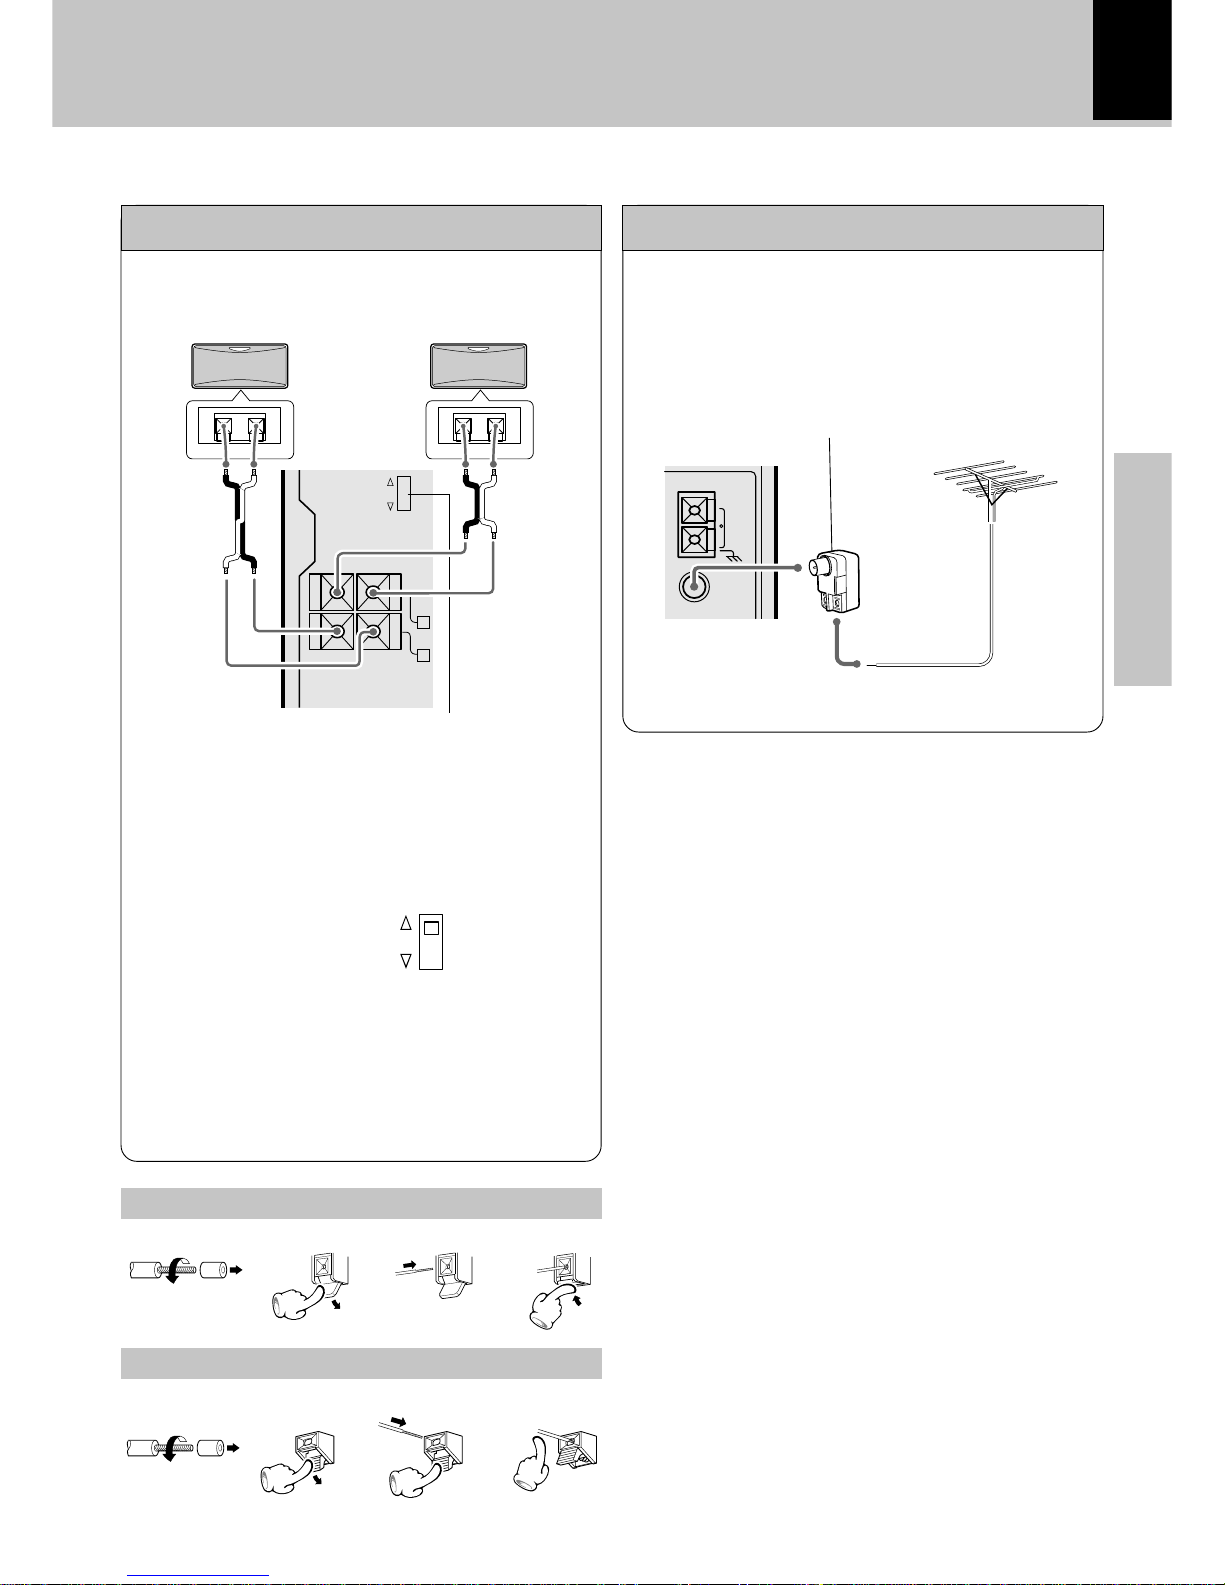
Surround (rear) speakers
This switch can be used only when the separately sold
surround (rear) speakers are connected. When the
switch is set to ON, surround playback can be enjoyed.
When this switch is set to OFF, normal playback is executed.
÷ Please operate this switch while the power is switched
off.
÷ We recommend that this switch be set to OFF when no
surround (rear) speakers are connected to obtain a
better sound quality.
÷ When the switch is set to OFF, no sound will come from
the surround (rear) speakers.
With regards to the SURROUND switch
123
Twist
4
Twist
Speaker Unit
Main Unit
RL
Surround switch
Lead the 75Ω coaxial cable connected to the FM outdoor antenna into the room and connect it to the FM
75Ω terminal.
FM outdoor antenna
Use a commercially-available antenna
adapter (a small-sized model).
Except for U.S.A. and Canada
·ª · ª
1234
ON
OFF
SURROUND
GND
FM
75Ω
AM
ANTENNA
+
-
SURROUND
SPEAKERS
(
8-16Ω
)
R
L
ON
OFF
SURROUND
−+−+
Page 10
10
Preparation section
Controls and indicators
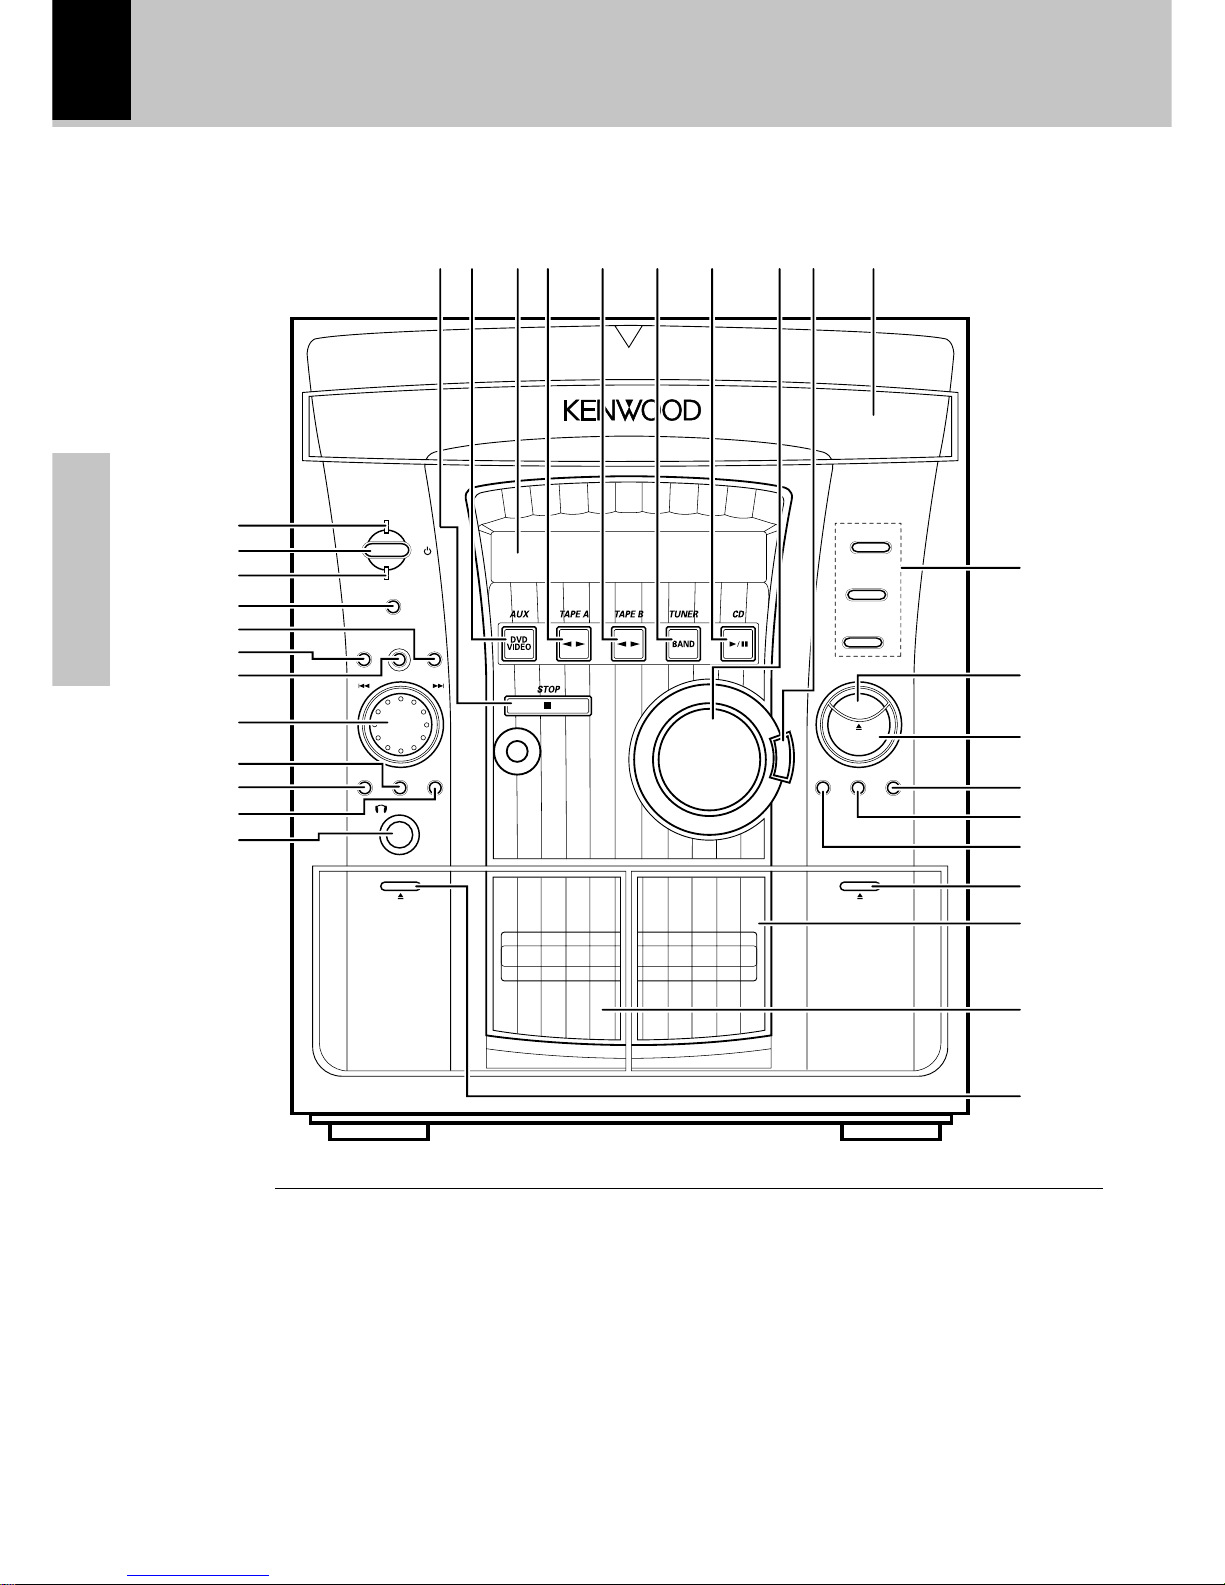
Main unit
# 7 (stop) key ¡
Operation key for the CD player and cassette deck.
( CD (6) key ¡
Press to select the CD and start playback.
™ Disc tray )
Three discs can be stored.
£ DISC SELECTOR keys ¡
The disc for playback (or recording) is selected.
CD player unit
¢ DISC SKIP key ¡
The disc for playback (or recording) is selected.This is also
used for loading CDs onto the disc tray.
∞ 0 OPEN/CLOSE key )
The disc tray is opened and closed.
DISC
1
DISC
2
DISC
3
STANDBY
TIMER
DISPLAY/DEMO
MENU
SELECTBACK ENTER
SOUND
CONTROL
TUNING
MODE
M
U
L
T
I
C
O
N
T
R
O
L
REC/ARM
REVERSE
MODE
TAPE EQ
PHONES
DISC SKIP
OPEN/
CLOSE
E
X
.
B
A
S
S
PUSH
OPEN
PUSH
OPEN
DECK
PLAY
A
DECK
REC/PLAY
B
VOLUME
CONTROL
™%$ ^&*( )¡#
1
3
2
4
7
6
@
0
9
!
8
5
¢
º
⁄
£
¶
•
¤
∞
ª
§
I/
Page 11
Preparation section
11
Controls and indicators
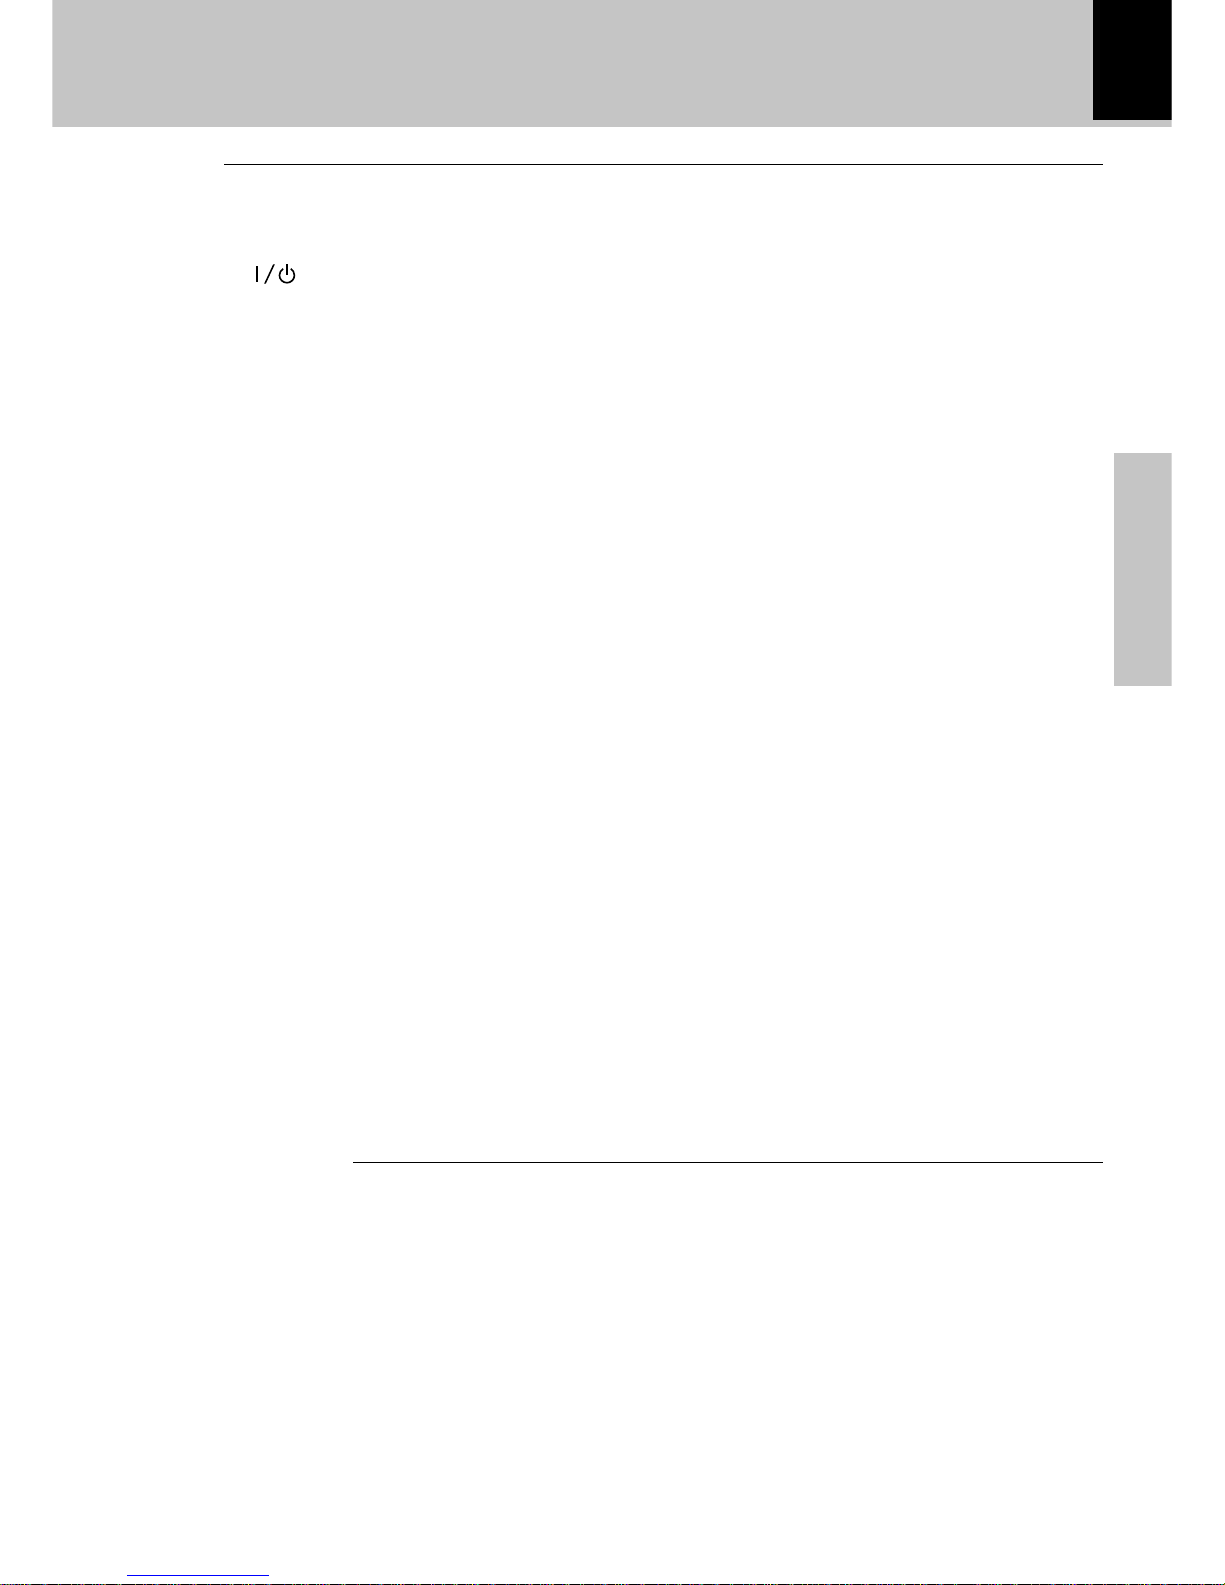
1 STANDBY indicator *
The indicator lights up when the power is set to the
STANDBY mode.
2 STANDBY ( ) key *
STANDBY (POWER) key (For U.S.A. Canada)
*
Power ON/OFF switching is executed.
3TIMER indicator Q
The indicator lights up when the power is set to the
STANDBY mode after having activated a timer program.
4 DISPLAY/DEMO key 4y
Switches the displayed information.
5 TUNING MODE key
Switches the tuning mode.
6 SOUND CONTROL key y
Press to select the equalizer and 3D surround settings.
7 MENU key %
Press to switch the mode set with the MULTI CON-
TROL jog dial ON or OFF.
8 MULTI CONTROL jog dial %£§
Turn this dial to select optimum modes according to the
desired operations.
When the CD input is selected, this dial is used to skip
tracks.
When the TUNER input is selected, this dial is used to
select a station.
When the TAPE input is selected, this dial is used to fast
forward or backward (rewind) the tape..
9 SELECT key %
Used for setting of various modes or establishing a
selection.
0 BACK key %
Press when setting a mode using the MULTI CON-
TROL jog dial to return to the previous step and restart
the operation from there.
! ENTER key %
Used for entering a selected mode in memory or executing it.
@ PHONES jack *
For connection of a headphone (optional).
# 7 (stop) key ¡
Operation key for the CD player and cassette deck.
When power is STANDBY:
Used for displaying the time. (When this key is pressed
while the “TIMER” indicator is lit, the timer icon and the
timer reservation setting mode appears in the display,
then the display returns to the previous condition.)
$ AUX (DVD/VIDEO) key *
Press to select the source connected to the DVD/VIDEO
INPUT jacks.
% Display @
* TUNER (BAND) key §
Press to select the tuner and switch the receiving band.
) VOLUME CONTROL knob *
This is used for volume adjustment.
¡ EX. BASS (Extra bass) key (
Switches the extra bass play on and off.
Cassette deck unit
# 7 (stop) key £
Operation key for the CD player and cassette deck.
^ TAPE A (™ £) key ™
Press to select the deck A and start playback.
& TAPE B (™ £) key ™
Press to select the deck B and start playback.
§ TAPE EQ. key £
Press to switch the Tape Equalizer on and off.
¶ REC/ARM key ª
Press to start recording. Pressing this key while recording pauses creates a non-recording space (blank) of
about 4 seconds.
• REVERSE MODE key £ª
The reverse mode of the deck (both sides, repeated,
one side) is switched.
ª
00
00
0 PUSH OPEN key (B)
Press to load or remove a tape.
º B deck cassette holder
⁄ A deck cassette holder
¤
00
00
0 PUSH OPEN key (A)
Press to load or remove a tape.
Receiver
Page 12
12
Preparation section
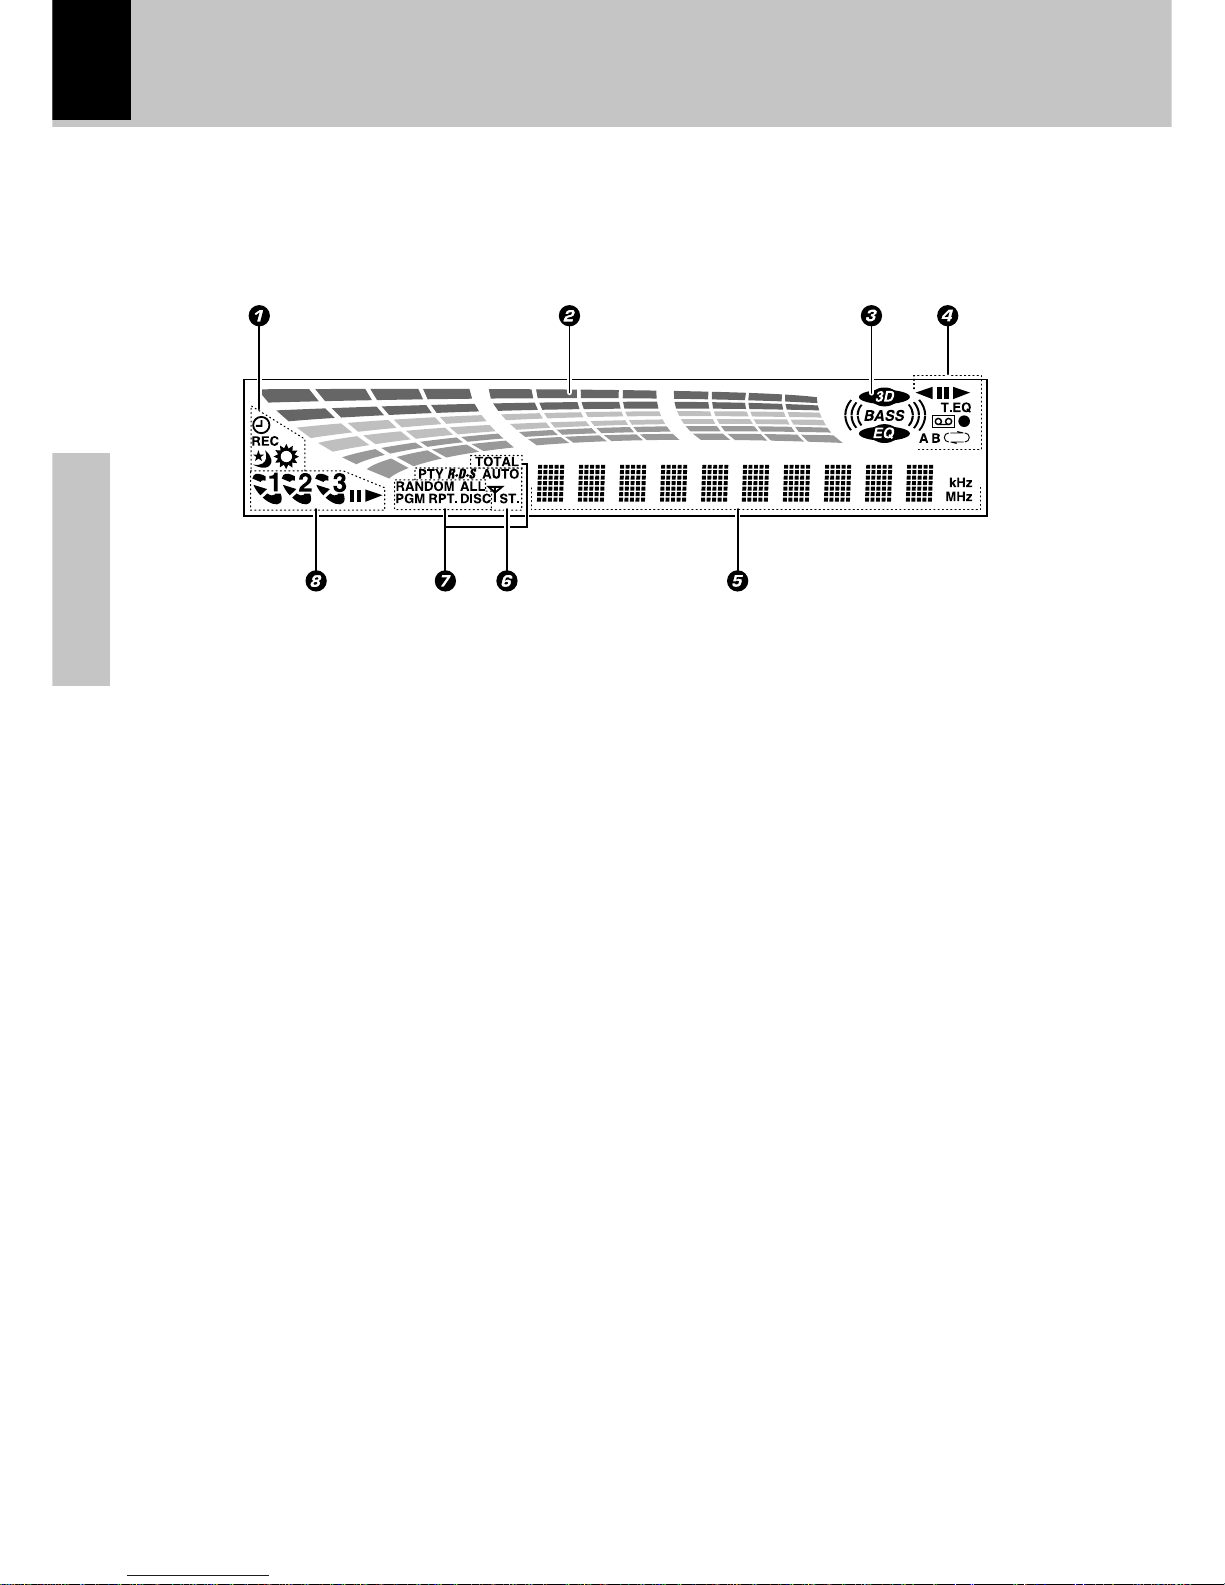
Display
The displays given in this manual are approximations only. They may differ from what
actually appears on the display.
Controls and indicators
1 Timer-related indicators
2 Sound level meter
The display varies according to the music or the operations of the CD, tape, etc.
During the volume adjustment, this meter displays the
current sound level as a reference.
3 Equalizer/3D surround/Ex. Bass indicators
4 Cassette deck-related indicators
This section contains the cassette deck operation indicators. The indicated information includes the tape
reverse mode and tape transport direction.
5 Character information display
Displays the input selection, frequency, volume level,
etc.
6 Tuner-related indicators
7 REPEAT/PGM/RANDOM/TOTAL indicators
8 CD player-related indicators
This section contains the CD play and pause mode
indicators.
Page 13
Preparation section
13
Remote control unit
Controls and indicators
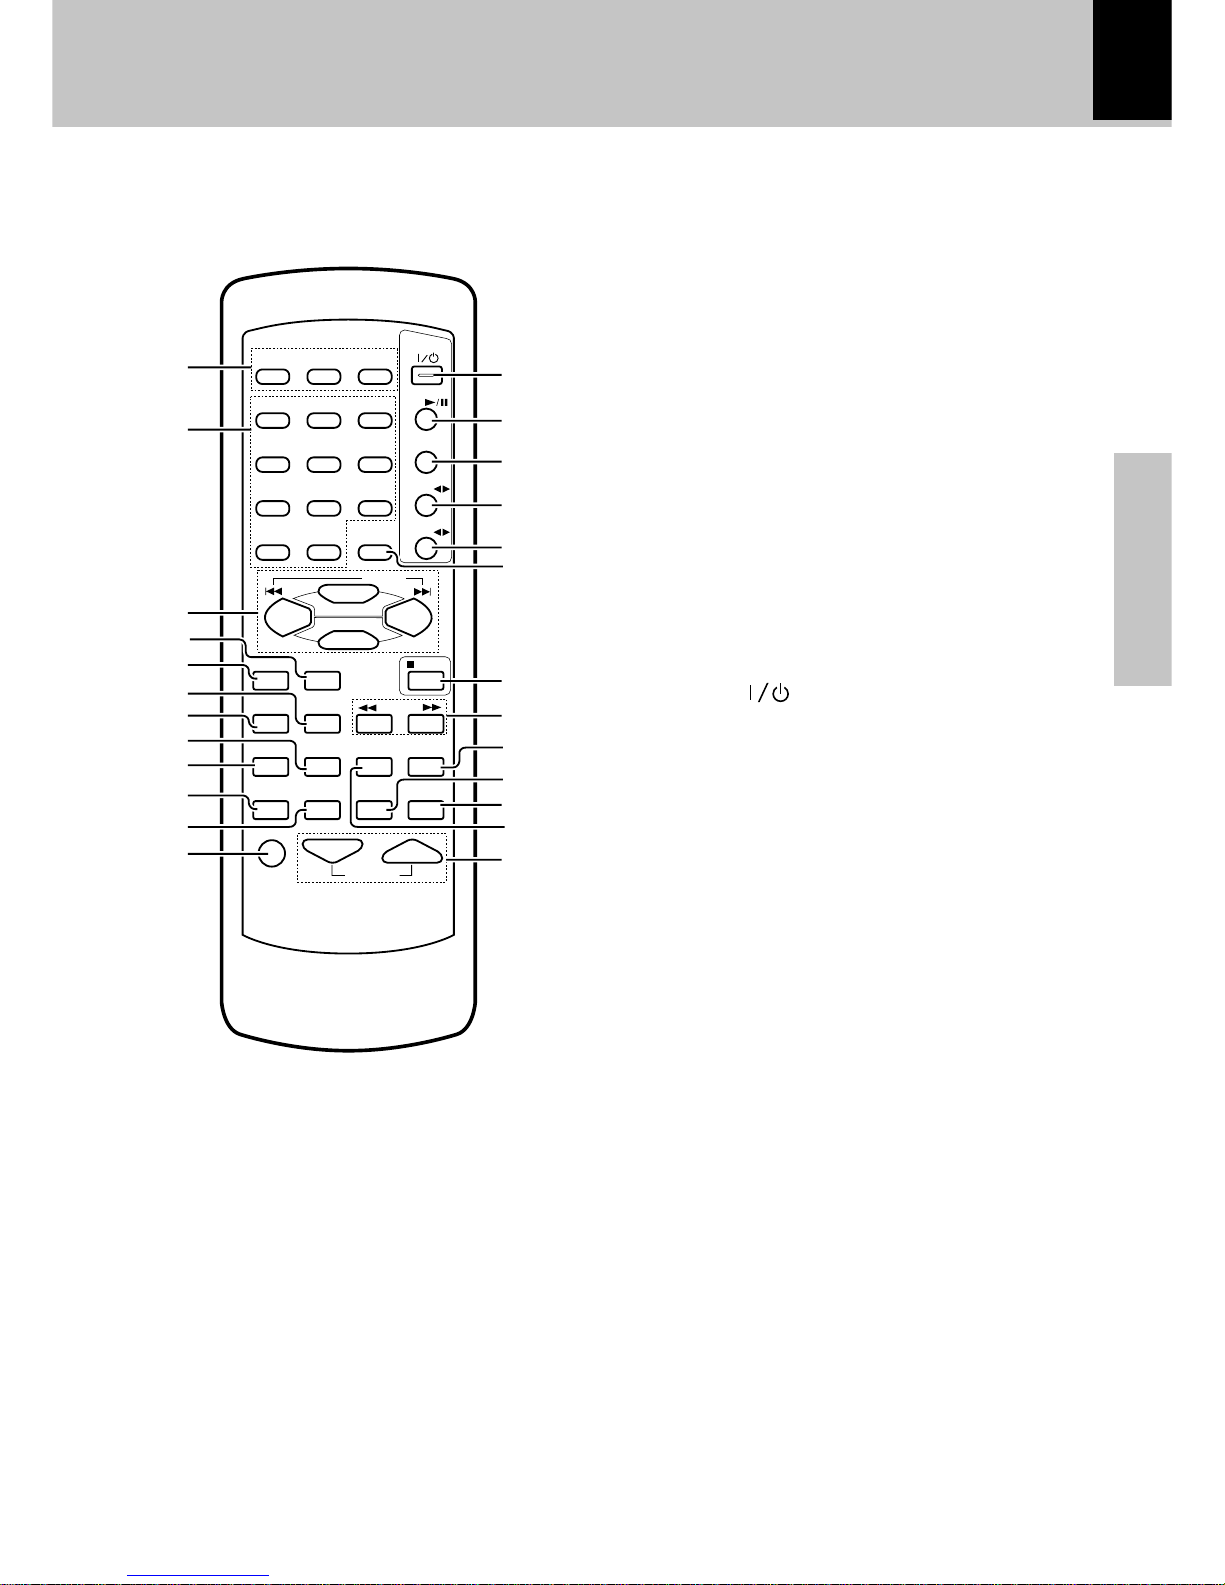
The keys on the remote control unit with the same names as on the main unit have the same function as the keys
on the main unit.
1 DISC SELECTOR keys ¡
The disc for playback (or recording) is selected.
2 Numeric keys ¡
Used as number keys when the input is CD or TUNER.
3 MULTI CONTROL keys %£§
The left and right keys have the same functions as the
MULTI CONTROL jog dial on the main unit.
P.CALL 4 ¢ (skip) keys (CD/TUNER)
¡¶
When the CD input is selected, press to skip forward or
backward on the disc.
When the TUNER input is selected, press to select
preset station.
When the TAPE input is selected, press the key to fastforward or rewind the tape.
SELECT key %
MENU key %
4 BACK key %
5 ENTER key %
6 REV. MODE key £ª
The reverse mode of the deck (both sides, repeated,
one side) is selected.
7 TAPE EQ key £
8 RANDOM key fl
For CD playback, switching is executed between random playback and normal playback.
9 REPEAT key ›
Used for repeated playback of a CD.
0 AUX key *
Press to select the source connected to the DVD/VIDEO
INPUT jacks.
! EX. BASS key (
@ MUTE key (
This is used to mute the sound temporarily.
# POWER ( ) key *
Power ON/OFF switching is executed.
$ CD (6) key )
% TUNER/BAND key §
^ TAPE A (™ £) key ™
& TAPE B (™ £) key ™
* DISC SKIP key ¡
( 7 STOP key ¡£
Operation key for the CD player and cassette deck.
) TUNING (1 ¡) keys (CD/TAPE/TUNER)
¡£§
When the CD or TAPE input is selected, press to fast
forward or backward (rewind) the disc or tape.
When the TUNER input is selected, press to select a
station.
¡ TEXT DISP key ‚
Press to switch the text information recorded in a CD
TEXT disc.
RDS DISP key (For U.K. and Europe)
‡
The display contents are switched during reception of
RDS broadcasts.
™ SOUND CONTROL key y
Press to select or the equalizer and 3D surround settings.
£ SLEEP key i
Press to set the sleep timer.
¢ TIME key ¡
Press to switch the time information on the CD player
unit.
PTY key (For U.K. and Europe) °
This is used to specify the program type when searching for a station.
∞ VOLUME keys *
This is used for volume adjustment.
1
REPEAT
RANDOM
ENTER
BACK
TAPE EQ
REV.MODE
TIME
TEXT DISP
AUX
EX.BASS
SOUND
CONT
SLEEP
23
POWER
CD
TUNER/BAND
TAPE A
TAPE B
DISC
SKIP
TUNING
MUTE VOLUME
STOP
P.CALL
MENU
SELECT
456
789
0 +10
RDS DISP
PTY
DISC 1 DISC 2 DISC 3
#
$
%
^
&
)
¡
∞
(
¢
™
£
*
1
2
!
4
6
9
8
@
3
5
0
7
Page 14
14
Preparation section
Operation of remote control unit
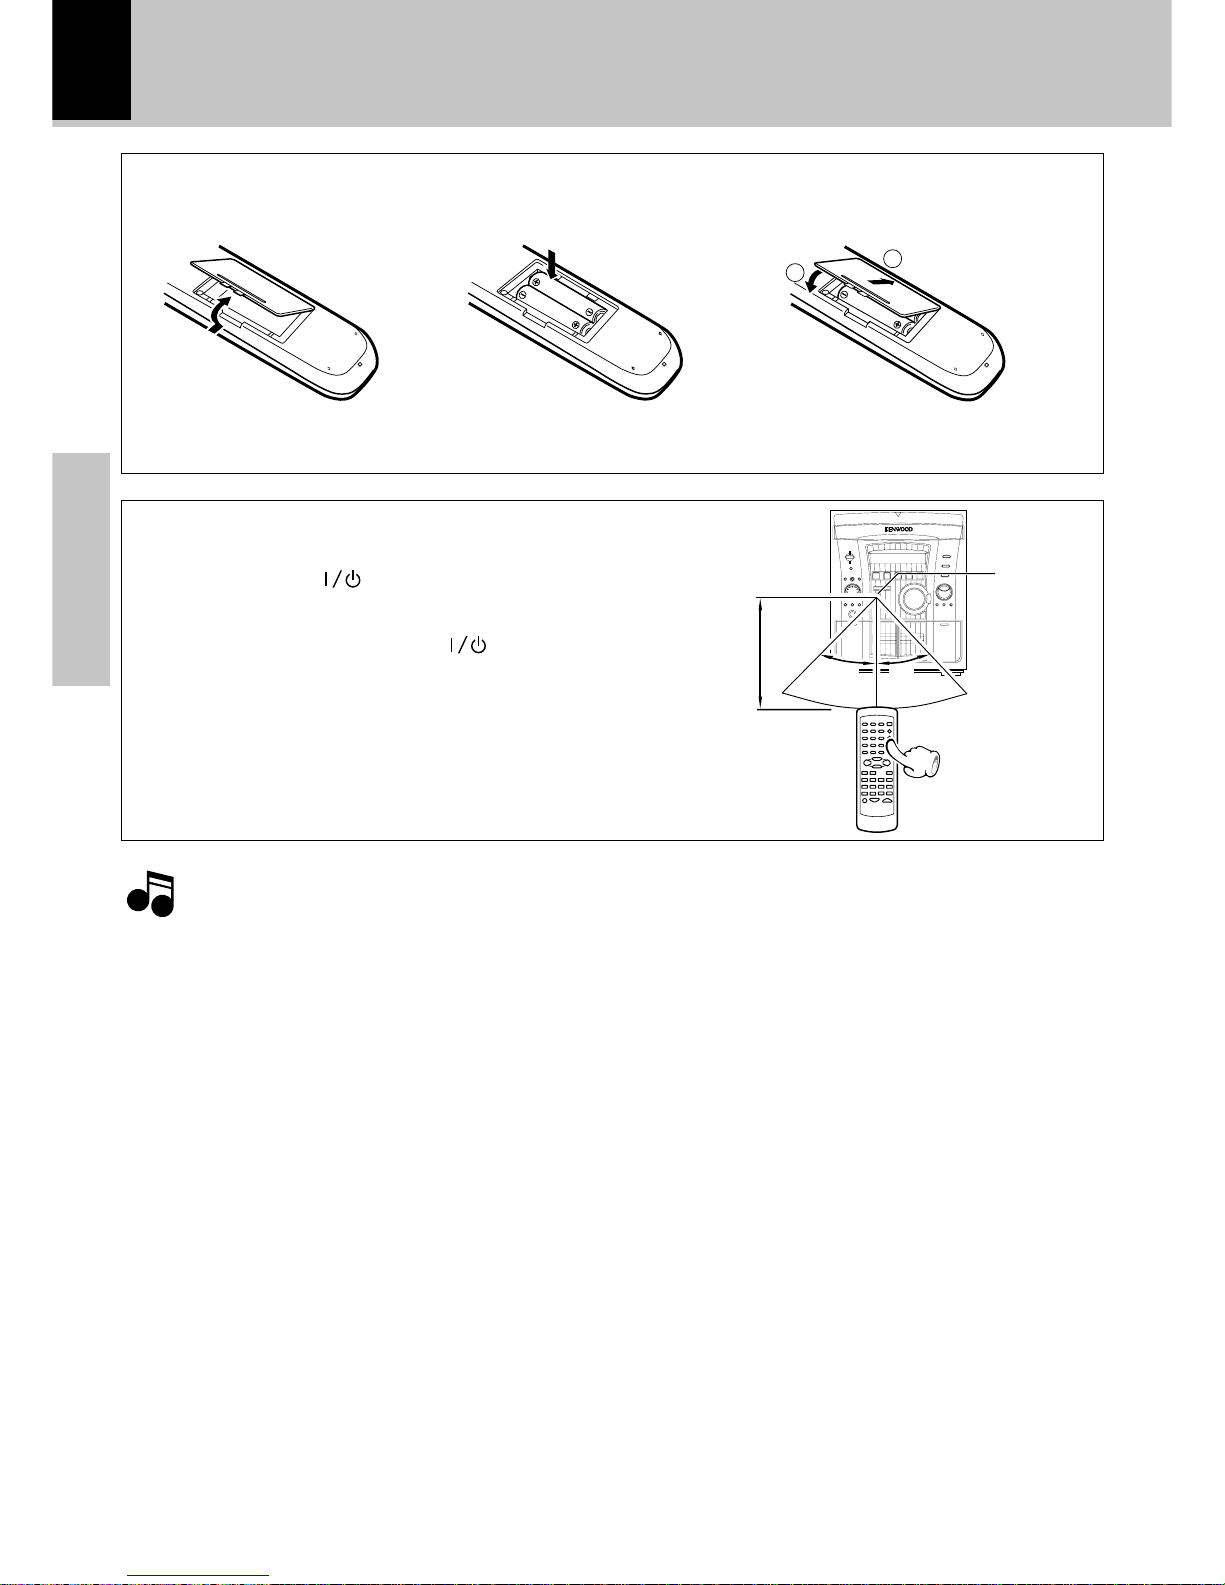
Loading batteries
1 Remove the cover. 3 Close the cover.
÷ Insert two R6 (“AA”-size) batteries
following the polarity indications.
2 Insert batteries.
Operation
Plug the power cord into the mains power outlet and
press the on/standby (
POWER) key of the remote
control unit to turn power ON. After the power has been
turned ON, press the desired key.
To turn power off, press the on /standby( POWER) k ey
again.
The power mode enters the STANDBY mode in which
the “STANDBY” indicator lights up. (The “TIMER” indicator also lights in this mode if a timer program has
been activated.)
÷ When pressing more than one remote control key suc-
cessively, press the keys securely by leaving an interval
of 1 second or more between the key presses.
1.The provided batteries are intended for use in operation checking, and their service life may be short.
2.When the remote controllable distance becomes short, replace both of the batteries with new ones.
3.If direct sunlight or the light of a high- frequency fluorescent lamp (inverter type, etc.) is incident to the remote
sensor, malfunction may occur. In such a case, change the installation position to avoid malfunction.
Operating range
(approx.) Remote
sensor
Notes
Notes
1
2
30
˚
6m
30
˚
Page 15
Preparation section
15
Operation of the jog dial
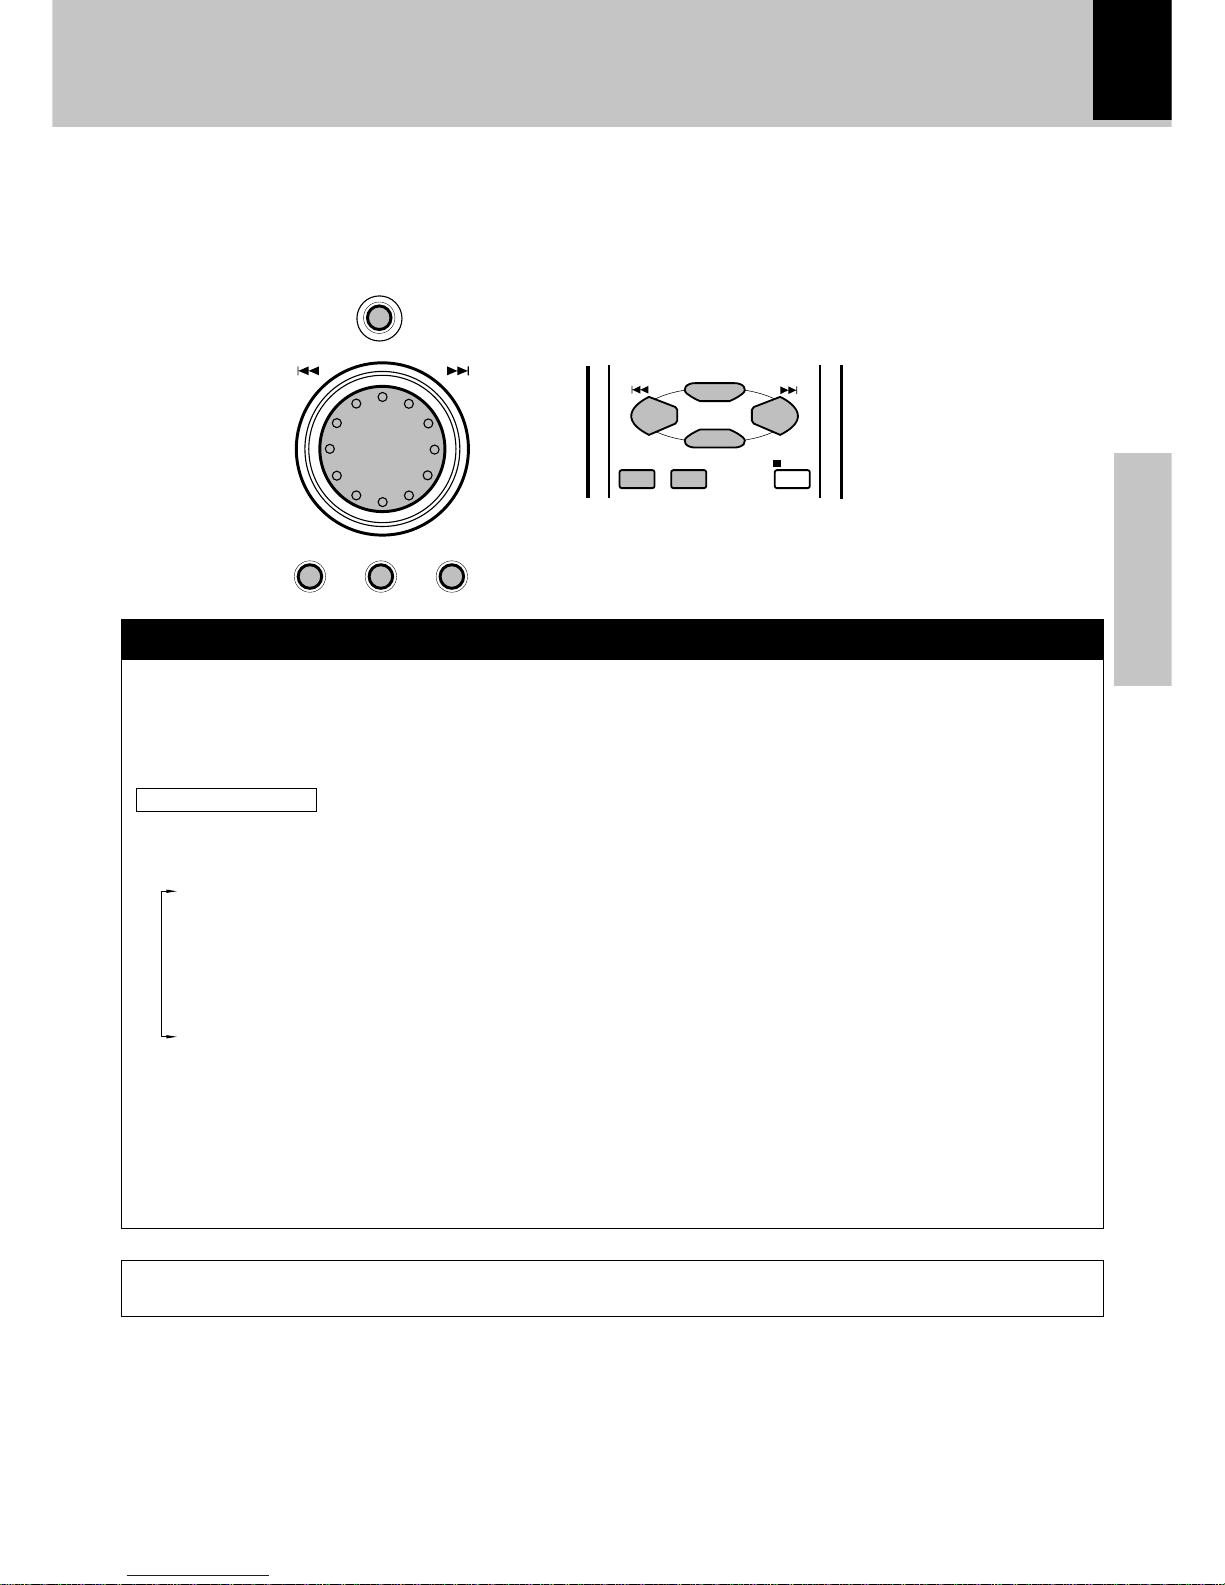
This unit has a jog dial named the MULTI CONTROL jog dial.
The MULTI CONTROL jog dial makes it possible to set (establish) many functions in a simple procedure.
When the MENU key is pressed, the items appears in the display according to the MULTI CONTROL jog dial
operation so you can select the desired mode based on a more intuitive method.
You can also use the 4/¢ keys on the remote control unit instead of the MULTI CONTROL jog dial.
1 Press the MENU key to enter the MULTI CONTROL setting mode.
2 Select an operation mode by turning the MULTI CONTROL jog dial (or pressing the MULTI CONTROL
keys on the remote control unit).
3 Set, establish or execute (determine) items by pressing the SELECT key and/or ENTER key.
MULTI CONTROL jog dial
÷ To cancel the mode for setting (using) MULTI CONTROL, read the description of each item in this manual.
÷ Press the BACK key to return to the previous step and restart operation from there. (The BACK key is inoperative once scrolling
message “Press ' ENTER ' to - - -” has been displayed.)
÷ With the remote control unit, pressing the MENU key makes it possible to select the same items as those available on the main
unit using the MULTI CONTROL keys.
The following items can be selected by turning the MULTI CONTROL jog dial.
“CD Program Play”
“Recording Options”
“Tape Dubbing”
“Audio Options”
“Clock Options”
“Language Options”
Display examples
In the MULTI CONTROL setting mode, only the volume control and 7 STOP key are operative.
MENU
SELECTBACK ENTER
M
U
L
T
I
C
O
N
T
R
O
L
ENTER
BACK
STOP
P.CALL
MENU
SELECT
Page 16
16
Preparation section
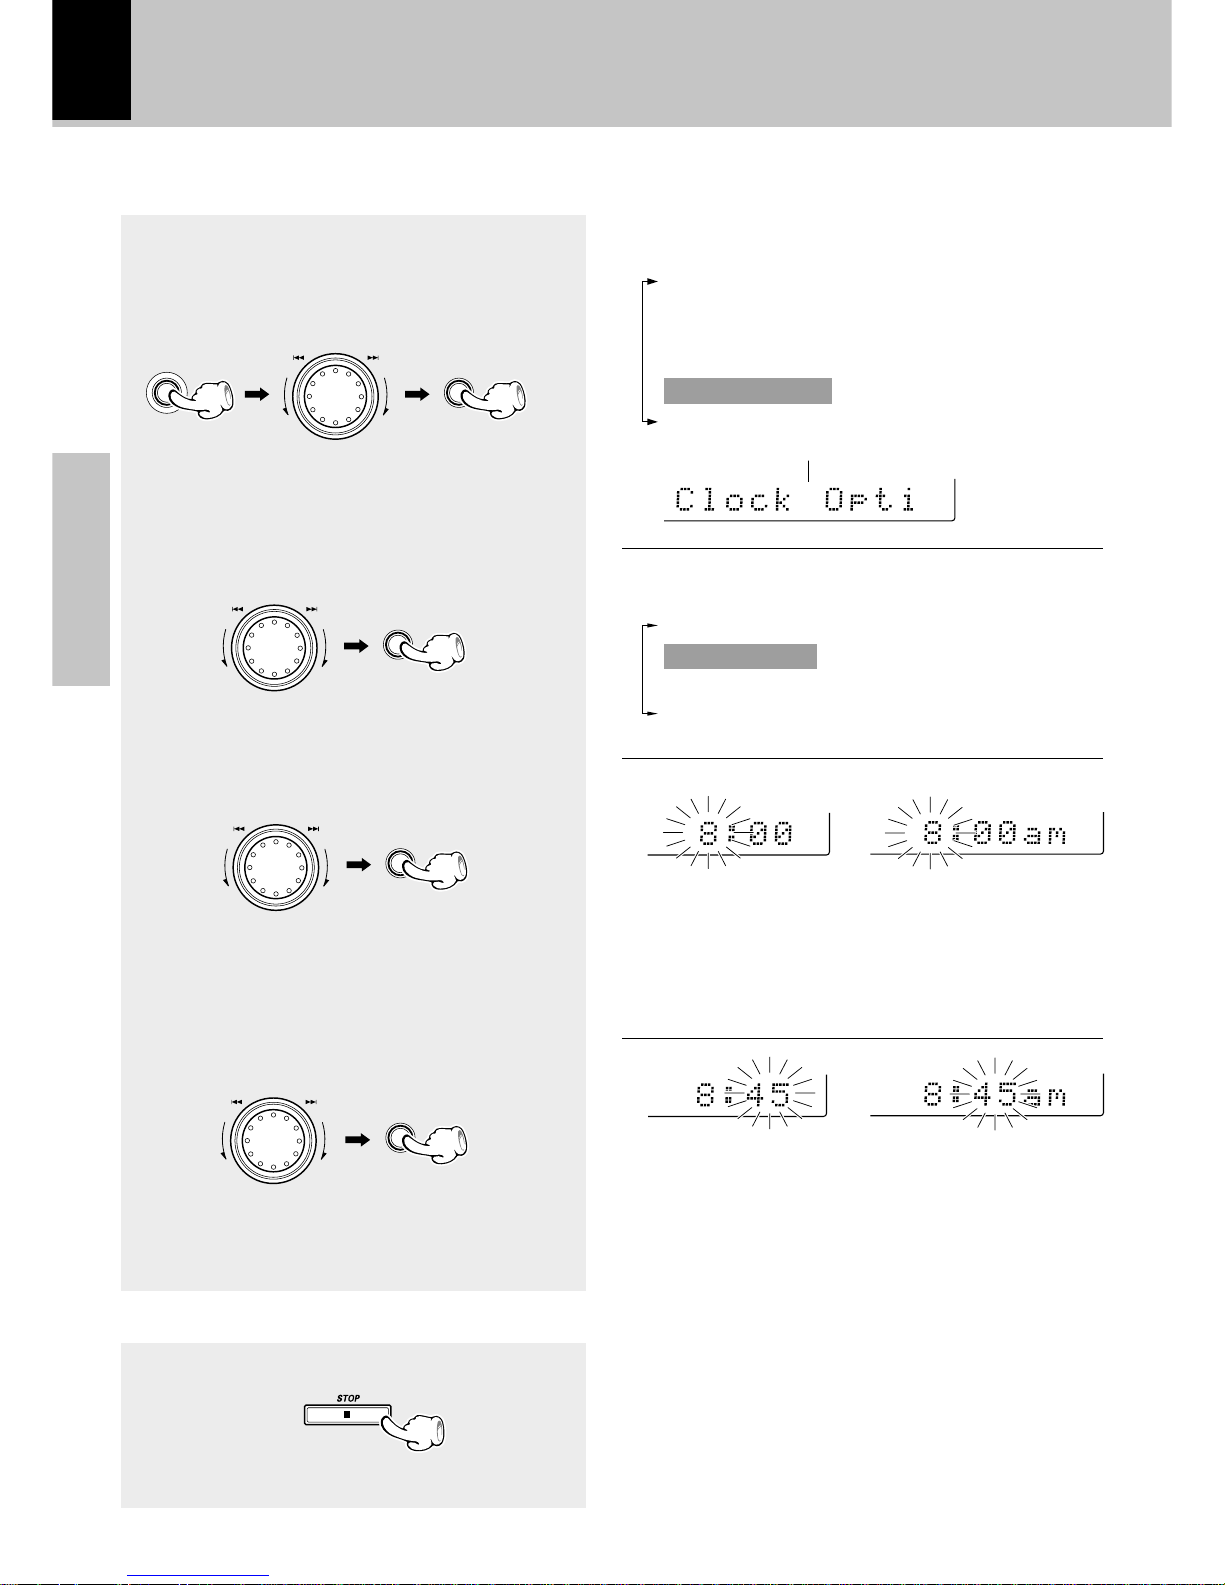
This unit incorporates a clock function. Be sure to adjust to the correct time before using the timer
function. The time can be displayed only while the power is off.
1
Select “Clock Options”.
2
Select “Adjust Time”.
3
Adjust the hour.
4
Adjust the minute.
Clock adjustment
÷ The time display starts to blink.
÷ Press the SELECT key. The hour is entered and the
minute display starts to blink.
Example: Adjustment to 8:45
The following items can be selected by turning the
MULTI CONTROL jog dial.
“Sleep Timer”
“Adjust Time”
“Timer Play”
“Auto Power Save”
To decrease
the figure
To increase
the figure
(Other countries)
AM12ÔAM1ÔAM2...
PM1ÔPM2...ÔAM12 ...
00Ô01Ô02...59Ô00Ô01...
÷ Press the BACK key to return to the previous step and
restart operation from there.
÷ To adjust correct time, press the ENTER key at the same
moment as a time announcement.
To decrease
the figure
To increase
the figure
+Scrolled display (Clock Options)
(In standby mode)
÷ The clock display blinks after the power cord has been
unplugged from the AC power outlet and plugged in
again or after a power failure. In this case, set the time of
the day again.
(Displayed for approx. 5 sec.)
The following items can be selected by turning the
MULTI CONTROL jog dial.
“CD Program Play”
“Recording Options”
“Tape Dubbing”
“Audio Options”
“Clock Options”
“Language Options”
(For U.K. and Europe)
0Ô1Ô2...13Ô14...Ô0 ...
(Other countries)(For U.K. and Europe)
To display the time
MENU
SELECT
SELECT
SELECT
ENTER
M
U
L
T
I
C
O
N
T
R
O
L
M
U
L
T
I
C
O
N
T
R
O
L
M
U
L
T
I
C
O
N
T
R
O
L
M
U
L
T
I
C
O
N
T
R
O
L
Page 17

Preparation section
17
You can change the display language manually.
1
Select “Language Options”.
2
Select the desired language.
Changing the display language
The following items can be selected by turning the
MULTI CONTROL jog dial.
“English”
“Français” (French)
“Deutsch” (German)
“Español” (Spanish)
“Italiano” (Italian)
“Language Options”
+Scrolled display (Language Options)
The following items can be selected by turning the
MULTI CONTROL jog dial.
“CD Program Play”
“Recording Options”
“Tape Dubbing”
“Audio Options”
“Clock Options”
“Language Options”
MENU
SELECT
LOanguage
ENTER
M
U
L
T
I
C
O
N
T
R
O
L
M
U
L
T
I
C
O
N
T
R
O
L
When you do not recognize which language is displayed:
÷ Press the MENU key and select “Language Options” (English), “Options de langue” (French),“Sprach-
Einstellungen” (German), “Opción Idioma” (Spanish) or “Opzioni lingua” (Italian), then select the desired
language.
When you press the key, a beep sounds. The number
of times that the beep sounds changes depending on
the operation.
When a beep sounds
Once: Normal operation
twice: The MENU or ENTER key is pressed.
three times: Abnormal operation (The error message
appears in the display.)
no sound: The key that cannot be operated is
pressed.
You can also set the beep to OFF:
About the beep sound
1 Select “Audio Options”.
MENU
SELECT
M
U
L
T
I
C
O
N
T
R
O
L
2 Select “Beep sound”.
SELECT
M
U
L
T
I
C
O
N
T
R
O
L
3 Select “Beep on” or “Beep off”.
SELECT
M
U
L
T
I
C
O
N
T
R
O
L
1 “Beep on”
2 “Beep off”
Page 18
18
Basic section
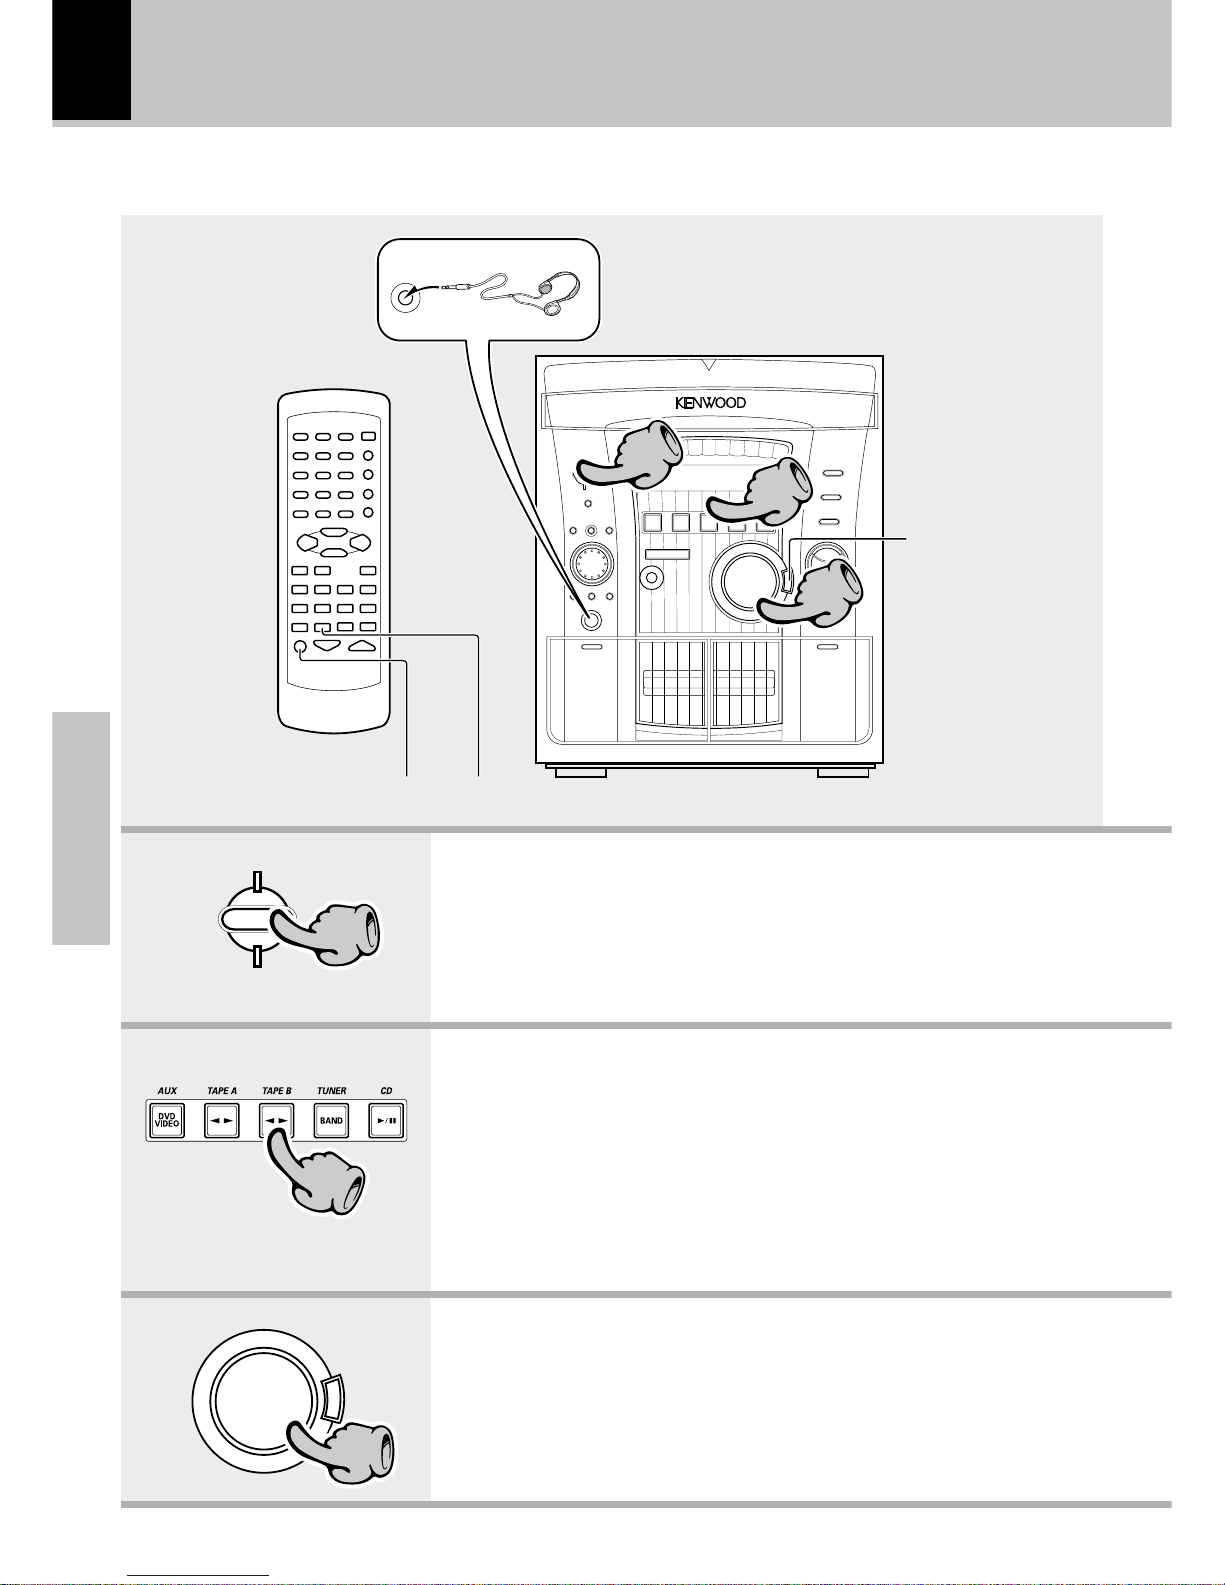
1. Switching the power ON (OFF)
Let’s have sound
÷ The display shows a reference value. (The reference value is also shown visually by
the sound level meter.)
2. Selecting the desired output
When the power is ON, pressing the STANDBY key enters the power
STANDBY mode, in which the standby indicator lights up.
Muting the sound temporarily
(MUTE)
Reproducing sound with enhanced bass
(EX.BASS)
3. Volume adjustment
÷ When you press the TAPE A, TAPE B, or CD key, the unit starts playback
automatically.
÷ If you select the AUX (DVD/VIDEO) (external input) mode, also read the
instruction manual of the component connected to the DVD/VIDEO INPUT
jacks.
Listening through headphones
Insert the headphone plug into the PHONES jack.
÷ The sounds from all speakers are cut off.
Reproducing sound
with enhanced bass
(EX.BASS)
Basic operation
22
VOLUME
CONTROL
E
X
.
B
A
S
S
33
Select the desired source by pressing the AUX (DVD/VIDEO), TAPE A, TAPE
B, TUNER, or CD key.
PHONES
1
1
33
22
STANDBY
TIMER
11
Page 19
19
Basic section
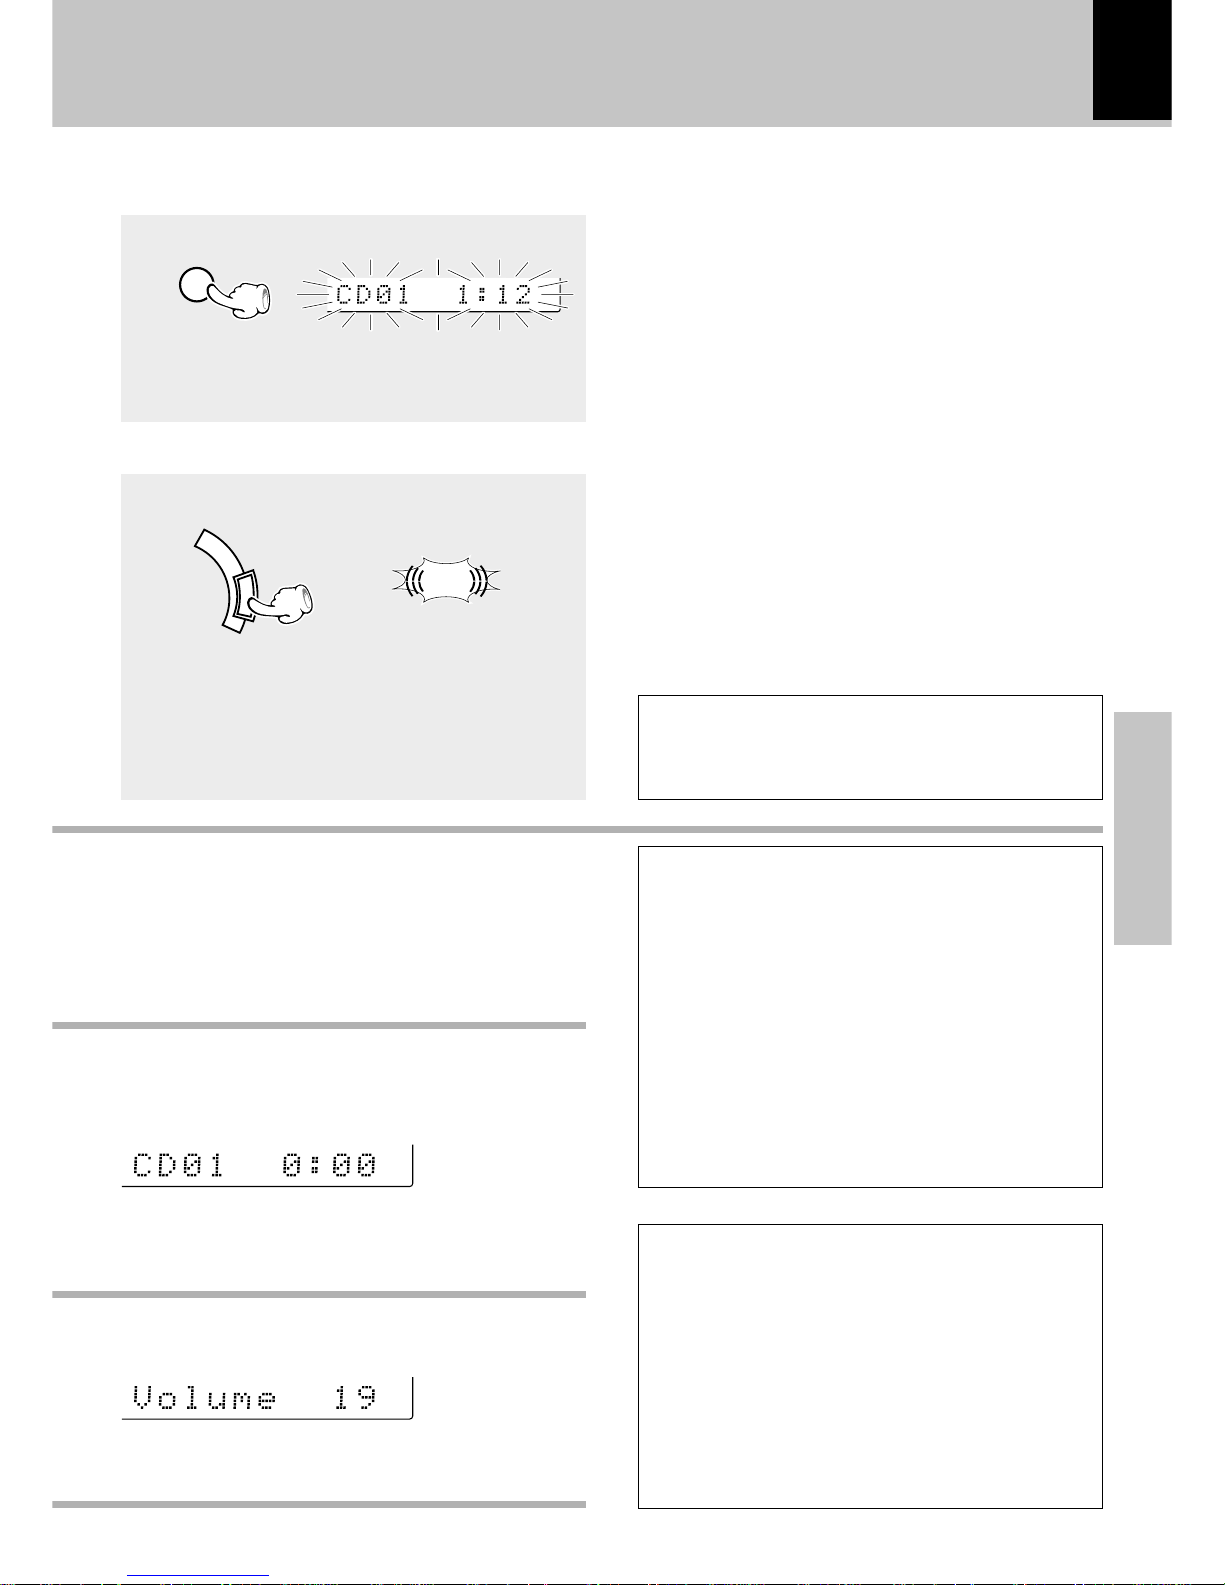
Muting the sound temporarily
(Remote control unit only)
When CD has been selected.
÷ Press again to resume the original volume.
÷ The sound muting is also canceled when the volume
is controlled.
Let's have sound
Blinks
÷ Each press switches EX.BASS on and off alternately.
Lights
Volume display
Reproducing sound with enhanced bass
(EX. BASS)
Standby mode
While the “STANDBY” indicator of the unit is lit, a
small amount of current is flowing into the unit to
back up its internal memory. (The TIMER indicator
also lights if a timer program has been activated before entering the STANDBY mode.)
This condition is referred to as the standby mode of
the unit. While the unit is in the standby mode, it can
be turned ON from the remote control unit.
This unit has been designed to minimize power consumption.
One-touch operation function
The power can also be turned ON by pressing the
TAPE A, TAPE B, TUNER, or CD key.
It is also possible to turn the power ON by simply
pressing the 0 OPEN/CLOSE key.
÷ When the CD or TAPE input is selected and a disc
has been loaded in the disc tray or a tape has been
loaded in the deck for use in playback, playback starts
automatically.
MUTE
E
X
.
B
A
S
S
BASS
Selecting DVD/VIDEO display
Hold down the AUX key for 2 seconds or more, the
display switches between DVD and VIDEO.
Page 20
20
Basic section
Let's have sound
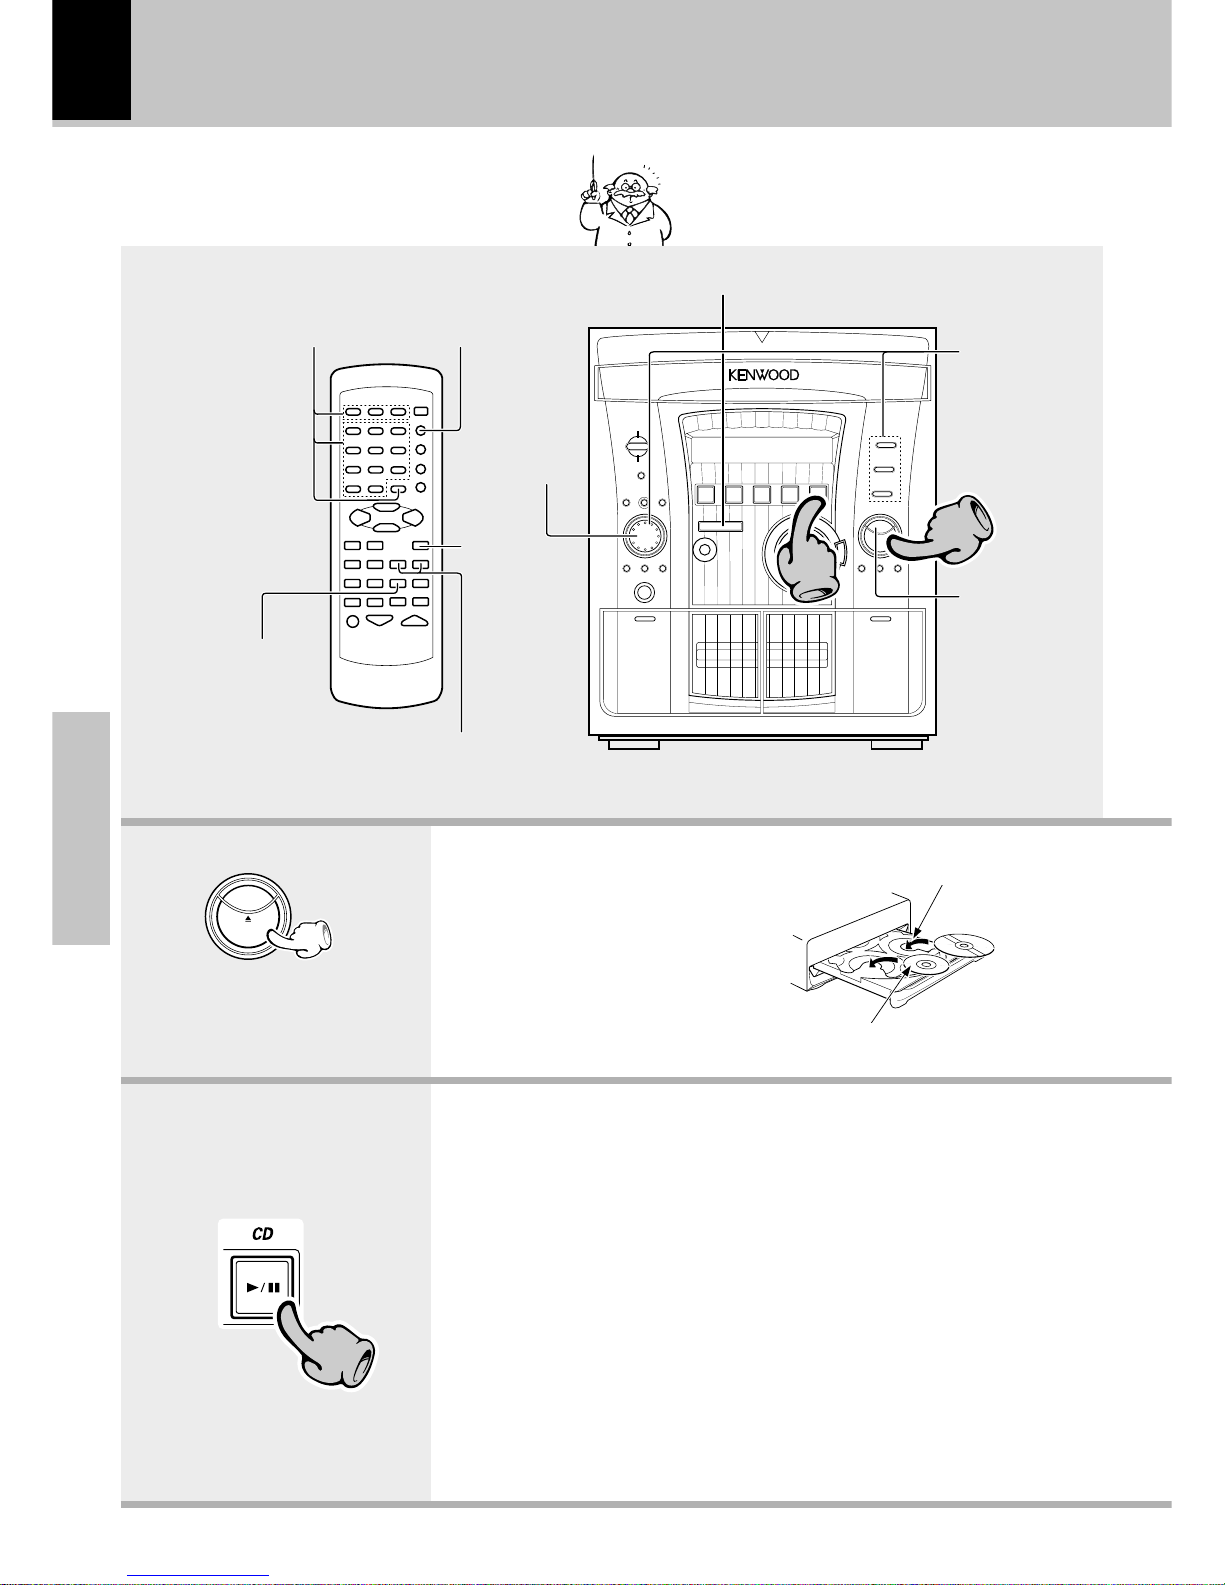
1 Open the tray.
2 Place discs.
3 Close the tray.
1. Load discs.
Playback of CD
The tray opens when the key is
pressed and closes when the key is
pressed again.
2. Start playback.
TIME
High-speed search in forward
and reverse directions (1/¡)
To stop Playback (7 STOP)
Skipping
tracks
(MULTI
CONTROL jog
dial)
If a disc has already been loaded in the CD player
and the power is OFF, simply pressing the CD key
turns power automatically ON and starts playback.
Playback from desired
track (DISC 1 – 3, DISC
SKIP, Numeric keys)
Playback from
desired track
(MULTI CONTROL jog dial,
DISC 1 – 3)
Disc played first when the CD 6
key is pressed.
The label must be on top.
÷ After a few seconds, play starts from track No.1.
÷ Playback stops after having played all discs in the trays. (Relay play)
÷ When the 0 OPEN/CLOSE key is pressed during playback, the tray opens
but the playback continues. (The DISC SKIP key is inoperative at this time.)
DISC SKIP
Start playback/
To pause playback
(CD 6)
22
OPEN/
CLOSE
To s t o p
Playback
(7 STOP)
11
22
Page 21
21
Basic section
Let's have sound
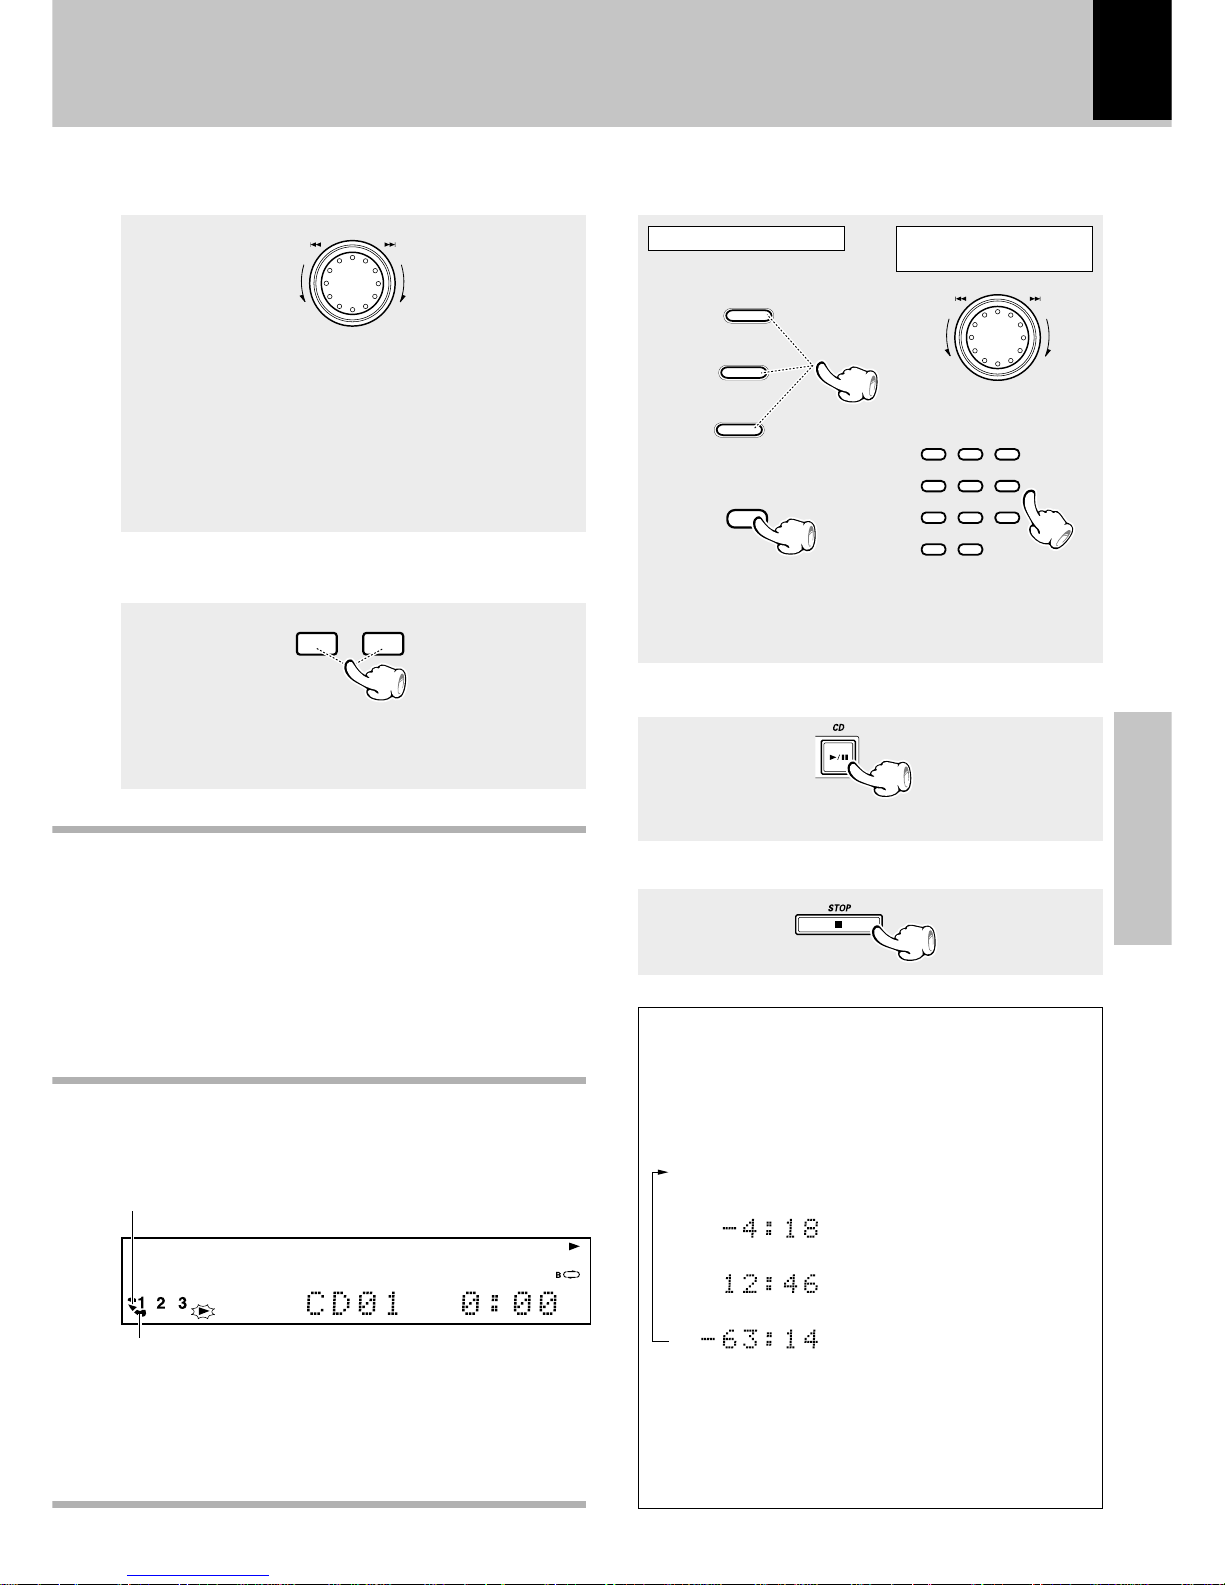
The selected disc is indicated.
Time display on the CD player
Each press of the TIME key of the remote control unit
switches the displayed time information.
÷ Only the elapsed and remaining time of the track
being played is displayed during program playback,
random playback and single-track repeated playback.
1
2
3
4
Lights when a disc is inserted at the time of playback.
÷ Do not touch the playing side of disc.
÷ Rotate the tray with the DISC SKIP key to insert the third
disc.
÷ The tray containing the disc to be played should come to the
front right position when the unit is seen from the front.
÷ Playback starts from the position where the key is
released.
High-speed search in forward and reverse directions
(Remote control unit only)
Skipping tracks
Backward search Forward search
÷
The tracks in the direction the dial is rotated are skipped,
and the selected track will be played from the beginning.
÷ When the jog dial is rotated a little in the direction of
counterclockwise once during playback, the track
being played will be played from the beginning.
÷ The CD tracks can also be skipped using the 4 or ¢
key of the remote control unit.
To skip backward To skip forward
To stop playback
÷ Each press pauses and plays the CD alternately.
To pause playback
Playback from desired track
Press the numeric keys as shown below....
To select track No. 23
: 003
To select track No. 40
: 0000)
(Main unit)
(Remote control unit)
Select the disc
Select the desired
track No.
Remaining time of disc
(“TOTAL” lights up)
Elapsed time of disc
(“TOTAL” lights up)
Remaining time of track being played
Elapsed time of track being played
TUNING
¡1
DISC
1
DISC
2
DISC
3
123
456
789
0 +10
DISC
SKIP
M
U
L
T
I
C
O
N
T
R
O
L
M
U
L
T
I
C
O
N
T
R
O
L
21:1
Page 22
22
Basic section
Let's have sound
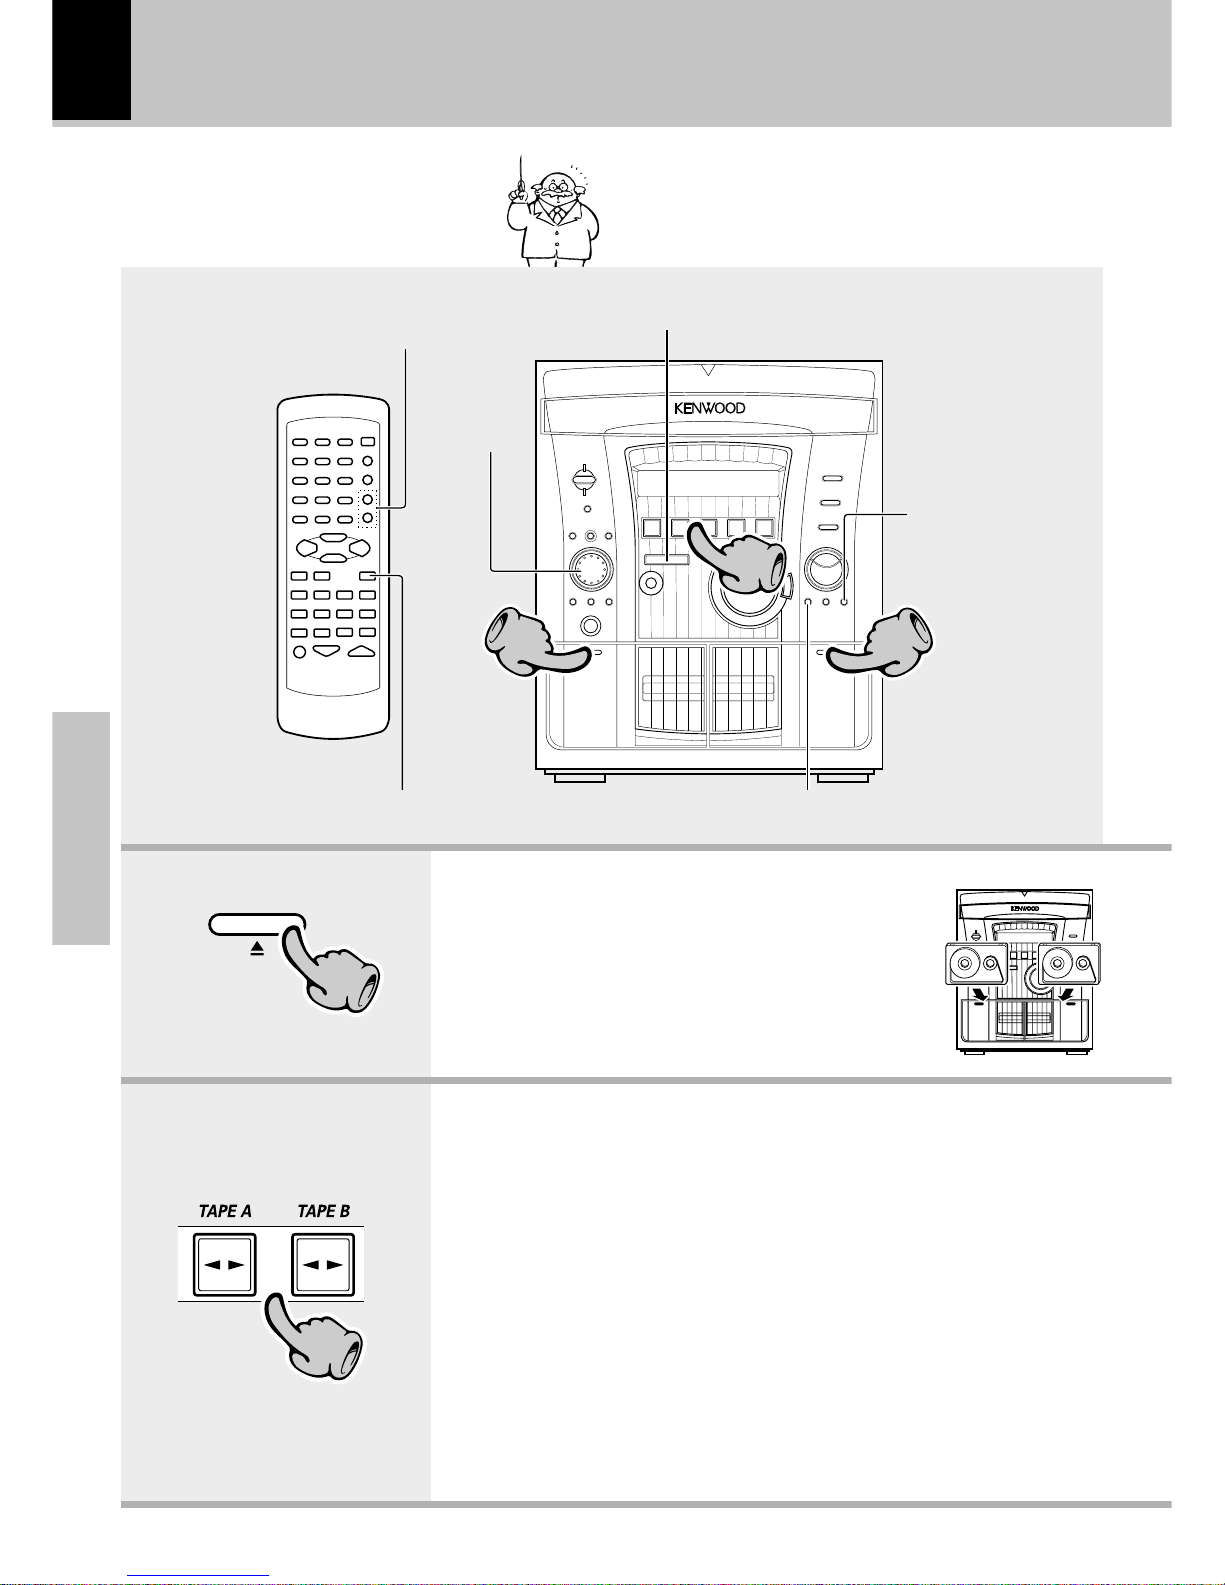
1. Load a cassette tape.
2. Select the deck to be used for playback.
Tape playback
1 Open the cassette holder.
2 Insert a tape and close the
door.
To stop playback (7 STOP)
To stop playback
(7 STOP)
Selection of Tape
Equalizer
(TAPE EQ.)
Selection of reverse mode
(REVERSE MODE)
Start playback
(TAPE A 2 3)
(TAPE B 2 3)
÷ Each time you press the TAPE A or TAPE B key, the direction changes.
When the power is off:
By loading a tape in the cassette deck to be used in
playback beforehand, simply pressing the play key automatically turns the power ON and starts playback.
PUSH
OPEN
11
AA
The selected deck (A or B) starts playback.
22
To wind tape
at high speed
(MULTI CONTROL jog dial)
11
22
11
Page 23
23
Basic section
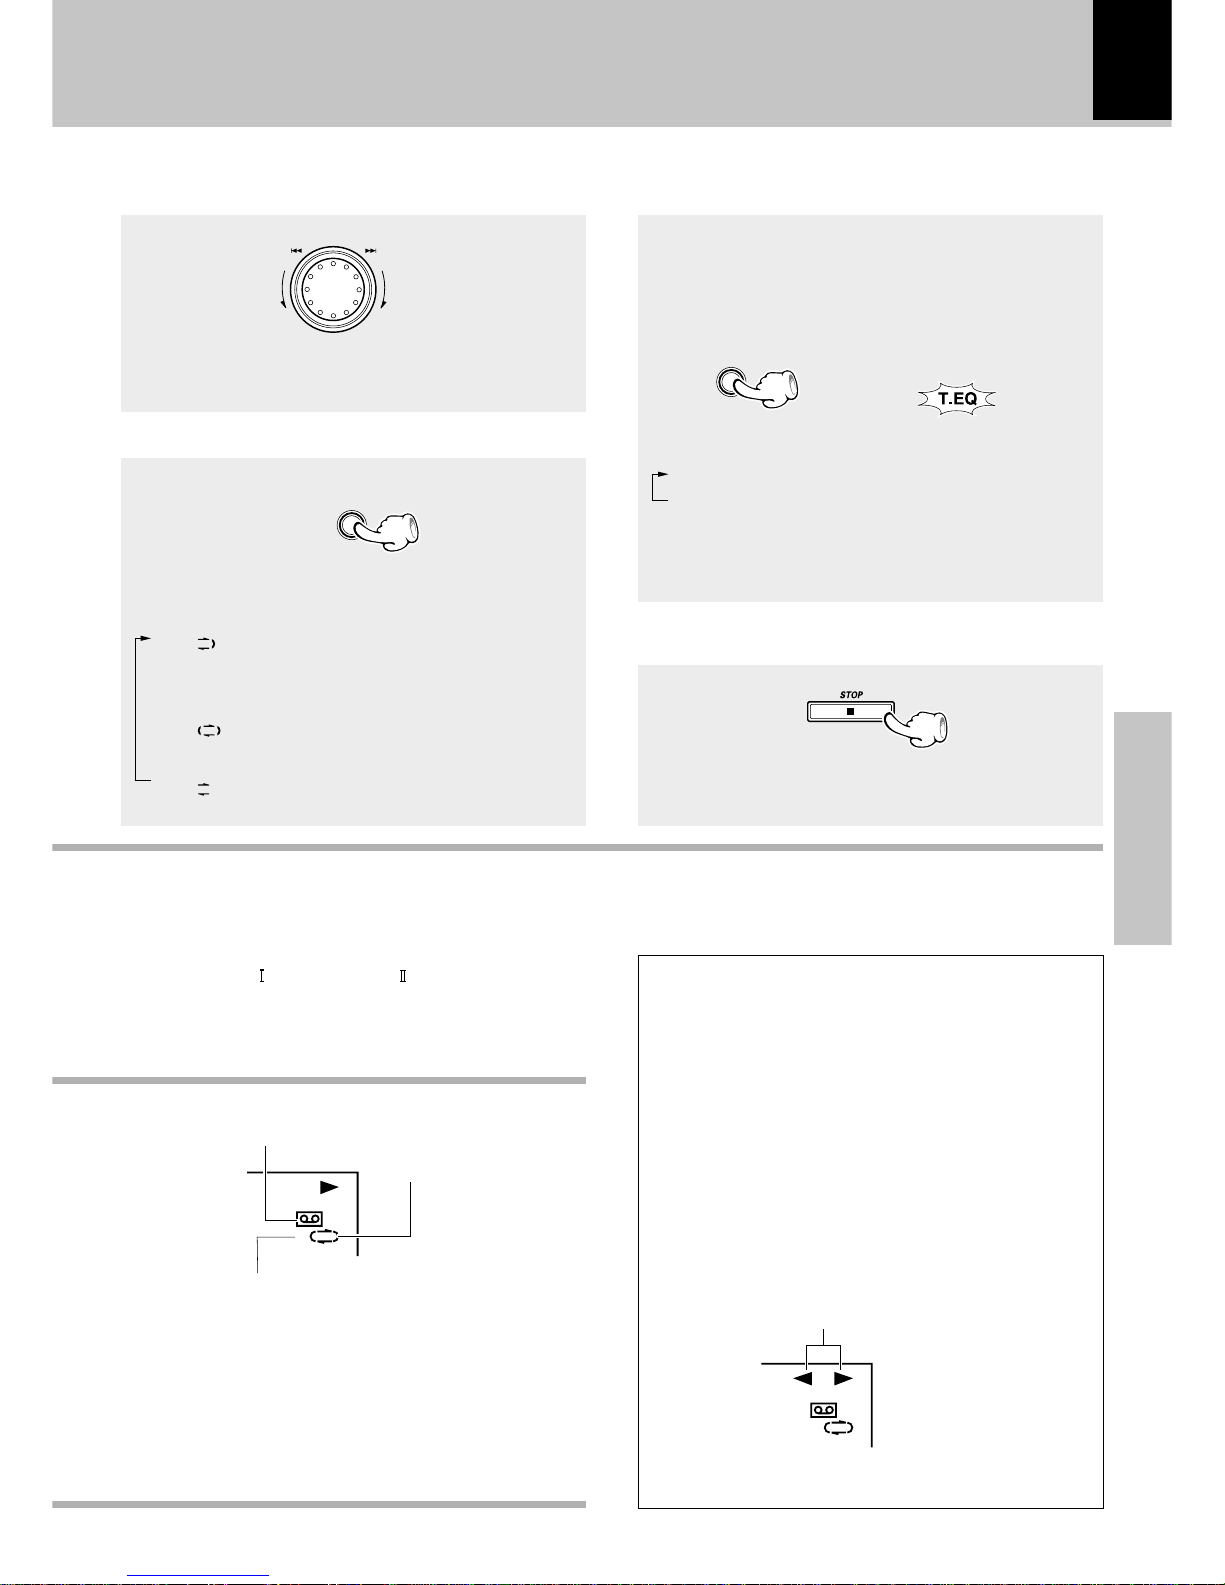
Selection of Tape Equalizer
÷ The Tape Equalizer is effective for reduction of
higher-frequency noise.
Select Tape Equalizer only when playing back a tape
recorded with Dolby Noise Reduction. (A tape recorded
without Dolby NR cannot be reproduced in normal audio if Tape Equalizer is selected when playing it.)
Lights up when
Tape Equalizer is on.
Each press switches the modes as follows.
1 “T.EQ” ON...... Tape Equalizer is used
2 “T. EQ” OFF ....... Tape Equalizer is not used
÷ If the tape transport direction is opposite to the desired
direction, press the play key corresponding to this.
÷ Normal (TYPE ) or high (TYPE ) tape selection is set
automatically.
÷ Remove tape slack before loading.
÷ Close the door securely.
The indicators (2 , 3) indicate the current direction
in which the tape advances when playback or recording is started automatically by the one-touch operation function, etc. This direction is the direction stored
in memory when the tape was last stopped.
(To switch the tape transport direction, press the play
key corresponding to the desired direction then press
the stop (7) key.)
Transport direction indicators
Tape direction indicators of currently selected deck.
To wind tape at high speed
÷ Press the 7 key to stop fast winding.
Each press switches the modes as follows.
1 “ ” .... Playback stops after having played
both sides of tape in a deck.
(Relay play :
¢)
2 “ ” ... Endless playback of both sides of
tape.
3 “ ” ...... Playback stops after having played
one side of tape.
Selection of reverse mode
To fast wind in
direction \
To fast wind in
direction |
To stop playback
÷ Do not take out the cassette tape until the tape
transport has stopped completely.
Reverse mode indication.
Lights up when a tape is present in the deck in use.
Displays the selected deck.
Let's have sound
REVERSE
MODE
TAPE EQ.
T.EQ
A B
T.EQ
A B
M
U
L
T
I
C
O
N
T
R
O
L
Page 24
24
Basic section
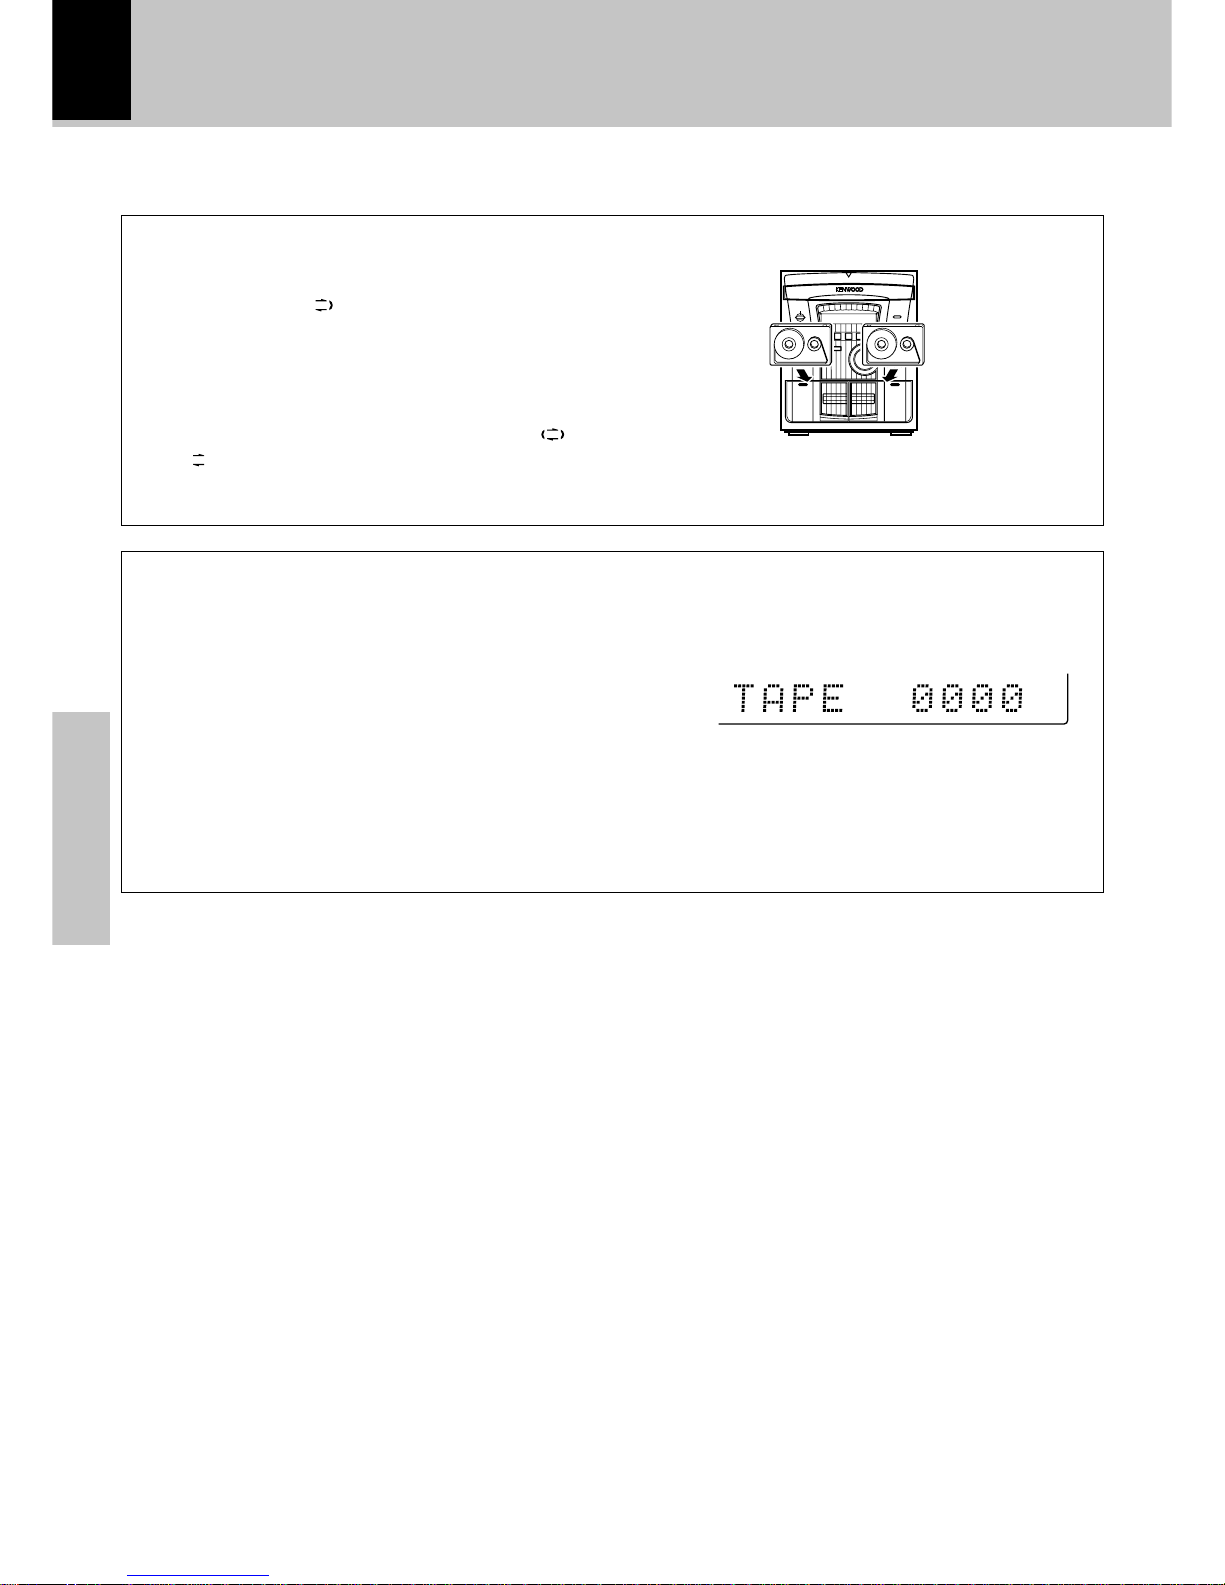
A tip for the use of the tape counter
The tape counter is set to “0000” when a cassette tape
is loaded. In case you want to interrupt recording
(playback) in the middle of the tape, the counter reading will be helpful as a reference for locating the same
position when continuing the recording (playback)
the next time. The tape counter figure decrements
during recording or playback of the reverse side
(while the 2 tape transport indicator is lit).
To set the tape counter to “0000”, open the cassette
holder once. Then the counter will be reset.
Let's have sound
Relay play
÷ Relay play is not possible in the reverse modes “ ”
and “
”.
÷ If a tape is loaded only in either deck, playback stops
after having played both sides of the tape.
When tapes are set in the decks A and B and the reverse mode is set to “
” (play of both sides), play of
the second deck will be started automatically after
play of the first deck has been completed. Tape play
will be repeated alternately.
AA
Page 25
25
Basic section
Let's have sound
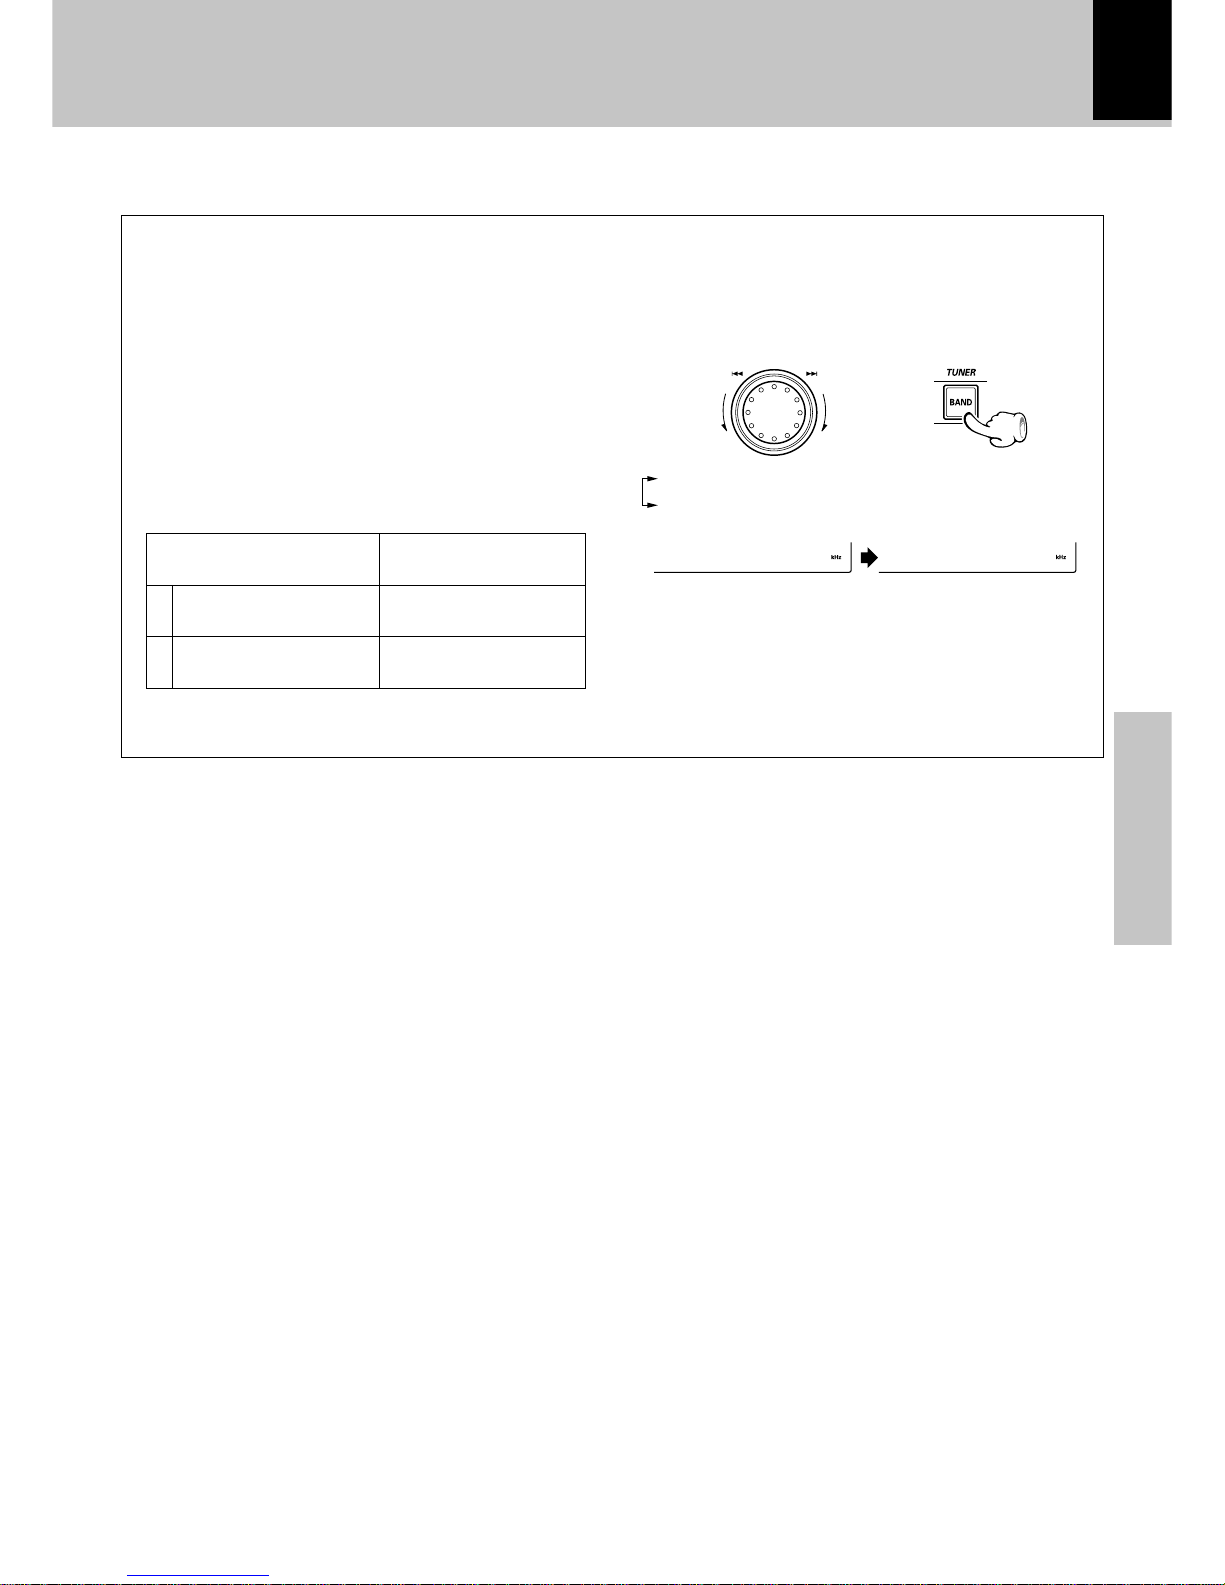
CHANNEL
SPACE freq.
Area
1
2
USA, Canada and South
American countries
Other countries
FM : 100 kHz
AM : 10 kHz
FM : 50 kHz
AM : 9 kHz
The space between radio channels has been set to the
one that prevails in the area to which the system is
shipped. However, if the current channel space setting
does not match the setting in the area where the system is to be used, for instance when you move from
area 1 or area 2 shown in the following table or vice
versa, proper reception of AM/FM broadcasts cannot
be expected. In this case, change the channel space
setting in accordance with your area by referring to the
following table.
1 Select the TUNER input.
2 While holding the TUNER (BAND) key de-
pressed, turn the MULTI CONTROL jog dial to
select the system mode.
÷ The “AM” display is variable depending on the model
(country or area), and “MW” may be displayed in
some areas.
1 “FM100/AM10 kHz” STEP,
2 “FM 50 /AM 9 kHz” STEP,
F0M100/AM1
F9M 50/AM
M
U
L
T
I
C
O
N
T
R
O
L
CHANNEL SPACE setting
(Except for the U.S.A., Canada, U.K., Europe, and Australia)
Page 26
26
Basic section
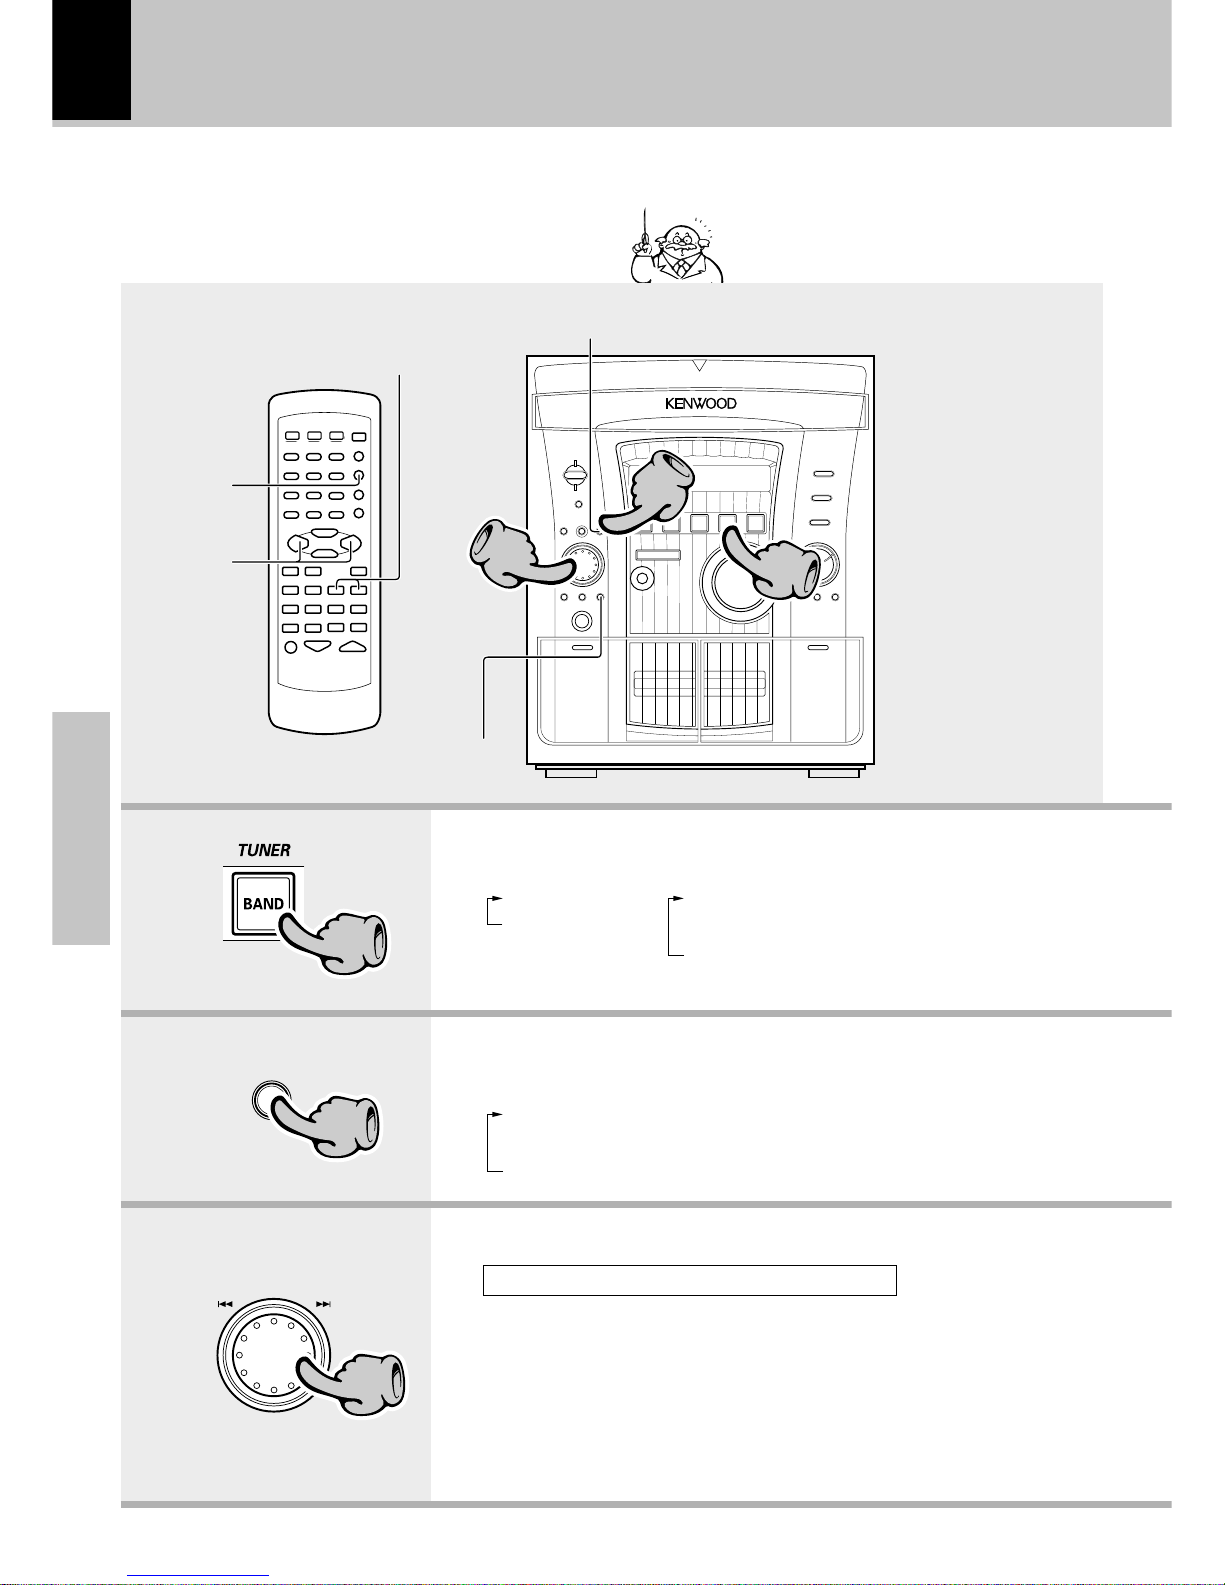
1. Select the broadcast band.
Receiving broadcast station
Collective presetting of stations (TUNING MODE)
One-by-one presetting
(ENTER)
Each press changes the band.
It is also possible to receive them by one-touch
operations.
2. Selecting the tuning mode
When the TUNER/BAND key is pressed,
this unit will be switched on automatically
and tuned to the last received frequency.
4 ¢
1 TUNING ¡
1 FM
2 AM
or
1 FM
2 MW (AM)
3 LW
÷The broadcast bands defer depending on the model (country or area).
When no stations have been memorized
Auto tuning : Turn the MULTI CONTROL jog dial to receive the next
tuned station automatically.
(On the remote control unit, press the 1 or ¡ key.)
Manual tuning : Turn the MULTI CONTROL jog dial to select a frequency.
(On the remote control unit, press the 1 or ¡ key.)
Let's have sound
3. Select a station.
Each press alternates the mode.
“Auto” (Auto tuning)
“P.call” (Preset call)
“Manual” (Manual tuning)
÷ When no operation has been
performed for 5 seconds while
“P.call” is displayed, the tuning
mode is set automatically to the
Auto mode.
11
TUNING
MODE
22
M
U
L
T
I
C
O
N
T
R
O
L
33
33
22
11
BAND
Page 27
27
Basic section
Let's have sound
÷ When a key is held depressed, preset stations will be
skipped at an interval of about 0.5 second.
÷ Preset stations can also be recalled using the numeric
keys of the remote control unit.
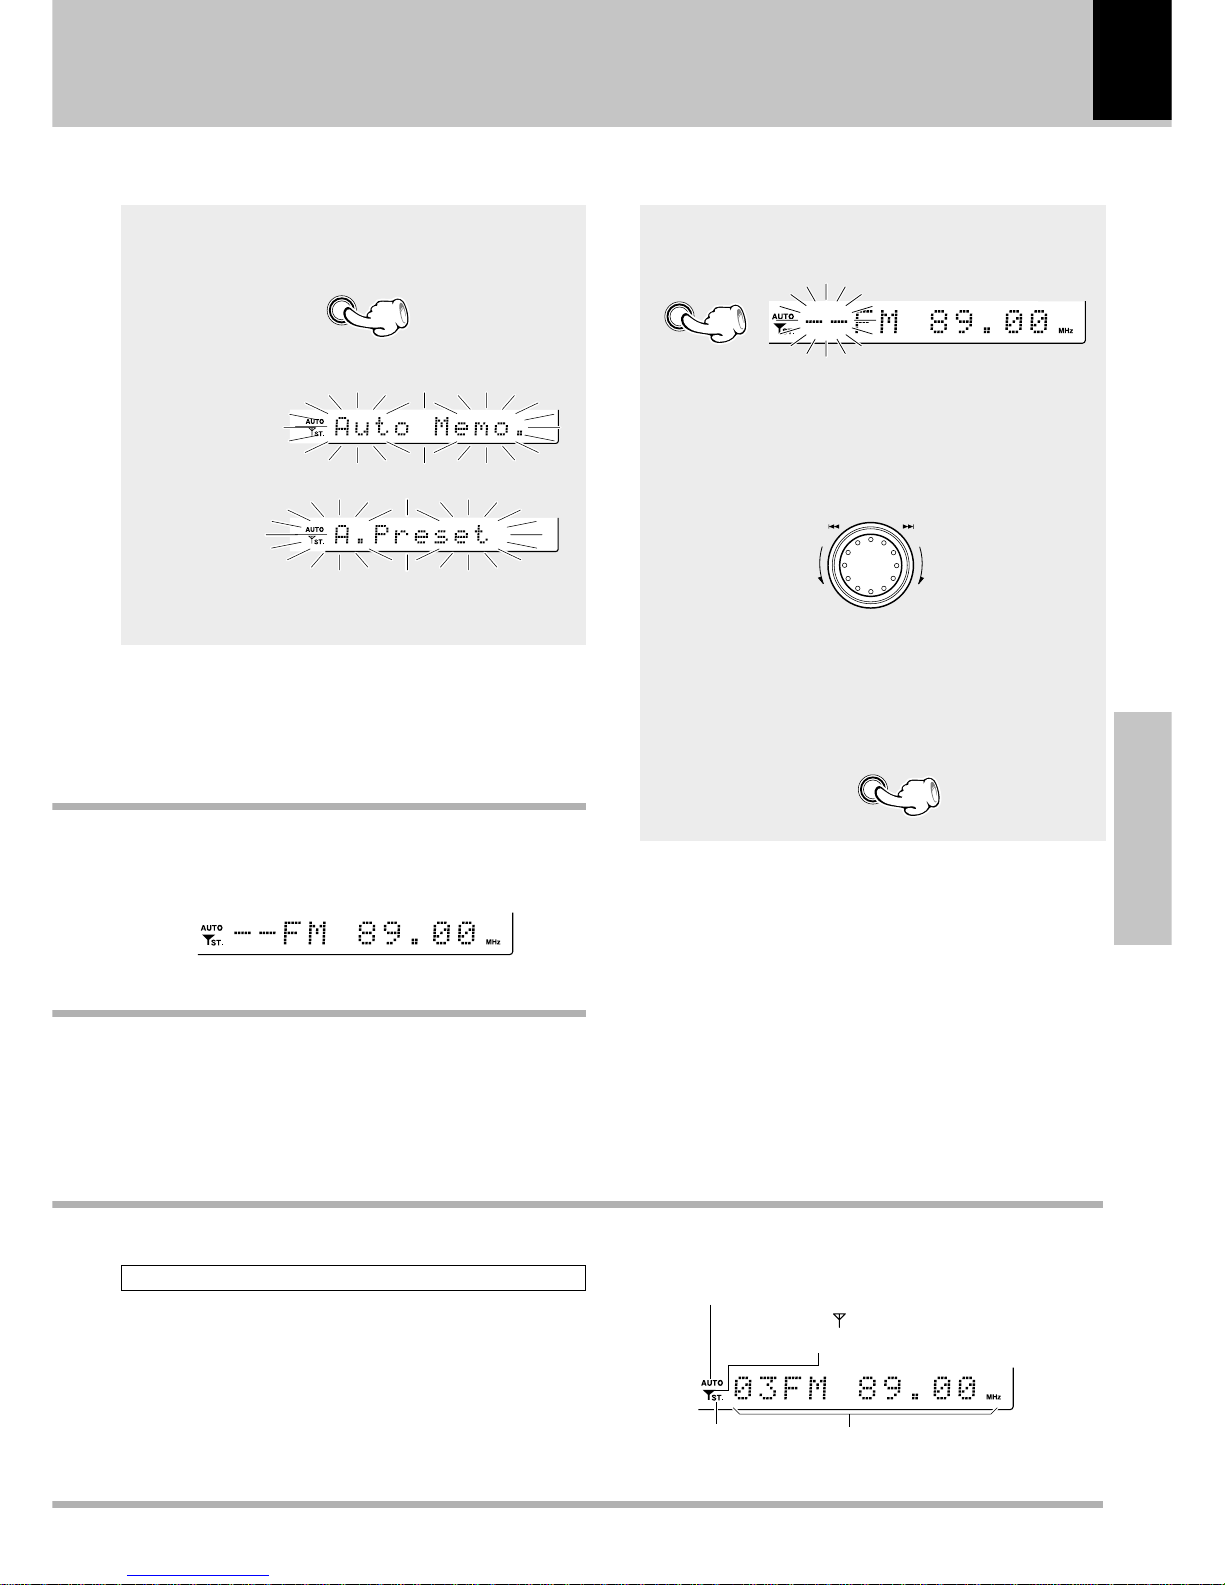
Collective presetting of stations
(Auto memory)
Keep the TUNING MODE key depressed
(about 2 seconds).
÷ A maximum of 30 stations are preset automatically by
giving the priority to the FM band.
÷ When there are many stations and the intended station
has not been preset, please use “One-by-one preset-
ting (manual preset)”.
÷ The stations which have been preset are overwritten.
(For U.K. and Europe)
(Other countries)
÷ Repeat steps 123 to preset other stations.
÷ If several stations are preset under the same number, the
previous memory is replaced with the latest memory
contents.
One-by-one presetting
(manual preset)
3 Press the ENTER key again.
Presetting is cancelled when no operation is executed for 5 seconds or more.
2 Select one of the preset numbers from 1 to 30.
Presetting is cancelled when no operation is executed for 5 seconds or more.
1 Press the ENTER key during reception.
Frequency display
Lights during auto tuning
The “
” indicator lights when
a station is received
Lights during stereo
reception
Example when an FM station is received
÷ Some stations may not be able to be preset if their
reception conditions are weak.
÷ Use the manual tuning mode when reception is noisy
due to weak reception. (In the manual mode, stereo
broadcasts are received in monaural.)
÷ Normally, use the “AUTO” (Auto tuning) mode.
÷ If you are operating the remote control unit, the “AUTO”
(Auto tuning) and manual tuning mode can be alternated
by pressing the stop (7) key (Remote).
When stations have been memorized (Preset call)
Turn the MULTI CONTROL jog dial to select a station.
(On the remote control unit, press the 4 or ¢ key.)
TUNING
MODE
ENTER
ENTER
M
U
L
T
I
C
O
N
T
R
O
L
Page 28
28
Basic section
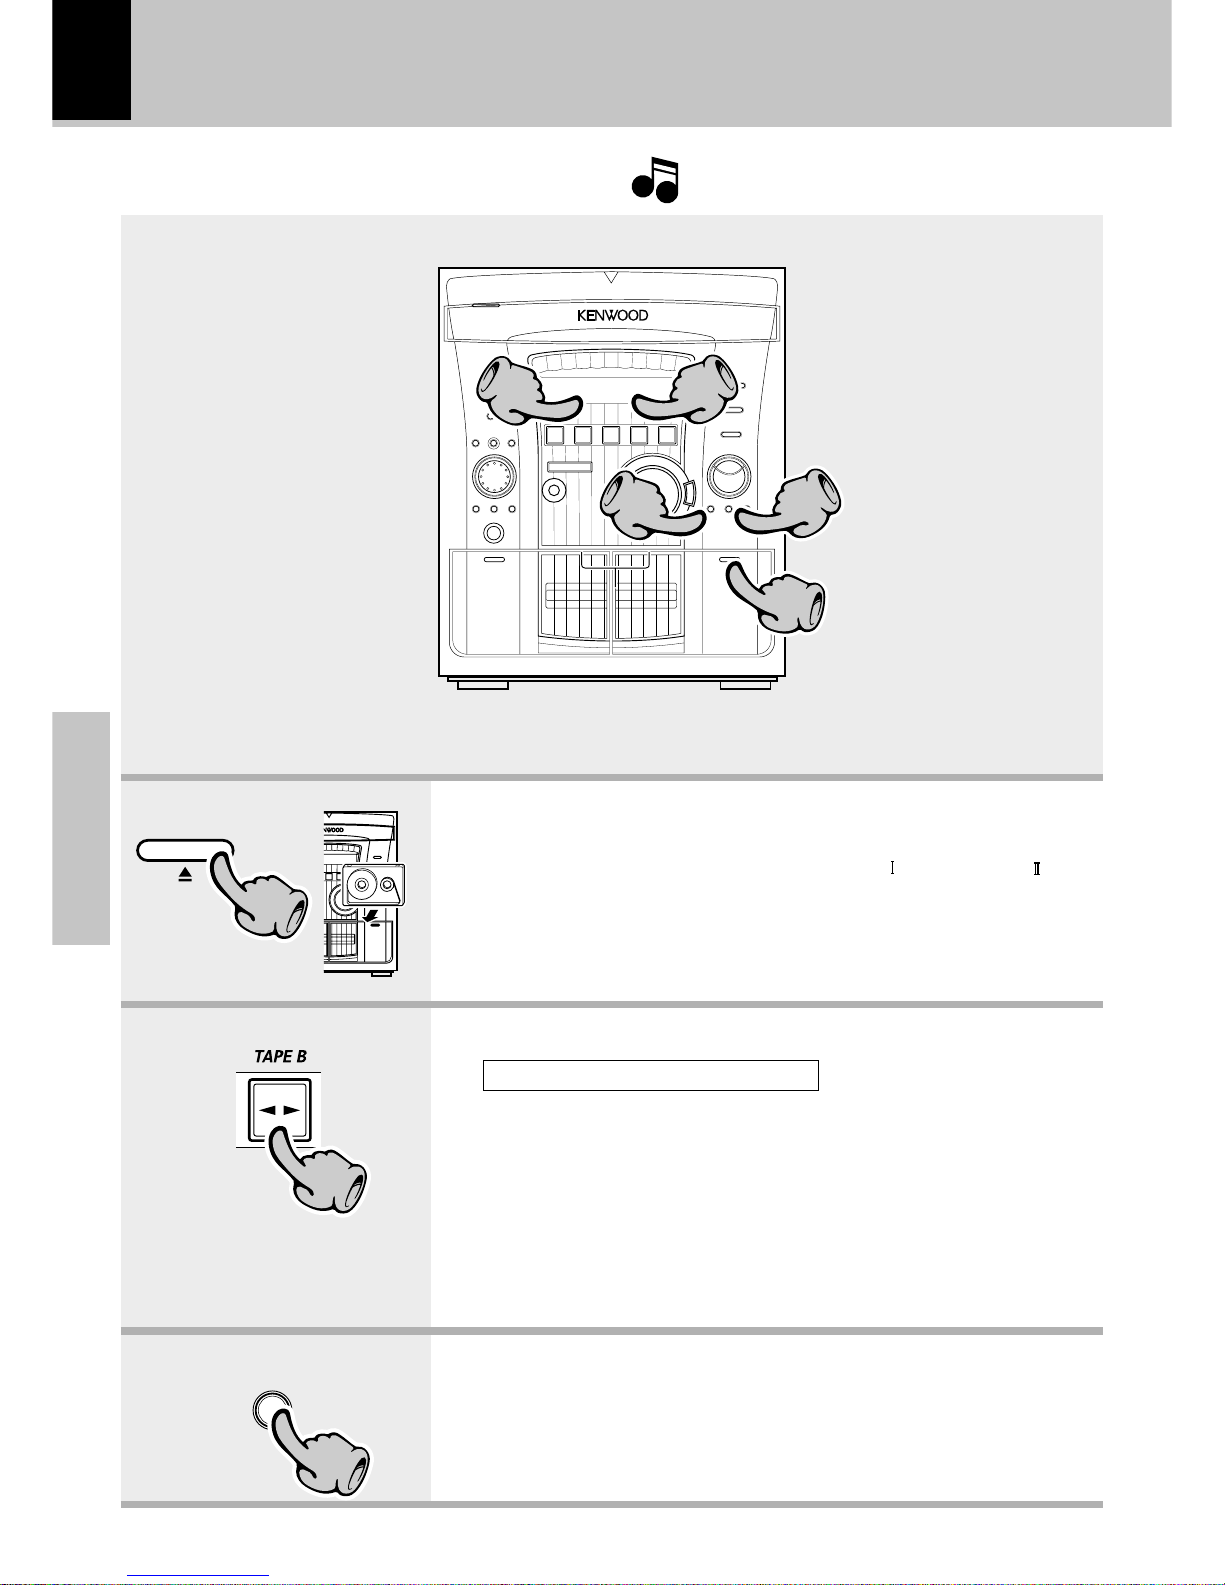
1. Load a cassette tape.
(Recording is available on deck B only.)
2. Select the tape transport direction.
Let's record
Recording on TAPE
1 Open the cassette holder
of deck B.
2 Insert a tape.
3 Close the door.
1 Select deck B by pressing the
TAPE B key.
2 Press the TAPE B key so that
the desired direction indicator
appears.
™
3 Stop playback (by pressing the
7 key).
To reverse the transport direction
÷ When recording is started, the
tape is transported in the direction
selected in this step.
÷ Wind the tape to the position
where recording is to be started.
3. Set the recording condition.
Select the reverse mode. ª
÷ The Tape Equalizer cannot be used in recording.
Note that this cassette deck cannot record onto
Metal tapes.
Note
Note
÷ Differentiation between normal
(TYPE
) and high (TYPE ) tape is
set automatically.
÷ Remove tape slack before load-
ing.
PUSH
OPEN
11
REVERSE
MODE
33
22
A
55
33
44
22
11
Page 29
29
Basic section
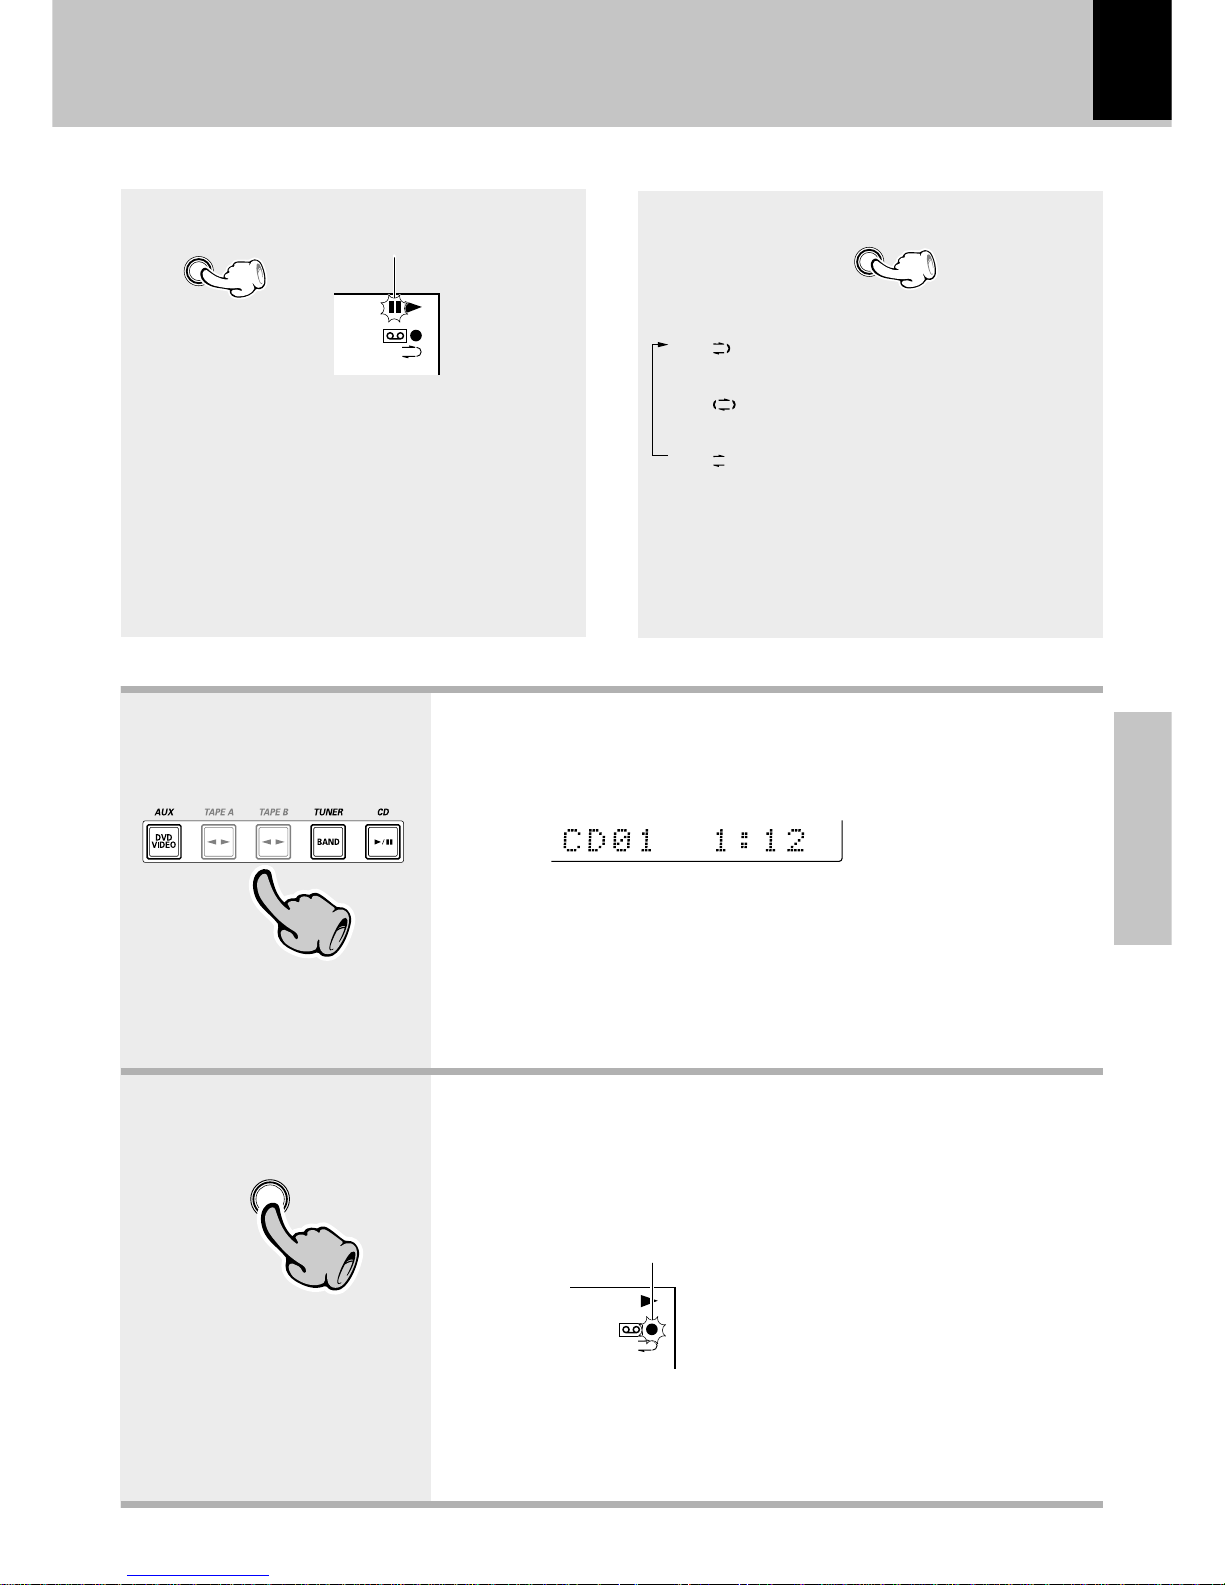
4. Select the source to be recorded.
The input source component to
be recorded should be displayed.
÷ If a disc has already been loaded when the CD input is selected, it will starts
to play automatically. In this case, press the stop (7) key to stop it.
÷ When you select DVD/VIDEO (External input), adjust the input level. t
Select an input source other
than “TAPE A or B”.
1 Start recording.
2 Play (or tune) the input source to be recorded.
5. Start recording.
÷ If a disc has already been loaded
when the CD input is selected, it
will starts recording automatically.
÷ Even if deck A is selected, it is
automatically switched to deck B
at the start of recording.
÷ Recording stops automatically
when the tape side(s) to be recorded have been fully recorded.
÷ Press the stop (7) key of the cas-
sette deck unit to stop recording
(see the next page).
Lights
Let's record
To pause recording
(Main unit only)
÷ Pressing the key pauses recording after leaving a
non-recorded space of about 4 seconds.
÷ If the key is pressed again in less than 4 seconds after it
has been pressed, recording resumes from that instant.
Each press switches the modes as follows.
1 “
” .... Recording stops after having re-
corded both sides of tape.
2 “
” ... Recording stops after having re-
corded both sides of tape.
3 “
” ..... Recording stops after having re-
corded one side of tape.
Selection of the reverse mode
Lights
÷ When the “2” transport direction indicator is lit,
recording always stops after having recorded one
side of tape.
REVERSE
MODE
REC/ARM
44
Press the desired key.
REC/ARM
55
T.EQ
A
B
T.EQ
A
B
Page 30
30
Basic section
Tips in CD recording
When recording CD tracks onto a tape, if you leave
the cassette deck in record-pause mode beforehand,
the cassette deck recording can be started at the same
time as the CD starts to be played (synchronous recording function).
1 Set the CD player in pause mode.
2 Select the track to be recorded with the skip
(4, ¢) keys.
(The CD player pauses at the beginning of
the selected track.)
3 Put the cassette deck in Record-pause mode.
(Press the REC/ARM key twice.)
4 Start playing the CD.
(Synchronous recording starts.)
÷ Recording stops when the stop (7) key of the CD player is
pressed. To stop the CD playback, press the stop (7) key
again.
Let's record
There may be cases in which beat noise interferes
with recording of AM(MW)/ LW broadcasting.
In such a case, press the TAPE EQ. key during recording to reduce or suppress the beat noise.
Beat cancel function
(For U.K.)
TAPE EQ.
Page 31
31
Basic section
Copying tape
(Tape dubbing)
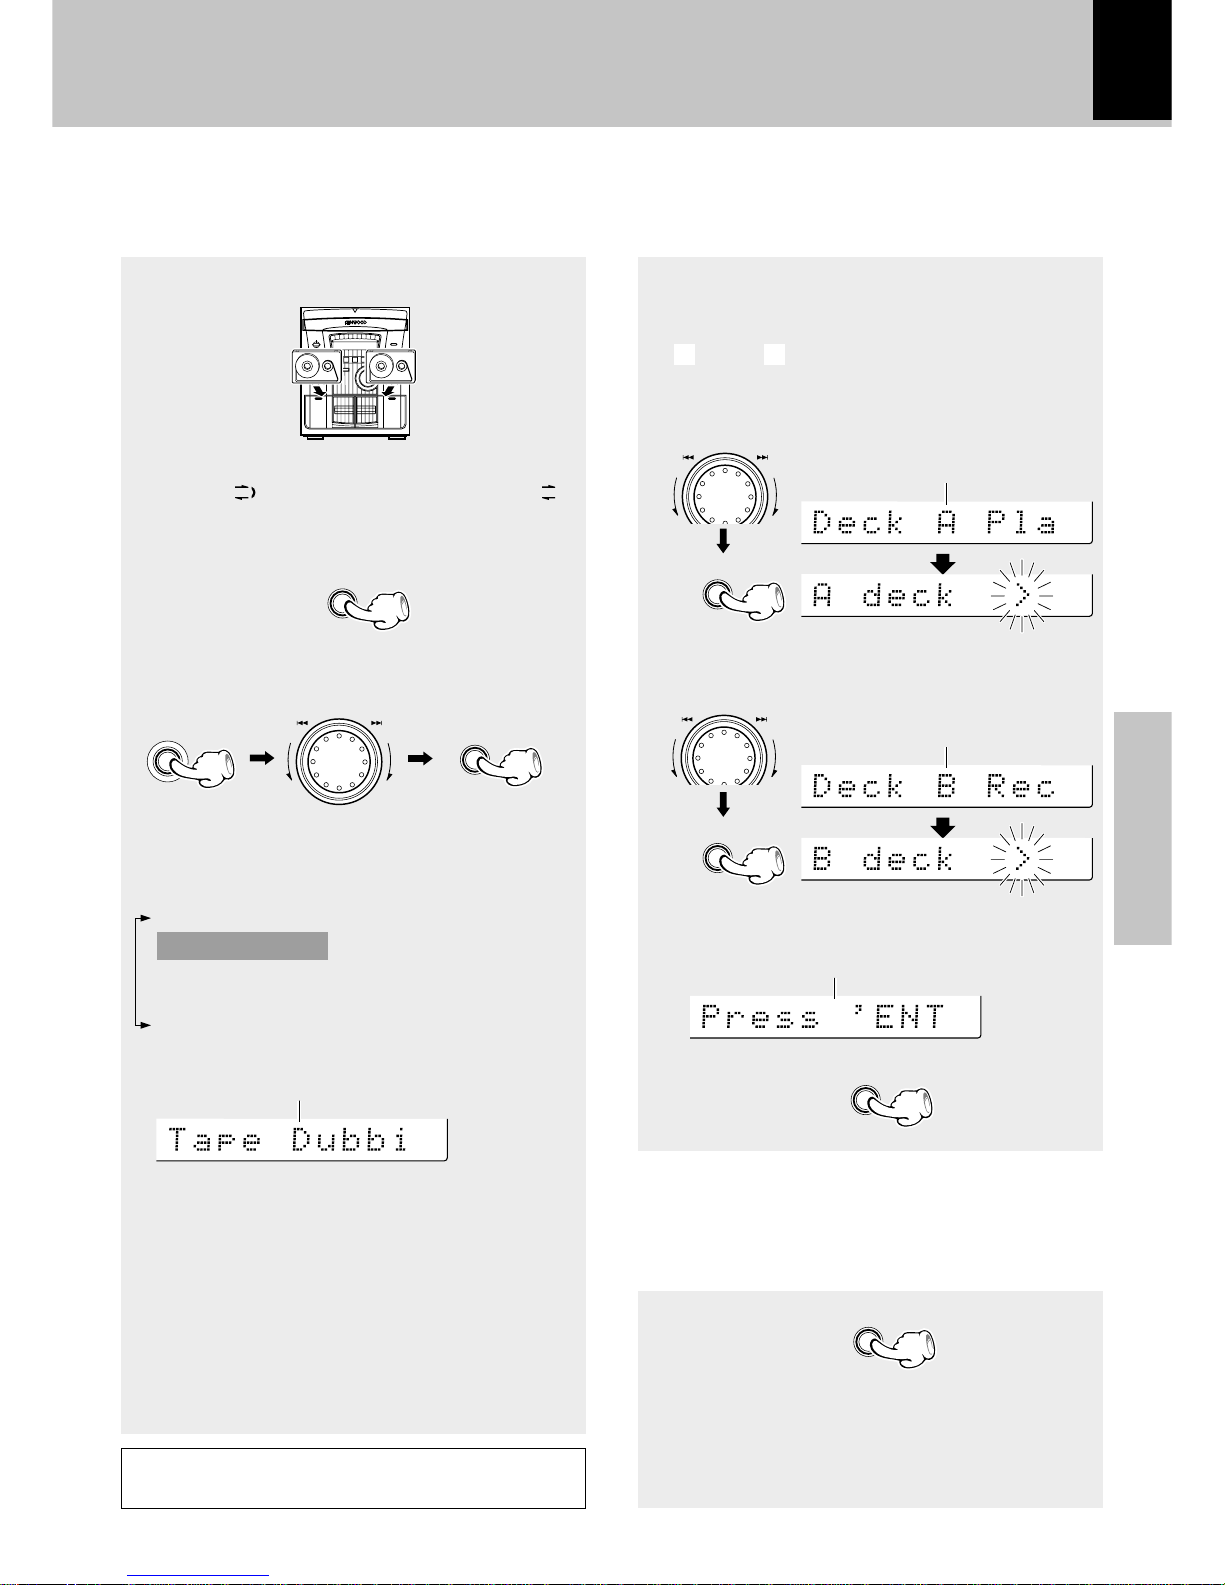
1 Select “ ” (double-side recording) or “ ”
(one-side recording). ª
2 Select “Tape Dubbing”.
The contents of the tape in deck A can be copied onto the tape in deck B.
÷ Dubbing ends automatically when the side(s) to be
dubbed has been fully recorded on.
Playing tape Recording tape
Load tapes in the decks.
+Scrolled display
(Tape Dubbing)
3 Use the same tape transport directions.
4 Start dubbing.
(1) Select the transport direction of deck A.
(2) Select the transport direction of deck B.
÷ When recording is started, the tape will be transported
in the direction selected in this step.
(
>
:side A, < : side B)
+Scrolled display
(Deck A Play Direction)
+Scrolled display
(Deck B Record Direction)
+Scrolled display (Press 'ENTER' to Start)
To stop dubbing
÷ The deck B will stop after creating a non-recorded
portion of about 4 sec, and then the deck A will stop.
÷ Dubbing can also be stopped by pressing the stop (7)
key of the cassette deck unit. Note that the nonrecorded space is not created in this case.
The TAPE EQ. key is ineffective during dubbing.
Let's record
The following items can be selected by turning
the MULTI CONTROL jog dial.
“Recording Options”
“Tape Dubbing”
“Audio Options”
“Clock Options”
“Language Options”
AA
REVERSE
MODE
SELECT
MENU
SELECT
ENTER
REC/ARM
SELECT
M
U
L
T
I
C
O
N
T
R
O
L
M
U
L
T
I
C
O
N
T
R
O
L
M
U
L
T
I
C
O
N
T
R
O
L
Page 32
32
Application section
Listening in the desired sequence
(program playback)
Playback of CD
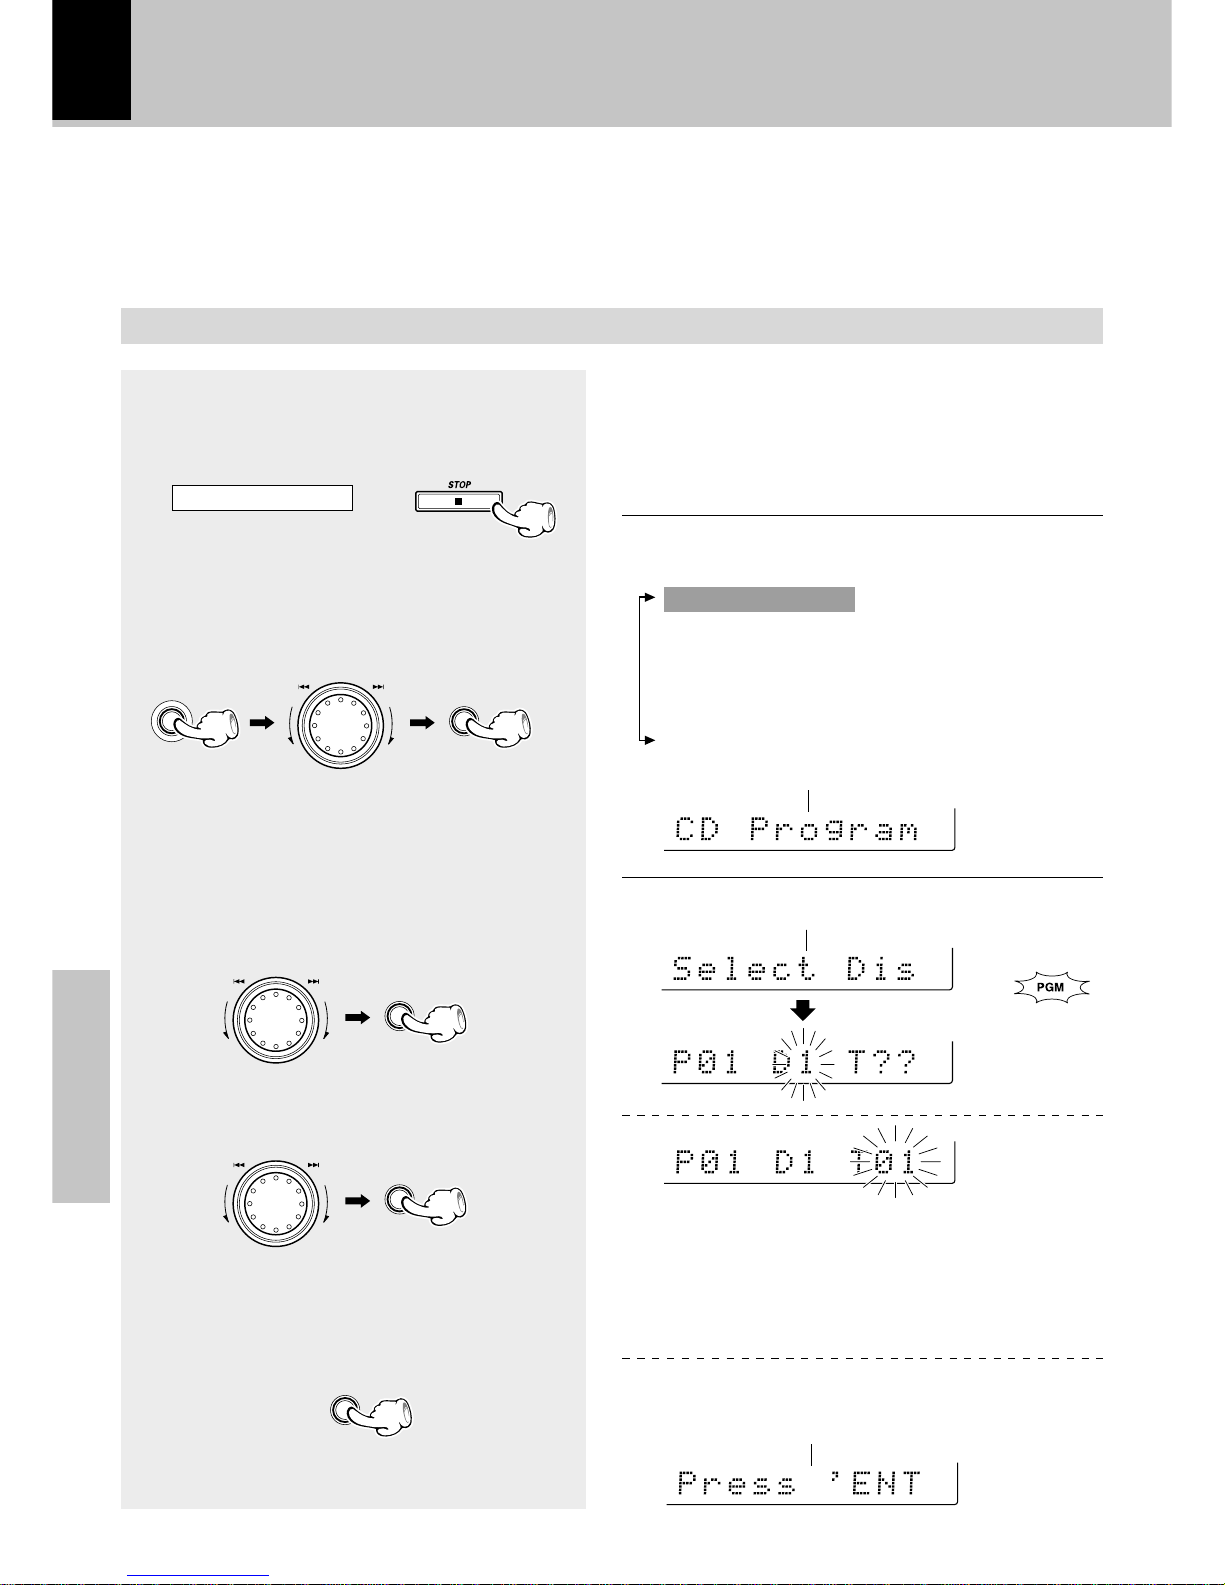
Any titles on the discs in the tray can be listened
to in the desired sequence. (Max. 32 titles)
Select the “CD” input.
1
Check that the CD player is in the
stop mode.
2
Select “CD Program Play”.
3
Enter track No.s in the order you
want to play them.
1 Select the disc.
2 Select the track.
3 Press the ENTER key.
(To select other tracks, repeat steps 1
and 2 for each of the additional tracks.)
÷ If the operation in step 2 is performed during playback of
a track, the current track can be programmed as the first
track in the program.
+Scrolled display (Select Disc/Track No.)
÷ Even if you program a disc or track which does not exist
in the tray, it is deleted automatically in playback.
÷ Press the BACK key to return to the previous step and
restart operation from there.
÷ Up to 32 tracks can be programmed. When “Full” is
displayed, no more tracks can be programmed.
+Scrolled display
(Press 'ENTER' to Start, 'JOG' to Check )
+Scrolled display (CD Program Play)
The following items can be selected by turning the
MULTI CONTROL jog dial.
“CD Program Play”
(“Recording Options”)
(“Tape Dubbing”)
“Audio Options”
“Clock Options”
“Language Options”
If it is in play mode
Lights
(Go to step 5 if you do not need to check the
program contents.)
MENU
SELECT
SELECT
SELECT
ENTER
M
U
L
T
I
C
O
N
T
R
O
L
M
U
L
T
I
C
O
N
T
R
O
L
M
U
L
T
I
C
O
N
T
R
O
L
Page 33
Application section
33
Playback of CD
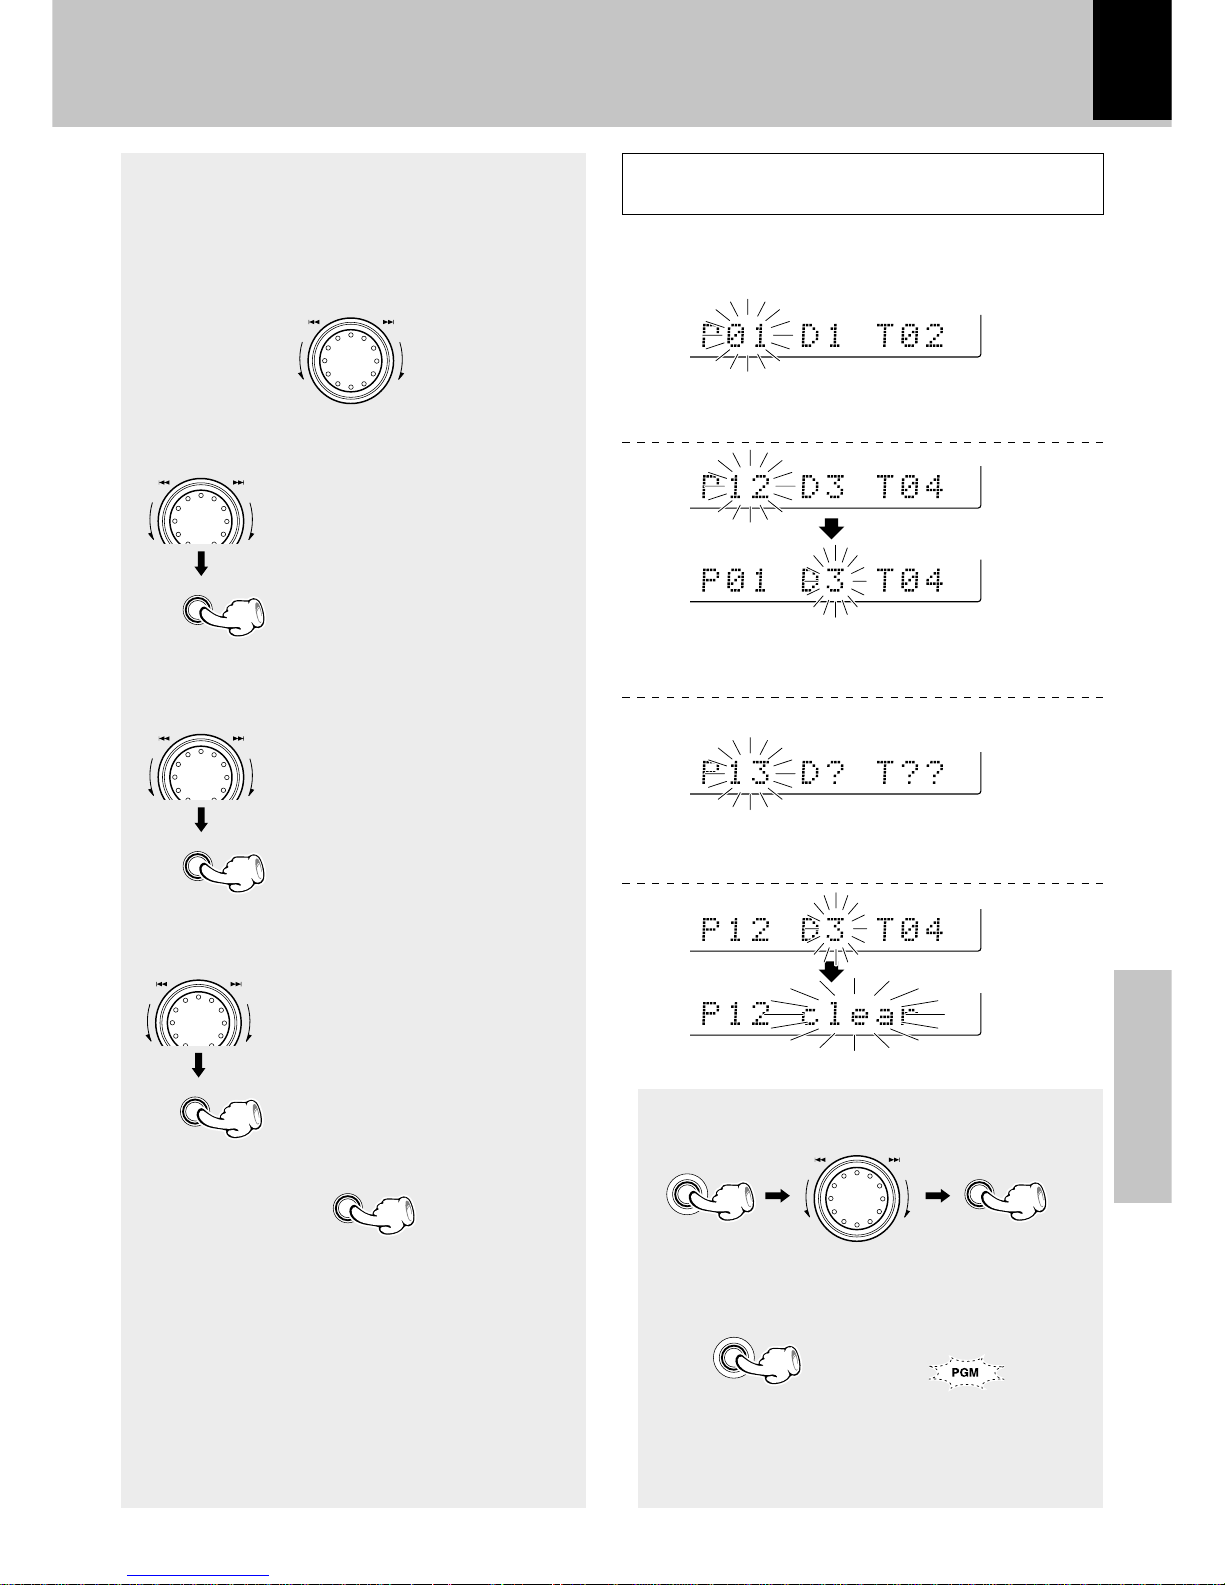
1 Select “CD Program Play”.
2 Press the MENU key.
4
Check the programmed tracks
(and replace, add or delete tracks as
required).
To check:
÷ The blinking item can be replaced.
To replace a track in the program:
÷ The added track number is added to the end of the
existing program.
÷ The programmed tracks are displayed in sequence.
÷ Turn the MULTI CONTROL jog dial during program
playback to stop to the previous or next programmed
track.
÷ When the jog dial is rotated a little in the counter-
clockwise direction once during playback, the track
being played will be played from the beginning.
÷ To check (modify, add or delete) the programmed
tracks after playback, perform the operations in steps
2 and 4.
5
Enter it.
÷ If the key is pressed during playback, normal playback in
order of tracks resumes from the current track.
÷ The program mode can also be canceled by pressing
the 0 OPEN/CLOSE key.
1 Select the programmed disc
or track to be replaced and
press the SELECT key.
2 Select a disc or track to re-
place the disc or track selected
above (step 3-1and 2).
1 Select the display as shown
on the right and press the
SELECT key.
2 Perform the same operations
as in step 3-1and 2.
To add a track to the program:
To delete a track from the program:
1 Select the programmed disc
or track to be cleared and
press the SELECT key.
2 Select “clear” and press the
SELECT key.
Goes off
To quit the program mode
Display when 12 tracks have been programmed
Press the TIME key on the remote control unit to switch
the time display.
(Playback starts from the first programmed
track (program No. 1))
SELECT
SELECT
SELECT
ENTER
MENU
SELECT
MENU
M
U
L
T
I
C
O
N
T
R
O
L
M
U
L
T
I
C
O
N
T
R
O
L
M
U
L
T
I
C
O
N
T
R
O
L
M
U
L
T
I
C
O
N
T
R
O
L
M
U
L
T
I
C
O
N
T
R
O
L
Page 34
34
Application section
Select the “CD” input.
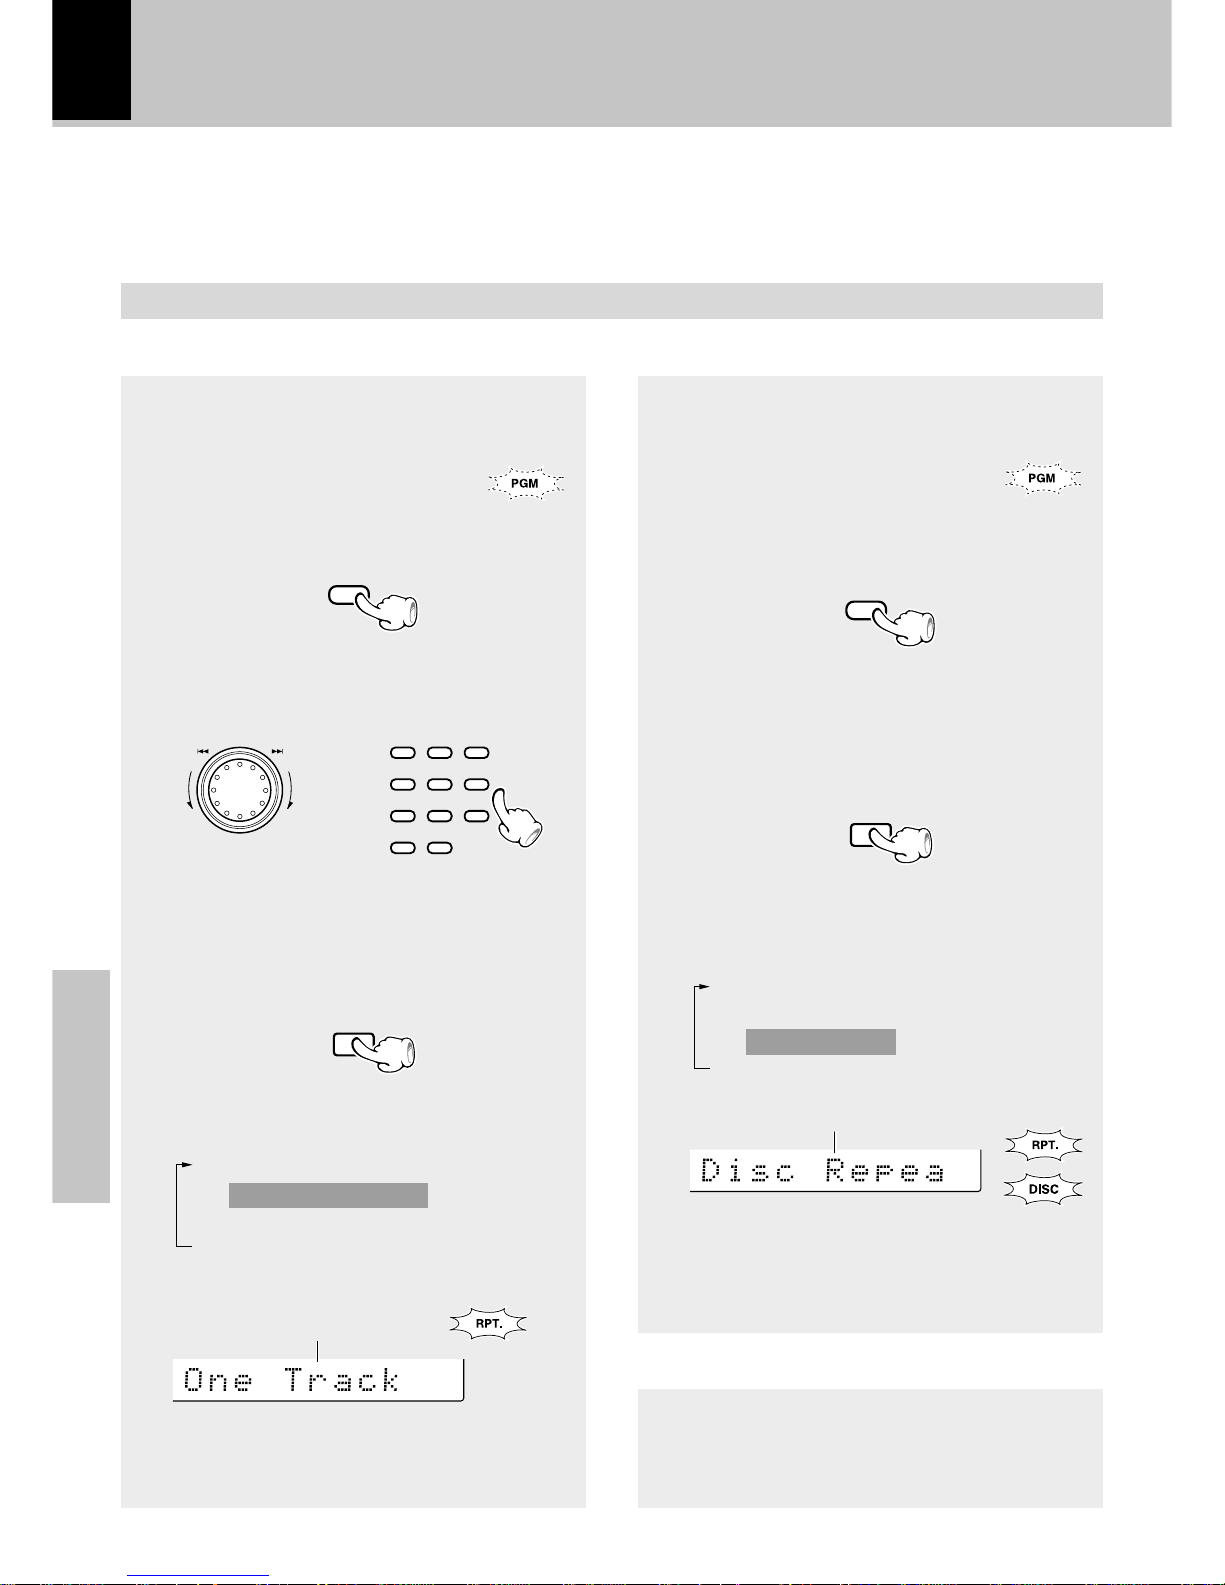
Repeated playback
Desired titles or discs can be played back repeatedly.
Playback of CD
1
Cancel “PGM”.
2
Select the disc.
3
Select the track.
4
Select “One Track Repeat”.
To repeat only one track
If the “PGM” indicator is lit, make
sure to turn it off.
‹
Goes off
(Remote control unit)
(Remote control unit only)
To repeat a disc
1
Cancel “PGM”.
2
Select the disc.
3
Select “Disc Repeat”.
If the “PGM” indicator is lit, make
sure to turn it off.
‹
(Remote control unit only)
Press the key repeatedly to switch the
display.
1 “Repeat off” (Repeat canceled)
2 “One Track Repeat”
3 “Disc Repeat”
4 “All Repeat”
+Scrolled display
(One Track Repeat)
Goes off
Lights
Press the key repeatedly to switch the
display.
1 “Repeat off” (Repeat canceled)
2 “One Track Repeat”
3 “Disc Repeat”
4 “All Repeat”
+Scrolled display (Disc Repeat)
To stop repeated playback
Press the REPEAT key repeatedly until the repeat
mode is switched off.
÷ The repeat mode can also be canceled by pressing
the 0 OPEN/CLOSE key.
(Main unit)
DISC
SKIP
123
456
789
0 +10
REPEAT
Lights
DISC
SKIP
REPEAT
M
U
L
T
I
C
O
N
T
R
O
L
Page 35
Application section
35
Playback of CD
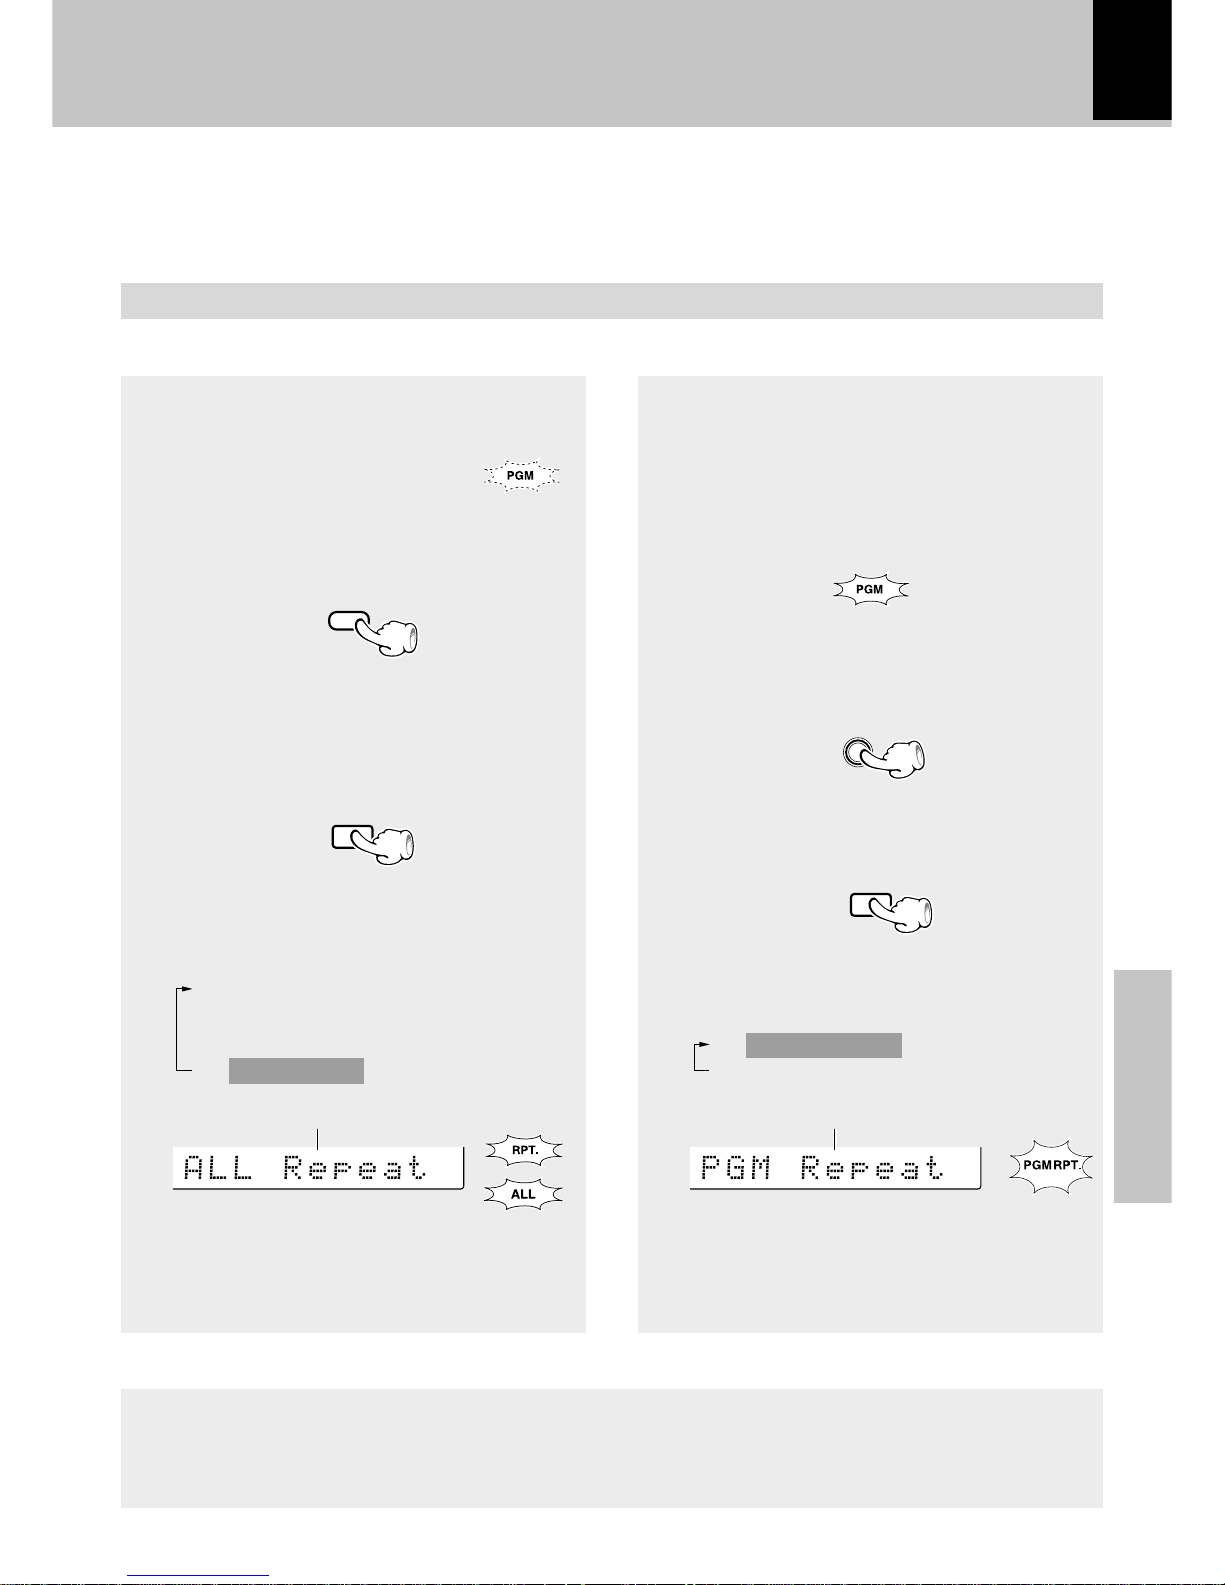
To repeat all discs
1
Cancel “PGM”.
2
Select the disc to be played first.
3
Select “All Repeat”.
If the “PGM” indicator is lit, make
sure to turn it off.
‹
Goes off
To stop repeated playback
Press the REPEAT key repeatedly until the repeat mode is switched off.
÷ The repeat mode can also be canceled by pressing the 0 OPEN/CLOSE key.
Lights
(Remote control unit only)
Press the key repeatedly to switch the
display.
1 “Repeat off” (Repeat canceled)
2 “One Track Repeat”
3 “Disc Repeat”
4 “All Repeat”
+Scrolled display (All Repeat)
To repeat only the programmed tracks
1
Perform the procedure in
“Listening in the desired sequence
(program playback)” till step
3
to
program the desired CD tracks.
¤
2
Start playback.
3
Select “PGM Repeat”.
(Remote control unit only)
÷ All of the programmed tracks will be played
repeatedly.
Press the key repeatedly to switch the
display.
1 “PGM Repeat”
2 “Repeat off” (Repeat canceled)
+Scrolled display (PGM Repeat)
Lights
Lights
DISC
SKIP
REPEAT
ENTER
REPEAT
Page 36
36
Application section
Playback of CD
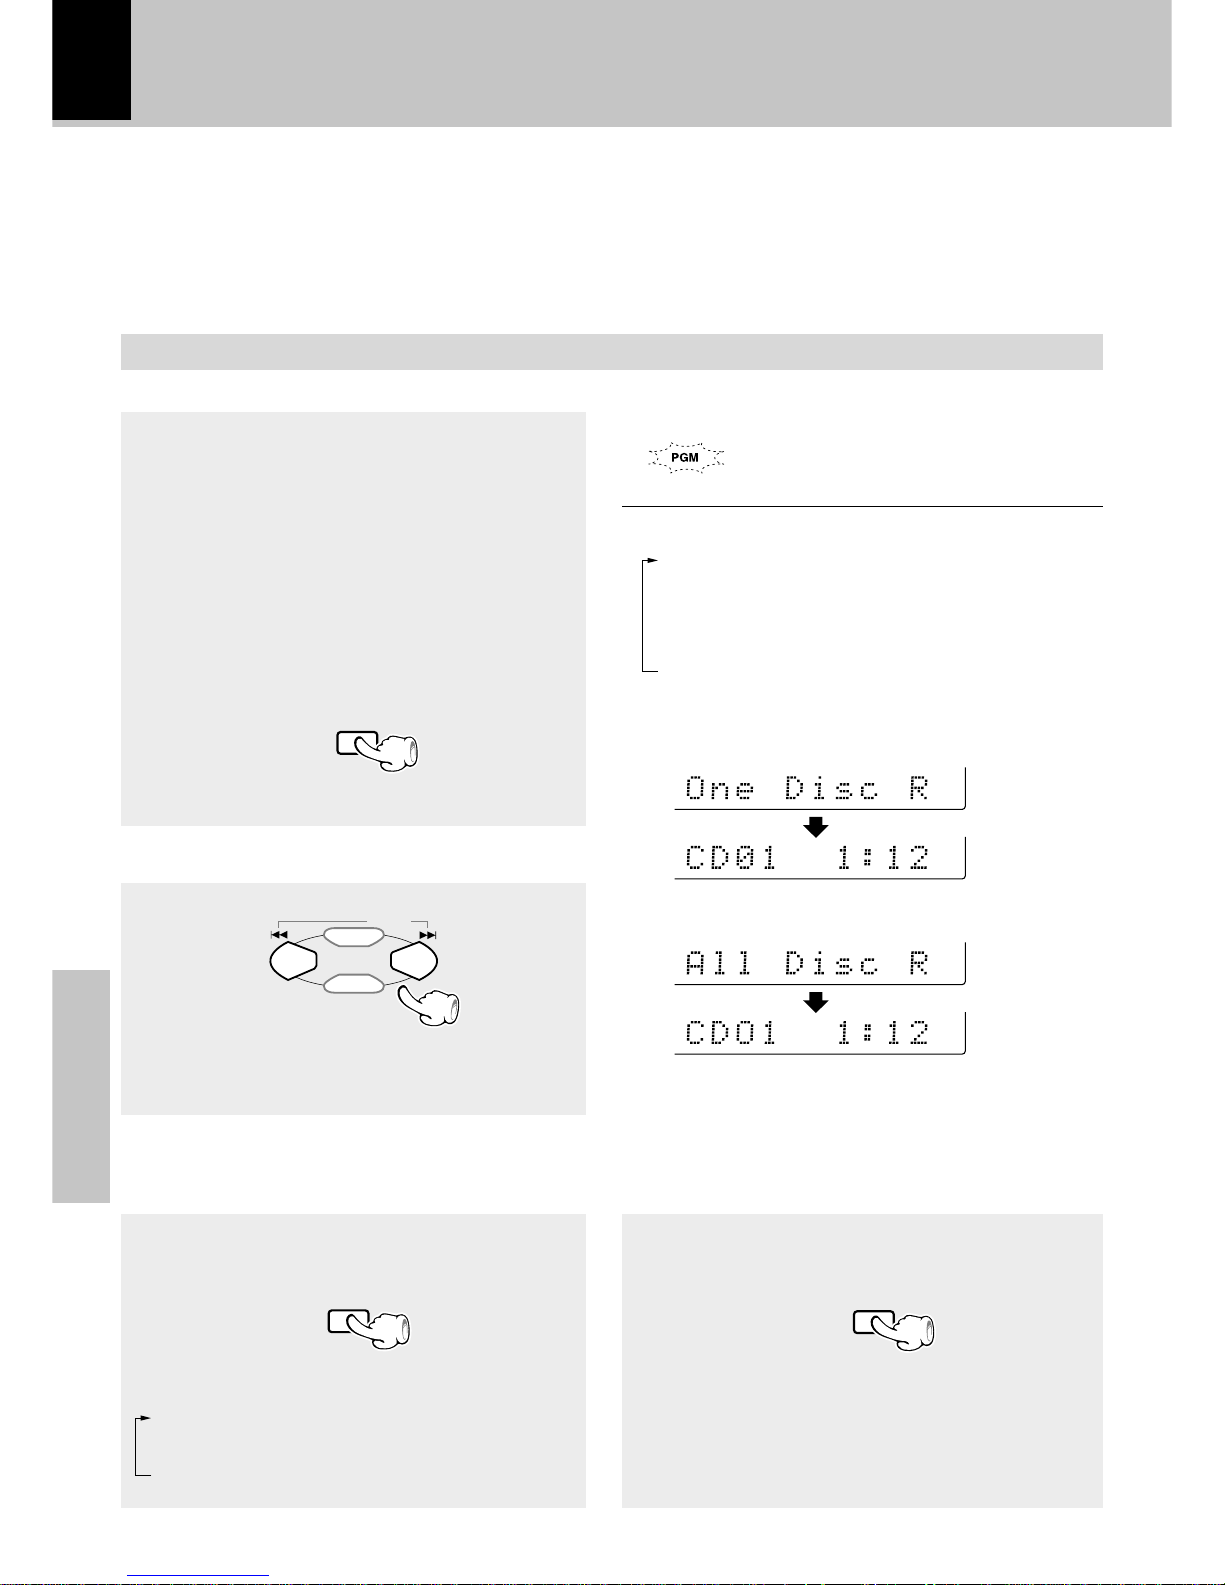
Random playback
Select the “CD” input.
Press the key repeatedly to switch the display.
1 “One Disc Random”
Random play of one disc
2 “All Disc Random”
Random play of all discs
3 “Random off” (Normal playback)
As the titles are selected randomly each time, the music can be enjoyed of it.
Random playback can play tracks in one to three discs.
1
Cancel “PGM”.
2
Select the RANDOM mode.
(For “One Disc Random” playback, select the
disc in advance.)
Random play of all discs
Random play of one disc
+Scrolled display (One Disc Random)
÷ The displayed character information returned to normal
display and normal playback in order of track numbers
starts from the track being played.
To cancel random playback
Select “Random off”.
To select another track in the middle of playing one
To repeat random playback
Select “Random Repeat”.
÷ Pressing the 4 key once returns to the beginning
of the track being played.
÷ Playback stops after each title has been played once.
÷ When the TIME key of the remote control unit is pressed
during playback, the time display appears but it soon
returns to the original display.
+Scrolled display (All Disc Random)
Each press switches the modes as follows.
1 “Random Repeat” .....Random repeat
mode
2 “Repeat off” .............. Repeat canceled
If the “PGM” indicator is lit, make sure to
turn it off.
‹
Goes off
(Remote control unit only)
(Remote control unit only) (Remote control unit only)
RANDOM
P.CALL
MENU
SELECT
REPEAT
RANDOM
Page 37
Application section
37
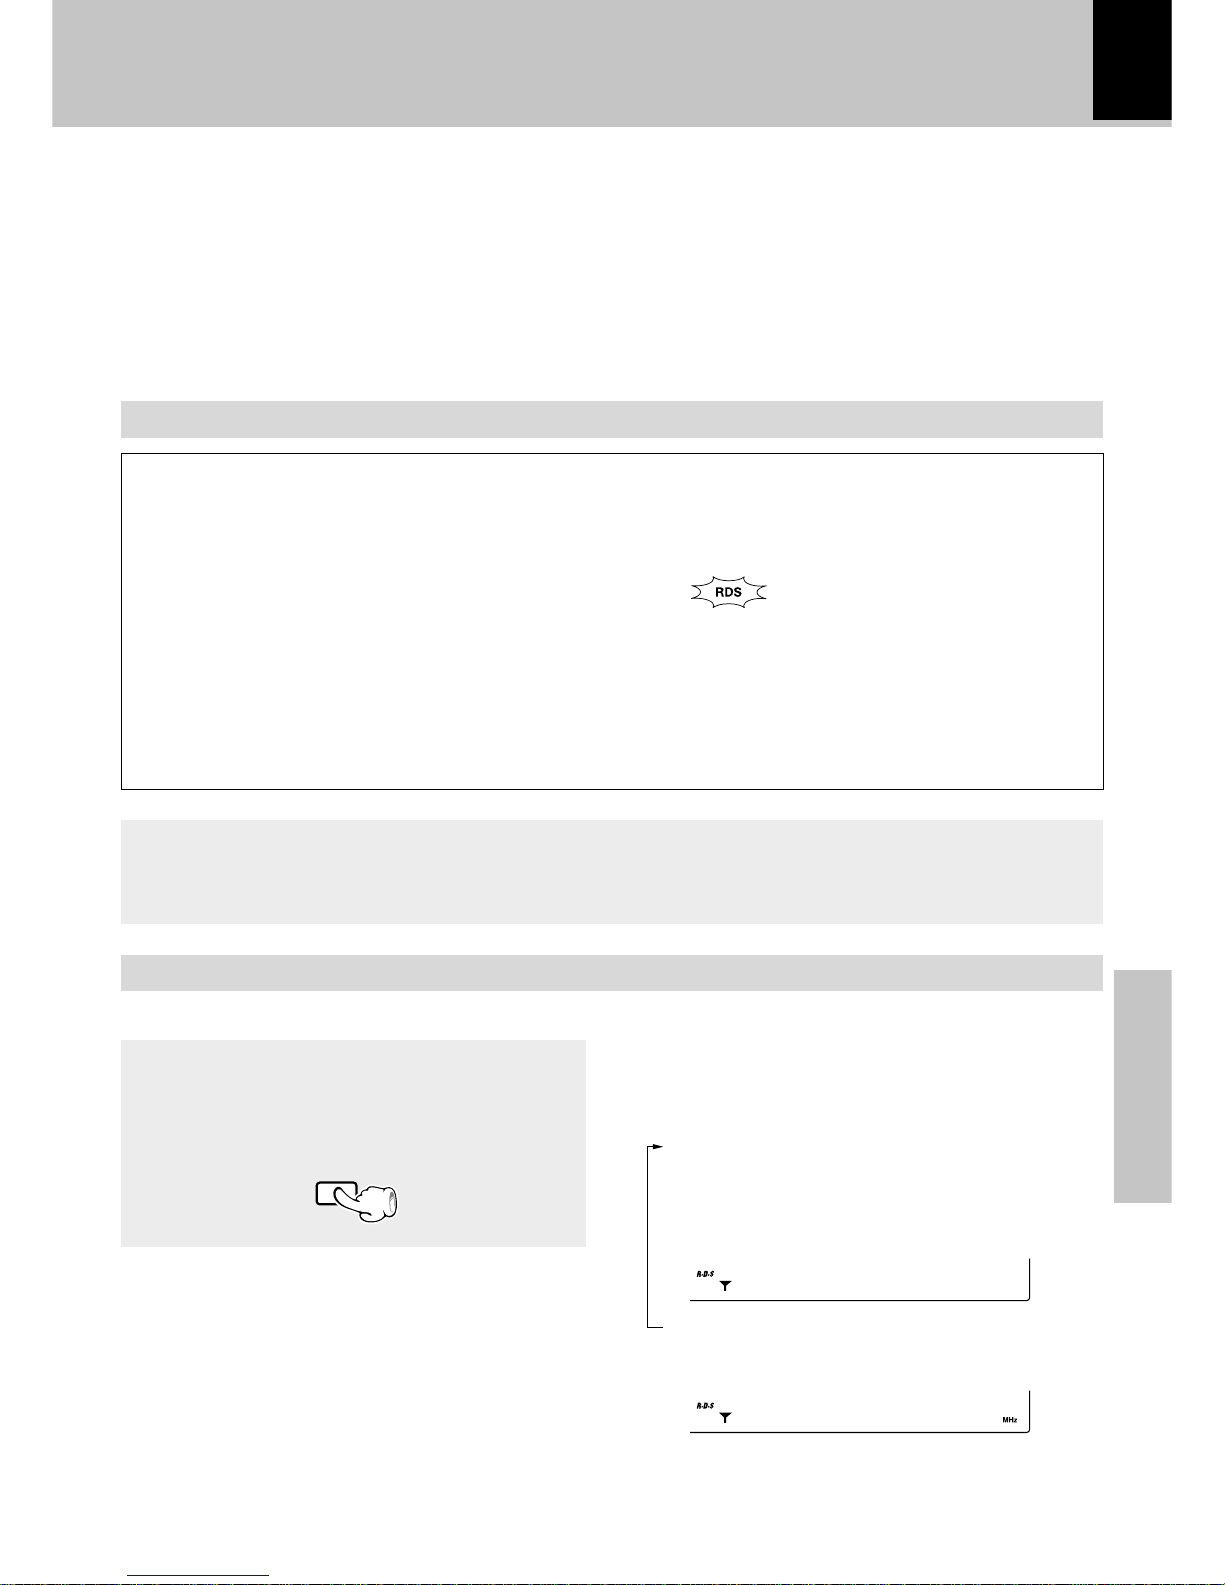
RDS is a system which transmits useful information (digital data) for FM broadcasts together
with the broadcast signal. Tuners and receivers
designed for RDS reception can extract the information from the broadcast signal for use with
various functions such as automatic display of
the station name.
R.D.S.
(Radio Data System) (For U.K. and Europe)
This unit is equipped with the following functions utilizing RDS data:
PTY (Program TYpe) Search : °
The tuner automatically searches for a station which is currently
broadcasting a specified program type (genre).
PS (Program Service) Display : (See below.)
When an RDS broadcast is received, the station name is
automatically displayed.
The “RDS” indicator lights up when an RDS broadcast
(signal) is received.
÷ Some functions may not be provided or be given differ-
ent names depending on countries or areas.
Pressing the RDS DISP. key changes the display contents.
Display mode priority ranking
When an RDS broadcast is received :
1PS (Program Service) Display :
When an RDS broadcast is received, the station
name is automatically displayed.
If it is not an RDS broadcast, “No PS” is displayed.
2Frequency Display :
The frequency of the current station is displayed.
Note before the use of RDS
Set the receiving band to FM and preset RDS stations with the auto memory function.
§
To switch the display contents
For reception of RDS stations, the auto presetting function must be used to preset the stations. With the auto
memory function, RDS stations are preset with priority.
(Remote control unit only)
RDS DISP.
TEXT DISP.
BBC
AUTO
ST.
01FM102.5
AUTO
ST.
0
Page 38
38
Application section
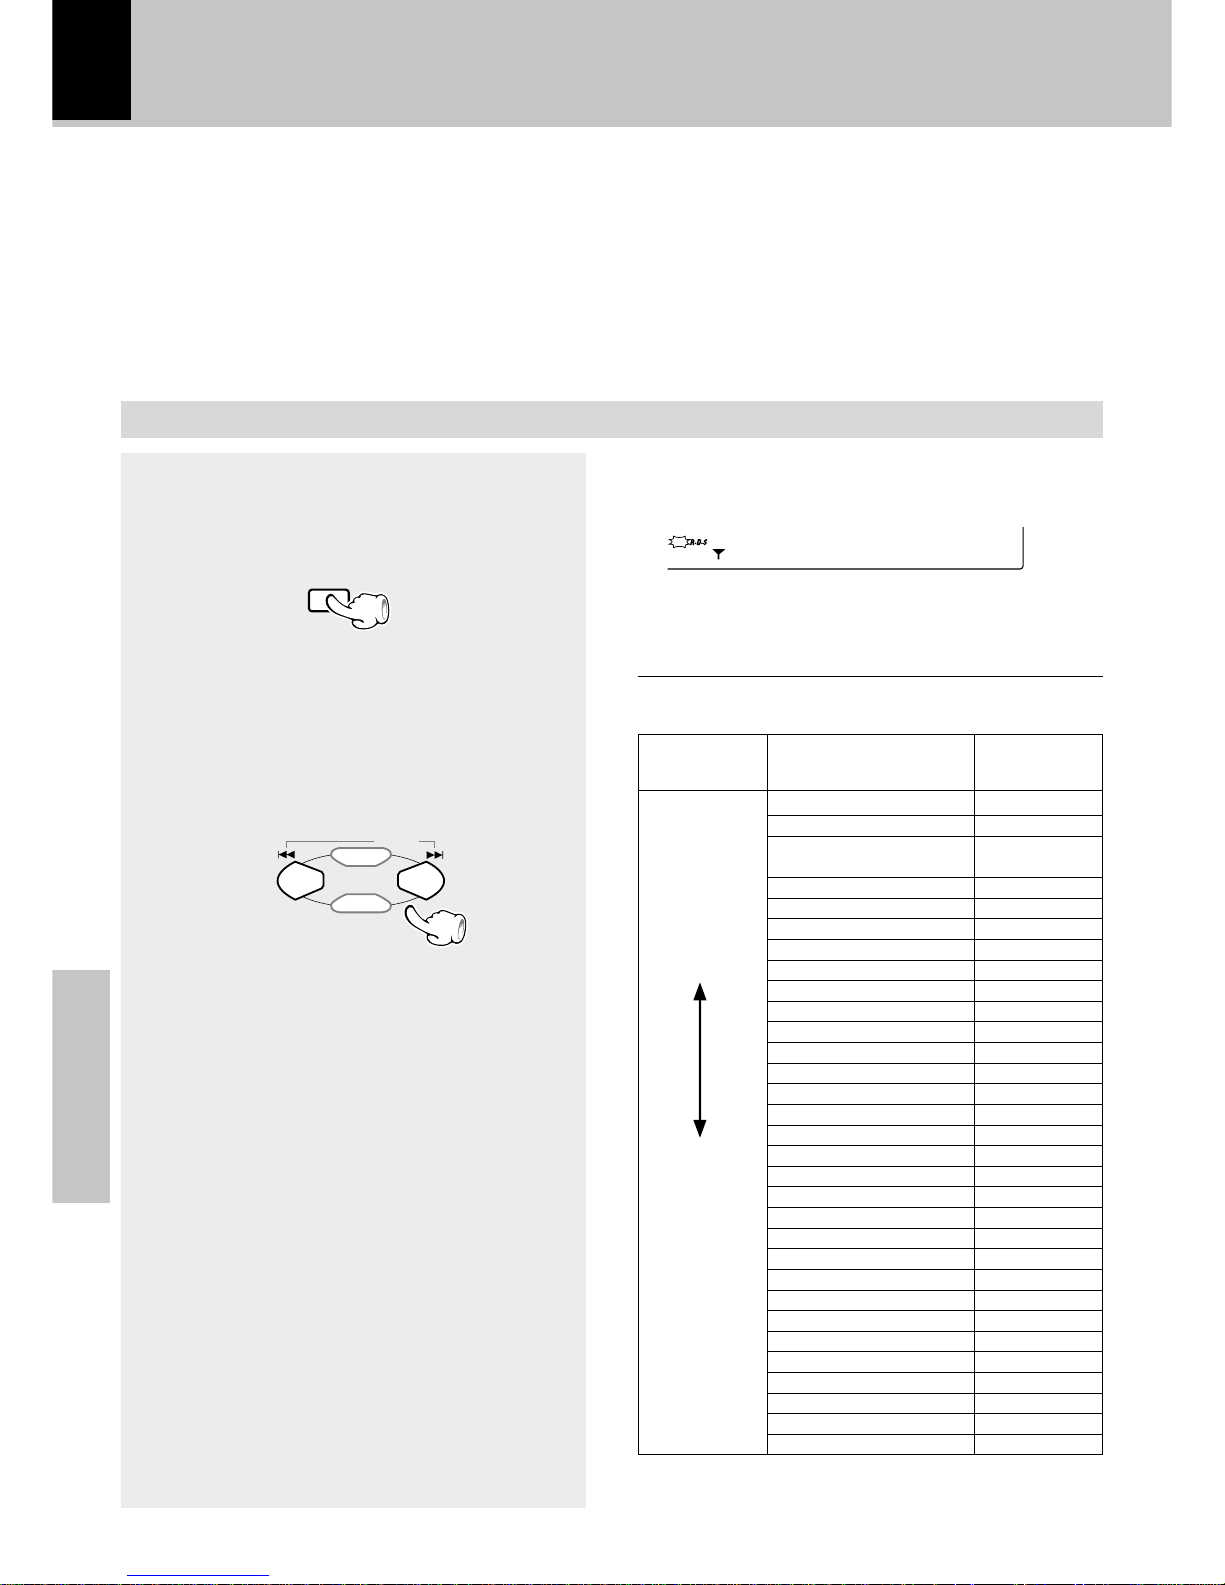
To select using the 4 ¢ keys
The 4 ¢ keys can be used to select one of
the 29 program types by displaying them in
sequence.
Press and hold the key and release it when the
desired program type appears.
Program Type
Name
R.D.S.
By specifying the type of program (genre) you
want to listen to, the tuner automatically
searches for a station which is currently broadcasting a program of the specified type.
Searching for a desired program type
(PTY search)
Set the reception band to FM. Preset RDS stations with the auto memory function.
§
When an RDS broadcast is received, the program type is
shown on the display. If the station is not an RDS station,
“None” is displayed.
Program type table
Select while “PTY” is lit.
POP M
ROCK M
EASY M
LIGHT M
CLASSICS
OTHER M
NEWS
AFFAIRS
INFO
SPORT
EDUCATE
DRAMA
CULTURE
SCIENCE
VARIED
WEATHER
FINANCE
CHILDREN
SOCIAL
RELIGION
PHONE IN
TRAVEL
LEISURE
JAZZ
COUNTRY
NATION M
OLDIES
FOLK M
DOCUMENT
TEST
ALARM
4 ¢ keys
Display
4
DOWN
UP
¢
Pop Music
Rock Music
Easy Listening
Music
Light classical
Serious classical
Other Music
News
Current Affairs
Information
Sport
Education
Drama
Culture
Science
Varied
Weather
Finance
Children’s program
Social Affairs
Religion
Phone In
Tr avel
Leisure
Jazz Music
Country Music
National Music
Oldies Music
Folk Music
Documentary
Alarm Test*
Alarm*
1
Select the PTY search mode.
2
Select the desired program type.
Use program type table on the right for your
convenience.
(Remote control unit only)
PTY
TIME
P.CALL
MENU
SELECT
* This item appears only when the unit receives the data. You
cannot select it using the 4 ¢ keys.
NEWS
AUTO
ST.
PTY
Page 39
Application section
39
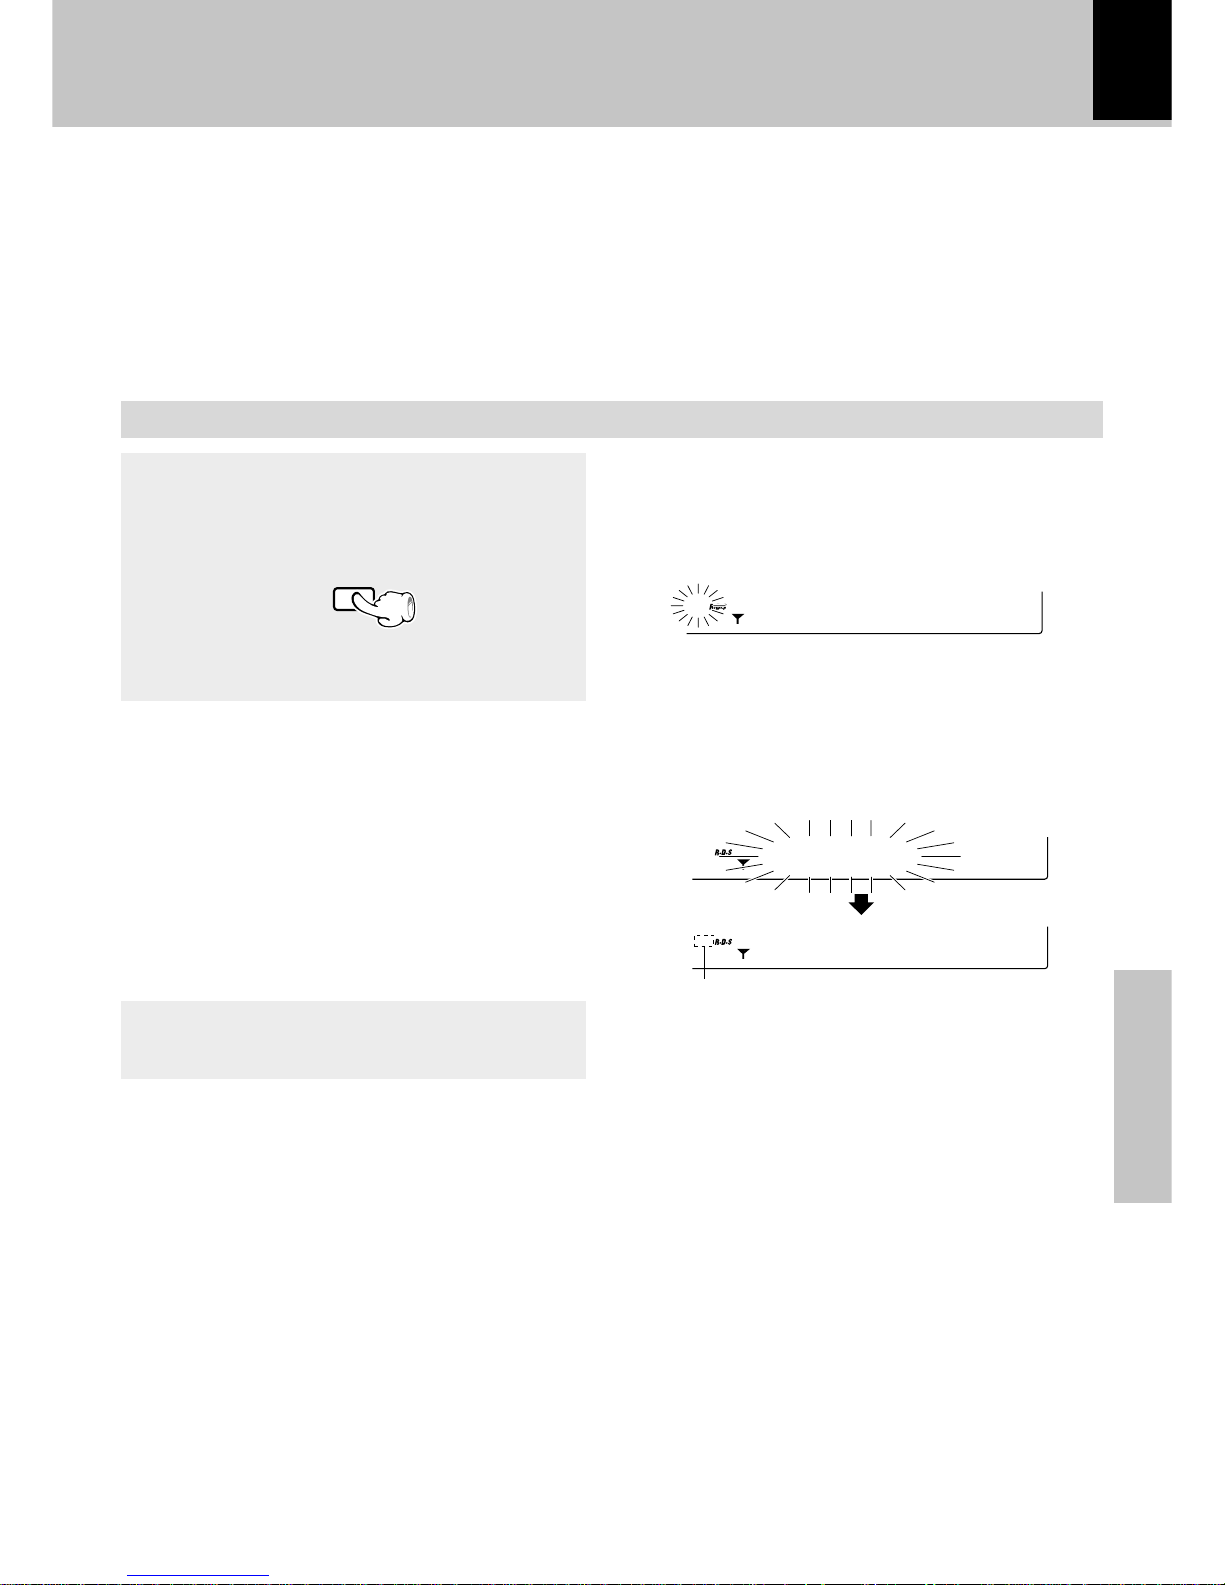
Repeat steps 1, 2, 3.
When searching for a Rock Music broadcast
When a station is received.
To change to a different program type :
Display while the tuner is searching.
Blinks
Goes off
÷ No sound is heard while “PTY” is blinking.
÷ If a program of the desired type cannot be found,
“No Program” is displayed (blinking), then after
several seconds the display returns to the original
display.
÷ If a program of the desired type is found, that program is
received and the program type name display changes
temporarily to the frequency display, and then to the
station name display.
Station name display.
Program type name display.
(Press the key again during search to cancel it.)
3
Start the search.
PTY
R.D.S.
(Remote control unit only)
ROCK M
AUTO
ST.
PTY
PTY
BBC
AUTO
ST.
ROCK M
AUTO
ST.
PTY
Page 40
40
Application section
Selection of the recording type
With this unit, the following edit recording is
possible according to the purpose.
Convenient CD recording
Note that this cassette deck cannot record onto
Metal tapes.
Recording only desired titles
q
Perform this operation when a track you want to record
starts during CD playback. This starts recording of the
track from the beginning.
\
CD ONE TRACK RECORDING
If you want to select the track to be recorded while playing a CD
Recording of an entire CD
w
Perform the “CD DIRECT RECORDING” operation while
the CD player is in stop mode to start recording.
\
CD DIRECT RECORDING
If you want to record a CD in order of track numbers
Recording the programmed titles
e
Program the desired tracks from up to 3 CD discs in the
desired order and record the programmed playback onto
tape.
\
CD PROGRAM RECORDING
If you want to record only the desired tracks
Note
Note
The recording will be interrupted for the part of the guide tape during both -side recording. To avoid the case like
this, please use single-side recording.
Note
Note
Regarding CD-TEXT
(Remote control unit only)
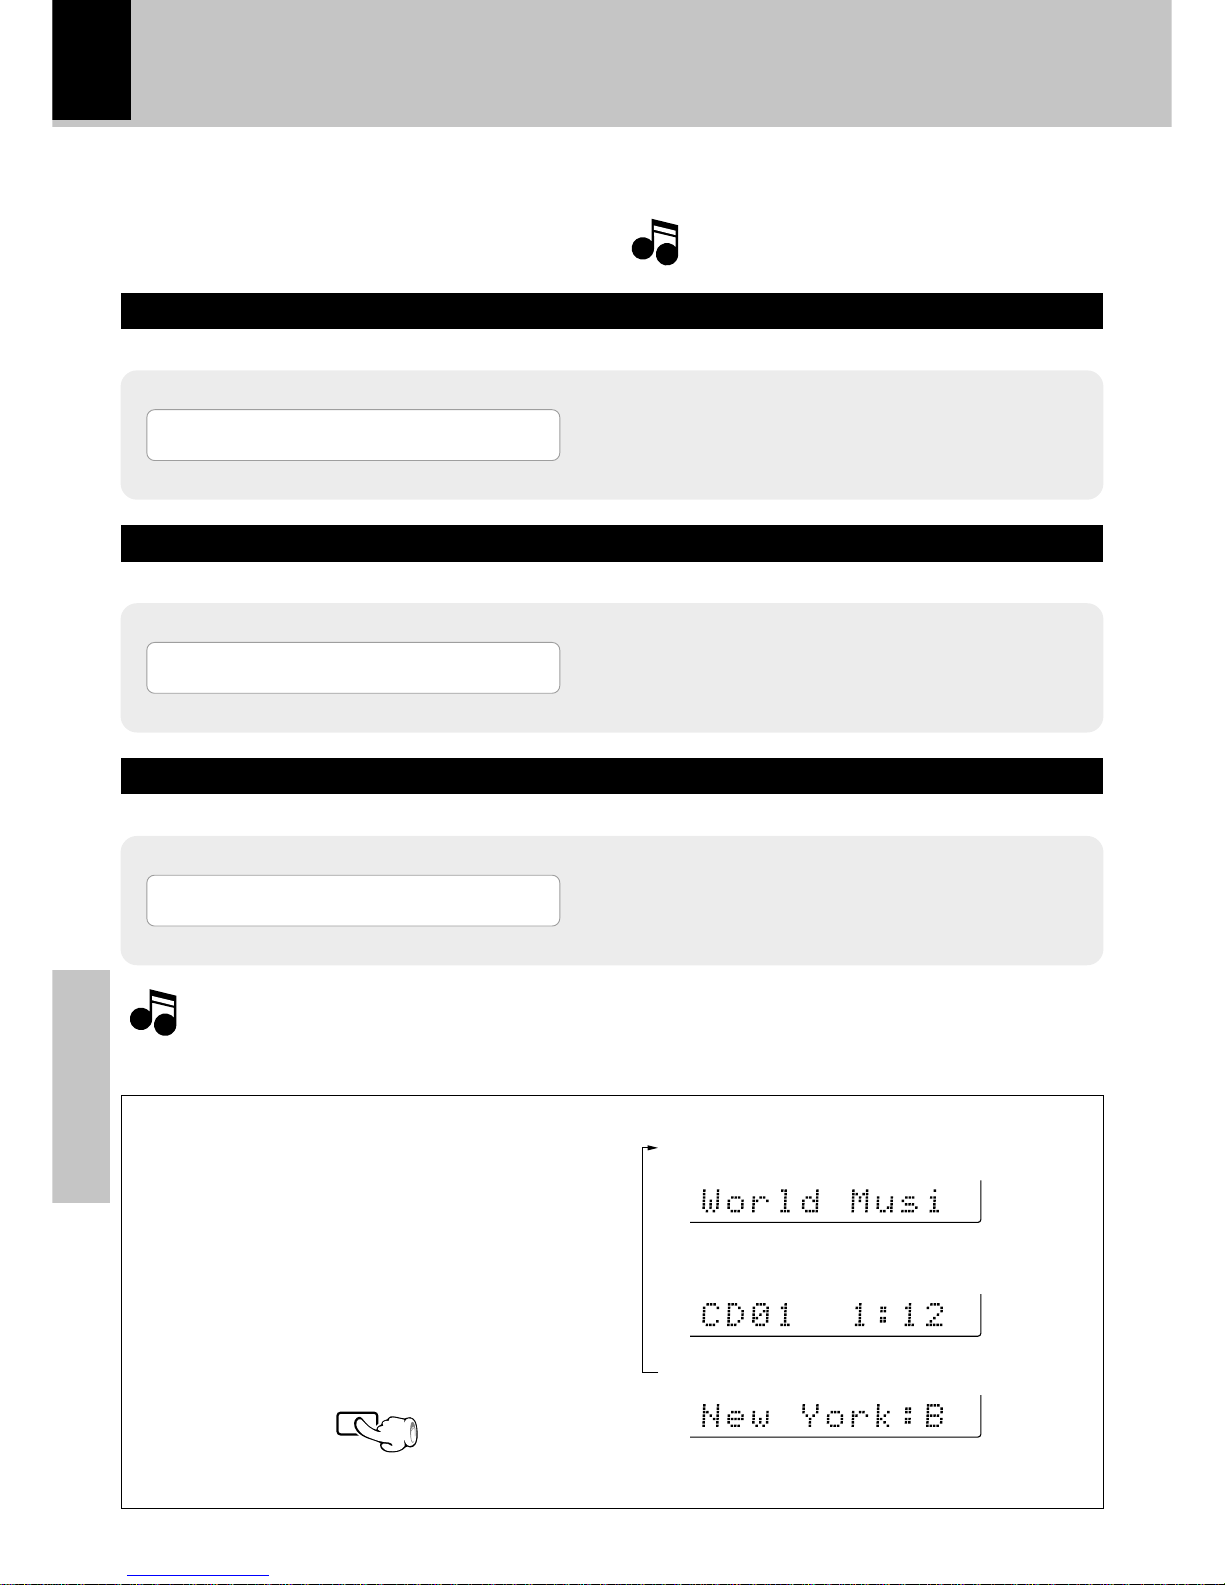
When a CD-TEXT disc is played on this unit, it displays the text information (disc or track title) recorded into the CD.
To switch the displayed text information between
the disc title and track title during playback, press
the TEXT DISP. key.
Scrolls the disc title display.
CD player’s time display.
Scrolls the track title display.
(When pressed during playback)
RDS DISP.
TEXT DISP.
Page 41
Application section
41
Recording preparations are required.
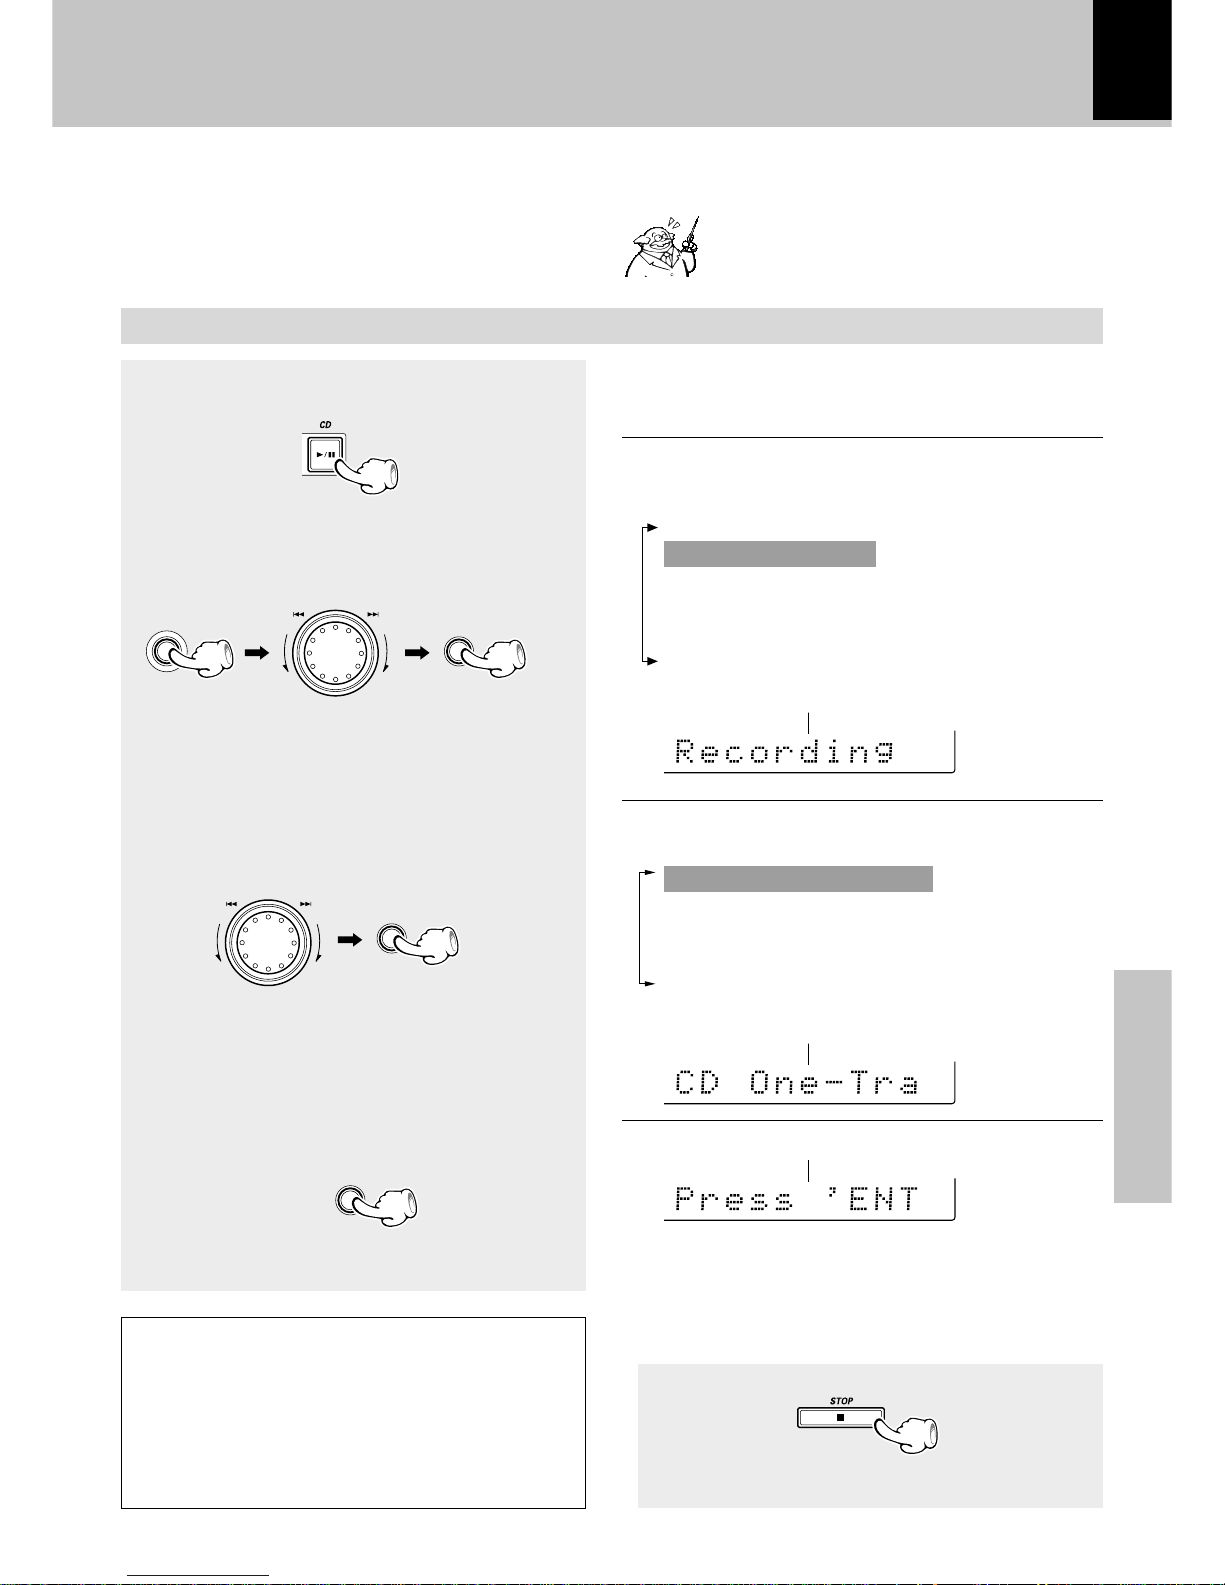
• (Steps 1 to 3)
At the time of CD playback, any desired title can
be selected immediately for recording.
1
Playback of CD.
2
Select “Recording Options”.
3
Select “CD-One Track Recording” .
4
Start recording.
To end recording in the middle
Recording only desired titles
(CD ONE TRACK RECORDING)
When the equalizer or other effects are applied to the sound, the effect applied to the
sound can be recorded.
y
Convenient CD recording
÷ Select a mode other than random play.
÷ Playback restarts from the beginning of the track being
played and recording starts at the same time.
+Scrolled display (CD One-Track Recording)
The following items can be selected by turning the
MULTI CONTROL jog dial.
“CD One-Track Recording”
(Only during CD playback)
“CD Direct Recording”
“CD Program Recording”
“Timer Recording”
÷ Both the cassette deck and CD player stop.
+Scrolled display (Press 'ENTER' to Start)
+Scrolled display (Recording Options)
The following items can be selected by turning the
MULTI CONTROL jog dial.
“CD Program Play”
“Recording Options”
“Tape Dubbing”
“Audio Options”
“Clock Options”
“Language Options”
When recording has been completed, a non-recorded
portion of 4 seconds will be produced and the cassette
deck part will stop. The CD player will enter temporary stop condition.
To record a different track, repeat the steps 1 to 4.
MENU
SELECT
SELECT
ENTER
M
U
L
T
I
C
O
N
T
R
O
L
M
U
L
T
I
C
O
N
T
R
O
L
Page 42
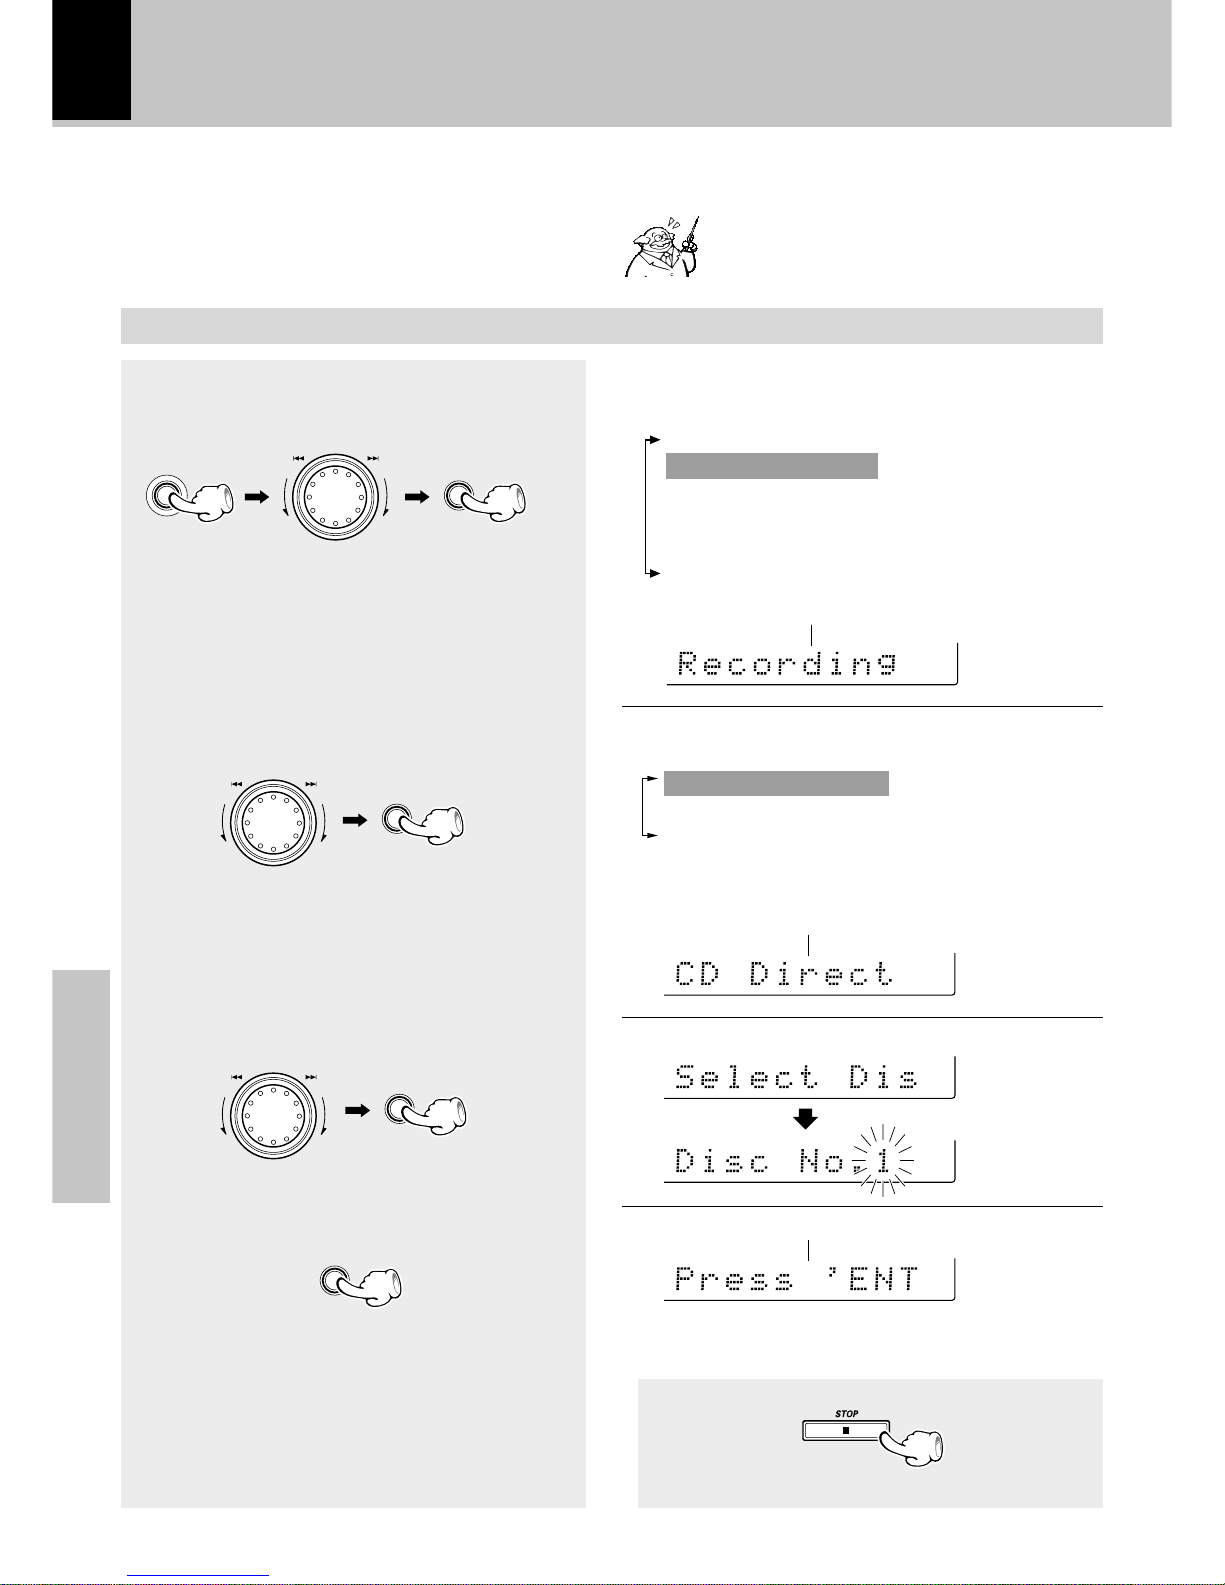
42
Application section
Recording preparations are required.
•
(Steps 1 to 4)
1
Select “Recording Options”.
2
Select “CD Direct Recording”.
3
Select the disc.
4
Start recording.
Recording of an entire CD
(CD DIRECT RECORDING)
Perform the following operation while the CD
player is in stop mode to start recording at the
same time as the start of playback.
When the equalizer or other effects are applied to the sound, the effect applied to the
sound can be recorded.
y
Convenient CD recording
÷ Recording of CD starts at the same time as playback.
÷ At the end of tape, the music is not recorded on the
leader tape portion. If you do not want any music to
be interrupted in the middle, refer to “Recording on
TAPE” and start recording of side B with the
interrupted track.
•
To end recording in the middle
÷ Both the cassette deck and CD player stop.
+Scrolled display (CD Direct Recording)
+Scrolled display (Select Disc No.)
+Scrolled display (Press 'ENTER' to Start)
The following items can be selected by turning the
MULTI CONTROL jog dial.
“CD Direct Recording”
“CD Program Recording”
“Timer Recording”
MENU
SELECT
SELECT
SELECT
ENTER
The following items can be selected by turning the
MULTI CONTROL jog dial.
“CD Program Play”
“Recording Options”
“Tape Dubbing”
“Audio Options”
“Clock Options”
“Language Options”
M
U
L
T
I
C
O
N
T
R
O
L
M
U
L
T
I
C
O
N
T
R
O
L
M
U
L
T
I
C
O
N
T
R
O
L
+Scrolled display (Recording Options)
Page 43
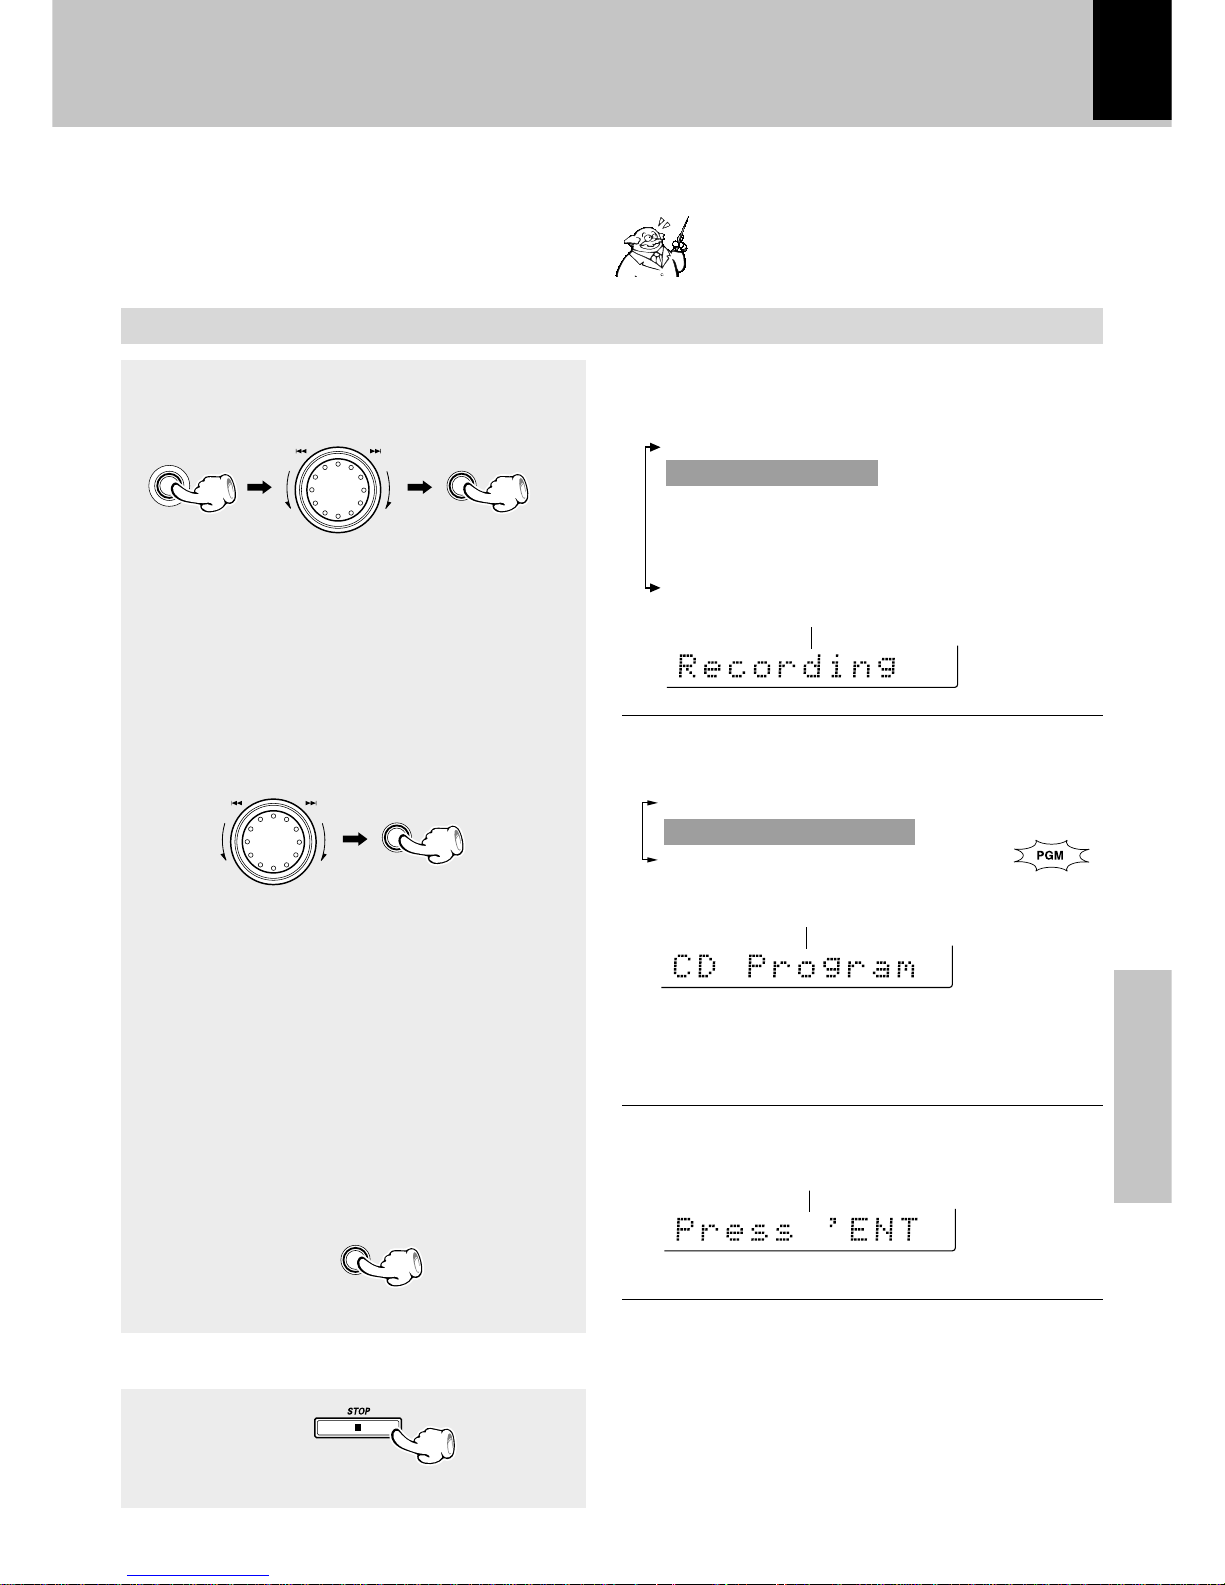
Application section
43
Recording preparations are required.
•
(Steps 1 to 4)
Recording the programmed titles
(CD PROGRAM RECORDING)
Program the desired tracks from up to 3 CD discs
in the desired order and record the programmed
playback onto tape.
Convenient CD recording
When the equalizer or other effects are applied to the sound, the effect applied to the
sound can be recorded.
y
+Scrolled display (CD Program Recording)
To end recording in the middle
÷ Both the cassette deck and CD player stop.
+Scrolled display
(Press 'ENTER' to Start, 'JOG' to Check)
÷ The program mode is maintained even after recording is
completed. To return to the normal mode, it is required
that the program mode is cancel.. ‹
1
Select “Recording Options” .
2
Select “CD Program Recording”.
3
Program the desired tracks.
4
Start recording.
1 Select tracks in the order you want to
play them. (Perform step 3 on page 32.)
2 Check, replace, add or delete the pro-
grammed tracks as required.
(Perform step 4 on page 33.)
The following items can be selected by turning the
MULTI CONTROL jog dial.
“CD Direct Recording”
“CD Program Recording”
“Timer Recording”
Lights
MENU
SELECT
SELECT
ENTER
+Scrolled display (Recording Options)
The following items can be selected by turning the
MULTI CONTROL jog dial.
“CD Program Play”
“Recording Options”
“Tape Dubbing”
“Audio Options”
“Clock Options”
“Language Options”
M
U
L
T
I
C
O
N
T
R
O
L
M
U
L
T
I
C
O
N
T
R
O
L
Page 44
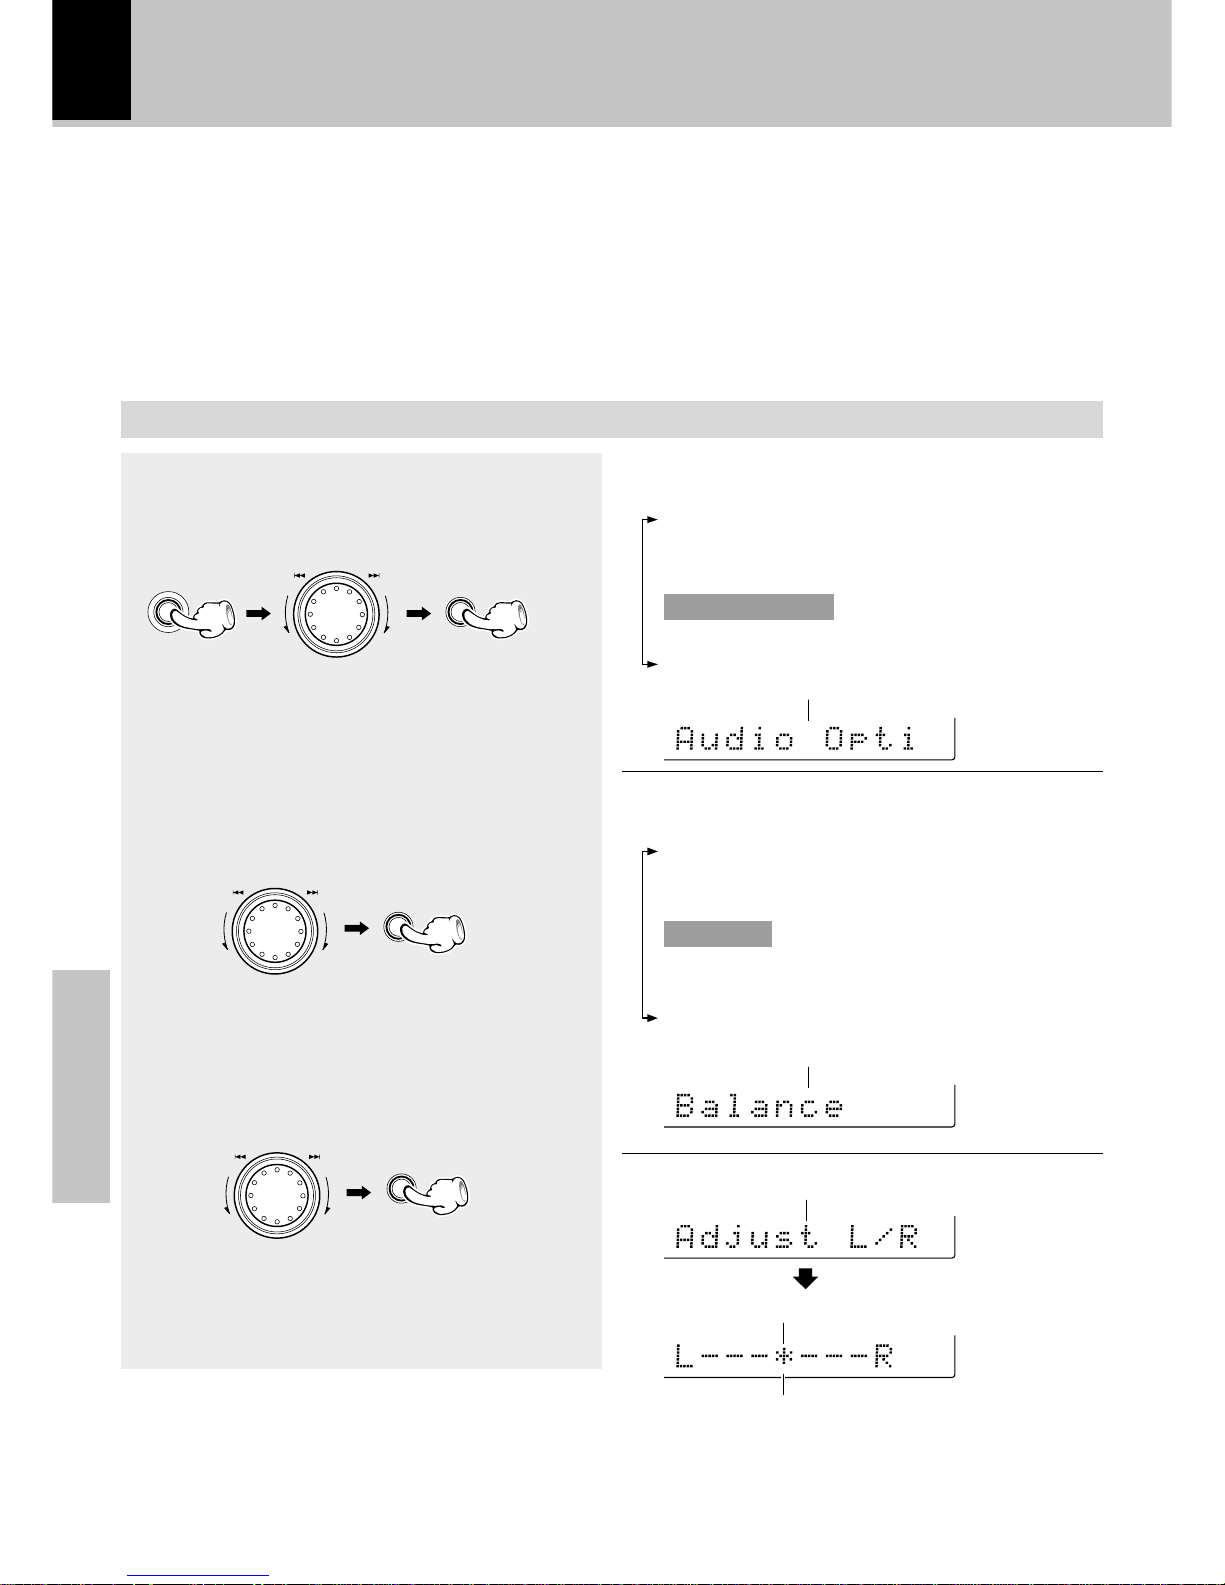
44
Application section
This unit permits selection of the levels of the equalizer and sound field reproduction effects.
Please select the equalizer as desired according to the music genre. Select the sound field mode according to the desired atmosphere.
Effective sound adjustment
1
Select “Audio Options”.
2
Select “Balance”.
3
Adjust.
The left volume
is decreased
The right volume
is decreased
The following items can be selected by turning the
MULTI CONTROL jog dial.
“Custom EQ 1”
“Custom EQ 2”
“Custom EQ 3”
“Balance”
“DVD/VIDEO Input Level” (
Only when the DVD/
VIDEO input is selected
)
“Beep Sound”
Indicates the balance setting
+Scrolled display (Balance)
+Scrolled display (Adjust L/R Balance)
Adjusts the balance of left and right volume.
Balance adjustment
+Scrolled display (Audio Options)
Indicates the center
The following items can be selected by turning the
MULTI CONTROL jog dial.
“CD Program Play”
“Recording Options”
“Tape Dubbing”
“Audio Options”
“Clock Options”
“Language Options”
÷ “Balance” is not displayed when “S.direct” is selected with the SOUND CONTROL jog dial, etc.
MENU
SELECT
SELECT
ENTER
M
U
L
T
I
C
O
N
T
R
O
L
M
U
L
T
I
C
O
N
T
R
O
L
M
U
L
T
I
C
O
N
T
R
O
L
Page 45
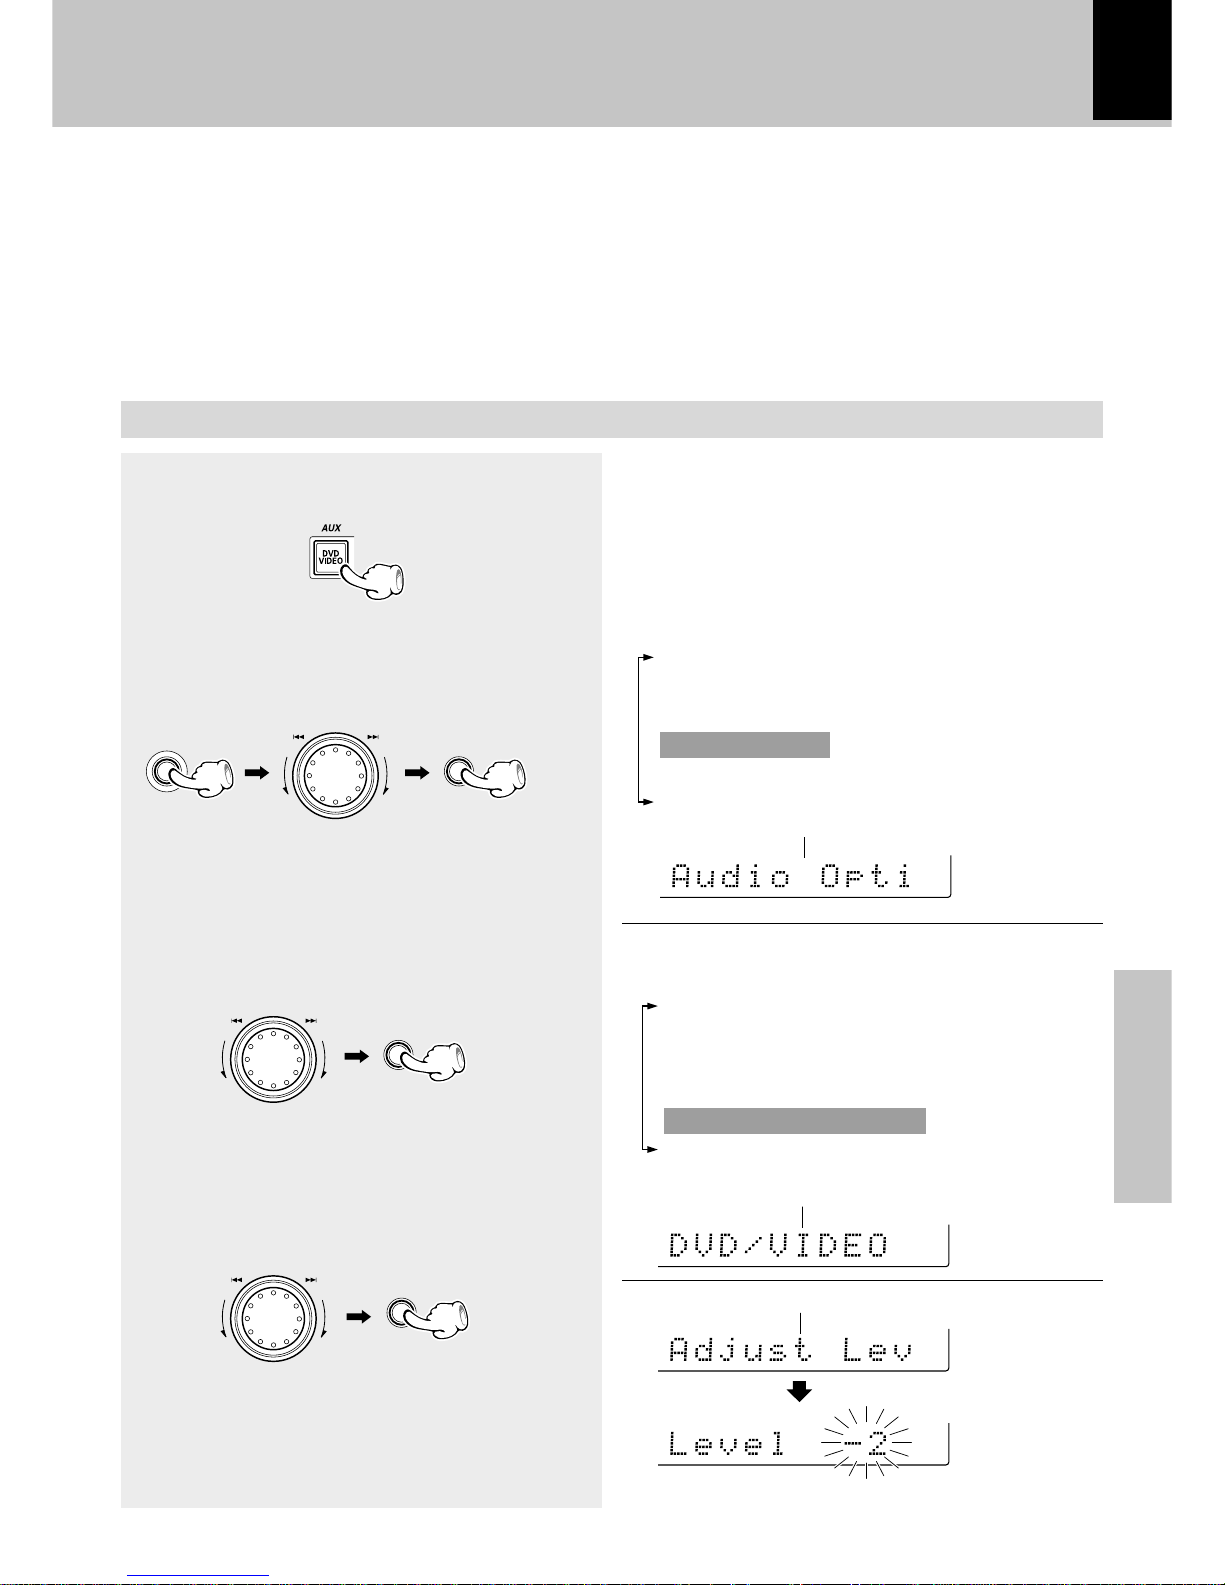
Application section
45
The input level from an external component connected to the DVD/VIDEO INPUT jacks, such as a MD recorder, DVD player, VCR or analog turntable can be adjusted as desired. Adjust so that the volume of the
DVD/VIDEO input source sounds at an equivalent level to the CD .
Input level adjustment
1
Select the “DVD/VIDEO” input.
2
Select “Audio Options”.
3
Select “DVD/VIDEO Input Level” .
4
Adjust.
The following items can be selected by turning the
MULTI CONTROL jog dial.
“Custom EQ 1”
“Custom EQ 2”
“Custom EQ 3”
“Balance” (
Only when “S.direct” is not selected)
“ “DVD/VIDEO Input Level”
“Beep Sound”
+Scrolled display (DVD/VIDEO Input Level)
+Scrolled display (Adjust Level)
÷ Adjustment is possible in the range of 0 to -- 7.
Effective sound adjustment
The level is
increased
The level is
decreased
MENU
SELECT
SELECT
ENTER
M
U
L
T
I
C
O
N
T
R
O
L
M
U
L
T
I
C
O
N
T
R
O
L
M
U
L
T
I
C
O
N
T
R
O
L
+Scrolled display (Audio Options)
The following items can be selected by turning the
MULTI CONTROL jog dial.
“CD Program Play”
“Recording Options”
“Tape Dubbing”
“Audio Options”
“Clock Options”
“Language Options”
Page 46
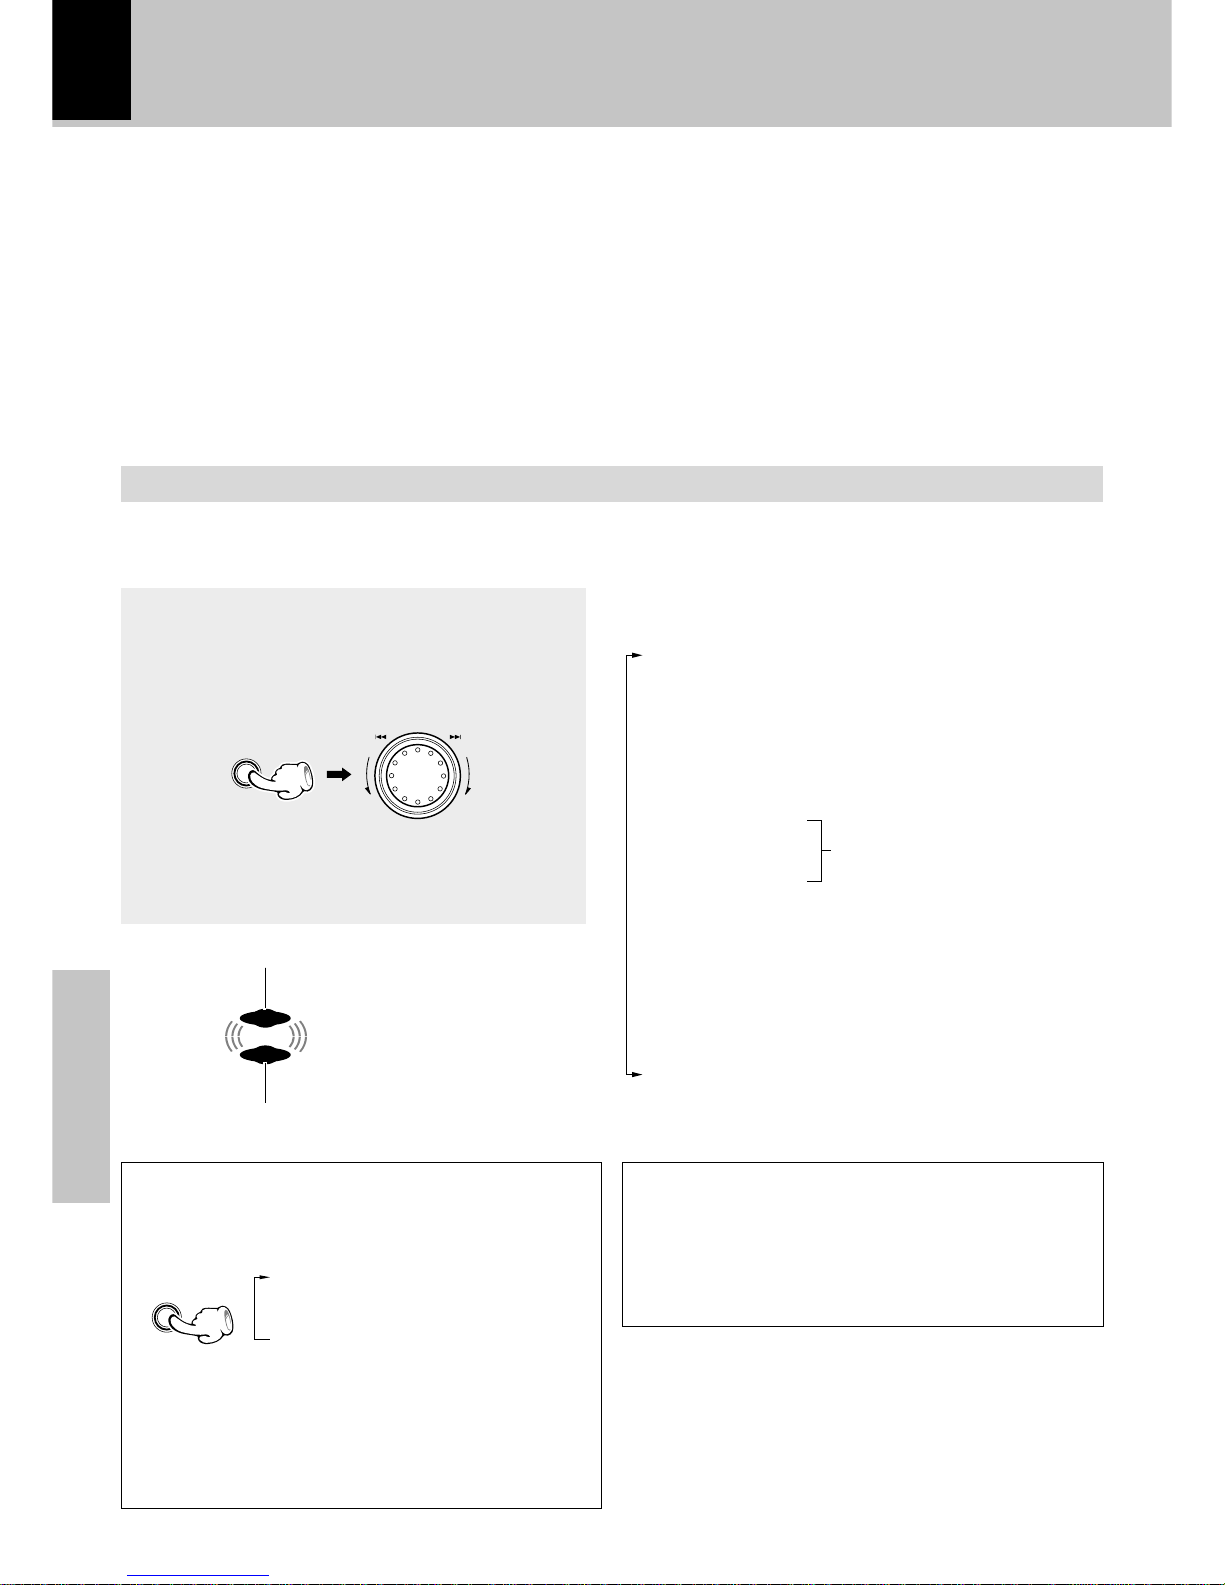
46
Application section
Selecting the equalizer pattern and 3D surround level
Select the desired pattern and 3D surround level according to the category of the played music.
The equalizer and 3D surround effects can be recorded together with the music.
Listening to music with desired tone and sound field/ Switching the display
(Equalizer effect and 3D surround effect)
This unit permits selection of six preset equalizer patterns and three user’s equalizer patterns as well
as the 3D surround levels. The “S.direct” (Source Direct) mode allows you to reproduce pure sound by
bypassing the EX.BASS, equalizer and 3D surround circuitry.
1
Play desired music.
2
Select the desired equalizer pattern.
Effective sound adjustment
3D surround
This is a system producing a three-dimensional sound
space. The feeling of depth, the width of the sound field,
etc. are enhanced, and the sound stage is widened.
÷ To cancel the equalizer, 3D surround and “S.direct”,
select “Effect off”.
Switching the sound level meter display mode
Each press switches the modes as
follows.
“Display Auto”
“Display 1”
“Display 2”
÷ When “Display Auto” is selected, the display mode
during CD playback changes to “Display 1” and “Display
2” every time the track changes.
÷ “Display 2” is displayed regardless of the current
music signal level.
Lights when equalizer is selected.
Lights when 3D surround is selected.
Equalizer patterns and 3D surround levels that can
be recalled
“Rock” .................. Rock music
“Disco” ................. Disco music
“Pop” .................... Pop music
“Samba” .............. Samba music
“Jazz” ................... Jazz music
“Classic”............... Classic music
“Custom EQ 1”
“Custom EQ 2”
“Custom EQ 3”
“3D Level 1” ......... 3D surround level 1
“3D Level 2” ......... 3D surround level 2
“S. direct” ............. Pure sound can be reproduced
by bypassing the EX.BASS,
equalizer and 3D surround circuitry
“Effect off” ............ Normal playback
Equalizer’s manual
memory created by the
user
SOUND
CONTROL
DISPLAY
/DEMO
M
U
L
T
I
C
O
N
T
R
O
L
3D
EQ
BASS
Page 47
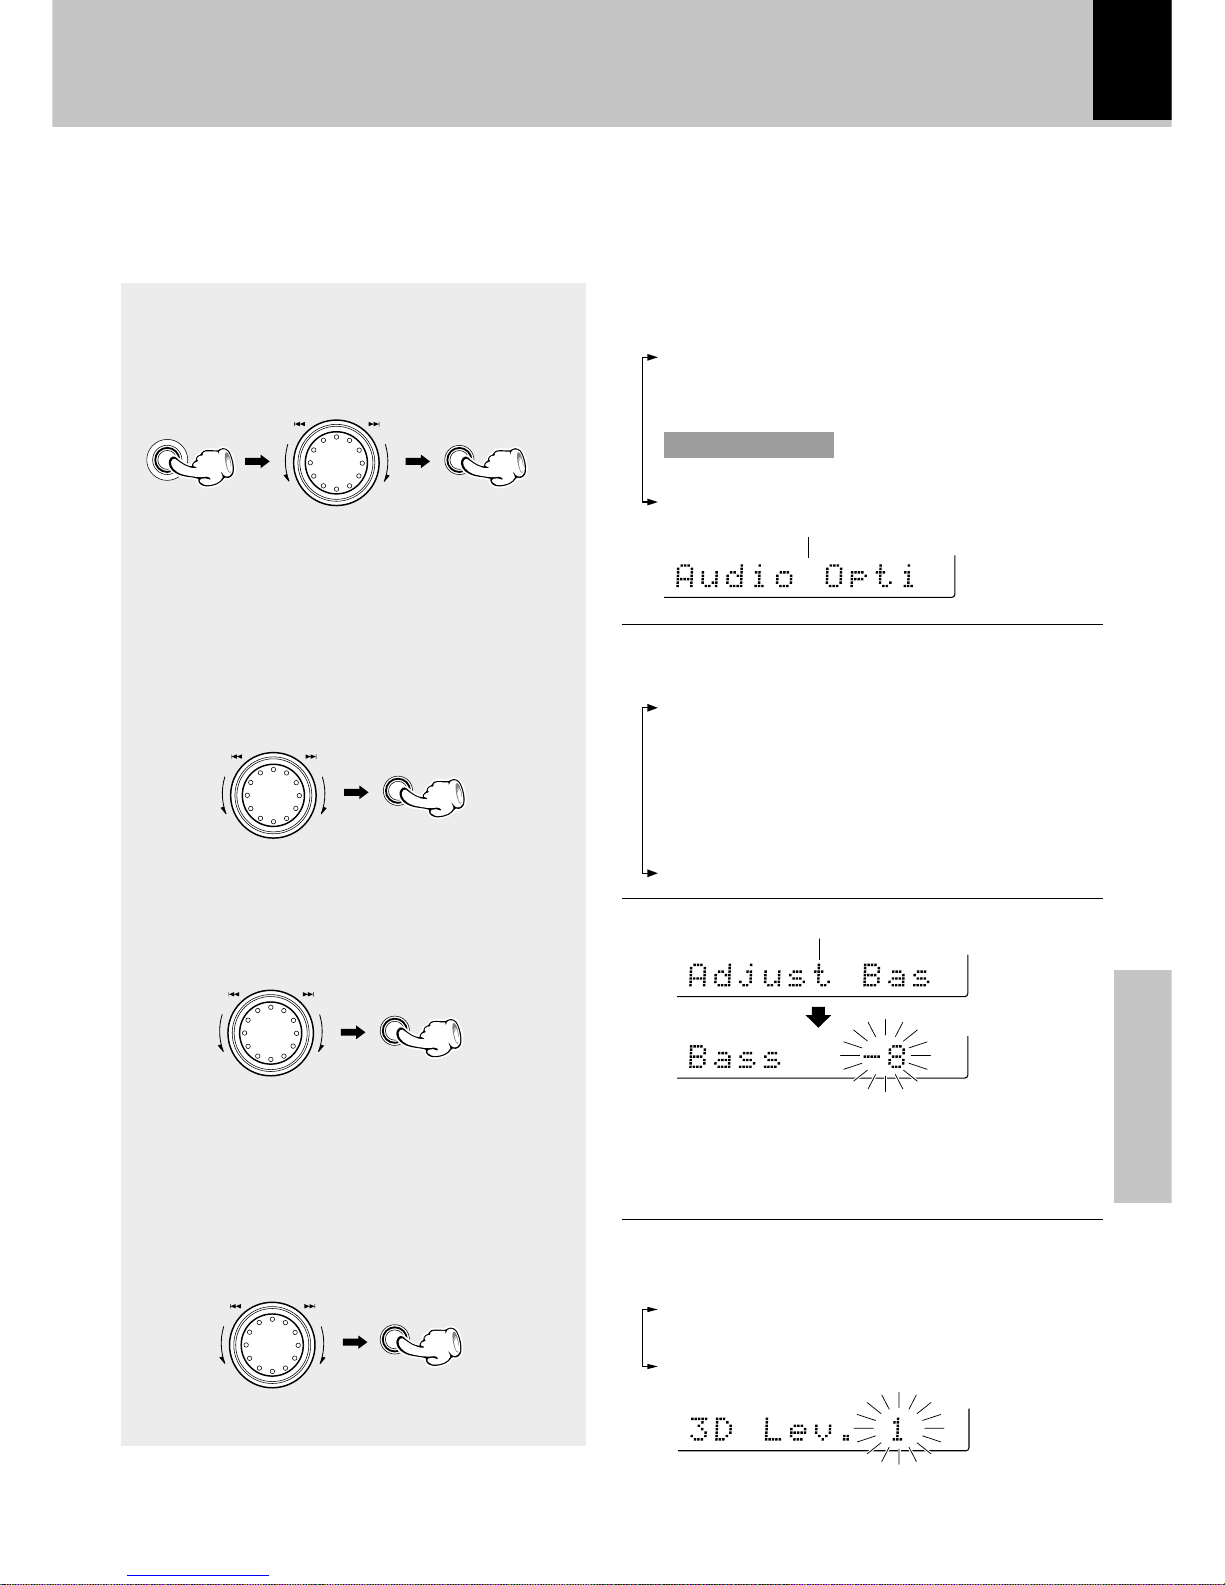
Application section
47
Equalizer pattern setting and saving
You can edit desired patterns manually and store
them in memory.
Effective sound adjustment
The following items can be selected by turning the
MULTI CONTROL jog dial.
“Custom EQ 1”
“Custom EQ 2”
“Custom EQ 3”
“Balance” (
Only when “S.direct” is not selected)
“DVD/VIDEO Input Level” (
Only when the DVD/
VIDEO input is selected
)
“Beep Sound”
The following items can be selected by turning the
MULTI CONTROL jog dial.
“3D Lev. off” ....3D surround off
“3D Lev. 1” ......3D surround level 1
“3D Lev. 2” ......3D surround level 2
1
Select “Audio Options”.
2
Select the number to be used for
storage.
(Custom EQ1 ~ EQ3)
3
Adjust the equalizer pattern.
4
Establish the 3D surround level.
+Scrolled display (Adjust Bass)
÷ Each frequency band can be adjusted in the range be-
tween -- 8 and + 8 .
÷ The “Bass”, “Mids” and “Highs” frequency bands can
be adjusted independently by repeating step 3 for each
of them.
To decrease
the level
To increase
the level
MENU
SELECT
SELECT
SELECT
ENTER
+Scrolled display (Audio Options)
The following items can be selected by turning the
MULTI CONTROL jog dial.
“CD Program Play”
“Recording Options”
“Tape Dubbing”
“Audio Options”
“Clock Options”
“Language Options”
M
U
L
T
I
C
O
N
T
R
O
L
M
U
L
T
I
C
O
N
T
R
O
L
M
U
L
T
I
C
O
N
T
R
O
L
M
U
L
T
I
C
O
N
T
R
O
L
Page 48
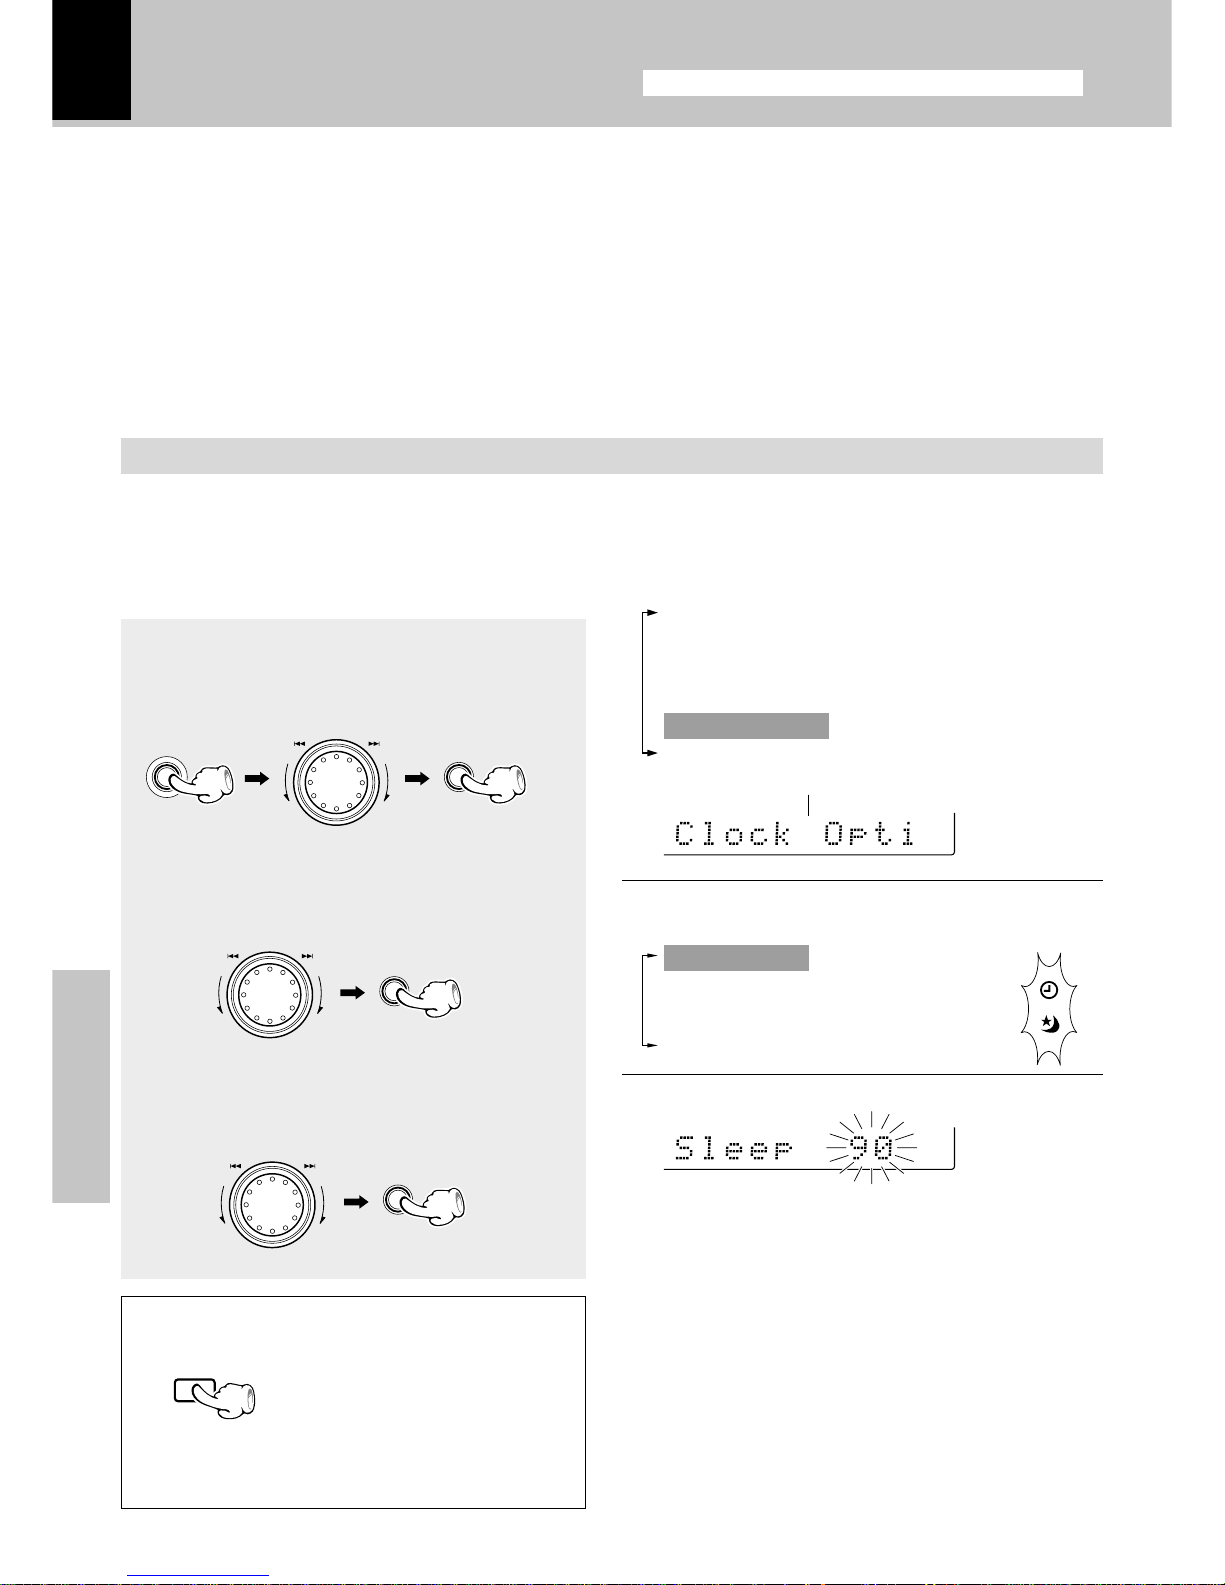
48
Application section
Adjust the clock before setting the timer.
^
Timer operation
Sleep timer
The power is turned OFF automatically after the specified period has elapsed.
Timer programming
Timer playback : Plays (or receives) the selected source in the set time range.
AI timer playback (When timer playback starts, the volume increases gradually.)
Timer recording: Records the selected source in the set time range.
Auto Power Save
When the power is ON and neither recording nor playback is executed for 30 minutes or more, the power
is switched off automatically by this function.
When the volume control is set to 0 or the mute function is on during playback, the Auto Power Save
function is also activated.
Sleep timer
Set the number of minutes after which the power is
to be turned OFF.
1
Select “Clock Options”.
2
Select “Sleep Timer”.
3
Set the time
10Ô20Ô30 ... 80Ô90Ô“Sleep off”Ô10 Ô20 ...
÷ The displayed time changes in 10-minute steps. The maxi-
mum time that can be set is 90 minutes.
÷ The power is turned OFF automatically after the set
time has elapsed.
÷ To cancel the sleep timer, turn the power off or select
“Sleep off”.
Lights
Blinks
The following items can be selected by turning the
MULTI CONTROL jog dial.
“Sleep Timer”
“Adjust Time”
“Timer Play”
“Auto Power Save”
Adjust the clock before setting the timer.
+Scrolled display (Clock Options)
The following items can be selected by turning the
MULTI CONTROL jog dial.
“CD Program Play”
“Recording Options”
“Tape Dubbing”
“Audio Options”
“Clock Options”
“Language Options”
MENU
SELECT
SELECT
ENTER
You can also set the sleep time by using the SLEEP
key on the remote control unit.
SLEEP
÷ Each time you press the SLEEP
key, the sleep time increases in
10-minutes steps.
M
U
L
T
I
C
O
N
T
R
O
L
M
U
L
T
I
C
O
N
T
R
O
L
M
U
L
T
I
C
O
N
T
R
O
L
10Ô20Ô30 ... 80Ô90Ô“Sleep off”
Page 49
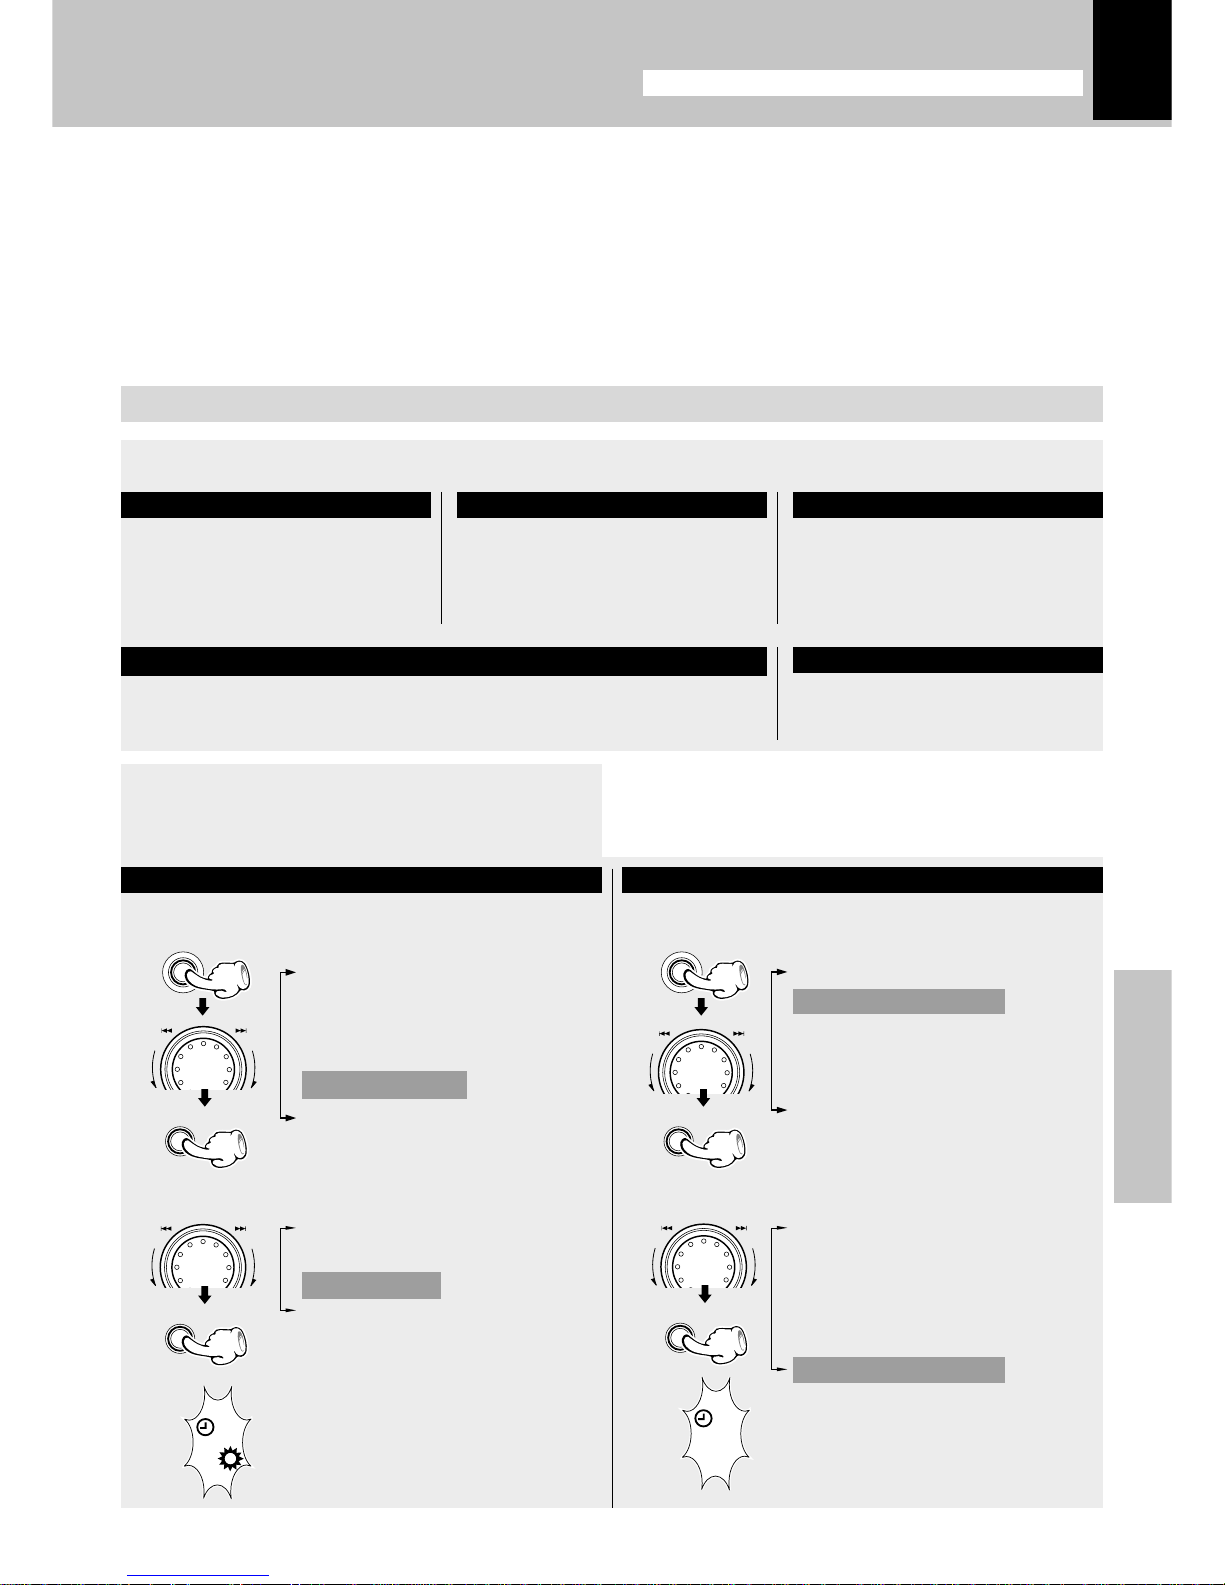
Application section
49
Timer programming
1
Make preparations for the play (recording).
÷ When the timer function is used for timer recording of
an input source, the speakers do not output the audio
even after the unit is turned on by the timer.
Playing or recording the auxiliary input source
Make preparations for recording.
•
Make timer setting of the component connected to the DVD/VIDEO
INPUT jacks.
For timer playback or AI timer playback For timer recording
1 Select “Clock Options”. 1 Select “Recording Options”.
2 Select “Timer Play”. 2 Select “Timer Recording”.
3
Select the timer operation.
2
Adjust the listening volume.
The stations to be received
should already be preset in advance.
§
Insert a disc. (Program playback
is not possible.)
Select the disc to be played
(1, 2 or 3).
)¡
Set a tape in the deck you want
to play.
™
To listen to radio To listen to CD To listen to tape
For recording
The program timer can set either timer playback or timer recording. Either “Everyday” (executing a
timer program once every day) or “One Time” (executing it only once) can be selected for each timer
program. Once the time range and content of a timer program has been set, it can be activated or
deactivated as desired.
÷ If you made a mistake during timer setting:
Press the BACK key to return to the previous step and restart operation from there.
Adjust the clock before setting the timer.
Timer operation
Adjust the clock before setting the timer.
^
“CD Program Play”
“Recording Options”
“Tape Dubbing”
“Audio Options”
“Clock Options”
“Language Options”
“CD Program Play”
“Recording Options”
“Tape Dubbing”
“Audio Options”
“Clock Options”
“Language Options”
“Sleep Timer”
“Adjust Time”
“Timer Play”
“Auto Power Save”
“CD One-Track Recording”
(Only when the CD input is selected
and during playback)
“CD Direct Recording”
“CD Program Recording”
“Timer Recording”
Lights
Lights
MENU
SELECT
SELECT
MENU
SELECT
SELECT
M
U
L
T
I
C
O
N
T
R
O
L
M
U
L
T
I
C
O
N
T
R
O
L
M
U
L
T
I
C
O
N
T
R
O
L
M
U
L
T
I
C
O
N
T
R
O
L
Continued on next page...
REC
Page 50
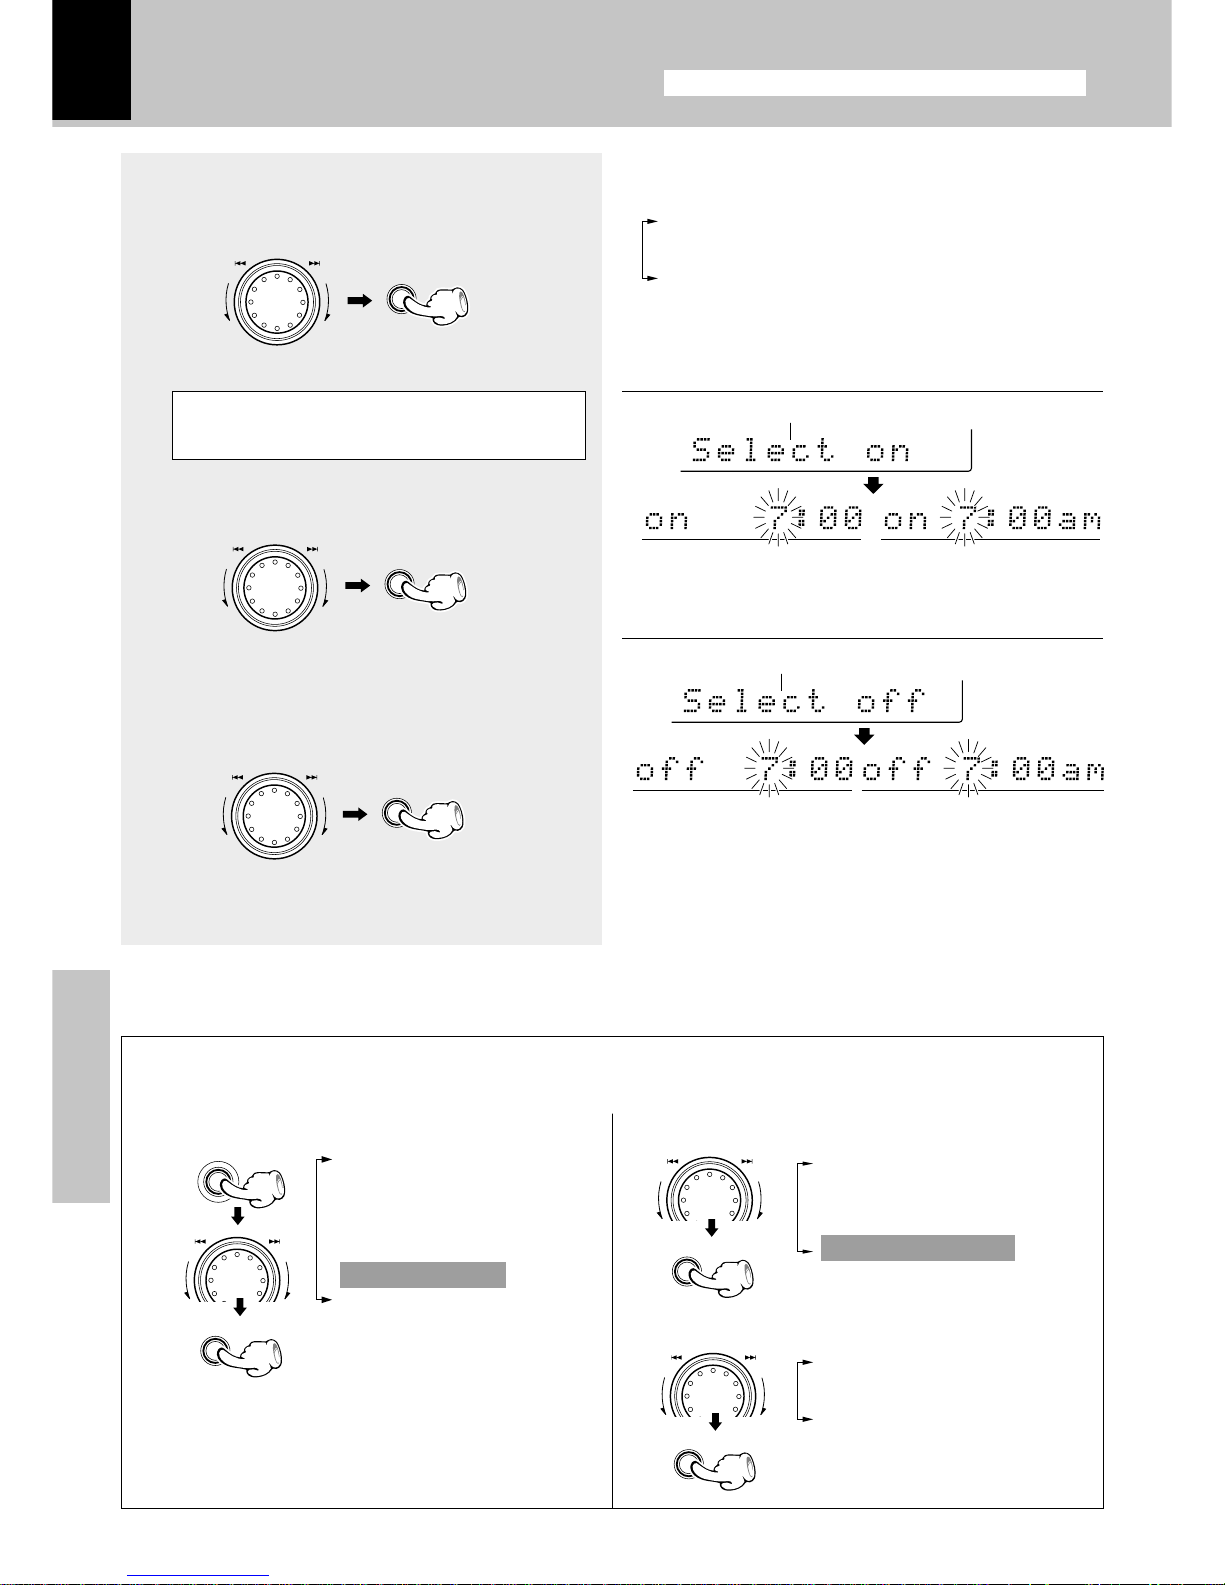
50
Application section
Adjust the clock before setting the timer.
Timer operation
When the power is ON and neither recording nor playback is executed for 30 minutes or more, the
power is switched off automatically by this function.
1 Select “Clock Options”. 2 Select “Auto Power Save”.
3 Select “A.P.S. on” or “A.P.S. off”.
÷ The auto power save operation does not occur unless
program timer operation has completed.
÷ When the TUNER or DVD/VIDEO input is selected, this
function works only when the volume is set to zero or
the mute function is ON.
“A.P.S. off”
Auto power save is not used.
“A.P.S. on”
Auto power save is used.
“CD Program Play”
“Recording Options”
“Tape Dubbing”
“Audio Options”
“Clock Options”
“Language Options”
“Sleep Timer”
“Adjust Time”
“Timer Play”
“Auto Power Save”
4
Select “Everyday” or “One Time”.
÷ To cancel a timer operation, select “Timer off” under
“Timer Play” (in case of timer playback) or “Timer
Recording” (in case of timer recording).
The following items can be selected by turning the
MULTI CONTROL jog dial.
“Timer off” (Canceled)
“Everyday”
“One Time”
5
Enter the ON time.
6
Enter the OFF time.
+Scrolled display (Select on time)
+Scrolled display (Select off time)
÷ After entering the “hour”, enter the “minute” with the
same procedure.
÷ After entering the “hour”, enter the “minute” with the
same procedure.
÷ Set the timer recording program and timer playback
program by leaving an interval of 1 minute or more so that
their time ranges do not overlap.
The saved contents cannot be cleared. The contents are cleared only when they are changed.
The time is
advanced
The time is
returned
The time is
advanced
The time is
returned
Auto Power Save
(For U.K. and Europe)
(Other countries)
(For U.K. and Europe)
(Other countries)
SELECT
SELECT
SELECT
MENU
SELECT
SELECT
ENTER
M
U
L
T
I
C
O
N
T
R
O
L
M
U
L
T
I
C
O
N
T
R
O
L
M
U
L
T
I
C
O
N
T
R
O
L
M
U
L
T
I
C
O
N
T
R
O
L
M
U
L
T
I
C
O
N
T
R
O
L
M
U
L
T
I
C
O
N
T
R
O
L
Page 51
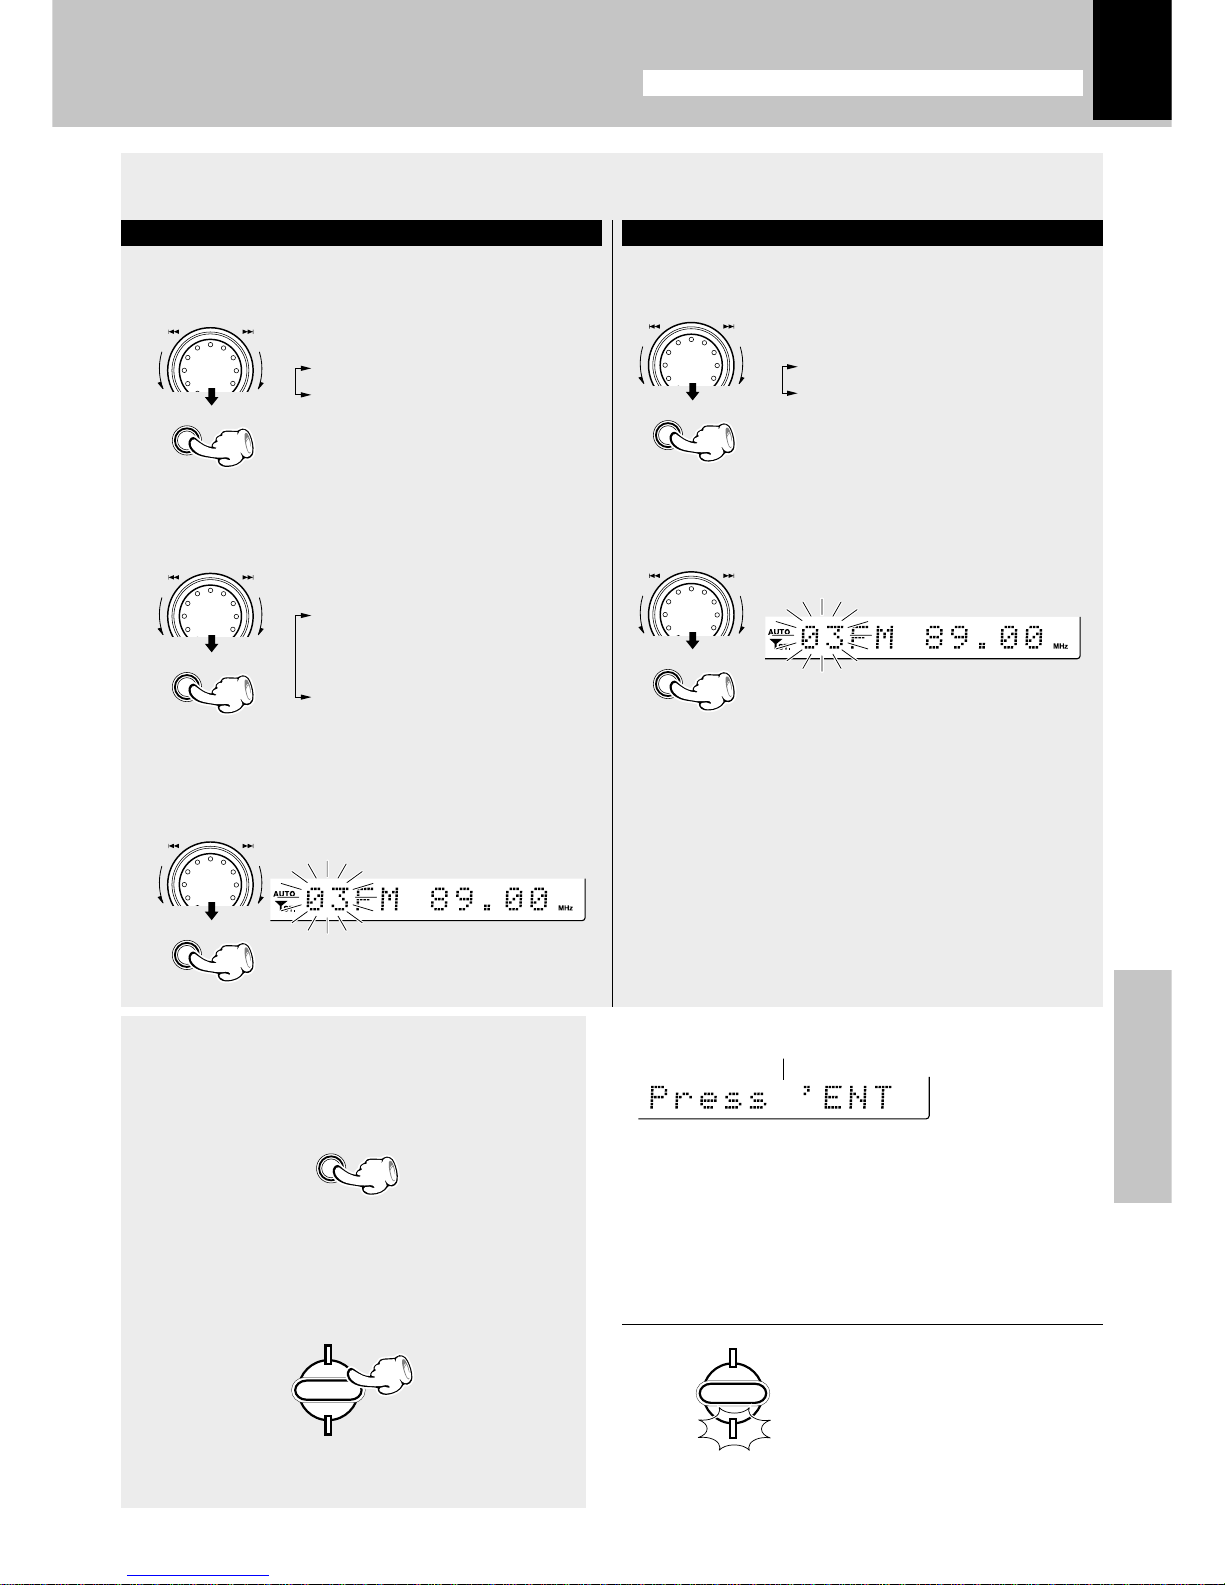
Application section
51
For timer recording
1 Select the input source.
Select the recorded input source.
2 Select the broadcast station (only when TUNER
is selected above).
Select the preset station No.
+Scrolled display (Press 'ENTER' to save, turn the MULTI
CONTROL jog dial to check
8
Press the ENTER key.
9
Put the unit in standby mode.
If you turn the MULTI CONTROL jog dial:
÷ The set program content items are displayed one after
another.
“Everyday” or “One Time” = On time = Off time =
Mode = Input source = Preset channel (only tuner)
When you press the SELECT key, you can change the
settings. Operate the procedure from step 4 on page 50.
Lights
Adjust the clock before setting the timer.
Timer operation
7
Make the desired reservation.
1 “TUNER“ ........ Radio
2
“DVD/VIDEO“ .... External input
For timer playback or AI timer playback
1 Select the mode.
Select “Timer Play” or “AI Play”.
2 Select the input source.
Select the source to be played.
3 Select the broadcast station (only when
“TUNER” is selected above).
Select the preset station No.
1 “Timer Play” Timer play
2 “AI Play” ..
Timer play with
gradually increasing volume
1 “TUNER” ...Radio
2 “CD”
3 “TAPE”
4
“DVD/VIDEO” ... External input
÷ If the TIMER indicator is blinking now, set the time of the
day again.
p
SELECT
SELECT
SELECT
SELECT
SELECT
ENTER
M
U
L
T
I
C
O
N
T
R
O
L
M
U
L
T
I
C
O
N
T
R
O
L
M
U
L
T
I
C
O
N
T
R
O
L
M
U
L
T
I
C
O
N
T
R
O
L
M
U
L
T
I
C
O
N
T
R
O
L
STANDBY
TIMER
STANDBY
TIMER
Page 52
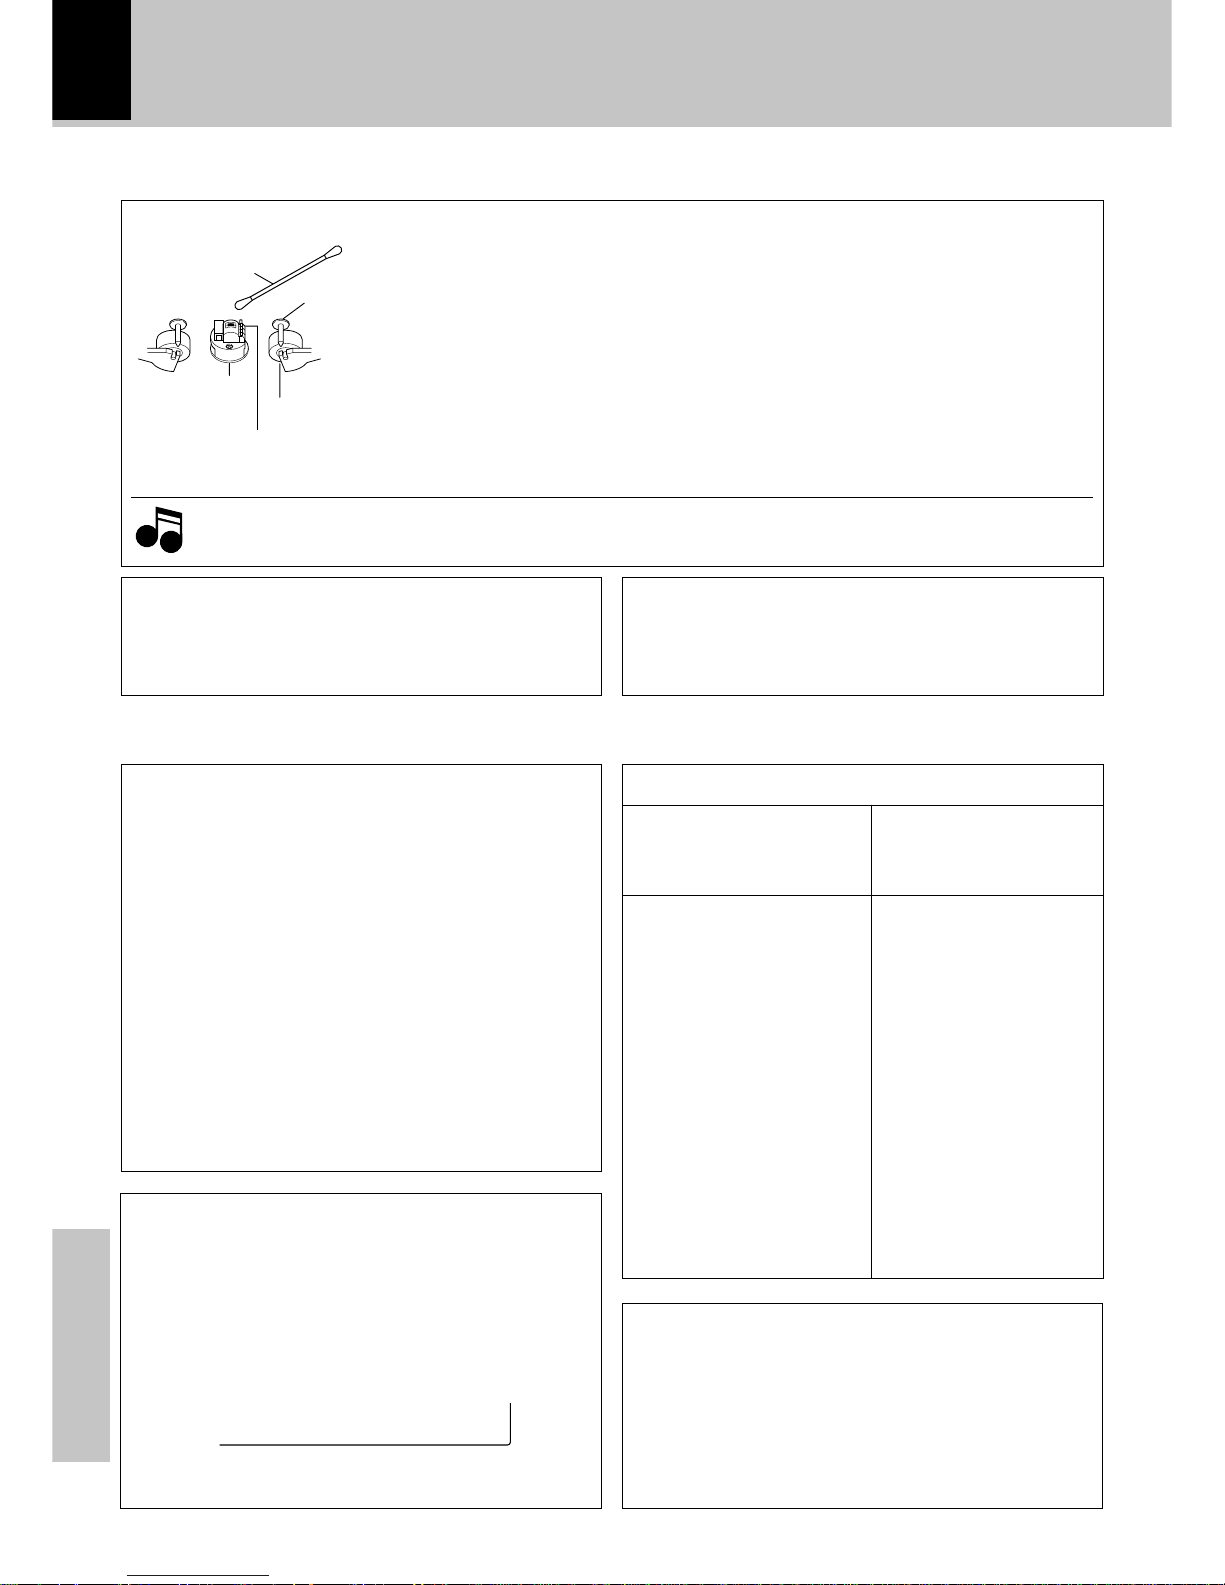
52
Knowledge section
Maintenance
Cotton swab
Tape guides
Pinch roller
Head
Capstan
Cleaning the head section
There are precisely aligned parts around the heads, including the tape guides.
When cleaning, pay special attention so as not to apply shock to them.
Cleaning the heads and peripheral components
For maintaining the best condition of the deck and for longer service life, always keep
the heads (recording / playback / erase), capstan and pinch roller clean.
To clean them, perform the following:
1. Open the cassette holder.
2. Using a cotton swab dipped in alcohol, clean the head (recording / playback / erase),
capstan and pinch roller carefully.
Demagnetizing the head
When the recording / playback head is magnetized, the sound quality will deteriorate.
In such a case, demagnetize the head using a commercially available demagnetizer
(head eraser).
Reference
Note
Note
Maintenance of the unit
When the front panel or case becomes dirty, wipe with a
soft, dry cloth. Do not use thinner, benzine, alcohol, etc.
for these agents may cause discoloration.
In regard to contact cleaner
Do not use contact cleaners because it could cause a malfunction. Be specially careful not to use contact cleaners
containing oil, for they may deform the plastic component.
Stored contents which are
cleared immediately when
power plug is unplugged
from power outlet
Clock display
Stored contents which are
cleared in at least a day after
power plug is unplugged
from power outlet
Amplifier
POWER status (ON or OFF)
Input selection
Volume control value
Balance level
Equalizer’s manual memory
created by the user
3D surround level
Tuner unit
Receiving band
Frequency
Preset stations
Program timer setting contents
Cassette deck unit
Transport direction
Tape Equalizer
Reverse mode
Other
Language
Memory backup function
Notes related to transportation and movement
Before transporting or moving this unit, carry out the
following procedures.
1 Turn the power ON but do not load a disc.
2 Press the CD 6 key.
3 Wait a few seconds, and ensure that the display is
as shown below.
4 Wait for a few seconds then turn power off.
Important Items
Caution on condensation
Condensation (of dew) may occur inside the unit when there
is a great difference in temperature between this unit and
the outside.
This unit may not function properly if condensation occurs. In this case, leave the unit for a few hours with the
power left ON, and restart the operation after the condensation has dried up.
Be specially cautious against condensation in a following circumstance:
When this unit is carried from a place to another across a
large difference in temperature, when the humidity in the
room where this unit is installed increases, etc.
IN MOST CASES IT IS AN INFRINGEMENT OF COPYRIGHT
TO MAKE COPIES OF TAPES OR DISCS WITHOUT THE
PERMISSION OF THE COPYRIGHT OWNERS. ANYONE
WISHING TO COPY COMMERCIALLY AVAILABLE TAPES
OR DISC SHOULD CONTACT THE MECHANICAL COPYRIGHT PROTECTION SOCIETY LIMITED OR THE PERFORMING RIGHTS SOCIETY LIMITED.
WARNING NOTICE:
No Disc
Page 53
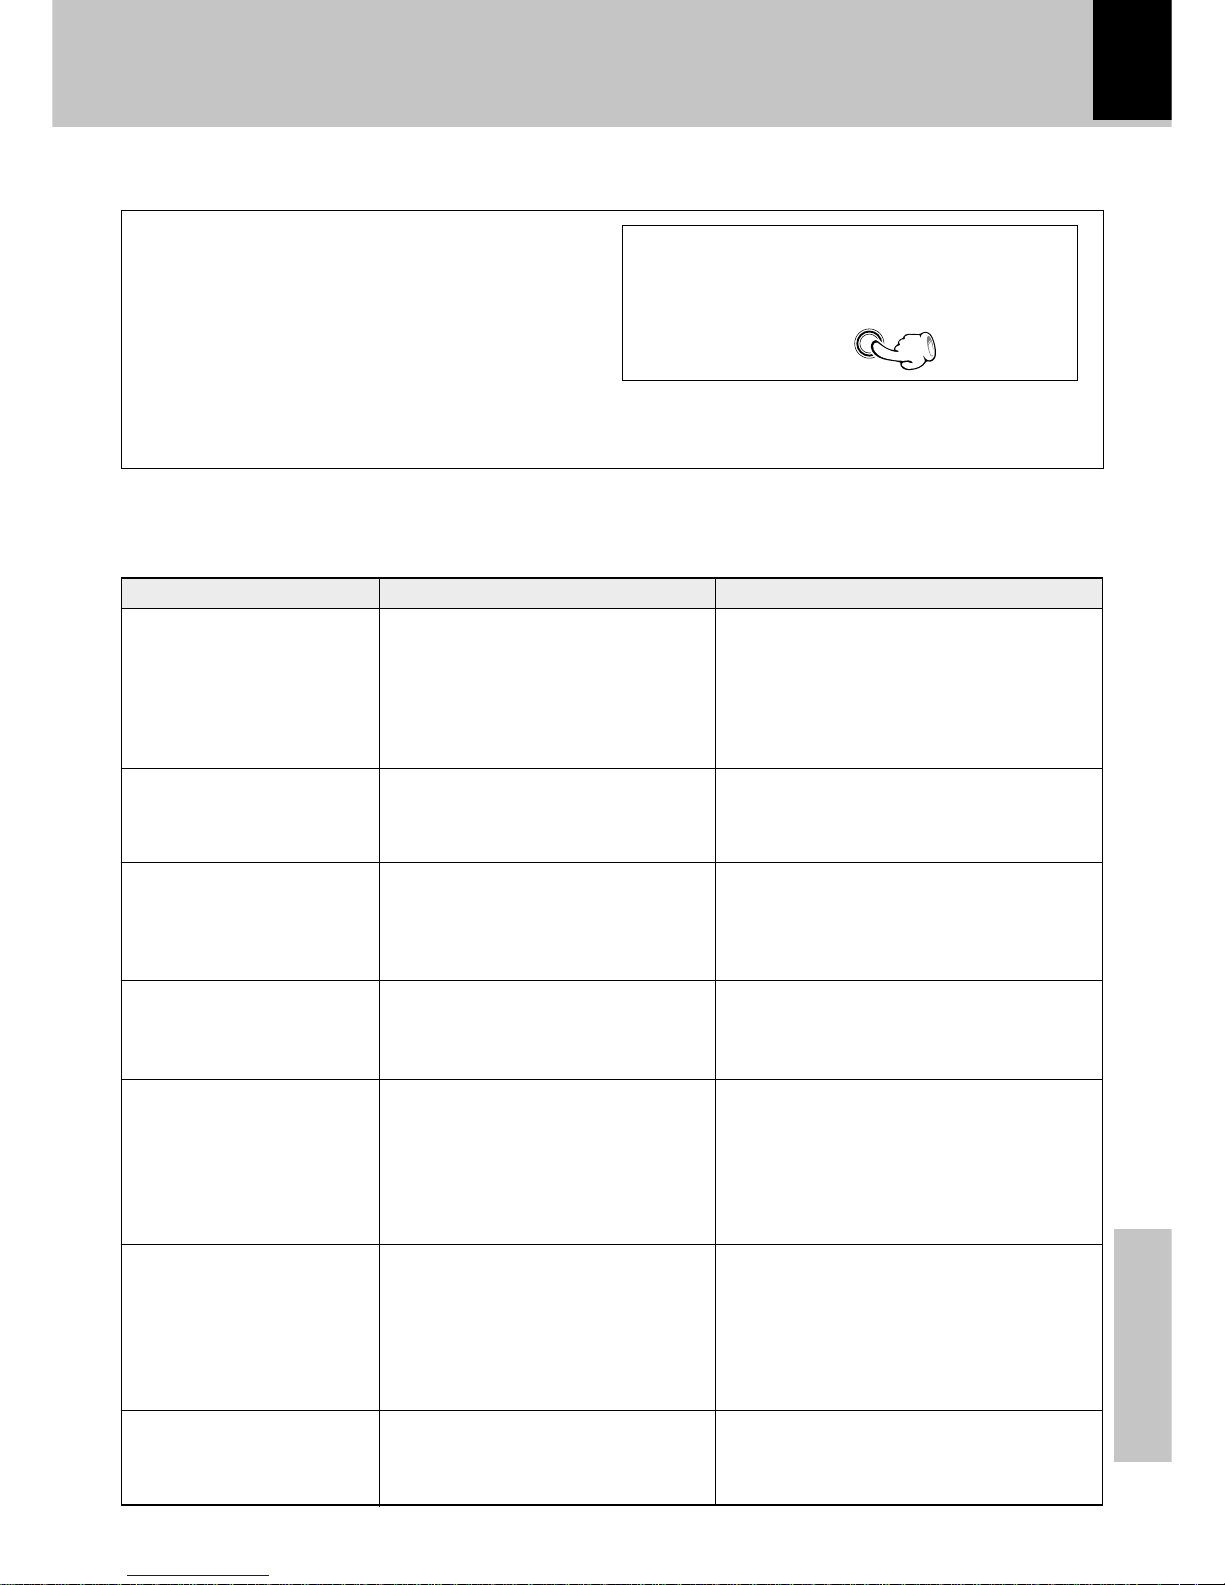
53
Knowledge section
In case of difficulty
What seems to be a malfunction is not always so. Before calling for service, check the following table
according to the symptom of your trouble.
Unplug the power cord from the power outlet
then, while holding the ENTER key depressed,
plug the power cord again.
÷ Please note that resetting the microcomputer clears
the stored contents and returns to the factory set
condition.
Operation to reset
The microcomputer may fall into malfunction (impossibility to operate, erroneous display, etc.) when the
power cord is unplugged while power is ON or due to
an external factor. In this case, execute the following
procedure to reset the microcomputer and return it to
normal condition.
Sound is not produced.
“STANDBY” and “TIMER”
indicators blink alternately
and no sound is output.
Sound is not produced from
the left or right speakers.
The clock display blinks.
Timer operation is not possible.
Radio stations cannot be received.
Sound from the DVD/
VIDEO INPUT (external input) is distorted.
÷ The speaker cords are disconnected.
÷ The MUTE switch of remote control
unit is switched ON.
÷ The headphone plug is inserted into
the jack.
÷ The speaker cords are short-circuited.
÷ The speaker cords are disconnected.
÷ The left and right volumes are not
balanced.
÷ There was a power failure.
÷ The power cord was unplugged from
the outlet.
÷ The present time has not been ad-
justed or there was a power failure.
÷ The timer program or the timer ON/
OFF time has not been set properly.
÷ The antennas have not been con-
nected.
÷ A proper broadcasting band has not
been selected.
÷ The frequency of the station to be
received is not tuned.
÷ The input level is too high.
÷ Connect properly referring to “Sys-
tem connection”.
÷ Switch MUTE OFF.
÷ Unplug the headphone plug.
÷ Turn the power OFF, remove the short-
circuit and turn the power ON again.
÷ Connect properly referring to “Sys-
tem connection”.
÷ Adjust the left and right volume bal-
ance.
÷ Adjust the present time again.
÷ Adjust the present time again.
÷ Adjust the present time referring to
“Clock adjustment”.
÷ Check the timer program and set its ON/
OFF time properly. Note that “Everyday”
and “One Time” cannot be set simultaneously for a single timer program.
÷ Connect antennas.
÷ Select a band.
÷ Tune to the frequency of the desired
station.
÷ Decrease the input level.
Remedy
Receiver, speakers
CauseSymptom
7
(
*
7
r
^
•
^
^
p
6
§
§
t
(Main unit only)
ENTER
Page 54
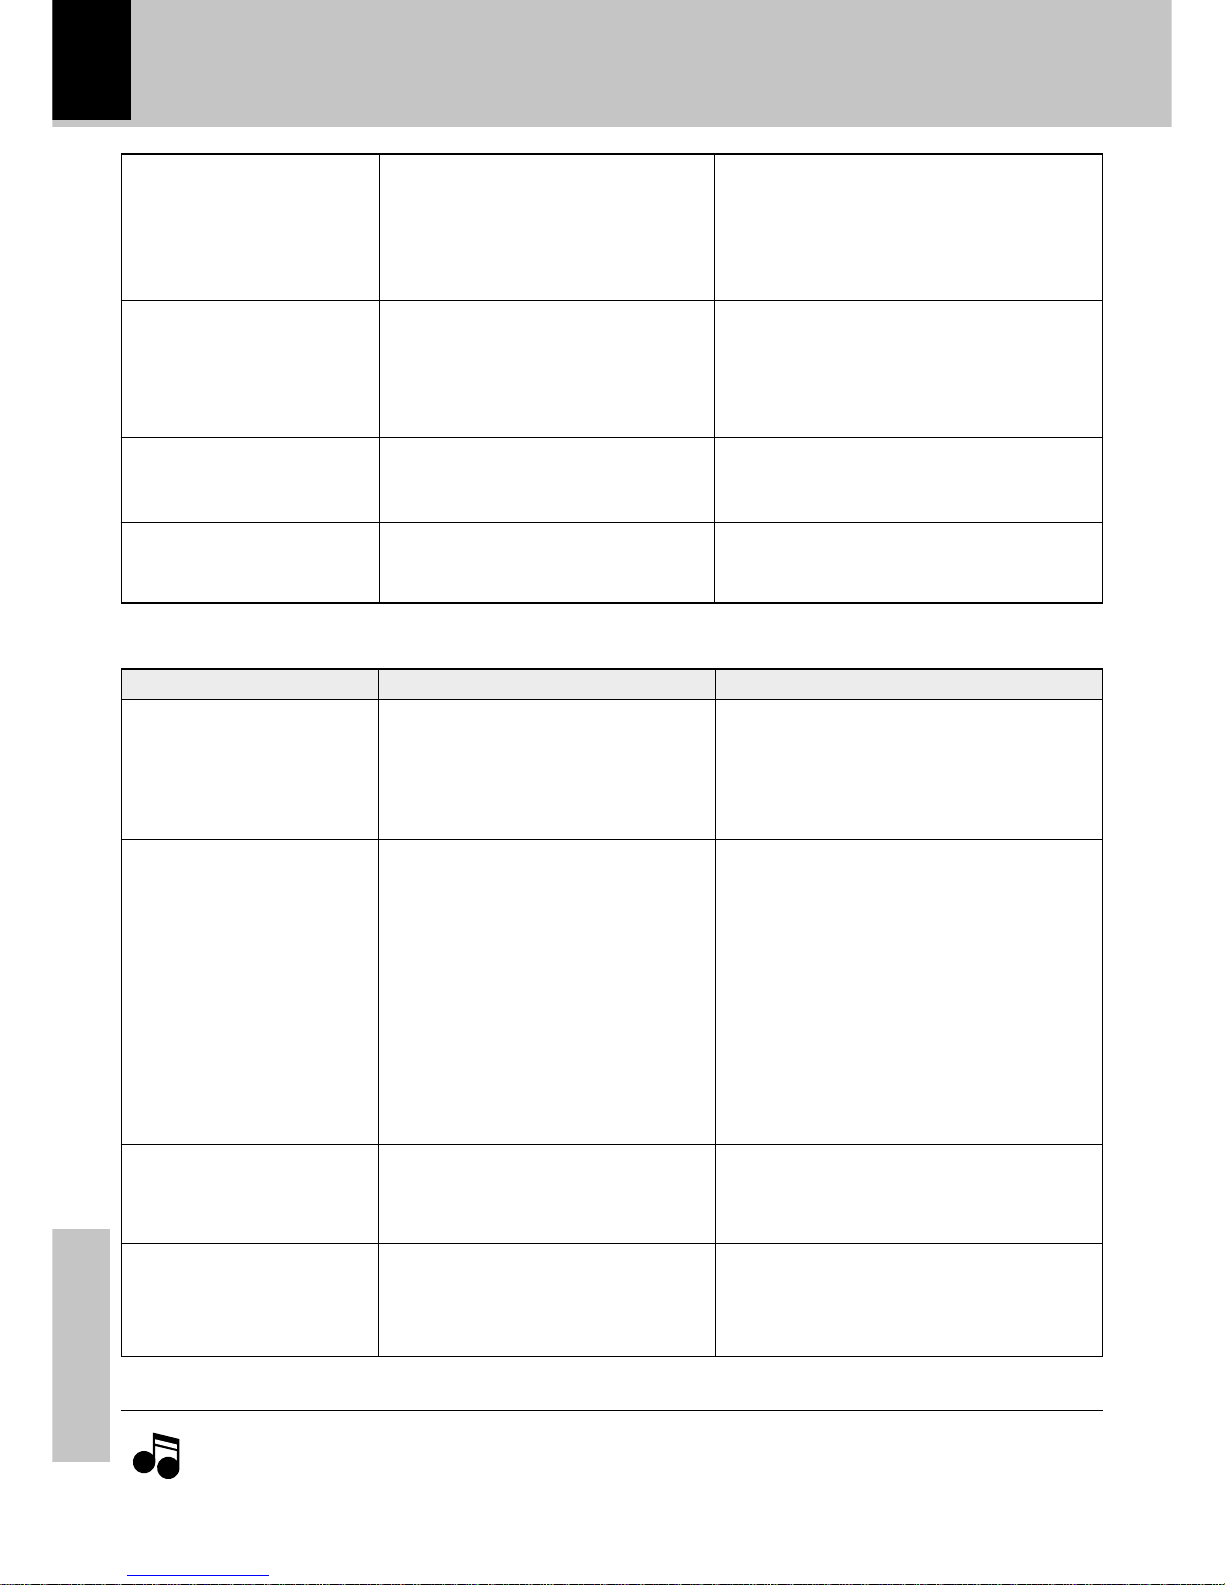
54
Knowledge section
In case of difficulty
÷ The head is dirty.
÷ The tape is wound too tight due to
irregular winding.
÷ A nonrecorded tape is played.
÷ The cassette holder is not closed com-
pletely.
÷ The operation key is pressed immedi-
ately after closing the cassette holder.
÷ The operation key is pressed in less
than 4 seconds after turning the power
ON.
÷ A tape is not inserted in the unit.
÷ The tape is wound too tight due to
irregular winding.
÷ The tape is fully wound to one of the
reels.
÷ This is due to the difference in the
tape length or characteristics of the
mechanisms of two cassette decks.
÷ The key is pressed during recording or
playback.
÷ The microcomputer is malfunctioning
due to external noise.
÷ Clean the head referring to “Mainte-
nance”.
÷ Try another tape.
÷ Play a recorded tape.
÷ Close the holder completely.
÷ Press operations keys in more than a
few seconds after closing the holder.
÷ Press operation keys after waiting for
more than 4 seconds.
÷ Insert a tape.
÷ Try another tape.
÷ Change the tape transport direction or
reverse the tape insertion orientation.
÷ Small time difference does not mean
a malfunction.
÷ Press in stop mode.
÷ Reset the microcomputer.
RemedySymptom Cause
Sound cannot be produced
by pressing the play key.
No operation occurs even
when an operation key is
pressed.
In dubbing, the tape stops
at different moments in
decks A and B.
The cassette holders cannot
be opened by pressing the
0 PUSH OPEN key.
Cassette deck
Noise interferes.
No station can be received
by preset call operation.
Demonstration starts suddenly.
Power turns OFF in the
middle of operation.
÷ Car ignition noise.
÷ Influence of an electric appliance.
÷ A TV set is installed near the system.
÷ The frequency of the preset station is
not tunable.
÷ The preset memory has been cleared
because the power cord has been
unplugged for a long period.
÷ The power plug was unplugged from
the outlet while the power switch
was ON, or there was a power failure.
÷ “A.P.S. on” is set.
÷ Install the outdoor antenna in an apart
position from the road.
÷ Switch the suspected electric appli-
ance OFF.
÷ Increase the distance between the
sets.
÷ Preset stations with tunable frequen-
cies.
÷ Preset stations again.
÷ This is not a malfunction. Press
the DISPLAY/DEMO key to can-
cel the demonstration.
÷ Set it to “A.P.S. off”.
1.With some tapes, a squeaky noise is produced when the tape is stopped automatically. This is due to the tape
protection function, and not a malfunction.
2.Do not use longer tape than 100 minutes tapes, for the tape is too thin and gets easily tangled.
Notes
Notes
W
™
™
™
E
7
¶
¶
4
p
Page 55
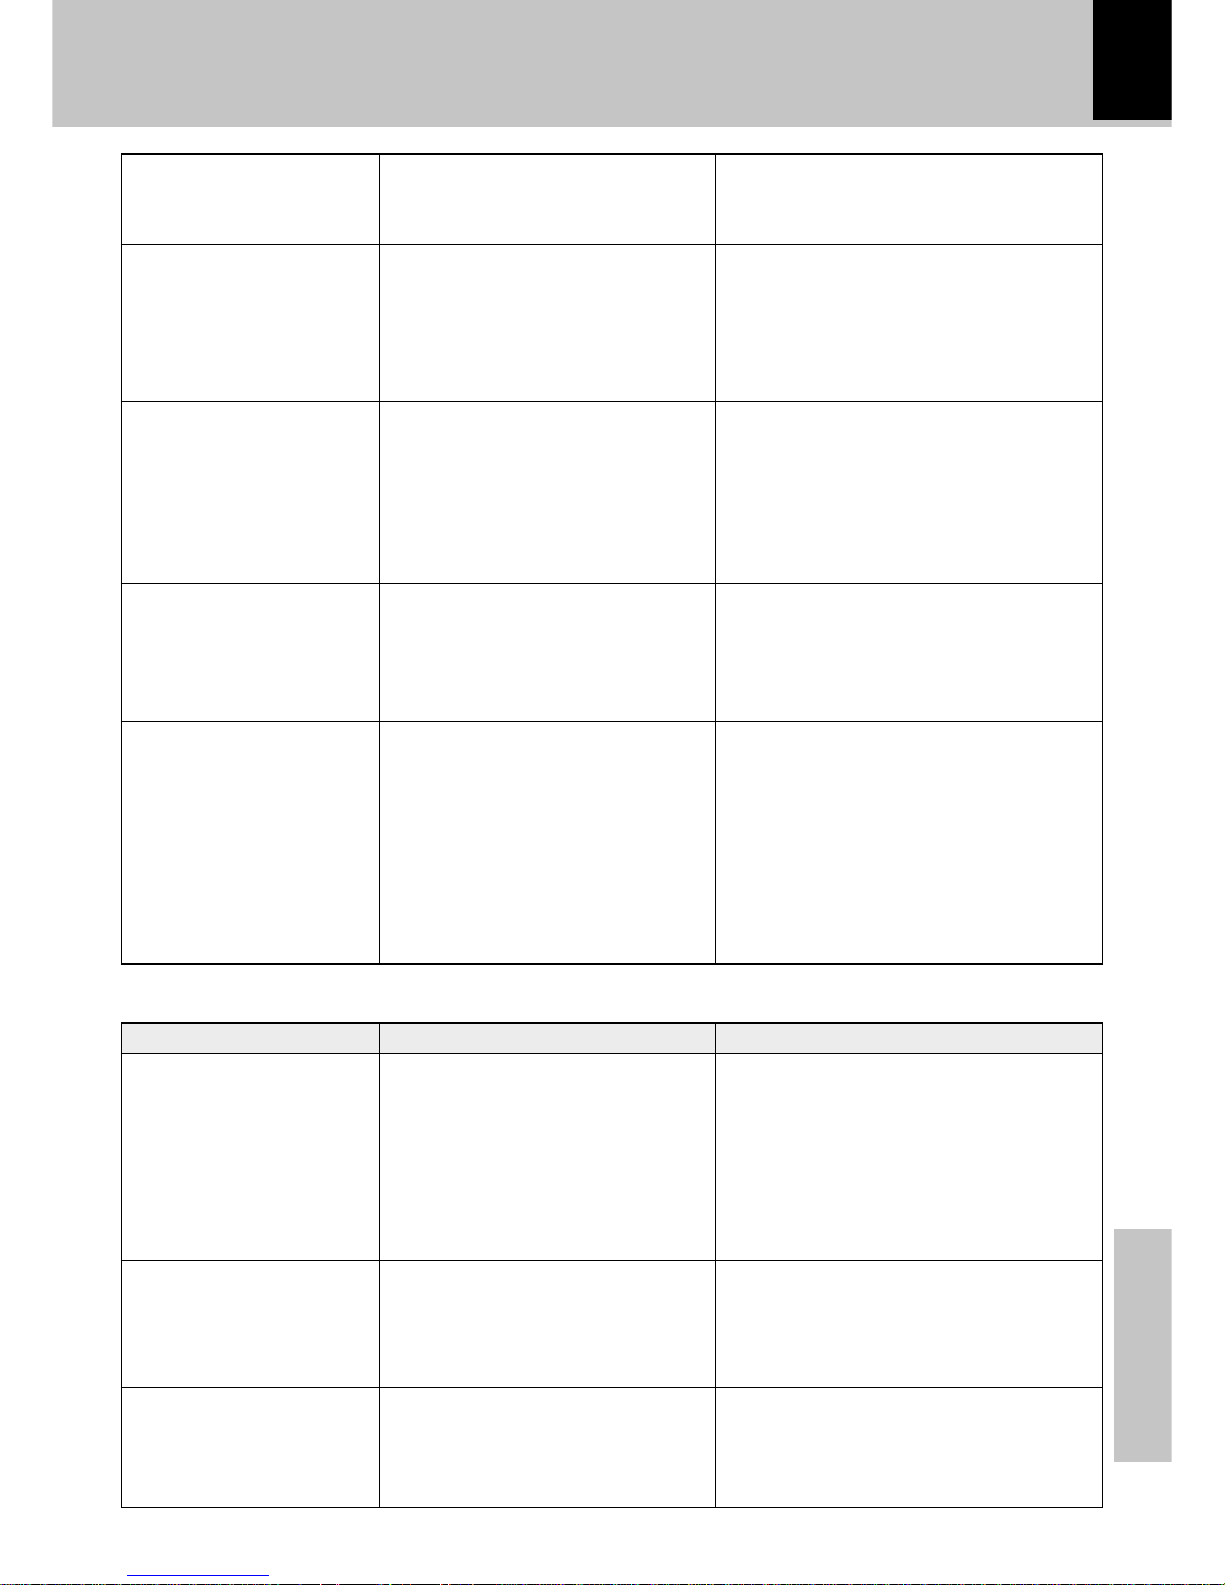
55
Knowledge section
In case of difficulty
÷ Clean the head referring to “Mainte-
nance”.
÷ Try another tape.
÷ Try another tape.
÷ Switch off the equalizer and 3D
surround effects before starting
playback.
÷ Demagnetize the head referring to
“Maintenance”.
÷ Install the system at a distance from
other electric appliances and TV.
÷ Switch on the Tape Equalizer.
÷ Clean the head referring to “Mainte-
nance”.
÷ Wind the tape again by fast forward-
ing, rewinding or playing from an end
to the other.
÷ Use a cassette with an unbroken re-
cording protect tab or block the hole.
÷ Close the holder completely.
÷ Select the source to be recorded with
the CD, TUNER, or AUX key.
÷ Change the tape transport direction of
deck B or reverse the tape insertion
orientation.
Sound is harsh or high frequencies are not reproduced.
Sound is distorted.
Noise is noticeable.
Sound vibrates.
Recording cannot be started
by pressing the record key.
RemedySymptom Cause
A CD is placed in the player
but it cannot be played.
Sound is not produced.
Sound skips.
÷ The disc is placed upside down.
÷ The disc position is displaced.
÷ The disc is extremely dirty.
÷ The disc is scratched.
÷ Dew is condensed on the optics lens.
÷ The disc has not been placed.
÷ The player is not set to the play mode.
÷ The disc is extremely dirty.
÷ The disc is scratched.
÷ The disc is dirty.
÷ The disc is scratched.
÷ The player was subjected to vibration.
÷ Place the disc properly, with the label
side facing upward.
÷ Place the disc properly.
÷ Clean the disc referring to “Handling
of discs and tapes”.
÷ Try another disc.
÷ Refer to “Caution on condensation”
and remove the condensation by
evaporation.
÷ Place a disc in the CD player.
÷ Press the play key.
÷ Clean the disc referring to “Handling
of discs and tapes”.
÷ Try another disc.
÷ Clean the disc referring to “Handling
of discs and tapes”.
÷ Try another disc.
÷ Install the unit in a place not subject to
vibrations.
CD player
÷ The head is dirty.
÷ The tape is stretched or shrunk.
÷ The tape being played was recorded
with distorted sound.
÷ A tape which has been recorded with
the equalizer and/or 3D surround
effects is being played back by
applying the equalizer effect.
÷ The tape head is magnetized.
÷ External noise is induced.
÷ A tape which has been recorded with
Dolby NR is being played back without switching the Tape Equalizer.
÷ The capstans or pinch rollers are dirty.
÷ The tape is wound irregularly.
÷ The recording protect tab of the cas-
sette has been broken.
÷ The cassette holder is not closed com-
pletely.
÷ The TAPE input is selected.
÷ The tape is fully wound to one of the
reels.
W
y
W
£
W
£
5
™
ª
•
)
)
5
W
)
)
5
5
Page 56
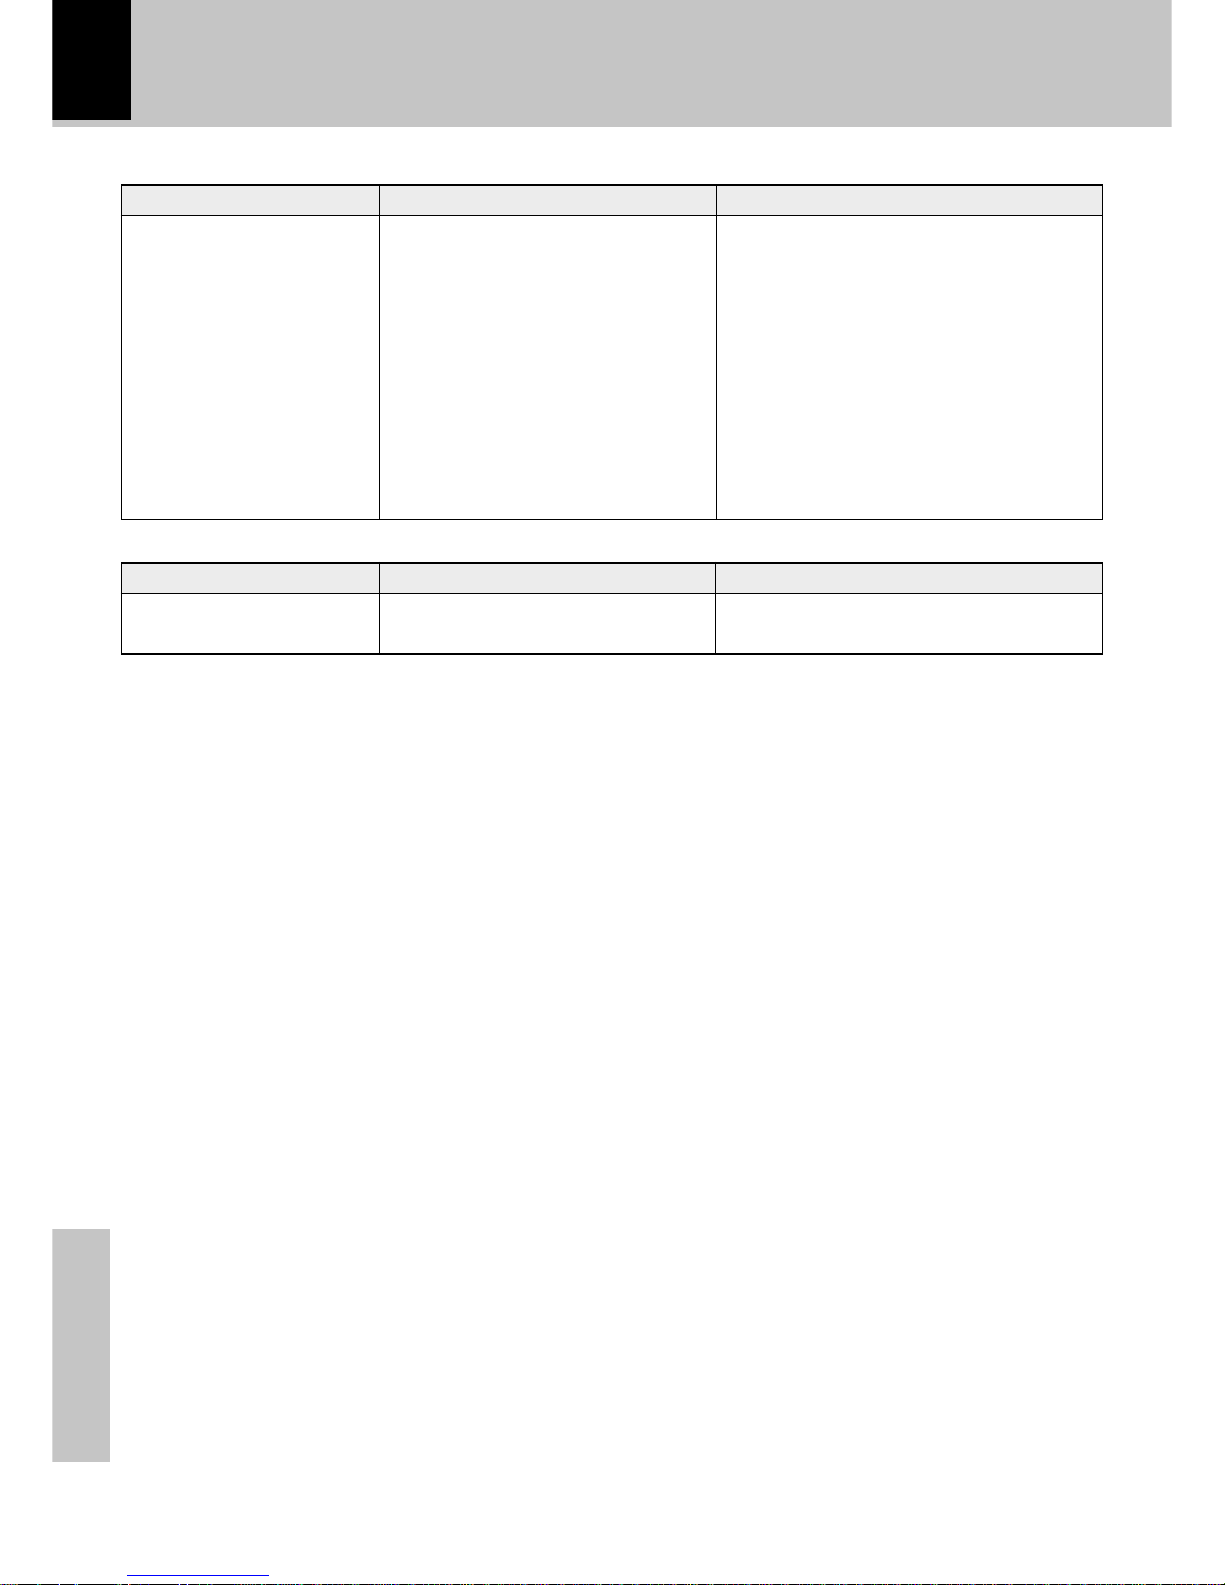
56
Knowledge section
RemedySymptom Cause
General
Remote control operation is
not possible.
÷ Batteries are exhausted.
÷ The remote control is too far away
from the system, the controlling angle
is deviated or there is an obstacle in
between.
÷ There is no tape or CD set in the
component to be played.
÷ An attempt is made to play the cas-
sette deck which is recording something.
÷ The MULTI CONTROL setting mode
is activated.
÷ Replace with new batteries.
÷ Operate the unit within the remote
controllable range.
÷ Set a tape or CD in the component to
be played.
÷ Wait until the recording ends.
÷ Cancel the MULTI CONTROL setting
mode.
Remote control unit
In case of difficulty
RemedySymptom Cause
No operation occurs when
an operation key is pressed.
÷ The MULTI CONTROL setting mode
is activated.
÷ Cancel the MULTI CONTROL setting
mode.
$
$
%
%
Page 57
57
Knowledge section
Specifications
[ Amplifier section ]
Rated power output
(For U.S.A. and Canada)
100 watts per channel minimum RMS, both channels
driven, at 6 Ω form 70 Hz to 20 kHz with no more than
0.9 % total harmonic distortion. (FTC)
(U.K. and Europe)
1 kHz, 0.7 % T.H.D., 6 Ω ........................ (DIN) 70 W + 70 W
(Other countries)
1 kHz, 1 % T.H.D., 6 Ω ......................... (RMS) 80 W + 80 W
Effective output power during STEREO operation
(For U.S.A. and Canada)
1 kHz, 10 % T.H.D., 6 Ω ................... (RMS) 130 W + 130 W
(Other countries)
1 kHz, 10 % T.H.D., 6 Ω ................... (RMS) 100 W + 100 W
Signal to noise ratio
DVD/VIDEO INPUT ..................................... 90 dB (IHF’ 66)
Input sensitivity / inpedance
(For U.S.A. and Canada)
DVD/VIDEO INPUT ................................... 300 mV / 47 kΩ
(Other countries)
DVD/VIDEO INPUT ................................... 350 mV / 47 kΩ
[ Tuner section ]
FM tuner section
Tuning frequency range........................ 87.5 MHz ~ 108 MHz
MW (AM) Tuner section
Tuning frequency range
(For U.S.A. and Canada) ....................... 530 kHz ~ 1,700 kHz
(For U.K. and, Europe) .......................... 531 kHz ~ 1,602 kHz
(Other countries)
9 kHz step........................................... 531 kHz ~ 1,602 kHz
10 kHz step......................................... 530 kHz ~ 1,610 kHz
LW Tuner section (For U.K.)
Tuning frequency range............................ 153 kHz ~ 279 kHz
NotesNotes
Notes
1.KENWOOD follows a policy of continuous advancements in development. For this reason specifications may be
changed without notice.
2.Sufficient performance may not be possible at very low temperatures (0°C or less).
[ Cassette deck section ]
Track ................................................. 4-track, 2-channel stereo
Recording system ........................................... AC bias system
(Frequency: 105 kHz)
Heads
A deckPlayback head........................................................... 1
B deckPlayback / recording head ....................................... 1
Erasing head ..................................................................... 1
Fast winding time ................................. Approx. 115 seconds
(C-60 tape)
[ CD player section ]
Laser wave lengh ............................................. 770 to 795 nm
Laser power class........................................................Class 3A
Wow & Flutter ....................... Less than unmeasurable Limit
(For Europe and U.K.)
Digital output (Optical) ........................... - 15 dBm ~ - 21 dBm
(Wave length 660 nm)
[ General ]
Power consumption
(For U.S.A. and Canada) .................................................2.5 A
(Other countries)...........................................................190 W
Dimensions .......................................W : 270 mm (11”)
H : 330 mm (13”)
D : 390 mm (15-3/8”)
Weight (net) ...................................................... 8.3 kg (18.3 lb)
Main unit (XD-5/6/7...Series)
Page 58

58
Knowledge section
Specifications
[ Amplifier section ]
Rated power output
(For U.S.A. and Canada)
70 watts per channel minimum RMS, both channels
driven, at 6 Ω form 70 Hz to 20 kHz with no more than
0.9 % total harmonic distortion. (FTC)
(U.K. and Europe)
1 kHz, 0.7 % T.H.D., 6 Ω ........................ (DIN) 50 W + 50 W
(Other countries)
1 kHz, 1 % T.H.D., 6 Ω ......................... (RMS) 50 W + 50 W
Effective output power during STEREO operation
(For U.S.A. and Canada)
1 kHz, 10 % T.H.D., 6 Ω ................... (RMS) 100 W + 100 W
(Other countries)
1 kHz, 10 % T.H.D., 6 Ω ....................... (RMS) 70 W + 70 W
Signal to noise ratio
DVD/VIDEO INPUT ..................................... 90 dB (IHF’ 66)
Input sensitivity / inpedance
(For U.S.A. and Canada)
DVD/VIDEO INPUT ................................... 350 mV / 47 kΩ
(Other countries)
DVD/VIDEO INPUT ................................... 300 mV / 47 kΩ
[ Tuner section ]
FM tuner section
Tuning frequency range........................ 87.5 MHz ~ 108 MHz
MW (AM) Tuner section
Tuning frequency range
(For U.S.A. and Canada) ....................... 530 kHz ~ 1,700 kHz
(For U.K. and, Europe) .......................... 531 kHz ~ 1,602 kHz
(Other countries)
9 kHz step........................................... 531 kHz ~ 1,602 kHz
10 kHz step......................................... 530 kHz ~ 1,610 kHz
LW Tuner section (For U.K.)
Tuning frequency range............................ 153 kHz ~ 279 kHz
[ Cassette deck section ]
Track ................................................. 4-track, 2-channel stereo
Recording system ........................................... AC bias system
(Frequency: 105 kHz)
Heads
A deckPlayback head........................................................... 1
B deckPlayback / recording head ....................................... 1
Erasing head ..................................................................... 1
Fast winding time ................................. Approx. 115 seconds
(C-60 tape)
[ CD player section ]
Laser wave lengh ............................................. 770 to 795 nm
Laser power class........................................................Class 3A
Wow & Flutter ....................... Less than unmeasurable Limit
[ General ]
Power consumption
(For U.S.A. and Canada) ....................................................2 A
(Other countries)...........................................................160 W
Dimensions .......................................W : 270 mm (11”)
H : 330 mm (13”)
D : 390 mm (15-3/8”)
Weight (net) ...................................................... 8.3 kg (18.3 lb)
Main unit (XD-3...Series)
Page 59

59
Knowledge section
Specifications
Speakers (LS-N753)
XD-7...Series
Enclosure ....................................................... Bass-reflex type
Speaker configuration
Woofer ............................................ 130 mm x2, cone type
Tweeter..............................................65 mm x2, cone type
Super-tweeter...................................... 25 mm, dome type
Impedance .......................................................................... 6 Ω
Peak input level .............................................................. 140 W
Dimensions .......................................W : 235 mm (9-1/4”)
H : 410 mm (16-1/8”)
D : 302 mm (11-7/8”)
Weight (net) ............................. 6.0 kg (13.2 lb) (1 piece)
Speakers (LS-N653)
XD-6...Series
Enclosure .............. Bass-reflex type (magnetically shielded)
Speaker configuration
Woofer ................................................. 130 mm, cone type
Tweeter...................................................50 mm, cone type
Super-tweeter..................................... 25 mm, dome type
Impedance .......................................................................... 6 Ω
Peak input level .............................................................. 100 W
Dimensions .......................................W : 215 mm (8-7/16”)
H : 330 mm (13”)
D : 270 mm (10-5/8”)
Weight (net) ............................... 4.0 kg (8.8 lb) (1 piece)
Speakers (LS-N553/LS-N503)
XD-5...Series
Enclosure ....................................................... Bass-reflex type
Speaker configuration
Woofer ................................................. 160 mm, cone type
Tweeter...................................................65 mm, cone type
Super-tweeter..................................... 15 mm, dome type
Impedance .......................................................................... 6 Ω
Peak input level .............................................................. 140 W
Dimensions .......................................W : 226 mm (8-7/8”)
H : 330 mm (13”)
D : 243 mm (9-9/16”)
Weight (net) ............................... 3.6 kg (7.9 lb) (1 piece)
Speakers (LS-N353/LS-N303)
XD-3...Series
Enclosure ....................................................... Bass-reflex type
Speaker configuration
Woofer ................................................. 160 mm, cone type
Tweeter...................................................65 mm, cone type
Impedance .......................................................................... 6 Ω
Peak input level .............................................................. 100 W
Dimensions .......................................W : 226 mm (8-7/8”)
H : 330 mm (13”)
D : 247 mm (9-3/4”)
Weight (net) ........................................ 3.4 kg (7.5 lb) (1 piece)
Page 60
For your records
Record the serial number, found on the back of the unit, in
the spaces designated on the warranty card, and in the
space provided below. Refer to the model and serial numbers whenever you call upon your dealer for information
or service on this product.
Model Serial Number
This instruction manual is used to describe multiple models.
Model availability and features (functions) may differ depending on the country and sales area.
DIGITAL OUT OPTICAL jack
8
XD-653/XD-753
SURROUND switch/
SPEAKERS terminals
9
XD-503/XD-553
XD-A53
YES
(Except for U.S.A.
and Canada)
YES
(For U.K. and
Europe)
XD-303/XD-353/
XD-A33
YES
(Except for U.S.A.,
Canada)
R.D.S.
‡
YES
(For U.K. and
Europe)
YES
(For U.K. and
Europe)
YES
(For U.K. and
Europe)
Beat cancel function
º
YES
(For U.K.)
YES
(For U.K.)
YES
(For U.K. and
Europe)
YES
(Except for U.S.A.
and Canada)
YES
(For U.K.)
 Loading...