

Page 1
KENWOOD
'-iy: "7,' y '17 " - ' '' V' ”
-Jwf ^ <
The remote control sends an RF (radio wave)
signal to the receiver. For equipment other than
the receiver, an IR (infrared) signal is sent.
For the operation of the RF remote function, see
page 14 and15 of the instruction of the unit.
Quick start guiiie
Getting the most from your remote controi
Gemote operation of other components
in case of difficulty..................................................14
This quick start guide explains how to setup the remote
control to operate audio and video components other
than the receiver.
in order to make full use of the functions of the remote
control, be sure to read the section of this manual
entitled “Getting the most from your remote control”.
It contains a detailed explanation of how to operate the
remote control and make the necessary settings.
The quick start guide describes the operation of the
following keys:
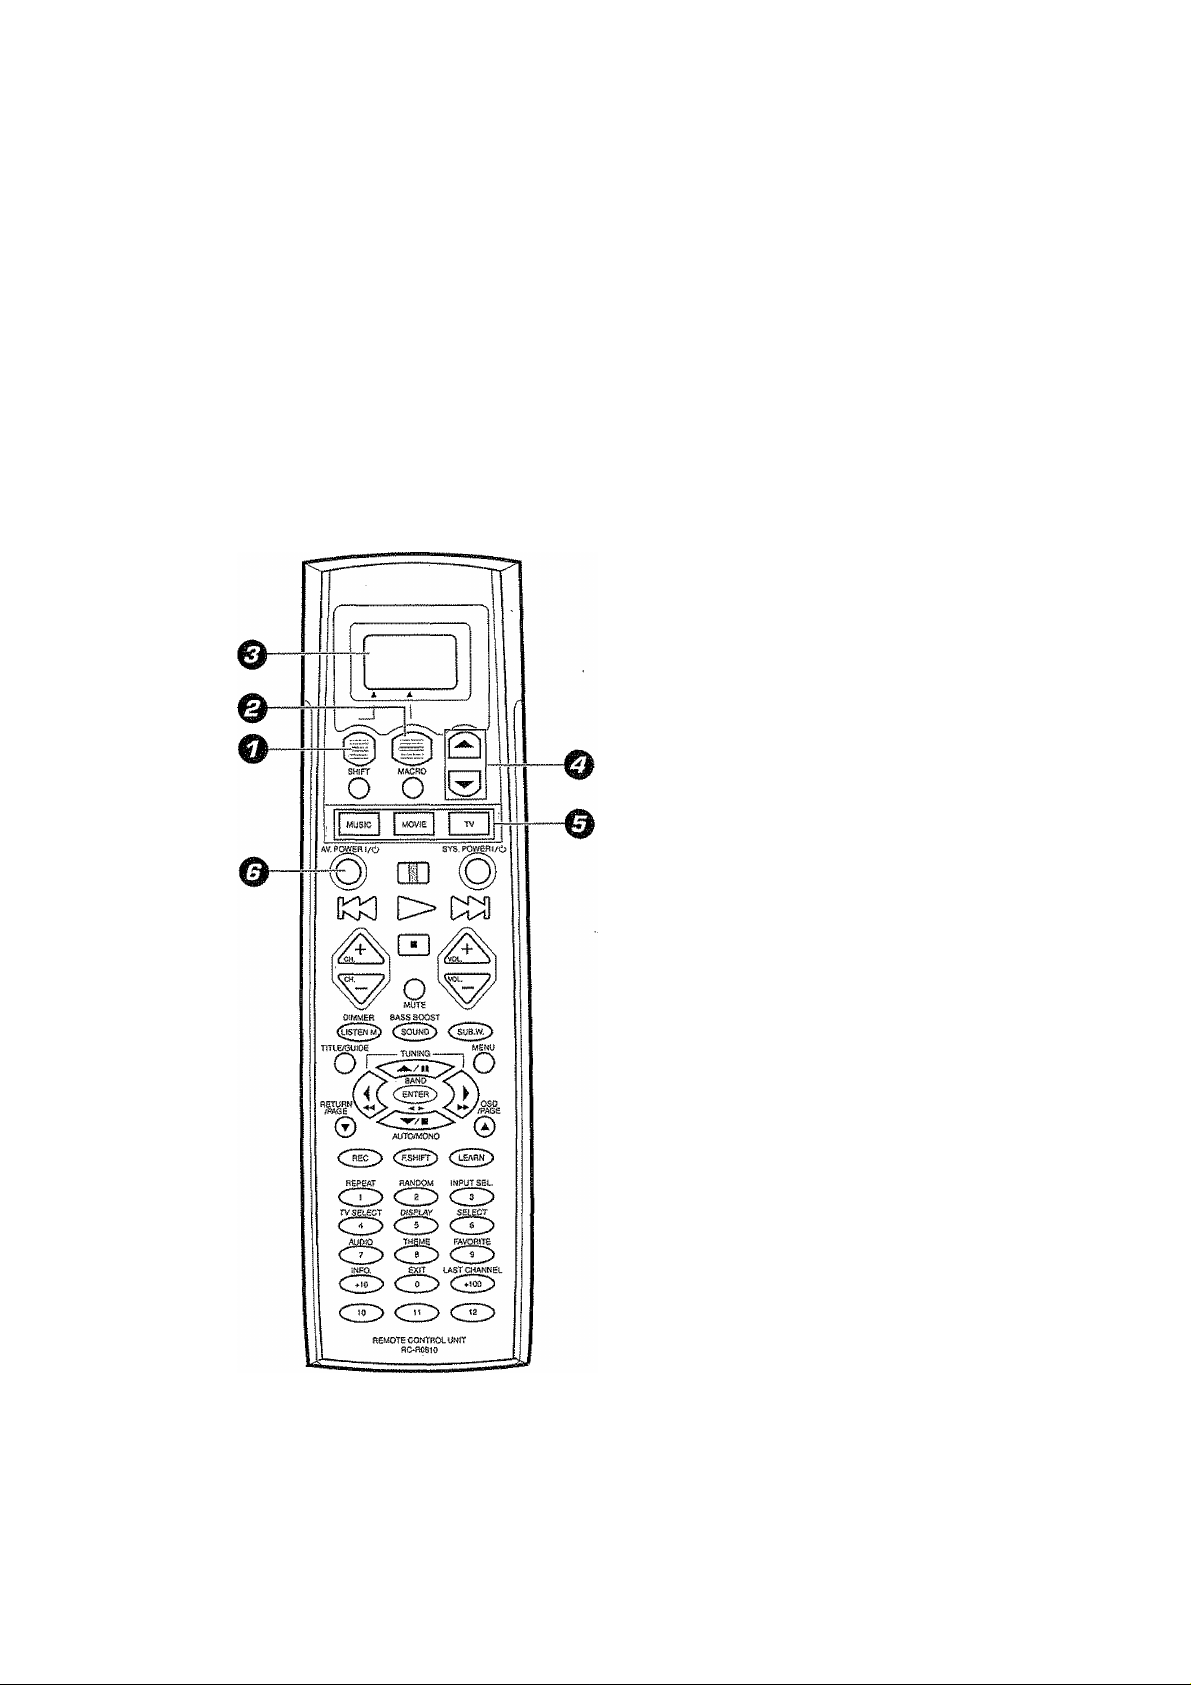
O Display operation 1 key
Use this key to go back to the previous display or initial
display.
@ Display operation 2 key
Gets you into and out of the preset code registration
mode.
® Display
The information for setup is displayed.
.....................................................1
...................
.....................
11
3
® A/Tkeys
Use these keys to select the source or setup code.
® MUSIC, MOVIE, and TV keys
Use these keys to select the input you want to register.
0 AV.POWER i/ci) key
Once you have entered the setup code for another
component, you can press this key to turn power to that
component on or off. This lets you confirm that you
entered the code properly.
B60-4608-00 01 C® (K, P) rx¥; 9911
Page 2
—
Uidei-ol:
ur:R
Press the display operation 1 key re
peatedly until appears in the dis
kteritj
play.
J
For step 1 through step 9, make sure you
start the next step within 8 seconds of
completing the previous one. If more than
8 seconds elapses between any two steps,
press the display operation key so that
the display appears.
Press the A/T keys to select the setup
code,
Av.powERi/6 Press the AV.POWER i/o keytoseeif
you can turn the component on and off.
S-0LIR
0:2. btrroijnd
Hopie Enii-er-
ii-iSl.IR
£r2. Sj"f!aund
Back EntjHi"
Uidecii
04'.,Uldpo:2
Bad'-: Erita-'-
S'05„UCR
Back Ent.er
Press the display operation 2 Penu]
key repeatedly until "01. IR" appears in
the display.
Press the A/t keys to select "01.. IR",
then press the display operation 2
[Enter] key.
Press the A/T keys to select the input
that you want to register, then press the
display operation 2 [Enter] key.
Press the A/T keys to select the com
ponent that you want to register, then
press the
key.
display operation 2 [Enter]
f your component has a mechanical
POWER switch that cannot be operated
by remote control unit, press the
dis
play operation 2 [Enter] key and dis
play operation 1 [Home] key, and se
lect the component by pressing the
MUSIC, MOVIE,
the PLAY {Cs-} key or TUNING ►-) key
to test It.
or TV key, then press
If the component does not respond when you try to
control it, return to step 7 and enter the next setup
code on the list. Repeat this procedure until you find
the code that matches the component. When the
component does not respond, select "Nothin9."
Press the display operation 2 [Enter]
s-eiLIR
02,. Suirrcii..rtd
Enter
Repeat steps 3 through 9 to enter the codes for each
component you want to control.
Press the display operation 1 key repeatedly until “Menu"
appears in the display.
key to store the code.
If you accidentally exit the registration mode by pressing the
wrong key, you wil not lose any setup codes you have
already saved.
Pii'ja
BiaC'k Errbai'"
Press the A/T keys to select the maker
of the component that you want to reg
ister, then press the display operation
2 [Enter] key.
Automatie iaput naming
In the initial factory setting, the remote control already has provisional component names registered for each input. Before you register setup codes, pressing
the input keys of the remote control causes the display to change from the factory preset input names of the receiver {VIDE01, VIDEOS, etc.) to the input
names registered in the remote control (VCR1. VCR2, etc.). Once you have registered the appropriate setup codes for your components, pressing the input
keys of the remote control causes the display to change to the actually connected component names {LD, DVD, etc.) for which you have registered setup
codes.
Page 3
The remote control supplied with this receiver is also
capable of controlling components from a variety of manu
facturers once you register the appropriate setup codes
into the remote contrpi unit.
Refer to "Remote operation of other components" for de
tails about the operations available for each component.
Low baiiery warning
Replace all four batteries with new ones when you notice a shortening
of the distance from which the remote control will operate. The remote
control is designed to retain setup codes in memory while you change
batteries.
Begistering setup podes forpther components
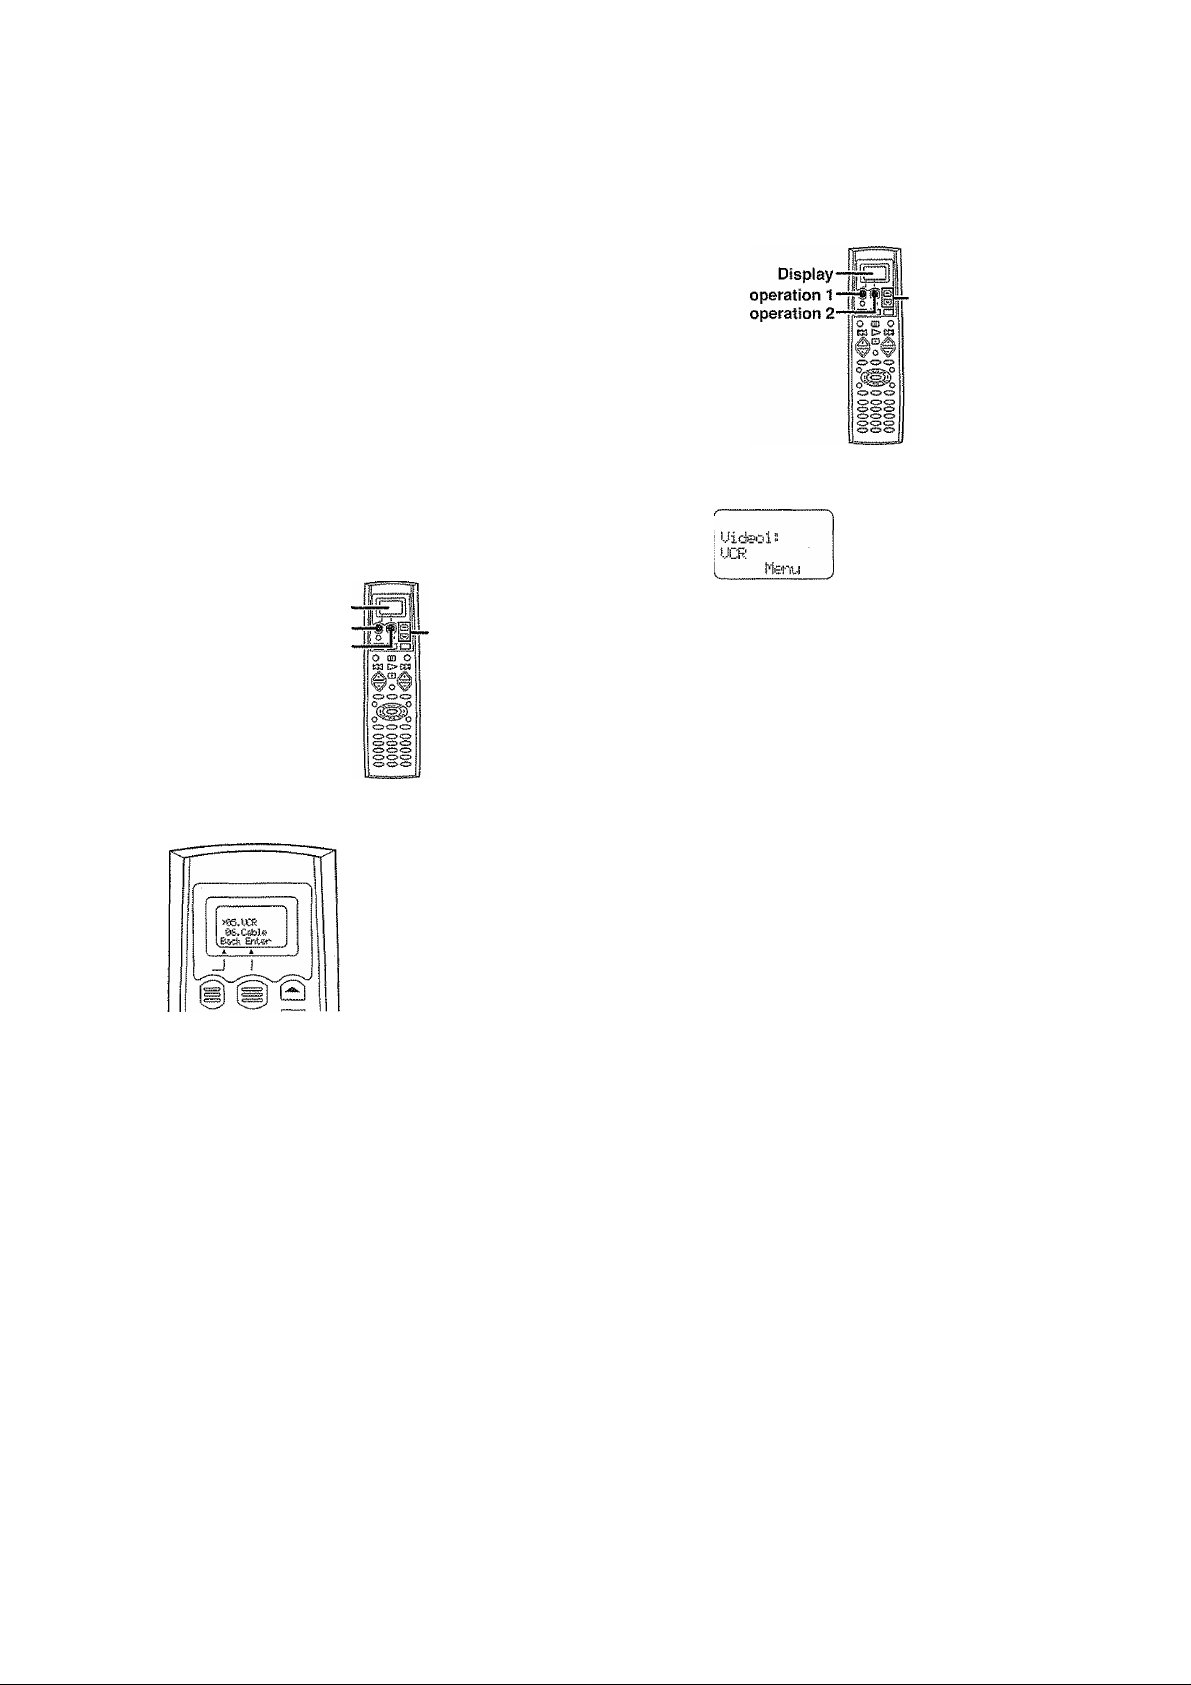
■A/T
Now to use the displagoperatimk^
To register the setup code, use the display operation 1 key. display
operation 2 key, or A/T keys.
Display
Display operation 1
Display operation 2
The display operation 1 key and display operation 2 key work as the
function key displayed in the display above.
The display operation 1 key
• fBack]
Go back to the previous display.
* [Home]
Go back to the initial display.
- ECtr]
Erase the internaJ memory.
The display operation 2 key
® [Enter]
Enter the selected item.
«[^enu|
Display the menu.
* [Setup]
Go to the setup display.
• [Exit]
Exit from the current operation.
. [Sei]
Select the item.
When the display goes off
The display goes off automatically when you do not operate for more than
8 seconds. In this case, press the display operation 1 key, display
operation 2 key. or a/T keys.
When you are confused about whaVs being displayed
Press the display operation 1 key repeatedly until ‘'ilsnu" appears in the
display.
The display returns to the Initial display.
A/T
O 'Pf'ess the display operation 1 key repeatedly until
” appears in the display.
Eor step El through step E3, make sure you start the next step
within 8 seconds of completing the previous one. If more than
8 seconds elapses between any two steps, press the display
operation keys so that the display appears.
Q Press the display operation 2 [Menu} key repeatedly until
‘^31IR " appears in the display.
“The setup display appears.
0'2. bi..n-xirrd
. Hc«e Enter
^ Press the a/w keys to select 'Si „ J.R, ” then press the
display operation 2 [Enter] key.
“ The input selecting display appears.
s-OS.Uidecil
014« t.tid©>p'2
Back &itar
“ At this time all inputs become available regardless of any earlier
registration,
О Press the a/v keys to select the input that you want to
register.
* Each time you press the &/t key, the input changes as follows;
0i; CD./DUD
02 s
i'1D..--TaF-e
Uideol
03 s
04“
Uideo2
Uideo3
86 E
DUD
07 ¡1
Tt.J:t
0Se
TU2
Cable
10S
Р1-ЮПО
Example: To select the source connected the VIDEOI jack, select
"Uideol".
iill
Фш
Continued to next page Ш Ш 4
Page 4

■Ш :::
0 Press the display operation 2 ¡Enter] key.
® The source selecting display appears,
* When you select “FTcriO" In step E3. go to step E3.
sPi!5„ t.iCFt
66. Cable
Back Erii0r
O Press the a/w keys to select the source you want to
register.
* Each time you press the A/v key, the input changes as follows:
> 01s CD
Т-эре>
025
63 s
Г‘Ю
045
C1>R
UCR
0Ss
06 s С.эЫе
075
Sate IИ i
00 s
TU
095 •
LD
10S
DUD
DSS (U.S.A
il5
i'2s
^ 135
• Select "Ho type" when the desired source does not appear in the
display.
• The selected input does not appears when you select ‘'Delete."
No t'dpe
Delete
1^ Press the display operation 2 [Enter] key.
• The maker selecting display appears.
For Europe and U.K For other countries
Г !
:-j^Keni'.ciCud
B.ac.k Ent.©!-
is^Kenwood
Mptid'-ai
[Back Enter-
© Press the a/w keys to select the maker you want to
register.
* Press the a/t keys until the desired maker appears in the display.
When the desired maker does not appear, select “HGti'd]-i9."
Press the display operation 2 [Enter] key.
“ The display returns to the setup display.
s-01 .IR
£12. Scrr-Ciund
Hopte &'iter-
Repeat steps B to Bio register additional components
until all components have been registered.
To returns to the initial display, press [Back] repeat
edly until appears in the display.
t.fid&oi “
tiCR
¡■‘■ferii
' Once registered, the display on the receiver shows the component
type instead of the default input name.
Example: if you register a VCR at the VIDEO 1 jacks, "yideol" and
"liCR" appear in the display,
' Any VIDEO or TV (TV1, fV2, CABLE) inputs that have not been
programmed with a setup code or Non-IR code are deleted from the
cyclic list.
When you mistake
Press the display operation 1 [Back] key repeatedly until the display
you want to re-operate appears.
Note
Although each setup code is designed to work with a number of different
models, certain codes may not work with some models. {Aiso, certain
codes may only operate some of the functions available on a given
model.)
m
Press the display operation 2 [Enter] key.
« The setup code selecting display appears.
; 0gb6
02i htothirS
B.3.p^; Enter
Ш Press the a/w keys to select the setup code.
Ш Press the AV.POWER \/<b key, and check to see that the
component you want to control turns on.
и the component does not react, and there is more than one
setup code, enter another setup code and try again.
« or TUNING key can also be used instead of the A V. POWER i /Ф
key.
• if the component is already on, pressing the AV, POWER i/<h key
will turn it off.
Page 5
t'
Opmting pth^
Getting the most from your remote control
This operation lets you operate the registered components.
KENWOOD audio components with system control turn on and off
automaticafly with the receiver via the system control connections.
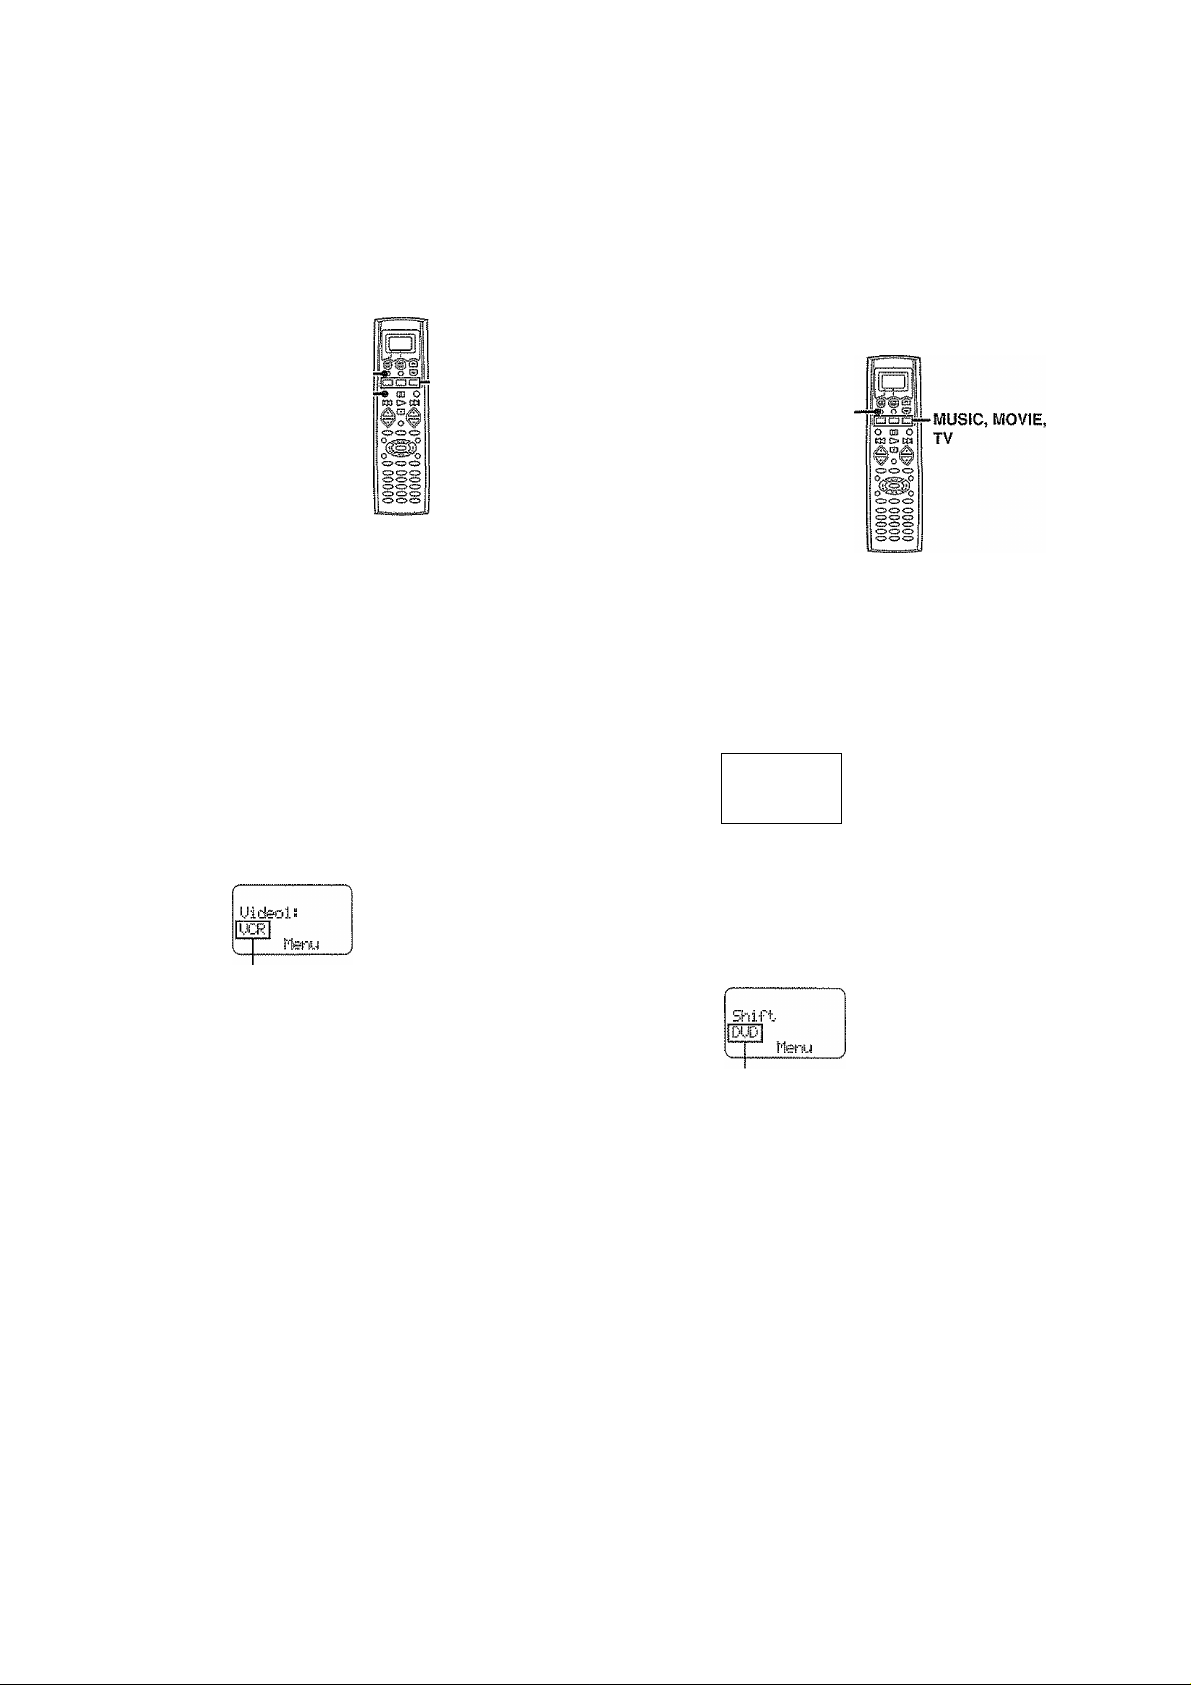
SHIFT-
AV.P0WERÍ/0*
During opration, make sure you start the next step within 8
seconds of completing the previous one. If more than 8
seconds elapses between any two steps, press the display
operation key so that the display appears.
■ItiUSIC, ftflOVIE,
TV
Q Use the l\^UStC, MOVIE, or TV key to select the component
you desire.
Pressing the MUSIC or MOVIE key also changes the input selector
on the receiver. If you do not want to change the current input, press
the SHIFT key before step E3.
MUSIC key
0) CD/DVD
(D TAPE or MD
CD Tuner
® PHONO
Select source
• You cannot select the source that is not registered,
MOVIE key
(D Videol
(D Video2
(D Videos
® DVD 6CH
(D AV AUX
TV key
(p TV1
CD TV2
® CABLE
This operation lets you change the remote control operation mode without
changing the input selector.
You may find this useful when you want to control one component while
using another. (For example, if you want to rewind the tape deck while
listening to a CD,)
SHIFT
During opration, make sure you start the next step within
Sseconds of completing the previous one. If more than 8
seconds elapses between any two steps, press the display
operation key so that the display appears.
O Press the SHtFT key.
• "Slnift" appears in the display.
......
Skiif-t.
I'feni
• To operate a TV, start form step EJ.
^ Press the MUSIC, MOVIE, or TV key repeatedly to display
the remote control mode for the component you want to
control.
Press the MUSIC, MOVIE, or TV key until the desired source
appears.
M Press the AV. POWER i/o key.
« The selected component turns on or off.
O Press the operation keys you desire.
*See "Remote operation of other components" at the end of this
manual for a list of keys available with each component.
Rc-oa
The remote control mode remains in the set at the component
selected in step EH mode until you select another component.
Note
Be sure to point the remote control at the remote sensor on the receiver
when you want to operate KENWOOD components connected by
system control cords. Otherwise, point the remote control at the compo
nent you want to operate.
The component to be controlled
* Pressing any other keys after the SHIFT key cancels the shift function
and sends the normal code associated with the respective key.
* The input selector does not change during this operation,
* If you press MUSIC or MOVIE key more than 3 seconds after
pressing the SHIFT key, the input selector changes together with the
operation mode.
O Execute the desired operations.
* See "Remote operation of other components" for a list of keys
available with each component. RC-^pTI
The operation mode remains set at the component specified In
step
To return control to the original component, press SHIFT and
then press the MUSIC or MOVIE key to return to the original
control mode.
"3
iti
Eí ■
e
OC
Page 6

GeUing the most from iroar remote pohiM
I Preparing for automata operatiom
'$ (MACRO play)
The macro play function allows you to set the remote to control several
components in succession. After completing this setup, you can perform
a series of operations automatically. Enter the setup codes for the
components you want to control beforehand.
MACRO
During opration, make sure you start the next step within 8
seconds of completing the previous one. if more than 8
seconds elapses between any two steps, the remote control
unit exits from the MACRO play mode.
O IVlBke a plan of the macro play you want to Setup.
The order of the operations may be fairly complex and you may
not be remerriber all of the necessary commands during the
setup procedure.
Use the space provided below to write down the operations in
the order you are going to enter them.
* Up to 20 steps can be memorized for each macro.
0 0
0
0
0
0
0
0
0
0
> The example below shows the plan for step O {which occupies a total
of 6 steps):
(D TV 4. AV. POWER 2 steps
(D FUNCTION SHIFT + 3 2 steps
<S) MOVIE 1 steps
(D AV, POWER 1 steps
Total
0
0
0
0
0
0
0
0
®
6 steps
O Pfsss the MUSIC, MOViC, or JV key to select the macro
location. (MACR01, 2, and 3 respectively)
* You can store up to 3 different macros, one at each key;
MOVIE ^ "MHaiiO 1", MUSIC 'TIRCED 2", TV "HFCiCi 3"
*The light flashes once when you select the macro location.
* Pressing a key other than MUSIC. MOVIE, or TV cancels the macro
program mode.
--------------
r
!-'«cr:oi
V. ;
When MOVIE is pressed
N
O Press the keys to be operated in order.
EXAMPLE:
This example shows you how to create a macro that; turns on the TV,
sets the TV to the appropriate input, selects the receiver's input selector
to LD, and turns on the LD player. All you have to do is insert the laser
disc!
© Press the TV key, then press the AV.POWER i/d) key to turn
on the TV,
0 Press the F. SHIFT key, then press the "3" (INPUT SEL.) key
to set the TV to the appropriate video Input.
® Press the MOVIE key to select the LD player registered at
VIDEO 2.
® Press the AV.POVI/ER i/<!) key to turn on the LD player.
» Make sure you start the next operation within 8 seconds of complet
ing the previous one. If more than 8 seconds elapses between any two
steps, exit the macro programming mode.
* in order to allow verification of the remote control mode, the name of
the selected input appears in the receiver's display when the MUSIC,
MOVIE, or TV key is pressed. When the MUSIC or MOVIE key is
pressed the receiver's input also changes.
O Press the MACRO key so that the light Hashes twice.
® The macro is stored at the locations specified in step £3. If another
macro was previously stored at the same iocation, it is erased.
Repeat steps O through 0 to program up to 3 macros.
This completes the macro programming procedure.
ili
itili
' If you attempt to store more than 20 steps, “Fiji 1" appears and exit
the macro programming mode,
' Enter channel numbers (for the monitor TV, etc.) exactly as you would
using the original remote.
• V№en you select the input by using the MUSIC, MOVIE, or TV key,
it is count 1 step even if you press these keys several times.
1^ Press and hold the MACRO key for more than 2 seconds.
• "MflCFlG flEHORV" appears in the display.
MfrjRO NBIOiRV
Page 7

; GéWng ìhé most from your remote comtqf;
Executing an^
iVIACRO
During opration, make sure you start the next step within 8
seconds of completing the previous one. if more than 8
seconds eiapses between any two steps, press the display
operation key so that the display appears.
O Press the li^ACRO key.
• "t'lRCPD E>iE" appears in the display.
MRCRO EKE
Seleci f'fl
O Press the IMIUSIC, IldOVIE, or TV key to execute the
corresponding macro play.
CRO
)
To delete the setup code
•AiW
During opration, make sure you start thè next step within 8
seconds of completing the previous one. if more than 8
seconds eiapses between any two steps, press the display
operation key so that the display appears.
Q Press the display operation 1 key repeatedly until
‘tleni-i ” appears in the display.
^ Press the [Menu] key repeatedly until 1-ji „ IF' ” appears
in the display.
o The setup display appears.
»"f'fiCRiD EKE" appears in the display and the pre-programmed macro
is performed:
• Some devicestake up to 1 second to power on. The macro function
has an automatic delay after any power function output.
• Pressing a key other than MUSIC, MOVIE, or TV cancels the macro
program mode.
MUSIC "MFCRO 1", MOVIE "IlfiCRO 2", TV "MflCRO 3"
vyhen MUSfC is pressed
SEILJR
02. bJ,.r'rof.rd
Hopre a-Ttej-'
O Press the a/V keys to select ‘^I'l „ ” then press the
[Enter] key.
® The input selecting display appears.
S-03.UideQl
04.Video2
B-scii Enter'
O Press the a/w keys to select the input that you want to
delete, then press the [Enter] key.
O Press the a/v keys to select 'Delete. ”
S't33 Delete
01 5 CD
Bad< Ei-t,er'
O Press [Enter].
® The setup code is deleted.
Page 8

1 storing the remote control cord of the other
" component^
The remote control unit can store the remote control cord ot the other
components and you can operate the other components from the remote
control unit. The remote control cord is stored on the key or memory of
the remote control unit.
Storing on the key
You can store the remote control code to the key as shown below:
© Press the desired key of the remote controi unit.
® The remote control is ready for receiving the remote control code,
—
WaiiirtS
,Clr Exit
® Press the key of the same operation that you want to store.
* The remote code is send to the remote control unit,
»“CoFiPleti-" appears when finished.
f
Ca-T■lete
J
» When it takes for more than 5 seconds or the remote control unit does
not receive the remote control code well. "Error-" appears in the
display. In this case, re-operate from the step ©.
® The remote control code is stored on the key of the remote
control unit.
IlfH
Ijpilll
iiitt
,,ii
iiiS
¡>- Play
Oil Pause
□ Stop
Ki< Rewind/skip
AV,POWER i /c!)
CH +/-
TlTLE/GUfDE
RETURN/PAGE
REC
Fast forward/skip
Cursor
ENTER
MENU
OSD/PAGE
Numeric keys
® Point the infrared ray system part of another remote control unit
to the remote sensor of the remote control unit.
00000 Remote control
OOOOOOMOoJiVSP
00000 oKo#-SoB
SItMi
1
unit of the other
source.
Infrared ray system part
© Press the MUSIC, MOVIE, or TV key to select the input of the
desired remote control unit.
lUidSQiji!
:R
Selected input
© Press the LEARN key.
When the setup code is registered
tiBderdl
E;:<t-Gn‘d2
I4:ip'ie Erits^-
' When the setup code is not registered, any messages do not appear.
To delete the memory stored on the key
Press the [ClrJ key fn step ©. "Ciear ed" appears in the display.
Tne memory previously stored is cleared.
To operate other components
© Press the MUSIC, MOVIE, or TV key to select desired input
source.
© Press the desired key.
Storing on the memory
You can store on the remote control unit up to 5 memories.
© Point the infrared ray system part of the other remote control
unit to the remote sensor of the remote control unit.
Remote control
00000
00000 0M>0#S3oiDiae
unit of the other
—
source.
Infrared ray system part
© Press the MUSIC, MOVIE, or TV key to select the input of the
desired remote control unit.
dideoil;
Selected input
© Press the LEARN key,
• The Extend selecting display appears.
When the setup code is registered
s&dj=rtdi
Ext-=r!d2
,Hc№ BntG-r-
' When the setup code is not registered, any messages do not appear.
N
_
/
Page 9

© Press the a/t keys to select the location.
1 Bitei-idl “ E-;rtend5 are available.
© Press the {Enter] key.
« The remote contro! is ready for receiving the remote control code.
B-'cti'endi
IClr Exit
® Press the key of the same operation that you want to store.
• The remote code is send to the remote control unit,
o ‘’CoMP-lete" appears when finished.
r
Cortiplelí'
Ext Sfidi
V.
* When it takes for more tharr 8 seconds or the remote control unit does
not receive the remote control code we)!, appears in the
display. In this case, re-operate from the step ©,
• "Full" appears when the mOTtory is full. Re-operate from the step
® after deleting some memories.
© The remote control code is stored on the memory {Extendi -
Extends) of the remote control unit.
__
J
)
To delete the stored memory
Press the [Clr] key in step ©. ’'Cleared" appears in the display
and the memory that is selected in step © is erased.
Restoring the original factory
...
You can restore the setup codes or memories to their original default
settings
....... ..........................................
Insert the batteries during pressing and holding the [a]
keys and key,
* "Cleared" appears in the display, and the remote settings return to
their original default settings.
....................................
iS l l
To operate other components by using the stared memory
0 Press the MUSIC, MOVIE, or TV key to select desired Input
source.
• The Menu display appears.
® Press the {Menu] key .
© Press the a/t keys to select the memory you want to operate.
© Press the [Enter] key.
Page 10

,'сйя^/J.;
PIsplaYlng the CD TEXT data
10
■ [^¡' ,'fj' When you connect a KENWOOD CD player (CD-425M, CD-4700M, CD'426OM, DPF-J6030), you can display the CD TEXT data in the display of
the remote control unit.
Before operation, regiser the setup code of the CD piayer.
O Load the CD TEXT data to the CD player.
0 Press the MUSIC key to select "CD".
® Press the [Menu] key repeatedly until "Setup" appears in the
display.
© Press the a/t keys to select "fil 1 Reaii" and press the [Enter]
key.
•The ioading time may take a few moments.
O Press the [Text] key.
» The display for selecting disc appears.
051»^
Hoffe'
O Press the a/t keys to select the desired disc, then press
the [Sell key.
stSi.T. Title
SG.TJitle
Back Bel
H Press the a/w keys to select the desired track, then press
the [Sell key.
IS Load the CD TEXT data of the CD player to the remote
control unit.
0 Press the MUSIC key to select "CD".
© Press the [Menu] key repeatedly until "S!atUp"s appears in the
display,
© Press the a/t keys to select "Disc Title" and press the
[Enter] key.
• The remote control unit starts reading the CO TEXT data (disc titles
are also read),
• appears during reading.
^ Press the [Home] key.
• appears when the CD TEXT data is read.
CD
Text t'bn j
»When "Tex:t" does not appears, select “Tr-ack Title" in the
"Se*tUp" display and press the ¡Enter] key.
Page 11

, ReMoté'<úfl§Miúrí^^^
You can operate other components by pressing keys or using the display.
The setup code for each component must be entered beforehand, RC-CI3
When you operate by using the keys
® Press the MUSIC, MOVIE, or TV key to select the component
you want to control.
© Press the keys corresponding to the operations you desire.
When you operate by using the display
O Press the MUSIC, MOVIE, or TV key to select the component
you want to control.
© Press the display operation 2 [Menu] key so that the Menu
display appears.
© Press the A/v keys to select desired item or memory, then
press the display operation 2 [Enter] key.
Tuner operations
oa
coo r> m
CD
KM
(P. CALL V)
[>£>!
(P. CALL A)
BAND
AUTO/MONO
TUNING <
TUNING ^
CD CD CD
CD CD CD
CD CD CD
CD CD
Numeric keys
® To execute a FUNCTION SHIFT command written above the numeric
keys, press the F. SHIFT key, then press the corresponding key.
® When pressing keys in succession, press each key firmly and be sure to
wait at least 1 second before pressing the next key.
Notes
1, Although each setup code is designed to work with a number of different
models, certain codes may not work with some models, (Also, certain
codes may only operate some of the functions available on a given
model.)
2. The charts below show the typical functions available for each compo
nent. Some manufacturers use different key combinations to perform
similar functions.
Cassette deck operations
QD
COO ODC3
ED
c=- (Play A)
Ofl (Pause A)
□ (Stop A)
KK (Rewind A)
>i>i (Fast forward A)
ENTER (Play 8)
ai (Pause B)
m (Stop B)
■« (Rewind B)
(Fast forward B)
Display operation
01-05: Extendi -5
CD
REC (Recording)
FUNCTION SHIFT commands
(Reverse play A), ENTER (Reverse play B)
CO player operations
QD
oca O DD0
CD
(Play)
00
(Pause)
□ (Stop)
KK) (Skip)
ooi (Skip)
MD recorder operations
QD
(SS)
« (Rewind)
goo o ca
ED
O' (Play)
00
(Pause)
□ (Stop)
KK (Skip)
ocH (Skip)
►6»- (Fast forward)
(Fast forward)
(Rewind)
(DISC SKIP A)
CD
REC
(Recording)
ctb CD
cDcd <!d
CD CD CD
<D cd^'CD'
Numeric keys
CD CD CD
CD CD CD
CDCD,<S
CD CD CD
CD C'C
Numeric keys
Sc5>cd
cD cD
FUNCTION SHIFT
commands
REPEAT
RANDOM
DISPLAY
c3 cD
c!3Cz3
FUNCTION SHIFT
commands
REPEAT
RANDOM
DISPLAY
Display operation
01: Disc Sel
02: Set
03: P.Mode
04; Check
05: Clear
06; Disc Title
07: Track Title
08: All Read
09: Subout Monitor
10: Continuous Play
11; All Info.
12-16: Exlend1-5
Display operation
01-05: Extend1-5
g ■
■<3
■ ■
s
Page 12

TV operations
Remote operation of other components
CHANNEL +
CHANNEL -
QD
eoo ODDS
fZj
VOLUME + >oi
VOLUME - KK]
VCR operations
CHANNEL +
CHANNEL -
Cursor
ENTER
Cursor
ENTER
cm
ra C> DCD
o (Mute)
m ™ CC3
E3
ps“ (Play)
00 (Pause)
□ (Stop)
KM (Skip)
{x>! (Skip)
<S>
REC (Recording)
Numeric keys
Numeric keys
5
MENU
<ss>
CD ^
FUNCTION SHIFT
commands
INPUT SEL.
TV SELECT
AUDIO
FUNCTION SHIFT
commands
INPUT SEL.
TITLE/GUIDE
Display operation
01:
02:>12
03: Wide
04: Picture in Picture
05: Text/Mix/TV
06; Text Oif
07; Mix
08: Exit
09-13: Extend1-5
Display operation
01: Thumb Up
02: Thumb Down
03: Jump
04: Instant
Replay
05: Quick Skip
06: Exit
07-11: Extend1-5
LD player operations
+ (Slow)
- (Slow)
ENTER
(Rewind)
(Fast forward)
DVD player operations
+ (Fast forward)
- (Rewind)
Cursor
Al'Vl<l\
ENTER
OD
eoa o tea
B
D=- (Play)
00
(Pause)
□ (Stop)
KM (Skip)
i>CH (Skip)
[]D
(fca o DDa
ED
o- (Play)
00 (Pause)
□ (Stop)
KK3 (Skip)
fc-CH (Skip)
0
OSD/
PAGE
Numeric keys
©
OSD/
PAGE
Numeric keys
a
MENU
o
GUIDE
FUNCTION SHIFT
commands
REPEAT
RANDOM
DISPLAY
Q
FUNCTION SHIFT
commands
RANDOM
REPEAT
DISPLAY
AUDIO
RETURN
©
Display operation
01: Frame/Time
02: Side A or A/B
03: Side B
04-08: Extendi-5
Display operation
01: Chapter/Time
02; Angle
03: PGM
04: DVD Set
05: Memory
06: Clear
07: Repeat A-B
08: Sub Title
09: Title Search
10: Aspect
11: On/Off
12-16: Extend1-5
Page 13

DSS receiver operations
CHANNEL +
CHANNEL■
Cable tuner operations
Cursor
ENTER
Ä><S>c!b
<S>cr>cz>
CX>Ö<S
® cz:>'^'
Numeric keys
tef i; ^
ÍB B!>
FUNCTION SHIFT
commands
INPUT SEL.
SELECT
AUDIO
THEME
FAVORITE
INFO.
a
MENU
O
CHANNEL
GUIDE
^V'.;.■;;;■:■'■■■■: v,ü;r,r';:
,'i .V Wf j( 1*^ i#V*!-* W;---V'v'-''-'^i !•'; ■ >!■ ■ :;■
Display operation
01: Exit
02-06; Extendi-5
ii
säte
CHANNEL +
CHANNEL -
CID
ra E> CCS
VOLUME + >tH
VOLUME -1<50
Satellite tuner operations
CHANNEL +
CHANNEL -
Cursor
ENTER
©
PAGE UP (A)
(^p)
Cursor
ENTER
Numeric keys
•w
©
PAGE DOWN (V)
c5q5'
c:o <z::> cätei
Numeric keys
Clr> Cte>
c3cB<S
cS> ^
FUNCTION SHIFT
commands
"iSiUL'-
INPUT SEL.
SELECT
THEME
FAVORITE
INFO.
EXIT
LAST CHANNEL
sss
FUNCTION SHIFT
commands
INPUT SEL.
SELECT
AUDIO
O
MENU
O
GUIDE
©
OSD
Display operation
01; A - B - C
04-08: Extend1-5
Display operation
01-05: Extend1-5
Page 14

In case of difficulty
Remote control unit
Mi
The battery indicator flashes during opera
tion.
Subwoofer volume cannot be adjusted.
Certain inputs cannot be selected using the
remote control.
Remote control operation is not posstbie.
Cause
> The batteries are nearing exhaustion.
« Subwoofer is OFF.
® No setup codes registered at for the respective
input(s).
* The remote control is set to a different operation
mode.
“ Batteries are exhausted.
» The remote control unit is too far away from the
main system, controiting angle is too large, or
there is an obstacle between the receiver and
the remote.
* The audio cords and system control cords are
not connected properly.
» No software is loaded in the source component.
® An attempt is made to play a tape which is being
recorded in the cassette deck.
* The remote control has not been set to the
operation mode for the component you wish to
control.
e The microprocessor of the remote control mal
functions.
,1 Remedy
® Replace with new batteries to presen/e the
currently registered setup information.
“ Turn the subwoofer ON.
«Register a setup code or Non-IR code at the
respective input(s). RC-C33
® Press the MUSIC, MOVIE, or TV keys to select
the appropriate operation mode,
" Replace witii new batteries,
o Operate the remote control unit within the con
trollable range.
‘ Connect properly referring to "Setting up the
system".
® Place software in the source component you
want to play,
® Wait until recording has completed.
* Press the MUSIC, MOVIE, or TV keys to acti
vate the operation mode for the component you
want to control before operation. RC-CC3
• Reset the microprocessor.
-OS
»i
 Loading...