

Page 1

STEREO CASSETTE DECK
CT/KXF-W SERIES
CT-203
CT-2050
KXF-W4010
KXF-W6010
INSTRUCTION MANUAL
KENWOOD CORPORATION
This manual contains instructions for four models. Model availability and features
(functions) may differ depending on country and sales area.
SI DICHIARA CHE :
gli apparecchi Sintonizzatori per casa Kenwood modelli KT-2080, KT-3080 rispondono
alle prescrizioni dell'art. 2 comma 1 del D.M. 28 agosto 1995, n. 548.
Fatto a Milano il 15 febbraio 1996
Kenwood Electronics Italia S.p.A. - via G. Sirtori, 7/9 - 20129 Milano
B60-3706-00 HZ ( K, P, T, M, X, Y )
99/3 2 1 98/12 11 10 9 8 7 6 5 4 3
ID
Page 2
Introduction
CT-20 50/ 203/ KXF-W 6 010 / W 401 0 (En/ M)
Before applying pow er
2
Units are designed for operation as follows.
U.S.A. and Canada ................................................................AC 120 V only
Australia ..................................................................................AC 240 V only
Caution : Read this section carefully to ensure safe operation.
Europe and U.K. .....................................................................AC 230 V only
* Other countries............................ AC 110-120 / 220-240 V sw itchable
Safety precautions
WARNING : TO PREVENT FIRE OR ELECTRIC SHOCK, DO NOT EXPOSE THIS
APPLIANCE TO RAIN OR MOISTURE.
CAUTION
RISK OF ELECTRIC SHOCK
DO NOT OPEN
THE LIGHTNING FLAS H WITH ARROWHEAD SY MBOL, WITHIN AN EQUILATER AL TR IANGLE , IS INT E NDED TO ALE RT
THE USER TO THE PRESENCE OF UNINSULATED “DANGEROUS VOLTAGE” WITHIN THE PRODUCT’S ENCLOSURE
THAT MAY BE OF SUFFICIENT MA GNITUDE TO CONSTITUTE A RISK OF ELECTRIC SHOCK TO PERSONS.
THE EXCLAMATION POINT WITHIN AN EQUILATERAL TRIANGLE IS INTENDED TO ALERT THE USER TO THE
PRESENCE OF IM PORTANT OPERATING AND MAINTENANCE (SERVICING) INSTRUCTIONS IN THE LITERATURE
ACCOMPANYING THE APPLIANCE.
CAUTION: TO REDUCE THE RISK OF ELECTRIC SHOCK, DO NOT REMOVE COVER (OR
BACK). NO USER-SERVICEABLE PARTS INSIDE. REFER SERVICING TO QUALIFIED
SERVICE PERSONNEL.
Caution : Read this section carefully to ensure safe operation.
Page 3
Introduction
CT-20 50/ 203/ KXF-W 6 010 / W 401 0 (En/ M)
Special features
Dolby HX pro and Auto-Bias function
DPSS function
CCRS function
Dubbing function
Unpacking
Unpack the unit carefully and make sure that all accessories are put aside so they will not be lost.
Exa mine the unit for a ny possibility of shipping damage. If your unit is dama ged or fails to opera te, notify your dealer immediately. If your unit was shipped
to you directly, notify the shipping company without dela y . Only the consignee ( the person or company receiving the unit) can file a claim against the ca rrier
for shipping damage.
We recommend that you retain the original carton and packing materials for use should you transport or ship the unit in the future.
Keep this manual handy for future reference.
The Dolby HX pro headroom ext ension and auto-bias function provide a recording wit h
superior high-fr eq u en cy c h aracterisitics.
¶Simple operations allow you to us e the following conve n ie nt functions.
1 Skip Play 2 Rewind & Play 3 Single-tune repeate d p layback
4 Dash & Play (DPSS: Direct pro g ram Search System)
¶This funct ion aut omatically stes t he op t imum record ing leve l of t he d isc to be recorded,
making it easy to re c or d a CD.
(CCRS: Computer-Controlled CD Recording System)
¶ With an ea sy operation, the tape loaded in deck A can be dubbed onto the ta pe in deck B.
making it easy to re c or d a CD.
3
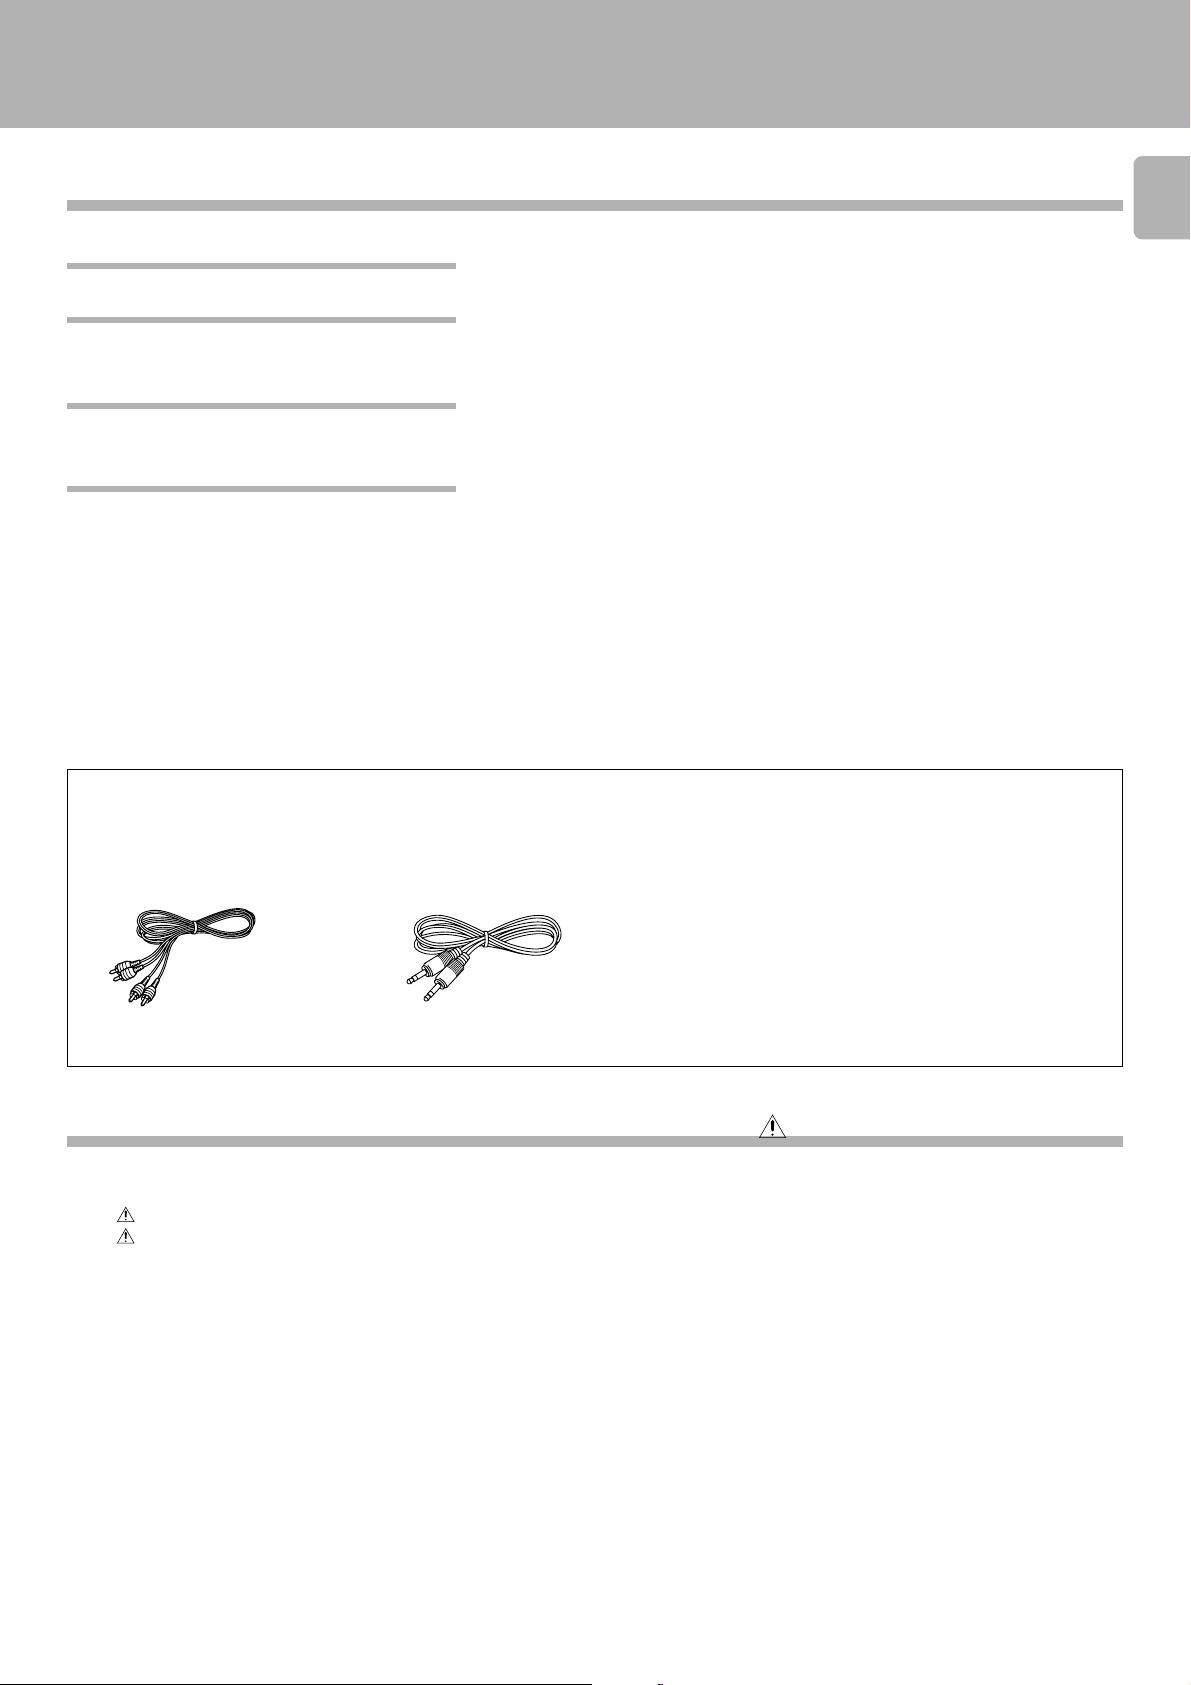
Accessories
Check that the following accessories are present.
Audio cord ........................ (2) System control cord ............ (1)
Contents Caution: Read the pages marked carefully to ensure safe operation.
Introduction.................................................................. 2
Before applying power ....................................................... 2
Safety precautions .............................................................. 2
Special features ................................................................... 3
Important items........................................................... 4
Maintenance ........................................................................ 4
Reference .............................................................................4
System connections.................................................... 6
Controls and indicators............................................... 8
Preparation for playback (recording) ....................... 10
Playback (recording) preparation ....................................10
Listening to cassette tapes....................................... 11
Normal playback ...............................................................11
Relay playback ................................................................... 12
Convenient music search (DPSS)............................. 14
Skip play operation ........................................................... 14
Rewind & Play operation ..................................................15
Single-tune repeated playback operation ....................... 15
Dash & Play operation ...................................................... 15
How to record (CT-203/KXF-W4010; Deck B only).. 16
Normal recording .............................................................. 16
Relay recording (CT-2050/KXF-W6010 only) ........... 19
Relay recording..................................................................19
T ape dubbing operation (Deck A \ Dec k B)................ 20
Tape dubbing ..................................................................... 20
Convenient CD recording (CT-203/KXF-W4010; Deck
B only)......................................................................... 21
CD synchro recording ....................................................... 21
Recording of CD playback (CCRS)(Deck B only)............. 22
Timer operations........................................................ 23
Timer playback of tape......................................................23
Timer recording of tuner broadcast(CT-203/KXF-W4010;
Deck B only) .......................................................................24
In case of difficulty..................................................... 25
Glossary...................................................................... 27
Specifications............................................................. 28
Downloaded from:
Page 4
Important items
M aintenance
4
CT-20 50/ 203/ KXF-W 6 010 / W 401 0 (En/ M)
Cleaning
Unplug this appliance from the wall outlet before cleaning. Do not
use volatile solv ents such as alcohol, paint t hinner, gasoline, or
benzine, etc. to clean the cabinet. U s e a clean dry cloth.
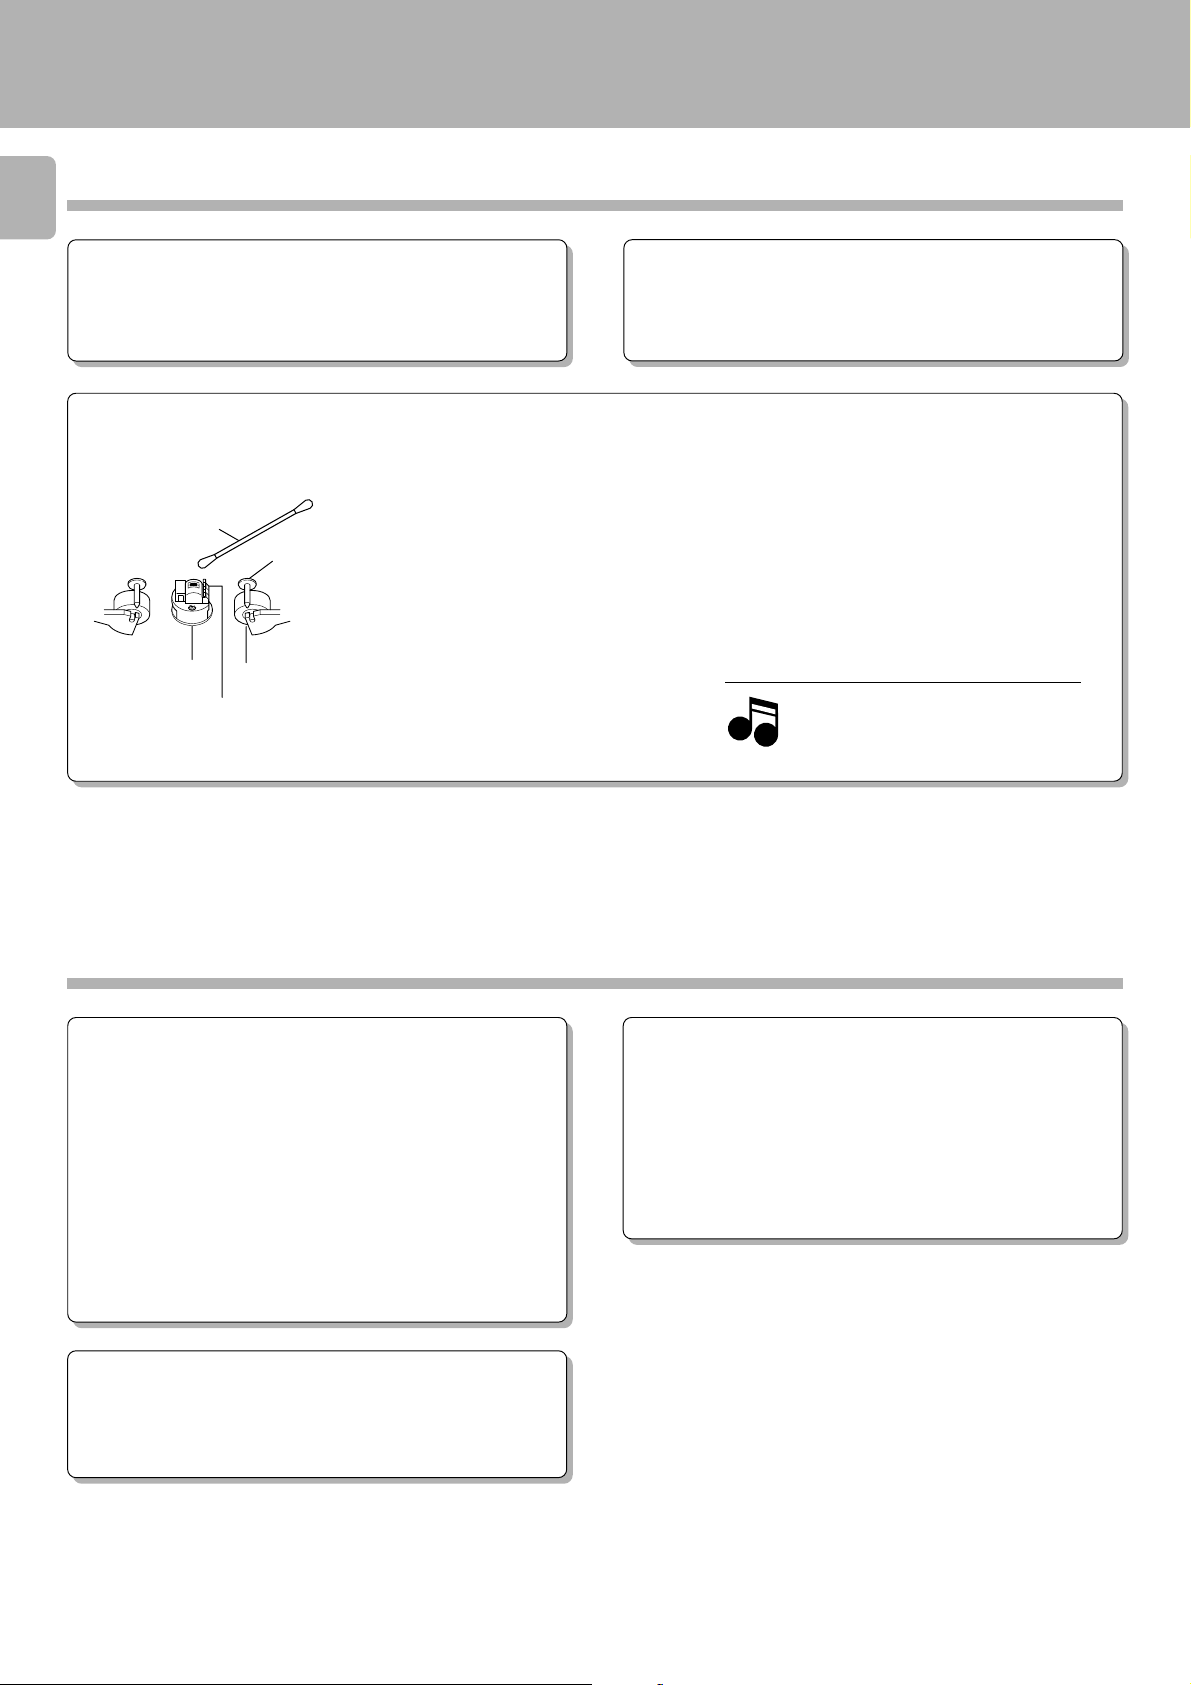
Cleaning the head section
Cleaning the heads and peripheral com-
Cotton s wab
Head
Tape guides
Capstan
Pinch roller
ponents
For maintaining the best condition of the deck and
for longer service life, always keep the head (recording/playback/erase) , ca pstan a nd pinch roller clean.
To clean them, p er form the following:
1. Open the cassett e h ol de r.
2. Using a cotton swab dipped in alcohol, clean the
head (recording/playback/erase), capstan and
pinch roller caref u ll y.
Caution against contact revitalizer
Do not use contact cleaners because it could cause a malfunction.
Be specially careful against conta ct cleaners conta ining oil, for they
may deform the pl ast ic c o mponente.
Demagnetizing the head
When the recording/playback head is magnetized,
the so und quality w ill be det eriorated. In such a
case, demagnetize the head using a commercially
available demagnet izer (head eraser).
There are precisely aligned parts around
Note
Note
the he ads, includ ing the tape guides.
When cleaning, pay special att ention so
as not to apply shock to them .
Reference
Caution on condensation
Condensation (of dew) may occur inside the unit when there is a grea t
difference in temperature between this unit and the outside.
This unit m ay not f unc tion properly if conde nsation occu rs. In t his
case, leave the unit for a few hours with the power left ON, a nd restart
the operation after the condensation has dried up.
Be specially cautions against condensation in a follow ing circumstance:
When this unit is carried from a place to anot her across a large
difference in temperature, when the humidity in the room where this
unit in installed increases, etc.
Dolby noise red uct ion and HX Pro headroom ext ension m anuf actured under license from Dolby Laboratories Licensing C orporation.
HX Pro originated by Bang & Olufsen.
“ DOLBY ”, the double- D symbol and “ HX P R O” are trademarks of
Dolby Laboratories Licen sin g Corporatio n.
WARNING NOTICE:
IN MOST CASE S IT IS AN INF RINGME NT OF COP YR IGHT
TO M AKE COPIES OF TAPES OR DISCS WITHOUT THE
PERM ISSION OF THE COPYRIGHT OWN ERS. ANYONE
WISHING TO C OPY C OMME RC IALL Y AVAILABL E TAP ES
OR DISC S SHOULD C ONTACT THE MECHANICAL C OP YRIGHT PROTECTION SOCIETY LIMITED OR THE PERFORM ING RIGHTS SOCIETY LIMITED.
Page 5
Handling the cassette tape
Notes on cassette tape
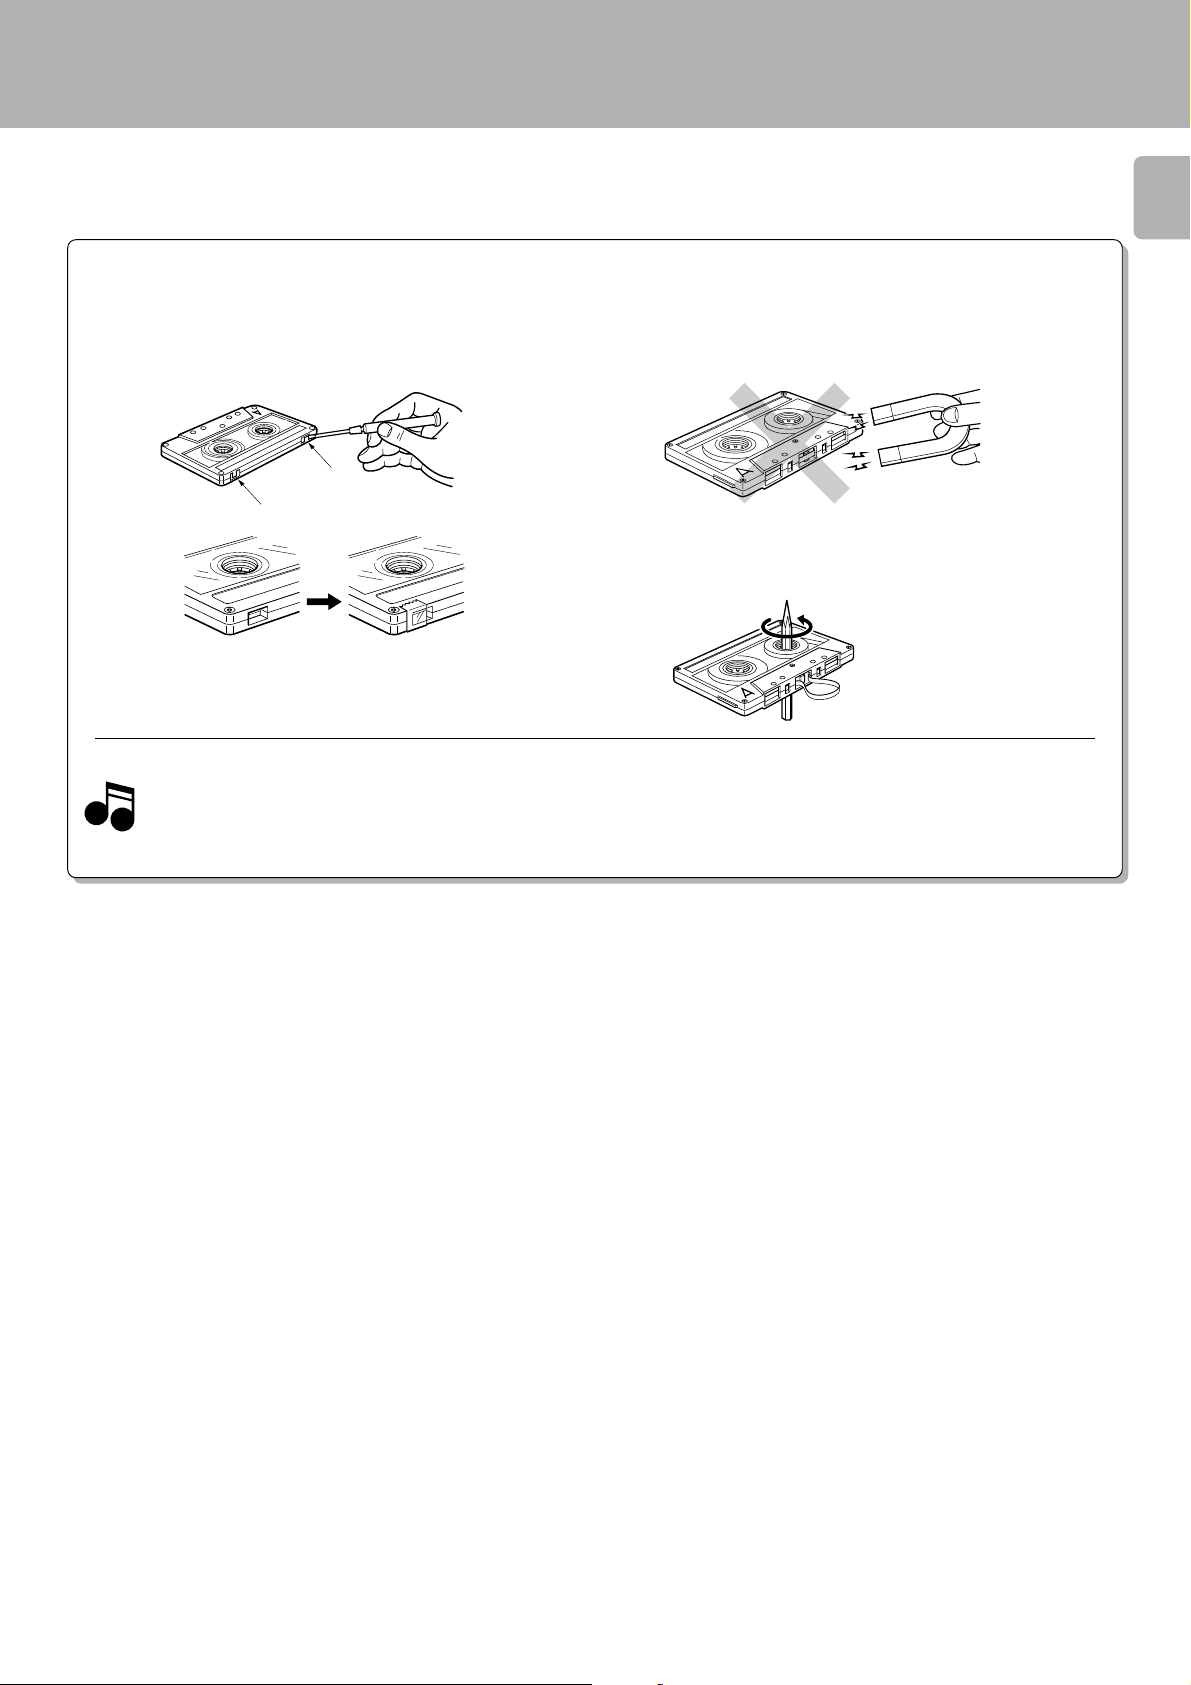
Safety tab (accidental erasure prevention tab)
After an importa nt recording ha s been finished, break the safety
tab, to prevent t he recorded cont ents f rom being erased or
recorded on accidentally.
For A side
For B side
Important items
CT-20 50/ 203/ KXF-W 6 010 / W 401 0 (En/ M)
5
To store cassette tapes
Do not store t he tapes in a place wh ich is subject t o direct
sunlight, or near equipment that generates heat. Keep the
cassett e tapes away from any magnetic field.
N
S
When there is slack in the tape
In such a case, insert a pencil into the reel hole a nd wind the reel
hub to r e move the s lack.
Notes
Notes
To re-record
1. Longer tape than 110 minutes cassette tape
Since longer tape t han 110 minu tes casset te t ape is very
thin, the tape could adhere to the pinch roller or be easily cut.
It is re com m end ed t hat t h ese t apes not be use d with t hi s
unit to prevent po s si bl e damage.
Apply tape only to the position
where the tab has been rem ov e d .
2. Endless tapes
Do not use a n endless ta pe, as this could damage the mechanism
of the unit.
Downloaded from:
Page 6
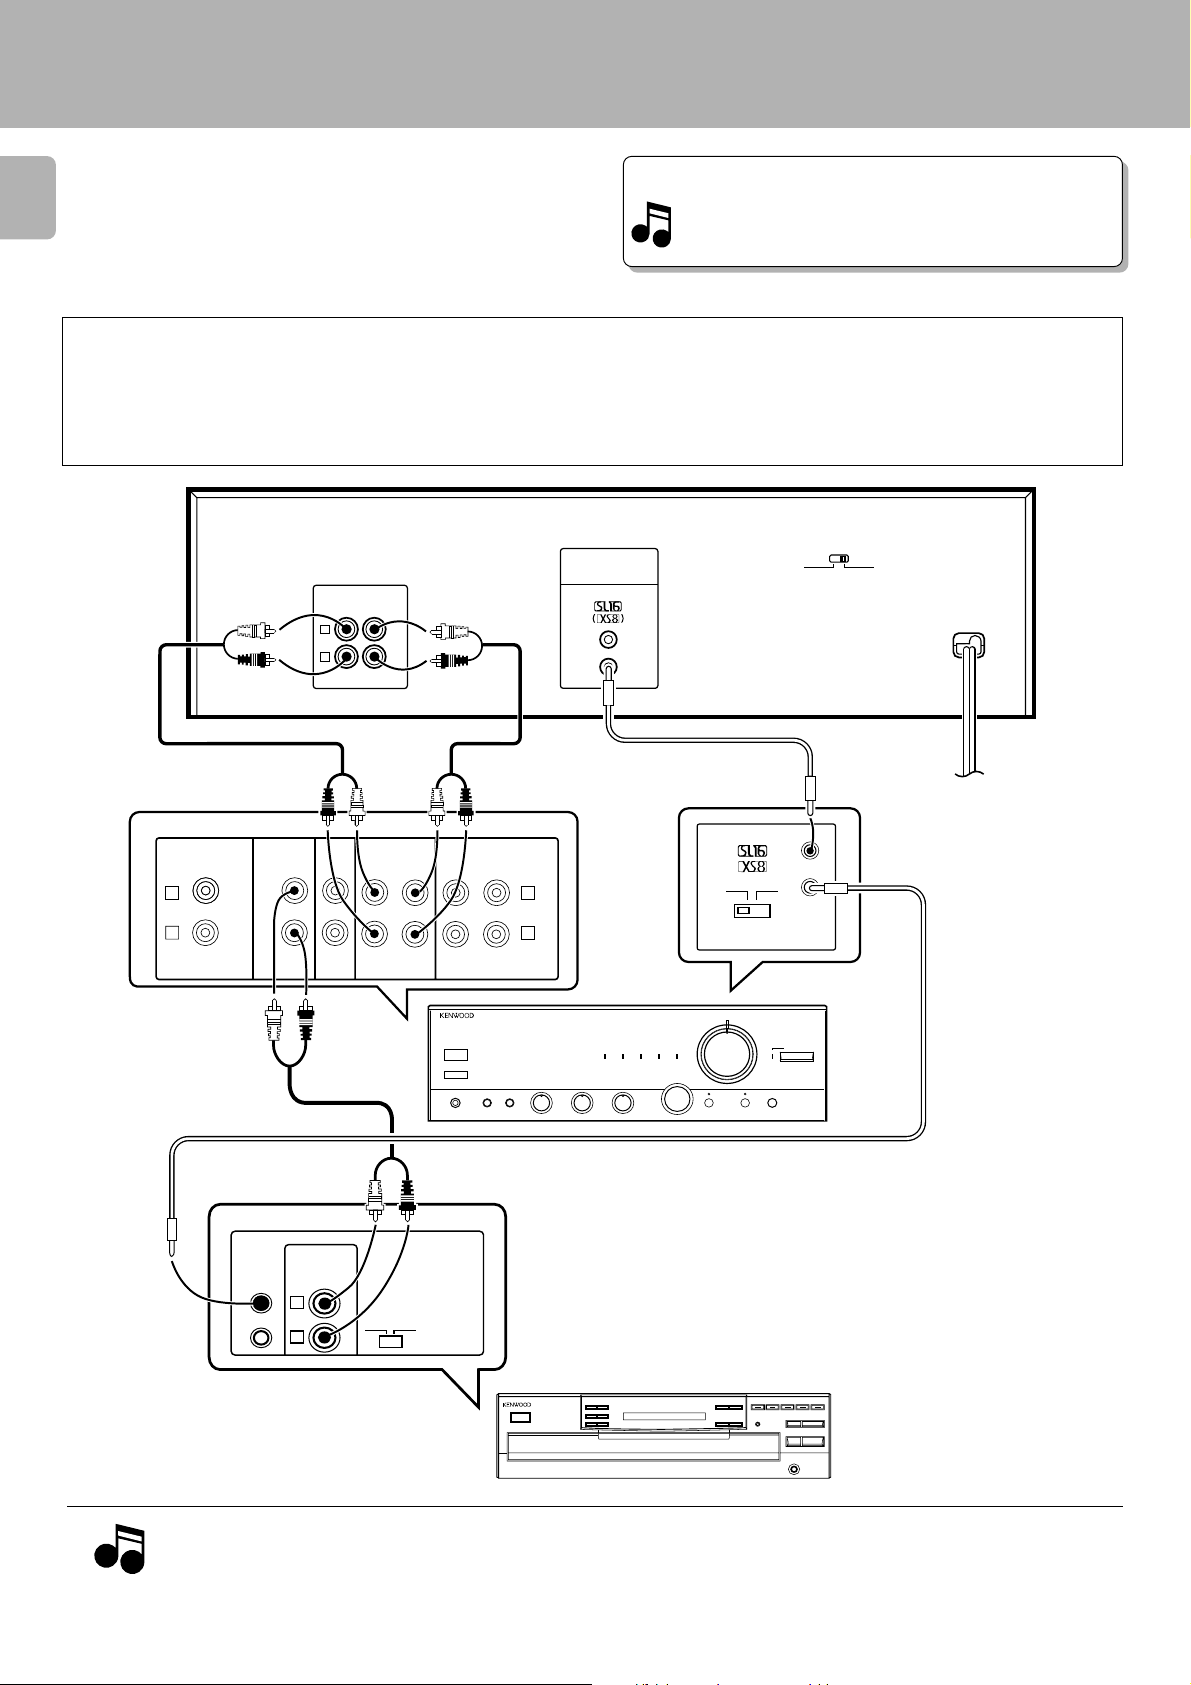
System connections
CT-20 50/ 203/ KXF-W 6 010 / W 401 0 (En/ M)
M ake connections as show n below . W hen connecting t he
related system component s, refer also to t he instruction
6
manuals of the related components.
Caution: Do not plug in the power lead until all connec tions
are completed.
Except for U.S.A., Canada
Caution regarding placement
To maintain proper ventilation, be sure to leave a space a round the unit (from the largest outer dimensions including projections) equal to, or greater
than, shown below.
Left and right panels: 10 cm, rear panel: 10 cm
REC PLAY
L
R
LINEIN LINEOUT
Malfunction of microcomputer
If opera tion is not possible or erroneous display a ppears even
thoug h all connect io ns have been made properly, reset the
micro co mputer referring to “ In case of d ifficulty”. ∞
SYSTEM CONTROL
AC110120V~
AC220-
240V~
PHONO
L
R
Audio cord
SYSTEM
CONTROL
CD TUNER
LINE OUTPUT
VARIABLE
L
R
Audio cords
TAPE
REC PLAY REC PLAY
SL16 XS 8
MD
System co ntrol cord
To wall AC outlet
SYSTEM CONTROL
SL 16
L
R
XS 8
Amplifier
System co ntrol cord
*The connected component model is
variable dependent on areas.
1. Connect all cords fir mly. If conn e ctions are loose, ther e c ou ld b e lo s s o f sound or noise prod uc e d .
Notes
Notes
2. W hen pluggi ng and unplugging conne ction c ords, be sure t o f irst rem ove t he pow er c ord fro m t he AC out let. Plugging/u nplugging
connection cords without r e moval of th e po wer cord c an cause m alf u n ctions or damage to the unit.
CD player
Page 7
System connections
CT-20 50/ 203/ KXF-W 6 010 / W 401 0 (En/ M)
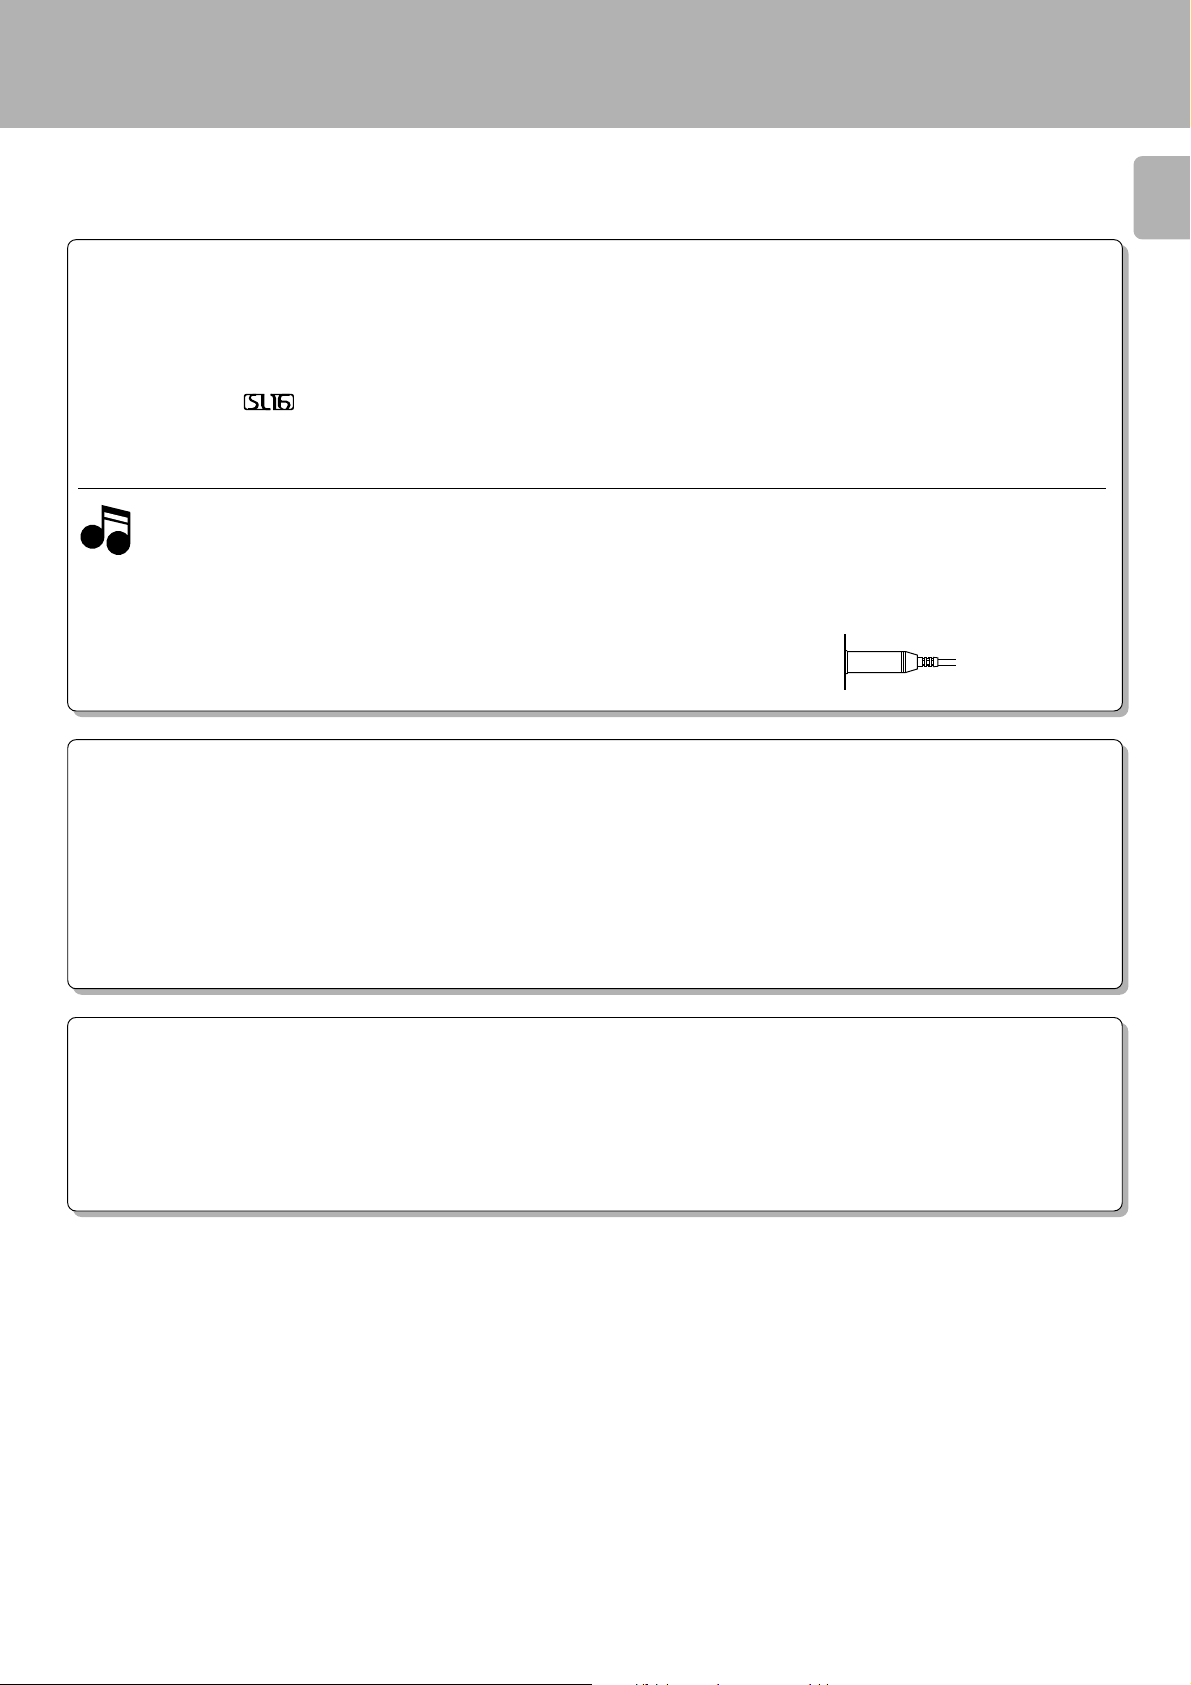
ABOUT THE SYSTEM CONTROL CONNECTIONS
Connecting system control cords after connecting a KENWOOD audio component system lets you take advantage of convenient system
control operations.
There are two KENW OOD system control modes. Make connections according to the groups of terminal symbols shown below.
[XS8] Mode : lets you combine F, f and ƒ terminals
[SL16] Mode : for
This unit is compatible with both [XS8] and [SL 16] modes . It comes from the factory set to the [SL16] mode. To
switch to the [XS8] mode, follow the instructions in “SWITCHING FROM [SL16] TO [XS8]” below.
1. [SL16] equipment cannot be combined with [X R], [X S], a nd [XS 8] equipment for system operations. If your equipment consists of this kind
Notes
Notes
of combination, please do not connect any system control cords. Even without system control cords, norma l operations can be carried out
without affecting performance.
2. If your amplifier or receiver does not ha ve a system control termina l, do not connect any system control cords to the system control terminals
on the other components.
3. Do not connect system control cords to any components other tha n those specified by KENWOOD. It may cause a malfunction and da ma ge
your equipment.
4. Be sure the system control plugs are inserted all the way in to the system control terminals.
terminals only
7
ABOUT THE SYSTEM CONTROL OPERATIONS
Remote Control
Lets you operate this unit with the system remote supplied with the amplifier or receiver.
Automatic Operation (except [X R] equipment)
Automatically sw itches the input selector on the amplifier or receiver when you start playback from this unit.
Synchronized Recording (except [XR] equipment)
Lets you synchronize recording wit h the start of playback when recording from CD, M D, LD, or analog discs. Also, the simple CCRS
operation lets you make great recordings from CD.
SW ITCHING FROM [SL16] TO [XS8]
You can easily change the system control mode with the following operation. Do this operation after completing all connections.
Switching to [X S8]: Hold down the 1 (rewind) key on Deck B and switch the POWER key from OFF to ON. 8
Switching back to [SL16]: Hold down the ¡ (fast forward) key on Deck B and switch the POWER key from OFF to ON.
÷ This operation will not affect it e ms stored i n the memory.
8
Page 8
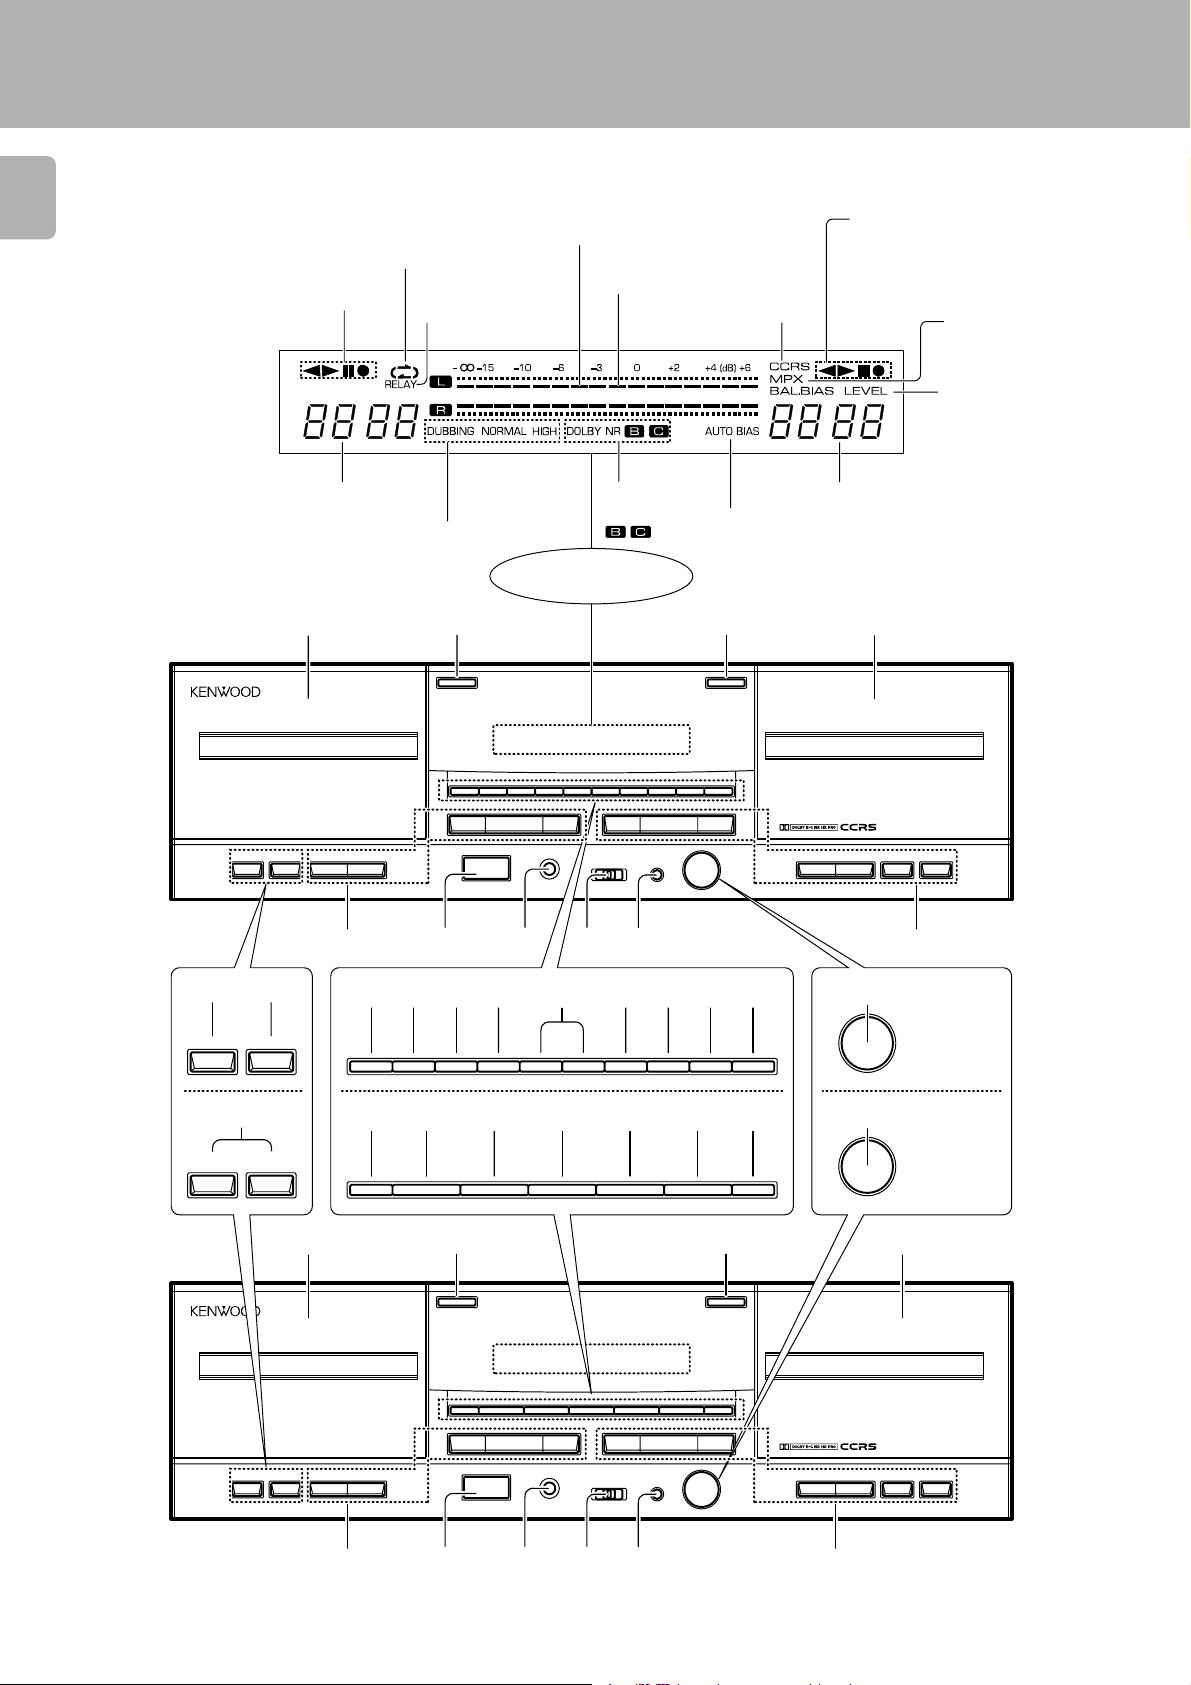
Controls and indicators
CT-20 50/ 203/ KXF-W 6 010 / W 401 0 (En/ M)
8
Operation indicato rs (Deck A)
2, 3 Transport dir ec tion
¶ Recording indicator (CT-2050/
8 Pause indicator (CT-2050/
CT-2050/KXF-W6010
indicators
KXF-W6010 only)
KXF-W6010 only)
STEREO DOUBLE CASSETTE DECK KXF-W6010
TAPE
A
PAUSE¶REC/ARM
Peak level indicators
REV.MOD E indicator s
(Dolby NR reference level)
RELAY indicator
Deck A COUNTER
indicators
DUBBING indicators
NORMA L
HIGH
DOLBY NR
indicators
Display
1 42 3
0 0
RELAY REC
NORM.DUBB.
PHONES
HIGH DUBB.
TIMER
REC OFF PLAY
MPX FILTER
MODE
CCRS
AUTO BIAS
∞
MIN/L
RESET A
DOLBY NR REV.MODE
237237
POWER
1
-ON –OFF
CCRS indicator
AUTO BIAS
indicator
RESET B
REC LEVEL/BAL.
/BIAS
∞
MAX/R
Operation indicato rs (Deck B)
2, 3 Transport dir ec tion
¶ Recording indicator
8 Pause indicator
Deck B COUNTER
indicators
AUTO REVERSEAUTO REVERSE
¡ 8
1¡8
PAUSE¶REC/ARM
indicators
MPX FILTER indicator
BAL. BIAS LEVE L indicators
(CT-203/KXF-W4010; BAL.
LEVEL only)
TAPE
B
8
PAUSE¶REC/ARM
&
NORMAL
DUBBING
TAPE
A
NORMAL
DUBBING
5 0
6 7 8 9
# $! @ % ^ & * ( ) ¡ ™
RELAY REC
NORM.DUBB.
RESET A
DOLBY NR REV.MODE
HIGH DUBB.
MPX FILTER
# $ % ( * ) ¡ £
HIGH
DUBBING
RESET A
DOLBY NR
REV. MODE
CCRS MPX FILTER AUTO BIAS
1 42 3
STEREO DOUBLE CASSETTE DECK KXF-W4010
HIGH
DUBBING
0 0
POWER
-ON –OFF
DOLBY NR
REV. MODE
PHONES
CCRS MPX FILTER AUTO BIAS
TIMER
REC OFF PLAY
RESET A
237237
MODE
CCRS
∞
MIN/L
AUTO BIAS
RESET B
MAX/R
RESET B
RESET B
REC LEVEL/BAL.
∞
REC LEVEL/BAL.
/BIAS
∞
∞
MAX/R
MIN/L
REC LEVEL/BAL.
∞
∞
MAX/R
MIN/L
AUTO REVERSEAUTO REVERSE
TAPE
B
¡ 8
1¡1
PAUSE¶REC/ARM
CT-203/KXF-W 4010
Downloaded from:
5 0
6 7 8 9
Page 9

Controls and indicators
CT-20 50/ 203/ KXF-W 6 010 / W 401 0 (En/ M)
9
1 Deck A
This deck is used exclu sively f or playback. (CT-203/KXF-W4010 only)
This deck is capable of bot h playback
and recording. (CT-2050/KXF-W6010
only)
2 Deck A eject (0) key 0
Press to open the cassett e holder of
deck A.
3 Deck B eject (0) key 0
Press to open the cassett e holder of
deck B.
4 Deck B
This deck is capable of bot h playback
and recording.
5 Deck A operation keys 0~!
1 :Rewind key (for f ast winding of
tape toward t he left reel seen
from you)
¡ :Fast Forward key (for fast wind-
ing of tape toward the right reel
seen from you)
2, 3 :Play keys
7 :Stop key (Stop)
6 POWER sw itch 0
Press to turn this un it ON and OFF.
7 PHONES jack !
Connect st ereo headphones (optio nal)
here.
8 TIMER switch £
This sw it ch is u sed in set t in g of t im er
playback and timer recording.
9 MODE key ^
Press to change the recording
level,balance,or bias settings.
0 Deck B operation keys 0~!
2, 3 :Play keys
7 :Stop key (Stop)
1 :Rew in d k ey (fo r fast winding of
tape toward t he left reel seen
from you)
¡ :Fa st Forwa rd key ( for fast wind-
ing of tape toward the right reel
seen from you)
PAUSE (
8) key !
:Press to let tape transport pause
temporarily.
REC/ARM (¶) key ^
:Press in stop mode to start recording or press in record mode
to le t t he re cording p ause aft er
leaving a non-recorded blank of
4 seconds.
! Deck A PAUSE (
8) key (CT-2050/
KXF-W6010 only) !
Press to let tape transport p ause te m porarily.
@ Deck A REC/ ARM (
¶) key (CT-2050/
KXF-W6010 only) ^
Press in stop mode to start recording or
press in record mode to let the recording pause afte r leaving a non-recorded
blank of 4 sec o n d s .
# RESET A key !
Press to reset the tape counter of deck
A to “0000”.
$ DOLBY NR key 0
Press to switch the Dolby Noise R eduction mode to B = C = OFF. This makes
it possible to use the Dolby NR effect in
recording and playback.
% REV. MODE key 0
Press to change t he t ape t ransport d irect ion.
^ RE LAY R EC key (C T-2050/KXF-W6010
only) (
Press to perform continuous recording
from deck A to deck B.
& DUBB. keys ( NORM./HIGH) (C T-2050/
KXF-W6010 only) )
DUBBING keys (NORMAL/HIG H) (C T-
203/KXF-W4010 only) )
Press to start tape dubbing.
NORM./NORMAL
: Dubbing at the normal
speed.
HIGH : Dubbing at a high speed .
* MPX FILTER key &
Press to reduce bea t noise when recording FM broadcasts.
( CCRS key ™
Press to sta rt recording a fter a utomatic
sett ing of t he optim um CD recording
level and optimum tape recording bias.
) AUTO BIAS key ^
When this key is pressed, the bias level
appropriate for the tape is set automatically for recording.
¡ RESET B key
Press to reset the tape counter of deck
B to “0000”.
™ REC LEVEL/BAL./BIAS knob (CT-
2050/KXF-W6010 only) ^
Adjust this before recording.
£ REC L EVEL /B AL. knob (C T-203/K XF-
W4010 only) ^
Adjust this before recording.
Downloaded from:
Page 10

Preparation for playback (recording)
Before playback (recording)
10
Set the TIMER sw itch to OFF.
1
TIMER
REC OFF PLAY
Set the POWER switch to ON.
2
POWER
-ON –OFF
Playback (recording) preparation
Load a cassette tape in deck A or B.
1
Press the eject (0) key.
1
÷ Be sure to r e move tape slack befo re i ns e rtion.
÷ The type of tape, that is, the Normal, High po sition or Metal position
÷ This unit cannot reco rd s o un d o n a Metal tape.
÷ Be sure to cl os e the cassett e h ol de r s ec u re ly b y pu s h in g it.
Insert a tape and close the cas sette holder.
2
Deck A:
Playback only. (CT-203/
KXF-W4010 only)
Playback/recording available. (CT-2050/KXF-W6010
only)
0
Deck B: Playback/recording
available.
CT-20 50/ 203/ KXF-W 6 010 / W 401 0 (En/ M)
: Keys a nd control used in the opera tions described on this page.
(playback only) is selected aut o matically.
Normal position TYPE
High position TYPE
Metal position (playback only) TYPE
Select the tape transport direction.
2
Press the play (2 or 3) key.
1
237
To play (record)
tape side B.
Feed the tape section w hich cannot be
played or recorded onto in the forw ard
direction.
Press the stop (7) key.
2
237
Determine the playback (recording) condition.
3
Select the playback (recording) mode.
1
REV.MODE
Select the Dolby NR mode.
2
DOLBY NR
BA
To play (record)
tape side A.
Tape transport direction indicators
The 2 and 3 indicators show the direction the tape is transported
during recordin g or playback. The direction us ed when the tape is
last stopped is held in memory even after this unit has been turned
OFF, and the tape transport starts in the indicated direction w hen
the unit is started a utomatically by a timer, etc. To change the ta pe
transport direction, press the play key for the opposite direction and
imm ediately press the stop (7) key.
Deck B direction indicators.Deck A direction indicators.
Each press switches the indication.
1 “ [” :Double-side playback (recording) w hich stops tape
stops after having played (or recorded) both sides.
2 “ ”” :Playbac k is endles s, but recording s tops after having
recorded both sides.
3 “ “” :One-way playback (recording) which stops tape af-
ter having played (or recorded) a single side.
Each press switches the indication.
1 DOLBY NR “OFF” (extinguished): Dolby NR is not used.
2 DOLBY NR “B”: Noise reduction of the ordinary type.
3 DOLBY NR “C”: Noise reduction with higher performance.
÷ Select the Dolby NR mode according to the tape recording status.
Downloaded from:
Page 11

Listening to cassette tapes
237
237
CT-20 50/ 203/ KXF-W 6 010 / W 401 0 (En/ M)
Preparation
Make “Playback (recording) preparation”.
0
To use the headphones
Connect commercially-available stereo headphones to the PHONES
jack for private listening.
PHONES
Normal playback
Start playback Fast forw arding or rew inding tape
Press the play (2 or 3) key.
To play side B.
237
÷ Tapes are played in t he directions indicat ed by their respect ive
indicators on the display.
To play side A.
Stop playback.
1
Press the 1 key or ¡ key.
2
1: Fast tape winding in the |
direction.
¡: Fast tape winding in the \
direction.
¡1
11
To pause playback (CT-203/KXF-W4010; Deck B only)
CT-2050/KXF-W6010
8
PAUSE
CT-203/KXF-W4010
÷ The 8 indicator lig hts.
Usage of counter
Before starting recording (playback), press the RESET A or
RESET B key to reset t he count er t o “ 0000” , and w rit e down t he
counter rea ding when the recording (playback) should be stopped in
the middle of the tape, etc.; this will make it ea sy to locate the same
positio n when you want to continue rec o rd in g (playback) next time.
It is also possible to use the Zero-stop function to return to the
positio n where rec or d in g (playback) was start e d .
Deck A counter.
RESET A
÷ Press the st o p (7) key to stop fast tape winding.
To stop playback
÷ Do not press the eject (0) button until the tape has stopped
completely.
Zero-stop operation
Fast w inding in the \ direction
Press simultaneously.
¡1
7
Fast w inding in the | direction
Press simultaneously.
¡1
7
Display example.
÷ Tape is wound until coun ter reading near “0000” where it stops.
Page 12

This function plays back the t apes in both decks A and B
continuously and repeatedly.
12
Relay playback
Load cassette tapes in both decks.
1
Open the cass ette holders of decks A and
1
B.
0
Insert cassette t apes and close the cas-
2
sette holders of decks A and B.
Deck A:
Playback only. (CT-203/
KXF-W4010 only)
Playback/recording available. (CT-2050/KXF-W6010
only)
Deck B: Playback/recording
available.
Listening to cassette tape
CT-20 50/ 203/ KXF-W 6 010 / W 401 0 (En/ M)
: Keys a nd control used in the opera tions described on this page.
÷ Be sure t o re move tape slack befo r e in se rtion.
÷ Be sure to cl os e the cassett e h ol de r s ec u re ly b y p us h in g it.
BA
Determine the playback condition.
2
Select the playback (recording) mode.
1
Select the Dolby NR mode.
2
Start playback.
3
237
To Stop relay playback
REV.MODE
DOLBY NR
Each press switches the indication.
1 “ [” : Relay playback of two s ides of tapes in dec ks A and
B is repeated.
2 “ ” ” : Relay playback is not available with this setting.
3 “ “ ” : Relay playback of only one side of tapes in decks A
and B is repeated.
Each press switches the indication.
1 DOLBY NR “OFF” (extinguished): Dolby NR is not used.
2 DOLBY NR “B”: Noise reduction of the ordinary type.
3 DOLBY NR “C”: Noise reduction with higher performance.
÷ Select t he Do lb y N R mode according to the tape recording status.
÷ Ta pes are played in the directions indicated by their respective indicators
on the d is p lay.
÷ The playback starts with the deck th e p lay key of w h ic h is p re s se d .
Press stop (7) key of the deck that is
playing.
237
Page 13

CT-20 50/ 203/ KXF-W 6 010 / W 401 0 (En/ M)
,
,
,
,
,
,
13
,,
,,
,,,
,,,
,,
,,
Page 14

Convenient music search (DPSS)
¡1
CT-20 50/ 203/ KXF-W 6 010 / W 401 0 (En/ M)
The DPSS (Direct Program Search System) enables the following convenient operations according to t he instructions of the
operation keys (these operation are however not available on both decks simultaneously). The DPSS functions are based on
14
the detection of non-recorded spaces of 4 seconds or more bet ween tunes.
1.Skip play : By s pec ifying a tune located several tunes beyond (or behind) the tune being played, s kips tunes
between the current tune and the selected tune and starts playback from the beginning of the
selected t une. Up to 16 tunes can be skipped in Skip Search.
2.Rew ind & Play : Rewinds the tape to the beginning and starts playback from there.
3.Single-tune repeated
playback
4. Dash & P lay : If a non-recorded spac e of more than 10 sec onds is detected during playback, that space will be
Space (non-recorded).
: One single tune is played back repeatedly up to 16 times.
skipped by fast forward tape winding.
Tune being played.
↑ ↑ ↑ ↑ ↑↑↑↑↑
Space (non-recorded).
Tape transport direction \.
: Keys a nd control used in the opera tions described on this page.
Skip play operation
The example below shows the case in which the direction indicated by the tape transport direction indicator is 3. If the direction
indicated by the t ape direction indicator is 2, alw ays press the keys for the opposite directions to those show n in the
illustrations below.
To play a tune located immediately after the
tune being played
¡1
Press once during the playback.
To play a tune located 4 tunes beyond
¡1
Press 4 times during the playback.
To play the tune being played from the beginning
¡1
Press once during the playback.
To play the tune located 4 tunes behind
Press 5 times during the playback.
DPSS will not function properly with the following types of tapes.
÷ Tapes containing spaces of 4 seconds or mo re , su c h as conversat io n s and speech e s.
÷ Tape containing extremely low levels or non-recorded s p aces in the middle of tunes, su ch as classical music.
÷ Tapes containing recording o f large noise between tunes.
Notes
Notes
÷ Tapes containing spaces of l es s than 4 seconds between tunes.
÷ Tapes recorded with low recording l e ve l.
÷ Tapes recorded using Cross-fade recording.
Page 15

Convenient music search (DPSS)
CT-20 50/ 203/ KXF-W 6 010 / W 401 0 (En/ M)
Rew ind & Play operation
This operation cannot be performed wit h the remote control (of t he separately sold amplifier).
Direction of tape direction indicator: 3.
237
Press simult aneously.
Direction of tape direction indicator: 2.
237
Press simult aneously.
¡1
¡1
÷ Tape returns to the beginning of the tape side being played and
playback restarts from th er e.
÷ Press the st o p (7) key to stop playback and cancel this operat io n .
Single-tune repeated playback operation
Play the tune to be repeated.
1
Press the play key of the same direction
2
as the current tape transport direction.
When direction of t ape direction indica-
tor is 3:
15
237
÷ Normal playback resumes after repeating the sa me tune for 16 times.
÷ Press the st o p (7) key to stop playback and cancel this operat io n .
Dash & Play operation
The Dash & Play skips long non-recorded spaces automatically as the tape is played.
This operation cannot be performed wit h the remote control (of t he separately sold amplifier).
Determine the playback mode (conditions).
1
Each press switches the indication.
1 “ [” : Two sides are played only onc e, after which playbac k
stops.
2
“””: Two sides are repeated 8 times, after whic h playback
REV.MODE
Press the 1 and ¡ keys simultaneously.
2
3 ““”: One side is repeated 8 tim es, after which playback
÷ In case the REV.MODE key is set to “[” and tapes are inserted in both
of the decks, when a deck finishes Dash & Play, the other deck starts
Dash & Play for 16 times, after wh ic h it stops.
stops.
stops.
Downloaded from:
Press simultaneously.
¡1
÷ Press the st o p (7) key to stop playback and cancel this operat io n .
Page 16

How to record (CT-203/KXF-W4010; Deck B only)
The cas s ette deck incorporates the Dolby HX Pro headroom
extension function and auto-bias function to provide a re-
16
cording with superior high-frequency characteristics.
CT-2050/KXF-W6010 only
Since this unit is not designed for recording with metal
(TYPE
Preparation
) tapes, do not use metal tapes for recording.
Make “Playbac k (recording) preparation”.
1
0
(CT-203/K XF-W4010; Insert a tape in deck
B.)
(Load a disc in the CD player.)
2
: Keys a nd control used in the opera tions described on this page.
Normal recording
CT-20 50/ 203/ KXF-W 6 010 / W 401 0 (En/ M)
Select the source to be recorded.
1
Perform auto-bias adjustment. (The bias adjustment is applied to deck B.)
2
AUTO BIAS
Set the recording level.
3
Play a music source.
1
Enter the record-pause mode.
2
CT-2050/KXF-W6010
8
PAUSE¶REC/ARM
CT-203/KXF-W4010
÷ Select by operating the input se le c tor of the amplifier (optional).
÷ In case of recording a FM broa dcast,refer to discription of "How to use
the MPX FILTER key". &
“AUTO BIAS”blinks. After approximately
÷ The optim um b ias is set in about 40 seconds, af ter which t he deck
enters the stop mode.
÷ For a fine adjustment after setting AUTO BIAS, refer to the description
of “Bias level adjustment”. (CT-2050/KXF-W6010 only ) &
÷ To cancel the auto-bias a djustment operation in the middle, press the
stop (7) key.
÷÷
÷ Recording is possible even when the auto-bias setting is omitted.
÷÷
÷ If the a mount of rema ining tape is sma ll, the auto-bias adjustment may
be canceled in t h e middle and tape stop pe d at that position .
÷ The bias level is canceled when th e e je c t (0) key is pressed.
÷ While pres si ng the PAUSE (8) key, press the REC/ARM (¶) key.
Each press of the MODE key changes the setting.
1 “LEVEL” lights up: Recording level setting mode
2
“BAL.” lights up: Recording balance setting mode
3 “BIAS” lights up: Recording bias setting mode (Deck B of the
CT-2050/KXF-W6010 only)
“LEVEL”,“BAL.”,and “BIAS”go off: Counter display mode
4
40 seconds
“AUTO BIAS” lightsup.
lights up
Pres s the MODE key and select the "BAL."
3
mode.
Adjust the recording balance.
4
Right sound
decreases.
Press the MODE key and select the
5
"LEVEL" mode.
Adjust the recording level.
6
Recording
level
decreases.
Stop playing t he source.
7
MIN/L
MIN/L
MODE
REC LEVEL/BAL.
/BIAS
Left sound
MODE
∞
MAX/R
REC LEVEL/BAL.
/BIAS
∞
MAX/R
decreases.
Recording
level
increases.
∞
∞
Right channel levelLeft channel level
÷ In counter, adjust the recording balance level so that the left and right
displays are the same. You can also check with the Òand Âpeak level
indicators.
Each press of the MODE key changes the setting.
1
“LEVEL” lights up: Recording level setting mode
2 “BAL.” lights up: Recording balance setting mode
3 “BIAS” lights up: Recording bias setting mode (Deck B of the
CT-2050/KXF-W6010 only)
“LEVEL”,“BAL.”,and “BIAS”go off: Counter display mode
4
0dB.
Recording level display.
÷ Adjust the recording level so that the 0 dB of the pea k level indicators
some times lights up.
÷ The recording level can be adjusted on b oth decks A and B. (CT-203/
KXF-W4010; D ec k B o nl y)
lights up
Page 17

Start recording.
4
CT-2050/KXF-W6010
CT-203/KXF-W4010
Press the REC/ARM (¶) key.
1
REC/ARM
Press once.
Play the music source from the begin-
2
ning.
How to record (CT-203/KXF-W 4010; Deck B only)
CT-20 50/ 203/ KXF-W 6 010 / W 401 0 (En/ M)
17
÷ Recording will start.
÷ The deck enters the stop mode automat ic ally when t h e tape has
been recorded till the end.
Bias level adjustment (Deck B of the CT-2050/KXF-W6010 only)
The MODE key can be used to adjust the bias level.
Pres s the MODE key and s elect the "BIAS"
1
mode.
MODE
Adjust the bias level.
2
REC LEVEL/BAL.
/BIAS
∞
MIN/L
The high frequency
decreases.
∞
MAX/R
The high frequency
increases.
Each press of the MODE key changes the setting.
1 “LEVEL” lights up: Recording level setting mode
2
“BAL.” lights up: Recording balance setting mode
“BIAS” lights up: Recording bias setting mode (Deck B of the
3
CT-2050/KXF-W6010 only)
“LEVEL”,“BAL.”,and “BIAS”go off: Counter display mode
4
÷ To a djust the bias level, play ba ck the recorded sound and a djust to the
suitable level.Repeat if necessary.
÷ The bias can be adjusted to a value of ±3.
How to use the MPX FILTER key
Use this function when recording a radio (FM) broadcasts.
MPX FILTER
Depending on the tuner, a recorded FM broadcast may
produce a “beat” s ound. In this c ase, pres s the MP X FIL TER
key before recording. To c ancel, pres s the MP X FIL TER key
again.
lights up
lights up
Page 18

18
237
How to record (CT-203/KXF-W 4010; Deck B only)
CT-20 50/ 203/ KXF-W 6 010 / W 401 0 (En/ M)
To pause recording temporarily
Pause
8
PAUSE
÷ The 8 indicator lights .
To resume recording
REC/ARM
To stop recording
1
CT-2050/KXF-W6010
CT-203/KXF-W4010
2
Stop the tape transport.
Stop playing the source component.
How to provide non-recorded blanks betw een programs
In stop mode
Press successively twice.
REC/ARM
During recording
Press once.
REC/ARM
÷ After lea ving a non-recorded blank of about 4 seconds, the deck enters
the re co rd -pause mo de .
To start recording again from the biginning
The following procedure is useful when you want to cancel recording in progress and re-start it.
A non-recorded space of about 4 seconds or more should be reserved before the position where recording was started.
CT-2050/KXF-W6010
CT-203/KXF-W4010
Rewind during recording.
1
During recording in the 3 direction:
¡1
During recording in the 2 direction:
¡1
Press the REC/ARM (¶) key twice.
2
REC/ARM
Replay the tune you wish to record.
3
Press the REC/ARM (¶) key once.
4
REC/ARM
÷ When t he ¡ (or 1) key is pressed d uring recordin g, recording is
aborted and tape is rewound as shown below if there is a non-recorded
space of more than 4 seconds before the re co rd in g s tart position .
Tape stops after 2 sec.
of t ransport.
Re-recording
Recorded tune Tune to be re-recorded.
Blank of 4 sec. or more.
÷ If t here is no recorded tune bef ore, th e tape w ill be rew ound t hen
stopp ed.
÷ When re- recording from the beginning of tape, feed the leader tape (the
first portion of tape that cannot be recorded) before starting rerecording.
÷ A non-recorded space of about 4 seconds is reserved on tape, then the
tape t ransport stops.
÷ Recording starts.
Downloaded from:
Page 19

Relay recording (CT-2050/KXF-W 6010 only)
This func tion allows to record s ound continuously from deck
A to B.
Since this unit is not designed for recording with metal
(TYPE
) tapes, do not use metal tapes for recording.
CT-20 50/ 203/ KXF-W 6 010 / W 401 0 (En/ M)
19
Preparation
Make “Playback (recording) preparation”.
0
(If relay recording is required, insert tapes
in both decks A and B . Selec t the recording mode t o set to "O" or "[" only.)
: Keys a nd control used in the opera tions described on this page.
Relay recording
Set the relay recording mode.
1
RELAY REC
Perform auto-bias adjustment. (The bias adjustment is applied to deck B.)
2
“AUTO BIAS”blinks. After approximately
AUTO BIAS
÷ The optim um b ias is set in about 40 seconds, af ter which t he deck
enters the stop mode.
÷ Recording is possible even if the auto-bias adjustm ent operation is
omit ted.
Adjust the recording level.
3
"RELAY" lights up.
40 seconds
“AUTO BIAS” lightsup.
Play the music source.
1
Set the record-pause mode. (deck A).
2
Adjust the recording balance and rec ord-
3
ing level.
Stop playing the music source.
4
Start recording.
4
Press the REC/ARM (¶) key (of deck A).
1
Play the music source from the begin-
2
ning.
To cancel relay recording
REC/ARM
RELAY REC
^
÷ Recording w i ll start.
÷ Recording on deck B sta rts immediately after recording on deck A has
completed.
"RELAY" goes off.
÷ Press the RELAY REC key again.
Note
Note
Relay recording cannot be perf o rm e d if the REV.M ODE key is set t o “ ”” .
Downloaded from:
Page 20

Tape dubbing operation (Deck A \ Deck B)
CT-20 50/ 203/ KXF-W 6 010 / W 401 0 (En/ M)
The dubbing refers to the copy of the recorded contents of a tape to another t ape (tape in Deck A \ tape in Deck B).
Since this unit is not designed for recording w ith metal (TYPE
20
Load the tape to be played in dec k A and
Preparation
1
the tape to be recorded in deck B. 0
Set the tape transport directions of decks
2
A and B to the same direction ( by
pressing the play (2 or 3) key then
pressing the stop (7) key immediately
after it ).
Make "P layback (recording) preparation".
3
) tapes, do not use metal tapes for recording.
CT-203/KXF-W4010 only CT-2050/KXF-W6010 only
: Keys a nd control used in the opera tions described on this page.
Tape dubbing
Perform auto-bias adjustment. (The bias adjustment is applied to deck B.)
1
“AUTO BIAS”blinks.
AUTO BIAS
÷ The optim um bias is set in about 40 seconds , after w hich t he deck
enters the stop mode.
÷ Recording is possible even if the auto-bias adjustm ent operation is
omit ted.
Aft er approximately
40 seconds
“AUTO BIAS” lightsup.
For normal-speed dubbing. For high-speed dubbing.
NORM.DUBB
CT-2050/KXF-W6010
NORMAL
DUBBING
CT-203/KXF-W4010
HIGH DUBB.
CT-2050/KXF-W6010
CT-203/KXF-W4010
HIGH
DUBBING
To pause dubbing
For normal-speed dubbing. For high-speed dubbing.
NORM.DUBB
CT-2050/KXF-W6010
NORMAL
DUBBING
CT-203/KXF-W4010
HIGH DUBB.
CT-2050/KXF-W6010
CT-203/KXF-W4010
HIGH
DUBBING
To stop dubbing
Press the stop (7) key of Deck B.
Normal dubbing:
Dubbing at the normal
speed.
÷ Only deck B enters the record- pause mode after leaving a non-
recorded space of about 4 seconds in case of normal-speed dubbing,
or about 6 seco nd s in case of high-speed dubbing.
÷ To resume dubbing aft er pause, press th e same DUBBING key as
above (NORMAL DUBBING or HIGH DUBBING) again.
High-speed dubbing:
Dubbing at about tw ice the
normal speed.
"DUBBING HIGH" lights up ."DUBBING NORMAL" lights up.
1. The recording balance and recording level cannot be adjusted for dubbing.
2. The DOLBY NR is not active during dubbing.
Notes
Notes
3. Noise from TV may interfere with dubbed sound if high-speed dubbing is executed near a T V set. To prevent this, insta ll the system farther
4. If the original tape was recorded a t a high level, the sound quality ma y be degraded, if high- speed dubbing is used. In such a ca se, use norma l-
Downloaded from:
237
÷ Both decks A and B enter the stop mode.
The tape recorded by dubbing features the same NR system as the original tape in Deck A.
from the TV set.
speed dubbing.
Page 21

Convenient CD recording (CT-203/KXF-W 4010; Deck B only)
CT-20 50/ 203/ KXF-W 6 010 / W 401 0 (En/ M)
By c onnecting this unit with a K ENWOOD "f", "ƒ", " (ƒ)", type amplifier (rec eiver) with a SYSTEM C ONTR OL jac k
and a KE NWOOD CD player with a SYSTEM C ONTROL jac k us ing s ys tem control cords, rec ording on this unit and playback on
the CD player can be start ed simultaneously.
Since this unit is not designed for recording w ith metal (TYPE
Complete the connections referring to
Preparation
1
"System connections".
Make “Playbac k (recording) preparation”.
2
(CT-203/KXF-W4010; Insert a tape in
deck B.)
(Load a disc in the CD player.)
3
6
0
) tapes, do not use metal tapes for recording.
: Keys a nd control used in the opera tions described on this page.
CD synchro recording
Perform auto-bias adjustment. (The bias adjustment is applied to deck B.)
1
÷ The optinum bias is set in about 40 seconds, aft er w hich t he deck
enters stop mode.
AUTO BIAS
÷ For a fine adjustment after setting AUTO BIAS, refer to the description
of "Bias level adjustment". (CT-2050/KXF-W6010 only)
÷To cancel the auto-bias adjustm ent operation in the middle, press
the st op (7) key.
÷ Recording is possible even when the auto-bias setting is omitted.
&
21
Adjust the recording level.
2
Play a CD.
1
Press the 6 key
of the CD player.
Set the record-pause mode.
3
CT-2050/KXF-W6010
CT-203/KXF-W4010
Start playing the CD.
4
Set the record-pause mode.
2
8
PAUSE¶REC/ARM
÷ While pres sing the PAUSE (8)
key, press the RE C/AR M (¶) key.
8
PAUSE¶REC/ARM
Adjust the recording balance
3
and recording level.
“How to record.”
÷ While pres s ing the PAUSE (8) key, press the REC/ARM (¶ ) k e y .
^
Put the CD player in stop
4
mode.
Press 7 key of the
CD player.
To pause : Press the 6 key of t he CD player.
To restart recording : Press the 6 key of the CD player.
To stop : Press the 7 key of the CD player.
Downloaded from:
Press the 6 key of the CD player.
÷ Synchro recording is not possible when tracks of more tha n one CD are
programmed using a Carrousel type CD player.
÷ Recording starts at this moment.
÷ When the CD pla yer has completed pla yback, the cassette deck stops
recording and enters the stop mode.
÷ If the stop (7) key of the cassette deck is pressed, the cassett e deck
enters the stop mode but the CD player does not st op.
Page 22

Convenient CD recording (CT-203/KXF-W 4010; Deck B only)
CT-20 50/ 203/ KXF-W 6 010 / W 401 0 (En/ M)
When connected w it h a KENW OOD amplifier,CD player provided w it h "f", "ƒ", " (ƒ)" marking through t he
sys tem c ontrol cord, this unit allows to use the CC RS, whic h starts recording automatic ally after setting the optimum recording
22
level for the CD and tape to be used in recording.
Since this unit is not designed for recording w ith metal (TYPE
Complete the connections referring to
Preparation
1
"System connections".
(Set the input selec tor of the amplifier to
2
CD.)
(Load a disc in the CD player.)
3
(Edit tracks as required on the CD player.)
6
) tapes, do not use metal tapes for recording.
: Keys a nd control used in the opera tions described on this page.
Recording of CD playback (CCRS) (Deck B only)
Insert a tape in deck B.
1
Determine the recording condition.
2
Select the recording mode.
1
Select the Dolby NR mode.
2
Press the CCRS key.
3
CT-2050/KWF-W6010
CT-203/KXF-W4010
REV.MODE
DOLBY NR
CCRS
÷ For the t ape direction setting, see the d e sc ri ption below “Select t he
tape transport direction”.
Each press switches the indication.
[[
1 “
[” :Double-side recording.
[[
””
2 “
”” :(Tape also stops after having recorded both sides.)
””
““
3 “
“” :One-way recording.
““
Each press switches the indication.
1 DOLBY NR “OFF” (extinguished): Dolby NR is not used.
2 DOLBY NR “B”: Noise reduction of the ordinary type.
3 DOLBY NR “C”: Noise reduction with higher performance.
÷ Program-edit r ec or d ing i s no t possible when tracks of more than one
CD are programmed using a Carrousel typ e CD player.
÷ When perf orming CCRS recording w ith a CD player which can be
loaded mult iple com pact discs, set the CD palyer t o TRACK mode,
press t he disc s elect or key and press t he CCRS key of t he cassett e
deck.
÷ The CCRS indicator blinks, and actual recording starts in about 20 to 200
seconds (after c re at in g a non-recorded blank of about 8 s e co n ds ).
0
How to cancel CCRS
During recording level sett ing:
Press the Stop key of the CD player or the stop key
of the cassett e deck.
During CCRS recording:
Press the Stop key of the CD player, then press the
OPEN / CLOSE key of the CD player.
After completion of CCRS recording:
Press the OPEN / CLOSE key of the CD player.
1. If the CCRS key is pressed during CD playback, playback stops and CCRS operation begins.
2 .If the rem aining amount of t ape is small, CCRS may not f unction corre ctly or CCRS operation m ay be canceled in mid-operation.
3.Once the CCRS recording level h as been set , the recording balance and recording level cannot b e adjust ed while t he CCRS operation
is being carried out.
Notes
Notes
4.The CCRS function sets the p eak level for t he en tire CD in approx. 20~ 200 seconds. On very rare occasions, how eve r, the func tion
may not be able t o set the opt imum reco rding lev el. If this occurs, carry out recordin g m anually referr ing t o the “N orm al recording”
sectio n.
5. The CCRS recording level setting is canceled when the open/close key of the CD pla yer is pressed or when the power is switched OFF.
6. With CD players equipped with the EDIT function, it is possible to make recordings in which the la st songs on sides A and B are not cut
off in the middle and in which the recording ca pacity of the tape is used to the fullest extent. (S et the R EV.MODE key of the deck to “ [” .)
÷ After recording, the cassette deck and CD player enter the stop
mode automatically.
÷ Afte r complet ion of CCRS recording , be sure t o cancel the CCRS
and ensure that the CCRS indicator has gone off.
^
Page 23

Timer operations
This unit incorporates a built-in timer standby function. By
using an audio timer optionally available in the market,
wake-up playbac k and unattended recording of tape can be
started at any tim e of the day. Connect the power cords of
the component s directry or indirectly t o t he t imer so that
their powers can be turned on via the timer.
The tim er setup operat ion varies depending on the tim er.
Also read carefully the instruction manual of your audio
tim er.
Tuner
Audio ti mer
CT-20 50/ 203/ KXF-W 6 010 / W 401 0 (En/ M)
To AC outlet
23
Set t he pow er sw itches of the compo-
Preparation
1
nents to ON.
Set the input selector of the amplifier to
2
TAPE.
Make "P layback (recording) preparation".
3
(If relay playback is required, insert tapes
in both decks A and B.)
Timer playback of tape
Start playback.
1
REVERSE
2
Adjust the volume of the amplifier.
2
Rew ind the tape(s) to the start position.
3
STOP
FORWARD
7
Amplifier
0
3
(CT-2050/203/KXF-W6010/W4010)
Set the TIM ER sw itch to PLAY.
4
Set the timer.
5
1. When connecting the KENWOOD equipment (amplifier, CD player) and the system, remove the disc from the CD player.
2. If relay playback is required, set to “
Notes
Notes
3. If tapes are inserted in both decks A and B, timer playback starts with deck B.
4. Switch on the power to the cassette deck. (The timer will not operate if it is switched off.)
TIMER
REC OFF PLAY
¡1
[[
[” or “
[[
““
“”.
““
÷ Set the timer so that the tape start s at the desired time of the day.
÷ When the set time comes, tape playback starts automatically.
÷ Read carefully t h e in s truction manual of your audio timer.
Page 24

Timer operations
CT-20 50/ 203/ KXF-W 6 010 / W 401 0 (En/ M)
Set t he pow er sw itches of the compo-
Preparation
24
1
nents to ON.
Set the input selector of the amplifier to
2
TUNE R .
Receive the desired radio station w ith
3
the tuner.
Make "P layback (recording) preparation".
4
(If relay recording is required, insert tapes
in both decks A and B.)
(Remove the disc from the CD player.)
5
CT-2050/KXF-W6010 only
0
: Keys a nd control used in the opera tions described on this page.
Timer recording of tuner broadcast (CT-203/KXF-W4010; Deck B only)
Press the M PX FILTER key to ON.
1
MPX FILTER
Adjust the recording level.
2
CT-2050/KXF-W6010
CT-203/KXF-W4010
Set the amplifier volume to the minimum position.
3
Set the TIM ER sw itch to REC.
4
Set the record-pause mode.
1
8
PAUSE¶REC/ARM
Adjust the recording balance and
2
recording level.
(w hen recording FM broadcasts only)
"MPX" lights up.
÷ Refer to t he "How to use the M PX FILTER key". &
÷ To cancel, press the M PX FILTER key again.
÷ While pres si ng the PAUSE (8) key, press the REC/ARM (¶) key.
÷ Refer to the "How to record".
^
TIMER
REC OFF PLAY
Set the timer.
5
Timer relay recording (CT-2050/KXF-W 6010 only)
Press the M PX FILTER key to ON.
Notes
Notes
1
Complete the procedure 1, 2, 3 of
2
"Relay recording".
Complete the procedure 3, 4, 5 of
3
"Timer recording of tuner broadcast".
1. To ensure that the cassette deck’s automa tic shut off switch operates before the power is shut off, set the timer so tha t it operates for a little
longer than the playing time of the tape.
2. Switch on the power to the cassette deck. (The timer will not operate if it is switched off.)
&
(
÷ Set the d e si re d time when t h e r ec o rd in g is to be starte d .
÷ When the set time comes, the powers of the related components are
turned O N and recordi ng s tarts.
÷ Recording stops when the end of side to be recorded is re ached.
÷ Read carefully t h e in s truction manual of your audio timer.
÷ Relay recording is not set, deck B will record .
Page 25

In case of difficulty
CT-20 50/ 203/ KXF-W 6 010 / W 401 0 (En/ M)
What appears to be a malfunction may not always be serious. If your unit should not perform as expected, consult the table
below to see if the problem can be corrected before seeking help from your dealer or service representative.
25
Operation to reset
The microcomputer may fall into m alfun ction (impossibilit y to operate, erroneous displa y, etc.) when the power cord is unplugged while
this unit is ON or due to an external factor. In this case, execute the
following method to reset the microcomputer and return it to normal
condition.
Symptom
Sounds is not produced when the Play key is
press ed.
The deck does not work when an operation
key is pressed.
÷ The connection cord s are connect ed im prop-
erly.
÷ The head is dirt y .
÷ Tape is irregularly wound and hard to take up.
÷ A non-recorded tape is being p layed.
÷ The cassette holder is not closed completely.
÷ The operation key w as pressed im mediate ly
after c lo si ng the cassett e h ol de r.
÷ An operation key is pressed in less than 3
seconds after this unit is turned ON .
÷ Tape is not ins er ted.
÷ Tape is irregularly wound and hard to take up.
÷ Tape has been fully wound to reel.
Turn the power switc h on and off again while pres s ing the stop
(7)key on deck B.
÷ Please note that resetting microc omputer cle ars contentsstored in
and returns it to the condition when it left the factory.
Cause
÷ Connect the cords properly referring to "Sys-
tem connections".
÷Clean the head referring to "Cleaning the
head section".
÷ Replace the tape.
÷ Play a recorded tape.
÷ Close the cassette holder com p le tely.
÷ Press the desired operation key in a few
seconds after closing the c assette holder.
÷ Press the desired operation key in more than
3 seconds after turning the power on.
÷ Insert a tape.
÷ Replace the tape.
÷ Change the tape transport direction or insert
the tape inversely.
Remedy
6
4
DPSS malfunctions.
CCRS does not work.
The dubbing on Deck A and Deck B ends at
different timing.
The cas sette holder does not open when the
eject(0)key is pressed.
Sound is hoars e, or high frequenc ies are not
audible.
Sound is distort ed.
÷ The tape is not suitable for DPSS operation, for
example t he spaces betw een tu nes are too
short.
÷ A recordable tape is not inserted in dec k B .
÷ A disc is not p laced in the CD player.
÷ The system control cord ma y be disconnected.
÷ The disc is dirty.
÷ This is due to the difference in tape length or to
the cha racteristics of the ca ssette deck mechanisms.
÷ The key is pressed during reco rding or play-
back.
÷ The head is dirty.
÷ The tape is stretched or wrinkled.
÷ The recording level was too high.
÷ A tape recorded with distorted sound is being
played.
÷ Read “ Convenient music search (DPSS)”.
$
÷ Insert a recordable tape in deck B and press
the CCRS key.
÷ Place a disc in the CD player and press the
CCRS key.
÷ Connect th e sy stem control cord securely.
÷ Clean the disc , place it in t h e CD player, and
press t h e CCRS key.
÷ A small tim e dif f erence is n ot regarded as a
failure.
÷ Press in the stop mode.
÷ Clean the head referring to "Cleaning the
head section".
÷ Replace the tape.
÷ Adjust t he recordin g level re f erring t o "How
to record". ^
÷ Replace the tape.
4
Page 26

26
In case of difficulty
CT-20 50/ 203/ KXF-W 6 010 / W 401 0 (En/ M)
Symptom RemedyCause
Recording is not initiated when the REC/
ARM (¶) key is pressed.
Noise level is high.
Sound is vibrating.
Playback or recording starts immediately
when the power is switched ON.
÷ The protect ion t ab on the casset te has been
broken.
÷ The cassette holder is not c losed completely.
÷ The recording level is set to the minimum
position.
÷ The TAPE input selector is select ed on the
amplifier.
÷ Tape has been fully wound t o a reel.
÷ The head is m agnetized.
÷ External noise is induced.
÷ The system assembly position is wrong.
÷ The recording level was too low.
÷ A tape recorded w it h Dolby NR ON is be ing
played with Dolby NR OFF.
÷ The capstans or pinch ro ll er s are dirty.
÷ Tape is irregularly wound.
÷ The TIMER switch is set to PLAY or REC.
÷ Use a cassette with unbroken tab or close the
hole.
÷ Close the cassette holder completely.
÷ Adjust the recording level re f erring t o "How
to record".
÷Press t he input select or key of t he source
to be recorded.
÷ Change the t ape transport direct ion of deck
or insert the tape inversely.
÷ Demagnet ize the head ref erring to "Clean-
ing the head section". 4
÷ Install th e system apart f rom other elec t ric al
appliances and TV set.
÷ Cha nge the a rrangement or the position of the
equipment.
÷ Adjust the recording level re f erring t o "How
to record".
÷ Set the DOLBY NR key to B or C.
÷ Clean the capstans and pinch rollers.
÷ Wind t he tape regularly by f ast f orw arding,
rew ind ing or playing it f ully f rom one reel t o
another.
÷ Set the TIM ER swit ch to O FF unless tim er
playback or tim er re c o rd in g is r eq u ire d .
^
^
Note
Note
With some ta pes, a squea ky noise is produced when the tape is stopped automa tically. T his is due to the tape protection function, and not
a malfunction.
Page 27

Glossary
Dolby noise reduction system
CT-20 50/ 203/ KXF-W 6 010 / W 401 0 (En/ M)
0
In case of difficulty
Dolby noise reduction system
The Dolby noise reduction system was developed to reduce the tape hiss noise generated durin g p layback.
The optimum effect of the Dolby NR system is obtained when the same type NR system is used for both recording and playback. If a different type
NR system is used, playback is not performed correctly. Ma ke sure tha t the same type noise reduction system is used for both recording and playba ck.
Dolby B NR
The most popular noise reduction sy s tem used in h o me audio componen ts. Usually, Dolby NR system corresponds to B NR.
Dolby C NR
Dolby C NR offers improved noise reduction performance over tha t of the Dolby B NR. It fea tures a superior noise reduction effect, use Dolby C NR
to rec or d o r p layback with this unit.
It is re c ommended that tapes recorded with the Dolby NR system be marked “ B” or “ C”, so t h at they can easily be distinguishe d .
27
DPSS (Direct Program Search System)
The DPSS detects non-recorded blanks of 4 seconds or m ore betw ee n music and enables the f oll owing f o ur types of simple playback operations
according to the instructions given by pressi ng o p e rat io n k ey s . (It is not possible to perform DPSS operations s imultaneously on the two decks.)
1. Skip play : By specifying a tune located several t u n e s be y on d (or behind ) t he tune being played, skips tunes between the current tune
and the selected tune and starts playback from the beginn in g o f the selected tune. U p to 16 tune s can be skip pe d i n Skip
Search.
2. Rewind & Play : Rewin d s the tape to the beginning and starts playback from there.
3. Single-tune repeat ed
playback : On e s in gl e tune is played back repeatedly up to 16 times.
4. Dash & Play : If a non-recorded space of more than 10 second s is d etected dur in g p layback, that s p ace will be skipped b y fast forward
tape winding.
Recording w ith Dolby HX Pro
$
^
What is Dolby HX Pro?
In ordinary recording usin g high-fre quency b iasing, the high-freq uency bias current , which should be co nst ant, is increased with some recording
sources due to the high-f reque ncy co mponent contained in the m us ic, etc. This increase aff ec t s t he recor ding c haracterist ics with distorted high
freque n c ie s and degraded dynami c range and f re qu e n cy r es p on s e .
The Dolby HX Pro circuit detects the high- frequency component contained in the music source being recorded, a nd reduces excessive bias current
to m ake it const ant. As a result , the record ing characterist ics of high f requencies are drastically imp roved, and the im proved high-frequency
reproduction can also be enjoyed even when the tape is played on tape decks which are not equipped with circuit.
Auto-bias function
The auto-bias function autom at ic ally adjusts the tape's bias value to ensu re o p timum recording perf o rmance with each and every tape.
^
CCRS (Computer-controlled CD Recording System)
Whe n con nected with a KENWOO D am plifier,CD player provided with "f", "ƒ", "
control cord, this unit allows to use the CCR S , which starts recording a utomatica lly a fter setting the optimum recording level for the
CD and tape to be used in recordin g .
1.T he C D starts to be played, and the peak value is sampled from
the le v e ls o f the sig n als on the CD.
2.The optimum recording level for the specific CD is determined
and set based on the peak value sampled.
3.The recording preparation steps above take about 20~200
seconds, after which the actual recording starts.
4.After recording (when the CD player is stopped or when the ta pe
has run out), both the cassette deck and CD player stop.
Downloaded from:
™
Cassette deck
»
CD player
(ƒ)" marking t hr ough the syst em
CCRS
Automatic recording level setting.
Page 28

Specifications
28
CT-2050/KXF-W 6010 CT-203/KXF-W 4010
CT-20 50/ 203/ KXF-W 6 010 / W 401 0 (En/ M)
Track System ................. 4 t rack, 2 channel stereo
Recording System .......... AC bias (Frequency: 105 kHz)
Heads ............................... A DECK
Playback/recording heads 1
Erasing head ..................... 1
B DECK
Playback/recording heads 1
Erasing head ..................... 1
Motors.............................. A DECK............. DC motor × 1
B DECK ............. DC motor × 1
Wow and Flutt er ............. ±0.17 % (IEC)
±0.28 % (DIN)
0.1 % (W.R.M.S)
Fast W inding Time ......... Approx. 110 seconds (C-60 tape)
Frequency Response
TYPE
TYPE
Signal to Noise Ratio
Harmonic Distortion ....... Less than 1.2 %
Input sensitivity/ Impedance
Output Level/Impedance
[General]
Power Consumption ...... 30 W
Dimensions......................W: 440 mm (15-3/4”)
Weight (Net ) .................... 4.6 kg (10.6 lb)
tape .................... 30 Hz t o 18,000 Hz, ±3 dB
tape .................. 30 Hz to 19,000 Hz, ±3 dB
Dolby NR OFF................ 56 dB
(IEC, 250 nWb/m, TYPE
Dolby NR OFF................ 59 dB
Dolby B NR ON.............. 68 dB
Dolby C NR ON.............. 75 dB
(3rd, H.D., 3 %, TYPE
(at 315 Hz, 3rd H.D., 250 nWb/m, TYPE
LINE IN ........................... 122.8 mV/ 47 kΩ
LINE OUT ....................... 775 mV/1.0 kΩ
Headphones ................... 0.5 mW/32 Ω
tape)
tape)
H: 134 mm (5-9/16”)
D: 369 mm (15-3/8”)
tape)
Track System ................. 4 t rack, 2 channel stereo
Recording System .......... AC bias (Frequency: 105 kHz)
Heads ............................... A DECK
Playback head................... 1
B DECK
Playback/recording heads 1
Erasing head ..................... 1
Motors.............................. A DECK............. DC motor × 1
B DECK ............. DC motor × 1
Wow and Flutt er ............. ±0.17 % (IEC)
±0.28 % (DIN)
0.1 % (W.R.M.S)
Fast W inding Time ......... Approx. 110 seconds (C-60 tape)
Frequency Response
tape .................... 30 Hz to 18,000 Hz, ±3 dB
TYPE
TYPE
Signal to Noise Ratio
Dolby NR OFF................ 56 dB
(IEC, 250 nWb/m, TYPE
Dolby NR OFF................ 59 dB
Dolby B NR ON.............. 68 dB
Dolby C NR ON.............. 75 dB
(3rd, H.D., 3 %, TYPE
Harmonic Distortion ....... Less than 1.2 %
(at 315 Hz, 3rd H.D., 250 nWb/m, TYPE
Input sensitivity/ Impedance
LINE IN ........................... 122.8 mV/47 kΩ
Output Level/Impedance
LINE OUT ....................... 775 mV/1.0 kΩ
Headphones ................... 0.5 mW/32 Ω
[General]
Power Consumption ...... 30 W
Dimensions...................... W: 440 mm (15-3/4”)
Weight (Net ) .................... 4.6 kg (10.6 lb)
tape .................. 30 Hz to 19,000 Hz, ±3 dB
tape)
tape)
tape)
H: 134 mm (5-9/16”)
D: 369 mm (15-3/8”)
1. KENWOOD follows a policy of continuous advancements in development. For this reason specifica tions ma y be changed without notice.
Notes
Notes
2. The fu ll pe rformance may not be e xh ib ited in an extremely cold location (under a water-free zing temperature).
For your records
Record the seri al number, found on the back of t he un it, in the spaces
designated on the wa rranty card, and in the space provided below. R efer
to the model and serial numbers whenever you call upon your dealer for
information or service on this product .
Model Serial Number
Page 29

documentation manual, user maintenance, brochure, user reference, pdf manual
This file has been downloaded from:
User Manual and User Guide for many equipments like mobile phones, photo cameras, monther board, monitors, software, tv, dvd, and othes..
Manual users, user manuals, user guide manual, owners manual, instruction manual, manual owner, manual owner's, manual guide,
manual operation, operating manual, user's manual, operating instructions, manual operators, manual operator, manual product,
 Loading...