

Page 1

AUDIO VIDEO SURROUND RECEIVER
KRF-V5070D
ENGLISH
KRF-V4070D
KRF-V5570D
INSTRUCTION MANUAL
KENWOOD CORPORATION
This instruction manual is for some models. Model availability and features
(functions) may differ depending on the country and sales area.
About the supplied remote control
Compared to standard remote controls, the remote control supplied with this receiver has several
operation modes. These modes enable the remote control to control other audio/video components. In
order to effectively use the remote control it is important to read the operating instructions and obtain a
proper understanding of the remote control and how to switch its operation modes (etc.).
Using the remote control without completely understanding its design and how to switch the operation
modes may result in incorrect operations.
FRANÇAIS
DEUTSCH
ITALIANO
ESPAÑOL
B60-5339-00 00 ID (E) 0211
EN
1
Page 2
Before applying the power
Caution : Read this page carefully to ensure safe
operation.
Units are designed for operation as follows.
U.S.A. and Canada ........................................... AC 120 V only
Australia ........................................................... AC 240 V only
Europe and U.K. ............................................... AC 230 V only
China and Russia ............................................. AC 220 V only
Other countries .......... AC 110-120 / 220-240 V switchable*
Maintenance of the unit
When the front panel or case becomes dirty, wipe with a soft, dry
cloth. Do not use thinner, benzine, alcohol, etc. for these agents may
ENGLISH
cause discoloration.
In regard to contact cleaner
Do not use contact cleaner because it could cause a malfunction. Be
specially careful not to use contact cleaners containing oil, for they
may deform the plastic component.
Safety precautions
WARNING :
TO PREVENT FIRE OR ELECTRIC SHOCK,
DO NOT EXPOSE THIS APPLIANCE TO
RAIN OR MOISTURE.
How to use this manual
This manual is divided into four sections, Preparations, Operations,
Remote Control, and Additional Information.
Preparations
Shows you how to connect your audio and video components to the
receiver and prepare the surround processor.
Since this receiver works with all of your audio and video components,
we will guide you in setting up your system to be as easy as possible.
Operations
Shows you how to operate the various functions available on the
receiver.
Remote Control
Shows you how to operate other components using the remote control,
as well as a detailed explanation of all remote control operations. Once
you have registered your components with the proper setup codes, you’ll
be able to operate both this receiver and your other AV components (TV,
VCR, DVD player, CD player, etc.) using the remote control supplied with
this receiver.
Additional Information
Shows you additional information such as “In case of difficulty”
(troubleshooting) and “Specifications”.
Memory back up function
Please note that the following items will be deleted from the unit's
memory if the power cord is disconnected from the AC outlet for
approximately 1 day.
• Power mode. • SUBWOOFER ON/OFF.
• Input selector settings. • SW RE-MIX ON/OFF.
• Picture output. • Distance setting.
• Speaker ON/OFF. • Input mode setting.
• Volume level. • Midnight mode setting.
• BASS, TREBLE, INPUT level. • PRO LOGIC II mode setting.
• TONE ON/OFF. • Broadcast band.
• LOUDNESS ON/OFF. • Frequency setting.
• Dimmer level. • Preset stations.
• MD/TAPE settings. • Tuning mode.
• Listen mode setting. • ACTIVE EQ mode.
• SP SYSTEM. • DSP mode.
• Speaker settings.
CAUTION
RISK OF ELECTRIC SHOCK
DO NOT OPEN
CAUTION: TO REDUCE THE RISK OF ELECTRIC SHOCK, DO NOT
REMOVE COVER (OR BACK). NO USER-SERVICEABLE PARTS
INSIDE. REFER SERVICING TO QUALIFIED SERVICE PERSONNEL.
THE LIGHTNING FLASH WITH ARROWHEAD SYMBOL,
WITHIN AN EQUILATERAL TRIANGLE, IS INTENDED TO
ALERT THE USER TO THE PRESENCE OF UNINSULATED
“DANGEROUS VOLTAGE” WITHIN THE PRODUCT’S
ENCLOSURE THAT MAY BE OF SUFFICIENT MAGNITUDE
TO CONSTITUTE A RISK OF ELECTRIC SHOCK TO
PERSONS.
THE EXCLAMATION POINT WITHIN AN EQUILATERAL
TRIANGLE IS INTENDED TO ALERT THE USER TO THE
PRESENCE OF IMPORTANT OPERATING AND
MAINTENANCE (SERVICING) INSTRUCTIONS IN THE
LITERATURE ACCOMPANYING THE APPLIANCE.
EN
2
Page 3

Before applying the power
Contents
Caution : Read the pages marked carefully to ensure
Preparations
safe operation.
Before applying the power .............................. 2
Safety precautions ............................................. 2
How to use this manual ..................................... 2
Unpacking .......................................................... 4
Preparing the remote control ............................ 4
Special features ................................................. 5
Names and functions of parts ......................... 6
Main Unit ........................................................... 6
Remote control unit (RC-R0627)
(KRF-V5070D) ..................................................... 7
Remote control unit (RC-R0628) (KRF-V4070D/
V5570D) ............................................................. 8
Setting up the system ........................................ 9
Connecting audio components ........................ 10
Connecting video components ........................ 11
Digital connections .......................................... 12
Connecting a DVD player (6-channel input)
(For KRF-V5070D only) .................................... 13
Connecting the speakers ................................. 14
Connecting the terminals ................................ 15
Connecting the antennas ................................. 15
Connecting the system control ....................... 16
Preparing for surround sound ....................... 17
Speaker settings .............................................. 17
Remote
Control
Additional
Information
Basic remote control operations for other
components ....................................................... 31
DVD player operation keys .............................. 31
CASSETTE deck, CD player & MD recorder
operations ........................................................ 32
In case of difficulty.......................................... 33
Specifications .................................................. 35
ENGLISH
Operations
Normal playback.............................................. 19
Preparing for playback ..................................... 19
Listening to a source component .................... 19
Adjusting the sound ......................................... 20
Recording .......................................................... 21
Recording audio (analog sources) ................... 21
Recording video ............................................... 21
Recording audio (digital sources) .................... 21
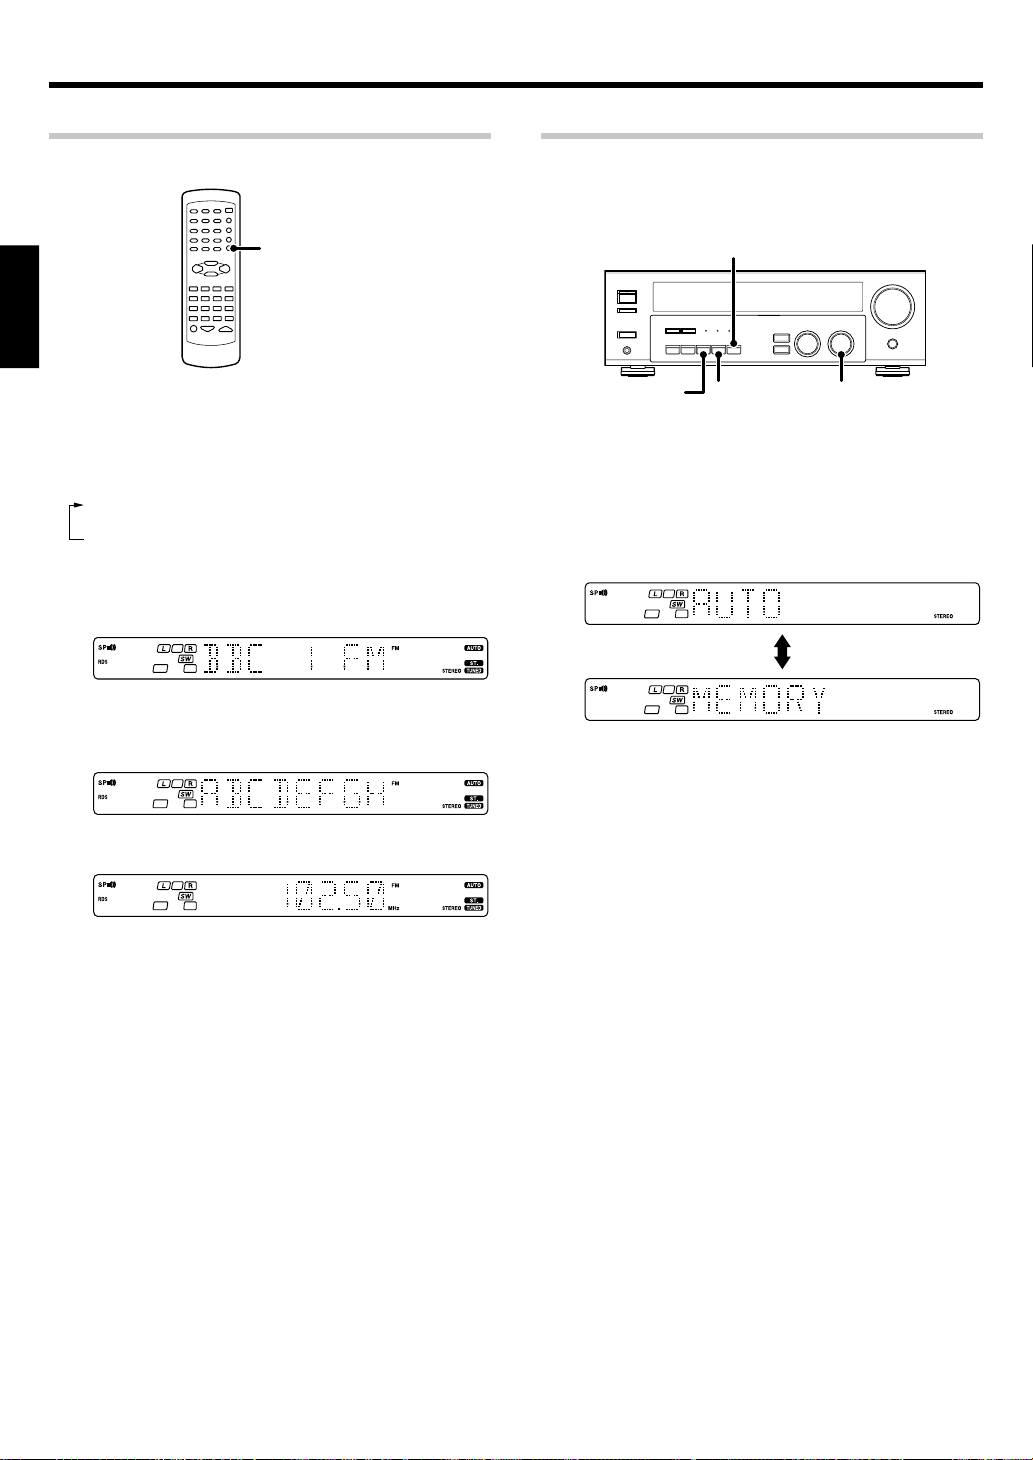
Listening to radio broadcasts ....................... 22
Tuning (non-RDS) radio stations ...................... 22
Using RDS (Radio Data System) ..................... 22
Presetting radio stations manually .................. 23
Receiving preset stations ................................ 23
Receiving preset stations in order (P.CALL) ... 23
Using the RDS DISPLAY key ........................... 24
Presetting RDS stations (RDS AUTO
MEMORY) ........................................................ 24
Tuning by Program TYpe (PTY search) ............ 25
Ambience effects ............................................. 26
Surround modes .............................................. 26
Surround play ................................................... 28
DVD 6-channel playback
(For KRF-V5070D only) .................................... 29
Convenient functions ....................................... 29
EN
3
Page 4
Before applying the power
Unpacking
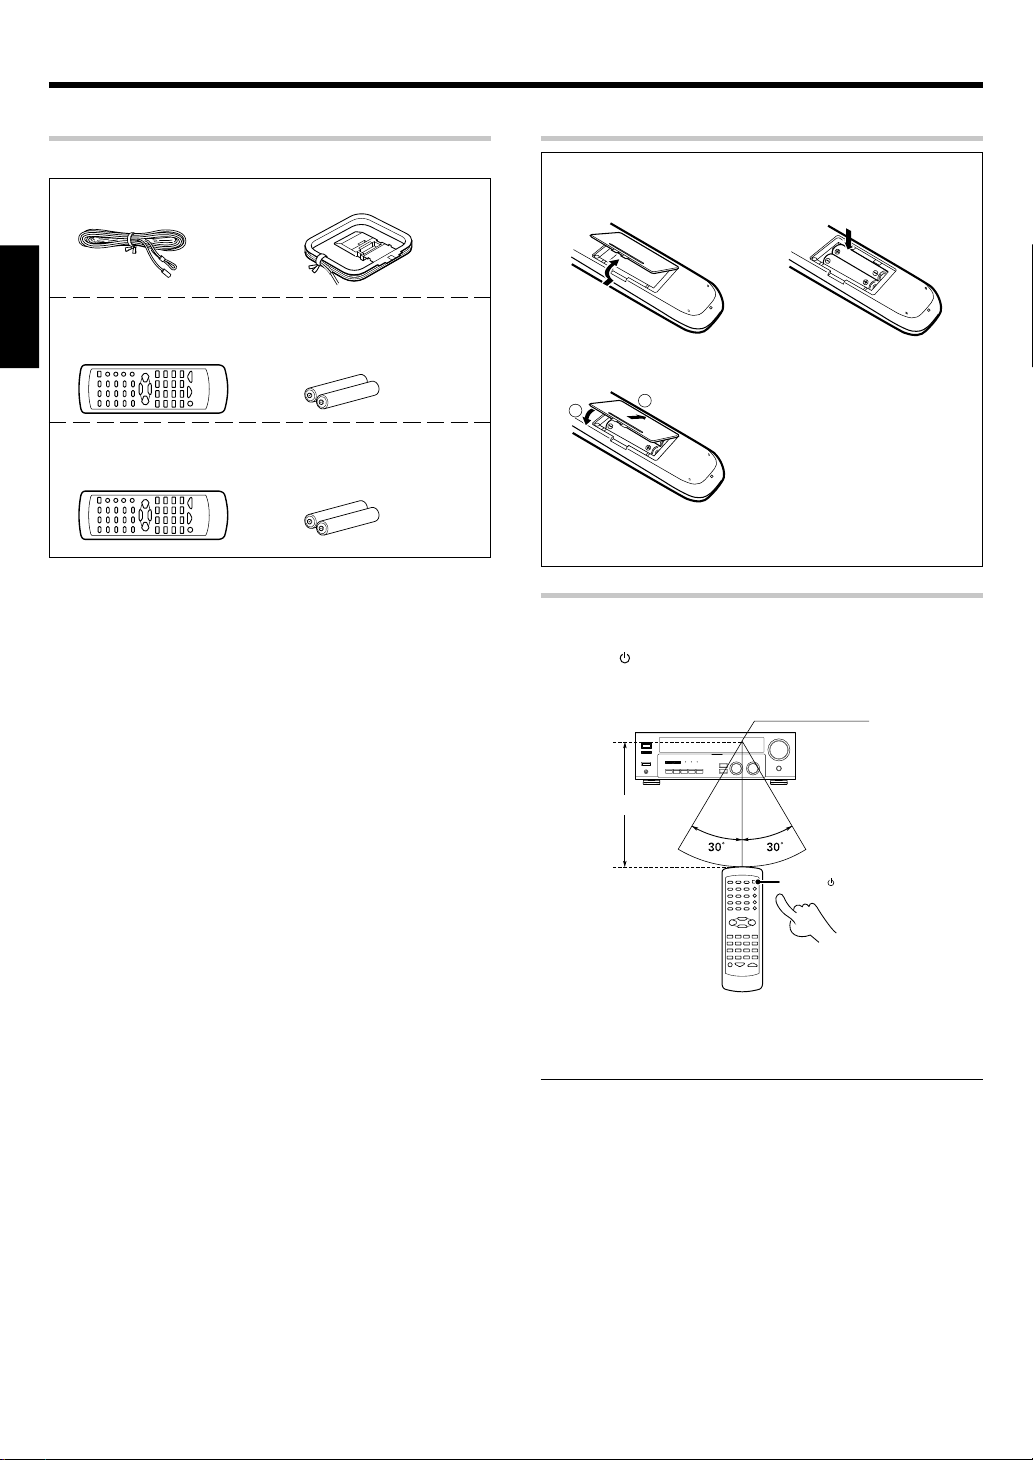
Unpack the unit carefully and make sure that all accessories are present.
FM indoor antenna (1) AM loop antenna (1)
For KRF-V5070D
Remote control unit (1) Batteries (R6/AA) (2)
ENGLISH
RC-R0627
For KRF-V4070D and KRF-V5570D
Remote control unit (1) Batteries (R6/AA) (2)
RC-R0628
If any accessories are missing, or if the unit is damaged or fails to operate,
notify your dealer immediately. If your unit was shipped to you directly,
notify your shipper immediately. Kenwood recommend that you retain
the original carton and packing materials in case you needs to move or
ship the unit in the future.
Keep this manual handy for future reference.
Preparing the remote control
Loading the batteries
1 Remove the cover. 2 Insert the batteries.
3 Close the cover.
2
• Insert two AA-size (R6) batteries as indicated by the polarity markings.
Operation
When the STANDBY indicator is lit, the power turns ON when you press
the POWER
press the key you want to operate.
1
key on the remote control. When the power comes ON,
Operating range
(Approx.)
Remote sensor
6 m
POWER
Infrared ray system
• When pressing more than one remote control key successively,
press the keys securely by leaving an interval of 1 second or more
between keys.
Notes
1. The supplied batteries may have shorter lives than ordinary batteries
due to use during operation checks.
2. When the remote-controllable distance gets shorter than before,
replace both batteries with new ones.
3. Placing the remote sensor in direct sunlight, or in direct light from a
high frequency fluorescent lamp may cause a malfunction.
In such a case, change the location of the system installation to
prevent malfunction.
EN
4
Page 5

Before applying the power
Special features
True home theater sound
This receiver incorporates a wide variety of surround modes to bring you
maximum enjoyment from your video software. Select a surround mode
according to your equipment or the software you are going to play and
enjoy! §
Dolby Digital
The DOLBY DIGITAL mode lets you enjoy full digital surround from
software processed in the Dolby Digital format. Dolby Digital provides up
to 5.1 channels of independent digital audio for better sound quality and
more powerful presence than conventional Dolby Surround.
Dolby PRO LOGIC
DOLBY PRO LOGIC II, whilst totally compatible with its predecessor
PRO LOGIC, provides greater advantages in surround sound. It allows
user to enjoy the conventional stereo or Dolby Surround with a convincing
“5.1 like” presentation. PRO LOGIC II offers special features for controlling
the overall spatial, dimensionality and frontal sound field imaging. PRO
LOGIC II produces an impressive surround sound from video software
marked
When listening to music, you will be able to enjoy the experience of sheer
STEREO surround sound.
II
and three-dimensional space from music CD.
DTS
DTS (Digital Theater System) is a 5.1 channel digital audio format that
provides five full-spectrum channels and one low-frequency (subwoofer)
channel for unprecedented clarity, optimum channel separation and a
(wide) dynamic range.
In the DTS mode, the 5.1 channel digital input from a DTS CD, LD or DVD
disc (carrying the “DTS” marking) can be played in Digital Surround.
Important:
When a DTS disc is played on a CD, LD or DVD player, noise may be
output from the analog output. It is recommended that you connect the
digital output of the player to the digital input of this unit.
DSP surround modes
The DSP (Digital Signal Processor) used for this receiver incorporates a
variety of high quality adjustable sound fields, like “ARENA”, “JAZZ
CLUB”, THEATER”, STADIUM” and “DISCO”. It is compatible with
almost any kind of program source.
DVD 6-channel input (For KRF-V5070D only)
If you own a DVD player equipped with 6-channel output, this receiver
allows you to obtain the full surround sound impact of DVD source
material featuring multi-channel encoding. Since the source signals are
digital and each channel is input independently, the resulting ambience
is far superior to what can be achieved with conventional surround sound
systems.
ACTIVE EQ
ACTIVE EQ mode will produce a more dynamic sound quality in any
condition. You can enjoy a more impressive sound effect when ACTIVE
EQ is turned on during Dolby Digital and DTS playback.
IR (InfraRed) remote control
In addition to the basic receiver opeations, this IR remote control
supplied can also operate Kenwood cassette deck, MD recorder or CD
player which are connected using the system control cords.
This remote control can also control Kenwood DVD players directly
without using the DVD players' remote control.
RDS (Radio Data System) tuner
The receiver is equipped with an RDS tuner that provides several
convenient tuning functions: RDS Auto Memory, to automatically preset
up to 40 RDS stations broadcasting different programs; station name
display, to show you the name of the current broadcast station; and PTY
search to let you tune stations by program type.
PTY (Program TYpe) search
Tune the stations by specifying the type of program you want to hear.
ENGLISH
EN
5
Page 6
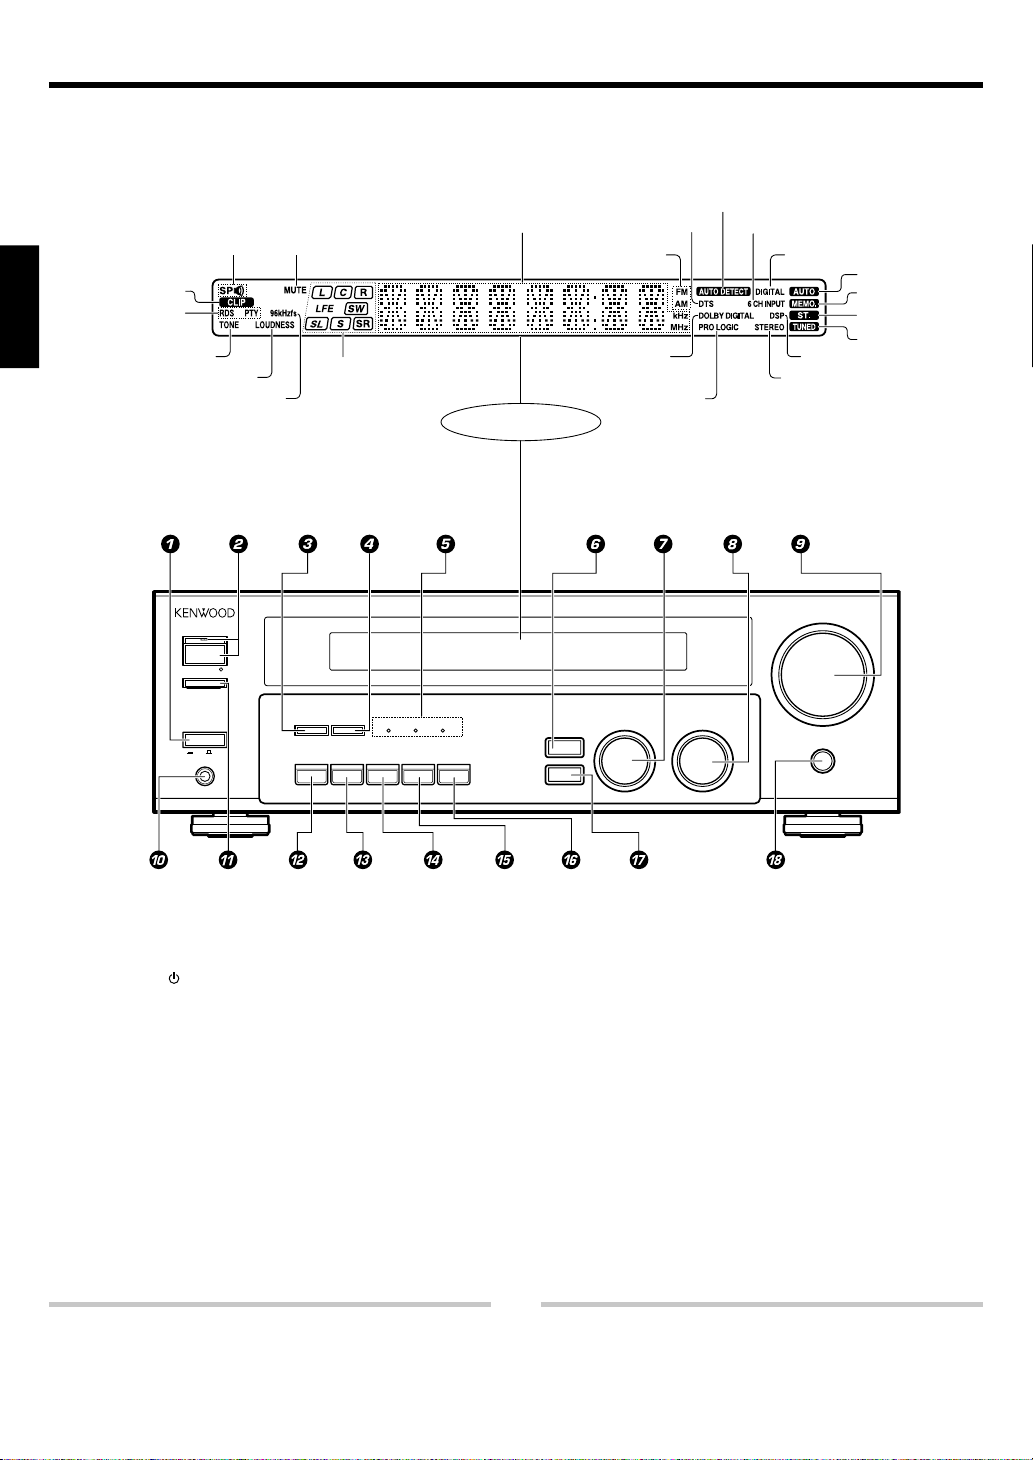
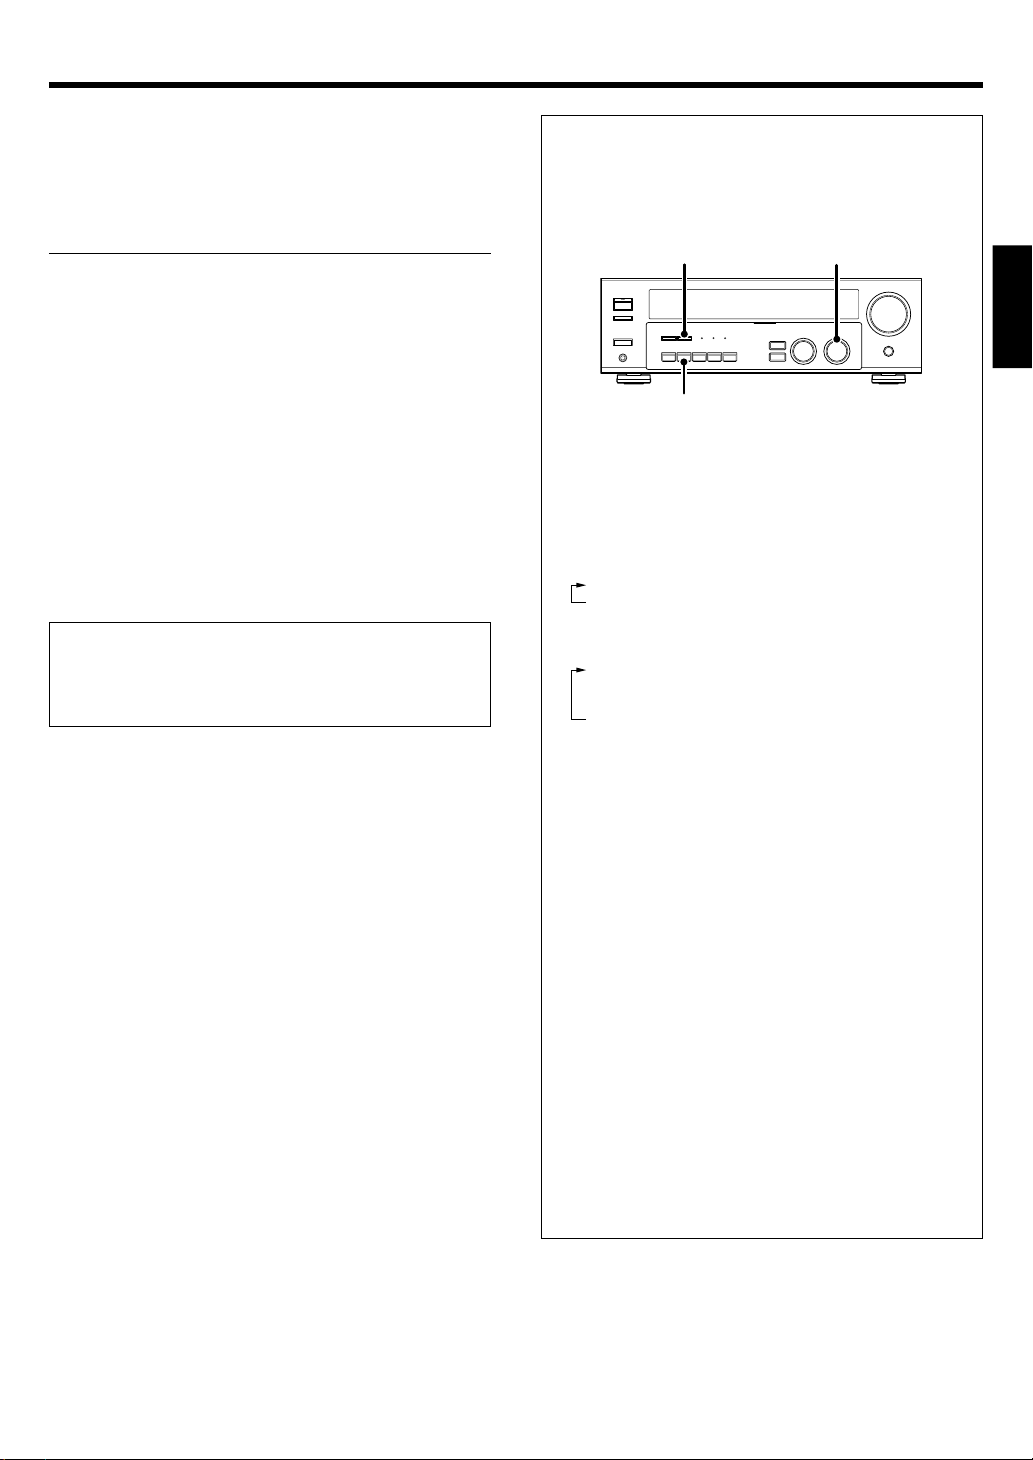
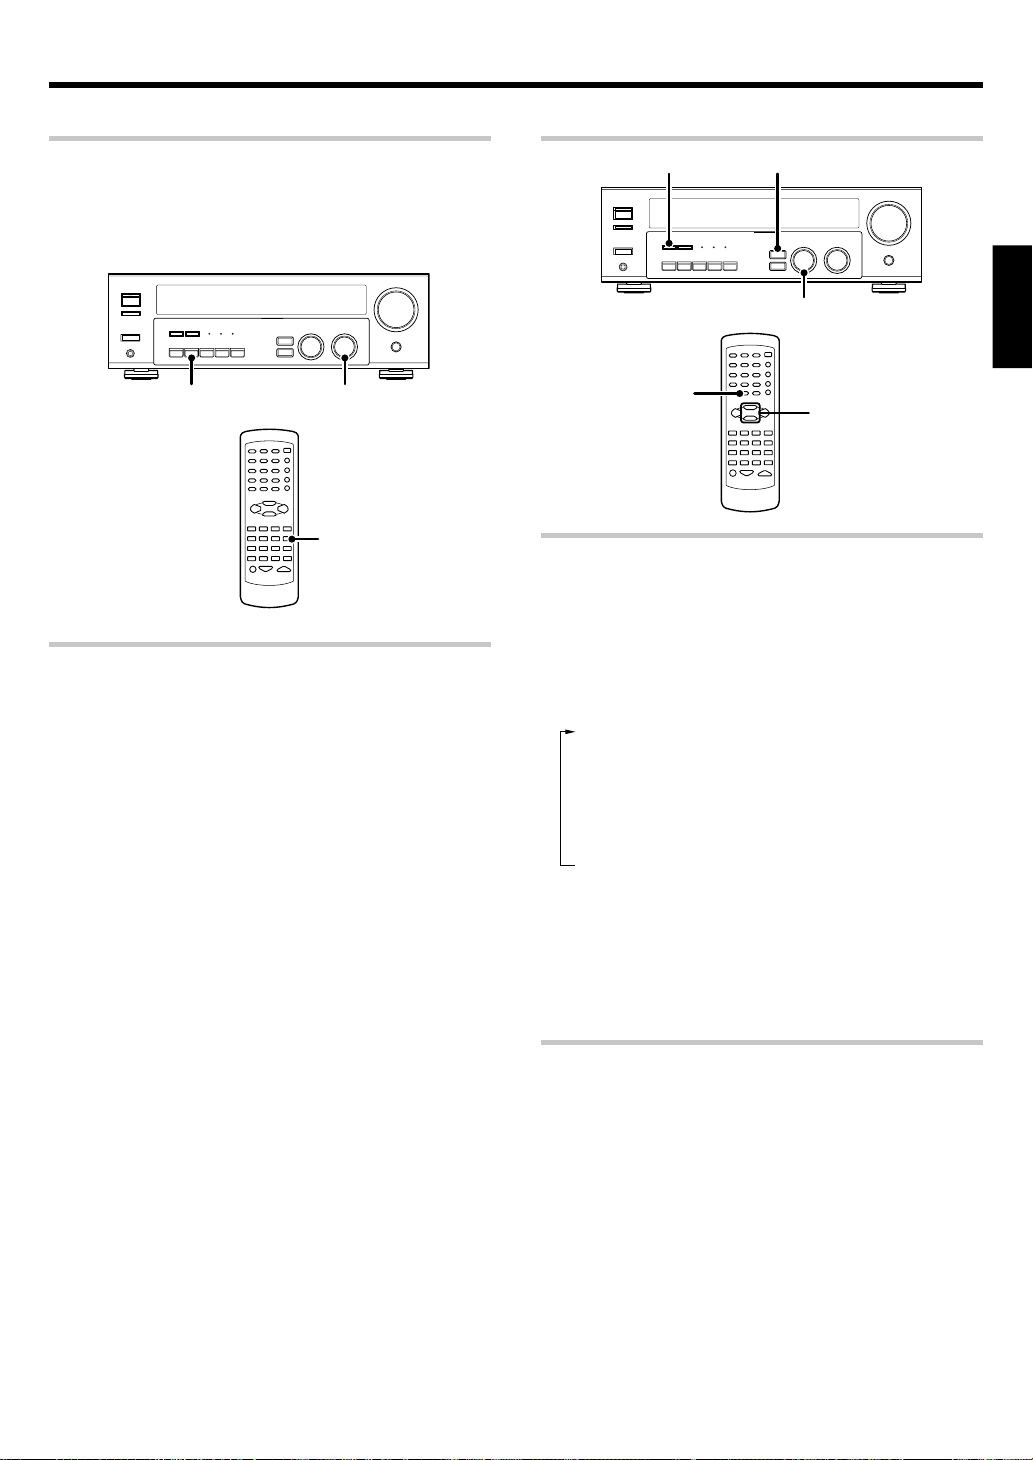
Names and functions of parts
Main Unit
RDS indicators
ENGLISH
Speaker indicator
CLIP indicator
TONE indicator
LOUDNESS indicator
96kHzfs indicator
ON ⁄ STANDBY
SPEAKERS ON ⁄ OFF
STANDBY
POWER
ON OFF
PHONES
MUTE indicator
AB
DIMMER
ACTIVE EQ
Frequency display,
Input display,
Preset channel display,
Surround mode display
Speaker selection indicators
Input channel indicators
Output channel indicators
ACTIVE EQ DTS
DOLBY DIGITAL
LISTEN MODE
INPUT MODE BAND AUTO MEMORY
Display
DTS indicator
Band indicators
DOLBY DIGITAL
indicator
PRO LOGIC
indicator
MULTI CONTROL INPUT SELECTOR
SOUND
SETUP
AUTO DETECT
indicator
6CH INPUT indicator
DOWN
DIGITAL indicator
AUTO indicator
MEMO. indicator
ST. indicator
TUNED indicator
DSP indicator
STEREO indicator
VOLUME CONTROL
UP
MUTE
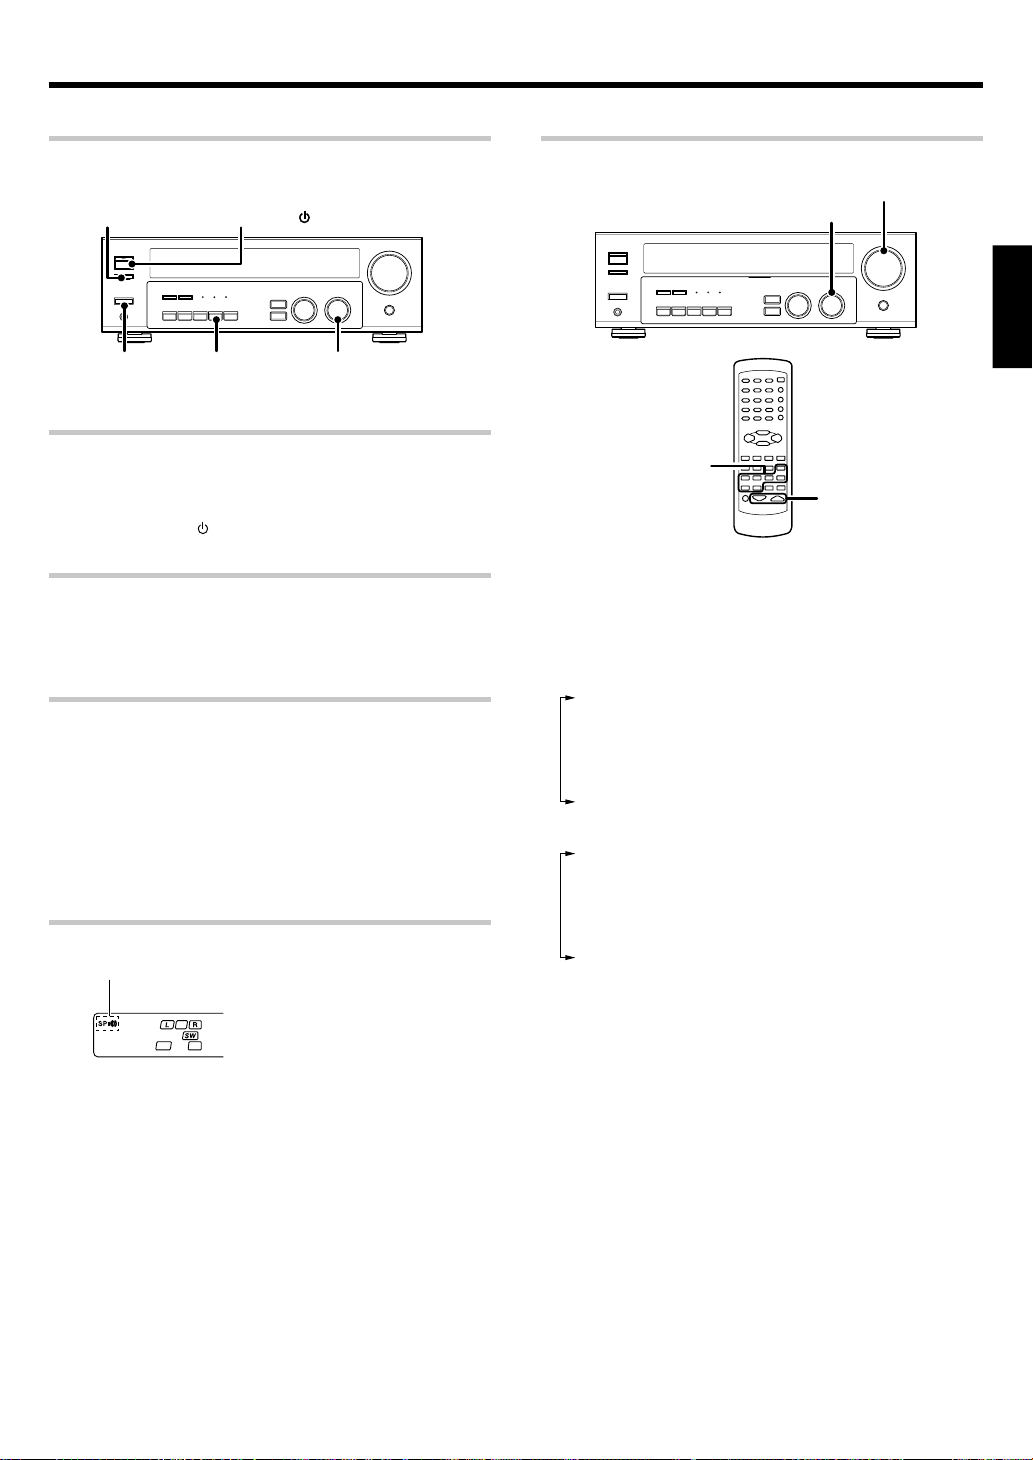
1 POWER ON/OFF key &
Use to turn the main power ON/OFF.
2 ON/STANDBY
key &
Use to switch the power ON/STANDBY when
the POWER is turned ON.
STANDBY indicator
3 DIMMER key
Use to select the REC MODE. ¡
Use to adjust the brightness of the display.
º
4 LISTEN MODE key •
Use to select the listening mode.
5 Surround LED (light-emitting diode)
indicators
ACTIVE EQ mode LED indicator )
Lights when the receiver is in the ACTIVE EQ
mode.
DOLBY DIGITAL mode LED indicator •
Lights when the receiver is in the Dolby
Digital mode.
6 SOUND key ª
Use to adjust the sound quality and the
ambience effects.
7 MULTI CONTROL knob &
Use to control a variety of settings.
8 INPUT SELECTOR knob (
Use to select the input sources.
9 VOLUME CONTROL knob (
0 PHONES jack )
Use for headphone listening.
! SPEAKERS ON/OFF key (
Use to turn the speakers ON/OFF.
@ ACTIVE EQ key )
Use to select ACTIVE EQ setting.
DTS mode LED indicator •
Lights when the receiver is in the DTS mode.
Standby mode
While the standby indicator is lit, a small amount of power is supplied to
the system to back-up the memory. This is called standby mode. Under
the condition, the system can be turned ON by the remote control unit.
EN
6
# INPUT MODE key 9
Use to switch between full auto, digital and
analog inputs.
$ BAND key ™
Use to select the broadcast band.
% AUTO key
Use to change “TAPE” indication to “MD”.
(
Use to select the auto tuning mode. ™
^ MEMORY key £
Use to store radio stations in the preset
memory.
& SETUP key &
Use to select the speakers' settings etc.
* MUTE key )
Use to temporarily mute the sound.
Connection at POWER ON/OFF key
The power in this equipment will not be completely cut off from the AC
wall outlet when the main switch is turned OFF.
Page 7

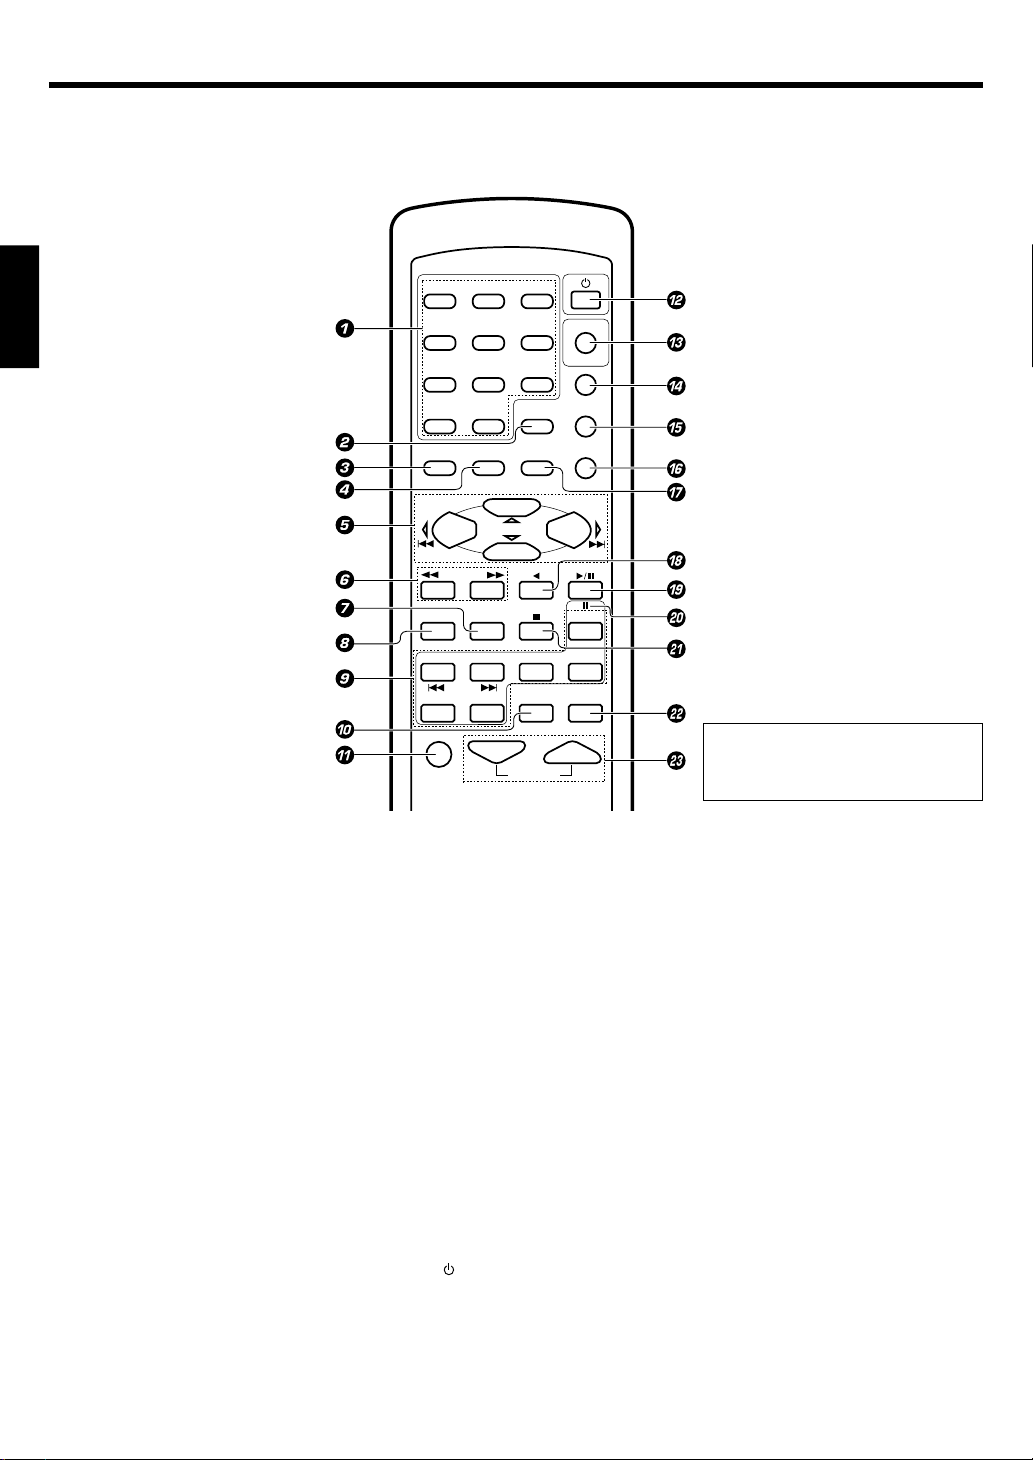
Names and functions of parts
Remote control unit (RC-R0627) (KRF-V5070D)
1
23
456
789
0+10
MENU
SETUP
P.CALL
TUNING
BASS BOOST
PHONO
DVD
VIDEO1 VIDEO2
MUTE
DOWN-PAGE-UP
LOUDNESS
OSD
RETURN
SOUND
LISTEN MODE
MULTI CONTROL
ENTER
AUTO
A/B+100
DISC SKIP
CD/DVD
TUNER
DISC SEL.
ACTIVE EQ
VOLUME
POWER
DVD
POWER
RECEIVER
PTY
TOP MENU
RDS DISPLAY
P.CALL
BAND
DVD/6CH
MD/TAPE
TONE
ENGLISH
If the name of a function is different on
the receiver and on the remote control,
the name of the remote control key in
this manual is indicated in parentheses.
1 Numeric keys £
If CD or MD is selected as the input source,
these keys function as numeric keys. If tuner
is selected as the input source, these keys
are used to call up station presets.
2 DOWN-PAGE- key
Use to operate the DVD component.
LOUDNESS key )
Use to switch the status of LOUDNESS.
3 MENU key
Use to operate the DVD component.
SETUP key &
Use to select the speakers' settings etc.
4 OSD (On Screen Display) key
Use to operate the DVD component.
SOUND key ª
Use to adjust the sound quality and ambience
effects.
5 MULTI CONTROL %/fi keys &
Use to control a variety of settings.
Use to operate other components.
P.CALL 4/¢ keys £
If tuner is selected as the input source, these
keys function as preset channel call keys.
4/¢ keys
If CD or MD is selected as the input source,
these keys function as skip keys.
6 TUNING 1/¡ keys
Use to operate the tuner or selected
component.
If CD, MD or TAPE is selected as the input
source, these keys function as search keys.
7 A/B key
If TAPE is selected as the input source, this is
A and B deck of a double cassette deck.
+100 key
Use to select the disc number with the multiCD player.
DISC SKIP key
If CD is selected as the input source, this key
functions as the multi-CD player disc skip
key.
8 BASS BOOST key )
Use to select the maximum adjustment
setting for the low frequency range.
9 Input Selector keys (DVD/6CH, PHONO,
CD/DVD, TUNER, MD/TAPE, VIDEO 1,
VIDEO 2) (
Use to select the input sources.
4 DVD ¢ keys
When in DVD player operations, these keys
function as skip keys.
0 DISC SEL. key
Use to operate other components.
ACTIVE EQ key )
Use to select ACTIVE EQ setting.
! MUTE key )
Use to temporarily mute the sound.
@ POWER
key
Use to turn the receiver on and off.
# DVD POWER key
Use to turn on the DVD equipment.
$ RECEIVER key
Use to return to the operation of the receiver.
% -PAGE-UP key
Use to operate the DVD component.
PTY key ∞
Use for PTY search.
^ TOP MENU key
Use to operate the DVD component.
RDS DISPLAY key ¢
Use for RDS function.
& RETURN key
Use to operate the DVD component.
LISTEN MODE key •
Use to select the listening mode.
* ENTER key
Use to operate other components.
2 key
Use to operate other components.
( BAND key ™
Use to select the broadcast band.
6 key
If CD is selected as the input source, this key
functions as the play/pause key.
If MD or TAPE is selected as the input source,
this key functions as the play key.
) 8 key
Use to operate other components.
¡ AUTO key ™
Use to select the auto tuning mode.
7 key
If CD, MD or TAPE is selected as the input
source, this key functions as the stop key.
™ TONE key )
Use to switch the status of TONE control.
£ VOLUME keys (
Use to adjust the receiver volume.
EN
7
Page 8
Names and functions of parts
Remote control unit (RC-R0628) (KRF-V4070D/V5570D)
ENGLISH
1
23
456
789
0+10
MENU
SETUP
P.CALL
TUNING
BASS BOOST
AUX CD/DVD
DVD
VIDEO1 VIDEO2
MUTE
DOWN-PAGE-UP
LOUDNESS
OSD
RETURN
SOUND
LISTEN MODE
MULTI CONTROL
ENTER
AUTO
A/B+100
DISC SKIP
TUNER
DISC SEL.
ACTIVE EQ
VOLUME
POWER
DVD
POWER
RECEIVER
PTY
TOP MENU
RDS DISPLAY
P.CALL
BAND
DVD
MD/TAPE
TONE
If the name of a function is different on
the receiver and on the remote control,
the name of the remote control key in
this manual is indicated in parentheses.
1 Numeric keys £
If CD or MD is selected as the input source,
these keys function as numeric keys. If tuner
is selected as the input source, these keys
are used to call up station presets.
2 DOWN-PAGE- key
Use to operate the DVD component.
LOUDNESS key )
Use to switch the status of LOUDNESS.
3 MENU key
Use to operate the DVD component.
SETUP key &
Use to select the speakers' settings etc.
4 OSD (On Screen Display) key
Use to operate the DVD component.
SOUND key ª
Use to adjust the sound quality and ambience
effects.
5 MULTI CONTROL %/fi keys &
Use to control a variety of settings.
Use to operate other components.
P.CALL 4/¢ keys £
If tuner is selected as the input source, these
keys function as preset channel call keys.
4/¢ keys
If CD or MD is selected as the input source,
these keys function as skip keys.
6 TUNING 1/¡ keys
Use to operate the tuner or selected
component.
If CD, MD or TAPE is selected as the input
source, these keys function as search keys.
EN
8
7 A/B key
If TAPE is selected as the input source, this is
A and B deck of a double cassette deck.
+100 key
Use to select the disc number with the multiCD player.
DISC SKIP key
If CD is selected as the input source, this key
functions as the multi-CD player disc skip
key.
8 BASS BOOST key )
Use to select the maximum adjustment
setting for the low frequency range.
9 Input Selector keys (DVD, AUX, CD/DVD,
TUNER, MD/TAPE, VIDEO 1, VIDEO 2)(
Use to select the input sources.
4 DVD ¢ keys
When in DVD player operations, these keys
function as skip keys.
0 DISC SEL. key
Use to operate other components.
ACTIVE EQ key )
Use to select ACTIVE EQ setting.
! MUTE key )
Use to temporarily mute the sound.
@ POWER
key
Use to turn the receiver on and off.
# DVD POWER key
Use to turn on the DVD equipment.
$ RECEIVER key
Use to return to the operation of the receiver.
% -PAGE-UP key
Use to operate the DVD component.
PTY key ∞
Use for PTY search.
^ TOP MENU key
Use to operate the DVD component.
RDS DISPLAY key ¢
Use for RDS function.
& RETURN key
Use to operate the DVD component.
LISTEN MODE key •
Use to select the listening mode.
* ENTER key
Use to operate other components.
2 key
Use to operate other components.
( BAND key ™
Use to select the broadcast band.
6 key
If CD is selected as the input source, this key
functions as the play/pause key.
If MD or TAPE is selected as the input source,
this key functions as the play key.
) 8 key
Use to operate other components.
¡ AUTO key ™
Use to select the auto tuning mode.
7 key
If CD, MD or TAPE is selected as the input
source, this key functions as the stop key.
™ TONE key )
Use to switch the status of TONE control.
£ VOLUME keys (
Use to adjust the receiver volume.
Page 9
Setting up the system
Make connections as shown in the following pages.
When connecting the related system components, be sure
to refer to the instruction manuals supplied with the
components you are connecting.
Do not connect the power cord to a wall outlet until all
connections are completed.
Notes
1. Be sure to insert all connection cords securely. If their connections are
imperfect, the sound may not be produced or there will be noise
interference.
2. Be sure to remove the power cord from the AC outlet before plugging
or unplugging any connection cords. Plugging/unplugging connection
cords without disconnecting the power cord can cause malfunctions
and may damage the unit.
3. Do not connect power cords from components whose power
consumption is larger than what is indicated on the AC outlet at the
rear of this unit.
Analog connections
Audio connections are made using RCA pin cords. These cables transfer
stereo audio signal in an “analog” form. This means the audio signal
corresponds to the actual audio of two channels. These cables usually
have 2 plugs at each end, red for the right channel and white for the left
channel. These cables are usually packed together with the source unit,
or are available at your local electronics retailer.
Microcomputer malfunction
If operation is not possible or an erroneous display appears, even
though all connections have been made properly, reset the
microcomputer by referring to “In case of difficulty”. ‹
Input mode settings
CD/DVD, VIDEO2 and DVD or DVD/6CH (KRF-V5070D only) inputs
each include jacks for digital audio input and analog audio input.
After completing connections and turning on the receiver, follow the
steps below.
LISTEN MODE
INPUT MODE
1 Use the INPUT SELECTOR knob to select CD/DVD, VIDEO2,
DVD or DVD/6CH (KRF-V5070D only).
2 Press the INPUT MODE key.
Each press switches the setting as follows:
In DTS play mode
1 F-AUTO (digital input, analog input)
2 D-MANUAL (digital input)
In CD/DVD, VIDEO2, DVD or DVD/6CH (KRF-V5070D only)
play mode
1 F-AUTO (digital input, analog input)
2 D-MANUAL (digital input)
3 6CH INPT (DVD/6CH input)
4 ANALOG (analog input)
INPUT SELECTOR
ENGLISH
Digital input:
Select this setting to play digital signals from a DVD, CD, or LD
player.
Analog input:
Select this setting to play analog signals from a cassette deck, VCR,
or record player.
Auto detect:
In “F-AUTO” (full auto) mode (AUTO DETECT and DIGITAL
indicators light up), the receiver detects the digital or analog input
signals automatically. Priority is given to digital signal during input
mode selection. The receiver will select the input mode and listening
mode automatically during playback to match the type of input
signal (Dolby Digital, PCM, DTS ) and the speaker setting. The initial
factory setting is full auto.
To keep the receiver set to the currently selected listening mode,
use the INPUT MODE key to select “D-MANUAL” (digital manual).
However, even when this setting is selected, there may be cases
in which the listening mode is selected automatically to match a
Dolby Digital source signal depending on the combination of listening
mode and source digital.
In D-MANUAL mode, if the audio reproduction stops in the middle
due to change in the input signals, etc, press the LISTEN MODE
key.
If the INPUT MODE key is pressed quickly, sound may not be
produced. Press the INPUT MODE key again.
EN
9
Page 10
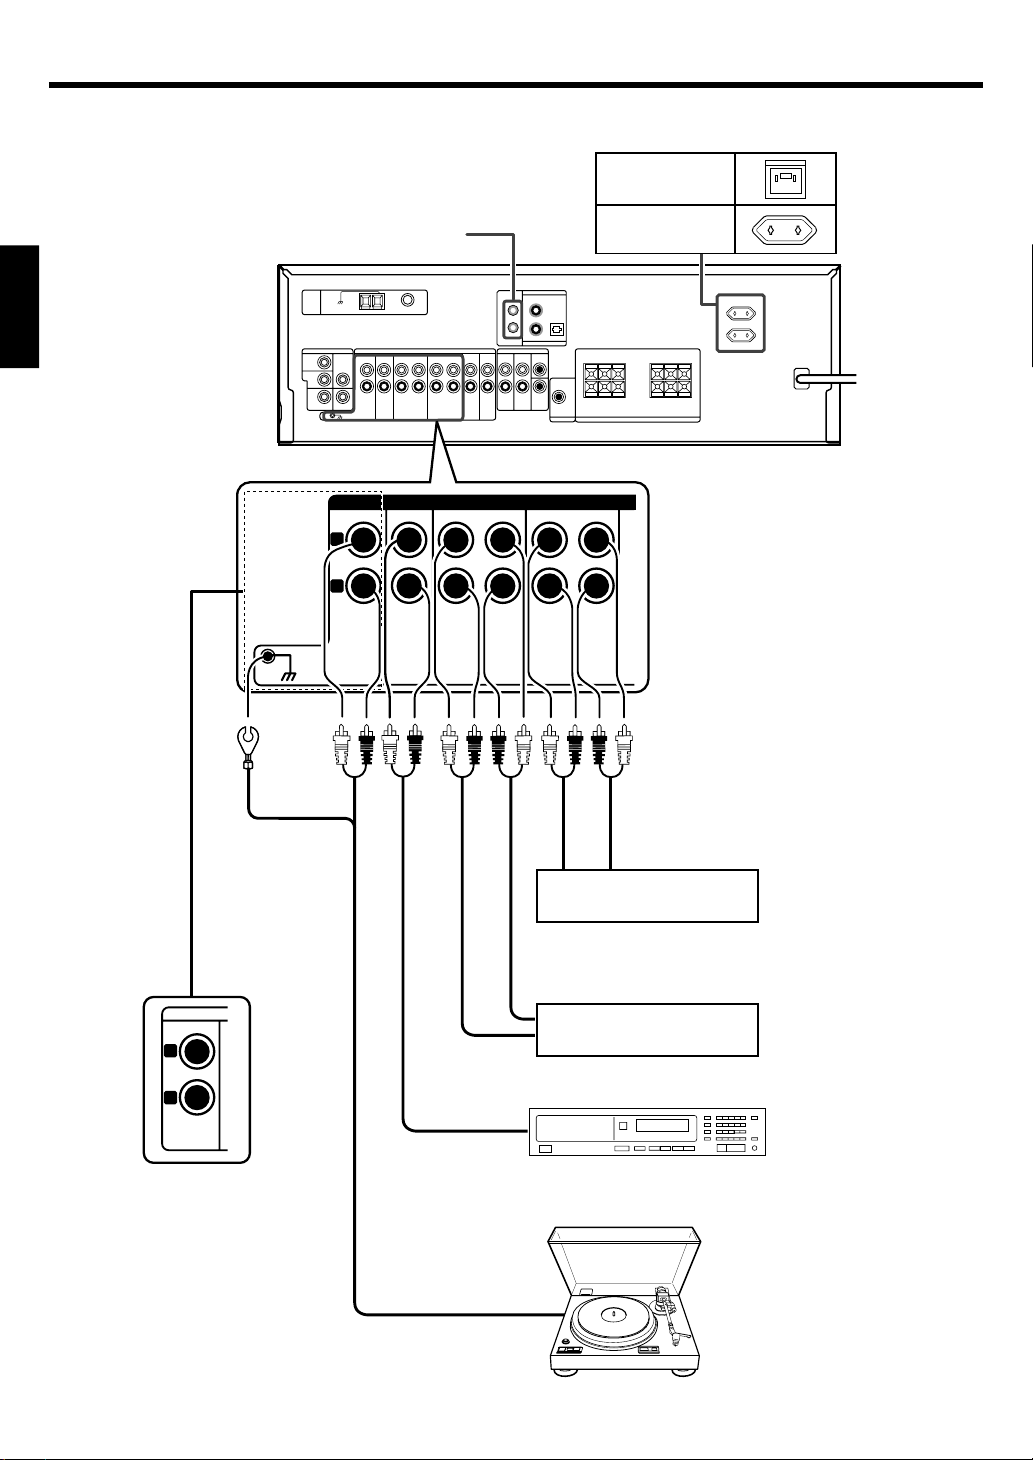
Setting up the system
Connecting audio components
ENGLISH
GND
SYSTEM CONTROL
jacks ^
L
R
CD/DVD
REC OUT PLAY IN
PHONO
MD / TAPE
AUDIO
REC OUT PLAY IN
VIDEO1
Shape of AC outlets
U.K.
EUROPE
+
-
+
-
To AC wall outlet
10
OUTIN
Video component ¡
IN
OUT
Cassette deck or MD recorder
L
R
AUX
(For KRF-V4070D/
OUT
CD or DVD player
V5570D)
Moving coil (MC) cartridge
record player cannot be used
directly from the receiver unit. It
OUT
can only be used when another
equalizer amplifier is connected.
(For KRF-V5070D only)
Record player
EN
Page 11
Setting up the system
Connecting video components
DVD
IN
VIDEO 2
IN
VIDEO 1
VIDEO
IN
MONITOR
OUT
VIDEO 1
OUT
VIDEO
IN
Monitor TV
AUDIO
VIDEO 1
+
-
PLAY IN
VIDEO 2
+
-
ENGLISH
For KRF-V4070D/
V5570D only
DVDREC OUT PLAY IN
Video inputs
Video
IN/OUT
IN IN
(Yellow RCA pin cords)
Video deck
OUT OUT
Video inputs and outputs
(Yellow RCA pin cords)
Audio inputs
and outputs
DVD player or LD player
OUT OUT
DVD player or LD player
OUT
OUT
A video component with digital audio outputs should be connected to the VIDEO 2 jacks.
Audio
IN/OUT
11
EN
Page 12
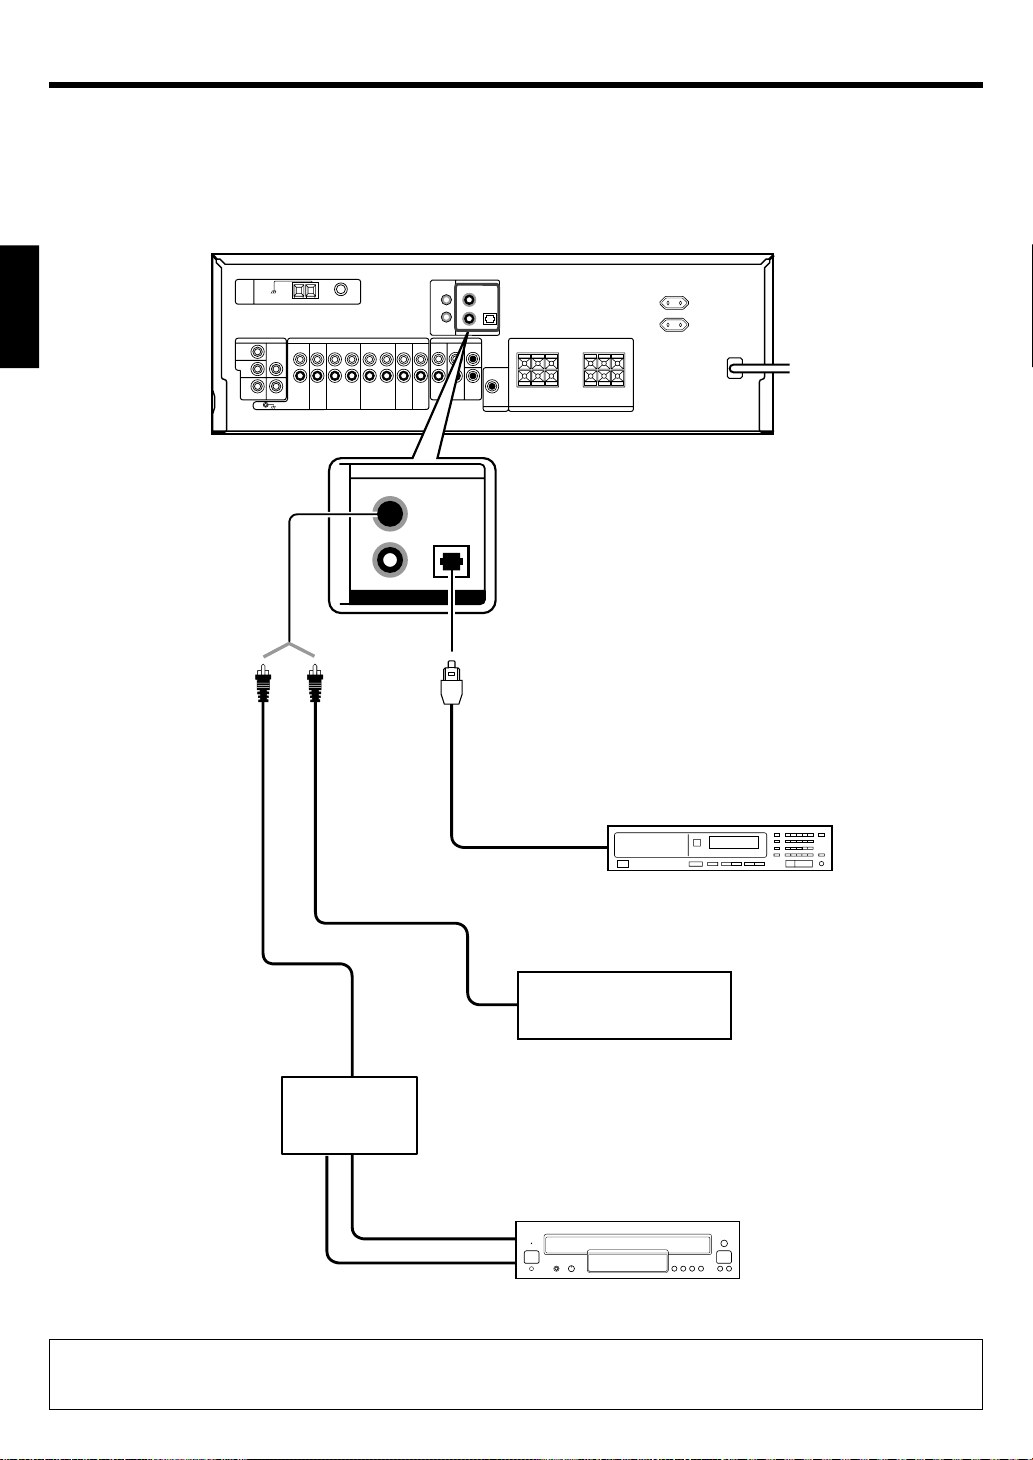
Setting up the system
Digital connections
The digital in jacks can accept DTS, Dolby Digital, or PCM signals. Connect components capable of outputting DTS, Dolby Digital, or standard PCM (CD)
format digital signals.
If you have connected any digital components to the receiver, be sure to read the “Input mode settings” section carefully. 9
ENGLISH
COAXIAL OPTICAL
VIDEO 2
DVD
DIGITAL IN
CD / DVD
Optical fiber cable
+
-
+
-
OPTICAL DIGITAL OUT (AUDIO)
CD or DVD player
COAXIAL DIGITAL OUT
(AUDIO)
Component with DTS,
COAXIAL
DIGITAL
OUT
(AUDIO)
RF digital
demodulator
(DEM-9991D)
(sold separately)
DOLBY DIGITAL RF
OUT (AUDIO)
PCM OUT
Dolby Digital, or PCM
COAXIAL DIGITAL OUT
Connect the video signal and analog
audio signals to the VIDEO 2 jacks.
(See “Connecting video components”.)
!
LD player
To connect an LD player with a DIGITAL RF OUT, connect the LD player to the KENWOOD RF digital demodulator (DEM-9991D).
Next, connect the DIGITAL OUT jacks of the demodulator to the DIGITAL IN jacks of the receiver.
Connect the video signal and analog audio signals to the VIDEO 2 jacks. (See “Connecting video components”.)
EN
12
Page 13

Setting up the system
Connecting a DVD player (6-channel input)
(For KRF-V5070D only)
If you have connected a DVD player to the receiver with digital connection, be sure to read the “Input mode settings” section carefully. 9
DVD
IN
VIDEO 2
IN
VIDEO 1
VIDEO
IN
MONITOR
OUT
VIDEO 1
OUT
DVD / 6CH INPUT
SURROUND
FRONT
CENTER
SUB
WOOFER
+
-
+
-
COAXIAL OPTICAL
VIDEO 2
DVD/6CH
DIGITAL IN
CD / DVD
ENGLISH
VIDEO OUT
(Yellow RCA
pin cord)
FRONT
OUT L/R
DVD player
SURROUND
OUT L/R
COAXIAL
DIGITAL
OUT
(AUDIO)
SUBWOOFER
OUT
CENTER OUT
CAUTION
Be sure to adhere to the following, or proper ventilation will be blocked causing damage or fire hazard.
• Do not place any object impairing heat radiation onto the top of the unit.
• Leave a space around the unit (from the largest outside dimension including projection) equal or greater than, shown below.
Top panel : 50 cm Side panel : 10 cm Back panel : 10 cm
13
EN
Page 14
Setting up the system
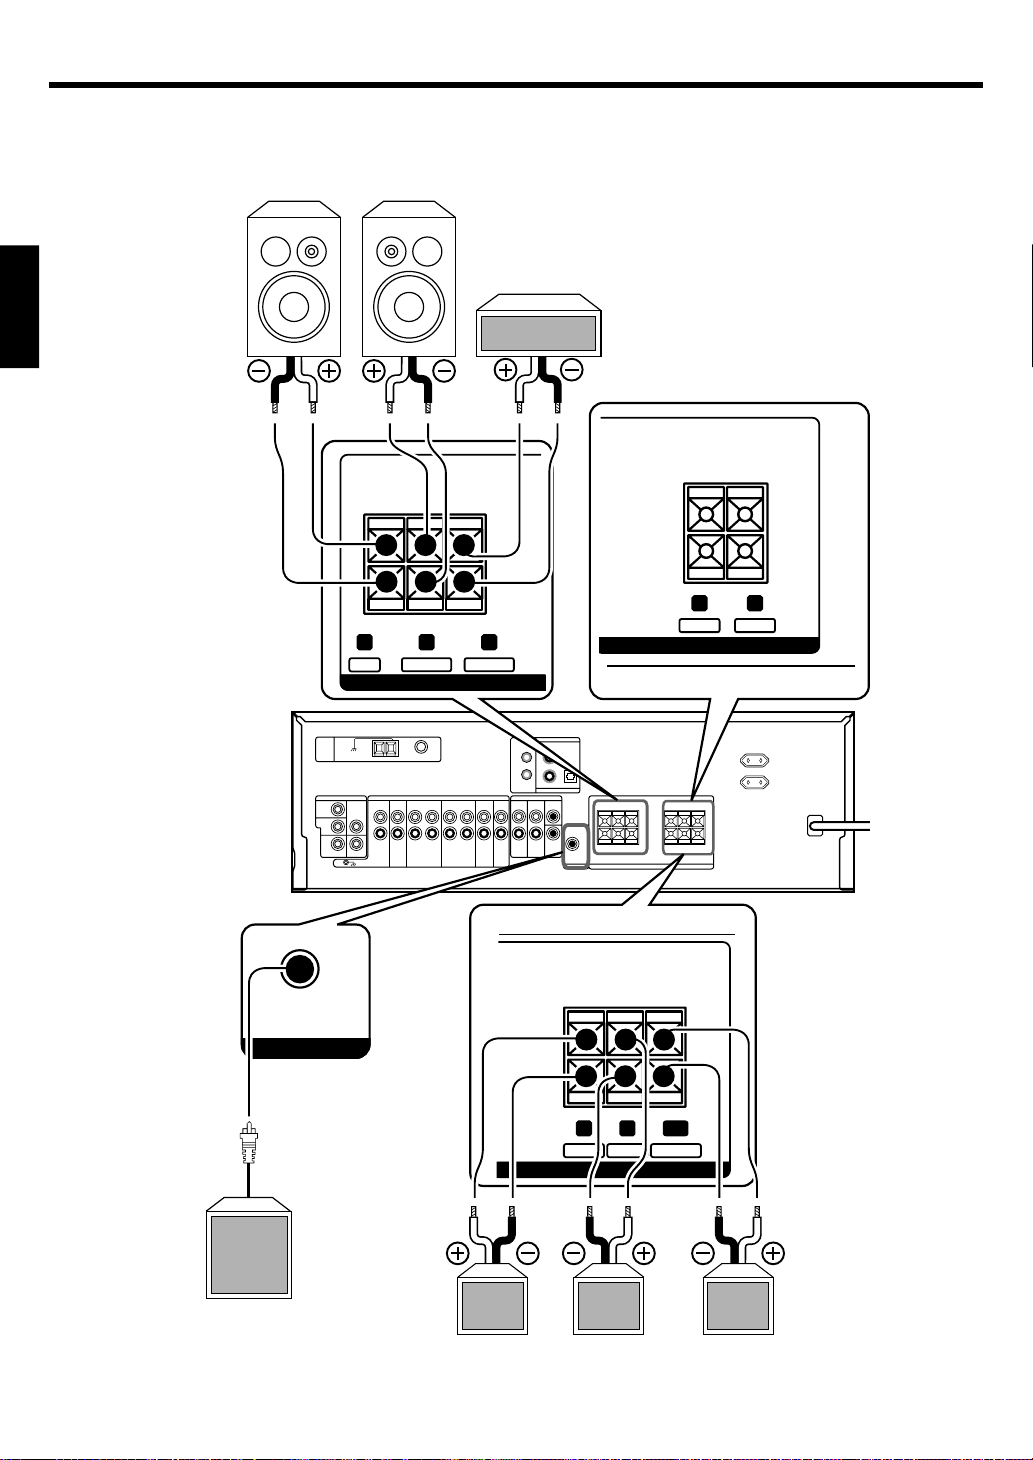
Connecting the speakers
ENGLISH
Front Speakers
Right Left
Center
Speaker
SURROUND
SUB WOOFER
PRE OUT
FRONT
RED WHITE GREEN
CENTER
CR L
SPEAKERS (6
+
+
-
-
SPEAKERS (6-16Ω)
KRF-V5570D
SURROUND
R
GRAYLBLUE
KRF-V5070D/KRF-V4070D
+
-
WOOFER
+
-
SUB
+
14
-
R
SPEAKERS (6-16Ω)
Powered
sub woofer
(KRF-V5070D/
V4070D)
EN
Right Left
Surround Speakers
(Be sure to connect both
surround speakers)
GRAYLBLUESWPURPLE
Sub woofer
Page 15
Setting up the system
Connecting the terminals
1 Strip coating.
3 Insert the cord. 4 Return the lever.
• Never short circuit the + and – speaker cords.
• If the left and right speakers are connected inversely or the speaker
cords are connected with reversed polarity, the sound will be
unnatural with ambiguous acoustic imaging. Be sure to connect the
speakers correctly.
Speaker impedance
After confirming the speaker impedance indications printed on the
rear panel of the receiver, connect speakers with matching impedance
ratings. Using speakers with a rated impedance other than that
indicated on the rear panel of the receiver could result in malfunctions
or damage to the speakers or receiver.
2 Push the lever.
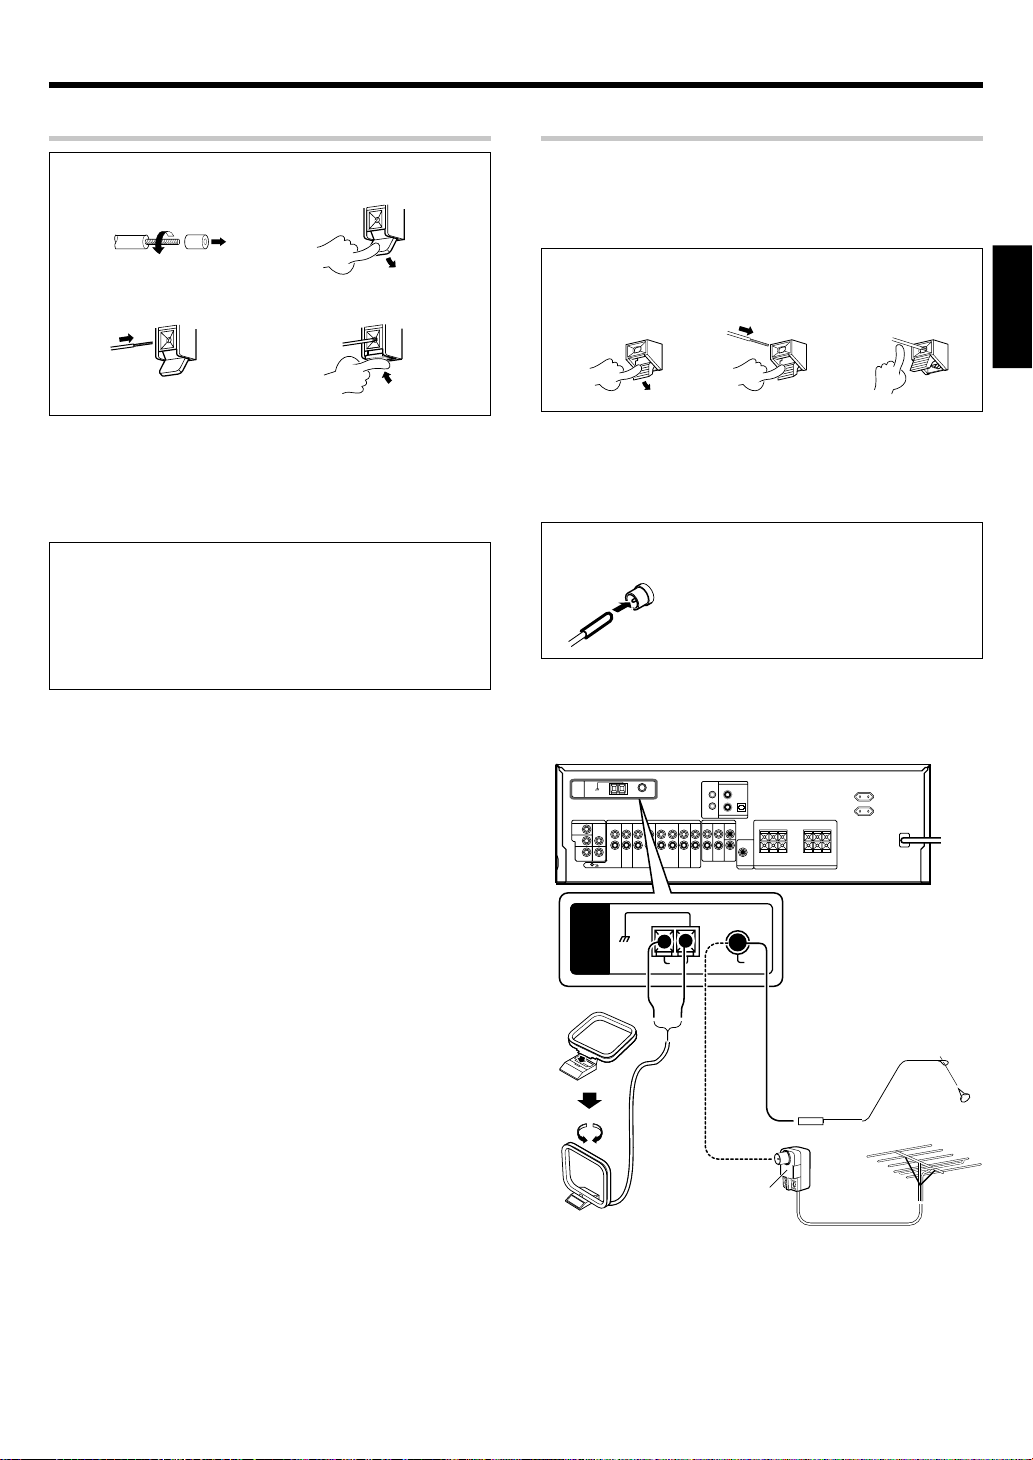
Connecting the antennas
AM loop antenna
The supplied loop antenna is for use indoors. Place it as far as possible
from the receiver, TV set, speaker cords and power cord, and adjust
the direction for best reception.
AM antenna terminal connections
1 Push lever. 2 Insert cord. 3 Release lever.
FM indoor antenna
The supplied indoor antenna is for temporary use only. For stable
signal reception we recommend using an outdoor antenna. Disconnect
the indoor antenna when you connect one outdoors.
FM antenna terminal connections
Insert cord.
FM outdoor antenna
Lead the 75Ω coaxial cable connected to the FM outdoor antenna into
the room and connect it to the FM 75Ω terminal.
ENGLISH
ANTENNA
GND
Attach to the
stand
AM loop antenna
AM
Use an antenna
adapter
(Commercially
available)
+
+
-
-
FM
75Ω
FM indoor antenna
FM outdoor antenna
15
EN
Page 16
Setting up the system
SYS
OL
Connecting the system control
Connecting system control cords after connecting a KENWOOD
audio component system lets you take advantage of convenient
system control operations.
This unit is compatible only with the [SL-16] mode. The system
control operation is not available if the unit is connected in the
[XS8], [XS], or [XR] connection mode.
If your component has the mode select switch, set the connected
components to the [SL16] mode.
ENGLISH
SYSTEM CONTROL
cord
TEM CONTR
• You may connect the system control cord to either the up or down
jack.
EXAMPLE: [SL16] mode connections
The underlined portion represents the setting of the system control
mode.
SL16]
[
SL16] [XS] [XS8] [XR]
[
SL16] [XS] [XS8]
[
[XS]
Receiver
Cassette deck
or MD recorder
CD player
Record player
SYSTEM
CONTROL
cord
SYSTEM CONTROL OPERATIONS
Remote Control
Lets you operate this unit with the system remote supplied with the
receiver.
Automatic Operation
When you start playback from a source component, the input selector
on this unit switches to that component automatically.
Synchronized Recording
Lets you synchronize recording with the start of playback when
recording from CD, MD or analog discs.
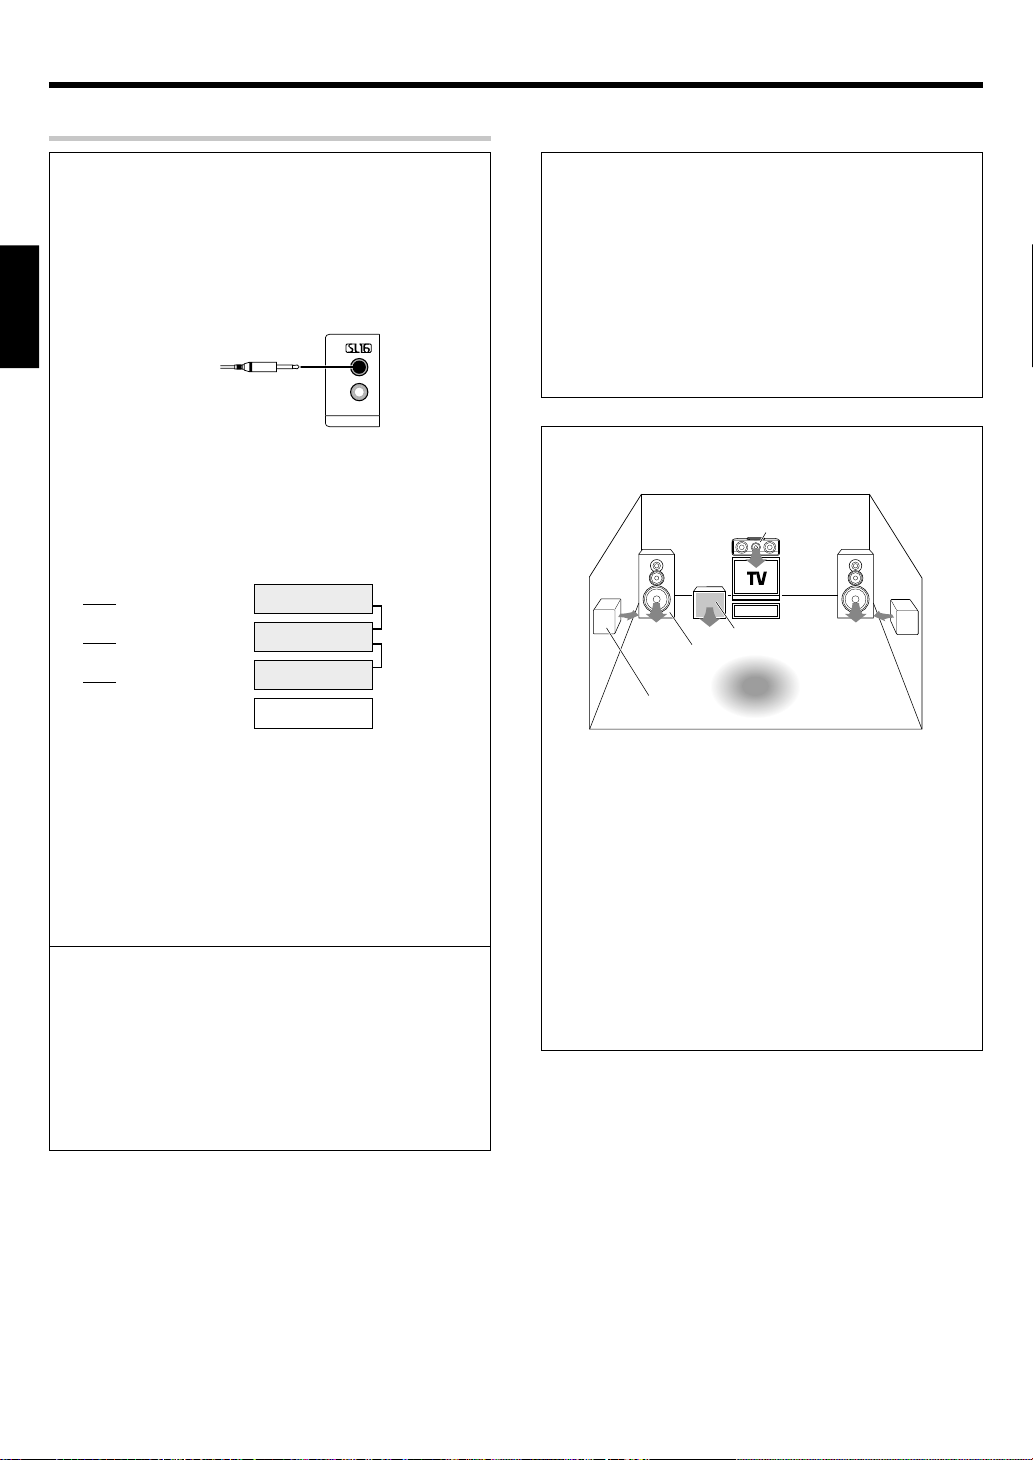
Speaker placement
Center speaker
Subwoofer
Front
Surround
speaker
speaker
Listening
position
• In order to take advantage of the system control operations, the
components must be connected to the correct jacks. To use a CD
player it must be connected to the CD jacks. To use a cassette deck
(or MD recorder) it must be connected to the MD/TAPE jacks.
When using more than one CD player (etc.) only the one connected
to the specified jacks may be connected for system control.
• Some CD players and cassette decks are not compatible with the
[SL16] system control mode. Do not make system connections
with equipment that is not [SL16] compatible.
• Some MD players are not system control compatible. You cannot
make system control connections to this kind of equipment.
Notes
1. [SL16] equipment cannot be combined with [XR], [XS], and [XS8]
equipment for system operations. If your equipment consists of
this kind of combination, please do not connect any system control
cords. Even without system control cords, normal operations can
be carried out without affecting performance.
2. Do not connect system control cords to any components other
than those specified by KENWOOD. It may cause a malfunction
and damage your equipment.
3. Be sure the system control plugs are inserted all the way in to the
system control terminals.
Front speakers : Place to the front left and right of the listening
position. Front speakers are required for all surround modes.
Center speaker : Place front and center. This speaker stabilizes the
sound image and helps recreate sound motion. Required for surround
playback.
Surround speakers : Place to the direct left and right, or slightly
behind, the listening position at even heights, approximately 1 meter
above the ears of the listeners. These speakers recreate sound
motion and atmosphere. Required for surround playback.
Subwoofer : Reproduces powerful deep bass sounds.
• Although the ideal surround system consists of all the speakers
listed above, if you don't have a center speaker or a subwoofer, you
can divide those signals between the available speakers in the
speaker settings steps to obtain the best possible surround
reproduction from the speakers you have available. &
EN
16
Page 17

Preparing for surround sound
Speaker settings
To enable you to obtain optimum enjoyment from the receiver’s listening
modes, make sure to complete the speaker settings (subwoofer, front,
center, and surround speakers) as described below.
ON/STANDBY
POWER ON/OFF
MULTI CONTROL
SETUP
POWER
SETUP
MULTI
CONTROL
1
Turn on the power to this receiver by pressing POWER ON/
OFF and ON/STANDBY
2
Press the SETUP key to enter the SETUP mode and use the
or POWER key.
MULTI CONTROL knob or keys for the following displays.
1 SP SETUP
2 TESTTONE
3 DISTANCE
4 EXIT
The flow of the SETUP is as follows;
SP SETUP TESTTONE DISTANCE EXIT
SP System
Full Range
2Way 2Speaker
2Way 3Speaker
Others
Subwoofer
Center
Surround
Subwoofer Re-mix
3
Select a speaker system.
1 Select SP SETUP and press the SETUP key again so that the
speaker system indication “SP SYSTEM” scrolls across the
display.
2 Use the MULTI CONTROL knob or keys to select the speaker
system setting.
1 FULL RANGE : For selected Kenwood speaker – for example,
2 2WAY 2SPKR : For selected Kenwood speaker – for example,
3 2WAY 3SPKR : For selected Kenwood speaker – for example,
4 OTHERS : For general speakers.
Front
AUTO
MANUAL
L
C
R
SR
SL
SW
KS-207HT.
KS-307HT.
KS-707HT.
L
C
R
SR
SL
SW
Front
Center
Surround
• The selection of FULL RANGE, 2WAY 2SPKR or 2WAY 3SPKR
should only be used with 5 channels speaker system setting.
• When the setting FULL RANGE, 2WAY 2SPKR or 2WAY 3SPKR
is selected, the procedure skips to step 4.
3 For general speaker setting, use the MULTI CONTROL knob or
keys to select OTHERS and press the SETUP key again.
• The subwoofer setting indication “SUBW ON” appears.
4 Use the MULTI CONTROL knob or keys to select the
appropriate subwoofer setting.
1 SUBW ON : Subwoofer setting mode to the receiver is ON.
2 SUBW OFF :
• The initial setting is “SUBW ON”.
• When the setting “SUBW OFF” is selected, the front speakers
are automatically set to “FRNT LRG” and the procedure skips to
step 8.
Before step 8, press the SETUP key to accept the setting.
• When subwoofer output sound is required, select “FRNT NML”.
5 Press the SETUP key to accept the setting.
• The front speakers setting indication “FRNT NML” appears.
6 Use the MULTI CONTROL knob or keys to select the
appropriate front speakers setting.
1 FRNT NML (normal) : Average size front speakers are
2 FRNT LRG (large) : Large front speakers are connected to
• For “FRNT LRG” selection, no sound will be heard from subwoofer
speaker even when it is set to ON. However, if you select “SW
RE-MIX ON” when subwoofer is selected, you will be able to
hear sound from the subwoofer.
When in STEREO mode, the sound goes directly to front speaker.
7 Press the SETUP key to accept the setting.
• The center speaker setting indication “CNTR NML” appears.
8 Use the MULTI CONTROL knob or keys to select the
appropriate center speaker setting.
If you have selected “LRG” as the front speakers setting,
1 CNTR NML (normal) : An average size center speaker is
2 CNTR LRG (large) : A large center speaker is connected to
3 CNTR OFF : Center speaker setting mode to the
If you have selected “NML” as the front speakers setting,
1 CNTR ON : Center speaker setting mode to the
2 CNTR OFF : Center speaker setting mode to the
9 Press the SETUP key again to accept the setting.
•The surround speaker setting indication “SURR NML” appears.
0 Use the MULTI CONTROL knob or keys to select the
appropriate surround speaker setting.
If you have selected “LRG” as the center speaker setting,
1 SURR NML (normal) : Average size surround speakers are
2 SURR LRG (large) : Large surround speakers are connected
3 SURR OFF : Surround speaker setting mode to the
Subwoofer setting mode to the receiver is OFF.
connected to the receiver.
the receiver.
connected to the receiver.
the receiver.
receiver is OFF.
receiver is ON.
receiver is OFF.
connected to the receiver.
to the receiver.
receiver is OFF.
Continued to next page
EN
17
ENGLISH
Page 18
Preparing for surround sound
If you have selected other than “LRG” as the center speaker
setting,
1 SURR ON : Surround speaker setting mode to the receiver is
2 SURR OFF : Surround speaker setting mode to the receiver is
! Press the SETUP key again to accept the setting.
• The subwoofer re-mix setting indication “SW RE-MIX” scrolls
across the display.
ON.
OFF.
ENGLISH
• If subwoofer is turned OFF, subwoofer re-mix setting is not
visible.
@ Use the MULTI CONTROL knob or keys to select the
appropriate subwoofer re-mix setting.
1 RMX ON : Subwoofer re-mix set mode to the receiver is ON.
2 RMX OFF : Subwoofer re-mix set mode to the receiver is OFF.
# Press the SETUP key to accept the setting.
• The receiver enters the speaker volume level adjustment mode.
• In step 4 and 5, indications appear only for the selected channels
of the speakers that require adjusting.
4
Adjust the speaker volume level.
From your usual listening position, adjust the volume levels. The
volume levels from each speaker should be the same.
1 Press the SETUP key to begin TEST TONE.
The selection of AUTO/MANUAL TEST TONE is done by the
MULTI CONTROL knob or keys.
1 AUTO
2 MANUAL
2 Press the SETUP key again to select either AUTO or MANUAL.
Use the MULTI CONTROL knob or keys to adjust the volume
level of the test tone output from the speaker channel to be
adjusted.
For AUTO selection, the test tone is heard from the speakers
in the following sequence for 2 seconds each:
5
Input the distance to the speakers.
1 Select the DISTANCE from the set up displays and press the
SETUP key again.
2 Measure the distance from the listening position to each of
the speakers.
Jot down the distance to each of the speakers.
Distance to front speakers : ____ feet (meters)
Distance to center speaker : ____ feet (meters)
Distance to surround speakers : ____ feet (meters)
3 Use the MULTI CONTROL knob or keys to select the distance
to the front speakers.
The speaker indicator to be adjusted blinks.
Indication in feet Indication in meters
• The allowable setting range is 1 to 30 feet (0.3m to 9.0m),
adjustable in 1 foot (0.3m) increments.
4 Press the SETUP key to accept the settings.
5 Repeat steps 3 and 4 to input the distance for each of the
speakers.
6 Setup is complete when the EXIT indication appears.
• The speakers you have selected should appear on the display.
Confirm that all the speakers have been correctly selected.
7 Press the SETUP key to exit the SETUP mode.
Input level adjustment (analog sources only)
If the input level of an analog source signal is too high, the CLIP indicator
will blink to indicate the source signal. Adjust the input level.
• If you change the volume level settings for the speakers while
listening to music, the settings referred to on this page are also
changed. ª
• If any of the speakers is set as OFF during SP SETUP, the TEST
TONE adjustment for that speaker will be skipped.
3 Press the SETUP key.
• The test tone is turned off. The receiver enters the mode for
inputting the distance to the speakers.
4 For MANUAL selection, press the SETUP key each time to
select the speaker channel.
EN
18
1 Use the INPUT SELECTOR knob to select the source of which the
input level you want to adjust.
• You can store a separate input level for each input source.
2 Press the SOUND key repeatedly until the “INPUT” indication
appears.
3 Use the MULTI CONTROL knob or keys to adjust the input level.
• The input level may be adjusted to any one of three settings: 0dB,
-3dB, and -6dB. (The initial setting is 0dB.)
4 Press the SOUND key again to return to the input indication.
Page 19
Normal playback
Preparing for playback
Some preparatory steps are needed before starting playback.
SPEAKERS
ON/OFF
ON/OFF
Turning on the receiver
1 Turn on the power to the related components.
2 Turn on the power to this receiver by pressing POWER ON/OFF
and ON/STANDBY
Selecting the input mode
If you have selected a component connected to the CD/DVD, VIDEO2,
DVD or DVD/6CH (KRF-V5070D only) jacks, make sure that the input
mode setting is correct for the type of audio signal to be used. 9
Selecting MD/TAPE
Select the source name corresponding to the component connected to
the MD/TAPE jacks. The initial factory setting is “TAPE”. To change the
source to “MD”, follow the steps below:
1 Use the INPUT SELECTOR knob to select “TAPE”.
2 Hold down the AUTO key for more than 2 seconds.
• The source indication changes to “MD”.
• To return to the original indication, repeat procedure 2.
Setting the speaker status
The speaker indicator lights up.
ON/STANDBY
AUTO INPUT SELECTORPOWER
key.
Listening to a source component
INPUT SELECTOR
Input
Selector
Use the INPUT SELECTOR knob or keys to select the source
1
you want to listen to.
The input sources change as shown below:
KRF-V4070D/V5570D
1 “AUX”
2 “TUNER”
3 “CD/DVD”
4 “TAPE” or “MD”
5 “VIDEO1”
6 “VIDEO2”
7 “DVD”
KRF-V5070D
1 “PHONO”
2 “TUNER”
3 “CD/DVD”
4 “TAPE” or “MD”
5 “VIDEO1”
6 “VIDEO2”
7 “DVD/6CH”
VOLUME CONTROL
VOLUME
ENGLISH
Press the SPEAKERS ON/OFF key to switch the speaker on or off.
Start playback from the selected source.
2
Use the VOLUME CONTROL knob or VOLUME keys to adjust
3
the volume.
19
EN
Page 20

Normal playback
Adjusting the sound
SPEAKERS ON/OFF
ACTIVE EQ
ENGLISH
PHONES
MULTI CONTROL
BASS BOOST
MUTE
Adjusting the TONE (remote control only)
You can adjust the sound quality when the receiver is in the PCM stereo
and analog stereo mode.
1 Press the TONE key to select the TONE mode.
2 Use the MULTI CONTROL knob or keys to select TONE ON/OFF.
3 When in TONE ON selection, press the TONE key for the following
displays.
BASS : Select this to adjust the low frequency range.
TREB : Select this to adjust the high frequency range.
4 Use the MULTI CONTROL knob or keys to adjust the sound
quality.
VOLUME CONTROL
MUTE
LOUDNESS
MULTI
CONTROL
ACTIVE EQ
TONE
VOLUME
Adjusting the LOUDNESS mode (remote control only)
You can adjust the Loudness function which controls the low volume
settings to maintain the music’s richness. The adjustment can be made
when the receiver is in the PCM stereo and analog stereo mode.
Press the LOUDNESS key to turn the LOUDNESS setting ON.
To cancel
Press the LOUDNESS key again so that the “LOUDNESS” indicator
goes off.
Muting the sound
The MUTE key lets you mute the sound of the speakers.
Press the MUTE key.
To cancel
Press the MUTE key again so that the “MUTE” indicator goes off.
• MUTE ON can also be deactivated by turning the volume control
knob.
ACTIVE EQ mode
You can enjoy a more impressive sound effect when ACTIVE EQ is
turned ON during Dolby Digital and DTS playback and, when in PCM and
analog stereo mode
Press the ACTIVE EQ key for the following selections;
1 ACTIVE EQ MUSIC : Effective when listening to music.
(The ACTIVE EQ LED indicator lights up.)
2 ACTIVE EQ CINEMA : Effective when watching a movie.
(The ACTIVE EQ LED indicator lights up.)
3 ACTIVE EQ TV : Effective when watching TV.
(The ACTIVE EQ LED indicator lights up.)
4 ACTIVE EQ OFF : The ACTIVE EQ function is turned OFF.
(The ACTIVE EQ LED indicator goes off.)
• ACTIVE EQ function will not be available when REC MODE, AUTO
TUNING or PRESET MEMORY is ON and during 96kHz LPCM
playback.
• The bass and treble levels are adjustable from -10 to +10 in 2 step
increments.
Once-touch low frequency emphasis (BASS BOOST )
(remote control only)
You can adjust the sound quality when the receiver is in the PCM stereo
and analog stereo modes.
Press the BASS BOOST key.
• Press the key once to select the maximum (+10) low frequency
emphasis setting.
• TONE will automatically be turned ON.
• This key does not function when the receiver is in the sound quality
or ambience effects adjustment mode. §~º
Switching back the previous setting
Press the BASS BOOST key again.
EN
20
Listening with headphones
1 Press the SPEAKERS ON/OFF key so that the speaker indicator
goes off.
Make sure the SP indicator is turned OFF.
• If you turn off all of the speakers when in surround mode, the
surround mode will be canceled as well, resulting in stereo playback.
2 Connect headphones to the PHONES jack.
PHONES
3 Use the VOLUME CONTROL knob or VOLUME keys to adjust the
volume.
Page 21
Recording
Recording audio (analog sources)
INPUT SELECTOR
Recording a music source
1 Use the INPUT SELECTOR knob to select the source (other than
“MD/TAPE”) you want to record.
2 Set the MD or TAPE recorder to record.
3 Start playback, then start recording.
Recording video
1 Use the INPUT SELECTOR knob to select the video source (other
than “VIDEO1”) you want to record.
2 Set the video deck connected to VIDEO 1 to record.
• Select the REC MODE to record a digital input source.
3 Start playback, then start recording.
• Recording may not be normal for some video software. This is due
to the copy guard condition. ‹
Recording audio (digital sources)
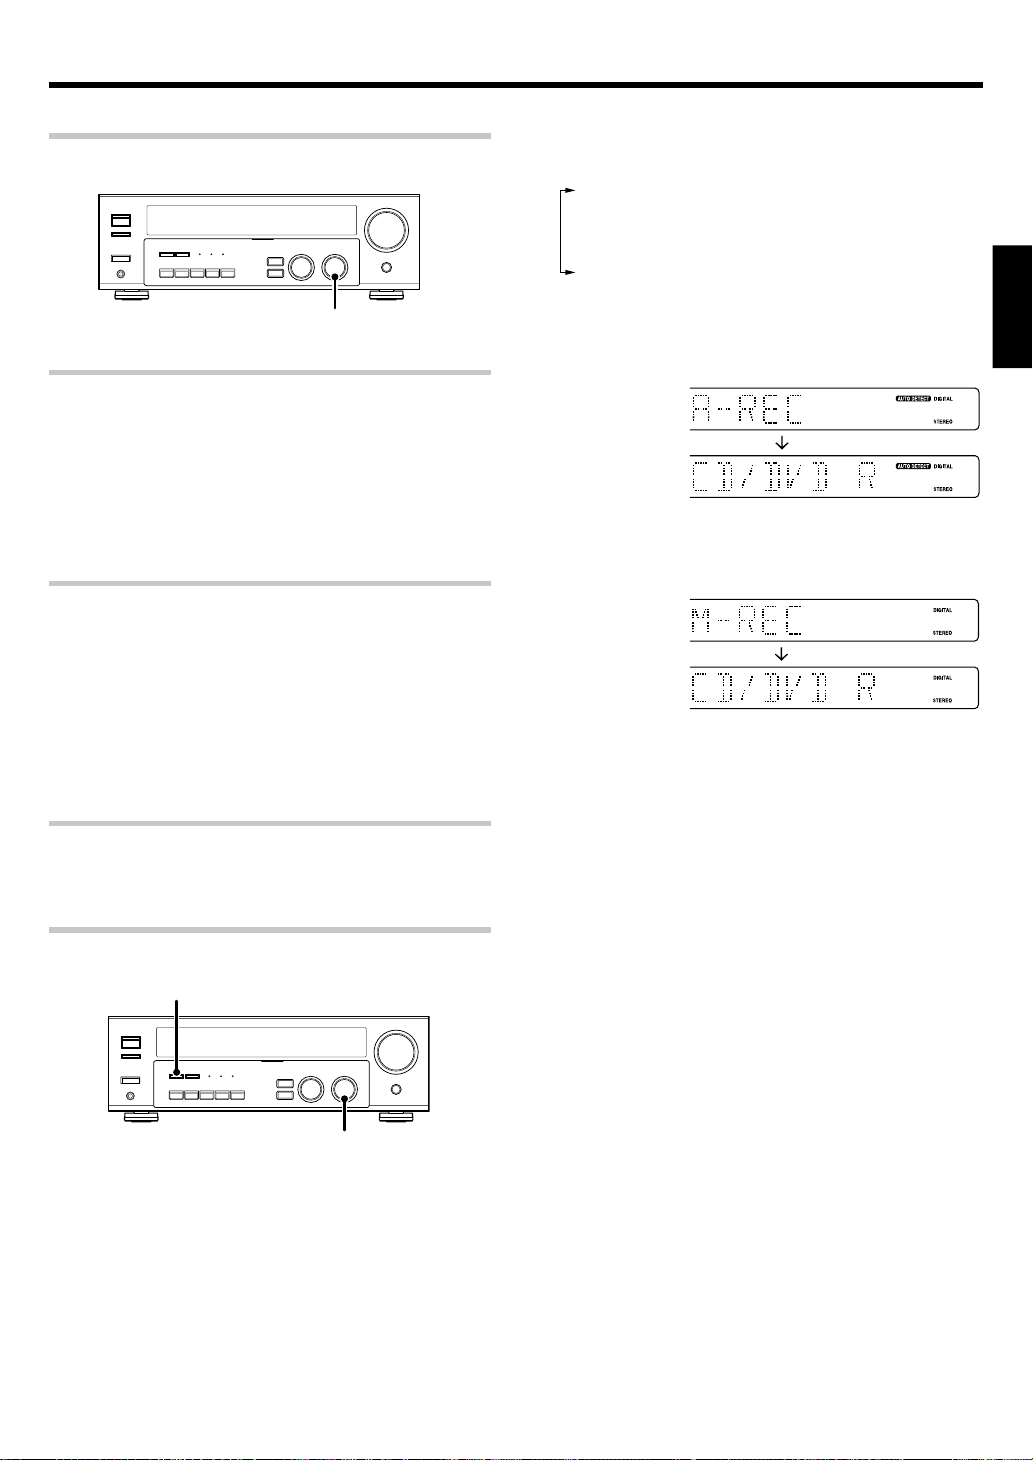
3 Press and hold the DIMMER key for more than 2 seconds to select
the A-REC or M-REC mode during digital input.
1 Rec mode off : The digital input record mode is switched off.
2 A-REC mode : The digital input signals (DTS, Dolby Digital,
or PCM) are identified automatically and
converted into stereo signals that are ready
for recording.
3 M-REC mode : The input signal type at the moment this
mode is selected is held throughout this
mode.
For A-REC mode:
For M-REC mode:
4 Start playback, then start recording.
• If the audio reproduction stops in the middle due to change in the
input signals, etc., press the DIMMER key.
ENGLISH
Switch on the REC mode to record a digital input source.
Usually use the A-REC (Auto-Record) mode to record audio input
sources. When the digital mode changes during recording in the A-REC
mode, the audio input source may be interrupted momentarily.
Recording music in A-REC or M-REC mode
DIMMER
INPUT SELECTOR
1 Use the INPUT SELECTOR knob to select the source [CD/DVD,
DVD or DVD/6CH (KRF-V5070D only) or VIDEO2] you want to
record.
2 Set the MD or TAPE recorder to record.
21
EN
Page 22
Listening to radio broadcasts
The receiver can store up to 40 stations in the memory and recall them
by one-touch operation.
Radio stations can be classified into RDS (Radio Data System) stations
and other stations. To listen to or store RDS stations in the preset
memory see “Using RDS (Radio Data System)”.
Tuning (non-RDS) radio stations
MULTI CONTROL
ENGLISH
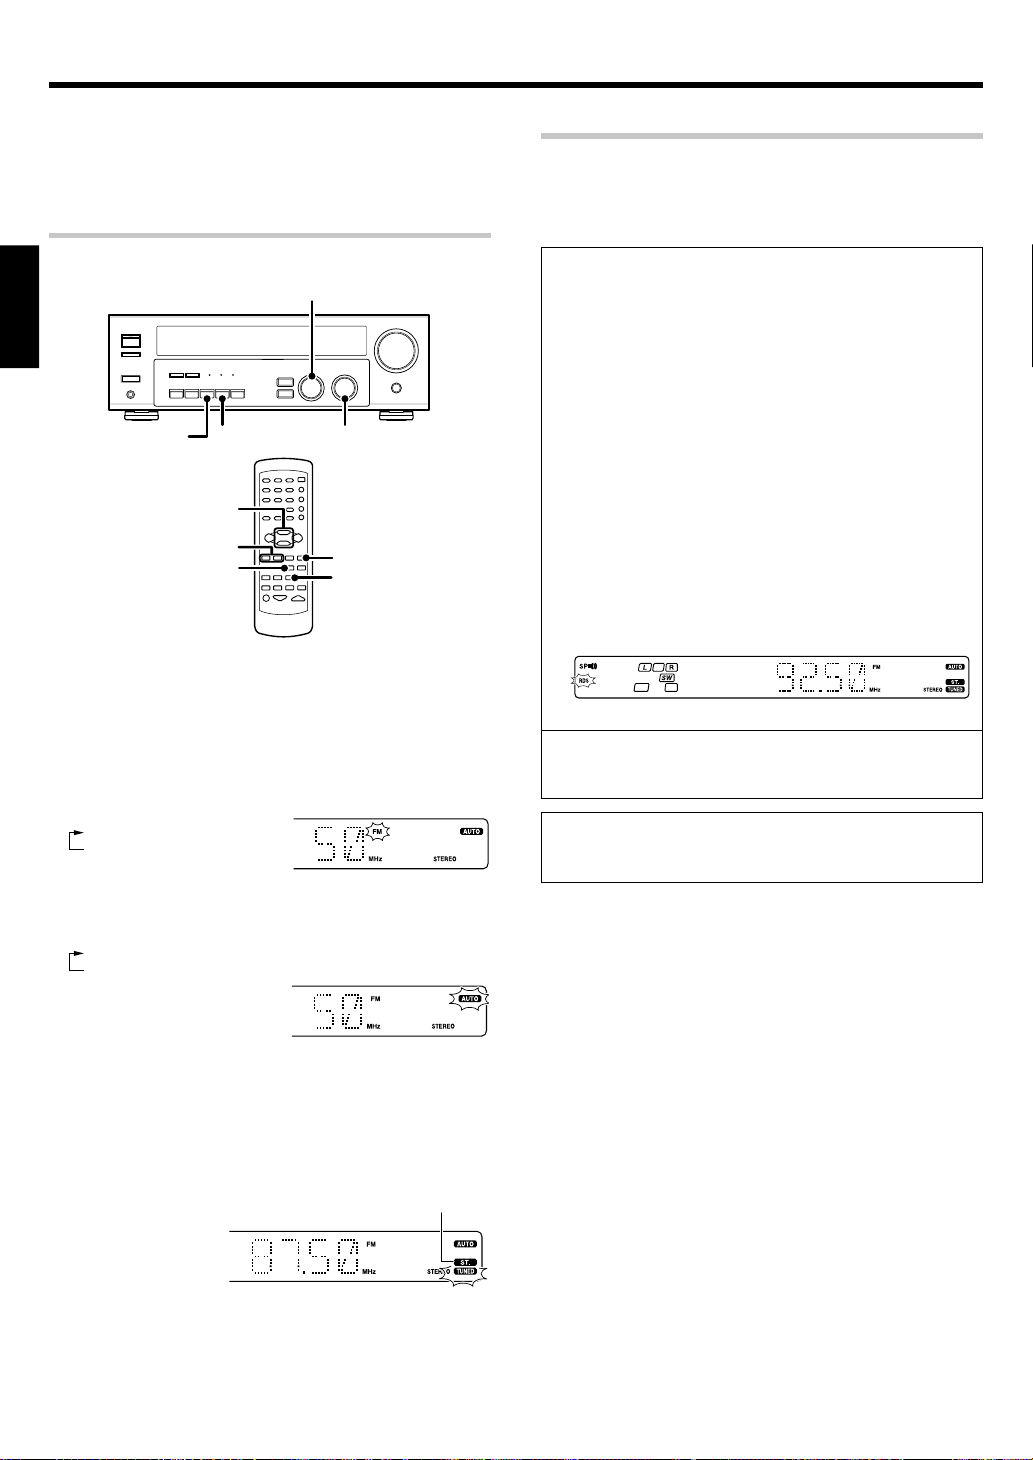
INPUT SELECTORBAND
BAND
TUNER
TUNING
AUTO
MULTI
CONTROL
1 /
¡
AUTO
Using RDS
RDS is a system that transmits useful information (in the form of digital
data) for FM broadcasts along with the broadcast signal. Tuners and
receivers designed for RDS reception can extract the information from
the broadcast signal for use with various functions, such as automatic
display of the station name.
(Radio Data System)
RDS functions:
PTY (Program TYpe Identification) Search ∞
Automatically tunes to a station that is currently broadcasting the
specified program type (genre).
PS (Program Service Name) Display
Automatically displays the station name transmitted by the RDS
station.
RDS AUTO MEMORY function ¢
Automatically selects and stores up to 40 RDS stations in the preset
memory.
If fewer than 40 RDS stations have been stored in the preset memory,
regular FM stations will be stored in the remaining places.
Radio Text function
Displays the radio text data transmitted by some RDS stations when
you press the RDS DISPLAY key. There is “NO RT” display if no text
data is transmitted.
The “RDS” indicator lights up when an RDS broadcast (signal) is
received.
1
Use the INPUT SELECTOR knob or TUNER key to select the
tuner.
2
Use the BAND key to select the desired broadcast band.
Each press switches the band
as follows:
1 FM
2 AM
3
Use the AUTO key to select the desired tuning method.
Each press switches the tuning method as follows:
1 AUTO lit (auto tuning)
2 AUTO not lit (manual tuning)
• Normally, set to “AUTO” (auto tuning). If the radio waves are weak
and there is a lot of interference, switch to manual tuning. (With
manual tuning, stereo broadcasts will be received in monaural.)
4
Use the MULTI CONTROL knob or keys, or TUNING 1 /
¡
keys to select the station.
Frequency
display
“AM” or “FM” indicator
appears in the display
“AUTO” indicator lights
up in the display.
“ST.” lights when
a broadcast is being
received in stereo.
Note
Some functions and function names may differ for certain countries
and areas.
Before using a function utilizing the RDS, be sure to perform the RDS
Auto Memory operation by referring to the description in “Presetting
RDS stations (RDS AUTO MEMORY)”. ¢
“TUNED” is displayed
when a station is received.
Auto tuning : The next station is tuned automatically.
Manual tuning : Turn the knob (press the key) to select the desired
EN
22
station.
Page 23
Listening to radio broadcasts
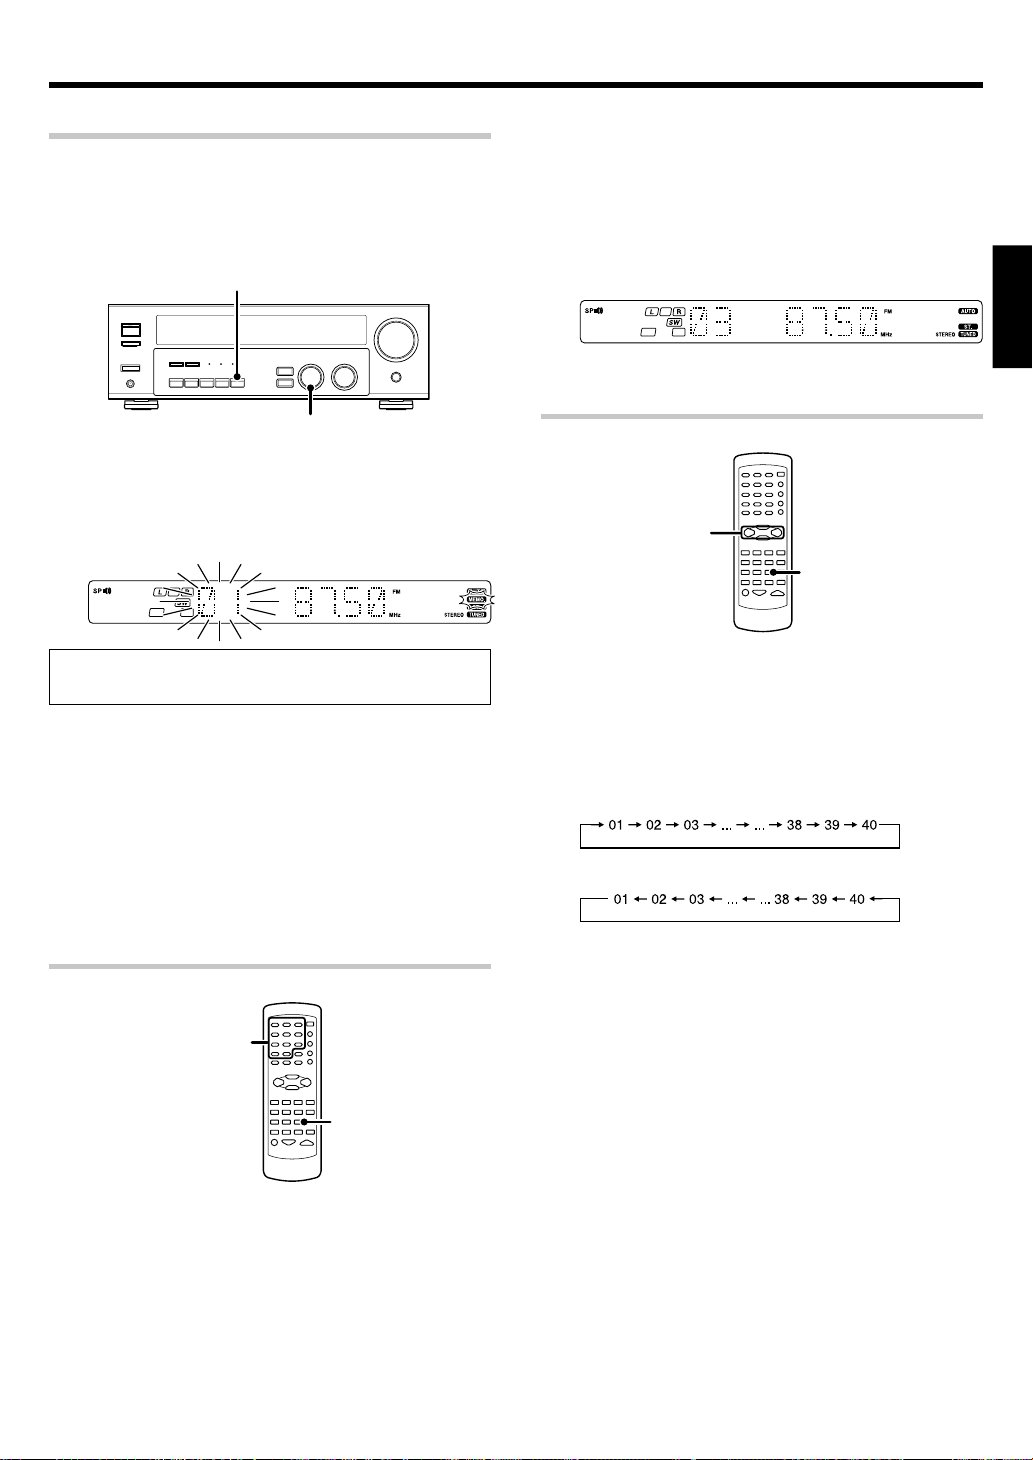
Presetting radio stations manually
The RDS auto memory function assigns preset numbers to RDS stations
starting from preset number “1”. Therefore, be sure to execute the RDS
auto memory function before using the following operations to manually
store AM stations and other FM stations, and RDS stations.
See “Presetting RDS stations (RDS AUTO MEMORY)”. ¢
MEMORY
2
Enter the number of the preset station you want to receive
(up to “40”).
Press the numeric keys in the following order:
For “15”, press ................................ 0,5
For “20”, press ................................ 0,0,)
• If you make a mistake entering a two digit number, press the +10
key repeatedly to return to the original display and start again.
ENGLISH
MULTI CONTROL
1
Tune to the station you want to store.
2
Press the MEMORY key while receiving the station.
Blinks for 5 seconds Lights for 5 seconds
Proceed to step 3 within 5 seconds.
(If more than 5 seconds elapse, press the MEMORY key again).
3
Use the MULTI CONTROL knob to select one of the station
presets (1 – 40).
4
Press the MEMORY key again to confirm the setting.
• Repeat steps 1, 2, 3, and 4 to store as many stations as
necessary.
• If you store a station at a previously used preset, the previous station
will be replaced by the new one.
Receiving preset stations
Receiving preset stations in order
P.CALL
4 / ¢
TUNER
1
Press the TUNER key to select tuner as the source.
2
Use the P.CALL
• Each time you press the key, another preset station is received in
order.
Pressing the P.CALL ¢ does the following :
Pressing the P.CALL 4 does the following :
Holding down the ¢ or 4 key, lets you skip through the
presets, receiving each preset station at 0.5 second intervals.
4¥¢
key to select the desired station.
(P.CALL)
Numeric keys
TUNER
1
Press the TUNER key to select tuner as the source.
23
EN
Page 24
Listening to radio broadcasts
Using the RDS DISPLAY key
RDS DISPLAY
ENGLISH
Pressing the RDS DISPLAY key changes the contents of the
display.
Each press switches the display mode as follows:
1 PS (Program Service name) display
2 RT (Radio Text) display
3 Frequency display
1 PS (Program Service name) display:
The station name is displayed automatically when an RDS broadcast
is received.
If no PS data was sent, “NO PS” is displayed.
Presetting RDS stations
This function automatically stores up to 40 RDS stations in the preset
memory. In order to use the PTY function, the RDS stations must be
stored in the preset memory using the RDS AUTO MEMORY function.
MEMORY
1
Use the INPUT SELECTOR knob to select the tuner.
2
Use the BAND key to set the broadcast band to “FM”.
3
Press and hold the MEMORY key for more than 2 seconds.
(RDS AUTO MEMORY)
INPUT SELECTORBAND AUTO
2 RT (Radio Text) display:
Text data accompanying the RDS broadcast scrolls across the display.
“NO RT” or “RT----” is displayed if the current RDS station does not
provide RT data.
3 Frequency display:
Displays the frequency of the current station.
• After a few minutes, up to 40 RDS stations are preset in order from
channel “01”.
• Stations already stored in the preset memory may be replaced by
RDS stations. (i.e., If the RDS AUTO MEMORY function detects 15
RDS stations, the stations currently preset at numbers 01~15 will
be replaced by the RDS stations.)
24
EN
Page 25
Listening to radio broadcasts
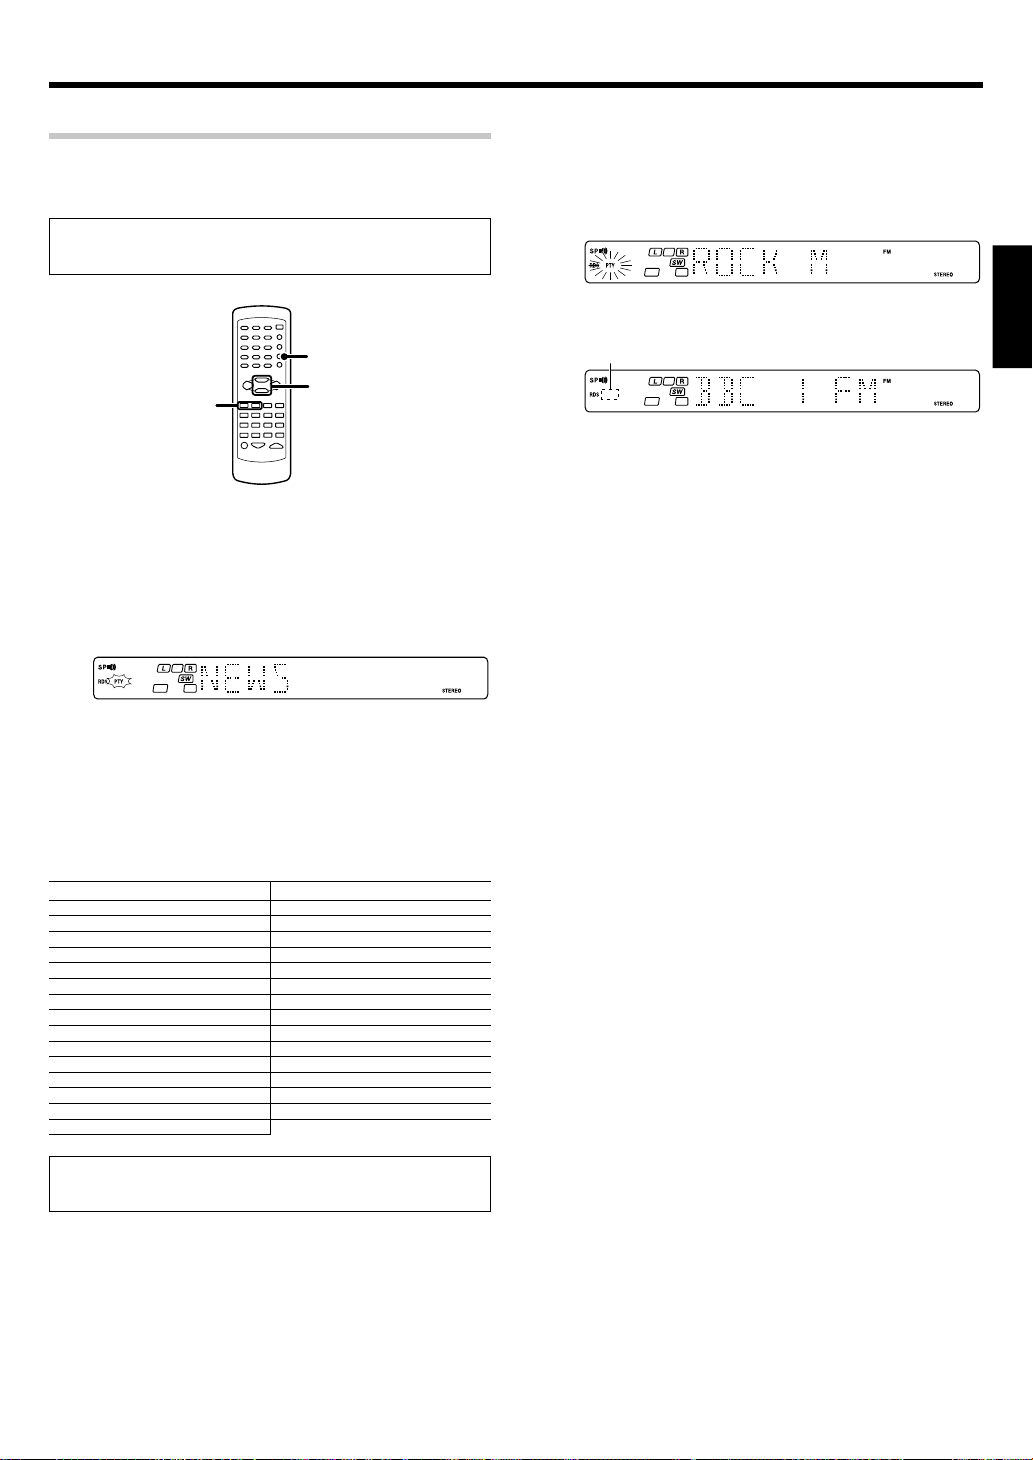
Tuning by Program TYpe (PTY search)
This function lets you set the tuner to automatically search for stations
which are currently broadcasting the type of program (genre) you want
to listen to.
Under certain receiving conditions, it may take more than 1
minute to complete the search.
3
Press the PTY key to start searching.
EXAMPLE: Searching for a Rock Music broadcast.
Display while searching.
Blinks Program type name display
Display when a station is received.
ENGLISH
PTY
MULTI
TUNING
1 / ¡
CONTROL
Preparations
• Execute the RDS auto memory procedure.
• Set the broadcast band to FM.
• Tune to an RDS station.
Press the PTY key to activate the PTY search mode.
1
When an RDS broadcast is received, the program type is shown on
the display. If no PTY data is available, or if the station is not an RDS
station, “NONE” is displayed.
2
While the “PTY” indicator is lit, use the MULTI CONTROL or
TUNING
1/ ¡
keys to select the program type of your
choice.
Program type table
Program Type Name Display
Pop Music POP M
Rock Music ROCK M
Easy Music EASY M
Light Classical Music LIGHT M
Serious Classical Music CLASSICS
Other Music OTHER M
News NEWS
Current Affairs AFFAIRS
Information INFO
Sport SPORT
Education EDUCATE
Drama DRAMA
Culture CULTURE
Science SCIENCE
Varied Speech VARIED
Program Type Name Display
Weather WEATHER
Finance FINANCE
Children’s Program CHILDREN
Social Affairs SOCIAL
Religion RELIGION
Phone In PHONE IN
Travel TRAVEL
Leisure LEISURE
Jazz Music JAZZ
Country Music COUNTRY
National Music NATION M
Oldies Music OLDIES
Folk Music FOLK M
Documentary DOCUMENT
Goes out
Station name display
• No sound is heard while “PTY” is blinking.
• If the desired program type cannot be found, “NO PROG” is
displayed, then after several seconds the display returns to the
original display.
To select another program type
Repeat steps 1, 2 and 3.
“NO PROG” is displayed if this operation is attempted before
performing the RDS Auto Memory operation.
25
EN
Page 26
Ambience effects
C
SW
This receiver is equipped with listening modes that allow
you to enjoy an enhanced sonic ambience with a variety of
video sources.
In order to obtain the optimum effect from the surround
modes, make sure to input the proper speaker settings
beforehand. &
Surround modes
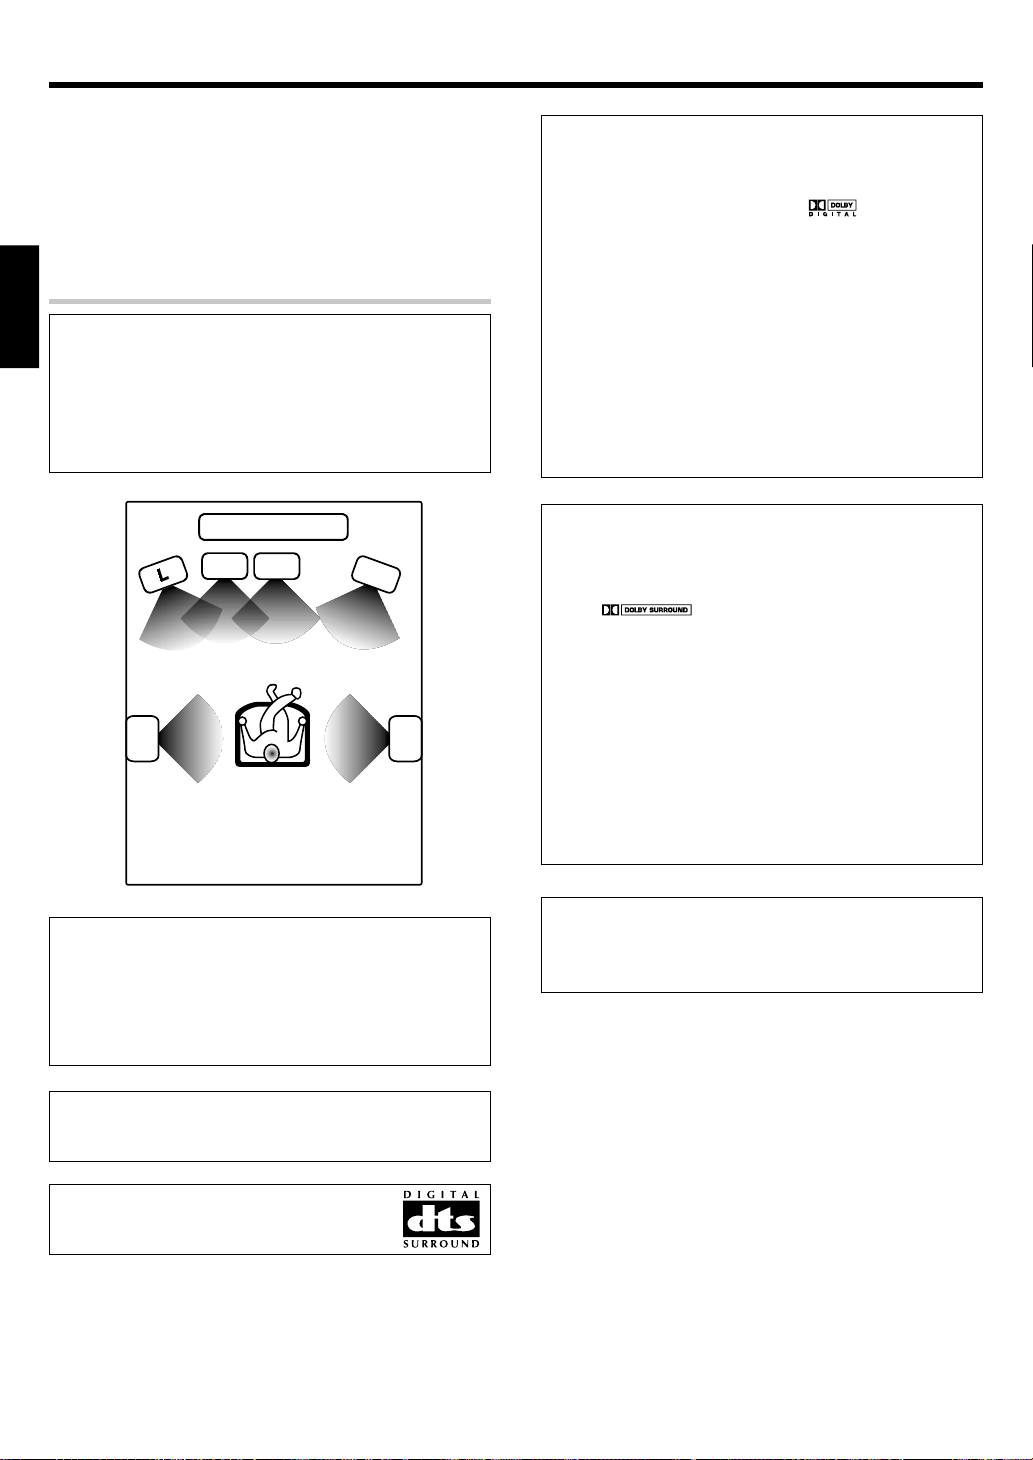
The below speaker placements are for 5.1 channel surround sound
ENGLISH
system which are;
• Dolby Digital
• Dolby Pro Logic II
• DTS
• DSP
• DVD 6-channel (For KRF-V5070D only)
TV / SCREEN
R
SRSL
Dolby Digital
The Dolby Digital surround format lets you enjoy up to 5.1 channels
of digital surround sound from Dolby Digital program sources (such
as Laserdisc or DVD software marked
previous Dolby surround, Dolby Digital provides even better sound
quality, greater spatial accuracy, and improved dynamic range.
Although a full set of speakers (front left, right, and center, surround
left and right, and a subwoofer) is required for true 5.1 channel Dolby
Digital surround sound, this receiver lets you enjoy Dolby Digital (and
Dolby Surround) program sources, even if you connect only the front
speakers.
Although only Dolby Digital soundtracks incorporate a separate low
frequency channel, connecting a subwoofer will also improve deep
bass performance in the other surround modes.
The indication “LFE” appears in the display when a signal is being
input for this channel.
Dolby PRO LOGIC
Dolby Pro Logic II was designed specifically to provide a new sense
of spatiality, directionality and articulation of sounds from Dolby
Surround encoded sources (such as video and Laserdisc software
marked
feedback logic design, a matrix surround decoding and the decoding
of stereo, full bandwidth surround outputs. The PRO LOGIC II modes
programmed into this receiver are “MOVIE”, “MUSIC” and “PRO
LOGIC”. The “MOVIE” mode of the PRO LOGIC II has preset
characteristics to produce a calibrated, high-level surround sound
playback while the “MUSIC” mode has user-adjustable characteristics
to offer the three optional controls, like “Dimension”, “Center
Width” and “Panorama” modes to allow optimization of the
soundfields as desired. The “Dimension” control allows the user to
gradually adjust the soundfield either towards the front or towards
the rear; the “Center Width” control allows various adjustment of the
left-center-right speakers’ balance; the “Panorama” extends the
front stereo image to include the surround speakers for an exciting
“wraparound” effect with side wall imaging.
II
). This is achieved with an intelligent, built-in
). Compared with
L Front left speaker
SW Subwoofer
C Center speaker
R Front right speaker
SL Surround left speaker
SR Surround right speaker
Manufactured under license from Dolby Laboratories. “DOLBY”,
the double-D symbol and “PRO LOGIC” are trademarks of Dolby
Laboratories.
“DTS” and “DTS Digital Surround” are registered
trademarks of Digital Theater Systems, Inc.
EN
26
Note
LFE = Low Frequency Effects. This channel delivers separate nondirectional bass signals to the subwoofer for more dynamic deep
bass sound effects.
Page 27

Ambience effects
DTS mode
The DTS multi-channel audio format is available on CD, LD and DVD
software. DTS is a strictly digital format and cannot be decoded inside
most CD, LD or DVD players. For this reason, if you attempt to listen
to DTS encoded software through the analog output of your new CD,
LD or DVD player, you will experience digital noise in most cases. This
noise can be quite loud if the analog output is connected directly to
a high power amplification system. Proper measures for playing the
digital output as described below should be taken to avoid this
situation. To enjoy DTS Digital Surround playback, an external 5.1
channel DTS Digital Surround decoder system or an amplifier with a
built-in DTS Digital Surround decoder must be connected to the
digital output (S/P DIF, AES/EBU or TosLink) of a CD, LD or DVD
player.
All models are incorporated with the DTS decoder.
DTS has a .1 or LFE channel.
The indication “LFE” appears in the display when a signal is being
input for this channel. §
DSP mode
The DSP mode lets you add the atmosphere of a live concert or hall to
almost any type of program source. These modes are particularly
effective when used with stereo program sources, like CD, television,
and FM radio. You might enjoy trying the ARENA, JAZZ CLUB, THEATER,
STADIUM or DISCO mode the next time you watch a concert or sporting
event!
What's DSP?
DSP stands for Digital Signal Processor.
The way a sound is heard in an actual environment depends on a
variety of different factors. One of the most important is reverberation
(the act of decaying elements of sound echoing in various places).
The DSP modes produce the feeling of presence by using the DSP to
create reverberation, without spoiling the sound quality of the original
signal.
DVD 6-channel mode
Using a DVD player or the like equipped with six (5.1) output channels
and the receiver, you can enjoy multi-channel encoded DVD source
material in all its splendor. Since the source signals are digital and
each channel is input independently, the resulting sound quality,
sense of spaciousness, and dynamic range are superb.
The indication “LFE” appears in the display during DVD 6-channel
mode selection. §
(
For KRF-V5070D only)
ENGLISH
27
EN
Page 28
Ambience effects
Surround play
The DTS compatible models can reproduce a CD, DVD, or LD carrying the
DTS mark.
DOLBY DIGITAL can be used when playing DVD or LD software bearing
the
DOLBY PRO LOGIC can be used when playing video, DVD, or LD
software bearing the
ENGLISH
mark and DOLBY DIGITAL format digital broadcasts (etc.).
mark.
LISTEN MODE
INPUT SELECTORINPUT MODE
LISTEN MODE
Input
Selector
Preparations
• Turn ON related components.
• Complete “Preparing for surround sound” (speaker settings).&
• Use the INPUT SELECTOR to select the component you wish to
play back with surround sound.
• Use the INPUT MODE key to select the input mode (analog or
digital) for the source you wish to playback. 9
• Noise will be produced when a DTS source is played by selecting the
analog input.
Start playing the video software.
1
Press the LISTEN MODE key to select the listening mode.
2
The listening mode settings are stored separately for each input. If the
input mode is set to full auto (“AUTO DETECT” lights), the receiver
selects the optimal listening mode automatically based on the type of
input signal and the speaker settings.
Each press of the LISTEN MODE key switches the setting as
listed.
The listening mode settings are different depending on the type
of input signal.
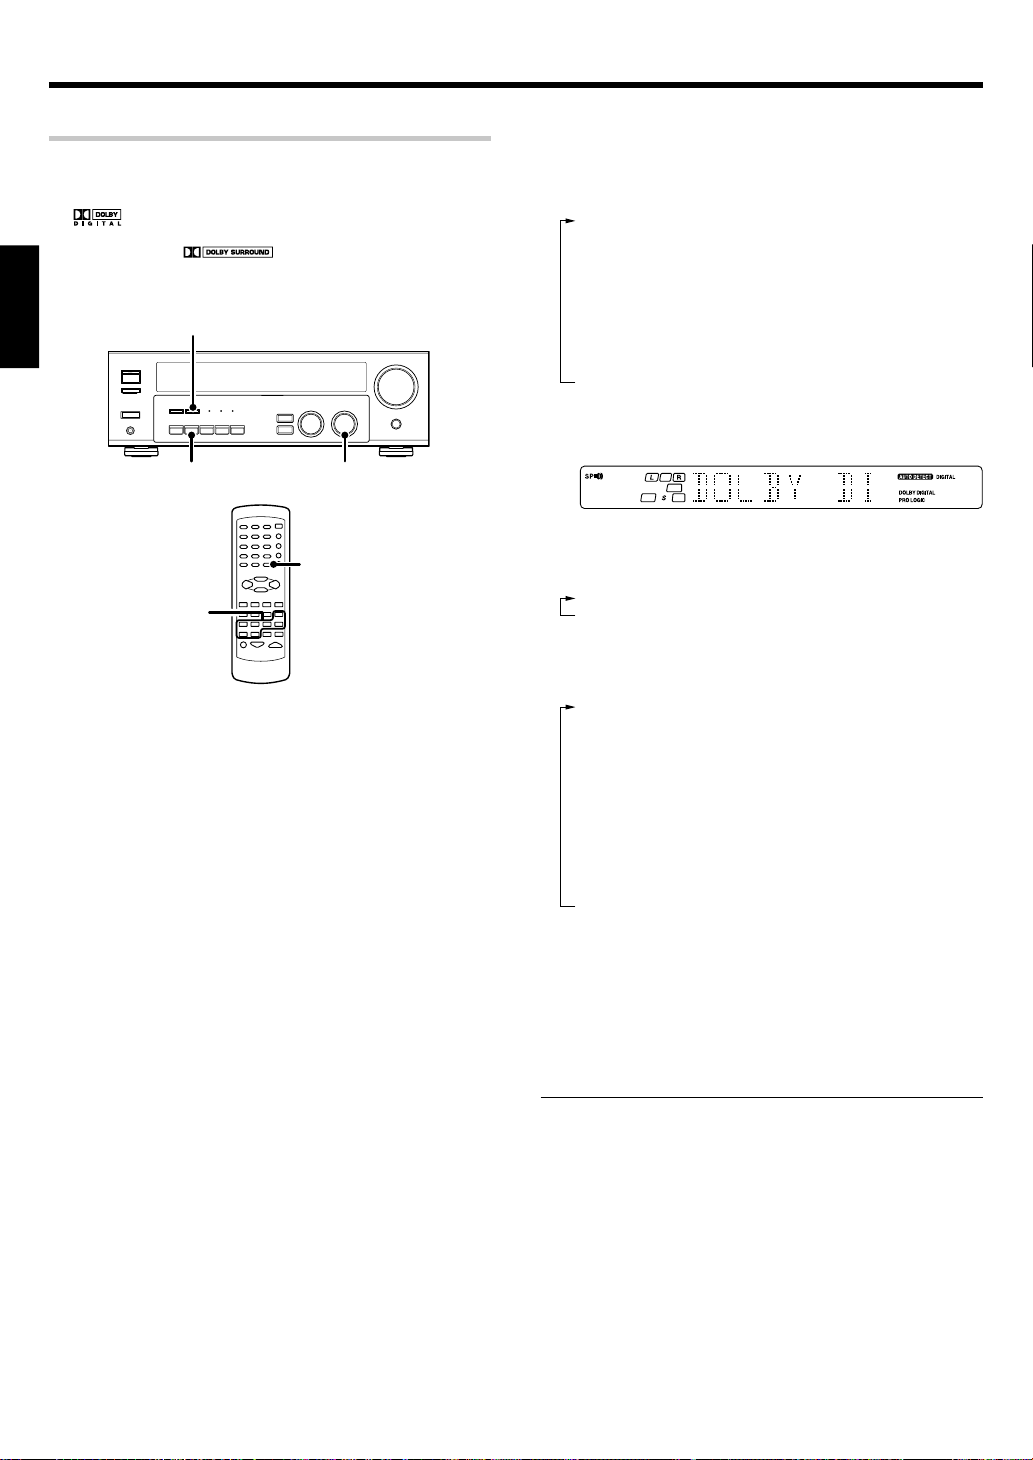
When the DOLBY DIGITAL signal is input:
(The DOLBY DIGITAL, PRO LOGIC, or STEREO indicator lights up.)
1 DOLBY DIGITAL : DOLBY DIGITAL surround.
2 PL II MOVIE : PRO LOGIC II surround MOVIE mode.
3 PL II MUSIC : PRO LOGIC II surround MUSIC mode.
4 PRO LOGIC : PRO LOGIC II surround PRO LOGIC mode.
5 STEREO : Normal stereo playback.
When you select DOLBY DIGITAL
“DOLBY DIGITAL” will scroll from right to left.
(The DOLBY DIGITAL LED indicator lights
up.)
(The PRO LOGIC indicator lights up.)
(The PRO LOGIC indicator lights up.)
(The PRO LOGIC indicator lights up.)
(The STEREO indicator lights up.)
When the DTS signal is input:
(The DTS LED indicator lights up.)
1 DTS : DTS surround
2 STEREO : Normal stereo playback
When the analog signal or the digital signal (except for
DOLBY DIGITAL or DTS signal) is input:
1 PL II MOVIE : PRO LOGIC II surround MOVIE mode.
2 PL II MUSIC : PRO LOGIC II surround MUSIC mode.
3 PRO LOGIC : PRO LOGIC II surround PRO LOGIC mode.
4 ARENA : DSP Surround ARENA mode.
5 JAZZ CLUB : DSP Surround JAZZ CLUB mode.
6 THEATER : DSP Surround THEATER mode.
7 STADIUM : DSP Surround STADIUM mode.
8 DISCO : DSP Surround DISCO mode.
9 STEREO : Normal stereo playback.
• Dolby Digital or DTS signal having more channels than the maximum
number of playback channels available using the receiver’s current
settings is input, downmixing is performed to match the number of
available channels.
Adjust the volume.
3
Notes
• Depending on the type of the signal or speaker setting, some
listening modes cannot be selected.
• When playback is started, the sound may be cut or interrupted
before the input source is confirmed as Dolby Digital.
• To enjoy Dolby Digital surround (as well as all the other listening
modes) from a single component, be sure to use a Dolby Digital
compatible source component.
(The PRO LOGIC indicator lights up.)
(The PRO LOGIC indicator lights up.)
(The PRO LOGIC indicator lights up.)
(The STEREO indicator lights up.)
28
EN
Page 29
Ambience effects
DVD 6-channel playback
Using a DVD player or the like equipped with six (5.1) output channels and
the receiver, you can enjoy surround sound playback.
Connecting a DVD player which can decode the surround signal itself is
also acceptable.
(
For KRF-V5070D only)
INPUT SELECTORINPUT MODE
DVD/6CH
Preparations
• Connect your DVD player to the DVD/6CH jacks of the receiver.
• Turn on all other components that will be used.
• Complete “Preparing for surround sound”. &
Select “DVD/6CH” as the input source.
1
Select "6CH INPT" by pressing the INPUT MODE key.
2
Start playback of the DVD software.
3
Adjust the volume.
4
• It is not possible to adjust the volume level or sound quality (SETUP,
SOUND, LISTEN MODE, ACTIVE EQ and TONE keys will not be
functional) of the channels separately when the receiver is in the
6CH INPUT mode. Adjust the volume with the controls of the DVD
player.
For the powered subwoofer, you can adjust the volume of the
subwoofer using the subwoofer’s own volume control.
Convenient functions
DIMMER
SOUND
Adjusting the sound
You can make further adjustments to the sound while listening to
playback in the surround mode.
1 Press the SOUND key until the desired item appears in the
display.
Each time you press the button, the menu changes as follows:
Note that some items are not displayed in certain modes.
1 C (center speaker level adjustment)*
2 SR (right surround speaker level adjustment)*
3 SL (left surround speaker level adjustment)*
4 SW (subwoofer level adjustment)*
5 INPUT (input level adjustment - analog mode only) *
6 NIGHT (midnight mode ON/OFF - Dolby Digital mode only)
7 PANORAMA (panorama mode ON/OFF)**
8 DIMENSION (dimension adjustment)**
9 CENTER WIDTH (center width adjustment)**
* The adjustment is only temporary for the current input selection.
The value will return automatically to the original setup value
when the power is turned on/off or when the input selection is
changed.
** Pro Logic II Music mode only.
2 Use the MULTI CONTROL knob or keys to adjust the setting as
desired.
Midnight mode (Dolby Digital mode only)
When watching movies at night, you might not be able to raise the
volume as loud as normal. Midnight mode compresses the dynamic
range of previously specified heavy sound passage of the Dolby Digital
sound track (like scenes with sudden increases in volume) to minimize
the difference in volume between the scenes with heavy sound passage
and scenes with normal sound passage. This makes it easy to hear all of
the sound track, even when listening at low volumes.
1 Press the SOUND key repeatedly until “NIGHT” appears on the
display.
• This can be selected only if CD/DVD, DVD or DVD/6CH (KRFV5070D only), or VIDEO2 is selected as the source and the listen
mode is set to “DOLBY DIGITAL.”
SOUND
MULTI CONTROL
MULTI
CONTROL
ENGLISH
Continued to next page
EN
29
Page 30
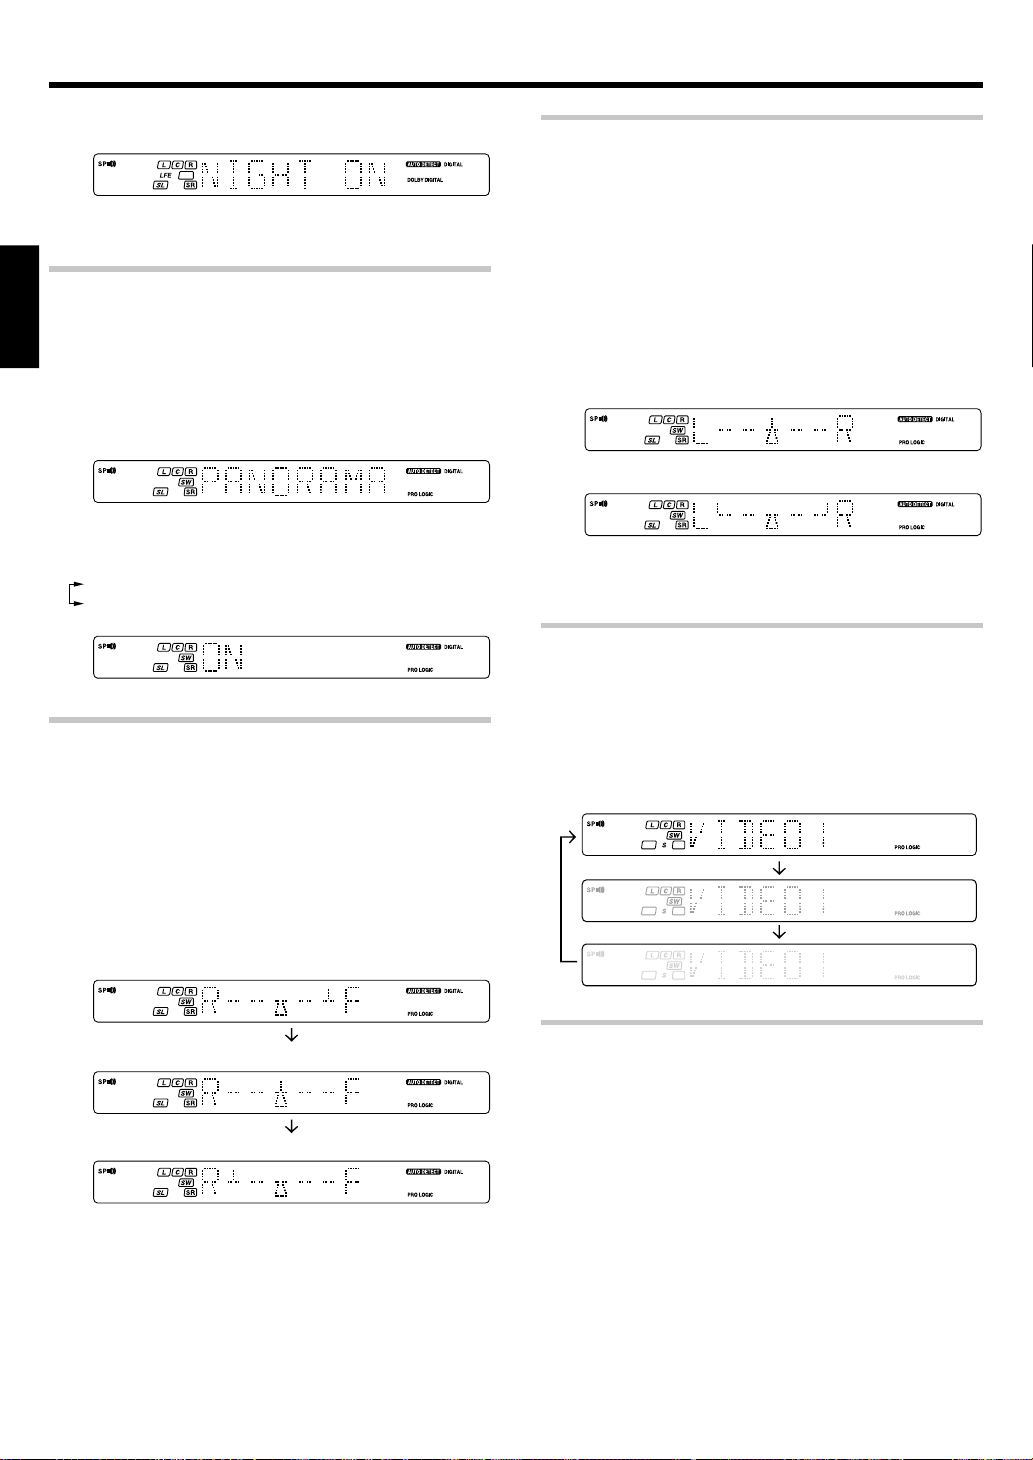
Ambience effects
2 Use the MULTI CONTROL knob or keys to select the ON or OFF
setting.
• Some Dolby Digital software may not be compatible with the
Midnight mode.
Panorama mode (Pro Logic II Music mode only)
When listening to music, you will be able to enjoy the “wraparound”
sound effect when you adjust the panorama mode.
ENGLISH
1 Press the SOUND key repeatedly until “PANORAMA” appears on
the display.
• The PANORAMA setting indication scrolls across the display.
“PANORAMA” will be scrolled from right to left.
2 Use the MULTI CONTROL knob or keys to select PANORAMA ON
or OFF.
1 ON : PANORAMA mode is ON.
2 OFF : PANORAMA mode is OFF.
Dimension mode (Pro Logic
When listening to music with certain recordings, you will also be able to
achieve a suitable balance from all the speakers by adjusting the
dimension mode.
1 Press the SOUND key repeatedly until “DIMENSION” appears on
the display.
• The DIMENSION indication scrolls across the display.
2 Use the MULTI CONTROL knob or keys to adjust the soundfield
towards the rear or the front.
Soundfield is adjusted towards the front.
II
Music mode only)
Center Width mode (Pro Logic II Music mode only)
Center Width adjustment allows you to enjoy an enhanced sound when
listening to music through center image from only center speaker, or left
and right speakers or various combinations adjustments.
1 Press the SOUND key repeatedly until “CENTER WIDTH” appears
on the display.
• The CENTER WIDTH indication scrolls across the display.
• When the center speaker is switched OFF, this mode will not
be effective.
2 Use the MULTI CONTROL knob or keys to adjust the left-center-
right output.
Center image will be heard from center speaker only.
Center image will be heard from left and right speakers only.
• When in other positions, center image from center speaker, left and
right speakers can be heard simultaneously with various
combinations.
Display dimmer adjustment
The dimmer function lets you select the brightness of the receiver's
display. You might find this useful if you darken your room to watch
movies or listen to music.
Each time you press the DIMMER key, the display brightness
changes among the three available settings. Select the brightness
level you find most pleasing.
Soundfield is in neutral position.
Soundfield is adjusted towards the rear.
EN
30
96kHz LPCM playback
The receiver is compatible with the 96kHz LPCM playback. To play a
96kHz DVD, set the listen mode to “STEREO”.
• In F-AUTO input mode, the listen mode will automatically be STEREO.
• When in D-MANUAL input mode (listen mode is not STEREO), “FS
96kHz” will appear in the display and no sound can be heard from the
speakers.
Press the LISTEN MODE key (the listen mode changes to the STEREO
mode) to output sound from the speakers.
Page 31

Basic remote control operations for other components
DVD player operation keys
The remote control of this unit can control two groups of KENWOOD DVD players directly without using the remote control supplied with the DVD player.
Group-1 : DV-4900, DV-4070B, DV-2070, DV-203, DVF-9010, DVF-K7010, DVF-5010, DVF-R9030, DVF-R7030, DVF-3530, DV-402, DV-5900,
Group-2 : DV-4050, DV-303, DVF-R6030, DVF-K5020, DVF-5020, DVF-3020 and DVF-3030.
Depending on your KENWOOD DVD model, you need to set up your receiver remote control as follows:
To set for Group-1 DVD players:
To set for Group-2 DVD players:
• If your DVD player is not listed in the list above, perform the set up for either Group-1 or Group-2. When the set up is successful, then your DVD
How to operate the DVD player with the remote control
1. Pressing the DVD Power key for more than 2 seconds turns the DVD player on or off.
2. To carry out the functions of the DVD player, first press the DVD Power key, then press each key for each operation as explained in the DVD
DVD player operation keys
You can perform these basic operations using the keys described below when connected to KENWOOD DVD player.
DV5700, DVF-R9050, DVF-J6050, DV-505, DV-503, DV-502, DVF-3550, DVF-3050, DVF-R4050, DVF-605, DV-6050, DVF-R5060,
DVF-3060, DVF-3060K, DV-705, DVF-R5070 and DVF-3070
Press the numeric “1” key while pressing the “POWER
Press the numeric “2” key while pressing the “POWER
” key (not the DVD Power key) on your remote control.
” key (not the DVD Power key) on your remote control.
player falls into that particular group.
operation pages in the operating instructions. In this case, the DVD operation mode is retained for 15 seconds after pressing any of those DVD
operation buttons.
(To turn the receiver operation mode within 15 seconds, press the RECEIVER key.)
ENGLISH
Numeric keys
(Select tracks)
OSD (OSD menu)
MENU
%(Cursor »)
fi(Cursor «)
#(Cursor \)
@(Cursor |)
1 (Search)
¡ (Search)
PHONO
(For RC-R0627 only)
1
23
456
789
0 +10
MENU
SETUP
P.CALL
TUNING
BASS BOOST
AUX CD/DVD
DVD
VIDEO1 VIDEO2
MUTE
DOWN-PAGE-UP
LOUDNESS
OSD
RETURN
SOUND
LISTEN MODE
MULTI CONTROL
ENTER
AUTO
A/B+100
DISC SKIP
TUNER
DISC SEL.
ACTIVE EQ
VOLUME
POWER
DVD
POWER
RECEIVER
PTY
TOP MENU
RDS DISPLAY
P.CALL
BAND
DVD
MD/TAPE
TONE
POWER
DVD POWER
RECEIVER
(Receiver mode)
DOWN-PAGE-UP
(Page up or down)
TOP MENU
(Title)
RETURN
ENTER (Enter)
6 (3 Play)
8 (Pause)
DVD/6CH
(For RC-R0627 only)
7 (Stop)
31
EN
Page 32

Basic remote control operations for other components
CASSETTE deck, CD player & MD recorder operations
You can perform these basic operations using the keys described below when connected to KENWOOD cassette deck, MD recorder or CD player
equipped with system control operations. ^
Cassette deck operations’ keys CD player operations’ keys
ENGLISH
1 (Rewind)
¡ (Fast forward)
A/B (Cassette
deck selection)
PHONO
(For RC-R0627 only)
1
456
789
0+10
MENU
SETUP
P.CALL
TUNING
BASS BOOST
AUX CD/DVD
DVD
VIDEO1 VIDEO2
MUTE
MD recorder operations’ keys
1
Numeric keys
(Select tracks)
4 (Skip down)
1 (Search)
¡ (Search)
+100 (Select tracks)
PHONO
(For RC-R0627 only)
456
789
0+10
MENU
SETUP
P.CALL
TUNING
BASS BOOST
AUX CD/DVD
DVD
VIDEO1 VIDEO2
MUTE
23
DOWN-PAGE-UP PTY
LOUDNESS
OSD
RETURN
SOUND
LISTEN MODE
MULTI CONTROL
ENTER
AUTO
A/B+100
DISC SKIP
TUNER
DISC SEL.
ACTIVE EQ
VOLUME
23
DOWN-PAGE-UP PTY
LOUDNESS
OSD
RETURN
SOUND
LISTEN MODE
MULTI CONTROL
ENTER
AUTO
A/B+100
DISC SKIP
TUNER
DISC SEL.
ACTIVE EQ
VOLUME
POWER
DVD
POWER
RECEIVER
TOP MENU
RDS DISPLAY
P.CALL
BAND
DVD
MD/TAPE
TONE
POWER
DVD
POWER
RECEIVER
TOP MENU
RDS DISPLAY
P.CALL
BAND
DVD
MD/TAPE
TONE
2 (Reverse play)
6 (3 Play)
DVD/6CH
(For RC-R0627 only)
7 (Stop)
¢ (Skip up)
6 (3 Play)
DVD/6CH
(For RC-R0627 only)
7 (Stop)
Numeric keys
(Select tracks)
4 (Skip down)
1 (Search)
¡ (Search)
DISC SKIP
PHONO
(For RC-R0627 only)
1
23
456
789
0+10
TUNING
DVD
OSD
SOUND
A/B+100
DISC SKIP
LOUDNESS
RETURN
LISTEN MODE
MULTI CONTROL
DISC SEL.
ACTIVE EQ
VOLUME
MENU
SETUP
P.CALL
BASS BOOST
AUX CD/DVD
VIDEO1 VIDEO2
MUTE
POWER
DVD
POWER
RECEIVER
DOWN-PAGE-UP PTY
TOP MENU
RDS DISPLAY
P.CALL
BAND
ENTER
AUTO
DVD
TUNER
MD/TAPE
TONE
¢ (Skip up)
6 (Play/Pause)
DVD/6CH
(For RC-R0627 only)
7 (Stop)
Notes
1. Certain codes may only operate some of the function available on a given model.
2. The pictures above show the typical functions available for each component. Some manufacturers use different key combinations to perform
similar functions. For that reason, we have programmed extra functions on some of the unused number keys to help you control your equipment.
EN
32
Page 33

In case of difficulty
Resetting the Microcomputer
The microcomputer may malfunction (unit cannot be operated,
or shows an erroneous display) if the power cord is unplugged
while the power is ON, or due to some other external factor. If
this happens, execute the following procedure to reset the
microcomputer and return the unit to its normal operating
condition.
Amplifier
Symptom
No sound from the speakers.
The standby indicator blinks and sound is
not output.
Sound is not output from one of the speakers.
Sound is not output from the surround
speakers and / or the center speaker, or their
sound is very soft.
A humming noise is generated when the
PHONO input selector is selected.
When playing a Dolby Digital source signal
using a DVD player, the sound is cut off soon
after it starts.
No sound is produced during playback from
a DVD player.
A video source cannot be recorded normally.
• The speaker cords are disconnected.
• VOLUME is set to the minimum position.
• MUTE is ON.
• The SPEAKERS switches are set to OFF.
• Speaker cords are short-circuited.
• The speaker cord is disconnected.
• The surround speaker cords and/or the center
speaker cord is disconnected.
• A surround mode has not been activated.
• The surround and/or center volume controls
are set to the minimum level.
• The audio cord from the record player is not
connected to the PHONO jacks.
• The record player is not grounded.
• There are many possible causes for this
problem, depending on the type of DVD player
used.
• The input mode is set to digital manual.
• The software is copy-guarded.
With the power cord plugged in, turn the POWER ON/
OFF key OFF. Then, while holding down the ON/
STANDBY
• Please note that resetting the microcomputer will clear the contents
of the memory and return the unit to the state it was in when it
left the factory
Cause
key, press POWER ON/OFF key.
Remedy
• Connect them properly referring to “Connecting
the speakers”. $
• Adjust the volume to a proper level.
• Turn OFF the MUTE. )
• Set the SPEAKERS switch to ON. (
• Turn the power off, eliminate the shortcircuiting, then turn on the power again.
• Connect it properly referring to “Connecting
the speakers”. $
• Connect it properly referring to “Connecting
the speakers”. $
• Select a surround mode.
• Adjust the speaker levels using the test tone.
• Insert the audio cord plugs securely into the
PHONO jacks.
• Connect the grounding wire to the GND terminal
on the rear panel.
• Set the input mode to digital manual before
starting playback of the Dolby Digital source.
• Press the INPUT MODE key to select to full
auto mode. 9
• Copy-guarded video software cannot be
recorded.
ENGLISH
*
9
Tuner
Symptom
Radio stations cannot be received.
Interference.
A station which was preset cannot be
received by pressing the corresponding
numeric key.
Cause
• No antenna is connected.
• The broadcast band is not set properly.
• The frequency of the desired station is not
tuned.
• Noise due to ignition of an automobile.
• Noise due to interference from an electric
appliance.
• Noise due to a nearby TV set.
• The preset station belongs to a frequency that
cannot be received.
• The preset memory was cleared because the
power cord had been unplugged for a long
period of time.
Remedy
• Connect an antenna. %
• Set the broadcast band properly.
• Tune the frequency of the desired station.
™
• Install the outdoor antenna away from the
road.
• Turn off the power to the appliance.
• Install the receiver farther away from the TV.
• Preset a station with a receivable frequency.
• Preset the station again.
33
EN
Page 34

In case of difficulty
Remote control unit
Symptom
Remote control operation is not possible.
ENGLISH
Cause
• The remote control is set to a different
operation mode.
• Batteries are exhausted.
• The remote control unit is too far away from
the main system, controlling angle is too large,
or there is an obstacle between the receiver
and the remote.
• The audio cords and system control cords are
not connected properly.
• No tape or CD is placed in the source
component.
• An attempt is made to play a tape which is
being recorded in the cassette deck.
Remedy
• Press the source select keys or DVD POWER
keys to select the appropriate operation mode.
• Replace with new batteries.
• Operate the remote control unit within the
controllable range.
• Connect properly referring to “Setting up the
system”.
• Place the tape or CD in the source component
which you want to play.
• Wait for recording to complete.
34
EN
Page 35

Specifications
Caution : Read this page carefully to ensure safe
operation.
AUDIO section (KRF-V5070D/V5570D)
Rated power output during STEREO operation
DIN/IEC (63 Hz ~ 12.5 kHz, 0.7% T.H.D., at 6Ω)
............................................................................... 100 W + 100 W
Effective power output during SURROUND operation
FRONT (1 kHz, 0.7% T.H.D. at 6Ω one channel driven)
............................................................................... 100 W + 100 W
CENTER (1 kHz, 0.7% T.H.D. at 6Ω one channel driven)
.............................................................................................. 100 W
SURROUND (1 kHz, 0.7% T.H.D. at 6Ω one channel driven)
............................................................................... 100 W + 100 W
SUBWOOFER (80Hz, 0.7% T.H.D. at 6Ω one channel driven)
(KRF-V5570D) ...................................................................... 100 W
Total harmonic distortion ............................ 0.05% (1kHz, 50 W, 6Ω)
Frequency response (IHF’66)
CD/DVD ......................................20 Hz ~ 70 kHz, +0 dB, –3.0 dB
Signal to noise ratio (IHF’66)
PHONO (MM) (KRF-V5070D) ............................................... 74 dB
CD/DVD, AUX, TAPE, VIDEO 1, VIDEO 2 .......................... 95 dB
Input sensitivity / impedance
PHONO (MM) (KRF-V5070D) ............................... 7.5 mV / 27 kΩ
CD/DVD ................................................................ 550 mV / 47 kΩ
DVD/6CH INPUT (KRF-V5070D)......................... 550 mV / 47 kΩ
Output level / impedance
TAPE REC ............................................................... 550 mV / 1 kΩ
PRE OUT (SUBWOOFER) (KRF-V5070D) ............. 1.5 V / 2.2 kΩ
Tone control
BASS................................................................ ±10 dB (at 100 Hz)
TREBLE ............................................................ ±10 dB (at 10 kHz)
Loudness control
VOLUME at -30dB level ................................... +8 dB (at 100 Hz)
AUDIO section (KRF-V4070D)
Rated power output during STEREO operation
(DIN 1 kHz 0.7% T.H.D., at 6Ω) ............................... 50 W + 50 W
Effective power output during SURROUND operation
FRONT (1 kHz, 0.7% T.H.D. at 6Ω one channel driven)
................................................................................... 50 W + 50 W
CENTER (1 kHz, 0.7% T.H.D. at 6Ω one channel driven)
................................................................................................ 50 W
SURROUND (1 kHz, 0.7% T.H.D. at 6Ω one channel driven)
................................................................................... 50 W + 50 W
Total harmonic distortion ........................... 0.15% (1 kHz, 20 W, 6Ω)
Frequency response (IHF’66)
CD/DVD ......................................20 Hz ~ 60 kHz, +0 dB, –3.0 dB
Signal to noise ratio (IHF’66)
CD/DVD, AUX, TAPE, VIDEO 1, VIDEO 2 .......................... 95 dB
Input sensitivity / impedance
CD/DVD ................................................................ 400 mV / 47 kΩ
Output level / impedance
TAPE REC ............................................................... 400 mV / 1 kΩ
PRE OUT (SUBWOOFER) ...................................... 1.5 V / 2.2 kΩ
Tone control
BASS................................................................ ±10 dB (at 100 Hz)
TREBLE ............................................................ ±10 dB (at 10 kHz)
Loudness control
VOLUME at -30dB level ................................... +8 dB (at 100 Hz)
DIGITAL AUDIO section
Sampling frequency ....................... 32 kHz, 44.1 kHz, 48 kHz, 96kHz
Input level / impedance / wave length
Optical ............................ (–15 dBm ~ –21 dBm), 660 nm ±30nm
Coaxial ................................................................... 0.5 Vp-p / 75 Ω
VIDEO section
VIDEO inputs / outputs
VIDEO (composite) ................................................. 1 Vp-p / 75 Ω
FM tuner section
Tuning frequency range ................................. 87.5 MHz ~ 108.0 MHz
Usable sensitivity (DIN at 75 Ω)
MONO.....................1.3 µV / 13.2 dBf (40 kHz DEV., S/N 26 dB)
STEREO ...................45 µV / 42.1 dBf (46 kHz DEV., S/N 46 dB)
Total harmonic distortion (1 kHz)
MONO..........................................................0.2% (71.2 dBf input)
STEREO ....................................................... 0.8% (71.2 dBf input)
Signal to noise ratio (DIN weighted at 1 kHz)
MONO................................. 65 dB (40 kHz DEV., 71.2 dBf input)
STEREO .............................. 60 dB (46 kHz DEV., 71.2 dBf input)
Stereo separation (DIN 1 kHz) ................................................... 36 dB
Selectivity (DIN ±300 kHz) .......................................................... 64 dB
Frequency response ................... (30 Hz ~ 15 kHz), +0.5 dB, –3.0 dB
AM tuner section
Tuning frequency range ..................................... 531 kHz ~ 1,602 kHz
Usable sensitivity ................................................. 16 µV / (600 µV/m)
Signal to noise ratio (30% mod. 1 mV input) ........................... 50 dB
GENERAL
Power consumption
KRF-V5070D/V5570D ........................................................... 280W
KRF-V4070D .......................................................................... 200W
AC outlet
SWITCHED ....................................................... (total 90 W max.)
Dimensions .................................................... W : 440 mm ( 17-5/16")
Weight (Net)
KRF-V5070D/V5570D ......................................... 8.5 kg (18.74 lb)
KRF-V4070D ........................................................ 8.9 kg (19.62 lb)
H : 143 mm ( 5-5/8")
D : 303 mm ( 11-15/16")
ENGLISH
Notes
1. KENWOOD follows a policy of continuous advancements in development. For this reason specifications may be changed without notice.
2. The full performance may not be exhibited in an extremely cold location (under a water-freezing temperature).
35
EN
Page 36

ENGLISH
36
For your records
Record the serial number, found on the back of the unit, in the spaces
designated on the warranty card, and in the space provided below. Refer
to the model and serial numbers whenever you call upon your dealer for
information or service on this product.
EN
Model_____________________ Serial Number_____________________
Page 37

RECEPTEUR AUDIOVISUEL SURROUND
KRF-V5070D
KRF-V4070D
KRF-V5570D
MODE D’EMPLOI
KENWOOD CORPORATION
Ce mode d’emploi couvre plusieurs modèles qui sont mentionnés ci-dessus. Les
particularités (fonctions) et la disponibilité de ces modèles dépendent du pays où ils
sont vendus.
Quelques mots sur la télécommande fournie
Contrairement à une télécommande ordinaire, celle qui est fournie avec ce récepteur possède plusieurs
modes de fonctionnement. Ces modes permettent de piloter à distance d’autres appareils audio/vidéo. Pour
tirer le meilleur profit de la télécommande, il est essentiel de lire ce document, de prendre connaissance des
modes opératoires de cet accessoire ainsi que de la manière de passer de l’un à l’autre, etc.
Si vous utilisez la télécommande sans avoir saisi son usage ni la façon d’adopter, le moment venu, le mode
de fonctionnement convenable, vous risquez de commettre diverses erreurs.
FRANÇAIS
Page 38

Avant la mise sous tension
Attention : Lire attentivement cette page pour garantir une
exploitation sans danger.
Les appareils sont destinés aux opérations comme les
suivantes.
L’Europe et le Royaume-Uni ............. CA 230 V uniquement
Etats-Unis et Canada..........................CA 120 V uniquement
Entretien de l’appareil
Si la face avant ou le coffret sont sales, les nettoyer avec un chiffon
propre et sec. N’utiliser ni diluant, essence, alcool, etc., car ces
produits peuvent décolorer les surfaces.
En ce qui concerne les produits à nettoyer les verres de
contact
Ne pas utiliser de nettoyeur de contact car ceci pourrait provoquer un
mauvais fonctionnement. Attention en particulier aux nettoyeurs de
contact contenant de l’huile car ils risquent de déformer les éléments
de plastique.
FRANÇAIS
Précautions de sécurité
AVERTISSEMENT:
POUR EVITERT OUT INCENDIE OU CHOC
ELECTRIQUE, NE PAS EXPOSER CET
APPAREIL A LA PLUIE OU A L’HUMIDITE.
Comment utiliser ce mode d’emploi
Ce manuel est divisé en quatre sections : Préparations, Opérations,
Télécommande et Informations complémentaires.
Préparations
Cette section décrit les opérations nécessaires pour connecter les
appareils audio/vidéo au récepteur et préparer le processeur d’ambiance.
Ce récepteur étant compatible avec tous vos appareils audio et vidéo,
nous vous aiderons à configurer votre système pour qu
à utiliser que possible.
Opérations
Cette section traite du fonctionnement des différentes fonctions offertes
par le récepteur.
Télécommande
Cette section indique comment piloter les appareils avec la télécommande
et fournit une explication détaillée de toutes les fonctions de la
télécommande. Après avoir enregistré vos appareils avec les codes de
commande appropriés, vous pouvez piloter ce récepteur et les autres
appareils audio/vidéo (téléviseur, magnétoscope, lecteur de DVD, lecteur
de CD, etc.) avec la télécommande fournie avec ce récepteur.
Informations complémentaires
Cette section donne des informations supplémentaires concernant le
dépannage (voir “En cas de problème”) et les “Spécifications”.
Secours de la mémoire
Notez que les éléments suivants seront effacés du contenu de la
mémoire si le cordon d’alimentation est débranché de la prise secteur
pendant environ 1 jour.
• Mode de puissance.
• Réglages du sélecteur
d’entrée.
• Sortie d’image.
• Enceinte ON/OFF.
• Niveau de volume.
• Niveau BASS, TREBLE,
INPUT.
• TONE ON/OFF.
• LOUDNESS ON/OFF.
• Niveau d’atténuateur.
• Réglages MD/TAPE.
• Réglage du mode d’écoute.
• SP SYSTEM.
• Réglage des enceintes.
• SUBWOOFER ON/OFF.
• SW RE-MIX ON/OFF.
• Réglage de la distance.
• Réglage du mode d’entrée.
• Réglage du mode “minuit”.
• Réglage de mode PRO LOGIC II.
• Gamme de fréquence.
• Réglage de la fréquence.
• Présélection des stations.
• Mode d’accord.
• Mode ACTIVE EQ.
• Mode DSP.
’il soit aussi facile
ATTENTION
RISQUE DE CHOC ELECTRIQUE
NE PAS OUVRIR
ATTENTION: POUR REDUIRE LES RISQUES DE CHOC ELECTRIQUE,
NE PAS DEPOSER LE COUVERCLE (OU LE PANNEAU ARRIERE).
ANCUNE PIECE REPARABLE PAR L’UTILISATEUR NE SE TROUVE
A L’INTERIEUR. CONFIER TOUT TRAVAIL D’ENTRETIEN A UN
PERSONNEL DE SERVICE QUALIFIE.
LE SYMBOLE DE L’ECLAIR DANS UN TRIANGLE
EQUILATERAL A POUR BUT D’ATTIRER L’ATTENTION DE
L’UTILISATION SUR LA PRESENCE, A L’INTERIEUR DU
COFFRET, D’UNE TENSION DANGEREUSE ET NON ISOLEE
D’UNE PUISSANCE SUFFISANTE POUR CONSTITUER UN
RISQUE DE COMMOTION ELECTRIQUE AUX ETRES
HUMAINS.
LE POINT D’EXCLAMATION DANS UN TRIANGLE
EQUILATERAL A POUR BUT D’ATTIRER L’ATTENTION DE
L’UTILISATEUR SUR LA PRESENCE, DANS LA LITTERATURE
QUI ACCOMPAGNE CET APPAREIL, D’INFORMATIONS
IMPORTANTES RELATIVE A L’EXPLOITATION ET A
L’ENTRETIEN.
FR
2
Page 39

Avant la mise sous tension
Sommaire
Attention: Lire les pages marquées par avec attention
Préparations
pour garantir un fonctionnement en toute
sécurité.
Avant la mise sous tension ............................ 2
Précautions de sécurité ..................................... 2
Comment utiliser ce mode d’emploi ................. 2
Déballage ........................................................... 4
Préparation de la télécommande ....................... 4
Particularités ...................................................... 5
Noms et fonctions des éléments .................... 6
Unité Principale .................................................. 6
Télécommande (RC-R0627)(KRF-V5070D) ........ 7
Télécommande (RC-R0628)(KRF-V4070D/
V5570D) ............................................................. 8
Configuration de base de l’ensemble ............ 9
Raccordement des appareils audio ................. 10
Raccordement des appareils vidéo ................. 11
Raccordements pour les signaux numériques ... 12
Raccordement d’un lecteur de DVD (entrée 6
voies) (Pour KRF-V5070D uniquement) ........... 13
Raccordement des enceintes .......................... 14
Raccordement des bornes .............................. 15
Raccordement des antennes .......................... 15
Raccordement de la commande d’ensemble
(SYSTEM CONTROL) ....................................... 16
Préparation des corrections d’ambiance ...... 17
Réglage des enceintes .................................... 17
Télécommande
Informations
complémentaires
Fonctionnement de base de la télécommande
pour les autres appareils ............................... 31
Touches de fonctionnement
du lecteur de DVD ............................................ 31
Opérations de la platine CASSETTE, du lecteur
de CD et de l’enregistreur de MD ................... 32
En cas de problème ......................................... 33
Spécifications .................................................. 35
FRANÇAIS
Opérations
Lecture normale ............................................... 19
Préparation de la lecture .................................. 19
Ecoute d’une source ........................................ 19
Réglage du son ................................................ 20
Enregistrement ................................................. 21
Enregistrement d’un signal audio (sources
analogiques) ..................................................... 21
Enregistrement d’un signal vidéo .................... 21
Enregistrement d’un signal audio (sources
numériques) ..................................................... 21
Ecoute de la radio ............................................ 22
Réglage des stations radiophoniques
(non RDS) ......................................................... 22
Utilisation du RDS (Radio Data System) ......... 22
Mise en mémoire manuelle des fréquences de
stations de radio .............................................. 23
Réception d’une station mémorisée. .............. 23
Réception successive des stations mémorisées
(P.CALL) ........................................................... 23
Utilisation de la touche RDS DISPLAY ............ 24
Mise en mémoire automatique des fréquences
de stations RDS (RDS AUTO MEMORY) ........ 24
Réception d’une émission d’un type donné
(recherche PTY) ............................................... 25
Effets d’ambiance ............................................ 26
Modes d’ambiance .......................................... 26
Lecture d’ambiance ......................................... 28
Lecture sur 6 voies DVD
(Pour KRF-V5070D uniquement) ..................... 29
Fonctions intelligentes ..................................... 29
FR
3
Page 40

Avant la mise sous tension
Déballage
Déballez soigneusement l’appareil et assurez-vous que tous les
accessoires ci-dessous sont présents.
Antenne FM intérieure (1)
Pour KRF-V5070D
Télécommande (1) Piles (R6/AA) (2)
RC-R0627
Pour KRF-V4070D et KRF-V5570D
FRANÇAIS
Télécommande (1) Piles (R6/AA) (2)
RC-R0628
Si un quelconque des accessoires est manquant, ou encore si l’appareil
est endommagé ou ne fonctionne pas, prévenez immédiatement le
revendeur. Si l’appareil vous a été livré directement, faites des réserves
auprès du transporteur. Kenwood vous suggère de conserver l’emballage
d’origine de manière que vous puissiez ultérieurement réexpédier
l’appareil sans risque.
Gardez ce manuel pour une référence future.
Antenne cadre AM (1)
Préparation de la télécommande
Mise en place des piles
2 Introduisez les piles.1 Retirez le couvercle.
3 Refermez le couvercle.
6 m
1
de la télécommande. Une
Capteur de
télécommande
2
• Introduisez deux piles AA (R6) en veillant à respecter les polarités
indiquées.
Mode d’emploi
Lorsque l’indicateur STANDBY est allumé, l’appareil se met en service
dès que vous appuyez sur la touche POWER
fois l’appareil sous tension, appuyez sur la touche correspondant à la
fonction que vous souhaitez utiliser.
Plage de fonctionnement
(Approx.)
POWER
Télécommande à
infrarouge
• Pour appuyer sur plusieurs touches de la télécommande les unes
après les autres, attendez au moins une seconde après chaque
pression sur une touche.
Remarques
1. Les piles fournies sont destinées à vérifier le fonctionnement. Par
conséquent, leur durée peut être plus courte que celle des piles
ordinaires.
2. Lorsque la distance télécommandable décroît, remplacez les deux
piles par des neuves.
3. Un dysfonctionnement peut se produire si le capteur de la
télécommande est exposé à la lumière directe du soleil ou à celle
d’une lampe fluorescente haute fréquence.
Dans ce cas, modifiez l’emplacement du système pour éviter tout
dysfonctionnement.
FR
4
Page 41

Avant la mise sous tension
Particularités
Les sonorités d’une salle de cinéma
Ce récepteur offre de nombreux modes visant à créer des ambiances
sonores vous permettant de profiter pleinement de vos programmes et
enregistrements vidéo. Adoptez le mode d’ambiance convenant le
mieux à votre équipement et au divertissement que vous avez sélectionné.
§
Dolby Digital
Le mode DOLBY DIGITAL vous permet de profiter d’une ambiance
acoustique “tout-numérique” avec les enregistrements effectués au
format Dolby Digital. Le mode Dolby Digital gère jusqu’à “5,1” voies
audionumériques indépendantes assurant une restitution du son et une
présence sonore d’une qualité supérieure au Dolby Surround traditionnel.
Dolby PRO LOGIC
DOLBY PRO LOGIC II est entièrement compatible avec le mode PRO
LOGIC précédent, mais offre encore plus d'avantages en matière
d'ambiance acoustique. Il permet à l'utilisateur de bénéficier du son
stéréo habituel ou du Dolby Surround avec une présentation “5,1”
canaux convaincante. PRO LOGIC II offre des fonctions spécifiques pour
contrôler la spatialisation globale et l'image sonore frontale. PRO LOGIC
II produit un son d'ambiance (surround) impressionnant à partir des
enregistrements vidéo identifiés par la marque
spatialisation tridimensionnelle à partir des CD audio. Lorsque vous
écouterez de la musique, vous aurez le plaisir d'entendre un son
d'ambiance authentiquement STEREO.
II
et une
DTS
DTS (Digital Theater System) est un format 5,1 canaux audio numériques
qui fournit cinq canaux pleine gamme et un canal sur lequel ne sont
transmises que les basses fréquences (enceinte d'extrêmes graves)
pour une clarté exceptionnelle, une séparation excellente des canaux et
une dynamique très étendue.
En mode DTS, l'entrée numérique des 5,1 canaux provenant d'un CD,
d'un LD ou d'un DVD portant un enregistrement au format DTS (le disque
porte la marque “DTS”) peut être écoutée en Digital Surround.
Important :
Lorsque vous écoutez un disque DTS sur un lecteur de CD, LD ou DVD,
du bruit peut se trouver présent sur la sortie analogique. Il est conseillé
pour éviter cela de relier la sortie numérique de l’appareil de lecture à
l’entrée numérique de cet appareil-ci.
Nouveaux modes d’ambiance DSP
Le processeur DSP (Digital Signal Processor) utilisé pour ce récepteur
intègre de nombreux champs acoustiques programmables de haute
qualité, tels que “ARENA”, “JAZZ CLUB”, “THEATER”, “STADIUM”
et “DISCO”. Il est compatible avec la quasi totalité des sources.
Entrée 6 voies DVD (Pour KRF-V5070D uniquement)
Si vous possédez un lecteur de DVD équipé d’une sortie pour 6 voies, ce
récepteur vous permettra de profiter au maximum du son ambiophonique
des sources DVD offrant un codage multivoie. Les signaux source étant
numériques et chaque voie étant émise indépendamment, l’ambiance
sonore ainsi produite sera de très loin supérieure à celle obtenue avec
des enceintes d’ambiance classiques.
ACTIVE EQ
Le mode ACTIVE EQ produit une qualité sonore plus dynamique quelles
que soient les conditions. Vous pouvez bénéficier d'un effet acoustique
plus impressionnant lorsque vous activez ACTIVE EQ ON en cours de
lecture Dolby Digital et DTS.
Télécommande IR (infrarouge)
En plus des opérations sur l'ampli-syntoniseur de base, cette
télécommande à IR peut également servir au fonctionnement de la
platine à cassette, de l'enregistreur de MD ou du lecteur de CD Kenwood
connectés au moyen du système des cordons de télécommande.
Cette télécommande peut également servir à télécommander les lecteurs
de DVD Kenwood sans avoir à utiliser la télécommande du lecteur de
DVD.
Syntoniseur RDS (Radio Data System)
Ce récepteur est doté d’un syntoniseur RDS qui offre plusieurs fonctions
d’accord très pratiques, telles que: RDS Auto Memory (permet de mettre
automatiquement en mémoire jusqu’à 40 fréquences de stations RDS),
affichage en clair du nom de la station reçue, recherche PTY (permet de
rechercher les stations en fonction du type d’émission).
Recherche PTY (Program TYpe)
Syntonisez les stations en spécifiant le type de programme que vous
souhaitez écouter.
FRANÇAIS
FR
5
Page 42

Noms et fonctions des éléments
Unité Principale
Indicateur CLIP
Indicateurs RDS
Indicateur TONE
Indicateur LOUDNESS
Indicateur 96kHzfs
FRANÇAIS
Indicateurs
d’enceinte
STANDBY
ON ⁄ STANDBY
SPEAKERS ON ⁄ OFF
POWER
ON OFF
PHONES
Indicateur MUTE
AB
DIMMER
ACTIVE EQ
Affichage de la
fréquence,
de l’entrée,
de la présélection,
du mode d’ambiance
Indicateurs de sélection des
enceintes
Indicateurs des canaux d’entrée
Indicateurs de voie
d’entrée
LISTEN MODE
ACTIVE EQ DTS
INPUT MODE BAND AUTO MEMORY
DOLBY DIGITAL
Afficheur
Indicateur DTS
Indicateurs de bande
Indicateur DOLBY
DIGITAL
Indicateur PRO
LOGIC
MULTI CONTROL INPUT SELECTOR
SOUND
SETUP
Indicateur AUTO DETECT
Indicateur 6CH INPUT
Indicateur DIGITAL
Indicateur DSP
Indicateur STEREO
VOLUME CONTROL
DOWN
MUTE
Indicateur AUTO
Indicateur MEMO.
Indicateur ST.
Indicateur TUNED
UP
1 Touche POWER ON/OFF &
Utilisez cette touche pour mettre l’appareil
sous tension ou hors tension.
2 Touche ON/STANDBY
&
Après la mise sous tension de l’appareil,
utilisez cette touche pour le mettre en
service (ON) ou en veille (STANDBY).
Indicateur STANDBY
3 Touche DIMMER
Utilisez également cette touche pour
sélectionner le mode d’enregistrement REC
MODE. ¡
Utilisez cette touche pour régler la luminosité
de l’afficheur. º
4 Touche LISTEN MODE •
Utilisez cette touche pour sélectionner le
mode d’écoute.
5 Indicateurs LED (diode
électroluminescente) d'ambiance
Indicateur LED mode ACTIVE EQ )
S’allume lorsque le récepteur est en mode
ACTIVE EQ.
Indicateur LED mode DTS •
S’allume lorsque le récepteur est en mode
DTS.
Indicateur LED mode DOLBY DIGITAL
S’allume lorsque le récepteur est en mode
Dolby Digital.
6 Touche SOUND ª
Utilisez cette touche pour régler la qualité
sonore et les effets d’ambiance.
7 Bouton MULTI CONTROL &
Utilisez ces touches pour effectuer divers
réglages.
8 Bouton INPUT SELECTOR (
Utilisez ce bouton pour sélectionner les
sources d’entrée.
9 Bouton VOLUME CONTROL (
0 Prise PHONES )
Utilisez cette prise pour le raccordement
d’un casque.
! Touche SPEAKERS ON/OFF (
Utilisez cette touche pour allumer et éteindre
les enceintes ON/OFF.
Mode de veille
Lorsque l’indicateur de veille est éclairé, une faible quantité de courant est
consommée par l’appareil pour assurer la sauvegarde du contenu de la
mémoire. On dit alors que l’appareil est en veille. Dans cette condition, il
peut être mis en service au moyen du boîtier de télécommande.
FR
6
@ Touche ACTIVE EQ )
Utilisez cette touche pour sélectionner le
réglage de la fonction ACTIVE EQ.
# Touche INPUT MODE 9
•
Utilisez cette touche pour commuter entre
le pleine automatique les entrées
numériques et analogiques.
$ Touche BAND ™
Utilisez cette touche pour sélectionner la
gamme de fréquence.
% Touche AUTO
Utilisez cette touche pour changer i’ndication
“TAPE” en “MD”. (
Utilisez cette touche pour sélectionner le
mode d’accord automatique. ™
^ Touche MEMORY £
Utilisez cette touche pour memoriser des
stations de radio (présélections).
& Touche SETUP &
Utilisez cette touche pour sélectionner les
réglages des enceintes, etc.
* Touche MUTE )
Utilisez cette touche pour atténuer fortement
les sons de manière momentanée.
Alimentation au niveau de la touche POWER ON/OFF
L’alimentation provenant de la prise murale n’est pas entièrement
interrompue lorsque le commutateur de marche/arrêt est enfoncé.
Page 43

Noms et fonctions des éléments
Télécommande (RC-R0627) (KRF-V5070D)
1 Touches numériques £
Si vous sélectionnez CD ou MD comme source
d'entrée, ces touches font office de touches
numériques. Si vous sélectionnez le
syntoniseur comme source d’entrée, utilisez
ces touches pour rappeler les stations
présélectionnées.
2 Touche DOWN-PAGE-
Utilisez ces touches pour commander le
composant DVD.
Touche LOUDNESS )
Utilisez cette touche pour changer le statut de
LOUDNESS.
3 Touche MENU
Utilisez ces touches pour commander le
composant DVD.
Touche SETUP &
Utilisez cette touche pour sélectionner les
réglages des enceintes, etc.
4 Touche OSD (affichage à l'écran)
Utilisez ces touches pour commander le
composant DVD.
Touche SOUND ª
Utilisez cette touche pour régler la qualité
sonore et les effets d’ambiance.
5 Touches MULTI CONTROL %/fi &
Utilisez ces touches pour effectuer divers
réglages.
Utilisez ces touches pour commander d'autres
composants.
Touches P.CALL 4/¢ £
Si vous sélectionnez le syntoniseur comme
source d’entrée, ces touches font office de
touches rappel de la station présélectionnée.
Touches 4/¢
Si vous sélectionnez CD ou MD comme source
d’entrée, ces touches font office de touches
de saut.
6 Touches TUNING 1/¡
Utilisez ces touches pour régler le syntoniseur
ou l’appareil choisi.
Si vous sélectionnez CD, MD ou TAPE comme
source d’entrée, ces touches font office de
touches de recherche.
1
23
456
789
0+10
MENU
OSD
SETUP
SOUND
P.CALL
MULTI CONTROL
TUNING
A/B+100
DISC SKIP
BASS BOOST
PHONO
CD/DVD
DVD
VIDEO1 VIDEO2
MUTE
7 Touche A/B
Si vous avez sélectionné TAPE comme source
d'entrée, ceci correspond aux têtes de lecture
A et B d'une platine double cassette.
Touche +100
Utilisez cette touche pour sélectionner le
numéro de disque du lecteur de multi-CD.
Touche DISC SKIP
Si vous sélectionnez CD comme source
d’entrée, cette touche fait office de touche de
saut de disque du lecteur de multi-CD.
8 Touche BASS BOOST )
Utilisez cette touche pour sélectionner le niveau
maximum de la plage des basses fréquences.
9 Touches de sélecteur d'entrée (DVD/6CH,
PHONO, CD/DVD, TUNER, MD/TAPE,
VIDEO 1, VIDEO 2) (
Utilisez ce bouton pour sélectionner les sources
d’entrée.
Touches 4 DVD ¢
En mode de fonctionnement DVD, ces touches
font office de touches de saut.
0 Touche DISC SEL.
Utilisez ces touches pour commander d'autres
composants.
Touche ACTIVE EQ )
Utilisez cette touche pour sélectionner le
réglage de la fonction ACTIVE EQ.
! Touche MUTE )
Utilisez cette touche pour atténuer fortement
les sons de manière momentanée.
@ Touche POWER
Utilisez cette touche pour mettre le récepteur
sous et hors tension.
# Touche DVD POWER
Utilisez cette touche pour allumer l’équipement
DVD.
$ Touche RECEIVER
Utilisez cette touche pour revenir à l’utilisation
du récepteur.
% Touche -PAGE-UP
Utilisez ces touches pour commander le
composant DVD.
Touche PTY ∞
Permet de procéder à une recherche PTY
(type de programmes).
POWER
DVD
POWER
RECEIVER
DOWN-PAGE-UP
LOUDNESS
TOP MENU
RETURN
LISTEN MODE
RDS DISPLAY
P.CALL
BAND
ENTER
AUTO
DVD/6CH
TUNER
MD/TAPE
DISC SEL.
TONE
ACTIVE EQ
VOLUME
PTY
Si le nom d’une fonction est différent
sur le récepteur et la télécommande, le
nom de la touche de la télécommande
est indiqué entre parenthèses dans ce
manuel.
^ Touche TOP MENU
Utilisez ces touches pour commander le
composant DVD.
Touche RDS DISPLAY ¢
Utilisez cette touche pour recevoir les
émissions RDS.
& Touche RETURN
Utilisez ces touches pour commander le
composant DVD.
Touche LISTEN MODE •
Utilisez cette touche pour sélectionner le mode
d’écoute.
* Touche ENTER
Utilisez ces touches pour commander d'autres
composants.
Touche 2
Utilisez ces touches pour commander d'autres
composants.
( Touche BAND ™
Utilisez cette touche pour sélectionner la
gamme de fréquence.
Touche 6
Si vous sélectionnez CD comme source
d’entrée, cette touche fait office de touche de
lecture/pause.
Si vous sélectionnez MD ou TAPE comme
source d’entrée, cette touche fait office de
touche de lecture.
) Touche 8
Utilisez ces touches pour commander d'autres
composants.
¡ Touche AUTO ™
Utilisez cette touche pour sélectionner le mode
d’accord automatique.
Touche 7
Si vous sélectionnez CD, MD ou TAPE comme
source d’entrée, cette touche fait office de
touche d’arrêt.
™ Touche TONE )
Utilisez cette touche pour changer le statut
de contrôle de TONE.
£ Touches VOLUME (
Utilisez ces touches pour régler le niveau
d’écoute.
7
FRANÇAIS
FR
Page 44

Noms et fonctions des éléments
Télécommande (RC-R0628) (KRF-V4070D/V5570D)
FRANÇAIS
1 Touches numériques £
Si vous sélectionnez CD ou MD comme source
d'entrée, ces touches font office de touches
numériques. Si vous sélectionnez le
syntoniseur comme source d’entrée, utilisez
ces touches pour rappeler les stations
présélectionnées.
2 Touche DOWN-PAGE-
Utilisez ces touches pour commander le
composant DVD.
Touche LOUDNESS )
Utilisez cette touche pour changer le statut de
LOUDNESS.
3 Touche MENU
Utilisez ces touches pour commander le
composant DVD.
Touche SETUP &
Utilisez cette touche pour sélectionner les
réglages des enceintes, etc.
4 Touche OSD (affichage à l'écran)
Utilisez ces touches pour commander le
composant DVD.
Touche SOUND ª
Utilisez cette touche pour régler la qualité
sonore et les effets d’ambiance.
5 Touches MULTI CONTROL %/fi &
Utilisez ces touches pour effectuer divers
réglages.
Utilisez ces touches pour commander d'autres
composants.
Touches P.CALL 4/¢ £
Si vous sélectionnez le syntoniseur comme
source d’entrée, ces touches font office de
touches rappel de la station présélectionnée.
Touches 4/¢
Si vous sélectionnez CD ou MD comme source
d’entrée, ces touches font office de touches
de saut.
6 Touches TUNING 1/¡
Utilisez ces touches pour régler le syntoniseur
ou l’appareil choisi.
Si vous sélectionnez CD, MD ou TAPE comme
source d’entrée, ces touches font office de
touches de recherche.
FR
8
1
23
456
789
0+10
MENU
OSD
SETUP
SOUND
P.CALL
MULTI CONTROL
TUNING
A/B+100
DISC SKIP
BASS BOOST
AUX CD/DVD
DVD
VIDEO1 VIDEO2
MUTE
7 Touche A/B
Si vous avez sélectionné TAPE comme source
d'entrée, ceci correspond aux têtes de lecture
A et B d'une platine double cassette.
Touche +100
Utilisez cette touche pour sélectionner le
numéro de disque du lecteur de multi-CD.
Touche DISC SKIP
Si vous sélectionnez CD comme source
d’entrée, cette touche fait office de touche de
saut de disque du lecteur de multi-CD.
8 Touche BASS BOOST )
Utilisez cette touche pour sélectionner le niveau
maximum de la plage des basses fréquences.
9 Touches de sélecteur d'entrée (DVD, AUX,
CD/DVD, TUNER, MD/TAPE, VIDEO 1,
VIDEO 2) (
Utilisez ce bouton pour sélectionner les sources
d’entrée.
Touches 4 DVD ¢
En mode de fonctionnement DVD, ces touches
font office de touches de saut.
0 Touche DISC SEL.
Utilisez ces touches pour commander d'autres
composants.
Touche ACTIVE EQ )
Utilisez cette touche pour sélectionner le
réglage de la fonction ACTIVE EQ.
! Touche MUTE )
Utilisez cette touche pour atténuer fortement
les sons de manière momentanée.
@ Touche POWER
Utilisez cette touche pour mettre le récepteur
sous et hors tension.
# Touche DVD POWER
Utilisez cette touche pour allumer l’équipement
DVD.
$ Touche RECEIVER
Utilisez cette touche pour revenir à l’utilisation
du récepteur.
% Touche -PAGE-UP
Utilisez ces touches pour commander le
composant DVD.
Touche PTY ∞
Permet de procéder à une recherche PTY
(type de programmes).
POWER
DVD
POWER
RECEIVER
DOWN-PAGE-UP
LOUDNESS
TOP MENU
RETURN
LISTEN MODE
RDS DISPLAY
P.CALL
BAND
ENTER
AUTO
DVD
TUNER
MD/TAPE
DISC SEL.
TONE
ACTIVE EQ
VOLUME
PTY
Si le nom d’une fonction est différent
sur le récepteur et la télécommande, le
nom de la touche de la télécommande
est indiqué entre parenthèses dans ce
manuel.
^ Touche TOP MENU
Utilisez ces touches pour commander le
composant DVD.
Touche RDS DISPLAY ¢
Utilisez cette touche pour recevoir les
émissions RDS.
& Touche RETURN
Utilisez ces touches pour commander le
composant DVD.
Touche LISTEN MODE •
Utilisez cette touche pour sélectionner le mode
d’écoute.
* Touche ENTER
Utilisez ces touches pour commander d'autres
composants.
Touche 2
Utilisez ces touches pour commander d'autres
composants.
( Touche BAND ™
Utilisez cette touche pour sélectionner la
gamme de fréquence.
Touche 6
Si vous sélectionnez CD comme source
d’entrée, cette touche fait office de touche de
lecture/pause.
Si vous sélectionnez MD ou TAPE comme
source d’entrée, cette touche fait office de
touche de lecture.
) Touche 8
Utilisez ces touches pour commander d'autres
composants.
¡ Touche AUTO ™
Utilisez cette touche pour sélectionner le mode
d’accord automatique.
Touche 7
Si vous sélectionnez CD, MD ou TAPE comme
source d’entrée, cette touche fait office de
touche d’arrêt.
™ Touche TONE )
Utilisez cette touche pour changer le statut de
contrôle de TONE.
£ Touches VOLUME (
Utilisez ces touches pour régler le niveau
d’écoute.
Page 45

Configuration de base de l’ensemble
Procédez aux raccordements indiqués ci-dessous.
Lors du raccordement des autres appareils, reportez-vous
impérativement aux modes d’emploi qui les accompagnent.
Ne branchez pas le cordon d’alimentation sur le secteur tant
que tous les raccordements ne sont pas terminés.
Remarques
1. Veillez à ce que tous les cordons de raccordement soient correctement
enfichés. Un mauvais contact peut entraîner des sons parasites ou une
absence de son.
2. Avant de brancher ou de débrancher un cordon de raccordement, veillez
à débrancher le cordon d’alimentation de la prise secteur. Dans le cas
contraire, l’appareil pourrait présenter un dysfonctionnement ou être
endommagé.
3. Ne branchez pas sur les prises secteur placées sur le panneau arrière du
récepteur des appareils dont la consommation électrique est supérieure
aux limites indiquées sur ces prises.
Connexions analogiques
Les connexions audio sont effectuées à l’aide de cordons à broche RCA.
Ces cordons transfèrent le signal audio stéréo sous forme “analogique”.
Cela signifie que le signal audio correspond au signal audio de deux canaux.
Ces cordons comportent généralement 2 fiches à chaque extrémité, une
rouge pour le canal droit et une blanche pour le canal gauche. En règle
générale, les cordons sont fournis avec l’appareil. Dans le cas contraire,
vous pouvez vous les procurer dans le commerce.
Anomalie de fonctionnement du microprocesseur
Si l’appareil ne fonctionne pas bien que tous les raccordements aient
été exécutés comme il convient, procédez à la réinitialisation du
microprocesseur; reportez-vous ci-après au paragraphe “En cas de
problème”. ‹
Réglage du mode d’entrée.
Les entrées CD/DVD, VIDEO2 et DVD ou DVD/6CH (KRF-V5070D
uniquement) comprennent chacune des prises pour une entrée audio
numérique et une entrée audio analogique.
Après avoir effectué tous les raccordements et mis le récepteur en
marche, procédez comme suit.
LISTEN MODE
INPUT MODE
1 Utilisez le bouton INPUT SELECTOR pour sélectionner CD/
DVD, VIDEO2, DVD ou DVD/6CH (KRF-V5070D uniquement).
2 Appuyez sur la touche INPUT MODE.
A chaque pression sur la touche, le réglage change comme suit:
Avec le mode de lecture DTS
1 F-AUTO (entrée numérique, entrée analogique)
2 D-MANUAL (entrée numérique)
Avec le mode de lecture CD/DVD, VIDEO2, DVD ou DVD/6CH
(KRF-V5070D uniquement)
1 F-AUTO (entrée numérique, entrée analogique)
2 D-MANUAL (entrée numérique)
3 6CH INPT (entrée DVD/6CH)
4 ANALOG (entrée analogique)
Entrée numérique:
Sélectionnez cette entrée pour lire les signaux numériques d’un
lecteur de DVD, CD ou LD.
Entrée analogique:
Sélectionnez cette entrée pour lire les signaux analogiques d’une
platine cassette, d’un magnétoscope ou d’une platine disque.
Détection automatique:
En “F-AUTO” mode (pleine automatique) (les indicateurs AUTO
DETECT et DIGITAL sont allumés), le récepteur détecte
automatiquement les signaux d'entrée numérique ou analogique.
Pendant la sélection du mode d'entrée, la priorité est donnée au signal
numérique. Le récepteur sélectionne automatiquement le mode
d'entrée ainsi que le mode d'écoute pendant la lecture en fonction du
type de signal d'entrée (Dolby Digital, PCM, DTS) et du réglage des
enceintes. L'appareil a été réglé en usine en mode de pleine
automatique.
Pour que le récepteur reste réglé sur le mode d’écoute sélectionné,
utilisez la touche INPUT MODE pour sélectionner “D-MANUAL”
(son manuel). Toutefois, même avec ce réglage, il peut arriver que le
mode d’écoute soit automatiquement sélectionné en fonction du
signal d’une source Dolby Digital, selon la combinaison du mode
d’écoute et du signal source.
En mode D-MANUAL, si la reproduction audio s'arrête au milieu,
notamment en raison du changement des signaux d'entrée, appuyez
sur la touche LISTEN MODE.
Si vous appuyez rapidement sur la touche INPUT MODE, il est
possible qu’aucun son ne soit entendu. Appuyez à nouveau sur les
touches INPUT MODE.
INPUT SELECTOR
FRANÇAIS
FR
9
Page 46

Configuration de base de l’ensemble
Raccordement des appareils audio
Prise secteur
Royaume-Uni
FRANÇAIS
GND
Prises SYSTEM
CONTROL ^
L
R
PHONO
CD/DVD
AUDIO
REC OUT PLAY IN
MD / TAPE
Europe
REC OUT PLAY IN
VIDEO1
+
-
+
-
Vers une prise secteur
(Pour KRF-V4070D/
FR
10
L
R
AUX
V5570D)
IN
Appareil vidéo ¡
OUTIN
Platine cassette ou
enregistreur de MD
OUT
Lecteur de CD ou DVD
OUT
Platine disque
OUT
Les platines disques à bobine
mobile (MC) ne peuvent pas
être utilisées directement avec
le récepteur. Pour les utiliser,
vous devez raccorder un autre
amplificateur égaliseur. (Pour
KRF-V5070D uniquement)
Page 47

Configuration de base de l’ensemble
Raccordement des appareils vidéo
DVD
IN
VIDEO 2
IN
VIDEO 1
VIDEO
IN
MONITOR
OUT
VIDEO 1
OUT
VIDEO
IN
Moniteur TV
AUDIO
VIDEO 1
+
-
PLAY IN
VIDEO 2
+
-
Pour KRF-V4070D/
FRANÇAIS
V5570D uniquement
DVDREC OUT PLAY IN
Entrées vidéo
(Cordon jaune à broche RCA)
Video
IN/OUT
IN IN
Platine vidéo
OUT OUT
Entrées et sorties vidéo
(Cordons jaunes à broche RCA)
Entrées et
sorties audio
Lecteur de DVD ou
OUT OUT
lecteur de LD
Lecteur de DVD ou
OUT
lecteur de LD
OUT
Il faudra raccorder un appareil vidéo avec sorties audio numériques aux prises VIDEO 2.
Audio
IN/OUT
11
FR
Page 48

Configuration de base de l’ensemble
Raccordements pour les signaux numériques
Les prises d’entrée numérique peuvent accepter des signaux DTS, Dolby Digital ou PCM. Raccordez des appareils capables de fournir des signaux
numériques au format DTS, Dolby Digital ou PCM (CD).
Si vous avez raccordé des appareils numériques au récepteur, lisez attentivement la section “Réglage du mode d’entrée”. 9
FRANÇAIS
COAXIAL OPTICAL
VIDEO 2
DVD
DIGITAL IN
CD / DVD
Câble à fibres optiques
+
-
+
-
OPTICAL DIGITAL OUT (AUDIO)
Lecteur CD ou DVD
COAXIAL DIGITAL OUT
(AUDIO)
Composant avec DTS, Dolby
Digital ou PCM COAXIAL
COAXIAL
DIGITAL OUT
(AUDIO)
Démodulateur numérique
radiofréquence
(DEM-9991D)
DIGITAL OUT
Appliquez les signaux vidéo et les
signaux audio analogiques sur les
prises VIDEO 2.
la section “Raccordement des
appareils vidéo”.)
(Reportez-vous à
!
(vendu séparément)
DOLBY DIGITAL RF
OUT (AUDIO)
PCM OUT
Lecteur de LD
Pour relier un lecteur de LD à une prise DIGITAL RF OUT, raccordez le lecteur de LD au démodulateur numérique KENWOOD RF
(DEM-9991D).
Ensuite, raccordez les prises DIGITAL OUT du démodulateur aux prises DIGITAL IN du récepteur.
Reliez le signal vidéo et les signaux audio analogiques aux prises VIDEO 2. (Voir “Raccordements des appareils vidéo”.)
FR
12
Page 49

Configuration de base de l’ensemble
Raccordement d’un lecteur de DVD (entrée 6 voies)
(Pour KRF-V5070D uniquement)
Si vous avez raccordé un lecteur de DVD à un récepteur avec connexion numérique, veillez à lire attentivement la section “Réglage du mode d’entrée”.
9
DVD
IN
VIDEO 2
IN
VIDEO 1
VIDEO
IN
MONITOR
OUT
VIDEO 1
OUT
DVD / 6CH INPUT
SURROUND
FRONT
CENTER
SUB
WOOFER
+
-
+
-
COAXIAL OPTICAL
VIDEO 2
DVD/6CH
DIGITAL IN
CD / DVD
FRANÇAIS
VIDEO OUT
(Cordon jaune à
broche RCA)
FRONT
OUT L/R
Lecteur de DVD
SURROUND
OUT L/R
COAXIAL
DIGITAL
OUT
(AUDIO)
SUBWOOFER
OUT
CENTER OUT
ATTENTION
Veuillez respecter ce qui suit, faute de quoi la ventilation de l'appareil serait perturbée, ce qui pourrait causer son endommagement, voire
un incendie.
• Ne posez aucun appareil sur le dessus de celui-ci.
• Ménagez un espace autour de l'appareil au moins égal aux valeurs ci-dessous (compté à partir des parties faisant saillie).
Panneau supérieur : 50 cm Panneau latéral : 10 cm Panneau arrière : 10 cm
13
FR
Page 50

Configuration de base de l’ensemble
Raccordement des enceintes
Enceintes avant
Droite
Gauche
Enceinte
centrale
SURROUND
FRANÇAIS
SUB WOOFER
PRE OUT
FRONT
RED WHITE GREEN
CENTER
CR L
SPEAKERS (6
+
+
-
-
SPEAKERS (6-16Ω)
KRF-V5570D
SURROUND
R
GRAYLBLUE
KRF-V5070D/KRF-V4070D
+
-
WOOFER
+
-
SUB
+
14
-
R
SPEAKERS (6-16Ω)
Enceinte d’extrêmes
graves active
(Pour KRF-V5070D/
V4070D)
FR
Droite
Enceintes d’ambiance
(Assurez-vous que les deux
enceintes sont bien reliées)
GRAYLBLUESWPURPLE
Gauche
Enceinte
d’extrêmes graves
Page 51

Configuration de base de l’ensemble
Raccordement des bornes
1 Dénudez le cordon.
3 Introduisez le cordon. 4 Relâchez la languette.
• Veillez à ce que les cordons + et – ne soient jamais en contact.
• Si vous inversez les cordons de liaison des enceintes droite et
gauche ou si vous ne respectez pas la polarité de ces cordons, le
son produit ne sera pas naturel et l’image acoustique sera déformée.
Veillez donc à effectuer correctement les raccordements.
Impédance des enceintes
Après avoir vérifié l’impédance des enceintes indiquée sur le panneau
arrière du récepteur, raccordez des enceintes ayant une impédance
nominale appropriée. Si vous utilisez des enceintes d’une impédance
autre que celle indiquée sur le panneau arrière du récepteur, vous
risquez de provoquer des dysfonctionnements ou d’endommager les
enceintes ou le récepteur.
2 Appuyez sur la languette.
Raccordement des antennes
Antenne cadre AM
L’antenne cadre fournie est une antenne intérieure. Installez-la aussi
loin que possible du récepteur, du téléviseur, des cordons de liaison
des enceintes et du cordon d’alimentation; orientez-la de manière à
obtenir la meilleure réception possible.
Raccordement de la borne d’antenne AM
1 Appuyez sur la
languette.
2 Introduisez le
câble.
Antenne FM intérieure
L’antenne FM n’est fournie que pour un usage provisoire. Pour
obtenir une bonne réception, nous vous conseillons d’utiliser une
antenne extérieure. Dans ce cas, vous devez débrancher l’antenne
intérieure.
Raccordement de la borne d’antenne FM
Introduisez le câble.
3 Relâchez la
languette.
FRANÇAIS
Antenne FM extérieure
Branchez le câble coaxial 75Ω provenant de l’antenne FM extérieure
sur la prise FM 75Ω.
+
+
-
-
ANTENNA
GND
AM
Fixez à l’embase
Antenne cadre AM
FM
75Ω
Utilisez un
adaptateur
d’antenne
(Disponible dans
le commerce)
Antenne FM intérieure
Antenne FM extérieure
15
FR
Page 52

Configuration de base de l’ensemble
SYS
OL
Raccordement de la commande d’ensemble
(SYSTEM CONTROL)
Après avoir relié les différents éléments de la chaîne KENWOOD,
vous pouvez brancher les câbles de commande d’ensemble afin
d’utiliser cette fonctionnalité très pratique.
Cet appareil est compatible uniquement avec le mode [SL-16]. La
commande d’ensemble n’est pas disponible si l’appareil est
connecté en mode [XS8], [XS] ou [XR].
Si votre appareil est doté d’un sélecteur de mode, mettez les
appareils raccordés sur le mode [SL16].
Cordon SYSTEM CONTROL
TEM CONTR
• Vous pouvez raccorder indifféremment le cordon de commande
d’ensemble à la prise haut ou bas.
FRANÇAIS
EXEMPLE : raccordements pour le mode [SL16]
La partie soulignée indique le réglage du mode de fonctionnement de
la commande d’ensemble.
SL16]
[
SL16] [XS] [XS8] [XR]
[
SL16] [XS] [XS8]
[
[XS]
• Pour pouvoir utiliser la commande d’ensemble, les différents
appareils doivent être reliés aux prises appropriées. Le lecteur de
CD doit être relié aux prises CD. La platine cassette (ou l’enregistreur
de MD) doit être reliée aux prises MD/TAPE. Si vous installez
plusieurs appareils de même nature (plusieurs lecteurs de CD, par
exemple), seul celui qui est relié aux prises prévues peut être
commandé.
• Certains lecteurs de CD et certaines platines cassettes ne sont pas
compatibles avec le mode de commande d’ensemble [SL16].
N’effectuez pas de connexions système avec des appareils qui ne
sont pas compatibles avec le mode [SL16].
• Certains lecteurs de MD ne sont pas prévus pour la commande
d’ensemble. Vous ne pouvez donc pas les connecter en vue d’utiliser
cette fonctionnalité.
Remarques
1. En ce qui concerne la commande d’ensemble, un appareil [SL16]
ne peut pas être associé à un appareil [XR], [XS] ou [XS8]. Si votre
chaîne est une association de ces appareils, n’utilisez pas les
cordons de commande d’ensemble. Les différents appareils
fonctionneront normalement même si les cordons de commande
d’ensemble ne sont pas branchés.
2. Ne branchez pas les cordons de commande d’ensemble sur des
appareils autres que ceux indiqués par KENWOOD sous peine
d’entraîner un dysfonctionnement ou d’endommager l’un des
appareils.
3. Veillez à ce que les fiches des cordons de commande d’ensemble
soient engagées à fond sur les prises.
Récepteur
Platine cassette ou
enregistreur de MD
Lecteur de CD
Platine disque
Cordon
SYSTEM
CONTROL
REMARQUES SUR LE FONCTIONNEMENT DE LA
COMMANDE D’ENSEMBLE
Télécommande
La télécommande fournie permet de piloter ce récepteur et les autres
appareils de la chaîne.
Fonctionnement Automatique
Lorsque vous commandez la lecture sur un appareil source, le
sélecteur d’entrée du récepteur se règle automatiquement sur cette
source.
Copie Synchronisée
Lorsque vous copiez un CD, un MD ou un disque analogique, cette
fonction permet de synchroniser l’enregistrement et le début de la
lecture de ces derniers.
Installation des enceintes
Enceinte centrale
Enceinte d’extrêmes graves
Enceinte
avant
Enceinte
d’ambiance
Enceintes avant : Placez ces enceintes à droite et à gauche de la
position d’écoute. Les enceintes avant sont requises quel que soit le
mode d’ambiance choisi.
Enceinte centrale : Placez cette enceinte à l’avant et au centre. Cette
enceinte a pour effet de stabiliser l’image acoustique et de recréer le
déplacement de la source sonore. Elles sont nécessaires pour obtenir
une bonne ambiance acoustique.
Enceintes d’ambiance : Placez ces enceintes à droite et à gauche de
la position d’écoute ou légèrement en arrière. Elles doivent être
fixées à la même hauteur, à environ 1 mètre au-dessus du niveau des
oreilles de l’auditeur. Ces enceintes reproduisent le déplacement de
la source sonore et recréent l’atmosphère générale. Elles sont
nécessaires pour obtenir une bonne ambiance acoustique.
Enceinte d’extrêmes graves : Cette enceinte accentue le registre
grave.
• Bien que l’installation idéale doive comporter toutes les enceintes
mentionnées ci-dessus, il est toutefois possible d’obtenir de bons
résultats même si vous ne possédez ni enceinte centrale, ni enceinte
d’extrêmes graves. Pour cela, il suffit de diriger, vers les enceintes
disponibles, les signaux qui sont destinés aux enceintes manquantes,
ce qui est expliqué dans la section réglage des enceintes.&
Position
d’écoute
FR
16
Page 53

Préparation des corrections d’ambiance
Réglage des enceintes
Pour vous permettre d’exploiter au mieux les modes d’écoute du
récepteur, procédez au réglage des enceintes (enceintes d’extrêmes
graves, avant, centrale et d’ambiance) comme décrit ci-dessous.
ON/STANDBY
POWER ON/OFF
MULTI CONTROL
SETUP
POWER
SETUP
MULTI
CONTROL
1
Mettez e récepteur sous tension en appuyant sur la touche
POWER ON/OFF et ON/STANDBY
2
Appuyez sur la touche SETUP pour activer le mode SETUP
ou sur la touche POWER .
et utilisez le bouton ou les touches MULTI CONTROL pour
obtenir les affichages suivants.
1 SP SETUP
2 TESTTONE
3 DISTANCE
4 EXIT
Le déroulement du mode SETUP est le suivant;
SP SETUP TESTTONE DISTANCE EXIT
SP System
Full Range
2Way 2Speaker
2Way 3Speaker
Others
Subwoofer
Center
Surround
Subwoofer Re-mix
3
Sélectionnez un système d’enceintes.
1 Sélectionner SP SETUP et appuyer à nouveau sur la touche
SETUP de façon à ce que l'indication du système d'enceintes
"SP SYSTEM" se déroule pendant l'affichage.
2 Utiliser le bouton ou les touches MULTI CONTROL pour
sélectionner le réglage du système d’enceintes.
1 FULL RANGE : Pour l'enceinte Kenwood sélectionnée – par
2 2WAY 2SPKR : Pour l'enceinte Kenwood sélectionnée – par
3 2WAY 3SPKR : Pour l'enceinte Kenwood sélectionnée – par
4 OTHERS : Pour les enceintes génériques.
• La sélection de FULL RANGE, 2WAY 2SPKR ou 2WAY 3SPKR
doit uniquement être utilisée avec le réglage du système
d'enceintes à 5 canaux.
Front
AUTO
MANUAL
L
L
C
C
R
SR
R
SL
SR
SW
SL
SW
exemple, KS-207HT.
exemple, KS-307HT.
exemple, KS-707HT.
Front
Center
Surround
• Lorsque le réglage FULL RANGE, 2WAY 2SPKR ou 2WAY
3SPKR est sélectionné, la procédure passe au point 4.
3 Pour la configuration des enceintes génériques, utiliser le
bouton ou les touches MULTI CONTROL pour sélectionner le
réglage OTHERS et appuyer à nouveau sur la touche SETUP.
• L’indication de réglage du d’extrêmes graves "SUBW ON" s’affiche.
4 Utilisez le bouton ou les touches MULTI CONTROL pour
sélectionner le réglage approprié de l’enceinte d’extrêmes graves.
1 SUBW ON : Le mode de réglage de l’enceinte d’extrêmes
2 SUBW OFF : Le mode de réglage de l’enceinte d’extrêmes
• Le réglage par défaut est “SUBW ON”.
• Si vous choisissez “SUBW OFF”, les enceintes avant sont
automatiquement réglées sur “FRNT LRG” et vous pouvez
passer à l’étape 8.
Avant de procéder à l’étape 8, appuyez sur la touche SETUP
pour valider le réglage.
• Si l’enceinte d’extrêmes graves est nécessaire, choisissez “FRNT
NML”.
5 Appuyez sur la touche SETUP pour valider le réglage.
• L’indication de réglage des enceintes avant “FRNT NML” s’affiche.
6 Utilisez le bouton ou les touches MULTI CONTROL pour
sélectionner le réglage d’enceintes avant approprié.
1 FRNT NML (normale) : Vous avez raccordé des enceintes avant
2 FRNT LRG (grande) : Vous avez raccordé des enceintes avant
• Si vous sélectionnez “FRNT LRG”, ancun son n'est émis par
enceintes d'extrêmes graves, même si ce réglage est activé.
Toutefois, si vous sélectionnez “SW RE-MIX ON” lorsque une
enceinte d'extrêmes graves est sélectionnée, vous pourrez
entendre des sons émis par les enceintes d'extrêmes graves.
Lorsque l'appareil est en mode STEREO, le son sort directement
du enceinte avant.
7 Appuyez sur la touche SETUP pour valider le réglage.
• L’indication de réglage de l’enceinte centrale “CNTR NML” s’affiche.
8 Utilisez le bouton ou les touches MULTI CONTROL pour
sélectionner le réglage d’enceinte centrale approprié.
Si vous avez sélectionné “LRG” comme réglage d’enceinte avant,
1 CNTR NML (normale) : Vous avez raccordé une enceinte centrale
2 CNTR LRG (grande) : Vous avez raccordé une enceinte centrale
3 CNTR OFF : Le mode de réglage de l’enceinte
Si vous avez sélectionné “NML” comme réglage d’enceinte avant,
1 CNTR ON : Le mode de réglage de l’enceinte centrale du
2 CNTR OFF : Le mode de réglage de l’enceinte centrale du
9 Appuyez sur la touche SETUP pour valider le réglage.
• L’indication de réglage des enceintes d’ambiance “SURR NML”
s’affiche.
0 Utilisez le bouton ou les touches MULTI CONTROL pour
sélectionner le réglage d’enceinte d’ambiance approprié.
Si vous avez sélectionné “LRG” comme réglage d’enceinte centrale,
1 SURR NML (normale) : Vous avez raccordé des enceintes
2 SURR LRG (grande) : Vous avez raccordé des enceintes
3 SURR OFF : Le mode de réglage des enceintes
graves du récepteur est activé.
graves du récepteur est désactivé.
de dimensions moyennes au récepteur.
de grandes dimensions au récepteur.
de dimensions moyennes au récepteur.
de grandes dimensions au récepteur.
centrale du récepteur est désactivé.
récepteur est activé.
récepteur est désactivé.
d’ambiance de dimensions moyennes
au récepteur.
d’ambiance de grandes dimensions
au récepteur.
d’ambiance du récepteur est désactivé.
Voir page suivante
17
FRANÇAIS
FR
Page 54

Préparation des corrections d’ambiance
Si vous avez sélectionné un réglage d’enceinte centrale différent
de “LRG”.
1 SURR ON : Le mode de réglage des enceintes d’ambiance
2 SURR OFF : Le mode de réglage des enceintes d’ambiance
! Appuyez à nouveau sur la touche SETUP pour valider le
réglage.
• L’indication de réglage du re-mix de l’enceinte d’extrêmes graves
“SW RE-MIX” défile dans la fenêtre d'affichage.
• Si l’enceinte d’extrêmes graves est éteinte, le réglage de re-mix
d’extrêmes graves n’est pas disponible.
@ Utilisez le bouton ou les touches MULTI CONTROL pour
sélectionner le réglage du re-mix de l'enceinte d’extrêmes
graves approprié.
1 RMX ON : Le mode de réglage du re-mix de l’enceinte
2 RMX OFF : Le mode de réglage du re-mix de l’enceinte
FRANÇAIS
# Appuyez sur la touche SETUP pour valider le réglage.
• Le récepteur passe en mode de réglage du niveau de volume des
enceintes.
• A l'étape 4 et 5, les indications s’affichent uniquement pour les
canaux des enceintes sélectionnés nécessitant un réglage.
4
Réglez le niveau de volume des enceintes.
A partir de votre position d’écoute habituelle, réglez le niveau d’écoute
jusqu’à ce que toutes les enceintes soient au même niveau.
1 Appuyez sur la touche SETUP afin de lancer TEST TONE.
AUTO/MANUAL TEST TONE est sélectionné à l’aide le bouton
ou les touches MULTI CONTROL.
1 AUTO
2 MANUAL
2 Appuyez à nouveau sur la touche SETUP pour sélectionner
AUTO ou MANUAL.
Utilisez le bouton ou les touches MULTI CONTROL pour régler
le niveau de volume de sortie de la tonalité d’essai à partir de
la voie d’enceinte à régler.
Pour la sélection AUTO, la tonalité d’essai est émise par les
enceintes pendant 2 secondes, chacune dans l’ordre suivant :
• Si vous modifiez le niveau d’écoute des enceintes pendant que
vous écoutez la musique, les réglages traités sur cette page
seront également modifiés. ª
• Si l'une des enceintes est paramétrée sur OFF pendant SP
SETUP, le réglage du TEST TONE pour cette enceinte ne sera
pas pris en compte.
3 Appuyez sur la touche SETUP.
• La tonalité d’essai est désactivée. Le récepteur passe en mode
d’entrée de la distance des enceintes.
4 Pour sélectionner MANUAL, appuyez sur la touche SETUP à
chaque fois pour sélectionner le canal d'enceinte.
du récepteur est activé.
du récepteur est désactivé.
d’extrêmes graves pour le récepteur est activé.
d’extrêmes graves pour le récepteur est désactivé.
5
Entrez la distance des enceintes.
1 Sélectionnez DISTANCE dans les affichages de réglage et
appuyez à nouveau sur la touche SETUP.
2 Mesurez la distance entre la position d’écoute et chaque
enceinte.
Notez la distance de chaque enceinte.
Distance des enceintes avant : ____ pieds (mètres)
Distance de l’enceinte centrale : ____ pieds (mètres)
Distance des enceintes d’ambiance : ____ pieds (mètres)
3 Utilisez le bouton ou les touches MULTI CONTROL pour
sélectionner la distance des enceintes avant.
L’indicateur de l’enceinte à régler clignote.
Indication en pieds Indication en mètres
• La plage de réglage admissible est de 1 à 30 pieds (0,3 à 9,0 m),
par paliers de 1 pied (0,3 m).
4 Appuyez sur la touche SETUP pour valider le réglage.
5 Répétez les opérations 3 et 4 pour entrer la distance des
autres enceintes.
6 La configuration est terminée lorsque l’indication EXIT
apparaît.
• Les enceintes sélectionnées doivent apparaître sur l’afficheur.
Vérifiez que toutes les enceintes ont été correctement
sélectionnées.
7 Appuyez sur la touche SETUP pour sortir du mode SETUP.
Réglage du niveau d’entrée (sources analogiques uniquement)
Si le niveau d’entrée d’un signal source analogique est trop élevé,
l’indicateur CLIP clignote pour indiquer le signal source. Réglez le niveau
d’entrée.
1 Utilisez le bouton INPUT SELECTOR pour sélectionner la source
dont vous souhaitez régler le niveau d’entrée.
• Vous pouvez mémoriser un niveau d’entrée séparé pour chaque
source d’entrée.
2 Appuyez plusieurs fois sur la touche SOUND jusqu’à ce que
l’indication “INPUT” s’affiche.
3 Utilisez le bouton ou les touches MULTI CONTROL pour régler le
niveau d’entrée.
• Vous pouvez régler le niveau d’entrée sur trois valeurs au choix:
0dB, –3dB et –6dB. (Le réglage usine est 0dB.)
4 Appuyez à nouveau sur la touche SOUND pour revenir à
l’indication d’entrée.
18
FR
Page 55

Lecture normale
Préparation de la lecture
Certaines opérations préliminaires sont nécessaires pour pouvoir effectuer
une lecture.
SPEAKERS
ON/OFF
ON/OFF
Mise sous tension du récepteur
1 Mettez les appareils concernés sous tension.
2 Mettez le récepteur sous tension en appuyant sur les touches
POWER ON/OFF et ON/STANDBY
Sélection du mode d’entrée
Si vous avez sélectionné l’appareil raccordé aux prises CD/DVD, VIDEO2,
DVD ou DVD/6CH, (KRF-V5070D uniquement), vérifiez que le mode
d’entrée est réglé correctement pour le type de signal audio à utiliser.
Sélection du MD/TAPE
Sélectionnez le nom de la source correspondant à l’appareil raccordé aux
prises MD/TAPE. Le réglage usine est “TAPE”. Pour changer le nom de
la source en “MD”, procédez comme suit:
1 Utilisez le bouton INPUT SELECTOR pour sélectionner “TAPE”.
2 Maintenez la touche AUTO enfoncée pendant plus de 2 secondes.
• L’indication de source devient “MD”.
• Pour revenir à l’indication d’origine, répétez l’opération 2.
Sélectionnez le système d'enceintes
L’indicateur d'enceintes s'allume.
ON/STANDBY
AUTO INPUT SELECTORPOWER
.
9
Ecoute d’une source
INPUT SELECTOR
Input
Sélecteur
Selector
d'entrée
1
Utilisez le bouton INPUT SELECTOR ou les touches
sélecteur d’entrée pour sélectionner la source que vous
souhaitez écouter.
Les sources d'entreé changent dans l’ordre suivant:
KRF-V4070D/V5570D
1 “AUX”
2 “TUNER”
3 “CD/DVD”
4 “TAPE” ou “MD”
5 “VIDEO1”
6 “VIDEO2”
7 “DVD”
KRF-V5070D
1 “PHONO”
2 “TUNER”
3 “CD/DVD”
4 “TAPE” ou “MD”
5 “VIDEO1”
6 “VIDEO2”
7 “DVD/6CH”
VOLUME CONTROL
VOLUME
FRANÇAIS
Appuyez sur la touche SPEAKERS ON/OFF pour mettre les enceintes
activé et désactivé.
2
Commandez la lecture sur l’appareil source sélectionné.
3
Pour régler le volume, utilisez le bouton VOLUME CONTROL
ou les touches VOLUME.
19
FR
Page 56

Lecture normale
Réglage du son
SPEAKERS ON/OFF
ACTIVE EQ
PHONES
MULTI CONTROL
BASS BOOST
FRANÇAIS
MUTE
Réglage de la tonalité (par télécommande uniquement)
Vous pouvez régler la qualité du son lorsque le récepteur se trouve en
mode PCM stéréo et en mode stéréo analogique.
1 Appuyez sur la touche TONE pour sélectionner le mode TONE.
2 Utilisez le bouton ou les touches MULTI CONTROL pour
sélectionner TONE ON/OFF.
3 Appuyez sur la touche TONE pour obtenir les offichages suivants.
BASS : Sélectionnez ce mode pour régler la plage des basses
fréquences.
TREB : Sélectionnez ce mode pour régler la plage des hautes
fréquences.
4 Utilisez le bouton ou les touches MULTI CONTROL pour régler la
qualite du son.
• La plage de réglage du niveau des graves et des aigus s’étend de
–10 à +10 par paliers de 2.
Accentuation des basses fréquences par pression unique sur la
touche (BASS BOOST)
(par télécommande uniquement)
Vous pouvez régler la qualité du son lorsque le récepteur se trouve en
mode PCM stéréo et en mode stéréo analogique.
Appuyez sur la touche BASS BOOST.
• Appuyez une fois sur la touche pour sélectionner l’accentuation
maximale des basses fréquences (+10).
• TONE sera automatiquement activé.
• Cette touche ne fonctionne pas si le récepteur est en mode de
réglage de la qualité sonore ou des effets d'ambiance.
VOLUME CONTROL
MUTE
LOUDNESS
MULTI
CONTROL
ACTIVE EQ
TONE
VOLUME
§~º
Réglage de l’intensité du son (par télécommande uniquement)
Vous pouvez régler la fonction d’intensité qui contrô le les réglages de
volume bas pour conserver la richesse de la musique. Le réglage peut
être effectué lorsque le récepteur est en mode PCM stéréo et en mode
stéréo analogique.
Appuyez sur la touche LOUDNESS pour activer le réglage LOUDNESS.
Pour annuler
Appuyez de nouveau sur la touche LOUDNESS afin que
l’indicateur “LOUDNESS” s’éteigne.
Atténuation des sons
La touche MUTE permet d’atténuer les sons émis par les enceintes.
Appuyez sur la touche MUTE.
Pour annuler
Appuyez de nouveau sur la touche MUTE afin que l’indicateur
“MUTE” s’éteigne.
• Vous pouvez également désactiver l’atténuation des sons MUTE
ON en réglant le bouton de contrôle de volume.
Mode ACTIVE EQ
Vous pouvez jouir d'un effet sonore plus intense lorsque la fonction
ACTIVE EQ est activée lors de la lecture en Dolby Digital et DTS et
lorsque vous êtes en mode PCM et en mode stéréo analogique.
Appuyez sur la touche ACTIVE EQ pour les affichages suivants;
1 ACTIVE EQ MUSIC : Opérationnel lorsque vous écoutez de la
2 ACTIVE EQ CINEMA : Opérationnel lorsque vous regardez un film.
3 ACTIVE EQ TV : Opérationnel lorsque vous regardez la
4 ACTIVE EQ OFF : La fonction ACTIVE EQ est désactivée.
• La fonction ACTIVE EQ ne sera pas disponible lorsque REC MODE,
AUTO TUNING ou PRESET MEMORY est activé et durant la lecture
LPCM 96kHz LPCM.
musique.
(L'indicateur LED ACTIVE EQ s'allume.)
(L'indicateur LED ACTIVE EQ s'allume.)
télévision.
(L'indicateur LED ACTIVE EQ s'allume.)
(L'indicateur LED ACTIVE EQ s'éteint.)
Ecoute avec un casque
1 Appuyez sur la touche SPEAKERS ON/OFF afin que l’indicateur
d’enceintes s’éteigne.
Assurez-vous que les indicateurs d’enceintes sont éteints.
• Si vous éteignez toutes les enceintes en mode d’ambiance, ce
mode s’annule également, ce qui activera la lecture stéréophonique.
2 Branchez un casque à la prise PHONES.
PHONES
Retour au réglage précédent
Appuyez de nouveau sur la touche BASS BOOST.
FR
20
3 Utilisez le bouton VOLUME CONTROL ou touches VOLUME pour
régler le volume.
Page 57

Enregistrement
Enregistrement d’un signal audio (sources analogiques)
INPUT SELECTOR
Enregistrement d’une source musicale
1 Utilisez le bouton INPUT SELECTOR pour sélectionner la source
(autre que “MD/TAPE”) que vous souhaitez enregistrer.
2 Réglez l'enregistreur MD ou TAPE pour procéder à
l'enregistrement.
3 Commandez la lecture, puis l’enregistrement.
Enregistrement d’un signal vidéo
1 Utilisez le bouton INPUT SELECTOR pour sélectionner la source
vidéo (autre que “VIDEO1”) que vous souhaitez enregistrer.
2 Réglez la platine vidéo raccordée à VIDEO 1 en vue de
l’enregistrement.
• Choisissez en REC MODE pour enregistrer une source numérique.
3 Commandez la lecture, puis l’enregistrement.
• Avec certains enregistrements vidéo, l’enregistrement peut ne pas
s’effectuer correctement en raison du système de protection contre
les copies. ‹
Enregistrement d’un signal audio (sources
numériques)
3 Maintenez la touche DIMMER enfoncée pendant plus de 2
secondes pour sélectionner le mode A-REC ou M-REC lors de
l'entrée digitale.
1 Mode Rec désactivé : Le mode d’enregistrement numérique
est désactivé.
2 Mode A-REC : Les signaux d’entrée numériques
(DTS, Dolby Digital, ou PCM) sont
automatiquement identifiés et
convertis en signaux stéréophoniques
prêts pour l’enregistrement.
3 Mode M-REC : Le type du signal d’entrée au moment
où ce mode est sélectionné est
conservé pendant tout la durée
d’activation de ce mode.
Pour le mode A-REC:
Pour le mode M-REC:
4 Commandez la lecture, puis l’enregistrement.
• Si la reproduction du signal audio s’interrompt en raison du changement
des signaux d’entrée, etc., appuyez sur la touche DIMMER.
FRANÇAIS
Passez en mode REC pour enregistrer un signal d’entrée numérique.
En principe, utilisez le mode A-REC (Auto-Record) pour enregistrer un
signal d’entrée audio. Si le mode numérique change pendant
l’enregistrement en mode A-REC, le signal audio peut être interrompu
momentanément.
Enregistrement de musique en mode A-REC ou M-REC
DIMMER
INPUT SELECTOR
1 Utilisez le bouton INPUT SELECTOR pour sélectionner la source
[CD/DVD, DVD ou DVD/6CH (KRF-V5070D uniquement) ou
VIDEO2] que vous souhaitez enregistrer.
2 Réglez l'enregistreur MD ou TAPE pour procéder à
l'enregistrement.
21
FR
Page 58

Ecoute de la radio
Le récepteur peut mémoriser jusqu’à 40 stations et les rappeler en
appuyant simplement sur une touche.
Les stations de radio peuvent être classées en deux catégories: “stations
RDS” (Radio Data System) et “autres stations”. Pour écouter une station
RDS ou mettre en mémoire la fréquence d’une station RDS, procédez
comme indiqué à la section “Utilisation du Radio Data System (RDS)”.
Réglage des stations radiophoniques (non-RDS)
MULTI CONTROL
AUTO
FRANÇAIS
TUNING
MULTI
CONTROL
1 /
¡
AUTO
1
Utilisez le bouton INPUT SELECTOR ou la touche TUNER
pour sélectionner le syntoniseur.
2
Utilisez la touche BAND pour sélectionner la gamme de
fréquence.
Chaque appuyez sur la
touche permet de passer
d’une gamme de fréquence
à l’autre, comme suit:
1 FM
2 AM
3
Utilisez la touche AUTO pour sélectionner la méthode
d’accord.
Chaque appuyez sur la touche permet de passer d'une méthode
d'accord à l'autre, comme suit :
1 AUTO est allumé
(accord automatique)
2 AUTO n’est pas allumé
(accord manuel)
INPUT SELECTORBAND
BAND
TUNER
L’indicateur “AM” ou “FM”
s’affiche sur l’afficheur.
L’indicateur “AUTO” s’allume
dans la fenêtre d’affichage.
Utilisation du RDS
Le système RDS transmet des informations utiles (sous la forme de
données numériques) dans les signaux d’émission en FM. Les
syntoniseurs et récepteurs conçus pour la réception RDS peuvent
extraire des informations du signal et les utiliser avec différentes fonctions,
telles que l’affichage automatique du nom des stations.
(Radio Data System )
Fonctions RDS:
Recherche PTY (identification du type de programme) ∞
Recherche automatiquement une station diffusant le type de
programme spécifié.
Affichage PS (nom de la chaîne de programmes)
Affiche automatiquement le nom de la station émis par la station RDS.
Fonction RDS AUTO MEMORY (Mise en mémoire automatique
des fréquences de stations RDS) ¢
Cette fonction permet de mémoriser automatiquement jusqu’à 40
stations RDS.
Si vous mémorisez moins de 40 stations RDS dans la mémoire, les
stations FM ordinaires seront mémorisées dans les adresses mémoires
restantes.
Affichage en clair d’un message (fonction RT, Radio Text)
Le message textuel émis par une station RDS s’affiche lorsque vous
appuyez sur la touche RDS DISPLAY. Si aucune donnée textuelle
n’est transmise, l’indication “NO RT” s’affiche.
L’indication “RDS” s’affiche lorsque une émission (signal) RDS est
reçue.
Remarque
Certaines fonctions et noms de fonctions peuvent être différents
selon les régions et le pays.
Avant d’utiliser une fonction RDS, vous devez effectuer les opérations
décrites dans la section “Mise en mémoire automatique des
fréquences de stations RDS (RDS AUTO MEMORY)”. ¢
• En temps normal, choisir “AUTO” (accord automatique). Utilisez le
mode manuel lorsque le signal radio est faible et la réception
médiocre. (En mode d’accord manuel, les émissions stéréo sont
reçues en monaural.)
4
Utilisez le bouton ou les touches MULTI CONTROL ou les
touches TUNING
Accord automatique : L’accord se fait automatiquement sur la
Accord manuel : Tournez le bouton (ou appuyez sur la touche)
FR
22
1/ ¡
pour sélectionner la station.
“ST.” s’allume à la
Affichage de la
fréquence
station suivante.
pour sélectionner la station.
réception d’une
émission stéréo.
“TUNED” s’allume à la
réception d’une station.
Page 59

Ecoute de la radio
Mise en mémoire manuelle des fréquences
de stations de radio
La fonction de mise en mémoire automatique des fréquences RDS
attribue des numéros de canaux aux stations RDS en commençant par
le numéro “1”. Par conséquent, avant de mettre en mémoire
manuellement des fréquences de stations FM, AM et RDS, vous devez
effectuer la mise en mémoire automatique des fréquences RDS. Reportezvous à la section “Mise en mémoire automatique des fréquences de
stations RDS (RDS AUTO MEMORY)”. ¢
MEMORY
MULTI CONTROL
1
Accordez le récepteur sur la fréquence de la station que
vous souhaitez enregistrer.
2
Appuyez sur la touche MEMORY à la réception de la station.
Clignote pendant 5 secondes S’allume pendant 5 secondes
2
Tapez le numéro de préréglage de la station que vous
souhaitez recevoir (il ne peut pas être supérieur à “40”).
Appuyez sur les touches numériques dans l’ordre suivant:
Pour “15”, appuyez sur ................... 0,5
Pour “20”, appuyez sur ................... 0,0,)
• En cas d’erreur sur un nombre à deux chiffres, appuyez plusieurs
fois sur la tou +10 pour revenir à láffichage d’origine et recommencez.
Réception successive des stations
mémorisées
(P.CALL)
P.CALL
4 / ¢
TUNER
FRANÇAIS
L’opération 3 doit être exécutée dans les 5 secondes.
(Si plus de 5 secondes se sont écoulées, appuyez à nouveau sur
la touche MEMORY.)
3
Utilisez le bouton MULTI CONTROL pour sélectionner l’une
des stations preselectionnées (1 – 40).
4
Appuyez à nouveau sur la touche MEMORY pour valider le
réglage.
• Répétez les opérations 1, 2, 3, et 4 pour chaque station à mémoriser.
• Si vous mémorisez une station sous un numéro déjà choisi, la
nouvelle station remplace l’ancienne.
Réception d’une station mémorisée.
Touches numériques
Numeric keys
TUNER
1
Appuyez sur la touche TUNER pour sélectionner le
syntoniseur comme source.
2
Utilisez les touches P.CALL 4/¢ pour sélectionner la
station, souhaiteé.
• A chaque appuyez sur la touche, l’appareil s’accorde sur la station
préréglée suivante.
Appuyez sur la touche P.CALL ¢ effectue ce qui suit :
Appuyez sur la touche P.CALL 4 effectue ce qui suit :
Si vous maintenez la touche ¢ ou 4 enfoncée, vous passez
d'une station memorisée à l'autre et vous pouvez entendre
l'émission par chaque station pendant 0,5 secondes.
1
Appuyez sur la touche TUNER pour sélectionner le
syntoniseur comme source.
23
FR
Page 60

Ecoute de la radio
Utilisation de la touche RDS DISPLAY
RDS DISPLAY
Vous pouvez modifier l’affichage peuvent être vues en
appuyant sur la touche RDS DISPLAY.
Chaque appuyez sur cette touche permet de passer d’un mode
d’affichage à l’autre comme suit :
1 Affichage PS (Nom de la chaîne de programmes)
FRANÇAIS
2 Affichage RT (Radio Text)
3 Affichage de la fréquence
1 Affichage PS (Nom de la chaîne de programmes):
Le nom de la station s’affiche automatiquement lors de la réception
d’une émission RDS.
En l’absence de données PS, l’afficheur indique “NO PS”.
Mise en mémoire automatique des
fréquences de stations RDS
Cette fonction permet de mettre automatiquement en mémoire les
fréquences de 40 stations RDS. Pour utiliser la fonction PTY, les stations
RDS doivent être mises en mémoire à l’aide de la fonction RDS AUTO
MEMORY.
MEMORY
1
Utilisez le bouton INPUT SELECTOR pour sélectionner le
syntoniseur.
2
Utilisez la touche BAND pour régler la gamme de
fréquence sur “FM”.
3
Maintenez la touche MEMORY enfoncée pendant plus de
2 secondes.
(RDS AUTO MEMORY)
INPUT SELECTORBAND AUTO
2 Affichage RT (Radio Text):
Un message textuel lié à l’émission RDS défile sur l’afficheur.
L’indication “NO RT” ou “RT----” apparaît lorsque la station RDS
n’émet pas de message.
3 Affichage de la fréquence:
Affiche la fréquence de la station reçue.
• Après quelques minutes, les fréquences de 40 stations RDS, au
maximum, sont mémorisées en commençant par le canal de
mémoire “01”.
• Les fréquences déjà enregistrées dans la mémoire peuvent être
remplacées par des fréquences de stations RDS. (cela signifie que,
si la fonction RDS AUTO MEMORY détecte 15 stations RDS,
celles-ci remplaceront les stations déjà enregistrées sur les canaux
01 à 15.)
24
FR
Page 61

Ecoute de la radio
Réception d’une émission d’un type donné
(recherche PTY)
Cette fonction est utilisée pour balayer automatiquement les stations qui
diffusent le type de programme que vous souhaitez écouter.
Dans certaines conditions de réception, la recherche peut durer
plus d’une minute.
3
Appuyez sur la touche PTY pour commencer la recherche.
EXEMPLE : Recherche de musique rock.
Affichage au cours de la recherche.
Clignote Affichage du nom du type de programme
PTY
MULTI
TUNING
1 / ¡
CONTROL
Préparations
• Procédez à la mise en mémoire automatique des fréquences RDS.
• Choisissez la gamme FM.
• Accordez le récepteur sur une station RDS.
1
Appuyez sur la touche PTY pour activer le mode de recherche
PTY.
Le type de programme s’affiche lorsqu’une émission RDS est reçue.
Lorsque aucune donnée PTY n’est émise ou lorsque la station n’est
pas une station RDS, l’afficheur indique “NONE”.
2
Lorsque l’indicateur “PTY” est allumé, utilisez les touches
1
MULTI CONTROL ou TUNING
/ ¡ pour sélectionner
le type de programme souhaité.
Affichage à la réception d’une fréquence.
S’éteint
FRANÇAIS
Affichage du nom de la station
• Aucun son n’est émis lorsque “PTY” clignote.
• Lorsqu’un type de programme ne peut pas être trouvé, l’indication
“NO PROG” s’affiche et l’afficheur revient à l’affichage d’origine.
Changement du type de programme
Répétez les opérations 1, 2 et 3.
Tableau des types de programme
Nom de type de
programme Afficheur
Musique pop POP M
Musique rock ROCK M
Musique variée EASY M
Musique classique légère LIGHT M
Musique classique sérieuse CLASSICS
Autre style de musique OTHER M
Informations NEWS
Magazine AFFAIRS
Services INFO
Sport SPORT
Education EDUCATE
Art dramatique DRAMA
Culture CULTURE
Science SCIENCE
Emission de variétés VARIED
L’indication “NO PROG” s’affiche si vous tentez d’effectuer cette
opération avant de réaliser la mise en mémoire automatique des
fréquences de stations RDS.
Nom de type de
programme Afficheur
Bulletin météorologique WEATHER
Finances FINANCE
Emissions pour enfants CHILDREN
Affaires sociales SOCIAL
Religion RELIGION
Programmes à ligne ouverte PHONE IN
Voyages TRAVEL
Loisirs LEISURE
Musique jazz JAZZ
Musique country COUNTRY
Musique nationale NATION M
Vieux succès musicaux OLDIES
Musique folk FOLK M
Documentaires DOCUMENT
25
FR
Page 62

Effets d’ambiance
C
SW
Le récepteur est équipé de modes d’écoute qui vous
permettent de profiter d’un son d’ambiance amélioré avec
diverses sources vidéo.
Pour obtenir des modes d’ambiance ayant un effet optimal,
réglez préalablement les enceintes en conséquence. &
Modes d’ambiance
Les emplacements des enceintes qui figurent ci-après sont conçus
pour un système d'ambiance de canal 5,1.
• Dolby Digital
• Dolby Pro Logic II
• DTS
• DSP
• 6 voies DVD (Pour KRF-V5070D uniquement)
FRANÇAIS
L Enceinte avant gauche
SW D’extrêmes graves
C Enceinte centrale
R Enceinte avant droite
SL Enceinte d'ambiance gauche
SR Enceinte d'ambiance droite
TV / SCREEN
R
SRSL
Dolby Digital
Le format d’ambiance Dolby Digital met en œuvre “5.1” voies pour
transmettre le son ambiophonique numérique provenant de sources
Dolby Digital telles que (les Laserdisc ou DVD portant la marque
). Dolby Digital fournit un son de meilleure qualité, une
précision spatiale et une plage dynamique améliorées par rapport au
Dolby Surround.
Bien qu’un ensemble complet d’enceintes (avant gauche et droite,
centrale, d’ambiance gauche et droite et d’extrêmes graves) soit
nécessaire pour bénéficier du véritable son ambiophonique Dolby
Digital “5.1” voies, ce récepteur permet de restituer une source
d’ambiance Dolby Digital (et Dolby Surround) même si vous n’avez
raccordé que des enceintes avant.
Bien que seules les pistes sonores Dolby Digital comportent une voie
indépendante pour les basses fréquences, l’utilisation d’une enceinte
d’extrêmes graves améliore la qualité du registre grave dans les
autres modes d’ambiance.
L’indication “LFE” apparaît sur l’afficheur quand un signal entre sur
cette voie.
Dolby PRO LOGIC
Dolby PRO LOGIC II a été spécifiquement conçu pour fournir une
nouvelle sensation d’espace, de déplacement d’articulation des sons
à partir de sources codées Dolby Surround (comme les
enregistrements vidéo et Laserdisc portant la marque
Ceci est rendu possible grâce à une conception logique et intelligente
intégrée de retour du son, à un décodage d’ambiance de la matrice et
à un décodage des sorties stéréo, d’ambiance sur toute la largeur de
la bande. Les modes PRO LOGIC II programmés dans ce récepteur
sont “MOVIE”, “MUSIC” et “PRO LOGIC”. Le mode “MOVIE” du
système PRO LOGIC II dispose de fonctions mémorisées pour
reproduire une lecture de son d’ambiance calibrée et de haut niveau,
tandis que le mode “MUSIC” dispose de fonctions modifiables par
l’utilisateur lui proposant trois commandes optionnelles telles que les
modes “Dimension”, “Center Width” et “Panorama” pour permettre
l’optimisation des champs acoustiques souhaitée. La commande
“Dimension” permet à l’utilisateur de régler graduellement le champ
acoustique vers l’avant ou vers l’arrière; la commande “Center
Width” permet d’effectuer divers réglages de la balance des enceintes
gauche/centrale/droite; le “Panorama” optimise l’image stéréo avant
pour inclure les enceintes d’ambiance et obtenir un effet
“panoramique” avec une représentation sur le mur.
Remarque
LFE = Low Frequency Effects (effets dus aux fréquences très
basses). Cette voie émet des sonorités non directives qui permettent
de renforcer la dynamique du registre grave.
II
).
Fabriquée sous licence de Dolby Laboratories. DOLBY, le symbole
double-D et PRO LOGIC sont des marques de Dolby Laboratories.
“DTS” et “DTS Digital Surround” sont des marques
déposées de Digital Theater Systems, Inc.
FR
26
Page 63

Effets d’ambiance
Mode DTS
Le format audio multivoie DTS est disponible avec les enregistrements
CD, LD et DVD. DTS est un format strictement numérique qui ne peut
pas être décodé par les circuits internes de la plupart des lecteurs de
CD, LD ou DVD. Pour cette raison, si vous tentez d’écouter un
enregistrement codé DTS grâce à la sortie analogique de votre
nouveau lecteur de CD, LD ou DVD, vous noterez, dans la plupart des
cas, que cette sortie n’émet que du bruit numérique. Ce bruit peut
être de forte amplitude si la sortie analogique est directement reliée
à un système d’amplification puissant. Des précautions doivent être
prises pour éviter cette situation. Pour profiter pleinement de
l’ambiance DTS Digital Surround, un décodeur externe DTS Digital
Surround à “5.1” voies ou un amplificateur avec décodeur DTS Digital
Surround intégré doit être relié à la sortie numérique (S/P DIF, AES/
EBU ou Toslink) du lecteur de CD, LD ou DVD.
Le décodeur DTS est intégré à tous les modèles.
DTS possède une voie .1 ou LFE.
L’indication “LFE” apparaît sur l’afficheur quand un signal entre sur
cette voie. §
Mode DSP
Le mode DSP reproduit l’ambiance d’un concert pour la quasi-totalité
des types de programmes. Ces modes sont particulièrement efficaces
lorsqu’ils sont utilisés avec des programmes stéréo, comme les CD,
la télévision et la radio FM. Vous pourrez essayer le mode ARENA,
JAZZ CLUB, THEATER, STADIUM, ou DISCO la prochaine fois que
vous regarderez un concert ou un événement sportif.
Qu’est-ce que le DSP?
DSP signifie Digital Signal Processor (processeur de signaux numériques).
La manière dont un son est entendu en réalité dépend de différents
facteurs. L’un des facteurs les plus importants est la réverbération
(l’affaiblissement du son se réfléchissant en plusieurs endroits).
Les modes DSP reproduisent cette ambiance en utilisant le DSP pour
créer la réverbération, sans altérer la qualité du signal d’origine.
Mode 6 voies DVD (Pour KRF-V5070D uniquement)
Si vous utilisez un lecteur de DVD ou un appareil similaire équipé de
six (5,1) voies de sortie avec le récepteur, vous pourrez profiter
pleinement des sources DVD avec codage multivoie. Les signaux
source étant numériques et chaque voie étant envoyée
indépendamment, la tonalité, le relief sonore et la dynamique sont
absolument extraordinaires.
L'indication "LFE" s'affiche lors de la sélection du mode 6 voies DVD.
§
FRANÇAIS
27
FR
Page 64

Effets d’ambiance
Lecture d’ambiance
Les modèles compatibles DTS peuvent lire un CD, un DVD ou un LD
portant la marque DTS.
Le DOLBY DIGITAL peut être utilisé lors de la lecture d’un DVD ou d’un
LD portant la marque
au format DOLBY DIGITAL (etc.). DOLBY PRO LOGIC peuvent être
utilisés lors de la lecture d’enregistrements vidéo et lors de la lecture
d’un DVD ou d’un LD portant la marque
LISTEN MODE
et pour l’écoute d’émissions numériques
INPUT SELECTORINPUT MODE
.
Lorsque le signal “DOLBY DIGITAL” est entré :
(L’indicateur DOLBY DIGITAL, PRO LOGIC, ou STEREO s’allume.)
1 DOLBY DIGITAL : Ambiance DOLBY DIGITAL.
(L’indicateur LED DOLBY DIGITAL
s’allume.)
2 PL II MOVIE : Mode MOVIE ambiance PRO LOGIC II.
(L’indicateur PRO LOGIC s’allume.)
3 PL II MUSIC : Mode MUSIC ambiance PRO LOGIC II.
(L’indicateur PRO LOGIC s’allume.)
4 PRO LOGIC : Mode PRO LOGIC ambiance PRO LOGIC II.
(L’indicateur PRO LOGIC s’allume.)
5 STEREO : Lecture normale en stéréo.
(L’indicateur STEREO s’allume.)
Lorsque vous sélectionnez DOLBY DIGITAL
L’indication “DOLBY DIGITAL” défile de droite à gauche.
FRANÇAIS
LISTEN MODE
Input
Sélecteur
Selector
d’entrée
Préparations
• Allumez les appareils concernés.
• Suivez la procédure décrite à la section “Préparation des corrections
d’ambiance” (Réglage des enceintes). &
• Utilisez le bouton INPUT SELECTOR ou les touches sélecteur
d’entreé pour sélectionner l’élément que vous souhaitez lire avec
le son ambiophonique.
• Utilisez la touche INPUT MODE pour sélectionner le mode d’entrée
(analogique ou numérique) en fonction de la nature du signal fourni
par la source. 9
• Du bruit sera émis si vous écoutez une source DTS en sélectionnant
l’entrée analogique.
1
Commandez la lecture de l’enregistrement vidéo.
2
Appuyez sur la touche LISTEN MODE pour sélectionner le
mode d’écoute.
Les réglages du mode d’écoute sont enregistrés séparément pour
chaque entrée. Si le mode d’entrée est réglé sur pleine automatique
(“AUTO DETECT” s’allume), le récepteur sélectionne le mode
d’écoute optimal en fonction du type de signal d’entrée et des
réglages d’enceintes.
A chaque fois que vous appuyez sur la touche LISTEN MODE, le
réglage défile comme indiqué.
Les réglages du mode d’écoute sont différents selon le type de
signal d’entrée.
Lorsque le signal DTS est entré :
(L’indicateur LED DTS s’allume.)
1 DTS : Ambiance DTS
2 STEREO: Lecture normale en stéréo
Lorsque le signal analogique ou numérique (sauf pour le
signal DOLBY DIGITAL ou DTS) est entré :
1 PL II MOVIE : Mode MOVIE ambiance PRO LOGIC II.
2 PL II MUSIC : Mode MUSIC ambiance PRO LOGIC II.
3 PRO LOGIC : Mode PRO LOGIC ambiance PRO LOGIC II.
4 ARENA : Mode ARENA ambiance DSP.
5 JAZZ CLUB : Mode JAZZ CLUB ambiance DSP.
6 THEATER : Mode THEATER ambiance DSP.
7 STADIUM : Mode STADIUM ambiance DSP.
8 DISCO : Mode DISCO ambiance DSP.
9 STEREO : Lecture normale en stéréo.
• Si un signal Dolby Digital ou DTS entré possède plus de voies que
le nombre maximum de voies de lecture disponibles avec les
réglages actuels du récepteur, une réduction s’effectue pour faire
concorder le nombre de voies disponibles.
3
Réglez le volume.
Remarques
• Les possibilités de sélection des modes d’écoute dépendent du type
de signal ou du réglage des enceintes.
• Au démarrage de la lecture, le son peut être coupé ou interrompu
avant que la source entrée soit reconnue comme Dolby Digital.
• Afin de profiter de l’ambiance Dolby Digital (et des autres modes
d’écoute), vous devez vous assurer que l’appareil source est compatible
avec ce format.
(L’indicateur PRO LOGIC s’allume.)
(L’indicateur PRO LOGIC s’allume.)
(L’indicateur PRO LOGIC s’allume.)
(L’indicateur STEREO s’allume.)
28
FR
Page 65

Effets d’ambiance
Lecture sur 6 voies DVD
Si vous utilisez un lecteur de DVD ou un appareil similaire équipé de six
(5,1) voies de sortie avec le récepteur, vous pourrez profiter de la lecture
en son ambiophonique.
Il est également possible de relier un lecteur de DVD qui puisse décoder
le signal d’ambiance.
(Pour KRF-V5070D uniquement)
INPUT SELECTORINPUT MODE
DVD/6CH
Préparations
• Reliez votre lecteur de DVD aux prises DVD/6CH du récepteur.
• Mettez sous tension tous les autres appareils nécessaires.
• Suivez la procédure décrite à la section “Préparation des corrections
d’ambiance”. &
1
Sélectionnez “DVD/6CH” comme source d’entrée.
2
Sélectionnez “6CH INPT” en appuyant sur la touche INPUT
MODE.
3
Commencez la lecture du DVD.
4
Réglez le volume.
• Il est impossible de régler individuellement le niveau d’écoute ou la
qualité du son (Les touches SETUP, SOUND, LISTEN MODE,
ACTIVE EQ et TONE ne seront pas fonctionnelles) des voies
lorsque le récepteur est en mode 6CH INPUT. Réglez le niveau
d’écoute avec les commandes du lecteur de DVD.
Pour l’enceinte d’extrêmes graves active, vous pouvez régler le
niveau d’écoute avec la propre commande de niveau d’écoute de
l’enceinte d’extrêmes graves.
Fonctions intelligentes
DIMMER
SOUND
Réglage du son
Vous pouvez parfaire le réglage du son lors de la lecture en mode
d’ambiance.
1 Appuyez sur la touche SOUND jusqu’à ce que la rubrique
souhaitée apparaisse dans la fenêtre d’affichage.
A chaque fois que vous appuyez sur cette touche, le menu défile
comme suit:
Certaines rubriques ne s’affichent pas dans certains modes.
1 C (réglage du niveau de l’enceinte centrale)*
2 SR (réglage du niveau de l’enceinte d’ambiance droite)*
3 SL (réglage du niveau de l’enceinte d’ambiance gauche)*
4 SW (réglage du niveau de l’enceinte d’extrêmes graves)*
5 INPUT (réglage du niveau d’entrée - mode analogique
uniquement) *
6 NIGHT (mise en/hors service du mode “minuit” - mode Dolby
Digital uniquement)
7 PANORAMA (mode panorama en/hors)**
8 DIMENSION (réglage de la dimension)**
9 CENTER WIDTH (réglage de la center width)**
* Le réglage n’est que temporaire pour la sélection d’entrée
en cours. La valeur se réajustera automatiquement à la
valeur configurée au préalable lorsque l’appareil sera mis
hors/sous tension ou lorsque la sélection d’entrée sera
modifiée.
** Mode Music Pro Logic II uniquement.
2 Utilisez le bouton ou les touches MULTI CONTROL pour adjuster
le réglage comme vous le souhaitez.
Mode “minuit” (mode Dolby Digital uniquement)
Il est possible que vous ne puissiez pas augmenter le volume autant que
vous le souhaitez lorsque vous regardez des films le soir. Le mode
Midnight compresse la gamme dynamique du passage sonore heavy de
la bande son Dolby Digital spécifiée précédemment (comme les scènes
avec une augmentation soudaine du volume) pour réduire la différence
de volume entre les scènes à passage sonore heavy et les scènes à
passage sonore normal. Ceci permet une écoute plus facile de toute la
bande son même si l'on est à des volumes bas.
1 Appuyez plusieurs fois sur la touche SOUND jusqu’à ce que
l’indication “NIGHT” apparaisse.
• Cette sélection n’est possible que si vous avez sélectionné CD/
DVD, DVD ou DVD/6CH (KRF-V5070D uniquement), ou VIDEO2
comme source et que le mode d’écoute est réglé sur “DOLBY
DIGITAL”.
SOUND
MULTI CONTROL
MULTI
CONTROL
Voir page suivante
29
FRANÇAIS
FR
Page 66

Effets d’ambiance
2 Utilisez le bouton ou les touches MULTI CONTROL pour
sélectionner le réglage activer (ON) ou désactiver (OFF).
• Certains enregistrements Dolby Digital ne permettent pas d’utiliser
le mode minuit.
Mode Panorama (mode Music Pro Logic II uniquement)
Lorsque vous écoutez de la musique, vous pouvez profiter de l'effet
sonore “panoramique” en activant le mode panorama.
1 Appuyez plusieurs fois sur la touche SOUND jusqu’à ce que
l’indication “PANORAMA” apparaisse.
• L’indication du réglage PANORAMA défile dans la fenêtre
d’affichage.
L’indication “PANORAMA” défile de droite à gauche.
FRANÇAIS
2 Utilisez le bouton ou les touches MULTI CONTROL pour
sélectionner activer (ON) ou désactiver (OFF) PANORAMA.
1 ON : Le mode PANORAMA es activé.
2 OFF : Le mode PANORAMA est désactivé.
Mode Dimension (mode Music Pro Logic
Lorsque vous écoutez de la musique provenant de certains
enregistrements, vous pouvez également obtenir une balance correcte
de toutes les enceintes en activant le mode Dimension.
1 Appuyez plusieurs fois sur la touche SOUND jusqu’à ce que
l’indication “DIMENSION” apparaisse.
• L’indication DIMENSION défile dans la fenêtre d’affichage.
2 Utilisez le bouton ou les touches MULTI CONTROL pour régler le
champ sonore vers l’arrière ou vers l’avant.
Le champ sonore est réglé vers l’avant.
II
uniquement)
Mode Center Width (mode Music Pro Logic II uniquement)
Ce réglage vous permet d’apprécier un meilleur son lorsque vous
écoutez de la musique via une image centrale depuis l’enceinte centrale
uniquement, ou depuis les enceintes gauche et droite ou depuis
différentes combinaisons d’enceintes.
1 Appuyez plusieurs fois sur la touche SOUND jusqu’à ce que
l’indication “CENTER WIDTH” apparaisse.
• L’indication CENTER WIDTH défile dans la fenêtre d’affichage.
• Lorsque l’enceinte centrale est désactivé, ce mode est inopérant.
2 Utilisez le bouton ou les touches MULTI CONTROL pour régler la
sortie gauche-centrale-droite.
L’image centrale est entendue depuis l’enceinte centrale uniquement.
L’image centrale est entendue depuis les enceintes gauche et droit
uniquement.
• Sur d’autres positions, vous pouvez entendre simultanément et
selon différentes combinaisons, l’image centrale depuis l’enceinte
centrale, les enceintes gauche et droite.
Réglage de la luminosité
La fonction ”éclairage atténué“ permet de régler la luminositó de
l'afficheur du récepteur. Cela peut être utile lorsque vous désirez regarder
un film ou écouter de la musique dans l'obscurité totale.
Chaque fois que vous appuyez sur la touche DIMMER, la luminosité
de l’afficheur varie suivant trois niveaux. Sélectionnez le niveau
que vous trouvez le plus agréable.
Le champ sonore est en position neutre.
Le champ sonore est réglé vers l’arrière.
FR
30
Lecture 96kHz LPCM
Le récepteur est compatible avec la lecture 96kHz LPCM. Pour lire un
DVD 96kHz, réglez le mode d’écoute sur “STEREO”.
• En mode d’entrée F-AUTO, le mode d’écoute sera automatiquement
STEREO.
• En mode D-MANUAL (le mode d’écoute n’est pas stéréo), “FS96kHz”
s’affiche et les enceintes ne produisent aucun son.
Appuyez sur la touche LISTEN MODE (le mode d’écoute devient le
mode STEREO) pour que les enceintes produisent du son.
Page 67

Fonctionnement de base de la télécommande pour les autres appareils
Touches de fonctionnement du lecteur de DVD
La télécommande de l’unité peut contrôler directement deux groupes de lecteurs de DVD KENWOOD et remplacer les télécommandes de ces lecteurs.
Groupe-1 : DV-4900, DV-4070B, DV-2070, DV-203, DVF-9010, DVF-K7010, DVF-5010, DVF-R9030, DVF-R7030, DVF-3530 DV-402, DV-5900,
Groupe-2 : DV-4050, DV-303, DVF-R6030, DVF-K5020, DVF-5020, DVF-3020 et DVF-3030.
Selon le modèle de votre lecteur de DVD KENWOOD, vous devez régler la télécommande du récepteur comme suit :
Pour les lecteurs de DVD du Groupe-1:
Pour les lecteurs de DVD du Groupe-2:
• Si votre lecteur de DVD ne figure pas dans la liste indiquée ci-dessus, choisissez un réglage de Groupe-1 ou de Groupe-2. Une fois le réglage
effectué, votre lecteur de DVD appartient au groupe choisi.
Utilisation du lecteur de DVD avec la télécommande
1. Une pression de plus de 2 secondes sur la touche alimentation du lecteur de DVD met ce lecteur sous ou hors tension.
2. Pour utiliser les fonctions du lecteur de DVD, commencez par appuyer sur la touche alimentation de ce lecteur, puis appuyez sur la touche
Touches de fonctionnement du lecteur de DVD
Vous pouvez utiliser ces fonctions de base à l’aide des touches décrites ci-dessous lors d’une connexion à un lecteur de DVD KENWOOD.
DV-5700, DVF-R9050, DVF-J6050, DV-505, DV-503, DV-502, DVF-3550, DVF-3050, DVF-R4050, DVF-605, DV-6050, DVF-R5060,
DVF-3060, DVF-3060K, DV-705, DVF-R5070 et DVF-3070.
Maintenez la touche ”POWER
“ enfoncée (pas la touche alimentation du lecteur de DVD) et appuyez sur la touche numérique 1 de
la télécommande.
Maintenez la touche ”POWER
“ enfoncée (pas la touche alimentation du lecteur de DVD) et appuyez sur la touche numérique 2 de la
télécommande.
correspondant à la fonction de votre choix, comme indiqué dans les instructions d’utilisation du lecteur. Dans ce cas, le mode d’utilisation du
lecteur de DVD est conservé pendant 15 secondes une fois que vous avez appuyé sur l’un des boutons de fonction du lecteur.
(Pour activer le mode d’utilisation du récepteur au bout de 15 secondes, appuyez sur la touche RECEIVER.)
FRANÇAIS
Touches numériques
élection des pistes)
(S
OSD (Menu avec
affichage sur
écran)
MENU (Menu)
%(Curseur »)
fi(Curseur «)
#(Curseur \)
@(Curseur |)
1 (Recherche)
¡ (Recherche)
PHONO
(Pour RC-R0627
uniquement)
1
23
456
789
0+10
MENU
SETUP
P.CALL
TUNING
BASS BOOST
AUX CD/DVD
DVD
VIDEO1 VIDEO2
MUTE
DOWN-PAGE-UP
LOUDNESS
OSD
RETURN
SOUND
LISTEN MODE
MULTI CONTROL
ENTER
AUTO
A/B+100
DISC SKIP
TUNER
DISC SEL.
ACTIVE EQ
VOLUME
POWER
DVD
POWER
RECEIVER
TOP MENU
RDS DISPLAY
P.CALL
BAND
DVD
MD/TAPE
TONE
PTY
POWER
DVD POWER
RECEIVER
(Mode de R
écepteur)
DOWN-PAGE-UP
(Page haut ou bas)
TOP MENU
(Titre)
RETURN
ENTER (Entrée)
6 (3 Lecture)
8 (Pause)
DVD/6CH
(Pour RC-R0627
uniquement)
7 (Arrêt)
31
FR
Page 68

Fonctionnement de base de la télécommande pour les autres appareils
Opérations de la platine CASSETTE, du lecteur de CD et de l’enregistreur de MD
Vous pouvez exécuter ces opérations de base à l’aide des touches décrites ci-dessous lorsque vous êtes raccordé à une platine cassette, un lecteur de
CD ou un enregistreur de MD KENWOOD équipés d’opérations de contrôle système. ^
Touches de commandes de la platine cassette
23
DOWN-PAGE-UP PTY
LOUDNESS
RETURN
LISTEN MODE
MULTI CONTROL
ENTER
AUTO
TUNER
DISC SEL.
ACTIVE EQ
VOLUME
POWER
DVD
POWER
RECEIVER
TOP MENU
RDS DISPLAY
P.CALL
BAND
DVD
MD/TAPE
TONE
1 (Rebobinage)
¡ (Avance rapide)
FRANÇAIS
A/B (Sélection de la
platine cassettes)
(Pour RC-R0627
uniquement)
PHONO
1
456
789
0+10
MENU
OSD
SETUP
SOUND
P.CALL
TUNING
A/B+100
DISC SKIP
BASS BOOST
AUX CD/DVD
DVD
VIDEO1 VIDEO2
MUTE
2 (Lecture en
marche arrière)
6 (3 Lecture)
DVD/6CH
(Pour RC-R0627
uniquement)
7 (Arrêt)
Touches de commandes du lecteur de CD
23
DOWN-PAGE-UP PTY
LOUDNESS
RETURN
LISTEN MODE
P.CALL
MULTI CONTROL
ENTER
AUTO
TUNER
DISC SEL.
ACTIVE EQ
VOLUME
POWER
DVD
POWER
RECEIVER
TOP MENU
RDS DISPLAY
BAND
DVD
MD/TAPE
TONE
Touches numériques
(Sélection des pistes)
4 (Saut vers la
1 (Recherche)
¡ (Recherche)
(Saut de disque)
(Pour RC-R0627
bas)
DISC SKIP
PHONO
uniquement)
1
456
789
0+10
MENU
OSD
SETUP
SOUND
P.CALL
TUNING
A/B+100
DISC SKIP
BASS BOOST
AUX CD/DVD
DVD
VIDEO1 VIDEO2
MUTE
¢ (Saut vers la
haut)
6 (Lecture/Pause)
DVD/6CH
(Pour RC-R0627
uniquement)
7 (Arrêt)
Touches de commandes de l’enregistreur de MD
23
DOWN-PAGE-UP PTY
LOUDNESS
RETURN
LISTEN MODE
P.CALL
MULTI CONTROL
ENTER
AUTO
TUNER
DISC SEL.
ACTIVE EQ
VOLUME
POWER
DVD
POWER
RECEIVER
TOP MENU
RDS DISPLAY
BAND
DVD
MD/TAPE
TONE
¢ (Saut vers la
haut)
6 (3 Lecture)
DVD/6CH
(Pour RC-R0627
uniquement)
7 (Arrêt)
1
Touches numériques
(Sélection des pistes)
4 (Saut vers la bas)
1 (Recherche)
¡ (Recherche)
(Sélection des pistes)
+100
PHONO
(Pour RC-R0627
uniquement)
456
789
0+10
MENU
OSD
SETUP
SOUND
P.CALL
TUNING
A/B+100
DISC SKIP
BASS BOOST
AUX CD/DVD
DVD
VIDEO1 VIDEO2
MUTE
Remarques
1. Certains codes ne sont pas en mesure de couvrir toutes les fonctions d’un modèle donné.
2. Les tableaux ci-dessous indiquent les fonctions disponibles pour chaque appareil. Certains fabricants utilisent des combinaisons de touche différentes
de celles image ici pour exécuter les mêmes opérations. C’est pour cette raison que nous avons programmé des réglages complémentaires au niveau
des touches numérotées inutilisés par ailleurs, pour vous aider à commander votre appareil.
FR
32
Page 69

En cas de problème
Réinitialisation du micro-ordinateur
Ils se peut que le micro-ordinateur présente un dysfonctionnement
(l’appareil ne fonctionne pas ou présente un affichage erroné) si
le câble d’alimentation est débranché alors que l’alimentation
est sur ON ou en raison de facteurs externes. Si ceci se produit,
effectuez les opérations suivantes pour réinitialiser le microordinateur et ramener l’appareil en état de fonctionnement
normal.
Amplificateur
Symptôme
Aucun son ne sort des enceintes.
L’indicateur STANDBY clignote et aucun son
ne sort.
Le son ne sort pas de l’une des enceintes.
Le son ne sort pas ou sort très faiblement des
enceintes d’ambiance et/ou de l’enceinte
centrale.
Un bourdonnement est émis lorsque le
sélecteur d’entrée PHONO est sélectionné.
Lorsqu’un signal de source Dolby Digital est
lu par un lecteur de DVD, le son est coupé dès
le début de la lecture.
Aucun son ne sort au cours de la lecture sur
un lecteur de DVD.
Une source vidéo ne peut pas être enregistrée
normalement.
• Les cordons des enceintes sont débranchés.
• Le bouton VOLUME est réglé au minimum.
• MUTE est sur ON.
• Les commutateurs SPEAKERS sont sur OFF.
• Il s’est produit un court-circuit au niveau des
cordons d’enceintes.
• Le cordon de l’enceinte est débranché.
• Les cordons de l’enceinte d’ambiance et/ou
de l’enceinte centrale est(sont) débranché(s).
• Un mode d’ambiance n’a pas été sélectionné.
• Les boutons du niveau d’écoute d’ambiance
et/ou central sont au minimum.
• Le cordon audio de la platine disque n’est pas
branché sur les prises PHONO.
• La platine disque n’est pas mise à la terre.
• Il existe de nombreuses causes possibles à ce
problème suivant le type de lecteur de DVD
utilisé.
• Le mode d’entrée est réglé sur manuel
numérique.
• L’enregistrement est protégé contre la copie.
Lorsque le cordon d’alimentation est branché, mettez
l’appareil hors tension (OFF) à l’aide de la touche
POWER ON/OFF. Puis, tout en maintenant la touche
ON/STANDBY
enfoncée, appuyez sur la touche
POWER ON/OFF.
• Veuillez noter que la réinitialisation du micro-ordinateur effacera le
contenu de la mémoire et ramènera l’appareil à l’état de sortie
d’usine.
Cause
• Branchez-les correctement en vous reportant à
la section “Raccordement des enceintes”.$
• Réglez le niveau d’écoute à un niveau approprié.
• Mettez MUTE sur OFF. )
• Mettez le(s) commutateur(s) SPEAKERS sur
ON. (
• Coupez l’alimentation, éliminez le court-circuit,
puis remettez sous tension.
• Branchez-le correctement en vous reportant à la
section “Raccordement des enceintes”. $
• Branchez-le correctement en vous reportant à la
section “Raccordement des enceintes”. $
• Sélectionnez un mode d’ambiance.
• Réglez les niveaux des enceintes à l’aide de la
tonalité d’essai. *
• Introduisez correctement les fiches des
cordons audio dans les prises PHONO.
• Branchez le câble de mise à la terre sur la
borne GND du panneau arrière.
• Réglez le mode d’entrée sur manuel numérique
avant de commander la lecture du signal de la
source Dolby Digital. 9
• Appuyez sur la touche INPUT MODE pour
sélectionner le mode pleine automatique.9
• Les enregistrements vidéo protégés contre la
copie ne peuvent pas être enregistrés.
Remède
FRANÇAIS
Syntoniseur
Symptôme
Les stations de radio ne peuvent pas être
captées.
Interférences.
Une station préalablement mémorisée ne
peut pas être captée même en appuyant sur
la touche numérique correspondante.
Cause
• Aucune antenne n’est raccordée.
• La gamme de fréquence n’est pas réglée
correctement.
• La fréquence de la station recherchée n’est
pas réglée.
• Bruit dû à l’allumage du moteur d’une voiture.
• Bruit dû aux parasites d’un appareil électrique.
• Bruit dû à la proximité d’un téléviseur.
• La station mémorisée correspond à une
fréquence qui ne peut pas être captée.
• La mémoire de présélection a été effacée car
le cordon d’alimentation a été débranché
pendant une longue période.
Remède
• Raccordez une antenne. %
• Réglez correctement la gamme de fréquence.
• Réglez la fréquence de la station recherchée.
™
• Installez l’antenne extérieure loin de la route.
• Mettez l’appareil hors tension.
• Installez le récepteur loin du téléviseur.
• Présélectionnez une station dont la fréquence
peut être captée.
• Présélectionnez à nouveau la station.
33
FR
Page 70

En cas de problème
Télécommande
Symptôme
La commande à distance de l’appareil est
impossible.
FRANÇAIS
Cause
• Le mode de fonctionnement de la
télécommande ne convient pas.
• Les piles sont déchargées.
• La télécommande est trop loin de l’appareil,
l’angle de commande est trop grand ou il y a un
obstacle entre le récepteur et la télécommande.
• Les cordons audio et les cordons de commande
d’ensemble ne sont pas correctement
raccordés.
• Aucune cassette ou CD n'est placé dans le
composant source.
• Vous tentez de lire une bande qui est en cours
d’enregistrement sur la platine cassette.
Remède
• Appuyez sur les touches de sélection de la
source ou sur les touches DVD POWER pour
sélectionner le mode de fonctionnement
approprié.
• Remplacez les piles.
• Utilisez la télécommande dans la zone de
fonctionnement.
• Effectuez correctement les raccordements en
vous reportant à la section “Configuration de
base de l’ensemble”.
• Placer la casette ou le CD dans le composant
source que vous voulez entendre.
• Attendez que l’enregistrement soit terminé.
34
FR
Page 71

Spécifications
Attention : Lire attentivement cette page pour garantir une
exploitation sans danger.
Section AUDIO (KRF-V5070D/V5570D)
Puissance de sortie nominale en mode “STEREO”
DIN/IEC (63 Hz ~ 12,5 kHz, 0,7% distorsion harmonique totale.,
à 6Ω) ...................................................................... 100 W + 100 W
Puissance de sortie effective en mode “SURROUND”
FRONT (Avant) (1 kHz, 0,7% distorsion harmonique totale à 6Ω,
une voie pilotée) .................................................. 100 W + 100 W
CENTER (Centrale) (1 kHz, 0,7% distorsion harmonique totale à
6Ω, une voie pilotée) .......................................................... 100 W
SURROUND (Ambiance) (1 kHz, 0,7% distorsion harmonique
totale à 6Ω, une voie pilotée) ............................. 100 W + 100 W
SUBWOOFER (D'extrêmes graves) (80 Hz, 0,7% distorsion
harmonique totale à 6Ω, une voie pilotée) (KRF-V5570D)
.............................................................................................. 100 W
Distorsion harmonique totale ..................... 0,05% (1 kHz, 50 W, 6Ω)
Réponse en fréquence (IHF ’66)
CD/DVD .......................................20 Hz ~ 70 kHz, +0 dB, –3,0 dB
Rapport signal-bruit (IHF’66)
PHONO (MM) (KRF-V5070D) ............................................... 74 dB
CD/DVD, AUX, TAPE, VIDEO 1, VIDEO 2 .......................... 95 dB
Sensibilité/impédance d’entrée
PHONO (MM) (KRF-V5070D) ............................... 7,5 mV / 27 kΩ
CD/DVD ................................................................ 550 mV / 47 kΩ
DVD/6CH INPUT (KRF-V5070D)......................... 550 mV / 47 kΩ
Niveau/impédance de sortie
TAPE REC ............................................................... 550 mV / 1 kΩ
PRE OUT (SUBWOOFER) (KRF-V5070D) ............. 1,5 V / 2,2 kΩ
Contrôle de tonalité
BASS..................................................................±10 dB (à 100 Hz)
TREBLE ..............................................................±10 dB (à 10 kHz)
Contrôle de l´intensité
VOLUME sur -30 dB nieau ................................ +8 dB (à 100 Hz)
Section AUDIO (KRF-V4070D)
Puissance de sortie nominale en mode “STEREO”
(DIN 1 kHz, 0,7% distorsion harmonique totale., à 6Ω)
................................................................................... 50 W + 50 W
Puissance de sortie effective en mode “SURROUND”
FRONT (Avant) (1 kHz, 0,7% distorsion harmonique totale à 6Ω,
une voie pilotée) ...................................................... 50 W + 50 W
CENTER (Centrale) (1 kHz, 0,7% distorsion harmonique totale à
6Ω, une voie pilotée) ............................................................ 50 W
SURROUND (Ambiance) (1 kHz, 0,7% distorsion harmonique
totale à 6Ω, une voie pilotée) ................................. 50 W + 50 W
Distorsion harmonique totale ..................... 0,15% (1 kHz, 20 W, 6Ω)
Réponse en fréquence (IHF ’66)
CD/DVD .......................................20 Hz ~ 60 kHz, +0 dB, –3,0 dB
Rapport signal-bruit (IHF’66)
CD/DVD, AUX, TAPE, VIDEO 1, VIDEO 2 .......................... 95 dB
Sensibilité/impédance d’entrée
CD/DVD ................................................................ 400 mV / 47 kΩ
Niveau/impédance de sortie
TAPE REC ............................................................... 400 mV / 1 kΩ
PRE OUT (SUBWOOFER) ...................................... 1,5 V / 2,2 kΩ
Contrôle de tonalité
BASS..................................................................±10 dB (à 100 Hz)
TREBLE ..............................................................±10 dB (à 10 kHz)
Contrôle de l´intensité
VOLUME sur -30 dB nieau ................................ +8 dB (à 100 Hz)
Section DIGITAL AUDIO
Fréquence d’échantillonnage ....... 32 kHz, 44,1 kHz, 48 kHz, 96 kHz
Niveau/impédance/longueur d’onde d’entrée
Optique ........................ (–15 dBm ~ –21 dBm), 660 nm ± 30 nm
Coaxial ................................................................... 0,5 Vp-p / 75 Ω
Section VIDEO
Entrées/sorties VIDEO
VIDEO (composite) ................................................. 1 Vp-p / 75 Ω
Section Syntoniseur FM
Plage de fréquence d’accord ......................... 87,5 MHz ~ 108,0 MHz
Sensibilité utilisable (DIN à 75 Ω)
MONO.......................1,3 µV/13,2 dBf (40 kHz DEV., S/N 26 dB)
STEREO ..................... 45 µV/42,1 dBf (46 kHz DEV., S/N 46 dB)
Distorsion harmonique totale (1 kHz)
MONO.......................................................0,2 % (entrée 71,2 dBf)
STEREO .................................................... 0,8 % (entrée 71,2 dBf)
Rapport signal-bruit (pondéré DIN à 1 kHz)
MONO............................... 65 dB (40 kHz DEV., entrée 71,2 dBf)
STEREO ............................ 60 dB (46 kHz DEV., entrée 71,2 dBf)
Séparation des deux voies (DIN 1 kHz) .................................... 36 dB
Sélectivité (DIN ±300 kHz) .......................................................... 64 dB
Réponse en fréquence ................ (30 Hz ~ 15 kHz), +0,5 dB, –3,0 dB
Section Syntoniseur AM
Plage de fréquence d’accord ............................. 531 kHz ~ 1.602 kHz
Sensibilité utilisable ............................................. 16 µV / (600 µV/m)
Rapport signal-bruit (30% mod. entrée 1mV) .......................... 50 dB
Généralités
Consommation
KRF-V5070D/V5570D .......................................................... 280 W
KRF-V4070D ......................................................................... 200 W
Prise CA
SWITCHED ...................................................... (total 90 W maxi.)
Dimensions ..........................................................................L : 440 mm
Poids (net)
KRF-V5070D/V5570D ......................................................... 8,5 kg
KRF-V4070D ........................................................................ 8,9 kg
H : 143 mm
P : 303 mm
FRANÇAIS
Remarques
1. KENWOOD suit une politique de progrès continus en matière de développement. Pour cette raison, les spécifications peuvent être modifiées sans
notification.
2. Il est possible que les appareils ne soient pas aussi performants dans un environnement très froid (à une température de gel).
35
FR
Page 72

FRANÇAIS
36
Pour votre référence
Inscrivez le numéro de série, que vous trouverez à l'arrière de l'appareil,
dans les espaces prévus de la carte de garantie et dans l'espace prévu
ci-dessous. Indiquez les numéros de modèle et de série au cas où vous
devrez faire appel à votre concessionnaire pour des renseignements ou
réparations de cet appareil.
FR
Modèle____________________Numéro de série_____________________
Page 73

AUDIO/VIDEO-MEHRKANAL-RECEIVER
KRF-V5070D
KRF-V4070D
KRF-V5570D
BEDIENUNGSANLEITUNG
KENWOOD CORPORATION
Diese Bedienungsanleitung enthält Beschreibungen der oben aufgelisteten Modelle. Die
Erhältlichkeit der Modelle und die Merkmale (Funktionen) können sich je nach Land und
Vertriebsgebiet unterscheiden.
Hinweis zur mitgelieferten Fernbedienung
Verglichen mit herkömmlichen Fernbedienungen verfügt die mit diesem Receiver gelieferte Fernbedienung
über verschiedene Betriebsarten, mit denen andere AV-Komponenten gesteuert werden können. Lesen
Sie die Bedienungsanleitung aufmerksam durch, um sich mit den Funktionen und der Handhabung der
Fernbedienung vertraut zu machen, damit Sie die Fernbedienung effektiv einsetzen können.
Nur wenn Sie mit den Besonderheiten der Fernbedienung und mit der Umschaltung der Steuermodi
vertraut sind, können Sie die Geräte fehlerfrei steuern.
DEUTSCH
Page 74

Vor Einschalten der Spannungsversorgung
Achtung : Lesen Sie diese Seite sorgfältig durch, um
einen sicheren Betrieb zu gewährleisten.
Geräte sind für Betrieb wie folgt vorgesehen.
Europe und Groß britannien ........ nur Wechselstrom 230 V
Hinweis zur Entsorgung der Batterien :
Verbrauchte Batterien dürfen nach der
Batterieverordnung nicht mehr mit dem Hausmüll
entsorgt werden. Kenwood beteiligt sich daher
am „Gemeinsamen Rücknahmesystem
Batterien“ (GRS Batterien).
Werfen Sie verbrauchte Batterien unentgeltlich in
die beim Handel aufgestellten Sammelbehälter.
Sammelbehälter für verbrauchte Batterien.
Auch Batterien, die in Geräten fest eingebaut sind, unterliegen diesen
gesetzlichen Vorschriften.
Auch bei Ihrem Fachhändler finden Sie einen
Wartung des Geräts
Wenn die Frontplatte oder das Gehäuse verschmutzt sind, können sie
mit einem weichen, trockenen Lappen abgewischt werden. Niemals
Verdünner, Benzol, Alkohol usw. verwenden, da diese Flüssigkeiten
eine Verfärbung des Gehäuses verursachen können.
Hinweis zu Kontactreinigern
Kontakt-Reinigungsmittel sollten nicht verwendet werden, weil
DEUTSCH
dadurch Fehlfunktionen verursacht werden können. Insbesondere
müssen Reinigungsmittel, die Öl enthalten, vermieden werden, weil
sich dadurch Plastikteile verformen können.
Sicherheitshinweise
WARNUNG :
DIESES GERÄT DARF NICHT IM REGEN
ODER IN FEUCHTEN RÄUMEN BETRIEBEN
WERDEN, UM FEUER UND ELEKTRISCHE
SCHLÄGE ZU VERMEIDEN.
Hinweis zu dieser Bedienungsanleitung
Diese Bedienungsanleitung ist in vier Kapitel unterteilt. Vorbereitungen,
Betrieb, Fernbedienung und Weitere Informationen.
Vorbereitungen
In diesem Kapitel wird erläutert, wie Sie die Audio- und Videokomponenten
an den Receiver anschließen und den Surroundprozessor vorbereiten.
Anhand der Erläuterungen in dieser Anleitung werden Sie die Anlage
mühelos einrichten können.
Dieser Emplänger ist fur den Einsatz mit all lhren Audio-und
Videokomponenton gedacht. Dia folgende Anleitung soll lhnen die
Einrichtung des Systems ericlchtern.
Betrieb
In diesem Kapitel wird erläutert, wie Sie die verschiedenen Funktionen,
die mit dem Receiver zu Verfügung stehen, ausführen.
Fernbedienung
Dieses Kapitel enthält Erläuterungen zum Steuern anderer Komponenten
mit der Fernbedienung sowie ausführliche Informationen zu allen
Fernbedienungsfunktionen. Sobald Sie die Komponenten mit den richtigen
Setup-Codes registriert haben, können Sie diesen Receiver und die
anderen AV-Komponenten (Fernsehgerät, Videorecorder, DVD-Player,
CD-Player usw.) mit der mit diesem Receiver gelieferten Fernbedienung
steuern.
Weitere Informationen
In diesem Kapitel finden Sie weitere Informationen wie z. B.
„Störungsbehebung“ und „Technische Daten“.
Datensicherung bei Stromausfall
Beachten Sie bitte, daß die folgenden Daten aus dem Speicher des
Geräts gelöscht werden, wenn das Netzkabel etwa 1 Tage lang nicht
mit einer Netzsteckdose verbunden ist.
• Stromversorgungsmodus.
• Einstellungen des.
Eingangswählschalters.
• Bildausgang.
• Lautsprecher ein/aus.
• Lautstärke.
• BASS-, TREBLE-, INPUTPegel.
• TONE ON/OFF.
• LOUDNESS ON/OFF.
• Abblendeinstellung.
• MD/TAPE-Einstellungen.
• Abhörmoduseinstellung.
• SP SYSTEM.
• Lautsprechereinstellungen.
• SUBWOOFER ON/OFF.
• SW RE-MIX ON/OFF.
• Einstellung des Abstands.
• Eingangsmoduseinstellung.
• Mitternachtsmoduseinstellung.
• Einstellung des Modus PRO
LOGIC II.
• Frequenzbereich.
• Frequenzeinstellung.
• Gespeicherte Sender.
• Sendereinstellmodus.
• ACTIVE EQ-Modus.
• DSP-Modus.
CAUTION
RISK OF ELECTRIC SHOCK
DO NOT OPEN
ACHTUNG: ZUR VERMEIDUNG VON ELEKTRISCHEN SCHLÄGEN
KEINE GEHÄUSETEILE (ODER DIE RÜCKWAND) ENTFERNEN. IM
INNERN BEFINDEN SICH KEINE VOM BENUTZER REPARIERBAREN
TEILE. WENDEN SIE SICH FÜR REPARATUREN AN QUALIFIZIERTES
KUNDENDIENSTPERSONAL.
DAS BLITZSYMBOL MIT PFEILSPITZE IN EINEM
GLEICHSEITIGEN DREIECK SOLL DEN BENUTZER AUF
NICHT ISOLIERTE, SPANNUNGSFÜHRENDE TEILE
INNERHALB DES GEHÄUSES HINWEISEN, UM
ELEKTRISCHE SCHLÄGE ZU VERMELDEN.
DAS AUSRUFUNGSZEICHEN IN EINEM GLEICHSEITIGEN
DREIECK SOLL DEN BENUTZER AUF WICHTIGE BEDIENUNGUND WARTUNGSANWEISUNGEN IN DER MIT DEM GERÄT
MITGELIEFERTEN BEDIENUNGSANLEITUNG AUFMERKSAM
MACHEN.
GE
2
Page 75

Vor Einschalten der Spannungsversorgung
Inhalt
Achtung : Lesen Sie die folgendent, min markierten
Seiten sorgfältig durch.
Vor Einschalten der Spannungsversorgung .... 2
Sicherheitshinweise........................................... 2
Hinweis zu dieser Bedienungsanleitung ........... 2
Auspacken ......................................................... 4
Vorbereiten der Fernbedienung......................... 4
Besondere Merkmale und Funktionen .............. 5
Lage und Funktion der Teile und
Bedienelemente ................................................. 6
Hauptgerät ......................................................... 6
Fernbedienung (RC-R0627) (KRF-V5070D) ....... 7
Fernbedienung (RC-R0628) (KRF-V4070D/
Vorbereitungen
V5570D) ............................................................. 8
Konfigurieren des Systems .............................. 9
Anschließen von Audiokomponenten ............. 10
Anschließen von Videokomponenten ............. 11
Digitale Verbindungen ..................................... 12
Anschließen eines DVD-Players (6 Kanäle)
(Nur beim KRF-V5070D) .................................. 13
Anschließen der Lautsprecher ........................ 14
Anschließen der Lautsprecherkabel ................15
Anschließen der Antennen ..............................15
Anschließen der Systemsteuerung
(SYSTEM CONTROL) ....................................... 16
Vorbereitungen für Surroundklang .............. 17
Lautsprechereinstellungen .............................. 17
Normale Wiedergabe ..................................... 19
Vorbereitungen für die Wiedergabe ................ 19
Wiedergeben des Tons von einer Komponente ... 19
Einstellen des Klangs ....................................... 20
Aufnahme .......................................................... 21
Aufnehmen von Audiosignalen
(analoge Quellen) ............................................. 21
Aufnehmen von Videosignalen ........................ 21
Aufnehmen von Audiosignalen
(digitale Quellen) .............................................. 21
Radioempfang................................................... 22
Einstellen von Radiosendern (ohne RDS) ....... 22
Das Radiodatensystem
Betrieb
(Radio Data System) ........................................ 22
Manuelles Speichern von Radiosendern ......... 23
Einstellen gespeicherter Radiosender ............ 23
Einstellen gespeicherter Sender der Reihe nach
(P.CALL) ........................................................... 23
Die Taste RDS DISPLAY .................................. 24
Speichern von RDS-Sendern (RDS AUTO
MEMORY) ........................................................ 24
Einstellen eines Senders nach Programmtyp
(PTY-Suche) ...................................................... 25
Raumklangeffekte ........................................... 26
Surroundklangmodi .......................................... 26
Surroundklangwiedergabe ...............................28
DVD-Wiedergabe (6 Kanäle)
(Nur beim KRF-V 5070D) ................................. 29
Nützliche Funktionen ....................................... 29
Fernbedienung
Weitere
Informationen
Grundlegende Fernbedienungsfunktionen
für andere Komponenten ................................ 31
DVD-Playerfunctionen-Tasten ......................... 31
Kassettendeck-, CD-player- und MD-
Recorderfunktionen ......................................... 32
Störungsbehebung .......................................... 33
Technische Daten ............................................35
DEUTSCH
GE
3
Page 76

Vor Einschalten der Spannungsversorgung
Auspacken
Packen Sie das Gerät vorsichtig aus, und achten Sie darauf, daß alle
Zubehörteile vorhanden sind.
FM-Zimmerantenne (1) AM-Rahmenantenne (1)
Nur KRF-V5070D
Fernbedienungsgeber (1) Batterie (R6/AA) (2)
RC-R0627
Nur KRF-V4070D und KRF-V5570D
Fernbedienungsgeber (1) Batterie (R6/AA) (2)
RC-R0628
Falls nicht alle Zubehörteile vorhanden sind bzw. das Gerät beschädigt ist
oder nicht einwandfrei funktioniert, wenden Sie sich sofort an das
Geschäft, in dem Sie das Gerät erworben haben. Wir empfehlen, den
DEUTSCH
Karton und die Verpackungsmaterialien für einen möglichen Transport
des Gerätes in der Zukunft aufzubewahren.
Bitte heben Sie diese Bedienungsanleitung für zukünftiges
Nachschlagen gut auf.
Vorbereiten der Fernbedienung
Einlegen der Batterien
2 Batterien einlegen.1 Abdeckung abnehmen.
3 Abdeckung schließen.
2
• Legen Sie zwei R6-Batterien der Größe AA ein. Richten Sie sich
dabei nach den Polaritätsmarkierungen.
Vorgehen
Wenn die Anzeige STANDBY leuchtet und Sie die Taste POWER an
der Fernbedienung drücken, schaltet sich das Gerät ein. Sobald sich das
Gerät eingeschaltet hat, drücken Sie die Taste zu der gewünschten
Funktion.
Reichweite
(ca.)
1
Fernbedienungssensor
6 m
POWER
Infrarotsystem
• Wenn Sie nacheinander mehrere Tasten auf der Fernbedienung
drücken, warten Sie zwischen einem Tastendruck und dem nächsten
mindestens 1 Sekunde.
Hinweise
1. Die Lebensdauer der mitgelieferten Batterien kann aufgrund von
Funktionsprüfungen, die mit diesen Batterien vorgenommen wurden,
kürzer sein als bei neu gekauften Batterien.
2. Wenn die Reichweite der Fernbedienung abnimmt, ersetzen Sie
beide Batterien durch neue.
3. Wenn Sie den Fernbedienungssensor direktem Sonnenlicht oder
dem Licht hochfrequenter Leuchtstoffröhren aussetzen, kann es zu
Fehlfunktionen kommen.
In solchen Fällen sollten Sie das System an einer anderen Stelle
aufstellen, um solche Fehlfunktionen zu vermeiden.
GE
4
Page 77

Vor Einschalten der Spannungsversorgung
Besondere Merkmale und Funktionen
Wirklichkeitsgetreuer Klang für das Heimkino
Dieser Receiver ist mit einer Vielzahl von Surroundklangmodi ausgestattet,
mit denen Sie Ihre Videosoftware optimal wiedergeben können. Wählen
Sie je nach den Geräten bzw. der wiederzugebenden Software einen
geeigneten Surroundklangmodus aus - und dann viel Spaß! §
Dolby Digital
Im DOLBY DIGITAL-Modus können Sie bei Software, die im Dolby
Digital-Format verarbeitet wurde, den vollen digitalen Surroundklang
wiedergeben lassen. Dolby Digital bietet bis zu 5,1 separate digitale
Audiokanäle für noch bessere Klangqualität und noch stärkere Präsenz
als bei herkömmlichem Dolby Surround.
Dolby PRO LOGIC
DOLBY PRO LOGIC II ist mit der Vorversion PRO LOGIC vollständig
kompatibel und bietet darüber hinaus bessere Möglichkeiten für den
Raumklang. Damit läßt sich herkömmlicher Stereo- oder Dolby Surround-Klang mit einer überzeugenden „5,1-ähnlichen“ Wirkung erzielen.
PRO LOGIC II bietet spezielle Funktionen zum Steuern der umfassenden
Raumklangwirkung, der Klangdimensionen und der Klangfeldabbildung.
PRO LOGIC II erzeugt bei Videosoftware mit dem Kennzeichen
eine hörbare Dreidimensionalität. Beim Musikaufnahmen läßt sich der
Klang als reiner STEREO-Surround-Sound wiedergeben.
II
einen eindrucksvollen Raumklang und bei Musik-CDs
DTS
DTS (Digital Theater System) ist ein digitales 5,1-Kanal-Audioformat, das
mit fünf Kanälen für das ganze Klangspektrum und einem niederfrequenten
Kanal (Tiefsttonlautsprecher) für die Bässe eine unübertroffene Klangfülle,
eine optimale Kanaltrennung und einen breiten Dynamikbereich bietet.
Im DTS-Modus kann der digitale 5,1-Kanal-Signaleingang von einer DTSCD, -LD oder -DVD (mit der Markierung „DTS“ gekennzeichnet) in
digitalem Surroundklang wiedergegeben werden.
Wichtig:
Wenn eine DTS-CD/LD/DVD auf einem CD-, LD- bzw. DVD-Player
wiedergegeben wird, können am analogen Ausgang des Geräts Störungen
ausgegeben werden. Es empfiehlt sich, den digitalen Ausgang des
Players mit dem digitalen Eingang dieses Geräts zu verbinden.
DSP-Surroundklangmodi
Ein hochwertiger DSP (digitaler Signalprozessor) in diesem Receiver
bietet eine Vielzahl auswählbarer Klangfelder, z. B. „ARENA“, „JAZZ
CLUB“, „THEATER“, „STADIUM“, und „DISCO“. Er unterstützt fast
alle Arten von Tonquellen.
DVD-Eingang über 6 Kanäle
Wenn Sie einen DVD-Player haben, der mit einem 6-Kanal-Ausgang
ausgestattet ist, ermöglicht dieser Receiver die volle
Surroundklangwirkung einer DVD-Tonquelle mit Mehrkanal-Codierung.
Da die Signale der Tonquelle digital sind und jeder Kanal getrennt
eingespeist wird, übertrifft der erzielte Klangeffekt bei weitem das
Ergebnis, das mit herkömmlichen Surroundsystemen möglich ist.
(Nur beim KRF-V5070D)
ACTIVE EQ
Mit dem Modus ACTIVE EQ wird unabhängig von den
Umgebungsbedingungen eine dynamischere Tonqualität erzeugt. Sie
erzielen einen wirkungsvolleren Klangeffekt, wenn Sie ACTIVE EQ
während der Dolby Digital- und DTS-Wiedergabe auf ON schalten.
Infrarot-Fernbedienung
Neben der Steuerung der grundlegenden Funktionen des Receivers
können Sie mit der im Lieferumfang enthaltenen IR-Fernbedienung
außerdem ein Kassettendeck, einen MD-Recorder oder einen CD-Player
von Kenwood bedienen, wenn diese über die Systemsteuerungskabel
miteinander verbunden sind.
Über diese Fernbedienung können Sie zusätzlich einen DVD-Player von
Kenwood direkt bedienen, ohne dass Sie dazu die Fernbedienung des
DVD-Players verwenden müssen.
Der RDS-Tuner (Radiodatensystem)
Der Receiver ist mit einem RDS-Tuner ausgestattet, der über mehrere
bequeme Einstellfunktionen verfügt: RDS Auto Memory zum
automatischen Speichern von bis zu 40 RDS-Sendern, die verschiedene
Programme ausstrahlen, Sendernnamensanzeige zum Anzeigen des
Namens des momentan eingestellten Senders und PTY-Suche zum
Einstellen von Sendern nach Programmtyp.
PTY-Suche (Programmtypsuche)
Sie geben einfach den gewünschten Programmtyp an, und der Tuner
stellt die entsprechenden Sender automatisch ein.
DEUTSCH
GE
5
Page 78

Lage und Funktion der Teile und Bedienelemente
Hauptgerät
Frequenzanzeige,
Lautsprecheranzeigen
Anzeige CLIP
RDS-Anzeigen
Anzeige TONE
Anzeige LOUDNESS
Anzeige 96kHzfs
Anzeige MUTE
AB
Eingangsanzeige,
Senderspeicheranzeige,
Surroundmodusanzeige
Lautsprecherauswahlanzeigen
Eingangskanalanzeigen
Ausgangskanalanzeigen
Frequenzbereichsanzeigen
DOLBY DIGITAL
Display
Anzeige AUTO DETECT
Anzeige DTS
Anzeige
PRO LOGIC
Anzeige 6CH INPUT
Anzeige DIGITAL
Anzeige AUTO
Anzeige MEMO.
Anzeige ST.
Anzeige TUNED
Anzeige DSP
Anzeige STEREO
Anzeige
STANDBY
ON ⁄ STANDBY
SPEAKERS ON ⁄ OFF
DEUTSCH
POWER
ON OFF
PHONES
DIMMER
ACTIVE EQ
1 Taste POWER ON/OFF &
Zum Ein- oder Ausschalten der
Hauptstromversorgung (ON/OFF).
2 Taste ON/STANDBY
Mit dieser Taste schalten Sie das Gerät ein
bzw. in den Bereitschaftsmodus (ON/
STANDBY), wenn POWER auf ON steht.
Anzeige STANDBY
3 Taste DIMMER
Sie können damit auch den Aufnahmemodus
REC MODE auswählen. ¡
Zum Einstellen der Helligkeit des Displays.
4 Taste LISTEN MODE •
Zum Auswählen des Wiedergabemodus.
5 Surround-LEDs (leuchtdioden)
LED-Anzeigen für ACTIVE EQ )
Leuchtet, wenn sich der Receiver im ACTIVE
EQ-Modus befindet.
LED-Anzeigen für DTS •
Leuchtet, wenn sich der Receiver im DTSModus befindet.
ACTIVE EQ DTS
DOLBY DIGITAL
LISTEN MODE
INPUT MODE BAND AUTO MEMORY
LED-Anzeigen für DOLBY DIGITAL •
Leuchtet, wenn sich der Receiver im Dolby
Digital-Modus befindet.
&
6 Taste SOUND ª
Zum Einstellen der Tonqualität und der
Raumklangeffekte.
7 Regler MULTI CONTROL &
Zum Vornehmen verschiedener
Einstellungen.
8 Regler INPUT SELECTOR (
Zum Auswählen der Eingangsquellen.
9 Regler VOLUME CONTROL (
º
0 Buchse PHONES )
Zur Wiedergabe über Kopfhörer.
! Taste SPEAKERS ON/OFF (
Zum Ein- oder Ausschalten der Lautsprecher.
@ Taste ACTIVE EQ )
Zum Umschalten des status von ACTIVE EQ.
# Taste INPUT MODE 9
Zum Umschalten zwischen vollautomatisch,
digitalen und analogen Eingängen.
MULTI CONTROL INPUT SELECTOR
SOUND
SETUP
VOLUME CONTROL
DOWN
UP
MUTE
$ Taste BAND ™
Zum Auswählen des Sendefrequenzbereichs.
% Taste AUTO
Zum Umschalten der Anzeige von „TAPE“ zu
„MD“. (
Zum Auswählen des automatischen
Sendereinstellmodus. ™
^ Taste MEMORY £
Zum Speichern von Radiosendern.
& Taste SETUP &
Zum Auswählen der Lautsprechereinstellungen
usw.
* Taste MUTE )
Zum vorübergehenden Stummschalten des
Tons.
Bereitschaftsmodus
Wenn die Bereitschaftsanzeige des Geräts aufleuchtet, werden die internen
Schaltkreise des Geräts mit einer geringen Menge Strom versorgt, der zur
Pufferung des Speicherinhalts dient. Dieser Betriebszustand wird als
Bereitschaftsmodus bezeichnet. Wenn sich das Gerät im
Bereitschaftsmodus befindet, kann es über die Fernbedienungseinheit
eingeschaltet werden.
GE
6
Stromversorgung über POWER ON/OFF-Taste
Die Stromversorgung zum Gerät wird beim Abschalten des Schalters (auf
OFF) nicht gänzlich unterbrochen.
Page 79

Lage und Funktion der Teile und Bedienelemente
Fernbedienung (RC-R0627) (KRF-V5070D)
1 Zahlentasten £
Wenn CD oder MD als Eingangsquelle
ausgewählt ist, fungieren diese Tasten als
Zahlentasten. Wenn der Tuner als
Eingangsquelle ausgewählt ist, dienen diese
Tasten zum Einstellen gespeicherter Sender.
2 Taste DOWN-PAGE-
Zum Steuern der DVD-Komponenten.
Taste LOUDNESS )
Zum Umschalten des Status von LOUDNESS.
3 Taste MENU
Zum Steuern der DVD-Komponenten.
Taste SETUP &
Zum Auswählen der Lautsprechereinstellungen
usw.
4 Taste OSD (On-Screen-Display)
Zum Steuern der DVD-Komponenten.
Taste SOUND ª
Zum Einstellen der Tonqualität und der
Raumklangeffekte.
5 Tasten MULTI CONTROL %/fi &
Zum Vornehmen verschiedener
Einstellungen.
Dienen zum Steuern anderer Komponenten.
Tasten P.CALL 4/¢ £
Wenn der Tuner als Eingangsquelle
ausgewählt ist, fungieren diese Tasten als
Taste zum Aufrufen der voreingestellten
Kanäle.
Tasten 4/¢
Wenn CD oder MD als Eingangsquelle
ausgewählt ist, fungieren diese Tasten als
Tasten zum Überspringen von Titeln.
6 Tasten TUNING 1/¡
Dienen zum Steuern des Tuners oder der
ausgewählten Komponente.
Wenn CD, MD oder TAPE als Eingangsquelle
ausgewählt ist, fungieren diese Tasten als
Suchtasten.
1
23
456
789
0+10
MENU
OSD
SETUP
SOUND
P.CALL
MULTI CONTROL
TUNING
A/B+100
DISC SKIP
BASS BOOST
PHONO
CD/DVD
DVD
VIDEO1 VIDEO2
MUTE
POWER
DVD
POWER
RECEIVER
DOWN-PAGE-UP
LOUDNESS
TOP MENU
RETURN
LISTEN MODE
RDS DISPLAY
P.CALL
BAND
ENTER
AUTO
DVD/6CH
TUNER
MD/TAPE
DISC SEL.
TONE
ACTIVE EQ
VOLUME
PTY
7 Taste A/B
Wenn TAPE als Eingangsquelle ausgewählt
ist, dient diese Taste bei einem
Doppelkassettendeck als Taste zum
Auswählen von Deck A bzw. B.
Taste +100
Zum Auswählen der CD-Nummer bei einem
Mehr-CD-Player.
Taste DISC SKIP
Wenn CD als Eingangsquelle ausgewählt ist,
dient diese Taste bei einem Mehr-CD-Player
als Taste zum Überspringen von CDs.
8 Taste BASS BOOST )
Zum Einstellen der maximalen
Baßverstärkung für die tiefen Frequenzen.
9 Eingangsauswahltasten (DVD/6CH,
PHONO, CD/DVD, TUNER, MD/TAPE,
VIDEO 1, VIDEO 2) (
Zum Auswählen der Eingangsquellen.
Tasten 4 DVD ¢
Bei DVD-Player-Funktionen dienen diese
Tasten als Tasten zum Überspringen von
Titeln.
0 Taste DISC SEL.
Zum Steuern anderer Komponenten.
Taste ACTIVE EQ )
Zum Umschalten des status von ACTIVE EQ.
! Taste MUTE )
Zum vorübergehenden Stummschalten des
Tons.
@ Taste POWER
Zum Ein- und Ausschalten des Receivers.
# Taste DVD POWER
Zum Einschalten der DVD-Anlage.
$ Taste RECEIVER
Mit dieser Taste schalten Sie wieder zur
Bedienung des Receivers um.
Wenn ein Bedienelement für eine Funktion
am Receiver und auf der Fernbedienung
unterschiedliche Namen hat, wird der
Name auf der Fernbedienung in dieser
Bedienungsanleitung in Klammern
angegeben.
% Taste -PAGE-UP
Zum Steuern der DVD-Komponenten.
Taste PTY ∞
Zur Verwendung der PTY-Suche.
^ Taste TOP MENU
Zum Steuern der DVD-Komponenten.
Taste RDS DISPLAY ¢
Zum Benutzung der RDS-Sendern.
& Taste RETURN
Zum Steuern der DVD-Komponenten.
Taste LISTEN MODE •
Zum Auswählen des Wiedergabemodus.
* Taste ENTER
Zum Steuern anderer Komponenten.
Taste 2
Zum Steuren anderer Komponenten.
( Taste BAND ™
Zum Auswählen des Sendefrequenzbereichs.
Taste 6
Wenn CD als Eingangsquelle ausgewählt ist,
dient diese Taste als Wiedergabe-/Pausetaste.
Wenn MD oder TAPE als Eingangsquelle
ausgewählt ist, dient diese Taste als
Stopptaste.
) Taste 8
Zum Steuern anderer Komponenten.
¡ Taste AUTO ™
Zum Auswählen des automatischen
Sendereinstellmodus.
Taste 7
Wenn CD, MD oder TAPE als Eingangsquelle
ausgewählt ist, fungieren diese Tasten als
Suchtasten.
™ Taste TONE )
Zum Einstellen des TONE-Reglers.
£ Tasten VOLUME (
Dienen zum Einstellen der ReceiverLautstärke.
GE
7
DEUTSCH
Page 80

Lage und Funktion der Teile und Bedienelemente
Fernbedienung (RC-R0628) (KRF-V4070D/V5570D)
DEUTSCH
1 Zahlentasten £
Wenn CD oder MD als Eingangsquelle
ausgewählt ist, fungieren diese Tasten als
Zahlentasten. Wenn der Tuner als
Eingangsquelle ausgewählt ist, dienen diese
Tasten zum Einstellen gespeicherter Sender.
2 Taste DOWN-PAGE-
Zum Steuern der DVD-Komponenten.
Taste LOUDNESS )
Zum Umschalten des Status von LOUDNESS.
3 Taste MENU
Zum Steuern der DVD-Komponenten.
Taste SETUP &
Zum Auswählen der Lautsprechereinstellungen
usw.
4 Taste OSD (On-Screen-Display)
Zum Steuern der DVD-Komponenten.
Taste SOUND ª
Zum Einstellen der Tonqualität und der
Raumklangeffekte.
5 Tasten MULTI CONTROL %/fi &
Zum Vornehmen verschiedener
Einstellungen.
Dienen zum Steuern anderer Komponenten.
Tasten P.CALL 4/¢ £
Wenn der Tuner als Eingangsquelle
ausgewählt ist, fungieren diese Tasten als
Taste zum Aufrufen der voreingestellten
Kanäle.
Tasten 4/¢
Wenn CD oder MD als Eingangsquelle
ausgewählt ist, fungieren diese Tasten als
Tasten zum Überspringen von Titeln.
6 Tasten TUNING 1/¡
Dienen zum Steuern des Tuners oder der
ausgewählten Komponente.
Wenn CD, MD oder TAPE als Eingangsquelle
ausgewählt ist, fungieren diese Tasten als
Suchtasten.
GE
8
1
23
456
789
0+10
MENU
OSD
SETUP
SOUND
P.CALL
MULTI CONTROL
TUNING
A/B+100
DISC SKIP
BASS BOOST
AUX CD/DVD
DVD
VIDEO1 VIDEO2
MUTE
POWER
DVD
POWER
RECEIVER
DOWN-PAGE-UP
LOUDNESS
TOP MENU
RETURN
LISTEN MODE
RDS DISPLAY
P.CALL
BAND
ENTER
AUTO
DVD
TUNER
MD/TAPE
DISC SEL.
TONE
ACTIVE EQ
VOLUME
PTY
7 Taste A/B
Wenn TAPE als Eingangsquelle ausgewählt
ist, dient diese Taste bei einem
Doppelkassettendeck als Taste zum
Auswählen von Deck A bzw. B.
Taste +100
Zum Auswählen der CD-Nummer bei einem
Mehr-CD-Player.
Taste DISC SKIP
Wenn CD als Eingangsquelle ausgewählt ist,
dient diese Taste bei einem Mehr-CD-Player
als Taste zum Überspringen von CDs.
8 Taste BASS BOOST )
Zum Einstellen der maximalen
Baßverstärkung für die tiefen Frequenzen.
9 Eingangsauswahltasten (DVD, AUX,
CD/DVD, TUNER, MD/TAPE, VIDEO 1,
VIDEO 2) (
Zum Auswählen der Eingangsquellen.
Tasten 4 DVD ¢
Bei DVD-Player-Funktionen dienen diese
Tasten als Tasten zum Überspringen von
Titeln.
0 Taste DISC SEL.
Zum Steuern anderer Komponenten.
Taste ACTIVE EQ )
Zum Umschalten des status von ACTIVE EQ.
! Taste MUTE )
Zum vorübergehenden Stummschalten des
Tons.
@ Taste POWER
Zum Ein- und Ausschalten des Receivers.
# Taste DVD POWER
Zum Einschalten der DVD-Anlage.
$ Taste RECEIVER
Mit dieser Taste schalten Sie wieder zur
Bedienung des Receivers um.
Wenn ein Bedienelement für eine Funktion
am Receiver und auf der Fernbedienung
unterschiedliche Namen hat, wird der
Name auf der Fernbedienung in dieser
Bedienungsanleitung in Klammern
angegeben.
% Taste-PAGE-UP
Zum Steuern der DVD-Komponenten.
Taste PTY ∞
Zur Verwendung der PTY-Suche.
^ Taste TOP MENU
Zum Steuern der DVD-Komponenten.
Taste RDS DISPLAY ¢
Zum Benutzung der RDS-Sendern.
& Taste RETURN
Zum Steuern der DVD-Komponenten.
Taste LISTEN MODE •
Zum Auswählen des Wiedergabemodus.
* Taste ENTER
Zum Steuern anderer Komponenten.
Taste 2
Zum Steuren anderer Komponenten.
( Taste BAND ™
Zum Auswählen des Sendefrequenzbereichs.
Taste 6
Wenn CD als Eingangsquelle ausgewählt ist,
dient diese Taste als Wiedergabe-/Pausetaste.
Wenn MD oder TAPE als Eingangsquelle
ausgewählt ist, dient diese Taste als
Stopptaste.
) Taste 8
Zum Steuern anderer Komponenten.
¡ Taste AUTO ™
Zum Auswählen des automatischen
Sendereinstellmodus.
Taste 7
Wenn CD, MD oder TAPE als Eingangsquelle
ausgewählt ist, fungieren diese Tasten als
Suchtasten.
™ Taste TONE )
Zum Einstellen des TONE-Reglers.
£ Tasten VOLUME (
Dienen zum Einstellen der ReceiverLautstärke.
Page 81

Konfigurieren des Systems
Nehmen Sie die Verbindungen wie auf den folgenden Seiten
erläutert vor.
Wenn Sie die Systemkomponenten anschließen, schlagen
Sie unbedingt auch in der Bedienungsanleitung nach, die
mit der Komponente, die Sie anschließen, mitgeliefert wurde.
Schließen Sie das Netzkabel immer erst an eine
Netzsteckdose an, nachdem Sie alle anderen Anschlüsse
vorgenommen haben.
Hinweise
1. Achten Sie darauf, alle Verbindungskabel sicher und fest anzuschließen.
Bei losen Verbindungen ist unter Umständen kein Ton oder
Störrauschen zu hören.
2. Ziehen Sie unbedingt das Netzkabel aus der Netzsteckdose, bevor Sie
andere Verbindungskabel anschließen oder lösen. Andernfalls kann es
zu Fehlfunktinen oder Schäden am Gerät kommen.
3.Schließen Sie keine Netzkabel von Komponenten an, deren
Leistungsaufnahme höher ist als am Netzausgang an der Rückseite
dieses Geräts angegeben.
Analogverbindungen
Audioverbindungen werden anhand von Cinchkabeln hergestellt. Diese
Kabel übertragen Stereotonsignale in einem „analogen“ Format. Das
heißt, das Tonsignal entspricht dem tatsächlichen zweikanaligen
Stereoton. Cinchkabel haben in der Regel 2 Stecker an jedem Ende,
einen roten für den rechten Kanal und einen weißen für den linken Kanal.
Sie erhalten diese Kabel entweder zusammen mit dem Gerät oder im
Elektronikfachhandel.
Funktionsstörung des Mikrocomputers
Wenn ein Betrieb des Geräts nicht möglich ist oder inkorrekte
Anzeigen am Display erscheinen, obwohl alle Anschlüsse
vorschriftsmäßig durchgeführt wurden, ist der Mikrocomputer
entsprechend den Anweisungen unter „Störungsbehebung” E
zurückzustellen. ‹
Eingangsmoduseinstellungen
Die CD/DVD-, VIDEO2-, und DVD oder DVD/6CH (nur KRF-V5070D)-
Eingänge umfassen alle Buchsen für digitalen und analogen
Audioeingang.
Wenn Sie die Anschlüsse vorgenommen und den Receiver eingeschaltet
haben, gehen Sie wie in den Schritten unten erläutert vor.
LISTEN MODE
INPUT MODE
1 Wählen Sie mit dem Regler INPUT SELECTOR die Funktion CD/
DVD, VIDEO2, DVD oder DVD/6CH (nur KRF-V5070D) aus.
2 Drücken Sie die Taste INPUT MODE.
Mit jedem Tastendruck wechselt die Einstellung folgendermaßen:
Im DTS-Wiedergabemodus
1 F-AUTO (digitaler Eingang, analoger Eingang)
2 D-MANUAL (digitaler Eingang)
Im
CD/DVD, VIDEO2,
Wiedergabemodus
1 F-AUTO (digitaler Eingang, analoger Eingang)
2 D-MANUAL (digitaler Eingang)
3 6CH INPT (DVD/6CH Eingang)
4 ANALOG (analoger Eingang)
Digitaler Eingang:
Wählen Sie diese Einstellung zur Wiedergabe digitaler Signale von
einem DVD-, CD- oder LD-Player.
Analoger Eingang:
Wählen Sie diese Einstellung zur Wiedergabe analoger Signale von
einem Kassettendeck, Videorecorder oder Plattenspieler.
Autom. Senderwahl:
Bei der vollautomatischen Einstellung „F-AUTO“ (Anzeigen AUTO
DETECT und DIGITAL leuchten) erkennt der Empfänger die digitalen
oder analogen Eingangssignale automatisch. Bei der Wahl des
Eingangsmodus hat das Digitalsignal Priorität. Der Empfänger wählt
den Eingangs- und den Hörmodus bei der Wiedergabe automatisch
und stimmt ihn mit dem jeweiligen Eingangssignal (Dolby Digital,
PCM, DTS) und der Lautsprechereinstellung ab. Werkseitig ist die
vollautomatische Einstellung aktiviert.
Wenn der ausgewählte Wiedergabemodus des Receivers eingestellt
bleiben soll, wählen Sie mit der Taste INPUT MODE die Einstellung
„D-MANUAL“ (manuelle Klangeinstellung). Aber auch wenn diese
Einstellung ausgewählt ist, kann es vorkommen, daß der
Wiedergabemodus automatisch ausgewählt wird, um je nach der
Kombination von Wiedergabemodus und Quellensignal ein Dolby
Digital-Signal zu erzeugen.
Wenn im Modus D-MANUAL die Audio-Wiedergabe aufgrund von
Änderungen des Eingangssignals usw. plötzlich unterbrochen wird,
drücken Sie die Taste LISTEN MODE.
Wenn Sie die Taste INPUT MODE zu schnell drücken, ist unter Umständen
kein Ton zu hören. Drücken Sie erneut die Taste INPUT MODE.
INPUT SELECTOR
DVD oder DVD/6CH (nur KRF-V5070D) -
DEUTSCH
GE
9
Page 82

Konfigurieren des Systems
Anschließen von Audiokomponenten
Buchsen SYSTEM
CONTROL ^
L
R
PHONO
CD/DVD
DEUTSCH
GND
AUDIO
REC OUT PLAY IN
MD / TAPE
REC OUT PLAY IN
VIDEO1
Formen von Netzsteckdosen
Großbritannien
Europa
+
-
+
-
An eine Netzsteckdose
(Beim KRF-V4070D/
GE
10
OUT
IN
Videokomponente ¡
OUTIN
Kassettendeck oder
L
R
AUX
OUT
MD-Recorder
CD-oder DVD-Player
V5570D)
Ein Plattenplayer mit
Drehspultonabnehmer kann
nicht direkt über diesen
Receiver betrieben werden.
OUT
Dazu muß ein weiterer
Equalizer-Verstärker
angeschlossen werden.
(Nur beim KRF-V5070D)
Plattenplayer
Page 83

Konfigurieren des Systems
Anschließen von Videokomponenten
DVD
IN
VIDEO 2
IN
VIDEO 1
VIDEO
IN
MONITOR
OUT
VIDEO 1
OUT
AUDIO
VIDEO
IN
Fernsehmonitor
VIDEO 1
+
-
PLAY IN
VIDEO 2
+
-
Nur beim
KRF-V4070D/V5570D
DVDREC OUT PLAY IN
DEUTSCH
Videoeingänge
(Gelbes
Cinchkabel)
Video
IN/OUT
IN IN
Videodeck
OUT OUT
Videoein- und -ausgänge
(Gelbe Cinchkabel)
OUT OUT
OUT
DVD-Player oder LD-Player
DVD-Player oder LD-Player
Audioein- und -ausgänge
OUT
Eine Videokomponente mit digitalen Audioausgängen muß an die Buchsen VIDEO 2 angeschlossen werden.
Audio
IN/OUT
11
GE
Page 84

Konfigurieren des Systems
Digitale Verbindungen
Die Digitaleingangsbuchsen eignen sich für DTS-, Dolby Digital- und PCM-Signale. Schließen Sie Komponenten an, die digitale Signale im DTS-, Dolby
Digital- oder Standard-PCM-Format (CD) ausgeben können.
Wenn Sie digitale Komponenten an den Receiver angeschlossen haben, lesen Sie unbedingt sorgfältig den Abschnitt „Eingangsmoduseinstellungen”.
9
DEUTSCH
COAXIAL OPTICAL
VIDEO 2
DVD
DIGITAL IN
CD / DVD
Optisches Kabel
+
-
+
-
OPTICAL DIGITAL OUT (AUDIO)
CD- oder DVD-Player
COAXIAL DIGITAL OUT
(AUDIO)
Komponenten mit einem DTS-,
Dolby Digital- oder PCM COAXIAL
COAXIAL
DIGITAL OUT
(AUDIO)
DIGITAL OUT-Digitalausgang
Verbinden Sie die Anschlüsse für
Videosignale und analoge Audiosignale
Digitaler RF-Demodulator
(DEM-9991D)
(gesondert erhältlich)
DOLBY DIGITAL RF
OUT (AUDIO)
PCM OUT
mit den Buchsen VIDEO 2.
(Schlagen Sie dazu unter „Anschließen
von Videokomponenten“ nach.) !
LD-Player
Wenn Sie einen LD-Player mit einem DIGITAL RF OUT-Ausgang anschließen wollen, verbinden Sie den LD-Player mit dem digitalen
KENWOOD RF-Demodulator (DEM-9991D).
Verbinden Sie als nächstes die Buchsen DIGITAL OUT des Demodulators mit den Buchsen DIGITAL IN des Receivers.
Verbinden Sie die Anschlüsse für Videosignale und analoge Audiosignale mit den VIDEO 2-Buchsen. (Schlagen Sie dazu unter „Anschließen
von Videokomponenten“ nach.)
GE
12
Page 85

Konfigurieren des Systems
Anschließen eines DVD-Players (6 Kanäle)
(Nur beim KRF-V5070D)
Wenn Sie einen DVD-Player mit einer digitalen Verbindung an den Receiver angeschlossen haben, lesen Sie unbedingt sorgfältig den Abschnitt
„Eingangsmoduseinstellungen“. 9
DVD
IN
VIDEO 2
IN
VIDEO 1
VIDEO
IN
MONITOR
OUT
VIDEO 1
OUT
DVD / 6CH INPUT
SURROUND
FRONT
CENTER
SUB
WOOFER
+
-
+
-
COAXIAL OPTICAL
VIDEO 2
DVD/6CH
DIGITAL IN
CD / DVD
DEUTSCH
VIDEO OUT
(Gelbes
Cinchkabel)
FRONT
OUT L/R
DVD-Player
SURROUND
OUT L/R
COAXIAL
DIGITAL
OUT
(AUDIO)
SUBWOOFER
OUT
CENTER OUT
ACHTUNG
Beachten Sie unbedingt die folgenden Punkte, da anderenfalls die Belüftung blockiert wird, was zu Feuergefahr führt.
• Stellen Sie niemals Gegenstände auf der Einheit ab, welche die Wärmeabfuhr beeinträchtigen.
• Halten Sie ausreichend Abstand rund um die Einheit ein (gemessen von der größten Außendimension einschließlich ßberständen), der mindestens
den nachfolgenden Werten entspricht.
Oberseite: 50 cm Seitenwand: 10 cm Rückwand: 10 cm
13
GE
Page 86

Konfigurieren des Systems
Anschließen der Lautsprecher
Lautsprecher vorn
Rechts
Links
Mittlerer
Lautsprecher
SURROUND
DEUTSCH
SUB WOOFER
PRE OUT
FRONT
RED WHITE GREEN
CENTER
CR L
SPEAKERS (6
+
+
-
-
SPEAKERS (6-16Ω)
KRF-V5570D
SURROUND
R
GRAYLBLUE
KRF-V5070D/KRF-V4070D
+
-
WOOFER
+
-
SUB
+
14
-
R
SPEAKERS (6-16Ω)
Tiefsttonlautsprecher
mit eigener
Stromversorgung
(Beim KRF-V5070D/
V4070D)
GE
Rechts
Surroundlautsprecher
(Schließen Sie unbedingt beide
Surroundlautsprecher an.)
GRAYLBLUESWPURPLE
Links
Tiefsttonlautsprecher
Page 87

Konfigurieren des Systems
Anschließen der Lautsprecherkabel Anschließen der Antennen
1 Lautsprecherkabel am
2 Lasche herunterdrücken.
Ende abisolieren.
3 Kabel hineinstecken. 4 Lasche zurück in die
Ausgangsposition stellen.
• Schließen Sie die Pole + und – der Lautsprecherkabel auf keinen Fall
kurz.
• Wenn der linke und der rechte Lautsprecher vertauscht oder die
Lautsprecherkabel mit umgekehrter Polarität angeschlossen sind,
klingt der Ton unnatürlich, und die räumliche Wirkung des Klangs geht
verloren. Achten Sie darauf, die Lautsprecher korrekt anzuschließen.
Lautsprecherimpedanz
Überprüfen Sie die Angaben für die Lautsprecherimpedanz, die auf
der Rückseite des Receivers angegeben sind, und schließen Sie dann
Lautsprecher mit entsprechenden Impedanzwerten an. Wenn Sie
Lautsprecher mit einer anderen Nennimpedanz als der auf der
Rückseite des Receivers angegebenen Impedanz anschließen, kann
es zu Fehlfunktionen kommen, oder die Lautsprecher oder der
Receiver können beschädigt werden.
AM-Ringantenne
Die mitgelieferte Ringantenne ist eine Zimmerantenne. Stellen Sie
sie so weit wie möglich vom Receiver, dem Fernsehgerät, den
Lautsprecherkabeln und dem Netzkabel entfernt auf, und richten Sie
sie für den bestmöglichen Empfang aus.
Verbindung des AM-Antennenanschlusses
1 Lasche
herunterdrücken.
2 Kabel
hineinstecken.
3 Lasche zurück in
Ausgangsposition
stellen.
FM-Zimmerantenne
Die mitgelieferte Zimmerantenne eignet sich nur vorübergehend für
den Empfang. Für einen stabilen Signalempfang empfiehlt sich eine
Außenantenne. Lösen Sie die Zimmerantenne vom Gerät, wenn Sie
eine Außenantenne anschließen.
Verbindung des FM-Antennenanschlusses
Stecken Sie das Kabel hinein.
FM-Außenantenne
Führen Sie das 75Ω-Koaxialkabel, das an die FM-Außenantenne
angeschlossen ist, ins Zimmer, und schließen Sie es den den Anschluß
FM 75Ω an.
DEUTSCH
ANTENNA
GND
Am
Ständer anbringen
AM-Ringantenne
AM
FM
75Ω
Verwenden Sie
einen
Antennenadapter
(im Handel
erhältlich)
+
+
-
-
FM-Zimmerantenne
FM-Außenantenne
GE
15
Page 88

Konfigurieren des Systems
SYS
OL
Anschließen der Systemsteuerung
(SYSTEM CONTROL)
Wenn Sie Systemsteuerkabel anschließen, nachdem Sie eine
KENWOOD-Audio-Anlage angeschlossen haben, können Sie eine
Reihe praktischer Systemsteuerfunktionen nutzen.
Dieses Gerät ist nur mit dem [SL-16]-Modus kompatibel. Die
Systemsteuerung steht nicht zur Verfügung, wenn das Gerät im
Verbindungsmodus [XS8], [XS] oder [XR] angeschlossen wird.
Wenn Ihre Komponente mit einem Moduswahlschalter
ausgestattet ist, stellen Sie an den angeschlossenen
Komponenten den [SL16]-Modus ein.
SYSTEM CONTROL kabel
SYSTEMSTEUERFUNKTIONEN
Fernbedienung
Sie können dieses Gerät mit der Systemfernbedienung steuern, die
mit dem Receiver geliefert wurde.
Automatischer Betrieb
Wenn Sie die Wiedergabe einer angeschlossenen Komponente
starten, schaltet der Eingangswählschalter an diesem Gerät
automatisch zu dieser Komponente um.
Synchronaufnahme
Sie können die Aufnahme mit dem Start der Wiedergabe
synchronisieren, wenn Sie von CD, MD oder Schallplatte aufnehmen.
TEM CONTR
• Sie können das Systemsteuerkabel an die entweder an das hohe
anschließen oder unten heben.
BEISPIEL: Verbindungen für den [SL16]-Modus
Die Einstellung des Systemsteuermodus ist durch Unterstreichung
gekennzeichnet.
SL16]
[
SL16] [XS] [XS8] [XR]
[
DEUTSCH
SL16] [XS] [XS8]
[
[XS]
• Damit die Systemsteuerfunktionen genutzt werden können, müssen
die Komponenten an die richtigen Buchsen angeschlossen werden.
Einen CD-Player müssen Sie an die CD-Buchsen anschließen. Ein
Kassettendeck oder einen MD-Recorder müssen Sie an die Buchsen
MD/TAPE anschließen. Wenn Sie mehrere CD-Player (oder mehrere
andere gleichartige Geräte) anschließen, ist nur bei dem Gerät an
den entsprechenden Buchsen eine Systemsteuerung möglich.
• Einige CD-Player und Kassettendecks entsprechen nicht dem [SL16]Systemsteuermodus. Nehmen Sie keine Systemverbindungen mit
Geräten vor, die nicht [SL16]-kompatibel sind.
• Einige MD-Player unterstützen die Systemsteuerung nicht. Wenn
Sie solche Geräte anschließen, ist keine Systemsteuerung möglich.
Hinweise
1. [SL16]-Geräte können für die Systemsteuerung nicht mit [XR]-,
[XS]- und [XS8]-Geräten kombiniert werden. Wenn Sie solche
Geräte haben, schließen Sie bitte keine Systemsteuerkabel an.
Auch ohne Systemsteuerkabel können normale Funktionen
ausgeführt werden, ohne daß die Leistung beeinträchtigt wird.
2. Schließen Sie Systemsteuerkabel nur an Komponenten an, die von
KENWOOD spezifiziert wurden. Andernfalls kann es zu
Fehlfunktionen oder Schäden an den Geräten kommen.
3. Vergewissern Sie sich, daß die Stecker der Systemsteuerkabel
vollständig in den Systemsteueranschlüssen sitzen.
Empfänger
Kassettendeck
oder MD-Recorder
CD-Player
Plattenplayer
SYSTEM
CONTROL
kabel
Aufstellung der Lautsprecher
Mittlerer
Lautsprecher
Lautsprecher
vorn
Surroundlautsprecher
Lautsprecher vorn : Stellen Sie diese Lautsprecher links und rechts
vor der Hörposition auf. Vordere Lautsprecher sind bei allen
Surroundmodi erforderlich.
Mittlerer Lautsprecher : Stellen Sie diesen Lautsprecher mittig vor
der Hörposition auf. Dieser Lautsprecher stabilisiert das Klangbild und
trägt zu einer naturgetreuen Wiedergabe bewegter Geräuschquellen
bei. Sie sind zur Wiedergabe von Surroundklang erforderlich.
Surroundlautsprecher : Stellen Sie diese Lautsprecher direkt links
und rechts neben oder leicht hinter der Hörposition auf. Beide
Lautsprecher müssen sich auf gleicher Höhe etwa 1 m oberhalb der
Kopfhöhe des Zuhörers befinden. Diese Lautsprecher tragen zu einer
naturgetreuen Wiedergabe bewegter Geräuschquellen und zur
Schaffung von Atmosphäre bei. Sie sind zur Wiedergabe von
Surroundklang erforderlich.
Tiefsttonlautsprecher : Dieser Lautsprecher ist für eine kraftvolle
Wiedergabe tiefer Bässe erforderlich.
• Zwar besteht ein ideales Surroundsystem aus allen oben
aufgelisteten Lautsprechern. Wenn jedoch kein mittlerer
Lautsprecher oder Tiefsttonlautsprecher vorhanden ist, können die
entsprechenden Tonsignale im Rahmen der Lautsprechereinstellung
auf die anderen Lautsprecher verteilt werden, so daß sich eine
optimale Tonwiedergabe über die vorhandenen Lautsprecher erzielen
läßt. &
Tiefsttonlautsprecher
Hörposition
GE
16
Page 89

Vorbereitungen für Surroundklang
Lautsprechereinstellungen
Damit Sie die Tonwiedergabemodi des Receivers optimal nutzen können,
nehmen Sie bitte die unten beschriebenen Lautsprechereinstellungen
(Tiefsttonlautsprecher, Lautsprecher vorn und in der Mitte,
Surroundlautsprecher) vor.
ON/STANDBY
POWER ON/OFF
SETUP
Schalten Sie diesen Receiver mit der Taste POWER ON/OFF
1
und ON/STANDBY
Drücken Sie die SETUP-Taste, um in den SETUP-Modus zu
2
bzw. Taste POWER ein.
schalten, und den MULTI-CONTROL-Schalter oder die Tasten für die folgenden Anzeigen.
1 SP SETUP
2 TESTTONE
3 DISTANCE
4 EXIT
Die Reihenfolge bei SETUP ist wie folgt:
SP SETUP TESTTONE DISTANCE EXIT
SP System
Full Range
2Way 2Speaker
2Way 3Speaker
Others
Subwoofer
Center
Surround
Subwoofer Re-mix
Wählen Sie ein Lautsprechersystem aus.
3
1 Wählen Sie SP SETUP, und drücken Sie erneut die Taste
SETUP, so dass die Lautsprechersystem-Anzeige "SP
SYSTEM" eingeblendet wird.
2 Wählen Sie mithilfe des MULTI CONTROL-
Bedienungsknopfes oder der entsprechenden Tasten die
Lautsprechersystem-Einstellung.
1 FULL RANGE : Für ausgewählte Kenwood-Lautsprecher –
2 2WAY 2SPKR : Für ausgewählte Kenwood-Lautsprecher –
3 2WAY 3SPKR : Für ausgewählte Kenwood-Lautsprecher –
4 OTHERS : Für sonstige allgemeine Lautsprecher.
• Die Auswahl FULL RANGE, 2WAY 2SPKR oder 2WAY 3SPKR
Front
AUTO
MANUAL
L
C
R
SR
SL
SW
z. B. KS-207HT.
z. B. KS-307HT.
z. B. KS-707HT.
MULTI CONTROL
SETUP
L
Surround
C
R
SR
SL
SW
POWER
MULTI
CONTROL
Front
Center
sollte nur mit der Einstellung für das 5-Kanal-Lautsprechersystem
verwendet werden.
• Bei Auswahl der Einstellung FULL RANGE, 2WAY 2SPKR oder
2WAY 3SPKR wird zu Schritt 4 gewechselt.
3 Wenn Sie die allgemeine Lautsprechereinstellung aufrufen
möchten, wählen Sie mithilfe des MULTI CONTROLBedienungsknopfes oder der entsprechenden Tasten die
Einstellung OTHERS und drücken erneut die Taste SETUP.
• Die Tiefsttonlautsprecher-Einstellungsanzeige "SUBW ON" wird
eingeblendet.
4 Wählen Sie mit dem Regler bzw. den Tasten MULTI CONTROL
die geeignete Einstellung für den Tiefsttonlautsprecher aus.
1 SUBW ON : Der Einstellmodus für den Tiefsttonlautsprecher
2 SUBW OFF : Der Einstellmodus für den Tiefsttonlautsprecher
• Werkseitig ist „SUBW ON“ eingestellt.
• Wird die Einstellung „SUBW OFF“ ausgewählt, wird für die
vorderen Lautsprecher automatisch „FRNT LRG“ eingestellt, und
Sie können mit Schritt 8 fortfahren. Vor Ausführung von Schritt
8 drücken Sie die Taste SETUP, um die Einstellung zu bestätigen.
• Wenn über den Tiefsttonlautsprecher Ton wiedergegeben
werden soll, wählen Sie „FRNT NML“.
5 Bestätigen Sie die Einstellung mit der Taste SETUP.
• Die Anzeige für die Einstellung der vorderen Lautsprecher
„FRNT NML“ erscheint.
6 Wählen Sie mit dem Regler bzw. den Tasten MULTI CONTROL
die geeignete Einstellung für die vorderen Lautsprecher aus.
1 FRNT NML (normal) : Vordere Lautsprecher in
2 FRNT LRG (groß) : Große vordere Lautsprecher sind an
• Bei der Einstellung „FRNT LRG“ wirdüber den Tiefsttonlautsprecher
kein Ton wiedergegeben, selbst wenn Tiefsttonlautsprecher auf
ON gesetzt ist. Wenn jedoch der Tiefsttonlautsprecher ausgewählt
ist und Sie „SW RE-MIX ON“ einstellen, wird über den
Tiefsttonlautsprecher Ton wiedergegeben.
In STEREO-Modus, wird der Ton direkt über die vorderen
Lautsprecher wiedergegeben.
7 Bestätigen Sie die Einstellung mit der Taste SETUP.
• Die Anzeige für die Einstellung des mittleren Lautsprechers
„CNTR NML“ erscheint.
8 Wählen Sie mit dem Regler bzw. den Tasten MULTI CONTROL
die geeignete Einstellung für den mittleren Lautsprecher aus.
Wenn Sie „LRG“ als Einstellung für die vorderen Lautsprecher
ausgewählt haben:
1 CNTR NML (normal) : Ein mittlerer Lautsprecher
2 CNTR LRG (groß) : Ein großer mittlerer Lautsprecher ist
3 CNTR OFF : Der Einstellmodus für den mittleren
Wenn Sie "NML" als Einstellung für die vorderen Lautsprecher
ausgewählt haben:
1 CNTR ON : Der Einstellmodus für den mittleren Lautsprecher
2 CNTR OFF : Der Einstellmodus für den mittleren Lautsprecher
9 Bestätigen Sie die Einstellung mit der Taste SETUP.
• Die Anzeige für die Einstellung der Surroundlautsprecher „SURR
NML“ erscheint.
0 Wählen Sie mit dem Regler bzw. den Tasten MULTI CONTROL
die geeignete Einstellung für den Surroundlautsprecher aus.
ist am Receiver aktiviert.
ist am Receiver deaktiviert.
durchschnittlicher Größe sind an den
Receiver angeschlossen.
den Receiver angeschlossen.
durchschnittlicher Größe ist an den
Receiver angeschlossen.
an den Receiver angeschlossen.
Lautsprecher ist am Receiver
deaktiviert.
ist am Receiver aktiviert.
ist am Receiver deaktiviert.
Fortsetzung auf der nächsten Seite
GE
17
DEUTSCH
Page 90

Vorbereitungen für Surroundklang
Wenn Sie „LRG“ als Einstellung für den mittleren Lautsprecher
ausgewählt haben:
1 SURR NML (normal) : Surroundlautsprecher in
2 SURR LRG (groß) : Große Surroundlautsprecher sind an
3 SURR OFF : Der Einstellmodus für die
Wenn Sie für den mittleren Lautsprecher nicht „LRG“ als
Einstellung ausgewählt haben,
1 SURR ON : Der Einstellmodus für die Surround- lautsprecher
2 SURR OFF : Der Einstellmodus für die Surround- lautsprecher
! Bestätigen Sie die Einstellung mit der Taste SETUP.
• Die Anzeige für die Subwoofer-Re-mix-Einstellung „SW REMIX“ bewegt sich über das Display.
• Solange der Subwoofer auf OFF steht, ist die subwoofer-Remix-Einstellung nicht verfügbar.
@ Wählen Sie mit dem Regler bzw. den Tasten MULTI-CONTROL
die geeignete Einstellung für die vorderen Lautsprecher.
1 RMX ON : Subwoofer-Re-mix-Einstellung zum Empfänger is t
2 RMX OFF : Subwoofer-Re-mix-Einstellung zum Empfänger ist
DEUTSCH
# Bestätigen Sie die Einstellung mit der Taste SETUP.
• Der Receiver schaltet in den Einstellmodus für den
Lautstärkepegel der Lautsprecher.
• In Schritt 4 und 5 erscheinen Anzeigen nur für die ausgewählten
Kanäle der Lautsprecher, die eingestellt werden müssen.
am Receiver aktiviert.
am Receiver deaktiviert.
durchschnittlicher Größe sind an den
Receiver angeschlossen.
den Receiver angeschlossen.
Surroundlautsprecher ist am Receiver
deaktiviert.
ist am Receiver aktiviert.
ist am Receiver deaktiviert.
3 Drücken Sie SETUP.
• Der Testton wird ausgeschaltet. Der Receiver schaltet in den
Einstellmodus für den Abstand zwischen Hörposition und
Lautsprechern.
4 Für die MANUAL-Auswahl drücken Sie jedes Mal die Taste
SETUP, um den Lautsprecherkanal zu wählen.
Geben Sie den Abstand zu den Lautsprechern ein.
5
1 Wählen Sie in der SETUP-Anzeige DISTANCE und drücken
Sie erneut die SETUP-Taste.
2 Messen Sie den Abstand zwischen der Hörposition und den
einzelnen Lautsprechern.
Notieren Sie sich dem Abstand zu den einzelnen Lautsprechern.
Abstand zu den Lautsprechern vorn : ____ Fuß (Meter)
Abstand zum mittleren Lautsprecher : ____ Fuß (Meter)
Abstand zu den Surroundlautsprechern : ____ Fuß (Meter)
3 Stellen Sie mit dem Regler bzw. den Tasten MULTI CONTROL
die Entfernung zu den Lautsprechern vorn ein.
Die Anzeige zu dem einzustellenden Lautsprecher blinkt.
Anzeige in Fuß Anzeige in Metern
• Der Einstellbereich beträgt 1 bis 30 Fuß (0,3 bis 9,0 m) in
Schritten zu 1 Fuß (0,3 m).
4 Bestätigen Sie die Einstellung mit der Taste SETUP.
5 Geben Sie wie in Schritt 3 und 4 erläutert den Abstand zu
den einzelnen Lautsprechern ein.
6 Die Einstellung ist abgeschlossen, sobald der EXIT erscheint.
Dient zum Einstellen der Lautsprecherlautstärke.
4
Stellen Sie die Lautstärke der Lautsprecher von Ihrer normalen
Hörposition aus ein. Die Lautstärkepegel der einzelnen Lautsprecher
sollten ausgewogen sein.
1 Drücken Sie die Taste SETUP, um mit TEST TONE anzufangen.
Die Auswahl von AUTO/MANUAL TEST TONE erfolgt über
den MULTI CONTROL-Regler oder die -Tasten-.
1 AUTO
2 MANUAL
2 Zum Einstellen von AUTO oder MANUAL drücken Sie erneut
die SETUP-Taste.
Stellen Sie mit dem Regler bzw. den Tasten MULTI CONTROL
den Lautstärkepegel des Testtons ein, der über den
betreffenden Lautsprecherkanal ausgegeben wird.
Für die AUTO-Auswahl der Testton wird jeweils 2 Sekunden
lang über die Lautsprecher ausgegeben, und zwar in folgender
Reihenfolge:
• Wenn Sie die Lautstärkeeinstellungen der Lautsprecher ändern,
während Sie Musik hören, ändern sich die auf dieser Seite
erläuterten Einstellungen. ª
• Wenn einer der Lautsprecher beim SP SETUP deaktiviert wurde
(Einstellung OFF), wird die TEST TONE-Anpassung für diesen
Lautsprecher übersprungen.
GE
18
• Die Lautsprecher, die Sie ausgewählt haben, sollten im Display
angezeigt werden. Vergewissern Sie sich, daß Sie alle
Lautsprecher korrekt ausgewählt haben.
7 Drücken Sie die Taste SETUP, um den SETUP-Modus zu
verlassen.
Eingangspegeleinstellung (nur analoge Quellen)
Wenn der Eingangspegel eines analogen Quellensignals zu hoch ist,
blinkt die CLIP-Anzeige und gibt das Quellensignal an. Stellen Sie den
Eingangspegel ein.
1 Wählen Sie mit dem Regler INPUT SELECTOR den Eingangspegel
der Tonquelle aus, die Sie einstellen wollen.
• Sie können für jede Eingangsquelle einen eigenen Eingangspegel
speichern.
2 Drücken Sie die Taste SOUND so oft, bis die Anzeige „INPUT“
erscheint.
3 Stellen Sie mit dem Regler bzw. den Tasten MULTI CONTROL den
Eingangspegel ein.
• Der Eingangspegel kann auf drei Werte eingestellt werden: 0 dB,
–3 dB und –6 dB. (Die werkseitige Einstellung ist 0 dB.)
4 Mit der Taste SOUND schalten Sie zur Eingangsanzeige zurück.
Page 91

Normale Wiedergabe
Vorbereitungen für die Wiedergabe
Bevor Sie das Gerät für die Wiedergabe benutzen können, sind einige
Vorbereitungen notwendig.
SPEAKERS
ON/OFF
ON/OFF
Einschalten des Receivers
1 Schalten Sie die gewünschten Komponenten ein.
2 Schalten Sie diesen Receiver mit der Taste POWER ON/OFF und
ON/STANDBY
Auswählen des Eingangsmodus
Wenn Sie eine Komponente ausgewählt haben, die an die Buchse
CD/DVD, VIDEO2, DVD oder DVD/6CH (nur KRF-V5070D)
angeschlossen ist, achten Sie darauf, daß die Eingangsmoduseinstellung
für den verwendeten Audiosignaltyp korrekt ist. 9
Auswählen von MD/TAPE
Geben Sie an, was für eine Tonquelle an die Buchsen MD/TAPE
angeschlossen ist. Werkseitig ist „TAPE“ (Kassettendeck) eingestellt.
Wenn Sie statt dessen „MD“ (MD-Gerät) einstellen wollen, gehen Sie
wie im folgenden erläutert vor.
1 Wählen Sie mit dem Regler INPUT SELECTOR die Einstellung
„TAPE“ aus.
2 Halten Sie die Taste AUTO mehr als 2 Sekunden gedrückt.
• Die Tonquellenanzeige wechselt zu „MD“.
• Soll wieder die ursprüngliche Tonquelle angezeigt werden, gehen
Sie wie unter 2 erläutert vor.
Einstellen des Lautsprecher-Status
Die Lautsprecher-Anzeige leuchtet.
ON/STANDBY
AUTO INPUT SELECTORPOWER
ein.
Wiedergeben des Tons von einer Komponente
INPUT SELECTOR
Eingangsauswchltasten
Wählen Sie mit dem Regler INPUT SELECTOR bzw. den
1
Input
Selector
Eingangsauswahltasten die Eingangsquelle aus, die Sie
hören möchten.
Die Eingangsquellen wechseln wie unten angegeben:
KRF-V4070D/V5570D
1 „AUX“
2 „TUNER“
3 „CD/DVD“
4 „TAPE“ oder „MD“
5 „VIDEO1“
6 „VIDEO2“
7 „DVD“
KRF-V5070D
1 „PHONO“
2 „TUNER“
3 „CD/DVD“
4 „TAPE“ oder „MD“
5 „VIDEO1“
6 „VIDEO2“
7 „DVD/6CH“
Starten Sie die Wiedergabe der ausgewählten Quelle.
2
Stellen Sie mit dem Regler VOLUME CONTROL die oder
3
den Tasten VOLUME Lautstärke ein.
VOLUME CONTROL
VOLUME
DEUTSCH
Mit der SPEAKERS ON/OFF-Taste können Sie die Lautsprecher
aktiviert oder deaktiviert.
19
GE
Page 92

Normale Wiedergabe
Einstellen des Klangs
SPEAKERS ON/OFF
ACTIVE EQ
PHONES
MULTI CONTROL
BASS BOOST
MUTE
Einstellen der Tonqualität (nur Fernbedienung)
Sie können am Receiver die Tonqualität im Stereomodus (PCM oder
analog) einstellen.
1 Drücken Sie die Taste TONE, um in den TONE-Modus zu schalten.
DEUTSCH
2 Wählen Sie mit dem Regler bzw. den Taste des MULTI CONTROL
die TONE ON/OFF.
3 Ist TONE ON ausgewählt, drücken Sie die Taste TONE, um die
folgenden Displays aufzurufen.
BASS : Bei dieser Einstellung können Sie die niedrigen Frequenzen
TREB : Bei dieser Einstellung können Sie die hohen Frequenzen
4 Stellen Sie mit dem Regler bzw. den Tasten MULTI CONTROL die
Tonqualität ein.
einstellen.
einstellen.
VOLUME CONTROL
MUTE
LOUDNESS
MULTI
CONTROL
ACTIVE EQ
TONE
VOLUME
Einstellen der Klangfülle (nur Fernbedienung)
Der Lautstärkeregler besitzt eine spezielle Funktion zur Wahrung der
Klangfülle. Einstellungen können vorgenommen werden, wenn sich der
Empfänger im Stereomodus (PCM oder analog) einstellen.
Drücken Sie die LOUDNESS-Taste zum Ein-/Ausschalten dieser
Funktion.
Beenden der Stummschaltung
Drücken Sie erneut die Taste LOUDNESS, so daß die Anzeige
„LOUDNESS“ erlischt.
Stummschalten des Tons
Mit der Taste MUTE können Sie den Ton der Lautsprecher stummschalten.
Drücken Sie die Taste MUTE.
Beenden der Stummschaltung
Drücken Sie erneut die Taste MUTE, so daß die Anzeige „MUTE“
erlischt.
• Die Stummschaltung (MUTE ON) läßt sich auch beenden, indem
Sie am Lautstärkeregler drehen.
ACTIVE EQ-Modus
Sie können einen noch eindrucksvolleren Klangeffekt genießen, wenn
der Modus ACTIVE EQ bei der Dolby Digital und DTS Wiedergabe auf ON
geschaltet ist und ebenso, wenn die PCM und analoge Stereomodi
eingeschaltet sind.
Drücken Sie die Taste ACTIVE EQ für die folgende Auswahl;
1 ACTIVE EQ MUSIC : Wirksam, wenn Sie Musik hören.
(Die LED-Anzeige ACTIVE EQ leuchtet auf.)
2 ACTIVE EQ CINEMA : Wirksam, wenn Sie einen Film sehen.
(Die LED-Anzeige ACTIVE EQ leuchtet auf.)
3 ACTIVE EQ TV : Wirksam, wenn Sie Fernsehn schauen.
(Die LED-Anzeige ACTIVE EQ leuchtet auf.)
4 ACTIVE EQ OFF : Die Funktion ACTIVE EQ ist auf deaktiviert
eingestellt.
(Die LED-Anzeige ACTIVE EQ erlischt.)
• Die Funktion ACTIVE EQ ist nicht verfügbar, wenn REC MODE,
AUTO TUNING oder PRESET MEMORY aktiviert sind (Einstellung
ON) und 96kHz-LPCM wiedergegeben werden.
• Baß- und Höhenpegel lassen sich um –10 bis +10 verstellen, und
zwar in Schritten zu je 2 dB.
Baßanhebung auf Tastendruck (BASS BOOST)
(nur Fernbedienung)
Sie können am Receiver die Tonqualität im Stereomodus (PCM oder
analog) einstellen.
Drücken Sie die Taste BASS BOOST.
• Drücken Sie die Taste einmal. Auf diese Weise stellen Sie die
maximale Baßanhebung (+10) ein.
• TONE wird automatisch Eingeschaltet.
• Diese Taste ist ohne Funktion, wenn sich der Receiver im
Einstellmodus für die Tonqualität oder Raumklangeffekte befindet.
§~º
Umschalten zur vorherigen Einstellung
Drücken Sie die Taste BASS BOOST erneut.
GE
20
Wiedergabe über Kopfhörer
1 Drücken Sie SPEAKERS ON/OFF, so daß sich die
Lautsprecheranzeige ausschaltet.
Vergewissern Sie sich, daß SP nicht leuchtet.
• Wenn Sie im Surroundmodus alle Lautsprecher ausschalten, wird
auch der Surroundmodus ausgeschaltet, und die Wiedergabe erfolgt
in stereo.
2 Schließen Sie die Kopfhörer an die Buchse PHONES an.
3 Stellen Sie mit VOLUME CONTROL oder den VOLUME-Tasten
die Lautstärke ein.
PHONES
Page 93

Aufnahme
Aufnehmen von Audiosignalen (analoge Quellen)
INPUT SELECTOR
Aufnehmen von einer Tonquelle
1 Wählen Sie mit dem Regler INPUT SELECTOR die aufzunehmende
Signalquelle (nicht „MD/TAPE“) aus.
2 Schalten Sie den MD-Recorder oder das Kassettendeck in den
Aufnahmemodus.
3 Starten Sie die Wiedergabe, und starten Sie dann die Aufnahme.
Aufnehmen von Videosignalen
1 Wählen Sie mit dem Regler INPUT SELECTOR die aufzunehmende
Videoquelle (nicht „VIDEO1“) aus.
2 Stellen Sie an dem Videodeck, das an VIDEO1 angeschlossen ist,
die Aufnahme ein.
• Wählen Sie REC MODE aus, wenn Sie von einer digitalen
Eingangsquelle aufnehmen wollen.
3 Starten Sie die Wiedergabe, und starten Sie dann die Aufnahme.
• Bei einigen Arten von Videosoftware ist eine normale Aufnahme
nicht möglich. Dies geht auf ein Kopierschutzsystem zurück.‹
Aufnehmen von Audiosignalen (digitale Quellen)
3 Halten Sie die Taste DIMMER mehr als 2 Sekunden lang gedrückt,
um den A-REC- oder M-REC-Modus während der digitalen Eingabe
auszuwählen.
1 Rec-Modus deaktiviert : Der Aufnahmemodus für digitale
Eingangssignale ist ausgeschaltet.
2 A-REC-Modus : Die digitalen Eingangssignale (DTS,
Dolby Digital oder PCM) werden
automatisch erkannt und in
Stereosignale konvertiert, die
aufgenommen werden können.
3 M-REC-Modus : Der Eingangssignaltyp, der zum
Zeitpunkt der Moduswahl gilt, wird
beibehalten.
Nur A-REC-Modus:
Nur M-REC-Modus:
DEUTSCH
4 Starten Sie die Wiedergabe, und starten Sie dann die Aufnahme.
• Wenn die Tonerzeugung aufgrund des Wechsels der Eingangssignale
usw. plötzlich stoppt, drücken Sie die Taste DIMMER.
Schalten Sie den REC-Modus ein, wenn Sie von einer digitalen
Eingangsquelle aufnehmen wollen. In der Regel nehmen Sie
Audioeingangsquellen im A-REC-Modus (Auto-Record) auf. Wenn der
digitale Modus während einer Aufnahme im A-REC-Modus wechselt,
setzt der Ton der Audioeingangsquelle unter Umständen kurz aus.
Aufnehmen von Musik im A-REC- oder M-REC-Modus
DIMMER
INPUT SELECTOR
1 Wählen Sie mit dem Eingangswählschalter INPUT SELECTOR
die aufzunehmende Tonquelle aus [CD/DVD, DVD oder DVD/
6CH (Beim KRF-V5070D) oder VIDEO2].
2 Schalten Sie den MD-Recorder oder das Kassettendeck in den
Aufnahmemodus.
21
GE
Page 94

Radioempfang
Der Empfänger kann bis zu 40 Sender speichern und auf Tastendruck
abrufen.
Radiosender lassen sich in RDS-Sender (Sender mit Radiodatensystem)
und Sender ohne RDS einteilen. Wenn Sie RDS-Sender hören oder
speichern möchten, schlagen Sie bitte unter „Das Radiodaten System
(RDS)“ nach.
Einstellen von Radiosendern (ohne RDS)
MULTI CONTROL
AUTO
MULTI
CONTROL
TUNING
1 /
¡
AUTO
Wählen Sie mit dem Regler INPUT SELECTOR oder der
1
DEUTSCH
Taste TUNER den Tuner aus.
INPUT SELECTORBAND
BAND
TUNER
Das Radiodatensystem
RDS ist ein Sendesystem, bei dem FM-Sender zusammen mit dem
eigentlichen Sendesignal weitere nützliche Informationen übertragen (in
Form digitaler Sendedaten). Tuner und Receiver, die auf RDS-Empfang
ausgelegt sind, können diese Informationen aus dem normalen
Sendesignal extrahieren und für eine Reihe von Zusatzfunktionen nutzen.
Zum Beispiel kann der Name des Radiosenders automatisch angezeigt
werden.
(Radio Data System)
RDS-Funktionen:
PTY-Suche (Suche nach Programmtypkennung) ∞
Das Gerät stellt automatisch einen Sender ein, der gerade eine
Sendung des angegebenen Programmtyps (Genres) ausstrahlt.
PS-Anzeige (Programmdienstname)
Das Gerät zeigt automatisch den Sendernamen an, der von dem RDSSender ausgestrahlt wird.
RDS-Speicherautomatik (RDS AUTO MEMORY) ¢
Das Gerät findet und speichert automatisch bis zu 40 RDS-Sender.
Wenn das Gerät weniger als 40 RDS-Sender findet, die es speichern
kann, werden die restlichen Speicherplätze mit normalen FM-Sendern
belegt.
Radiotext
Wenn Sie RDS DISPLAY drücken, zeigt das Gerät den Radiotext an,
der von manchen RDS-Sendern ausgestrahlt wird. Wenn der Sender
keinen Radiotext ausstrahlt, wird „NO RT“ angezeigt.
Die Anzeige „RDS“ leuchetet, wenn das Gerät eine RDS-Sendung
(also ein RDS-Signal) empfängt.
Stellen Sie mit der Taste BAND den gewünschten
2
Sendefrequenzbereich ein.
Mit jedem Tastendruck wechselt das
Frequenzband folgendermaßen:
1 FM
2 AM
Wählen Sie mit AUTO das gewünschte Einstellverfahren
3
Anzeige „AM“ oder „FM“
erscheint im Display.
aus.
Mit jedem Tastendruck wechselt die Sendereinstellung folgendermaßen:
1 AUTO
(automatische Einstellung)
2 AUTO leuchtet nicht
(manuelle Einstellung)
• Normalerweise sollten Sie „AUTO“ (automatische Einstellung)
wählen. Wenn das Radiosignal schwach ist und es starke Interferenzen
gibt, schalten Sie um zur manuellen Einstellung. (Bei der manuellen
Einstellung werden Stereosendungen monaural empfangen.)
Wählen Sie mit dem Regler bzw. den Tasten MULTI
4
CONTROL oder TUNING
Automatische Sendersuche: Der nächste Sender wird
Manuelle Sendersuche : Drehen Sie am Regler (oder drücken
GE
22
1
Frequenzanzeige
Anzeige „AUTO“ leuchtet
im Display auf.
/ ¡ den Sender aus.
„ST.“ leuchtet bei einer
Stereosendung auf.
„TUNED“ erscheint, wenn
ein Sender empfangen wird.
automatisch eingestellt.
Sie die Taste), um den gewünschten
Sender einzustellen.
Hinweis
Je nach Land und Region stehen unterschiedliche RDS-Funktionen
zur Verfügung, oder die RDS-Funktionen haben andere
Bezeichnungen.
Bevor Sie eine RDS-Funktion nutzen können, müssen Sie die RDSSpeicherautomatikfunktion ausführen. Schlagen Sie dazu unter
„Speichern von RDS-Sendern (RDS AUTO MEMORY)“ nach. ¢
Page 95

Radioempfang
Manuelles Speichern von Radiosendern
Die RDS-Speicherautomatik weist RDS-Sendern Speichernummern zu,
beginnend mit Speichernummer „1“. Speichern Sie Sender mit der RDSSpeicherautomatik daher unbedingt, bevor Sie, wie im folgenden
beschrieben, AM- und andere FM oder RDS-Sender von Hand speichern.
Weitere Informationen finden Sie unter „Speichern von RDS-Sendern
(RDS AUTO MEMORY)“. ¢
MEMORY
MULTI CONTROL
Stellen Sie den Sender ein, den Sie speichern wollen.
1
Drücken Sie die Taste MEMORY erneut, um die Einstellung
2
zu bestätigen.
Blinkt 5 Sekunden lang Leuchtet 5 Sekunden lang
Fahren Sie innerhalb von 5 Sekunden mit Schritt 3 fort.
(Wenn mehr als 5 Sekunden vergehen, drücken Sie nochmals die
Taste MEMORY.)
Wählen Sie mit dem Regler bzw. den Tasten MULTI
3
CONTROL eine der Speichernummern aus (1 – 40).
Bestätigen Sie die Einstellung mit der Taste MEMORY.
4
• Speichern Sie wie in Schritt 1, 2, 3, und 4 erläutert so viele
Sender, wie Sie möchten.
• Wenn Sie einen Sender unter einer bereits belegten
Speichernummer speichern, wird der ursprüngliche Sender durch
den neuen ersetzt.
Geben Sie die Speichernummer des Senders ein, den Sie
2
hören möchten (1 - 40).
Drücken Sie die Zahlentasten in folgender Reihenfolge:
Für Sender „15“ drücken Sie ...............0,5
Für Sender „20“ drücken Sie ...............0,0,)
• Wenn Sie beim Eingeben einer zweistelligen Zahl einen Fehler
machen, drücken Sie so oft +10, bis wieder die ursprüngliche
Anzeige erscheint, und geben Sie dann die richtige
Speichernummer ein.
Einstellen gespeicherter Sender der Reihe
nach
(P.CALL)
P.CALL
4 / ¢
TUNER
Stellen Sie mit der Taste TUNER den Tuner als
1
Eingangsquelle ein.
Wählen Sie mit den Tasten P.CALL 4/¢ den
2
gewünschten Sender aus.
• Mit jedem Tastendruck wechselt das Gerät zum nächsten
gespeicherten Sender.
Drücken von P.CALL ¢ hat folgende Wirkung:
Drücken von P.CALL 4 hat folgende Wirkung:
DEUTSCH
Einstellen gespeicherter Radiosender
Zahlentasten
Numeric keys
TUNER
Stellen Sie mit der Taste TUNER den Tuner als
1
Eingangsquelle ein.
Wenn Sie die Taste ¢ oder 4 gedrückt halten, wechselt das
Gerät in Intervallen von 0,5 Sekunden der Reihe nach durch die
gespeicherten Sender.
GE
23
Page 96

Radioempfang
Die Taste RDS DISPLAY
RDS DISPLAY
Mit der Taste RDS DISPLAY wechseln Sie die Anzeige im
Display.
Mit jedem Tastendruck wechselt die Anzeige folgendermaßen:
1 PS-Anzeige (Programmdienstname)
2 RT-Anzeige (Radiotext)
3 Frequenzanzeige
1 PS-Anzeige (Programmdienstname):
Der Sendername wird automatisch angezeigt, wenn das Gerät eine
RDS-Sendung empfängt.
Werden keine PS-Daten ausgestrahlt, so wird „NO PS“ angezeigt.
2 RT-Anzeige (Radiotext):
Radiotext, der parallel zu einer RDS-Sendung ausgestrahlt wird, läuft
DEUTSCH
im Display durch. Wenn der gerade eingestellte Sender keinen
Radiotext ausstrahlt, wird „NO RT“ oder „RT----“ angezeigt.
3 Frequenzanzeige:
Die Sendefrequenz des gerade eingestellten Senders wird angezeigt.
Speichern von RDS-Sendern
Bei dieser Funktion speichert das Gerät automatisch bis zu 40 RDSSender. Wenn Sie die PTY-Funktion nutzen wollen, müssen Sie die RDSSender zuvor mit der RDS-Speicherautomatik (RDS AUTO MEMORY) im
Gerät speichern.
MEMORY
Wählen Sie mit INPUT SELECTOR den Tuner aus.
1
Stellen Sie mit BAND als Frequenzbereich „FM“ ein.
2
Halten Sie die Taste MEMORY mehr als 2 Sekunden lang
3
(RDS AUTO MEMORY)
INPUT SELECTORBAND AUTO
gedrückt.
• Innerhalb von wenigen Minuten werden nun bis zu 40 RDS-Sender
gespeichert, und zwar in der Reihenfolge der Sendekanäle,
beginnend mit Kanal „01“.
• Sender, die bereits im Gerät gespeichert sind, werden unter
Umständen durch RDS-Sender ersetzt. (Das heißt, wenn die RDSSpeicherautomatik (RDS AUTO MEMORY) 15 RDS-Sender findet,
werden die Sender, die bis dahin unter den Speichernummern 01
bis 15 gespeichert waren, durch diese RDS-Sender ersetzt.)
24
GE
Page 97

Radioempfang
Einstellen eines Senders nach Programmtyp
(PTY-Suche)
Bei dieser Funktion sucht der Tuner automatisch nach Sendern, die
gerade den Typ von Sendung (Genre) ausstrahlen, den Sie hören wollen.
Unter bestimmten Empfangsbedingungen kann die Suche über
1 Minute dauern.
Starten Sie mit der Taste PTY die Suche.
3
BEISPIEL: Suchen nach einer Sendung mit Rock-Musik.
Anzeige im Display während der Suche.
Blinkt Anzeige des Programmtyps
PTY
MULTI
TUNING
1 / ¡
CONTROL
Vorbereitungen
• Speichern Sie mit der RDS-Speicherautomatik Sender im Gerät.
• Stellen Sie als Sendefrequenzbereich FM ein.
• Stellen Sie einen RDS-Sender ein.
Drücken Sie die Taste PTY, um die PTY-Funktion
1
einzuschalten.
Wenn das Gerät eine RDS-Sendung empfängt, wird der Programmtyp
im Display angezeigt. Wenn der Sender keine PTY-Daten ausstrahlt
oder es sich nicht um einen RDS-Sender handelt, wird „NONE“
angezeigt.
Wählen Sie, solange die Anzeige „PTY“ leuchtet, mit dem
2
Tasten MULTI CONTROL oder TUNING
1/ ¡
den
gewünschten Programmtyp aus.
Programmtyptabelle
Programmtyp Display
Pop-Musik POP M
Rock-Musik ROCK M
Schlager usw. EASY M
Leichte klassische Musik LIGHT M
Ernste klassische Musik CLASSICS
Sonstige Musik OTHER M
Nachrichten NEWS
Aktuelles Zeitgeschehen AFFAIRS
Informationen INFO
Sportsendungen SPORT
Erziehung EDUCATE
Hörspiele DRAMA
Kultursendungen CULTURE
Wissenschaft SCIENCE
Nicht-Musik-Sendungen VARIED
Programmtyp Display
Wetter WEATHER
Finanzberichte FINANCE
Kinderprogramme CHILDREN
Magazinsendungen SOCIAL
Religion RELIGION
Hörer-Telefon PHONE IN
Reiseinformationen TRAVEL
Freizeitprogramm LEISURE
Jazz JAZZ
Country-Musik COUNTRY
Volksmusik NATION M
Oldies OLDIES
Folk-Musik FOLK M
Dokumentarsendungen DOCUMENT
Anzeige bei Empfang eines Senders.
Erlischt
Anzeige des Sendernamens
• Solange „PTY“ blinkt, ist kein Ton zu hören.
• Wenn keine Sendung des gewünschten Typs zu finden ist, erscheint
„NO PROG“ im Display. Nach einigen Sekunden erscheint im
Display dann wieder die ursprüngliche Anzeige.
So wählen Sie einen anderen Programmtyp
Gehen Sie wie in Schritt 1, 2 und 3 erläutert vor.
DEUTSCH
„NO PROG“ wird angezeigt, wenn Sie eine PTY-Suche starten,
ohne zuvor mit der RDS-Speicherautomatik Sender gespeichert
zu haben.
25
GE
Page 98

Raumklangeffekte
C
SW
Bei diesem Receiver können Sie eine Reihe von Modi für die
Tonwiedergabe einstellen, so daß Sie - auch bei der Wiedergabe
von Videoquellen - ein besonderes Klangerlebnis genießen
können.
Die verschiedenen Surroundklangeffekte funktionieren nur dann
optimal, wenn Sie zuvor die richtigen Lautsprechereinstellungen
am Gerät vornehmen. &
Surroundklangmodi
Die unten gezeigten Lautsprecheranordnungen gelten für ein 5,1Kanal-Surroundsoundsystem, für das Folgendes zutrifft;
• Dolby Digital
• Dolby Pro Logic II
• DTS
• DSP
• DVD 6-Kanal (Nur beim KRF-V5070D)
TV / SCREEN
R
DEUTSCH
SRSL
L Vorderer linker Lautsprecher
SW Tiefsttonlautsprecher
C Mittlerer Lautsprecher
R Vorderer rechter Lautsprecher
SL Linker Surround-Lautsprecher
SR Rechter Surround-Lautsprecher
Dolby Digital
Mit dem Dolby Digital-Surroundklangformat können Sie bis zu 5,1Kanäle mit digitalem Surroundklang von Dolby Digital-Tonquellen (z.
B. mit
lassen. Verglichen mit herkömmlichem Dolby-Surroundklang bietet
Dolby Digital eine noch höhere Tonqualität mit größerer räumlicher
Genauigkeit und einem verbesserten Dynamikbereich.
Obwohl für echten 5,1-Kanal-Surroundklang mit Dolby Digital ein
vollständiger Satz Lautsprecher (Lautsprecher vorn links und rechts,
mittlerer Lautsprecher, Surroundlautsprecher links und rechts sowie
Tiefsttonlautsprecher) erforderlich ist, können Sie mit diesem Receiver
Dolby Digital- und Dolby Surround-Tonquellen wiedergeben lassen,
auch wenn Sie nur vordere Lautsprecher anschließen.
Obwohl nur Dolby Digital-Tonspuren über einen getrennten Kanal für
Bässe verfügen, verbessert das Anschließen eines
Tiefsttonlautsprechers auch bei anderen Surroundklangmodi die
Baßleistung.
Die Anzeige „LFE“ erscheint im Display, wenn ein Signal für diesen
Kanal eingespeist wird.
Dolby PRO LOGIC
Dolby PRO LOGIC II bietet dank seines speziellen Designs eine ganz
neue Klangqualität mit beispielloser Raumwirkung, exzellent
definierten Klangrichtungen und einer herausragenden Klangpräzision
bei Dolby Surround-codierten Tonquellen (z. B. Video- und LaserdiscSoftware mit dem Kennzeichen
Dolby PRO LOGIC II durch eine intelligente, integrierte FeedbackLogik, eine Matrix-Raumklangdecodierung und die Decodierung des
ausgegebenen Stereo-Raumklangs in voller Bandbreite. In diesem
Receiver sind die PRO LOGIC II-Modi „MOVIE“, „MUSIC“ und
„PRO LOGIC“ vorprogrammiert. Der Modus „MOVIE“ von PRO
LOGIC II enthält die nötigen Voreinstellungen für eine Wiedergabe in
kalibriertem Raumklang von hoher Qualität. Der Modus „MUSIC“
bietet einige benutzerdefinierbare Einstellungen, die mit Hilfe der
drei zusätzlichen Steueroptionen „Dimension-“, „Center Width-“
und „Panorama-“ Modus eine individuelle Optimierung des Klangfelds
ermöglichen. Mit der Option „Dimension“ kann der Benutzer das
Klangfeld stufenlos nach vorne oder nach hinten verlagern. Mit der
Option „Center Width“ läßt sich die Links-Mitte-Rechts-Balance der
Lautsprecher unterschiedlich einstellen. Die Option „Panorama“
schließlich integriert die Klangwirkung der Surroundlautsprecher in
das Klangbild der Stereolautsprecher vorn und erzeugt auf diese
Weise einen faszinierenden Rundumklangeffekt.
Hinweis
LFE = Low Frequency Effects. Dieser Kanal leitet getrennte,
nichtdirektionale Baßsignale an den Tiefsttonlautsprecher und
erzeugt damit Tiefbaßklangeffekte mit noch mehr Dynamik.
gekennzeichnete LD- oder DVD-Software) wiedergeben
II
). Diese Qualität erzielt
Hergestellt unter Lizenz von Dolby Laboratories. DOLBY, das doppel D
symbol und PRO LOGIC sind Warenzeichen der Dolby Laboratories.
„DTS“ und „DTS Digital Surround“ sind
eingetragenes Warenzeichen der Digital Theater
Systems, Inc.
GE
26
Page 99

Raumklangeffekte
DTS-Modus
Das DTS-Mehrkanalformat für die Audiowiedergabe steht auf CD-,
LD- und DVD-Software zur Verfügung. DTS ist ein rein digitales
Format und kann mit den meisten CD-, LD- oder DVD-Playern nicht
decodiert werden. Daher werden Sie in den meisten Fällen digitales
Rauschen hören, wenn Sie versuchen, mit DTS codierte Software
über den analogen Ausgang Ihres neuen CD-, LD- oder DVD-Players
wiederzugeben. Das Rauschen kann sehr laut werden, wenn der
analoge Ausgang direkt an ein leistungsstarkes Verstärkersystem
angeschlossen ist. Um dies zu vermeiden, sind zur Wiedergabe
digitaler Ausgangssignale bestimmte Schritte erforderlich (siehe
unten). Zur Wiedergabe von DTS Digital-Surroundklang muß ein
externes 5,1-Kanal-Decodersystem für DTS Digital-Surroundklang
oder ein Verstärker mit einem integrierten DTS Digital SurroundDecoder an den digitalen Ausgang (S/P DIF, AES/EBU oder TosLink)
eines CD-, LD- oder DVD-Players angeschlossen werden.
Alle Modelle sind mit einem DTS-Decoder ausgestattet.
Bei DTS gibt es einen .1- oder LFE-Kanal.
Die Anzeige „LFE“ erscheint im Display, wenn ein Signal für diesen
Kanal eingespeist wird. §
DSP-Modus
In den DSP-Modi können bei der Wiedergabe fast aller
Programmquellen die Atmosphäre eines Live-Konzerts erzeugen.
DSP ist besonders wirksam bei Stereoprogrammquellen wie CDs,
Fernsehen und FM Radiosendern. Probieren Sie doch einmal die
DSP-Modi ARENA, JAZZ CLUB, THEATER, STADIUM oder DISCO
aus, wenn Sie das nächste Mal ein Konzert hören oder eine
Sportsendung ansehen!
DVD-Wiedergabe im 6-Kanalmodus (Nur beim KRF-V5070D)
Mit einem DVD-Player oder einem ähnlichen Gerät mit sechs
Ausgangskanälen (5,1) und diesem Receiver können Sie mehrkanalig
codierte DVD-Quellen in bester Qualität wiedergeben lassen. Da die
Tonsignale bei solchem Material digital codiert sind und jeder Kanal
unabhängig von den anderen verarbeitet wird, sind der Ton, die
klangliche Raumwirkung und der Dynamikbereich von unübertroffener
Qualität.
Bei Auswahl des DVD 6-Kanalmodus erscheint die Anzeige "LFE" im
Display. §
DEUTSCH
Was ist DSP?
DSP steht für „Digital Signal Processor“ (digitaler Signalprozessor).
Wie man einen Klang in der Realität wahrnimmt, hängt von zahlreichen
Faktoren ab. Einer der wichtigsten dieser Faktoren ist der Nachhall,
also die Art, wie Klanganteile im Raum von verschiedenen Stellen als
Echo zurückgeworfen werden.
In den einzelnen DSP-Modi wird eine naturgetreue Klangwirkung
erzeugt, indem der digitale Signalprozessor Nachhall generiert, ohne
daß sich dabei die Tonqualität des ursprünglichen Signals
verschlechtert.
27
GE
Page 100

Raumklangeffekte
Surroundklangwiedergabe
Die DTS-kompatiblen Modelle können CDs, DVDs oder LDs mit DTSMarkierung wiedergeben.
DOLBY DIGITAL kann bei der Wiedergabe von DVD- oder LD-Software
mit der Markierung
DIGITAL-Format usw. verwendet werden. DOLBY PRO LOGIC können
bei der Wiedergabe von Video-, DVD- oder LD-Software mit der Markierung
verwendet werden.
LISTEN MODE
Eingangsauswahltasten
Vorbereitungen
DEUTSCH
• Schalten Sie die entsprechenden Komponenten ein.
• Führen Sie die Schritte unter „Vorbereitungen für Surroundklang“
(Lautsprechereinstellungen) aus. &
• Wählen Sie mit dem Regler INPUT SELECTOR bzw. den
Eingangsauswahltasten die Komponente aus, die mit Surroundklang
wiedergegeben werden soll.
• Wählen Sie mit der Taste INPUT MODE die wiederzugebende
Tonquelle den Eingangsmodus (analog oder digital) aus. 9
• Rauschen ist zu hören, wenn der analoge Eingang ausgewählt und
eine DTS-Tonquelle wiedergegeben wird.
Starten Sie die Wiedergabe der Videosoftware.
1
Wählen Sie mit der Taste LISTEN MODE den
2
Tonwiedergabemodus aus.
Die Einstellungen für den Tonwiedergabemodus werden für alle
Eingänge separat gespeichert. Wenn als Eingangsmodus der
vollautomatischen Einstellung („AUTO DETECT“ leuchtet)
ausgewählt ist, wählt der Receiver automatisch den optimalen
Tonwiedergabemodus, und zwar je nach Typ des Eingangssignals
und den Lautsprechereinstellungen.
Mit jedem Tastendruck auf LISTEN MODE wechselt die
Einstellung wie unten aufgelistet.
Die Einstellungen für den Tonwiedergabemodus unterscheiden
sich je nach Typ des Eingangssignals.
und von digitalen Sendungen im DOLBY
INPUT SELECTORINPUT MODE
LISTEN MODE
Input
Selector
Wenn ein DOLBY DIGITAL-Signal eingespeist wird:
(Die DOLBY DIGITAL-, PRO LOGIC- oder STEREO-Anzeige auf):
1 DOLBY DIGITAL : DOLBY DIGITAL-Surround.
2 PL II MOVIE : PRO LOGIC II-Surround-Modus MOVIE.
3 PL II MUSIC : PRO LOGIC II-Surround-Modus MUSIC.
4 PRO LOGIC : PRO LOGIC II-Surround-Modus PRO LOGIC.
5 STEREO : Normale Stereowiedergabe.
Wenn Sie DOLBY DIGITAL wählen
„DOLBY DIGITAL“ Rolle von rechts nach links.
(LED-Anzeige DOLBY DIGITAL leuchtet.)
(Anzeige PRO LOGIC leuchtet.)
(Anzeige PRO LOGIC leuchtet.)
(Anzeige PRO LOGIC leuchtet.)
(Anzeige STEREO leuchtet.)
Wenn das DTS-Signal eingespeist wird:
(Die LED-Anzeige DTS leuchtet auf.)
1 DTS : DTS-Surround
2 STEREO : Normale Stereowiedergabe
Wenn ein Analog- oder Digitalsignal eingespeist wird
(kein DOLBY DIGITAL- oder DTS-Signal):
1 PL II MOVIE : PRO LOGIC II-Surround-Modus MOVIE.
2 PL II MUSIC : PRO LOGIC II-Surround-Modus MUSIC.
3 PRO LOGIC : PRO LOGIC II-Surround-Modus PRO LOGIC.
4 ARENA : DSP-Surround-Modus ARENA.
5 JAZZ CLUB : DSP-Surround-Modus JAZZ CLUB.
6 THEATER : DSP-Surround-Modus THEATER.
7 STADIUM : DSP-Surround-Modus STADIUM.
8 DISCO : DSP-Surround-Modus DISCO.
9 STEREO : Normale Stereowiedergabe.
• Wird ein Dolby Digital oder DTS-Signal mit mehr Kanälen eingespeist
als die maximale Anzahl der Wiedergabekanäle, die bei den aktuellen
Einstellungen des Receivers zur Verfügung stehen, erfolgt ein
Downmixing (Abstimmung auf die verfügbaren Kanäle).
Stellen Sie die Lautstärke ein.
3
Hinweise
• Je nach Eingangssignaltyp oder Lautsprechereinstellung können
einige Tonwiedergabemodi nicht ausgewählt werden.
• Wenn die Wiedergabe gestartet wird, setzt der Ton möglicherweise
aus, oder die Wiedergabe wird unterbrochen, bevor die
Eingangsquelle als Dolby Digital erkannt wird.
• Wenn Sie Dolby Digital-Surroundklang und alle anderen
Tonwiedergabemodi mit einer einzigen Komponente erzeugen
wollen, müssen Sie eine Dolby Digital-kompatible Komponente
verwenden.
(Anzeige PRO LOGIC leuchtet.)
(Anzeige PRO LOGIC leuchtet.)
(Anzeige PRO LOGIC leuchtet.)
(Anzeige STEREO leuchtet.)
28
GE
 Loading...