


CASSETTE-RECEIVER
KRC-701
KRC-601
INSTRUCTION MANUAL
KENWOOD CORPORATION
Take the time to read through this instruction manual.
Famiiiarity with installation and operation procedures
will help you obtain the best performance from your new
cassette-receiver.
For your records
Record the serial number, found on the back of the unit, in
the spaces designated on the warranty card, and in the space
provided below. Refer to the model and serial numbers
whenever you call upon your KENWOOD dealer for
information or service on the product.
Model KRC-701/601 SehaLnumber .
©B64-04S7-00 (K) (MC)
_
_______

Contents
Before use
Safety precautions..
CD
Features
CO
D
^ Basic operations
Power / Volume / Attenuator
Loudness........
CD
CÙ
Auto seek tuning...
Manual tuning.......
Local seek
Cassette tape play
Dolby B NR / Tape type selection
Basic operation of remote control
Tuner features
Station preset memory
Auto memory entry
Priority radio preset
CRSC
Channel space selection
Cassette player features
DPSS
Index scan.
Music repeat
Blank skip
Tuner call
Disc changer control features
Disc play witn Disc changer
Track / Disc search........—-------------------
Track / Disc repeat
Track scan
Disc scan .......................................
Random play..............................................
Magazine random play
.....
.
____
..............
...................
..........
.........
.................................................
.................
.....
......
.
---------------------------------
.........
........
.—
...........................
.............................
...
...............................
.
.
...............
-
...........
-
.........
.........
....3
..,.5
....8
....9
..10
..11
..12
„13
,.U
..15
...18
.„19
...20
.„21
„.22
„.23
...24
™25
...26
.„27
.
.
...28
„.29
...30
...31
„.32
...33
...34
General features
Clock display / setting
Audio controls ......................
Selectable illumination
Theft deterrent faceplate....
Disabled system indicator.
..........
.........
Installation
Accessories.
Installation procedure.
Installation.....................
Connections
........
.
Troubleshooting guide.
Specifications.........
Dolby noise reduction manufactured under license fronn Dolby Laboratories Licensing Corporation.
"DOLBY" and the double-D symbol are trademarks of Dolby Laboratories Licensing Corporation.
......
2 English
...35
...36
...38
...39
„,40
„41
„42
„43
„45
..46
..48

Safety precautions
Awarning
Take the following precautions to
prevent fire and avoid personal injury :
• Press in the faceplate until it is firmly
locked to the main unit to prevent it
from being detached in an accident.
• When extending the ignition cable,
battery cable, or ground cable, use
0.75mm^ (AWG18) or larger automotive
grade cable to avoid cable deterioration
or damage to the covering.
• Check that no metal objects (coins,
tools, etc.) are left inside the unit to
avoid short circuits.
• If you smell or see smoke, turn the
power off immediately and consult your
Kenwood dealer.
ACAUTION
Take the following precautions to keep
the unit in proper working order.
• Be sure the unit is connected to a 12V
DC power supply with a negative ground
connection.
• Do not open the top or bottom cover.
• Do not install the unit in places it is
exposed to direct sunlight, high heat or
humidity, water may splash over it, or
dust exists. _
• Do not store the detached faceplate or
faceplate storage case in places it is
exposed to direct sunlight or high heat.
• Do not splash water on the faceplate,
• The faceplate is a precision piece of
equipment that contains sensitive parts.
Do not subject it to excessive shock.
• Do not touch the terminals of the
faceplate or the unit.
• If you need to replace the fuse, make
sure the new fuse is of the same type
and rating. Using a fuse of a different
type of rating may damage your unit.
The fuse rating is normally shown on the
fuse and fuse box.
• If you need to replace the fuse, unplug
the wiring harness before replacing the
fuse to prevent short circuits. .
FCC WARNING
• This equipment may generate or use
radio frequency energy. Changes or
modifications to this equipment may
cause harmful interference'unless the
modifications are expressly approved in
the instruction manual. The user could
lose the authority to operate this
equipment if an unauthorized change or
modification is made.
IMPORTANT INFORMATION
This unit is NOT designed to be
connected directly to a CD changer that
was manufactured and sold before
1994* If you plan to use such units^
please read the following information
carefully.
• To control KDC-C200 / KDC-CSOO / KDC-C400
A CA-DS100 (sold separately as an’
optional accessory), along with the
control box and extension cord supplied
with the CD changer, are required.
• To control KDC-C301 / KDC-C6Q0 / KDC-C8Q0/
KDC-C601/KDC-C40!
A CA-DS100 (sold separately as an
optional accessory), along with the
extension cord supplied with the CD
changer, are required.
• KDC-ClOO / KDC-C302/ C205 / C705 and CD
changer Manufactured by Other Companies
are not compatible with this Kenwood
model.
FAILURE TO FOLLOW THESE INSTRUCTIONS
MAY RESULT IN DAMAGE TO THIS UNIT
AND/ORTHE CD CHANGER
03
CD
—h
o
CD
C
</)
CD
English 3
Safety precautions
NOTE
CD
If you have difficulty in installing this unit
CO
in your vehicle, contact your Kenwood
(D
dealer.
О
If it doesn't seem to be working
Ч—
(D
properly, first press the Reset button.
CD
If the malfunction persists, consult your
Kenwood dealer.
Cleaning the unit
* If the front panel is dirty, wipe it clean
with a silicon cloth or soft dry cloth with
the power off.
ACAUTION
Do not use hard cloths or paint thinner,
alcohol, or other volatile solvents. These
may damage external surfaces or
remove indicator.characters.
Cleaning the faceplate terminal
• If the faceplate terminal or mount
faceplate terminal becomes dirty, wipe it
clean with a soft dry cloth.
Cleaning the tape head
• As you play tapes for a long time,
magnetic dust and other grime
- accumulates around the heads and
eventually causes noise that lowers
sound quality. To clean the heads, use a
cleaning tape or cleaning kit. Make sure
you purchase a cleaning tape or cleaning
kit suited to car audio use.
Reset button
Be careful with your tapes.
• Before loading a cassette, take up any
slack tape, by turning one of the spools
with a pencil. Loading a slack tape can
cause tape to tangle around the capstan
and pinch roller and other problems,
• Do not use any deformed .cassettes or
cassettes with labels coming off, or the
unit may fail.
• Do not leave cassettes exposed to high
heat (for example, on the dashboard
where it is exposed _Lo direct sunlight, or
near heater outlets). This can deform
the cassette shell.
• Avoid long cassettes, such as 120minute tapes. The tape is thin and
easily tangled around the pinch roller or
other parts.
• If you do not listen to your tape, remove,
it from the unit and store it safely. If a
cassette is I.eftin for a long time, the
tape can stick to the tape head, causing
failure.
4 English

Features
ITuner section
Auto seek tuning (Page 10]
Automaticaily searches for stations you
can receive.
Station preset memory (Page 18)
Stores the frequencies of your favourite
stations in теплоту* The frequencies
stored in nnemory can be recalled by a
single touch of a button.
Auto memory entry (Page 19)
Automatically stores the stations in the
band you are listening to in memory.
You can tune to the stations stored in
memory by a single touch of a button in
the same way as for the Stations preset
memory function. If you use this
function when you drive a long way and
do not know what stations are available
there, you can check the programmes
broadcast by local stations by recalling
them by a single touch of a button.
Priority radio preset (Page 20)
This function enables you to tune to the
preset station by a single touch of a
button while you are listening to a .
cassette or disc. Since you can listen to
a station without switching to the tuner
mode, it is useful to listen your favourite
station (such as news, traffic
information).
Local seek (Page 12)
When this feature is turned on, the
tuner scans only the stations offering
good reception during Auto seek tuning
and Auto memory entry.
^ CRSC (Clean Reception System
Circuit) (Page 21)
When this feature is turned on, the
tuner switches reception to mono to
reduce multi-path noise if it occurs in the
broadcast you are listening to.
Channel space selection {Page 22)
This feature allows you to change the
frequency step between 200 kHz in
FM/10 kHz in AM and 50 kHz in FM/9
kHz in AM.
из
CD
o’
CD
c
СЛ
CD
English 5

Cassette player section
„ Tape type selection (Page 14)
Ill
The Tape type selection function allows
3
you to play normal tapes and metal
ci>
(chrome) tapes.
o
M—
o
„DPSS (Direct Program Search
CQ
System) (Page 23)
This function lets you select tracks up to
nine positions before or after the one
you are playing.
.Index scan (Page 24)
When this function is turned on, the. first
part of each track on the tape is played
in succession. This function is useful to
search for the track you want to listen
to.
. Music repeat [Page 25)
When this function is turned on, the
player plays the track you are listening to
repeatedly,
• Blank skip (Page 26)
When this feature is turned on, the .
player automatically fast forwards to the
next track if it detects a long blank
section.
___________
,
.Tuner call (Page 27)
When this function is turned on, you can
listen to the radio while rewinding or
fast forwarding a cassette.
■Disc changer (optional) control
section
.Disc changer control (Page 28)
This unit has a Disc changer control
function.
. Track / Disc search (Page 29)
You can search far [he track / disc you
want by specifying the track / disc
number.
.Track repeat (Page 30)
When this function is turned on, the
track you are listening to is played
repeatedly.
. Disc repeat (Page 30)
When this function is turned on, the disc
you are listening to is played repeatedly.
. Track scan (Page 31)
When this function is turned on, the first
part of each track on -the disc you are
listening to is played automatically to
help you find the one you-want.
. Disc scan (Page 32)
When this function is turned on, the first
part of each disc in the Disc changer is
played automatically to help you find
one you want from the magazine loaded
in the Disc changer.
• Random play (Page 33)
When this function is turned on, the
tracks on the disc you are listening to
are played in random order.
6 English
I Magazine random play (Page 34)
When this function is turned on, the
tracks on the discs in your Disc changer
are played in random order.

■General section
Remote control (Function of KRC-701)
(Page 15}
This unit can be operated with the
wireless remote control.
There are also convenient features
available only with the remote control
Attenuator (Page 8)
This function allows you to lower the
volume quickly. The fade-in function is .
provided to restore the originai volume
gradually.
Loudness control (Page 9)
When this function is turned on when
the volume level is tow, sound is made
clear by emphasizing bass. .
Audio controls (Page 36)
Adjust the bass, treble, balance, and
fader.
Selectable illumination (Function of KRC-701) (Page 38)
Allows illumination colour to be
switched between green and orange.
Clock display (Page 35)
The time can be displayed.
Theft deterrent faceplate (Page 39)
The faceplate is detachable. When you
leave the vehicle, you can take the
faceplate with you to help prevent theft.
Disabled system indicator (Page 40}
When the faceplate is detached from
the unit, the LED blinks.
Automatic illumination control (Function of KRC-701)
When the illumination cable is
connected, the display panel lights up
when the vehicle's lights are on even if
the power is off. You can turn the
power on easily in darkness.
If the disabled system is removed, the
Disabled System indicator LED lights to
remind you to reattach the faceplate.
Automatic dimmer control (Function of KRC-701)
When the dimmer cable is connected,
automatically dims the display when the
car's light control is turned on.
DO
CD
■H-i
О
-n
CD
C
w
CD
English 1
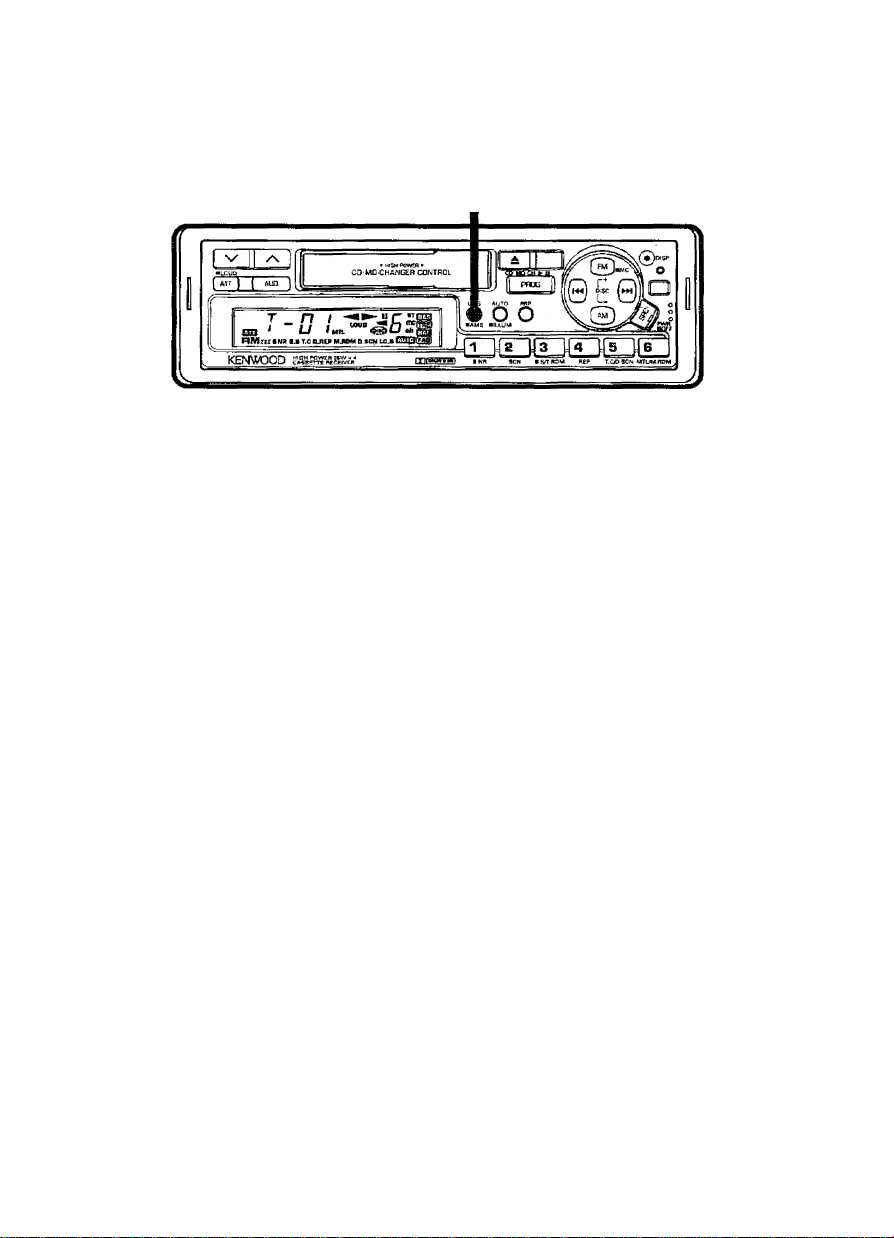
Power/Volume/Attenuator
Volume
[ Wjo ]
T “ 0
ENWOOD
CD MC CHArJGEH GCNTBOL
■SlvsH
Attenuator
To turn the power on
Press the Source button.
NOTE
Perform the foilowing operations with
the power on.
To turn the power off
Press the Source button for more
than a second.
To increase the volume
Press the Audio up button{>^).
PfAi
38
To decrease the volume
Press the Audio down button{N/).
-VP
Power
To use the Attenuator function
Press the Attenuator button.
The Attenuator indicator will appear
on the display and Attenuator
function will turn on.
5^.
ON
To cancel the Attenuator
function
Press the Attenuator button or set
the volume to minimum.
The Attenuator indicator disappears
and the Attenuator function is
cancelled.
To stop all the functions with the power on
Press the Source button to select
All off mode.
When “OFF" is displayed, you are in
All off mode. You can stop all the
function with the power on,
8 English
Loudness
Loudness
To use loudness control
Press the Loudness button for
more than a second.
Loudness is turned on and the
Loudness indicator appears on the
display. This function is factory-set to
ON.
^ ^ j <Tauo>
To cancel loudness
control
Press the Loudness button for
nnore than a second.
Loudness is turned off and the
Loudness indicator disappears.
I
DO
?2.
o*
o
■O
o
o
D
cn
ON
English 9

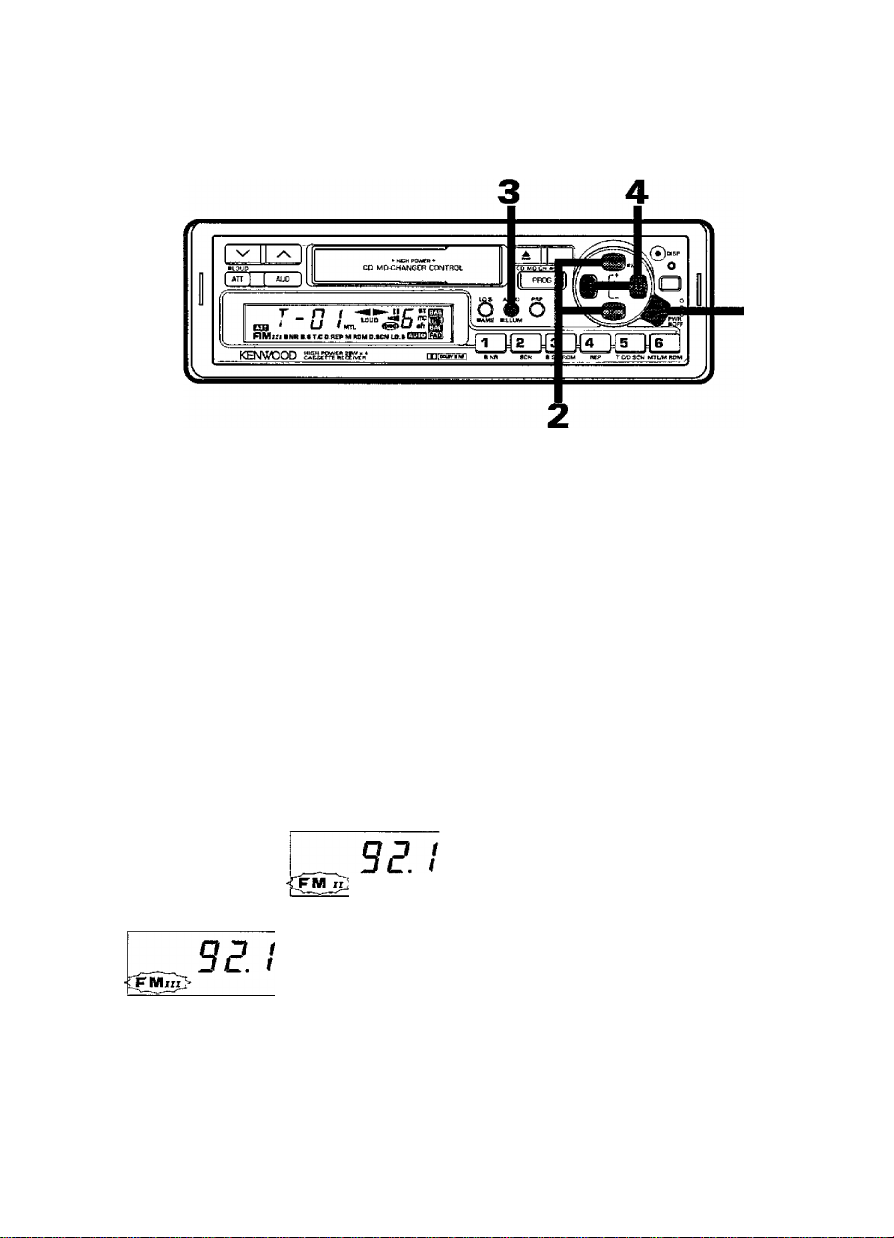
Auto seek tuning
Listen to the radio
Press the Source button to select
Tuner mode.
When "TUnE" is displayed, you are in
Tuner mode.
i u n iz
To selecta band
Press the FM/AM button.
Each tinne you press the FM button
briefly, the band changes between
FM1, FM2, and FM3.
Press the AM button to choose AM
band.
^ ''
FMl
FM3
FM2
AM
To select Auto seek tuning
mode
Press the Auto button.
The Auto indicator wilt appear on the
display and Auto seek tuning will turn
on. This function is factory-set to ON.
5^.1
To tune
Press the Tuning up/down button.
When the Tuning up button is
pressed, up seeking is performed.
When the Tuning down button is
pressed,.down seeking is performed.
The Stereo indicator appears on the
display when stereo broadcasts are
received.
SE.
10 English
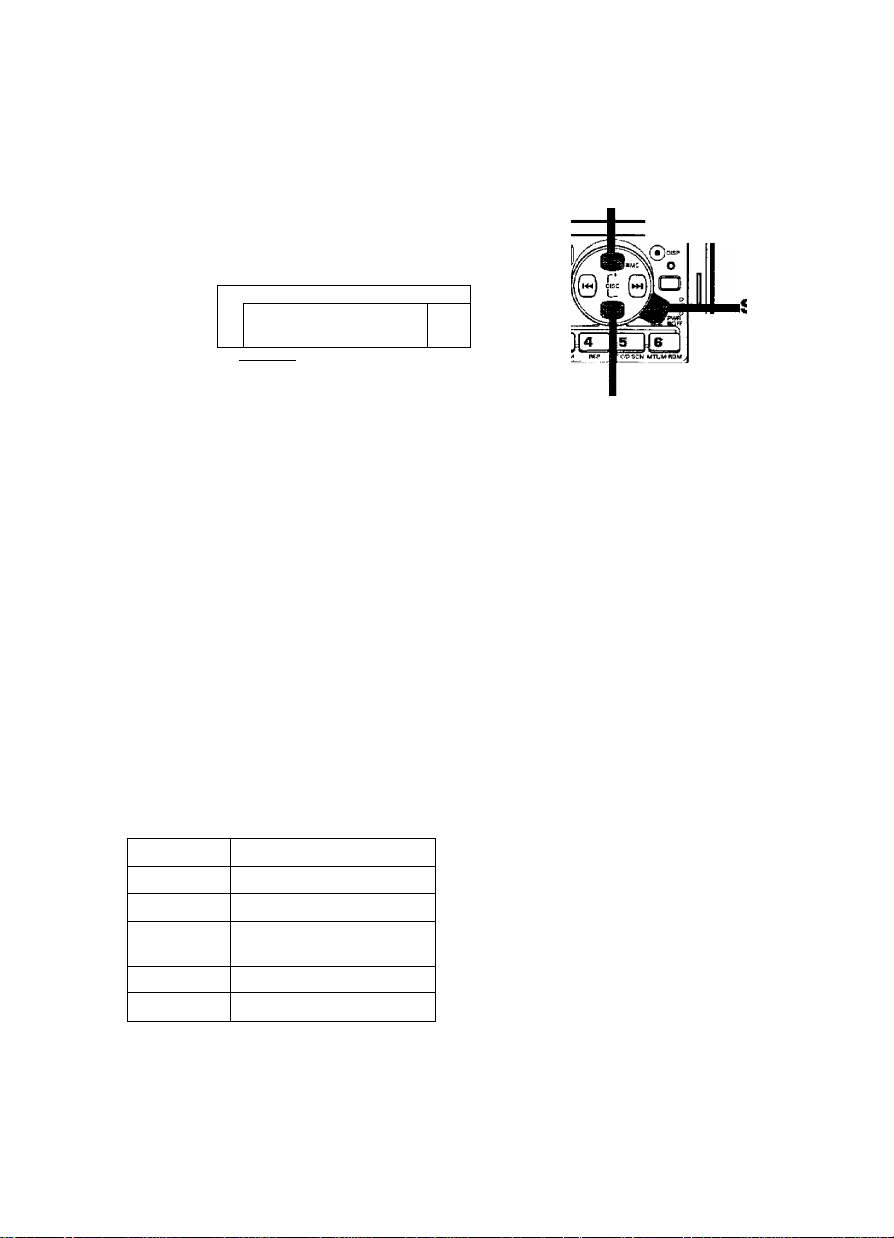
Manual tuning
"O
0
o
0)
DO
CÙ
£2
o'
o
0
D
Listen to the radio
Press the Source button to select
Tuner mode.
When "TUhE" is displayed, you are in
Tuner mode.
* unc
To select a band
Press the FM/AM button.
Each time you press the FM button
briefly, the band changes between
FMl, FM2, and FM3,
Press the AM button to choose AM
band.
FM1
FM2
53D
FM3
AM
To select Manual tuning mode
Press the Auto button.
The Auto indicator disappears and the
Auto seek tuning is cancelled..
9£
To tune
Press the Tuning up/down button.
When you press the button once; the
received frequency changes by one
step. The frequency will continue to
change as long as you hold the button
down.
The Stereo indicator appears on the
display when stereo broadcasts are
received.
Si?.
English 11
Local seek
I
CO
c
o
CO
1_
CD
Cl
O
'co
CO
CO
To use Local seek
Briefly press the Local seek button.
The Local seek indicator will appear'
on the display, and local seek wi(! turn
on.
вг. I
Local seek
To cancel Local seek
Briefly press the Local seek button.
The Local seek indicator disappears,
and local seek turns off.
ON
12 English
Cassette tape play
Cassette slot Eject Fast forward
^
--
gB ^ Li 1щ п .
FtMiri BNB BLBT.C □ ЛЕРМ.РПМO.KN LD.iGSD
KENWOOD
To play a cassette
Insert a cassette with the tape
aperture on the right.
If there is a tape in the unit, press
the Source button to select Tape
mode.
The word "TAPE" will be displayed,
and playback will start.
ТИРЕ
il
ÌOE
Program Fast rewind
ÀCAUTION
If you do not listen to your tape,
remove it from the unit and store it
safely. If a cassette is left in for a
long time, the tape can stick to the
tape head, causing failure.
To stop and eject
Press the Eject button.
The tape playing stops and the player
ejects the cassette.
>ource ^
I
CO
CD
СЛ
o'
о
■D
CD
CD
о
CO
NOTE
When you insert the cassette with
side A up, one of the following
indicators appears or blinks on the
display to indicate the tape operation.
Indicator
►
◄
Tape side playing/status
Side A
SideB
The tape is stopped. The
player is in another mode.
Fast forwarding
Fast rewinding
To fast forward/rewind
Press the Fast forward or Fast
rewind button.
When you press the fast forward
button, the tape is fast forwarded.
When you press the fast rewind
button, the tape is rewound.
The Operation indicator blinks.
To cancel fast
forward/rewind
Press the Program button.
The fast forward/rewind is cancelled
and the tape playing begins.
To switch sides
Press the Program button.
The player will play the reverse side.
English 13
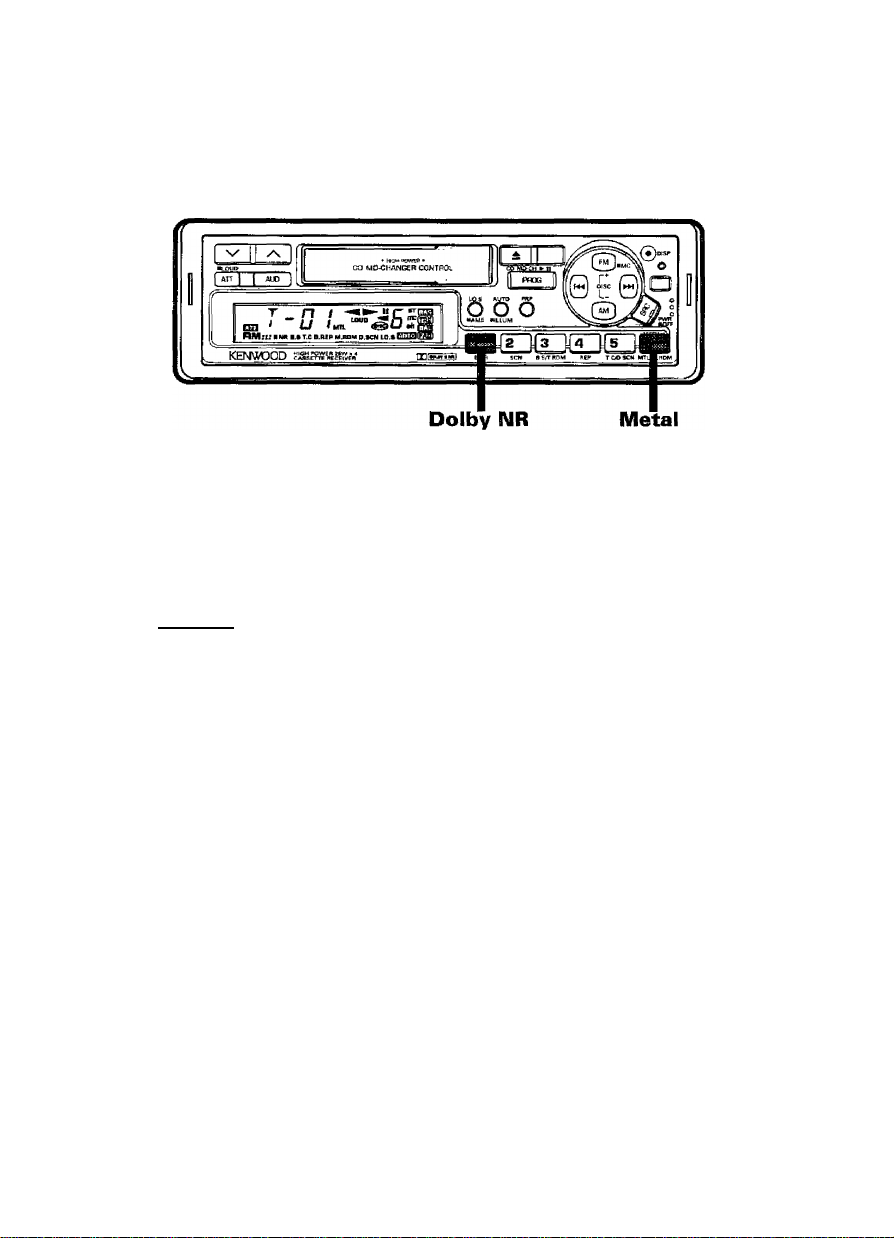
Dolby B NR/Tape type selection
I
CO
c
_o
'■M
CO
cu
QO
o
‘co
co
CQ
To use Dolby B NR
Press the Dolby NR button,
The Dolby B NR indicator will appear
on the display and Dolby B NR will
turn on.
TRPE
<s> ■ .
ON
To cancel Dolby B NR
Press the Dolby NR button.
The Dolby B NR indicator will
disappear and Dolby B NR will turn
off.
To listen to
metal/chrome tapes
Press the Metal button.
The Metal indicator will appear on the
display and the unit will be set to the
metal/chrome tape position.
Metal/chrome tape position
To listen to normal tapes
Press the Metal button.
The Metal indicator will disappear and
the unit will be set to the normal tape
position. The unit is factory-set to the
normal tape position.
TRPE^ ^
14 English
TRPE
Norma! tape position
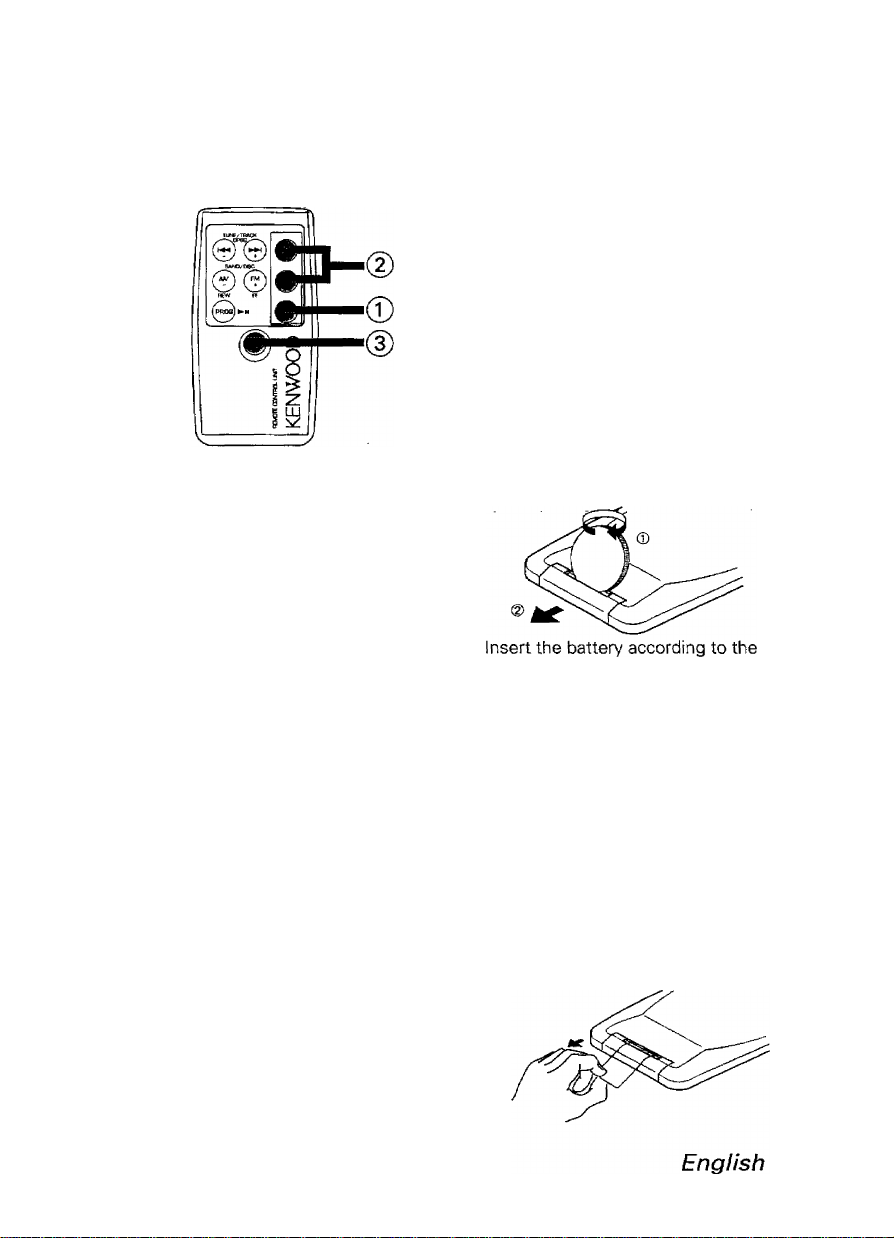
Ba si c o p er at i on s o f r e mo t e c on t r ol (F u nc t io n o f t h e К ВС - Ш)
All modes
©Attenuator button
Lowers vofume imnnediately.
To restore previous level, press this
button again or set the volume to
minimum.
©Volume button
The ^button increases the volume.
The button decreases the volume.
©Source button
Each time you press this button, the
mode changes.
Replacing the battery
* Use one lithium battery (CR2025}.
illustration inside the battery case,
taking care not to reverse the -f and polarity.
* This battery life is about 6 months,
depending on operating conditions.
When it expires, replace it.
I
Ш
Q>
o'
о
о
о
D
W
AWARNINGI
Store the lithium battery outside the
reach of children. In case a person
swallows a lithium battery, immediately
call the doctor.
NOTE
Before using the remote controller for
the first time, pull out the film from the
battery case.
 Loading...