

Page 1

KRC-691
KRC-591V
KRC-591
CASSETTE RECEIVER
INSTRUCTION MANUAL
AMPLI-TUNER-LECTEUR DE CASSETTE
MODE D’EMPLOI
CASSETTEN-RECEIVER
BEDIENUNGSANLEITUNG
© B64-2556-00/00 (EW)
Page 2

Contents
Safety precautions......................3
About Cassette tape ...................4
English
About RDS ..................................4
General features .........................5
Power
Selecting the Source
Volume
Attenuator
Loudness
System Q
Audio Control
Speaker Setting
Switching Display
Auxiliary Input Display Setting
Theft Deterrent Faceplate
TEL Mute
Tuner features .............................9
Tuning
Station Preset Memory
Auto Memory Entry
Preset Tuning
RDS features .............................11
Traffic Information
Radio Text Scroll
PTY (Program Type)
Program Type preset
Changing Language for PTY Function
Cassette player features...........14
Playing Cassette Tapes
Fast Forwarding and Rewinding
Dolby B NR
Selecting the Tape type
Tape Advance
Blank Skip
Music Repeat
External disc control features..16
Playing External Disc
Fast Forwarding and Reversing
Track Search
Album Search
Track/Album Repeat
Track Scan
Random Play
Magazine Random Play
Disc Naming (DNPS)
Text/Title Scroll
Menu system.............................19
Menu System
Security Code
Touch Sensor Tone
Manual Clock Adjustment
Synchronize Clock
DSI (Disabled System Indicator)
Selectable Illumination
Switching Graphic Display
Switching Display Type
Contrast Adjustment
Dimmer
News Bulletin with Timeout Setting
Local Seek
Tuning Mode
Auto Memory Entry
AF (Alternative Frequency)
Restricting RDS Region
(Region Restrict Function)
Auto TP Seek
Monaural Reception
Text Scroll
Power OFF Timer
Accessories ...............................25
Installation Procedure ..............25
Connecting Wires to Terminals 26
Installation ................................27
Troubleshooting Guide .............29
Specifications ...........................33
— 2 —
Page 3
Safety precautions
2WARNING
To prevent injury and/or fire, take the
following precautions:
• Insert the unit all the way until it is fully
locked in place. Otherwise it may fly out of
place during collisions and other jolts.
• When extending the ignition, battery, or
ground wires, make sure to use automotivegrade wires or other wires with a 0.75mm
(AWG18) or more to prevent wire
deterioration and damage to the wire
coating.
•To prevent short circuits, never put or leave
any metallic objects (e.g., coins or metal
tools) inside the unit.
• If the unit starts to emit smoke or strange
smells, turn off the power immediately and
consult your Kenwood dealer.
• Make sure not to get your fingers caught
between the faceplate and the unit.
• Be careful not to drop the unit or subject it to
strong shock.
The unit may break or crack because it
contains glass parts.
• Do not touch the liquid crystal fluid if the
LCD is damaged or broken due to shock. The
liquid crystal fluid may be dangerous to your
health or even fatal.
If the liquid crystal fluid from the LCD
contacts your body or clothing, wash it off
with soap immediately.
2
2CAUTION
To prevent damage to the machine,
take the following precautions:
• Make sure to ground the unit to a negative
12V DC power supply.
• Do not open the top or bottom covers of the
unit.
• Do not install the unit in a spot exposed to
direct sunlight or excessive heat or humidity.
Also avoid places with too much dust or the
possibility of water splashing.
•Do not set the removed faceplate or the
faceplate case in areas exposed to direct
sunlight, excessive heat or humidity. Also
avoid places with too much dust or the
possibility of water splashing.
•To prevent deterioration, do not touch the
terminals of the unit or faceplate with your
fingers.
• Do not subject the faceplate to excessive
shock, as it is a piece of precision
equipment.
• When replacing a fuse, only use a new one
with the prescribed rating. Using a fuse with
the wrong rating may cause your unit to
malfunction.
•To prevent short circuits when replacing a
fuse, first disconnect the wiring harness.
• Do not place any object between the
faceplate and the unit.
• During installation, do not use any screws
except for the ones provided. The use of
improper screws might result in damage to
the main unit.
— 3 —
IMPORTANT INFORMATION
About the disc changer/CD player to
be connected:
To connect a disc changer having the "O-N"
switch to this unit, set the "O-N" switch to "N".
To connect a disc changer having no "O-N"
switch to this unit, the converter cord CADS100 and/or switching adapter KCA-S210A
are required as options.
A disc changer doesn't work when it is
connected without using these options.
If a model with no "O-N" switch is connected,
some unavailable functions and information
that cannot be displayed are generated.
Note that none of the KDC-C100, KDC-C302,
C205, C705, and non-Kenwood CD changers
can be connected.
You can damage both your unit and the CD
changer if you connect them incorrectly.
Manufactured under license from Dolby
Laboratories.
“Dolby” and the double-D symbol are
trademarks of Dolby Laboratories.
Page 4
Safety precautions
NOTE
• If you experience problems during
installation, consult your Kenwood dealer.
English
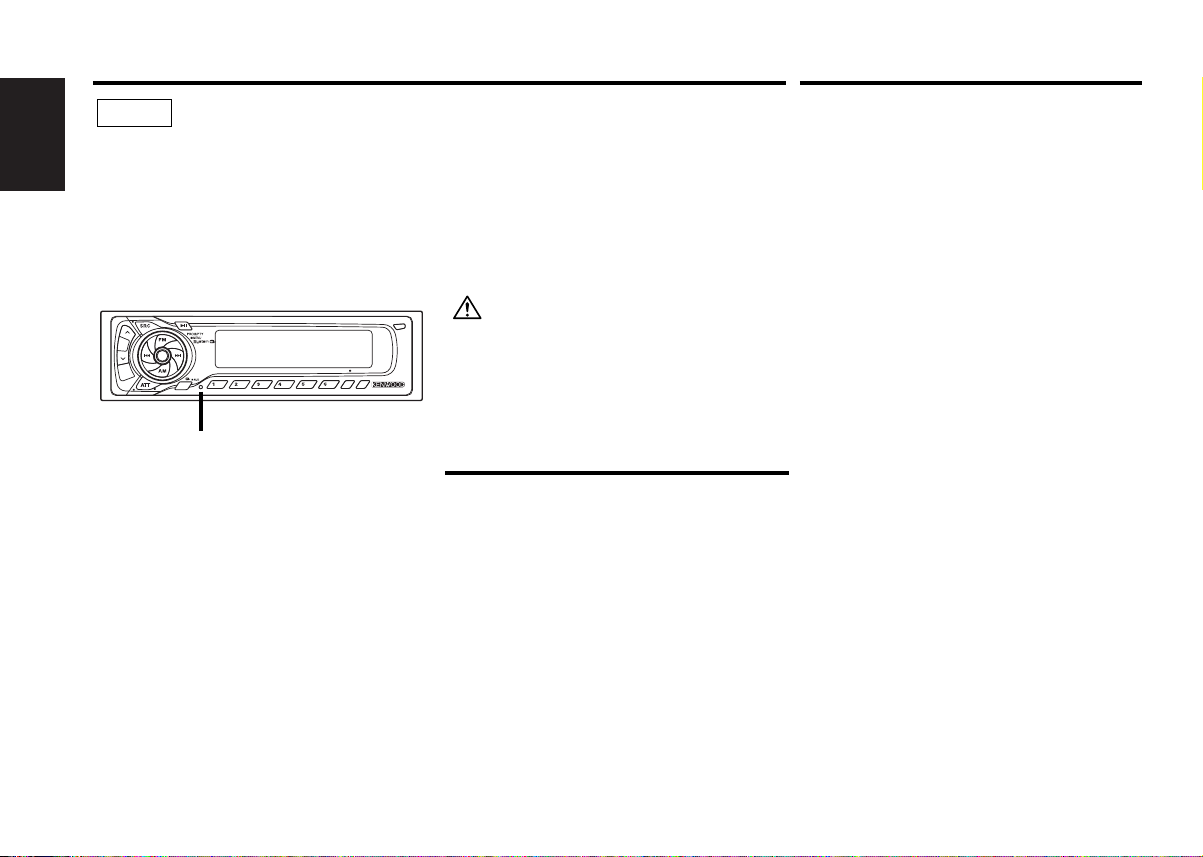
• If the unit does not seem to be working
right, try pressing the reset button first. If
that does not solve the problem, consult
your Kenwood dealer.
•Press the reset button if the Disc auto
changer fails to operate correctly. Normal
operation should be restored.
OFF
DAB
SCAN B.S./RDM REP MTL/M.RDM DISP
NF
LOUD
Reset button
• Characters in the LCD may become difficult
to read in temperatures below 41 ˚F (5 ˚C).
• The illustrations of the display and the panel
appearing in this manual are examples used
to explain more clearly how the controls are
used. Therefore, what appears on the display
in the illustrations may differ from what
appears on the display on the actual
equipment, and some of the illustrations on
the display may represent something
impossible in actual operation.
•We strongly recommend the use of the Code
Security function (see p.20) to prevent theft.
B NR
About RDS
Cleaning the Faceplate Terminals
If the terminals on the unit or faceplate get
dirty, wipe them with a dry, soft cloth.
Cleaning the Unit
If the faceplate of this unit is stained, wipe it
with a dry soft cloth such as a silicon cloth.
If the faceplate is stained badly, wipe the stain
off with a cloth moistened with neutral
cleaner, then wipe neutral detergent off.
Applying spray cleaner directly to the unit may
affect its mechanical parts. Wiping the
faceplate with a hard cloth or using a volatile
TITI
NAME
liquid such as thinner or alcohol may scratch
the surface or erases characters.
About Cassette tape
Cleaning the tape head
When there’s noise or the sound quality is bad
during tape play the tape head maybe dirty,
clean the tape head.
About Cassette tape
• If the tape is slack tighten it.
• If the cassette tape label is peeling off glue it
on again.
• Don’t use deformed cassette tape.
• Don’t place cassette tape on the dashboard
etc. where the temperature is high.
• Don’t use cassette tape that’s 100 minutes
long or longer.
RDS (Radio Data System)
When listening to an RDS station, the program
service name of the station is displayed,
advising you quickly which station is being
received.
RDS (Radio Data System) stations also
transmit frequency data for the same station.
When you are making long trips, this function
automatically alternative switches to the
particular frequency with the best reception
for the particular network of stations that you
want to listen to. The data is automatically
stored, allowing you to switch quickly to
another RDS stations, broadcasting the same
program, that has better reception. These
include stations stored in the station preset
memory that you often listen to.
Enhanced Other Network
Stations that offer <Enhanced Other
Network> also transmit information about
other RDS stations that have traffic
information. When you are tuned to a station
that is not transmitting traffic information, but
another RDS station starts transmitting a
traffic bulletin, the tuner automatically
switches to the other station for the duration
of the bulletin.
Alarm
When an emergency transmission (announcing
disasters, etc.) is sent, all current functions are
interrupted to allow the warning to be
received.
— 4 —
Page 5
General features
LOUD
DAB
SCAN B.S./RDM REP MTL/M.RDM DISP
OFF
TITI
NAME
B NR
u
d
ATT/
LOUD
SRC/
PWR OFF
DISP
4¢
AM
Q/
AUD
FM
KRC-691
KRC-591V/KRC-591
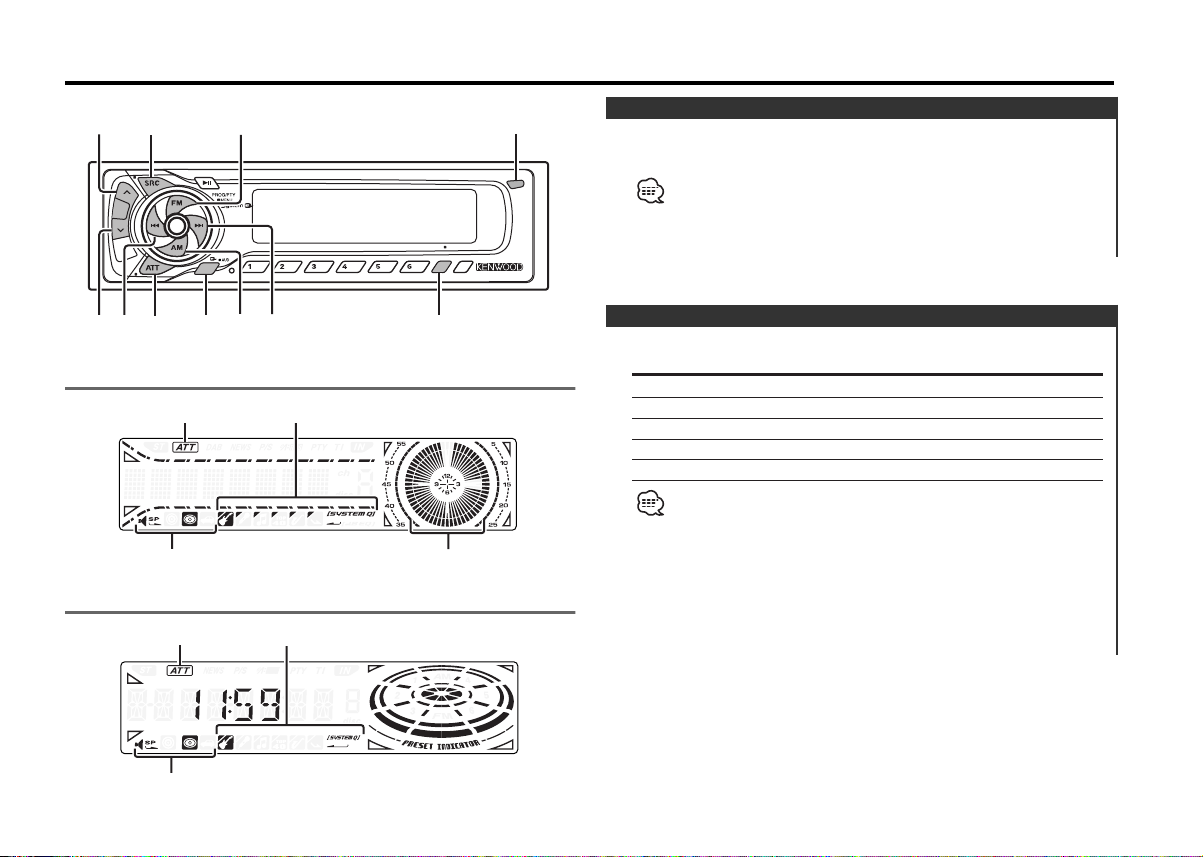
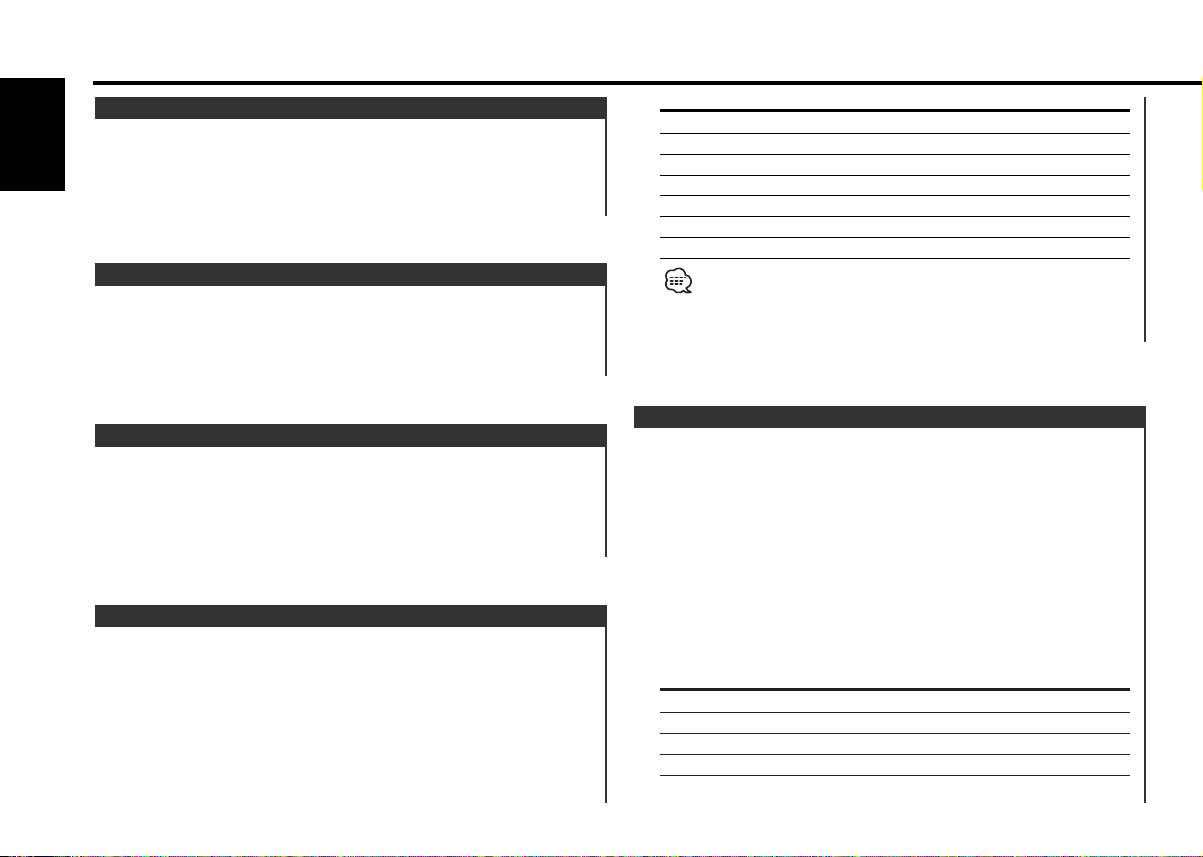
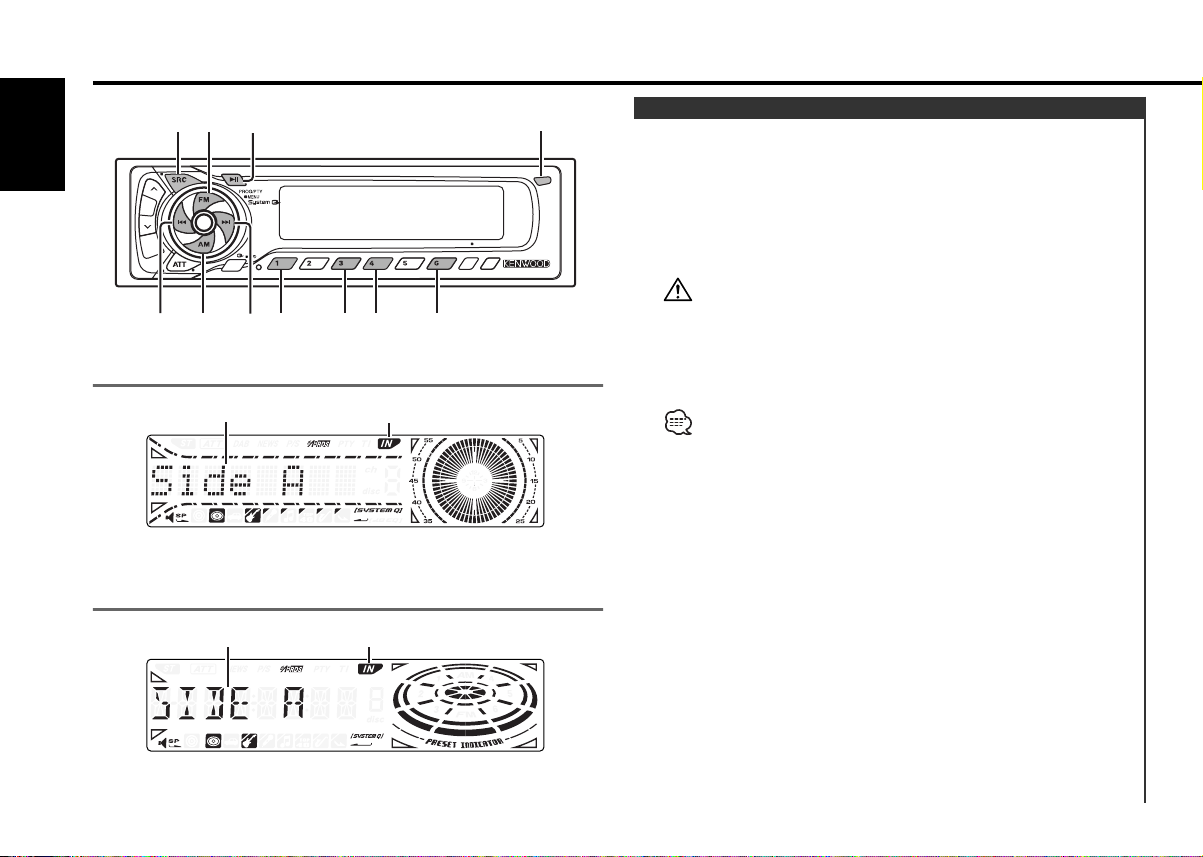
ATT indicator
SYSTEM Q indicator
Speaker Setting indicator
ATT indicator
SYSTEM Q indicator
Release button
Clock indicator
Power
Turning ON the Power
Press the [SRC] button.
When the power is ON, the <Security Code> (page 20) is displayed
as "CODE ON" or "CODE OFF".
Turning OFF the Power
Press the [SRC] button for at least 1 second.
Selecting the Source
Press the [SRC] button.
Source required Display
Tuner "TUNER"
Tape "TAPE"
External disc "DISC-CH"
Auxiliary input "AUX"
Standby (Illumination only mode) "ALL OFF"
• For Auxiliary input one of the below optional accessories is
necessary.
- KCA-S210A
- CA-C1AX
- CD changer with an Auxiliary input function installed.
• This unit automatically turns full power OFF after 20 minutes
lapses in Standby mode in order to save the vehicles battery.
The time until full power OFF can be set in <Power OFF Timer>
(page 24).
Speaker Setting indicator
— 5 —
Page 6
General features
Volume
Increasing Volume
English
Press the [u] button.
Decreasing Volume
Press the [d] button.
Attenuator
Turning the volume down quickly.
Press the [ATT] button.
Each time the button is pressed the Attenuator turns ON or OFF.
When it’s ON, the "ATT" indicator blinks.
Sound setting Display
Flat "Flat"/"FLAT"
User memory "User"/"USER"
Rock "Rock"/"ROCK"
Pops "Pops"/"POPS"
Easy "Easy"/"EASY"
Top 40 "Top40"/"TOP40"
Jazz "Jazz"/"JAZZ"
• User memory: The values set on the <Audio control> (page 6).
• Each setting value is changed with the <Speaker setting> (page
7).
First, select the speaker type with the Speaker setting.
Loudness
Compensating for low and high tones during low volume.
Press the [LOUD] button for at least 1 second.
Each time the button is pressed for at least 1 second the
Loudness turns ON or OFF.
When it's ON, "LOUD ON" is displayed.
System Q
You can recall the best sound setting preset for different types of
the music.
1 Select the source to set
Press the [SRC] button.
2 Select the Sound type
Press the [Q] button.
Each time the button is pressed the sound setting switches.
Audio Control
1 Select the source for adjustment
Press the [SRC] button.
2 Enter Audio Control mode
Press the [AUD] button for at least 1 second.
3 Select the Audio item for adjustment
Press the [FM] or [AM] button.
Each time the button is pressed the items that can be adjusted
switch as shown below.
4 Adjust the Audio item
Press the [4] or [¢] button.
Adjustment Item Display Range
Bass level "Bas"/"BAS" –8 — +8
Middle level "Mid"/"MID" –8 — +8
Treble level "Tre"/"TRE" –8 — +8
Balance "Bal"/"BAL" Left 15 — Right 15
Fader "Fad"/"FAD" Rear 15 — Front 15
— 6 —
Page 7

Volume offset "V-OFF" –8 — ±0
Volume offset: Each source's volume can be set as a difference
from the basic volume.
5 Exit Audio Control mode
Press the [AUD] button.
Speaker Setting
Fine-tuning so that the System Q value is optimal when setting
the speaker type.
1 Enter Standby
Press the [SRC] button.
Select the "ALL OFF" display.
2 Enter Speaker Setting mode
Press the [Q] button.
3 Select the Speaker type
Press the [4] or [¢] button.
Each time the button is pressed the setting switches as shown
below.
Speaker type Display
OFF "SP OFF"
For 5 & 4 in. speaker "SP 5/4"
For 6 & 6x9 in. speaker "SP 6*9/6"
For the OEM speaker "SP OEM"
4 Exit Speaker Setting mode
Press the [Q] button.
Switching Display
Switching the information displayed.
Press the [DISP] button.
Each time the button is pressed the display switches as shown
below.
In Tuner source
Information Display
Program Service name or Frequency
Radio text "R-TEXT"
Clock
Displaying the frequency during Program Service name
reception
Press the [DISP] button for at least 1 second.
The frequency for the RDS station will be displayed for 5
seconds instead of the Program Service name.
In Tape source
Information
Play side
Tape running
Clock
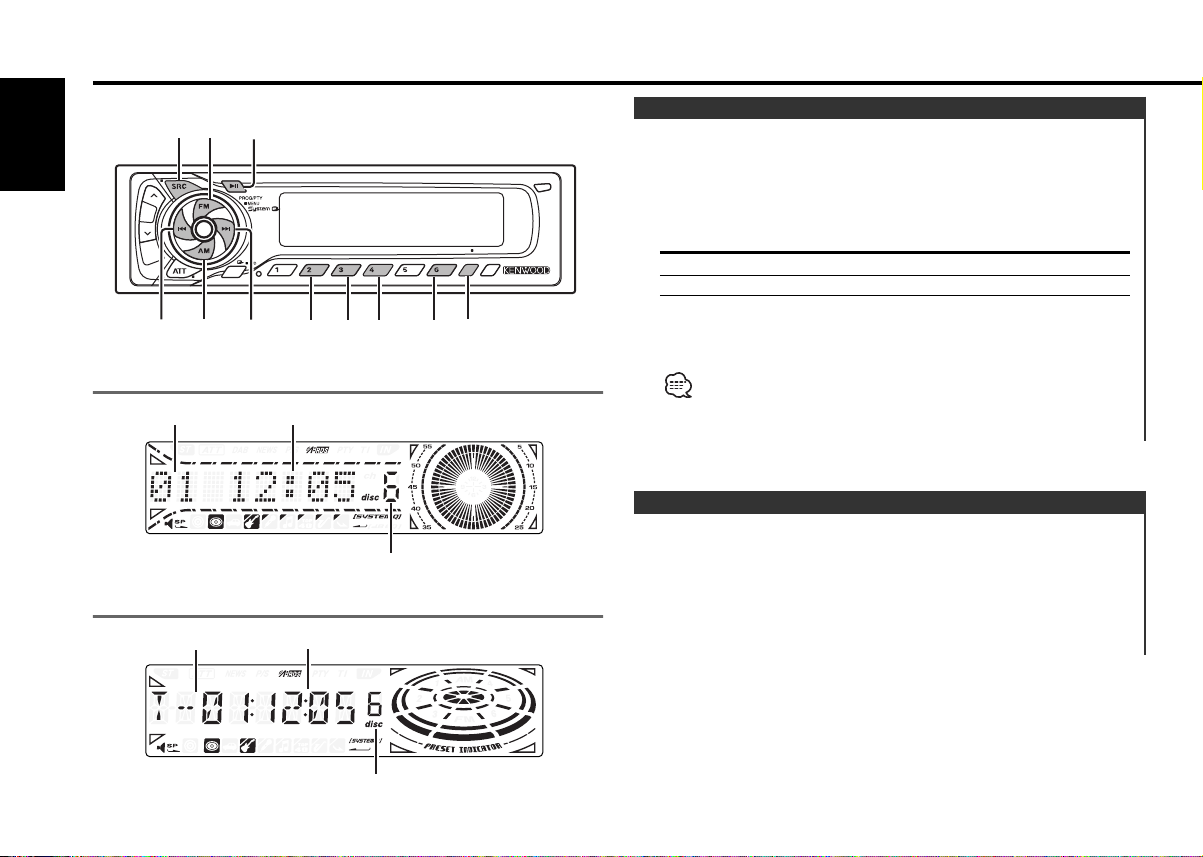
In External disc source
Information Display
Track number (KRC-691)
Track number & Track Time
(KRC-591V/591)
Disc name "DNPS"
Disc title "D-TITLE"
Track title "T-TITLE"
Track number & Track Time (KRC-691)
Clock
— 7 —
Page 8
General features
Auxiliary Input Display Setting
Selecting the display when this device is switched to Auxiliary
input source.
English
1 Select Auxiliary input source
Press the [SRC] button.
Select the "AUX" display.
2 Enter Auxiliary input display setting mode
Press the [DISP] button for at least 2 seconds.
The presently selected AUX Name is blinks.
3 Select the Auxiliary input display
Press the [4] or [¢] button.
Each time the button is pressed it switches through the below
displays.
• "AUX"
• "TV"
• "VCP"
• "GAME"
• "PORTABLE"
• "DVD"
4 Exit Auxiliary input display setting mode
Press the [DISP] button.
• When operation stops for 10 seconds, the name at that time is
selected, and Auxiliary input display setting mode closes.
• This function doesn't work when CA-C1AX is used.
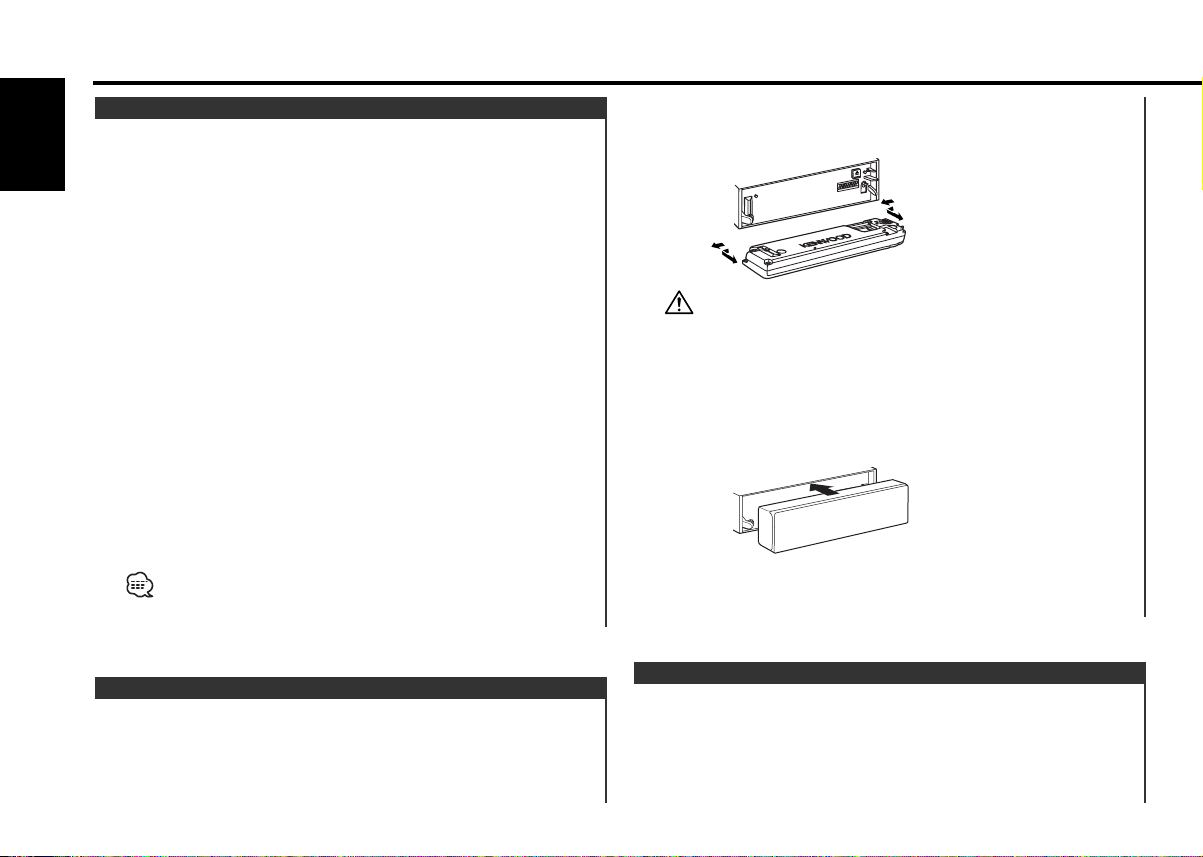
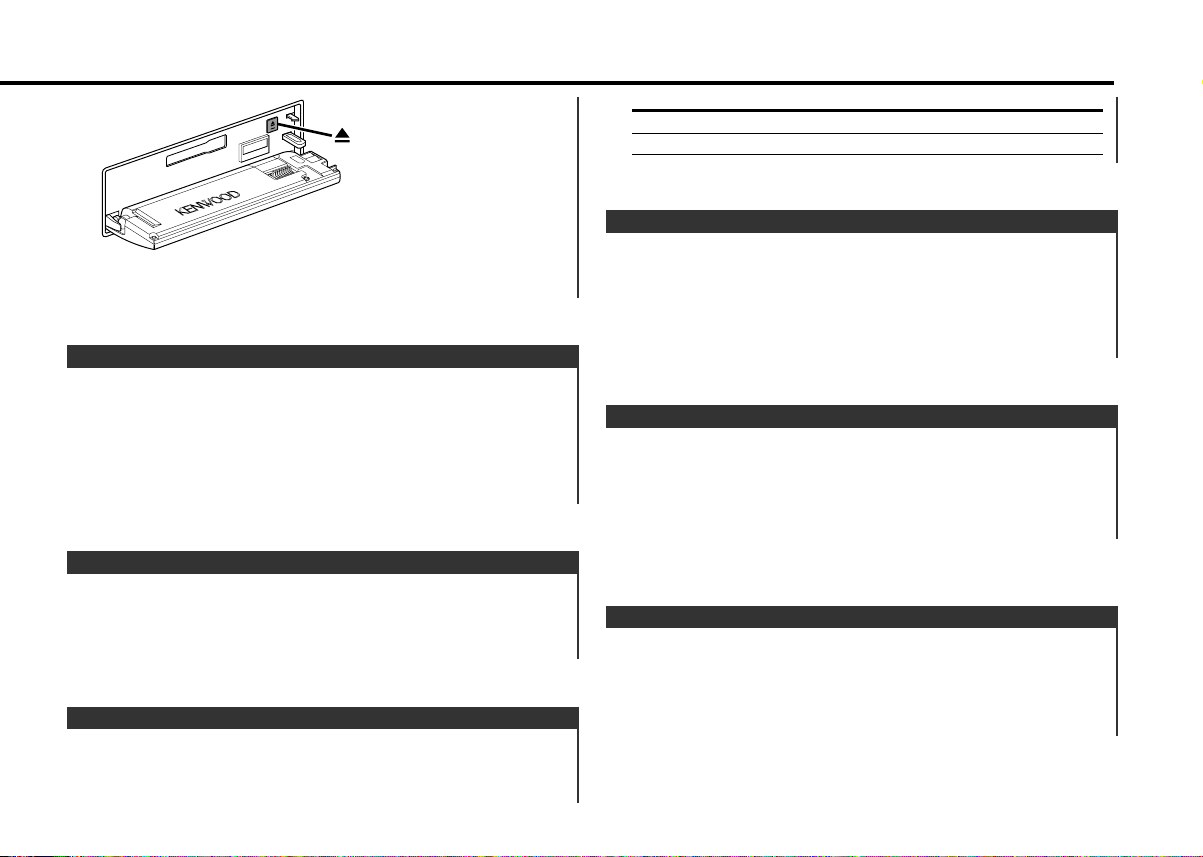
Drop open the faceplate.
2 Drawing the faceplate to left side pull it to the front and
remove it.
• The faceplate is a precision piece of equipment and can be
damaged by shocks or jolts. For that reason, keep the faceplate in
its special storage case while detached.
• Do not expose the faceplate or its storage case to direct sunlight
or excessive heat or humidity. Also avoid places with too much
dust or the possibility of water splashing.
Reattaching the Faceplate
1 Align the shaft on the unit with the depression on the
faceplate.
2 Push the faceplate in until it clicks.
The faceplate is locked in place, allowing you to use the unit.
Theft Deterrent Faceplate
The faceplate of the unit can be detached and taken with you,
helping to deter theft.
Removing the Faceplate
1 Press the Release button.
TEL Mute
The audio system automatically mutes when a call comes in.
When a call comes in
"CALL" is displayed.
The audio system pauses.
— 8 —
Page 9
Listening to the audio during a call
LOUD
DAB
SCAN B.S./RDM REP MTL/M.RDM DISP
OFF
TITI
NAME
B NR
SRC
4¢
AM # 1-6
FM
MENU
KRC-691
KRC-591V/KRC-591
Press the [SRC] button.
The "CALL" display disappears and the audio system comes back
ON.
When the call ends
Hang up the phone.
The "CALL" display disappears and the audio system comes back
ON.
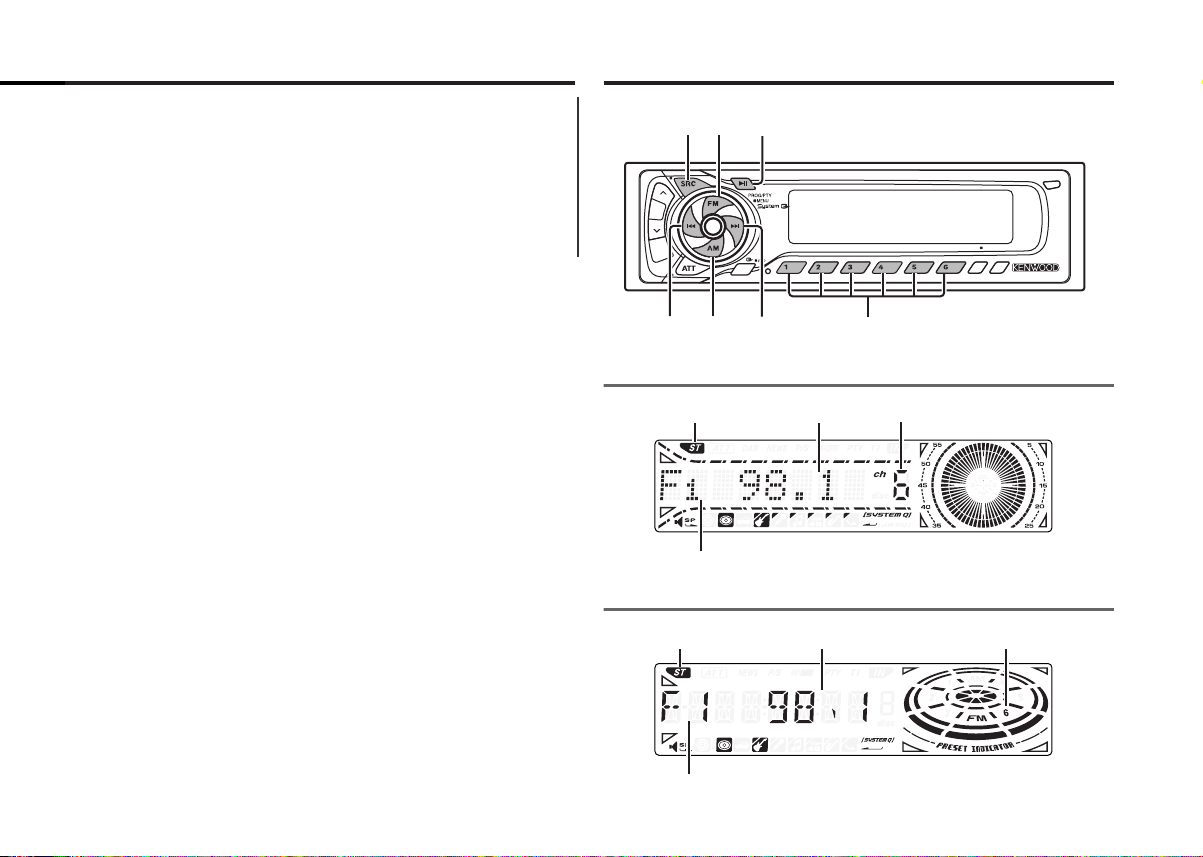
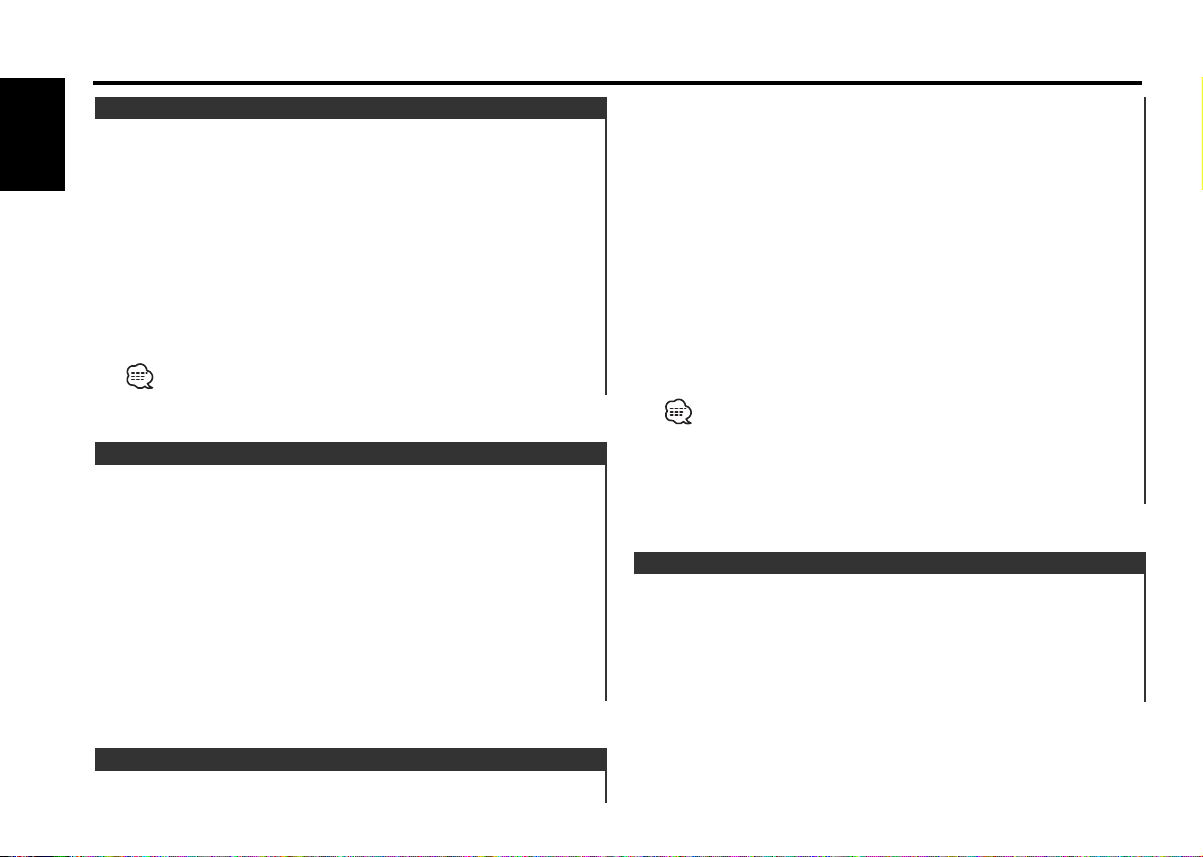
Tuner features
ST indicator
Frequency display
Preset station number
Band display
ST indicator
Frequency display
Preset station number
Band display
— 9 —
Page 10
Tuner features
Tuning
Selecting the station.
English
1 Select tuner source
Press the [SRC] button.
Select the "TUNER" display.
2 Select the band
Press the [FM] or [AM] button.
Each time the [FM] button is pressed it switches between the
FM1, FM2, and FM3 bands.
3 Tune up or down band
Press the [4] or [¢] button.
During reception of stereo stations the "ST" indicator is ON.
Station Preset Memory
Putting the station in the memory.
1 Select the band
Press the [FM] or [AM] button.
2 Select the frequency to put in the memory
Press the [4] or [¢] button.
3 Put the frequency in the memory
Press the [#1] — [#6] button for at least 2 seconds.
The preset number display blinks 1 time.
On each band, 1 station can be put in the memory on each [#1]
— [#6] button.
automatically.
1 Select the band for Auto Memory Entry
Press the [FM] or [AM] button.
2 Enter Menu mode
Press the [MENU] button for at least 1 second.
"MENU" is displayed.
3 Select the Auto Memory Entry mode
Press the [FM] or [AM] button.
Select the "A-Memory"/"A-MEMORY" display.
4 Open Auto Memory Entry
Press the [4] or [¢] button for at least 2 seconds.
When 6 stations that can be received are put in the memory
Auto Memory Entry closes.
• When the <AF Function> (page 23) is ON, only RDS stations are
put in the memory.
• When Auto Memory Entry is done in the FM2 band, the RDS
stations preset in the FM1 band aren't put in the memory.
Likewise, when it is done in the FM3 band, RDS stations preset in
FM1 or FM2 aren't put in the memory.
Preset Tuning
Calling up the stations in the memory.
1 Select the band
Press the [FM] or [AM] button.
2 Call up the station
Press the [#1] — [#6] button.
Auto Memory Entry
Putting a station with good reception in the memory
— 10 —
Page 11
RDS features
LOUD
DAB
SCAN B.S./RDM REP MTL/M.RDM DISP
OFF
NF
TITI
NAME
B NR
TIDISP# 1-6
4¢
AM
FM
PTY
KRC-691
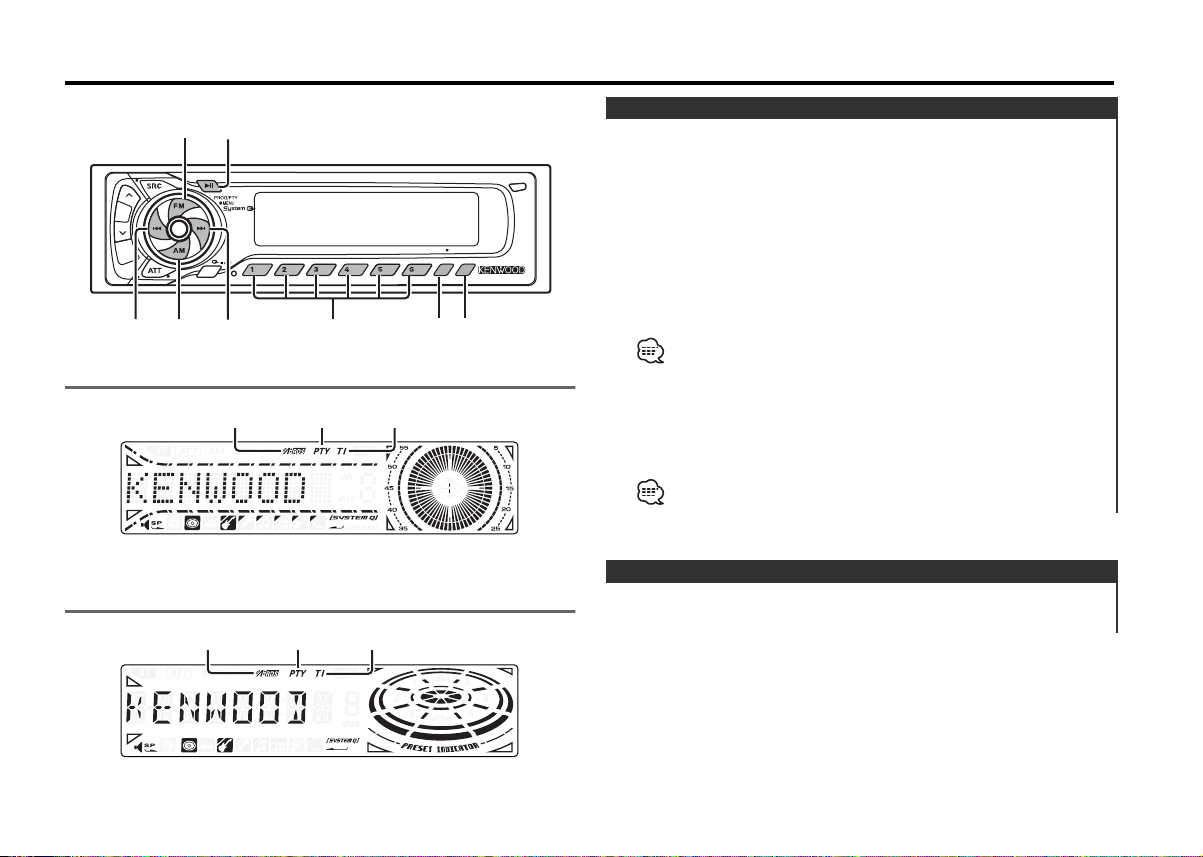
KRC-591V/KRC-591
RDS indicator
RDS indicator
PTY indicator
PTY indicator
TI indicator
TI indicator
Traffic Information
Switching to traffic information automatically when a traffic
bulletin starts even when you aren't listening to the radio.
Press the [TI] button.
Each time the button is pressed the Traffic Information function
turns ON or OFF.
When it's ON, "TI" indicator is ON.
When a traffic information station isn't being received the "TI"
indicator blinks.
When a traffic bulletin starts, "Traffic"/"TRAFFIC" is displayed it
and it switches to traffic information.
• During reception of a AM station when the Traffic Information
function is turned ON, it switches to a FM station.
•During reception of traffic information the adjusted volume is
automatically remembered, and the next time it switches to traffic
information it's automatically the remembered volume.
Receiving other traffic information stations
Press the [4] or [¢] button.
Traffic information station switching can be done when listening to
the radio.
Radio Text Scroll
Scrolling the displayed radio text.
Press the [DISP] button for at least 1 second.
— 11 —
Page 12
RDS features
PTY (Program Type)
Selecting the Program Type and searching for a station.
English
1 Enter PTY mode
Press the [PTY] button.
During PTY mode the "PTY" indicator is ON.
This function can't be used during a traffic bulletin or AM reception.
2 Select the Program Type
Press the [FM] or [AM] button.
Each time the button is pressed the Program Type switches as
shown below.
No. Program Type Display
KRC-691 KRC-591V /
1. Speech "Speech" "SPEECH"
2. Music "Music" "MUSIC"
3. News "News" "NEWS"
4. Current Affairs "Affairs" "AFFAIRS"
5. Information "Info" "INFO"
6. Sport "Sport" "SPORT"
7. Education "Educate" "EDUCATE"
8. Drama "Drama" "DRAMA"
9. Culture "Culture" "CULTURE"
10. Science "Science" "SCIENCE"
11. Varied "Varied" "VARIED"
12. Pop Music "Pop M" "POP M"
13. Rock Music "Rock M" "ROCK M"
14. Easy Listening Music "Easy M" "EASY M"
15. Light Classical "Light M" "LIGHT M"
16. Serious Classical "Classics" "CLASSICS"
17. Other Music "Other M" "OTHER M"
18. Weather "Weather" "WEATHER"
KRC-591
19. Finance "Finance" "FINANCE"
20. Children's programs "Children" "CHILDREN"
21. Social Affairs "Social" "SOCIAL"
22. Religion "Religion" "RELIGION"
23. Phone In "Phone In" "PHONE IN"
24. Travel "Travel" "TRAVEL"
25. Leisure "Leisure" "LEISURE"
26. Jazz Music "Jazz" "JAZZ"
27. Country Music "Country" "COUNTRY"
28. National Music "Nation M" "NATION M"
29. Oldies Music "Oldies" "OLDIES"
30. Folk Music "Folk M" "FOLK M"
31. Documentary "Document" "DOCUMENT"
• Speech and Music include the Program type shown below.
Speech: No.3
Music: No.12
• The Program Type can be put in the [#1]
and called up quickly. Refer to the <Program Type preset> (page
13).
• The display language can be changed. Refer to <Changing
Language for PTY Function> (page 13).
— 11, 18 — 25, 31
— 17, 26 — 30
3 Search for the selected Program Type station
Press the [4] or [¢] button.
When you want to search for other stations press the [4] or
[¢] button again.
When the selected Program Type isn't found, "No PTY"/"NO PTY" is
displayed. Select another Program Type.
4 Exit PTY mode
Press the [PTY] button.
— 12 —
— [#6] button memory
Page 13

Program Type preset
Putting the Program Type in the Preset button memory and
calling it up quickly.
Presetting the Program Type
1 Select the Program Type to preset
Refer to <PTY(Program Type)> (page 12).
2 Preset the Program Type
Press the [#1] — [#6] button for at least 2 seconds.
Calling up the preset Program Type
1 Enter PTY mode
Refer to <PTY(Program Type)> (page 12).
2 Call up the Program Type
Press the [#1] — [#6] button.
Changing Language for PTY Function
Selecting the Program Type display language.
1 Enter PTY mode
Refer to <PTY (Program Type)> (page 12).
2 Enter Changing Language mode
Press the [DISP] button.
3 Select the language
Press the [FM] or [AM] button.
Each time the button is pressed the language switches as shown
below.
Language Display
English "English"/"ENGLISH"
French "French"/"FRENCH"
Swedish "Swedish"/"SWEDISH"
German "German"/"GERMAN"
4 Exit Changing Language mode
Press the [DISP] button.
— 13 —
Page 14
Cassette player features
LOUD
DAB
SCAN B.S./RDM REP MTL/M.RDM DISP
OFF
NF
TITI
NAME
B NR
B NR B.S REP MTL
SRC
4¢
AM
FM
PROG
KRC-691
KRC-591V/KRC-591
English
Play side
Play side
IN indicator
IN indicator
Release button
Playing Cassette Tapes
When there's no Cassette Tape inserted
1 Drop open the faceplate
Press the Release button.
2 Insert a Cassette Tape.
3 Press the faceplate on the right side, and return it to its
former position.
• When the faceplate has been dropped open, it might interfere
with the shift lever or something else. If this happens, pay
attention to safety and move the shift lever or take an appropriate
action, then operate the unit.
• Do not use the unit with the faceplate in the open condition. If it's
used in the open position dust can enter the inside part and cause
damage.
When there's a Cassette Tape inserted, the "IN" indicator is ON.
When there's a Cassette Tape inserted
Press the [SRC] button.
Select the "TAPE" display.
When you want to listen to the reverse side
Press the [PROG] button.
Eject the Cassette Tape
1 Drop open the faceplate
Press the Release button.
2 Eject the Cassette Tape
Press the [0] button.
— 14 —
Page 15
3 Press the faceplate on the right side, and return it to its
former position.
Fast Forwarding and Rewinding
Fast Forwarding
Press the [FM] button.
When it's stopped press the [PROG] button.
Rewinding
Press the [AM] button.
When it's stopped press the [PROG] button.
Dolby B NR
Press the [B NR] button.
Each time the button is pressed the Dolby B NR turns ON or
OFF.
When it's ON, "B-NR" is displayed.
Selecting the Tape type
Press the [MTL] button.
Each time the button is pressed the Tape type switches as
shown below.
Tape type Display
CrO2 (Type II), FeCr (Type III), Metal (Type IV) "MTL ON"
Normal (Type I) "MTL OFF"
Tape Advance
Skipping to the next song or the start of the current song.
Skipping to the next song
Press the [¢] button.
Skips to the start of the current song
Press the [4] button.
Blank Skip
Fast forwarding automatically when an unrecorded portion
continues for at least 10 seconds.
Press the [B.S] button.
Each time the button is pressed the Blank Skip turns ON or OFF.
When it's ON, "BS ON" is displayed.
Music Repeat
Repeating the present song.
Press the [REP] button.
Each time the button is pressed the Music Repeat turns ON or
OFF.
When it's ON, "REP ON" is displayed.
— 15 —
Page 16
External disc control features
LOUD
DAB
SCAN B.S./RDM REP MTL/M.RDM DISP
OFF
NF
TITI
NAME
B NR
38
SCAN RDM REP M.RDM DISP/
NAME
SRC
4¢
AM
FM
KRC-691
KRC-591V/KRC-591
English
Track number
Track number
Track time
Disc number
Track time
Playing External Disc
Playing discs set in the optional accessory disc player connected
to this unit.
Press the [SRC] button.
Select the display for the disc player you want.
Display examples:
Display Disc player
"CD" CD player
"DISC-CH" CD changer/ MD changer
Pause and play
Press the [38] button.
Each time the button is pressed it pauses and plays.
• Disc #10 is displayed as "0".
• The functions that can be used and the information that can be
displayed will differ depending on the external disc players being
connected.
Fast Forwarding and Reversing
Fast Forwarding
Hold down on the [¢] button.
Release your finger to play the disc at that point.
Reversing
Hold down on the [4] button.
Release your finger to play the disc at that point.
Disc number
— 16 —
Page 17
Track Search
Selecting the song you want to hear.
Press the [4] or [¢] button.
Album Search (Function of disc changer)
Selecting the disc you want to hear.
Press the [AM] or [FM] button.
Track/Album Repeat
Replaying the track/disc you're listening to.
Press the [REP] button.
Each time the button is pressed the Repeat Play switches as
shown below.
Repeat play Display
Track Repeat "T-REP ON"
Album Repeat (Function of disc changer) "D-REP ON"
OFF "REP OFF"
Track Scan
Playing the first part of each song on the disc you are listening
to and searching for the song you want to listen to.
Press the [SCAN] button.
Random Play
Playing all the songs on the disc in random order.
Press the [RDM] button.
Each time the button is pressed Random Play turns ON or OFF.
When it's ON, "RDM ON" is displayed.
When the [¢] button is pressed, the next song select starts.
Magazine Random Play
(Function of disc changer)
Play the songs on all the discs in the disc changer in random
order.
Press the [M.RDM] button.
Each time the button is pressed the Magazine Random Play turns
ON or OFF.
When it's ON, "MRDM ON" is displayed.
When the [¢] button is pressed, the next song select starts.
1 Start Track Scan
Press the [SCAN] button.
"Scan ON"/"SCAN ON" is displayed.
2 Release it when the song you want to listen to is played
— 17 —
Page 18
External disc control features
Disc Naming (DNPS)
Attaching a title to a CD.
English
1 Play the disc you want to attach a name to
•A title can't be attached to a MD.
• Disc Naming can't be done during CD text or clock display.
2 Enter name set mode
Press the [NAME] button for at least 2 seconds.
"NAME SET" is displayed.
3 Move the cursor to the enter character position
Press the [4] or [¢] button.
4 Select the character type (KRC-691 only)
Press the [38] button.
Each time the button is pressed the character typed switches as
shown below.
Character type
Alphabet upper case
Alphabet lower case
Numbers and symbols
Special characters (Accent characters)
5 Select the characters
Press the [FM] or [AM] button.
6 Repeat steps 3 through 5 and enter the name.
7 Exit name set mode
Press the [NAME] button.
• When operation stops for 10 seconds the name at that time is
registered, and Name Set mode closes.
• Media that you can attach names to
- External CD changer/ player: Varies according to the CD changer/
player. Refer to the CD changer/ player manual.
• The name of a CD can be changed by the same operation you
used to name it.
Text/Title Scroll
Scrolling the displayed CD text or MD title.
Press the [DISP] button for at least 1 second.
— 18 —
Page 19
Menu system
LOUD
DAB
SCAN B.S./RDM REP MTL/M.RDM DISP
OFF
NF
TITI
NAME
B NR
MENU
SRC
4¢
AM
FM
KRC-691
KRC-591V/KRC-591
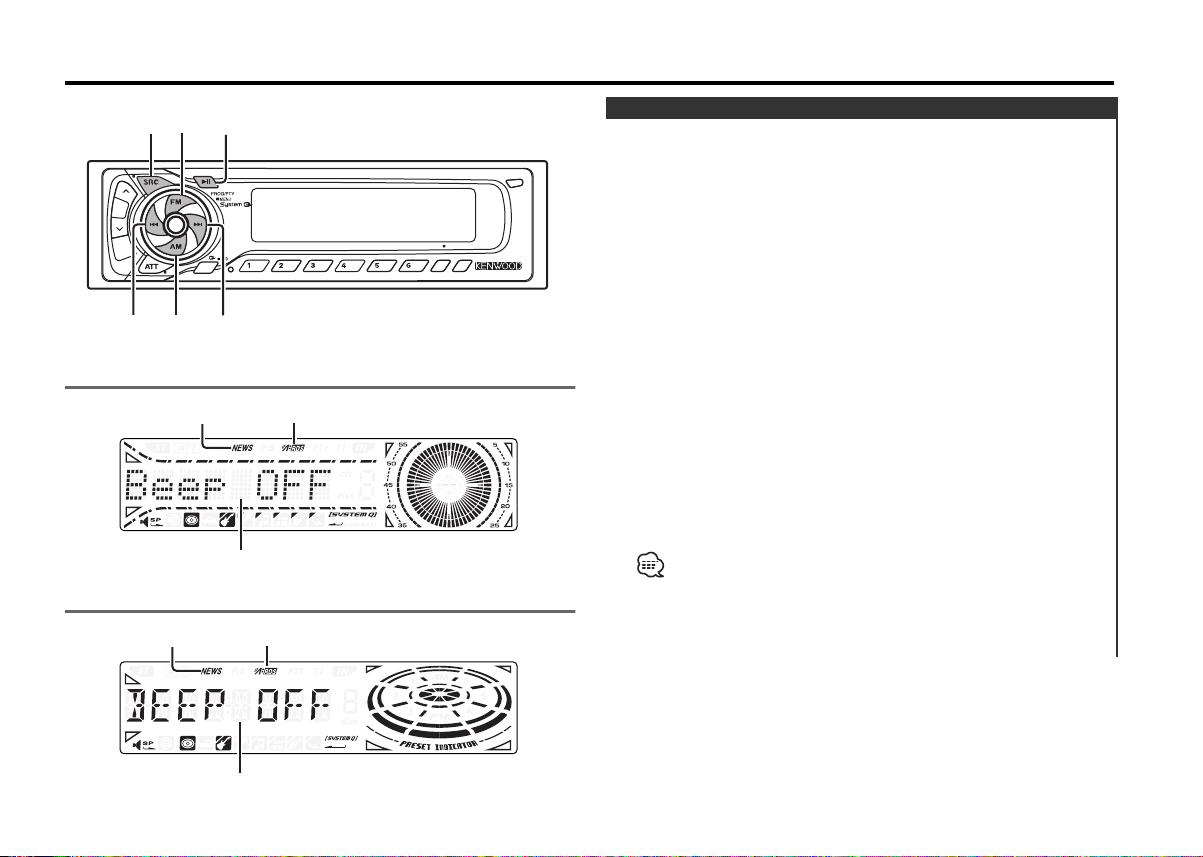
NEWS indicator
Menu display
NEWS indicator
RDS indicator
RDS indicator
Menu System
Setting during operation beep sound etc. functions.
The Menu system basic operation method is explained here. The
reference for the Menu items and their setting content is after
this operation explanation.
1 Enter Menu mode
Press the [MENU] button for at least 1 second.
"MENU" is displayed.
2 Select the menu item
Press the [FM] or [AM] button.
Example: When you want to set the beep sound select the
"Beep"/"BEEP" display.
3 Set the menu item
Press the [4] or [¢] button.
Example: When "Beep"/"BEEP" is selected, each time the button
is pressed it switches "Beep ON"/"BEEP ON" or "Beep
OFF"/"BEEP OFF". Select 1 of them as the setting.
You can continue by returning to step 2 and setting other items.
4 Exit Menu mode
Press the [MENU] button.
When other items that are applicable to the basic operation method
above are displayed afterwards their setting content chart is
entered. (Normally the uppermost setting in the chart is the original
setting.)
Also, the explanation for items that aren't applicable (<Manual Clock
Adjustment>etc.) are entered step by step.
Menu display
— 19 —
Page 20
Menu system
Security Code
Because authorization by the Security Code is required when it's
removed from the vehicle, personalizing this unit is by using the
English
Security Code is a help in preventing theft.
When the Security Code function is activated it can't be released.
Note, your Security Code is the 4 digit number entered in your "Car
Audio Passport" in this package.
1 Enter Standby
Press the [SRC] button.
Select the "ALL OFF" display.
2 Enter Menu mode
Press the [MENU] button for at least 1 second.
When "MENU" is displayed, "Security"/ "SECURITY" is displayed.
3 Enter Security Code mode
Press the [4] or [¢] button for at least 1 second.
When "ENTER" is displayed, "CODE" is displayed.
4 Select the digits to enter
Press the [4] or [¢] button.
5 Select the Security Code numbers
Press the [FM] or [AM] button.
6 Repeat steps 4 and 5, and complete the Security Code.
7 Confirm the Security Code
Press the [¢] button for at least 3 seconds.
When "RE-ENTER" is displayed, "CODE" is displayed.
8 Do the step 4 through 7 step operation, and reenter the
security code.
"APPROVED" is displayed.
The Security Code function activates.
If you enter a Code different from your Security Code, you have to
start over from step 4.
Press the Reset button and when it's removed from the
battery power source
1 Turn the power ON.
2 Do the step 4 through 7 step operation, and reenter the
security code.
"APPROVED" is displayed.
The unit can be used.
If an incorrect code is input, "WAITING" is displayed, and the input
prohibited time shown below is generated.
After the input prohibited time lapses, "CODE" is displayed, and
input can be done.
Number of times Input prohibited time
the incorrect code was input
1—
25 minutes
31 hour
4 24 hours
Touch Sensor Tone
Setting the operation check sound (beep sound) ON/OFF.
Display Setting
"Beep ON"/"BEEP ON" Beep is heard.
"Beep OFF"/"BEEP OFF" Beep canceled.
Manual Clock Adjustment
This adjustment can be done when the <Synchronize Clock> (page
21) is set as OFF.
1 Select Clock Adjustment mode
Press the [FM] or [AM] button.
Select the "CLK ADJ" display.
— 20 —
Page 21
2 Enter Clock Adjust mode
Press the [4] or [¢] button for at least 1 second.
The clock display blinks.
3 Adjust the hours
Press the [FM] or [AM] button.
Adjust the minutes
Press the [4] or [¢] button.
4 Exit Clock adjustment mode
Press the [MENU] button.
Synchronize Clock
Synchronizing the RDS station time data and this unit's clock.
Display Setting
"SYNC ON" Synchronizes the time.
"SYNC OFF" Adjust the time manually.
It takes 3 to 4 minutes to synchronize the clock.
DSI (Disabled System Indicator)
A red indicator will blink on the unit after the faceplate is
removed, warning potential thieves.
Display Setting
"DSI ON" LED flashes.
"DSI OFF" LED OFF.
Selectable Illumination
Selecting the button illumination color as green or red.
Display Setting
"KEY GRN" The illumination color is green.
"KEY RED" The illumination color is red.
Function of the KRC-591V/KRC-591
Switching Graphic Display
Setting the graphic part display ON/OFF.
Display Setting
"GRPH ON" The graphic part is displayed.
"GRPH OFF" The graphic part isn't displayed.
Function of the KRC-691
Switching Display Type
Setting the Display type.
Display Setting
"DisplayD" Demonstration.
"DisplayA" Circle Display is play time.
"DisplayB" Circle Display is clock.
"DisplayC" Silent display type.
— 21 —
Page 22
Menu system
Function of the KRC-691
Contrast Adjustment
Adjusting the display contrast.
English
Display and Setting
"CONT 0"
"CONT 5" (Original setting)
… …
"CONT 10"
Function of the KRC-691
Dimmer
Dimming this unit's display automatically when the vehicle light
switch is turned ON.
Display Setting
"DIM ON" The display dims.
"DIM OFF" The display doesn't dim.
Interrupt function is ON.
When it's ON, the "NEWS" indicator is ON.
When the news bulletin starts, "NEWS" is displayed, and it
switches to the news bulletin.
• If you choose the "20M" setting, further news bulletins will not be
received for 20 minutes once the first news bulletin is received.
• The news bulletin volume is the same level that was set for traffic
information (page 11).
• This function is only available if the desired station sends PTY-code
for news bulletin or belongs to <Enhanced Other Network>Network sending PTY-code for news bulletin.
• When the News Bulletin Interrupt function is ON, it switches to an
FM station.
Local Seek <In Tuner mode>
Only stations whose reception is good are searched for in auto
seek tuning.
Display Setting
"LO.S OFF" The local seek function is OFF.
"LO.S ON" The local seek function is ON.
News Bulletin with Timeout Setting
It switches automatically when a news bulletin starts even if the
radio isn't being listened to. Also, the time interval when
interrupt is prohibited can be set.
Display and Setting
"NEWS OFF"
"NEWS 00M"
…
"NEWS 90M"
When "NEWS 00M" — "NEWS 90M" is set, the News Bulletin
Tuning Mode <In Tuner mode>
Sets the tuning mode.
Tuning mode Display Operation
Auto seek "AUTO 1" Automatic search for a station.
Preset station seek "AUTO 2" Search in order of the stations in
the Preset memory.
Manual "Manual"/ Normal manual tuning control.
"MANUAL"
— 22 —
Page 23
Auto Memory Entry <In Tuner mode>
For the operation method refer to <Auto Memory Entry> (page
10).
AF (Alternative Frequency)
When poor reception is experienced, automatically switch to
another frequency broadcasting the same program in the same
RDS network with better reception.
Display Setting
"AF ON" The AF function is ON.
"AF OFF" The AF function is OFF.
When the AF function is ON, the "RDS" indicator is ON.
When no other stations with stronger reception are available for the
same program in the RDS network, you may hear the incoming
broadcast in bits and snatches. Turn OFF the AF function in such a
case.
Auto TP Seek
When the TI function is ON and poor reception conditions are
experienced when listening to a traffic information station,
another traffic information station with better reception will be
searched for automatically.
Display Setting
"ATPS ON" The Auto TP Seek Function is ON.
"ATPS OFF" The Auto TP Seek Function is OFF.
Monaural Reception <In FM reception>
Noise can be reduced when stereo broadcasts are received as
monaural.
Display Setting
"MONO OFF" The monaural reception is OFF.
"MONO ON" The monaural reception is ON.
Restricting RDS Region
(Region Restrict Function)
You can choose whether or not to restrict the RDS channels,
received with the AF function for a particular network, to a
specific region.
Display Setting
"REG ON" The Region Restrict Function is ON.
"REG OFF" The Region Restrict Function is OFF.
Sometimes stations in the same network broadcast different
programs or use different program service names.
Text Scroll
Setting the displayed text scroll.
Display Setting
"SCL MANU" Doesn't scroll.
"SCL AUTO" Scrolls when the display changes.
The text scrolled is shown below.
• CD text
• MD title
• Radio text
— 23 —
Page 24
Menu system
Power OFF Timer
Setting the timer to turn this unit's power OFF automatically
when Standby mode continues.
English
Using this setting can save the vehicle's battery power.
Display Setting
"OFF – – –" Power OFF Timer function is OFF.
"OFF 20M" Turns the power OFF after 20 minutes.
(Original setting)
"OFF 40M" Turns the power OFF after 40 minutes.
"OFF 60M" Turns the power OFF after 60 minutes.
This setting is done after setting <Security Code> (page 20).
— 24 —
Page 25
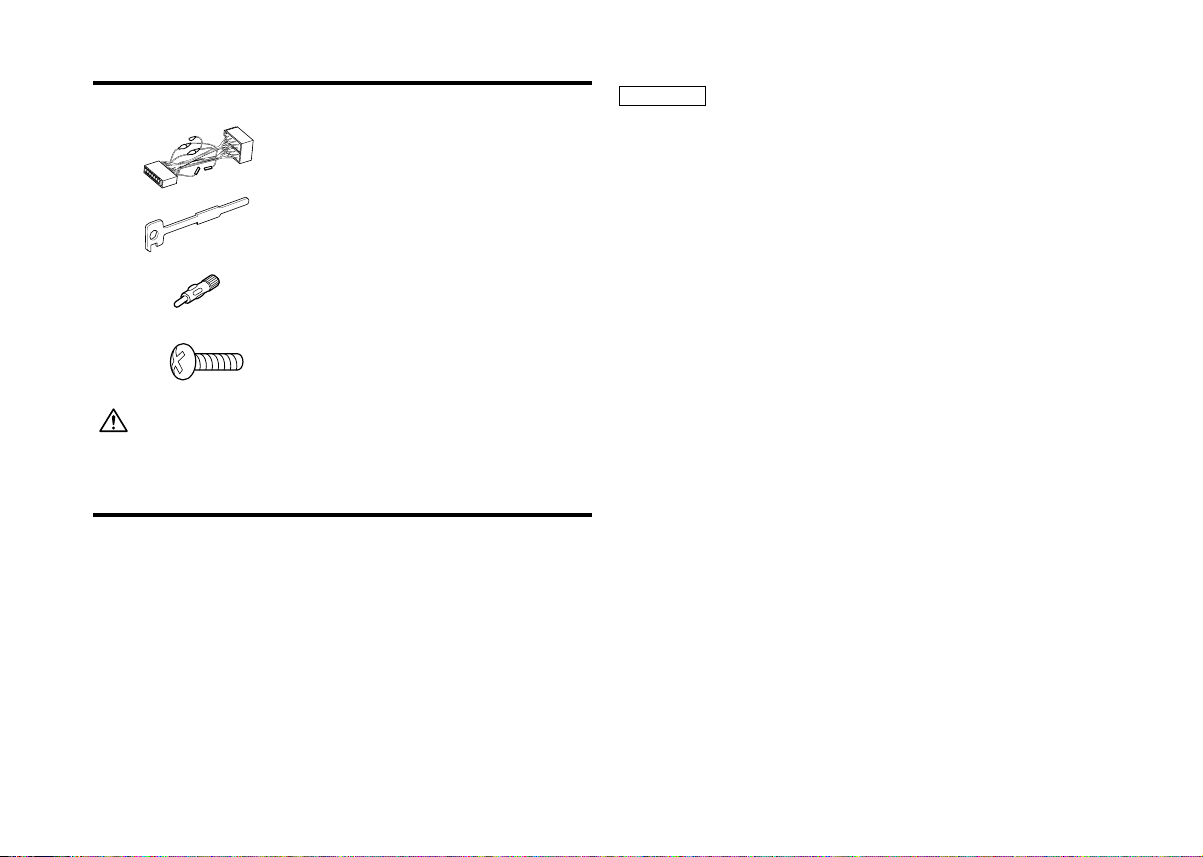
Accessories
External view
1
2
3
4
The use of any accessories except for those provided might result in
damage to the unit. Make sure only to use the accessories shipped with
the unit, as shown above.
..........................................1
..........................................2
..........................................1
..........................................2
Number of items
Installation Procedure
1. To prevent short circuits, remove the key from the ignition and
disconnect the - terminal of the battery.
2. Make the proper input and output wire connections for each unit.
3. Connect the wire on the wiring harness.
4. Take Connector B on the wiring harness and connect it to the
speaker connector in your vehicle.
5. Take Connector A on the wiring harness and connect it to the
external power connector on your vehicle.
6. Connect the wiring harness connector to the unit.
7. Install the unit in your car.
8. Reconnect the - terminal of the battery.
9. Press the reset button.
2CAUTION
• If your car is not prepared for this special connection-system,
consult your Kenwood dealer.
• Only use antenna conversion adapters (ISO-JASO) when the
antenna cord has an ISO plug.
• Make sure that all wire connections are securely made by
inserting jacks until they lock completely.
• If your vehicle's ignition does not have an ACC position, or if the
ignition wire is connected to a power source with constant
voltage such as a battery wire, the power will not be linked with
the ignition (i.e., it will not turn on and off along with the
ignition). If you want to link the unit's power with the ignition,
connect the ignition wire to a power source that can be turned
on and off with the ignition key.
• If the fuse blows, first make sure that the wires have not caused
a short circuit, then replace the old fuse with one with the same
rating.
• Insulate unconnected wires with vinyl tape or other similar
material. To prevent short circuits, also do not remove the caps
on the ends of the unconnected wires or the terminals.
• Connect the speaker wires correctly to the terminals to which
they correspond. The unit may receive damage or fail to work if
you share the - wires and/or ground them to any metal part in
the car.
• After the unit is installed, check whether the brake lamps,
indicators, wipers, etc. on the car are working properly.
• If the console has a lid, make sure to install the unit so that the
faceplate does not hit the lid when closing and opening.
•Mount the unit so that the mounting angle is 30° or less.
— 25 —
Page 26
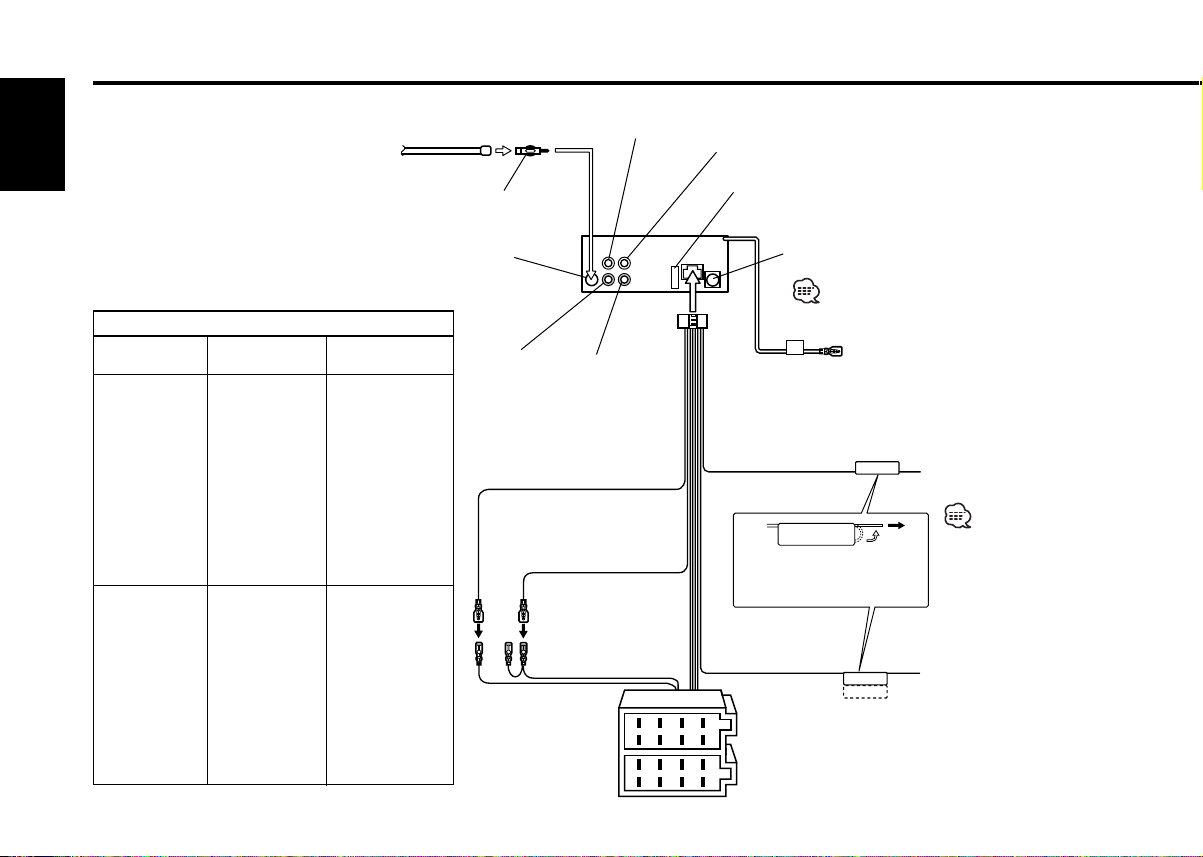
Connecting Wires to Terminals
English
Antenna Conversion Adaptor (ISO–JASO) (Accessory3) 2
Connector Function Guide
Pin Numbers for
ISO Connectors
External Power
Connector
A–4
A–5
A–6
(KRC-691 only)
A–7
A–8
Speaker
Connector
B–1
B–2
B–3
B–4
B–5
B–6
B–7
B–8
Cable Colour Functions
Yellow
Blue/White
Orange/White
Red
Black
Purple
Purple/Black
Gray
Gray/Black
White
White/Black
Green
Green/Black
Antenna Cord (ISO) 1
FM/AM antenna
input 3
1
Battery
*
Ignition (ACC)*
Power Control
Dimmer
Ignition (ACC)*
2
Battery*
Earth (Ground)
Connection
Rear Right (+)
Rear Right (–)
Front Right (
Front Right (
+)
–)
Front Left (+)
Front Left (–)
Rear Left (+)
Rear Left (–)
Rear right
output (Red)
4
2
1
*1 KRC-691/591
Battery wire (Yellow)
*2 KRC-591V :
Ignition wire (Red) 6
*1 KRC-691/591
Ignition wire (Red)
*2 KRC-591V :
Battery wire (Yellow) 7
A–7 Pin (Red) 8
A–4 Pin (Yellow) 9
Connector A
Connector B
10
Rear left
output (White)
Front right
output (Red)
5
— 26 —
Front left output
(White) 12
Fuse (10A) 13
To KENWOOD disc changer/
DAB control input/
KPA-SD100/KPA-HD100/KPA-SS100 16
To connect these leads, refer
to the relevant instruction
manuals. 17
To Steering remote
Wiring harness
(Accessory1) 16
17
TEL mute wire (Brown)
If no connections are
made, do not let the wire
come out from the tab. 18
Power control/ Motor
antenna control wire
(Blue/White) 20
8
8
1234567
1234567
(KRC-691 only) 30
Connect to the terminal that is
grounded when either the
telephone rings or during
conversation. 21
Connect either to the power
control terminal when using
the optional power amplifier,
or to the antenna control
terminal in the vehicle. 23
P.CONT
ANT.CONT
TEL MUTE
To connect the
KENWOOD navigation
system, consult your
navigation manual. 22
Page 27

2WARNING
Connecting the ISO Connector (see p.26)
The pin arrangement for the ISO connectors depends on the type of
vehicle you drive. Make sure to make the proper connections to
prevent damage to the unit.
The default connection for the wiring harness is described in 1 below.
If the ISO connector pins are set as described in 2 or 3, make the
connection as illustrated.
1 (Default setting) The A-7 pin (red) of the vehicle's ISO connector
is linked with the ignition, and the A-4 pin (yellow) is connected to
the constant power supply.
Ignition cable (Red)
Battery cable (Yellow)
Unit Vehicle
A–7 Pin (Red)
A–4 Pin (Yellow)
2 The A-7 pin (red) of the vehicle's ISO connector is connected to
the constant power supply, and the A-4 pin (yellow) is linked to
the ignition.
Ignition cable (Red)
Battery cable (Yellow)
Unit Vehicle
A–7 Pin (Red)
A–4 Pin (Yellow)
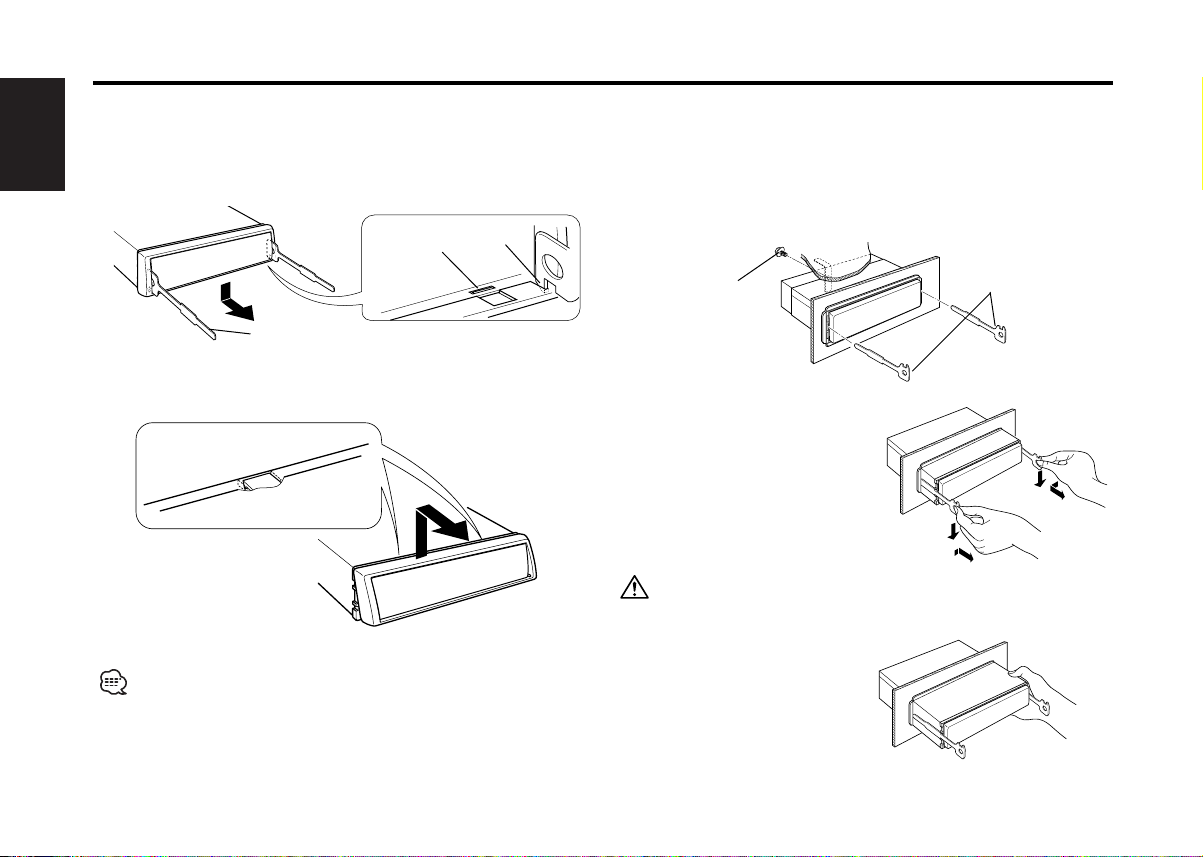
Installation
■ Installation
Firewall or metal support
Screw (M4X8)
(commercially
available)
Self-tapping
screw
(commercially
available)
Make sure that the unit is installed securely in place. If the unit is
unstable, it may malfunction (eg, the sound may skip).
Metal mounting
strap
(commercially
available)
Bend the tabs of the
mounting sleeve
with a screwdriver or
similar utensil and
attach it in place.
3 The A-4 pin (yellow) of the vehicle's ISO connector is not
connected to anything, while the A-7 pin (red) is connected to the
constant power supply (or both the A-7 (red) and A-4 (yellow) pins
are connected to the constant power supply).
Ignition cable (Red)
Battery cable (Yellow)
When the connection is made as in 3 above, the unit's power will not
be linked to the ignition key. For that reason, always make sure to turn
off the unit's power when the ignition is turned off.
To link the unit's power to the ignition, connect the ignition cable
(ACC...red) to a power source that can be turned on and off with the
ignition key.
Unit Vehicle
A–7 Pin (Red)
A–4 Pin (Yellow)
■ Screwing the Faceplate on the Unit
If you want to fasten the
faceplate to the main unit so
that it does not fall off,
screw in the provided
screws (ø4 X 16 mm) in the
holes shown below.
Never insert the taptite screw (ø4 × 16 mm) in any other screw hole
than the one specified. If you screw it in another hole, it will contact
and may cause damage to the mechanical parts inside the unit.
— 27 —— 27 —
Accessory4
Bottom panel
Page 28
Installation
■ Removing the hard rubber frame
1 Engage the catch pins on the removal tool and remove the two
English
locks on the lower level.
Lower the frame and pull it forward as shown in the figure.
Lock
Catch
■ Removing the Unit
1 Refer to the section “Removing the hard rubber frame” and then
remove the hard rubber frame.
2 Remove the screw (M4×8) on the back panel.
3 Insert the two removal tools deeply into the slots on each side,
as shown.
Accessory2 Removal tool
2 When the lower level is removed, remove the upper two
locations.
The frame can be removed from the top side in the same manner.
Screw (M4X8)
(commercially
available)
4 Lower the removal tool
toward the bottom, and pull
out the unit halfway while
pressing towards the inside.
Be careful to avoid injury from the catch pins on the removal tool.
5 Pull the unit all the way out
with your hands, being
careful not to drop it.
— 28 —— 28 —
Accessory2 Removal tool
Page 29

Troubleshooting Guide
What might seem to be a malfunction in your unit may
just be the result of slight misoperation or miswiring.
Before calling service, first check the following table
for possible problems.
General
? The power does not turn ON.01
✔ The fuse has blown.
☞ After checking for short circuits in the wires, replace the fuse with
one with the same rating.
✔ No ACC position on vehicle ignition.02
☞ Connect the same wire to the ignition as the battery wire.
? If you have selected Standby mode, the power will go OFF
automatically.03
✔ The Power OFF Timer function has been activated.
☞ If you do not want the power to go OFF automatically, cancel the
Power OFF Timer function.
? Nothing happens when the buttons are pressed.04
✔ The computer chip in the unit is not functioning normally.
☞ Press the reset button on the unit (page 4).
? There’s a source you can’t switch.05
✔ There’s no tape inserted.
☞ Set the media you want to listen to. If there’s no media in this
unit, you can't switch to each source.
✔ The Disc changer isn’t connected.08
☞ Connect the Disc changer. If the Disc changer isn’t connected to
it's input terminal, You can't switch to an external disc source.
? The memory is erased when the ignition is turned OFF.10
✔ The battery wire has not been connected to the proper terminal.
☞ Connect the wire correctly, referring to the section on
<Connecting Wires to Terminals>.
✔ The ignition and battery wire are incorrectly connected.11
☞ Connect the wire correctly, referring to the section on
<Connecting Wires to Terminals>.
? The TEL mute function does not work.15
✔ The TEL mute wire is not connected properly.
☞ Connect the wire correctly, referring to the section on
<Connecting Wires to Terminals>.
? The TEL mute function turns ON even though the TEL mute wire is
not connected.16
✔ The TEL mute wire is touching a metal part of the car.
☞ Pull the TEL mute wire away from the metal part of the car.
? Even if Loudness is turned ON, high-pitched tone isn't compensated
for. 17
✔ Tuner source is selected.
☞ High-pitched tone isn't compensated for when in Tuner source.
? No sound can be heard, or the volume is low.
✔ The fader or balance settings are set all the way to one side.21
☞ Center the fader and balance settings.
✔ The input/output wires or wiring harness are connected incorrectly.22
☞ Reconnect the input/output wires or the wiring harness correctly.
See the section on <Connecting Wires to Terminals>.
✔ The cassette tape is bad.23
☞ Tr y playing another cassette tape. If works fine, the first tape was
bad.
✔ The values of Volume offset are low.24
☞ Increase the values of Volume offset. (page 6)
? The sound quality is poor or distorted.25
✔ One of the speaker wires is being pinched by a screw in the car.
☞ Check the speaker wiring.
✔ The tape head is dirty.26
☞ Clean the tape head.
✔ The speakers are not wired correctly.27
☞ Reconnect the speaker wires so that each output terminal is
connected to a different speaker.
? The Security Code item isn’t displayed in the Menu System.32
✔ The Security Code function is already activated.
☞ When the Security Code function is activated it isn’t displayed in
the menu items.
— 29 —
Page 30

Troubleshooting Guide
? The Touch Sensor Tone doesn’t sound.34
✔ The preout jack is being used.
☞ The Touch Sensor Tone can’t be output from the preout jack.
English
? Even though Synchronize Clock is ON, the clock can’t be adjusted.35
✔ The received RDS station isn’t sending time data.
☞ Receive another RDS station.
? Even though the vehicle light switch is turned ON, the unit’s display
won’t dim.36
✔ The dimmer wire isn’t connected.
☞ Connect the dimmer wire correctly.
? The Dimmer function doesn’t work. 38-1
✔ The Dimmer wire isn’t connected correctly.
☞ Check the Dimmer wire connection.
Tuner source
? Radio reception is poor.39
✔ The car antenna is not extended.
☞ Pull the antenna out all the way.
✔ The antenna control wire is not connected.40
☞ Connect the wire correctly, referring to the section on
<Connecting Wires to Terminals>.
? It isn't the set Traffic information sound volume. 43
✔ The set sound volume is less than the tuner sound volume.
☞ If the tuner sound volume is louder than the set sound volume,the
tuner sound volume is used.
Cassette tape source
? Can’t remove tape.44
✔ The cause is that more than 10 minutes has elapsed since the vehicle
ACC switch was turned OFF.
☞ The tape can only be removed within 10 minutes of the ACC
switch being turned OFF. If more than 10 minutes has elapsed,
turn the ACC switch ON again and press the Eject button.
? The DPSS, Tape Advance and Music Repeat don’t operate
correctly.45
✔ The space between the songs on the tape can’t be recognized
because it’s too short.
☞ Have at least 4 seconds between songs.
✔ The space between songs can’t be recognized because there’s too
much noise between songs.46
☞ Reduce the noise between songs.
? The blank skip doesn’t work.47
✔ Because noise is too loud, the non-recorded part can’t be recognized.
☞ Reduce the noise between songs.
? Blank Skip functions at places that are recorded.48
✔ Because the recording level is low, it’s recognized as not recorded.
☞ Tu rn Blank Skip OFF.
— 30 —
Page 31

Disc source
? "AUX" is displayed without achieving External disc control mode.50
✔ O-N switch is set to "O" side.
☞ Set the switch to "N" side.
✔ Unsupported disc changer is connected.51
☞ Connect the supported disc changer. (page 3)
? The specified disc does not play, but another one plays instead.52
✔ The specified CD is quite dirty.
☞ Clean the CD.
✔ The CD is upside-down.53
☞ Load the CD with the labeled side up.
✔ The disc is loaded in a different slot from that specified.54
☞ Eject the disc magazine and check the number for the specified
disc.
✔ The disc is severely scratched.55
☞ Tr y another disc instead.
? The specified track will not play.58
✔ Random play or magazine random play has been selected.
☞ Tu rn off random play or magazine random play.
? Track repeat, disc repeat, track scan, random play, and magazine
random play start by themselves.59
✔ The setting is not canceled.
☞ The settings for these functions remain on until the setting to off
or the disc ejected, even if the power is turned off or the source
changed.
? Cannot play CD-R or CD-RW.60
✔ Finalization processing is not being conducted for CD-R/CD-RW.
☞ Conduct finalization processing with CD recorder.
✔ A non-compatible CD changer is being used to play the CD-R/CD-
RW.61
☞ Use a CD changer compatible with CD-R/CD-RW to play.
? Track Search can't be done.66-2
✔ For the albums first or last song.
☞ For each album, Track Search can't be done in the backward
direction for the first song or in the forward direction for the last
song.
If the following situations, consult your nearest service
center:
• Even though the disc changer is connected, the Disc Changer source is
not ON, with "AUX" showing in the display during the Changer Mode.
• Even though no device (KCA-S210A, CA-C1AX, KDC-CPS87, KDC-CX87,
KDC-CPS85, KDC-CX85, KDC-CPS82 or KDC-CX82) is connected, the
Auxiliary input is entered when switching modes.
— 31 —
Page 32

Troubleshooting Guide
The messages shown below display your systems
condition.
EJECT: No disc magazine has been loaded in the changer.
English
NO DISC: No disc has been loaded in the disc magazine.
TOC ER: No disc has been loaded in the disc magazine.
BLANK: Nothing has been recorded on the MD.
NO TRACK: No tracks are recorded on the MD, although it has a
NO PANEL: The faceplate of the slave unit being connected to
E-77: The unit is malfunctioning for some reason.
MECHA ER: Something is wrong with the disc magazine. Or the
The disc magazine is not completely loaded.E01
➪
Load the disc magazine properly.
No CD in the unit.
➪ Insert the CD.
➪
Load a disc into the disc magazine.
➪
Load a disc into the disc magazine.
The CD is quite dirty. The CD is upside-down. The CD
is scratched a lot.
➪ Clean the CD and load it correctly.
title.E11
this unit has been removed.E30
➪
Replace it.
➪
Press the reset button on the unit. If the "E-77"
code does not disappear, consult your nearest
service center.
unit is malfunctioning for some reason.
➪
Check the disc magazine. And then press the reset
button on the unit. If the "MECHA ER" code does
not disappear, consult your nearest service center.
E10
E99
E77
E02
E04
HOLD ER: The protective circuit in the unit activates when the
temperature inside the automatic disc changer
exceeds 60°C (140°F), stopping all operation.E0d
➪
Cool down the unit by opening the windows or
turning on the air conditioner. As the temperature
falls below 60°C (140°F), the disc will start playing
again.
NO NAME: Attempted to display DNPS during the CD play having
no disc names preset.
E51
NO TITLE: Attempted to display the disc title or track title while
the MD having no MD title is being played.E53
NO TEXT: • Attempted to display the disc text or track text
while the CD having no CD text is being played.E54
• Attempted to display text during reception of the
station that isn't sending text data.E55
WAITING: Radio text data is being received.E56
LOAD: Discs are being exchanged in the Disc changer.E57
READING: The unit is reading the data on the disc.E57-2
NO ACCES: After setting it in the Disc Changer, DNPP was done
without having it been played at least 1 time.E58
IN (Blink): The tape player section is not operating properly.E60
➪
Reinsert the Tape. If the tape cannot be ejected or
the display continues to flash even when the tape
has been properly reinserted, please switch off the
power and consult your nearest service center.
— 32 —
Page 33

Specifications
Specifications subject to change without notice.
FM tuner section
Frequency range (50 kHz space) ..............87.5 MHz – 108.0 MHz
Usable sensitivity (S/N = 26dB) .................................0.7 µV/75 Ω
Quieting Sensitivity (S/N = 46dB) ..............................1.6 µV/75 Ω
Frequency response (±3 dB).................................30 Hz – 15 kHz
Signal to Noise ratio (MONO)..............................................65 dB
Selectivity (DIN) (±400 kHz)............................................. ≥ 80 dB
Stereo separation (1 kHz) ....................................................35 dB
MW tuner section
Frequency range (9 kHz space) .....................531 kHz – 1611 kHz
Usable sensitivity (S/N = 20dB) ...........................................25 µV
LW tuner section
Frequency range .............................................153 kHz – 281 kHz
Usable sensitivity (S/N = 20dB) ...........................................45 µV
Cassette player section
Tape Speed...............................................................4.76 cm/sec.
Wow & Flutter (WRMS) ....................................................0.08 %
Frequency response (±3 dB) (70 µs)......................30 Hz – 18 kHz
Separation (1 kHz) ...............................................................43 dB
Signal to Noise ratio
Dolby NR OFF ................................................................57 dB
Dolby B NR ON ..............................................................65 dB
Audio section
Maximum output power.................................................47 W x 4
Output power (DIN 45324, +B=14.4V) ..........................29 W x 4
Tone action
Bass : ..............................................................100 Hz ±10 dB
Middle : .............................................................1 kHz ±10 dB
Treble : ............................................................10 kHz ±10 dB
Preout level / Load (during disc play) .................1800 mV / 10 kΩ
Preout impedance............................................................≤ 600 Ω
General
Operating voltage (11 – 16V allowable) .............................14.4 V
Current consumption.............................................................10 A
Installation Size (W x H x D) .........................182 x 53 x 150 mm
Weight ................................................................................1.2 kg
— 33 —
Page 34

Table des matiéres
Précautions de sécurité............35
Au sujet des cassettes..............36
A propos du RDS .....................36
Caractéristiques générales .......37
Alimentation
Sélectionner la source
Volume
Atténuateur
Français
Bruit
System Q
Commande du son
Réglage des enceintes
Mode de commutation de l'affichage
Sélection de l'affichage d'entrée
auxiliaire
Façade antivol
Sourdine TEL
Fonctions du tuner ...................41
Accord
Mémoire de station pré-réglée
Entrée en mémoire automatique
Accord pré-réglé
Fonctions RDS ..........................43
Informations routières
Défilement de texte radio
PTY (Type de Programme)
Pré-régler le type de programme
Changer la langue pour la fonction Type
de programme (PTY)
Fonctions du lecteur de cassette
................................................46
Lire des cassettes
Avance rapide et rembobinage rapide
Dolby B NR
Sélectionner le type de cassette
Avance de la cassette
Saut des blancs
Répétition de musique
Fonctions de contrôle de disque
externe ...................................48
Lire un disque extérieur
Avance rapide et retour
Recherche de plages
Recherche d'album
Répétition de plage/album
Balayage des plages
Lecture aléatoire
Lecture aléatoire du chargeur
Nomination de disque (DNPS)
Défilement du Texte/Titre
A propos du menu ....................51
A propos du menu
Code de sécurité
Tonalité capteur tactile
Ajustement manuel de l'horloge
Synchronisation de l'horloge
DSI (Disabled System Indicator)
Eclairage sélectionnable
Changement de l'affichage graphique
Changement du type d'affichage
Réglage du contraste
Variateur d'intensité
Bulletin d'informations avec définition du
temps d'écoute
Recherche locale
Mode d'accord
Entrée en mémoire automatique
AF (Alternative Frequency - Fréquence
alternative)
Restriction de la région RDS (Fonction de
restriction régionale)
Recherche automatique TP
Réception monaurale
Défilement du texte
Minuterie de temporisation de la coupure
de l'alimentation
Accessoires ...............................57
Procédure d’installation ...........57
Connexion des câbles sur les
prises ......................................58
Installation ................................59
Guide de depannage .................61
Spécifications ...........................65
— 34 —
Page 35

Précautions de sécurité
2AVERTISSEMENT
Pour éviter toute blessure et/ou
incendie, veuillez prendre les
précautions suivantes:
• Insérez l'appareil à fond jusqu'à ce qu'il soit
complètement calé. Sinon, il risquerait d'être
projeté en cas de collisions ou de cahots.
• Si vous prolongez un câble d'alimentation, de
batterie ou de masse, assurez vous d'utiliser
un câble pour automobile ou un câble avec
une section de 0,75mm
d'éviter tous risques de détérioration ou
d'endommagement du revêtement des
câbles.
• Pour éviter les court-circuits, ne jamais
mettre ou laisser d'objets métalliques
(comme une pièce de monnaie ou un outil
en métal) à l'intérieur de l'appareil.
• Si l'appareil commence à émettre de la
fumée ou une odeur bizarre, mettez
immédiatement l'appareil hors tension et
consultez un revendeur Kenwood.
• Faites attention de ne pas vous prendre les
doigts entre la façade et l'appareil.
• Faites attention de ne pas laisser tomber
l'appareil ou lui faire subir de chocs
importants. L'appareil risque de se casser ou
de se fêler car il contient des parties en
verre.
• Ne touchez pas le cristal liquide si l'affichage
LCD était endommagé ou cassé à cause
d'un choc. Le cristal liquide peut être
dangereux pour votre santé et même mortel.
Si le cristal liquide de l'affichage LCD entrait
en contact avec votre corps ou un vêtement,
lavez-le immédiatement avec du savon.
2
(AWG18) afin
2ATTENTION
Pour éviter tout dommage à l'appareil,
veuillez prendre les précautions
suivantes:
• Assurez-vous de mettre l'appareil à la masse
sur une alimentation négative de 12V CC.
• N'ouvrez pas le couvercle supérieur ou
inférieur de l'appareil.
• N'installez pas l'appareil dans un endroit
exposé directement à la lumière du soleil, à
une chaleur excessive ou à l'humidité. Evitez
aussi les endroits trop poussiéreux et où
l'appareil risque d'être éclaboussé.
• Ne placez pas la façade amovible ou le
boîtier de la façade dans un endroit exposé
directement à la lumière du soleil, à une
chaleur excessive ou à l'humidité. Evitez
aussi les endroits trop poussiéreux et où la
façade risque d'être éclaboussée.
• Pour éviter toute détérioration, ne touchez
pas les contacts de l'appareil ou de la façade
avec les doigts.
• Ne faites pas subir de chocs excessifs à la
façade car elle fait partie d'un équipement de
précision.
• Lors du remplacement d'un fusible, utilisez
seulement un fusible neuf avec la valeur
indiquée. L'utilisation d'un fusible d'une
valeur différente peut être la cause d'un
mauvais fonctionnement de votre appareil.
• Pour éviter les courts-circuits lors du
remplacement d'un fusible, déconnectez
d'abord le faisceau de câbles.
Ne placez aucun objet entre la façade et l'appareil.
•
• Pendant l'installation, n'utilisez aucunes autres
vis que celles fournies. L'utilisation de vis
incorrectes pourrait endommager l'appareil.
— 35 —
INFORMATION IMPORTANTE
A propos du changeur de
disques/lecteur de CDs à connecter:
Pour connecter à cet appareil un changeur de
disque avec commutateur "O-N", réglez ce
dernier sur "N".
Pour connecter à cet appareil un changeur de
disque sans commutateur "O-N", il est
nécessaire d'utiliser le câble de conversion
CA-DS100 et/ou l'adaptateur de commutation
KCA-S210A en option.
Le changeur de disques ne fonctionne pas s’il
est raccordé sans utiliser ces options.
Si un modèle sans bouton "O-N" est connecté,
certaines fonctions et informations non
disponibles et ne pouvant pas être affichées
sont générées.
Notez qu'aucun des changeurs KDC-C100,
KDC-C302, C205, C705 et ceux de marques
autres que Kenwood ne peuvent être
connectés.
Vous pouvez endommager à la fois votre
appareil et le changeur de CD si vous les
connectez incorrectement.
Fabriqué sous licence de Dolby
Laboratories.
"Dolby" et le symbole double D sont des
marques de commerce de Dolby
Laboratories.
Page 36

Précautions de sécurité
REMARQUE
• Si vous rencontrez des problèmes pendant
l'installation, consultez votre revendeur
Kenwood.
• Si l'appareil semble ne pas fonctionner
correctement, essayez d'abord d'appuyer sur
la touche de réinitialisation. Si cela ne résout
pas le problème, consultez votre revendeur
Kenwood.
• Appuyez sur la touche de réinitialisation si le
changeur automatique de disques fonctionne
Français
incorrectement. Les conditions de
fonctionnement originales seront rappelées.
OFF
DAB
SCAN B.S./RDM REP MTL/M.RDM DISP
NF
LOUD
Touche de réinitialisation
• Les caractères de l’affichage LCD peuvent
devenir difficiles à lire quand la température
est inférieure à 5 °C (41 °F).
• Les illustrations de l’affichage et du panneau
apparaissant dans ce manuel sont des
exemples utilisés pour expliquer avec plus
de clarté comment les commandes sont
utilisées. Il est donc possible que les
illustrations d’affichage puissent être
différentes de ce qui réellement affiché sur
l’appareil et aussi que certaines illustrations
représentent des choses impossibles à
réaliser en cours de fonctionnement.
• Nous vous recommandons d’utiliser la
fonction de code de sécurité (voir p.52) pour
dissuader le vol.
B NR
A propos du RDS
Nettoyage des contacts de la façade
Si les contacts de l'appareil ou de la façade
deviennent sales, essuyez-les avec un tissu
sec et doux.
Nettoyage de l’appareil
Si le panneau avant de cet appareil est taché,
essuyez-le avec un chiffon sec et doux
comme ceux au silicone. Si le panneau avant
est très taché, essuyez-le avec un chiffon
imbibé d'un produit de nettoyage neutre et
ensuite essuyez toute trace de ce produit.
La pulvérisation directe de produit de
nettoyage sur l'appareil risque d'affecter les
pièces mécaniques. L'utilisation d'un chiffon
rugueux ou d'un liquide volatile tel que solvant
ou alcool pour essuyer le panneau avant peut
TITI
NAME
rayer la surface ou effacer des caractères.
Au sujet des cassettes
Nettoyage de la tête de lecture de
cassette
Lorsqu'il y a du bruit ou une mauvaise qualité
sonore pendant la lecture de cassette à cause
d'une tête de lecture sale, nettoyez cette
dernière.
Au sujet des cassettes
• Si le ruban de la cassette est lâche,
resserrez-le.
• Si l'étiquette de la cassette se décolle,
recollez-la.
• Ne pas utiliser de cassette déformée.
• Ne pas placer de cassette sur le tableau de
bord, etc. et aux endroits où la température
est élevée.
• Ne pas utiliser de cassette de durée égale ou
supérieure à 100 minutes.
— 36 —
RDS (Radio Data System)
Lors de l’écoute d’une station RDS ( c.a.d.
d’une station avec une capacité RDS), le nom
de la station est affiché vous permettant de
savoir quelle station voues êtes en train de
recevoir.
Les stations RDS (Radio Data System)
transmettent aussi des fréquences de données
pour la même station. Quand vous effectuez de
longs voyages, cette fonction change
automatiquement sur la fréquence particulière
avec la meilleure réception pour un réseau de
stations particulier que vous souhaitez écouter.
Les données sont automatiquement
mémorisées, vous permettant de changer
rapidement sur une autre station RDS, diffusant
le même programme avec la meilleure
réception. Cela comprend les stations
mémorisées dans la mémoire des stations
préréglées que vous écoutez souvent.
Enhanced Other Network
Les stations offrant le service <Enhanced
Other Network> transmettent aussi des
informations sur les autres stations RDS
diffusant des informations routières. Quand
vous écoutez une station qui ne transmet pas
d'informations routières et qu'une autre
station RDS commence à diffuser un bulletin
d'informations routières, le tuner commute
automatiquement sur cette station pendant la
durée du bulletin.
Alarm
Quand une émission d'urgence (annonce de
désastres, etc.) est diffusée, toutes les
fonctions actuelles sont interrompues pour
permettre à l'émission d'urgence d'être reçue.
Page 37

Caractéristiques générales
LOUD
DAB
SCAN B.S./RDM REP MTL/M.RDM DISP
OFF
TITI
NAME
B NR
u
d
ATT/
LOUD
SRC/
PWR OFF
DISP
4¢
AM
Q/
AUD
FM
KRC-691
KRC-591V/KRC-591
Touche de
déverrouillage
Alimentation
Allumer l'alimentation
Appuyez sur la touche [SRC].
Lorsque l'alimentation est allumée, le <Code de sécurité> (page 52)
est affiché sous la forme "CODE ON" ou "CODE OFF".
Eteindre l'alimentation
Appuyez sur la touche [SRC] pendant au moins 1 seconde.
Indicateur ATT
Indicateur SYSTEM Q
Indicateur de réglage d’enceinte
Indicateur ATT
Indicateur SYSTEM Q
Indicateur de réglage d’enceinte
Indicateur d’horloge
Sélectionner la source
Appuyez sur la touche [SRC].
Source requise Affichage
Tuner "TUNER"
Cassette "TAPE"
Disque extérieur "DISC-CH"
Entrée auxiliaire "AUX"
Veille (Mode éclairage seulement) "ALL OFF"
• Pour l'entrée auxiliaire un des accessoires optionnels ci-dessous
est nécessaire.
- KCA-S210A
- CA-C1AX
- Changeur de CD avec une fonction d'entrée auxiliaire installée.
• Cet appareil s'éteint complètement après que 20 minutes se sont
écoulées en mode veille afin de sauvegarder la batterie des
véhicules. Le délai jusqu'à ce que l'appareil s'éteigne
complètement peut être réglé dans <Minuterie de temporisation
de la coupure de l'alimentation> (page 56).
— 37 —
Page 38

Caractéristiques générales
Volume
Augmenter le volume
Appuyez sur la touche [u].
Baisser le volume
Appuyez sur la touche [d].
Atténuateur
Baisser le volume rapidement.
Français
Appuyez sur la touche [ATT].
Chaque fois que l'on appuie sur cette touche, l'Atténuateur est
activé ou désactivé.
Lorsqu'il est activé, l'indicateur "ATT" clignote.
Bruit
Compenser les graves et les aigus lorsque le volume est bas.
Appuyez sur la touche [LOUD] pendant au moins 1 seconde.
Chaque fois que l'on appuie sur la touche pendant au moins 1
seconde, le système Bruit est activé ou désactivé.
Lorsqu'elle est activée, "LOUD ON" est affiché.
System Q
Vous pouvez rappeler le meilleur réglage de son pré-réglé pour
différents types de musique.
1 Sélectionnez la source à régler
Appuyez sur la touche [SRC].
2 Sélectionnez le type de son
Appuyez sur la touche [Q].
Chaque fois que l'on appuie sur la touche, le réglage du son change.
Réglage du son Affichage
Flat (Normal) "Flat"/"FLAT"
Mémoire utilisateur "User"/"USER"
Rock "Rock"/"ROCK"
Pops (Musique pop) "Pops"/"POPS"
Easy (Ambiance) "Easy"/"EASY"
Top 40 "Top40"/"TOP40"
Jazz "Jazz"/"JAZZ"
• Mémoire utilisateur: Les valeurs réglées sur la <Commande du
son> (page 38).
• Chaque valeur de réglage est changée avec le <Réglage des
enceintes> (page 39).
D'abord, sélectionnez le type d'enceinte avec le Réglage des
enceintes.
Commande du son
Sélectionnez la source pour l'ajustement
1
Appuyez sur la touche [SRC].
2 Entrez en mode de commande du son
Appuyez sur la touche [AUD] pendant au moins 1 seconde.
3 Sélectionnez l'élément audio pour l'ajustement
Appuyez sur la touche [FM] ou [AM].
Chaque fois que l'on appuie sur la touche, les éléments qui
peuvent être ajustés défilent de la manière décrite ci-dessous.
4 Ajustez l'élément audio
Appuyez sur la touche [4] ou [¢].
Elément d'ajustement Affichage Gamme
Niveau des graves "Bas"/"BAS" –8 — +8
Niveau des fréquences
moyennes
Niveau des aigus "Tre"/"TRE" –8 — +8
Balance "Bal"/"BAL" Gauche 15 — Droite 15
— 38 —
"Mid"/"MID" –8 — +8
Page 39

Balance avant/arrière "Fad"/"FAD" Arrière 15 — Avant 15
Compensation du volume "V-OFF" –8 — ±0
Compensation du volume: Le volume de chaque source peut être
réglé différemment du volume de base.
5 Sortez du mode de commande du son
Appuyez sur la touche [AUD].
Réglage des enceintes
Accord fin pour que la valeur du System Q soit optimale en
réglant le type d'enceinte.
1 Entrez en Veille
Appuyez sur la touche [SRC].
Sélectionnez l'affichage "ALL OFF".
2 Entrez en mode de réglage des enceintes
Appuyez sur la touche [Q].
3 Sélectionnez le type d'enceinte
Appuyez sur la touche [4] ou [¢].
Chaque fois que l'on appuie sur la touche, le réglage change de
la manière suivante.
Type d'enceinte Affichage
ETEINT "SP OFF"
Pour enceinte 5 & 4 pouces "SP 5/4"
Pour enceinte 6 & 6x9 pouces "SP 6*9/6"
Pour enceinte OEM "SP OEM"
4 Sortez du mode de réglage des enceintes
Appuyez sur la touche [Q].
Mode de commutation de l'affichage
Changer les informations affichées.
Appuyez sur la touche [DISP].
Chaque fois que l'on appuie sur la touche, l'affichage change de
la manière suivante.
En source tuner
Information Affichage
Nom du service de programme ou Fréquence
Texte radio "R-TEXT"
Horloge
Afficher la fréquence pendant la réception du nom du
Service de programme
Appuyez sur la touche [DISP] pendant au moins 1 seconde.
La fréquence de la station RDS sera affichée pendant 5 secondes
à la place du nom de service de programmes.
En source cassette
Information
Lire la face
marche de la cassette
Horloge
En source disque extérieur
Information Affichage
Numéro de plage (KRC-691)
Numéro de plage & Durée de la plage
(KRC-591V/591)
Nom du disque "DNPS"
Titre du disque "D-TITLE"
Titre de la plage "T-TITLE"
Numéro de plage & Durée de la plage
(KRC-691)
Horloge
— 39 —
Page 40

Caractéristiques générales
Sélection de l'affichage d'entrée auxiliaire
Sélection de l'affichage lorsque cet appareil est commuté sur la
source d'entrée auxiliaire.
1 Sélectionnez la source d'entrée auxiliaire
Appuyez sur la touche [SRC].
Sélectionnez l'affichage "AUX".
2 Entrez en mode de sélection de l'affichage d'entrée auxiliaire
Appuyez sur la touche [DISP] pendant au moins 2 secondes.
Français
Le nom de l’AUX actuellement sélectionné est clignotements.
3 Sélectionnez la source d'entrée auxiliaire
Appuyez sur la touche [4] ou [¢].
Chaque fois que l'on appuie sur la touche, on passe aux
affichages ci-dessous.
• "AUX"
• "TV"
• "VCP"
• "GAME"
• "PORTABLE"
• "DVD"
4 Sortez du mode de sélection de l'affichage d'entrée auxiliaire
Appuyez sur la touche [DISP].
• Lorsque l'opération est interrompue pendant 10 secondes, le nom
alors présent est sélectionné et le mode de sélection d'affichage
d'entrée auxiliare est fermé.
• Cette fonction n’est pas opérationnelle lorsque le CA-C1AX est
utilisé.
Façade antivol
Vous pouvez détacher la façade de l'appareil et l'emmener avec
vous, ce qui aide à éviter les vols.
Retirer la façade
1 Appuyez sur la touche de détachement.
Ouvrez la façade en la laissant tomber vers le bas.
2 En tirant la façade vers la gauche, tirez-la vers l'avant et
retirez-la.
• La façade est une pièce de précision de l'équipement et elle peut
être endommagée en cas de chocs ou de secousses. C'est
pourquoi, vous devez garder la façade dans sa boîte spéciale
lorsqu'elle est détachée.
• N'exposez pas la façade ou sa boîte aux rayons du soleil, à des
températures excessives ou à l'humidité. Evitez aussi les endroits
trop poussiéreux et où l'appareil risque d'être éclaboussé.
Remettre en place la façade
1 Alignez l'axe sur l'appareil avec le creux situé sur la façade.
2 Poussez la façade jusqu'au clic.
La façade est vérouillée en position et vous pouvez alors utiliser
l'appareil.
— 40 —
Page 41

Sourdine TEL
LOUD
DAB
SCAN B.S./RDM REP MTL/M.RDM DISP
OFF
TITI
NAME
B NR
SRC
4¢
AM # 1-6
FM
MENU
KRC-691
KRC-591V/KRC-591
Le son est automatiquement coupé lorsqu'un appel est reçu.
Lorsqu'un appel est reçu
"CALL" est affiché.
Le système audio se met en pause.
Ecouter l'autoradio pendant un appel
Appuyez sur la touche [SRC].
L'affichage "CALL" disparaît et le système audio se remet en
marche.
A la fin de l'appel
Raccrochez le téléphone.
L'affichage "CALL" disparaît et le système audio se remet en
marche.
Fonctions du tuner
Indicateur ST
Affichage de la gamme d'onde
Affichage de
la fréquence
Numéro de station préréglée
— 41 —
Indicateur ST
Affichage de
la fréquence
Affichage de la gamme d'onde
Numéro de station préréglée
Page 42

Fonctions du tuner
Accord
Sélectionner la station.
1 Sélectionnez la source tuner
Appuyez sur la touche [SRC].
Sélectionnez l'affichage "TUNER".
2 Sélectionnez la bande
Appuyez sur la touche [FM] ou [AM].
Chaque fois que l'on appuie sur la touche [FM] la gamme d'onde
Français
change parmi FM1, FM2 et FM3.
3 Réglez une bande supérieure ou inférieure
Appuyez sur la touche [4] ou [¢].
Pendant la réception de stations stéréo, l'indicateur "ST" est allumé.
Mémoire de station pré-réglée
Mettre la station en mémoire.
1 Sélectionnez la bande
Appuyez sur la touche [FM] ou [AM].
2 Sélectionnez la fréquence à mettre en mémoire
Appuyez sur la touche [4] ou [¢].
3 Mettez en mémoire la fréquence
Appuyez sur la touche [#1] — [#6] pendant au moins 2
secondes.
Le numéro pré-réglé affiché clignote 1 fois.
Sur chaque bande, 1 station peut être mise en mémoire sur
chaque touche [#1] — [#6].
Entrée en mémoire automatique
Mettre automatiquement en mémoire les stations dont la
réception est bonne.
1 Sélectionnez la bande pour l'entrée en mémoire automatique
Appuyez sur la touche [FM] ou [AM].
2 Entrez en mode menu
Appuyez sur la touche [MENU] pendant au moins 1 seconde.
"MENU" est affiché.
3 Sélectionnez le mode d'entrée en mémoire automatique
Appuyez sur la touche [FM] ou [AM].
Sélectionnez l'affichage "A-Memory"/"A-MEMORY".
4 Ouvrez le mode entrée en mémoire automatique
Appuyez sur la touche [4] ou [¢] pendant au moins 2
secondes.
Lorsque 6 stations qui peuvent être captées sont mises en
mémoire, le mode entrée en mémoire automatique est fermé.
• Lorsque la <Fonction AF> (page 55) est activée, seules les
stations RDS sont mises en mémoire.
• Lorsque l'entrée en mémoire automatique est faite dans la bande
FM2, les stations RDS pré-réglées dans la bande FM1 ne sont pas
mises en mémoire.
De même, lorsque cela est fait dans la bande FM3, les stations
RDS pré-réglées dans FM1 ou FM2 ne sont pas mises en
mémoire.
Accord pré-réglé
Rappeler les stations mises en mémoire.
Sélectionnez la bande
1
Appuyez sur la touche [FM] ou [AM].
Rappelez la station
2
Appuyez sur la touche [#1] — [#6].
— 42 —
Page 43

Fonctions RDS
LOUD
DAB
SCAN B.S./RDM REP MTL/M.RDM DISP
OFF
NF
TITI
NAME
B NR
TIDISP# 1-6
4¢
AM
FM
PTY
KRC-691
KRC-591V/KRC-591
Indicateur RDS
Indicateur PTY
Indicateur TI
Informations routières
Passer automatiquement aux informations routières lorsqu'un
bulletin d'informations routières commence même si vous n'êtes
pas en train d'écouter la radio.
Appuyez sur la touche [TI].
Chaque fois que l'on appuie sur la touche, la fonction
d'informations routières est activée ou désactivée.
Lorsqu'elle est activée, l'indicateur "TI" est allumé.
Lorsqu'une station d'informations routières n'est pas captée,
l'indicateur "TI" clignote.
Lorsqu'un bulletin d'informations routières commence,
"Traffic"/"TRAFFIC" est affiché et l'autoradio bascule sur les
informations routières.
• Pendant la réception d'une station AM station lorsque la fonction
d'informations routières est activée, l'autoradio passe à une
station FM.
• Pendant la réception d'informations routières, le volume réglé est
mémorisé automatiquement et la fois suivante où l'autoradio
passe aux informations routières, ce sera automatiquement le
volume précédemment mémorisé.
Capter d'autres stations d'informations routières
Appuyez sur la touche [4] ou [¢].
Le passage aux informations routières peut se faire lorsque l'on
écoute la radio.
Indicateur RDS
Indicateur PTY
Indicateur TI
Défilement de texte radio
Faire défiler le texte radio affiché.
Appuyez sur la touche [DISP] pendant au moins 1 seconde.
— 43 —
Page 44

Fonctions RDS
PTY (Type de Programme)
Sélectionner du type de programme et rechercher une station.
1 Entrez en mode PTY
Appuyez sur la touche [PTY].
Pendant le mode PTY, l'indicateur "PTY" est allumé.
Cette fonction ne peut pas être utilisée pendant un bulletin
d'informations routières ou une réception AM.
2 Sélectionnez le type de programme
Français
Appuyez sur la touche [FM] ou [AM].
Chaque fois que l'on appuie sur la touche, le Type de programme
change de la manière suivante.
No. Type de programme Affichage
KRC-691 KRC-591V /
1. Discours "Speech" "SPEECH"
2. Musique "Music" "MUSIC"
3. Informations "News" "NEWS"
4. Affaires courantes "Affairs" "AFFAIRS"
5. Informations "Info" "INFO"
6. Sport "Sport" "SPORT"
7. Education "Educate" "EDUCATE"
8. Théâtre "Drama" "DRAMA"
9. Culture "Culture" "CULTURE"
10. Science "Science" "SCIENCE"
11. Divers "Varied" "VARIED"
12. Musique Pop "Pop M" "POP M"
13. Musique Rock "Rock M" "ROCK M"
14. Musique d'ambiance "Easy M" "EASY M"
15. Musique classique légère "Light M" "LIGHT M"
16. Musique classique sérieuse "Classics" "CLASSICS"
17. Autre musique "Other M" "OTHER M"
18. Météo "Weather" "WEATHER"
KRC-591
19. Finance "Finance" "FINANCE"
20. Programmes pour enfants "Children" "CHILDREN"
21. Affaires sociales "Social" "SOCIAL"
22. Religion "Religion" "RELIGION"
23. Téléphone "Phone In" "PHONE IN"
24. Voyage "Travel" "TRAVEL"
25. Loisirs "Leisure" "LEISURE"
26. Musique Jazz "Jazz" "JAZZ"
27. Musique Country "Country" "COUNTRY"
28. Musique Nationale "Nation M" "NATION M"
29. Chansons populaires "Oldies" "OLDIES"
30. Musique Folk "Folk M" "FOLK M"
31. Documentaire "Document" "DOCUMENT"
Recherchez la station du type de programme sélectionné
3
Appuyez sur la touche [4] ou [¢].
Lorsque vous désirez chercher d'autres stations, apppuyez sur la
touche [4] ou [¢] de nouveau.
4 Sortez du mode PTY
Appuyez sur la touche [PTY].
— 44 —
• Discours et Musique incluent les types de programmes cidessous.
Discours : No.3
Musique : No.12
• Le type de programme peut être mis en mémoire sous les
touches [#1] — [#6] puis rappelé rapidement. Référez-vous à la
section <Pré-réglage du type de programme> (page 45).
• La langue d'affichage peut être changée. Référez-vous à la section
<Changer la langue pour la fonction Type de programme (PTY)>
(page 45).
Lorsque le type de programme sélectionné n'est pas trouvé, le
message "No PTY"/"NO PTY" est affiché. Sélectionnez un autre type
de programme.
— 11, 18 — 25, 31
— 17, 26 — 30
Page 45

Pré-régler le type de programme
Mettre le type de programme dans la mémoire des touches préréglées et le rappeler rapidement.
Pré-régler le type de programme
1 Sélectionnez le type de programme à pré-régler
Référez-vous à la section <PTY (Type de Programme)> (page 44).
2 Pré-réglez le type de programme
Appuyez sur la touche [#1] — [#6] pendant au moins 2
secondes.
Rappeler le type de programme pré-réglé
1 Entrez en mode PTY
Référez-vous à la section <PTY (Type de Programme)> (page 44).
Rappelez le type de programme
2
Appuyez sur la touche [#1] — [#6].
Changer la langue pour la fonction Type de
programme (PTY)
électionner la langue d'affichage du type de programme.
1 Entrez en mode PTY
Référez-vous à la section <PTY (Type de Programme)> (page 44).
2 Entrez en mode de changement de langue
Appuyez sur la touche [DISP].
3 Sélectionnez la langue
Appuyez sur la touche [FM] ou [AM].
Chaque fois que l'on appuie sur la touche, la langue change de la
manière suivante.
Langue Affichage
Anglais "English"/"ENGLISH"
Français "French"/"FRENCH"
Suédois "Swedish"/"SWEDISH"
Allemand "German"/"GERMAN"
4 Sortez du mode de changement de langue
Appuyez sur la touche [DISP].
— 45 —
Page 46

Fonctions du lecteur de cassette
LOUD
DAB
SCAN B.S./RDM REP MTL/M.RDM DISP
OFF
NF
TITI
NAME
B NR
B NR B.S REP MTL
SRC
4¢
AM
FM
PROG
KRC-691
KRC-591V/KRC-591
Français
Lire la face
Lire la face
Indicateur IN
Indicateur IN
Touche de
déverrouillage
Lire des cassettes
Lorsqu'il n'y a pas de cassette
1 Ouvrir la façade en la laissant tomber vers le bas
Appuyez sur la touche de détachement.
2 Insérez une cassette.
3 Appuyez sur le côté droit de la façade et retournez-la pour la
remettre dans sa position précédente.
• Lorsque la façade a été ouverte vers le bas, elle pourrait gêner le
levier de déplacement ou autre chose. Si cela se produit, faites
attention et déplacez le levier de déplacement ou prenez une
mesure appropriée, puis faire fonctionner l'appareil.
• N'utilisez pas l'appareil avec façade ouverte. S'il est utilisé avec
façade ouverte, de la poussière peut pénétrer à l'intérieur et
endommager les pièces internes.
Lorsqu'une cassette est présente dans l'appareil, l'indicateur "IN" est
allumé.
Lorsqu'une cassette est insérée
Appuyez sur la touche [SRC].
Sélectionnez l'affichage "TAPE".
Lorsque vous désirez écouter l'autre face
Appuyez sur la touche [PROG].
Ejectez la cassette
1 Ouvrir la façade en la laissant tomber vers le bas
Appuyez sur la touche de détachement.
2 Ejectez la cassette
Appuyez sur la touche [0].
— 46 —
Page 47

3 Appuyez sur le côté droit de la façade et retournez-la pour la
remettre dans sa position précédente.
Avance rapide et rembobinage rapide
Avance rapide
Appuyez sur la touche [FM].
Lorsque cela s'arrête appuyez sur la touche [PROG].
Rembobinage
Appuyez sur la touche [AM].
Lorsque cela s'arrête appuyez sur la touche [PROG].
Dolby B NR
Appuyez sur la touche [B NR].
Chaque fois que l'on appuie sur la touche, la fonction Dolby B NR
est activée ou désactivée.
Lorsqu'elle est activée, "B-NR" est affiché.
Type de cassette Affichage
CrO
2 (Type II), FeCr (Type III),
Metal (Type IV)
Normal (Type I) "MTL OFF"
"MTL ON"
Avance de la cassette
Passer à la chanson suivante ou au début de la chanson en
cours.
Passer à la chanson suivante
Appuyez sur la touche [¢].
Passer au début de la chanson en cours
Appuyez sur la touche [4].
Saut des blancs
Aller automatiquement en avance rapide lorsqu'une portion de
cassette non enregistrée dure plus de 10 secondes.
Appuyez sur la touche [B.S].
Chaque fois que l'on appuie sur la touche, la fonction de saut des
blancs est activée ou désactivée.
Lorsqu'elle est activée, "BS ON" est affiché.
Sélectionner le type de cassette
Appuyez sur la touche [MTL].
Chaque fois que l'on appuie sur la touche, le type de cassette
change de la manière suivante.
— 47 —
Page 48

Fonctions du lecteur de cassette
LOUD
DAB
SCAN B.S./RDM REP MTL/M.RDM DISP
OFF
NF
TITI
NAME
B NR
38
SCAN RDM REP M.RDM DISP/
NAME
SRC
4¢
AM
FM
KRC-691
KRC-591V/KRC-591
Répétition de musique
Réécouter la chanson en cours.
Appuyez sur la touche [REP].
Chaque fois que l'on appuie sur la touche, la fonction de
répétition de musique est activée ou désactivée.
Lorsqu'elle est activée, "REP ON" est affiché.
Fonctions de contrôle de disque externe
Français
Numéro de plage
Durée de la plage
Numéro de disque
Numéro de plage
Durée de la plage
Numéro de disque
— 48 —
Page 49

Lire un disque extérieur
Lire des disques présents dans le lecteur de disque optionnel
connecté à cet appareil.
Appuyez sur la touche [SRC].
Sélectionnez l'affichage pour le lecteur de disque que vous
désirez.
Exemples d'affichage:
Affichage Lecteur de disque
"CD" Lecteur de CD
"DISC-CH" Changeur de CD/Changeur de MD
Pause et lecture
Appuyez sur la touche [38].
Chaque fois que l'on appuie sur ce bouton, il se met en pause ou
en lecture.
• Le disque #10 est affiché comme "0".
• Les fonctions pouvant être utilisées et les informations affichées
peuvent être différentes suivant les lecteurs de disque externes
connectés.
Avance rapide et retour
Avance rapide
Maintenez la touche [¢] enfoncée.
Relâchez la touche pour reproduire le disque à partir de ce point.
Retour
Maintenez la touche [4] enfoncée.
Relâchez la touche pour reproduire le disque à partir de ce point.
Recherche de plages
Sélectionner la chanson que vous souhaitez entendre.
Appuyez sur la touche [4] ou [¢].
Recherche d'album
(Fonction du changeur de disques)
Sélectionner le disque que vous souhaitez entendre.
Appuyez sur la touche [AM] ou [FM].
Répétition de plage/album
Réécouter la chanson / le disque que vous êtes en train
d'écouter.
Appuyez sur la touche [REP].
Chaque fois que l'on appuie sur le bouton, la fonction Répétition
de la lecture change de la manière suivante.
Répétition de la lecture Affichage
Répétition de la plage "T-REP ON"
Répétition de l'album "D-REP ON"
(Fonction du changeur de disque)
Désactivé "REP OFF"
— 49 —
Page 50

Fonctions de contrôle de disque externe
Balayage des plages
Ecouter le début de chaque chanson du disque que vous écoutez
et rechercher la chanson que vous souhaitez écouter.
1 Commencez le balayage des plages
Appuyez sur la touche [SCAN].
"Scan ON"/"SCAN ON" est affiché.
2 Relâchez la touche lorsque vous entendez la chanson que
vous souhaitez écouter
Français
Appuyez sur la touche [SCAN].
Lecture aléatoire
Ecouter toutes les chansons du disque dans un ordre aléatoire.
Appuyez sur la touche [RDM].
Chaque fois que l'on appuie sur la touche, la lecture aléatoire est
activée ou désactivée.
Lorsqu'elle est activée, "RDM ON" est affiché.
Lorsque l'on appuie sur la touche [¢], la chanson suivante
sélectionnée commence.
Lecture aléatoire du chargeur
(Fonction du changeur de disque)
Ecoutez les chansons de tous les disques présents dans le
changeur de disque dans un ordre aléatoire.
Appuyez sur la touche [M.RDM].
Chaque fois que l'on appuie sur la touche, la lecture aléatoire du
chargeur est activée ou désactivée.
Lorsqu'elle est activée, "MRDM ON" est affiché.
Lorsque l'on appuie sur la touche [¢], la chanson suivante
sélectionnée commence.
Nomination de disque (DNPS)
Attribuer un titre à un CD.
1 Ecoutez le disque auquel vous souhaitez attribuer un nom
• On ne peut pas attribuer un titre à un MD.
• On ne peut pas effectuer la nomination d'un disque pendant
l'affichage du texte CD ou de l'heure.
2 Entrez en mode de définition du nom
Appuyez sur la touche [NAME] pendant au moins 2
secondes.
"NAME SET" est affiché.
3 Mettez le curseur en position de saisie de caractère
Appuyez sur la touche [4] ou [¢].
4 Sélectionnez le type de caractère (KRC-691 seulement)
Appuyez sur la touche [38].
Chaque fois que l'on appuie sur la touche, le type de caractère
change de la manière suivante.
Type caractère
Alphabet haut de casse
Alphabet bas de casse
Chiffres et symboles
Caractères spéciaux (Caractères accentués)
5 Sélectionnez les caractères
Appuyez sur la touche [FM] ou [AM].
6 Répétez les étapes 3 à 5 et saisissez le nom.
7 Sortez du mode de définition de nom
Appuyez sur la touche [NAME].
• Lorsque l'opération est interrompue pendant 10 secondes, le nom
alors présent est enregistré et le mode de définition de nom est
fermé.
•Supports auxquels vous pouvez attribuer des noms.
- Changeur/Lecteur de CD externe: Cela varie en fonction du
— 50 —
Page 51

changeur/lecteur de CD. Référez-vous au manuel du
LOUD
DAB
SCAN B.S./RDM REP MTL/M.RDM DISP
OFF
NF
TITI
NAME
B NR
MENU
SRC
4¢
AM
FM
KRC-691
KRC-591V/KRC-591
changeur/lecteur de CD.
• Le nom du CD peut être changé en suivant la même procédure
que pour le nommer.
Défilement du Texte/Titre
Faire défiler le texte du CD affiché ou le titre du MD.
Appuyez sur la touche [DISP] pendant au moins 1 seconde.
A propos du menu
— 51 —
Indicateur NEWS
Affichage des menus
Indicateur NEWS
Affichage des menus
Indicateur RDS
Indicateur RDS
Page 52

A propos du menu
A propos du menu
Activer en cours de fonctionnement des fonctions de signaux
sonores etc..
La méthode de base d'utilisation du système du menu est
expliquée ici. Les références pour les éléments du menu et leur
réglage se trouve après l'explication de cette opération.
1 Entrez en mode menu
Appuyez sur la touche [MENU] pendant au moins 1 seconde.
"MENU" est affiché.
Français
2 Sélectionnez l'élément du menu
Appuyez sur la touche [FM] ou [AM].
Exemple:Lorsque vous voulez activer le signal sonore,
sélectionnez l'affichage "Beep"/"BEEP".
3 Réglez l'élément du menu
Appuyez sur la touche [4] ou [¢].
Exemple:Lorsque "Beep"/"BEEP" est sélectionné, chaque fois que
l'on appuie sur la touche, on commute sur "Beep
ON"/"BEEP ON" ou "Beep OFF"/"BEEP OFF".
Vous pouvez continuer en retournant à l'étape 2 et en réglant
d'autres éléments.
Sélectionnez l’un d’eux comme réglage.
4 Sortez du mode menu
Appuyez sur la touche [MENU].
Lorsque d'autres éléments pour lesquels la méthode de
fonctionnement normale ci-dessus est applicable sont affichés, on
entre ensuite dans le graphique de réglage. (Normalement les
réglages au sommet du graphique sont les réglages d'origine.)
De plus, l'explication des éléments pour lesquels la méthode n'est
pas applicable <Ajustement manuel de l'horloge>etc.) sont exposés
étape par étape.
Code de sécurité
Puisqu'il faut l'autorisation du code de sécurité lorsqu'il est retiré
du véhicule, la personnalisation de cet appareil à l'aide du Code
de Sécurité aide à éviter les vols.
Lorsque la fonction code de sécurité est activée, elle ne peut pas
être désactivée.
Remarque, votre code de sécurité est le numéro de 4 chiffres situé
dans votre "Car Audio Passport" dans ce package.
1 Entrez en Veille
Appuyez sur la touche [SRC].
Sélectionnez l'affichage "ALL OFF".
2 Entrez en mode menu
Appuyez sur la touche [MENU] pendant au moins 1 seconde.
Lorsque "MENU" est affiché, "Security"/ "SECURITY" est affiché.
3 Entrez en mode code de sécurité
Appuyez sur la touche [4] ou [¢] pendant au moins 1
seconde.
Lorsque "ENTER" est affiché, "CODE" est affiché.
4 Sélectionnez les chiffres à saisir
Appuyez sur la touche [4] ou [¢].
Sélectionnez les numéros du code de sécurité
5
Appuyez sur la touche [FM] ou [AM].
6 Répétez les étapes 4 et 5, et complétez le code de sécurité.
7 Confirmez le code de sécurité
Appuyez sur la touche [¢] pendant au moins 3 secondes.
Lorsque "RE-ENTER" est affiché, "CODE" est affiché.
8 Effectuez les opérations des étapes 4 à 7 et saisissez de
nouveau le code de sécurité.
"APPROVED" est affiché.
La fonction code de sécurité est activée.
— 52 —
Page 53

Si vous saisissez un code différent de votre code de sécurité, vous
devez recommencer à l'étape 4.
Appuyez sur la touche Reset et quand il est retiré de la
source d'alimentation de la batterie
1 Allumez l'alimentation.
2 Effectuez les opérations des étapes 4 à 7 et saisissez de
nouveau le code de sécurité.
"APPROVED" est affiché.
L'appareil peut être utilisé.
Si un code incorrect est entré, "WAITING" est affiché, et le temps
d'interdiction de saisie indiqué ci-dessous est généré.
Après que le temps d'interdiction se soit écoulé, "CODE" est affiché,
et la saisie peut s'effectuer.
Nombre de fois qu'un
mauvais code a été saisi
1—
25 minutes
31 heure
4 24 heures
Tonalité capteur tactile
Activer/Désactiver le signal sonore de contrôle d'opération (bip).
Affichage Réglage
"Beep ON"/"BEEP ON" Le bip est entendu.
"Beep OFF"/"BEEP OFF" Le bip est annulé.
Ajustement manuel de l'horloge
Ce réglage peut être fait lorsque la fonction <Synchronisation de
l'horloge> (page 53) est désactivée.
Temps d'interdiction de saisie
1 Sélectionnez le mode d'ajustement de l'horloge
Appuyez sur la touche [FM] ou [AM].
Sélectionnez l'affichage "CLK ADJ".
2 Entrez en mode d'ajustement de l'horloge
Appuyez sur la touche [4] ou [¢] pendant au moins 1
seconde.
L'affichage de l'horloge clignote.
3 Réglez les heures
Appuyez sur la touche [FM] ou [AM].
Réglez les minutes
Appuyez sur la touche [4] ou [¢].
4 Sortez du mode d'ajustement de l'horloge
Appuyez sur la touche [MENU].
Synchronisation de l'horloge
Synchroniser les données temps de la station RDS avec
l'horloge de cet appareil.
Affichage Réglage
"SYNC ON" Synchronise l'heure.
"SYNC OFF" Réglez l'heure manuellement.
Il faut 3 ou 4 minutes pour synchroniser l'horloge.
DSI (Disabled System Indicator)
Un indicateur rouge clignotera sur l'appareil après que la façade
aura été enlevée, pour mettre en garde les éventuels voleurs.
Affichage Réglage
"DSI ON" La LED clignote.
"DSI OFF" LED éteinte.
— 53 —
Page 54

A propos du menu
Eclairage sélectionnable
Sélectionner la couleur verte ou rouge pour l'éclairage de la
touche.
Affichage Réglage
"KEY GRN" La couleur de l'éclairage est verte.
"KEY RED" La couleur de l'éclairage est rouge.
Fonction du KRC-591V/KRC-591
Français
Changement de l'affichage graphique
Activer/Désactiver l'affichage de la partie graphique.
Affichage Réglage
"GRPH ON" La partie graphique est affichée.
"GRPH OFF" La partie graphique n'est pas activée.
Fonction du KRC-691
Changement du type d'affichage
Définir le type d'affichage.
Affichage Réglage
"DisplayD" Mode de démonstration
"DisplayA" L'affichage rond correspond au temps.
"DisplayB" L'affichage rond correspond à l'horloge.
"DisplayC" Type d'affichage silencieux.
Fonction du KRC-691
Réglage du contraste
Régler le contraste de l'affichage.
Affichage et réglage
"CONT 0"
"CONT 5" (Réglage d'origine)
… …
"CONT 10"
Fonction du KRC-691
Variateur d'intensité
Diminuer l'intensité de l'affichage de l'appareil lorsque la
lumière du véhicule est allumée.
Affichage Réglage
"DIM ON" L'intensité de l'affichage diminue.
"DIM OFF" L'intensité de l'affichage ne diminue pas.
Bulletin d'informations avec définition du temps
d'écoute
Il y a basculement automatique lorsqu'un bulletin d'informations
commence même si l'on écoute pas la radio. De plus, on peut
également définir le délai pendant lequel l'écoute ne peut pas
être interrompue.
Affichage et réglage
"NEWS OFF"
"NEWS 00M"
…
"NEWS 90M"
— 54 —
Page 55

Lorsque "NEWS 00M" — "NEWS 90M" est sélectionné, la
fonction d'interruption du bulletin d'informations est activée.
Lorsqu'elle est activée, l'indicateur "NEWS" est allumé.
Lorsqu'un bulletin d'informations commence, "NEWS" est affiché
et on passe au bulletin d'information.
• Si vous choisissez le réglage "20M" aucun autre bulletin
d'information ne sera reçu avant 20 minutes après le premier
bulletin d'information.
• Le volume pour les bulletins d'information est le même que celui
défini pour les informations routières (page 43).
• Cette fonction n'est disponible que si la station souhaitée envoie
un code PTY pour le bulletin d'information ou appartient à un
réseau <Enhanced Other Network> envoyant un code PTY pour le
bulletin d'information.
• Lorsque la fonction d'interruption du bulletin d'informations est
activée, l'appareil bascule sur une station FM.
Recherche locale <En mode Tuner>
Seules les stations dont la réception est bonne sont recherchées
en mode d'accord automatique.
Affichage Réglage
"LO.S OFF" La fonction de recherche locale est désactivée.
"LO.S ON" La fonction de recherche locale est activée.
Mode d'accord <En mode Tuner>
Définit le mode d'accord.
Mode d'accord Affichage Fonction
Recherche automatique
"AUTO 1"
Recherche automatique
d'une station
Recherche de station Recherche dans l'ordre
pré-réglée des stations présentes
"AUTO 2"
dans la mémoire de
pré-réglage
Manuel "Manual"/"MANUAL" Contrôle de l'accord manuel
normal
Entrée en mémoire automatique
<En mode Tuner>
Pour connaître la méthode de fonctionnement, référez-vous à la
section <Entrée en mémoire automatique> (page 42).
AF (Alternative Frequency - Fréquence
alternative)
Quand la réception est mauvaise, cette fonction commute
automatiquement sur une autre fréquence du même programme
avec une meilleure réception dans le même réseau RDS.
Affichage Réglage
"AF ON" La fonction AF est activée.
"AF OFF" La fonction AF est désactivée.
Lorsque la fonction AF est activée, l'indicateur "RDS" est allumé.
Quand aucune autre station avec un fort signal de réception n'est
disponible pour le même programme dans le réseau RDS, il se peut
que vous entendiez l'émission par intermittence. Dans ce cas,
— 55 —
mettez hors service le fonction AF.
Page 56

A propos du menu
Restriction de la région RDS
(Fonction de restriction régionale)
Vous pouvez choisir de restreindre ou non les canaux RDS reçus
avec la fonction AF pour un réseau particulier, pour une région
particulière.
Affichage Réglage
"REG ON" La fonction de restriction de la région est activée.
"REG OFF" La fonction de restriction de la région est désactivée.
Français
Parfois, les stations du même réseau diffusent des programmes
différents ou utilisent des noms de programme différents.
Recherche automatique TP
Quand la fonction TI est en service et que la réception devient
mauvaise lors de l'écoute d'une station diffusant des
informations routières, une autre station diffusant des
informations routières avec une meilleure réception est
recherchée automatiquement.
Affichage Réglage
"ATPS ON" La fonction recherche automatique TP est
"ATPS OFF" La fonction recherche automatique TP est
activée.
désactivée.
Réception monaurale <En réception FM>
On peut réduire les parasites lorsqu'une émission stéréo est
captée en mode monaural.
Affichage Réglage
"MONO OFF" La réception monaurale est désactivée.
"MONO ON" La réception monaurale est activée.
Défilement du texte
Régler le défilement du texte affiché.
Affichage Réglage
"SCL MANU" Ne défile pas.
"SCL AUTO" Défile lorsque l'affichage change.
Le texte qui défile est indiqué ci-dessous.
• Texte CD
• Titre du MD
• Texte radio
Minuterie de temporisation de la coupure de
l'alimentation
Régler le minuteur pour que l'appareil soit éteint
automatiquement lorsqu'il reste longtemps en veille.
L'utilisation de ce réglage peut permettre d'économiser la
batterie du véhicule.
Affichage Réglage
"OFF – – –" La fonction de temporisation de la coupure
de l'alimentation est désactivée.
"OFF 20M" Coupe l'alimentation au bout de 20 minutes.
(Réglage d'origine)
"OFF 40M" Coupe l'alimentation au bout de 40 minutes.
"OFF 60M" Coupe l'alimentation au bout de 60 minutes.
Ce réglage se fait après le réglage du <Code de sécurité> (page 52).
— 56 —
Page 57

Accessoires
Vue externe
1
2
3
4
L’utilisation d’accessoires autres que les accessoires fournis pourrait
endommager l’appareil. Assurez-vous d’utiliser les accessoires fournis,
indiqués ci-dessus.
..........................................1
..........................................2
..........................................1
..........................................2
Nombre d’éléments
Procédure d’installation
1. Pour éviter les courts-circuits, retirez la clef de contact et
déconnectez la borne · de la batterie.
2. Effectuez les connexions d’entrée et sortie correctement pour
chaque appareil.
3. Connectez le câble au faisceau de fils.
4. Prenez le connecteur B sur le faisceau de fils et connectez-le au
connecteur haut-parleur de votre véhicule.
5. Prenez le connecteur A sur le faisceau de fils et connectez-le au
connecteur d'alimentation externe de votre véhicule.
6. Connectez le connecteur du faisceau à l’appareil.
7. Installez l’appareil dans votre voiture.
8. Reconnectez la borne · de la batterie.
9. Appuyez sur la touche de réinitialisation.
2ATTENTION
• Si votre véhicule n’est pas prévu pour ce type de connection,
consultez votre revendeur KENWOOD.
• Utilisez uniquement des adaptateurs de conversion d'antenne
(ISO-JASO) quand le cordon d'antenne a un fiche ISO.
• Assurez-vous que toutes les connexions de câble sont faites
correctement en insérant les fiches jusqu'à ce qu'elles soient
verrouillées.
• Si l'allumage de votre véhicule n'a pas de position ACC, ou si le
câble d'allumage est connecté à une source d'alimentation à
tension constante comme un câble de batterie, l'alimentation de
l'appareil ne sera pas relié à l'allumage (c. à d., il ne se mettra
pas sous et hors tension en même temps que l'allumage). Si
vous souhaitez connecter l'alimentation de l'appareil avec
l'allumage, connectez le câble d'allumage à une source
d'alimentation qui peut être mise sous et hors tension avec la
clef de contact.
• Si un fusible grille, assurez-vous d’abord que les câbles n’ont pas
causé de court-circuit puis remplacez le vieux fusible par un
nouveau de même valeur.
• Isolez les câbles non-connectés avec un ruban vinyle ou autre
matériel similaire. Pour éviter, les courts-circuits, ne retirez pas
non plus les capuchons à l’extrémité des câbles non-connectés
ou des prises.
• Connectez séparément chaque câble d'enceinte à la prise
correspondante. L'appareil peut être endommagé si le câble
négatif · pour une des enceintes ou le câble de masse entre en
contact avec une partie métallique du véhicule.
• Après avoir installé l’appareil, vérifiez si les lampes de frein, les
indicateurs, les clignotants, etc de la voiture fonctionnent
correctement.
• Si la console a un couvercle, assurez-vous d’installer l’appareil de
façon à ce que la façade ne frappe pas le couvercle lors de la
fermeture ou de l’ouverture.
• Monter l'unité de façon à ce que l'angle de montage soit de 30˚
ou moins.
— 57 —— 57 —
Page 58

1234567
8
1234567
8
TEL MUTE
P.CONT
ANT.CONT
Connexion des câbles sur les prises
Câble d'antenne (ISO) 1
Adaptateur de conversion d'antenne (ISO-JASO)
(Accessoire3) 2
Français
Entrée de l’antenne
AM/FM 3
Sortie arrière gauche
(Blanc) 10
Sortie avant gauche
(Blanc) 12
Fusible (10A) 13
Vers le KENWOOD changeur de disque/
Entrée de commande DAB/
KPA-SD100/KPA-HD100/KPA-SS100 16
Pour la connexion de ces fils, veuillez
consulter les manuels d'utilisation appropriés.
17
Guide des connecteurs
Numéros de broche
pour connecteurs ISO
Connecteur d’alimentation externe
A–4
A–5
A–6
(KRC-691 seulement)
A–7
A–8
Connecteur de hautparleurs
B–1
B–2
B–3
B–4
B–5
B–6
B–7
B–8
Couleur du
câble
Jaune
Bleu/Blanc
Orange/Blanc
Rouge
Noir
Violet
Violet/Noir
Gris
Gris/Noir
Blanc
Blanc/Noir
Vert
Vert/Noir
Fonctions
1
Batterie*
Allumage (ACC)*
2
Commande d’alimentation
Gradateur d'intensité
d'éclairage
Allumage (ACC)*
Batterie*
1
2
Connexion de la terre
(masse)
Arrière droit(+)
Arrière droit (
Avant droit (
Avant droit (
Avant gauche (
Avant gauche (
Arrière gauche (
Arrière gauche (
–)
+)
–)
+)
–)
+)
–)
Sortie arrière
droite (Rouge) 4
*1KRC-691/591 :
Câble de batterie (Jaune) 6
*2KRC-591V :
Câble d’allumage (Rouge)
1
KRC-691/591 :
*
Câble d’allumage (Rouge) 7
*2KRC-591V :
Câble de batterie (Jaune)
Sortie avant
droite (Rouge)
5
Broche A–7 (Rouge) 8
Broche A–4 (Jaune) 9
Connecteur A
Connecteur B
— 58 —
— 58 —
Vzers la télécommande du vorant
Faisceau de câbles
(Accessoire1) 16
Câble de sourdine TEL
(Marron) 17
Si aucune connexion n'est
faite, ne laissez pas le
câble sortir à l'extérieur. 18
Câble de commande de
l’alimentation/antenne
moteur (Bleu/Blanc) 20
(KRC-691 seulement) 30
Connectez à une prise qui est
à la masse même quand le
téléphone sonne ou pendant
une conversation. 21
Pour connecter le
système de navigation
KENWOOD, consulter
le manuel du système
de navigation. 22
Connectez à la prise de
commande d'alimentation
lors de l'utilisation d'un
amplificateur de puissance
optionnel, ou à la prise de
commande d'antenne du
véhicule. 23
Page 59

2AVERTISSEMENT
Connexion du connecteur ISO (voir p.58)
La disposition des broches pour les connecteurs ISO dépend du type de
votre véhicule. Assurez de réaliser les connexions correctes pour éviter
d'endommager l'appareil.
La connexion par défaut du harnais de câbles est décrite dans la section
1 ci-dessous. Si les broches du connecteur ISO sont réglées comme
décrit dans la section 2 ou 3, réalisez les connexions comme indiqué
dans l’illustration.
1 (Réglage par défaut) La broche A-7 (rouge) du connecteur ISO du
véhicule est associée à l'allumage, et la broche A-4 (jaune) est
connectée à l'alimentation constante.
Câble d’allumage (Rouge)
Câble de batterie (Jaune)
Appareil Voiture
Broche A–7 (Rouge)
Broche A–4 (Jaune)
2 La broche A-7 (rouge) du connecteur ISO du véhicule est
connectée à l'alimentation constante et la broche A-4 (jaune) est
associée à l'allumage.
Câble d’allumage (Rouge)
Câble de batterie (Jaune)
Appareil Voiture
Broche A–7 (Rouge)
Broche A–4 (Jaune)
Installation
■ Installation
Tôle pare-feu ou support métallique
Vis (M4X8)
(disponibles dans
le commerce)
Tordre les pattes du
manchon de
Vis à tôle
(disponibles
dans le
commerce)
Assurez-vous que l’appareil est solidement installé. Si l’appareil est
instable, il risque de mal fonctionner (ex. le son risque de sauter).
Armature de montage
métallique
(disponible dans le
commerce)
montage
avec un tournevis ou
un outil similaire et
fixer.
3 La broche A-4 (jaune) du connecteur ISO du véhicule n'est connectée
à rien, tandis que la broche A-7 (rouge) est connectée à l'alimentation
constante (ou bien, les deux broches A-7 (rouge) et A-4 (jaune) sont
connectées à l'alimentation constante).
Câble d’allumage (Rouge)
Appareil
Câble de batterie (Jaune)
Quand la connexion est faite comme dans 3 ci-dessus, l'alimentation
de l'appareil ne sera pas associée à la clef de contact de l'appareil. Pour
cette raison, assurez-vous toujours de mettre l'appareil hors tension
quand vous coupez le contact.
Pour associer l'alimentation de l'appareil à l'allumage, connectez le câble
d'allumage (ACC...rouge) à une source d'alimentation qui peut être
mise sous et hors tension avec la clef de contact.
Voiture
Broche A–7 (Rouge)
Broche A–4 (Jaune)
■ Vissage de la façade sur l’appareil
Si vous souhaitez fixer la
façade sur l’appareil principal
de façon qu’elle ne tombe
pas, vissez-la avec la vis (ø4
× 16 mm) dans le trou
montré cidessous.
N’insérez jamais la vis taraudé (ø4 × 16 mm) dans un autre trou que
celui spécifié. Si vous la vissez dans un autre trou, elle fera contact et
risquera d’endommager des parties mécaniques à l’intérieur de
l’appareil.
— 59 —— 59 —
Accessoire4
Panneau inférieur
Page 60

Installation
■ Retrait du cadre en caoutchouc dur
1 Engagez les loquets sur l'outil de démontage et enlevez les
deux crochets inférieurs.
Baissez le cadre et tirez-le vers l'avant comme montré sur
l'illustration.
crochet
Français
Accessoire 2 Outil de démontage
2 Quand la partie inférieure est retirée, retirez les deux crochets
supérieurs.
Le cadre peut être retiré à partir de la partie supérieur de la même
façon.
loquet
■ Retrait de l’appareil
1 Référez vous à la section "Retrait du cadre en caoutchouc dur"
puis retirez le cadre en caoutchouc dur.
2 Retirez la vis (M4 × 8 mm) sur le panneau arrière.
3 Insérez les deux outils de démontage profondément dans les
fentes de chaque côté, comme montré.
Accessoire 2
Vis (M4X8)
(disponibles dans
le commerce)
Outil de démontage
4 Baissez les outils de
démontage vers le bas et
tirez l'appareil à moitié en
faisant pression vers
l'intérieur.
Faites attention de ne pas vous blesser avec le loquet de l'outil de
démontage.
5 Sortez l’appareil entièrement
avec les mains, en faisant
attention de ne pas le faire
tomber.
— 60 —
— 60 —
Page 61

Guide de depannage
Ce qui peut apparaître comme un mauvais
fonctionnement de votre appareil n’est peut être que le
résultat d’une mauvaise opération ou d’une mauvaise
connexion. Avant d’appeler un centre de service, vérifiez
d’abord dans le tableau suivant les problèmes possibles.
Général
? L’appareil ne se met pas sous tension.01
✔ Le fusible a grillé.
☞ Après avoir vérifiez qu'il n'y a pas de court-circuits dans les
câbles, remplacez le fusible par un de la même valeur.
✔ Pas de position ACC sur l'allumage du véhicule.02
☞ Connectez le même câble à l'allumage comme câble de batterie.
? Si vous avez sélectionné le mode d’attente, l’appareil va s’éteindre
automatiquement.03
✔ La fonction d’arrêt de la minuterie est devenue opérationnelle.
☞ Si vous ne voulez pas éteindre l’appareil automatiquement,
annulez la fonction d’arrêt de la minuterie.
Rien ne se passe quand les touches sont pressées.04
?
✔ Le microprocesseur dans l’appareil ne fonctionne pas correctement.
☞ Appuyez sur la touche de réinitialisation sur l’appareil.(page 36)
? Impossible de commuter sur une source. 05
✔ Il n'y a pas de cassette dans le lecteur.
☞ Effectuez les réglage pour le média que vous souhaitez écouter.
S'il n'y a aucun média dans cet appareil, il est impossible de
commuter les sources.
✔ Le changeur de disque n'est pas connecté.08
☞ Connectez le changeur de disque. Si le changeur de disque n'est
pas connecté à sa borne d'entrée, il est impossible de commuter
l'appareil sur une source de disque externe.
? La mémoire est effacée quand le contact est mis. 10
✔ Le câble de batterie n’a pas été connecté correctement.
☞ Connectez le câble correctement en vous référant à la section
<Connexion des câbles sur les prises>.
✔ Les câble de batterie et d'allumage ne sont pas connectés
correctement. 11
☞ Connectez le câble correctement en vous référant à la section
<Connexion des câbles sur les prises>.
? La fonction de sourdine TEL ne fonctionne pas. 15
✔ Le câble de sourdine TEL n’est pas connecté correctement.
☞ Connectez le câble correctement en vous référant à la section
<Connexion des câbles sur les prises>.
? La fonction de sourdine TEL se met en service même si le câble de
sourdine TEL n’est pas connecté. 16
✔ Le câble de sourdine TEL touche une partie métallique de la voiture.
☞ Eloignez le câble de sourdine TEL des parties métalliques de la
voiture.
? Même si la force est activée, les sons de haute fréquence ne seront
pas compensés. 17
✔ La source de tuner est sélectionnée.
☞ Les sons de haute fréquence ne seront pas compensés lorsque la
source est le tuner.
? Aucun son ne peut être entendu, ou le volume est faible. 20
✔ Les réglages du fader ou de l'équilibre sont réglés complètement
d'un côté. 21
☞ Centrer les réglages du fader et de la balance.
✔ Les câbles d’entrée/sortie ou le faisceau de câbles sont connectés
incorrectement.22
☞ Reconnectez les câbles d’entrée/sortie et/ou le faisceau de câbles
correctement. Voir la section sur la <Connexion des câbles sur les
prises>.
✔ La bande de la cassette est mauvaise.23
☞ Essayez de reproduire une autre cassette. S’il n'y a pas de
problème, c’est que la première cassette est mauvaise.
✔ Les valeurs de décalage de volume sont faibles.24
☞ Augmentez les valeurs de décalage de volume. (page 38)
? Le son est de mauvaise qualité ou déformé.25
✔ Un câble de haut-parleur a peut être été pincé par une vis dans la
voiture.
☞ Vérifiez la connexion des haut-parleurs.
✔ La tête de lecture de bande est sale.26
☞ Nettoyez la tête de lecture de cassette.
✔ Les enceintes ne sont pas connectées correctement.27
☞ Reconnectez les câbles de haut-parleurs de manière que chaque
prise de sortie soit connectée à un haut-parleur différent.
— 61 —
Page 62

Guide de depannage
? L'élément code de sécurité n'est pas affiché dans le système de
menu.32
✔ La fonction code de sécurité est déjà activée.
☞ Lorsque la fonction code de sécurité est activée, celle-ci ne
s'affiche pas parmi les éléments de menu.
? La tonalité de touche ne s'entend pas. 34
✔ La sortie de préampli sans fading est en cours d'utilisation.
☞ La tonalité de touche ne peut être émise par le jack de préampli.
? Bien que la fonction de synchronisation d'horloge soit activée, celle-
ci ne peut être réglée. 35
✔ La station RDS reçue n'envoie pas de données d'heure.
Français
☞ Syntonisez l’appareil sur une autre station RDS.
? Bien que le commutateur des feux soit activé, l'affichage de l'unité
ne s'atténue pas. 36
✔ Le fil d'atténuation n'est pas connecté.
☞ Connectez le fil d'atténuation correctement.
La fonction d'atténuation ne fonctionne pas. 38-1
?
✔ Le fil d'atténuation n'est pas connecté correctement.
☞ Vérifiez la connexion du fil d'atténuation.
Source tuner
La réception radio est mauvaise.39
?
✔ L’antenne de la voiture n’est pas sortie.
☞ Sortez l’antenne complètement.
✔ Le câble de commande de l’antenne n’est pas connecté.40
☞ Connectez le câble correctement en vous référant à la section
<Connexion des câbles sur les prises>.
? Le volume sonore n'est pas celui réglé pour l'information de
circulation routière. 43
✔ Le volume sonore réglé est inférieur au son du tuner.
☞ Si le volume du tuner est plus élevé que le volume réglé, le
volume sonore du tuner sera utilisé.
En source Platine cassette
? Impossible de retirer la cassette.44
✔ La cause en est que plus de 10 minutes se sont écoulées depuis que
le commutateur ACC du véhicule a été coupé.
☞ La cassette ne peut être retirée que dans les 10 minutes suivant
la mise hors tension du commutateur ACC.
Si plus de 10 minutes se sont écoulées, remettez le commutateur
ACC sous tension et appuyez sur la touche d’éjection.
? Le DPSS, l'avance de cassette et la répétition musicale ne
fonctionne pas correctement.45
✔ Les espaces entre plages de la cassette ne peuvent être reconnus
car ils sont trop courts.
☞ Utilisez des espaces d'au moins 4 secondes entre plages.
✔ Les espaces entre plages de la cassette ne peuvent être reconnus
car il y a trop de bruit entre les plages.46
☞ Réduisez le bruit entre plages.
Le saut de blanc ne fonctionne pas.47
?
✔ Le bruit est trop fort, les sections non enregistrées ne peuvent être
reconnues.
☞ Réduisez le bruit entre plages.
? Le saut de blanc fonctionne sur des parties enregistrées.48
✔ C'est à cause du niveau d'enregistrement trop bas, les parties
enregistrées ne sont pas reconnues comme telles.
☞ Désactivez le saut de blanc.
— 62 —
Page 63

En source disque
? "AUX" s'affiche sans réaliser le mode de commande de disque
extérieur.50
✔ L'interrupteur O-N est réglé sur le côté "O".
☞ Réglez l'interrupteur sur le côté "N".
✔ Un changeur de disque non reconnu est connecté.51
☞ Connectez un changeur de disque reconnu. (page 35)
? Le disque spécifié n’est pas reproduit mais un autre est reproduit à
sa place.52
✔ Le disque spécifié est très sale.
☞ Nettoyez le CD.
✔ Le CD est à l’envers.53
☞ Insérez un CD avec la face imprimée dirigée vers le haut.
✔ Le disque a été inséré dans une autre fente que celle spécifiée.54
☞ Ejectez le magasin et vérifiez le numéro du disque spécifié.
✔ Le disque est très rayé.55
☞ Essayez un autre disque.
? La plage spécifiée n’est pas reproduite.58
✔ La lecture aléatoire ou la lecture aléatoire de magasin a été choisie.
☞ Mettez hors service la lecture aléatoire ou la lecture aléatoire de
magasin.
? La répétition d’une plage ou d’un dique, le balayage d’une plage, la
lecture aléatoire et la lecture aléatoire du chargeur de disques
commencent d’eux-mêmes.59
✔ Le réglage n’est pas annulé.
☞ Les réglages pour ces fonctions restent activés tant qu’ils ne sont
pas désactivés ou que le disque n’est pas éjecté, même si
l’appareil est éteint ou que la source d’alimentation électrique est
changée.
? Ne peut lire de CD-R ou de CD-RW.60
✔ Le processus de finalisation du CD-R/CD-RW n'a pas été effectué.
☞ Effectuez le processus de finalisation avec le graveur de CD.
✔ Un changeur de CD incompatible est utilisé pour lire le CD-R/CD-
RW.61
☞ Utilisez un changeur de CD compatible CD-R/CD-RW pour
effectuer la lecture.
? La recherche par piste ne peut pas être effectuée.66-2
✔ Pour la première ou la dernière chanson du disque.
☞ La recherche par piste ne peut jamais être effecutée, sur aucun
disque, vers l'arrière pour la première chanson ou vers l'avant
pour la dernière chanson.
Dans les situations suivantes, contacter le centre SAV
le plus proche :
• Bien que le changeur de disques soit connecté, la source n'est pas
activée et "AUX" s'affiche en mode changeur.
• Bien qu'aucun dispositif (KCA-S210A, CA-C1AX, KDC-CPS87, KDC-CX87,
KDC-CPS85, KDC-CX85, KDC-CPS82 ou KDC-CX82) ne soit connecté,
l'appareil se commute sur l'entrée auxilliaire lorsque les modes sont
commutés.
— 63 —
Page 64

Guide de depannage
Les messages ci-dessous indiquent l’état de votre
système.
EJECT: Aucun magasin à disque n’a été inséré dans le
NO DISC: Aucun disque n’a été inséré dans le magasin à
Français
TOC ER: Aucun disque n’a été inséré dans le magasin à
BLANK: Rien n’a été enregistré sur le MD.
NO TRACK: Aucune plage n’est enregistrée sur le MD bien qu’il y
NO PANEL: La façade de l'unité esclave connectée à cet appareil
E-77: L’appareil fonctionne mal pour certaines raisons.
MECHA ER: Il y a une anomalie dans le magasin de disque. Ou
changeur. Le magasin à disque n’est pas
complètement inséré.E01
➪
Insérez le magasin à disques correctement.
Absence de CD dans l'unité.
➪ Insérer le CD.
E02
disque.
➪
Insérez un disque dans le magasin à disques.
E04
disque.
➪
Insérez un disque dans le magasin à disques.
Le CD est très sale. Le CD est à l’envers. Le CD est
très rayé.
➪ Nettoyez le CD et insérez-le correctement.
E10
ait un titre.E11
a été enlevée.E30
➪
La remplacer.
➪
Appuyez sur la touche de réinitialisation sur
l’appareil. Si le code "E-77" ne disparaît pas,
consultez la station technique la plus proche.
l'unité fonctionne mal pour une raison quelconque.
➪
Vérifier le magasin de disque. Et appuyer ensuite
sur la touche de initialisation de l'unité.Si le code
"MECHA ER" ne disparaît pas, consultez la station
technique la plus proche.
E77
HOLD ER: Le circuit de protection de l’appareil se met en
service quand la température à l’intérieur du changeur
de disques automatique dépasse 60°C (140°F),
arrêtant toutes les opérations.
➪
Refroidir l’appareil en ouvrant les fenêtres ou en
E0d
mettant en service l’air conditionné. Quand la
température descend au dessous de 60°C (140°F),
la lecture du disque reprend de nouveau.
NO NAME: Il y a eu tentative d'afficher DNPS en cours de lecture
de CD, mais il n'y avait pas de nom de disque
préréglé.
E51
NO TITLE: Il y a eu tentative d'afficher le titre de la plage ou du
disque en cours de lecture de MD, mais le MD n'a
pas de titre.E53
NO TEXT: • Il y a eu tentative d'afficher le texte de piste ou de
disque en cours de lecture de CD, mais le CD n'a
pas de texte.E54
• L'appareil a tenté d'afficher du texte pendant la
réception d'une station qui n'envoie pas de.E55
WAITING: Les données de texte radio sont en cours de
réception. E56
LOAD: Les disques sont été échangés dans le changeur de
disque. E57-1
READING: L'appareil lit les données sur le disque.E57-2
NO ACCES: Après avoir été placés dans le changeur de disque, le
DNPP a été effectué sans avoir été joué au moins
une fois. E58
IN (clignote): La platine cassette ne marche pas correctement.E60
➪
E99
Réinsérez la cassette. si la cassette ne peut pas
être ejectée ou si l'affichage continue à clignoter
même si la cassette a àtà correctement remise en
place, veuillez couper le courant et consulter votre
centre de service après-vente le plus proche.
— 64 —
Page 65

Spécifications
Les spécifications sont sujettes à changements sans notification.
Section tuner FM
Plage de fréquence
(espacement de 50 kHz)......................87,5 MHz – 108,0 MHz
Sensibilité utilisable (S/N = 26dB) .............................0,7 µV/75 Ω
Sensibilité silencieuse (S/N = 46dB) ..........................1,6 µV/75 Ω
Réponse en fréquence (±3 dB) .............................30 Hz – 15 kHz
Taux de Signal/Bruit (MONO) ..............................................65 dB
Sélectivité (DIN) (±400 kHz) ............................................ ≥ 80 dB
Séparation stéréo (1 kHz) ....................................................35 dB
Section tuner MW
Plage de fréquence
(espacement de 9 kHz).............................531 kHz – 1611 kHz
Sensibilité utilisable (S/N = 20dB)........................................25 µV
Section tuner LW
Plage de fréquence .........................................153 kHz – 281 kHz
Sensibilité utilisable (S/N = 20dB)........................................45 µV
Section lecteur de cassette
Vitesse de bande......................................................4,76 cm/sec.
Pleurage et scintillement (WRMS) ....................................0,08 %
Réponse en fréquence (±3 dB) (70 µs)..................30 Hz – 18 kHz
Séparation stéréo (1 kHz) ....................................................43 dB
Taux de Signal/Bruit
Dolby NR hors service....................................................57 dB
Dolby B NR en service ...................................................65 dB
Section audio
Puissance de sortie maximum .......................................47 W x 4
Puissance de sortie (DIN45324, +B = 14,4 V) ...............29 W x 4
Action en tonalité
Graves : ...........................................................100 Hz ±10 dB
Centrale : ...........................................................1 kHz ±10 dB
Aiguës : ...........................................................10 kHz ±10 dB
Niveau de préamplification/charge
(pendant le mode CD) ...................................1800 mV / 10 kΩ
Impédance de sortie préamplificateur..............................≤ 600 Ω
Général
Tension de fonctionnement (11 – 16 V admissible) ...........14,4 V
Courant absorbé....................................................................10 A
Taille d’installation (L x H x P) .......................182 x 53 x 150 mm
Masse.................................................................................1,2 kg
— 65 —
Page 66

Inhalt
Sicherheitshinweise..................67
Über Cassetten .........................68
Über RDS...................................68
Allgemeine Funktionen ............69
Ein- und Ausschalten
Auswählen der Quelle
Lautstärke
Stummschaltung
Loudness
System Q
Klangeinstellungen
Lautsprecher-Einstellung
Umschalten der Displayanzeige
Zusatzeingangs-Displayeinstellung
Abnehmbare Frontblende
Deutsch
Telefon-Stummschaltung
Tuner-Funktionen ......................73
Senderabstimmung
Senderspeicher
Automatischer Senderspeicher
Voreinstellungs-Abstimmung
RDS-Funktionen ........................75
Verkehrsinformationen
Durchlaufende Anzeige des Radiotextes
Wahl der Programmart (PTY)
Speichern von Programmarten
Ändern der Sprache für die PTY-Funktion
Cassetten-Funktionen...............78
Wiedergabe von Cassettenbändern
Schneller Vor- und Rücklauf
Dolby B-Rauschunterdrückung
Bandsortenwahl
Titelsprung
Überpringen von Leerstellen
Wiederholfunktion
Steuerung eines externen Disc-
Wechslers / Spielers...............80
Wiedergabe eines CD-/MD-Wechslers
Schneller Vor- und Rücklauf
Suche nach einem bestimmten Titel
Album-Suche
Titel-/Album-Wiederholung
Titelanspielautomatik
Zufallswiedergabe
Magazin-Zufallswiedergabe
Eingabe eines Disc-Namens (DNPS)
Anzeige des CD-Textes oder MD-Titels
Menü-Steuerung........................83
Menü-Steuerung
Sicherheitscode
Tastenton
Manuelle Einstellung der Uhr
"Gesperrt"-Anzeige
DSI (Disabled System Indicator)
Einstellen der Display-Beleuchtung
Ein- und Ausschalten des Grafik-Displays
Umschalten der Display-Anzeige
Kontrast-Einstellung
Dimmer
Nachrichteneinblendungen mit Timeout-
Funktion
Regionalsendersuche
Abstimmungsmodus
Automatischer Senderspeicher
AF (Alternative Frequency)
"Region Restrict"-Funktion
Automatische Verkehrsfunk-Suche
Mono-Empfang
Textdurchlauf
Automatische Abschaltung
Zubehör .....................................89
Hinweise zum Einbau ...............89
Anschlußdiagramm ..................90
Einbau........................................91
Fehlersuche ...............................93
Technische Daten......................97
— 66 —
Page 67

Sicherheitshinweise
2WARNUNG
Zur Vermeidung von Bränden und
Verletzungen beachten Sie bitte die
folgenden Hinweise:
• Befestigen Sie das Gerät sicher im
Einbauschacht, damit es bei einem Unfall
nicht durch das Wageninnere geschleudert
wird.
•Verwenden Sie bei Verlegung des
Betriebsstrom-, Speicherschutz- und
Massekabels besonders strapazierfähige und
speziell für die Installation im Auto
angebotene Kabel mit einem
Leitungsquerschnitt von mindestens 0,75
2
(AWG 18).
mm
• Stellen Sie sicher, dass keine
Metallgegenstände (Münzen, Nadeln,
Werkzeuge etc.) ins Innere des Geräts
gelangen und Kurzschlüsse verursachen.
• Schalten Sie das Gerät bei Geruch- oder
Rauchentwicklung sofort aus und suchen Sie
einen KENWOOD-Fachhändler auf.
•Bitte berühren Sie nicht die Frontblende,
während sie sich dreht. Es besteht die
Gefahr, dass Ihre Finger zwischen
Frontblende und Gerätechassis geraten
könnten.
• Das Gerät verfügt über Glasbauteile, die
durch Sturz oder Schlag beschädigt werden
könnten.
•Wird das LCD-Display durch äußere
Einwirkungen wie Sturz oder Schlag
zerbrochen, meiden Sie den Kontakt mit der
evtl. austretenden Kristallflüssigkeit. Diese
Flüssigkeit kann Ihre Gesundheit
beeinträchtigen.
Sollten Sie mit der Flüssigkeit in Kontakt
kommen, bitte sofort mit Wasser und Seife
abwaschen
2ACHTUNG
Bitte beachten Sie folgende
Vorsichtsmaßnahmen, damit Ihr Gerät
stets einwandfrei funktioniert:
• Betreiben Sie das Gerät ausschließlich mit
12-Volt-Gleichstrom und negativer
Masseverbindung.
• Entfernen Sie nicht die oberen oder unteren
Gehäuseabdeckungen.
• Schützen Sie das Gerät vor direkter
Sonneneinstrahlung, zu hohen Temperaturen,
Feuchtigkeit, Spritzwasser und Staub.
• Setzen Sie die abnehmbare Frontblende und
ihr Schutz-Etui keinem direkten Sonnenlicht
und zu hohen Temperaturen aus und
schützen Sie sie vor Feuchtigkeit,
Spritzwasser und Staub.
• Die abnehmbare Bedieneinheit ist ein
Präzisionsteil und enthält empfindliche
Elektronikbausteine. Behandeln Sie sie daher
äußerst sorgfältig.
• Berühren Sie nicht die Metallkontakte an der
abnehmbaren Frontblende und am
Radioeinschub.
• Achten Sie beim Austauschen einer Sicherung
darauf, dass der Wert der Sicherung mit den
Angaben am Gerät übereinstimmt.
Sicherungen mit einem falschen Wert können
Fehlfunktionen verursachen oder zur
Beschädigung des Geräts führen.
• Unterbrechen Sie vor dem Austauschen einer
Sicherung zunächst die Kabelverbindungen,
um Kurzschlüsse zu verhindern.
• Achten Sie bitte darauf, dass keine
Gegenstände zwischen Frontblende und
Gerätechassis fallen.
•Verwenden Sie für den Einbau ausschließlich
die mitgelieferten Schrauben. Zu lange oder
zu dicke Schrauben können das Gerät
beschädigen.
— 67 —
WICHTIGE INFORMATION
Über den anzuschließenden DiscWechsler/CD-Player:
Stellen Sie bei dem Anschluss eines CDWechslers den "O-N"-Schalter Ihres Gerätes
auf "N", um einen ordnungsgemäßen Betrieb
zu gewährleisten.
Besitzen Sie einen älteren CD-Wechsler, der
keinen "O-N"-Schalter besitzt, benötigen Sie
das als Sonderzubehör erhältliche
Adapterkabel CA-DS100 und/ oder den
Umschalt-Adapter KCA-S210A.
Ein Disc-Wechsler funktioniert nicht, wenn er
ohne die Verwendung dieser Option
angeschlossen wird.
Wenn ein Modell angeschlossen wird, das
über keinen "O-N"-Schalter verfügt, werden
einige nicht verfügbare Funktionen und
Informationen entwickelt, die nicht angezeigt
werden können.
Beachten Sie, dass die KENWOOD-Wechsler
KDC-C100, KDC-C302, C205, C705 sowie
Geräte anderer Hersteller nicht angeschlossen
werden können.
Bei einem falschem Anschluss von Autoradio
und CD-Wechsler können Fehlfunktionen
oder Defekte auftreten.
In Lizenz von Dolby Laboratories
hergestellt.
"Dolby" und das Doppel-D-Symbol sind
Warenzeichen der Dolby Laboratories.
Page 68

Sicherheitshinweise
ANMERKUNGEN
• Sollten Sie Probleme bei der Installation des
Geräts haben, lassen Sie sich von Ihrem
KENWOOD-Fachhändler beraten.
• Falls das Gerät nicht richtig zu funktionieren
scheint, drücken Sie zuerst die Reset-Taste.
Lässt sich die Fehlfunktion auf diese Weise
nicht beheben, wenden Sie sich bitte an
Ihren KENWOOD-Fachhändler.
• Falls der automatische Disc-Wechsler nicht
funktioniert, drücken Sie bitte die ResetTaste. Nun sollte ein normaler Betrieb
möglich sein.
OFF
DAB
SCAN B.S./RDM REP MTL/M.RDM DISP
NF
LOUD
Deutsch
Reset -Taste
• Bei Temperaturen unter 5 °C (41 °F) sind die
Zeichen im LCD möglicherweise schwer
lesbar.
• Die in dieser Bedienungsanleitung gezeigten
Abbildungen des Autoradio-Displays und der
Frontblende dienen lediglich als
Erklärungshinweise für die vielseitigen
Einstellmöglichkeiten Ihres Geräts. Deshalb
können sich geringfügige Abweichungen
zwischen der Display-Darstellung Ihres
Geräts und den Illustrationen in der Anleitung
ergeben.
•Wir empfehlen Ihnen, den Sicherheits-Code
in jedem Fall zu aktivieren (siehe S.84).
B NR
Über RDS
Reinigen der Kontakte am Bedienteil
Reinigen Sie die Kontakte an der Rückseite des
Bedienteils und an der Front des Einschubs mit
einem trockenen, weichen Tuch.
Reinigung
Sollte die Frontblende Ihres Gerätes verschmutzt
oder verstaubt sein, reinigen Sie die Blende nur
mit einem weichen Tuch (z. B. Silikontuch). Bei
stärkeren Verschmutzungen verwenden Sie
bitten ein feuchtes Tuch und Neutralreiniger. Bitte
nicht vergessen: Auch die Rückstände des
Neutralreinigers müssen entfernt werden.
Bei der Verwendung von Reinigungssprays kann
eine Beschädigung der mechanischen Teile des
Gerätes nicht ausgeschlossen werden. Rauhe
Tücher und flüchtige Lösungsmittel wie
Verdünner, Spiritus oder Alkohol zerstören die
TITI
NAME
Blendenoberfläche oder den Aufdruck.
Über Cassetten
Reinigen des Tonkopfes
Reinigen Sie den Tonkopf bitte, wenn es
während der Cassettenwiedergabe zu
Störgeräuschen kommt oder wenn die
Tonqualität während der Wiedergabe schlecht
ist, da der Tonkopf verschmutzt ist.
Über Cassetten
• Sollte das Cassettenband Schlaufen
aufweisen, ziehen Sie es durch Drehen eines
Wickels fest.
•Wenn sich das Etikett der Cassette löst,
kleben Sie es wieder an.
•Verwenden Sie keine deformierten
Cassetten.
• Bewahren Sie Cassetten nicht auf der
Ablage des Armaturenbretts oder an
ähnlichen Orten auf, wo hohe Temperaturen
herrschen.
•Verwenden Sie keine Cassetten mit einer
Spielzeit von 100 Minuten oder darüber.
— 68 —
RDS (Radio Data System)
Wenn Sie sich einen RDS-Sender
anhören, wird im Radiodisplay der Name
des Senders angezeigt, so dass Sie auf
einen Blick sehen,welcher Sender
empfangen wird.
Alternativ lässt sich im Display des
Radios auch die Frequenz des
eingestellten Senders anzeigen. Zudem
sorgt RDS stets für bestmöglichen
Empfang, da das Radio bei Bedarf sofort
auf eine störungsfreie Alternativfrequenz
des eingestellten Senders umschaltet.
Dazu überträgt RDS die aktuelle Uhrzeit
und in zunehmenden Maße eine
Kennung (PTY) des gerade
ausgestrahlten Programmangebots.
Enhanced Other Network
Nicht alle Stationen einer Senderkette
übertragen Verkehrsinformationen. Die
<Enhanced Other Network>-Funktion
ermöglicht es aber, dass Sie auch beim Hören
eines Senders ohne Verkehrsfunk (z.B. NDR 3)
die Verkehrsinformationen eines
Verkehrsfunksenders der gleichen Senderkette
(z.B. NDR 2) hören können. Der RDS-Tuner
schaltet automatisch um.
Alarm
Wird von einem RDS-Sender eine
Katastrophenwarnung oder eine überaus
wichtige Meldung ausgestrahlt, unterbricht
das Autoradio automatisch den Betrieb und
schaltet auf Empfang.
Page 69

Allgemeine Funktionen
LOUD
DAB
SCAN B.S./RDM REP MTL/M.RDM DISP
OFF
TITI
NAME
B NR
u
d
ATT/
LOUD
SRC/
PWR OFF
DISP
4¢
AM
Q/
AUD
FM
KRC-691
KRC-591V/KRC-591
ATT -Anzeige
SYSTEM Q -Anzeige
Lautsprechereinstellungs-Anzeige
ATT -Anzeige
SYSTEM Q -Anzeige
Uhranzeige
Freigabe-Taste
Ein- und Ausschalten
Einschalten des Geräts
Drücken Sie die [SRC]-Taste.
Bei eingeschalteter Stromversorgung wird der Status des<Sicherheitscode> (Seite 84) mit "CODE ON" oder "CODE OFF" angezeigt.
Ausschalten des Geräts
Drücken Sie mindestens 1 Sekunde lang die [SRC]-Taste.
Auswählen der Quelle
Drücken Sie die [SRC]-Taste.
Benötigte Quelle Display
Tuner "TUNER"
Cassettendeck "TAPE"
Externe Disc "DISC-CH"
Zusatz-Eingang "AUX"
Standby (Modus für "Nur Beleuchtung") "ALL OFF"
• Für den oben aufgeführten Zusatzeingang 1 ist optionales Zubehör
erforderlich.
- KCA-S210A
- CA-C1AX
- CD-Wechsler mit integrierter Zusatz-Eingangsfunktion
• Dieses Gerät schaltet sich nach 20 Minuten im Standby-Modus
automatisch vollständig aus, um die Fahrzeugbatterie zu schonen.
Die Zeit, nach der sich das Gerät vollständig ausschalten soll, kann
in <Automatische Abschaltung> (Seite 88) eingestellt werden.
Lautsprechereinstellungs-Anzeige
— 69 —
Page 70

Allgemeine Funktionen
Lautstärke
Erhöhen der Lautstärke:
Drücken Sie die [u]-Taste.
Senken der Lautstärke:
Drücken Sie die [d]-Taste.
Stummschaltung
Schnelles Senken der Lautstärke.
Drücken Sie die [ATT]-Taste.
Bei jeder Betätigung der Taste wird die Lautstärkeabsenkung einoder ausgeschaltet.
Wenn sie eingeschaltet ist, blinkt die "ATT"-Anzeige.
Bei jeder Betätigung der Taste ändert sich die Klangeinstellung.
Klangeinstellung Display
Flat "Flat"/"FLAT"
Benutzerspeicher "User"/"USER"
Rock "Rock"/"ROCK"
Pop "Pops"/"POPS"
Easy "Easy"/"EASY"
Top 40 "Top40"/"TOP40"
Jazz "Jazz"/"JAZZ"
• Benutzerspeicher: Die in <Klangeinstellungen> (Seite 70)
eingestellten Werte.
• Jeder Einstellwert wird mit der <Lautsprecher-Einstellung>
(Seite 71) geändert. Wählen Sie zunächst mit der LautsprecherEinstellung den Lautsprechertyp aus.
Loudness
Deutsch
Anhebung der Bass- und Hochtonanteile bei niedriger
Wiedergabelautstärke.
Drücken Sie mindestens 1 Sekunde lang die [LOUD]-Taste.
Bei jeder Tastenbetätigung fur mindestens 1 Sekunde wird die
Loudness-Funktion ein- oder ausgeschaltet.
Wenn die Funktion eingeschaltet ist, wird "LOUD ON" angezeigt.
System Q
Im System Q sind verschiedene Klangeinstellungen gespeichert,
mit denen sich Ihre Audioquellen wiedergeben lassen.
1 Wählen Sie die Quelle aus, für die Sie den Klang einstellen
möchten
Drücken Sie dazu die [SRC]-Taste.
2 Wählen Sie die gewünschte Klangeinstellung aus
Drücken Sie dazu die [Q]-Taste.
Klangeinstellungen
1 Wählen Sie die Quelle aus, für die Sie den Klang einstellen
möchten
Drücken Sie dazu die [SRC]-Taste.
2 Aktivieren Sie die Klangeinstellungen
Drücken Sie mindestens 1 Sekunde lang die [AUD]-Taste.
Wählen Sie die gewünschte Einstellung aus
3
Drücken Sie die [FM]- oder [AM]-Taste.
Bei jeder Betätigung der Taste ändern sich die Punkte, die
eingestellt werden können, wie nachfolgend gezeigt.
4 Stellen Sie den gewünschten Wert ein
Drücken Sie die [4]- oder [¢]-Taste.
Einstellung Display Bereich
Basspegel "Bas"/"BAS" –8 — +8
Mittenpegel "Mid"/"MID" –8 — +8
Höhenpegel "Tre"/"TRE" –8 — +8
— 70 —
Balance "Bal"/"BAL" Links 15 — Rechts 15
Page 71

Fader "Fad"/"FAD" Rear 15 — Front 15
Lautstärke-Anpassung "V-OFF" –8 — ±0
Lautstärke-Anpassung: Der Lautstärkepegel lässt sich für jede
Quelle individuell einstellen, damit beim
Umschalten keine Lautstärkesprünge
auftreten.
5 Verlassen Sie die Klangeinstellungen
Drücken Sie die [AUD]-Taste.
Lautsprecher-Einstellung
Damit der Q-Faktor für Ihre Lautsprecher optimal eingestellt ist,
sollte der richtige Lautsprechertyp eingestellt werden.
1 Aktivieren Sie den Standby-Modus
Drücken Sie die [SRC]-Taste.
Wählen Sie das "ALL OFF"-Display aus.
2 Aktivieren Sie den Modus für die Lautsprecher-Einstellung
Drücken Sie die [Q]-Taste.
3 Wählen Sie den Lautsprechertyp aus
Drücken Sie die [4]- oder [¢]-Taste.
Bei jeder Betätigung der Taste ändert sich die Einstellung wie
nachfolgend gezeigt.
Lautsprechertyp Display
Aus "SP OFF"
Für 5- und 4 Zoll-Lautsprecher "SP 5/4"
Für 6x6- und 6x9-Zoll-Lautsprecher "SP 6*9/6"
Für Original-Lautsprecher "SP OEM"
4 Verlassen Sie den Lautsprecher-Einstellmodus
Drücken Sie die [Q]-Taste.
Umschalten der Displayanzeige
Umschalten der angezeigten Informationen.
Drücken Sie die [DISP]-Taste.
Bei jeder Betätigung der Taste ändert sich das Display wie
nachfolgend gezeigt.
Im Tuner-Betrieb
Informationen Display
Programmart oder Frequenz
Radio-Text "R-TEXT"
Uhr
Anzeigen der Frequenz bei Empfang des Sendernamens
Drücken Sie mindestens 1 Sekunde lang die [DISP]-Taste.
Die Frequenz des RDS-Senders wird an Stelle des
Programmservice-Namens fünf 5 Sekunden lang angezeigt.
Im Cassettenbetrieb
Informationen
Wiedergabeseite
Bandlaufanzeige
Uhr
Im CD/MD-Wechsler-Betrieb
Informationen Display
Titelnummer (KRC-691)
Titelnummer & Titel-Spielzeit (KRC-591V/591)
Disc-Name "DNPS"
Disc-Titel "D-TITLE"
Titelname "T-TITLE"
Titelnummer & Titel-Spielzeit (KRC-691)
Uhr
— 71 —
Page 72

Allgemeine Funktionen
Zusatzeingangs-Displayeinstellung
Auswählen des Displays, wenn dieses Gerät auf die ZusatzEingangsquelle umgeschaltet worden ist.
1 Wählen Sie die Zusatz-Eingangsquelle aus
Drücken Sie die [SRC]-Taste.
Wählen Sie das "AUX"-Display aus.
2 Aktivieren Sie den Modus für die Zusatzeingangs-
Displayeinstellung
Drücken Sie mindestens 2 Sekunden lang die [DISP]-Taste.
Der momentan gewählte AUX-Name blinkt.
3 Wählen Sie das Zusatzeingangs-Display aus
Drücken Sie die [4]- oder [¢]-Taste.
Bei jeder Betätigung der Taste wird zwischen den nachfolgend
aufgeführten Displays hin- und hergeschaltet.
• "AUX"
Deutsch
• "TV"
• "VCP"
• "GAME"
• "PORTABLE"
• "DVD"
Verlassen Sie den Modus für die Zusatzeingangs-
4
Displayeinstellung
Drücken Sie die [DISP]-Taste.
•Wenn 10 Sekunden lang keine Eingabe gemacht wurde, ist der zu
dem Zeitpunkt eingegebene Name ausgewählt und der Modus für
die Zusatzeingangs-Displayeinstellung wird beendet.
• Diese Funktion ist nicht verfügbar, wenn CA-C1AX verwendet
wird.
Abnehmbare Frontblende
Die Frontblende des Gerätes kann abgenommen und
mitgenommen werden.
Abnehmen der Frontblende
1 Drücken Sie die Freigabe-Taste.
Klappen Sie die Frontblende auf.
2 Ziehen Sie die Frontblende zunächst nach links, dann nach
vorn und nehmen Sie sie ab.
• Bei der Frontblende handelt es sich um ein Präzisionsbauteil, das
durch Erschütterungen oder Stöße beschädigt werden kann. Aus
diesem Grunde sollten Sie die Frontblende stets in dem dafür
vorgesehenen Etui aufbewahren, nachdem Sie sie abgenommen
haben.
• Setzen Sie weder die Frontblende noch deren Etui direktem
Sonnenlicht, extremer Wärme oder Luftfeuchtigkeit aus. Schützen
Sie beides darüber hinaus vor Spritzwasser und Staub.
Einsetzen der Frontblende
1 Setzen Sie die Frontblende so auf das Gerät, dass die
Vertiefungen an der Blende in die Vorsprünge am Gerät passen.
2 Drücken Sie die Frontblende hinein, bis sie einrastet.
Die Frontblende ist eingerastet und Sie können das Gerät in
Betrieb nehmen.
— 72 —
Page 73

Telefon-Stummschaltung
LOUD
DAB
SCAN B.S./RDM REP MTL/M.RDM DISP
OFF
TITI
NAME
B NR
SRC
4¢
AM # 1-6
FM
MENU
KRC-691
KRC-591V/KRC-591
Beim Eingehen eines Anrufes unterbricht das Audiosystem
automatisch seinen Betrieb.
Bei einem eingehenden Anruf
"CALL" wird angezeigt.
Das Audiosystem unterbricht seinen Betrieb.
Musikhören während des Telefonats
Drücken Sie die [SRC]-Taste.
Das "CALL"-Display verschwindet und das Audiosystem schaltet
sich wieder ein.
Wenn das Gespräch beendet ist
Legen Sie den Hörer auf.
Das "CALL"-Display verschwindet und das Audiosystem schaltet
sich wieder ein.
Tuner-Funktionen
ST -Anzeige
Frequenzanzeige
Wellenbereichsanzeige
Stationsnummer
— 73 —
ST -Anzeige
Wellenbereichsanzeige
Frequenzanzeige
Stationsnummer
Page 74

Tuner-Funktionen
Senderabstimmung
So wählen Sie einen Sender aus.
1 Schalten Sie auf Tuner-Betrieb
Drücken Sie die [SRC]-Taste.
Wählen Sie das "TUNER" -Display aus.
2 Wählen Sie den Wellenbereich aus
Drücken Sie die [FM]- oder [AM]-Taste.
Bei jeder Betätigung der [FM]-Taste wechseln die Wellenbereiche
zwischen FM1, FM2 und FM3.
3 Abstimmen einer höheren oder niedrigeren Frequenz
Drücken Sie die [4]- oder [¢]-Taste.
Während des Empfangs von Stereo-Sendern leuchtet das "ST"Symbol.
Senderspeicher
Deutsch
Häufiger gehörte Sender lassen sich im Senderspeicher ablegen.
Wählen Sie den Wellenbereich aus
1
Drücken Sie die [FM]- oder [AM]-Taste.
Wählen Sie die Frequenz aus, die im Speicher abgelegt
2
werden soll
Drücken Sie die [4]- oder [¢]-Taste.
3 Legen Sie die Frequenz im Speicher ab
Drücken Sie mindestens 2 Sekunden lang die [#1] — [#6]Taste.
Die Speicherplatz-Anzeige blinkt einmal.
In jedem Wellenbereich kann jeweils 1 Sender im Speicher auf
jeder der Tasten [#1] — [#6] abgelegt werden.
Automatischer Senderspeicher
Im automatischen Senderspeicher werden sechs gut
empfangbare Sender abgelegt.
Die Reihenfolge wird durch die Empfangsfrequenz — beginnend
am unteren Ende des Frequenzbands — bestimmt.
1 Wählen Sie den Wellenbereich für den automatischen
Senderspeicher aus
Drücken Sie die [FM]- oder [AM]-Taste.
2 Aktivieren Sie den Menü-Modus
Drücken Sie mindestens 1 Sekunde lang die [MENU]-Taste.
"MENU" wird angezeigt.
3 Wählen Sie den automatischen Senderspeicher-Modus aus
Drücken Sie die [FM]- oder [AM]-Taste.
Wählen Sie das "A-Memory"/"A-MEMORY" -Display aus.
4 Starten Sie den automatischen Senderspeicher
Drücken Sie mindestens 2 Sekunden lang die [4]- oder
[¢]-Taste.
Wenn sechs Sender im Speicher abgelegt worden sind, ist die
automatische Speicherung der Sender beendet.
•Wenn die <AF-Funktion> (Seite 87) aktiviert ist, werden
ausschließlich RDS-Sender im Speicher abgelegt.
•Wenn die automatische Senderspeicherung im FM2-Wellenbereich
ausgeführt worden ist, werden die im FM1-Wellenbereich
gespeicherten Sender nicht im Speicher abgelegt.
Genauso wenig werden die in den Wellenbereichen FM1 oder
FM2 gespeicherten RDS-Sender bei der Ausführung der
automatischen Senderspeicherung im FM3-Wellenbereich im
Speicher abgelegt.
Voreinstellungs-Abstimmung
Abrufen der im Speicher abgelegten Sender
1 Wählen Sie den Wellenbereich aus
Drücken Sie die [FM]- oder [AM]-Taste.
2 Rufen Sie den Sender ab
Drücken Sie die [#1] — [#6]-Taste.
— 74 —
Page 75

RDS-Funktionen
LOUD
DAB
SCAN B.S./RDM REP MTL/M.RDM DISP
OFF
NF
TITI
NAME
B NR
TIDISP# 1-6
4¢
AM
FM
PTY
KRC-691
KRC-591V/KRC-591
RDS -Anzeige
PTY-Anzeige
TI -Anzeige
Verkehrsinformationen
Ihr Radio verfügt über eine Verkehrsfunk-Funktion, mit der
Verkehrsmeldungen automatisch wiedergegeben werden, auch
wenn Sie gerade kein Radio hören.
Drücken Sie die [TI]-Taste.
Bei jeder Betätigung der Taste schaltet sich die VerkehrsfunkFunktion ein oder aus.
Wenn die Funktion aktiviert ist, leuchtet die "TI"-Anzeige.
Wenn kein Verkehrsfunksender empfangen wird, blinkt die "TI"Anzeige.
Beim Beginn einer Verkehrsmeldung wird "Traffic"/"TRAFFIC"
angezeigt und automatisch zu den Verkehrsmeldungen
geschaltet.
•Wenn Sie während des Empfangs eines MW-Senders die
Verkehrsfunk-Funktion einschalten, wird auf einen UKW-Sender
umgeschaltet.
•Verkehrsmeldungen werden automatisch in der Lautstärke
wiedergegeben, die beim Hören der letzten Verkehrsmeldungen
eingestellt war. Diese Lautstärke lässt sich beim Abhören von
Verkehrsmeldungen ändern.
Empfang von anderen Verkehrsfunksendern
Drücken Sie die [4]- oder [¢]-Taste.
Die Umschaltung zu Verkehrsfunksendern ist möglich, während Sie
sich eine Rundfunksendung anhören.
RDS -Anzeige
PTY-Anzeige
TI -Anzeige
Durchlaufende Anzeige des Radiotextes
Durchlauf des angezeigten Radio-Textes.
Drücken Sie mindestens 1 Sekunde lang die [DISP]-Taste.
— 75 —
Page 76

RDS-Funktionen
Wahl der Programmart (PTY)
Auswählen der Programmart und Suche nach einem Sender.
1 Aktivieren Sie den PTY-Modus
Drücken Sie die [PTY]-Taste.
Bei aktiviertem PTY-Modus leuchtet die "PTY"-Anzeige.
Diese Funktion kann nicht während der Einblendung einer
Verkehrsmeldung oder während des AM-Empfangs angewendet
werden.
2 Wählen Sie die Programmart aus
Drücken Sie die [FM]- oder [AM]-Taste.
Bei jeder Betätigung der Taste ändert sich die Programmart wie
nachfolgend gezeigt.
Nr. Programmart Display
KRC-691 KRC-591V /
Deutsch
1. Sprache "Speech" "SPEECH"
2. Musik "Music" "MUSIC"
3. Nachrichten "News" "NEWS"
4. Aktuelles "Affairs" "AFFAIRS"
5. Informationen "Info" "INFO"
6. Sport "Sport" "SPORT"
7. Bildung "Educate" "EDUCATE"
8. Drama "Drama" "DRAMA"
9. Kultur "Culture" "CULTURE"
10. Wissenschaft "Science" "SCIENCE"
11. Verschiedenes "Varied" "VARIED"
12. Popmusik "Pop M" "POP M"
13. Rockmusik "Rock M" "ROCK M"
14. Easy-Listening-Musik "Easy M" "EASY M"
15. Leichte Klassik "Light M" "LIGHT M"
16. Anspruchsvolle Klassik "Classics" "CLASSICS"
17. Andere Musik "Other M" "OTHER M"
KRC-591
18. Wetter "Weather" "WEATHER"
19. Finanzen "Finance" "FINANCE"
20. Kinderprogramme "Children" "CHILDREN"
21. Gesellschaftliches "Social" "SOCIAL"
22. Religion "Religion" "RELIGION"
23. Hörersendungen "Phone In" "PHONE IN"
24. Reisen "Travel" "TRAVEL"
25. Freizeit "Leisure" "LEISURE"
26. Jazz "Jazz" "JAZZ"
27. Country-Musik "Country" "COUNTRY"
28. Nationale Musik "Nation M" "NATION M"
29. Oldies "Oldies" "OLDIES"
30. Volksmusik "Folk M" "FOLK M"
31. Dokumentationen "Document" "DOCUMENT"
• Sprache und Musik beinhalten die nachfolgend gezeigten
Programmarten.
Sprache: Nr.3
Musik: Nr.12
• Die Programmart kann im Tastenspeicher [#1]
und schnell abgerufen werden. Lesen Sie dazu <Speichern von
Programmarten> (Seite 77).
• Die Display-Sprache kann geändert werden. Lesen Sie dazu
<Ändern der Sprache für die PTY-Funktion> (Seite 77).
— 11, 18 — 25, 31
— 17, 26 — 30
— [#6] abgelegt
3 Suche nach dem ausgewählten Programmarten-Sender
Drücken Sie die [4]- oder [¢]-Taste.
Wenn Sie nach anderen Sendern suchen möchten, drücken Sie
noch einmal die [4]- oder [¢]-Taste.
Wenn die ausgewählte Programmart nicht gefunden werden konnte,
wird "No PTY"/"NO PTY" angezeigt. Wählen Sie eine andere
Programmart aus.
Verlassen Sie den PTY-Modus
4
Drücken Sie die [PTY]-Taste.
— 76 —
Page 77

Speichern von Programmarten
Wenn Sie bevorzugt eine bestimmte Programmart hören,
können Sie diese speichern und die entsprechenden Sender
schneller abrufen.
Speichern der Programmart
1 Wählen Sie die Programmsparte aus, die Sie speichern
möchten
Lesen Sie dazu <Wahl der Programmart (PTY)> (Seite 76).
2 Speichern Sie die Programmart
Drücken Sie mindestens 2 Sekunden lang die [#1] — [#6] Taste.
Abrufen der gespeicherten Programmart
1 Aktivieren Sie den PTY-Modus
Lesen Sie dazu <Wahl der Programmart (PTY)> (Seite 76).
2 Rufen Sie die Programmart auf
Drücken Sie die [#1]- — [#6]-Taste.
Ändern der Sprache für die PTY-Funktion
Wählen Sie eine Sprache für die Anzeige der Programmarten
aus.
1 Aktivieren Sie den PTY-Modus
Lesen Sie dazu <Wahl der Programmart (PTY)> (Seite 76).
2 Aktivieren Sie den Modus zum Ändern der Sprache
Drücken Sie die [DISP]-Taste.
3 Wählen Sie die Sprache aus
Drücken Sie die [FM]- oder [AM]-Taste.
Bei jeder Betätigung der Taste ändert sich die Sprache wie
nachfolgend gezeigt.
Sprache Display
Englisch "English"/"ENGLISH"
Französisch "French"/"FRENCH"
Schwedisch "Swedish"/"SWEDISH"
Deutsch "German"/"GERMAN"
4 Verlassen Sie den Modus zum Ändern der Sprache
Drücken Sie die [DISP]-Taste.
— 77 —
Page 78

Cassetten-Funktionen
LOUD
DAB
SCAN B.S./RDM REP MTL/M.RDM DISP
OFF
NF
TITI
NAME
B NR
B NR B.S REP MTL
SRC
4¢
AM
FM
PROG
KRC-691
KRC-591V/KRC-591
Wiedergabeseite
Deutsch
Wiedergabeseite
IN -Anzeige
IN -Anzeige
Freigabe-Taste
Wiedergabe von Cassettenbändern
Wenn keine Cassette eingelegt ist
1 Klappen Sie die Frontblende auf
Drücken Sie die Freigabe-Taste.
2 Legen Sie eine Cassette ein.
3 Drücken Sie die Frontblende auf der rechten Seite herunter
und bringen Sie sie zurück in ihre ursprüngliche Position.
•Wenn die Frontblende aufgeklappt ist, kann sie möglicherweise
mit dem Schalthebel oder Ähnlichem zusammentreffen. Achten
Sie in einem solchen Fall auf Sicherheit und verändern Sie die
Position des Schalthebels oder treffen Sie eine andere
Abhilfemaßnahme, bevor Sie das Gerät bedienen.
• Benutzen Sie das Gerät nicht mit geöffneter Frontblende. Wenn
Sie das Gerät mit aufgeklappter Frontblende benutzen, kann Staub
in das Gerät eintreten und Beschädigungen verursachen.
Wenn ein Cassettenband eingelegt ist, leuchtet die "IN"-Anzeige.
Wenn eine Cassette eingelegt ist
Drücken Sie die [SRC]-Taste.
Wählen Sie das "TAPE"-Display aus.
Wenn Sie sich die andere Seite der Cassette anhören
möchten
Drücken Sie die [PROG]-Taste.
Auswerfen der Cassette
1 Öffnen Sie die Frontblende
Drücken Sie die Freigabe-Taste.
2 Werfen Sie die Cassette aus
Drücken Sie die [0] Taste.
— 78 —
Page 79

3 Drücken Sie die Frontblende auf der rechten Seite herunter
und bringen Sie sie zurück in ihre ursprüngliche Position.
Schneller Vor- und Rücklauf
Schneller Vorlauf
Drücken Sie die [FM]-Taste.
Drücken Sie nach dem Stoppen die [PROG]-Taste.
Schneller Rücklauf
Drücken Sie die [AM]-Taste.
Drücken Sie nach dem Stoppen die [PROG]-Taste.
Dolby B-Rauschunterdrückung
Drücken Sie die [B NR]-Taste.
Bei jeder Betätigung der Taste schaltet sich die
Rauschunterdrückung Dolby B ein oder aus.
Wenn der Ausgang eingeschaltet ist, wird "B-NR" angezeigt.
Bandart Bandsorte
CrO
2 (Type II), FeCr (Type III),
Metall (Type IV)
Normal (Type I) "MTL OFF"
"MTL ON"
Titelsprung
Mit einem Tastendruck können Sie zum nächsten Titel oder zum
Anfang des gegenwärtigwiedergegebenen Titels springen.
Zum nächsten Titel springen
Drücken Sie die [¢]-Taste.
Zum Anfang des gegenwärtig wiedergegebenen Titels
zurückspringen
Drücken Sie die [4]-Taste.
Überpringen von Leerstellen
Bei mehr als 10sekündigen Leerstellen kann automatisch zu
ihrem
Ende vorgespult werden.Drücken Sie die [B.S]-Taste.
Bei jeder Betätigung der Taste schaltet sich die Funktion zum
Überspringen von Pausen ein oder aus.
Wenn die Funktion eingeschaltet ist, wird "BS ON" angezeigt.
Bandsortenwahl
Drücken Sie die [MTL]-Taste.
Bei jeder Betätigung der Taste ändert sich die Bandsorte wie
nachfolgend gezeigt.
— 79 —
Page 80

Cassetten-Funktionen
LOUD
DAB
SCAN B.S./RDM REP MTL/M.RDM DISP
OFF
NF
TITI
NAME
B NR
38
SCAN RDM REP M.RDM DISP/
NAME
SRC
4¢
AM
FM
KRC-691
KRC-591V/KRC-591
Wiederholfunktion
Der gegenwärtig laufende Titel lässt sich wiederholt abspielen.
Drücken Sie die [REP]-Taste.
Bei jeder Betätigung der Taste schaltet sich die
Wiederholfunktion ein oder aus.
Wenn die Funktion eingeschaltet ist, wird "REP ON" angezeigt.
Steuerung eines externen Disc-Wechslers / Spielers
Deutsch
Titelnummer
Titel-Spielzeit
Disc-Nummer
Titelnummer
Titel-Spielzeit
Disc-Nummer
— 80 —
Page 81

Wiedergabe eines CD-/MD-Wechslers
Über Ihr Autoradio können Sie auch einen optionalen KenwoodWechsler steuern und die CDs bzw. MDs wiedergeben.
Drücken Sie die [SRC]-Taste.
Wählen Sie das Display für den von Ihnen gewünschten CDPlayer aus.
Display-Beispiele:
Display Disc-Player
"CD" CD-Player
"DISC-CH" CD-Wechsler/MD-Wechsler
Pause und Wiedergabe
Drücken Sie die [38]-Taste.
Bei jeder Betätigung der Taste wird die Wiedergabe entweder
unterbrochen oder fortgesetzt.
• Die zehnte Disc wird im Display mit "0" angezeigt.
• Der Funktionsumfang und die Display-Anzeigen sind von den
jeweils angeschlossenen externen Disc-Spielern/Wechslern
abhängig.
Schneller Vor- und Rücklauf
Schneller Vorlauf
Halten Sie die [¢]-Taste gedrückt.
Nach dem Loslassen der Taste wird die Wiedergabe fortgesetzt.
Schneller Rücklauf
Halten Sie die [4]-Taste gedrückt.
Nach dem Loslassen der Taste wird die Wiedergabe fortgesetzt.
Suche nach einem bestimmten Titel
Wählen Sie den Titel aus, den Sie sich anhören möchten.
Drücken Sie die [4]- oder [¢]-Taste.
Album-Suche (Disc-Wechsler-Funktion)
Wählen Sie die Disc aus, die Sie sich anhören möchten.
Drücken Sie die [AM]- oder [FM]- Taste.
Titel-/Album-Wiederholung
Wiedergabe-Wiederholung des Titels/der Disc, das/die
gegenwärtig wiedergegeben wird.
Drücken Sie die [REP]-Taste.
Bei jeder Betätigung der Taste ändert sich die WiedergabeWiederholungsfunktion wie nachfolgend gezeigt.
Wiedergabe-Wiederholung Display
Titel-Wiederholung "T-REP ON"
Album-Wiederholung "D-REP ON"
(Disc-Wechsler-Funktion)
AUS "REP OFF"
— 81 —
Page 82

Steuerung eines externen Disc-Wechslers / Spielers
Titelanspielautomatik
Die ersten Sekunden jedes sich auf der gegenwärtig
wiedergegebenen Disc befindlichen Titels werden angespielt,
damit Sie bestimmte Musiktitel leichter finden können.
1 Starten Sie den Titel-Scan
Drücken Sie die [SCAN]-Taste.
"Scan ON"/"SCAN ON" wird angezeigt.
2 Deaktivieren Sie die Funktion, wenn der von Ihnen
gewünschte Titel wiedergegeben wird
Drücken Sie die [SCAN]-Taste.
Zufallswiedergabe
Alle Titel werden in zufälliger Reihenfolge wiedergegeben.
Deutsch
Drücken Sie die [RDM]-Taste.
Bei jeder Betätigung der Taste schaltet sich die
Zufallswiedergabe-Funktion ein oder aus.
Wenn der Ausgang eingeschaltet ist, wird "RDM ON" angezeigt.
Wenn die [¢]-Taste gedrückt ist, wird der nächste Titel
ausgewählt.
Magazin-Zufallswiedergabe
(in Verbindung mit einem CD/MD-Wechsler)
Wiedergabe aller sich im Disc-Wechsler befindlichen Discs in
zufälliger Reihenfolge.
Drücken Sie die [M.RDM]-Taste.
Bei jeder Betätigung der Taste, schaltet sich die MagazinZufallswiedergabe-Funktion ein oder aus.
Wenn der Ausgang eingeschaltet ist, wird "MRDM ON"
angezeigt.
Wenn die [¢]-Taste gedrückt ist, wird der nächste Titel
ausgewählt.
Eingabe eines Disc-Namens (DNPS)
CDs lassen sich mit einem Namen kennzeichnen.
1 Geben Sie die Disc wieder, der Sie einen Namen vergeben
wollen
•Die Vergabe von Titeln an MDs ist nicht möglich.
• Die Disc-Benennung kann nicht ausgeführt werden, während der
CD-Text oder die Uhr angezeigt wird.
2 Aktivieren Sie den Namen-Eingabemodus
Drücken Sie mindestens 2 Sekunden lang die [NAME]-Taste.
"NAME SET" wird angezeigt.
Setzen Sie den Cursor an die Zeichen-Eingabeposition
3
Drücken Sie die [4]- oder [¢]-Taste.
Wählen Sie die Zeichenart aus (nur KRC-691)
4
Drücken Sie die [38]-Taste.
Bei jeder Betätigung der Taste ändert sich die Zeichenart wie
nachfolgend gezeigt.
Zeichenart
Alphabet in Großbuchstaben
Alphabet in Kleinbuchstaben
Zahlen und Symbole
Sonderzeichen (Betonungszeichen)
5 Wählen Sie die Zeichen aus
Drücken Sie die [FM]- oder [AM]-Taste.
6 Wiederholen Sie die Schritte 3 bis 5 und geben Sie den
Namen ein.
7 Verlassen Sie den Namen-Eingabe-Modus
Drücken Sie die [NAME]-Taste.
— 82 —
Page 83

LOUD
DAB
SCAN B.S./RDM REP MTL/M.RDM DISP
OFF
NF
TITI
NAME
B NR
MENU
SRC
4¢
AM
FM
KRC-691
KRC-591V/KRC-591
•Wenn 10 Sekunden lang keine Eingabe gemacht wurde, wird der
zu dem Zeitpunkt eingegebene Name registriert und der NamenEingabemodus wird geschlossen.
• Medien, denen Namen vergeben werden können.
- Externer CD-Wechsler/Player: Variiert entsprechend des CDWechslers/Players. Lesen Sie dazu das Handbuch des CDWechslers/Players.
• Der Name einer CD lässt sich auf gleiche Weise wie bei der
Titelvergabe ändern.
Menü-Steuerung
Anzeige des CD-Textes oder MD-Titels
Scrollen des angezeigten CD-Textes oder MD-Titels.
Drücken Sie mindestens 1 Sekunde lang die [DISP]-Taste.
NEWS -Anzeige
RDS -Anzeige
Menü-Display
NEWS -Anzeige
RDS -Anzeige
Menü-Display
— 83 —
Page 84

Menü-Steuerung
Menü-Steuerung
Im Menü lassen sich die Funktionen des Autoradios einstellen.
Die Hauptfunktionen des Menüsystems werden in diesem
Kapitel beschrieben. Nach dieser Erklärung finden Sie Hinweise
zu den Grundeinstellungen und Einstellmöglichkeiten der
Menüpunkte.
1 Aktivieren Sie den Menümodus
Drücken Sie mindestens 1 Sekunde lang die [MENU]-Taste.
"MENU" wird im Display angezeigt.
2 Wählen Sie den gewünschten Menüpunkt aus
Drücken Sie die [FM]- oder [AM]-Taste.
Beispiel: Wenn Sie den Tastenton einstellen möchten, wählen Sie
bitte das "Beep"/"BEEP" -Menü aus.
3 Wählen Sie die gewünschte Einstellung aus
Drücken Sie die [4]- oder [¢]-Taste.
Deutsch
Beispiel: Wenn "Beep"/"BEEP" angewählt ist, wird abwechselnd
die Funktion "Beep ON"/"BEEP ON" oder "Beep
OFF"/"BEEP OFF" eingestellt. Wählen Sie die
gewünschte Einstellung aus.
Sie können weitere Einstellungen vornehmen, indem Sie zu
Schritt 2 zurückkehren.
4 Verlassen Sie den Menü-Modus
Drücken Sie die [MENU]-Taste.
Wenn Sie die Einstellungen der anderen Hauptfunktionen ändern,
wird der zuletzt angezeigte Status der Funktion übernommen und
abgespeichert. (Die zuerst erscheinde Statusanzeige der Funktion ist
normalerweise die Werkseinstellung.)
Auch die Erläuterung der Einstellung für nicht im Hauptmenü
verankerten Funktionen (<Manuelle Einstellung der Uhr> etc.)
erfolgt Schritt für Schritt.
Sicherheitscode
Zur ersten Inbetriebnahme und nach jeder Unterbrechung der
Stromversorgung des Autoradios muss der Code des Mask Keys
an das Autoradio übertragen werden.
Die Sicherheitscode-Funktion kann nach Eingabe des SicherheitsCodes nicht mehr deaktiviert werden.
Beachten Sie, dass Ihr Sicherheitscode aus der 4-stelligen Zahl
besteht, die im Ihrem Gerät beiliegenden "Car Audio Passport"
eingetragen ist.
1 Aktivieren Sie den Standby-Modus
Drücken Sie die [SRC]-Taste.
Wählen Sie das "ALL OFF"-Display aus.
2 Aktivieren Sie den Menü-Modus
Drücken Sie mindestens 1 Sekunde lang die [MENU]-Taste.
Nach der Anzeige "MENU" erscheint "Security"/ "SECURITY" auf
dem Display.
Aktivieren Sie den Sicherheitscode-Modus
3
Drücken Sie mindestens 1 Sekunde lang die [4]- oder [¢]-
Taste.
Nach der Anzeige "ENTER" erscheint "CODE" auf dem Display.
4 Wählen Sie die Ziffern aus, die Sie eingeben möchten
Drücken Sie die [4]- oder [¢]-Taste.
5 Wählen Sie die Sicherheitscode-Zahlen aus
Drücken Sie die [FM]- oder [AM]-Taste.
6 Wiederholen Sie die Schritte 4 und 5 und vervollständigen
Sie den Sicherheitscode.
7 Bestätigen Sie den Sicherheitscode
Drücken Sie mindestens 3 Sekunden lang die [¢]-Taste.
Nach der Anzeige "RE-ENTER" erscheint "CODE" auf dem Display.
8 Führen Sie die Schritte 4 bis 7 aus und geben Sie den
Sicherheitscode noch einmal ein.
— 84 —
Page 85

"APPROVED" wird im Display angezeigt.
Die Sicherheitscode-Funktion ist aktiviert.
Wenn Sie einen von Ihrem Sicherheitscode abweichenden Code
eingegeben haben, müssen Sie noch einmal von Schritt 4 beginnen.
Drücken Sie nach dem Abtrennen von der Batterie die
Reset-Taste
1 Schalten Sie die Zündung ein.
2 Führen Sie die Schritte 4 bis 7 aus und geben Sie den
Sicherheitscode noch einmal ein.
"APPROVED" wird im Display angezeigt.
Das Gerät ist betriebsbereit.
Wenn ein nicht korrekter Code eingegeben wird, wird "WAITING"
(Warten) angezeigt und die unten dargestellte Eingabe-Sperrzeit wird
aktiviert.
Nachdem die Eingabe-Sperrzeit verstrichen ist, wird "CODE"
angezeigt und die Eingabe kann durchgeführt werden.
Anzahl der Eingaben eines
nicht korrekten Codes
1—
25 Minuten
31 Stunde
4 24 Stunden
Tastenton
Ein-/Ausschalten des Tastentons (Biepton).
Display Einstellung
"Beep ON"/"BEEP ON" Der Tastenton ertönt.
"Beep OFF"/"BEEP OFF" Es ertönt kein Tastenton.
Eingabe-Sperrzeit
Manuelle Einstellung der Uhr
Diese Einstellung kann ausgeführt werden, wenn die Funktion
<"Gesperrt"-Anzeige> (Seite 85) ausgeschaltet ist.
1 Wählen Sie den Uhr-Einstellmodus aus
Drücken Sie die [FM]- oder [AM]-Taste.
Wählen Sie das "CLK ADJ" -Display aus.
2 Aktivieren Sie den Uhr-Einstellmodus
Drücken Sie mindestens 1 Sekunde lang die [4]- oder [¢]-
Taste.
Das Uhr-Display blinkt.
3 Stellen Sie die Stunden ein
Drücken Sie die [FM]- oder [AM]-Taste.
Stellen Sie die Minuten ein
Drücken Sie die [4]- oder [¢]-Taste.
4 Verlassen Sie den Uhr-Einstellmodus
Drücken Sie die [MENU]-Taste.
"Gesperrt"-Anzeige
Nach dem Abnehmen der Frontblende blinkt die "Gesperrt"Anzeige am Gerät.
Display Einstellung
"SYNC ON" Leuchtanzeige ist eingeschaltet.
"SYNC OFF" Leuchtanzeige ist ausgeschaltet.
Das Synchronisieren der Uhr dauert 3 bis 4 Minuten.
— 85 —
Page 86

Menü-Steuerung
DSI (Disabled System Indicator)
Wählen Sie als Farbe der Tastenbeleuchtung entweder Grün
oder Rot aus.
Display Einstellung
"DSI ON" Die LED blinkt.
"DSI OFF" Die LED ist ausgeschaltet.
Einstellen der Display-Beleuchtung
Wählen Sie als Tastenbeleuchtungsfarbe entweder Grün oder
Rot aus.
Display Einstellung
"KEY GRN" Die Beleuchtungsfarbe ist grün.
"KEY RED" Die Beleuchtungsfarbe ist rot.
Deutsch
Funktion des KRC-591V/KRC-591
Ein- und Ausschalten des Grafik-Displays
Ein-/Ausschalten des Grafik-Displays.
Display Einstellung
"GRPH ON" Der Grafikteil wird angezeigt.
"GRPH OFF" Der Grafikteil wird nicht angezeigt.
"DisplayA" Das runde Display zeigt die Wiedergabezeit an.
"DisplayB" Das runde Display zeigt die Uhrzeit an.
"DisplayC" Stiller Display-Typ.
Funktion des KRC-691
Kontrast-Einstellung
Einstellung des Display-Kontrasts
Display und Einstellung:
"CONT 0"
"CONT 5" (Original-Einstellung)
… …
"CONT 10"
Funktion des KRC-691
Dimmer
Das Gerätedisplay wird beim Einschalten der Fahrzeugbeleuchtung automatisch gedimmt.
Display Einstellung
"DIM ON" Das Display ist gedimmt
"DIM OFF" Das Display ist nicht gedimmt
Umschalten der Display-Anzeige
Einstellen der Display-Anzeige.
Display Einstellung
"DisplayD" Demonstration.
Funktion des KRC-691
Nachrichteneinblendungen mit Timeout-Funktion
Schaltet automatisch auf eine Nachrichteneinblendung, auch
wenn keine Rundfunksendung gehört wird. Auch das
Zeitintervall, in dem keine Unterbrechung erfolgen soll, kann
eingestellt werden.
— 86 —
Page 87

Display und Einstellung
"NEWS OFF"
"NEWS 00M"
…
"NEWS 90M"
Wenn "NEWS 00M" — "NEWS 90M" eingestellt ist, ist die
Funktion zur Unterbrechung von Nachrichteneinblendungen
aktiviert.
Wenn die Funktion eingeschaltet ist, leuchtet die "NEWS"Anzeige.
Beim Beginn einer Nachrichteneinblendung wird "NEWS"
angezeigt und die Nachrichteneinblendung wiedergegeben.
• Haben Sie beispielsweise ein Zeitintervall von "20M" eingestellt,
sperrt die "PTY News Timeout"-Funktion
Nachrichteneinblendungen für 20 Minuten nach dem Empfang der
ersten Nachrichtensendung.
• Die Lautstärke der Nachrichteneinblendungen ist dieselbe wie die,
die für die Verkehrsmeldungen eingestellt worden ist (Seite 75).
• Diese Funktion ist nur verfügbar, wenn der gewünschte Sender
einen PTY-Code für die Nachrichteneinblendung sendet oder zu
einem <Enhanced Other Network>-Netzwerk gehört, das den PTYCode für die Nachrichteneinblendung sendet.
•Wenn die Nachrichteneinblendungs-Unterbrechungsfunktion
eingeschaltet ist, wird automatisch zu einem UKW-Sender
umgeschaltet.
Regionalsendersuche <nur im Tuner-Modus>
Bei der automatischen Senderabstimmung wird nur nach
Sendern gesucht, die sehr gut empfangen werden.
Display Einstellung
"LO.S OFF" Die Regional-Suchfunktion ist ausgeschaltet.
"LO.S ON" Die Regional-Suchfunktion ist eingeschaltet.
Abstimmungsmodus <im Tunerbetrieb>
Stellt den Abstimmungsmodus ein.
Abstimmungsmodus Display Funktion
Automatik-Suche "AUTO 1" Automatische Suche nach
einem Sender
Suche nach einem "AUTO 2" Suche nach den im
gespeicherten Sender Senderspeicher abgelegten
Sendern
Manuell "Manual"/"MANUAL" Normaler manueller
Sendersuche Abstimmregler
Automatischer Senderspeicher <im Tunerbetrieb>
Lesen Sie bezüglich der Funktion <Automatischer
Senderspeicher> (Seite 74).
AF (Alternative Frequency)
Das Autoradio schaltet automatisch auf eine andere Frequenz
des eingestellten RDS-Senders, wenn der Empfang schwächer
wird.
Display Einstellung
"AF ON" Die AF-Funktion ist eingeschaltet.
"AF OFF" Die AF-Funktion ist ausgeschaltet.
Bei eingeschalteter AF-Funktion leuchtet die "RDS"-Anzeige.
Wenn für das abgestimmte Programm kein RDS-Sender mit einem
besseren Empfang verfügbar ist, hören Sie die Rundfunksendung
möglicherweise nur bruchstückhaft. Schalten Sie in diesem Fall die
AF-Funktion aus.
— 87 —
Page 88

Menü-Steuerung
"Region Restrict"-Funktion
Diese Funktion ermöglicht es, bei der Wahl von RDSAlternativsendern regional aussgestrahlte Programme
auszuschliessen oder miteinzubeziehen. Wird das Signal des
eingestellten Senders zunehmend schwächer und findet die AFFunktion keine alternativen Sender, schaltet das Gerät auf
Regionalsendersuche um.
Display Einstellung
"REG ON" Die "Region Restrict"-Funktion ist eingeschaltet.
"REG OFF" Die "Region Restrict"-Funktion ist ausgeschaltet.
Gelegentlich strahlen Sender im selben Netzwerk jedoch
unterschiedliche Programme aus oder verwenden unterschiedliche
Programm-Dienstnamen.
Automatische Verkehrsfunk-Suche
Deutsch
Verschlechtert sich der Rundfunkempfang und Sie haben die TIFunktion eingeschaltet, dann sucht der Tuner automatisch einen
anderen, besser zu empfangenen Verkehrsfunksender.
Display Einstellung
"ATPS ON" Die automatische TP-Suchfunktion ist eingeschaltet.
"ATPS OFF" Die automatische TP-Suchfunktion ist ausgeschaltet.
Mono-Empfang <Beim FM-Empfang>
Nebengeräusche können reduziert werden, wenn StereoRundfunksendungen monaural empfangen werden.
Display Einstellung
"MONO OFF" Der Mono-Empfang ist ausgeschaltet.
"MONO ON" Der Mono-Empfang ist eingeschaltet.
Textdurchlauf
Einstellung der Textanzeige.
Display Einstellung
"SCL MANU" Text wird nicht gescrollt
"SCL AUTO" Text wird beim Display-Wechsel gescrollt
Folgende Textanzeigen können gescrollt werden.
• CD-Text
• MD-Titel
• Radio-Text
Automatische Abschaltung
Wenn sich das Autoradio längere Zeit im Standby-Modus
befindet, lässt es sich mit dieser Funktion nach einer bestimmten
Zeit automatisch ausschalten. Dadurch wird die FahrzeugBatterie geschont.
Display Einstellung
"OFF – – –" Stromzufuhr ist ausgeschaltet. Die Timer-
Funktion ist ausgeschaltet.
"OFF 20M" Schaltet das Gerät nach 20 Minuten aus.
(Original-Einstellung)
"OFF 40M" Schaltet das Gerät nach 40 Minuten aus.
"OFF 60M" Schaltet das Gerät nach 60 Minuten aus.
Diese Funktion wird erts nach Eingabe des <Sicherheitscode> (Seite
84) aktiviert.
— 88 —
Page 89

Zubehör
Ansicht
1
2
3
4
Verwenden Sie nur dieses Original-Zubehör, um Beschädigungen Ihres
Autoradios zu vermeiden.
Verwenden Sie nur das mit dem Gerät gelieferte, oben aufgeführte
Zubehör.
..........................................1
..........................................2
..........................................1
..........................................2
Anzahl der Teile
Hinweise zum Einbau
1. Ziehen Sie den Zündschlüssel ab und trennen Sie den Minuspol
von der Batterie, um Kurzschlüsse zu vermeiden.
2. Verbinden Sie die Ein und Ausgangskabel der einzelnen Geräte.
3. Schließen Sie alle Kabel an den Kabelbaum an.
4. Verbinden Sie den Steckverbinder B des Kabelbaums mit dem
Lautsprecheranschluß Ihres Fahrzeugs.
5. Verbinden Sie den Steckverbinder A mit dem Dauerplus Ihres
Fahrzeugs.
6. Stecken Sie die Kabelbaumanschluß ans Gerät.
7. Bauen Sie das Autoradio ein.
8. Schließen Sie den Minuspol der Batterie an.
9. Drücken Sie die Reset Taste.
2 ACHTUNG
• Sollte Ihr Fahrzeug über keinen ISO-Anschluß verfügen, wenden
Sie sich bitte an Ihren KENWOOD-Fachhändler.
•Verwenden Sie Antennen-Übergangsadapter (ISO-JASO) nur
dann, wenn das Antennenkabel einen ISO-Stecker besitzt.
•Vergewissern Sie sich, daß alle Kabelverbindungen einwandfrei
ausgeführt sind, indem Sie die Stecker bis zum vollkommenen
Einrasten in die Buchsen einführen.
• Falls das Zündschloß Ihres Fahrzeugs keine ACC-Stellung besitzt,
oder das Zündkabel an eine Konstantspannungs-Stromquelle,
wie z.B. ein Batteriekabel, angeschlossen ist, wird die
Stromversorgung des Gerätes nicht mit der Zündung verbunden
(d.h. es wird nicht zusammen mit der Zündung ein- und
ausgeschaltet). Wenn Sie die Stromversorgung des Gerätes mit
der Zündung verbinden wollen, schließen Sie das Zündkabel an
eine Stromquelle an, die mit dem Zündschlüssel ein- und
ausgeschaltet werden kann.
•Wenn die Sicherung anspricht, überprüfen Sie zunächst die
Kabel auf einen Kurzschluß. Ersetzen Sie dann die defekte
Sicherung durch eine intakte Sicherung gleichen Werts.
• Nicht angeschlossene Kabel mit Vinylband oder ähnlichem
Material isolieren. Um Kurzschlüsse zu verhindern, entfernen Sie
keine Schutzhüllen von den Kabelenden oder
Verbindungssteckern.
•Verbinden Sie beide Pole der Lautsprecher mit den
Lautsprecherausgängen am Gerät. Das Anschließen der
Lautsprecher Minuspole an die Karosserie kann zu
Betriebsstörungen führen oder die Elektronik beschädigen.
• Prüfen Sie nach dem Einbau, ob Bremslichter, Blinker und
Scheibenwischer einwandfrei funktionieren.
•Wenn das Armaturenbrett eine Klappe hat, vergewissern Sie
sich beim Einbau, daß die Frontplatte beim Öffnen und
Schließen nicht an die Klappe stößt.
• Das Gerät so anbringen, daß der Befestigungswinkel 30˚ oder
weniger beträgt.
— 89 —— 89 —
Page 90

1234567
8
1234567
8
TEL MUTE
P.CONT
ANT.CONT
Anschlußdiagramm
Stiftnummern
für ISO-Stecker
Externer
Stromanschluß
Deutsch
A–4
A–5
A–6
(nur KRC-691)
A–7
A–8
Lautsprecheranschluß
Antennen-Übergangsadapter (ISO-JASO) (Zubehör3) 2
Steckerfunktionsanleitung
Kabelfarber Funktionen
B–1
B–2
B–3
B–4
B–5
B–6
B–7
B–8
Gelb
Blau/Weiß
Orange/ Weiß
Rot
Schwarz
Lila
Lila/Schwarz
Grau
Grau/Schwarz
Weiß
Weiß/Schwarz
Grün
Grün/Schwarz
Batterie*
Zündung (ACC)*
Stromsteuerung
Dimmer
Zündung (ACC)*
Batterie*
Erdanschluß
(Masse)
Hinten rechts(
Hinten rechts (
Vorne rechts (+)
Vorne rechts (–)
Vorne links (+)
Vorne links (–)
Hinten links (+)
Hinten links (–)
Antennenkabel (ISO) 1
UKW/MWAntenneneingang
3
Ausgang für
hinten rechts (Rot)
4
*1KRC-691/591 :
1
2
2
1
*2KRC-591V :
+)
–)
Steckvorrichtung A
Steckvorrichtung B
Ausgang für hinten
links (Weiß) 10
Ausgang für
vorne rechts (Rot)
5
Dauerpluskabel (gelb) zur Batterie
Spannungsversorgungskabel (rot)
*1KRC-691/591 :
Spannungsversorgungskabel (rot)
*2KRC-591V :
Dauerpluskabel (gelb) zur Batterie
Stift A-7 (rot) 8
Stift A-4 (gelb) 9
— 90 —
— 90 —
Ausgang für vorne
links (Weiß) 12
Sicherung (10A) 13
An den Disc-Wechsler von KENWOOD/
DAB-Steuereingang/
KPA-SD100/KPA-HD100/KPA-SS100 16
Beziehen Sie sich für den Anschluss dieser
Kabel auf die entsprechenden
Anleitungshandbücher. 17
Anschluß-Kabelbaum
(Zubehör1) 16
TEL Stummkabel
(Braun)
Wenn keine Anschlüsse
vorgenommen werden, das
Kabel nicht von der Öse
überstehen lassen. 18
20
Steuerleitung für
Stromversorgung und
Motorantenne (blau/weiß)
Zur Lenkradfernbedienung
(nur KRC-691)
Wird mit dem Masse-Anschluß
verbunden, wenn das Telefon
klingelt oder telefoniert wird. 21
Um das KENWOOD
Navigationssystem
anzuschließen,
schlagen Sie in Ihrem
Navigationshandbuch
nach. 22
Bei Verwendung des
gesonderten
Leistungsverstärkers an die
Stromsteuerklemme
anschließen, anderenfalls an
die Antennensteuerklemme
im Fahrzeug anschließen. 23
Page 91

2WARNUNG
Anschließen des ISO-Steckers (siehe S.90)
Die Stiftbelegung für die ISO-Stecker hängt von dem Typ Ihres Fahrzeugs
ab. Nehmen Sie unbedingt die richtigen Anschlüsse vor, um
Beschädigung des Gerätes zu vermeiden. Der Standard-Anschluß für den
Kabelbaum ist nachfolgend unter 1 beschrieben. Falls die ISOSteckerstifte gemäß 2 oder 3 belegt sind, nehmen Sie den Anschluß
vor, wie abgebildet.
1 (Standard-Einstellung) Der Stift A-7 (rot) des ISO-Steckers am
Fahrzeug ist mit der Zündung verbunden, während der Stift A-4
(gelb) mit der Konstantspannungsquelle verbunden ist.
Spannungsversorgungs-
kabel (rot)
Dauerpluskabel (gelb)
zur Batterie
Gerät Fahrzeug
Stift A-7 (rot)
Stift A-4 (gelb)
2 Der Stift A-7 (rot) des ISO-Steckers am Fahrzeug ist mit der
Konstantspannungsquelle verbunden, während der Stift A-4 (gelb)
mit der Zündung verbunden ist.
Spannungsversorgungs-
kabel (rot)
Dauerpluskabel (gelb)
zur Batterie
Gerät Fahrzeug
Stift A-7 (rot)
Stift A-4 (gelb)
3 Der Stift A-4 (gelb) des ISO-Steckers am Fahrzeug ist mit nichts
verbunden, während der Stift A-7 (rot) mit der
Konstantspannungsquelle verbunden ist (oder Stift A-7 (rot) und Stift
A-4 (gelb) sind mit der Konstantspannungsquelle verbunden).
Spannungsversorgungs-
kabel (rot)
Dauerpluskabel (gelb)
zur Batterie
Wenn der Anschluß so vorgenommen wird, wie im obigen Fall 3
beschrieben, ist die Stromversorgung des Gerätes nicht mit dem
Zündschloß gekoppelt. Denken Sie daher stets daran, das Gerät nach
dem Ausschalten der Zündung auszuschalten. Um die Stromversorgung
des Gerätes mit der Zündung zu koppeln, schließen Sie das Zündkabel
(ACC...rot) an eine Stromquelle an, die mit dem Zündschlüssel ein- und
ausgeschaltet werden kann.
Gerät Fahrzeug
Stift A-7 (rot)
Stift A-4 (gelb)
Einbau
■ Einbau
Motortrennwand oder Metallstütze
Schraube (M4×8)
(Im Fachhandel
erhältliches Teil)
Blechschraube
(Im Fachhandel
erhältliches Teil)
Bauen Sie das Gerät fest ein. Wenn das Gerät nicht fest sitzt, können
Fehlfunktionen und Klangbeeinträchtigungen auftreten.
■ Anschrauben der Frontplatte am Gerät
Wenn Sie den Bildschirm fest am
Hauptgerät befestigen möchten,
schrauben Sie die mitgelieferten
Schrauben (Ø4 x 16 mm) in die
folgenden Löcher.
Beachten Sie, dass die Schneidschrauben (ø4 x 16 mm) nur in die dafür
spezifizierten Schraubenlöcher eingedreht werden. Ansonsten können
die mechanische Teile im Geräteinneren beschädigt werden.
— 91 —— 91 —
Montagebügel
(Im Fachhandel
erhältliches Teil)
Sichern Sie das
Einbaugehäuse,
indem Sie die MetallLaschen mit einem
Schraubenzieher
umbiegen.
Zubehör4
Unterseite
Page 92

Einbau
■ Ausbau des Hartgummirahmens
1 Die Anschlagstifte des Ausbauwerkzeugs einrasten und die
beiden Verriegelungen der unteren Hälfte ausbauen.
Wie in der Abbildung gezeigt, den Rahmen senken und nach
vorn ziehen.
Anschlag
Verriegelung
Zubehör2 Ausbauwerkzeug
2 Nach Ausbau der unteren Hälfte, Ausbau bei den beiden
oberen Stellen vornehmen.
■ Herausnehmen des Geräts
1 Nehmen Sie den Hartgummirahmen ab. (Siehe Kapitel “Ausbau
des Hartgummirahmens”.)
2 Entfernen Sie die Schraube (M4×8) an der Rückseite des
Geräts.
3 Setzen Sie die beiden Ausbauwerkzeuge in die seitlichen
Schlitze an der Frontseite ein (siehe Skizze).
Zubehör 2
Schraube (M4×8)
(Im Fachhandel
erhältliches Teil)
Ausbauwerkzeug
Deutsch
Der Rahmen kann von der Oberseite auf die gleiche Weise ausgebaut
werden.
4 Drücken Sie die
Ausbauwerkzeuge nach
unten und ziehen Sie das
Gerät etwa bis zur Hälfte
heraus.
Achten Sie darauf, daß Sie sich nicht an den Vorsprüngen der
Ausbauwerkzeuge verletzen.
5 Fassen Sie das Gerät mit
den Händen und ziehen Sie
es vorsichtig heraus.
— 92 —
— 92 —
Page 93

Fehlersuche
Manchmal funktioniert das Gerät nicht richtig, weil
möglicherweise ein Bedienungsfehler vorliegt. Schauen
Sie daher zunächst in die nachfolgende Übersicht,
bevor Sie Ihr Gerät zur Reparatur geben. Vielleicht
lässt sich der Fehler ganz leicht beheben.
Allgemein
? Das Gerät lässt sich nicht einschalten.01
✔ Die Sicherung ist durchgebrannt.
☞ Überprüfen Sie die Kabel auf Kurzschluß und ersetzen Sie die
Sicherung durch eine neue mit gleichen Werten.
✔ Das Zündschloss verfügt über keine ACC-Stellung.02
☞ Verbinden Sie die Leitung für “geschaltetes” Plus mit dem
Dauerplus-Kabel.
? Wenn Sie die Standby-Betriebsart gewählt haben, schaltet sich der
Strom automatisch aus (OFF).03
✔ Die automatische Abschaltung wurde aktiviert.
☞ Falls Sie nicht wollen, dass sich das Gerät automatisch
ausschaltet (OFF), deaktivieren Sie die automatische Abschaltung.
? Das Gerät reagiert auf keinen Tastendruck.04
✔ Der Mikrocomputer arbeitet nicht richtig.
☞ Drücken Sie die Reset-Taste (Seite 68).
? Das Radio lässt sich nicht auf Cassettenbetrieb umschalten.05
✔ Es wurde keine Cassette eingelegt.
☞ Legen Sie die gewünschte Cassette ein. Wenn sich keine
Cassette im Gerät befindet, können Sie nicht auf Cassettenbetrieb
umschalten.
✔ Der Disc-Wechsler wurde nicht angeschlossen.08
☞ Schließen Sie den Disc-Wechsler an. Wenn der Disc-Wechsler
nicht am entsprechenden Eingang angeschlossen wurde, können
Sie zu keiner externen Quelle umschalten.
? Nach dem Abziehen des Zündschlüssels sind die Senderspeicher
gelöscht.10
✔ Das Dauerpluskabel ist nicht richtig angeschlossen.
☞ Schließen Sie das Kabel richtig an (siehe Kapitel
<Anschlußdiagramm>).
✔ Dauerplus-Kabel und Leitung für “geschaltetes” Plus wurden nicht
richtig angeschlossen.11
☞ Schließen Sie das Kabel richtig an (siehe Kapitel
<Anschlußdiagramm>).
? Die Telefonstummschaltung funktioniert nicht.15
✔ Das Kabel zwischen Autoradio und Telefon ist nicht richtig
angeschlossen.
☞ Schließen Sie das Kabel richtig an (siehe Kapitel
<Anschlußdiagramm>).
? Die Telefonstummschaltung spricht an, obwohl das "Tel Mute"-
Verbindungskabel nicht angeschlossen ist.16
✔ Das Kabel zwischen Autoradio und Telefon berührt die Karosserie.
☞ Isolieren Sie das offene Ende des Anschlusskabels.
Trotz Loudness-Funktion werden die Höhen nicht angehoben. 17
?
✔ Das Radio befindet sich im Tuner-Betrieb.
☞ Im Tuner-Betrieb hebt die Loudness-Funktion die Höhen nicht an.
? Kein Ton oder zu geringe Lautstärke.20
✔ Fader und/oder Balanceregler sind zu einer Seite gedreht.21
☞ Mitteln Sie die Fader- und Abgleicheinstellung.
✔ Die Anschlusskabel oder der Kabelbaum sind nicht richtig
verbunden.22
☞ Überprüfen Sie die Kabelanschlüsse (siehe Kapitel
<Anschlußdiagramm>).
✔ Das Cassettenband ist beschädigt.23
☞ Verwenden Sie eine andere Cassette.
✔ Die Pegeleinstellungen der Quellen sind zu niedrig.24
☞ Erhöhen Sie die Lautstärkepegel der Programmquellen. (Seite 70)
— 93 —
— 93 —
Page 94

Fehlersuche
? Schlechte Klangqualität (Verzerrungen, Störungen).25
✔ Ein Lautsprecherkabel wird durch eine Schraube kurzgeschlossen.
☞ Überprüfen Sie die Lautsprecherkabel.
✔ Der Tonkopf ist verschmutzt.26
☞ Reinigen Sie den Tonkopf des Cassettenlaufwerks.
✔ Die Lautsprecher sind nicht richtig angeschlossen.27
☞ Schießen Sie die Plus- und Minuspole aller Lautsprecher korrekt
an.
? Der Sicherheitscode wird im Menüsystem nicht angezeigt.32
✔ Die Sicherheitscode-Funktion wurde bereits aktiviert.
☞ Wenn die Sicherheitscode-Funktion aktiviert ist, wird sie in den
Menüpunkten nicht mehr angezeigt.
? Der Tastenton ist nicht zu hören.34
✔ Der Vorverstärkerausgang wird verwendet.
☞ Der Tastenton kann nicht über den Vorverstärkerausgang
ausgegeben werden.
Auch wenn die Funktion zur Synchronisierung der Uhr auf AN
?
gestellt worden ist, kann die Uhr nicht eingestellt werden.35
✔ Der empfangene RDS-Sender sendet keinerlei Uhrzeitdaten.
Deutsch
☞ Wählen Sie einen anderen RDS-Sender.
? Wenn die Fahrzeugbeleuchtung angeschaltet wird, wird das
Gerätedisplay nicht abgedunkelt.36
✔ Das Dimmer-Kabel ist nicht angeschlossen.
☞ Schließen Sie das Dimmer-Kabel ordnungsgemäß an.
? Die Dimmer-Funktion arbeitet nicht.38-1
✔ Das Dimmer-Kabel wurde nicht ordnungsgemäß angeschlossen.
☞ Überprüfen Sie den Anschluss des Dimmer-Kabels.
Tuner-Betrieb
? Schlechter Radioempfang.39
✔ Die Fahrzeugantenne ist nicht herausgezogen.
☞ Ziehen Sie die Antenne vollständig heraus.
✔ Das Kabel für die Steuerung der Motorantenne ist nicht richtig
angeschlossen.40
☞ Schließen Sie das Kabel richtig an (siehe Kapitel
<Anschlußdiagramm>)
? Hierbei handelt es sich nicht um den eingestellten Lautstärkepegel
für Verkehrsinformationen. 43
✔ Der eingestellte Lautstärkepegel ist geringer als der Lautstärkepegel
des Tuners.
☞ Sollte der Lautstärkepegel des Tuners höher sein als der
eingestellte Lautstärkepegel, wird der Tuner-Lautstärkepegel
verwendet.
Cassettenbetrieb
? Die Cassette kann nicht entnommen werden.44
✔ Die Zündung des Fahrzeuges wurde bereits vor mehr als 10 Minuten
ausgeschaltet.
☞ Die Cassette kann nur innerhalb von 10 Minuten nach Ausschalten
der Fahrzeug-Zündung entnommen werden.
Wenn mehr als 10 Minuten vergangen sind, müssen Sie zunächst
die Zündung einschalten und dann die Auswurftaste drücken.
? Die Funktionen DPSS, Tape Advance und Musikwiederholung
arbeiten nicht ordnungsgemäß.45
✔ Die Leerstelle zwischen den einzelnen Titeln auf einer Cassette kann
nicht als solche erkannt werden, da sie zu kurz ist.
☞ Achten Sie darauf, dass sich eine Leerstelle von ca. 4 Sekunden
zwischen den Titeln befinden.
✔ Die Leerstelle zwischen den einzelnen Titeln kann nicht als solche
erkannt werden, da sich zwischen den Titeln zu viele Störgeräusche
befinden.46
☞ Reduzieren Sie die Störgeräusche zwischen den Titeln.
? Die Übersprungfunktion bei Leerräumen (Blank Skip) funktioniert
nicht.47
✔ Da die Störgeräusche zu laut sind, können die Teile ohne Aufnahme
nicht erkannt werden.
☞ Reduzieren Sie die Störgeräusche zwischen den Titeln.
? Die Funktion Blank Skip arbeitet nur an Stellen mit einer
Aufnahme.48
✔ Da der Aufnahmepegel zu niedrig ist, wird die Stelle nicht als
aufgenommen erkannt.
☞ Schalten Sie die Funktion Blank Skip AUS.
— 94 —
Page 95

CD-Wechsler-Betrieb
? Im Display wird "AUX" angezeigt, ein Wechsler-Betrieb ist nicht
möglich.50
✔ O-N-Schalter steht auf der Position "O".
☞ Stellen Sie den Schalter auf die Position "N".
✔ Der angeschlossene Wechsler lässt sich nicht über Ihr Radio
steuern.51
☞ Verwenden Sie einen zu Ihrem Radio passenden Wechsler.
(Seite 67)
? Statt der angewählten Disc wird eine andere abgespielt.52
✔ Die angewählte CD ist sehr verschmutzt oder beschädigt.
☞ Die CD überprüfen und ggf. reinigen (siehe Kapitel <Reinigung
einer CD>).
✔ Die CD ist verkehrt herum eingelegt.53
☞ Nehmen Sie das Magazin heraus und legen die CD richtig herum
ein.
✔ Die Nummer des Disc-Fachs stimmt nicht mit der Nummer der
angewählten Disc überein.54
☞ Nehmen Sie das Magazin heraus und überprüfen die Bestückung.
✔ Die Disc ist beschädigt.55
☞ Tauschen Sie die Disc aus.
Der angewählte Titel wird nicht wiedergegeben.58
?
✔ Der Wechsler arbeitet mit Zufallswiedergabe.
☞ Schalten Sie die Zufallswiedergabefunktion aus.
? Spurwiederholung, Disc-Wiederholung, Spursuchautomatik,
Zufallswiedergabe und Magazin-Zufallswiedergabe starten
automatisch.59
✔ Die Einstellung ist nicht aufgehoben.
☞ Die Einstellungen dieser Funktionen bleiben so lange aktiviert, bis
die Einstellung deaktiviert oder die Disc ausgeworfen wird, auch,
wenn die Stromversorgung ausgeschaltet oder die Quelle
geändert wird.
? CD-Rs oder CD-RWs können nicht wiedergegeben werden.60
✔ Der Aufnahmeprozess der CD-R/CD-RW wurde nicht
ordnungssgemäß abgeschlossen (finalized).
☞ Aufnahmeprozess mit CD-Recorder ordnungsgemäß beenden.
✔ Ein nicht-kompatibler CD-Wechsler wird für die CD-R/CD-RW-
Wiedergabe verwendet.61
☞ Verwenden Sie für die CD-R/CD-RW-Wiedergabe einen
kompatiblen CD-Wechsler.
? Die Spursuche kann nicht durchgeführt werden.66-2
✔ Für das erste oder letzte Musikstück eines Albums.
☞ Die Spursuche kann nicht bei jedem Album in Rückwärtsrichtung
für das erste Musikstück und in Vorwärtsrichtung für das letzte
Musikstück durchgeführt werden.
Wenden Sie sich in den folgenden Situationen an Ihren
Service-Center:
• Obwohl ein Disc-Wechsler angeschlossen ist, wird der Wechsler als
Quelle nicht erkannt. Es erscheint lediglich die Anzeige "AUX" im Display.
• Obwohl keines der Geräte KCA-S210A, CA-C1AX, KDC-CPS87, KDC-CX87,
KDC-CPS85, KDC-CX85, KDC-CPS82 oder KDC-CX82 angeschlossen ist,
schaltet das Gerät beim Umschalten der Betriebsarten zum AUX-Eingang
um.
— 95 —
Page 96

Fehlersuche
Die unten angeführten Meldungen zeigen den Zustand
Ihres Systems an.
EJECT: Es befindet sich kein Magazin im Disc-Wechsler. Das
NO DISC: Es befindet sich keine Disc im Magazin.
TOC ER: Es befindet sich keine Disc im Magazin.
BLANK: Die MD ist nicht bespielt.
NO TRACK: Die MD hat zwar einen Titel, es sind aber keine
Deutsch
NO PANEL: Die Frontblende der an diesem Gerät
E-77: Das Gerät arbeitet aufgrund eines internen Fehlers
MECHA ER: Etwas stimmt mit dem Disc-Fach nicht oder das
Magazin ist nicht eingesetzt.E01
➪
Setzen Sie das Magazin richtig ein.
Keine CD im Gerät.
➪ Die CD einlegen.
➪
Stecken Sie eine Disc ins Magazin.
➪
Stecken Sie eine Disc ins Magazin.
Die CD ist zu verschmutzt, verkehrt herum eingelegt
oder beschädigt.
➪ Reinigen Sie die CD und legen Sie die CD richtig
ein.
E10
Musikstücke aufgenommen.E11
angeschlossenen Zusatzeinheit wurde abgenommen.
➪ Setzen Sie sie wieder ein.E30
nicht richtig.E77
➪
Drücken Sie die Reset-Taste. Erlischt die Anzeige
"E-77" nicht, wenden Sie sich an Ihren KENWOOD-
Fachhändler.
Gerät hat einen Defekt.
➪
Prüfen Sie das Disc-Fach und drücken Sie ggf. die
E99
Reset-Taste am Gerät.
Erlischt die Anzeige "MECHA ER" nicht, wenden
Sie sich an Ihren KENWOOD-Fachhändler.
E02
E04
HOLD ER: Die Schutzschaltung des Disc-Wechslers hat alle
Funktionen unterbrochen, da die Betriebstemperatur
60°C übersteigt.
➪
Lassen Sie den Disc-Wechsler (ggf. durch Öffnen
E0d
der Fenster oder Einschalten der Lüftung)
abkühlen. Wenn er wieder betriebsbereit ist, wird
die Wiedergabe fortgesetzt.
NO NAME: Versuch einer Sendernamen-Anzeige beim Empfang
eines Senders, der keinen Sendernamen ausstrahlt.
E51
NO TITLE: Versuch einer Anzeige des MD- oder Titelnamens,
wenn die MD keine Titelinformationen enthält.E53
NO TEXT: • Versuch einer Anzeige des CD- oder Titelnamens,
wenn die CD keine Titelinformationen enthält.E54
•Versuch einer Text-Anzeige, während ein Sender
empfangen wird, der keinerlei Textdaten sendet.E55
WAITING: Radiotext-Daten werden empfangen.E56
LOAD: Discs werden im Disc-Wechsler ausgewechselt.E57-1
READING: Das Gerät liest die Daten auf der Disc.E57-2
NO ACCES: DNPP wurde nach der Einstellung im Disc-Wechsler
durchgeführt, ohne dass es zumindest ein Mal
wiedergegeben wurde.E58
IN (Blinken): Das Cassettendeck funktioniert nicht
ordnungsgemäß.E60
➪
Legen Sie die Cassette erneut ein. Wenn sich die
Cassette nicht auswerfen lässt oder das Display
weiterhin blinkt, schalten Sie das Gerät bitte aus
und wenden sich an Ihren KENWOOD-Fachhändler.
— 96 —
Page 97

Technische Daten
Die technischen Daten können sich ohne besonderen Hinweis ändern.
UKW-Tuner
Frequenzband
(Abstimmschritte: 50 kHz)...................87,5 MHz – 108,0 MHz
Empfindlichkeit (Rauschabstand = 26dB)...................0,7 µV/75 Ω
Empfindlichkeitsschwelle (Rauschabstand = 46dB) ...1,6 µV/75 Ω
Frequenzgang (±3 dB)...........................................30 Hz – 15 kHz
Rauschabstand (MONO)......................................................65 dB
Selektivität (DIN) (±400 kHz) ........................................... ≥ 80 dB
Kanaltrennung (1 kHz) .........................................................35 dB
MW-Tuner
Frequenzband
(Abstimmschritte: 9 kHz)..........................531 kHz – 1611 kHz
Empfindlichkeit (Rauschabstand = 20dB).............................25 µV
LW-Tuner
Frequenzband..................................................153 kHz – 281 kHz
Empfindlichkeit (S/N = 20dB)...............................................45 µV
Cassettenspieler
Bandgeschwindigkeit ...............................................4,76 cm/sek.
Tonhöhenschwankung (WRMS) ........................................0,08 %
Frequenzgang (±3 dB) (70 µs) ...............................30 Hz – 18 kHz
Kanaltrennung (1 kHz) .........................................................43 dB
Rauschabstand
ohne Dolby NR ...............................................................57 dB
mit Dolby B NR ..............................................................65 dB
Verstärker
Max. Ausgangsleistung ..................................................47 W x 4
Ausgangsleistung (DIN 45324, +B=14,4V) ....................29 W x 4
Klangregler
Baß : ...............................................................100 Hz ±10 dB
Mittel : ..............................................................1 kHz ±10 dB
Höhen : ...........................................................10 kHz ±10 dB
Pegel und Impedanz des Vorstufenausgangs
(während eine CD wiedergegeben wird) .......1800 mV / 10 kΩ
Vorverstärker-Impedanz....................................................≤ 600 Ω
Allgemein
Betriebsspannung (11 – 16 V möglich) ..............................14,4 V
Stromverbrauch.....................................................................10 A
Einbaumaß ....................................................182 x 53 x 150 mm
Gewicht ..............................................................................1,2 kg
— 97 —
Page 98

Page 99

Page 100

 Loading...