

Page 1

KRC-394
KRC-37
KRC-31
CASSETTE RECEIVER
INSTRUCTION MANUAL
KACCETHЫЙ PAДИOПPИEMHИK
ИHCTPУKCИЯ ПO ЭKCПЛУATAЦИИ
RADIOODTWARZACZ
PODRĘCZNIK OBSŁUGI
RADIOPŘIJÍMAČ S KAZETOVÝM PŘEHRÁVAČEM
NÁVOD K POUŽITÍ
Изделие изготовлено в Индонезии
© B64-2390-00/00 (E2N)
Page 2

Contents
Safety precautions......................3
About Cassette tape...................4
English
About RDS ..................................4
General features .........................5
Power
Selecting the Source
Volume
Attenuator
Loudness
System Q
Audio Control
Speaker Setting
Switching Display
TEL Mute
Theft Deterrent Faceplate
Tuner features
(KRC-394/KRC-37) ....................8
Tuning
Station Preset Memory
Auto Memory Entry
Preset Tuning
RDS features .............................10
Traffic Information
Presetting Volume for Traffic Information
PTY (Program Type)
Program Type preset
Changing Language for PTY Function
Tuner features (KRC-31)............13
Tuning Mode
Tuning
Station Preset Memory
Auto Memory Entry
Preset Tuning
Cassette player features...........14
Playing Cassette Tapes
Fast Forwarding and Rewinding
Tape Advance
Blank Skip
Tuner Call
Music Repeat
External disc control features..16
Playing External Disc
Fast Forwarding and Reversing
Track Search
Album Search
Track/Album Repeat
Track Scan
Random Play
Magazine Random Play
Disc Naming (DNPS)
Text/Title Scroll
Menu system.............................19
Menu System
Touch Sensor Tone
Manual Clock Adjustment
Synchronize Clock
DSI (Disabled System Indicator)
Selectable Illumination
News Bulletin with Timeout Setting
Local Seek
Tuning Mode
Auto Memory Entry
AF (Alternative Frequency)
Restricting RDS Region
Auto TP Seek
Monaural Reception
Text Scroll
Disc Naming
Power OFF Timer
Accessories...............................23
Installation Procedure ..............23
Connecting Wires to
Terminals................................24
Installation ................................26
Troubleshooting Guide .............28
Specifications ...........................31
— 2 —
Page 3
Safety precautions
2WARNING
To prevent injury and/or fire, take the
following precautions:
• Insert the unit all the way until it is fully
locked in place. Otherwise it may fly out of
place during collisions and other jolts.
• When extending the ignition, battery or
ground wires, make sure to use automotivegrade wires or other wires with an area of
2
0.75mm
deterioration and damage to the wire
coating.
•To prevent short circuits, never put or leave
any metallic objects (e.g., coins or metal
tools) inside the unit.
• If the unit starts to emit smoke or strange
smells, turn off the power immediately and
consult your Kenwood dealer.
• Make sure not to get your fingers caught
between the faceplate and the unit.
• Be careful not to drop the unit or subject it to
strong shock.
The unit may break or crack because it
contains glass parts.
• Do not touch the liquid crystal fluid if the
LCD is damaged or broken due to shock. The
liquid crystal fluid may be dangerous to your
health or even fatal.
If the liquid crystal fluid from the LCD
contacts your body or clothing, wash it off
with soap immediately.
(AWG18) or more to prevent wire
2CAUTION
To prevent damage to the machine,
take the following precautions:
• Make sure to ground the unit to a negative
12V DC power supply.
• Do not open the top or bottom covers of the
unit.
• Do not install the unit in a spot exposed to
direct sunlight or excessive heat or humidity.
Also avoid places with too much dust or the
possibility of water splashing.
• Do not set the removed faceplate or the
faceplate case in areas exposed to direct
sunlight, excessive heat or humidity. Also
avoid places with too much dust or the
possibility of water splashing.
•To prevent deterioration, do not touch the
terminals of the unit or faceplate with your
fingers.
• Do not subject the faceplate to excessive
shock, as it is a piece of precision
equipment.
• When replacing a fuse, only use a new one
with the prescribed rating. Using a fuse with
the wrong rating may cause your unit to
malfunction.
•To prevent short circuits when replacing a
fuse, first disconnect the wiring harness.
• Do not place any object between the
faceplate and the unit.
• During installation, do not use any screws
except for the ones provided. The use of
improper screws might result in damage to
the main unit.
IMPORTANT INFORMATION
About CD players/disc changers
connected to this unit:
KENWOOD disc changers/ CD players
released in 1998 or later can be connected to
this unit.
Refer to the catalog or consult your Kenwood
dealer for connectable models of disc
changers/ CD players.
Note that any KENWOOD disc changers/ CD
players released in 1997 or earlier and disc
changers made by other makers cannot be
connected to this unit.
Unsupported connection may result in
damage.
Setting the O-N Switch to the "N" position for
the applicable KENWOOD disc changers/ CD
players.
The functions that can be used and the
information that can be displayed will differ
depending on the models being connected.
You can damage both your unit and the CD
changer if you connect them incorrectly.
— 3 —
Page 4
Safety precautions
NOTE
• If you experience problems during
installation, consult your Kenwood dealer.
English
• If the unit does not seem to be working
right, try pressing the reset button first. If
that does not solve the problem, consult
your Kenwood dealer.
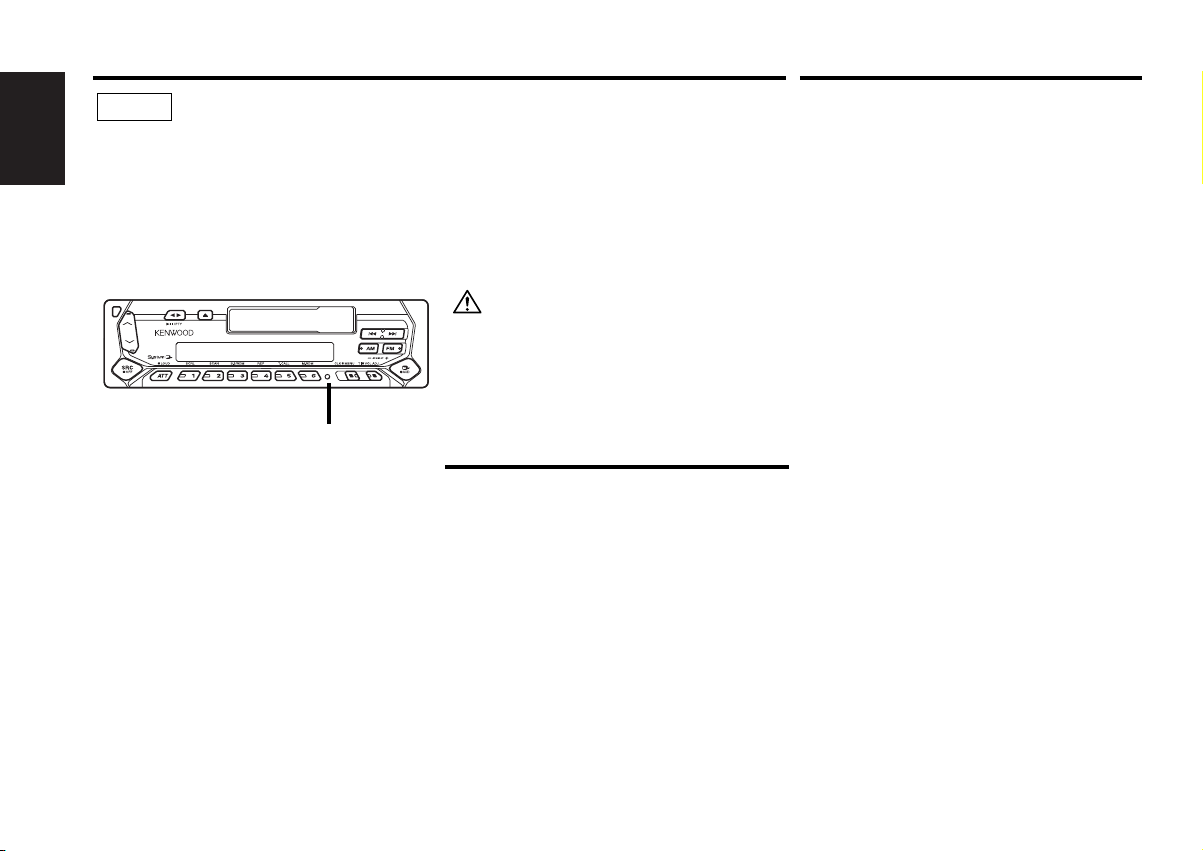
•Press the reset button if the Disc auto
changer fails to operate correctly. Normal
operatin should be restored.
Reset button
• Characters in the LCD may become difficult
to read in temperatures below 41 ˚F (5 ˚C).
• The illustrations of the display and the panel
appearing in this manual are examples used
to explain more clearly how the controls are
used. Therefore, what appears on the display
in the illustrations may differ from what
appears on the display on the actual
equipment, and some of the illustrations on
the display may represent something
impossible in actual operation.
Cleaning the Faceplate Terminals
If the terminals on the unit or faceplate get
dirty, wipe them with a dry, soft cloth.
Cleaning the Unit
If the faceplate of this unit is stained, wipe it
with a dry soft cloth such as a silicon cloth.
If the faceplate is stained badly, wipe the stain
off with a cloth moistened with neutral
cleaner, then wipe neutral detergent off.
Applying spray cleaner directly to the unit may
affect its mechanical parts. Wiping the
faceplate with a hard cloth or using a volatile
liquid such as thinner or alcohol may scratch
the surface or erases characters.
About Cassette tape
Cleaning the tape head
When there’s noise or the sound quality is bad
during tape play the tape head maybe dirty,
clean the tape head.
About Cassette tape
• If the tape is slack tighten it.
• If the cassette tape label is peeling off glue it
on again.
• Don’t use deformed cassette tape.
• Don’t place cassette tape on the dashboard
etc. where the temperature is high.
• Don’t use cassette tape that’s 100 minutes
long or longer.
About RDS
RDS (Radio Data System)
When listening to an RDS station, the
programme service name of the station is
displayed, advising you quickly which station is
being received.
RDS (Radio Data System) stations also
transmit frequency data for the same station.
When you are making long trips, this function
automatically alternative switches to the
particular frequency with the best reception
for the particular network of stations that you
want to listen to. The data is automatically
stored, allowing you to switch quickly to
another RDS stations, broadcasting the same
programme, that has better reception. These
include stations stored in the station preset
memory that you often listen to.
Enhanced Other Network
Stations that offer <Enhanced Other
Network> also transmit information about
other RDS stations that have traffic
information. When you are tuned to a station
that is not transmitting traffic information, but
another RDS station starts transmitting a
traffic bulletin, the tuner automatically
switches to the other station for the duration
of the bulletin.
Alarm
When an emergency transmission (announcing
disasters, etc.) is sent, all current functions are
interrupted to allow the warning to be
received.
— 4 —
Page 5
General features
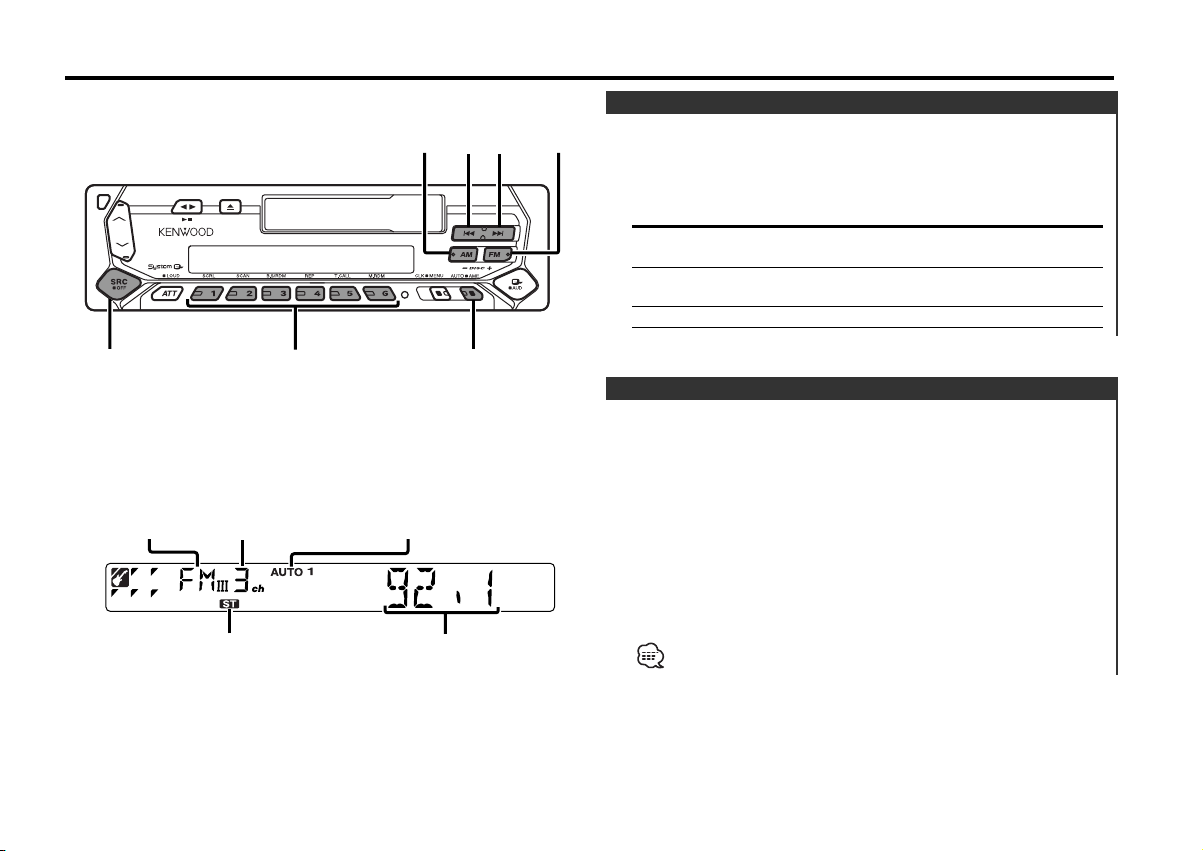
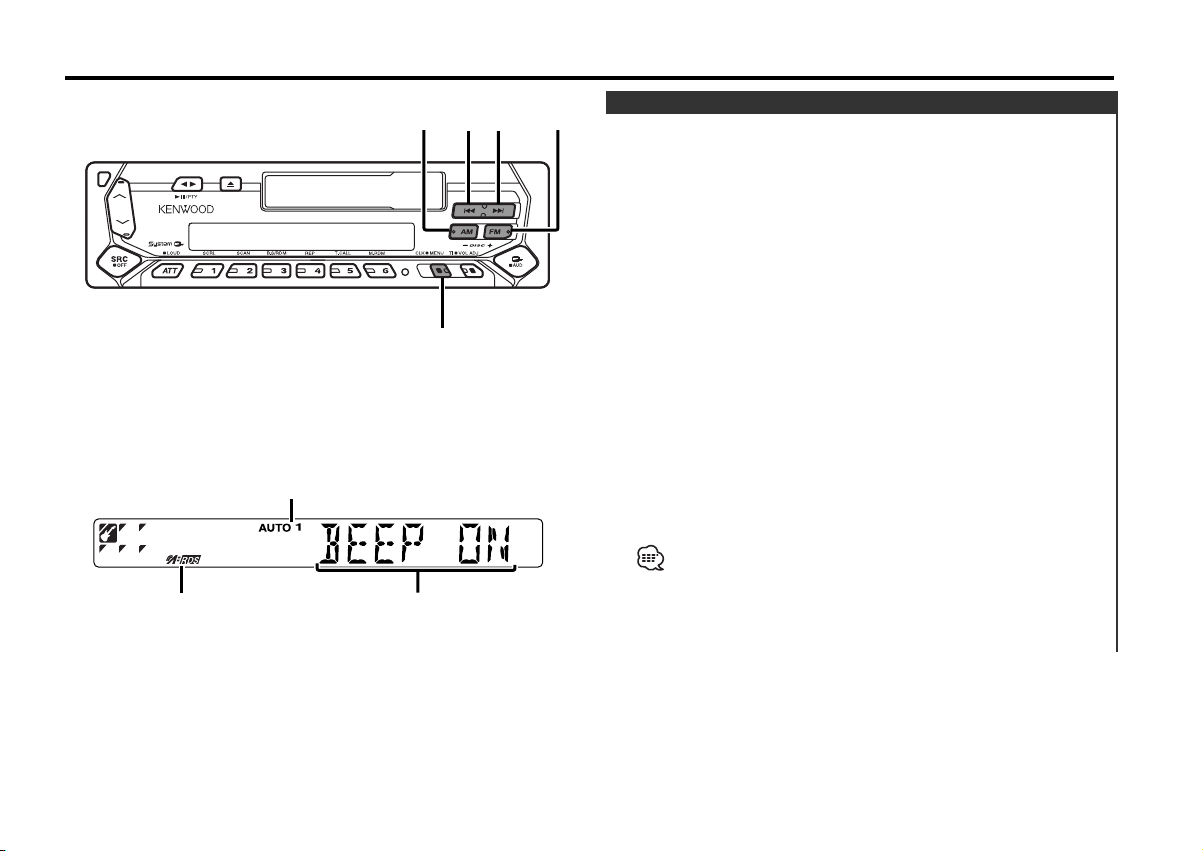
4
¢
SRC
FMAM
Q
/AUD
u
d
ATT/LOUD
CLK
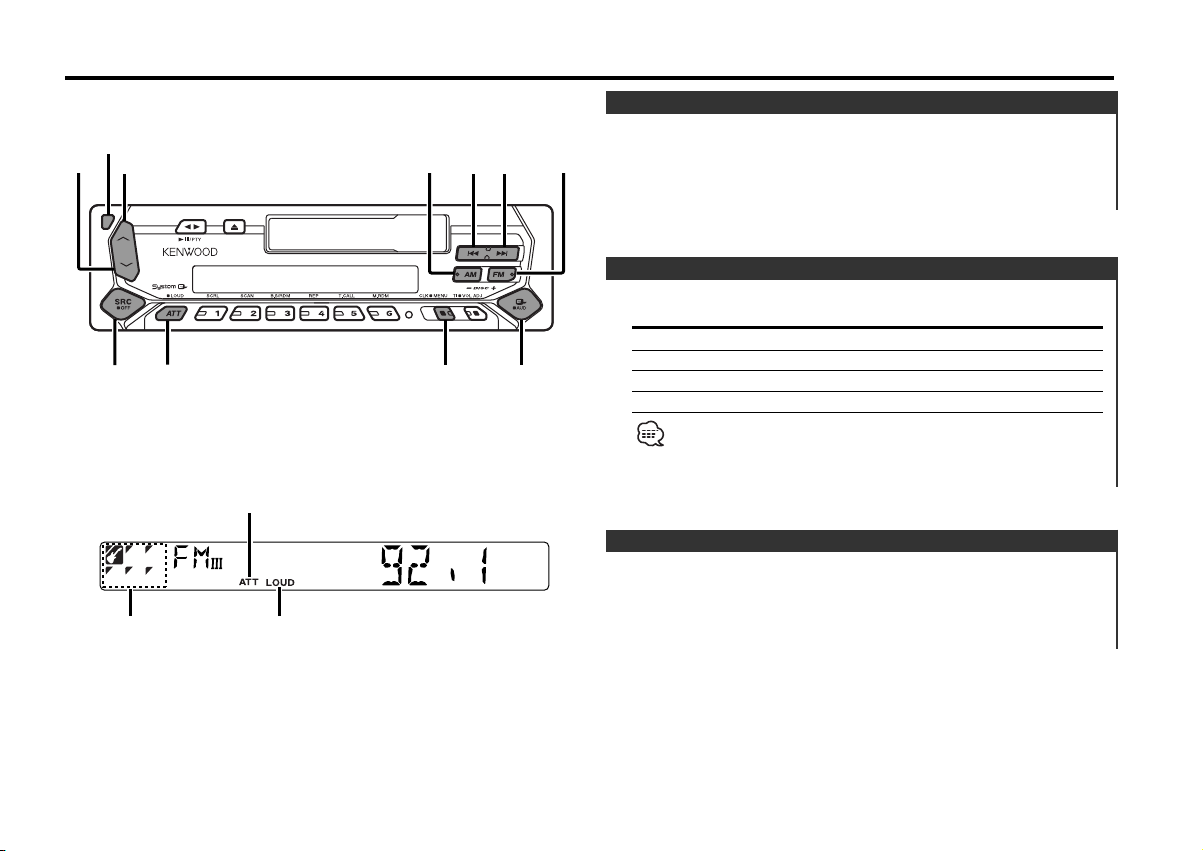
Release button
SYSTEM Q indicator
ATT indicator
LOUD indicator
Power
Turning ON the Power
Press the [SRC] button.
Turning OFF the Power
Press the [SRC] button for at least 1 second.
Selecting the Source
Press the [SRC] button.
Source required Display
Tuner "TUNER"
Tape "TAPE"
External disc "DISC"/"CD"
Standby (Illumination only mode) "ALL OFF"
This unit automatically turns full power OFF after 20 minutes lapses
in Standby mode in order to save the vehicles battery.
The time until full power OFF can be set in <Power OFF Timer>
(page 22).
Volume
Increasing Volume
Press the [u] button.
Decreasing Volume
Press the [d] button.
— 5 —
Page 6
General features
Attenuator
Turning the volume down quickly.
English
Press the [ATT] button.
Each time the button is pressed the Attenuator turns ON or OFF.
When it’s ON, the "ATT" indicator blinks.
Loudness
Compensating for low and high tones during low volume.
Press the [LOUD] button for at least 1 second.
Each time the button is pressed for at least 1 second the
Loudness turns ON or OFF.
When it’s ON, "LOUD" indicator is ON.
System Q
You can recall the best sound setting preset for different types of
the music.
1 Select the source to set
Press the [SRC] button.
2 Select the Sound type
Press the [Q] button.
Each time the button is pressed the sound setting switches.
Sound setting Display
Flat "FLAT"
Rock "ROCK"
Top 40 "TOP40"
Pops "POPS"
Jazz "JAZZ"
Easy "EASY"
Scan of Flat — Easy "SCAN"
• Each setting value is changed with the <Speaker Setting> (page
7).
First, select the speaker type with the Speaker setting.
• When the System Q setting is changed, the Bass, Middle, and
Treble set in audio control replace the System Q values.
Audio Control
1 Select the source for adjustment
Press the [SRC] button.
2 Enter Audio Control mode
Press the [AUD] button for at least 1 second.
3 Select the Audio item for adjustment
Press the [FM] or [AM] button.
Each time the button is pressed the items that can be adjusted
switch as shown below.
4 Adjust the Audio item
Press the [4] or [¢] button.
Adjustment Item Display Range
Bass level "BAS" –8 — +8
Middle level "MID" –8 — +8
Treble level "TRE" –8 — +8
Balance "BAL" L15 — R15
Fader "FAD" R15 — F15
5 Exit Audio Control mode
Press the [AUD] button.
— 6 —
Page 7
Speaker Setting
Fine-tuning so that the System Q value is optimal when setting
the speaker type.
1 Enter Standby
Press the [SRC] button.
Select the "ALL OFF" display.
2 Enter Speaker Setting mode
Press the [Q] button.
3 Select the Speaker type
Press the [4] or [¢] button.
Each time the button is pressed the setting switches as shown
below.
Speaker type Display
OFF "SP OFF"
For the OEM speaker "SP OEM"
For 6 & 6x9 in. speaker "SP 6/6x9"
For 5 & 4 in. speaker "SP 5/4"
4 Exit Speaker Setting mode
Press the [Q] button.
Switching Display
Switching the information displayed.
Press the [CLK] button.
Each time the button is pressed the display switches as shown
below.
In Tuner source
Information
Program Service name or Frequency
Clock
In Tape source
Information
Play side
Clock
In External disc source
Information Display
Track Time
Disc name "D-NAME"
Disc title "D-TITLE"
Track title "T-TITLE"
Clock
TEL Mute
The audio system automatically mutes when a call comes in.
When a call comes in
"CALL" is displayed.
The audio system pauses.
Listening to the audio during a call
Press the [SRC] button.
The "CALL" display disappears and the audio system comes back
ON.
When the call ends
Hang up the phone.
The "CALL" display disappears and the audio system comes back
ON.
— 7 —
Page 8
General features
#1 – 6
4
¢
SRC
AM
FM
MENU
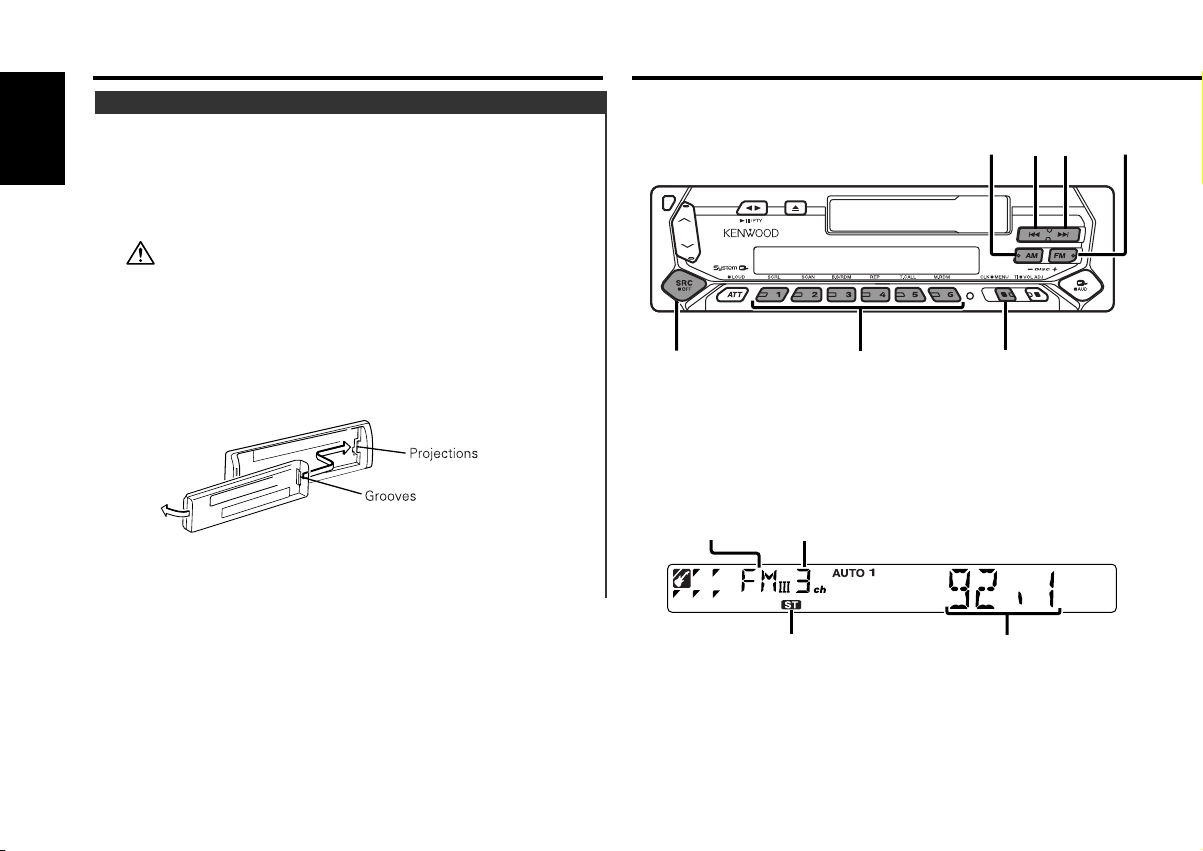
Theft Deterrent Faceplate
The faceplate of the unit can be detached and taken with you,
helping to deter theft.
English
Removing the Faceplate
Press the Release button.
The faceplate is unlocked, allowing you to detach it.
• The faceplate is a precision piece of equipment and can be
damaged by shocks or jolts. For that reason, keep the faceplate in
its special storage case while detached.
• Do not expose the faceplate or its storage case to direct sunlight
or excessive heat or humidity. Also avoid places with too much
dust or the possibility of water splashing.
Reattaching the Faceplate
1 Align the projections on the unit with the grooves on the
faceplate.
Tuner features
Function of the KRC-394/KRC-37
2 Push the faceplate in until it clicks.
The faceplate is locked in place, allowing you to use the unit.
— 8 —
Band display
Preset station number
ST indicator
Frequency display
Page 9
Tuning
Selecting the station.
1 Select tuner source
Press the [SRC] button.
Select the "TUNER" display.
2 Select the band
Press the [FM] or [AM] button.
Each time the [FM] button is pressed it switches between the
FM1, FM2, and FM3 bands.
3 Tune up or down band
Press the [4] or [¢] button.
During reception of stereo stations the "ST" indicator is ON.
Station Preset Memory
Putting the station in the memory.
1 Select the band
Press the [FM] or [AM] button.
2 Select the frequency to put in the memory
Press the [4] or [¢] button.
3 Put the frequency in the memory
Press the [#1] — [#6] button for at least 2 seconds.
The preset number display blinks 1 time.
On each band, 1 station can be put in the memory on each [#1]
— [#6] button.
Auto Memory Entry
Putting a station with good reception in the memory
automatically.
1 Select the band for Auto Memory Entry
Press the [FM] or [AM] button.
2 Enter Menu mode
Press the [MENU] button for at least 1 second.
"MENU" is displayed.
3 Select the Auto Memory Entry mode
Press the [FM] or [AM] button.
Select the "A-MEMORY" display.
4 Open Auto Memory Entry
Press the [4] or [¢] button for at least 2 seconds.
When 6 stations that can be received are put in the memory
Auto Memory Entry closes.
• When the <AF Function> (page 21) is ON, only RDS stations are
put in the memory.
• When Auto Memory Entry is done in the FM2 band, the RDS
stations preset in the FM1 band aren't put in the memory.
Likewise, when it is done in the FM3 band, RDS stations preset in
FM1 or FM2 aren't put in the memory.
Preset Tuning
Calling up the stations in the memory.
1 Select the band
Press the [FM] or [AM] button.
2 Call up the station
Press the [#1] — [#6] button.
— 9 —
Page 10

RDS features
#1 – 6
AM
PTY
4¢
FM
TI/VOL ADJ
CLK
Function of the KRC-394/KRC-37
English
Traffic Information
Switching to traffic information automatically when a traffic
bulletin starts even when you aren't listening to the radio.
Press the [TI] button.
Each time the button is pressed the Traffic Information function
turns ON or OFF.
When it's ON, "TI" indicator is ON.
When a traffic information station isn't being received the "TI"
indicator blinks.
When a traffic bulletin starts, "TRAFFIC" is displayed it and it
switches to traffic information.
During reception of a AM station when the Traffic Information
function is turned ON, it switches to a FM station.
Receiving other traffic information stations
Press the [4] or [¢] button.
Traffic information station switching can be done when listening to
the radio.
PTY indicator
TI indicator
Presetting Volume for Traffic Information
Setting the volume during Traffic Information.
1 Receive the station.
2 Set the volume you want.
3 Preset the volume
Press the [VOL ADJ] button for at least 2 seconds.
The volume level display blinks 1 time.
— 10 —
Page 11
PTY (Program Type)
Selecting the Program Type and searching for a station.
1 Enter PTY mode
Press the [PTY] button.
During PTY mode the "PTY" indicator is ON.
This function can't be used during a traffic bulletin or AM reception.
2 Select the Program Type
Press the [FM] or [AM] button.
Each time the button is pressed the Program Type switches as
shown below.
No. Program Type Display
1. Music "MUSIC"
2. Speech "SPEECH"
3. News "NEWS"
4. Current Affairs "AFFAIRS"
5. Information "INFO"
6. Sport "SPORT"
7. Education "EDUCATE"
8. Drama "DRAMA"
9. Culture "CULTURE"
10. Science "SCIENCE"
11. Varied "VARIED"
12. Pop Music "POP M"
13. Rock Music "ROCK M"
14. Easy Listening Music "EASY M"
15. Light Classical "LIGHT M"
16. Serious Classical "CLASSICS"
17. Other Music "OTHER M"
18. Weather "WEATHER"
19. Finance "FINANCE"
20. Children's programs "CHILDREN"
21. Social Affairs "SOCIAL"
22. Religion "RELIGION"
23. Phone In "PHONE IN"
24. Travel "TRAVEL"
25. Leisure "LEISURE"
26. Jazz Music "JAZZ"
27. Country Music "COUNTRY"
28. National Music "NATION M"
29. Oldies Music "OLDIES"
30. Folk Music "FOLK M"
31. Documentary "DOCUMENT"
• Speech and Music include the Program type shown below.
Music: No.12
Speech: No.3
• The Program Type can be put in the [#1] — [#6] button memory
and called up quickly. Refer to the <Program Type preset> (page
12).
• The display language can be changed. Refer to <Changing
Language for PTY Function> (page 12).
— 17, 26 — 30
— 11, 18 — 25, 31
3 Search for the selected Program Type station
Press the [4] or [¢] button.
When you want to search for other stations press the [4] or
[¢] button again.
When the selected Program Type isn't found, "NO PTY" is displayed.
Select another Program Type.
4 Exit PTY mode
Press the [PTY] button.
— 11 —
Page 12

RDS features
Function of the KRC-394/KRC-37
Program Type preset
Putting the Program Type in the Preset button memory and
calling it up quickly.
English
Presetting the Program Type
1 Select the Program Type to preset
Refer to <PTY(Program Type)> (page 11).
2 Preset the Program Type
Press the [#1] — [#6] button for at least 2 seconds.
Calling up the preset Program Type
1 Enter PTY mode
Refer to <PTY(Program Type)> (page 11).
2 Call up the Program Type
Press the [#1] — [#6] button.
Changing Language for PTY Function
Selecting the Program Type display language.
1 Enter PTY mode
Refer to <PTY (Program Type)> (page 11).
2 Enter Changing Language mode
Press the [CLK] button.
3 Select the language
Press the [#1] — [#3] button.
Button Language
[#1] English
[#2] French
[#3] German
4 Exit Changing Language mode
Press the [CLK] button.
— 12 —
Page 13
Tuner features
#1 – 6
4
¢
SRC
AM
FM
AUTO/AME
Function of the KRC-31
Band display
Preset station number
ST indicator
AUTO indicator
Frequency display
Tuning Mode
Choose the tuning mode.
Press the [AUTO] button.
Each time the button is pressed the Tuning mode switches as
shown below.
Tuning mode Display Operation
Auto seek "AUTO 1" Automatic search for a station.
indicator
Preset station "AUTO 2" Search in order of the stations
seek indicator in the Preset memory.
Manual — Normal manual tuning control.
Tuning
Selecting the station.
1 Select tuner source
Press the [SRC] button.
Select the "TUNER" display.
2 Select the band
Press the [FM] or [AM] button.
Each time the [FM] button is pressed it switches between the
FM1, FM2, and FM3 bands.
3 Tune up or down band
Press the [4] or [¢] button.
During reception of stereo stations the "ST" indicator is ON.
— 13 —
Page 14
Tuner features
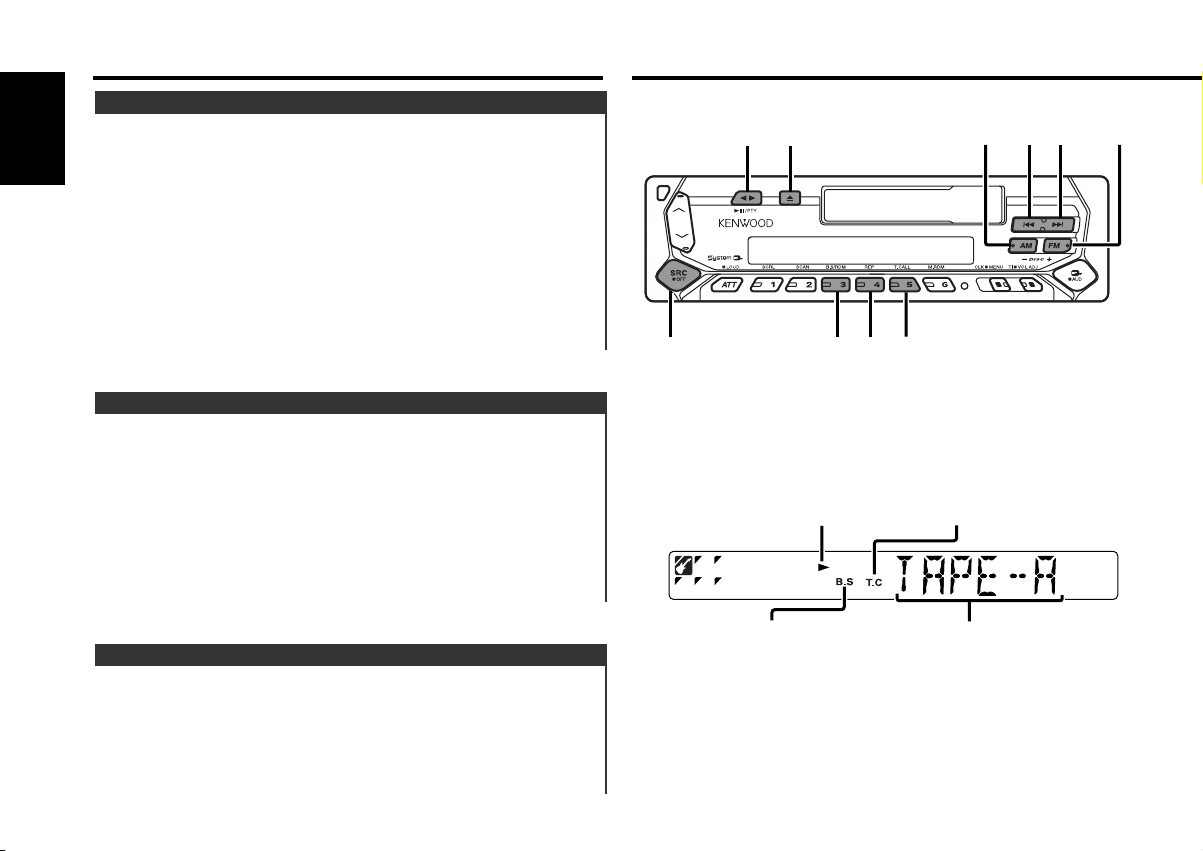
4
¢
SRC
FMAM
B.S
2 30
T.CALL
REP
Function of the KRC-31
Station Preset Memory
Putting the station in the memory.
English
1 Select the band
Press the [FM] or [AM] button.
2 Select the frequency to put in the memory
Press the [4] or [¢] button.
3 Put the frequency in the memory
Press the [#1] — [#6] button for at least 2 seconds.
The preset number display blinks 1 time.
On each band, 1 station can be put in the memory on each [#1]
— [#6] button.
Auto Memory Entry
Putting stations with good reception in the memory
automatically.
1 Select the band for Auto Memory Entry
Press the [FM] or [AM] button.
2 Open Auto Memory Entry
Press the [AME] button for at least 2 seconds.
When 6 stations that can be received are put in the memory
Auto Memory Entry closes.
Cassette player features
T.C indicatorTape indicator
Preset Tuning
Calling up the stations in the memory.
1 Select the band
Press the [FM] or [AM] button.
2 Call up the station
Press the [#1] — [#6] button.
— 14 —
B.S indicator
Play side
Page 15

Playing Cassette Tapes
When the Cassette Tape is inserted
Press the [SRC] button.
Select the "TAPE" display.
When you want to listen to the reverse side
Press the [23] button.
Eject the Cassette Tape
Press the [0] button.
Fast Forwarding and Rewinding
Fast Forwarding
Press the [FM] button.
When it's stopped press the [23] button.
Rewinding
Press the [AM] button.
When it's stopped press the [23] button.
Tape Advance
Skipping to the next song or the start of the current song.
Skipping to the next song
Press the [¢] button.
Skips to the start of the current song
Press the [4] button.
Blank Skip
Fast forwarding automatically when an unrecorded portion
continues for at least 10 seconds.
Press the [B.S] button.
Each time the button is pressed the Blank Skip turns ON or OFF.
When it's ON, the "B.S" indicator is ON.
Tuner Call
Switching to the radio automatically during Fast Forwarding and
Rewinding.
Press the [T.CALL] button.
Each time the button is pressed the Tuner Call turns ON or OFF.
When it's ON, the "T.C" indicator is ON.
Music Repeat
Repeating the present song.
Press the [REP] button.
Each time the button is pressed the Music Repeat turns ON or
OFF.
When it's ON, "REP ON" is displayed.
— 15 —
Page 16
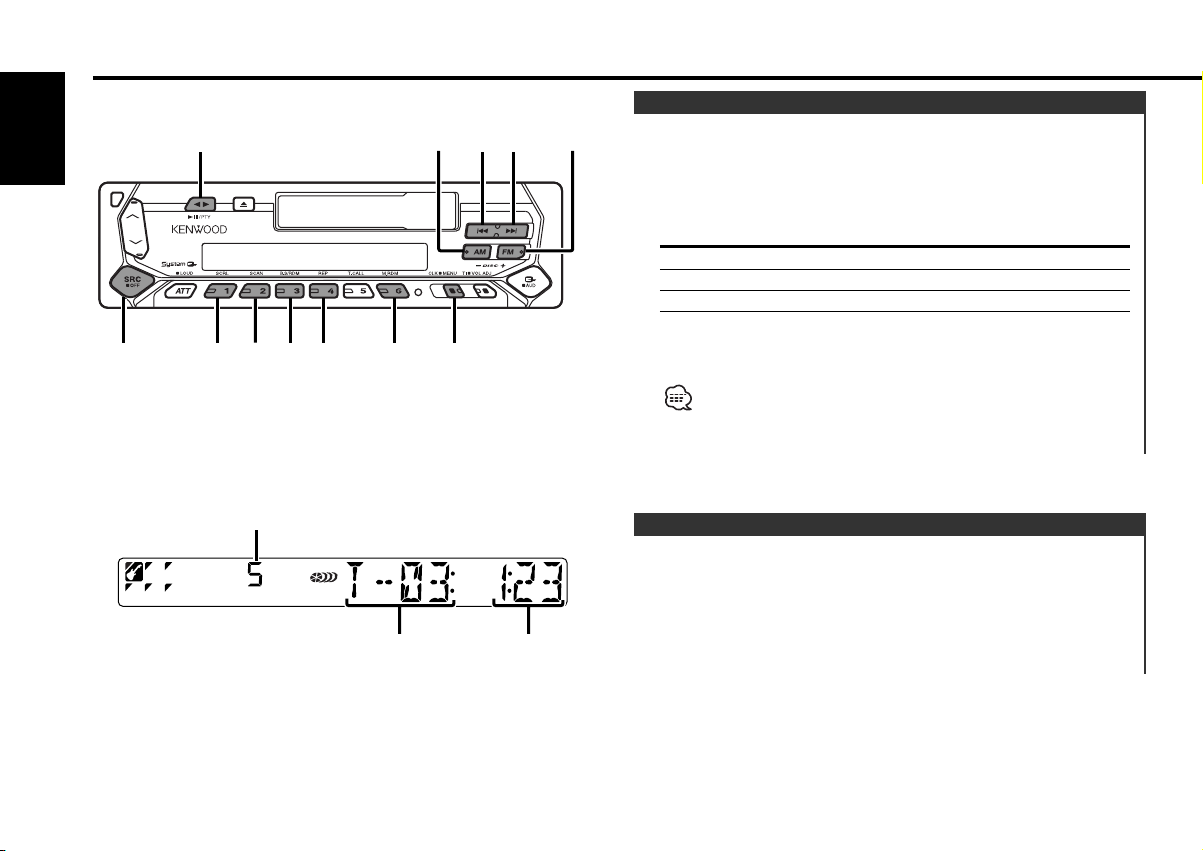
External disc control features
DISC+/FM
DISC
–/AM
4
¢
SRC
38
REPSCAN
SCRL RDM M.RDM MENU
English
Playing External Disc
Playing discs set in the optional accessory disc player connected
to this unit.
Press the [SRC] button.
Select the display for the disc player you want.
Display examples:
Display Disc player
"CD" CD player
"DISC" CD changer
"DISC" MD changer
Pause and play
Press the [38] button.
Each time the button is pressed it pauses and plays.
• Disc #10 is displayed as "0".
• The functions that can be used and the information that can be
displayed will differ depending on the external disc players being
connected.
Disc number
Track number
Track time
Fast Forwarding and Reversing
Fast Forwarding
Hold down on the [¢] button.
Release your finger to play the disc at that point.
Reversing
Hold down on the [4] button.
Release your finger to play the disc at that point.
— 16 —
Page 17
Track Search
Selecting the song you want to hear.
Press the [4] or [¢] button.
Album Search (Function of disc changer)
Selecting the disc you want to hear.
Press the [DISC–] or [DISC+] button.
Track/Album Repeat
Replaying the track/disc you're listening to.
Press the [REP] button.
Each time the button is pressed the Repeat Play switches as
shown below.
Repeat play Display
Track Repeat "TREP ON"/"REP ON"
Album Repeat (Function of disc changer) "DREP ON"
OFF "REP OFF"
Track Scan
Playing the first part of each song on the disc you are listening
to and searching for the song you want to listen to.
Random Play
Playing all the songs on the disc in random order.
Press the [RDM] button.
Each time the button is pressed Random Play turns ON or OFF.
When it's ON, "RDM ON" is displayed.
When the [¢] button is pressed, the next song select starts.
Magazine Random Play
(Function of disc changer)
Play the songs on all the discs in the disc changer in random
order.
Press the [M.RDM] button.
Each time the button is pressed the Magazine Random Play turns
ON or OFF.
When it's ON, "MRDM ON" is displayed.
When the [¢] button is pressed, the next song select starts.
1 Start Track Scan
Press the [SCAN] button.
"TSCN/SCAN ON" is displayed.
2 Release it when the song you want to listen to is played
Press the [SCAN] button.
— 17 —
Page 18

External disc control features
Disc Naming (DNPS)
Attaching a title to a CD.
English
1 Play the disc you want to attach a name to
A title can't be attached to a MD.
2 Enter Menu mode
Press the [MENU] button for at least 1 second.
"MENU" is displayed.
3 Select Name set mode
Press the [FM] or [AM] button.
Select the "NAME SET" display.
4 Enter Name set mode
Press the [4] or [¢] button for at least 2 seconds.
5 Move the cursor to the enter character position
Press the [4] or [¢] button.
6 Select the characters
Press the [FM] or [AM] button.
7 Repeat steps 5 through 6 and attach a name.
8 Exit Menu mode
Press the [MENU] button.
• When operation stops for 10 seconds the name at that time is
registered, and Name Set mode closes.
• Media that you can attach a name to
- External CD changer/ player: Varies according to the CD changer/
player. Refer to the CD changer/ player manual.
• The name of a CD can be changed by the same operation you
used to name it.
Text/Title Scroll
Scrolling the displayed CD text or MD title.
Press the [SCRL] button.
— 18 —
Page 19
Menu system
AM
4¢
FM
MENU
RDS indicator
AUTO indicator
Menu display
Menu System
Setting during operation beep sound etc. functions.
The Menu system basic operation method is explained here. The
reference for the Menu items and their setting content is after
this operation explanation.
1 Enter Menu mode
Press the [MENU] button for at least 1 second.
"MENU" is displayed.
2 Select the menu item
Press the [FM] or [AM] button.
Example: When you want to set the beep sound select the
"BEEP" display.
3 Set the menu item
Press the [4] or [¢] button.
Example: When "BEEP" is selected, each time the button is
pressed it switches "BEEP ON" or "BEEP OFF". Select 1
of them as the setting.
You can continue by returning to step 2 and setting other items.
4 Exit Menu mode
Press the [MENU] button.
When other items that are applicable to the basic operation method
above are displayed afterwards their setting content chart is
entered. (Normally the uppermost setting in the chart is the original
setting.)
Also, the explanation for items that aren't applicable (<Manual Clock
Adjustment>etc.) are entered step by step.
— 19 —
Page 20
Menu system
Touch Sensor Tone
Setting the operation check sound (beep sound) ON/OFF.
English
Display Setting
"BEEP ON" Beep is heard.
"BEEP OFF" Beep canceled.
Manual Clock Adjustment
This adjustment can be done when the <Synchronize Clock> (page
20) is set as OFF.
1 Select Clock Adjustment mode
Press the [FM] or [AM] button.
Select the "CLK ADJ" display.
2 Enter Clock Adjust mode
Press the [4] or [¢] button for at least 2 seconds.
The clock display blinks.
3 Adjust the hours
Press the [FM] or [AM] button.
Adjust the minutes
Press the [4] or [¢] button.
4 Exit Clock adjustment mode
Press the [MENU] button.
Function of the KRC-394/KRC-37
Synchronize Clock
Synchronizing the RDS station time data and this unit's clock.
Display Setting
"SYNC ON" Synchronizes the time.
"SYNC OFF" Adjust the time manually.
It takes 3 to 4 minutes to synchronize the clock.
DSI (Disabled System Indicator)
A red indicator will blink on the unit after the faceplate is
removed, warning potential thieves.
Display Setting
"DSI ON" LED flashes.
"DSI OFF" LED OFF.
Selectable Illumination
Selecting the button illumination color as green or red.
Display Setting
"COL GRN" The illumination color is green.
"COL RED" The illumination color is red.
Function of the KRC-394/KRC-37
News Bulletin with Timeout Setting
It switches automatically when a news bulletin starts even if the
radio isn't being listened to. Also, the time interval when
interrupt is prohibited can be set.
Display and Setting
"NEWS OFF"
"NEWS 00M"
…
"NEWS 90M"
When "NEWS 00M" — "NEWS 90M" is set, the News Bulletin
Interrupt function is ON.
— 20 —
Page 21
When the news bulletin starts, "NEWS" is displayed, and it
switches to the news bulletin.
• If you choose the "20M" setting, further news bulletins will not be
received for 20 minutes once the first news bulletin is received.
• The news bulletin volume is the same level that was set for traffic
information (page 10).
• This function is only available if the desired station sends PTY-code
for news bulletin or belongs to <Enhanced Other Network>Network sending PTY-code for news bulletin.
• When the News Bulletin Interrupt function is ON, it switches to an
FM station.
Local Seek <In Tuner mode>
Only stations whose reception is good are searched for in auto
seek tuning.
Display Setting
"LO.S OFF" The local seek function is OFF.
"LO.S ON" The local seek function is ON.
Function of the KRC-394/KRC-37
Tuning Mode <In Tuner mode>
Sets the tuning mode.
Tuning mode Display Operation
Auto seek "AUTO 1" Automatic search for a station.
Preset station seek "AUTO 2" Search in order of the stations
in the Preset memory.
Manual "MANUAL" Normal manual tuning control.
Function of the KRC-394/KRC-37
Auto Memory Entry <In Tuner mode>
For the operation method refer to <Auto Memory Entry> (9page).
Function of the KRC-394/KRC-37
AF (Alternative Frequency)
When poor reception is experienced, automatically switch to
another frequency broadcasting the same program in the same
RDS network with better reception.
Display Setting
"AF ON" The AF function is ON.
"AF OFF" The AF function is OFF.
When the AF function is ON, the "RDS" indicator is ON.
When no other stations with stronger reception are available for the
same program in the RDS network, you may hear the incoming
broadcast in bits and snatches. Turn OFF the AF function in such a
case.
— 21 —
Page 22
Menu system
Function of the KRC-394/KRC-37
Restricting RDS Region
English
You can choose whether or not to restrict the RDS channels,
received with the AF function for a particular network, to a
specific region.
Display Setting
"REG ON" The Region Restrict Function is ON.
"REG OFF" The Region Restrict Function is OFF.
(Region Restrict Function)
Text Scroll <In External disc control mode>
Setting the displayed text scroll.
Display Setting
"SCL MANU" Doesn't scroll.
"SCL AUTO" Scrolls when the display changes.
The text scrolled is shown below.
• CD text
• MD title
Sometimes stations in the same network broadcast different
programs or use different program service names.
Function of the KRC-394/KRC-37
Auto TP Seek
When the TI function is ON and poor reception conditions are
experienced when listening to a traffic information station,
another traffic information station with better reception will be
searched for automatically.
Display Setting
"ATPS ON" The Auto TP Seek Function is ON.
"ATPS OFF" The Auto TP Seek Function is OFF.
Monaural Reception <In FM reception>
Noise can be reduced when stereo broadcasts are received as
monaural.
Display Setting
"MONO OFF" The monaural reception is OFF.
"MONO ON" The monaural reception is ON.
Disc Naming <In External disc control mode>
For the setting method refer to the <Disc Naming> (page 18).
Power OFF Timer
Setting the timer to turn this unit's power OFF automatically
when Standby mode continues.
Using this setting can save the vehicle's battery power.
Display Setting
"OFF – – –" Power OFF Timer function is OFF.
"OFF 20M" Turns the power OFF after 20 minutes.
(Original setting)
"OFF 40M" Turns the power OFF after 40 minutes.
"OFF 60M" Turns the power OFF after 60 minutes.
— 22 —
Page 23
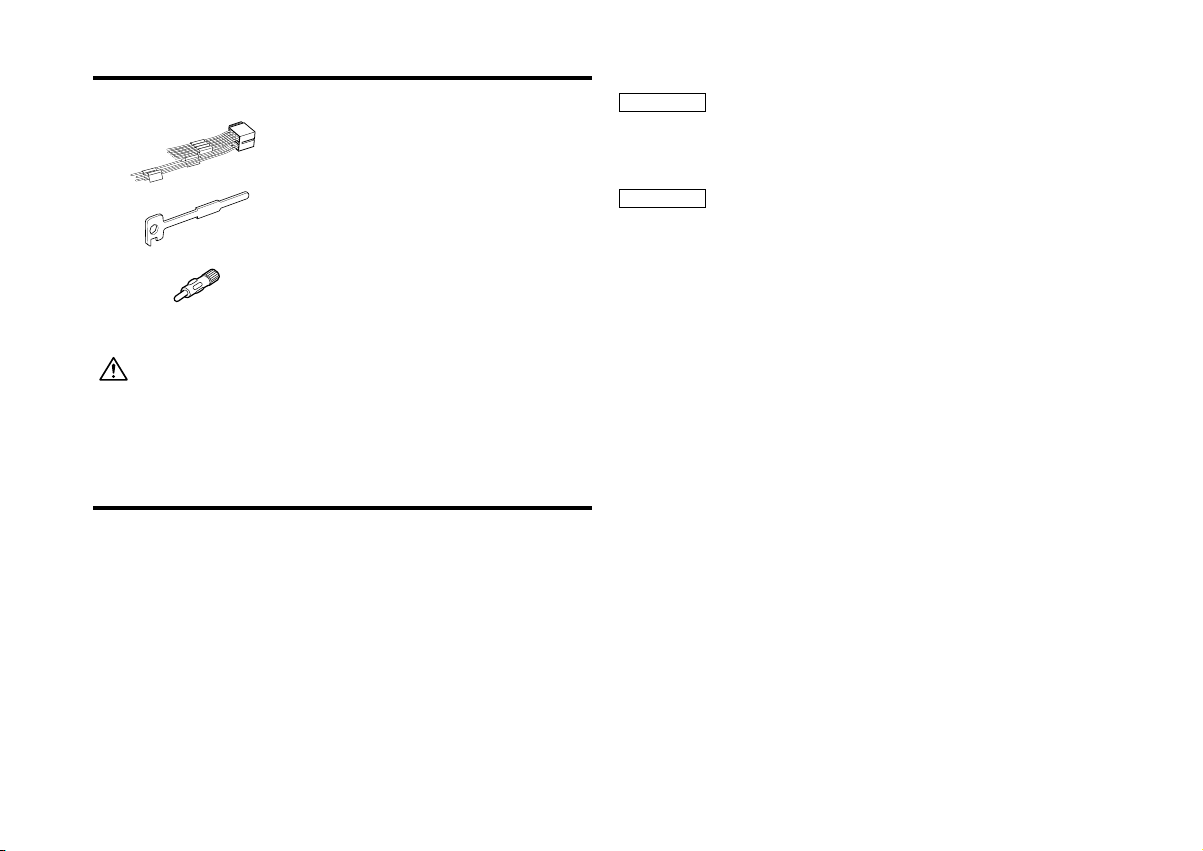
Accessories
External view Number of items
1
2
3
The use of any accessories except for those provided might result in
damage to the unit. Make sure only to use the accessories shipped with
the unit, as shown above.
..........................................1
..........................................2
..........................................1
Installation Procedure
1. To prevent short circuits, remove the key from the ignition and
disconnect the - terminal of the battery.
2. Make the proper input and output wire connections for each unit.
3. Cars with an ISO connector:
Connect the speaker connector of the car to Connector B of the
unit, and then connect the external power connector to
Connector A.
Cars without an ISO connector:
First connect the wire of the wiring harness, and then connect
the wiring harness connector to the unit.
4. Install the unit in your car.
5. Reconnect the - terminal of the battery.
6. Press the reset button.
2WARNING
If you connect the ignition wire (red) and the battery wire (yellow)
to the car chassis (ground), you may cause a short circuit, that in
turn may start a fire. Always connect those wires to the power
source running through the fuse box.
2CAUTION
• If your car is not prepared for this special connection-system,
consult your Kenwood dealer.
• Only use antenna conversion adapters (ISO-JASO) when the
antenna cord has an ISO plug.
• Make sure that all wire connections are securely made by
inserting jacks until they lock completely.
• If your vehicle's ignition does not have an ACC position, or if the
ignition wire is connected to a power source with constant
voltage such as a battery wire, the power will not be linked with
the ignition (i.e., it will not turn on and off along with the
ignition). If you want to link the unit's power with the ignition,
connect the ignition wire to a power source that can be turned
on and off with the ignition key.
• If the fuse blows, first make sure that the wires have not caused
a short circuit, then replace the old fuse with one with the same
rating.
• Insulate unconnected wires with vinyl tape or other similar
material. To prevent short circuits, also do not remove the caps
on the ends of the unconnected wires or the terminals.
• Connect the speaker wires correctly to the terminals to which
they correspond. The unit may receive damage or fail to work if
you share the - wires and/or ground them to any metal part in
the car.
• When only two speakers are being connected to the system,
connect the connectors either to both the front output terminals
or to both the rear output terminals (do not mix front and rear).
For example, if you connect the + connector of the left speaker
to a front output terminal, do not connect the - connector to a
rear output terminal.
• After the unit is installed, check whether the brake lamps,
indicators, wipers, etc. on the car are working properly.
• If the console has a lid, make sure to install the unit so that the
faceplate does not hit the lid when closing and opening.
— 23 —— 23 —
Page 24
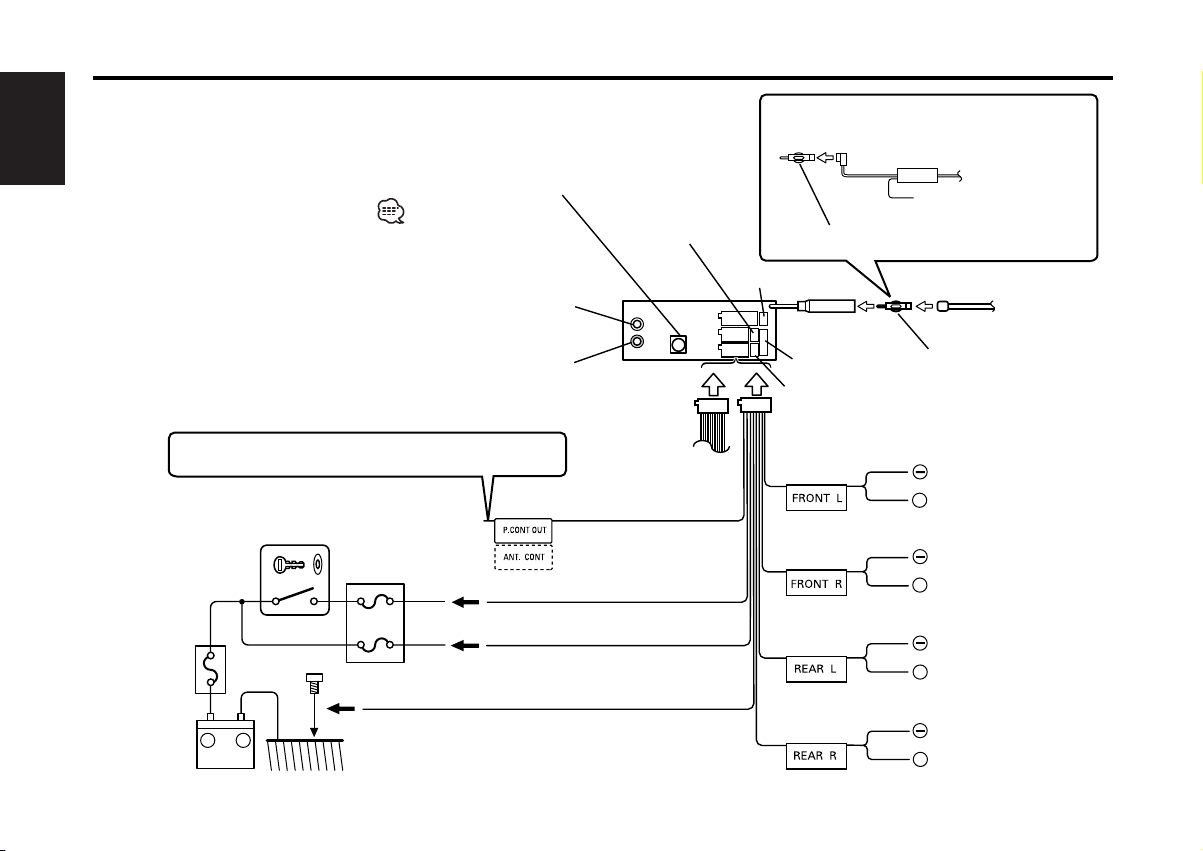
Connecting Wires to Terminals
English
KENWOOD disc changer input 25
To connect the Disc
changer, consult your
Disc changer manual. 26
Power Control
terminal (page 26) 22
For Volkswagen car 1
Special antenna adapter
(Commercially available) 3
Antenna Conversion Adaptor
(ISO–JASO) (Accessory3) 2
To Power Control terminal
4
Car fuse box
(Main fuse)
6
8
Rear left output (White)
9
Rear right output (Red)
If no connections are made, do not let the wire come
out from the tab. 3
4 Connect either to the power control terminal
when using the optional power amplifier, or to
the antenna control terminal in the vehicle.
Ignition key
switch 5
+
Battery 7
Car fuse box 16
–
ACC 15
Car’s wiring
harness 10
Power control/ Motor antenna
control wire (Blue/White) 14
Ignition wire (Red) 17
Battery wire (Yellow) 18
Ground wire (Black) - (To car chassis)
19
— 24 —
— 24 —
Fuse (10A) 23
FM/AM
antenna input 10
Plug (page 25) 24
TEL mute terminal
28
Wiring harness
(Accessory1) 13
29White/Black
White
31
32
Gray/Black
Gray
34
35
Green/Black
Green
37
38
Purple/Black
Purple
40
Antenna Cord (ISO) 11
Antenna Conversion Adaptor
(ISO–JASO) (Accessory3) 12
To front left
speaker 31
+
To front right
speaker 33
+
To rear left
speaker 37
+
To rear right
speaker 39
+
Page 25
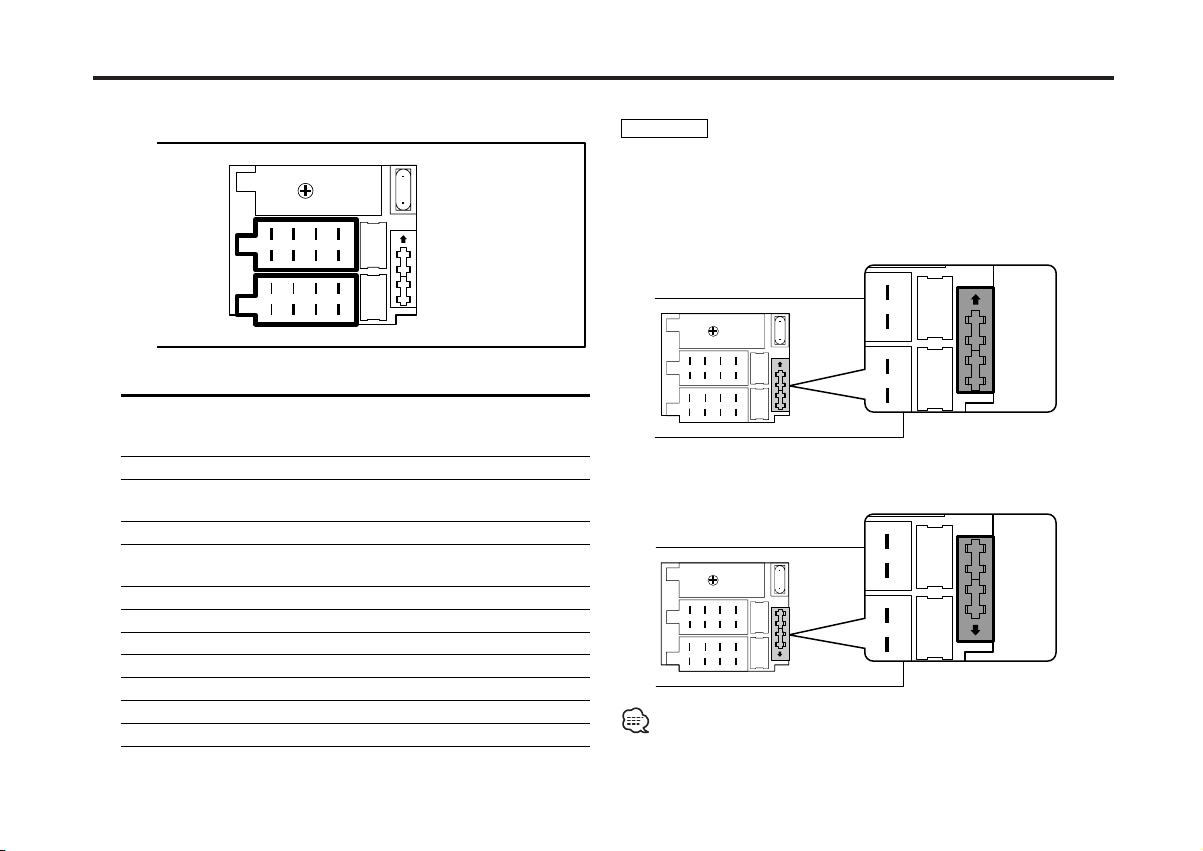
Connecting Wires to Terminals
■ Connector Function Guide ■ Plug Setting
10
Connector B
Connector A
12345
1234567
7
6
8
8
Pin Numbers Plug Functions
for ISO Connectors setting*
<External Power Connector>
A–4 1 Battery
2 Ignition (ACC)
A–5 Power Control
A–7 1 Ignition (ACC)
2 Battery
A–8 Earth (Ground) Connection
<Speaker Connector>
B–1 Rear Right (+)
B–2 Rear Right (–)
B–3 Front Right (+)
B–4 Front Right (–)
B–5 Front Left (+)
B–6 Front Left (–)
B–7 Rear Left (+)
B–8 Rear Left (–)
*Plug setting: See right side.
2WARNING
The pin arrangement for the ISO connectors depends on the type
of vehicle you drive. Make sure to make the proper connections
to prevent damage to the unit.
1 The A-7 pin of the vehicle's ISO connector is linked with the
ignition, and the A-4 pin is connected to the constant power
supply. (Default setting)
2 The A-7 pin of the vehicle's ISO connector is connected to
the constant power supply, and the A-4 pin is linked to the
ignition.
— 25 —— 25 —
Connecting the ISO Connector
• If both the A-7 pin and A-4 pin are connected to the vehicle constant
power supply, use Plug setting 2.
• If the A-7 pin is connected to the vehicle constant power supply,
and the A-4 pin isn't connected to anything, wire the unit using the
Wiring harness (Accessory 1).
10
10
Page 26
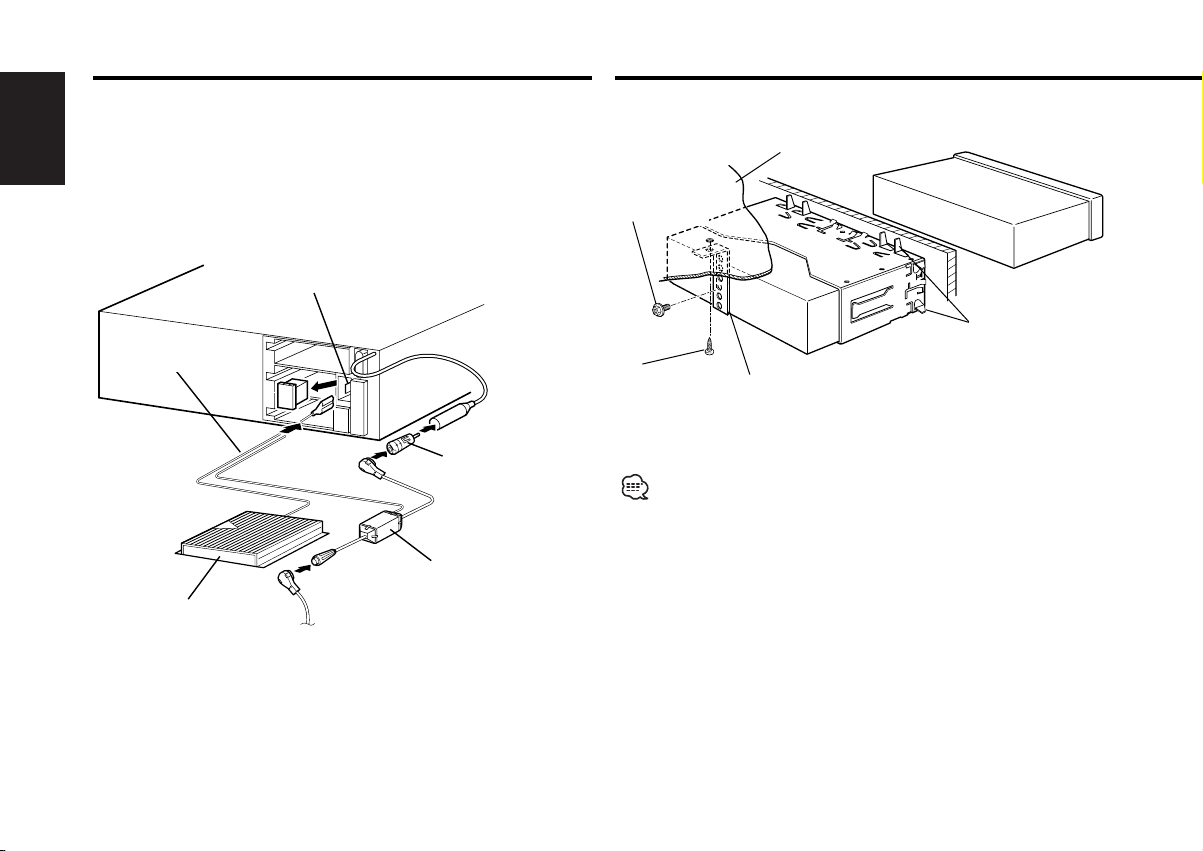
Connecting Wires to Terminals
■ Power Control Terminal Connections
The output of the Power Control terminal is switched along with
the power on/off switching of the unit.
English
This terminal can be connected to the P.CON (REMOTE) terminal
of the amplifier, or used as the power supply of the special
antenna adapter for Volkswagen cars. (MAX. 310 mA)
Power Control terminal
(Flat terminal) 4
Power control wire 5
Antenna Conversion
Adaptor (ISO–JASO)
(Accessory3) 1
Special antenna adapter
(For Volkswagen car)
Power Amplifier 6
Antenna Cord (ISO) 2
(Commercially available) 3
Installation
■ Installation
Firewall or metal support
Screw (M4X8)
(commercially
available)
Self-tapping
screw
(commercially
available)
Make sure that the unit is installed securely in place. If the unit is
unstable, it may malfunction (eg, the sound may skip).
Metal mounting
strap
(commercially
available)
Bend the tabs of the
mounting sleeve
with a screwdriver or
similar utensil and
attach it in place.
— 26 —— 26 —
Page 27
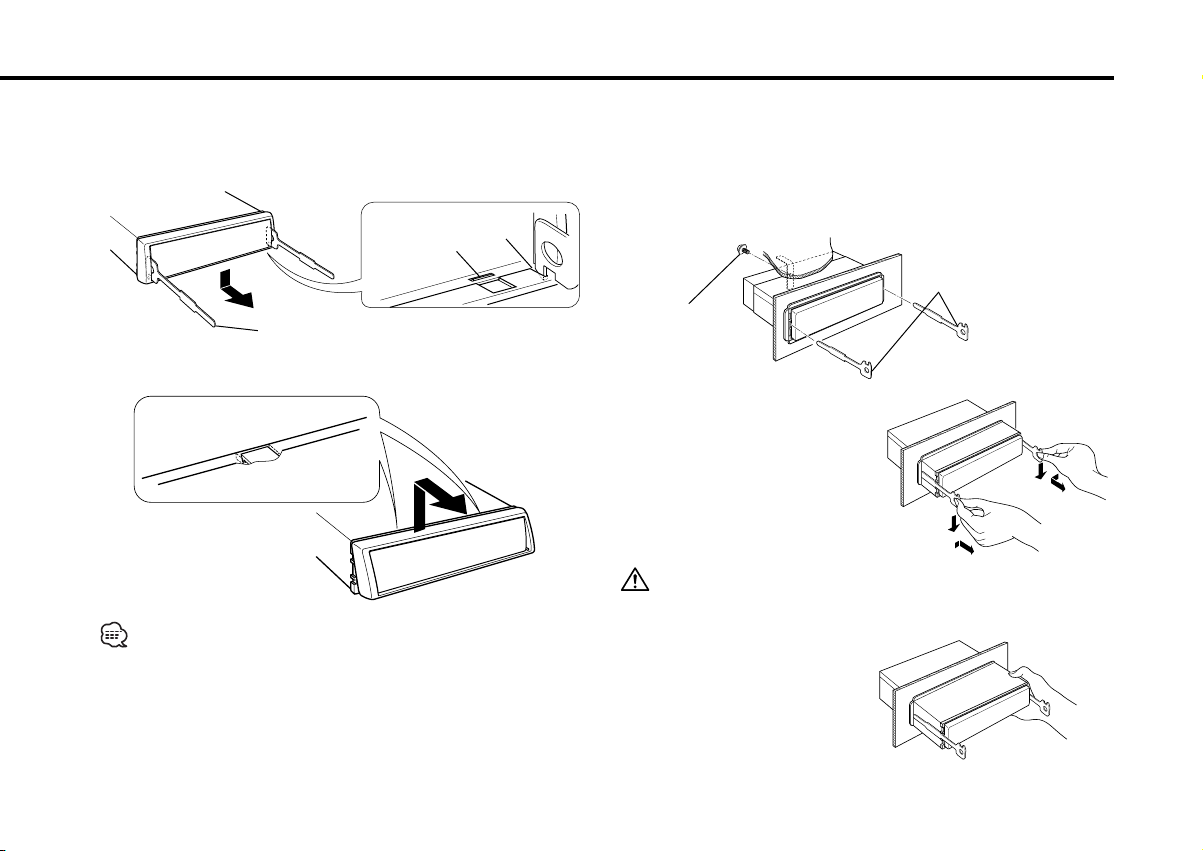
■ Removing the hard rubber frame
1 Engage the catch pins on the removal tool and remove the two
locks on the lower level.
Lower the frame and pull it forward as shown in the figure.
Catch
Lock
Accessory2 Removal tool
2 When the lower level is removed, remove the upper two
locations.
■ Removing the Unit
1 Refer to the section "Removing the hard rubber frame" and
then remove the hard rubber frame.
2 Remove the screw (M4×8) on the back panel.
3 Insert the two removal tools deeply into the slots on each side,
as shown.
Accessory2 Removal tool
Screw (M4X8)
(commercially
available)
4 Lower the removal tool
toward the bottom, and pull
out the unit halfway while
pressing towards the inside.
Be careful to avoid injury from the catch pins on the removal tool.
The frame can be removed from the top side in the same manner.
5 Pull the unit all the way out
with your hands, being
careful not to drop it.
— 27 —— 27 —
Page 28

Troubleshooting Guide
What might seem to be a malfunction in your unit may
just be the result of slight misoperation or miswiring.
Before calling service, first check the following table
for possible problems.
English
General
? The power does not turn ON.01
✔ The fuse has blown.
☞ After checking for short circuits in the wires, replace the fuse with
one with the same rating.
✔ No ACC position on vehicle ignition.02
☞ Connect the same wire to the ignition as the battery wire.
? If you have selected Standby mode, the power will go OFF
automatically.03
✔ The Power OFF Timer function has been activated.
☞ If you do not want the power to go OFF automatically, cancel the
Power OFF Timer function.
? Nothing happens when the buttons are pressed.04
✔ The computer chip in the unit is not functioning normally.
☞ Press the reset button on the unit (page 4).
? There’s a source you can’t switch.05
✔ There’s no tape inserted.
☞ Set the media you want to listen to. If there’s no media in this
unit, you can't switch to each source.
✔ The Disc changer isn’t connected.08
☞ Connect the Disc changer. If the Disc changer isn’t connected to
it's input terminal, You can't switch to an external disc source.
? The memory is erased when the ignition is turned OFF.10
✔ The battery wire has not been connected to the proper terminal.
☞ Connect the wire correctly, referring to the section on
<Connecting Wires to Terminals>.
✔ The ignition and battery wire are incorrectly connected.11
☞ Connect the wire correctly, referring to the section on
<Connecting Wires to Terminals>.
? The TEL mute function does not work.15
✔ The TEL mute wire is not connected properly.
☞ Connect the wire correctly, referring to the section on
<Connecting Wires to Terminals>.
? The TEL mute function turns ON even though the TEL mute wire is
not connected.16
✔ The TEL mute wire is touching a metal part of the car.
☞ Pull the TEL mute wire away from the metal part of the car.
? No sound can be heard, or the volume is low.
✔ The fader or balance settings are set all the way to one side.21
☞ Center the fader and balance settings.
✔ The input/output wires or wiring harness are connected incorrectly.22
☞ Reconnect the input/output wires or the wiring harness correctly.
See the section on "Connecting Wires to Terminals".
✔ The cassette tape is bad.23
☞ Tr y playing another cassette tape. If works fine, the first tape was
bad.
? The sound quality is poor or distorted.25
✔ One of the speaker wires is being pinched by a screw in the car.
☞ Check the speaker wiring.
✔ The tape head is dirty.26
☞ Clean the tape head.
✔ The speakers are not wired correctly.27
☞ Reconnect the speaker wires so that each output terminal is
connected to a different speaker.
? The Touch Sensor Tone doesn’t sound.34
✔ The preout jack is being used.
☞ The Touch Sensor Tone can’t be output from the preout jack.
? Even though Synchronize Clock is ON, the clock can’t be adjusted.35
✔ The received RDS station isn’t sending time data.
☞ Receive another RDS station.
— 28 —
Page 29

Tuner source
? Radio reception is poor.39
✔ The car antenna is not extended.
☞ Pull the antenna out all the way.
✔ The antenna control wire is not connected.40
☞ Connect the wire correctly, referring to the section on
<Connecting Wires to Terminals>.
? It isn't the set Traffic information sound volume. 43
✔ The set sound volume is less than the tuner sound volume.
☞ If the tuner sound volume is louder than the set sound volume,the
tuner sound volume is used.
Cassette tape source
? Can’t remove tape.44
✔ The cause is that more than 10 minutes has elapsed since the vehicle
ACC switch was turned OFF.
☞ The tape can only be removed within 10 minutes of the ACC
switch being turned OFF. If more than 10 minutes has elapsed,
turn the ACC switch ON again and press the Eject button.
? The Tape Advance and Music Repeat don’t operate correctly.45
✔ The space between the songs on the tape can’t be recognized
because it’s too short.
☞ Have at least 4 seconds between songs.
✔ The space between songs can’t be recognized because there’s too
much noise between songs.46
☞ Reduce the noise between songs.
? The blank skip doesn’t work.47
✔ Because noise is too loud, the non-recorded part can’t be recognized.
☞ Reduce the noise between songs.
? Blank Skip functions at places that are recorded.48
✔ Because the recording level is low, it’s recognized as not recorded.
☞ Tu rn Blank Skip OFF.
Disc source
? "AUX" is displayed without achieving External disc control mode.50
✔ O-N switch is set to "O" side.
☞ Set the switch to "N" side.
✔ Unsupported disc changer is connected.51
☞ Connect the supported disc changer. (page 3)
? The specified disc does not play, but another one plays instead.52
✔ The specified CD is quite dirty.
☞ Clean the CD.
✔ The CD is upside-down.53
☞ Load the CD with the labeled side up.
✔ The disc is loaded in a different slot from that specified.54
☞ Eject the disc magazine and check the number for the specified
disc.
✔ The disc is severely scratched.55
☞ Tr y another disc instead.
? The specified track will not play.58
✔ Random play or magazine random play has been selected.
☞ Tu rn off random play or magazine random play.
? Track repeat, disc repeat, track scan, random play, and magazine
random play start by themselves.59
✔ The setting is not canceled.
☞ The settings for these functions remain on until the setting to off
or the disc ejected, even if the power is turned off or the source
changed.
? Cannot play CD-R or CD-RW.60
✔ Finalization processing is not being conducted for CD-R/CD-RW.
☞ Conduct finalization processing with CD recorder.
✔ A non-compatible CD changer is being used to play the CD-R/CD-
RW.61
☞ Use a CD changer compatible with CD-R/CD-RW to play.
?Track Search can't be done.66-2
✔ For the albums first or last song.
☞ For each album, Track Search can't be done in the backward
direction for the first song or in the forward direction for the last
song.
— 29 —
Page 30

Troubleshooting Guide
If the following situations, consult your nearest service
center:
• Even though the disc changer is connected, the Disc Changer source is
not ON, with "AUX" showing in the display during the Changer Mode.
English
• Even though no device (KCA-S210A, CA-C1AX, KDC-CPS89, KDC-CPS87,
KDC-CX87, KDC-CPS85, KDC-CX85, KDC-CPS82 or KDC-CX82) is
connected, the Auxiliary input is entered when switching modes.
The following messages are displayed when your
system condition.
EJECT: No disc magazine has been loaded in the changer.
NO DISC: No disc has been loaded in the disc magazine.
E-04: No disc has been loaded in the disc magazine.
BLANK: Nothing has been recorded on the MD.
NO TRACK: No tracks are recorded on the MD, although it has a
NO PANEL: The faceplate of the slave unit being connected to
E-77: The unit is malfunctioning for some reason.
The disc magazine is not completely loaded.E01
➪
Load the disc magazine properly.
No CD in the unit.
➪ Insert the CD.
➪
Load a disc into the disc magazine.
➪
Load a disc into the disc magazine.
The CD is quite dirty. The CD is upside-down. The CD
is scratched a lot.
➪ Clean the CD and load it correctly.
E10
title.E11
this unit has been removed.E30
➪
Replace it.
➪
Press the reset button on the unit. If the "E- 77"
code does not disappear, consult your nearest
service center.
E77
E02
E04
E-99: Something is wrong with the disc magazine. Or the
unit is malfunctioning for some reason.
➪
Check the disc magazine. And then press the reset
E99
button on the unit. If the "E-99" code does not
disappear, consult your nearest service center.
HOLD: The protective circuit in the unit activates when the
temperature inside the automatic disc changer
exceeds 60°C (140°F), stopping all operation.
➪
Cool down the unit by opening the windows or
E0d
turning on the air conditioner. As the temperature
falls below 60°C (140°F), the disc will start playing
again.
NO NAME: Attempted to display DNPS during the CD play having
no disc names preset.
E51
NO TITLE: Attempted to display the disc title or track title while
the MD having no MD title is being played.E53
NO TEXT: Attempted to display the disc text or track text while
the CD having no CD text is being played.E54
LOAD: Discs are being exchanged in the Disc changer.E57
(Blink): The tape player section is not operating properly.E60
2
3
➪
Reinsert the Tape. If the tape cannot be ejected or
the display continues to flash even when the tape
has been properly reinserted, please switch off the
power and consult your nearest service center.
NO ACCES: After setting it in the Disc Changer, DNPP was done
without having it been played at least 1 time.
E58
— 30 —
Page 31

Specifications
Specifications subject to change without notice.
FM tuner section
Frequency range (50 kHz space) ..............87.5 MHz – 108.0 MHz
Usable sensitivity (S/N = 26dB) .................................0.7 µV/75 Ω
Quieting Sensitivity (S/N = 46dB) ..............................1.6 µV/75 Ω
Frequency response (±3 dB).................................30 Hz – 15 kHz
Signal to Noise ratio (MONO)..............................................65 dB
Selectivity (DIN) (±400 kHz)............................................. ≥ 80 dB
Stereo separation (1 kHz) ....................................................35 dB
MW tuner section
Frequency range (9 kHz Space).....................531 kHz – 1611 kHz
Usable sensitivity (S/N = 20dB) ...........................................25 µV
LW tuner section
Frequency range .............................................153 kHz – 281 kHz
Usable sensitivity (S/N = 20dB) ...........................................45 µV
Cassette player section
Tape Speed...............................................................4.76 cm/sec.
Wow & Flutter (WRMS) ....................................................0.08 %
Frequency response (±3 dB) (120 µs)....................30 Hz – 14 kHz
Separation (1 kHz) ...............................................................43 dB
Signal to Noise ratio ............................................................54 dB
Audio section
Maximum output power.................................................45 W x 4
Output power (DIN 45324, +B=14.4V) ..........................28 W x 4
Tone action
Bass : ..............................................................100 Hz ±10 dB
Middle : .............................................................1 kHz ±10 dB
Treble : ............................................................10 kHz ±10 dB
Preout level / Load (during disc play) .................2000 mV / 10 kΩ
Preout impedance............................................................≤ 600 Ω
General
Operating voltage (11 – 16V allowable) .............................14.4 V
Current consumption.............................................................10 A
Installation Size (W x H x D) .........................182 x 53 x 152 mm
Weight ................................................................................1.4 kg
— 31 —
Page 32

Cодержание
Меры предосторожности..............33
О кассетах ........................................34
O RDS..................................................34
Общие характеристики ..................35
Питание
Как выбрать источник
Громкость
Аттенуатор
Pyccкий
Уровень громкости
System Q
Управление аудио
Установка акустической системы
Пераключение дисплея
Отключение при звонке по телефону
Лицевая пластинка,
предотвращающая кражу
Cвойства тюнера
(KRC-394/KRC-37)..........................38
Настройка
Память предварительной настройки
станций
Ввод в авто память
Настройка на предварительную
установку
Cвойства RDS ...................................40
Дорожная информация
Предварительная установка
громкости для дорожной
информации
PTY (Тип программы)
Предварительная установка типа
программы
Изменение языка для функции PTY
Cвойства тюнера (KRC-31)............43
Режим настройки
Настройка
Память предварительной настройки
станций
Ввод в авто память
Настройка на предварительную
установку
Cвойства кассетного
проигрывателя.............................44
Проигрывание магнитофонных кассет
Ускоренная перемотка ленты вперёд
и назад
Продвижение ленты вперёд
Пропуск пустых участков
Вызов тюнера
Повторение музыки
Функции управления внешним
диском............................................46
Проигрывание внешнего диска
Ускоренное передвижение вперёд и
назад
Поиск дорожек
Поиск альбома
Повтор диска/дорожки
Просмотр дорожек
Произвольное проигрывание
Произвольное проигрывание магазина
Название диска (DNPS)
Просмотр текста/названий
Система меню...................................49
Система меню
Тон с датчиком прикосновения
Регулировка часов в ручном режиме
Синхронизация часов
DSI (Disabled System Indicator)
Подсветка на выбор
Установка бюллетеня новостей с
тайм-аутом
Местный поиск
Режим настройки
Ввод авто памяти
AF (Alternative Frequency)
Ограничение региона RDS
Авто поиск TP
Монофонический приём
Просмотр текста
Название диска
Таймер отключения питания
Принадлежности .............................53
Процесс установки..........................53
Подсоединение кабелей к гнездам
для подключения........................54
Установка ..........................................56
Поиск и устранение
неисправностей............................58
Те хнические характеристики ........61
— 32 —
Page 33

Меры предосторожности
2 ПРEДУПРEЖДEHИE
Bо избежание травмы и/или пожара
следует обратить внимание на:
• Bставляйте устройство, пока оно
полностью не зaфикcиpyeтcя на месте. B
противном случае оно может вылететь co
cвoeгo места во время cтoлкнoвeний и
других сотрясений.
• При удлинении кабелей для запуска,
кaбeлeй батaреи или заземляющих
кабелей следует проверить, что
применяются питающие кабели или
другие кабели, сечение которых 0,75 мм2
(AWG18) или больше, чтобы
предотвратить повреждение кабеля и
оболочки кабеля.
• Bо избежание коротких замыканий
никогда не оставляйте металлическиe
предметы (напр. монеты или
металлические инструменты) внутри
аппарата.
• Eсли из аппарата начнет выходить дым
или неприятный запах, следует
немедленно выключить питание и
обратиться к дилеру изделий фирмы
Kenwood.
• Cледите за тем, чтобы ваши пальцы не
попадали между передней панелью и
устройством.
• Cледует избегать сильных сотрясений
аппарата, не poнять на пол.
Аппарат может сломаться или тpecнуть,
так как содержит стеклянные части.
Hе трогайте жидкость из жидких
•
кристаллов, если ЖK-дисплей поврежден
или сломан вследствие удара. Жидкость из
жидких кристаллов может стать опасной для
вашего здоровья или даже смертельной.
Eсли произойдет контакт с жидкостью
жидких кристаллов из ЖK-дисплея с вашим
телом или одеждой, следует немедленно эти
места вымыть мылом.
2 BHИMAHИE
Bо избежание повреждения аппарата
следует обратить внимание на
следующие меры предосторожности:
• Cледует соединить заземление аппарата с
отрицательным электропитанием 12 B
постоянного тока.
• Не открывайте верхние или нижние
крышки аппарата.
• Не следует эксплуатировать аппарат в
очень жарких или влажных местах, следует
предохранять устройство от воздействия
прямых солнечных лучей. Также избегайте
сильно запыленных мест и мест, где на
аппарат могут попасть брызги воды.
• Не следует размещать снятую с аппарата
переднюю панель или футляр передней
панели в очень жарких или влажных местах
или местах, подвергающихся воздействию
прямых солнечных лучей. Также избегайте
сильно запыленных мест и мест, где на
аппарат могут попасть брызги воды.
•
Во избежании ухудшения рабочих
характеристик старайтесь не дотрагиваться
руками выводов аппарата или передней панели.
• Переднюю панель следует предохранять от
сильных сотрясений, поскольку это очень
точное устройство.
• При замене предохранителя следует
применить новый с указанным
номинальным значением. Вследствие
применения предохранителя с
неправильным номинальным значением
может произойти повреждение аппарата.
• Во избежание коротких замыканий при
замене предохранителя сначала следует
отключить провода.
• Не размещайте какие-либо предметы
между передней панелью и устройством.
• При установке не применяйте никаких
винтов, кроме винтов, поставленных вместе с
аппаратом. Применение других винтов может
вызвать повреждение основного аппарата.
— 33 —
ВАЖНЫE ИНФОРМАЦИИ
О подсоединяемом чейнджере
дисков:
Установка положения панели.
Установка угла или положения
вперёд/назад панели управления.
Войдите в режим установки панели
управления.
Выберите функцию для регулировки.
Каждый раз, когда нажимается кнопка,
регулируемая функция переключается, как
показано ниже.
Изменение угла вперёд.
Изменение угла назад.
Панель выдвигается вперёд.
Панель задвигается назад.
Выйдите из режима установки положения
панели.
Панель управления может мешать при
работе с рычагом переключения скоростей
или другими узлами в зависимости от угла
установки панели управления.
Установите такой угол, чтобы панель
ничему не мешала.
Вследствие неправильного подсоединения
вашего аппарата к проигрывателю компактдисков можно повредить оба устройства.
При Правильном соблюдении всех условий
эксплуатации и техническких требований,
указанных в данной инструкций, срок
службы купленного Baм изделия
составляет 7 лет. Гарантийный срок
эксплуатации изделия соответевует сpоку,
указанному в гaрантийном талоне.
В период срока службы эксплуатация и
хранение изделия не может представлять
oпасность для Вашей жизни, здоровья,
причинять вред Вашему имуществу или
окружающей срeде.
Page 34

Меры предосторожности
ПРИМEЧАНИE
• При любых проблемах во время
установки обращайтесь к вашему дилеру
изделий фирмы Kenwood.
• Eсли устройство работает со сбоями,
сначала попробуйте нажать Kнопку
Cброс. Если после этого неисправность
сохраняется, обратитесь за помощью к
дилеру изделий фирмы Kenwood.
•В случае некорректной работы
автоматического проигрывателя
компактов-дисков при первом его
Pyccкий
включении нажмите на кнопку Cброс. В
результате установятся первоначальные
условия эксплуатации.
Очистка выводов передней панели
В случае загрязнения выводов аппарата
или передней панели протрите их сухой
мягкой тканью.
Очистка аппарата
Если лицевая пластинка аппарата
испачкается, протрите её мягкой сухой
материей, например, силиконовой
материей. Если лицевая пластинка сильно
загрязнена, протрите её материей,
смоченной в нейтральном чистящем
средстве, затем удалите с поверхности это
нейтральное чистящее средство.
Нанесение аэрозольных чистящих средств
непосредствено на аппарат может повредить
механические части. Протирание лицевой
пластинки грубой материей или использование
активных чистящих средств типа
растворителей или спирта может поцарапать
поверхность или стереть надписи.
O RDS
RDS (Cистема радиоданных)
При прослушивании станции RDS (т.е.
станции с возможностями RDS) на дисплее
воспроизводятся позывные программы
станции, что дает вам возможность быстро
понять, какая станция принимается.
K тому же станции RDS (системы
радиоданных) передают для той же станции
частотную информацию. При длительных
поездках данная функция автоматически
переключается на конкретную частоту,
обеспечивающую наилучший прием для
конкретной радиовещательной сети
станций, которые вы хотели бы прослушать.
При этом данные автоматически
запоминаются, что позволяет вам быстро
переключаться на другую станцию RDS,
транслирующую ту же программу, но
обеспечивающую лучший прием. K ним
относятся станции, хранящиеся в памяти
предварительной установки станций,
которые вы привыкли слушать.
Kнопку Cброс
• При температурах ниже 5 °С ( 41 °F)
символы, появляющиеся на LCD-дисплее,
могут быть неразборчивыми.
• Иллюстрации диспля и панли, показанны
в настоящм руководств по эксплуатации,
являются примрами, объясняющими
функции элмнтов управлния. Поэтому
информация диспля, прдставлнная на
этих иллюстрациях, можт отличаться от
информации, появляющйся на настоящм
диспл конкртного прибора, и нкоторы
иллюстрации на диспл могут прдставлять
что-либо нвозможно во врмя фактичской
эксплуатации.
О кассетах
Чистка магнитной головки
Если воспроизводится шум или ухудшается
качество звучания из-за загрязнения
головки, прочистите её.
О кассетах
• Если лента провисает, натяните её.
• Если отстаёт этикетка кассеты,
приклейте её обратно.
• Не используйте деформированную ленту.
• Не кладите кассеты на консоль приборов
и т. п. и там, где температура высока.
• Не используйте кассету
продолжительности звучания 100 минут
или более.
— 34 —
Enhanced Other Network
(Улучшенная остальная сеть)
Cтанции, которые предлагают <Enhanced
Other Network>, также передают
информацию об остальных станциях RDS,
которые имеют информацию о ситуации на
дорогах. Eсли вы настраиваетесь на
станцию, которая не передает информацию
о ситуации на дорогах, но другая станция
RDS начинает транслировать такую
информацию, тюнер автоматически
переключается на эту станцию на время
информации о ситуации на дорогах.
Экстренные сообщения
Kогда посылается срочное сообщение
(оповещающее о катастрофах и т.п.), все
текущие функции прерываются, позволяя
получить предупреждение.
Page 35

Общие характеристики
4
¢
SRC
FMAM
Q
/AUD
u
d
ATT/LOUD
CLK
Kнопка освобождения
Индикатор SYSTEM Q
Индикатор ATT
Индикатор LOUD
Питание
Включение питания
Нажмите кнопку [SRC].
Выключение питания
Нажмите кнопку [SRC] как минимум на 1 секунду.
Как выбрать источник
Нажмите кнопку [SRC].
Трбутся источник Дисплей
Тюнер "TUNER"
Магнитофон "TAPE"
Внешний диск "DISC"/"CD"
Ожидание (Режим только подсветка) "ALL OFF"
Данное устройство автоматически полностью выключает
питание по истечению 20 минут в режиме ожидания с целью
сохранения аккумулятора транспортного средства.
Время, после которого питание полностью выключается можно
установить в <Таймер отключения питания> (страница 52).
Громкость
Увеличение громкости
Нажмите кнопку [u].
Уменьшение громкости
Нажмите кнопку [d].
— 35 —
Page 36

Общие характеристики
Аттенуатор
Быстрое уменьшение громкости.
Нажмите кнопку [ATT].
Каждый раз, когда нажимается эта кнопка, аттенуатор
включается или выключается.
Когда он включен, мигает индикатор "ATT".
Уровень громкости
Компенсация низких и высоких частот при низкой
громкости.
Pyccкий
Нажмите кнопку [LOUD] как минимум на 1 секунду.
Каждый раз, когда нажимается эта кнопка как минимум на 1
секунду, уровень громкости включается или выключается.
Когда он включен, включается индикатор "LOUD".
System Q
Вы можете вызвать самую лучшую заранее установленную
установку звучания для различного типа музыки.
1 Выберите устанавливаемый источник
Нажмите кнопку [SRC].
2 Выберите тип звучания
Нажмите кнопку [Q].
Каждый раз, когда нажимается эта кнопка, переключается
установка звучания.
Установка звучания Дисплей
Плоская "FLAT"
Рок "ROCK"
Топ 40 "TOP40"
Поп "POPS"
Джаз "JAZZ"
Лёгкая "EASY"
Просмотр Плоская - Лёгкая "SCAN"
• Каждая устанавливаемая величина изменяется при помощи
<Установка акустической системы> (страница 37).
Сначала выбирите тип акустической системы при помощи
установки акустической системы
•Когда изменяется установка System Q, НЧ, СЧ, и ВЧ,
установленные в управлении аудио заменяют величины
System Q.
Управление аудио
1 Выберите источник для регулировки
Нажмите кнопку [SRC].
2 Войдите в режим Управления аудио
Нажмите кнопку [AUD] как минимум на 1 секунду.
3 Выберите функцию аудио для регулировки
Нажмите кнопку [FM] или [AM].
Каждый раз, когда нажимается кнопка, регулируемые
функции для регулировки переключаюся в следующем
порядке.
4 Отрегулируйте функцию аудио
Нажмите кнопку [4] или [¢].
Регулируемая функция Дисплей Параметры
Уровень НЧ "BAS" –8 — +8
Уровень СЧ "MID" –8 — +8
Уровень ВЧ "TRE" –8 — +8
Баланс "BAL" L15 — R15
Баланс фронт/тыл "FAD" R15 — F15
5 Выход из режима Управления аудио
Нажмите кнопку [AUD].
— 36 —
Page 37

Установка акустической системы
Точная установка таким образом, что величина System Q
становится оптимальной во время установки типа
акустической системы.
1 Войдите в режим ожидания
Нажмите кнопку [SRC].
Выбирите дисплей "ALL OFF".
2 Войдите в режим установки акустической системы
Нажмите кнопку [Q].
3 Выбирите тип акустической системы
Нажмите кнопку [4] или [¢].
Каждый раз, когда нажимается кнопка, регулируемые
функции для регулировки переключаюся в следующем
порядке.
Тип акустической системы Дисплей
ВЫКЛ "SP OFF"
Для акустической системы OEM "SP OEM"
Для 6 & 6x9 дюйм. акустической системы "SP 6/6x9"
Для 5 & 4 дюйм. акустической системы "SP 5/4"
4 Выход из режима Установки акустической системы
Нажмите кнопку [Q].
Пераключение дисплея
Переключение инфорамационного дисплея.
Нажмите кнопку [CLK].
Каждый раз, когда нажимается эта кнопка, дисплей
переключается как показано ниже.
При источнике тюнер
Информация
Название сервиса программы или частота
Часы
При источнике магнитофон
Информация
проигрываемая сторона
Часы
При источнике внешний диск
Информация Дисплей
Время дорожки
Новое название диска "D-NAME"
Исходное название диска "D-TITLE"
Исходное название дорожки "T-TITLE"
Часы
Отключение при звонке по телефону
Звук аудио систмы автоматичски отключатся, сли поступат
тлфонный звонок.
Если поступает телефонный звонок
"CALL" появится на дисплее.
Аудио система отключается.
Прослушивание аудио во время телефонного звонка
Нажмите кнопку [SRC].
"CALL" исчезает с дисплея и аудио система включается
снова.
Когда кончается телефонный разговор
Повесьте телефон.
"CALL" исчезает с дисплея и аудио система включается
снова.
— 37 —
Page 38

Общие характеристики
#1 – 6
4
¢
SRC
AM
FM
MENU
Лицевая пластинка, предотвращающая кражу
Лицевую пластинку данного устройства можно снять и
взять с собой, что предотвращает кражу устройства.
Снятие лицевой пластинки
Нажмите кнопку, освобождающую лицевую пластинку.
Лицевая пластинка освобождается и её можно отсоединить.
• Лицевая пластинка является точным приспособлением и её
можно повредить механически. Поэтому, после снятия,
храните её в специальном футляре.
Pyccкий
Установка лицевой пластинки
• Не оставляйте лицевую пластинку или футляр для хранения
на прямом солнечном свету, в местах с повышенной
температурой или влажностью. Также избегайте сильно
запылённых мест и попадания воды.
1 Совместите выступы на устройстве с пазами на лицевой
пластинке.
2 Вставьте лицевую пластинку до щелчка.
Пластинка замыкается на месте, позволяя Вам использовать
устройство.
Cвойства тюнера
Функция модели KRC-394/KRC-37
Дисплей
диапазоно
в частот
Номер запрограммированной
радиостанции
— 38 —
Индикатор ST
Частотный дисплей
Page 39

Настройка
Выбор станции.
Ввод в авто память
Автоматический ввод в память станций с хорошим приёмом.
1 Выберите источник тюнер
Нажмите кнопку [SRC].
Выберите дисплей "TUNER".
2 Выберите диапазон
Нажмите кнопку [FM] или [AM].
Каждый раз, когда нажимается кнопка [FM], диапазоны
переключаются между FM1, FM2, и FM3.
3 Настройка диапазона вверх или вниз
Нажмите кнопку [4] или [¢].
Во время приёма стерео станций, включается индикатор "ST".
Память предварительной настройки станций
Ввод станции в память.
1 Выберите диапазон
Нажмите кнопку [FM] или [AM].
2 Выберите частоту для ввода в память
Нажмите кнопку [4] или [¢].
3 Введите частоту в память
Нажмите кнопку [#1] — [#6] как минимум на 2 секунды.
Установленная частота появится на дисплее 1 раз.
В каждом из диапазонов, 1 станция может быть введена в
память на каждой из кнопок [#1] — [#6].
1 Выберите диапазон для ввода в автоматическую память
Нажмите кнопку [FM] или [AM].
2 Войдите в режим меню
Нажмите кнопку [MENU] как минимум на 1 секунду.
"MENU" появится на дисплее.
3 Выберите режим ввода в автоматическую память
Нажмите кнопку [FM] или [AM].
Выберите дисплей "A-MEMORY".
4 Откройте ввод в авто память
Нажмите кнопку [4] или [¢] как минимум на 2 секунды.
Когда 6 станций, которые могут приниматься, введены в
память, ввод в авто память закрывается.
•Когда включена <Функция AF> (страница 51), станции RDS
вводятся в память.
•Когда осуществлён ввод в авто память в диапазоне FM2,
станции RDS, заранее установленные в диапазоне FM1, не
вводятся в память.
Аналогично, когда ввод в авто память осуществлён в
диапазоне FM3, станции RDS, заранее установленные в
диапазоне FM1 или FM2 не вводятся в память.
Настройка на предварительную установку
Вызов станций из памяти.
1 Выберите диапазон
Нажмите кнопку [FM] или [AM].
2 Вызовите станцию
Нажмите кнопку [#1] — [#6].
— 39 —
Page 40

Cвойства RDS
#1 – 6
AM
PTY
4¢
FM
TI/VOL ADJ
CLK
Функция модели KRC-394/KRC-37
Pyccкий
Дорожная информация
Автоматическое переключение на дорожную информацию,
когда начинает передаваться бюллетень с дорожной
информацией, если Вы не слушаете радио.
Нажмите кнопку [TI].
Каждый раз, когда нажимается эта кнопка, функция
дорожной информации включается или выключается.
Если она включена, включается индикатор "TI".
Если не принимается станция, передающая дорожную
информацию, индикатор "TI" мигает.
Когда начинает передаваться бюллетень с дорожной
информацией, на дисплее появляется "TRAFFIC" и он
переключается на дорожную информацию.
Во время приёма станции AM, если включена функция
дорожной информации, происходит переключение на станцию
FM.
Приём других станций, передающих дорожную информацию
Нажмите кнопку [4] или [¢].
Можно осуществить переключение станций, передающих
дорожную информацию, во время прослушивания радио.
Индикатор PTY
Индикатор TI
Предварительная установка громкости для
дорожной информации
Установка громкости во время дорожной информации.
1 Осуществите приём станции.
2 Установите желаемый уровень громкости.
3 Запомните уровень громкости
Нажмите кнопку [VOL ADJ] как минимум на 2 секунды.
Дисплей уровня громкости появится 1 раз.
— 40 —
Page 41

PTY (Тип программы)
Выбор типа программы и поиск станции.
1 Войдите в режим PTY
Нажмите кнопку [PTY].
В режиме PTY включается индикатор "PTY".
Данную функцию нельзя использовать во время приёма
дорожной информации или приёма AM.
2 Выберите тип программы
Нажмите кнопку [FM] или [AM].
Каждый раз, когда нажимается эта кнопка, тип программы
переключается, как показано ниже.
No. Тип программы Дисплей
1. Музыка "MUSIC"
2. Речь "SPEECH"
3. Новости "NEWS"
4. Текущие события "AFFAIRS"
5. Информация "INFO"
6. Спорт "SPORT"
7. Образование "EDUCATE"
8. Драма "DRAMA"
9. Культура "CULTURE"
10.Наука "SCIENCE"
11.Разное "VARIED"
12. Поп музыка "POP M"
13.Рок музыка "ROCK M"
14. Лёгкая музыка "EASY M"
15. Лёгкая классическая "LIGHT M"
16. Серьёзная классическая "CLASSICS"
17.Другая музыка "OTHER M"
18. Погода "WEATHER"
19. Финансы "FINANCE"
20. Детские программы "CHILDREN"
21. Общественные события "SOCIAL"
22. Религия "RELIGION"
23. Звонок в студию "PHONE IN"
24. Путешествия "TRAVEL"
25. Отдых "LEISURE"
26. Джазовая музыка "JAZZ"
27. Музыка кантри "COUNTRY"
28. Национальная музыка "NATION M"
29. Старые хиты "OLDIES"
30. Народная музыка "FOLK M"
31. Документальные программы "DOCUMENT"
•Речь и музыка включают типы программ, показанные ниже.
Музыка: No.12
Речь: No.3
•Тип программы может быть введён в память кнопок [#1]
[#6] и легко вызван. Смотрите <Предварительная установка
типа программы> (страница 42).
• Язык дисплея можно изменить. Смотрите <Изменение языка
для функции PTY> (страница 42).
— 17, 26 — 30
— 11, 18 — 25, 31
3 Поиск станции выбранного типа программы
Нажмите кнопку [4] или [¢].
Если Вы хотите найти другие станции, нажмите кнопку [4]
или [¢] снова.
Если выбранный тип программы не найден, на дисплее
появляется "NO PTY". Выберите другой тип программы.
4 Выход из режима PTY
Нажмите кнопку [PTY].
— 41 —
—
Page 42

Cвойства RDS
Функция модели KRC-394/KRC-37
Предварительная установка типа программы
Ввод типа программы в память кнопки и быстрый её вызов.
Предварительная установка типа программы
1 Выберите тип программы для предварительной
установки
Смотрите <PTY (Тип программы)> (страница 41).
2 Введите тип программы в память
Нажмите кнопку [#1] — [#6] как минимум на 2 секунды.
Вызов предварительно запрограммированного типа
Pyccкий
программы
1 Войдите в режим PTY
Смотрите <PTY (Тип программы)> (страница 41).
2 Вызов типа программы
Нажмите кнопку [#1] — [#6].
Изменение языка для функции PTY
Выбор языка дисплея типа программы.
1 Войдите в режим PTY
Смотрите <PTY (Тип программы)> (страница 41).
2 Войдите в режим изменения языка
Нажмите кнопку [CLK].
3 Выберите язык
Нажмите кнопку [#1] — [#3].
Кнопка Язык
[#1] Английский
[#2] Французский
[#3] Немецкий
4 Выход из режима изменения языка
Нажмите кнопку [CLK].
— 42 —
Page 43

Cвойства тюнера
#1 – 6
4
¢
SRC
AM
FM
AUTO/AME
Функция модели KRC-31
Дисплей
диапазонов
частот
Номер
запрограммированной
радиостанции
Индикатор ST
Индикатор AUTO
Частотный дисплей
Режим настройки
Выберите режим настройки.
Нажмите кнопку [AUTO].
Каждый раз, когда нажимается эта кнопка, режим настройки
переключается, как показано ниже.
Режим
настройки Дисплей Работа
Авто поиск Индикатор Осуществляет
"AUTO 1" автоматический
поиск станции.
Поиск заранее Индикатор Осуществляет поиск
установленной "AUTO 2" станций по порядку
станции в памяти предварительной
установки.
Ручной режим — Обычная настройка
в ручном режиме.
Настройка
Выбор станции.
1 Выберите источник тюнер
Нажмите кнопку [SRC].
Выберите дисплей "TUNER".
2 Выберите диапазон
Нажмите кнопку [FM] или [AM].
Каждый раз, когда нажимается кнопка [FM], диапазоны
переключаются между FM1, FM2, и FM3.
3 Настройка диапазона вверх или вниз
Нажмите кнопку [4] или [¢].
Во время приёма стерео станций, включается индикатор "ST".
— 43 —
Page 44

Cвойства тюнера
4
¢
SRC
FMAM
B.S
2 30
T.CALL
REP
Функция модели KRC-31
Память предварительной настройки станций
Ввод станции в память.
1 Выберите диапазон
Нажмите кнопку [FM] или [AM].
2 Выберите частоту для ввода в память
Нажмите кнопку [4] или [¢].
3 Введите частоту в память
Нажмите кнопку [#1] — [#6] как минимум на 2 секунды.
Pyccкий
Установленная частота появится на дисплее 1 раз.
В каждом из диапазонов, 1 станция может быть введена в
память на каждой из кнопок [#1] — [#6].
Ввод в авто память
Автоматический ввод в память станций с хорошим приёмом.
1 Выберите диапазон для ввода в автоматическую память
Нажмите кнопку [FM] или [AM].
2 Откройте ввод в автоматическую память
Нажмите кнопку [AME] как минимум на 2 секунды.
Когда 6 станций, которые могут приниматься, введены в
память, ввод в авто память закрывается.
Cвойства кассетного проигрывателя
Индикатор T.CИндикатор ленты
Настройка на предварительную установку
Вызов станций из памяти.
1 Выберите диапазон
Нажмите кнопку [FM] или [AM].
2 Вызовите станцию
Нажмите кнопку [#1] — [#6].
Индикатор B.S
— 44 —
Сторона ленты
Page 45

Проигрывание магнитофонных кассет
Если вставлна магнитофонная касста
Нажмите кнопку [SRC].
Выберите дисплей "TAPE".
Если Вы хотите прослушать обратную сторону
Нажмите кнопку [23].
Выброс кассеты
Нажмите кнопку [0].
Ускоренная перемотка ленты вперёд и назад
Ускоренная перемотка вперёд
Нажмите кнопку [FM].
Когда кассета остановится, нажмите кнопку [23].
Ускоренная перемотка назад
Нажмите кнопку [AM] .
Когда кассета остановится, нажмите кнопку [23].
Продвижение ленты вперёд
Перескок на следующую песню или перескок начало
проигрываемой песни.
Перескок на следующую песню
Нажмите кнопку [¢].
Перескакивает на начало проигрываемой песни
Нажмите кнопку [4].
Пропуск пустых участков
Автоматически перематывает вперёд, если в течение 10
секунд на ленте ничего не записано.
Нажмите кнопку [B.S].
Каждый раз, когда нажимается эта кнопка, функция
пропуска пустых участков включается или выключается.
Если он включен, включен индикатор "B.S".
Вызов тюнера
Автоматическое переключение на радио во время
ускоренной перемотки вперёд или назад.
Нажмите кнопку [T.CALL].
Каждый раз, когда нажимается эта кнопка, вызов тюнера
включается или выключается.
Если он включен, включен индикатор "T.C".
Повторение музыки
Повтор проигрываемой песни.
Нажмите кнопку [REP].
Каждый раз, когда нажимается эта кнопка, повтор музыки
включается или выключается.
Если он включен, на дисплее показывается "REP ON".
— 45 —
Page 46

Функции управления внешним диском
DISC+/FM
DISC
–/AM
4
¢
SRC
38
REPSCAN
SCRL RDM M.RDM MENU
Pyccкий
Проигрывание внешнего диска
Проигрывание диска, установленного в дополнительном
проигрывателе дисков, подсоединённом к данному
устройству.
Нажмите кнопку [SRC].
Выберите дисплей для нужного Вам проигрывателя дисков.
Примеры дисплеев:
Дисплей Проигрыватель дисков
"CD" Проигрыватель CD
"DISC" Чейнджер CD
"DISC" Чейнджер MD
Пауза и проигрывание
Нажмите кнопку [38].
Каждый раз, когда нажимается эта кнопка, проигрывание
CD останавливается или возобновляется.
• Диск №10 показывается на дисплее как "0".
• Функции, которы могут быть использованы, и информация,
которая можт быть прдставлна на диспл будт различаться в
зависимости от подсодинямых вншних проигрыватлй дисков.
Номер диска
Номер
дорожки
Время
воспроизведе
ни-я дорожки
Ускоренное передвижение вперёд и назад
Ускоренное передвижение вперёд
Нажмите и держите кнопку [¢].
Отпустите палец для начала проигрывания диска с этого
места.
Ускоренное передвижение назад
Нажмите и держите кнопку [4].
Отпустите палец для начала проигрывания диска с этого
места.
— 46 —
Page 47

Поиск дорожек
Выбор песни, которую Вы хотите послушать.
Нажмите кнопку [4] или [¢].
2 Освободите его, когда начнёт проигрываться песня,
которую Вы хотите послушать
Нажмите кнопку [SCAN].
Поиск альбома (Функция чейнджера дисков)
Выбор диска, который Вы хотите прослушать.
Нажмите кнопку [DISC–] или [DISC+].
Повтор диска/дорожки
Повторное проигрывание песни/диска, которые Вы
прослушиваете в данный момент.
Нажмите кнопку [REP].
Каждый раз, когда нажимается эта кнопка, повторное
проигрывание переключается, как показано ниже.
Повторное проигрывание Дисплей
Повтор дорожки "TREP ON"/"REP ON"
Повтор альбома (Функция пульта
дистанционного управления)
ВЫКЛ "REP OFF"
"DREP ON"
Просмотр дорожек
Проигрывание начала каждой песни на диске, который Вы
прослушиваете, и поиск песни, которую Вы хотите
прослушать.
1 Начните просмотр дорожек
Нажмите кнопку [SCAN].
"TSCN/SCAN ON" появится на дисплее.
Произвольное проигрывание
Проигрывание всех песен на диске в произвольном
порядке.
Нажмите кнопку [RDM].
Каждый раз, когда нажимается эта кнопка, произвольное
проигрывание включается или выключается.
Если он включен, на дисплее показывается "RDM ON".
Когда нажимается кнопка [¢], начинается следующий выбор
песни.
Произвольное проигрывание магазина
(Функция чейнджера дисков)
Проигрывание песен на всех дисках в чейнджере дисков в
произвольном порядке.
Нажмите кнопку [M.RDM].
Каждый раз, когда нажимается эта кнопка, произвольное
проигрывание магазина включается или выключается.
Если он включен, на дисплее показывается "MRDM ON".
Когда нажимается кнопка [¢], начинается следующий выбор
песни.
— 47 —
Page 48

Функции управления внешним диском
Название диска (DNPS)
Как дать название диску CD.
1 Проиграйте диск, которому Вы хотите дать название
Нельзя дать название диску MD.
2 Войдите в режим меню
Нажмите кнопку [MENU] как минимум на 1 секунду.
"MENU" появится на дисплее.
3 Выберите режим ввода названия
Pyccкий
Нажмите кнопку [FM] или [AM].
Выбирите дисплей "NAME SET".
4 Войдите в режим ввода названия
Нажмите кнопку [4] или [¢] как минимум на 2 секунды.
5 Передвигайте курсор для ввода положения символов
Нажмите кнопку [4] или [¢].
6 Выбирите символы
Нажмите кнопку [FM] или [AM].
7 Повторите последовательности 5 – 6 и введите название.
8 Выход из режима меню
Нажмите кнопку [MENU].
•Когда работа останавливается на 10 секунд, название в это
время регистрируется, и режим ввода названия закрывается.
• Средства, которым можно дать название.
- Внешний чейнджер/ проигрыватель CD: В зависимости от
чейнджера/ проигрывателя CD. Смотрите руководство по
эксплуатации чейнджера/проигрывателя CD.
• Название CD можно изменить при помощи той же операции,
что и для ввода названия.
Просмотр текста/названий
Просматривает показываемые на дисплее тексты CD или
названия MD.
Нажмите кнопку [SCRL].
— 48 —
Page 49

Система меню
AM
4¢
FM
MENU
Индикатор RDS
Индикатор AUTO
Дисплей меню
Система меню
Установка во время звукового сигнала работы и др.
Функций.
Основные способы работы системы меню описаны здесь.
Ссылки для функций меню и их установок находятся после
данного объяснения работы.
1 Войдите в режим меню
Нажмите кнопку [MENU] как минимум на 1 секунду.
"MENU" появится на дисплее.
2 Выберите функцию меню
Нажмите кнопку [FM] или [AM].
Пример: Если Вы хотите установить звуковой сигнал,
выберите дисплей "BEEP".
3 Установите функцию меню
Нажмите кнопку [4] или [¢].
Пример: Если выбрана "BEEP", каждый раз, когда
нажимается эта кнопка, происходит переключение с
"BEEP ON" на "BEEP OFF" и обратно. Выберите
способ установки.
Вы можете продолжить, возвращаясь к последовательности
2, и установить другие функции.
4 Выход из режима меню
Нажмите кнопку [MENU].
Если потом на дисплее показываются другие функции,
применимые к описанному выше основному способу работы,
вводится таблица содержания их установки. (Обычно, верхняя
установка в таблице является изначальной установкой.)
Также, объяснения неприменяемых функций (<Регулировка
часов в ручном режиме> и т. д.) вводятся последовательно.
— 49 —
Page 50

Система меню
Тон с датчиком прикосновения
Включение и выключение сигнала проверки работы
(звукового сигнала).
Дисплей Установка
"BEEP ON" Слышится звуковой сигнал.
"BEEP OFF" Звуковой сигнал отмнён.
Регулировка часов в ручном режиме
Pyccкий
Данную регулировку можно производить, когда <Синхронизация
часов> (страница 50) поставлена в положение ВЫКЛ.
1 Выберите режим регулировки часов
Нажмите кнопку [FM] или [AM].
Выберите дисплей "CLK ADJ".
2 Войдите в режим регулировки часов
Нажмите кнопку [4] или [¢] как минимум на 2 секунды.
Дисплей часов мигает.
3 Отрегулируйте часы
Нажмите кнопку [FM] или [AM].
Отрегулируйте минуты
Нажмите кнопку [4] или [¢].
4 Выход из режима регулировки часов
Нажмите кнопку [MENU].
Функция модели KRC-394/KRC-37
Синхронизация часов
Синхронизация времени данной станции RDS и часов
данного устройства.
Дисплей Установка
"SYNC ON" Синхронизирует время.
"SYNC OFF" Отрегулируйте время в ручном режиме.
Требуется от 3 до 4 минут для синхронизации часов.
DSI (Disabled System Indicator)
Замигает красный индикатор после того, как будет снята
лицевая пластинка, предупреждающий потенциальных
воров.
Дисплей Установка
"DSI ON" Мигат LED.
"DSI OFF" LED отключн.
Подсветка на выбор
Выбор подсветки кнопок зелёного или красного цвета.
Дисплей Установка
"COL GRN" Зелёный цвет подсветки.
"COL RED" Красный цвет подсветки.
Функция модели KRC-394/KRC-37
Установка бюллетеня новостей с тайм-аутом
Автоматически включается, когда начинается бюллетень
новостей, даже если в этот момент Вы не слушаете радио.
Также можно установить временной интервал, когда
прерывание не разрешено.
Дисплей и установка
"NEWS OFF"
"NEWS 00M"
…
"NEWS 90M"
Когда установлено "NEWS 00M" — "NEWS 90M", функция
прерывания бюллетеня новостей включена.
— 50 —
Page 51

Когда начинается бюллетень новостей, на дисплее
показывается "NEWS" и происходит переключение на
бюллетень новостей.
• Если Вы выберите установку "20M", последующие бюллетени
новостей не будут приниматься в течение 20 минут после
приёма первого бюллетеня новостей.
• Уровень громкость приёма бюллетеня новостей тот же самый,
что и для дорожной информации (страница 40).
• Данная функция возможна только в том случае, если
желаемая станция передаёт код PTY для бюллетеня новостей
или принадлежит к сети <Enhanced Other Network>,
передающей код PTY для бюллетеня новостей.
•Когда включена функция прерывания информационного
бюллетеня, происходит переключение на станцию FM.
Местный поиск <В режиме тюнера>
То лько хорошо принимаемые станции можно искать при
помощи настройки автоматического поиска.
Дисплей Установка
"LO.S OFF" Функция местного поиска выключена.
"LO.S ON" Функция местного поиска включена.
Функция модели KRC-394/KRC-37
Режим настройки <В режиме тюнера>
Устанавливает режим настройки.
Ржим настройки Дисплй Работа
Авто поиск "AUTO 1" Осуществляет
автоматический
поиск станции.
Поиск заранее "AUTO 2" Осуществляет поиск
установленной станций по порядку
станции в памяти предварительной
установки.
Ручной режим "MANUAL" Обычная настройка
в ручном режиме.
Функция модели KRC-394/KRC-37
Ввод авто памяти <В режиме тюнера>
Для получения информации о способе работы, смотрите
<Ввод авто памяти> (страница 39).
Функция модели KRC-394/KRC-37
AF (Alternative Frequency)
Если приём плохой, происходит автоматическое
переключение на другую частоту, передающую эту же
программу в этой же сети RDS с лучшим приёмом.
Дисплей Установка
"AF ON" Функция AF включена.
"AF OFF" Функция AF выключена.
Когда включена функция AF, включен индикатор "RDS".
Если нет других станций с более сильным приёмом этой же
программы в сети RDS, Вы будете слушать передачу
отрывками. В этом случае выключите функцию AF.
— 51 —
Page 52

Система меню
Функция модели KRC-394/KRC-37
Ограничение региона RDS
Вы можете выбрать, хотите ли Вы ограничить каналы RDS,
принимаемые функцией AF для конкретной сети на
конкретный регион.
Дисплей Установка
"REG ON" Функция ограничения региона включена.
"REG OFF" Функция ограничения региона выключена.
Pyccкий
Иногда станции в той же самой сети передают разные
программы или используют разные названия сервисов
программ.
Авто поиск TP
Когда включена функция TI, и при прослушивании станции с
дорожной информацией наблюдается плохой приём, будет
автоматически производится поиск другой станции с
дорожной информацией с лучшим приёмом.
Дисплей Установка
"ATPS ON" Функция авто поиска TP включена.
"ATPS OFF" Функция авто поиска TP выключена.
Монофонический приём <При приёме FM>
Уровень шума можно уменьшить, если стерео передачу
принимать в режиме моно.
Дисплей Установка
"MONO OFF" Монофонический приём выключен.
"MONO ON" Монофонический приём включен.
(Функция ограничения региона)
Функция модели KRC-394/KRC-37
Просмотр текста <В режиме управления внешним
диском>
Установка показываемого на дисплее просмотра текста.
Дисплей Установка
"SCL MANU" Не просматривает.
"SCL AUTO" Просматривает, когда изменяется дисплей.
Просматриваемый текст показан ниже.
• Текст CD
• Название MD
Название диска <В режиме управления внешним
диском>
Для получения информации о способах установки смотрите
<Название диска> (страница 48).
Таймер отключения питания
Автоматичская установка таймра отключния данного
устройства в продолжающмся ржим ожидания.
Использование данной установки сохраняет напряжение
аккумулятора транспортного средства.
Дисплей Установка
"OFF – – –" Функция таймера отключения
питания выключена.
"OFF 20M" Отключает питание через 20 минут.
(Изначальная установка)
"OFF 40M" Отключает питание через 40 минут.
"OFF 60M" Отключает питание через 60 минут.
— 52 —
Page 53

Принадлежности
Внешний вид Kоличество
1
2
3
Применение других принадлежностей, которые не входят в
комплект поставки, может привести к повреждению аппарата.
Проверьте, что вы применяете только принадлежности,
поставленные вместе с аппаратом, как показано выше.
..........................................1
..........................................2
..........................................1
Процесс установки
1. Во избежание короткого замыкания следует извлечь ключ
из зажигания и разъединить отрицательный вывод
батареи.
2. Правильно присоедините входные и выходные кабели всех
частот.
3. Автомобили, имеющие коннектор ISO:
Подсоедините коннектор громкоговорителя автомобиля к
коннектору В данного устройства, затем подсоедините
коннектор внешнего источника питания к коннектору А.
Автомобили, не имеющие коннектор ISO:
Сначала подсоедините кабель проводки, затем
подсоедините коннектор проводки к устройству.
4. Установите аппарат в вашем автомобиле.
5. Oпять соедините отрицательный вывод
- батареи.
6. Нажмите на кнопку Reset.
-
2ПРEДУПРEЖДEНИE
Если Вы подсоедините провод зажигания (красный) и провод
аккумулятора (жёлтый) к шасси автомобиля (масса), это может
вызвать короткое замыкание, что может привести к возгоранию.
Всегда подсоединяйте эти провода к источнику питания только через
предохранители.
2ВНИМАНИE
●
Eсли ваш автомобиль не подготовлен к такой специальной системе
присоединения, обратитесь к дилеру изделий фирмы KENWOOD.
●
Применяйте только адаптеры для кабелей антенны (ISO-JASО), если у
шнура антенны имеется штепсель ISO.
●
Проверьте, что все кабельные связи прочно соединены с помощью
вставленных гнезд до полного закрытия.
●
Eсли зажигание вашего автомобиля не имеет положения АCC или если
кабель зажигания присоединен к источнику питания с постоянным
напряжением, как например батарейный кабель, питание не будет
соединено с зажиганием (то есть не будет включаться и выключаться
одновременно с зажиганием). Eсли хотите соединить питание аппарата
с зажиганием, следует присоединить кабель зажигания к источнику
питания, который можно включать и выключать с помощью ключа
замка зажигания.
●
Eсли предохранитель перегорит, сначала следует проверить, что
кабели не вызвали короткое замыкание, затем заменить старый
предохранитель новым одинакового значения.
●
Чтобы присоединить некоторые автоматические проигрыватели дисков,
необходимо применить преобразовательные кабели. Во избежание
короткого замыкания не следует также удалять шапки, покрывающие
концы несоединенных кабелей или выводов.
●
Присоедините правильно кабели громкоговорителя к соответствующим
выводам. Aппарат можно повредить, если соедините отрицательные
кабели - и/или заземлите их к любой металлической части автомобиля.
●
Когда к системе подсоединяются только два динамика, подсоедините
соединительные провода к обоим передним клеммам выхода или к
задним клеммам выхода (не соединяйте передние и задние вместе).
Например, если Вы соединяете провод
передней клеммой выхода, не соединяйте провод - с задней
клеммой выхода.
●
После установки аппарата следует проверить, правильно ли в автомобиле
работают стоп-сигналы, индикаторы, стеклоочистители и т.д.
●
Если панель управления снабжена крышкой, блок следует подключить
таким образом, чтобы его передняя панель не задевала крышку при
открывании и закрывании.
+ левого динамика с
— 53 —
Page 54

Подсоединение кабелей к гнездам для подключения
25
Вход управления автоматическим проигрывателем
дисков KENWOOD
Pyccкий
Коробка
предохранителей
автомобиля
(главный
предохранитель)
6
Для подсоединения
автоматического проигрывателя
дисков прочитайте инструкцию по
эксплуатации автоматического
проигрывателя дисков. 26
Eсли вы не подключаете этот шнур, убедитесь в том,
что он находится внутри контактного столбика. 3
Присоедините или к выводу управления питанием,
пользуясь усилителем питания, который не входит
в комплект поставки, или к выводу управления
антенной в автомобиле. 4
Ключ
зажигания
5
–
+
Аккумулятор 7
Коробка предохранителей
автомобиля 16
ACC 15
Задний левый
вывод (Белый)
8
Задний правый
вывод (Kрасный) 9
Провод зажигания (Kрасный) 17
Kабель батареи (Желтый) 18
Провод заземления (Чёрный) (К шасси автомобиля) 19
Контакт регулятора
мощности (см. стр.56) 22
10
Управление питанием/
управляющий кабель
двигателя антенны
(Cиний/Белый) 14
— 54 —
Проводка
автомобиля
Для автомобиля Фольксваген 1
Специальный провод антены
(можно купить в магазинах) 3
Адаптер для кабелей антенны
(ISO-JASO) (Принадлежность 3) 2
Предохранитель
(10A) 23
Вход антенны
FM/AM 10
Смотри правую
сторону (см. стр.55) 24
Вывод контроля питания 28
Жгут проводов
(Принадлежность 1) 13
29 Белый/Черный
Белый
31
32
Cерый/Черный
Cерый
35
Зеленый/Черный
38
Фиолетовый/Черный
34
Зеленый
37
Фиолетовый
40
Кнопка трансмиссии 4
11 Шнур антенны (ISO)
Адаптер для кабелей
антенны (ISO-JASO)
(Принадлежность
К переднему левому
усилителю 30
+
К переднему правому
усилителю 33
+
К заднему левому
усилителю 36
+
К заднему правому
усилителю 39
+
3) 12
Page 55

■ Ta б лица функций разеъема
10
Разъем B
12345
1234567
Разъем A
Номера штырей Установка Функции
разъемов ISO вилки*
<
Разъем для внешнего питания
A–4 1 Аккумулятор
A–5 Управление питанием
A–7 1 Зажигание (АCC)
A–8 Заземляющее
<Разъем для колонок>
B–1 Задний правый (+)
B–2 Задний правый (–)
B–3 Передний правый (+)
B–4 Передний правый (–)
B–5 Передний левый (+)
B–6 Передний левый (–)
B–7 Задний левый (+)
B–8 Задний левый (–)
*Установка вилки: Смотри правую сторону.
7
6
8
8
>
2 Зажигание (АCC)
2 Аккумулятор
соединение (земля)
■ Установка вилки
2ПРEДУПРEЖДEНИE
Расположение штырей у разъемов ISO зависит от типа
автомобиля, который вы водите. Во избежание повреждения
аппарата следует проверить, что соединения сделаны
правильно.
1 Штепсель А-7 автомобильного разъема ISO подсоединен к
зажиганию, а штепсель А-4 подсоединен к постоянному
электропитанию. (Cтандартная настройка)
2 Штепсель А-7 автомобильного разъема ISO подсоединен к
источнику постоянного электропитания, а штепсель А-4
соединен с зажиганием.
• Если подсоединены оба вывода A-7 и A-4 подсоединены к
постоянному источнику питания транспортного средства,
используйте установку вилки 2.
• Если вывод A-7 подсоединён к постоянному источнику питания
транспортного средства, а вывод A-4 ни к чему не
подсоединён, подключите устройство, используя комплект
проводки (Дополнительное приспособление 1).
— 55 —
Присоединение разъема ISO
10
10
Page 56

Подсоединение кабелей к гнездам для
подключения
■ Подключения контакта регулятора мощности
Напряжение на контакте регулятора мощности выключается и
включается вместе с выключением/включением питания аппарата.
Этот контакт может быть соединен с контактом P.CON
(ДИСТАНЦИОННЫЙ) усилителя или может использоваться в качестве
источника питания специального антенного кабеля для автомобилей
Volkswagen. (Максимальный ток 300 mА)
Контакт регулятора мощности
(Плоский контакт) 4
Pyccкий
Провод управления
питания 5
Адаптер для кабелей
антенны (ISO-JASO)
(Принадлежность 3)
1
Специальный провод антены
(Для автомобиля Фольксваген)
Усилитель мощности
питания 6
Шнур антенны (ISO) 2
(можно купить в магазинах)3
Установка
■ Установка
Противопожарная перегородка
или металлическая опора
Винт (M4×8)
(можно купить
в магазинах)
Cледует согнуть
выступы сборочной
части с помощью
отвертки или
подобного
Резьбонарезаю
щий винт
(можно купить в
магазинах)
Cледует проверить, что аппарат прочно установлен на месте. Eсли
аппарат укреплен неустойчиво, это может привести к
неисправности (например пропуск звука).
Металлическая
сборочная лента
(можно купить в
магазинах)
инструмента и
прикрепить ее на
место.
— 56 —
Page 57

■ Cнятие жесткой резиновой оправки
1 Насадите крючки на экстрактор и снимите два запора на
нижнем уровне, оставляя экстрактор на верхнем уровне.
Подайте оправку вниз и вытащите ее, как показано на
рисунке.
Фиксирующая кромка
Затвор
Входящий в комплект
принадлежностей экстрактор 2
2 После освобождения нижнего края выполните аналогичную
процедуру и для верхних креплений.
■ Cнятие аппарата
1 Прочитайте раздел “Cнятие жесткой резиновой оправки” и
затем снимите жесткую резиновую оправку.
2 Удалите винт (М4×8) из задней панели.
3 Вставьте оба экстрактора под углом и введите их глубоко в
отверстия с каждой стороны, как показано на рисунке.
Входящий в комплект
принадлежностей
экстрактор 2
Винт (M4×8)
(можно купить в
магазинах)
4 Отведите экстрактор в
нижнее направление и
потяните устройство на
себя, выдвинув его из
отверстия наполовину,
надавливая при этом на
его боковые стенки.
Cнимая аппарат, будьте осторожны, чтобы не ранить себя
захватывающими крючками.
Eсли начинать операции с верхнего края, то оправка может быть
снята аналогичным образом.
5 Затем следует вытащить
аппарат руками, следя за
тем, чтобы не уронить его.
— 57 —
Page 58

Поиск и устранение неисправностей
Что кажется неисправным действием вашего
аппарата, может быть лишь результатом
незначительного ошибочного использования или
неправильно выполненной электрической схемы.
Прежде чем обращаться в сервисную службу,
проверьте следующую таблицу неисправностей.
Общие характеристики
? Питание не включается.01
✔ Предохранитель перегорел.
☞ После проверки коротких замыканий в кабелях следует
заменить предохранитель новым предохранителем
Pyccкий
? Если Вы выбрали режим ожидания, питание отключится
? После нажатия кнопки ничего не происходит.04
? Есть источник, который Вы не можете включить.05
? При выключении зажигания сотрется память.10
одинакового значения.
✔ Отсутствие позиции АСС в зажигании автомобиля.02
☞ Следует подсоединить такой же кабель к зажиганию, как и
кабель батареи.
автоматически.03
✔ Функция таймера отключения активирована.
☞ Если Вы нехотите автоматического отключения питания,
отмените функцию таймера отключения.
✔ Kомпьютерный чип в этом аппарате действует неправильно.
☞ Нажмите кнопку Reset, расположенную на аппарате (стр. 34).
✔ Не вставлена кассета.
☞ Установите средство, которое Вы хотите прослушивать. Если
в устройстве нет такого средства, Вы не сможете
переключать с источника на источник.
✔ Не подсоединён чейнджер дисков.08
☞ Подсоедините чейнджер дисков. Если чейнджер дисков не
подсоединён к клемме входа, Вы не сможете переключать на
внешний источник дисков.
✔ Kабель батареи не подсоединен к соответствующему выводу.
☞ Cледует правильно подсоединить кабель соответственно
разделу <Подсоединение кабелей к гнездам для
подключения>.
✔ Kабели зажигания и батареи неправильно подсоединены.11
☞ Cледует правильно подсоединить кабели соответственно
разделу <Подсоединение кабелей к гнездам для
подключения>.
? Не работает функция приглушения звука при телефонном
вызове.15
✔ Неправильно подключен кабель TEL mute.
☞ Cледует правильно подсоединить кабели соответственно
разделу <Подсоединение кабелей к гнездам для
подключения>.
? Даже при отсоединенном кабеле TEL mute включается функция
приглушения звука при телефонном вызове.16
✔ Kабель TEL mute касается металлических частей автомобиля.
☞ Отведите кабель TEL mute от металлических частей
aвтомобиля.
? Не слышен звук или звучание слишком слабо.20
✔ Установки фронта/тыла и баланса полностью установлены на
одну сторону.21
☞ Сцентруйте установки фронта/тыла и баланса.
✔ Вводные/выходные кабели или жгут проводов неправильно
подсоединены.22
☞ Подсоедините снова правильно входные/выходные кабели
и/или жгут проводов. Смотрите раздел <Подсоединение
кабелей к гнездам для подключения>.
✔ Плохая кассетная лента.23
☞ Попробуйте воспроизводить другую кассетную ленту. Eсли
она воспроизводится без проблем, первая лента была плохая.
? Плохое качество звука или искаженный звук.25
✔ Какой-либо винт в автомобиле может прижимать кабель
громкоговорителя.
☞ Следует проверить провода громкоговорителя.
✔ Магнитофонная головка загрязнена.26
☞ Прочистите магнитную головку.
✔ Громкоговорители неправильно подсоединены.27
☞ Снова соедините кабели громкоговорителей, чтобы каждое
выходное гнездо было подсоединено к отдельному
громкоговорителю.
? Не звучит тон датчика дотрагивания.34
✔ Используется штекер пред-входа.
☞ Тон датчика дотрагивания не выходит со штекера пред-входа.
? Даже когда Синхронизация часов установлена в положение
ВКЛ, часы не устанавливаются.35
✔ Принимаемая станция RDS не передаёт информацию времени.
☞ Настройтесь на другую станцию RDS.
— 58 —
Page 59

Источник тюнера
? Плохой радиоприем.39
✔ Антенна автомобиля не выдвинута.
☞ Следует выдвинуть антенну до конца.
✔ Кабель, управляющий антенной, не подсоединен.40
☞ Следует правильно подсоединить кабель соответственно
разделу <Подсоединение кабелей к гнездам для
подключения>.
? Это не установленная громкость для дорожной информации. 43
✔ Установленная громкость ниже громкости тюнера.
☞ Если громкость тюнера выше установленной громкости, то
используется громкость тюнера.
Источник магнитофона
? Не может вывести кассету.44
✔ Причиной этого является истечение 10 минут с момента
установки переключателя ACC на автомобиле в положение
ВЫКЛ.
☞ Кассета может быть выведена только втечение 10 минут с
момента установки переключателя ACC в положение ВЫКЛ.
Если прошло более 10 минут, снова установите
переключатель ACC в положение ВКЛ (ON), затем нажмите
кнопку вывода диска (Eject).
? Неправильно работают функции перемотки ленты и
музыкального повтора.45
✔ Промежуток между песнями на кассете не распознаётся, так как
он слишком короткий.
☞ Промежуток между песнями должен быть как минимум 4
секунды.
✔ Промежуток между песнями не распознаётся, так как между
песнями слишком много шумовых помех.46
☞ Уменьшите шум между песнями.
? Не работает функция перескакивания пустых мест.47
✔ Это из-за высокого уровня шума, чистая часть кассеты не
распознаётся.
☞ Уменьшите шум между песнями.
? Функция перескакивания пустых мест срабатывает на
записанных участках.48
✔ Это происходит из-за низкого уровня записи, распознаётся как
пустое место.
☞ Выключите функцию пропуска пустых участков.
Источник диска
? На дисплее появляется "AUX" без ввода в режим управления
внешнего диска.50
✔ Переключатель O-N установлен в положение "O".
☞ Установите перключатель в положение "N".
✔ Неподдержанный чейнджер дисков подсоединён.51
☞ Подсоедините поддержанный чейнджер дисков. (стр. 33)
? Не воспроизводится нужный диск, а воспроизводится другой
диск.52
✔ Заданный компакт-диск сильно загрязнен.
☞ Очистите компакт-диск.
✔ Kомпакт-диск перевернут.53
☞ Cледует вставить компакт-диск, направив сторону с
этикеткой вверх.
✔ Kомпакт-диск вставлен в неправильный паз.54
☞ Cледует вынуть магазин и проверить номер определенного
компакт-диска.
✔ Kомпакт-диск сильно поцарапан.55
☞ Cледует попробовать другой компакт-диск.
? Не происходит проигрывание определенной дорожки.58
✔ Был выбран режим проигрывания в случайном порядке или
проигрывание в случайном порядке дисков из магазина.
☞ Отключите функцию проигрывания в случайном порядке или
проигрывания в случайном порядке дисков из магазина.
? Повторение дорожки, повторение диска, сканирование
дорожки, произвольное проигрывание и магазинное
произвольное проигрывание начинаются самостоятельно.59
✔ Установка не отменена.
☞ Установка для этих функций остаётся вкючённой до тех пор,
пока не будет произведена установка на ВЫКЛ или не будет
выдвинут диск, даже если выключено питание или изменён
источник.
? Не может проигрывать CD-R или CD-RW.60
✔ Обработка финализации не была произведена для CD-R/CD-RW.
☞ Произведите обработку финализации с записывающим
устройством CD.
✔ Используется несовместимый чейнджер CD для проигрывания
CD-R/CD-RW.61
☞ Используйте чейнджер CD, совместимый с CD-R/CD-RW для
проигрывания средств.
— 59 —
Page 60

Поиск и устранение неисправностей
? Поиск дорожки нельзя осуществить. 66-2
✔ Для первой и последней песен альбома.
☞ Для каждого альбома, поиск дорожки нельзя осуществлять в
обратном порядке для первой песни или в последовательном
порядке для последней песни.
Приведённые ниже сообщения показывают
состояние Вашей системы.
• Даже когда подсоединён чейнджер дисков, источник Чейнджера
Дисков не включен и на дисплее показывается "AUX" в Режиме
Чейнджера.
• Даже когда не подсоединено никакого приспособления (KCA-S210A,
Pyccкий
CA-C1AX, KDC-CPS89, KDC-CPS87, KDC-CX87, KDC-CPS85, KDCCX85, KDC-CPS82 или KDC-CX82) дополнительный выход вводится
при переключении режимов.
При появлении определенных неисправностей в
вашей системе на дисплее будут изображены
следующие сообщения. Поступайте соответственно
рекомендованным инструкциям.
EJECT: В автоматический проигрыватель дисков не был
NO DISC: В магазине дисков нет дисков.
E-04: В магазине дисков нет дисков.
BLANK: На MD ничего не записано.
NO TRACK: На MD не было записано никаких дорожек, хотя у
NO PANEL: Лицевая панель подчиненного блока,
вставлен диск из магазина дисков. Магазин
дисков не заполнен полностью.E01
Заполните магазин дисков как следует.
➪
Отсутствие в устройстве компакт-диска.
➪ Вставьте компакт-диск.
Вставьте диск в магазин дисков.
➪
Вставьте диск в магазин дисков.
➪
E02
E04
Kомпакт-диск сильно загрязнен. Kомпакт-диск
перевернут. Kомпакт-диск сильно поцарапан.
➪ Очистите компакт-диск и вставьте правильно.
E10
него есть заглавие.E11
подключенного к этому блоку, снята.E30
Установите ее на место.
➪
E-77: По какой-либо причине аппарат неисправно
действует.
Нажмите кнопку Reset, расположенную на
➪
E77
аппарате. Eсли не исчезнет код "E-77"
обратитесь в ближайшую сервисную службу.
E-99: Или автомагнитола по какой-то причине работает
неисправно.
Нажмите кнопку сбоса на устойстве. Если на
➪
E99A
дисплее не исчезает код "E-99", обатитесь в
ближайший севисный цент.
HOLD: Защитная цепь в аппарате активизируется, если
температура внутри автоматического
проигрывателя дисков превысит 60°C и остановит
действие аппарата.
Аппарат следует охладить, поэтому откройте
➪
Eod
окна или включите кондиционирование
воздуха. Kогда температура понизится ниже
60°C, снова начнется проигрывание диска.
NO NAME: Попытка показа DNPS во время проигрывания CD
без предварительного установленного названия
диска.
E51
NO TITLE: Попытка показа названия диска или названия
дорожки во время проигрывания MD, не
имеющего названия MD.E53
NO TEXT: Попытка показа названия диска или названия
дорожки во время проигрывания CD, не имеющего
текста CD. E54
LOAD: Меняется диск в чейнджере дисков.E57
(Мигает): Магнитофонная секция работает не должным
2
3
образом.E60
Вставьте кассету заново. Если кассету нельзя
➪
вынуть или дисплей будет продолжать мигать
даже, если кассета была вставлена правильно,
отключите питание и свяжитесь с ближайшим
сервисным центром.
NO ACCES: После установки в чейнджер дисков, функция
DNPP была произведена раньше, чем он
проигрался по крайней мере 1 раз.
E58
— 60 —
Page 61

Технические характеристики
Те хнические характеристики могут быть изменены без уведомления.
Cекция тюнера FM
Диапазон частот (50 кГц пространственных)
.........................................................87,5 МГц – 108,0 МГц
Применимая чувствительность (S/N = 26дБ)
..................................................................0,7 мкВ / 75 Ом
Приглушенная чувствительность (S/N = 46дБ)
..................................................................1,6 мкВ / 75 Ом
Частотная характеристика (±3 дБ)....................30 Гц – 15 кГц
Отношение сигнал/шум (монофонический) .....................65 дБ
Избирательность (DIN) (±400 кГц)............................... ≥ 80 дБ
Разделение стереозвука (1 кГц)......................................35 дБ
Cекция тюнера MW
Диапазон частот (9 кГц пространственных)
.............................................................531 кГц – 1611 кГц
Применимая чувствительность (S/N = 20дБ) ................25 мкВ
Cекция тюнера LW
Диапазон частот ............................................153 кГц – 281 кГц
Применимая чувствительность (S/N = 20дБ) ................45 мкВ
Cекция кассетного проигрывателя
Cкорость ленты...........................................................4,76 см/с.
Детонация (WRMS)..........................................................0,08 %
Частотная характеристика (±3 дБ) (120 мкс)....30 Гц – 14 кГц
Разделение частот (1 кГц)................................................43 дБ
Отношение сигнал/шум.....................................................54 дБ
Звуковая секция
Mаксимальная выходная мощность ...........................45 Bт X 4
Bыходная мощность (DIN 45324, +B = 14,4 B)...........28 Bт X 4
Действие тембра
Hизкие частоты : ............................................100 Гц ±10 дБ
Средние частоты :............................................1 кГц ±10 дБ
Bысокие частоты : ..........................................10 кГц ±10 дБ
Уровень / нагрузка перед выходомБ
(Во время проигрывания диска) ..............2000 mV / 10 kОм
Импеданс перед выходом ...........................................≤ 600 Ом
Общие характеристики
Рабочее напряжение (допускается 11 – 16 B)................14,4 B
Потребляемая мощности.....................................................10 A
Габариты установки (Ш x B x Г).....................182 x 53 x 152 мм
Mасса .................................................................................1,4 кг
— 61 —
Page 62

Treść
Środki ostrożności ............................63
Uwagi dotyczące kaset .....................64
Informacje o RDS...............................64
Ogólne możliwości............................65
Zasilanie
Wybieranie źródła
Siła głosu
Tłumik
Funkcja głośności
System Q
Sterowanie dźwiękiem
Ustawianie głośnika
Przełączanie zobrazowania
Wyłączanie dźwięku w celu odebrania
Polski
telefonu
Panel czołowy zniechęcający złodziei
Możliwości tunera
(KRC-394/KRC-37)..........................68
Strojenie
Pamięć nastawiania stacji
Automatyczne wprowadzanie do pamięci
Strojenie zaprogramowane
Możliwości RDS .................................70
Informacje o ruchu drogowym
Programowanie siły głosu dla informacji
o ruchu drogowym
PTY (Rodzaj programu)
Programowanie rodzaju programu
Zmiana języka dla funkcji rodzaju
programu (PTY)
Możliwości tunera (KRC-31).............73
Tr yb strojenia
Strojenie
Pamięć nastawiania stacji
Automatyczne wprowadzanie do pamięci
Strojenie zaprogramowane
Możliwości odtwarzacza kaset ........74
Odtwarzanie kaset
Szybkie przewijanie
Przesunięcie taśmy
Przepuszczanie pustych fragmentów
taśmy
Przywołanie tunera
Powtarzanie muzyki
Możliwości sterowania zewnętrznymi
płytami .............................................76
Odtwarzanie dysków zewnętrznych
Szybkie i normalne przewijanie
Poszukiwanie utworu
Poszukiwanie albumu
Powtarzanie utworu/albumu
Przeglądanie utworów
Odtwarzanie w przypadkowej kolejności
Funkcja odtwarzania magazynu płyt
kompaktowych w przypadkowej
kolejności
Nadawanie nazw dyskom (DNPS)
Przewijanie tekstu/tytułu
Menu systemu....................................79
Menu systemu
Strefa czujnika dotykowego
Ręczna regulacja zegara
Synchronizacja zegara
DSI (Disabled System Indicator)
Wybieralna iluminacja
Funkcja biuletynu wiadomości z
ustawianiem czasu
Przeszukiwanie lokalne
Tr yb strojenia
Automatyczne wprowadzanie do pamięci
AF (Alternative Frequency)
Ograniczenie rejonu RDS
Automatyczne przeszukiwanie TP
Odbiór mono
Przewijanie tekstu
Nadawanie nazw dyskom
Timer wyłączający zasilanie
Akcesoria............................................83
Procedura instalowania....................83
Podłączanie przewodów do
końcówek........................................84
Instalacja.............................................86
Przewodnik wykrywania i usuwania
usterek.............................................88
Dane techniczne ................................91
— 62 —
Page 63

Środki ostrożności
2
OSTRZEŻENIE
Aby zapobiec zranieniom czy
zagrożeniu pożarem, należy stosować
następujące środki ostrożności:
• Wstaw radioodtwarzacz w jego miejsce aż
zostanie całkiem zamknięty; w innym
przypadku może wypaść podczas kolizji czy
innych szarpnięć.
• Przedłużając przewody zapłonu,
akumulatora czy masy używaj tylko kabli
dopuszczonych do stosowania w
samochodach o przekroju 0,75 mm2
(AWG18) lub większym, aby zapobiec
pogorszeniu się własności przewodu czy
ryzyku uszkodzenia izolacji.
• Aby nie dopuścić do zwarć, nigdy nie
wkładaj ani nie wrzucaj do środka zespołu
żadnych obiektów metalowych (np. monet
czy narzędzi metalowych).
• Jeżeli z zespołu zaczyna się wydobywać
dym, lub nieprzyjemny zapach, natychmiast
wyłącz zasilanie i skontaktuj się z dealerem
Kenwooda.
• Nie wkładaj palców pomiędzy płytę czołową
a urządzenie.
• Zespoł może się połamać lub uszkodzić,
ponieważ zawiera elementy szklane.
Nie upuszczaj zespołu ani nie poddawaj go
silnym wstrząsom ponieważ zawiera części
szklane, które mogą popękać.
• Nie dotykaj ciekłego kryształu jeżeli
wyświetlacz się uszkodzi lub zostanie
zniszczony wskutek wstrząsu; ciekły kryształ
może być niebezpieczny dla zdrowia, a
nawet śmiertelny; jeżeli jednak dojdzie do
zetknięcia ciekłego kryształu z ciałem lub
ubraniem, natychmiast zmyj go wodą z
mydłem.
2
UWAGA!
Aby zapobiec uszkodzeniu maszyny
stosuj następujące środki ostrożności:
• Upewnij się czy masa zespołu została
podłączona do ujemnego przewodu
zasilania prądem stałym o napięciu 12 V DC.
• Nie otwieraj pokrywy górnej ani dolnej
radioodtwarzacza.
• Nie instaluj radioodtwarzacza w miejscu
wystawionym na bezpośrednie promienie
słoneczne o nadmiernym wydzielaniu się
ciepła czy wilgotnym; unikaj również miejsc
narażonych na nadmierne zapylenie czy
rozbryzgi wody.
• Nie odkładaj zdjętego panelu czołowego ani
jego pudełka w miejscu wystawionym na
bezpośrednie promienie słoneczne, o
nadmiernym wydzielaniu się ciepła czy
wilgotnym; unikaj również miejsc narażonych
na nadmierne zapylenie czy rozbryzgi wody.
• Aby zapobiec uszkodzeniu, nie dotykaj
palcami końcówek zespołu ani panelu
czołowego.
• Nie narażaj panelu czołowego na nadmierne
uderzenia ponieważ jest to element
precyzyjnego urządzenia.
Podczas wymiany bezpiecznika wkładaj tylko
•
nowy bezpiecznik o określonych danych
znamionowych; założenie bezpiecznika o innym
amperażu może uszkodzić radioodtwarzacz.
• Aby zapobyec zwarciu podczas wymiany
bezpiecznika, najpierw rocłącz wiązki
przewodów.
• Nie wkładaj żadnych przedmiotów pomiędzy
panel przedni i urządzenie.
• Podczas montażu nie używaj innych wkrętów
poza dostarczonymi; użycie niewłaściwych
wkrętów może doprowadzić do uszkodzenia
zespołu głównego.
— 63 —
WAŻNE INFORMACJE
Informacje o podłączanym zmieniaczu
płyt:
Informacje o odtwarzaczach/zmieniaczach
płyt kompaktowych podłączonych do tej
jednostki.
Zmieniacze/odtwarzacze płyt kompaktowych
KENWOOD wyprodukowane w 1998 lub
później mogą być podłączane do tej
jednostki.
Aby uzyskać informacje o możliwości
podłączania modeli zmieniaczy/odtwarzaczy
płyt kompaktowych skorzystaj z katalogu lub
zasięgnij porady u dealera.
Należy zwrócić uwagę, że dowolny
zmieniacz/odtwarzacz płyt kompaktowych
marki KENWOOD, wyprodukowany w roku
1997 lub wcześniej, jak również dowolny
zmieniacz innego producenta nie mogą być
podłączane do tej jednostki.
Nie polecane podłączenie może spowodować
uszkodzenie.
Ustawianie przełącznika O-N w położeniu "N"
dla odpowiedniego zmieniacza / odtwarzacza
płyt kompaktowych firmy KENWOOD.
Funkcje, z których można skorzystać oraz
informacje, które mogą być wyświetlone, są
odmienne w zależności od podłączonego
modelu.
W przypadku błędnych połączeń możesz
uszkodzić zarówno odtwarzacz jak też
zmieniacz płyt kompaktowych.
Page 64

Środki ostrożności
UWAGA
•W przypadku napotkania trudności podczas
instalacji, zasięgnij porady u dealera firmy
Kenwood.
• Jeżeli wydaje się, że zespół nie pracuje prawidłowo, popróbuj najpierw nacisnąć
przycisk Reset. Jeżeli trudności nie ustąpią,
zasięgnij porady u dealera firmy Kenwood.
• Naciśnij przycisk ponownego nastawiania
(reset), jeżeli automatyczny zmieniacz płyt
kompaktowych jest wysterowany pierwszy i
nieprawidłowo funkcjonuje. Powrócą
oryginalne warunki operacyjne.
Polski
Przycisk Reset
• Znaki na wyświetlaczu ciekłokrystalicznym
LCD mogą stać się trudne do odczytania w
temperaturze poniżej 5 °C (41 °F).
• Ilustracje przedstawiające wyświetlacz i
pulpit pojawiające się w tej instrukcji są
przykładami wykorzystywanymi do bardziej
wyrazistego zilustrowania jak korzystać z
organów sterowych. Tym niemniej, to, co
pojawia się na wyświetlaczu przedstawionym
na ilustracjach, może różnić się od tego co
pojawia się na wyświetlaczu rzeczywistego
urządzenia, a niektóre ilustracje
wyświetlacza mogą przedstawiać coś
niemożliwego w aktualnej operacji.
Czyszczenie końcówek panelu
czołowego
Jeżeli końcówki urządzenia lub panelu
czołowego pobrudzą się, wycieraj je za
pomocą suchej, miękkiej ściereczki.
Czyszczenie urządzenia
Jeżeli płyta czołowa niniejszego urządzenia
jest zabrudzona, wytrzyj ją suchą, miękką
ściereczką taką jak ściereczka silikonowa.
Jeżeli płyta czołowa jest silnie pobrudzona,
wytrzyj ją ściereczką zwilżoną neutralnym
środkiem czyszczącym, a potem wytrzyj ten
neutralny detergent.
Bezpośrednie spryskiwanie urządzenia
środkiem czyszczącym, może uszkodzić
części mechaniczne. Wycieranie płyty
czołowej szorstką ściereczką, albo stosowanie
parującego płynu, takiego jak rozcieńczalnik
czy alkohol, może uszkodzić powierzchnię lub
naruszyć liternictwo.
Uwagi dotyczące kaset
Czyszczenie głowic
Jeżeli słychać szum, albo jakość dźwięku jest
zła podczas odtwarzania kasety ze względu
na zabrudzenie głowicy, oczyść ją.
Uwagi dotyczące kaset
• Jeżeli taśma się obluzuje – skręć ją.
• Jeżeli etykietka kasety odkleja się – przyklej
ją znowu.
• Nie stosuj zdeformowanych kaset.
• Nie kładź płyt na desce rozdzielczej itp. ani
tam, gdzie temperatura jest wysoka.
• Nie używaj kasety dłużej niż 100 minut.
— 64 —
Informacje o RDS
RDS (radiowy system cyfrowy)
Słuchając stacji RDS (tzn. stacji, która posiada
możliwości RDS), wyświetlana jest nazwa
programu usługowego stacji, powiadamiając
szybko jaką stację odbierasz.
Stacje RDS przesyłają również dane o
częstotliwości dla samej stacji. Gdy jesteś w
trakcie długiej podróży, ta funkcja
automatycznie przełącza radio na te
szczególne częstotliwości o najlepszym
odbiorze sieci stacji, którą chcesz odbierać.
Dane są automatycznie zapamiętywane,
pozwalając ci na szybkie przełączenie się na
inną stację RDS emitującą ten sam program,
lecz o lepszym odbiorze. Obejmuje to stacje
zachowane w pamięci wstępnego
nastawiania, których często słuchacie.
Enhanced Other Network
(udoskonalenie korzystania z innych
sieci)
Stacje, które oferują <Enhanced Other
Network>, nadają również informacje o innych
stacjach RDS podających informacje o ruchu.
Gdy twoje radio jest dostrojone na stację,
które nie nadaje informacji o ruchu, a inna
stacja RDS rozpoczyna nadawanie biuletynu o
ruchu drogowym, tuner automatycznie
przełącza się na inną stację na czas trwania
biuletynu.
Alarm
Gdy nadawana jest transmisja nadzwyczajna
(ogłoszenie katastrofy itd.), wszystkie aktualne
funkcje są przerywane, aby umożliwić
wysłuchanie ostrzeżenia.
Page 65

Ogólne możliwości
4
¢
SRC
FMAM
Q
/AUD
u
d
ATT/LOUD
CLK
Przycisk zwalniania
Wskaźnik SYSTEM Q
Wskaźnik ATT
Wskaźnik LOUD
Zasilanie
Włączanie zasilania (ON)
Naciśnij przycisk [SRC].
Wyłączanie zasilania (OFF)
Naciśnij przycisk [SRC] oraz przytrzymaj go przynajmniej przez 1
sekundę.
Wybieranie źródła
Naciśnij przycisk [SRC].
Wymagane źródło Zobrazowanie
Tuner "TUNER"
Taśma "TAPE"
Dysk zewnętrzny "DISC"/"CD"
Gotowość (Tylko tryb podświetlenia) "ALL OFF"
To urządzenie automatycznie wyłącza zasilanie po upływie 20 minut
przebywania w stanie gotowości w celu ochrony akumulatora
pojazdu.
Czas do pełnego wyłączenia zasilania można ustawiać <Timer
wyłączający zasilanie> (strona 82).
Siła głosu
Zwiększanie siły głosu
Naciśnij przycisk [u].
Zmniejszanie siły głosu
Naciśnij przycisk [d].
— 65 —
Page 66

Ogólne możliwości
Tłumik
Szybkie przekręcenie pokrętła siły głosu w kierunku zmniejszenia.
Naciśnij przycisk [ATT].
Za każdym naciśnięciem przycisku tłumik włącza się lub
wyłącza.
Kiedy tłumik jest włączony, pulsuje wskaźnik "ATT".
Funkcja głośności
Kompensowanie dźwięków niskich i wysokich przy małej sile głosu.
Naciśnij przycisk [LOUD] oraz przytrzymaj go przynajmniej przez
1 sekundę.
Za każdym naciśnięciem oraz przytrzymaniem przycisku
przynajmniej przez 1 sekundę funkcja głośności włącza się lub
wyłącza.
Kiedy jest włączona, włączony jest również wskaźnik "LOUD".
Polski
System Q
Możesz przywrócić ustawienie najlepszego dźwięku zaprogramowane
dla rozmaitych rodzajów muzyki.
1 Wybierz źródło w celu nastawienia
Naciśnij przycisk [SRC].
2 Wybierz Rodzaj dźwięku
Naciśnij przycisk [Q].
Za każdym naciśnięciem przycisku przełącza się źródło dźwięku.
Ustawienie dźwięku Zobrazowanie
Muzyka jednostajna "FLAT"
Rock "ROCK"
Lista przebojów top 40 "TOP40"
Muzyka pop "POPS"
Jazz "JAZZ"
Muzyka lekka i przyjemna "EASY"
Przeglądanie Muzyka jednostajna
—Muzyka lekka i przyjemna
• Dokonywanie zmian ustawień każdej wartości patrz <Ustawianie
głośnika> (strona 67).
Najpierw, za pomocą ustawień mikrofonu, wybierz rodzaj
mikrofonu .
• Kiedy zostają zmienione ustawienia System Q, ustawienia tonów
niskich, średnich i wysokich w sterowaniu audio zastępują
wartości w System Q.
"SCAN"
Sterowanie dźwiękiem
1 Wybierz źródło w celu jego wyregulowania
Naciśnij przycisk [SRC].
2 Wejście do trybu sterowania dźwiękiem
Naciśnij przycisk [AUD] oraz przytrzymaj go przynajmniej przez 1
sekundę.
3 Wybierz pozycję audio w celu wyregulowania
Naciśnij przycisk [FM] lub [AM].
Za każdym naciśnięciem przycisku pozycje, które mogą być
regulowane przełączają się jak poniżej.
4 Wyreguluj pozycję audio
Naciśnij przycisk [4] lub [¢].
Regulowana pozycja Zobrazowanie Zakres
Poziom tonów niskich "BAS" –8 — +8
Poziom tonów średnich "MID" –8 — +8
Poziom tonów wysokich "TRE" –8 — +8
Wyrównanie "BAL" L15 — R15
Ściszanie "FAD" R15 — F15
5 Wyjście z trybu sterowania dźwiękiem
Naciśnij przycisk [AUD].
— 66 —
Page 67

Ustawianie głośnika
Precyzyjne strojenie, aby po ustawieniu rodzaju głośnika wartości
System Q były optymalne.
1 Wejście do trybu gotowości
Naciśnij przycisk [SRC].
Wybierz zobrazowanie "ALL OFF".
2 Wejście do trybu ustawiania głośnika
Naciśnij przycisk [Q].
3 Wybierz rodzaj głośnika
Naciśnij przycisk [4] lub [¢].
Za każdym naciśnięciem przycisku ustawienie przełącza się jak
przedstawiono poniżej.
Rodzaj głośnika Zobrazowanie
Wyłączony "SP OFF"
Dla głośnika OEM "SP OEM"
Dla głośnika 6 i 6x9 cali "SP 6/6x9"
Dla głośnika 5 i 4 cale "SP 5/4"
4 Wyjście z trybu ustawiania głośnika
Naciśnij przycisk [Q].
Przełączanie zobrazowania
Przełączanie wyświetlanych informacji.
Naciśnij przycisk [CLK].
Za każdym naciśnięciem przycisku wyświetlacz przełącza się jak
przedstawiono poniżej.
Źródło - tuner
Informacja
Automatyczne wyświetlanie nazwy lub częstotliwości stacji
Zegar
Źródło w taśmie
Informacja
Odtwarzana strona
Zegar
Źródło - dysk zewnętrzny
Informacja Zobrazowanie
Utwór Czas
Nazwa dysku "D-NAME"
Tytuł dysku "D-TITLE"
Tytuł utworu "T-TITLE"
Zegar
Wyłączanie dźwięku w celu odebrania telefonu
System audio automatycznie ścisza się, gdy zadzwoni telefon.
Gdy zadzwoni telefon
wyświetlony zostaje napis "CALL".
System audio wyłącza się.
Słuchanie audio podczas odbierania telefonu
Naciśnij przycisk [SRC].
Znika zobrazowanie "CALL" natomiast zostaje z powrotem
włączony system audio.
Gdy kończy się rozmowa telefoniczna
Odwieś słuchawkę.
Znika zobrazowanie "CALL" natomiast zostaje z powrotem
włączony system audio.
— 67 —
Page 68

Ogólne możliwości
#1 – 6
4
¢
SRC
AM
FM
MENU
Panel czołowy zniechęcający złodziei
Panel czołowy urządzenia można odłączyć i zabrać ze sobą co może
zniechęcać złodziei.
Odejmowanie panelu czołowego
Naciśnij przycisk zwalniania.
Panel czołowy odblokowuje się umożliwiając jego wyjęcie.
• Panel czołowy jest urządzeniem precyzyjnym i może zostać
uszkodzony wskutek wstrząsów czy uderzeń. Z tych powodów
należy go, po odłączeniu, przechowywać w specjalnym pudełku.
• Nie wystawiaj panelu czołowego ani jego pudełka na
bezpośrednie działanie promieni słonecznych, nadmierne ciepło
czy wilgotność. Unikaj również miejsc nadmiernie zakurzonych
czy narażonych na rozbryzgi wody.
Ponowne podłączenie panelu czołowego
1 Ustaw panel czołowy tak, aby jego rowki zgadzały się z
Polski
występami na urządzeniu.
2 Dociśnij panel czołowy aż usłyszysz kliknięcie.
W ten sposób panel czołowy zostaje zablokowany na swoim
miejscu umożliwiając korzystanie z urządzenia.
Możliwości tunera
Funkcja KRC-394/KRC-37
Wyświetlacz
pasma
częstotliwości
Numer wstępnie nastawionej stacji
— 68 —
Wskaźnik ST
Zobrazowanie częstotliwości
Page 69

Strojenie
Wybieranie stacji.
1 Wybierz tuner jako źródło
Naciśnij przycisk [SRC].
Wybierz zobrazowanie "TUNER".
2 Wybierz pasmo
Naciśnij przycisk [FM] lub [AM].
Po każdorazowym naciśnięciu przycisku [FM], zakresy
przełączają się pomiędzy FM1, FM2 i FM3.
3 Strojenie można wykonywać w górę lub w dół zakresu
Naciśnij przycisk [4] lub [¢].
Podczas odbierania stereofonicznego sygnału stacji, zapala się
wskaźnik "ST" .
Pamięć nastawiania stacji
Wprowadzanie stacji do pamięci.
1 Wybierz pasmo
Naciśnij przycisk [FM] lub [AM].
2 Wybierz częstotliwość w celu wprowadzenia do pamięci
Naciśnij przycisk [4] lub [¢].
3 Wprowadź częstotliwość do pamięci
Naciśnij przycisk [#1] — [#6] oraz przytrzymaj go przynajmniej
przez 2 sekundy.
Przez chwilę wyświetlany jest zaprogramowany numer.
W każdym zakresie fal można zachować 1 stację pod każdym
przyciskiem [#1] — [#6] .
Automatyczne wprowadzanie do pamięci
Automatyczne wprowadzanie do pamięci stacji o dobrym odbiorze.
1 Wybierz pasmo dla automatycznego wprowadzania do
pamięci
Naciśnij przycisk [FM] lub [AM].
2 Wejście do trybu menu
Naciśnij przycisk [MENU] oraz przytrzymaj go przynajmniej przez
1 sekundę.
Wyświetlone zostaje "MENU".
3 Wybierz tryb automatycznego wprowadzania do pamięci
Naciśnij przycisk [FM] lub [AM].
Wybierz zobrazowanie "A-MEMORY".
4 Otwórz automatyczne wprowadzanie do pamięci
Naciśnij przycisk [4] lub [¢] oraz przytrzymaj go przynajmniej
przez 2 sekundy.
Jeżeli 6 stacji, jakie mogą być odbierane, są wprowadzone do
pamięci, funkcja automatycznego wprowadzania do pamięci
zostaje zamknięta.
• Jeżeli włączona jest <Funkcja AF> (strona 81), w pamięci są
zachowywane tylko stacje RDS.
• Jeżeli automatyczne wprowadzanie do pamięci jest zrealizowane
w zakresie FM2, stacje RDS zaprogramowane w zakresie FM1, nie
zostają wprowadzone do pamięci.
Podobnie jeżeli automatyczne wprowadzanie do pamięci jest
zrealizowane w zakresie FM3, stacje RDS zaprogramowane w
zakresach FM1 i FM2, nie zostają wprowadzone do pamięci.
Strojenie zaprogramowane
Wywoływanie stacji zapisanych w pamięci.
1 Wybierz pasmo
Naciśnij przycisk [FM] lub [AM].
2 Wywoływanie stacji
Naciśnij przycisk [#1] — [#6].
— 69 —
Page 70

Możliwości RDS
#1 – 6
AM
PTY
4¢
FM
TI/VOL ADJ
CLK
Funkcja KRC-394/KRC-37
Polski
Informacje o ruchu drogowym
Automatyczne przełączanie na informacje o ruchu drogowym, gdy
rozpoczyna się nadawanie biuletynu informacji o ruchu drogowym,
gdy nawet nie słucha się radia.
Naciśnij przycisk [TI].
Za każdym naciśnięciem przycisku funkcja informacji o ruchu
drogowym włącza się lub wyłącza.
Jeżeli jest włączona, wskaźnik "TI" jest też włączony.
Kiedy odbierana jest stacja nadająca informacje o ruchu
drogowym, pulsuje wskaźnik "TI".
Gdy rozpoczyna się nadawanie biuletynu informacji o ruchu
drogowym, zostanie wyświetlony napis "TRAFFIC" oraz następuje
przełączenie na informacje o ruchu drogowym.
Jeżeli podczas odbierania stacji AM włączy się funkcja informacji o
ruchu drogowym, następuje przełączenie na stację FM.
Odbieranie innych stacji nadających informacje o ruchu
drogowym
Naciśnij przycisk [4] lub [¢].
Przełączanie stacji nadającej informacje o ruchu drogowym może
być wykonywane podczas słuchania radia.
Wskaźnik PTY
Wskaźnik TI
Programowanie siły głosu dla informacji o ruchu
drogowym
Programowanie siły głosu podczas odbierania informacji o ruchu
drogowym.
1 Nastaw odbiór stacji radiowej.
2 Ustaw pożądaną siłę głosu.
3 Zaprogramuj siłę głosu
Naciśnij przycisk [VOL ADJ] oraz przytrzymaj go przynajmniej
przez 2 sekundy.
Poziom siły głosu wyświetla się tylko 1 raz.
— 70 —
Page 71

PTY (Rodzaj programu)
Wybieranie rodzaju programu oraz poszukiwanie stacji.
1 Wejście do trybu rodzaju programu (PTY)
Naciśnij przycisk [PTY].
Po wejściu w tryb PTY wyświetlony zostaje napis "PTY".
Nie można korzystać z tej funkcji podczas odbierania biuletynu o
ruchu drogowym ani audycji w zakresie AM.
2 Wybierz rodzaj programu
Naciśnij przycisk [FM] lub [AM].
Za każdym naciśnięciem przycisku rodzaj programu przełącza
się jak przedstawiono poniżej.
Nr Rodzaj programu Zobrazowanie
1. Muzyka "MUSIC"
2. Mowa "SPEECH"
3. Wiadomości "NEWS"
4. Aktualności "AFFAIRS"
5. Informacje "INFO"
6. Sport "SPORT"
7. Programy edukacyjne "EDUCATE"
8. Dramat "DRAMA"
9. Kultura "CULTURE"
10. Nauka "SCIENCE"
11. Rozmaitości "VARIED"
12. Muzyka pop "POP M"
13. Muzyka rock "ROCK M"
14. Muzyka lekka i przyjemna "EASY M"
15. Lekka muzyka klasyczna "LIGHT M"
16. Muzyka poważna "CLASSICS"
17. Muzyka inna "OTHER M"
18. Pogoda "WEATHER"
19. Finanse "FINANCE"
20. Programy dla dzieci "CHILDREN"
21. Sprawy społeczne "SOCIAL"
22. Religia "RELIGION"
23. Telefon "PHONE IN"
24. Programy podróżnicze "TRAVEL"
25. Rozrywka "LEISURE"
26. Muzyka jazzowa "JAZZ"
27. Muzyka country "COUNTRY"
28. Muzyka krajowa "NATION M"
29. Muzyka dawna "OLDIES"
30. Muzyka ludowa "FOLK M"
31. Dokument "DOCUMENT"
• Do kategorii programów słownych i muzycznych należą rodzaje
programów przedstawione poniżej.
Muzyka: Nr 12 — 17, 26 — 30
Mowa: Nr 3 — 11, 18 — 25, 31
• Rodzaj programu można zapisać pod przyciskami pamięci [#1] —
[#6], co umożliwia późniejsze szybkie wybieranie tego programu.
Patrz <Programowanie rodzaju programu> (strona 72).
• Język wyświetlanych napisów można zmienić. Patrz <Zmiana
języka dla funkcji rodzaju programu (PTY)> (strona 72).
3 Poszukiwanie stacji nadającej wybrany rodzaj programu
Naciśnij przycisk [4] lub [¢].
Jeżeli chcesz wyszukać inne stacje, naciśnij ponownie przycisk
[4] lub [¢].
Jeżeli wybrany rodzaj programu nie jest odnaleziony, zostanie
wyświetlony napis "NO PTY". Wybierz inny rodzaj programu.
4 Wyjście z trybu PTY
Naciśnij przycisk [PTY].
— 71 —
Page 72

Możliwości RDS
Funkcja KRC-394/KRC-37
Programowanie rodzaju programu
Zapisanie rodzaju programu pod wybrany przycisk pamięci oraz
szybkie wywoływanie tego rodzaju programu.
Programowanie rodzaju programu
1 Wybierz rodzaj programu w celu jego zaprogramowania
Patrz <PTY (Rodzaj programu)> (strona 71).
2 Zaprogramuj rodzaj programu
Naciśnij przycisk [#1] — [#6] oraz przytrzymaj go przynajmniej
przez 2 sekundy.
Wywołanie zaprogramowanego rodzaju programu
1 Wejście do trybu rodzaju programu (PTY)
Patrz <PTY (Rodzaj programu)> (strona 71).
2 Wywołanie rodzaju programu
Polski
Naciśnij przycisk [#1] — [#6].
Zmiana języka dla funkcji rodzaju programu (PTY)
Wybór języka wyświetlania rodzaju programu.
1 Wejście do trybu rodzaju programu (PTY)
Patrz <PTY (Rodzaj programu)> (strona 71).
2 Wejście do trybu zmiany języka
Naciśnij przycisk [CLK].
3 Wybierz język
Naciśnij przycisk [#1] — [#3].
Klawisz Język
[#1] Angielski
[#2] Francuski
[#3] Niemiecki
4 Wyjście z trybu zmiany języka
Naciśnij przycisk [CLK].
— 72 —
Page 73

Możliwości tunera
#1 – 6
4
¢
SRC
AM
FM
AUTO/AME
Funkcja KRC-31
Wyświetlacz
pasma
częstotliwości
Numer wstępnie
nastawionej stacji
Wskaźnik ST
Wskaźnik AUTO
Zobrazowanie częstotliwości
Tryb strojenia
Wybór trybu strojenia.
Naciśnij przycisk [AUTO].
Za każdym naciśnięciem przycisku tryb strojenia przełącza się
jak przedstawiono poniżej.
Tryb strojenia Zobrazowanie Działanie
Automatyczne Wskaźnik Automatyczne poszukiwanie
przeszukiwanie "AUTO 1" stacji.
Programowe
przeszukiwanie
stacji według kolejności.
Wskaźnik
"AUTO 2"
Poszukiwanie stacji w
zaprogramowanej pamięci
Ręczne — Normalne ręczne sterowanie
strojeniem.
Strojenie
Wybieranie stacji.
1 Wybierz tuner jako źródło
Naciśnij przycisk [SRC].
Wybierz zobrazowanie "TUNER".
2 Wybierz pasmo
Naciśnij przycisk [FM] lub [AM].
Po każdorazowym naciśnięciu przycisku [FM], zakresy
przełączają się pomiędzy FM1, FM2 i FM3.
3 Strojenie można wykonywać w górę lub w dół zakresu
Naciśnij przycisk [4] lub [¢].
Podczas odbierania stereofonicznego sygnału stacji, zapala się
wskaźnik "ST" .
— 73 —
Page 74

Możliwości tunera
4
¢
SRC
FMAM
B.S
2 30
T.CALL
REP
Funkcja KRC-31
Pamięć nastawiania stacji
Wprowadzanie stacji do pamięci.
1 Wybierz pasmo
Naciśnij przycisk [FM] lub [AM].
2 Wybierz częstotliwość w celu wprowadzenia do pamięci
Naciśnij przycisk [4] lub [¢].
3 Wprowadź częstotliwość do pamięci
Naciśnij przycisk [#1] — [#6] oraz przytrzymaj go przynajmniej
przez 2 sekundy.
Przez chwilę wyświetlany jest zaprogramowany numer.
W każdym zakresie fal można zachować 1 stację pod każdym
przyciskiem [#1] — [#6] .
Automatyczne wprowadzanie do pamięci
Automatyczne wprowadzanie do pamięci stacji o dobrym odbiorze.
Polski
1 Wybierz pasmo dla automatycznego wprowadzania do
pamięci
Naciśnij przycisk [FM] lub [AM].
2 Otwórz automatyczne wprowadzanie do pamięci
Naciśnij przycisk [AME] oraz przytrzymaj go przynajmniej przez 2
sekundy.
Jeżeli 6 stacji, jakie mogą być odbierane, są wprowadzone do
pamięci, funkcja automatycznego wprowadzania do pamięci
zostaje zamknięta.
Strojenie zaprogramowane
Wywoływanie stacji zapisanych w pamięci.
Możliwości odtwarzacza kaset
Wskaźnik T.CWskaźnik taśmy
Wskaźnik B.S
Strona taśmy
1 Wybierz pasmo
Naciśnij przycisk [FM] lub [AM].
2 Wywoływanie stacji
Naciśnij przycisk [#1] — [#6].
— 74 —
Page 75

Odtwarzanie kaset
Gdy kaseta taśmy jest wstawiona
Naciśnij przycisk [SRC].
Wybierz zobrazowanie "TAPE".
Jeżeli chcesz odsłuchać drugą stronę
Naciśnij przycisk [23].
Wyrzut kasety
Naciśnij przycisk [0].
Szybkie przewijanie
Szybkie przewijanie do przodu
Naciśnij przycisk [FM].
Gdy się zatrzyma, naciśnij przycisk [23].
Szybkie przewijanie
Naciśnij przycisk [AM].
Gdy się zatrzyma, naciśnij przycisk [23].
Przesunięcie taśmy
Przeskok do następnej piosenki lub rozpoczęcie bieżącej.
Przeskok do następnej piosenki
Naciśnij przycisk [¢].
Przeskok do początku piosenki bieżącej
Naciśnij przycisk [4].
Przepuszczanie pustych fragmentów taśmy
Automatycznie przewija do przód, gdy pusty fragment taśmy zajmuje
więcej niż 10 sekund tych fragmentów taśmy.
Naciśnij przycisk [B.S].
Za każdym naciśnięciem przycisku przepuszczanie pustych
fragmentów taśmy włącza się lub wyłącza.
Jeżeli jest włączone, zapala się wskaźnik "B.S".
Przywołanie tunera
Automatycznie włącza radio podczas szybkiego przewijania taśmy.
Naciśnij przycisk [T.CALL].
Za każdym naciśnięciem przycisku przywołanie tunera włącza
się lub wyłącza.
Jeżeli jest włączony, zapala się wskaźnik "T.C".
Powtarzanie muzyki
Wielokrotne odtwarzanie bieżącego utworu.
Naciśnij przycisk [REP].
Za każdym naciśnięciem przycisku powtarzanie muzyki włącza
się lub wyłącza.
Jeżeli jest włączony, wyświetlany jest napis "REP ON".
— 75 —
Page 76

Możliwości sterowania zewnętrznymi płytami
DISC+/FM
DISC
–/AM
4
¢
SRC
38
REPSCAN
SCRL RDM M.RDM MENU
Polski
Numer płyty
Numer ścieżki (utworu)
Czas utworu
Odtwarzanie dysków zewnętrznych
Odtwarzanie zestawu dysków w opcjonalnym odtwarzaczu
pomocniczym podłączonym do tego urządzenia.
Naciśnij przycisk [SRC].
Wybierz zobrazowanie odtwarzacza dysków.
Przykłady zobrazowań:
Zobrazowanie Odtwarzacz
"CD" Odtwarzacz CD
"DISC" Zmieniacz CD
"DISC" Zmieniacz MD
Pauza oraz odtwarzanie
Naciśnij przycisk [38].
Za każdym naciśnięciem przycisku występuje pauza lub
odtwarzanie.
• Dysk #10 jest wyświetlany jako "0".
• Funkcje, z których można korzystać oraz informacje, które mogą
być wyświetlone, będą odmienne w zależności od podłączonych
zewnętrznych odtwarzaczy dysków.
Szybkie i normalne przewijanie
Szybkie przewijanie do przodu
Wciśnij i przytrzymaj przycisk [¢].
W celu rozpoczęcia odtwarzania od danego punktu, zwolnij
przycisk.
Przewijanie
Wciśnij i przytrzymaj przycisk [4].
W celu rozpoczęcia odtwarzania od danego punktu, zwolnij
przycisk.
— 76 —
Page 77

Poszukiwanie utworu
Wybieranie piosenki jakiej chcesz wysłuchać.
Naciśnij przycisk [4] lub [¢].
Poszukiwanie albumu (funkcja zmieniaczy dysków)
Wybieranie płyty jakiej chcesz wysłuchać.
Naciśnij przycisk [DISC–] lub [DISC+].
Powtarzanie utworu/albumu
Powtórzenie odsłuchiwanej piosenki/płyty
Naciśnij przycisk [REP].
Za każdym naciśnięciem przycisku, powtarzanie utworu
przełącza się jak przedstawiono poniżej.
Powtarzanie odtwarzania Zobrazowanie
Powtarzanie utworu "TREP ON"/"REP ON"
Powtarzanie albumu
(Funkcja zmieniaczy dysków)
WYŁ. "REP OFF"
"DREP ON"
Przeglądanie utworów
Kolejno odtwarza początek każdej piosenki na płycie aż odnajdziesz
piosenkę, jakiej chcesz wysłuchać.
1 Rozpocznij przeglądanie utworów
Naciśnij przycisk [SCAN].
Wyświetlony zostaje napis "TSCN/SCAN ON".
2 Zwolnij przycisk, gdy jest odtwarzana piosenka, jakiej chcesz
wysłuchać
Naciśnij przycisk [SCAN].
Odtwarzanie w przypadkowej kolejności
Odtwarzanie w przypadkowej kolejności wszystkich piosenek na
dysku.
Naciśnij przycisk [RDM].
Za każdym naciśnięciem przycisku Odtwarzanie w przypadkowej
kolejności włącza się lub wyłącza.
Jeżeli jest włączone, wyświetlony zostaje "RDM ON".
Gdy przycisk [¢] zostaje wciśnięty, rozpoczyna się odtwarzanie
następnej wybranej piosenki.
Funkcja odtwarzania magazynu płyt kompaktowych w
przypadkowej kolejności (Funkcja zmieniaczy dysków)
Odtwarzanie w przypadkowej kolejności wszystkich piosenek na
płytach kompaktowych znajdujących się w magazynie.
Naciśnij przycisk [M.RDM].
Za każdym naciśnięciem przycisku funkcja odtwarzania
magazynu płyt kompaktowych w przypadkowej kolejności włącza
się lub wyłącza.
Jeżeli jest włączone, wyświetlony zostaje "MRDM ON".
Gdy przycisk [¢] zostaje wciśnięty, rozpoczyna się odtwarzanie
następnej wybranej piosenki.
— 77 —
Page 78

Możliwości sterowania zewnętrznymi płytami
Nadawanie nazw dyskom (DNPS)
Przypisywanie tytułu do płyty CD.
1 Odtwarzanie dysku, do którego chcesz przypisać nazwę
Tytuł nie może być przypisany do minidysku MD.
2 Wejście do trybu menu
Naciśnij przycisk [MENU] oraz przytrzymaj go przynajmniej przez
1 sekundę.
Wyświetlone zostaje "MENU".
3 Wybierz tryb nadawania nazwy
Naciśnij przycisk [FM] lub [AM].
Wybierz zobrazowanie "NAME SET".
4 Wejście do trybu nadawania nazw
Naciśnij przycisk [4] lub [¢] oraz przytrzymaj go przynajmniej
Polski
przez 2 sekundy.
5 Przesuń kursor do położenia, w którym ma być wprowadzany
znak
Naciśnij przycisk [4] lub [¢].
6 Wybierz znaki
Naciśnij przycisk [FM] lub [AM].
7 Powtórz kroki 5 do 6 oraz przypisz nazwę.
8 Wyjście z trybu menu
Naciśnij przycisk [MENU].
• Jeżeli wprowadzanie nazwy zatrzyma się na 10 sekund, nazwa
zostaje zarejestrowana, a tryb nadawania nazwy zamknięty.
•Media, do których można przypisać nazwę
- Zewnętrzny zmieniacz/odtwarzacz płyt CD: zmienia się w
zależności od zmieniacza/odtwarzacza. Patrz instrukcja obsługi
zmieniacza/odtwarzacza płyt CD.
• Nazwę płyty CD można zmienić za pomocą tej samej operacji
jaką zastosowano do nadania nazwy.
Przewijanie tekstu/tytułu
Przewijanie wyświetlanego tekstu CD lub tytułu minidysku MD.
Naciśnij przycisk [SCRL].
— 78 —
Page 79

Menu systemu
AM
4¢
FM
MENU
Wskaźnik RDS
Wskaźnik AUTO
Wyświetlacz menu
Menu systemu
Ustawianie podczas pracy dźwięku brzęczyka i temu podobnych
funkcji.
W tym miejscu objaśniono podstawową metodę funkcjonowania
systemu menu . Po tym objaśnieniu operacji przedstawiono pozycje
menu oraz ich ustawione treści.
1 Wejście do trybu menu
Naciśnij przycisk [MENU] oraz przytrzymaj go przynajmniej przez
1 sekundę.
Wyświetlone zostaje "MENU".
2 Wybierz pozycję menu
Naciśnij przycisk [FM] lub [AM].
Przykład: Gdy chcesz ustawić dźwięk brzęczyka, wybierz
zobrazowanie "BEEP".
3 Ustaw pozycję menu
Naciśnij przycisk [4] lub [¢].
Przykład: Gdy zostanie wybrany "BEEP", za każdym
naciśnięciem przycisku brzęczyk włącza się lub
wyłącza - "BEEP ON" lub "BEEP OFF". Jako ustawianie
wybierz.
Możesz kontynuować powracając do kroku 2 oraz ustawiając
inne pozycje.
4 Wyjście z trybu menu
Naciśnij przycisk [MENU].
Gdy zostają potem wyświetlone inne pozycje, które odpowiadają
powyższej podstawowej metodzie funkcjonowania, wchodzi się do
mapy ustawień ich wartości. (Normalnie oryginalnym ustawieniem
jest najwyższe ustawienie na mapie.)
Wyjaśnienia dla pozycji, które nie odpowiadają tej metodzie
(<Ręczna regulacja zegara> itp.) są wprowadzone stopniowo.
— 79 —
Page 80

Menu systemu
Strefa czujnika dotykowego
Ustawienie włączania/wyłączania dźwięku kontrolnego (brzęczyka).
Zobrazowanie Ustawienie
"BEEP ON" Słyszalny jest brzęczyk.
"BEEP OFF" Sygnał brzęczyka skasowany.
Ręczna regulacja zegara
Ta ka regulacja zegara może być wykonana jeżeli <Synchronizacja
zegara> (strona 80) jest wyłączona.
1 Wybierz tryb regulacji zegara
Naciśnij przycisk [FM] lub [AM].
Wybierz zobrazowanie "CLK ADJ".
2 Wejście do trybu regulacji zegara
Polski
Naciśnij przycisk [4] lub [¢] oraz przytrzymaj go przynajmniej
przez 2 sekundy.
Zobrazowanie zegara pulsuje.
3 Nastaw godzinę
Naciśnij przycisk [FM] lub [AM].
Nastaw minutę
Naciśnij przycisk [4] lub [¢].
4 Wyjście z trybu regulacji zegara
Naciśnij przycisk [MENU].
Funkcja KRC-394/KRC-37
Synchronizacja zegara
Synchronizacja danych czasu nadawanych przez stację RDS oraz
zegara tego urządzenia.
Zobrazowanie Ustawienie
"SYNC ON" Synchronizuje czas.
"SYNC OFF" Ręczna regulacja czasu.
Synchronizacja zegara zajmuje 3 do 4 minut.
DSI (Disabled System Indicator)
Po odłączeniu płyty czołowej pulsuje czerwony wskaźnik ostrzegając
potencjalnych złodziei.
Zobrazowanie Ustawienie
"DSI ON" Dioda świecąca pulsuje.
"DSI OFF" Dioda świecąca wyłączona.
Wybieralna iluminacja
Wybieranie zielonego lub czerwonego koloru iluminacji
(podświetlenia).
Zobrazowanie Ustawienie
"COL GRN" Kolor iluminacji jest zielony.
"COL RED" Kolor iluminacji jest czerwony.
Funkcja KRC-394/KRC-37
Funkcja biuletynu wiadomości z ustawianiem czasu
Funkcja ta włącza stację, gdy biuletyn wiadomości rozpoczyna się
jeżeli nawet nie słucha się radia. Można również ustawić okres czasu,
w którym przerwania są zabronione.
Zobrazowanie i ustawienie
"NEWS OFF"
"NEWS 00M"
…
"NEWS 90M"
Jeżeli ustawiony jest okres "NEWS 00M" — "NEWS 90M",
włączona zostaje funkcja przerywania biuletynu wiadomości.
Gdy rozpoczyna się biuletyn wiadomości, wyświetlony zostaje
— 80 —
wskaźnik "NEWS" oraz biuletyn zostaje włączony.
Page 81

• Jeżeli wybierzesz ustawienia "20M", następne biuletyny
wiadomości nie będą odbierane przez 20 minut po odebraniu
pierwszego biuletynu.
• Poziom głośności odbioru biuletynu wiadomości jest taki sam jak
ustawiony dla informacji o ruchu drogowym (strona 90).
• Funkcja ta jest dostępna jedynie wtedy, gdy wymagana stacja
wysyła sygnał PTY dla biuletynów wiadomości lub należy do sieci
<Enhanced Other Network> wysyłających kod PTY dla biuletynów
wiadomości.
• Jeżeli funkcja przerywania nadawania wiadomości jest włączona,
wówczas przełącza na stację FM.
Przeszukiwanie lokalne <w trybie tunera>
Strojenie z automatycznym przeszukiwaniem uwzględnia tylko stacje
o dobrym odbiorze.
Zobrazowanie Ustawienie
"LO.S OFF" Funkcja przeszukiwania lokalnego jest
wyłączona.
"LO.S ON" Funkcja przeszukiwania lokalnego jest
włączona.
Funkcja KRC-394/KRC-37
Tryb strojenia <w trybie tunera>
Ustawianie trybu strojenia.
Tryb strojenia Zobrazowanie Działanie
Automatyczne "AUTO 1" Automatyczne poszukiwanie
przeszukiwanie stacji.
Programowane Poszukiwanie stacji w
przeszukiwanie "AUTO 2" zaprogramowanej pamięci
według kolejności.
Ręczne "MANUAL" Normalne ręczne sterowanie
strojeniem.
Funkcja KRC-394/KRC-37
Automatyczne wprowadzanie do pamięci
<w trybie tunera>
Gdy chodzi o metodę funkcjonowania, patrz <Automatyczne
wprowadzanie do pamięci> (strona 69).
Funkcja KRC-394/KRC-37
AF (Alternative Frequency)
Gdy odbiór jest w dalszym ciągu niedobry, funkcja ta automatycznie
przełącza na stację o lepszym odbiorze na innej częstotliwości, która
nadaje ten sam program w tej samej sieci RDS.
Zobrazowanie Ustawienie
"AF ON" Funkcja AF jest włączona.
"AF OFF" Funkcja AF jest wyłączona.
Gdy funkcja AF zostaje włączona, zapala się wskaźnik "RDS".
Gdy nie jest dostępna żadna stacja o silniejszym odbiorze,
nadająca ten sam program sieci RDS, możesz słuchać nadawanych
audycji w kawałkach i strzępach. W takim przypadku wyłącz funkcję
AF.
— 81 —
Page 82

Menu systemu
Funkcja KRC-394/KRC-37
Ograniczenie rejonu RDS (funkcja ograniczenia rejonu)
Sam możesz wybrać czy ograniczać się czy nie do konkretnego
rejonu kanałów RDS odbieranych przy włączonej funkcji AF dla
konkretnej sieci.
Zobrazowanie Ustawienie
"REG ON" Funkcja ograniczenia rejonu jest włączona.
"REG OFF" Funkcja ograniczenia rejonu jest wyłączona.
Czasami stacje tej samej sieci nadają różne programy lub
korzystają z różnych nazw programów usługowych.
Przewijanie tekstu
<w trybie sterowania odtwarzaczem zewnętrznym>
Ustawianie przewijanie wyświetlanego tekstu.
Zobrazowanie Ustawienie
"SCL MANU" Przewijanie nie następuje.
"SCL AUTO" Przewijanie następuje, gdy zmieni się
zobrazowanie.
Przewijanie tekstu jest przedstawione poniżej.
• CD tekst
• MD tytuł
Funkcja KRC-394/KRC-37
Automatyczne przeszukiwanie TP
Gdy włączona jest funkcja TI oraz panują złe warunki odbioru stacji
nadającej informacje o ruchu drogowym, automatycznie zostanie
Polski
wyszukana stacja również nadająca informacje o ruchu drogowym
natomiast o lepszych warunkach odbioru.
Zobrazowanie Ustawienie
"ATPS ON" Funkcja automatycznego przeszukiwania TP
"ATPS OFF" Funkcja automatycznego przeszukiwania TP
jest włączona.
jest wyłączona.
Odbiór mono <Odbiór w zakresie FM>
Szum można zmniejszyć odbierając audycje stereofoniczne jako
mono.
Zobrazowanie Ustawienie
"MONO OFF" Odbiór mono jest wyłączony.
"MONO ON" Odbiór mono jest włączony.
Nadawanie nazw dyskom
<w trybie sterowania odtwarzaczem zewnętrznym>
Metoda ustawiania patrz <Nadawanie nazw dyskom> (strona 78).
Timer wyłączający zasilanie
Ustawienie timera na automatyczne wyłączenie zasilania tego
urządzenia, gdy przedłuża się trwanie stanu gotowości.
Skorzystanie z tego ustawienia może zaoszczędzić akumulator
pojazdu.
Zobrazowanie Ustawienie
"OFF – – –" Timer wyłączający zasilanie jest
wyłączony.
"OFF 20M" Wyłącza zasilanie po upływie 20 minut.
(Ustawienie fabryczne)
"OFF 40M" Wyłącza zasilanie po upływie 40 minut.
"OFF 60M" Wyłącza zasilanie po upływie 60 minut.
— 82 —
Page 83

Akcesoria
Widok zewnętrzny
1
2
3
Wykorzystanie jakichkolwiek akcesoriów spoza tych, które zostały
dostarczone, może spowodować uszkodzenie aparatu. Upewnij się czy
rzeczywiście używasz akcesoria dostarczone razem z urządzeniem
przedstawione na powyższym rysunku.
..........................................1
..........................................2
..........................................1
Liczba pozycji
Procedura instalowania
1. Aby zapobiec zwarciom, wyjmij kluczyki samochodu ze stacyjki i
odłącz końcówkę - akumulatora.
2. Dokonaj odpowiednich połączeń przewodów wejściowych i
wyjściowych dla każdego urządzenia.
3. Samochody ze złączem ISO:
Połącz końcówkę głośnika samochodu do złącza B urządzenia
oraz końcówkę zasilania zewnętrznego do złącza A.
Samochody bez złącza ISO:
Najpierw podłącz kable wiązki przewodów do kostki, a potem
podłącz kostkę do urządzenia.
4. Zainstaluj radioodtwarzacz w samochodzie.
5. Podłącz końcówkę - akumulatora.
6. Naciśnij przycisk (reset).
2
OSTRZEŻENIE
Jeżeli podłączysz przewód zapłonu (czerwony) i przewód
akumulatora (żółty) do nadwozia (masa), możesz spowodować
zwarcie oraz wywołać pożar. Zawsze podłączaj te przewody do
źródła zasilania poprzez skrzynkę bezpiecznikową.
2
OSTRZEŻENIA
●
Jeżeli twój samochód nie jest przygotowany do tego konkretnego
systemu połączeń, zasięgnij porady u dealera firmy KENWOOD.
●
Wykorzystuj tylko adaptery antenowe (standardu ISO-JASO) jeżeli
przewód antenowy posiada wtyczkę ISO.
●
Upewnij się czy wszystkie podłączenia są pewne wkładając końcówki
tak aż zamkną się całkowicie.
●
Jeżeli układ zapłonowy w twoim samochodzie nie posiada pozycji
ACC, albo przewód zapłonu jest podłączony do źródła zasilania o
stałym napięciu, takiego jak przewód akumulatora, zasilanie nie
będzie sprężone z zapłonem (tzn. nie będzie włączane ani wyłączane
razem z zapłonem). Jeżeli chcesz połączyć włączenie zasilania
radioodtwarzacza z zapłonem, podłącz przewód zapłonu do źródła
zasilania, które może być włączone i wyłączone kluczem zapłonu.
●
Jeżeli przepali się bezpiecznik, najpierw upewnij się czy przewody
nie spowodowały krótkiego zwarcia, a potem zamień uszkodzony
bezpiecznik na nowy o tym samym amperażu.
●
Niepodłączone końcówki kabli zabezpiecz taśmą winylową lub za
pomocą innego podobnego materiału. Aby zapobiec zwarciom, nie
usuwaj osłonek na końcach lub końcówkach niepodłączonych kabli.
●
Podłącz przewody głośników do odpowiadającym im końcówek.
Urządzenie może się uszkodzić, albo nie będzie funkcjonować jeżeli
połączysz przewody zasilające
lową częścią samochodu.
●
Gdy do systemu podłączone są tylko dwa głośniki, podłącz ich
- i/lub połączysz je z dowolną meta-
przewody albo do obu przednich końcówek wyjściowych, albo
do obu tylnych końcówek wyjściowych (nie mieszaj przednich z
tylnymi). Dla przykładu, jeżeli podłączysz przewód + lewego
głośnika do przedniej końcówki wyjściowej, nie podłączaj
przewodu - do tylnej końcówki wyjściowej.
●
Po zainstalowaniu radioodtwarzacza sprawdź czy właściwie
funkcjonują światła hamowania, wskaźniki, wycieraczki itp.
●
Jeżeli konsola posiada pokrywÍ, sprawdę czy jednostka została tak
zainstalowana, aby płyta czołowa nie uderzała w tÍ pokrywÍ podczas
otwierania i zamykania.
— 83 —
Page 84

Podłączanie przewodów do końcówek
Wejście sterujące zmieniacza płyt kompaktowych
KENWOOD 25
Przed podłączeniem
zmieniacza płyt zapoznaj
się z jego instrukcją. 26
Polski
Skrzynka
bezpiecznikow
a samochodu
(główny
bezpiecznik) 6
Jeżeli nie dokonano połączenia, nie należy dopuścić
aby kabel wysunął się z osłonki. 3
4 Podłącz albo do końcówki sterowania zasilaniem,
gdy korzysta się z opcyjnego wzmacniacza zasilania,
albo do końcówki sterowania anteną w samochodzie.
Klucz
włącznika
zapłonu 5
Skrzynka bezpiecznikowa
samochodu 16
–
+
Akumulator 7
Wyjście tylne lewe
(Biały) 8
Wyjście tylne prawe
(Czerwony) 9
Przewód sterowania zasilaniem/
Silnikiem anteny (Niebieski/biały) 14
Do akumulatora 15
Końcówka sterowania
zasilaniem (P.86) 22
Samochodowa
wiązka kabli10
Przewód zapłonu (Czerwony)
17
Przewód akumulatora (Żółty)
18
Przewód masy (czarny) (do nadwozia samochodu)
19
— 84 —
Dla samochodu Volkswagen 1
Adapter antenowy (ISO-JASO)
(Akcesoria poz. 3) 2
Bezpiecznik (10A)
23
Wejście anteny
FM/AM 10
Położenie (P.85) 24
Końcówka sterowania
zasilaniem 28
Wiązka przewodów
(Akcesoria poz. 1) 13
29 Biały/czarny
Biały
31
32
Szary/czarny
Szary
34
35
Zielony/czarny
Zielony
38
Purpurowy/czarny
37
Purpurowy
40
Przewód anteny specjalnej
(dostępny w sprzedaży) 3
Do końcówki zasilania
sterowania 4
11 Przewód antenowy (ISO)
Adapter antenowy (ISO-JASO)
(Akcesoria poz.3) 12
Do lewego przedniego
głośnika 30
+
Do prawego przedniego
głośnika 33
+
Do lewego tylnego
głośnika 36
+
Do prawego
tylnego głośnika 39
+
Page 85

■ Mapa funkcji kostki
10
Kostka
połączeniowa B
Kostka
połączeniowa A
12345
1234567
Numer szpilki Położenie Funkcje
dla kostek ISO wtyczki*
<Kostka zasilania zewnętrznego>
A–4 1 Akumulator
2 Zapłon (ACC)
A–5 Sterowanie zasilaniem
A–7 1 Zapłon (ACC)
2 Akumulator
A–8 Połączenie Ziemia (masa)
<Kostka głośników>
B–1 Tylny prawy (+)
B–2 Tylny prawy (–)
B–3 Przedni prawy (+)
B–4 Przedni prawy (–)
B–5 Przedni lewy (+)
B–6 Przedni lewy (–)
B–7 Tylny lewy (+)
B–8 Tylny lewy (–)
* Położenie wtyczki: Patrz strona prawa
7
6
8
8
■ Położenie wtyczki
2
OSTRZEŻENIE
Układ kołków w kostce ISO zależy od typu twojego samochodu. Aby
nie uszkodzić urządzenia, upewnij się czy połączenia są
odpowiednie.
1 Kołek A-7 kostki ISO pojazdu jest połączony z zapłonem, a
kołek A-4 jest podłączony do źródła stałego zasilania.
(Ustawienie standardowe)
2 Kołek A-7 kostki połączeniowej ISO pojazdu jest podłączony do
źródła stałego zasilania, a kołek A-4 jest podłączony do
zapłonu.
• Jeżeli zarówno kołek A-7 jak też kołek A-4 są podłączone do stałego
zasilania pojazdu, stosuj ustawienia wtyczki 2.
• Jeżeli kołek A-7 jest podłączony do stałego zasilania pojazdu,
natomiast kołek A-4 nie jest podłączony do niczego, podłącz
urządzenie korzystając z wiązki przewodów (akcesoria poz.1).
— 85 —
Podłączanie kostki połączeniowej ISO
10
10
Page 86

Podłączanie przewodów do końcówek
■ Podłączenia końcówki sterowania zasilania
Wyjście końcówki sterowania zasilaniem jest przełączane razem z
włączaniem/wyłączaniem zasilania urządzenia. Końcówka ta może
być podłączona do końcówki P.CON (REMOTE) wzmacniacza,
albo wykorzystana jako zasilanie specjalnego kabla anteny dla
samochodów Volkswagen (MAKS. 300 mA).
Końcówka sterowania
zasilaniem
(końcówka płaska) 4
Instalacja
■ Instalacja
Ściana ogniowa lub wspornik metalowy
Wkręt (M4×8)
(dostępny w
sprzedaży)
Przewód sterowania
zasilania 5
Polski
Wzmacniacz mocy 6
Przewód antenowy (ISO) 2
Adapter antenowy
(ISO-JASO)
(Akcesoria poz. 3) 1
Przewód anteny specjalnej
Dla samochodu Volkswagen
(dostępny w sprzedaży)3
— 86 —
Zagnij płytki kieszeni
montażowej za po-
mocą śrubokręta lub
Wkręt samogwintujący
(dostępny w
sprzedaży)
Upewnij się czy aparat jest pewnie umocowany w swoim miejscu. Jeżeli
jego położenie nie jest stabilne, może ulec uszkodzeniu (może dla
przykładu zaniknąć dźwięk).
Metalowy pasek
montażowy
(dostępny w
sprzedaży)
podobnego urządze-
nia, mocując kieszeń
w swoim miejscu
Page 87

■ Zdejmowanie obramowania z twardej gumy
1 Włącz zaczepy uchwytów do wyjmowania i usuń oba dolne
zamki.
Opuść obramowanie i pociągnij ją do przodu tak jak przedstawiono na rysunku.
Zaczep
Zamek
Akcesoria poz. 2 Uchwyt do wyjmowania
2 Gdy opuszczona jest dolna krawędź obramowania, usuń dwa
górne elementy ustalające.
■ Wyjmowanie aparatu
1 Wyjmij obramowanie z twardej gumy jak przedstawiono w
punkcie “Zdejmowanie obramowania z twardej gumy”.
2 Wykręć wkręt (M4×8) z tylnej ścianki.
3 Wstaw głęboko oba uchwyty do wyjmowania w szczeliny po obu
stronach jak przedstawiono na rysunku.
Akcesoria poz. 2
Uchwyt do wyjmowania
Wkręt (M4×8)
(dostępny w
sprzedaży)
4 Opuść uchwyty do wyjmo-
wania w kierunku do dołu i
wycią gnij aparat do połowy
naciskając uchwyty do
wewnątrz.
Zachowaj ostrożność, aby uniknąć zranienia od zaczepów na
uchwytach do wyciągania.
Obramowanie może być wyjęte w ten sam sposób od góry.
5 Wyjmij aparat do końca
trzymając go rękami. Należy
uważać, aby go nie upuścić.
— 87 —
Page 88

Przewodnik wykrywania i usuwania usterek
To co wydaje się nieprawidłowym działaniem twojego
aparatu, może być jedynie rezultatem drobnych
nieprawidłowości obsługi lub błędnego podłączenia.
Zanim wezwiesz serwis sprawdź najpierw poniższą
tabelę prezentującą możliwe do napotkania trudności.
Ogólne
? Nie włącza się zasilanie.01
✔ Przepalił się bezpiecznik.
☞ Po sprawdzeniu przewodów pod kątem zwarcia, zamień
bezpiecznik na nowy o tym samym amperażu.
✔ W układzie zapłonowym pojazdu brak pozycji ACC.02
☞ Podłącz ten sam przewód zarówno do przewodu zapłonu jak też
do przewodu akumulatora.
? Jeżeli wybrałeś tryb gotowości, zasilanie zostanie wyłączone (OFF)
automatycznie.03
✔ Uruchamia się funkcja programatora, która wyłącza zasilanie (OFF).
☞ Jeżeli nie chcesz, aby zasilanie wyłączało się automatycznie
(OFF), skasuj funkcję programatora wyłączającą zasilanie.
Polski
? Nic się nie dzieje po wciskaniu przycisków.04
✔ Obwód scalony komputera umieszczony w radiood-twarzaczu nie
funkcjonuje prawidłowo.
☞ Naciśnij przycisk reset na radioodtwarzaczu (strona 64).
? Nie możesz przełączyć na to źródło.05
✔ Nie została włożona taśma (kaseta).
☞ Wstaw nośnik, który chcesz odsłuchać. Jeżeli nie ma nośników w
tym urządzeniu - nie możesz włączyć żadnego źródła.
✔ Nie jest podłączony zmieniacz.08
☞ Podłącz zmieniacz. Jeżeli zmieniacz nie jest podłączony do
końcówki wejściowej nie możesz przełączyć na takie źródło jak
dysk zewnętrzny.
? Pamięć zostaje wymazana po wyłączeniu zapłonu.10
✔ Przewód antenowy nie został podłączony do właściwej końcówki.
☞ Podłącz przewód w sposób prawidłowy, zgodnie z rozdziałem
<Podłączanie przewodów do końcówek>.
✔ Przewody zapłonu i akumulatora zostały nieprawidłowo
podłączone.11
☞ Podłącz przewód w sposób prawidłowy, zgodnie z rozdziałem
<Podłączanie przewodów do końcówek>.
? Funkcja wyłączenia w celu odebrania telefonu nie pracuje.15
✔ Kebel funkcji wyłączenia w celu odebrania telefonu nie jest właściwie
podłączony.
☞ Podłącz prawidłowo kabel korzystając z punktu <Podłączanie
przewodów do końcówek>.
? Funkcja wyłączenia w celu odebrania telefonu włącza się nawet
wówczas, gdy kabel tej funkcji nie jest podłączony.16
✔ Kabel funkcji wyłączenia w celu odebrania telefonu dotyka
metalowych części samochodu.
☞ Odsuń kabel funkcji wyłączenia w celu odebrania telefonu od
metalowych części samochodu.
? Nie słychać żadnego dźwięku, albo jest on słabo słyszalny.20
✔ Ustawienia tłumika lub równowagi znajdują się całkowicie po jednej
stronie.21
☞ Wypośrodkuj ustawienia tłumika lub równowagi.
✔ Przewody wejściowe/wyjściowe lub wiązki przewodów są podłączone
nieprawidłowo.22
☞ Podłącz prawidłowo przewody wejściowe/wyjściowe i/lub wiązki
przewodów. Patrz rozdział <Podłączanie przewodów do
końcówek>.
✔ Uszkodzona kaseta.23
☞ Popróbuj odtwarzanie innej kasety. Jeżeli nie ma z tym trudności,
pierwsza kaseta jest uszkodzona.
? Jakość dźwięku jest słaba lub dźwięk jest zniekształcony.25
✔ Przewód głośnika może być ściągnięty przez wkręt.
☞ Sprawdź przewody głośnika.
✔ Głowica taśmy jest brudna.26
☞ Oczyść głowicę taśmy.
✔ Głośniki nie zostały prawidłowo podłączone.27
☞ Przełącz przewody głośnika tak, aby każda końcówka wyjściowa
była podłączona do różnych głośników.
? Dźwięk czujnika dotykowego nie jest słyszalny.34
✔ Wykorzystywane jest gniazdo preout.
☞ Z gniazda preout nie można wyprowadzić dźwięku czujnika
dotykowego.
? Jeżeli nawet synchronizacja zegara jest włączona, nie można go
skorygować.35
✔ Odbierana stacja RDS nie wysyła sygnałów czasowych.
☞ Nastaw odbiór innej stacji RDS.
— 88 —
Page 89

Tuner jako źródło
? Odbiór stacji radiowych jest słaby.39
✔ Nie jest wysunięta antena zewnętrzna.
☞ Wyciągnij do końca pręt anteny.
✔ Nie został podłączony przewód sterowania anteną.40
☞ Podłącz przewód w sposób prawidłowy, zgodnie z rozdziałem
<Podłączanie przewodów do końcówek>.
? To nie jest ustawiona siła głosu informacji o ruchu drogowym. 43
✔ Ustawiona siła głosu jest mniejsza niż siła głosu tunera.
☞ Jeżeli siła głosu tunera jest większa od ustawionej, wówczas
wykorzystywana jest siła głosu tunera.
Źródłem jest kaseta
? Nie można wyjąć kasety taśmy.44
✔ Przyczyną może być to, że upłynęło ponad 10 minut od wyłączenia
przełącznika ACC.
☞ Kasetę można wyjąć tylko przed upływem 10 minut od wyłączenia
przełącznika ACC. Jeżeli upłynęło więcej czasu, wtedy włącz
przełącznik ACC ponownie i naciśnij przycisk wyrzutu kasety.
? Przewijanie taśmy oraz powtarzanie muzyki nie pracują
prawidłowo.45
✔ Odstępy pomiędzy utworami na taśmie nie mogą być rozpoznane
ponieważ są zbyt krótkie.
☞ Pomiędzy utworami powinno być co najmniej 4 sekundy.
✔ Odstępy pomiędzy utworami na taśmie nie mogą być rozpoznane ze
względu na zbyt silny szum w tych miejscach taśmy.46
☞ Zredukuj szum pomiędzy utworami.
? Przepuszczanie pustych fragmentów nie funkcjonuje.47
✔ Ponieważ szum jest zbyt głośny, nienagrane fragmenty nie mogą być
rozpoznane.
☞ Zmniejsz szum pomiędzy utworami.
? Przepuszczanie pustych fragmentów zachodzi w miejscach
nagranych.48
✔ Ze względu na niski poziom nagrania, jest ono rozpoznawane jako
brak nagrania.
☞ Wyłącz funkcję przepuszczania pustych fragmentów.
Źródłem jest płyta kompaktowa
? Wyświetlany jest komunikat "AUX" bez uzyskania trybu sterowania
dyskiem zewnętrznym.50
✔ Przełącznik O-N jest ustawiony po stronie "O".
☞ Ustaw przełącznik po stronie "N".
✔ Podłączony jest nie obsługiwany zmieniacz dysków.51
☞ Podłącz obsługiwany zmieniacz dysków. (strona 63)
? Wybrana płyta nie jest od-twarzana, lecz zamiast niej jest
odtwarzana inna.52
✔ Wybrana płyta kompaktowa jest bardzo brudna.
☞ Oczyść płytę kompaktową.
✔ Płyta kompaktowa została włożona odwrotnie.53
☞ Wstaw płytę kompaktową etykietą do góry.
✔ Płyta została wstawiona do innej szczeliny niż zadana.54
☞ Wyjmij cały magazyn płyt kompaktowych i sprawdź numer
zadanej płyty.
✔ Płyta kompaktowa jest poważnie zarysowana.55
☞ Dokonaj próby innej płyty kompaktowej.
? Nie odtwarza się wybrany utwór.58
✔ Wybrano odtwarzanie w przypadkowej kolejności lub odtwarzanie
magazynu płyt kompaktowych w przypadkowej kolejności.
☞ Wyłącz funkcję odtwarzania w przypadkowej kolejności lub
funkcję odtwarzania magazynu płyt kompaktowych w
przypadkowej kolejności.
? Funkcje: powtórzenie utworu, powtórzenie dysku, przeglądanie
utworów, odtwarzanie w przypadkowej kolejności oraz odtwarzanie
magazynu w przypadkowej kolejności rozpoczynają się same. 59
✔ Ustawienia nie zostają skasowane.
☞ Ustawienia tych funkcji pozostają włączone dopóki nie zostaną
wyłączone lub dysk wyrzucony, jeżeli nawet zasilanie jest
wyłączone lub zostanie zmienione źródło.
? Nie może odtwarzać dysków CD-R ani CD-RW.60
✔ Końcowe przetwarzanie nie jest wykonywane dla CD-R/CD-RW.
☞ Wykonywanie końcowego przetwarzaniae na nagrywarce CD.
✔ Do odtwarzania CD-R/CD-RW zastosowano niezgodny zmieniacz
(niekompatybilny).61
☞ Do odtwarzania CD-R/CD-RW należy zastosować zgodny
zmieniacz (kompatybilny).
— 89 —
Page 90

Przewodnik wykrywania i usuwania usterek
? Nie może być wykonane poszukiwanie utworu.66-2
✔ W przypadku pierwszej lub ostatniej piosenki w albumie.
☞ W każdym albumie poszukiwanie utworu nie może być dokonane
w kierunku do tyłu dla pierwszej piosenki, ani w kierunku do
przodu dla ostatniej piosenki.
W następujących sytuacjach zasięgnij konsultacji w
najbliższym punkcie serwisowym:
• Jeżeli nawet zmieniacz dysków jest podłączony, a źródło w zmieniaczu
nie jest podłączone, wówczas w trybie zmieniacza wyświetlane jest
zobrazowanie "AUX".
• Jeżeli nawet nie podłączone jest żadne urządzenie (KCA-S210A, CAC1AX, KDC-CPS89, KDC-CPS87, KDC-CX87, KDC-CPS85, KDC-CX85,
KDC-CPS82 czy KDC-CX82) wprowadzane jest wejście pomocnicze
podczas przełączania trybów.
Przedstawione poniżej komunikaty zobrazowują stan
twojego systemu.
EJECT: Magazyn płyt kompaktowych nie został załadowany
Polski
NO DISC: Żadna płyta nie została załadowana do magazynu.E02
E-04: Żadna płyta nie została załadowana do magazynu.E04
BLANK: Na minidysku nic nie zostało nagrane.
NO TRACK: Na minidysku nie zapisano żadnego utworu, chociaż
NO PANEL: Płyta czołowa podłączona do odtwarzacza CD
do zmieniacza. Magazyn płyt nie jest całkowicie
załadowany.E01
➪
Załaduj odpowiednio magazyn płyt.
W urządzeniu nie ma płyty kompaktowej.
➪ Wstaw płytę kompaktową.
➪
Załaduj płytę do magazynu płyt.
➪
Załaduj płytę do magazynu płyt.
Płyta kompaktowa jest bardzo brudna. Płyta
kompaktowa została wstawiona odwrotnie. Płyta
kompaktowa jest bardzo zarysowana.
➪ Oczyść płytę kompaktową i załaduj ją prawidłowo.
E10
posiada ona tytuł.E11
została zdjęta.E30
➪
Wstaw ją.
E-77: Aparat z jakichś powodów źle funkcjonuje.
➪
Naciśnij przycisk reset umieszczony na aparacie.
Jeżeli nie zniknie kod błędu "E-77" skontaktuj się
zajbliższym punktem serwisowym.
E-99: Być może zespół jest uszkodzony z jakiegoś
powodu.E99A
➪
Naciśnij przycisk reset umieszczony na
urządzeniu. Jeżeli kod "E-99" nie zniknie, zasięgnij
porady w najbliższym punkcie serwisowym.
HOLD: Gdy temperatura wewnątrz automatycznego
zmieniacza płyt przekracza 60°C, aktywizuje się
obwód zabezpieczający aparat, wstrzymując
wszystkie funkcje.Eod
➪
Ostudź aparat przez otwarcie okna lub włączenie
klimatyzacji. Gdy temperatura spadnie poniżej
60°C, płyta zacznie być odtwarzana od nowa.
NO NAME: Próba wyświetlenia DNPS podczas odtwarzania płyty
kompaktowej CD bez zaprogramowanych nazw.
NO TITLE: Próba wyświetlenia tytułu dysku lub tytułu utworu
podczas odtwarzania minidysku MD nie
posiadającego tytułu.E53
NO TEXT: Próba wyświetlenia tekstu płyty lub tekstu utworu
podczas odtwarzania płyty kompaktowej CD bez
tekstu.E54
LOAD: W zmieniaczu zachodzi wymiana dysku.E57
: Sekcja magnetofonu nie funkcjonuje prawidłowo.E60
2
3
(Migotanie)
➪
Ponownie wstaw kasetę. Jeżeli ta kaseta nie może
zostać wyrzucona, albo wyświetlacz nadal pulsuje
nawet, gdy kaseta została ponownie założona
prawidłowo, prosimy o wyłączenie zasilania oraz o
zasięgnięcie konsultacji w najbliższym ośrodku
serwisowym.
NO ACCES: Po włożeniu do zmieniacza, wykonywany jest DNPP
nie odtwarzany przynajmniej jeden raz.
E58
— 90 —
E77
E51
Page 91

Dane techniczne
Dane techniczne mogą ulec zmianie bez ostrzeżenia.
Sekcja tunera FM
Zakres odbioru (odstęp 50 kHz)...............87,5 MHz – 108,0 MHz
Czułość wejściowa (S/N = 26dB)........................0,7 µV/75 omów
Czułość bezszumności (S/N = 46dB) .................1,6 µV/75 omów
Charakterystyka częstotliwościowa (±3 dB) .........30 Hz – 15 kHz
Odstęp napięcia szumów (MONO) .....................................65 dB
Selektywność (DIN) (±400 kHz) ...................................... ≥ 80 dB
Odstęp stereo (1 kHz).........................................................35 dB
Sekcja tunera MW
Zakres odbioru (odstęp 9 kHz).....................531 kHz – 1611 kHz
Czułość wejściowa (S/N = 20dB) ........................................25 µV
Sekcja tunera LW
Zakres odbioru ...............................................153 kHz – 281 kHz
Czułość wejściowa (S/N = 20dB) ........................................45 µV
Sekcja odtwarzacza kasetowego
Szybkość taśmy .......................................................4,76 cm/sek.
Kołysanie i drżenie dźwięku (WRMS) ................................0,08 %
Charakterystyka częstotliwościowa (±3 dB) (120 µs)
...................................................................30 Hz – 14 kHz
Odstęp (1 kHz) ...................................................................43 dB
Odstęp napięcia szumów ...................................................54 dB
Sekcja audio
Maksymalna moc wyjściowa ..........................................45 W x 4
Moc wyjściowa (DIN 45324, +B=14,4 V)........................28 W x 4
Brzmienie dźwięku
Tony niskie (Bass) :..........................................100 Hz ±10 dB
Środkowe (Middle) :...........................................1 kHz ±10 dB
Tony wysokie (Treble) :.....................................10 kHz ±10 dB
Poziom/obciążenie preout
(podczas odtwarzania płyty dysku)........2000 mV / 10 komów
Impedancja preout....................................................≤ 600 omów
Ogólne
Napięcie robocze (dozwolony jest zakres 11 – 16 V).........14,4 V
Pobór prądu..........................................................................10 A
Rozmiary instalacyjne (Szerokość x Wysokość x Głębokość)
.............................................................182 x 53 x 152 mm
Masa ..................................................................................1,4 kg
— 91 —
Page 92

Obsah
Bezpečnostní pokyny .......................93
O magnetofonových kazetách.........94
O RDS..................................................94
Obecné funkce...................................95
Napájení
Výběr zdroje
Řízení hlasitosti
Atenuátor
Hlasitost (Loudness)
System Q
Ovládání audio
Nastavení reproduktoru
Přepínání zobrazení
TEL Mute (umlčení)
Odnímatelný čelní panel
Funkce tuneru (KRC-394/KRC-37)...98
Ladění
Paměť předvolených stanic
Automatické ukládání do paměti
Vyvolání stanic z paměti
Funkce RDS......................................100
Česky
Dopravní informace
Předvolená hlasitost pro dopravní
vysílání
PTY (Program Type)
Předvolba typu programu
Změna jazyka pro funkci PTY
Funkce tuneru (KRC-31).................103
Režim ladění
Ladění
Paměť předvolených stanic
Automatické ukládání do paměti
Vyvolání stanic z paměti
Funkce kazetového přehrávače.....104
Přehrávání magnetofonových kazet
Rychlé převíjení vpřed a vzad
Zdokonalené funkce kazety
Přeskočení prázdných částí
Vstup tuneru
Opakování
Funkce ovládání externího disku..106
Přehrávání externího disku
Rychlé převíjení vpřed a vzad
Vyhledávání skladby
Vyhledávání alba
Opakování skladby/alba
Ukázky skladeb
Nahodilé přehrávání
Nahodilé přehrávání zásobníku
Vkládání názvů disků (DNPS)
Přesouvání textu/názvu
Systém menu ...................................109
Systém menu
Tón dotykového sensoru
Manuální nastavení hodin
Synchronizované hodiny
DSI (Disabled System Indicator)
Volitelné podsvětlení
Nastavení vysílání zpráv s časovačem
Lokální vyhledávání
Režim ladění
Vstup automatické paměti
AF (Alternative Frequency - alternativní
kmitočet)
Omezení RDS na region
Automatické vyhledávání TP
Příjem mono
Přesouvání textu
Vkládání názvů disků
Časovač vypnutí
Příslušenství.....................................113
Postup při instalaci .........................113
Připojování kabelů ke svorkám.....114
Instalace............................................116
Przewodnik wykrywania i usuwania
usterek...........................................118
Specifikace .......................................121
— 92 —
Page 93

Bezpečnostní pokyny
2
VÝSTRAHA
Abyste předešli nebezpečí požáru,
pečlivě dodružujte následující pokyny:
• Přístroj zasuňte až nadoraz, aby byl
bezpečně zajištěn. V opačném případě se
může při havárii nebo nárazu uvolnit.
• Při prodlužování přívodů k zapalování, baterii
nebo zemního přívodu používejte pouze
kabely určené pro automobily nebo kabely o
průřezu 0,75 mm2 (AWG18) nebo větším,
aby nedošlo k přetížení kabelu a zničení
izolace.
• Aby nedošlo ke zkratu, nevkládejte do
přístroje ani v něm nenechávejte kovové
předměty (např. mince nebo kovové
nástroje).
• Jestliže se z přístroje uvolňuje kouř nebo
zápach, ihned přístroj vypněte a obraťte se
na prodejce Kenwood.
• Dbejte, aby se vaše prsty nezachytily mezi
čelní panel a přístroj.
• Dbejte, aby přístroj nespadl, ani jej
nevystavujte silným nárazům.
Přístroj se může poškodit nebo mohou
prasknout skleněné díly, které obsahuje.
•V případě poškození displeje z kapalných
krystalů (LCD) nebo jeho prolomení nárazem
se nedotýkejte uvolněné tekutiny. Tekutina
kapalných krystalů může ohrožovat vaše
zdraví nebo dokonce i život.
Jestliže vám tekutina kapalných krystalů z
LCD potřísní pokožku nebo oděv, ihned
zasažené místo důkladně umyjte mýdlem.
2
UPOZORNĚNÍ
Dodržováním následujících pokynů
předejdete poškození přístroje:
• Ujistěte se že přístroj připojujete na napájení
12 Vss s ukostřeným záporným pólem.
• Nesnímejte vrchní ani spodní kryt přístroje.
• Přístroj neinstalujte na místa, vystavená
přímému slunečnímu záření, vysokým
teplotám nebo nadměrné vlhkosti. Vyhněte
se i místům, kde by se do přístroje mohla
dostat voda, nebo místům prašným.
• Ne postavljajte uklonjenu prednju ploču ili
kućište prednje ploče na područja koja su
izložena izravnoj sunčanoj svijetlosti,
pretjeranoj toplini ili vlažnosti. Takodjer
izbjegavajte mjesta s previše prašine ili gdje
je moguće polijevanje vodom.
• Da biste spriječili pogoršanje, ne dirajte
terminale uredjaja ili prednje ploče prstima.
• Čelní panel nevystavujte silným nárazům,
jedná se o součást přesného zařízení.
• Při výměně pojistky používejte pouze
pojistky předepsaných hodnot. Použití
pojistky s jinými hodnotami může způsobit
selhání přístroje.
• Aby nedošlo ke zkratu, při výměně pojistky
nejprve odpojte kabelový svazek.
• Mezi čelní panel a přístroj nevkládejte žádné
předměty.
•K instalaci nepoužívejte jiné šrouby než
dodávané. Použití nesprávných šroubů může
přístroj poškodit.
DŮLEŽITÉ INFORMACE
O měniči disků, který se připojuje:
O CD přehrávačích/měničích CD připojených
k této jednotce.
K této jednotce lze připojit CD
přehrávače/měniče CD KENWOOD, uvedené
na trh v roce 1998 a později.
Viz také příslušný katalog, nebo konzultujte
prodejce produktů KENWOOD, který vám
poskytne informace o modelech CD
přehrávačů/měničů CD, které lze připojit.
Všimněte si, že kterýkoliv CD přehrávač/měnič
CD, uvedený na trh v roce 1997 nebo dříve a
měnič CD vyrobený jinými výrobci, nelze k
této jednotce připojit.
Nepodporovaná spojení mohou vést k
poškození jednotky.
Nastavení přepínače O-N do polohy "N" pro
použitelné měniče disků/CD přehrávače
KENWOOD.
Funkce, které lze použít a informace, které lze
zobrazit, se budou lišit v závislosti na
modelech, které připojujete.
Nesprávným propojením přístroje s CD
měničem může dojít k poškození obou
přístrojů.
— 93 —
Page 94

Bezpečnostní pokyny
POZNÁMKA
• Jestliže při instalaci přístroje nastanou
obtíže, obraťte se na prodejce Kenwood.
• Jestliže zařízení selže, stiskněte tlačítko
RESET. Jestliže se zdá, že přístroj nepracuje
správně, stiskněte nejprve tlačítko Reset. V
případě, že se problém nevyřeší, obraťte se
na prodejce Kenwood.
• Jestliže ovládáte měnič CD poprvé a ten
nepracuje správně, stiskněte tlačítko RESET.
Nastaví se základní pracovní podmínky.
Tlačítko Reset
• Při teplotách nižších než 5 stupňů celsia (41
°F) může být zobrazení na LCD displeji
špatně čitelné.
• Zobrazení displeje a panelu v tomto návodu
slouží jako příklad pro ujasnění výkladu
použití ovládání. Zobrazení na displeji na
Česky
těchto ilustracích se proto může lišit od
zobrazení na skutečném zařízení a některé
ilustrace znázorňují momenty, které v
reálném provozu nemohou nastat.
Čišćenje terminala prednje ploče
Ukoliko se terminali uredjaja ili prednje ploče
isprljaju, obrišite ih suhom, mekanom krpom.
Čištění jednotky
Jestliže je čelní panel znečištěn, otřete jej
měkkou suchou látkou. Při silném znečištění
lze použít látku navlhčenou neutrálním
čistidlem a po vyčištění zbytky čistidla
důkladně otřít.
Použití spreje přímo na přístroj může mít vliv
na mechanické díly. Čištění čelního panelu
hrubou látkou nebo čistidly na bázi ředidel
nebo alkoholu může poškodit povrch panelu
nebo smazat popisy.
O magnetofonových kazetách
Čištění magnetofonové hlavy
Pokud je reprodukce zašuměná nebo je
kvalita zvuku během přehrávání nízká kvůli
znečištěné magnetofonové hlavě, vyčistěte ji.
O magnetofonových kazetách
• Je-li páska uvolněná, napněte ji.
• Pokud se etiketa z kazety odlupuje, přilepte
ji lepidlem.
• Nepoužívejte poničené kazety.
• Nepokládejte kazety na palubní desku a
všude tam, kde jsou vysoké teploty.
• Nepoužívejte kazety, které jsou delší než 100
minut.
O RDS
RDS (Radio Data System – systém
radiových dat)
Při poslechu RDS stanice (tj. stanice vysílající
signál RDS) se zobrazuje název stanice,
usnadňující přehled o přijímané stanici.
RDS (Radio Data System) stanice vysílají i
kmitočty jiných vysílačů této stanice. Jestliže
cestujete na delší trase, tato funkce automaticky přepíná na místní kmitočty s nejlepším
signálem sítě vysílačů stanice, kterou chcete
poslouchat. Data se automaticky uloží do
paměti, takže přijímač může rychle přepnout
na jinou RDS stanici, vysílající stejný program,
ale s lepším příjmem. To i včetně stanic
uložených v paměti předvoleb, které
posloucháte často.
Enhanced Other Network
(rozšíření na další sítě)
Stanice poskytující <Enhanced Other
Network> vysílají informaci o jiných RDS
stanicích, které vysílají dopravní vysílání.
Máte-li naladěnu stanici, která nevysílá
dopravní informace, ale jiná RDS stanice
začne vysílat dopravní zpravodajství, tuner se
na dobu dopravního vysílání automaticky
přeladí na tuto jinou stanici.
Alarm
Jestliže je vysíláno nouzové vysílání
(oznamující nehodu atd.), přeruší se aktivní
funkce a přijme se varování.
— 94 —
Page 95

Obecné funkce
4
¢
SRC
FMAM
Q
/AUD
u
d
ATT/LOUD
CLK
Uvolňovací tlačítko
Napájení
Zapnutí napájení
Stiskněte tlačítko [SRC].
Vypnutí napájení
Stiskněte tlačítko [SRC] na dobu alespoň 1 vteřiny.
Výběr zdroje
Stiskněte tlačítko [SRC].
Požadovaný režim Zobrazení
Tuner "TUNER"
Kazeta "TAPE"
Externí disk "DISC"/"CD"
Standby (pouze v režimu podsvětlení) "ALL OFF"
Po uplynutí 20ti minut v režimu Standby tato jednotka automaticky
vypne napájení, aby tak šetřila baterii automobilu.
Doba vypnutí může být nastavena v kapitole <Časovač vypnutí>
(viz str. 112).
Indikátor SYSTEM Q
Indikátor ATT
Indikátor LOUD
Řízení hlasitosti
Zvýšení hlasitosti
— 95 —
Stiskněte tlačítko [u].
Ztlumení hlasitosti
Stiskněte tlačítko [d].
Page 96

Obecné funkce
Atenuátor
Rychlé ztlumení hlasitosti.
Stiskněte tlačítko [ATT].
Každým stisknutím tlačítka je atenuátor buď zapnut, nebo vypnut.
Je-li jednotka zapnutá, indikátor "ATT" bliká.
Hlasitost (Loudness)
Vyrovnání basů a výšek při ztlumené hlasitosti.
Stiskněte tlačítko [LOUD] na dobu alespoň 1 vteřiny.
Každým stisknutím tlačítka na dobu alespoň 1 vteřiny je loudness
buď zapnuta, nebo vypnuta.
Je-li jednotka zapnutá, indikátor "LOUD" svítí.
System Q
Nastavení nejlepšího zvuku pro různé hudební styly.
1 Zvolte zdroj, který chcete nastavit
Stiskněte tlačítko [SRC].
2 Zvolte typ zvuku
Česky
Stiskněte tlačítko [Q].
Při každém stisknutí tlačítka je aktivováno nastavení zvuku.
Nastavení zvuku Zobrazení
Plochý zvuk "FLAT"
Rock "ROCK"
To p 40 "TOP40"
Pop "POPS"
Jazz "JAZZ"
Lehký žánr "EASY"
Prostorový zvuk — Jednoduchý "SCAN"
• Každé nastavení hodnot je obměňováno v režimu <Nastavení
reproduktoru> (viz str. 97).
Nejdříve zvolte typ reproduktoru pomocí Nastavení reproduktoru.
• Je-li změněno nastavení System Q, nahradí hloubky, středy a
výšky, nastavené v režimu Ovládání audio, hodnoty System Q.
Ovládání audio
1 Zvolte zdroj, který chcete upravit
Stiskněte tlačítko [SRC].
2 Aktivujte režim Ovládání audio
Stiskněte tlačítko [AUD] na dobu alespoň 1 vteřiny.
3 Zvolte funkci audio, kterou chcete upravit
Stiskněte tlačítko [FM] nebo [AM].
Při každém stisknutí tlačítka se funkce, které mohou být
upraveny, přepnou tak, jak je zobrazeno níže.
4 Upravte vybranou funkci
Stiskněte tlačítko [4] nebo [¢].
Nastavitelné funkce Zobrazení Rozsah
Úroveň basů "BAS" –8 — +8
Středy "MID" –8 — +8
Výšky "TRE" –8 — +8
Vyvážen "BAL" L15 — R15
Předozadní vyvážení "FAD" R15 — F15
5 Ukončete režim Ovládání audio
Stiskněte tlačítko [AUD].
— 96 —
Page 97

Nastavení reproduktoru
Jemné ladění, aby hodnota System Q byla při nastavování typu
reproduktoru optimální.
1 Aktivujte Standby
Stiskněte tlačítko [SRC].
Zvolte zobrazení "ALL OFF".
2 Aktivujte režim Nastavení reproduktorů
Stiskněte tlačítko [Q].
3 Zvolte typ reproduktoru
Stiskněte tlačítko [4] nebo [¢].
Každým stisknutím tlačítka je aktivováno nastavení tak, jak je
uvedeno níže.
Typ reproduktoru Znázornění
VYPNUTO "SP OFF"
Pro reproduktor OEM "SP OEM"
Pro reproduktor 6 & 6x9 palců "SP 6/6x9"
Pro reproduktor 5 & 4 palců "SP 5/4"
4 Ukončete režim Nastavení reproduktorů
Stiskněte tlačítko [Q].
Přepínání zobrazení
Přepínání zobrazovaných informací.
Stiskněte tlačítko [CLK].
Každým stisknutím tlačítka aktivujete zobrazení tak, jak je
uvedeno níže.
V režimu tuneru
Informace
Služba pro zobrazování názvu stanice nebo frekvence
Hodiny
V režimu kazety
Informace
Přehrávaná strana
Hodiny
V režimu externího disku
Informace Zobrazení
Délka skladby
Název disku "D-NAME"
Titul disku "D-TITLE"
Titul skladby "T-TITLE"
Hodiny
TEL Mute (umlčení)
Audio systém se při příchozím telefonátu automaticky odmlčí.
Při příchozím telefonátu
se zobrazí "CALL".
Audio systém se přeruší.
Poslech audio zařízení během telefonování
Stiskněte tlačítko [SRC].
"CALL" zmizí a audio systém se opět aktivuje.
Ukončení telefonátu
Zavěste telefon.
"CALL" zmizí a audio systém se opět aktivuje.
— 97 —
Page 98

Obecné funkce
#1 – 6
4
¢
SRC
AM
FM
MENU
Odnímatelný čelní panel
Čelní panel je možné sejmout a odnést jej s sebou, což pomáhá
odradit zloděje.
Sejmutí čelního panelu
Stiskněte tlačítko Release (Uvolnit).
Čelní panel je odjištěn a lze jej sejmout.
• Čelní panel je křehkým zařízením a může být úderem nebo ránou
snadno poškozen. Proto jej vždy uchovávejte v přiloženém
speciálním pouzdře.
• Nevystavujte čelní panel ani pouzdro přímým slunečním paprskům
nebo vysokým teplotám a vlhkosti. Vyhněte se i místům, kde by se
do přístroje mohla dostat voda nebo prach.
Nasazení čelního panelu
1 Spojte výstupky na zařízení s drážkami na čelním panelu.
Funkce tuneru
Funkce modelů KRC-394/KRC-37
Česky
2 Zatlačte na čelní panel tak, aby cvaklo zajištění.
Čelní panel je nyní zajištěn na svém místě a zařízení je možno
používat.
Zobrazení pásma
— 98 —
Číslo stanice předvoleb
Indikátor ST
Zobrazení frekvence
Page 99

Ladění
Výběr stanice.
Automatické ukládání do paměti
Automatické ukládání stanic s dobrým příjmem.
1 Zvolte režim tuneru
Stiskněte tlačítko [SRC].
Zvolte zobrazení "TUNER".
2 Zvolte pásmo
Stiskněte tlačítko [FM] nebo [AM].
Stisknutí tlačítka [FM] přepínáte mezi pásmem FM1, FM2 a FM3.
3 Vyberte laděním nahoru a dolů pásmo
Stiskněte tlačítko [4] nebo [¢].
Při příjmu stereo stanic se aktivuje indikátor "ST".
Paměť předvolených stanic
Vložení stanice do paměti.
1 Zvolte pásmo
Stiskněte tlačítko [FM] nebo [AM].
2 Zvolte kmitočet (frekvenci), který chcete uložit do paměti
Stiskněte tlačítko [4] nebo [¢].
3 Vložte kmitočet do paměti
Stiskněte tlačítko [#1] — [#6] na dobu alespoň 2 vteřin.
Uložené číslo jednou blikne na displeji.
Pro každé pásmo může být uložena pod tlačítky [#1] — [#6]
vždy jedna stanice.
1 Zvolte pásmo pro Vstup automatické paměti
Stiskněte tlačítko [FM] nebo [AM].
2 Aktivujte režim Menu
Stiskněte tlačítko [MENU] na dobu alespoň 1 vteřiny.
Zobrazí se "MENU".
3 Zvolte režim Vstup automatické paměti
Stiskněte tlačítko [FM] nebo [AM].
Zvolte zobrazení "A-MEMORY".
4 Otevřete Vstup automatické paměti
Stiskněte tlačítko [4] nebo [¢] na dobu alespoň 2 vteřin.
Po uložení šesti stanic, které mohou být přijímány, se Vstup
automatické paměti uzavře.
• Je-li <Funkce AF> (viz str. 111) zapnutá, mohou být do paměti
ukládány pouze stanice RDS.
• Je-li Vstup automatické paměti použit v pásmu FM2, nastavené
stanice RDS v pásmu FM1 nejsou uloženy do paměti.
Podobně je tomu při jeho použití v pásmu FM3, nastavené stanice
RDS v pásmech FM1 nebo FM2 nejsou uloženy.
Vyvolání stanic z paměti
Vyvolávání stanic z paměti.
1 Zvolte pásmo
Stiskněte tlačítko [FM] nebo [AM].
2 Vyvolejte vybranou stanici
Stiskněte tlačítko [#1] — [#6].
— 99 —
Page 100

Funkce RDS
#1 – 6
AM
PTY
4¢
FM
TI/VOL ADJ
CLK
Funkce modelů KRC-394/KRC-37
Česky
Indikátor PTY
Indikátor TI
Dopravní informace
Automatické přepnutí na dopravní informace v okamžiku, kdy začne
dopravní vysílání i přesto, že neposloucháte rádio.
Stiskněte tlačítko [TI].
Každým stisknutím tlačítka je zobrazení funkce Dopravní
informace buď zapnuta, nebo vypnuta.
Je-li jednotka zapnutá, rozsvítí se indikátor "TI".
Není-lil naladěna žádná stanice, která vysílá dopravní informace,
indikátor "TI" bliká.
Jakmile začne dopravní vysílání, rozsvítí se "TRAFFIC" a vysílání
se zapne.
Je-li funkce Dopravní informace aktivovaná během poslechu AM
pásma, vysílání se automaticky přepne do pásma FM.
Příjem dalších stanic s dopravními informacemi
Stiskněte tlačítko [4] nebo [¢].
Přepnutí stanic s dopravními informacemi může být provedeno při
poslechu rádia.
Předvolená hlasitost pro dopravní vysílání
Nastavení hlasitosti během dopravního vysílání.
1 Nalaďte stanici.
2 Nastavte požadovanou hlasitost.
3 Nastavenou hlasitost uložte
Stiskněte tlačítko [VOL ADJ] na dobu alespoň 2 vteřin.
Úroveň hlasitosti jednou blikne na displeji.
— 100 —
 Loading...