

Page 1

KDC-PS9060R
KDC-8060R
KDC-7060R
©B64-1181-00 (EW)
COMPACT
DIGITAL AUDIO
CD-RECEIVER
INSTRUCTION MANUAL
Page 2
Contents
— 2 —
English
Before use
Safety precautions ........................................................................3
Handling Compact discs................................................................5
Buttons and Display
Basic operations............................................................................6
Tuner features...............................................................................6
RDS features.................................................................................7
Disc control features.....................................................................7
Other features...............................................................................8
Steering remote control................................................................8
Remote control .............................................................................8
Basic operations
Stealth Retraction Mechanism......................................................9
Switching Modes........................................................................10
Volume........................................................................................10
Attenuator...................................................................................10
Loudness ....................................................................................10
Menu System..............................................................................10
Tuner features
K2I (Kenwood Inteligent Twin IF) ................................................12
Selecting Tuning Mode...............................................................12
Tuning .........................................................................................12
Local Seek Function....................................................................13
Monaural Reception....................................................................13
Switching Display for Tuner (non-RDS station)...........................13
Station Preset Memory...............................................................13
Auto Memory Entry.....................................................................14
Direct Access Tuning..................................................................14
Preset station seek with Programme service name...................15
RDS features
RDS (Radio Dara System) ...........................................................15
EON (Enhanced Other Network).................................................15
Alarm...........................................................................................15
AF (Alternative Frequency) Function...........................................16
Restricting RDS Region (Region Restrict Function)....................16
Traffic Information Function........................................................16
Auto TP Seek Function................................................................17
Presetting Volume for Traffic Information/News ........................17
News Bulletin Function with PTY News Timeout Setting...........18
Programme Type (PTY) Function ................................................18
Disc control features
Playing CDs.................................................................................20
Playing Other Disc mode ............................................................21
Fast Forwarding and Reversing Disc Play...................................21
Track Search................................................................................21
Disc Search.................................................................................22
Track / Disc Repeat Function ......................................................22
Track Scan Function....................................................................22
Disc Scan Function......................................................................23
Random Play Function ................................................................23
Magazine Random Play Function................................................23
Presetting Disc Names ...............................................................24
Text Scroll ...................................................................................25
Switching Display for Discs.........................................................26
Direct Track Search.....................................................................26
Direct Disc Search.......................................................................27
Disc Name Preset Play (DNPP)...................................................27
Other features
Audio Control Setting..................................................................28
Table of Audio Control Setting....................................................28
Switching Preout.........................................................................29
TEL Mute Function......................................................................29
Navigation Mute Function...........................................................29
Touch sensor tone ......................................................................30
Selectable Illumination................................................................30
Contrast Adjustment...................................................................30
Automatic Dimmer Function.......................................................30
Switching Graphic Display...........................................................31
Switching Clock Display..............................................................31
Switching Spectrum Analyzer Display.........................................31
Adjusting Time............................................................................32
Code Security Function...............................................................33
Basic operations of remote control (Optional)
...................34
Basic operations of steering remote control
......................36
Installation
Accessories.................................................................................37
Installation Procedure..................................................................37
Connecting Cables to Terminals .................................................38
Installation...................................................................................39
Removing the Unit......................................................................40
Attaching Steering Remote Control............................................41
Troubleshooting guide.............................................................42
Specifications.............................................................................45
Page 3
— 3 —
To prevent injury and/or fire, take the
following precautions:
• Insert the unit all the way until it is fully
locked in place. Otherwise it may fly out of
place during collisions and other jolts.
• When extending the ignition, battery or
ground cables, make sure to use automotivegrade cables or other cables with an area of
0.75mm
2
(AWG18) or more to prevent cable
deterioration and damage to the cable
coating.
• To prevent short circuits, never put or leave
any metallic objects (e.g., coins or metal
tools) inside the unit.
• If the unit starts to emit smoke or strange
smells, turn off the power immediately and
consult your Kenwood dealer.
• Make sure not to get your fingers caught
between the faceplate and the unit.
• Be careful not to drop the unit or subject it to
strong shock.
The unit may break or crack because it
contains glass parts.
• Do not touch the liquid crystal fluid if the LCD
is damaged or broken due to shock. The
liquid crystal fluid may be dangerous to your
health or even fatal.
If the liquid crystal fluid from the LCD
contacts your body or clothing, wash it off
with soap immediately.
2WARNING
To prevent damage to the machine,
take the following precautions:
• Make sure to ground the unit to a negative
12V DC power supply.
• Do not open the top or bottom covers of the
unit.
• Do not install the unit in a spot exposed to
direct sunlight or excessive heat or humidity.
Also avoid places with too much dust or the
possibility of water splashing.
• Do not subject the faceplate to excessive
shock, as it is a piece of precision equipment.
• When replacing a fuse, only use a new one
with the prescribed rating. Using a fuse with
the wrong rating may cause your unit to
malfunction.
• To prevent short circuits when replacing a
fuse, first disconnect the wiring harness.
• Do not place any object between the
faceplate and the unit.
• During installation, do not use any screws
except for the ones provided. The use of
improper screws might result in damage to
the main unit.
2CAUTION
IMPORTANT INFORMATION
You cannot connect the unit directly to the
following CD automatic changers. For users
who want to use older changers with the
unit, follow the directions below according to
the type of changer you own:
• KDC-C200 / KDC-C300 / KDC-C400
Use the extension cable and the control box
attached to the CD changer, and the optional
CA-DS100 converter cable.
• KDC-C301 / KDC-C600 / KDC-C800 / KDC-C601 /
KDC-C401
Use the extension cable attached to the CD
changer, and the optional CA-DS100
converter cable.
• KDC-C100 / KDC-C302 / C205 / C705 /
non-Kenwood CD changers
Cannot be used with this model.
You can damage both your unit and
the CD changer if you connect them
incorrectly.
2CAUTION
Safety precautions
Page 4
— 4 —
English
• If you experience problems during
installation, consult your Kenwood dealer.
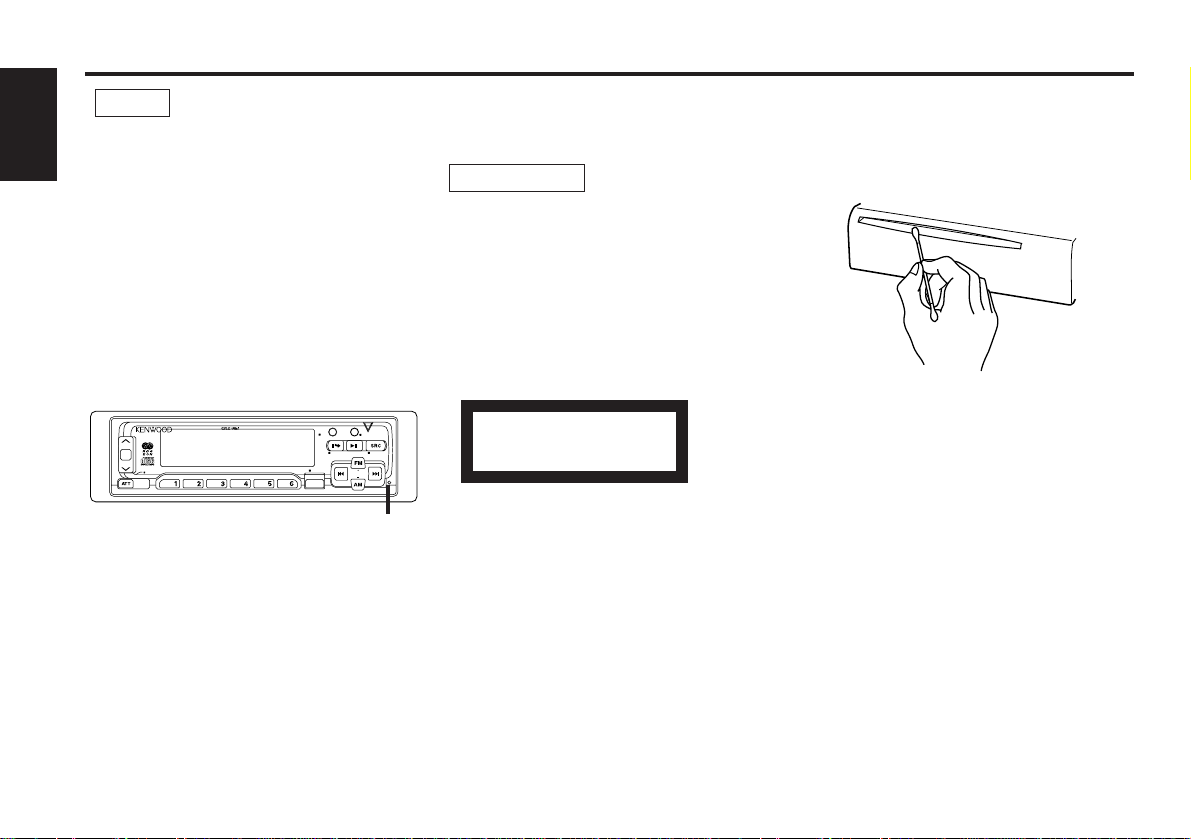
• If the unit fails to operate properly, press the
RESET button. When the faceplate is not
visible, press “the touch-sensitive spot” at
the rear of the faceplate (as illustrated on p.9)
to make the faceplate control appear. The
unit returns to factory settings when the
RESET button is pressed. If the unit still fails
to operate properly after the RESET button
has been pressed, contact your local
KENWOOD dealer for assistance.
• Press the reset button if the CD auto changer
is first controlled and operates incorrectly.
The original operating condition will return.
• We strongly recommend the use of the Code
Security function (see p.33) to prevent theft.
NOTE
AUD
DISC
SCAN RDM REP D.SCN M.RDM MENU
LOUD
40W 4x
DISP/
TEXT
NAME. S
EJECT PTY
CLOSE
PWR OFF
DAB
TI
VOL
ADJ
TUNER
Reset button
Cleaning the Unit
If the front panel gets dirty, turn off the
power and wipe the panel with a dry silicon
cloth or soft cloth.
Do not wipe the panel with a stiff cloth or a
cloth dampened by volatile solvents such as
paint thinner and alcohol. They can scratch
the surface of the panel and/or cause the
indicator letters to peel off.
2CAUTION
Safety precautions
Cleaning the CD Slot
As dust can accumulate in the CD slot, clean
it occasionally. Your CDs can get scratched if
you put them in a dusty CD slot.
Lens Fogging
Right after you turn on the car heater in cold
weather, dew or condensation may form on
the lens in the CD player of the unit. Called
lens fogging, CDs may be impossible to play.
In such a situation, remove the disc and wait
for the condensation to evaporate. If the unit
still does not operate normally after a whilst,
consult your Kenwood dealer.
The marking of products using lasers
(Except for some areas)
The label is attached to the chassis/case and
says that the component uses laser beams
that have been classified as Class 1. It means
that the unit is utilizing laser beams that are
of a weaker class. There is no danger of
hazardous radiation outside the unit.
CLASS 1
LASER PRODUCT
Page 5
— 5 —
Playing a CD that is dirty, scratched
or warped can cause the sound to
skip and the unit to operate
incorrectly, resulting in worsened
sound quality. Take the following
precautions to prevent your CDs from
getting scratched or damaged.
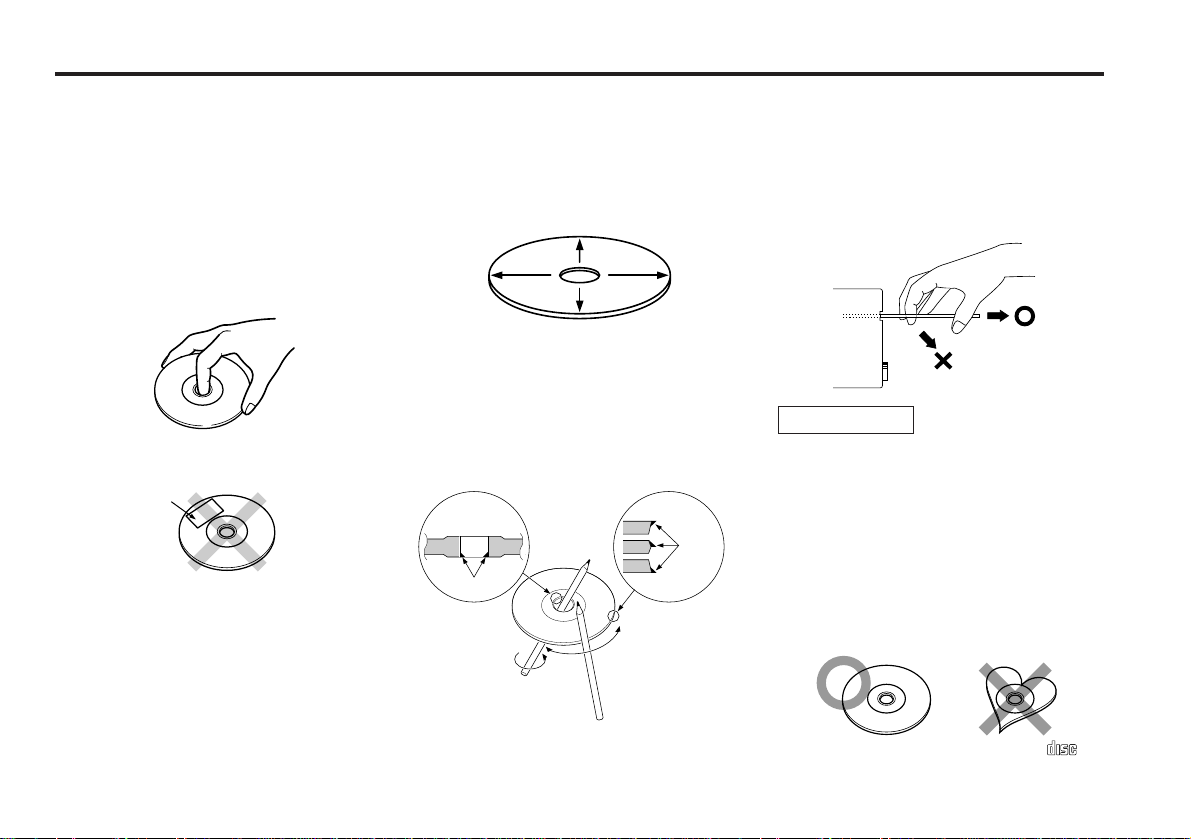
Handling CDs
• Do not touch the recorded side of the CD
(i.e., the side opposite the label) when
holding it.
• Do not stick tape on either side of the CD.
Storing CDs
• Do not store CDs in areas exposed to direct
sunlight – such as a car seat or above the
fascia panel (dashboard) – or other hot
places.
• Remove CDs from the unit when not
listening to them for a whilst, and put them
back in their cases. Do not stack CDs that
have been removed from their cases or prop
them against something.
Cleaning CDs
If a CD has become dirty, wipe it off gently
using a commercially available cleaning cloth
or a soft cotton cloth, starting from the
centre of the disc and moving outward. Do
not clean CDs with conventional record
cleaners, anti- static formulas, or chemicals
such as paint thinner or benzene.
Checking New CDs for Burrs
When playing a new CD for the first time,
check that there are not any burrs stuck to
the perimeter of the disc or in the central
hole. CDs with burrs stuck on them may not
load properly or may skip whilst playing.
Remove burrs using a ballpoint pen or a
similar utensil.
Do Not Load CD Accessories in Slot
Do not use commercially available CD
accessories that can be loaded into the CD
slot, such as stabilisers, protective sheets, or
CD cleaning discs, since they can cause the
unit to malfunction.
Removing the CD
Only remove the CD from the machine in a
horizontal direction. You may damage the
surface of the CD if you try pulling it down as
it ejects.
Do Not Load 8-cm (3-in.) CDs in the
CD slot
If you try to load an 8-cm CD with its adapter
into the unit, the adapter might separate
from the CD and damage the unit.
Do Not Use Special Shape CDs
• Be sure to use round shape CDs only for this
unit and do not use any special shape CDs.
Use of special shape CDs may cause the
unit to malfunction.
• Be sure to use CDs with disc mark
only for this unit.
2CAUTION
Tape
Burrs
Burrs
Handling Compact discs
COMPACT
DIGITAL AUDIO
Page 6
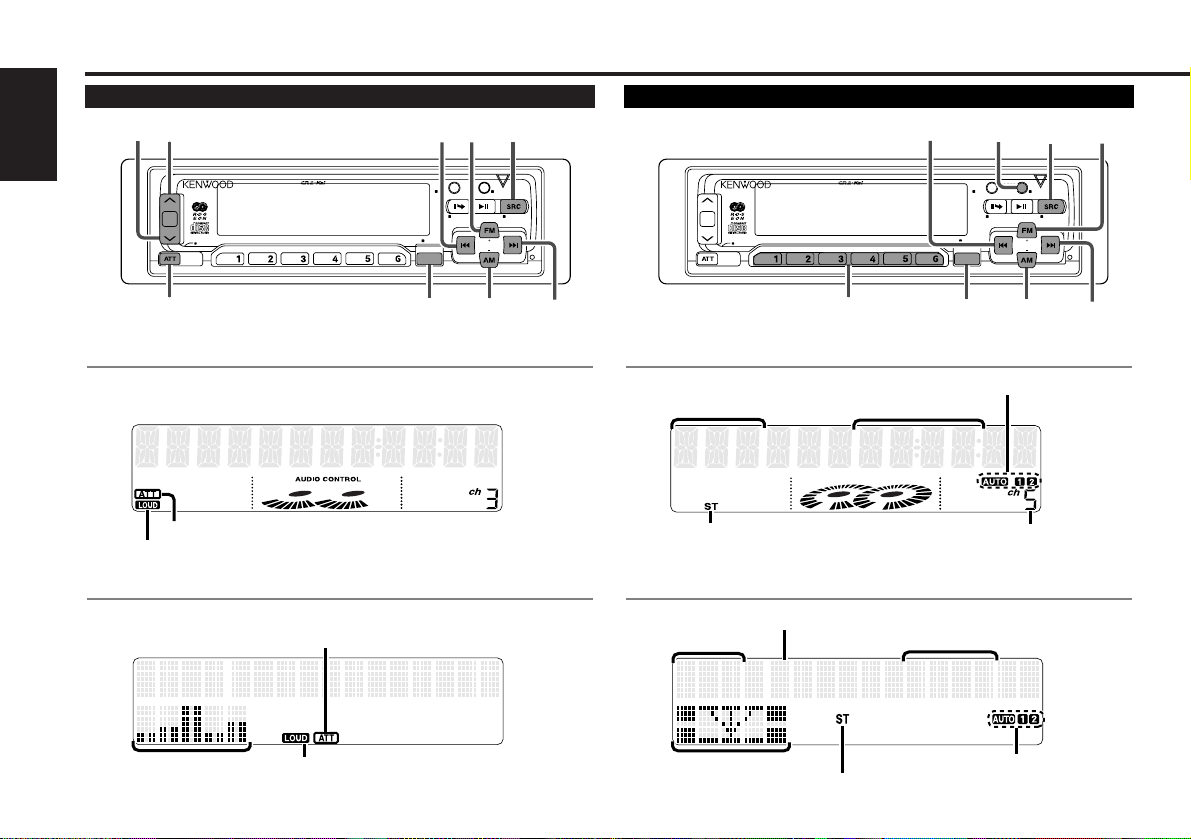
for KDC-8060R/7060R
FM1 92.1
5ch 92.1FM1-
VOLUME 10
English
Buttons and Display
— 6 —
DISC
SCAN RDM REP D.SCN M.RDM MENU
LOUD
40W 4x
DISP/
TEXT
NAME. S
EJECT PTY
CLOSE
PWR OFF
DAB
TI
VOL
ADJ
TUNER
MENU
SRC
ATT/LOUD
u
d
FM
¢
4
AM
AUD
DISC
SCAN RDM REP D.SCN M.RDM MENU
LOUD
40W 4x
DISP/
TEXT
NAME. S
EJECT PTY
CLOSE
PWR OFF
DAB
TI
VOL
ADJ
TUNER
MENU
SRC
#1~6
FM
¢
4
AM
DISP
AUD
LUME 10 VO
AUTO indicator
Frequency
ATT indicator
LOUD indicator
Band display
AUTO indicator
ST indicator
Basic operations Tuner features
for KDC-8060R/7060R
for KDC-PS9060R
ATT indicator
LOUD indicator
for KDC-PS9060R
Frequency
Band display
Preset station number
ST indicator
Preset station number
Spectrum analyzer
display
Mode display
Page 7
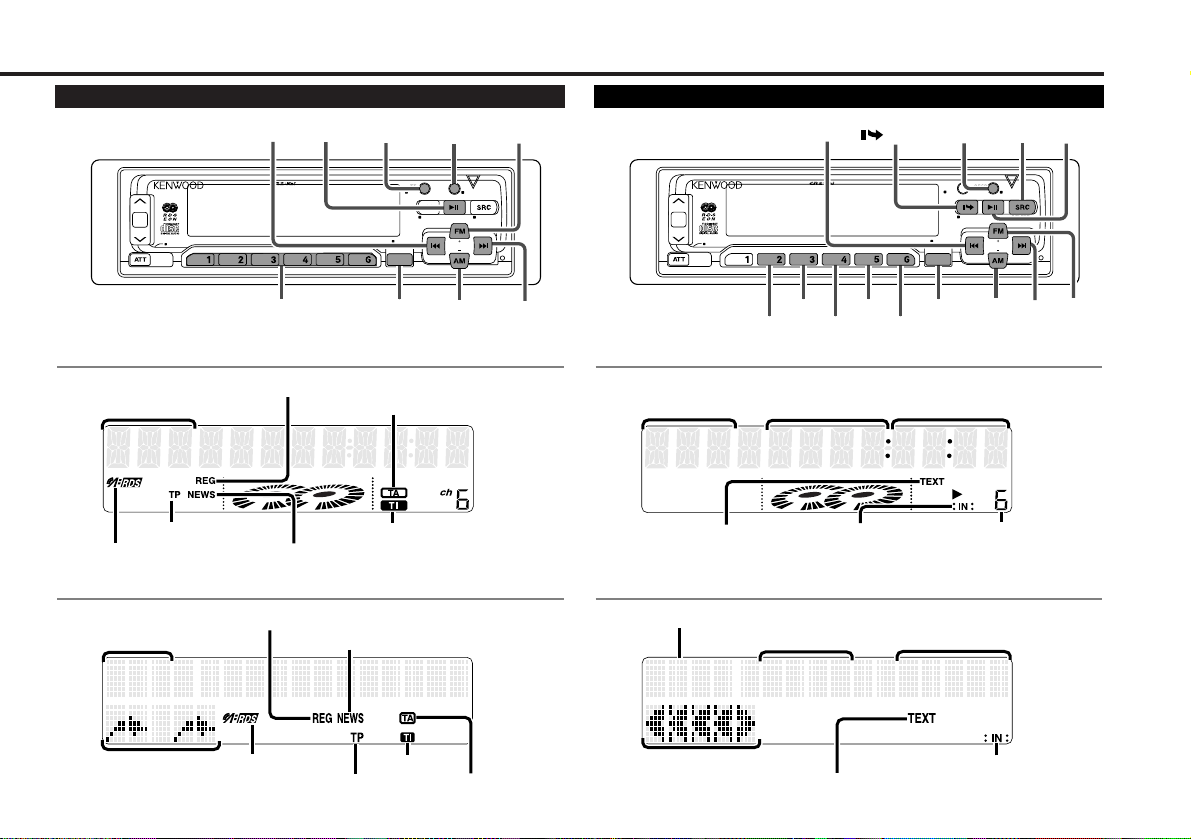
— 7 —
CH T-0 8 23 5
T-08 : 2:35D06
FM 3 KE NWO OD
6ch KENWOODFM3-
for KDC-8060R/7060R
for KDC-PS9060R
for KDC-8060R/7060R
for KDC-PS9060R
DISC
SCAN RDM REP D.SCN M.RDM MENU
LOUD
40W 4x
DISP/
TEXT
NAME. S
EJECT PTY
CLOSE
PWR OFF
DAB
TI
VOL
ADJ
TUNER
MENU
AUD
FM
¢
4
AM
DISP
TI/
VOL ADJ
38/
PTY
#1~6
DISC
SCAN RDM REP D.SCN M.RDM MENU
LOUD
40W 4x
DISP/
TEXT
NAME. S
EJECT PTY
CLOSE
PWR OFF
DAB
TI
VOL
ADJ
TUNER
MENU
SRC
RDM
FM/
DISC
+
¢
4
AM/
DISC–
DISP/
NAME.S
38
/EJECT
M.RDM
D.SCN
REPSCAN
AUD
TI indicator
Band display
™ indicator
TP indicator
TA indicator
Disc number
Track number
Track time/
Direct inputted track number/
Direct inputted disc number
RDS features Disc control features
Track time/
Direct inputted track number/
Direct inputted disc number
TI indicator
Band display
™ indicator
TP indicator
TA indicator
Disc number
Track number
Mode display
Mode display
TEXT indicator
TEXT indicator
¢ indicator
¢ indicator
REG indicator
NEWS indicator
REG indicator
NEWS indicator
Character display
Page 8
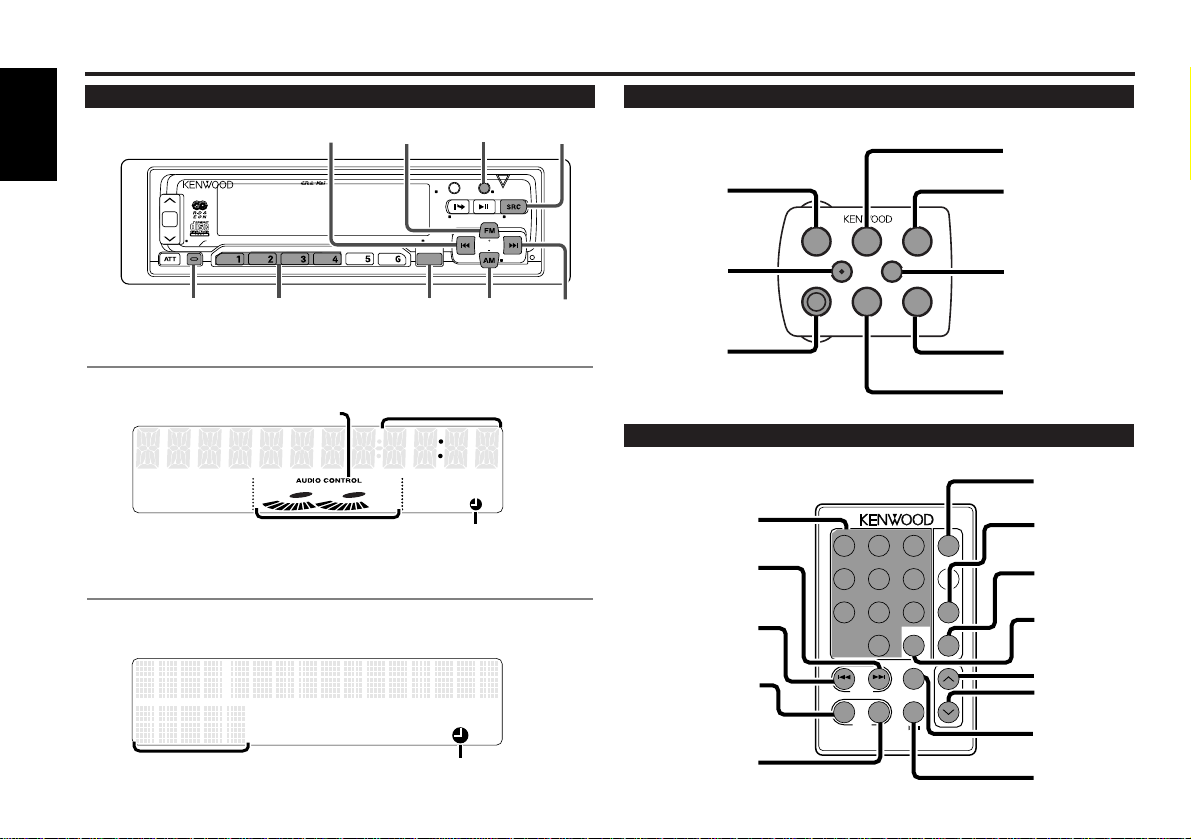
English
— 8 —
FM 1 123 5
Buttons and Display
92.1FM1
12:35
for KDC-8060R/7060R
for KDC-PS9060R
DISC
SCAN RDM REP D.SCN M.RDM MENU
40W 4x
DISP/
TEXT
NAME. S
EJECT PTY
CLOSE
PWR OFF
DAB
TI
VOL
ADJ
TUNER
NF
CLK/ANA
LOUD
CLK/ANA
AUD/MENU
AM/
NF
FM
4 DISP
SRC
AUD
#1~4
¢
VOL.
TUNE
TRACK
REMOTE CONTROL UNIT
DISC
REW FF
#0~9
A~Z
TUNE
+
TRACK +
TUNE –
TRACK –
AM
DISC –
FM
DISC +
TUNER
CD
CD
¥
MD CH
DIRECT
OK
u
d
DNPP
38
1 2 3
4 5 6
7 8 9
0
DEF
MNOJKLGHI
WXYTUVPRS
QZ
ABC
TUNER
TAPE
FM
+
PROG
–
+
CD
CD·MD
CH
DIRECT
OK
DNPP
AM
–
Remote control
Clock display
Other features
Clock display/
Spectrum analyzer display
£ indicator
£ indicator
Steering remote control
VOLUME
SRC
AM/DISC
–
FM/DISC+
4
¢
ATT
DWN
UP
5
∞
AM/DISC –
FM/DISC +
SRC
d
u
ATT
¢
4
Optional
Graphic display
AUDIO CONTROL indicator
Optional for the KDC-7060R
Page 9
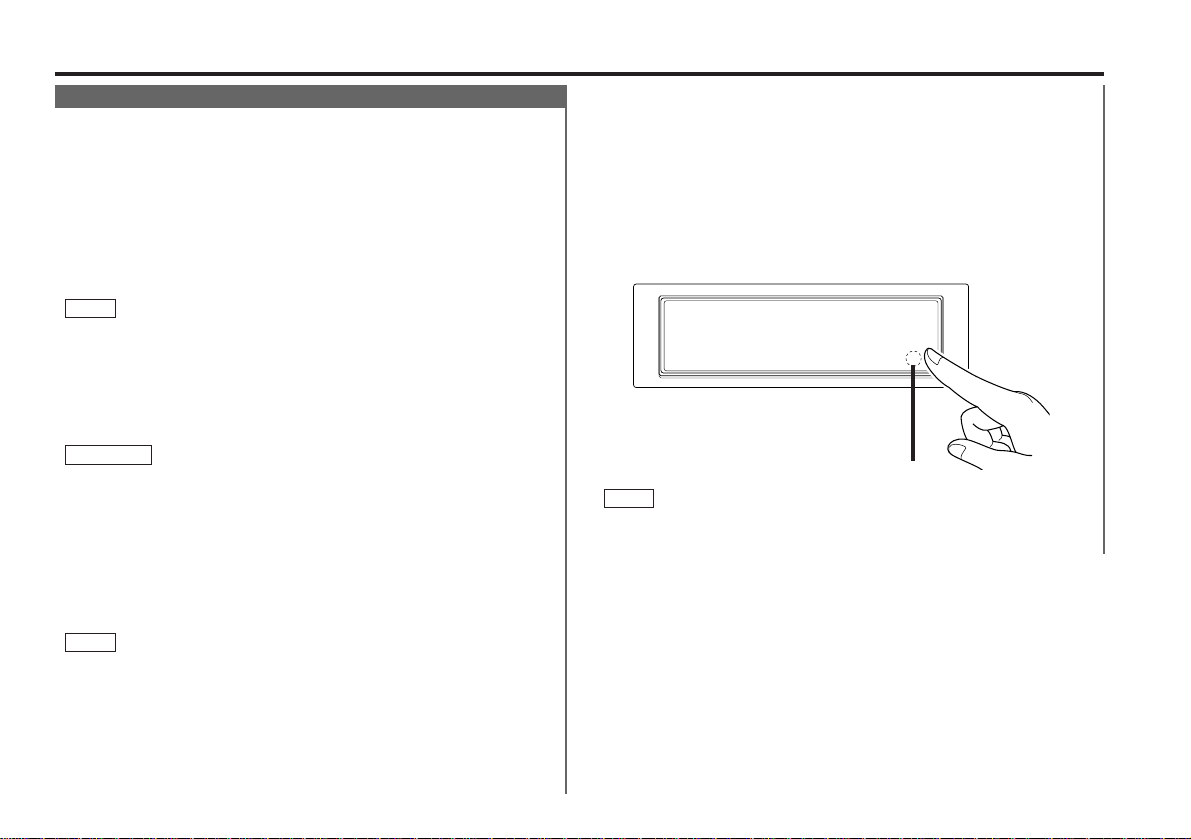
— 9 —
Basic operations (See page 6)
Stealth Retraction Mechanism
You can help prevent theft of the unit by reversing the
faceplate so that the control panel cannot be seen, hiding the
unit, and shutting off the audio.
Power ON/OFF:
When you turn your vehicle’s ignition on, the unit’s power will
also turn on, with the faceplate reversing to show the control
panel.
When you turn your vehicle’s ignition off, the faceplate will
reverse to hide the control panel, and the unit’s power will turn
off.
• When the moving faceplate is hit by an object, it will stop and
return to its original state. Remove the object and repeat the
action.
• The status of the Code Security Function (P.33) is displayed
whenever the power is switched on.
"CODE ON" (Code Security has been registered)
"CODE OFF" (Code Security has not been registered)
Using the Unit in Vehicles with Covered Consoles
• Make sure the console is uncovered whilst the faceplate is
reversed.
• Do not exert any excess force on the movable parts of the unit,
including the faceplate, as it can cause failure in the unit’s
mechanism.
Hiding the unit with the ignition turned on (forced closing):
Hold down the SRC button for one second or more.
The faceplate will reverse, hiding the unit. The unit will turn
off.
• When the closing faceplate is hit by an object, the unit will turn
off without the faceplate closing all the way. Remove the object
and press the SRC button to turn the unit back on, then turn it
off again to make it close properly.
• Whilst the control panel is moving, pressing the buttons will not
have any effect. Do not try to press the buttons on the control
panel as the faceplate is moving, as excessive force may
damage the unit.
NOTE
2CAUTION
NOTE
• During the forced closing of the unit (i.e., having the unit left
closed whilst ignition is turned on), the faceplate will not open
no matter how often the ignition is turned on or off, unless “the
touch-sensitive spot” at the rear of the faceplate is pressed in
order to open it. You can prevent tampering of the unit when
letting someone else drive your car by keeping it closed this
way.
To cancel the stealth retraction mechanism’s forced closing of
unit and open control panel:
Press “the touch-sensitive spot” at the rear of the faceplate.
(as illustrated)
Touch-sensitive spot
The invisible switch is hiding behind the touch-sensitive spot.
Press the hollow spot (invisible switch) to open.
NOTE
Touch-sensitive spot
Page 10
— 10 —
English
Basic operations (See page 6)
Switching Modes
Switching Modes:
Each time you press the SRC button, the mode switches as
follows:
▼
Tuner mode
▼
CD mode
▼
Disc control mode
• The mode switches to the next mode from any mode which
cannot be used.
• The disc control mode will differ depending on the unit that is
connected.
NOTE
Volume
Increasing Volume:
Press the u button to turn up the volume.
Decreasing Volume:
Press the d button to turn down the volume.
Attenuator
This function allows you to turn down the volume quickly.
Turning Attenuator On/Off:
Press the ATT button to switch the attenuator on and off.
When the attenuator is on, the ATT indicator blinks.
When the attenuator is off, the volume returns to the original
level.
Turning down the volume all the way turns off the attenuator
function.
NOTE
Loudness
This function amplifies low and high tones when the volume
is turned down.
The LOUD indicator lights up, when the loudness function is
on.
Turning Loudness On/Off:
Hold down the LOUD button for one second or more to switch
the loudness on and off.
Menu System
To accommodate a greater number of functions, a menu
system has been employed for making settings. Press the
MENU button to enter the menu mode and then display the
function to make the setting. Details on each setting are
explained separately in the corresponding function page.
Hold down the MENU button for one second or more.
"MENU" is displayed when the menu mode is entered.
The function that you can adjust is indicated with the current
settings displayed.
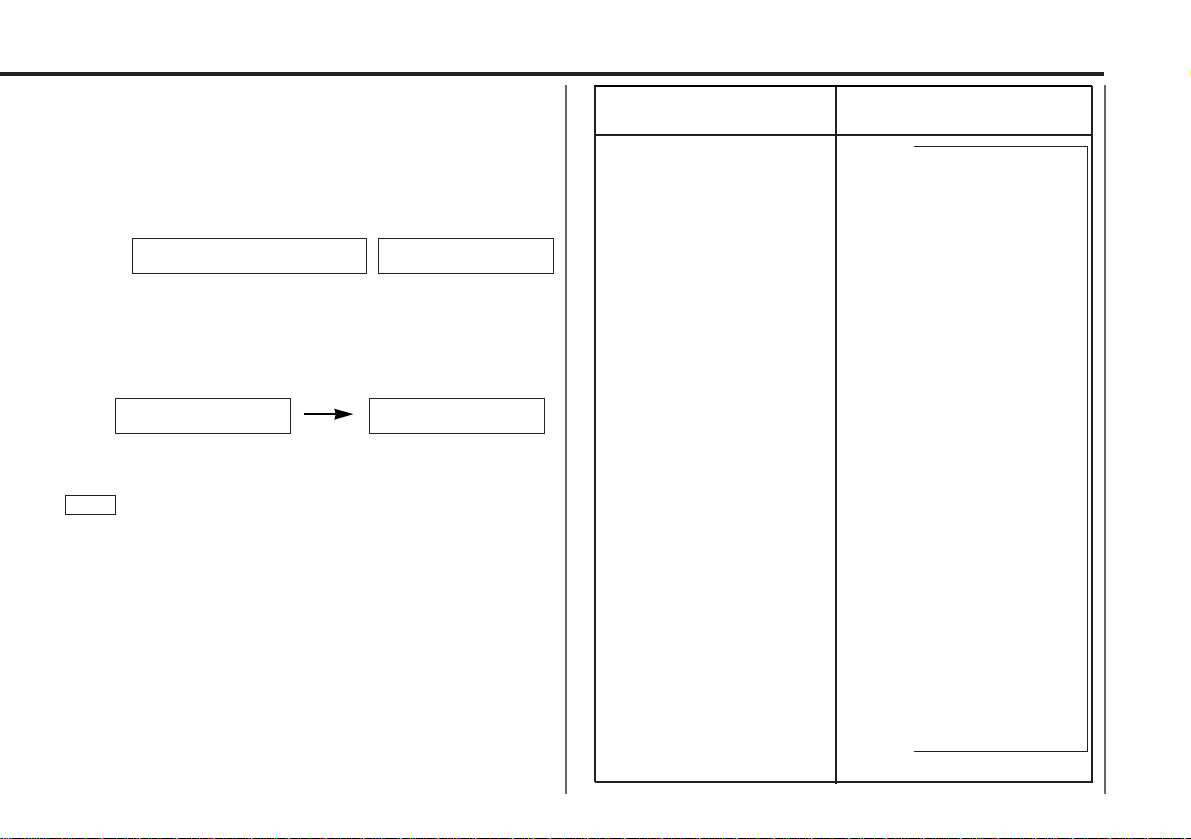
1
Page 11
— 11 —
Selecting function to set
Press the ¢ button to search through the functions until you
see the one you want to adjust in the display.
Press the 4 button to search through the functions
backward.
Example: If you want to switch the tuning mode from AUTO1
to manual, first search through the functions until
you see "AUTO 1" in the display.
Changing setting for currently displayed function
Press either the AM or FM button.
The setting will change for each function.
Example: The tuning mode will switch from AUTO 1 to AUTO
2. Pressing the button again switches the setting to
manual, and "MANUAL" is displayed.
Ending the menu mode
Press the MENU button.
• Make sure to end the menu mode when finished.
If you fail to end the menu mode, several functions may not
operate properly, including the Traffic Information function, the
News Bulletin function with PTY news timeout setting, and the
Alarm function.
• The News function turns on when the setting is made for the
news interruption interval. The "##MIN" display indicates the
setting selected for the news interruption timeout interval.
• The "##" display indicates the setting value.
NOTE
4
3
2
↓
CLOCK ON ↔ CLOCK OFF
↑↓
CLOCK ADJST (Time
adjustment mode entered)
↑↓
SYNC ON ↔ SYNC OFF
↑↓
SECURITY
↑↓
COLOR GREEN ↔ COLOR AMBER
↑↓
CONTRAST ##
↑↓
GRAPHIC ON ↔ GRAPHIC OFF
↑↓
BEEP ON ↔ BEEP OFF
↑↓
SWPRE FRONT ↔ SWPRE N-FAD
↑↓
NEWS OFF ↔ NEWS ##MIN
↑↓
LOCAL.S OFF ↔ LOCAL.S ON
↑↓
AUTO1 → AUTO2 → MANUAL
↑↓
AUTO-MEMORY (start)
↑↓
AF ON ↔ AF OFF
↑↓
REG ON ↔ REG OFF
↑↓
ATPS ON ↔ ATPS OFF
↑↓
MONO OFF ↔ MONO ON
↑↓
SCROLL MANU ↔ SCROLL AUTO
↑
Function
Varieties of settings for
each function (display)
Switching Clock Display
Time Adjustment (Manual)
Automatic Time Adjustment
Security mode
Selectable Illumination
Contrast Adjustment
Switching Graphic Display
Touch Sensor Tone
Switching Preout
News Bulletin Function
Local seek
Selecting Tuning Mode
Auto Memory Entry
AF Function
Region Restrict Function
Auto TP Seek
Monaural Reception
Text Scroll
KDC-PS9060R Only
<In Tuner mode>
<In Tuner mode>
<In Tuner mode>
<In CD or Disc changer mode>
<In FM reception of Tuner mode>
<Except in AM band>
<Except in AM band>
<Except in AM band>
KDC-8060R/7060R Only
KDC-PS9060R Only
MENU AUTO 1 AUTO 1
AUTO 2 MANUAL
for KDC-PS9060R for KDC-8060R/7060R
<When Automatic Time Adjustment is off>
Page 12
— 12 —
English
Tuner features (See page 6)
Selecting Tuning Mode
You can choose from three tuning modes: auto seek, preset
station seek, and manual. The “AUTO 1” indicator lights up
when auto seek tuning is selected, and the “AUTO 2”
indicator lights when preset station seek tuning is selected.
Hold down the MENU button for one second or more.
"MENU" is displayed and the menu mode is turned on.
Press the ¢ button repeatedly until the tuning function
appears in the display.
Press the 4 button to search in the other direction.
The tuning method is displayed as ”AUTO 1“, ”AUTO 2“, or
”MANUAL“ referring respectively to auto seek tuning, preset
station seek tuning, and manual tuning.
Switching settings
Press either the AM button or FM button to switch the tuning
mode.
The display and setting will change.
Press the MENU button to end the menu mode.
4
3
2
1
Tuning
Press the SRC button repeatedly until the tuner mode is
obtained. "TUNER" is displayed only when the tuner mode is
selected.
Press either the FM or AM button to select the band.
Each time you press the FM button, the band switches
between the FM1, FM2 and FM3.
Press the AM button to select the MW and LW bands.
•Auto Seek Tuning
Press the ¢ button to seek increasing frequencies.
Press the 4 button to seek decreasing frequencies.
•Preset station seek tuning
Press the ¢ button to move to the next preset station (i.e.,
the one with the next highest number), and the 4 button to
move to the last preset station (i.e., the one with the next
lowest number).
If the frequencies stored at the preset numbers receive
stations which were not originally memorized when traveling
long distances, the preset number is not displayed. In such
cases, pressing the 4/¢ button to use preset station
seek will receive channel 1.
•Manual Tuning
Press the ¢ button to increase the frequency by one step.
Press the 4 button to decrease the frequency by one step.
The ST indicator lights up when stereo broadcasts are being
received.
NOTE
NOTE
3
2
1
K2I ( Kenwood Intelligent Twin IF)
When the frequency of another station is too close to that of
the station currently being listened to, interfering with proper
reception, this function automatically narrows the range of
received frequencies to prevent such interference.
Page 13
— 13 —
With the local seek function turned on, auto seek tuning skips
stations with relatively poor reception.
Turning Local Seek Function On/Off:
Hold down the MENU button for one second or more.
"MENU" is displayed and the menu mode is turned on.
Press the ¢ button repeatedly until the local seek function
appears in the display.
Press the 4 button to search in the other direction.
The function setting is indicated by "LOCAL.S ON" or "LOCAL.S
OFF" in the display, indicating that the local seek function is on
or off, respectively.
Switching settings
Press either the AM button or FM button.
The display and setting will change.
Press the MENU button to end the menu mode.
4
3
2
1
Local Seek Function
When poor stereo reception is experienced, this function will
reduce noise and improve listening conditions.
Hold down the MENU button for one second or more.
"MENU" is displayed and the menu mode is turned on.
Press the ¢ button repeatedly until the monaural reception
function appears in the display.
Press the 4 button to search in the other direction.
The function setting is indicated by "MONO ON" or "MONO
OFF" in the display, indicating that monaural reception is on or
off, respectively.
Switching settings
Press either the AM button or FM button.
The display and setting will change.
Press the MENU button to end the menu mode.
4
3
2
1
Monaural Reception
Switching Display for Tuner (non-RDS station)
Switching the Display:
Each time you press the DISP button, the display switches
between the frequency and clock.
• When the switching clock display (P.31) is set to off, the display
will not switch to the clock display.
• The £ indicator lights whilst the clock is displayed.
NOTE
Function of the KDC-8060R/7060R
Station Preset Memory
Store the frequency of the station currently being listened to.
You can then recall that station with a single touch of a
button.
Select the band/ station that you want to have stored.
Hold down the button (#1-6) that you want to use for the
station, for two seconds or more.
The button number blinks once in the display to indicate that
the data has been stored.
Recalling a Preset Station:
Press the preset station button (#1-6) for the desired station.
The number of the recalled station is displayed.
You can store 6 stations in each of the FM1, FM2, FM3, and AM
(MW and LW) bands.
NOTE
2
1
Page 14
— 14 —
English
Tuner features (See page 6)
Auto Memory Entry
You can automatically store all the receivable frequencies in
the band currently being listened to, and then recall them with
the touch of a button later. This function is especially useful
when you are travelling and do not know what stations are
available. Up to 6 frequencies can be stored this way.
Select the band for auto memory entry.
Hold down the MENU button for one second or more.
"MENU" is displayed and the menu mode is turned on.
Press the ¢ button repeatedly until "AUTO-MEMORY"
appears in the display.
Press the 4 button to search in the other direction.
Hold down either the AM button or FM button for two seconds
or more to start auto memory function.
The numbers of the preset station buttons showed in order.
When all the stations in a certain band are stored in the preset
memory, the auto memory entry stops. The tuner then plays
the last station received.
Recalling a Preset Station:
Press the preset station button (#1-6) for the desired station.
The number of the recalled station is displayed.
• When the AF function is turned on whilst auto memory entry
takes place, only RDS stations (i.e., stations with RDS
capability) are stored. RDS stations that have been preset for
FM1 cannot also be preset in FM2 or FM3.
• When the local seek function is turned whilst auto memory
entry takes place, stations with poor reception are not stored.
• When the Traffic Information function is on , only the local
traffic information station frequency will be stored.
Cancelling Auto Memory Entry During Its Operation:
Press the MENU button whilst auto memory entry is taking
place to stop the process.
NOTE
4
3
2
1
Direct Access Tuning
When you already know the frequency of the station that you
want to listen to, you can enter it directly for quick access.
Select the band by pressing the FM or AM button.
Press the DIRECT button.
The frequency part of the display blinks for 10 seconds.
If you make no input in the 10-second period, direct access
tuning is automatically cancelled.
Enter the frequency of the desired station whilst the display is
blinking.
If you want to listen to an FM station at 92.1 MHz, for
example, press 0, 9, 2, and 1.
If you want to listen to an AM station at 810 kHz, for example,
press 0, 8, 1, and 0.
• When a frequency which cannot be received is input, this
frequency is not verified and operation returns to the original
frequency input mode.
• FM frequencies can only be input in 0.1 MHz steps, and not in
0.01 steps.
Cancelling Direct Access Tuning:
Press the DIRECT button again.
NOTE
3
2
1
Function of remote control with number/letter entry buttons
(See page 8)
Page 15
— 15 —
Preset station seek with Programme service name
You can search for the preset station with Programme Service
name.
Press the DNPP button on the remote control.
“SNP PLAY” will be displayed once the seek mode is entered.
The names of the stations preset in the band currently listened
to are displayed for 5 seconds each.
The display band switches in the following order:
= FM1 Ô FM2 Ô FM3 Ô AM +
Each time you press the TUNE
+ button, the station display
switches in the forward direction.
Each time you press the TUNE– button, the station display
switches in the reverse direction.
Stations which have no names will be displayed as
frequencies.
Changing the Displayed Band
Pressing the FM button switches between the FM1, FM2, FM3
and AM displays, in that order.
Pressing the AM button switches between the displays in the
reverse direction.
Once the name is displayed for the station you want to listen
to
Press the OK button.
Reception starts of the displayed station, and the seek mode
ends.
Cancelling mode during input:
Press the DNPP button.
The seek mode is cancelled.
2
NOTE
1
Function of remote control with DNPP button (See page 8)
RDS features (See page 7)
RDS (Radio Data System)
RDS is a digital information system that lets you receive
signals besides those of regular radio programmes, such as
network information being transmitted from radio stations.
When listening to an RDS station (ie, a station with RDS
capability), the programme service name of the station is
displayed along with the frequency, advising you quickly
which station is being received.
RDS (Radio Data System) stations also transmit frequency
data for the same station. When you are making long trips,
this function automatically switches to the particular
frequency with the best reception for the particular network of
stations that you want to listen to. The data is automatically
stored, allowing you to switch quickly to another RDS
stations, broadcasting the same programme, that has better
reception. These include stations stored in the station preset
memory that you often listen to.
EON (Enhanced Other Network)
Stations that offer EON also transmit information about other
RDS stations that have traffic information. When you are
tuned to a station that is not transmitting traffic information,
but another RDS station starts transmitting a traffic bulletin,
the tuner automatically switches to the other station for the
duration of the bulletin.
Alarm
When an emergency transmission (announcing disasters, etc.)
is sent, all current functions are interrupted to allow the
warning to be received.
Page 16
— 16 —
English
RDS features (See page 7)
AF (Alternative Frequency) Function
When poor reception is experienced, automatically switch to
another frequency broadcasting the same programme in the
same RDS network with better reception.
The ™indicator lights up when the AF function is turned
on.
Turning AF Function On/Off:
Hold down the MENU button for one second or more.
"MENU" is displayed and the menu mode is turned on.
Press the ¢ button repeatedly until the AF function appears
in the display.
Press the 4 button to search in the other direction.
The function setting is indicated by "AF ON" or "AF OFF" in the
display, indicating that the AF function is on or off,
respectively.
Switching settings
Press either the AM button or FM button.
The display and setting will change.
Press the MENU button to end the menu mode.
Displaying Frequencies:
•When the Switching Clock Display function is OFF, and for
KDC-PS9060R:
Press the DISP button.
•When the Switching Clock Display function is ON:
Hold down the DISP button for one second or more.
The frequency for the RDS station will be displayed for five
seconds instead of the station name.
When no other stations with stronger reception are available for
the same programme in the RDS network, you may hear the
incoming broadcast in bits and snatches. Turn off the AF function
in such a case.
NOTE
4
3
2
1
Restricting RDS Region (Region Restrict Function)
You can choose whether or not to restrict the RDS channels,
received with the AF function for a particular network, to a
specific region. When the Region Restrict Function is on, the
region is restricted and the REG indicator is turned on.
Turning Region Restrict Function On/Off:
Hold down the MENU button for one second or more.
"MENU" is displayed and the menu mode is turned on.
Press the ¢ button repeatedly until the Region restrict
function appears in the display.
Press the 4 button to search in the other direction.
The function setting is indicated by "REG ON" or "REG OFF" in
the display, indicating that the function is on or off,
respectively.
Switching settings
Press either the AM button or FM button.
The display and setting will change.
Press the MENU button to end the menu mode.
Sometimes stations in the same network broadcast different
programmes or use different programme service names.
NOTE
4
3
2
1
Traffic Information Function
You can listen to traffic information. If you are listening to
tapes or discs, they will continue playing until a traffic bulletin
is broadcast.
Turning TI function On/Off:
Press the TI button to turn the function on and off.
When the function is on, the TI indicator is turned on.
When a traffic information station is being received, the TP
indicator will turn on. When none is being received, the TI
indicator will blink on and off.
When a traffic bulletin begins to be broadcast, the TA indicator
will turn on, and reception will begin at the preset volume.
Page 17
— 17 —
If you are listening to a tape or disc when a traffic bulletin
begins, they will automatically be turned off. When the
bulletin ends or poor reception is experienced, the tape or disc
will begin playing again.
Pressing the TI button whilst in the MW/LW band automatically
switches reception to the FM band. However, the MW/LW band
is not returned to when the TI button is pressed again.
Switching to a Different Traffic Information Station:
Use the 4 / ¢ buttons to make an auto seek of the TI
stations in a certain band.
• When you are listening to a tape or disc, you cannot change to
another TI station.
• When the auto TP seek function is turned on and reception
starts to weaken, the tuner automatically seeks stations with
better reception.
• If you are tuned to a station that is not a traffic information
station itself but which provides EON services, you can still
have traffic information received.
• Holding the TI button down for one second or more when the TI
function is on in the disc control mode results in a change to
the frequency display of the traffic information station for five
seconds.
NOTE
NOTE
Auto TP Seek Function
When the TI function is on and poor reception conditions are
experienced when listening to a traffic information station,
another traffic information station with better reception will
be searched for automatically. This function is on, when unit
is first powered on.
Turning Auto TP Seek Function On/Off:
Hold down the MENU button for one second or more.
"MENU" is displayed and the menu mode is turned on.
1
Presetting Volume for Traffic Information/News
Preset the volume level to be used for traffic information and
news broadcasts.
Tune into the station for which you want to set the volume.
Adjust the volume to the desired level.
Hold down the VOL ADJ button for two seconds or more.
The volume level blinks once in the display to indicate that the
data has been stored.
Future traffic information/news broadcasts are heard at the
preset level.
• The volume cannot be lowered by this function during tuner
reception. The volume is only set when it is louder than the
listening volume of the tuner.
• You can arrange only to listen to traffic information or news
bulletins with at preset volume with the volume set at
minimum.
NOTE
3
2
1
Press the ¢ button repeatedly until the Auto TP Seek
function appears in the display.
Press the 4 button to search in the other direction.
The function setting is indicated by "ATPS ON" or "ATPS OFF"
in the display, indicating that the function is on or off,
respectively.
Switching settings
Press either the AM button or FM button.
The display and setting will change.
If the traffic information station you are tuned to experiences
poor reception, this function automatically seeks another TP
station.
Press the MENU button to end the menu mode.
4
3
2
Page 18
News Bulletin Function with PTY News Timeout Setting
You can arrange to have news bulletins interrupt your current
listening source, including other radio stations. When the
News Bulletin function is on, the PTY News Timeout setting
allows you to set the interval during which further news
interruption cannot take place. You can adjust the PTY news
interruption period from 10 to 90 minutes for each journey.
Turning News Bulletin Function On/Off:
Hold down the MENU button for one second or more.
"MENU" is displayed and the menu mode is turned on.
Press the ¢ button repeatedly until the News Bulletin
function appears in the display.
Press the 4 button to search in the other direction.
The function setting is indicated by "NEWS ##MIN" or "NEWS
OFF" in the display, indicating that the function is on or off,
respectively.
Depending on the interval chosen, the "##MIN" in the display will
change when the function is turned on.
Changing the Function Setting
Press either the FM or AM button.
Each time you press the FM or AM button until the desired
setting is displayed.
Press the FM button to increase the interval, and the AM
button to decrease it.
OFF ↔ 00MIN ↔ 10MIN ↔ 20MIN ↔ 30MIN ↔ 40MIN ↔ 50MIN
↔ 60MIN ↔ 70MIN ↔ 80MIN ↔ 90MIN (MIN= minutes)
When you select the news interruption timeout interval, the
News function turns on and the NEWS indicator lights up.
When a news bulletin is received, the NEWS indicator will blink
and reception will begin at the preset volume.
If you choose the "20
MIN
" setting, further news bulletins will not
be received for 20 minutes once the first news bulletin is
received. Setting the interval at the "00
MIN
" factory default
indicates no News Timeout will be made, meaning that additional
news bulletins will continue to be searched for.
NOTE
3
NOTE
2
1
Press the MENU button to end the menu mode.
• This function is only available if the desired station sends PTYcode for news bulletin or belongs to EON-Network sending
PTY-code for news bulletin.
• If you turn on the news bulletin function in the MW/LW band,
the band is switched automatically to the FM band.
However, the MW/LW band is not returned to when you turn
off the function.
NOTE
4
— 18 —
English
RDS features (See page 7)
Programme Type (PTY) Function
Conduct auto seek tuning only on those stations with selected
kinds of programmes.
Press the 38(PTY) button.
"PTY" is displayed and the Programme Type Selection (PTY)
Mode entered.
If you make no key input in 30 seconds, the mode will
automatically turn off.
You cannot use this function whilst the traffic information
function is turned on.
Changing the Display Language to French or German
In the PTY mode, hold down the 38(PTY) button for one second
or more to display the name of the language currently used.
If you want to change the language, press the preset button for
the desired language and then the 38(PTY) button.
English is #1, French is #2, and German is #3.
Select the type of programme to be received
• Press either the FM or AM buttons repeatedly to select the
type of programme you want to listen to.
The selection includes:
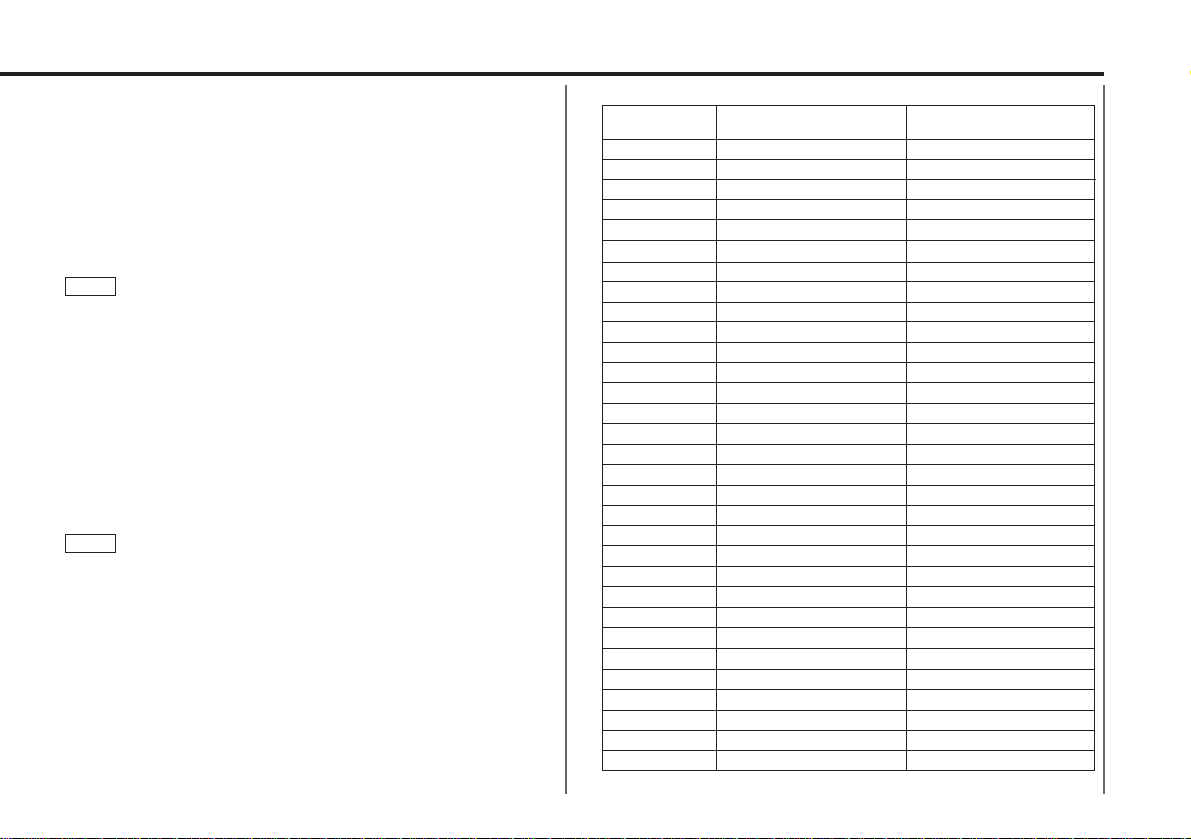
Speech ↔ 1.News ↔ 2.Current Affairs ↔ 3.Information ↔
4.Sport ↔ 5.Education ↔ 6.Drama ↔ 7.Culture ↔
8.Science ↔ 9.Varied ↔ 10.Pop Music ↔ 11.Rock Music ↔
12.M,O,R Music ↔ 13.Light Classical ↔ 14.Serious
Classical ↔ 15.Other Music ↔ 16.Weather ↔ 17.Finance
2
NOTE
NOTE
1
Page 19
— 19 —
↔ 18.Children's programmes ↔ 19.Social Affairs ↔
20.Religion ↔ 21.Phone ↔ 22.Travel ↔ 23.Leisure ↔
24.Jazz Music ↔ 25.Country Music ↔ 26.National Music ↔
27.Oldies Music ↔ 28.Folk Music ↔ 29.Documentary ↔
Music ↔ Speech ↔
(Speech.....1~9,16~23, 29, Music.....10~15, 24~28)
• You can select the type of programme directly by pressing a
preset button. The buttons are factory-set to the following
type of programmes:
1. Music 2. Speech 3. News
4. Other Music 5. Serious Classical 6. Varied
Changing the Preset Button Settings for Programme Type
After selecting the type of programme to be stored in a certain
preset button, hold down that button for two seconds or more.
The previously stored data for that button are erased and the
new programme type is stored.
Seeking the selected programme type
Press the 4 or ¢ button to make a seek of frequencies
with your selected type of programme.
The display blinks and the seek starts.
If your selected type of programme is found, the name of the
station is displayed and the station is tuned into.
"PTY" blinks in the display for about 30 seconds.
If you make no key input in 30 seconds, the PTY selection
mode will turn off automatically.
If no programme can be found, "NO PTY" is displayed.
If you want to select another type of programme, repeat steps 2
and 3 above.
Switching to Other Stations with the Same Type of Programme:
When "PTY" is blinking in the display, perform auto seek
tuning.
The tuner scans for another station with the same type of
programme.
Cancelling Programme Type Function During Its Operation:
Press the 38(PTY) button.
NOTE
3
NOTE
News NEWS1
AFFAIRS2 Current Affairs
KDC-8060R/7060R
Programme
type number
KDC-PS9060R
Programme Type Display
Information INFO3
SPORT4 Sport
Education EDUCATE5
DRAMA6 Drama
Cultures CULTURE7
SCIENCE8 Science
Varied Speech VARIED9
POP M10 Pop Music
Rock Music ROCK M11
M.O.R. M12 M.o.R Music
Light Classics M LIGHT M13
CLASSICS14 Serious Classics
Other Music OTHER M15
WEATHER16 Weather& Metr
Finance FINANCE17
CHILDREN18 Children's Progs
Social Affairs SOCIAL A19
RELIGION20 Religion
Phone In PHONE IN21
TRAVEL22 Travel & Touring
Leisure & Hobby LEISURE23
JAZZ24 Jazz Music
Country Music COUNTRY25
NATION M26 National Music
Oldies Music OLDIES27
FOLK M28 Folk Music
Documentary DOCUMENT29
MUSIC– All Music
All Speech SPEECH–
Page 20
— 20 —
English
Disc control features (See page 7)
Playing CDs:
Press the ¡(EJECT) button to slide open the faceplate,
showing the CD (insertion) slot. Holding the CD with the
labeled side facing up, insert it in the slot. The faceplate will
show the control panel, and the CD will start playing.
The ¢ indicator will light when a CD has been inserted.
Playing CDs Already Inserted:
Press the SRC button repeatedly until the CD mode is
obtained. "CD" is displayed when the CD mode has been
selected.
The CD will start playing.
Pausing and Restarting CD Play:
Press the 38 button to make the disc pause.
Press the same button again to start play again.
Eject:
Hold down the ¡(EJECT) button for one second or more to
stop CD play. The faceplate will slide to eject the CD.
Press the ¡(EJECT) button to show the control panel.
• Do not attempt to insert a CD into the slot if another one is
already there.
• The unit can only play 12-cm (5-inch) CDs. If you insert an 8-cm
(3-inch) CD, it will get stuck inside and can cause the unit to
malfunction.
• The sound will be temporarily muted whilst the faceplate is
moving.
• The only buttons that will work during the eject state are the
¡(EJECT), SRC, TI and ATT buttons, as well as the volume
control button.
• When you load a CD and eject it right away, the next time you
try to insert the CD may not load. In such a situation, take the
CD out for a moment and then reinsert it.
NOTE
2CAUTION
Playing CDs
■ When a unit equipped with an O-N switch is to be connected,
please also see the instruction manual of this unit.
Set the O-N switch to "N". "N"-operation will be set.
■ When a unit that is not equipped with an O-N switch, or the
changer switching unit "KCA-S200" is connected, "O"operation will be set.
"N"-operation:
•The disc title and track title of the CD text can be displayed.
•The disc name will be displayed when the name has been
registered to any connected unit with the Presetting Disc
Names function, or when the playing unit contains a disc to
which the disc title has been recorded.
"O"-operation:
•CD text cannot be displayed.
•Regardless of the control unit, the characters that can be
registered with the Presetting Disc Names function are "A~Z
0~9 /, +, –, ∗, =, <, >, [ , ]".
•The disc name will be displayed when the name has been
registered to the playing unit with the Presetting Disc Names
function.
The CD text, Presetting Disc Names, and Disc Name Preset Play
functions may not be operational depending on the unit.
NOTE
Page 21
— 21 —
Fast Forwarding and Reversing Disc Play
Fast Forwarding Disc Play:
Hold down on the ¢ button.
Release your finger to play the disc at that point.
Reversing Disc Play:
Hold down on the 4 button.
Release your finger to play the disc at the point.
You cannot use reverse play between tracks depending on the
model being connected. Instead, the reverse play function is
cancelled when it reaches the beginning of a track, at which point
normal play automatically resumes.
NOTE
Track Search
Search forwards or backwards through the tracks on the disc
until you reach the one that you want to listen to.
Making a Reverse Track Search:
Press the 4 button to display the desired track number.
Press once to search back to the beginning of the current
track, twice to search back to the beginning of the previous
track, and so forth.
Play starts at the beginning of the displayed track number.
(for disc changers)
Pressing the 4 button whilst listening to track 1 only searches
back to the beginning of that track. The reverse search is not
"recycled" to the last track on the disc.
Making a Forward Track Search:
Press the ¢ button to display the desired track number.
Press once to fast forward to the next track, twice to fast
forward to the track after that, and so forth.
Play starts at the beginning of the displayed track number.
(for disc changers)
You cannot make a forward track search when listening to the
last track on a disc.
NOTE
NOTE
Playing Other Disc mode
This function permits the connection of optional players and
the playing of discs other than the loaded CD (in the current
unit).
Playing Discs:
Press the SRC button repeatedly until the disc control mode is
obtained.
The disc will start playing.
The disc control mode will differ, depending on the unit that is
connected.
Mode Display Examples
• "DISC"...when a disc changer is connected
• "DISC-1", "DISC-2"...when two disc changers are connected
Pausing and Restarting Disc Play:
Press the 38 button to make the disc pause.
Press the same button again to start play again.
• When one disc has finished playing its last track, the next disc
in the changer starts playing. When the last disc in the changer
has finished, the player returns to the first disc and starts
playing it.
• Disc #10 is displayed as "0". (KDC-8060R/7060R Only)
NOTE
NOTE
Page 22
— 22 —
English
Disc control features (See page 7)
Disc Search
Search forwards or backwards through the discs in a disc
changer until you reach the one that you want to listen to.
Making a Reverse Disc Search:
Press the DISC– button to display the desired disc number.
Each time the button is pressed, the displayed disc number
decreases by one.
Play starts at the beginning of the displayed disc.
Making a Forward Disc Search:
Press the DISC+ button to display the desired disc number.
Each time the button is pressed, the displayed disc number
increases by one.
Play starts at the beginning of the displayed disc.
"LOAD" is displayed when discs are being exchanged on the disc
changer.
NOTE
The repeat play function is cancelled when you stop playing the
disc.
NOTE
Function of disc changers
Track Scan Function
Successively play the beginning of each track on a disc until
you find the track that you want to listen to.
Turning Track Scan Function On/Off:
Press the SCAN button to switch the track scan function on
and off.
The first 10 seconds of each track are played, and the tracks
are played in order.
The track number currently being heard blinks in the display.
Stopping to Listen to the Track Being Scanned:
Press the 38 or SCAN button again to stop the scan and keep
on listening to a track normally.
• The track scan function is cancelled when you stop playing a
disc.
• The track scan function only scans each track on a disc once.
NOTE
Repeat playing the current track or disc.
Turning Repeat Play Function On/Off:
Press the REP button to switch the repeat play function on and
off as follows :
▼
Track Repeat ON
▼
Disc Repeat ON (Function of disc changers)
▼
Track/Disc Repeat OFF
The track number blinks in the display when the track repeat
function is on.
The disc number blinks in the display when the disc repeat
function is on.
Track / Disc Repeat Function
Page 23
— 23 —
Disc Scan Function
Successively play the beginning of each disc on a changer
until you find the one that you want to listen to.
Turning Disc Scan Function On/Off:
Press the D.SCN button to switch the disc scan function on
and off.
The first 10 seconds of each disc are played, in the order in
which they are loaded on the changer.
The disc number currently being heard blinks in the display.
Stopping to Listen to the Disc Being Scanned:
Press the 38 or D.SCN button again to stop the scan and keep
on listening to the disc normally.
• The disc scan function is cancelled when you stop playing a
disc.
• The disc scan function only scans each disc on the changer
once.
• "LOAD" is displayed when discs are being exchanged on the
disc changer.
NOTE
Function of disc changers
Random Play Function
Play all the tracks on the current disc in random order.
Press the RDM button to switch the random play function on
and off.
The display of the track number changes continuously as the
next track is being selected.
When the track has been selected, play starts.
The selected track number blinks in the display as it is being
played.
1
Magazine Random Play Function
Play the tracks on all the discs in the disc changer in random
order.
Press the M.RDM button to switch the magazine random play
function on and off.
The display of the disc and track numbers change continuously
as the next track is being selected.
When the disc/track has been selected, play starts.
The selected disc/track number blinks in the display as it is
being played.
This function is not available with the following models:
KDC-C200/C300/C400/C301/C401
To change the track being heard, press the ¢ button.
Another disc/track is selected and played.
• The magazine random play function is cancelled when you stop
playing a disc.
• The time needed for random selection depends on the number
of discs loaded in the disc magazine.
NOTE
2
NOTE
1
Function of disc changers
When all the tracks on a certain disc have been played using the
random play function, the next disc on the changer starts playing
(with the random play function still turned on).
To change the track being heard, press the ¢ button.
Another track is selected and played.
The random play function is cancelled when you stop playing a
disc.
NOTE
2
NOTE
Page 24
— 24 —
English
Disc control features (See page 7)
Presetting Disc Names
Store the names of discs to be displayed when played.
Play the disc whose name you want to preset.
• This function is not available for disc changers that do not
feature the Disc Name Preset function.
• This procedure is not to be used to store the disc and track
titles for MDs that you record.
Press the NAME.S button for at least two seconds.
"NAME SET" is displayed and the disc name preset mode is
entered.
The cursor blinks in the position where character input can be
made.
Press either the 4 or ¢ button to move the cursor to the
desired position.
The 4 button moves the cursor to the left, and the ¢
button to the right.
You can also move the cursor left or right by pressing the
TRACK
+ or TRACK– buttons, respectively, on the remote
control.
Each time the 38 button is pressed, the characters to be
entered change as listed below.
Press the DISC+ or DISC– button to display the desired
character.
Characters that can be displayed are as follows.
▼
Alphabet (upper case): A ~ Z
▼
Alphabet (lower case): a ~ z (KDC-PS9060R Only)
▼
Numerals and symbols: 1~9 0 @ ” ‘ ` % & * + - = , . / \ < > [ ]
▼
Special characters: байинмутъщСЗ®Я‹flвдкл
опфцыьсз©Ж›fi
(KDC-PS9060R Only)
4
3
2
NOTE
1
The operation and characters that can be entered may change
as listed below, depending on the unit that is connected.
A press of the 38 button exits the disc name preset mode.
Operations can be followed again from Step 2 at a time such
as this, and the characters to be input are selected using the
procedure described below.
Press the DISC+ or DISC– button to display the desired
character. Besides the alphabet (capital letters only) and
numbers, you can choose the following characters: /, +, –, ∗,
=, <, >, [ and ].
Direct Alphabet Input
If the disc changers that were manufactured and sold after 1997
are connected, you can directly input letters using the
number/letter entry buttons on the remote control.
Example: Use the following table to enter the name "DANCE".
Continue steps 3 and 4 until all the characters are chosen for
the name.
Press either the NAME.S button on the main unit or the OK
button on the remote.
The disc name is stored and the disc name preset mode is
canceled.
If you make no entry in a 10-second period, the name will be
stored with the characters input so far.
• The number of characters and discs whose names can be
stored will differ depending on the disc changer that is
connected. Please see your disc changer manual for details.
Up to 12 characters and 30 CDs can be registered with this
unit.
NOTE
6
5
NOTE
NOTE
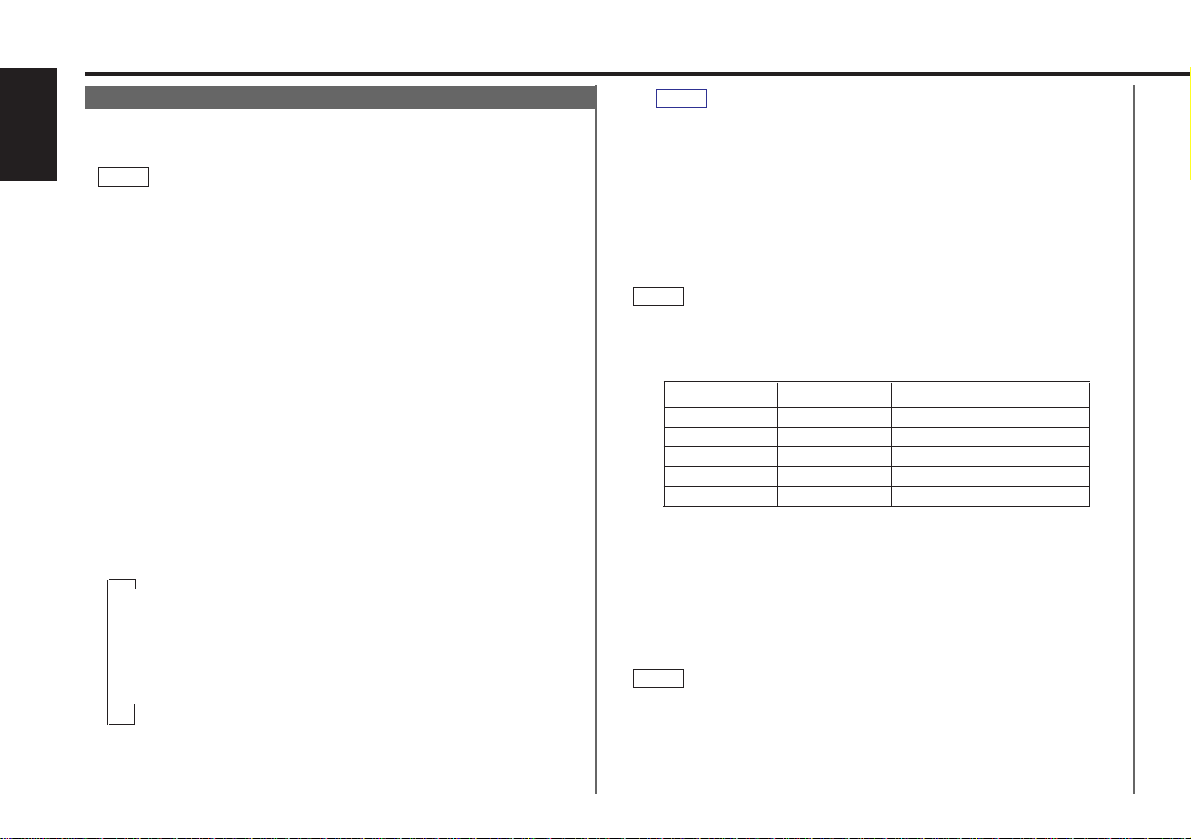
#3 1“D”
1“A” #2
#6“N” 2
#2 3“C”
#3“E” 2
Button to press # Times pressedCharacter
Page 25
• Discs are identified by their total length and number of tracks. If
another disc happens to have the same specifications as one
that you have already stored a name for, the name will be
displayed for it, too.
• If you want to change the name of a disc, repeat steps 1 and 2
to display the name, and then repeat steps 3 and 4 to input the
changes.
• Pressing the reset button erases the disc names stored in this
unit, but does not erase the names stored in a disc changer.
— 25 —
Press the MENU button to end the menu mode.
To scroll automatically:
Press the DISP button to display the disc title or the track title.
The titles will be displayed in one scrolling display.
When the disc or track to be played changes, the title is
displayed in one scrolling display.
Holding down the DISP button for one second or more results
in one scrolling display of the titles.
Only units with a CD text feature permit title display.
NOTE
2
NOTE
1
4
Text Scroll
This function permits the text to be scrolled and the entire
text to be displayed. Switching between manual scrolling and
automatic scrolling is permitted. The factory default is manual
scrolling.
To scroll manually:
Press the DISP button to display the disc title or the track title.
Holding down the DISP button for one second or more results
in one scrolling display of the titles.
Manual/Automatic scroll switching:
Hold down the MENU button for one second or more.
"MENU" is displayed and the menu mode is turned on.
Press the ¢ button repeatedly to switch the function to be
set to the text scroll function.
Pressing the 4 button results in the functions being
switched in the reverse order.
The text scroll function is displayed with "SCROLL MANU" or
"SCROLL AUTO".
"SCROLL MANU" (Manual scrolling)
"SCROLL AUTO" (Automatic scrolling)
Switching settings
Press either the AM or FM button.
The display and setting will change.
3
2
1
2
1
Page 26
— 26 —
English
Disc control features (See page 7)
Direct Track Search
Using the remote control, make direct input of the track
number that you want to listen to.
Using the numeric buttons on the remote control, enter the
number of the track that you want to listen to.
The selected track number blinks in the display for 10 seconds.
If you make no further input in the 10-second period, the
number entry mode will automatically be cancelled.
Press either the TRACK+ or TRACK– button whilst the track
number is blinking.
The track specified in step 1 starts playing.
Cancelling Direct Track Search During Its Operation:
Press the 38 button.
You cannot use the direct track search function whilst doing track
or disc scans or using random or magazine-random play.
NOTE
2
1
Function of remote control with number/letter entry buttons
(See page 8)
Switching Display for Discs
Switch the display that appears whilst discs are playing.
Switching Display for Discs:
Each time you press the DISP button, the display during disc
play switches as follows.
▼
Track time
▼
Total disc playing time (CD only)
▼
Disc name
▼
Disc title (Units featuring CD text/MD only)
▼
Track title (Units featuring CD text/MD only)
▼
Clock (KDC-8060R/7060R only)
• Disc title/track title cannot be displayed with the CD mode of
the KDC-7060R.
• You can give names to discs through the presetting disc name
function (see p.24).
Note that depending on the unit, display may not be possible.
• If you try to display the name of a disc that does not have one,
"NO NAME" is displayed instead.
• Only when the Switching Clock display function (P.31) is on, the
clock is displayed.
• When there is an attempt to display the title of a disc for which
the disc title/track title has not been recorded, "NO TEXT" is
displayed for CD and "NO NAME" is displayed for MD.
• Depending on the type of characters of the CD Text, some
characters may not be displayable.
NOTE
Page 27
— 27 —
Direct Disc Search
Using the remote control, make direct input of the disc
number that you want to listen to.
Using the numeric buttons on the remote control, enter the
number of the disc that you want to listen to.
The selected disc number blinks in the display for 10 seconds.
If you make no further input in the 10-second period, the
number entry mode will automatically be cancelled.
• Input "0" to select disc #10.
• If you enter more than two numbers all at once, a search will be
made only of the last number entered.
Press either the DISC
+ or DISC– button whilst the number
inputted is blinking.
The disc specified in step 1 starts playing.
Cancelling Direct Disc Search During Its Operation:
Press the 38 button.
2
NOTE
1
Disc Name Preset Play (DNPP)
If you have preset the name of a disc that you want to listen
to in the disc changer, you can look for it by name and start
playing it.
Press the DNPP button on the remote control.
"DNP PLAY" will appear in the display, and the disc name
preset play mode is entered.
1
Function of disc changers with remote control having
number/letter entry buttons (See page 8)
Function of remote control with DNPP button (See page 8)
The preset names/disc titles of the disc in the disc changer to
which you are currently listening are successively displayed for
five seconds each.
In any of the units that are connected, discs that have not been
disc name preset will display "NO NAME".
• This function can only be used in disc changers that were
manufactured or sold as of 1997. Also note that some units
cannot provide a display unless the disc name preset has been
made by the unit that is playing.
• Discs in the disc changer that have never been played before
will appear as "NO ACCESS" when the disc names are
displayed. When you cannot identify a disc because of the "NO
ACCESS" display after inserting a disc magazine, try playing it
using the disc scan or a similar function to display the disc
name.
Also note that "NO DISC" will be displayed when a disc has not
been loaded.
Rapid display (forward / reverse):
Press the DISC
+ or DISC– button.
Pressing the DISC+ button will rapidly display the preset
names/disc titles in order.
Pressing the DISC– button will rapidly display the preset
names/disc titles in reverse order.
When the name appears for the disc you want to play
Press the OK button.
The disc whose name is displayed will be recalled, and the disc
name preset play (DNPP) mode will end.
To cancel DNPP mode:
Press the DNPP button.
The disc name preset play (DNPP) mode will be cancelled.
2
NOTE
Page 28
— 28 —
English
Other features (See page 8)
Audio Control Setting
Adjust various parameters of sound quality.
Press the AUD button to enter the control mode.
Press either the FM or AM button.
Each time the button is pressed, the adjustment mode will
change as follows:
Pressing the FM button advances the display, and pressing the
AM button reverses it.
▼
Bass High-pass filter (rear)
▼▲
Treble High-pass filter (front)
▼▲
Balance N-F Level (only when being switched)
▼▲
Fader
Source tone memory
Each source (CD, FM, AM, and disc changer) has its own
memory in which to store the bass and treble tone settings.
The settings made for a particular source are then recalled
automatically whenever you use that source (e.g., FM mode uses
the tone settings made for FM, AM for AM, etc.).
Press the 4/¢ button.
Look at the table to adjust the mode being displayed.
Press the AUD button to end the control mode.
Setting the high-pass filter
You can separately set the high-pass filter for front and rear
output, including preouts. The high-pass filter works except
during non- fading preout when switching to non-fading.
The factory default settings for front output and rear output are
"through".
NOTE
4
3
NOTE
2
1
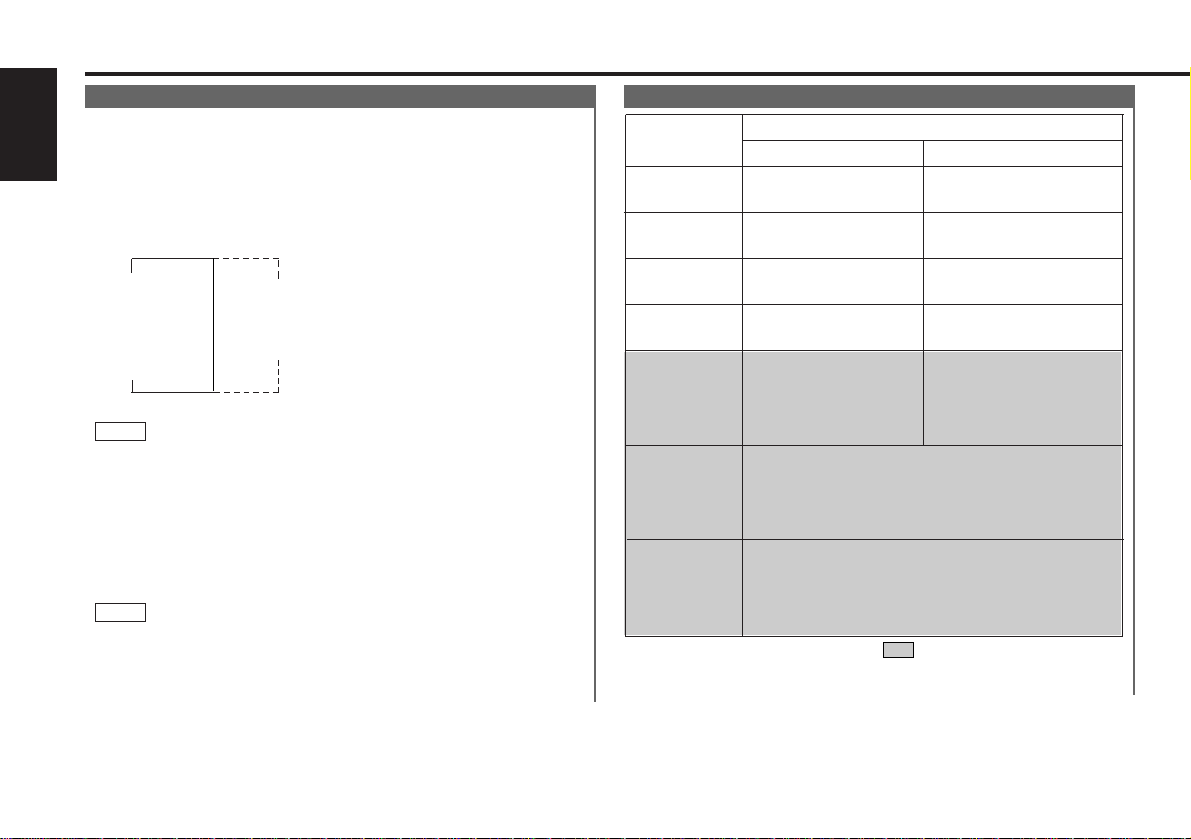
Table of Audio Control Setting
Bass
(“BAS”)
Treble
(“TRE”)
Balance
(“BAL”)
Fader
(“FAD”)
Non-Fading
Preout Level
(“NF”)
Bass decreased.
Treble decreased.
Left channel
emphasized.
Rear channel
increased.
The front and rear
sound is emphasized.
Bass increased.
Treble increased.
Front channel
increased.
The non-fading sound is
emphasized.
Right channel
emphasized.
Adjustment
mode
(Display)
4 button ¢ button
Operation of Audio control button
High-pass
filter for front
output
(“HPF F”)
You can select the frequency to be cut, as
follows:
THROU (through) ↔ 40Hz ↔ 60Hz ↔ 80Hz ↔
100Hz ↔ 120Hz ↔ 150Hz ↔ 180Hz ↔ 220Hz
High-pass
filter for rear
output
(“HPF R”)
You can select the frequency to be cut, as
follows:
THROU (through) ↔ 40Hz ↔ 60Hz ↔ 80Hz ↔
100Hz ↔ 120Hz ↔ 150Hz ↔ 180Hz ↔ 220Hz
KDC-PS9060R only
(KDC-PS9060R only)
(KDC-PS9060R only)
Page 29
— 29 —
Switching Preout
Switch the preout between the front and non-fading. When
you switch to non-fading, you can adjust the volume
separately. The factory defalt is front preout.
Switching the preout:
Hold down the MENU button for one second or more.
"MENU" is displayed and the menu mode is turned on.
Press the ¢ button repeatedly until the Switching preout
function appears in the display.
Press the 4 button to search in the other direction.
The function setting is indicated by "SWPRE FRONT" or
"SWPRE N-FAD" in the display, indicating that the current
preout is front or non-fading, respectively.
"SWPRE FRONT" (Front preout)
"SWPRE N-FAD" (Non-fading preout)
Switching settings
Press either the AM or FM button.
The display and setting will change.
Press the MENU button to end the menu mode.
You cannot use the high-pass filter with non-fading preout.
Turning non-fading output On/Off :
Hold down the NF button for one second or more to set the
function ON or OFF.
"NF ON" is displayed when the non-fading output is set ON.
NOTE
4
3
2
1
Function of the KDC-PS9060R
TEL Mute Function
Shut down the audio system temporarily whenever an
incoming call is received.
The function will not work if a cable is not connected to the car
phone.
When the telephone rings:
When a call is received, "CALL" is displayed and all the unit
functions are temporarily interrupted.
Restoring Original Unit Source During Phone Call:
Press the SRC button.
"CALL" disappears from the display, and the volume of the
original source is restored gradually.
Turning TEL Mute Function Off After Phone Call:
Hang the phone up.
"CALL" disappears from the display.
The original source (i.e., the one used before the phone call) is
returned to automatically, and the volume restored gradually.
NOTE
Navigation Mute Function
When the KENWOOD Navigation System is connected, an
interruption of the audio guide results in the temporary
lowering of the audio level.
The Navigation mute function cannot be used unless a TEL mute
cable is connected to the KENWOOD Navigation System.
NOTE
Page 30
— 30 —
English
Other features (See page 8)
Selectable Illumination
You can switch the colour of the button illumination between
green and amber.
Hold down the MENU button for one second or more.
"MENU" is displayed and the menu mode is turned on.
Press the ¢ button repeatedly until the Selectable
Illumination function appears in the display.
Press the 4 button to search in the other direction.
The function setting is indicated by "COLOR GREEN" or
"COLOR AMBER" in the display, indicating that the current
colour is green or amber, respectively.
Switching settings
Press either the AM button or FM button.
The display and setting will change.
Press the MENU button to end the menu mode.
4
3
2
1
Touch sensor tone
This function produces a beep sound that accompanies button
operation. It can be switched on or off.
Turning the Beep On/Off:
Hold down the MENU button for one second or more.
"MENU" is displayed and the menu mode is turned on.
Press the ¢ button repeatedly until the Touch sensor tone
function appears in the display.
Press the 4 button to search in the other direction.
The function setting is indicated by "BEEP ON" or "BEEP OFF"
in the display, indicating that the current beep setting is on or
off, respectively.
Switching settings
Press either the AM or FM button.
The display and setting will change.
Press the MENU button to end the menu mode.
The beep sound is not output from the preout jacks.
NOTE
4
3
2
1
Automatic Dimmer Function
The display dims when the car's lights are turned on.
The dimmer function is not available for units if the dimmer cable
is not connected.
NOTE
Contrast Adjustment
This adjustment permits easy viewing of the display.
To adjust the contrast:
Hold down the MENU button for one second or more.
"MENU" is displayed and the menu mode is turned on.
Press the ¢ button repeatedly until the Contrast Adjustment
function appears in the display.
Press the 4 button to search in the other direction.
The function setting is indicated by "CONTRAST ##" in the
display, indicating that the Contrast Adjustment mode is on.
Switching settings
Press either the AM or FM button.
Press the FM button to change the setting values higher, and
press the AM button to change them lower. Settings may be
made from 0 to 10.
Press the MENU button to end the menu mode.
The "##" display in the contrast adjustment mode will differ
depending on the setting. The initial setting value is "5".
NOTE
4
3
2
1
Function of the KDC-PS9060R
Page 31
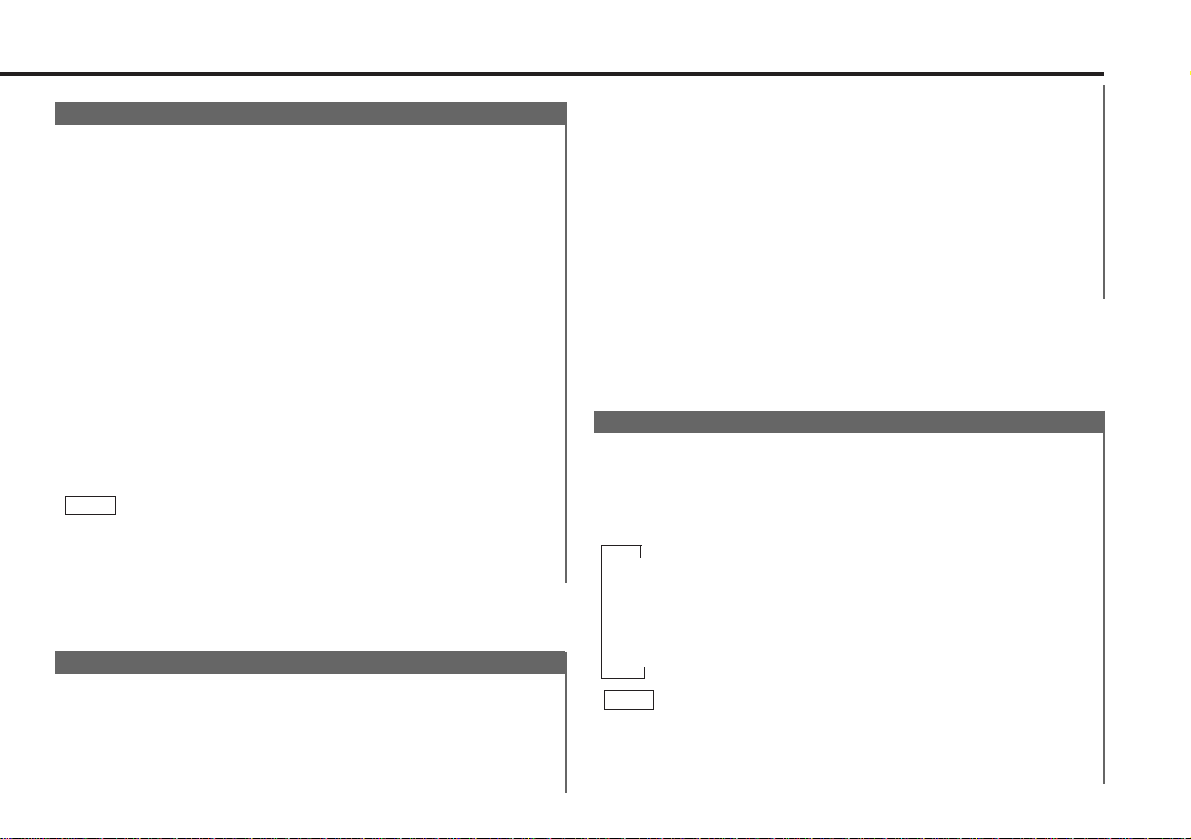
— 31 —
Switching Spectrum Analyzer Display
This function permits switching of the spectrum analyzer
display.
Switching the Spectrum Analyzer Display:
Each time you press the CLK/ANA button, the display switches
as follows;
▼
Speana
▼
Mode display (Icon)
▼
Character
▼
Clock
• Only when the Switching Clock display function (P.31) is on, the
clock is displayed.
• The £ indicator lights whilst the clock is displayed.
NOTE
Switching Graphic Display
This function permits the graphic display to be switched to
one that is linked with the volume level value or to display
various modes. The initial setting is ON (displaying various
modes).
Turning the Graphic Display On/Off:
Hold down the MENU button for one second or more.
"MENU" is displayed and the menu mode is turned on.
Press the ¢ button repeatedly until the Switching Graphic
Display function appears in the display.
Press the 4 button to search in the other direction.
The function setting is indicated by "GRAPHIC ON" or
"GRAPHIC OFF" in the display, indicating that the Graphic
display is on or off, respectively.
"GRAPHIC ON" (Displays various modes)
"GRAPHIC OFF" (Display linked to the volume level value)
Switching settings
Press either the AM button or FM button.
The display and setting will change.
Press the MENU button to end the menu mode.
When making audio adjustments, even when this function is on,
the display will be linked to the audio adjustment value, not the
display of the various modes.
NOTE
4
3
2
1
Function of the KDC-8060R/7060R
Press the ¢ button repeatedly until the Switching Clock
Display function appears in the display.
Press the 4 button to search in the other direction.
The function setting is indicated by "CLOCK ON" or "CLOCK
OFF" in the display, indicating that the Clock Display function is
on or off, respectively.
Switching settings
Press either the AM button or FM button .
The display and setting will change.
Press the MENU button to end the menu mode.
4
3
2
Switching Clock Display
This function permits switching the clock display on/off when
switching the display during each of the modes.
Turning the Clock Display On/Off:
Hold down the MENU button for one second or more.
"MENU" is displayed and the menu mode is turned on.
1
Function of the KDC-PS9060R
Page 32
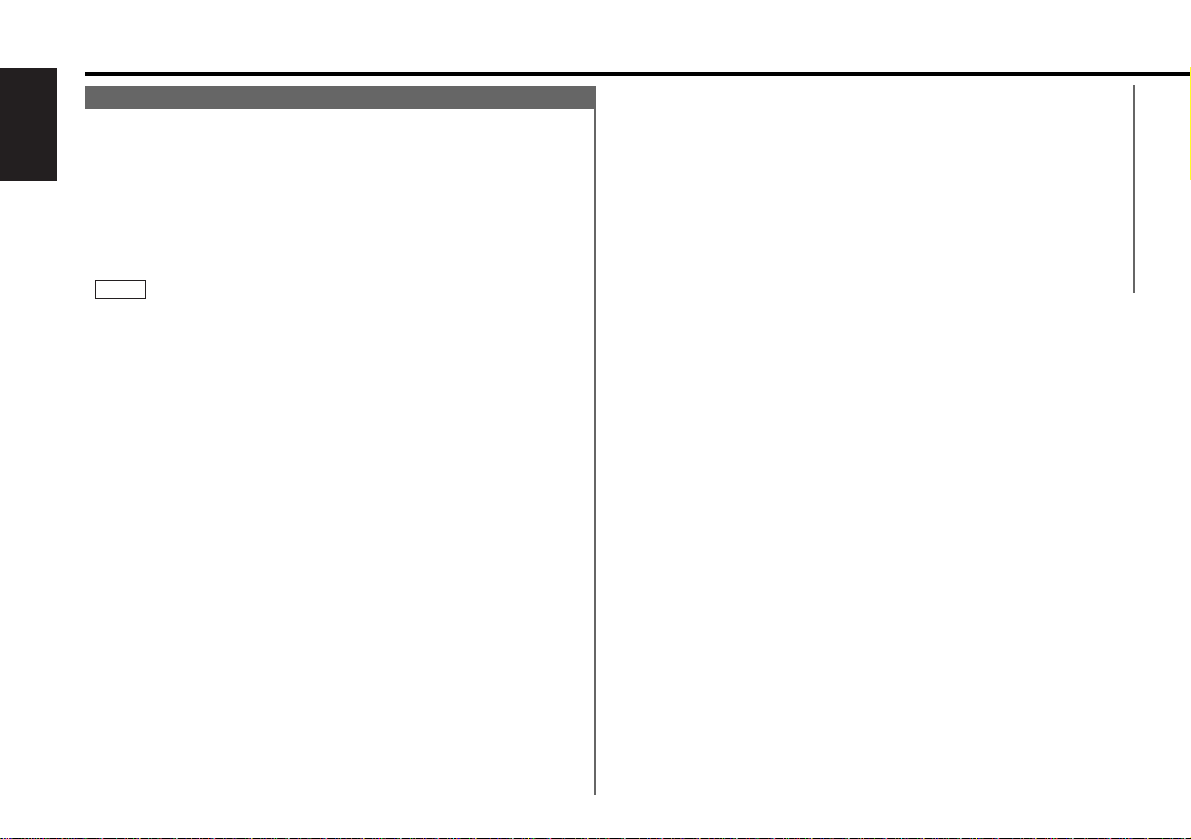
— 32 —
English
Adjusting Time
With automatic time adjustment, you can set the clock time
automatically according to time data sent from RDS stations
(after receiving RDS signals for several minutes). You can also
set the time manually if the automatic time adjustment
function is turned off. The factory default is automatic time
adjustment.
Adjusting Time Automatically:
Tune into an RDS station for 3 or 4 minutes.
The time adjusts automatically to the correct local time.
The time is not adjusted when the RDS station you are tuned to
is not transmitting a time signal. Choose another RDS station in
such a case.
Turning Automatic Time Adjustment On/Off:
Hold down the MENU button for one second or more.
"MENU" is displayed and the menu mode is turned on.
Press the ¢ button repeatedly until the Automatic Time
Adjustment function appears in the display.
Press the 4 button to search in the other direction.
The function setting is indicated by "SYNC ON" or "SYNC OFF"
in the display, indicating that the Automatic Time Adjustment
is on or off, respectively.
"SYNC ON" (Automatic time adjustment)
"SYNC OFF" (Manual time adjustment)
Switching settings
Press either the AM button or FM button.
The display and setting will change.
Press the MENU button to end the menu mode.
Adjusting Time Manually:
Turn off the Automatic Time Adjustment as mentioned above.
Hold down the MENU button for one second or more.
"MENU" is displayed and the menu mode is turned on.
Press the ¢ button repeatedly until the "CLOCK ADJST"
appears in the display.
Press the 4 button to search in the other direction.
3
2
1
4
3
2
1
NOTE
Hold down either the AM or FM button for two seconds or
more to enter the Time Adjustment mode.
The hour display will blink.
•Adjusting the hours
Press the FM button to advance the hours, or press the AM
button to make the hours go back.
•Adjusting the minutes
Press the ¢ button to advance the minutes, or press the
4 button to make the minutes go back.
Press the MENU button to end the menu mode.
6
5
4
Other features (See page 8)
Page 33
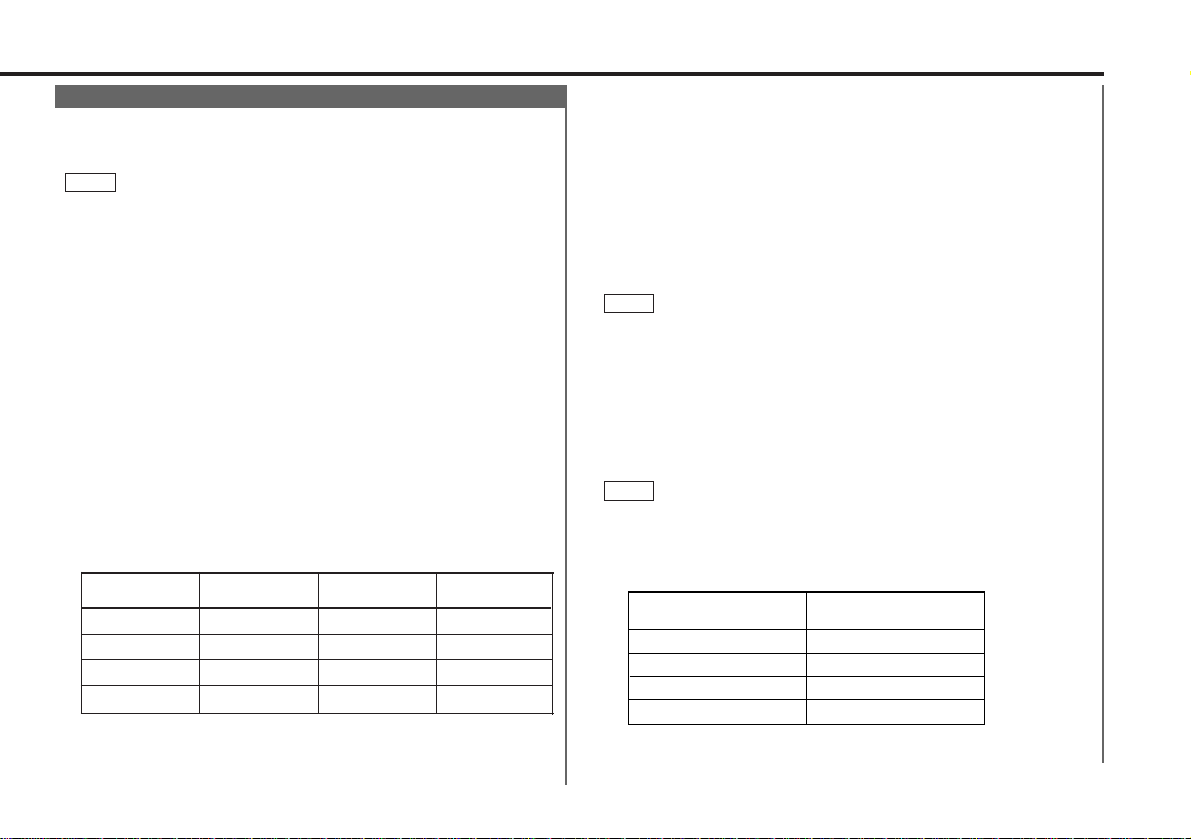
— 33 —
Code Security Function
After a security code has been registered, power cannot be
restored if the battery is disconnected from the unit unless the
code is first input.
All the steps in this procedure (1 through 7) must be completed
before the code security function can be turned on. However,
once the procedure is finished, it need not be repeated.
Once the code security function has been activated, "SECURITY"
disappears from the MENU system. Note that it will no longer be
possible to cancel this function afterwards.
Hold down the MENU button for one second or more.
"MENU" is displayed and the menu mode is turned on.
Press the ¢ button repeatedly until "SECURITY" appears in
the display.
Press the 4 button to search in the other direction.
Hold down either the AM or FM button for two seconds or
more.
"ENTER" will appear in the display for one second, indicating
the code setting mode has been entered. When "CODE"
appears in the display, you can start inputting the code.
Press the preset button and enter your security code.
Use the security code shown on your Car Audio Passport.
Example: Enter "3510" as your code, pressing the buttons as
follows:
Hold down the DISP button for three seconds or more.
The security code will be set.
"RE-ENTER" will appear in the display for one second, asking
5
4
3
2
1
NOTE
Step Button to press
# Times
pressed
Display
1 #1 4 “3”
3
6 “5”#22
#3 “1”2
4 #4 1 “0”
you to enter the code once again for confirmation. When
"CODE" appears in the display, you can start inputting the
code.
Press the Preset button and input the security code again.
Hold down the DISP button again for three seconds or more.
"APPROVED" will appear in the display, with the code security
function turning on. From this point on, if the unit is
disconnected from the battery, the security code must be
entered the first time that the unit's power is turned on.
"ENTER" and "CODE" will appear in the display, asking you to
input the code.
If you input an incorrect security code, the display ask you once
more to input the correct one. Follow the procedure in step 6
above.
If you press the RESET button or remove the battery:
The first time you turn the unit on again, "CODE" will appear in
the display, asking you to input the security code.
Repeat steps 6 and 7 above, and input the security code.
You can start operating the unit again when "APPROVED"
appears in the display.
If you enter the wrong code, "WAITING" is displayed and you
cannot make further input of the code for a fixed interval (see
table below), which grows longer each time you enter the wrong
code.
When "CODE" is displayed, you can make input again.
The number of wrong inputs is displayed.
NOTE
NOTE
7
6
Number of wrong
inputs
Interval until next input
is allowed
12 5 minutes
3 1 hour
4 24 hours
Page 34
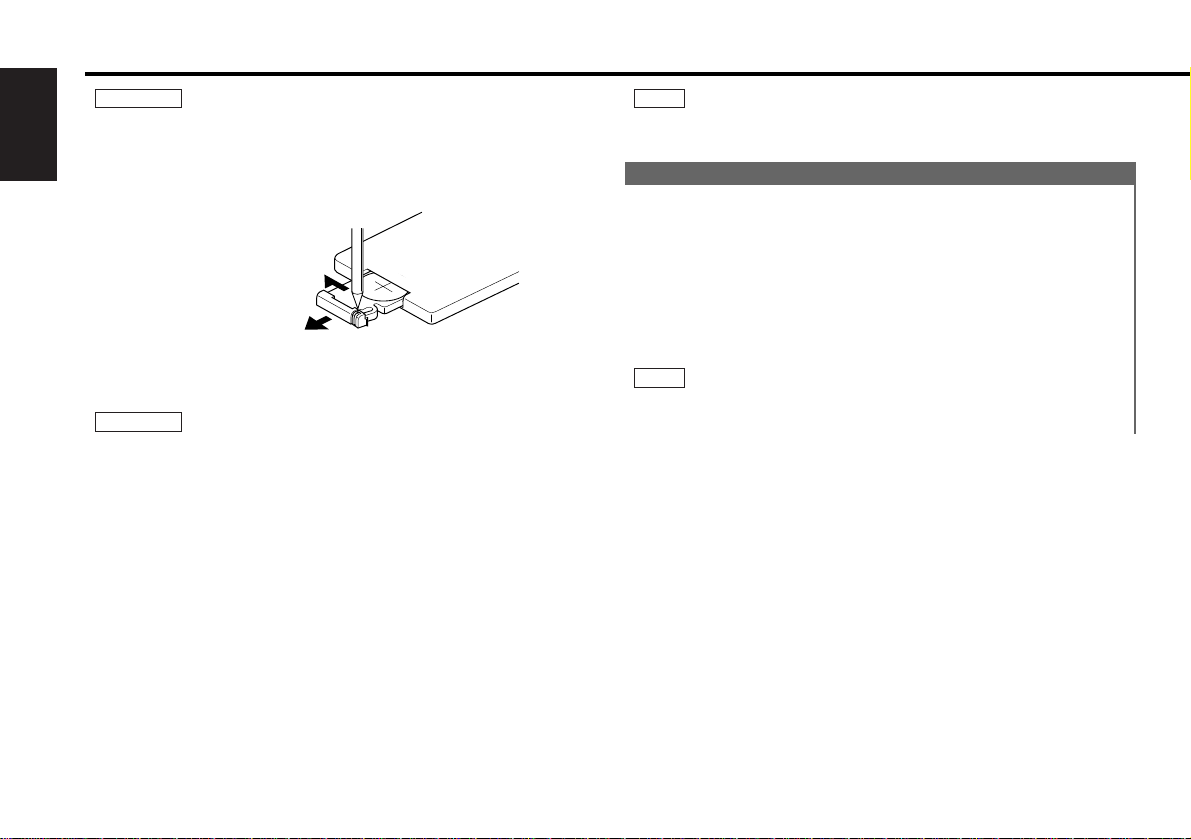
Do not set the remote control on hot places such as above the
fascia panel (dashboard).
Replacing the Lithium Battery:
Use one lithium battery (CR2025).
Remove the case following the instructions as illustrated.
Insert the battery with the + and – poles aligned properly,
following the illustration inside the case.
Store unused lithium batteries out of the reach of children.
Contact a doctor immediately if the battery is accidentally
swallowed.
2WARNING
2CAUTION
2
1
To open
① Keep on slide
➁ Pull out.
All Modes
• VOL. buttons
Keep on pressing the u button to turn the volume up.
keep on pressing the d button to turn the volume down.
• TUNER button
Selects the tuner mode.
• CD button
Selects the CD mode.
• CD•MD CH button
Selects the disc control mode.
The disc control mode will differ depending on the unit that is
connected.
NOTE
— 34 —
English
Basic operations of remote control (See page 8)
Optional
A portion of the operations may not be possible, depending on
the unit that is connected.
NOTE
Page 35
— 35 —
Tuner Mode
• Number/ letter entry buttons
Press buttons #1-6 to recall preset stations.
During direct access tuning, use these buttons to input the
frequency of the station.
• TUNE buttons
Press the 4 button to make decreasing seeks (using the
preset tuning mode).
Press the ¢ button to make increasing seeks (using the preset
tuning mode).
• AM/FM button
Press the AM button to select the MW and LW bands.
Press the FM button to select and switch between FM1, FM2,
and FM3 bands.
• DIRECT/OK button
Selects the direct access tuning mode, used to input
frequencies directly. Press this button again to cancel the mode
whilst it is operating.
During Station name preset play mode, selects station.
• DNPP button
Enters and cancels the Station Name Preset Play mode.
Disc Control Mode
• Number/ letter entry buttons
Used to specify the track (disc) number used in direct track
(disc) searches.
Used to enter letters during disc name preset.
• TRACK buttons
Press the TRACK
– button to search through the tracks
backwards.
Press the TRACK+ button to search through the tracks
forwards.
Used to move the cursor whilst entering disc name.
• DISC buttons
Press the DISC– button to search through the discs backwards.
Press the DISC+ button to search through the discs forwards.
Selects numbers and symbols whilst entering disc name.
• 38 button
When a disc is playing, this button pauses the play.
Press the same button again to start play again.
Selects the type of characters at the time of entering the disc
name.
• OK button
During disc name input, stores the already input data in memory
and ends the input mode.
Selects disc during the disc name preset play mode.
• DNPP button
Enters and cancels the Disc Name Preset Play mode.
Page 36
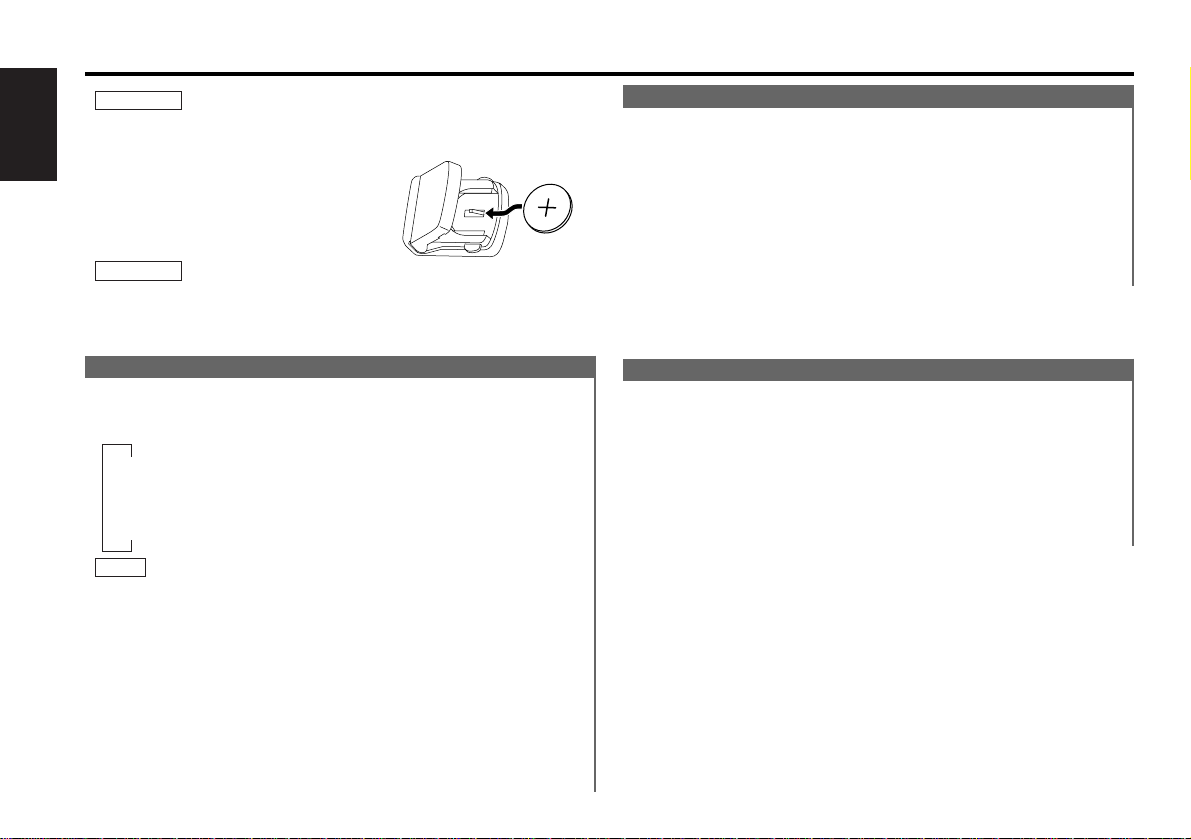
— 36 —
English
To prevent accidents, do not attempt to use the steering remote
control whilst turning the steering wheel.
Replacing the Lithium Battery:
Use one lithium battery (CR2025).
Insert the battery with the + and –
poles aligned properly, following
the illustration.
Store unused lithium batteries out of the reach of children.
Contact a doctor immediately if the battery is accidentally
swallowed.
2WARNING
2WARNING
All Modes
• SRC button
Each time you press the SRC button, the mode switches as
follows:
▼
Tuner mode
▼
CD mode
▼
Disc control mode
• The mode switches to the next mode from any mode which
cannot be used.
• The disc control mode will differ depending on the unit that is
connected.
• VOLUME buttons
Press the 5 button to turn the volume up.
Press the ∞ button to turn the volume down.
• ATT button
Turns down the volume quickly. To return the volume to its
original level, press the button again. Turning down the volume
all the way also cancels attenuation.
NOTE
Basic operations of steering remote control (See page 8)
Optional for the KDC-7060R
Tuner Mode
• TUNE buttons
Press the 4 button to make decreasing seeks (using the
preset tuning mode).
Press the ¢ button to make increasing seeks (using the preset
tuning mode).
• FM button
Selects and switches between the FM1, FM2 and FM3 bands.
• AM button
Selects the MW and LW bands.
Disc Control Mode
• DISC buttons
Press the AM/DISC– button to search through the discs
backwards.
Press the FM/DISC+ button to search through the discs
forwards.
• TRACK buttons
Press the 4 button to search through the tracks backwards.
Press the ¢ button to search through the tracks forwards.
Page 37
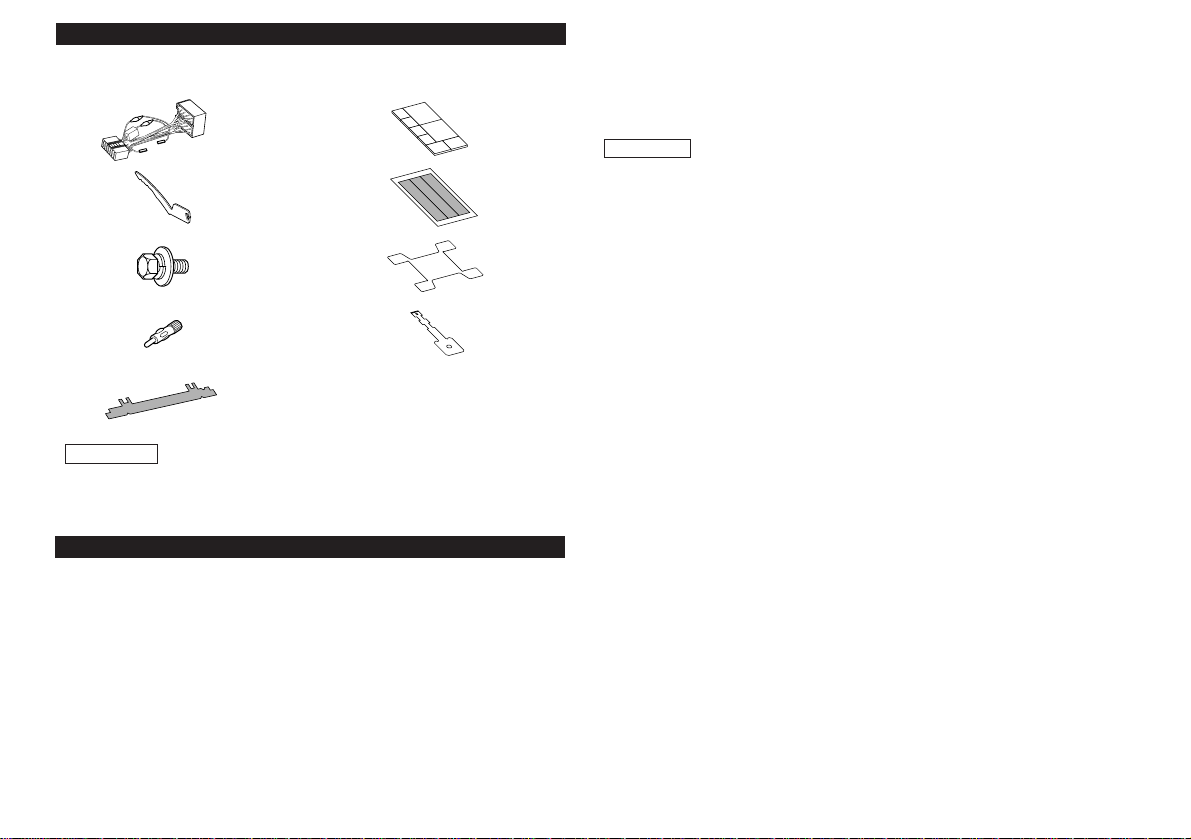
— 37 —
The use of any accessories except for those provided might result
in damage to the unit. Make sure only to use the accessories
shipped with the unit, as shown above.
2CAUTION
Accessories
.........1
1
.........2
2
.........1
3
.........1
4
.........1
5
External view
......... Number of items
.........1
6
.........1
7
.........1
8
.........1
9
External view
......... Number of items
Installation Procedure
1. To prevent short circuits, remove the key from the ignition and
disconnect the - terminal of the battery.
2. Make the proper input and output cable connections for each unit.
3. Connect the cable on the wiring harness.
4. Take Connector B on the wiring harness and connect it to the
speaker connector in your vehicle.
5. Take Connector A on the wiring harness and connect it to the
external power connector on your vehicle.
6. Connect the wiring harness connector to the unit.
7. Install the unit in your car.
8. Reconnect the - terminal of the battery.
• If your car is not prepared for this special connection-system,
consult your KENWOOD dealer.
• Only use antenna conversion adapters (ISO-JASO) when the
antenna cord has an ISO plug.
• Make sure that all cable connections are securely made by
inserting jacks until they lock completely.
• If your vehicle's ignition does not have an ACC position, or if
the ignition cable is connected to a power source with constant
voltage such as a battery cable, the power will not be linked
with the ignition (i.e., it will not turn on and off along with the
ignition). If you want to link the unit's power with the ignition,
connect the ignition cable to a power source that can be turned
on and off with the ignition key.
• If the fuse blows, first make sure that the cables have not
caused a short circuit, then replace the old fuse with one with
the same rating.
• Do not let unconnected cables or terminals touch metal on the
car or anything else conducting electricity. To prevent short
circuits, also do not remove the caps on the ends of the
unconnected cables or the terminals.
• Connect the speaker cables correctly to the terminals to which
they correspond. The unit may receive damage or fail to work if
you share the - cables and/or ground them to any metal part in
the car.
• After the unit is installed, check whether the brake lamps,
indicators, wipers, etc. on the car are working properly.
• Insulate unconnected cables with vinyl tape or other similar
material.
• Some disc changers need conversion cables for connection.
See the section on "Safety Precautions" for details.
• If the console has a lid, make sure to install the unit so that the
faceplate does not hit the lid when closing and opening.
• Mount the unit so that the mounting angle is 30° or less.
2CAUTION
9. Press “the touch-sensitive spot” at the rear of the faceplate (see
p.9) to make the faceplate control panel appear. Then press the
reset button.
6~9...KDC-PS9060R/8060R
only
Page 38
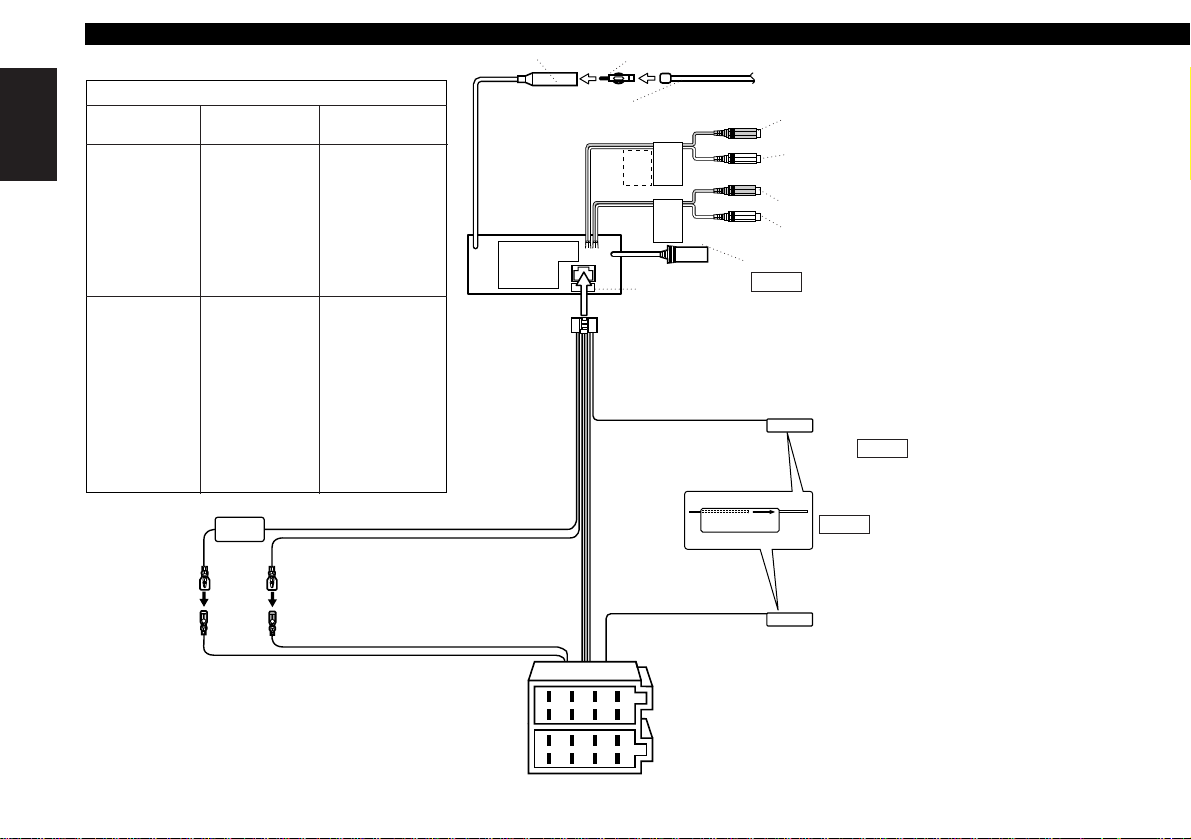
— 38 —
English
Connecting Cables to Terminals
TEL MUTE
P.CONT.OUT
1234567
8
1234567
8
FRONT
NON-FAD
REAR
Front left output (White)/
Non-fading left output (White) (KDC-PS9060R only)
Front right output (Red)/
Non-fading right output (Red) (KDC-PS9060R only)
Rear right output (Red)
Rear left output (White)
Connector Function Guide
Pin Numbers for
ISO Connectors
Cable Colour Functions
External Power
Connector
A–4
A–5
A–6
A–7
A–8
Speaker
Connector
B–1
B–2
B–3
B–4
B–5
B–6
B–7
B–8
Yellow
Blue/White
Orange/White
Red
Black
Purple
Purple/Black
Gray
Gray/Black
White
White/Black
Green
Green/Black
Battery
Power Control
Dimmer
Ignition (ACC)
Earth (Ground)
Connection
Rear Right (+)
Rear Right (–)
Front Right (+)
Front Right (–)
Front Left (+)
Front Left (–)
Rear Left (+)
Rear Left (–)
KENWOOD disc changer/DAB control input
Battery cable (Yellow)
Ignition cable (Red)
FM/AM antenna input
Antenna Cord (ISO)
Antenna Conversion Adaptor (ISO–JASO) (Accessory4)
To connect the Disc changer or DAB unit,
consult each manual.
NOTE
Wiring harness
(Accessory1)
If no connections are
made, do not let the cable
come out from the tab.
NOTE
Connect to the terminal that is grounded when
either the telephone rings or during conversation.
Power control/ Motor antenna
control cable (Blue/White)
Connect either to the power control terminal
when using the optional power amplifier, or to
the antenna control terminal in the vehicle.
A–7 Pin (Red)
A–4 Pin (Yellow)
Connector B
Fuse
Connector A
TEL mute cable (Brown)
To connect the KENWOOD navigation
system, consult your navigation manual.
NOTE
Page 39
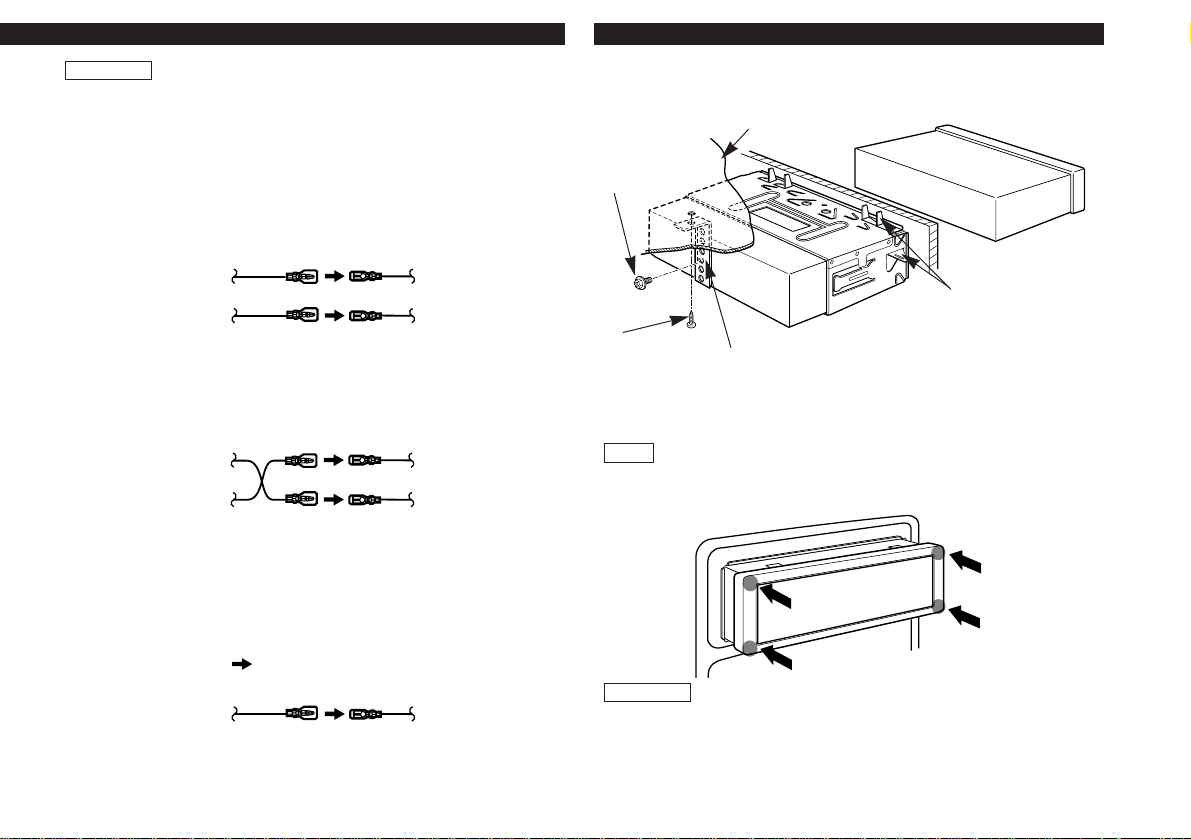
— 39 —
Connecting the ISO Connector (see p.38)
The pin arrangement for the ISO connectors depends on the type
of vehicle you drive. Make sure to make the proper connections to
prevent damage to the unit.
The default connection for the wiring harness is described in 1
below. If the ISO connector pins are set as described in 2 or 3,
make the connection as illustrated.
2WARNING
Unit Vehicle
Ignition cable (Red)
Battery cable (Yellow)
A–7 Pin (Red)
A–4 Pin (Yellow)
Unit Vehicle
Ignition cable (Red)
Battery cable (Yellow)
A–7 Pin (Red)
A–4 Pin (Yellow)
Unit Vehicle
Ignition cable (Red)
Battery cable (Yellow) A–4 Pin (Yellow)
1 (Default setting) The A-7 pin (red) of the vehicle's ISO
connector is linked with the ignition, and the A-4 pin (yellow) is
connected to the constant power supply.
2 The A-7 pin (red) of the vehicle's ISO connector is connected to
the constant power supply, and the A-4 pin (yellow) is linked to
the ignition.
3 The A-7 pin (red) of the vehicle's ISO connector is not
connected to anything, whilst the A-4 pin (yellow) is connected
to the constant power supply (or both the A-7 (red) and A-4
(yellow) pins are connected to the constant power supply).
Connect to a power source that can be
turned on and off with the ignition key.
Make sure that the unit is installed securely in place. If the unit is
unstable, it may malfunction (eg, the sound may skip).
NOTE
Bend the tabs of the
mounting sleeve with
a screwdriver or
similar utensil and
attach it in place.
Metal mounting
strap
(commercially
available)
Self-tapping
screw
(commercially
available)
Firewall or metal support
Accessory3
Installation
■
Installtion
To attach this unit, fit it into the mounting sleeve by pressing the four
corners of the hard rubber frame.
Do not apply strong pressure to other sections than the corners;
otherwise troubles such as the impossibility of opening or closing the
panel may result.
2CAUTION
Page 40
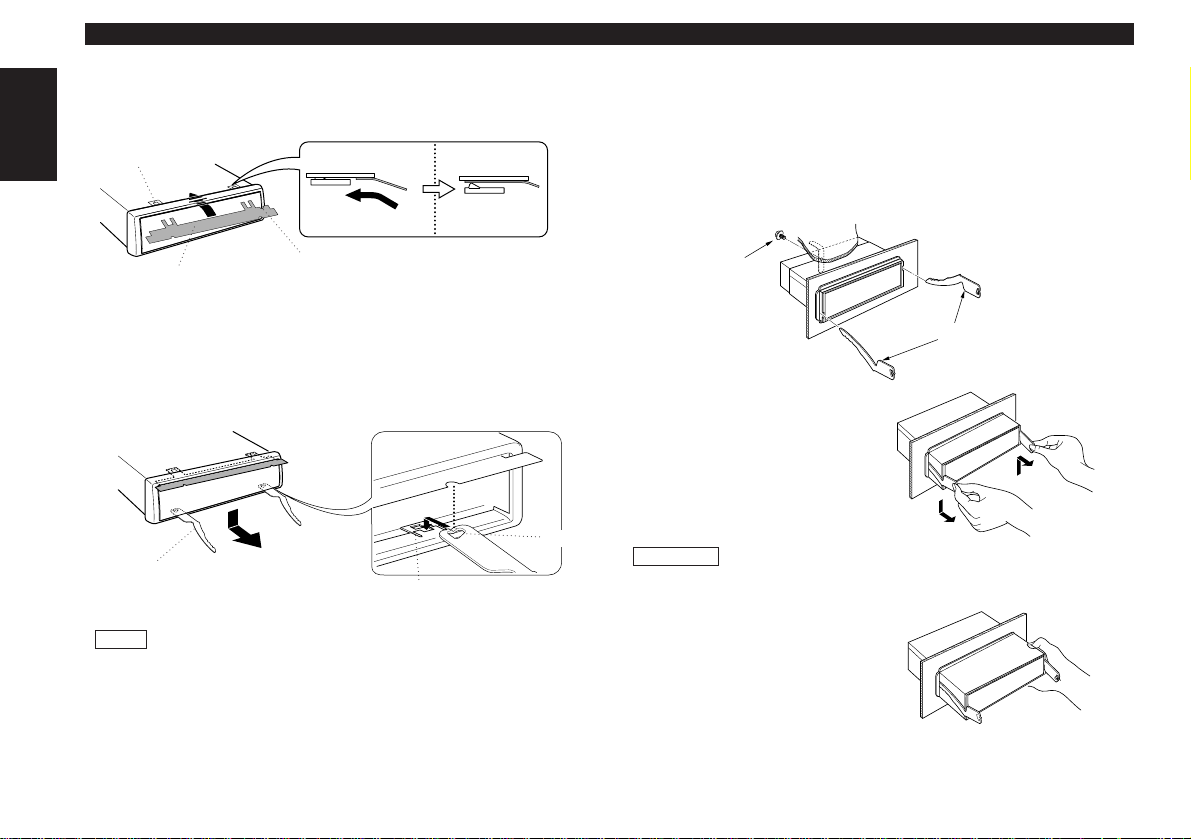
— 40 —
English
Removing the hard rubber frame
■
Engage the catches on the removal tool2 and remove the two
locks on the lower level, leaving the removal tool5 inserted on
the upper level.
Use the removal tool facing the side covered with the
protective sheet to the faceplate.
Lower the frame and pull it forward as shown in the figure.
2
You will feel (not hear) a click when the tabs lock securely.
NOTE
Insert the removal tool5 deeply with the cut placed to the
right to remove the upper locks at an angle as shown below.
1
Removing the Unit
Lock
Accessory5
Removal tool
Catch
Lock
Accessory2
Removal tool
Cut
Removing the Unit
■
Accessory3
Push downward on the lefthand tool and the upward
on the right-hand tool, as
shown, and pull the unit
toward you until it is
halfway out. The unit may
drop if you pull it out
completely.
4
Pull the unit all the way out
with your hands, being
careful not to drop it.
5
Be careful to avoid injury from the catch pins on the removal tool.
2CAUTION
Refer to the section “Removing the hard rubber frame” and
then remove the hard rubber frame.
Remove the hex head machine screw with washer (M4×8) on
the back panel.
Insert the two removal tools at an angle and push them deeply
into the slots on each side, as shown.
3
2
1
Accessory2
Removal tool
Page 41
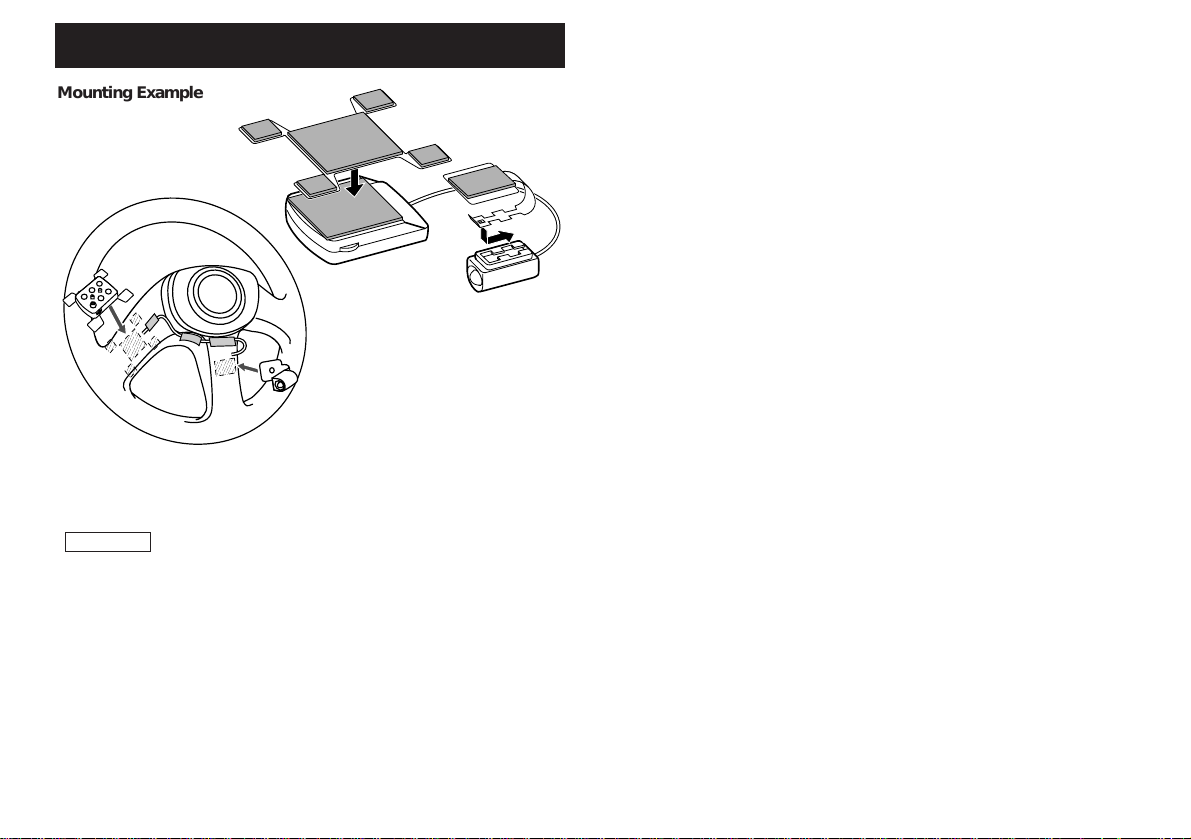
— 41 —
Attaching Steering Remote Control (Optional for the KDC-7060R)
Attach the operation section and the light emitting section of the
Steering Remote Control as shown above.
Be sure to attach them to positions that can ensure proper
operation.
•Clean dirt and oil from the positions where the Steering Remote
Control sections are to be attached.
•If the attached position is cold, warm it before attaching.
•The position should be selected so that the product does not
come in the way of steering operation.
•Do not attach anything on the surface of a steering wheel
incorporating an air bag.
2CAUTION
,
,
,
,,
,,
,
,,
,
,
,,,
,
,,
,
,,
,,,,,,,,,
,
,,
,,
,
,,
,,
,,
,
,
,,
,
,
,,
,,
,
,,
,,
,
,
,,
,
,,,
,
,
,,
,
,
,
,
,,
,,
,
,,
,
Mounting Example
Page 42
— 42 —
English
What might appear to be a malfunction in your unit may just be the result of slight misoperation or miswiring. Before
calling service, first check the following table for possible problems.
SOLUTIONPOSSIBLE CAUSEPROBLEM
A speaker cable may be pinched by a screw in the car. Check the speaker wiring.
No sound can be heard, or the
volume is low.
The fader and/or balance settings are set all the way to
one side.
Reset the fader and/or balance settings.
The input/output cables or wiring harness are connected
incorrectly.
Reconnect the input/output cables and/or the wiring harness
correctly. See the section on "Connecting Cables to
Terminals".
Nothing happens when the
buttons are pressed.
The computer chip in the unit is not functioning normally. Press the reset button on the unit (see page 4).
The sound quality is poor or
distorted.
The speakers are not wired correctly. Reconnect the speaker cables so that each output terminal
is connected to a different speaker.
The antenna control cable is not connected. Connect the cable correctly, referring to the section on
"Connecting Cables to Terminals".
Radio reception is poor. The car antenna is not extended. Pull out the antenna all the way.
The power does not turn on. The fuse has blown. After checking for short circuits in the cables, replace the
fuse with one having the same rating.
The Attenuator function is turned on. Turn off the Attenuator function.
Troubleshooting Guide
No ACC position on vehicle ignition. Connect the same cable to the ignition as the battery cable.
The memory is erased when
the ignition is turned off.
The battery cable has not been connected to the proper
terminal.
Connect the cable correctly, referring to the section on
"Connecting Cables to Terminals".
The TEL mute function does
not work.
The TEL mute cable is not connected properly. Connect the cable correctly, referring to the section on
"Connecting Cables to Terminals".
The ignition and battery cable are incorrectly connected. Connect the cable correctly, referring to the section on
"Connecting Cables to Terminals".
The TEL mute function turns on
even though the TEL mute
cable is not connected.
The TEL mute cable is touching a metal part of the car. Pull the TEL mute cable away from the metal part of the car.
Page 43
— 43 —
SOLUTIONPOSSIBLE CAUSEPROBLEM
A CD ejects as soon as it is
loaded.
The CD is upside-down. Load the CD with the labelled side up.
The CD is quite dirty. Clean the CD, referring to the section on "Cleaning CDs" (see
page 5).
The sound skips on a CD. The CD is scratched or dirty. Clean the CD, referring to the section on "Cleaning CDs" (see
page 5).
The specified track does not
play.
Random play has been selected. Turn off the random play function.
The faceplate does not open or
close.
The ambient temperature is too low. Warm up your car.
Disc Changer
SOLUTIONPOSSIBLE CAUSEPROBLEM
The computer chip in the unit is not functioning normally. Press the reset button on the unit (see page 4).
The disc changer mode cannot
be selected.
No cable has been connected to the disc changer input
terminal on the unit.
Connect the cable to the disc changer input terminal on the
unit.
The specified disc does not
play, but another one plays
instead.
The specified CD is very dirty. Clean the CD.
The CD is upside-down. Load the CD with the labelled side up.
The disc is loaded in a different slot from that specified. Eject the disc magazine and check the number for the
specified disc.
The disc is severely scratched. Try another disc instead.
The sound skips. Something is touching the disc changer. Remove whatever is touching it.
The CD is scratched or dirty. If skipping happens at the same place when the car is
stopped, something is wrong with the CD. Clean the CD.
The display shows that the
changer is being played, but no
sound can be heard.
The specified track does not
play.
Random play or magazine random play has been selected. Turn off the random play or magazine random play function.
Page 44

— 44 —
English
Troubleshooting Guide
The following messages are displayed when certain problems are occurring in your system. Take the recommended
actions.
Nothing has been recorded on the MD.
The next MD is automatically played back
]
BLANK
No disc magazine has been loaded in the changer. The disc magazine is not completely loaded.
Load the disc magazine properly.
No CD in the unit.
Insert the CD.
]
]
EJECT
No tracks are recorded on the MD, although it has a title.
The next MD is automatically played back.
]
NO TRACK
The protective circuit in the unit activates when the temperature inside the automatic disc changer exceeds 60°C (140°F), stopping
all operation.
Cool down the unit by opening the windows or turning on the air conditioner. As the temperature falls below 60°C (140°F), the
disc starts playing again.
]
HOLD
No disc has been loaded in the disc magazine.
Load a disc into the disc magazine.
The CD is very dirty. The CD is upside-down. The CD is scratched a lot.
Clean the CD and load it correctly.
]
]
E-04
No disc has been loaded in the disc magazine.
Load a disc into the disc magazine.
]
NO DISC
The unit is malfunctioning for some reason.
Press the reset button on the unit. If the "E- 77" code does not disappear, consult your nearest service centre.
]
E-77
Something is wrong with the disc magazine. Or the unit is malfunctioning for some reason.
Check the disc magazine. And then, press the reset button on the unit.
If the "E- 99" code does not disappear, consult your nearest service centre.
]
E-99
Page 45

— 45 —
FM tuner section
Frequency range (50 kHz Space) ..............87.5 MHz – 108.0 MHz
Usable sensitivity (S/N=26dB) ....................................0.7 µV/75 Ω
Quieting Sensitivity (S/N=46dB)..................................1.6 µV/75 Ω
Frequency response (±3.0 dB) ..............................30 Hz – 15 kHz
Signal to Noise ratio (MONO) ..............................................65 dB
Selectivity (DIN) (400kHz)..................................................≥ 80 dB
Stereo separation (1 kHz) .................................................... 35 dB
MW tuner section
Frequency range (9kHz Space) ......................531 kHz – 1611 kHz
Usable sensitivity (S/N=20dB).............................................. 25 µV
LW tuner section
Frequency range ..............................................153 kHz – 281 kHz
Usable sensitivity (S/N=20dB).............................................. 45 µV
CD player section
Laser diode ....................................................GaAlAs (λ=780 nm)
Digital filter (D/A) ......................................8 Times Over Sampling
D/A Converter........................................................................ 1 Bit
Spindle speed ..............................................500 – 200 rpm (CLV)
Wow & Flutter ........................................Below Measurable Limit
Frequency response (±1 dB)..................................10 Hz – 20 kHz
Total harmonic distortion (1 kHz) ........................................ 0.01 %
Signal to Noise ratio
KDC-PS9060R ..............................................105 dB (1 kHz)
KDC-8060R/7060R..........................................93 dB (1 kHz)
Dynamic range
KDC-PS9060R ..........................................................100 dB
KDC-8060R/7060R......................................................93 dB
Channel separation ..............................................................85 dB
Audio section
Maximum output power..................................................40 W × 4
Output power (DIN 45324, +B=14.4V)............................27 W × 4
Tone action
Bass:............................................................100 Hz ±10 dB
Treble:..........................................................10 kHz ±10 dB
Preout level / Load
KDC-PS9060R ..................4000 mV/10 kΩ (During CD play)
KDC-8060R/7060R ...................................... 1800 mV/10 kΩ
Preout impedance
KDC-PS9060R..............................................................80 Ω
KDC-8060R/7060R ..................................................≤ 600 Ω
General
Operating voltage ..............................14.4 V (11 – 16 V allowable)
Current consumption ................................10.0 A at Rated power
Installation size (W × H × D) ..........................182 × 53 × 165 mm
Weight ................................................................................2.0 kg
Specifications
Specifications subject to change without notice.
Page 46

 Loading...