

Kenwood KDC-610U Instruction Manual

KDC-610U
CD-RECEIVER
INSTRUCTION MANUAL
Take the time to read through this instruction manual.
Familiarity with installation and operation procedures will help you obtain the best performance from your new
CD-receiver.
For your records
Record the serial number, found on the back of the unit, in the spaces designated on the warranty card, and in the space
provided below. Refer to the model and serial numbers whenever you call upon your Kenwood dealer for information or
service on the product.
Model KDC-610U Serial number
US Residence Only
Register Online
Register your Kenwood product at www.Kenwoodusa.com
B59-2804-00/01 (KW)© 2013 JVC KENWOOD Corporation

Contents
1. Before use 4
1-1. Safety precaution
1-2. Important information
1-3. Regulatory Compliance
2. Appendix 6
2-1. Specifications
2-2. Trademarks
3. Basic operations 8
3-1. Component names
3-2. Preparations
3-3. How to select the item
3-4. Adjusting the clock
3-5. General operations
4. Audio adjustments 11
4-1. Audio control
4-2. Audio preset
4-3. Audio preset recall
5. Listen to the iPod 13
5-1. Models of iPods/iPhones that can be
connected to this unit
5-2. Playing music
5-3. Music search
5-4. Alphabet search
5-5. Direct search
5-6. Skip search
5-7. Skip search ratio setting
5-8. Playback mode
5-9. App & iPod mode setting search
6. Pandora® 17
6-1. Requirements Pandora®
6-2. Listening to Pandora®
6-5. Bookmark registration
6-3. Basic operation
6-4. Station search
6-6. New Station Creation
6-7. Deletion of station
6-8. Pandora source control
7. iHeartRadio 20
7-1. Requirements iHeartRadio™
7-2. Listening to the iHeartRadio
7-3. Basic operations
7-4. Station search
7-5. Station scan
7-6. Favorite station delete
7-7. iHeartRadio source control
8. Listen to the CD/ Audio file 22
8-1. Playing music
8-2. Music search
8-3. Skip search
8-4. Skip search ratio setting
8-5. Playback mode
8-6. Direct music search
8-7. About the Audio file
8-8. About the USB device
8-9. About “KENWOOD Music Editor Light” and
“KENWOOD Music Control”
8-10. About the discs used with this unit
8-11. Handling discs
9. Listen to the tuner 26
9-1. Listening to the radio
9-2. Station preset memory
9-3. Auto memory
9-4. Recall preset station
9-5. Tuner setting
9-6. Direct access tuning
9-7. PTY (Program Type)
10. Display settings 29
10-1. Selecting a display type
10-2. Information display setting
10-3. Illumination color selection
10-4. Adjusting the Illumination color
10-5. Selecting a text display
10-6. Display & Illumination setting
11. General settings 33
11-1. Adjusting the date
11-2. Clock & date display type setting
11-3. Auxiliary input display setting
11-4. Muting the audio upon reception of a
phone call
11-5. Demonstration mode setting
11-6. Initial settings
12. SiriusXM™ Satellite Radio (optional
tuner and service required) 35
12-1. Before use
12-2. Listening to the SiriusXM™ Satellite Radio
12-3. Category and channel search
12-4. Channel preset memory
12-5. Preset tuning
12-6. Tune Start™
12-7. Direct access tuning
12-8. iTunes tagging
12-9. Parental Lock setting
12-10. Clearing the Parental Lock setting
12-11. Setting Parental Lock for Mature content
12-12. Parental Lock pass code setting
12-13. Setting the Song and Artist Alerts
12-14. Song or Artist setting
12-15. Editing a Song or Artist item
12-16. Delete a Song or Artist item
12-17. SiriusXM Replay™
12-18. Channel skip setting
12-19. Clearing the channel skip setting
12-20. SiriusXM tuner setting
13. Basic operation of remote control 42
13-1. Before using remote control
13-2. Basic opreation
14. Troubleshooting guide 44
14-1. Setting error
14-2. Operation/wiring error
14-3. Error messages
|
2
KDC-610U
English
|
3
1. Before use
1-1. Safety precaution
# WARNING
To prevent injuries or a fire, take the following
precautions:
• Stop the car before operating the unit.
• To prevent a short circuit, never put or leave any
metallic objects (such as coins or metal tools) inside
the unit.
! CAUTION
• Adjust the volume so that you can hear the sound
outside the car. Driving with the volume too high
may cause an accident.
• Wipe off the dirt on the panel with a dry silicon or
soft cloth.
Failure to observe this precaution may result in
damage to the monitor or unit.
• If you experience problems during installation,
consult your Kenwood dealer.
1-2. Important information
Before using the this unit for the first time
This unit is factory-set to operate in the
Demonstration mode initially.
When using this unit for the first time, cancel
the Demonstration mode. Refer to <Cancel the
Demonstration mode> (page 9).
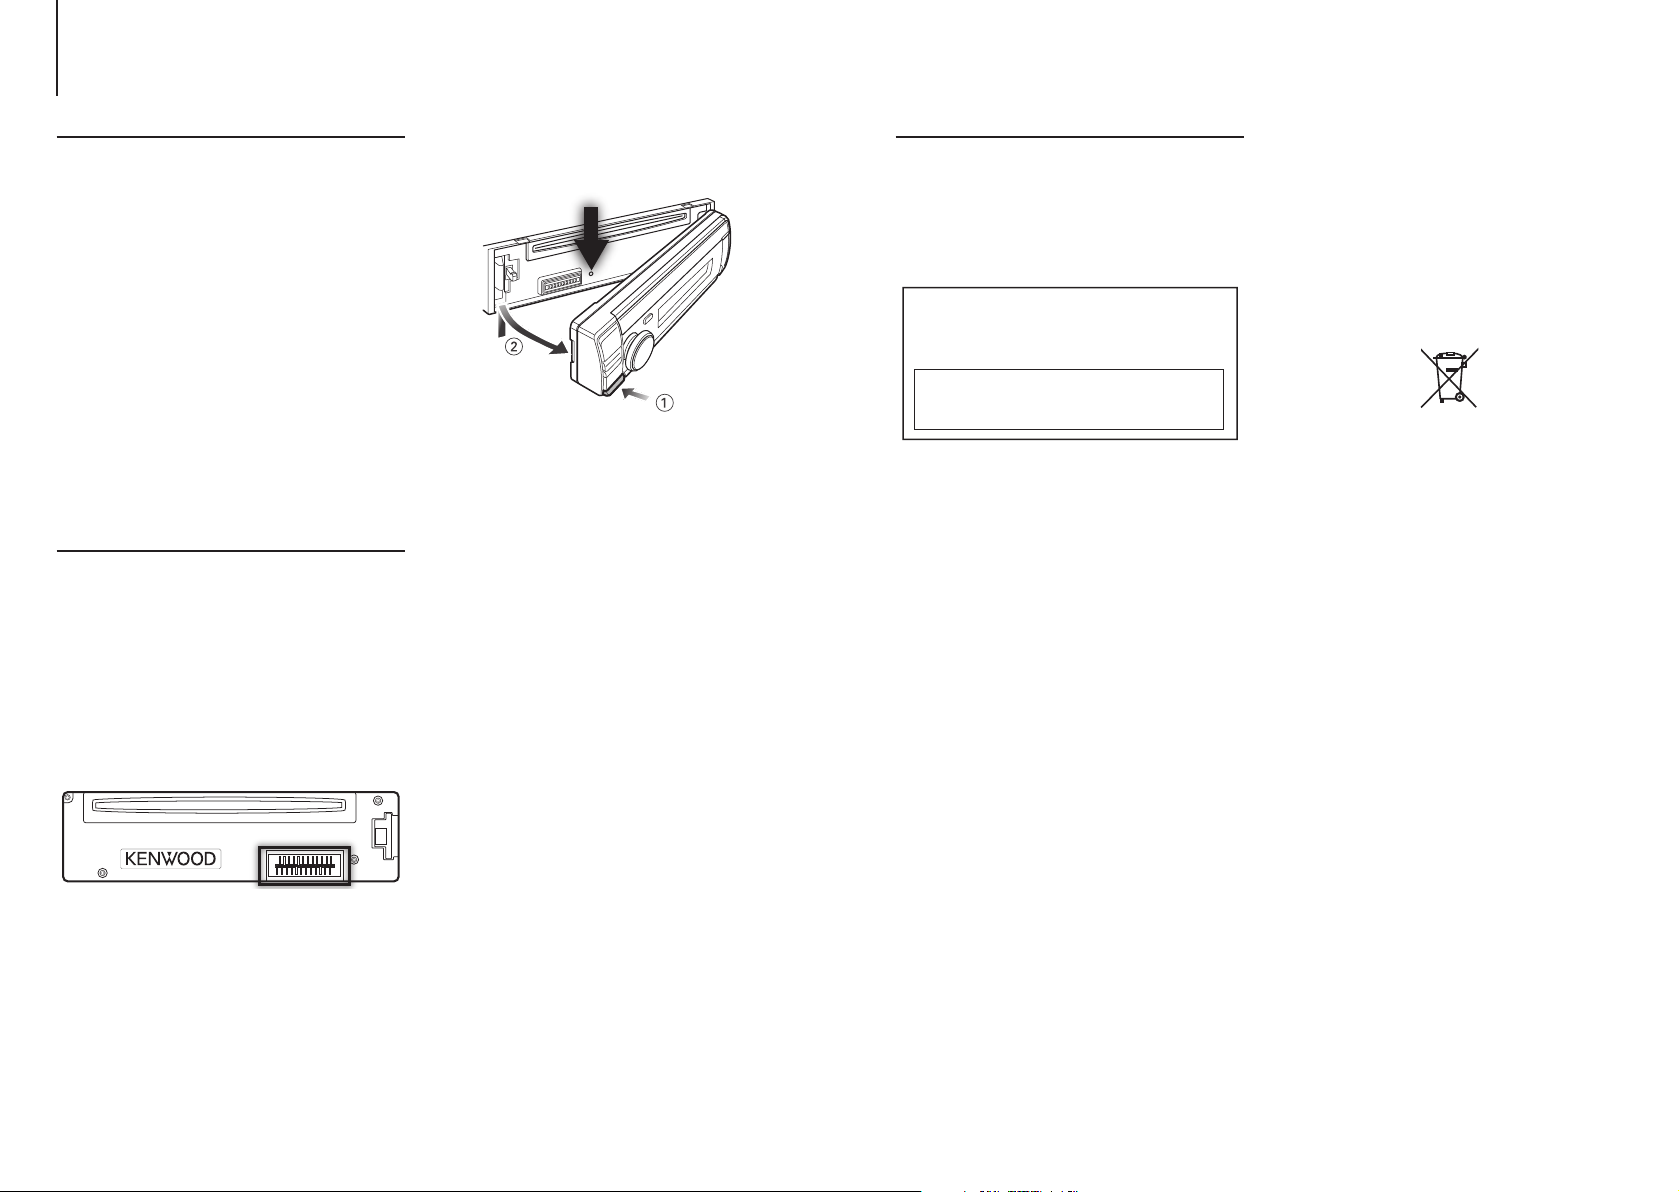
Cleaning the connector
The unit may not function properly if the connectors
between the unit and faceplate are dirty. Detach the
faceplate and clean the connector with a cotton swab
gently, being careful not to damage the connector.
Condensation
When the car is air-conditioned, moisture may collect
on the laser lens. This may cause disc read errors. In
this case, remove the disc and wait for the moisture
to evaporate.
How to reset your unit
If the unit fails to operate properly, press the Reset
button. The unit returns to the factory settings when
the Reset button is pressed.
Notes
• When you purchase optional accessories, check with
your Kenwood dealer to make sure that they can
work with your model and in your area.
• Characters that conform to ISO 8859-1 can be
displayed.
• The illustrations of the display and panel appearing
in this manual are examples used to explain more
clearly how the controls are used. Therefore, what
appears on the display in the illustrations may differ
from what appears on the display on the actual
equipment, and some of the images on the display
may be inapplicable.
1-3. Regulatory Compliance
#CAUTION
Use of controls or adjustments or performance of
procedures other than those specified herein may
result in hazardous radiation exposure.
In compliance with Federal Regulations, following
are reproductions of labels on, or inside the product
relating to laser product safety.
JVC KENWOOD Corporation
2967-3, ISHIKAWA-MACHI,
HACHIOJI-SHI, TOKYO, JAPAN
THIS PRODUCT COMPLIES WITH DHHS RULES
21 CFR SUBCHAPTER J IN EFFECT AT DATE OF
MANUFACTURE.
Location : Top plate
FCC WARNING
This equipment may generate or use radio
frequency energy. Changes or modifications to this
equipment may cause harmful interference unless
the modifications are expressly approved in the
instruction manual. The user could lose the authority
to operate this equipment if an unauthorized change
or modification is made.
FCC NOTE
This equipment has been tested and found to
comply with the limits for a Class B digital device,
pursuant to Part 15 of the FCC Rules. These limits are
designed to provide reasonable protection against
harmful interference in a residential installation. This
equipment may cause harmful interference to radio
communications, if it is not installed and used in
accordance with the instructions. However, there
is no guarantee that interference will not occur in a
particular installation. If this equipment does cause
harmful interference to radio or television reception,
which can be determined by turning the equipment
off and on, the user is encouraged to try to correct
the interference by one or more of the following
measures:
• Reorient or relocate the receiving antenna.
• Increase the separation between the equipment
and receiver.
• Connect the equipment into an outlet on a
circuit different from that to which the receiver is
connected.
• Consult the dealer or an experienced radio/TV
technician for help.
CALIFORNIA, USA
This product contains a CR Coin Cell Lithium Battery
which contains
Perchlorate Material – special handling may apply.
See www.dtsc.ca.gov/hazardouswaste/perchlorate
Información acerca de la eliminación de
equipos eléctricos y electrónicos al final
de la vida útil (aplicable a los países que
hayan adoptado sistemas independientes
de recogida de residuos)
Los productos con el símbolo de un contenedor con
ruedas tachado no podrán ser desechados como
residuos domésticos.
Los equipos eléctricos y electrónicos al final de la
vida útil, deberán ser reciclados en instalaciones
que puedan dar el tratamiento adecuado a
estos productos y a sus subproductos residuales
correspondientes. Póngase en contacto con su
administración local para obtener información sobre
el punto de recogida más cercano. Un tratamiento
correcto del reciclaje y la eliminación de residuos
ayuda a conservar los recursos y evita al mismo
tiempo efectos perjudiciales en la salud y el medio
ambiente.
|
4
KDC-610U
English
|
5

2. Appendix
2-1. Specifications
FM tuner section
Frequency range (200 kHz step)
: 87.9 MHz – 107.9 MHz
Usable sensitivity (S/N = 30dB)
: 9.3dBf (0.8 μV/75 Ω)
Quieting Sensitivity (S/N = 46dB)
: 10.2 dBf (1.13 μV/75 Ω)
Frequency response (±3 dB)
: 30 Hz – 15 kHz
Signal to Noise ratio
: 75 dB (MONO)
Stereo separation
: 45 dB (1 kHz)
AM tuner section
Frequency range (10 kHz step)
: 530 kHz – 1700 kHz
Usable sensitivity (S/N = 20dB)
: 28 dBµ (25 µV)
CD player section
Laser diode
: GaAlAs
Digital filter (D/A)
: 8 Times Over Sampling
D/A Converter
: 24 Bit
Spindle speed (Audio files)
: 500 – 200 rpm (CLV)
Wow & Flutter
: Below Measurable Limit
Frequency response (±1 dB)
: 10 Hz – 20 kHz
Total harmonic distortion (1 kHz)
: 0.010 %
Signal to Noise ratio (1 kHz)
: 105 dB
Dynamic range
: 93 dB
MP3 decode
: Compliant with MPEG-1/2 Audio Layer-3
WMA decode
: Compliant with Windows Media Audio
AAC decode
: AAC-LC “.m4a” files
USB interface
USB Standard
: USB1.1/ 2.0 (Full speed)
File System
: FAT12/16/ 32
Maximum Supply current
: DC 5 V = 1 A
Decode
: MP3, WMA, AAC, WAV
Audio section
Maximum output power
: 50 W x 4
Full Bandwidth Power (at less than 1% THD)
: 22 W x 4
Preout level/ Load (CD)
: 2500 mV/10 kΩ
Preout impedance
: ≤ 600 Ω
Speaker Impedance
: 4 – 8 Ω
Tone
Bass : 100 Hz ±8 dB
Middle : 1 kHz ±8 dB
Treble : 12.5 kHz ±8 dB
Auxiliary input
Frequency response (±3 dB)
: 20 Hz – 20 kHz
Input Maximum Voltage
: 1200 mV
Input Impedance
: 10 kΩ
General
Operating voltage
: 14.4 V (11 – 16V allowable)
Maximum Current consumption
: 10 A
Installation Size (W x H x D)
: 182 x 53 x 159 mm
7-3/16 x 2-1/16 x 6-1/4 inch
Weight
: 2.7 lbs (1.2 kg)
Specifications subject to change without notice.
2-2. Trademarks
• “Made for iPod” and “Made for iPhone” mean that an
electronic accessory has been designed to connect
specifically to iPod or iPhone, respectively, and has
been certified by the developer to meet Apple
performance standards. Apple is not responsible for
the operation of this device or its compliance with
safety and regulatory standards. Please note that the
use of this accessory with iPod or iPhone may affect
wireless performance.
• iPhone, iPod, iPod classic, iPod nano, and iPod touch
are trademarks of Apple Inc., registered in the U.S.
and other countries.
• iTunes and Safari are trademark of Apple Inc.
• Sirius, XM and all related marks and logos are
trademarks of Sirius XM Radio Inc. All rights reserved.
• PANDORA, the PANDORA logo, and the Pandora
trade dress are trademarks or registered trademarks
of Pandora Media, Inc., used with permission.
• Chrome is a trademark of Google Inc.
• Internet Explorer and Windows Media are registered
trademark of Microsoft Corporation in the United
States and other countries.
|
6
KDC-610U
• The “AAC” logo is a trademark of Dolby Laboratories.
English
|
7
3. Basic operations
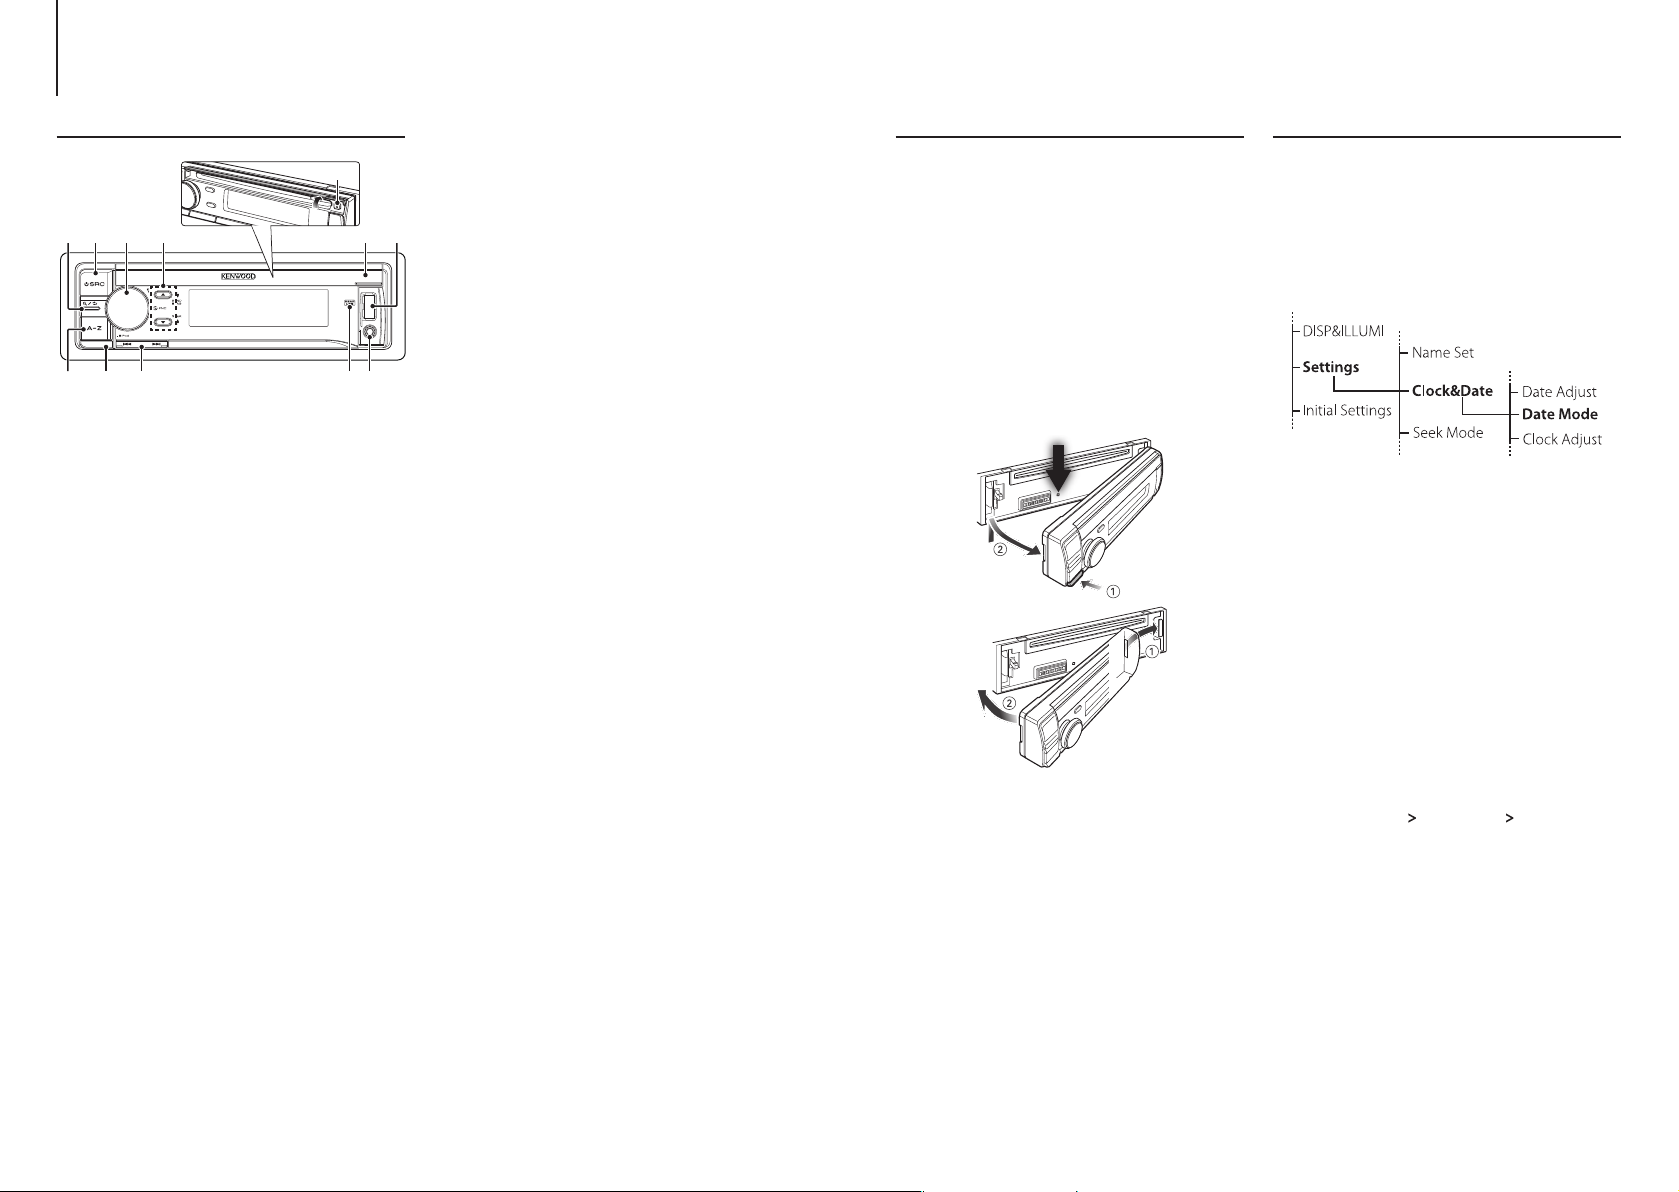
3-1. Component names
(5)
(1) (2) (4)(3)
(1) [1/6] button
When listening to the iPod, audio file, CD, or radio,
press this button to enter the search mode.
In each of the selected modes, press the button to
return to the previous item.
(2) [SRC] button
Press this button to enter source select mode. Refer
to <Source selection> (page 10).
(3) [Control] knob (Volume knob)
In the normal mode, turn the knob to adjust the
volume or press the knob to enter the Function
setting mode.
In the Function mode, turn the knob to select an
item or press the knob to determine the selection.
(4) [R]/ [S] button
Press the button to select an audio file folder or use
it as a Likes/ Dislikes button on Pandora etc.
The [R] button can be used to select broadcast
band as well.
(5) [G] button
Press the button to eject the disc.
(6) Disc slot cover
When this cover opens upward, the disc insertion
slot appears
(7) USB terminal (inside of the cover)
Connect an iPod or USB device.
(8) Auxiliary input (inside of the cover)
Connect the output of an external device using a
stereo mini-jack.
(9) REAR USB indicator
When a USB device or iPod is connected to the USB
(6) (7)
terminal of the rear, this indicator stays lit. During
playback of the connected device, this indicator
blinks.
(10) [E]/ [F] button
Press the button to select a song or station.
(11) Release button
Press the button to detach the faceplate.
(12) [A~Z] button
Press any of (A to Z) button during the Music
search mode to enter the alphabet search mode.
(8)(9)(10)(11)(12)
3-2. Preparations
Cancel the Demonstration mode
Cancel the Demonstration mode when you use the
unit for the first time after installation.
Press [Control] knob to cancel the
Demonstration mode when the message “To
cancel DEMO Press the volume knob” appears
(approx. 15 seconds).
Turn [Control] knob to select the “YES”, and
then press [Control] knob.
The Demonstration mode can also be canceled
in the Function Setting mode. Refer to <11-5.
Demonstration mode setting> (page 34).
Detaching/ Attaching the faceplate
3-3. How to select the item
For how to select setting items such as a function
setting item, see the following example:
Example: Setting the Date format of the display
Press [Control] knob.
“Function” appears and enters the Function setting
mode.
Select the Date Mode function item
Turn [Control] knob to select “Settings”, and
then press [Control] knob.
Next, turn [Control] knob to select “Clock&Date”,
and then press [Control] knob.
Finally, turn [Control] knob to select “Date
Mode”, and then press [Control] knob.
To cancel and return to the previous item, press
[1/6].
Turn [Control] knob to select a format (7
types), and then press [Control] knob.
Returns to the previous item.
Press and hold [1/6].
Exits the Function setting mode.
About the description in this manual
!
• Remove the faceplate at once after pressing the
Release button; otherwise it can fall down due to
vibration.
• The faceplate is a precision component of the unit
and can be damaged by shocks or jolts.
• Keep the faceplate in its case while detached.
• Do not place the faceplate (and case) in areas
exposed to direct sunlight, excessive heat or
humidity. Also avoid places with too much dust or
the possibility of water splashing.
• In this manual, operations performed in steps 2 and 3 are
described as follows:
2. Select “Settings”
using [Control] knob.
3. Select a format (7 types) using [Control] knob.
> “Clock&Date” > “Date Mode”
|
8
KDC-610U
English
|
9

3. Basic operations
4. Audio adjustments
3-4. Adjusting the clock
Press [Control] knob.
Enters the Function setting mode.
Select “Settings” > “Clock&Date” > “Clock
Adjust” using [Control] knob.
For how to use [Control] knob, refer to <3-3. How
to select the item> (page 9).
Set the hour using [Control] knob.
Set the minute using [Control] knob.
Exiting from the Function setting mode
Press and hold [1/6].
3-5. General operations
Power
Press [SRC] to turn the power ON.
Press and hold [SRC] to turn the power OFF.
Source selection
Press [SRC].
The currently selected source is displayed and
enters the Source selection mode.
Select a source using [Control] knob.
Source Display
Standby “STANDBY”
SiriusXM (optional accessory)[1] “SiriusXM”
Tuner “TUNER”
USB device connected to front USB terminal “USB(FRONT)”
USB device connected to rear USB terminal “USB(REAR)”
iPod connected to front USB terminal[1] “iPod(FRONT)”
iPod connected to rear USB terminal[1] “iPod(REAR)”
Pandora® of iPod connected to front USB
terminal[1]
Pandora® of iPod connected to rear USB
terminal[1]
iHeartRadio of iPod connected to front USB
terminal [1]
iHeartRadio of iPod connected to rear USB
terminal [1]
CD[1] “CD”
Auxiliary Input “AU X”
[1] This source can be selected only when it can be played.
Setting the source switching
• Source switching can be set so that pressing [SRC] switches
among sources. For more details, refer to <11-6. Initial
settings> (page 34).
• Source switching can be set so that “Pandora”, “iHeartRADIO”
and “AUX” sources can not be selected when not in use. For
more details, refer to <11-6. Initial settings> (page 34).
Volume
Turn [Control] knob.
USB terminal
A USB device or iPod can be connected.
The CA-U1EX (Max. 500mA) or KCA-iP102
(optional accessories) is recommended to
connect a USB device or iPod.
Auxiliary input
A portable audio device can be connected with
a stereo mini-plug (3.5 mm ø).
“Pandora(FRONT)”
“Pandora(REAR)”
“iHeartRADIO (FRONT)”
“iHeartRADIO (REAR)”
4-1. Audio control
You can adjust the audio control items.
Press [SRC] and select a source other than
Standby (“STANDBY”) using [Control] knob.
Refer to <Source selection> (page 10).
Press [Control] knob.
Enters the Function setting mode.
Select “Audio Control” using [Control] knob.
For how to use [Control] knob, refer to <3-3. How
to select the item> (page 9).
Select a audio control item using [Control]
knob.
Display Audio control item Range
“SubWoofer Level” Subwoofer level –15 — +15 (dB)
“Bass Level” Bass level –8 — +8 (dB)
“Middle Level” Middle level –8 — +8 (dB)
“Treble Level” Treble level –8 — +8 (dB)
“Preset Equalizer” Preset Equalizer curve “Rock”/ “Pops”/ “Easy”/
“Bass Boost” B ass Boost “OFF”/ “Level1”/
“Loudness” Loudness “OFF”/ “Level1”/
“Balance” Balance Left 15 — Right 15
“Fader” Fader Rear 15 — Front 15
“SubWoofer” Subwoofer output ON/ OFF
“Detailed Settings”
“HPF” High Pass Filter Through/ 100/ 120/
“LPF SubWoofer” Low Pass Filter 85/ 120/ 160/ Through
“SubWoofer
Phase”[3]
“Supreme”[4] Supreme setting OFF/ ON
“Audio Preset” Audio Preset
“Volume Offset” Volume offset –8 — ±0 (dB)
[1] Refer to <4-2. Audio preset> (page 12), <4-3. Audio
preset recall> (page 12).
[2] “User”: The customized Bass, Middle, and Treble settings
are effective.
[3] Displayed only when “LPF SubWoofer” is set to ”85”/
“120”/ “160”.
[4] Audio file source only
Subwoofer Phase Reverse (180°)/
memory[1]
“Top40”/ “Jazz”/
”Powerful”/ “Natural”/
“User”[2]
“Level2”/ ”Level3”
“Level2”
150 (Hz)
(Hz)
Normal (0°)
Recall/ Memory
(AUX: -8 — +8)
Select a value using [Control] knob.
Exiting from the Function setting mode
Press and hold [1/6].
Adjusting Bass, Middle, and Treble levels
• You can set Bass, Middle, and Treble levels for each source.
10
|
KDC-610U
English
|
11

4. Audio adjustments 5. Listen to the iPod
4-2. Audio preset
You can register the values set the Audio control
items.
Set the audio control items
Refer to <4-1. Audio control> (page 11).
Select “Audio Control” > “Detailed Settings”
> “Audio Preset” > “Memory” using [Control]
knob.
For how to use [Control] knob, refer to <3-3. How
to select the item> (page 9).
Select “YES” using [Control] knob.
“Memory Completed” appears.
Exiting from the Function setting mode
Press and hold [1/6].
Number of Audio preset memories that can be stored
• Register a pair of Audio preset memories. You cannot
register them by source.
When reset
• When you press the Reset button, audio control values of all
sources will be set to the values registered here.
Audio control items that can be registered
• The following Audio control items can be registered.
“Bass Level”, “Middle Level”, “Treble Level”, “SubWoofer Level”,
“HPF”, “LPF SubWoofer”, “SubWoofer Phase”
4-3. Audio preset recall
You can recall the Audio control items registered to
the <4-2. Audio preset> (page 12).
Press [SRC] and select a recall source using
[Control] knob.
Refer to <Source selection> (page 10).
Press [Control] knob.
Enters the Function setting mode.
Select “Audio Control” > “Detailed Settings” >
“Audio Preset” > “Recall” using [Control] knob.
For how to use [Control] knob, refer to <3-3. How
to select the item> (page 9).
Select “YES” using [Control] knob.
“Recall Completed” appears.
Exiting from the Function setting mode
Press and hold [1/6].
5-1. Models of iPods/iPhones that can be connected to this unit
Made for
• iPod nano (7th generation)
• iPod nano (6th generation)
• iPod nano (5th generation)
• iPod nano (4th generation)
• iPod nano (3rd generation)
• iPod nano (2nd generation)
• iPod nano (1st generation)
• iPod with video
• iPod classic
• iPod touch (5th generation)
• iPod touch (4th generation)
• iPod touch (3rd generation)
• iPod touch (2nd generation)
• iPod touch (1st generation)
• iPhone 5
• iPhone 4S
• iPhone 4
• iPhone 3GS
• iPhone 3G
• iPhone
• For information on the compatibility with iPod/
iPhone software, visit www.kenwood.com/cs/ce/
ipod/.
• Types of available control vary depending on the
type of connected iPod. Visit www.kenwood.com/
cs/ce/ipod/ for further details.
• The word “iPod” appearing in this manual indicates
the iPod or the iPhone connected with the iPod
connection cable (optional accessory).
• Refer to the web site for connectable iPods and iPod
connection cables.
www.kenwood.com/cs/ce/ipod/
• When connecting devices featuring the Lightning
connector, KCP-iP102 (optional accessory) and
Apple Lightning to 30-pin Adapter are necessary.
• Do not keep Apple Lightning to 30-pin Adapter in
your car to avoid the damage by heat.
Notes
• If you start playback after connecting the iPod, the music
that was playing on the iPod is played first.
In this case, “RESUMING” appears without displaying a folder
name, etc. Changing the browse item will display a correct
title, etc.
• You cannot operate the iPod if “KENWOOD” or “ä” appears
on the iPod.
5-2. Playing music
Playing a iPod
Connect the iPod to the USB terminal using the
KCA-iP102 (optional accessory).
[1] Front USB terminal
[2] Rear USB terminal
You can connect the iPod to either one of the USB
terminals provided at the front and rear of this unit.
If you connect a device to the USB terminal
provided at the rear, the “REAR USB” indicator stays
lit.
When it is connected, the source is switched
automatically and playback starts.
Selecting a song
Press [E] or [F] button.
Fast-forwarding or fast-backwarding a song
Press and hold [E] or [F].
Pause and play a song
Press and hold [1/6].
Removing iPod
Switch the source to a device other than iPod,
Pandora, and iHeartRadio, and then remove
the iPod.
Data contained in the iPod may be damaged
if you remove it when it is used as the active
source.
When playback of iPod touch or iPhone does not start
• If an unsupported application has started when connecting
iPod touch or iPhone, “APP & iPod Mode” appears and
sometimes playback does not starts. In this case, APP & iPod
Mode is set to “OFF”. Refer to <5-9. App & iPod mode setting
search> (page 16).
12
|
KDC-610U
English
|
13

5. Listen to the iPod
5-3. Music search
You can search for the song you want to play.
Press [1/6].
“MUSICSEARCH” appears and enters the Music
search mode.
Search for a song
Operation type Operation
Movement between items Turn [Control] knob.
Selection of item Press [Control] knob.
Return to previous item Press [1/6].
Return to Top menu Press and hold [E].
Exiting from the Music search mode
Press and hold [1/6].
Undisplayable titles
• If no characters included in a song name can be displayed,
the browse item name and digits are displayed.
Items Display
Playlists “PLIST***”
Artists “ART***”
Albums “ALB***”
Songs “PRGM***”
Podcasts “PDCT***”
Genres “GEN***”
Composers “COM***”
5-4. Alphabet search
You can select an alphabetic character from the
list in the browse item (artist, album, etc.) currently
selected.
Press [1/6].
“MUSICSEARCH” appears and enters the Music
search mode.
Press [A~Z].
Select a character using [Control] knob.
Return to the Music search mode.
Exiting from the Alphabet search mode
Press and hold [1/6].
Notes on alphabet search
• Turning [Control] knob fast in the Music search mode allows
you to enter the alphabet search mode.
• The time of Alphabet search may become long depending
on the number of items (songs) in iPod.
• To search for a character other than A to Z and 1, enter “*”.
• If the first character string begins with an article “a”, “an”,
or “the” in the alphabet search mode, it is searched for in
defiance of the article.
5-5. Direct search
You can search for music by selecting a browse item
and an alphabetic character(s).
Press [1/6].
“MUSICSEARCH” appears and enters the Music
search mode.
Press and hold [Control] knob.
Enter the Search select mode
Select “Direct Search” using [Control] knob.
Select browse item using [Control] knob.
Display Browse item
“PLAYLISTS” Playlists
“ARTISTS” Artists
“ALBUMS” Albums
“SONGS” Songs
“PODCASTS” Podcasts
“GENRES” Genres
“COMPOSERS” Composers
Select select a character(s) using [Control]
knob.
You can select up to three characters.
Select “DONE” using [Control] knob.
A search result list is displayed.
Select music using [Control] knob.
Exiting from the Music search mode
Press and hold [1/6].
5-6. Skip search
You can search for a song by skipping songs at the
set skip search ratio (the ratio of the number of
songs to skip to the total number of songs in the
selected list)
Press [1/6].
“MUSICSEARCH” appears and enters the Music
search mode.
Select browse item using [Control] knob.
Press and hold [Control] knob.
Enter the Search select mode
Select “Skip Search” using [Control] knob.
Search for music
Operation type Operation
Movement between items Turn [Control] knob.
Skip Search Press [R] or [S].
Selection of item Press [Control] knob.
Setting of skip search ratio Press [E] or [F].
Exiting from the Music search mode
Press and hold [1/6].
Skip search ratio setting
• You can also set the skip search ratio in the Function setting
mode. Refer to <5-7. Skip search ratio setting> (page 16).
14
|
KDC-610U
English
|
15
 Loading...