


COMPACT Hi-Fi COMPONENT SYSTEM
K-525
INSTRUCTION MANUAL
Declaration of Conformity with regard to the EMC Directive
2004/108/EC
Manufacturer:
Kenwood Corporation
2967-3 Ishikawa-machi, Hachioji-shi, Tokyo, 192-8525 Japan
EU Representative's:
Kenwood Electronics Europe BV
Amsterdamseweg 37, 1422 AC UITHOORN, The Netherlands
© B60-5832-08/00 (E/X)

Contents
Read the pages marked ¤ carefully to
ensure safe operation.
Before applying power ............................. 4
Safety precautions ....................................................... 4
IMPORTANT SAFETY INSTRUCTIONS .......4
Read Before Use
Accessories ................................................. 7
Preparation of remote control ................. 7
Installation ................................................. 8
Connections ............................................... 9
Component names and functions .......... 12
Playing music
Basic Operation ........................................16
Playing a CD or audio le disc ................. 18
Playback............................................................................18
Folder play mode .......................................................18
Program playback ......................................................20
Playback of Digital Audio Player ............21
Playback............................................................................21
Playing an iPod/iPhone ........................... 22
Playback............................................................................22
Playing a USB device ...............................24
Playback............................................................................24
Folder play mode .......................................................24
Program playback ......................................................26
Playing an external component ............. 27
Playing an external component ........................27
Adjusting the input level (INPUT LEVEL) ......27
Listening to Radio Broadcasting ............28
Listening to Radio Broadcasting .......................28
Presetting stations automatically
(AUTO MEMORY) ...............................................29
Presetting stations manually
(Manual Preset) ...................................................30
Radio Data System .....................................................30
PS (Program Service Name) Display................30
Searching for a desired program type
(PTY search) ...........................................................31
Creating the desired sound setting
Sound Adjustments ................................. 32
Enhancing the bass tone (D-BASS) .................32
Adjusting the tone or playing surround
audio (TONE) ........................................................32
Resetting the adjusted sound to the
original sound (FLAT) ......................................33
Advanced operations
System Setup ............................................34
Adjusting the Time (TIME ADJUST) .................34
Setting the Sleep Timer (SLEEP) ........................35
Setting the
Setting the display saver
Setting Auto Power Save (A.P.S. SET)..............38
Adjusting the recording output level
Setting the brightness of the display
Switching the Display Information ........ 40
program timer (TIMER SET) .........36
(DISP. SAVER) ...........38
(Rec Out LEVEL) ..................................................39
(DIMMER) ................................................................39
Maintenance
Additional Information ........................... 41
Media Usable With This System ........................41
Caution for Disc Writing .........................................41
Playable audio fi les ....................................................42
Handling of CD ...........................................................44
Handling of D.AUDIO .............................................. 44
Handling of iPod ........................................................ 44
Handling of USB device ..........................................45
Caution for Transport or Movement ..............45
Memory Backup ..........................................................45
Troubleshooting ...................................... 46
Amplifi er/Speaker Section ................................... 46
Tuner Section ............................................................... 46
USB /iPod/iPhone Section ................................... 46
CD Section ......................................................................47
Component connected to D.AUDIO IN
connector ..............................................................47
Remote Control Unit ................................................47
Resetting the system ...............................................47
Message List .............................................48
Glossary .................................................... 49
Care and Storage ..................................... 50
Speci cations ........................................... 51
Read Before Use
Playing music
Creating the desired sound setting
Advanced operations
Maintenance
K-525
2 3
English
Before applying power
¤
Caution : Read this page carefully to
ensure safe operation.
Units are designed for operation as follows.
Australia ........................................................... AC 240 V only
Europe .............................................................. AC 230 V only
Safety precautions
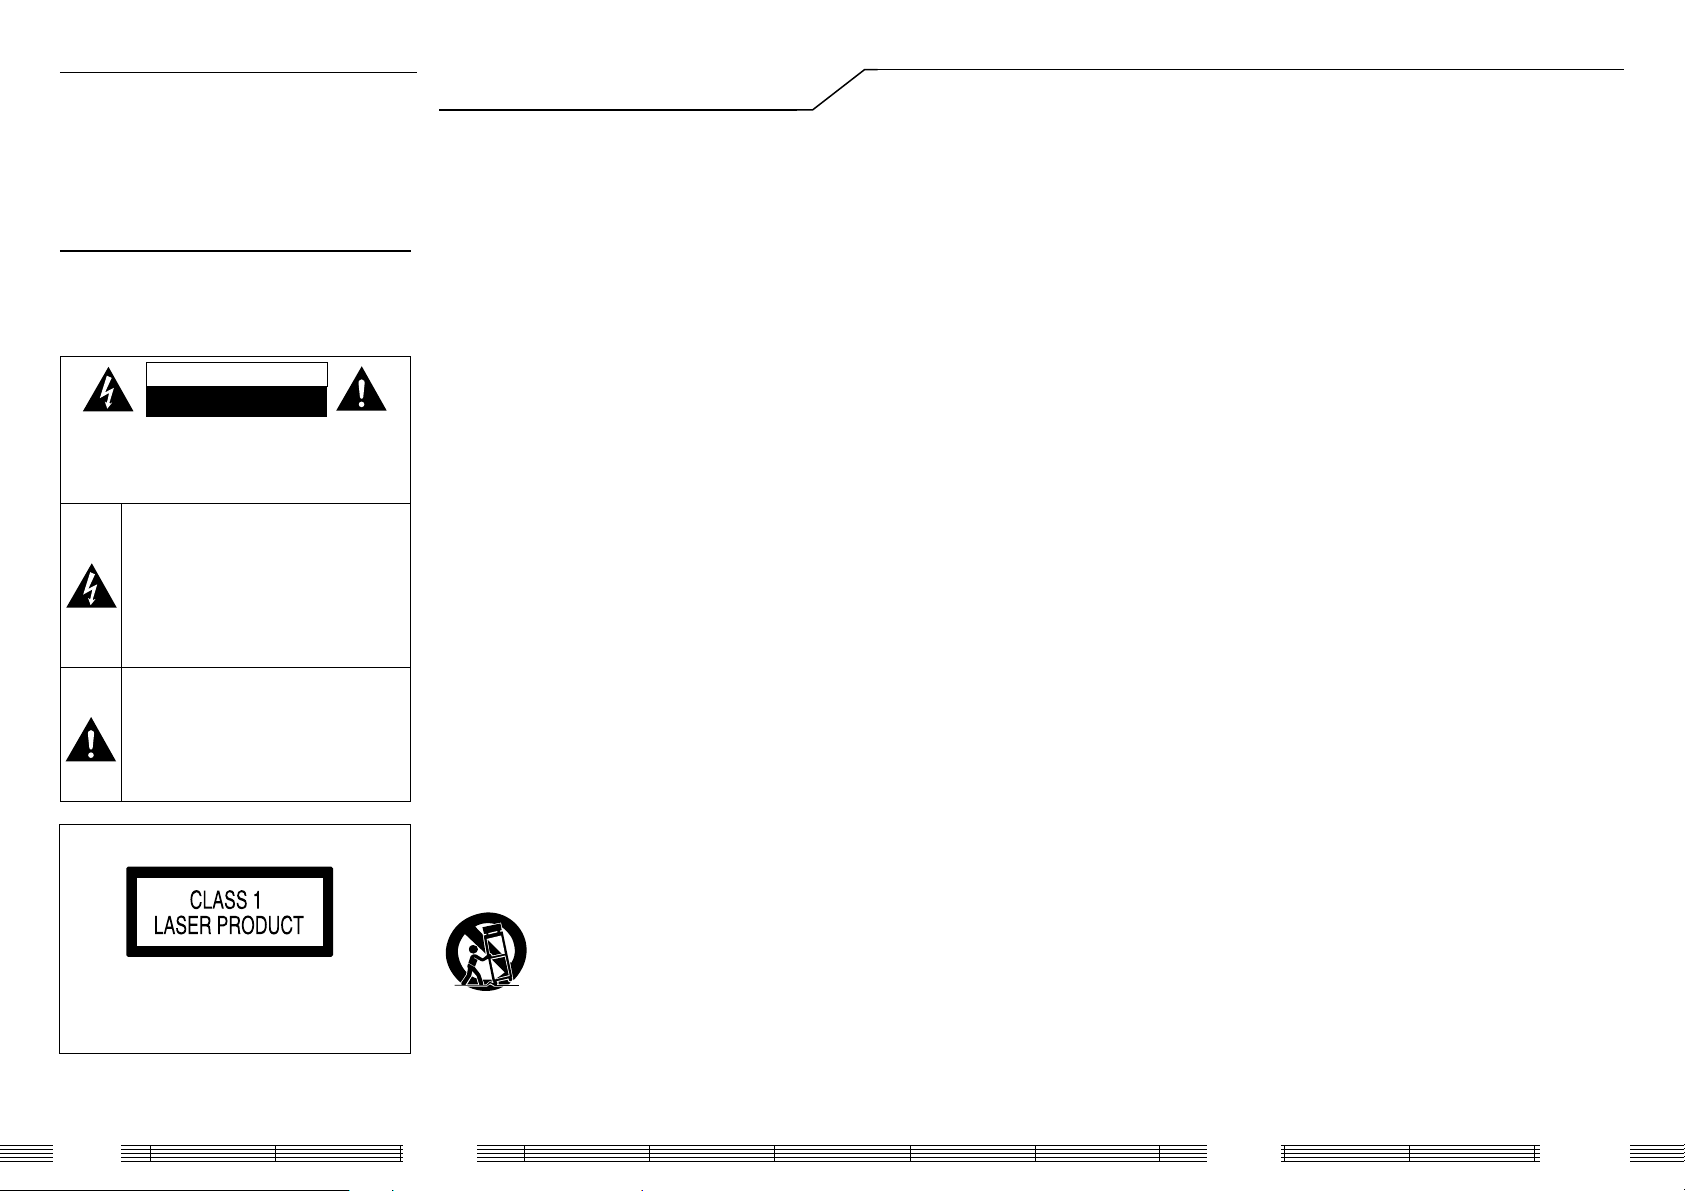
WARNING : TO PREVENT FIRE
OR ELECTRIC SHOCK, DO NOT
EXPOSE THIS APPLIANCE TO
RAIN OR MOISTURE.
CAUTION
RISK OF ELECTRIC SHOCK
DO NOT OPEN
CAUTION: TO REDUCE THE RISK OF ELECTRIC
SHOCK, DO NOT REMOVE COVER (OR BACK). NO
USER-SERVICEABLE PARTS INSIDE. REFER SERVICING
TO QUALIFIED SERVICE PERSONNEL.
THE LIGHTNING FLASH WITH ARROWHEAD
SYMBOL, WITHIN AN EQUILATERAL TRIANGLE, IS INTENDED TO ALERT THE USER
TO THE PRESENCE OF UNINSULATED "DANGEROUS VOLTAGE" WITHIN THE PRODUCT’
S ENCLOSURE THAT MAY BE OF SUFFICIENT
MAGNITUDE TO CONSTITUTE A RISK OF
ELECTRIC SHOCK TO PERSONS.
THE EXCLAMATION POINT WITHIN AN EQUILATERAL TRIANGLE IS INTENDED TO ALERT
THE USER TO THE PRESENCE OF IMPORTANT
OPERATING AND MAINTENANCE (SERVICING) INSTRUCTIONS IN THE LITERATURE ACCOMPANYING THE APPLIANCE.
The marking of products using lasers
The marking this product has been classified as
Class 1. It means that there is no danger of hazardous radiation outside the product.
Location: Back panel
IMPORTANT SAFETY
INSTRUCTIONS
¤
Caution : Read this page carefully to
ensure safe operation.
Read These Instructions
– All the safety and operating instructions should
be read before the product is operated.
Keep These Instructions
– The safety and operating instructions should be
retained for future reference.
Heed All Warnings
– All warnings on the product and in the operating
instructions should be adhered to.
Follow All Instructions
– All operating and use instructions should be
followed.
1. Clean only with dry cloth
– Unplug this product from the wall outlet before
cleaning. Do not use liquid cleaners or aerosol
cleaners. Use a damp cloth for cleaning.
2. Attachments
– Only use attachments/accessories specifi ed by
the manufacturer.
3. Do not use this apparatus near water
– This product shall not be exposed to dripping
and splashing – for example, near a bath tub,
wash bowl, kitchen sink, or laundry tub; in a wet
basement; or near a swimming pool; and the like.
Do not place an object containing liquid, such as a
fl ower vase, on the appliance.
4. Accessories
– Use only with the cart, stand, tripod, bracket, or
table specifi ed by the manufacturer, or sold with
the apparatus. When a cart is used, use caution
when moving the cart/apparatus combination to
avoid injury from tip-over.
5. Ventilation
– Slots and openings in the cabinet are provided
for ventilation and to ensure reliable operation of
the product and to protect it from overheating.
Do not block any ventilation openings. Install in
accordance with the manufacturer’s instructions.
The openings should never be blocked by placing
the product on a bed, sofa, rug, or other similar
surface. This product should not be placed in a
built-in installation such as a bookcase or rack
unless proper ventilation is provided or the
manufacturer’s instructions have been adhered to.
6. Power Sources
– This product should be operated only from the
type of power source indicated on the product.
If you are not sure of the type of power supply to
your home, consult your product dealer or local
power company.
CAUTION – Polarization
7.
– Do not defeat the safety purpose of the polarized
or grounding-type plug. A polarized plug has two
blades with one wider than the other. A grounding
type plug has two blades and a third grounding
prong. The wide blade or the third prong are
provided for your safety. If the provided plug does
not fi t into your outlet, consult an electrician for
replacement of the obsolete outlet.
8. Power Cord Protection
– Protect the power cord from being walked on
or pinched particularly at plugs, convenience
receptacles, and the point where they exit from the
apparatus.
9. Lightning
– Unplug this apparatus during lightning storms or
when unused for long periods of time.
10. Overloading
– Do not overload wall outlets, extension cords, or
integral convenience receptacles as this can result
in a risk of fi re or electric shock.
11. Object and Liquid Entry
– Never push objects of any kind into this product
through openings as they may touch dangerous
voltage points or short-out parts that could result in
a fi re or electric shock. Never spill liquid of any kind
on the product.
12. Servicing
– Do not attempt to service this product yourself
as opening or removing covers may expose you
to dangerous voltage or other hazards. Refer all
servicing to qualifi ed service personnel.
13. Damage Requiring Service
– Refer all servicing to qualifi ed service personnel.
Servicing is required when the apparatus has been
damaged in any way, such as power-supply cord or
plug is damaged, liquid has been spilled or objects
have fallen into the apparatus, the apparatus has
been exposed to rain or moisture, does not operate
normally, or has been dropped.
14. Replacement Parts
– When replacement parts are required, be sure
the service technician has used replacement parts
specifi ed by the manufacturer or have the same
characteristics as the original part. Unauthorized
substitutions may result in fi re, electric shock, or
other hazards.
15. Safety Check
– Upon completion of any service or repairs to
this product, ask the service technician to perform
safety checks to determine that the product is in
proper operating condition.
16. Wall or Ceiling Mounting
– This product should be mounted to a wall or
ceiling only as recommended by the manufacturer.
17. H ea t
– Do not install near any heat sources such as
radiators, heat registers, stoves, or other apparatus
(including amplifi ers) that produce heat. Do not
place a fl aming object, such as a candle or lantern,
or near the product.
18. Power Lin es
– An outside antenna system should not be located
in the vicinity of overhead power lines or other
electric light or power circuits, or where it can fall
into such power lines or circuits. When installing an
outside antenna system, extreme care should be
taken to keep from touching such power lines or
circuits as contact with them might be fatal.
Notes:
Item 7 is not required except for grounded or
polarized equipment.
K-525
4 5
English
Accessories
Preparation of remote control
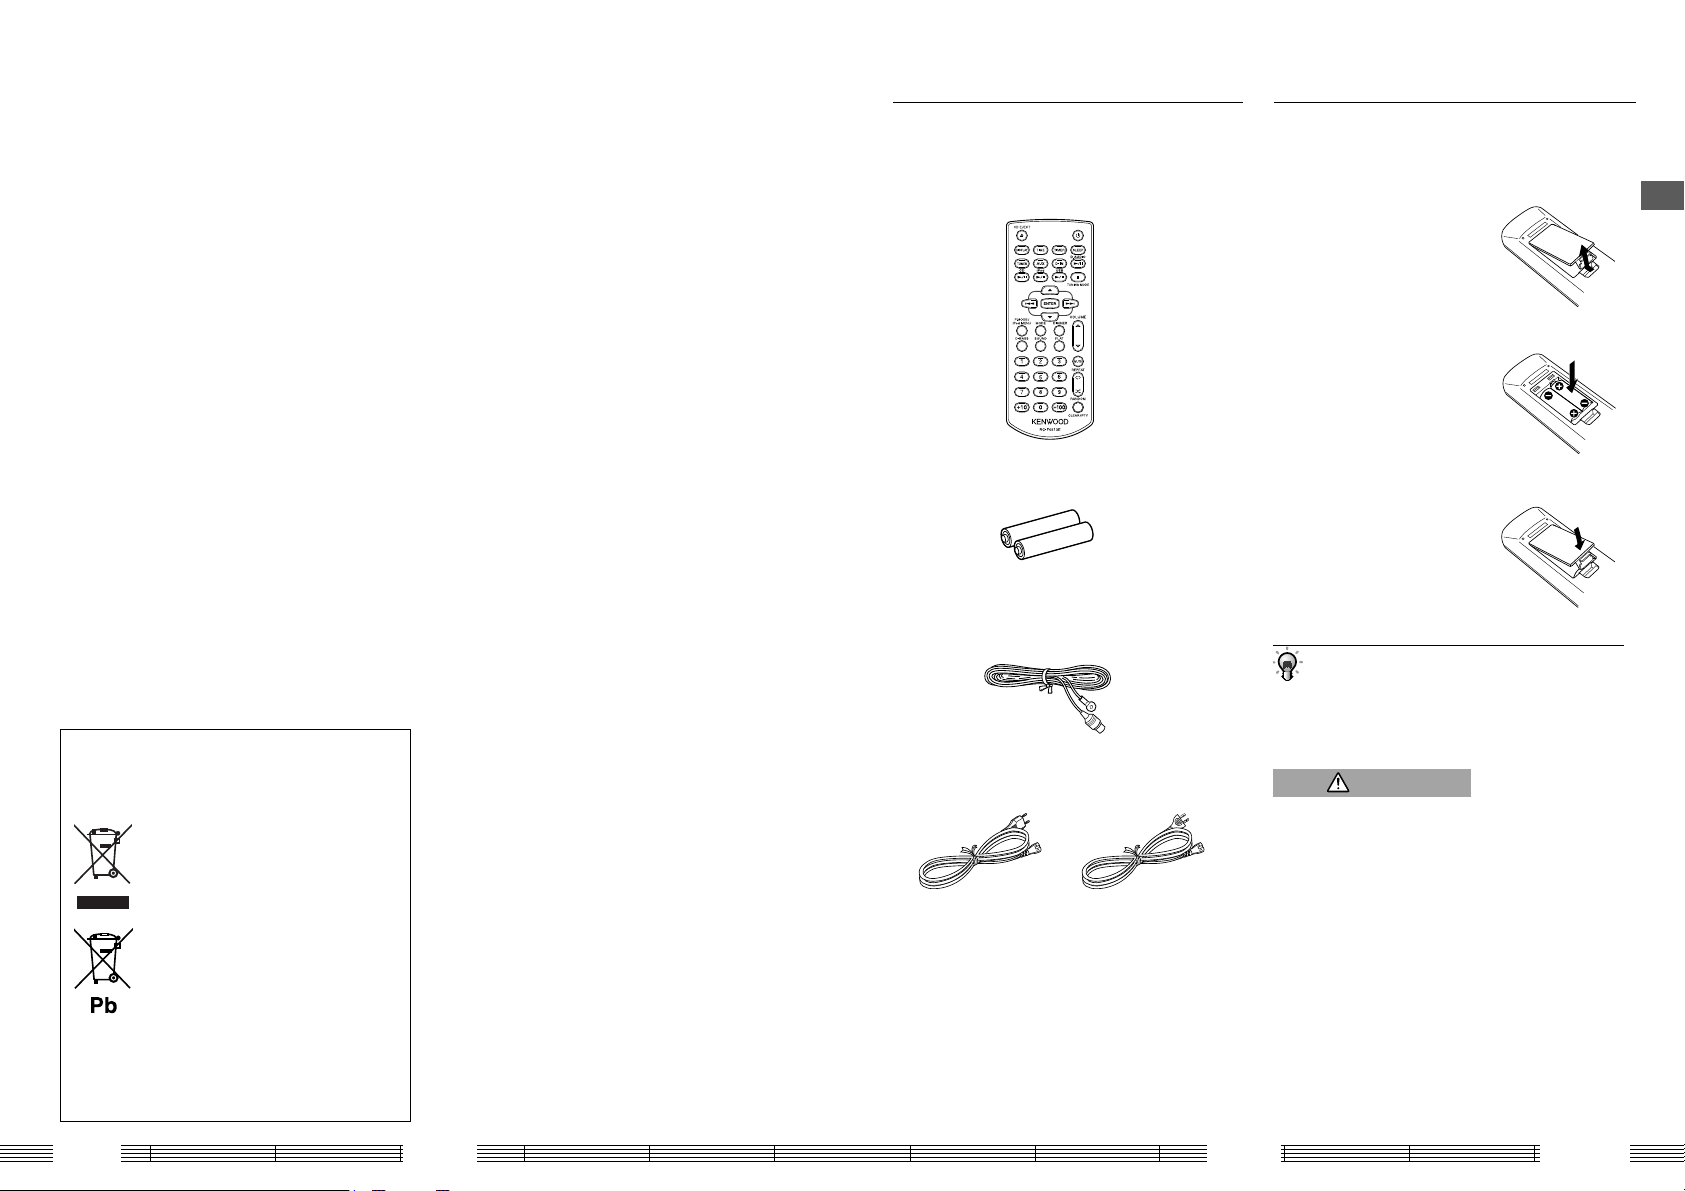
Information on Disposal of Old Electrical
and Electronic Equipment and Batteries
(applicable for EU countries that have
adopted separate waste collection systems)
Products and batteries with the symbol
(crossed-out wheeled bin) cannot be disposed
as household waste.
Old electrical and electronic equipment and
batteries should be recycled at a facility
capable of handling these items and their
waste by products.
Contact your local authority for details in
locating a recycle facility nearest to you.
Proper recycling and waste disposal will help
conserve resources whilst preventing
detrimental effects on our health and the
environment.
Notice: The sign "Pb" below the symbol for
batteries indicates that this battery
contains lead.
Accessories
Remote control unit
(RC-F0513E x 1)
Remote control batteries
FM indoor antenna
For Europe
(LR03 (AAA) x 2)
(x 1)
Power cords (2 types)
For Australia
Loading batteries in the remote
control unit
Remove the battery cover.
1
Insert the provided AAA-size
2
batteries.
• Insert batteries with correct
polarity.
Close the battery cover.
3
• The provided batteries are intended for use in
operation check and their service life may be shorter
than usual.
• When replacing batteries, be always sure to replace
both of the two batteries together.
CAUTION
Do not leave the battery near re or under direct sunlight.
A re, explosion or excessive heat generation may result.
Read Before Use
K-525
6 7
English
Installation
Connections
Installation precautions
• Always install the system on a level, stable surface. When installing on a stand or tabletop, be sure to con rm the strength of
the stand.
• The magnetism from the speakers may cause color irregularities on a nearby TV or PC screen. Always install the speakers at a
distance from a TV or PC.
CAUTION
Observe the following cautions when installing the system. Insu cient heat radiation may build up internal heat and
cause a malfunction or re hazard.
• Do not place an object that may hinder heat radiation on the system.
• Do not install the system on the back, on the side or upside down.
• Do not place a cloth on the system or place it on a carpet or cushion.
• Do not use the system in a poorly ventilated place.
• Leave the spaces speci ed below around the cabinets of the main unit.
Top: 50 cm or more Side: 10 cm or more Rear: 10 cm or more
Install the system so that the power outlet is easily accessible from the user, and unplug the power cord from the
power outlet immediately in case of a trouble.
Note that the power supply to the system is not shut down completely by simply setting the power button to OFF.
To shut down the power supply completely, it is required to unplug the power cord.
Malfunction of the system
If the system does not function properly or the display shows erroneous information
even when the connections are made correctly, reset the system (page 47).
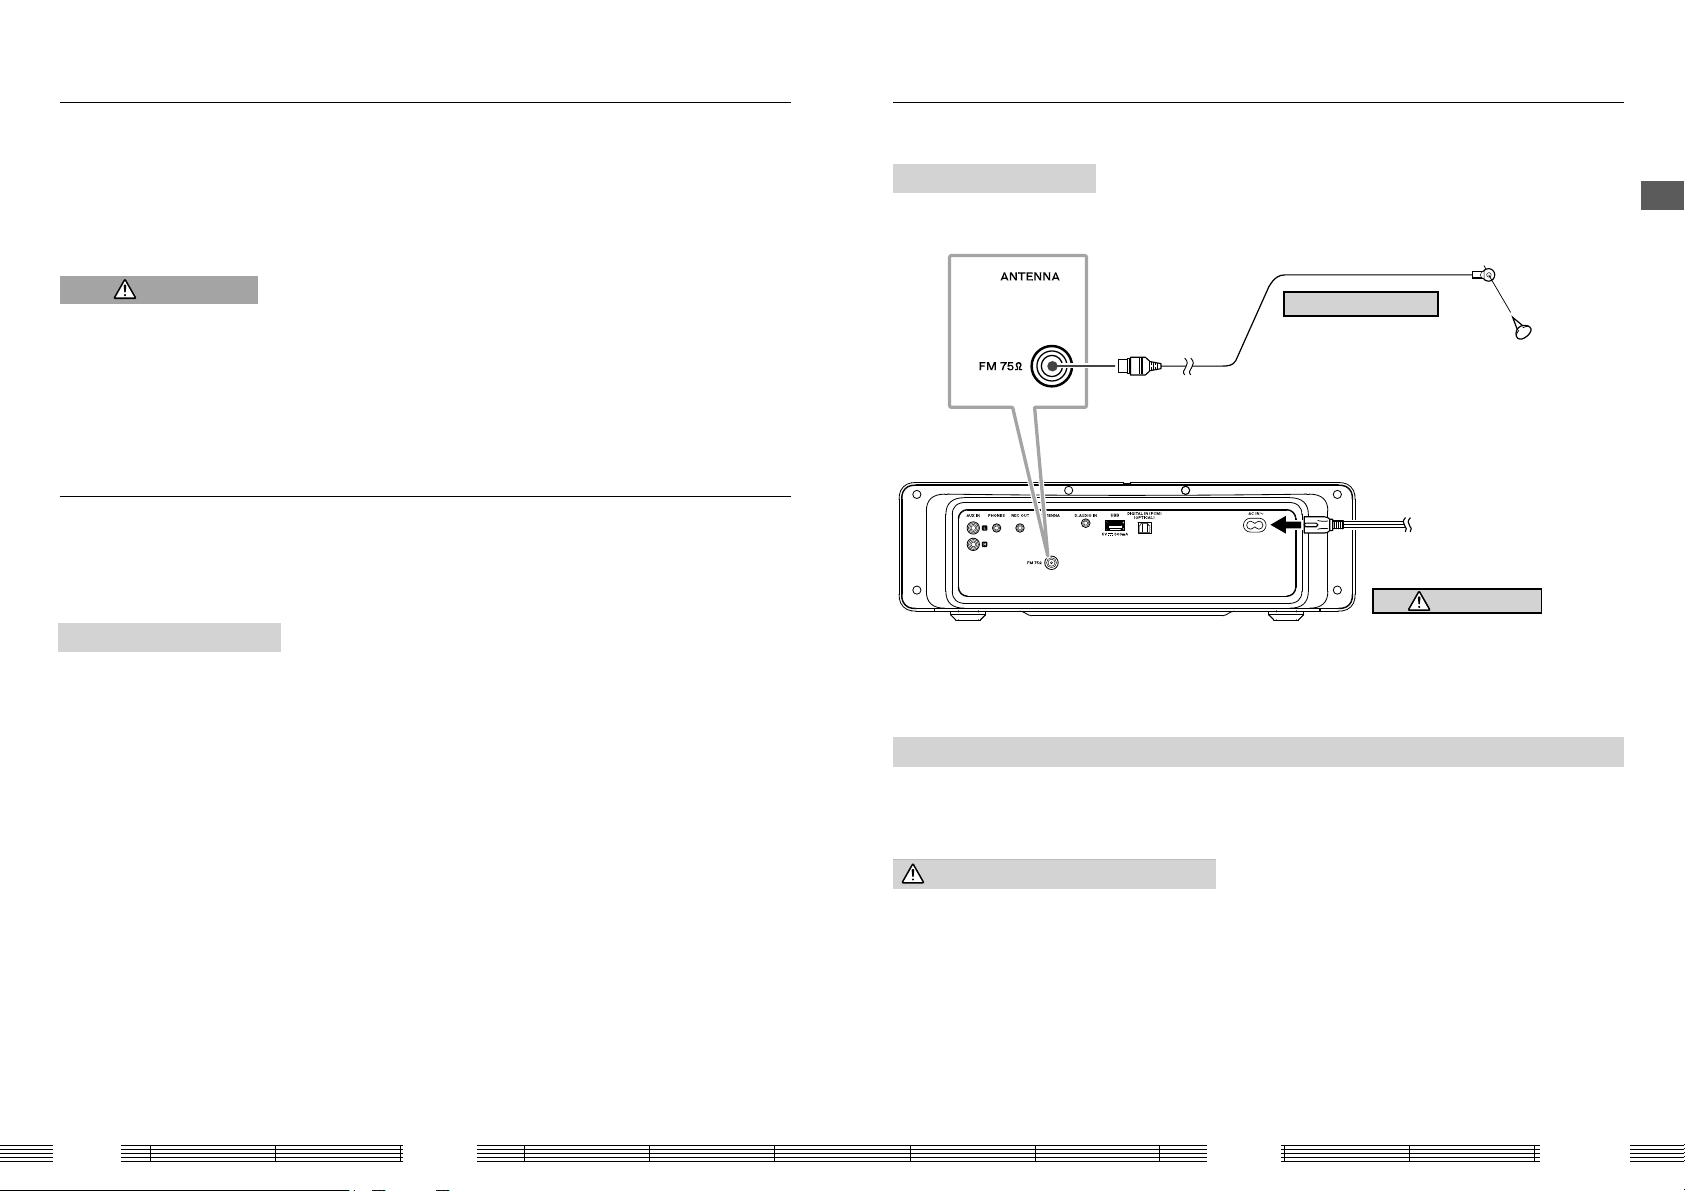
Basic connections
Caution for connection
Do not plug the power cord into the power outlet until all other connections are
completed. Before unplugging a connected cord or cable, be sure to switch the system
OFF and unplug the power cord from the power outlet in advance.
FM indoor antenna
Connect to the [FM75Ω] terminal.
1
Find the antenna location that o ers
2
best reception.
Fix the antenna in the found location.
3
To AC wall outlet
• Inser t the plug firmly all the way
into the AC wall outlet.
Power cord
Two types of power cords are provided.
Select the one designed for the country
in which this unit is used.
Read Before Use
K-525
Connecting the FM indoor antenna
The provided FM antenna is a simpli ed one for indoor use. To receive FM stations stably, it is recommended to use an
outdoor antenna (commercially available). Remove the simpli ed antenna before connecting the outdoor antenna.
Caution for outdoor antenna installation
Since antenna installation necessitates skill and experience, always
consult your dealer before installation. The antenna should be
placed at a distance from the power distribution wires. Otherwise, an
electric shock accident may occur if the antenna falls down.
8 9
English
Connections
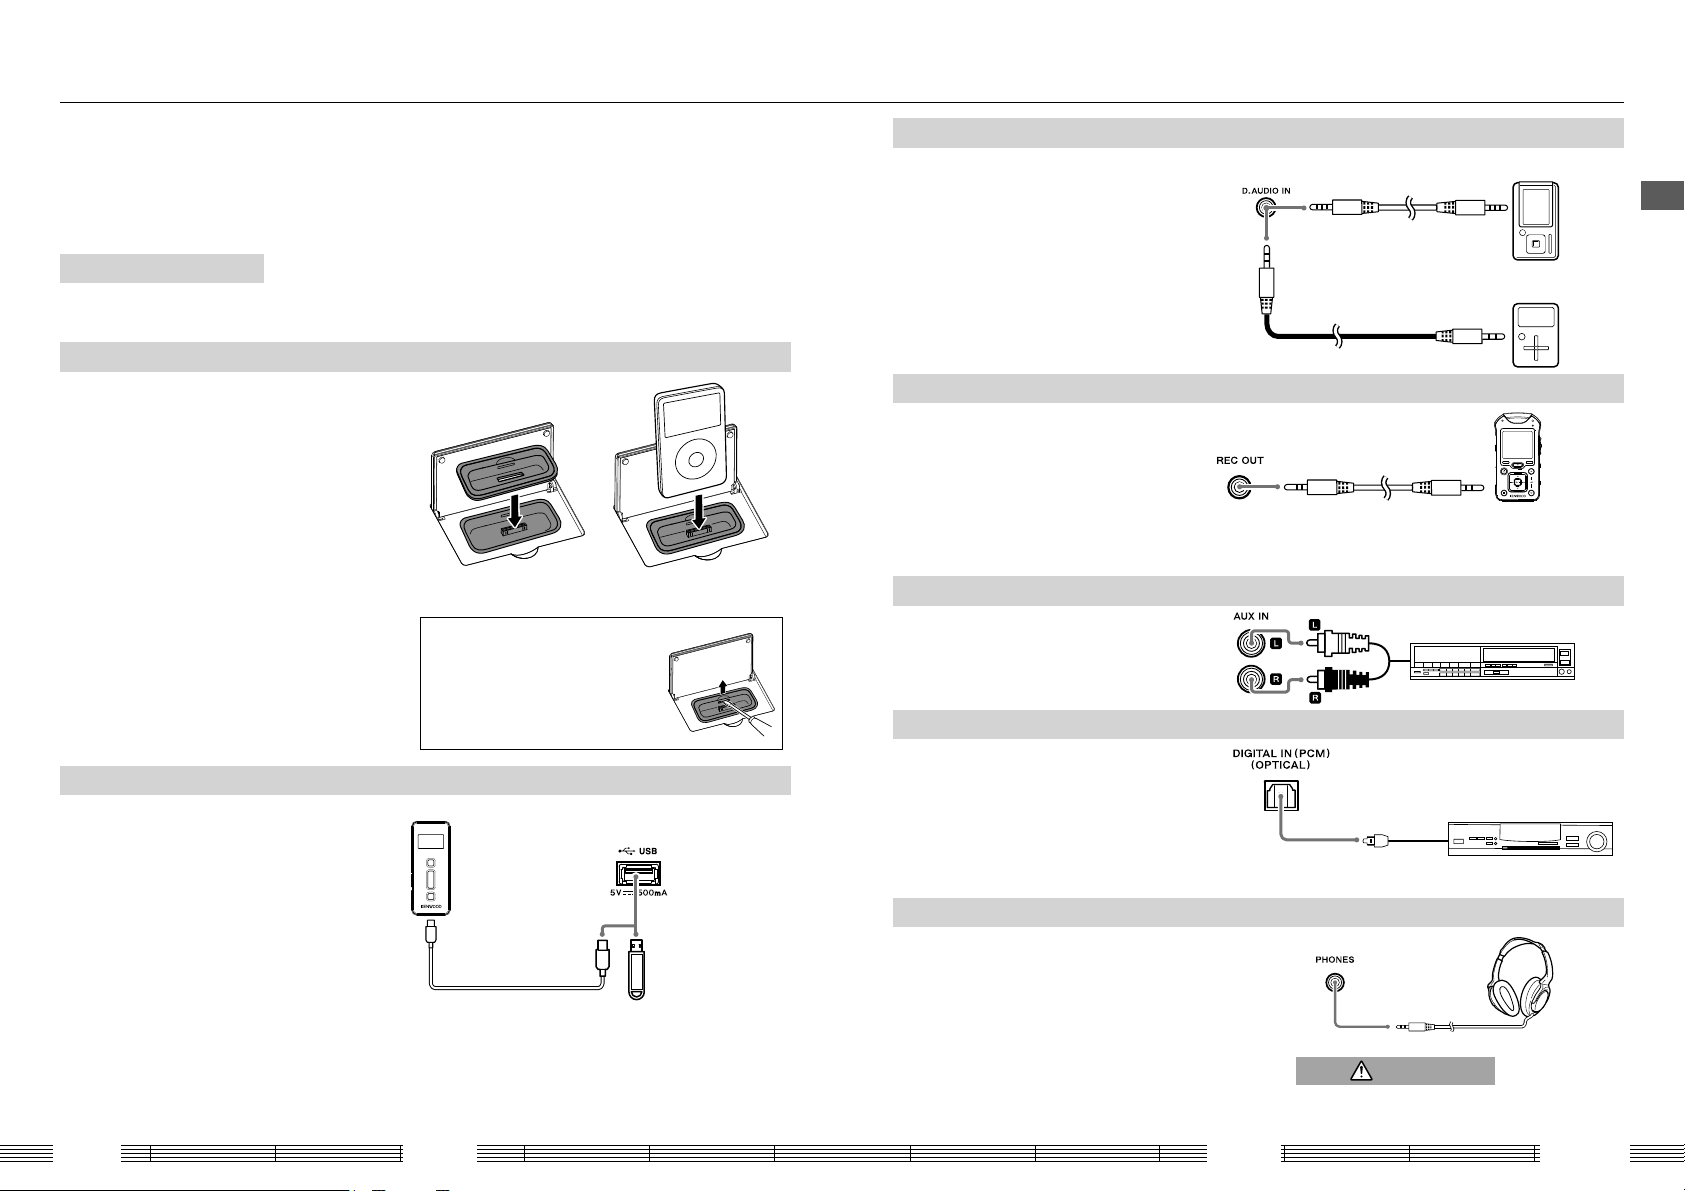
Connecting Associated Products (Commercially Available)
• Before connecting associated system products, be sure to read their instruction manuals.
• Connect every connection cord rmly. Incomplete insertion may cause loss of audio output or generation of noise.
Caution for connection
iPod/iPhone (iPod/iPhone applied part)
Attach the Dock adapter supplied with the iPod/iPhone
to the system. Open the cover on the main unit, and
then push down the Dock adapter into the unit with its
slit facing toward the unit until it clicks.
• You cannot attach an iPod/iPhone to the system if it is in
a cover, case, or with other accessories. Always remove it.
• Connecting an iPod/iPhone to the system without
using the Dock adapter may deteriorate or damage the
connector. Always use the Dock adapter.
• Keep the iPod/iPhone on a straight position while
connecting/disconnecting it.
• Once the iPod/iPhone is connected, it can be charged.
(
without select USB source)
USB (USB device connector)
Connect a USB ash memory or a digital audio
player with USB mass storage class compatibility
to the [USB] terminal on the rear of this unit.
• With certain models, it takes a certain period before
the connection is recognized.
• Certain models display the USB connection mode
selection menu. In this case, select the "Storage"
mode.
• The USB device cannot be recognized via a USB
hub, etc.
• Once the USB device (charging type) is connected,
it can be charged. (
Select USB source only)
Set the main unit in the standby mode before connecting any associated product to
it and do not set the power button to ON until all connections are completed. Before
unplugging a connected cord or cable, be sure to set the power button to OFF and
unplug the power cord from the power outlet in advance.
Attach the dock adapter.
Install an iPod/iPhone on the
unit.
To disconnect the dock adapter…
Insert the blade of a at-blade
screwdriver into the slit on the dock
adapter and lift it.
Digital audio player,
etc.
USB ash memory
D.AUDIO IN (D.AUDIO input connector)
Connect a digital audio player to the [D.AUDIO IN]
terminal on the rear of this unit.
• When a Kenwood digital audio player with digital
audio link compatibility is connected using the
dedicated cable (separately available), the player
can be controlled from this system or its remote
control unit.
• A digital audio player other than above can
be connected using a stereo mini plug cable
(commercially available).
REC OUT (Recording output connector)
Connect a Kenwood digital audio player/recorder
with direct encoding function to the [REC OUT]
terminal on the rear of this unit.
• The [REC OUT ] connector outputs analog audio
signals.
• Note that, if the input selector is set to [iPod], the
audio output from the iPhone/iPod is not output
at the [REC OUT] terminals.
AUX IN (Auxiliary input connector)
Connect the audio output of the VCR, etc. to the
[AUX IN] terminals on the rear of this unit.
DIGITAL IN (Digital audio input connector)
Connect the optical digital output of a digital
tuner, etc. to the [DIGITAL IN] connector on the
rear of this unit.
• Set the digital audio setting of the connected
component to "PCM".
Optical digital cable
(commercially available)
PHONES (Headphones connector)
Connect headphones with a stereo mini-plug to the [PHONES]
connector on the rear of this unit.
Connecting headphones mutes the sound from the speakers.
• When the input selector is set to [iPod], the audio output from
the iPhone/iPod is not output from headphones even when
these are connected to the PHONES connector. When using the
iPhone/iPod, listen to the music through the speakers without
using headphones.
Kenwood
digital audio player
separately available
Stereo miniplug cord
(commercially available)
Stereo mini-plug cord
(commercially available)
AUDIO OUT
Optical digital output
(PCM signal)
CAUTION
Digital audio player,
etc.
To REC IN
Kenwood digital audio recorder
with direct encoding capability
(MGR-E8, etc.)
VCR, etc.
Digital tuner, etc.
A warning that excessive sound pressure from
earphones and headphones can cause hearing loss.
Read Before Use
K-525
10 11
English
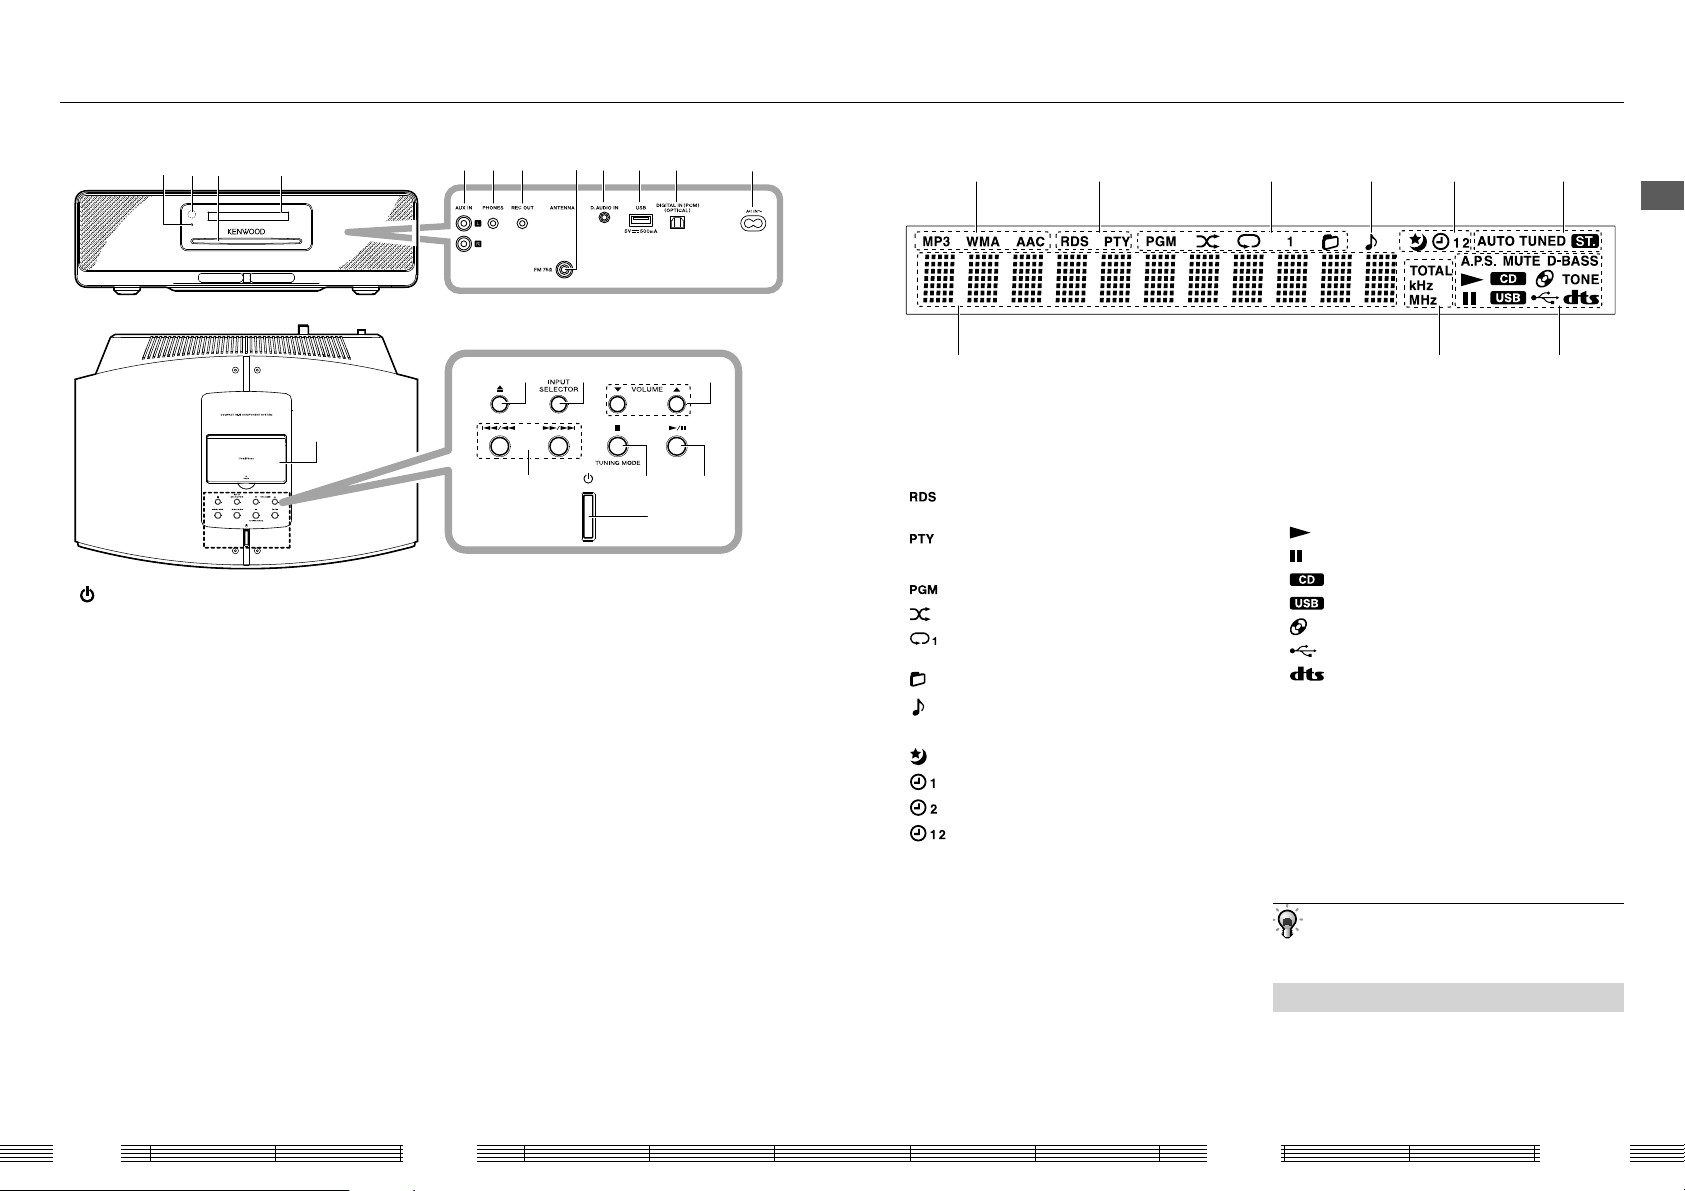
Component names and functions
Main unit
0 b
a
9
8
1
(Power)
● Press to switch the power ON/OFF (standby).
2
GI/JH
● Press to skip the music.
●
Press and hold to fast forward or fast backward the
music.
● During radio listening,
3 F(STOP)/TUNING MODE
● Press to stop playback of CD/USB/D.AUDIO.
●
During radio listening, pressing the button switches
the tuning mode between auto and manual.
4 E
● Press to play the CD/USB/iPod/iPhone/D.AUDIO or
let it pause.
5 CD EJECT 0
● Eject the disc.
6 INPUT SELECTOR
● Press to switch the input sources in order of
[TUNER] R [CD] R [iPod] R[USB] R [D.AUDIO] R
[DIGITAL IN] R [AUX].
A
7 VOLUME
●
B
Press to control the volume level. Pressing A
increases the volume level and pressing B
decreases it.
/
press to select a station.
(Volume control)
5
2
f
6
3
j
7
4
c d g he i
1
8 iPod/iPhone applied part
●
Open the cover before attaching an iPod/iPhone.
9 STANDBY/TIMER indicator
● Red: Normal standby mode.
● Orange: Timer standby mode
0 Remote control sensor
a Disc slot
b Display
c
AUX IN (Auxiliary input connector)
PHONES (Headphones connector)
d
●
Connect headphones equipped with a stereo mini-plug.
e REC OUT (Recording output connector)
f ANTENNA terminal
● Connect the provided FM indoor antenna.
g D.AUDIO IN (D.AUDIO input connector)
h USB (USB device connector)
i DIGITAL IN (Digital audio input connector)
j AC IN (Power input connector)
● Connect the unit to a mains outlet using the
provided power cord.
Display
1
1
Light to indicate the type of the audio file
being played (MP3/WMA/AAC)
2 Light when an Radio data system station is
tuned or the PTY mode is selected.
:
Lights when an Radio data system station is
tuned.
:
Lights when PTY is selected.
3 Lights when a playback mode is set.
: Program play mode
: Random play mode.
: Repeat play mode (1 indicates the single track/
file repeat).
: Folder play mode.
: Lights when music is played or in pause.
4
Light when the sleep/program timer is set.
5
: Sleep timer
: Program timer 1
: Program timer 2
: Program timer 1/2
6 Indicate the radio tuning conditions.
AUTO : Lights in auto tuning mode. Does not light in
manual tuning mode.
TUNED :
Lights when a station is tuned.
ST. : Lights when stereo broadcasting is tuned.
2
3 4 5 6
89
7 Indicate the sound setups and CD/USB device
status.
A.P.S. : Lights when Auto Power Save is set.
MUTE : Flashes during muting.
D-BASS : Lights when D-BASS is set.
TONE : Lights when TONE is set.
: Lights during playback.
: Lights during pause.
: Lights when the CD input source is selected.
: Lights when the USB input source is selected.
: Lights when a disc is inserted.
: Lights when a USB device is connected.
: Lights when DTS Surround Sensation is set.
8 Light when the time indication or radio
turning frequency is displayed.
TOTAL : Lights to indicate the elapse time and
remaining time of the disc during CD
playback.
kHz : Lights when the sampling frequency is
displayed.
MHz : Shows the FM tuning frequency.
9 Character display
• The display illustrations shown in this manual may
diff er from actual display.
Standby mode
When the [STANDBY/TIMER] indicator is lit, a small
amount of power is supplied to the system to operate
the microcomputer. This status is referred to as the
standby mode. In this state, the system can be switched
OFF from the remote control unit.
7
Read Before Use
K-525
12 13
English
Component names and functions
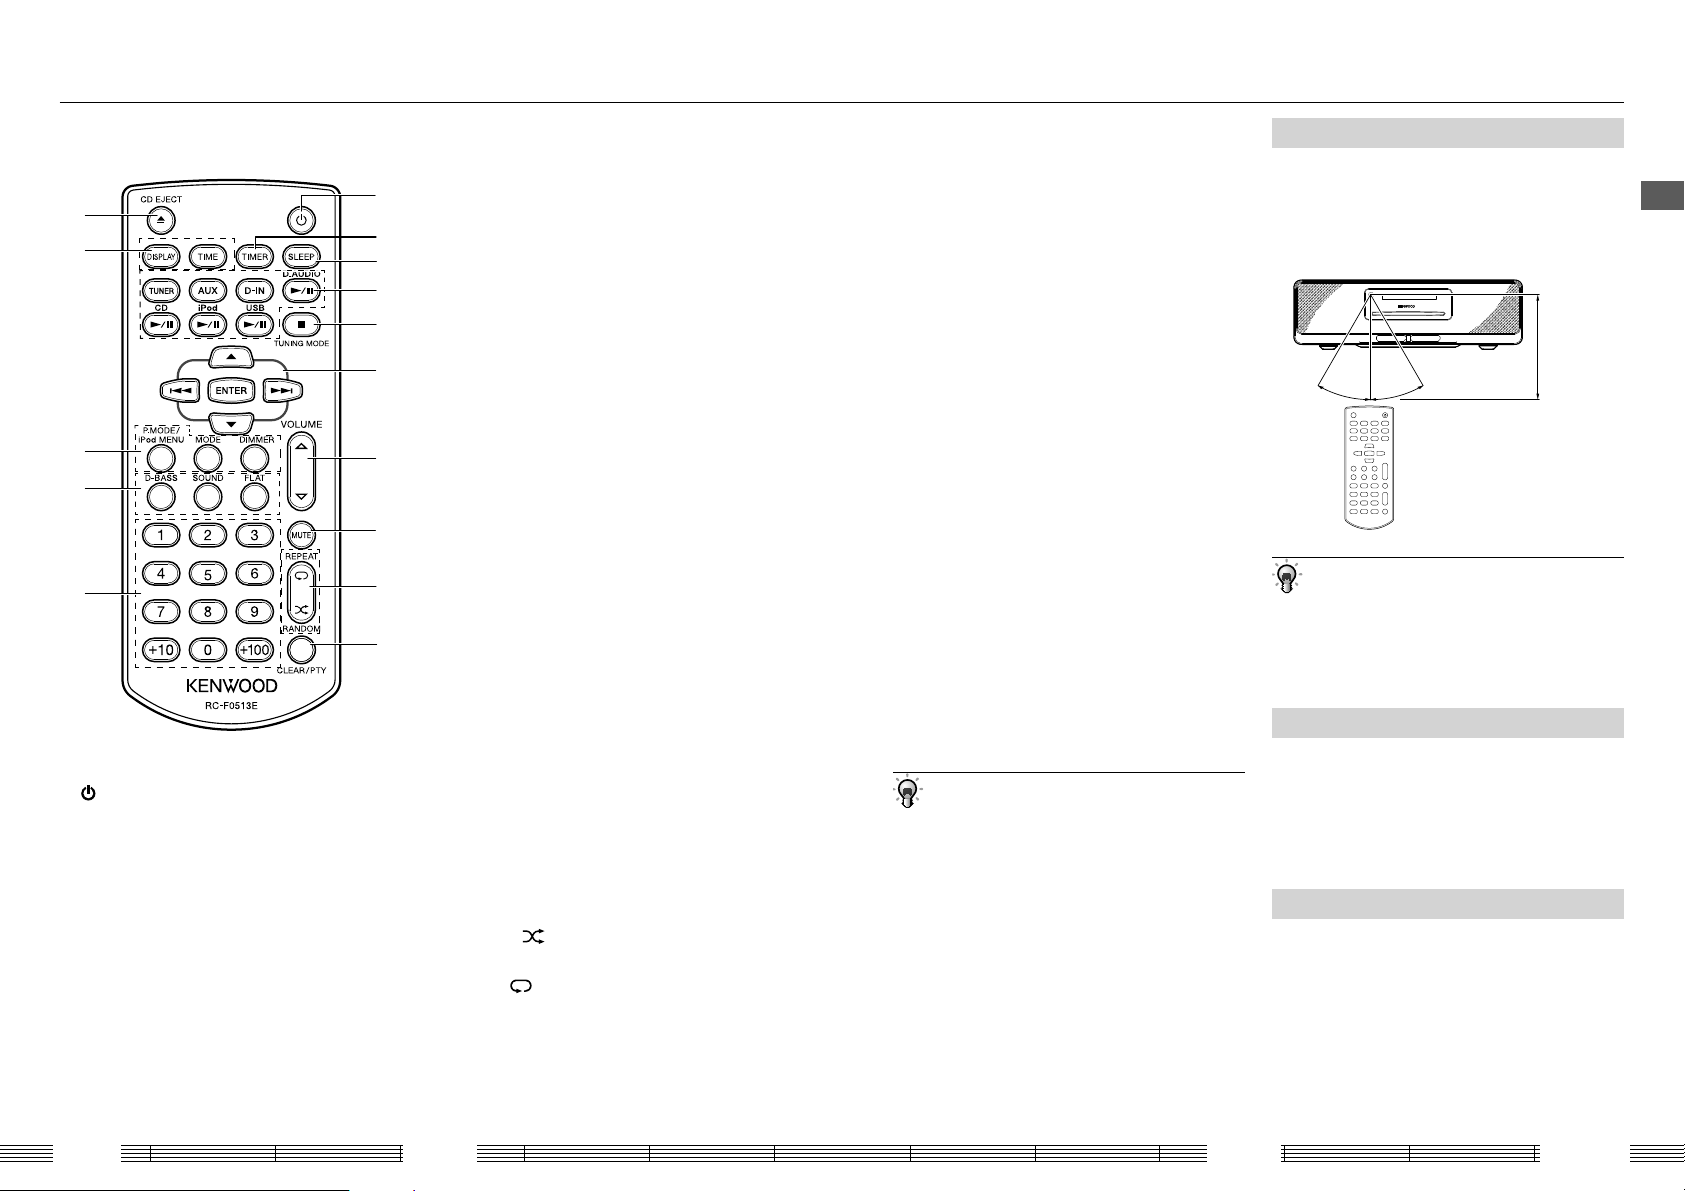
Remote Control Unit
e
d
c
b
a
1
(POWER)
● Press to switch the power ON/OFF (standby).
2 TIMER
● Press to switch the set program(s) ON/OFF.
3 SLEEP
● Press to set the sleep timer.
4 Press to select the input source.
TUNER(Radio)
● Press to select the TUNER source.
AUX
● Press to select the AUX input.
D-IN (DIGITAL IN)
● Press to select the DIGITAL IN input.
1
2
3
4
5
6
7
8
9
0
D.AUDIOE
● Press to play the D.AUDIO component or let it
pause.
CDE
● Press to play the CD or let it pause.
iPodE
● Press to play the iPod/iPhone or let it pause.
USBE
●
Press to play the USB device or let it pause.
5
F(STOP)/TUNING MODE
● Press to stop playback of CD/USB/D.AUDIO.
●
During radio listening, pressing the button switches
the tuning mode between auto and manual.
● Press during a setup to stop it in the middle.
6 Press to select the music/radio station or to set
an item.
A/B
● Press to select a folder.
● Press to enter the selected iPod/iPhone menu
item.
G/H
● Press to skip the music.
●
Press and hold to fast forward or fast backward the
music.
● During radio listening,
● Press to select
ENTER
● Press to enter the selected item.
7 VOLUME
●
A/B
Press to control the volume level. Pressing A
increases the volume level and pressing B
decreases it.
press to select a station.
the setup items.
(Volume control)
8 MUTE
● Press to mute the sound temporarily.
9 Play mode selectors
RANDOM
● Plays music in a random order.
REPEAT
● Repeats playback.
0 CLEAR/PTY
● Press to clear a program.
● Performs PTY search.
a Numeric buttons
● Press to select the music or radio station.
b Sound setting selectors
D-BASS
● Enhances the low frequencies.
SOUND
● Adjusts the sound.
● Sets DTS Surround Sensation.
FLAT
● Resets the adjusted sound to the original sound.
c Selects the play mode or to set an item
P.MODE/iPod MENU
● Selects the play mode.
● Call the iPod/iPhone menu display.
MODE
● Press to start
DIMMER
● Sets the display brightness.
the setup of this unit.
d Display mode selectors
DISPLAY
● Press to switch the information shown on the
display.
TIME DISPLAY
● Switches the displayed time information.
e CD EJECT 0
● Ejects the disc.
• The buttons having the same names as the buttons
on the main unit function in the same way as the main
unit buttons with the same times.
Operation
Plug the power cord of the system to a power outlet
and press [K] on the remote control unit to turn the
system ON. After the system is switched ON, press the
desired operation button. Use the remote control unit
by pointing it to the remote sensor on the main unit.
About 6 m
About 30° About 30°
• The system may malfunction if the remote control
sensor is exposed to direct sunlight or the light of a
fl uorescent lamp with high frequency lighting system
(inverter system, etc.). Change the system installation
to prevent malfunction.
One touch operation function
The system incorporates the convenient one touch
operation function. When the system is in standby
mode, pressing any of input source button turns the
system ON. Playback also starts if a button related to CD
or USB, D.AUDIO, iPod and iPhone is pressed.
Resume function
After the music from a CD or USB pauses during
playback, pressing [CDE] or [USBE] restarts the
of the music from the beginning.
Read Before Use
K-525
14 15
English
Basic Operation
This symbol indicates an operation on the main unit. When it is marked,
perform the operation by pressing the required button(s) on the main unit.
This symbol indicates an operation on the remote control unit. When it is marked,
perform the operation by pressing the required button(s) on the remote control unit.
If both are marked, the operation is available either on the remote control unit
or this unit.
1 233
4
3
Turn the system ON (OFF).
1
Press [K].
• Pressing the play/pause [E] button of the
desired audio input source also turns the system
ON (page 15, "One touch operation function").
• Pressing [K] while the system is ON switches it OFF
(standby mode).
Select the audio source.
2
Press the play/pause button of the desired audio
source.
[TUNER]/ [AUX]/ [D-IN]/
Press
[D.AUDIOE]/ [CDE]/ [iPodE]/
E
[USB
Press [INPUT SELECTOR].
].
■
To eject the disc...
Press CD EJECT[L]. "EJECT" is displayed and the
disc is ejected.
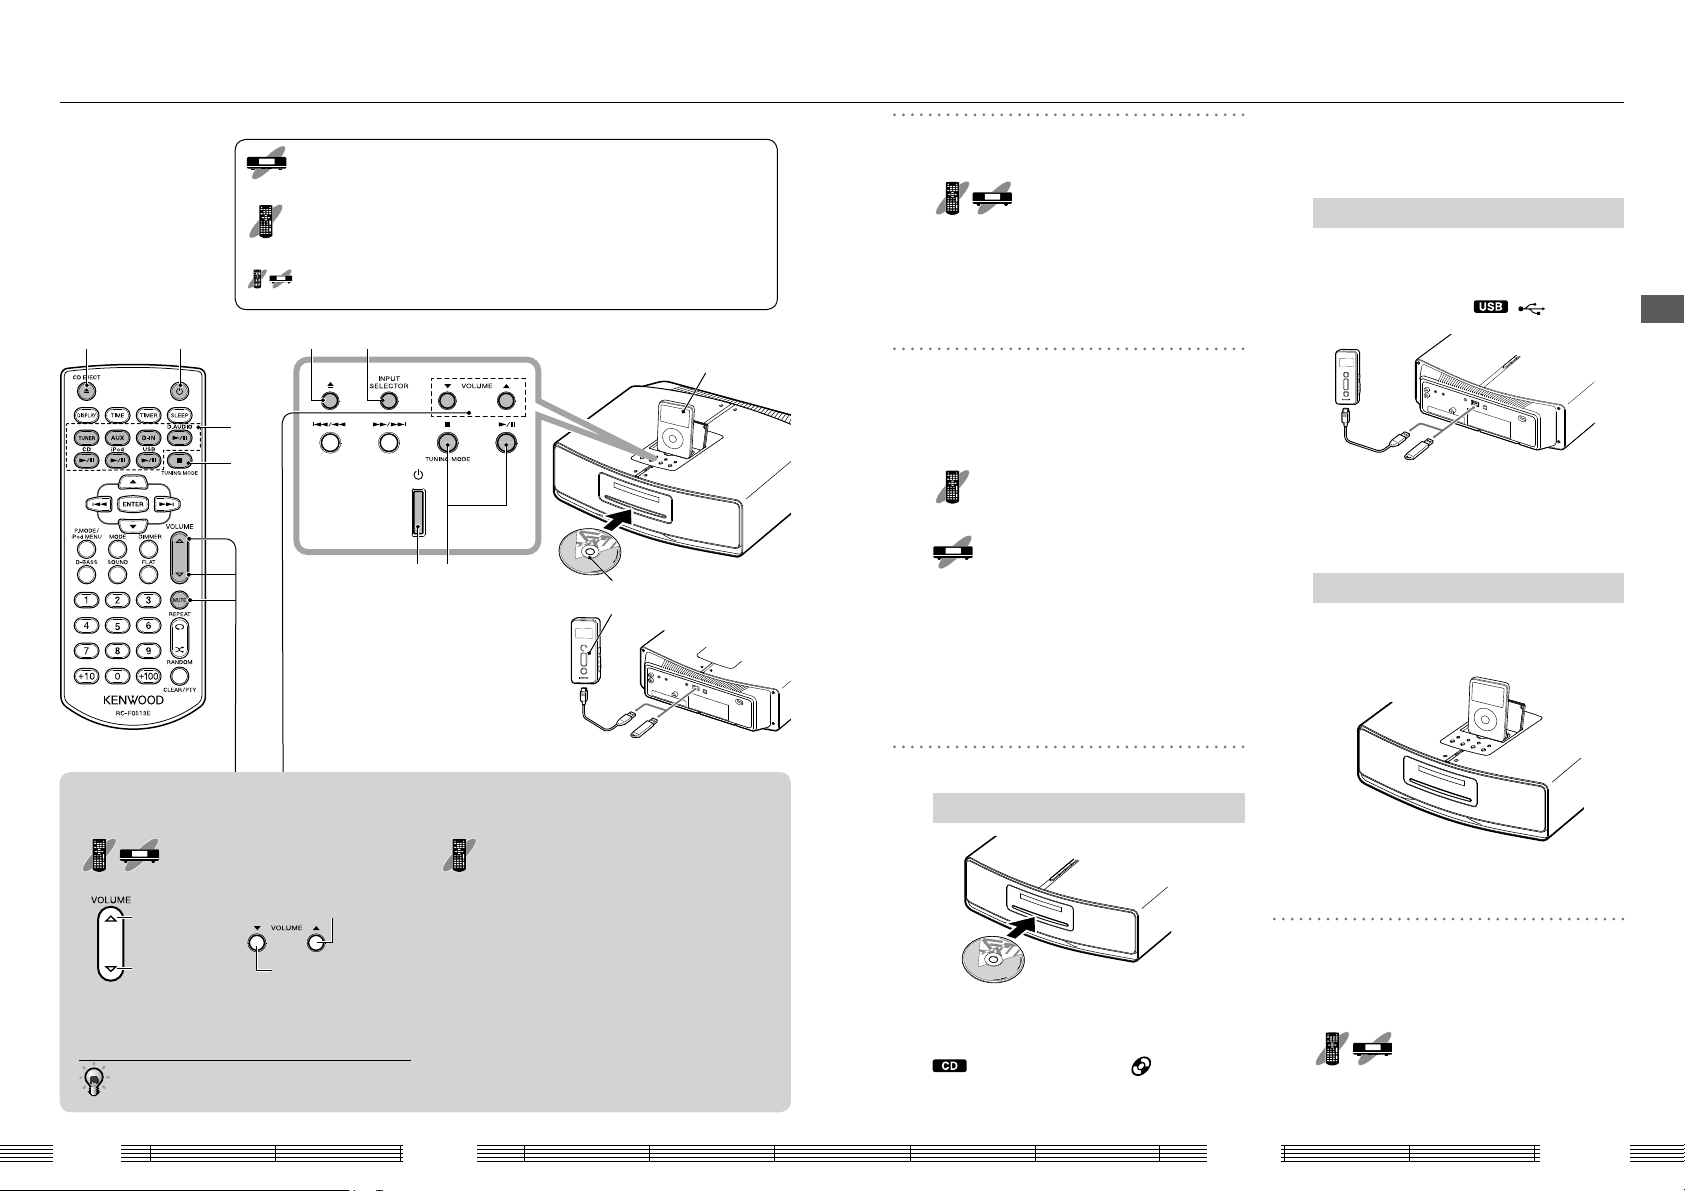
How to connect a USB device
Hold the device in the correct orientation and
insert the connector all the way. When you select
USB source, "READING" is displayed and the input
source is switched to USB
■
To remove the USB device...
After stopping, set the system to the standby
mode and pull out the USB device.
. "
" lights.
Playing music
Adjusting the volume
Adjust using [VOLUME].
Increasing the
Increasing the
volume level
Decreasing the
volume level
Adjust in the range from 0 to 40 (max.).
• Press and hold the button to vary the volume level
at a high speed.
K-525
volume level
Decreasing the
volume level
124
3
Press [INPUT SELECTOR] on main unit to switch
the input source in order of [TUNER] R [CD] R
[iPod] R [USB] R [D,AUDIO] R [DIGITAL IN]
[AUX].
With the CD/iPod inputs, loading a disc or iPod/
iPhone in this unit selects the corresponding
input source automatically.
R
Set the source to be played.
3
Muting the sound temporarily
Press [MUTE].
"MUTE" blinks on the display.
■To cancel muting...
Press [MUTE] again (this resumes the original volume)
or adjust the volume.
How to load a disc
Hold the disc with the label side up and insert
it into the centre of the disc slot. "LOADING" is
displayed and the input source is switched to CD
. When the disc is loaded, " " lights and
playback starts automatically.
16 17
How to install iPod/iPhone
Install iPod/IPhone on the unit. "READING" is
displayed and the input source is switched to iPod
and playback starts automatically.
■
To remove the iPod/iPhone...
After stopping, set the system to the standby
mode and pull out the iPod/iPhone.
Start playback.
4
Play the connected input source.
■
When you select USB source.
E
Press [USB
■
To stop playback of CD/USB/D.AUDIO...
Press [F] during playback.
]/[
E
].
English

Playing a CD or audio le disc
A CD or a CD-ROM/CD-R/CD-RW containing audio
les can be played as described below.
• For the playable les, see "Playable audio les" (page 42).
Playback
Load the disc and play it.
1
Hold the disc with the label side up and insert
it into the centre of the disc slot. "LOADING" is
displayed and the input source is switched to CD
. When the disc is loaded, " " lights and
playback starts automatically.
When a CD is played.
Display when an audio le is played.
The CD is played from the rst track.
When a disc containing audio les is played, the
folders and les are searched and playback is
started with the le with the smallest le number.
• For the order of playback when there are multiple
folders and/or audio les, see
folders and audio les
• With a CD-TEXT compatible disc, character information
including the track title and album title is displayed.
(page 43).
"
Order of playback
"
Folder play mode
Audio le disc only
The system can be set to a mode for playback per
folder. In this mode, the system plays only the
selected folder and stops after all of its les have
been played.
• Select the CD source and enter stop mode.
Select "N" (folder play mode).
1
Press [P.MODE].
Each press switches the playback mode.
lit
N
lit
PGM
Not lit
Display when the folder play mode is selected.
Folder play mode
Program play mode
Normal play mode
Select a folder and play it.
2
Press [A]/[B].
Display when folder 5 is selected.
When a folder is selected, "FOLDER" is
displayed and the selected folder starts to play
automatically.
■
To cancel the folder play mode...
Stop playback and press [P.MODE] to select the
normal play mode.
Button operations during playback/stop
To Operation
Switch the display
information
Switch the time
display information
Stop Press [F] during playback.
Pause
Select a track/ le
Folder selection
(Audio les)
Fast forward/
fast backward
Skip a track/ le
Return to previous
track/ le
Return to the
beginning of current
track/ le
Start random
playback
(Playing music in a
random order)
Start repeat
playback
(Playing music
repeatedly)
Press [DISPLAY] during playback or pause.
Each press switches the displayed information (page 40).
Press [TIME DISPLAY].
Each press switches the displayed information (page 40).
Press [CDE]/[E] during playback.
Press again to resume playback.
Press the [Numeric] button(s).
Track/ file number selection methods: 7th track/ file R Press [7].
12th track/ file R Press [+10], [2].
103rd file
Press [A]/[B].
Press and hold [G]/[H]/[GI]/[JH] during playback.
Press [H]/[JH].
Press [G]/[GI] successively twice or more.
Press [G]/[GI] once.
Press [RANDOM].
Each press switches the
selection.
• When [
REPEAT
in a di erent order of track/ les will start after the current random playback has
completed.
• It is not possible to skip to already played music during random playback.
Press [REPEAT].
Each press switches the
selection.
Random
playback is set.
] is pressed in the middle of random playback, random playback
Repeat playback of
a single track/ le.
R
Press [+100], [3].
lit Not lit
Random playback
is cancelled.
lit lit Not lit
Repeat playback
of all tracks/ les.
Repeat playback
is cancelled.
Playing music
K-525
18 19
English

Playing a CD or audio le disc
Playback of Digital Audio Player
Program playback
Music in a CD or audio le disc can be played in the
order programmed by the user.
• Select the CD source and enter stop mode.
Select "PGM" (program play mode).
1
Press [P.MODE].
Each press switches the playback mode.
CD operation
PGM
Not lit
lit
Program play mode
Normal play mode
Audio le disc operation
lit
N
lit
PGM
Not lit
Display when the program mode is selected for a CD.
Folder play mode
Program play mode
Normal play mode
Select a track/ le.
2
CD operation
G
Select the track with [
or [Numeric] buttons, and press
[ENTER].
When the 7th track is selected as the rst track of the
program.
]/[
H
]
Audio le disc operation
Select the folder with [
or [Numeric] buttons, and press
[ENTER].
Select an audio le with [
H
[
] or [Numeric] buttons, and
press [ENTER].
Display when le 10 in folder 003 is programmed as
the 1st le in the program.
If you committed a mistake in selection, press
[CLEAR] on the remote control unit before
pressing [ENTER] and restart selection.
• Up to 32 les can be programmed.
G
Start playback.
3
E
Press [CD
■
To clear a track/ le from the program...
Stop playback and press [CLEAR] on the remote
control unit. Each press clears the last track/ le in
the current program.
■
To add a track/ le to the program after
programming...
If playback is underway, stop it and perform steps
2 and after.
■
To cancel the program mode...
Stop playback and press [P.MODE] to select the
normal play mode. The program is cleared at this
time.
• The set program is cleared when the input source is
switched, the disc is ejected or the unit is switched
OFF.
]/[
E
G
]/[
].
H
]/
Kenwood digital audio player can be connected to
]
play audio les in it.
• For the Kenwood digital audio players models that can be
connected to this unit, see “Handling of D.AUDIO” (page
44).
Playback
Connect the player.
1
Connect a Kenwood digital audio player to the
[D.AUDIO IN] connector using an optional cable or
adapter (page 11).
Also read the instruction manual for the
connected component.
Select the "D.AUDIO" input.
2
Press [D.AUDIO
Press [INPUT SELECTOR].
Display when the D.AUDIO input is selected.
Turn the connected player ON and
3
start playing it.
• While the player is connected to this system, the
volume and tone settings on the player are defeated.
If the input level from D.AUDIO seems to be higher
or lower than other input sources when this unit is
set at the same volume level, adjust the input level as
described in "Adjusting the input level" (page 27).
E
].
Button operations during
playback/stop
To Operation
Press
Stop
Pause
Skip a folder Press [A]/[B].
Fast forward/
fast backward
Skip a le
Return to
previous le
Return to the
beginning of
current le
• Some control operations may be unavailable depending
on the connected player.
■Dedicated cable/device for connection
When the Kewnood digital audio player is connected
using the optional Kenwood digital audio player
connection cable, the connected component can be
controlled from this unit or the remote control unit.
For details on the connection and installation, refer to
the instruction manual provided with the connection
cable.
[F] during
playback.
Press
[D.AUDIOE] /
[E] during
playback.
Press again to
resume playback.
Press and hold
H
[G]/[
[GI]/
[JH]
during playback.
Press [H]/
[JH].
Press [G]/
[GI]
successively twice
or more.
Press [G]/
[GI]
once.
]/
Playing music
K-525
20 21
English

Playing an iPod/iPhone
This unit can play music stored in iPod/iPhone.
• For the iPod/iPhone models that can be connected to this
unit, see “Usable iPod/iPhone models” (page 45).
Playback
Install an iPod/iPhone on the unit.
1
"READING" is displayed and the input source
is switched to iPod and playback starts
automatically.
Display when the iPod input is selected.
• iPod/iPhone cannot be connected together with
accessories such as the cover or case. Be sure to
remove the accessories before connecting.
• If iPod/iPhone is connected directly to this unit
without using the dock adapter, the connector may
be damaged. Be always sure to use the dock adapterv
(page 10).
• Keep the iPod/iPhone on a straight position while
connecting/disconnecting it.
• Be sure to read the instruction manuals provided with
your iPod/iPhone.
• Update the software of your iPod/iPhone to the latest
version before use.
Button operations during playback/stop
To Operation
Switch the display
information
Call to iPod/iPhone
menu display
Pause
Select a le Press [G]/[H].
Fast forward/
fast backward
Skip a le
Return to previous
le
Return to the
beginning of current
le
Start random
playback
(Playing music in a
random order)
Start repeat
playback
(Playing music
repeatedly)
Press [DISPLY] during playback or pause.
Each press switches the displayed information
Press [iPod MENU]. Call to iPod/iPhone menu display.
Press to [A]/[B] enter the selected iPod/iPhone menu item.
Press [iPodE]/[E] during playback.
Press again to resume playback.
Press and hold [G]/[H]/[GI]/[JH] during playback.
Press [H]/[JH].
Press [G]/[GI] successively twice or more.
Press [G]/[GI] once.
Press [
RANDOM
].
Each press switches the selection of iPod/iPhone play mode.
Press [
REAPET
].
Each press switches the selection of iPod/iPhone play mode.
(page 40).
Playing music
K-525
22 23
English

Playing a USB device
A USB ash memory or USB mass storage class
compatible digital audio player can be connected to
this unit to play music (audio les) in it.
• For the playable les, see "Playable audio les" (page 42).
Playback
Connect a USB device.
1
Connect the USB ash memory or the USB cable
of the USB audio player to the USB connector of
this unit (page 10). Also refer to the instruction for
the connected device.
When you select USB source, "READING" is
displayed and the input source is switched to USB
. "
" lights.
Start playback.
2
E
Press [USB
The folders and les are searched and playback is
started with the le with the smallest le number.
• For the order of playback when there are multiple
folders and/or audio les, see
folders and audio les
• Playback does not start if there is no playable fi le in the
USB device.
• When a digital HDD audio player is connected, the
characteristics of the HDD system may cause the
sound to be interrupted when playback is resumed
after pause.
(page 43).
"
E
]/[
Order of playback
"
].
Folder play mode
The system can be set to a mode for playback per
folder.
In this mode, the system plays only the selected
folder and stops after all of its les have been
played.
• Select the USB source and enter stop mode.
Select "N" (folder play mode).
1
Press [P.MODE].
Each press switches the playback mode.
lit
N
lit
PGM
Not lit
Display when the folder play mode is selected.
Folder play mode
Program play mode
Normal play mode
Select a folder and play it.
2
Press [A]/[B].
Display when folder 5 is selected.
When a folder is selected, "FOLDER" is
displayed and the selected folder starts to play
automatically.
■
To cancel the folder play mode...
Stop playback and press [P.MODE] to select the
normal play mode.
Button operations during playback/stop
To Operation
Switch the display
information
Stop Press [F] during playback.
Pause
Select a le
Select a folder and/
or le
Fast forward/
fast backward
Skip a le
Return to previous
le
Return to the
beginning of current
le
Start random
playback
(Playing music in a
random order)
Start repeat
playback
(Playing music
repeatedly)
Press [DISPLY] during playback or pause.
Each press switches the displayed information
Press [USBE]/[E] during playback.
Press again to resume playback.
Press the [Numeric] button(s).
File number selection methods: 7th file R Press [7].
12th file
103rd file
To select a folder: Press [A]/[B].
To select a le: Press [
Press and hold [G]/[H]/[GI]/[JH] during playback.
Press [H]/[JH].
Press [G]/[GI] successively twice or more.
Press [G]/[GI] once.
Press [
RANDOM
Each press switches the
selection.
• When [
REPEAT
in a di erent order of audio les will start after the current random playback has
completed.
• It is not possible to skip to already played music during random playback.
Press [REPEAT].
Each press switches the
selection.
G
]/[H].
].
Random
playback is set.
] is pressed in the middle of random playback, random playback
Repeat playback of
a single audio le.
(page 40).
R
Press [+10], then [2].
R
Press [+100], then [3].
lit Not lit
Random playback
is cancelled.
lit lit Not lit
Repeat playback
of all audio les.
Repeat playback
is cancelled.
Playing music
K-525
24 25
English

Playing a USB device
Playing an external component
Program playback
Audio les can be played in the order programmed
by the user.
• Select the USB source and enter stop mode.
Select "PGM" (program play mode).
1
Press [P.MODE].
Each press switches the playback mode.
N
PGM
Not lit
lit
lit
Folder play mode
Program play mode
Normal play mode
Select a le.
2
G
Select the folder with [
or [Numeric] buttons, and press
[ENTER].
Select an audio le with [
H
[
] or [Numeric] buttons, and
press [ENTER].
Display when le 10 in folder 003 is programmed as
the 1st le in the program.
]/[
G
H
]/
Start playback.
3
Press [USB
■
To clear a le from the program...
Stop playback and press [CLEAR] on the remote
control unit. Each press clears the last track in the
current program.
■
To add a le to the program after
programming...
If playback is underway, stop it and perform steps
2 and after.
■
To cancel the program mode...
Stop playback and press [P.MODE] to select the
normal play mode. The program is cleared at this
time.
E
]/[
E
].
An external component can be connected to AUX
IN/DIGITAL IN of this unit and played back.
Playing an external component
Connect an external component.
1
Connect an external component to the [AUX IN]
or [DIGITAL IN] connector on the rear of this unit
(page 11).
• Also read the instruction manual for the connected
auxiliary component.
• Be sure to turn both this system and the component
OFF before connecting them.
Select the "AUX" or "D-IN" input.
2
Adjusting the input level
(INPUT LEVEL)
If the audio level of the connected external component is
lower or higher than the level at the same volume control
position of other audio sources, the input level of this
system can be adjusted in the range between −3 and +5.
Select the "AUX" or "D.AUDIO" input
1
source.
Enter the setup mode.
2
Press [MODE].
Playing music
Select "INPUT LEVEL".
• The program is cleared when the system is turned
OFF or the USB device used in programming is
disconnected.
]
Press [AUX] or [D-IN].
Press [INPUT SELECTOR].
Display when the AUX input is selected.
Display when the DIGITAL IN input is selected.
3
Press [
then press [ENTER].
Adjust the input level.
G
]/[
H
] to select,
4
Sampling frequency
• When DIGITAL IN is selected, the sampling frequency
of the input signal is displayed. This unit can play the
PCM (32 kHz/44.1 kHz/48 kHz) signals.
Display when the input level is adjusted to "+3".
G
Press [
then press [ENTER].
]/[
H
] to select,
If you committed a mistake in selection, press
[CLEAR] on the remote control unit before
pressing [ENTER] and restart selection.
• Up to 32 les can be programmed.
K-525
Start playing the connected external
3
component.
• If the input level from the external component seems
to be higher or lower than other input sources when
this unit is set at the same volume level, adjust the
input level as described in "Adjusting the input level"
(page 27).
26 27
• The input level adjustment is applied only to the
audio source selected in step 1.
When the setting completes, the unit exits the
setup mode automatically.
• Adjusting the input level also varies the input level of
the signal from the external components connected to
the [AUX IN] and [D.AUDIO IN] connectors.
English

Listening to Radio Broadcasting
A radio station can be selected and listened to.
Listening to Radio Broadcasting
Select the "TUNER" input.
1
Press [TUNER].
Press [INPUT SELECTOR].
Select a radio station.
2
Selecting a station preset in the
memory (Preset call)
Select a radio station from the preset memory
(No. 01 to 40).
G
Press [
When preset No. 27 is selected.
• Holding the button depressed switches the preset
numbers at intervals of about 0.5 second.
• The preset number can also be entered directly.
Press the [Numeric] button(s) to select.
To select preset No. 27
Press [+10] twice and [7] once.
]/[
H
].
R
Selecting a station that is not preset in
memory (Auto tuning/Manual tuning)
Select the tuning mode.
1
G
lit
G
H
]/[
].
Auto tuning
Auto reception is possible
when the radio wave
condition is favorable.
Manual tuning
When the radio wave
condition is poor, vary
the tuning frequency
manually.
H
]/[
].
Press [
Each press switches the tuning mode alternately.
AUTO
not lit
AUTO
When auto tuning is selected.
Select a station.
2
Press [
■
Auto Tuning:
Each press tunes into the next receivable station
automatically.
■
Manual Tuning:
Each press varies the frequency by 1 step. Hold
the button continuously varies tuned frequencies
at a high speed.
• No audio is output during either auto or manual
tuning.
• Auto Tuning receives stations in stereo audio but
Manual Tuning receives them in monaural audio.
"TUNED" lights up when a station is tuned. "ST." lights
up when stereo broadcasting is tuned.
Presetting stations automatically
(AUTO MEMORY)
Radio stations can be preset automatically in
preset channels.
• Stations cannot be preset if other audio source is
selected.
• Up to 40 stations can be preset in the system.
• Select the TUNER.
• For use of the Radio data system function, stations
must be memorized by AUTO MEMORY.
Enter the setup mode.
1
Press [MODE].
Select "AUTO MEMORY".
2
G
Press [
press [ENTER].
"SEARCHING" blinks on the display and the
receivable radio stations are preset automatically.
When the AUTO MEMORY operation has
completed, the unit enters the condition in which
preset station 01 is tuned.
• A broadcast station that cannot be preset with AUTO
MEMORY should be set with Manual preset (page 30).
]/[
H
] to select, then
Playing music
K-525
28 29
English

Listening to Radio Broadcasting
Presetting stations manually
(Manual Preset)
The station being tuned can be preset in memory
by specifying the preset number. If a station is
preset in a preset number in which another station
has already been preset, the existing setting is
overwritten and replaced with the new setting.
• Up to a total of 40 stations can be preset in memory.
Tune the radio station to be preset
1
in memory.
Tune with auto tuning or manual tuning (page 28).
Enter the tuned station.
2
Press [ENTER].
Select the desired preset number
3
(01 to 40).
G
Press [
When preset No. 35 is selected.
• The preset number can also be entered directly.
Press the numeric button(s) to select.
To select preset No. 35
Press [+10] 3 times and [5] once.
]/[
H
].
R
Preset a radio station.
4
Press [ENTER].
The radio station is preset in memory.
• To preset other stations, repeat steps 1 to 4 for each
of them.
• Even when a station is preset, it cannot be tuned if the
radio wave condition is poor.
Radio Data System
This system is designed for Radio data system
reception, it can extract the information from the
broadcast signal for use with various functions
such as automatic display of the station name.
• Select the TUNER.
• Preset Radio data system stations with the AUTO
MEMORY function (page 29).
• Some functions may not be provided or be given
di erent names depending on countries or areas.
PS (Program Service Name)
Display
When an Radio data system broadcast is received,
the station name is automatically displayed.
The " " indicator lights up when an Radio
data system broadcast (signal) is received.
■
To switch the displays...
Press [DISPLAY].
Each press switches the selection.
(Program Service Name)
PS
Frequency
Day of Week/Clock
Searching for a desired program
type (PTY search)
The tuner automatically searches for a station
which is currently broadcasting a speci ed
program type (genre).
Enter the PTY search mode.
1
Press [PTY].
When an Radio data system broadcast is received,
the program type is shown on the display. If no
PTY data is available, or if the station is not an
Radio data system station, "None" is displayed.
Select the desired program type.
2
G
Press [
Select it while the " " indicator is lit. Use
program type table for your convenience.
Program type table
Program Type Name Display
Pop Music Pop M
Rock Music Rock M
Easy Listening Music Easy M
Light Classical Light M
Serious Classical Classics
Other Music Other M
News News
Current Affairs Affairs
Information Info
Sport Sport
Education Educate
Drama Drama
]/[
H
].
Program Type Name Display
Culture Culture
Science Science
Varied Varied
Weather Weather
Finance Finance
Children's programs Children
Social Affairs Social
Religion Religion
Phone In Phone In
Trav el Trave l
Leisure Leisure
Jazz Music Jazz
Country Music Country
National Music Nation M
Oldies Music Oldies
Folk Music Folk M
Documentary Document
Start the search.
3
Press [PTY].
If a program of the desired type is found, that
program is received and the program type name
display changes to the station name display.
■
To cancel in the middle...
Press [PTY].
• If a program of the desired type cannot be found,
"NO PROGRAM" blinks, then after several seconds the
display returns to the original display.
Playing music
K-525
30 31
English

Sound Adjustments
Enhancing the bass tone
(D-BASS)
The level of the low frequency enhancement can
be set as desired in the range from 0 (D-BASS OFF)
to 10.
Select D-BASS.
1
Adjusting the tone or playing
surround audio (TONE)
The volume levels of low frequencies (BASS)
and high frequencies (TREBLE) can be set
independently in the ranges between −6 and +6.
When DTS Surround Sensation is set, the music
can be enjoyed in the 3D surround e ect with high
feeling of presence.
■
When "BASS" or "TREBLE" is selected:
G
Press [
The level can be adjusted in the increment/
decrement of 1.
BASS +6
BASS 0
H
]/[
To increase
].
Resetting the adjusted sound to
the original sound (FLAT)
The results of the D-BASS and TONE adjustments
can be cancelled to at levels so that the original
sound is reproduced.
Select FLAT.
1
Press [D-BASS].
Adjust the enhancement level.
2
G
Press [
The level can be adjusted in the increment/
decrement of 1.
D-BASS 0
D-BASS 5
D-BASS 10
" " lights when D-BASS is set.
H
]/[
D-BASS is
Low frequencies are
enhanced.
Enter the selection.
3
Press [ENTER].
].
OFF.
Select TONE.
1
Press [SOUND].
Each press switches the tone mode alternately.
Adjust the low frequencies.
Adjust the high frequencies.
Select DTS Surround Sensation.
Cancels the setting mode.
Select the frequency range to
2
be adjusted and adjust it to the
optimum level. Alternatively, select
DTS Surround Sensation for the
surround e ect.
BASS -6
" " lights when the BASS or TREBLE tone is
set.
■
When "Surr Sens" is selected:
Press [
Each press switches the DTS surround e ect in the
following order.
DTS OFF
DTS ON : 1
DTS ON : 2
" " lights when DTS Surround Sensation is
set.
To decrease
G
H
]/[
Surround is
Surround is
Surround e ect is enhanced
further.
].
OFF.
ON.
Enter the selection.
3
Press [ENTER].
• It is not possible to adjust the tone (BASS/TREBLE), DTS
Surround Sensation (
• The DTS Surround Sensation (
when headphones are connected. Disconnecting the
headphones resumes the previous eff ect.
) and D-BASS simultaneously.
) eff ect is cancelled
Press [FLAT].
Each press switches FLAT/UNDO alternately.
When FLAT is selected, the "D-BASS", "TONE" and
" " settings are cancelled and their indicators
extinguished.
• Pressing [FLAT] cancels the low frequency
enhancement (D-BASS), tone adjustments (TONE)
and DTS Surround Sensation eff ect (
it again returns the low frequency enhancement,
tone adjustments and DTS Surround Sensation to the
previous settings.
). Pressing
Creating the desired sound setting
K-525
32 33
English

System Setup
Adjusting the Time
(TIME ADJUST)
The day of the week and the time of the day of the
system can be set.
■
To display time of day when the system is OFF
(standby mode):
Press [F].
The time of the day is displayed for 5 seconds.
Setting the Sleep Timer (SLEEP)
When the sleep timer (10 minutes up to 90
minutes) is set before or during listening to an
input source, this unit stops playback when the set
time has expired and switches OFF automatically.
Enter the setup mode.
1
Press [MODE].
Select "TIME ADJUST".
2
G
G
]/[
]/[
H
H
] to select,
] to select,
Press [
then press [ENTER].
Set the day of the week, hour and
3
minute.
Adjust the day of the week, the hour,
then the minute.
Press [
then press [ENTER].
• If the power cord is unplugged then plugged in or
after a power failure, adjust the time of the day again.
• The clock operation involves a certain error. It
is recommended to adjust the time of the day
periodically.
Set the Sleep Timer.
1
Press [SLEEP].
Each press switches the set time.
" " Not lit
10
20
30
40
50
Display when the sleep timer is set to 30 min.
" " lights when the sleep timer is set.
■
To check the remaining period of the sleep
timer after setting...
The remaining sleep timer period is displayed for 5
seconds.
OFF
90
80
70
60
Press [SLEEP].
Advanced operations
Enter the selection.
4
Press [ENTER].
When the setting completes, the unit exits the
setup mode automatically.
K-525
• When [SLEEP] is pressed now, the sleep timer can be
set from the current remaining time.
The sleep timer cannot be set when the system status is
one of the following:
• In standby mode
• During power OFF processing
• During clock/program timer setting
34 35
English

System Setup
Setting the
program timer
(TIMER SET)
The program timer makes it possible to play radio
broadcasting, a CD or a USB device on the speci ed
time of the speci ed day(s) of the week.
Up to 2 timer programs can be set.
• Be sure to adjust the clock to the correct time. For the
procedure, see "Adjusting the time (TIME ADJUST )" (page
34).
• When setting more than one timer program, reserve an
interval of at least 1 minutes between the time zones of
the programs.
Enter the setup mode.
1
Press [MODE].
Select "TIMER SET".
2
G
Press [
then press [ENTER].
]/[
H
] to select,
Select the program number.
3
G
Press [
then press [ENTER].
PROG. 1 SET
H
]/[
] to select,
Program 1 is selected.
Select and enter the program items.
4
G
Press [
then press [ENTER].
ON/OFF
EVERYDAY
ON TIME
OFF TIME
PLAY MODE
VOLUME
PLAY SOURCE
For the setting items, see "Program item list" (page
37).
When the setting completes, "COMPLETE" is
displayed and the unit exits the setup mode
automatically.
Display when 2 programs 1 and 2 are set.
H
]/[
] to select,
Select timer ON/OFF.
Set the day(s) of the
week.
Select the ON time.
Select the OFF time.
Select the timer
operation mode.
Select the playback
volume.
Set the audio source.
Turn the system OFF.
5
Press [K].
The [STANDBY/TIMER] indicator lights orange.
Program item list
Programming item
ON/OFF
Day of the week
setting
ON TIME
OFF TIME Set the timer end time.
PLAY MODE
VOLUME
PLAY SOURCE
■
To cancel (OFF) or re-set (ON) the timer...
Press [TIMER].
Each press switches the timer setting ON/OFF
alternately.
Summary
Select whether the timer
is executed or canceled.
Select the day of the
week.
Select the timer start
time.
When AI PLAY is set,
the volume is increased
gradually until the level
set with VOLUME.
Set the playback volume
level.
Select the input source to be played from TUNER (radio)/CD/iPod/USB/D-IN/AUX.
When TUNER (radio) is selected, select the preset number of the desired preset station.
lit
Program 1 is ON.
Selection options
ON: Executes the timer operation.
OFF: Cancels the timer operation.
EVERYDAY
SUNDAY
MONDAY
TUESDAY
WEDNESDAY
THURSDAY
FRIDAY
SATURDAY
MON-FRI (Monday to Friday)
TUE-SAT (Tuesday to Saturday)
SAT-SUN (Saturday, Sunday)
Set the gure of
1
[ENTER].
Set the figure of "MINUTE"
2
[ENTER].
PLAY: AI PLAY is cancelled.
(The playback begins at the level set with VOLUME.)
AI PLAY: AI PLAY is executed.
This item can be set between 0 and 40 (MAX).
"HOUR"
Select whether the timer program is
activated only once or every week.
Press [ENTER]
1
Select "ONE TIME" or "EVERY WEEK"
2
with
[G]/[H], and press
[ENTER].
. Select with [
. Select with [
G
.
H
]/[
G
]/[H] and press
] and press
Advanced operations
PROG. 2 SET
Display when program 1 is selected.
K-525
Program 2 is selected.
• If the power cord is unplugged then plugged in or
after a power failure, adjust the time of the day again
(page 34).
lit
lit
Not lit
• Be sure to set the timer with this unit ON.
Program 2 is ON.
Programs 1 and 2 are
ON.
Timer is OFF.
36 37
English

System Setup
Setting the display saver
(DISP. SAVER)
When this unit has not been controlled for a certain
period of time, the display scrolls to prevent burns
and brightness irregularities from being produced
on the display panel.
Enter the setup mode.
1
Press [MODE].
Select "DISP. SAVER".
2
G
Press [
then press [ENTER].
Set Display Saver.
]/[
H
] to select,
3
G
Press [
then press [ENTER].
D. SAVER ON
D. SAVER OFF
When the setting completes, the unit exits the
setup mode automatically.
• When the input source is CD/USB, Display Saver is
activated when the unit has not been controlled for 10
minutes after the end of the last playback. With other
inputs, Display Saver is activated when the unit has
not been controlled for 10 minutes after a button is
pressed.
H
]/[
] to select,
Display Saver is
Display Saver is
ON.
OFF.
Setting Auto Power Save
(A.P.S. SET)
A.P.S. stands for Auto Power Save, which is the function
that switches this unit OFF when it has not been
controlled for more than 30 minutes while its power is
ON and the CD and other inputs are in stop mode.
Enter the setup mode.
1
Press [MODE].
Select "A.P.S. SET".
2
G
Press [
then press [ENTER].
Set the A.P.S. mode to ON/OFF.
]/[
H
] to select,
3
G
Press [
then press [ENTER].
A.P.S. ON
A.P.S. OFF
When the setting completes, the unit exits the
setup mode automatically.
"
" lights when A.P.S. is set to ON.
■
When the A.P.S. mode is ON...
A.P.S. is activated when this unit is in either
condition below.
• When the input source is TUNER, AUX, D.AUDIO, iPod
or DIGITAL IN, the volume level is 0 and no button has
been pressed for 30 minutes.
• When the input source is CD or USB, the CD player or
USB device is in stop mode and no button has been
pressed for 30 minutes.
H
]/[
] to select,
A.P.S. mode is ON.
A.P.S. mode is OFF.
Adjusting the recording output
(Rec Out LEVEL)
level
If the audio recorded on the component connected
to the [REC OUT] connector is distorted or too low,
adjust the recording output level.
Select the input source to be output
1
at the recording output.
Enter the setup mode.
2
Press [MODE].
Select "RecOut LEVEL".
3
G
Press [
then press [ENTER].
Adjust the recording output level.
]/[
H
] to select,
4
G
Press [
then press [ENTER].
The recording level can be adjusted as desired in
the range between –2 and +2.
Display when the recording output level is "+2".
When the setting completes, the unit exits the
setup mode automatically.
]/[
H
] to select,
Setting the brightness of the
display
The brightness of the display can be set as desired.
(DIMMER)
Sets the display brightness.
1
Press [DIMMER].
Each press switches the dimmer mode alternately.
Advanced operations
K-525
38 39
English

Switching the Display Information
Additional Information
Press [DISPLAY] or [ TIME DISPLAY].
The displayed information varies as shown below according to the operating status of and selected audio source of the system.
Audio source [DISPLAY] [TIME DISPLAY]
CD
(commercially
available CD)
CD-DA format
Audio files
USB
Playback Stop
File title*
Track No./
Track play time
Day of Week/Clock
File No./File play time
File name
Folder name
Music title
Artist Name
Album Name
Day of Week/Clock
Album name*
Track count/
Disc play time
Day of Week/Clock
Folder/track count
File name
Folder name
Day of Week/Clock
Normal/program
play mode
Elapsed time of
played music
Remaining time of
played music
Elapsed time of whole
CD/program
Remaining time of
whole CD/program
Elapsed time of
played music
1-track repeat/
random play mode
Elapsed time of
played music
Remaining time of
played music
iPod/ iPhone
D.AUDIO/ AUX
Day of Week/Clock
DIGITAL IN
With station name
Without station name
Media Usable With This System
Medium Note
USB flash
USB
CD
memory
USB mass storage class
compatible digital audio
player
Commercially available CD
CD-R/CD-RW recording the
CD-DA format data
CD-ROM/CD-R/CD-RW
recording MP3/WMA/AAC
data
• Do not connect a component other than a USB flash memory or a USB mass
storage class compatible digital audio player to the [USB] terminal. Kenwood
will not assume any liabilities for the malfunction, damage or loss of data
that may result from connection of other kind of component.
• Discs that do not comply with the CD standards, such as the copy controlled
CD may sometimes be unable to be played.
• Finalizing is required after disc writing.
• The CD-ROM, CD-R and CD-RW may sometimes unable to be played with
this system depending on the equipment use for recording, the recording
conditions and the type of disc.
Caution for Disc Writing
• A disc recorded with the packet write method or UDF (Universal Disc Format) cannot be played back.
• Be sure to close the session or nalize the disc after writing. A disc that has not been closed or nalized may be unable to
be played properly.
• The written folder and le names may not be displayed properly depending on the speci cations of the software used in
writing.
• When a multi session disc or a disc containing a large number of folders is played, the time before playback starts may be
longer than ordinary discs.
• If both audio les and CD les (CD-DA format) are written on a single disc, it may be unable to be played properly.
• Before writing audio les in a disc, make sure that the PC used in writing can play the les properly. After writing, also
con rm that the written les can be played properly.
• Be sure to attach the correct extension (mp3, wma or m4a) to the lename of each audio le. A le without the extension
cannot be played. Also do not attach an audio le extension (mp3, wma or m4a) to a non audio le. For the le extensions,
see "Playable audio les" (page 42).
Maintenance
TUNER
(radio)
The maximum displayable time is 999 min. 59 sec.
* The track and album titles are displayed when the CD-TEXT data is available.
Station name
Receiving frequency
Day of Week/Clock
K-525
Receiving frequency
NO PS
Day of Week/Clock
40 41
English

Additional Information
Playable audio les
This unit can play the CD-ROM, CD-R and CD-RW discs and the USB devices recording the following types of audio les.
MP3 le
File format: MPEG 1 Audio Layer 3/MPEG 2 Audio Layer 3/
MPEG 2 Audio Layer 3 Lower sampling rate (MPEG2.5)
File extension: .mp3
Sampling frequency:
MPEG 1 Audio Layer 3: 32 kHz/ 44.1 kHz/ 48 kHz
MPEG 2 Audio Layer 3: 16 kHz/ 22.05 kHz/ 24 kHz
MPEG 2.5: 8 kHz/ 11.025 kHz/ 12 kHz
Bit rate:
:
MPEG 1 Audio Layer 3
MPEG 2 Audio Layer 3
MPEG 2.5
:
8 kbps ~ 160 kbps
32 kbps ~ 320 kbps
:
8 kbps ~ 160 kbps
WMA le
File format:
Windows Media™ Audio compliant
File extension: .wma
Sampling frequency: 32 kHz/ 44.1 kHz/ 48 kHz
Bit rate: 48 kbps ~ 192 kbps
• Files created with the following functions provided
Windows Media™ Player 9 or after cannot be played back:
- WMA Professional
- WMA Lossless
- WMA Voice
AAC le
File format: MPEG-4 AAC (created using iTunes™ 4.1 to 9.2)
File format: .m4a
Sampling frequency: 16 kHz/ 22.05 kHz/ 24 kHz/ 32 kHz/
44.1 kHz/ 48 kHz
Bit rate: 32 kbps ~ 320 kbps
• Files created using the Apple lossless encoder cannot be
played back.
Disc formats
ISO 9660 Level 1
ISO 9660 Level 2
Joliet
Romeo
USB compatible le systems
FAT16
FAT32
File number limits
Maximum number of folders: 255
Maximum number of les: 999
Maximum number of displayable characters
Folder name: 64 characters
Filename: 64 characters (including extension)
Tag display (Title/Album/Artist)
ID3 v1.0/ 1.1: 30 characters
ID3 v2.2/ 2.3/ 2.4: 100 characters
• The non displayable character is displayed as "*".
Other cautions
• Even audio les compliant to the above standard may be
unable to be played depending on the characteristics and
recording conditions of the disc.
• Playback may sometimes be impossible depending on the
speci cations and setup of the software used in encoding.
• Files with DRM (Digital Rights Management) cannot be
played back.
• Audio les encoded with VBR (Variable Bit Rate) may
include bit rates exceeding the compatible bit rate range
of this unit. Such audio les containing incompatible bit
rates cannot be played back.
Order of playback of folders and audio les
Audio les are played beginning with those located in the Root directory.
The following diagram shows how this system selects the stored audio les.
Folder con guration example
Root
1.mp3
Folder
Audio les
2.mp3
3.mp3
F1_1.mp3
F1_2.mp3
F2_1.mp3
F3*
* The folders that do not contain audio les are
also displayed but cannot be selected because
of the absence of audio les.
F4_1.mp3
F4_2.mp3
F5_1.mp3
F5_2.mp3
F6_1.mp3
F6_2.mp3
F6_3.mp3
■Order of playback
1st 1.mp3
2nd 2.mp3
3rd 3.mp3
4th F1_1.mp3
5th F1_2.mp3
6th F2_1.mp3
7th F4_1.mp3
8th F4_2.mp3
9th F5_1.mp3
10th F5_2.mp3
11th F6_1.mp3
12th F6_2.mp3
13th F6_3.mp3
Maintenance
K-525
42 43
English

Additional Information
Handling of CD
Handling precautions
• Hold a CD taking care not to touch the played surface.
• Do not use any disc accessory (stabilizer, protective sheet,
protection ring, etc.).
• Do not use a CD if the sticker or label on it is peeled o or
paste is projected from below a sticker or label.
• Do not stick a sheet of paper, sticker or label on a CD.
• Do not write letters on a CD using a pencil or ballpoint
pen.
Discs playable on the system
• The audio part of a CD (12 cm), CD-ROM, CD-R, CD-RW and
CD-EXTRA can be played back.
Notes on CD-ROM/CD-R/CD-RW discs
• If a CD-ROM, CD-R or CD-RW with a printable label is used,
the label surface may stick to the internal mechanism,
making it impossible to eject the disc. To prevent
malfunction of the system, do not use such a disc.
Cautions on CD discs
Always use a disc carrying the marking.
A disc without this marking may be unable to be played
back correctly.
• The disc rotates at a high speed during playback. Never
use a cracked, chipped or greatly warped disc. Otherwise,
damage or malfunction of the player may result.
• Also, do not use a disc with a non circular shape as this
may result in malfunction.
• The 8 cm CD adapter cannot be used.
CD storage
• When the main unit is not to be used for a long period,
take out the CD and store in the case.
When a CD gets dirty
• When a disc is stained with dirt or ngerprints, wipe the
disc in the radial direction with a soft cloth, etc.
• Do not use an analog disk cleaner, lacquer thinner, benzine
or alcohol.
Handling of D.AUDIO
Handling precautions
• Be sure to read the instruction manual provided with your
Kenwood digital audio player.
• The Kenwood digital audio player is not provided with this
system.
• The saved data may be lost depending on the operating
situations of the Kenwood digital audio player. Kenwood
will not assume any liabilities for the damage incurred due
to loss of saved data.
Usable D.AUDIO
• To control a Kenwood digital audio player from this unit
or the remote control unit, it is required to purchase the
optional Kenwood digital audio player connection cable.
Usable Kenwood digital audio player models
HDD audio
player
HD20GA7 MGR-E8/MGR-A7
Memory audio
player/recorder
M2GD55/M1GD55
M1GC7/M2GC7
As of Sep. 2010.
Handling of iPod
Handling precautions
• Be sure to read the instruction manuals provided with
your iPod/iPhone.
• The iPod/iPhone is not provided with this system.
• The saved data may be lost depending on the operating
situations of the iPod/iPhone. Kenwood will not assume
any liabilities for the damage incurred due to loss of saved
data.
Usable iPod/iPhone models
The following iPod/iPhone models can be connected to this
unit (as of Sep 2010).
Made for
• iPod nano (6th generation)
• iPod nano (5th generation)
• iPod nano (4th generation)
• iPod nano (3rd generation)
• iPod nano (2nd generation)
• iPod classic
• iPod touch (4th generation)
• iPod touch (3rd generation)
• iPod touch (2nd generation)
• iPod touch (1st generation)
• iPhone 4
• iPhone 3GS
• iPhone 3G
Handling of USB device
Handling precautions
• Be sure to read the instruction manuals provided with
each USB device.
• The USB device is not provided with this system.
• The [USB] connector on the rear of this unit is USB2.0 (Full
speed) compatible.
• It is not permitted to connect a USB device through a USB
hub.
• The data saved in the USB device may be lost depending
on the usage conditions. Kenwood will not assume any
liabilities for the damage incurred due to loss of saved data.
Usable USB devices
The following restrictions are applicable to the type and
operating method of the USB device.
• The USB device should be USB mass storage class
compatible. For whether each USB device is compatible
with the USB mass storage class, consult its dealer.
• The maximum current drain should be no more than "500
mA".
If a USB device other than speci ed above is used, the
music les may be unable to be played correctly. Also,
note that even a USB device complying with the above
speci cations may be unable to play certain music les
depending on the type or condition of the music les.
Caution for Transport or Movement
Before transporting or moving the system, prepare it as
described below.
Disconnect the external components including the
1
USB device, and also take out the disc.
Press [CDE] and con rm that "NO DISC" is
2
displayed.
Wait a while, and then turn the system OFF.
3
If any other external component is connected, make
4
sure that it is turned OFF before disconnecting the
connection cable.
Memory Backup
Even when the power plug is unplugged from the mains
outlet, the setups of the unit are retained for about a day.
The backed up setups are as follows.
Sound and system setups
• Input source selection
• Volume setting
• Input level setting
• D-BASS and TONE settings
• TIMER SET setting
• DIMMER setting
• DISP. SAVER setting
• A.P.S. setting
• Rec Out LEVEL setting
Tuner setups
• Preset stations
• Tuning mode (Auto/manual tuning)
• Receiving frequency
Maintenance
K-525
44 45
English

Troubleshooting
A trouble with the system does not always mean the failure. Before calling for service, check the following table
according to the symptom of trouble.
Ampli er/Speaker Section
Symptom Remedy See page
• Reconnect the cords properly.
No sound output.
The [STANDBY/TIMER] flashes red
and no sound is output.
No sound from headphones.
The time of the day is not displayed. • Set the time of the day. 34
Turn the system OFF automatically. • Set the A.P.S. mode to ON. 38
Timer cannot be activated.
• Increase the volume level.
• Cancel muting.
• If headphones are plugged in, unplug them.
• An internal fault may be produced. Turn the system OFF, unplug
the power cord and call for service.
• Check if headphone plug is inserted properly.
• Increase the volume level.
• Cancel muting.
• Set the time of the day ([STANDBY/TIMER] indicator is flashing
in orange).
• Set the On time and Off timer of program timer.
9~11
16
16
11
—
11
16
16
34
36
Tuner Section
Symptom Remedy See page
Radio stations cannot be tuned.
Noise interferes with reception.
Preset stations cannot be called.
• Connect the antenna(s).
• Select the correct tuning mode.
• Tune into the frequency of the desired station.
• Install the outdoor antenna away from the road.
• Turn OFF the electric appliances installed near this system.
• Install the system away from a TV set.
• Preset radio stations with AUTO MEMORY again.
• Preset stations with receivable frequencies manually.
9
28
28
—
29
30
USB/iPod/iPhone Section
Symptom Remedy See page
Sound is not output even when
a USB flash memory or USB mass
storage class compatible audio
player/iPod and iPhone is connected.
• Insert the iPod/iPhone properly.
• Insert the USB flash memor y properly.
• Connect the USB cable properly.
• Check if the USB mass storage class compatible digital audio
player is turned ON.
10
CD Section
Symptom Remedy See page
• Place the CD properly with the label side up.
Loaded CD cannot be played back.
CD audio is not output.
CD sound skips.
An audio file cannot be played.
Playback takes time before starting.
The TAG information is displayed improperly.
• Clean the disc.
• Wait until the condensation on the disc surface evaporates.
• Press [CDE].
• Clean the disc.
• Playback is impossible if the audio file is destroyed.
• Check if the audio file is playable with this system.
• Playback is impossible if the audio file is destroyed.
• Check if the audio file is playable with this system.
• The time until playback may become long if there are large
number of folders and/or files.
• Confirm the TAG information that can be displayed on this unit. 42
Component connected to D.AUDIO IN connector
Symptom Remedy See page
Kenwood digital audio player cannot
be controlled from the main unit or
remote control unit.
• Connect it using the special connection cable (optional).
• Check if a compatible model is connected.
Remote Control Unit
Symptom Remedy See page
Remote control is unavailable.
• Replace the batteries with new ones.
• Use the remote control unit within the controllable distance.
Resetting the system
Symptom Check Points & Remedy
The system may malfunction due to unplugged and plugging of a cable while
the system is ON or to an extraneous cause. In this case, reset the system with the
following steps. Resetting the microcomputer results in erasing the setups of the
The system malfunctions (resulting
in inoperability of the system,
erroneous display, etc.).
system and returns it to the factory shipped condition.
Unplug the power plug from the mains outlet.
1
While pressing and holding [K] on the main unit, unplug the power cord and
2
plug it again.
"INITIALIZE" is displayed. This unit is reset.
17
44
44
17
44
42
42
—
11
44
Maintenance
7
15
K-525
46 47
English

Message List
Glossary
Displayed Message Description
CAN'T PLAY An attempt was made to play an audio file that cannot be played with this unit.
CHECK DISC
CONNECT ERR iPod or iPhone is not connected.
D-IN ---- The sampling frequency of the input signal is other than 32k/ 44.1k/ 48k Hz.
D-IN NonPCM A non PCM signal is input to the DIGITAL IN connector.
D-IN UNLOCK
NO DISC No CD disc is loaded.
NO iPod No iPod/iPhone is connected.
NO USB No USB device is connected.
NOT FOUND There is no file that can be read by this system.
NOT SUPPORT Cannot be used with this unit is connected.
PGM FULL
PROTECTED
*1: The CD contains information called TOC (Table Of Contents) in addition to audio signals. Like the table of contents of
a book, the TOC includes non rewritable information among the information on the disc such as the number of tracks,
playing time and other character information.
• The TOC
• The disc is loaded improperly.
• No digital component is connected to the DIGITAL IN connector.
• The digital component connected to the DIGITAL IN connector is not switched ON.
An attempt was made to program the 33rd audio file.
(Programming is possible up to 32 audio files.)
An attempt was made to play a DRM (Digital Rights Management) protected audio
le.
*1
information cannot be read.
Term Description
AAC
CD-DA Stands for "Compact Disc – Digital Audio". The CD-DA is usually called "CD".
CD-TEXT
DTS Surround Sensation
MP3
PCM
USB
USB hub Adapter for connecting more than one USB device simultaneously.
USB mass storage class
VBR (Variable Bit Rate)
AAC stands for "Advanced Audio Coding", which is an audio compression method use
with the video compression of digital broadcasting, etc.
Music CD in which the character information such as the disc titles, artist names, track
titles, etc. is recorded.
This is an audio reproduce system developed by DTS, Inc., and is capable of
reproducing high quality 3D surround audio using two speakers. It makes it possible to
enjoy feeling of presence of 3D surround from a 2-channel stereo input source.
An audio compression method developed by Fraunhofer IIS, Germany. It achieves
a high compression rate by thinning out the data of the sound that is less audible
to human ears. It can compress music CD data into about 1/11 (128 kbps) while
maintaining similar audio quality.
PCM stands for “Pulse Code Modulation”, which is a system for converting analog audio
signals into digital data. The CD (CD-DA) utilises the PCM system with a sampling
frequency of 44.1 kHz.
Standard for interfacing between the PC and peripheral devices. This system is
compatible with USB 1.1 and 2.0.
Standard for controlling a USB device from a PC. Also, refers to the action that a PC
recognizes a USB device connected to it as an external storage device.
Technology for assigning the bits by varying their quantity according to the amount of
music information.
Maintenance
K-525
WMA
Sampling frequency
TAG information
Bit rate
Stands for "Windows Media™ Audio", which is an audio compressed encoding system
developed by Microsoft Corporation.
Number of times analog signal is converted into digital signal per second. It is 44.1 kHz
with music CD. In general, higher sampling frequencies offer higher audio quality.
Information written in audio file, including the title name, artist name, album name and
genre.
Figure expressing the amount of information per second. A higher bit rates offer higher
audio quality.
48 49
English

Care and Storage
Speci cations
Care and storage of main unit
Do not place in the following locations
• Place exposed to direct sunlight.
• Place subjected to excessive humidity or dirt.
• Place exposed to direct heat from heating equipment.
Be careful against condensation
When the di erence in temperatures between the
main unit and the environmental air is large, dew may
be condensed inside the main unit and may cause
malfunction of the main unit. If this happens, leave the
main unit for a few hours until its internal mechanisms
are dried up.
Take special care against condensation when the main
unit is moved between places with a large temperature
di erence or into a room with high humidity.
When the unit becomes dirty
When the front panel or case gets dirty, wipe with a soft
dry cloth. Do not use lacquer thinner, benzine, alcohol
or contact revitalizer for these chemicals will cause
discoloration or deformation.
• “Made for iPod,” and “Made for iPhone” mean that an
electronic accessory has been designed to connect specifically to iPod, or iPhone, respectively, and has been
certified by the developer to meet Apple performance
standards. Apple is not responsible for the operation of
this device or its compliance with safety and regulatory
standards. Please note that the use of this accessory
with iPod, or iPhone may affect wireless performance.
• iPhone, iPod, iPod classic, iPod nano, and iPod touch
are trademarks of Apple Inc., registered in the U.S. and
other countries.
[Ampli er section]
Rated power
Output power ……… 20 W + 20 W RMS (1 kHz, 10 W, 8 Ω)
Total harmonic distortion ………………………… 0.05 %
(1kHz, 1W, 8 Ω, 30 kHz LPF)
Frequency response ………………………10 Hz ~ 20 kHz
Tone control characteristics
BASS ……………………………………… ±6 dB (100 Hz)
TREBLE …………………………………… ±6 dB (10 kHz)
Input terminals (Sensitivity/impedance)
D.AUDIO/AUX (INPUT LEVEL 0) ……… 300 mV / 27 kΩ
Output terminals (Level/impedance)
Recording output (REC OUT LEVEL 0)
………………………………………… 900 mV / 10 kΩ
[Tuner section]
FM tuner
Tuning frequency range ………87.50 MHz ~ 108.00 MHz
Antenna impedance ………………… 75 Ω unbalanced
[CD section]
Read method
……………… Non-contact optical readout (laser diode)
D/A Converter ………………………………………… 1 bit
Oversampling ……………………………8 fs (352.8 kHz)
[USB section]
Compatible USB devices
………………………… USB mass storage class devices
Interface ……… USB 2.0 (Full speed), USB 1.1 compatible
Compatible le system ………………………… FAT 16/32
Maximum supply current …………………………500 mA
[General section]
Power consumption …………………………………… 25 W
Power consumption in standby mode ……… 0.5 W or less
Dimensions (Max.) …………………………Width 390 mm
Height 119.5 mm
Depth 277.5 mm
Weight ………………………………………… 5.8 kg (net)
• Design and speci cations are subject to change
without notice.
• The system may be unable to manifest the full
performance in an extremely cold place (under the
water freezing temperature).
Maintenance
K-525
Manufactured under license from DTS Licensing
Limited. DTS and the Symbol are registered
trademarks, & DTS Surround Sensation and the DTS
logos are trademark of DTS, Inc. Product includes
software. © DTS, Inc. All Rights Reserved.
Windows Media is a registered trademark or trademark
of Microsoft Corporation in the United States and other
countries.
Other system names and product names are generally
trademarks or registered trademarks of their developers.
However, note that the text in this manual does not use the
TM and ® markings to them.
[Digital section]
Compatible sampling frequencies …… 32k/44.1k/48k Hz
Input connectors (Sensitivity/Wavelength) ……… Optical
(−15 dbm to −24 dbm/660 nm ±30 nm)
[Speakers section]
Enclosure …………………………… Bass re ex system
Speakers …………………………………80 mm cone type
Impedance …………………………………………… 8 Ω
Maximum input ……………………………………… 30 W
50 51
English

For your records
Record the serial number, found on the back of the unit,
in the spaces designated on the warranty card, and in the
space provided below. Refer to the model and serial numbers
whenever you call upon your dealer for information or service
on this product.
Model Serial Number
 Loading...