

Page 1

COMPACT Hi-Fi COMPONENT SYSTEM
K-511USB
RD-K511USB
INSTRUCTION MANUAL
Declaration of Conformity with regard to the EMC Directive
2004/108/EC
Manufacturer:
Kenwood Corporation
2967-3 Ishikawa-machi, Hachioji-shi, Tokyo, 192-8525 Japan
EU Representative's:
Kenwood Electronics Europe BV
Amsterdamseweg 37, 1422 AC UITHOORN, The Netherlands
© B60-5755-00/00 (EW/XW)
Page 2
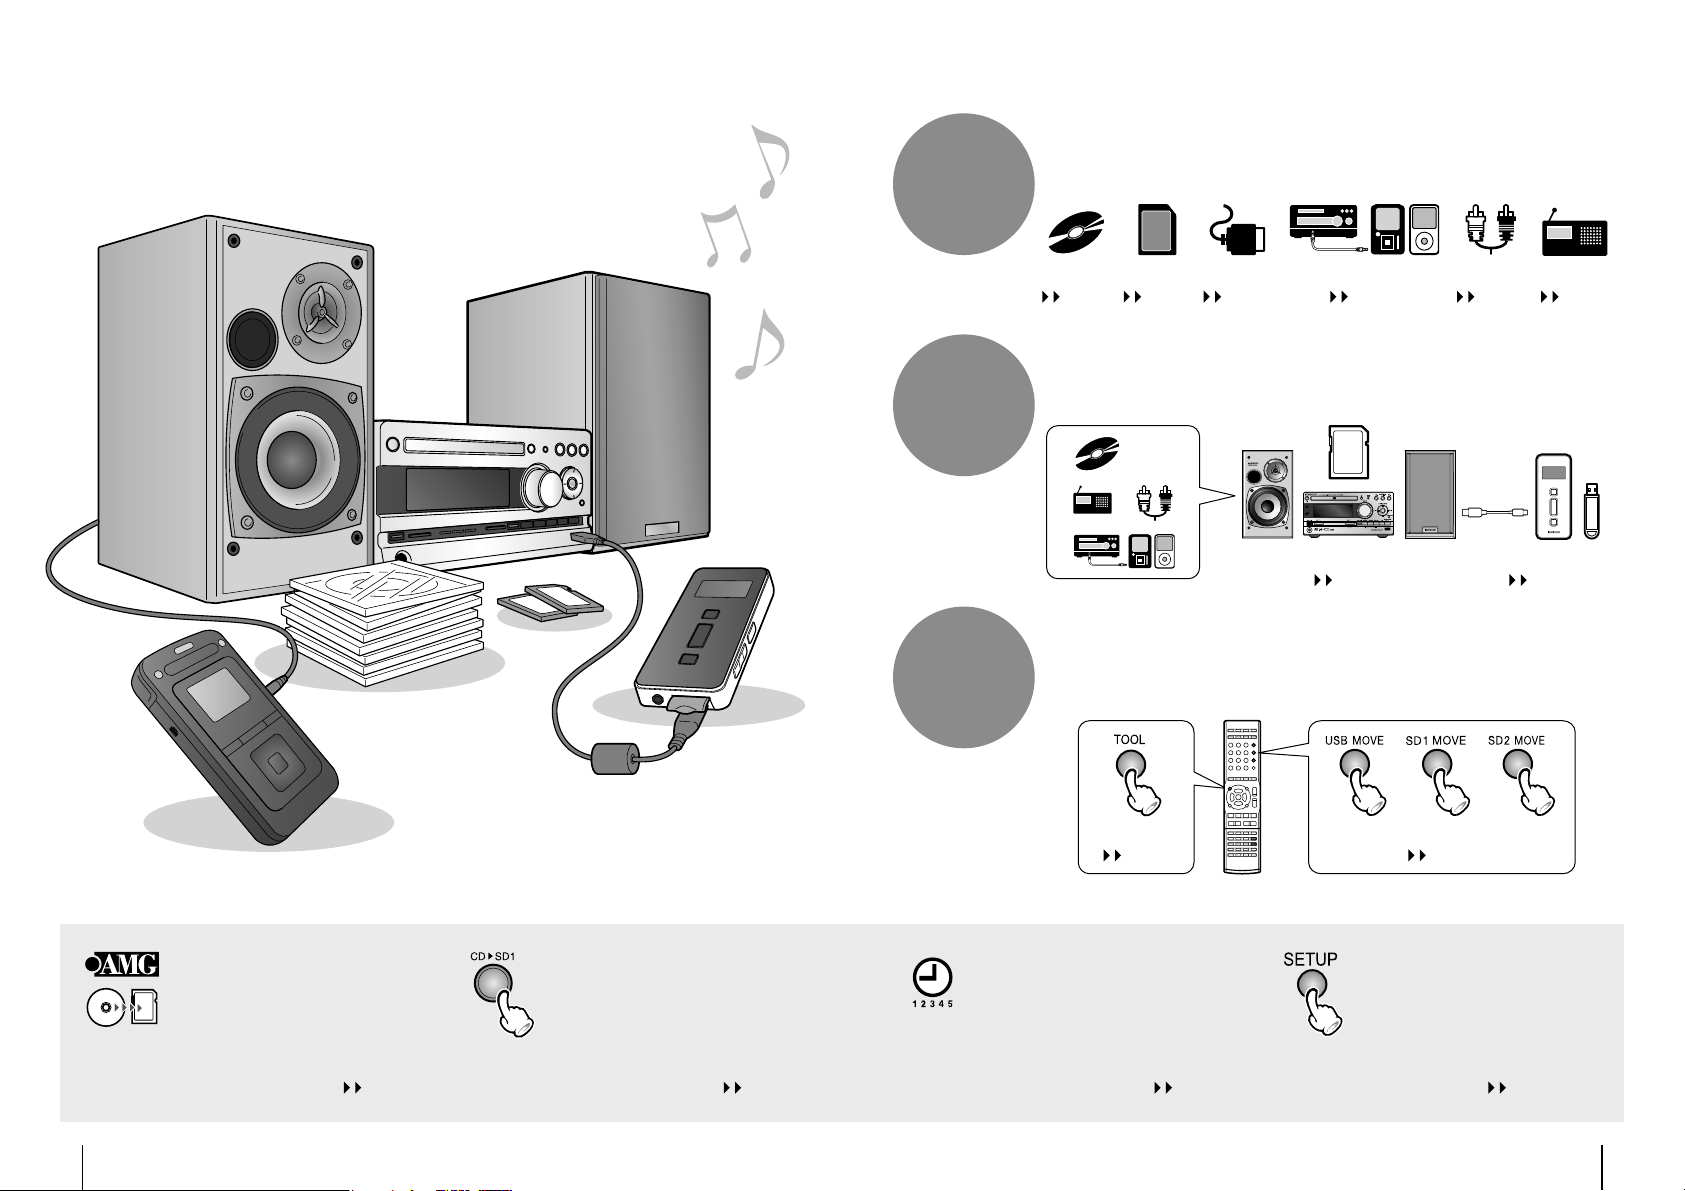
What are available with this system
Playback of a large variety of media including the SD card and
digital audio player as well as CD.
Play
Record
Edit
CD
page 28
SD
page 32
USB
page 36
iPod/D.AUDIO
page 40
AUX
page 42
TUNER
page 44
Recording of various sources including CD, radio broadcasting and
externally connected source to the SD card or digital audio player
without using a PC.
Recording on SD
page 52
Recording on USB
page 52
Editing of folders and les in SD and USB, including move, delete and
title input operations. Pressing the [TOOL] button opens the menu of
editing items for each audio source.
Tool menu
page 70
Moving folders and les
page 60
Auto CD title acquisition
The title information including the album
name, track names and artist name can
be obtained from the AMG database for
display during playback or addition as
the tag information to the recorded les.
page 24
2
K-511USB/RD -K511USB
One-Touch Edit recording
Single press of a button can start
recording of CD audio in SD card or
USB memory at either the 4x or 1x
speed.
page 52
5-program timer
The weekly timer is convenient for
recording or listening to the radio
program you are fond of.
page 78
[SETUP] button for setting the
system according to your lifestyle
The system setup function, the recording settings
including the recording speed and level, and the sound
setup for reproducing desired audio in each sound
range allow you to arrange the system as you like.
pages 72, 84, 92
English
3
Page 3

Contents
Caution : Read the pages marked ¤ carefully to
ensure safe operation.
Before applying power ……………………… 6
Safety precautions ………………………………6
IMPORTANT SAFETY INSTRUCTIONS ……… 6
Read before use
Accessories …………………………………… 9
Installation …………………………………… 10
Preparation of remote control ……………… 11
Connect ions …………………………………… 12
Names and functions of parts ……………… 16
Playing music tracks
Basic Operation ……………………………… 22
Acquiring the CD title information ………… 24
AMG database ………………………………… 24
How to use the AMG database ……………… 24
Folders and music les ……………………… 26
Playing a CD or audio le disc ……………… 28
Playback ……………………………………… 28
Folder play mode ……………………………… 30
Program playback …………………………… 30
Playing an SD card …………………………… 32
Playback ……………………………………… 32
Folder play mode ……………………………… 34
Program playback …………………………… 34
Relay playback of two SD cards ……………… 35
Intro Scan playback …………………………… 35
Playing a USB device ………………………… 36
Playback ……………………………………… 36
Folder play mode ……………………………… 38
Program playback …………………………… 38
Playing iPod/D.AUDIO ……………………… 40
Playback ……………………………………… 40
Switching the mode ………………………… 41
Playback with the AUX Connection ………… 42
Playback ……………………………………… 42
Switching the mode ………………………… 43
Listening to Radio Broadcasting …………… 44
Listening to Radio Broadcasting ……………… 44
Presetting stations automatically
(Auto Preset) ……………………………… 46
Presetting stations manually
(Manual Preset) …………………………… 46
RDS (Radio Data System) ……………………… 48
PS (Program Service Name) Display ………… 48
Searching for a desired program type
(PTY search) ………………………………… 48
Record
Before recording ……………………………… 50
Various recording methods ………………… 50
Selecting the recording mode according to the
quality and purpose ……………………… 51
One-Touch Edit recording …………………… 51
Recording destination folder/ le names …… 51
Recording CD in SD/USB ……………………… 52
One-Touch Edit recording …………………… 52
Recording all tracks in CD …………………… 52
Recording a single track in CD ……………… 53
Recording desired tracks in desired order …… 53
Recording general audio source into SD/USB
Recording in the digital audio player ……… 56
Listening to an audio source while recording
another …………………………………… 58
…54
Edit
Moving a folder or audio le ………………… 60
Renaming a folder or music le ……………… 62
Renaming ……………………………………… 62
Character Input ……………………………… 64
Deleting a folder or audio le ……………… 66
Checking the remaining recording time of
SD or USB ………………………………… 68
Adjusting the External Signal Input Level … 69
Editing using the Tool menu ………………… 70
Advanced operations
Making the system setup using the
Setup menu ……………………………… 72
Setting the Sleep Timer (SLEEP) ……………… 74
Adjusting the Display Brightness
Formatting an SD card (SD FORMAT) ………… 75
Setting Auto Power Save (A.P.S.) ……………… 76
Adjusting the Time (TIME ADJUST) ………… 77
Setting the program timer (TIMER SETTING) … 78
Switching the Display Information ………… 82
(DIMMER SET) 75
Recording setup
Making the recording setup using the
Setup menu ……………………………… 84
Setting recording mode for each audio source
(REC MODE) ………………………………… 86
Setting the recording speed (O.T.E. SPEED) … 87
Setting the recording input (REC INPUT) …… 88
Setting the recording level (REC LEVEL) ……… 88
Setting the le division method
(AUTO DIVIDE) ……………………………… 89
Dividing les automatically (DIVIDE TIME) … 90
Recording the CD-TEXT information
(TEXT COPY) ………………………………… 90
Relay recording between SD1 and SD2
(RELAY REC) ………………………………… 91
Creating the desired sound setting
Making the sound setup using the
Setup menu ……………………………… 92
Enhancing the bass tone (D-BASS) …………… 94
Enhancing both bass and treble (TONE) …… 95
Setting the desired sound properties
(MANUAL EQ) ……………………………… 96
Recalling a user setup of sound properties
(MANUAL EQ) ……………………………… 97
Reproducing audio with sound properties
close to the original (SPRM: Supreme) …… 98
Playing best- t sound according to genre
(BestFit EQ EX) ……………………………… 98
Playback with high sound quality (HR SOUND) 99
Setting the left and right speaker balance
(BALANCE) ………………………………… 99
Resetting the adjusted frequenc y characteristics
to the original sound (FLAT) ……………… 99
Maintenance
Additional Information …………………… 100
Message List ………………………………… 106
Troubleshooting …………………………… 108
Glossary …………………………………… 111
Care and Storage …………………………… 112
Speci cations ……………………………… 114
Read before use
Playing music tracks
Record
Edit
Advanced operations
Recording setup
Creating the desired sound setting
Maintenance
4
K-511USB/RD -K511USB
English
5
Page 4
Before applying power
¤
Caution : Read this page carefully to
ensure safe operation.
Units are designed for operation as follows.
Australia ...........................................................AC 240 V only
Europe .............................................................. AC 230 V only
Safety precautions
WARNING : TO PREVENT FIRE
OR ELECTRIC SHOCK, DO NOT
EXPOSE THIS APPLIANCE TO
RAIN OR MOISTURE.
CAUTION
RISK OF ELECTRIC SHOCK
DO NOT OPEN
CAUTION: TO REDUCE THE RISK OF ELECTRIC SHOCK,
DO NOT REMOVE COVER (OR BACK). NO USERSERVICEABLE PARTS INSIDE. REFER SERVICING TO
QUALIFIED SERVICE PERSONNEL.
THE LIGHTNING FLASH WITH ARROWHEAD
SYMBOL, WITHIN AN EQUILATERAL TRIANGLE, IS INTENDED TO ALERT THE USER
TO THE PRESENCE OF UNINSULATED "DANGEROUS VOLTAGE" WITHIN THE PRODUCT’
S ENCLOSURE THAT MAY BE OF SUFFICIENT
MAGNITUDE TO CONSTITUTE A RISK OF
ELECTRIC SHOCK TO PERSONS.
THE EXCLAMATION POINT WITHIN AN EQUILATERAL TRIANGLE IS INTENDED TO ALERT
THE USER TO THE PRESENCE OF IMPORTANT
OPERATING AND MAINTENANCE (SERVICING) INSTRUCTIONS IN THE LITERATURE ACCOMPANYING THE APPLIANCE.
The marking of products using lasers
CLASS 1
LASER PRODUCT
The marking this product has been classified as
Class 1. It means that there is no danger of hazardous radiation outside the product.
Location: Back panel
6
K-511USB/RD -K511USB
IMPORTANT SAFETY
INSTRUCTIONS
¤
Caution : Read this page carefully to
ensure safe operation.
Read Instructions – All the safety and operating
instructions should be read before the product is
operated.
Retain Instructions – The safety and operating
instructions should be retained for future reference.
Heed Warnings – All warnings on the product and in
the operating instructions should be adhered to.
Follow Instructions – All operating and use
instructions should be followed.
1. Cleaning – Unplug this product from the wall
outlet before cleaning. Do not use liquid cleaners or
aerosol cleaners. Use a damp cloth for cleaning.
2. Attachments – Do not use attachments not
recommended by the product manufacturer as they
may cause hazards.
3. Water and Moisture – This product shall not be
exposed to dripping and splashing – for example, near
a bath tub, wash bowl, kitchen sink, or laundry tub; in
a wet basement; or near a swimming pool; and the
like. Do not place an object containing liquid, such as a
ower vase, on the appliance.
4. Accessories – Do not place this product on
an unstable cart, stand, tripod, bracket, or table.
The product may fall, causing serious injury to a
child or adult, and serious damage to the product.
Use only with a cart, stand, tripod, bracket, or table
recommended by the manufacturer. Any mounting
of the product should follow the manufacturer’s
instructions, and should use a mounting accessory
recommended by the manufacturer.
A product and cart combination should
be moved with care. Quick stops,
excessive force, and uneven surfaces may
cause the product and cart combination
to overturn.
5. Ventilation – Slots and openings in the cabinet
are provided for ventilation and to ensure reliable
operation of the product and to protect it from
overheating, and these openings must not be blocked
or covered. The openings should never be blocked
by placing the product on a bed, sofa, rug, or other
similar surface. This product should not be placed in a
built-in installation such as a bookcase or rack unless
proper ventilation is provided or the manufacturer’s
instructions have been adhered to.
I
6. Power Sources –
only from the type of power source indicated on the
product. If you are not sure of the type of power supply
to your home, consult your product dealer or local power
company.
7.
CAUTION
be equipped with a polarized alternating-current line
plug (a plug having one blade wider than the other).
This plug will t into the power outlet only one way. This
is a safety feature. If you are unable to insert the plug
fully into the outlet, try reversing the plug. If the plug
should still fail to t, contact your electrician to replace
your obsolete outlet. Do not defeat the safety purpose
of the polarized plug.
8. Power Cord Protection – Power-supply cords
should be routed so that they are not likely to be
walked on or pinched by items placed upon or against
them, paying particular attention to cords at plugs,
convenience receptacles, and the point where they exit
from the product.
9. Lightning – For added protection for this product
during a lightning storm, or when it is left unattended
and unused for long periods of time, unplug it from
the wall outlet and disconnect the antenna or cable
system. This will prevent damage to the product due to
lightning and power-line surges.
10. Overloading – Do not overload wall outlets,
extension cords, or integral convenience receptacles as
this can result in a risk of re or electric shock.
11. Object and Liquid Entry – Never push objects of
any kind into this product through openings as they
may touch dangerous voltage points or short-out parts
that could result in a re or electric shock. Never spill
liquid of any kind on the product.
12. Servicing – Do not attempt to service this product
yourself as opening or removing covers may expose
you to dangerous voltage or other hazards. Refer all
servicing to quali ed service personnel.
13. Damage Requiring Service – Unplug this product
from the wall outlet and refer servicing to quali ed
service personnel under the following conditions:
a) When the power-supply cord or plug is damaged,
b) If liquid has been spilled, or objects have fallen
into the product,
c) If the product has been exposed to rain or water,
d) If the product does not operate normally by
following the operating instructions.
e) If the product has been dropped or damaged in
any way, and
f) When the product exhibits a distinct change in
performance – this indicates a need for service.
g) If an abnormal smell or smoke is detected.
This product should be operated
– Polarization – This product may
Replacement Parts – When replacement parts
14.
are required, be sure the service technician has used
replacement parts speci ed by the manufacturer or have
the same characteristics as the original part. Unauthorized
substitutions may result in re, electric shock, or other
hazards.
15. Safety Check – Upon completion of any service
or repairs to this product, ask the service technician to
perform safety checks to determine that the product is
in proper operating condition.
16. Wall or Ceiling Mounting – This product should
be mounted to a wall or ceiling only as recommended
by the manufacturer.
17. Heat – This product should be situated away from
heat sources such as radiators, heat registers, stoves,
or other products that produce heat. Do not place a
aming object, such as a candle or lantern, or near the
product.
18. Power Lines – An outside antenna system should
not be located in the vicinity of overhead power lines
or other electric light or power circuits, or where it can
fall into such power lines or circuits. When installing an
outside antenna system, extreme care should be taken
to keep from touching such power lines or circuits as
contact with them might be fatal.
19. Outdoor Antenna Grounding – If an outside
antenna or cable system is connected to the product, be
sure the antenna or cable system is grounded so as to
provide some protection against voltage surges and builtup static charges. Article 810 of the National Electrical
Code, ANSI/NFPA 70, provides information with regard to
proper grounding of the mast and supporting structure,
grounding of the lead-in wire to an antenna discharge
unit, size of grounding conductors, location of antennadischarge unit, connection to grounding electrodes, and
requirements for the grounding electrode.
EXAMPLE OF ANTENNA GROUNDING AS PER
NATIONAL ELECTRICAL CODE
ANTENNA
LEAD IN WIRE
GROUND CLAMPS
ELECTRIC
SERVICE
EQUIPMENT
NEC – NATIONAL ELECTRICAL CODE
Notes:
1. Item 7 is not required except for grounded or
polarized equipment.
2. Item 19 complies with UL in the U.S.A.
ANTENNA
DISCHARGE UNIT
(NEC SECTION 810-20)
GROUNDING CONDUCTORS
(NEC SECTION 810-21)
GROUND CLAMP
POWER SERVICE GROUNDING
ELECTRODE SYSTEM
(NEC ART 250, PART H)
English
7
Page 5
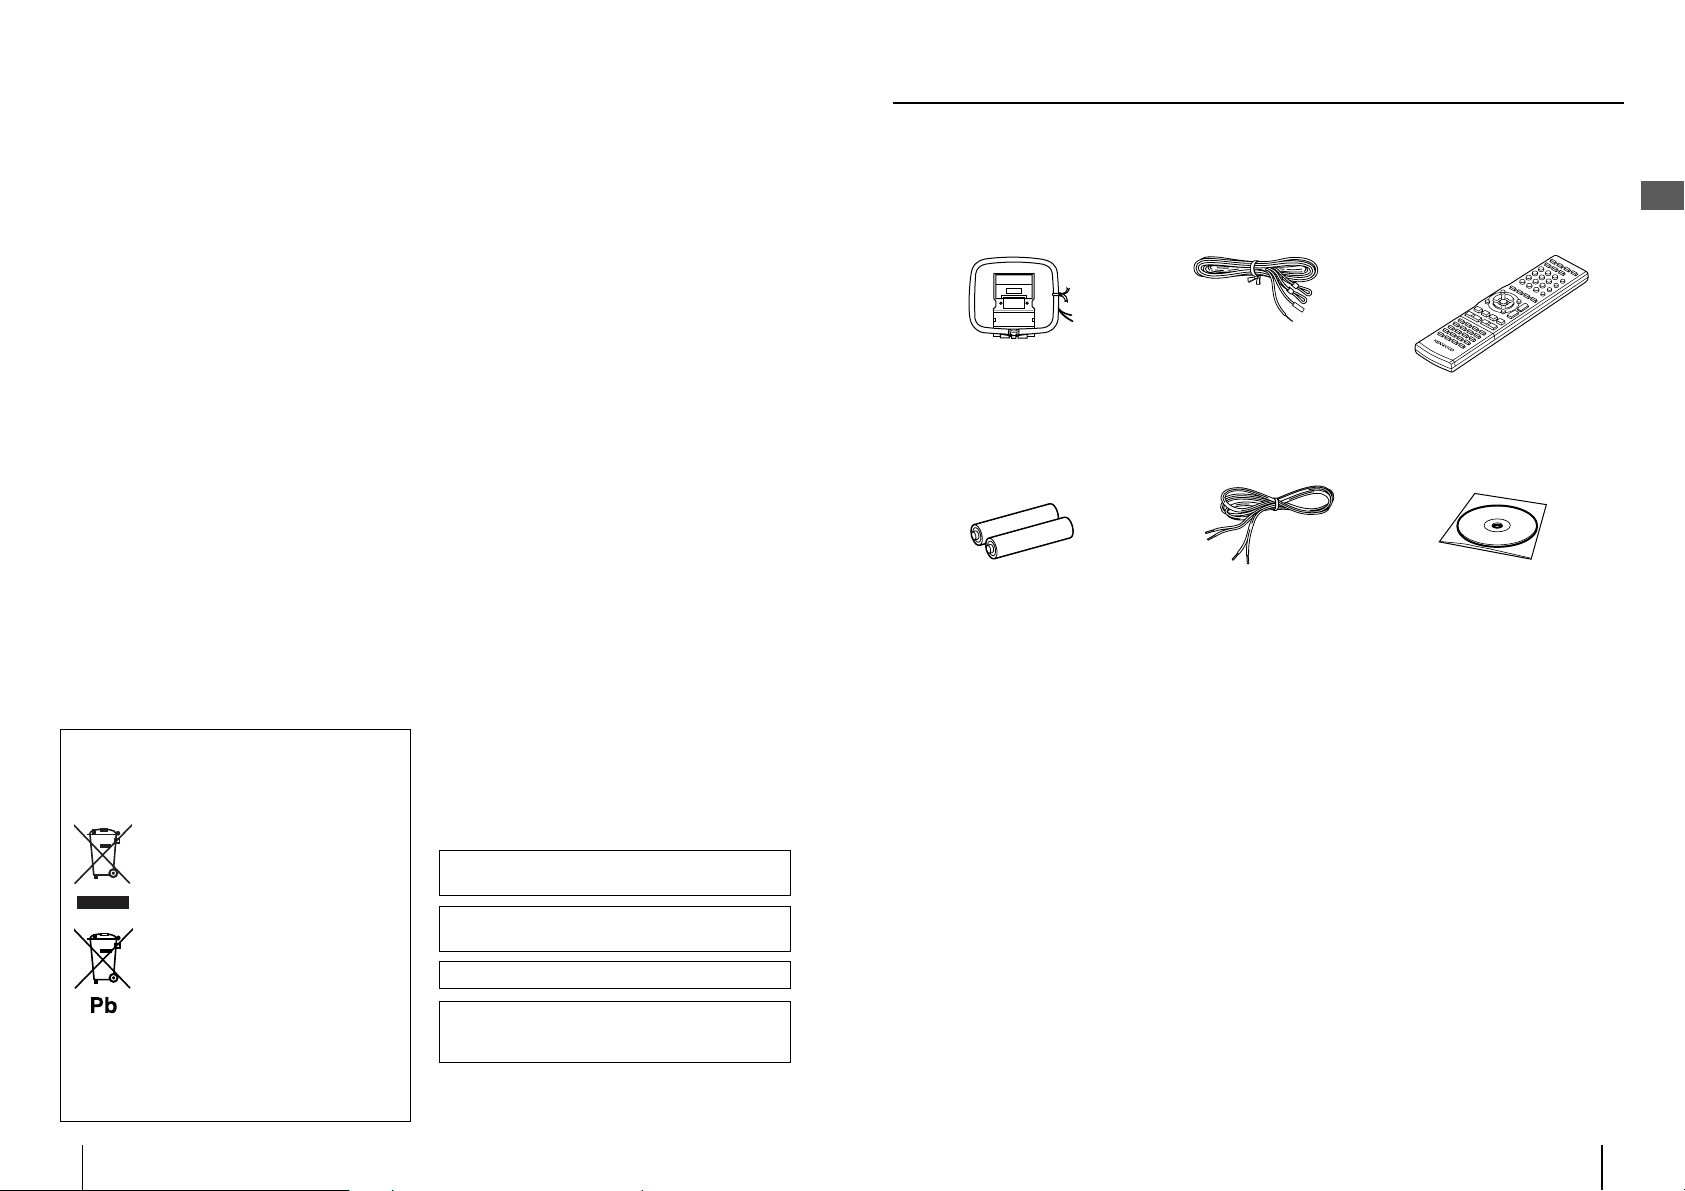
Accessories
Accessories
Information on Disposal of Old Electrical
and Electronic Equipment and Batteries
(applicable for EU countries that have
adopted separate waste collection systems)
Products and batteries with the symbol
(crossed-out wheeled bin) cannot be disposed
as household waste.
Old electrical and electronic equipment and
batteries should be recycled at a facility
capable of handling these items and their
waste by products.
Contact your local authority for details in
locating a recycle facility nearest to you.
Proper recycling and waste disposal will help
conserve resources whilst preventing
detrimental effects on our health and the
environment.
Notice: The sign "Pb" below the symbol for
batteries indicates that this battery
contains lead.
Apple and iPod are trademarks of Apple Inc.,
registered in the U.S. and other countries.
Supreme is a registered trademark of Kenwood
Corporation.
The SDHC logo is a trademark.
Microsoft, Windows and Windows Media are registered
trademarks or trademarks of Microsoft Corporation in
the United States and other countries.
Other system names and product names are generally trademarks or
registered trademarks of their developers. However, note that the text
in this manual does not use the TM and ® markings to them.
AM loop antenna
(x 1)
Remote control batteries
(LR03(AAA) x 2)
The batteries are inserted
in the packaging material.
FM indoor antenna
(x 1)
Speaker cords
(2 m x 2)
K-511USB only:
Packaged with the speakers.
Remote control unit
(RC-F0714E x 1)
AMG database CD
(x 1)
Read before use
8
K-511USB/RD -K511USB
English
9
Page 6

Installation
Preparation of remote control
Installation precautions
Always install the system on a level, stable surface. When installing on a stand or tabletop, be sure to con rm the strength of the stand.
•
The magnetism from the speakers may cause color irregularities on a nearby TV or PC screen. Always install the speakers at
•
a distance from a TV or PC.
The speakers is not provided with
RD-K511USB.
CAUTION
Left speaker Right speaker
Observe the following cautions when installing the system. Insu cient heat
radiation may build up internal heat and cause a malfunction or re hazard.
•
•
•
•
•
Install the system so that the power outlet is easily accessible from the user, and
unplug the power cord from the power outlet immediately in case of a trouble.
Note that the power supply to the system is not shut down completely by simply
setting the power button to OFF. To shut down the power supply completely, it is
required to unplug the power cord.
Main unit
Do not place an object that may hinder heat radiation on the system.
Do not install the system on the back, on the side or upside down.
Do not place a cloth on the system or place it on a carpet or cushion.
Do not use the system in a poorly ventilated place.
Leave the spaces speci ed below around the cabinets of the main unit.
Top: 50 cm or more, Side: 10 cm or more, Rear: 10 cm or more
Preparing the remote control unit
Loading batteries
Remove the battery cover.
1
Insert the provided AAA-
2
size batteries.
Insert batteries with correct
•
polarity.
Close the battery cover.
3
The provided batteries are intended for use in operation
•
check and their service life may be shorter than usual.
When replacing batteries, be always sure to replace both
•
of the two batteries together.
Operation
Plug the power cord of the system to a power outlet
and press [K] on the remote control unit to turn the
system ON. After the system is switched ON, press the
desired operation button. Use the remote control unit
by pointing it to the remote sensor on the main unit.
About
6 m
About 30°
•
The system may malfunction if the remote control sensor
is exposed to direct sunlight or the light of a uorescent
lamp with high-frequency lighting system (inverter
system, etc.). Change the system installation to prevent
malfunction.
About 30°
Read before use
To fully enjoy the acoustic e ects
The audio is variable depending on how the speakers are installed. Ensure the following points to enjoy music with
higher quality.
Make the environments around the left and right speakers as equal as possible. Install the left and right speakers at a
•
distance of a wall, and minimize the sound reverberations by drawing thick curtains on the windows.
Place the left and right speakers at a large distance between each other.
•
Place the left and right speakers on the same height as the ears of the listener.
•
10
K-511USB/RD -K511USB
¤
CAUTION
• Do not leave the battery near fire or under direct
sunlight. A fire, explosion or excessive heat generation
may result.
English
11
Page 7
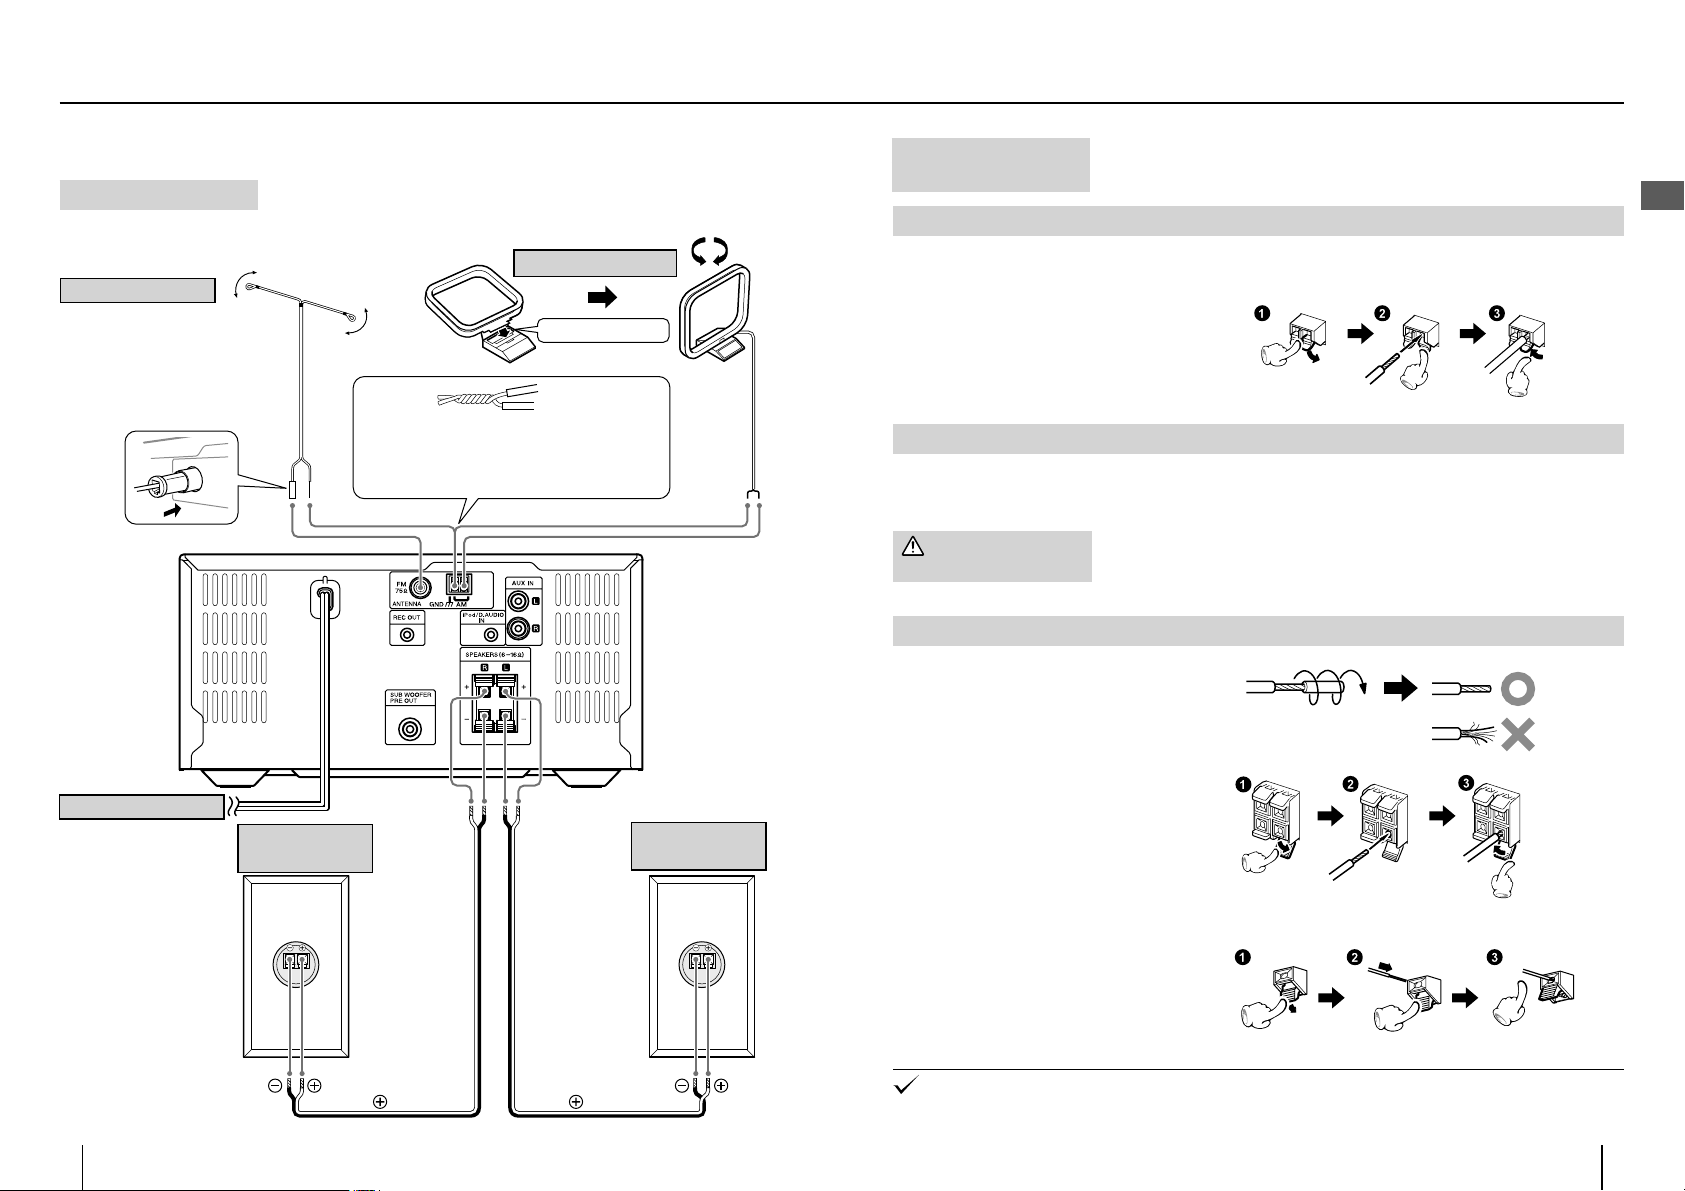
Connections
Basic connections
Caution for connection
FM indoor antenna
Connect the [FM75Ω] and [MGND]
1
terminals.
Find the antenna location that o ers
2
best reception.
Fix the antenna in the found location.
3
Do not plug the power cord into the power outlet until all other connections are
completed. Before unplugging a connected cord or cable, be sure to switch the
system OFF and unplug the power cord from the power outlet in advance.
AM loop antenna
Fit into the groove.
Bind one of the conductors of the AM loop
antenna with a conductor of the FM indoor
antenna by twisting them together, and insert the
twisted pair into the [MGND] terminal.
Malfunction of the
system
If the system does not function properly or the display shows erroneous information even
when the connections are made correctly, reset the system. (page 110)
Connecting the AM loop antenna
The provided AM antenna is an indoor antenna. Install it as apart as possible from the main unit, TV set, speaker cords
and power cord and orient it in the direction that o ers best reception condition.
Connecting a antenna cord
•
Connect the AM antenna code across the [AM] and
[MGND] terminals as shown on the right.
Connecting the FM indoor antenna
The provided FM antenna is a simpli ed one for indoor use. To receive FM stations stably, it is recommended to use an
outdoor antenna (commercially available). Remove the simpli ed antenna before connecting the outdoor antenna.
Caution for outdoor
antenna installation
Since antenna installation necessitates skill and experience, always consult your dealer
before installation. The antenna should be placed at a distance from the power distribution
wires. Otherwise, an electric shock accident may occur if the antenna falls down.
Connecting the speakers
Treatment of the speaker cord extremities
•
Twist and remove the vinyl coating on the
extremity of each speaker cord.
Read before use
Power cord
To AC wall outlet
• Insert the plug firmly all the
way into the AC wall outlet.
12
K-511USB/RD -K511USB
LS-K511 R
Right speaker
White line on transparent
coating
White line on transparent
coating
LS-K511 L
Left speaker
Connecting a speaker cord to the main unit•
Connecting the speaker cords to the speakers
•
Be careful not to short-circuit the + and – conductors of the speaker cord (be sure to avoid contact between the + and –
•
conductors). If the speaker cord is connected by inverting the + and – polarity, the reproduced audio will be unnatural with
unclear positioning of musical instruments.
English
13
Page 8
Connections
Connecting associated products (commercially available)
Before connecting associated system products, be sure to read their instruction manuals.
•
Connect every connection cord rmly. Incomplete insertion may cause loss of audio output or generation of noise.
•
Caution for connection
Set the main unit in the standby mode before connecting any associated product to
it and do not set the power button to ON until all connections are completed. Before
unplugging a connected cord or cable, be sure to set the power button to OFF and
unplug the power cord from the power outlet in advance.
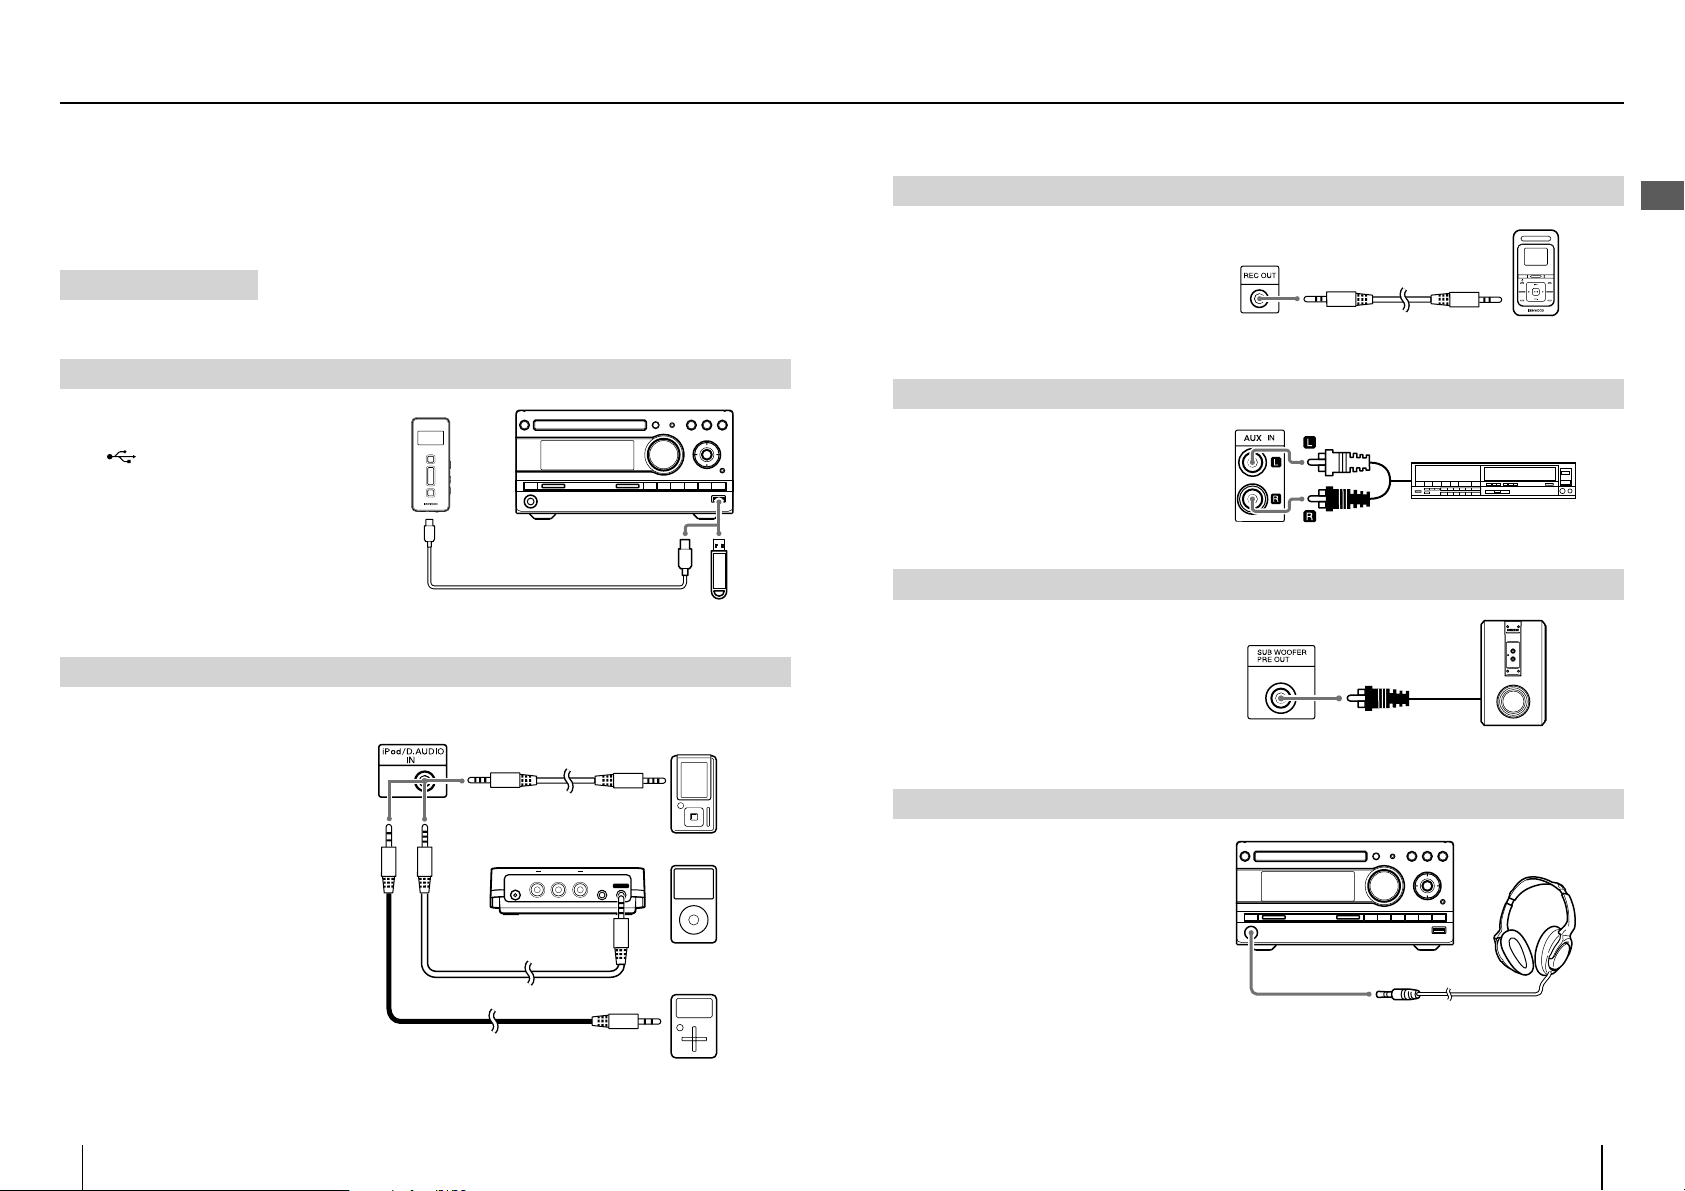
REC OUT
Connect a kenwood digital audio player with
direct encoding function to the [REC OUT]
terminal on the rear of the main unit.
The [REC OUT] terminal output the analog audio
•
signals.
Read before use
To REC IN
USB
Connect a USB ash memory or a digital audio
player with USB mass storage class compatibility
to the [
USB] terminal on the front of the main
unit.
•
With certain models, it takes a certain period
before the connection is recognized.
•
Certain models display the USB connection mode
selection menu. In this case, select the "Storage"
mode.
iPod/D.AUDIO IN
Connect a digital audio player or an iPod to the
[iPod/D.AUDIO IN] terminal on the rear of the
main unit.
•
When a kenwood digital audio player with digital
audio link compatibility is connected using the
PNC-150 dedicated cable (separately available),
the player can be controlled from this system or
its remote control unit. The iPod can be controlled
when it is connected using the PAD-iP7 dedicated
adapter (separately available). (page 40)
A digital audio player other than above can
•
be connected using a stereo miniplug cable
(commercially available).
When not using the digital audio player or the iPod,
•
unplug the miniplug cable from the main unit.
PNC-150 (separately
available)
COMPONENT VIDEO
Y Cb Cr
DC IN
PAD-iP7 (separately
available)
kenwood
digital audio player
AUDIO/
D.AUDIO
VIDEO
iPod
AUX IN
Connect the audio output of the VCR, etc. to the
[AUX IN] terminals on the rear of the main unit.
SUB WOOFER PRE OUT
Connect a subwoofer (SW-40HT (separately
available), etc.) to the [SUB WOOFER PRE OUT]
terminal on the rear of the main unit.
PHONES
Connect headphones with a stereo miniplug to
the [PHONES] jack on the front of the main unit.
AUDIO OUT
VCR, etc.
Subwoofer
14
K-511USB/RD -K511USB
Stereo miniplug cord (separately
available)
Digital audio player,
etc.
English
15
Page 9

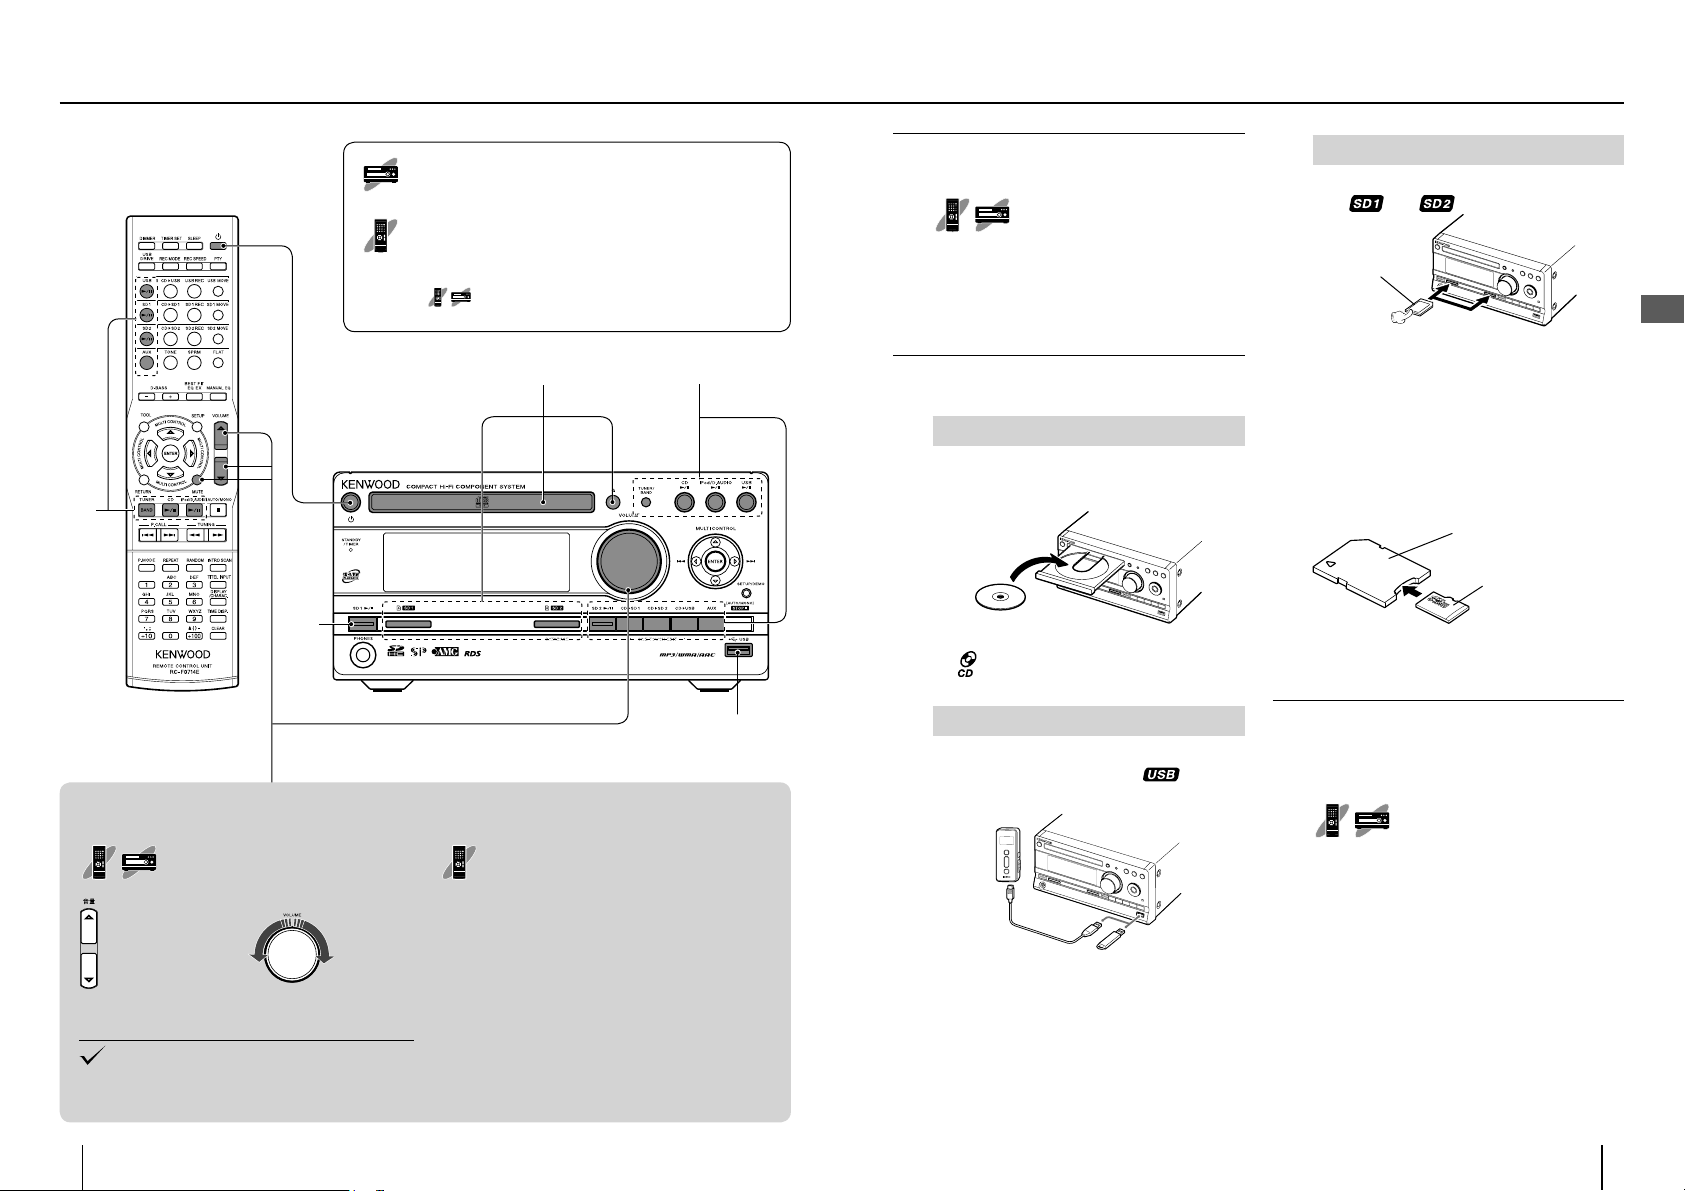
Names and functions of parts
Main unit
4765321
m
l
k
K
(page 23)
1
Press to switch the power of the system ON/OFF
(standby mode).
STANDBY/TIMER indicator
Red lighting: Ordinary standby mode
Orange lighting: Timer standby mode
CD tray (page 23)
2
VOLUME (page 22)
3
L
(page 23)
4
Press to open or close the CD tray.
TUNER (page 44)
5
Press to switch the radio band between FM/AM.
CDE (page 28)
6
Press to start/pause CD playback.
iPod/D.AUDIOE (page 40)
7
Press to start/pause iPod/D.AUDIO playback.
USBE (page 36)
8
Press to start/pause USB playback.
MULTI CONTROL
9
Press to select a track, le or radio station.
Press to fast forward or fast reverse it during
playback.
Press to select a menu item.
i
gjhfed
ENTER
Press to enter the selected item.
SETUP/DEMO
0
Press to initiate the mode for selecting the function setups.
(page 72-)
Press to switch the demonstration function ON/OFF.
F
STOP
a
Press to stop playback or recording.
When the TUNER input is selected, press to switch
the tuning mode between auto and manual.
Press during a setup to stop it in the middle.
USB terminal (page 14)
b
AUX (page 42)
c
Press to select the AUX source.
CDDUSB (page 52)
d
Press to start One-Touch Edit recording of CD into
USB.
CDDSD2 (page 52)
e
Press to start One-Touch Edit recording of CD into
SD2.
CDDSD1 (page 52)
f
Press to start One-Touch Edit recording of CD into
SD1.
c
8
9
0
a
b
SD2E (page 32)
g
Press to start/pause SD2 playback.
SD2 slot (page 23)
h
Insert an SD card. This slot is used as the AMG
database slot during CD playback.
SD card illumination
i
The illumination varies as SD playback/record/move
operation advances.
During playback/pause: Blue (Blinks during pause.)
During recording/record-pause: Red (Blinks during recordpause.)
During move: Moving red
SD1 slot (page 23)
j
Insert an SD card.
PHONES terminal (page 15)
k
SD1E (page 32)
l
Press to start/pause SD1 playback.
Display (page 18)
m
Standby mode
When the [STANDBY/TIMER] indicator is lit, a small
amount of power is supplied to the system to operate
the microcomputer. This status is referred to as the
standby mode. In this state, the system can be switched
OFF from the remote control unit.
One-touch operation function
The system incorporates the convenient one-touch
operation function. When the system is in standby
mode, pressing any of [TUNER], [CDE], [iPod/
D.AUDIOE], [USBE], [AUX], [SD1E] and
[SD2E] turns the system ON. Playback also starts if a
button related to CD, SD or USB is pressed.
Demonstration function
This system incorporates a demonstration function
(display only). In the demonstration mode, the lighting
operation indicators vary in sequence but this variation
is accompanied with no change in played audio.
■
To cancel:
Press [SETUP] on the main unit in the middle of
demonstration.
■
To start:
When the system is ON, press and hold the [SETUP]
button on the main unit for more than 2 seconds.
The demonstration is switched on automatically when a
•
power failure occurs or the power cord is unplugged or
plugged in again while the system power is ON.
Uni ed naming on the main unit and remote control unit
In the text describing operations in this manual, the following controls on the main unit and the
remote control unit are expressed as shown below.
[MULTI CONTROL]
When operation in all of the 4 directions is required: [MULTI CONTROL]
•
When only the up-down operations are required: [MULTI CONTROL
•
A/B
]
When only the left-right operations are required: [MULTI CONTROL
•
C/D
]
[STOPF]
Read before use
16
K-511USB/RD -K511USB
English
17
Page 10
Names and functions of parts
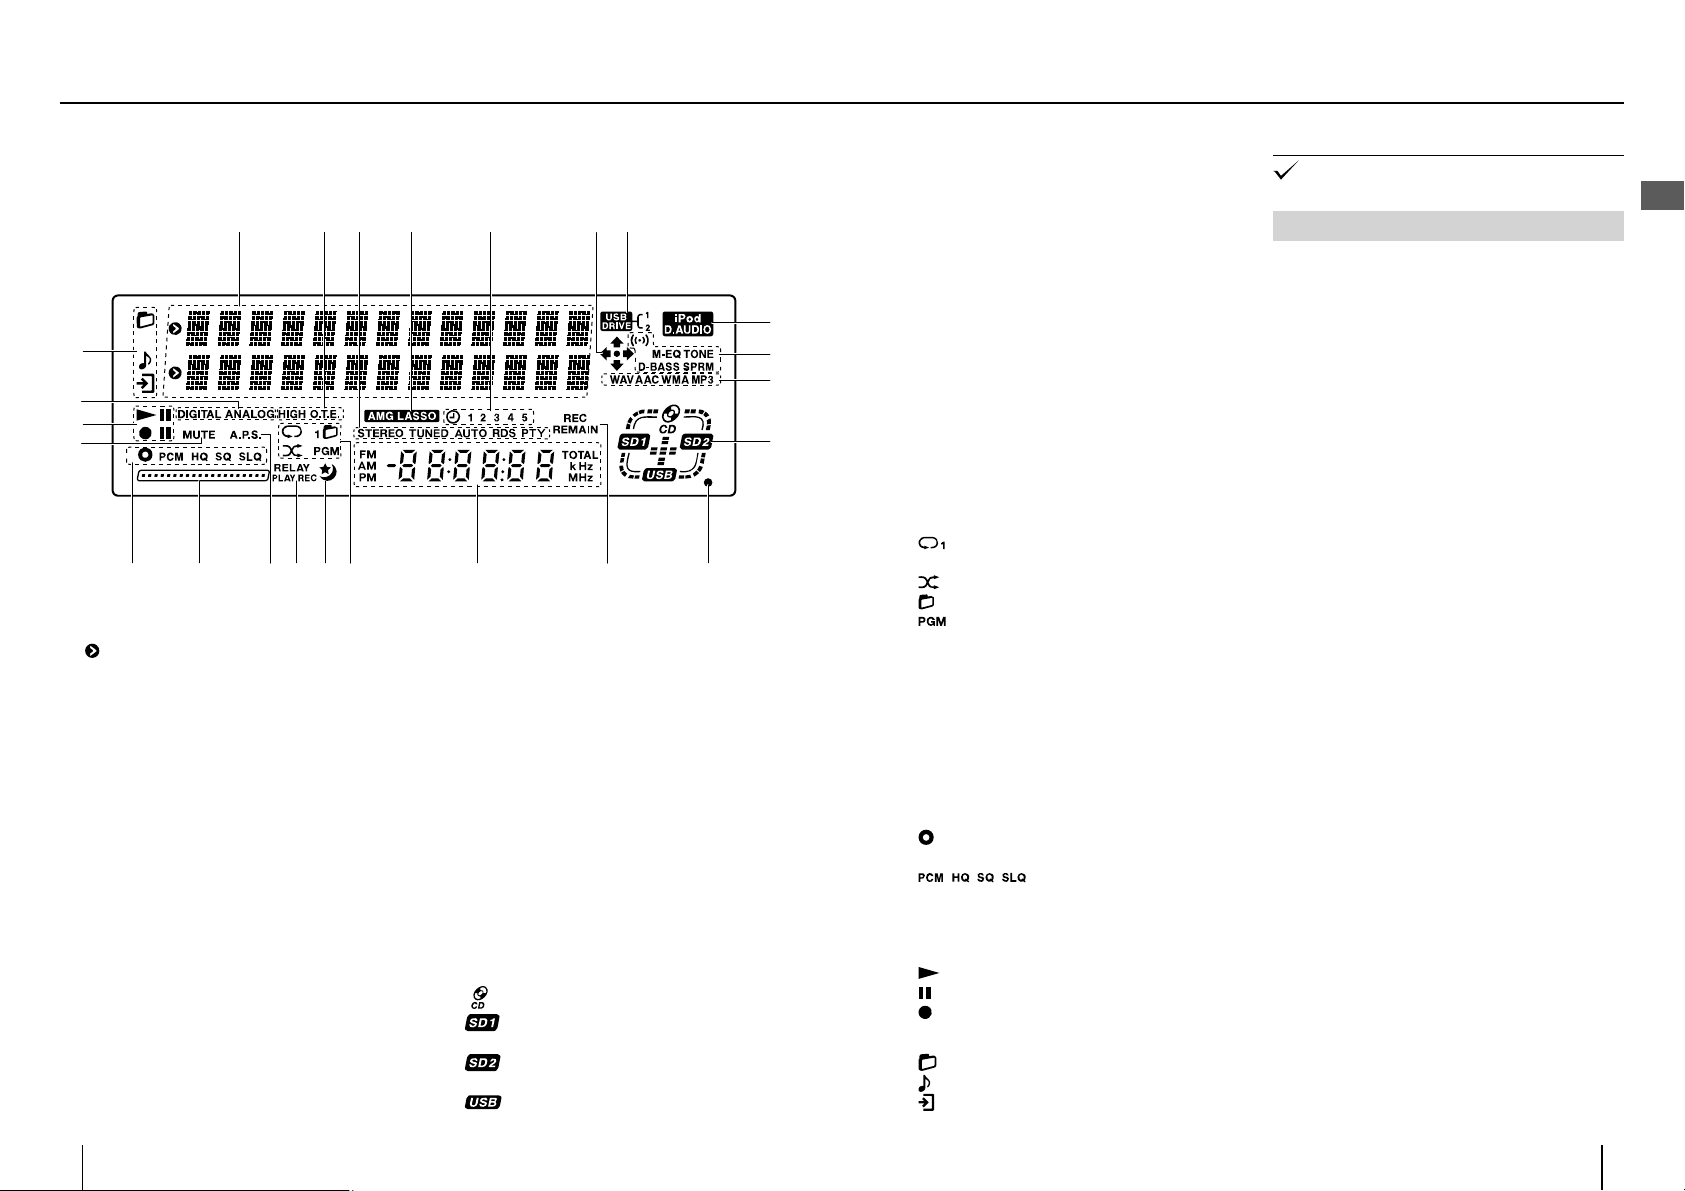
Display
1 2 3 5
n
m
l
k
j
Shows the information in alphanumeric characters.
1
indicates the information being selected.
O.T.E. (page 52)
2
Lights during One-Touch Edit recording.
HIGH (page 87)
Lights during One-Touch Edit recording at the high
speed.
STEREO (page 45)
3
Lights when stereo broadcasting is tuned.
TUNED (page 45)
Lights when a radio station is turned.
AUTO (page 45)
Lights during auto tuning. Does not light in manual
tuning mode.
RDS (page 48)
Lights when an RDS station is tuned.
PTY (page 48)
Lights when PTY is selected.
AMG LASSO (page 24)
4
Lights when an SD card in which the AMG database
is copied is inserted into the SD2 slot.
Lights when the program timer is set.
5
4
76
d cefghi
The arrows light to indicate the directions
6
controllable with [MULTI CONTROL] for music
selection, setup or editing.
Lights when the connected USB device has two
7
drives, such as the internal memory and SD card
drives, for example when kenwood MGR-A7 is
connected. The number indicates the drive being
selected on the USB device.
Lights when an iPod or kenwood digital audio player
8
is connected. (page 40)
Lights when a SOUND SETUP item is selected. (page
9
92–)
Lights to indicate the type of the audio le being
0
played.
Lights or blinks according to the connection and
a
recording status of each medium.
: Lights when a disc is inserted.
: Lights when an SD card is inserted in the SD1
slot.
: Lights when an SD card is inserted in the SD2
slot.
: Lights when a USB device is connected.
b
8
9
0
a
Lights when HR SOUND is set. (page 99)
b
REC REMAIN (page 66)
c
Lights when the remaining recording time is
displayed.
Shows the time of the day, time information or
d
frequency.
FM (page 44)
Lights in FM tuning mode.
AM (page 44)
Lights in AM tuning mode.
TOTAL (page 82)
Lights to indicate the elapse time and remaining
time of the disc during CD playback.
kHz
Shows the AM tuning frequency.
MHz
Shows the FM tuning frequency.
Lights when a playback mode is set.
e
: Repeat: Repeat play mode (1 indicates single
repeat.)
: Random play mode
: Folder play mode
: Program play mode
Lights when the sleep timer i.e. set.
f
RELAY PLAY: Lights when relay play is set. (page 35)
g
RELAY REC: Lights when relay recording is set.
(page 91)
A.P.S. (page 76)
h
Lights when Auto Power Save is set.
Shows the progress of recording.
i
Shows the SD or USB recording mode.
j
: Lights when another source is played during
recording. (page 58)
86)
MUTE (page 22)
k
Blinks when muting is activated.
: Lights during playback.
l
: Lights during pause.
: Lights during recording.
Indicates the recording signal. (page 88)
m
: Lights when a folder is selected.
n
: Lights when a le is selected.
: Lights during setup or tool editing operation.
:
Indicate the recording mode. (page
The display illustrations shown in this manual may di er
•
from actual display.
Resume function
When the source of playback is switched from CD-ROM,
SD or USB to another input source, pressing [CDE],
[SDE] or [USB
previous source from the point that has been played
before the source switching.
E
] results the playback of the
Read before use
18
K-511USB/RD -K511USB
English
19
Page 11

Names and functions of parts
Remote Control Unit
A
z
y
x
w
v
u
t
s
R
q
p
o
n
m
l
k
j
1
2
3
4
5
6
7
8
9
0
a
b
c
d
e
f
g
h
i
K
(page 23)
1
Press to switch the power of the system ON/OFF
(standby mode).
REC MODE (page 86)
2
Press to set the recording mode used in recording.
PTY (page 48)
3
Performs PTY search.
REC SPEED (page 87)
4
Press to set the speed of One-Touch Edit recording.
Press to start O.T.E. recording of a CD to SD1/SD2/
5
USB.
Press to start recording in SD1/SD2/USB.
6
Press to move a le or folder between SD1/SD2/USB.
7
SD1 MOVE :
SD2 MOVE :
USB MOVE
Press to set TONE, SPRM, FLAT, D-BASS +/−, BEST
8
FIT EQ EX and MANUAL EQ. (page 92-)
SETUP (pages 72, 84, 92)
9
Press to set up the system of this unit.
VOLUME A/B (page 22)
0
Press to adjust the listening volume.Pressing A
increases the volume and pressing B decreases the
volume.
MUTE (page 22)
a
STOP
b
TUNINGI/
c
Press to fast forward or fast reverse music.
When the tuner source is selected, press to select a
broadcasting station. (page 45)
RANDOM (pages 29, 33, 37)
d
Press to start random playback.
INTRO SCAN (page 35)
e
Press to play the rst 10 seconds of every le in SD.
TITLE INPUT (page 62)
f
Press to rename music les or folders.
Moves into SD1
Moves into SD2
: Moves into USB
F
.
.
.
J
DISPLAY/CHARAC.
g
Press to switch the information shown on the
display. (page 82)
Press during title input to switch the character
group. (page 64)
TIME DISP. (page 82)
h
Press to switch the time information on the display.
CLEAR
i
Press to clear a program or preset radio stations.
Press during title input to clear a character. (page
64)
Numeric buttons
j
Press to select music or broadcasting station.
Press during title input to input desired characters.
(page 64)
P.MODE (page 30, 34, 38)
k
Press to switch the playback mode.
REPEAT (pages 29, 33, 37)
l
Press to start repeat playback.
P.CALLG/
m
Press to skip an audio le/track.
When the tuner source is selected, press to select a
broadcasting station. (page 44)
iPod/D.AUDIOE (page 40)
n
TUNER (page 44)
o
CDE (page 28)
p
RETURN (pages 70, 72, 84, 92)
q
Press during menu selection to return to the
previous operation.
MULTI CONTROL A/B/C/
r
Press to select music or music le.
Press to select an item.
ENTER
Press to enter the selected item.
TOOL (page 70)
s
Press to start editing operations.
AUX (page 42)
t
SD2E (page 32)
u
SD1E (page 32)
v
H
D
USBE (page 36)
w
USB DRIVE (page 37)
x
When the connected USB device has two drives,
such as the internal memory and SD card drives,
for example when kenwood MGR-A7 is connected,
press to select the drive to be used.
DIMMER (page 75)
y
Press to adjust the display brightness.
TIMER SET (page 78)
z
Press to reserve recording of radio broadcasting or
playback of music at the speci ed time of the day
on the speci ed day(s) of the week.
SLEEP (page 74)
A
Press to set the sleep timer.
The buttons having the same names as the buttons on
•
the main unit function in the same way as the main unit
buttons with the same times.
Read before use
20
K-511USB/RD -K511USB
English
21
Page 12
Basic Operation
3
Adjusting the volume
Adjust using [VOLUME]
Increasing the
volume level
Decreasing the
volume level
Adjust in the range from 0 to 40 (max.).
Turning the knob quickly (on the main unit) or
•
holding a button depressed (on the remote control
unit) accelerates the volume variation speed.
Decreasing the
volume level
This symbol indicates an operation on the main unit. When
it is marked, perform the operation by pressing the required
button(s) on the main unit.
This symbol indicates an operation on the remote control
unit. When it is marked, perform the operation by pressing the
required button(s) on the remote control unit.
When both are marked for an operation, it can be controlled either
on the main unit or the remote control unit.
123
3
Muting the audio temporarily
Press [MUTE].
"MUTE" blinks on the display.
Increasing the
volume level
■
To cancel muting
Press [MUTE] again (this resumes the original
volume) or adjust the volume.
2
Turn the system ON (OFF).
1
Press [K].
Pressing the play/pause button of the desired audio
•
input source also turns the system ON. (page 17,
"One-touch operation function")
Pressing [K] while the system is ON switches it OFF
•
(standby mode).
Set the source to be played.
2
How to load a CD
Press [L] on the main unit to open the tray.
1
Place a disc with the label side facing up.
2
Press [L] on the main unit to close the tray.
3
" is displayed.
"
How to connect a USB device
Hold the device in the correct orientation and
insert the connector all the way. " " is
displayed.
■
To disconnect the USB device:
After stopping, set the system to the standby
mode and pull out the USB device.
How to load an SD card
Insert the card completely into the SD1 or SD2
slot. "
Be careful of
orientation.
Insert the SD card so that the label side faces up and
•
the side with a cut comes on the right.
■
To remove the SD card:
After stopping, set the system to the standby
mode and push the SD card. When it pops out,
grasp it and pull out.
■
To use a mini SD or micro SD card:
Attach the card to a special adapter (commercially
•
available) and insert it. The adapter is inserted in the
same orientation as the SD card.
"
or
" "
is displayed.
microSD card
adapter
microSD card
Start playback.
3
Press the play/pause button of the desired audio
source.
[CDE], [USBE],
[SD1E], [SD2E], [TUNER],
[iPod/D.AUDIO], [AUX]
■
Note on audio source switching
Since this system is compatible with various audio
sources (CD, SD card, USB device, etc.), the input
selection is not switched by simply setting the
audio source in the system.
In this manual, the operation of switching the input
selector is expressed as "audio source switching".
Whenever this instruction is given, press the play button
for the desired audio source. The switching operation
should sometimes be started from stop mode.
Playing music tracks
22
K-511USB/RD -K511USB
English
23
Page 13
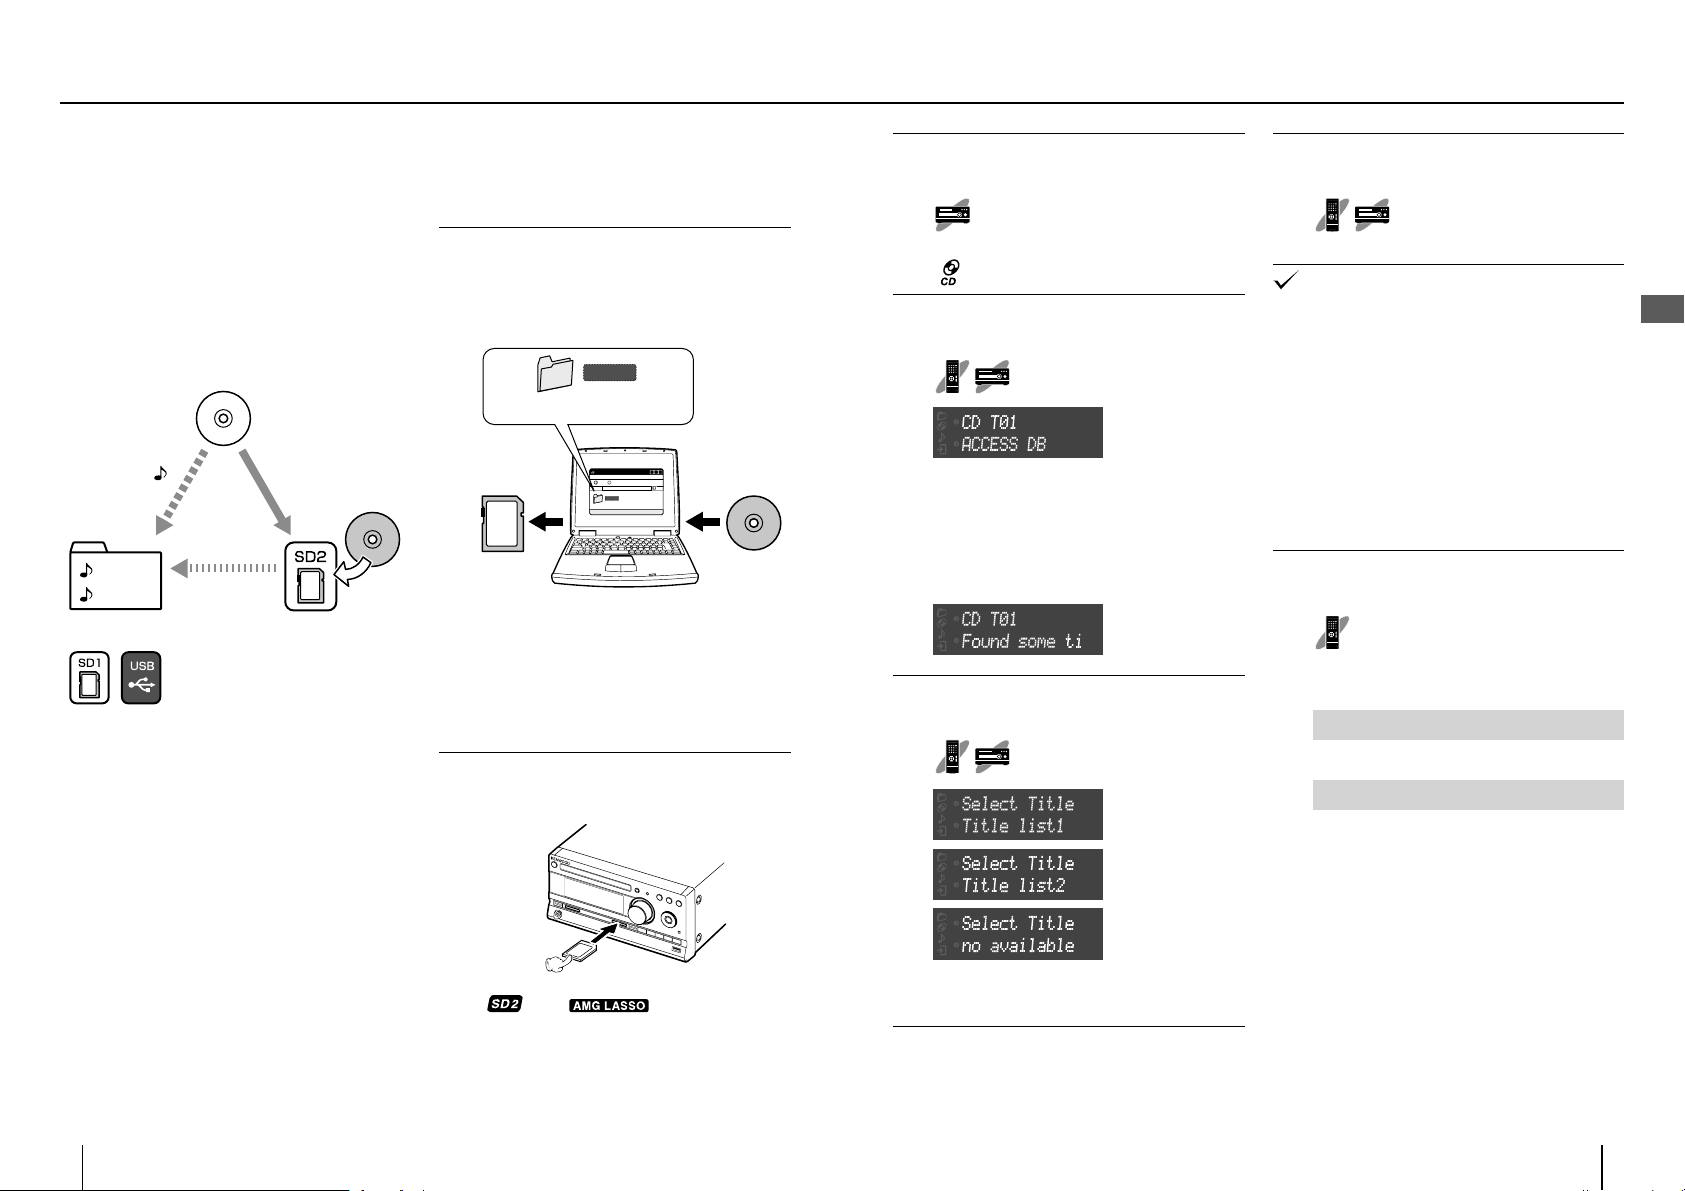
Acquiring the CD title information
AMG database
When a CD is played, the AMG Database can be used
to search the title information of the CD based on its
TOC (Table Of Contents) information and to acquire
information including the album name, track names and
artist name.
When the CD is recorded into SD or USB, the title
information is added to the recorded les so that it is not
necessary to input the information written on the album
manually.
CD
Music
XXXXX
XXXXX
Auto acquisition of
album information
•
Even when the played CD is a CD-TEXT disc (a CD
containing recording of character information on the
titles and artist), the information acquired from the AMG
database is displayed in priority.
The AMG database is updated periodically. The updating
•
allows the users to acquire the title information of even
latest albums.
AMG database
and matching
TOC data
AMG database
CD
How to use the AMG database
The title information can be acquired automatically
when the CD source is selected and a CD is loaded.
Copy the provided AMG Database
1
CD into an SD card.
Copy using a PC.
(The copy takes about 10 minutes.)
AMG
Copy the entire folder.
AMG
ファイル(F) 編集(E) 表示 (V)
AMG
SD card AMG database
Your PC
For how to copy the data, refer to the manuals
provided with your PC.
•
For accommodating the database, it is recommended
to use an SD or SDHC card with a capacity of 2 GB or
more (transfer rate Class 4 or higher).
Insert the SD card containing the
copy in the SD2 slot.
2
CD
Load a CD.
3
Press [L] to open the tray and place
a CD.
" " is displayed.
Start playback.
4
Press [CDE].
When the CD starts to be played, the AMG
database in the SD card is searched using the
TOC information of the CD and, if the applicable
information is found, it is shown on the display. If
the AMG database contains more than one items
of applicable information, you can select one of
them and use it with the system.
Select the candidate information.
5
Press [MULTI CONTROL A/B].
Enter the selected candidate.
6
Press [ENTER].
With certain CDs, the title information of a CD having
•
similar TOC information may be acquired.
Do not attempt to record anything in the SD card
•
containing a copy of the AMG database. Otherwise, the
AMG database search will take a longer period.
The non-displayable character is displayed as "*".
•
When there is only one candidate, the candidate is
•
selected and entered automatically.
Switching the displayed
information
The acquired title information is displayed.
Switch the displayed information.
1
Press [DISPLAY/CHARAC.].
Each press switches the displayed information in
the following sequence.
Stop mode
Disc title R Artist R Genre R Day of week/time
Play mode
Disc title R Track title
Artist R Genre R Day of week/time
R
Playing music tracks
24
K-511USB/RD -K511USB
" " and " " are displayed.
Always insert the SD card containing a copy of the
•
AMG database in the SD2 slot.
If "no available" is selected, the information of the
AMG database will not be displayed.
English
25
Page 14
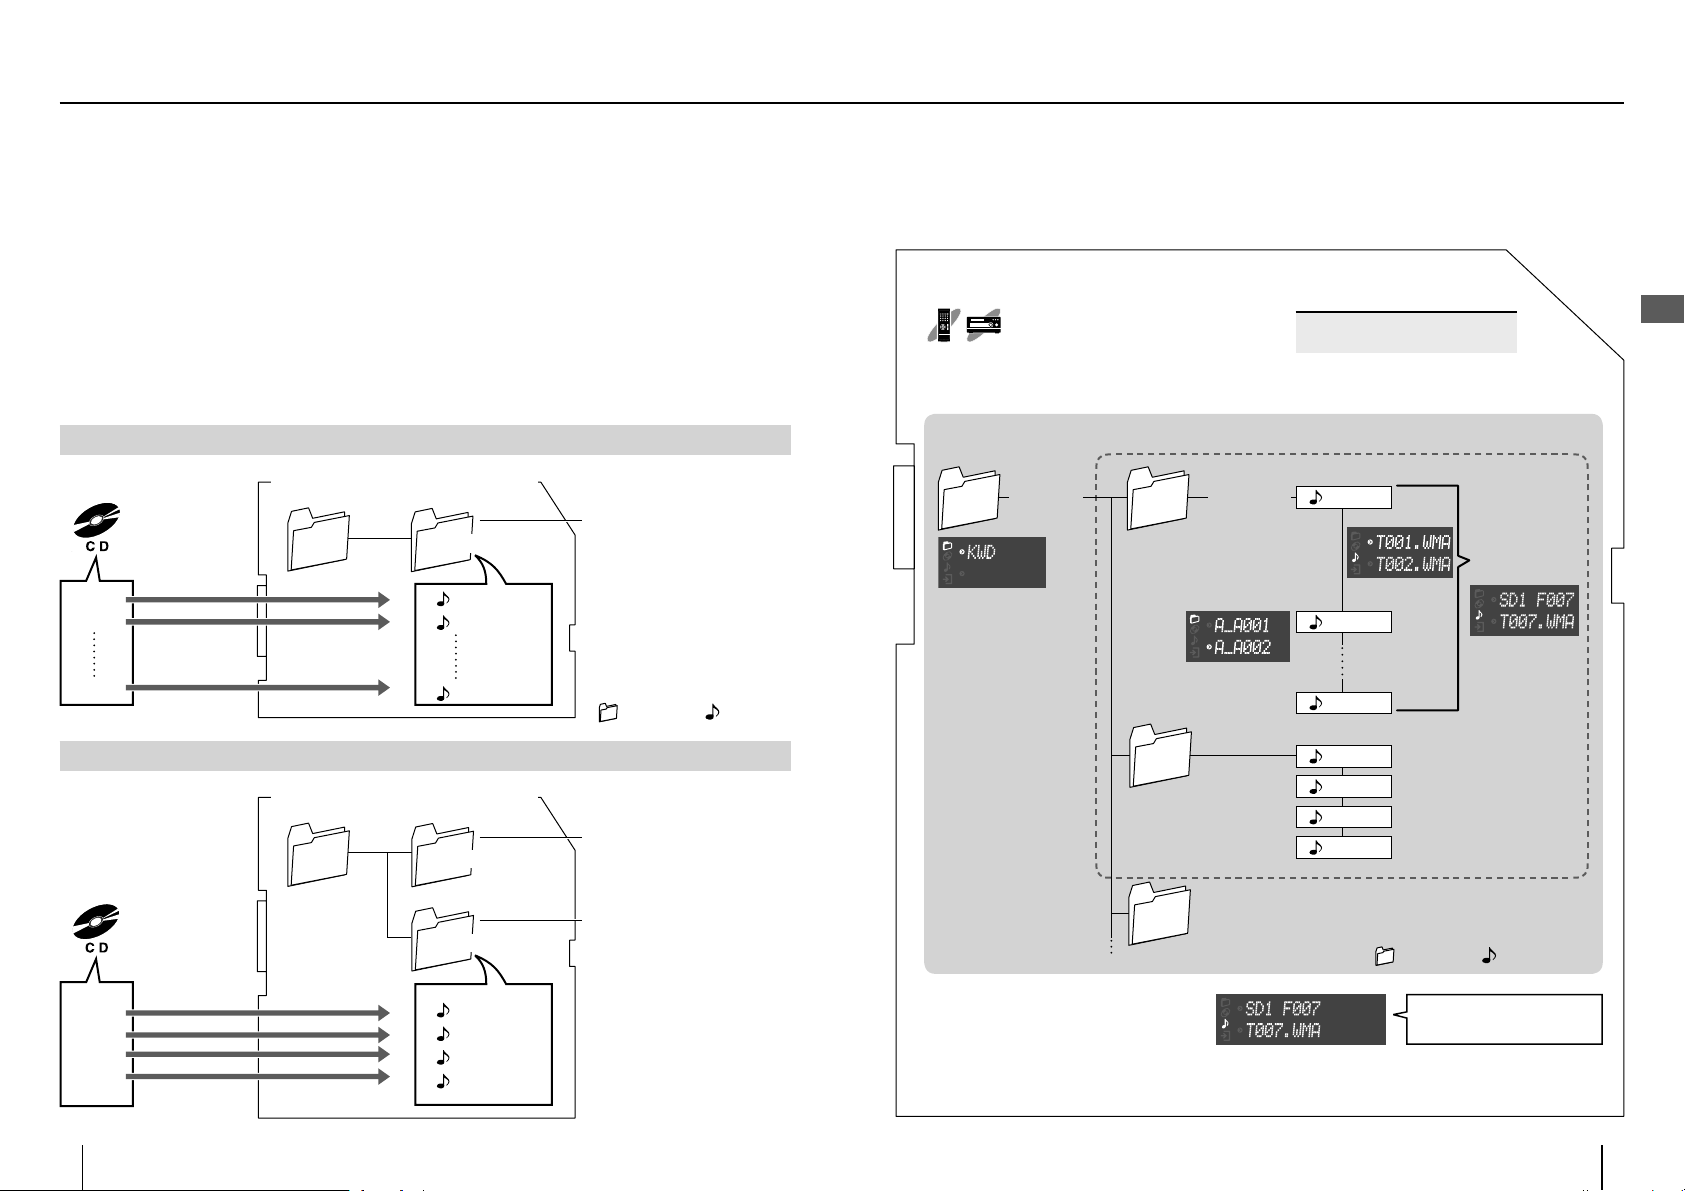
Folders and music les
With this system, the music recorded in the CD-ROM, SD card, USB device or digital audio player is referred to as
"audio le(s)" or " le(s)".
When an SD card or USB card is recorded using this system:
The les recorded into an SD card or USB device using this system are grouped in folders, and management numbers
are automatically given to the created folders and les.
Management number given automatically to a folder: A_A001…A_A999…A_Z999
•
Management number given automatically to a le: T001.WMA, T002.WMA……
•
•
When a folder is recorded after the title information has been acquired from the AMG database, the album name is attached automatically
after the management number of the le, and the lename is attached automatically after the management number of each le.
This system uses the WMA and WAV formats for recording audio into the SD card and USB device.
When a CD is recorded:
Inside of the SD card or USB device
AL_A001 folder is automatically
created.
*
When an SD card or USB device is
recorded for the rst time using this
system, the KWD folder is created
automatically. The folders and les
recorded hereafter are managed in
the KWD folder.
: Folder
AL_A001 folder created in
previous recording.
: File
Track 1
Track 2
Track 11
KWD
*
A_A001_albumname
T001_title.WMA
T002_title.WMA
T011_title.WMA
When the desired tracks of another CD are recorded after the above:
Inside of the SD card or USB device
KWD
A_A001_albumname
How to select a folder and/or le
The folder and le can be selected as follows.
Use [MULTI CONTROL] for selection, then
press [ENTER] to enter the selection.
KWD
Move using
[MULTI
CONTROL
C/D
].
A_A001
Move using
[MULTI
CONTROL
A/B
A_A002
Move using [MULTI
CONTROL A/B] .
Move using
CONTROL
Move using [MULTI
].
Move using
COTROL C/D].
Numbers of folders and les that can
be accommodated in the KWD folder
To check the numbers of available folders
and les, see "Checking the remaining
SD/USB recording time". (page 68)
[MULTI
C/D
].
COTROL A/B].
[MULTI
Folder .........................200
File ............................ 1000
T001.WMA
T002.WMA
T011.WMA
T001.WMA
T002.WMA
T003.WMA
T004.WMA
Move using [MULTI CONTROL
A/B
*
Select the le
and press [ENTER]
to start playback.
] .
Playing music tracks
26
Track 3
Track 5
Track 8
Track 9
K-511USB/RD -K511USB
A_A002_albumname
T001_title.WMA
T002_title.WMA
T003_title.WMA
T004_title.WMA
AL_A002 folder is newly created.
A_A003
*
FXXX indicates the order of each le. The
folders and les are numbered automatically
according to the positions in their orders.
Pressing the numeric buttons of the remote
control unit makes it possible to start
playback from the selected le. (pages 33, 37)
: Folder
Examples) F007: [7]
F102: [+100], [2]
: File
English
27
Page 15
Playing a CD or audio le disc
ENTER
E
CD
G/H
P. M O DE
Numeric
MULTI CONTROL
F
STOP
I/J
REPEAT
RANDOM
DISPLAY/
CHARAC.
TIME DISP.
CLEAR
A CD or a CD-ROM/CD-R/CD-RW containing audio
les (WMA/MP3/AAC) can be played as described
below.
For the playable les, see "Playable audio les". (page 102)
•
Playback
Load a CD.
1
Press [L] to open the tray and place
a CD.
" " is displayed.
Start playback.
2
Press [CDE].
When a CD is played:
The CD is played from the rst track.
When a disc containing audio les is played, the
folders and les are searched and playback is
started with the le with the smallest le number.
•
For the sequence of playback in case multiple folders
and/or les are present, see page 103.
■
To acquire the CD title information automatically:
Insert the SD card containing a copy of the AMG
database in the SD2 slow. See page 24 for details.
With a CD-TEXT compatible disc, character information
•
including the track title and album title is displayed.
When the AMG database is used, the information
•
acquired from it is given the priority.
•
The audio is interrupted if [REC INPUT] is switched
during playback. (page 88)
Button operations during playback/stop
To Operation
Switch the display
information
Switch the time
display information
Stop
Pause
Select a track
Selecting a folder
(
audio le disc
Fast forward/fast
reverse
Skip a track
Return to previous
track
Return to the
beginning of current
track
Start random
playback
(Playing music in a
random order)
Start repeat
playback
(Playing music
repeatedly)
)
Press [DISPLAY/CHARAC.] during playback or stop.
Each press switches the displayed information.
Press [TIME DISP.].
Each press switches the displayed information. (page 82)
Press [STOPF] during playback.
Press [CDE] during playback.
Press again to resume playback.
Press the numeric button(s).
File number selection methods : 7th file R Press [7].
12th file
Press [MULTI CONTROL A/B].
Press [I]/[J] during playback.
Press and hold [MULTI CONTROL C/D] during playback.
Press [CDH].
Press [MULTI CONTROL D].
Press [G] successively twice or more.
Press [MULTI CONTROL C] successively twice or more.
Press [G] once.
Press [MULTI CONTROL C1] once.
Press [RANDOM].
Each press switches the
selection.
When [REPEAT] is pressed in the middle of random playback, random playback in a
•
di erent order of audio les will start after the current random playback has completed.
It is not possible to skip to already played music during random playback.
•
Random
playback ON
Press [REPEAT].
Each press switches the
selection.
Repeat playback
of single music
le/track.
(page 82)
Press [+10], then [2].
R
lit Not lit
Random
playback OFF
lit lit Not lit
Repeat playback
of all music les/
tracks.
Repeat playback
canceled.
Playing music tracks
28
K-511USB/RD -K511USB
English
29
Page 16
Playing a CD or audio le disc
Folder play mode
Audio le disc only
The system can be set to a mode for playback per
folder. In this mode, the system plays only the
selected folder and stops after all of its les have
been played.
Select the CD source and enter stop mode.
•
Select "N" (folder play mode).
1
Press [P.MODE].
Each press switches the selection.
N
PGM
Not lit
lit
ON
Folder play mode
Program play mode
Normal play mode
Select the folder to be played.
2
Press [MULTI CONTROL A/B].
Start playback.
3
Press [CDE].
■
To cancel the folder play mode:
Stop playback and press [P.MODE] to select the
normal play mode.
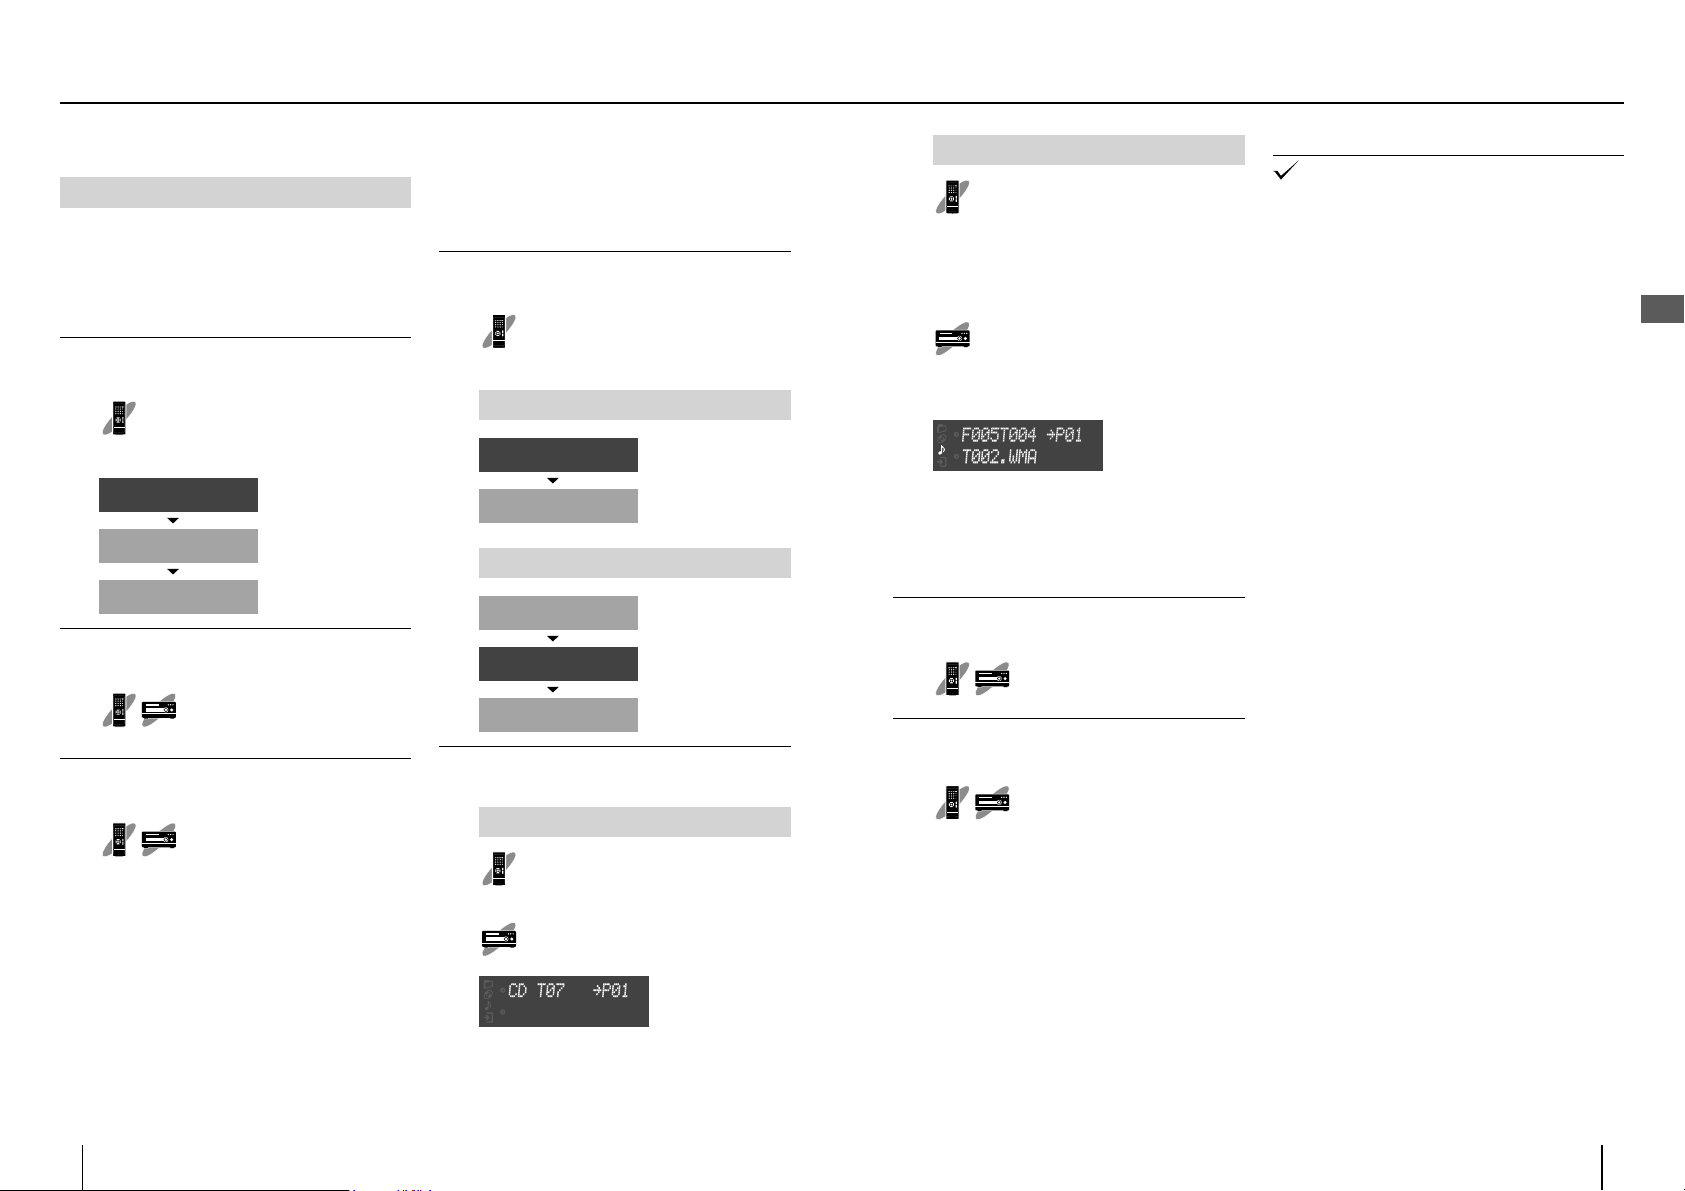
Program playback
Music in a CD or audio le disc can be played in the
order programmed by the user.
Select the CD source and enter stop mode.
•
Select "PGM" (program play mode).
1
Press [P.MODE].
Each press switches the selection.
CD operation
lit
PGM
Not lit
Audio le disc operation
lit
N
lit
PGM
Not lit
Program play mode
Normal play mode
Folder play mode
Program play mode
Normal play mode
Select a le.
2
CD operation
Press [MULTI CONTROL A/B] or
the numeric button(s) to select, then
press [ENTER].
Use [MULTI CONTROL] to select, then
press [ENTER].
When the 7th le is
selected as the rst le
of the program:
Audio le disc operation
Press [MULTI CONTROL] or the
numeric button(s) to select the
folder, then press [ENTER].
Press [MULTI CONTROL] or the
numeric button(s) to select the le,
then press [ENTER].
Use [MULTI CONTROL] to select, then
press [ENTER].
Use [MULTI CONTROL] to select, then
press [ENTER].
When the 4th le in
folder "005" (T002.WMA)
is selected as the rst
track of the program:
If you committed a mistake in selection, press
[CLEAR] on the remote control unit before
pressing [ENTER] and restart selection.
Up to 32 les can be programmed.
•
End the programming.
3
Press [STOPF].
Start playback.
4
Press [CDE].
■
To clear a music le from the program
Stop playback and press [CLEAR] on the remote
control unit. Each press clears the currently last
track in the program.
■
To add a track in the program
If playback is underway, stop it and perform steps
2 and after.
■
To cancel program playback
Stop playback and press [P.MODE] to select the normal
play mode. The program is cleared at this time.
Turning the system OFF or taking out a CD with program
•
playback set erases the set program.
Playing music tracks
30
K-511USB/RD -K511USB
English
31
Page 17

Playing an SD card
E
SD1
E
SD2
ENTER
G/H
P. M O DE
Numeric
MULTI CONTROL
F
STOP
I/J
REPEAT
RANDOM
INTRO SCAN
DISPLAY/
CHARAC.
TIME DISP.
CLEAR
The audio les in an SD card can be played as
described below.
The SD1 and SD2 slots can be used exactly in the
same way.
For the playable les, see "Playable audio les". (page 102)
•
Playback
Insert the SD card.
1
Insert the SD card in the SD1 or SD2 slot of the
main unit.
" or " " is displayed.
"
Start playback.
2
Press [SD1E] or
[SD2E].
The folders and les are searched and playback is
started with the le with the smallest le number.
For the sequence of playback in case multiple folders
•
and/or les are present, see page 103.
■
To remove the SD card:
After stopping, set the system to the standby
mode and push the SD card. When it pops out,
grasp it and pull out.
Playback does not start if there is no playable le in the
•
card.
Button operations during playback/stop
To Operation
Switch the display
information
Switch the time
display information
Stop
Pause
Select a track
Select a folder and/
or le
Fast forward/fast
reverse
Skip a le/track
Return to previous
le/track
Return to the
beginning of current
le/track
Start random
playback
(Playing music in a
random order)
Start repeat
playback
(Playing music
repeatedly)
Press [DISPLAY/CHARAC.] during playback or stop.
Each press switches the displayed information. (page 82)
Press [TIME DISP.].
Each press switches the displayed information. (page 82)
Press [STOPF] during playback.
Press [SD1E] or [SD2E] during playback.
Press again to resume playback.
Press the numeric button(s).
File number selection methods: 7th file R Press [7].
12th file
Press [MULTI CONTROL].
Press [I]/[J] during playback.
Press and hold [MULTI CONTROL C/D] during playback.
Press [H].
Press [G] successively twice or more.
Press [G] once.
Press [RANDOM].
Each press switches the
selection.
When [REPEAT] is pressed in the middle of random playback, random playback
•
in a di erent order of audio les will start after the current random playback has
completed.
It is not possible to skip to already played le/track during random playback.
•
Random
playback ON
Press [REPEAT].
Each press switches the
selection.
Repeat playback
of single music
le/track.
Press [+10], then [2].
R
lit Not lit
Random
playback OFF
lit lit Not lit
Repeat playback
of all music les/
tracks.
Repeat playback
canceled.
Playing music tracks
32
K-511USB/RD -K511USB
English
33
Page 18
Playing an SD card
Folder play mode
The system can be set to a mode for playback
per folder.In this mode, the system plays only the
selected folder and stops after all of its les have
been played.
SD1 and SD2 can be set separately.
Select the SD source and enter stop mode.
•
Select "N" (folder play mode).
1
Press [P.MODE].
Each press switches the selection.
lit
N
lit
PGM
RELAY PLAY
Not lit
Folder play mode
Program play mode
Relay play mode
ON
Normal play mode
Select the folder to be played.
2
Press [MULTI CONTROL].
For how to select it, see "Folders and les" on page
•
26.
Start playback.
3
Press [SD1E] or
[SD2E].
■
To cancel the folder play mode:
Stop playback and press [P.MODE] to select the
normal play mode.
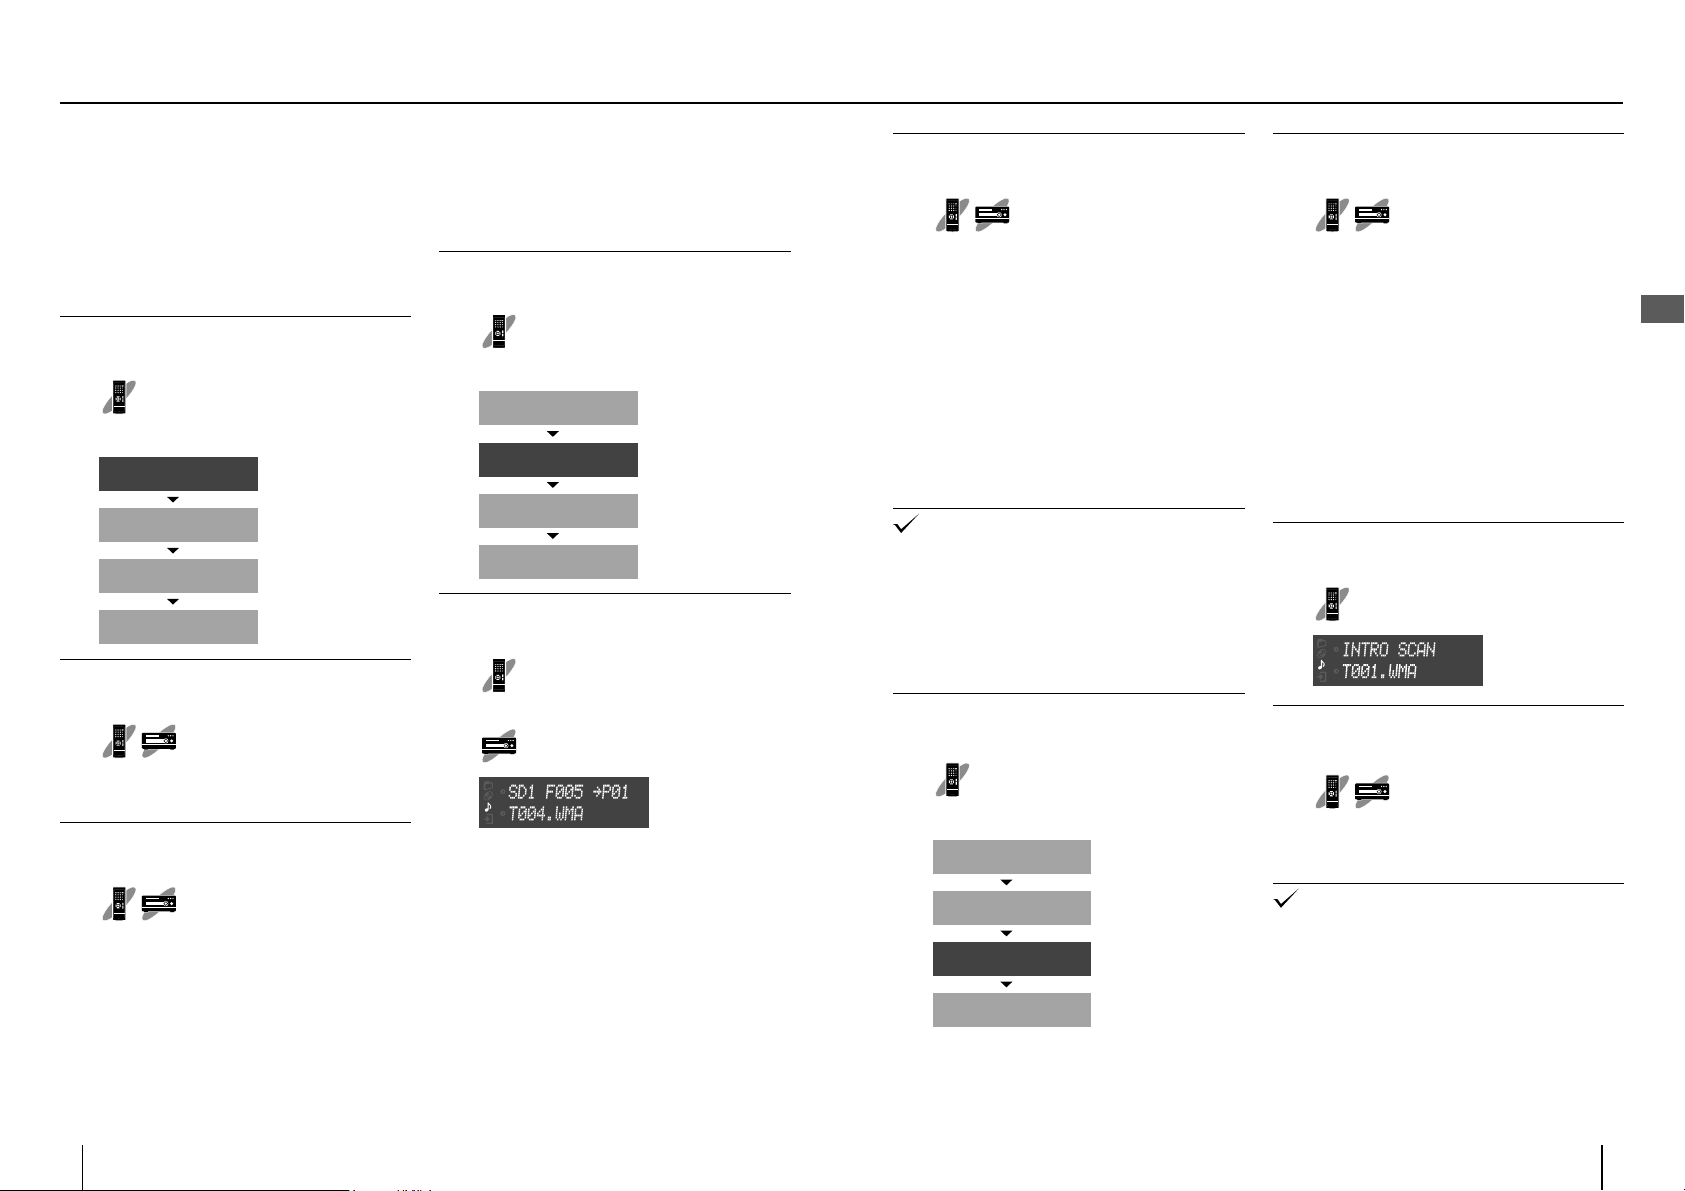
Program playback
Audio les can be played in the order programmed
by the user.
Select the SD source and enter stop mode.
•
Select "PGM" (program play mode).
1
Press [P.MODE].
Each press switches the selection.
lit
N
lit
PGM
RELAY PLAY
Not lit
Folder play mode
Program play mode
Relay play mode
lit
Normal play mode
Select a le.
2
Press [MULTI CONTROL] or the
numeric button(s) to select the le,
then press [ENTER].
Use [MULTI CONTROL] to select, then
press [ENTER].
When the 5th le "T004.
WMA" is selected as the
rst track of the program:
If you committed a mistake in selection, press
[CLEAR] on the remote control unit before
pressing [ENTER] and restart selection.
Up to 32 les can be programmed.
•
For how to select it, see "Folders and les" on page
•
26.
Start playback.
3
Press [SD1E] or
[SD2E].
■
To clear a music le from the program
Stop playback and press [CLEAR]. Each press
clears the currently last track in the program.
■
To add an audio le in the program:
If playback is underway, stop it and perform steps
2 and after.
■
To cancel program playback:
Stop playback and press [P.MODE] to select the
normal play mode. The program is cleared at this
time.
The program is cleared when the system is turned OFF
•
or the SD card used in programming is disconnected.
Relay playback of two SD cards
Two SD cards can be played successively in order
from SD1 to SD2 or from SD2 to SD1.
Select the SD source and enter stop mode.
•
Select "RELAY PLAY" (relay play
1
mode).
Press [P.MODE].
Each press switches the selection.
ON
N
ON
PGM
RELAY PLAY
Not lit
Folder play mode
Program play mode
Relay play mode
ON
Normal play mode
Start playback.
2
Press [SD1E] or
[SD2E].
■
To cancel relay playback:
Stop playback and press [P.MODE] to select the
normal play mode.
Intro Scan playback
Intro Scan plays the rst 10 seconds of every audio
le. This makes it possible to select the desired
audio le from the introduction part and play the
entire le in normal playback.
Select the SD source and enter stop mode.
•
Select the Intro Scan play mode.
1
Press [INTRO SCAN].
When the introduction of the
2
desired le is played, select it.
Press [ENTER].
Intro Scan playback completes and normal
playback starts.
•
Editing operations such as le deletion, renaming and
moving are possible even in the middle of Intro Scan
playback.
Intro Scan can also be started from the Tool menu. (page
•
70)
Playing music tracks
34
K-511USB/RD -K511USB
English
35
Page 19

Playing a USB device
USB DRIVE
E
USB
ENTER
G/H
P. M O DE
Numeric
MULTI CONTROL
F
STOP
I/J
REPEAT
RANDOM
DISPLAY/
CHARAC.
TIME DISP.
CLEAR
A USB device such as a USB ash memory or a
digital audio player with USB mass storage class
compatibility can be connected to play audio les
in it.
For the playable les, see "Playable audio les". (page 102)
•
Playback
Connect the USB device.
1
Connect the USB device to the [ USB] terminal
of the main unit.
" is displayed.
"
Also read the instruction manual for the connected
•
USB device.
Start playback.
2
Press [USBE].
The folders and les are searched and playback is
started with the le with the smallest le number.
For the sequence of playback in case multiple folders
•
and/or les are present, see page 103.
Button operations during playback/stop
To Operation
Switch the display
information
Switch the time
display information
Switch to another
drive
Stop
Pause
Select a track
Select a folder and/
or le
Fast forward/fast
reverse
Skip a le/track
Press [DISPLAY/CHARAC.] during playback or stop.
Each press switches the displayed information. (page 82)
Press [TIME DISP.].
Each press switches the displayed information. (page 82)
Press [USB DRIVE].
When the connected USB device has two drives,
such as the internal memory and SD card
drives, for example when kenwood MGR-A7 is
connected, press to select the drive to be used.
Press [STOPF] during playback.
Press [USBE] during playback.
Press again to resume playback.
Press the numeric button(s).
File number selection methods: 7th file R Press [7].
12th file
Press [MULTI CONTROL].
Press [I]/[J] during playback.
Press and hold [MULTI CONTROL C/D] during playback.
Press [CDH].
Display "1" and "2" are switched
over.
R
Press [+10], then [2].
Playing music tracks
36
K-511USB/RD -K511USB
Playback does not start if there is no playable le in the
•
card.
•
When a digital HDD audio player is connected, the
characteristics of the HDD system may cause the sound
to be interrupted when playback is resumed after pause.
Return to previous
le/track
Return to the
beginning of current
le/track
Start random
playback
(Playing music in a
random order)
Start repeat
playback
(Playing music
repeatedly)
Press [G] successively twice or more.
Press [G] once.
Press [RANDOM].
Each press switches the
selection.
When [REPEAT] is pressed in the middle of random playback, random playback in a
•
di erent order of audio les will start after the current random playback has completed.
It is not possible to skip to already played le/track during random playback.
•
Press [REPEAT].
Each press switches the
selection.
lit Not lit
Random
playback ON
Random
playback OFF
lit lit Not lit
Repeat playback
of single music
le/track.
Repeat playback
of all music les/
tracks.
Repeat playback
canceled.
English
37
Page 20

Playing a USB device
Folder play mode
The system can be set to a mode for playback per
folder. In this mode, the system plays only the
selected folder and stops after all of its les have
been played.
Select the USB source and enter stop mode.
•
Select "N" (folder play mode).
1
Press [P.MODE].
Each press switches the selection.
N
PGM
Not lit
lit
lit
Folder play mode
Program play mode
Normal play mode
Select the folder to be played.
2
Press [MULTI CONTROL].
For how to select it, see "Folders and les" on page
•
26.
Start playback.
3
Press [USBE].
Program playback
Audio les can be played in the order programmed
by the user.
Select the USB source and enter stop mode.
•
Select "PGM" (program play mode).
1
Press [P.MODE].
Each press switches the selection.
N
PGM
Not lit
lit
lit
Folder play mode
Program play mode
Normal play mode
Select a le.
2
Press [MULTI CONTROL] or the
numeric button(s) to select the le,
then press [ENTER].
Use [MULTI CONTROL] to select, then
press [ENTER].
When the 4th le in
folder "005" is selected
as the rst track of the
program:
If you committed a mistake in selection, press
[CLEAR] on the remote control unit before
pressing [ENTER] and restart selection.
Start playback.
3
Press [USBE].
■
To clear a music le from the program:
Stop playback and press [CLEAR]. Each press
clears the currently last track in the program.
■
To add an audio le in the program:
Stop playback and perform the operation in steps
2 and 3.
■
To cancel program playback:
Stop playback and press [P.MODE] to select the
normal play mode. The program is cleared at this
time.
The program is cleared when the system is turned OFF
•
or the USB device used in programming is disconnected.
Playing music tracks
38
■
To cancel the folder play mode:
Stop playback and press [P.MODE] to select the
normal play mode.
K-511USB/RD -K511USB
Up to 32 les can be programmed.
•
For how to select it, see "Folders and les" on page
•
26.
English
39
Page 21

Playing iPod/D.AUDIO
ENTER
iPod/
D.AUD IO
G/H
MULTI CONTROL
F
STOP
I/J
DISPLAY/
CHARAC.
An iPod or kenwood digital audio player can be
connected to play audio les in it.
For the iPod and kenwood digital audio players that can
•
be connected to this system, see "Handling iPod" and
"Handling D.AUDIO". (pages 104, 105)
Playback
Connect the player.
1
Connect an iPod or kenwood digital audio player to
the [iPod/D.AUDIO IN] terminal on the rear of the main
unit using a commercially available connection cable.
kenwood
digital audio player
PNC-150 (separately
available)
COMPONENT VIDEO
Y Cb Cr
DC IN
PAD-iP7 (separately
available)
Also read the instruction manual for the connected
•
component.
AUDIO/
D.AUDIO
VIDEO
iPod
Select the audio source.
2
Press [iPod/D.AUDIOE].
Turn the connected player ON and
start playing it.
3
"
" is displayed.
While the player is connected to this system, the volume and
•
tone settings on the player are defeated (* except when an iPod is
connected through PAD-iPod). If the audio level of the connected
iPod/D.AUDIO player is lower or higher than the level at the same
volume control position of other audio sources, adjust the input
level of this system. For how to adjust the input level, see page 69.
Switching the mode
The playback with the iPod/D.AUDIO connection
can be switched between the following two modes.
iPod/D.AUDIO: Use this mode when the connected player
•
outputs audio only.
iPod/D.AUDIO (BYPASS MODE): Use this mode when the
•
connected player outputs both video and audio. In this
mode, the audio signal is output without passing through
the DSP (Digital Signal Processor) so that it will not be
delayed with respect to the played video. Note that
recording in SD/USB is not possible in BYPASS MODE.
Switching the mode
1
Press [ENTER].
Each press switches the mode.
Select BYPASS MODE.
Operation in BYPASS MODE
The system cannot set the audio settings other than
•
the TONE setting.
The record button of the system is defeated.
•
The mode setting is held even after the audio source
•
is switched or the system is turned OFF.
■
Dedicated cable/device for connection
When the separately available PNC-150 (special cable
for kenwood digital audio player connection) or PADiP7 (special cable for iPod connection) is used to
connect the player, the player can be controlled from
the main unit and remote control unit.
For details on the connection and installation, refer to
the manual provided with the PNC-150 or PAD-iP7.
Button operations during
playback/stop
To Operation
Stop
Pause
Skip a folder
Fast forward/
fast reverse
Skip a le
Return to
previous le
Return to the
beginning of
current le/
track
Some control operations may be unavailable depending
•
on the connected player.
Press [STOPF]
during playback.
Press [iPod/
D.AUDIOE]
during playback.
Press again to
resume playback.
Press [MULTI
CONTROL
Press and hold
[G]/[H]
during playback.
Press and hold
[MULTI CONTROL C/
D] during playback.
Press [CDH].
Press [MULTI
CONTROL D].
Press [G]
successively twice
or more.
Press [MULTI
CONTROL C]
successively twice
or more.
Press [G] once.
Press [MULTI
CONTROL C] once.
A/B
Playing music tracks
].
40
K-511USB/RD -K511USB
English
41
Page 22

Playback with the AUX Connection
AUX
ENTER
DISPLAY/
CHARAC.
An external component can be connected to the
system for playback as the AUX audio source.
Playback
Connect an external component.
1
Connect the [AUX IN] terminals on the rear of
the system to the audio outputs of the external
component.
VCR, etc.
Also read the instruction manual for the connected
•
auxiliary component.
Be sure to turn both this system and the external
•
component OFF before connecting them.
Set the audio source.
2
Press [AUX].
Turn the connected external
component ON and start playing it.
3
Switching the mode
The playback with the AUX connection can be
switched between the following two modes.
AUX: Use this mode when the connected component
•
outputs audio only.
AUX (BYPASS MODE): Use this mode when the connected
•
player outputs both audio and video, for example it is
a VCR. In this mode, the audio signal is output without
passing through the DSP (Digital Signal Processor) so that
it will not be delayed with respect to the played video.
Note that recording in SD/USB is not possible in BYPASS
MODE.
Switching the mode
1
Press [ENTER].
Each press switches the mode.
Select "BYPASS MODE".
Operation in BYPASS MODE
The system cannot set the audio settings other than
•
the TONE setting.
The record button of the system is defeated.
•
The mode setting is held even after the audio source
•
is switched or the system is turned OFF.
Playing music tracks
42
K-511USB/RD -K511USB
If the audio level of the connected external component
•
is lower or higher than the level at the same volume
control position of other audio sources, adjust the input
level of this system. For how to adjust the input level, see
page 69.
English
43
Page 23

Listening to Radio Broadcasting
TOOL
ENTER
TUNER
G/H
Numeric
PTY
MULTI CONTROL
F
STOP
I/J
DISPLAY/
CHARAC.
A radio station in the FM/AM band can be selected
and listened to.
Listening to Radio Broadcasting
Select the FM or AM band.
1
Press [TUNER].
Each press switches the FM/AM band.
FM lit
AM lit
FM radio
AM radio
Select a radio station.
2
Selecting a station preset in the
memory (Preset call)
Select a radio station from the preset memory (No.
P01 to P40).
Press [G/H].
Press [MULTI CONTROL C/D].
When preset No. P27 is
selected
•
Pressing and holding the button switches the preset
numbers at a high speed.
•
The preset number can also be entered directly.
Press the numeric button(s) to select.
To select preset No. P27
Press [+10] twice and [7] once.
Selecting a station that is not preset in
memory (Auto tuning/Manual tuning)
Select the tuning mode.
1
Press [STOPF].
Each press switches the selection.
AUTO lit
AUTO lit
Select a station.
2
Press [I/J].
Press [MULTI CONTROL A/B].
■
Auto Tuning:
Each press tunes into the next receivable station
automatically.
■
Manual Tuning:
Each press varies the frequency by 1 step. Hold
the button or tilting the knob continuously varies
tuned frequencies at a high speed.
No audio is output during either auto or manual tuning.
•
Auto Tuning receives stations in stereo audio but Manual
•
Tuning receives them in monaural audio. "TUNED" lights
up when a station is tuned. "STEREO" lights up when
stereo broadcasting is tuned.
Auto tuning
Auto reception is possible
when the radio wave
condition is favorable.
Manual tuning
When the radio wave
condition is poor, vary
the tuning frequency
manually.
When auto tuning is
selected:
Playing music tracks
44
K-511USB/RD -K511USB
English
45
Page 24

Listening to Radio Broadcasting
Presetting stations
automatically (Auto Preset)
Radio stations can be preset automatically in
preset channels.
Stations cannot be preset if other audio source is
•
selected.
Up to 40 stations can be preset in the system.
•
Select the FM or AM band.
•
For use of the RDS function, stations must be
•
memorized by AUTO MEMORY.
Enter the Tool menu.
1
Press [TOOL].
Select "AUTO MEMORY".
2
Press [MULTI CONTROL A/B]
to select, then press [ENTER].
The station is preset
in memory and the
system enters the status
of reception of preset
station No. P01.
"AUTO MEMORY" blinks on the display and the
receivable radio stations are preset automatically.
Presetting stations manually
(Manual Preset)
The FM/AM station being tuned can be preset in
memory by specifying the preset No. If a station
is preset in a preset No. in which another station
has already been preset, the existing setting is
overwritten and replaced with the new setting.
Tune the radio station to be preset
in memory.
1
Tune with auto tuning or manual tuning. (page
44)
Enter the tuned station.
2
Press [ENTER].
Select the desired preset number
3
(P01 to P40).
Press [G/H].
Press [MULTI CONTROL C/D].
When preset No. P35 is
selected:
Preset a radio station.
4
Press [ENTER].
To preset other stations, repeat steps 1 to 4 for each
•
of them.
Even when a station is preset, it cannot be tuned if the
•
radio wave condition is poor.
Playing music tracks
46
RDS stations are given priority during auto presetting. If
•
there is memory left after presetting, this unit continues
presetting regular FM and AM stations.
A broadcast station that cannot be preset with AUTO
•
MEMORY should be set with Manual preset. (page 45)
K-511USB/RD -K511USB
The preset number can also be entered directly.
•
Press the numeric button(s) to select.
To select preset No. P35
Press [+10] three times and [5] once.
English
47
Page 25

Listening to Radio Broadcasting
RDS (Radio Data System)
This system is designed for RDS reception, it can
extract the information from the broadcast signal
for use with various functions such as automatic
display of the station name.
Select the FM band.
•
Preset RDS stations with the AUTO MEMORY function.
•
(page 46.)
Some functions may not be provided or be given
•
di erent names depending on countries or areas.
PS (Program Service Name)
Display
When an RDS broadcast is received, the station
name is automatically displayed.
The "RDS" indicator lights up when an RDS
broadcast (signal) is received.
■
To switch the displays
Press [DISPLAY/CHARAC.].
Each press switches the selection.
PS (Program Service Name)
Clock
Searching for a desired program
type (PTY search)
The tuner automatically searches for a station
which is currently broadcasting a speci ed
program type (genre).
Enter the PTY search mode.
1
Press [PTY].
When an RDS broadcast is received, the program
type is shown on the display. If no PTY data is
available, or if the station is not an RDS station,
"None" is displayed.
Select the desired program type
2
Press [G/H].
Select it while the PTY indicator is lit. Use program
type table for your convenience.
Program type table
Program Type Name Display
Pop Music Pop M
Rock Music Rock M
Easy Listening Music Easy M
Light Classical Light M
Serious Classical Classics
Other Music Other M
News News
Current Affairs Affairs
Information Info
Sport Sport
Education Educate
Drama Drama
Program Type Name Display
Culture Culture
Science Science
Varied Varied
Weather Weather
Finance Finance
Children's programs Children
Social Affairs Social
Religion Religion
Phone In Phone In
Trav el Travel
Leisure Leisure
Jazz Music Jazz
Country Music Country
National Music Nation M
Oldies Music Oldies
Folk Music Folk M
Documentaty Document
Start the search.
3
Press [ENTER].
If a program of the desired type is found, that
program is received and the program type name
display changes to the station name display.
■
To cancel in the middle
Press [PTY].
If a program of the desired type cannot be found, "No
•
Program" blinks, then after several seconds the display
returns to the original display.
Playing music tracks
48
K-511USB/RD -K511USB
English
49
Page 26

Before recording
Various recording methods
This system is capable of various recording methods to enable optimum recording according to the recording format
and sound properties of the audio sources.
Audio sources recordable with this system
Recording Destination
SD1 SD2 USB device
Recording Source
CD
SD1 — MOVE MOVE
SD2 MOVE — MOVE
USB device MOVE MOVE —
iPod/D.AUDIO
Radio broadcast (TUNER)
External component (connected
to AUX)
: Signal is recorded in a digital format. —: Recording is impossible.
Ä
:
Signal is recorded in the analog format. When a digital copy-controlled CD is recorded, the REC INPUT is switched automatically to "ANALOG". (page 88)
ô
MOVE: Movement of folders/ les is possible. (page 60)
The following diagram shows the signal paths used in recording of this system.
Ä/ôÄ
ôôôô
ôôôô
ôôôô
VCR, etc.
ôÄ
/
ôô
/
Analog recording
Digital recording
MOVE function
Component
connected to REC OUT
ô
ô
ô
Selecting the recording mode according to the quality and purpose
Four modes are available for recording in SD/USB.
To record audio in the
same quality as CD
PCM
(High-quality mode)
Recording modes and recording time
Record mode
Memory capacity
128 MB About 10 minutes
256 MB About 20 minutes
512 MB
1 GB
2 GB
4 GB
8 GB
The maximum number of les recordable in an SD card is 999.
•
The recording mode is variable depending on the audio source. For the available recording modes, see "Setting the
•
recording mode per audio source (REC MODE)". (page 86)
About 1 hour 20 minutes
About 2 hour 40 minutes
About 5 hour 20 minutes
About 10 hour 40 minutes About 85 hour 20 minutes
To record high-
quality audio
(High-quality mode)
PCM
(1411 kbps)
About 40 minutes
HQ
HQ
(192 kbps)
About 1 hour 20 minutes
About 2 hour 40 minutes
About 5 hour 20 minutes
About 10 hour 40 minutes
About 21 hour 20 minutes
About 42 hour 40 minutes
To record standard-
quality audio
SQ
(Standard-quality mode)
SQ
(128 kbps)
About 2 hours
About 4 hours
About 8 hours
About 16 hours
About 32 hours
About 64 hours
About 128 hours
To record radio, etc. for
an extended period
SLQ
(Long-hour mode)
SLQ
(96 kbps)
About 2 hour 40 minutes
About 5 hour 20 minutes
About 10 hour 40 minutes
About 21 hour 20 minutes
About 42 hour 40 minutes
About 85 hour 20 minutes
About 170 hour 40 minutes
Record
50
PNC-150
(separately available)
kenwood
digital audio
player, etc.
K-511USB/RD -K511USB
REC OUT
iPod
iPod adapter
PAD-iP7 (separately
available)
The REC OUT terminal outputs the
signal of the selected audio source.
3-pole miniplug cord (commercially available)
kenwood
digital audio
player, etc.
USB
device
One-Touch Edit recording
The One-Touch Edit (O.T.E.) recording function allows the CD to be recorded in an SD card or USB device with a single
press of a button.
When recording from a digital copy-controlled CD, switch REC INPUT to "ANALOG" before starting the O.T.E. recording.
Recording destination folder/ le names
Regardless of the TEXT COPY setting, the radio station name, AMG database information and disc le information are
added to the folder and le names.
In recording from the CD, the title information is added only when it is recorded with the O.T.E. recording. If the AMG
•
database information is available, it is used in priority over other types of title information.
English
51
Page 27

Recording CD in SD/USB
CDDUSB
CDDSD1
CDDSD2
ENTER
E
CD
G/H
P. M O DE
Numeric
MULTI CONTROL
F
STOP
One-Touch Edit recording
Single press of a button starts automatic recording
from a CD into SD1, SD2 or USB.
Preparation before recording
When the CD title information is necessary, acquire it in
•
advance as described in "Acquiring CD title information".
(page 24)
Insert a recordable SD card or USB device in the main unit.
•
Load the CD to be recorded.
•
Recording all tracks in CD
All tracks in the CD will be recorded.
Select the CD source and enter stop
1
mode.
Start recording.
2
Recording in SD
Press [CDDSD1]/[CDDSD2].
Recording in USB
Press [CDDUSB].
Recording from CD into SD1/SD2/USB starts.
It stops when all of the CD tracks have been
recorded.
Recording a single track in CD
Only one track in a CD can be selected and recorded.
Select the CD source.
1
Play the track to be recorded.
2
Press [CDE].
Select the track in advance.
•
Start recording.
3
Recording in SD
Press [CDDSD1]/[CDDSD2].
Recording in USB
Press [CDDUSB].
Recording starts with the beginning of the track
being played, and pauses after completion.
Recording desired tracks in
desired order
CD tracks can be recorded in the desired order
using the program mode.
Select the CD source and enter stop
1
mode.
Enter the program mode and select
2
the tracks to be recorded.
Program tracks following steps 1 to 4 in "Program
mode playback". (page 30).
Start recording.
3
Recording in SD
Press [CDDSD1]/[CDDSD2].
Recording in USB
Press [CDDUSB].
Recording of program playback starts.
■
To stop recording in the middle:
Press [STOPF].
The programmed tracks are recorded until the
position where playback is stopped. It is not
possible to pause recording in the middle.
■
When recording completes:
"DATA WRITING" blinks
and recording end
completely.
To change recording-related settings, see "Making the
•
recording setup using the Setup menu". (page 84)
•
A message is displayed if recording is not possible. For
details, see "Displayed Message List". (page 106)
If the AMG database information or CD-TEXT information
•
is available, the information is added to the recorded
folder/ les.
Do not switch the system OFF or apply shock or vibration
•
to it while "DATA WRITING" is displayed.
•
If the power to the system is shut o before "DATA
WRITING" disappears, the recorded data will be lost.
Press [STOPF] twice to record all of the les in an audio
•
le disc.
PCM recording at the 4x speed is not possible with a USB
•
device. Set the 1x-speed recording when using the PCM
recording mode. (page 87)
Record
52
K-511USB/RD -K511USB
English
53
Page 28

Recording general audio source into SD/USB
As well as the audio played with the CD source, the
audio played with the TUNER, AUX, iPod or D.AUDIO
(kenwood digital audio player) source can be
recorded in SD/USB.
Preparation before recording
USB REC
SD1 REC
SD2 REC
AUX
MULTI CONTROL
Insert a recordable SD card or USB device in the main unit.
•
Prepare the audio source to be recorded.
•
Automatic title information acquisition from the AMG
•
database is not available. Remove the SD card containing
a copy of AMG database from the SD2 slot.
Select the recording source.
1
Press [CDE], [TUNER],
ENTER
E
CD
TUNER
G/H
Numeric
iPod/
D.AUD IO
F
STOP
I/J
RANDOM
When the audio source is CD, select the rst track to
•
be recorded and pause at its beginning in advance.
Make sure that the iPod or D.AUDIO source is
•
stopped.
Enter record-pause mode.
2
[iPod/D.AUDIOE], [AUX].
Press [SD1 REC]/[SD2 REC]/
[USB REC].
Start recording.
3
Recording CD tracks
Start playback of the track to be recorded.
Press [CDE].
Recording starts automatically following the start
of playback (sync recording).
Recording radio broadcasting
Select the station to be recorded. (page 44)
1
Start recording.
2
Press [SD1 REC]/[SD2 REC]/
[USB REC].
Recording D.AUDIO les
Select the rst le to be recorded.
1
Start recording.
2
Press [SD1 REC]/[SD2 REC]/
[USB REC].
Start playback of the le to be recorded.
3
When the dedicated cable (separately available
•
PNC-150) is used for the connection, the Kenwood
digital audio player can be controlled from the main
unit or remote control unit.
If a cable other than PNC-150 is used for the
•
connection, start playback on the connected
Kenwood digital audio player.
Recording iPod les
On the iPod, select the le to be recorded.
1
Start recording.
2
Press [SD1 REC]/[SD2 REC]/
[USB REC].
On the iPod, start playback of the le to be
3
recorded.
When the dedicated adapter (separately available
•
PAD-iP7) is used for the connection, the iPod can be
controlled from the main unit or remote control unit.
Recording AUX source
On the AUX-connected external component,
1
start playback of the source.
Start recording.
2
Press [SD1 REC]/[SD2 REC]/
[USB REC].
■
To pause recording temporarily:
Press [SD1 REC]/[SD2 REC]/
[USB REC].
The le being recorded is closed and saved. When
recording is resumed, the rest of music is saved as
a new le in the same folder.
■
To stop recording in the middle:
Press [STOPF].
■
When recording completes:
"DATA WRITING" blinks
and recording end
completely.
To change recording-related settings, see "Making the
•
recording setup using the Setup menu". (page 82)
A message is displayed if recording is not possible. For
•
details, see "Displayed Message List". (page 106)
Do not switch the system OFF or apply shock or vibration
•
to it while "DATA WRITING" is displayed.
If the power to the system is shut o before "DATA
•
WRITING" disappears, the recorded data will be lost.
Dividing a le during recording
When recording radio broadcasting, the le can be
divided automatically.
For details, see "Setting the le division method (AUTO
•
DIVIDE)". (page 89)
Dividing a le manually
When the point you want to divide comes during
recording,
Press [ENTER].
Each press creates a new le.
Dividing a le automatically
Set AUTO DIVIDE to ON before starting recording. For
details, see "Dividing les automatically (DIVIDE TIME)".
(page 99)
Record
54
K-511USB/RD -K511USB
English
55
Page 29

Recording in the digital audio player
The audio of the CD, SD, USB, TUNER and AUX
sources can be recorded in the analog format in a
kenwood digital audio player.
Preparation before recording
•
E
USB
E
SD1
E
SD2
AUX
MULTI CONTROL
ENTER
E
CD
F
TUNER
G/HI
STOP
J
/
Prepare the audio source to be recorded.
Connect the digital audio player to
1
the [REC OUT] terminal.
REC OUT
Connectable kenwood digital
audio player/recorder models
•
Also read the instruction manual for the connected
digital audio player.
Select the audio source to be
2
Numeric
recorded.
The CD, SD and USB sources should be set to stop
•
mode.
(as of Aug. 2008)
M2GC7/M1GC7/MGR-A7
Press [CDE]/[SD1E]/
[SD2E]/[USBE]/
[TUNER]/[AUX].
Prepare recording.
3
Recording CD/SD/USB tracks/ les
Select the track/ le to be recorded or pause at the
position where you want to start recording.
Recording radio broadcasting
Select the station to be recorded. (page 44)
Recording AUX source
On the AUX-connected external component, start
playback of the source.
Start recording of the digital audio
4
player.
For the recording procedure, also refer to the manual
•
for the connected digital audio player.
Recording CD/SD/USB tracks/ les
Press [CDE]/[SD1E]/
[SD2E]/[USBE].
Recording radio broadcasting
Recording starts.
Recording AUX source
Recording starts.
■
To stop the track/ le being recorded:
Record
56
K-511USB/RD -K511USB
Press [STOPF].
■
To stop recording:
Press the stop button of the connected digital
audio player.
■
If the recorded audio is distorted or its level is
too low:
Adjust the recording level. Adjust the recording
level. For details, see "Setting the recording level
(REC LEVEL)". (page 88)
English
57
Page 30

Listening to an audio source while recording another
After the start of recording, this system can switch the audio
source and listen to its play. This function is convenient when
the recorded audio cannot be monitored, for example during
One-Touch Edit recording of CD (at the 4x speed).
Whether or not playback of another source is possible is
•
determined by the recording speed, recording path and
E
USB
E
SD1
E
SD2
AUX
MULTI CONTROL
ENTER
E
CD
TUNER
G/HI
Numeric
iPod/
D.AUD IO
F
STOP
J
/
the new audio source. Check the table on the next page.
Example) Listening to an audio source during
recording of CD in SD1 (at 4x speed)
The TUNER, SD2, AUX ,USD or iPod/D.AUDIO source can
be selected.
Press [TUNER]/[SD2E]/[AUX]/
[USBE]/[iPod/D.AUDIOE].
Example) Listening to an audio source during
recording of radio broadcasting in USB
The CD source can be selected.
Press [CDE].
■
The display becomes as follows when an audio source
is listened to during recording of another source.
The record indicator changes
from "
" to " ".
■
To stop recording in the middle:
Switch the audio source to the source being recorded.
1
The record indicator changes
from "
" to " ".
Press [STOPF].
2
Press [STOPF].
The programmed tracks are recorded until the
position where playback is stopped. It is not possible
to pause recording in the middle.
■
When recording completes:
The audio source is switched automatically to the recorded
source even the playback being listened to is not completed.
■
During 4x-speed recording
Playable audio source
Recording path
TUNER CD SD1 SD2 USB AUX iPod/D.AUDIO
CDRSD1
CDRSD2
CDRUSB
■
During 1x-speed recording
In use for
ô
recording
In use for
ô
recording
In use for
ô
recording
—
*1
ô
*1
ô
*1
ô
—
*1
ô
*1
ô
*1
ô
—
ôô
ôô
ôô
Playable audio source
Recording path
TUNER CD SD1 SD2 USB AUX iPod/D.AUDIO
TUNERRSD1
TUNERRSD2
TUNERRUSB
CDRSD1
CDRSD2
CDRUSB
AUXRSD1 —
AUXRSD2 —
AUXRUSB —
iPod/D.AUDIORSD1 —
iPod/D.AUDIORSD2 —
iPod/D.AUDIORUSB —
: Playable.
ô
—: Not playable.
*1: It is not possible to use [G] for skipping to a previous track/ le. If track/ e selection is required, use [MULTI CONTROL] or the numeric
button(s).
*2:
録音中は、AMGデータベースでCDのタイトル取得はできません。
In use for
recording
In use for
recording
In use for
recording
ô
ô
ô
*2
ô
*2
ô
*2
ô
In use for
recording
In use for
recording
In use for
recording
*2
ô
*2
ô
*2
ô
*2
ô
*2
ô
*2
ô
———— —
———— —
———— —
———
———
———
———
———
———
— — — — In use for recording
— — — — In use for recording
— — — — In use for recording
ôô
ôô
ôô
In use for
recording
In use for
recording
In use for
recording
—
—
—
Record
58
K-511USB/RD -K511USB
Relay playback of SD1 and SD2 is not possible.
•
English
59
Page 31

Moving a folder or audio le
E
USB
E
SD1
E
SD2
TOOL
ENTER
RETURN
G/H
Numeric
USB MOVE
SD1 MOVE
SD2 MOVE
MULTI CONTROL
F
STOP
A folder or audio le can be moved between SD1,
SD2 and USB. Even an audio le being played can
be moved.
: Folder
: File
USB
device
To move the le being played, start the procedure from
•
step 4.
The moved le should be a WMA, MP3, AAC or WAV le.
•
Insert the media.
1
Insert the SD card(s) and/or USB device for use as
the move source and move destination.
•
Move source: Medium from which the folder or le is
moved.
•
Move destination: Medium to which the folder or le
is moved.
Select the move source audio
2
source.
Press [SD1E]/[SD2E]/
[USBE].
Select the folder or le to be moved.
3
Use [MULTI CONTROL] or the
numeric button(s).
Use [MULTI CONTROL].
•
When there is a le being played, this le will be
moved.
Select the move destination.
4
Press [SD1 MOVE]/[SD2 MOVE]/[USB
MOVE].
continued from "Editing using the
Tool menu" (page 70)
Use [MULTI CONTROL A/B]
to select, then press [ENTER].
When moving from SD1
to SD2
Perform the following steps in the same way as above.
Select the move destination folder.
5
Select where the le or folder is moved by newly
creating a folder or to an existing folder.
Press [MULTI CONTROL A/B]
to select, then press [ENTER].
When a new folder is
created
When an existing folder
is selected
When move is canceled
Enter the selection.
6
Once the move operation is started, it cannot be
canceled in the middle.
Select "CANCEL" to cancel the move operation before starting it.
•
When moving into a newly created folder
Press [MULTI CONTROL A/B]
to select, then press [ENTER].
A new folder is created in
the move destination KWD
folder and movement of the
le into the new folder starts.
When moving into an existing folder
Select the move destination folder.
1
Press [MULTI CONTROL A/B]
to select, then press [ENTER].
When folder "A_A001"
is selected as the move
destination folder
Start the move operation.
2
Press [MULTI CONTROL A/B]
to select, then press [ENTER].
If a le with the same name as the moved le is
•
present in the move destination folder, it is possible
to select whether the le is moved by overwriting the
existing le or the move operation is canceled.
■
The display becomes as follows when the move
operation completes.
At the completion of
move from SD1 to SD2
■
Folder and le names of move destination
The folder or le name may sometimes be
changed automatically as a result of move.
KWD
A_A001
T010.WMA
A_A010
T001.WMA
T002.WMA
Selection of an
existing folder
Creation of a
new folder
KWD
A_A001
T001.WMA
T010.WMA
A_A002
T001.WMA
T002.WMA
: Folder
: File
Edit
60
K-511USB/RD -K511USB
English
61
Page 32

Renaming a folder or music le
E
USB
E
SD1
E
SD2
TOOL
ENTER
RETURN
G/H
Numeric
MULTI CONTROL
F
STOP
TITLE INPUT
DISPLAY/
CHARAC.
CLEAR
Renaming
The name of a folder or audio le in SD and USB
can be modi ed.
Insert the media.
1
Insert the SD card or USB device containing the
le or folder to be renamed in the main unit.
Select the audio source.
2
Press [SD1E]/[SD2E]/
[USBE].
Select the folder or le to be
3
renamed.
Use [MULTI CONTROL] or the
numeric button(s).
Use [MULTI CONTROL].
If a music le is being played, this le will be renamed.
•
Select Title Input.
4
Press [TITLE INPUT].
Input the desired characters.
5
To input characters, refer to "Character Input".
(page 64)
■
Folder renaming
Character group
(page 64)
The cursor is displayed
after the current folder
name.
When "BLUE" is added to
the folder name
■
File renaming
The cursor is displayed
after the current le
name.
When "SKY" is added to
the lename
Enter the selection.
6
Press [ENTER].
"COMPLETE" is displayed,
then the normal display
resumes.
Edit
62
K-511USB/RD -K511USB
continued from "Editing using the Tool
menu" (page 70)
Perform the following steps in the same way as
above.
■
To cancel editing in the middle:
Press [TITLE INPUT], [TOOL] or
[STOPF].
Press [STOPF].
When renaming a folder or le in SD or USB, be careful
•
not to assign the same name as an existing folder or le.
The le extension cannot be modi ed.
•
The tag data cannot be modi ed.
•
To rename other folders or les, repeat steps 3 to 6 for
•
each.
English
63
Page 33

Renaming a folder or music le
Character Input
The character input operation required for
renaming is as detailed in the following.
Select the character group.
1
Press [DISPLAY/CHARAC.].
Each press switches the selection.
Aa
12
For details, see "List of characters usable in editing"
•
on the next page.
Alphabet or symbol
input
Numeric or symbol
input
Input the desired characters.
2
Press the numeric button(s).
Example) When [2] is pressed with group
"Aa", each press switches the characters in the
following cycle.
Input other characters by repeating
3
steps 1 and 2 for each.
When "HAPPY" is input
ABCABC
Character
H [4] 2 presses
A [2] 1 press
P [7] 1 press
Moving
cursor to
the right
P [7] 1 press
Y [9] 3 presses
To input numeric characters, press [DISPLAY/
•
CHARAC.] to switch the character group and input in
the same way as above.
Button
[MULTI CONTROL D] 1 press
Enter the selection.
4
Press [ENTER].
"COMPLETE" is displayed,
then the normal display
resumes.
■
To clear a character:
Place the cursor on the character to be cleared.
1
Press [MULTI CONTROL C/D].
Press to clear the character.
2
Press [CLEAR].
■
To insert a character:
Move the cursor to the position you want to
1
insert a character.
Number of
presses
Number of input characters
A folder or le name of SD or USB can be input using
max. 28 characters.
Note on the folder and le management
numbers
Do not modify the alphanumeric characters
(management number) put before a folder or le name
in SD or USB. Otherwise, the order of music les will be
altered.
Folder management No.
Management No.
File management No.
Management No.
List of characters usable in editing
Group
[Numeric] buttons
[1] 1 (Space) 1
[2] 2 ABC A B C a b c 2
[3] 3 ABC D E F d e f 3
[4] 4 GHI G H I g h i 4
[5] 5 JKL J K L j k l 5
[6] 6 MNO M N O m n o 6
[7] 7 PQRS P Q R S p q r s 7
[8] 8 TUV T U V t u v 8
[9] 9 WXYZ W X Y Z w x y z 9
[0] 0 (Space) 0
[+10] +10 ’ , ; ’ , ! ; _ ` $ (Space)
[+100] +100 &()- & ( ) − + = # % @
Aa 12
Edit
64
K-511USB/RD -K511USB
Press [MULTI CONTROL C/D].
Input the desired characters.
2
English
65
Page 34

Deleting a folder or audio le
E
USB
E
SD1
E
SD2
ENTER
RETURN
Numeric
TOOL
MULTI CONTROL
F
STOP
A folder or audio le in SD or USB can be deleted.
Insert the media.
1
Insert the SD card or USB device containing the
folder or le to be deleted in the main unit.
Select the audio source.
2
Press [SD1E]/[SD2E]/
[USBE].
Select the folder or le to be
3
deleted.
Use [MULTI CONTROL] or the
numeric button(s).
Use [MULTI CONTROL].
When there is a le being played, this le will be
•
deleted.
Enter the Tool menu.
4
Press [TOOL].
Delete the folder or le.
6
Select "CANCEL" to cancel deletion.
•
Press [MULTI CONTROL A/B]
to select, then press [ENTER].
"COMPLETE" is displayed,
then the normal display
resumes.
■
To cancel editing in the middle:
Press [TOOL].
A le that cannot be recognized by the system cannot
•
be deleted.
Edit
66
K-511USB/RD -K511USB
Select "ERASE".
5
Press [MULTI CONTROL A/B]
to select, then press [ENTER].
English
67
Page 35

Checking the remaining recording time of SD or USB
Adjusting the External Signal Input Level
TOOL
ENTER
RETURN
TUNER
E
CD
AUX
MULTI CONTROL
A/B
iPod/
D.AUD IO
F
STOP
The number of folders, the number of audio les
and the remaining recording time of SD or USB can
be viewed.
Insert the media.
1
Insert the SD card or USB device to be checked in
the main unit.
Select the audio source.
2
Press [CDE]/[iPod/
D.AudioE]/[TUNER]/[AUX].
The remaining recording time of SD1/SD2/USB available
•
with the currently selected audio source is displayed.
When the CD source is selected, be sure to load a disc.
•
Enter the Tool menu.
3
Press [TOOL].
Select "CAPACITY".
4
Press [MULTI CONTROL A/B]
to select, then press [ENTER].
When checking the
capacity of SD1
If the audio level of the connected external
component is lower or higher than the level at
the same volume control position of other audio
sources, the input level of this system can be
adjusted in the range between −3 and +3.
Select the audio source.
1
Press [iPod/D.AUDIOE]/
[AUX].
Enter the Tool menu.
2
Press [TOOL].
Select "INPUT LEVEL".
3
Press [MULTI CONTROL A/B]
to select, then press [ENTER].
Adjust the input level.
4
Press [MULTI CONTROL A/B].
Edit
68
K-511USB/RD -K511USB
Enter the selection.
5
Recording mode
All of the folders and les recorded with this system are
•
stored in the KWD folder, but the numbers of storable
folders and les are limited. (page 102)
The remaining recording time information is calculated
•
based on the recording modes available with each audio
source. (page 86)
Current number of folders/
Folder number limit (200)
Current number of les/
File number limit (1000)
Remaining recording time
When the AUX input
level is adjusted to "+3"
The input level adjustment is applied only to the
•
audio source selected in step 1.
Enter the selection.
5
Press [ENTER].
Adjusting the input level varies the input levels from the
•
external components connected to both the [iPod/
D.AUDIO IN] and [AUX IN] terminals.
English
69
Page 36

Editing using the Tool menu
E
USB
E
SD1
E
SD2
ENTER
RETURN
TUNER
E
CD
Numeric
AUX
TOOL
MULTI CONTROL
iPod/
D.AUD IO
F
STOP
The same editing operations as those available
using [TITLE INPUT] of the remote control unit
can also be executed using [TOOL]. In addition,
some editing items are available only from the
Tool menu. If editing is started from the Tool menu,
it is possible to apply editing results by simply
switching the audio source and editing item.
Select the audio source to be edited.
1
To move, delete or rename a folder or le, also
select the folder or le to be edited.
Enter the Tool menu.
2
Press [TOOL].
Editing items are displayed.
Select the editing item.
3
Press [MULTI CONTROL A/B]
to select, then press [ENTER].
When "ERASE" is
selected
Perform detail settings of the
4
selected editing item.
Continue operation by following the procedure described
in the reference page shown in the following table.
■
If you committed a mistake in item or setting
Press [RETURN].
The display returns to the previous
display.
■
To exit the Tool menu
Press [TOOL] or [STOPF].
Press [STOPF].
[TOOL]
Audio source Editing item Editing summary
AUTO MEMORY *Radio stations can be preset automatically in preset channels. 46 (step 3)
Display the number of folders, number of files and remaining
SD1 CAPACITY
TUNER
CD
iPod/D.AUDIO
AUX
SD1/SD2
USB
*
These operations are available only from [TOOL].
SD2 CAPACITY
USB CAPACITY
EXIT Exits the Tool menu.
SD1 CAPACITY
SD2 CAPACITY
USB CAPACITY
No candidate
EXIT Exits the Tool menu.
INPUT LEVEL
SD1 CAPACITY
SD2 CAPACITY
USB CAPACITY
EXIT Exits the Tool menu.
ERASE
TITLE INPUT Renames a folder or file. 62 (step 4)
INTRO SCAN Starts Intro Scan playback. 35 (step 2)
MOVE MODE Moves a folder or file 61 (step 4)
EXIT Exits the Tool menu.
ERASE
TITLE INPUT Renames a folder or file. 62 (step 4)
MOVE MODE Moves a folder or file 60 (step 4)
EXIT Exits the Tool menu.
*
recording time of the SD card in the SD1 slot.
Display the number of folders, number of files and remaining
*
recording time of the SD card in the SD2 slot.
Display the number of folders, number of files and remaining
*
time of the digital audio player connected to USB.
Display the number of folders, number of files and remaining
*
recording time of the SD card in the SD1 slot.
Display the number of folders, number of files and remaining
*
recording time of the SD card in the SD2 slot.
Display the number of folders, number of files and remaining
*
time of the digital audio player connected to USB.
*
Set the selected AMG database information to "no available". 24
Adjusts the input level from the connected external
*
component.
Display the number of folders, number of files and remaining
*
recording time of the SD card in the SD1 slot.
Display the number of folders, number of files and remaining
*
recording time of the SD card in the SD2 slot.
Display the number of folders, number of files and remaining
*
time of the digital audio player connected to USB.
*
*
Deletes a folder or file. 66 (step 6)
Deletes a folder or file. 66 (step 6)
See page
68 (step 5)
68 (step 5)
68 (step 5)
68 (step 5)
68 (step 5)
68 (step 5)
Edit
69 (step 4)
68 (step 5)
68 (step 5)
68 (step 5)
70
K-511USB/RD -K511USB
English
71
Page 37

Making the system setup using the Setup menu
ENTER
RETURN
MULTI CONTROL
SETUP
F
STOP
The same setting operations as those available
using [DIMMER] of the remote control unit can
also be executed using [SETUP] of the main unit
or remote control unit. In addition, some setting
items are available only from [SETUP]. If setting is
started from the Setup menu, it is possible to apply
setting results by simply switching the setting
item.
Enter the Setup menu.
1
Press [SETUP].
The setup categories are displayed.
Select "SYSTEM SETUP" from the
2
categories.
Use [MULTI CONTROL A/B]
to select, then press [ENTER].
Select the setting item.
3
Press [MULTI CONTROL A/B]
to select, then press [ENTER].
When "TIME ADJUST" is
selected
Perform detail settings of the
4
selected editing item.
Continue operation by following the procedure described
in the reference page shown in the following table.
■
If you committed a mistake in item or setting
Press [RETURN].
The display returns to the previous
display.
■
To exit the Setup menu:
Press [SETUP] or [STOPF].
[SETUP]
Category Setting item Setting summary See page
SLEEP Sets the sleep timer. 74
DIMMER SET Adjusts the display brightness. 75
SD FORMAT
A.P.S.
SYSTEM SETUP
REC SETUP
SOUND SETUP
EXIT Exits the Setup menu.
*
These operations are available only from [SETUP].
TIME ADJUST*Adjusts the clock (day of week/hour/minute). 77
TIMER SETTING
RETURN Return to the category display.
REC MODE Set the recording mode of each audio source.
O.T.E. SPEED Set the recording speed of One-Touch Edit recording.
REC INPUT
REC LEVEL Set the level of recording in SD/USB/D.AUDIO.
AUTO DIVIDE
DIVIDE TIME
TEXT COPY
RELAY REC
RETURN Return to the category display.
D-BASS Adjust the level of low frequencies.
TONE
MANUAL EQ
SPRM Sets SPRM (Supreme) to OFF/ON.
BestFit EQ EX Sets BestFit EQ EX.
HR SOUND Sets HR SOUND to OFF/ON.
BALANCE Adjust the balance between the left and right speaker levels.
RETURN Return to the category display.
*
Formats an SD card. 75
*
Sets the Auto Power Save function to ON/OFF. 76
Reserve recording of radio broadcasting or playback of music
at the specified time of the day on the specified day(s) of the
week.
Sets whether the digital or analog signal is used in recording
of CD in SD/USB.
Sets whether the file is divided (for marking distinctions’
between music tunes) automatically or manually during
recording in SD/USB.
Set the interval for dividing files (for marking distinctions
between music tunes) during recording of radio broadcasting,
etc. in SD/USB.
Sets copy of the CD-TEXT information together with the CD
audio recorded into SD/USB.
Sets whether or not recording is relayed from SD1 to SD2
when recording TUNER/AUX/iPod/D.AUDIO into SD.
Adjust the levels of the low frequencies (BASS) and high
frequencies (TREBLE).
Adjust the level of each of the seven frequency bands and
registers up to three combinations of settings.
78
84 −
Advanced operations
92 −
72
K-511USB/RD -K511USB
English
73
Page 38

Making the system setup using the Setup menu
DIMMER
ENTER
RETURN
SLEEP
MULTI CONTROL
SETUP
F
STOP
Setting the Sleep Timer (SLEEP)
During or before playing an audio source, the sleep
timer can be set to end the play after the set period
of time and turn the system OFF automatically.
Select "SLEEP".
1
Press [MULTI CONTROL A/B]
to select, then press [ENTER].
Setting the Sleep Timer
2
Press [MULTI CONTROL A/B]
to select, then press [ENTER].
Each press switches the selection.
10
20
30
40
OFF
90
80
70
Select "OFF" to cancel.
The sleep timer cannot be set when the system status is
one of the following:
In standby mode
•
During power OFF processing
•
During clock/program timer setting
•
During setting using [SETUP]/[TOOL]
•
To set using [SLEEP] of the remote control unit
Press [SLEEP].
Each press switches the timer.
Adjusting the Display Brightness
(DIMMER SET)
The brightness of the display panel can be adjusted
and the illumination can be switched ON/OFF.
Select "DIMMER SET".
1
Press [MULTI CONTROL A/B]
to select, then press [ENTER].
The display brightness cannot be adjusted when the
system status is one of the following:
In standby mode
•
Immediately after power ON
•
During power OFF processing
•
During setting using [SETUP]/[TOOL]
•
To set using [DIMMER] of the remote control unit
Press [DIMMER].
Each press switches the brightness.
Formatting an SD card (SD
FORMAT)
This system can be used to format an SD card. Formatting
an SD card erases all of the data recorded in it.
Select "SD FORMAT".
1
Press [MULTI CONTROL A/B]
to select, then press [ENTER].
Advanced operations
74
K-511USB/RD -K511USB
50
■
To check the remaining period of the sleep
timer after setting:
Press [SLEEP].
Pressing the button again makes it possible to add
•
a new sleep timer period to the current remaining
period.
60
The sleep timer
operation indicator
lights on the display.
The remaining sleep
timer period is displayed
for 5 seconds.
Adjust the display brightness and
2
illumination.
Press [MULTI CONTROL A/B]
to select, then press [ENTER].
Each press switches the selection.
DIMMER OFF
DIMMER 1
DIMMER 2
DIMMER 3
High display brightness,
illumination ON
Low display brightness,
illumination ON
Low display brightness,
illumination OFF
High display brightness,
illumination OFF
Select the SD card to be formatted.
2
Press [MULTI CONTROL A/B]
to select, then press [ENTER].
Each press switches the selection.
SD1 FORMAT
SD2 FORMAT
RETURN
continued on next page
The display returns to the
"SYSTEM SETUP" display.
English
75
Page 39

Making the system setup using the Setup menu
Start formatting.
3
Select "CANCEL" to cancel formatting.
•
Press [MULTI CONTROL A/B]
to select, then press [ENTER].
Enter the selection.
4
A message is displayed
to solicit recon rmation
of the formatting.
Press [ENTER].
After completion of formatting, the display returns to
the "SYSTEM SETUP" display.
Formatting is impossible if the SD card contains a copy
•
of the AMG database.
Formatting may take long time with certain types of SD
•
card.
Setting Auto Power Save (A.P.S.)
The A.P.S. (AUTO POWER SAVE) function switches
the system OFF automatically when it has not been
operated for more than 30 minutes while its power
is ON and the CD or SD is in stop mode.
Select "A.P.S.".
1
Press [MULTI CONTROL A/B]
to select, then press [ENTER].
Set the A.P.S. mode to ON/OFF.
2
Press [MULTI CONTROL A/B]
to select, then press [ENTER].
Each press switches ON/OFF.
"A.P.S."
lights
set.
■
When the A.P.S. mode is ON
A.P.S. is activated when the system is in the
following status.
The selected audio source is TUNER, AUX or iPod/
•
D.AUDIO, the volume is set to "0" and no button is
pressed
CD, SD1, SD2 and USB are in stop mode and no
•
button is pressed.
when ON is
Adjusting the Time
(TIME ADJUST)
The day of the week and the time of the day of the
system can be set.
Select "TIME ADJUST".
1
Press [MULTI CONTROL A/B]
to select, then press [ENTER].
Set the day of the week, hour and
2
minute.
Selecting the setting item from day of
week, hour and minute
Press [MULTI CONTROL C/D].
Each press switches the selection.
Day of Week
Hour
Minute
The selected item lights up.
When "DAY OF WEEK" is
selected
Enter the selection.
3
Press [ENTER].
The display returns to the "SYSTEM SETUP" display.
■
To display time of day when the system is OFF
(standby mode):
Press [STOPF].
The time of the day is
displayed for 5 seconds.
If the power cord is unplugged then plugged in or after
•
a power failure, adjust the time of the day again.
The clock operation involves a certain error. It is
•
recommended to adjust the time of the day periodically.
Advanced operations
76
K-511USB/RD -K511USB
When "MINUTE" is
selected
Setting the day of week, hour or
minute
Press [MULTI CONTROL A/B].
English
77
Page 40

Making the system setup using the Setup menu
TIMER SET
ENTER
RETURN
K
MULTI CONTROL
SETUP
Setting the program timer
(TIMER SETTING)
The program timer can be used to record radio
broadcasting in SD1/SD2 at the speci ed day of
the week and time of the day as well as to play
radio broadcasting, CD or SD1.
Up to ve timer programs can be set. The setting
contents can be variable between program numbers.
Setting programs 1 to 3 (for exclusive used
in recording)
Radio broadcasting can be recorded in SD1. These
programs are designed for exclusive used in timer
recording so their setting is easier than programs 4 and 5.
The recording mode can be selected from SQ (standard
quality) and SLQ (long-hour).
Setting program 4 and 5 (for playback/recording)
Radio broadcasting, CD or SD1 can be played with timer
(TIMER PLAY).
as a morning call.
In addition, radio broadcasting can be recorded in SD1/SD2.
The recording mode can be selected from HQ (high
quality), SQ (standard quality) and SLQ (long-hour).
Be sure to adjust the clock to the correct time. For the
•
procedure, see "Adjusting the time (TIME ADJUST)". (page
77)
These programs are optimum for setting
Select "TIMER SETTING".
1
Press [MULTI CONTROL A/B]
to select, then press [ENTER].
Each press switches the selection.
PROGRAM 1 SET
Recording from
PROGRAM 2 SET
PROGRAM 3 SET
PROGRAM 4 SET
PROGRAM 5 SET
RETURN
TUNER
to SD1
Playback of TUNER/
CD/SD1
Recording from
TUNER to SD1/SD2
The display returns to the
"SYSTEM SETUP" display.
Select the programming item.
3
Press [MULTI CONTROL A/B].
Each press switches the selection.
When PROGRAM1, 2 or 3 is selected in step 2
ON/OFF
OPERATION
ON TIME
OFF TIME
ON VOLUME
TUNER PRESET
Select timer ON/OFF.
Set the day(s) of the
week.
Select the ON time.
Select the OFF time.
Select the recording
level.
Select a radio station.
Enter the selection of programming
4
item.
Press [ENTER].
Set the details of the programming item.
5
For the detail setting operation, see "List of
programming items". (page 80)
Set all of the necessary programming items by
repeating steps 3 to 5 for each.
Turn the system OFF.
6
Press [K].
The standby and time
indicators also light
green.
The clock should be readjusted when the power plug is
•
disconnected or after a power failure. (page 77)
When recording of radio broadcasting is programmed,
•
the rst section of the broadcasting may be cut o if ON
TIME is set exactly at the start time. To prevent this, it is
recommended to set ON TIME at about a minute earlier
than the start of the broadcasting to be recorded.
When setting more than one timer program, reserve an
•
interval of at least 3 minutes between the time zones of
the programs.
To set using [TIMER SET] of the remote control unit:
Press [TIMER SET].
Each press switches the PROGRAM number.
Select the desired PROGRAM number and
perform steps 3 to 6.
Advanced operations
78
K-511USB/RD -K511USB
Select the PROGRAM number.
2
Press [MULTI CONTROL A/B].
REC MODE
EXIT
For the programming items when PROGRAM
4 or 5 is selected in step 2, see the "List of
programming items". (page 80)
Select the recording
mode.
The display returns to
the "SYSTEM SETUP"
display.
English
79
Page 41

Making the system setup using the Setup menu
List of programming items
Programming items of PROGRAM 1, 2 and 3
Programming item
ON/OFF
OPERATION
ON TIME Set the timer ON time.
OFF TIME Set the timer OFF time.
ON VOLUME Set the recording level. This item can be set between 0 and 40 (MAX).
TUNER PRESET
REC MODE
EXIT Return to the PROGRAM number selection display in "TIMER SETTING".
Summary
Select whether the timer
is executed or canceled.
Select the day(s) of the
week.
Select a radio station
(preset number).
Select the recording
mode.
Operation
Press [MULTI CONTROL A/B] to select, then press
[ENTER].
ON: Executes the timer operation.
OFF: Cancels the timer operation.
EVERYDAY (Everyday)
SUNDAY (Sunday)
MONDAY (Monday)
TUESDAY (Tuesday)
WEDNESDAY (Wednesday)
THURSDAY (Thursday)
FRIDAY (Friday)
SATURDAY (Saturday)
MON-FRI (Monday to Friday)
TUE-SAT (Tuesday to Saturday)
SAT-SUN (Saturday, Sunday)
1 Set the figure of "HOUR".
2 Press [MULTI CONTROL D] to switch to "MINUTE".
3 Set the figure of "MINUTE".
Select one of P01 to P40.
See page 44 for details.
WMA (SLQ)
WMA (SQ)
Select whether the timer is executed only once
or every week.
Press [MULTI CONTROL D].
1
Press
2
For details on the recording mode, see "Selecting the
recording mode according to the quality and purpose".
(page 51)
[MULTI CONTROL A/B]
select "ONE TIME" or "EVERY WEEK",
then press [ENTER].
to
Programming items of PROGRAM 4 and 5
Programming item
ON/OFF
PLAY/REC
OPERATION
ON TIME Set the timer ON time.
OFF TIME Set the timer OFF time.
ON VOLUME
*
AI PLAY
PLAY
*
SOURCE
TUNER PRESET
RECORDER
REC MODE
EXIT Return to the PROGRAM number selection display in "TIMER SETTING".
*
TIMER PLAY/
**
**
**
**
TIMER REC: The items displayed hereafter vary depending on the selected operation.
Summary
Select whether the timer
is executed or canceled.
Select timer playback or
timer recording.
Select the day(s) of the
week.
Set the timer playback
volume or the timer
recording level.
At the start of timer
playback, the volume is
increased gradually until the
value set with ON VOLUME.
Set the audio source to
be played.
Select to set a radio
(preset) station.
Select the recording
destination source.
Select the recording
mode.
Operation
Press [MULTI CONTROL A/B] to select, then press
[ENTER].
ON: Executes the timer operation.
OFF: Cancels the timer operation.
TIMER PLAY*: Execute timer playback.
TIMER REC**: Execute timer recording.
EVERYDAY (Everyday)
SUNDAY (Sunday)
MONDAY (Monday)
TUESDAY (Tuesday)
WEDNESDAY (Wednesday)
THURSDAY (Thursday)
FRIDAY (Friday)
SATURDAY (Saturday)
MON-FRI (Monday to Friday)
TUE-SAT (Tuesday to Saturday)
SAT-SUN (Saturday, Sunday)
1 Set the figure of "HOUR".
2 Press [MULTI CONTROL D] to switch to "MINUTE".
3 Set the figure of "MINUTE".
This item can be set between 0 and 40 (MAX).
ON: Sets AI PLAY.
OFF: Cancels AI PLAY.
TUNER
CD
SD1
Select one of P01 to P40.
See page 44 for details.
SD1: Recording in SD1.
SD2: Recording in SD2.
WMA (SLQ)
WMA (SQ)
WMA (HQ)
Select whether the timer is executed only once
or every week.
Press [MULTI CONTROL D].
1
Press
2
select "ONE TIME" or "EVERY WEEK",
then press [ENTER].
When TUNER is selected, proceed to the selection of
the radio station (preset number).
Press [MULTI CONTROL D].
1
Press [MULTI CONTROL A/B]
2
radio station, then press [ENTER].
For details on the recording mode, see "Selecting the
recording mode according to the quality and purpose".
(page 51)
[MULTI CONTROL A/B]
to select the
to
Advanced operations
80
K-511USB/RD -K511USB
English
81
Page 42

Switching the Display Information
Press [DISPLAY/CHARAC.]or [TIME DISP.].
Audio Source Button Display During Recording Display During Playback
The displayed information varies as shown below according to the operating status of and selected audio source of the system.
DISPLAY/
[
CHARAC.
]
CD
TIME DISP.
Audio files
[
DISPLAY/
[
CHARAC.
]
]
Recording source
name display
SD/USB recording
indicators
The longest time that can be displayed is 9999 minutes 59 seconds. Time longer than this is displayed as " - - - - : - - ".•
AMG database
Normal/program
play mode
1-track repeat/
random play mode
File name Folder name File title* Artist name*
Track title* Artist Name
* Not displayed in stop mode.
Track title* Artist NameCD-TEXT present Day of Week/Clock Album Name
Day of Week/ClockCD-TEXT absent
Elapsed time of
played music
Elapsed time of
played music
*
Not displayed in stop mode.
**
Not displayed with CD-ROM.
Remaining time of
played music
Remaining time of
played music
Genre Day of Week/Clock
Disc title*
Elapse time of
whole CD
Day of Week/Clock Genre*/**
Remaining time of
whole CD
Album name*
Advanced operations
82
SD
USB
iPod/D.AUDIO/AUX
TUNER
K-511USB/RD -K511USB
TIME DISP.
[
DISPLAY/
[
CHARAC.
DISPLAY/
[
CHARAC.
Remaining SD
recording time
]
The time information is not displayed during the move operation from
•
SD1 or SD2 to USB.
]
]
Station name displayed
(FM only)
Station name not
displayed
Elapsed time of
played music
Day of Week/Clock
Station name/
Frequency
Receiving
frequency
Remaining time of
played music
Only the clock is displayed during
•
playback in BYPASS MODE.
Day of Week/Clock
Day of Week/Clock
English
83
Page 43

Making the recording setup using the Setup menu
ENTER
RETURN
MULTI CONTROL
A/B
SETUP
F
STOP
The same recording setting operations as those
available using [REC MODE] of the remote control
unit can also be executed using [SETUP] of the
main unit or remote control unit. In addition,
some setting items are available only from
[SETUP]. If setting is started from the Setup menu,
it is possible to apply setting results by simply
switching the setting item.
Enter the Setup menu.
1
Press [SETUP].
The setup categories are displayed.
Select "REC SETUP" from the
2
categories.
Press [MULTI CONTROL A/B]
to select, then press [ENTER].
Select the setting item.
3
Press [MULTI CONTROL A/B]
to select, then press [ENTER].
When "REC INPUT" is
selected
Perform detail settings of the
4
selected editing item.
Continue operation by following the procedure described
in the reference page shown in the following table.
■
If you committed a mistake in item or setting
Press [RETURN].
The display returns to the previous
display.
■
To exit the Setup menu:
Press [SETUP] or [STOPF].
[SETUP]
Category Setting item Setting summary See page
SLEEP Sets the sleep timer.
DIMMER SET Adjusts the display brightness.
SD FORMAT Formats an SD card.
A.P.S. Sets the Auto Power Save function to ON/OFF.
SYSTEM SETUP
REC SETUP
SOUND SETUP
EXIT Exits the Setup menu.
*
These operations are available only from [SETUP].
TIME ADJUST Adjusts the clock (day of week/hour/minute).
Reserve recording of radio broadcasting or playback of music
TIMER SETTING
RETURN Return to the category display.
REC MODE Set the recording mode of each audio source. 86
O.T.E. SPEED Set the recording speed of One-Touch Edit recording. 87
REC INPUT
REC LEVEL
AUTO DIVIDE
DIVIDE TIME
TEXT COPY
RELAY REC
RETURN Return to the category display.
D-BASS Adjust the level of low frequencies.
TONE
MANUAL EQ
SPRM Sets SPRM (Supreme) to OFF/ON.
BestFit EQ EX Sets BestFit EQ EX.
HR SOUND Sets HR SOUND to OFF/ON.
BALANCE Adjust the balance between the left and right speaker levels.
RETURN Return to the category display.
at the specified time of the day on the specified day(s) of the
week.
Sets whether the digital or analog signal is used in recording
*
of CD in SD/USB.
*
Set the level of recording in SD/USB/D.AUDIO. 88
Sets whether the file is divided (for marking distinctions’
*
between music tunes) automatically or manually during
recording in SD/USB.
Set the interval for dividing files (for marking distinctions
*
between music tunes) during recording of radio broadcasting,
etc. in SD/USB.
Sets copy of the CD-TEXT information together with the CD
*
audio recorded into SD/USB.
Sets whether or not recording is relayed from SD1 to SD2
*
when recording TUNER/AUX/iPod/D.AUDIO into SD.
Adjust the levels of the low frequencies (BASS) and high
frequencies (TREBLE).
Adjust the level of each of the seven frequency bands and
registers up to three combinations of settings.
72 −
88
89
90
90
91
92 −
Recording Setup
84
K-511USB/RD -K511USB
English
85
Page 44

Making the recording setup using the Setup menu
REC MODE
ENTER
RETURN
REC SPEED
MULTI CONTROL
A/B
SETUP
F
STOP
Setting recording mode for each
audio source
The recording mode used in recording in SD/USB
can be set per recorded audio source.
Select "REC MODE".
(REC MODE)
1
Press [MULTI CONTROL A/B]
to select, then press [ENTER].
Select the audio source you want to
2
set the recording mode.
Press [MULTI CONTROL A/B].
Each press switches the selection.
TUNER
CD
AUX
iPod/D.AUDIO
RETURN
The display returns to
the "REC SETUP" display.
Enter the selection of audio source.
3
Press [ENTER].
Select the recording mode.
4
Press [MULTI CONTROL A/B].
Each press switches the selection.
TUNER
WMA(HQ)
WMA(SQ)
WMA(SLQ)
CD/AUX/iPod/D.AUDIO
PCM
WMA(HQ)
WMA(SQ)
WMA(SLQ)
High-quality mode
Standard-quality mode
Long-hour mode
High-quality mode
High-quality mode
Standard-quality mode
Long-hour mode
Enter the selection.
5
Press [ENTER].
For details on the recording mode, see "Selecting the
•
recording mode according to the quality and purpose".
(page 51)
To set using [REC MODE] of the remote control unit:
When the CD, iPod/D.AUDIO, TUNER or AUX
audio source is selected:
Press [REC MODE].
Setting the recording speed
(O.T.E. SPEED)
The recording speed used in One-Touch Edit
recording (page 52) can be set.
Select "O.T.E. SPEED".
1
Press [MULTI CONTROL A/B]
to select, then press [ENTER].
Select the recording speed.
2
Press [MULTI CONTROL A/B].
Each press switches the selection.
HIGH
NORMAL
Recording at the 4x
speed.
Recording at the 1x
speed.
Enter the selection.
3
Press [ENTER].
When a digital copy-controlled CD is recorded, the REC
•
INPUT is switched automatically to "ANALOG". (page 88)
At this time, the O.T.E. speed should be set to "NORMAL".
To set using [REC SPEED] of the remote control unit:
When the CD, iPod/D.AUDIO, TUNER or AUX
audio source is selected:
Press [REC SPEED].
Each press switches the recording speed.
Recording Setup
86
K-511USB/RD -K511USB
Each press switches the recording mode.
English
87
Page 45

Making the recording setup using the Setup menu
Setting the recording input
(REC INPUT)
When recording a CD in SD/USB, this item is used
to select whether digital recording is performed to
record the digital output signal or analog recording
is performed to record the analog output signal.
Select "REC INPUT".
1
Press [MULTI CONTROL A/B]
to select, then press [ENTER].
Select the recording input.
2
Press [MULTI CONTROL A/B].
Each press switches the selection.
DIGITAL
ANALOG
Enter the selection.
Digital recording
Analog recording
3
Press [ENTER].
When a digital copy-controlled CD is recorded, the REC
•
INPUT is switched automatically to "ANALOG".
Setting the recording level
(REC LEVEL)
If the audio recorded in the component connected
to the [ USB]/[REC IN] terminal or in the SD
card is distorted or its level is too low, adjust the
recording level.
Select "REC LEVEL".
1
Press [MULTI CONTROL A/B]
to select, then press [ENTER].
Select the audio source you want to
2
change the recording level.
Press [MULTI CONTROL A/B].
Each press switches the selection.
SD1/SD2/USB
REC OUT
RETURN
Enter the selection of audio source.
Setting of SD1/SD2/USB
Setting of [REC OUT]
The display returns to
the "REC SETUP" display.
3
Press [ENTER].
Adjust the recording level.
4
Press [MULTI CONTROL A/B].
SD1/SD2/USB
The recording level can be adjusted as desired in
the range between "−2" and "+2".
Example) When REC
LEVEL is set to "+2"
REC OUT
Select "HIGH" or "LOW" as desired.
Example) When REC
LEVEL is set to "HIGH"
Enter the selection.
5
Press [ENTER].
ワンタッチエディット録音のときは、録音レベルは
•
調整できません。
Setting the le division method
(AUTO DIVIDE)
When recording radio broadcasting, etc. in SD/USB,
this item is used to set whether the le is divided
automatically or manually.
Select "AUTO DIVIDE".
1
Press [MULTI CONTROL A/B]
to select, then press [ENTER].
Select the division method.
2
Press [MULTI CONTROL A/B].
OFF
ON
Enter the selection.
Manual le division.
Automatic le division.
3
Press [ENTER].
Divide the le.
4
When OFF is selected
When the point you want to divide comes during
recording,
Press [ENTER].
Each press creates a new le.
When ON is selected
Set the interval for le division in minute. For
details, see "Dividing les automatically (DIVIDE
TIME)". (page 90)
When recording from radio broadcasting, the le is
•
divided at the intervals set with DIVIDE TIME. (page 90)
When recording from a component connected to
•
iPod/D.AUDIO or AUX, the le is divided every time a nosound condition has lasted for 3 seconds or more.
Recording Setup
88
K-511USB/RD -K511USB
Each press switches the selection.
English
89
Page 46

Making the recording setup using the Setup menu
Dividing les automatically
(DIVIDE TIME)
During recording of radio broadcasting in SD/
USB, the le can be divided automatically at the
intervals set below.
Select "DIVIDE TIME".
1
Press [MULTI CONTROL A/B]
to select, then press [ENTER].
Select the le division interval.
2
Press [MULTI CONTROL A/B].
Each press switches the selection.
OFF
30 min.
File is divided automatically
after 3 seconds of nosound condition.
File is divided every 30
minutes.
Recording the CD-TEXT
information (TEXT COPY)
When recording CD into SD/USB, the CD-TEXT
information can be copied in the recording
destination folder or le name according to the
following setting.
Select "TEXT COPY".
1
Press [MULTI CONTROL A/B]
to select, then press [ENTER].
Select whether or not the CD-TEXT
2
data is recorded.
Press [MULTI CONTROL A/B].
Each press switches the selection.
OFF
ON
CD-TEXT data is not
recorded.
CD-TEXT data is
recorded.
Relay recording between SD1 and
(RELAY REC)
SD2
Sets whether or not recording is relayed from SD1
to SD2 when recording iPod/D.AUDIO/TUNER/AUX
into SD.
Select "RELAY REC".
1
Press [MULTI CONTROL A/B]
to select, then press [ENTER].
Select whether or not relay
2
recording is used.
Press [MULTI CONTROL A/B].
Each press switches the selection.
OFF
ON
Relay recording is
canceled.
Relay recording is set.
"RELAY REC" lights up.
90
15 min.
Enter the selection.
File is divided every 15
minutes.
3
Press [ENTER].
Even when the setting for dividing the le every time a
•
no-sound condition has lasted for 3 seconds or more, the
le division sometimes does not occur due to noise from
the audio source, etc.
K-511USB/RD -K511USB
Enter the selection.
3
Press [ENTER].
When the CD title information is acquired from the AMG
•
database, the AMG database information is recorded in
priority over the CD-TEXT data.
Enter the selection.
3
Press [ENTER].
•
If the SD card containing a copy of the AMG database is
inserted in the SD2 slot, replace the card with another
SD card.
•
The audio is interrupted at the point the recording
destination is switched from SD1 to SD2.
English
Recording Setup
91
Page 47

Making the sound setup using the Setup menu
ENTER
RETURN
MULTI CONTROL
SETUP
F
STOP
The same sound property setting operations as
those available using [REC MODE] of the remote
control unit can also be executed using [SETUP] of
the main unit or remote control unit. In addition,
some setting items are available only from
[SETUP]. If setting is started from the Setup menu,
it is possible to apply setting results by simply
switching the setting item.
Enter the Setup menu.
1
Press [SETUP].
The setup categories are displayed.
Select "SOUND SETUP" from the
2
categories.
Press [MULTI CONTROL A/B]
to select, then press [ENTER].
Select the setting item.
3
Press [MULTI CONTROL A/B]
to select, then press [ENTER].
When ERASE is selected
Perform detail settings of the
4
selected editing item.
Continue operation by following the procedure described
in the reference page shown in the following table.
■
If you committed a mistake in item or setting
Press [RETURN].
The display returns to the previous
display.
■
To exit the Setup menu:
Press [SETUP] or [STOPF].
[SETUP]
Category Setting item Setting summary See page
SLEEP Sets the sleep timer.
DIMMER SET Adjusts the display brightness.
SD FORMAT Formats an SD card.
A.P.S. Sets the Auto Power Save function to ON/OFF.
SYSTEM SETUP
REC SETUP
SOUND SETUP
EXIT Exits the Setup menu.
*
These operations are available only from [SETUP].
TIME ADJUST Adjusts the clock (day of week/hour/minute).
Reserve recording of radio broadcasting or playback of music
TIMER SETTING
RETURN Return to the category display.
REC MODE Set the recording mode of each audio source.
O.T.E. SPEED Set the recording speed of One-Touch Edit recording.
REC INPUT
REC LEVEL Set the level of recording in SD/USB/D.AUDIO.
AUTO DIVIDE
DIVIDE TIME
TEXT COPY
RELAY REC
RETURN Return to the category display.
D-BASS Adjust the level of low frequencies. 94
TONE
MANUAL EQ
SPRM Sets SPRM (Supreme) to OFF/ON. 98
BestFit EQ EX Sets BestFit EQ EX. 98
HR SOUND
BALANCE
RETURN Return to the category display.
at the specified time of the day on the specified day(s) of the
week.
Sets whether the digital or analog signal is used in recording
of CD in SD/USB.
Sets whether the file is divided (for marking distinctions’
between music tunes) automatically or manually during
recording in SD/USB.
Set the interval for dividing files (for marking distinctions
between music tunes) during recording of radio broadcasting,
etc. in SD/USB.
Sets copy of the CD-TEXT information together with the CD
audio recorded into SD/USB.
Sets whether or not recording is relayed from SD1 to SD2
when recording TUNER/AUX/iPod/D.AUDIO into SD.
Adjust the levels of the low frequencies (BASS) and high
frequencies (TREBLE).
Adjust the level of each of the seven frequency bands and
registers up to three combinations of settings.
*
Sets HR SOUND to OFF/ON. 99
*
Adjust the balance between the left and right speaker levels. 99
72 −
84 −
95
95
Creating the desired sound setting
92
K-511USB/RD -K511USB
English
93
Page 48

Making the sound setup using the Setup menu
TONE
D-BASS
BEST FIT
EQ EX
ENTER
RETURN
FLAT
SPRM
MANUAL EQ
MULTI CONTROL
SETUP
F
STOP
Enhancing the bass tone (DBASS)
The level of reproducing the low frequencies can
be adjusted in the range between "0" (OFF) and
"10".
Select "D-BASS".
1
Press [MULTI CONTROL A/B]
to select, then press [ENTER].
Adjust the enhancement level.
2
Press [MULTI CONTROL A/B].
The level can be adjusted in the increment/
decrement of 1.
"D-BASS" lights up when
this setting is made.
Enhancing both bass and treble
(TONE)
The volume levels of the low frequencies (BASS)
and high frequencies (TREBLE) can be enhanced
or attenuated independently in 2 dB increments/
decrements in the range between "−8 dB" and "+8
dB".
Select "TONE".
1
Press [MULTI CONTROL A/B]
to select, then press [ENTER].
Select the group of frequencies to
be enhanced/attenuated and adjust
2
its level as desired.
To select the frequency group
Press [MULTI CONTROL C/D] to
select low frequencies (BASS)
or high frequencies (TREBLE).
To adjust the level
Enter the selection.
3
Press [ENTER].
Pressing [FLAT] ends the TONE setting after saving the
•
last condition. Pressing [FLAT] again resets it to the
original setting.
To set using [TONE] of the remote control unit
Press [TONE].
Each press switches ON/OFF. Perform the
setting with the operations in steps 2 and 3.
94
K-511USB/RD -K511USB
Enter the selection.
3
Press [ENTER].
Pressing [FLAT] ends the D-BASS setting after saving
•
the last condition. Pressing [FLAT] again resets it to the
original setting.
To set using [D-BASS +/–] of the remote control unit:
Press [D-BASS +/–].
Press [MULTI CONTROL A/B].
When the low frequency
(BASS) level is attenuated
by "−2dB".
When the high
frequency (TREBLE) level
is enhanced by "+6dB".
"TONE" lights up when
this setting is made.
English
Creating the desired sound setting
95
Page 49

Making the sound setup using the Setup menu
Setting the desired sound
properties (MANUAL EQ)
The level of reproducing each of the seven frequency bands
(represented by center frequencies) can be enhanced or attenuated
independently. Three combinations of these settings can be registered
as user setups and later used according to the genres of music.
Select "MANUAL EQ".
1
Press [MULTI CONTROL A/B]
to select, then press [ENTER].
Select the user setup number to be used.
2
Press [MULTI CONTROL A/B]
to select, then press [ENTER].
Each press switches the selection.
USER 1
USER 2
USER 3
RETURN
Select the frequency band (center frequency)
3
to be adjusted and adjust its level as desired.
To select the frequency group
Press [MULTI CONTROL C/D].
Frequency band (center frequency)
USER 1 setup
USER 2 setup
USER 3 setup
The display returns to
the "SOUND SETUP"
display.
The level bar of the
selected frequency band
blinks.
Example) When 400 Hz is
selected
63Hz
160Hz
400Hz
1kHz
2.5kHz
6.3kHz
16kHz
For the frequency bands, see
"Essences of sound setup".
(page 97)
To adjust the level
Press [MULTI CONTROL
A/B].
The level can be adjusted in 1 dB increments/
decrements in the range between −6 dB and +6dB.
When the level of 400 Hz
band is set to −6dB
"M-EQ" lights when this
setting is made.
Enter the selection.
4
Press [ENTER].
Pressing [FLAT] ends the MANUAL EQ setting after saving
•
the last condition. Pressing [FLAT] again resets it to the
original setting.
To set using [MANUAL EQ] of the remote control unit:
Press [MANUAL EQ].
Each press switches the setup number to be
used. Perform the setting with the operations
in steps 3 to 4.
Recalling a user setup of sound
properties (MANUAL EQ)
Select the user setup number to be
1
used.
Press [MANUAL EQ].
Each press switches the selection.
MANUAL EQ OFF
USER 1
USER 2
USER 3
MANUAL EQ is canceled.
USER 1 setup
USER 2 setup
USER 3 setup
Essences of sound setup
Frequency band (center frequency)
Heavy bass band (63 Hz) Increasing this level reproduces the low-frequency instruments such as the bass
Bass
Bass band (160 Hz) With Japanese-style houses that are less tightly close to European-style houses,
Mid-bass band (400 Hz) This band is the basis of music and determines the richness of music. If the audio is
Mid band (1 kHz) This Mid band affects most the music featuring the vocal, either enhancing or
Mid-treble band (2.5 kHz) When increased, this band makes the sound more stimulating, metallic or hard. This
Treble band (6.3 kHz) This band effects the image of music such as the hardness or softness. Increasing its
Ultrahigh treble band
(16 kHz)
Treble
and bass drum in a heavy, stable tone. If very low frequencies are too noticeable
during listening, decrease this level to an appropriate level.
the resonant frequency of the listening room is often located in this band, so the
low frequencies tend to be exaggerated. In this case, it is often recommended to
decrease this level to reduce resonance in the listening room.
felt poor, it is recommended to increase this level slightly to enrich the sound.
attenuating the feeling of presence of the vocal according to its level. It is also
associated with the depth of music.
band can represent freshness or brightness according to the setting, but too much
enhancement may sometimes render the sound noisy.
level enriches the sounds of strings (violin, etc.) or wind instruments (flute, piccolo,
etc.), but decreasing its level makes these sounds rather quiet.
This band affects the expansion and quality of sound. Increasing its level represents
the ultrahigh-frequency instruments (triangle, cymbal, etc.) brilliant at the same
time as increasing the expansion and delicacy of their sounds.
Essences of sound setup
Creating the desired sound setting
96
Each press switches the selection.
K-511USB/RD -K511USB
English
97
Page 50

Making the sound setup using the Setup menu
Reproducing audio with sound
properties close to the original
(SPRM: Supreme)
When the played audio le lacks high frequencies
due to compression used in recording, this function
optimizes the reproduced audio using Kenwoodoriginal technology.
SPRM is valid in playback of SD1, SD2 and USB.
•
Select "SPRM".
1
Press [MULTI CONTROL A/B]
to select, then press [ENTER].
"SPRM" lights when "ON"
is selected.
Select ON/OFF.
2
Press [MULTI CONTROL A/B]
to select, then press [ENTER].
With the remote control unit, this function can be set
•
with the CD, SD and USB audio sources.
To set using [SPRM] of the remote control unit
Press [SPRM].
Each press switches ON/OFF.
Playing best- t sound according
to genre (BestFit EQ EX)
This function reproduces the optimum sound
according to the genre of music.
Select "BestFit EQ EX".
1
Press [MULTI CONTROL A/B]
to select, then press [ENTER].
" " lights when ON is
selected.
Select one of the preset modes.
2
Press [MULTI CONTROL A/B].
Each press switches the selection.
OFF
Vocal High
Vocal Low
Radio mode
BestFit EQ EX is
canceled.
女性ボーカルの声を
明瞭に再生します。
男性ボーカルの声を
明瞭に再生します。
ラジオ放送のパーソナリ
ティーの声などを明瞭に再
生します。
Enter the selection.
3
Press [ENTER].
Pressing [FLAT] ends the BestFit EQ EX setting after
•
saving the last condition. Pressing [FLAT] again resets it
to the original setting.
BestFitEQEXを設定するとMANUALEQが解除
•
されます。
Playback with high sound
quality
(HR SOUND)
This is Kenwood-original sound quality
improvement technology, which is capable of
reproducing the CD audio with lower distortion as
well as audio les.
HRSOUND以外の音質設定がOFFのときに有効で
•
す。
Select "HR SOUND".
1
Press [MULTI CONTROL A/B]
to select, then press [ENTER].
"SPRM" lights when "ON"
is selected.
Select ON/OFF.
2
Press [MULTI CONTROL A/B]
to select, then press [ENTER].
Setting the left and right
speaker balance (BALANCE)
Adjust the balance of volume between the left and
right speakers.
Select "BALANCE".
1
Press [MULTI CONTROL A/B]
to select, then press [ENTER].
Adjust the balance position.
2
Press [MULTI CONTROL C/D].
Enter the selection.
3
Press [ENTER].
Resetting the adjusted
frequency characteristics to the
original sound (FLAT)
All of the adjustments set with D-BASS, TONE,
MANUAL EQ, SPRM and BestFit EQ EX can be reset
to the at condition to reproduce the original
sound as it is.
Press [FLAT].
1
Press [FLAT].
Each press switches ON/OFF.
When ON is selected,
lighted indicators such as
"TONE" and "D-BASS" are
turned o .
If the D-BASS, TONE, MANUAL EQ, SPRM and BestFit EQ EX
•
settings are not adjusted after FLAT is set to ON, pressing
FLAT again to OFF recalls their previous settings.
Creating the desired sound setting
98
K-511USB/RD -K511USB
To set using [BEST FIT EQ EX] of the remote control unit:
Press [BEST FIT EQ EX].
Each press switches the preset mode.
English
99
Page 51

Additional Information
Media Usable With This System
Medium
USB flash
memory
Icon on this system
USB
USB mass storage class-
compatible digital
audio player
SD/SDHC card
TM
card
SD
CD
miniSD
micro SD/SDHC card
Commercially available CD
CD-R/CD-RW
recorded in
CD-DA format
CD-ROM/CDR/CD-RW
recorded
MP3/WMA/AAC/WAV
in
Copyright Information
Note
Do not connect a component other than a USB flash memory or a
•
USB mass storage class-compatible digital audio player to the
USB] terminal. Kenwood will not assume any liabilities for
[
the malfunction, damage or loss of data that may result from
connection of other kind of component.
An SD/SDHC card of 128 MB to 32 GB can be used. SD/SDHC cards
•
with transfer rate of Class 4 or higher are recommended.
A special adapter is required for using a miniSD/microSD card.
•
A multimedia card (MMC) cannot be used.
•
Discs that do not comply with the CD standards, such as the copy-
•
controlled CD may sometimes be unable to be played.
Finalizing is required after disc writing.
•
The CD-ROM, CD-R and CD-RW may sometimes unable to be played
•
with this system depending on the equipment use for recording, the
recording conditions and the type of disc.
Caution for Disc Writing
A disc recorded with the packet write method or UDF (Universal Disc Format) cannot be played back.
•
Be sure to close the session or nalize the disc after writing. A disc that has not been closed or nalized may be unable to be
•
played properly.
The written folder and le names may not be displayed properly depending on the speci cations of the software used in
•
writing.
When a multi-session disc or a disc containing a large number of folders is played, the time before playback starts may be
•
longer than ordinary discs.
If both audio les and CD les (CD-DA format) are written on a single disc, it may be unable to be played properly.
•
Before writing audio les in a disc, make sure that the PC used in writing can play the les properly. After writing, also
•
con rm that the written les can be played properly.
Make sure that audio lenames have proper extensions (mp3, wma, m4a). A le without the extension cannot be played.
•
Also, do not put extension (mp3, wma, m3a) to a le that is not an audio le. For the le extensions, see "Playable audio
les". (page 102)
Caution for Transport or Movement
Before transporting or moving the system, prepare it as described below.
Remove the external components including the USB device, SD cards and CD.
1
Press [SD1E], [SD2E] and [CD
2
Wait a while, and then turn the system OFF.
3
If any other external component is connected, make sure that it is turned OFF before disconnecting the
4
connection cable.
E
] and con rm that "NO CARD" or "NO DISC" is displayed.
Memory Backup
The setups in the system are backed up for about a day even after the power cord has been unplugged from the
power outlet.
The backed-up setups are as follows.
100
Materials recorded from broadcasting, CDs, discs or other recorded materials (music tapes, karaoke tapes, etc.) are
•
protected by the copy right just like the verses and melodies of songs.
The copyright law prescribes that the permission from the copyright owners is required to sell, distribute, transfer
•
or lend the materials recorded from the above recorded materials or to use them on a commercial basis (including
background music in shops, etc.).
K-511USB/RD -K511USB
Sound and system setups
Input selection
•
Volume setting
•
Balance setting
•
Input level setting
•
D-BASS, MANUAL EQ and
•
SPRM function settings
Timer settings
•
DIMMER setting
•
A.P.S.setting
•
Tuner setups
Preset stations
•
Tuning mode
•
(Auto/manual tuning)
Receiving band
•
Receiving frequency
•
Recording setups
Record mode
•
Recording speed
•
TEXT COPY setting
•
Recording level setting
•
DIVIDE TIME setting
•
AUTO DIVIDE setting
•
English
Maintenance
101
Page 52

Additional Information
Playable audio les
MP3 le
File format: MPEG 1 Audio Layer 3/ MPEG 2 Audio Layer 3/
MPEG 2 Audio Layer 3 Lower sampling rate (MPEG2.5)
File extension: .mp3
Sampling frequency:
MPEG 1 Audio Layer 3: 32 kHz/44.1 kHz/48 kHz
MPEG 2 Audio Layer 3: 16 kHz/22.05 kHz/24 kHz
MPEG 2.5: 8 kHz/11.025 kHz/12 kHz
Bit rate:
MPEG 1 Audio Layer 3: 32 kbps − 320 kbps
MPEG 2 Audio Layer 3: 8 kbps − 160 kbps
MPEG 2.5: 8 kbps − 160 kbps
WMA le
File format:
Windows Media™ Audio compliant
File extension: .wma
Sampling frequency: 32 kHz/44.1 kHz/48 kHz
Bit rate: 48 kbps − 192 kbps
Files created with the following functions provided
•
Windows Media™ Player 9 or after cannot be played back:
- WMA Professional
- WMA Lossless
- WMA Voice
WAV le
File format: Linear PCM
File extension: .wav
Sampling frequency: 44.1 kHz/48 kHz
Bit rate: 1411 kbps
AAC le
File format: MPEG-4 AAC (created using iTunes™ 4.1 to 7.7)
File format: .m4a
Sampling frequency: 16 kHz/22.05 kHz/24 kHz/32 kHz/
44.1 kHz/48 kHz
Bit rate: 32 kbps − 320 kbps
Files created using the Apple™ lossless encoder cannot be
•
played back.
This system can play CD-ROM, CD-R, CD-RW, SD and USB
containing the recording of following audio les.
Disc formats
ISO 9660 Level 1
ISO 9660 Level 2
Joliet
Romeo
SD/USB compatible le systems
FAT16
FAT32
File number limits
Maximum number of folders/ les: Total 1000
Maximum number of folders: 200
Maximum number of les per folder: 255
Maximum number of displayable
characters
Folder name: 64 characters
Filename: 64 characters (including extension)
Tag display (Title/Album/Artist)
ID3 v1.0/ 1.1: 30 characters
ID3 v2.2/ 2.3/ 2.4: 128 characters
•
The non-displayable character is displayed as "*".
Other cautions
•
Even audio les compliant to the above standard may be
unable to be played depending on the characteristics and
recording conditions of the disc.
•
Playback may sometimes be impossible depending on the
speci cations and setup of the software used in encoding.
•
Files with DRM (Digital Rights Management) cannot be
played back.
•
Audio les encoded in VBR (Variable Bit Rate) may contain
data outside the compatible bit rate of this system. Such
audio les containing incompatible bit rates cannot be
played back.
Order of playback of folders and audio les
Audio les in the root directory are played rst. The following diagram shows how this system selects the stored audio
les.
Folder con guration example
Root
F0_1.MP3
F0_2.MP3
F0_3.WMA
RED_1.MP3
RED_2.MP3
BLUE_1.WMA
BLUE_2.WMA
RED
KWD
BLUE
Audio les recorded
with this system
A_A001
T001_title.WMA
T002_title.WMA
T003_title.WMA
A_A002
T001_title.WAV
T002_title.WAV
SKY
SKY_1.WMA
SKY_2.WMA
SKY_3.WMA
: Folder
Order of audio file playback
1st F0_1.MP3
nd
: F0_2.MP3
2
rd
: F0_3.WMA
3
th
: RED_1.MP3
4
th
: RED_2.MP3
5
th
: T001_title.WMA
6
th
7
: T002_title.WMA
th
: T003_title.WMA
8
th
: T002_title.WAV
9
th
: T002_title.WAV
10
th
: BLUE_1.WMA
11
th
: BLUE_2.WMA
12
th
: SKY_1.WMA
13
th
: SKY_2.WMA
14
th
: SKY_3.WMA
15
: File
Maintenance
102
K-511USB/RD -K511USB
English
103
Page 53

Additional Information
Handling of CD
Handling precautions
Hold a CD taking care not to touch the played surface.
Discs playable on the system
This system can play back the audio part of a CD (12 cm,
•
8 cm), CD-ROM, CD-R, CD-RW or CD-EXTRA disc.
The 8 cm CD adapter cannot be used.
•
Notes on CD-ROM/CD-R/CD-RW discs
If the CD-ROM, CD-R or CD-RW disc in use has a printable
label surface, the disc may be unable to be taken out
of the system due to sticking of the label surface. To
prevent malfunction of the system, do not use such a
disc.
Cautions on CD discs
Always use a disc carrying the marking.
A disc without this marking may be unable to be played
back correctly.
The disc rotates at a high speed during playback.
Never use a cracked, chipped or greatly warped disc.
Otherwise, damage or malfunction of the player may
result.
Also, do not use a disc with a non-circular shape as this
may result in malfunction.
Handling of USB device
Handling precautions
•
Be sure to read the instruction manuals provided with
each USB device.
•
The USB device is not provided with this system.
•
The [ USB] terminal on the front panel of the main
unit is USB2.0 (Full speed) compatible.
•
It is not permitted to connect a USB device through a USB hub.
•
The data saved in the USB device may be lost depending
on the usage conditions. Kenwood will not assume any
liabilities for the damage incurred due to loss of saved data.
Usable USB devices
The following restrictions are applicable to the type and
operating method of the USB device.
•
The USB device should be USB mass storage class
compatible. For whether each USB device is compatible
with the USB mass storage class, consult its dealer.
•
The maximum current drain should be no more than
"500 mA".
If a USB device other than speci ed above is used, the
music les may be unable to be played correctly. Also,
note that even a USB device complying with the above
speci cations may be unable to play certain music les
depending on the type or condition of the music les.
Handling iPod
Handling precautions
Handling of D.AUDIO
Handling precautions
Be sure to read the instruction manual provided with your
•
kenwood digital audio player.
The kenwood digital audio player is not provided with this
•
system.
The saved data may be lost depending on the operating
•
situations of the kenwood digital audio player. Kenwood
will not assume any liabilities for the damage incurred
due to loss of saved data.
Usable D.AUDIO
To control a kenwood digital audio player iPod from the
•
main unit or remote control unit, the PNC-150 Kenwood
Digital Audio Player Connection Cable is necessary.
Usable kenwood digital audio player models
HDD audio
player
HD20GA7 MGR-A7/M2GD55/
Memory audio
player/recorder
M1GD55/M1GC7/M2GC7
(as of Aug. 2008)
Handling of SD card
Handling precautions
•
Be sure to read the instruction manual provided with your
SD card.
•
The SD card is not provided with this system
•
The saved data may be lost depending on the operating
situations of the SD card. Kenwood will not assume any
liabilities for the damage incurred due to loss of saved
data.
Note for disposal/transfer of SD card
The "formatting" and "deletion" functions of this
system and a PC consist simply of modifying the le
management, and do not erase the data in the SD
card completely. Before disposing of or transferring
an SD card, it is recommended to destroy the SD card
physically or erase the data in it completely by running
commercially available data erasure software on a PC.
The data in the SD card should be managed on the user’
s own responsibility.
SD card (Write protect switch)
The SD card a switch for inhibiting data write in it. Set
the switch to "LOCK" when you want to protect the
written data. Set the switch to the unlock position
before starting recording, transfer, editing or deletion of
the data.
104
K-511USB/RD -K511USB
•
Be sure to read the instruction manuals provided with
your iPod.
•
The iPod is not provided with this system.
•
The saved data may be lost depending on the operating
situations of the iPod. Kenwood will not assume any
liabilities for the damage incurred due to loss of saved data.
Usable iPod
•
To control an iPod from the main unit or remote control
unit, the PAD-iP7 iPod Dock is necessary. For the usable
iPod models, refer to the manual for the PAD-iP7.
Write protected
Unlocked
English
Maintenance
105
Page 54

Message List
Displayed Message Description
AUTO PRESET Auto Preset is underway for presetting radio stations automatically.
CAN'T EDIT The SD/USB cannot be edited.
Can't fix title An error occurred during entry of the DB title information.
Can't load Title Multiple tiles were hit but the title acquisition failed.
CAN'T PLAY An attempt was made to play a copyright protected file.
CAN'T READ Files in SD/USB cannot be read.
Can't Rec.
(***: Medium name)
Check *** No Capacity
(***: Medium name)
CHECK CLOCK An attempt was made to set the timer while the clock is not adjusted.
CHECK DISC
DATA BASE exists in SD An attempt was made to format the SD card containing a copy of the AMG database.
Don't remove ***
(***: Medium name)
EDIT FAILURE An error occurred during SD/USB editing.
Edit now Locked keys. A button was pressed during editing.
END OF TIMER The system is turned OFF by the program timer/sleep timer.
Failed DB search CD database search failed.
Failed MOVE Check ***
(***: Medium name)
FORMAT Locked keys A button was pressed during formatting.
Insert DB SD into SD2 slot An SD card containing a copy of the AMG database is inserted in the SD1 slot.
no available An error occurred during CD database search (no candidate in the DB).
No candidate No title was hit in CD database search.
NO CARD No SD card is inserted.
NO DISC No CD disc is loaded.
NOT CONNECTED
Recording could not be started because it was impossible because the medium
cannot be read, etc.
Recording was attempted but the medium does not have enough capacity.
*1
TOC
data cannot be read.
•
The disc is not inserted properly.
•
RECORD/MOVE/FORMAT is underway.
An error occurred during MOVE or the SD/USB is write protected.
No USB device is connected.
•
An attempt was made to perform REC or MOVE while no USB device is connected.
•
Displayed Message Description
Not fixed CD title
NOT FOUND There is no file that can be read by this system.
Now Moving Locked keys. A button was pressed during MOVE.
PGM FULL
Please Change Normal Speed
RANDOM MODE
PROTECTED The SD card is write protected.
SCMS
Searching Time-Out DB title search was aborted forcibly.
SETUP TIMER The system is turned OFF because the program timer is set.
Stopped DB searching DB title search was aborted forcibly.
*** Folder No. limit (***: Media) The folder number in the KWD folder has reached "A_Z999".
*1: The CD contains information called TOC (Table Of Contents) in addition to audio signals. Like the table of contents of
a book, the TOC includes non-rewritable information among the information on the disc such as the number of tracks,
playing time and other character information.
An attempt was made to start One-Touch Edit recording
while the title information is not acquired from the AMG database.
An attempt was made to program a 33rd track for program playback.
(Programming is possible up to 32 tracks.)
When 4x-speed recording into a USB device is attempted.
•
When write in a SD/USB device is not possible with the 4x speed.
•
An attempt was made to start One-Touch Edit recording in the middle of CD random playback.
(Random playback should be canceled.)
An attempt was made to record the digital signal of a digital copy-controlled source.
(Digital recording is not available. Switch to analog recording.)
Maintenance
106
K-511USB/RD -K511USB
English
107
Page 55

Troubleshooting
A trouble with the system does not always mean the failure. Before calling for service, check the following table
according to the symptom of trouble.
CD Block
Symptom Remedy See page
Ampli er/Speaker Blocks
Symptom Remedy See page
Reconnect the cords properly.
•
Increase the volume level.
No audio output.
The standby/timer indicator blinks in
red and no audio is output.
No audio from headphones.
No audio from one of the speakers. Reconnect the cords properly.•12
The time of the day is not displayed. Adjust the clock.•77
Timer cannot be activated.
•
Set [MUTE] to OFF.
•
If headphones are plugged in, unplug them.
•
The speaker cords may be short-circuited. Unplug the power
•
cord and reconnect the speakers.
An internal fault may be produced. Turn the system OFF, unplug
•
the power cord and call for service.
Check if headphone plug is inserted properly.
•
Increase the volume level.
•
Set [MUTE] to OFF.
•
Adjust the clock.
•
Set the On time and Off timer of program timer.
•
12
22
22
15
14
—
15
22
77
78
Loaded CD cannot be played back.
CD audio is not output.
CD sound skips.
An audio file cannot be played.
Playback takes time before starting.
The tag data is not displayed
correctly.
Even when [L] is pressed, "LOCKED"
is displayed and the disc will not
come out.
Place the CD properly with the label side up.
•
Clean the disc.
•
Wait until the condensation on the disc surface evaporates.
•
Press [CDE].
•
Clean the disc.
•
Playback is impossible if the audio file is destroyed.
•
Check if the audio file is playable with this system.
•
Playback is impossible if the audio file is destroyed.
•
Check if the audio file is playable with this system.
•
The time until playback may become long if there are large
•
number of folders and/or files.
Check if the tag data is of the type displayable with this system.•25
Unplug the power cord from the power outlet and, while
•
pressing and holding [K], plug the power cord again.
SD Block
Tuner Block
Symptom Remedy See page
Radio stations cannot be tuned.
Noise interferes with reception.
After Auto Preset, no station can be
received by pressing [P.CALL].
Remote Control Unit
Symptom Remedy See page
Remote control is unavailable.
Connect the antenna(s).
•
Select the appropriate broadcasting band (tuning mode).
•
Tune into the frequency of the desired station.
•
Install the outdoor antenna away from the road.
•
Turn OFF the electric appliances installed near this system.
•
Install the system away from a TV set.
•
Perform Auto Preset again.
•
Preset stations with receivable frequencies manually.
•
Replace the batteries with new ones.
•
Use the remote control unit within the controllable distance.
•
No sound is output even when an
12
44
44
—
46
48
11
SD card is inserted.
Recording stops in the middle.
Recording or editing is impossible.
Some folders cannot be found after
recording.
A folder cannot be erased.
No folder and file in the SD card is
displayed.
Symptom Remedy See page
Insert the SD card properly.
•
Insert an SD card containing music files.
•
The SD card may not have enough capacity for recording. If
•
there are no unnecessary audio files, replace the SD card with a
recordable SD card.
If the write protect switch is set to "LOCK", set the switch to the
•
unlock position.
Replace the SD card with a recordable SD card.
•
Select the audio source you want to record.
•
The number of folders has reached 200. Delete unnecessary
•
folders.
The SD card may contain files other than audio files. Check the
•
SD card content on your PC.
The data in the SD card may be destroyed or the SD card may
•
contain files that cannot be recognized with this system.
23
112
112
28
112
102
102
—
110
23
66
105
—
—
66
—
—
Maintenance
108
K-511USB/RD -K511USB
English
109
Page 56

Tro ub le sh ooti ng
Glossary
USB Block
Symptom Remedy See page
Sound is not output even when
a USB flash memory or USB mass
storage class-compatible audio
player is connected.
Error message "NOT FOUND" is
displayed even when the drive is
switched.
A folder cannot be erased.
Insert the USB flash memory properly.
•
Connect the USB cable properly.
•
Check if the USB mass storage class-compatible digital audio
•
player is turned ON.
Insert an SD card containing music files.
•
Insert an SD card in the drive.
•
The USB flash memory or USB mass storage class-compatible
•
digital audio player may contain files other than audio files.
Check the content on your PC.
Component connected to iPod/D.AUDIO connector
Symptom Remedy See page
Kenwood digital audio player cannot
be controlled from the main unit or
remote control unit.
Connect using the PNC-150 connection cable (separately
•
available).
Check if a compatible model is connected.
•
Resetting the system
Symptom Check Points & Remedy
The system may malfunction due to unplugged and plugging of a cable while
the system is ON or to an extraneous cause. In this case, reset the system with the
following steps. Resetting the microcomputer results in erasing the setups of the
system and returns it to the factory-shipped condition.
The system malfunctions (resulting
in inoperability of the system,
erroneous display, etc.).
1 Unplug the power cord from the power outlet.
2 While pressing holding [K] on the main unit, unplug the power cord and plug it
again.
("INITIALIZE" is displayed to indicate that the system is reset.)
14
105
Term Description
AAC
23
37
—
CD-DA Stands for "Compact Disc – Digital Audio". The CD-DA is usually called "CD".
CD-TEXT
MP3
SD memory card
Class2
Class4
Class6
Supreme
USB
USB hub Adapter for connecting more than one USB device simultaneously.
USB mass storage class
VBR (Variable Bit Rate)
WAV This is the Windows standard noncom pressed audio format.
WMA
Sampling frequency
Tag data
Bit rate
Ripping Action of reading digital data from a CD, etc. into a PC.
AAC stands for "Advanced Audio Coding" It is the audio compression method use with
the video compression of digital broadcasting, etc.
Music CD in which the character information such as the disc titles, artist names, track
titles, etc. is recorded.
An audio compression method developed by Faunhofer IIS, Germany. It achieves a high
compression rate by thinning out the data of the sound that is less audible to human
ears. It can compress music CD data into about 1/11 (128 kbps) while maintaining similar
audio quality.
Standard on the data read/write speeds of the SD and SDHC memory cards. Three steps
of Classes 2, 4 and 6 are standardized and their data transfer rates for read/write are
guaranteed respectively at 2 MB/s or more, 4 MB/s or more and 6 MB/s or more. When
writing continual data such as music data, it is required that the card is compatible with a
speed higher than a certain data transfer rate. With this system, it is recommended to use
SD cards of Class 4 or higher.
This is Kenwood-original band interpolation technology for reproducing audio files
in an SD card or USB device with sound properties that are extremely close to the
original properties. It employs a unique algorithm to estimate and interpolate the high
frequencies lost due to compression for natural, realistic reproduction of music.
Standard for interfacing between the PC and peripheral devices. This system is
compatible with USB 1.1 and 2.0.
Standard for controlling a USB device from a PC. Also, refers to the action that a PC
recognizes a USB device connected to it as an external storage device.
Technology for assigning the bits by varying their quantity according to the amount of
music information.
Stands for "Windows Media™ Audio". This is an audio compressed encoding system
developed by Microsoft Corporation.
Number of times analog signal is converted into digital signal per second. It is 44.1 kHz
with music CD. In general, higher sampling frequencies offer higher audio quality.
Information written in audio file, including the title name, artist name, album name and
genre.
Figure expressing the amount of information per second. A higher bit rates offer higher
audio quality.
Maintenance
110
K-511USB/RD -K511USB
English
111
Page 57

Care and Storage
Care and storage of main unit
Do not place in the following locations.
Place exposed to direct sunlight.
•
Place subjected to excessive humidity or dirt.
•
Place exposed to direct heat from heating equipment.
•
Be careful against condensation
When the di erence in temperatures between the
main unit and the environmental air is large, dew
may be condensed inside the main unit and may
cause malfunction of the main unit.If this happens,
leave the main unit for a few hours until its internal
mechanisms are dried up.
Take special care against condensation when the
main unit is moved between places with a large
temperature di erence or into a room with high
humidity.
When a CD becomes dirty:
When the front panel or case gets dirty, wipe with a
soft dry cloth.Do not use lacquer thinner, benzine,
alcohol or contact revitalizer for these chemicals will
cause discoloration or deformation.
Care and storage of CD
Before storing the SD card:
When the main unit is not to be used for a long
period, take out the CD and store in the case.
When a CD becomes dirty:
When a disc is contaminated with ngerprints or other
•
stains, wipe gently in the radial direction using a soft
dry cloth.
Do not use an analog disk cleaner, lacquer thinner,
•
benzine or alcohol.
Do not use a disc accessory (stabilizer, protective sheet,
•
protective ring, etc.) or lens cleaner.
Other cautions
Do not write letters on a CD using a pencil or ballpoint
•
pen.
Do not use a CD if the sticker or label on it is peeled o
•
or bond is over owed around the sticker or label.
Do not stick a sheet of paper, sticker or label on a CD.
•
Care and storage of SD card
Before storing the SD card:
Always store the SD card in its case.
•
Avoid locations with a very high temperature (such as a
•
place exposed to direct sunlight) or high humidity.
When a CD becomes dirty:
•
Wipe gently with a soft, dry cloth.
•
Do not use lacquer thinner, benzine or alcohol.
Other cautions
•
Do not attempt to open or modify a card.
•
Do not peel o the label from the card.
•
Do not attach a label or sticker on the card.
•
Do not touch the metallic terminals on the back side
with a hand or metallic object.
Care and storage of USB device
Be sure to read the instruction manuals provided with
each USB device.
Before using the AMG Database CD provided with this product, the user is requested to agree with the following terms and
conditions.
Macrovision Flow-Down License Terms (Terms of Use)
This application incorporates software and technology of
Macrovision Corporation ("Macrovision"). The Macrovision
software and technology (collectively, the "AMG Technology")
allows End Users to access music-related data ("AMG Data")
over the Internet and otherwise from proprietary AMG
databases (the "AMG Databases") located on AMG servers (the
"AMG Servers") and to perform other functions. You may access
and use AMG Data only by means of the intended End User
functions of this application software.
You agree that you will use the AMG Data, the AMG
Technology, and the AMG Servers for your own personal noncommercial use only. You agree not to assign, copy, transfer or
transmit the AMG Data to any third party. You agree not to use
or exploit AMG Data, the AMG Technology, the AMG Databases,
or the AMG Servers, except as expressly permitted herein.
You agree that your non-exclusive license to access the AMG
Databases and to use the AMG Data, the AMG Technology, and
the AMG Servers will terminate if you violate these restrictions.
If your license terminates, you agree to cease any and all
use of the AMG Data, the AMG Technology, and the AMG
Servers. Macrovision reserves all rights in AMG Data, the AMG
Technology, and AMG Servers, including all ownership rights.
You agree that Macrovision may enforce its rights under this
Agreement against you directly in its own name.
Macrovision reserves the right to delete data from the AMG
Databases or to change data categories for any cause that
Macrovision deems su cient. No warranty is made that
the AMG Technology or AMG Servers are error-free or that
functioning of AMG Technology or AMG Servers will be
uninterrupted. Macrovision is not obligated to provide you
with any new enhanced or additional data types or categories
that AMG may choose to provide in the future and is free to
discontinue its online services at any time.
To the extent that you, the End User, provide any information
or original works of authorship to be added to AMG Databases,
you represent and warrant that you are the sole author of such
work(s) and further hereby assign to Macrovision all rights of
copyright therein, including the right to register the copyright
in such work(s) as part of the AMG Database.
THE AMG TECHNOLOGY AND EACH ITEM OF AMG DATA
ARE LICENSED TO YOU "AS IS". MACROVISION MAKES NO
REPRESENTATIONS OR WARRANTIES, EXPRESS OR IMPLIED,
REGARDING THE ACCURACY OF ANY AMG DATA ON THE
AMG SERVERS. MACROVISION DISCLAIMS ALL WARRANTIES
EXPRESS OR IMPLIED, INCLUDING, BUT NOT LIMITED TO,
IMPLIED WARRANTIES OF MERCHANTABILITY, FITNESS FOR
A PARTICULAR PURPOSE, TITLE AND NON-INFRINGEMENT.
MACROVISION DOES NOT WARRANT THE RESULTS THAT
WILL BE OBTAINED BY YOUR USE OF THE AMG TECHNOLOGY
OR ANY AMG SERVER. IN NO CASE WILL MACROVISION
BE LIABLE TO YOU OR ANY THIRD PARTY FOR ANY
CONSEQUENTIAL OR INCIDENTAL DAMAGES OR FOR ANY
LOST PROFITS OR LOST REVENUES RESULTING FROM YOUR
USE OF AMG DATA, THE AMG TECHNOLOGY OR OTHERWISE.
Maintenance
112
K-511USB/RD -K511USB
English
113
Page 58

Speci cations
Main unit (RD-K511USB)
[Audio section]
Rated power
Output power ……… 20 W + 20 W RMS (1kHz, 10%, 6 Ω)
DIN music power ……………………………24 W + 24 W
[Tuner section]
FM tuner sec tion
Tuning frequency range
…………………… 87.50 MHz – 108 MHz (50 kHz step)
AM tuner section
Tuning frequency range
…………………………531 kHz – 1,602 kHz (9kHz step)
[CD section]
Laser ……………………………… Semiconductor laser
Wow & utter ……………………… Unmeasurable limit
Supporting disc format
……………………… ISO 9660 Level 1/2, Juliet, Romeo
Decording format/type
MP3
MPEG1 Audio layer3
Sampling frequency ………………32k/44.1k/48 kHz
Bit rate …………………………………32k − 320 kbps
MPEG2 Audio layer3
Sampling frequency …………… 16k/22.05k/24 kHz
Bit rate ………………………………… 8k − 160 kbps
MPEG2.5
Sampling frequency …………… 8k/11.025k/12 kHz
Bit rate ………………………………… 8k − 160 kbps
WMA (WMA9 compliant, DRM non-compatible)
Sampling frequency ………………32k/44.1k/48 kHz
Bit rate (CBR/VBR*) ………………… 48k − 192 kbps
AAC (created using iTunes™ 4.1 to 7.7)
Sampling frequency
………………16k/22.05k/24k/32k/44.1k/48 kHz
Bit rate (CBR/VBR*) ……………………32k − 320 kbps
ID3 tag …………… ver. 1.0/1.1/2.2/2.3/2.4 compatible
Maximum number of folders ……………………… 255
Maximum number of les …………………………… 512
[SD card section]
Format ……… SD memory card (Playback /Recording)
Usable SD cards …SD/SDHC, miniSD, microSD/SDHC card
A special adapter is required for using a miniSD/microSD
card. A multimedia card (MMC) cannot be used.
Suppor ting SD card capacit y ………… 128 MB – 32 GB
Supporting le format ………………………… FAT 16/32
Encording format/type
WMA SLQ …………………… 96 kbps/44.1 kHz Stereo
WMA SQ …………………… 128 kbps/44.1 kHz Stereo
WMA HQ…………………… 192 kbps/44.1 kHz Stereo
WAV PCM ………… 1411 kbps/44.1 kHz Stereo/16 bit
Decording format/type
MP3
Sampling frequency …………………… 8k − 48 kHz
Bit rate (CBR/VBR*) ……………………32k − 320 kbps
WMA (WMA9 compliant, DRM non-compatible)
Sampling frequency …………………… 8k − 48 kHz
Bit rate (CBR/VBR*) ………………… 6 4k − 384 kbps
AAC (created using iTunes™ 4.1 to 7.7)
Sampling frequency
………………16k/22.05k/24k/32k/44.1k/48 kHz
Bit rate (CBR/VBR*) ……………………32k − 320 kbps
PCM
Sampling frequency ………………… 44.1k/48 kHz
Bit rate (CBR/VBR*) ………………………… 1411 kbps
ID3 tag …………… ver. 1.0/1.1/2.2/2.3/2.4 compatible
Maximum number of folders ……………… 200 folders
Maximum number of les ……………………… 1000 les
Maximum number of folder levels …………… 10 levels
[USB section]
Format ………………… USB Host (Playback/Recording)
Usable USB devices …… USB mass storage class devices
Interface ……… USB 2.0 (Full speed), USB 1.1 compatible
Supporting le format ………………………… FAT 16/32
Encording format/type
WMA SLQ …………………… 96 kbps/44.1 kHz Stereo
WMA SQ …………………… 128 kbps/44.1 kHz Stereo
WMA HQ…………………… 192 kbps/44.1 kHz Stereo
WAV PCM ………… 1411 kbps/44.1 kHz Stereo/16 bit
Decording format/type
MP3
Sampling frequency …………………… 8k − 48 kHz
Bit rate (CBR/VBR*) ……………………32k − 320 kbps
WMA (WMA9 compliant, DRM non-compatible)
Sampling frequency …………………… 8k − 48 kHz
Bit rate (CBR/VBR*) ………………… 6 4k − 384 kbps
AAC (created using iTunes™ 4.1 to 7.7)
Sampling frequency
………………16k/22.05k/24k/32k/44.1k/48 kHz
Bit rate (CBR/VBR*) ……………………32k − 320 kbps
PCM
Sampling frequency ………………… 44.1k/48 kHz
Bit rate (CBR/VBR*) ………………………… 1411 kbps
ID3 tag …………… ver. 1.0/1.1/2.2/2.3/2.4 compatible
Maximum number of folders ……………… 200 folders
Maximum number of les ……………………… 1000 les
Maximum number of folder levels …………… 10 levels
Maximum supply current ………………………… 500 mA
[General section]
Power consumption ………………………………… 67 W
Dimensions (Max.) …………………………Width 240 mm
Height 122 mm
Depth 362 mm
Weight ……………………………………… 5.0 kg (net)
* VBR audio data may extend outside the compatible bit
rate of this system. Audio les containing such data may
sometimes be unable to be played.
Speakers (LS-K511)
Enclosure …………………………… Bass re ex system
Mounted speaker unit
Woofer ……………………………… 120 mm cone type
Tweeter ………………… 25 mm balanced-dome type
Impeda nce …………………………………………… 6 Ω
Maximum input power ………………………………30 W
Max. dimensions …………………………Width 152 mm
Height 265 mm
Depth 212 mm
Weight ……………………………………… 2.7 kg (1 pc)
•
Design and speci cations are subject to change
without notice.
•
The system may be unable to manifest the full
performance in an extremely cold place (under the
water freezing temperature).
114
K-511USB/RD -K511USB
English
Maintenance
115
Page 59

For your records
Record the serial number, found on the back of the unit,
in the spaces designated on the warranty card, and in the
space provided below. Refer to the model and serial numbers
whenever you call upon your dealer for information or service
on this product.
Model Serial Number
 Loading...