

30 Litre Stainless Steel Combination Microwave
K30CSS10E
instruction manual (GB)
bruksanvisning (NO)
bruksanvisning (SE)
käyttöopas (FI)
brugsanvisning (DK)


Contents
GB
Innhold
NO
unpacking .................................................6
getting ready ............................................7
checking your cooking utensils ....................9
using aluminium foil
in your microwave ..............................................9
microwave heating categories ................... 10
steam ................................................................... 11
condensation .................................................... 11
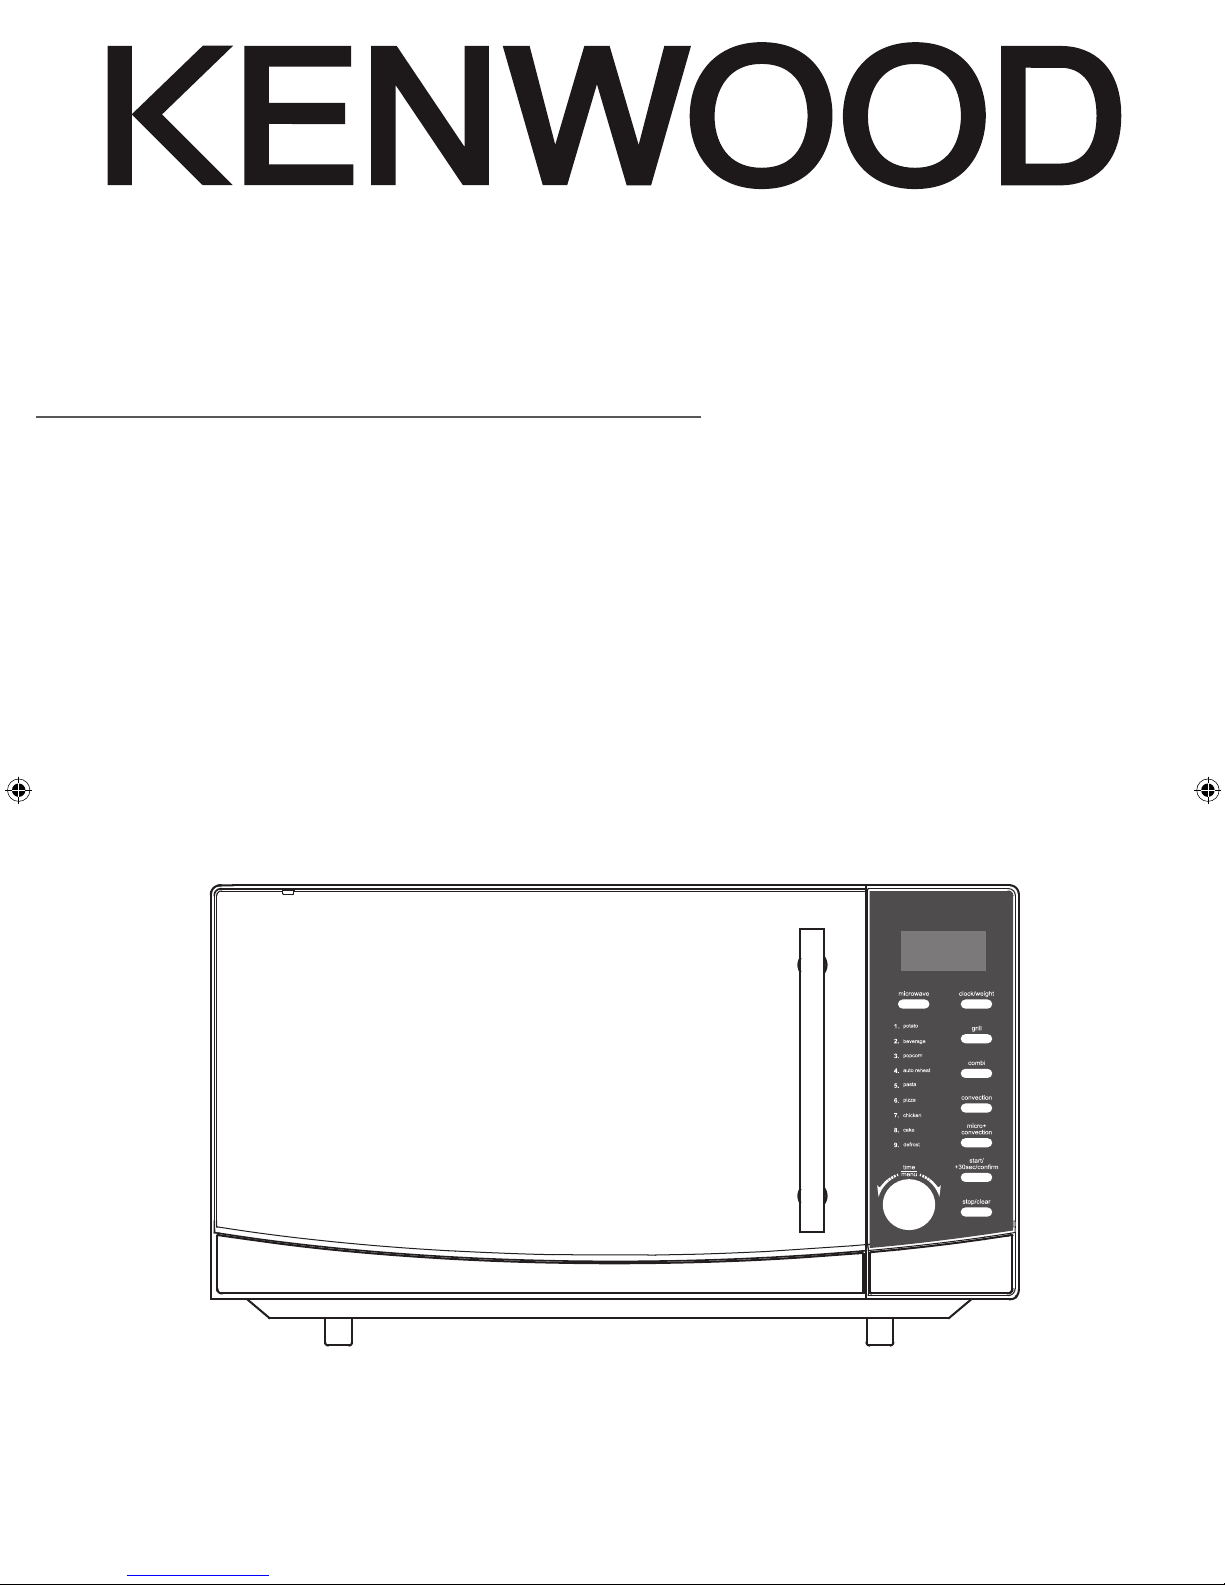
product overview ...................................12
the main unit ..................................................... 12
the control panel ............................................. 12
checking your microwave.....................13
clock setting...........................................14
setting the child lock .............................15
microwave cooking ...............................16
grill or combination cooking ................17
convection combination cooking ........18
convection cooking
(with preheating) ....................................19
convection cooking
(without preheating) ..............................20
multi-stage cooking ...............................21
auto cooking ..........................................22
auto menu .......................................................... 22
auto-cook menu table ................................... 23
defrosting ...............................................24
defrost by time ................................................. 24
quick start cooking................................25
querying the cooking function .............25
to nd out the
current cooking setting ................................. 25
cleaning your microwave......................26
frequently asked questions ..................27
specications.........................................28
safety warnings ...................................121
pakke opp ...............................................29
klargjøring ..............................................30
kontrollere redskaper for tilberedning .... 32
bruke aluminiumsfolie
i mikrobølgeovnen ......................................... 32
oppvarmingskategorier
for mikrobølgeovn .......................................... 33
damp .................................................................... 34
kondens .............................................................. 34
produktoversikt .....................................35
hovedenheten .................................................. 35
kontrollpanelet ................................................. 35
kontrollere mikrobølgeovnen ...............36
klokkeinnstilling ....................................37
aktivere barnesikringen ........................38
mikrobølgekoking ..................................39
grilling eller kombinasjonskoking .......40
konveksjonskombinasjonskoking .......41
konveksjonkoking
(med forvarming) ...................................42
konveksjonkoking
(uten forvarming) ...................................43
ertrinnskoking .....................................44
automatisk tilberedning ........................45
automeny ........................................................... 45
automenytabell ................................................ 46
tining .......................................................47
tining etter tid ................................................... 47
hurtigstartkoking ...................................48
undersøke kokefunksjonen ..................48
slik nner du den gjeldende
kokeinnstillingen ............................................. 48
rengjøre mikrobølgeovnen ...................49
ofte stilte spørsmål................................50
spesikasjoner ......................................51
sikkerhetsadvarsler .............................123

Innehållsförteckning
SE
Sisältö
FI
uppackning ............................................52
förberedelse ...........................................53
kontrollera matlagningsutrustningen ..... 55
använda aluminiumfolie
i din mikrovågsugn ......................................... 55
olika kategorier för
mikrovågsuppvärmning ............................... 56
ånga ...................................................................... 57
kondens .............................................................. 57
produktöversikt .....................................58
huvudenheten .................................................. 58
kontrollpanelen ................................................ 58
kontrollera mikrovågsugnen ................59
klockinställning .....................................60
ställa in barnlåset ..................................61
tillagning i mikrovågsugn .....................62
grill eller kombinationstillagning .........63
konvektionskombinationstillagning ....64
konvektionstillagning
(med förvärmning) .................................65
konvektionstillagning
(utan förvärmning) .................................66
matlagning i era steg ..........................67
automatisk tillagning .............................68
automeny ........................................................... 68
automatisk tillagningstabell ........................ 69
pakkauksesta purkaminen....................75
Valmistelut..............................................76
keittiövälineiden tarkistaminen ................. 78
alumiinifolion käyttäminen
mikroaaltouunissa ........................................... 78
mikroaaltolämpöluokat ................................ 79
höyry .................................................................... 80
tiivistyminen ...................................................... 80
tuotteen yleiskatsaus ............................81
laite ....................................................................... 81
ohjauspaneeli ................................................... 81
mikroaaltouunin tarkistus.....................82
kellon asettaminen ................................83
lapsilukon asettaminen .........................84
mikroaaltouunin käyttäminen...............85
grilli- ja yhdistelmävalmistus ...............86
kiertoilmayhdistelmäkypsennys ..........87
kypsennys kiertoilmalla
(esilämmityksellä)..................................88
kypsennys kiertoilmalla
(ilman esilämmitystä) ............................89
monivaiheinen ruoanvalmistus ............90
automaattinen kypsennys ....................91
automaattivalikko ........................................... 91
automaattinen
kypsennys -valikkotaulukko ........................ 92
upptining ................................................70
upptining efter tid ........................................... 70
snabbstartstillagning ............................71
frågor om tillagningsfunktionen ..........71
ta reda på aktuell
tillagningsinställning ..................................... 71
rengöra mikrovågsugnen .....................72
Vanliga frågor.........................................73
specikationer .......................................74
säkerhetsvarningar .............................125
sulattaminen ..........................................93
sulattaminen ajan mukaan .......................... 93
kypsentämisen pika-aloitus..................94
kysymyksiä kypsennystoiminnosta ....94
saadaksesi selville nykyisen
kypsennysasetuksen ...................................... 94
mikroaaltouunin puhdistaminen ..........95
usein kysyttyjä kysymyksiä..................96
tekniset tiedot ........................................97
turvallisuusvaroitukset .......................127

Indholdsfortegnelse
udpakning ..............................................98
klargøring ...............................................99
introduktion til madlavning i
mikrobølgeovn .....................................100
madlavning med mikrobølgeovn ...........100
efterse dine køkkenredskaber .................. 101
brug af alufolie i din mikrobølgeovn ......101
opvarmningskategorier
for mikrobølger ..............................................102
damp .................................................................. 103
kondensation .................................................. 103
produktoversigt ...................................104
hovedenheden ...............................................104
kontrolpanelet ................................................104
eftersyn af din mikrobølgeovn ...........105
indstilling af uret ..................................106
DK
indstilling af børnesikringen ..............107
madlavning med mikrobølgeovn .......108
grill- og kombinationsmadlavning .....109
varmlufts- og kombinationskogning .110
varmluftskogning
(med forvarmning) ...............................111
varmluftskogning
(uden forvarmning) ..............................112
er-trins madlavning ........................... 113
autom. madlavning .............................. 114
autom. menu ................................................... 114
autom. kogemenuoversigt ........................115
optøning ...............................................116
optøning i forhold til tid..............................116
hurtigmadlavning ................................117
spørgsmål vedrørende
kogefunktionen .................................... 117
sådan ndes de nuværende
kogeindstillinger ............................................ 117
rengøring af din mikrobølgeovn ........118
ofte stillede spørgsmål .......................119
specikationer .....................................120
sikkerhedsadvarsler ............................129
GB
Thank you for purchasing your new Kenwood Combination Microwave.
These operating instructions will help you use it properly and safely.
We recommend that you spend some time reading this instruction manual in
order that you fully understand all the operational features it offers.
Read all the safety instructions carefully before use and keep this instruction
manual for future reference.
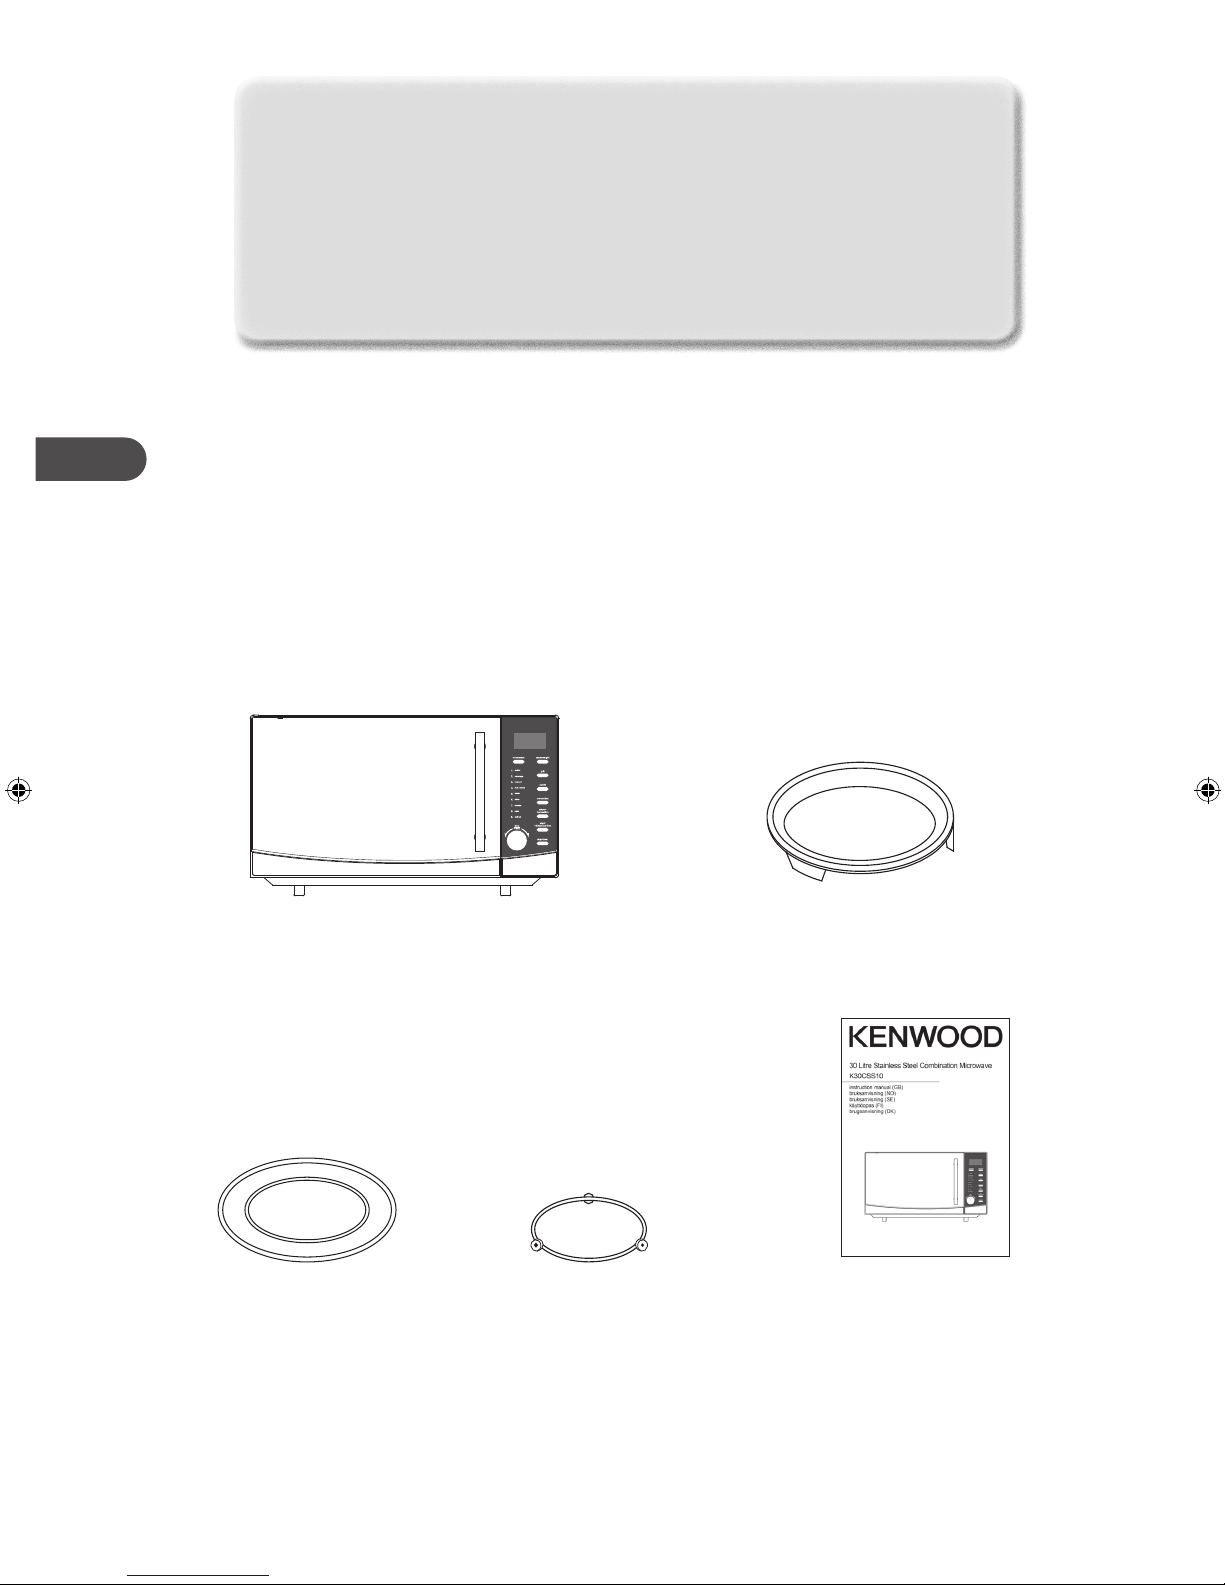
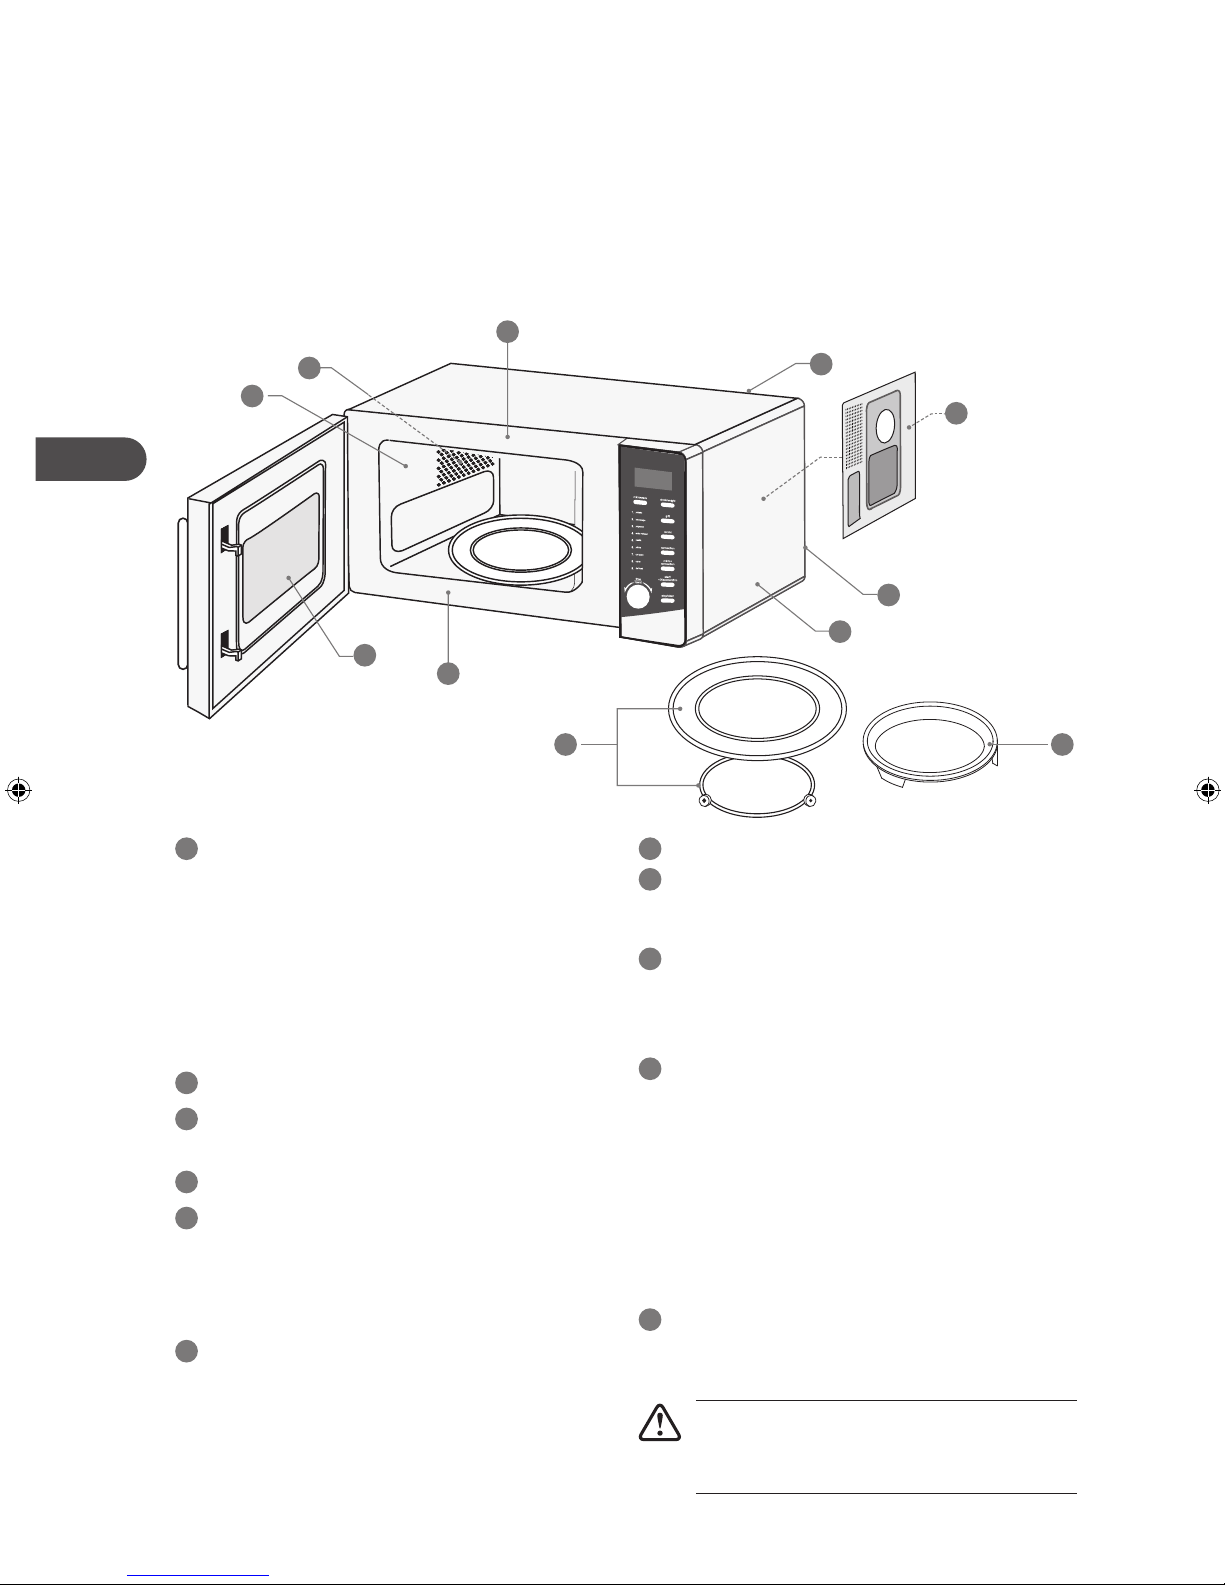
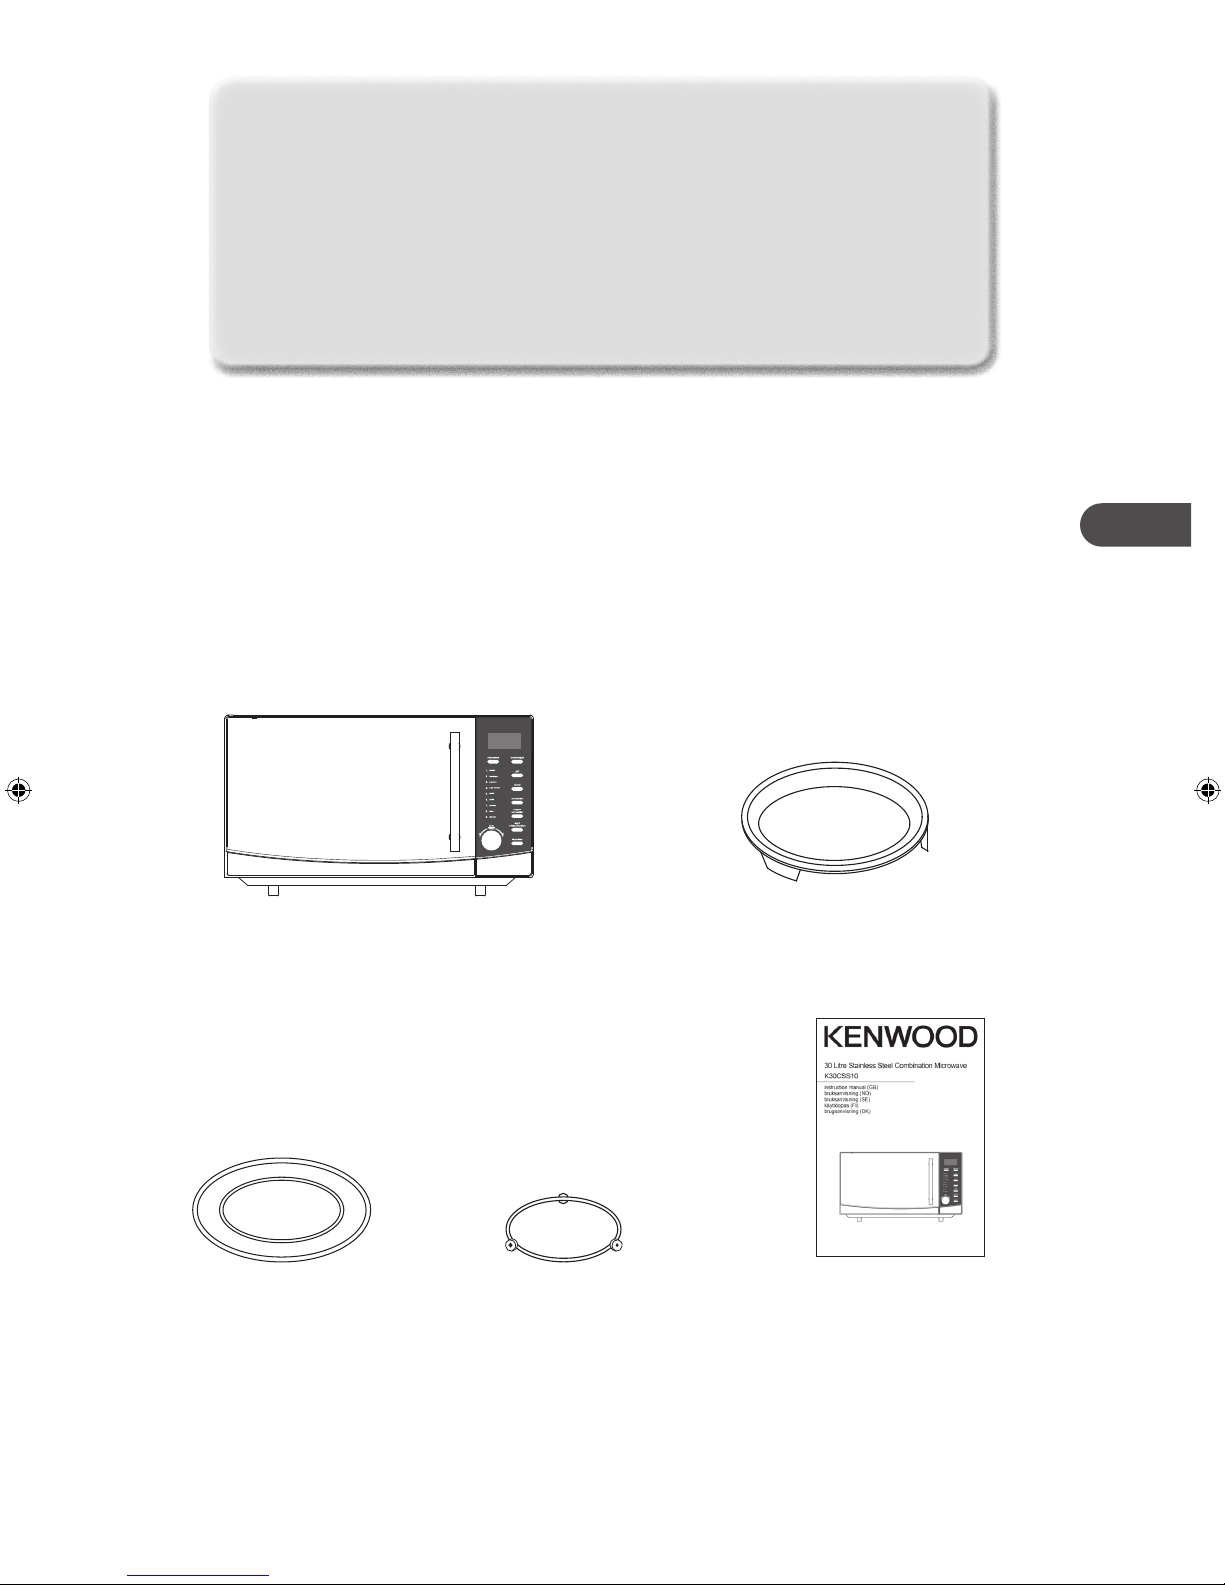
unpacking
Remove all packaging from the unit. Retain the packaging. If you dispose of it please do so
according to local regulations.
The following items are included:
The Main Unit
Glass Turntable Plate x 1 Turntable Support x 1
Baking Plate x 1
Instruction Manual x 1
8
GB
getting ready
This microwave is designed for home use. It should not be used for commercial catering.
1. After unpacking your microwave, check that it has not been damaged whilst in the box. Make
sure there are no dents on the microwave, and the door closes properly. A dented or damaged
microwave could allow microwave energy to escape. Make sure that you have taken all the
packaging from inside the microwave. Please dispose of the plastic wrappings or bags safely
and keep out of the reach of babies and young children.
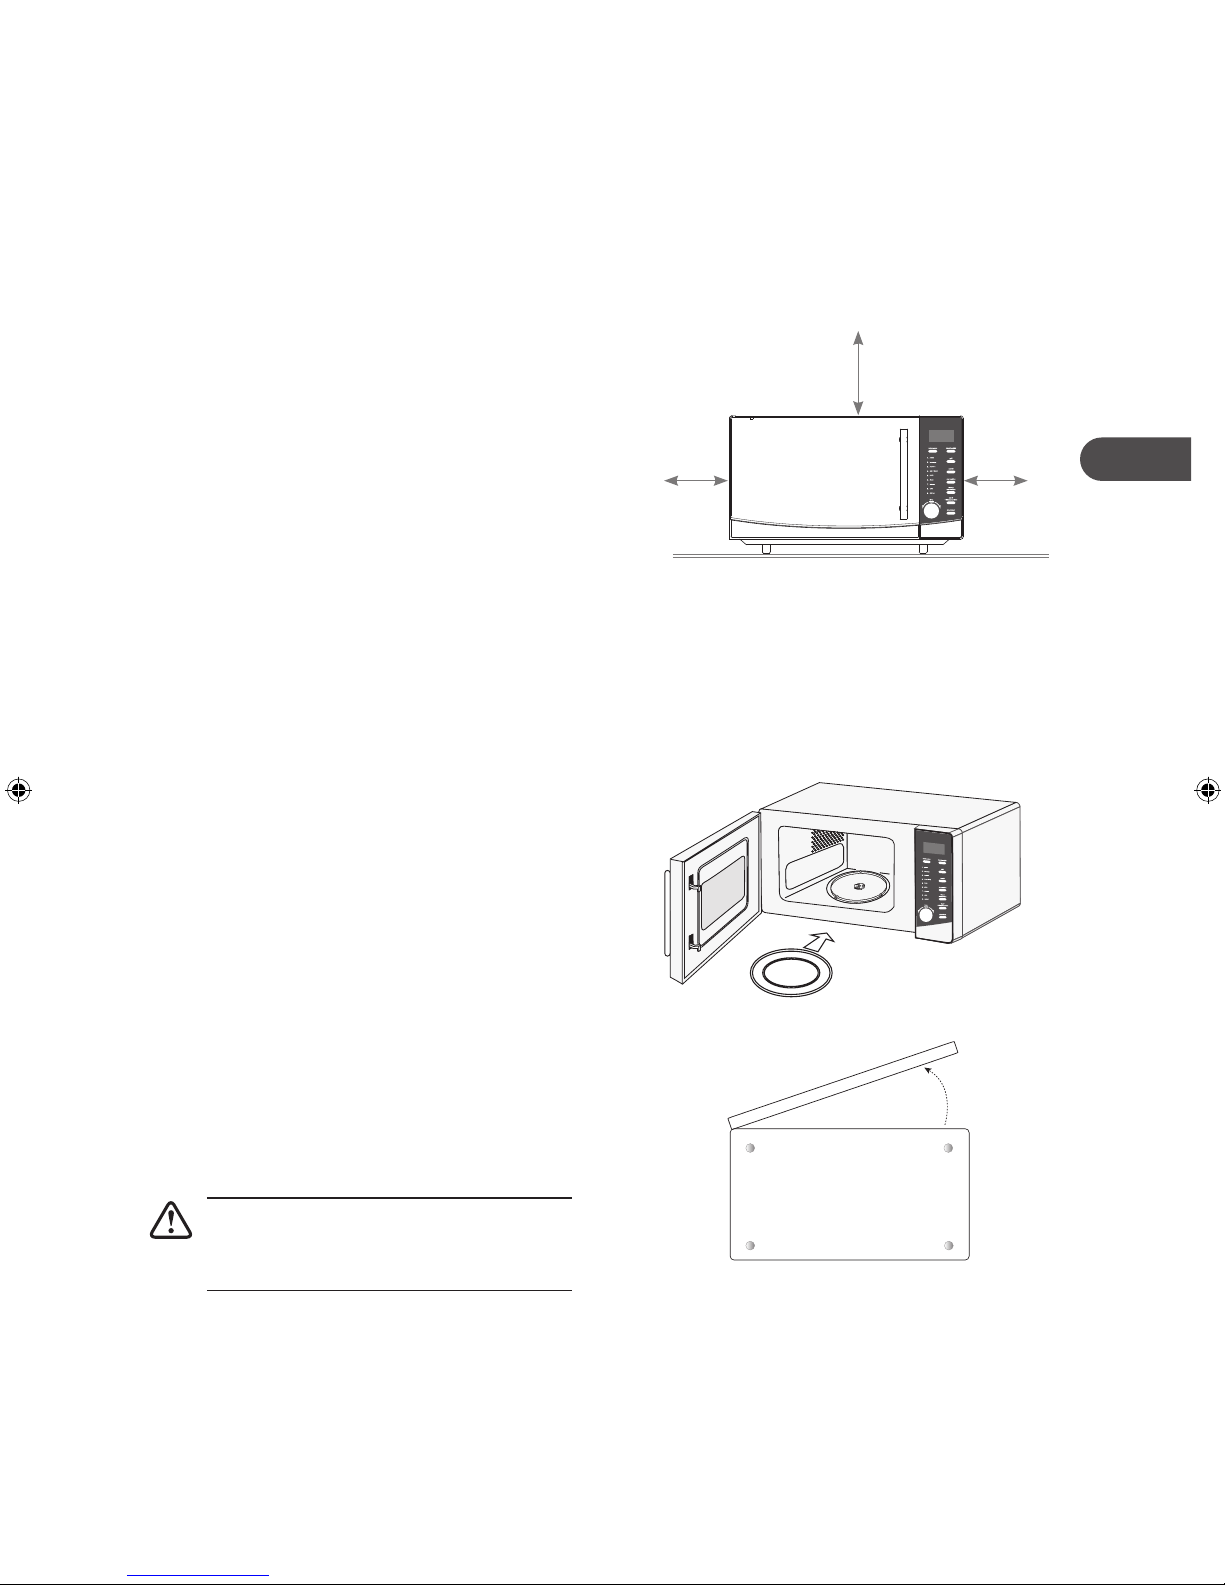
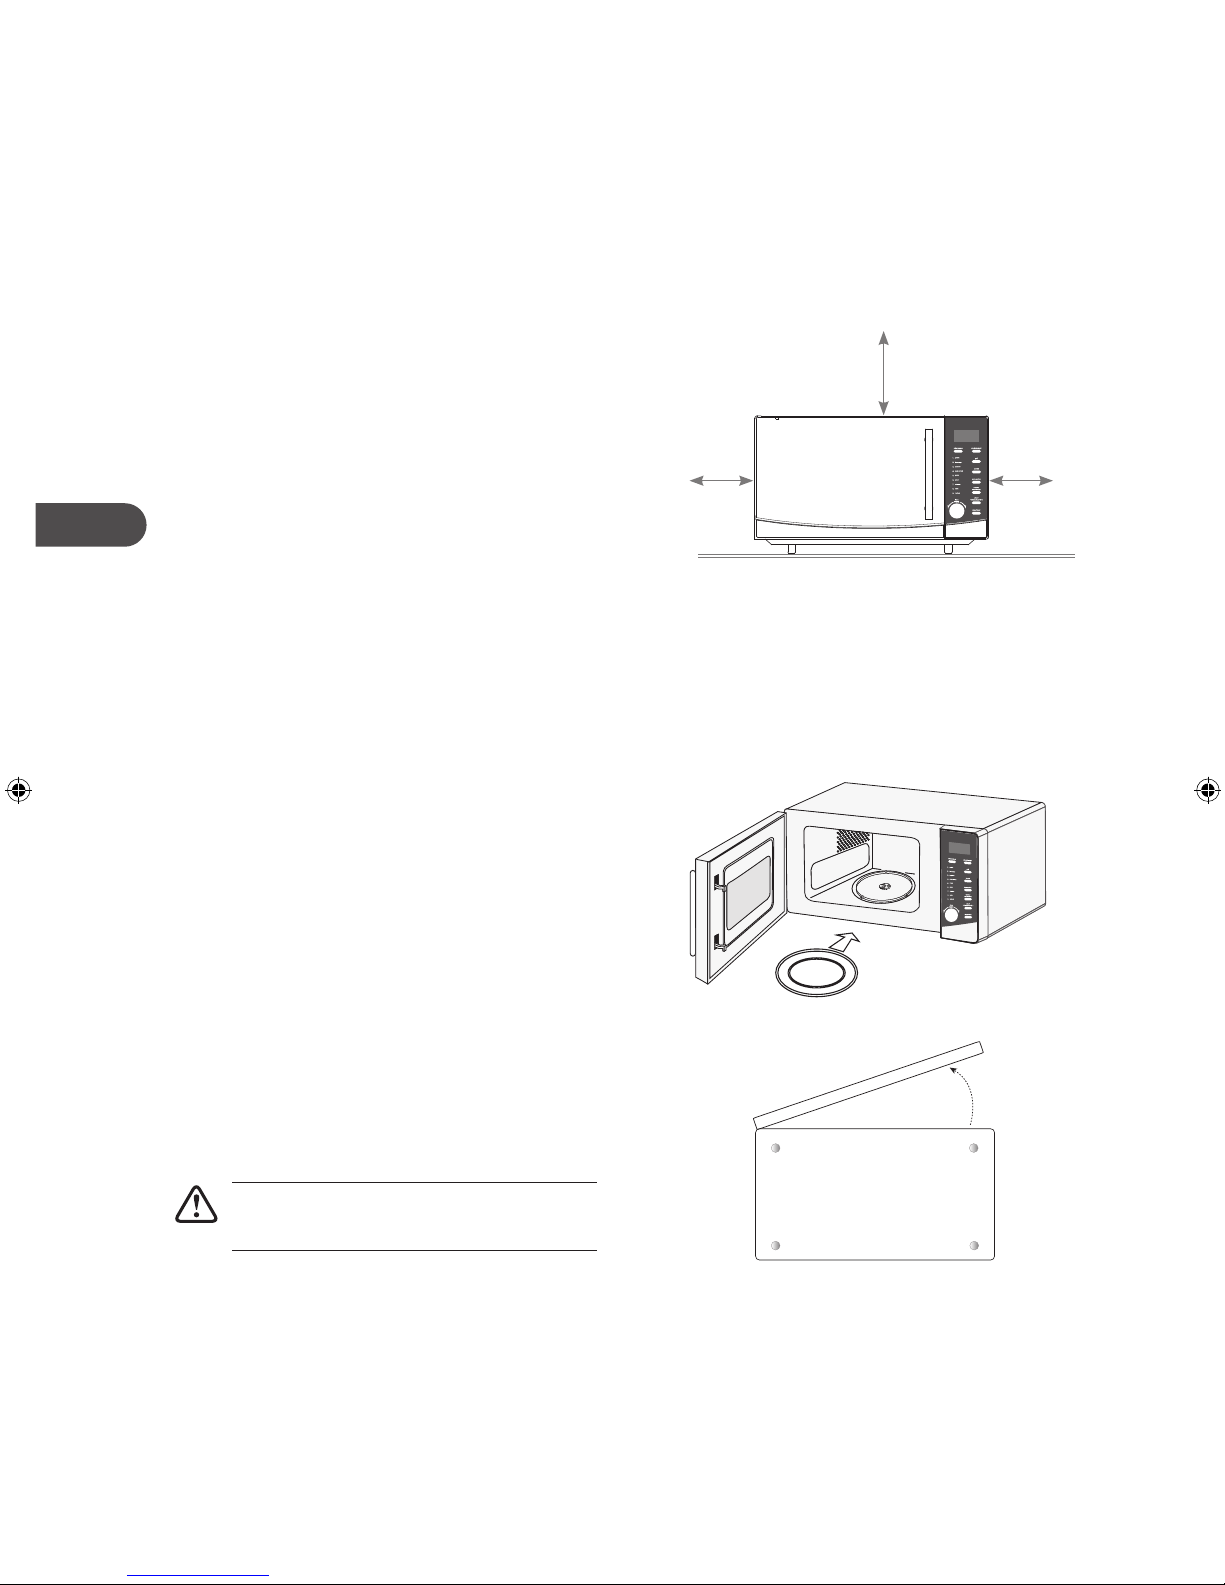
2. Choose a flat work surface for your
microwave away from heat sources such
as radiators or fires and away from cold
areas. You should allow a 10cm space all
around the microwave and 30cm above so
that warm air can escape from the vents
during cooking – This microwave is not
designed to be built in.
3. Plug your microwave into a standard
household electrical socket. Avoid using a
socket that also has an adaptor and other
equipment plugged in. Do not use a multiadaptor.
4. Put the turntable support inside the
microwave and place the glass turntable
plate on top of the support. The turntable
support is shaped to sit securely on the
spindle. You must always use the turntable
plate and support whenever you use the
microwave.
30cm
10cm10cm
5. To protect your work surface, we
recommend that you fix some nonslip cushion pads (not included) to the
underside of the microwave.
Remove the turntable plate and
turntable support before turning the
microwave upside down.
Underside View
9
GB
introducing microwave cooking
Always remember the basic safeguards you would follow when using any cooking equipment or
handling hot food.
See below for basic guidelines in microwave cooking.
If you are unfamiliar with using a microwave, refer to the back of this instruction booklet for more
information.
cooking with a microwave
• Cooking with a microwave is much faster than conventional cooking and, whilst you should
make sure that food is fully cooked, you should be careful not to overcook it.
• Microwave energy can heat unevenly so stirring to distribute heat is very important. Always stir
from the outside, inwards.
• If you are cooking a number of individual foods at the same time, such as baked potatoes or
small cakes, arrange them evenly on the turntable plate so that they cook evenly. Never stack
food in your microwave.
• Turn larger foods such as meat roasts and poultry during cooking so that the top and bottom
cook evenly. It is also recommended to turn pieces of meat or poultry, especially if they have not
been deboned.
• Meat and poultry which is cooked for 15 minutes or more will brown lightly in it’s own fat.
Anything cooked for a shorter time can be brushed with a browning sauce to give an appetising
colour.
• Strips of aluminium foil can be used to cover the thinner pieces of food to stop them overcooking
before the thicker parts of the food have had a chance to cook. Use the aluminium foil sparingly
and wrap around the food or container carefully to stop it touching the inside of the microwave
which could cause sparks.
• Microwaves cook food using microwave energy that is similar to naturally occurring radio waves.
Normally, these “waves” would fade as they disappeared into the atmosphere but in a microwave
they are concentrated onto food causing it to heat up.
• Microwave energy can not pass through metal – so it can not escape from inside your
microwave – but it can pass through materials like glass, porcelain, plastic, and paper. These
are the things used to make microwave-safe cooking equipment.
• Microwave-safe cooking equipment will still get hot as the
food it contains heats up.
• The microwave energy focuses on the moisture in the food
causing lots of tiny vibrations. The vibrations get so great
that the moisture, and the food heat up.
10
GB
checking your cooking utensils
Most heat-resistant, non-metallic cooking utensils are safe to use in your microwave. If you are not
sure if you can use a utensil in your microwave, follow this simple test:
1. Put the utensil into the microwave next to a cup of water – use a cup that you know is
microwave safe. Close the door.
2. Turn the microwave on for 30 seconds only.
3. After 30 seconds, carefully check to see if the water has warmed up. If the water has not
warmed up but the utensil has, the utensil is not microwave-safe and should not be used in the
microwave.
4. Do not use your hands to touch the utensil as it may already be hot.
• Never use equipment made of metal, except aluminium foil in your microwave.
• The microwave energy can not pass through the metal so it bounces off and sparks
against the inside of the microwave.
• Stop the microwave straight away if any equipment does cause sparks.
• Remember that some crockery has a metal trim around the edge. Even this trim can
cause sparks.
• Never use scratched, cracked or damaged glass in a microwave. Damaged glass can
explode.
• Your microwave comes with a microwave safe baking plate. If you want to use another
baking plate, please carry out this test to ensure that it is microwave safe.
using aluminium foil in your microwave
It is safe to use aluminium foil in your microwave as long as you follow these safety guidelines.
As with all metals, microwave energy cannot pass through aluminium foil, but provided you keep the
aluminium foil away from the side of the microwave it will not cause sparks and there will not be any
damage to your microwave.
Using aluminium foil is a good way of shielding parts of food that you do not want to cook as quickly
as others – perhaps where the food is narrower and would otherwise overcook.
Place the aluminium foil over the area you want to shield, taking care that the aluminium foil will not
touch the sides of the microwave when the turntable plate rotates. Only use one piece of aluminium
foil at a time so that you do not get sparks between the separate pieces.
Follow these guidelines when using aluminium foil in your microwave:
• Remove aluminium foil lids from containers before using in the microwave. Some lids are made
of card with a aluminium foil covering – these should be removed too. Use a microwave safe
transparent lid if possible.
• Stir food during cooking if the container has a lid or film cover.
• Always use the glass turntable plate.
• Use shallow containers with a large surface area. Do not use containers that are more than
1.25in (3.5cm) deep.
• Use gloves when handling hot aluminium foil containers.
• Do not completely cover food with aluminium foil. The microwave energy cannot pass through
the aluminium foil so the food will not cook.
• Do not let aluminium foil touch the inside of the microwave.
• Do not use more than one piece of aluminium foil in the microwave at the same time.
11
GB
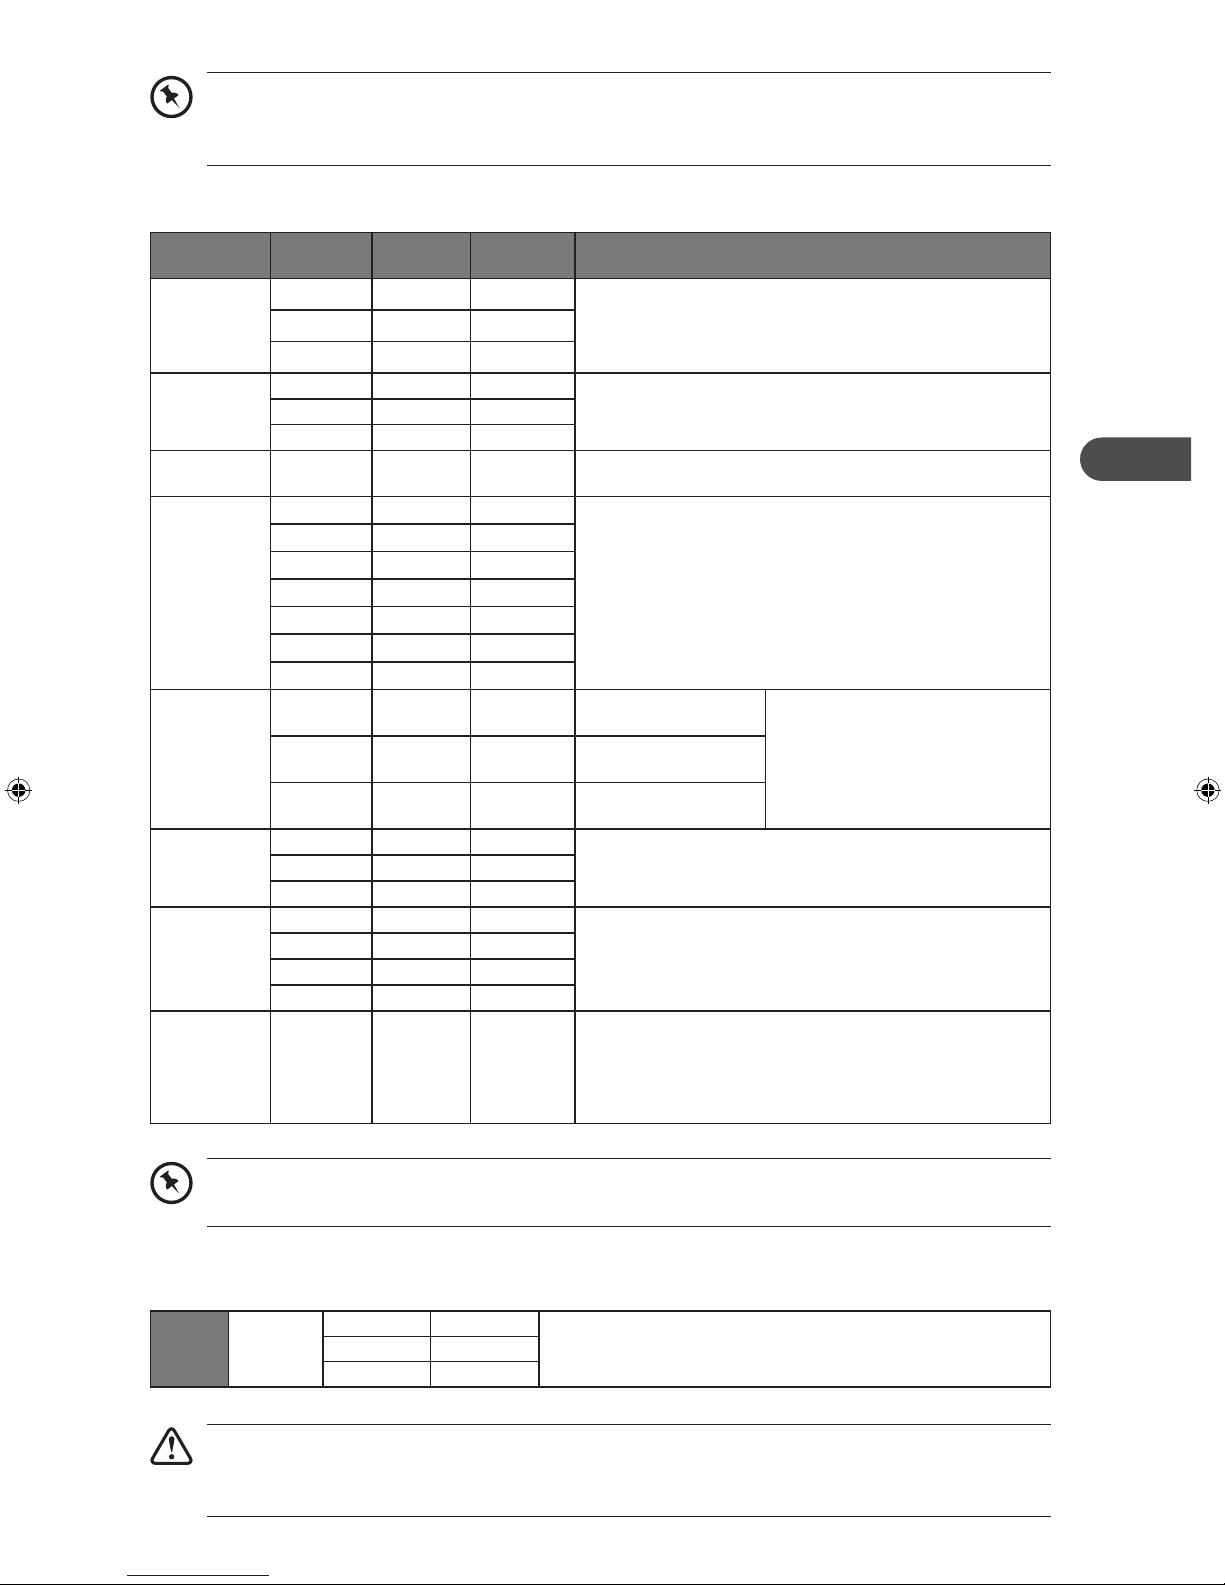
microwave heating categories
Your microwave has been tested and labelled to meet the government’s voluntary agreement on the
reheating of pre-cooked food.
The heating characteristics and output power levels of microwaves are usually calculated using a
relatively large portion of food (a 1000 gram load, IEC 705) but many packs of pre-cooked food are
sold in smaller packs, often about 350 grams.
The government, in partnership with food companies and microwave manufacturers, have set up a
system of heating categories to help you choose the reheating time for pre-cooked food.
900W is the output power of the microwave.
900W
E
to microwave:
1. Remove outer packaging.
2. Pierce film lid SEVERAL TIMES.
3. Place on a microwaveable plate.
4. Heat on full power.
5. Stir or turn halfway through heating.
Heating
Category
B D 650W 750W
Full power (in
minutes)
Stir / Turn Stir / Turn Stir / Turn
2 2 2 2
Wattage
(IEC705)
E is the heating category for your microwave.
Check the cooking times for category E
on the food’s packaging to see how long it
should be cooked for. Please see the below
example for reference.
to microwave from frozen:
1. Remove outer packaging.
2. Pierce film lid SEVERAL TIMES.
3. Place on a microwaveable plate.
4. Heat on full power.
5. Stir or turn halfway through heating.
Heating
Category
B D 650W 750W
Full power (in
minutes)
Stir / Turn Stir / Turn Stir / Turn
3 2.5 3 2.5
Wattage
(IEC705)
Full power
(in minutes)
Standing time
(in minutes)
12
2 1.5 2 1.5
1 1 1 1
Full power
(in minutes)
Standing time
(in minutes)
4 3.5 4 3.5
1 1 1 1
GB
steam
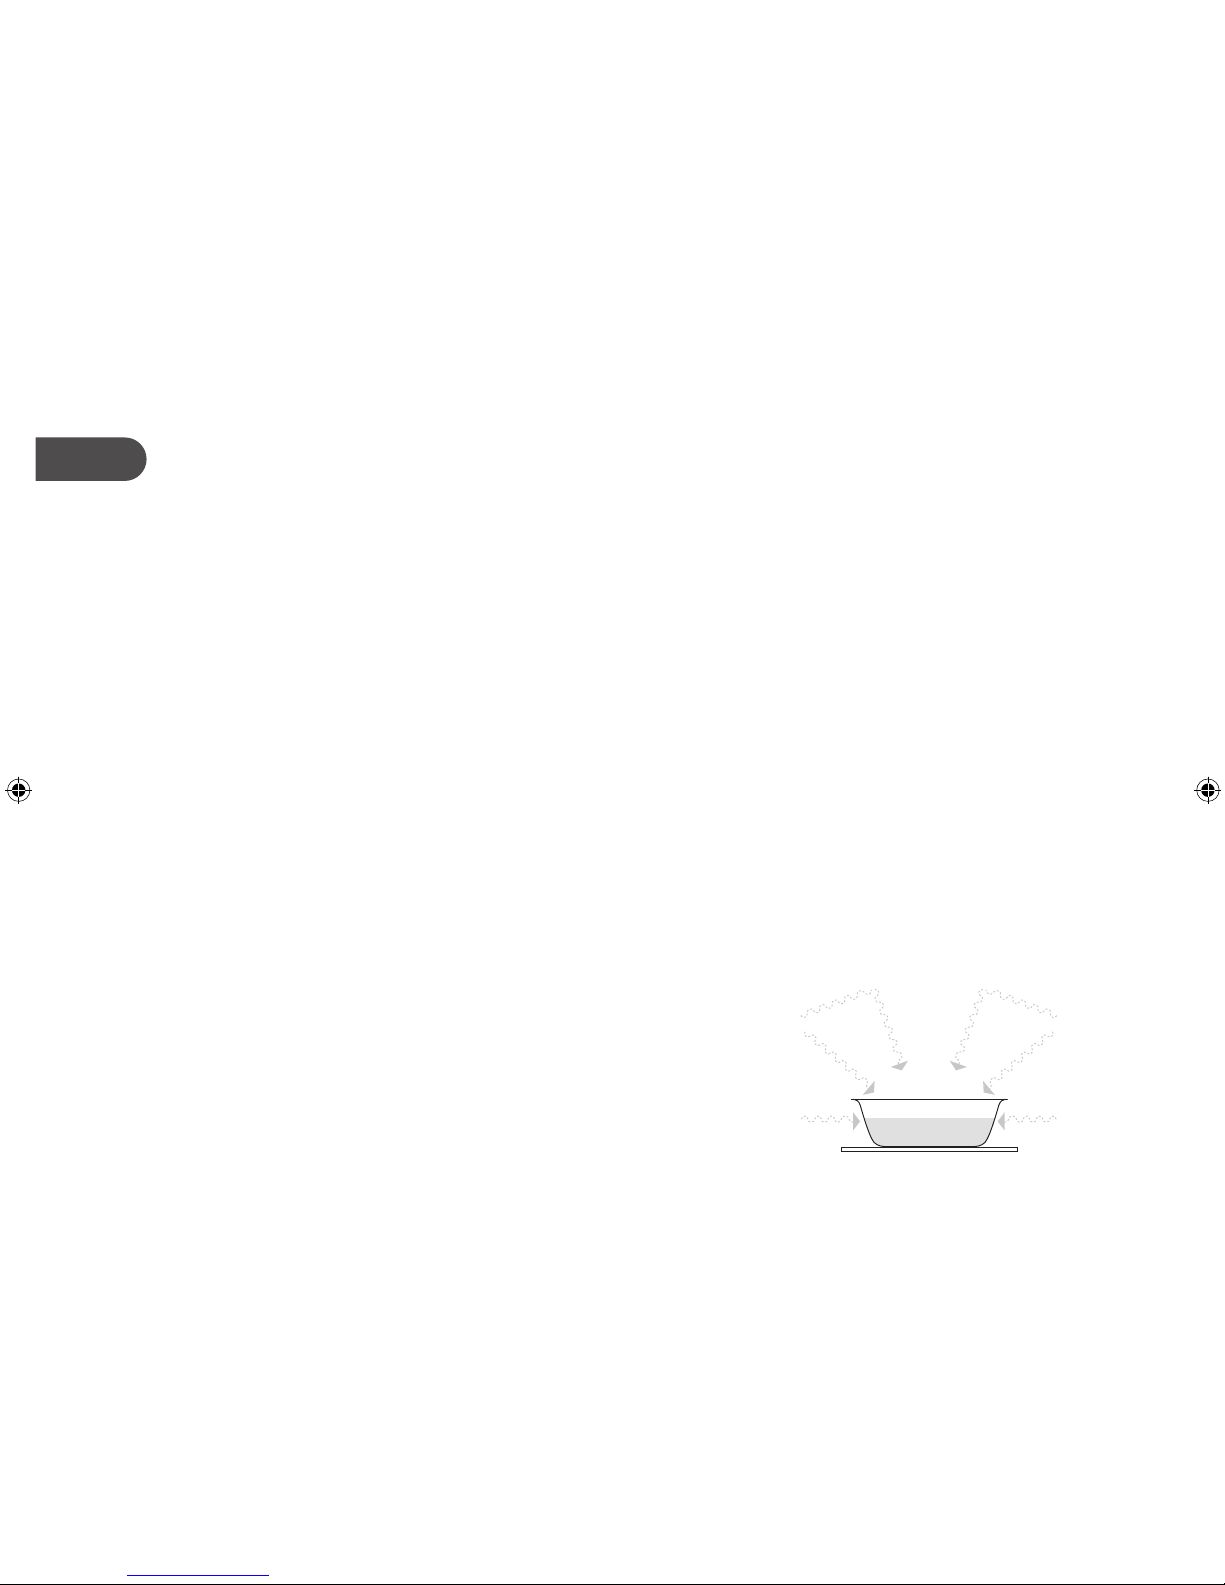
When you microwave food, steam is created as water in the food heats up and evaporates.
The steam formed during microwave cooking is entirely safe. It has to escape from the microwave to
prevent pressure from building up inside the microwave. It does this through the vents on the back
of the microwave and from around the door.
condensation
As the steam cools, you may find that condensation
gathers in small pools inside your microwave and on
the work surface beneath the door and vents. Always
dry the microwave after cooking foods with a high
moisture content.
Your microwave is designed to let steam escape from
the vents and around the door without microwave
energy escaping. There is no danger of microwave
energy escaping with the steam.
13
GB
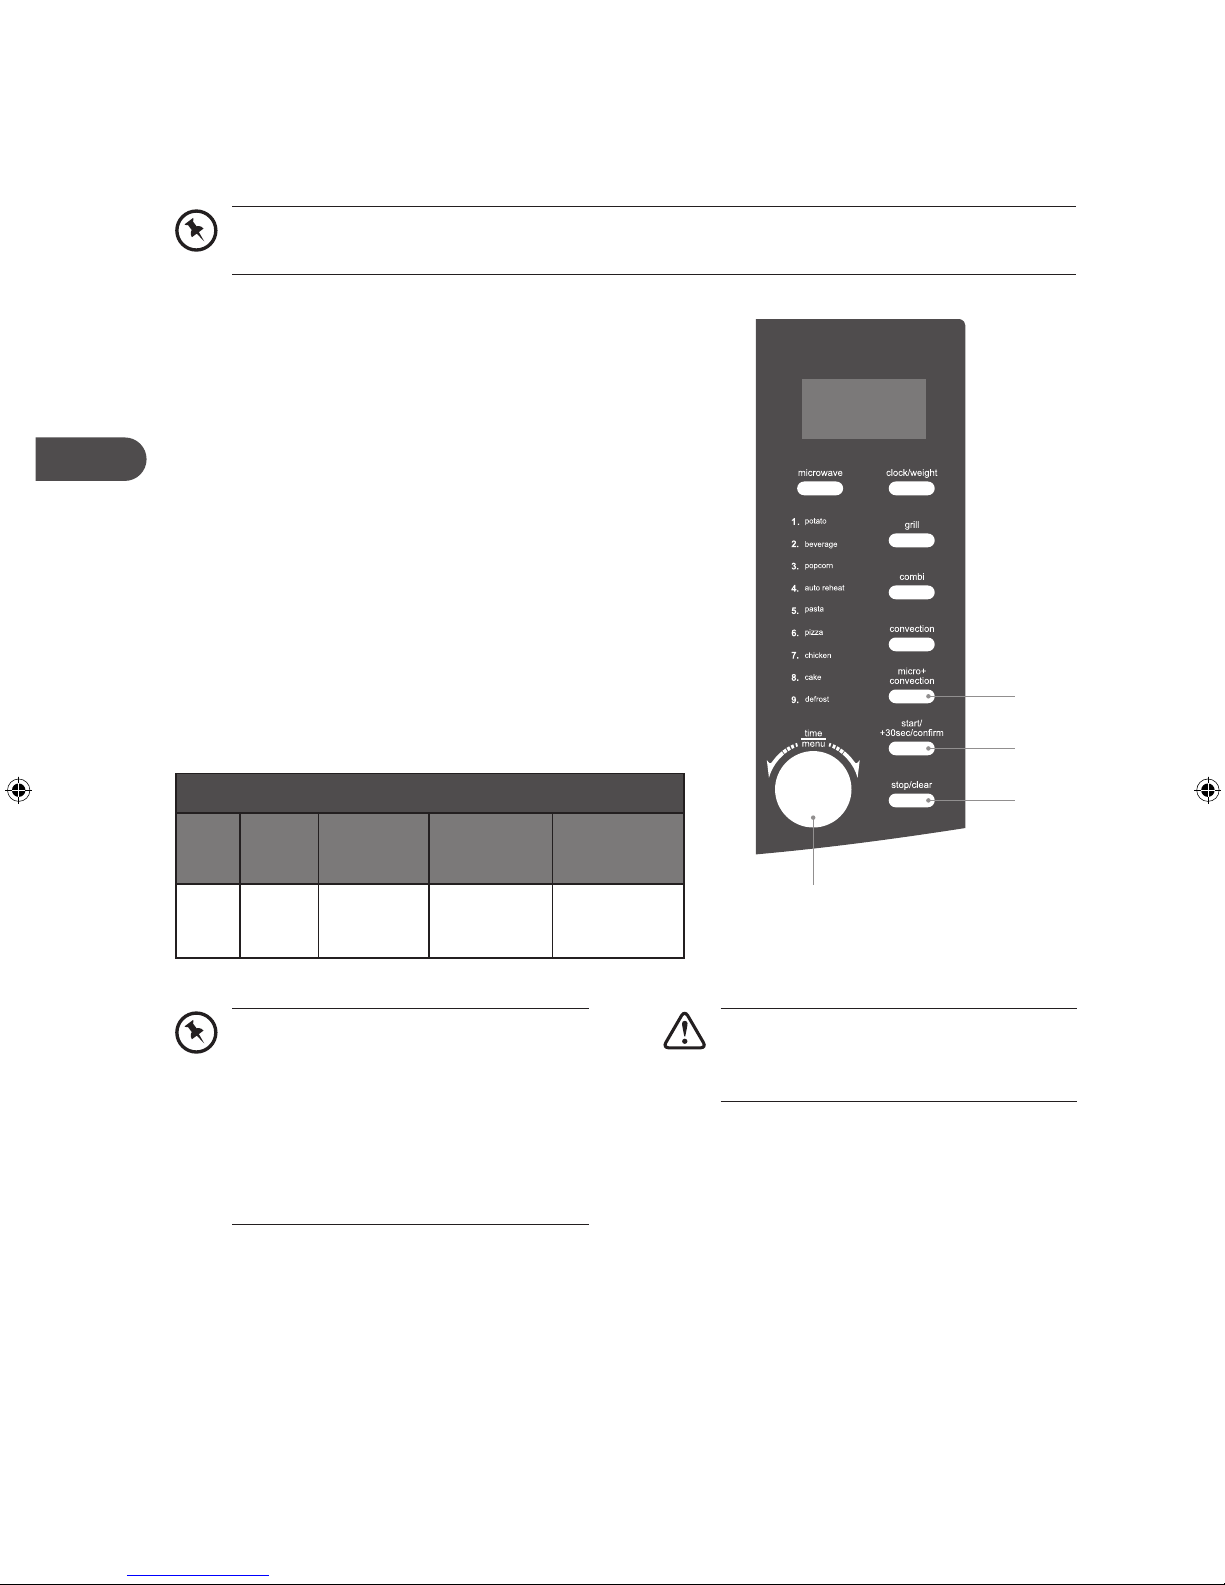
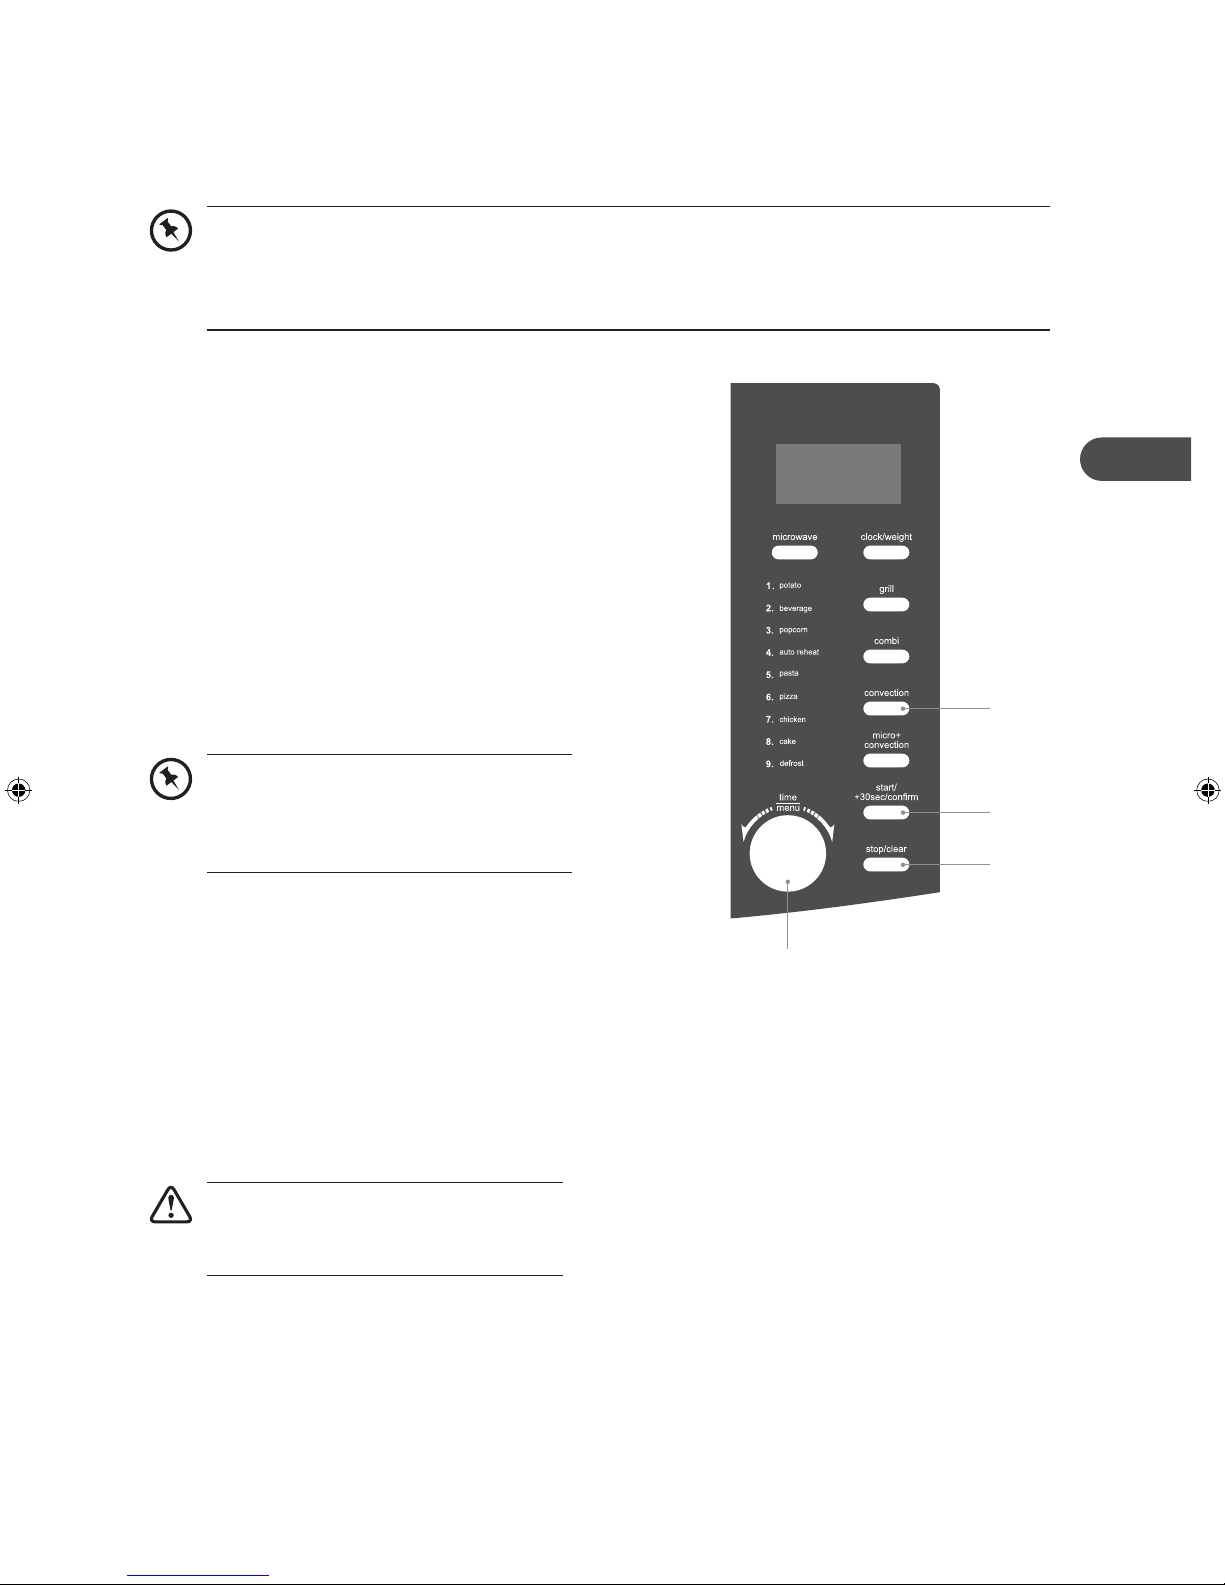
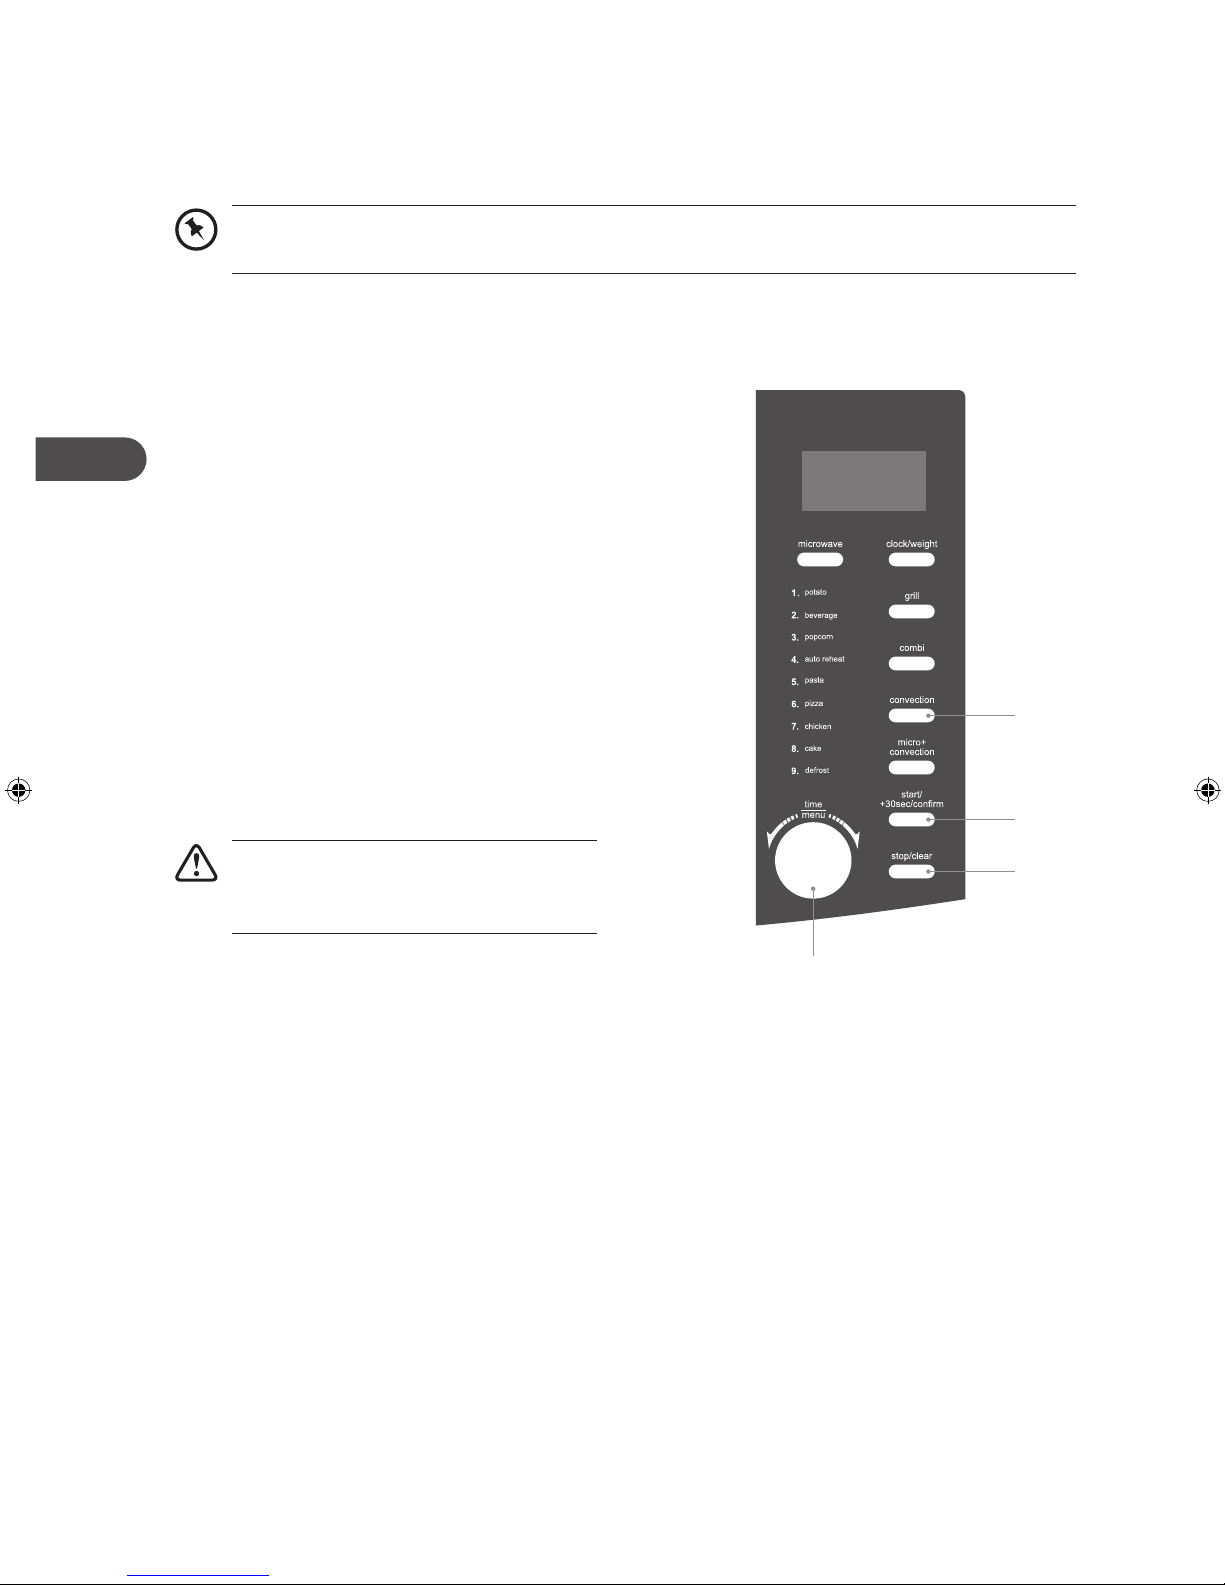
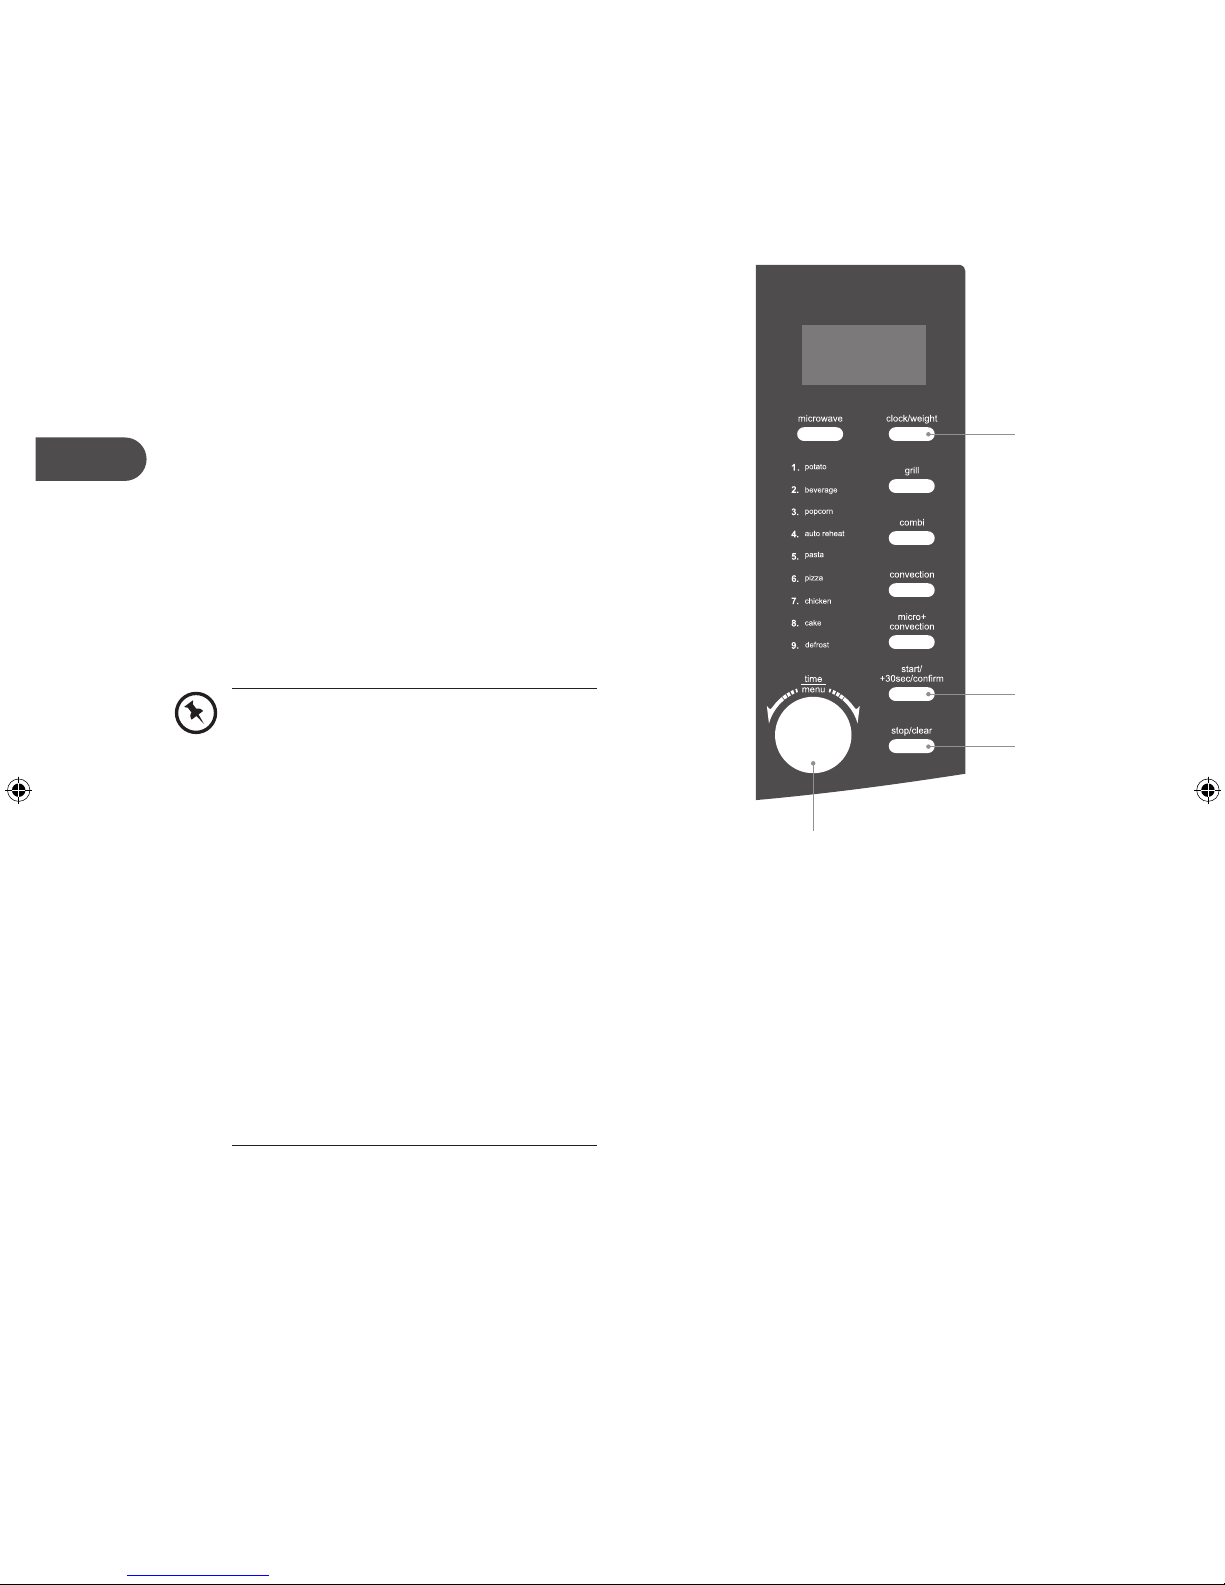
product overview
the main unit
control panel
the control panel
LED display
Shows the clock,
cooking time
and setting.
microwave button
Use this button to select the
microwave power level.
start/+30sec/conrm
button
Use this button to quick start
cooking by increments of 30
seconds. Each press adds
30 seconds. Use this button
to also start/ restart cooking.
baking plate
For use when grilling,
convection, combination
or auto cooking.
door handle
clock/weight button
Use this button to set the clock
and to preset cooking time.
grill button
Use this button to select the
grill function.
combination button
Use this button to select
the microwave and grill
combination function.
convection button
Use this button to select the
convection function.
micro+convection button
Use this button to select the
microwave and convection
combination function.
time/menu dial
Use this dial to set
time or to choose
the auto menu
programmes.
14
stop/clear button
Use this button to stop
cooking and cancel
cooking settings.
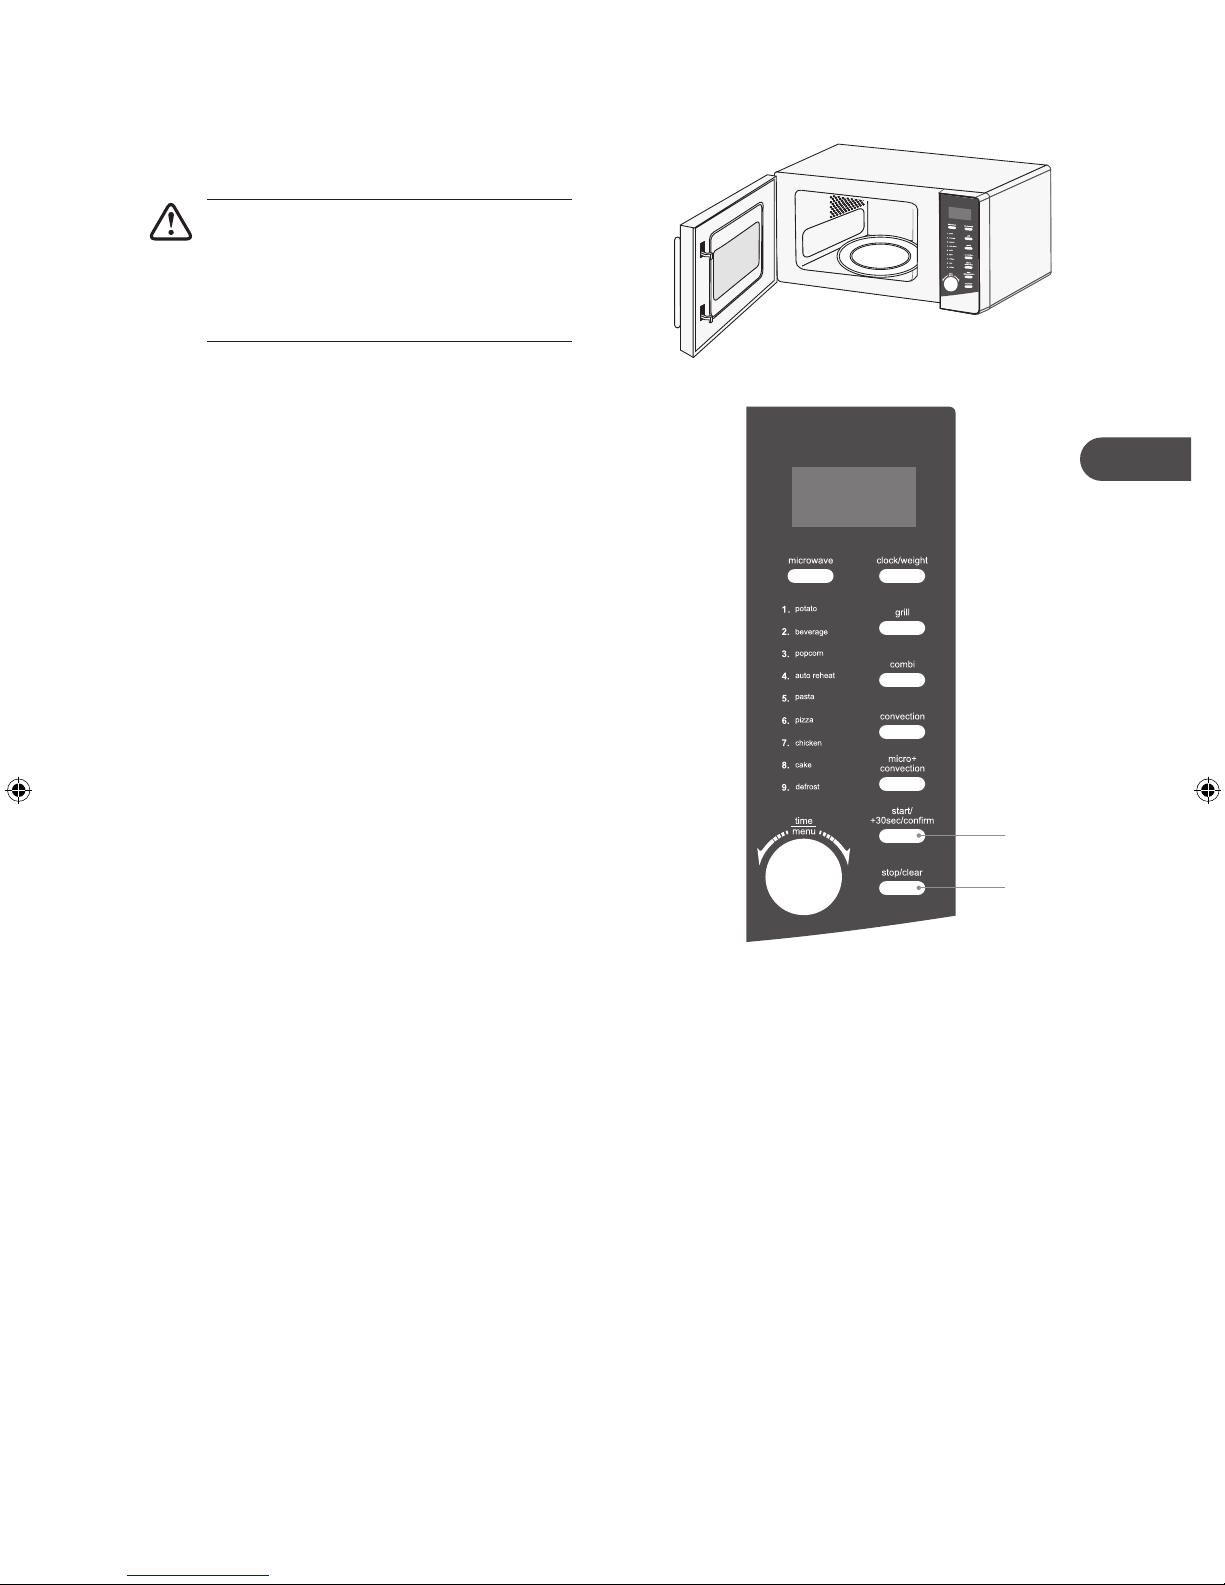
GB
checking your microwave
Check your microwave after unpacking.
For your safety, the microwave
stops if the door is opened during
cooking. Close the door and press
the start/+30sec/confirm button to
continue the cooking cycle.
1. Pull handle to open the door.
2. Place a cup of water on the glass turntable
plate. Make sure the cup is microwave safe
(it should not have any decorative metal
trim).
3. Close the door.
4. Press the stop/clear button to clear any
settings that have already been made
5. Press the start/+30sec/confirm button
once to start a simple 30-second
microwave cooking cycle and that
allows you to check the operation of the
microwave.
6. When the cooking cycle has finished, the
water should be hot (be careful when you
take the cup out of the microwave). Press
the stop/clear button to clear any settings.
5
4, 6
15
GB
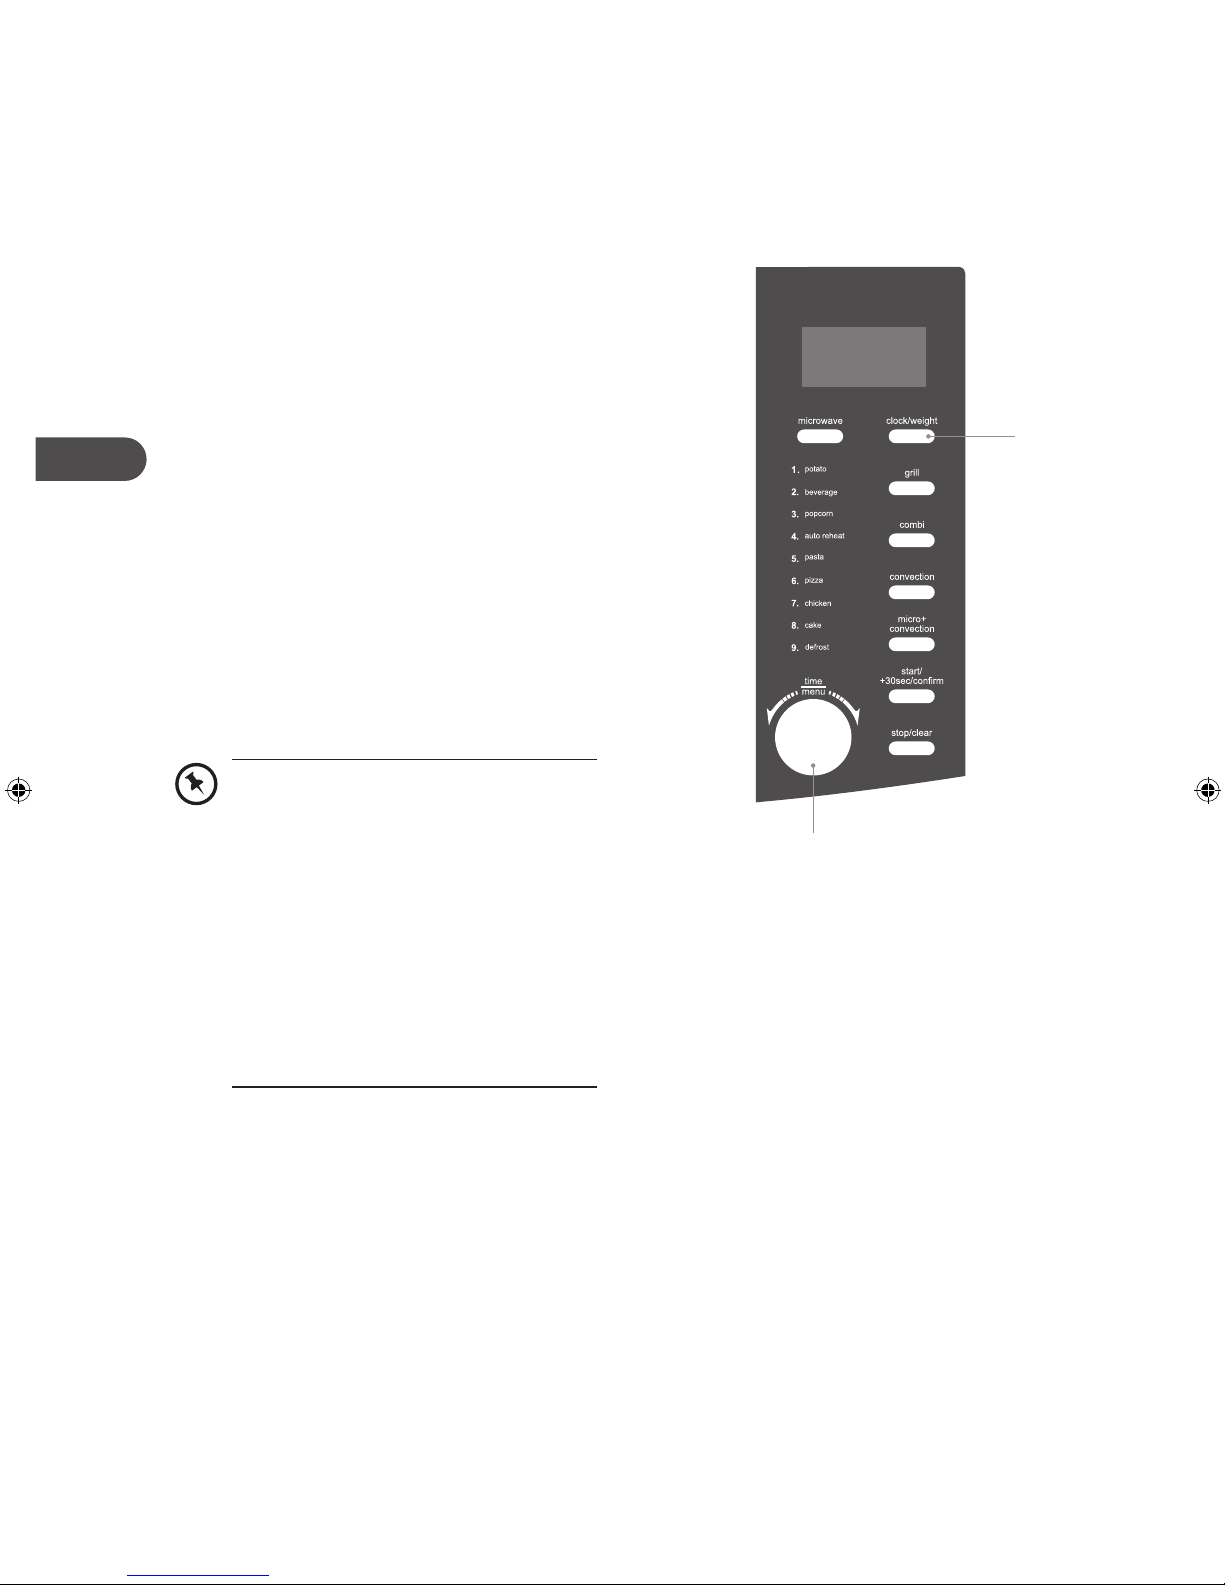
clock setting
When the microwave is connected to the mains power, the LED display will show “1:01”, and the
microwave will sound once. Please ensure that you have set the clock prior to use.
Please follow the steps below to set the clock.
1. Press the clock/weight button once for
12-hour setting. Press the clock/weight
button again for 24-hour setting.
2. Turn the time/menu dial to adjust the hour
digits.
3. Press the clock/weight button and the
minute digits will display.
4. Turn the time/menu dial to adjust the
minute digits, the input time has to be
within 00-59.
5. Press the clock/weight button again to
complete the clock setting.
“:” will start flashing and the time will
illuminate.
• In the process of clock setting, if
the stop/clear button is pressed
or if there is no operation within 1
minute, the microwave will go back
to the previous status automatically.
• If the clock needs to be reset,
please repeat steps 1 to 3.
• To find out the current time while
the microwave is operating, press
the clock/weight button. It will last
for 2-3 seconds and then return to
its original display.
1, 3, 5
2, 4
16
GB
setting the child lock
This feature prevents the electronic operation of the microwave by locking the operation of the
control panel until you have cancelled it.
Please follow the steps below to set the child lock.
1. Press the stop/clear button for 3 seconds
and a tone will sound. The child lock
indicator will illuminate on the LED display
to indicate that the microwave has set the
child lock.
2. To release the child lock, press the stop/
clear button again for 3 seconds and a
tone will sound. The child lock indicator will
disappear from the LED display to indicate
that the microwave has released the child
lock.
1, 2
17

GB
microwave cooking
For simple microwave cooking, follow the steps below.
For instance: If you want to use 80% microwave power to cook for 20 minutes.
1. Press the microwave button once and the
LED display will show “P-100”. Press the
microwave button repeatedly until the LED
display shows “P-80”.
2. Turn the time/menu dial to adjust the
cooking time until the LED display shows
“20:00”.
3. Press the start/+30sec/confirm button to
confirm and start cooking.
4. Press the stop/clear button to stop
cooking. Press the stop/clear button again
to cancel the setting.
1
Microwave Button Control
Press
Order
1 P-100 100%
2 P-90 90%
3 P-80 80%
4 P-70 70%
5 P-60 60%
6 P-50 50%
7 P-40 40%
8 P-30 30%
9 P-20 20%
10 P-10 10%
0 P-00 0%
When P00 is selected, no microwave
power will be present. This setting is
for deodorising purposes only.
LED
Display
Microwave Power
3
4
2
• When removing food from the
microwave, please ensure that the
microwave has stopped.
• Operating the microwave without
food in it can result in overheating
and damage the magnetron.
18
GB
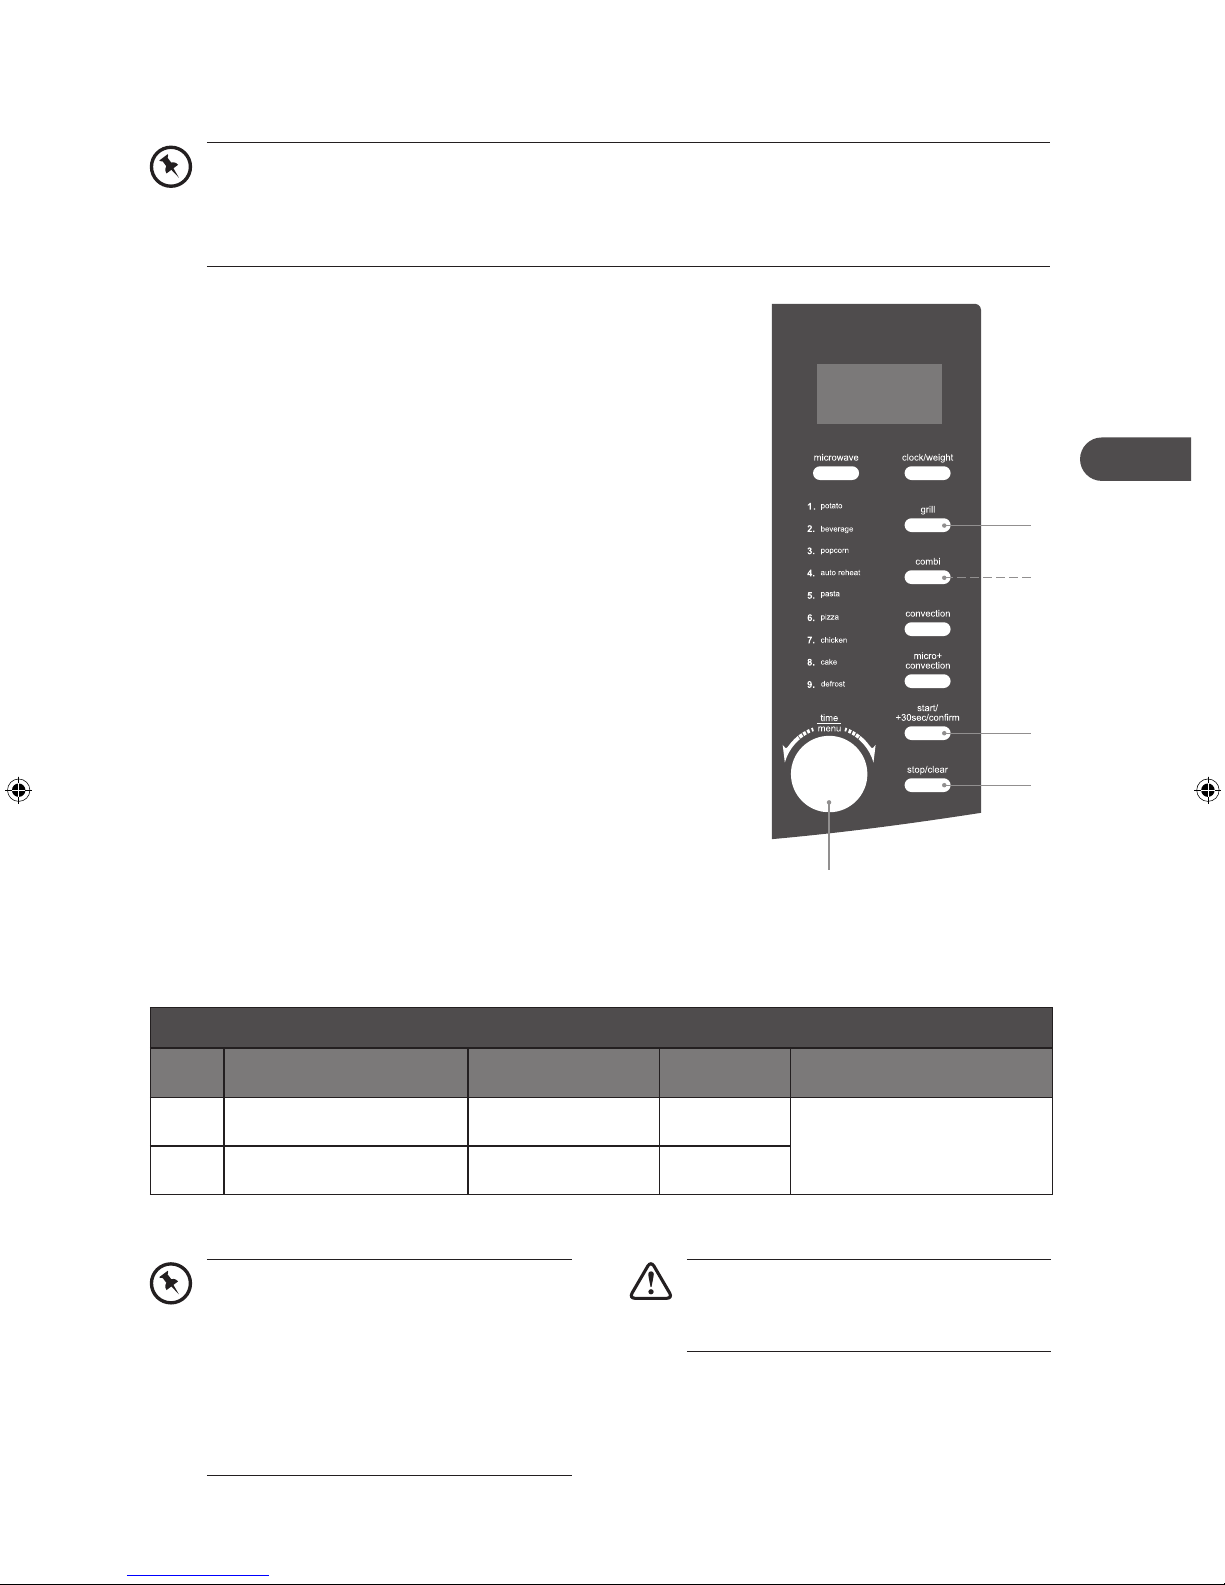
grill or combination cooking
• During first time use of grill cooking, operate the microwave empty for at least 20
minutes. Some smoke and/or odour may occur. This is normal and will stop.
• We recommend that you use the supplied baking plate. Place your food on the baking
plate then place on top of the glass turntable plate.
For grilling, follow the steps below.
1. Press the grill button once and the LED display
will show “GRILL”.
2. Turn the time/menu dial to adjust the cooking
time.
3. Press the start/+30sec/confirm button to confirm
and start cooking.
4. Press the stop/clear button to stop cooking. Press
the stop/clear button again to cancel the setting.
For combination cooking (microwave and grill),
follow the steps below.
1
1
1. Press the combi button once and the LED display
will show “GRILL”, “MICRO” and “CO-1”. Press
the combi button again and the LED display will
show “GRILL”, “MICRO” and “CO-2”.
2. Turn the time/menu dial to adjust the cooking
time.
3. Press the start/+30sec/confirm button to confirm
and start cooking.
4. Press the stop/clear button to stop cooking. Press
the stop/clear button again to cancel the setting.
Combination Button Control
Order
1 GRILL, MICRO, CO-1 30% 70%
2 GRILL, MICRO,CO-2 55% 45%
LED
Display
Microwave
Power
Grill
Power
3
4
2
Cavity
Temperature
Approximately keeping at
160°C
In order to obtain better grilling
performance for your food, please
turn your food over periodically. Press
the stop/clear button once to stop
cooking and open the door. Then,
turn your food over and close the
door. Press the start/+30sec/confirm
button to continue cooking.
Do not use plastic microwave
containers or covers when using grill,
combination or convection cooking.
19
GB
convection combination cooking
For combination cooking (microwave and convection), follow the steps below.
We recommend that you use the supplied baking plate. Place your food on the baking plate
then place on top of the glass turntable plate.
1. Press the micro+convection button and
the LED display will show “200C“. Press
the micro+convection button repeatedly
until the LED display shows your preferred
temperature. The temperature ranges from
110°C – 200°C.
2. Place your food in the microwave and close
the door. Turn the time/menu dial to adjust
the cooking time.
3. Press the start/+30sec/confirm button to
confirm and start cooking.
4. Press the stop/clear button to stop
cooking. Press the stop/clear button again
to cancel the setting.
1
3
Microwave + Convection Button Control
Order
LED
Display
110°C ~
1
200°C
In order to obtain better convection
performance for your food, please
turn your food over periodically.
Press the stop/clear button once
to stop cooking and open the door.
Then, turn your food over and close
the door. Press the start/+30sec/
confirm button to continue cooking.
Microwave
Power
73% 27% 110°C - 200°C
Convection
Power
4
Cavity
Temperature
2
Do not use plastic microwave
containers or covers when using grill,
combination or convection cooking.
20
GB
convection cooking (with preheating)
Convection cooking allows you to cook the food like a traditional oven.
• We recommend that you use the supplied baking plate. Place your food on the baking
plate then place on top of the glass turntable plate.
• It is recommended to preheat the microwave to the appropriate temperature before
placing the food in the microwave. Microwave power will not be used.
1. Press the convection button once and the
LED display will show “200C”.
2. Press the convection button repeatedly
until the LED display shows your preferred
temperature setting. The temperature
ranges from 110°C to 200°C.
3. Press the start/+30sec/confirm button
to confirm the temperature setting and
start preheating. Once the preheating
temperature is reached, the microwave will
sound and the timer shown on the LED
display will pause.
Cooking time cannot be input until the
preheating temperature is reached
and the door should be opened and
then closed.
4. Place your food in the microwave and close
the door. Turn the time/menu dial to adjust
the cooking time.
5. Press the start/+30sec/confirm button to
confirm and start cooking.
1, 2
3, 5
6
4
6. Press the stop/clear button to stop
cooking. Press the stop/clear button again
to cancel the setting.
Do not use plastic microwave
containers or covers when using grill,
combination or convection cooking.
21
GB
convection cooking (without preheating)
For convection cooking without preheating, please follow the steps below.
We recommend that you use the supplied baking plate. Place your food on the baking plate
then place on top of the glass turntable plate.
For instance: If you want to cook your food for 16 minutes at 180°C.
1. Press the convection button once and the
LED display will show “200C”.
2. Press the convection button repeatedly
until the LED display shows “180C”. The
temperature ranges from 110°C to 200°C.
3. Place your food in the microwave and close
the door. Turn the time/menu dial to adjust
the cooking time to 16:00.
4. Press the start/+30sec/confirm button to
confirm and start cooking.
5. Press the stop/clear button to stop
cooking. Press the stop/clear button again
to cancel the setting.
Do not use plastic microwave
containers or covers when using grill,
combination or convection cooking.
1, 2
4
5
3
22

GB
multi-stage cooking
For multi-stage cooking, please follow the steps below.
For instance: If you want to defrost your food for 5 minutes, then to cook it with 80% microwave
power for 7 minutes and finally grill it for 8 minutes.
You can set a maximum of 3 stages for multi-stage cooking. If defrosting is among one of
the stages, then it will be set as the first stage. Auto cooking (CODE A-1 to CODE A-8) and
quick start cooking are not available in multi-stage cooking.
1. Turn the time/menu dial anti-clockwise to
select the defrost function from the auto
menu programme. The LED display will
show “CODE A-9”.
2. Press the clock/weight button once and
turn the time/menu dial to adjust the
defrosting time until the LED display shows
“5:00”.
Do not press the start/+30sec/confirm
button at this stage.
2
3
5
3. Press the microwave button once and
the LED display will show “P-100”. Press
it again 2 more times and the LED display
will show “P-80”.
4. Turn the time/menu dial to adjust the
cooking time until the LED display shows
“7:00”.
5. Press the grill button once and the LED
display will show “GRILL”. Turn the time/
menu dial to adjust the cooking time until
the LED display shows “8:00”.
6. Press the start/+30sec/confirm button to
confirm and start cooking. The microwave
will sound once to indicate that it has
started the defrosting count down. The
microwave will sound again as it starts the
microwave cooking (the second stage) and
the grill cooking (the third stage). Upon
completion the microwave will sound five
times.
6
7
1, 4
Do not use plastic microwave
containers or covers when using grill,
combination or convection cooking.
7. Press the stop/clear button to stop
cooking. Press the stop/clear button again
to cancel the setting.
23
GB
auto cooking
This feature allows you to cook most of your food based on the food category and the weight. Select
the category and choose the weight of your food. For quick reference of the cooking time and the
weight, please refer to the auto menu table.
auto menu
1. Turn the time/menu dial anti-clockwise to
select the auto menu programme required.
The LED display will show “CODE A-1”,
“CODE A-2” etc.
2. Press the clock/weight button repeatedly
to select the weight option for your chosen
programme. Please refer to the auto menu
table for information.
3. Press the start/+30sec/confirm button to
confirm and start cooking.
4. Press the stop/clear button once to stop
the cooking. Press the stop/clear button
again to cancel the setting.
For instance: If you want to cook 1000g of
chicken using the auto menu programme,
please follow the steps below.
1. Turn the time/menu dial anti-clockwise
to select the auto menu programme for
chicken. The LED display will show “CODE
A-7”.
2. Press the clock/weight button to select the
weight of your chicken until the LED display
shows “1000”.
2
3
4
1
3. Press the start/+30sec/confirm button to
confirm and start cooking.
24
GB
The density and thickness of food can affect its cooking time. Ensure all food is piping hot
and cooked thoroughly before serving. It is essential that food is checked during and after
the recommended cooking time, even if auto menu was used.
auto-cook menu table
Menu Weight Display
230g 1 5’00”
CODE A-1
potatoes
CODE A-2
beverage
CODE A-3
popcorn
CODE A-4
auto reheat
CODE A-5
pasta
CODE A-6
pizza
CODE A-7
chicken
CODE A-8
cake
460g 2 8’00”
690g 3 12’00”
200ml 1 1’30”
400ml 2 2’40”
600ml 3 3’50”
99g 99 3’00”
200g 200 1’30”
300g 300 2’00”
400g 400 2’30”
500g 500 3’00”
600g 600 3’30”
700g 700 4’00”
800g 800 4’30”
100g 100 22’00”
200g 200 27’00”
300g 300 32’00”
150g 150 14’00”
300g 300 15’00”
450g 450 16’00”
800g 800 30’00”
1000g 1000 33’00”
1200g 1200 36’00”
1400g 1400 39’00”
475g 475 45’00”
Cooking
Time
Comments
For best results, pierce the potato’s skin before
cooking. Once the potato is cooked, wrap it in
aluminium foil for at least 5 minutes to ensure it is
cooked thoroughly.
Only use suitable microwavable containers and cling
film in the microwave. Pierce the film with a fork
before cooking.
For best results, we recommend using ready mix
packed popcorn. Cover it with a microwavable lid.
Make sure food is cooked thoroughly before
consuming. Additional cooking time may be required
for thicker pieces of food.
100g of pasta +
800ml of cold water
200g of pasta +
1400ml of cold water
300g of pasta +
2100ml of cold water
This setting is designed for cooking pizza slices from
frozen. Additional cooking time may be required for
thicker pieces of pizza.
Make sure food is cooked thoroughly before
consuming. Additional cooking time may be required
for thicker pieces of chicken.
For best results, we recommend using cake mix. Use
a tin no larger than 8 inches and remember to preheat
the microwave to 180°C first. We recommend using a
grill rack to support the tin. Check the cake at regular
intervals.
Only use suitable microwavable
containers and cling film in the
microwave.
Check the cooking regularly to
make sure the water does not
boil over.
CODE A-9 (defrost) allows you to defrost your frozen food only and it is not one of the Auto
Menu programmes.
* It is recommended that when auto-cooking a potato, the potato should weight at least 200g. Note
that potatoes will vary in water-content depending on age, type, weight, etc.
200 5’00”
400 9’00”
600 11’00”
potato
200g per
potato
It is recommended that you use the lowest cooking time to prevent overcooking your
food. Add more cooking time as necessary. Ensure all food is thoroughly cooked before
consuming.
For best results, pierce the potato’s skin before cooking. Once
the potato is cooked, wrap it in aluminium foil for at least 5
minutes to ensure it is cooked thoroughly.
25
GB
defrosting
This feature allows you to defrost your frozen foods simply by entering the time.
defrost by time
1. Press stop/clear button once to clear any
previous programme setting.
2. Turn the time/menu dial anti-clockwise until
the LED display shows “CODE A-9”.
3. Press the clock/weight button and then
turn the time/menu dial to adjust the
defrosting time.
4. Press the start/+30sec/confirm button to
start defrosting.
5. Press the stop/clear button to stop
defrosting. Press the stop/clear button
again to cancel the setting.
• The microwave will sound 3 times
and pause after 2/3 of the running
time has elapsed. You will need to
open the door. After you rotate the
food, close the door and press the
start/+30sec/confirm button to
restart defrosting.
• Large items may be frozen in the
centre. To ensure even thawing,
turn them over from time to time
and break them into smaller pieces
during defrosting.
• Place roasts fat-side down or whole
poultry breast-side down.
• Drain liquids during defrosting as
the juices from food can get hot and
cook the food.
3
4
1, 5
2
26
GB
quick start cooking
This feature allows you to quickly cook your food for 30 seconds with 100% microwave power.
Please follow the steps below.
1. Press the start/+30sec/confirm button
to start the quick start cooking. Press the
start/+30sec/confirm button again to add
another 30 seconds. You may increase the
cooking time up to 10 minutes.
Alternatively, turn the time/menu dial
anti-clockwise to set the cooking time
with 100% microwave power first.
Then, press the start/+30sec/confirm
button to start cooking.
2. Press the stop/clear button to stop
cooking. Press the stop/clear button again
to cancel the setting.
This feature is only applicable to
microwave programme only.
1
2
querying the cooking function
This feature allows you to check and view the current cooking settings.
to find out the current cooking setting
1. Press the microwave, convection, or
micro+convection button once and
the LED display will show the current
cooking setting while the microwave
is in either microwave, convection, or
micro+convection cooking respectively. It
will last for 2 - 3 seconds and then return to
its original display.
1
27
GB
cleaning your microwave
Cleaning your microwave each time you use it will help to prevent a build up of stubborn marks that
can be difficult to clean.
Unplug your microwave from the mains and wait for it to completely cool down before cleaning.
On the right hand side wall of the cavity is the wave guide cover. Microwaves are passed through
this to enable your food to cook. It is important that this wave guide cover is kept clean at all times.
Wipe it with mild detergent and water and leave to dry.
3
2
1
6
7
4
5
9
8
1
The microwave walls have a special enamel
coating which makes cleaning very easy.
Use a soft damp cloth to wipe off any
splashes or a paper towel to mop up any
spills. Wipe off grease with a damp cloth
and a little detergent. Dry thoroughly. If
grease is left to accumulate, it can smoke
and even catch fire.
2
Make sure you keep the outlet grids clean.
3
Keep the front of the microwave clean so
that the door can close properly.
4
Be careful not to spill water into the vents.
5
Do not remove the wave guide cover: It
is important to keep the cover clean in
the same manner as the inside of the
microwave. If grease is left to accumulate, it
can smoke and even catch fire.
6
Keep the inside of the door clean with a
damp cloth. Use warm soapy water for
stubborn marks and dry thoroughly. The
inside of the door has a special coating and
must not be cleaned with abrasive pads or
cleaning powders.
10 11
7
Clean behind the door ledge.
8
Use warm soapy water to clean the outside
of the microwave. Do not use abrasive pads
or powders that could scratch the surface.
9
Unplug the microwave before cleaning the
power lead and the microwave. Wipe with a
damp cloth and leave to dry before plugging
it back in.
10
Treat the glass turntable plate as you would
any glass plate. After you have used it for
more than 15 minutes, allow it to cool down
before you use it again. Do not wash the
turntable plate in very hot water, this could
crack it. Wash the turntable support in warm
water. Do not use very hot water which
could make it warp. Make sure the glass
turntable plate and turntable support are dry
before you put them back in the microwave.
11
Wash the baking plate in warm water. Do
not use very hot water which could make it
warp.
Do not remove any fixed parts from
the inside of your microwave during
cleaning or at any other time.
28
GB
frequently asked questions
If a problem does occur, it may often be due to something very minor. The following Q & A may be
able to resolve the problem.
Questions Answers
Why doesn’t the food seem to
cook?
Why does the food seem
undercooked or overcooked?
How can I stop eggs from popping? When you bake or poach eggs in the microwave, the yolk can
Why is it so important that I allow
standing time after cooking?
Why does my microwave
sometimes take longer to cook than
it says in the recipe?
Why do I get condensation on the
inside of the door?
Does the microwave energy get
through the window on the door?
Steam comes out of the side of the
door and vents. Can microwave
energy get out too?
What happens if the microwave is
switched on while the microwave is
empty?
Why doesn’t the microwave’s light
illuminate?
There are sparks inside the
microwave when I use the
microwave. Will this cause any
damage?
Light is showing through the vents
and door. Does this mean the
microwave energy can escape?
Why do I get interference on
my TV and radio when I use the
microwave?
Check that:
•the cooking time has been set
•the door is closed
•the mains socket is not overloaded causing the fuse to blow.
Check that:
•the correct cooking time has been set
•the correct power setting has been used.
sometimes pop as steam builds up inside it. You can stop the egg
from popping by piercing the yolk with a toothpick before cooking.
Never cook eggs that are still in their shells.
With microwave cooking, many foods build up enough heat inside
them to continue cooking even after they’ve been taken out of the
microwave. Because microwave cooking works from the outside
of food inwards, standing time lets you cook the centre of the
food without the outside being overcooked.
First check that the microwave was set just as the recipe said.
Cooking times and heat settings are suggestions to help
prevent overcooking but differences in the weight, size, shape
and starting temperature of food will all affect how long it takes
to cook – just as it does with a conventional oven. Use your
judgement along with the recipe to check whether the food has
been cooked properly.
Condensation is perfectly normal, especially when you are
cooking food with a high moisture content such as potatoes.
No. The door has a special metal screen with holes in that lets
you see inside but stops microwave energy from getting out.
No. The door and vents are carefully designed to let steam out
during cooking but keep microwave energy in. The gaps are not
big enough for microwave energy to escape.
The microwave will be damaged. Do not switch the microwave
on when there’s nothing inside the microwave. It is a good idea
to keep a cup of water in the microwave just in case someone
accidentally starts the microwave.
Open the door. If the light does not illuminate, the bulb has
probably blown. Call a qualified technician – do not try to change
the bulb yourself.
Yes. Make sure that you are not using any metal utensils and that
your containers don’t have a metal trim. You must not use metal
in your microwave when you cook (except aluminium foil).
No. It is normal for the light to be visible and is nothing to be
concerned about.
Microwaves use radio waves similar to those received by TVs
and radios. You can lessen the interference by moving your
microwave further away from the TV or radio.
29
GB
specifications
Model
Input
Microwave Output
Microwave Frequency
Outside Dimensions
(width x deep x height)
Power consumption
Microwave Input
Grill Input
Convection Input
Complies with EC directives 2004/108/EC and 2006/95/EC.
Features and specifications are subject to chanage without prior notice.
540mm x 405mm x 300mm
K30CSS10E
230 - 240V~ 50Hz
850 - 900 Watts
1350 - 1450 Watts
1200 - 1300 Watts
2100 - 2300 Watts
2450MHz
30
NO
Takk for at du kjøpte ny Kenwood kombinasjonsmikrobølgeovn.
Denne bruksanvisningen vil hjelpe deg med å bruke den på en trygg og
riktig måte.
Vi anbefaler at du tar deg tid til å lese gjennom hele bruksanvisningen for å
bli fortrolig med alle funksjonene.
Les alle sikkerhetsanvisningene nøye før bruk og oppbevar
bruksanvisningen for fremtidig referanse.
pakke opp
Fjern all emballasje fra enheten. Ta vare på emballasjen. Ta hensyn til lokale forskrifter hvis du må
kaste emballasjen.
Følgende elementer er vedlagt:
Hovedenheten
Bakeplate x 1
Glassdreieplate x 1 Dreieplatestøtte x 1
Bruksanvisning x 1
31
NO
klargjøring
Denne mikrobølgeovnen er beregnet på hjemmebruk. Det må ikke brukes til kommersiell catering.
1. Etter å ha pakket ut mikrobølgeovnen, må du kontrollere at den ikke er blitt skadet mens den var
i esken. Kontroller at det ikke er noen bulker i mikrobølgeovnen og at døren lukkes ordentlig. En
bulket eller skadet mikrobølgeovn kan føre til utslipp av mikrobølgeenergi. Kontroller at du har
tatt all emballasjen ut fra innsiden av mikrobølgeovnen. Kast plastemballasjen eller posene på
en forsvarlig måte, og oppbevar dem utilgjengelig for barn.
2. Plasser mikrobølgeovnen på en flat
overflate unna varmekilder, som radiatorer
og åpen ild, og unna kalde områder. La det
være et mellomrom på 10 cm rundt sidene
og 30 cm over ovnen slik at varm luft kan
slippe ut av luftehullene under matlaging –
denne mikrobølgeovnen er ikke konstruert
for innbygging.
3. Sett mikrobølgeovnens støpsel inn i en
standard stikkontakt. Unngå å bruke en
kontakt der en forgrening eller annet utstyr
også er tilkoblet. Ikke bruk en forgrening
med flere stikkontakter.
4. Sett dreieplatestøtten inn i
mikrobølgeovnen og sett glassdreieplaten
oppå støtten. Dreieplatestøtten er utformet
for å sitte stødig på spindelen. Du må alltid
bruke dreieplaten og støtten når du bruker
mikrobølgeovnen.
30 cm
10 cm10 cm
5. For å beskytte arbeidsflaten, anbefaler vi at
du fester noen sklisikre puter (ikke vedlagt)
under mikrobølgeovnen.
Fjern dreieplaten og dreieplatestøtten
før du snur mikrobølgeovnen opp ned.
32
Sett fra undersiden
 Loading...