

Kenwood HTB-805DV User Manual
Congratulations!
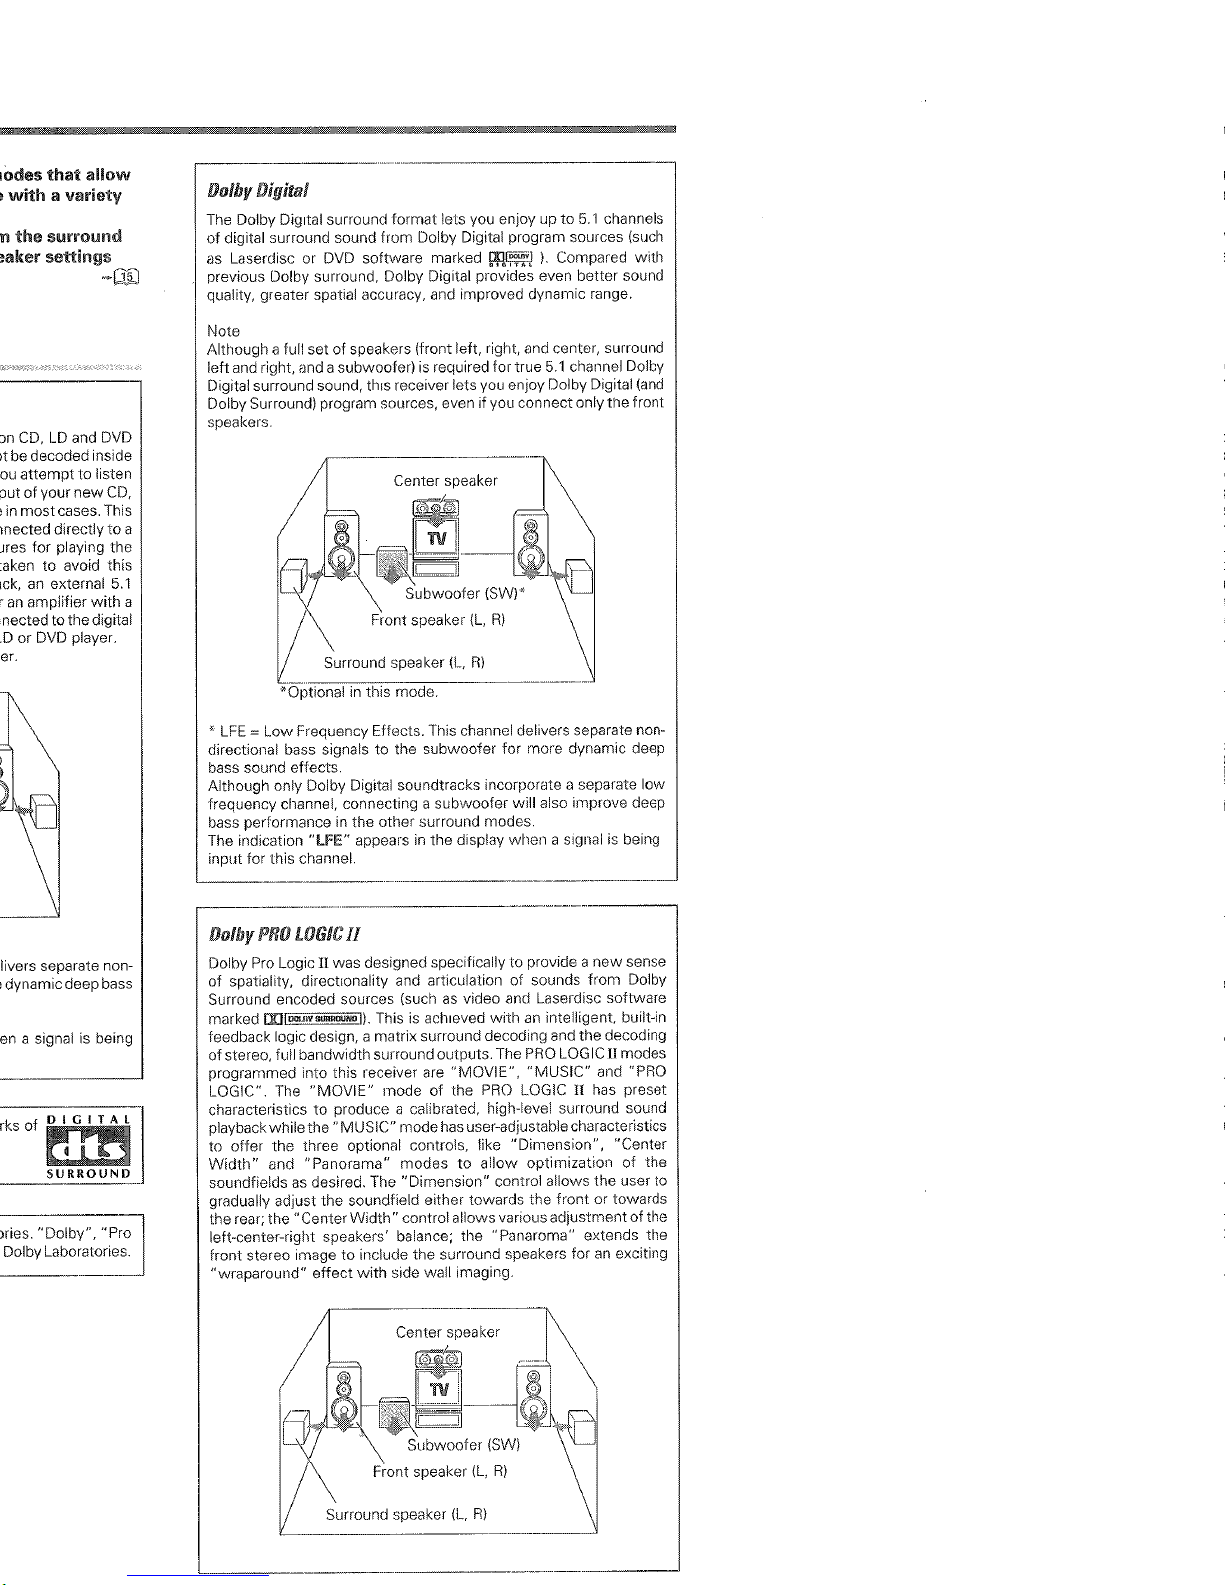
The HTB-805DV Holne Theatre System will make watching
movies at home more fun than ever. To connect your speakers
to the recewer follow the mstrwt~ons on this sheet. To learn
how to operate your receiver please read and follow the
instruction manual included in the receiver’s box. If you’re also
connecting other equipment, such as a TV, VCR, DVD player,
CD player or other source component, use the receiver’s man-
ual in combination wth the manuals that came with those
components.
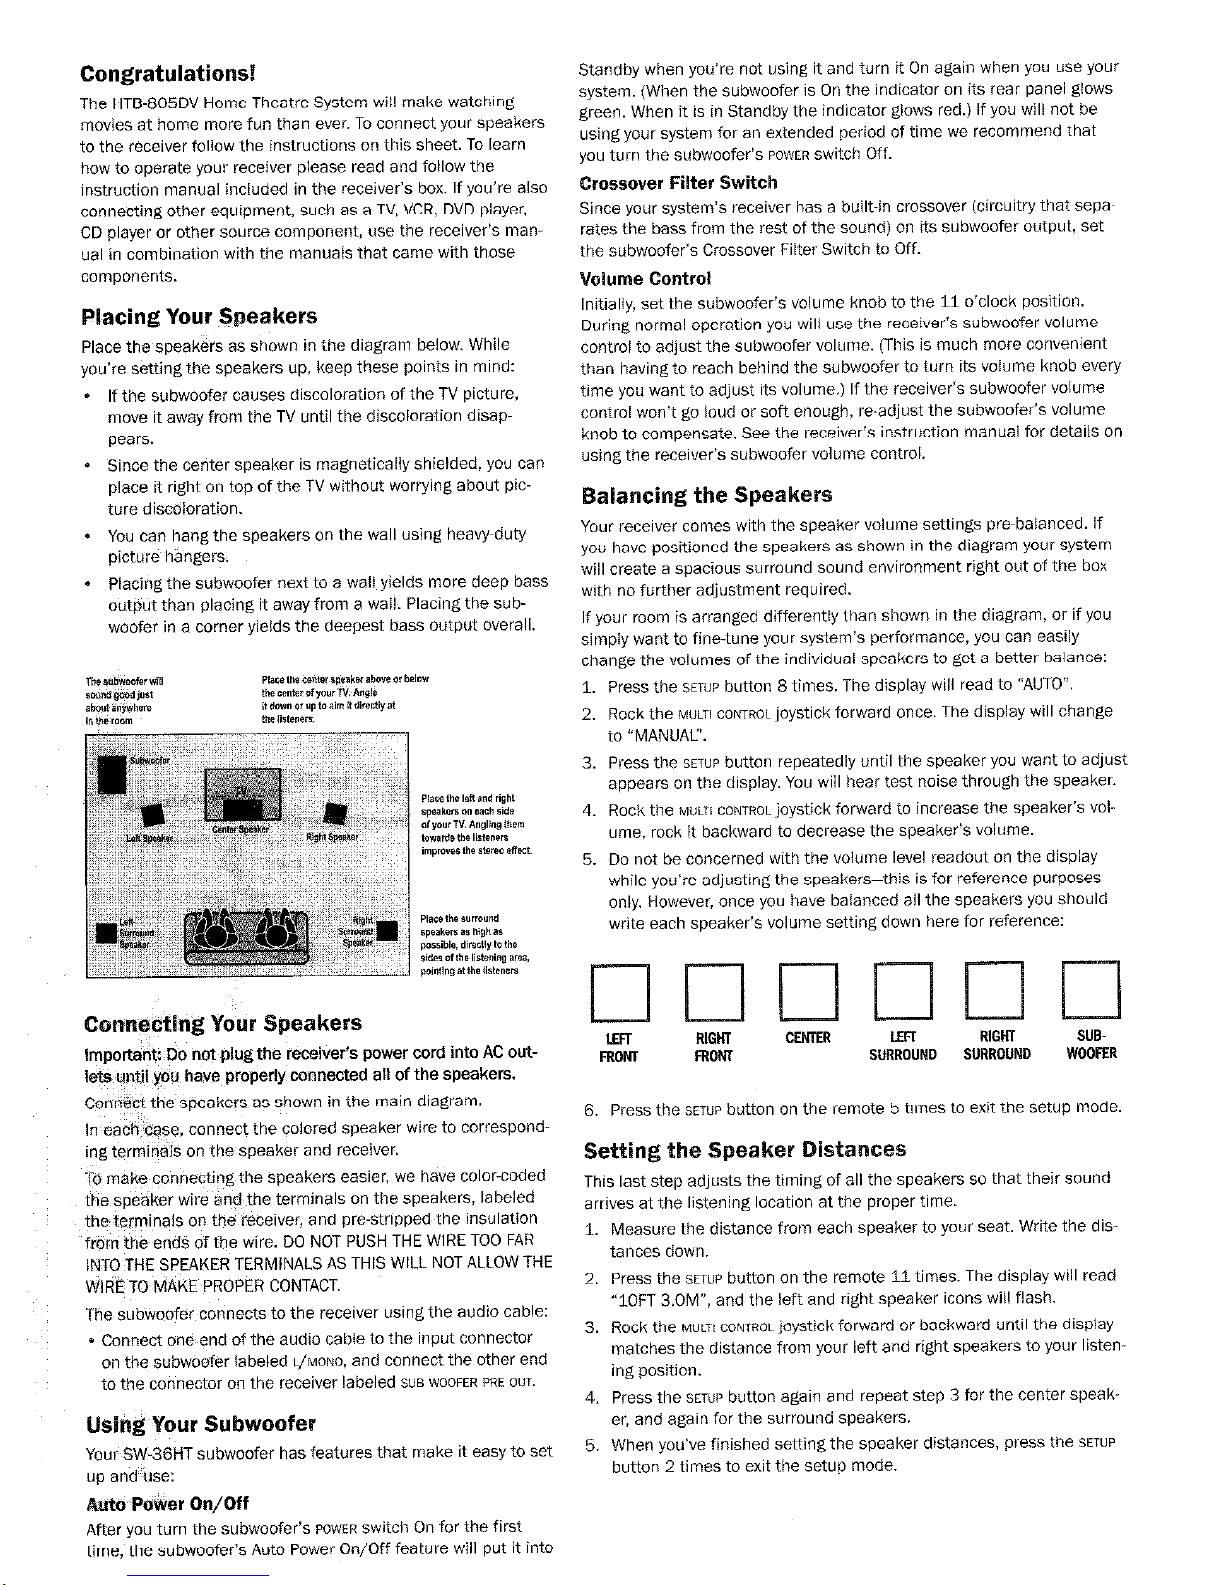
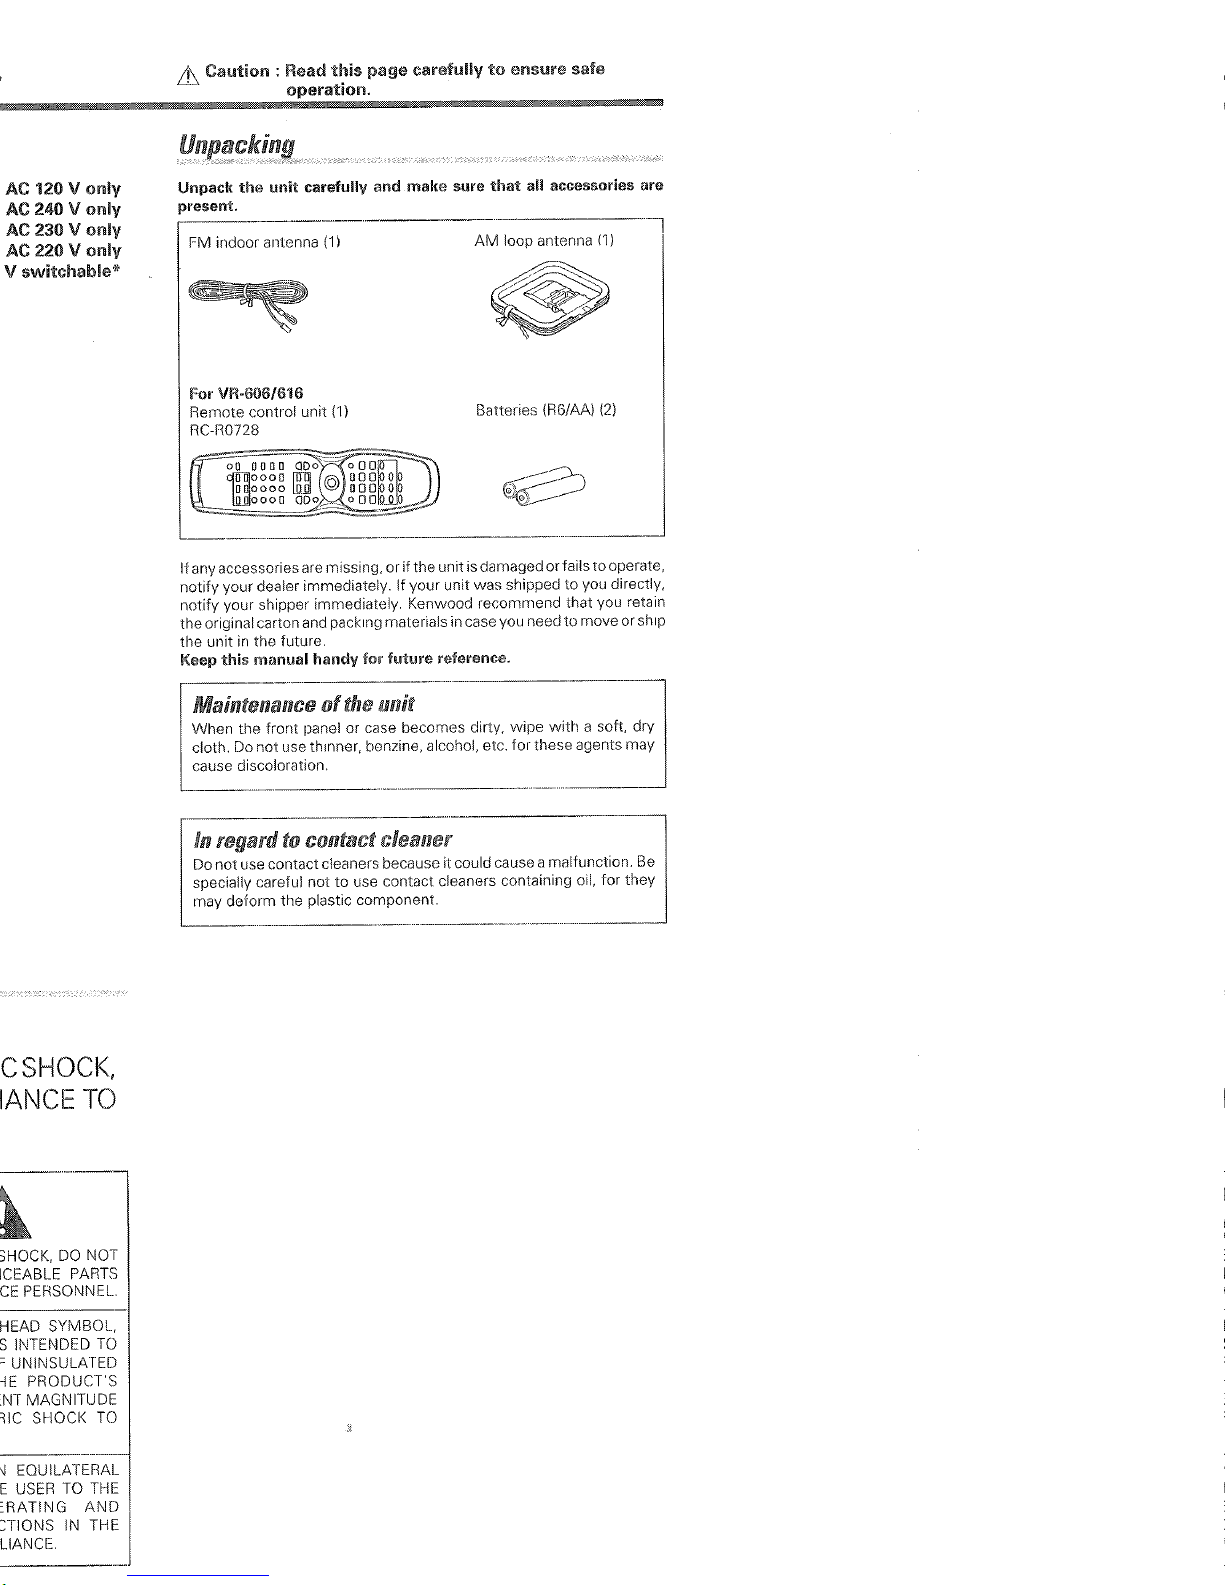
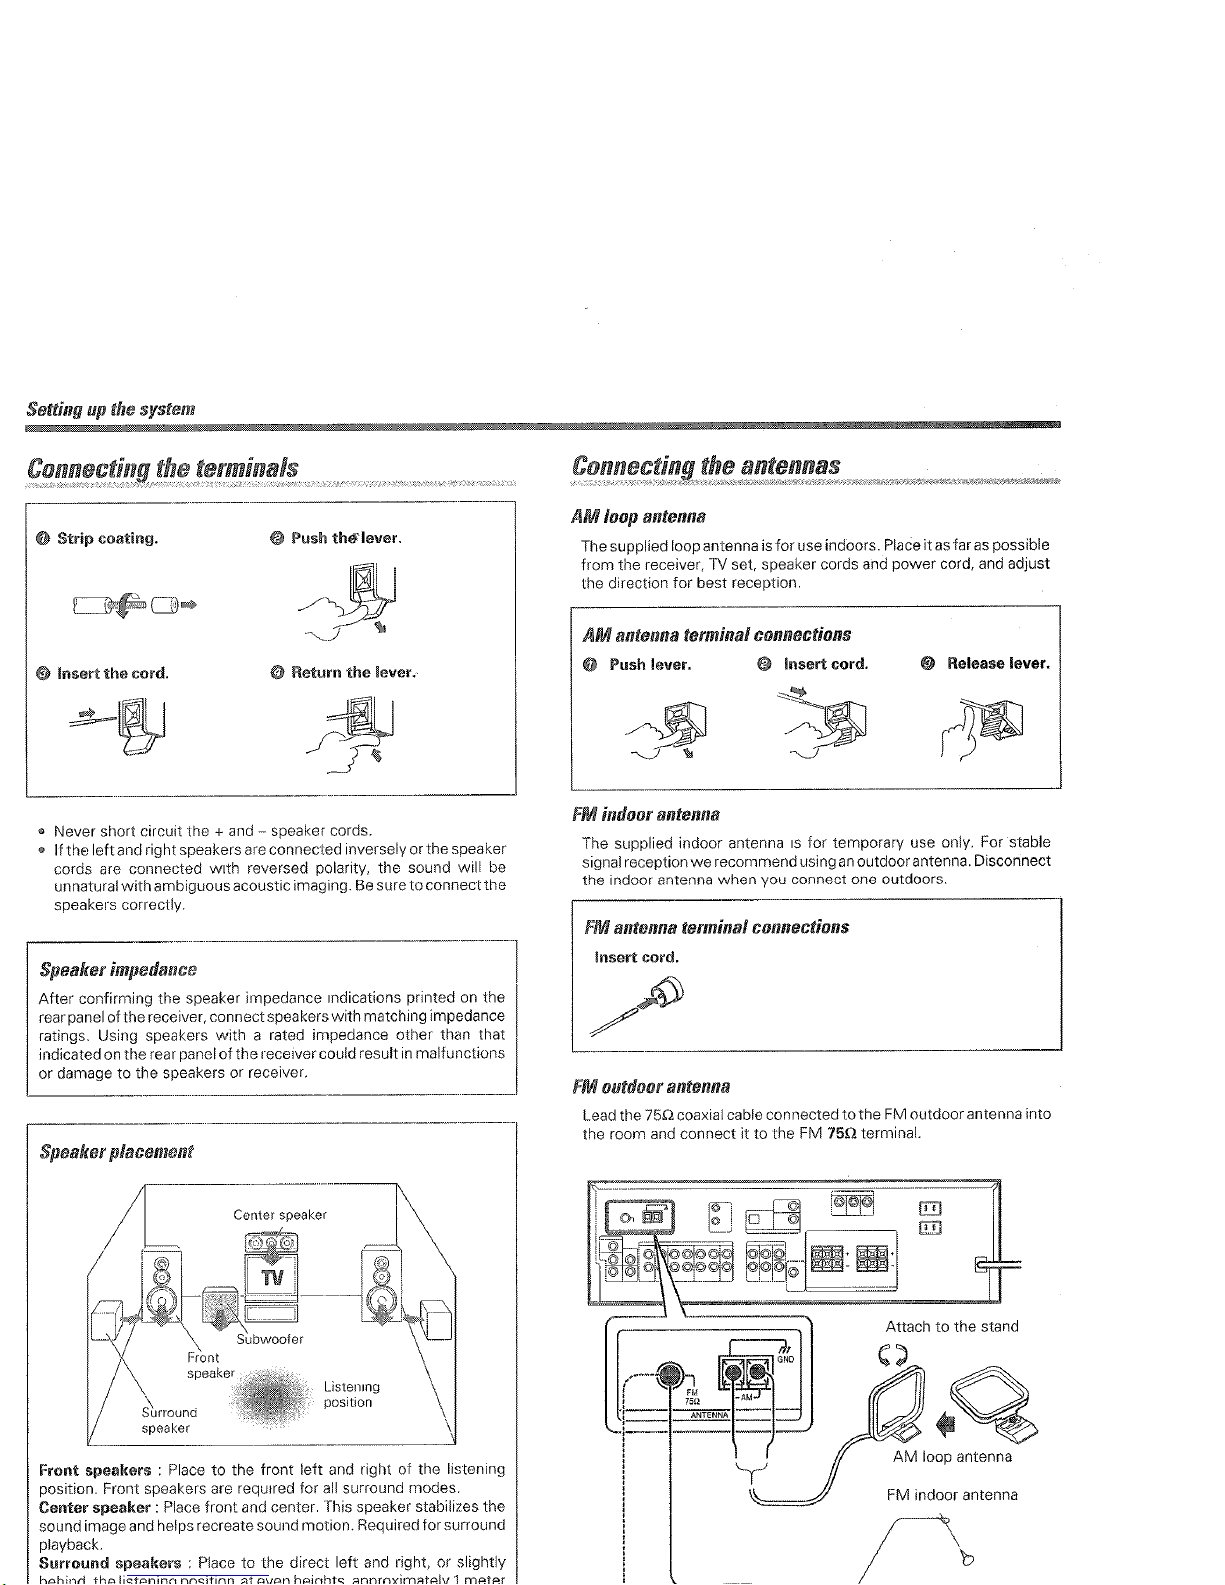
Place the speakers as shown m the diagram below. While
you’re settingthe speakers up, keep these points in mind:
* If the subwoofer causes discoloration of the TV picture,
move it away from the TV until the discoloration disappears.
* Since the center speaker IS magnetically shielded, you can
place it right on top of the TV without wori’y~ng about picture discoloration.
* You can hangthe speakers on the wall using heavy-duty
picture hangers.
* Placing the subwoofer next to a wall yields more deep bass
output than placing It away from a waii. Placing the subwoofer in a comer yields the deepest bass output overall.
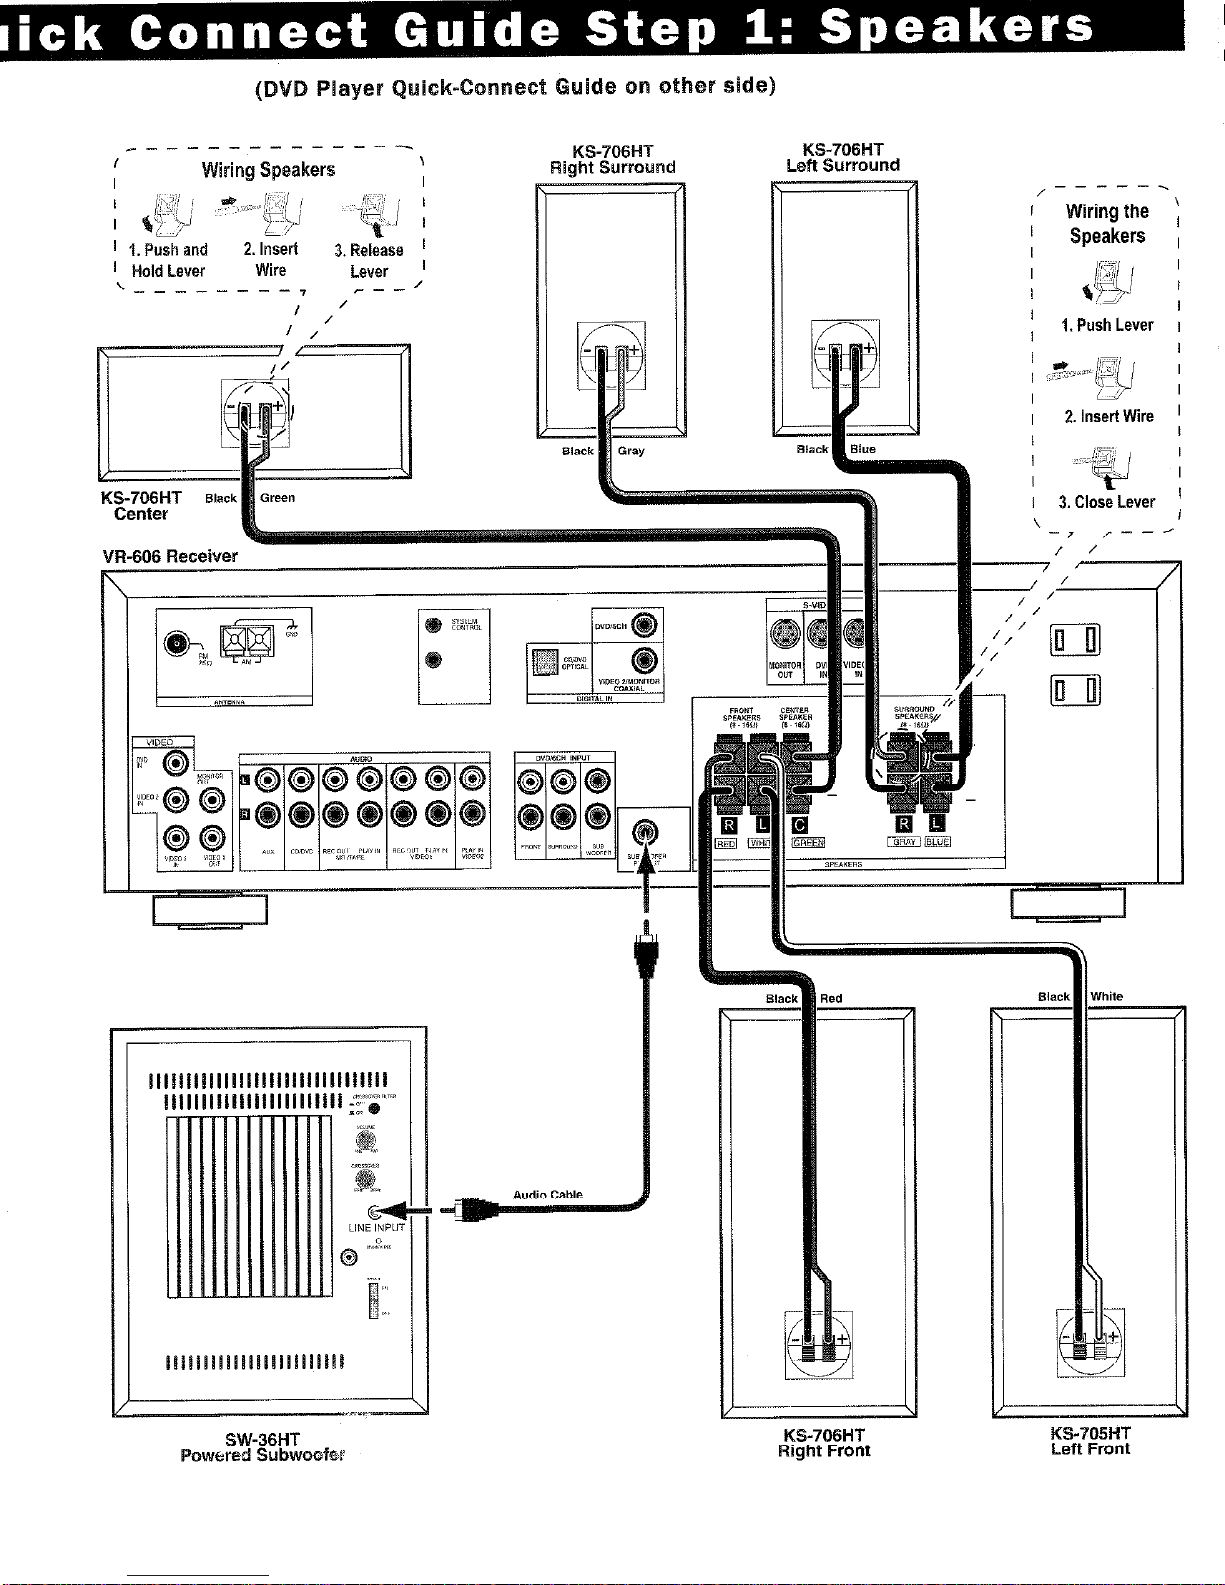
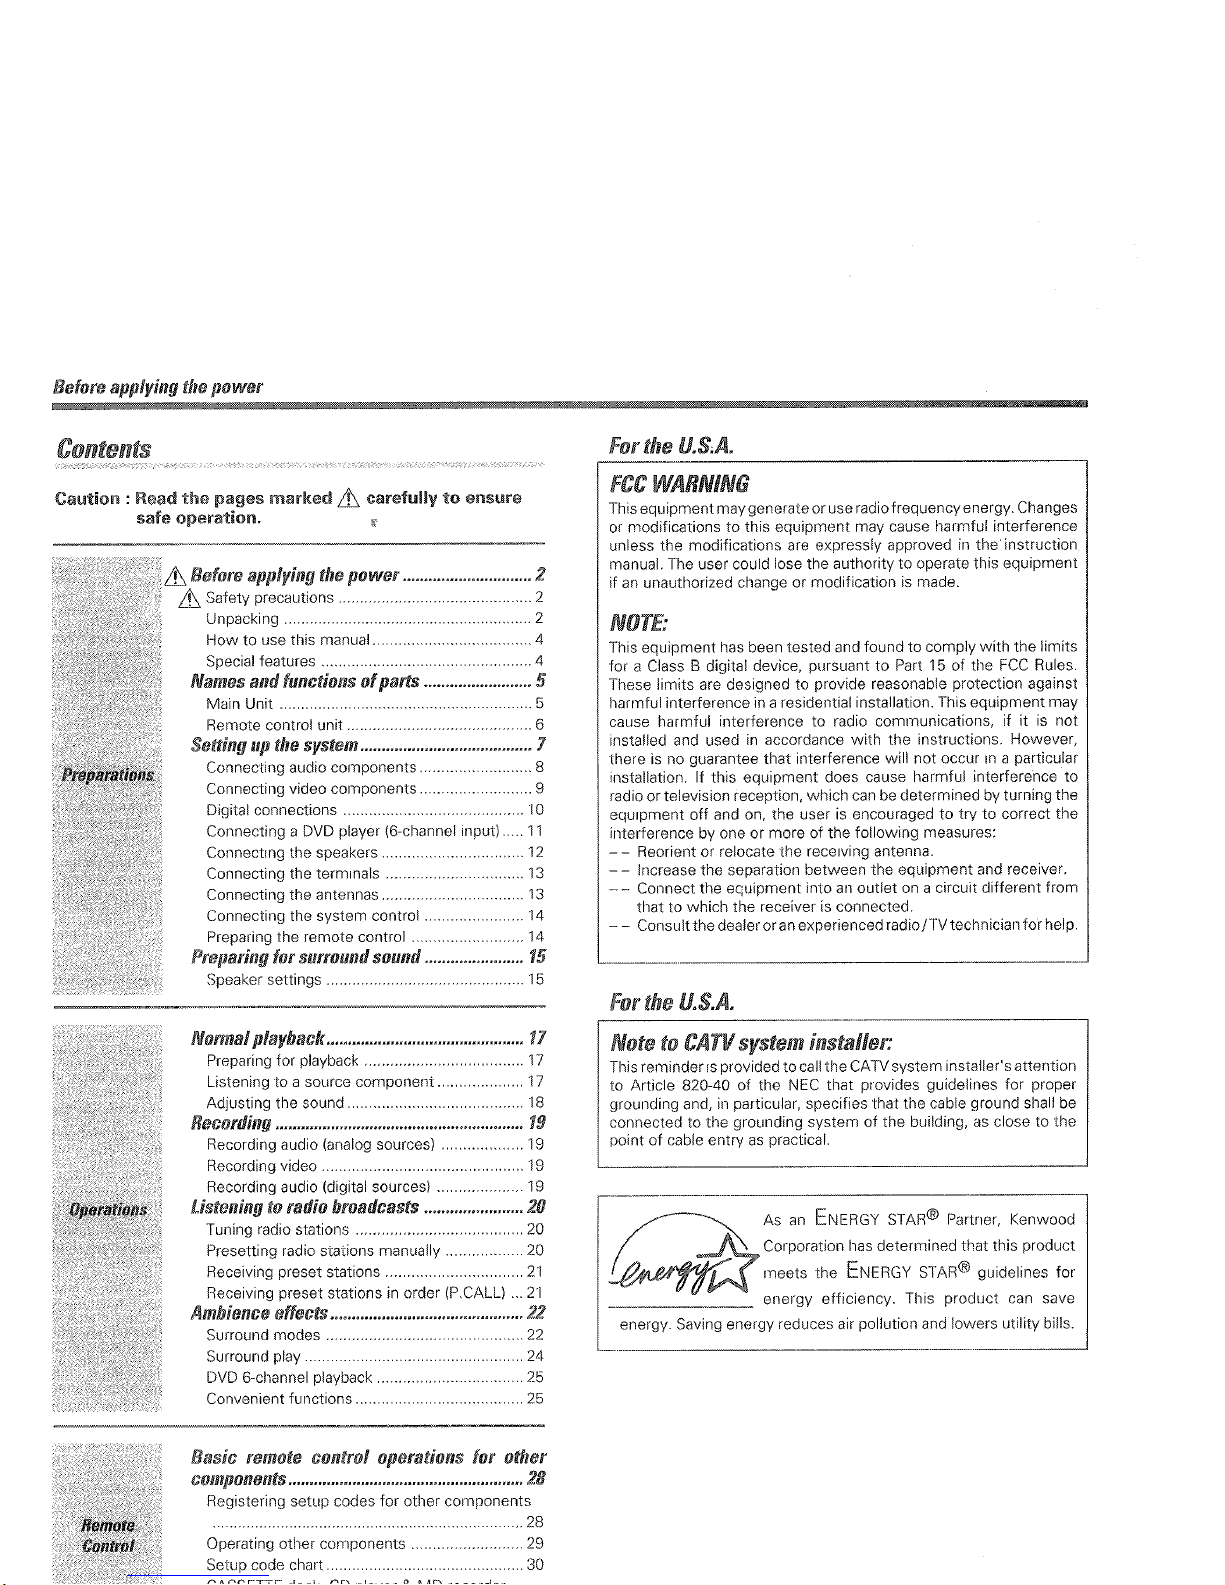
Connecting Your Speakers
Important: Do not plug the receiver’s power cord into AC outlets until yo” have
properly
connected all of the speakers.
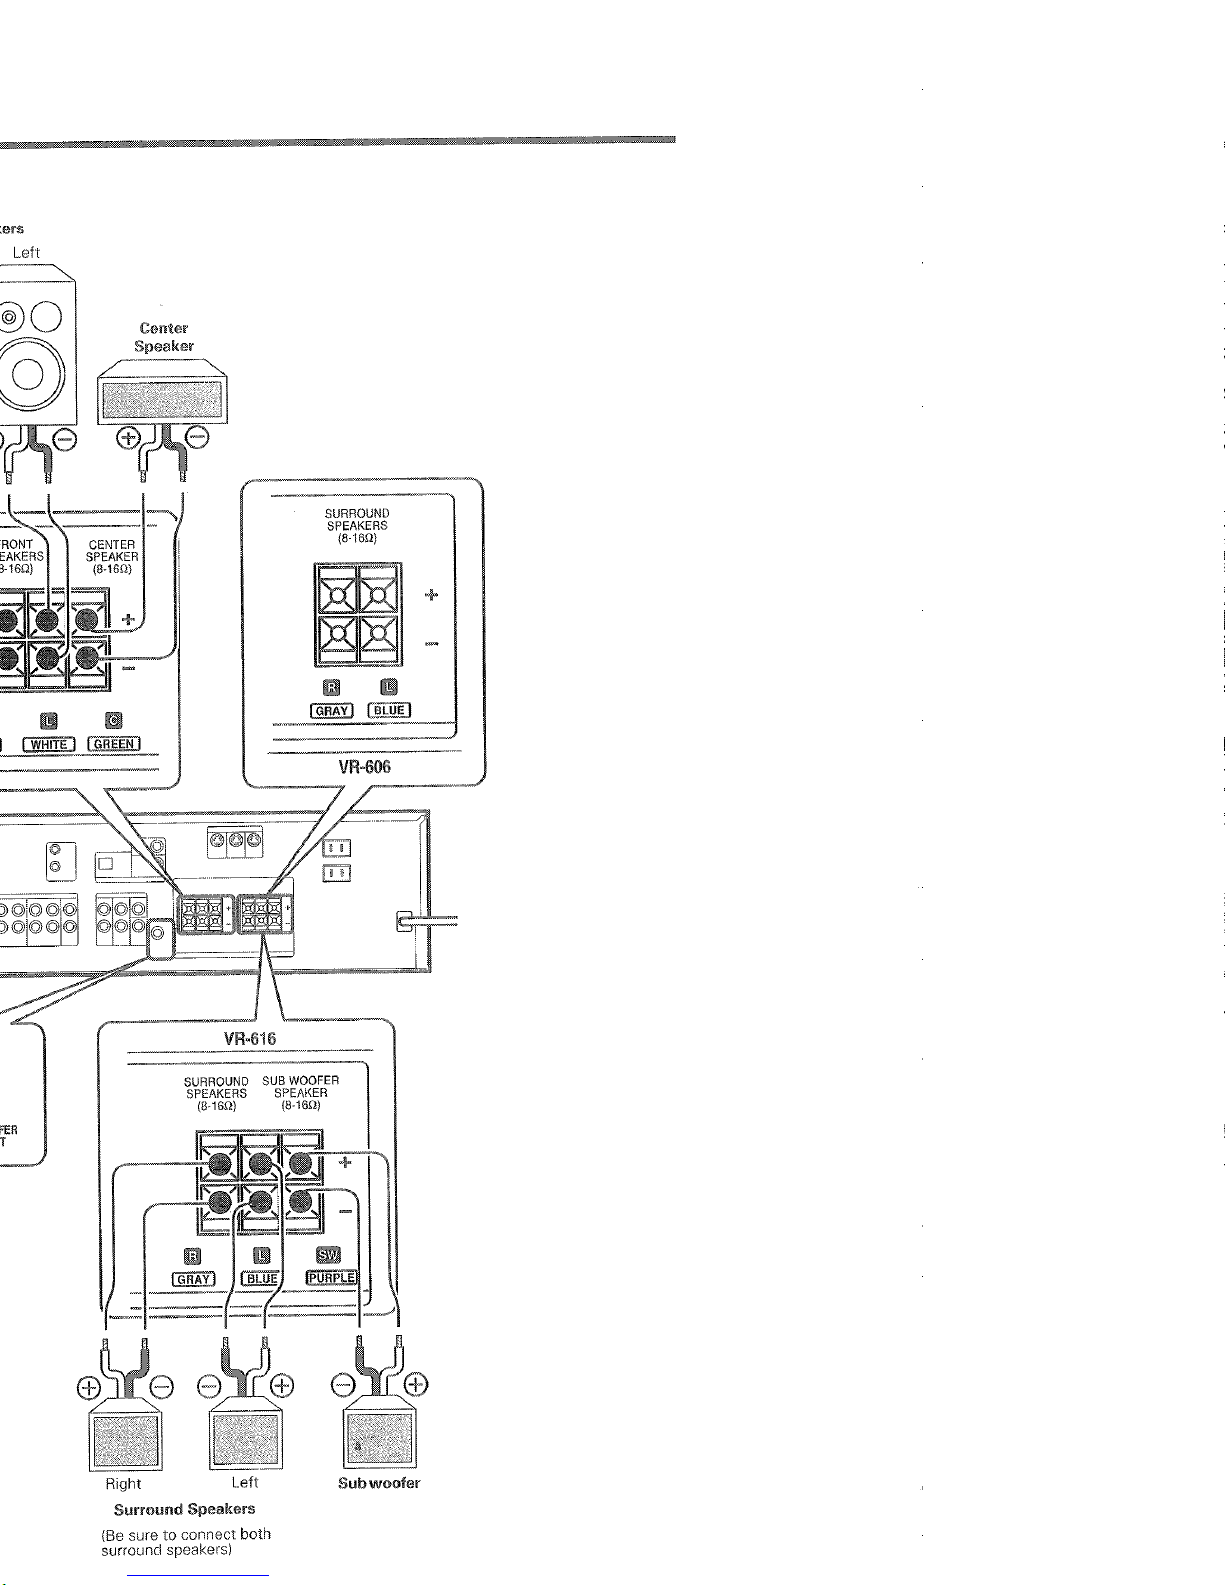
Conn&t the speakers as shown in the main diagram.
In each case, connect the colored speaker wire to correspondmg terminals on the speaker and receiver.
To make connecting the speakers eas~ei, we have color-coded
the speaker wire and the terrrxnals on the speakers, labeled
the terminals on the receiver, and pestripped the
inSulStiOn
from the ends of the wire. DO NOT PUSH THE WIRE TOO FAR
INTO THE SPEAKER TERMINALS AS THIS WILL NOT ALLOW THE
WIRETO MAKE PROPER CONTACT
The subwoofer connects to the rexaver using the audio cable:
- Connect one end of the audio cable to the input connector
on the subwoofer labeled L/MONO, and connect the other end
to the connector on the recewer labeled SUB WOOFER PRE o”i.
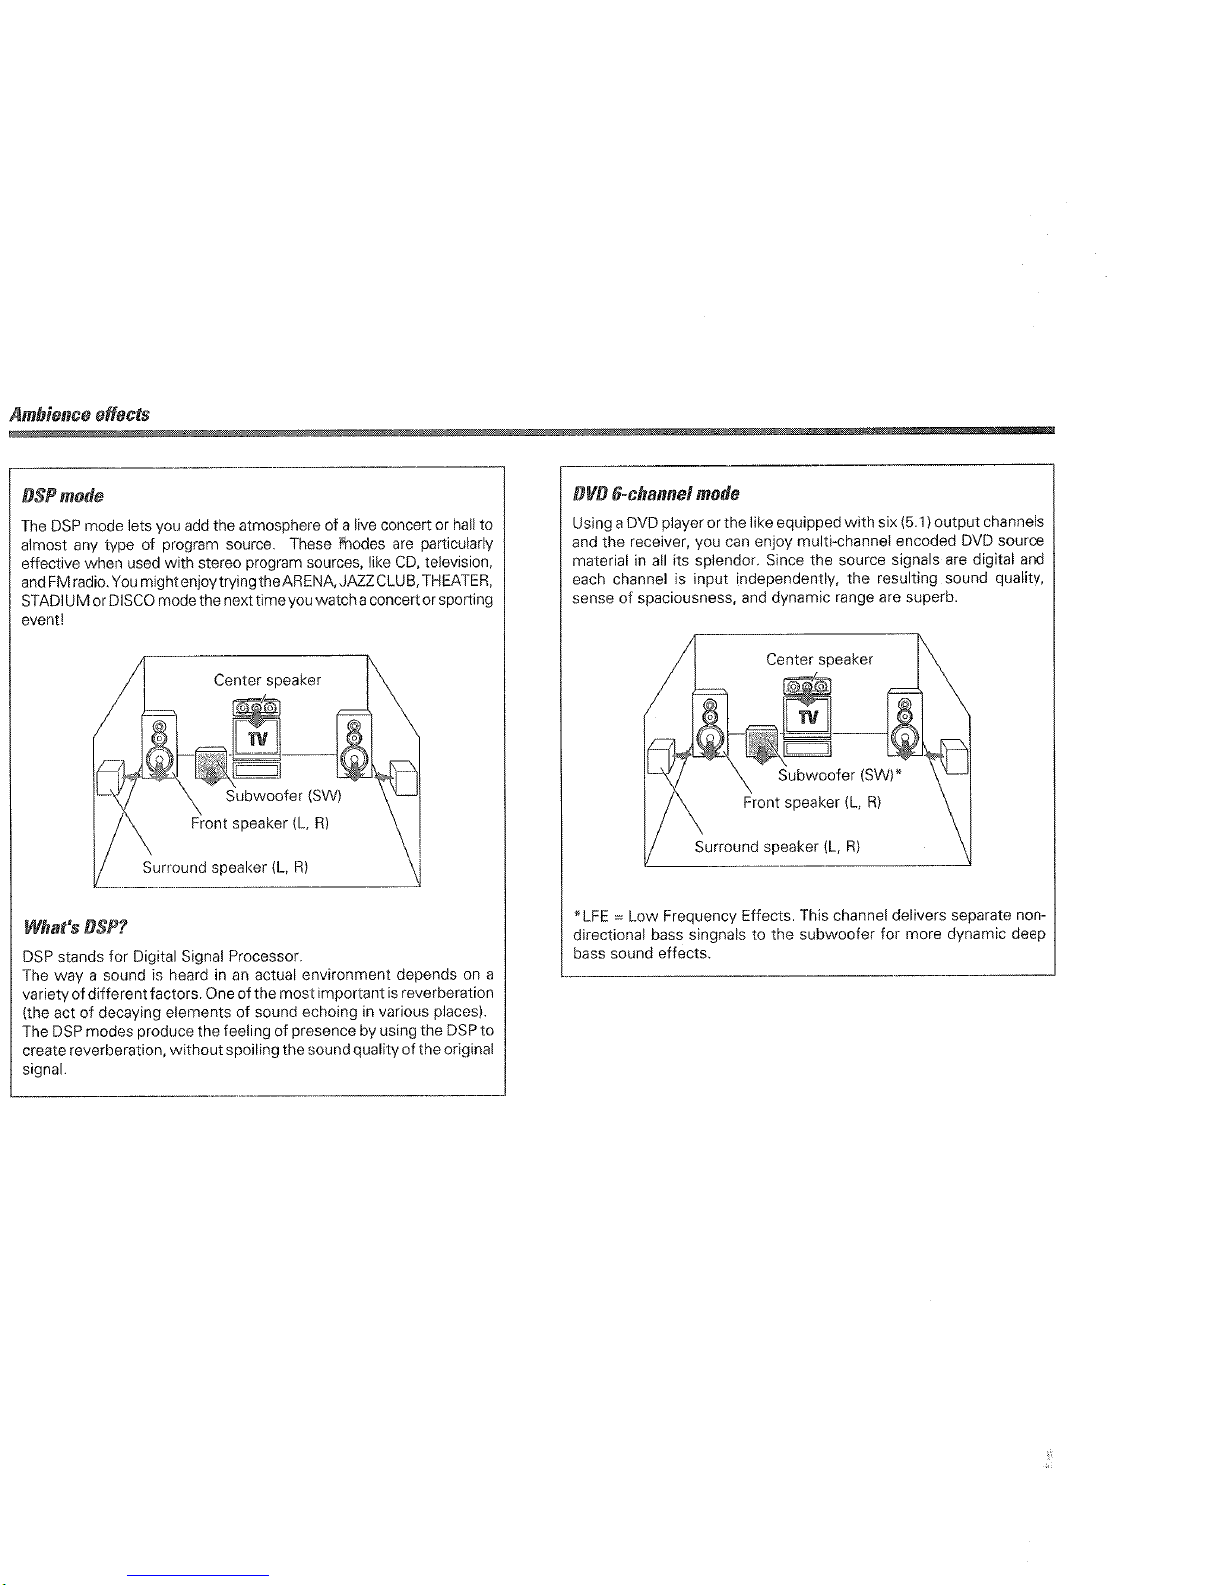
Using Your Subwoofer
Your SW-36HT subwoofer has features that make It easy to set
up and rise:
to Power On/Off
After you turn the subwoofer’s POWER switch On for the first
Standby when you’re not using It and turn @t On again when you use your
system. (When the subwoofer is On the ,ndicator on its rear panel glows
green. When it is in Standby the indicator glows red.) If you will not be
using your system for an extended period of lmx we recommend that
you turn the subwoofer’s POWER switch Off.
Crossover Filter Switch
Since your system’s receiver has a built-in crossover (circuitry that sepa
rates the bass from the rest of the sound) on its subwoofer output, set
the subwoofer’s Crossover Filter Switch to Off.
Volume Control
Initially, set the subwoofer’s volume knob to the 11 o’clock position.
During normal operation you wili use the receiver’s subwoofer volume
control to adjust the subwoofer volume. (This is much more convenient
than hawng to reach beh,nd the subwoofer to turn Its “oiume knob every
time you want to ad,ust Its volume.) If the recelvel’s subwoofer volume
control won’t go loud oi soft enough, re-adjust the subwoofer’s volume
knob to compensate. See the receiver’s lnstiuction manual for details on
using the rece~ver’s subwoofer volume control.
Balancing the Speakers
Your receiver comes with the speaker volume settings pre-balanced. If
you have positioned the speakers as shown in the diagram your systeln
will create a spacious surround sound environment right out of the box
wth no further adjustment required.
If your room is arranged differently than shown in the diagram, or If you
simply want to fine-tune your system’s performance, you can easily
change the volumes of the lndlvlduai speakers to get a better balance:
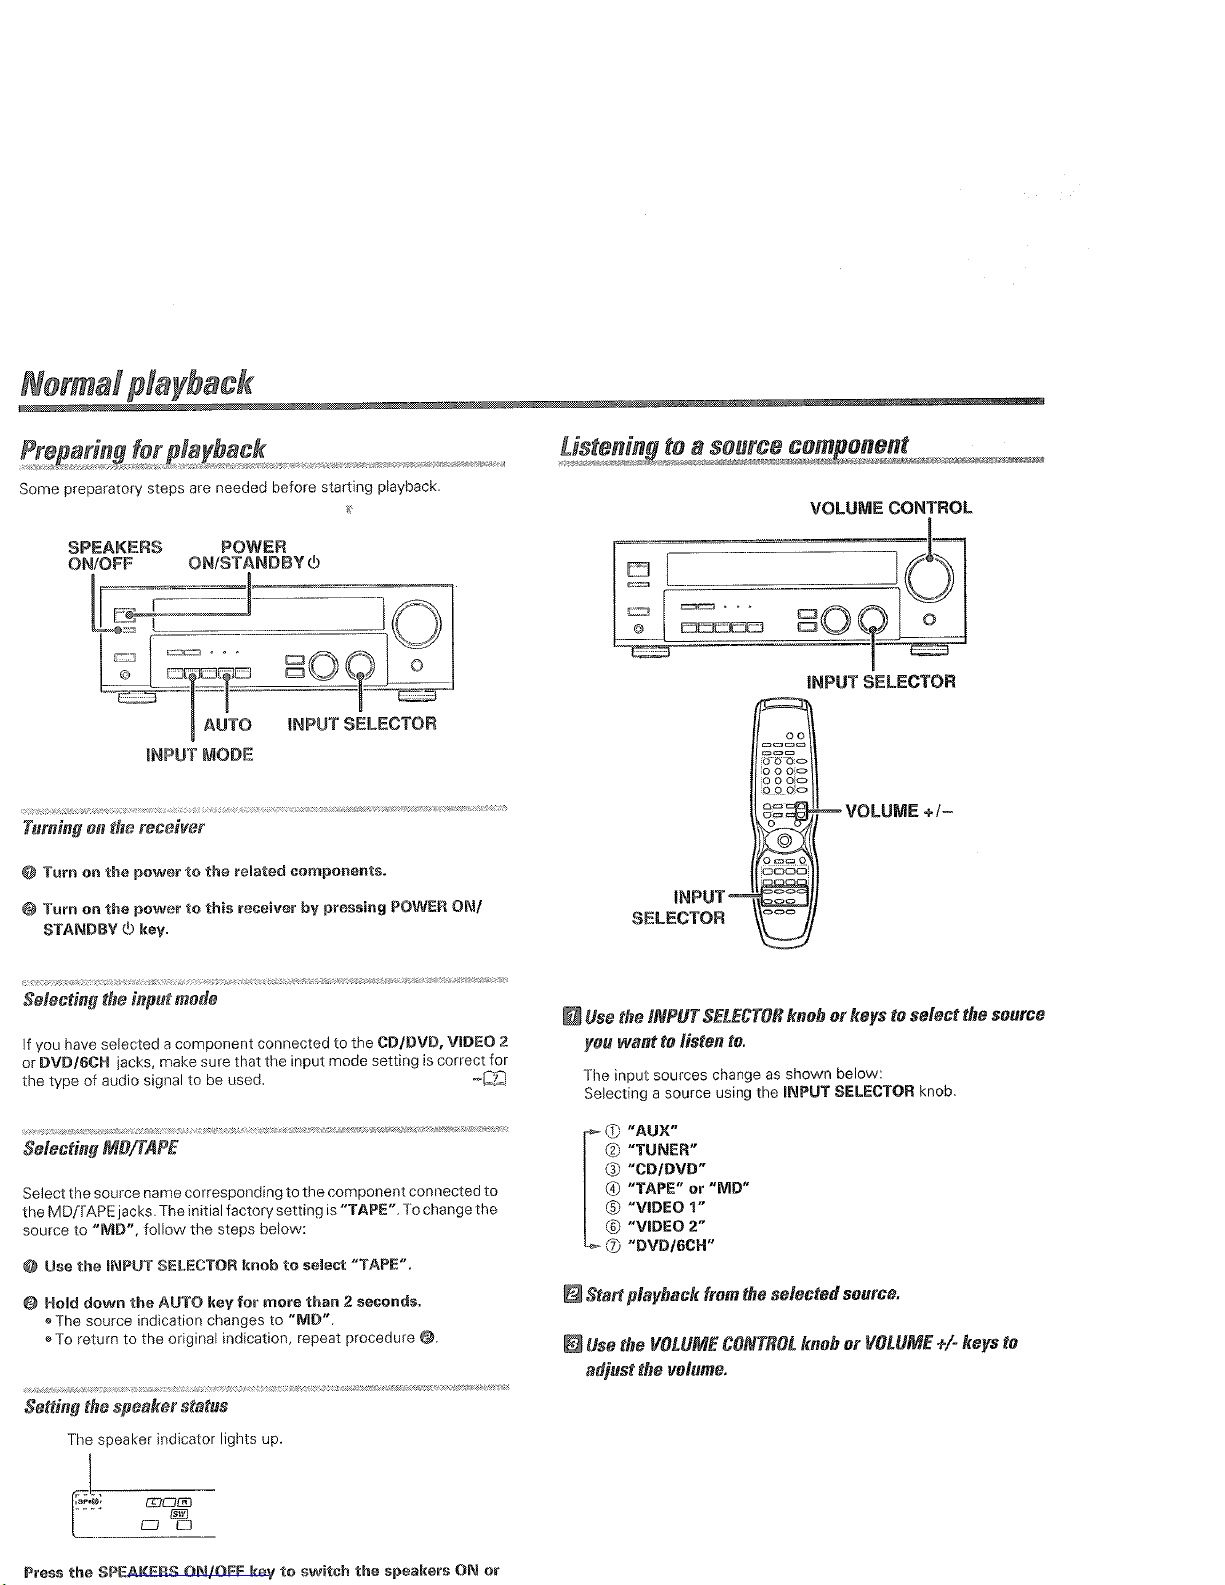
1, Press the SETUP button 8 times. The display WIII read to “AUTO”.
2. Rock the MULT, colvrnoi,oyst,ck forward once. The display w,ll change
to “MANUAY.
3. Press the SETUP button repeatedly until the speaker you want to adjust
appears on the display. You WIII hear test noise through the speaker.
4, Rock the MULTI CONTROL joystick forward to increase the speaker’s vol-
ume, rock it backward to decrease the speaker’s volume.
5. Do not be concerned wuth the volume level readout on the display
while you’re adjustmg the speakers-this is for reference purposes
only. Hwe”er, once you have balanced all the speakers you should
write each speaker’s volume setting down here for reference:
6. Press the SETUP butto” on the remote 5 times to exit the setup mode.
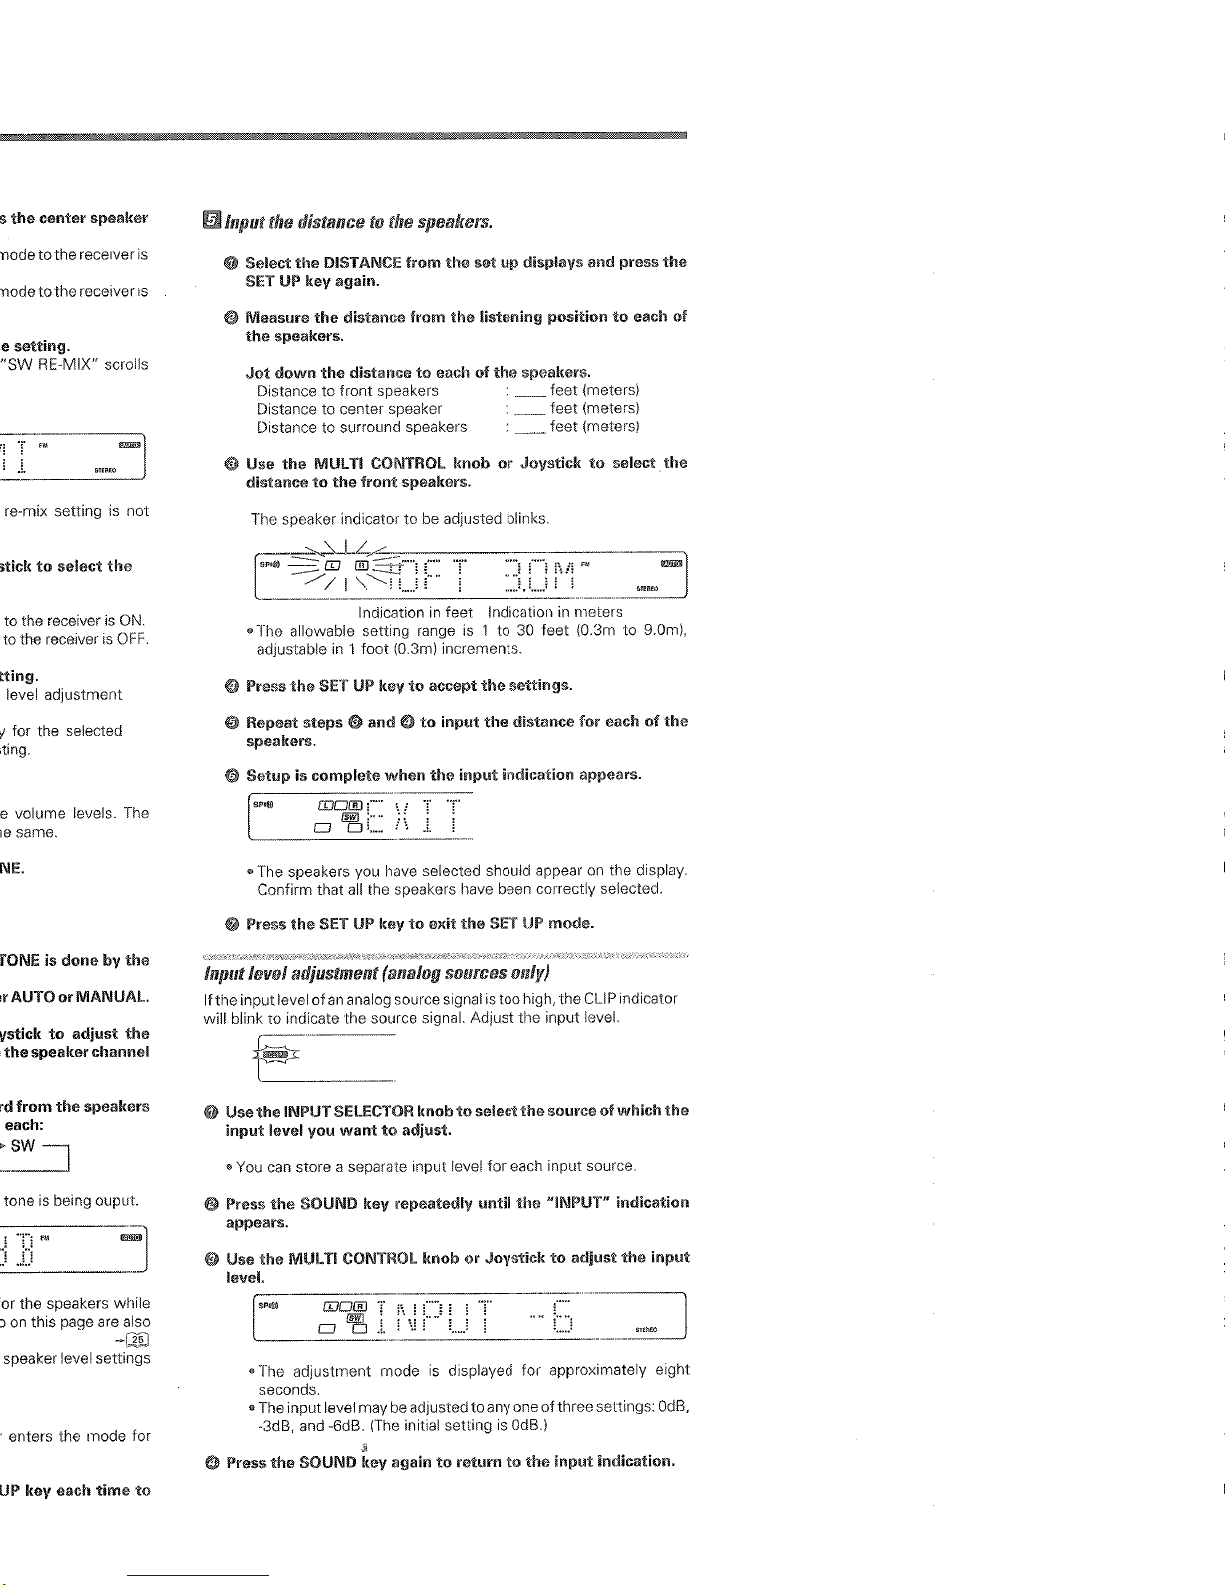
Setting the Speaker Distances
This last step adlusts the tmxng of ali the speakers so that their sound
arrives at the listening location at the proper time.
1. Measure the distance from each speaker to your seat. Write the distances
down.
2. Press the SETUP button on the remote 11 times. The display will read
“IOFT 3.OM”, and the left and right speaker 10x1s will flash.
3. Rock the rviu~ii CoNmoLJoystick forward or backward until the dlspiay
matches the distance from your left and right speakers to your listening position.
4. Press the SETUP button again and repeat step 3 for the center speak-
er, and agal” for the surround speakers.
5. When you’ve finlshed setting the speaker distances, press the SETUP
button 2 times to exit the setup mode.
time, the subwoofer’s Auto Power On/Off feature will put it into
_--...------
---_
/
\
Wiring Speakers ,
,- I/: i.,
’ !
YY
.I I
2. Insert
i Hold Lever
Wire
3. Release I
Lever
\
/
----___-- ?---
’ 1’
1 /
KS-706HT
KS-706HT
Left Surround
/---- -
1 Wiring the / :
I
Speakers ,
I
I
’ l.PushLever I
; .$$gJ ;
I 2. Insert Wire ’
I
I
I :,,
,.._ I;-i,,
iu!
I
I -
I
1 3. Close Lever :
\
-I /--/
/ /
m-606 Receiver
SW-36HT
owtred Subwoofer
KS-706HT
Right Front
KS-705HT
Left Front
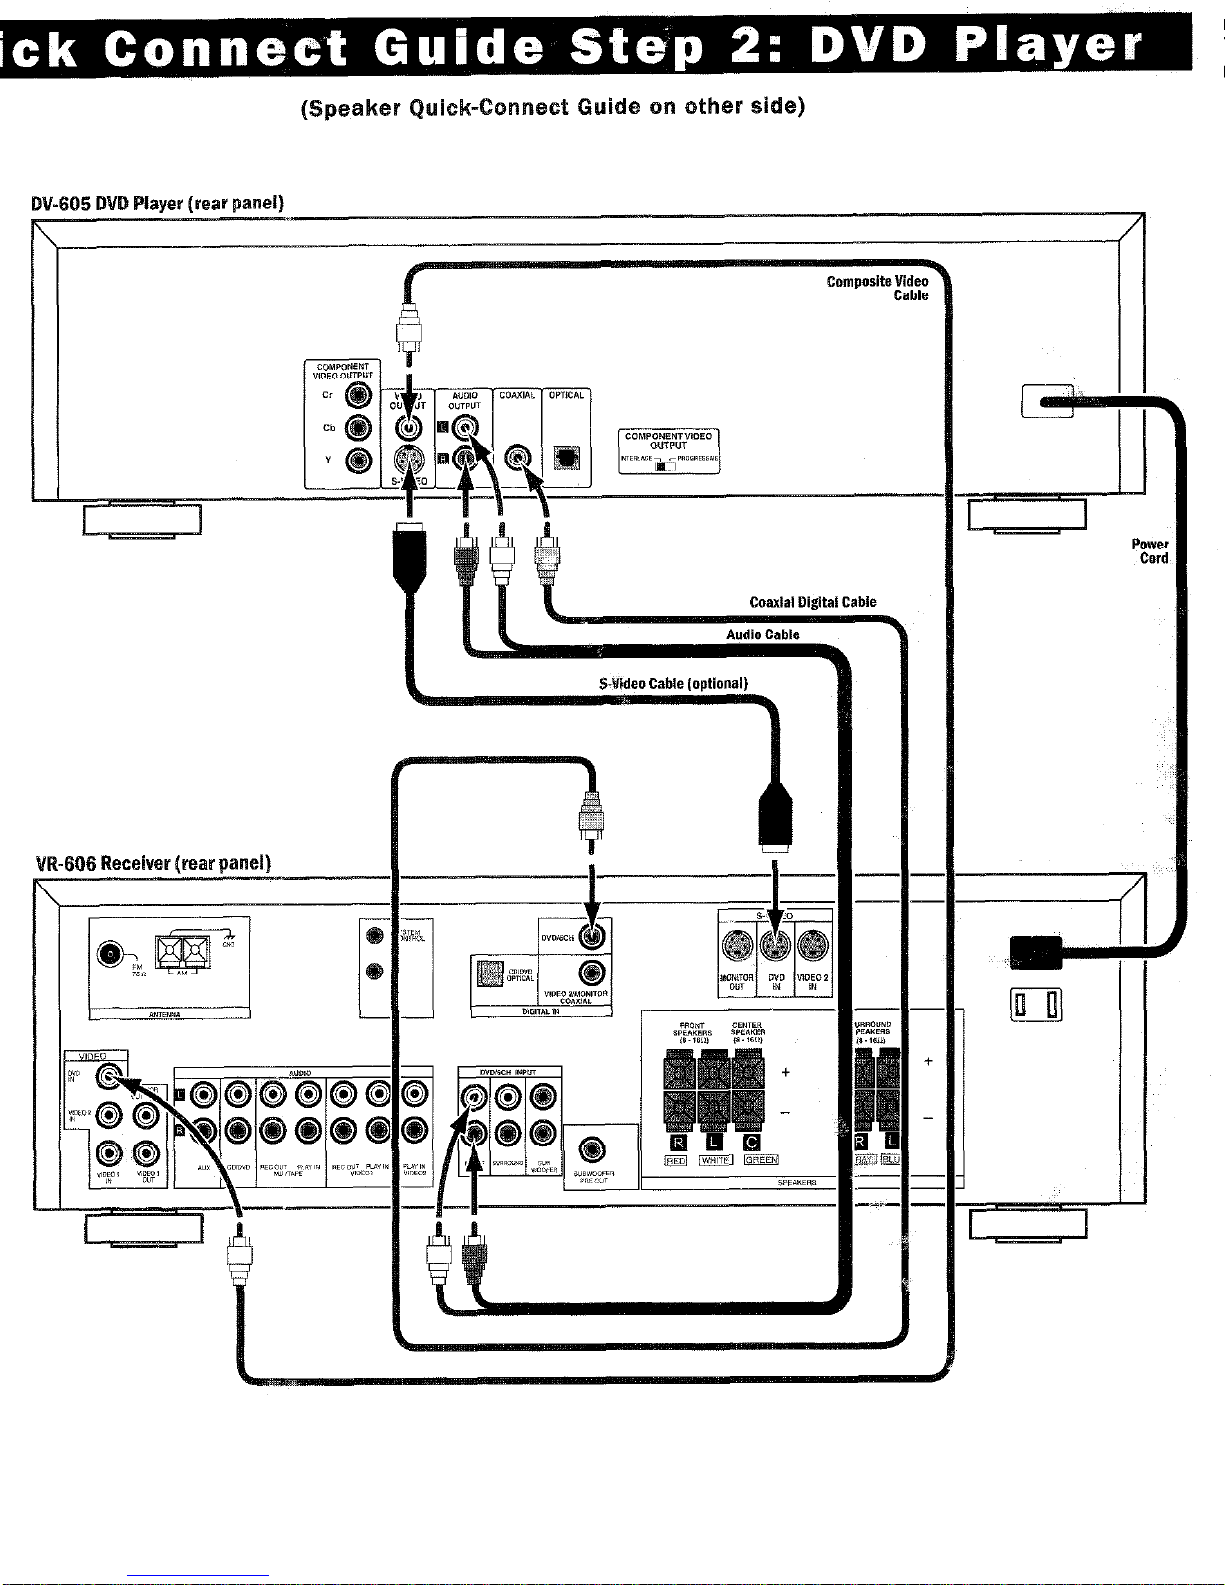
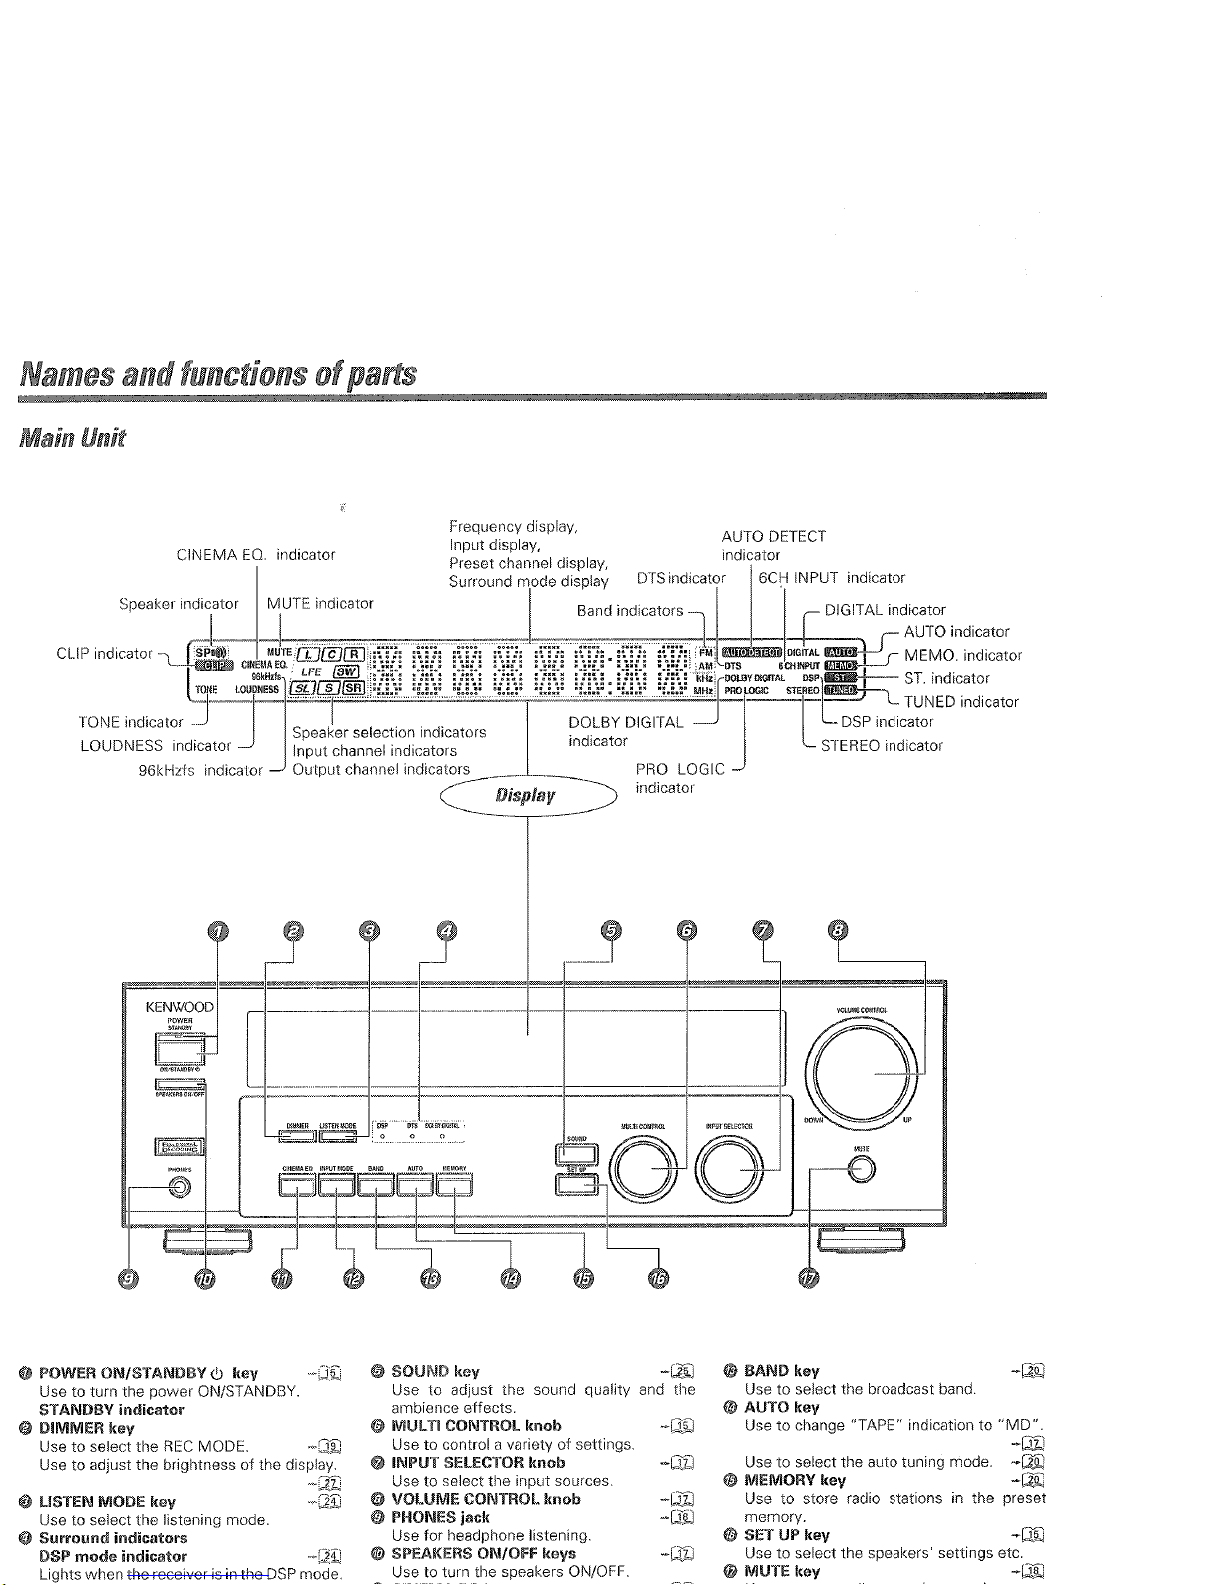
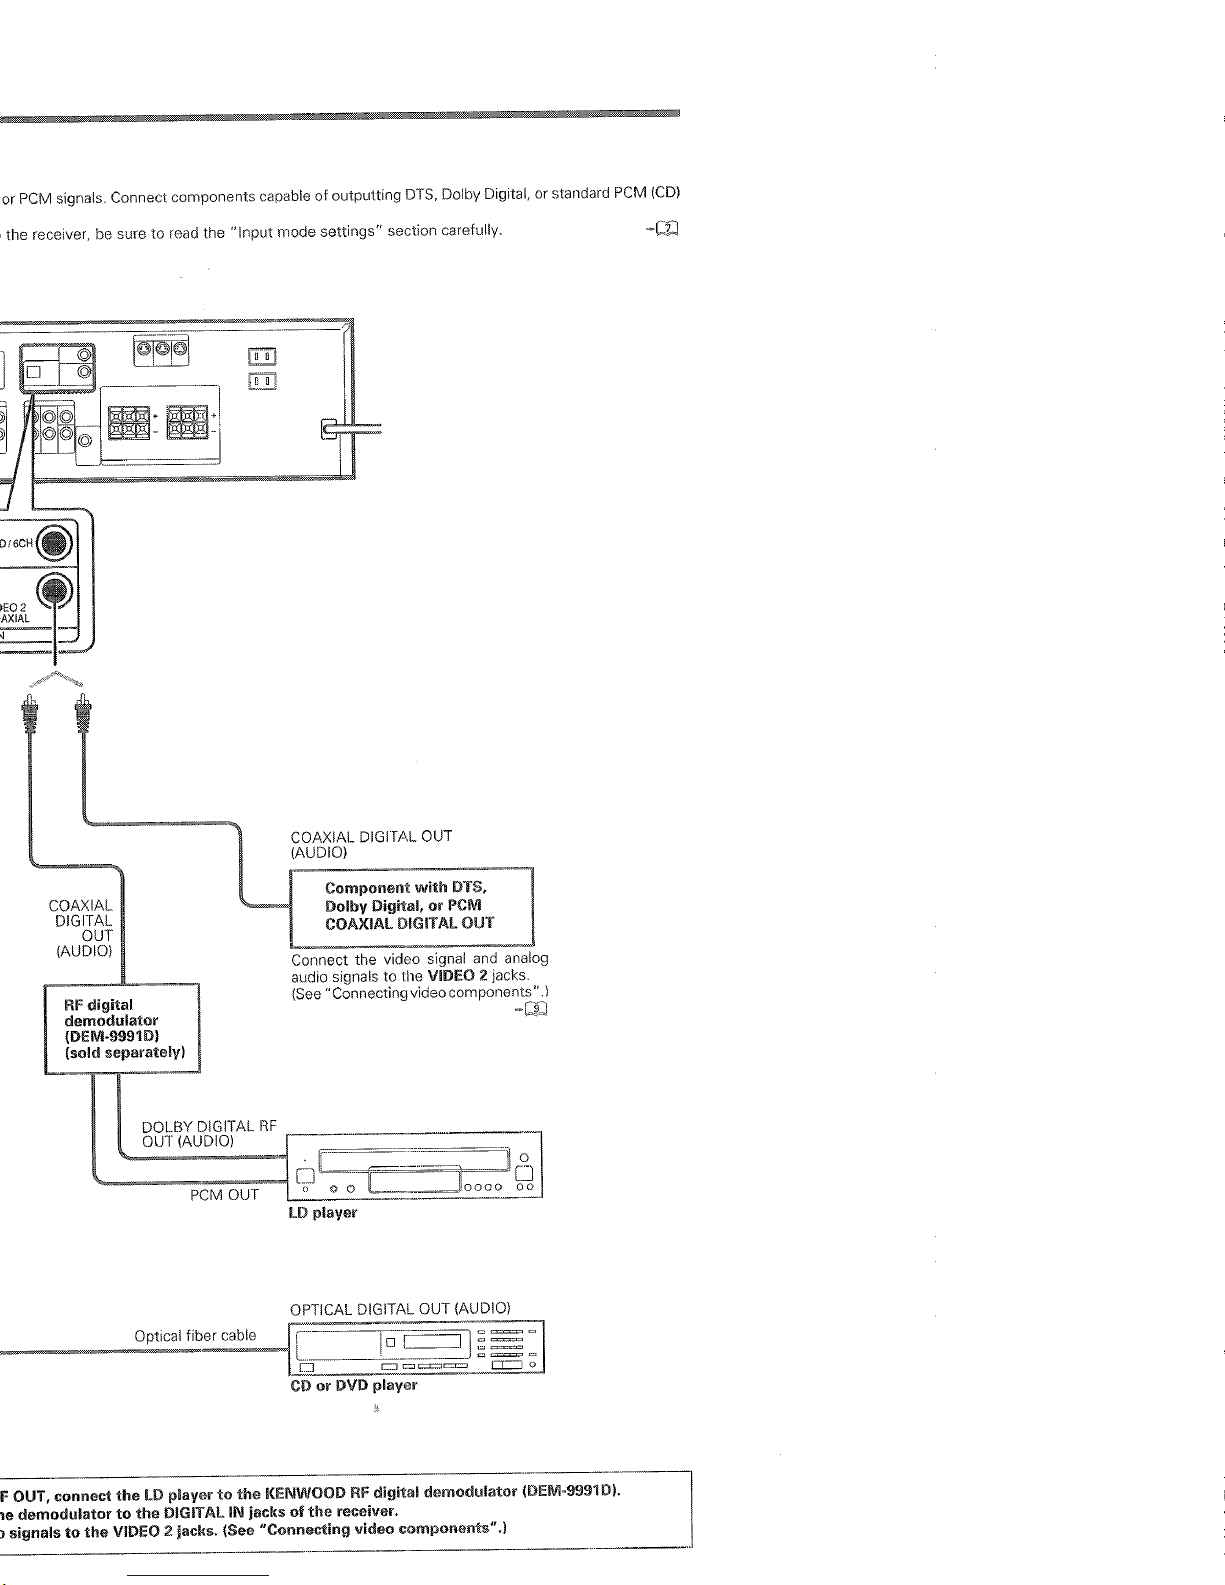
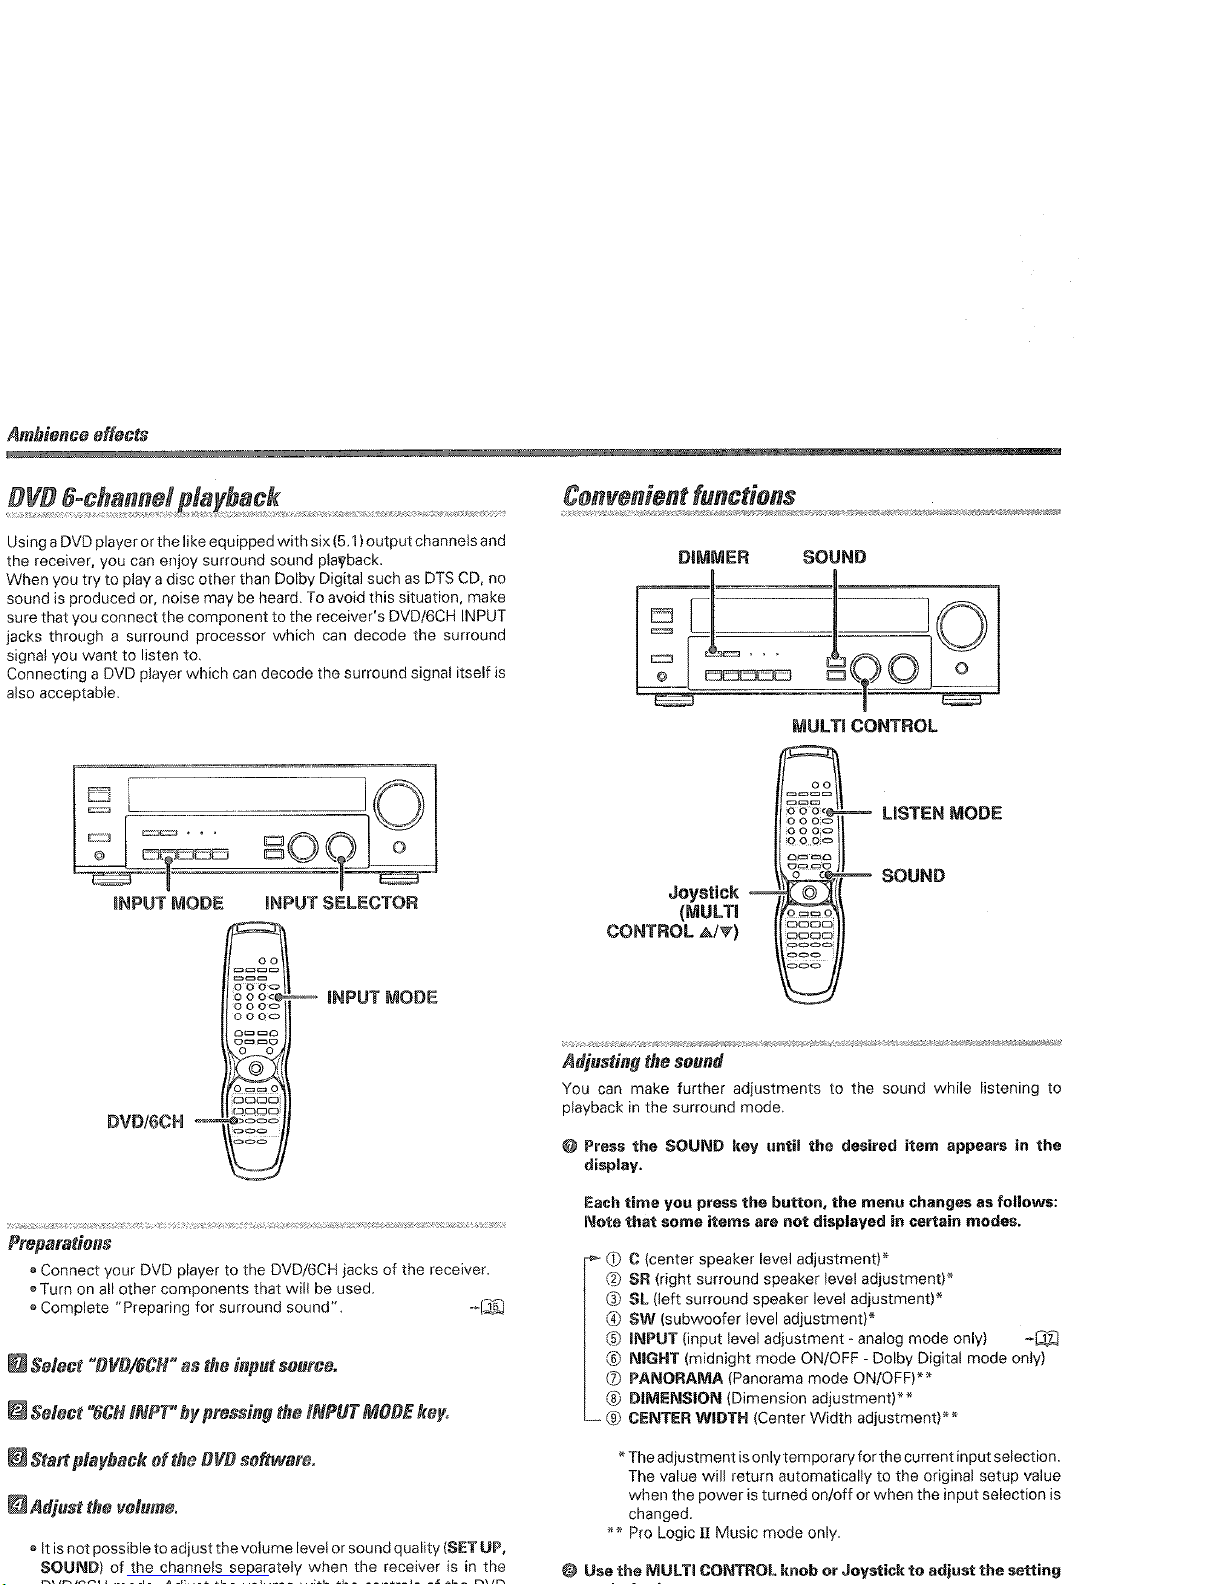
Connecting the DVD Player to the Receiver
Connect the DVD player to the receiver as shown in the main diagram,
using the supplied cab& You can piug the DVD player’s power cord mto
one of the receiver’s sw,tched AC outlets.
Coaxial Digital Cable
The coax1.3 dig&l cable (orange) caries the digital audio bitstream to
the receiver for decodlng.
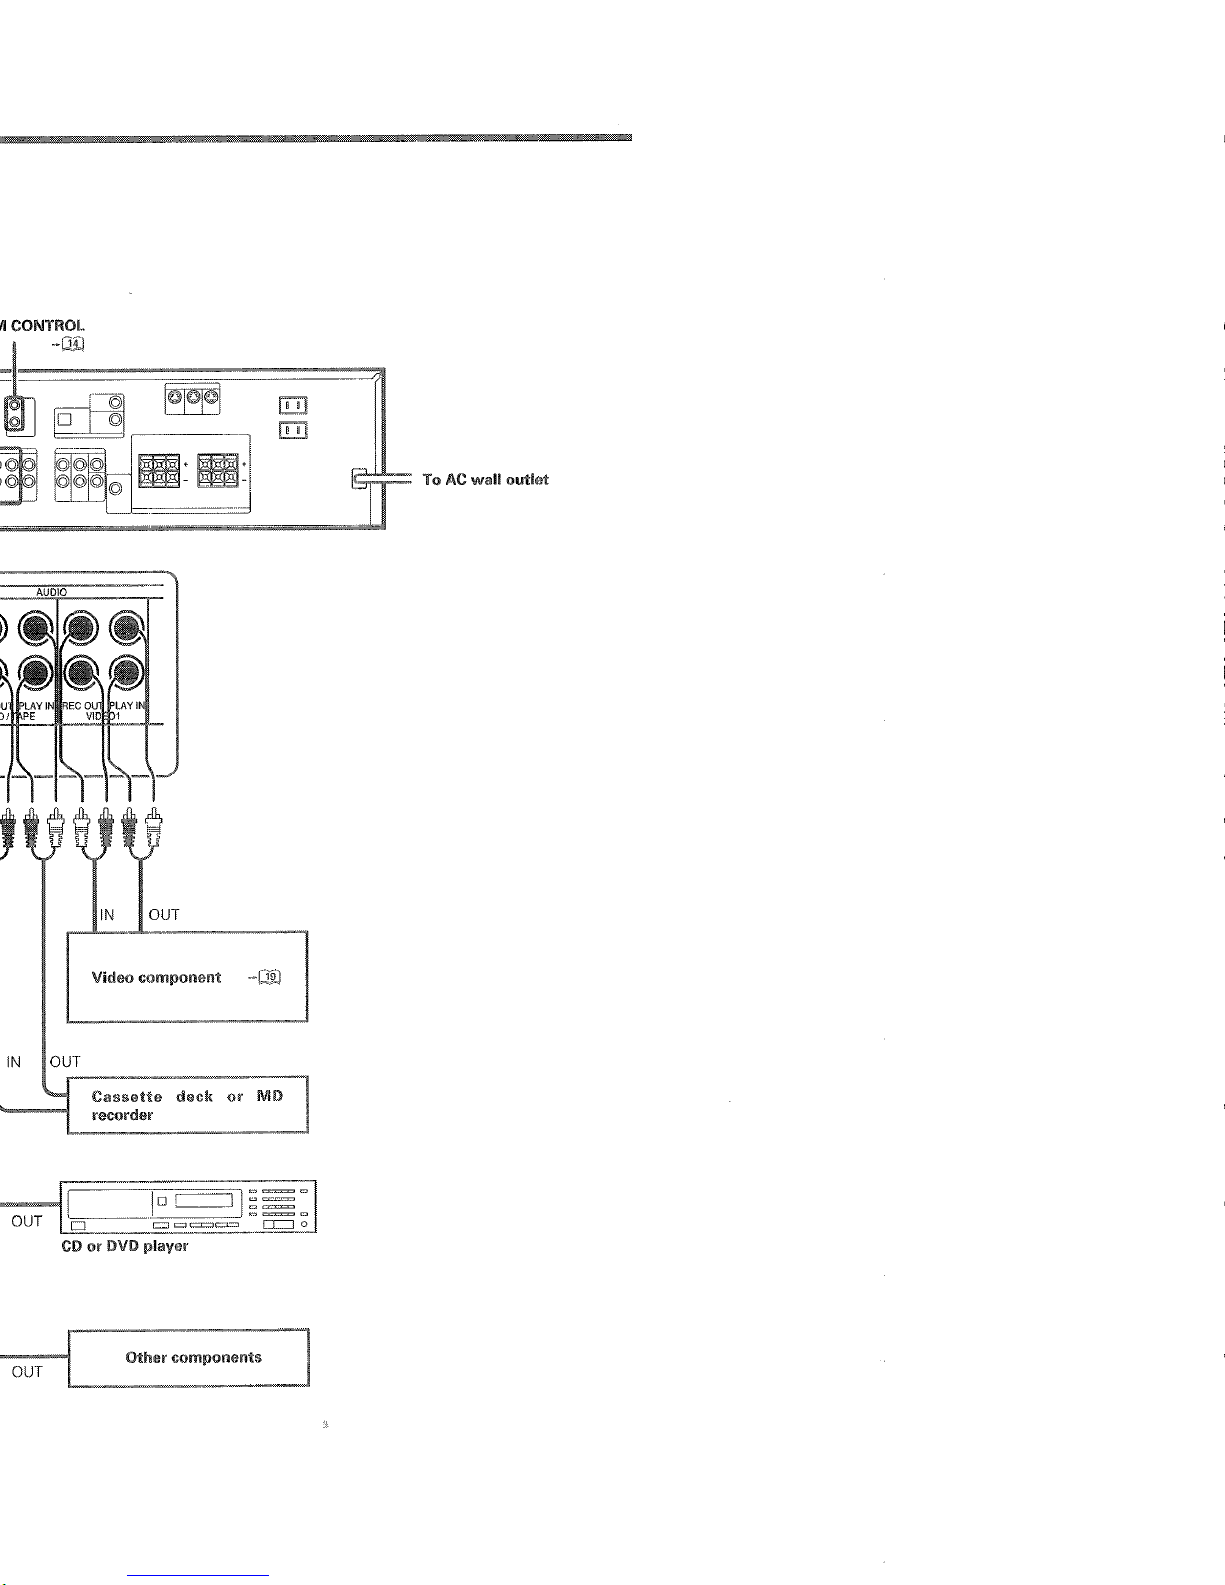
Audio and Composite Video Cables
The audio and composite wdeo cables carry the standard analog audio
and composite video s~gnais to the receiver. Use the red wire for the
right audio channel, the white wire for the left audio channel and the
yellow wire for the video connection.
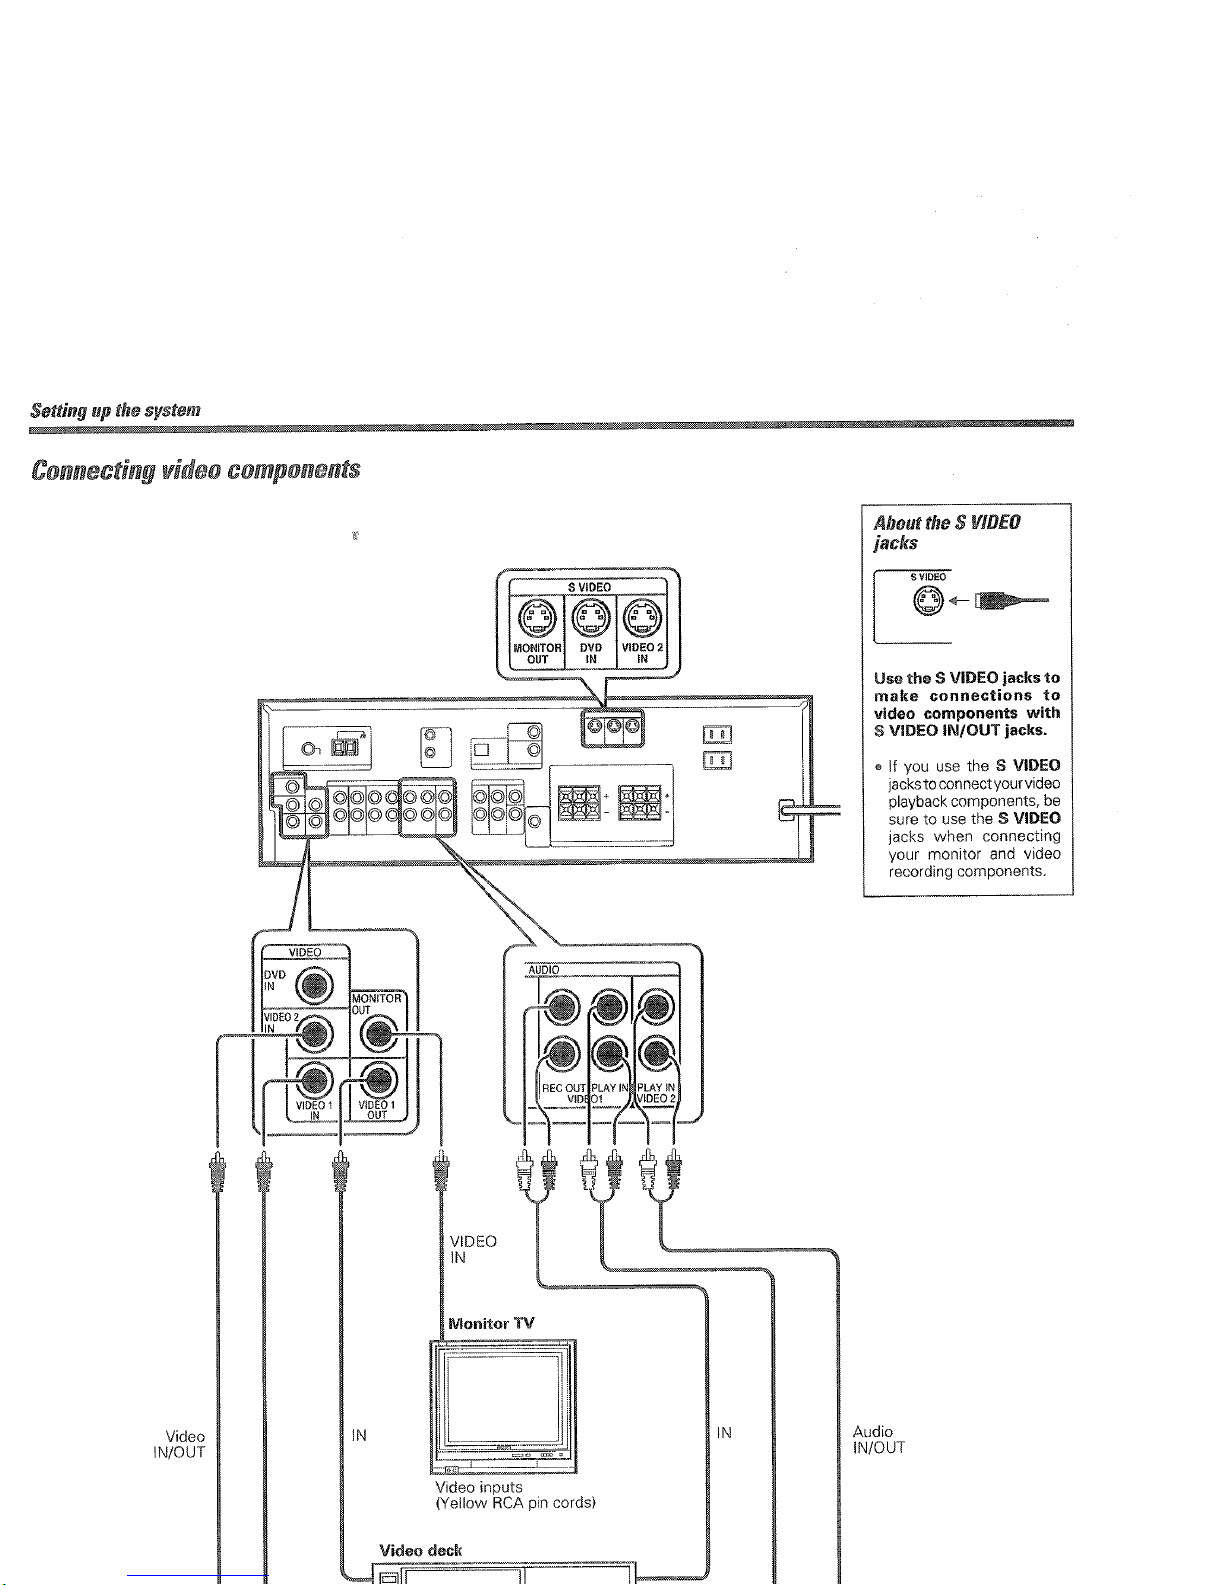
S-Video Connections
If your TV or monitor has an S-Video input you can use an optional SVideo cable to connect the DVD player to the wxeivel for improved video
quality over the standard composite video connection. if you use an SVideo cable to connect the DVD player to the receiver you must also use
an S-V,deo cable to connect the iecewer to the TV or monitor.
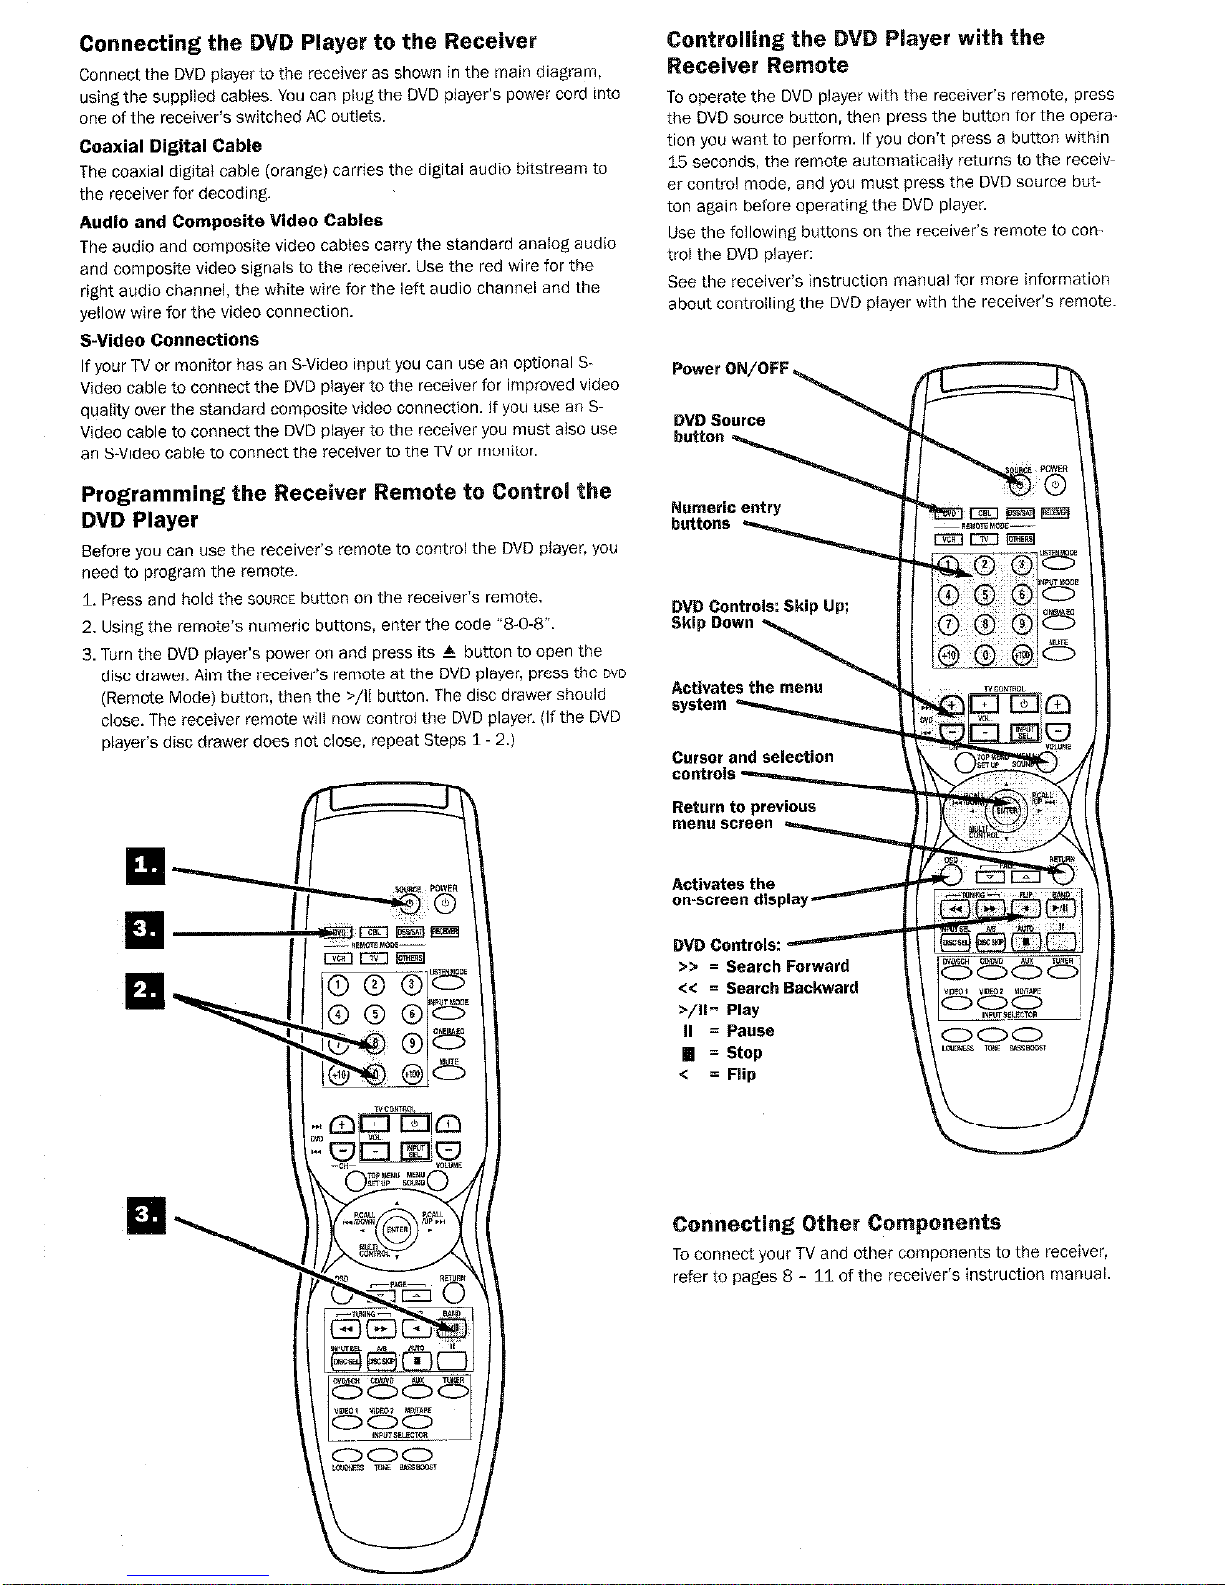
Programming the Receiver Remote to Control
DVD Player
Before you can use the recwer’~ remote to control the DVD player, you
need to program the remote.
1. Press and hold the SOURCE button on the receiver’s remote.
2. Using the remote’s numei!c buttons, eniel the code “8-0-8”.
3. Turn the DVD player’s power on and press I&S 4 button to open the
disc drawer. Aim the recewer’s wnote at the DVD player, press the WC
(Remote Mode) burton, then the >/Ii button. The disc drawer should
close. The receiver remote w,,, now control the DVD player. (If the DVD
player’s disc drawer does not close. repeat Steps I- 2.)
ontrolling the
layer with the
eceiver Remote
To opera& the DVD player with the recewer’s remote. press
Ihe DVD so”rce button, then press the button for the operat,on you want to perform. If you don’t press a button wthin
15 seconds, the remote automatically returns to the receiver control mode, and you must press the DVD ~o”rce button agal” before operatingthe DVD player.
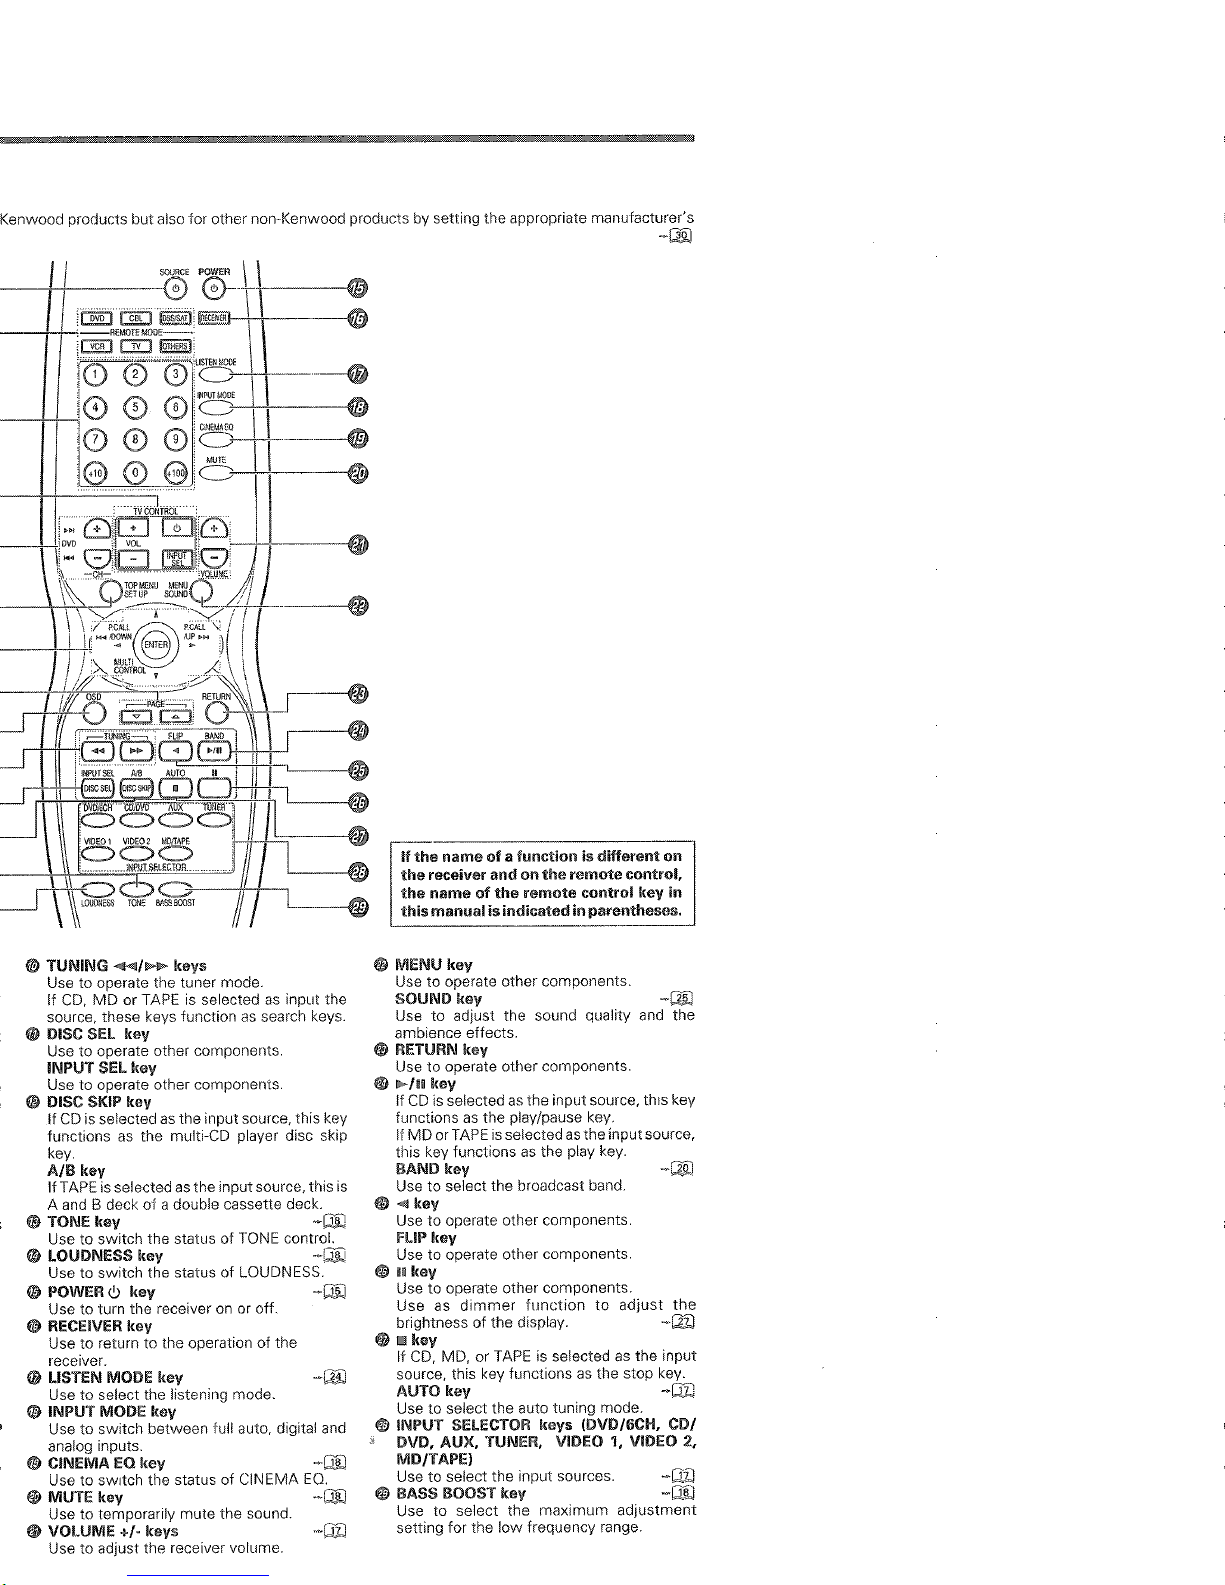
“se the followng buttons on the recwer’s remote to con
troi the DVD player:
See the receiver’s instwct~on manual for more information
about controillngthe DVD player with the receiver’s remote.
Activates the me
system
IT-3
Return to
previous
l-r
menu *ween
Activates the
on-screen display
DVD Controls:
>)I = Search
. = stop
< = Flip
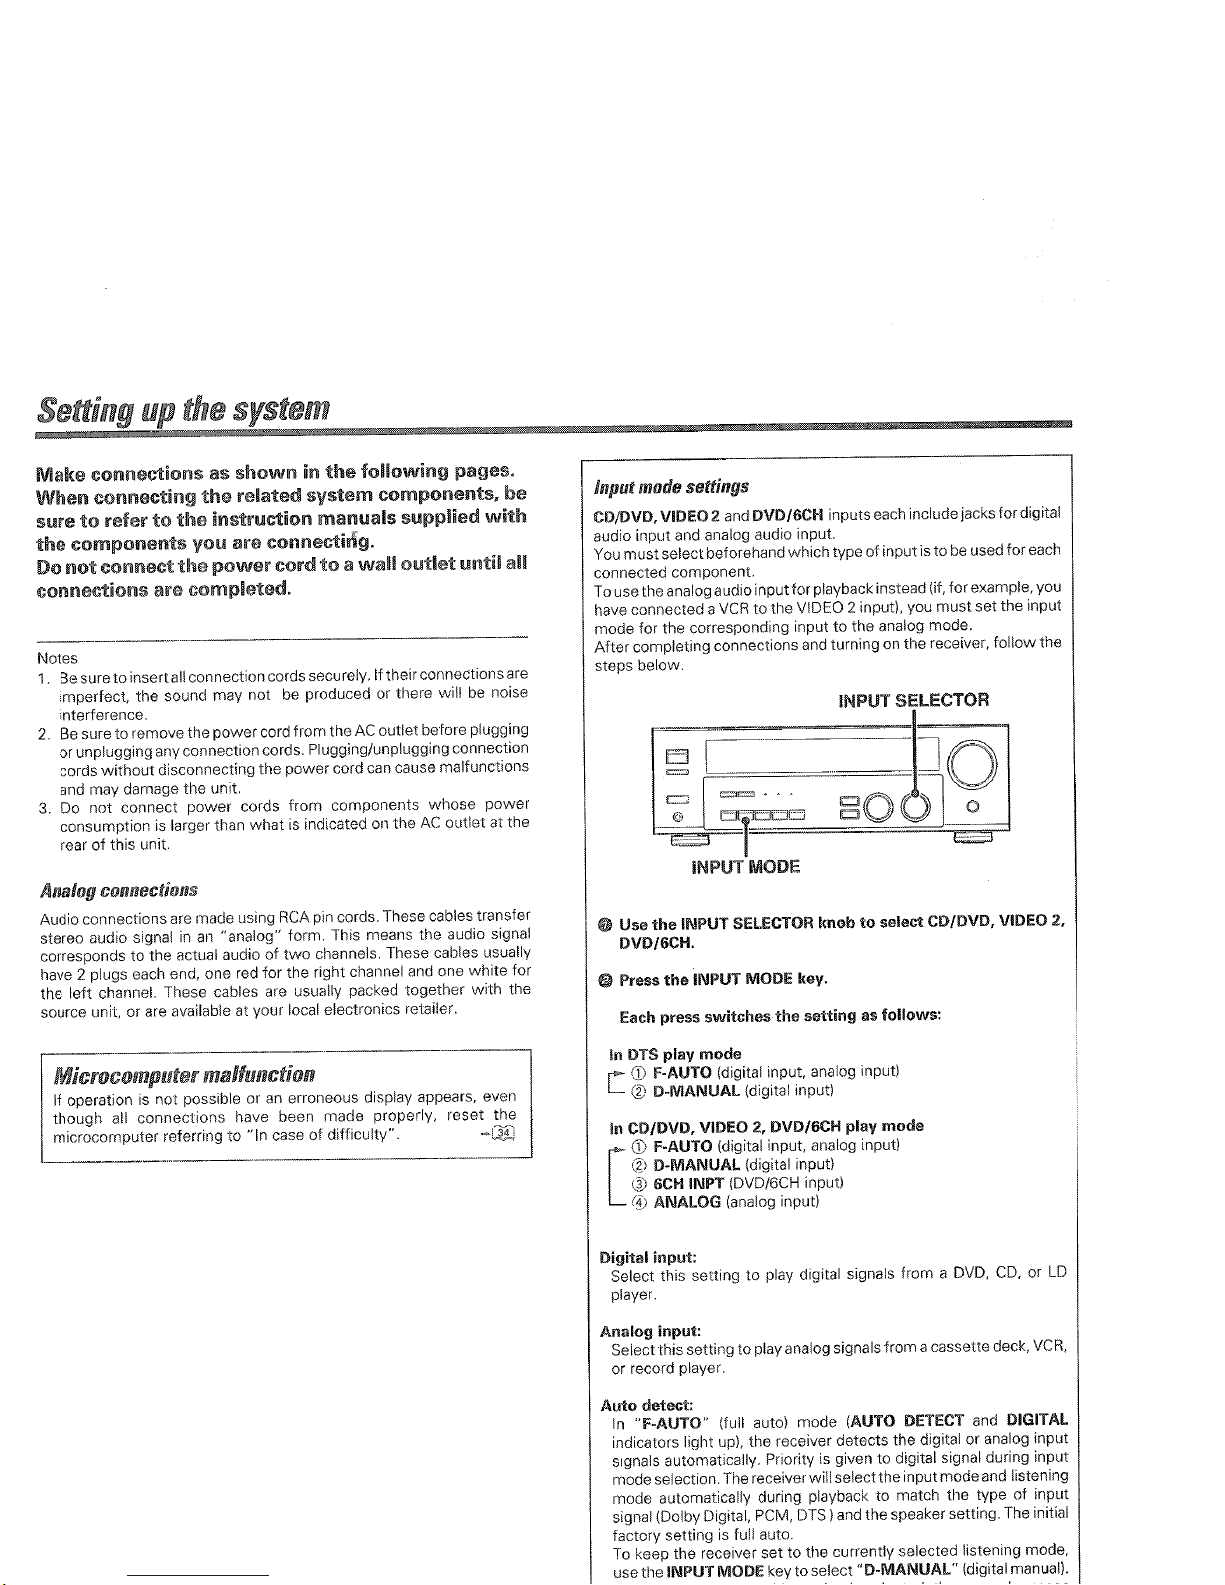
To connect your TV and other components to the receiver,
refer to pages 8 - 11 of the rece~ver’s instructIon manual.
f-605 DVD Player (rear panel)
S-Video Cable (optional)


 Loading...